If you love that sweet plush-to-clay vibe—everyday objects turned into little buddies with faces—this list is for you. I’m sharing my favorite jellycat clay ideas that lean hard into the signature look: tiny eyes, a simple smile, and those iconic dangly legs.
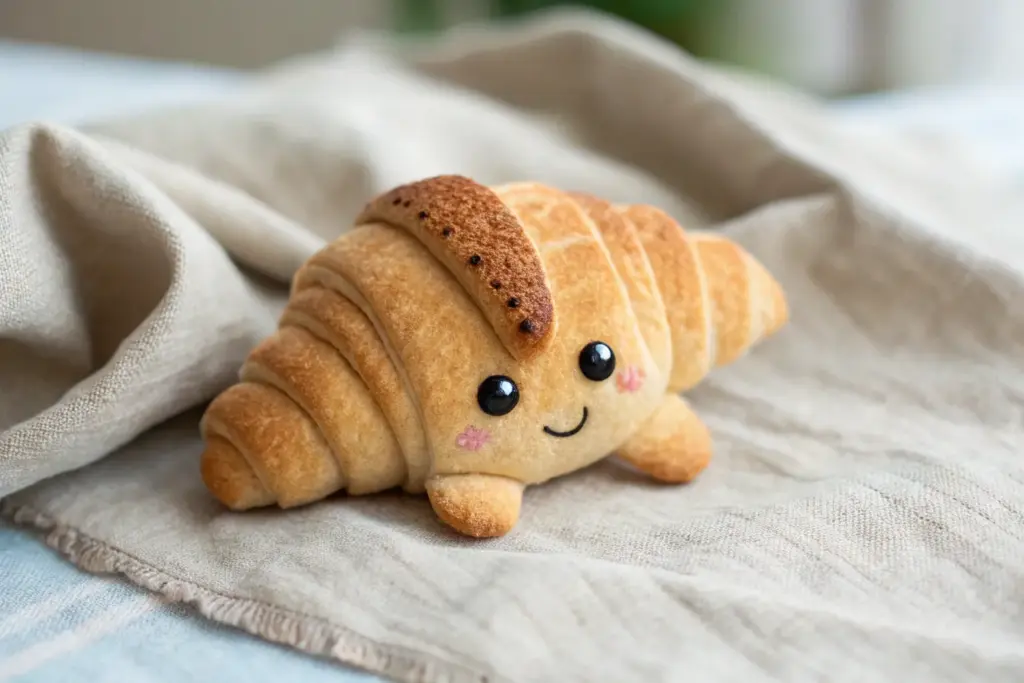
Smiley Croissant Buddy

Bring the bakery to life with this adorable croissant character, featuring perfectly baked golden layers and a cheerful smile. This polymer clay project captures the flaky texture of pastry while adding a delightful anthropomorphic twist with stick legs and shiny shoes.
Step-by-Step
Materials
- Polymer clay (translucent white, yellow ochre, warm brown)
- Black polymer clay (tiny amount for eyes)
- Thick floral wire or brown pipe cleaners (for legs)
- Soft artist pastels (brown, orange, yellow)
- Liquid clay (TLS or Fimo liquid)
- Black acrylic paint
- High-gloss varnish
- Needle tool
- Soft paintbrush
- Ball stylus tool
- Aluminum foil
- Super glue
Step 1: Shaping the Pastry Base
-
Mix the dough color:
Start by mixing translucent white clay with a small amount of yellow ochre and a tiny speck of warm brown. You want a pale, raw dough color that looks slightly translucent. -
Create the core:
Scrunch a small piece of aluminum foil into a cone shape to serve as the armature. This saves clay and keeps the figurine light. -
Cover the core:
Flatten your mixed clay into a sheet and wrap it completely around the foil cone, smoothing the seams until you have a seamless teardrop or cone shape. -
Form the spiral:
Roll a long snake of the same dough-colored clay. Starting at the very tip of the cone, wind this snake tightly around the body, working your way down to the base to create the classic croissant spiral. -
Blend the layers:
Use a silicone tool or your finger to gently blend the bottom edge of each coil into the body beneath it, leaving the top edge distinct. This creates the ‘layered’ pastry look.
Step 2: Texturing and Baking
-
Add flaky texture:
Take a toothbrush or a crinkled ball of aluminum foil and gently press it all over the surface of the clay. This mimics the porous, baked texture of real pastry. -
Apply the ‘egg wash’:
Scrape some brown and orange chalk pastels into a powder. With a soft dry brush, dust the top ridges of the croissant layers, focusing on where the ‘oven’ would brown them most. Leave the crevices paler. -
Add the smile:
Use a needle tool or small blade to impress a shallow, curved smile into the lower third of the croissant body. Fill this groove carefully with a tiny snake of black clay or paint it after baking. -
Attach the eyes:
Roll two small balls of black clay and press them firmly onto the face, just above the smile. Keep them wide-set for that cute ‘Jellycat’ appearance. -
Create the arms:
Form two small, rounded nub shapes from your dough-colored clay. Attach these to the sides of the body, blending the seams so they look like little expressive hands. -
Pre-bake:
Bake the body according to your clay package instructions (usually 275°F/130°C for 15-20 minutes). Let it cool completely.
Browning Too Fast?
If your clay starts darkening in the oven before the time is up, make a ‘tent’ out of aluminum foil and place it loosely over the intricate features to shield them from direct heat.
Step 3: Legs and Finishing
-
Prepare the legs:
Cut two pieces of thick brown floral wire, about 1.5 inches long each. These will be the skinny legs. -
Make the shoes:
Mix a darker, toasted brown clay color. Form two oval, loaf-like shapes for the shoes. Poke a hole in the top of each shoe and insert the wire legs. -
Drill the body:
Once the body is cool and hard, carefully use a hand drill or pin vise to drill two small holes into the bottom base for the legs. -
Assemble the stance:
Test the fit of the wires into the body. Adjust the angle of the shoes so the croissant can stand balanced on its own. Glue the wires into the shoes and the body using super glue. -
Texture the shoes:
To make the shoes look like darker crusty bread, texture them with your foil ball and dust them with dark brown pastel. -
Final bake:
If you used raw clay for the shoes, bake the whole assembly again for another 15 minutes to set the feet. -
Glazing:
Apply a coat of semi-gloss varnish to the ‘browned’ parts of the croissant to simulate a sticky honey glaze, and use high-gloss polyurethane on the black eyes to make them shine.
Pro Tip: Realistic shine
Mix a drop of liquid clay with brown pastel chalk and paint it onto the highest ridges before baking. It cures into a permanently shiny, syrup-like glaze.
Now you have a sweet, bakery-fresh friend to brighten up your desk


Happy Toast Slice Charm
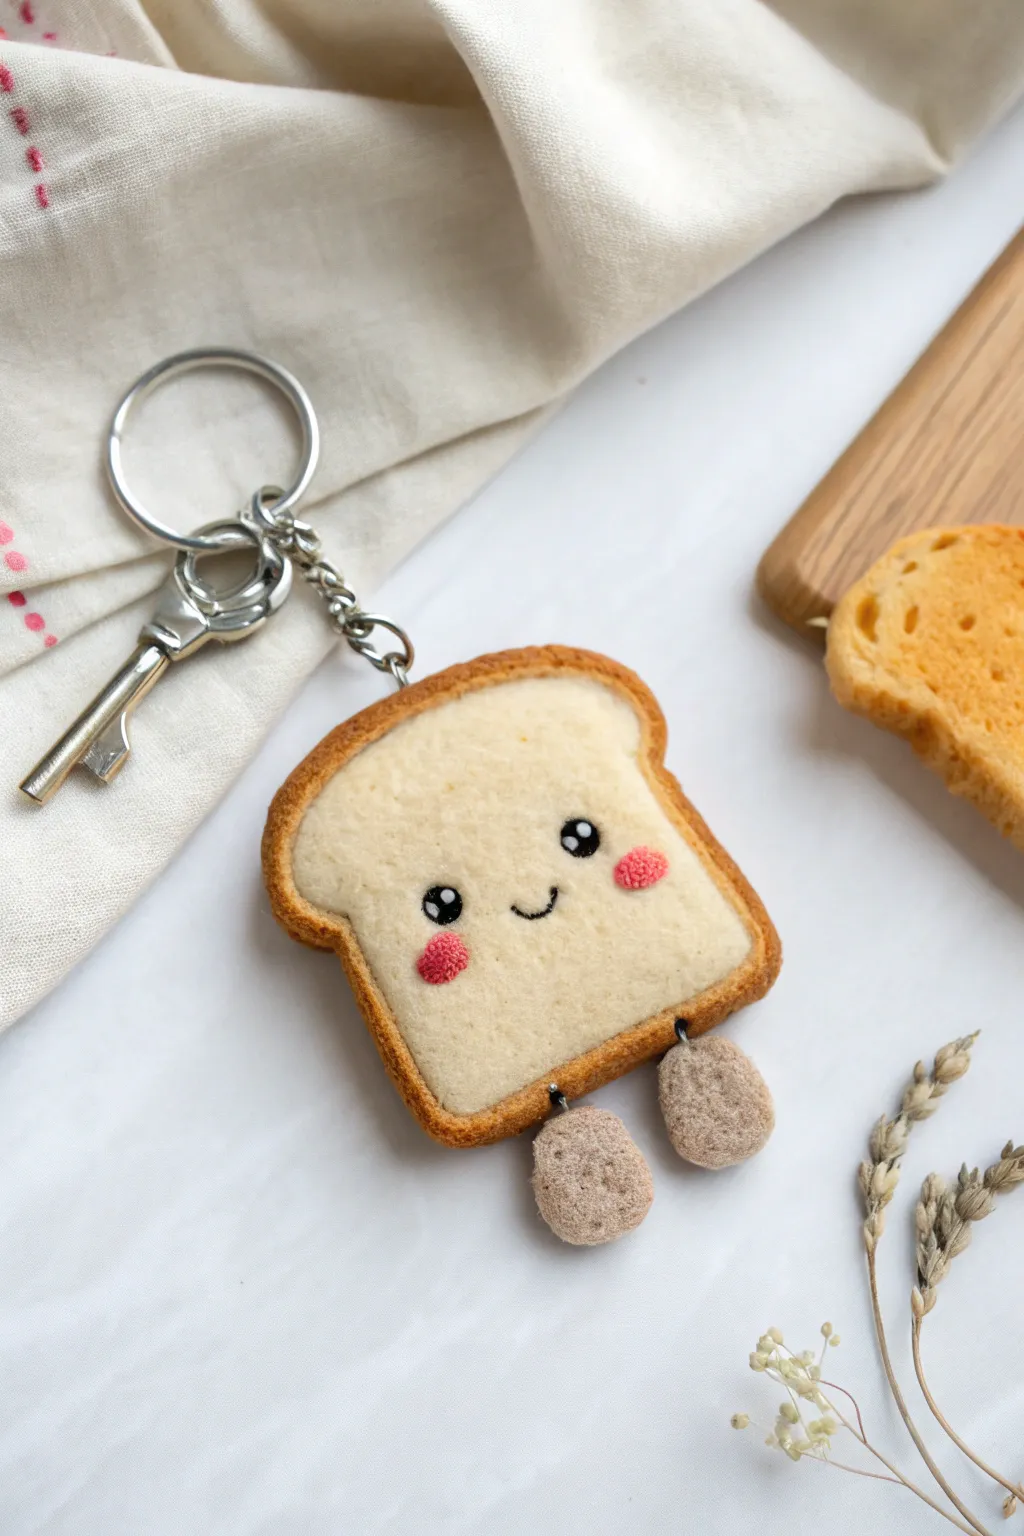
This adorable toast slice charm brings a smile to your keys or bag with its soft texture and cheerful expression. Made from layers of felt and detailed with simple embroidery, it features charming little dangling feet for extra personality.
Detailed Instructions
Materials
- Cream or light beige soft felt (for the bread face)
- Golden brown or tan felt (for the crust)
- Beige or brown felt pom-poms or felt balls (for the feet)
- Black embroidery floss
- Pink yarn or embroidery floss (for cheeks)
- Polyester fiberfill stuffing
- Keychain hardware with chain and jump rings
- Sewing needle and embroidery needle
- Matching sewing threads (cream and brown)
- Fabric glue (optional)
- Scissors
Step 1: Shaping the Bread
-
Draft your pattern:
Sketch a simple bread slice shape on paper. It should be roughly 2.5 inches wide with a rounded top and a flatter bottom. Cut this out to use as your template. -
Cut the face:
Trace your paper template onto the cream/light beige felt. Cut out two identical pieces—one for the front and one for the back of the toast. -
Create the crust strip:
Cut a long strip of the golden brown felt, about 0.5 inches wide. This strip needs to be long enough to wrap around the entire perimeter of your cream bread shapes.
Uneven Shape?
If your bread looks lumpy after stuffing, use a long needle or a chopstick to gently redistribute the fiberfill into the corners and smooth out the flat surfaces.
Step 2: Adding the Personality
-
Embroider the eyes:
Take one cream felt piece for the front. Using black embroidery floss and a satin stitch, sew two vertical ovals for the eyes. Add a tiny white French knot or a single stitch of white thread in the corner of each eye for a sparkling highlight. -
Stitch the smile:
Use a backstitch with a single strand of black floss to create a small, centered U-shaped smile right between the eyes. -
Add rosy cheeks:
Using pink yarn or floss, stitch small, textured circles beneath the eyes. I find French knots work beautifully here creates a slightly raised, fluffy look that mimics the image.
Step 3: Assembly and Stuffing
-
Attach the crust:
Starting at the bottom center, sew the edge of the long brown strip to the edge of the front cream piece using a blanket stitch or whip stitch. Keep your stitches small and neat. -
Connect the back:
Sew the other edge of the brown strip to the second cream felt piece, mirroring what you did on the front. Stop when you have about an inch left open at the bottom. -
Plump it up:
Gently push polyester fiberfill into the opening. Stuff the corners first to maintain the shape, but don’t overstuff it or the flat bread look will turn into a ball.
Make it Sweet
Turn this into ‘fairy bread’ or a donut-toast hybrid by sewing tiny, colorful seed beads on the face piece before assembling to look like sprinkles.
Step 4: Finishing Touches
-
Prepare the feet:
Take two small beige felt balls or cut small oval shapes from sturdy felt. Thread a needle with dark grey or brown thread. -
Attach the feet:
Sew through the top of one foot, then insert the needle into the bottom opening of the toast body. Anchor it securely inside, leaving a tiny bit of thread visible so the leg can dangle freely. Repeat for the second foot. -
Close the seam:
Finish sewing the bottom seam of the crust closed, ensuring the leg threads are secure and spaced evenly apart. -
Secure the hardware:
At the top center of the crust, sew a small loop of strong thread or attach a jump ring directly through the felt. Connect your keychain hardware to this point firmly.
Now you have a soft, smiling companion ready to tag along on all your daily adventures


Mini Birthday Cake Desk Pal
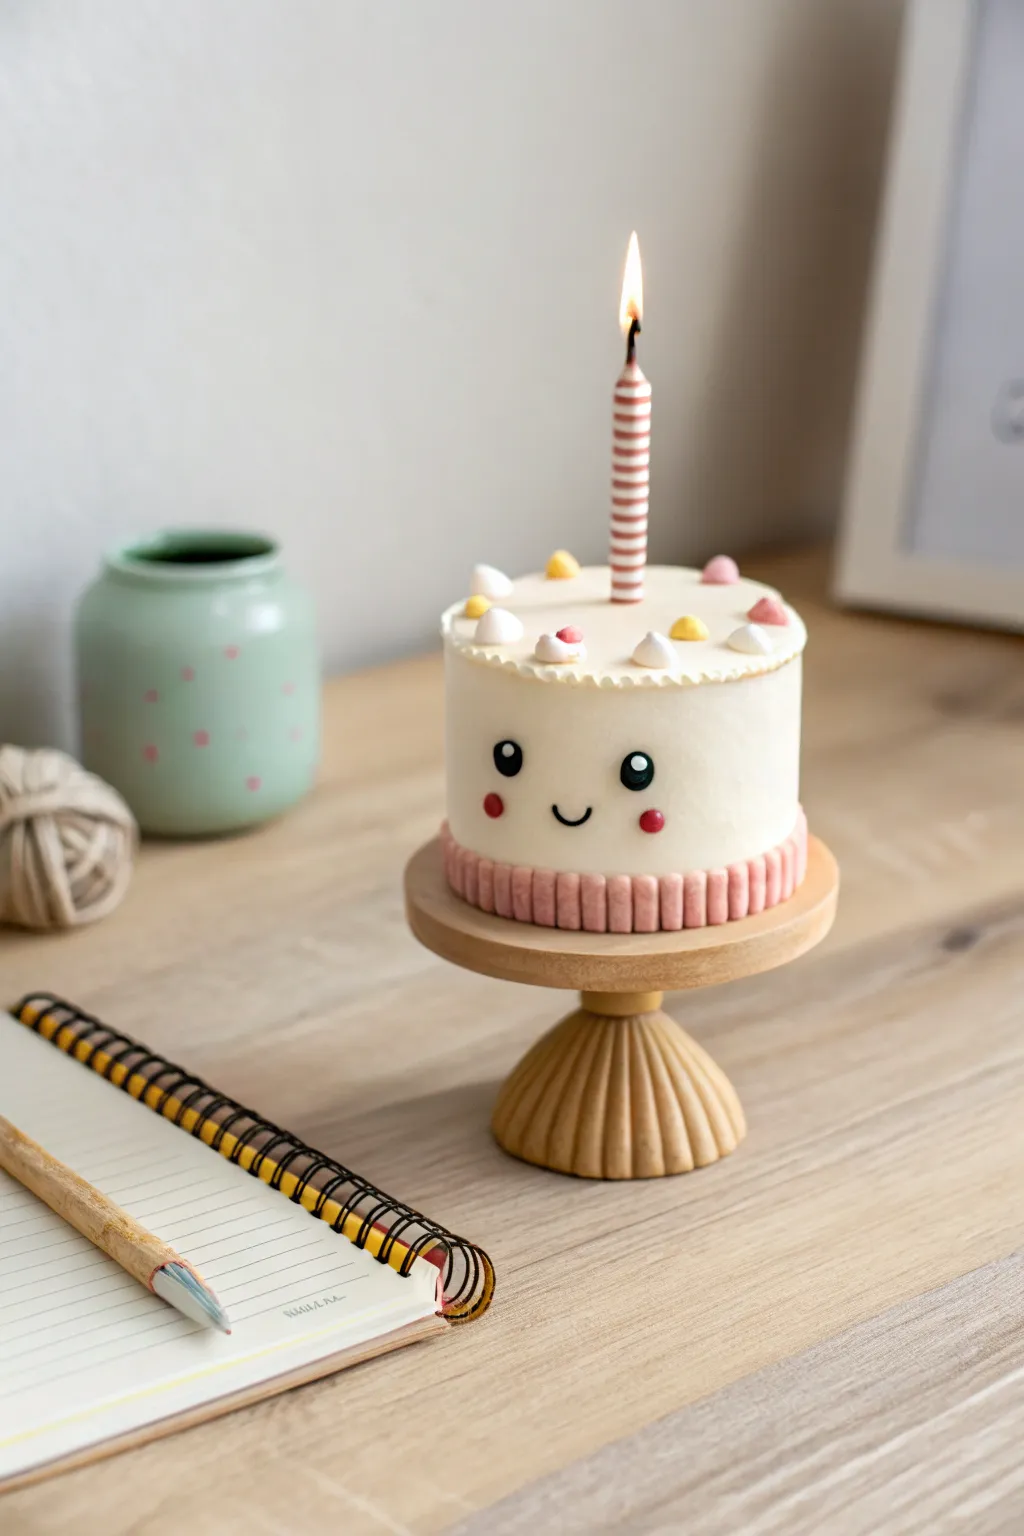
Bring a little slice of joy to your workspace with this adorable clay desk companion. Modeled after the lovable softness of Jellycat plushies, this miniature cake features a sweet, simple smiling face and a festive striped candle.
How-To Guide
Materials
- White polymer clay (approx. 2oz)
- Pink polymer clay (pastel shade)
- Black polymer clay (tiny amount)
- Yellow polymer clay
- Translucent liquid clay or bake-and-bond
- Clay sculpting tools (needle tool, ball tool)
- Small piece of wire or toothpick for structure
- Rolling pin or pasta machine
- Small round cookie cutter (approx. 1.5 – 2 inches)
- Gloss glaze (optional)
Step 1: Forming the Cake Base
-
Condition the Clay:
Begin by thoroughly kneading your white clay until it is soft and pliable. This prevents cracking later on. Roll it into a smooth, seamless ball. -
Shape the Cylinder:
Gently press the ball onto your work surface and flatten the top and bottom to create a cylinder shape. Aim for a height of about 1.5 to 2 inches to keep proportions cute and chunky. -
Refine the Sides:
Roll the cylinder sideways on your surface to smooth out any fingerprints. You want the sides to be perfectly straight and the top edge to be slightly rounded, mimicking the softness of fondant or icing.
Step 2: Adding the Details
-
Create the Pink Piping:
Roll out a thin snake of pastel pink clay. Cut it into many small, equal-sized segments, roughly 1/4 inch long. -
Attach the Base Border:
Press these small pink segments vertically around the very bottom edge of your white cylinder. Arrange them side-by-side so they look like a textured ribbon or piped frosting border. -
Make the Face Indentations:
Use a medium-sized ball tool to gently press two indentations where the eyes will go. Keeping them wide-set adds to that classic Jellycat charm. -
Add the Eyes:
Roll two tiny balls of black clay and press them into the sockets you just made. Flatten them slightly so they look embedded rather than protruding. -
Add the Sparkle:
Take the tiniest speck of white clay and place it on the upper right side of each black eye to create a ‘catchlight.’ This brings the character to life. -
Create the Smile:
Roll an incredibly thin thread of black clay. Cut a small U-shape and gently press it into the clay between the eyes. I find using a needle tool helps position this delicate piece without joyful smudging. -
Apply Blush:
Roll two small, flat circles of pink clay and press them onto the cheeks, just below and outside the eyes.
Clean Clay Is Key
White clay picks up dust easily! Wipe your hands and tools with a baby wipe or rubbing alcohol before shaping the white base to keep it pristine.
Step 3: Toppings and Candle
-
Make the Top Icing:
Roll a very thin snake of white clay. Twist it gently or use a texturing tool to give it a ‘piped’ look, then wrap it around the top circumference of the cake. -
Create Dollops:
Form tiny teardrop shapes from white, yellow, and pink clay. Arrange these randomly on the top surface of the cake to look like little meringue kisses or gumdrops. -
Construct the Candle Core:
Insert a small piece of wire or a toothpick into the center of the cake top to act as an armature. Leave about an inch sticking out. -
Stripe the Candle:
Roll a thin snake of white clay and a thin snake of pink clay. Twist them together to create a spiral effect, then roll this gently on the table to smooth it into a uniform striped log. -
Mount the Candle:
Cut the striped log to size and slide it over your wire armature. Press it gently into the cake top to secure it. -
Add the Flame:
Shape a small teardrop from yellow clay and attach it to the top of the candle. Pull the tip slightly to look like a flickering flame. -
Bake and Finish:
Bake your creation according to the polymer clay package instructions (usually 275°F/135°C for 15-30 minutes). Once cool, you can brush a little gloss glaze on the eyes and flame for extra shine.
Getting the texture right
For a ‘plush’ texture instead of smooth icing, gently tap the white surface with a clean toothbrush before baking to create a fuzzy fabric look.
Now you have a permanent celebration on your desk that never goes stale


Pretzel With Little Boots
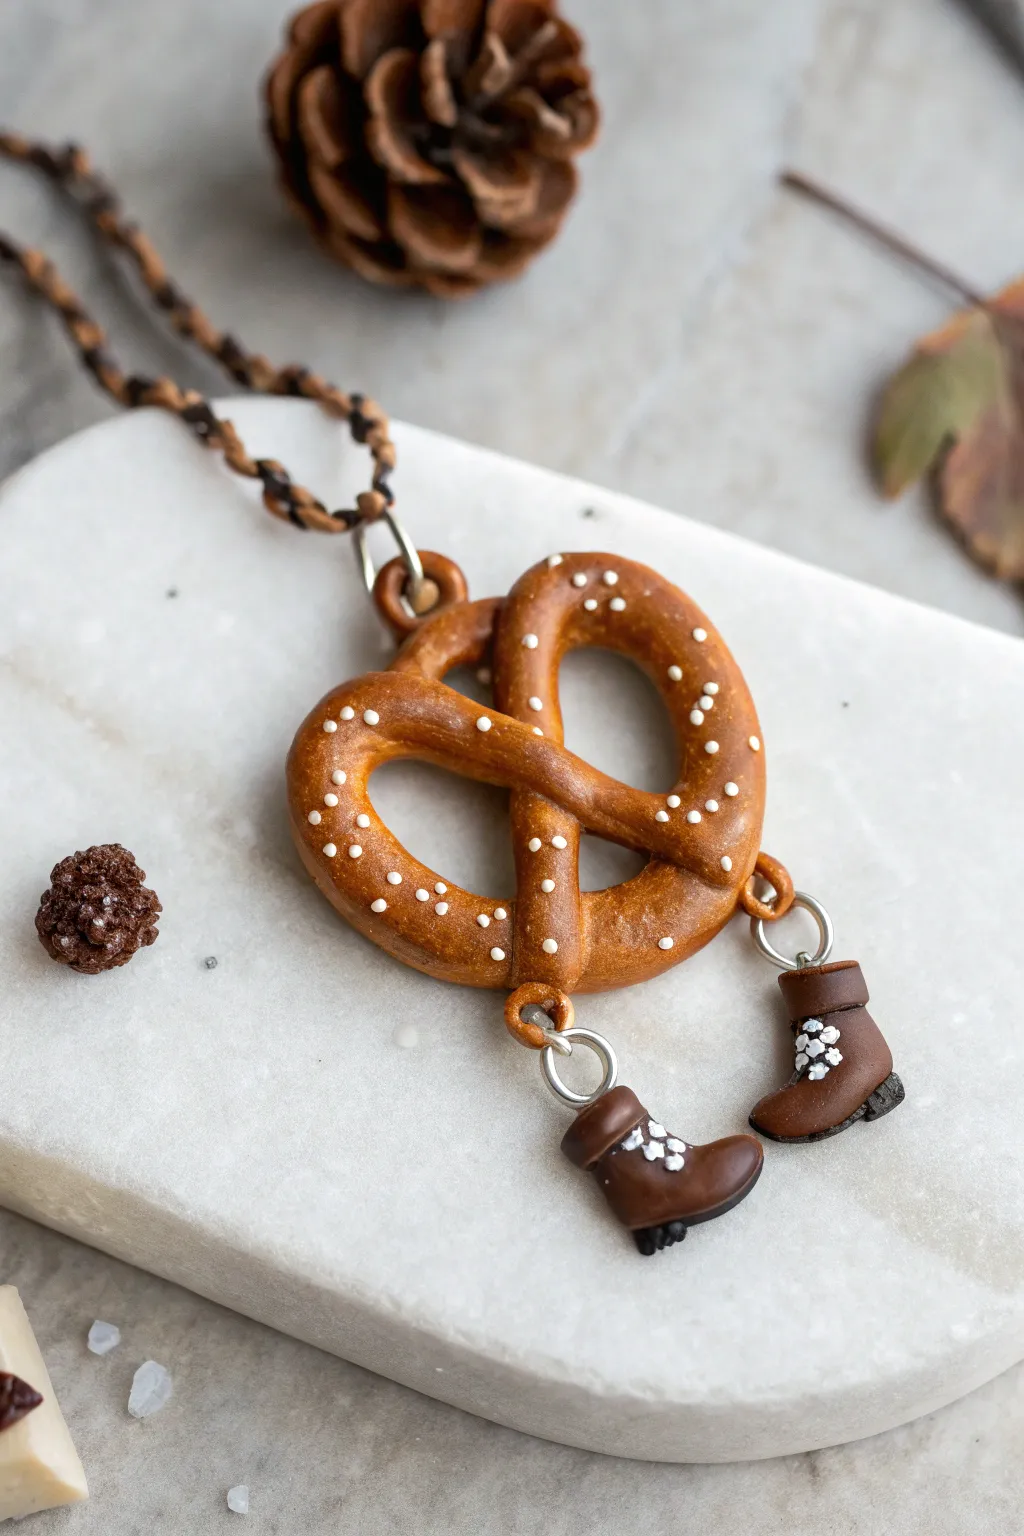
This whimsical necklace captures the cozy charm of fall with a hyper-realistic soft pretzel charm dangling tiny brown hiking boots. The warm, toasted finish and miniature details make this a unique piece of wearable art perfect for Oktoberfest or quirky everyday style.
Step-by-Step Guide
Materials
- Polymer clay in ‘Pretzel’ tan, dark brown, and white
- Soft pastels (brown, orange, red ochre) for shading
- Liquid clay (translucent) or gloss varnish
- Sculpting tools (needle tool, dotting tool)
- Eye pins (silver tone)
- Jump rings (silver tone)
- Braided necklace cord (leather or faux leather)
- Fine paintbrush
- Sandpaper (fine grit)
- Oven for baking
Step 1: Sculpting the Pretzel
-
Roll the Dough:
Start by conditioning your tan clay until it is soft and pliable. Roll it into a long, even snake that tapers just slightly at both ends, roughly 4-5 inches long depending on your desired pendant size. -
Form the Shape:
Create a ‘U’ shape with the snake, then cross the ends over each other once to create a twist. Fold the twisted ends back down onto the bottom curve of the U to form the classic knotted pretzel shape. -
Secure the Knot:
Gently press the ends into the bottom curve to secure them. Use a smoothing tool or your finger to blend the seams slightly so they look like dough pressed together rather than just laying on top. -
Add Hardware:
Insert a silver eye pin into the top center of the pretzel for the necklace cord. Then, insert two more eye pins at the bottom curves where the boots will eventually hang. Secure them with a tiny dab of liquid clay if needed. -
Pre-Bake Shading:
Scrape some soft pastel chalk into a fine powder. Use a soft brush to dust orange and red ochre chalk over the raw clay, concentrating on the ‘baked’ areas leaving the crevices slightly lighter for a realistic uneven dough look. -
Adding Salt:
Roll extremely tiny balls of white clay to resemble coarse salt grains. Press them randomly onto the pretzel surface. I find using a needle tool to pick up and place these tiny specks helps keep them precise.
Step 2: Crafting the Little Boots
-
Boot Base:
Take two small balls of dark brown clay. Shape each into an ‘L’ shape to form the foot and ankle shaft of a boot. Ensure the proportions look chunky and sturdy, like hiking boots. -
Refining the Form:
Flatten the bottom of each boot slightly. Use a needle tool to create a distinct groove separating the heel from the sole. Widen the top of the boot slightly where the leg would go. -
Adding Detail:
On the side of each boot, add tiny patches of white clay or paint tiny white flowers/laces after baking. Add a small strip of clay around the top edge for a cuff. -
Attaching Hardware:
Insert a small eye pin into the top of each boot cuff. These loops need to be large enough to accommodate a jump ring later.
Why is my clay burning?
To prevent scorching your light-colored ‘dough,’ tent a piece of aluminum foil over the clay while baking. This shields it from direct heat and prevents browning too quickly.
Step 3: Assembly & Finishing
-
Baking:
Arrange all your pieces on a tile or baking sheet. Bake according to your brand of clay’s temperature instructions, usually for about 15-20 minutes. -
Cooling and Varnish:
Let the pieces cool completely. To get that egg-wash shine, lightly coat the pretzel (avoiding the salt grains if possible) with a satin or gloss varnish. The boots can remain matte. -
Linking the Boots:
Open two jump rings using pliers. Connect the loop of each boot to the corresponding eye pins at the bottom of the pretzel. -
Final Assembly:
Thread a larger jump ring through the top eye pin of the pretzel. Through this ring, loop your braided leather cord to finish the necklace.
Make it ‘Everything’ Bagel Style
Instead of just white salt, add tiny black specks (poppy seeds) and beige flakes (garlic) made from clay crumbs. Mix them into liquid clay and brush on for a textured seasoning effect.
Now you have a charming, wearable snack that adds a dash of personality to any outfit

The Complete Guide to Pottery Troubleshooting
Uncover the most common ceramic mistakes—from cracking clay to failed glazes—and learn how to fix them fast.
Baguette With Tiny Smile
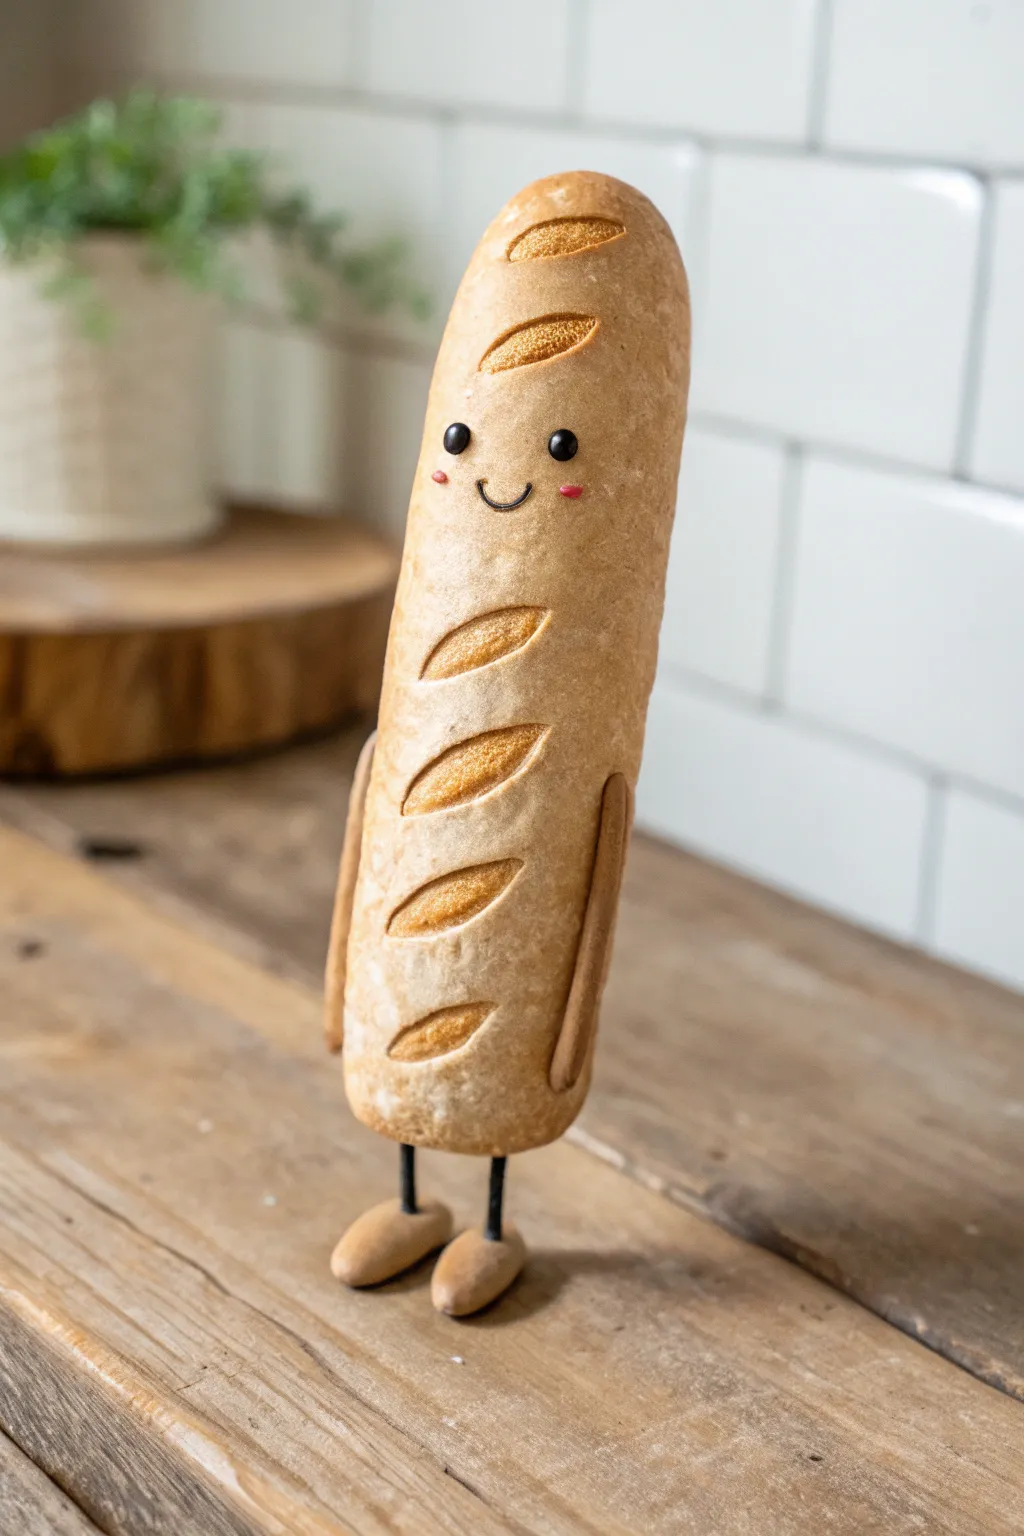
Transform a simple lump of dough-colored clay into this irresistibly cheerful bakery friend. With its golden-brown crust, tiny stick legs, and that signature happy expression, this baguette brings a touch of whimsy to any shelf.
How-To Guide
Materials
- Beige polymer clay (bread color)
- Translucent polymer clay
- Soft pastels (brown, orange, yellow)
- Black polymer clay
- Pink polymer clay or acrylic paint
- Black crafting wire (approx. 18-20 gauge)
- Pliers and wire cutters
- Pointed sculpting tool or needle tool
- Soft paintbrush
- Aluminum foil
- Gloss glaze (optional)
Step 1: Forming the Loaf
-
Mix the Dough Color:
Start by conditioning your beige clay. To get that realistic baked-bread translucency, I like to mix one part translucent clay with three parts beige clay. -
Create the Core:
Crumple a small piece of aluminum foil into a tight cylinder shape. This saves clay and keeps the figurine lightweight. -
Shape the Baguette:
Roll your clay into a smooth log and flatten it slightly. Wrap it completely around your foil core, ensuring there are no seams and the ends are rounded off gently. -
Texture the Crust:
Using a clean toothbrush or a crumpled ball of aluminum foil, gently tap the entire surface of the clay to create a baked bread texture. Avoid smoothing it out with your fingers afterward. -
Carve the Scores:
Use a sculpting tool to carve four diagonal slashes across the front of the baguette. Press deep enough to mimic the way bread splits when baking, slightly pulling the clay back to open the ‘wounds’.
Wobbly Legs?
If the baguette won’t stand, bake the feet first. Then, glue the wires into the feet. Finally, push the body onto the wires while the body clay is raw and bake the whole assembly upright.
Step 2: Adding Limbs and Face
-
Form the Arms:
Roll two very thin snakes of the beige clay mix. Attach them vertically to the sides of the baguette body, pressing the top ends in to blend them seamlesssly while leaving the bottom ends slightly free. -
Prepare the Legs:
Cut two equal lengths of black wire, about 1 inch long each. Insert them into the bottom of the baguette body about half an inch deep to create the leg holes, then remove them for baking prep (or leave in if your wire is oven-safe). -
Make the Feet:
Shape two small ovals of beige clay. Poke a hole in the top of each with the wire, ensuring the bread stands balanced, then remove the wire again. -
Apply the Smile:
Roll an incredibly thin thread of black clay. Shape a small ‘U’ for the mouth and press it gently onto the face area between the top two bread scores. -
Add the Eyes:
Roll two tiny balls of black clay. Place them wide apart above the smile to create that distinctively cute wide-set look. -
Add Rosy Cheeks:
Take the tiniest speck of pink clay or a dab of pink paint and apply it right under the eyes at the ends of the mouth.
Bakery Touches
Before baking, create a tiny dusting of ‘flour’ on the baguette’s surface using white pastel powder or cornstarch for ultimate realism.
Step 3: Baking and Finishing
-
Shade the Crust:
Scrape some brown and orange soft pastels into a powder. Using a dry, soft brush, dust the top of the baguette, focusing heavily on the area around the scores and the very top to simulate browning. -
Detail the Scores:
Use a lighter yellow-orange pastel dust inside the carved scores to make the ‘inner bread’ look lighter than the crust. -
Bake the Pieces:
Bake the body and the feet separately according to your clay manufacturer’s instructions (usually 275°F/130°C for 15-30 minutes). Support the body with foil so the back doesn’t flatten. -
Assembly:
Once cool, use super glue to secure the black wires into the body holes and then into the feet holes. Hold steady until the glue sets to ensure he stands straight. -
Final Glaze:
For a fresh-from-the-oven sheen, apply a very thin layer of satin or gloss glaze just to the ‘crust’ portions, avoiding the inside of the scores.
Now you have a charming little bakery buddy ready to brighten up your desk or kitchen counter
Coffee Mug Companion
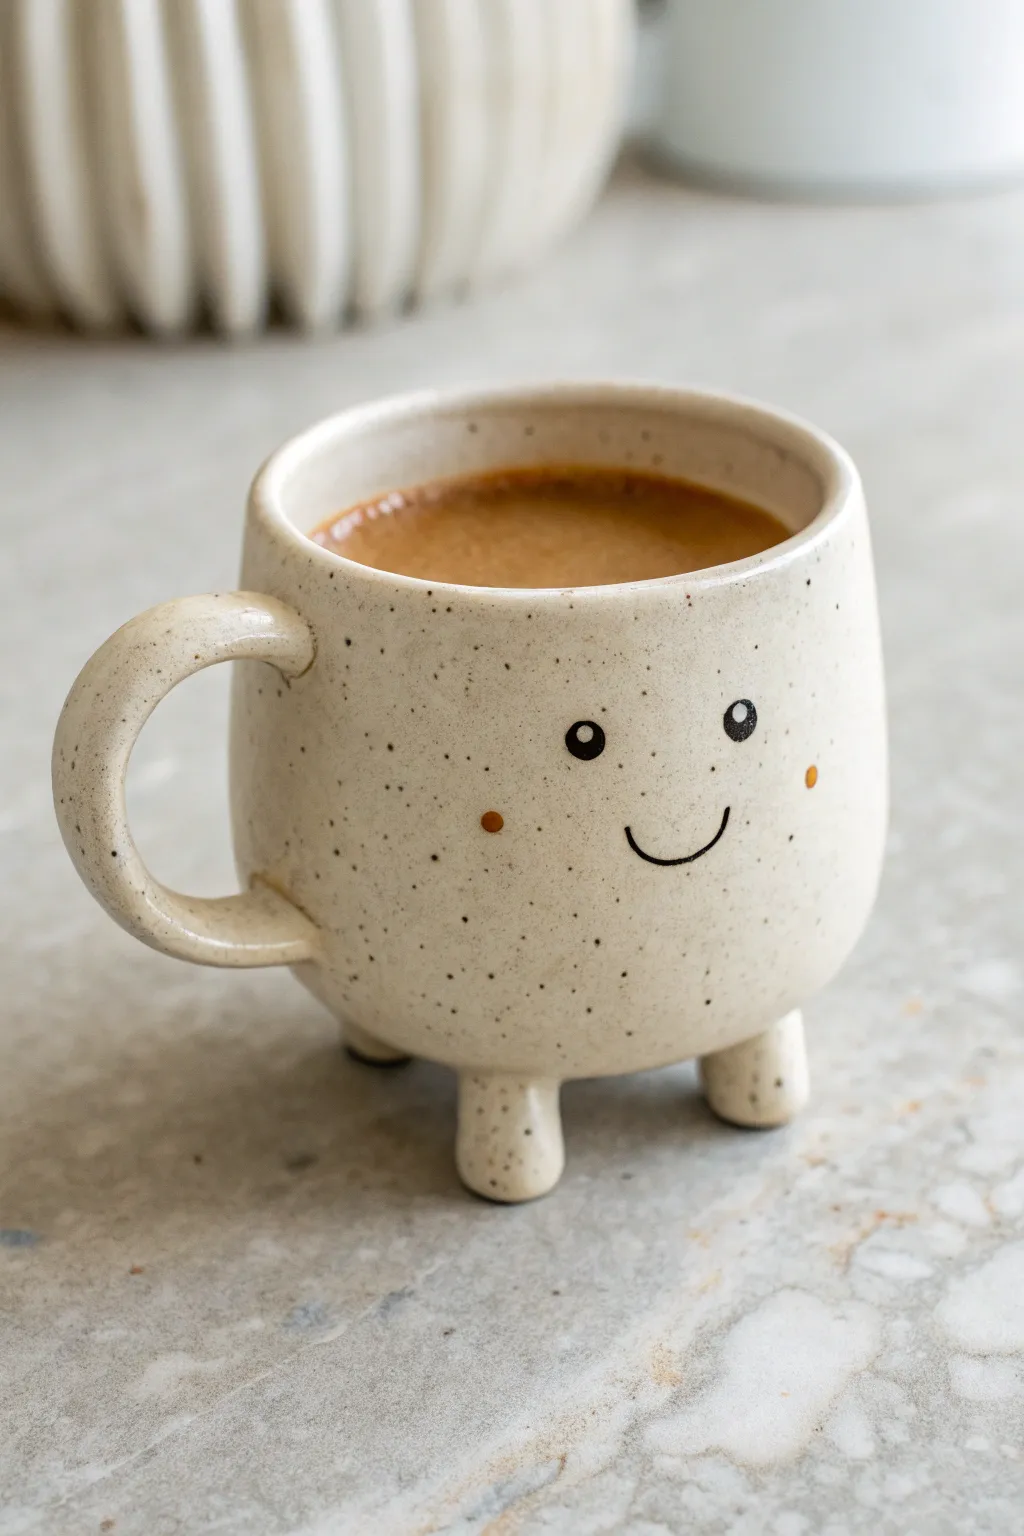
This whimsical project transforms a simple vessel into an adorable character straight out of a storybook, featuring a speckled cream glaze and tripod feet. With its sweet, minimalist face and sturdy little legs, this mug adds a touch of playful personality to your morning routine.
Step-by-Step Tutorial
Materials
- Stoneware clay (speckled or buff)
- Pottery wheel (or slab roller for hand-building)
- Needle tool
- Metal kidney rib
- Sponge
- Scoring tool
- Slip
- Underglaze (black and rust/orange)
- Fine detail brush
- Clear or food-safe white speckled glaze
- Rolling pin (if hand-building)
Step 1: Forming the Body
-
Throw or Build the Cylinder:
Begin by wedging your clay thoroughly. If throwing, center about 1 lb of clay and pull up a short, stout cylinder with a slightly rounded bottom. If hand-building, roll a slab and form a cylinder, ensuring you smooth the seam completely. -
Shape the Belly:
If on the wheel, use a rib to gently push the walls outward from the inside to create a rounded, bulbous shape that tapers slightly inward at the rim. Hand-builders can achieve this by gently paddling the outside or using a rib on the inside of the leather-hard form. -
Refine the Rim:
Compress the rim with a chamois or sponge to ensure it is smooth and comfortable for drinking. Aim for a medium thickness—not too delicate, but not chunky. -
Trim the Bottom:
Once the body is leather hard, trim the bottom to create a rounded curve. You won’t need a traditional foot ring since we are adding legs, so just aim for a smooth, convex curve.
Step 2: Adding Personality (Legs and Handle)
-
Create the Legs:
Roll three small coils of clay, each about an inch thick. Cut them to be approximately 1.5 inches long. Taper one end slightly and flatten the top end where it will attach to the mug. -
Shape the Feet:
Tap the tapered end of each leg gently on your work surface to create a flat standing point. Round off the edges so they look like soft, chubby paws. -
Attach the Legs:
Flip your cup upside down. Score the bottom of the mug in a triangle pattern and score the tops of the legs. Apply slip and press them firmly into place. I like to wiggle them slightly to ensure a strong bond. -
Level the Mug:
Flip the mug right side up and gently tap it on a flat surface to ensure all three legs touch the ground evenly and the mug sits level. -
Pull the Handle:
Pull a small strap handle or roll a coil. Shape it into a ‘C’ or demi-ear shape. The handle should be relatively small and round to match the cute aesthetic. -
Attach the Handle:
Score and slip the attachment points on the side of the mug. Press the handle on, blending the clay smoothly into the body using a modeling tool or your thumb.
Wobbly Mug?
If the legs dry unevenly and the mug rocks, gently sand the bottom of the longer leg on a flat piece of sandpaper after the bisque fining but before glazing.
Step 3: Decoration and Glazing
-
Bisque Fire:
Allow the mug to dry slowly to prevent cracking, especially at the leg joints. Once bone dry, bisque fire it to cone 04. -
Paint the Face:
Using a very fine detail brush and black underglaze, paint two small circles for eyes. Leave a tiny negative space white spot in the upper right of each pupil for the ‘catchlight.’ Create a simple ‘U’ shape for the smile. -
Add Cheeks:
Dip the back end of a paintbrush into rust or burnt orange underglaze. Dot it gently onto the clay just outside the smile line to create rosy cheeks. -
Apply Glaze:
Dip the entire mug into a glossy cream or white speckled glaze. If your clay body is not already speckled, use a ‘speckled’ glaze formula to get that vanilla bean look. Ensure the glaze is food-safe. -
Wipe the Feet:
carefully wipe the glaze off the very bottom of the three feet with a damp sponge so they don’t stick to the kiln shelf. -
Final Firing:
Glaze fire the piece to the temperature recommended for your specific clay and glaze combination (usually cone 5 or 6 for stoneware).
Pro Tip: Cheeky Details
For perfectly round cheeks without a brush, use a Q-tip dipped in underglaze. Press straight down and lift up for a flawless circle every time.
Once cooled, fill your new little friend with coffee and enjoy the cheerful company.


What Really Happens Inside the Kiln
Learn how time and temperature work together inside the kiln to transform clay into durable ceramic.
Bubble Tea Cup Charm
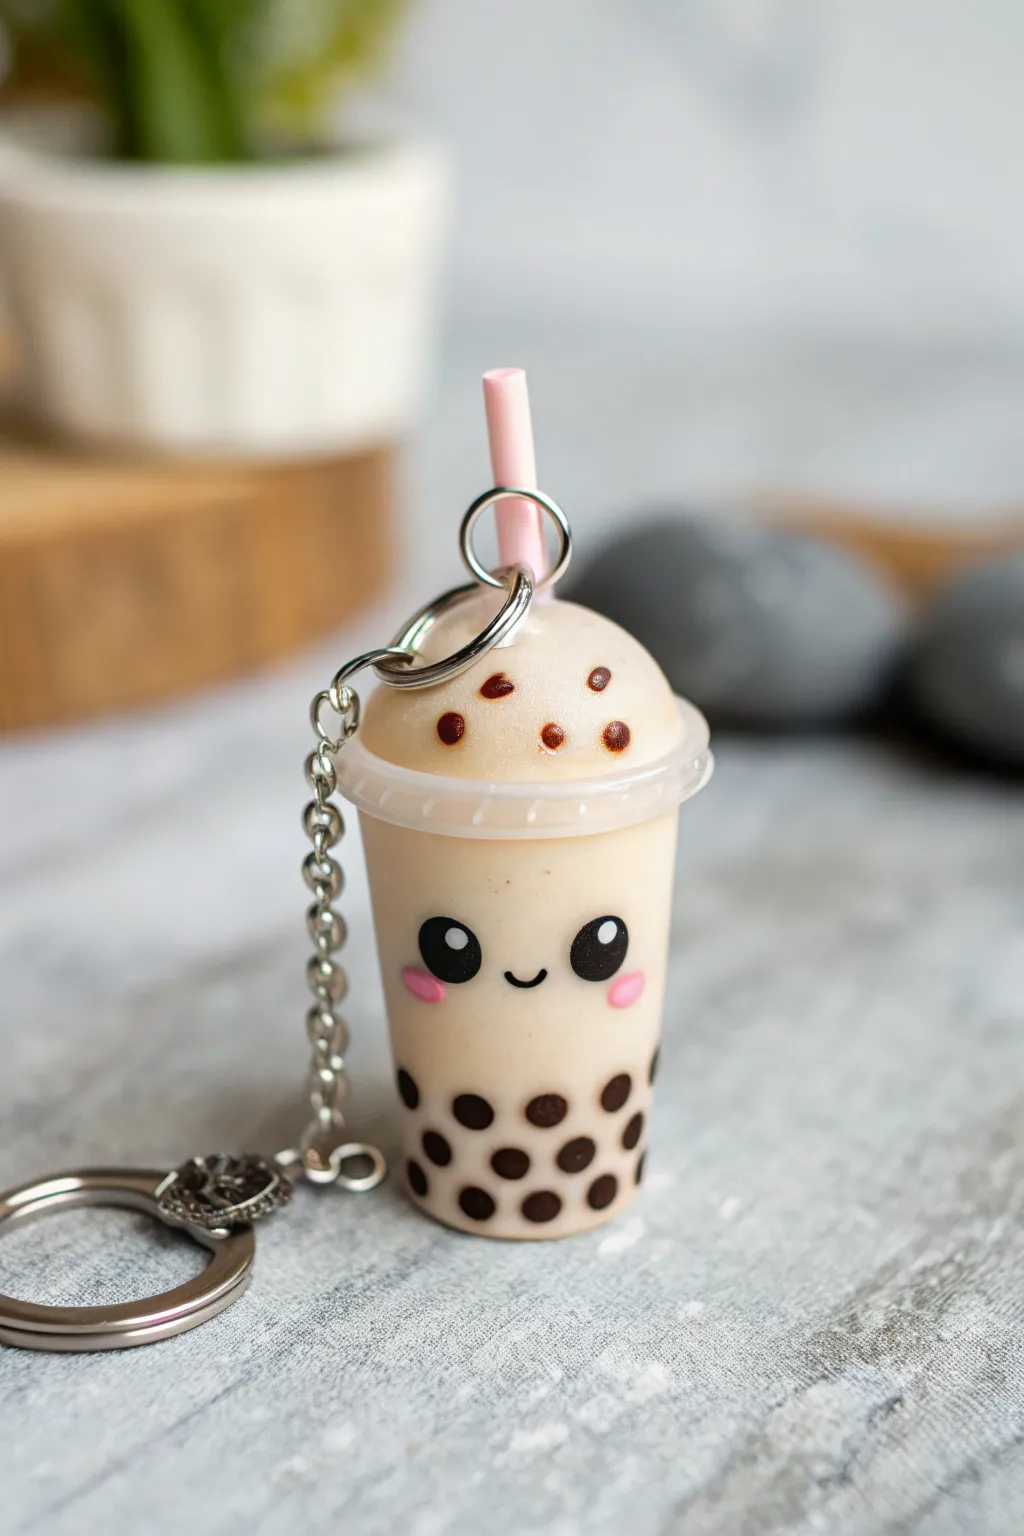
Create this adorable bubble tea charm that looks sweet enough to sip. With its creamy beige color, tiny suspended tapioca pearls, and a happy little face, this polymer clay project is the perfect fun accessory for your keys or bag.
Step-by-Step Guide
Materials
- Polymer clay (translucent, white, beige/tan, black, pink)
- Liquid polymer clay (translucent)
- UV resin and UV light (optional but recommended for shine)
- Small eye screws
- Keychain hardware with chain
- Needle tool or toothpick
- X-Acto knife or clay blade
- Acrylic rolling pin
- Ball stylus tool
- Black acrylic paint (fine detail)
- Super glue (gel type recommended)
Step 1: Shaping the Cup Base
-
Mix the Tea Color:
Start by mixing translucent clay with a small amount of beige or tan clay. You want a milky tea color that isn’t completely opaque, which adds realism. If it’s too dark, add white. -
Form the Cup Body:
Roll your mixed clay into a smooth cylinder. Taper the bottom slightly so it resembles a standard to-go cup shape, being careful to keep the top surface flat and circular. -
Create the Boba Pearls:
Roll a very thin snake of black clay. Use your blade to cut tiny, equal-sized pieces from the snake, then roll each piece into a perfect sphere between your fingers. -
Attach Lower Pearls:
Press these black spheres gently into the bottom third of the cup. Don’t flatten them completely; just embed them enough so they stick securely to the ‘glass’ surface.
Boba Transparency Hack
Mix just a speck of translucent clay into your black boba pearls. When baked, they will have a slight depth similar to cooked tapioca rather than looking like flat plastic dots.
Step 2: Adding the Face & Lid
-
Sculpt the Face Indentations:
Use a medium ball stylus to create two small, shallow indentations where the eyes will go. This helps the black clay sit flush rather than bulging out excessively. -
Insert the Eyes:
Roll two slightly larger black clay balls for the eyes. Place them into the indentations you made and press gently to flatten. Add tiny white clay specks for light reflections if desired. -
Paint the Smile:
Using a very fine detail brush or a needle tool dipped in black paint, carefully draw a small U-shaped smile between the eyes. I find a toothpick works great for this tiny detail. -
Add Rosy Cheeks:
Take the tiniest amount of pink clay, flatten two minuscule ovals, and press them onto the cheeks just below the eyes. -
Create the Done Lid:
Roll a ball of the same tea-colored clay mixture, slightly smaller than the cup width. Cut it in half to create a dome shape and attach this to the top of the cylinder. -
Simulate Floating Boba:
Press a few more black boba pearls into the top of the dome, making it look like they are floating at the surface of the drink. -
Add the Straw:
Roll a small snake of pink clay. Cut a short segment and insert it into the top of the dome. You can insert a small piece of wire inside the straw for extra structural strength.
Make it a Shaker
Instead of clay boba, use a hollow resin mold for the cup. Fill with baby oil and tiny black beads so the pearls actually float and move when you shake the keychain.
Step 3: Rim, Baking & Hardware
-
The Plastic Rim:
Roll a very thin snake of translucent or white clay. Wrap this around the seam where the dome meets the cup body to create the lid’s rim. -
Refining the Rim:
Use a flat tool to gently press vertical lines into the rim, mimicking the texture found on plastic cup lids. -
Insert Eye Screw:
Before baking, screw an eye screw firmly into the top of the dome, near the straw but not touching it. This will hold your keychain later. -
Bake the Clay:
Bake the piece according to your polymer clay package instructions (usually 275°F for 15-30 minutes). Let it cool completely before handling. -
Apply Glossy Finish:
Coat the entire cup (cup body, lid, and boba) with UV resin or a glossy water-based varnish. This gives it that wet, plastic-cup shine. Cure under UV light or let dry. -
Final Assembly:
Once the finish is hard and dry, attach your keychain hardware to the eye screw using jump rings and pliers.
This charming boba tea accessory is now ready to add a splash of sweetness to your daily routine
Strawberry With Dangly Legs
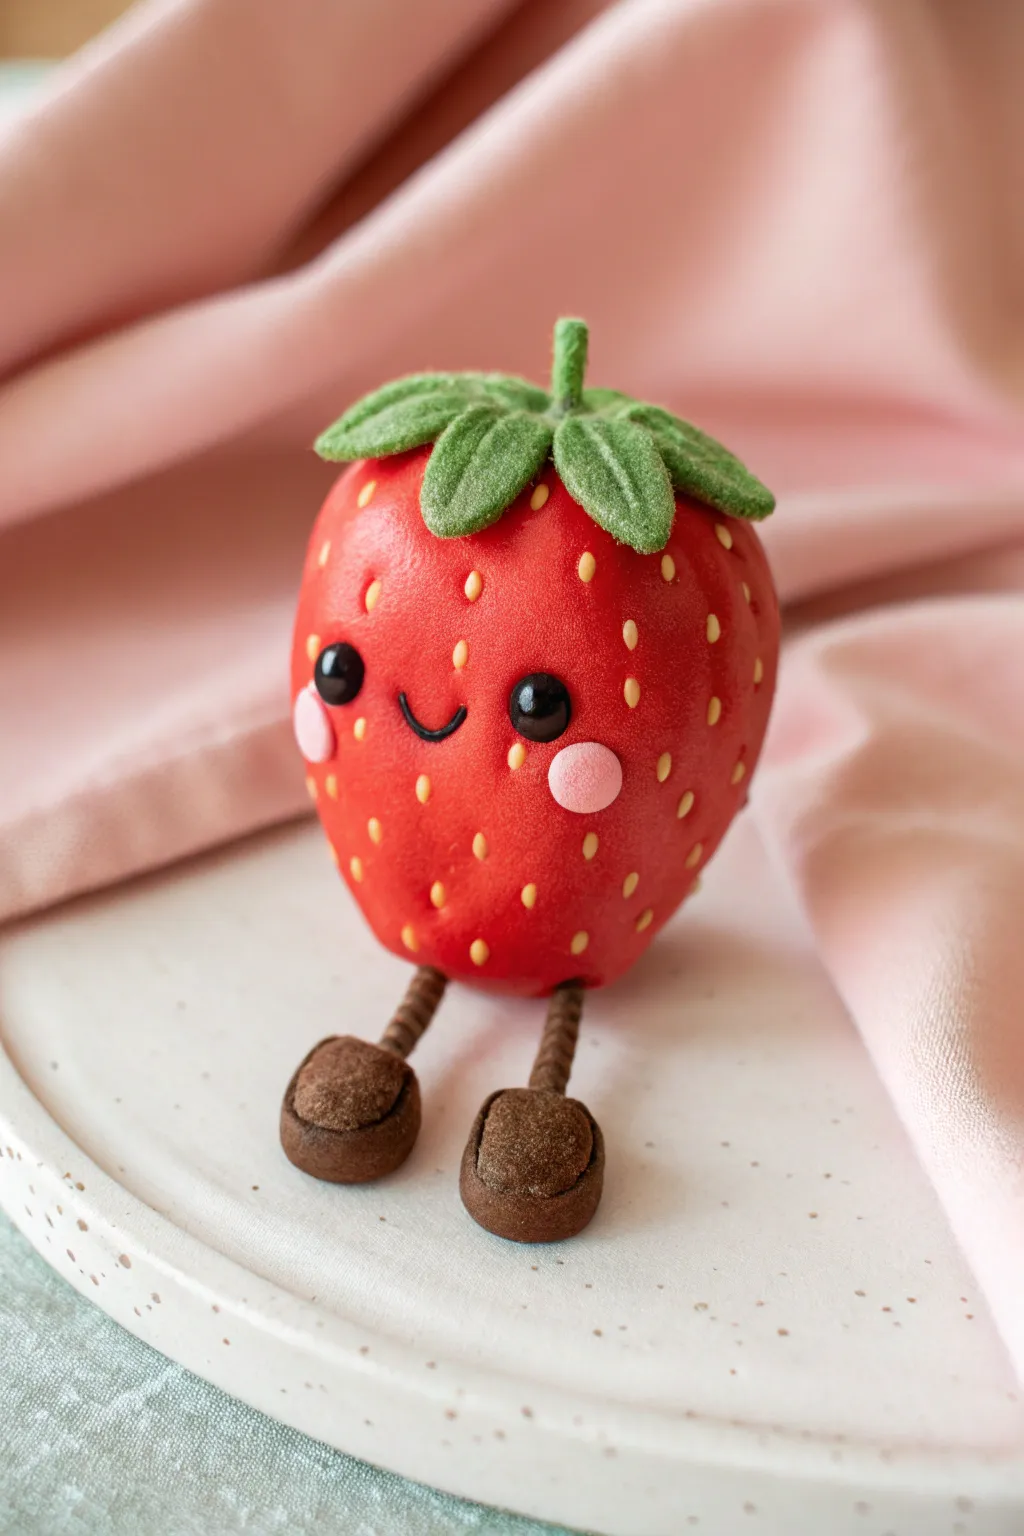
Create this adorable strawberry character featuring textured skin, a sweet smiling face, and charming dangly legs. This project combines simple shapes with fun texturing techniques to bring a quirky fruit friend to life.
Step-by-Step
Materials
- Red polymer clay (for the body)
- Green polymer clay (for the leaves)
- Brown polymer clay (for legs and shoes)
- Small amounts of yellow, pink, and black polymer clay
- Aluminum foil (for the core)
- Needle tool or toothpick
- Ball tool (small and medium)
- Brown cord or twisted twine (for the legs)
- Super glue or liquid clay
- Wire cutters
- Soft pastel chalks in darker red (optional for shading)
- Small paintbrush
Step 1: Creating the Strawberry Base
-
Form the core:
Crumple a piece of aluminum foil into a tapered egg shape, slightly wider at the top and narrower at the bottom. This saves clay and makes the figure lighter. -
Condition the red clay:
Warm up your red polymer clay by kneading it until it’s soft and pliable. Roll it into a sheet about 1/4 inch thick. -
Wrap the core:
Wrap the red clay sheet around your foil core, smoothing out all seams with your fingertips until the surface is completely seamless and shaped like a plump strawberry. -
Add texture:
Using a soft toothbrush or a stiff bristle brush, gently tap the entire surface of the red clay to give it a realistic, slightly pitted skin texture. -
Indent seed pockets:
Take a small ball tool or the blunt end of a needle tool and press tiny indentations all over the strawberry body, spacing them evenly in a pattern. -
Place the seeds:
Roll tiny, rice-grain-sized pieces of yellow clay. Carefully place one seed into each indentation you created, pressing them in gently so they stay put without flattening completely.
Seed Spacing Trick
Work in a diamond pattern rather than straight rows when placing seeds. This mimics nature and prevents the texture from looking robotic.
Step 2: Adding the Face and Leaves
-
Create the eyes:
Press two shallow sockets near the middle of the strawberry using a medium ball tool. Roll two small balls of black clay and press them into these sockets. Add a tiny speck of white clay to each for a highlight. -
Add rosy cheeks:
Flatten two small circles of soft pink clay and place them just below and to the outside of the eyes. -
Sculpt the smile:
Roll an incredibly thin snake of black clay. Shape it into a small ‘U’ and gently press it into the clay between the eyes to create a smile. -
Form the leaves:
Condition green clay and shape 5-6 teardrop pieces. Flatten them slightly and use a needle tool to score a central vein and smaller side veins on each leaf. -
Attach the crown:
Arrange the leaves in a circle on top of the strawberry, pressing them down securely. Add a small stem of green clay rising from the center.
Make it a Keychain
Before baking, insert a screw eye pin deep into the top of the stem. Once baked, you can attach a keyring to take your berry buddy everywhere.
Step 3: Legs and Assembly
-
Prepare the leg holes:
Flip the strawberry over and use a tool to poke two deep holes in the bottom where the legs will attach. Make sure they are wide enough for your cord. -
Make the shoes:
Shape two ovals from brown clay. Flatten the bottoms slightly so the figure can sit. Create an opening on the top of each shoe to insert the leg cord. -
Connect cord to shoes:
Cut two equal lengths of brown cord or twisted twine. Apply a drop of super glue or liquid clay into the shoe openings and insert one end of the cord into each. -
Detail the shoes:
Add a thin strip of brown clay around the opening of the shoe to finish the look and secure the cord further. -
Bake the parts:
This is a little tricky—I recommend baking the strawberry body and the leg/shoe assembly separately according to your clay package instructions. Prop the body up on a bit of batting so it doesn’t flatten. -
Final assembly:
Once cooled, apply strong super glue to the top ends of the leg cords and insert them into the pre-made holes at the bottom of the strawberry body.
Now you have a sweet little strawberry friend ready to sit on your shelf

TRACK YOUR CERAMIC JOURNEY
Capture glaze tests, firing details, and creative progress—all in one simple printable. Make your projects easier to repeat and improve.
Avocado Half With Pit Face
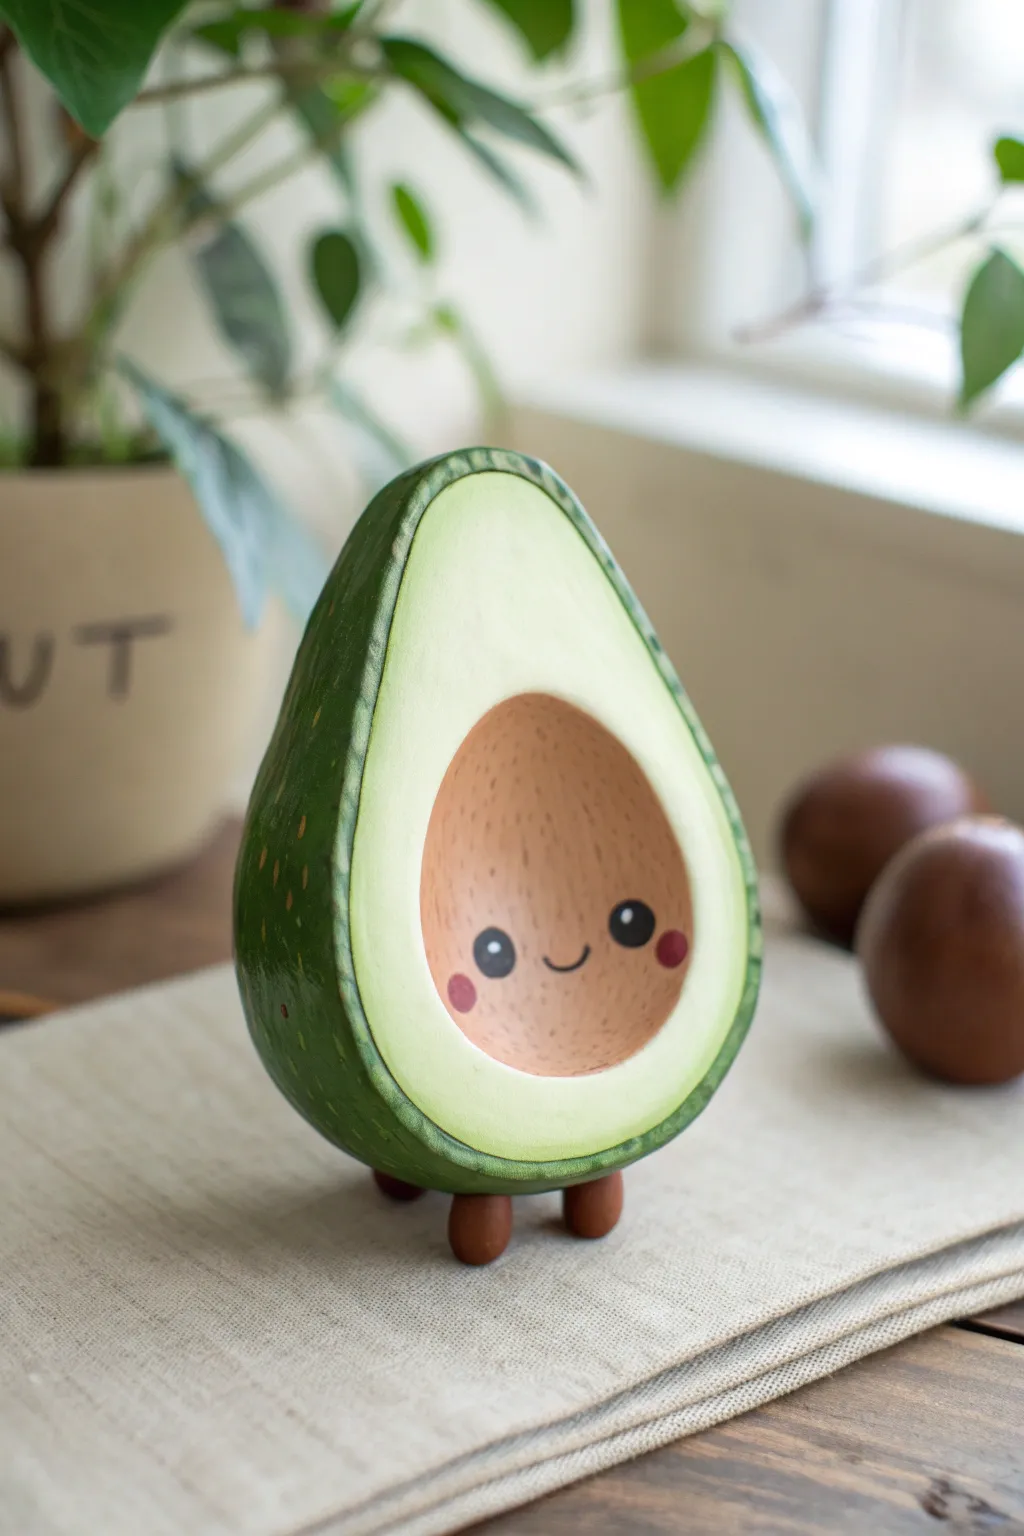
Transform a lump of clay into this adorable, smiling avocado buddy, complete with tiny legs and a rosy-cheeked pit face. This project captures the smooth, matte finish of a modern ceramic piece with the whimsical charm of a beloved plush toy.
Step-by-Step Guide
Materials
- Polymer clay (white or translucent base recommended)
- Acrylic paints (Dark green, light lime green, beige/peach, dark brown, pink, black)
- Ball stylus tool
- Fine grit sandpaper
- Paintbrushes (flat shader, fine detail liner)
- Matte varnish or sealant
- Sculpting tool or craft knife
- Aluminum foil (for armature)
Step 1: Sculpting the Base Form
-
Create the core:
Crumple a piece of aluminum foil into a pear shape. This saves clay and keeps the figurine lightweight. Compress it tightly so it’s dense and smooth. -
Cover with clay:
Roll out a sheet of your base clay to about 1/4 inch thickness. Wrap it completely around the foil pear, smoothing the seams together until you have a seamless organic shape. -
Flatten the face:
Slice off the front curve of the pear shape to create a clean, flat surface where the inside of the avocado will be. Smooth out the edges of this cut so they are rounded, not sharp. -
Carve the pit socket:
Using a large ball tool or your thumb, gently press a concave circle into the unlimited center of the flat face. This depression is where the pit will sit comfortably. -
Form the pit face:
Roll a ball of clay that fits perfectly into the depression you just made. Press it in so it protrudes slightly, like a real avocado pit, but flatten the very front surface just a tiny bit to make painting the face easier later. -
Add the legs:
Roll two small, identical cylinders of clay for the legs. Attach them to the bottom of the avocado body. I find blending the clay at the join site ensures they won’t pop off after baking. -
Texture the skin:
On the curved back and sides (the ‘skin’ area), lightly tap the surface with a stiff-bristled toothbrush or a crumpled ball of foil to add a subtle bumpy texture. -
Bake or dry:
Follow your clay manufacturer’s instructions to bake or air-dry your sculpture. Ensure usage of an oven thermometer if baking to prevent scorching.
Clean Lines Pro-Tip
For the crispest separation between the dark green skin and light green flesh, use thin masking tape or washi tape to mask off the front before painting the dark outer shell.
Step 2: Painting and Details
-
Sand for smoothness:
Once fully cured and cooled, lightly sand the flat front face and the pit area with fine-grit sandpaper to get that ultra-smooth, ceramic-like finish. -
Base coat the flesh:
Paint the flat front border (around the pit) with a very pale, creamy lime green. You may need two coats for opaque coverage. -
Paint the skin:
Paint the textured back and sides with a deep forest green. bring this dark green just over the edge to the front rim to create the ‘peel’ effect seen in the photo. -
Stipple the transition:
Mix a medium green shade. Using a dry brush, gently stipple small dots along the border where the dark skin meets the light flesh to create a natural, speckly gradient. -
Color the pit and legs:
Paint the protruding pit and the tiny legs in a warm, soft brown. A slightly peachy-brown works best for the pit to keep it looking friendly. -
Add the face:
Using your finest detail brush or a dotting tool, paint two widely spaced black circles for eyes on the pit. Add a tiny, thin ‘U’ shape between them for the smile. -
Bring it to life:
Dip the very tip of a stylus in white paint to add tiny highlight dots to the eyes. Then, use a watered-down pink paint or pastel dust to add soft, round blush marks to the cheeks. -
Seal the piece:
Finish with a coat of matte varnish to protect the paint and unify the sheen, giving it that high-quality store-bought look.
Level Up: Texture
Before baking, use a real avocado skin to press texture into the dark green clay areas. This stamps an authentic organic pattern that looks incredible once painted.
Now you have a charming little desk companion ready to brighten up your workspace
Potted Plant With a Sweet Face
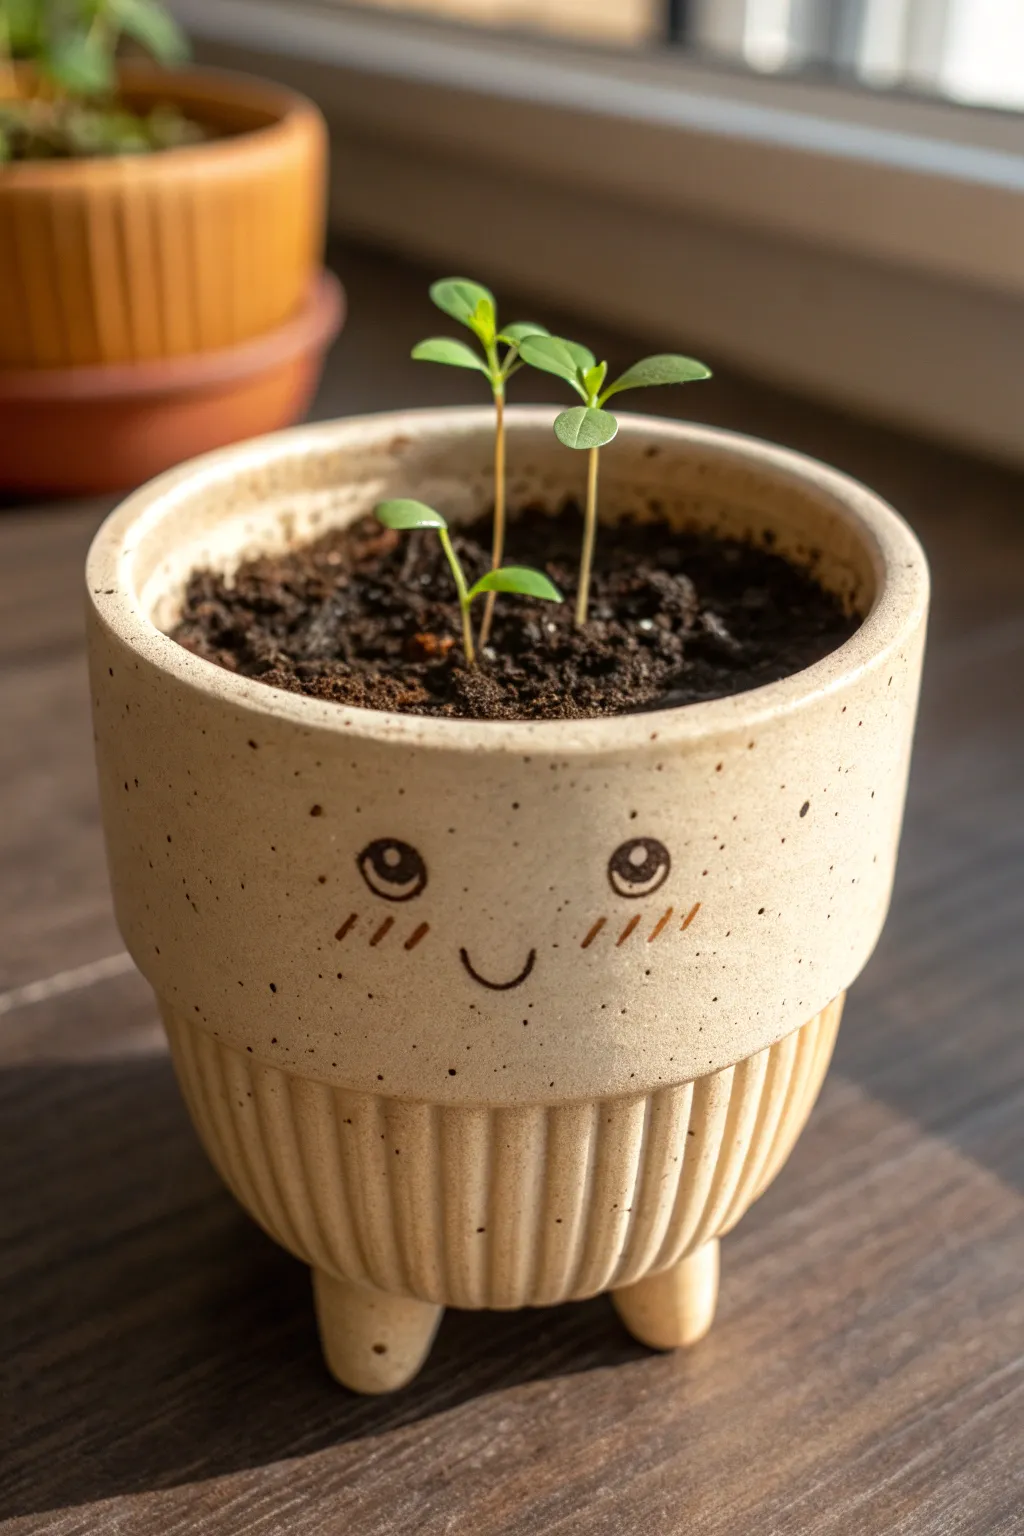
Give your tiny green sprouts the perfect little home with this adorable footed planter featuring a gentle, blushing smile. The dual-textured design combines a smooth upper rim with a ribbed base for a piece that feels just as sweet as it looks.
Detailed Instructions
Materials
- Air-dry clay or polymer clay (beige/cream color)
- Clay rolling pin
- Modeling tools (specifically a needle tool and a blending tool)
- Small round cookie cutter (or a jar lid)
- Ruler
- Water slip (for joining air-dry clay) or liquid clay (for polymer)
- Acrylic paints (brown, pink)
- Fine detail paintbrush
- Matte varnish or sealant
- Sandpaper (fine grit)
Step 1: Forming the Base Structure
-
Prepare the clay slab:
Begin by conditioning your clay until it is soft and pliable, then use your rolling pin to create a smooth, even slab about 1/4 inch thick. -
Cut the base and walls:
Use your round cutter to stamp out a circle for the bottom of the pot. Next, measure and cut a long rectangular strip that is long enough to wrap around the circumference of your base circle. -
texture the lower half:
Before assembling, take the rectangular strip and lightly mark a horizontal line across the middle to separate the top and bottom sections. I find it easiest to use a sculpting tool or the edge of a ruler to press vertical indentations into the bottom half only, creating the ribbed ‘cupcake wrapper’ texture. -
Assemble the cylinder:
Wrap the rectangular strip around the circular base. Carefully join the seam where the strip ends meet by scoring the edges and applying a little slip or liquid clay, blending the clay until the join is invisible. -
Attach the base:
Connect the cylinder walls to the circular base, smoothing the clay on the inside to ensure a watertight seal. Be gentle so you don’t squash the ribbed texture on the outside.
Smoother Ribbing
Instead of carving, roll thin ‘snakes’ of clay and press them vertically onto the bottom half of the pot side-by-side for a more pronounced, embossed ribbed effect.
Step 2: Adding Feet and Refining
-
Create the tripod legs:
Roll three small balls of clay of equal size. Slightly taper them into soft cone shapes with rounded tips to form the feet. -
Attach the feet:
Flip your pot upside down. Score the bottom of the pot and the flat side of each foot, apply your adhesive medium, and press them firmly onto the base in a triangle formation for stability. -
Smooth the transition:
Use a blending tool or your finger to smooth the clay where the feet meet the pot, ensuring they are securely attached. -
Refine the rim:
Turn the pot right-side up and check the top rim. If it’s uneven, trim it carefully with a craft knife or smooth it with a little water on your fingertip. -
Initial drying or baking:
If using polymer clay, bake according to package instructions. For air-dry clay, let it dry partially until it is leather-hard before proceeding to sanding.
Secret Sprout
sculpt a tiny matching clay seedling to permanently ‘plant’ in the soil, just in case you haven’t developed your green thumb yet.
Step 3: The Kawaii Face
-
Sand for smoothness:
Once the pot is fully dry (or baked and cooled), use fine-grit sandpaper to gently smooth the top half of the pot where the face will go. A smooth surface is crucial for clean painted lines. -
Draft the expression:
Lightly sketch the face placement with a pencil. aim for the middle of the smooth upper section. Draw two wide-set eyes and a small, simple U-shaped smile between them. -
Paint the eyes:
Using a fine detail brush and dark brown paint, carefully fill in the circular eyes. Leave a tiny speck unpainted (or add a white dot later) for that sparkling highlight. -
Add the smile:
With the very tip of your brush, trace the smile line in the same dark brown. Keep the line thin and delicate. -
Apply the blush:
Mix a warm, rusty pink color. Paint three tiny diagonal dashes under each eye to create the blushing cheeks shown in the photo. -
Speckle effect (optional):
To mimic the ceramic glaze look, load an old toothbrush with thinned brown paint and flick it lightly over the pot to create natural-looking speckles.
Step 4: Finishing Touches
-
Seal the artwork:
Apply a coat of matte varnish over the entire outside of the pot to protect the paint and the clay texture. -
Waterproofing the inside:
If you plan to use real plants, apply several coats of a heavy-duty waterproof sealer to the inside of the pot so moisture doesn’t degrade the clay.
Once sealed and dry, your cheery little pot is ready to hold fresh soil and new beginnings.
Cloud Buddy With Star Friend
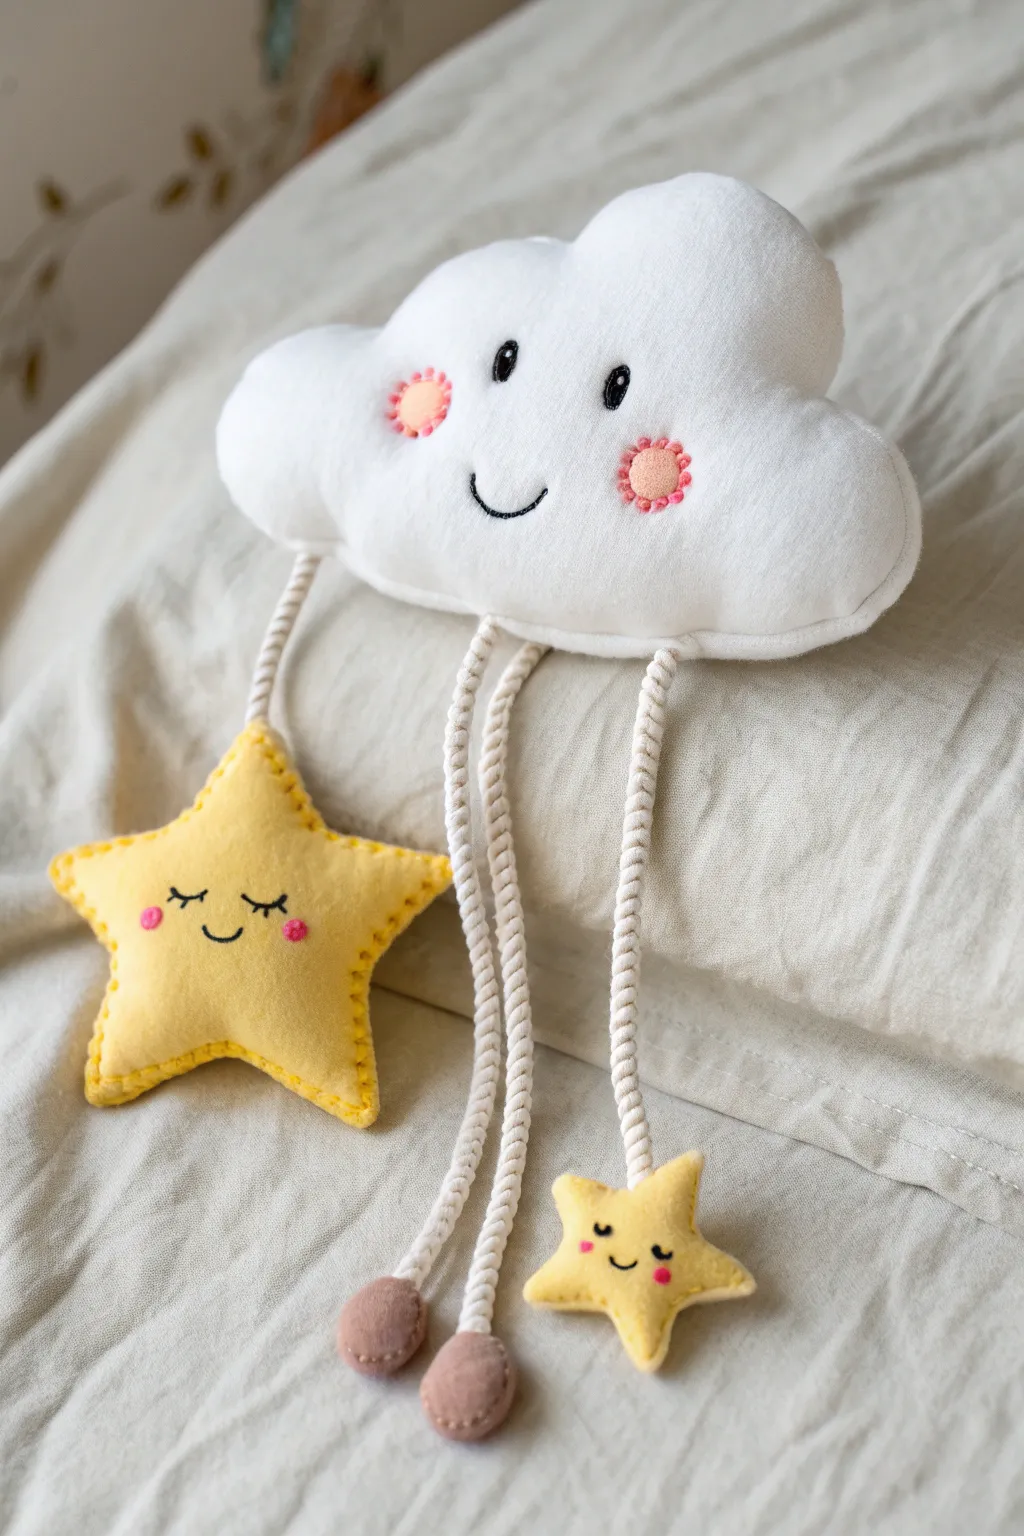
Recreate the soft, plush texture of a nursery mobile using lightweight polymer clay to capture that cozy Jellycat aesthetic. This charming cloud features dangling star friends and simple cord textures detailed directly into the clay for a faux-fabric finish.
Step-by-Step
Materials
- White polymer clay (approx. 200g)
- Yellow polymer clay (approx. 100g)
- Small amount of pink polymer clay
- Small amount of black polymer clay
- Small amount of dusty pink/brown polymer clay
- Liquid polymer clay (translucent or white)
- Rolling pin
- Needle modeling tool
- Clay knife or craft blade
- Small ball stylus tool
- Texture sponge or toothbrush
- White twisted cotton cord or macramé rope
- Superglue or strong craft adhesive
Step 1: Sculpting the Cloud
-
Shape the base:
Condition your white clay until soft and roll it into a thick, elongated oval. Gently push the sides in at random intervals to create the puffy, irregular shape of a cloud. -
Refine the edges:
Flatten the cloud slightly with your palm so it’s about 1.5 cm thick. Use your fingers to smooth and round off the edges so there are no sharp angles, mimicking a stuffed pillow. -
Add texture:
To simulate fabric, gently dab the surface of the cloud with a texture sponge or an old toothbrush. Do this lightly so you don’t distort the shape. -
Create the face:
Roll two tiny ovals of black clay for eyes and press them onto the upper center of the cloud. Roll a very thin snake of black clay for the smile and curve it gently below the eyes. -
Add rosy cheeks:
Flatten two small circles of pink clay. Press them onto the cheeks. Using a needle tool, poke tiny dots around the perimeter of these pink circles to mimic embroidery stitching. -
Prepare for hanging:
Use your needle tool to poke three deep holes into the bottom edge of the cloud where the legs will attach. Make them slightly wider than your cotton cord.
Clean Clay Only
White clay picks up dust instantly. Wash your hands thoroughly and wipe down your work surface with alcohol or a baby wipe before handling the white clay cloud.
Step 2: Creating the Stars & Accents
-
Cut the large star:
Roll out a slab of yellow clay about 1 cm thick. Cut out a classic five-point star shape using a cutter or your knife. Smooth the edges to look puffy. -
Stitch details:
Using your needle tool, press small, evenly spaced indentations all along the outer edge of the star to create a ‘blanket stitch’ effect. -
Star face:
Indent curved sleeping eyes using a curved tool or fingernail, then fill with thin black clay snakes. Add tiny pink cheeks. -
Make the small star:
Repeat the previous steps to make a miniature version of the yellow star, about a third of the size of the first one. -
Form the clay beads:
Roll two medium-sized balls from the dusty pink/brown clay. These will weigh down the center cords. Poke a hole halfway through each one to accept the cord later. -
Bake everything:
Place all clay pieces on a parchment-lined baking sheet. Bake according to your clay package instructions (usually 275°F/135°C for 15-30 minutes per 1/4 inch thickness). Let cool completely.
Step 3: Assembly
-
Prepare the cords:
Cut three lengths of white twisted cord. One short piece for the large star, one long piece for the small star, and two medium pieces for the clay balls. -
Attach the stars:
Put a drop of superglue into the top of the large yellow star (you may need to drill a small hole if you forgot to make one pre-bake) and insert the short cord. Repeat for the small star with the long cord. -
Attach the beads:
Glue the ends of the medium cords into the holes of the dusty pink clay balls. -
Connect to cloud:
Apply strong adhesive into the three holes at the bottom of the cloud. Insert the large star cord on the left, the two bead cords in the center hole, and the small star cord on the right. -
Final secure:
I like to hold the cords in place for a minute until the glue sets to ensure they hang straight down.
Soften the Look
Dust a tiny bit of pink soft pastel chalk onto the clay cheeks with a dry paintbrush before baking for an even softer, airbrushed blush effect.
Hang your adorable clay creation on a wall hook or shelf edge to bring a dreamy vibe to the room
Acorn Pocket Pal
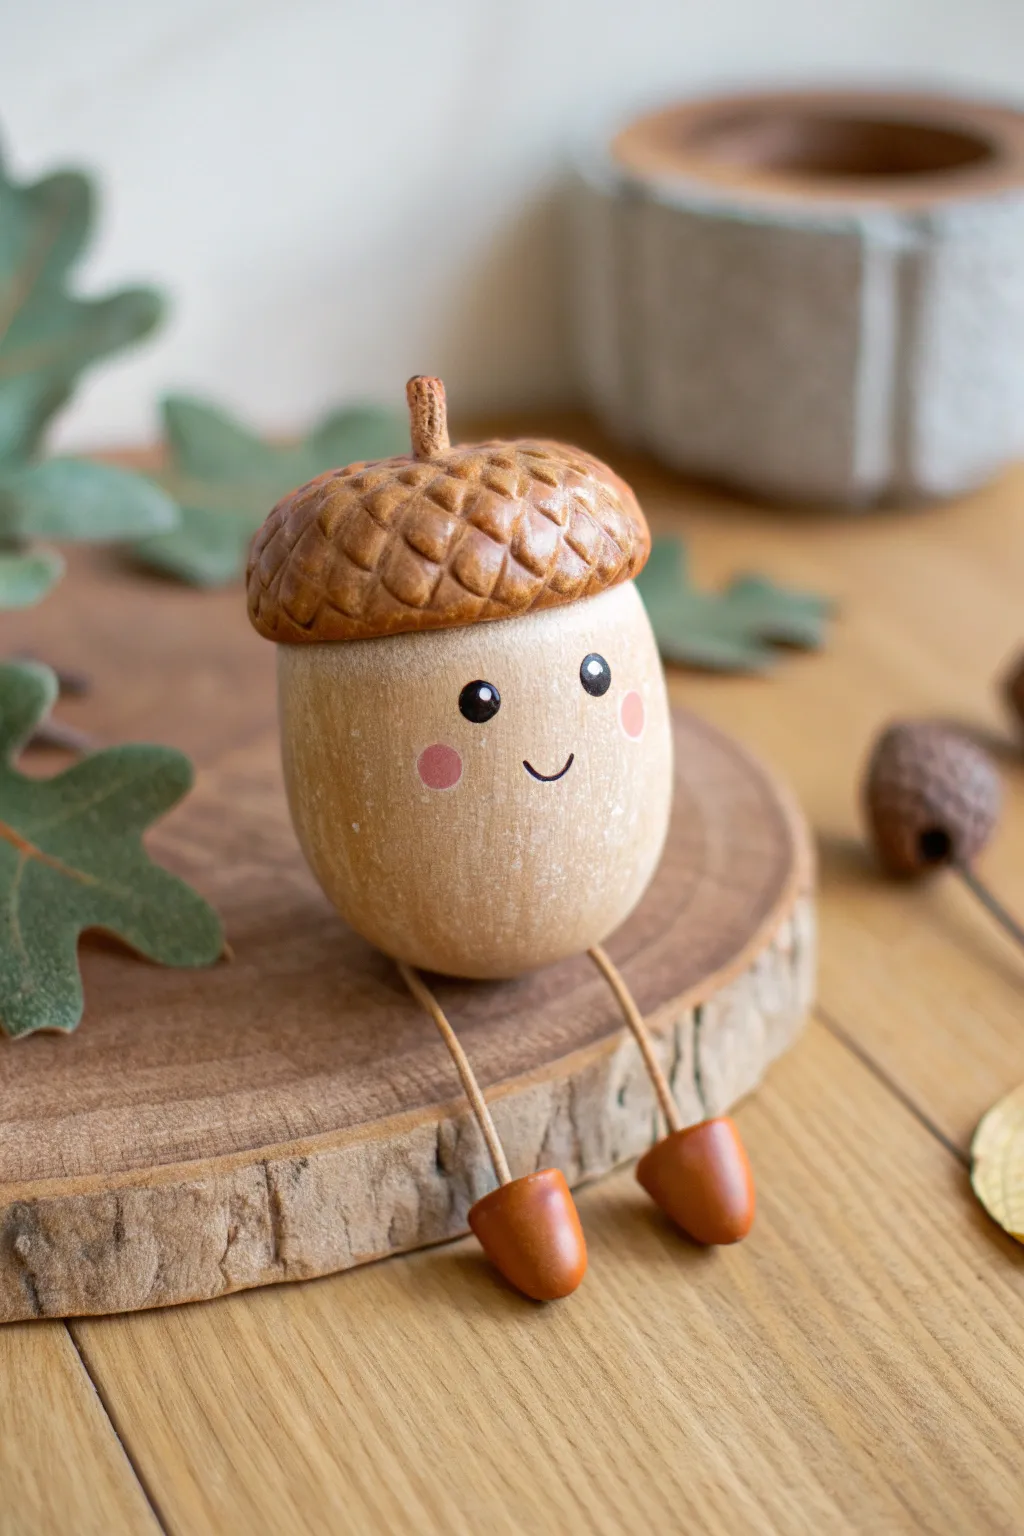
This adorable little woodland friend brings a touch of nature indoors with its textured cap and cheerful, rosy-cheeked expression. It’s a delightful project that combines basic sculpting techniques with delicate painting to create a charm full of personality.
Step-by-Step Guide
Materials
- Light beige polymer clay (for the body)
- Medium brown polymer clay (for the cap)
- Terracotta or rust-colored polymer clay (for feet)
- Thin crafting wire or floral wire (for legs)
- Texturizing tool (needle tool, toothpick, or small sculpting blade)
- Black acrylic paint
- Pink acrylic paint
- White acrylic paint
- Fine detail paintbrush
- Dotting tool or ball stylus
- Matte finish varnish (optional)
- Craft glue or liquid clay
Step 1: Shaping the Base
-
Prepare the Body Clay:
Start by conditioning the light beige polymer clay until it is soft and pliable. Roll it into a smooth ball free of cracks. -
Form the Acorn Shape:
Gently gently roll the ball into an oval or egg shape, flattening the top slightly where the cap will sit. Use your fingers to smooth out any fingerprints. -
Prepare the Wire Legs:
Cut two equal lengths of thin crafting wire, approximately 1.5 inches long. These will serve as the dangling legs. -
Insert the Wires:
Carefully push the wire pieces into the bottom of the body shape, spacing them slightly apart. I like to add a tiny dab of liquid clay on the tips before inserting them to ensure a strong bond after baking. -
Make the Feet:
Take two small pieces of terracotta clay and shape them into tiny, rounded cones or gumdrop shapes. -
Attach the Feet:
Slide one foot onto the end of each wire leg. Press the clay firmly around the wire so it holds secure.
Step 2: Creating the Textured Cap
-
Form the Cap Base:
Take the medium brown clay and flatten it into a thick disc or pancake shape, ensuring it is slightly wider than the top of your acorn body. -
Attach the Cap:
Place the brown disc onto the flattened top of the beige body. Gently curve the edges down so it hugs the top of the acorn like a beanie. -
Add the Stem:
Roll a tiny cylinder of brown clay and attach it to the very center of the cap. -
Create the Grid Pattern:
Using a needle tool or a small sculpting blade, gently score a diagonal cross-hatch pattern across the entire surface of the cap to create diamond shapes. -
Detail the Diamonds:
To mimic real oak texture, press a small indentation or dot into the center of each diamond shape using a dull tool or toothpick. -
Texture the Stem:
Lightly scratch vertical lines onto the stem to give it a woody, fibrous look.
Natural Texture
For a more organic look on the body, lightly brush the unbaked beige clay with a stiff toothbrush to create a subtle grain.
Step 3: Baking and Finishing
-
Pre-Bake Check:
Double-check that your acorn is sitting upright or propped securely so that the legs hang naturally while baking. -
Bake:
Bake your creation according to the specific temperature and time instructions on your package of polymer clay. Let it cool completely before handling. -
Paint the Eyes:
Using a dotting tool dipped in black acrylic paint, place two small dots for the eyes on the upper half of the face. -
Add Eye Highlights:
Once the black paint is dry, use the very tip of a needle or smallest brush to add a tiny white reflection dot to each eye. -
Paint the Smile:
Mix a very tiny amount of water into your black paint to help it flow. Use your finest detail brush to paint a delicate, small ‘u’ shape for the mouth between the eyes. -
Add Rosy Cheeks:
Dip a rounded tool or the back of a paintbrush into pink paint and stamp two soft circles onto the cheeks. -
Seal the piece:
Finish by applying a thin coat of matte varnish over the painted face to protect your details from scratching off over time.
Autumn Leaf Variation
Sculpt a tiny oak leaf from green or rust clay and attach it next to the stem before baking for an extra seasonal detail.
Find a cozy spot on a shelf for your new friend to dangle their legs and enjoy the view
Smiley Snack Magnet Set
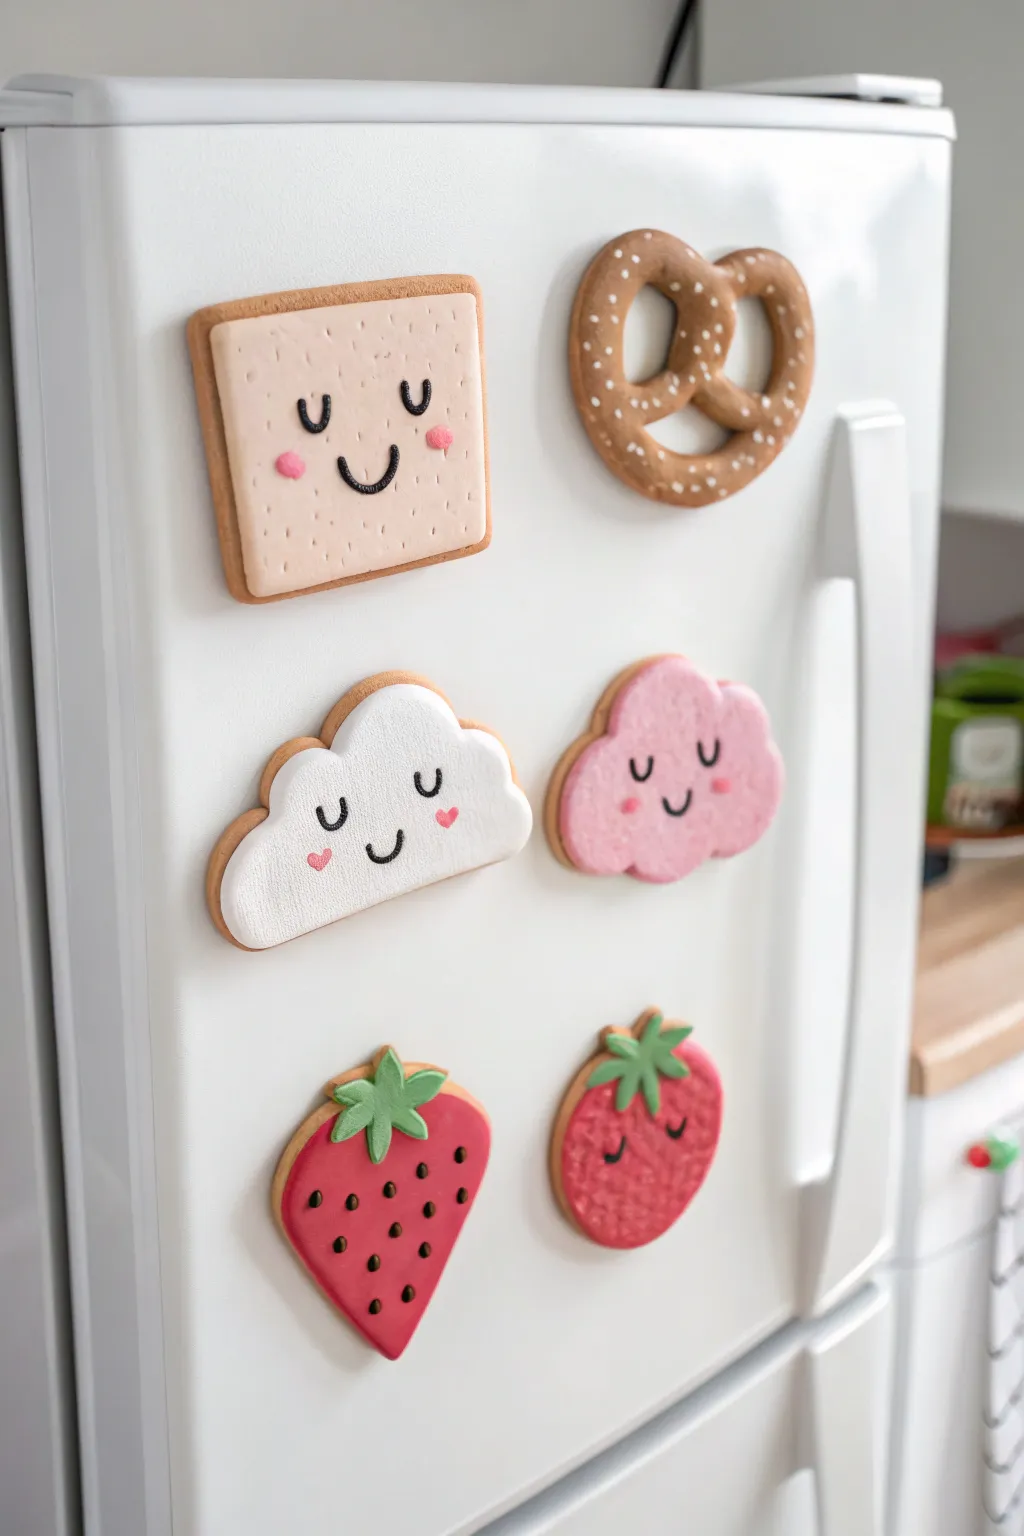
Transform your fridge into a gallery of smiles with this adorable set of food-themed magnets inspired by Jellycat plushies. Using polymer clay, you’ll sculpt and decorate six distinct characters including a cracker, pretzel, clouds, and strawberries, all featuring that signature friendly expression.
Step-by-Step Tutorial
Materials
- Polymer clay (colors: tan/dough, white, pastel pink, bright pink, red, green, black)
- Non-stick rolling pin
- Clay cutting tools (blade or craft knife)
- Small circle cutters (or cookie cutters for shape bases)
- Needle tool or toothpick
- Ball stylus tool
- Heavy-duty round magnets
- Industrial strength glue (like E6000)
- Texturing tool (clean toothbrush or sandpaper)
- Acrylic matte varnish (optional)
Step 1: Dough Basics & Pretzel
-
Mix the dough color:
Start by conditioning a large block of tan clay. If the color is too dark, mix in a little white to achieve a perfect ‘baked cookie’ shade. This will be the base for all the magnets to give them a cohesive bakery look. -
Roll the pretzel snake:
Take a portion of the tan clay and roll it into a long, even rope, about 1/4 inch thick. Taper exactly just the very ends slightly. -
Shape the twist:
Form the classic pretzel knot by creating a U-shape, twisting the ends around each other once, and folding them back down onto the bottom of the U. Press gently to secure the connection points. -
Add texture and salt:
Gently tap the surface with a clean toothbrush to mimic a baked texture. For the salt, roll tiny, irregular specks of white clay and press them randomly onto the pretzel surface.
Clean Clay Pro-Tip
Keep baby wipes nearby! Clean your hands and tools thoroughly between colors, especially before switching to white clay, to avoid transferring lint or red dye.
Step 2: The Cracker & Clouds
-
Cut the cracker base:
Roll out a slab of tan clay about 1/4 inch thick. Cut a perfect square for the cracker back. Roll a thinner layer of very pale pink-tan clay and cut a slightly smaller square to layer on top as the ‘icing’. -
Detail the cracker:
Use a needle tool or the tip of a small paintbrush to create the signature grid of dimples across the surface of the cracker face. -
Shape the cloud bases:
Roll out more tan clay for the backing. Use a cloud cutter or freehand cut two cloud shapes with a craft knife. Smooth the edges with your finger so they are rounded, not sharp. -
Add cloud icing:
Roll out white clay for one cloud and pink clay for the other. Cut matching cloud shapes, just slightly smaller than the tan bases, and press them on top. Gently tap the edges to blend the layers slightly.
Level Up: Scented Clay
Mix a tiny drop of vanilla, strawberry, or chocolate detailed fragrance oil into the clay before baking to make your magnets actually smell like the snacks they represent.
Step 3: Strawberries & Baking
-
Form the strawberry shape:
Create the signature heart-like strawberry shape using red clay. Like the others, you can create a tan backing layer if you want that uniform ‘cookie’ edge, or just keep it solid red. -
Add leafy tops:
Roll out green clay and cut small star shapes or individual teardrops. Arrange them at the top of the strawberry for the calyx and stem. -
Detailed seeds:
Using a tiny needle tool, indent rows of small holes across the berry surface. Roll teeny-tiny tapered logs of black clay and insert them into the holes for seeds. -
Bake the batch:
Arrange all your shapes on a tile or baking sheet. Bake according to your polymer clay package instructions (usually 275°F/130°C for 15-30 minutes). Let them cool completely before handling.
Step 4: Faces & Assembly
-
Roll facial features:
While the pieces cool, prepare the faces. Roll extremely thin ‘noodles’ of black clay for the eyes and mouths. Roll tiny balls of pink clay for cheeks. -
Apply the faces:
Apply a tiny dab of liquid clay or glue to the cooled pieces where the face will go. Carefully place the black clay noodles. Use U-shapes for smiling eyes on the cracker and clouds, and inverted U-shapes for sleeping eyes on one cloud. -
Add blushing cheeks:
Press the small pink balls onto the cheeks of the cracker and white cloud to give them a sweet, flushed look. I usually flatten them slightly with a ball tool. -
Second bake (optional):
If you used raw clay for the faces on baked pieces, pop them back in the oven for 10 minutes to set the features permanently. -
Attach magnets:
Once everything is fully cool and hard, flip the pieces over. Apply a strong industrial adhesive to the back and press a heavy-duty round magnet firmly into the center.
Enjoy seeing these cheerful little faces every time you head to the fridge for a snack
Glossy Finish for Plush-Like Shine
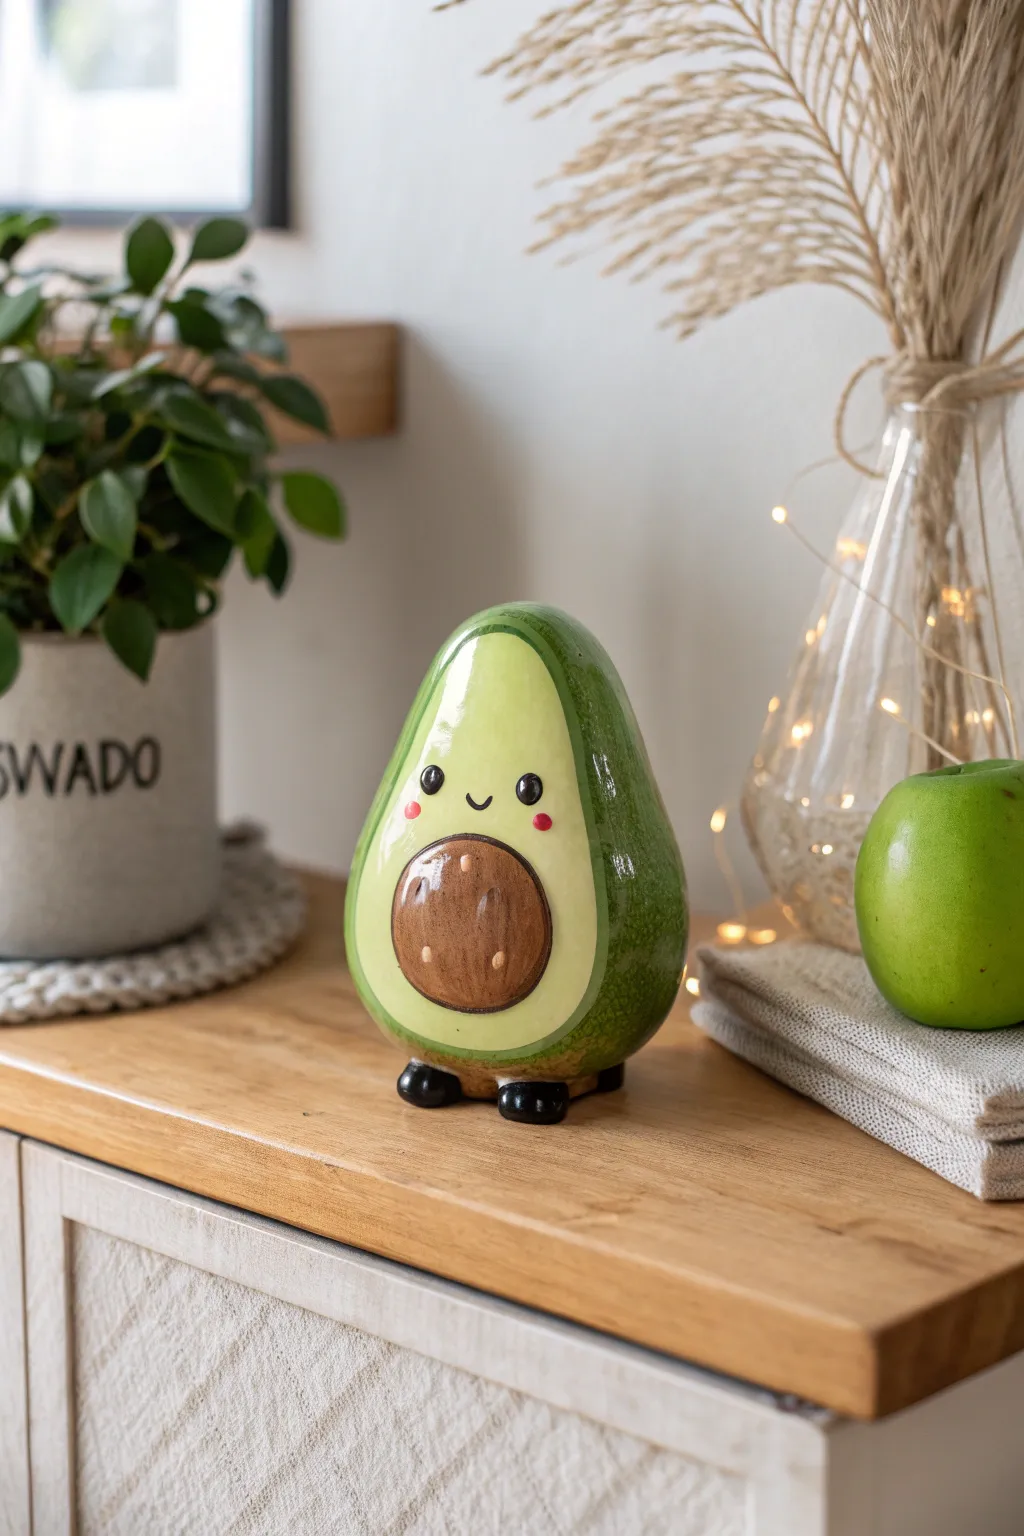
Transform simple air-dry clay into this cheerful, high-shine avocado figurine that mimics the look of expensive glazed ceramics. Its adorable smiling face and ultra-smooth finish make it a perfect desk companion or a handmade gift for a Jellycat lover.
Step-by-Step Guide
Materials
- White air-dry clay (smooth texture)
- Acrylic paints: Avocado green, dark forest green, warm brown, light beige, black, pink
- High-gloss varnish or polyurethane gloss
- Sculpting tools (needle tool, smoothing sponge)
- Fine-grit sandpaper (220 and 400 grit)
- Soft synthetic paintbrushes (flat and fine detail)
- Cup of water
- Aluminum foil (for armature)
Step 1: Sculpting the Base
-
Prepare the core:
Crumple a piece of aluminum foil into a pear shape to serve as the lightweight core of your avocado. This saves clay and helps the sculpture dry evenly. -
Wrap and shape:
Roll out a slab of white air-dry clay and wrap it fully around your foil core. Press the clay firmly to remove air pockets and shape it into a smooth, plump pear form, slightly narrower at the top. -
Create the belly:
Gently press your thumb into the lower front center of the shape to create a shallow, circular indentation where the pit will eventually sit. -
Sculpt the pit:
Roll a separate ball of clay into a smooth sphere that fits perfectly into the indentation. Gently press it into place, blending the back edges slightly if you want it permanent, or just pressing firmly for a 3D relief effect. -
Add the feet:
Roll two small, equal-sized balls of clay for the feet. Flatten the bottoms against your work surface and attach them to the base of the avocado using a little water or slip (clay mixed with water) as glue. -
Check balance:
Stand the avocado up on its new feet and give it a gentle tap to ensure it is stable and doesn’t tip over. Adjust the feet positions if necessary. -
Smooth the surface:
Using a slightly damp sponge or finger, smooth out all fingerprints, bumps, and joining marks. The smoother the clay now, the better the glossy finish will look later. -
Dry thoroughly:
Let the sculpture dry completely for 24-48 hours. I usually rotate it occasionally so the bottom gets airflow.
Step 2: Refining and Painting
-
Sand to perfection:
Once bone dry, sand the entire piece with 220-grit sandpaper to remove major imperfections. Follow up with 400-grit for a glass-smooth finish. Wipe away dust with a damp cloth. -
Base coat the flesh:
Mix a pale, creamy avocado green (mostly white with a confusing hint of green and yellow). Paint the center front face area, avoiding the pit and the outer rim. -
Paint the skin:
Use a darker, rich forest green for the back and sides of the avocado, bringing the color around to frame the pale green face. Create a clean, curved line where the two greens meet. -
Texture the skin (optional):
For added realism, lightly dab a textured sponge with a mix of lighter and darker greens near the transition line to create that speckled avocado skin look. -
Color the pit:
Paint the protruding pit in the center with a warm, medium brown tone. You can add tiny lighter brown flecks or lines to mimic the texture of a real seed. -
Paint the feet:
Carefully paint the two little feet at the bottom in solid black. Use a small flat brush to keep the edges near the green body crisp. -
Add the face:
Using your smallest detail brush or a paint pen, draw two small black circles for eyes on the upper pale section. Add a tiny ‘u’ shape between them for a smile. -
Add highlights and cheeks:
Dot two tiny white specks inside the black eyes to bring them to life. Finally, dab two soft pink circles on the cheeks just below the eyes.
Uneven Shine?
If your gloss coat looks streaky, you likely brushed over drying varnish. Apply coats quickly and don’t touch them again until fully cured.
Step 3: The Glossy Finish
-
Apply first gloss coat:
Using a soft, wide brush, apply a comprehensive layer of high-gloss varnish. Move the brush in long, single strokes to minimize bubbles. -
Dry and repeat:
Allow the first coat to dry according to the bottle’s instructions (usually 1-2 hours). Apply a second or even third coat to build up that thick, ceramic-like ‘glaze’ shine.
Level Up: Texture
Before the clay dries, gently stipple the dark green ‘skin’ area with a stiff toothbrush. This creates a realistic bumpy avocado texture under the gloss.
Now you have a brilliantly shiny, durable little avocado that captures all the charm of a ceramic collectible without the kiln
Mix-and-Match Dangly Leg Styles
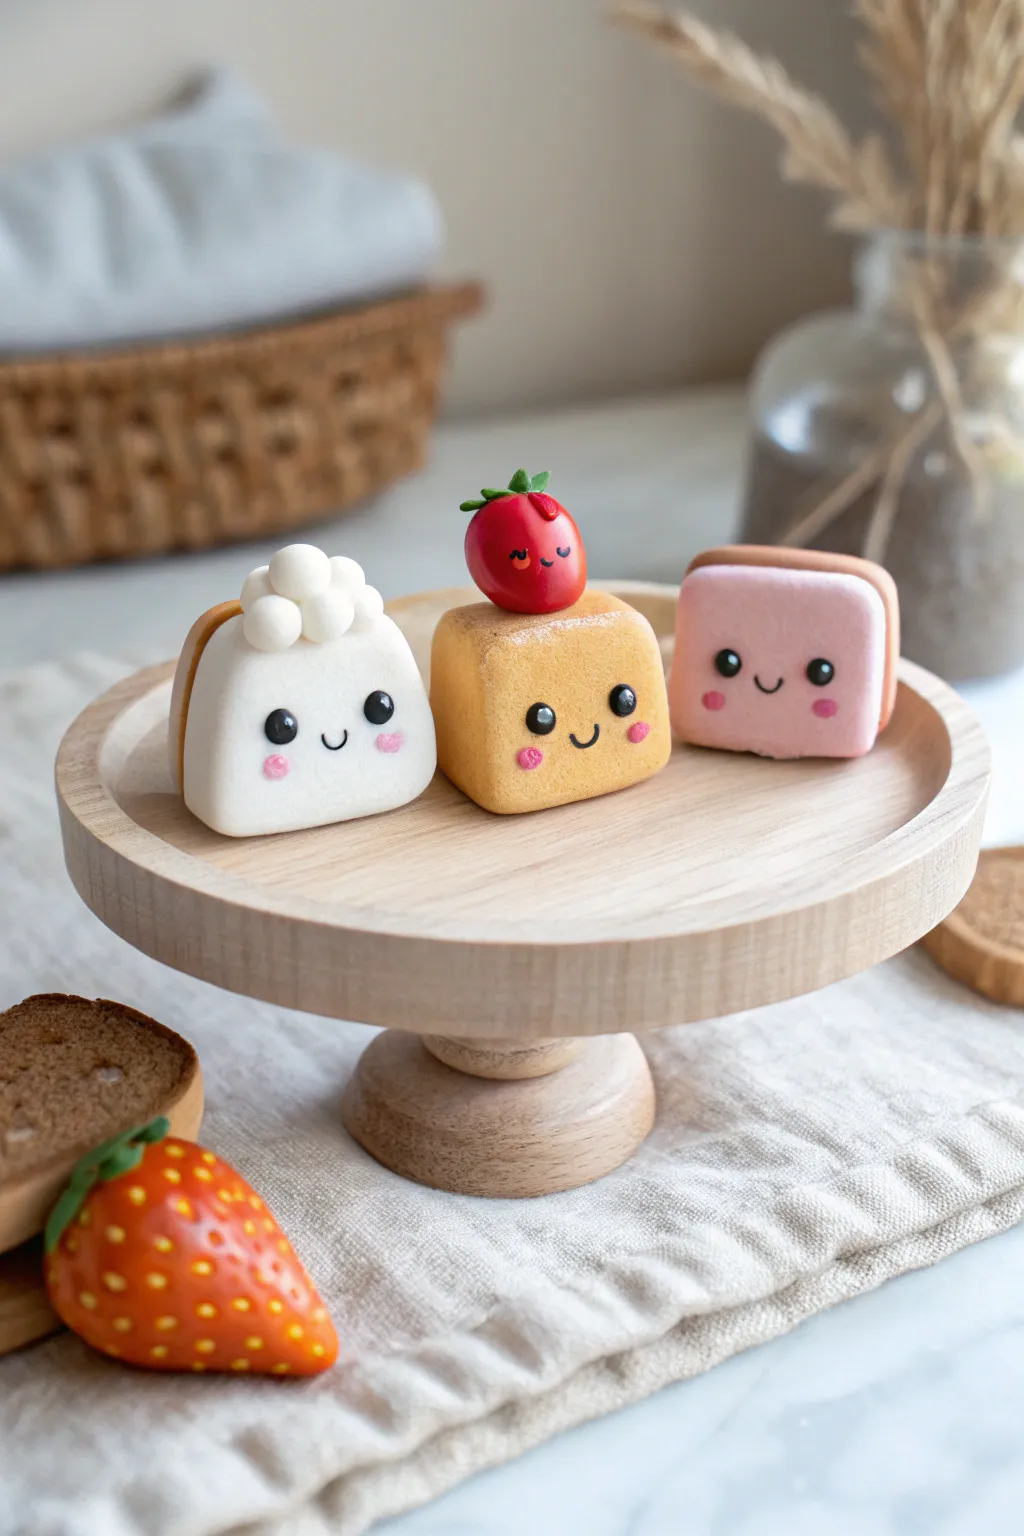
These adorable clay miniatures transform sweet treats into charming characters with lovable expressions and soft, pastel tones. This trio creates a delightful display on a wooden stand, perfect for adding a touch of whimsy to any shelf or desk.
Step-by-Step Tutorial
Materials
- Polymer clay (white, beige/golden pastry, pink, red, green, black)
- Clay roller or pasta machine
- Flexible clay blade or craft knife
- Small ball stylus tools (various sizes)
- Hobby knife or needle tool
- Soft pastel chalks (pink, light brown) for shading
- Small soft brush for pastels
- Oven for baking polymer clay
- Liquitex gloss varnish (optional for strawberry/eyes)
Step 1: Base Shapes
-
Mix your dough colors:
Begin by conditioning your clay. For the center ‘honey cake’ character, mix beige with a tiny dot of yellow and translucent to get a baked-good tone. Keep the white pure and the pink soft and pale. -
Form the cubes:
Roll each main color into a smooth ball, then gently press against your work surface to flatten the bottom. Use your fingers and a flat blade to shape the sides, creating soft, rounded cubes or rectangular prisms. -
Add filling layers:
For the white and pink cakes, roll out a thin sheet of contrasting clay (tan for the white cake, white for the pink cake). Cut a strip and attach it to the side or back to mimic a sandwich layer or crust. -
Texture the surface:
For the center honey cake, gently tap the surface with an old toothbrush or a ball of aluminum foil to give it a realistic sponge texture before baking.
Clean Slates
Keep baby wipes handy! White clay picks up every speck of dust. Wipe your hands and tools thoroughly before handling lighter colors to keep your cakes pristine.
Step 2: Adding Details
-
Create the dollop:
For the white cake, roll tiny spheres of white clay. Cluster them together on the top corner to look like whipped cream, pressing them gently so they adhere without smashing the shape. -
Sculpt the strawberry topper:
Roll a small red teardrop shape for the center character’s hat. Add tiny indented dots for seeds using a needle tool. -
Leafy greens:
Create tiny green teardrops, flatten them, and attach them to the top of the strawberry. I find using a needle tool to press the center of the leaves helps bond them securely. -
Add a face to the fruit:
Give the strawberry its own tiny personality with microscopic black clay eyes and a little smile indented with a small blade.
Step 3: Faces and Finishing
-
Mark eye placement:
Before adding clay, gently mark where the eyes will go with a needle tool to ensure the faces are symmetrical. -
Create the eyes:
Roll very small balls of black clay. Press them flattening into the marked spots on each cube character. -
Add the smiles:
Roll an incredibly thin snake of black clay and curve it into a ‘U’ shape for the mouth. Alternatively, you can imprint the smile with a curved tool or straw cut in half. -
Add highlights:
Place tiny specks of white clay on the upper right corner of each black eye to bring the characters to life. -
Blush application:
Scrape a little pink soft pastel into a powder. Use a soft brush to gently dust rosy cheeks onto the raw clay underneath the eyes. -
Baking:
Bake the figures according to your clay manufacturer’s instructions (usually 275°F/130°C for 15-30 minutes). -
Cooling:
Allow the pieces to cool completely inside the oven or on the tray before handling to prevent cracking. -
Varnishing:
Once cool, apply a small dot of gloss varnish to the eyes and the strawberry topper to make them shine like real fruit and glass.
Uneven Cheeks?
If you apply too much pastel blush, don’t wipe it with a wet cloth, which can smear it. Instead, use a piece of scotch tape to gently lift the excess powder off the raw clay.
Arrange your sweet new friends on a tiered stand or a cute napkin to complete this delightful scene