Whenever I’m stuck creatively, I make pottery tiles—they’re like tiny canvases that let you play with texture, carving, and glaze without committing to a big piece. Here are my favorite pottery tile ideas you can mix and match for wall art, backsplashes, coasters, and little tiled moments around your home.
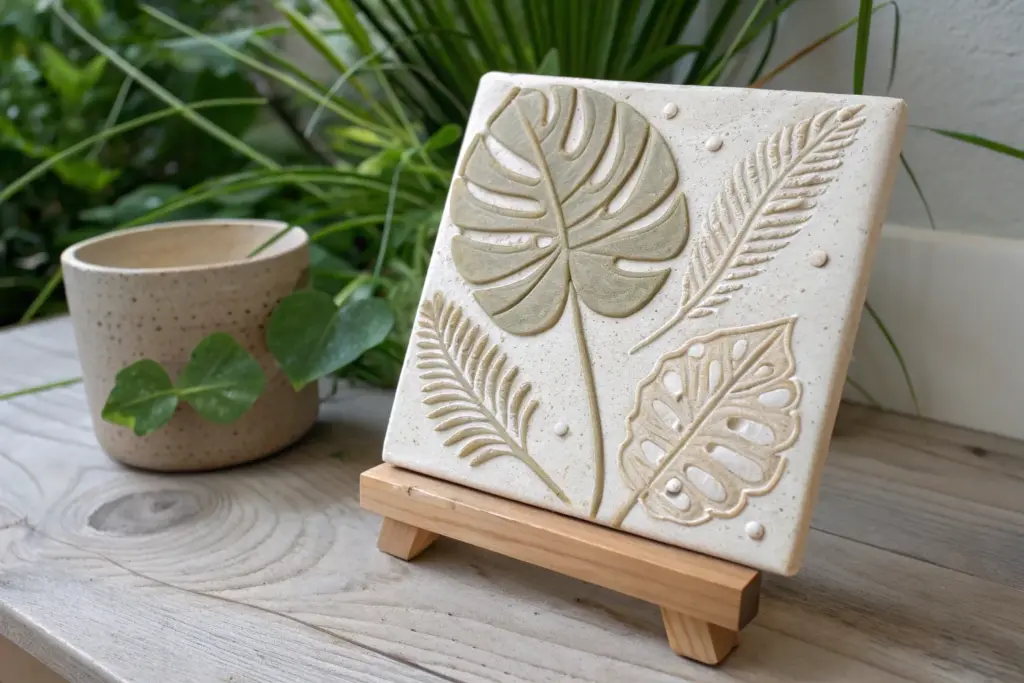
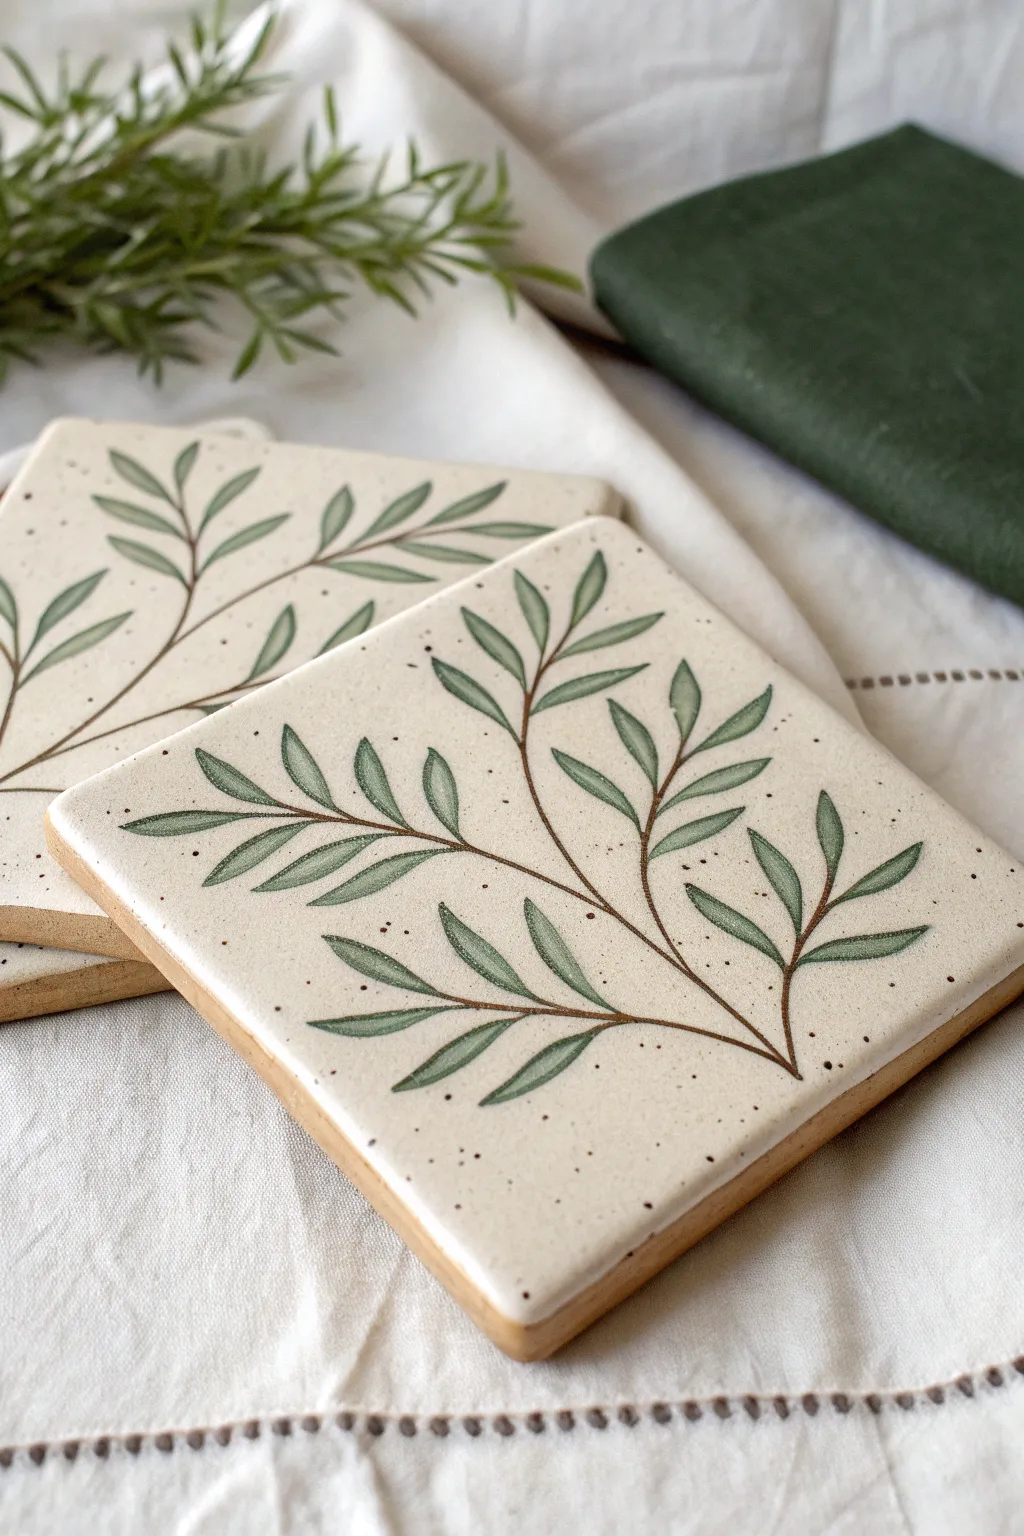
Classic Leaf Imprint Tiles
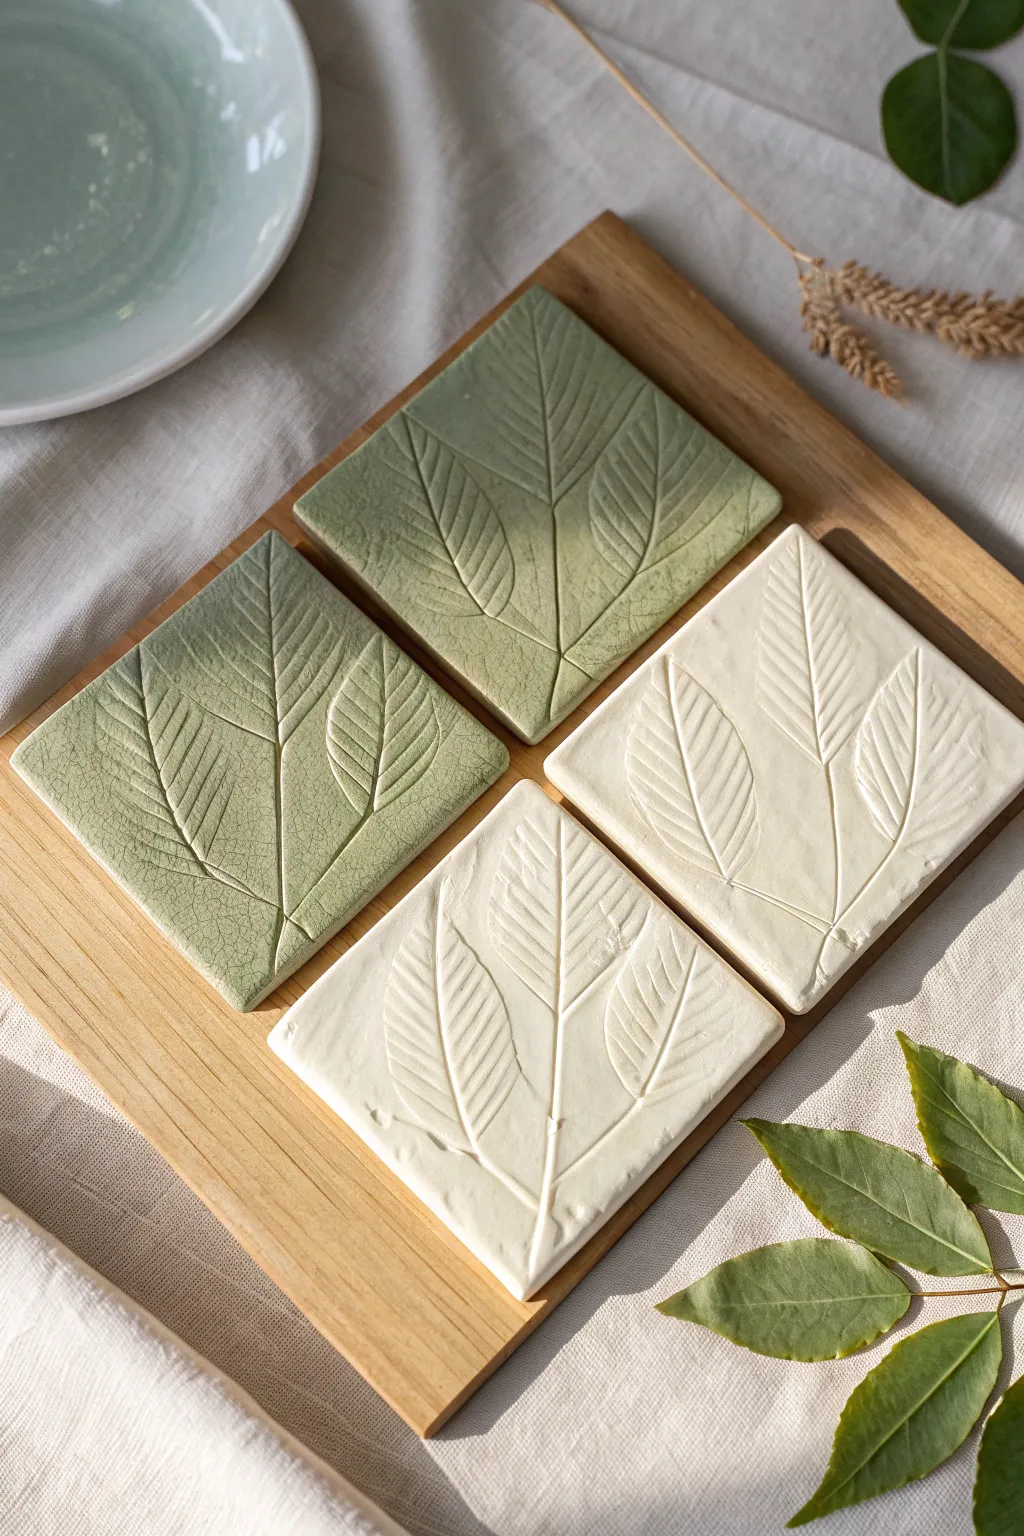
Capture nature’s intricate details forever with these elegant leaf-imprinted ceramic tiles. Featuring a sophisticated matte finish in sage and cream, this project turns fresh foliage into a permanent, tactile art piece perfect for your coffee table.
Step-by-Step Tutorial
Materials
- White air-dry clay or polymer clay (oven-bake)
- Rolling pin
- Two wooden guide strips (approx. 0.5 cm thick)
- Fresh leaves with prominent veins (e.g., beech, hydrangea, or salal)
- Square cookie cutter (approx. 4×4 inches) or ruler and craft knife
- Fine-grit sandpaper (220-400 grit)
- Acrylic paints (Sage Green, Cream/Off-White)
- Matte spray sealant or clear matte varnish
- Sponge or soft paintbrush
- Wax paper or canvas mat (for rolling)
Step 1: Preparing the Clay Canvas
-
Condition the Clay:
Begin by kneading your clay until it is soft, pliable, and free of cracks. Warm clay takes impressions much better than cold, stiff material. -
Set Up Guides:
Place your wax paper or canvas mat on a flat surface. Position your two wooden guide strips on either side of the clay ball. These will ensure your tiles are perfectly uniform in thickness. -
Roll the Slab:
Use the rolling pin to flatten the clay, resting the pin on the wooden guides as you roll. Continue until the pin glides smoothly across the guides and the clay is perfectly level. -
Smooth the Surface:
Examine the surface for any air bubbles or imperfections. Gently smooth them out with a damp fingertip or a rubber rib tool if you have one.
Fixing Warped Clay
If air-dry clay corners curl up while drying, limit airflow by covering them loosely with plastic wrap. You can also sandwich them between boards with a light weight once they are semi-dry.
Step 2: Creating the Botanical Impression
-
Select and Position Leaves:
Choose fresh leaves that are slightly larger than your intended coaster size so the pattern runs off the edge. Place them vein-side down onto the clay slab; the back of the leaf always has the strongest texture. -
Preliminary Press:
Gently press the leaves down with your fingers to tack them in place, ensuring no edges are curled up. -
Roll the Impression:
Take your rolling pin and roll firmly over the leaves once. Do not roll back and forth, as this can create a double image. One meaningful pass is usually sufficient to embed the veins deep into the clay. -
Reveal the Texture:
Find the stem of the leaf and carefully peel it away from the clay. I love this moment—reveal the crisp, organic design hiding underneath.
Step 3: Cutting and Refining
-
Cut the Shape:
Position your square cutter over the most interesting part of the leaf print. Press down firmly to cut the shape. If using a knife and ruler, measure carefully to ensure 90-degree corners. -
Release the Tile:
Remove the excess clay from around the square first, then carefully lift the tile. If it sticks, slide a piece of dental floss underneath to separate it from the surface. -
Soften Edges:
Dip your finger in a little water (or baby oil for polymer clay) and gently run it along the cut edges to smooth out any sharpness or burrs. -
Drying or Baking:
If using air-dry clay, allow the tiles to dry on a wire rack for 24-48 hours, flipping them occasionally to prevent warping. If using polymer clay, bake according to the package instructions.
Level Up: Antique Wash
After the base color dries, apply a diluted brown paint wash over the entire tile, then immediately wipe it off with a damp cloth. The dark color will stay in the leaf veins for an aged look.
Step 4: Finishing Touches
-
Sand for Perfection:
Once fully cured, use fine-grit sandpaper to buff the edges and corners gently. The surface should feel smooth to the touch. -
Apply Base Color:
Using a sponge or soft brush, apply your chosen paint color. For the sage green tiles, apply a wash of green; for the cream tiles, a warm off-white works best. A sponge helps dab paint into the deep veins without pooling. -
Enhance the Veins (Optional):
To make the veins pop, you can lightly dry-brush a slightly lighter shade over the raised areas, leaving the deeper recesses darker. -
Seal the Work:
Protect your coasters from moisture by applying two coats of matte spray sealant or varnish. This is crucial if they will be used for drinks. -
Add Protection:
Finish by attaching small felt or cork pads to the bottom corners to protect your furniture surfaces.
Arrange your set of botanical tiles on a wooden tray for a stunning, organic display in your home


Simple Geometric Linework Tiles
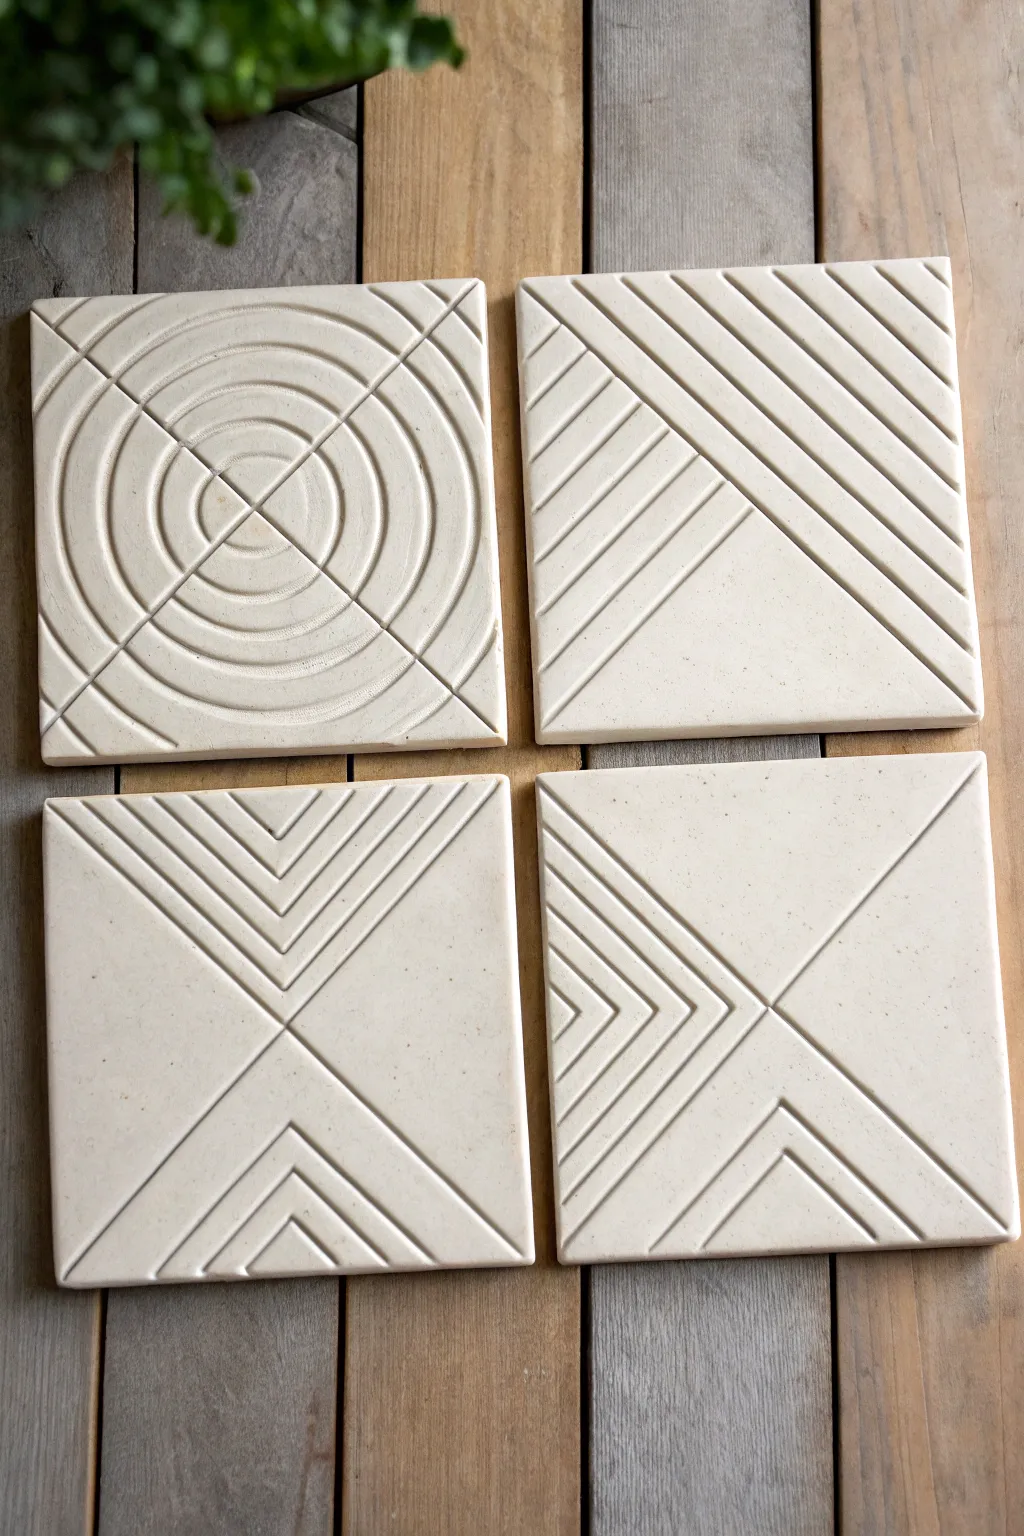
These striking ceramic tiles rely on clean, incised lines and the natural texture of clay to create a modern graphic statement. The project explores four distinct linear patterns—concentric circles, diagonal grids, and chevron variations—that look deceptively complex but are built on simple geometry.
Detailed Instructions
Materials
- Four 4×4 inch square ceramic tiles (leather-hard clay slabs)
- Fettling knife or clay cutter
- Ruler or straight edge
- Carving tool (needle tool or small loop tool)
- Damp sponge
- Plastic wrap
- Compass or circle template (optional)
- Rolling pin and guide strips (if making slabs from scratch)
Step 1: Preparation & Planning
-
Prepare the Slabs:
Roll out your clay to a uniform thickness, ideally around 1/4 to 3/8 inch. Cut out four perfect 4×4 inch squares using a fettling knife and a ruler. -
Dry to Leather Hard:
Allow the clay squares to dry slowly until they reach a leather-hard state. This is crucial; the clay should be firm enough to handle without warping but soft enough to carve cleanly without chipping. -
Smooth the Surface:
Gently wipe the surface of each tile with a slightly damp sponge to remove any texture from the rolling pin or canvas. You want a pristine, smooth canvas for your linework.
Clean Lines Tip
When carving long straight lines, pull the tool toward your body rather than pushing it away. This gives you steadier control and prevents wobbling.
Step 2: Layout & Carving
-
Mark the Circle Center:
For the first tile, find the exact center by lightly pressing a ruler from corner to corner to make a tiny ‘X’ mark. -
Incise the Radiating Lines:
Using your straight edge, carve two deep diagonal lines connecting opposite corners, crossing exactly at your center point. -
Carve Concentric Circles:
Using a compass with a light touch (or tracing circle templates), carve a series of concentric circles radiating from the center. Press firmly to create a distinct groove, spacing them evenly. -
Layout the Diagonal Stripe Tile:
For the second tile, place your ruler diagonally across the square, connecting two opposite corners to establish a bisecting line. -
Carve Parallel Diagonals:
Carve the main diagonal line. Then, working outward from that center line towards the top-right corner, carve parallel lines spaced about 1/4 inch apart. -
Fill the Lower Half:
Repeat the parallel line process on the bottom-left half, but change the angle slightly or keep it uniform depending on whether you want a continuous flow or a perpendicular contrast. -
Create the Top Chevron Tile:
For the third tile, carve a large ‘X’ connecting all corners. In the top triangle section, carve nested ‘V’ shapes parallel to the upper arms of the ‘X’. -
Mirror the Chevron:
Repeat this pattern in the bottom triangle section, creating an inverted set of nested ‘V’ shapes that mirror the top. -
Design the Side Chevron Tile:
For the final tile, carve the large central ‘X’ again. This time, fill the left and right triangular sections with nested ‘V’ shapes pointing toward the center. -
Deepen the Grooves:
Go back over all your incised lines with your carving tool to ensure they are distinctive and uniform depth. I like to do this when the clay has stiffened just a tiny bit more for a cleaner cut.
Step 3: Finishing Touches
-
Clean Up Burrs:
Once the tiles are bone dry, use a stiff brush or a slightly damp sponge to gently knock off the little clay crumbs (burrs) created by the carving tool. -
Soften the Edges:
Run a damp finger or sponge along the outer perimeter of each tile to soften the sharp cut edges, which prevents chipping later. -
Slow Drying:
Place the finished tiles on a drywall board or between heavy plastic sheets to dry very slowly. This helps prevent corners from curling up. -
Bisque Fire:
Check that the tiles are completely bone dry, then bisque fire them according to your clay body’s specifications. -
Glazing Decisions:
You can leave them unglazed for a raw stone look (as seen here) or apply a translucent celadon glaze that will pool in the grooves to accentuate the pattern.
Make Coasters
Glue thin cork backing or small felt pads to the bottom of your fired tiles to instantly transform these art pieces into functional, modern drink coasters.
Enjoy arranging your new geometric set in different configurations to see how the patterns interact


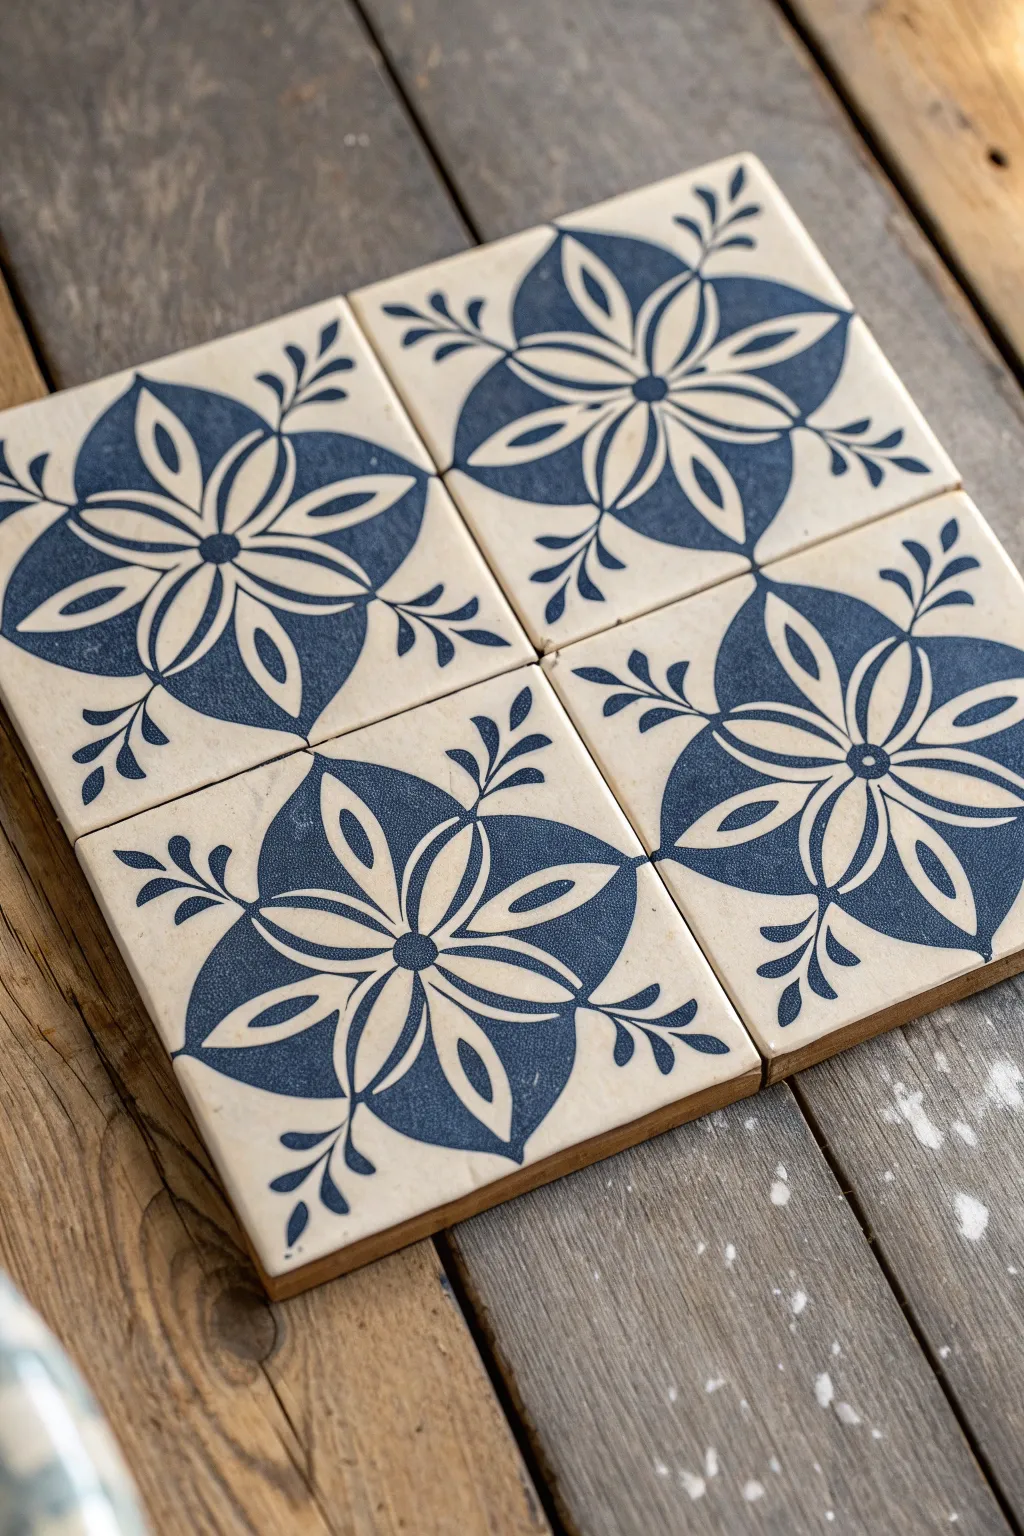
Blue-and-White Sgraffito Tiles
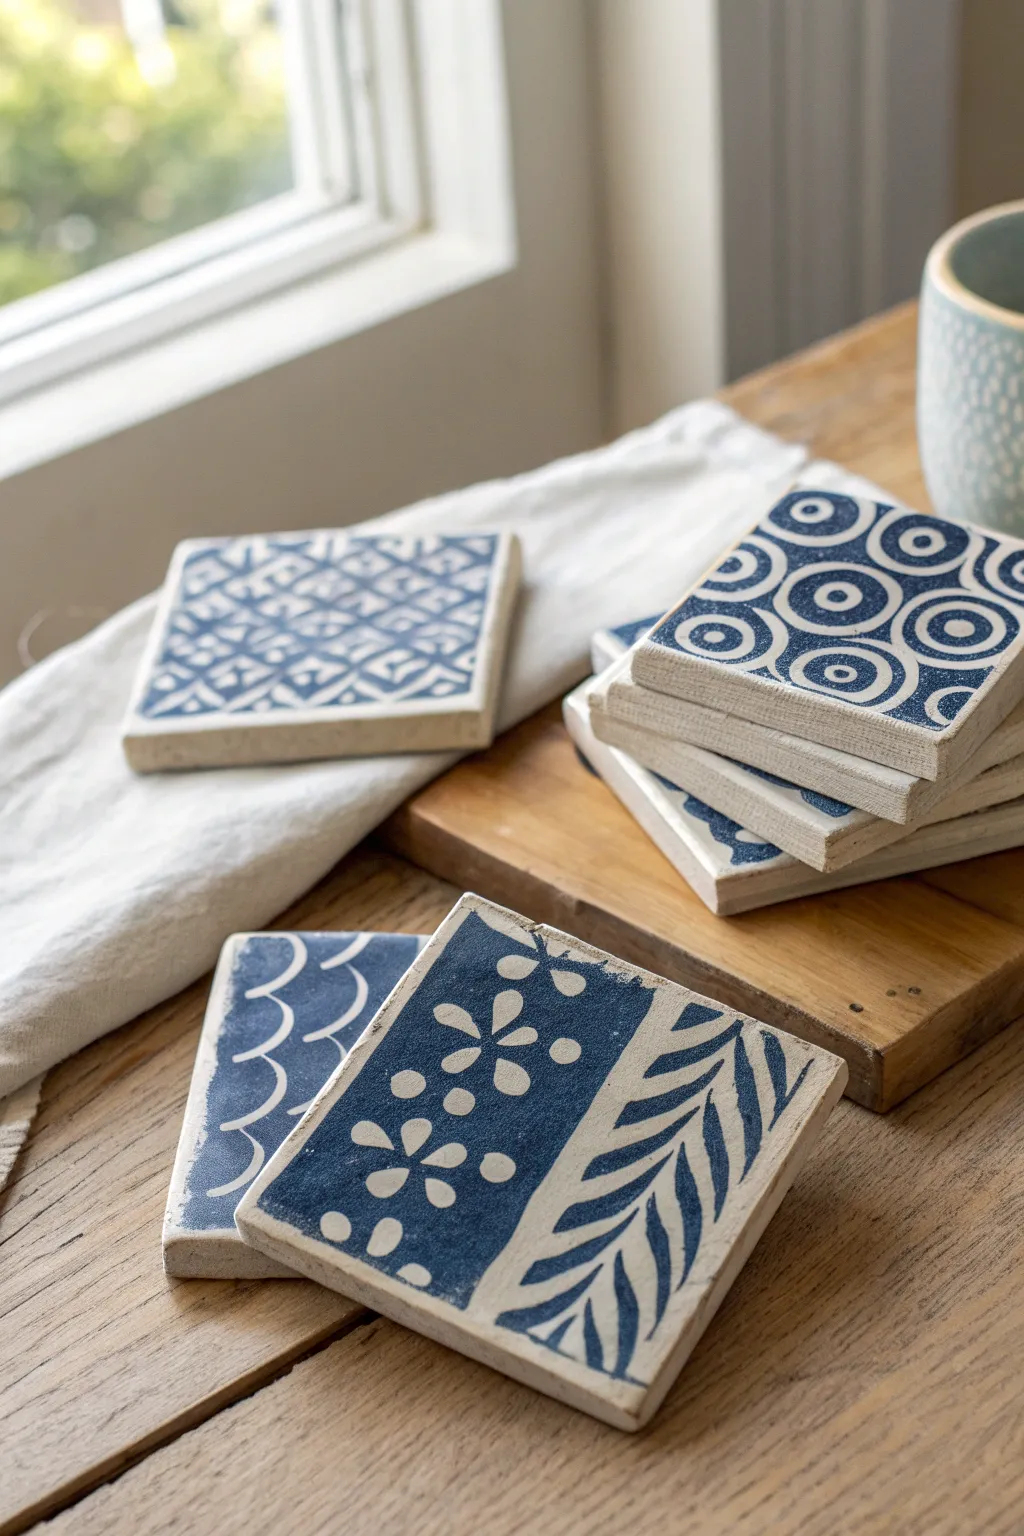
These charming blue-and-white tiles bring a touch of the seaside into your home using the classic sgraffito technique. By carving through a layer of bold blue underglaze to reveal the white clay body beneath, you will create striking, high-contrast patterns that feel both modern and handmade.
Step-by-Step
Materials
- Leather-hard white stoneware clay tiles (approx. 4×4 inches)
- Cobalt blue underglaze
- Wide specialized fan brush or hake brush
- Sgraffito loop tool (small)
- Needle tool
- Carving tool set
- Pencil
- Tracing paper (optional)
- Clear glaze
- Sponge
- Clean water
Step 1: Preparation & Underglazing
-
Prepare your clay tiles:
Start with clay slabs that are cut into 4×4 squares. They need to be at the ‘leather-hard’ stage—firm enough to hold their shape without bending, but soft enough to carve into easily. -
Clean surface:
Gently wipe the surface of your tiles with a very slightly damp sponge to remove any dust or crumbled clay bits that might interfere with the painting. -
Apply first coat:
Using a wide fan brush, apply a smooth, even coat of cobalt blue underglaze across the entire top face of the tile. Brush in one consistent direction. -
Layering opaqueness:
Let the first layer dry until it is no longer shiny. Apply a second coat perpendicular to the first stroke direction to ensure complete coverage without streaks. -
Final coat:
Apply a third coat if your underglaze brand is thinner. Allow the tiles to dry until the surface is matte and dry to the touch, but the clay underneath still retains some moisture.
Smudged the Blue?
If you accidentally smear blue dust into a white carved area, don’t panic. Wait for the bisque firing. After bisque, you can lightly sand the spot to remove the smudge before glazing.
Step 2: Design & Carving
-
Plan the patterns:
Sketch your ideas on paper first. Aim for variety: a repeating geometric diamond pattern, a concentric circle motif, or a botanical leaf design like the ones shown. -
Transfer or sketch:
You can lightly sketch your design directly onto the blue underglaze with a regular pencil. The graphite will burn off in the kiln, leaving only your carving lines. -
Begin the geometric tile:
For the diamond pattern, use a ruler to lightly scribe a grid. Use a small loop tool to carve out the triangles, ensuring you remove the blue entirely to show crisp white clay. -
Carve the concentric circles:
Start from the center and work outward. Use a needle tool for thin specific lines or a small loop tool for wider bands. Spin the tile on a banding wheel if you have one for smoother circles. -
Create the botanical tile:
Section off the tile into panels. For the floral section, carve simple 5-petal flower shapes. For the leaf section, make confident swooping cuts to mimic fern fronds. -
Clean up crumbs:
As you carve, ‘burrs’ or crumbs of clay will accumulate. Do not wipe them with your hand or a sponge, as this will smear the blue. Gently blow them away or use a very soft, dry fluffy brush to sweep them off. -
Detailing:
Check your lines for crispness. I like to go back over the edges of wider carved areas to make sure the transition between blue and white is sharp.
Level Up: Mishima Hybrid
Try the reverse! Carve deep lines into raw clay first, fill the grooves with blue underglaze, let it stiffen, then scrape the surface clean to reveal blue lines on white clay.
Step 3: Finishing & Firing
-
Slow drying:
Once carving is complete, let the tiles dry very slowly. Cover them loosely with plastic for a day or two to prevent warping, then uncover to bone dry. -
Bisque fire:
Fire the tiles to cone 04 (or your clay’s specific bisque temperature). This hardens the clay and sets the underglaze. -
Wipe down:
After the tiles adhere from the kiln, wipe them with a damp sponge to remove any dust created during firing. -
Glazing:
Dip the tiles into a clear glaze or brush on a clear gloss. Make sure not to apply it too thick, or it might cloud your crisp sgraffito lines. -
Final firing:
Fire the tiles again to the glaze maturity temperature (often cone 5 or 6 for stoneware). Check your clay body specifications to be sure.
Now you have a stunning set of custom coasters ready to protect your tabletops with handmade style


Raised Bas-Relief Floral Tiles
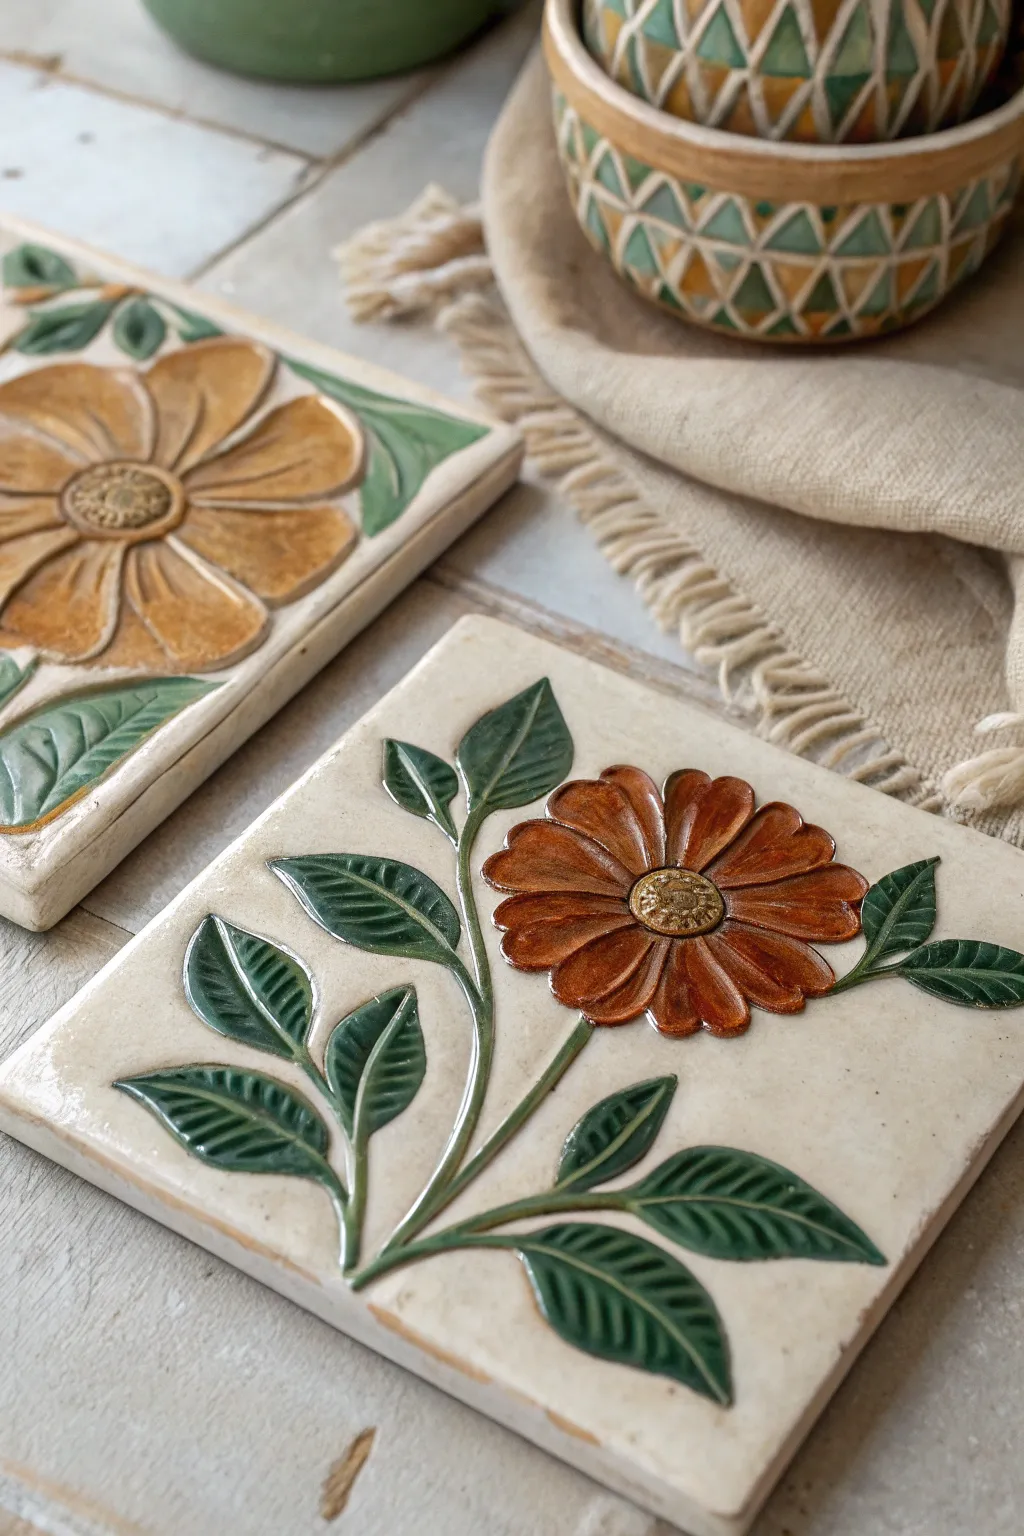
Capture the rustic charm of a Tuscan afternoon with these handcrafted ceramic tiles, featuring raised floral motifs that beg to be touched. The design relies on a bas-relief carving technique where clay is carved away and built up to create a dimensional, tactile surface highlighted by warm, earthy glazes.
How-To Guide
Materials
- White or speckled stoneware clay
- Rolling pin
- Two 1/4-inch wooden guide strips (slats)
- Square tile cutter or fettling knife
- Ruler
- Canvas mat or slab roller
- Needle tool
- Loop carving tools (various sizes)
- Small sponge
- Slip (clay slurry)
- Scoring tool or serrated kidney
- Soft detail brushes
- Underglazes: Sap Green, Burnt Orange, Mustard Yellow
- Clear transparent glaze
- Kiln
Step 1: Forming the Base
-
Prepare the slab:
Begin by wedging your stoneware clay thoroughly to remove air pockets. Place the clay on a canvas mat between the two 1/4-inch guide strips. Roll the clay out until the rolling pin rests flat on the strips, ensuring a completely uniform thickness. -
Cut the tiles:
Using a ruler and a needle tool (or a dedicated square tile cutter if you have one), cut out perfect squares. For the look in the photo, aim for about 6×6 inches, keeping in mind the clay will shrink during firing. -
Smooth the edges:
Compress the cut edges with a damp sponge or your finger. This prevents sharp, fragile edges later on and gives the tile a finished, professional look before you even start designing.
Step 2: Sculpting the Bas-Relief
-
Sketch the design:
Lightly trace your floral design directly onto the leather-hard clay using a needle tool. Draw a central circle for the flower head and extend a stem with leaves branching outward. -
Excavate the background:
Using a wide loop tool, gently carve away the clay surrounding your traced flower and leaves. Remove about 1/8th of an inch of clay from the background, leaving the floral shape raised. -
Refine the background texture:
Smooth the lowered background area with a damp sponge or a wooden rib to erase tool marks, creating a flat, neutral plane that makes the flower pop. -
Detail the petals:
Now, tackle the raised flower. Use a smaller loop tool to carve deeper grooves between the individual petals, defining their separation. Allow the petals to overlap slightly for a natural look. -
Sculpt the leaves:
Use a modeling tool to press a center vein into each leaf. Then, create small, angled indentations along the sides of the leaves to mimic vein patterns. -
Add the flower center:
Roll a small ball of fresh clay and flatten it slightly. Score the back of this button and the center of your flower, apply a dab of slip, and press it firmly into place. -
Texture the center:
Take your needle tool and prick the surface of the added center button repeatedly to create a stippled, pollen-like texture. -
Final smoothing:
Before the clay dries too much, go over any sharp elevated ridges on the petals and leaves with a barely damp sponge to soften them just enough so they hold glaze well.
Warping Worries?
To prevent curling edges, dry tiles extremely slowly. Place them on a drywall board and cover loosely with plastic for several days, flipping them daily.
Step 3: Glazing and Firing
-
Bisque fire:
Allow the tiles to dry slowly under plastic sheeting to prevent warping. Once bone dry, fire them to cone 04 (or your clay’s specific bisque temperature). -
Wax the background:
Apply a coat of wax resist to the lowered background areas of the tile. We want this area to remain the natural color of the clay body, contrasting with the colored flower. -
Paint the leaves:
I prefer to start with the greenery. Apply 2-3 coats of Sap Green underglaze to the raised leaves and stem. Let each coat dry slightly before applying the next. -
Paint the flower:
Apply Burnt Orange or Mustard Yellow underglaze to the petals. For depth, you can dilute a darker brown slightly and wash it into the crevices between petals, then wipe the high points clean. -
Highlight the center:
Dab a contrasting yellow or light brown underglaze onto the textured center button. -
Apply clear glaze:
Once the underglaze is dry, brush a thin layer of clear transparent glaze over ONLY the painted floral elements (not the background). This will make the colors jewel-like while keeping the background matte. -
Glaze fire:
Fire the tiles again to cone 5 or 6 (depending on your clay and glaze fit). Place tiles flat on the kiln shelf to ensure they stay perfectly straight.
Make it a Set
Create a coordinating trivet by making a larger square tile and attaching small felt feet to the bottom after the final firing to protect your table surface.
Once cooled, your tiles define rustic elegance with their rich, dimensional surfaces ready for display or installation

The Complete Guide to Pottery Troubleshooting
Uncover the most common ceramic mistakes—from cracking clay to failed glazes—and learn how to fix them fast.
Fish and Lily Pad Relief Tile
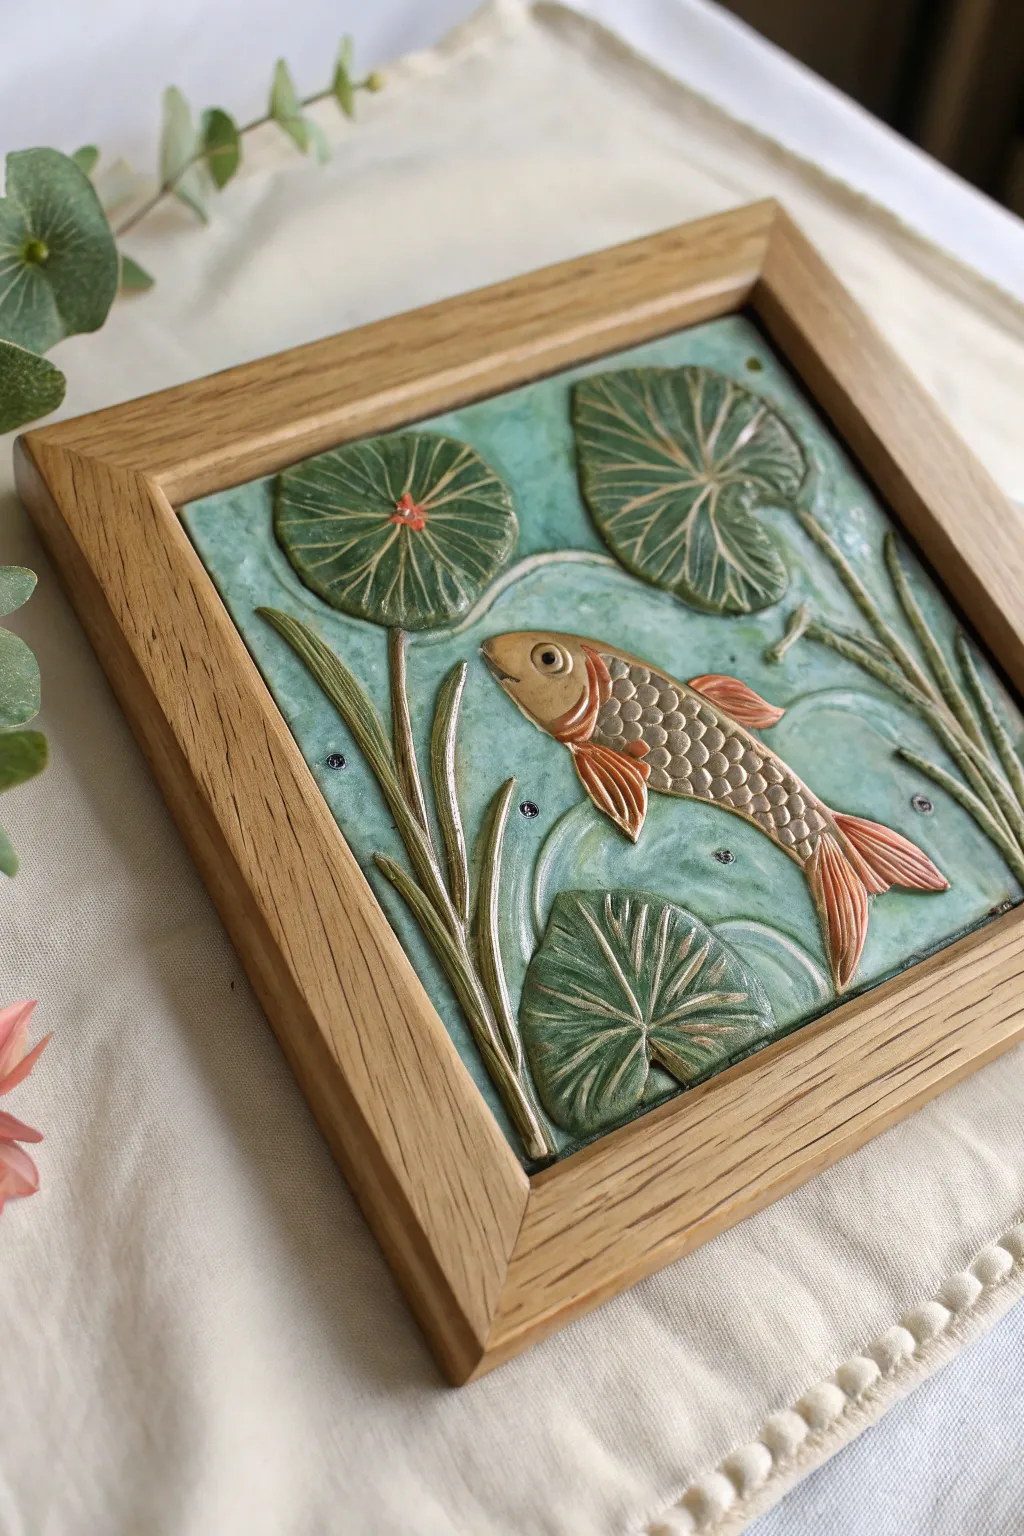
Capture the serenity of a garden pond with this charming low-relief ceramic tile featuring a swimming carp among textured lily pads. The soft celadon greens and warm terracotta oranges create a peaceful, organic palette perfect for nature lovers.
Step-by-Step
Materials
- Light-colored stoneware or earthenware clay slab (approx. 1/2 inch thick)
- Square wooden frame (for sizing and framing)
- Needle tool
- Loop carving tools (small and medium)
- Small rolling pin
- Slip (clay slurry)
- Underglazes: Sap Green, Terracotta Orange, Dark Green, Black
- Glaze: Transparent gloss or semi-gloss
- Celadon glaze (optional for background)
- Sponge
- Kiln
- Strong adhesive (like E6000)
Step 1: Shaping the Base
-
Prepare the slab:
Roll out a smooth slab of clay to about 1/2 inch thickness. Cut it into a precise square that is slightly larger than your frame’s opening to account for clay shrinkage during drying and firing (usually 10-12%). -
Smooth the surface:
Using a metal rib or a slightly damp sponge, compress the surface of the tile to remove canvas texture and ensure a smooth canvas for your carving. -
Sketch the design:
Lightly trace your composition onto the clay using a needle tool. Place a large fish diagonally in the center, flanked by three lily pads—two at the top and one at the bottom—and vertical reeds on the sides.
Shrinkage Check
Make a “shrinkage ruler” from a scrap of your clay to track exactly how much it shrinks from wet to fired, ensuring your tile fits the frame perfectly every time.
Step 2: Sculpting the Relief
-
Build up the forms:
For the fish and lily pads, I prefer to add small coils or flattened pieces of clay on top of the slab to create height. Score and slip these additions thoroughly to ensure they adhere. -
Model the fish body:
Smooth the added clay into a tapered fish shape. Use a modeling tool to round over the body so it sits proud of the background. -
Add fins and tail:
Attach small, flat triangles of clay for the dorsal fin, pectoral fins, and tail. Use a needle tool to scratch fine lines into them to mimic the ribbed texture of fins. -
Detail the scales:
Using a small loop tool or a specialized scale tool, impress a pattern of overlapping semi-circles across the fish’s body. Start from the head and work your way back to the tail for a natural flow.
Mishima Magic
Carve thin lines into the background, fill them with white slip, and scrape it back (Mishima technique) to create ghostly white water ripples instead of carved ones.
Step 3: Detailing the Vegetation
-
Sculpt the lily pads:
Flatten your clay circles for the lily pads. Press a small indentation in the center of each, then use a fettling knife or needle tool to crave radiating veins from the center to the edges. -
Create the reeds:
Roll very thin coils of clay and attach them vertically along the left and right sides. Flatten them slightly and use a tool to create a central groove, making them look like tall grasses. -
Refine the background:
Use a small loop tool to gently carve away excess clay around your raised elements. This lowers the background and makes the fish and plants pop visually. -
Add water ripples:
With a round-ended tool, gently carve swirling, curved lines into the background clay around the fish and leaves to suggest gentle movement in the water.
Step 4: Glazing and Finishing
-
Bisque fire:
Allow the tile to dry slowly under plastic to prevent warping, then bisque fire it according to your clay’s specifications. -
Apply base color:
Paint the background with a watery wash of celadon-colored glaze or a light turquoise underglaze. Wipe back slightly with a sponge if you want it to settle into the ripple textures. -
Paint the fish:
Apply a warm terracotta or golden-brown underglaze to the fish’s body. Use a darker orange for the fins and tail to create contrast. -
Greenery details:
Paint the lily pads and reeds with a muted sap green underglaze. If you have a darker green, add a tiny dot to the center of the lily pads for depth. -
The eye:
Carefully place a small dot of white slip or underglaze for the fish’s eye, followed by a tiny black dot for the pupil. -
Final glaze and fire:
Coat the entire tile in a clear, transparent glaze. Fire the piece again to the glaze temperature specific to your materials. -
Mounting:
Once cool, use a strong adhesive like epoxy or E6000 to secure the ceramic tile into the center of your wooden frame.
Hang your finished relief tile on a well-lit wall to let the shadows play across the textured surface
Carved Sea Turtle Tiles
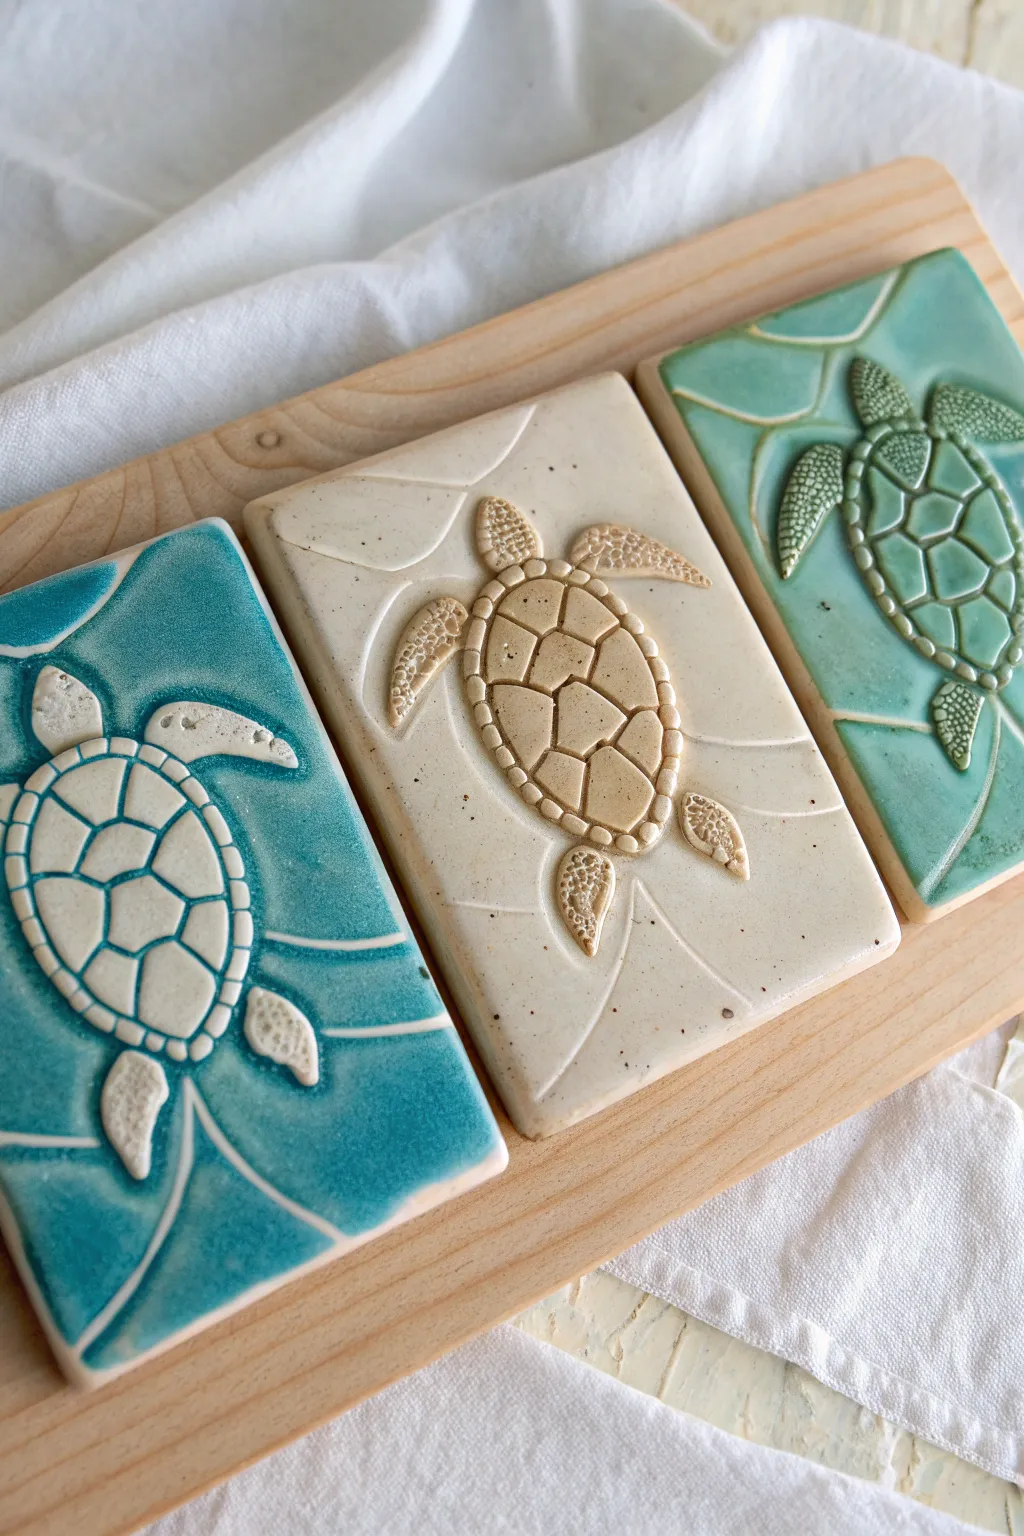
Capture the serene beauty of the ocean with these handcrafted ceramic tiles featuring detailed sea turtle motifs. The raised relief design combined with soothing teal, cream, and celadon glazes creates a stunning tactile finish perfect for a coastal accent.
Step-by-Step Tutorial
Materials
- Light-colored stoneware clay (smooth body)
- Rolling pin and guide sticks (approx. 1/4 inch thickness)
- Rectangular clay cutter or ruler and needle tool
- Sea turtle sprig mold or turtle cookie cutter (optional)
- Modeling tools (wire loop tool, small ball stylus)
- Rubber kidney rib
- Bisque stains or underglazes (optional)
- Celadon or translucent gloss glazes (Teal, Cream, Light Green)
- Soft fan brush
- Sponge and water bowl
- Kiln
Step 1: Forming the Base Tile
-
Roll out the slab:
Begin by wedging your clay thoroughly to remove air bubbles. Roll it out into a smooth slab using guide sticks to ensure an even thickness of about 1/4 to 3/8 inch. -
Cut the shapes:
Use a rectangular cutter or measure careful rectangles with a ruler and slice them cleanly with a needle tool or fettling knife. Aim for tiles approximately 4×6 inches. -
Smooth the surface:
Run a rubber kidney rib gently over the surface of each tile to compress the clay particles and erase any canvas texture from your rolling mat.
Clean Lines
Wait until the clay is ‘leather hard’ before carving the fine water ripples. If the clay is too wet, the tool will drag and create messy burrs.
Step 2: Sculpting the Turtle
-
Outline the turtle:
Lightly sketch the outline of a swimming sea turtle in the center of the tile using a needle tool. Alternatively, lightly press a cookie cutter into the clay to create a guide, but don’t cut all the way through. -
Build relief (Method A: Carving):
If you prefer subtractive sculpting, use a wire loop tool to carve away the background clay around the turtle outline, lowering the ‘water’ level by a few millimeters so the turtle stands proud. -
Build relief (Method B: Adding):
I actually find it easier to add clay here. Roll a small coil and flatten it into the shell shape, scoring and slipping it onto the base. Repeat for the head and flippers. -
Refine the shell:
Use a modeling tool to carve deep grooves into the shell to create the scutes (the hexagonal plate patterns). Smooth the edges of each plate to make them look organic. -
Texture the skin:
Take a small ball stylus or a textured stamp and press it repeatedly into the head and flippers to mimic the pebbled texture of turtle skin. -
Add movement lines:
Using a U-shaped carving tool or the back of a paintbrush, carve sweeping, fluid lines into the background clay. These should radiate from the turtle to represent water ripples and currents.
Mosaic Arrangement
Create nine smaller square tiles instead of rectangles. Carve one large turtle spanning across four or more tiles for a stunning large-scale wall mural.
Step 3: Drying and Bisque Firing
-
Slow drying:
Place the tiles between two boards of drywall or sandwich them between sheets of plastic to ensure they dry slowly and evenly. This prevents the corners from warping. -
Check for flatness:
Inspect the tiles after a day. If they start to bow, gently weigh down the edges with small sandbags or additional clay scraps. -
Bisque fire:
Once bone dry, fire the tiles in your kiln to a standard bisque temperature (usually Cone 04) to prepare them for glazing.
Step 4: Glazing and Finishing
-
Clean the bisque:
Wipe the bisque-fired tiles with a damp sponge to remove any kiln dust that could interfere with glaze adhesion. -
Apply wax resist (optional):
For the cream/beige tile shown, you might want to wax the turtle itself if you want the raw clay texture to show through, or simply use a different glaze for the animal. -
Select translucent glazes:
I recommend celadon-type glazes for this project. They pool beautifully in the carved lines and textures, highlighting the details while remaining transparent on the high points. -
Apply the glaze:
Using a soft fan brush, apply 2-3 coats of glaze. For the teal and green tiles, cover the entire surface including the turtle. The glaze will naturally break over the textured skin and shell lines. -
Wipe back (optional):
If you want the texture to pop even more, gently wipe the raised surfaces of the turtle skin with a damp sponge after the glaze dries, leaving more pigment in the recesses. -
Final firing:
Fire the tiles to the maturity temperature of your chosen clay and glaze (often Cone 5 or 6 for stoneware). Place them on stilts if you glazed the very edges.
Once fired, you can mount these serene tiles in a wooden frame or use them as unique coasters to bring a touch of the sea to your home


What Really Happens Inside the Kiln
Learn how time and temperature work together inside the kiln to transform clay into durable ceramic.
Moroccan-Inspired Repeat Pattern Tiles
Bring the timeless elegance of Moroccan design to your table with these handcrafted ceramic tiles. Using a repeating stencil technique and deep indigo hues, you’ll create a striking set of coasters that look like authentic hand-painted pottery.
Step-by-Step Guide
Materials
- 4 unglazed bisque ceramic tiles (4×4 inch)
- Deep indigo or navy blue underglaze
- Clear ceramic glaze (brush-on or dipping)
- Mylar stencil sheets or pre-cut Moroccan flower stencil
- Craft knife or stencil cutter (if making your own stencil)
- Sponge dabbers or stencil brushes
- Small round detail brush (size 1 or 2)
- Pencil
- Kiln (or access to a firing service)
- Masking tape
Step 1: Preparation and Stencil Design
-
Clean the bisque:
Begin by wiping down your unglazed bisque tiles with a slightly damp sponge to remove any dust or oils from handling, which can repel the glaze. -
Prepare the design:
If you aren’t using a pre-cut stencil, draw or trace a four-petaled geometric flower motif onto a sheet of Mylar. The design should feature a central flower surrounded by curved, bracket-like shapes. -
Cut the stencil:
Carefully cut out the negative space of your design using a sharp craft knife. Remember that the cut-out areas will be where the blue underglaze is applied. -
Find the center:
Lightly mark the center of your tile with a pencil. Align the center of your stencil with this mark to ensure symmetry. -
Secure the stencil:
Use small pieces of masking tape on the edges of the stencil to hold it firmly against the bisque tile. Any shifting now will blur the crisp lines later.
Fixing Bleeds
If underglaze bleeds under the stencil, don’t panic. Let it dry completely, then gently scratch the blue excess off with a needle tool or an X-Acto blade before glazing.
Step 2: Applying the Underglaze
-
Load the sponge:
Pour a small amount of deep indigo underglaze onto a palette. Dip your sponge dabber into the color, then blot it on a paper towel until it is almost dry. -
First light coat:
Gently dab the sponge over the stencil openings using an up-and-down motion. Avoid dragging the sponge, as this can force paint under the stencil edges. -
Build opacity:
Once the first layer is touch-dry (usually just a minute or two on thirsty bisque), apply a second coat of underglaze with your sponge to ensure a rich, solid blue color. -
Check the corners:
Pay special attention to the decorative sprigs in the corners of the design, making sure the sponge reaches the narrow tips of the leaves. -
Remove the stencil:
Lift the stencil straight up while the underglaze is still slightly damp. This helps create a cleaner edge than waiting for it to be fully bone dry.
Step 3: Refining and Glazing
-
Clean up edges:
Dip a small, stiff brush in water and use it to gently scrub away any smudges or bleed-through where the underglaze might have slipped effectively erasing mistakes. -
Sharpen the details:
I like to use a size 1 round brush with a tiny bit of underglaze to manually sharpen the points of the petals and leaves if the stenciling looks too fuzzy. -
Dry completely:
Allow the tiles to dry completely, preferably overnight, to ensure the underglaze is set. -
Apply clear glaze:
Brush on three even coats of clear transparent glaze, allowing each coat to dry to the touch before applying the next. Alternatively, dip the tile once if you have a dipping container. -
Clean the bottom:
Wipe the bottom of the tiles with a wet sponge to remove any glaze drips. This prevents the tile from fusing to the kiln shelf during firing. -
Fire the tiles:
Load the tiles into the kiln and fire to the temperature recommended by your clay and glaze manufacturers (typically Cone 06 or 6).
Vintage Effect
For an aged look, lightly sand the underglaze pattern after it dries but before clear glazing. This reveals some of the white clay body underneath for a distressed finish.
Once cooled, arrange your tiles together to see how the corner motifs connect to form secondary patterns across the set
Soft Lace Texture Tiles
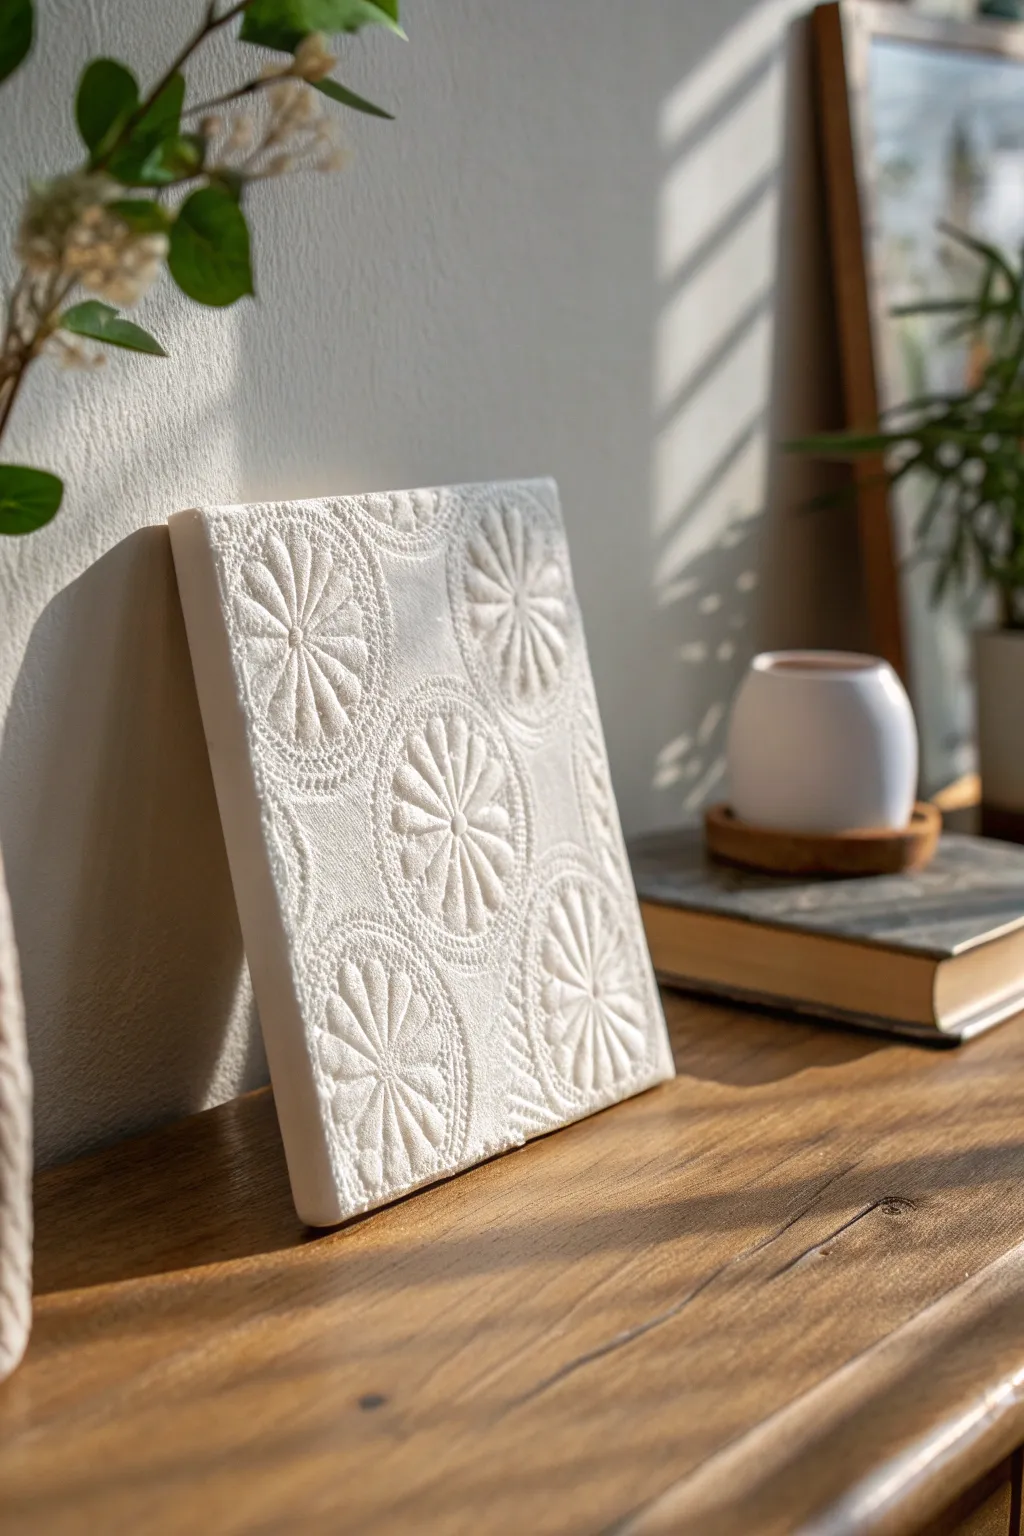
Capture the intricate beauty of vintage textiles in permanent form with this elegant lace-texture tile project. By pressing fabric directly into clay, you create a sophisticated, tactile surface that looks stunning as a standalone art piece or part of a larger installation.
How-To Guide
Materials
- White earthenware or stoneware clay (low-fire or mid-fire)
- Wooden rolling pin
- Two wooden guide strips (approx. 1/4 or 3/8 inch thick)
- Canvas mat or heavy fabric for rolling surface
- Cotton lace doilies or textured lace fabric scraps
- Needle tool or fettling knife
- Straight edge or ruler
- Rib tool (rubber or metal)
- Sponge
- Ware board for drying
- Clear matte or satin white glaze (optional, or leave as bare bisque)
Step 1: Preparing the Slab
-
Wedge the Clay:
Begin by wedging a 2-pound ball of white clay thoroughly to remove air bubbles and ensure the consistency is uniform. -
Set Up Rolling Area:
Place your canvas mat on a flat work surface. Position your two wooden guide strips parallel to each other, slightly wider than the final tile size you want. -
Roll the Primary Slab:
Place the clay ball between the guides. Using the rolling pin, roll the clay out until the pin rides smoothly on top of the wooden strips, creating a perfectly even thickness. -
Compress the Surface:
Run a rubber rib tool firmly over the surface of the clay slab in multiple directions. This aligns the clay particles, prevents warping later, and creates a smooth canvas for your texture.
Fixing Sticking Lace
If the lace pulls up clay when removed, lightly dust the clay surface with cornstarch before laying down the fabric. This acts as a release agent and burns off in the kiln.
Step 2: Applying the Lace Texture
-
Arrange the Lace:
Lay your lace doilies or fabric pieces onto the smooth clay slab. You can use a single large piece or arrange several smaller doilies in a pleasing pattern. -
Roll the Impression:
Gently glide your rolling pin over the lace. Apply firm, steady pressure to push the fabric flush with the clay surface, but be careful not to thin the slab significantly. -
Lift the Lace:
Carefully find the edge of each lace piece and peel it back slowly. Reveal the crisp impression left behind in the clay. -
Inspect the Detail:
Check for any loose bits of clay or imperfections. Smooth them gently with a fingertip, being careful not to smudge the intricate lace design.
Step 3: Cutting and Refining
-
Measure the Square:
Place your ruler or straight edge over the textured area to define your tile’s boundaries. A 6×6 inch square is a standard manageable size. -
Cut the Perimeter:
Hold the needle tool vertically against the straight edge and slice cleanly through the clay. Repeat for all four sides. -
Remove Excess Clay:
Peel away the scraps of clay from outside your cut lines, leaving just the square tile. -
Clean the Edges:
Once the tile has stiffened slightly to a ‘leather hard’ state, run a slightly damp sponge or a finger along the cut edges to soften the sharpness.
Add Color Depth
Brush an iron oxide wash or a dark underglaze into the lace texture and wipe it back with a sponge before the final firing to make the vintage pattern pop with antique contrast.
Step 4: Drying and Firing
-
Slow Drying:
Place the tile on a ware board. To prevent curling corners, I sometimes place a small weight (like a bag of rice) on the center while it dries slowly under light plastic. -
Bisque Fire:
Once bone dry, fire the tile in a kiln to bisque temperature (usually cone 04) to harden the clay. -
Glazing Strategy:
For the look in the photo, apply a thin coat of matte white glaze. Alternatively, leave the white clay unglazed for a raw, textural finish. -
Wipe Back:
If glazing, gently wipe the surface with a damp sponge so glaze remains primarily in the deep recesses of the lace pattern, highlighting the texture. -
Final Firing:
Fire the tile a second time to the maturation temperature of your specific clay and glaze.
Display your finished tile on a stand or mount it as a permanent backsplash feature to enjoy the timeless texture

TRACK YOUR CERAMIC JOURNEY
Capture glaze tests, firing details, and creative progress—all in one simple printable. Make your projects easier to repeat and improve.
Bold Stamped Texture Tiles
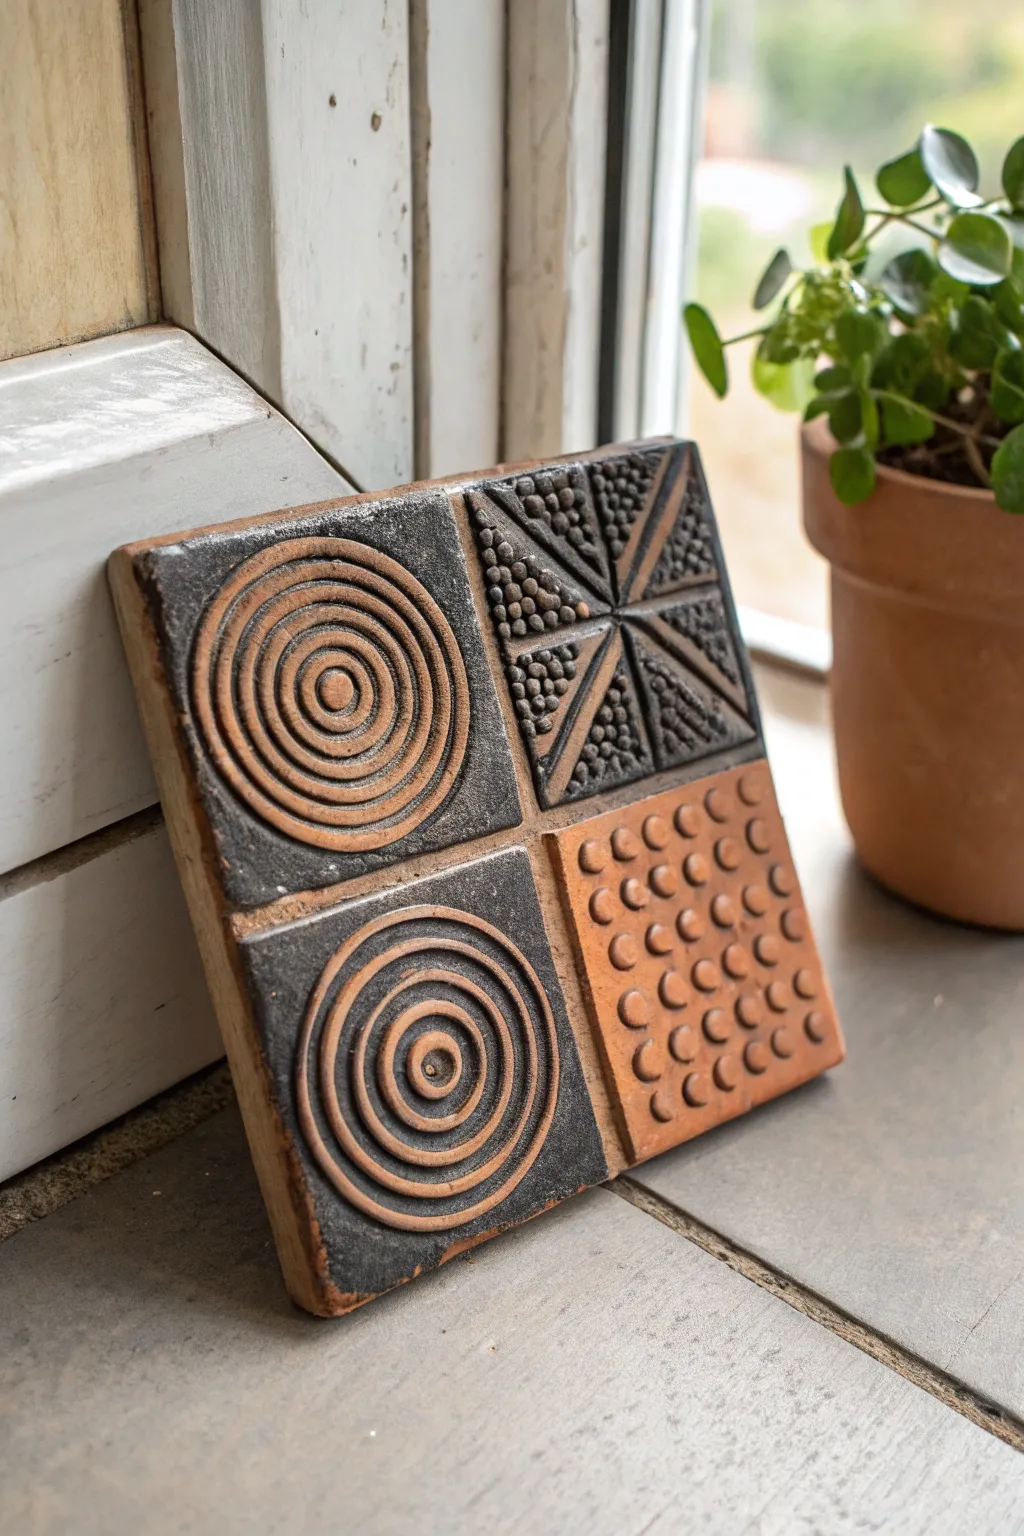
This striking tile project combines deep relief carving and contrasting surface treatments to create a bold, modern piece. By sectioning the clay into quadrants, you’ll explore different textures—from concentric circles to intricate stippling—highlighted by a dark metallic glaze against raw terracotta.
Step-by-Step
Materials
- Terracotta or brown stoneware clay slab (approx. 1/2 inch thick)
- Square tile cutter or fettling knife and ruler
- Loop tool or carving gouge
- Needle tool
- Geometric texture stamps (handmade or found objects)
- Wooden modeling tool with a rounded end
- Small spherical tool or bead for impressions
- Black underglaze or metallic oxide wash (like iron or manganese)
- Small stiff-bristled brush
- Sponge
- Clear matte glaze (optional)
Step 1: Slab Preparation & Layout
-
Roll and cut:
Begin by rolling out your clay slab to a uniform thickness of about 1/2 inch. Using your square cutter or a ruler and knife, cut out a perfect square, roughly 6×6 inches. -
Smooth the surface:
Compress the clay surface with a rib tool to align the particles and remove any canvas texture. This creates a clean canvas for your stamping. -
Define the quadrants:
Lightly score a cross into the clay with a needle tool to divide the square into four equal quadrants. Don’t cut too deep; these are just guide lines.
Stamp Master Tip
To get perfectly concentric circles without a wheel, place a jar lid in the center and trace around it, then use smaller lids or caps for inner rings.
Step 2: Creating the Textures
-
Carve concentric circles (Left Top & Bottom):
For the two left-hand quadrants, you will create a bullseye pattern. Use a small loop tool to carve deep circular channels, starting from the center and working outward. -
Refine the ridges:
Once the initial circles are carved, use a damp sponge or your finger to smooth the raised ridges between the channels, ensuring they are rounded and distinct. -
Structure the top right quadrant:
In the top right section, press a straight edge or modeling tool deeply into the clay to create an ‘X’ shape, dividing this small square into four triangular zones. -
Add horizontal ribs:
Inside the left and right triangles of this ‘X’, create horizontal ribbed lines. You can press a clay tool sideways or carve these lines out. -
Stipple the remaining triangles:
For the top and bottom triangles of the ‘X’, create a stippled texture. Use a small, blunt tool (like the end of a paintbrush) to press tiny dots tightly together until the area is filled. -
Create the dot pattern (Bottom Right):
In the final bottom right quadrant, use a rounded tool or a small spherical object to press a grid of uniform indentations. Arrange them in neat rows for a structured look. -
Clean up edges:
Go around the outer edge of the entire tile and smooth it with a damp sponge to remove any sharp burrs created during the texturing process.
Warping Woes?
Tiles love to warp. Dry them slowly between two pieces of drywall or wooden boards. This sandwich method forces the clay to stay flat as moisture evaporates.
Step 3: Glazing & Finishing
-
Bisque fire:
Allow the tile to dry slowly to prevent warping, especially at the corners. Once bone dry, bisque fire it according to your clay body’s specifications. -
Apply dark wash:
Mix your black underglaze or oxide wash. Using a stiff brush, apply it heavily to the two left quadrants (the circles) and the top right quadrant (the geometric mix). -
Wipe back:
Before the wash fully dries, take a damp sponge and wipe the surface of the raised areas. This leaves the dark color in the recessed grooves while revealing the raw clay on the high points, enhancing the relief. -
Leave one section raw:
Leave the bottom right quadrant (the dots) completely unglazed to utilize the natural warmth of the terracotta as a design element. -
Final wipe:
Do a final clean-up of the edges to ensure the division lines between the dark and light quadrants are crisp and sharp. -
Glaze fire:
Fire the tile a second time to the maturation temperature of your clay. If you prefer a sealed surface, you can apply a thin coat of clear matte glaze over the dark sections before firing.
Once fired, display your textured masterpiece on a shelf or mount it as part of a larger wall installation
Two-Tone Checkerboard Tiles
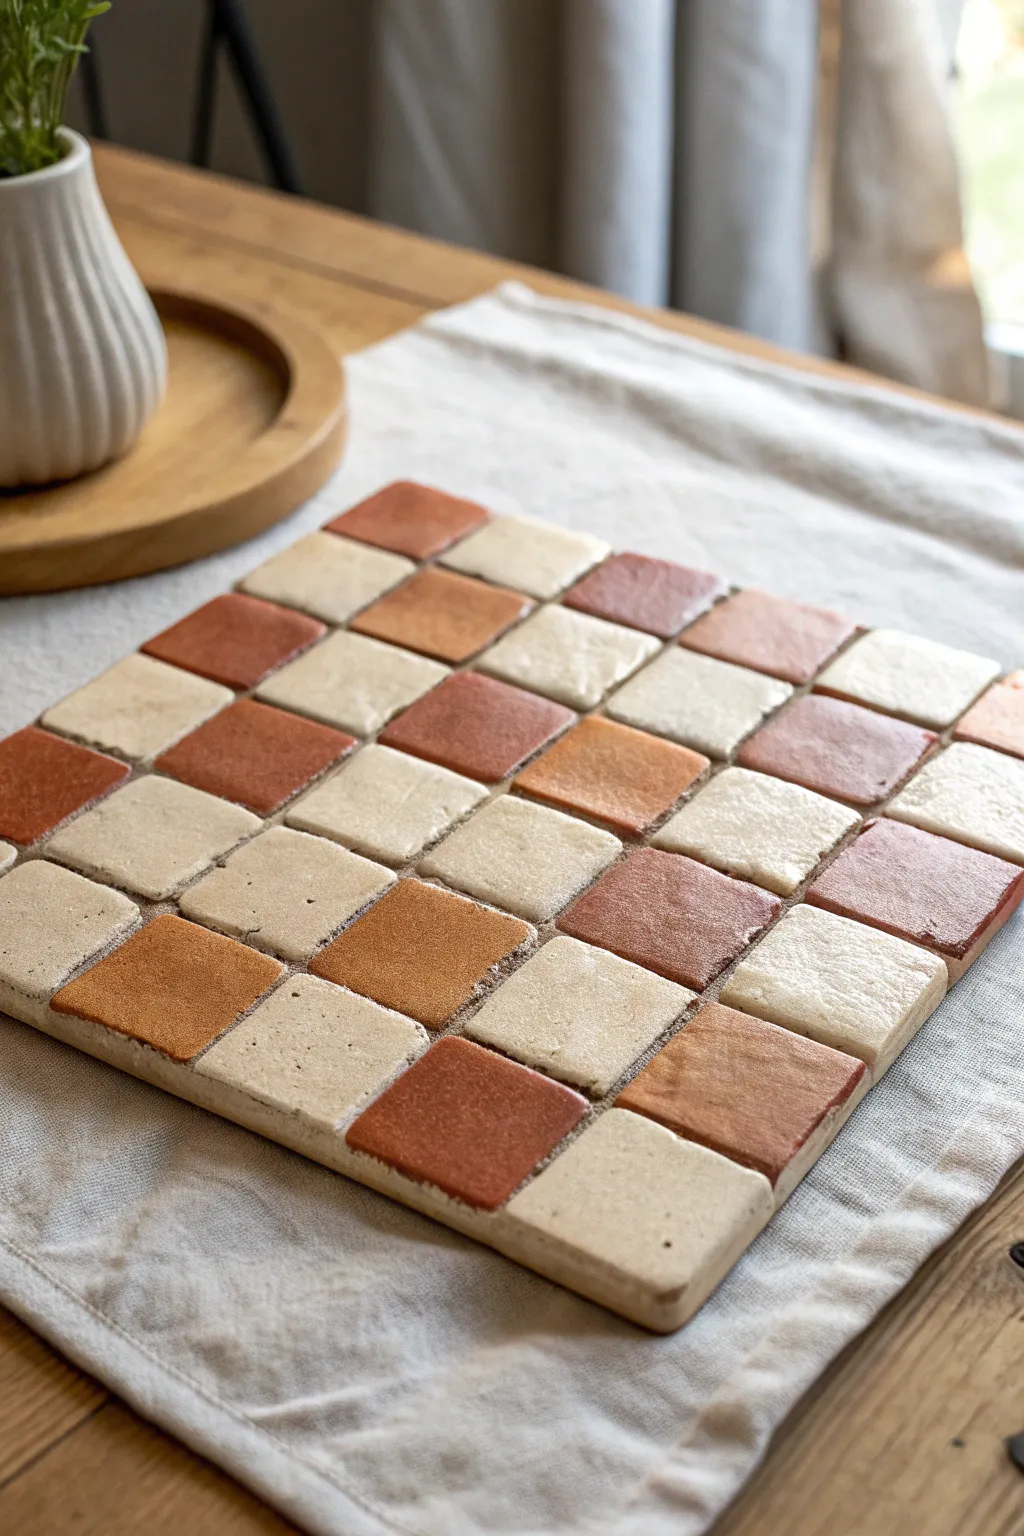
Bring the warmth of Mediterranean craftsmanship to your table with this handmade ceramic tile trivet. Featuring a charmingly imperfect checkerboard pattern of creamy beige and rich terracotta squares, this project combines rustic texture with functional elegance.
Detailed Instructions
Materials
- Polymer clay or air-dry clay (terracotta and cream colors)
- Rolling pin
- Square cookie cutter (approx. 1 inch)
- Square wooden board or cork backing (6×6 inches)
- Strong craft glue (E6000 or similar)
- Tile grout (sanded, beige or light gray)
- Sponge and water bowl
- Sealant or varnish (matte finish)
- Sandpaper (fine grit)
- Ruler
- Plastic wrap or parchment paper
Step 1: Prepping and Cutting Tiles
-
Condition the terra cotta clay:
Begin by kneading your terracotta-colored clay until it is soft and pliable. This conditioning step is crucial to prevent cracking later on. -
Roll out the first slab:
Place the clay between two sheets of parchment paper or plastic wrap. Roll it out to an even thickness of about 1/4 inch. I find using guide sticks on either side of the roller helps keep the thickness consistent. -
Cut the terracotta squares:
Using your small square cookie cutter, stamp out approximately 18-20 squares. If you don’t have a cutter, measure a grid with a ruler and cut carefully with a craft knife. -
Process the cream clay:
Repeat the kneading and rolling process with the cream-colored clay. Aim for the exact same thickness as your terracotta slab to ensure a level surface for your finished trivet. -
Cut the cream squares:
Stamp out another 18-20 squares from the cream clay. It is always better to cut a few extras of each color just in case some warp or break during drying. -
Soften the edges:
Gently tap the edges of each cut square with your finger to remove any sharp burrs or clay crumbs. This gives them that tumbled, handmade pottery look.
Natural Variation
Don’t stress about perfect squares! Slightly irregular edges and subtle size differences actually enhance the rustic, old-world aesthetic of this project.
Step 2: Baking and Assembly
-
Dry or bake the tiles:
If using polymer clay, bake on a parchment-lined sheet according to the package instructions (usually 275°F for 15-30 mins). If using air-dry clay, let them dry fully for 24-48 hours until hard. -
Sand for imperfections:
Once cool or dry, lightly sand the edges of the tiles if they seem too sharp or irregular. Wipe away any dust with a slightly damp cloth. -
Mock up the pattern:
Lay your square backing board on your workspace. Arrange your baked tiles on top without glue first. Create a random checkerboard pattern, alternating colors but allowing for some organic variation. -
Glue the tiles down:
Lift one tile at a time, apply a small dot of strong craft glue to the back, and press it firmly onto the board. Leave a small gap (about 1/8 inch) between each tile for the grout lines. -
Let the adhesive set:
Allow the glue to cure completely according to the manufacturer’s timeline. The tiles must be immovable before you start the grouting process.
Hazy Grout Fix
If a stubborn grout haze remains on your tiles after drying, mix a solution of half water and half vinegar. Wipe tiles gently to dissolve the film immediately.
Step 3: Grouting and Finishing
-
Prepare the grout:
Mix your sanded grout with water in a small container until it reaches the consistency of peanut butter. It shouldn’t be too runny. -
Apply the grout:
Scoop the grout onto the center of your trivet. Use a spreader or your fingers (wearing gloves) to push the grout into all the crevices between the tiles. -
Clean the surface:
Let the grout sit for about 10-15 minutes until it starts to haze over. Then, take a damp (not soaking wet) sponge and gently wipe across the surface to remove excess grout from the tile faces. -
Final polish:
Once the grout is fully dry (usually overnight), use a soft, dry cloth to buff the tiles and remove any remaining haze. -
Seal the piece:
Apply a coat of matte varnish or sealant over the entire top surface. This protects the porous clay and grout from stains, especially if you plan to use this as a coaster for drinks.
Your beautiful new trivet is ready to add a touch of artisan charm to your coffee table or dining spread
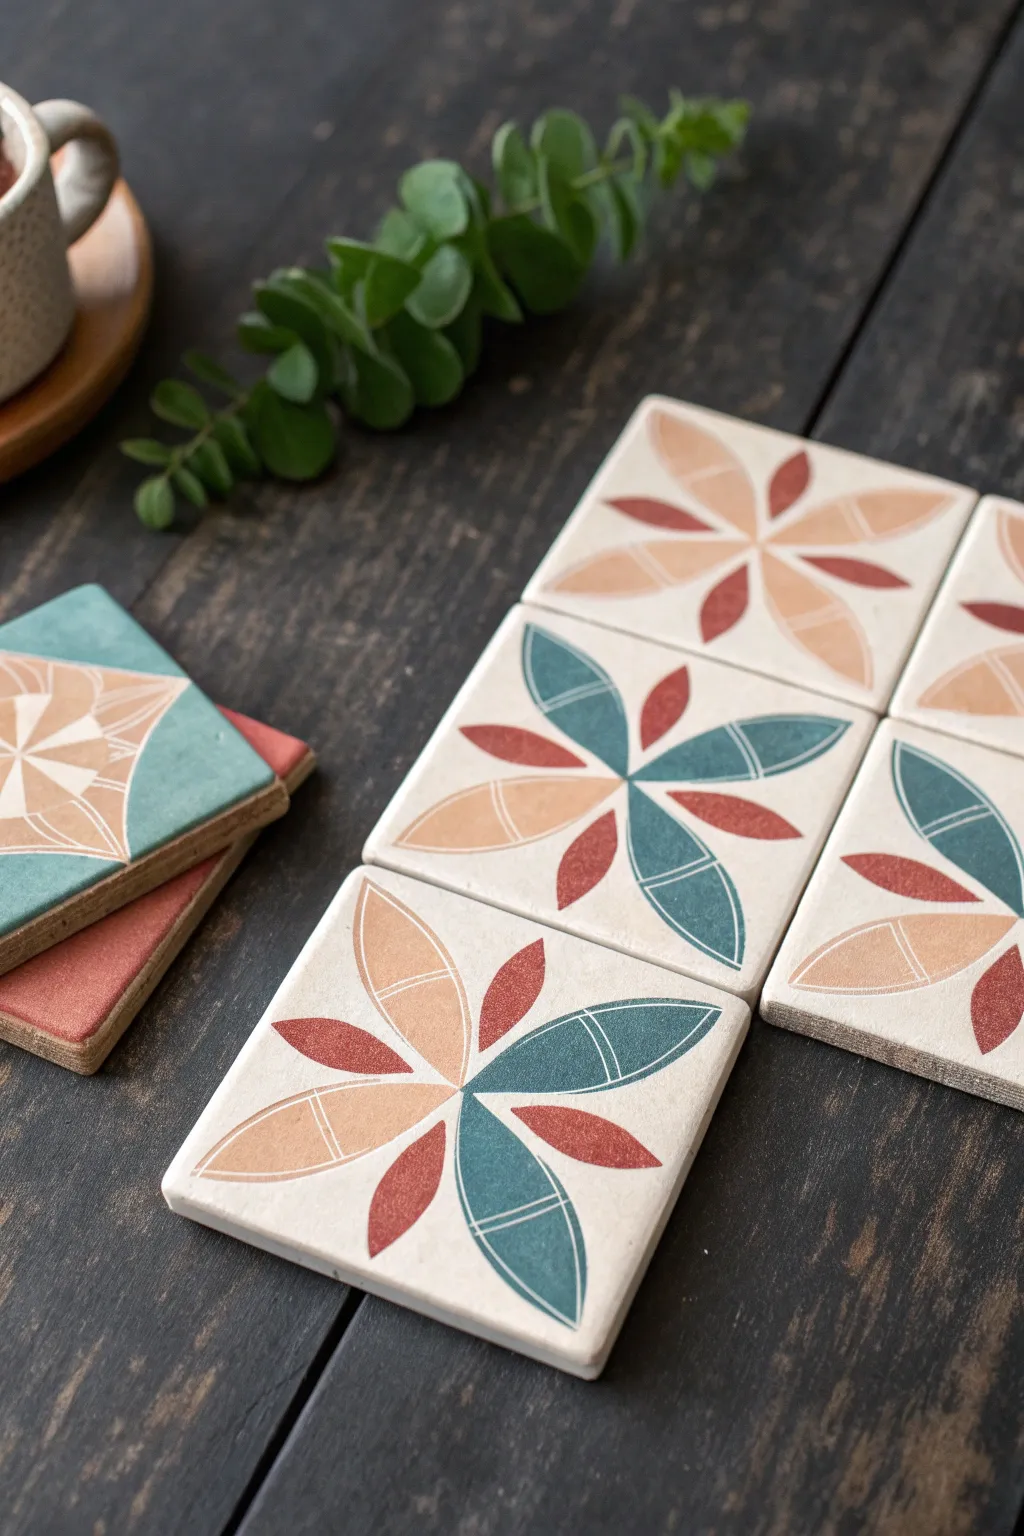
Terrazzo-Style Clay Inlay Tiles
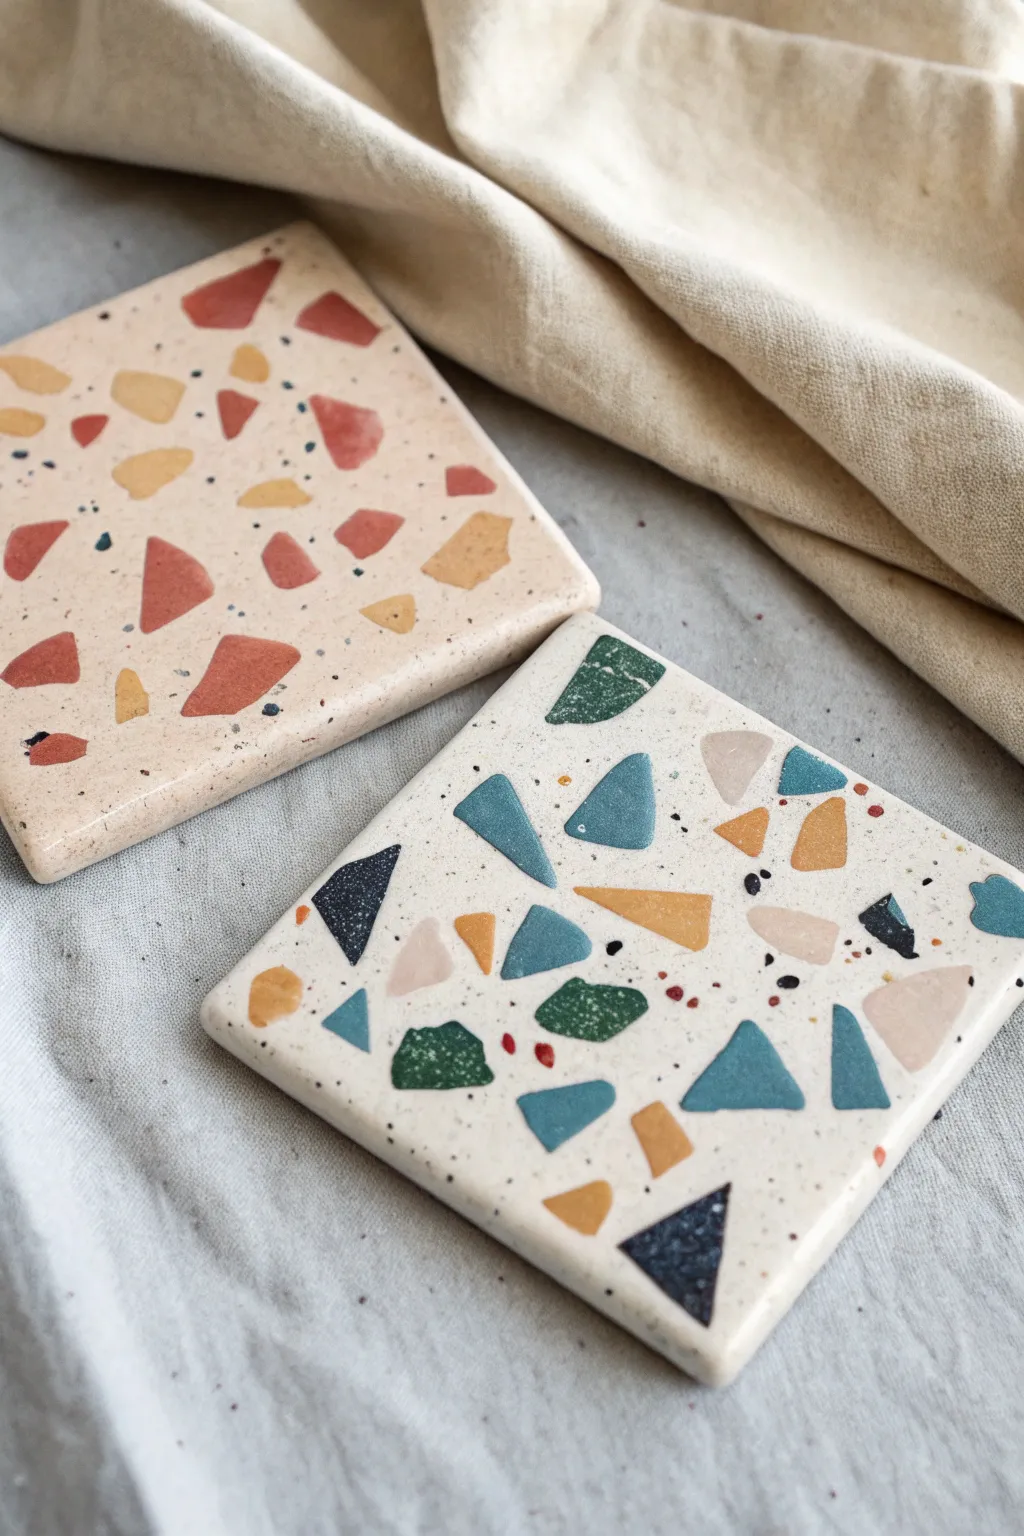
Recreate the trendy, speckled charm of classic terrazzo flooring using polymer or ceramic clay with an inlay technique. These modern graphic coasters feature sharp, geometric fragments embedded in a smooth base for a polished, durable finish.
Step-by-Step Tutorial
Materials
- Polymer clay or ceramic clay (Base colors: beige/cream; Chip colors: rust, mustard, teal, navy, green)
- Acrylic roller or rolling pin
- Square cookie cutter (approx. 4×4 inches) or craft knife and ruler
- Tissue blade or sharp clay knife
- Parchment paper or ceramic workspace
- Fine-grit sandpaper (waterproof)
- UV resin or clear polyurethane varnish (if using polymer clay)
- Oven (for polymer) or Kiln (for ceramic)
- Soft brush
Step 1: Preparing the ‘Chips’
-
Condition the accent colors:
Start by conditioning your chosen accent colors. For the warm coaster, mix rust, mustard yellow, and deep terra cotta. For the cool version, prepare teal, dark green, navy blue, and a touch of mustard. Knead until pliable. -
Create flat sheets:
Roll each color out into a thin sheet, approximately 2mm thick. Uniform thickness helps the final inlay look consistent. -
Cut geometric shapes:
Use your tissue blade to cut random, sharp-edged geometric shapes from these sheets. Think triangles, trapezoids, and irregular polygons. Keep them roughly the size of a fingernail or smaller. -
Make the micro-speckles:
For that authentic stone look, take tiny scraps of black or dark grey clay and chop them into very fine, sand-like crumbs. These will be sprinkled in between the larger shapes.
Sticky Situation?
If clay sticks to your cutter, dip the cutting edge in cornstarch (for polymer) or water (for ceramics) before slicing for a clean release.
Step 2: Building the Base
-
Prepare the base slab:
Condition a large block of your base color (beige or off-white). Roll this out into a slab that is slightly thicker than your final desired depth, about 6-8mm. -
Arrangement strategy:
Place your base slab on parchment paper. Gently lay your cut geometric colored chips onto the surface. Don’t press them in yet; just arrange them until the balance feels right. -
Filling the gaps:
Once the big pieces are placed, sprinkle your tiny micro-speckles into the empty spaces. This adds depth and mimics the aggregate found in real terrazzo.
Step 3: The Inlay Process
-
Rolling it flush:
Cover the clay with a sheet of parchment paper to prevent sticking. Use your roller to firmly press the chips *into* the base slab. Apply even pressure until the surface creates a unified, smooth plane. -
Check surface level:
Peel back the paper. If the chips are still raised, cover and roll again. The goal is a completely flat surface where the chips become one with the base. -
Cut the final shape:
Place your square cutter over the patterned area you like best. Press down firmly to cut the coaster shape. If using a knife, measure carefully and slice straight down to avoid dragging the pattern. -
Soften edges:
Before baking, gently run your finger along the cut edges to smooth out any sharpness or burrs.
Go Metallic
Add flakes of gold or copper leaf along with the colored chips before the rolling step to create an elegant, high-end terrazzo finish.
Step 4: Finishing Touches
-
Bake or Fire:
If using polymer clay, bake according to the package instructions (usually 275°F for 15-30 mins). If using ceramic clay, proceed with your standard drying and bisque firing schedule. -
Wet sanding:
Once cooled (and for polymer clay specifically), use wet fine-grit sandpaper to buff the top surface. This removes any final unevenness and reveals crisp edges on your geometric shapes. -
Rinse and dry:
Wash off any sanding dust and dry the coaster thoroughly with a lint-free cloth. -
Seal:
For polymer clay, brush on a thin layer of UV resin or varnish to protect the surface and make it water-resistant. For ceramics, apply a clear glaze and fire again.
Enjoy your new set of custom, geometric coasters mixed and matched to your home decor values
Speckled Rustic Farmhouse Tiles
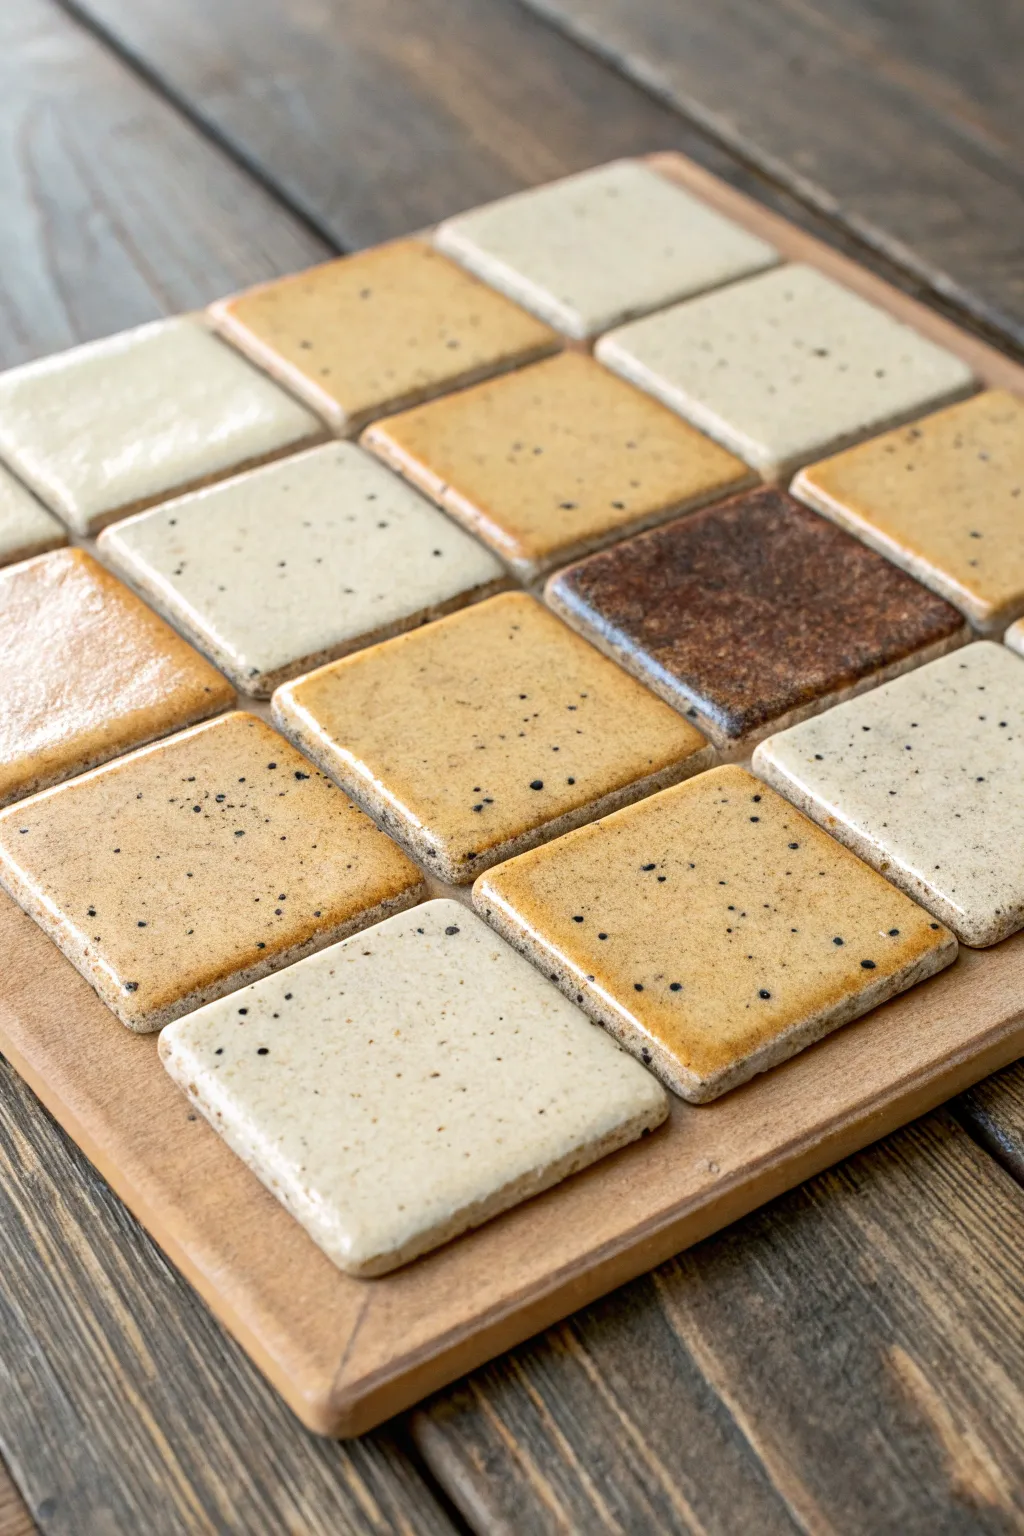
Recreate the charm of a rustic farmhouse kitchen with these handmade speckled tiles arranged in a warm, inviting grid. The natural variations in glaze thickness and iron-rich speckles give each piece a unique character that feels perfectly imperfect.
Detailed Instructions
Materials
- Cone 5/6 stoneware clay (buff or speckled)
- Square tile cutter (2×2 inch)
- Wooden rolling guides or slab roller
- Rolling pin
- Fettling knife
- Sponge
- Canvas ware board
- Wax resist
- Assorted cone 5/6 glazes (Cream, Oatmeal, Amber, Iron Red)
- Granular Ilmenite (for speckling)
- Soft fan brush
- Wooden mounting board (finished)
Step 1: Forming the Tiles
-
Prepare the Clay Slab:
Begin by wedging your stoneware clay thoroughly to remove air pockets. Roll it out onto a canvas surface using wooden guide sticks to ensure an even thickness of about 1/4 to 3/8 inch. Consistency here is key to preventing warping later. -
Cut the Squares:
Using your square tile cutter, press firmly into the slab to cut out 16 tiles. If you don’t have a cutter, create a paper template and carefully trace around it with a fettling knife for precision. -
Refine the Edges:
Once cut, gently compress the edges of each tile with your finger or a slightly damp sponge. This ‘healing’ step prevents sharp, fragile edges after firing and gives that soft, handmade look shown in the photo. -
Dry Under Weight:
Sandwich your tiles between two pieces of drywall or wooden ware boards to dry slowly. This is crucial for keeping them perfectly flat. Let them dry to bone dry over several days. -
Bisque Fire:
Load the bone-dry tiles into the kiln and bisque fire to Cone 04. Ensure they are stacked carefully or placed on flat shelves to maintain their shape.
Warp Prevention
Tiles love to warp. Flip your tiles over every few hours during the leather-hard drying stage to ensure both sides dry at the same rate.
Step 2: Glazing and Speckling
-
Surface Preparation:
Wipe each bisque-fired tile with a damp sponge to remove kiln dust. Apply wax resist to the bottom of each tile and slightly up the sides to prevent glaze from running onto your kiln shelves. -
Enhance the Speckle:
If your base clay isn’t naturally speckled, sprinkle a tiny pinch of granular Ilmenite into your liquid glazes. This additive creates those lovely dark iron spots that burst through the surface during firing. -
Cream Glaze Application:
Dip about half of your tiles into a Cream or Oatmeal glaze. Hold them submerged for 3 seconds for a thick, opaque covering, then shake gently to level the surface before setting them down. -
Warm Tone Application:
For the remaining tiles, use your Amber and Iron Red glazes. I find that brushing these on with a soft fan brush creates subtle variations in thickness that pool beautifully in the corners. -
Create the Dark Contrast:
Select one or two tiles to be the ‘anchors’ of your design and glaze them completely with a dark Tenmoku or textured brown glaze to add depth to your final collection. -
Cleaning the Foot:
Use a sponge to wipe away any glaze droplets that may have beaded up on the waxed bottoms. Clean margins ensure your tiles don’t fuse to the kiln shelf. -
Final Firing:
Fire the glazed tiles to Cone 5 or 6 (depending on your clay body). Allow the kiln to cool naturally and slowly to prevent thermal shock crazing.
Level Up: Texture
Before the clay dries, gently press a piece of coarse linen or canvas onto a few random tiles. The glaze will break over the fabric texture for added depth.
Step 3: Assembly
-
Arrangement Planning:
Lay out your finished tiles on a table. Shuffle them around to balance the colors, scattering the cream, amber, and dark brown tiles until the composition feels balanced. -
Prepare the Board:
Take your wooden mounting board and determine the center. Mark faint pencil lines to guide your grid placement so the outer border remains even. -
Adhere the Tiles:
Apply a strong adhesive, like E6000 or silicone caulk, to the back of each tile. Press them firmly onto the wood, using tile spacers if you want precise gaps, or eyeball it for a more rustic feel.
Now you have a stunning, handcrafted tile display ready to bring earthy warmth to your home
Mountain Landscape Gradient Tiles
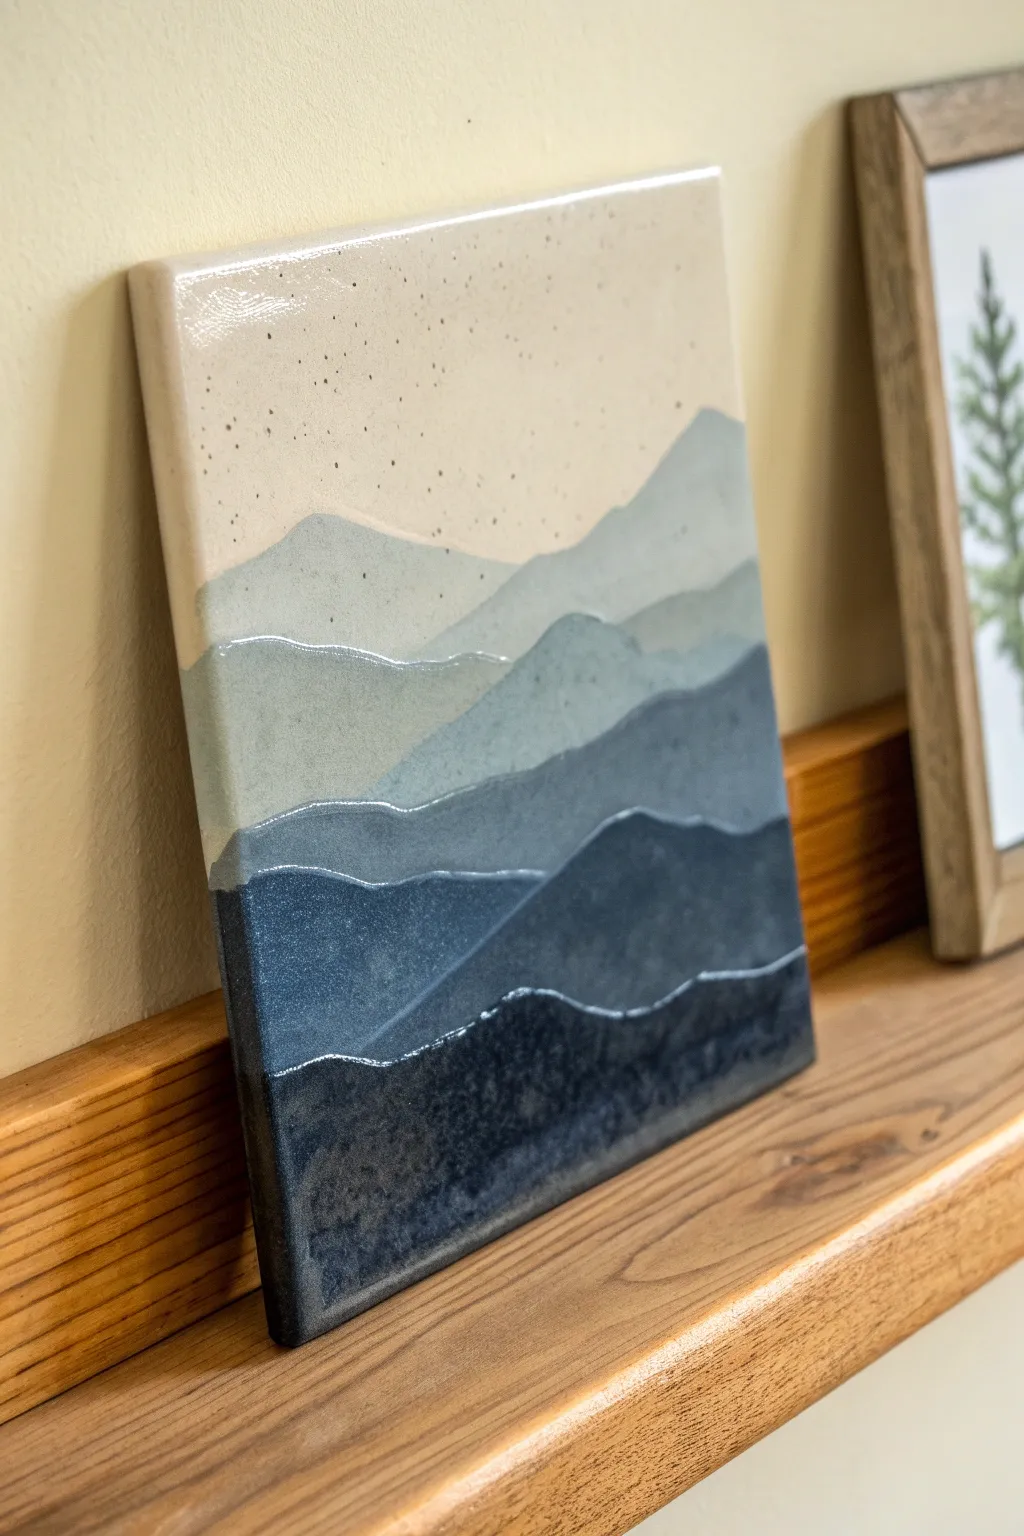
Capture the serenity of a twilight mountain range with this stunning relief tile project. By layering slabs of clay and applying a carefully chosen gradient of glazes, you will create a dimensional landscape that feels both modern and timeless.
Step-by-Step Tutorial
Materials
- White stoneware clay body (cone 5/6)
- Rolling pin
- Two guide strips (1/4 inch thickness)
- Needle tool or fettling knife
- Serrated rib or scoring tool
- Slip (clay mixed with water)
- Rubber kidney rib
- Sponge
- Selection of glazes: Speckled Cream/White, Light Grey-Blue, Medium Slate Blue, Dark Navy, Deep Indigo
- Soft fan brushes for glazing
- Detail brush for edges
- Clean work surface (canvas or ware board)
Step 1: Slab Construction & Layering
-
Prepare the Base Slab:
Start by rolling out your clay into a smooth slab. Use your 1/4 inch guide strips on either side of the clay to ensure an even thickness. Cut a perfect square—roughly 6×6 or 8×8 inches—to serve as your base canvas. Smooth the surface with a rubber rib to remove any canvas texture. -
Create the Sky:
The top portion of the base slab will remain exposed to represent the sky. Simply ensure this upper third is perfectly smooth and free of blemishes. -
Cut the First Mountain Range:
Roll out a second, slightly thinner piece of clay. Use your needle tool to cut a wavy, organic line across the top to mimic distant peaks. Place this piece over the bottom two-thirds of your base tile to check the fit. -
Attach the First Layer:
Score the back of your new mountain piece and the corresponding area on the base tile. Apply a generous amount of slip. Press the layer down firmly but gently to avoid trapping air bubbles. Use a tool to smooth the bottom and side edges so they are flush with the base tile’s perimeter. -
Shape the Second Range:
Repeat the process for the next mountain layer. Cut a new profile that dips and rises differently than the first one to create visual interest. This layer should cover roughly the bottom half of the tile. -
Layer and Refine:
Attach this second mountain layer using the score-and-slip method. I like to use a soft, damp sponge or a rubber shaping tool to bevel the top edge of the clay slightly; this softens the look and helps the glaze break beautifully over the ridge later. -
Add the Foreground:
Cut your final, lowest mountain shape. This should be the bottom-most layer. Attach it securely. You should now have a ‘staircase’ of clay layers building up from the sky down to the foreground. -
Clean the Edges:
Once all layers are attached, the sides of your tile might look messy. Use a sharp knife or a shredder to trim the outer edges square again, ensuring all the layers are flush and the tile is a perfect square. -
Drying and Bisque Fire:
Let the tile dry slowly. Because it has varying thicknesses, cover it loosely with plastic for the first day or two to prevent warping. Once bone dry, bisque fire it to the appropriate cone (usually Cone 04) for your clay body.
Step 2: Glazing the Gradient
-
Wax Resist (Optional):
If you want extremely crisp lines between mountain ranges, carefully paint a thin line of wax resist along the top edge of each ridge. However, letting the glazes naturally overlap slightly creates a more organic look. -
Glaze the Sky:
Start at the top. Apply 2-3 coats of the Speckled Cream glaze to the sky area. Bring the glaze right down to the edge of the first mountain range. If you overlap slightly, wipe it back with a damp angled brush. -
First Mountain Color:
For the furthest mountain range (the top clay layer), apply your Light Grey-Blue glaze. Use a steady hand to paint up to the ridge line. The glaze can pool slightly at the bottom of this layer where it meets the next mountain. -
Mid-Ground Tones:
Apply the Medium Slate Blue glaze to the next mountain layer down. This color should be visibly darker than the previous one to enhance the atmospheric perspective effect. -
Deepening Shadows:
Move to the Dark Navy glaze for the second-to-last layer. Ensure full coverage, dabbing the brush into any textures or tool marks if you left the clay slightly rougher here. -
The Darkest Foreground:
Apply your Deep Indigo or a nearly black-blue glaze to the very bottom layer. This grounds the composition. I prefer to apply an extra thick coat here (if the glaze is stable) to create a deep, watery depth. -
Clean Up:
Using a damp sponge, meticulously wipe all glaze off the sides and the back of the tile. Any glaze left on the sides will likely run onto your kiln shelf. -
Glaze Fire:
Fire the tile to the final temperature required by your clay and glaze combination (likely Cone 5 or Cone 6). Place the tile on a level area of the kiln to prevent the thick glaze layers from drifting.
Warping Woes?
Tiles love to warp. Dry very slowly between two pieces of drywall or ware board. Flip the sandwich daily to ensure even airflow on both sides.
Pro Tip: Depth Illusion
Use a satin or matte glaze for the distant sky and progressively glossier glazes for the foreground layers. This mix of finishes exaggerates the depth.
Once cooled, display your tile on a sturdy stand or frame it to bring a touch of the outdoors into your home
Tiny Houseplant Tiles
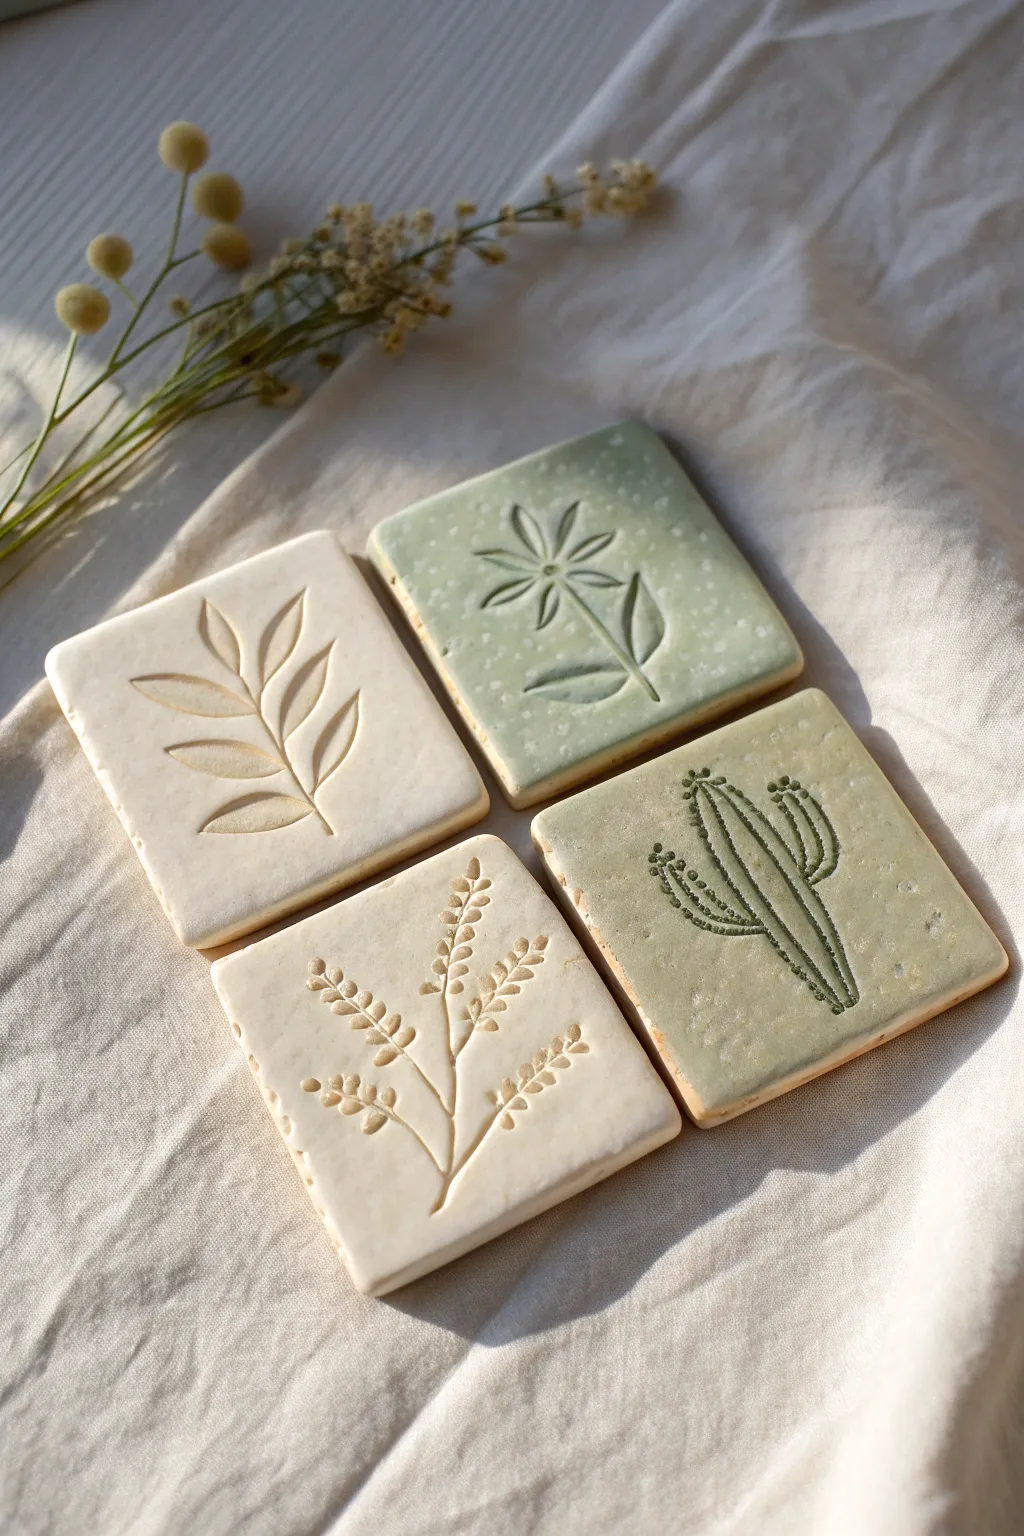
Capture the delicate beauty of nature with these understated ceramic tiles featuring embossed botanical motifs. With a mix of creamy white and muted sage green glazes, they evoke a calm, organic aesthetic perfect for tiny houseplants or as charming coasters.
Step-by-Step Guide
Materials
- White earthenware or stoneware clay
- Rolling pin
- Two wooden guide strips (approx. 1/4 inch thick)
- Square cookie cutter (approx. 3.5 inches) or a ruler and needle tool
- Linoleum carving tools or a sharp needle tool
- Small geometric stamps or found objects (for cactus texture)
- Sponge
- Creamy white glaze (glossy or satin)
- Sage green celadon or semi-transparent glaze
- Kiln for firing
Step 1: Shaping the Canvas
-
Prepare your clay:
Begin by wedging your clay thoroughly to remove any air bubbles, ensuring a smooth, consistent texture that won’t crack during firing. -
Roll out a slab:
Place your clay between two wooden guide strips on a canvas-covered surface. Roll the clay out until the rolling pin rests on the strips, creating an even slab that is perfectly uniform in thickness. -
Smooth the surface:
Before cutting, take a damp sponge or a flexible rib and gently smooth the surface of the clay slab to remove canvas textures or imperfections. This blank slate is crucial for clean carving later. -
Cut the squares:
Use a square cookie cutter to stamp out your four tile shapes. If you don’t have a cutter, measure 3.5-inch squares with a ruler and carefully slice them out using a needle tool or fettling knife. -
Soften edges:
Gently run a damp finger along the sharp cut edges of each square to round them slightly. This prevents the glaze from crawling away from sharp corners and gives the tile a more finished, handmade feel.
Clean Lines Tip
After carving, let the clay dry just a bit more before brushing away crumbs. If the clay is too wet, brushing will smear the debris back into your crisp lines.
Step 2: Carving the Flora
-
Wait for leather-hard stage:
Allow the tiles to dry slowly until they reach a ‘leather-hard’ state. The clay should be firm enough to handle without warping but soft enough to carve into easily. -
Sketch the designs:
Lightly trace your botanical designs onto the surface using a needle tool. For this set, aim for a leafy branch, a simple daisy, a sprig of berries, and a saguaro cactus. -
Carve the leafy branch:
For the first white tile, use a small loop tool or V-gouge to carve out the negative space of the leaves. Instead of outlining, press and scoop to create a concave, leaf-shaped depression. -
Create the berry sprig:
On the second white tile, use a finer tool to carve the central stem. For the small leaves or berries, press a small, rounded tool into the clay repeatedly along the stem to create a textured, organic pattern. -
Sculpt the daisy:
For the first green tile, carve simple, elongated petals radiating from a center point. Keep the lines relatively deep so they will pool with glaze later. -
Detail the cactus:
On the final tile, carve the outline of a saguaro cactus. To replicate the prickly texture seen in the photo, use a needle tool to poke rows of tiny dots along the ribs of the cactus. -
Clean up debris:
Brush away any clay crumbs or ‘burrs’ created by the carving tools using a soft, dry paintbrush. I find this step oddly satisfying and essential for a crisp final look. -
Dry thoroughly:
Place the tiles on a wire rack or between pieces of drywall to dry completely before the first firing. This ensures even drying and prevents warping.
Add Cork Backing
Glue a thin sheet of cork to the bottom of your finished fired tiles. This protects your furniture from scratches and gives the coasters a professional finish.
Step 3: Glazing and Finishing
-
Bisque fire:
Load the bone-dry tiles into the kiln and bisque fire them according to your clay body’s specifications (usually cone 04 or 06). -
Apply white glaze:
Dip or brush the two carved leaf/berry tiles with a creamy white glaze. Ensure the glaze isn’t too thick, or it might obscure the delicate carving details. -
Apply green glaze:
For the cactus and daisy tiles, apply a sage green celadon or breaking glaze. These types of glazes are translucent and pool in recesses, highlighting the carved textures beautifully. -
Wipe the foot:
Use a damp sponge to wipe any glaze off the bottom of the tiles so they don’t stick to the kiln shelf. -
Glaze fire:
Fire the tiles a second time to the maturation temperature of your glaze and clay (often cone 5 or 6 for stoneware).
Once cooled, these durable little squares are ready to hold your morning coffee or showcase your favorite tiny succulents
Mishima Inlay Botanical Lines
These elegant ceramic tiles feature a graceful botanical design created using the traditional Mishima inlay technique. The contrast between the dark, crisp engraved lines and the soft sage green glaze creates a sophisticated, nature-inspired look perfect for coasters or wall accents.
Step-by-Step
Materials
- White or speckled stoneware clay slab
- Rolling pin and guide slats (approx. 1/4 inch thick)
- Square cookie cutter or tile cutter (3.5 to 4 inches)
- Needle tool or very fine carving tool (loop tool)
- Black or dark brown underglaze
- Sage green underglaze or celadon glaze
- Wax resist (optional)
- Clean sponge and bucket of water
- Metal rib or scraper
- Clear transparent glaze
- Small fine-tip paintbrush
Step 1: Preparing the Canvas
-
Roll out the slab:
Begin by rolling out your clay slab to an even thickness of about 1/4 inch using guide slats. Compress the slab on both sides with a rib to align the clay particles, which helps prevent warping later. -
Cut the tiles:
Use your square cutter or a knife and ruler to cut out your tile shapes. If you are making coasters, aim for about 4×4 inches to account for shrinkage. -
Refine the edges:
Smooth the cut edges with a damp sponge or your finger to remove any sharp burrs. Allow the tiles to dry slowly until they reach a ‘leather-hard’ state—firm enough to carve without deforming, but still containing moisture.
Pro Tip: Waxing Lines
Before applying the dark inlay, paint wax resist over the entire surface *except* the lines. When you wipe back the underglaze, it lifts off the waxed areas effortlessly.
Step 2: Carving the Design
-
Sketch the layout:
Lightly sketch your botanical branch design onto the leather-hard clay surface using a pencil. Don’t worry about graphite marks; they will burn off in the kiln. -
Incise the lines:
Using a needle tool or a very fine carving tool, carefully trace over your sketched lines. You want to create a clean, shallow channel for the stem and the outline of each leaf. -
Add detail dots:
To mimic the speckled look in the reference, poke small, shallow holes randomly around the background area or near the stems using the tip of your needle tool. -
Clean the burrs:
Once your carving is complete, gently brush away any loose clay crumbs. If there are raised burrs along the lines, let the tile dry slightly more, then gently rub the surface with a barely damp sponge or your finger to knock them down.
Step 3: The Mishima Technique
-
Apply dark underglaze:
Take your black or dark brown underglaze and paint it generously over the carved lines. You want the underglaze to fully fill the incised channels. -
Let it firm up:
Allow the underglaze to dry until it is no longer distinctively shiny. I find waiting just 10-15 minutes usually does the trick. -
Wipe back the surface:
Using a clean, damp (well-wrung) sponge or a metal scraper, carefully wipe away the excess underglaze from the surface of the tile. The goal is to leave the color trapped only inside the carved lines, revealing the clean clay body again.
Troubleshooting: Smudged Lines
If your inlay lines look smeared after wiping, your sponge was likely too wet. Wring it out thoroughly and rinse it often to keep the clay surface clean.
Step 4: Adding Color & Glazing
-
Paint the leaves:
Using a fine-tip brush, fill in the leaf shapes with your sage green underglaze. Work carefully to stay within the dark inlay lines you just created. -
Bisque fire:
Allow the tiles to dry completely to the bone-dry stage. Fire them in the kiln to cone 04 (or your clay’s specific bisque temperature). -
Wax the bottom:
After the bisque fire, wipe the tile with a damp sponge to remove dust. Apply wax resist to the bottom (and optionally the sides) of the tile to prevent glaze from sticking to the kiln shelf. -
Apply clear glaze:
Dip the tile into a clear transparent glaze or brush on a few even coats. This will seal the piece and make the colors pop. -
Final wipe:
Clean up any glaze drips on the waxed bottom with a sponge. -
Glaze fire:
Fire the tiles a second time to the maturation temperature of your clay and glaze (typically cone 5 or 6 for stoneware).
Once cooled, your tiles are ready to bring a touch of handcrafted botanical charm to your table or home decor
A Coaster Tile Set With Matching Corners
Elevate your coffee table with this charming set of hand-painted ceramic tile coasters. Featuring a geometric floral starburst design in earthy teal, terracotta, and soft peach tones, these coasters blend modern lines with cozy, handmade warmth.
Detailed Instructions
Materials
- 4-inch unfinished bisque ceramic tiles (square)
- Acrylic paints (teal, terracotta, light peach/sand, off-white)
- Fine grit sandpaper (220 grit)
- Pencil and ruler
- Protractor or compass (optional)
- Fine tip paintbrushes (liner brush and small filbert)
- White or cream paint pen (fine tip) for detailing
- Matte finish clear sealant spray
- Cork backing squares or adhesive felt pads
Step 1: Preparation & Design Transfer
-
Surface prep:
Begin by lightly sanding your bisque tiles with 220-grit sandpaper to remove any rough spots or manufacturing burrs. Wipe them clean with a slightly damp cloth to ensure the surface is dust-free. -
Base coating:
Decide on your color scheme. For the main set shown, paint the top surface of four tiles with an off-white or cream acrylic base coat. For the accent coasters, paint the entire background in solid teal or terracotta. Let this base layer dry completely. -
Marking the center:
Find the precise center of your tile by lightly drawing an ‘X’ from corner to corner with a pencil. This intersection point will be the anchor for your floral starburst. -
Sketching the petals:
Sketch a four-pointed star shape first, with the points reaching toward the corners of the tile. In the gaps between these main petals, sketch four smaller, thinner leaf shapes. Aim for symmetry, but don’t worry if it’s not machine-perfect; a little variation adds character. -
Refining the lines:
Before painting, I suggest observing the image closely; notice how the larger petals are split down the middle or have segments. Draw these internal lines now to guide your brush later.
Uneven Petals?
Make a paper stencil! Cut one perfect petal shape from cardstock and trace it repeatedly around the center point for uniformity.
Step 2: Painting the Pattern
-
Blocking in color:
Start with your darkest color (teal). Using a small filbert or round brush, fill in two opposite large petals. Be careful to stay within your pencil lines. -
Adding warmth:
Switch to your terracotta paint. Fill in the smaller, thinner leaf shapes that sit between the larger petals. This creates a strong contrast against the cool teal. -
Softening the palette:
Use the light peach or sand color for the remaining two large petals. If the paint looks streaky, allow the first coat to dry and apply a second thin layer for opacity. -
Painting the variation tiles:
For the solid-colored coasters (the ones with colored backgrounds), paint the floral design using only the cream and peach tones. This inverse look makes the set feel cohesive but not repetitive. -
Clean up edges:
If painting the petals caused any smudges on the background, use a small brush with your background color (off-white, teal, or terracotta) to tidy up the outlines.
Step 3: Detailing & Finishing
-
Adding fine lines:
Once the color blocks are 100% dry, take your fine-tip white paint pen (or a liner brush with slightly watered-down white paint). Draw a single line down the center of each teal and peach petal. -
Geometric accents:
Add the horizontal curve lines across the petals as shown in the photo. These simple white lines give the design its distinct geometric structure. -
Drying time:
Allow the painted tiles to cure for at least 24 hours. This ensures the moisture has fully evaporated from the porous ceramic before sealing. -
Sealing the work:
In a well-ventilated area, spray the tiles with a matte clear acrylic sealer. Apply 2-3 light coats rather than one heavy one to prevent drips or cloudiness. -
Applying the backing:
Flip the tiles over and adhere self-adhesive cork squares or felt pads to the bottom. This protects your furniture from scratches.
Use Tape for Crisp Lines
For the ‘split’ petal look, place a thin strip of painter’s tape or washi tape down the center of the petal before painting, then peel it off to reveal a crisp line.
Arrange your beautiful new coaster set on your coffee table and enjoy a piece of handmade art with your next cup of tea
House Number or Nameplate Tiles
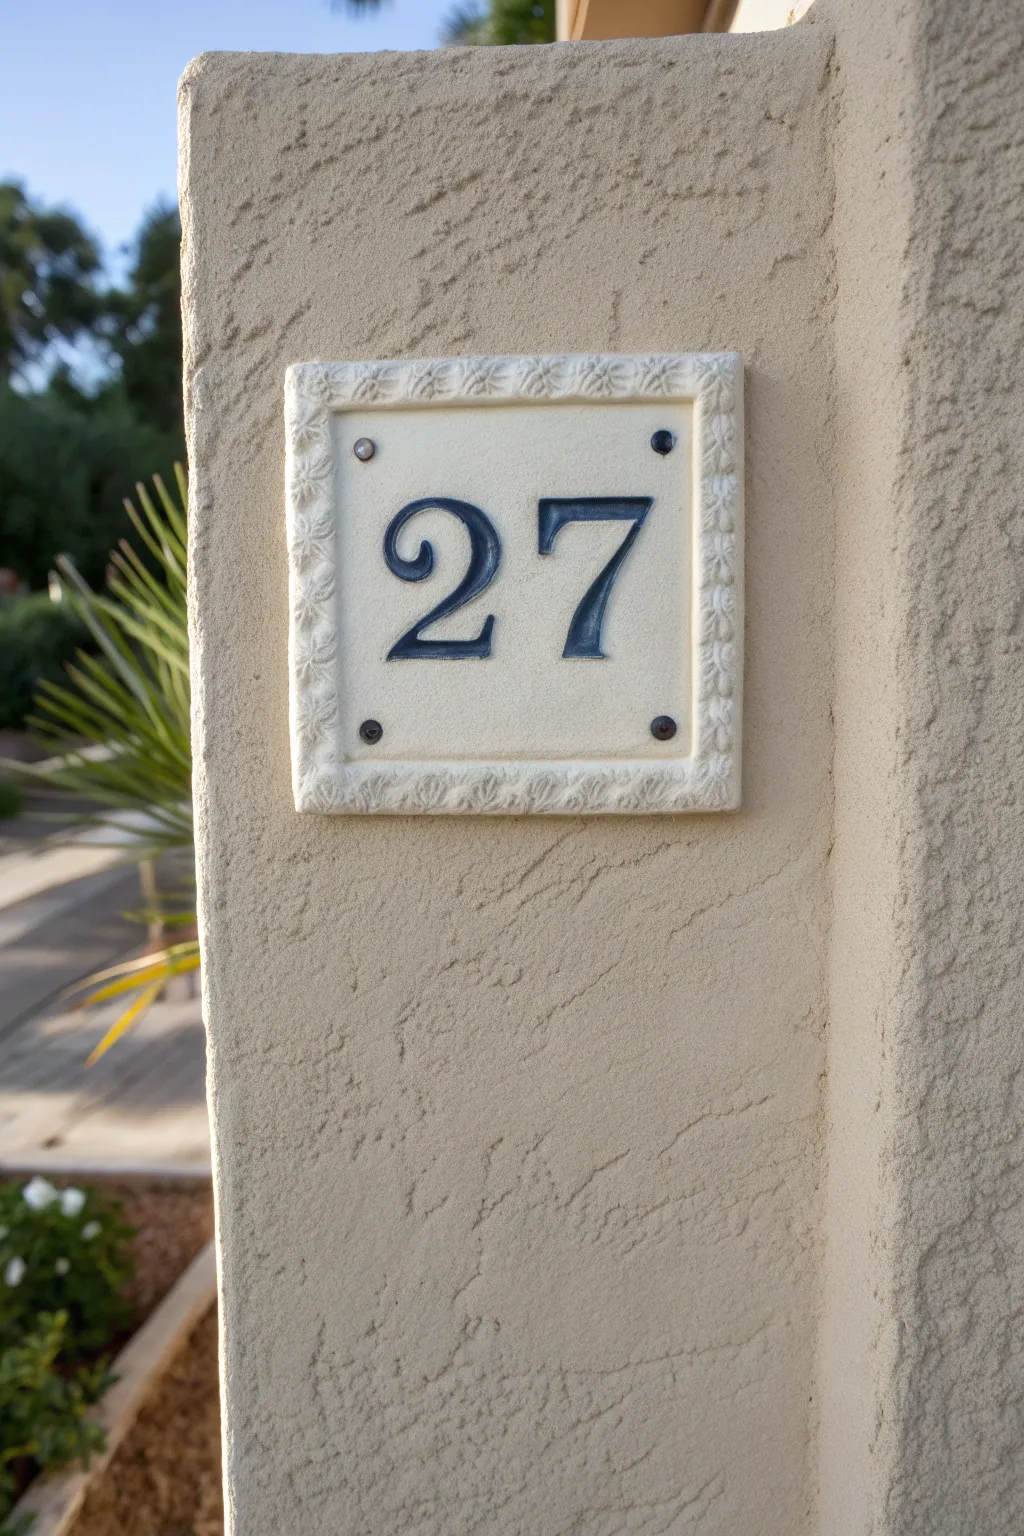
This elegant house number tile features a timeless design with a raised decorative border and crisp serif numerals. The creamy glazed background contrasts beautifully with deep blue numbers, creating a welcoming and legible entrance marker.
Step-by-Step Tutorial
Materials
- White earthenware clay
- Rolling pin and guide strips (1/4 inch)
- Square tile cutter or fettling knife
- Decorative texture rollers or stamps (floral/leaf pattern)
- Slip (liquid clay)
- Scoring tool
- Underglaze (dark blue/cobalt)
- Clear or transparent cream glaze
- Small flat brush and fine detail brush
- Sponge
- Drill bit for clay (approx. 3/16 inch)
- Serif number stencils or printed teplate
Step 1: Forming the Base Tile
-
Roll the slab:
Begin by wedging your white earthenware clay to remove air bubbles. Roll it out into a smooth, even slab using 1/4 inch guide strips to ensure uniform thickness. -
Cut the square:
Measure and mark a square slightly larger than your desired finished size (remembering clay shrinks about 10-15%). Use a fettling knife or square cutter to slice the tile cleanly. -
Create the border strips:
Roll out four thin coils or narrow strips of clay for the decorative frame. These should be roughly the same length as the sides of your tile. -
Texturize the border:
Press a small floral or leaf texture tool into these strips while they are still soft. I like to do this on a separate surface so I don’t warp the main tile. -
Attach the frame:
Create a picture-frame effect by scoring the edges of the main tile and the back of your textured strips. Apply slip, press the strips firmly into place, and miter the corners for a neat join. -
Add mounting holes:
While the clay is leather hard, gently drill or punch four holes in the inside corners of the frame. Make sure they are large enough to accommodate mounting screws after shrinkage. -
Smooth and dry:
Run a damp sponge lightly over the central flat area to ensure it’s perfectly smooth for lettering. Allow the tile to dry slowly between two boards to prevent warping before bisque firing.
Warp Watch
Tiles warp easily. Dry your tile slowly under plastic or sandwiched between drywall boards. Flip it daily to ensure even drying.
Step 2: Glazing and Lettering
-
Bisque fire:
Fire the bone-dry tile in a kiln to cone 04 (or your clay body’s specification) to harden it into bisque ware. -
Outline the numbers:
Place your number stencil or template onto the center of the bisque tile. Lightly trace the outline of the numbers with a pencil; the graphite will burn off in the kiln. -
Apply underglaze:
Using a fine detail brush, carefully fill in the number outlines with dark blue or cobalt underglaze. Apply 2-3 coats for solid, opaque coverage. -
Clean up edges:
If any underglaze strays outside the lines, gently scrape it away with a sharp tool or a stiff, slightly damp brush once it’s dry. -
Glaze application:
Dip the brush into a transparent cream or clear glaze. Apply it evenly over the entire surface, including the textured border. -
Wipe the texture:
For a subtle antiqued look, you can gently wipe the high points of the textured border with a sponge just after glazing, allowing the clay body to show through slightly, though a full coat works beautifully too. -
Clear coat check:
Ensure the glaze doesn’t pool too thickly in the screw holes; use a needle tool to clear them if necessary. -
Final firing:
Fire the tile again to the glaze temperature (typically cone 05 or 06). Once cool, mount it to your wall using screws with decorative caps or dark heads to match the numbers.
Go 3D
instead of painting, cut thin clay numbers and slip-score them onto the center for a raised relief effect.
Now you have a durable, custom piece of pottery that adds instant curb appeal to your home
Quilted Slip-Trailed Tiles

Recreate the cozy, plush look of a quilt in ceramic form with this slip-trailing technique. The result is a dimensional tile featuring alternating glossy cream and tan squares adorned with pearl-like accents.
Step-by-Step
Materials
- Stoneware clay slab (approx. 1/4 inch thick)
- Square tile cutter or fettling knife
- Ruler
- Slip trailer bottle with fine metal nozzle
- Thick slip (made from your clay body)
- Underglazes or colored slip (tan/beige and cream)
- Clear transparent glaze
- Small round brush
- Needle tool
- Sponge
Step 1: Base Preparation
-
Roll and cut:
Begin by rolling out a smooth slab of stoneware clay to a uniform thickness, about 1/4 inch. Use a rib to compress the surface, ensuring it’s free of canvas texture. Cut out your desired square tile shape; a 4×4 or 6×6 inch square works well for this pattern. -
Establish the grid:
Using a ruler and a needle tool, lightly scratch a grid pattern into the surface. Don’t cut all the way through; these lines are just guides for your slip trailing. For the look in the image, aim for a 4×4 grid of smaller squares.
Deflocculate for Flow
Add a drop of sodium silicate (deflocculant) to your flooding slip. It allows the slip to flow smoothly into corners without needing extra water, reducing shrinkage cracks.
Step 2: Creating the Quilt Structure
-
Prepare the grid slip:
Fill a slip trailer bottle with thick slip made from your clay body. It should be the consistency of thick yogurt or pudding so it stands up without flattening. -
Pipe the lines:
Carefully drag the slip trailer nozzle along your scored grid lines. Squeeze consistently to create raised, uniformed ridge lines that will separate your quilt squares. -
Clean connections:
Where the slip lines intersect, use a slightly damp brush to smooth any harsh peaks or blobs, ensuring the grid looks like a continuous, stitched fabric seam. -
Stiffening:
Allow the slip lines to set up slightly until they losing their wet sheen. This creates a dam for the colored sections.
Step 3: Flooding and Puffing
-
Mix flooding slip:
Prepare two small batches of slip or use underglazes: one stained a warm tan/beige and the other kept natural cream. These should be slightly more fluid than your grid slip but still thick enough to mound up. -
Fill the squares:
Working in a checkerboard pattern, flood the alternating squares with your tan slip. I like to use a bulb syringe or a large brush to drop a generous amount into the center of the square. -
Spread to edges:
Gently nudge the colored slip toward the raised grid lines using a brush or needle tool. The slip should pile up slightly, creating that puffy, pillow-like dimension characteristic of quilting. -
Complete the checkerboard:
Repeat the flooding process with the cream-colored slip in the remaining empty squares, ensuring good volume so they look inflated.
Cracking Slip?
If slip lifts or cracks off the base, the moisture difference was too great. Score the base deeper next time or apply slip when the base is slightly wetter (leather hard).
Step 4: Detailing and Glazing
-
Adding the pearls:
Using very stiff white slip or underglaze in a fine-tipped trailer, pipe small pearl dots. Place one dot at every grid intersection. -
Centering accents:
Pipe a single matching pearl dot directly in the center of every square ‘pillow’ to mimick the tufting found on upholstered furniture. -
Slow drying:
Because of the varying thicknesses of slip, cover the tile loosely with plastic and let it dry very slowly to prevent cracking or warping. -
Bisque fire:
Once bone dry, bisque fire the tile according to your clay body’s specifications (usually cone 04). -
Glaze application:
Dip or brush a clear, glossy transparent glaze over the entire piece. The gloss will enhance the ‘wet’ look of the pearls and distinct colors. -
Final firing:
Glaze fire the tile to maturity. Ensure the tile is placed flat on the kiln shelf to maintain its shape.
Once fired, the glossy finish and raised textures will make you want to reach out and touch the surface
3D Pebble Relief Tiles
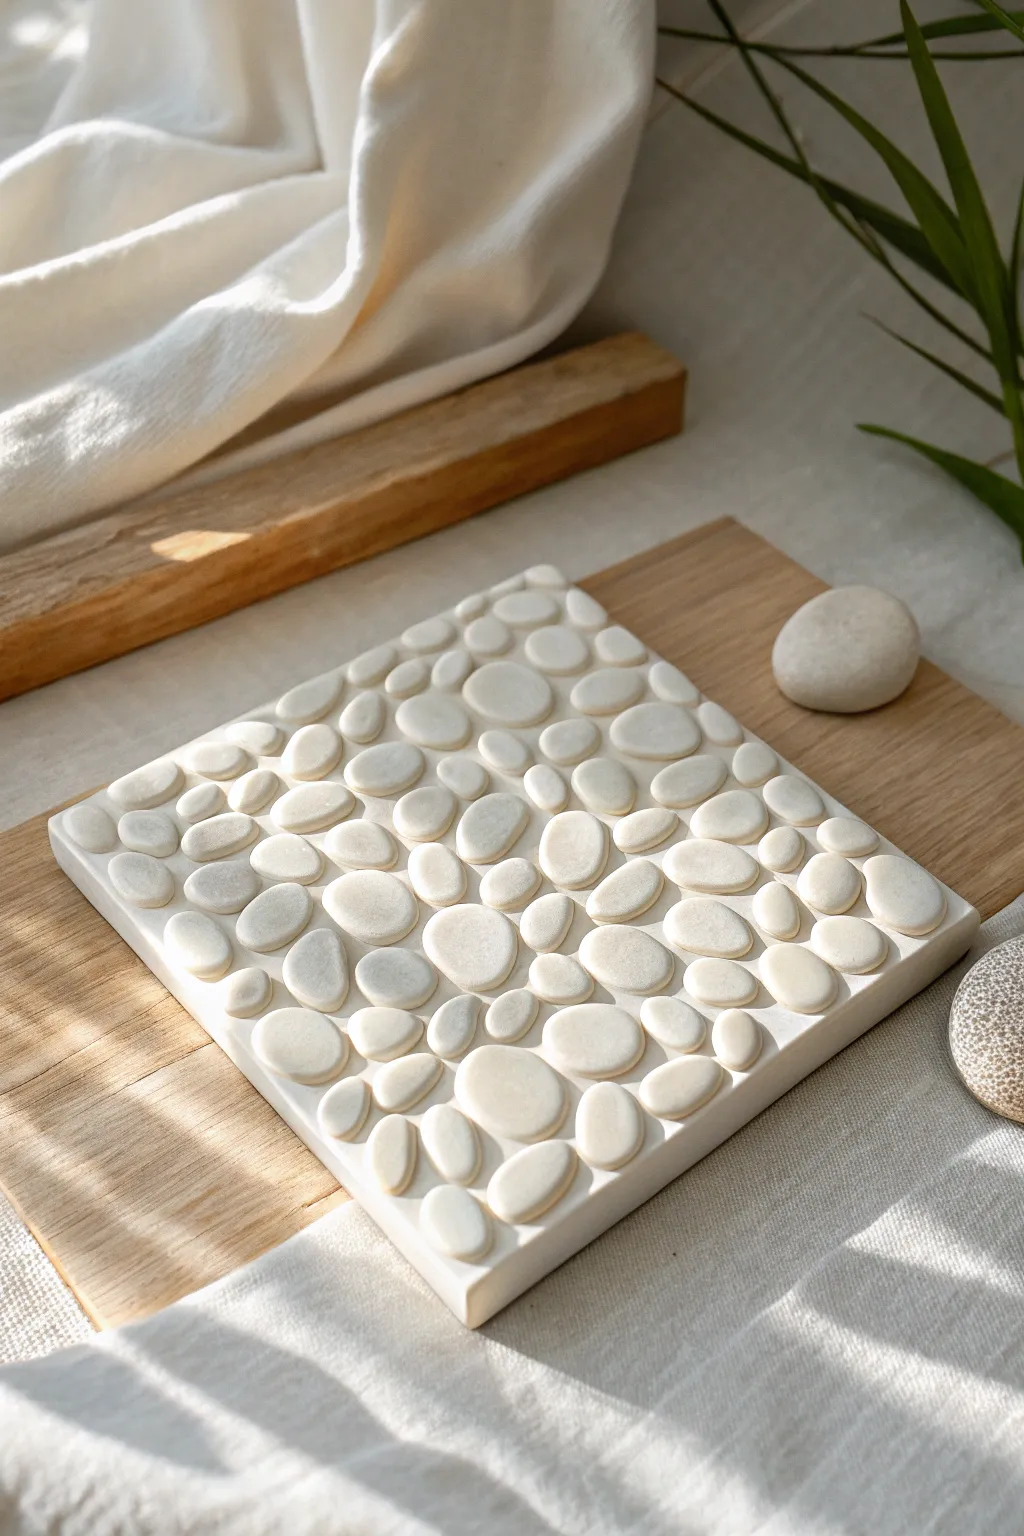
Bring the calming essence of a riverbed into your home with this tactile 3D relief tile. By adding smooth, raised pebble shapes to a slab base, you create a monochromatic, modernist piece that celebrates the organic beauty of clay.
Step-by-Step Guide
Materials
- White or light-bodied stoneware clay
- Rolling pin
- Two 1/4-inch wooden thickness strips (guide rails)
- Square template (paper or rigid)
- Needle tool or fettling knife
- Scoring tool (serrated rib)
- Slip (clay slurry)
- Rubber kidney rib
- Small sponge
- Smooth river stone or metal spoon (for burnishing)
- Sanding block (fine grit, optional)
- Board or drywall ware board for drying
Step 1: Creating the Base
-
Wedge the clay:
Start by thoroughly wedging your white stoneware clay to remove any air bubbles. This is crucial for tiles, as pockets of air can cause warping or cracking later. -
Roll the slab:
Place your 1/4-inch thickness strips on either side of your clay block. Roll the clay out firmly until the rolling pin rests evenly on both wooden guides, ensuring a perfectly uniform thickness. -
Smooth the surface:
Take your rubber kidney rib and drag it across the surface of the clay slab in multiple directions. This compresses the clay particles and creates a smooth, canvas-like finish for your work. -
Cut the square:
Place your square template over the smoothed slab. Using a needle tool or fettling knife held vertically, cut around the template to get clean, sharp 90-degree edges.
Grout Line Trick
To keep the background smooth, lay a thin sheet of plastic wrap over the base, then press the pebbles down through it. Remove plastic for a perfect ’embedded’ look.
Step 2: Forming the Pebbles
-
Prepare variable lumps:
From your remaining clay, pinch off small amounts of varying sizes. You want a mix of tiny, medium, and slightly larger pieces to mimic the erratic sorting of nature. -
Shape the stones:
Roll each lump into a ball between your palms, then gently press it flat against your work surface to create a smooth, domed ‘pebble’ shape. The bottoms should be flat for attachment. -
Refine the edges:
Check each clay pebble for cracks or rough spots. Smooth them out with a fingertip dipped very lightly in water; I find that perfected edges now save hours of sanding later. -
Arrange the composition:
Lay out your pebbles loosely on top of the cut slab without attaching them yet. Move them around to find a pleasing, organic balance, leaving small consistent gaps between them like grout lines.
Step 3: Assembly and Finishing
-
Mark positions:
Once satisfied with the layout, lightly trace a small circle around a few key pebbles to remember their general placement, then remove them and set them aside in order. -
Score the slab:
Using a serrated rib or needle tool, aggressively score (scratch) the surface of the slab where the pebbles will sit. -
Score and slip the pebbles:
Score the flat back of each clay pebble. Apply a generous dab of slip to the scored area. -
Attach firmly:
Press the slip-covered pebble onto the scored slab. Give it a tiny wiggle to lock the clay particles together, ensuring no air is trapped underneath. -
Clean the distinct lines:
Use a small, slightly damp brush to clean up any slip that squeezed out around the edges. You want a sharp definition between the raised pebble and the flat background. -
Slow drying:
Place another board or a sheet of plastic lightly over the tile to let it dry slowly. Uneven drying is the enemy of flat tiles, so take your time here. -
Optional burnishing:
When the clay is leather hard, you can rub the tops of the pebbles with a smooth stone or the back of a spoon to create a soft subtle sheen. -
Bisque fire:
Once bone dry, fire the piece to bisque temperature (usually cone 04). Since the beauty is in the raw clay texture, you might choose to leave it unglazed or apply a clear matte glaze.
Warping Woes
If your tile edges curl up while drying, place a piece of drywall on top of the tile (sandwiching it) to weigh it down while it dries evenly.
Display your finished relief tile on a stand or mount several together for a stunning tactile wall installation
A Multi-Tile Backsplash Mural Panel
Bring the movement of the seal into your kitchen with this stunning multi-tile relief mural. By combining classic white textured tiles with a hand-carved, wave-inspired center band, you create a timeless artistic focal point.
Step-by-Step Tutorial
Materials
- High-quality white stoneware clay or porcelain clay body (for durability)
- Tile cutter or square cookie cutter (4×4 or 6×6 inch)
- Slab roller or rolling pin with depth guides
- Carving tools (loop tools, needle tools, ribbon tools)
- Underglazes (Deep Teal, Navy Blue, Terracotta, Plum)
- Clear glossy glaze (food safe)
- White embossed commercial tiles (for the border rows)
- Kiln access
- Canvas board or ware board
- Sponge and water
- Ruler and pencil
Step 1: Planning and Slab Preparation
-
Design the Wave Pattern:
Begin by sketching your wave motif on graph paper. Since this design spans multiple tiles, draw a long continuous wave, then create a grid over it to see how the image breaks across individual squares. -
Roll the Slab:
Roll out your clay slab to a uniform thickness, ideally around 3/8 inch. Using depth guides or slat sticks on either side of your rolling pin ensures every tile will be level. -
Compress the Clay:
Use a renal rib or a smooth rubber rib to compress the clay slab in multiple directions. This step aligns the clay particles and is crucial for preventing warping during the firing process. -
Cut the Tile Squares:
Using your tile cutter or a ruler and knife, cut your clay into precise squares. Remember that clay shrinks about 10-12% during firing, so cut them slightly larger than your intended final size.
Warped Tiles?
If tiles warp while drying, place a piece of drywall on top of them while they are in the leather-hard stage. The weight and even absorption help flatten them back out.
Step 2: Carving the Relief
-
Transfer the Design:
Arrange your cut clay squares side-by-side on a board to recreate the layout. Lightly sketch your continuous wave design across the entire group using a needle tool, ensuring the lines flow from one tile to the next. -
Carve the Outlines:
Use a small V-tip carving tool to deepen the main lines of the waves. I find it helpful to keep the tool perpendicular to the clay for clean, crisp channels. -
Sculpt the Depth:
With a loop tool, gently remove clay from the ‘background’ areas of the waves. You want the wave crests to remain raised while the valleys dip down, creating a tactile 3D relief effect. -
Add Texture Details:
Use a needle tool or a fine stylus to scratch in current lines within the waves. These striated lines mimic the flow of water and will catch the glaze beautifully later. -
Clean and Dry:
Smooth any sharp burrs of clay with a slightly damp sponge. Let the tiles dry slowly under plastic for several days to the ‘bone dry’ stage to prevent warping.
Step 3: Glazing and Firing
-
Bisque Fire:
Load the bone-dry tiles into the kiln for a bisque firing (usually to Cone 04). This hardens the clay and prepares it for glazing. -
Clean the Bisqueware:
Once cool, wipe each tile with a damp sponge to remove any kiln dust, which can prevent glaze from adhering properly. -
Apply Oceanic Colors:
Paint the wave sections with deep teal and navy underglazes. Let the underglaze settle into the carved recesses to emphasize the texture. -
Add Accents:
Fill the circular sun or abstract shapes with terracotta and plum underglazes. This warm contrast against the cool blues makes the design pop. -
Wax Resist (Optional):
If you want the raised lines to remain white (raw clay look), carefully apply wax resist to the high points before glazing. Otherwise, proceed to the next step. -
Clear Glaze Application:
Dip or brush a coat of clear glossy glaze over the entire front face of the tiles. This sets the color and makes the backsplash easy to clean. -
Glaze Fire:
Fire the tiles a second time to the maturation temperature of your clay body (e.g., Cone 5 or 6). Ensure tiles are not touching inside the kiln.
Make It Sparkle
Add crushed glass or a transparent crackle glaze to the deepest parts of the water for a shimmering, wet look that catches the light beautifully.
Step 4: Installation Preparation
-
Layout Check:
Lay your finished handmade tiles out next to your commercial white embossed tiles to check sizing and arrangement before adhering them to the wall. -
Install:
Proceed with standard tiling installation using thin-set mortar and grout, treating your handmade pieces with extra care during grouting to avoid scratching the glaze.
Now you have a custom ceramic masterpiece that turns your kitchen wall into a work of art