If you’re craving a project that’s cute, a little goofy, and totally doable, a clay bobblehead is the perfect win. I’m sharing my favorite ideas that lean into that classic big head, small body look—plus a few playful twists once you’ve got the basics down.
Classic Cat Bobblehead
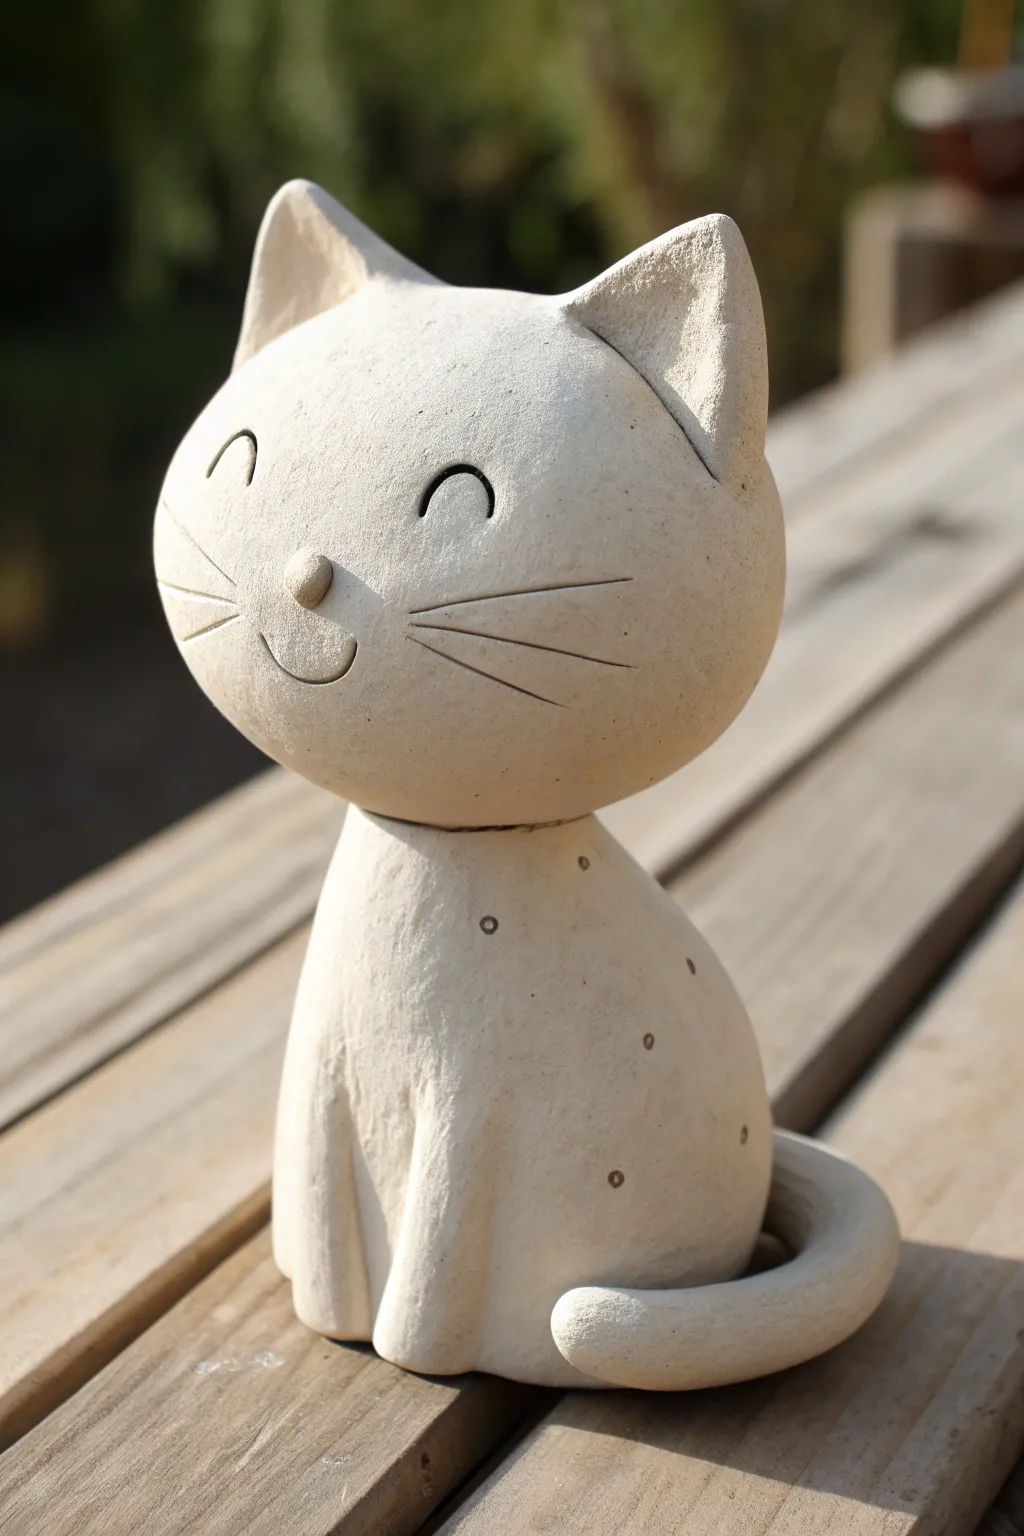
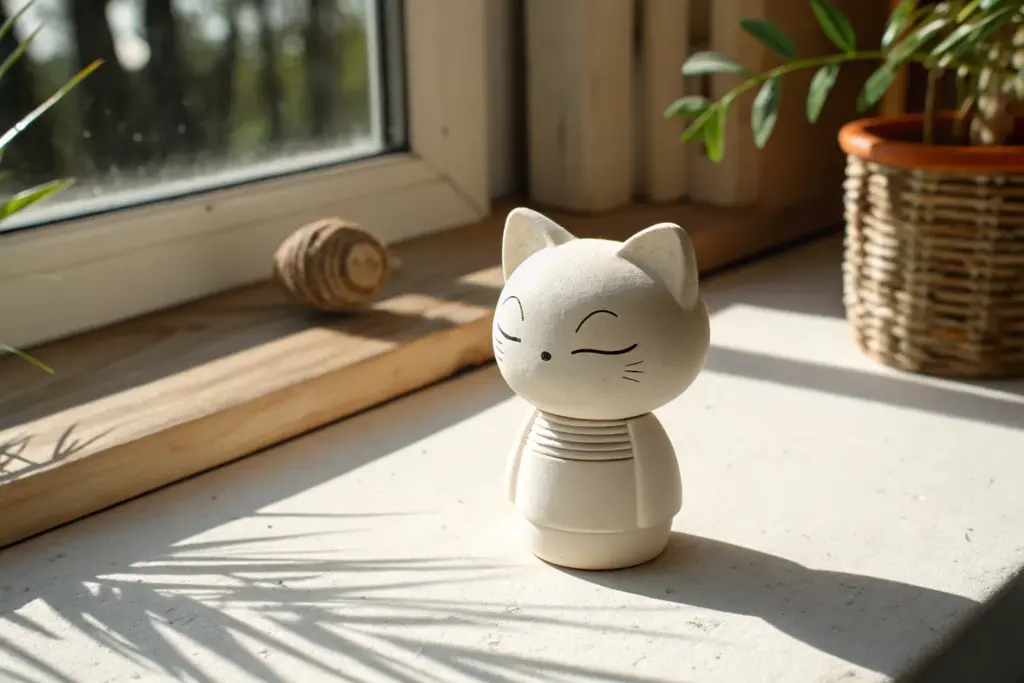
This charming feline bobblehead relies on clean lines and simple shapes to capture a friendly personality. Its rounded, slightly textured stone finish gives it a timeless, handmade feel perfect for a desk or garden shelf.
Step-by-Step
Materials
- White or speckled stoneware clay (or air-dry clay)
- Small metal spring
- Epoxy glue
- Clay modeling tools (needle tool, rib tool)
- Slip (liquid clay)
- Sponge
- Clear matte varnish (optional)
Step 1: Sculpting the Head
-
Form the base sphere:
Begin by rolling a smooth, even ball of clay. It should be slightly flattened on the front and back to create a disc-like sphere rather than a perfect globe. -
Shape the ears:
Create two matching triangles from fresh clay. Pinch them gently to give them a natural curve, then score and slip them onto the top of the head. -
Refine the seams:
Using a modeling tool or your finger, blend the clay of the ears seamlessly into the skull until no join lines are visible. -
Carve the expression:
Use a needle tool or a small gouge to carve two upward-curved arches for the happy, sleeping eyes. -
Add facial details:
Roll a tiny ball of clay for the nose and attach it securely in the center. Then, carve three radiating lines on each cheek for whiskers and a simple curve for the mouth. -
Prepare the neck socket:
On the underside of the head, gently hollow out a small area. This hidden cavity will eventually house the top half of your spring mechanism.
Natural Texture
To mimic the stone look in the photo, gently dab the wet clay with a rough sponge or a crumpled ball of aluminum foil before carving the details.
Step 2: Forming the Body
-
Create the body shape:
Roll a larger piece of clay into a smooth pear shape. This needs to be sturdy enough to support the head, so ensure the base is wide and flat. -
Define the legs:
Instead of attaching separate legs, use a modeling tool to crave vertical indentations into the front of the pear shape. This suggests the front paws while keeping the form solid. -
Attach the tail:
Roll a tapered coil of clay. Wrap it around the base of the body, curling the tip upward, and score/slip it into place. -
Add texture:
Using a small, round tool or end of a paintbrush, press shallow, random dots across the body to create a subtle spotted pattern. -
Prepare the neck mount:
Flatten the very top of the body’s neck area. Make a shallow indentation here as well to receive the bottom half of the spring. -
Smoothing and drying:
Wipe the entire piece down with a slightly damp sponge to remove fingerprints and soften any sharp carving lines. Let both pieces dry completely according to your clay type.
Balance Check
Before gluing, dry-fit the spring. If the head leans too far back or forward, gently bend the spring coils to correct the posture.
Step 3: Assembly
-
Fire or cure:
If using kiln-fire clay, bisque fire the pieces now. If using air-dry, ensure they are bone dry before proceeding. -
Mount the spring:
Apply strong epoxy glue to one end of your spring and press it firmly into the indentation on the body’s neck. -
Attach the head:
I find it helpful to wait for the body glue to set first. Once stable, apply epoxy to the top of the spring and carefully lower the head onto it. -
Final finish:
If desired, apply a clear matte varnish to protect the surface while maintaining that raw, stone-like appearance.
Give the head a gentle tap to watch your new friend nod happily on your desk


Happy Puppy Bobblehead
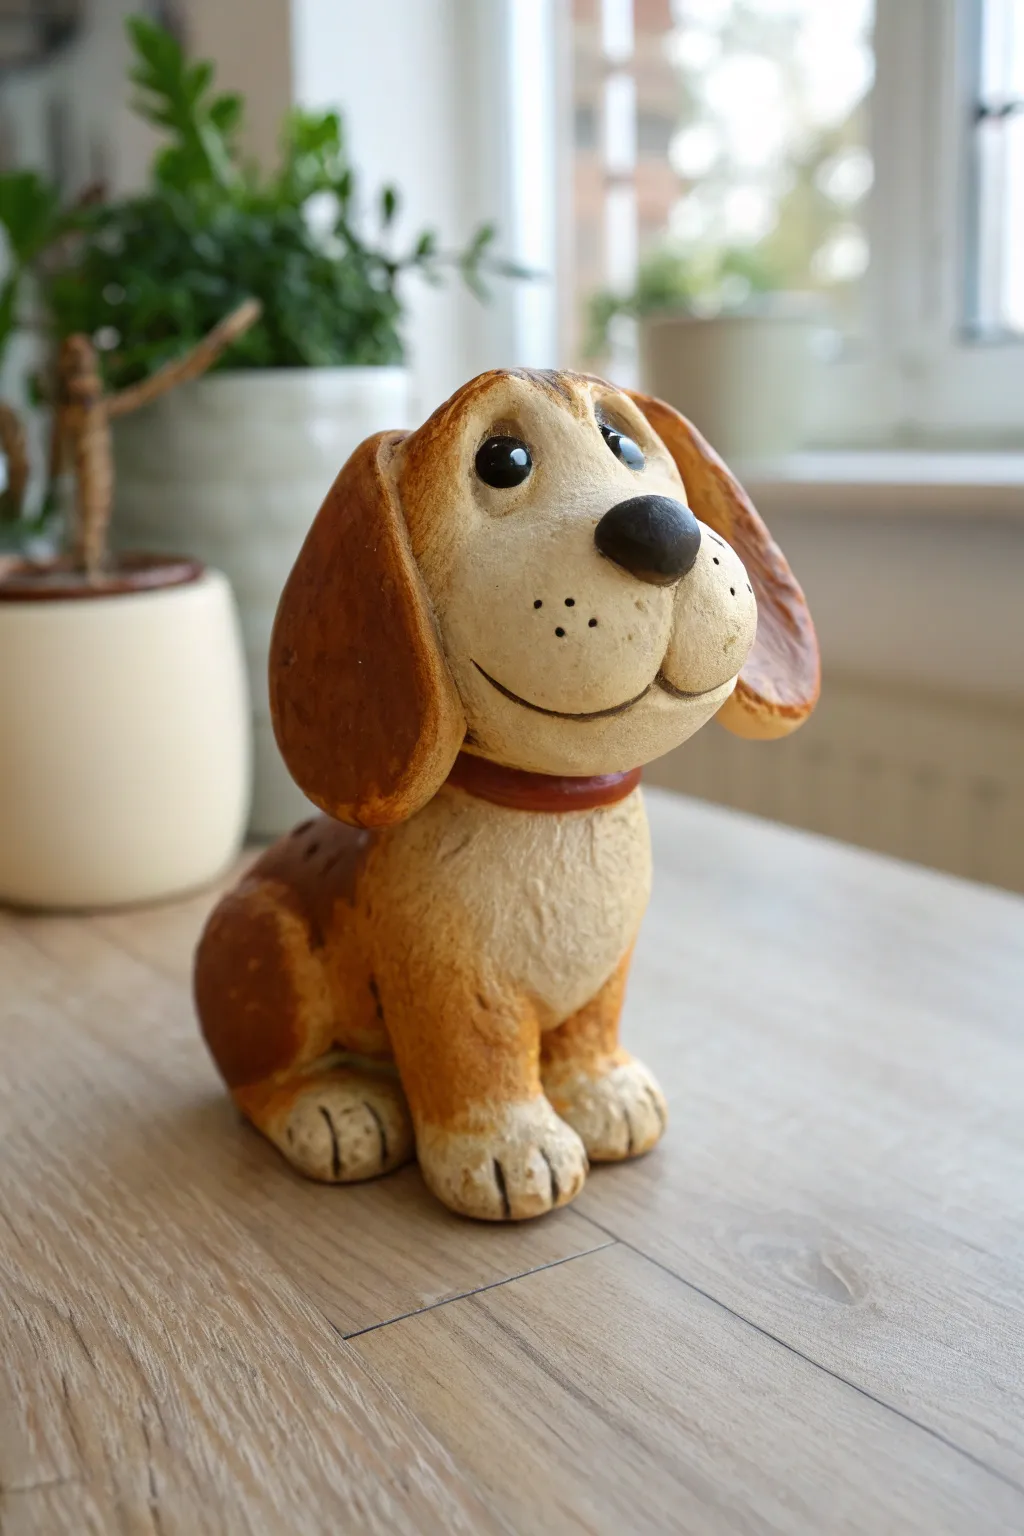
Brighten up your desk with this cheerful, wide-eyed puppy figurine that nods in agreement with everything you say. This project combines simple clay sculpting shapes with a hidden spring mechanism to create an irresistible, textured keepsake.
Detailed Instructions
Materials
- Polymer clay (white, beige/tan, dark brown, black, red)
- Small metal spring or stiff wire coiled around a pencil
- Sculpting tools (needle tool, ball stylus)
- Wire armature wire or toothpicks (for body structural support)
- Aluminum foil (for bulking out the core)
- Texture sponge or old toothbrush
- Acrylic sealer (matte and gloss)
- Oven for baking
Step 1: Shaping the Body
-
Create the core:
Crumple a small ball of aluminum foil into a pear shape to serve as the core of the puppy’s body. This saves clay and keeps the figurine lighter. -
Cover the form:
Sheet out your tan or light beige clay and wrap it completely around the foil pear, smoothing all seams until you have a seamless base shape. -
Add the chest fur:
Take a smaller patch of white or cream clay and press it onto the front chest area. Use a toothbrush or a stiff bristled brush to stipple the surface, blending the edges into the tan clay to mimic fluffy fur texture. -
Sculpt the hind legs:
Roll two thick sausages of dark brown clay. Curve them slightly and press them onto the sides of the body near the bottom for the haunches. -
Form the front paws:
Create two shorter, stubby cylinders of tan clay. Attach white clay to the tips and use a needle tool to press three indentations into each for toes. Adhere these to the front of the body. -
Add back paws:
Repeat the paw process for the rear feet, tucking them just under the dark brown haunches. -
Attach the collar:
Roll a thin snake of red clay and flatten it slightly. Wrap this around the very top of the body neck area to act as a collar and a clean visual break between head and body. -
Embed the spring:
Insert your metal spring firmly into the center of the neck. Ensure at least half the spring is exposed to support the head later. You can bake the body now to firm it up before adding the head.
Head Balance Trick
Before baking the head, verify the balance carefully. If the muzzle is too heavy, the head will constantly look down. Add clay to the back of the skull to act as a counterweight.
Step 2: Sculpting the Head
-
Form the head base:
Roll a ball of foil slightly smaller than the body and cover it with a layer of beige clay. It needs to be light enough for the spring to hold. -
Create the muzzle:
Shape a flattened oval of beige clay and press it onto the lower half of the face ball to create the muzzle snout. -
Add the nose:
Roll a slightly triangular lump of black clay. Press it firmly onto the top center of the muzzle, smooth the edges, and add a tiny highlight for shine. -
Carve the smile:
Using a curved blade or needle tool, carve a deep, upward-curving smile line horizontally across the muzzle, just under the nose. -
Texture the muzzle:
Use your needle tool to poke tiny freckle holes on either side of the muzzle for whisker spots. -
Make the eyes:
Press two deep indentations above the muzzle using a ball tool. Place small balls of black clay inside, slightly protruding. I like to add a tiny white dot to each for a ‘spark of life.’ -
Sculpt the ears:
Flatten two large teardrop shapes from dark brown clay. Attach the narrow ends to the top sides of the head, letting the wide ends flop down loosely. -
Create the spring cavity:
Underneath the head, carve out a hole large enough to accommodate the top of the spring sticking out of the body. Test the fit—it should sit loosely enough to wobble. -
Final Assembly:
Bake the head separately according to your clay package instructions. Once cool, use a dab of strong superglue to attach the spring tip inside the head cavity.
Variant Idea
Swap the ear shape to change the breed! Pointy triangles make a husky, while long textured ears create a spaniel. You can also paint spots on the body after baking.
Give the head a gentle tap and watch your new desk companion nod happily at you


Panda Pal Bobblehead

This adorable panda bobblehead features a charmingly rustic texture and a sweet expression, making it a perfect desk companion. With its oversized head and tiny bamboo snack, this project captures the gentle nature of everyone’s favorite bear in sculpted form.
Step-by-Step
Materials
- White polymer clay or air-dry clay
- Black polymer clay or black acrylic paint
- Green jewelry wire or floral wire
- Small bobblehead spring mechanism (or strong wire coil)
- Sculpting tools (needle tool, ball stylus)
- Strong craft glue (E6000 or similar)
- Clear matte varnish (optional)
- Small paintbrush
Step 1: Sculpting the Base Body
-
Form the torso foundation:
Start by rolling a ball of white clay roughly the size of a large walnut. Press it gently against your work surface to flatten the bottom so it sits securely on its own. -
Shape the body:
Gently taper the top of the white ball slightly, creating a pear-like shape that is wider at the bottom. This stability is crucial for supporting the bobbling head later. -
Create the legs:
Roll two small balls of black clay and flatten them slightly into thick discs. If you are painting later, use white clay for all parts; otherwise, attach these black discs to the lower front of the white body as the feet. -
Add the arms:
Roll two elongated teardrop shapes from black clay. Attach these to the upper sides of the white body, curving them forward so they look like they are ready to hold something. -
Refine the limbs:
Use a modeling tool to blend the seams where the black limbs meet the white body just slightly for a secure bond, but keep the definition sharp.
Step 2: Creating the Oversized Head
-
Form the head sphere:
Roll a significantly larger ball of white clay for the head—it should be bigger than the body to emphasize the cute bobble effect. Give it a slightly oval shape horizontally. -
Texture the surface:
I like to take a stiff bristle brush or a crumpled ball of aluminum foil and gently tap it all over the head and body. This creates that lovely organic, fur-like texture seen in the photo. -
Make the eye patches:
Flatten two small pieces of black clay into irregular ovals. Press these firmly onto the face area, angling them slightly downwards for a gentle expression. -
Add the eyes:
Roll tiny balls of white clay and press them into the upper part of the black eye patches. Add even tinier black pupils if desired, or leave them plain white for a stylized look. -
Sculpt the nose and mouth:
Place a small triangular piece of black clay between the eyes for the nose. Use a needle tool to lightly etch a small ‘w’ shape beneath it for the smiling mouth. -
Attach the ears:
Form two small semi-circles of black clay. Attach these to the top of the head, blending the back seam so they stay put while pressing a ball tool into the front center to create the inner ear hollow.
Pro Tip: Balanced Bobble
Before baking or drying, test the balance by placing the wet clay head loosely on the body. If it tips over, flatten the bottom of the body more or add a weighted coin inside the base.
Step 3: Assembly and Finishing
-
Prepare the neck connection:
Create a divot or hollow in the top of the body neck and the underside of the head that is large enough to accommodate your spring mechanism. -
Bake or dry the components:
If using polymer clay, bake the head and body separately according to package instructions. If using air-dry clay, allow them to dry fully for 24-48 hours. -
Paint details (if needed):
If you used all white clay, now is the time to carefully paint the limbs, ears, and eye patches with black acrylic paint. Let this dry completely. -
Create the bamboo:
Take a short length of green wire. Sculpt tiny bits of green clay around it to form the bamboo stalk segments, leaving a bit of wire exposed at the ends for leaves. -
Position the snack:
Glue the bamboo stalk into the panda’s hands so it is held diagonally across the chest. -
Install the spring:
Using strong craft glue, secure the bottom of the spring into the neck hollow of the body. Once dry, glue the top of the spring into the hollow under the head. -
Final coat:
Apply a thin layer of matte varnish to protect the paint and clay, giving the panda a finished, professional look without making it too shiny.
Troubleshooting: Falling Head
If the head tilts too far backward or forward once assembled, the spring is likely too long. Trim a coil or two off the spring with wire cutters to tighten the tension and improve posture.
Give the head a gentle tap and enjoy watching your new bamboo-loving friend nod in agreement


Wide-Eyed Owl Bobblehead
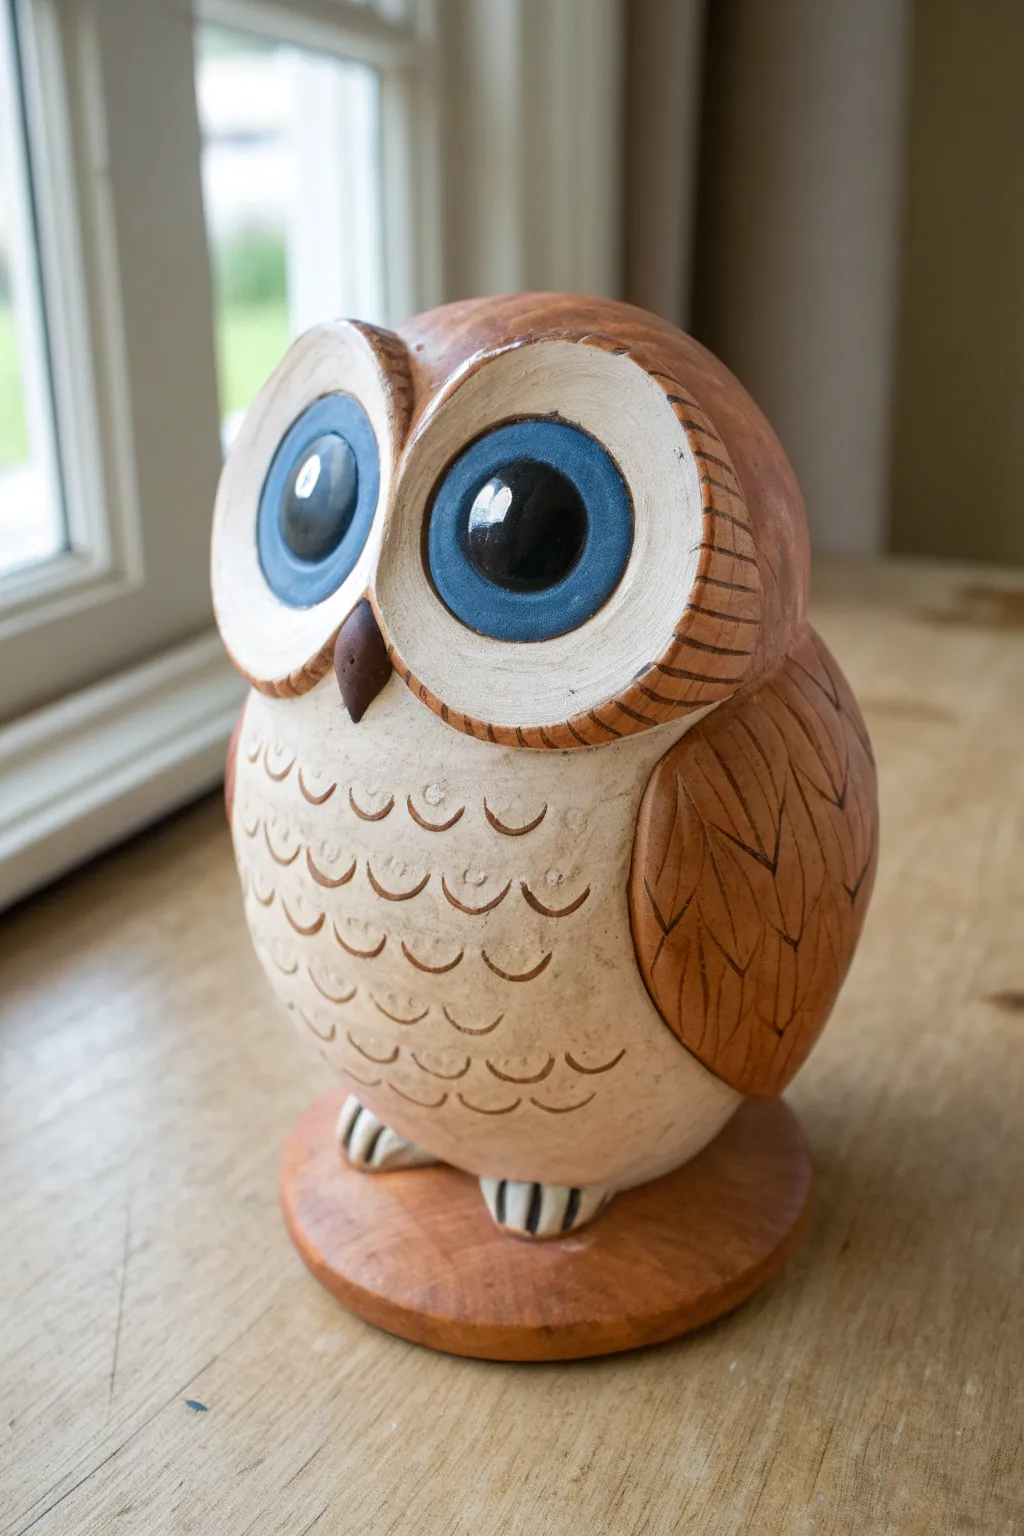
Capture the charm of hand-carved folk art using polymer clay with this adorable wide-eyed owl bobblehead project. The secret lies in the texturing and painting techniques that mimic the warm grain of finished wood without needing a single chisel.
Step-by-Step Tutorial
Materials
- Polymer clay (terracotta, white, and translucent)
- Strong tension spring for bobbleheads
- Acrylic paints (burnt sienna, raw umber, cream, bright blue, black, white)
- Sculpting tools (needle tool, small loop tool)
- Aluminum foil
- Liquid polymer clay (or Bake and Bond)
- Matte varathane or glaze
- Gloss glaze (for the eyes)
- Round wooden base (pre-made or clay)
Step 1: Forming the Core Structure
-
Build the armature:
Start by crumpling aluminum foil into two distinct shapes: a larger, slightly tapered egg shape for the body and a rounded, flattened oval for the head. Compress the foil tightly so it provides a solid base. -
Insert the spring:
Embed the bottom half of your bobblehead spring into the top of the foil body. Push the top half of the spring into the bottom of the foil head to create a hollow for it, but remove the head for now so you can work on the pieces separately. -
Mix the base color:
Create a custom ‘wood’ color by mixing terracotta clay with a small amount of translucent clay. This adds depth and prevents the finished piece from looking too flat or plastic-like. -
Cover the body:
Roll your mixed clay into a sheet about 1/4 inch thick. Wrap it completely around the foil body, smoothing the seams together with your fingers until you have a seamless egg shape. Leave the spring exposed at the top.
Step 2: Sculpting the Head and Details
-
Form the head shape:
Cover the foil head armature with your clay sheet, ensuring the hole for the spring remains accessible underneath. Shape the head to be slightly wider at the top than the bottom. -
Create the eye sockets:
Roll two large balls of cream-colored clay and flatten them into thick discs. Press these firmly onto the front of the face, side-by-side, creating large circles that take up most of the facial area. -
Add the beak:
Form a small, sharp triangle from dark brown clay (or paint it later). Position it right between the two eye discs, pointing downward, pressing it in securely. -
Sculpt the wings:
Roll two tear-drop shapes from your wood-colored clay. Flatten them slightly and attach them to the sides of the body, curving them to follow the rounded form of the owl. -
Detail the feathers:
Using a small loop tool or a U-shaped carving tool, gently carve repeating ‘U’ shapes into the chest area to simulate breast feathers. For the wings and the back of the head, use a needle tool to scratch deeper, angled lines that mimic wood grain carving marks. -
Add the feet:
Sculpt two small, three-toed feet using white or cream clay. Attach these to the very bottom of the body. I like to score the underside of the body first with a needle tool to help them grip better. -
Prepare the base:
Create a simple disc from your wood-colored clay to serve as the platform. Texture the sides slightly to look like rough-hewn timber.
Faux Wood Texture
Before baking, drag an old toothbrush or stiff bristle brush vertically over the clay. This creates microscopic parallel lines that look incredibly like natural wood grain once the paint wash is applied.
Step 3: Painting and Assembly
-
Bake the components:
Place the head, body, and base on a baking sheet. Prop the head up with paper towels so it doesn’t flatten. Bake according to your clay manufacturer’s instructions (usually 275°F for 15-30 minutes). -
Apply a wash:
Once cool, mix burnt sienna acrylic paint with water to create a thin wash. Brush this over the entire body and wings, letting it settle into the carved grooves to highlight the texture. Wipe away excess from the high points with a paper towel. -
Paint the eyes:
Paint large circles inside the cream discs using bright blue paint. Once dry, add large black pupils in the center and a tiny white reflection dot in the upper corner of each pupil for life. -
Add the ‘carved’ details:
Use a fine liner brush and thinned raw umber paint to add thin lines around the eyes and on the wing feathers, enhancing the look of carved wood separation. -
Seal the piece:
Coat the entire owl with a matte varnish to protect the paint and give it a satin wood finish. Once that is dry, apply a high-gloss glaze only to the blue eyes to make them look glassy and wet. -
Final assembly:
Use super glue or strong epoxy to attach the feet to the base. Finally, apply a dab of strong glue to the top spring and inside the head cavity, then press the head onto the spring.
Head Too Heavy?
If the head tilts too far backward or forward, the foil core might be off-balance. Glue a small washer inside the lighter side of the head cavity to act as a counterweight before attaching the spring.
Now give your wise little wooden owl a gentle tap and watch him thoughtfully agree with everything you say

The Complete Guide to Pottery Troubleshooting
Uncover the most common ceramic mistakes—from cracking clay to failed glazes—and learn how to fix them fast.
Chubby Frog Bobblehead
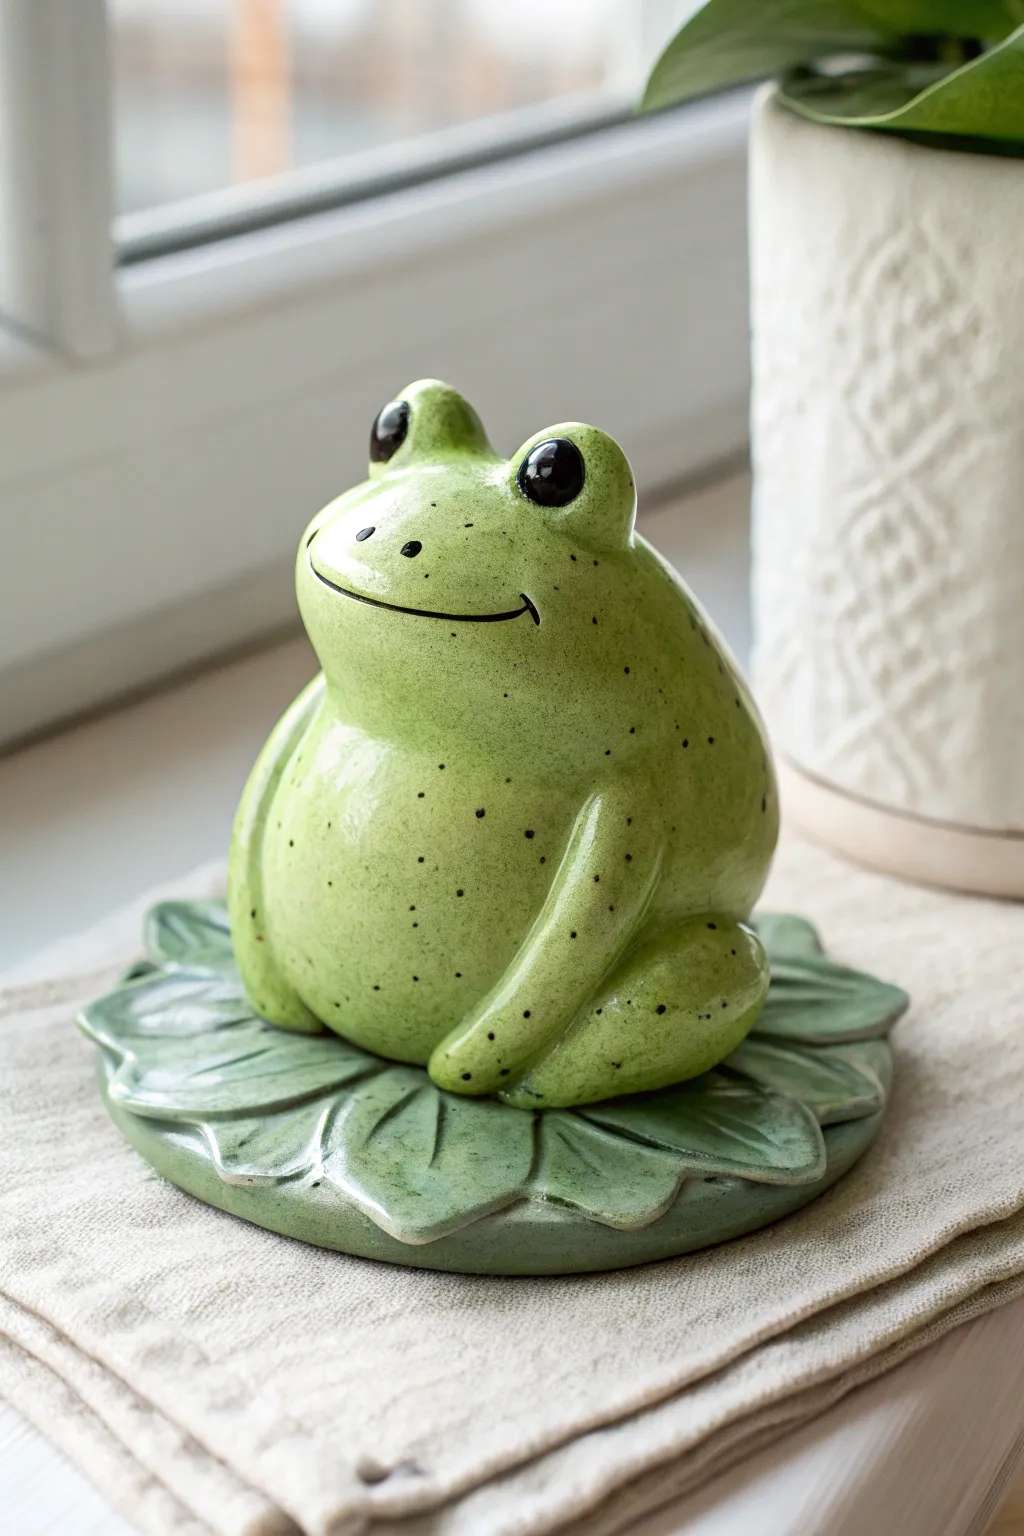
This delightful chubby frog bobblehead sits contentedly on his own lily pad, bringing a touch of pond life to your desk or shelf. With his glossy finish and speckled skin, he looks just like fresh ceramic, though simple polymer clay works perfectly for this project.
How-To Guide
Materials
- Polymer clay (Bright Green, Dark Green, White, Black)
- Bobblehead spring component
- Sculpting tools (needle tool, ball tool)
- Acrylic rolling pin
- Glossy polyurethane varnish or UV resin
- Black acrylic paint (optional for speckles)
- Toothbrush or stiffness brush for texturing (optional)
- Oven for baking
Step 1: Sculpting the Lily Pad Base
-
Mix and flatten base clay:
Start by mixing a small amount of white clay into your dark green clay to create a mottled, natural leaf color. Roll this into a ball about 3 inches wide, then flatten it into a thick disc. -
Shape the leaf edges:
Using your fingers, pinch the edges of the disc to thin them out slightly. Cut a small ‘V’ shape out of one side to give it that classic lily pad silhouette. -
Add leaf veins:
Take a sculpting tool or the back of a knife and firmly press vein lines radiating from the center of the lily pad out to the edges. Make these grooves deep enough to be visible after baking. -
Secure the spring:
Push the base of your bobblehead spring into the heavy center of the lily pad. You can bake it directly into the clay or secure it later with strong glue after baking.
Smooth Operator
Before baking, brush a tiny bit of rubbing alcohol or baby oil over the clay with your finger. This melts away fingerprints and creates a flawlessly smooth surface for the glaze.
Step 2: Forming the Frog Body
-
Create the main body shape:
Switch to your bright green clay. Roll a large, smooth ball for the body, slightly flattening the bottom. It should be pear-shaped but very round and chubby at the base. -
Embed the spring top:
Create a hole in the bottom of the body to accept the top of the spring mechanism. Test the fit now to ensure it will wobble freely without hitting the base. -
Define the head:
Since this is a chubby frog, the head and body are one continuous shape. Just slightly narrow the clay near the top to suggest a neck area, keeping the overall form very fluid. -
Add eye mounds:
Roll two small balls of green clay and blend them seamlessly onto the very top of the head to create the pronounced eye sockets typical of frogs. -
Insert the eyes:
Press a small ball of solid black clay into each green eye mound. The black clay should bulge out slightly, looking bright and alert. -
Sculpt the mouth:
Use a needle tool or a thin blade to carve a long, wide smile. Curve the ends upward deeply to give him a permanently happy expression. -
Add nostril details:
Poke two tiny holes above the mouth for nostrils using a small dotting tool.
Step 3: Limbs and Finishing Touches
-
Form the rear legs:
Roll two thick sausages of green clay. Bend them into a V-shape to form the hulking thigh and calf of the frog’s folded legs. -
Attach the legs:
Press these folded legs onto the sides of the body. Blend the upper thigh into the body smoothly so it looks like one solid piece, not just stuck on. -
Add front arms:
Roll two smaller logs for the front arms. Attach them so they rest neatly on the frog’s belly, tapering them slightly at the ‘hands’ which blend into the body. -
Add speckles:
For texture, I like to take a toothbrush, dip it in black acrylic paint, and flick tiny speckles over the green clay before baking. Alternatively, use a tiny tool to add minute indentations. -
Bake the pieces:
Bake the body and the base separately according to your clay package instructions. Supporting the hollow body with some paper towel can help it keep its shape in the oven. -
Assembly:
Once cool, use a strong adhesive (like E6000) to permanently fix the spring into the body and base if they weren’t baked together. -
Apply the glaze:
To get that wet, ceramic look shown in the photo, apply two or three thin coats of high-gloss varnish or UV resin. This is the secret to making polymer clay look like expensive pottery.
Crown Jewel
Make him a prince! Sculpt a tiny yellow crown out of clay to perch between his eyes, or use a gold bead for a majestic touch.
Give his head a little tap and watch your new amphibious friend wobble happily on his leaf.
Sweet Piggy Bobblehead
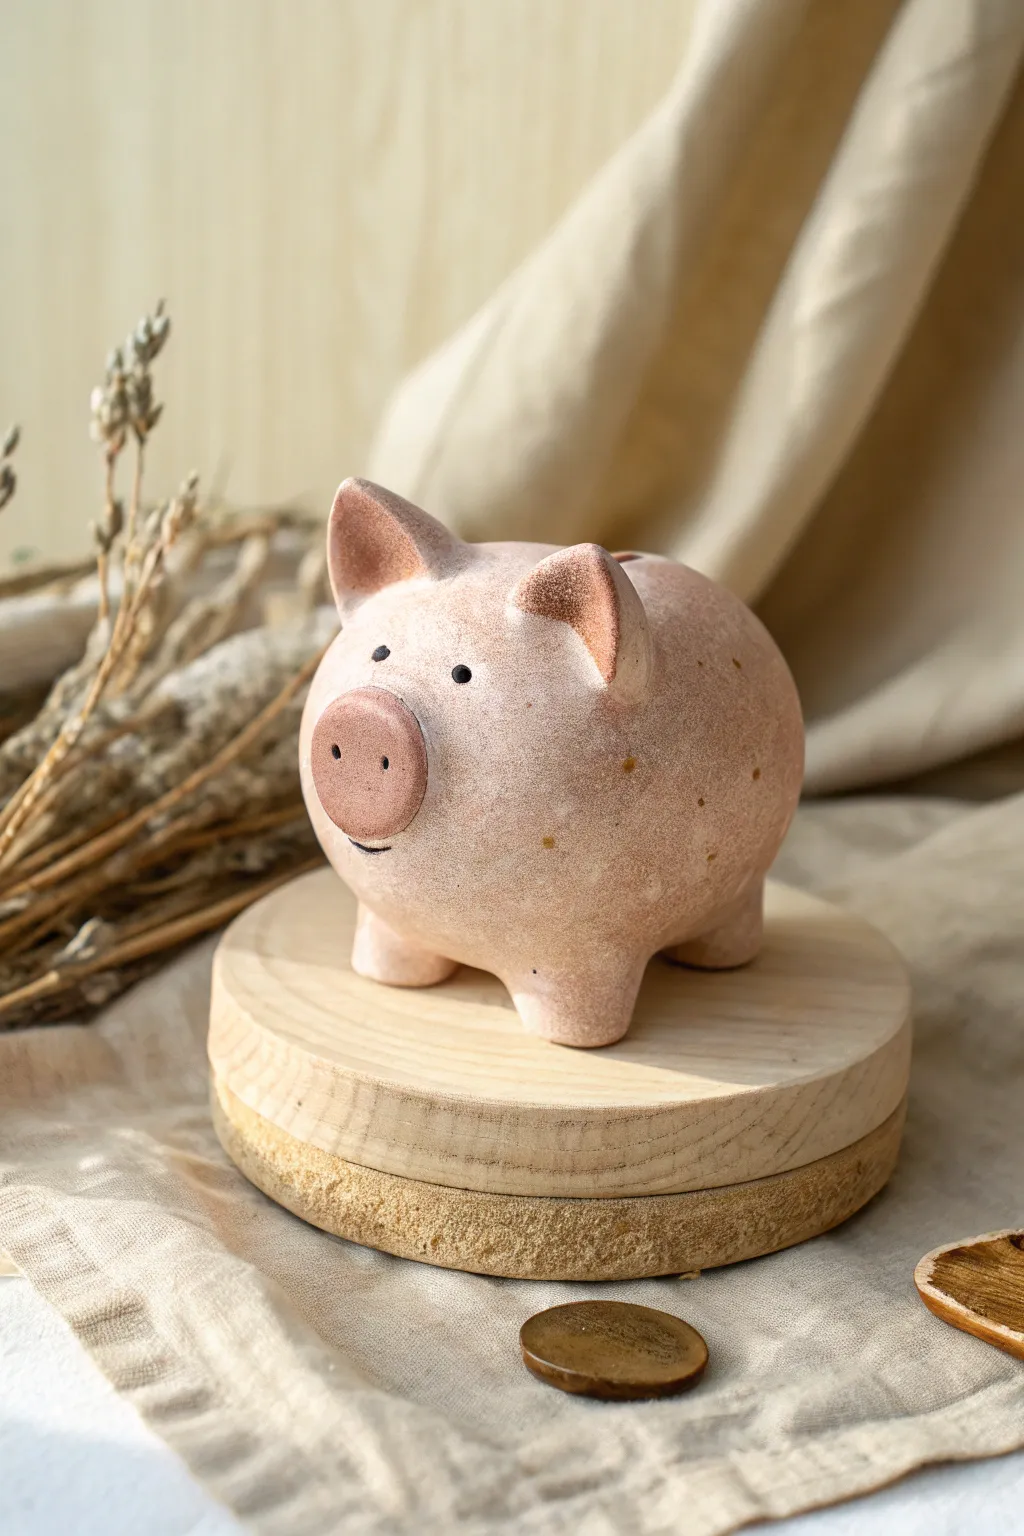
This charming little pig features a rustic, textured finish that gives it the heartwarming feel of handmade pottery. With its sweet expression and soft blush tones, it’s a delightful project that captures the innocence of a classic piggy bank.
Step-by-Step
Materials
- Polymer clay (pale pink or beige)
- Acrylic paints (deep rose, white, burnt umber, black)
- Texture sponge or stiff bristle brush
- Sculpting tools (ball styluses, needle tool)
- Old toothbrush
- Aluminum foil (for armature)
- Matte varnish or sealant
- Round wooden base (optional for display)
Step 1: Forming the Body
-
Create the core:
Crumple aluminum foil into a tight egg shape to serve as the lightweight core of your pig. This saves clay and keeps the figurine from being too heavy. -
Condition the clay:
Take your pale pink polymer clay and knead it thoroughly until it is soft and pliable. If you want a more natural ceramic look like the photo, you can mix a little white or translucent clay into a beige base. -
Cover the armature:
Flatten a sheet of your conditioned clay and wrap it fully around the foil egg. Smooth out all the seams with your thumbs so you have a seamless, smooth oval. -
Add texture:
Before adding limbs, gently press a texture sponge or a stiff brush all over the surface of the body. This creates that lovely, slightly pitted ceramic texture seen in the reference.
Uneven Legs?
If your pig wobbles, gently sand the bottom of the feet against a piece of fine-grit sandpaper placed flat on the table until they are perfectly level.
Step 2: Sculpting Features
-
Attach the legs:
Roll four small, equal-sized balls of clay. Press them onto the bottom of the body to form short, stubby legs, blending the clay upwards into the body so they don’t fall off. -
Check stability:
Set the pig down on your work surface to ensure it stands level. Adjust the legs by pressing down gently until it sits flat without wobbling. -
Make the snout:
Roll a smaller ball of clay and flatten it slightly into a thick disk. Press this onto the front of the face area. -
Detail the snout:
Use a medium ball stylus to create two distinct indentations for the nostrils. I like to make these slightly deep to catch the shadow later. -
Shape the ears:
Form two small triangles of clay. Gently curve them forward and attach them to the top of the head, blending the back seams smooth while keeping the front edges distinct. -
Adding eyes:
Use a small ball tool to make tiny sockets for the eyes. Roll two minuscule balls of black clay (or paint them later) and press them into these sockets. -
Carve the mouth:
Use a needle tool or a thin blade to carefully score a small smile line underneath the snout.
Springy Surplus
Turn this figure into a true bobblehead by slicing the neck before baking and inserting a small spring mechanism between the head and body.
Step 3: Painting & Finishing
-
Bake the clay:
Bake your creation according to your specific clay brand’s package instructions. Let it cool completely before painting. -
Base wash:
Mix a very watery wash of burnt umber acrylic paint. Brush it all over the pig and immediately wipe it off with a paper towel. This will settle into your sponge textures, aging the piece. -
Blushing effects:
Dry brush a deep rose pink onto the snout, the tips of the ears, and the very bottom of the legs to give it that rosy, warm glow. -
Speckling technique:
Dip an old toothbrush into thinned brown paint. Run your thumb over the bristles to flick tiny speckles across the pig’s body. Practice on paper first to control the spray. -
Detailing the eyes:
If you painted the eyes, use a fine detail brush with black paint. Add a tiny dot of white reflection if you want a livelier expression. -
Seal the work:
Once all paint is fully dry, coat the entire pig with a matte varnish. This unifies the surface sheen and protects your paint job.
Place your finished pig on a small wooden coaster to complete the rustic display look


What Really Happens Inside the Kiln
Learn how time and temperature work together inside the kiln to transform clay into durable ceramic.
Mini Me Self-Portrait Bobblehead
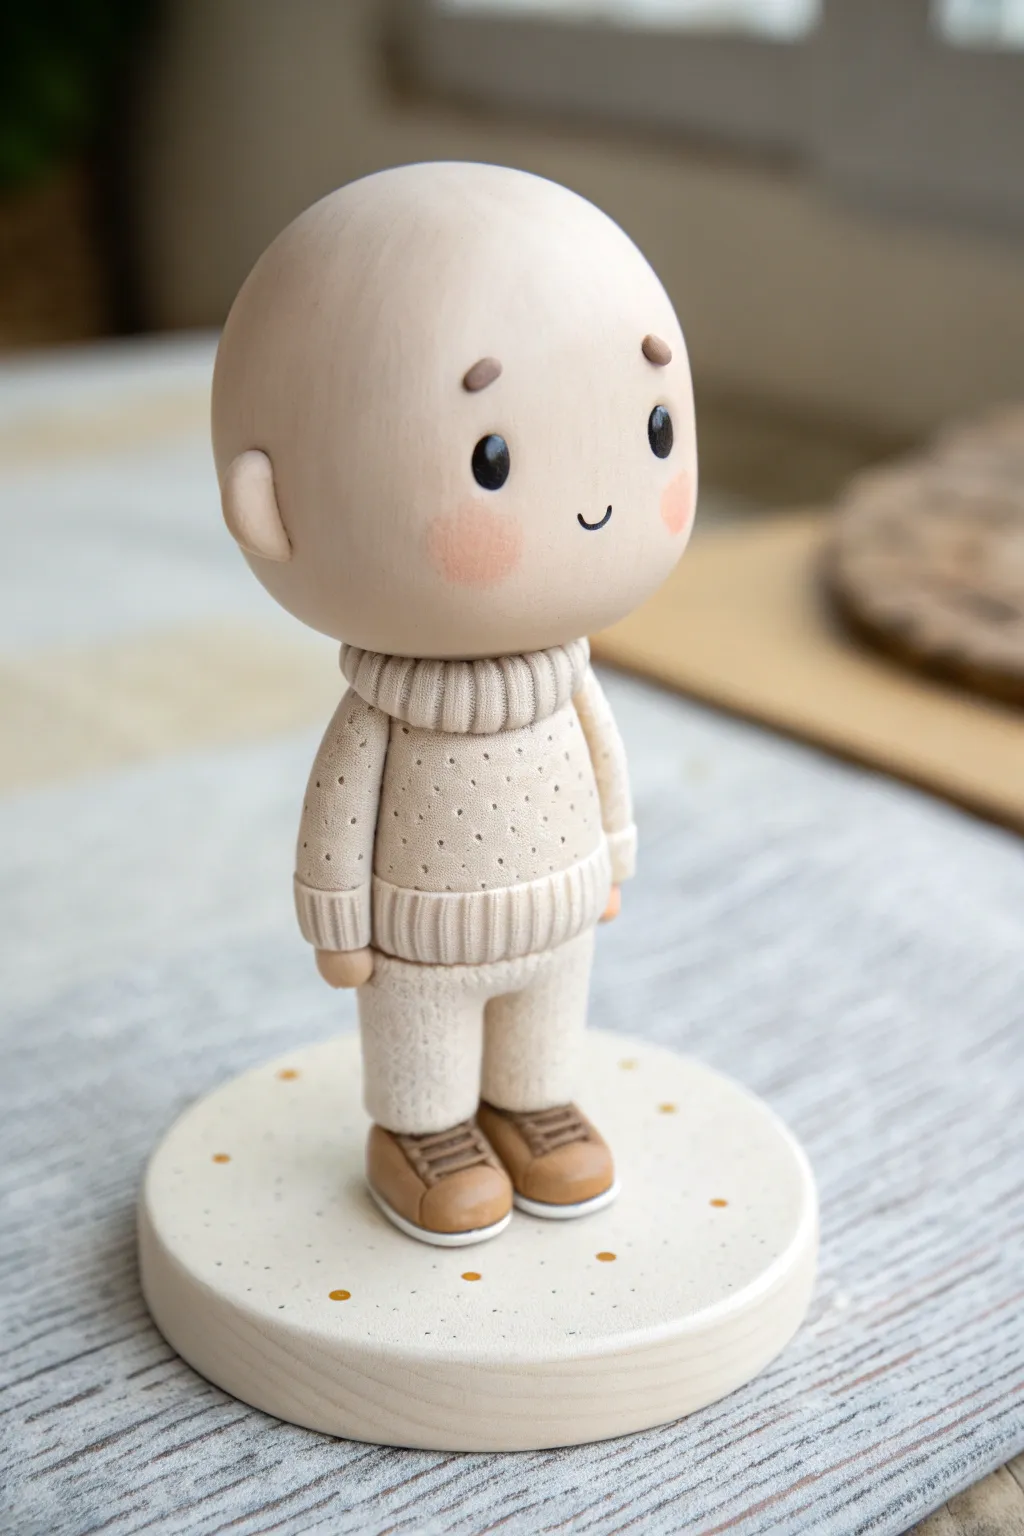
Capture the charm of childhood with this adorable, minimalist figurine made from polymer clay. Its clean lines, neutral palette, and soft textural details make it a perfect, modern keepsake or a sweet personalized gift.
How-To Guide
Materials
- Polymer clay (pale peach/beige skin tone, cream, oatmeal flecked/granite, tan/light brown)
- Aluminum foil (for armature core)
- Needle tool or toothpick
- Dotting tool or small ball styles
- Soft pastel chalks (pink or coral)
- Black acrylic paint
- Fine detail paintbrush
- Clay roller or pasta machine
- Texture sponge or toothbrush
- Oven for baking
Step 1: Sculpting the Head and Body
-
Form the Core:
Start by crumpling a small ball of aluminum foil into a tight sphere roughly the size of a walnut to serve as the lightweight core for the head. -
Cover the Head:
Condition your skin-tone clay until pliable, flatten a sheet, and wrap it smoothly around the foil ball; roll it between your palms until it is perfectly spherical and seamless. -
Shape the Torso:
Create a slightly tapered cylinder from the cream or oatmeal-colored clay for the sweater body; insert a toothpick halfway into the top of this cylinder to act as a neck support. -
Attach the Head:
Gently press the head onto the exposed toothpick sticking out of the torso, smoothing the connection slightly to ensure it sits securely. -
Add Ears:
Roll two tiny, equal-sized balls of skin-tone clay and press them onto the sides of the head; use a dotting tool to indent the center of each for a simple ear shape.
Fixing Fingerprints
Before baking, brush the raw clay lightly with a little baby oil or cornstarch. This smooths out accidental fingerprints and lint for a pro finish.
Step 2: Adding the Cozy details
-
Create the Collar:
Roll a thick snake of cream clay and flatten it slightly into a strip. Wrap this around the neck connection to form a chunky turtleneck. -
Detail the Ribbing:
Using a dull knife or needle tool, press vertical lines evenly around the collar strip to simulate a ribbed knit texture. -
Texture the Sweater:
For that cozy knit look, I like to gently press a clean texture sponge or a toothbrush bristles against the main body of the sweater to create a subtle stippled surface. -
Add Sweater Pattern:
Use a needle tool to poke shallow, arranged holes into the sweater chest to mimic a polka-dot or knit stitch pattern. -
Add Arms and Hem:
Attach two sausage-shaped clay logs for arms. Add a ribbed strip (matching the collar) at the bottom hem of the sweater and at the cuffs of the sleeves. -
Form the Pants:
Create two short, thick logs from oatmeal or white clay for the legs. Texture them slightly to look like fabric and attach them beneath the sweater hem.
Step 3: Shoes, Base, and Finishing
-
Sculpt the Shoes:
Mold two small ovals from tan clay. Flatten the bottoms and add a thin white strip around the sole. Use a knife to lightly score ‘laces’ on the top. -
Assemble the Figure:
Press the legs firmly onto the shoes, ensuring the figure is balanced enough to stand upright on its own. -
Create the Base:
Roll a disk of white or cream clay about 1/4 inch thick. You can add gold speckles or clay dots for decoration, then center your figure on top and press gently to adhere. -
Paint the Face:
Once the clay is baked and cooled according to package instructions, use a fine brush with black acrylic to paint tiny oval eyes, floating eyebrows, and a small U-shaped smile. -
Apply Blush:
Scrape a little pink pastel chalk into a powder. Use a dry, soft brush to gently dust rosy cheeks onto the face completely dry.
Custom Accessories
Personalize your mini-me! Add wire glasses, a tiny clay beanie, or a miniature heavy scarf to match the details of the person you are sculpting.
Display your charming little character on a shelf or desk as a cheerful reminder of your creativity
Best Friend Duo Bobbleheads
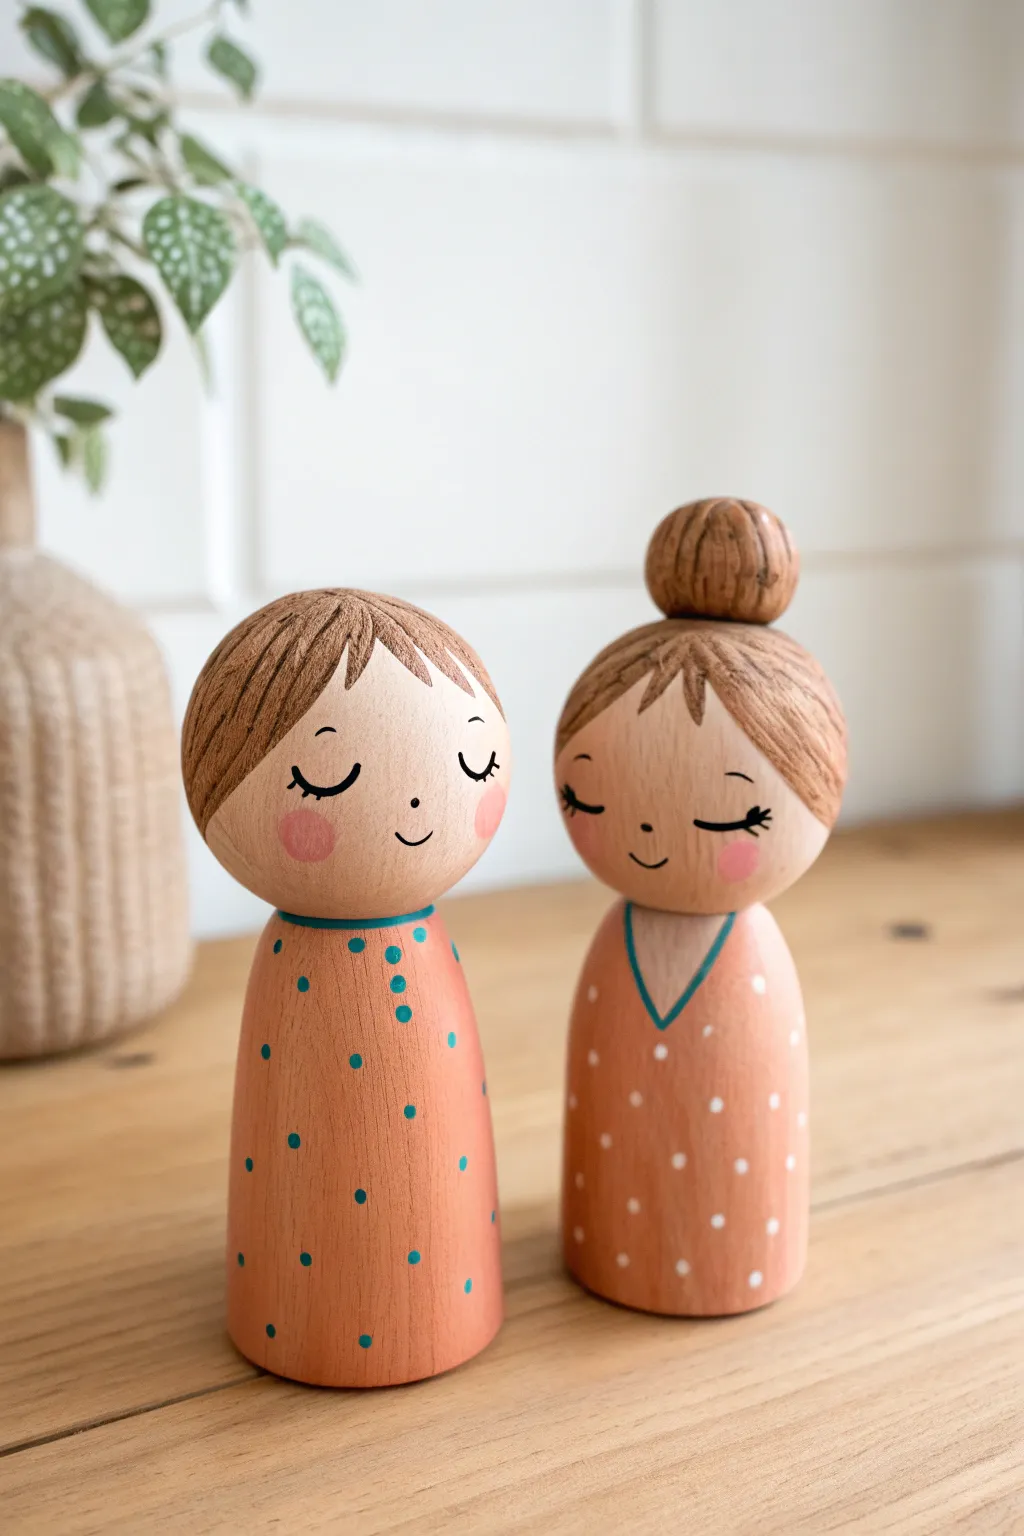
These charming wooden peg dolls capture the sweet simplicity of friendship with their serene expressions and coordinating polka-dot outfits. While the title mentions bobbleheads, this tutorial focuses on creating these delightful static figures using wooden blanks, perfect for minimalistic decor or a heartfelt gift.
Detailed Instructions
Materials
- Two large unfinished wooden peg dolls (approx. 3.5 inches)
- Small wooden ball or bead (for the hair bun)
- Strong wood glue
- Acrylic paints: warm beige/rosy peach (skin tones), warm terracotta/orange, soft coral pink, teal blue, white, brown
- Fine detail paintbrush (size 0 or 00)
- Medium flat paintbrush
- Small dotting tool or toothpick
- Pencil and eraser
- Matte spray varnish or sealant
Step 1: Preparation & Base Coats
-
Attach the bun:
For the doll on the right, glue the small wooden bead or ball to the very top of the head to create a high bun. Let the wood glue cure completely before painting. -
Sand surfaces:
Lightly sand specific rough spots on the wooden dolls if necessary, wiping them clean with a dry cloth to ensure the paint adheres smoothly. -
Sketch the design:
Using a pencil very lightly, draw the hairline on both dolls. Mark a neckline for each—a rounded neck for the left doll and a deep V-neck for the right. -
Paint the skin:
Mix a warm beige or rosy peach tone that suits your preference. Paint the face area and the exposed chest area on the right doll. You might need two thin coats for opaque coverage.
Step 2: Dresses & Hair
-
Paint the first dress:
For the left doll, paint the entire body below the neck in a warm terracotta orange shade. Use smooth, vertical strokes to cover the wood grain. -
Paint the second dress:
For the right doll, paint the body in a slightly softer coral pink or dark peach, being careful around the V-neck skin area you previously painted. -
Hair base coat:
Based on the pencil lines, paint the hair area brown. For the left doll, this covers the top sphere down to ear level. For the right doll, paint the top sphere and coat the attached wooden bun completely. -
Add hair texture:
Once the brown base is dry, mix a slightly darker brown or lighter tan shade. Using your finest brush, paint quick, short strokes near the forehead to mimic bangs and hair strands. This adds depth so it doesn’t look flat.
Pro Tip: Cheeky Blush
For the softest blush effect, use a dry Q-tip dipped in pastel chalk dust/powder instead of paint. Rub it gently onto the cheeks for an airbrushed look.
Step 3: Details & Features
-
Add dress collars:
With the fine brush and teal paint, carefully outline the rounded neckline on the left doll. Do the same for the V-neck on the right doll. -
Teal polka dots:
Dip your dotting tool or the blunt end of a toothpick into the teal paint. Apply randomly spaced dots all over the terracotta dress of the left doll. Try to keep the pressure consistent for uniform sizes. -
White polka dots:
Clean your tool and switch to white paint. Apply delicate white dots to the coral dress of the right doll. -
Draw the faces:
This is the most critical step. Using a pencil, lightly sketch the closed eyes (u-shapes for sleeping eyes) and a tiny simple smile on both faces. Keeping the features low on the face makes them look cuter. -
Paint the eyes:
Go over your pencil lines with black paint and a size 00 brush or a fine-tip paint marker. Add small eyelashes to the outer corners. -
Rosy cheeks:
Dilute a bit of pink paint with water to make a glaze. Dab a small circle on each cheek with your fingertip or a soft brush to create a blushing effect. -
Protect your work:
Allow the dolls to dry overnight. I always recommend finishing with a matte spray sealant to protect the paint from chipping and to give the wood a finished professional look.
Level Up: Mix & Match
Paint tiny matching accessories, like a miniature painted necklace on one and a matching painted bracelet on the other to symbolize their friendship.
Place your finished duo on a shelf or desk where their peaceful expressions can bring a moment of calm to your day

TRACK YOUR CERAMIC JOURNEY
Capture glaze tests, firing details, and creative progress—all in one simple printable. Make your projects easier to repeat and improve.
Graduation Cap Bobblehead
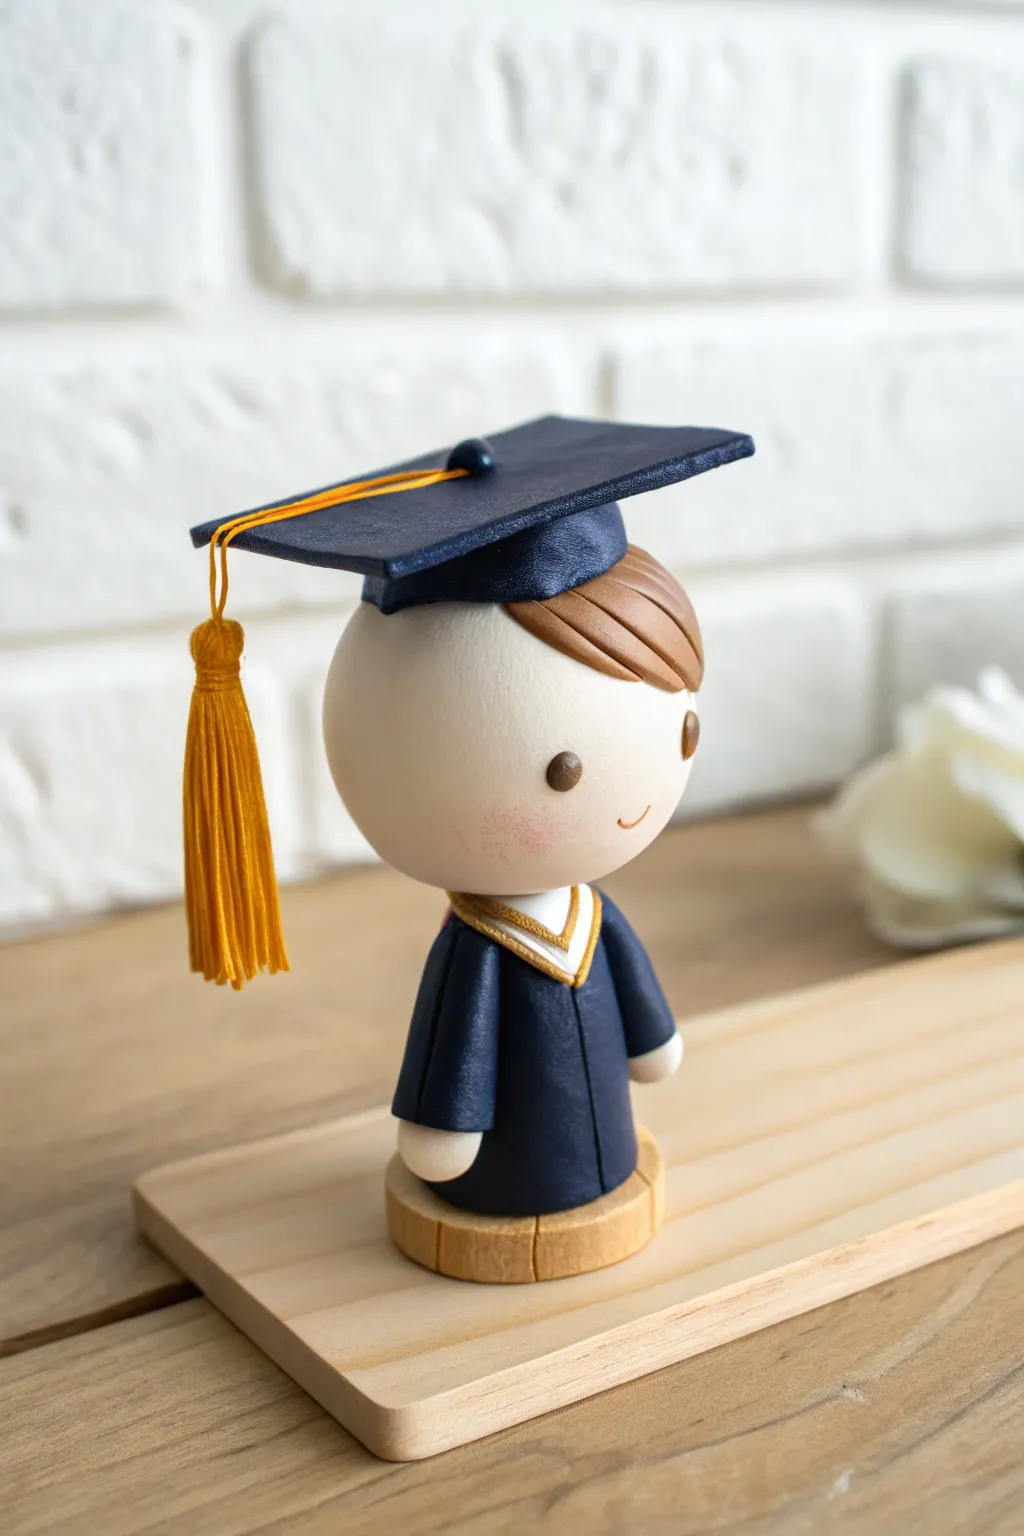
Capture the milestone of graduation with this adorable, minimalist clay figure. Featuring a crisp navy gown, a real tassel detail, and a sweet wooden base, this personalized keepsake is the perfect heartfelt gift for any new graduate.
Step-by-Step Guide
Materials
- Polymer clay (flesh tone, navy blue, white, brown, gold/yellow)
- Small wooden disc base (approx. 1.5 inches)
- Embroidery floss (mustard yellow or gold)
- Liquid polymer clay (translucent or Bake & Bond)
- Clay sculpting tools (needle tool, ball stylus)
- Acrylic rolling pin
- Gloss glaze (optional)
- Soft pastel chalk (pink or peach)
- Small paintbrush
- Wire cutters
- Aluminum foil (for armature core)
Step 1: Sculpting the Head & Body
-
Core construction:
Begin by rolling a tight ball of aluminum foil about the size of a walnut to serve as the core for the head. This saves clay and keeps the figure lightweight. -
Covering the head:
Condition your flesh-tone clay until pliable, then roll it into a sheet. Wrap this specifically around your foil core, smoothing seams until you have a perfect, seamless sphere. -
Adding facial features:
Use a ball stylus to make two small indentations for eye sockets. Press tiny balls of brown or black clay into these spots. Use a needle tool to gently impress a small, curved smile. -
Blushing cheeks:
Shave a tiny bit of pink soft pastel onto a piece of paper. Use a soft, dry paintbrush to pick up the powder and gently dust it onto the cheeks for a rosy glow. -
Forming the body:
Create a cone shape from navy blue clay for the gown. It should be slightly shorter than the head to maintain that cute ‘chibi’ proportion. Flatten the bottom so it stands securely.
Step 2: Dressing the Graduate
-
Adding the collar:
Roll a very thin snake of white clay and flatten it. Drape it around the neck area of the gown to form the shirt collar. Add a thinner strip of gold or yellow clay over it for the academic hood detail. -
Creating sleeves:
Roll two small cylinders of navy clay. Attach them to the sides of the body cone, blending the clay at the shoulder connection point so it looks like one piece. -
Hands:
Make two tiny balls of flesh-tone clay. Attach them to the bottom of the sleeves to represent hands peeking out. -
Attaching the head:
Insert a piece of wire or a toothpick into the body and place the head on top. I like to add a drop of liquid clay here to ensure a super strong bond during baking.
Clean Clay Tip
Keep baby wipes or hand sanitizer nearby. Clean your hands thoroughly when switching from the dark navy clay to the white clay to avoid transferring blue lint or smudges.
Step 3: Hair & Mortarboard
-
Hair sculpting:
Flatten a disc of brown clay and place it on the head. Use a sculpting tool or knife to carve textured lines for the side-swept bangs, pulling the clay down slightly on one side. -
Cap base:
Form a small, squarish mound of navy blue clay and place it directly on top of the hair. This ‘skullcap’ part helps the flat board sit naturally. -
Mortarboard structure:
Roll out a slab of navy blue clay and cut a perfect square. Let this sit for a few minutes to firm up slightly so the corners don’t droop. -
Tassel creation:
Cut several short strands of yellow embroidery floss. Tie them together in the middle, fold them over, and wrap another thread around the top to create the tassel head. Trim the ends evenly. -
Attaching the cap:
Place the square mortarboard onto the skullcap base. Press a tiny ball of navy clay in the exact center to serve as the button. -
Securing the tassel:
Press one end of your embroidery floss tassel under the center button before securing it down. Let the tassel hang naturally off one corner.
Make It wobble
To make it a true bobblehead, connect the head to the body using a small, stiff spring instead of a wire. Secure the spring ends into the clay before baking.
Step 4: Baking & Assembly
-
Baking:
Bake the figure according to your polymer clay package instructions (usually 275°F/135°C for 15-30 minutes). Use an oven thermometer to prevent scorching the light colors. -
Cooling:
Allow the figure to cool completely inside the oven with the door cracked open; this gradual cooling prevents cracking. -
Base preparation:
While the figure cools, ensure your wooden disc is clean. You can leave it raw for a natural look or stain it lightly. -
Final assembly:
Use a strong epoxy or super glue to attach the hardened clay figure to the center of the wooden base.
Now you have a charming, personalized graduate to celebrate the big achievement
Chef Hat Bobblehead
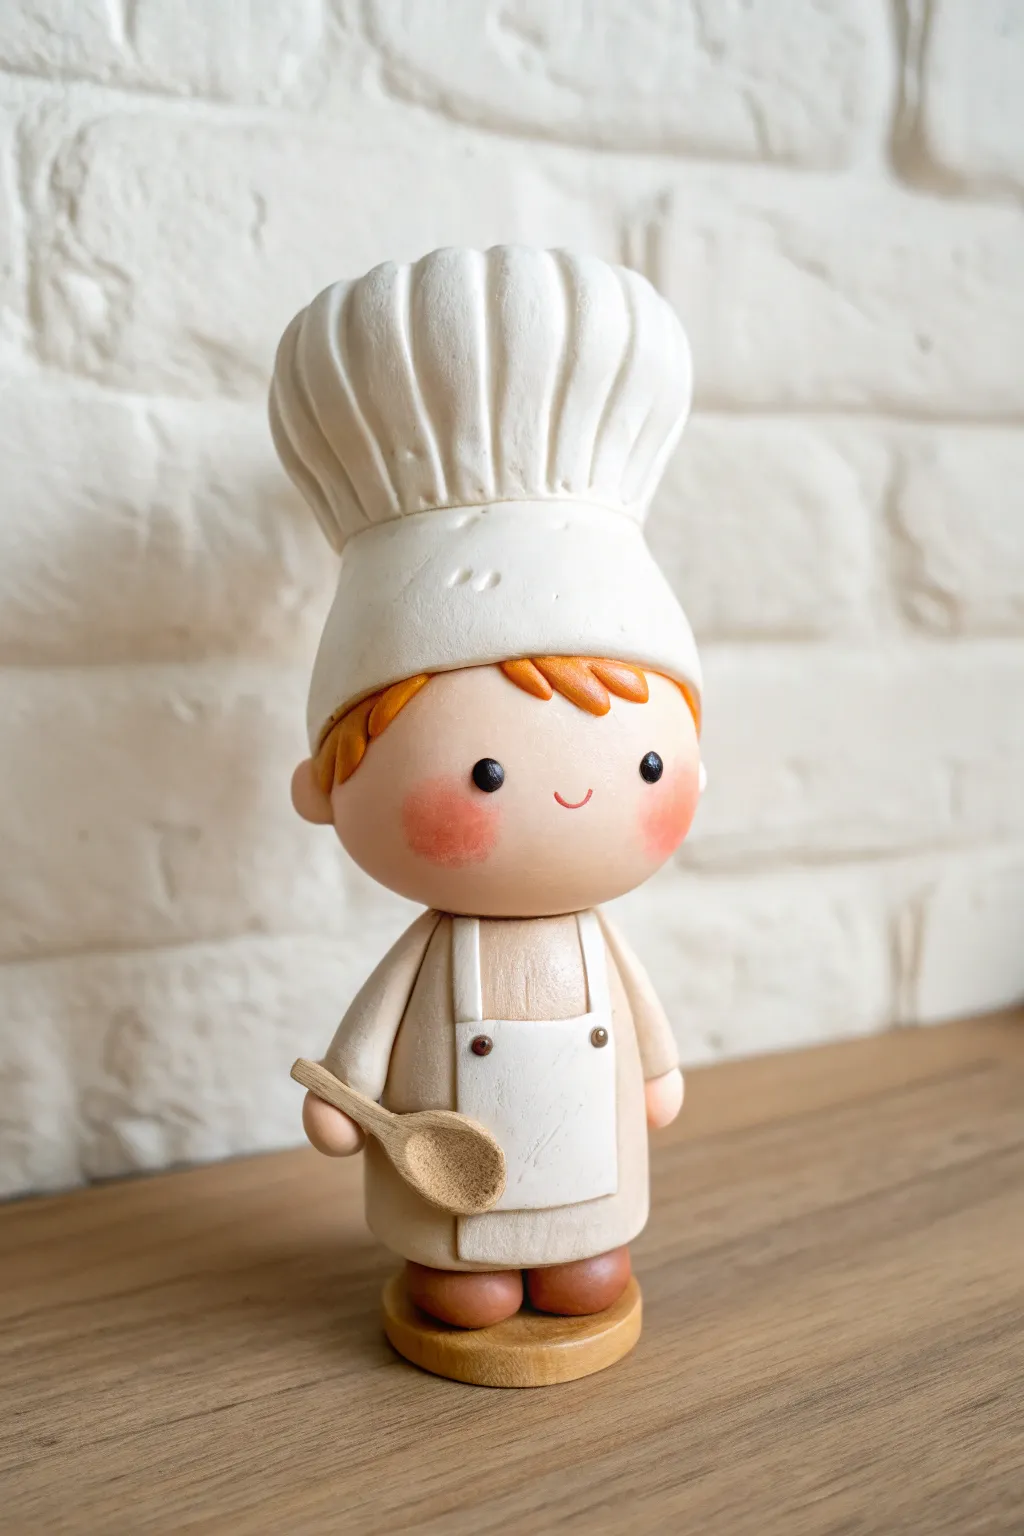
Capture the joy of cooking with this adorable chef figurine, featuring a voluminous pleated hat and a tiny wooden spoon. Its clean lines and rosy cheeks give it a sweet, minimalist charm perfect for displaying on a kitchen shelf.
Detailed Instructions
Materials
- Polymer clay (White, Beige/Skin Tone, Terracotta/Orange, Brown)
- Small wooden spoon (miniature prop size) or additional beige clay
- Wooden circular base (approx. 2-3 inches)
- Mod Podge or strong craft glue
- Black acrylic paint and fine-tip dotting tool
- Soft pink pastel chalk or blush
- Basic sculpting tools (needle tool, blending tool)
- Small roller (acrylic or wooden)
- Bobblehead spring (optional, if making it wobble as per article theme)
Step 1: Sculpting the Head and Features
-
Form the base head shape:
Start by conditioning a substantial ball of beige or skin-tone polymer clay until it is soft and pliable. Roll it into a smooth sphere, approximately 1.5 inches in diameter, ensuring there are no cracks or visible seams. -
Add rosy cheeks:
Before baking or adding other details, I like to apply the blush now for a softer look. Use a soft brush to apply shaved pink pastel chalk (or real cosmetic blush) to the lower cheeks in circular motions. -
Create the hair:
Take small amounts of terracotta or orange clay and roll them into tapered teardrop shapes. Flatten them slightly and press them onto the upper forehead area of the beige sphere to create bangs that peek out. -
Paint the face details:
Using a dotting tool and black acrylic paint, add two widely spaced eyes. Use a very fine needle tool or brush to paint a tiny, red curved smile right between the cheeks.
Hat Heavy?
If the chef’s hat is too heavy and causes the head to slump, scrunch a ball of aluminum foil as a core for the hat. Cover it with a thinner layer of white clay to reduce weight significantly.
Step 2: Crafting the Signature Chef Hat
-
Make the hat band:
Roll out a thick strip of white clay and wrap it around the top of the head, overlapping the top of the orange hair. Smooth the seam at the back so it looks like a continuous band. -
Shape the hat’s volume:
Form a large, mushroom-cap shape from a significant amount of white clay. It should be tall and wider at the top than the bottom. -
Add the pleats:
Using a needle tool or a dull knife, press vertical indentations all around the ‘mushroom cap’ part of the hat to simulate fabric folds. Deepen these lines to exaggerate the puffy texture. -
Assemble the headwear:
Press the pleated top section firmly onto the band you created earlier. Use a blending tool to ensure the white clays join securely so the hat doesn’t topple off later.
Step 3: Building the Body and Outfit
-
Form the torso:
Create a cylinder of beige clay slightly smaller than the head. Flatten the bottom so it stands upright on your work surface. -
Sculpt the apron:
Roll out a thin sheet of white clay. Cut a rectangle for the main apron and a smaller square for the bib. Press these onto the front of the beige torso. -
Add apron details:
Roll tiny snakes of white clay for the neck strap and waist ties. Add two miniscule dots of brown clay where the straps meet the bib to look like buttons or rivets. -
Make the arms:
Roll two small sausages of beige clay for arms. Attach them to the sides of the body, angling one slightly forward to hold the spoon. -
Create hands:
Form tiny balls of skin-tone clay and attach them to the ends of the sleeves. Keep them simple and rounded, mimicking the mitten-like style of the photo. -
Attach the feet:
Roll two balls of brown clay and flatten them slightly into ovals. Place these under the body cylinder to act as sturdy shoes. -
Insert the spoon:
If using a wooden miniature spoon, press the handle into one of the clay hands now. If sculpting one, shape a small piece of tan clay into a spoon shape and attach it firmly.
Make it Bobble
To turn this into a true bobblehead, don’t glue the head! Instead, glue a small metal spring into the neck hole of the body, and glue the other end into a hole drilled into the head.
Step 4: Final Assembly and Baking
-
Connect head to body:
If making a static figure, insert a piece of wire or toothpick into the neck area and press the head down. If making a bobblehead, leave a cavity in the neck and head for the spring mechanism. -
Bake the figure:
Bake your creation according to the polymer clay package instructions (usually 275°F/135°C only for 15-30 minutes). Let it cool completely inside the oven to prevent cracking. -
Mount to base:
Once cool, use strong craft glue or super glue to attach the shoes to the wooden circular base for stability.
Now your little culinary master is ready to oversee all your kitchen adventures
Musician Bobblehead With Tiny Instrument
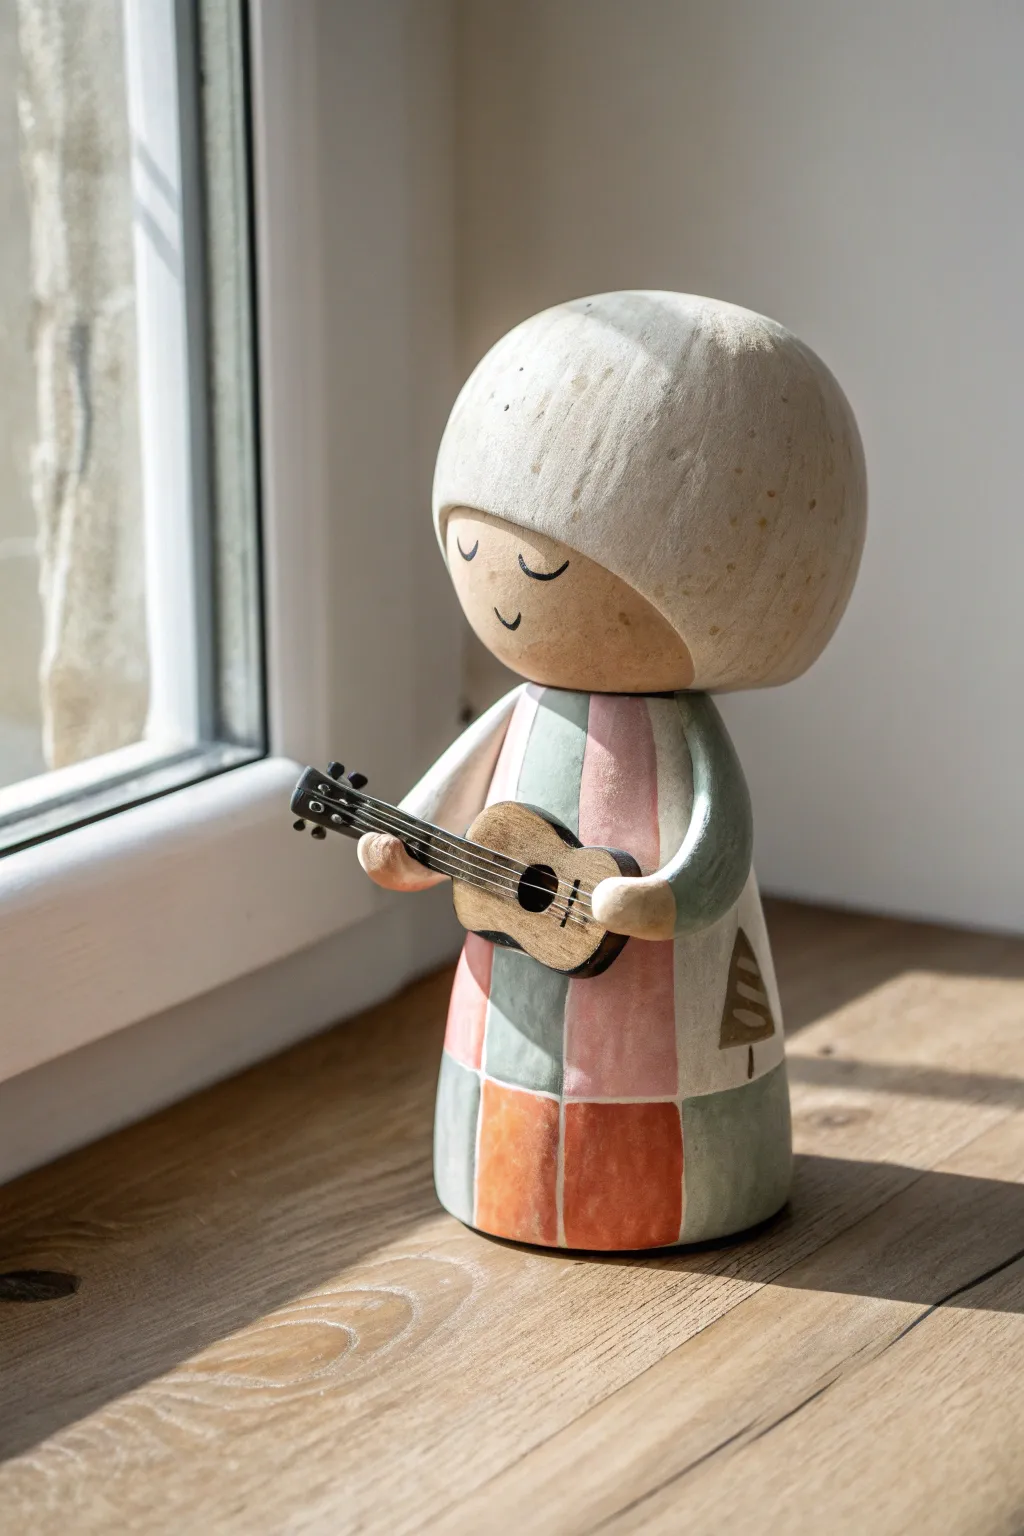
Create this charming, serene musician bobblehead that mimics the look of carved wood using polymer or air-dry clay. Its patchwork dress and tiny guitar make it a heartwarming addition to any windowsill.
Step-by-Step
Materials
- Polymer clay or air-dry clay (white)
- Acrylic paints (cream, pale terracotta, sage green, salmon pink, black, dark brown)
- Sculpting tools (needle tool, smoothing tool)
- Small craft wire or headpin (for bobble mechanism)
- Spring (specifically for bobblehead mechanism, sized to fit inside the neck)
- Fine grit sandpaper
- Small flat paintbrush
- Detail paintbrush (000 size)
- Matte varnish or sealant
Step 1: Sculpting the Base Form
-
Form the body cone:
Start with a golf-ball-sized lump of clay and roll it into a smooth cone shape. Flatten the bottom so it stands securely on your work surface, tapering slightly towards the top where the neck will be. -
Create the oversize head:
Roll a larger sphere of clay for the head. It should be slightly oversized compared to the body to get that cute ‘chibi’ proportion. Press into the top slightly to define the hairline area. -
Sculpt the haircut:
Add a thick layer of clay over the top two-thirds of the sphere to create the ‘helmet’ hair shape. Smooth the transition at the back, but leave a distinct ridge around the forehead and sides to separate the hair from the face. -
Add the arms:
Roll two small sausage shapes for arms. Attach them to the sides of the body cone, bending them forward at the ‘elbows’ so the hands will meet in the center to hold the instrument. -
Prepare the neck connection:
At the top of the body cone, insert your spring mechanism securely into the wet clay. Create a matching hollow in the bottom of the head so it can sit atop the spring later without being permanently fixed yet. Let these pieces dry or bake separately according to your clay’s instructions.
Faux Wood Texture
Before painting, drag a stiff-bristled brush through the wet clay vertically. When you paint and lightly sand later, this texture will look just like wood grain.
Step 2: Crafting the Tiny Guitar
-
Shape the guitar body:
Flatten a small piece of clay and cut out a figure-eight shape for the ukulele or guitar body. It needs to be small enough to fit between the figure’s hands. -
Add the neck and fretboard:
Attach a thin rectangular strip of clay to the top of the guitar body for the neck. Use a needle tool to gently scribe lines for the strings and frets while the clay is soft. -
Bake or dry the instrument:
Once you are happy with the shape, bake or let the instrument dry completely. It needs to be hard before painting.
Seasonal Details
Change the pattern on the dress to fit the season—try tiny painted holly leaves for winter or small daisies for a spring version.
Step 3: Painting and Assembly
-
Base coat the head:
Paint the hair area in a creamy off-white. For the face, mix a touch of terracotta into your white to create a warm, pale skin tone and apply two even coats. -
Paint the patchwork dress:
Using a pencil, lightly sketch a grid pattern on the dress. Paint alternating squares in soft salmon pink, sage green, and pale terracotta. I like to keep the paint slightly translucent to mimic a stained wood effect. -
Paint the instrument:
Paint the guitar body a light wood color (tan or pine). Use black paint for the sides and neck to give it contrast and depth. -
Add facial details:
Using your finest detail brush and black paint watered down slightly, paint two U-shaped curves for closed eyes and a tiny curve for the smile. -
Add texture and distress:
To achieve the rustic look shown in the image, lightly sand the painted surfaces with fine-grit sandpaper, focusing on the edges of the hair and the dress folds. This reveals a bit of the texture underneath. -
Paint the guitar strings:
Carefully paint thin silver or white lines for the strings on the guitar neck. A steady hand is key here. -
Attach the instrument:
Glue the painted guitar to the figure’s stomach area, and then glue the hands onto the guitar neck and body so it looks like she is strumming. -
Assemble the bobble:
Attach the head to the spring mechanism on the body. Secure with strong adhesive if the fit isn’t tight enough, ensuring the head can still wobble freely. -
Final varnish:
Apply a coat of matte varnish to the entire piece. This protects the paint and unifies the sheen, giving it that finished, professional ceramic or wood look.
Now you have a sweet musical companion to brighten up your shelf.
Sports Mascot Bobblehead
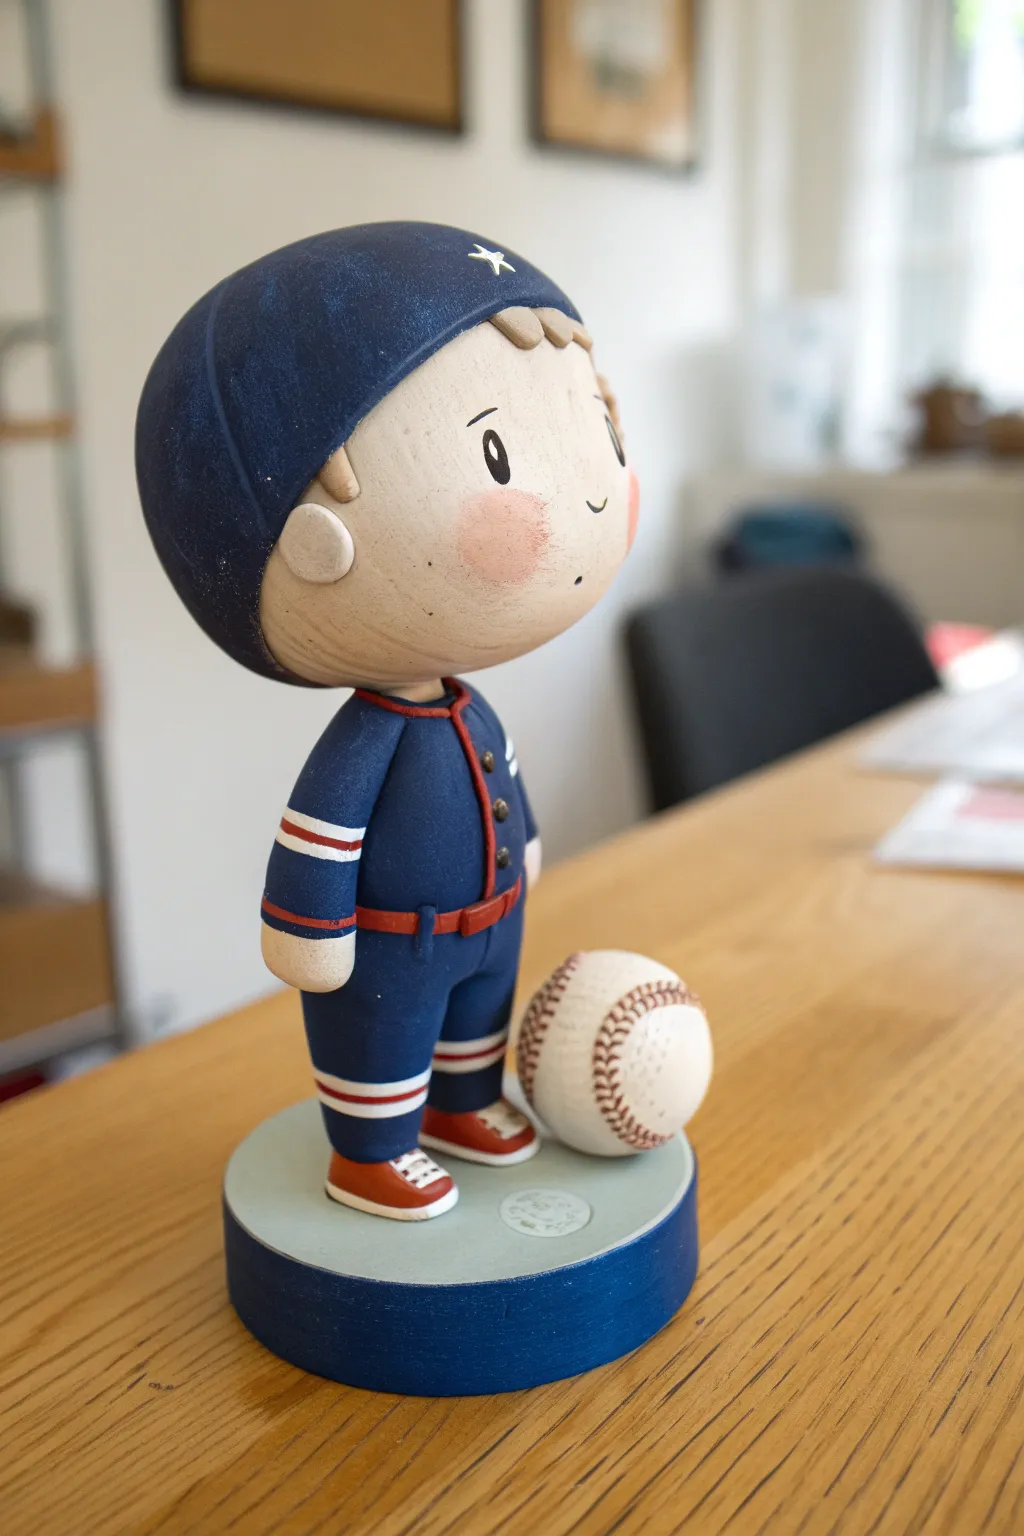
Step up to the plate with this adorable baseball player figurine, characterized by its stylized, oversized head and classic navy blue uniform. The matte finish and rosy cheeks give it a timeless, vintage toy aesthetic perfect for gifting to sports fans.
Step-by-Step Guide
Materials
- Polymer clay (navy blue, white, red, pale peach/skin tone)
- Aluminum foil
- Wire armature (16 or 18 gauge)
- Sculpting tools (needle tool, ball stylus, silicone shapers)
- Acrylic paints (black, white, pink)
- Matte varnish or sealant
- Liquid polymer clay or bake and bond
- Rolling pin or pasta machine
- X-Acto knife
- Round wooden base (optional for extra stability)
Step 1: Building the Head and Armature
-
Form the core:
Crumple a ball of aluminum foil roughly 2 inches in diameter for the head. Insert a sturdy wire through the center, leaving enough length at the bottom to support the body and legs later. -
Cover with skin tone:
Condition your pale peach polymer clay and roll it into a sheet about 1/4 inch thick. Wrap this completely around the foil ball, smoothing the seams until the surface is flawless. -
Sculpt the face shape:
Gently press the front of the sphere to flatten the face area slightly. Use your thumbs to create subtle indentations for eye sockets, keeping the overall look round and stylized. -
Add the helmet:
Roll out a sheet of navy blue clay. Cut a large circle and drape it over the top/back of the head. Trim the front edge in a curve to frame the face, smoothing the blue clay onto the peach clay seamlessly. -
Detail the helmet:
Roll a thin snake of blue clay to create the brim of the helmet. Attach it just above the forehead area. Add a tiny white clay star to the center of the helmet for a team logo.
Head Heavy?
If the head keeps tipping the figure over before baking, prop it up with a makeshift scaffold of crumpled aluminum foil or cardboard. Once baked and cool, the wire armature will hold it rigid.
Step 2: Constructing the Body and Uniform
-
Build the torso:
Form a teardrop shape from navy blue clay for the body. Thread this onto the wire extending from the head. I find it helps to add a dab of liquid clay on the wire to keep the body from sliding. -
Attach the legs:
Roll two thick logs of navy blue clay for legs. Attach them to the bottom of the torso, blending the clay upwards so there are no visible seams at the hip connection. -
Add the belt:
Roll a very thin strip of red clay. Wrap it around the waistline where the torso meets the legs to create a belt, adding a tiny square for the buckle. -
Sculpt the arms:
Create two smaller logs for arms using navy blue clay. Attach them to the shoulders, positioning them straight down by the sides in a relaxed pose. -
Add stripe details:
Roll incredibly thin threads of white and red clay. Apply these as stripes around the cuffs of the sleeves and the pant legs. Gently press them flat so they look integrated into the fabric. -
Create the hands:
Form two small balls of pale peach clay. Press them slightly flat and attach them to the ends of the sleeves to act as simple, mitten-like hands. -
Make the shoes:
Sculpt two oval shapes from reddish-brown or orange clay. flattened slightly at the bottom. Attach these to the bottom of legs. Add tiny white laces or toe caps for detail.
Step 3: Base, Accessories, and Finishing
-
Prepare the base:
Create a thick disc of light grey or blue clay for the mound. If you want extra weight, wrap this clay around a wooden disc or a foil core. Insert the figure’s projecting leg wires into this base. -
Sculpt the baseball:
Roll a ball of white clay. Use a needle tool to scratch the texture of stitching in two curving lines. Backfill these scratches with thinned reddish-brown paint later, or lay very thin threads of brown clay into the grooves. -
Position the ball:
Place the baseball on the mound next to the player’s left foot. Use liquid clay to ensure a strong bond between the ball, the base, and the leg. -
Bake the project:
Bake your sculpture according to the manufacturer’s instructions for your specific brand of clay (usually 275°F for 15-30 minutes depending on thickness). -
Paint facial features:
Once cool, use a fine detail brush and black acrylic paint to add two simple oval eyes and a small curved smile. Keep the expression minimal and sweet. -
Add blush:
Dip a dry brush into a tiny amount of pink paint and dab almost all of it off on a paper towel. Gently stipple rosy cheeks onto the face for a soft, airbrushed look. -
Seal the work:
Apply a coat of matte varnish to the entire figure to protect the paint and give the clay a professional, unified finish.
Bobble It Up
To make a real bobblehead, don’t bake the head onto the neck. Instead, create a hollow neck cavity and attach the head post-bake using a small novelty spring found at craft stores.
Now you have a charming little slugger ready for display on your desk or bookshelf
Baby Dragon Bobblehead
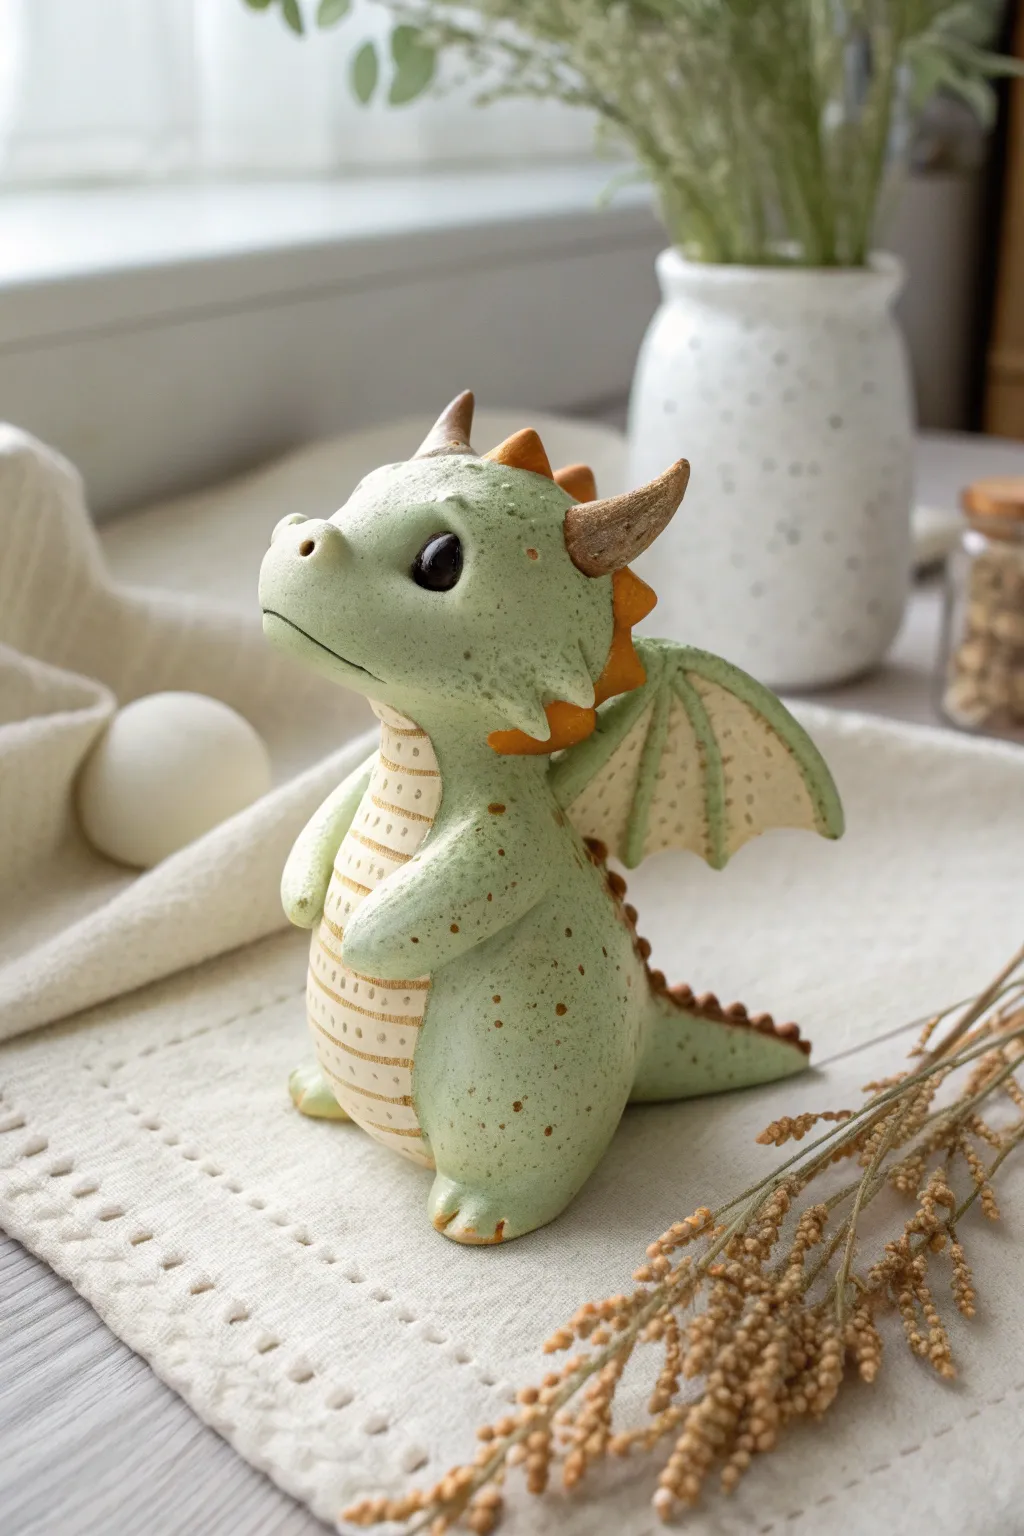
Sculpt your very own fantasy companion with this adorable baby dragon project. Featuring a speckled mint-green body, tiny orange spikes, and a gentle expression, this figurine adds a touch of magic to any desk or shelf.
Step-by-Step Tutorial
Materials
- Polymer clay (mint green, white, pale orange, translucent, dark brown, gold)
- Bobblehead spring mechanism (small)
- Sculpting tools (needle tool, ball stylus)
- Aluminum foil
- Liquid polymer clay (transparent)
- Toothbrush or stiff bristle brush
- Acrylic paint (brown) for speckles
- Gloss glaze (optional)
- Oven and baking tray
Step 1: Sculpting the Base Form
-
Create the armature:
Ball up a piece of aluminum foil into a pear shape for the body and a slightly flattened oval for the head. This saves clay and keeps the figurine lightweight. -
Mix the perfect green:
Knead mint green clay with a tiny pinch of white and translucent clay. This creates a soft, organic look rather than a flat plastic color. -
Cover the body:
Roll out a sheet of your green mix and wrap it smoothly around the foil pear shape. Blend the seams until invisible and insert the bottom half of your bobblehead spring into the neck area. -
Cover the head:
Cover the head foil armature similarly, smoothing it out. Insert the top half of the spring mechanism into the bottom of the head, ensuring the fit is snug but allows movement.
Head Drooping?
If the head is too heavy for the spring, remove some foil from the inside before baking, or use a stronger, wider spring mechanism.
Step 2: Adding Details and Texture
-
Texture the skin:
Gently tap a clean toothbrush or stiff bristle brush all over the green clay surfaces. This creates a subtle, porous skin texture. -
Form the belly:
Roll a thin sheet of cream or pale yellow clay. Cut an oval shape and press it onto the dragon’s tummy. Use a needle tool to press horizontal lines across it for the ribbed belly look. -
Add the speckles:
Dilute a small drop of brown acrylic paint with water. Dip a stiff brush in and flick the bristles to spray tiny brown speckles over the green skin. Let this dry completely before handling. -
Attach the legs:
Roll two thick logs of green clay for the legs. Press them firmly against the bottom sides of the body, blending the upper seams so they look integrated. Add tiny indentations for toes. -
Sculpt the arms:
Create two smaller sausage shapes for arms. Attach them resting on the belly, gently curving them inward. I find using a little liquid clay here helps them stick securely.
Step 3: Wings, Face, and Finishing Touches
-
Shape the wings:
Cut two triangle shapes from the green clay. Press a pattern of dots on the underside using a needle tool. Attach these to the back of the dragon. -
Add spinal spikes:
Form small triangular pyramids from pale orange clay. Line them up starting from the back of the head down the spine and onto the tail. -
Create the tail:
Roll a tapered cone of green clay. Attach it to the back base of the body, curving it slightly to the side so it’s visible adjacent to the leg. -
Sculpt the horns:
Roll two small cones of gold or bronze-colored clay. Press a wood-grain texture into them with a needle tool and attach them to the top of the head. -
Detail the face:
Use a large ball stylus to make deep sockets for eyes. Insert smooth, round balls of black clay. Add tiny highlights with white clay if desired. -
Final assembly:
Place the head onto the spring neck. Bake according to your clay manufacturer’s instructions (usually 275°F/130°C for 15-30 minutes). -
Glaze eyes:
Once cool, brush a coat of gloss glaze over just the black eyes to make them look wet and alive.
Make it Sparkle
Mix a tiny amount of mica powder into your green clay before sculpting for a subtle, magical shimmer that catches the light.
Now you have a charming little dragon friend ready to nod along with your day
Mushroom Cap Sprite Bobblehead
This charming forest figurine combines the natural texture of faux wood with the delightful wobble of a classic bobblehead. With its sweetly sleeping face and classic spotted cap, this sprite brings a touch of fairytale magic to any desk or shelf.
Step-by-Step
Materials
- Polymer clay (Terra cotta/red, beige/cream, white, green)
- Small tension aesthetic spring or bobblehead spring mechanism
- Acrylic paints (White, black, peach, brown)
- Small detail brushes (0 and 00 sizes)
- Ball stylus tool
- Needle tool or toothpick
- Aluminum foil
- Round clay cutter or jar lid (approx. 3 inches)
- Matte varnish or sealant
Step 1: Sculpting the Components
-
Form the core:
Begin by crumpling a small ball of aluminum foil roughly the size of a ping-pong ball. This will be the armature for the mushroom cap to keep it lightweight. -
Cover the cap:
Sheet your terra cotta or red-orange clay to about 1/4 inch thickness. Wrap it completely around the foil ball, smoothing out any seams until you have a perfect, polished dome shape. -
Texture the underside:
Flip the cap over. Using a needle tool or toothpick, gently score fine lines radiating from the center to the edge to mimic the gills of a mushroom. Create a small central indentation where the spring will go later. -
Shape the head:
Roll a ball of beige clay, slightly flattened at the top and bottom. This should be slightly smaller than the cap’s width so the mushroom top fits comfortably over it like a hat. -
Create the body:
Roll a cylinder of the same beige clay, tapering it slightly so it gets wider at the bottom. Attach this securely to the bottom of the head piece, blending the clay where they join for a seamless neck connection. -
Add arms:
Roll two small, thin logs of beige clay for the arms. Attach them flush against the sides of the body, curving them slightly inward so they rest naturally against the torso. -
Build the base:
Use your round cutter and green clay to create a thick, sturdy disc base, about half an inch high. Center the body on this base and press down firmly to adhere it. -
Pre-bake prep:
Before baking, make a small hole in the top of the head and check that it aligns with the hole under the cap for your spring mechanism. I find it helpful to test the fit now while the clay is soft.
Step 2: Painting and Assembly
-
Bake the pieces:
Bake the body/base unit and the cap separate according to your clay manufacturer’s instructions (usually 275°F for 15-30 minutes). Let them cool completely. -
Create the wood effect:
Dilute brown acrylic paint with water to create a wash. Brush this over the beige body and head, then quickly wipe most of it off with a paper towel. This leaves pigment in the tiny crevices, mimicking wood grain. -
Paint the cap details:
Using white acrylic paint and a small round brush, add the signature polka dots to the red cap. Vary the sizes slightly for a more organic look. -
Add the face:
With your finest brush and black paint, carefully draw two downward curves for closed, sleeping eyes and a tiny ‘u’ for a smile. Use a dry brush with a dab of peach paint to blush the cheeks. -
Detail the dress:
Using a light brown paint, add a scalloped collar design around the neck area. Use a toothpick dipped in brown paint to add tiny speckles all over the body section to create a textured dress pattern. -
Install the spring:
Once the paint is dry, use strong super glue or epoxy to attach the spring into the hole on top of the head. Let it set firmly. -
Attach the cap:
Apply glue to the top of the spring and carefully lower the mushroom cap onto it. Hold it in place until the glue grabs, ensuring the face remains visible under the brim. -
Final flourish:
Add a tiny pebble or sculpted snail made of scrap clay to the green base for a final decorative touch. -
Seal:
Coat the entire piece with a matte varnish to protect the paint and unifed the surface sheen.
Natural Texture Hack
Before baking the beige body, gently roll it over a piece of coarse sandpaper. This imitates a wood-carved surface, holding the paint wash perfectly.
Level Up: Mossy Base
Instead of plain green clay, mix flocking powder or dried tea leaves into the base clay before baking to create a realistic, mossy forest floor effect.
Give the head a gentle tap to watch your little forest friend nod off to sleep
Plant Head Bobblehead Planter Buddy
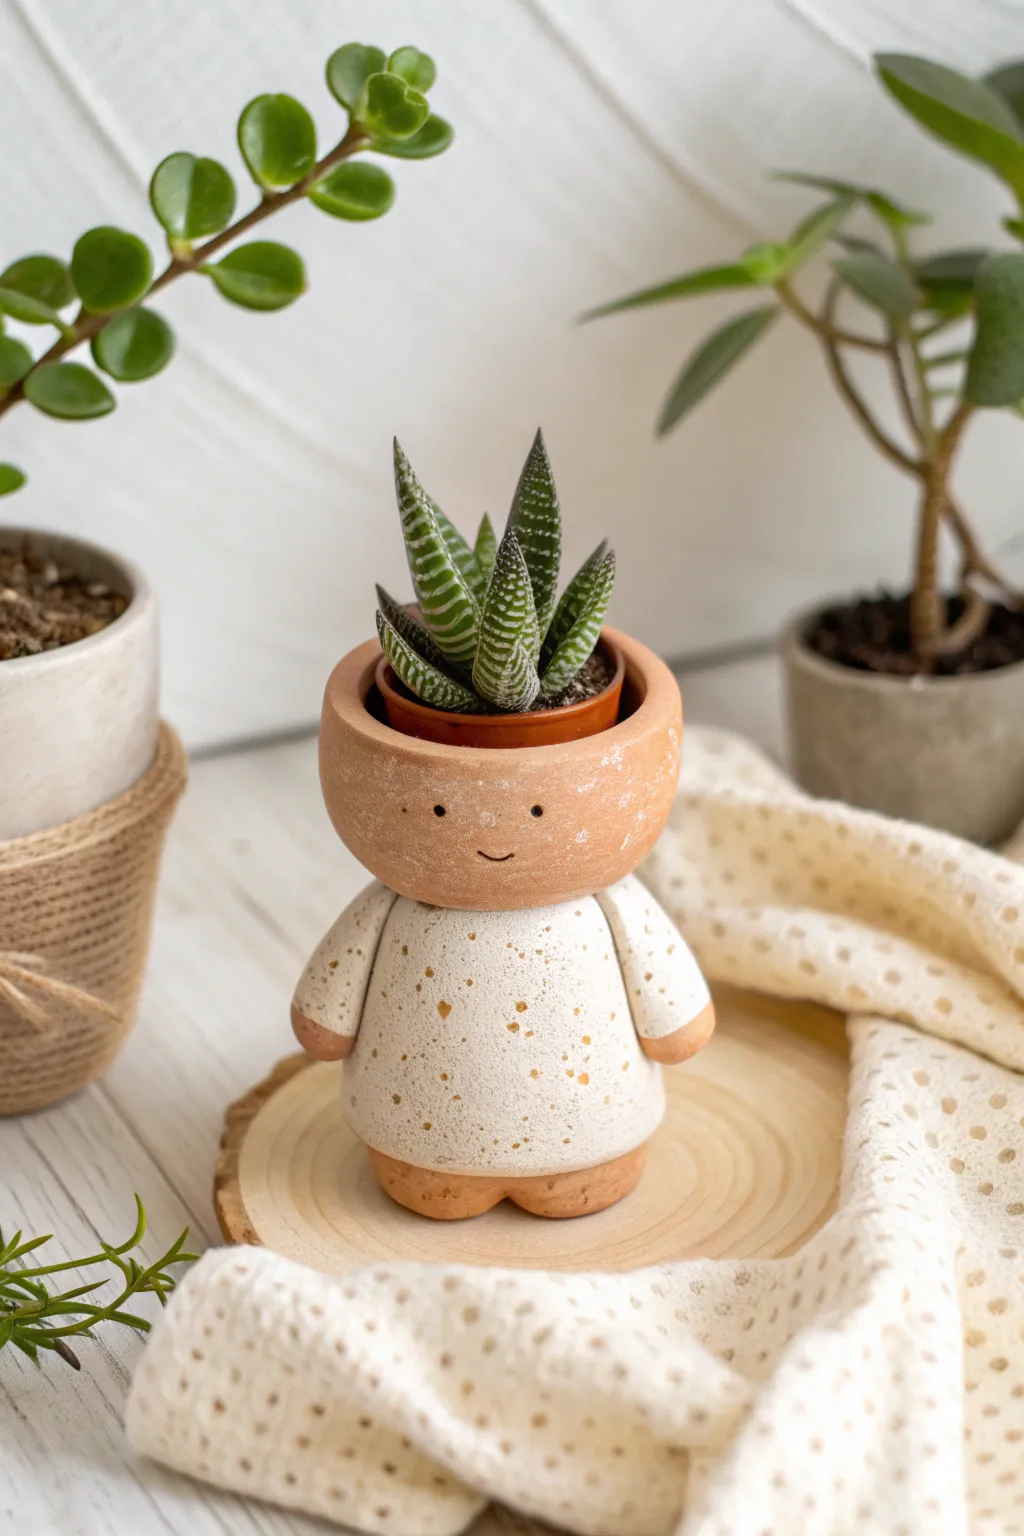
This charming little clay figure doubles as a functional planter, perfect for housing a tiny succulent right inside its head. With its terracotta-toned features and speckle-glazed body, it adds a touch of whimsical personality to any plant shelf.
Step-by-Step Tutorial
Materials
- Polymer clay (terracotta color)
- Small styrofoam ball (approx. 2 inches)
- Small plastic condiment cup (to form the planter void)
- Small metal spring or bobblehead spring mechanism
- White acrylic paint
- Gold or bronze acrylic paint for speckles
- Matte varnish or sealant
- Sculpting tools (needle tool, smoothing tool)
- Old toothbrush or stiffness brush
- Strong craft glue (E6000 or similar)
- Fine-grit sandpaper
Step 1: Sculpting the Head and Body
-
Form the head base:
Condition your terracotta-colored polymer clay until soft. Roll a large ball, slightly larger than a golf ball. Press your small plastic condiment cup into the top to create a deep indentation for the plant; leave the cup in temporarily to hold the shape or remove carefully if you prefer a solid clay interior. -
Shape the face:
Smooth the clay around the rim so it is thick and rounded. The head should have a slightly flattened spherical look. Use a smoothing tool to ensure there are no fingerprints. -
Add facial features:
Using a needle tool or a small dotting tool, poke two small holes for the eyes. Use a curved tool or the edge of a spoon to press a gentle, small smile into the clay between the eyes. -
Create the body form:
Roll a second ball of clay, slightly smaller than the head. Shape it into a gumdrop or rounded cone shape, creating a flat base so it stands securely. -
Attach the arms:
Roll two small snakes of clay for arms. Attach them to the sides of the body, blending the clay at the shoulder joint so it looks seamless. Add tiny balls of clay at the ends for hands. -
Form the feet:
Create two small flattened ovals for feet. Attach these to the bottom of the body, ensuring the figure still stands perfectly flat and balanced. -
Prepare the neck joint:
Create a slight depression in the top of the body and the bottom of the head where the spring will eventually go. Ensure both surfaces are flat enough for the glue to bond later. -
Bake the pieces:
Follow your polymer clay package instructions for baking temperatures and times—usually around 275°F (135°C) for 15-30 minutes. Bake the head and body separately. Let them cool completely.
Step 2: Painting and Assembly
-
Masking the extremities:
Once cool, use small pieces of painter’s tape or masking fluid to cover the hands, feet, and the very top rim of the neck area. We want to keep these the natural terracotta color. -
Painting the outfit:
Sponge or brush white acrylic paint onto the main body section. You might need two coats for full opacity. I like to let this dry briefly between coats to prevent streaking. -
Creating the speckled effect:
Dip an old toothbrush or stiff bristle brush into gold or bronze paint. Run your thumb over the bristles to flick tiny specks of paint onto the white body. Practice on paper first to control the spray. -
Highlighting the eyes:
Dip a fine-point needle or toothpick into black paint and carefully fill the indented eye holes to make the expression pop. -
Sealing the work:
Apply a coat of matte varnish to the entire piece, including the unpainted clay areas. This protects the paint and gives the terracotta a finished look. -
Attaching the spring:
Using a strong adhesive like E6000, glue one end of your spring to the depression in the body and the other to the bottom of the head. Let it cure fully (often 24 hours) before testing the bobble. -
Final planting:
Place a small potted succulent (in its nursery pot) into the hollow space in the head. Using a nursery pot makes watering easier and protects your clay from moisture.
Keep it Clean
Wipe your clay with a bit of baby oil or rubbing alcohol before baking. This smooths out fingerprints and removes any lint that stuck to the clay.
Hair Styles
Before baking, add texture to the head rim or sculpt clay ‘bangs’ to give your planter buddy a specific hairstyle alongside the plant.
Give the head a gentle tap and watch your new green friend nod in approval
Interchangeable Mood Face Bobblehead
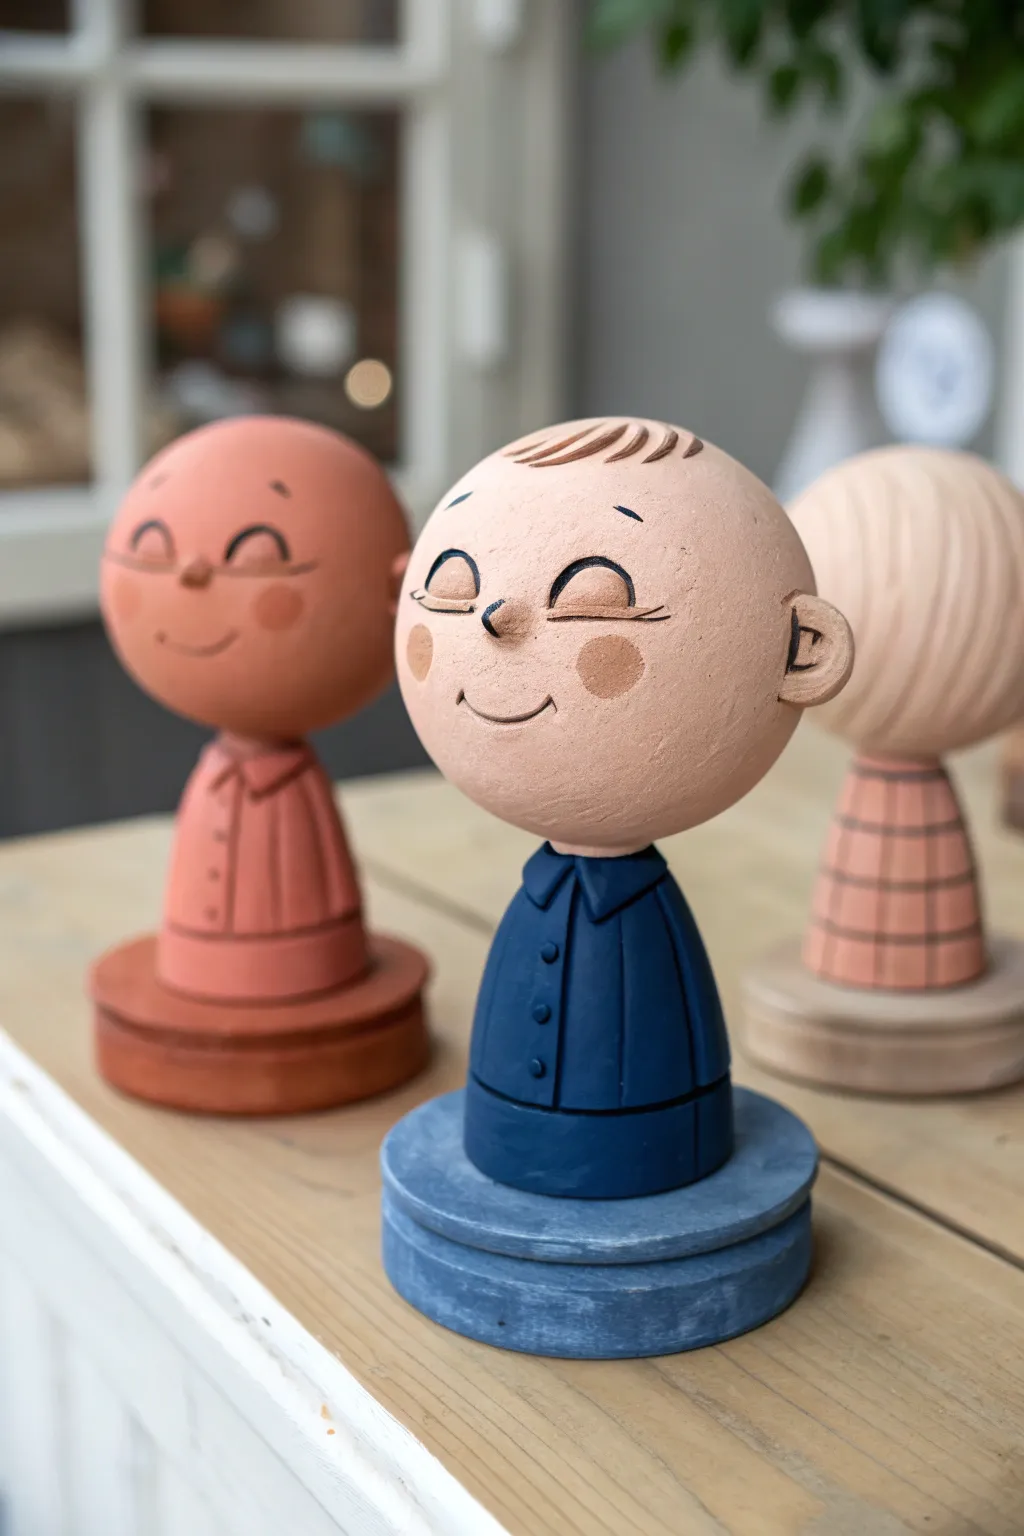
Capture the charm of classic cartoon strips with these delightful, interchangeable clay figures featuring round, expressive heads and simple collared bodies. This project focuses on creating smooth forms and painted details to bring three distinct personalities to life on sturdy bases.
Step-by-Step Guide
Materials
- Polymer clay (flesh tone, deep blue, terracotta, beige)
- Aluminum foil
- Wire or toothpicks for internal armature
- Sculpting tools (needle tool, ball stylus)
- Acrylic paints (black, white, rosy pink)
- Fine detail paintbrush
- Matte spray varnish or sealant
- Circle cutter or cookie cutter
- Sandpaper (fine grit)
Step 1: Sculpting the Head and Body Bases
-
Form the foil cores:
Start by scrunching aluminum foil into three tight balls, roughly 2 inches in diameter. Roll them firmly against your work surface to compress the foil as much as possible, creating a dense, lightweight core for the heads. -
Cover with flesh-tone clay:
Condition your flesh-colored polymer clay until pliable. Roll it into a sheet about 1/4 inch thick. Wrap the clay completely around the foil ball, smoothing the seams with your thumb until you have a perfect, seamless sphere. -
Shape the torso shape:
For the bodies, shape a solid cylinder of colored clay (blue for the main figure) that is slightly narrower at the top than the bottom. It should be about two-thirds the height of the head. Gently round the shoulders. -
Create the heavy base:
Roll out a thick slab of clay in a matching or contrasting color (like the slate blue base for the main figure). Use a circle cutter to create a thick disc that is wider than the body to ensure stability.
Head Tilt Fix
If the head feels too heavy or tilts, remove it before baking. Bake the head and body separately, then glue them together with a strong epoxy after cooling.
Step 2: Adding Character Details
-
Sculpt the nose:
Take a tiny pinch of the flesh-tone clay and roll it into a small ball. Press this into the center of the face sphere. Use a sculpting tool to blend the edges deeply into the face so the nose looks organic, not just stuck on. -
Add the ears:
Form two small C-shapes or semi-circles from flesh clay. Attach them to the sides of the head. Use a needle tool to press a small indentation inside each ear to mimic the cartilage detail. -
Detail the clothing:
For the collar, flatten two small triangles of blue clay and wrap them around the neck area of the torso. Use a needle tool to impress a vertical line down the center of the chest and three small dots for buttons. -
Add hair strands:
Roll very thin ‘snakes’ of clay in a brown or darker tone. Lay 3-4 strands across the top of the forehead in a swooping motion to create the signature wispy bangs. Tap them gently to adhere. -
Assemble the structure:
Insert a toothpick or wire vertically into the neck of the body piece. Carefully push the head onto this support. I like to leave it slightly loose if you want to be able to turn the head later. -
Bake the figures:
Place your assembled figures on a baking sheet. Bake according to your customized clay package instructions (usually 275°F/135°C for 15-30 minutes). Let them cool completely before handling.
Step 3: Painting and Finishing
-
Sand for smoothness:
Once cool, lightly sand any fingerprints or rough spots on the head using fine-grit sandpaper. Wipe away the dust with a damp cloth. -
Draft the face:
Use a pencil to very lightly sketch the facial features. For the ‘blissful’ expression, draw two downward curving arches for eyes and a wide, upward curve for the smile. -
Paint the eyes and mouth:
Using your finest brush and black acrylic paint, trace over your pencil lines. Keep your hand steady and the lines thin. Add small eyebrows floating above the closed eyes. -
Apply rosy cheeks:
Mix a diluted wash of pink paint or use a dry-brush technique with very little paint. Dab soft circles on the cheeks to give the character a warm, flushed look. -
Seal the work:
Finish by spraying the entire piece with a matte varnish. This protects the paint and gives the clay a professional, uniform finish without looking shiny or plastic.
Mix & Match
Install small neodymium magnets in the neck and base of the head instead of a permanent wire. This lets you swap different mood heads onto different outfits.
Display your trio of expressive characters on a shelf to bring a smile to anyone who sees them
Extra Wobble Neck With Hidden Coil
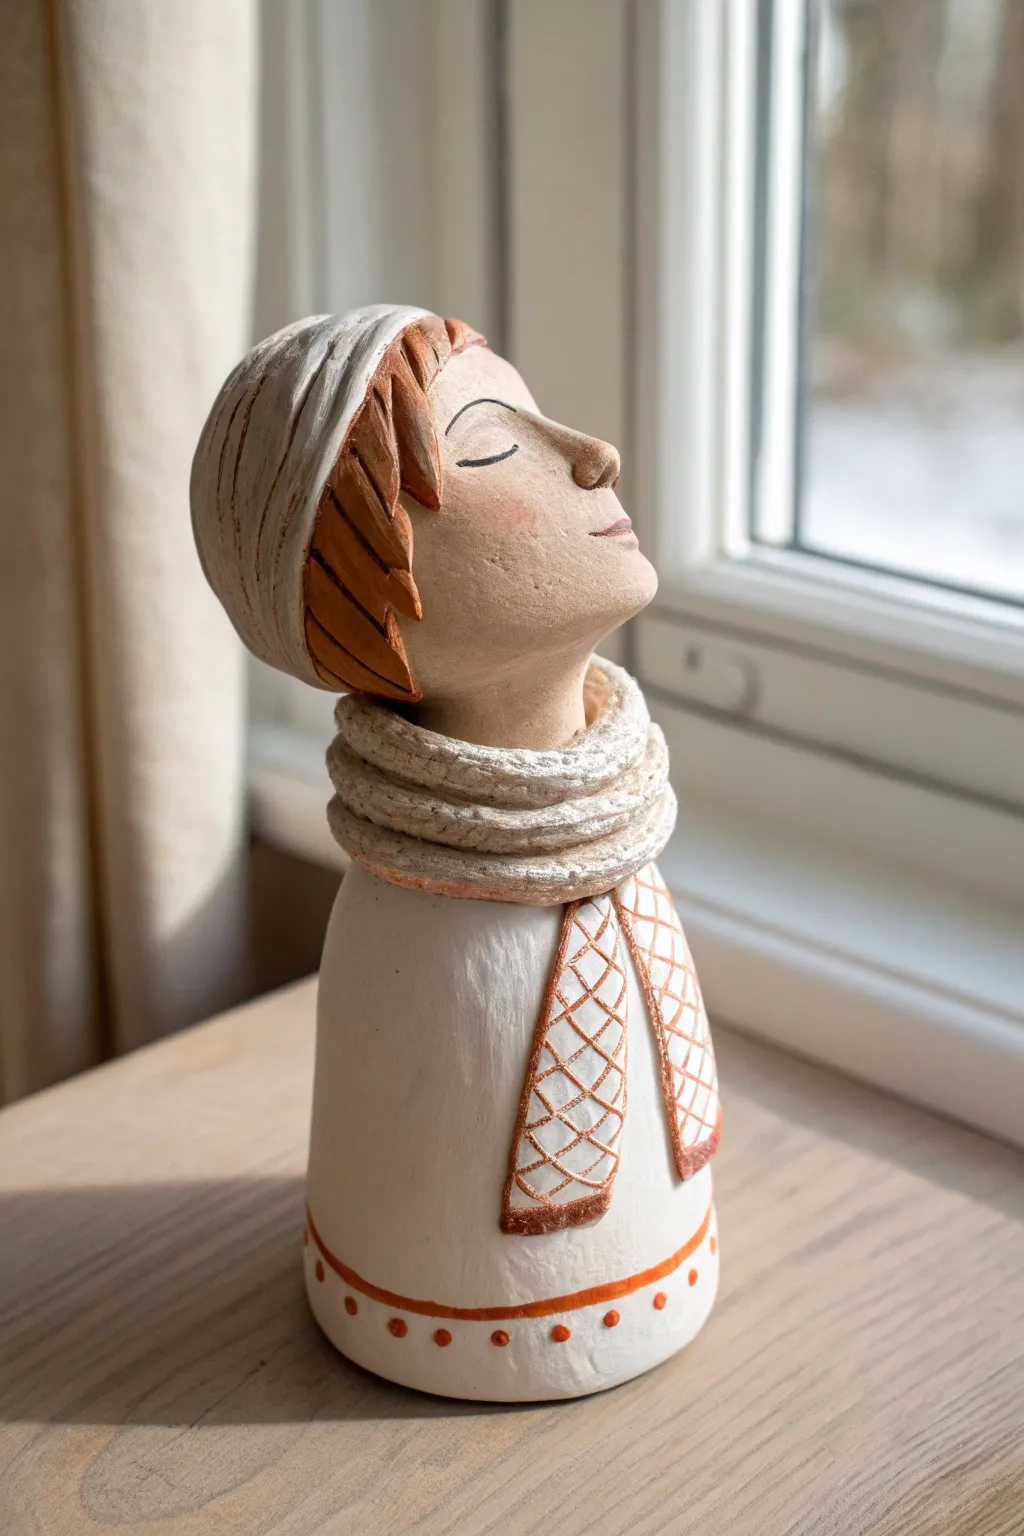
Capture a moment of peaceful contemplation with this charming clay bobblehead that hides its mechanism beneath a textured scarf. The design features a stylized figure with closed eyes and a gently tilted head, using a hidden wire coil to create a subtle, soothing wobble.
How-To Guide
Materials
- Air-dry clay or polymer clay (white/cream)
- Ceramic sculpting tools (needle tool, loop tool)
- Thick gauge crafting wire (for the spring)
- Wire cutters and pliers
- Rolling pin
- Acrylic paints (terracotta/rust orange, light beige/flesh tone)
- Fine grit sandpaper
- Fine detail paintbrushes
- Matte varnish or sealant
- Water cup (for smoothing)
Step 1: Sculpting the Base and Body
-
Form the main torso cone:
Start with a large ball of white clay and roll it into a thick cone shape. This will form the body and dress of the figure. Flatten the bottom firmly against your work surface so it stands stable without wobbling on its own. -
Shape the shoulders:
Gently round off the top of the cone to create a sloping shoulder area. The top should be flat enough to eventually support the neck coil mechanism. -
Create the scarf ends:
Roll out a thin slab of clay and cut two long, rectangular strips. Drape these down the front of the body to resemble the hanging ends of a scarf. Press them gently onto the body to adhere, using a little water or slip if you are using air-dry clay.
Step 2: Creating the Head and Features
-
Shape the head:
Roll a separate ball of clay for the head. Mold it into an oval shape, slightly flattening the face area. Pinch out a small nose and give the face an upward tilt, as if basking in the sun. -
Sculpt the facial details:
Use a needle tool or small loop tool to carve gentle, curved lines for the closed eyes. Keep the expression minimal and peaceful. You can softly shape cheeks and a small mouth with your fingers. -
Add the hair texture:
Apply flattened pieces of clay to the back and sides of the head for hair. Use a sculpting tool to carve deep, jagged grooves to represent layered strands. Add a rounded cap-like shape on top if you want the hat look shown in the reference. -
Hollow the neck area:
Carefully hollow out a small cavity at the base of the neck/head. This is where the top of your spring will anchor.
Head Tilt Trouble?
If the head tilts too far forward or back, the wire gauge might be too thin. Try doubling the wire or using a stiffer gauge to support the clay’s weight.
Step 3: The Hidden Mechanism
-
Wind the wire coil:
Take your thick gauge wire and wrap it tightly around a marker or dowel to create a spring about 1-1.5 inches long. I find it helpful to leave straight tails on both ends of the spring for easier embedding. -
Embed the spring in the body:
Push the bottom tail of the spring into the center of the body’s shoulders. Secure it with extra clay so only the coiled part is sticking up. -
Create the scarf collar:
Roll three or four snake-like coils of clay. Stack these loosely around the wire spring, resting on the shoulders, to create the wrapped look of a thick scarf. Ensure they don’t touch the wire itself—the wire needs space to move. -
Attach the head:
Carefully mount the head onto the top of the spring, pushing the top wire tail into the cavity you made earlier. Test the wobble to ensure the head clears the scarf collar without rubbing.
Pro Tip: Hidden Collar
Make the scarf coils slightly wider than the neck hole. This creates a visual shield that hides the wire completely while still allowing full movement.
Step 4: Finishing Touches
-
Final smoothing and drying:
Check over your sculpture for fingerprints. Smooth them out with a little water. Allow the piece to dry completely according to your clay manufacturer’s instructions (usually 24-48 hours for air-dry). -
Sanding:
Once fully dry (or baked), use fine-grit sandpaper to smooth any rough edges on the base or the scarf folds. -
Painting the base colors:
Paint the hair and the scarf details with a warm terracotta or rust orange acrylic. Leave the dress and majority of the hat white or cream. Dilute the paint slightly for a softer, washed look. -
Adding the pattern:
Using a very fine brush, paint a cross-hatch or diamond pattern onto the scarf ends using the terracotta color. Paint a simple dotted border near the bottom hem of the dress. -
Highlighting the face:
Mix a very watery wash of pink or beige and lightly brush it onto the cheeks to give a lively blush. Paint the closed lash lines with a fine dark brown or black line. -
Seal the work:
Apply a coat of matte varnish to protect the paint and give the clay a finished, ceramic-like quality.
Place your finished figure on a sunny windowsill and give it a gentle tap to see it nod in agreement with the peaceful day