
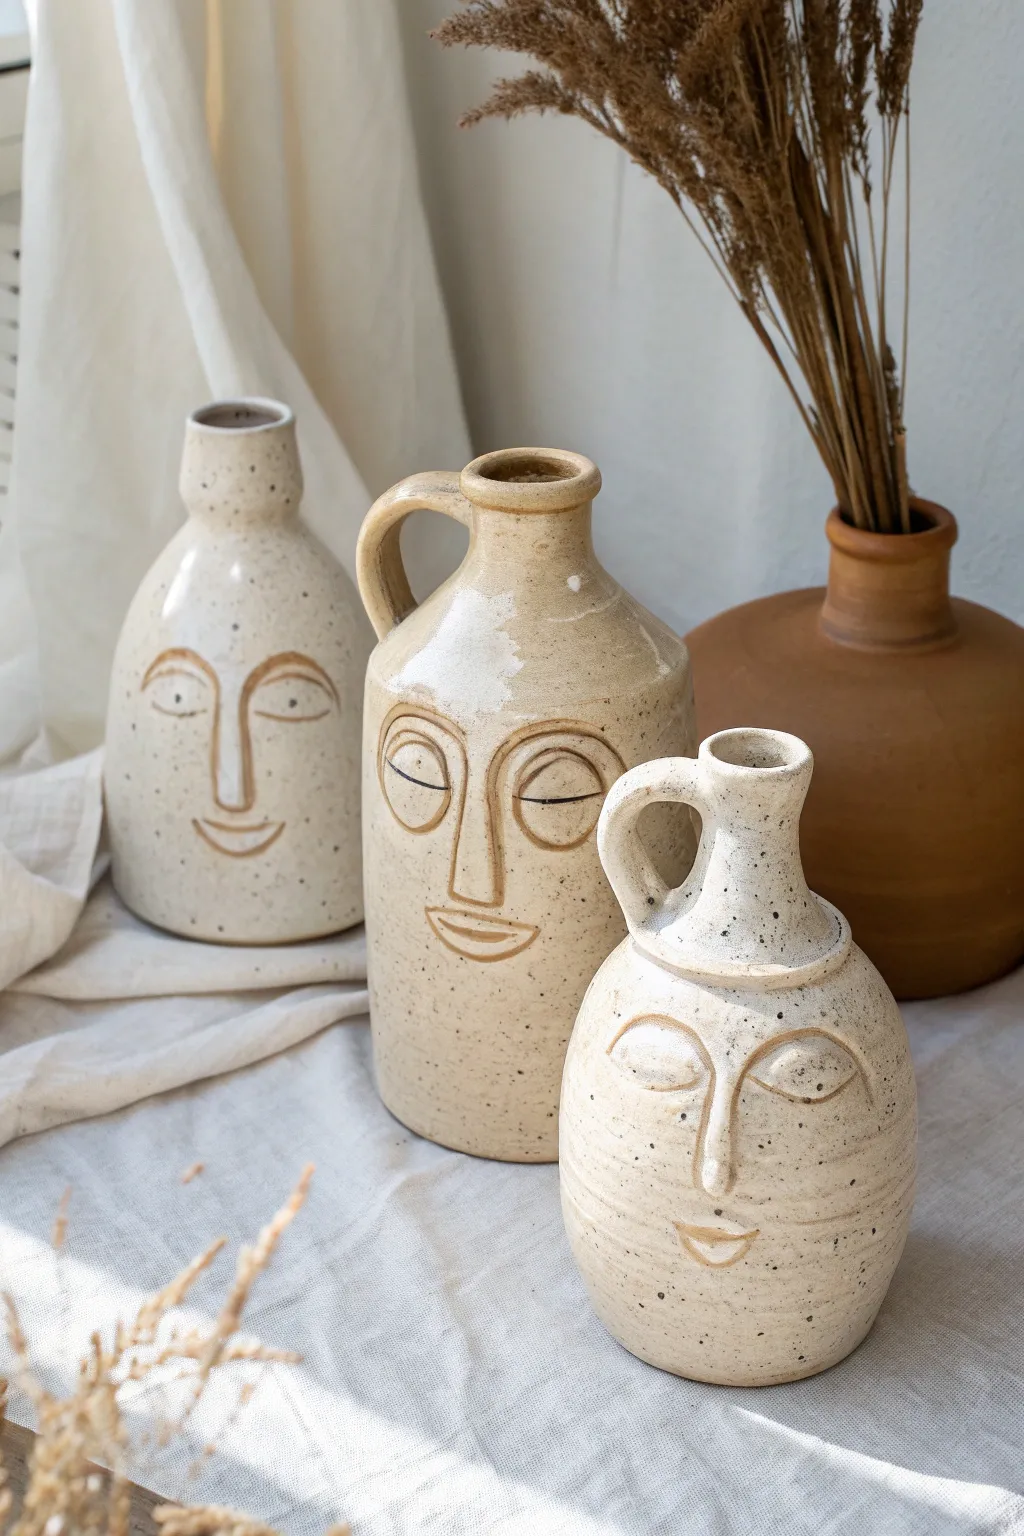
If you’ve ever wanted to make pottery with a little attitude, face jugs are where it’s at. I love how a simple jug shape turns into a full-on personality once you start pushing features like bulging eyes and wonky grins into place.
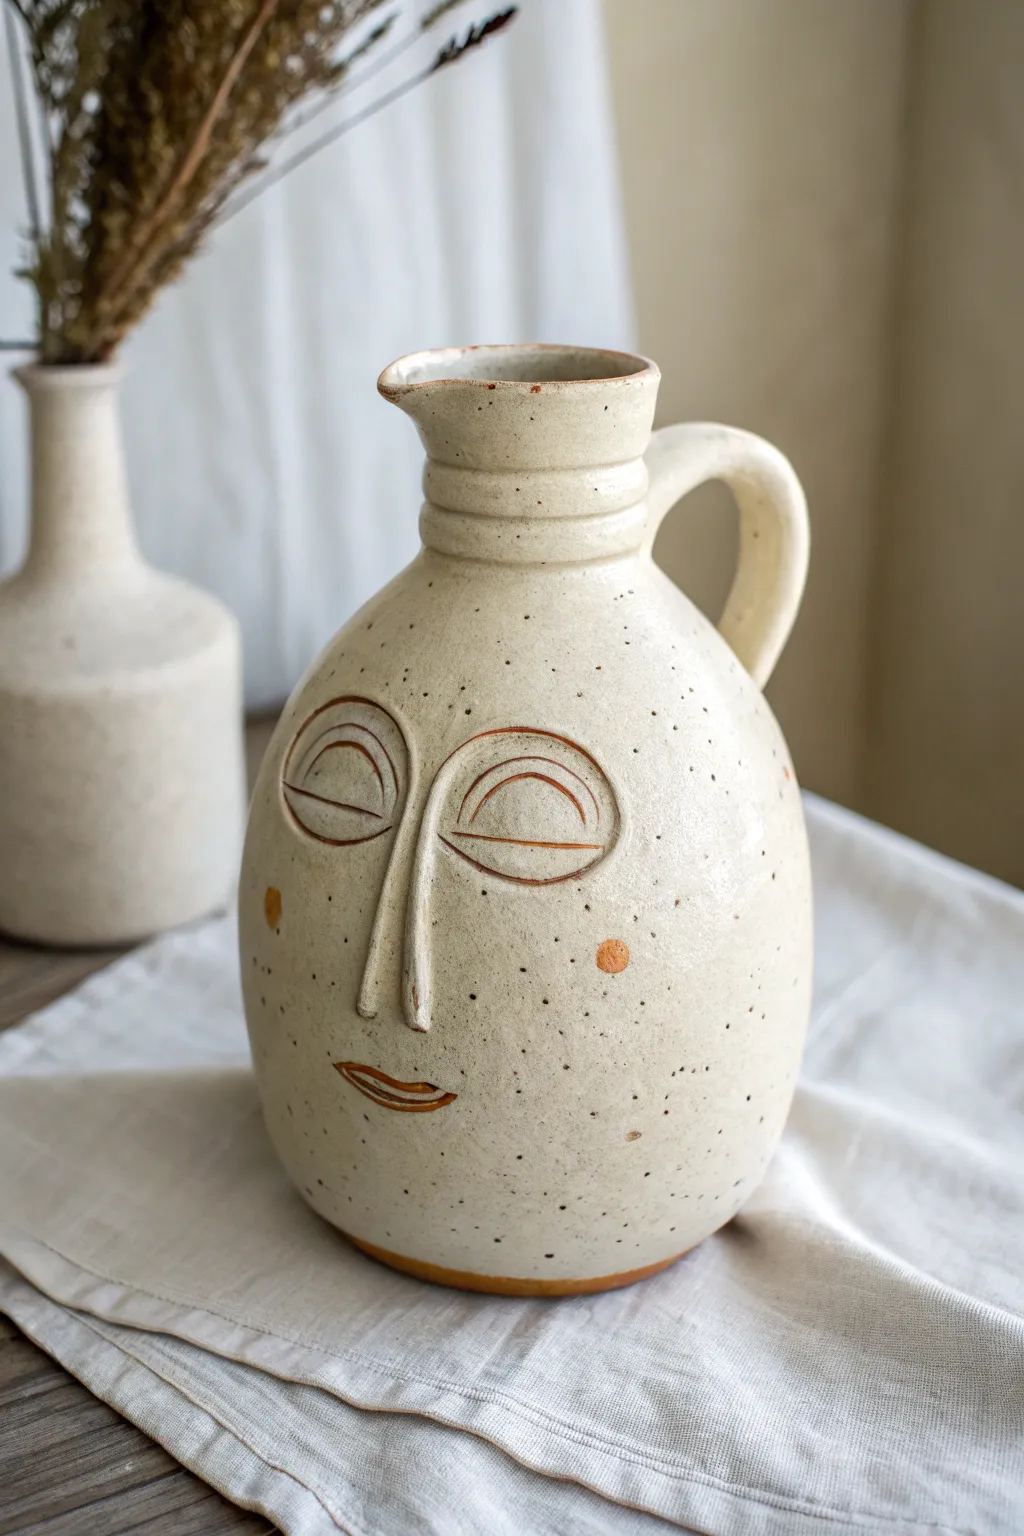
Classic Folk-Style Face Jug
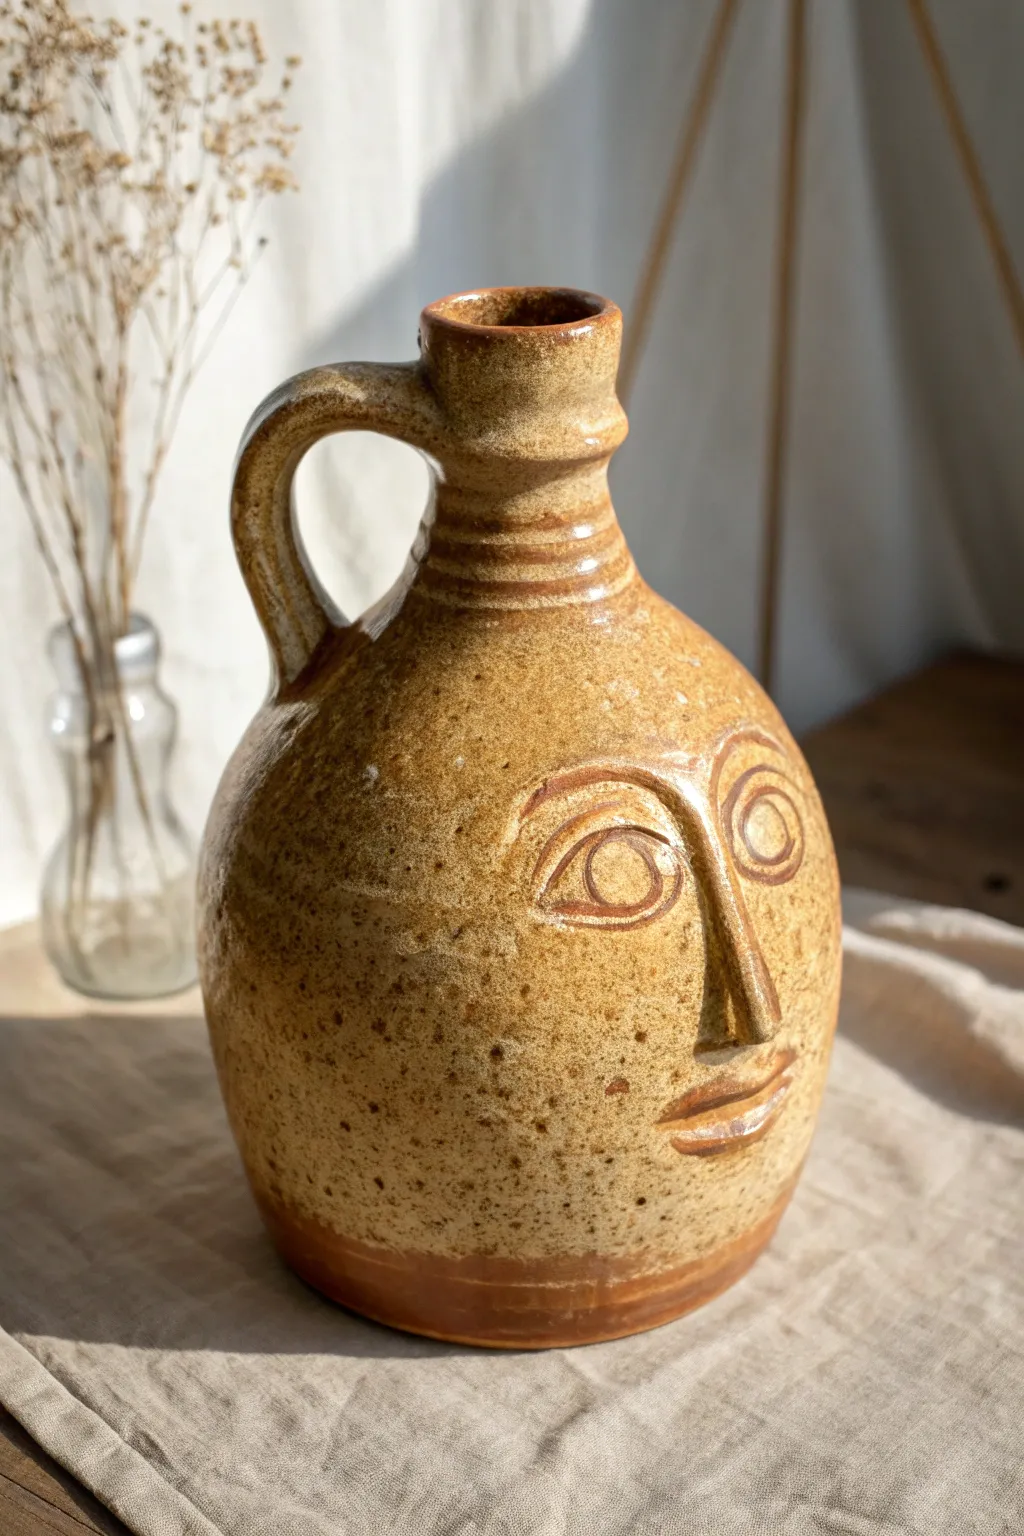
Embrace the rustic charm of traditional pottery with this textured folk-style face jug. The piece features a warm, speckled glaze, a classic narrow neck with a sturdy handle, and a stylized, watchful expression carved directly into the clay body.
Step-by-Step
Materials
- Stoneware clay (speckled or buff)
- Pottery wheel
- Throwing tools (sponge, rib, wire cutter)
- Modeling tools (wooden knife, needle tool)
- Scoring tool or serrated rib
- Slip
- Soft brushes for glazing
- Honey or amber colored speckled glaze
- Darker oxide wash (optional, for recesses)
- Kiln
Step 1: Throwing the Form
-
Center and open:
Begin with about 3-4 pounds of wedged stoneware clay. Center it firmly on the wheel and open the clay to create a flat, even floor, about 4 inches wide. -
Pull the cylinder:
Pull the walls up into a tall, even cylinder. Focus on keeping the base slightly thicker to support the belly of the jug later. -
Shape the belly:
From the inside, gently push the clay outward while supporting the outside to create a bulbous, rounded belly shape. Keep the shoulder area narrower. -
Collar the neck:
Gradually collar the clay inward at the shoulder to create a narrow, vertical neck. Do this in stages to prevent the clay from buckling. -
Finish the rim:
Refine the rim with a chamois or sponge. Use a wooden tool to create a slight decorative ridge or gallery just below the lip if desired, matching the photo’s style.
Collaring Cracks?
If the neck ripples or cracks while collaring, you’re squeezing too hard or the clay is too dry. Use plenty of slip and compress the wall after each inward push.
Step 2: Sculpting the Face
-
Trimming and prep:
Once leather hard, trim the foot of the jug. Inspect the surface; if it feels too dry, mist it lightly with water before sculpting. -
Map out features:
With a needle tool, lightly sketch the placement of the eyes, nose, and mouth on the widest part of the belly. Symmetry isn’t strictly necessary for folk art, but keeps it balanced. -
Add the nose:
Score the nose area and a small coil of clay. Attach the coil vertically, blending the edges smoothly into the face to create a long, prominent nose bridge. -
Build the eyes:
Roll two small balls of clay for the eyes. Score the sketched eye areas and attach the balls, pressing them flat. Roll thin coils to outline the eyes, creating the eyelids, and blend the outer edges. -
Define the iris:
Use a modeling tool to incise a distinct circle within each eye for the iris. Keep the lines sharp, as glaze will pool here later. -
Sculpt the mouth:
Attach a small, oblong piece of clay for the mouth area. Use a wooden knife to slice a horizontal line for the lips and shape them gently. -
Refine the expression:
Go over the eyebrows and nose bridge with a modeling tool to sharpen the definition. The folk style relies on clear, bold lines rather than realistic shading.
Step 3: Handle and Finishing
-
Pull a handle:
Pull a thick strap handle from a separate piece of clay. Let it set up until it holds a curve without drooping. -
Attach the handle:
Score and slip the attachment points at the back of the neck and on the shoulder. Press the handle firmly into place, smoothing the joints for a seamless look. -
Bisque fire:
Allow the jug to dry slowly under plastic to equalise moisture, especially around the thick face parts. Once bone dry, bisque fire to cone 04/06. -
Highlight the features:
I prefer to apply a thin iron oxide wash into the recessed lines of the eyes, nose, and mouth, then wipe it back with a damp sponge. This ensures the face ‘pops’ after glazing. -
Glaze application:
Dip or brush the entire jug with a honey-amber stoneware glaze. Avoid investigating the glaze too thickly over the face details, or they might blur. -
Wipe the foot:
Clean the glaze off the very bottom of the foot ring and fire the piece to the glaze’s maturity temperature (usually cone 6 or 10).
Eye Definition Pro Tip
Make the incisions around the eyes slightly deeper than you think is necessary. Glaze tends to act like a filler, so deep cuts ensure the expression remains visible.
Now you have a timeless guardian for your shelf that carries a little bit of history in its expression


Big-Toothed Grin Face Jug
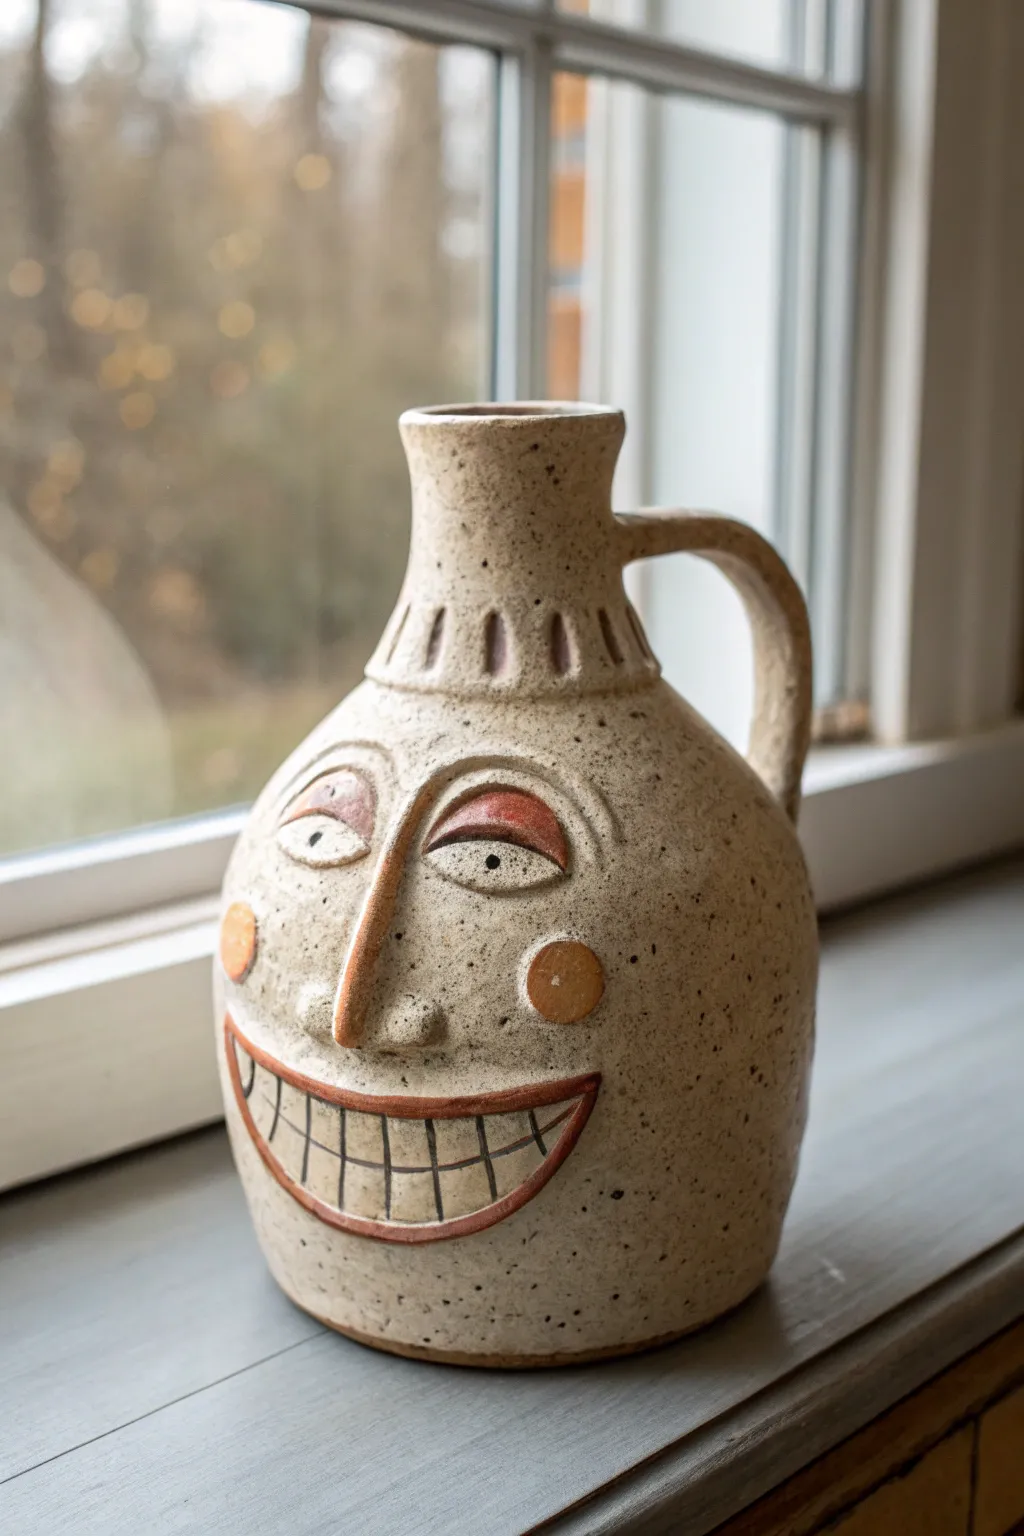
This charming ceramic jug combines traditional wheel-throwing techniques with whimsical hand-building to create a character full of personality. With its speckled beige glaze, oversized toothy smile, and rosy cheeks, this friendly vessel adds a touch of folk art warmth to any windowsill.
How-To Guide
Materials
- Speckled stoneware clay (approx. 3-4 lbs)
- Pottery wheel
- Throwing tools (sponge, wire cutter, ribs)
- Needle tool
- Scoring tool (serrated rib or needle)
- Slip (clay mixed with water)
- Underglaze (Terracotta/Red, Black, Orange)
- Clear matte or satin glaze
- Small stiff bristle brush
- Fine detail brush
- Sponge for smoothing
Step 1: Throwing the Form
-
Center and open:
Begin by centering your speckled stoneware clay on the wheel. Open up the clay, ensuring you leave a bottom thickness of about half an inch to support the eventual height. -
Pull the cylinder:
Pull the walls up into a tall cylinder. You want a decent height here, aiming for a form that will eventually be about 8-10 inches tall. -
Shape the belly:
Apply pressure from the inside to belly out the form. Create a nice, round lower section that tapers gently inward as you move up towards the shoulder. -
Collar the neck:
Collar the clay in significantly to form a narrow neck. Unlike a standard bottle, you want this neck to flare out slightly at the very top rim for a classic jug silhouette. -
Trim and dry:
Clean up the foot with a wooden knife tool. wire the pot off the bat and let it dry to a leather-hard state. This firmness is crucial for attaching the heavy facial features without warping the pot.
Cracking Features?
If facial features crack away as they dry, your pot was likely too dry when you attached them. Wrap the next one in plastic for a day after scoring and slipping to equalize moisture.
Step 2: Sculpting the Face
-
Pull and attach handle:
Before doing the face, pull a strap handle. Attach it securely to the back of the neck and the shoulder using the score and slip method. Smooth the connection points seamlessly. -
Build the nose:
Roll a coil of clay and shape it into a long, teardrop nose. Score the center of the jug’s belly and slip the nose into place, blending the edges onto the pot surface smoothly. -
Add the eyes:
Create two small mound shapes for eyes and attach them on either side of the nose bridge. Add half-moon coils above them to create the heavy eyelids, blending the top edge into the pot so they look integrated. -
Sculpt the grin:
Roll a very long, thin coil to outline the wide, U-shaped mouth. Score and slip this outline onto the lower belly. Flatten the coil slightly against the pot to create the lip ridge. -
Detail the teeth:
Using a needle tool or a small carving tool, incise a horizontal line through the center of the mouth area, then add vertical lines to define the individual large, square teeth. -
Apply the cheeks:
Roll two small balls of clay, flatten them into discs, and attach them at the corners of the mouth for the rosy cheeks. -
Neck decoration:
Use a carving tool to create small vertical dash marks around the base of the neck, creating a collar-like texture.
Step 3: Glazing and Finishing
-
Bisque fire:
Allow the jug to dry completely—this can take several days for thicker areas like the nose. Bisque fire the piece to cone 04. -
Apply underglaze colors:
Using the terracotta or red underglaze, paint the eyelids, the prominent nose, the lips, and the decorative dashes on the neck. Use orange underglaze for the round cheeks. -
Define the eyes and teeth:
Paint the pupils black. I like to use a very diluted black underglaze or a wash to fill the lines between the teeth, wiping away the excess so the dark pigment just stays in the crevices. -
Clear glaze application:
Dip or brush the entire jug with a clear matte or satin glaze. This seals the clay and brings out the natural speckles of the stoneware without making the piece overly shiny. -
Final firing:
Fire the piece to cone 6 (or whatever temperature your clay body requires) to vitrify the stoneware and mature the glaze.
Make it a Set
Make a matching set of mugs by throwing smaller cylinders and adding just a nose and eyes to each one, varying the expressions from grumpy to surprised.
Place your finished jug in a spot with natural light to let those fun speckles and the friendly grin shine.


Bulging Eyes Stare Face Jug
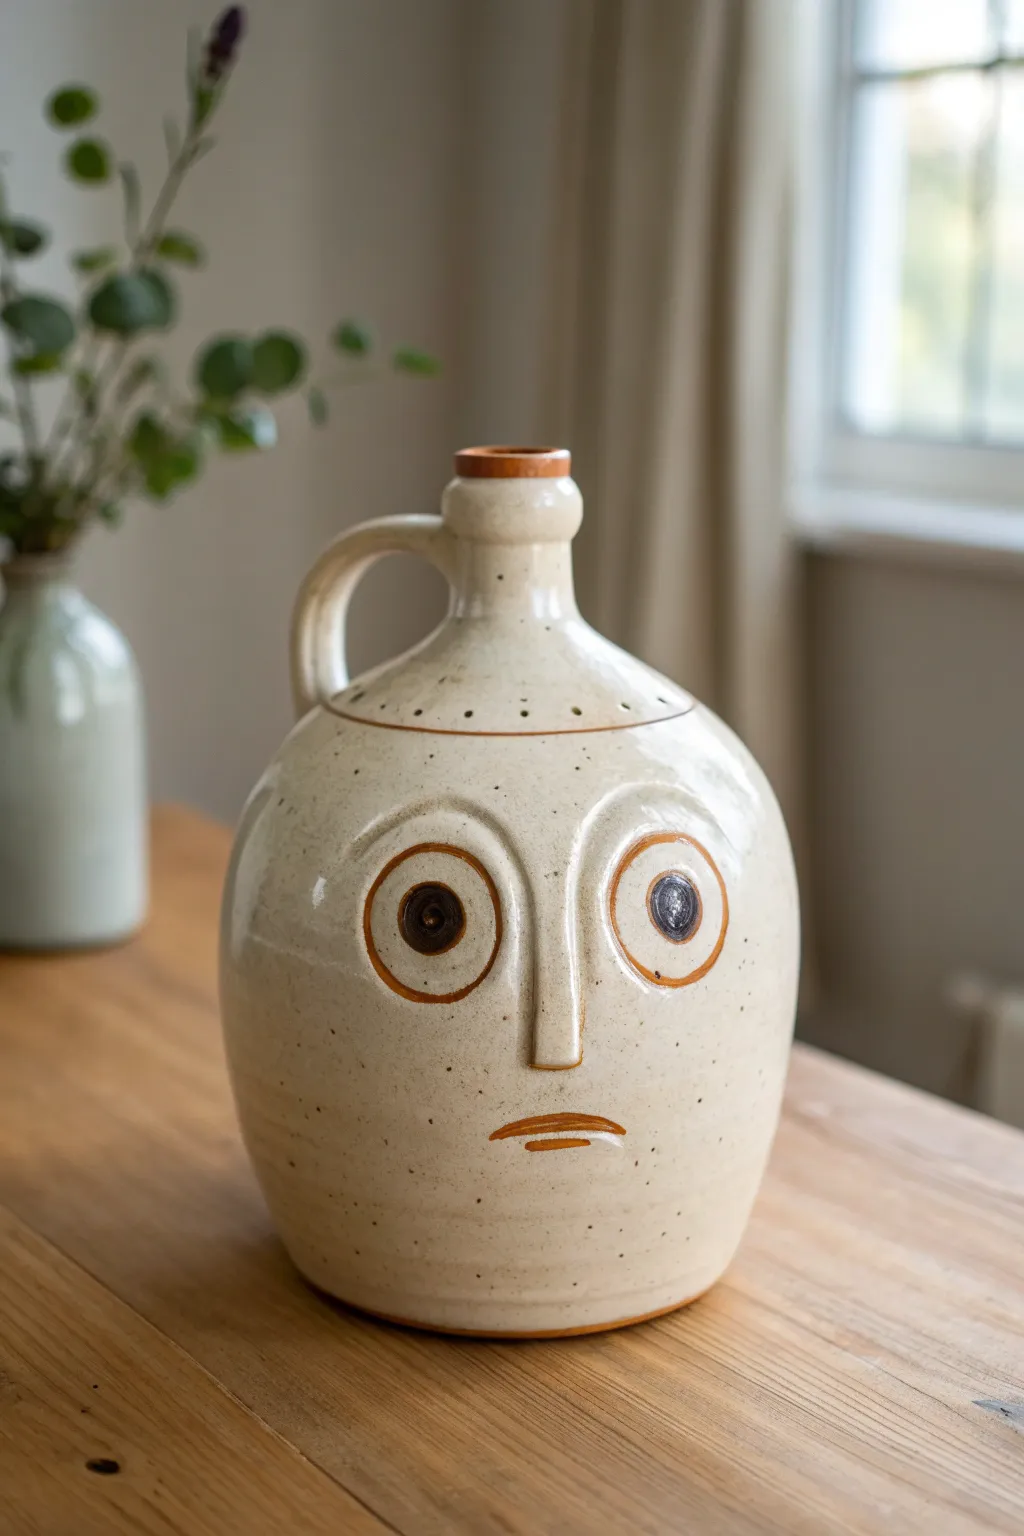
This charming stoneware piece combines the rustic tradition of face jugs with a streamlined, modernist aesthetic. The result is a whimsical character featuring distinctively large, staring eyes and a sleek oatmeal glaze that lets the warmth of the raw clay peek through.
Detailed Instructions
Materials
- Stoneware clay body (buff or speckled)
- Pottery wheel
- Throwing tools (sponge, ribs, wire cutter)
- Needle tool
- Trimming tools
- Scoring tool or serrated rib
- Slip (made from your clay body)
- Oatmeal or speckled cream glaze (cone 5/6 or suitable for your clay)
- Underglaze (dark brown or black) for pupils/lines
- Small round paintbrush
- Wax resist
Step 1: Throwing the Form
-
Center and open:
Begin with about 3-4 lbs of wedged clay. Center it firmly on the wheel, open lightly, and compress the floor well to prevent cracks. -
Pull the cylinder:
Pull the walls up into a tall, even cylinder. Aim for a height of about 8-9 inches, keeping the walls approximately 1/4 inch thick throughout. -
Belly the form:
Using a rib on the outside and your hand on the inside, gently push the belly of the pot outward to create that rounded, friendly jug shape. Taper the neck inward significantly as you move up. -
finish the neck:
Collar the neck in tightly until it is about 1.5 inches wide. Use a small throwing stick or your finger to create a pronounced, rolled rim at the very top. -
Dry to leather hard:
Wire the pot off the bat and let it dry until it holds its shape firmly but can still be manipulated—perfect leather hard stage.
Glaze Running?
If glaze runs into your waxed lines, wait for it to dry completely, then scrape it away with a needle tool or wooden skewer for a crisp edge again.
Step 2: Sculpting the Face
-
Trim the base:
Flip the pot over (using a chuck if necessary for the narrow neck) and trim a clean foot ring to give the jug visual lift. -
Attach the handle:
Pull a small strap handle. attach it from the neck to the shoulder of the jug. The loop should be small and tight, just big enough for a finger or two. -
Outline the features:
Lightly sketch the position of the eyes and nose with a needle tool. Notice how the nose connects directly to the brow line in a continuous ‘T’ shape. -
Add the nose:
Roll a coil of clay and flatten it slightly. Score and slip the center of the face, then attach the coil vertically. Smooth the sides down to blend seamlessly with the jug, but keep the front ridge sharp. -
Create the eyes:
Roll two flat discs of clay. Score and slip them onto the face on either side of the nose bridge. They should be slightly raised from the surface. -
Define the eye rings:
Using a carving tool or a small loop tool, carve a groove around the inner part of the eye disc to separate the ‘eyeball’ from the ‘eyelid’ rim. I like to smooth this groove with a damp brush immediately. -
Sculpt the mouth:
Add a very small, thin coil for the mouth below the nose. Press it down and shape it into a slight frown, blending the edges so it looks like a natural protrusion. -
Add texture and punch holes:
If you want the decorative holes around the shoulder (as seen in the photo), use a small hole punch or needle tool to create a ring of perforations near the neck.
Step 3: Glazing and Firing
-
Bisque fire:
Let the jug bone dry completely, then bisque fire it to your clay body’s specifications (usually Cone 04). -
Wax accents:
Apply wax resist to the specific lines you want to remain brown/raw clay: the thin ring around the eyes, the line of the mouth, the neck collar, and the perforations. -
Paint the pupils:
Using a dark brown or black underglaze, carefully paint the large pupils in the center of the eyes. -
apply the main glaze:
Dip the entire jug into your oatmeal or speckled cream glaze. Because of the wax resist, the glaze will bead off the detailed lines. -
Clean and refine:
Use a damp sponge to wipe any stray glaze droplets off the waxed areas and the foot ring to ensure clean, sharp lines. -
Glaze fire:
Fire the piece to maturity (Cone 5 or 6 typically). The glaze should melt into a smooth, glossy finish while the exposed clay turns a rich, toasted brown.
Play with Expression
Change the angle of the ‘eyebrow’ ridge or the curve of the mouth coil. A slight upturn makes a smile; slanting brows creates worry or anger.
Place your finished jug near a window where natural light can catch the gloss and distinctive expression


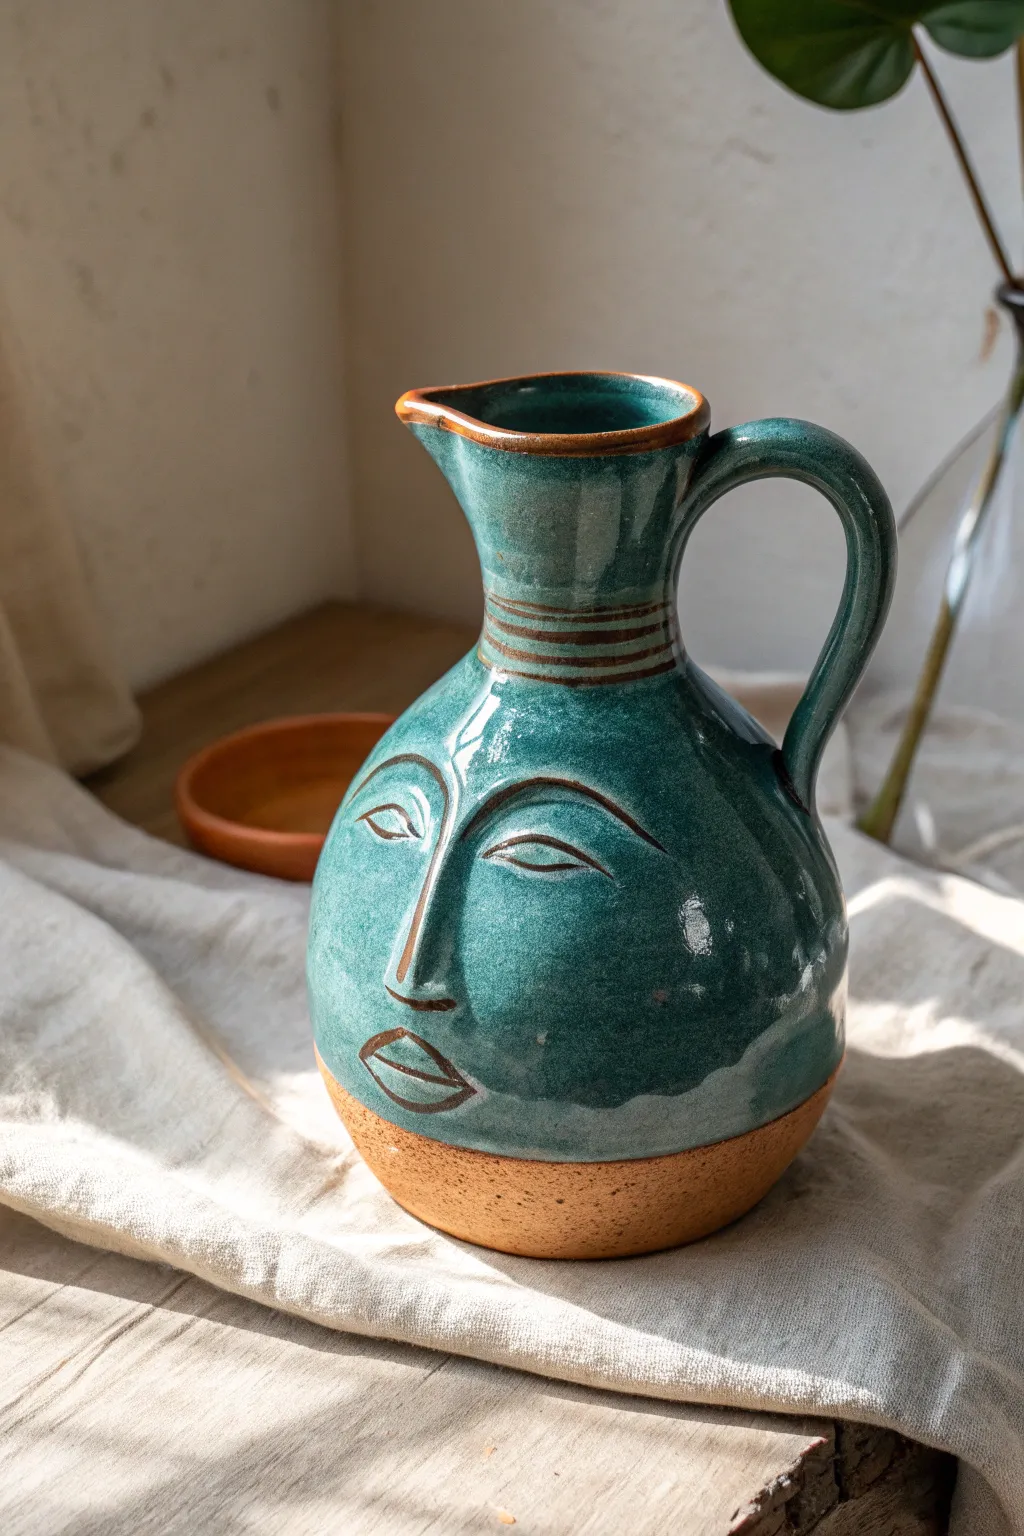
Crooked Nose Character Face Jug
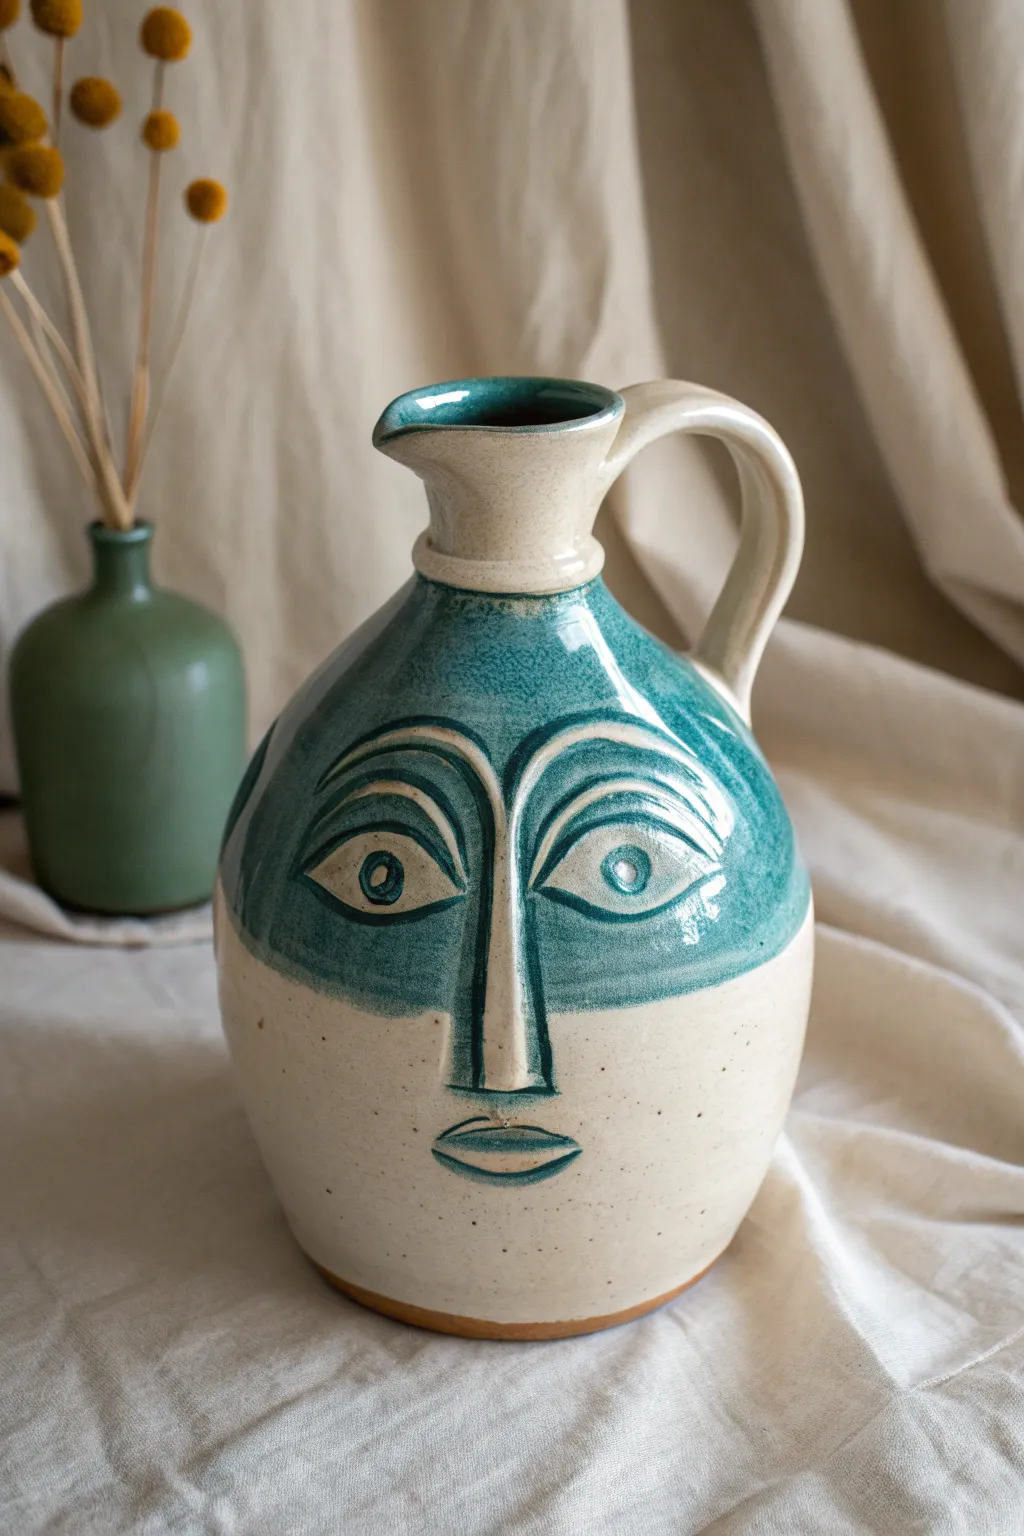
This elegant ceramic pitcher combines traditional wheel-throwing with stylized, sculpture-like facial features. The striking contrast between the glossy teal glaze on the upper face and the speckled raw clay below gives it a modern, artistic presence perfect for holding dried florals.
Step-by-Step
Materials
- Stoneware clay (speckled or buff)
- Pottery wheel
- Throwing tools (sponge, rib, wire cutter)
- Trimming tools
- Needle tool
- Scoring tool (serrated rib)
- Slip
- Small carving loop tools
- Teal or turquoise dipping glaze
- Sponge or wax resist
- Clear glaze (optional for interior)
Step 1: Throwing the Base Form
-
Center and open:
Begin with about 2-3 pounds of wedged stoneware clay on the wheel. Center it firmly and open the clay, aiming for a floor that is not too wide, as we want a bulbous belly. -
Pull the cylinder:
Pull the walls up into a tall cylinder. As you pull, gently shape the clay outward to create a rounded, spherical body, then collar it back in significantly as you reach the shoulder area. -
Create the neck and rim:
Pull a narrow, vertical neck from the collared shoulder. Use a rib to compress the neck and flare the rim slightly outward for a classic pitcher silhouette. -
Form the spout:
While the clay is still wet, gently use your index finger and thumb to pull a small spout on one side of the rim. Support the clay underneath to maintain the curve. -
Make the handle:
Pull a strap handle from a separate piece of clay. Let the pitcher and handle dry to a soft leather-hard stage before attaching.
Collapsing Neck?
If the neck starts twisting or collapsing while throwing, you likely thinned the walls too fast. Collar in stages, compressing the clay with a rib between each pull to keep it strong.
Step 2: Sculpting the Face
-
Attach the handle:
Score and slip the back of the neck and the shoulder. Attach your handle, creating a high, elegant arch that mimics the curves of the pot. -
Outline the features:
Opposite the handle, lightly sketch the facial placement with a needle tool. Draw large, arching eyebrows that connect directly into a long, straight nose bridge. -
Build up the nose:
Roll a coil of clay for the nose bridge. Score and slip the area between the eyes, pressing the coil on firmly. Use a modeling tool to blend the edges seamlessly into the pot, extending it down to the upper lip area. -
Define the eyes:
For the eyes, add two almond-shaped pads of clay on either side of the nose bridge. Smooth them down so they are slightly raised but integrated. -
Carve the details:
Using a small loop tool or sharp wooden tool, carve deep lines to define the eyelids and the pupils. The pupils should be distinct circles in the center of the eye almond. -
Sculpt the mouth:
Add a small, flat oval of clay below the nose. Carve a horizontal line through the center to separate the lips, and refine the shape to create a simple, resting expression. -
Smooth the surface:
Wait until the added features stiffen slightly, then use a damp sponge to smooth away any sharp carving marks or rough clay burrs.
Use Colored Slip
Instead of dipping glaze, paint the facial features with teal underglaze or colored slip before the first firing. This gives you more precision on the eyes and prevents the glaze from running.
Step 3: Glazing and Finishing
-
Bisque fire:
Slowly dry the piece completely to avoid cracking at the handle or spout. Fire the piece in a bisque kiln to cone 04 (or your clay’s specification). -
Prepare for glazing:
Wipe the bisque ware with a damp sponge to remove dust. If you want the bottom half to remain raw, you can apply wax resist starting at the cheekbone line and covering everything below, or simply rely on careful dipping. -
Dip the top section:
Hold the pitcher by the unglazed base. Dip the top half—covering the rim, neck, handle, and the eyes/nose area—into a teal or turquoise glaze. I like to hold it upside down for a few seconds to let the excess drip off cleanly. -
Clean the lines:
If you didn’t use wax, use a damp sponge to wipe away any glaze drips from the lower face. You want a clean, curved line that follows the bottom of the eye sockets and nose. -
Glaze fire:
Load the kiln, making sure the unglazed foot is clean. Fire to the maturity temperature of your clay and glaze (typically Cone 5 or 6 for stoneware).
Once cooled, fill your new sculpture with minimalist dried branches to echo the organic feel of the clay

What Really Happens Inside the Kiln
Learn how time and temperature work together inside the kiln to transform clay into durable ceramic.
Deep Wrinkles and Furrows Face Jug
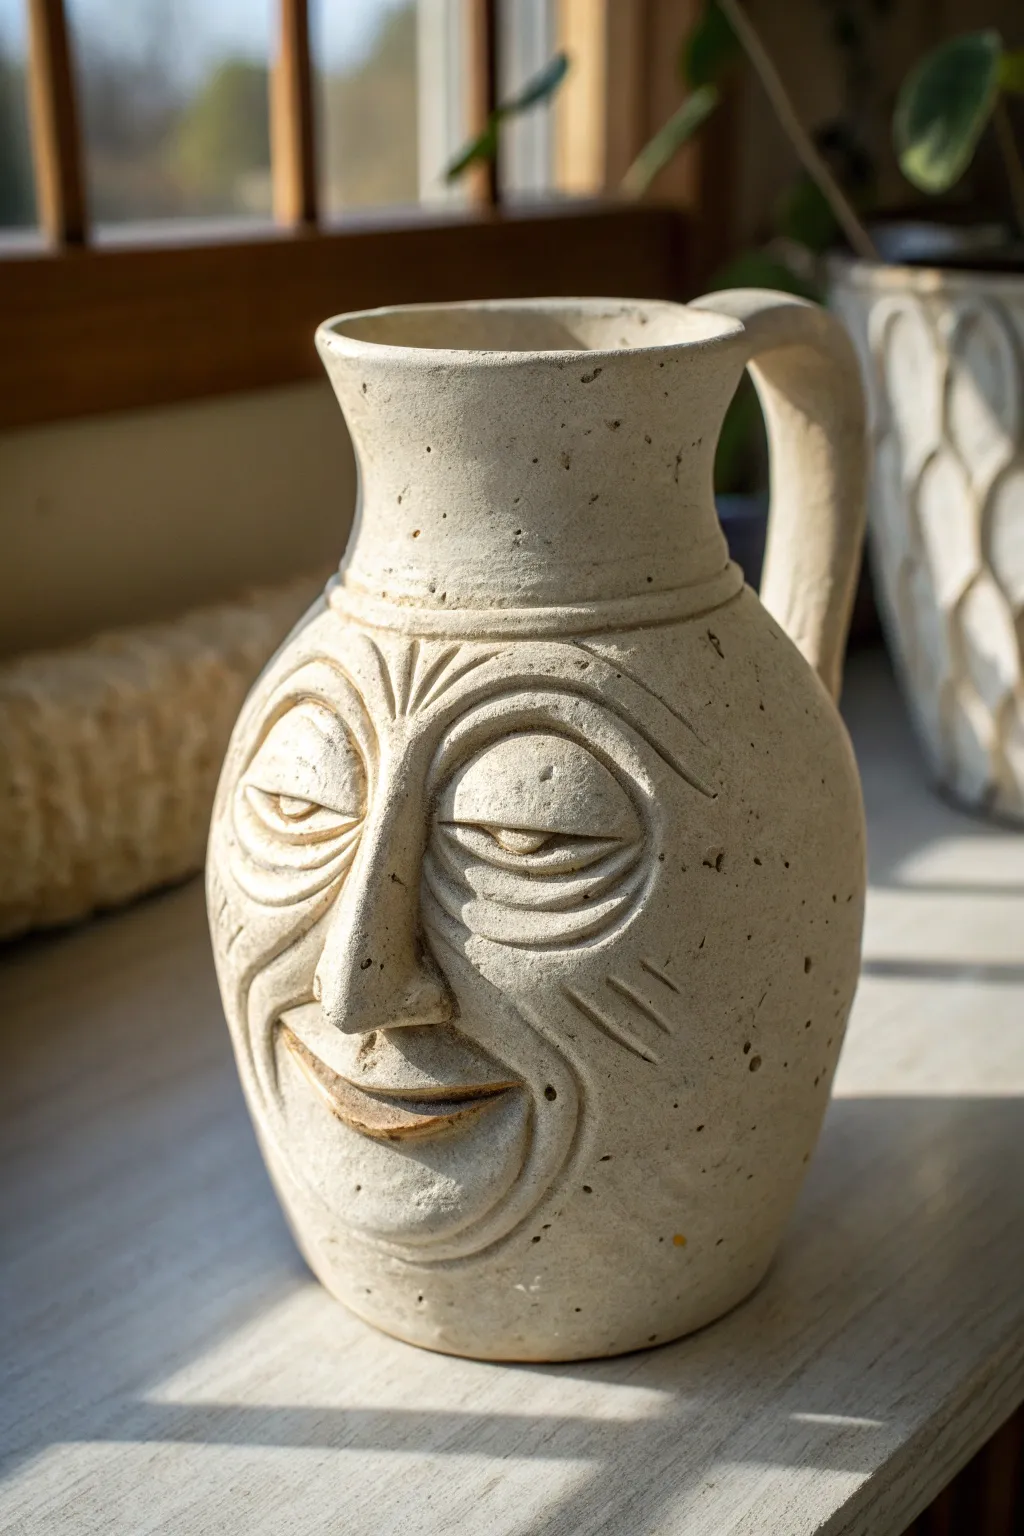
Capture a look of serene, ancient wisdom with this stylized face jug, characterized by its deep, carved furrows and heavy eyelids. The unfinished, matte texture highlights the speckled clay body, giving the piece a rustic and timeless charm.
Step-by-Step Guide
Materials
- Speckled stoneware clay (mid-fire)
- Pottery wheel (or coil/slab tools)
- Needle tool
- Wooden modeling tools (various curves)
- Rib tool (metal and rubber)
- Sponge
- Score and slip mixture
- Iron oxide wash (optional)
- Clear matte glaze (optional)
Step 1: Throwing the Vessel Body
-
Center and Open:
Start by centering about 3-4 pounds of speckled stoneware clay on the wheel. Open the clay and pull the walls up to form a cylinder about 8-9 inches tall, keeping the walls even but slightly thick to support the sculpting later. -
Shape the Belly:
Using a rib tool on the inside, gently belly out the form to create a rounded, bulbous shape for the face area. Leave the cylinder slightly narrower at the top. -
Form the Neck:
Collar in the top section to create a distinct transition between the shoulder and the neck. Pull the neck upward, flaring it slightly at the rim for a classic pitcher silhouette. -
Add Texture Band:
Before removing from the wheel, use a wooden tool to press a defined indentation or ring right at the base of the neck, separating the face area from the pouring spout.
Cracks in the Face?
Thick added features like noses dry slower than the pot wall, causing cracks. Score very deeply and wrap the wet piece in plastic for 2 days to equalize moisture before unboxing.
Step 2: Sculpting the Features
-
Map the Face:
Once leather hard, lightly sketch the placement of the eyes, nose, and mouth using a needle tool. Ensure the nose is centered and the mouth curves upward. -
Build the Nose:
Score and slip a triangular wedge of clay onto the center of the face. Smooth it down, creating a long, slightly hooked bridge that flattens out near the nostrils. -
Add Eyebrow Ridges:
Apply two distinct coils of clay above the eye area. Blend the top edges smoothly into the pot wall, but leave the bottom edges sharp and prominent to create a heavy brow line. -
Form the Eyelids:
Add thick, half-moon shapes of clay below the brows for the eyelids. Carve a horizontal slit across each one to create the ‘half-closed’ sleepy look, rather than sculpting a full open eye. -
Carve the Furrows:
Using a rounded wooden modeling tool, deeply carve concentric curved lines under the eyes. These shouldn’t just be surface scratches; push into the clay to create dramatic shadows. -
Shape the Mouth:
Add a coil for the mouth and blend it onto the surface. Use a needle tool to slice a wide smile line, then press the corners deep into the cheeks. I like to tuck the ends of the lips slightly upward to enhance the grin. -
Detail the Cheeks:
Carve deep brackets (nasolabial folds) running from the nose wings down past the corners of the mouth. Add angled hatch marks on the cheeks for additional texture. -
Forehead Decoration:
Carve a fan-like pattern or vertical lines between the eyebrows, leading up toward the neck ring, to suggest furrowed concentration.
Make it Functional
Even if keeping the outside raw and unglazed for texture, pour a liner glaze inside the vessel. This makes the jug watertight and food-safe for serving liquids.
Step 3: Handle and Finish
-
Pull the Handle:
Pull a sturdy handle from a separate lug of clay. It should be thick enough to balance the visual weight of the face. -
Attach Handle:
Score and slip the back of the neck and the shoulder of the jug. Attach the handle firmly, blending the clay well at the connection points so it looks seamless. -
Refine and Clean:
Go over the entire piece with a damp sponge to soften any sharp burrs from carving, but be careful not to wash away the deep definition of the wrinkles. -
Adding Contrast:
For the look in the photo, emphasize the mouth line and eye slits by painting a very small amount of iron oxide wash into the deepest crevices, wiping away any excess on the surface. -
Firing:
Bisque fire the piece. For the finish shown, leave the exterior unglazed to show off the raw clay texture, or apply a very thin, matte clear glaze before the final glaze firing to cone 5/6.
Place your finished jug near a window where shadows can play across the deep carving lines throughout the day
Mustache and Beard Texture Face Jug
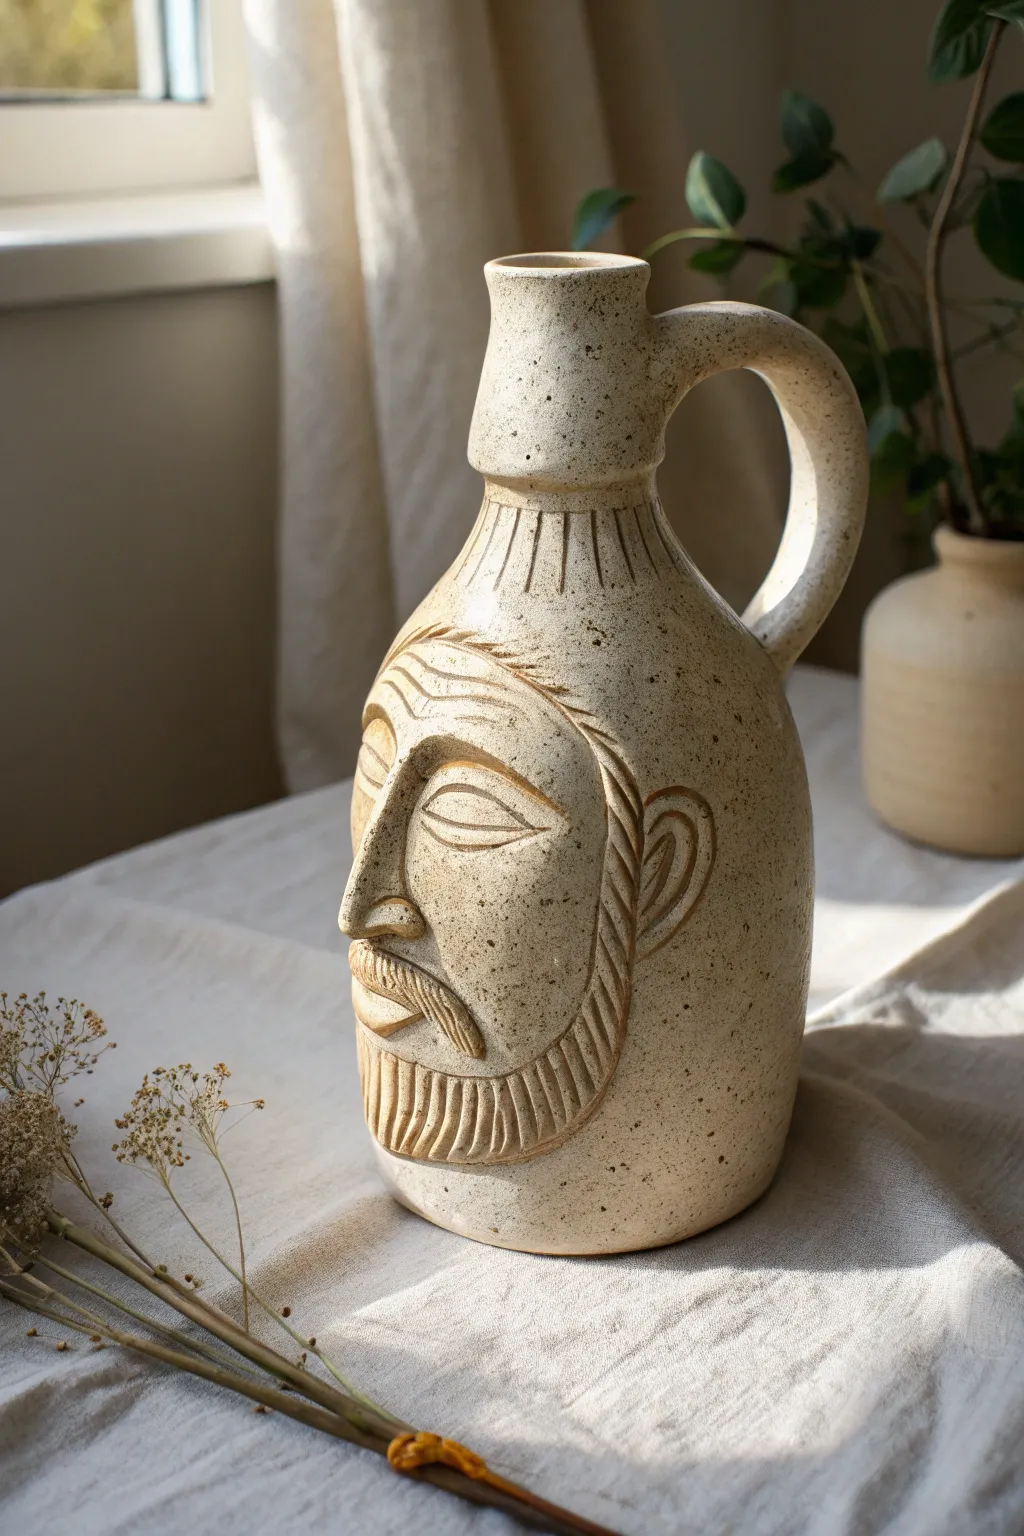
This project transforms a classic ceramic form into a character-filled vessel featuring stylized facial features and intricate textures. The result is a stoneware-look piece with a calm, weathered expression that adds warmth to any shelf.
Step-by-Step Tutorial
Materials
- Stone-colored polymer clay or air-dry clay (approx. 2-3 lbs)
- Pottery tools (needle tool, loop tool, rib)
- Rolling pin
- Slip (water mixed with clay bits) or liquid clay adhesive
- Sponge
- Wire cutter
- Canvas mat or work surface
- Kiln (if using stoneware clay) or sealant (if using air-dry)
Step 1: Forming the Base Vessel
-
Roll the Base Slab:
Begin by rolling out a medium-thick slab of clay, roughly 1/4 inch thick. Cut a rectangle that will form the cylinder of the jug’s body and a circle for the base. -
Construct the Cylinder:
Score and slip the edges of your rectangle. Stand it up and wrap it into a cylinder, pressing the scored ends together firmly to create a seam. Smooth the seam inside and out. -
Attach the Bottom:
Score and slip the bottom edge of the cylinder and the outer edge of your circular base. Join them together, using a wooden modeling tool to blend the clay upward from the base onto the wall. -
Shape the Shoulder:
Gently collar the clay inward near the top to create the sloping shoulder of the jug. I like to do this slowly, rotating the piece constantly to keep it symmetrical. -
Create the Neck:
Add a smaller coil or cylinder of clay to the top opening to form the narrow neck. Flare the lip slightly outward at the very top for a classic spout look.
Crack Control
If the handle pulls away during drying, wrap the joint in wet paper towels and cover the whole piece in plastic for 24 hours to re-hydrate and re-join.
Step 2: Sculpting the Face
-
Mark Feature Placement:
Lightly trace where the nose, eyes, and beard will go using a needle tool. The nose should be prominent and central on the belly of the jug. -
Build the Nose:
Form a triangular wedge of clay. Score and slip the attachment area, then press the nose onto the jug. Blend the edges seamlessly into the surrounding surface. -
Carve the Eyes:
Unlike many face jugs with bulging eyes, this style uses relief carving. Outline almond shapes and carve away the clay around the eyelids to make them stand out. -
Add the Moustache:
Roll two small taper coils. Attach them under the nose, curving them downwards. Use a small tool to press vertical lines into them for hair texture. -
Define the Beard Outline:
Roll a long, thin coil to create the perimeter of the beard and hairline. Attach this line from the ear area down to the chin, creating a distinct frame for the face. -
Texture the Beard:
Using a fine loop tool or a texture comb, carve vertical, rhythmic lines inside the beard area to simulate thick, groomed facial hair. -
Sculpt the Ear:
Add a ‘C’ shaped coil on the side of the head. Press an indentation into the center to suggest the inner ear structure.
Step 3: Handle texturing & Finishing
-
Pull the Handle:
Pull or roll a thick coil of clay for the handle. It needs to be sturdy enough to visual balance the heavy neck. -
Attach the Handle:
Score and slip the back of the neck and the shoulder area. Attach the handle in a high arch, smoothing the connection points thoroughly for strength. -
Add Speckling:
If your clay body isn’t naturally speckled, flick iron oxide or dark watered-down acrylic paint (if using air dry) onto the surface with an old toothbrush. -
Final Surface Smoothing:
Use a slightly damp sponge to wipe down any sharp burrs created during carving, especially around the beard lines. -
Drying and Firing:
Let the piece dry slowly under loose plastic to prevent the handle from cracking. Once bone dry, fire according to your clay’s instructions.
Antique Wash
After firing, apply a dark brown oxide wash and wipe it back with a sponge. The dark color will stay in the beard grooves, highlighting your texture.
Place your finished jug near a window to let natural light reveal the depth of your carving


The Complete Guide to Pottery Troubleshooting
Uncover the most common ceramic mistakes—from cracking clay to failed glazes—and learn how to fix them fast.
Ears-as-Handles Face Jug
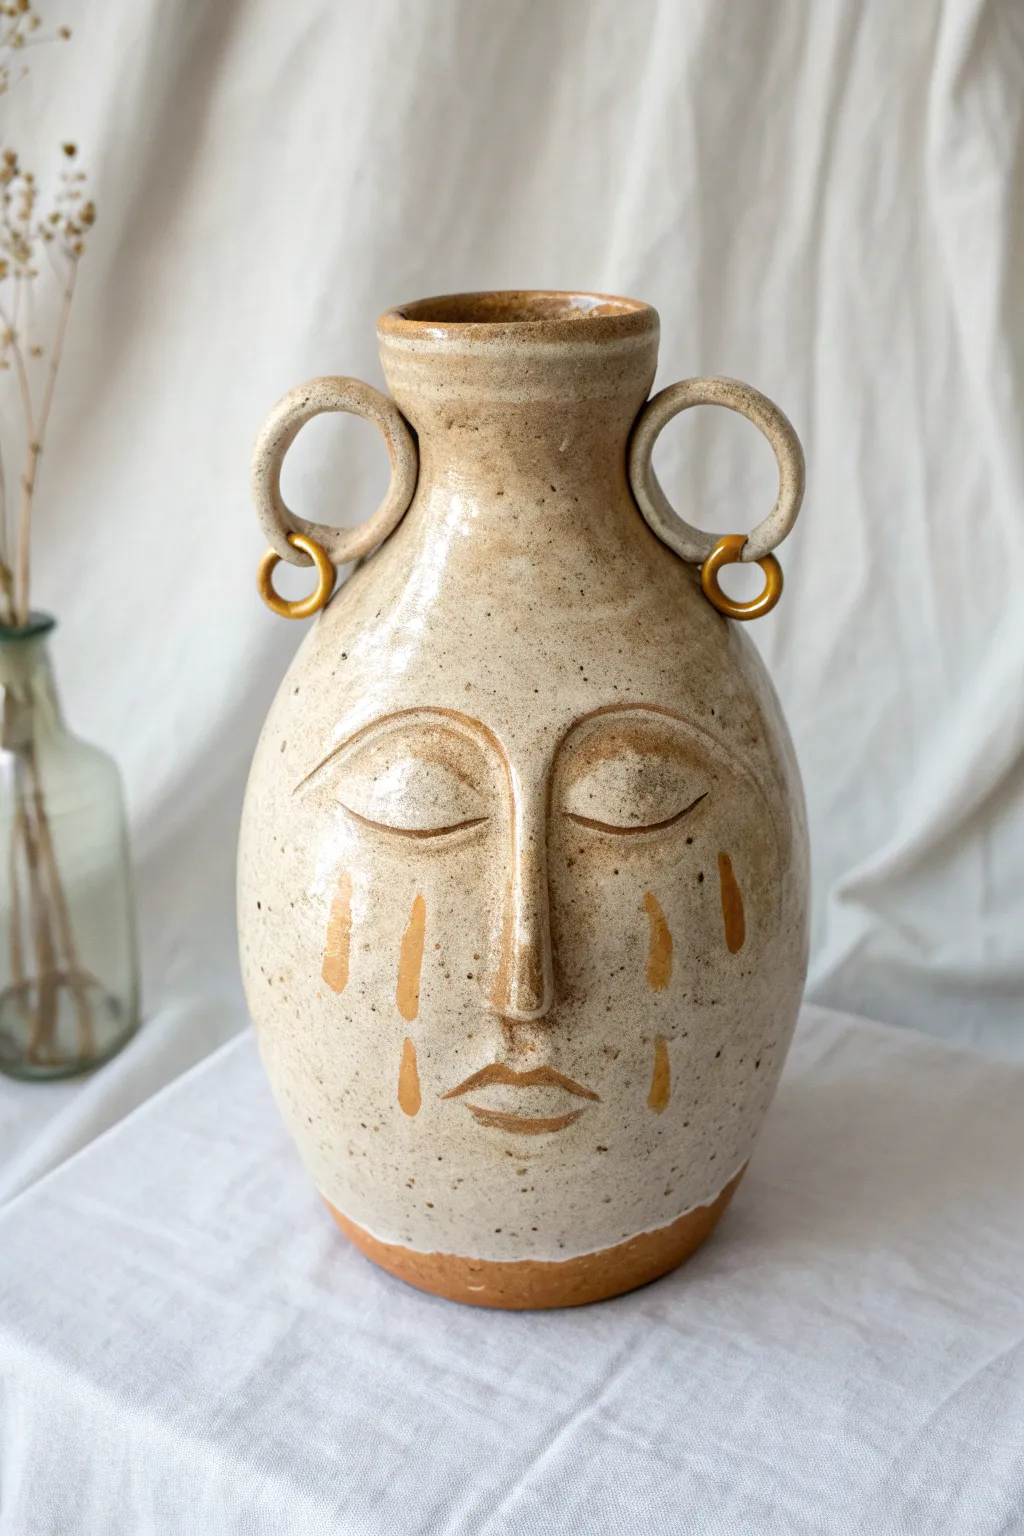
This soulful, sculptural vessel combines a serene, closed-eye visage with a unique double-loop handle design. It features a speckled cream glaze contrasted by warm amber “teardrops” and playful hanging rings for a touch of movement.
How-To Guide
Materials
- Stoneware clay (smooth or lightly groggy body)
- Pottery wheel (or coil building tools)
- Needle tool
- Loop trimming tools
- Wooden modeling tool
- Sponge
- Cream/White speckled glaze (glossy)
- Amber/Iron oxide wash or underglaze
- Gold luster (optional for ring accents)
- High-temp hanging wire (Nichrome) or extra clay for rings
Step 1: Forming the Body
-
Center and throw:
Start with about 3-4 lbs of clay on the wheel. Center it firmly and open the vessel, pulling up a tall cylinder that will become the neck and body. -
Shape the belly:
Applying pressure from the inside, gently belly out the clay to create a wide, ovoid shape for the face area. You want a smooth, continuous curve that tapers back in at the shoulder. -
Collar the neck:
Collar the clay inwards at the top to create a defined, narrow neck, then flare the rim slightly outward for a classic vase lip. Compress the rim well to prevent cracking. -
Trim the foot:
Once the piece is leather hard, trim a neat foot ring at the bottom, removing excess weight from the base.
Stuck Rings?
If you’re worried about the hanging rings fusing to the handle during firing, place a tiny dab of alumina hydrate or kiln wash between the ring and the handle as a barrier.
Step 2: Sculpting the Face
-
Map the features:
On the belly of the pot, lightly sketch where the nose, eyes, and mouth will sit using a needle tool. Symmetry is key here for that serene look. -
Add the nose:
Score and slip a small, long coil of clay onto the center of the face. Smooth it down onto the surface with a wooden tool, blending the edges completely until the nose emerges seamlessly from the wall. -
Define the eyes:
Instead of adding clay, use your modeling tool to carve and press into the clay body. Outline two large arches for the brow bone and a lower curve for the closed eyelids. -
Refine the mouth:
Add a tiny coil for the lips, then sculpt them into a gentle bow shape. Use a fine tool to define the line between the lips.
Precious Metal Accent
For extra luxury, apply a third-fire gold luster specifically to the hanging rings and the teardrops. This requires a third, lower-temperature firing but adds incredible shine.
Step 3: Handles & Rings
-
Pull the handles:
Pull two medium-sized strap handles. Curve them into circles (donuts) and let them stiffen slightly until they can hold their shape. -
Attach the handles:
Score and slip the sides of the neck. Attach the circular handles vertically so they look like large ears or hoops. Secure them firmly and smooth the connection points. -
Create the hanging rings:
Roll two very small coils and form them into rings. These need to be interlocked with the main handles before you seal them shut. Carefully loop them through the bottom of the main handles and join the ends.
Step 4: Glazing & Decoration
-
Bisque fire:
Slowly dry the piece to avoid cracks around the added features, then bisque fire to cone 04 (or your clay’s specific temperature). -
Wax resist:
Apply wax resist to the very bottom foot ring and specifically over the hanging rings so they don’t fuse to the handles during firing. -
Apply base glaze:
Dip or pour a speckled cream glaze over the entire interior and exterior. I usually wipe back the glaze just slightly on the high points of the face (nose bridge, brows) to highlight the texture. -
Paint the tears:
Using an amber-colored glaze, stain, or iron oxide wash, paint vertical drips under the eyes to simulate golden tears. Add touches of this color to the lips and eyebrows for definition. -
Final Fire:
Glaze fire the piece to the maturity temperature of your clay and glaze (typically Cone 5 or 6 for stoneware).
Now you have a stunning, emotionally resonant piece of pottery with just the right amount of whimsy
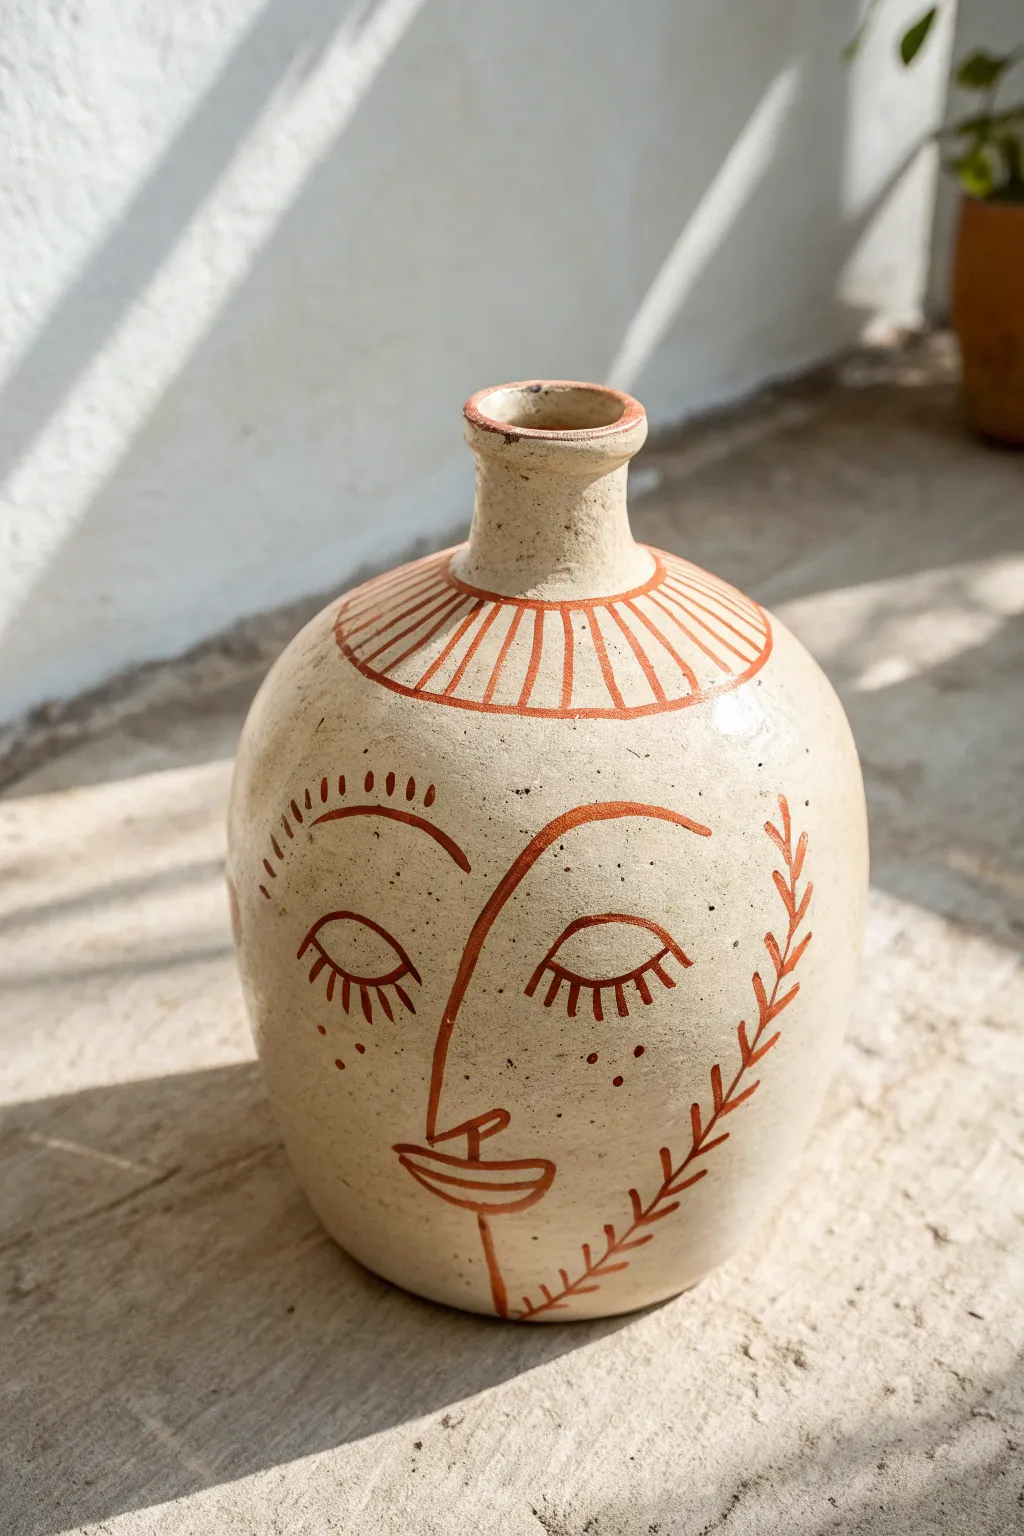
Spout-as-Nose Face Jug
This elegant face jug marries utility with modern art, featuring a calming teal glaze and stylized, incised facial features. The design uses the natural shape of the vessel to suggest a head, with simple line work creating a peaceful, contemplative expression.
Step-by-Step Tutorial
Materials
- Stoneware clay (speckled or buff)
- Pottery wheel
- Throwing tools (sponge, rib, wire cutter)
- Needle tool
- Trimming tools
- Carving tool (small loop or sgraffito tool)
- Teal/Turquoise gloss glaze
- Wax resist
- Paintbrush for wax
- Kiln
Step 1: Throwing the Form
-
Center constraints:
Begin by centering about 2-3 pounds of stoneware clay on the wheel. You want enough mass to create a bulbous body and a tall neck. -
Open and pull:
Open the clay and pull the walls into a cylinder. As you pull, gently shape the belly of the pot outward to create a rounded, spherical base. -
Collar the neck:
Once the body volume is set, collar the top third of the clay inward significantly to form a long, narrow neck. Do this gradually to avoid twisting the clay. -
Form the rim:
Flare the top rim slightly outward. Using your finger or a throwing stick, gently pull a spout on the side opposite where the handle will go. -
Refine the shape:
Use a metal rib to smooth the exterior walls, removing throwing lines from the belly where the face will be carved to ensure a clean canvas.
Uneven Glaze Lines?
If wax resist feels tricky, you can cover the whole piece in glaze and then use a distinct ‘sgraffito’ tool to scratch the glaze out of the grooves before firing.
Step 2: Trimming and Handles
-
Leather hard stage:
Let the piece dry to a leather-hard state. I like to check firmness by pressing a fingernail slightly near the base; it should leave a mark but not feel sticky. -
Trim the foot:
Secure the pot upside down on the wheel. Trim the bottom to create a defined foot ring, leaving a portion of raw clay exposed at the bottom for that two-tone look seen in the photo. -
Pull the handle:
Pull a strap of clay for the handle. It should be elegant and substantial enough to support the full jug. -
Attach the handle:
Score and slip the contact points on the neck and shoulder. Attach the handle, blending the clay smoothly into the pot body for a seamless connection. Give it a nice, high arch.
Pro Tip: Depth of Cut
Carve deeper than you think is necessary. Glaze has a tendency to fill in shallow textures, so a bold, deep cut ensures the face remains visible after firing.
Step 3: Carving the Face
-
Sketch first:
Lightly sketch the face features with a needle tool. Place the eyebrows high on the curve of the shoulder and the mouth lower on the belly. -
Carve the lines:
Using a small loop tool or V-tip carving tool, incise the lines for the eyes, eyebrows, nose, and lips. The lines should be deep enough to hold the raw clay look later. -
Add neck details:
Carve three or four horizontal rings around the neck of the jug. This adds visual interest and separates the ‘head’ from the opening. -
Clean up:
Smooth away any burrs or crumbs of clay from your carving lines with a barely damp sponge. Let the piece dry completely. -
Bisque fire:
Load the bone-dry piece into the kiln and bisque fire it to cone 04 (or your clay body’s specification).
Step 4: Glazing and Finishing
-
Wax the features:
Using a fine brush and wax resist, carefully paint inside the carved lines of the face and the neck rings. Also, wax the bottom 1-2 inches of the vase including the foot. -
Wax the rim:
If you want the exposed clay line on the rim shown in the reference, carefully apply a thin line of wax resist to the very edge of the spout and rim. -
Apply glaze:
Dip the pitcher into a teal or turquoise gloss glaze. Alternatively, pour the glaze inside, swirl to coat, pour out, and then spray or brush the exterior. -
Wipe back:
Use a damp sponge to wipe any glaze droplets off the waxed areas (the carved lines and the base). The wax should resist the glaze, but cleaning ensures crisp lines. -
Final fire:
Fire the piece to glaze temperature (likely Cone 5 or 6). The glaze will melt around the waxed lines, leaving the raw, toasted clay color visible as the outline.
Now you have a stunning, functional piece of art ready for your table or shelf

TRACK YOUR CERAMIC JOURNEY
Capture glaze tests, firing details, and creative progress—all in one simple printable. Make your projects easier to repeat and improve.
Open Mouth Gulp Face Jug
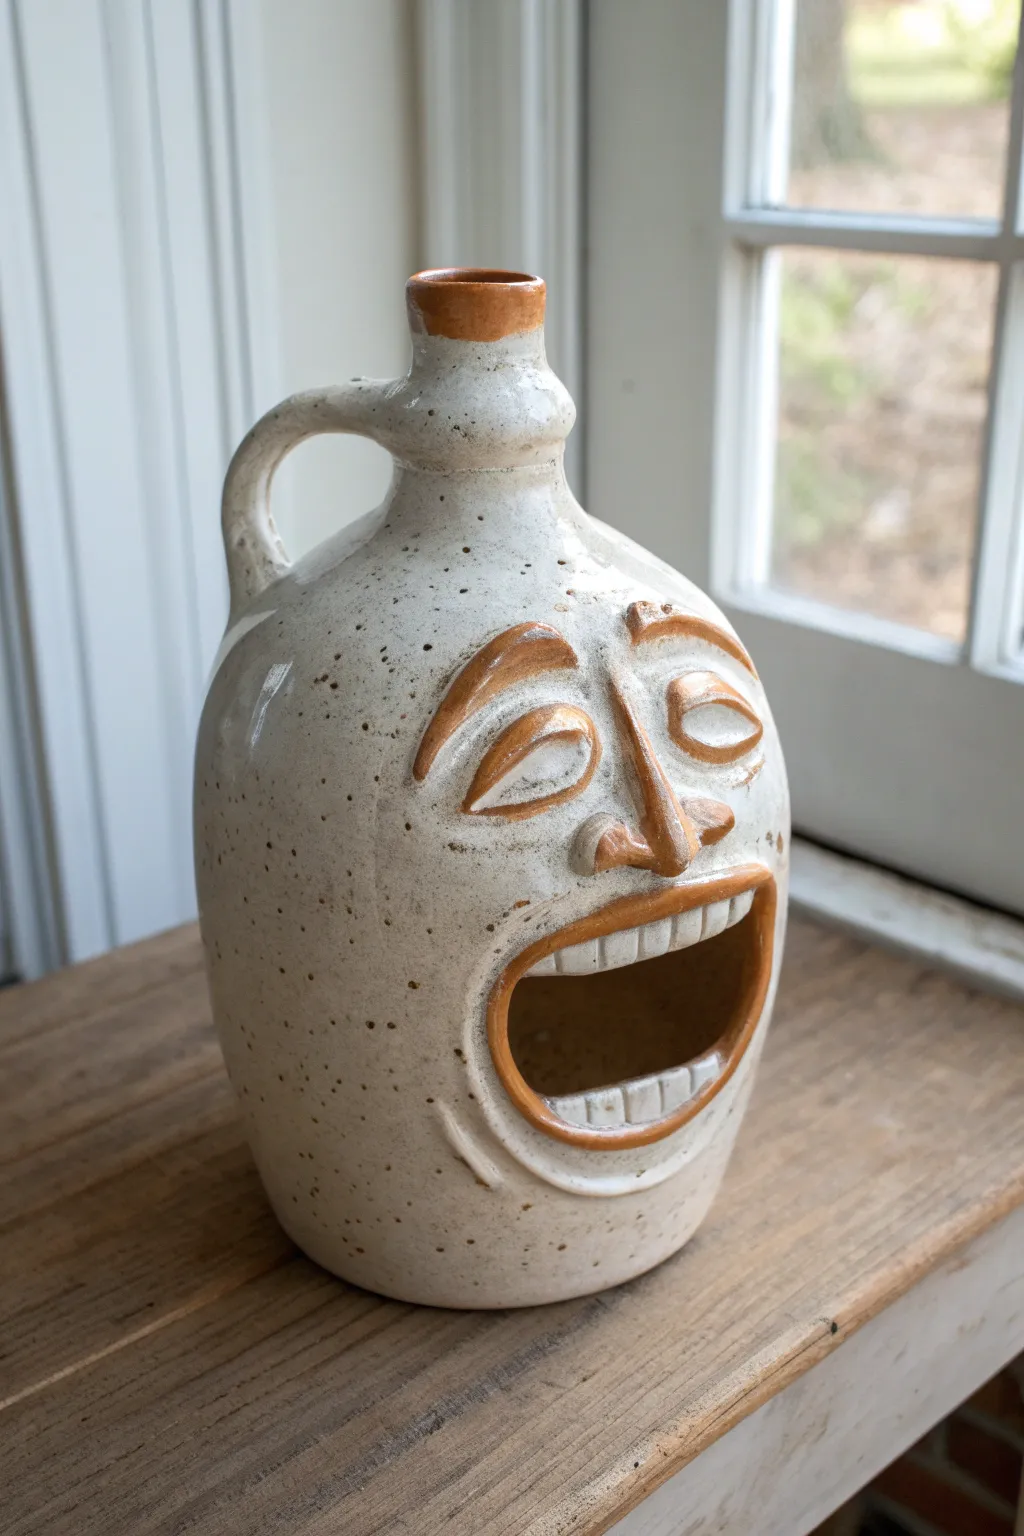
This whimsical stoneware jug features a wide, laughing mouth that doubles as a unique opening, perfect for holding dried flowers or utensils. The speckled cream glaze and contrasting brown features give it a classic folk art pottery feel that captures immediate attention.
Step-by-Step
Materials
- Stoneware clay body (medium grit, speckled if possible)
- Pottery wheel
- Throwing tools (sponge, wood rib, wire tool)
- Needle tool
- Scoring tool or serrated rib
- Slip (matching clay body)
- Wooden modeling tools
- Sponge for smoothing
- Iron oxide wash or dark brown underglaze
- Clear or speckled white stoneware glaze
- Kiln
Step 1: Throwing the Base Form
-
Center and open:
Begin by centering about 3-5 pounds of clay on your wheel to create a substantial base. Open the clay down to the bat, leaving about a half-inch thickness for the floor. -
Pull the walls:
Pull the walls up into a tall cylinder first. Aim for even thickness, as you’ll be manipulating the shape significantly. -
Create the jug shape:
Belly the form out from the inside, creating a nice, rounded shoulder. I like to collar the neck in tightly to create that distinctive narrow jug spout, ensuring the rim is slightly flared. -
Trim and dry:
Use a wood rib to refine the curve and remove throwing lines if desired. Wire the pot off the bat and let it dry to leather-hard consistency.
Crack Control
Additions like big noses dry slower than the thin jug walls. Wrap the face in plastic while leaving the rest exposed to even out the drying process.
Step 2: Sculpting the Features
-
Map out the face:
With the clay leather hard, lightly sketch where the large mouth, nose, and eyes will sit using a needle tool. Ensure the mouth is positioned centrally on the belly. -
Shape the nose:
Form a triangular wedge of clay for the nose. Score and slip the attachment area, pressing the clay firmly onto the jug. Smooth the edges into the main body so no seams show. -
Refine the bridge:
Use a modeling tool to carve out nostrils and extend the bridge of the nose upwards toward the forehead area. -
Construct the eyebrows:
Roll two thick coils of clay. Arch them dramatically above the eye area, scoring and attaching them securely. Smooth the top edge into the forehead while leaving the bottom edge defined. -
Add the eyelids:
Create almond-shaped flat pieces of clay for the closed eyelids. Attach these below the brows, smoothing them onto the face surface. -
Create the mouth opening:
Using a fettling knife or needle tool, carefully cut out the large, kidney-bean shaped opening for the mouth. Save the clay you remove. -
Form the lips:
Roll a long coil to outline the entire mouth opening. Score the rim of the cut hole and attach the coil, flattening it slightly to create a distinct lip border. -
Insert the teeth:
Form a small strip of clay to fit inside the top and bottom of the mouth opening just behind the lips. Use a tool to impress vertical lines, creating the look of individual teeth. -
Attach the handle:
Pull a traditional strap handle. Attach the top directly to the jug’s neck and the bottom to the shoulder, opposite the face. Ensure the curve has a nice, high lift.
Step 3: Glazing and Finishing
-
Bisque fire:
Allow the piece to dry completely slowly to prevent cracking around the heavy features. Bisque fire according to your clay body’s specifications. -
Apply oxide accents:
Brush iron oxide or a brown underglaze onto the eyebrows, eyelids, nose ridge, lips, and spout rim. Wipe back any excess with a damp sponge so the color highlights the texture and depth. -
Glaze application:
Dip or pour a white or cream speckled glaze over the entire piece. If you want the brown features to pop more, you can wax resist them before dipping, or simply let the glaze break over the high points. -
Final wipe:
Check the foot of the jug to ensure it is free of glaze. -
Glaze fire:
Fire the jug to the maturity temperature of your clay and glaze (typically Cone 5, 6, or 10 depending on your materials).
Functional Twist
Turn this into a specialized planter by adding small drainage holes in the back or bottom before firing, allowing water to escape while plants grow from the mouth.
Once cooled, your expressive jug becomes a lively conversation starter for any shelf or table
Two-Clay Contrast Face Jug
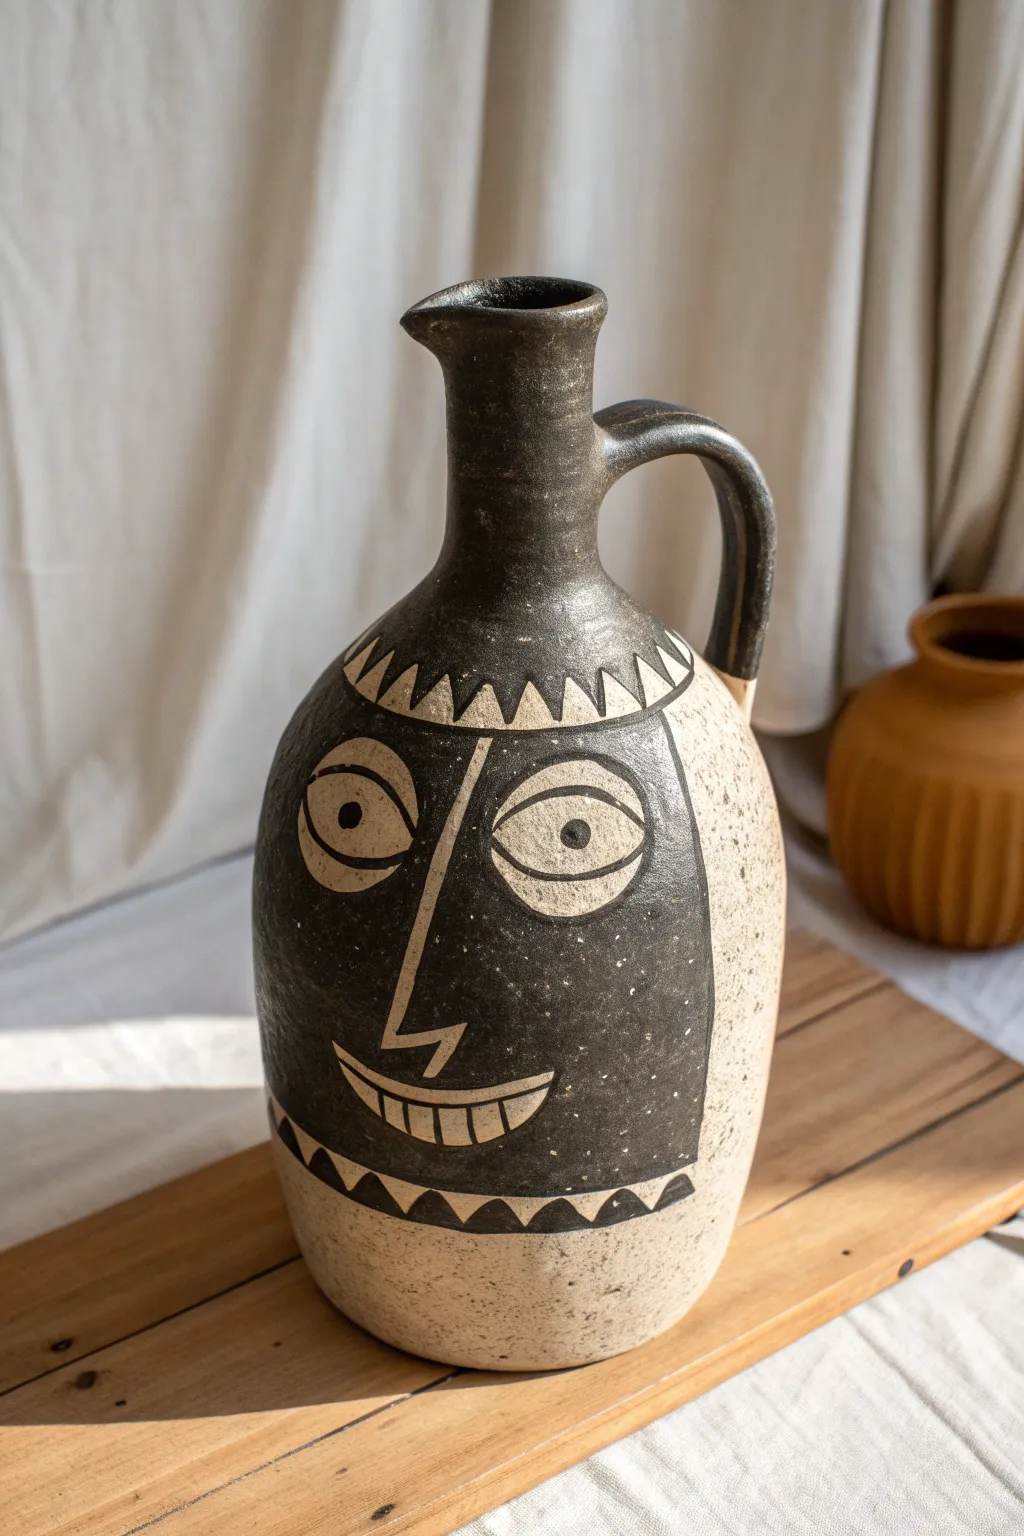
This striking vessel combines a rustic speckled clay body with a bold, sgraffito-carved face design. The graphic black-and-beige contrast gives the piece a modern, almost tribal feel while maintaining the charm of handmade ceramics.
Detailed Instructions
Materials
- Speckled stoneware clay (approx. 3-4 lbs)
- Black underglaze or black slip
- Pottery wheel (or coil building tools)
- Needle tool
- Rib tool (metal and rubber)
- Sponge
- Wire cutter
- Sgraffito carving tool (loop or stylus)
- Clear matte glaze
- Kiln
- Paintbrush (flat, wide)
Step 1: Throwing the Form
-
Center and open:
Begin with about 3 pounds of well-wedged speckled clay. Center it firmly on the wheel and open the clay, keeping the base somewhat narrow to match the jug’s profile. -
Pull the cylinder:
Pull the walls up into a tall cylinder. Don’t worry about the curves yet; focus on getting even wall thickness and height. -
Shape the belly:
Using a rib on the outside and your hand on the inside, gently push the belly of the pot outward to create a rounded, oval shape. Keep the top third of the clay thicker for the neck. -
Collar the neck:
Slowly collar (constrict) the upper portion of the clay to form a long, narrow neck. This requires steady hands and a bit of water to prevent twisting. -
Form the spout:
Refine the rim. While the wheel is stopped or moving very slowly, gently pull one side of the rim outward with your finger to create a small pouring spout. -
Trim and dry:
Cut the pot from the wheel with a wire tool. Allow the piece to dry to a leather-hard state so it’s firm enough to handle without deforming.
Clean Lines Only
If your black slip smears into the beige clay while carving, your clay is too wet. Let it dry 30 more mins; the carved crumbs should flake off cleanly.
Step 2: Handle and Prep
-
Pull a handle:
Take a slug of fresh clay and pull a strap-style handle. It should be long enough to connect the neck to the shoulder. -
Attach the handle:
Score and slip the attachment points on the neck and shoulder. Firmly press the handle on, smoothing the seams seamlessly. Curve it gracefully as shown in the photo. -
Refine the surface:
Before decorating, ensure the exterior is smooth. Wipe it down with a slightly damp sponge to remove any grog or rough patches that might interfere with carving.
Variant Idea
Swap the colors! Use a dark chocolate clay body and apply white slip for the face area to create a reverse-contrast effect that looks like a photo negative.
Step 3: Decoration and Glazing
-
Map the design:
Lightly sketch the outline of the face block with a needle tool. You need a large rectangular area that wraps around the front, spanning from the shoulder to the lower belly. -
Apply the black field:
Using a flat brush, apply 2-3 even coats of black underglaze or slip inside your mapped specific area. Cover the neck and spout entirely in black as well. -
Let it firm up:
Allow the underglaze to dry until it’s no longer tacky but still leather-hard. This is the sweet spot for crisp carving. -
Carve the border:
Use your sgraffito tool to carve a row of triangles along the top edge (the shoulder) and the bottom edge of the black face rectangle. Carve deeply enough to reveal the raw beige clay underneath. -
Carve the features:
Carve the large, oval eyes with pupils. I find it helpful to start with the outlines and then clear out the larger white spaces inside the eyes. -
Add nose and mouth:
Carve a long nose line connecting directly to one eyebrow. Add a wide, crescent smile and carve vertical lines to suggest teeth. -
Bisque fire:
Allow the jug to dry completely (bone dry) before loading it into the kiln for a bisque firing. -
Glaze and final fire:
Dip or brush a clear matte glaze over the entire piece. This will seal the clay and make the black underglaze pop without adding unwanted shine. Fire to the final temperature required for your clay body.
Place your finished jug on a shelf where the light can catch the subtle texture of the speckled clay
Freckles, Scars, and Face Marks Jug
This serene jug combines modern simplicity with ancient character, featuring a stylized face carved directly into creamy, speckled clay. The gentle features and scattered ‘freckles’ give it a soulful expression perfect for displaying dried stems.
Step-by-Step Tutorial
Materials
- Speckled stoneware clay (white or cream)
- Pottery wheel
- Throwing tools (rib, sponge, wire cutter)
- Needle tool
- Small loop tool or carving tool
- Sponge for smoothing
- Rolling pin (for the handle)
- Serrated rib or scoring tool
- Slip (clay slurry)
- Iron oxide wash or brown underglaze
- Orange underglaze (for cheeks)
- Small detail brush
- Clear matte or satin glaze
Step 1: Throwing the Form
-
Center and Open:
Begin with about 3-4 pounds of speckled clay on your wheel. Center it firmly, then open the clay, keeping a sturdy floor thickness for the base. -
Pull the Cylinder:
Pull the walls up into a tall cylinder. As you pull, start to belly out the middle section to create a rounded, oval shape, while keeping the neck narrower. -
Shape the Shoulders:
Collar the clay inwards near the top to form distinct shoulders, leading into a narrower neck. Use a rib to smooth the curve of the body so it feels organic and continuous. -
Finish the Rim:
Refine the rim so it is smooth and slightly flared. Use your finger to gently pull one side outward to create a subtle pouring spout. -
Add Texture:
While the wheel is spinning slowly, press a tool or your finger gently into the neck to create two distinct horizontal ridges or rings.
Clay Choice Matters
Use a clay body with aggressive grog or iron speckles. The natural spots act as the ‘freckles,’ saving you painting time later.
Step 2: Sculpting the Features
-
Trimming and Drying:
Wire cut the pot from the wheel and let it dry to a leather-hard state. Once firm, trim the bottom to create a neat foot ring. -
Pulling the Handle:
Pull a strap handle from a lump of clay or roll a coil and flatten it slightly. Let it stiffen until it holds a curve without drooping. -
Attach the Handle:
Score and slip the attachment points on the neck and shoulder. Press the handle on firmly, smoothing the seams so it looks like it grew out of the pot. Create a high, elegant arch. -
Map the Face:
Using a needle tool, lightly sketch the position of the nose and eyes on the flattest part of the jug’s belly. Symmetry is less important here than expression. -
Sculpt the Nose:
Roll a small coil of clay for the nose. Score and slip the area, then attach the coil vertically. Blend the edges smoothly into the face, leaving the bridge distinct and prominent. -
Carve the Eyes:
Instead of adding clay, use a needle tool or small loop tool to carve the eye shapes. Outline distinct semi-circles for the eyelids and lower eyes, carving just deep enough to catch glaze later. -
Refine the Lines:
Go over your carved lines with a damp sponge or soft brush to remove any sharp clay burrs. The lines should feel soft, not jagged. -
Create the Smile:
Carve a small, serene smile below the nose. Keep it simple—just an outline of the lips is enough to convey the mood.
Step 3: Decorating and Firing
-
Highlight the Lines:
Using a very fine brush, paint an iron oxide wash or brown underglaze into the carved lines of the eyes, nose bridge, and mouth. Wipe away excess with a damp sponge so the color remains only in the recesses. -
Add Cheek Spots:
Dip a brush or your fingertip into orange underglaze and dab two perfectly round circles on the cheeks for a pop of color. -
Bisque Fire:
Let the piece dry completely (bone dry) before loading it into the kiln for a bisque fire (usually cone 04). -
Glazing:
Once bisque fired, coat the entire piece in a clear matte or satin glaze. This will seal the clay and make the speckles pop without obscuring your carving work. -
Final Firing:
Fire the piece to the maturity temperature of your clay body (likely Cone 5 or 6 for stoneware). Let the kiln cool naturally before unloading.
Lines Looking Messy?
If oxide smears on the face during wiping, wait for the mistake to dry, then gently sand it off. Don’t scrub wet clay or it will blur.
Place your finished jug near a window where the light can play across the carved features
Drippy Glaze Tears Face Jug
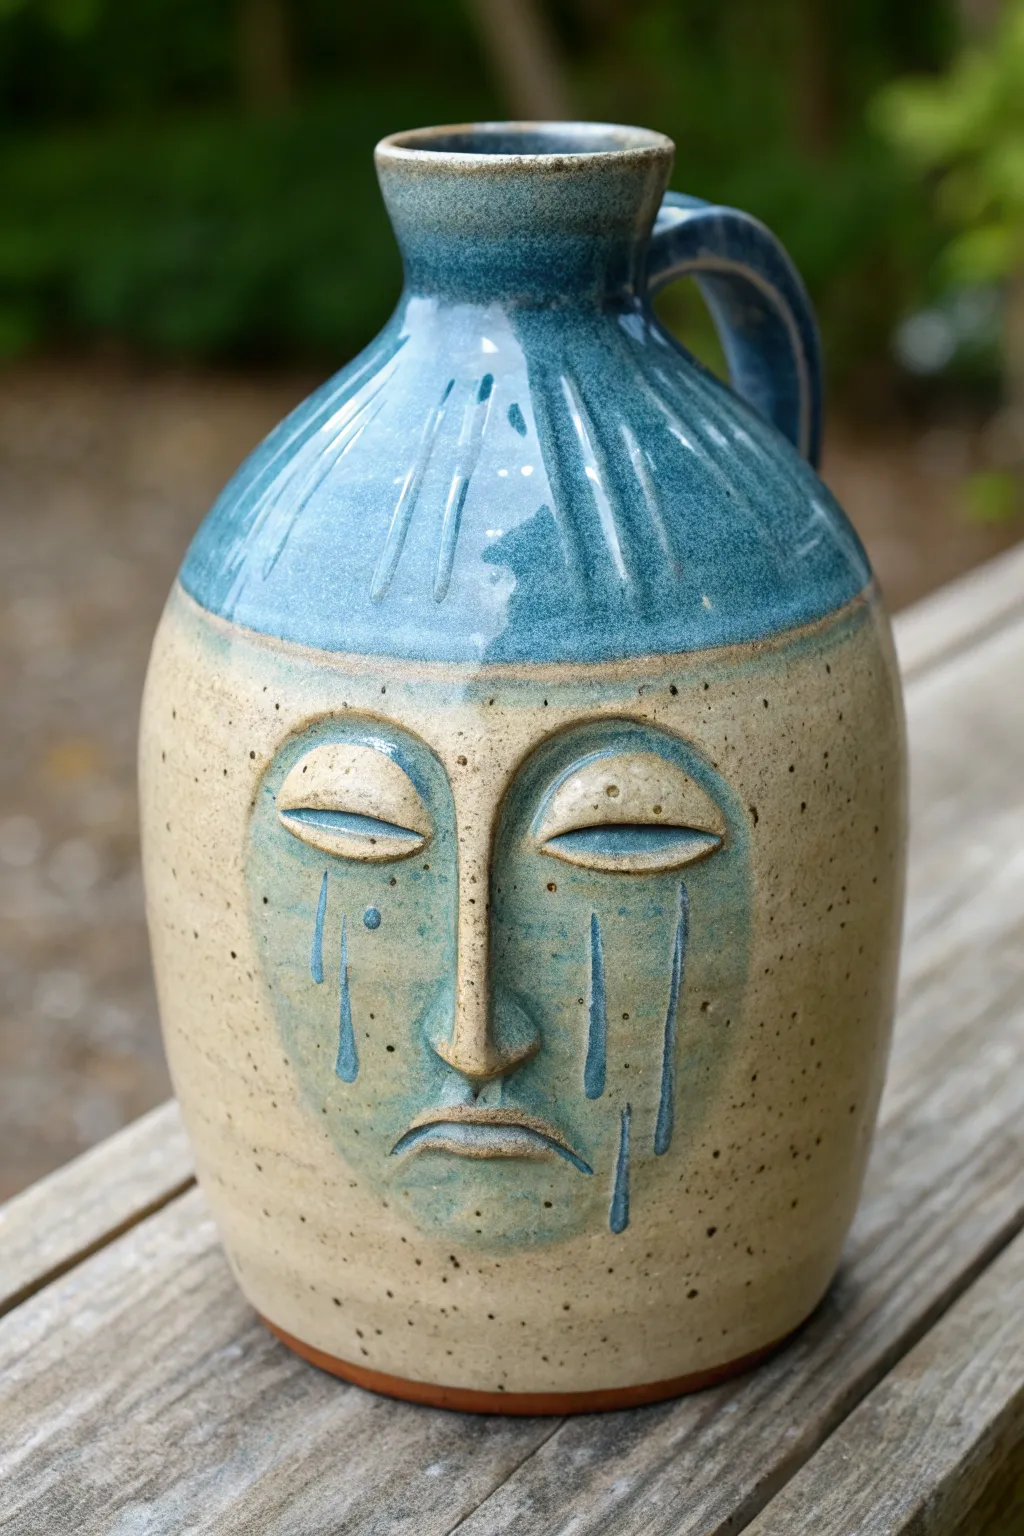
This emotive face jug captures a quiet melancholy with its sculpted, downcast features and stylized glaze ‘tears’ tracking down the cheeks. The dual-tone effect, combining a speckled oatmeal clay body with a glossy blue glaze that emphasizes the facial structure, creates a striking piece perfect for displaying on a rustic wooden shelf.
Step-by-Step
Materials
- Stoneware clay (speckled or oatmeal variety)
- Pottery wheel
- Throwing tools (sponge, wire, rib)
- Needle tool
- Modeling tools (wooden knife, small loop tool)
- Score and slip
- Sponge for smoothing
- Glossy teal-blue cone 6 glaze
- Clear matte glaze (optional)
- Wax resist
- Small paintbrush
Step 1: Throwing the Form
-
Base Preparation:
Begin by centering about 3-4 pounds of speckled stoneware clay on the wheel. Open up the center and pull the floor flat, establishing a base width of about 5 inches. -
Pulling the cylinder:
Pull the walls up into a tall, even cylinder. Keep the walls medium-thick (about 1/4 to 3/8 inch) to support the later addition of facial features without warping. -
Collaring the neck:
Slowly collar in the top third of the cylinder to create the jug shape. Bringing the clay in requires steady hands and plenty of lubrication—don’t rush this or the clay may buckle. -
Refining the spout:
Form a distinct, slightly flared rim at the top. I like to use a chamois cloth on the rim to make it incredibly smooth and durable. -
Trimming and drying:
Cut the jug from the wheel and let it dry to a solid leather-hard state. It needs to be firm enough to handle the sculpting pressure.
Glaze Running Too Much?
If your glaze runs too aggressively, apply it thinner near the bottom of the tear tracks. You can also add a ‘catch’ line or slightly undercut the tear end so the glaze pools there instead of running off.
Step 2: Sculpting the Face
-
Mapping features:
Lightly trace the outline of the face on the belly of the jug using a needle tool. Mark the positions for the eyebrows, nose, and mouth. -
Adding clay coils:
Roll out small coils of clay. Score and slip the marked areas, then attach the coils to build up the eyebrows/upper eyelids, the nose bridge, and the lips. -
Shaping the eyes:
Smooth the clay into the pot’s surface to look organic. For the eyes, sculpt heavy, half-moon eyelids that appear closed or downcast. Don’t crave open eyeballs; the closed lid look is key to this design. -
Defining the nose:
Blend the nose bridge seamlessly up into the forehead area. Keep the nose long and narrow to exaggerate the sorrowful expression. -
Forming the mouth:
Sculpt the mouth in a distinct frown. Add a small coil for the bottom lip and press the corners of the mouth downward deeply to create shadow. -
Carving tears:
Instead of adding clay for tears, carve shallow, irregular channels trailing down from the eyes. These channels will help guide the glaze later. -
Adding the handle:
Pull a strap handle and attach it to the back of the neck and shoulder. Ensure the connection points are well-blended.
Add Dimension
Use an iron oxide wash on the bare clay areas before glazing. Wipe it back with a sponge so it stays only in the clay pores, darkening the speckles and giving the ‘skin’ an aged, antique appearance.
Step 3: Decoration and Glazing
-
Rim texture:
While the clay is still leather hard, use a modeling tool to press vertical indentations around the shoulder area, radiating down from the neck. -
Bisque fire:
Allow the piece to bone dry completely, then bisque fire it according to your clay body’s specifications. -
Wax resist application:
Apply wax resist to the bottom of the jug and specifically over the lower face area where you want the bare clay to show, leaving the carved tear channels unwaxed if possible, or precise paint them later. -
Dipping the top:
Hold the jug by the foot and dip the top third into the glossy teal-blue glaze. Let the glaze cover the neck, handle, and the shoulder texture. -
Painting the face mask:
Using a brush, carefully apply the same blue glaze to the sculpted face area—the eyes, nose, mouth—and fill in the tear tracks. Leave the rest of the cheek and jaw area as bare clay. -
Refining the drip:
Use a detail brush to add a little extra dollop of glaze at the bottom of the tear tracks to encourage a specific drip during firing. -
Cleanup:
Wipe away any stray glaze specks from the raw clay sections with a damp sponge to keep the speckled surface clean. -
Final firing:
Fire the jug to cone 6 (or your glaze’s maturity temperature). The heat will melt the blue glaze, allowing it to pool in the recesses of the face.
This solemn guardian serves as a beautiful reminder that there is art to be found even in the quietest moments of emotion
Scribbly Slip Face Jug
Capture the essence of abstract line art with this charming ceramic project that transforms a simple bottle form into a whimsical character. Using a warm terracotta underglaze on speckled clay creates an earthy, ancient feel while keeping the expression playful and modern.
Detailed Instructions
Materials
- Speckled stoneware clay (approx. 2-3 lbs)
- Pottery wheel or coil-building tools
- Terracotta colored underglaze or slip
- Fine-point liner brush (size 0 or 1)
- Clear matte glaze
- Sponge
- Needle tool
- Rib tool
- Wire cutter
- Kiln access
Step 1: Forming the Vessel
-
Prepare the clay:
Begin by thoroughly wedging about 2 to 3 pounds of speckled stoneware clay to remove air bubbles and ensure a uniform consistency. -
Center and open:
Center your clay on the pottery wheel. Open up the ball, pulling the floor out to be about 3-4 inches wide, creating a stable base for your bottle shape. -
Pull the walls:
Pull the walls upward into a cylinder first. Ensure you leave slightly thicker walls at the bottom to support the belly of the jug. -
Shape the belly:
From the inside, gently push outward to create a rounded, bulbous belly shape. Use a rib tool on the outside to smooth the curve and remove throwing lines if you want a cleaner canvas. -
Collar the neck:
Gently collar the top inward to narrow the opening. Do this gradually to avoid buckling the clay, pulling up slightly after each collaring motion to elongate the neck. -
Refine the rim:
Create a distinct, slightly flared rim at the very top. This adds visual weight and creates a stopping point for your future decoration. -
Leather hard stage:
Cut the pot off the wheel and allow it to dry slowly to a distinct leather-hard stage. The surface needs to be firm enough to accept brushwork without absorbing water too instantly.
Step 2: Painting the Face
-
Sketch loosely:
Before committing with underglaze, I prefer to very lightly sketch the main lines with a dull pencil. The graphite will burn off in the kiln, leaving just your guide marks. -
Mix the underglaze:
Dilute your terracotta underglaze slightly with water until it reaches an inky, fluid consistency that flows easily off a liner brush. -
paint the neckline:
Start by painting a ring around the shoulder of the pot. From this ring, paint vertical radiating lines up toward the neck, creating a decorative collar effect. -
Draw the nose line:
Using a confident, continuous stroke, paint the long, curved line that forms the bridge of the nose, extending all the way from the forehead area down to the nostrils. -
Add the eyes:
Paint two large, sleepy semi-circles for eyelids. Add long, exaggerated vertical lashes underneath the eyelids for that distinct ‘closed eye’ look. -
Define the brows:
Create eyebrows using two distinct styles: one simple arched line on the right, and a series of short, dashed lines on the left for asymmetrical character. -
Lips and branch:
Paint a simple, almond-shaped mouth with a line through the center. From the chin, draw a stem line traveling upward along the cheek, adding small V-shaped leaves. -
Freckles and details:
Dip just the tip of your brush and dot a few freckles on the cheeks to balance the negative space.
Brush Control Trick
Rest your pinky finger on the dry surface of the pot while you paint. It acts as an stabilizer, preventing shaky lines on the curved surface.
Step 3: Firing and Glazing
-
Bisque fire:
Once the piece is bone dry, bisque fire it in the kiln (usually to Cone 04) to harden the clay and set the underglaze decoration. -
Clear glaze application:
Apply a thin coat of clear matte glaze over the entire piece. A matte finish is crucial here to keep the natural, stone-like texture of the speckled clay visible. -
Final firing:
Load the kiln for the final glaze firing (temperature depends on your specific clay and glaze, typically Cone 5 or 6 for stoneware). Ensure the foot is wiped clean of glaze.
Level Up: Sgraffito
Paint a solid patch of underglaze first, let it dry to leather hard, and carve the face lines *through* it to reveal the speckled clay beneath.
Now you have a charismatic vessel ready to hold a few dried stems or simply smile from your shelf
Mini Face Jug Collection
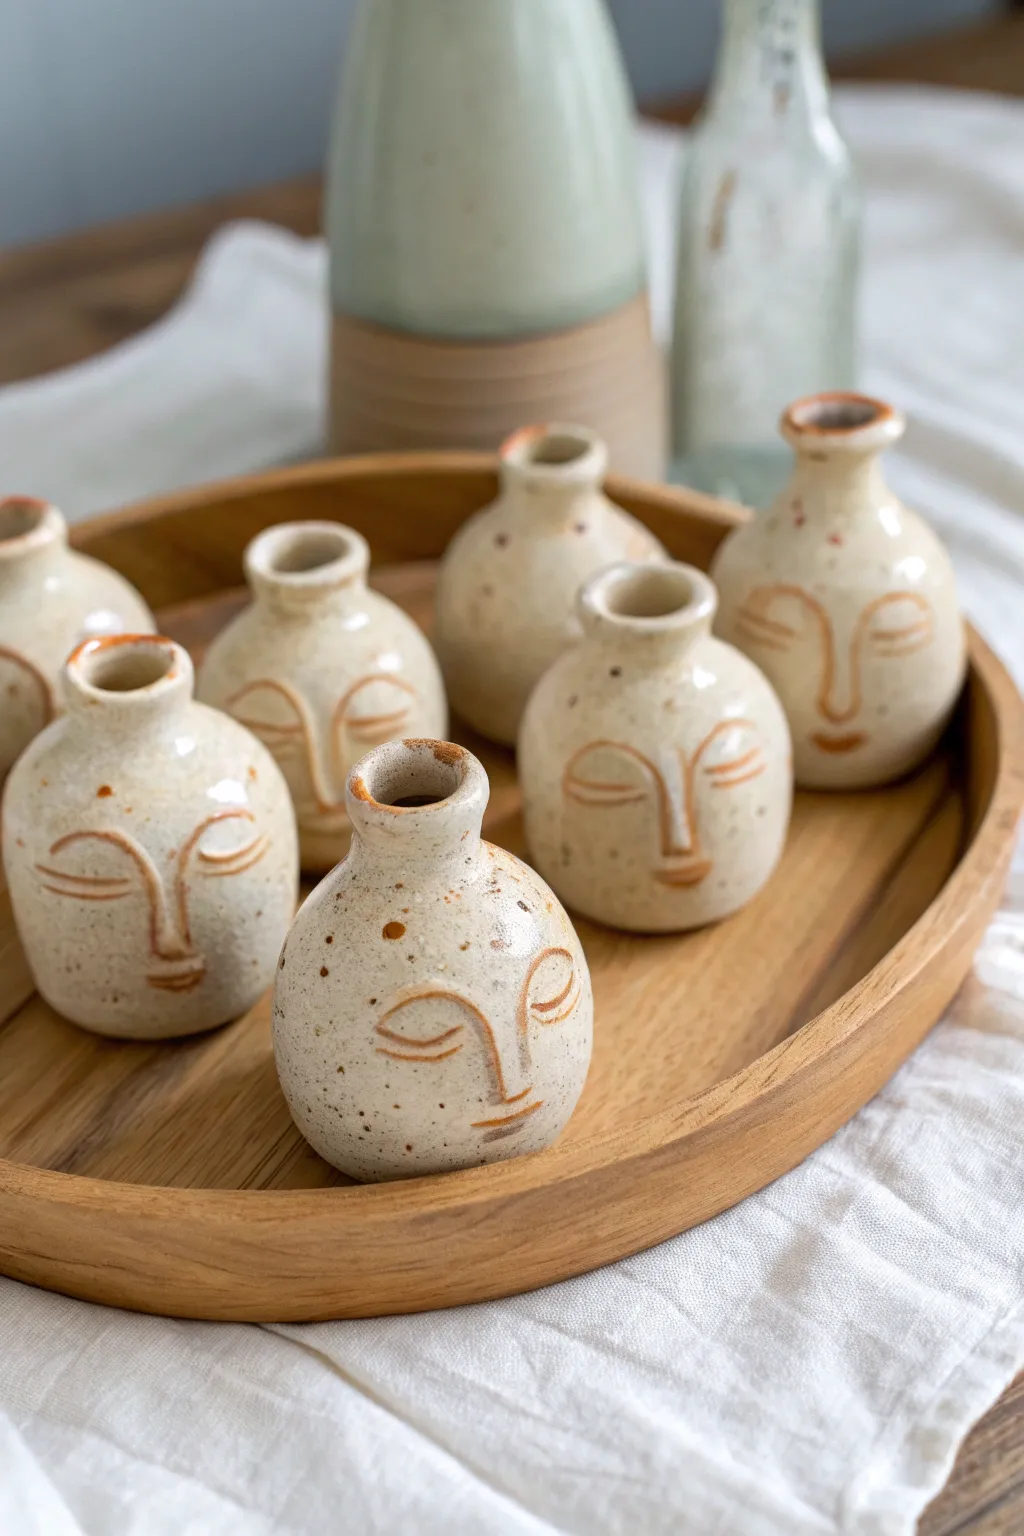
Create a serene collection of miniature face jugs that bring a calm, artistic touch to any shelf. These small, rounded forms feature simple line-drawn expressions and a speckled, glossy finish that mimics high-end stoneware.
Step-by-Step Tutorial
Materials
- Air-dry clay (white or light cream)
- Pottery tools (sponge, needle tool, rib)
- Acrylic paint (burnt orange/terracotta)
- Fine liner paintbrush
- Flecking brush or old toothbrush
- Brown acrylic paint (diluted for speckling)
- High-gloss varnish or sealant
- Small bowl of water
- Sandpaper (fine grit)
Step 1: Forming the Vessels
-
Portion the clay:
Start by dividing your block of air-dry clay into several small, equal portions, each about the size of a golf ball. This size is manageable and ensures your collection looks consistent. -
Shape the base:
Roll each portion into a smooth sphere between your palms. Gently tap the bottom on your work surface to create a flat base so the jug stands independently. -
Create the opening:
Using your thumb, press gently into the top center of the sphere to create a small indentation, but don’t go too deep as these are largely decorative pinch pot forms. -
Build the neck:
Pinch the clay around the opening upwards to form a short, narrow neck. I like to smooth the transition between the round body and the neck with a wet finger for a seamless look. -
Refine the rim:
Flatten the top rim slightly with your finger or a flat tool to give it a finished, wheel-thrown appearance. Repeat this shaping process for all your clay portions. -
Smooth the surface:
Dip a small sponge in water and wipe down the exterior of each jug to remove fingerprints and bumps. Let the jugs dry completely, which usually takes 24-48 hours depending on humidity.
Smooth Operator
Keep a small bowl of water nearby while shaping. Dip your finger frequently to smooth cracks instantly, preventing them from splitting later as the clay shrinks.
Step 2: Painting and Finishing
-
Sand for smoothness:
Once fully dry, use fine-grit sandpaper to buff away any remaining rough spots or imperfections on the clay surface. Wipe away the dust with a barely damp cloth. -
Mix the speckle wash:
Create a very watery mixture of brown acrylic paint. You want a translucent wash, not an opaque layer. -
Apply the speckles:
Dip an old toothbrush or stiff brush into the watery brown paint. Run your thumb across the bristles to flick tiny splatters onto the jugs. Practice on paper first to get the density right. -
Let the speckles dry:
Allow the speckled effect to dry completely before attempting to paint the faces, otherwise the lines might bleed. -
Sketch the faces:
Lightly sketch simple, sleeping faces onto the rounded bellies of the jugs using a pencil. Focus on curved lines for closed eyes and a long, straight line for the nose. -
Paint facial features:
Using a fine liner brush and burnt orange or terracotta acrylic paint, carefully trace over your pencil lines. Keep the pressure even to maintain a consistent line width. -
Add the rim detail:
Paint the inside rim of the jug opening with the same terracotta color to tie the design together. -
Seal the work:
Apply a coat of high-gloss varnish over the entire piece. This not only protects the paint but mimics the glazed look of the ceramic inspiration. -
Apply a second coat:
For an extra durable and glassy finish, apply a second coat of varnish once the first has dried.
Level Up: Ears & Handles
Before drying, attach tiny C-shaped coils to the sides to act as abstract ears or handles. This adds dimension and gives the ‘face’ more character.
Arrange your finished collection on a wooden tray for a warm, curated display
Expression Series Face Jugs
These serene, modern vessels combine functional pottery with minimalist line art, featuring stylized faces impressed directly into the clay surface. The speckled cream glaze and raw clay warmth give them an organic, earthy feel perfect for displaying dried botanicals.
Step-by-Step Guide
Materials
- Stoneware clay (speckled or buff)
- Pottery wheel (or rolling pin for slab building)
- Needle tool
- Loop carving tools (small)
- Ribs (metal and wood) for smoothing
- Sponge
- Scoring tool or fork
- Slip (clay and water mixture)
- Fettling knife
- Glaze: Speckled Cream or Matte White
- Small paintbrush for wax resist (optional)
- Kiln
Step 1: Forming the Vessel Body
-
Prepare the Clay:
Begin by thoroughly wedging your stoneware clay to remove air bubbles. For the taller jugs shown, start with about 2-3 pounds of clay; use slightly less for the smaller front vessel. -
Center and Open:
Center the clay on the wheel head. Open the center and pull up the walls to form a cylinder. Aim for a distinct bottle shape: a wider base that tapers gently into a narrow neck. -
Define the Shoulders:
Using a rib on the outside and your fingers inside, collar the neck inward to create a defined shoulder. The transition should be smooth but noticeable, separating the face area (body) from the spout (neck). -
Refine the Rim:
Finish the rim by compressing it with a chamois or sponge. Create a slightly flared or rolled lip, similar to the bottle on the left, or keep it straight for the jugs. -
Trim the Foot:
Once the vessel is leather-hard, trim the bottom to create a clean foot ring. This elevates the piece and gives it a finished look.
Clean Lines
For crisper facial features, let the added nose clay stiffen up just a bit before carving around it. Carving into soft, mushy clay often results in messy, ragged edges.
Step 2: Sculpting the Features
-
Create the Nose Strip:
Roll a small coil of clay and flatten it slightly into a strip. Score and slip the center of the vessel where the nose will go. Attach the strip vertically, blending the top into the forehead area seamlessly but leaving the bridge and tip defined. -
Outline the Eyes:
Using a needle tool, lightly sketch large, almond-shaped eyes on either side of the nose bridge. Position them slightly lower than you might expect to elongate the forehead. -
Carve the Eye Lines:
Use a small loop tool to carve over your sketched lines, creating a distinct groove. I find that carving fairly deeply helps the glaze pool nicely later. -
Add the Eyelids:
To create the ‘sleepy’ look, carve a horizontal or slightly curved line across the middle of the almond eye shape. This separates the lid from the eye itself. -
Carve the Mouth:
Sketch and carve a simple smile below the nose. Keep the lines varying in thickness—thinner at the corners and slightly wider in the center—to mimic a drawn illustration. -
Smooth the Edges:
Use a damp sponge or your finger to gently soften the sharp edges of your carving. You want the lines to look like impressions, not jagged cuts.
Step 3: Handles and Finishing
-
Pull a Handle:
For the jug variations, pull a small strap handle from a fresh lug of clay. It should be proportional to the neck of your vessel. -
Attach the Handle:
Score and slip the attachment points on the neck and shoulder. Press the handle firmly into place, smoothing the clay connection with a modeling tool so it looks like it grew out of the pot. -
Final Surface Checks:
Wipe down the entire piece with a clean, barely damp sponge to remove any burrs or clay crumbs. -
Bisque Fire:
Let the piece dry completely (slowly) before loading it into the kiln for a bisque firing (usually to Cone 04). -
Glazing:
Dip or pour a speckled matte cream glaze over the piece. If you want the carved lines to stand out more, you can gently wipe the glaze back slightly on the high points of the relief, or rely on the natural break of the glaze over the edges. -
Glaze Firing:
Fire the piece to the maturity temperature of your clay and glaze (typically Cone 5 or 6). Allow the kiln to cool completely before unloading.
Glaze Fill-in
If your glaze completely filled in the carved eye lines, hiding the design, your glaze application was too thick. Next time, thin the glaze slightly or sponge the carved areas before firing.
Arrange these soulful vessels in a group to create a quiet conversation piece on your mantel or table
Snake-Hair Monster Face Jug
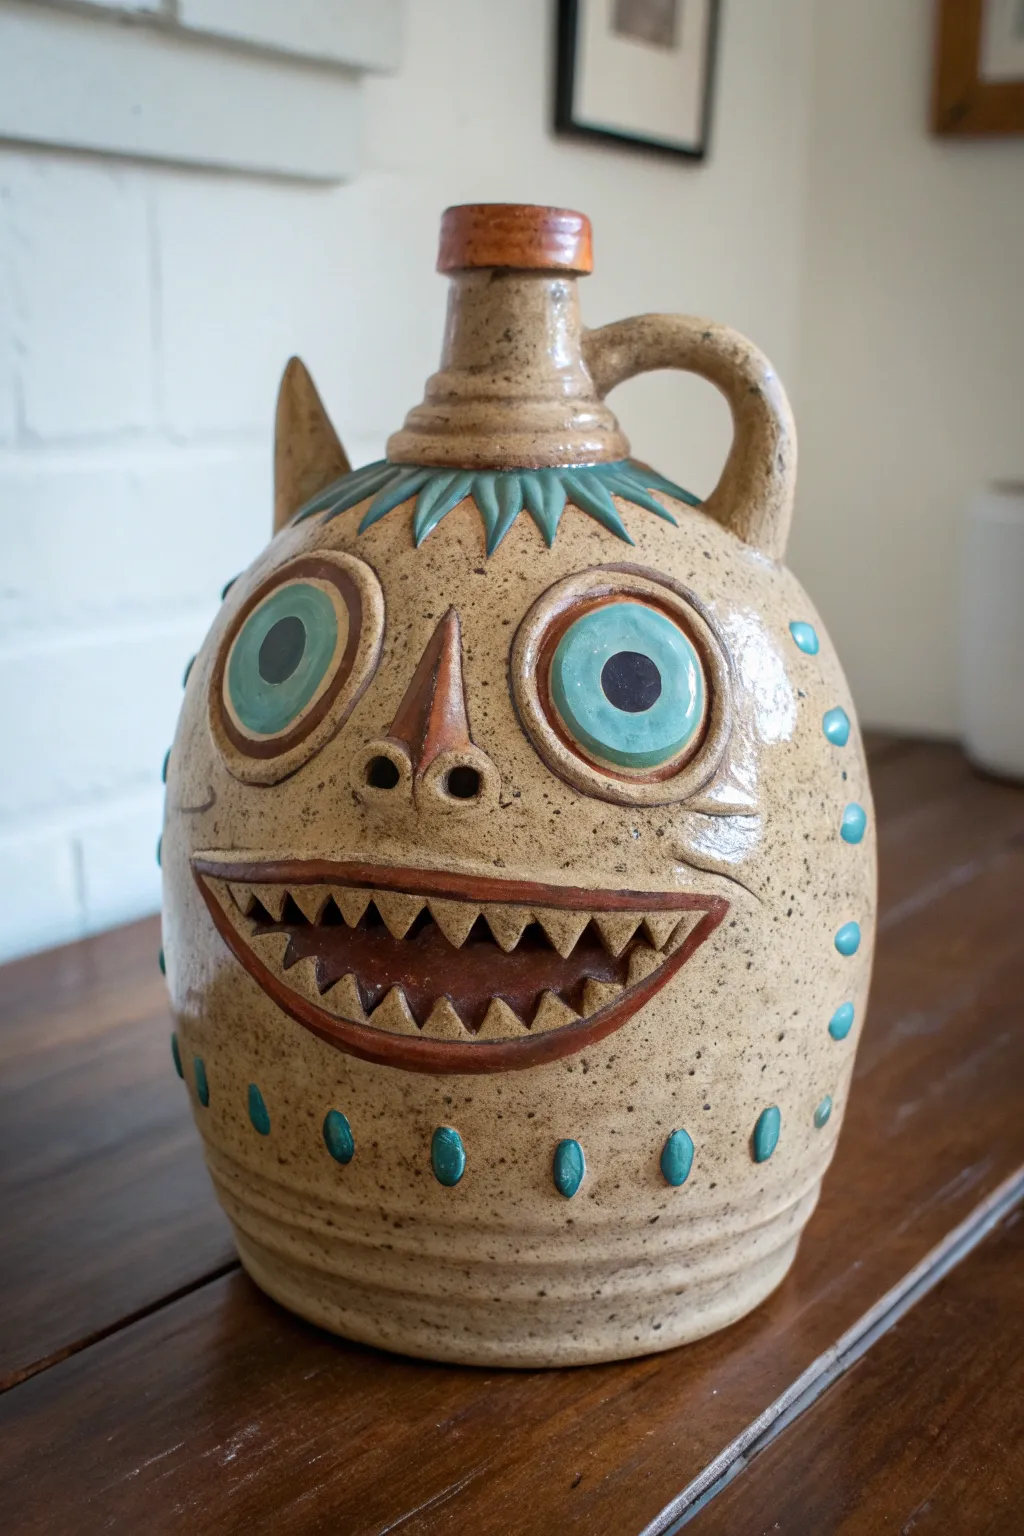
This whimsical stoneware jug combines the classic wheel-thrown form with expressive hand-built features, resulting in a face that is both startling and charming. With its wide, toothy grin, piercing teal eyes, and a crown of stylized snake-hair, this project is a perfect introduction to traditional face jugs.
How-To Guide
Materials
- Stoneware clay (smooth or grogged)
- Pottery wheel
- Throwing tools (sponge, rib, wire cutter)
- Needle tool
- Scoring tool or serrated rib
- Slip (made from your clay body)
- Loop tools (for carving)
- Small brushes for underglaze
- Teal/Turquoise underglaze
- Black underglaze
- Dark brown or iron oxide wash
- Clear or transparent gloss glaze
Step 1: Throwing the Base Form
-
Center and throw the body:
Begin with about 3-5 lbs of clay centered on the wheel. Throw a tall cylinder, widening the belly significantly to create a bulbous, egg-like shape while keeping the walls even. -
Collar the neck:
Gently collar the top of the form inward to create a distinct shoulder and a narrow neck. You want a distinct transition between the round body and the vertical spout. -
Refine the rim:
Finish the rim with a sturdy, slightly flared lip. Use a finishing leather or chamois to smooth the edge so it is pleasant to touch. -
Add a handle:
Pull a sturdy strap handle and attach it opposite where the face will be. Connect it from the neck to the shoulder of the jug, creating a comfortable loop.
Pro Tip: Eye Depth
Make the eyes pop by slightly carving out the pupil area before painting. The glaze will pool there, creating a lifelike depth.
Step 2: Sculpting the Facial Features
-
Mark placement:
Once the pot is leather hard, lightly sketch the positions for the large eyes, the nose, and the wide mouth using a needle tool. -
Build the eyes:
Roll two balls of clay and flatten them into discs. Score and slip the marked eye areas and attach the discs securely, smoothing the edges slightly onto the body. -
Detail the eyes:
Add a coil around each eye disc to create a protruding eyelid. I like to blend the outer edge of this coil into the face while keeping the inner edge sharp. -
Form the nose:
Shape a triangular wedge of clay for the nose. Attach it between the eyes, blending it thoroughly. Use a modeling tool to press deep nostrils into the bottom. -
Create the mouth foundation:
For that wide grin, roll a long, thick coil. Score the mouth area and attach the coil in a wide ‘U’ shape, smoothing the outer edges onto the jug surface. -
Carve the teeth:
Instead of adding individual teeth, carve them out of the mouth coil. Use a sharp knife or wire tool to cut triangular shapes, removing the negative space to leave sharp, jagged teeth. -
Add the ‘snake hair’:
Roll small, pointed coils of clay. Attach them around the shoulder of the jug, pointing downwards, to mimic a fringe of hair. Blend the top edges smoothly into the shoulder. -
Apply texture accents:
Roll tiny balls of clay for the warts or spots. Score and slip them onto the sides of the face in a vertical line pattern. Add a horn-like protrusion on the left side near the hair if desired.
Troubleshooting: Cracks
If small cracks appear around the added features during drying, fill them immediately with a little soft clay slip and compress the area.
Step 3: Glazing and Finishing
-
Bisque fire:
Allow the piece to dry slowly and completely before bisque firing to cone 04 (or your clay’s specific bisque temperature). -
Apply colored oxides:
Brush an iron oxide wash or dark brown underglaze over the entire piece, then sponge it off. This will leave dark color in the crevices of the teeth, eyes, and speckles, highlighting the texture. -
Paint the eyes:
Paint the irises with a bright teal underglaze. Use black underglaze for the pupils and the centers of the nostrils. -
Paint the accents:
Use the same teal underglaze to paint the ‘snake hair’ fringe and the small wart dots running down the sides of the jug. -
Outline features:
Carefully outline the mouth and eyes with a thin line of reddish-brown underglaze or stain to make them pop against the speckled clay body. -
Final glaze:
Apply a clear or transparent gloss glaze over the entire piece. This will seal the underglazes and give the jug a finished, shiny look. -
Glaze fire:
Fire the jug to its final maturity temperature (typically cone 5/6 or cone 10 depending on your clay body).
Now you have a charismatic face jug ready to guard your shelf with its quirky grin
Two-Faced Surprise Face Jug
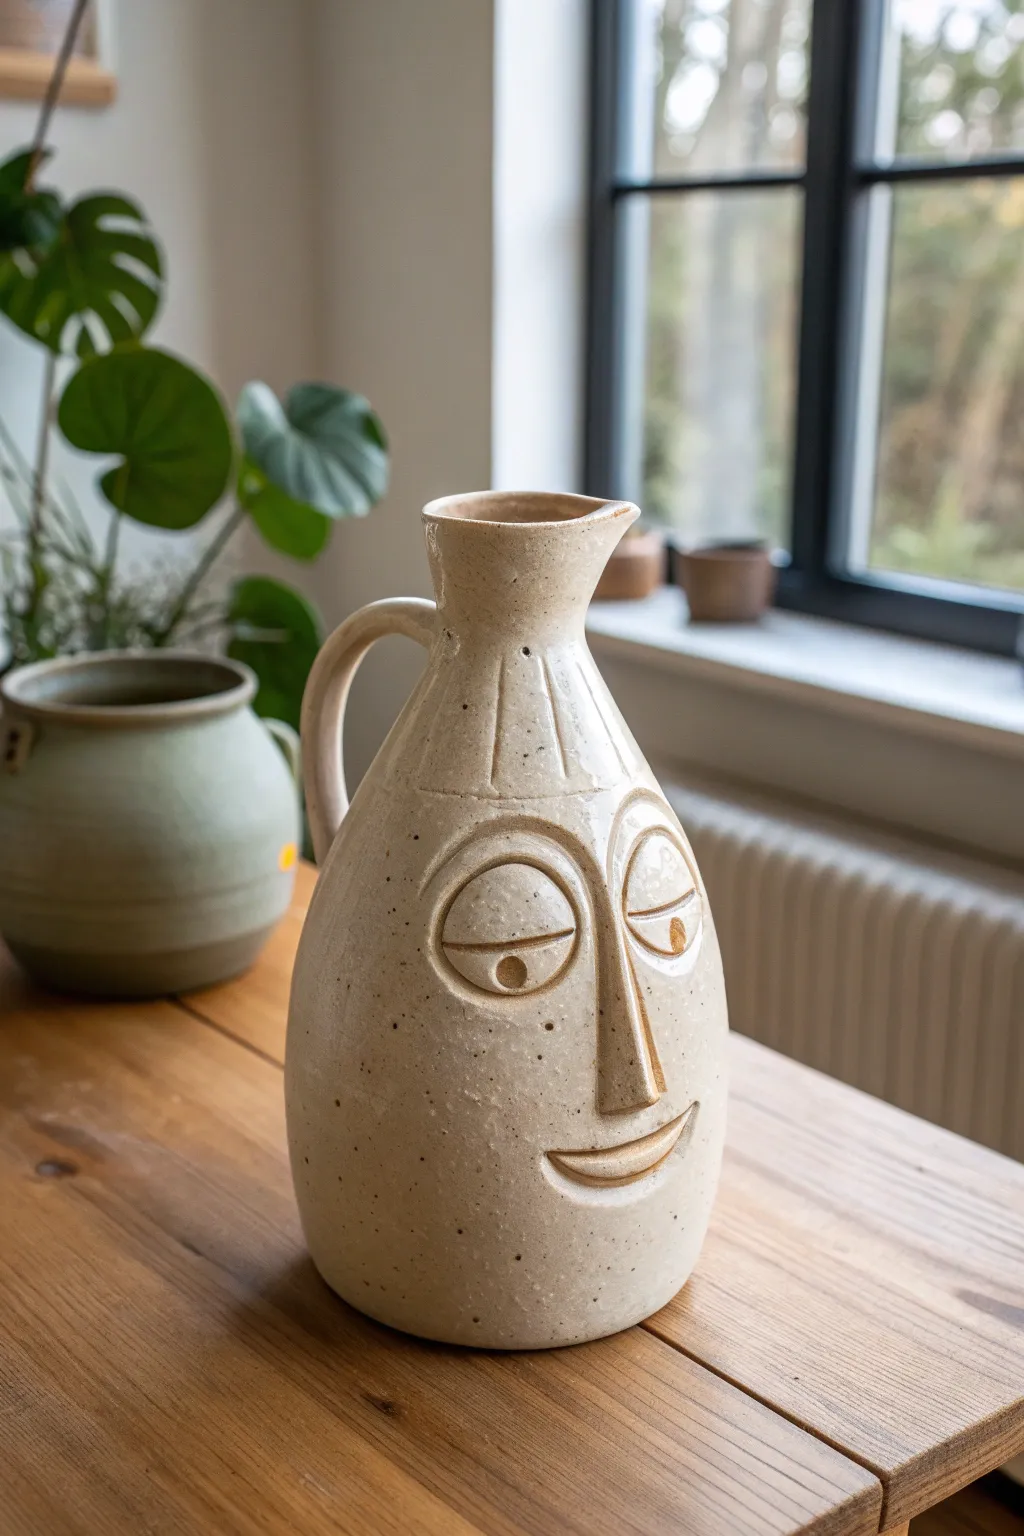
Move away from traditional folk grotesque styles with this serene, stylized face jug featuring clean lines and a speckled oatmeal glaze. This project combines wheel-thrown body techniques with hand-built facial features to create a functional pitcher that doubles as a sculptural centerpiece.
Step-by-Step
Materials
- Speckled stoneware clay (buff or oatmeal)
- Pottery wheel
- Throwing tools (sponge, rib, wire cutter)
- Modeling tools (wooden knife, small loop tool)
- Needle tool
- Scoring tool or serrated rib
- Slip (made from your clay body)
- Clear or transparent oatmeal glaze
- Kiln
Step 1: Throwing the Form
-
Center and open:
Begin with about 3-4 lbs of speckled stoneware clay. Center it firmly on the wheel head and open the clay, keeping the base relatively narrow to achieve that tall, elegant silhouette. -
Pull the cylinder:
Pull the walls up into a tall cylinder. I find it helpful to cone the clay up and down once before the final pulls to ensure the particles are aligned for height. -
Shape the belly:
Using a rib on the inside and a sponge on the outside, gently push the clay outward from the inside to create a rounded belly, tapering it back in significantly as you reach the neck. -
Form the neck and spout:
Collar the neck in tightly, leaving enough clay thickness at the rim. Pull a slight flare at the very top, then use your finger to gently pull a spout on one side. -
Wheel trim:
While the pot is still on the wheel, use a wooden knife to trim away excess clay at the foot for a clean undercut.
Step 2: Adding the Handle
-
Let it stiffen:
Allow the vase to dry to a soft leather-hard stage. It should be firm enough to handle without deforming but soft enough to join attachments. -
Pull a handle:
Pull a strap of clay for the handle. Aim for a simple C-shape that starts at the mid-neck and connects to the upper shoulder. -
Attach the handle:
Score the attachment points on both the jug and the handle. Apply slip and press the handle firmly into place, smoothing the seams so they are invisible.
Cracking Features?
If facial features crack away during drying, your slip was too dry or the pot was too hard. Wrap the pot in wet paper towels and plastic for a day to rehydrate before fixing.
Step 3: Sculpting the Face
-
Outline the features:
Using a needle tool, lightly sketch the large almond eyes, the long nose bridge, and the smiling mouth directly onto the belly of the pot to guide your sculpting. -
Add the nose:
Roll a coil of clay and shape it into a long, triangular prism. Score, slip, and attach it vertically to create the prominent nose bridge. -
Define the eyes:
Roll two thin coils and attach them as large ovals for the eyes. Use a modeling tool to blend the outer edges into the vase while keeping the inner edges sharp. -
Create eyelids:
Add a horizontal line of clay across the upper third of the eye ovals to create heavy, sleepy eyelids. This gives the face its distinct calm expression. -
Add pupils:
Attach small, flat circles of clay for the pupils, placing them partially under the eyelids to enhance the relaxed gaze. -
Sculpt the smile:
Roll a tapered coil for the mouth. Attach it in a gentle U-shape, blending the edges so the smile feels raised but integrated. -
Add decorative lines:
Using a small loop tool or needle, carve the vertical ridges around the neck of the jug, stopping just above the eyebrows to mimic a collar or hair texture.
Dual Personality
Make it a true “two-faced” jug by sculpting a totally different expression (perhaps angry or surprised) on the reverse side of the vessel for a reversible decor piece.
Step 4: Finishing and Glazing
-
Clean and dry:
Sponge away any sharp burrs or rough crumbs of clay. Let the piece dry slowly under plastic to ensure the handle and thick facial features dry at the same rate as the body. -
Bisque fire:
Fire the piece to cone 04 (or your clay’s specific bisque temperature). -
Apply glaze:
Dip or brush a clear or semi-transparent oatmeal glaze over the entire piece. The transparency is crucial so the speckles of the clay body show through. -
Glaze wiping:
To accentuate the face, lightly wipe the glaze off the high points of the nose, eyebrows, and mouth with a damp sponge, allowing the raw clay color to break through. -
Final firing:
Glaze fire to cone 5 or 6 (mid-range). Ensure the kiln is well-ventilated for a clean, bright finish.
Place your finished jug near a window where the natural light can catch the subtle relief of the sculpted face