When you’re staring at a fresh lump of clay, it helps to have a menu of tiny, doable projects that actually turn out cute. These simple modeling clay ideas are all about easy shapes, quick wins, and that satisfying “I made this!” feeling.
Mini Clay Animals From Basic Shapes
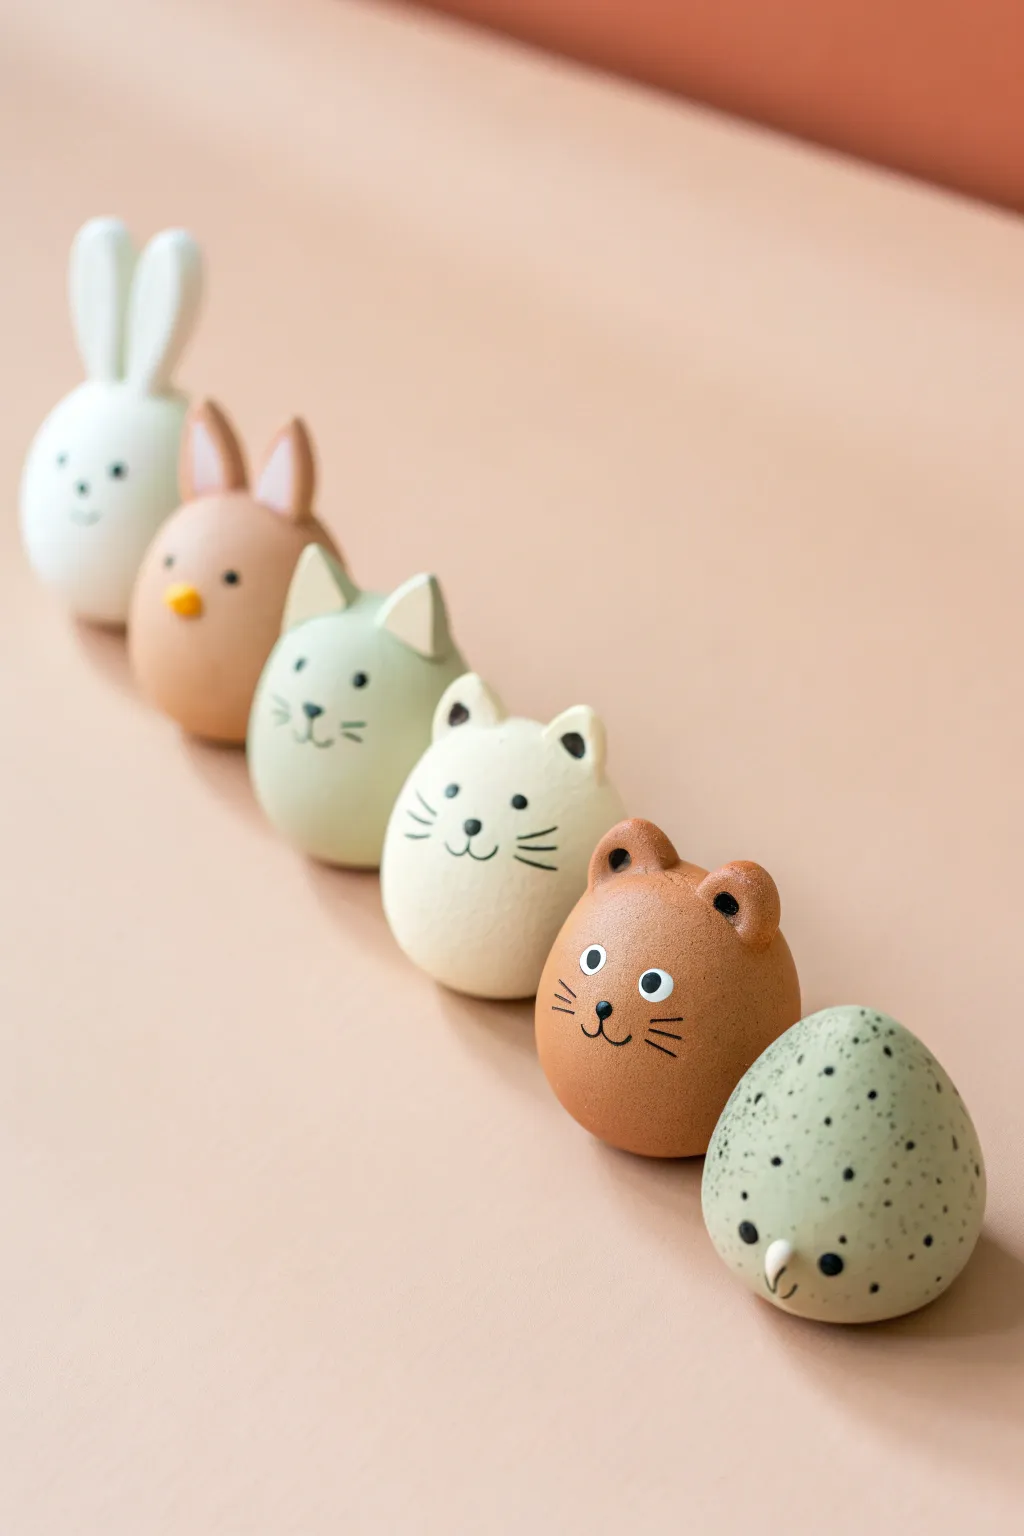
Transform simple egg shapes into an adorable lineup of barnyard friends with this minimalist modeling clay project. By starting with a uniform base, you can focus on adding charming little details like pointy ears, whiskers, and speckled patterns to give each character a unique personality.
Step-by-Step
Materials
- Air-dry clay or polymer clay (white, beige, terracotta/brown, pale sage green)
- Acrylic paints (black, white, pink, grey)
- Fine-point paintbrush or dotting tool
- Fine-point black permanent marker (optional)
- Clay sculpting tools (or a toothpick)
- Toothbrush (for speckling)
- Smooth work surface
Step 1: Shaping the Base Bodies
-
Prepare your clay portions:
Start by dividing your different colored clays into equal portions. You will need six main lumps—white, terracotta brown, pale sage green, tan, and perhaps a speckled stone color if available (or use grey). -
Roll the main shapes:
Take your first portion of clay and roll it between your palms to create a smooth, perfect sphere. -
Form the egg shape:
Gently apply more pressure to the top half of the sphere while rolling to taper it slightly, forming a classic egg shape. Make sure the bottom is slightly flattened so the figure stands upright without wobbling. -
Repeat for the collection:
Create an egg-shaped body for each animal in your lineup using their respective base colors. Aim to keep them all roughly the same size for a cohesive look.
Cracks Appearing?
If you see tiny cracks forming as the clay dries, dip your finger in a small amount of water (or clay softener for polymer) and gently smooth them over immediately.
Step 2: sculpting Ears and Features
-
Sculpt the white bunny ears:
Roll two small logs of white clay and flatten them into long ovals. Pinch the bottoms and gently press them onto the top of the white egg body, blending the clay at the join so they stand tall. -
Create the brown bunny ears:
For the tan/brown bunny, create similar long oval ears but add a tiny piece of lighter pink or white clay to the inside of each ear before attaching them. -
Form the cat ears:
For the green and cream cats, pinch two small triangles of clay. Attach them to the top of the heads, spacing them slightly apart. I find using a small blending tool helps smooth the seam completely invisible. -
Mold the bear ears:
Roll two tiny brown balls for the bear. Press them onto the top corners of the head and use a round tool to make a small indentation in the center of each ear. -
Add specialized noses:
For the second animal (the brown bunny), roll a tiny yellow ball for a nose and press it into the center. For the bird at the end, roll a tiny white cone for a beak.
Pro Tip: Symmetry
To get perfectly matching ears, roll a single ball of clay first, then cut it exactly in half. This ensures both ears start with the same amount of material.
Step 3: Painting Expressions
-
Dry the clay:
If using air-dry clay, let your figures harden completely (usually 24 hours). If using polymer clay, bake according to the package instructions and let cool. -
Paint the eyes:
Using a very fine brush or a dotting tool dipped in black paint, add two small dots for eyes on each face. For the bear and speckled bird, add a tiny white highlight dot inside the black to make them look alert. -
Draw delicate details:
Use a fine liner brush or a black marker to draw thin whiskers on the cats and bear. Add small ‘v’ shapes for noses and curved lines for mouths. -
Add the speckles:
For the grey bird on the far right, dilute a little black paint with water. Dip a toothbrush into the mix and run your thumb over the bristles to flick tiny speckles across the surface. -
Final touches:
Add any last distinct details, like the three lines on the bear’s forehead or inner ear colors if you didn’t sculpt them earlier.
Line them up on a shelf or windowsill to enjoy your handcrafted miniature zoo.


Kawaii Fruit With Tiny Faces
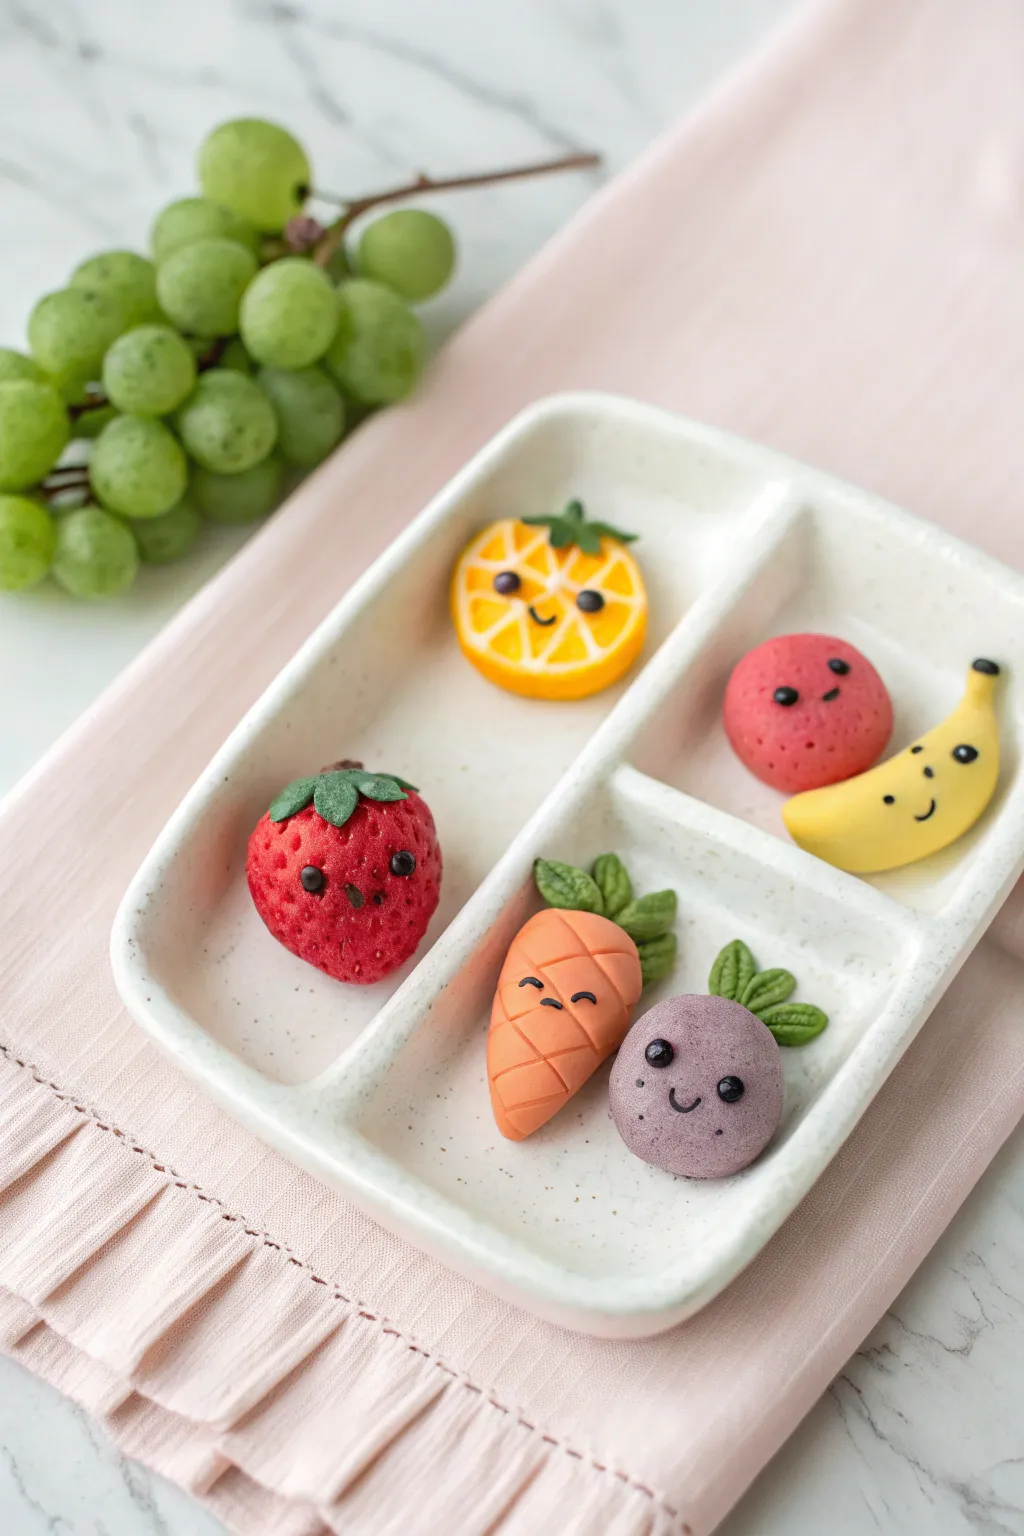
These adorable, bite-sized clay fruits and vegetables are bursting with personality thanks to their tiny, expressive faces. Arranged in a bento box, they create a charming miniature display that looks good enough to eat but is designed to last forever.
Step-by-Step Guide
Materials
- Polymer clay (red, orange, yellow, purple, white, dark green, black)
- Clay sculpting tools (needle tool, small ball tool)
- Small divided ceramic dish or bento box
- Liquid clay or bake-and-bond (optional)
- Clean work surface or ceramic tile
- Soft brush (for texture)
Step 1: Creating the Red Fruits
-
Strawberry base:
Roll a small ball of red clay into a rounded cone shape, flattening the top slightly where the leaves will sit. Gently poke small indentations all over the surface using a needle tool to mimic seeds. -
Strawberry leaves:
Flatten a tiny piece of dark green clay and cut a star shape or individual teardrops. Press this onto the flat top of your strawberry, smoothing the edges down. -
Round fruit base:
Mix a small amount of white into red clay to create a softer pinkish-red. Roll this into a smooth, perfect sphere for the apple or peach character. -
Adding expressions:
For both fruits, roll microscopic balls of black clay for eyes and press them gently onto the faces. I like to use a needle tool to lightly press a tiny curved mouth shape between the eyes.
Needle Tool Trick
To make eyes identical without rolling tiny balls, dip the tip of your ball tool into black acrylic paint and dot them onto the baked clay instead.
Step 2: Citrus & Banana
-
Orange slice outer:
Create a thick disk of bright orange clay. Wrap a thin strip of white clay around the circumference to act as the pith. -
Orange segments:
On the flat face of the orange, press in radial lines using a needle tool to divide it into segments. Add tiny white clay lines into these grooves if desired for extra detail. -
Refining the orange:
Add a tiny green stem to the top edge. Place the eyes and mouth near the center of the slice where the segments meet. -
Banana curve:
Roll yellow clay into a cylinder and taper both ends. Bend the shape into a gentle ‘C’ curve. -
Banana stem:
Dip the very tip of the stem end in a tiny bit of brown or black paint, or add a tiny cap of black clay. Add the standard kawaii face to the center of the curve.
Make Them Charms
Before baking, insert a tiny metal eye screw into the top of each fruit. After baking, turn them into stitch markers, earrings, or a chunky charm bracelet.
Step 3: Root Vegetables
-
Carrot shape:
Form a soft orange cone, slightly blunter than the strawberry. Use a knife tool to score horizontal lines across the body for that characteristic carrot texture. -
Carrot greens:
Create three small teardrop shapes from green clay. Press them together at the top of the carrot, using a needle tool to scratch a leafy texture into them. -
Purple root vegetable:
Mix purple clay with a speck of white for a speckled, organic look. Roll it into a flattened round shape, wider at the bottom. -
Textured skin:
Gently tap the surface of the purple clay with a clean toothbrush or sanding sponge to give it an earthy, matte texture. -
Finishing the roots:
Add leafy green tops similar to the carrot, but keep them shorter. Apply the tiny black eyes and smiling mouths to both vegetables.
Step 4: Baking & Display
-
Final check:
Before baking, ensure all tiny eye beads are securely pressed in so they don’t fall off during heating. -
Baking:
Bake the pieces according to your clay package instructions (usually 275°F/135°C for 15-30 minutes). Let them cool completely. -
Arrangement:
Place your cooled figures into the divided dish or bento box for the final presentation seen in the photo.
Now you have a nutritious collection of cuteness to brighten up your desk or shelf


Smiley Avocado Half
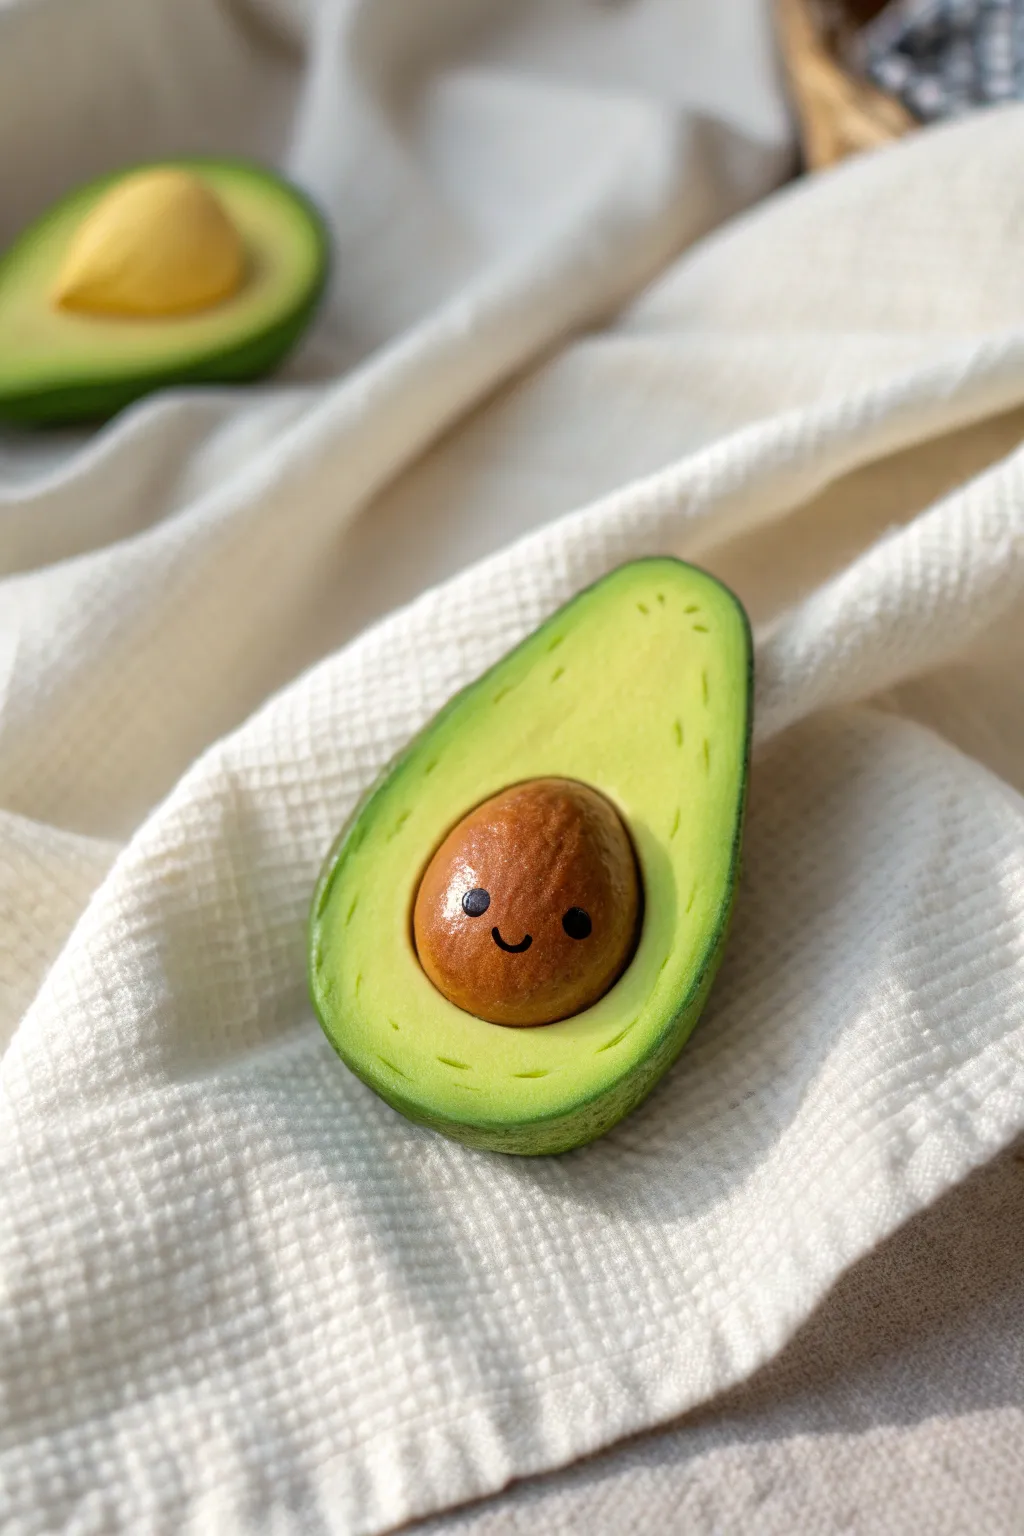
Create a miniature buddy that looks almost good enough to eat with this adorable polymer clay avocado half. This project features realistic coloring techniques and a tiny, kawaii face on the pit that adds a perfect touch of personality.
Step-by-Step Tutorial
Materials
- Polymer clay (Dark Green, Light Green, Yellow, Translucent, Brown)
- Black acrylic paint
- Fine detail paintbrush (000 size)
- Dotting tool or toothpick
- Dry pastels/chalk (Orange or reddish-brown)
- Soft brush for shading
- Modeling tools (blade, needle tool)
- Texturing tool (sandpaper or stiff bristle brush)
- Gloss glaze (optional)
Step 1: Creating the Avocado Flesh
-
Mix the perfect green:
Start by mixing translucent clay with a small amount of yellow and a tiny bit of light green. You want a pale, creamy chartreuse color that mimics the inner flesh. -
Form the base shape:
Roll your mixed clay into a smooth ball, then gently pinch the top to create a teardrop or pear shape. -
Flatten the face:
Place the pear shape on your work surface and press down gently to flatten the back, creating a half-avocado shape. Smooth the front surface with your finger to remove any prints. -
Hollow out the center:
Use a large ball tool or your thumb to press a rounded indentation into the lower, wider part of the avocado. This is where the pit will sit comfortably later. -
Add rim texture:
With a needle tool, create very faint, radiating lines or tiny indentations around the outer rim of the flesh to simulate the natural fibers found in real avocados.
Step 2: Creating the Skin
-
Prepare the skin layer:
Roll out a thin sheet of dark green clay. It should be consistent in thickness, roughly 1-2mm. -
Texture the skin:
Before attaching it, press coarse sandpaper or a stiff bristle brush onto the dark green sheet to give it that bumpy avocado skin texture. -
Wrap the flesh:
Carefully drape the dark green sheet over the curved back of your pale green base. Trim the excess clay flush with the flat front surface using a sharp blade. -
Blend the seam:
Gently smooth the transition between the dark skin and pale flesh with your finger so they bond, but keep a distinct line.
Fixing Smudges
If dark green clay smudges onto your light flesh color, use a q-tip dipped in rubbing alcohol (isopropyl) to gently wipe the pale clay clean before baking.
Step 3: Sculpting the Pit
-
Shape the pit:
Roll a ball of brown clay that fits perfectly into the indentation you made earlier. Press it slightly so it looks embedded rather than just resting on top. -
Detail the texture:
I like to use a stiff brush or a crumpled piece of foil to dab the surface of the pit, giving it a woody, organic texture rather than leaving it perfectly smooth. -
Add warmth:
Detailed shading makes this pop. Shave a little orange or reddish-brown chalk pastel into powder. Use a soft dry brush to dust the center of the pit to give it a glowing, warm highlight. -
Bake the piece:
Bake your clay creation according to the manufacturer’s instructions (usually 275°F/135°C for 15-30 minutes). Let it cool completely before painting.
Turn it into Jewelry
Insert a metal eye pin into the top of the avocado before baking. Once baked and cooled, you can attach it to a keychain, necklace, or earring hooks.
Step 4: Bringing it to Life
-
Paint the eyes:
Using a dotting tool dipped in black acrylic paint, place two small, wide-set dots on the pit for the eyes. -
Draw the smile:
With an ultra-fine detail brush, paint a tiny ‘u’ shape between the eyes for the smile. Keep the line very thin for the cutest expression. -
Optional shine:
If you want a fresh-cut look, apply a thin layer of gloss glaze to the pale green flesh, avoiding the skin and the pit.
Your little avocado is now ready to sit on a shelf or become a charming handmade gift


Tiny Donuts With Simple Sprinkles
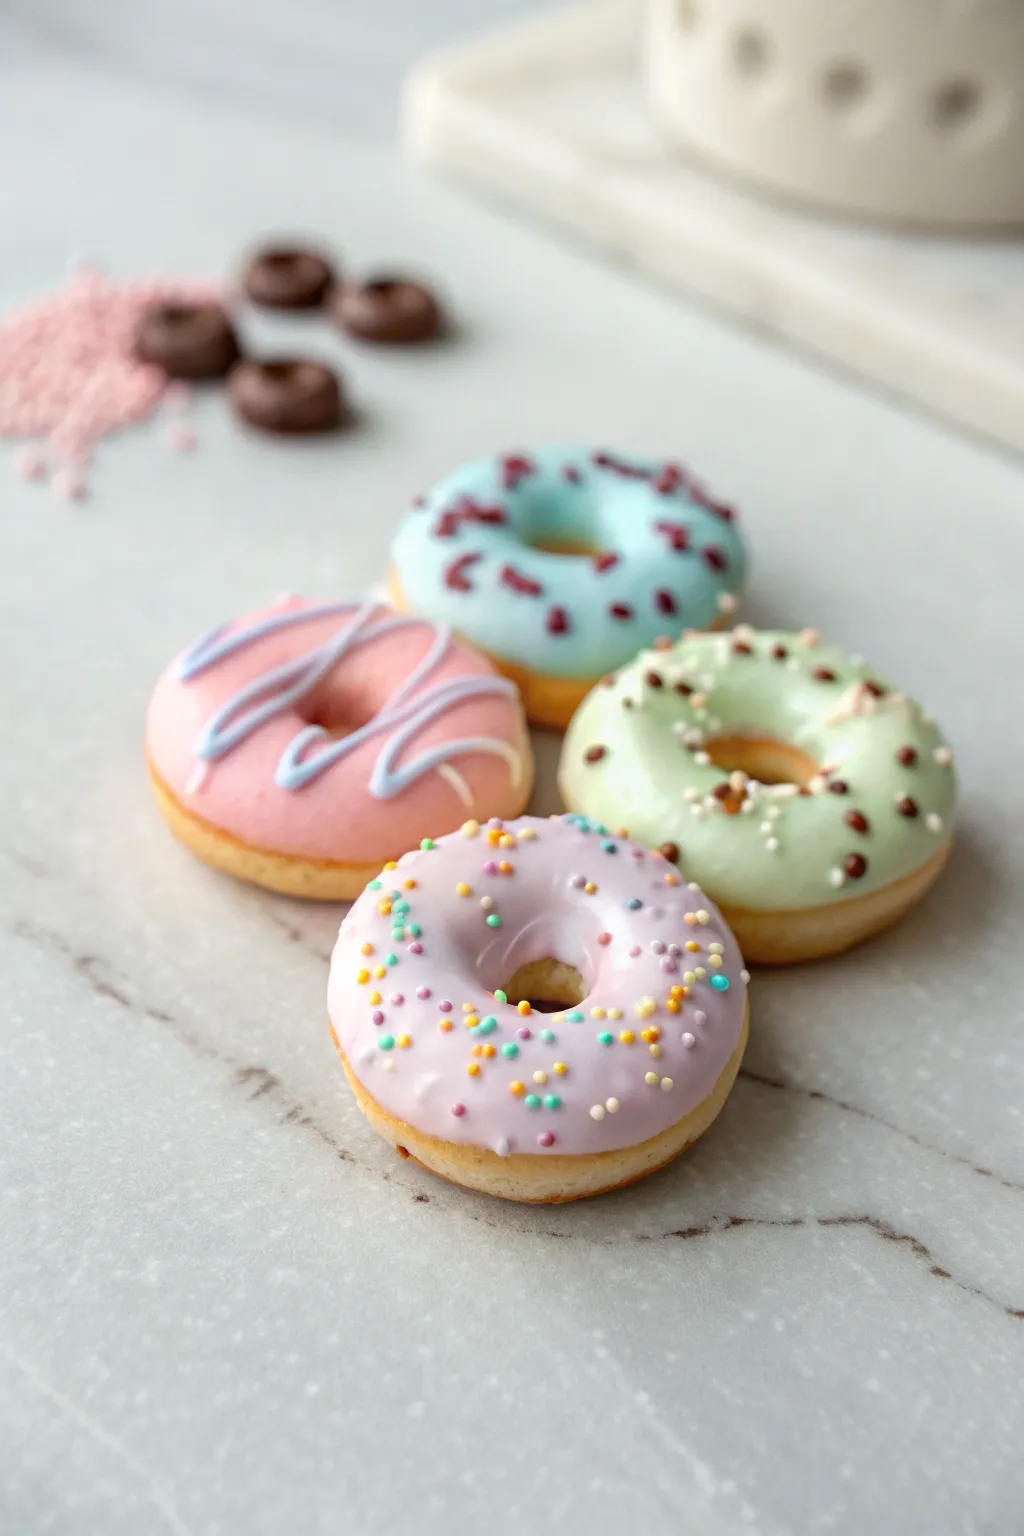
These adorable miniature donuts look good enough to eat with their smooth pastel icing and tiny, intricate toppings. Perfect for dollhouses or charm bracelets, this project teaches you how to create distinct frosting styles and realistic sprinkles using polymer clay.
Step-by-Step Guide
Materials
- Light beige polymer clay (dough color)
- Pastel polymer clay colors (pink, baby blue, mint green, lavender)
- Liquid polymer clay (translucent or white)
- Small dotting tool or toothpick
- Rolling pin or smooth round marker
- Small circle cutter (approx. 1 inch)
- Tiny straw or smaller circle cutter (for the hole)
- X-acto knife or clay blade
- Soft pastel chalks or brown acrylic paint (for shading)
- Glaze (glossy or matte)
- Baking sheet and parchment paper
Step 1: Shaping the Dough Base
-
Condition the clay:
Start by taking your light beige clay and kneading it thoroughly until it is soft, pliable, and free of cracks. -
Roll the base sheet:
Roll the beige clay out on a smooth surface until it is roughly 1/4 inch thick. You want the donuts to have a nice, fluffy height. -
Cut the donut shapes:
Use your larger circle cutter to punch out four rounds. If the edges stick, dip the cutter in a little cornstarch first. -
Create the center holes:
Take a tiny straw or the smallest circle cutter you have and punch a hole directly in the center of each beige round. -
Soften the edges:
Gently tap and rub the sharp cut edges of the clay with your finger to round them off. Real donuts don’t have sharp corners, so this step adds realism. -
Add a baked effect:
Use a soft brush to dust a tiny amount of orange or light brown pastel chalk powder around the edges of the donuts to simulate a golden-brown crust.
Step 2: Creating the Frosting
-
Mix liquid clay icing:
For the most realistic look, mix a small chunk of your pastel colored clay with liquid polymer clay in a small cup. Mash it until it becomes a thick, sticky paste. -
Achieve the right consistency:
If the mixture is too stiff, add more liquid clay drop by drop. It should resemble thick royal icing that holds its shape but can be spread. -
Alternative sheet method:
If you don’t have liquid clay, simply roll your pastel clay very thin and cut it with a flower cutter or uneven circle cutter to mimic a poured look. -
Apply the icing:
Using a toothpick or small tool, carefully spread your colored ‘icing’ onto the beige bases. Let it drip slightly down the sides for a natural look, but keep the donut hole distinct.
Texturing Tip
Use a clean toothbrush to gently tap the ‘dough’ part of the donut before baking. This creates a realistic sponge-cake texture.
Step 3: Adding the Toppings
-
Make the drizzle:
For the pink donut with blue stripes, roll a very sophisticated, hair-thin snake of baby blue clay. -
Apply the zig-zag:
Lay the thin blue snake across the pink icing in a zig-zag pattern. Gently press it down so it adheres without flattening completely. -
Create custom sprinkles:
For the purple donut, roll out tiny threads of yellow, orange, and blue clay. Bake these threads for 5 minutes first to harden them, then chop them into tiny bits with a blade. -
Sprinkle placement:
Scatter your pre-baked hardened sprinkles onto the wet liquid clay of the purple donut. Press them in lightly with a dotting tool. -
Chocolate shavings technique:
For the blue donut, take a piece of cured dark brown clay and grate it with coarse sandpaper or a blade to create chocolate ‘shavings’ or irregular crumbs to sprinkle on top. -
Crushed nut topping:
On the green donut, use tiny balls of beige and brown clay to simulate crushed nuts or cookie crumbles, pressing them gently into the green icing.
Scented Charms
Mix a tiny drop of vanilla or strawberry essential oil into the clay before baking to make your donuts smell as sweet as they look.
Step 4: Finishing Touches
-
Final inspection:
Check all your donuts for fingerprints. I usually use a soft brush dipped in baby oil to essentially ‘erase’ any prints on the smooth areas. -
Bake the batch:
Place your donuts on parchment paper and bake according to your specific brand of clay’s instructions (usually 275°F for 15-20 minutes). -
Cool and glaze:
Once fully cooled, apply a gloss glaze only to the icing part of the donuts to make them look wet and sugary, leaving the ‘dough’ matte.
Display your sweet creations on a tiny plate or add eye pins to turn them into delightful jewelry

The Complete Guide to Pottery Troubleshooting
Uncover the most common ceramic mistakes—from cracking clay to failed glazes—and learn how to fix them fast.
Easy Clay Mushrooms
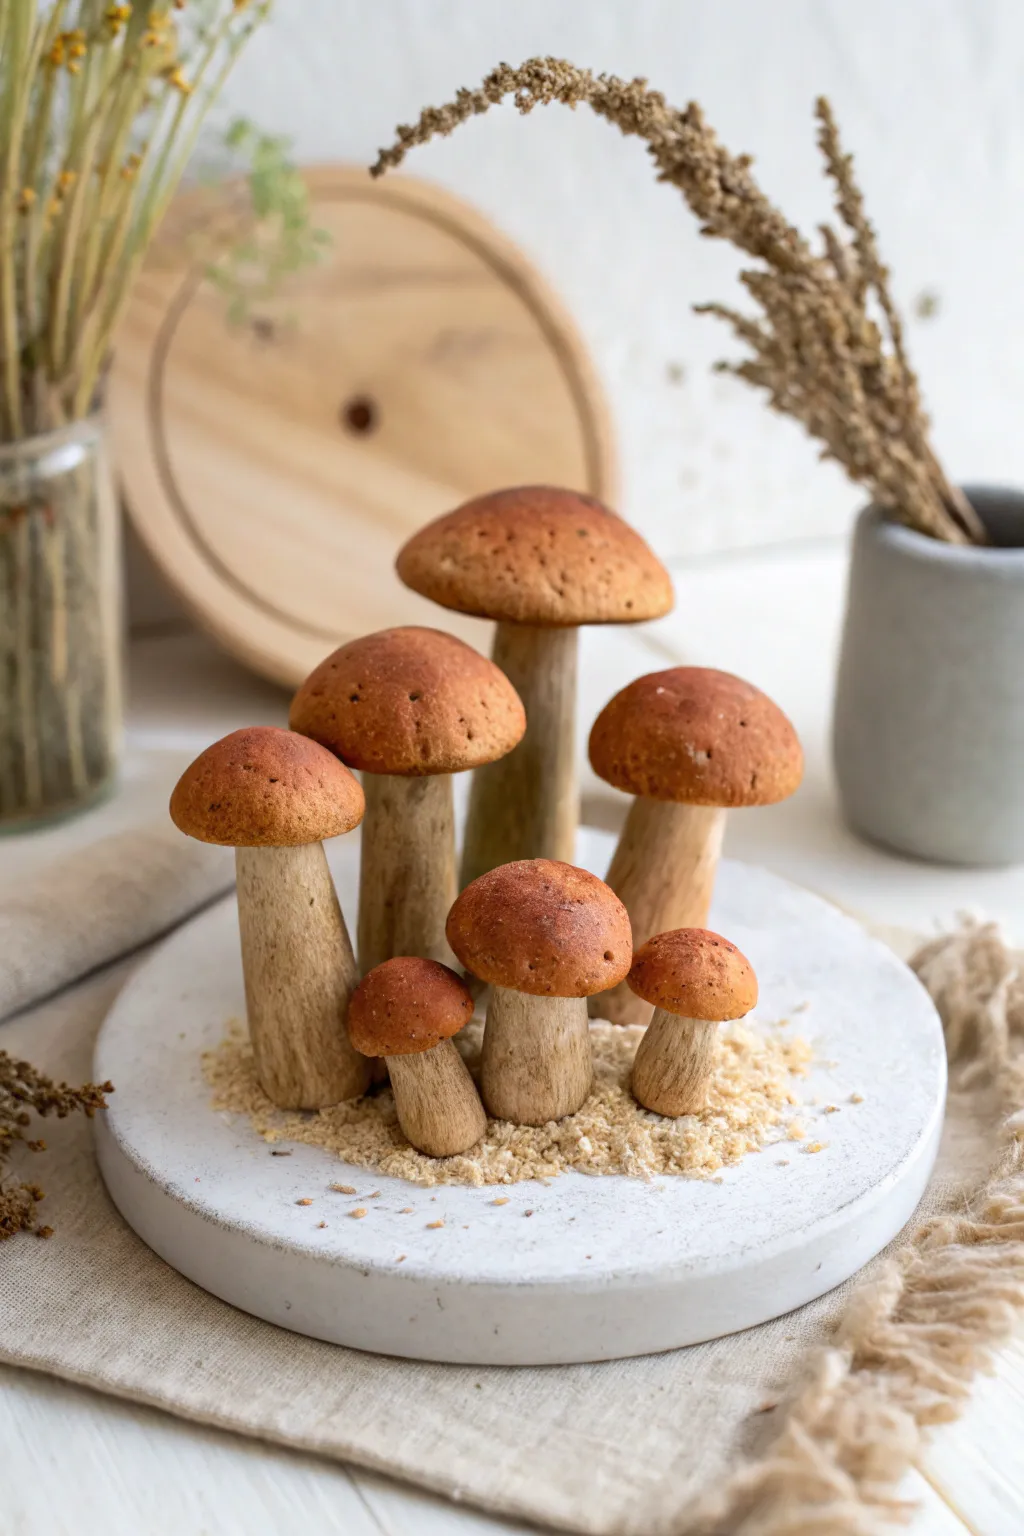
These charming, rustic mushrooms look almost plucked straight from a forest floor, but they are actually a delightful modeling clay project. Their earthy textures and gradient tones make for a sophisticated yet accessible craft that brings a touch of nature indoors.
How-To Guide
Materials
- Air-dry modeling clay (stone or light grey color)
- Air-dry modeling clay (terracotta or reddish-brown)
- Small rolling pin
- Modeling tools (knife, needle tool, or toothpick)
- Toothbrush or stiff bristle brush
- Cocoa powder or brown pastel chalk (grated)
- Soft paintbrush
- Water in a small cup
- Clear matte varnish (optional)
- Crushed cookie crumbs or dried breadcrumbs (for display)
Step 1: Shaping the Stems
-
Prepare the stem clay:
Start by kneading the light grey or stone-colored clay until it is soft and pliable. Divide it into seven portions of varying sizes to create a natural-looking cluster. -
Form the base shapes:
Roll each portion into a thick cylinder. Gently taper the tops slightly, leaving the bottoms wider and slightly bulbous, mimicking the classic ‘fat’ look of a Porcini mushroom stem. -
Create texture:
Using a needle tool or toothpick, lightly scratch vertical lines up and down the stems. These shouldn’t be perfect; irregular lines add realism. -
Add surface detail:
Take your toothbrush or stiff brush and gently stipple the surface of the clay to remove fingerprints and add a porous, organic texture. -
Dust the stems:
Dip a soft, dry paintbrush into a little cocoa powder or grated brown pastel. Lightly dust the bottom third of each stem to make it look like it has been pulled from the dirt.
Step 2: Crafting the Caps
-
Prepare the cap clay:
Knead the terracotta or reddish-brown clay. Since mushroom caps vary, tear off pieces that correspond to the sizes of your stems—larger stems need larger caps. -
Shape the domes:
Roll each piece into a smooth ball, then gently flatten the bottom against your work surface while cupping the top with your palm to create a domed shape. -
Texture the caps:
I like to gently press a coarse piece of fabric or a sponge against the top of the caps to give them a leathery, non-shiny finish distinctive of wild mushrooms. -
Add imperfections:
Real mushrooms aren’t perfect. Use a small tool to create tiny nicks, divots, or uneven spots on the cap surface for character. -
Darken the edges:
Brush a slightly heavier layer of your brown powder or chalk around the very rim of the mushroom caps to create a beautiful baked gradient effect.
Cracked Clay?
If cracks appear while the clay dries, mix a tiny bit of fresh clay with water to make a paste. Fill the cracks, smooth it over with a wet finger, and let it dry again.
Step 3: Assembly and Finishing
-
Score the connection points:
Use your needle tool to rough up the top of the stem and the underside of the cap where they will meet. This helps the clay bond better. -
Apply slip:
Dab a tiny drop of water or liquid clay (slip) onto the roughened top of a stem. -
Attach the caps:
Press the cap firmly onto the stem. You can tilt some caps slightly to the side to give the mushrooms individual personality and movement. -
Blend the underside:
If you want a seamless look, use a modeling tool to smooth the clay slightly underneath the cap where it meets the stem, or leave it distinct for a different variety. -
Let them dry:
Place your finished mushrooms on a flat surface to dry completely. Depending on your clay brand and humidity, this usually takes 24 to 48 hours. -
Final dusting (optional):
Once fully dry, you can brush on a tiny bit more brown powder if the colors faded during drying, or apply a matte varnish for protection. -
Create the display:
Arrange the mushrooms on a plate or board. Scatter dried crumbs or sand around the bases to simulate the forest debris shown in the reference photo.
Pro Tip: Realistic Weights
To prevent the mushrooms from tipping over while drying, insert a toothpick halfway into the stem before attaching the cap. This acts as an internal spine for stability.
Now you have a charming little forest scene that will look wonderfully rustic on your shelf or dining table
Coil Snakes and Wormy Friends
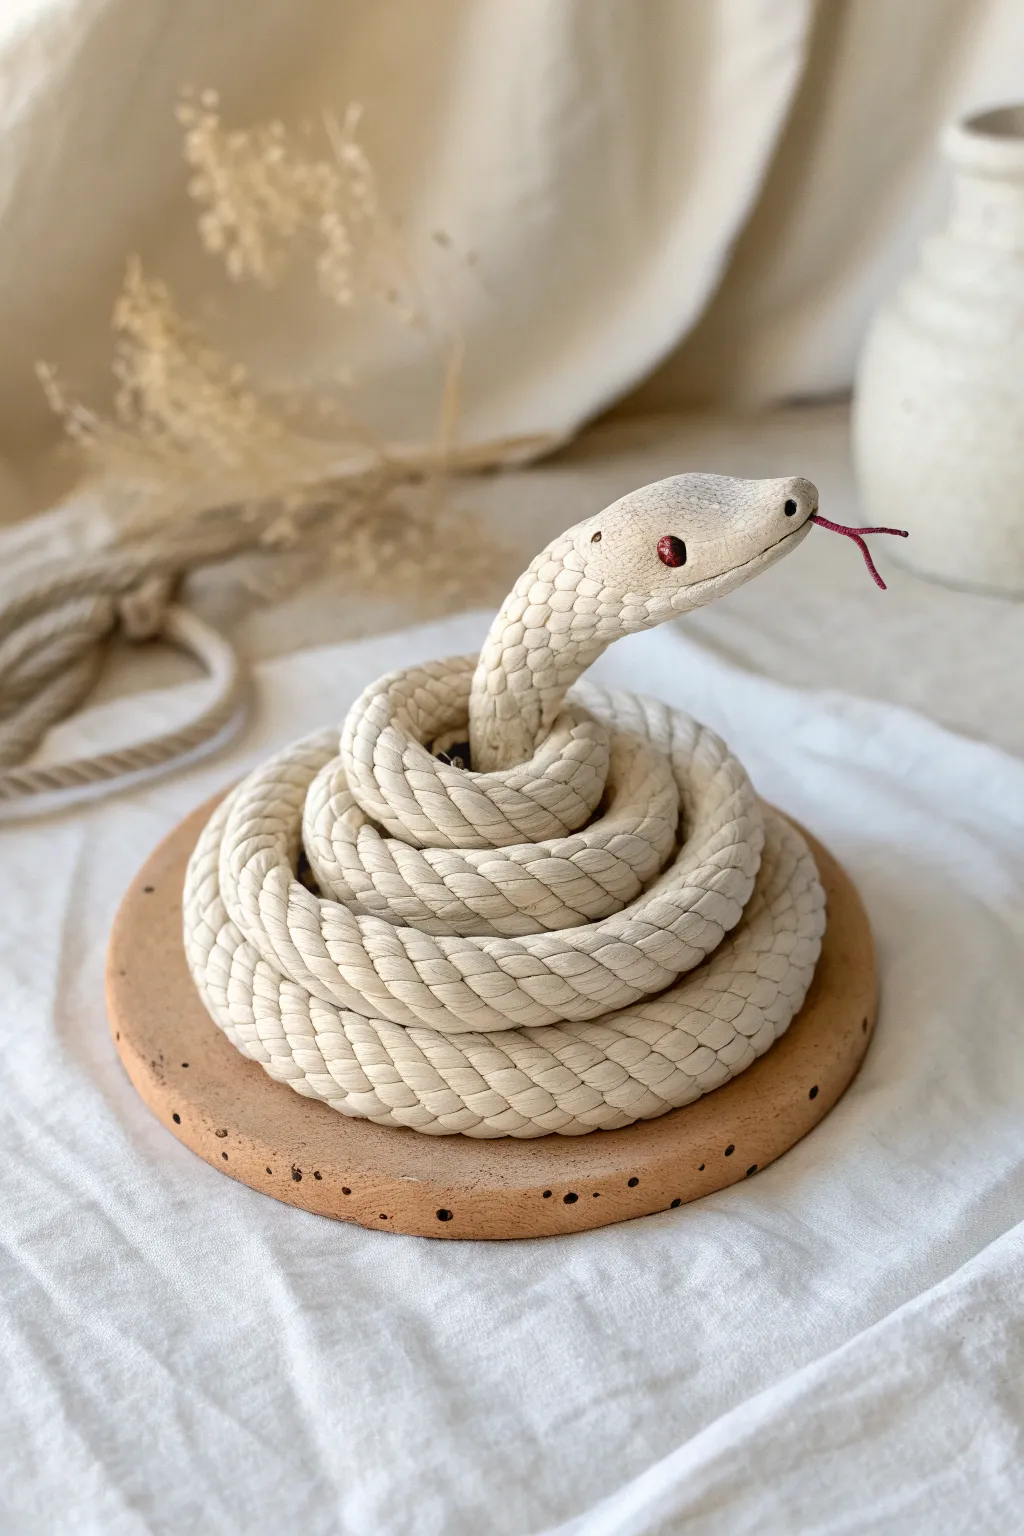
This elegant take on the classic coil pot technique transforms simple clay ropes into a striking serpentine sculpture. With its textured, rope-like body and delicate scale details, this piece looks sophisticated yet relies on beginner-friendly methods.
Step-by-Step Guide
Materials
- Air-dry clay or polymer clay (white or cream)
- Wooden round base or cork coaster
- Rolling pin or acrylic roller
- Wire texture tool or fine-tooth comb
- Modeling tools (needle tool, small ball stylus)
- Thin crafting wire (red or painted later)
- Small red beads or red paint for eyes
- Liquid clay or slip (depending on clay type)
- Acrylic paints (ivory, light brown wash)
- Clear matte varnish
Step 1: Creating the Base and Body
-
Prepare the base:
Start with your circular wooden or cork base. If you want it to look like stone or ceramic, give it a quick wash of diluted brown acrylic paint and speckle it with darker brown spots using a toothbrush. -
Roll the main coil:
Take a large chunk of your white clay and begin rolling it into a long, even snake. You want this coil to be quite thick, roughly the width of your thumb, and uniform in thickness. -
Add rope texture:
Before coiling, create the twisted texture. Gently roll a wire texture tool or a fine-tooth comb diagonally across the surface of the clay rope to simulate twisted strands of hemp or rope. -
Begin the spiral:
Apply a little slip or liquid clay to the center of your base. Start coiling the textured clay rope from the center outward, keeping the coils tight against each other. -
Build upward:
Once you have a fiat base spiral about 3 inches wide, begin stacking the coil on top of the previous row to build height. Create a pleasing, tapered stack, ending with the neck rising upwards. -
Support the neck:
When you reach the end of the coil, extend the clay upward and slightly forward to form the neck. You might need to prop this up with a crumpled piece of paper towel while it firms up.
Seamless Joints
If your clay rope isn’t long enough, join a new piece by slicing both ends at a 45-degree angle. Score, slip, and smooth the seam, then re-apply the texture.
Step 2: Sculpting the Head and Details
-
Shape the head:
Flatten the tip of the rising coil slightly to form a diamond-shaped head. Smooth out the rope texture on the head area so you have a clean surface for the face. -
Define the mouth:
Use a needle tool or craft knife to carefully slice a horizontal line for the mouth, curving it slightly at the corners for a natural expression. -
Add scale texture:
Using a small U-shaped tool or the tip of a small straw, press tiny scale patterns into the clay on the head, starting from the neck and moving toward the nose. -
Insert the eyes:
Press a small indentation on each side of the head. Place a tiny red bead into each socket, or leave a hole to paint red later. Add a tiny roll of clay around the eye for a lid. -
Create the tongue:
Take a short piece of thin wire (about 1 inch). Twist two ends together to make a fork, and insert the straight end into the mouth opening. Secure with a dot of glue or liquid clay. -
Refine the transition:
I always take a moment here to smooth the transition where the rope texture meets the scaled head, ensuring there isn’t an awkward line.
Step 3: Finishing Touches
-
Drying or baking:
Follow the instructions for your specific clay. If air drying, let it sit for at least 24-48 hours until fully hard and white. -
Painting the tongue:
If your wire wasn’t already red, use a fine brush to paint the tongue a deep crimson color. -
Applying a wash:
To enhance the rope texture, mix a very watery light brown or grey paint. Brush it over the whole snake and immediately wipe the surface with a damp cloth, leaving simple shadows in the crevices. -
Sealing the piece:
Protect your sculpture with a coat of matte varnish. This keeps the ‘rope’ looking natural rather than glossy and plastic.
Sagging Head?
If the head droops while sculpting, insert a piece of thick crafting wire or a toothpick through the neck and into the body coil for invisible internal structure.
Place your finished serpent on a shelf for a touch of mystical charm that feels both rustic and modern


What Really Happens Inside the Kiln
Learn how time and temperature work together inside the kiln to transform clay into durable ceramic.
Simple Clay Hearts and Love Tokens
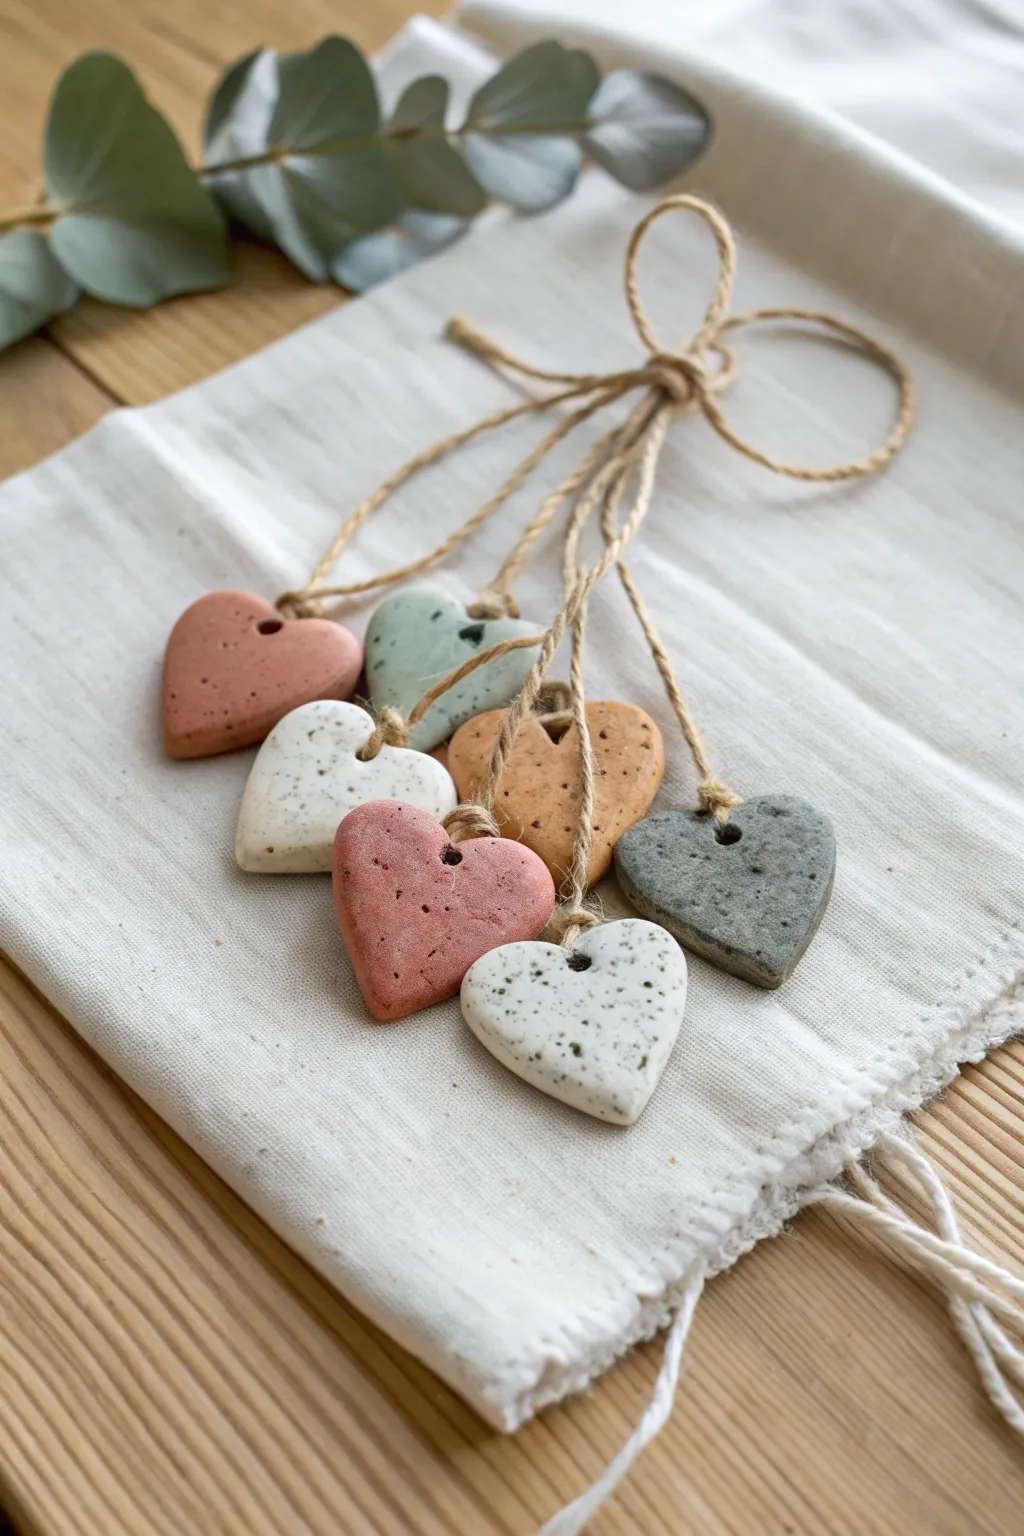
These charming rustic hearts capture a natural, stony aesthetic with their beautiful speckled finish and muted earth tones. Perfect as gift tags, ornaments, or tokens of affection, they are surprisingly simple to create using basic modeling clay techniques.
Step-by-Step
Materials
- Polymer clay or air-dry clay (white, terracotta, beige, grey, muted green)
- Black pepper or dried coffee grounds (for speckling)
- Small rolling pin or acrylic roller
- Heart-shaped cookie cutter (approx. 1.5 – 2 inches)
- Straw, toothpick, or small circular tool (for holes)
- Fine-grit sandpaper (optional)
- Jute twine or hemp cord
- Parchment paper or clay work mat
- Scissors
Step 1: Preparing the Clay
-
Choose your palette:
Select a variety of earthy clay colors to match the photo. You will need a mix of terracotta, sage green, creamy white, mustard yellow, dusty rose, and slate grey. If you are starting with white clay, mix in small amounts of acrylic paint or pigment powder to achieve these muted shades. -
Create the faux-stone texture:
To achieve that beautiful speckled grit seen in the reference, flatten a ball of your chosen clay color. Sprinkle a generous pinch of coarse black pepper or dried coffee grounds onto the surface. -
Incorporate the speckles:
Fold the clay over the pepper/grounds and knead it thoroughly. Continue kneading until the specks are evenly distributed throughout the entire lump of clay. Repeat this process for each color of clay you intend to use. -
Roll it out:
Place your clay onto a piece of parchment paper to prevent sticking. Using your rolling pin, roll the clay out to an even thickness of about 1/4 inch (6mm). Avoid rolling it too thin, as you want these tokens to have a nice, substantial feel.
Step 2: Shaping and Refining
-
Cut the shapes:
Press your heart-shaped cookie cutter firmly into the rolled clay. Wiggle it slightly to ensure a clean cut, then lift the cutter. If the clay sticks inside, gently push it out. -
Soften the edges:
Once you have removed the excess clay from around your heart shapes, use your fingertip to very gently smooth the sharp edges cut by the metal. This gives the hearts a softer, more finished pottery look. -
Create the hanging hole:
Using a straw or a small cylindrical tool, punch a hole near the top center of the heart (at the “V” dip). Ensure the hole is large enough for your jute twine to pass through later. -
Clean the hole:
Sometimes punching a hole creates a jagged exit wound on the back. Flip the heart over and smooth down any clay that pushed through so both sides look neat. -
Final inspection:
Check the surface for unwanted fingerprints. I like to lightly buff the surface with the palm of my hand one last time before curing to ensure a matte, smooth finish.
Cracking Issues?
If using air-dry clay, cracks can happen if it dries too fast. Keep hearts away from direct heat or sunlight while drying. Fix minor cracks by applying a tiny bit of fresh, wet clay paste and smoothing.
Step 3: Curing and Finishing
-
Dry or bake:
If using polymer clay, bake according to the package instructions (usually 275°F/135°C for 15-30 minutes depending on thickness) on a baking sheet lined with parchment paper. If using air-dry clay, let them sit undisturbed in a dry area for 24-48 hours, flipping them halfway through to ensure even drying. -
Cool down:
Allow the hearts to cool completely before handling them. They harden fully as they cool. -
Sanding (optional):
If there are any rough spots on the edges, you can very lightly sand them with fine-grit sandpaper. Wipe away dust with a slightly damp cloth afterwards. -
Cut the twine:
Cut lengths of jute twine, roughly 8-10 inches long for each heart. -
Thread the hearts:
Fold a piece of twine in half to create a loop. Push the folded loop end through the hole in the heart from front to back. -
Secure with a lark’s head knot:
Take the two loose ends of the twine and pass them through the loop you just pushed through the hole. Pull tight to secure the knot against the top of the heart. -
Bundle them up:
Gather all your finished hearts by their strings. Tie the loose ends of all the strands together into a large, decorative bow or knot as shown in the picture to create a unified bundle.
Scented Tokens
For air-dry clay (not polymer), mix a few drops of essential oil into the clay before drying. Lavender or cedarwood works beautifully, turning these into fragrant drawer sachets or closet fresheners.
Enjoy styling these simple tokens on gifts or hanging them around your home for a touch of rustic warmth
Mini Food Plates: Sushi, Cookies, and Toast
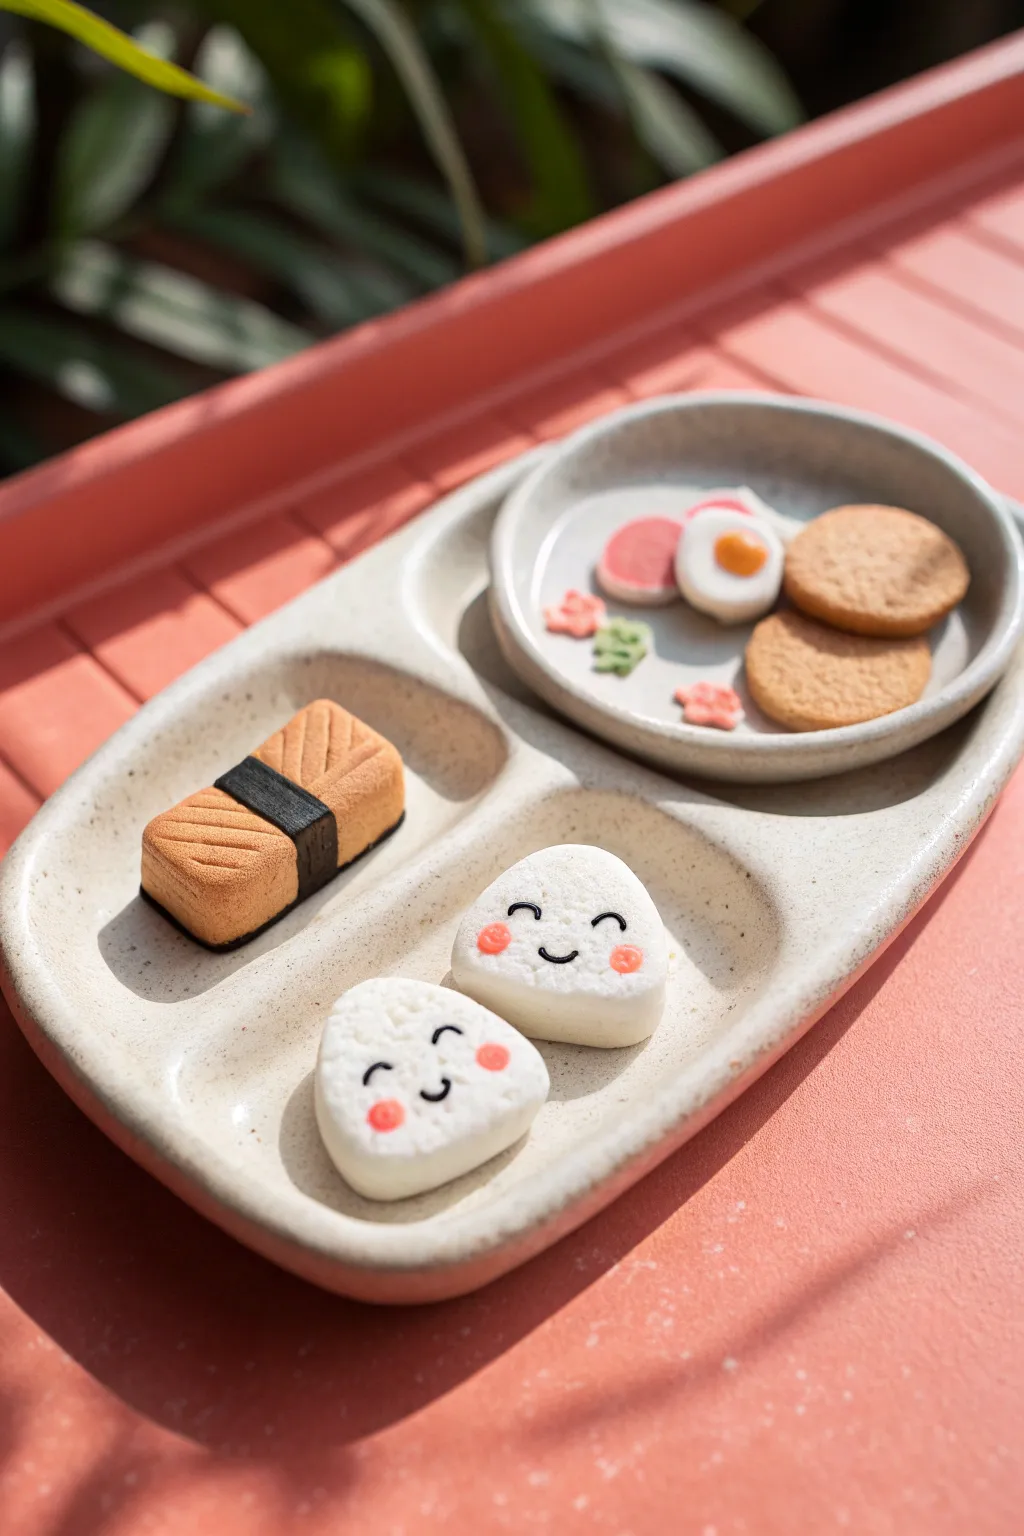
Craft a delightful miniature meal with this adorable bento box set featuring smiling rice balls, nigiri sushi, and sweet treats. This simple modeling clay project captures the charm of Japanese lunch boxes with easy-to-make shapes and cute facial details.
Detailed Instructions
Materials
- White modeling clay (polymer or air-dry)
- Light orange or salmon-colored clay
- Black clay
- Beige or tan clay
- Pink clay
- Yellow clay
- Green clay
- Clay sculpting tools (needle tool, ball tool)
- Texture sponge or toothbrush
- Rolling pin
- Craft knife
- Clear matte varnish (optional)
Step 1: Creating the Bento Tray
-
Shape the base:
Start with a large ball of white or speckled beige clay. Flatten it into a thick, rounded rectangle shape to serve as the main tray. -
Divide the sections:
Use your fingers or a modeling tool to press down into the clay, creating three distinct compartments: a large bottom section and two smaller top sections. -
Refine the edges:
Smooth the walls between the compartments so they look organic and soft, rather than sharp-edged. -
Make the side plate:
Roll a smaller ball of beige clay and flatten it into a shallow round dish with a slight rim. This will hold your cookies.
Sticky Situation?
If your clay gets too soft or sticky while shaping tiny details like the eyes, pop it in the fridge for 10 minutes to firm it up.
Step 2: Sculpting the Savory Foods
-
Form the rice balls:
Take two pieces of white clay and shape them into soft, rounded triangles for the onigiri. -
Texture the rice:
Gently tap a clean toothbrush or texture sponge over the surface of the triangles to mimic grain texture. -
Add cute faces:
Roll extremely tiny snakes of black clay for the eyes and mouths. Press them gently onto the rice balls. Add tiny circles of pink clay for blushed cheeks. -
Shape the nigiri base:
Form a small rectangular block of beige or light orange clay for the sushi rice base and texture it like the onigiri. -
Add the topping:
Create a slightly larger rectangle of salmon-colored clay. Use a needle tool to score diagonal lines across the top for a fish texture. -
Wrap the seaweed:
Roll a thin strip of black clay and wrap it around the center of the nigiri to hold the topping to the base.
Step 3: Crafting the Sweets & Garnishes
-
Make the cookies:
Roll small balls of tan clay and flatten them into discs. Lightly texture the surface with a toothbrush so they look baked. -
Create the egg:
Flatten a tiny ball of white clay into an irregular oval. Add a small dome of yellow clay in the center for the yolk. -
Add garnishes:
Using pink and green clay, cut or shape tiny flower petals or leaves to scatter on the side plate. -
Assembly:
Place the rice balls in the large compartment, the sushi in a side slot, and the plate of sweets in the remaining space. -
Finalize:
If using polymer clay, bake according to package instructions. If using air-dry clay, let it sit undisturbed for 24 hours until fully hard.
Add Sparkle
Brush a tiny amount of pink pastel dust on the cheeks of the rice balls for a softer blush effect instead of using clay circles.
Display your miniature meal on a desk or turn it into a cute fridge magnet set

TRACK YOUR CERAMIC JOURNEY
Capture glaze tests, firing details, and creative progress—all in one simple printable. Make your projects easier to repeat and improve.
Peas in a Pod
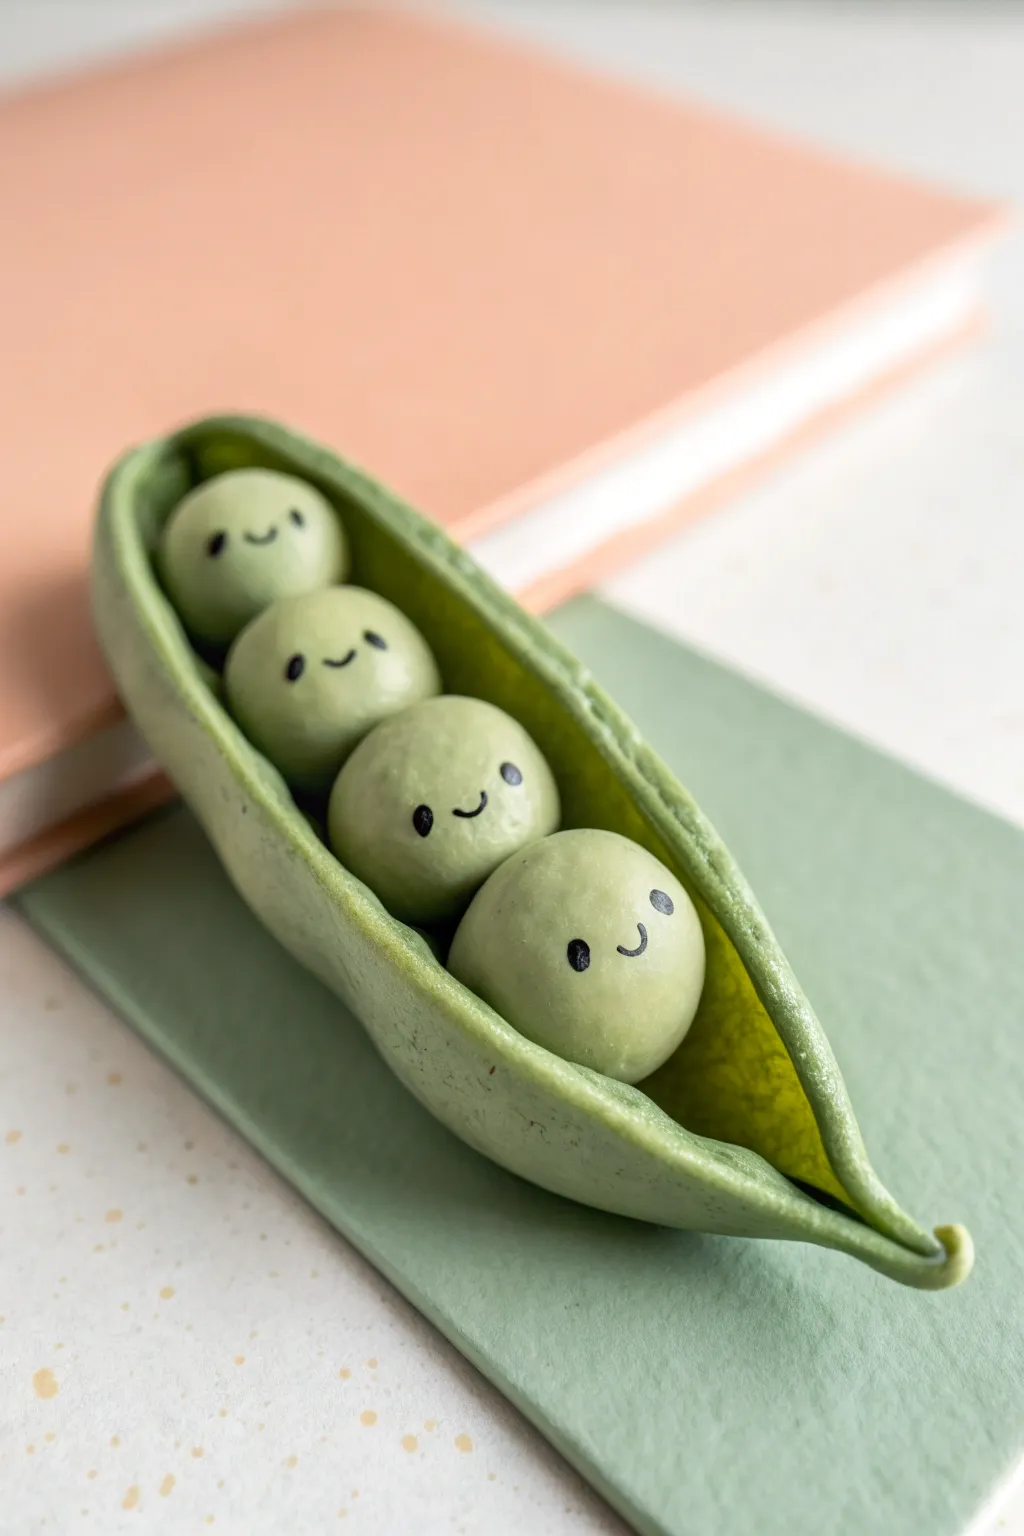
Create a delightful quartet of smiling peas tucked safely into their cozy pod. This simple modeling clay project captures a charming, whimsical texture and makes for an adorable desk companion or keychain charm.
Step-by-Step
Materials
- Polymer clay (green and black)
- Clay roller or acrylic rolling pin
- Pointed sculpting tool or toothpick
- Ball stylus tool
- Black acrylic paint or fine-tip black marker (optional)
- Clear matte varnish (optional)
Step 1: Shaping the Peas
-
Prepare the Clay:
Start by conditioning your green clay, kneading it in your hands until it becomes soft, pliable, and free of any cracks. -
Divide the Portions:
Pinch off four small, roughly equal-sized pieces of green clay. These will become your peas, so aim for spheres about the size of a large blueberry. -
Roll the Spheres:
Roll each piece between your palms to create four smooth, perfect little balls. Inspect them to ensure there are no fingerprints or dents. -
Check the Fit:
Place the four balls in a line to see how they look together. This is where I like to make slight size adjustments if one pea looks too large or too small compared to its neighbors.
Clean Clay Trick
Work with lighter colors first or wash hands thoroughly before touching green clay. Lint shows up easily on light green, so keep baby wipes nearby to clean your hands often.
Step 2: Crafting the Pod
-
Roll the Pod Base:
Take a larger lump of the same green clay—you’ll need roughly three times the amount used for the peas—and roll it into a thick log shape. -
Flatten the Form:
Using your acrylic roller, flatten the log into a long oval shape. It should be thick enough to hold its shape (about 3-4mm) but flexible enough to fold. -
Texture the Interior:
Gently press a piece of rough fabric or a textured sponge against the inside surface of the flattened clay to give the pod a realistic, natural texture. -
Arrange the Peas:
Place your four green spheres in a straight line right down the center of your flattened oval pod base. -
Close the Pod:
Carefully lift the sides of the oval and wrap them upwards around the peas. You don’t want to cover them completely; just cradle them snugly. -
Pinch the Ends:
Gently pinch the clay at both ends of the pod to seal it shut. Taper the tips slightly to form that classic pea-pod point. -
Curve the Stem:
On one end, extend the clay slightly to create a tiny stem. Use your finger to give it a little upward curl for extra character. -
Refine the Sides:
Using your fingers, gently curve the walls of the pod inwards slightly between the peas to emphasize their round shapes. -
Final Texturing:
Use a toothbrush or a texture tool to lightly stipple the outside of the pod, giving it a soft, organic matte finish rather than a shiny plastic look.
Pro Tip: Seamless Pods
To merge the ends of the pod seamlessly, use a rubber blending tool to smooth the pinched clay until the seam disappears, creating a single continuous shape.
Step 3: Bringing Them to Life
-
Add Mouths:
Use a very fine needle tool or a stiff toothpick to gently press small, curved smiles into each pea. Vary the angles slightly so they have individual personalities. -
Create Eye Sockets:
With a small ball stylus, make two tiny indentations above the mouth on each pea where the eyes will go. -
Add the Eyes:
Roll extremely tiny specks of black clay and press them into the eye sockets. Alternatively, you can bake the piece first and paint the eyes on later. -
Bake the Piece:
Place your creation on a baking sheet or ceramic tile. Follow the specific temperature and timing instructions on your package of polymer clay to cure it safely. -
Cool Down:
Allow the clay to cool completely before handling it. This ensures the polymer hardens fully and prevents fingerprints on the warm surface. -
Finishing Touches:
If you want a bit of shine on the eyes, apply a tiny dot of gloss varnish to them, but keep the pod and skin matte for a natural effect.
Display your cheerful little pod on a shelf or gift it to a friend who needs a smile
Simple Star and Moon Charms
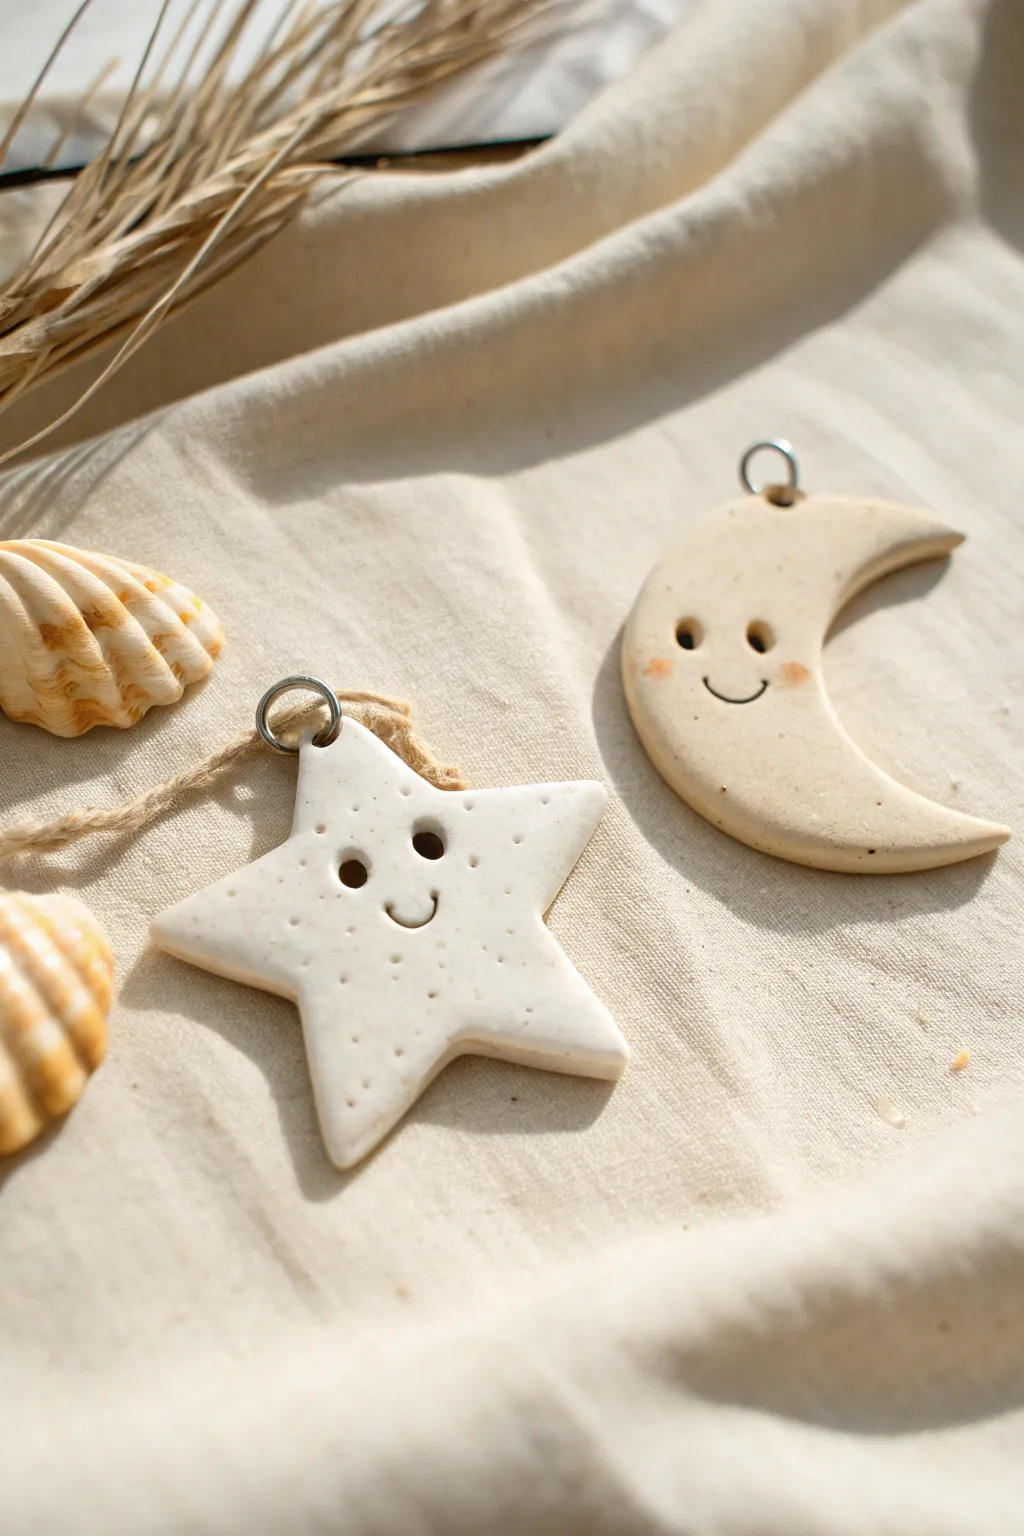
Bring the night sky down to earth with these adorable, textured clay charms featuring a smiling star and crescent moon. Crafted from simple modeling clay, they boast a lovely matte finish, sweet facial expressions, and tiny speckle details that give them an organic, handmade feel.
Step-by-Step Tutorial
Materials
- Air-dry clay or polymer clay (creamy white/beige)
- Small rolling pin
- Rolling guides or playing cards (optional)
- Star cookie cutter (approx. 2 inches)
- Round cookie cutter or drinking glass (for the moon)
- Needle tool or toothpick
- Small dotting tool or back of a paintbrush
- Small straw or metal eyelets/jump rings
- Black acrylic paint
- Pink or peach soft pastel or blush (for cheeks)
- Fine grit sandpaper
- Matte varnish (optional)
Step 1: Shaping the Sky
-
Condition the Clay:
Begin by taking a chunk of your creamy white clay and kneading it in your hands until it becomes soft, pliable, and free of cracks. This warm-up helps prevent surface imperfections later. -
Roll it Out:
Flatten the clay on a clean work surface. Use your rolling pin to create an even slab about 1/4 inch thick. I find that using rolling guides on either side ensures the thickness is perfectly uniform. -
Cut the Star:
Press your star-shaped cookie cutter firmly into the clay. Give it a tiny wiggle to ensure it cuts all the way through, then lift it away. Gently push the star out if it sticks inside the cutter. -
Shape the Moon:
For the crescent moon, you can use a specific cutter or improvise. First, cut a circle using a round cutter. Then, offset the same cutter and cut into the circle again to slice away a crescent shape. -
Create the Loop Holes:
While the clay is still wet, decide where your charms will hang from. Insert a small metal jump ring directly into the top tip of the star and the top curve of the moon. Alternatively, use a straw to punch a clean hole for stringing later. -
Soften the Edges:
Dip your finger in a tiny bit of water (or baby oil for polymer clay) and gently run it along the cut edges of your shapes. This rounds them off nicely so they look finished rather than sharp.
Sticky Situation?
If your clay sticks to the table or roller, dust the surface lightly with cornstarch (cornflour) before rolling. It acts like flour on dough and brushes off easily once dry.
Step 2: Adding Personality
-
Indent the Eyes:
Use a medium-sized dotting tool or the smooth end of a paintbrush handle to press two deep indentations for the eyes. Place them fairly wide apart on both the star and moon for that cute, kawaii look. -
Carve the Smiles:
Using a needle tool or a specialized clay curve tool, gently press a small ‘U’ shape between and slightly below the eyes. Make the smile simple and subtle. -
Add Texture Details:
This is the secret to their charm: take a needle tool or toothpick and prick tiny, shallow holes randomly across the surface of the star. Keep the moon smooth to distinguish the two textures. -
Initial Cure:
Let your clay dry completely according to the package instructions. If using air-dry clay, flip them over halfway through the drying process to prevent warping. For polymer clay, bake as directed. -
Smooth Perfection:
Once fully hardened, use a piece of fine-grit sandpaper to buff away any fingerprints or rough spots on the edges, ensuring the surface feels silky smooth.
Pro Tip: Rustic Texture
To get realistic brown speckles like the photo, mix a tiny pinch of used, dried coffee grounds or black pepper into the white clay before rolling it out.
Step 3: Finishing Touches
-
Prep the Paint:
Squeeze a tiny dot of black acrylic paint onto a palette. You want the consistency to be fluid but not watery, so the color stays exactly where you put it. -
Fill the Features:
Dip a very fine brush or the tip of a toothpick into the black paint. Carefully fill in the recessed eye holes and the smile line. If you go outside the lines, wipe it quickly with a damp cotton swab. -
Rosy Cheeks:
Scrape a little bit of powder from a pink pastel stick or use real powder blush. Pick up the pigment with a dry, fluffy brush or your fingertip. -
Apply Blush:
Gently dab the pink powder onto the clay directly under the eyes on the outer edges. Build the color slowly rather than adding too much at once. -
Seal (Optional):
To protect the pink cheeks and paint, you can apply a thin coat of matte varnish. Avoid glossy finishes if you want to keep the natural, stone-like appearance shown in the photo. -
String Them Up:
Pass a piece of jute twine, ribbon, or a metal chain through the jump rings you installed earlier. Tie a secure knot if you are making ornaments.
Now you have a charming set of celestial friends ready to hang as ornaments or gift tags.
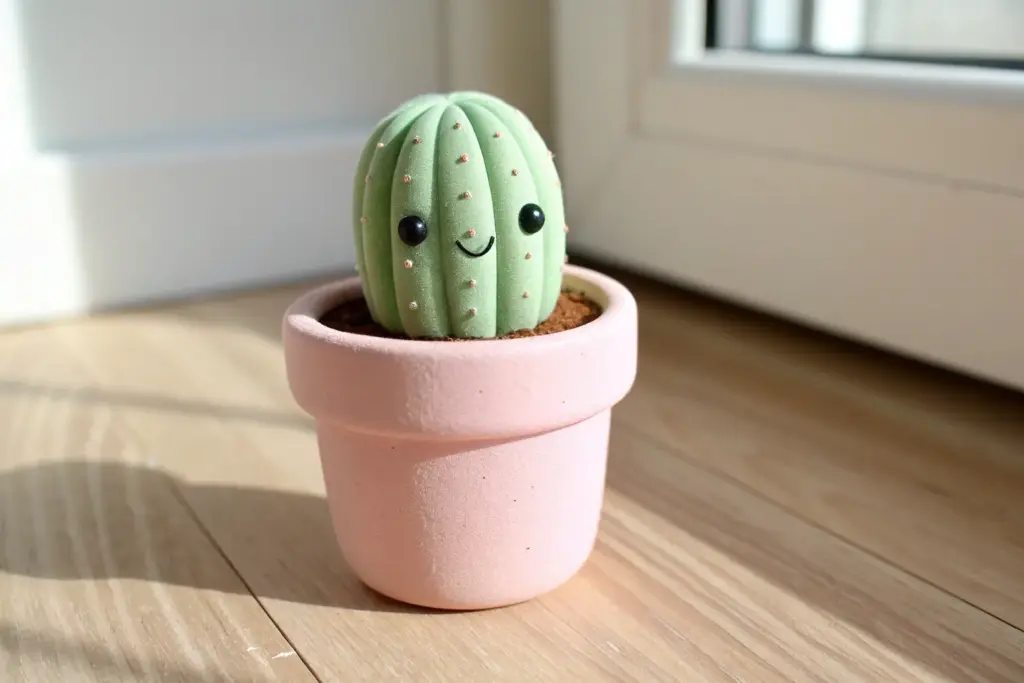
Cute Mini Cactus Sculptures

Bring a touch of the arid desert to your desk with these adorable, unkillable succulents. This trio of clay cacti features soft pastel greens, delicate pink blooms, and charming textured details that mimic real spines without the prickly pain.
Step-by-Step
Materials
- Polymer clay (soft sage green, pale pink, white or light beige)
- Clean working surface (tile or glass mat)
- Clay sculpting tools (needle tool, small ball stylus)
- Rolling pin or pasta machine
- Blade or craft knife
- Soft brush (optional, for smoothing)
- Baking sheet and oven (if using polymer clay)
Step 1: Prepping the Shapes
-
Condition the clay:
Start by warming up your sage green clay in your hands until it becomes soft and pliable. This conditioning step is crucial to prevent cracks later on. -
Form the tall cactus:
Take a medium-sized portion of green clay and roll it into a smooth cylinder. Gently round off the top into a dome shape and flatten the bottom slightly so it stands upright on its own. -
Shape the medium cactus:
Create a second cylinder, slightly shorter and stouter than the first. Like before, dome the top and ensure the base is flat and stable. -
Create the round barrel cactus:
Roll a smaller ball of green clay. Flatten the bottom firmly to create a hemispherical, barrel-cactus shape.
Fixing Cracks
If you see tiny cracks forming while smooth the ribs, rub a tiny drop of baby oil or clay softener over the area and massage it until the crack disappears.
Step 2: Adding Texture and Spines
-
Indent vertical ribs:
Using the side of a needle tool or a dull knife, gently press vertical lines into the sides of each cactus form. Space them evenly around the circumference to create puffy, ribbed sections. -
Refine the ridges:
Smooth the edges of your indented lines with your finger or a soft silicone tool so the ridges look organic and plump rather than sharp. -
Prepare tiny spines:
Take a tiny amount of white or light beige clay and roll it into a very thin snake, almost like a piece of thread. -
Place the spines:
Cut the thin snake into minuscule bits. Press these tiny dots gently into the center of the vertical ridges you created earlier. A ball stylus tool is really helpful here to seating them securely. -
Detail the round cactus:
For the smallest round cactus, place the dots in a radial pattern following the ribs, ending near the very center top.
Realistic Soil
Make fake soil by baking some brown clay scraps, chopping them into crumbs once cool, and gluing them into the base of your display dish.
Step 3: Creating the Blooms
-
Form petal bases:
Roll small balls of pale pink clay, about the size of a peppercorn. Flatten them slightly between your fingers to create petal shapes. -
Assemble the flowers:
Group 5-6 flattened petals together in a circle, pressing them gently at the center to join them. I like to lift the edges slightly to make the flower look open and alive. -
Add flower centers:
Place a teeny tiny ball of yellow or white clay in the center of your pink blooms if you want extra detail, or simply use a tool to texture the center. -
Attach to cacti:
Gently press a flower onto the top of the tall cactus and the medium cactus. The clay should stick on its own, but a drop of liquid clay or translucent bake and bond can ensure security.
Step 4: Finishing Up
-
Final inspection:
Check your sculptures for any fingerprints. You can brush them lightly with a little baby oil or cornstarch to smooth them out before baking. -
Bake:
Follow the manufacturer’s instructions for your specific brand of clay regarding temperature and time. Usually, this is around 275°F (135°C) for 15-30 minutes. -
Cool down:
Let the pieces cool completely on the baking sheet before moving them, as the clay is fragile while hot. -
Display:
Arrangement is key! Place your trio into a small shallow dish or coaster to mimic the look of a potted arrangement.
Place your finished garden near a window to enjoy their permanent, cheerful greenery
Beginner Pinch-Pot Trinket Dish
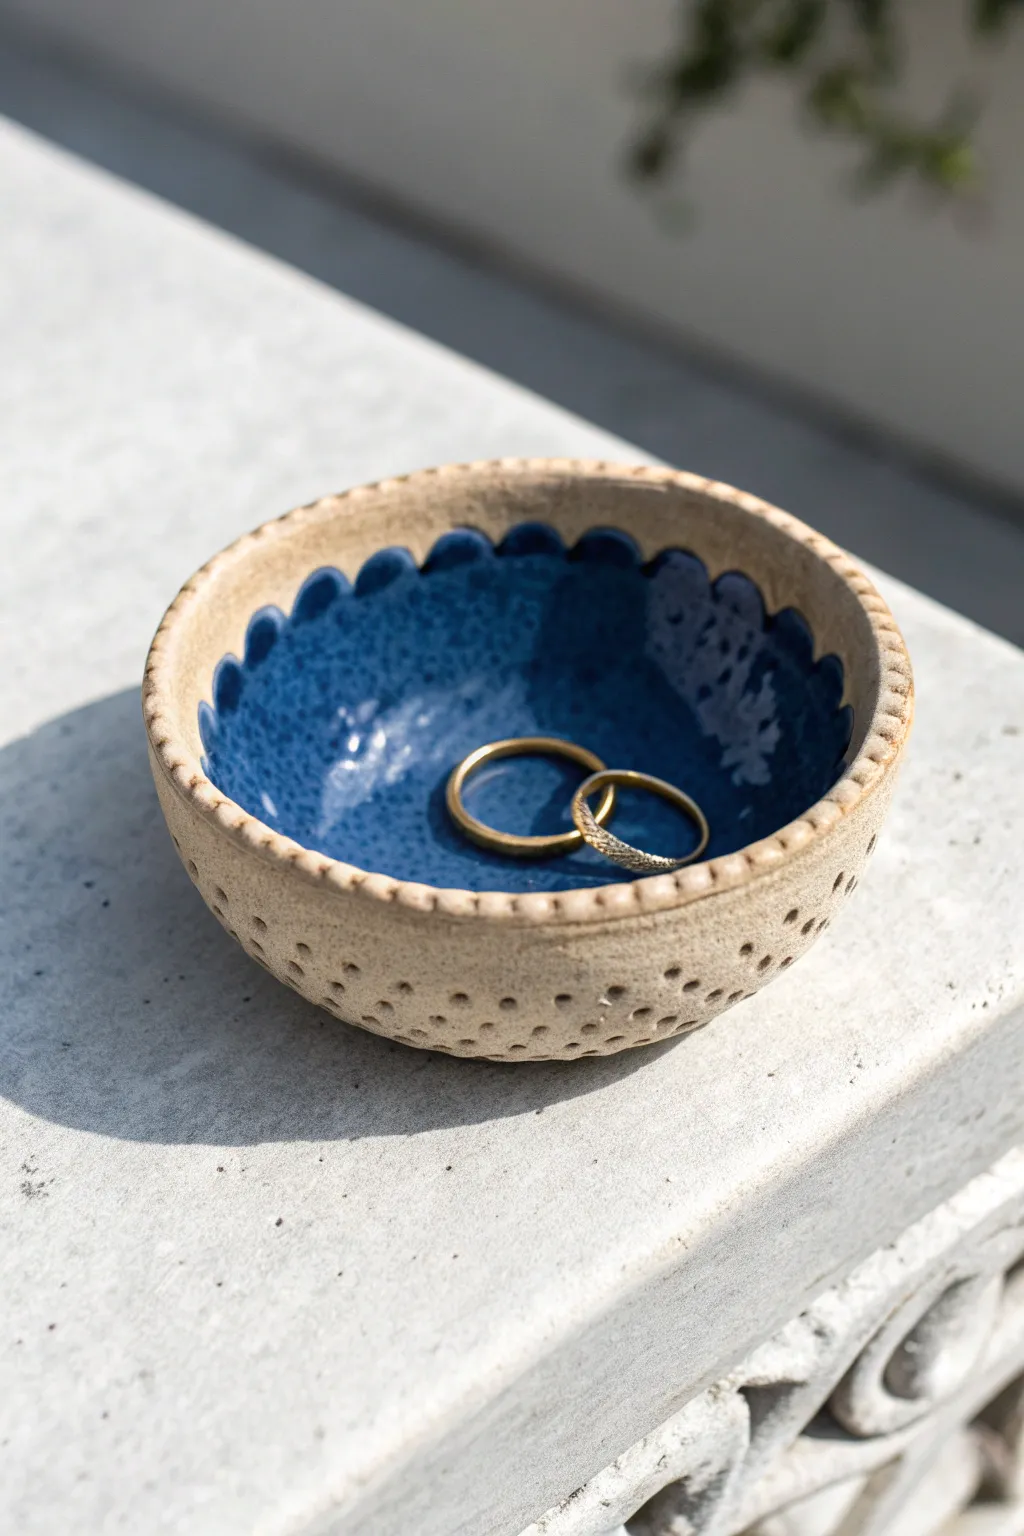
This charming trinket dish combines a rustic, textured exterior with a glossy, vibrant blue interior reminiscent of ocean waves. Using the simple pinch-pot technique, it’s the perfect beginner project for holding your favorite rings.
How-To Guide
Materials
- Air-dry clay or stone-colored polymer clay
- Acrylic paint (deep blue and clear gloss varnish) OR ceramic glaze if firing
- Needle tool or toothpick
- Small round paintbrush
- Sponge and water
- Sandpaper
Step 1: Forming the Base
-
Prepare the Clay:
Start with a ball of clay roughly the size of a golf ball or slightly larger. Knead it well until it’s smooth and pliable to prevent cracking later on. -
Open the Pinch Pot:
Hold the ball in one hand and push your thumb into the center, stopping just before you poke through the bottom. This creates the initial well of your dish. -
Pinch the Walls:
Gently pinch the clay between your thumb and fingers, rotating the ball as you go. Work from the bottom up to thin out the walls evenly. -
Shape the Form:
Continue pinching and turning until you have a small bowl shape. Aim for walls about 1/4 inch thick. Tap the bottom gently on your table to create a flat, stable base so the bowl doesn’t wobble.
Keep it Clean
Wipe your hands frequently while pinching. Dry clay on your fingers sucks moisture out of the working clay, causing unwanted surface cracks.
Step 2: Adding Texture and Details
-
Smooth the Surface:
Use a barely damp sponge or your finger to smooth out any major cracks or fingerprints on the rim and exterior. I like to leave it a little natural looking, but major cracks should be sealed. -
Create the Scalloped Rim:
Using your thumb or the rounded end of a paintbrush, gently press indentations into the inner rim at regular intervals. This creates the wavy, scalloped edge effect. -
Refine the Waves:
After pressing, lightly pinch the peaks between the indentations to sharpen the wave shape. Make sure the rim thickness stays consistent. -
Add Dotted Texture:
Take your needle tool or a toothpick. Starting near the bottom, poke a row of shallow holes around the exterior circumference. -
Continue the Pattern:
Add 2-3 more rows of dots above the first one, staggering them slightly or keeping them aligned depending on your preference. Vary the pressure slightly for an organic look. -
Dry or Bake:
If using air-dry clay, let it sit for 24-48 hours until bone dry. If using polymer clay, bake according to the package instructions.
Step 3: Painting and Finishing
-
Sand Irregularities:
Once fully dry or cooled, lightly sand any sharp burrs created by the toothpick holes or rough spots on the rim. -
Apply Blue Core:
Paint the entire interior of the bowl with a deep blue acrylic paint. Carefully bring the paint just up to the edge of the scallops, following the wave pattern. -
Refine the Edge:
Use a small detail brush to neaten the transition line at the rim. The blue shouldn’t spill over onto the textured exterior. -
Apply Second Coat:
Let the first layer dry completely, then add a second coat of blue to get that rich, opaque color. -
Glaze the Interior:
Apply a high-gloss varnish or glaze strictly to the blue painted area. This mimics the look of ceramic glaze and makes the color pop. -
Seal the Exterior (Optional):
For a matte finish on the outside, leave it raw or use a matte varnish to protect the clay without adding shine.
Rim Cracking?
If the rim cracks while making the scallops, dip your finger in water (or slip) and smooth the crack immediately before reshaping. Don’t let cracks dry.
Place this lovely little dish on your vanity or bedside table for a perfect spot to keep your rings safe
Easy Clay Beads for Bracelets
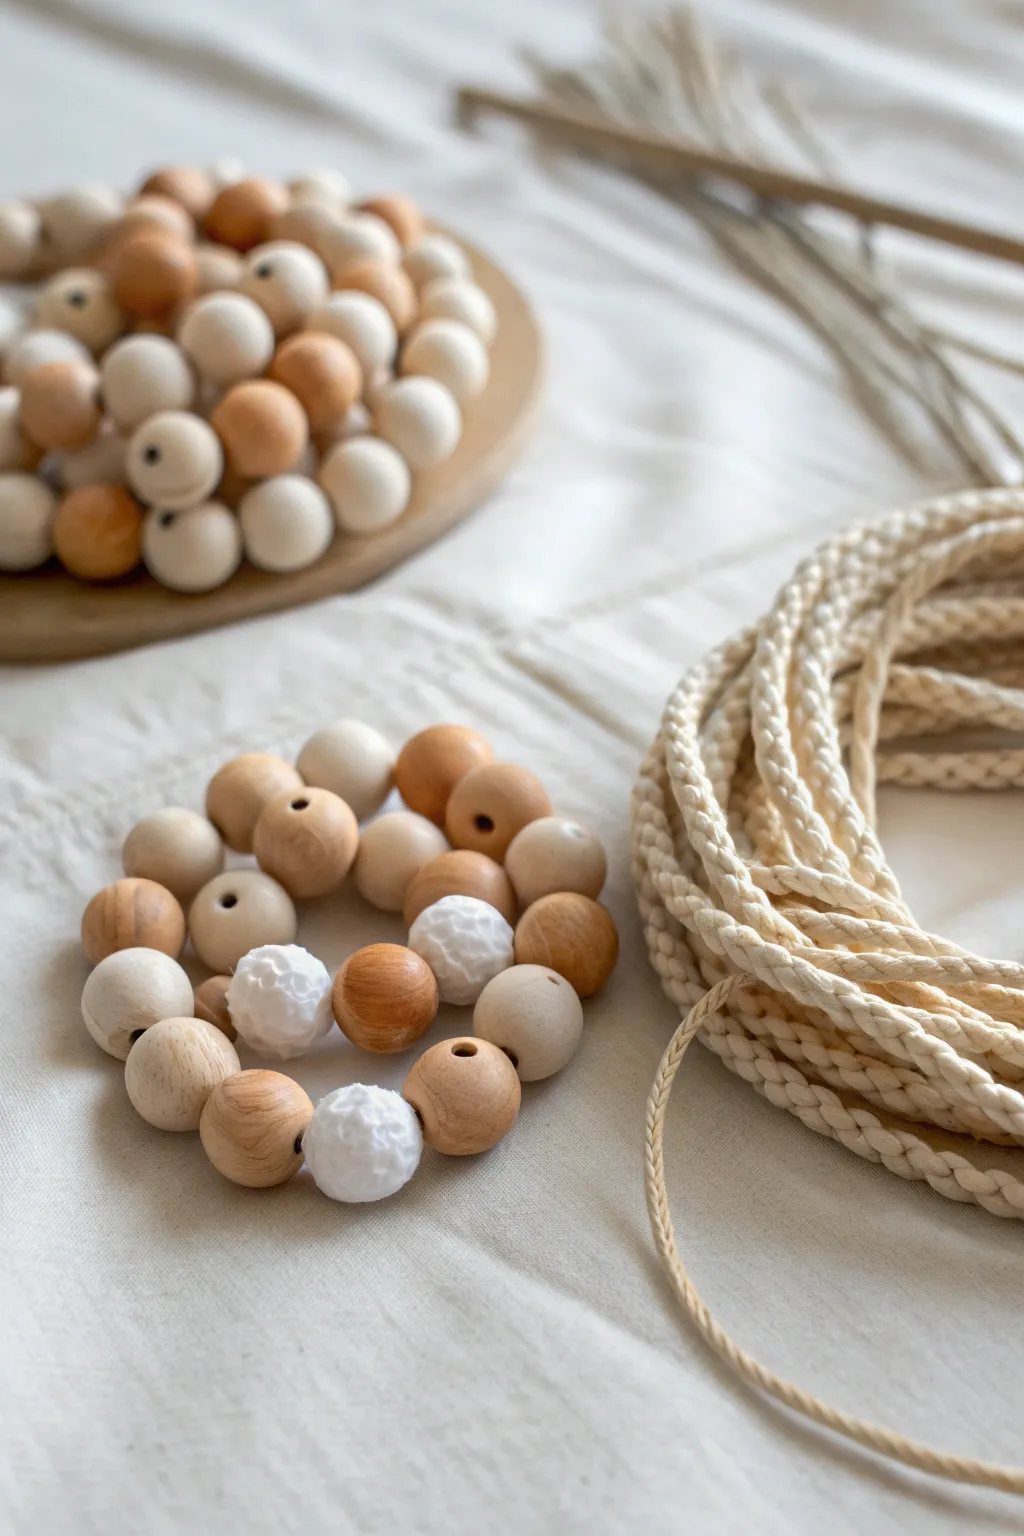
Combine the warmth of natural wood with the handmade charm of textured clay beads in this simple bracelet project. The contrasting smooth wood and dimpled clay surfaces create a tactile, organic accessory perfect for a minimalist aesthetic.
Step-by-Step
Materials
- White polymer clay or air-dry clay (modeling clay)
- Wooden beads (approx. 15-20mm diameter, unfinished)
- Texturing tool (toothpick, dotting tool, or crumpled foil)
- Elastic cord or strong cotton cord
- Skewer or knitting needle (for piercing holes)
- Scissors
- Sandpaper (optional, for wood beads)
- Clear sealant (optional, for clay beads)
Step 1: Crafting the Clay Beads
-
Condition the clay:
Start by taking a small portion of your white modeling clay. Knead it thoroughly in your hands until it becomes soft, pliable, and free of cracks. -
Size your beads:
Pinch off small pieces of clay. Roll them into balls that match the approximate size of your wooden beads—around 15mm to 20mm is usually a good standard. -
Shape the spheres:
Roll each piece between your palms to create a smooth, perfect sphere. If you see any seams or cracks, smooth them out with your finger. -
Add texture:
This is where the magic happens. Take a texturing tool—I find a small ball-tip tool or even a crumpled ball of aluminum foil works great—and gently press it all over the clay surface to create a dimpled, stone-like effect. -
Pierce the holes:
carefully push a skewer or knitting needle through the center of each clay bead to create the stringing hole. -
Widen the openings:
Review the holes you just made. Gently wiggle the skewer in a circular motion to ensure the opening is large enough for your cord, especially if you plan to use a thicker rope. -
Dry or bake:
If using polymer clay, bake according to the package instructions. If using air-dry clay, set the beads aside in a dry, warm spot for at least 24 hours to harden completely.
Hole Distortion?
If piercing the clay deforms the round shape, let the clay firm up slightly (about 15-20 mins for air-dry) before piercing, then reshape gently.
Step 2: Assembling the Bracelet
-
Prepare the cord:
Cut a length of elastic or cotton cord. Measure your wrist and add about 6 inches of extra length to allow for easier tying. -
Plan your pattern:
Lay out your beads on a flat surface. Mix the natural wooden beads with your handmade white clay beads. An alternating pattern or random clusters often look best. -
String the first bead:
Thread your cord through the first bead. If you are using a non-elastic cord, you might want to tie a temporary knot at the end so beads don’t slide off. -
Continue threading:
Add the remaining beads one by one, following the pattern you designed. Keep tension loose enough to work with but tight enough to see how the bracelet curves. -
Check the fit:
Wrap the strand around your wrist to check the sizing. Add or remove beads as necessary to ensure a comfortable fit. -
Secure the loop:
Once satisfied with the length, bring the two ends of the cord together. Remove any temporary knots if you made them. -
Tie the knot:
Tie a strong surgeon’s knot (right over left, left over right) to secure the bracelet. Pull it tight to ensure it won’t slip. -
Hide the knot:
Clip the excess cord ends close to the knot. Gently pull the adjacent beads so the knot slips inside the hole of one of the wooden or clay beads, hiding it from view.
Scent Infusion
Use unsealed wooden beads as essential oil diffusers. Add a drop of lavender or eucalyptus oil to the wood for a subtle, wearable scent.
Now you have a stylish, tactile accessory that brings a touch of nature to your outfit
Tiny Letter Tiles and Initial Tags

These charming, dusty-hued letter tiles and hanging monogram tags add a personalized touch to gifts or decor. With their smooth matte finish and stamped typography, they have a lovely, handcrafted ceramic feel without needing a kiln.
Detailed Instructions
Materials
- Air-dry modeling clay (white and terracotta/pink)
- Acrylic rolling pin
- Small square cookie cutter (approx. 1 inch)
- Small round cookie cutter (approx. 1.25 inch)
- Letter stamp set
- Parchment paper or craft mat
- Fine-grit sandpaper
- Toothpick or skewer
- Natural twine or hemp cord
- Matte sealant (optional)
Step 1: Preparing the Clay
-
Condition the clay:
Start by kneading your air-dry clay until it is warm, pliable, and free of cracks. If you want custom shades like the pale blush seen in the photo, mix a tiny amount of terracotta clay into the white clay until fully blended. -
Roll it out:
Place the clay on a sheet of parchment paper to prevent sticking. Use an acrylic rolling pin to roll the clay out to an even thickness of about 1/4 inch (6mm). -
Smooth the surface:
Before cutting, I like to run a slightly damp finger over the surface to smooth out any rolling texture or fingerprints.
Clean Cuts
dip your cutter in cornstarch or baby powder before pressing into the clay. This prevents sticking and ensures sharp, clean edges every time.
Step 2: Creating Square Tiles
-
Cut the shapes:
Using your small square cutter, press firmly into the rolled clay to create your tiles. Cut as many squares as you need for your alphabet set. -
Clean edges:
Gently lift the squares. If the edges are jagged, lightly tap them on your work surface or smooth them with a fingertip. -
Stamp the letters:
Select a letter from your stamp set. Press it firmly into the center of a square tile. Ensure equal pressure so the impression is crisp and deep. -
Repeat for the alphabet:
Continue stamping until you have a full alphabet or your desired words. Create a mix of white, beige, and pink tiles for visual variety.
Step 3: Making Round Tags
-
Cut circles:
using the round cutter, create several circular discs from the remaining rolled clay. -
Add the hole:
While the clay is still wet, use a toothpick or skewer to poke a hole near the top edge of each circle. Wiggle it slightly to ensure the hole is large enough for your twine. -
Stamp initials:
Press a single letter into the center of each round tag, just below the hanging hole.
Color Pop
After drying, paint inside the stamped letter grooves with diluted acrylic paint, then wipe the surface clean to make the letters stand out boldly.
Step 4: Finishing Touches
-
Let them dry:
Arrange all pieces on a flat surface lined with parchment paper. Let them air dry for 24-48 hours, flipping them halfway through to prevent curling. -
Sand for perfection:
Once fully cured and hard, use fine-grit sandpaper to gently buff the edges and surface. This gives that professional, stone-like smoothness. -
String the tags:
Cut lengths of natural twine. Loop the twine through the holes in the round tags and secure with a simple knot. -
Optional: Seal:
To protect your work, you can brush on a thin layer of matte varnish, though leaving them raw preserves the earthy texture.
Now you have a beautiful set of custom tactile letters ready for educational play or personalized gifting
Mini Planets and a Simple Solar Set
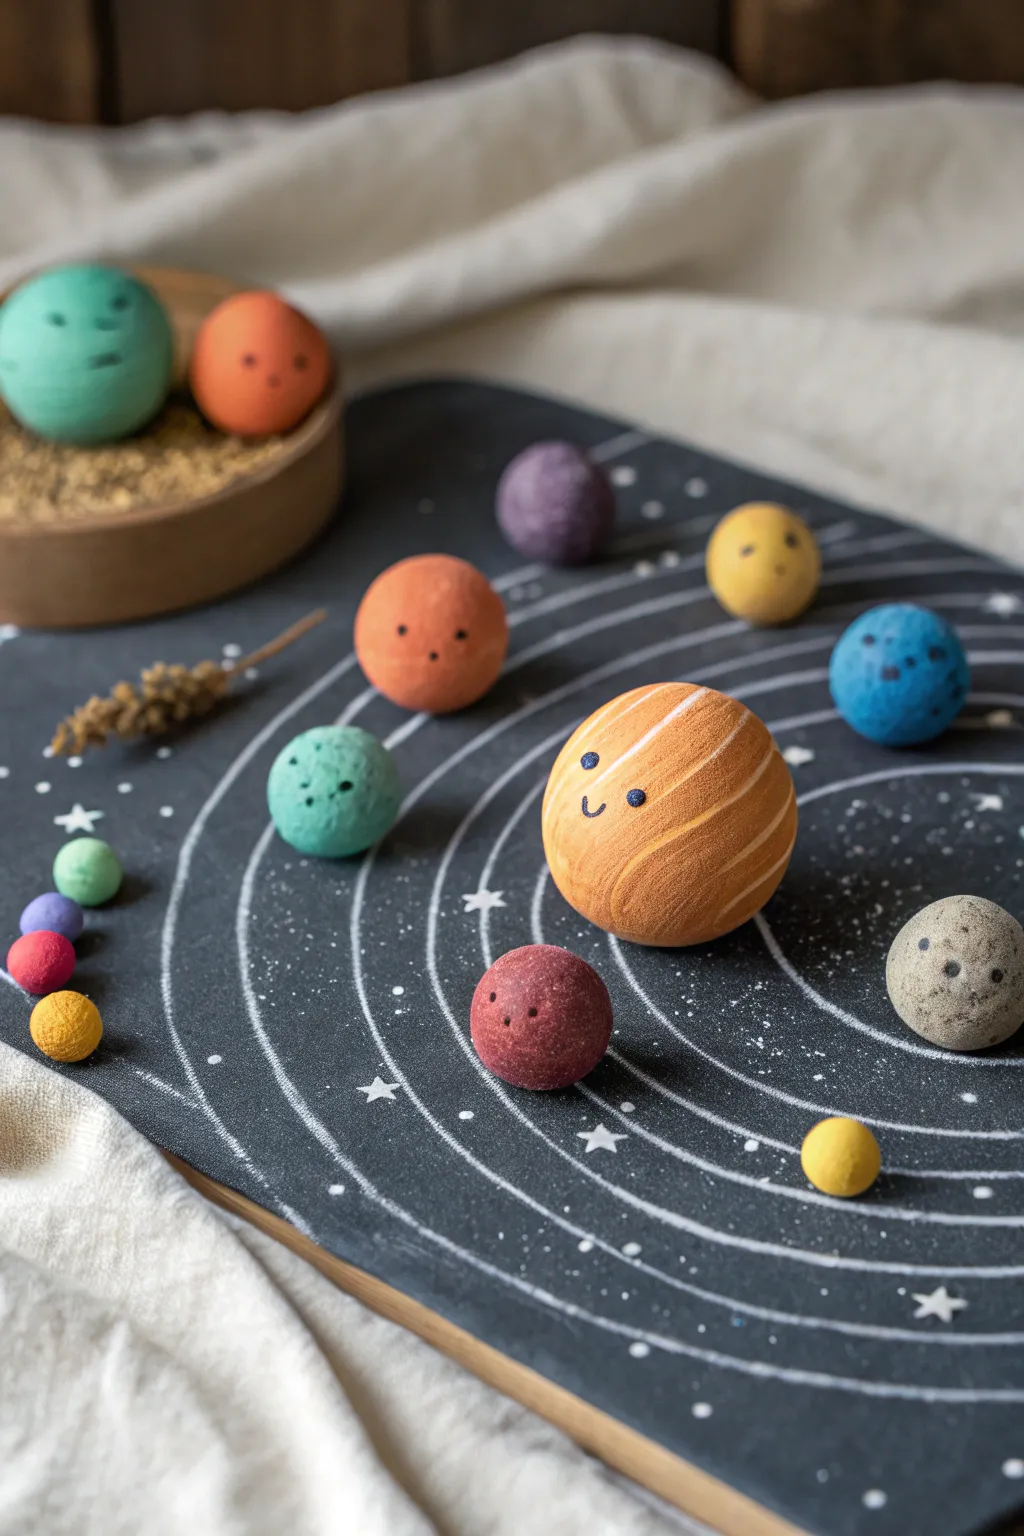
Create a charming, pocket-sized universe with this tactile solar system set, featuring smiling planets made from smooth modeling clay. This project combines simple sculpting with a hand-drawn chalkboard surface, perfect for playful learning or cute desk decor.
Step-by-Step
Materials
- Air-dry clay or polymer clay
- Acrylic paints (various colors: oranges, blues, greys, yellow, purple)
- Fine-point paintbrush
- Fine-point black marker or paint pen
- Wooden board or heavy cardstock (approx. A4 size)
- Black chalkboard paint or dark grey acrylic paint
- White gel pen or white paint marker
- Sandpaper (fine grit)
- Matte varnish (optional)
Step 1: Preparing the Base
-
Prime the Surface:
Start by taking your wooden board or heavy cardstock. If it has a rough texture, verify it is sanded smooth first. -
Apply the Night Sky:
Paint the entire surface with black chalkboard paint or a deep charcoal acrylic. Use a wide flat brush to ensure even coverage without heavy brushstrokes. -
Dry and Repeat:
Allow the first coat to dry completely. If the wood grain still shows through, apply a second coat for a solid, opaque finish. -
Sketch the Orbits:
Once the board is fully dry, take a white gel pen or paint marker. Draw concentric, slightly elliptical rings starting from the center to represent orbital paths. They don’t need to be mathematically perfect; a hand-drawn look adds charm. -
Add Stardust:
Dot tiny stars and small star shapes scattered across the black background using the white pen to create a galaxy effect.
Smooth Rolling
To get perfectly round spheres without fingerprints, try rolling the final shape on a piece of clear plexiglass or acrylic rather than in your palms.
Step 2: Sculpting the Planets
-
Size the Spheres:
Break off pieces of clay in varying sizes. You will need one large ball for Jupiter (or the Sun), medium balls for planets like Neptune and Uranus, and tiny spheres for Mars and Mercury. -
Roll Smooth:
Roll each piece of clay between your palms. Apply gentle, even pressure to make them perfectly round sphere shapes. -
Dry the Clay:
Set the spheres on a flat surface to dry according to your clay package instructions. I find rotating them every few hours prevents flat spots from forming on the bottom. -
Sand Imperfections:
Once hardened, inspect the spheres. Use fine-grit sandpaper to gently smooth out any fingerprints or bumps.
Step 3: Painting the Details
-
Base Colors:
Paint each sphere its respective color—orange for the large gas giant, blue for Earth/Neptune, red for Mars, and yellow/grey for others. Let the base coats dry. -
Add Texture Details:
For the large orange planet, mix a lighter cream color and paint horizontal stripes to mimic atmospheric bands. For rocky planets, lightly sponge a darker shade to create texture. -
Draw the Faces:
Using a very fine paintbrush or a black paint pen, add two small dots for eyes and a tiny ‘u’ create a smile on each planet. This gives them their distinct personality. -
Highlight the Eyes:
Add the tiniest spec of white paint to the black eye dots to create a ‘sparkle’ of life. -
Create the Extras:
Roll tiny leftover bits of clay into a small line of spheres for an asteroid belt or extra moons. -
Seal (Optional):
If you want the set to be durable for handling, brush a coat of matte varnish over each planet. -
Final Assembly:
Arrange the finished planets on their corresponding orbital lines on your prepared board.
Magnetic Magic
Glue small round magnets to the bottom of the planets and use a metal baking sheet as the base instead of wood for an interactive, movable solar system.
Now you have an adorable, handheld galaxy ready to explore right from your table
Silly Monster Blobs With Big Eyes
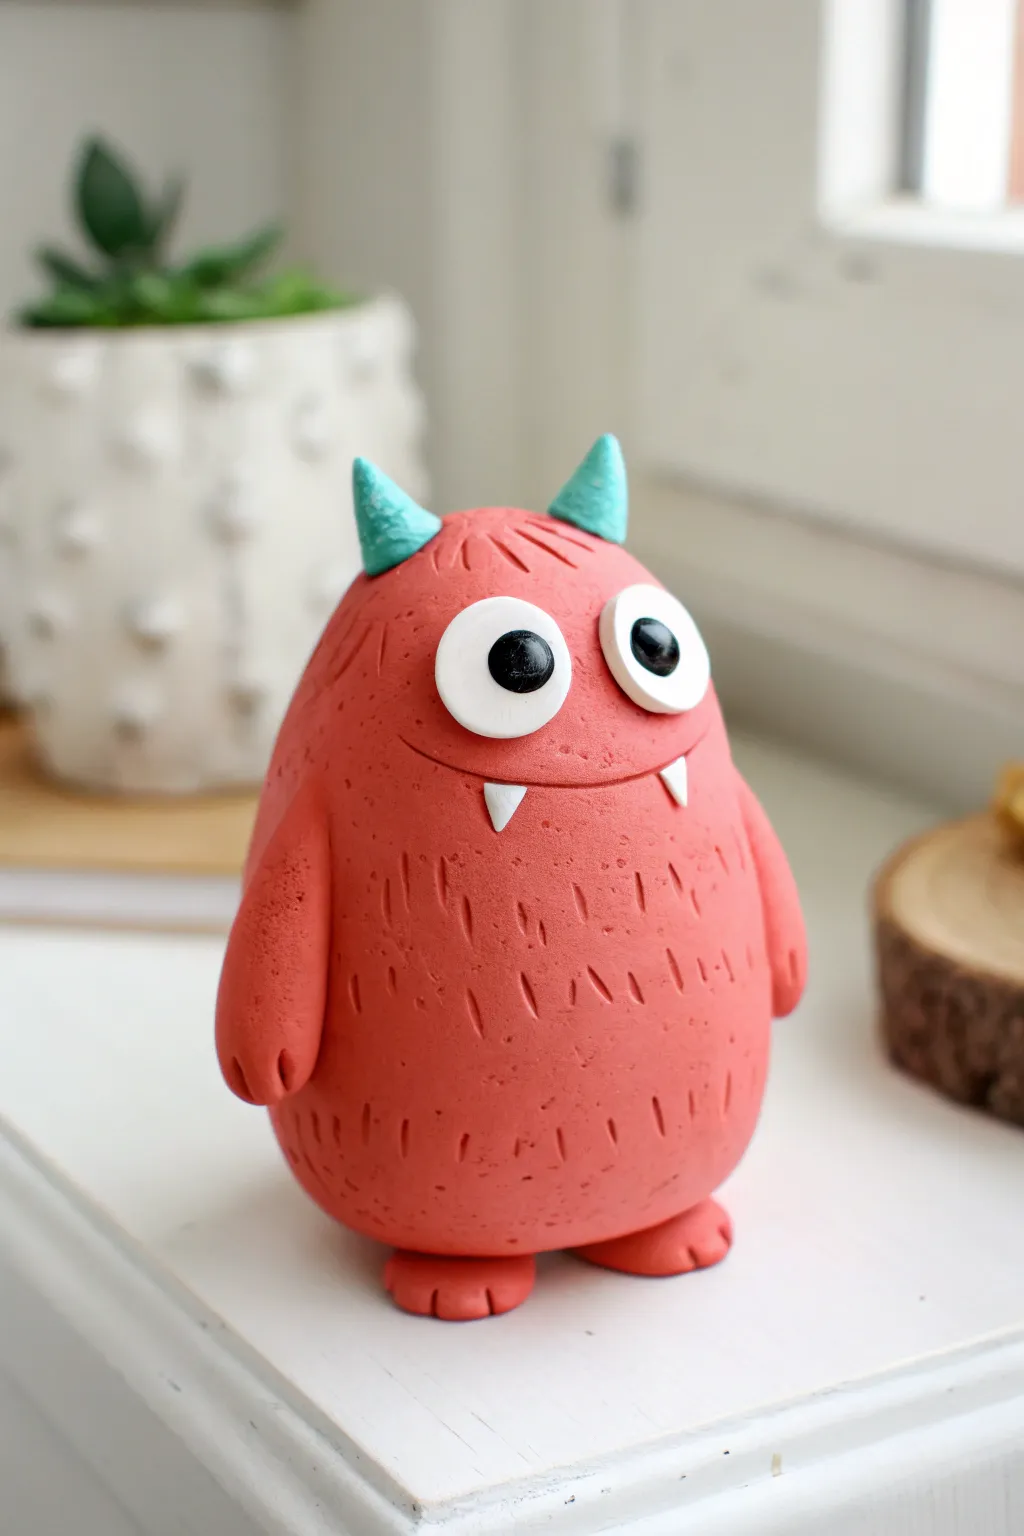
Create an adorable little desk buddy with this simple, texture-rich clay project. This cheerful red monster features playful blue horns, oversized eyes, and a charmingly goofy smile that is sure to bring a grin to your face.
Step-by-Step Guide
Materials
- Red polymer clay or air-dry clay
- Light blue polymer clay
- White polymer clay
- Black polymer clay
- Needle tool or toothpick
- Modeling tool with a curved blade (for the mouth)
- Small ball stylus tool
- Work surface (silicone mat or parchment paper)
Step 1: Shaping the Base
-
Form the body:
Start with a large chunk of red clay. Roll it into a smooth ball between your palms to remove any cracks or lines. -
Create the egg shape:
Gently taper the top of the ball to create an egg-like or pear shape. The bottom should remain wide and somewhat flat so the monster stands up effectively on its own. -
Add feet:
Roll two small balls of red clay for the feet. Flatten them slightly into oval discs. -
Detail the toes:
Use a modeling tool or the side of a toothpick to press two indentations into the front of each foot, creating three little toes. -
Attach the feet:
Press the feet firmly onto the bottom of the body, positioning them slightly apart for stability. Blend the clay at the connection point underneath if needed for a stronger bond.
Horns Falling Off?
If the horns won’t stay put, insert a tiny piece of dry spaghetti or wire inside the horn and push it into the head to act as an internal armature.
Step 2: Adding Character
-
Make the arms:
Roll two medium-sized sausage shapes from red clay for the arms. Taper one end of each slightly. -
Attach the arms:
Press the thicker end of the arms onto the sides of the body, about halfway down. Smooth the seam where the arm meets the body so it looks like one continuous piece. -
Review the pose:
Curve the arms slightly forward or let them hang naturally. You can add tiny indentations at the tips to suggest fingers. -
Create the signature texture:
This is my favorite part for adding personality. Take your needle tool or a toothpick and gently press short, vertical lines all over the red body. -
Vary the texture:
Don’t make the lines too uniform; scatter them randomly to mimic the look of coarse fur, leaving the area where the face will go relatively smooth.
Step 3: Facial Features
-
Form the eyes:
Roll two balls of white clay—make one slightly larger than the other for a goofy look—and flatten them into discs. -
Place the eyes:
Press the white discs onto the upper center of the face, making sure they touch each other. -
Add pupils:
Roll two small balls of black clay. Flatten them and press them onto the white discs. Placing them slightly cross-eyed or looking in different directions adds to the silly character. -
Carve the mouth:
Use a curved modeling tool to press a wide, U-shaped smile into the red clay below the eyes. -
Add teeth:
Shape two tiny, pointed triangles from white clay. Press these ‘fangs’ onto the bottom edge of the smile, pointing downward.
Clean White Clay
White clay picks up dust easily. Always wipe your hands with a baby wipe or wash them thoroughly before handling the white clay to keep the eyes bright.
Step 4: Crown and Finish
-
Shape the horns:
Take small amounts of light blue clay and shape them into two cones. -
Attach the horns:
Press the horns onto the top of the monster’s head. If the clay isn’t sticking well, you can roughen the attachment point slightly. -
Final check:
look over your monster from all angles. Smooth out any accidental fingerprints, re-texturing those areas if necessary. -
Bake or dry:
Follow the specific instructions for your type of clay. If baking polymer clay, ensure your oven is preheated to the correct temperature to prevent scorching.
Once dry or baked, place your whimsical monster on a shelf to guard your books with a friendly smile