Whenever I need a quick joy-boost at the clay table, I make tiny clay fruit—they’re colorful, beginner-friendly, and ridiculously satisfying. Here are my favorite clay fruit ideas you can turn into charms, earrings, mini displays, or sweet little desk buddies.
Strawberry Charms With Seed Texture
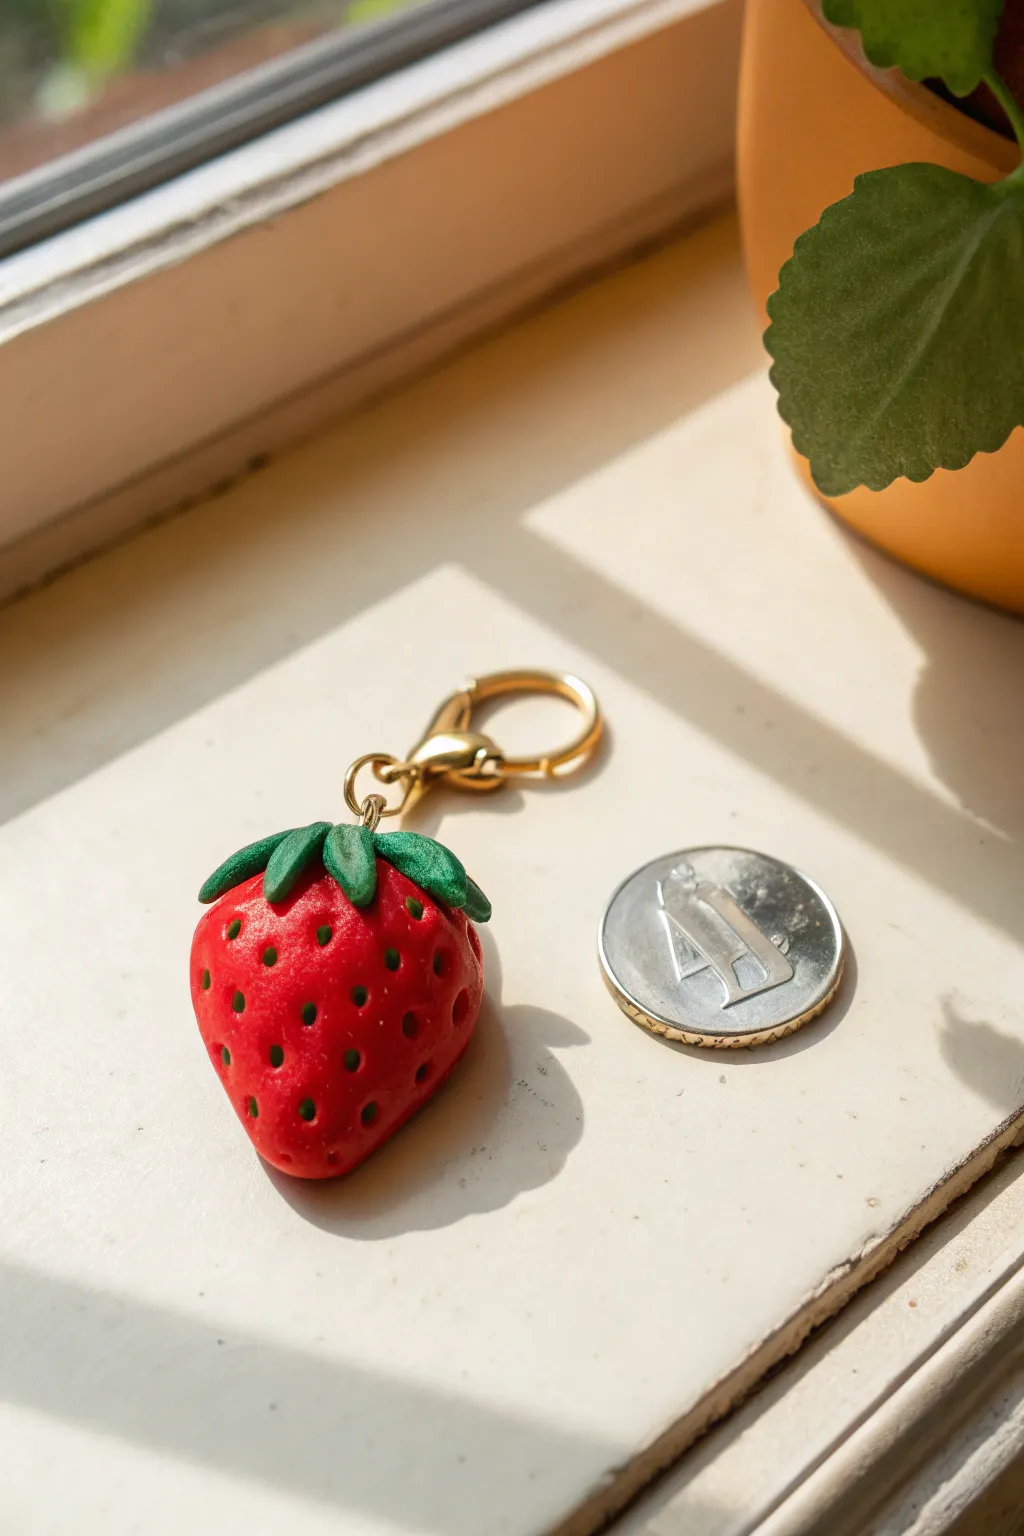
Capture the sweetness of summer with this delightful strawberry charm, perfect for adding a pop of color to your keys or bag. The realistic seed texture and vibrant polymer clay colors give it a fresh-picked look that’s surprisingly simple to achieve.
Step-by-Step Tutorial
Materials
- Red polymer clay
- Green polymer clay
- Sculpting tool with a small round tip (or a toothpick)
- Eye pin (gold finish)
- Jump ring (gold finish)
- Lobster clasp keychain (gold finish)
- Polymer clay glaze (glossy or satin)
- Small paintbrush
- Baking tray and parchment paper
- Oven
Step 1: Shaping the Berry
-
Preparation:
Begin by kneading your red polymer clay until it is soft and conditioned. This ensures the clay is pliable and prevents cracking during the baking process. -
Forming the Base:
Roll a small amount of the red clay into a smooth ball, roughly the size of a large marble. The size can be adjusted based on your preference, but keep it manageable for a keychain. -
Creating the Taper:
Gently roll one side of the ball between your fingers to create a teardrop shape. Flatten the wider top slightly to create a surface for the leaves, while keeping the bottom point rounded but distinct. -
Texturing the Surface:
Using a small round-tipped tool or a toothpick, carefully press tiny indentations all over the surface of the red clay. Stagger the rows slightly to mimic natural seed patterns, leaving the very top smooth for the leaves. -
Refining the Shape:
If the strawberry became slightly misshapen during texturing, gently pat it back into its teardrop form without smoothing out your seed dimples.
Step 2: Adding Leaves & Hardware
-
Conditioning Green Clay:
Clean your hands to remove any red residue, then condition a small amount of green clay for the calyx (the leafy top). -
Making the Leaves:
Pinch off five or six tiny pieces of green clay. Roll each one into a small teardrop shape and flatten them to create individual leaves. -
Attaching the Foliage:
Place the leaves onto the flat top of the strawberry, arranging them in a starburst pattern so the points drape slightly over the red shoulder of the fruit. I like to curve one or two tips upward for a more organic feel. -
Creating the Stem:
Roll a tiny cylinder of green clay and place it in the center where all the leaves meet, blending the clay slightly downward to secure it. -
Inserting the Hardware:
Take a gold eye pin and trim it if it’s too long. Push the straight end down through the center of the green stem and into the body of the strawberry. -
Securing the Eye Pin:
Gently pinch the green clay around the base of the eye pin to ensure it holds tight during baking.
Seed Depth Tip
Don’t press too deep for the seeds! Shallow, uniform pokes look more realistic. Deeper holes can distort the berry’s overall teardrop shape.
Step 3: Finishing Touches
-
Baking:
Place your charm on a parchment-lined baking tray. Bake according to your polymer clay brand’s specific package instructions (usually around 275°F or 130°C for 15-30 minutes). -
Cooling:
Allow the strawberry to cool completely before handling. Polymer clay is strongest once it has returned to room temperature. -
Glazing:
Apply a thin coat of glossy or satin glaze to the red portion of the strawberry using a small brush. This highlights the seed texture and gives it a juicy sheen. -
Assembly:
Once the glaze is dry, open a gold jump ring using pliers. -
Connecting the Clasp:
Loop the jump ring through the eye pin on your strawberry and the loop of the lobster clasp keychain. -
Closing:
Close the jump ring securely to finish your charm.
Make It Sparkle
Before baking, lightly brush gold mica powder over the seed indentations. The powder will settle in the holes for magical, golden seeds.
Now you have a durable, juicy-looking accessory ready to brighten up your daily routine


Watermelon Wedges With Layered Rind
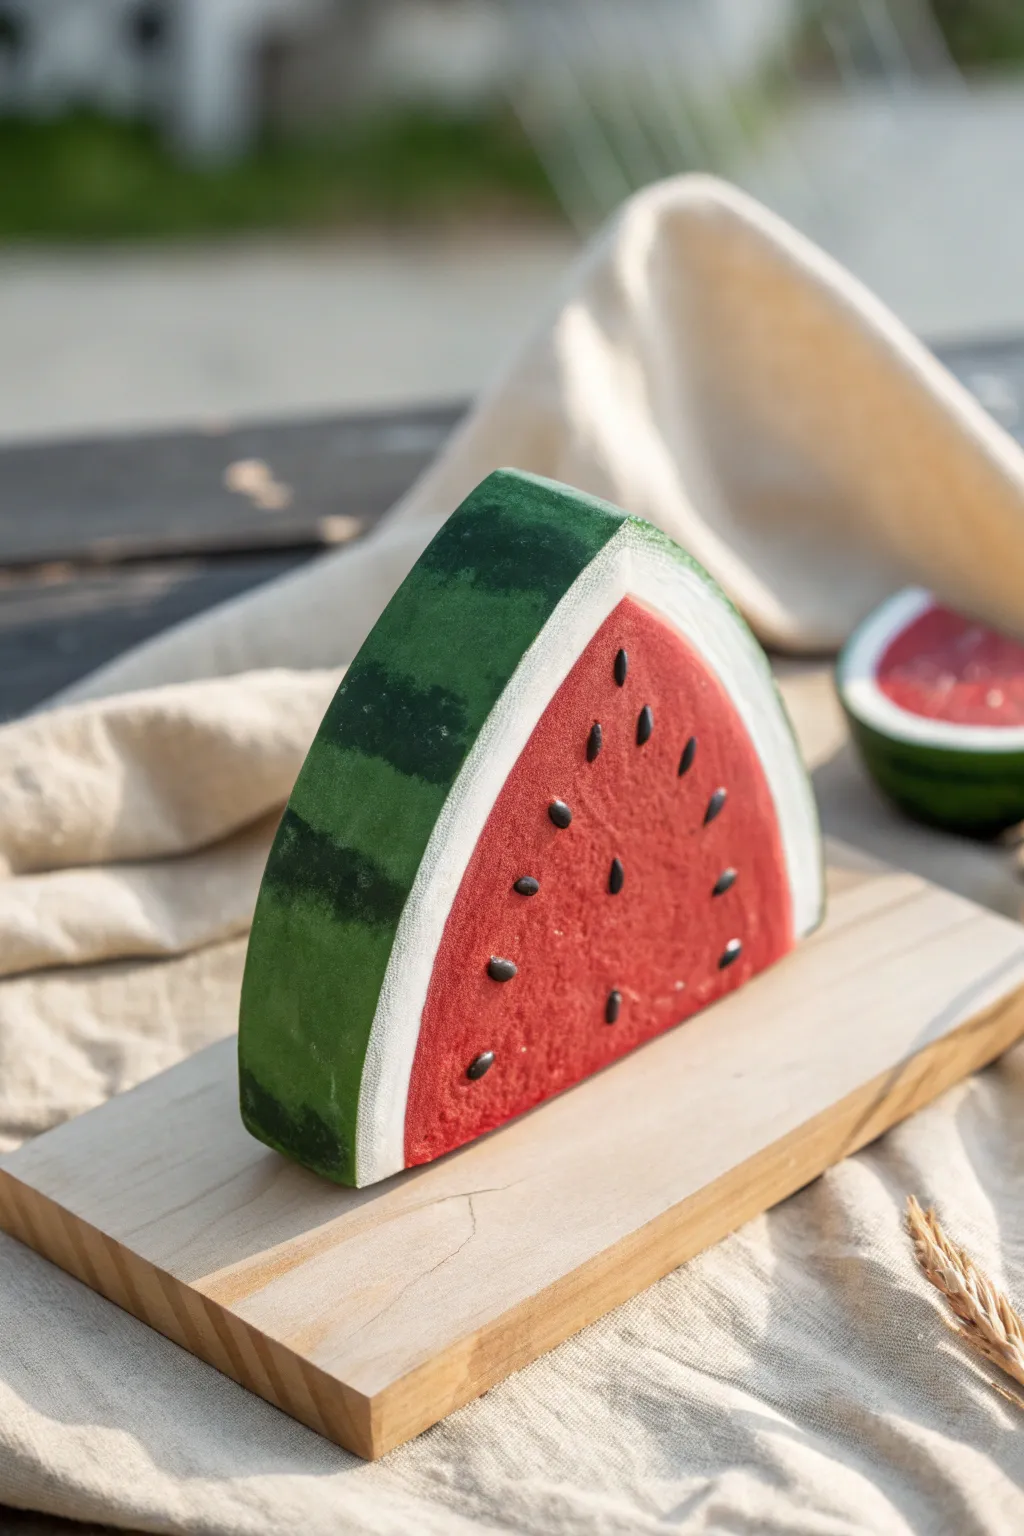
This project captures the refreshing look of summer with a chunky, realistic watermelon wedge made entirely of clay. By carefully layering your colors and texturing the surface, you’ll create a durable piece of faux fruit perfect for play food or seasonal décor.
Step-by-Step Guide
Materials
- Polymer clay or air-dry clay (Red, White, Dark Green)
- Acrylic paint (Dark Green, Black)
- Small paintbrush
- Clay roller or rolling pin
- Craft knife or clay blade
- Needle tool or toothpick
- Fine-grit sandpaper (optional)
- Matte varnish or sealant
- Texturing sponge or toothbrush
Step 1: Forming the Flesh
-
Prepare the red core:
Start by conditioning a large block of red clay until it is soft and pliable. Roll it into a thick log, then flatten the sides slightly to begin forming a triangular wedge shape. -
Refine the wedge shape:
Using your hands or a flat surface, press and mold the red clay into a precise wedge. Make sure the back is curved like a natural melon slice and the two flat sides are even. -
Add texture:
Take a toothbrush or a texturing sponge and gently dab the flat red surfaces. This creates the porous, juicy texture typical of real watermelon flesh.
Step 2: Layering the Rind
-
Roll out the white rind:
Condition your white clay and use a roller to create a sheet about 3-4mm thick. You want this layer visible but not overpowering. -
Wrap the core:
Cut a strip of the white clay sheet that matches the width of your red wedge’s curved back. Lay it over the curved surface, pressing it gently to adhere without squishing the texture. -
Trim the excess:
Use your craft knife to slice away any overhanging white clay so the edges are flush with the flat red sides of the wedge. -
Roll out the green skin:
Roll out a sheet of dark green clay, making it slightly thinner than the white layer. This forms the hard outer skin. -
Apply the green layer:
Apply the green sheet directly over the white layer on the curved back. Smooth it down with your fingers to ensure a tight bond between the layers. -
Clean up edges:
Just like before, trim the excess green clay with your blade to create a clean, sharp profile where the layers meet the red flesh.
Uneven Layers?
If your rind layers smear during cutting, pop the clay in the fridge for 15 minutes before trimming. The firmer clay cuts cleanly for crisp lines.
Step 3: Adding Details
-
Create the seeds:
Roll tiny teardrop shapes out of black clay. These should be quite small to match the scale of your wedge. -
Embed the seeds:
Press the seeds gently into the textured red surface. You can use your needle tool to nudge them into position, arranging them in a loose, radial pattern. -
Paint the stripes:
Mix a small amount of dark green acrylic paint with a touch of black. Using a fine brush, paint irregular, wavy stripes across the green back of the rind. -
Soften the paint:
I prefer to lightly dab the wet paint with a sponge or paper towel to soften the edges, making the stripes look organically grown rather than painted on. -
Initial refinement:
Check the entire piece for fingerprints or unintentional marks. Gently smooth them out with your finger or a bit of baby oil.
Texture Pop
Mix translucent liquid clay with red clay for the core. The slight transparency mimics the juicy, water-filled look of real fruit flesh.
Step 4: Finishing Touches
-
Dry or bake:
If using polymer clay, bake according to the manufacturer’s instructions. If using air-dry clay, allow it to dry completely in a safe spot for 24-48 hours. -
Seal the artwork:
Once fully cured or dry, apply a coat of matte varnish over the entire piece. This protects the paint and gives the clay a consistent finish. -
Optional gloss:
For an extra touch of realism, add a tiny dot of gloss varnish to each black seed to make them shine like wet fruit seeds.
Place your finished wedge on a wooden board or in a fruit bowl to enjoy a slice of summer all year round


Lemon And Lime Slice Studs
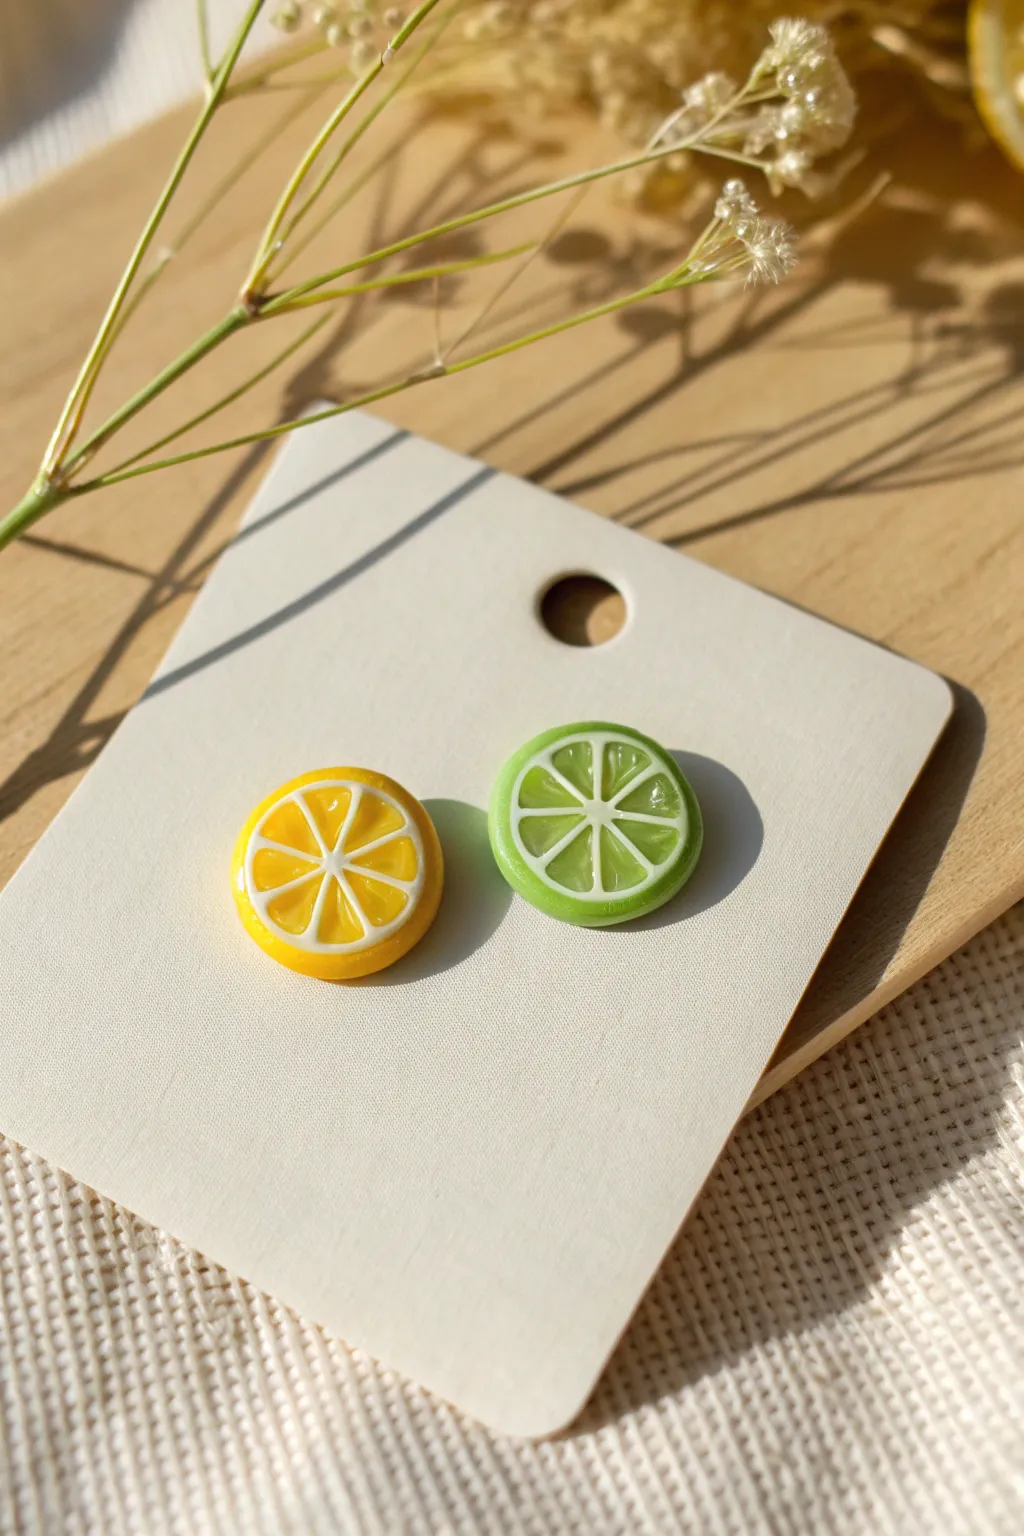
Brighten up your jewelry collection with these adorable, miniature citrus slice earrings that look almost good enough to eat. With their translucent juicy segments and realistic rind texture, these tiny lemon and lime studs are a refreshing accessory for any season.
Detailed Instructions
Materials
- Polymer clay in opaque white
- Polymer clay in translucent yellow and translucent green
- Polymer clay in opaque yellow and opaque lime green
- Liquid polymer clay (optional)
- Tissue blade or sharp craft knife
- Acrylic rolling pin or pasta machine
- Small round cutter (approx. 1cm diameter)
- Post earring studs and backs
- Super glue or E6000
- UV resin or gloss glaze
- UV lamp (if using resin)
- Needle tool or toothpick
Step 1: Creating the Citrus Cane
-
Prepare the segments:
Start by conditioning your translucent yellow clay. Roll it into a thick log, about 1 inch in diameter. This will form the juicy interior of your lemon slices. -
Wrap the segments:
Roll out a very thin sheet of opaque white clay. Wrap this sheet around your translucent yellow log, trimming any excess so the seams meet perfectly without overlapping. -
Shape the wedge:
Gently pinch and stretch the log until it is much longer and thinner. Cut it into 8 equal lengths. Pinch one side of each small log to turn the round shape into a teardrop or wedge shape. -
Construct the wheel:
Arrange the 8 wedges in a circle with the pointed opaque white tips meeting in the center. Use a small snake of white clay in the very center if there is a gap. -
Add the pith:
Roll out another thin sheet of opaque white clay and wrap it around the entire bundle of wedges to create the inner pith layer. -
Add the rind:
Roll out a medium-thickness sheet of opaque yellow clay. Wrap this around the white layer to create the lemon skin. Repeat the entire process with green clays to make a lime cane. -
Reduce the cane:
Review your large cylinder. Now, gently squeeze and roll the cane to reduce its diameter. Work from the center outwards to avoid distorting the pattern inside. Reduce it until the cane is about 1cm thick.
Smudged Slices?
If your white lines look smeared after slicing, your clay was likely too warm. chill the cane in the fridge for 20 minutes before slicing for crisp, clean definition.
Step 2: Slicing and Baking
-
Slice the detailed rounds:
Allow your canes to rest for about 30 minutes to cool down; firm clay slices cleaner. Using a very sharp tissue blade, slice two thin rounds from the lemon cane and two from the lime cane. -
Refine the shape:
If the slicing slightly flattened your circles, gently pat them back into perfect rounds. You can use your small round cutter to trim the edges for a perfectly uniform size if needed. -
Texture the surface:
Using a needle tool, gently poke small indentations into the rind (the outer colored ring) to mimic the texture of citrus skin. -
Texture the fruit:
Lightly scratch tiny lines radiating from the center within the translucent segments. This adds a realistic fibrous look to the fruit flesh. -
Bake the pieces:
Place your slices on a ceramic tile or baking sheet lined with parchment paper. Bake according to your clay manufacturer’s instructions, usually around 275°F (135°C) for 15-20 minutes.
Step 3: Finishing Touches
-
Cool and clean:
Let the pieces cool completely. If there are any rough edges from baking, lightly sand them with fine-grit sandpaper. -
Attach the hardware:
Flip the slices over. Apply a tiny dot of super glue or E6000 to the flat pad of an earring post and press it firmly onto the back of the slice. Let the glue cure fully. -
Secure the post:
For extra durability, you can add a small dab of liquid clay or resin over the glued post base (avoiding the mechanism itself) and cure it again. -
Apply the gloss:
I find that a glossy finish really brings these to life. Apply a dome of UV resin or water-based gloss glaze over the front of the fruit slice. Ensure the surface tension holds the liquid at the edges without spilling over. -
Final cure:
If using UV resin, cure under a UV lamp for 2-3 minutes until hard and non-tacky. If using glaze, allow it to air dry completely.
Make it Sparkle
Mix a tiny amount of fine iridescent glitter into your translucent clay segments before rolling the cane. It mimics the wet glisten of fresh citrus juice.
Wear your fresh and tangy accessories to add a playful pop of color to any outfit


Avocado Halves With Cute Pits
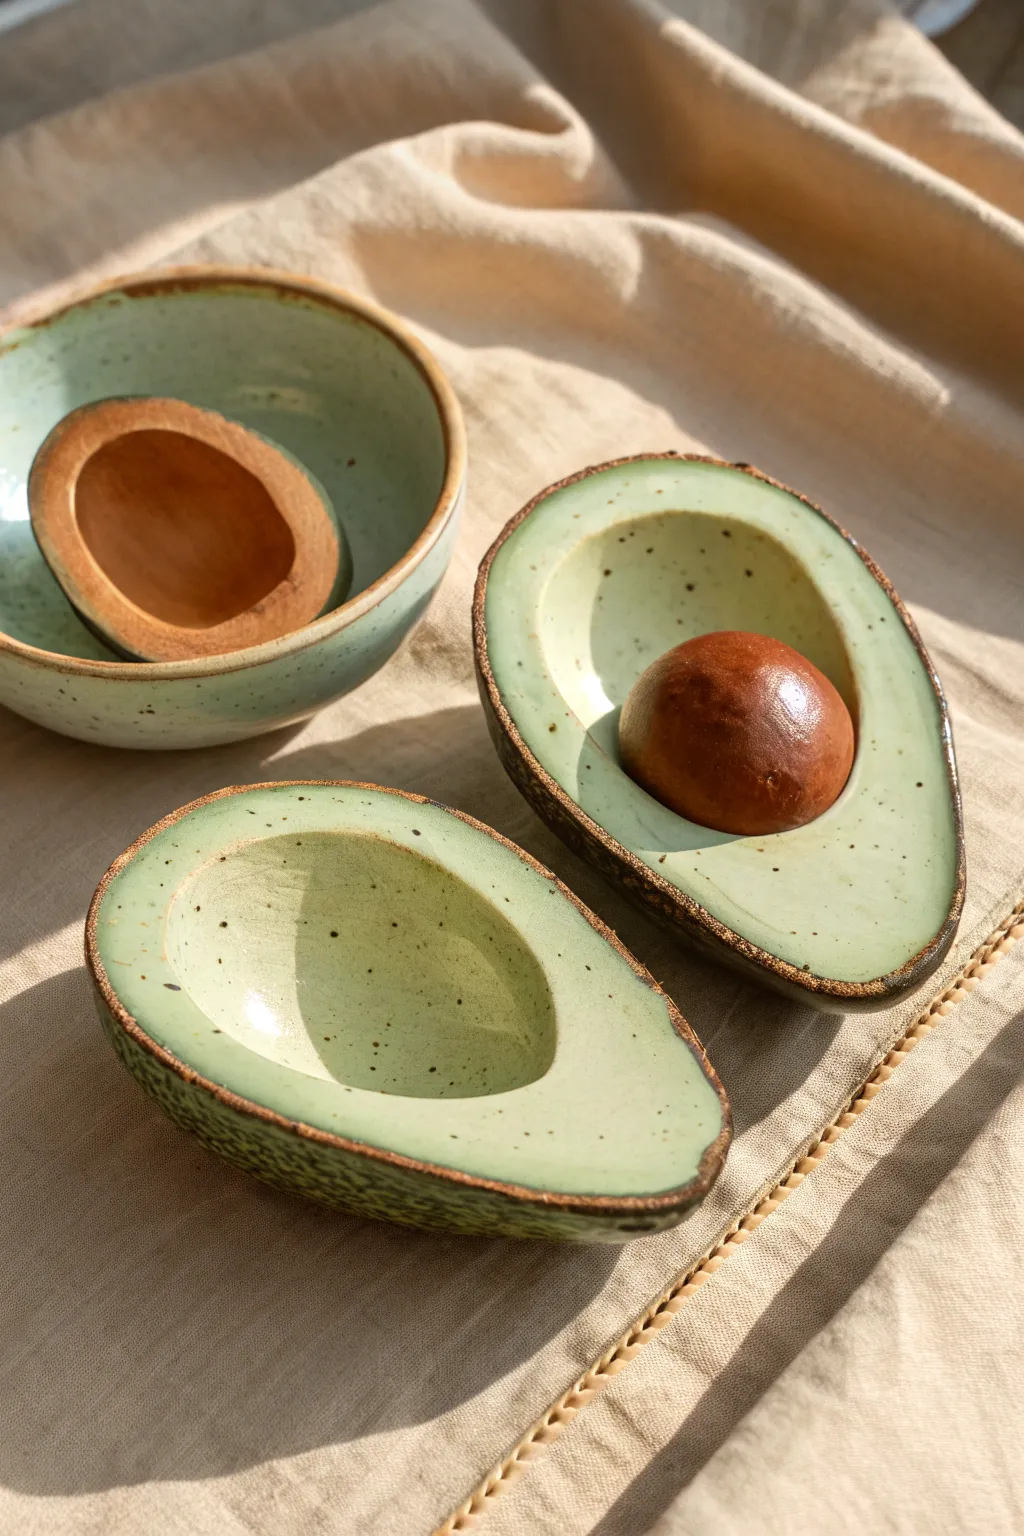
These delightful ceramic avocado halves serve as perfect little trinket dishes or spoon rests, complete with a removable clay pit. The smooth, pale green glaze contrasts beautifully with the exposed, speckled stoneware rim for a modern, organic look.
How-To Guide
Materials
- Speckled stoneware clay (light colored)
- Pottery wheel (optional, for the bowl shape) or slab roller
- Rib tool (wooden or silicone)
- Loop trimming tool
- Sponge
- Fettling knife
- Kiln
- Underglaze (dark brown)
- Celadon glaze (pale mint or avocado green)
- Glossy clear glaze (optional)
- Iron oxide wash (optional)
Step 1: Forming the Body
-
Prepare the clay:
Start by wedging your speckled stoneware clay thoroughly to remove air bubbles. You want a consistency that is firm enough to hold its shape but soft enough to mold. -
Shape the avocado form:
You can either hand-build this by creating a thick pinch pot and stretching it into an oval, or throw a small, thick bottomless bowl on the wheel and alter it. Aim for that classic pear-like silhouette. -
Refine the curve:
Using a rib tool, smooth the interior walls. The curve should be gentle and seamless, mimicking the buttery flesh of a real avocado. -
Thicken the walls:
Ensure the walls are fairly thick (about 1/4 to 1/2 inch) to give it a substantial feel and to allow space for texturing later. I find slightly thicker walls help prevent warping in the kiln.
Smooth Seating
Make the pit cavity slightly larger than the clay ball. Clay shrinks as it dries and fires; giving it wiggle room ensures the pit won’t get stuck permanently inside.
Step 2: Creating the Interior
-
Carve the seed cavity:
Once the clay is leather hard, use a loop tool to carve a circular depression in the wider bottom section of the avocado. This will house your pit. -
Sculpt the pit:
Take a separate ball of clay and roll it into a sphere that fits perfectly into the cavity you just carved. It should be slightly polished and very smooth. -
Texture the skin:
On the exterior of the avocado bowl, use a stiff brush, sponge, or textured rib to create a rough, bumpy surface that mimics avocado skin. -
Smooth the rim:
Run a damp sponge along the top rim to slightly expose the grit and ensure it isn’t sharp. The rim should remain unglazed later to show off the clay body.
Step 3: Painting and Glazing
-
Bisque fire:
Fire all pieces (the halves and the loose pit) to cone 04 (or your clay’s specific bisque temperature). -
Apply rim detail:
Using a small brush, apply a weak iron oxide wash or a thin line of dark brown underglaze to the very edge of the rim and the outer skin texture to highlight the bumps. -
Wipe back texture:
If you applied oxide to the skin, gently wipe it back with a damp sponge so the dark color remains only in the crevices of the texture. -
Glaze the flesh:
Pour or brush a pale mint or celadon glaze into the interior of the bowl. This semi-translucent glaze type loves speckled clay and will pool nicely in the bottom. -
Glaze the pit:
Dip the clay pit into a rich, reddish-brown glaze. A glossy Temmoku or an amber celadon works wonders here to make it look smooth and shiny. -
Glazing the skin:
For the exterior skin, you can use a matte dark green glaze, or leave it raw with just the oxide wash for a rustic, tactile feel. -
Clean the foot:
Wipe away any glaze from the bottom of the avocado and the contact point of the seed so they don’t stick to the kiln shelf. -
Final firing:
Fire the pieces to cone 5/6 (or your clay’s maturity temperature). The heat will melt the glaze into that luscious, glass-like surface.
Dual Purpose Design
Flatten the bottom of the avocado pit slightly so it can sit on a table independently. This turns the pit into a tiny separate pinch pot for salt or rings.
Once cooled, nestle the shiny brown pit into its green home and enjoy your permanent piece of produce

The Complete Guide to Pottery Troubleshooting
Uncover the most common ceramic mistakes—from cracking clay to failed glazes—and learn how to fix them fast.
Mini Banana Bunch Keychain Piece

This charming project shrinks a grocery staple down to a delightful accessory perfect for your keys or bag. By blending polymer clay and careful shading techniques, you’ll create a surprisingly realistic bunch of bananas that captures the nuanced yellow and subtle brown spots of the real fruit.
Step-by-Step Tutorial
Materials
- Polymer clay (yellow, translucent, green, and brown)
- Liquid polymer clay (Fimo liquid or similar)
- Soft pastels (brown, orange, green)
- Small paintbrush
- Modeling tools (needle tool, ball tool)
- Metal findings (eye pin, jump rings, split ring keychain)
- Gloss or satin varnish (optional)
- Oven for baking
Step 1: Shaping the Bananas
-
Mix the perfect yellow:
Start by conditioning your yellow polymer clay. To make it look more organic and slightly waxy like real fruit peel, I usually mix one part translucent clay into four parts yellow clay. -
Divide into portions:
Roll your mixed yellow clay into a log and cut four equal segments. These will become your individual bananas. -
Form the base cylinders:
Roll each segment into a smooth cylinder, tapering the ends slightly so they aren’t blunt. -
Create the banana curve:
Gently bend each cylinder into a crescent ‘C’ shape. Keep the inner curve smooth and the outer curve slightly more bulbous. -
Sculpt the ridges:
Using your fingers or the side of a smooth modeling tool, gently pinch along the length of each banana to create 3-4 soft ridges. Real bananas aren’t perfectly round; they have distinct facets. -
Detail the tips:
At the bottom end of each banana, pinch a tiny bit of brown clay onto the very tip to mimic the blossom scar. Roll it between your fingers to integrate it seamlessly.
Step 2: Assembly and Coloring
-
Join the bunch:
Arrange the four bananas side-by-side in a staggered cluster. Press the top stems together securely, smoothing the clay so they fuse into a single, thick stalk. -
Add the green gradient:
Blend a tiny amount of green clay into the banana stalk area, or dust green pastel powder near the top to show that unripe stem transition. -
Create the stalk cap:
Flatten a small square of dark brown or metallic grey clay to resemble the distinct cut mark found on banana bunches. Press this onto the very top of your fused stalk. -
Insert the hardware:
Before baking, trim an eye pin to size. Dip the end in liquid polymer clay (to act as glue) and insert it deep into the center of the stalk cap. -
Texture the stalk:
Use a needle tool or stiff brush to texturize the dark brown cap, making it look fibrous and woody. -
Apply shading:
Shave some brown and orange soft pastels into a powder. With a dry brush, lightly dust the ridges and crevices of the bananas to add depth. -
Add realistic spots:
Dilute a tiny bit of brown acrylic paint or use a fine-tip brown marker to add random speckles and bruises, focusing on the bottom curves where bananas naturally ripen first.
Keeping It Clean
Yellow clay picks up lint instantly. Wipe your hands and work surface with a baby wipe before starting, and keep a scrap piece of ‘garbage clay’ nearby to roll over your hands to pick up dust.
Step 3: Finishing Touches
-
Bake the piece:
Bake your clay creation according to the manufacturer’s instructions (usually 230°F – 275°F for 15-30 minutes). Let it cool completely. -
Seal the surface:
For extra durability and a slight shine, apply a thin coat of satin varnish. Avoid high gloss, as real bananas have a semi-matte finish. -
Attach the chain:
Use pliers to open a jump ring. Loop it through the eye pin on your banana bunch and connect it to the chain and split ring. -
Secure the jump ring:
Close the jump ring tightly with your pliers, ensuring there are no gaps where the chain could slip out.
Pro Detail: The Bruise
For ultra-realism, mix a tiny dot of brown clay into a small spot on the yellow skin and smooth it flat. It mimics a soft, ripe bruise better than paint ever could.
This little bunch will add a fun pop of color wherever you decide to hang it
Pineapple Minis With Simple Crosshatch Skin
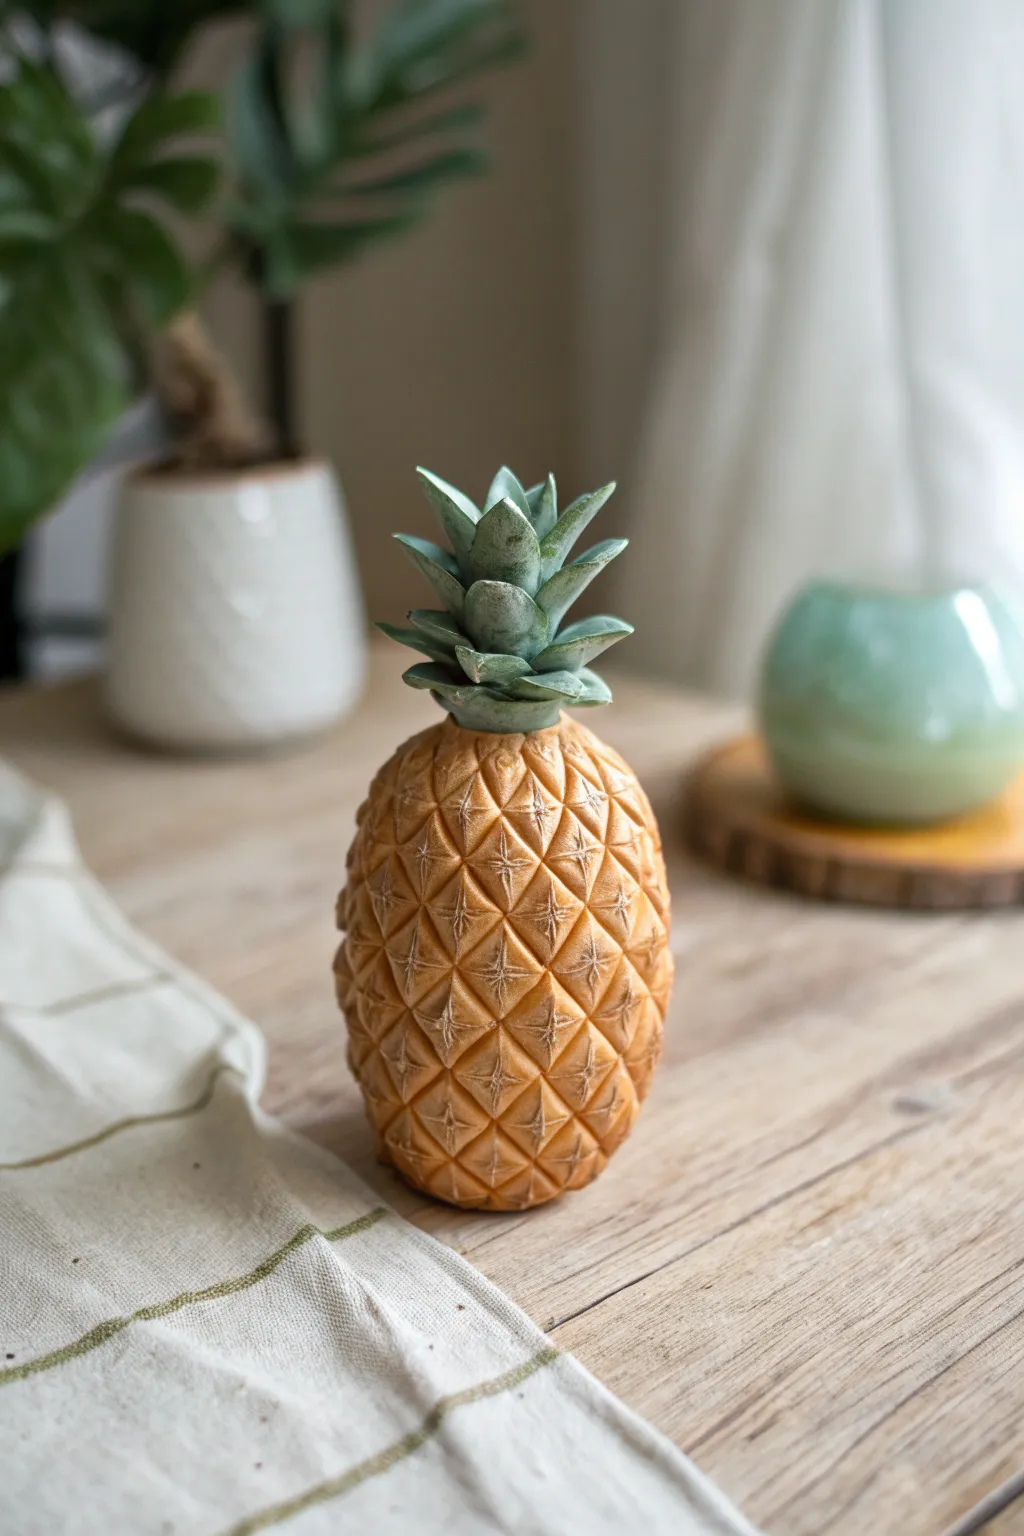
This miniature pineapple project captures the charm of tropical fruit with a satisfyingly tactile crosshatch texture. Using simple sculpting techniques and a wash of acrylics, you’ll transform a basic lump of clay into a warm, golden decoration perfect for a desk or shelf.
Step-by-Step Guide
Materials
- Air-dry clay or polymer clay (white or beige)
- Acrylic paints (golden yellow, burnt sienna, raw umber, sage green, deep forest green)
- Sculpting tools (needle tool, small knife tool)
- Small paintbrush
- Aluminum foil
- Water cup
Step 1: Forming the Base
-
Create the core:
Start by crumpling a small piece of aluminum foil into an oval shape about the size of a large egg. This saves clay and keeps the sculpture lightweight while helping it dry evenly. -
Sheath in clay:
Roll out a slab of your chosen clay to about 1/4 inch thickness. Wrap this smoothly around the foil core, massaging the seams together until they disappear completely. -
Shape the fruit:
Roll the clay-covered form gently between your palms to smooth it. Taper the top slightly more than the bottom to create that classic pineapple silhouette, flattening the base just enough so it stands upright on its own.
Grooves Disappearing?
If your crosshatch lines are closing up while you work, let the clay firm up for 15 minutes before carving. Softer clay tends to ‘heal’ itself too quickly.
Step 2: Texturing the Skin
-
Scribe diagonal lines:
Using a knife tool or the edge of a ruler, lightly press diagonal lines across the entire body of the pineapple, spacing them about 1/2 inch apart. -
Cross the lines:
Create the diamond pattern by pressing a second set of diagonal lines in the opposite direction. Try to keep your pressure consistent so the grooves are distinct but not too deep. -
Detail the diamonds:
For that realistic spike look, use a needle tool to poke a small, shallow hole or make a tiny ‘x’ inside the center of each diamond shape. -
Add surface texture:
I like to take a stiff-bristled toothbrush or a texturing sponge and gently tap the surface of each diamond to give it a rough, organic fruit-skin finish rather than leaving it perfectly smooth.
Dusty Leaf Finish
To get that realistic, waxy leaf look, mix a tiny bit of cornstarch or baby powder into your final light green paint layer for a matte, dusty texture.
Step 3: Sculpting the Crown
-
make the base leaves:
Roll out small, flattened teardrop shapes of clay for the leaves. You will need about 10-15 leaves in varying sizes, with the smallest ones reserved for the very top. -
Attach the bottom tier:
Score and slip (if using air-dry clay) the bottom of your largest leaves and attach them in a ring at the top of the fruit body. Curve them outward slightly. -
Build the layers:
Add a second and third tier of leaves, placing them inside the previous ring. As you move inward, make the leaves point more vertically. -
Refine the crown:
Use your fingers to pinch the tips of the leaves to ensure they look sharp. Smooth out the connection point where the leaves meet the fruit body so it looks like one cohesive piece. -
Let it dry:
Allow the sculpture to dry completely. For air-dry clay, this usually takes 24-48 hours depending on humidity; for polymer, bake according to package instructions.
Step 4: Painting and Finishing
-
Base coat the body:
Paint the entire fruit body with a mix of golden yellow and a touch of burnt sienna. It’s okay if this layer is a bit uneven, as it adds to the natural look. -
Apply a wash:
Mix raw umber with plenty of water to create a thin wash. Brush this over the body, letting the dark paint settle into the crosshatch grooves. -
Wipe back:
While the wash is still wet, gently wipe the surface with a paper towel. This leaves the dark color in the crevices while revealing the golden color on the raised diamonds. -
Dry brush highlights:
Dip a dry brush into a tiny amount of pale yellow or cream paint. Lightly strict it over the raised centers of the diamonds to make the texture pop. -
Paint the leaves:
Paint the crown with a sage green. Once dry, add depth by painting the inner recesses with deep forest green and dry-brushing the tips with a lighter, whitish-green mix to simulate that dusty look seen in the photo.
Place your finished pineapple on a shelf or use it as a cheerful paperweight to bring a touch of summer to your workspace


What Really Happens Inside the Kiln
Learn how time and temperature work together inside the kiln to transform clay into durable ceramic.
Apple Beads With Tiny Stems
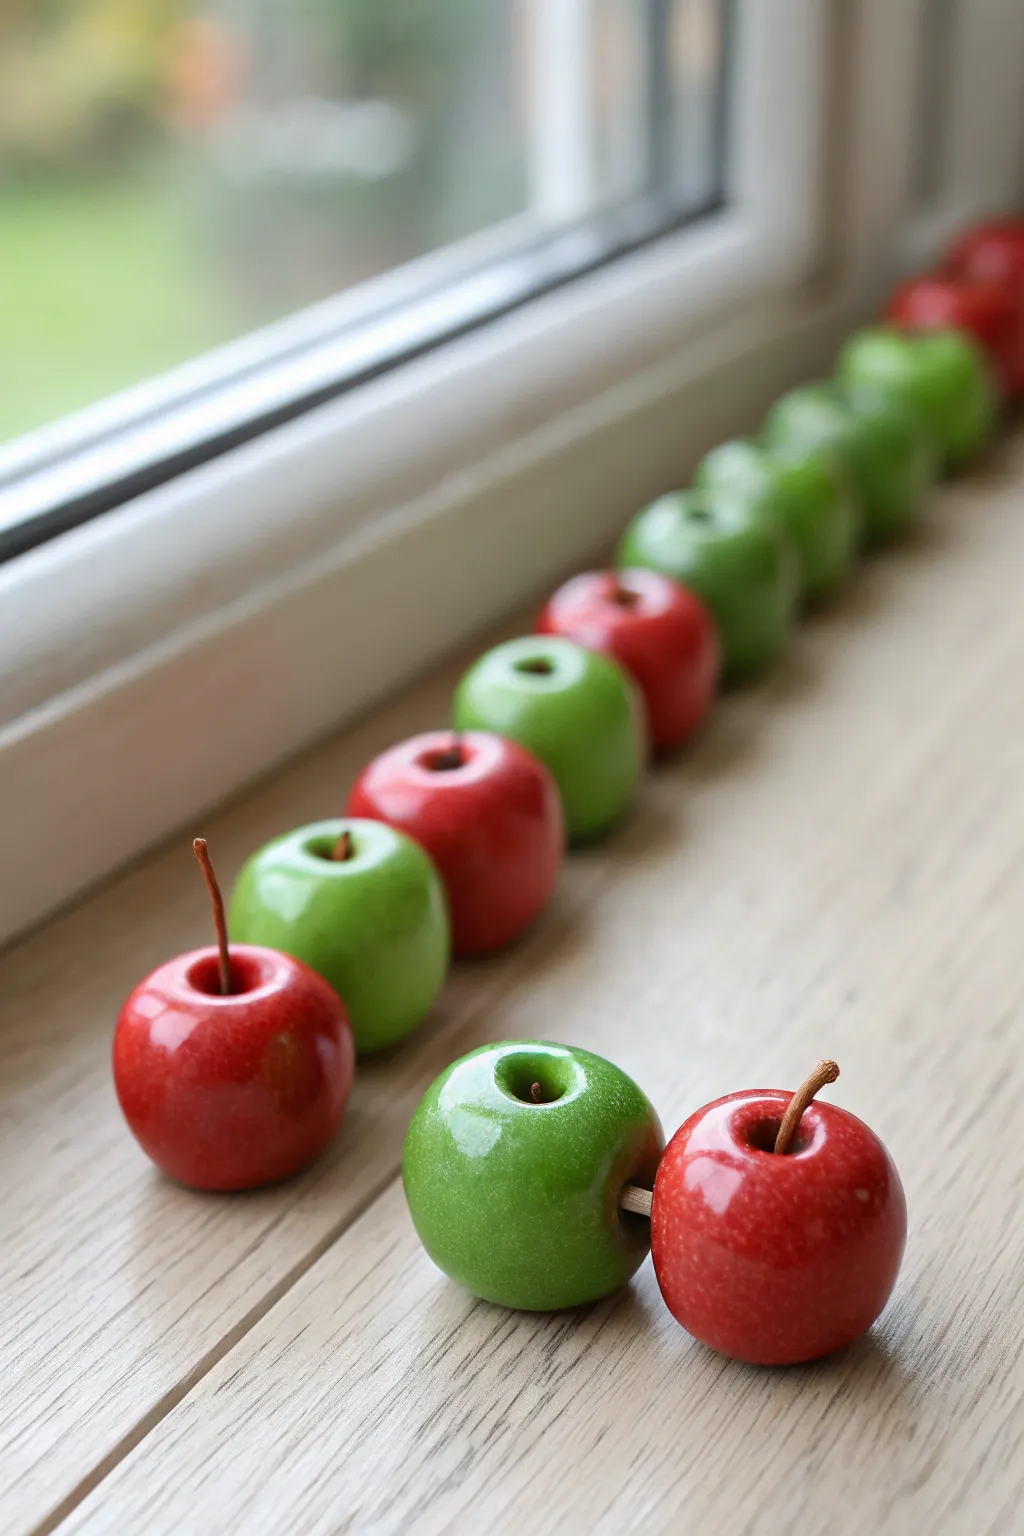
These charming little apple beads capture the glossy shine of fresh fruit in a miniature form. Perfect for autumn garlands or jewelry, they feature realistic shaping and sturdy little woody stems.
Detailed Instructions
Materials
- Polymer clay in bright red and apple green
- Brown jewelry wire or thin natural twigs (for stems)
- Glossy polyurethane varnish or UV resin
- Small paintbrush
- Dotting tool or round-tipped sculpting tool
- Toothpick or bead piercing pin
- Baking sheet with parchment paper
- Oven (for curing polymer clay)
Step 1: Shaping the Base
-
Condition the clay:
Start by warming the red and green polymer clay in your hands until it becomes soft and pliable. This conditioning step is crucial to prevent cracks later on. -
Create uniform balls:
Roll small pieces of clay into smooth spheres. Aim for a size roughly similar to a large marble or a cherry tomato for the scale shown in the photo. -
Form the apple shape:
Gently press the top and bottom of each sphere slightly to flatten them just a bit, moving away from a perfect circle toward an organic apple form. -
Indent the top:
Take your dotting tool or the round end of a paintbrush and press it firmly into the top center of the sphere to create the characteristic dip where the stem will sit. -
Refine the bottom shape:
Flip the apple over and create a slightly smaller indentation on the bottom. Apples taper slightly, so you can gently pinch the lower half to narrow it just a tiny bit. -
Pierce for stringing:
If you intend to use these as beads rather than loose decor, carefully enhance the holes. Using a bead pin or toothpick, pierce straight through the center from top indentation to bottom indentation.
Uneven Shine?
If your glaze leaves brushstrokes, try a self-leveling UV resin instead of varnish. Cure it under UV light for a glass-like finish without any streaks.
Step 2: Stemming and Baking
-
Prepare the stems:
Cut short lengths of brown wire or very tiny, dry natural twigs. They should be just long enough to poke out of the top indentation. -
Curve the stems:
If using wire, give each piece a slight, natural-looking bend. Straight lines rarely exist in nature, and this curve adds significant realism. -
Smooth the edges:
Before adding the stems final placement, run a fingertip lightly over the clay surface to remove any fingerprints or harsh tooling marks. -
Pre-bake check:
Arrange the apples on your parchment-lined baking sheet. Ensure they aren’t touching each other so they don’t fuse during curing. -
Bake the clay:
Bake the apples according to your specific polymer clay manufacturer’s instructions (usually around 275°F/130°C for 15-30 minutes). -
Cool down:
Allow the apples to cool completely on the tray. Polymer clay is fragile when hot and reaches its full strength only after cooling.
Step 3: Finishing Touches
-
Secure the stems:
Once cool, dip the end of your wire or twig stem into a tiny drop of super glue and insert it firmly into the top hole (unless you are threading a cord through). -
Apply the first gloss coat:
Using a soft brush, apply a thin, even layer of gloss varnish to the red and green surfaces. Avoid pooling in the stem indentation. -
Let it dry:
Allow the first coat of varnish to dry completely. I usually prop them up on toothpicks stuck into a scrap of styrofoam to keep the bottoms clean. -
Add a second coat:
For that ultra-shiny, ‘candy apple’ look similar to the inspiration photo, apply a second coat of gloss varnish.
Make Them Speckled
Before glazing, use a stiff toothbrush to flick tiny droplets of diluted yellow or brown acrylic paint onto the apples for realistic skin speckling.
Line up your glossy creations on a sill or string them together for a festive decoration that lasts year-round
Grape Clusters That Dangle Nicely
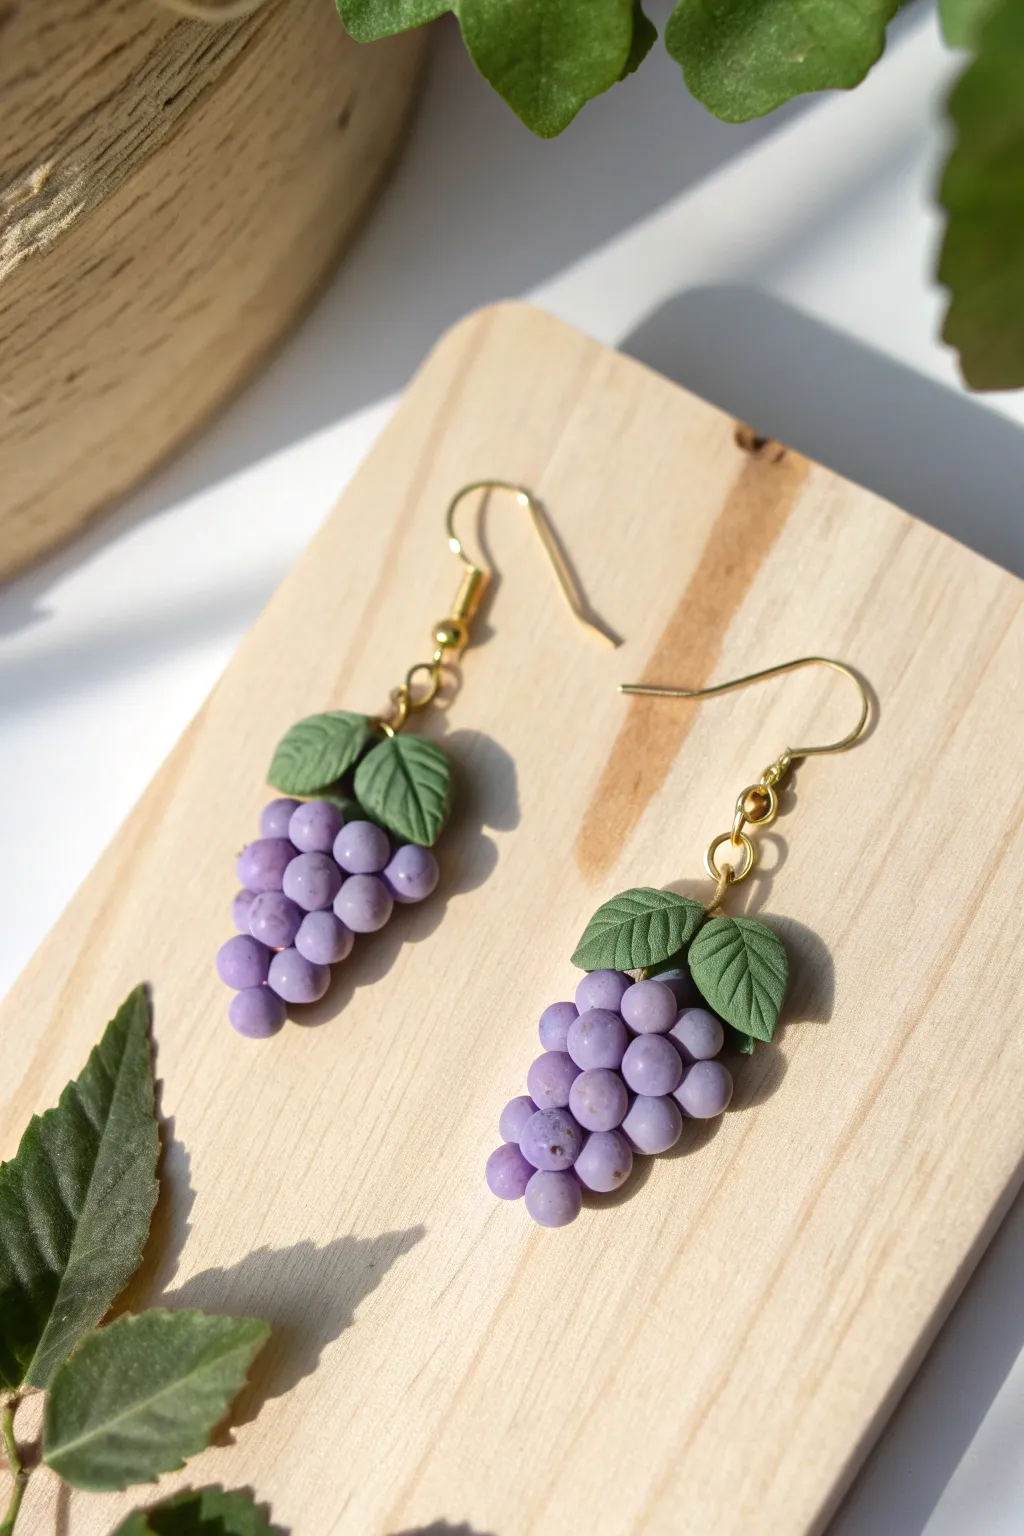
These charming earrings feature tiny, clustered grapes reaching the perfect balance of realism and artisan style. With their soft purple hue and dainty textured leaves, they create a delightful dangle that brings a touch of vineyard beauty to any outfit.
How-To Guide
Materials
- Polymer clay (light purple or lilac)
- Polymer clay (subdued, earthy green)
- Gold-tone earring hooks (french hooks)
- Gold-tone headpins (2)
- Gold-tone jump rings (small, optional depending on assembly)
- Needle tool or toothpick
- Liquid polymer clay (Bake & Bond) or strong glue
- Razor blade or craft knife
- Oven for baking
- Jewelry pliers (round nose and wire cutters)
- Gloss varnish (optional)
Step 1: Prepping the Base Structure
-
Prepare the stems:
Start by taking two gold-tone headpins. These will serve as the central structure for your grape clusters. -
Create a core:
Take a very small amount of purple clay and mold it into a thin, elongated cone shape around the bottom half of the headpin. This hidden core gives the grapes something to stick to so the bunch looks full without using excessive clay.
Step 2: Forming the Grapes
-
Mix your colors:
If your purple clay is too bright, mix in a tiny speck of brown or grey to achieve the realistic, matte lavender shade seen in the trellis-fresh inspiration. -
Roll tiny spheres:
Pinch off very small pieces of purple clay and roll them into spheres. You will need about 15-20 tiny spheres per earring. Vary the sizes slightly for a more organic, natural look. -
Apply adhesive:
Brush a thin layer of liquid polymer clay (or Bake & Bond) onto the clay core you created earlier. This acts as the mortar for your fruit. -
Build the bottom layer:
Begin attaching the smallest clay spheres at the very bottom tip of the core. Press them gently so they adhere to the core and each other without squishing their round shape. -
Work upwards:
Continue adding spheres in rows, moving upward. As you get to the wider part of the bunch (the ‘shoulders’ of the grape cluster), use slightly larger spheres to create that classic tapered shape. -
Fill the gaps:
Inspect the cluster from all angles. If you see the core peeking through, gently nestle a tiny clay sphere into the gap.
Fixing “Squashed” Grapes
If you accidentally flatten a grape while adding others, use a soft brush or a silicone tool to gently reshape it while it’s already on the cluster, rather than trying to pull it off.
Step 3: Adding the Foliage
-
Shape the leaves:
Roll two small balls of green clay for each earring (four total). Flatten them into teardrop shapes with your fingertips. -
Texture the leaves:
Use a needle tool or a craft knife to gently press a central vein down the middle of each leaf. Then, press smaller diagonal veins branching out from the center. -
Attach the leaves:
Apply a dot of liquid clay to the top of the grape cluster, right where the wire emerges. Press two leaves onto the top, positioning them so they slightly overlap the grapes and frame the wire stem. -
Clean the wire:
Ensure the top of the headpin is clean of clay residue. You need enough exposed wire to create a loop later.
Level Up: Color Variation
Before baking, lightly dust the cured grapes with white pastel chalk powder using a soft brush. This mimics the natural ‘bloom’ or waxy coating found on fresh grapes.
Step 4: Baking and Assembly
-
Bake the pieces:
Place your grape clusters on a baking tile or parchment-lined tray. Follow the temperature and time instructions specific to your brand of polymer clay. -
Cool down:
Let the pieces cool completely before handling. Polymer clay is fragile when warm and reaches its full strength only after cooling. -
Create a loop:
Using your round nose pliers, grasp the exposed wire at the top of the grape cluster. Bend it 90 degrees, trim the excess wire to about 1cm, and roll it back to form a closed loop. -
Attach the hook:
Open the small loop at the bottom of your gold earring hook. Slide the loop of your grape cluster onto it and gently close the hook’s loop securely. -
Optional varnish:
For a ‘dewy’ morning look, you can brush a light coat of gloss varnish over just the grapes, leaving the leaves matte for contrast.
Now you have a stunning, nature-inspired accessory ready to wear or gift to a friend

TRACK YOUR CERAMIC JOURNEY
Capture glaze tests, firing details, and creative progress—all in one simple printable. Make your projects easier to repeat and improve.
Kiwi Cane Slices For Bulk Minis

Capture the fresh, vibrant look of sliced kiwi with this detailed polymer clay cane tutorial. By layering translucent and opaque clays, you’ll create a realistic fruit interior perfect for jewelry, miniature dollhouse scenes-or just satisfying slicing.
Step-by-Step
Materials
- Translucent polymer clay
- Opaque white polymer clay
- Green alcohol ink (or green polymer clay)
- Black acrylic paint
- Liquid polymer clay (Fimo Liquid or similar)
- Clay roller or pasta machine
- Tissue blade or sharp craft knife
- Needle tool
- Ruler
Step 1: Creating the Translucent Seed Core
-
Prepare the translucent clay:
Start by conditioning a block of translucent polymer clay until it is soft and pliable. Mix in a small amount of green alcohol ink or a tiny pinch of green clay to tint it a pale, icy green without making it opaque. -
Form the center log:
Roll a cylinder of pure white opaque clay about 1/4 inch thick. This will be the very white center of the kiwi. -
Wrap the center:
Roll out a sheet of your tinted translucent green clay. Wrap this sheet around the white center log until the total diameter is about 1/2 inch to 3/4 inch. -
Prepare the seed mixture:
Mix a small amount of black acrylic paint into liquid polymer clay until you have a thick, black paste. Alternatively, you can use very thin snakes of black clay, but the liquid method often looks more organic. -
Insert the seeds:
Using a needle tool, poke deep, vertical channels into the translucent green layer surrounding the white core. These should radiate outward like spokes. -
Fill the channels:
Carefully fill these channels with your black liquid clay mixture or insert tiny threads of black clay. These will become the seeds when sliced. -
Add more green:
Wrap another substantial layer of the translucent green clay sheet around the seed layer. This builds up the flesh of the fruit.
Step 2: Adding the Rind and Reducing
-
Create the inner rind:
Roll a thin sheet of opaque white clay. Wrap this around the entire green cylinder. This creates the sharp definition between the fruit flesh and the skin. -
Prepare the outer skin:
For the stylized spotted skin look in the photo, take a sheet of beige or light tan clay. Randomly press tiny balls of dark brown or black clay onto it to mimic the fuzzy texture. -
Apply the skin:
Roll the spotted sheet flat to embed the dots, then wrap this layer around your cane as the final outer coating. -
Begin reduction:
Squeeze the cane gently from the center moving outward to release trapped air. Begin to roll and stretch the cane on your work surface to reduce its diameter. -
Check for distortion:
Periodically stop rolling and gently pull from the ends. Ensure the pattern stays circular and doesn’t become square or flattened. -
Rest the cane:
Once reduced to your desired size (usually 1/2 inch to 1 inch thick for these specific slices), let the cane rest in the fridge for 30 minutes. I find this chilling step crucial for avoiding smudging when cutting.
Smudged Slices?
If your knife drags the black seeds into the green part, your clay is too warm. Chill the cane longer and clean your blade with rubbing alcohol between every single cut.
Step 3: Slicing and Baking
-
Slice the cane:
Using your sharpest tissue blade, slice the cane into even discs. Try to keep the thickness consistent, roughly 3-4mm for chunky charms. -
Refine the shape:
If the slicing flattened the bottom slightly, gently reshape the discs back into perfect circles with your fingertips. -
Bake the pieces:
Place your slices on a ceramic tile or baking sheet paper. Bake according to your clay manufacturer’s instructions, usually at 275°F (130°C) for 15-30 minutes depending on thickness. -
Quench the pieces:
Immediately plunge the hot baked pieces into a bowl of ice water. This ‘quenching’ technique significantly increases the transparency of the translucent clay.
Realistic Texture
Before baking, use a toothbrush to gently texture the outer skin. This removes fingerprints and adds a fuzzy, realistic kiwi skin quality.
Now you have a pile of perfectly preserved fruit slices ready to be turned into magnets or miniature decor
Citrus Cane Mix For Variety Packs
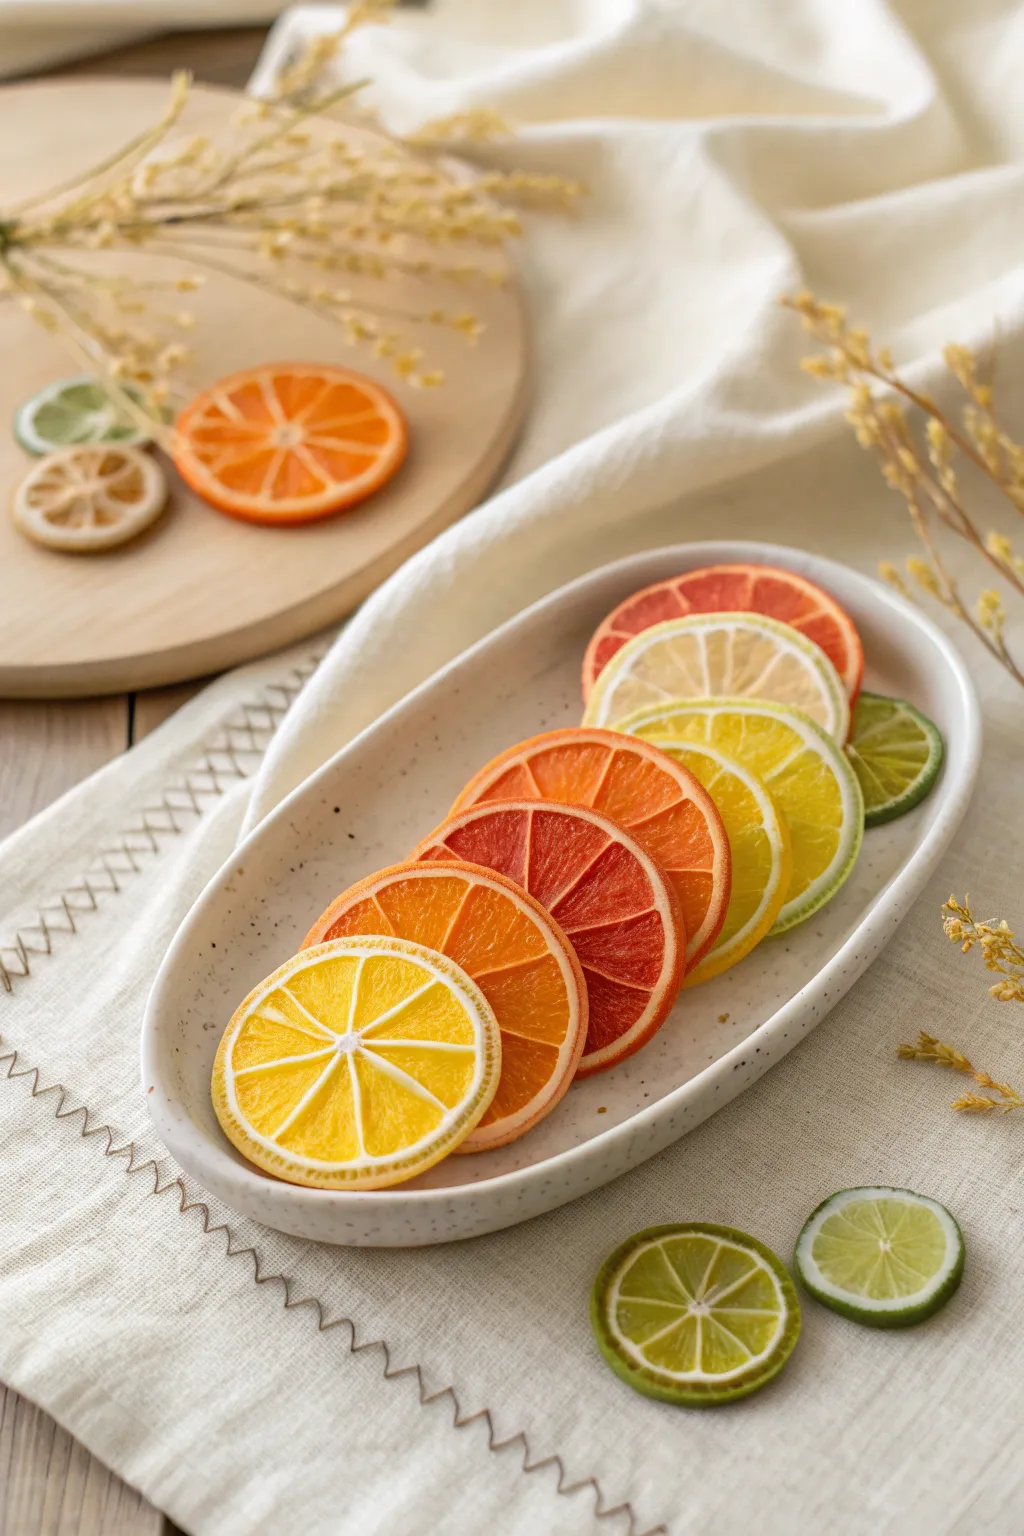
Create a vibrant assortment of everlasting citrus slices using the polymer clay cane technique. These realistic miniatures capture the juicy translucence of real fruit, perfect for jewellery, dollhouse miniatures, or decorative bowl fillers.
Step-by-Step Tutorial
Materials
- Translucent polymer clay
- Opaque white polymer clay
- Yellow, orange, red, and green alcohol inks or clay dyes
- Pasta machine or rolling pin
- Tissue blade (flexible and rigid)
- Acrylic rod
- Small round cutter (optional)
- Sandpaper (various grits)
- Matte or satin varnish
Step 1: Preparing the Colors
-
Tint the translucent clay:
Divide your translucent clay into four portions. Tint one yellow (lemon), one orange (orange), one pinkish-red (grapefruit/blood orange), and one lime green using tiny amounts of alcohol ink or clay dye to maintain translucency. -
Prepare the pith:
Condition the opaque white clay until soft. Run it through the pasta machine on a medium-thin setting to create sheets for the pith (the white part of the rind). -
Create the rind colors:
Mix small amounts of opaque clay to match your translucent fruit colors (yellow, orange, green, etc.), but make these slightly darker and fully opaque to serve as the outer skin.
Smudgy Cane Slices?
If slices look smeared, the clay was too warm or the blade too dull. Chill the cane longer and wipe your blade with alcohol between every single cut.
Step 2: Building the Cane Segments
-
Form the juicy segments:
Take a portion of your tinted translucent clay and roll it into a thick log, about 1 inch in diameter. Pinch one side of the log along its entire length to create a teardrop cross-section. -
Wrap vertically:
Roll a very thin sheet of white clay. Wrap this sheet around the translucent teardrop log, trimming exact seams so they don’t overlap. -
Reduce to size:
Gently squeeze and stretch the wrapped teardrop log until it is much longer and thinner, roughly 1/4 inch at the wide end. I find letting the clay rest for ten minutes here helps prevent distortion. -
Cut into lengths:
Cut the long teardrop cane into 8 to 10 equal lengths. These will be the individual segments of your citrus slice.
Make Them Sparkle
Mix a tiny pinch of white or iridescent glitter into the translucent pulp clay before rolling. It mimics the glistening juice sacs perfectly.
Step 3: Assembling the Fruit
-
Create the center pith:
Roll a very thin ‘snake’ of white clay for the center of the fruit. Assemble your teardrop segments around this white center, with the pointy ends facing inward. -
Fill the gaps:
If there are gaps between the rounded outer edges of the segments, insert tiny triangular snakes of translucent clay to fill them and keep the shape round. -
Wrap the pith:
Wrap the entire assembled circle with a medium-thin sheet of white clay to form the main pith layer. -
Add the skin:
Finally, wrap the designated opaque colored clay (yellow for lemon, etc.) around the white pith layer to form the rind.
Step 4: Reducing and Slicing
-
Reduce the cane:
Compress the large cane by squeezing from the center out, rotating constantly. Stretch it until the diameter matches your desired slice size (usually 1-2 inches for coasters or decorations). -
Chill the cane:
Place the finished cane in the refrigerator for 20 minutes. Firm clay slices much cleaner than warm, soft clay. -
Slice the fruit:
Using a very sharp tissue blade, slice the cane into even discs. Try to cut straight down rather than sawing to avoid distorting the pattern. -
Texture the surface:
For added realism, lightly press a piece of fine sandpaper or a toothbrush onto the surface of the translucent parts to mimic juice sacs.
Step 5: Finishing
-
Bake carefully:
Bake the slices according to your clay manufacturer’s instructions. Watch the oven temperature closely, as translucent clay can yellow if scorched. -
Quench for clarity:
Immediately after removing from the oven, plunge the hot slices into a bowl of ice water. This thermal shock helps increase the clarity of the translucent clay. -
Seal (optional):
If you want a ‘wet’ look, coat the slices with a thin layer of gloss varnish; otherwise, a matte finish keeps them looking like dried fruit slices.
Enjoy your fresh batch of miniature citrus slices, perfect for adding a zesty touch to any craft.
Peachy Blends With Soft Blush Gradients
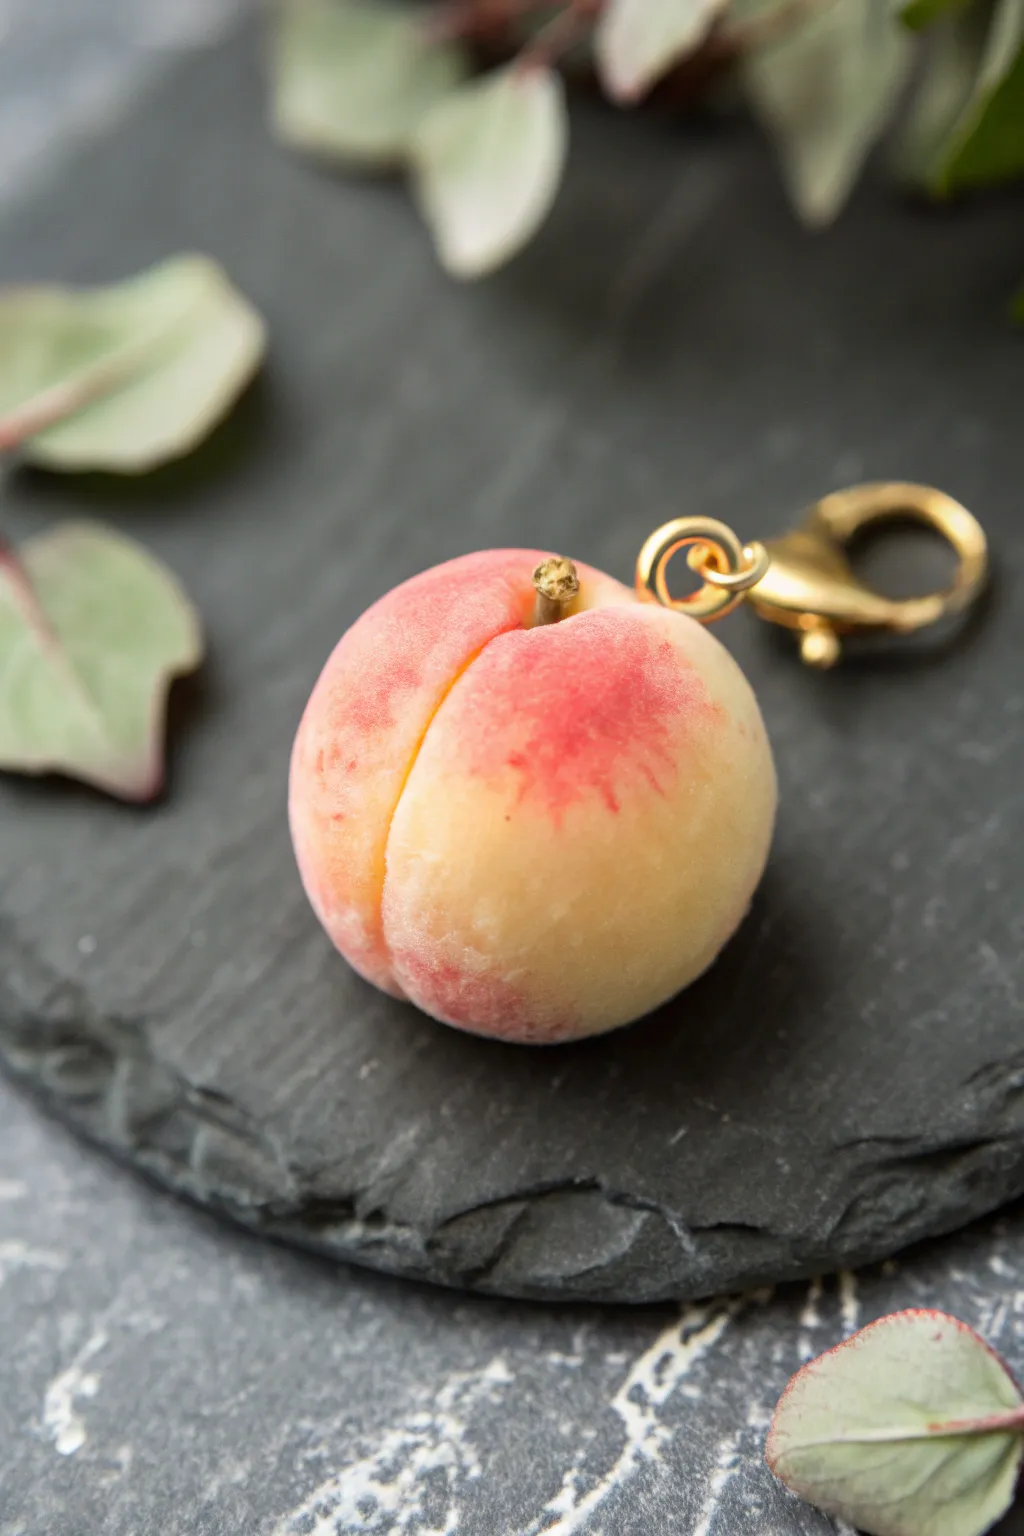
Capture the soft, fuzzy essence of a summer peach with this delightful miniature charm. The key lies in layering translucent and opaque clays to create that realistic, sun-ripened gradient.
Detailed Instructions
Materials
- Polymer clay (white, translucent, pale yellow, brown)
- Soft pastels (red, pink, orange)
- Small paintbrush or makeup brush
- Detailing tool or needle tool
- Eyepin or headpin (gold)
- Gold lobster clasp and jump ring
- Liquid polymer clay or bake-and-bond
- Disposable gloves
- Fine sandpaper or sanding sponge
- Matte varnish (optional)
Step 1: Fruity Base
-
Color Mixing:
Begin by conditioning your clay. Mix equal parts white and translucent clay, then add a pinch of pale yellow. You want a very creamy, off-white base color rather than a bright yellow. -
Forming the Shape:
Roll the clay into a smooth ball, approximately 2cm in diameter. Gently roll it slightly oval, adhering to the natural non-spherical shape of a real peach. -
Creating the Cleft:
Use the side of a needle tool or a modeling tool to press a distinctive groove or ‘cleft’ down one side of the fruit. Start from the top center and curve it slightly as you go down to the bottom, softening the edges with your finger so it isn’t too sharp. -
Texture:
To mimic peach fuzz, gently roll the surface of the clay over a piece of fine sandpaper or tap it all over with a stiff toothbrush. This micro-texture is crucial for realism.
Step 2: The Perfect Blush
-
Pastel Preparation:
Shave a small amount of red, pink, and orange soft pastels into fine powder using a craft knife. -
First Layer:
Using a soft brush, pick up a mix of pale yellow and light orange pastel dust. Apply this generally over the fruit, leaving some areas paler to represent the highlight. -
Building the Gradient:
Switch to your pink pastel. Dab this color concentrated on one side of the peach and along the upper shoulders near where the stem will be. -
Deepening the Red:
Finally, use the red pastel dust sparingly. Focus this darkest shade in the very center of your pink patch and slightly into the top of the cleft to create depth. -
Blending:
Use a clean, fluffy brush to gently buff the edges where the colors meet, ensuring there are no harsh lines between the yellow and the red blush.
Too Much Dust?
If you applied too much red pastel and it looks messy, use a piece of scotch tape to gently lift excess powder off the raw clay before baking.
Step 3: Stem and Assembly
-
Stem Logic:
Mix a tiny amount of brown clay. Roll it into a very thin snake and cut a segment about 2-3mm long. -
Stem Placement:
Use a ball tool to make a small indentation at the top of the peach right where the cleft starts. Place the tiny brown stem inside, pressing it gently to secure it. -
Hardware Insertion:
Trim an eyepin to about 1cm in length. Dip the end in liquid clay or bake-and-bond for extra security. -
Securing the Loop:
Insert the eyepin directly next to or slightly behind the stem. The loop should sit flush against the top of the fruit. -
Baking:
Bake the piece according to your specific brand of clay’s instructions (usually 275°F/130°C for 15-30 minutes). I like to tent foil over it to prevent the light colors from scorching.
Realistic Tip
Real peaches have speckles. Before baking, flick a toothbrush with diluted brown acrylic paint for tiny, microscopic dots on the ‘skin’ surface.
Step 4: Finishing Touches
-
Cooling:
Allow the peach to cool completely before handling. Polymer clay is still slightly soft when hot. -
Sealing (Optional):
If you want to protect the pastel powders, apply a very thin layer of matte varnish. Do not use gloss, or you will lose the fuzzy peach effect. -
Final Assembly:
Using pliers, open a small gold jump ring. Thread it through the eyepin loop on the peach and attach the gold lobster clasp. -
Close and Complete:
Close the jump ring securely, ensuring there is no gap for the charm to slip through.
Your juicy little peach charm is now ready to add a touch of sweetness to any bag or zipper pull
Cherry Pairs With Curved Stems
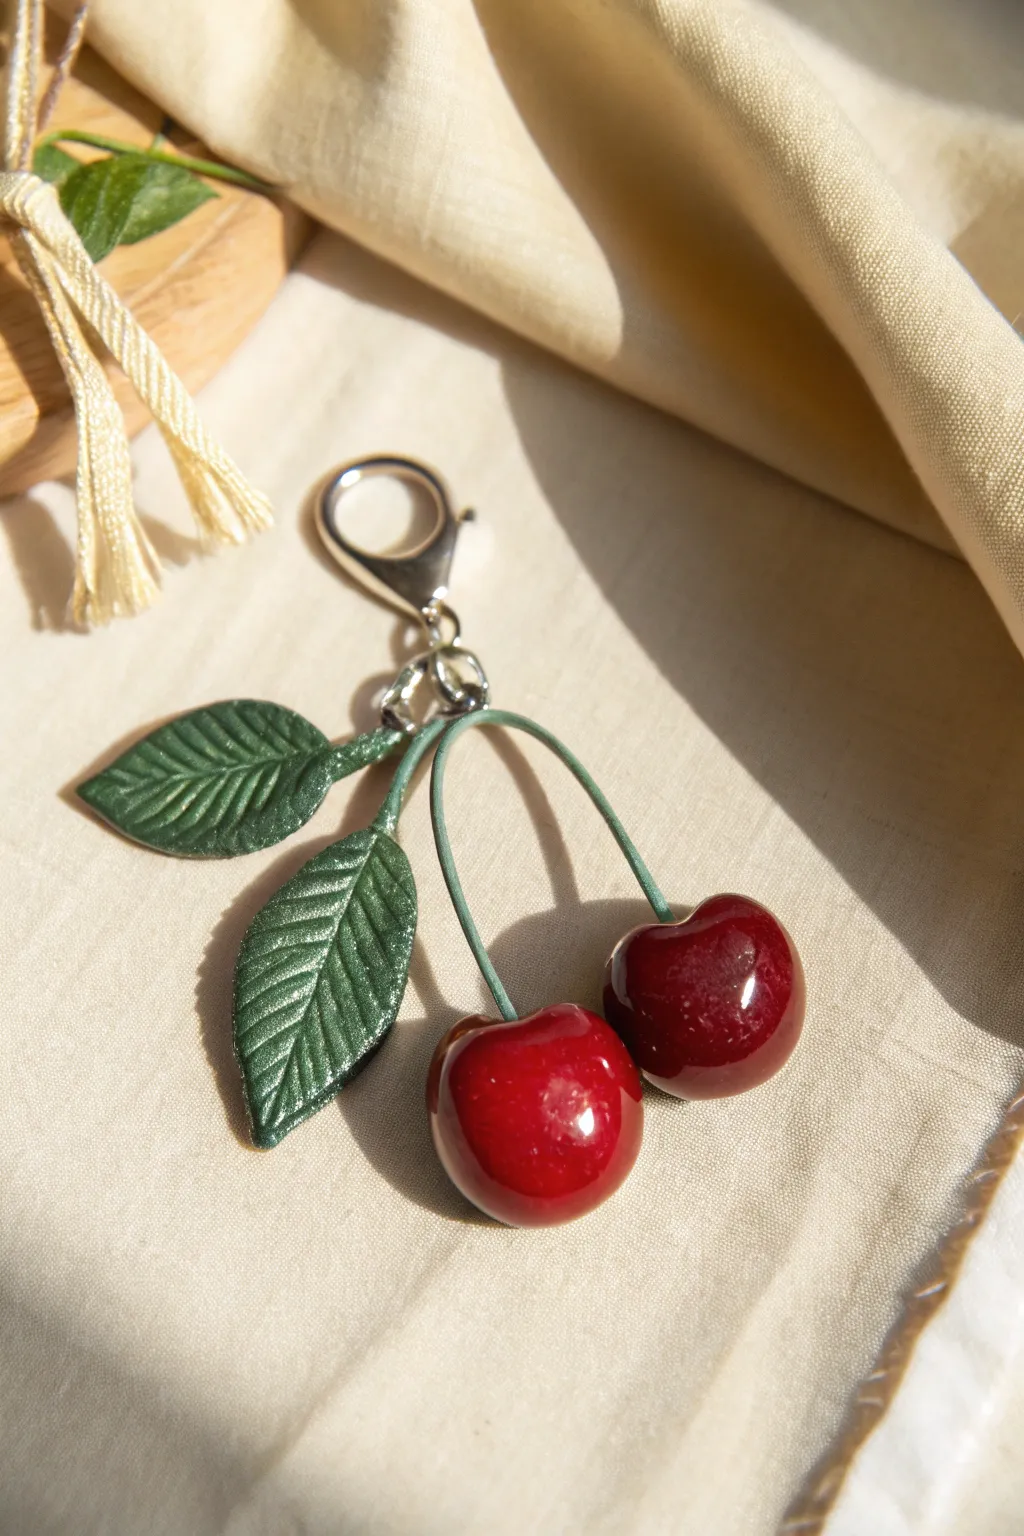
Capture the sweetness of summer with this incredibly realistic cherry keychain made from polymer clay. The deep red, glossy finish and textured leaves make this accessory look good enough to eat.
Step-by-Step
Materials
- Red polymer clay (translucent red and opaque dark red)
- Green polymer clay (olive or forest green)
- Green jewelry wire (20-22 gauge) or rubber-coated wire
- Silver lobster clasp keychain hardware with jump rings
- Liquid polymer clay (translucent)
- High-gloss polyurethane varnish or UV resin
- Leaf vein texture mat or needle tool
- Ball tool
- Wire cutters and pliers
- Super glue (cyanoacrylate)
- Oven for baking
Step 1: Creating the Stems and Hardware
-
Prepare the wire:
Cut two pieces of your green wire, each about 2 inches long. If you are using plain wire, you may want to wrap it thinly in green clay first for a thicker stem appearance, but coated wire works perfectly as is. -
Create the loop:
Take the two wire pieces and twist them together at the very top to join them. Use your pliers to form a small loop at this junction where the hardware will attach later. -
Shape the curve:
Gently bend each wire outward and downward to mimic the natural, slightly bouncy drape of cherry stems. They shouldn’t be perfectly straight or symmetrical. -
Attach the clasp:
Open a jump ring with your pliers and attach the silver lobster clasp to the loop you made in the stems. Doing this now makes handling easier later.
Sticky Situation?
If dust gets stuck in your red clay (it shows easily!), wipe the raw clay with a Q-tip dipped in rubbing alcohol or baby oil before baking to smooth it out.
Step 2: Sculpting the Cherries
-
Mix the color:
Condition your red clay. I like to mix a little translucent red with opaque dark red; this gives the final fruit a stunning depth that mimics real cherry skin. -
Form the spheres:
Roll two balls of clay, roughly 1 inch in diameter. Smooth out any fingerprints or seams very carefully. -
Indent the top:
Use a medium-sized ball tool to press a gentle indentation into the top of each cherry sphere. This is where the stem will emerge. -
Texture the bottom:
Flip the cherry over and use a smaller tool to make a tiny, subtle dot on the bottom for realism. -
Connect stems to fruit:
Dip the ends of your wire stems into a tiny bit of liquid polymer clay or bake-and-bond. -
Insert the wires:
Push the wire ends into the top indentation of the cherries. Gently pinch the clay around the wire insertion point to secure it.
Glazed & Confused
For an even deeper ‘glassy’ look, create an ombre effect by dusting the bottom of the raw cherries with dark purple pastel chalk before adding your gloss layer.
Step 3: Adding the Foliage
-
Form leaf teardrops:
Roll two small balls of green clay, smaller than the cherries, and flatten them into teardrop shapes. -
Add texture:
Press the clay teardrops onto a leaf vein texture mold. If you don’t have a mold, use a needle tool to scratch in a central vein and smaller diagonal veins. -
Shape the leaves:
Pinched the ends slightly to sharpen the tip and give the leaf a slight curve so it doesn’t look flat and stiff. -
Attach leaves to stem:
Apply a dab of liquid clay to the top of the stem junction (near the metal loop). Press the base of the leaves firmly onto this area, ensuring they bond with the stem clay.
Step 4: Finishing Touches
-
Bake carefully:
Suspend the keychain on a wire rack or prop the cherries up with crumpled foil so they don’t develop flat spots. Bake according to your clay package instructions (usually 275°F/130°C for 30 mins). -
Cool it down:
Let the piece cool completely before handling. The clay is fragile while hot. -
Reinforce:
For extra durability, you can add a tiny drop of super glue where the wire enters the cherry if it feels loose. -
Apply the gloss:
This is the most crucial step for realism. Paint two coats of high-gloss polyurethane varnish or UV resin over the red cherry parts only. Leave the leaves matte or satin for contrast.
Clip this charming accessory onto your bag and enjoy your evergreen fruit all year round
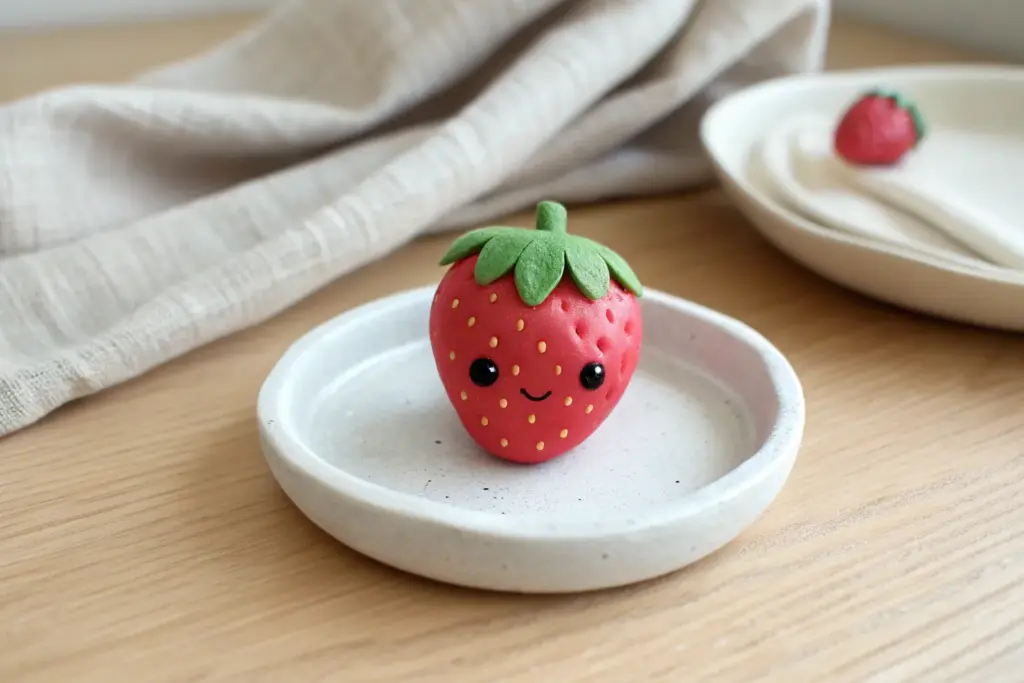
Kawaii Fruit Faces With Simple Expressions
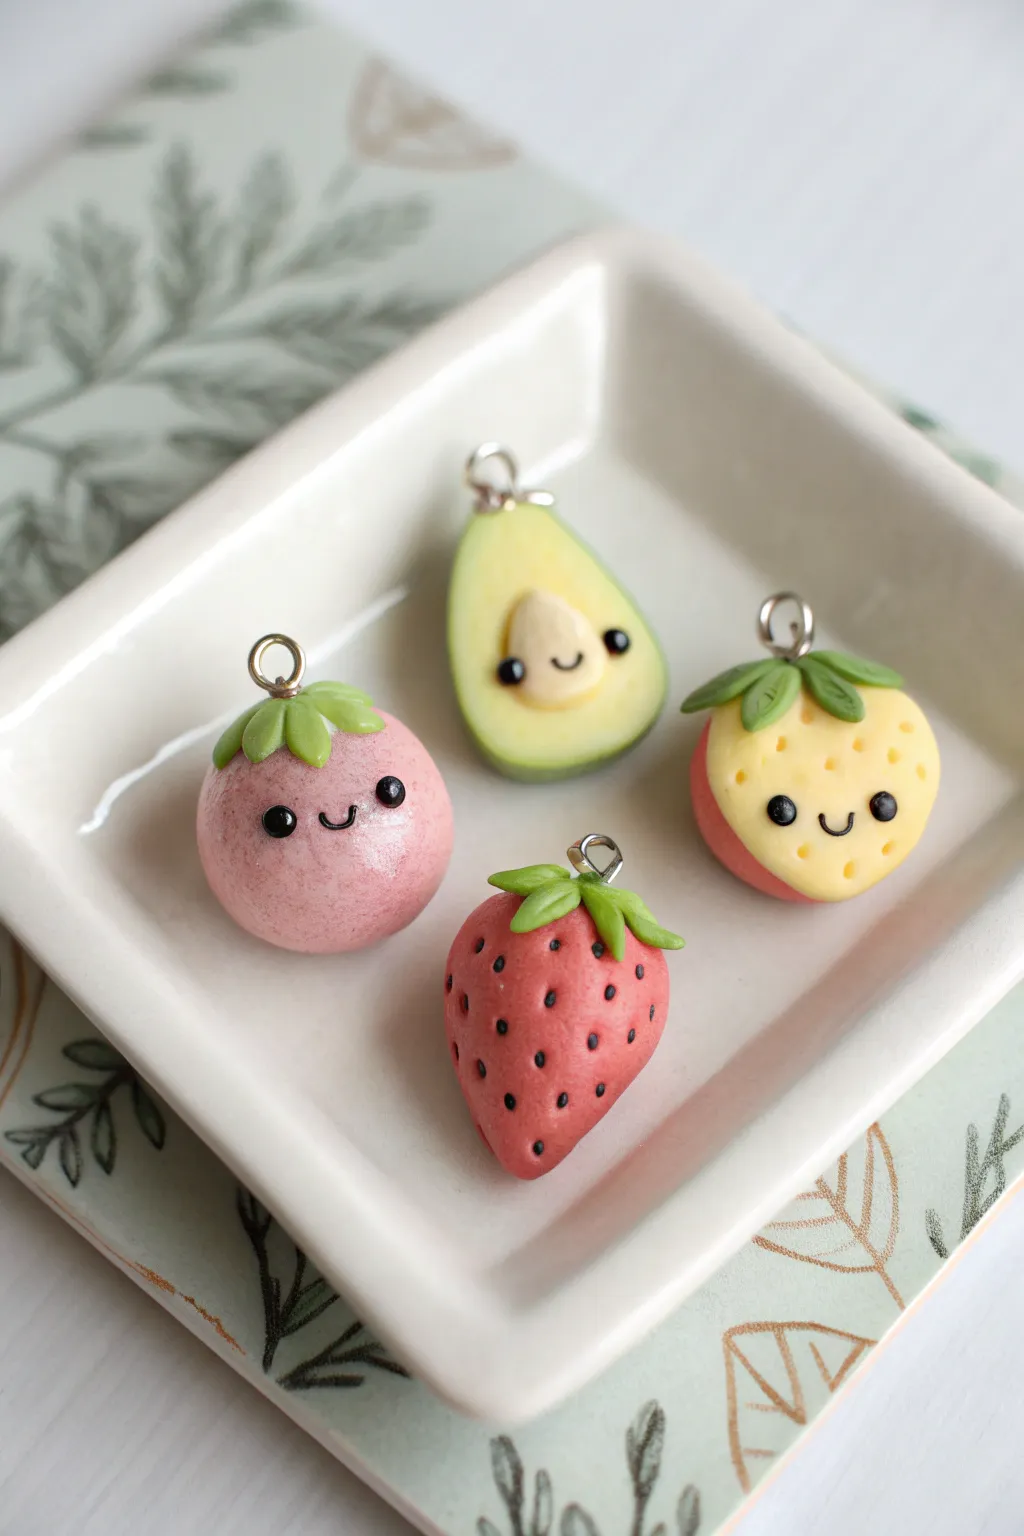
These adorable polymer clay charms transform ordinary fruit into delightful characters with tiny, sweet expressions. The set features a playful mix of a pink berry, a friendly avocado, a dipped strawberry, and a classic red berry, all finished with glossy charm loops.
Step-by-Step Guide
Materials
- Polymer clay (pink, avocado green, light yellow, red, white, leaf green, black)
- Clay sculpting tools (needle tool, ball stylus)
- Eye pins or screw eyes (silver)
- Gloss glaze or polyurethane varnish
- Small paintbrush
- Razor blade or craft knife
- Baking sheet and parchment paper
- Oven (designated for clay)
Step 1: Shaping the Bases
-
Mix your colors:
Begin by conditioning your clay. For the pink fruit, mix a little white into pink to get a soft pastel shade. For the avocado, mix yellow and green for the flesh, and keep a darker green for the peel. -
Roll the spheres:
Roll three balls of clay roughly the size of a large marble: one pink, one red, and one yellow. Slightly flatten the bottom of the pink one so it sits upright. -
Form the strawberry shape:
Take the red and yellow spheres and gently pinch the bottom to create a tapered strawberry point. The yellow one will get a special ‘dipped’ look later. -
Sculpt the avocado:
Form the light green clay into a pear shape, then slice it vertically in half with your blade to create a flat face. Wrap a thin strip of darker green clay around the curved edge to mimic the skin. -
Add the avocado pit:
Roll a tiny ball of tan or light brown clay. I prefer to flatten it slightly into a dome shape and press it gently onto the lower center of the avocado slice.
Smudged Faces?
Work with the lightest colors first. If black clay smudges onto the yellow or pink faces, use a cotton swab dipped in rubbing alcohol to gently wipe the stain away before baking.
Step 2: Adding Details & Faces
-
Create the bicolor strawberry:
For the yellow strawberry that looks ‘dipped,’ flatten a small disc of red clay. Press this onto the back and bottom of the yellow berry, smoothing the seams so it looks like the yellow part is emerging from a red shell. -
Indent the seeds:
Using a needle tool or small ball stylus, gently press seed indentations all over the red strawberry and the yellow portion of the bicolor strawberry. -
Make the leaves:
Roll tiny teardrop shapes of leaf green clay. Flatten them and press them onto the top of each fruit. Use your needle tool to score a center vein down each leaf for texture. -
Attach the hardware:
Insert a silver eye pin into the top center of each fruit, right through the leaves. If the clay is soft, you can do this now; otherwise, drill a hole after baking. -
Sculpt tiny eyes:
Roll minuscule balls of black clay for the eyes. Place them on the pink fruit, the avocado pit, and the yellow strawberry face. Press them in gently to secure them. -
Add the smiles:
Roll an incredibly thin snake of black clay. Cut tiny curved segments to create the smiles and place them between the eyes. For the avocado, the face goes directly on the pit. -
Paint the red seeds:
The all-red strawberry doesn’t get a face. instead, create tiny black elongated dots inside your seed indentations using a tiny bit of black clay or paint after baking.
Step 3: Baking & Finishing
-
Bake the charms:
Place all charms on a baking sheet lined with parchment paper. Bake according to your brand of clay’s instructions (usually 275°F/135°C for 15-30 minutes). -
Cool down:
Let the charms cool completely in the oven before moving them to prevent cracking. -
Secure the pins:
If your eye pins feel loose after baking, pull them out, add a dab of superglue, and reinsert them for a permanent hold. -
Apply glaze:
Brush a coat of gloss glaze over the fruit parts to make them shine. Avoid glazing the leaves if you want a matte contrast, or glaze everything for a fully polished look.
Make It a Keychain
Instead of single charms, attach all four fruits to a single chunky gold chain bracelet or a keychain ring for a fruit-salad themed accessory.
Now you have a handful of sweet, smiling fruit characters ready to brighten up any jewelry project
Surreal Fruit Mashups For Wow-Factor Charms
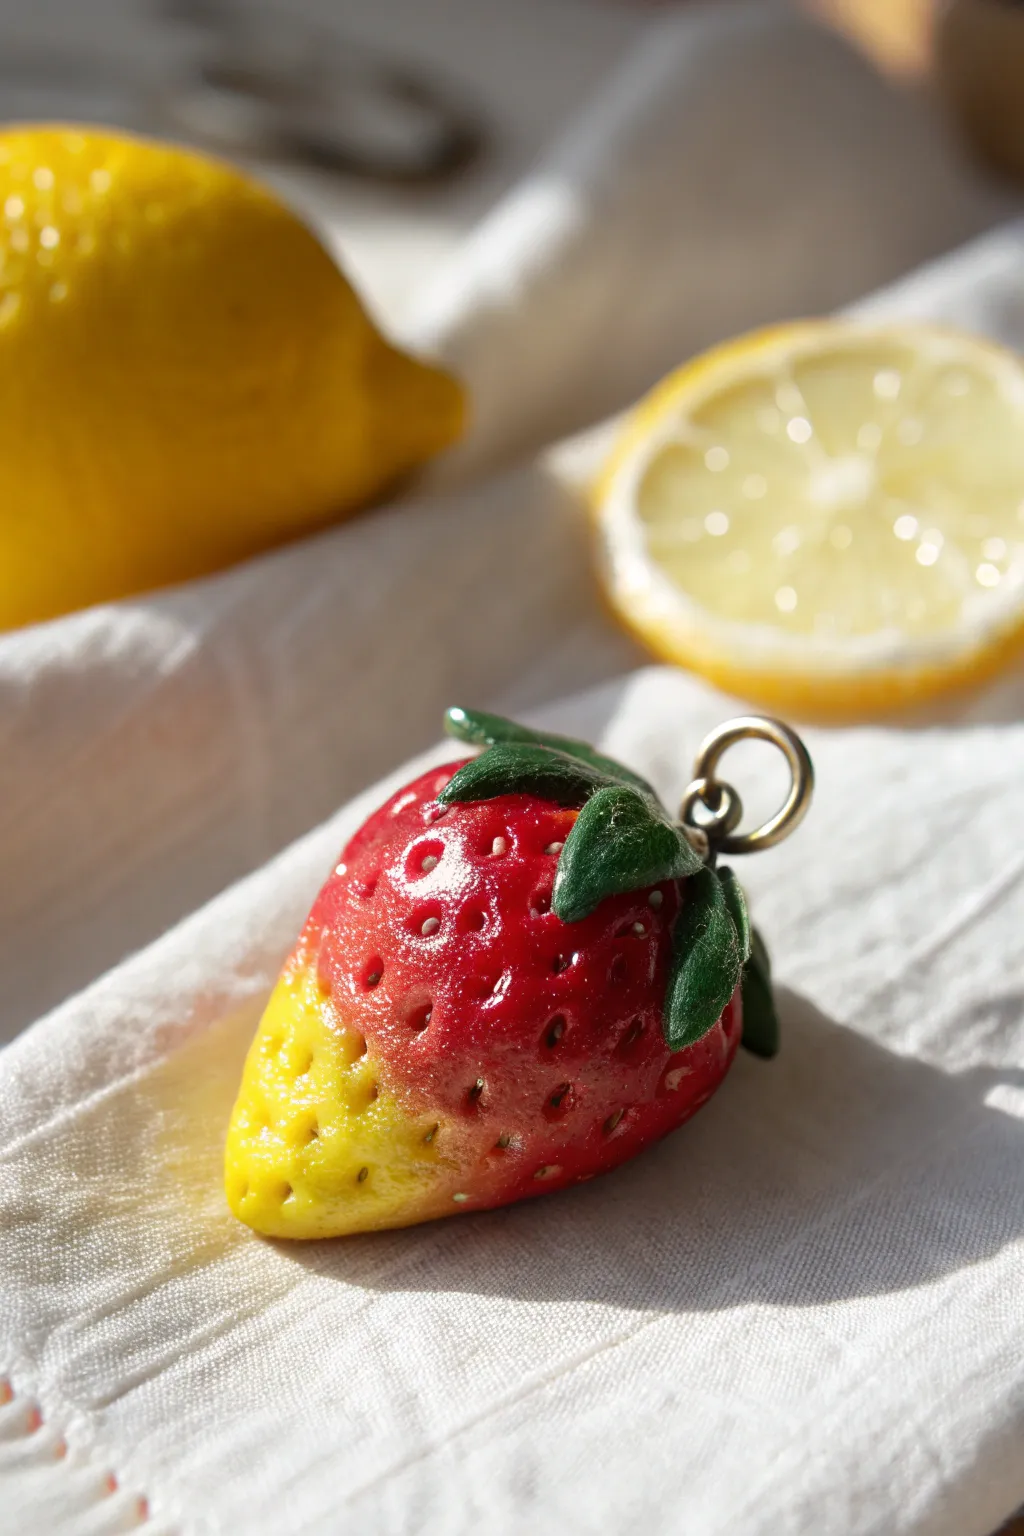
This whimsical charm captures the surreal beauty of a fruit that can’t quite decide what it wants to be, blending the sunny zest of a lemon with the classic sweetness of a ripe strawberry. With its glossy finish and seamless color gradient, this piece serves as a stunning pendant or a quirky keychain accessory.
How-To Guide
Materials
- Polymer clay (translucent white, cadmium yellow, cadmium red, moss green)
- Liquid polymer clay (optional)
- Acrylic paint (white or cream for seeds)
- Gloss varnish or UV resin
- Basic sculpting tools (needle tool, ball stylus)
- Soft pastel chalks (red and yellow)
- Small paintbrush
- Metal screw eye pin
- Baking tile or parchment paper
- Oven
Step 1: Forming the Base
-
Mix your colors:
Start by conditioning your polymer clay. You will need a bright, zesty yellow and a deep, rich red. I like to mix a tiny amount of translucent clay into both colors to give the fruit a deeper, more realistic waxiness once baked. -
Create a Skinner blend:
To achieve that perfect fade, create a ‘Skinner blend’ or a simple gradient by mostly mixing the two colors in the middle. Combine a ball of yellow and a ball of red, pressing them together and rolling until the boundary blurs but distinct ends remain. -
Shape the strawberry:
Roll your gradient log into a smooth ball, keeping the yellow on one side and red on the other. Gently taper the yellow end to form the bottom tip of the strawberry and flatten the red top slightly for the leaves. -
Refine the ombre:
If the transition looks too harsh, shave some red pastel chalk into a fine powder. Use a dry, soft brush to gently dust the red powder over the middle section where the colors meet, smoothing the visual blend.
Natural Texture
Before making seed holes, lightly roll the unbaked strawberry over a piece of coarse sandpaper. This adds a microscopic skin texture that stops it from looking like plastic.
Step 2: Adding Textures and Details
-
Create the seed pockets:
Using a small ball stylus or a blunt needle tool, press gently into the clay to create the strawberry’s characteristic pitted surface. Be sure to stagger these indentations rather than placing them in straight rows for a natural look. -
Add the seeds:
For the seeds themselves, you have two options. You can gently press actual tiny balls of white clay into the pits, or wait until after baking to paint them. Given the scale, pressing the seed pockets now is crucial regardless of your choice. -
Sculpt the calyx (leaves):
Roll out a thin sheet of moss green clay. Cut out small, star-shaped sepals or individual teardrops. Use a needle tool to drag texture lines down the center of each leaf. -
Attach the greenery:
Press the green leaves onto the broad red top of your strawberry. Use a dot of liquid clay if they aren’t sticking well. Gently curl the tips of a few leaves upwards to give it life and movement. -
Insert the hardware:
Take your metal screw eye pin. Dip the threaded end into a little liquid polymer clay for extra grip, then screw it firmly into the center of the green leaves at the top.
Step 3: Baking and Finishing
-
Bake the charm:
Place your creation on a ceramic tile or parchment paper. Bake according to your specific clay brand’s instructions (usually around 275°F or 130°C for 15-30 minutes). Let it cool completely. -
Highlight the seeds:
If you didn’t add clay seeds earlier, dilute a tiny bit of cream or white acrylic paint. Wash it over the surface and quickly wipe it off with a damp paper towel, leaving paint only inside the recessed seed pits. -
Clean up:
Use a cotton swab dipped in rubbing alcohol or water to clean up any paint that smeared onto the smooth surface of the ‘skin’ to keep the colors bright. -
Seal the piece:
For that juicy, wet-fruit look seen in the photo, apply a coat of gloss varnish. I prefer UV resin for a durable, glass-like finish; brush it on evenly and cure under a UV lamp. -
Final inspection:
Check near the eye pin to ensure the varnish hasn’t clogged the loop. If it has, use a needle to clear it before the varnish fully sets.
Sugar Frosted
For a ‘candied’ fruit effect, coat the bottom yellow tip in a thin layer of liquid clay and dip it into extra-fine clear glitter or white crafting sand before baking.
Enjoy wearing your vibrant summer mashup or gifting it to a fruit-loving friend