
A clay ashtray is one of my favorite small projects because it’s quick, useful, and you can sneak in so much personality. Here are my go-to cool clay ashtray ideas—starting with the classics and ending with the kind of designs that make people pick it up and stare.
Classic Pinch-Pot Ashtray
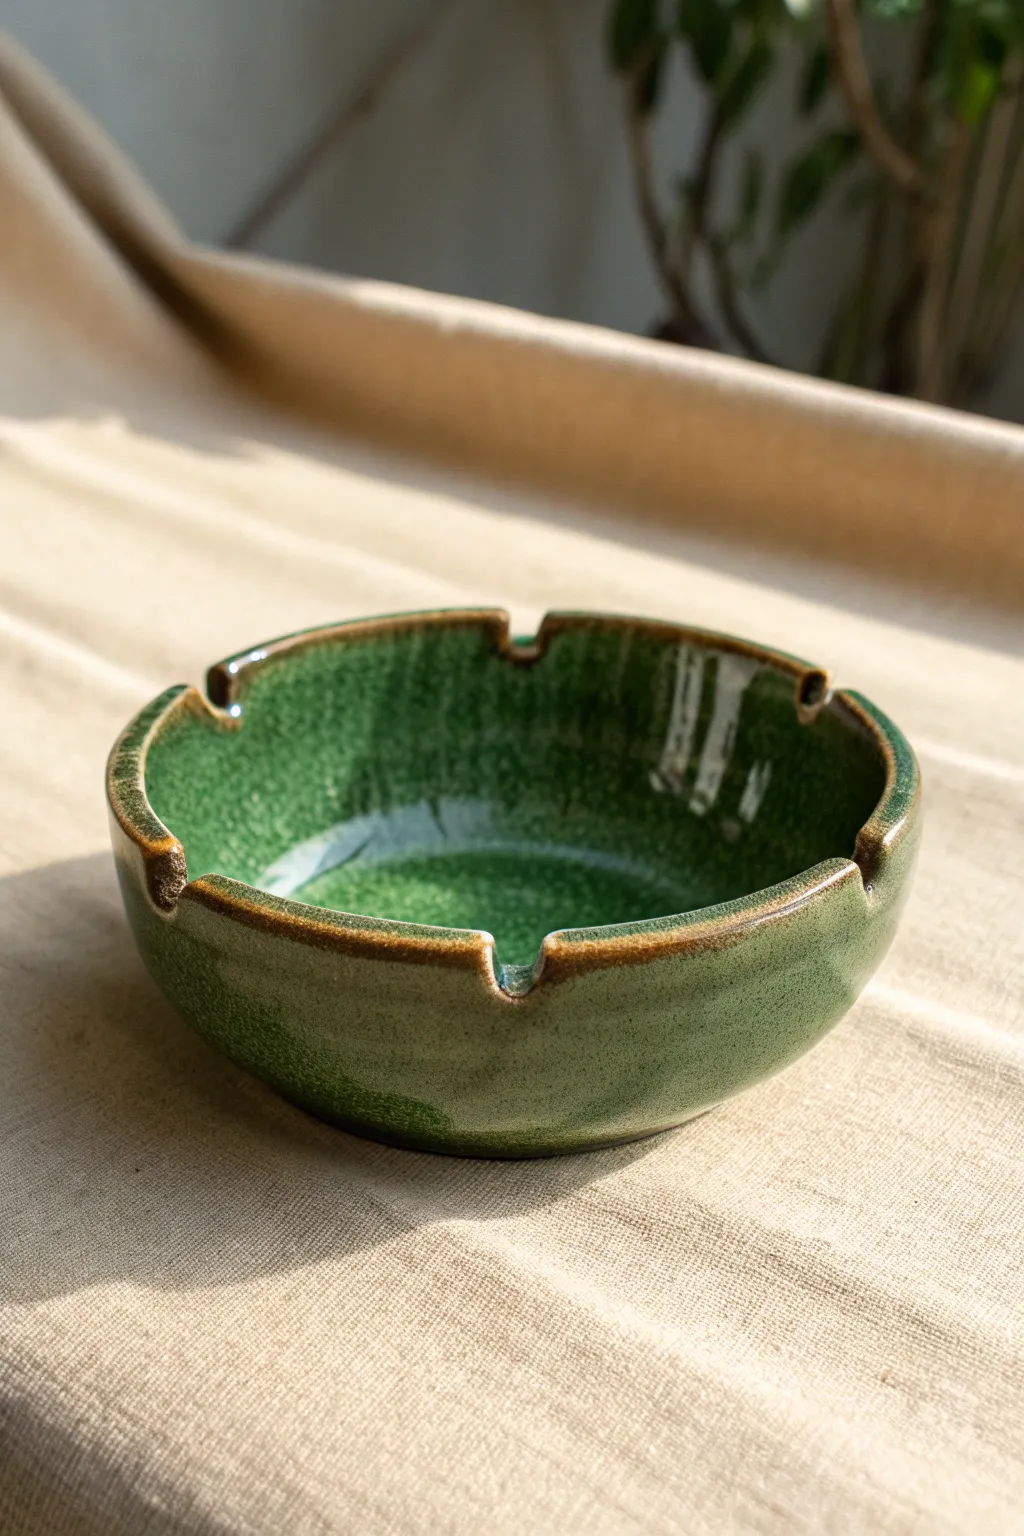
Embrace the timeless appeal of handmade pottery with this classic pinch-pot ashtray. Featuring a deep, glossy green glaze with a beautifully contrasting rim, this piece is both functional and decorative.
Detailed Instructions
Materials
- Stoneware clay (smooth or slightly groggy)
- Pottery wheel (optional, can be hand-built)
- Sponge
- Wire cutter
- Rib tool (wood or metal)
- Fettling knife
- Loop carving tool
- Forest green glossy glaze
- Clear glaze (optional for rim)
- Kiln access
Step 1: Forming the Base
-
Prepare the Clay:
Begin by wedging about 1 to 1.5 pounds of stoneware clay to remove air bubbles and ensure a uniform consistency. -
Center the Clay:
Throw the clay onto the wheel head and center it firmly. If you are hand-building, start by forming a smooth, round ball in your hands. -
Open the Form:
Press your thumbs into the center to open the clay, leaving about half an inch of thickness at the bottom for stability. -
Pull the Walls:
Whether pulling on the wheel or pinching by hand, raise the walls to create a shallow bowl shape about 2-3 inches high. -
Shape the Curve:
Use a rib tool to smooth the interior curve and refine the exterior profile, aiming for a rounded, organic slope. -
Define the Rim:
Compress the rim with a damp sponge or piece of chamois leather to make it smooth and rounded, which will be comfortable to handle later.
Rim Reveal Tip
For the rim effect, don’t wipe all the glaze off. Just thin it out with a sponge so the iron in the clay burns through during firing.
Step 2: Carving Details
-
Leather Hard Stage:
Allow the piece to dry to a leather-hard state where it is firm enough to handle but still retains moisture. -
Trim the Foot:
If wheel-thrown, flip the piece over and use a loop tool to trim a neat foot ring. This elevates the form and adds professionalism. -
Mark the Notches:
Lightly mark four equidistant points around the rim where you want to place the cigarette rests. -
Create the Notches:
Use a round file or the handle of a tool to gently press or carve semi-circular indentations into the rim at your marked points. -
Smooth the Edges:
Take a slightly damp sponge and go over the notched areas to soften any sharp edges created during carving. -
Bisque Fire:
Let the piece dry completely (bone dry) before loading it into the kiln for the initial bisque firing, typically to Cone 04.
Step 3: Glazing and Finishing
-
Wax the Foot:
Apply wax resist to the bottom foot ring to prevent glaze from sticking to the kiln shelf. -
Dip the Glaze:
Stir your forest green glaze thoroughly. Dip the entire ashtray into the bucket for an even coat, holding it for about 3 seconds. -
Clean the Rim (The Trick):
While the glaze is powdery but not fired, gently wipe the very edge of the rim with a damp sponge. This exposes the raw clay body slightly, creating that beautiful brown transitional line seen in the photo. -
Check Internal Coverage:
Inspect the inside bowl to ensure the glaze has pooled slightly at the bottom but isn’t too thick, which could cause crawling. -
Glaze Firing:
Fire the piece again to your clay body’s maturity temperature (e.g., Cone 5 or 6) to melt the glaze into that deep, glassy finish. -
Final Polish:
Once cool, use fine-grit sandpaper to smooth the unglazed foot ring so it won’t scratch table surfaces.
Add Texture
Before the clay dries, gently tap the exterior with a paddle or stone to give it a faceted, hammered look under the glaze.
Now you have a durable, custom piece perfect for a coffee table or patio


Simple Slab-Built Square Ashtray
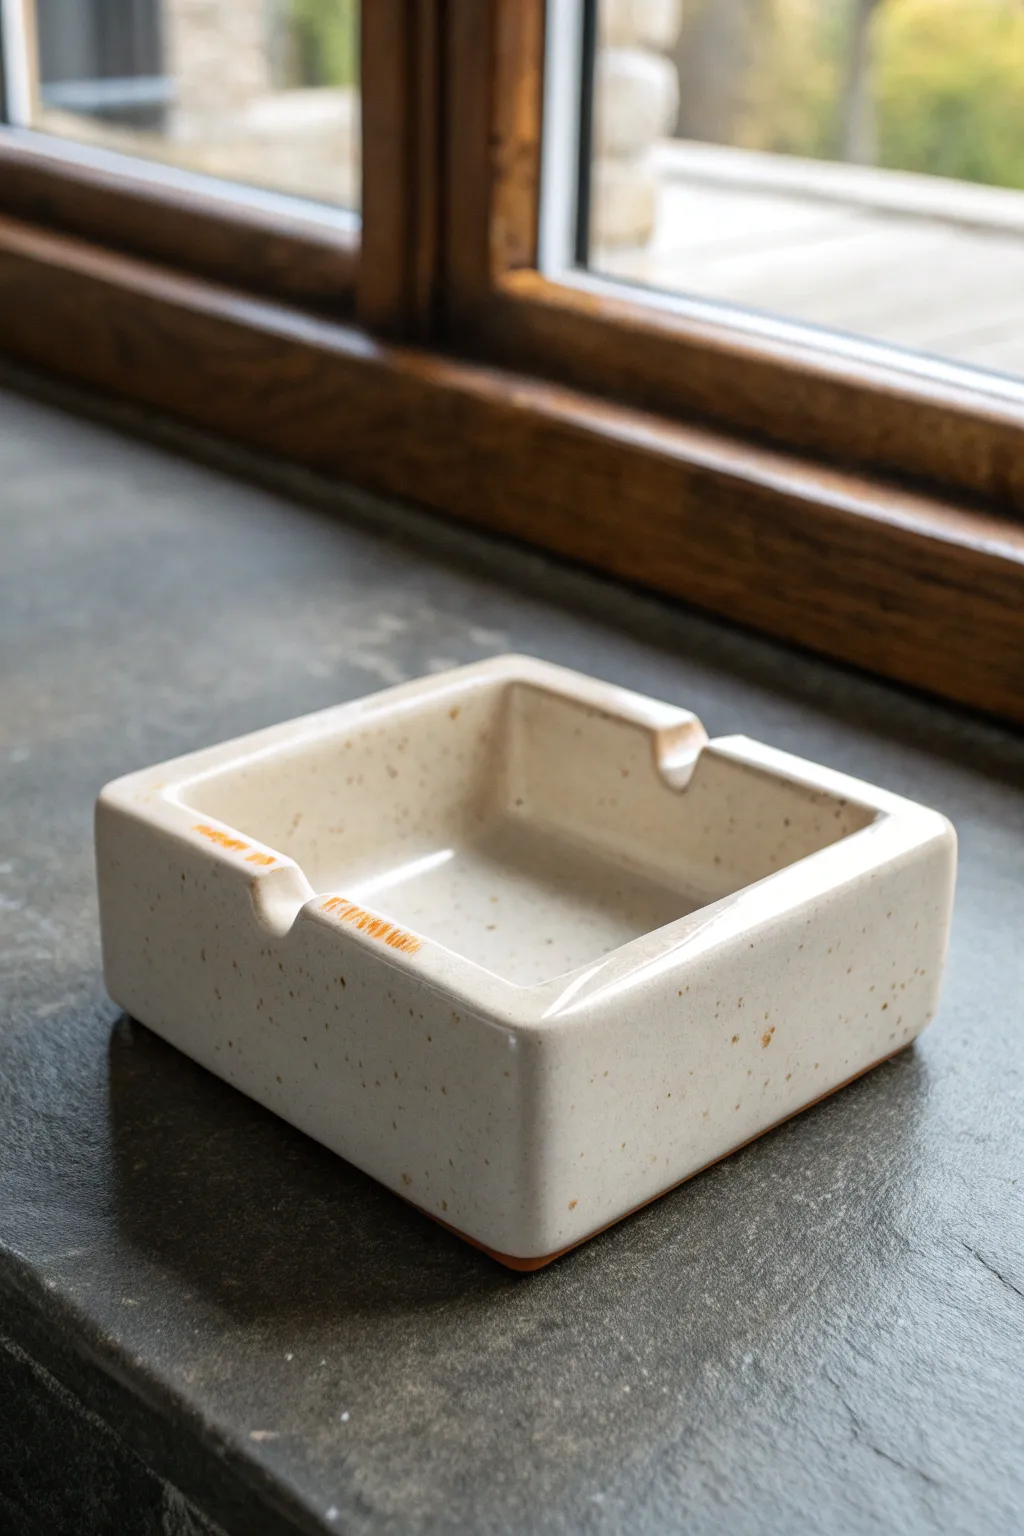
This minimalist square ashtray combines clean lines with a warm, speckled finish for a modern yet rustic feel. The subtle orange accents on the cigarette rests add just the right pop of color to the creamy glaze.
Step-by-Step
Materials
- Speckled Stoneware Clay (cone 5/6)
- Rolling pin
- Guide sticks (approx 1/4 inch thick)
- Fettling knife or craft knife
- Rib tool (rubber or silicone)
- Straight edge or ruler
- Scoring tool (or fork)
- Slip (liquid clay)
- Sponge
- Round texturing tool or dowel
- Cream/White Satin Matte Glaze
- Iron Oxide wash or Orange Underglaze
Step 1: Creating the Slab Base
-
Roll the clay:
Begin by wedging your speckled clay to remove air bubbles, then place it between two guide sticks on a canvas board. Roll the clay out into a smooth, even slab that is roughly 1/4 inch thick. -
Smooth the surface:
Take your rubber rib tool and gently compress the clay surface on both sides. This aligns the clay particles to prevent warping and creates that nice, professional finish we want. -
Cut the components:
Using a ruler and your fettling knife, cut out a perfect 4×4 inch square for the base. Next, cut four rectangular strips for the walls; they should be 4 inches long and about 1.5 inches tall.
Warped Walls?
If your square walls are curving inward during drying, place a piece of soft foam inside the box to support the shape, or let the slab firm up to leather-hard before assembling.
Step 2: Assembling the Form
-
Score the edges:
Score the outer perimeter of your base square and the bottom edge of each wall strip. Use a cross-hatch pattern to create a rough texture that will grip the slip. -
Apply slip:
Dab a generous amount of slip onto the scored areas of the base. I like to make sure the slip is thick like yogurt for the strongest bond. -
Attach the first wall:
Place the first wall on the base edge. Press it down firmly to squeeze out excess slip, ensuring a tight seal between the wall and the floor. -
Attach remaining walls:
Repeat with the remaining three walls. When joining the corners where the walls meet, score and slip the vertical edges as well. -
Reinforce the interior:
Run a small coil of soft clay along the interior seams where the walls meet the floor. Smooth this coil down with your finger or a modeling tool to create a rounded, easy-to-clean corner. -
Refine the shape:
Use a wooden paddle or a flat board to gently tap the outside walls. This helps straighten the sides and sharpens the square shape if it bowed out during handling.
Step 3: Finishing Touches
-
Create cigarette rests:
On two opposite walls, identify the center point of the top rim. Use a round dowel or the handle of a tool to gently press a U-shaped indentation into the rim for the cigarette rests. -
Smooth the rim:
Take a slightly damp sponge and run it over the top rim and sharp corners. You want to soften the edges just enough so the glaze breaks nicely over them later. -
Dry and bisque fire:
Let the piece dry slowly under plastic for a day, then uncover to bone dry. Fire it in a bisque kiln to Cone 04.
Make it a Set
Create a matching lighter holder by building a smaller, taller rectangular box using the same slab technique and orange accent glaze on the rim.
Step 4: Glazing
-
Clean the bisque:
Wipe the creative dust off your bisque-fired piece with a damp sponge to ensure the glaze adheres properly. -
Glaze application:
Dip the entire piece into a satin matte cream glaze. Hold it upside down for a few seconds to let the excess drip off, then clean the bottom where it will touch the kiln shelf. -
Add accent color:
Once the base glaze is dry to the touch, use a small brush to apply a stroke of iron oxide wash or bright orange underglaze directly into the U-shaped notches on the rim. -
Final firing:
Fire the piece to maturity (Cone 5 or 6 depending on your clay body). The heat will draw out the speckles in the clay through the translucent cream glaze.
Enjoy using your sleek handmade ashtray or gifting it to a friend who appreciates modern ceramics


Wavy Rim Blob Ashtray
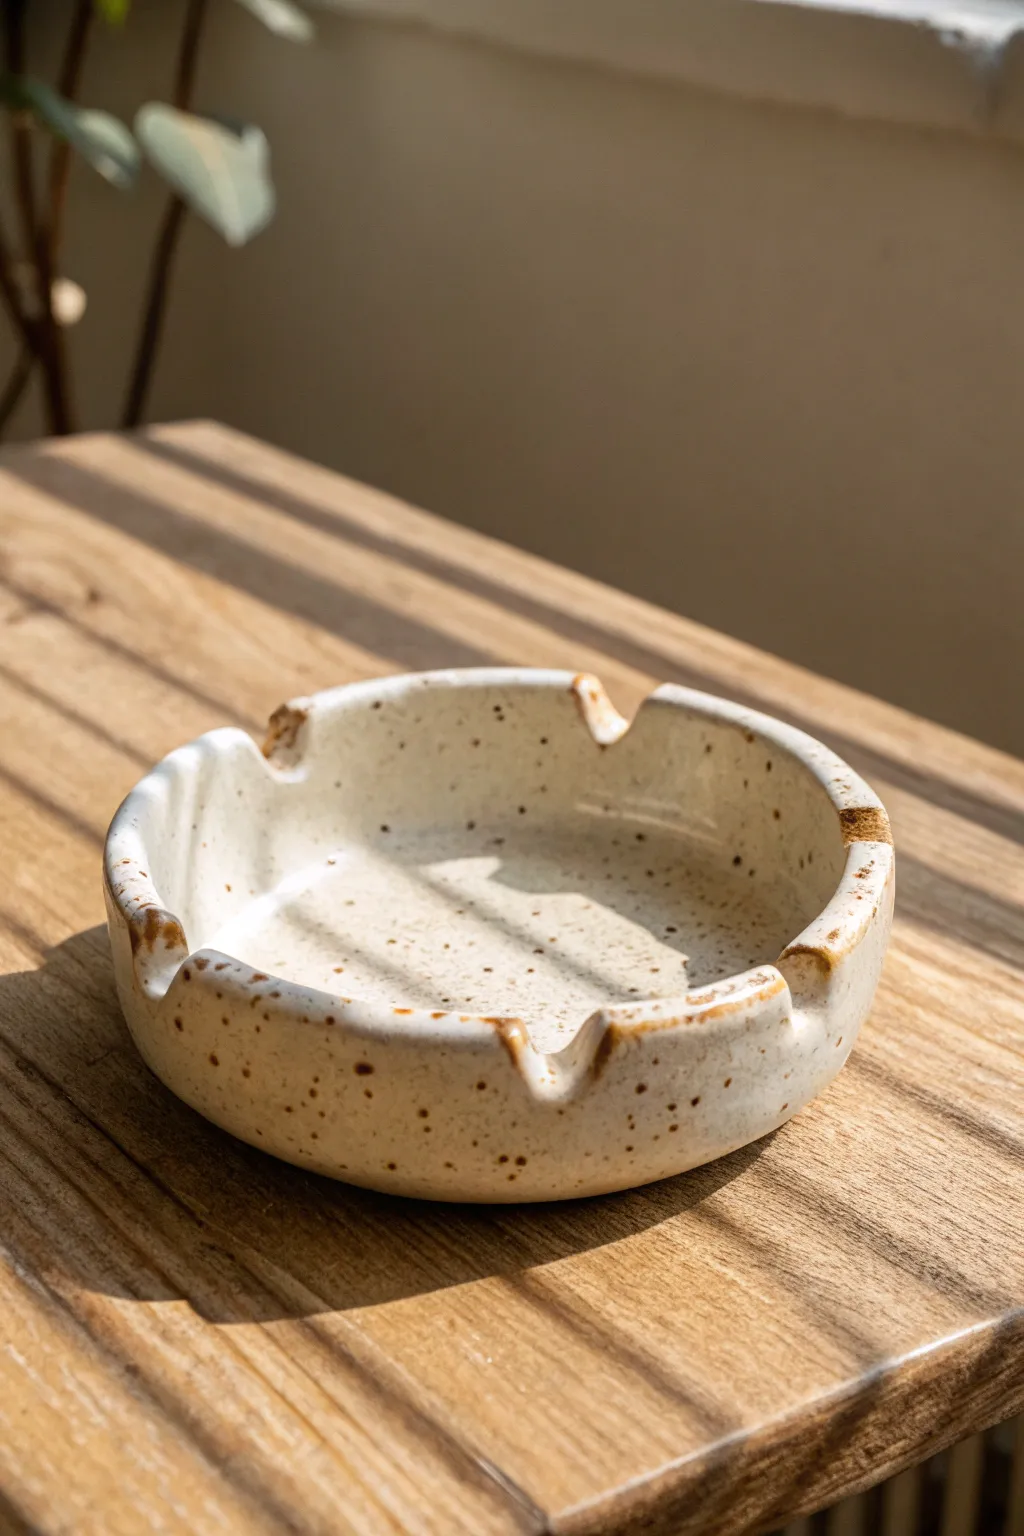
Capture the warmth of earthy ceramics with this chunky, hand-built ashtray featuring deep notches and a rustic speckled glaze. The design balances a thick, sturdy form with an elegant cream finish, perfect for a modern natural aesthetic.
How-To Guide
Materials
- White or buff stoneware clay (groggy for texture)
- Speckled cream glaze (or white glaze with added iron flecks)
- Iron oxide wash or brown underglaze
- Rolling pin
- Two wooden guide strips (approx. 1/4 inch thick)
- Circular template or bowl (approx. 4-5 inches diameter)
- Needle tool or fettling knife
- Small sponge
- Soft rib tool (rubber or silicone)
- Loop tool or clay carving tool
- Medium round paintbrush
Step 1: Forming the Base Structure
-
Prepare the Clay Slab:
Begin by wedging a ball of stoneware clay to remove air bubbles. Place it between two wooden guide strips and roll it out into a uniform slab found to be about 1/4 inch thick. -
Cut the Base:
Lay your circular template onto the slab. Using your needle tool, trace around the template to cut out a perfect circle for the floor of the ashtray. -
Create the Wall Strip:
Re-roll the remaining clay if needed and cut a long rectangular strip. This strip should be roughly 1.5 inches tall and long enough to wrap around the circumference of your base circle with a little overlap. -
Score and Slip:
Score the outer edge of the circular base and one long edge of your wall strip. Apply a generous amount of slip (clay mixed with water) to the scored areas. -
Attach the Wall:
Wrap the strip onto the base, pressing firmly to join them. Where the ends of the wall meet, maintain the thickness by cutting diagonally through the overlap and pressing the ends together. -
Reinforce the Seams:
Take a very thin coil of clay and press it into the interior seam where the floor meets the wall. Smooth this out with your finger or a modeling tool to ensure a watertight bond.
Step 2: Refining and Notching
-
Thicken and Smooth:
Using a wet sponge and your thumb, compress the rim of the wall to slightly thicken and round it off. This gives the piece that chunky, substantial feel. -
Shape the Notches:
Visualize four evenly spaced points around the rim. Use the handle of a paintbrush or your thumb to gently press down into the rim at these points to start the notches. -
Refine the Rests:
Use a damp sponge or your fingers to smooth the indents into soft U-shapes perfectly sized to hold a cigarette. The edges should be rounded, not sharp. -
Dry to Leather Hard:
Cover the piece loosely with plastic and let it dry slowly until it reaches a leather-hard state. I find this usually takes about 24 hours depending on humidity. -
Clean and Bisque Fire:
Once leather hard, sponge away any rough bits or sharp edges. Allow the piece to dry completely to the bone-dry stage, then proceed with a bisque fire in your kiln according to your clay body’s specifications.
Rustic Speckle Hack
If you don’t have pre-speckled clay or glaze, sprinkle coarse dried coffee grounds into your wet glaze. They burn out, leaving lovely dark voids.
Step 3: Glazing and Finishing
-
Apply the Base Glaze:
Dip the entire bisqued piece into your speckled cream glaze. Ensure even coverage inside and out. -
Wipe the Foot:
Use a damp sponge to completely wipe the glaze off the bottom of the ashtray to prevent it from fusing to the kiln shelf. -
Accent the Rim:
Dip a brush into iron oxide wash or a rustic brown underglaze. Gently dab this onto the very top edge of the rim and inside the crucial notch areas. -
Create the Melt Effect:
Allow the brown accent to interact with the cream glaze. If using oxide, apply it lightly so it speckles and bleeds slightly during firing rather than creating a solid dark line. -
Final Firing:
Load the kiln for the glaze firing. Fire to the maturity temperature of your clay and glaze (typically Cone 5 or 6 for stoneware). -
Sand the Bottom:
After cooling, check the unglazed bottom. If it feels rough, give it a quick sand with high-grit sandpaper to protect your tabletops.
Uneven Rim Fix
If your rim looks wobbly before firing, flip the leather-hard piece upside down on a flat board and gently press to level the top edge.
Now you have a durable, custom piece of pottery ready for display or daily use


Round Ashtray With Deep Center Bowl
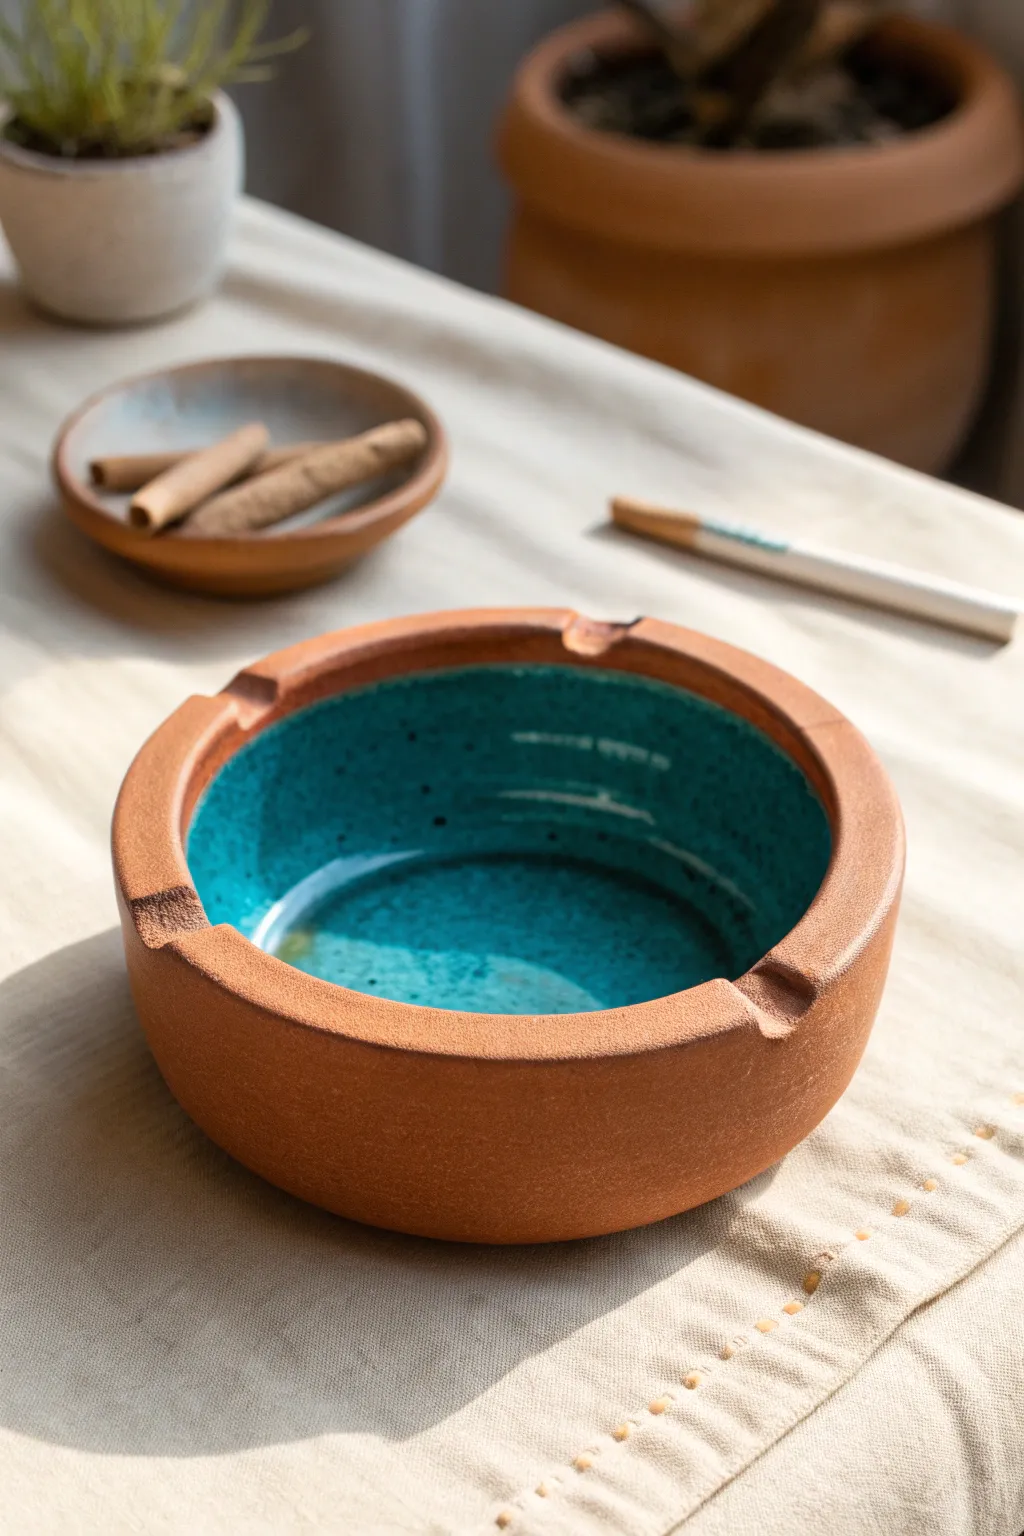
Embrace the natural warmth of unglazed terracotta paired with a stunning pop of glossy turquoise in this functional deep-bowl ashtray. The design features a substantial, rounded rim with classic cigarette rests, offering both practical depth and a striking aesthetic contrast.
Step-by-Step
Materials
- Red earthenware or terracotta clay (low-fire)
- Pottery wheel (or coil building tools)
- Wooden sculpting rib
- Loop trimming tool
- Sponge and water bucket
- Metal kidney rib
- Fettling knife
- Round carving tool (for notches)
- Turquoise crackle glaze (cone 04-06 compatible)
- Wax resist emulsion
- Kiln
Step 1: Throwing the Form
-
Center the Clay:
Begin with about 2-3 pounds of wedged terracotta clay. Throw the ball forcefully onto the center of the wheel head and use wet hands to center it perfectly, coning up and down to align the clay particles. -
Open the Interior:
Press your thumbs into the center to open the clay, leaving a floor about 1/2 inch thick to allow for trimming later. Pull the floor out until it’s roughly 5-6 inches in diameter. -
Pull the Walls:
Pull the walls up vertically, aiming for a thick, substantial cylinder. Unlike a delicate bowl, you want the walls to remain about 1/4 to 3/8 inch thick to give the ashtray a weighty, solid feel. -
Shape the Deep Bowl:
Use a wooden rib inside the vessel to gently curve the interior floor into the walls, creating a seamless, deep curvature. This deep center is key to the design, preventing ash from blowing away. -
Define the Rim:
Compress the rim downwards to create a flattened, horizontal surface roughly 1/2 inch to 3/4 inch wide. Use a distinct pinch between your thumb and forefinger to slightly overhang the rim towards the exterior.
Step 2: Trimming and Sculpting
-
Leather Hard Stage:
Allow the piece to dry to a leather-hard state (firm but still cool to the touch). This usually takes a day or two depending on humidity. -
Trim the Foot:
Invert the ashtray onto the wheel head and secure it with clay lugs. Use a loop tool to trim the excess weight from the base, mirroring the interior curve on the outside. Create a subtle foot ring to lift the pot slightly. -
Smooth the Exterior:
Since the exterior will remain unglazed, spend extra time here. Use a metal kidney or a slightly damp sponge to burnish the surface, removing any grog or roughness. I find that rubbing the surface with the back of a spoon at this stage creates a lovely sheen. -
Carve the Rests:
Turn the piece upright. Select three or four equidistant points on the rim. Use a round carving tool or a fettling knife to scoop out smooth, semi-circular notches for resting cigarettes. -
Refine the Notches:
Use a damp sponge or your finger to smooth the edges of your carved notches. They should be soft and rounded, not sharp. -
Bisque Fire:
Let the piece dry completely to bone dry. Fire it in the kiln to bisque temperature (usually Cone 04), which prepares it for glazing.
Burnishing Secret
For that super-smooth exterior without glaze, rub the leather-hard clay with a smooth stone or the back of a spoon. This compresses the particle alignment.
Step 3: Glazing and Finishing
-
Clean and Prep:
Wipe the bisque-fired piece with a damp sponge to remove any kiln dust. This ensures the glaze sticks properly. -
Wax the Exterior:
This is the most crucial step for this look. Apply wax resist carefully to the entire exterior wall and the top face of the rim. You only want glaze inside the bowl. -
Apply the Glaze:
Pour your turquoise crackle glaze inside the bowl. Roll it around to coat the entire interior surface up to the inner edge of the rim, then pour the excess back into your bucket. -
Clean the Lines:
Use a wet sponge to wipe away any glaze drips that might have gotten onto the rim or exterior. The line where the glaze meets the raw clay should be crisp. -
Glaze Fire:
Fire the piece again to the maturity temperature of your glaze (check your specific glaze instructions, typically Cone 05 or 06 for low-fire). Let the kiln cool completely before opening.
Level Up: Colored Slip
Before bisque firing, apply a darker iron-oxide wash to the rim notches. When wiped back, it emphasizes the carved details against the terracotta.
Once cooled, the crackle glaze will catch the light beautifully against the matte earth tones, giving you a functional piece of art ready for use.

The Complete Guide to Pottery Troubleshooting
Uncover the most common ceramic mistakes—from cracking clay to failed glazes—and learn how to fix them fast.
Heart-Shaped Ashtray
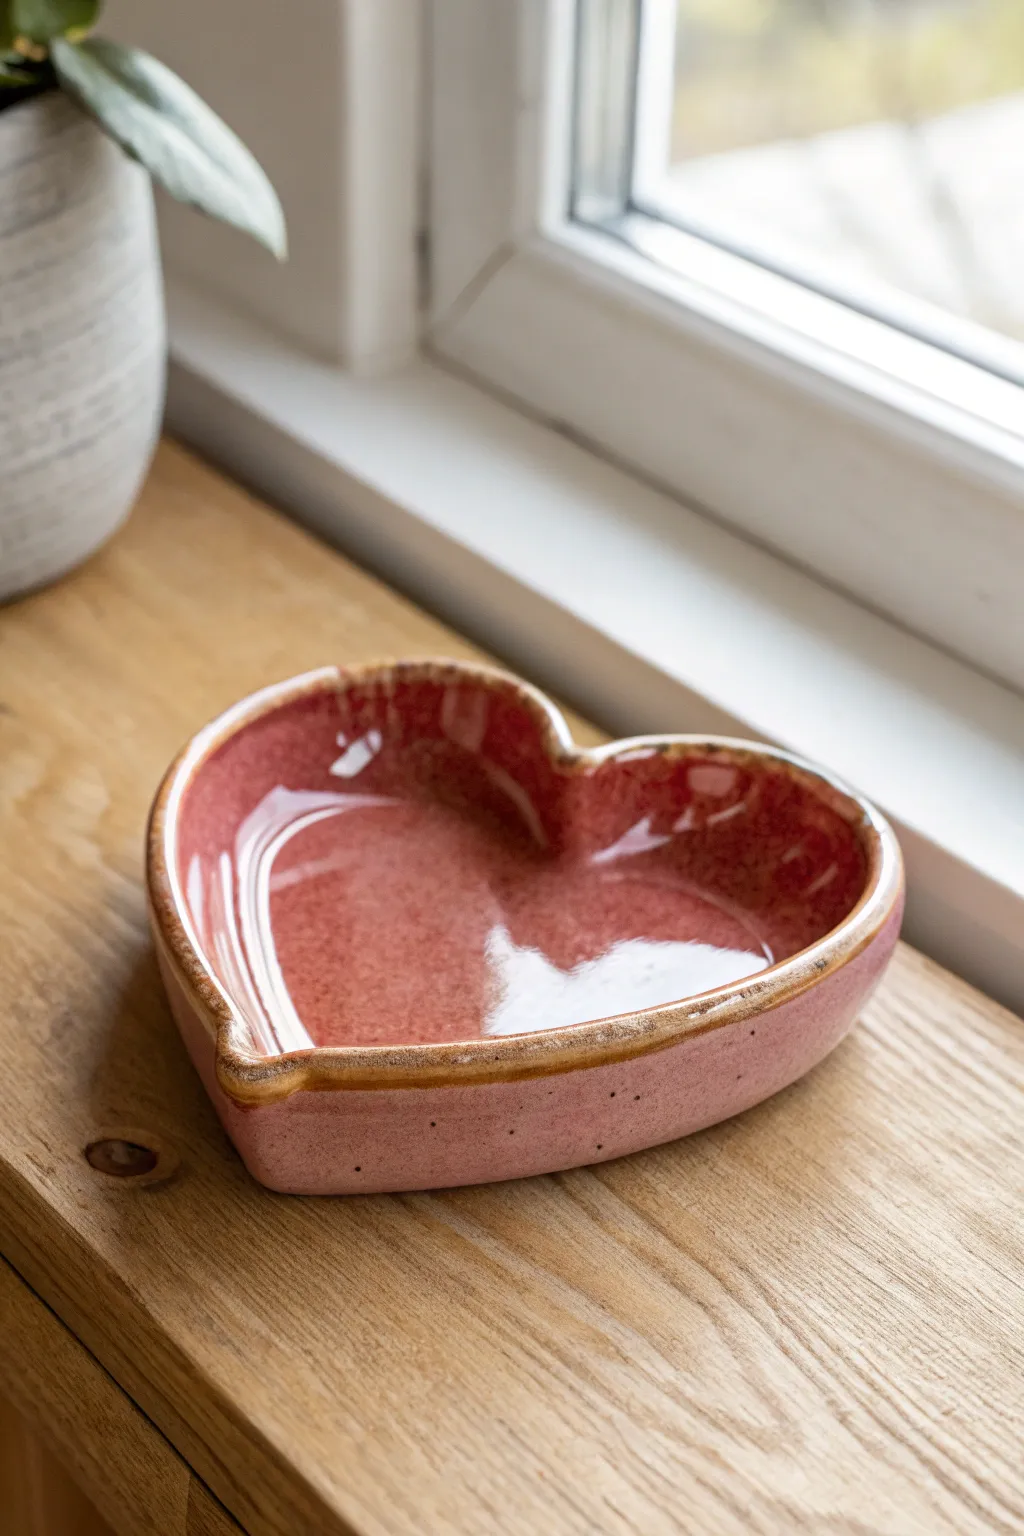
This charming heart-shaped tray combines a glossy pink speckled glaze with a raw, earthy rim for a cozy, handcrafted feel. It’s perfect as a delicate ashtray or a sweet catch-all dish for jewelry and trinkets.
Step-by-Step Guide
Materials
- Stoneware clay (buff or white)
- Heart-shaped template (paper or card)
- Rolling pin
- Canvas mat or slab roller
- Fettling knife or needle tool
- Smoothing rib (rubber or wood)
- Sponge
- Scoring tool
- Pink speckled stoneware glaze
- Clear glaze (optional)
- Iron oxide wash (for the rim)
- Paintbrushes (soft bristle)
- Kiln access
Step 1: Shaping the Clay Body
-
Prepare the slab:
Begin by wedging your clay to remove air bubbles, then roll it out into a smooth, even slab about 1/4 inch thick. Using a canvas mat here prevents sticking. -
Cut the base:
Place your heart-shaped template onto the slab. Trace around it with a needle tool or fettling knife to cut out the base of your tray. -
Create the walls:
Reroll your scraps into a long coil or a long, thin strip (about 3/4 inch high). This will become the retaining wall for the ashtray. -
Score and slip:
Wait for the clay to stiffen slightly, then score the outer edge of your heart base and the bottom edge of your wall strip. Apply slip generously to both scored areas. -
Attach the walls:
Press the wall firmly onto the base, following the heart curve. Ensure you pinch the V-shape at the top and the point at the bottom securely so they don’t crack during drying. -
Blend the seams:
Use a wooden tool or your thumb to drag clay from the wall down onto the base on the inside and outside, creating a seamless transition. -
Refine the shape:
Smooth out the attachment marks with a moist sponge. I like to run a rubber rib along the inside curve to make sure the floor is perfectly smooth and concave. -
Detail the rim:
Using a damp sponge/chamois, soften the top edge of the rim. It shouldn’t be sharp; aim for a rounded, organic lip similar to the reference photo. -
Bisque fire:
Allow the piece to dry slowly under plastic for a day, then uncovered until bone dry. Fire it in the kiln to bisque temperature (usually roughly cone 04).
Step 2: Glazing and Finishing
-
Clean the bisque:
Wipe the fired piece with a damp sponge to remove any kiln dust, which can prevent glaze from adhering properly. -
Apply rim oxide:
Dip a small brush into iron oxide wash. Carefully paint just the very top edge of the rim. This creates that rustic, toasted brown separation line. -
Wipe back excess oxide:
If the oxide line gets too thick or drips, gently wipe the excess away with a damp sponge, leaving just a stain on the rim. -
Glaze the interior:
Pour your pink speckled glaze into the heart. Swirl it around to coat the bottom and inner walls evenly, then pour the excess back into your bucket. -
Glaze the exterior:
Brush two to three even coats of the same pink glaze onto the exterior walls, being careful not to cover the oxide-stained rim. -
Clean the distinct line:
Use a stiff brush or sponge to wipe away any pink glaze that accidentally touched the brown rim. The goal is a clear separation between the pink body and the brown lip. -
Foot check:
Ensure the bottom of the tray (the foot) is completely free of glaze so it doesn’t fuse to the kiln shelf. -
Glaze fire:
Fire the piece again to your clay body’s maturity temperature (likely cone 5 or 6). This melts the glaze into that high-gloss, durable finish.
Glaze Crawling?
If the glaze pulls away leaving bare spots, your bisque might have been dusty or oily. Always wash hands and wipe bisque with a damp sponge before glazing.
Add Texture
Before the clay dries, press a piece of lace or a textured roller into the outer walls. The glaze will break beautifully over the pattern.
Once cooled, your heart-shaped creation is ready to add a touch of warmth to any coffee table or windowsill
Terrazzo Speckle Ashtray
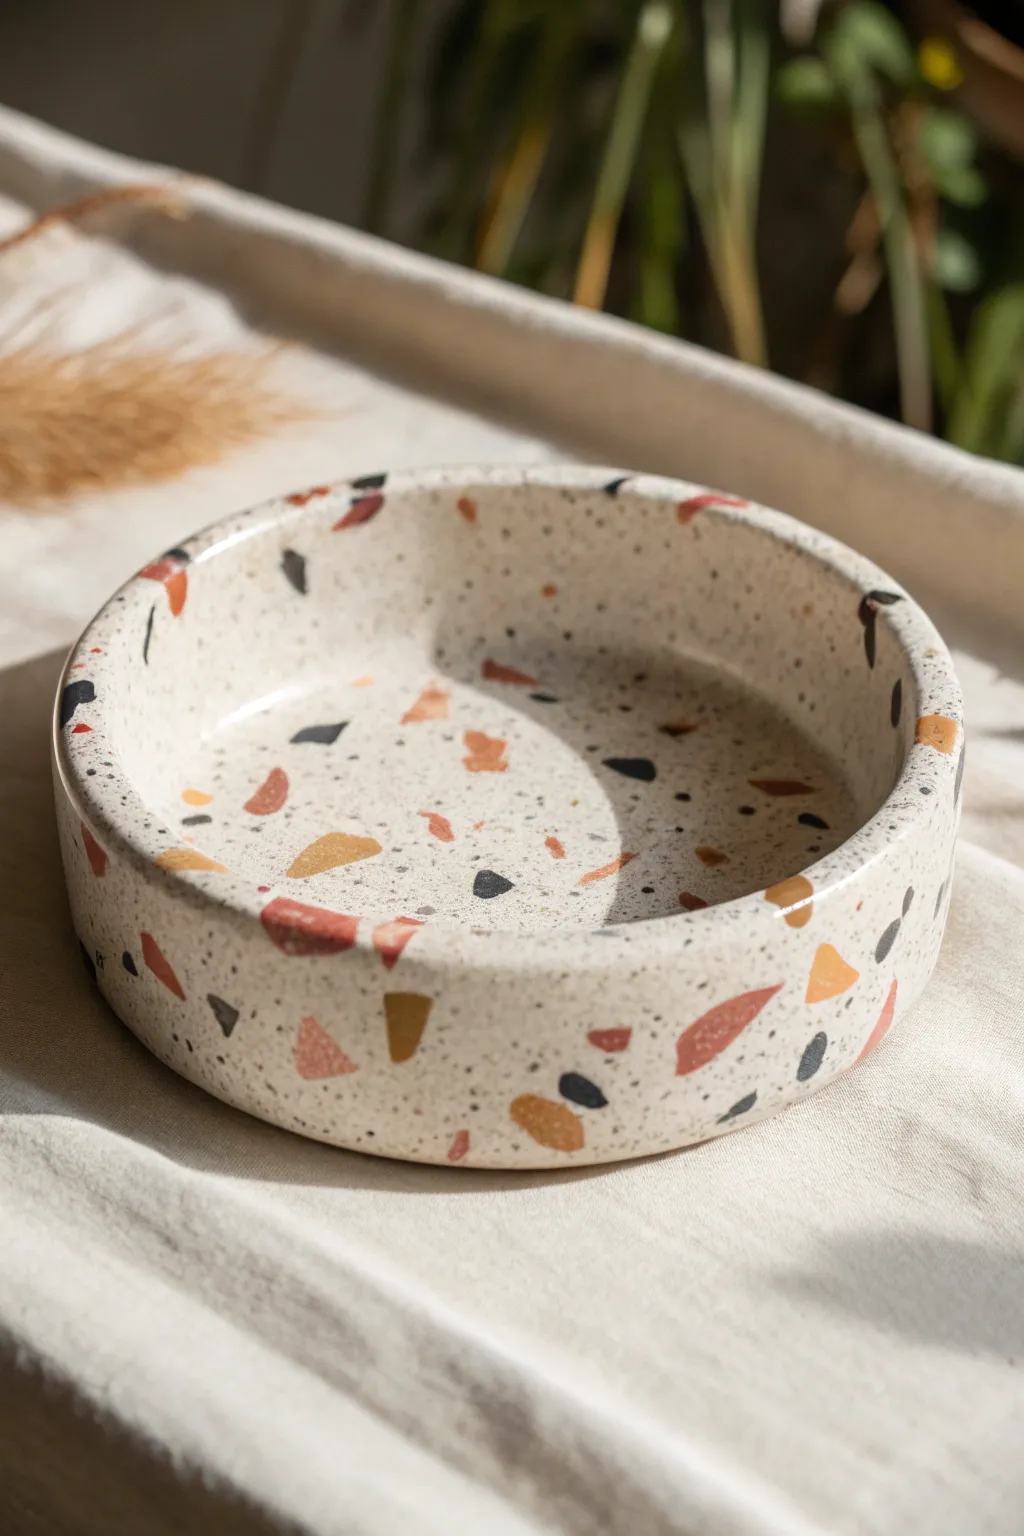
This project captures the trendy, vibrant look of terrazzo stone using accessible polymer clay. The result is a substantial, wide-rimmed ashtray featuring a creamy base scattered with organic chips of burnt orange, mustard yellow, terra cotta, and charcoal black.
Step-by-Step
Materials
- Polymer clay (white or beige for the base)
- Polymer clay (assorted colors: burnt orange, mustard, black, terra cotta)
- Black pepper or dark sand (optional for fine speckling)
- Rolling pin or acrylic roller
- Circle cutters (one large 4-5″, one medium 3-4″)
- Craft knife or scalpel
- Fine-grit sandpaper (400-1000 grit)
- UV resin or gloss varnish (optional for finish)
- Oven for baking
- Parchment paper
Step 1: Preparing the Terrazzo Chips
-
Condition the colored clays:
Start by taking your accent colors—burnt orange, mustard yellow, terra cotta, and black—and knead them individually until soft and pliable. -
Roll thin sheets:
Roll each color out into a very thin sheet, roughly 1-2mm thick. The thinner the sheet, the cleaner your chips will look later. -
Chop the clay:
Using your craft knife, chop these thin sheets into random, irregular shards. Aim for a mix of sizes, from tiny specks to slightly larger triangles, to mimic real stone aggregate. -
Separate and set aside:
Keep the chopped piles separate for now so you can control the color distribution later. I usually scatter them on a piece of extra parchment paper.
Clean Rolling Tip
To prevent your colorful chips from smearing while rolling them into the white base, place a sheet of parchment paper or plastic wrap over the clay before using your roller.
Step 2: Creating the Base Slab
-
Condition the base clay:
Take a large block of your white or beige clay and condition it thoroughly. You want this base to be solid and crack-free. -
Add fine speckles:
For that realistic stone grit texture, knead in a pinch of ground black pepper or very tiny bits of black clay into the white base before rolling. -
Roll the main slab:
Roll the base clay out to a thickness of about 4-5mm. This needs to be thick enough to act as the floor and walls of the ashtray. -
Apply the terrazzo chips:
Sprinkle your chopped colored clay chips onto the surface of the white slab. Be generous but leave some negative space. Press them down gently with your fingers. -
Embed the chips:
Run your roller over the slab again firmly. This forces the colored chips flush with the white clay, creating a smooth, unified surface. -
Cut the base:
Use your largest circle cutter (or a bowl as a template) to cut out the flat, circular bottom of the ashtray.
Step 3: Forming the Rim
-
Create the wall strip:
Take the remaining terrazzo-patterned clay slab and cut a long, rectangular strip. It should be about 1 to 1.5 inches tall and long enough to wrap around the circumference of your base circle. -
Attach the wall:
Wrap the strip around the edge of your circle base. Place the strip *on top* of the circle’s edge rather than around the side for a cleaner seam. -
Blend the seams:
On the inside and outside, gently smudge the clay downward and upward where the wall meets the base to bond them. A silicone tool helps blend without leaving fingerprints. -
Close the loop:
Where the two ends of the wall strip meet, cut through both overlapping layers at a diagonal angle. Remove excess clay and blend the seam together smoothly.
Troubleshooting Cracks
If the clay creates tiny cracks while bending the wall strip, rub a tiny drop of baby oil or clay softener over the area and smooth it with your finger to heal the fissure.
Step 4: Refining and Finishing
-
Smooth the edges:
Run your finger along the top rim to soften any sharp angles. The look should be slightly organic but polished. -
Inspect for air bubbles:
Check the surface for any trapped air bubbles beneath the terrazzo chips. If you find one, prick it gently with a needle and smooth it down. -
Bake the piece:
Bake according to your polymer clay package instructions. I typically bake slightly longer at a lower temp to prevent scorching the white clay. -
Cool and sand:
Once fully cooled, wet sand the piece under running water. Start with 400 grit to reveal the crisp edges of the chips and move up to 1000 grit for smoothness. -
Seal the surface:
Since this is an ashtray, you might want to seal it with a heat-resistant gloss varnish or a thin layer of resin to protect the clay from ash stains.
Enjoy your stylish, modern terrazzo piece that doubles as functional decor.


What Really Happens Inside the Kiln
Learn how time and temperature work together inside the kiln to transform clay into durable ceramic.
Marbled Swirl Polymer Clay Ashtray
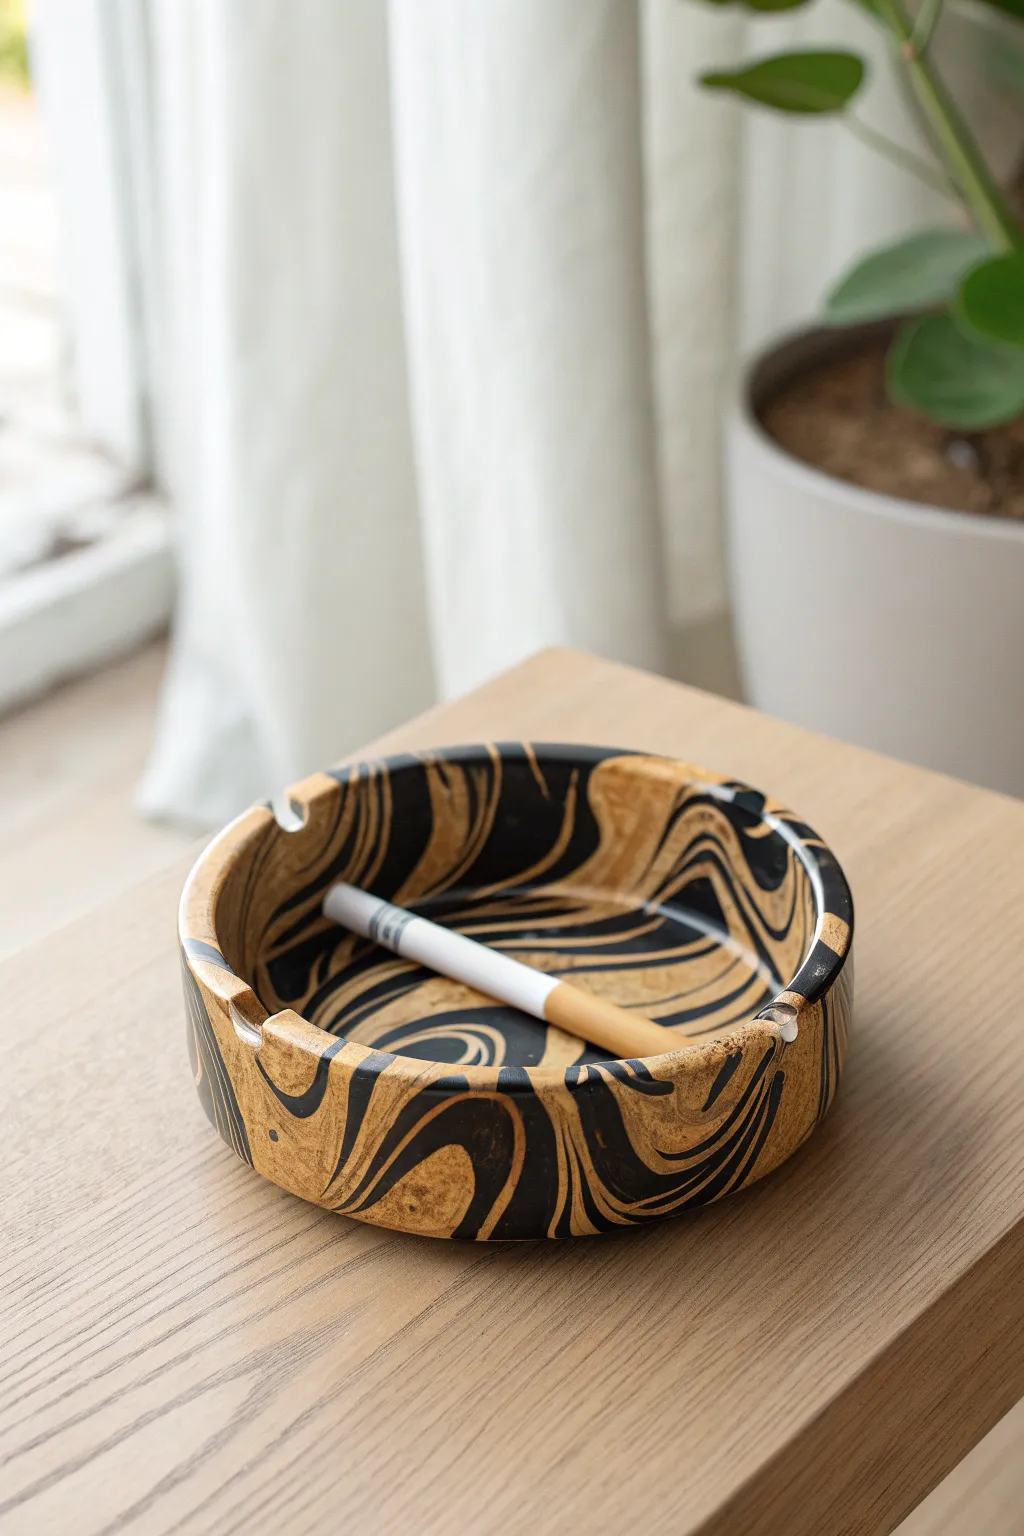
This sophisticated catch-all combines the organic look of sandstone with bold black accents for a striking statement piece. The hypnotic swirl pattern looks complicated, but it’s achieved with a simple polymeric clay marbling technique that ensures no two pieces are ever identical.
How-To Guide
Materials
- Polymer clay (Tan/Beige)
- Polymer clay (Black)
- Polymer clay (Gold metallic – optional for shimmer)
- Acrylic roller
- Circular clay cutter or a round bowl for a template
- Craft knife or scalpel
- Smooth glass jar or cylindrical object (for shaping)
- Oven-safe glass or ceramic bowl (to use as a baking form)
- Wet/dry sandpaper (400, 800, 1000 grit)
- Gloss glaze or resin (for finishing)
Step 1: Preparing the Clay
-
Condition the clay:
Start by warming up your clay blocks. Knead the tan and black clay separately until they are soft, pliable, and free of cracks. If you are adding a metallic gold, condition that now as well. -
Create snakes:
Roll each color into long, snake-like logs about 1/2 inch thick. You’ll want roughly twice as much tan clay as black clay to achieve the dominant sandy background seen in the photo. -
Twist and combine:
Gather your clay snakes and twist them together into one large rope. Fold the rope in half and twist it again. Repeat this twist-and-fold process about 4-5 times. -
Marbling magic:
Roll the twisted rope into a smooth ball. Don’t over-knead it, or the colors will blend into a muddy grey instead of distinct swirls. I prefer to stop mixing earlier than I think I need to.
Step 2: Shaping the Form
-
Flatten the slab:
Place your marbled ball on a clean work surface. Using your acrylic roller, roll it out into a flat slab approximately 1/4 inch thick. Rotate the clay frequently to keep the circular shape even. -
Cut the circle:
Use a large circular cutter or place a bowl upside down on the slab as a template. Cut around it with your craft knife to get a perfect circle base. -
Create the walls:
Cut a long strip from the remaining marbled clay slab, about 1 inch wide and long enough to wrap around the circumference of your base. -
Attach the wall:
Wrap the strip around the edge of your circular base. Use your fingers to smudge the clay from the wall down onto the base on the inside, sealing the seam fully. -
Smooth the exterior:
Flip the piece over gently and smooth the seam on the bottom as well. Use a little baby oil on your finger if the clay is sticky. -
Refine the shape:
To ensure perfectly straight sides, I like to gently roll a glass jar along the inside walls, pushing outward slightly to even out any bumps.
Muddy colors?
If your swirl turns grey, you over-mixed the colors. Stop twisting/folding sooner next time. Cut the ball in half to check the cross-section before rolling.
Step 3: Detailing and Baking
-
Carve the rests:
Using the handle of a paintbrush or a cylindrical tool, press gently into the top rim of the wall to create the u-shaped divots. Make 3 or 4 evenly spaced indentations. -
Smooth the edges:
Run a finger lightly dipped in water or clay softener along the top rim and the indentations to remove any sharp edges or fingerprints. -
Bake carefully:
Place your ashtray on a foil-lined baking sheet or parchment paper. Bake according to your brand of polymer clay instructions (usually around 275°F or 135°C for 30 minutes). -
Cool down:
Turn the oven off and let the piece cool completely inside the oven. This helps prevent cracking from thermal shock.
Perfect Rims
Instead of building a wall, drape the clay slab inside an oven-safe bowl. The bowl acts as a mold during baking, ensuring perfectly rounded, even sides.
Step 4: Finishing Touches
-
Wet sanding:
Once cool, manipulate the piece under running water with wet/dry sandpaper. Start with 400 grit to remove imperfections, then move to 800 and 1000 for a silky feel. -
Wash and dry:
Thoroughly wash off any sanding residue with soap and water, then let it dry completely. -
Seal it:
Choose a finish that protects the pattern. A layer of UV resin gives a glass-like finish, while a water-based polyurethane varnish provides a more natural satin sheen. Apply thinly and let cure.
Enjoy using your sleek new creation or gift it to a friend who appreciates modern decor
Carved Line-Art Sgraffito Ashtray
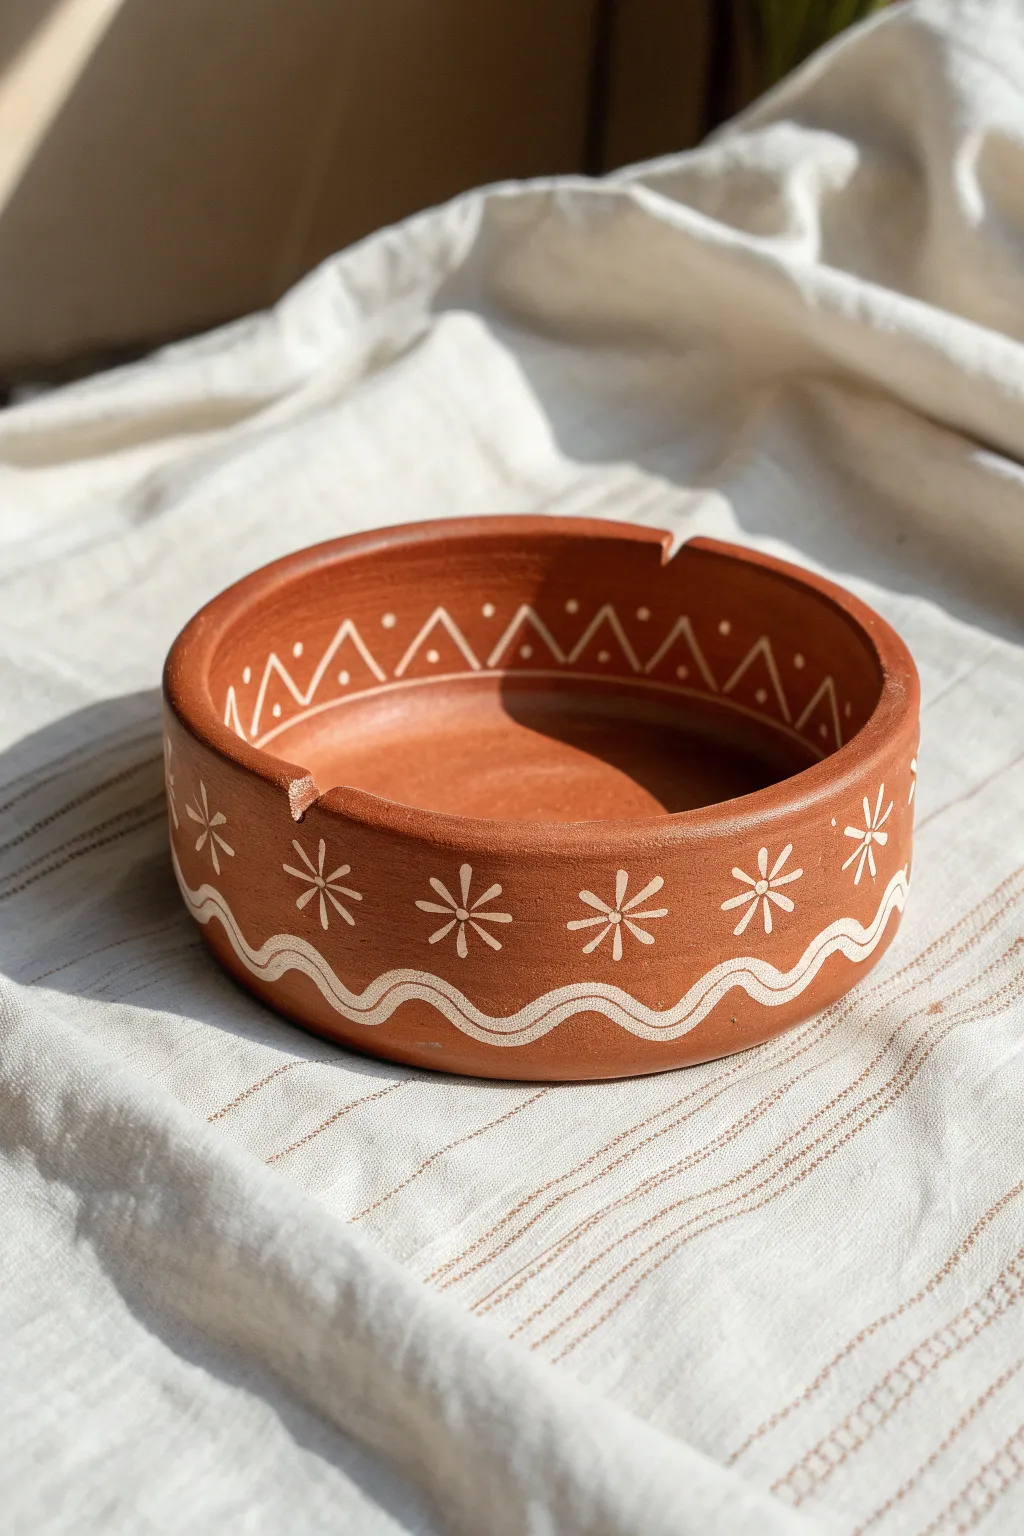
Embrace the warmth of natural clay with this stunning terracotta ashtray featuring delicate Sgraffito-style carvings. The white inlaid slip creates a beautiful contrast against the rich, earthy stoneware, making for a functional piece that feels ancient yet modern.
Detailed Instructions
Materials
- Red stoneware or terracotta clay (approx. 1-2 lbs)
- White underglaze or white slip
- Pottery wheel (optional, can be hand-built)
- Needle tool or sgraffito carving tool
- Sponge
- Wire cutter
- Clear matte glaze (optional)
- Rib tool (wooden or metal)
- Small paintbrush
Step 1: Forming the Basin
-
Prepare the Clay:
Begin by thoroughly wedging your red clay to remove any air bubbles. This ensures a smooth surface for carving later. Form it into a tight, consistent ball. -
Example Throwing or Pinching:
If using a wheel, center the clay and open it up into a low, wide cylinder. If hand-building, use the pinch method to create a thick base and build up the walls with coils, smoothing them together seamlessly. -
Shape the Walls:
Pull the walls up to a height of about 1.5 to 2 inches. I like to keep the walls strictly vertical rather than flared to provide a flat canvas for the side patterns. -
Define the Rim:
Compress the rim with a chamois or your sponge to make it smooth and rounded. A thick rim adds durability and visual weight to the piece. -
Create Cigarette Rests:
While the clay is still soft but holding its shape, use the side of your finger or a round tool to gently press two indentations into the rim directly across from each other. Smooth the edges of these notches so they aren’t sharp.
Clean Lines
If your hand is shaking, rest your pinky finger against the pot for stability while painting the fine white lines.
Step 2: Applying Design and Carving
-
Leather Hard Stage:
Allow the piece to dry slowly until it reaches a ‘leather hard’ state. It should feel cool and firm, like a block of cheddar cheese, but not chalky. -
Apply White Slip:
Depending on your preferred look, you can either paint white slip into carved lines later (Mishima) or paint the design directly. For this specific look, paint the white designs directly onto the leather-hard clay using a fine brush and white underglaze. -
Paint the Exterior Flowers:
Along the outer wall, paint a series of simple six-petaled flowers or starbursts evenly spaced around the circumference. -
Add the Wavy Border:
Below the flowers near the base, paint a continuous, double-lined wavy pattern. Try to keep the wave amplitude consistent as you rotate the piece. -
Decorate the Interior:
On the inner vertical wall, paint a geometric border of triangles. Inside each triangle, add a small dot, and separate the triangles with vertical hash marks. -
Incision Technique (Optional):
To sharpen the look seen in the photo, take a needle tool and gently scratch through the center of your painted white lines to reveal a tiny bit of red clay underneath, or simply refine the edges of the paint with a cleanup tool.
Smudged Underglaze?
If you accidentally smear white slip on the red clay, let it dry completely, then gently scratch it off with a needle tool.
Step 3: Finishing and Firing
-
Clean Up:
Once the underglaze is dry, gently brush away any crumbs. Use a slightly damp sponge to clean up any white smudges on the red areas, keeping the background pristine. -
Slow Drying:
Cover the ashtray loosely with plastic to let it dry very slowly. This prevents the base from cracking, especially if the bottom is thick. -
Bisque Fire:
Fire the piece to bisque temperature (usually cone 04) once it is bone dry. -
Glazing:
For the look in the photo, the exterior is left unglazed or coated with a very thin matte sealer. However, for functionality, pour a clear glaze inside the basin and brush it over the rim. -
Final Fire:
Fire the piece a second time to the maturation temperature of your specific clay body and glaze.
Place this on your coffee table to add a touch of handcrafted geometric charm to your space

TRACK YOUR CERAMIC JOURNEY
Capture glaze tests, firing details, and creative progress—all in one simple printable. Make your projects easier to repeat and improve.
Sun and Moon Ashtray
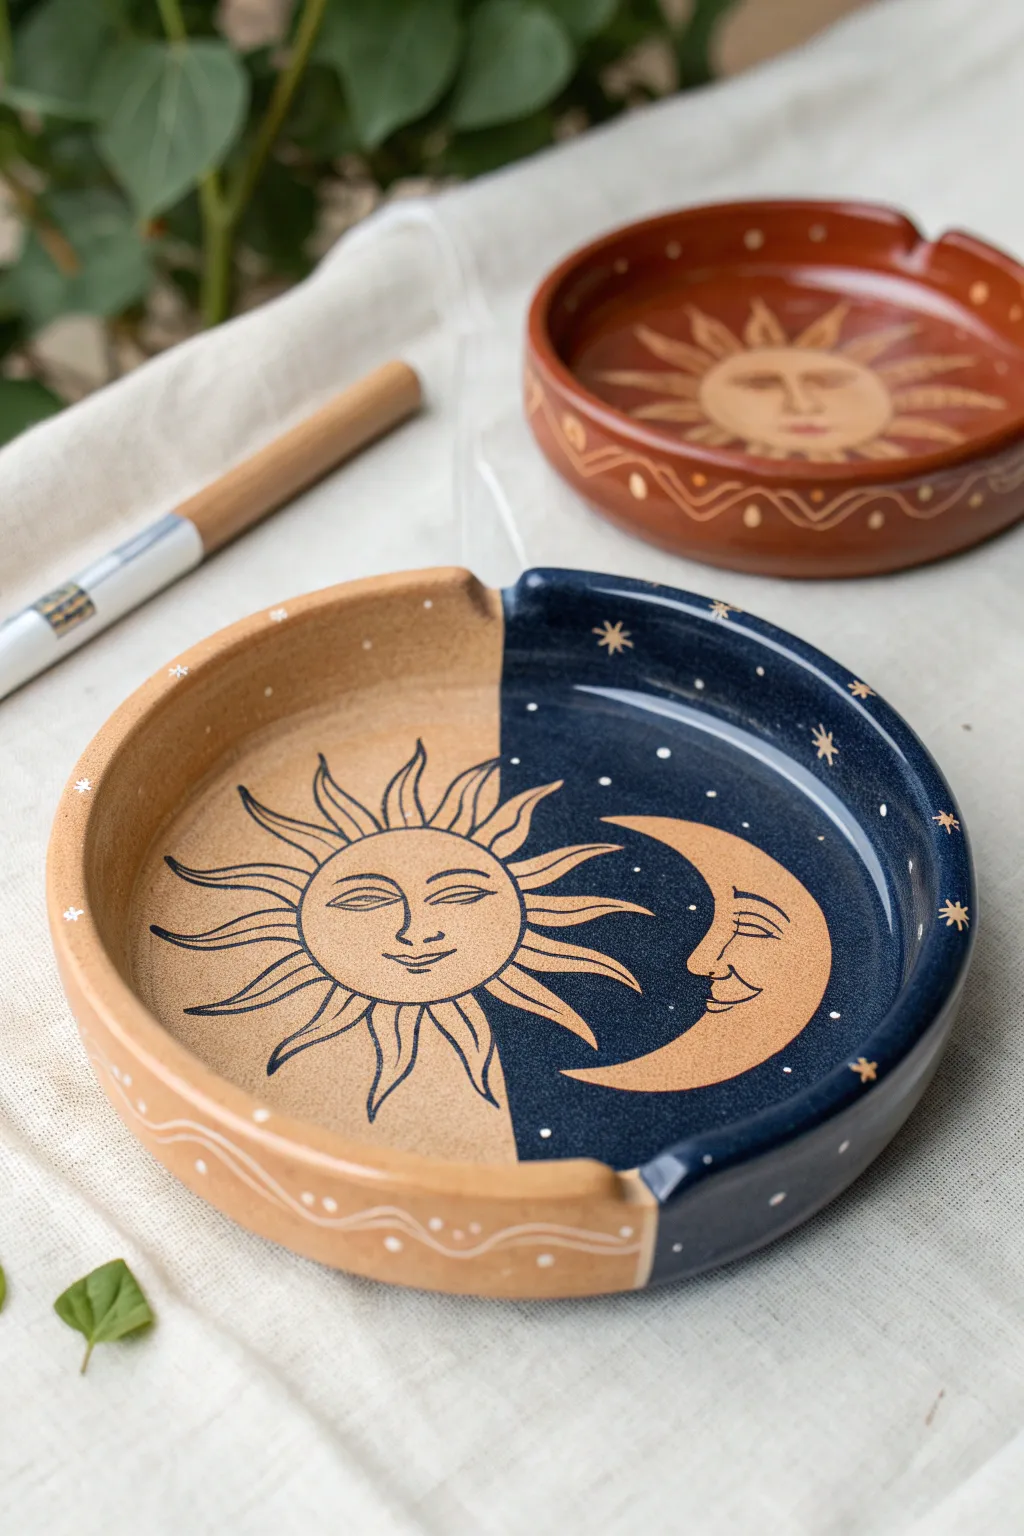
Balance raw earth tones with deep cosmic blues in this split-design ashtray. This project combines exposed clay texture with glossy glazing techniques to create a stunning piece featuring an interlocking sun and moon motif.
Step-by-Step Guide
Materials
- Earthenware or terra cotta clay (smooth body)
- Pottery wheel or rolling pin and round mold
- Pin tool or needle tool
- Fettling knife
- Sponge
- Dark blue ceramic glaze (underglaze or gloss)
- Clear transparent glaze
- Small fine-liner detail brush
- Medium glazing brush
- Black underglaze pencil or very fine black underglaze applicator
- Pencil and paper for sketching
- Sanding sponge
- Tracing paper (optional)
Step 1: Forming the Base
-
Prepare the Clay:
Begin by wedging your clay thoroughly to remove air bubbles. You want a smooth, consistent consistency before you start shaping. -
Shape the Dish:
You can throw a low, wide cylinder on the wheel, or roll out a slab about 1/4 inch thick and slump it into a round mold. Aim for a diameter between 4 to 6 inches. -
Define the Rim:
Pull up the walls to create a rim about 1 inch high. Ensure the walls are vertical and the thickness is uniform from the base to the lip. -
Create the Notches:
While the clay is leather hard, use your thumb or a rounded tool to gently press down two or three evenly spaced indentations on the rim. These will rest the cigarettes. -
Smooth the Surface:
Use a damp sponge to wipe away any fingerprints or rough edges. The surface needs to be very smooth for the drawing phase later. -
Bisque Fire:
Allow the piece to dry slowly until bone dry, then fire it in the kiln to bisque temperature (usually Cone 04). This hardens the clay for glazing.
Use Wax Resist
Paint the moon shape with wax resist BEFORE applying the blue background. The glaze will bead off the wax, leaving a perfect raw clay moon shape.
Step 2: Drawing and Glazing
-
Sketch the Design:
On a piece of paper the same size as your dish, draw out your split design: a sun with radiating rays on the left and a crescent moon profile on the right. -
Transfer the Guide:
Lightly sketch a vertical line down the center of the bisque dish with a pencil. Pencil marks will burn off in the kiln, so don’t worry about mistakes. -
Apply the Midnight Blue:
Using a medium brush, apply the streaming dark blue glaze to exactly one half of the dish. Coat the interior, the rim, and the exterior of that side carefully. I usually do three coats for opacity. -
Clean the edges:
If any blue glaze crossed your center line, wipe it away immediately with a clean, damp brush or sponge to keep that sharp division. -
Draw the Sun:
On the unglazed terra cotta side, use a black underglaze pencil or a very fine liner brush with black underglaze to draw the sun’s face and rays. -
Outline the Moon:
For the moon on the blue side, you are essentially painting the ‘negative space’. Use a wax resist over the moon shape if you want raw clay to show through, or simply paint the moon face using a tan/gold underglaze on top of the blue. -
Add Celestial Details:
Using a tiny brush, add white or gold stars and dots to the blue night sky section. Add small white accent lines or symbols along the rim of the terra cotta side for balance. -
Refine the Lines:
Go back over your main illustration lines. The eyes, nose, and lips of both the sun and moon should be bold and distinct.
Step 3: Final Firing
-
Apply Clear Glaze:
Once the underglaze design is dry, dip the entire piece in clear transparent glaze, or brush a clear coat over just the unglazed (sun) half if you want to preserve a texture difference. -
Clean the Foot:
Wipe the bottom of the ashtray completely clean of glaze so it doesn’t fuse to the kiln shelf. -
Glaze Fire:
Fire the piece again to the maturation temperature of your specific glazes (often Cone 05 or 06 for earthenware).
Uneven Glaze Line?
Use automotive masking tape or specific potter’s tape to mark the center line before glazing. Peel it off carefully when the glaze is damp, not dry.
Now you have a timeless piece that captures the magic of the day and night sky in one dish
Leaf-Imprint Botanical Ashtray

Capture the delicate veins of nature with this rustic botanical ash tray or trinket dish. Using a real leaf impression and warm, earthy underglazes creates a piece that feels both grounded and elegant.
How-To Guide
Materials
- Stoneware clay (buff or speckled)
- Fresh maple leaf (with sturdy veins)
- Clay rolling pin
- Guide sticks or slats (approx. 1/4 inch thick)
- Fettling knife or needle tool
- Circle template (or a small bowl)
- Scoring tool and slip
- Underglazes (Warm Brown, Dark Green)
- Clear transparent glaze
- Sponge
- Soft paintbrush
Step 1: Creating the Base
-
Roll the slab:
Begin by wedging your clay to remove air bubbles, then flatten it onto a canvas workspace. Place guide sticks on either side and roll the clay out until it is a uniform slab, about 1/4 inch thick. -
Texture with nature:
Place your fresh maple leaf vein-side down onto the clay slab. I like to gently roll over the leaf once with the rolling pin to firmly press the veins into the soft clay surface. -
Cut the circle:
Position your circle template or bowl over the leaf imprint to frame it nicely. Use your needle tool to cut vertically around the template to create the base disc. -
Remove the leaf:
Carefully peel the leaf away to reveal the intricate impression beneath. If any small bits of leaf stick, use a needle tool to gently lift them out without marring the texture.
Step 2: Building the Walls
-
Prepare the wall slab:
Roll out a separate strip of clay, maintaining the same thickness as your base. Cut a long rectangular strip that is tall enough for your desired depth (about 1.5 inches) and long enough to wrap around the circumference of your base. -
Score and slip:
Score (scratch) the top outer edge of your circular base and one long edge of your wall strip. Apply a generous amount of clay slip to both scored areas. -
Attach the wall:
Wrap the strip around the base, setting it on top of the scored edge. Press firmly to join them. Where the two ends of the wall meet, bevel cut them at a 45-degree angle for a stronger, seamless overlap. -
Smooth the seams:
Use a modeling tool or your finger to blend the clay on the inside and outside seams where the wall meets the floor, ensuring a watertight bond. -
Refine the rim:
Use a damp sponge to smooth the top rim of the dish. You can leave it slightly organic and uneven for a rustic look, or level it perfectly flat depending on your preference.
Veins Not Showing?
If the impression is faint, the clay might be too dry or the leaf too flimsy. Use a fresh, hydrated leaf and roll firmly. Dried leaves crumble and don’t impress well.
Step 3: Decoration and Glazing
-
Carve side details:
Using a needle tool or small carving loop, verify the clay is leather hard, then sketch simple leaf outlines on the exterior and interior walls to matching the fall theme. -
Bisque fire:
Allow the piece to dry slowly and completely under loose plastic to prevent warping. Once bone dry, fire it in the kiln to cone 04 (bisque). -
Apply brown wash:
Water down your Warm Brown underglaze. Brush it liberally over the central leaf impression and the carved exterior leaves, ensuring it gets deep into the crevices. -
Wipe back:
Using a clean, damp sponge, wipe away the excess underglaze from the high points of the texture. The color should remain only in the veins and carved lines, highlighting the details. -
Add green accents:
Paint the remaining leaves on the rim or walls with the Dark Green underglaze for a pop of contrast against the brown tones. -
Clear glaze application:
Dip or brush a clear transparent glaze over the entire piece. This will seal the clay and make the underglaze colors vibrant and glossy. -
Final firing:
Fire the piece again to the maturity temperature of your clay and glaze (typically Cone 5 or 6 for stoneware).
Pro Tip: Oxide Wash
Instead of underglaze, try Iron Oxide mixed with water for the leaf wipe-back. It creates an even more earthy, ‘burnt’ antique look ideal for rustic pottery.
Place this on a windowsill to let the sunlight catch the subtle textures of your ceramic leaf
Ashtray With Built-In Lighter Slot
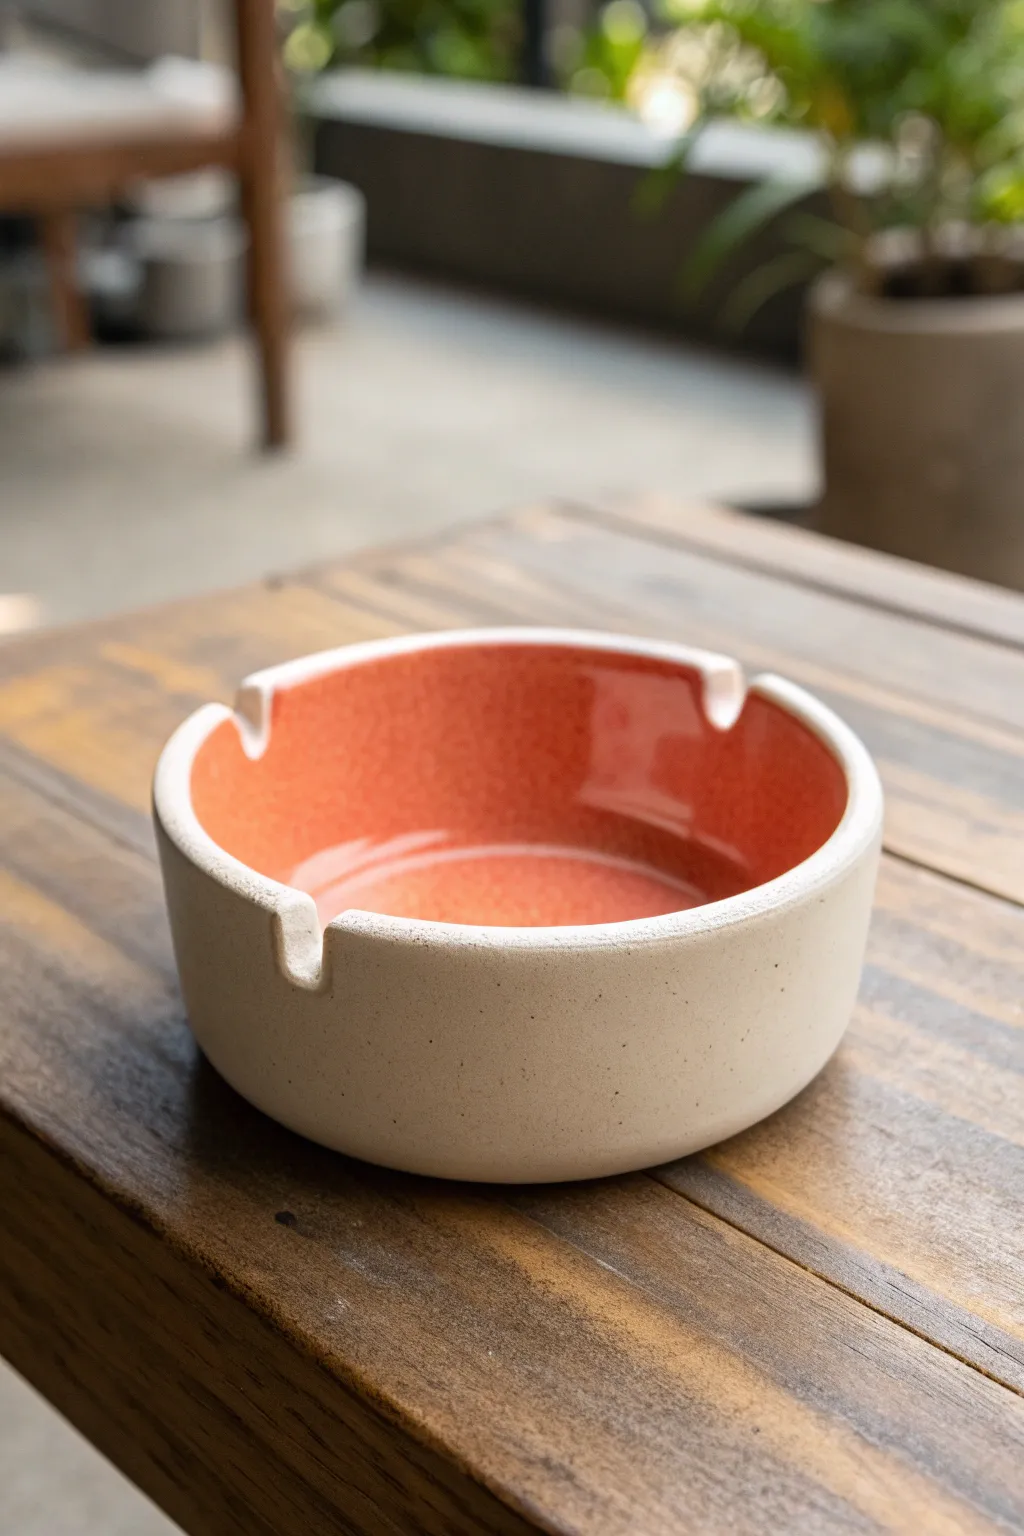
This contemporary ashtray features a stunning contrast between a speckled creamy matte exterior and a vibrant, glossy coral interior glazes. The thick, sturdy walls give it a substantial feel, while the three perfectly carved notches make it as functional as it is stylish.
Detailed Instructions
Materials
- Stoneware clay (smooth or lightly groggy)
- Pottery wheel (or slab roller/rolling pin for hand-building)
- Needle tool
- Rib tool (metal and rubber)
- Sponge
- Wire cutter
- Loop tool (small U-shape)
- Glaze: Speckled Coral or Orange (glossy)
- Glaze: Matte Cream or Oatmeal (speckled)
- Kiln
Step 1: Forming the Body
-
Prepare the Clay:
Begin by wedging about 1.5 to 2 pounds of stoneware clay to remove any air bubbles. Pat it into a round ball. -
Center on the Wheel:
Throw the clay onto the center of the wheel head. Use water and firm pressure to center the clay, working it up into a cone and pushing it back down into a puck shape. -
Open the Form:
Press your thumbs into the center to open the mound, leaving about a half-inch of thickness for the floor. Pull the opening outwards until the interior diameter is roughly 4-5 inches. -
Pull the Walls:
Gently pull the walls up. Aim for a distinct thickness—this piece relies on a chunky, modern aesthetic, so keep the walls about 1/4 inch to 3/8 inch thick rather than pulling them too thin. -
Shape Profile:
Use a metal rib on the exterior and a sponge on the interior to ensure the walls are perfectly vertical with a flat rim. The transition from floor to wall inside should be a smooth, gentle curve, not a sharp angle. -
Refine the Rim:
Compress the rim with a piece of chamois or a damp sponge to make it slightly rounded and smooth. This prevents chipping later. -
Cut and Dry:
Wire the piece off the wheel and set it on a ware board. Allow it to dry to a ‘leather hard’ consistency, where it is firm but still cold to the touch and able to be carved.
Clean Rims
For a sharp separation between interior and exterior colors, wax the rim after the first glaze coat dries. This keeps the second color from overlapping.
Step 2: Trimming and Notching
-
Trim the Base:
Once leather hard, place the pot upside down on the wheel. Trim away excess clay from the bottom to create a flat, stable base or a very subtle foot ring. -
Mark Notch Placement:
Turn the pot right-side up. Visualize the rim as a clock face and lightly mark three equidistant points (at 12, 4, and 8 o’clock) with a needle tool. -
Carve the Notches:
Using a U-shaped loop tool or a sharp knife, carefully carve out the cigarette rests at your markings. Cut downwards about 1/4 inch deep. -
Round the Edges:
I like to take a damp sponge or fingertip and smooth the freshly cut edges of the notches. They should flow seamlessly into the rim without sharp corners. -
Bisque Fire:
Let the piece dry completely (bone dry). Load it into the kiln for a bisque firing (usually Cone 04) to prepare it for glazing.
Add Texture
Before the first firing, gently tap a stiff brush against the exterior clay body to flick tiny specks of iron oxide on the surface for a natural speckled effect.
Step 3: Glazing
-
Wax the Bottom:
Apply wax resist to the bottom of the piece and slightly up the side (about 1mm) to prevent glaze from fusing it to the kiln shelf. -
Glaze Interior:
Pour the glossy coral glaze inside the ashtray. Roll it around to coat the entire interior and the inner curve, then pour out the excess. Wipe any drips off the rim immediately. -
Glaze Exterior:
Dip the exterior into the matte cream glaze. Hold the piece by the foot (or use tongs) and dip straight down until the cream glaze meets the coral glaze at the center of the rim. -
Clean Up:
If the glazes overlapped messily on the rim, use a damp sponge to tidy the transition line. The rim should be clean, or the two glazes should meet intentionally. -
Final Fire:
Fire the kiln to the maturation temperature of your clay and glaze (typically Cone 5 or 6). Allow the kiln to cool completely before removing your finished piece.
Enjoy using your sleek new ceramic piece or gift it to a friend who appreciates modern design
Split-Level Tray and Bowl Ashtray
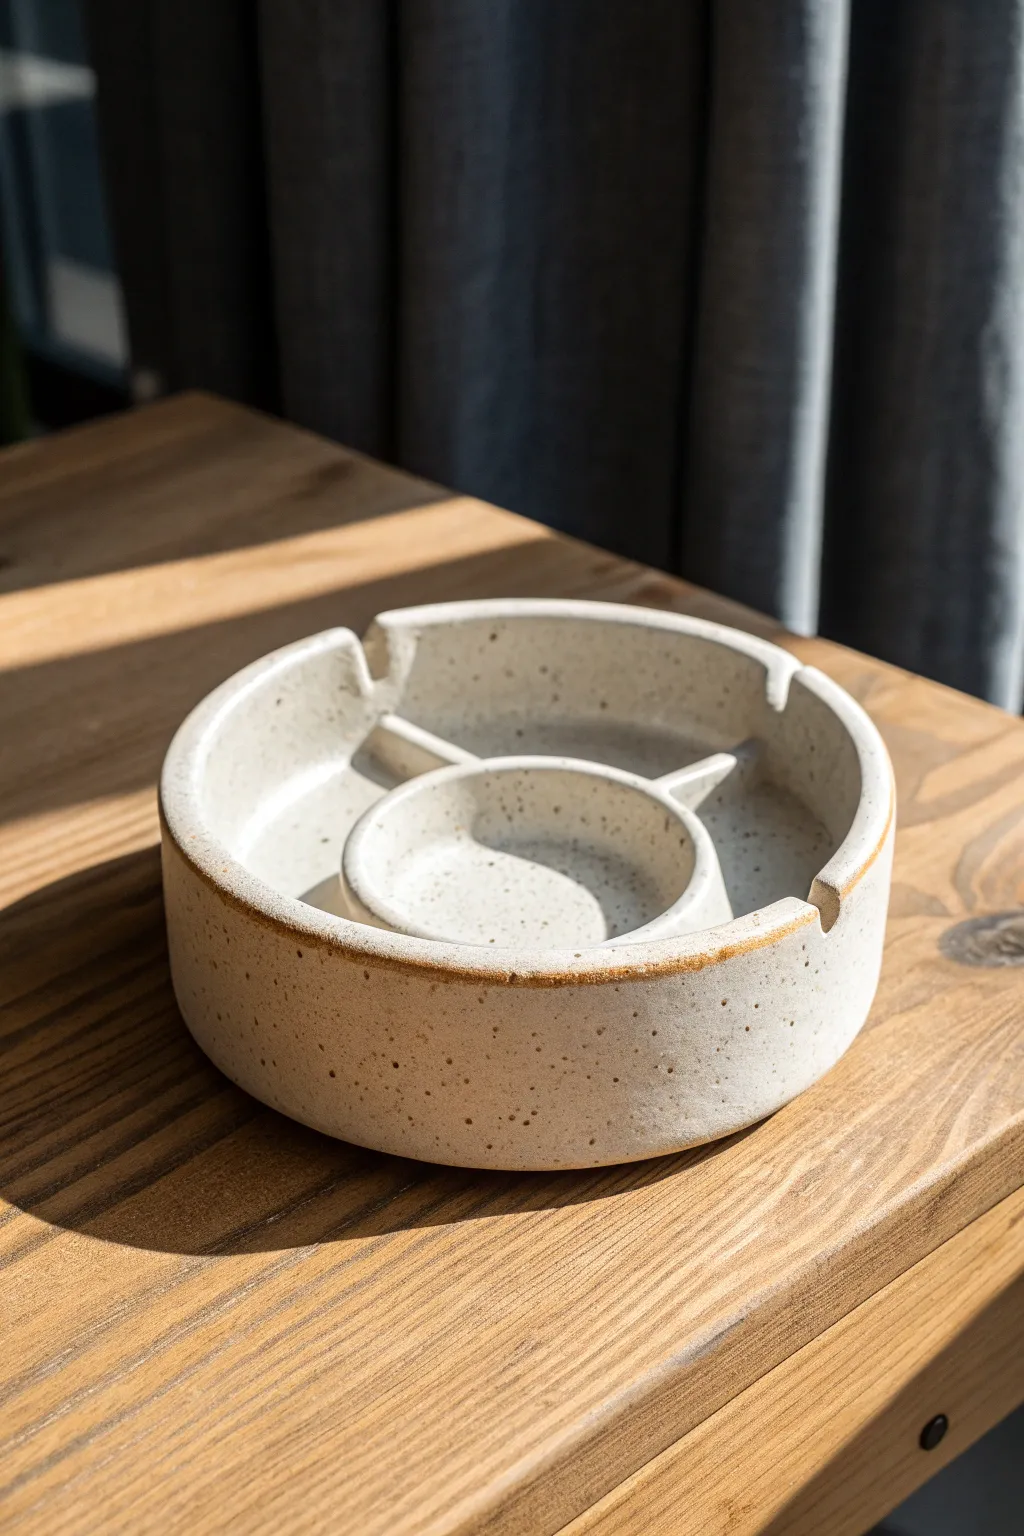
This clever design combines a central bowl for extinguishing with partitioned outer sections for ash, creating a functional piece of modern decor. The speckled clay body and exposed warm rim give it a rustic yet contemporary feel perfect for any table setting.
Step-by-Step
Materials
- Speckled Stoneware Clay
- Rolling pin
- Guide strips (1/4 inch thickness)
- Circle templates (5-inch and 2-inch)
- Needle tool
- Scoring tool (or fork)
- Slip (clay and water slurry)
- Small sponge
- Modeling tool (wooden or rubber rib)
- Clear or matte white glaze
- Wax resist (optional)
Step 1: Base Construction
-
Roll the Slab:
Begin by wedging your speckled stoneware clay to remove air bubbles. Lay out your 1/4 inch guide strips and roll the clay into a smooth, even slab that is large enough to cut all your pieces from. -
Cut the Circles:
Using your circle templates and needle tool, cut out one large 5-inch circle for the main base. You won’t need a template for the walls yet, but ensure you have enough slab left over. -
Measure Wall Strips:
Calculate the circumference of your base and inner bowl. Cut a long strip of clay for the outer wall (approx. 1.5 inches tall) and a smaller strip for the inner ring. -
Prepare for Attachment:
Score the outer edge of your circular base aggressively. Apply a generous amount of slip to the scored area to act as your glue. -
Attach Outer Wall:
Wrap the long clay strip around the base. I find it easiest to overlap the ends slightly, then cut through both layers at an angle (a bevel cut) to create a seamless join. -
Smooth the Join:
Blend the clay from the wall down onto the base on both the inside and outside. Use a wooden modeling tool to ensure the seam disappears completely, reinforcing the bond.
Step 2: Inner Structure
-
Position the Center:
Mark the exact center of your dish. take your smaller strip of clay and form it into a ring about 2 inches in diameter. Place it in the center to test the fit before scoring. -
Secure the Inner Ring:
Score the base where the ring sits and slip it well. Press the ring down firmly and blend the bottom edge into the floor of the ashtray with a small tool. -
Create Dividers:
Cut three small rectangular pieces of clay to act as the spokes. These should fit snugly between the inner ring and the outer wall. Trim them to match the height of your walls. -
Install the Spokes:
Arrange the dividers evenly (like a peace sign or Mercedes logo). Score and slip all contact points—the floor, inner wall, and outer wall—before sliding them into place. -
Create Notches:
While the clay is leather hard, use a circular sanding tool or the handle of a paintbrush to gently press down on the outer rim directly above each divider, creating the resting notches for cigarettes.
Cracking Seams?
If you see cracks forming at the joints as it dries, your slip wasn’t wet enough. Score deeply, add vinegar to your slip, and compress joints firmly.
Step 3: Finishing Touches
-
Clean and Smooth:
Once the piece has stiffened to leather hard, take a damp sponge and smooth all the rims. Pay special attention to the notches to ensure they are rounded and comfortable to touch. -
Bisque Fire:
Allow your piece to dry slowly under plastic for a day, then uncover until bone dry. Fire it in the kiln to cone 04 for the bisque stage. -
Rim Maintenance:
Before glazing, apply liquid wax resist or simply use a damp sponge to wipe the very top rim of both the inner and outer walls. This exposes the raw toasted clay body shown in the photo. -
Glaze Application:
Dip or brush a clear or satin white glaze over the entire piece. If you waxed the rim, the glaze will bead off; just wipe any remaining droplets away with a clean sponge. -
Final Fire:
Fire the piece to cone 5 or 6 (depending on your clay body) to achieve that durable, stony finish causing the speckles to bleed through the glaze beautifully.
Make it Modular
Make the center bowl removable by creating a separate small pinch pot that nests inside a ring, allowing for easier emptying and cleaning.
Place your finished piece in a spot with natural light to highlight the beautiful texture variations
Mushroom Garden Ashtray
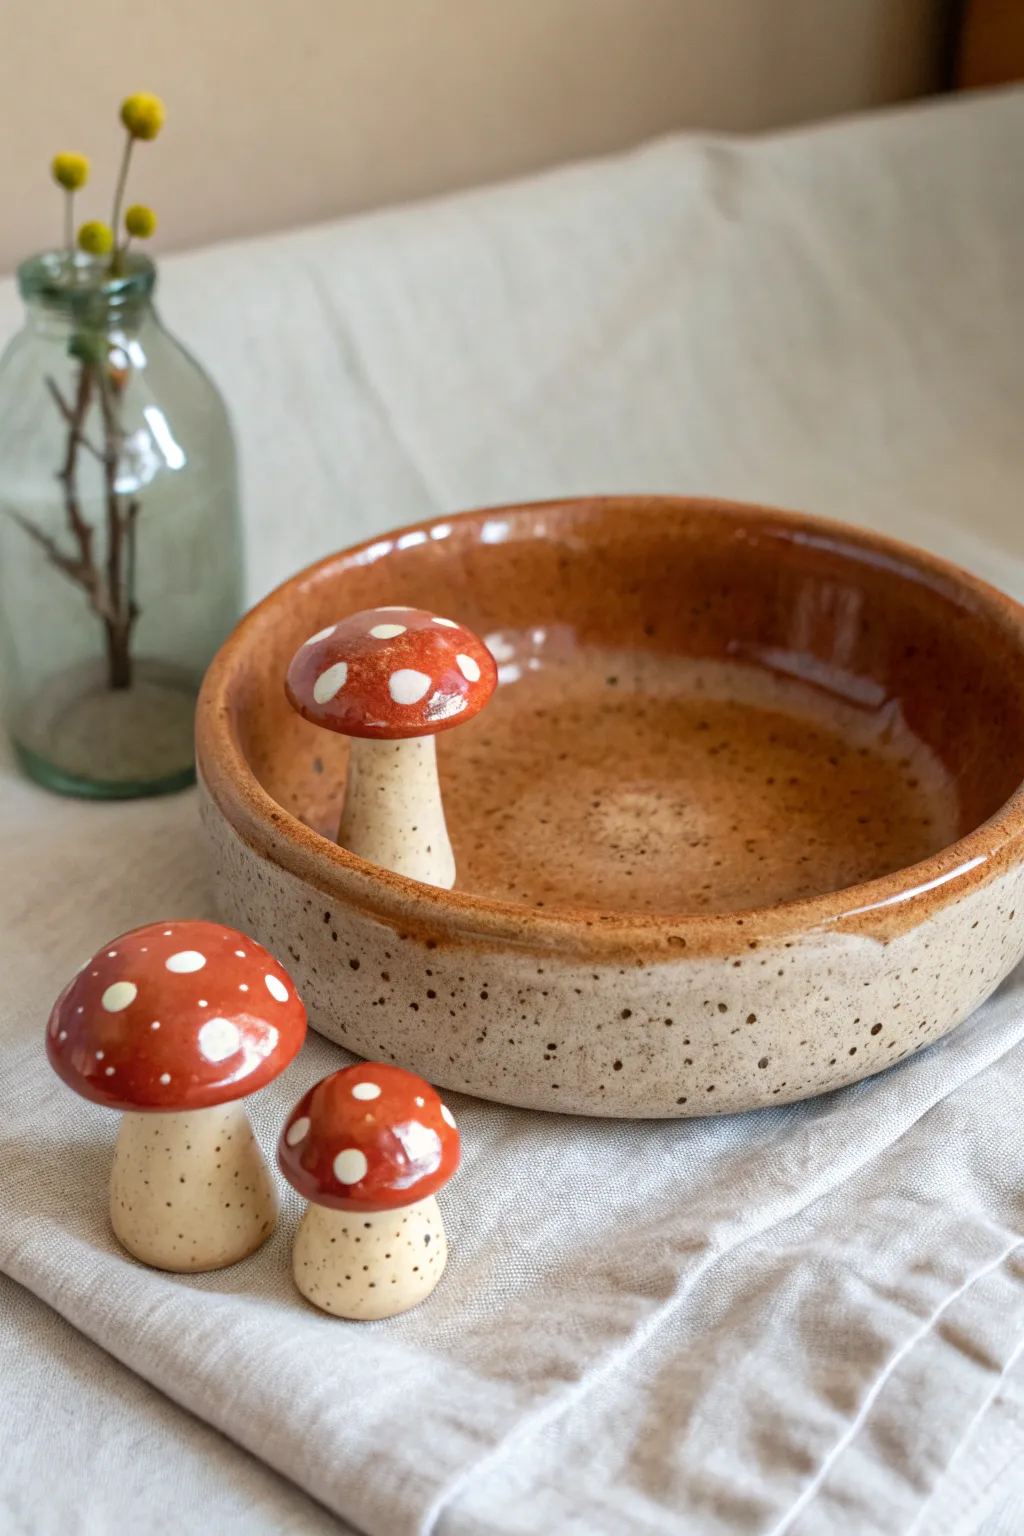
Bring a touch of the forest floor into your home with this charming ceramic bowl, featuring an integrated mushroom accent and matching figurines. The warm, speckled clay body and classic red-capped toadstools create a cozy, handmade aesthetic perfect for incense, trinkets, or as a traditional ashtray.
Step-by-Step Tutorial
Materials
- Speckled Stoneware Clay
- Pottery Wheel (optional, can be hand-built)
- Needle Tool
- Scoring Tool or Serrated Kidney
- Slip (clay slurry)
- Sponge
- loop trimming tools
- Underglaze (Red, White)
- Clear Glaze
- Honey/Amber Glaze
- Small Paintbrushes
- Kiln
Step 1: Forming the Base & Mushrooms
-
Throw the bowl base:
Begin with a ball of speckled stoneware clay on your wheel. Center it and throw a low, wide cylinder with straight walls, about 5-6 inches in diameter and 1.5 inches tall. -
Refine the rim:
Use a chamois or a damp sponge to smooth the rim, creating a soft, rounded edge. This makes the piece feel more finished and pleasant to touch. -
Trim the foot:
Once the bowl is leather-hard, trim the bottom to create a neat foot ring. This lifts the piece slightly and gives it a professional profile. -
Sculpt the mushroom stems:
Roll small coils of clay to form the stems. Make one stem slightly curved to attach to the bowl, and two straight ones for the freestanding mushrooms. Taper them slightly toward the top. -
Shape the mushroom caps:
Roll small balls of clay and press your thumb into them to form shallow domes. These will be your red caps. Smooth the edges so they are nice and round. -
Assemble the mushrooms:
Score the top of the stems and the underside of the caps. Apply a dab of slip and press them together firmly. Smooth the join with a modeling tool or your finger so it looks seamless.
Step 2: Integration & Bisque Firing
-
Attach the main mushroom:
Select a spot on the interior wall of your leather-hard bowl. Deeply score both the wall and the side/bottom of the curved mushroom stem. Apply slip and wiggle the mushroom into place until it grabs. -
Secure the joint:
Roll a tiny, thin coil of clay and wrap it around the base of the mushroom where it meets the bowl floor. Blend this coil into both surfaces to reinforce the connection so it doesn’t crack during drying. -
Dry slowly:
Cover the bowl and the loose mushrooms loosely with plastic. Let them dry very slowly over a few days to ensure the attachments don’t pull apart as the clay shrinks. -
Bisque fire:
Once bone dry, load the pieces into the kiln and fire to cone 04 (or your clay’s specific bisque temperature). This prepares them for glazing.
Mushroom Tipping Over?
If the attached mushroom droops while wet, prop it up with a small sponge or wad of paper towel until the clay stiffens to leather-hard.
Step 3: Glazing & Final Firing
-
Paint the caps:
Apply three coats of bright red underglaze to the tops of all three mushroom caps. Allow each coat to dry to the touch before applying the next for solid, opaque color. -
Add the dots:
Dip the handle end of a paintbrush into white underglaze. Gently dot the red caps to create the classic toadstool look. Vary the size of the dots slightly for a natural feel. -
Wax the stems:
Brush wax resist over the mushroom stems and the speckled exterior of the bowl if you want the raw clay texture to remain exposed. I find this connects the piece beautifully back to the earth. -
Glaze the interior:
Pour a warm amber or honey glaze into the bowl, swirl it around to coat the interior walls and floor, and pour out the excess. Avoid getting this dark glaze on the red mushroom caps. -
Clear coat the caps:
Carefully brush a clear gloss glaze over the red and white mushroom caps. This will make the colors pop and give them a shiny, wet look after firing. -
Final wipe down:
Use a damp sponge to wipe any stray glaze droplets off the foot ring or the raw clay exterior. Clean bottoms are essential to save your kiln shelves. -
Glaze fire:
Fire the kiln to your clay’s maturity temperature (typically cone 5 or 6 for stoneware). Let the kiln cool completely before opening to avoid thermal shock.
Pro Tip: Speckle It
If you don’t have speckled clay, mix a small amount of granular manganese or ilmenite into plain stoneware to get that spotted effect.
Once cooled, your little ceramic garden is ready to hold ash or tiny treasures.
Mini Pool Diorama Ashtray
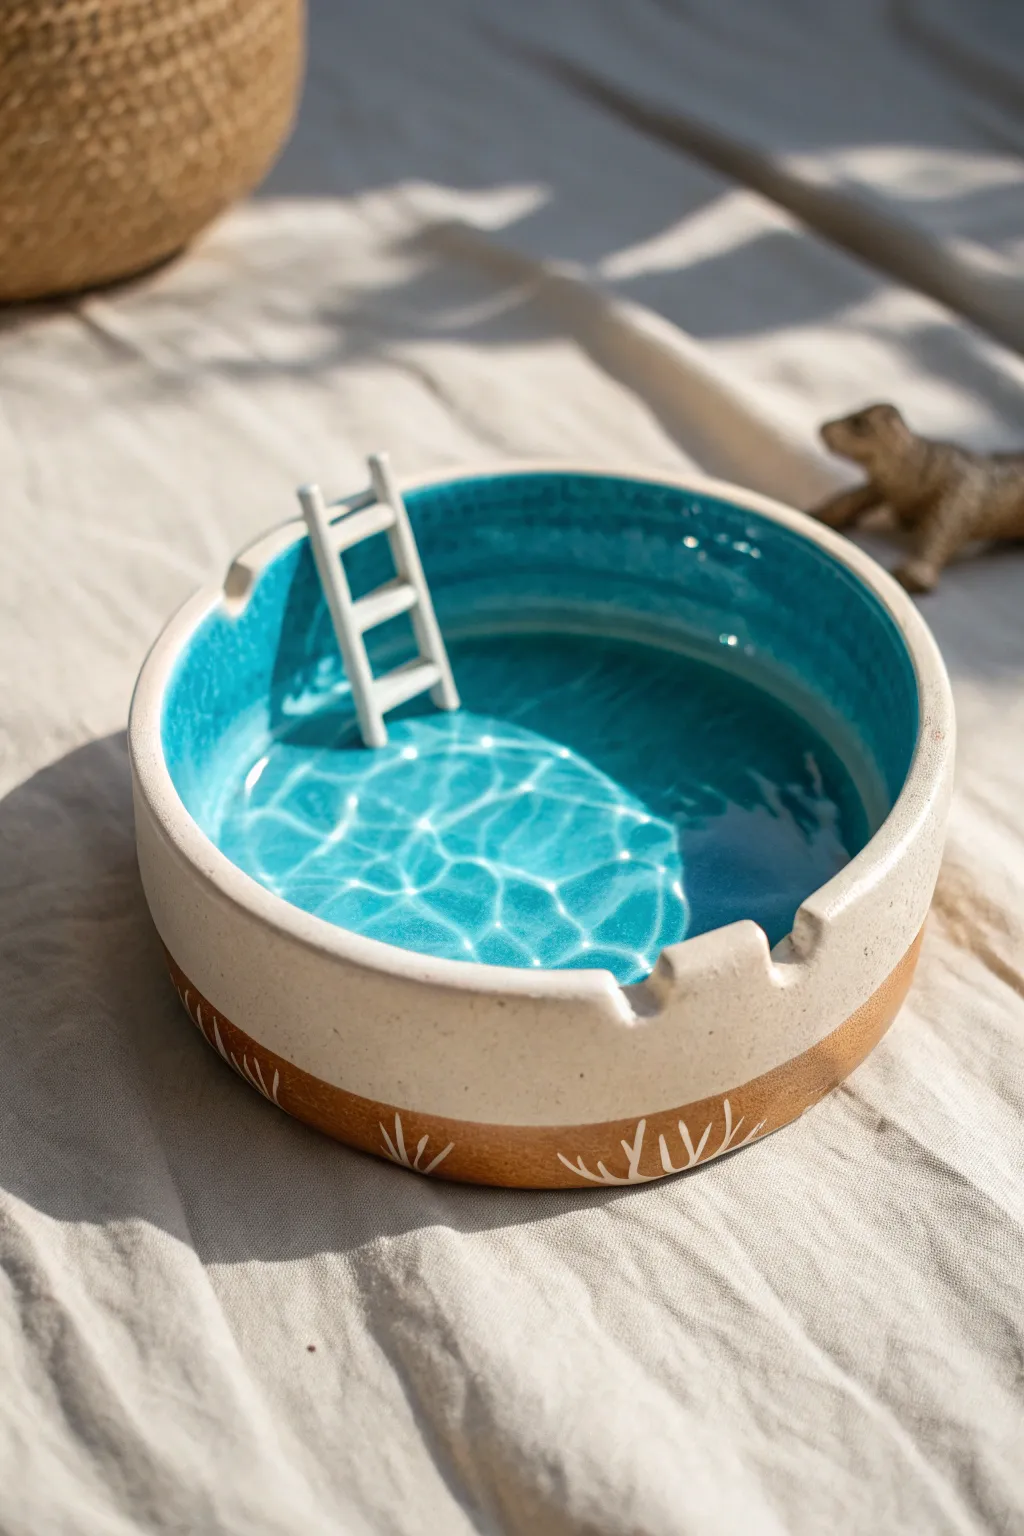
This whimsical ashtray doubles as a miniature swimming pool diorama, complete with a tiny ladder and realistic water ripples. The glossy teal interior contrasts beautifully with the warm, unglazed clay exterior for a striking functional art piece.
Step-by-Step
Materials
- White or light-colored polymer clay (or ceramic clay if you have a kiln)
- Small rolling pin
- Clay knife or craft blade
- Circle cutter or bowl template
- Needle tool
- Aluminum wire or paperclip (for ladder armature)
- Teal acrylic paint (glossy)
- White acrylic paint
- UV resin or clear two-part epoxy resin
- Fine detail paintbrush
- UV lamp (if using UV resin)
- Masking tape
- Sandpaper (fine grit)
Step 1: Basic Form Construction
-
Roll the base:
Begin by conditioning your clay until soft, then roll it out into a slab about 1/4 inch thick. Use a circle cutter or a bowl as a template to cut out the base of your ashtray. -
Create the walls:
Roll a long snake of clay and flatten it into a ribbon of equal thickness to your base. This will form the walls of the pool. -
Attach the walls:
Wrap the flattened clay ribbon around the edge of your circular base. Blend the seams together thoroughly on both the inside and outside using your fingers or a modeling tool to ensure a watertight seal. -
Cut the notches:
While the clay is still soft, use a craft knife to carve out two or three U-shaped notches on the top rim where cigarettes would rest. Smooth out the cut edges with your finger and a bit of water. -
Smooth the surface:
Go over the entire piece with a damp sponge or your finger to remove fingerprints and ensure the interior is perfectly smooth, which is crucial for the pool effect.
Step 2: The Tiny Ladder
-
Form the armature:
Bend a small piece of wire into a U-shape that hooks over the rim of your ashtray and extends down to the ‘floor’ of the pool. -
Clad the ladder:
Roll very thin snakes of white clay. Wrap or press these around your wire armature to hide the metal completely. -
Add rungs:
Cut tiny, short pieces of the thin clay snake for the rungs. Press them gently between the two vertical rails of the ladder. I find using a needle tool helps secure these delicate connections. -
Bake the clay:
Place the ladder inside the bowl in its final position (or bake separately if preferred) and bake the entire project according to your clay package instructions. Let is cool completely.
Depth Perception Trick
Make the white ripple lines slightly thicker and brighter near the center, and thinner/fainter near the edges to enhance the illusion of depth.
Step 3: Painting the Water
-
Mask the exterior:
Use masking tape to cover the bottom third of the exterior walls. This protects the raw clay look at the bottom while you paint the interior. -
Base coat:
Paint the entire interior of the bowl, including the bottom and inner walls, with a vibrant teal acrylic paint. You may need two coats for full opacity. -
Draw caustic lines:
Using a very fine detail brush and watered-down white acrylic paint, or a white gel pen, draw a web-like pattern on the bottom of the pool. These wobbly interconnected shapes mimic light refracting through water. -
Soften the lines:
Before the white lines fully dry, you can lightly stipple them with a dry brush to soften the edges, making the light reflection look more natural. -
Paint the ladder:
If your ladder clay wasn’t bright white, give the ladder a coat of white acrylic paint now carefully avoiding the teal walls.
Cloudy Resin?
If your resin looks cloudy after curing, wipe surface with an alcohol wipe. Avoid mixing too vigorously beforehand to prevent trapped micro-bubbles.
Step 4: Finishing Touches
-
Pour the resin:
Pour a layer of clear UV resin or epoxy into the bottom of the bowl. It should be thick enough to cover the painted bottom but not so deep it submerges the ladder entirely. -
Coat the walls:
Use a brush to pull some of the resin up the sides of the inner walls to give them a wet, glossy look. Ensure the ladder is secured in the resin. -
Cure the resin:
Use a UV lamp to cure the resin (or let epoxy set for 24 hours). This creates the depth and glass-like finish of real water. -
Add exterior details:
Remove the masking tape. Using white paint, add small, simple grass or coral-like line drawings around the bottom unglazed section of the exterior.
Light up a conversation with this refreshing piece of decor that brings summer vibes to your table year-round
Monster Mouth Ashtray
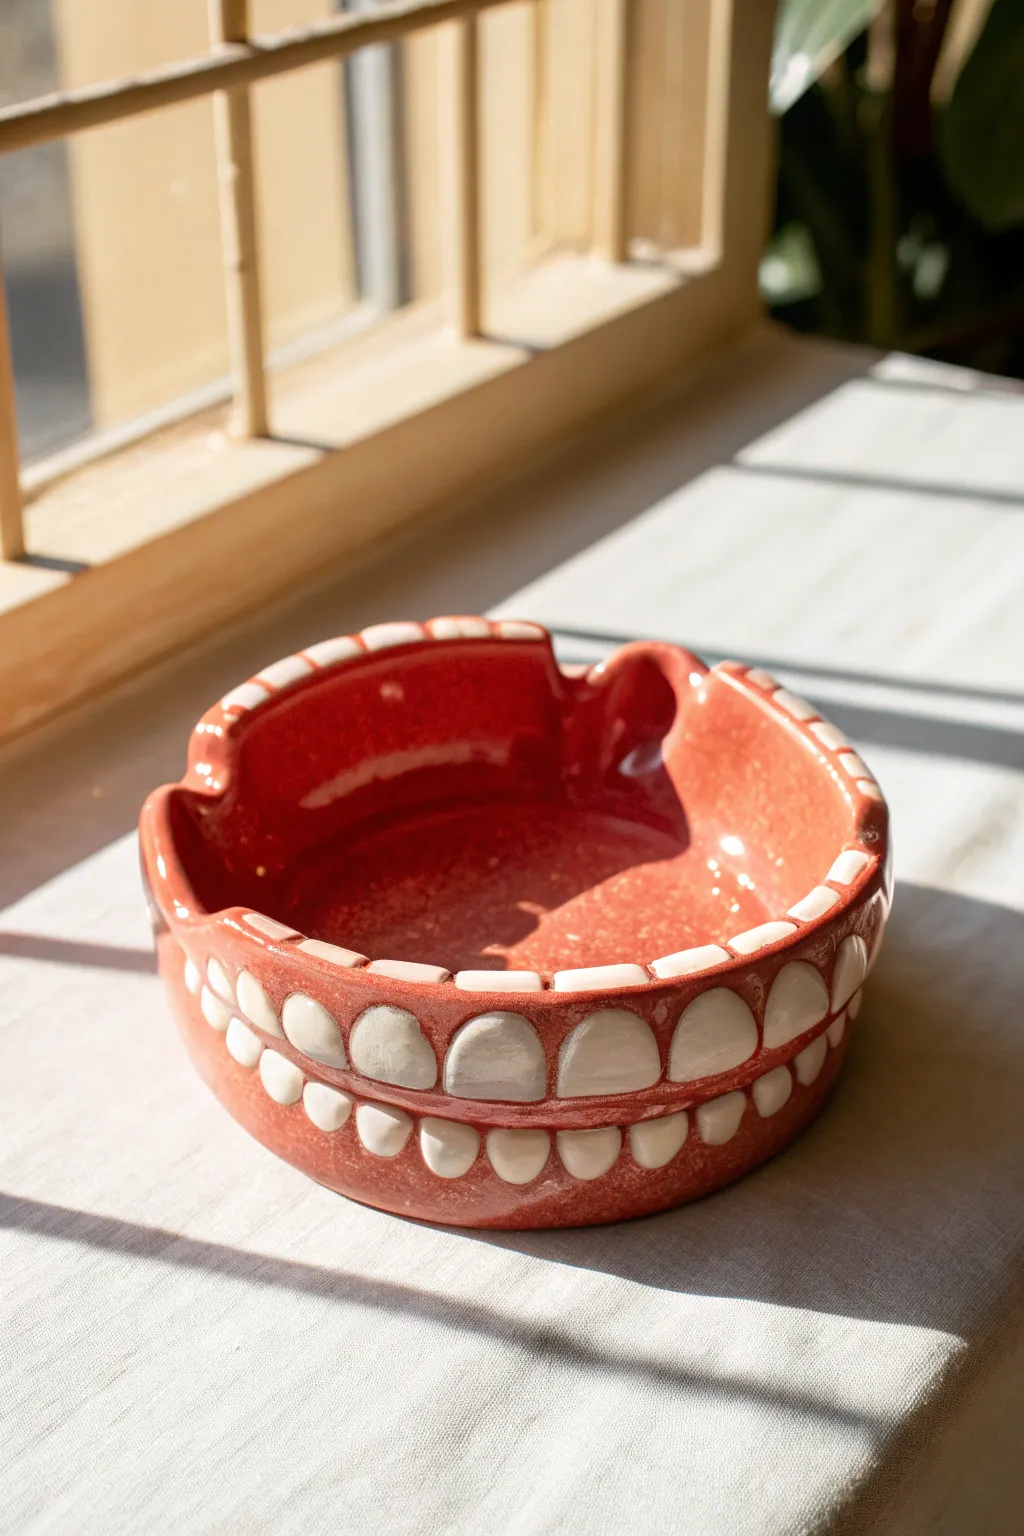
Transform a simple pinch pot into a conversation starter with this cheeky ceramic project. The design features a realistic double row of teeth set against a fleshy red clay body, finished with a high-gloss glaze for a perpetually wet look.
Step-by-Step Guide
Materials
- Red earthenware or terracotta clay
- White clay or slip (for the teeth)
- Pottery sponge
- Pin tool or needle tool
- Rib tool (kidney)
- Scoring tool or serrated rib
- Slip (clay slurry)
- Clear glossy glaze
- Glaze brush
- Kiln access
Step 1: Forming the Mouth
-
Prepare the Clay:
Start by wedging a baseball-sized ball of red earthenware clay to remove air bubbles and ensure consistency. -
Open the Pinch Pot:
Push your thumb into the center of the ball and gently pinch the walls while rotating the clay to create a uniform bowl shape. -
Shape the Walls:
Flare the walls slightly outward as you build up, ensuring the rim is thick enough (about 1/2 inch) to support the teeth later. -
Smooth the Surface:
Use a damp sponge or a soft rib tool to smooth the interior and exterior walls, removing any fingerprints or cracks. -
Create Cigarette Rests:
While the clay is still soft, gently press down on the rim in three or four spots to create the divots for resting cigarettes. Use your thumb to mold these smoothly.
Step 2: Adding the Chompers
-
Roll Tooth Coils:
Switch to your white clay. Roll out several small, consistent logs or thick coils that match the curvature of your bowl’s rim. -
Segment the Teeth:
Cut the white clay logs into uniform, chiclet-sized pieces. Shape each one into a rounded rectangle to resemble a molar or incisor. -
Score the Rim:
Using a needle tool or serrated rib, aggressively score the entire rim of the red pinch pot where the teeth will sit. Apply a generous amount of slip. -
Attach the Bottom Row:
Press the first row of white teeth firmly onto the exterior of the rim. Score the back of each tooth before attaching to ensure a strong bond. -
Attach the Top Row:
Place the second row of teeth directly on top of the rim, aligning them slightly offset from the bottom row for a natural look. -
Clean the Gums:
Use a small modeling tool to smooth the red clay around the base of each white tooth, creating the appearance of gums holding them in place. -
Refine the Shape:
I like to go back over each individual tooth with a damp sponge to smooth out sharp edges and make them look comfortably worn.
Teeth popping off?
This happens if the moisture levels differ. Make sure your white clay teeth have the same wetness as the red bowl. Score deeply and use plenty of slip.
Step 3: Firing and Glazing
-
Slow Dry:
Loosely cover the ashtray with plastic and let it dry slowly over several days to prevent the teeth from cracking away from the body. -
Bisque Fire:
Once bone dry, fire the piece in the kiln to cone 04 (or your clay’s specific bisque temperature). -
Apply Glaze:
Wipe the bisque ware with a damp sponge to remove dust. Apply 2-3 coats of clear glossy glaze over the entire piece, inside and out. -
Clean the Foot:
Thoroughly wipe away any glaze from the very bottom of the ashtray ensuring it won’t fuse to the kiln shelf. -
Glaze Fire:
Fire the piece a second time to the maturation temperature of your glaze and clay body.
Pro Tip: Realistic finish
For extra realism, use a slightly off-white or cream clay for the teeth rather than stark bright white. It contrasts better with the earthy red body.
Now you have a wonderfully weird piece of decor ready to hold keys, candy, or ash