If you’ve been itching to turn a lump of ceramic clay into something with personality, sculpture is where the magic happens fast. These beginner-friendly ideas are all about simple shapes, satisfying texture, and pieces you’ll actually want to display (or use) once they’re fired.
Owl Planter With Feather Texture
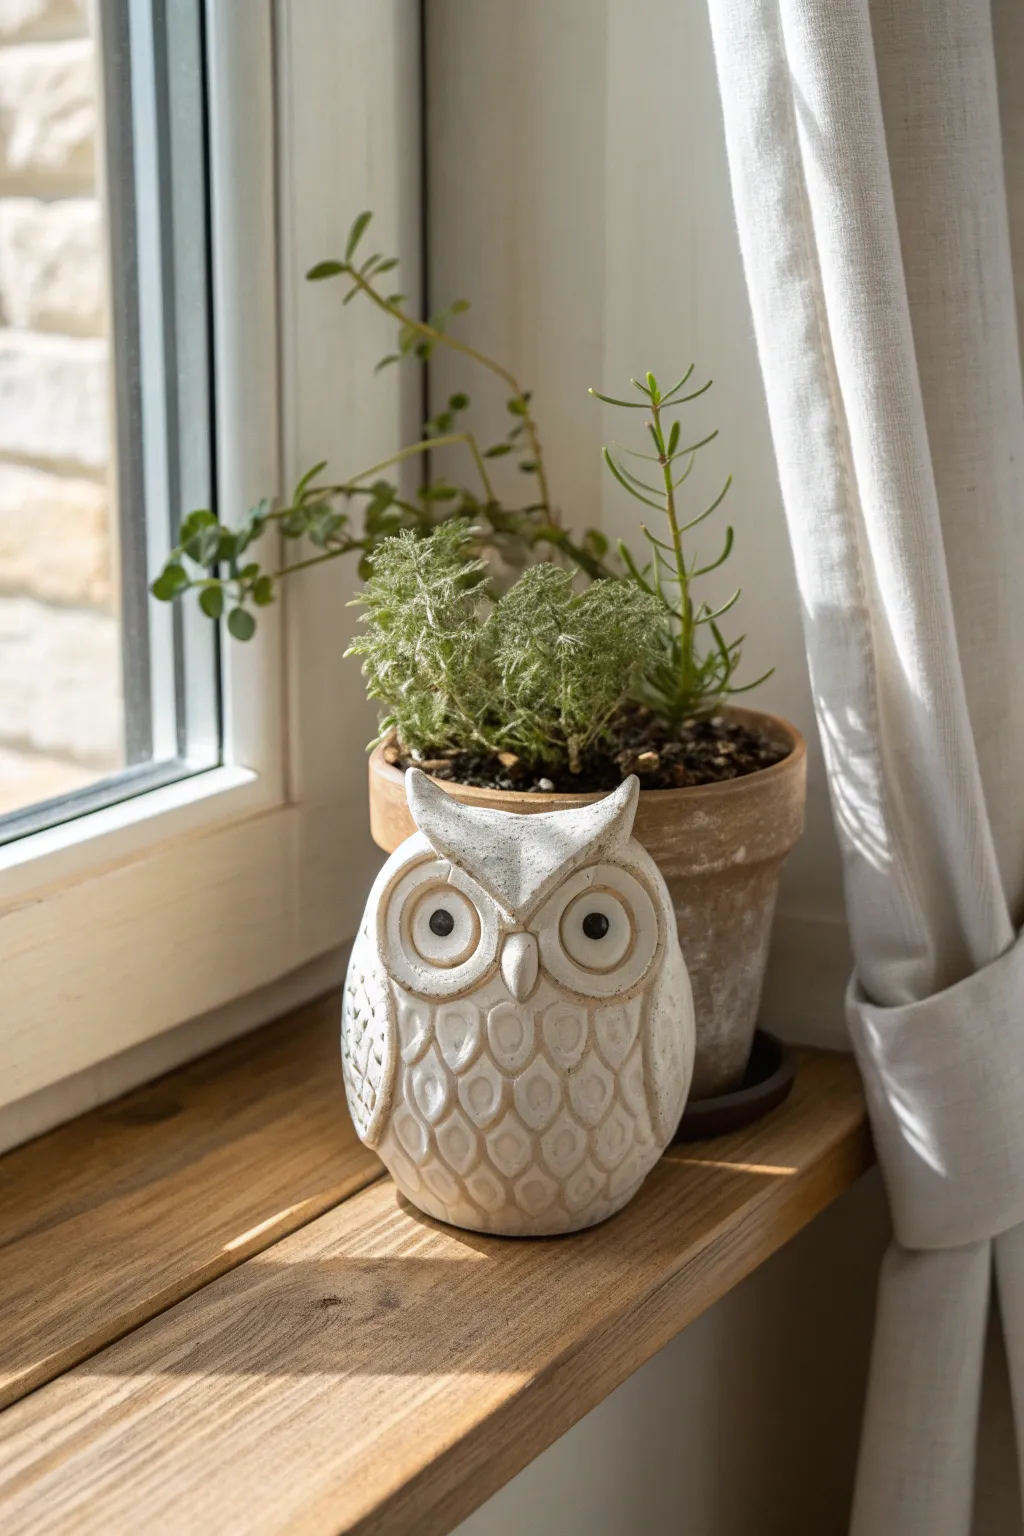
Brighten up your indoor garden display with this charming ceramic owl sculpture, featuring distinct textured feathers and wide, watchful eyes. Its rustic white finish with warm undertones makes it a perfect companion for terracotta pots and greenery.
Step-by-Step Tutorial
Materials
- White stoneware or earthenware clay
- Basic sculpting tools (rib, needle tool, loop tool)
- Small U-shaped carving tool or linoleum cutter
- Rolling pin
- Canvas work surface
- Slip and scoring tool
- Sponge
- White or cream matte glaze
- Iron oxide wash or diluted brown underglaze
- Black underglaze (for pupils)
Step 1: Forming the Body
-
Prepare the base:
Start with a ball of well-wedged clay about the size of a large grapefruit. Tap it gently on your work surface to create a flat bottom so it stands securely. -
Shape the egg form:
Using your hands, smooth and shape the ball into a tall, slightly tapered egg shape. The wider part should be at the bottom for stability. -
Establish the head:
About one-third of the way down from the top, gently pinch into the sides to distinguish the head area from the body, keeping the transition smooth and subtle. -
Create the ears:
Pinch the clay at the very top of the head to form two small, pointed tufts for the ears. Use your thumb to create a slight depression between them on the forehead.
Step 2: Sculpting the Face
-
Mark the eyes:
Roll two thin coils of clay and form them into large circles. Attach these to the face area using slip and scoring to create the owl’s prominent eye discs. -
Add the beak:
Form a small diamond or tear-drop shape of clay. Attach it securely between the lower part of the eye circles, pointing downward. -
Refine the eyes:
Inside the large eye circles, attach small, flattened balls of clay for the eyeballs. Use a modeling tool to smooth the edges of the outer rings so they blend slightly ensuring they look like feathers framing the eyes. -
Create pupils:
Press a small indentation into the center of each eyeball using the back of a paintbrush or a rounded tool.
Cracks appearing?
If small cracks appear while adding texture, your clay might be getting too dry. Mist it lightly with water and cover with plastic for an hour to rehydrate before continuing.
Step 3: Adding Texture & Details
-
Define the wings:
Lightly trace the outline of wings on the sides of the body using a needle tool. They should curve from the shoulder area down towards the base. -
Carve chest feathers:
Using a U-shaped carving tool or a small loop tool, carve repetitive ‘U’ shapes creates the scaled feather look on the chest. Start from the neck and work your way down in offset rows. -
Detail the wings:
Switch to a finer point tool to draw longer, vertical lines or elongated loops on the wing areas to differentiate flight feathers from the chest plumage. -
Smooth rough edges:
Once the texture is complete, gently run a damp sponge over the surface to knock down any sharp clay burrs without erasing your carving work. -
Hollow out (optional):
If your piece feels too thick, wait until it is leather hard, shape a hole in the bottom, and carefully hollow out the interior with a loop tool to ensure even drying.
Make it a luminary
Cut out the eyes completely and leave the bottom open. Once fired, you can place a battery-operated tealight inside to make the owl glow at night.
Step 4: Finishing & Glazing
-
Bisque fire:
Allow the sculpture to dry slowly and completely before firing it to bisque temperature (usually cone 04). -
Apply oxide wash:
Mix iron oxide with water (or use watered-down brown underglaze) and brush it over the entire textured surface. I find this really helps the carving pop. -
Wipe back:
While the wash is still damp, wipe the surface with a clean, wet sponge. The dark color acts as an antique finish, staying in the recesses of the feathers while revealing the white clay on the high points. -
Glaze application:
Apply a thin coat of matte white or cream glaze over the body, being careful not to obscure the texture. Paint the pupil indentations with a tiny dab of black underglaze. -
Final firing:
Fire the piece again to your clay body’s recommended glaze temperature (often cone 5 or 6 for stoneware).
Place your finished owl on a sunny sill and enjoy the cozy, handcrafted vibe it brings to the room


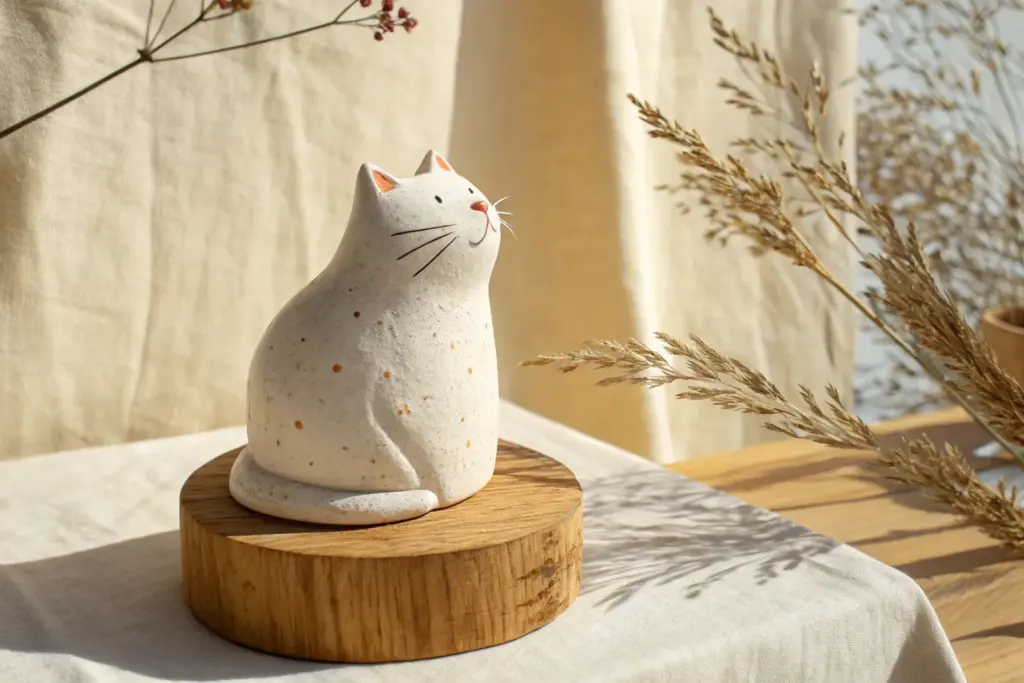
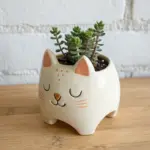
Simple Pet Bust Shelf Buddy
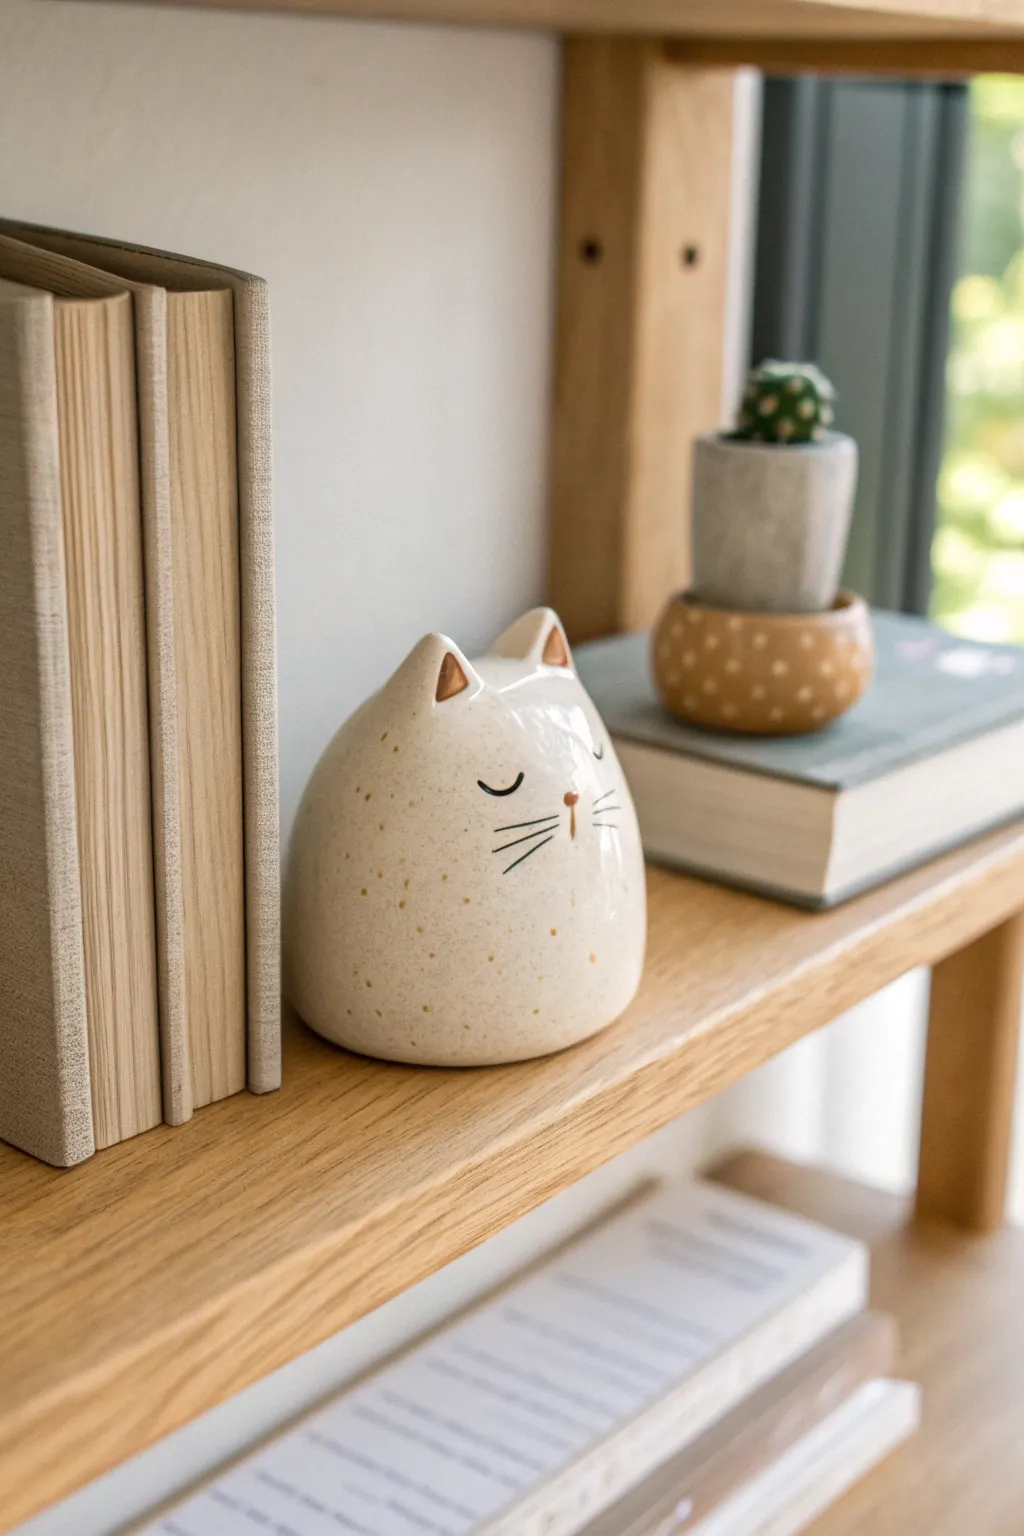
This charming ceramic cat figurine is the perfect minimalist companion for your bookshelf or desk. With its soothing rounded form, subtle speckled finish, and metallic ear accents, it brings a serene presence to any corner of your home.
Detailed Instructions
Materials
- White stoneware clay (preferably with grog for strength)
- Pottery wheel (optional, can be hand-built)
- Rib tool (metal or rubber)
- Needle tool
- Small elevated trimming tool
- Sponge
- Speckled cream or oatmeal glaze
- Underglaze pencil or fine liner brush (black/dark brown)
- Gold or bronze distinct luster overglaze
- Kiln
Step 1: Forming the Body
-
Prepare the Clay:
Begin with a ball of clay roughly the size of a large orange. Wedge it thoroughly to remove air bubbles, ensuring a smooth, consistent texture. -
Form the Base Shape:
If throwing on the wheel, center your clay and pull a closed form that is wider at the bottom and tapers gently toward the top. It should resemble a soft, rounded gumdrop or a very fat teardrop. -
Smoothing the Curve:
Use a metal rib to refine the exterior curve. You want a continuous, uninterrupted line from the base to the shoulder. If hand-building, use the pinch pot method to create two bowls, join them, and paddle into this egg-like shape. -
Defining the Head:
Gently press inward near the top third of the form to subtly suggest a neck area, though keep this transition very soft; the goal is a blob-like, integrated head and body. -
Closing the Form:
If wheel-throwing, close the top of the form completely so it is a sealed hollow object. Compress the top well to prevent cracking.
Fixing Wobbles
If your closed form wobbles, gently tap the bottom on a flat table while the clay is still soft to create a stable, flat seat.
Step 2: Sculpting Details
-
Wait for Leather Hard:
Allow the piece to dry to a leather-hard state. It should be firm enough to handle without deforming but soft enough to carve and attach additions. -
Forming Ears:
Roll out a small slab or pinch two small, equal-sized triangles of clay. Gently curve them to mimic a cat’s ear shape. -
Attaching Ears:
Score the top of the head and the base of the ears. Apply slip and press the ears firmly onto the head, spaced slightly apart. Blend the seams downward into the head for a smooth transition. -
Refining the Surface:
Use a damp sponge to smooth out any finger marks, especially around the ear attachments. The surface needs to be pristine for the sleek look. -
Venting the Piece:
Flip the cat over. Use a needle tool to poke a small, inconspicuous hole in the bottom. This allows expanding air to escape during firing so your kitty doesn’t explode.
Step 3: Finishing and Firing
-
Bisque Fire:
Let the piece bone dry completely. This may take several days depending on humidity. Fire to cone 04 (or your clay’s specific bisque temperature). -
Glazing the Base:
Dip or brush the entire piece in a speckled cream or oatmeal glaze. Ensure an even coat. If brushing, I usually apply three smooth coats in alternating directions. -
Wiping the Details:
If you want the face to be super crisp, you can gently wipe glaze away from the nose area, but applying underglaze over the base glaze works too if the base is light enough. -
Painting the Face:
Use a fine liner brush with black or dark brown underglaze (or a specialist glaze pen) to draw two curved lines for closed sleeping eyes, a tiny triangular nose, and three whiskers on each side. Keep the lines delicate. -
Cleaning the Foot:
Wipe any glaze off the very bottom where the cat sits on the shelf to prevent it from sticking to the kiln shelf. -
Glaze Fire:
Fire the piece again to the maturation temperature of your glaze (typically cone 5 or 6 for stoneware). -
Adding the Gold Accents:
Once cool, apply gold luster to the inner triangles of the ears and tip of the nose if desired. This requires a third, much lower temperature firing (usually cone 018) so be sure to check your luster’s instructions.
Texture Twist
Instead of painted whiskers, carefully carve the whisker lines into the leather-hard clay for a tactile, recessed detail.
Place your finished feline on a stack of books for immediate cozy vibes


Pinch-Pot Monster With Big Mouth
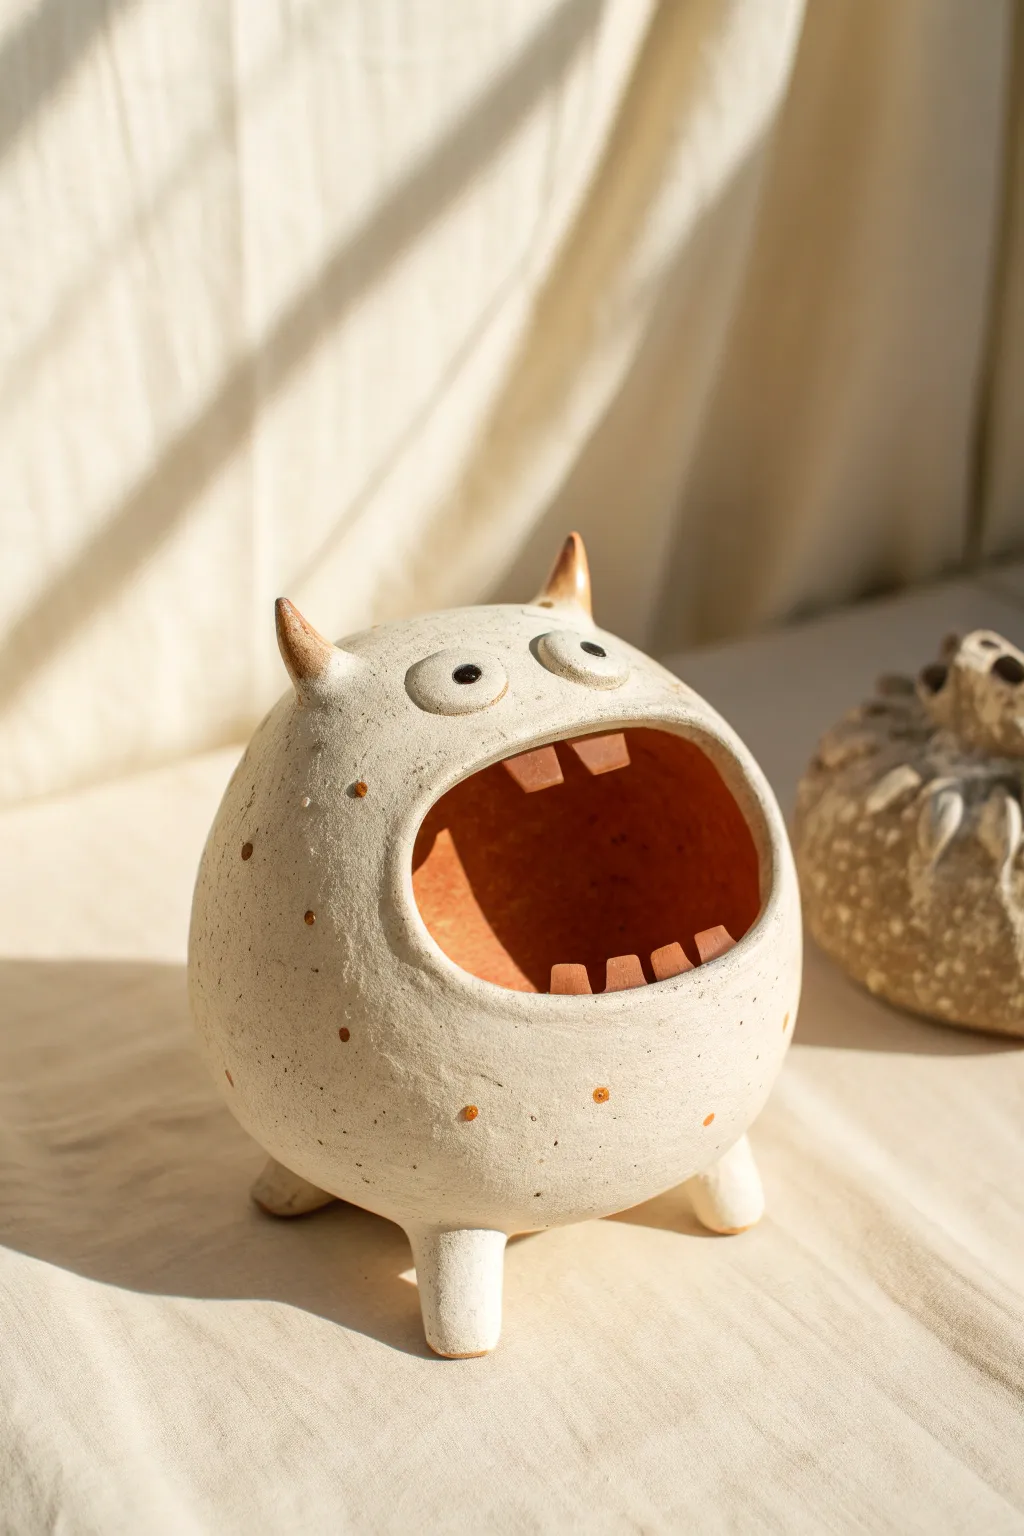
This whimsical ceramic creature features a satisfyingly round body, a cavernous mouth ready to hold trinkets or candy, and playful polka dot details. Its rugged, speckled texture and unfinished interior give it an earthy, handmade charm perfect for a desk companion.
Step-by-Step Tutorial
Materials
- White speckled stoneware clay (or white clay with sand/grog)
- Small amount of terracotta or red clay (for teeth)
- Needle tool
- Scoring tool or old toothbrush
- Slip (clay and water mixture)
- Wooden modeling tool
- Sponge
- Underglaze (brown/orange)
- Clear matte glaze
- Black underglaze (for pupils)
Step 1: Forming the Body
-
Pinch two bowls:
Start by dividing a fist-sized ball of speckled white clay into two equal halves. Form each half into a smooth ball, then stick your thumb in the center and pinch the walls evenly to create two matching bowl shapes. -
Join the spherical form:
Score the rims of both pinch pots thoroughly and apply a generous amount of slip. Press the two rims together firmly to trap air inside, creating a sealed hollow sphere. -
Smooth the seam:
Use a wooden tool or your thumb to drag clay across the seam, knitting the two halves together. Smooth the entire surface with a rib tool or damp sponge until the join line is completely invisible. -
Shape the legs:
Roll three thick, short coils of clay for the legs. Tap them on the table to flatten the bottoms, creating sturdy stumps. -
Attach the legs:
Score and slip the bottom of your sphere and the tops of the three legs. Attach them in a tripod formation so the creature stands stable and slightly tilted back.
Air Pressure Safety
When closing your sphere, create a tiny pinhole somewhere inconspicuous (like the bottom) to let expanding air escape before you cut the mouth open.
Step 2: Sculpting the Face
-
Cut the mouth:
Once the clay has stiffened slightly to leather-hard, use a needle tool to cut a large, wide oval opening for the mouth. Position it somewhat high on the sphere so it looks like it’s looking up. -
Refine the lip:
Gently smooth the cut edge of the mouth with a damp sponge or your finger to remove any sharp burrs and give it a soft, rounded lip. -
Create the eyes:
Roll two small balls of white clay and flatten them slightly into discs. Stick them just above the mouth opening using the score and slip method. -
Add pupils:
Make tiny indentations in the center of the eyes. Roll infinitesimal balls of clay or simply dab a dot of black underglaze later; for now, just mark the spot. -
Form the horns:
Roll two small cones of clay. Gently curve them if you like, then attach them to the top of the head using slip, blending the clay downwards for a seamless transition.
Step 3: Adding Details & Finishing
-
Make the teeth:
Switch to your terracotta or red clay. Roll a small slab and cut out four or five rectangular, chiclet-shaped teeth. -
Install the dentition:
Score the inside of the upper and lower lip. Attach the red clay teeth securely, two on top and three on the bottom, ensuring they are firmly bonded. -
Clean connections:
Check all seams, especially around the small teeth and legs. I prefer to use a small paintbrush dipped in water to smooth these tight areas. -
Bisque fire:
Allow the monster to dry intimately slowly to prevent cracking, then fire it in the kiln to bisque temperature (usually cone 04). -
Applying dots:
Using a small brush and your brown/orange underglaze, paint random polka dots all over the white body. Paint the tips of the horns with the same color. -
Glaze application:
Apply a clear matte glaze over the exterior white clay to make the speckles pop, but leave the inside mouth unglazed if you want that raw clay look, or use a matte clear there too. -
Final firing:
Fire the piece again to the appropriate temperature for your clay and glaze (likely cone 5 or 6 for stoneware).
Candy Keeper
Resize the mouth opening based on use! Make it wider if you want this monster to function as a sponge holder or a candy bowl for wrapped treats.
Once out of the kiln, your little monster is ready to guard your desk with a toothy grin


Tiny House Village Set
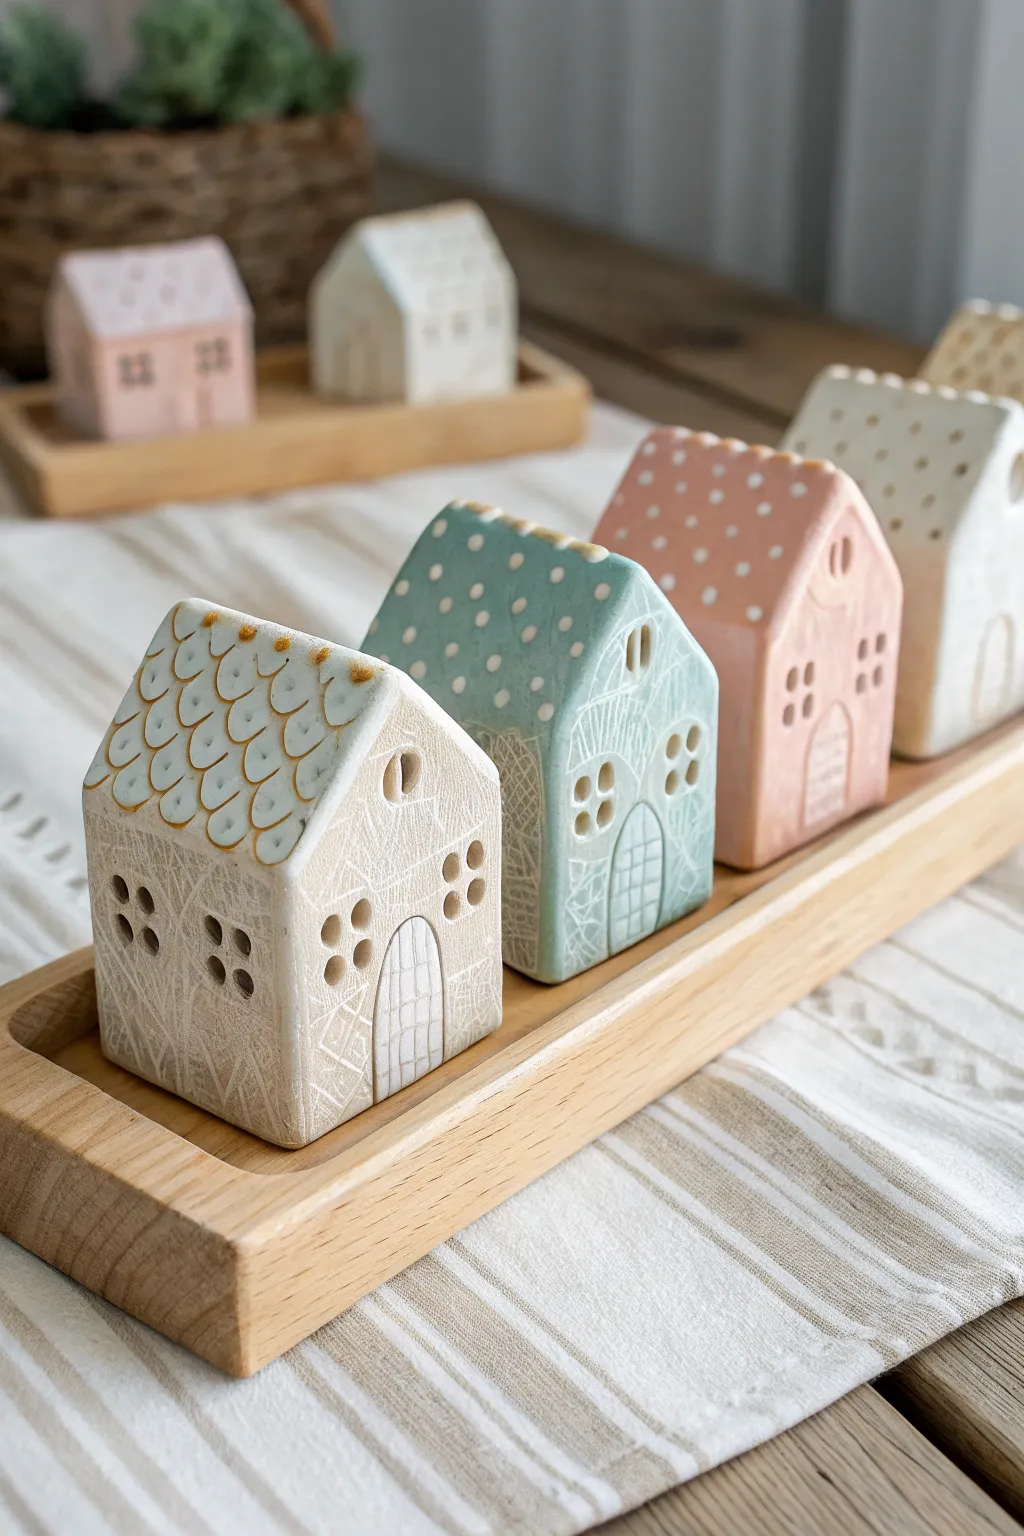
Bring a charming, miniature neighborhood to life with this delightful set of ceramic tiny houses. Featuring soft pastel glazes, textural sgraffito patterns, and cutout windows for light to shine through, these houses make for a cozy display on any mantel or table.
Step-by-Step Guide
Materials
- White or light-bodied stoneware clay
- Rolling pin and guide sticks (approx. 1/4 inch thickness)
- Fettling knife or X-Acto blade
- Paper templates (rectangles for walls, triangles for gables)
- Needle tool
- Small circle cutter or straw (for windows)
- Scoring tool (serrated rib or fork)
- Slip (clay mixed with water)
- Underglazes (white, beige, teal, dusty pink)
- Fine carving tool or stylus (for sgraffito details)
- Clear matte or satin glaze
- Sponge and water
- Bevel cutter (optional but helpful)
Step 1: Forming the Structures
-
Roll Your Slabs:
Start by rolling out your clay on a canvas surface to an even thickness of about 1/4 inch. Using guide sticks helps ensure the walls are perfectly uniform, which is crucial for stability later. -
Cut Out Shapes:
Using paper templates, cut out your house components: two pentagons for the front and back (a rectangle with a triangle on top) and two rectangles for the side walls. You’ll also need two rectangular pieces for the roof. -
Dry to Leather Hard:
Let the flat pieces sit until they reach a ‘leather hard’ state. They should be stiff enough to hold their shape when stood up, but still soft enough to bend slightly without cracking. I usually check them after about an hour. -
Bevel the Edges:
For cleaner corners, cut a 45-degree angle (miter) on the vertical edges of your walls where they will join. This isn’t strictly necessary, but it makes the joints stronger and less visible. -
Score and Slip:
Rough up the edges you plan to join using a serrated rib or needle tool, then apply a generous amount of slip. This creates the ‘glue’ for your clay. -
Assemble the Walls:
Press the walls together firmly to create the box shape of the house. Use a small coil of clay on the inside corners to reinforce the seams, smoothing it out with your finger. -
Add the Roof:
Score and slip the top edges of the house and the contact points of your roof panels. Attach the roof pieces, ensuring there is a slight overhang if desired, and smooth not only the ridge seam but also underneath the eaves. -
Cut Windows and Doors:
Once the basic form is assembled, use a small cutter or X-Acto knife to carefully remove clay for the windows and arched doors. Cutting them now while the house is standing prevents the walls from warping.
Step 2: Decorating and Glazing
-
Smooth the Surface:
Use a damp sponge to smooth out any sharp edges, fingerprints, or rough spots on the exterior. The surface needs to be fairly clean for the carving details to show up well. -
Apply Base Underglaze:
Paint the roofs and bodies of the houses with your chosen pastel underglazes. For the front house, use a creamy beige; use teal and dusty pink for the others. Apply 2-3 coats for opaque coverage. -
White Wash Effect:
For the specific look in the image, you might want to sponge a very thin layer of white underglaze over the dried colored sections to give a softer, weathered appearance. -
Carve Roof Details:
Using a fine stylus or sgraffito tool, gently scratch through the underglaze layer to reveal the clay body beneath. For the beige house, create a scalloped fish-scale pattern; for the teal house, use simple dots. -
Carve Wall Textures:
Continue carving details onto the walls. Draw vertical lines for the doors to mimic planks, and scratch whimsical, scratchy lines around the base to suggest grass or texture. -
Add Roof Accents:
On the scalloped roof, paint small dots of a darker gold or brown specific to the corners of the scales to add dimension. -
Bisque Fire:
Once bone dry, fire the pieces in the kiln to bisque temperature (usually cone 04). This hardens the clay and prepares it for the final glaze. -
Clear Glaze Application:
Dip or brush a clear matte or satin glaze over the entire piece. A glossy glaze would work too, but matte finishes tend to suit this rustic, pastel aesthetic better. -
Final Firing:
Place the houses back in the kiln for the glaze firing (temperature depends on your specific clay and glaze, typically cone 5 or 6). Ensure no glaze touches the bottom of the houses to prevent them sticking to the kiln shelf.
Clean Carving
When carving sgraffito lines, let the underglaze dry to the touch but not completely bone dry. Use a soft brush to sweep away the crumbs immediately to keep lines crisp.
Illuminated Village
Leave the bottom of the houses open (don’t add a floor slab). This allows you to place battery-operated tea lights underneath later for a glowing window effect.
Arranging your finished village on a wooden tray completes the cozy, handcrafted vibe.

The Complete Guide to Pottery Troubleshooting
Uncover the most common ceramic mistakes—from cracking clay to failed glazes—and learn how to fix them fast.
Mushroom Cottage Sculpture
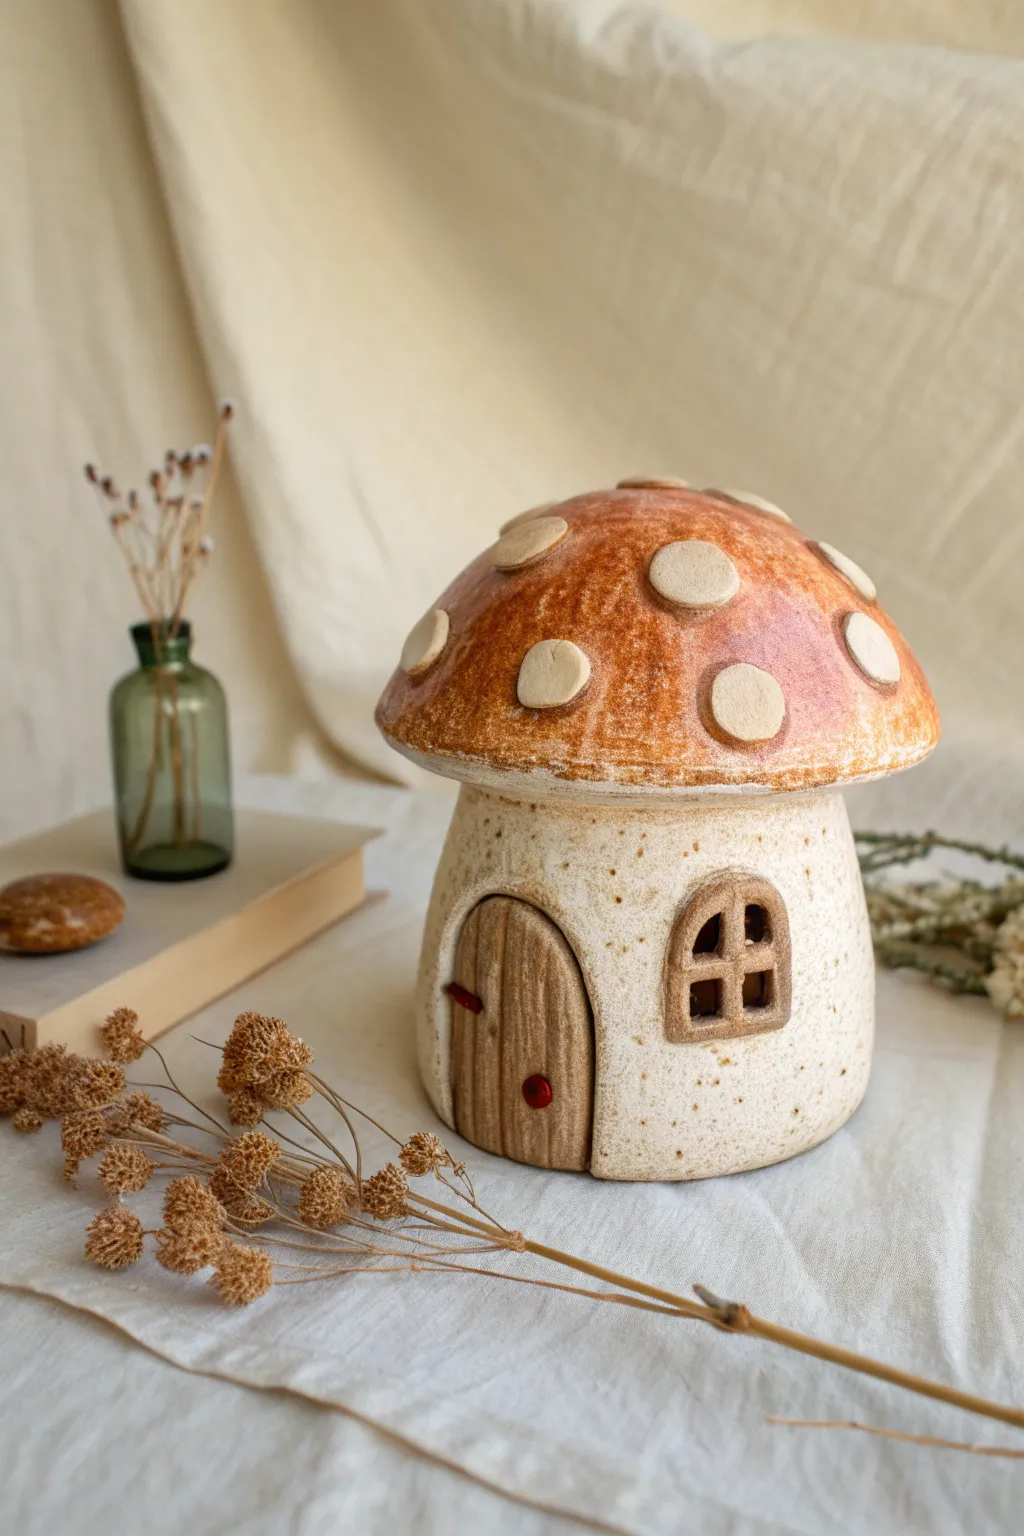
This charming ceramic sculpture transforms a simple pinch pot base into a cozy fairy dwelling, complete with a spotted toadstool roof and rustic details. The piece features a lovely speckled finish and warm, earthy glazes that bring the magical cottage to life.
Detailed Instructions
Materials
- Stoneware clay (preferably speckled or buff)
- Pottery tools (needle tool, rib tool, scoring tool)
- Rolling pin
- Canvas working surface
- Slip (liquid clay)
- Small circle cutter (or bottle cap)
- Wooden modeling tool
- Underglazes: Burnt orange/rust, white, red
- Clear transparent glaze
- Bisque and glaze kiln firing access
Step 1: Forming the Base Structure
-
Shape the cottage walls:
Begin with a ball of clay roughly the size of a large orange. Insert your thumb into the center and gently pinch the walls upward and outward to create an elongated pinch pot. Aim for a slightly tapered shape that widens at the bottom for stability. -
Refine the surface:
Once the walls are even—about 1/4 inch thick—use a metal rib tool to smooth the exterior. You can leave some subtle texture, but ensure the rim is leveled flat so the roof will sit securely later. -
Create the roof cap:
Take a second, slightly smaller ball of clay and form a shallow bowl shape using the same pinch pot method. This will be the mushroom cap. Flatten the curve slightly so it resembles an umbrella, ensuring the diameter is wider than the top of your cottage base. -
Check the fit:
Place the roof onto the base to test the proportions. I like to make sure the overhang is generous, as this gives it that classic toadstool silhouette. Adjust the shape if necessary while the clay is still plastic.
Preventing Cracks
If making a solid sculpture, puncture a hidden hole in the base. Trapped air inside a sealed hollow form will expand in the kiln and cause the piece to explode.
Step 2: Adding Architectural Details
-
Carve the door opening:
On the base, use a needle tool to lightly outline an arched doorway. Carefully cut this shape out, but don’t discard the clay slab—you will use it to make the actual door. -
Construct the door:
Take the cutout slab and roll it slightly thinner. Use a wooden modeling tool to press vertical lines into it, mimicking wood grain planks. Attach a tiny ball of clay for a doorknob and a small coil for the hinge. -
Attach the door:
Score and apply slip to the edges of the door hole and the back of your textured door slab. Press the door back into place, perhaps slightly recessed or ajar for character. -
Fashion a window:
Roll a small coil of clay and shape it into a square or arched window frame. Score and slip it onto the cottage wall. Inside the frame, add a tiny cross made of thinner coils to create windowpanes. -
Cut the window opening:
Once the frame is secure, use a small fettling knife or detail tool to carefully cut out the negative space between the panes, allowing you to see through into the darker interior.
Texture Trick
Rub the raw clay base with a damp sponge before firing. This exposes the ‘grog’ or speckles in the clay body, enhancing the natural stone look without needing extra glaze.
Step 3: Sculpting the Mushroom Cap
-
Prepare the spots:
Roll out a thin slab of clay (about 1/8 inch). Use a small circle cutter or uneven hand-cut shapes to create varied flat circles for the mushroom spots. -
Attach the polka dots:
Score the back of each spot and the surface of the roof cap. Slip and press them firmly onto the roof, smoothing the edges down slightly so they look integrated rather than just stuck on. -
Join or separate:
Decide if you want a lidded box or a solid sculpture. If solid, score and slip the meeting points where the roof touches the base and seal them together along the inside seam. If making a jar, simply ensure the fit is snug and let them dry separately.
Step 4: Glazing and Finishing
-
Bisque fire:
Allow the piece to dry slowly under loose plastic for a few days, then uncover until bone dry. Fire it in a kiln to bisque temperature (usually Cone 04 or 06). -
Apply base color:
Paint the main mushroom cap area with 2-3 coats of a burnt orange or rust-colored underglaze. Avoid painting over the raised raised spots. -
Detail the spots and stem:
Carefully paint the raised spots with white underglaze. Leave the main cottage base (the stem) unglazed if you are using speckled clay to show off the natural texture, or apply a matte white glaze. -
Accent the door:
Use a brown iron oxide wash or underglaze on the door to enhance the wood texture, wiping back the high points. Dot the doorknob with a tiny bit of bright red glaze for a pop of color. -
Clear glaze and final fire:
Once the underglaze is dry, apply a clear transparent glaze over the colored roof ease cleaning and add shine. Fire to the maturity temperature of your clay body (e.g., Cone 5/6).
Place your finished cottage on a shelf or among your potted plants for a hidden touch of magic
Face Vase With Minimal Features
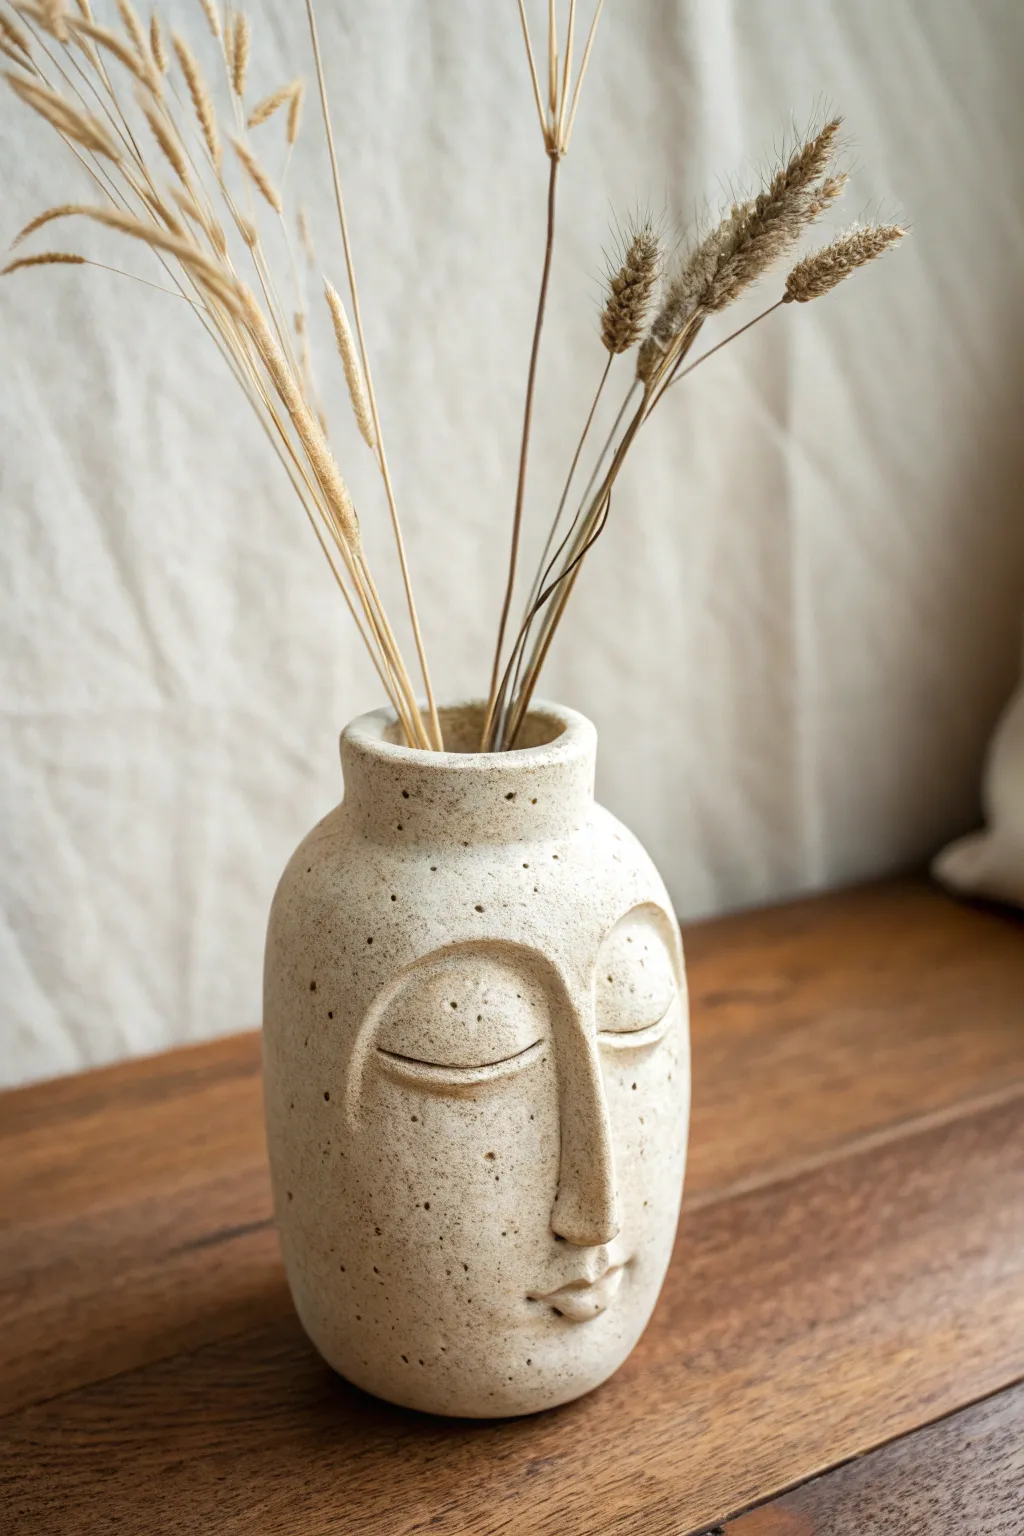
Sculpt a moment of calm with this textured ceramic vase featuring a tranquil, stylized face. The minimalist features emerge softly from the speckled stoneware, creating a functional piece of art perfect for displaying dried grasses.
Step-by-Step
Materials
- Speckled stoneware clay (approx. 2-3 lbs)
- Fettling knife
- Rolling pin
- Canvas work surface
- Two wooden guide slats (approx. 1/4 inch thick)
- Scoring tool or serrated rib
- Slip (clay mixed with water)
- Wooden modeling tool
- Small loop tool
- Soft sponge
- Cardboard cylinder or rolling tube (for armature)
Step 1: Forming the Base Cylinder
-
Roll the slab:
Begin by rolling out your speckled clay on a canvas surface. Place the wooden guide slats on either side of the clay to ensure an even thickness of about 1/4 inch as you roll. -
Cut the rectangle:
Measure and cut a rectangular slab. The height should be roughly 6-7 inches and the width long enough to wrap around your chosen cylinder diameter (about 10-12 inches). -
Cut the base:
Cut a separate circle from the remaining slab that matches the diameter of the cylinder you are creating. -
Join the walls:
Stand the rectangular slab up and curve it to form a tube. Bevel the vertical edges at a 45-degree angle to create a seamless overlap. -
Score and slip:
Score the beveled edges aggressively and apply a generous amount of slip. Press the two edges together firmly to seal the seam. -
Attach the base:
Score the bottom rim of your cylinder and the outer edge of the circular base. Apply slip and press the cylinder onto the base. Use a wooden tool to blend the clay from the outside wall down onto the base for a strong connection. -
Shape the neck:
Gently collar the top inch of the cylinder inward to create a slightly narrower neck. You can do this by encircling the top with your hands and applying gentle, even pressure while rotating the piece. -
Create the rim:
Add a small coil of clay to the top edge to create a thickened rim. Smooth it down and round it off with a damp sponge.
Features slipping?
If the nose or eyelids slide down, the slip might be too wet. Hold the feature in place for 30-60 seconds after attaching to let the clay bond initially.
Step 2: Sculpting the Face
-
Map out the features:
Lightly trace a vertical center line to guide the placement of the nose. Mark horizontal lines for where the eyes and mouth will sit. -
Add volume for the nose:
Roll a tapered wedge of clay for the nose. Score the center of the face and the back of the nose piece, apply slip, and press it onto the vase. The bridge should be flush with the forehead area. -
Blend the nose:
Using a wooden modeling tool, blend the edges of the nose seamlessly into the cheeks and forehead. I find it helpful to leave the tip defined while smoothing the sides completely. -
Define the brow:
Add two curved, flat semi-circles of clay above the nose line to create the heavy, peaceful eyelids. Score and slip these into place. -
Sculpt the eyelids:
Blend the upper edge of these semi-circles seamlessly into the forehead so they look like one continuous surface. Leave the bottom edge sharp and defined to create the ‘closed eye’ look. -
Carve the eye line:
Use a sharp tool or knife to gently incise a curved line just under the eyelid shapes to emphasize the separation between the lid and the cheek. -
Form the lips:
Add a very small, flattened oval of clay below the nose. Blend the outer edges into the face, then use a needle tool or knife to press a horizontal line across the middle for the mouth opening. -
Refine the expression:
Use a small loop tool to gently remove excess clay around the nostrils and the corners of the mouth to deepen the shadows.
Pro Tip: Texture
To enhance the stone-like look, gently tap the leather-hard surface with a stiff-bristled toothbrush. This adds tiny pores that mimic natural rock.
Step 3: Finishing Touches
-
Smooth the surface:
Once the added features have stiffened slightly, go over the entire piece with a damp sponge. This softens any harsh tool marks and exposes the beautiful speckles in the clay. -
Dry slowly:
Loosely cover the vase with plastic to let it dry slowly over several days. This prevents the added features from cracking away from the main body. -
Fire:
Bisque fire the piece, then glaze only the inside with a clear liner glaze to make it watertight. Leave the outside unglazed to maintain the raw, stony texture.
Fill your finished vase with dried pampas grass or wheat for a serene, monochromatic display


What Really Happens Inside the Kiln
Learn how time and temperature work together inside the kiln to transform clay into durable ceramic.
Little Bird On a Branch Stand
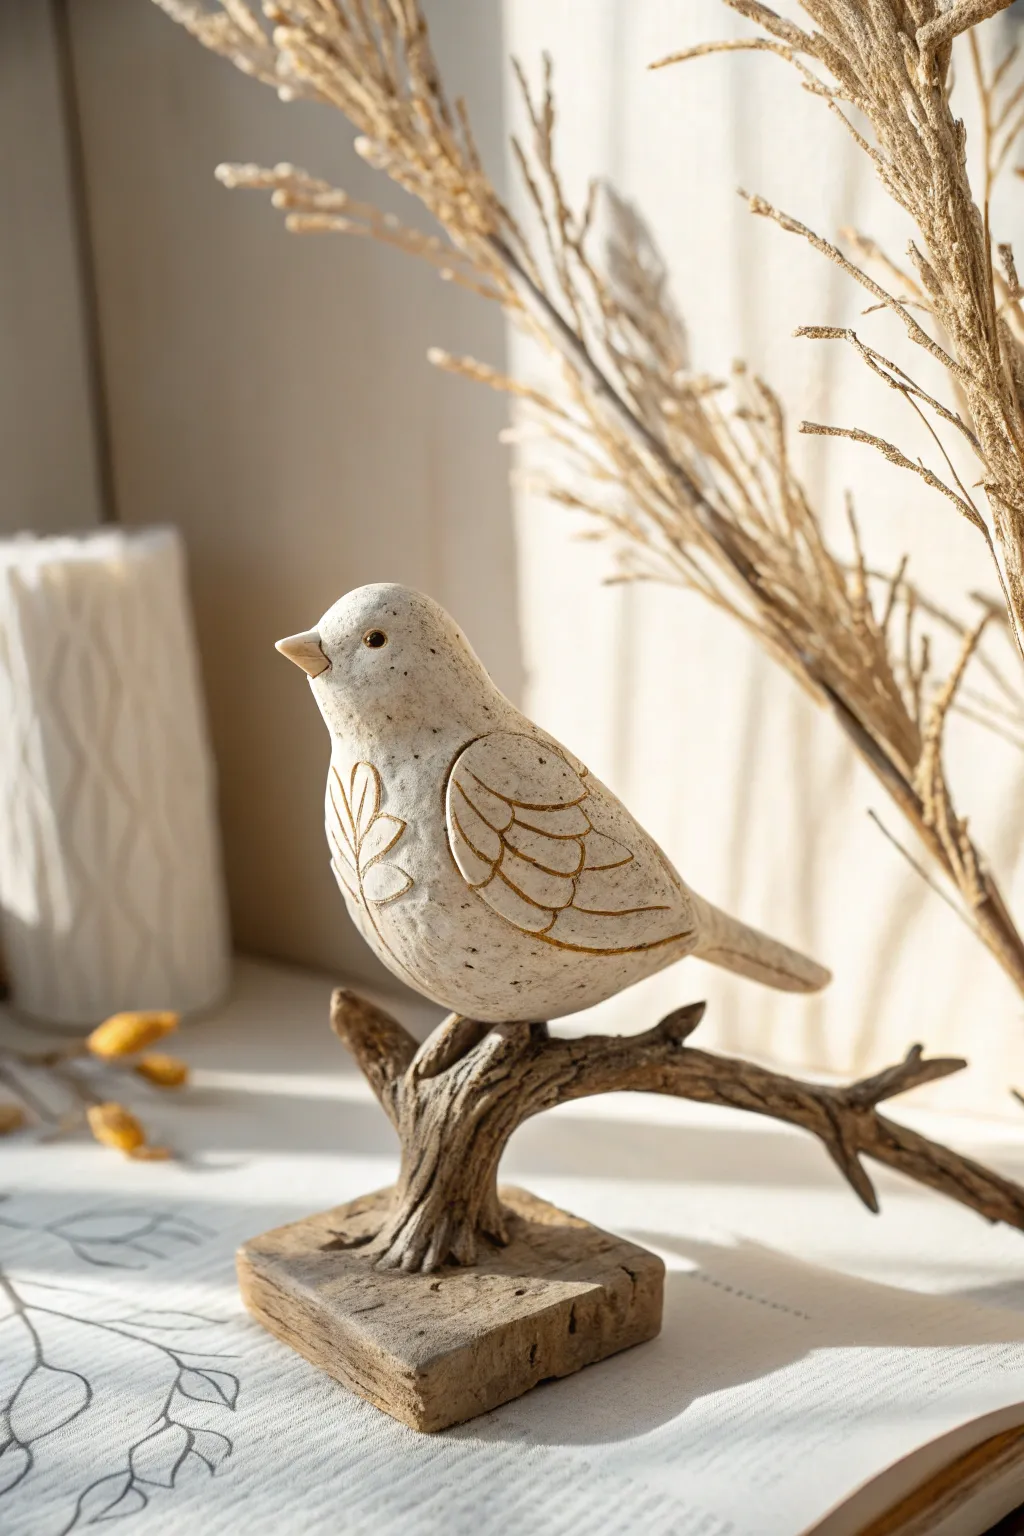
This charming project captures the serene beauty of nature with a stylized stoneware bird perched upon a faux-wood branch. With its textural speckled finish and elegant carved details, this piece makes for a sophisticated yet approachable addition to any bookshelf or mantel.
Step-by-Step
Materials
- Speckled stoneware clay (approx. 2 lbs)
- Fettling knife
- Loop tools (variety of sizes)
- Needle tool
- Metal kidney rib
- Slip and scoring tool
- Underglaze (dark brown or black)
- Gold luster or metallic wax (optional)
- Matte transparent glaze
- Wooden sculpting tool
- Sponge
Step 1: Sculpting the Bird
-
Form the Body:
Start with a ball of clay roughly the size of a large orange. Gently roll and shape it into a teardrop form, ensuring the wider end becomes the chest and the tapered end becomes the tail. -
Define the Head:
Pinch and smooth the narrower top portion of the teardrop to distinguish the head from the body. You don’t need a distinct neck; a subtle transition creates a more modern silhouette. -
Add the Beak:
Take a tiny piece of clay, roll it into a cone, and attach it to the face. Score and slip the connection point thoroughly to prevent it from popping off later, blending the edges seamlessly with a wooden tool. -
Refine the Surface:
Use a metal kidney rib to smooth the entire surface of the bird. The goal isn’t perfection; the speckled clay adds character, but you want to remove major fingerprints. -
Carve Wing Details:
Using a needle tool or small loop tool, lightly sketch the outline of the wings on the sides. Once satisfied with the placement, carve deeper grooves to define the wing shape and the leaf-like feather patterns on the chest.
Cracking at the Join?
If the bird separates from the branch during drying, wrap the joint in a damp paper towel and plastic. Re-compress the seam daily until the moisture levels equalize.
Step 2: Creating the Perch
-
Form the Base Block:
Flatten a separate slab of clay into a square or rectangle, roughly 1 inch thick. This will serve as the heavy, stable foundation. Texture the edges with a rough rock or wire tool to simulate hewn wood or stone. -
Build the Branch:
Roll a coil of clay that tapers at one end. Bend it into a natural, slightly crooked branch shape. I usually like to add a smaller offshoot branch for visual balance. -
Texture the Bark:
Drag a serrated rib or a fork along the length of the branch clay to create deep, bark-like grooves. Twist the clay slightly as you do this to mimic the natural torque of wood growth. -
Assemble the Stand:
Score and slip the bottom of the branch and attach it firmly to the center of your base block. Reinforce the connection with a small coil of clay blended around the seam.
Step 3: Final Assembly & Finish
-
Mount the Bird:
Place the bird onto the branch to check the balance. If it sits well, excessive scoring and slipping are needed here. Press the bird firmly onto the branch, blending the clay where the feet would be to create a unified sculpture. -
Hollow Out (Important):
If your bird is solid and thick, let the piece stiffen to leather-hard. Then, carefully cut a hole in the bottom (through the base and up the branch if possible, or create a discreet vent hole) to hollow out the bird’s body to avoid explosions in the kiln. -
Bisque Fire:
Allow the sculpture to dry slowly under loose plastic for several days before firing to bisque temperature (usually Cone 04). -
Antique the Grooves:
Dilute dark brown underglaze with water and brush it liberally over the textured bark and the carved wing lines. Before it dries, wipe the raised surfaces with a damp sponge, leaving the dark color only in the recesses. -
Glaze and Fire:
Apply a matte transparent glaze over the entire piece to seal it while keeping the raw clay look. Fire to the final temperature (e.g., Cone 5/6). -
Metallic Accents:
Once fully fired and cooled, you can rub a bit of metallic wax (like Rub ‘n Buff) or apply gold luster (which requires a third firing) into the wing grooves for that elegant finish seen in the image.
Customize Your Fowl
Swap the generic bird shape for an owl or cardinal by changing the beak shape and head tufts. Use different colored slips on the wings before the bisque firing.
Place your finished sculpture near a window to let natural light catch those gilded details
Elephant Jewelry Holder With Curved Trunk
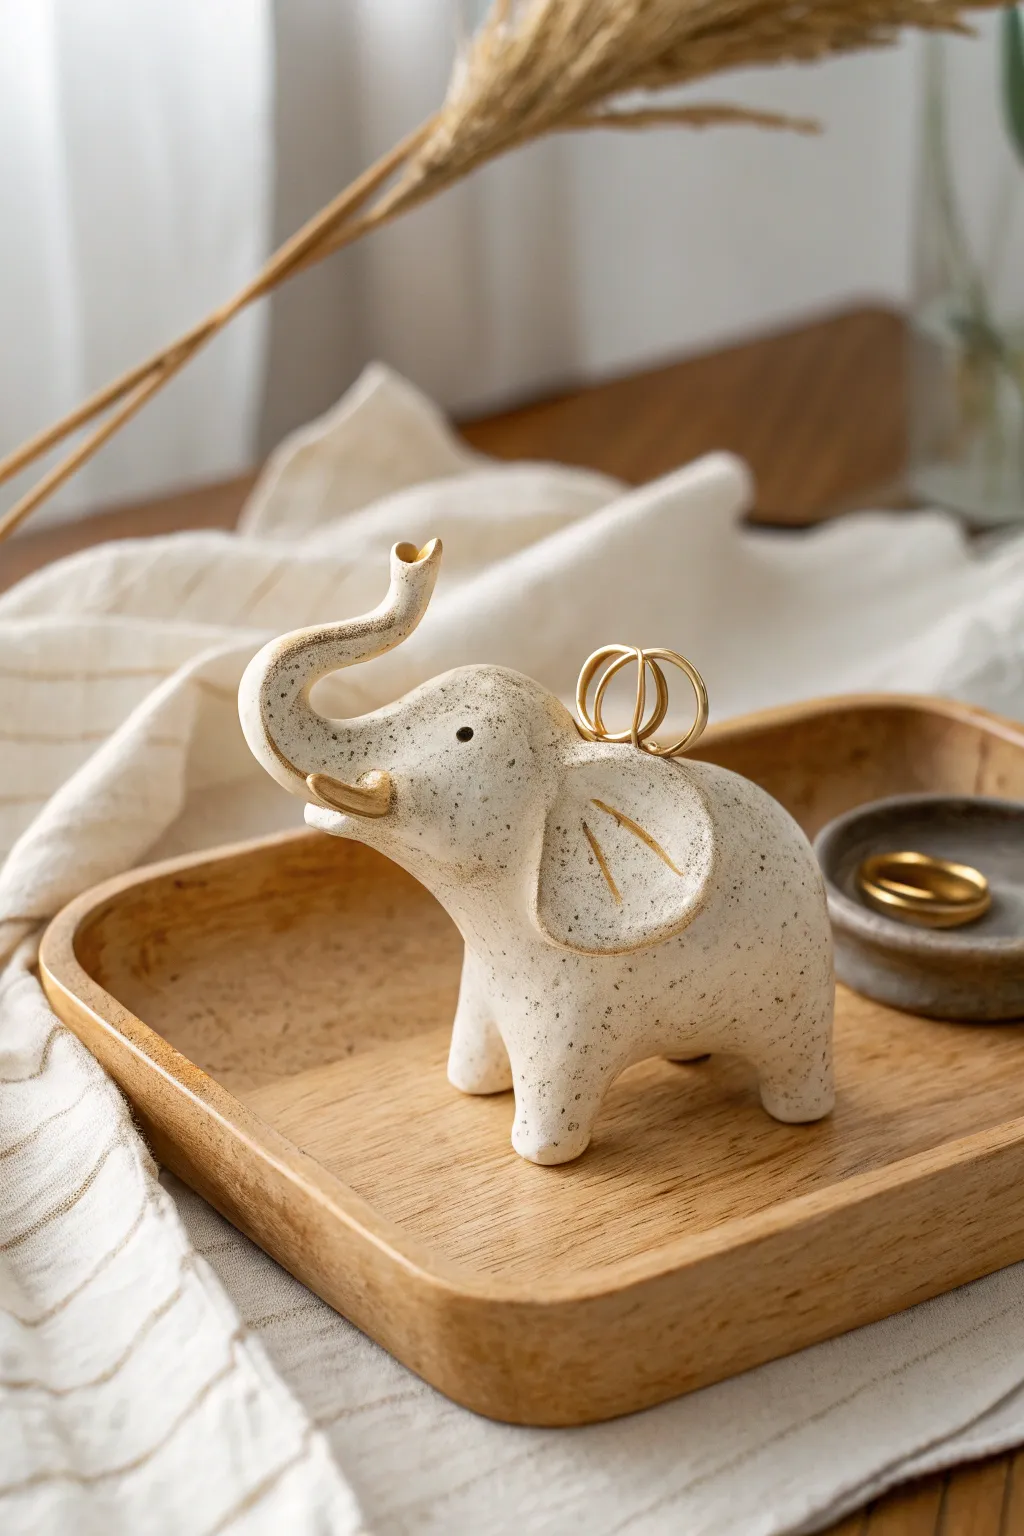
Sculpt a charming little elephant companion to keep your rings safe and displayed. This project features a lovely speckled clay body, gold accents on the tusks and ears, and an elegantly curved trunk designed to hold your favorite jewelry.
Step-by-Step Tutorial
Materials
- Speckled cream stoneware clay (or polymer clay with faux speckles)
- Clay sculpting tools (needle tool, rib tool, small loop tool)
- Slip and scoring tool (or a toothbrush)
- Sponge and water
- Rolling pin
- Gold luster or gold acrylic paint
- Small fine-point paintbrush
- Clear matte glaze (if using ceramic clay)
- Black underglaze or acrylic paint (for the eyes)
Step 1: Forming the Body
-
Shape the main mass:
Start with a ball of clay roughly the size of a large orange. Gently roll it in your hands to smooth out any cracks, then elongate one side slightly to begin forming the head area. -
Pull the legs:
Instead of attaching separate legs, try pinching them directly from the main body mass. Gently pull four short, sturdy nubs from the bottom corners of your oval shape. -
Refine the stance:
Tap the bottom of the feet against your work surface to flatten them. Adjust the legs until the elephant stands level and stable; stability is key since it will hold weight later. -
Smooth the form:
Use a damp sponge or your fingers to smooth the transition between the legs and the belly. The body should look like a continuous, organic shape.
Trunk Drooping?
If the trunk sags while the clay is wet, prop it up with a small piece of foam or a crumpled paper towel. Leave this support in place until the clay is leather hard.
Step 2: Sculpting the Head and Trunk
-
Form the head:
Define the head by gently indenting the neck area with your thumb. The head should be rounded and merging seamlessly into the back. -
Create the trunk coil:
Roll a separate coil of clay that is thicker at one end and tapers toward the other. This needs to be long enough to curve upwards dramatically. -
Attach the trunk:
I like to score and slip heavily here to ensure a strong bond. Attach the thicker end of the coil to the front of the face, blending the clay smoothly metal rib or modeling tool. -
Curve the trunk:
Shape the trunk into an ‘S’ curve, pointing upwards. The tip should be vertical enough to act as a ring hook without items sliding off. -
Hollow the trunk tip:
Use a small ball stylus or the end of a paintbrush to create a small indentation at the very tip of the trunk for a realistic touch.
Step 3: Adding Details
-
Make the ears:
Flatten two small balls of clay into teardrop shapes. They should be relatively thick to match the stylized look. -
Attach the ears:
Score and slip the ears onto the sides of the head. Press them firmly, smoothing the back edge into the head but leaving the front edge slightly raised for dimension. -
Add tusks:
Roll two tiny cones of clay for tusks. Attach them just below the trunk on either side, curving them slightly upward. -
Create the eyes:
Use a needle tool or small punch to create small, deep holes for the eyes. Position them halfway between the ear and the trunk base. -
Refine surface:
Look over the piece for any fingerprints. A soft brush dampened with water works wonders for wiping away tool marks without destroying texture.
Make it a Set
Make a smaller baby elephant to stand next to it for earring storage, or create a matching shallow tray where the elephant can stand.
Step 4: Firing and Decoration
-
Bisque fire:
Allow your elephant to dry intricately and completely before bisque firing according to your clay body’s specifications. -
Glaze application:
Apply a clear matte glaze to the entire piece to seal it while letting the natural speckles show through. Wipe the bottom of the feet clean. -
Glaze fire:
Fire the piece again to the glaze temperature appropriate for your materials. -
Apply gold accents:
Once cooled, paint the tusks and the inner lines of the ears with gold luster (for a third firing) or gold paint (no firing needed). -
Define the eyes:
Carefully dab a tiny amount of black paint or underglaze into the eye indentations to make the expression pop.
Place your new ceramic friend on your nightstand or vanity to keep your rings organized in style

TRACK YOUR CERAMIC JOURNEY
Capture glaze tests, firing details, and creative progress—all in one simple printable. Make your projects easier to repeat and improve.
Coral-Inspired Textured Form
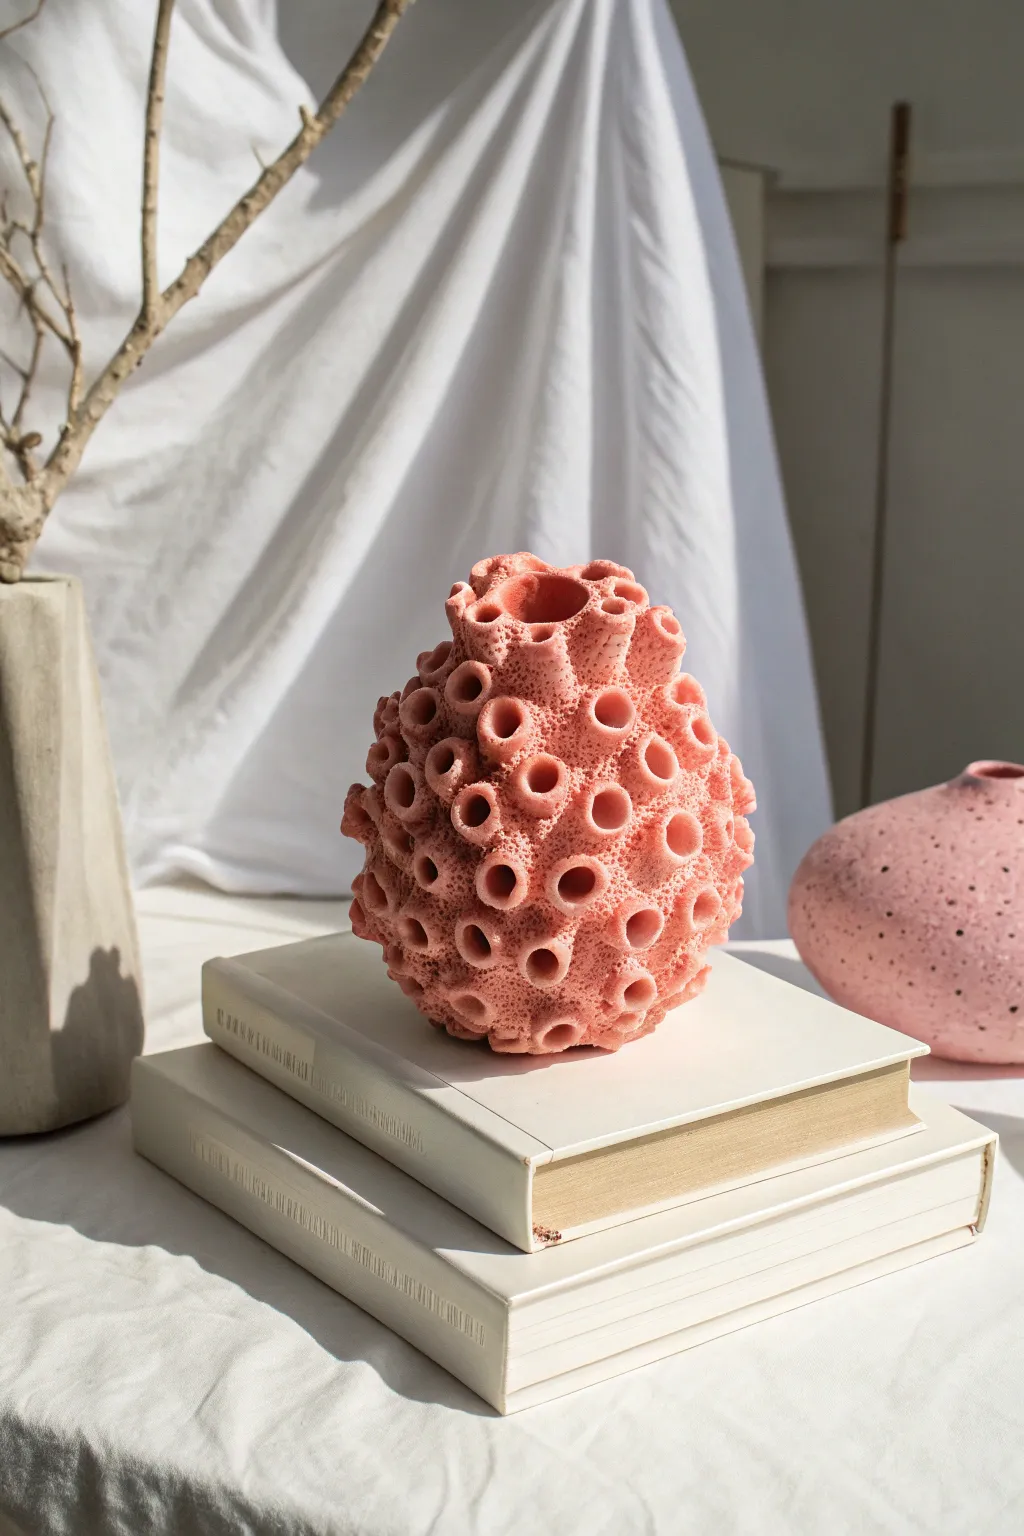
Recreate the delicate, organic structures of the ocean floor with this striking coral-inspired sculpture. Its intricate textured surface and soft pink hue make it a tactile centerpiece that looks as if it has just been plucked from a reef.
Step-by-Step Tutorial
Materials
- White stoneware or porcelain clay body
- Underglaze (coral/peach color) or Mason stain
- Various sized wooden dowels or needle tools
- Ball stylus tool
- Sponge
- Metal kidney rib
- Wire cutter
- Loop tool
- Clear matte glaze (optional)
Step 1: Forming the Base
-
Prepare the Clay:
Start by wedging your white clay thoroughly to remove air pockets. If you want the color inherent in the clay body rather than painted on later, knead a pink Mason stain into the wet clay at this stage until fully uniform. -
Pinch Pot Method:
Take a ball of clay roughly the size of a grapefruit. Insert your thumb into the center and gently pinch and turn the clay to open up a basic hollow form. -
Shape the Egg:
Continue pinching the walls, guiding the clay into an elongated, closed egg shape. Don’t worry about keeping the surface perfectly smooth, as the texture will cover it. -
Close the Form:
Gradually bring the clay walls together at the top to close the air inside. Trapping the air provides resistance and support for the sculpting phase. Smooth the seam with a kidney rib.
Step 2: Texturing the Surface
-
Plan the Opening:
Decide where the top opening of your vessel will be. Gently mark a small circle at the apex so you know where to focus your texture. -
Apply Clay Nodes:
Roll dozens of small clay balls, varying from pea-sized to marble-sized. Slip and score the surface of your base form, then attach these balls densely across the entire surface. -
Blend the Nodes:
Using a small wooden tool or your fingers, smooth the edges of the attached balls into the main body so they look like organic protrusions rather than stuck-on lumps. -
Create the Pores:
Select a medium-sized wooden dowel. Press it firmly into the center of one of the clay nodes to create a deep, tubular opening. I prefer to rotate the tool slightly as I pull it out to keep the hole clean. -
Vary Hole Sizes:
Switch between tool sizes—use the back of a paintbrush, a needle tool, or larger dowels—to poke holes into the other nodes. This variety mimics natural growth patterns. -
Add Micro-Texture:
Take a coarse sponge or a stiff stippling brush and tap it vigorously over the clay between the large holes. This creates the rough, limestone-like surface typical of dried coral. -
Refine the Openings:
Inspect the holes you created earlier. If the edges were flattened during texturing, use a ball stylus to gently reopen and round them out.
Needle Tool Trick
Before firing, use a needle tool to gently scratch tiny radiating lines around the rims of the larger holes. This adds extra realism.
Step 3: Finishing and Firing
-
Open the Vessel:
Now cut into the top area you marked earlier. Carve out an opening that blends with the surrounding texture, perhaps making the rim irregular and hole-filled. -
Hollow the Interior:
If the piece is heavy, carefully use a loop tool through the top opening to scrape away excess clay from the interior walls, ensuring an even thickness. -
Dry Slowly:
Because of the varied wall thickness, cover the piece loosely with plastic and let it dry very slowly over several days to prevent cracks. -
Bisque Fire:
Once bone dry, fire the piece to bisque temperature (usually cone 04). -
Apply Color:
If you didn’t stain the clay earlier, apply a wash of coral or pink underglaze. Wipe it back with a damp sponge so the color remains deep in the pores and pits but is lighter on the raised surfaces. -
Final Fire:
Glaze the interior if it needs to be water-tight, but leave the exterior unglazed (or use a very thin matte spray) to preserve the texture. Fire to final maturity.
Go Bioluminescent
Try glazing the interior with a bright, contrasting color like teal or lime green to make the coral sculpture pop.
Place your finished coral vessel near a window to let the light play across its complex surface shadows
Mini Scene Diorama Box Sculpture
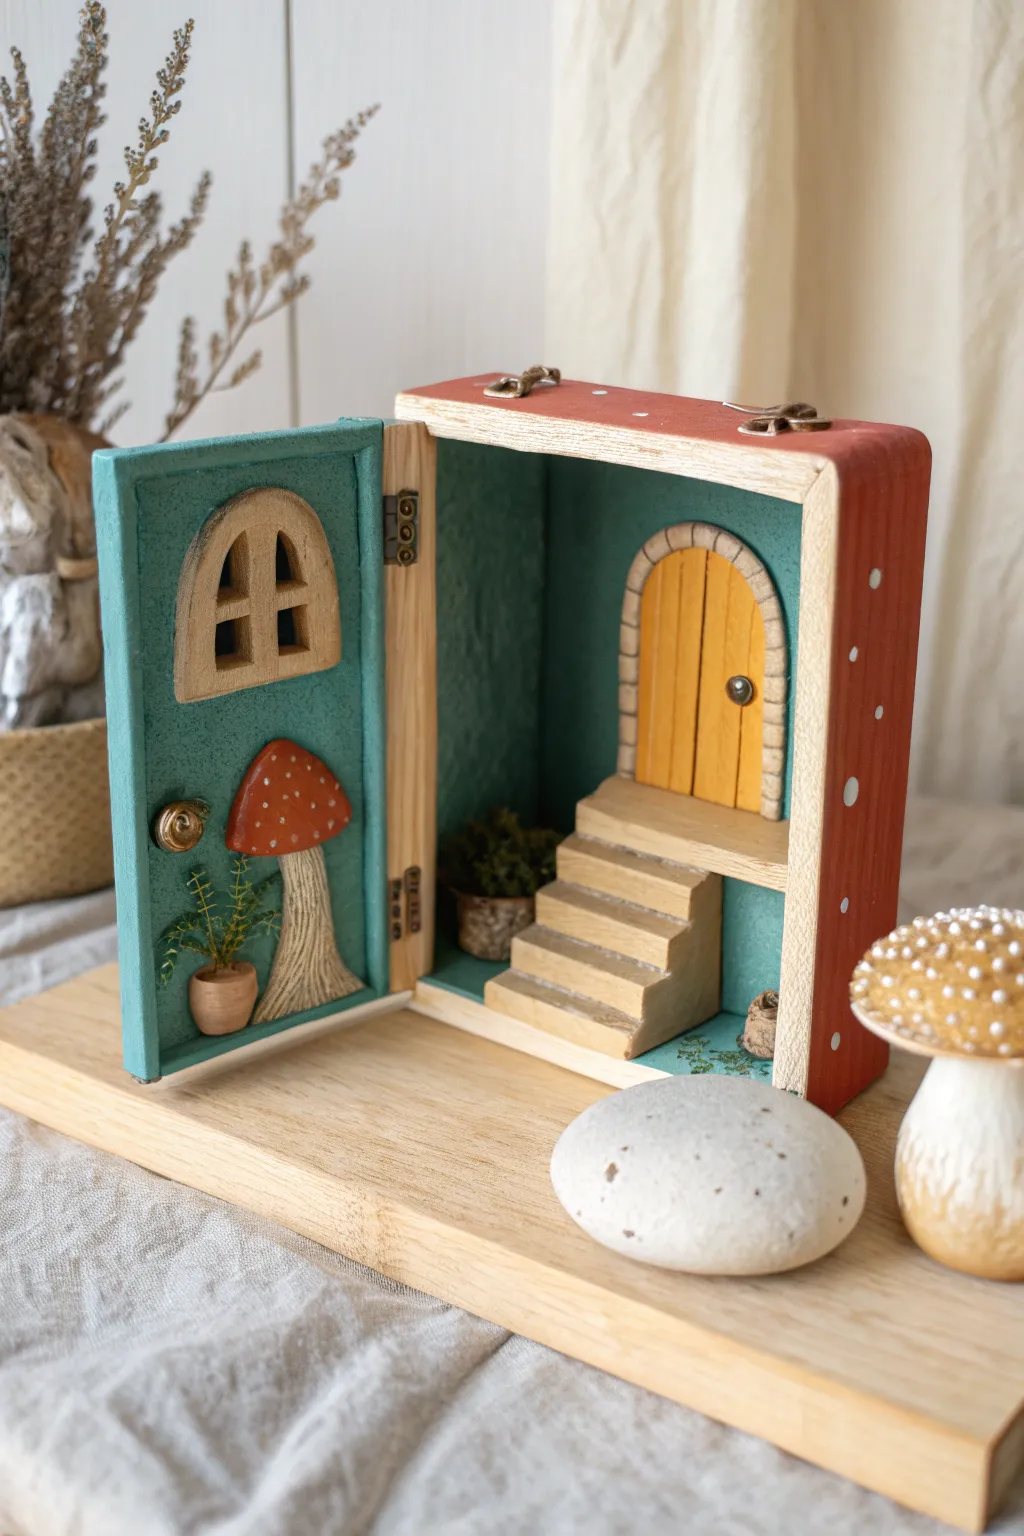
Transform a simple hinged wooden box into a magical hidden home for tiny forest creatures. This mixed-media project combines wood painting with detailed clay sculpting to create a cozy, dimensional miniature scene that looks like it was plucked straight from a fairytale.
Step-by-Step
Materials
- Small hinged wooden box (rectangular, deep lid)
- Air-dry clay or polymer clay (white or tan)
- Acrylic paints (Teal, Red, White, Ochre, Brown, Green)
- Small paintbrushes (flat and detail)
- Wood glue or strong craft glue
- Sculpting tools (needle tool, small blade)
- Textured rolling pin or rough stone (for texture)
- Dried moss (optional)
- Matte sealant or varnish
Step 1: Preparing the Structure
-
Base coating:
Begin by painting the interior of the box lid and the back interior wall with a muted teal or turquoise acrylic paint. This will be your ‘sky’ or wall color. Let it dry completely before adding a second coat for opacity. -
Exterior details:
Paint the exterior sides and top of the box with a rusty red. Once dry, use the handle end of a paintbrush dipped in white paint to dot small circles randomly over the red, mimicking a mushroom cap pattern. -
Natural wood accents:
Leave the front edges of the box frame and the interior side walls unpainted to showcase the natural wood grain, or give them a very light wash of diluted white paint.
Sticky Situation
Score the wood surface with sandpaper before gluing your clay pieces down. The rough texture gives the glue significantly more grip.
Step 2: Sculpting the Architectural Elements
-
Door and stairs:
Roll out a slab of clay about 1/4 inch thick. Cut out an arched door shape and sculpt a set of stairs that will fit perfectly inside the box’s depth. I prefer to measure the interior width first so the stairs don’t get stuck during assembly. -
Adding texture:
Use a needle tool or knife to score vertical lines into the door to resemble wooden planks. For the door frame, press small balls of clay around the arch to create a stone masonry look. -
The window:
Create a smaller arched window frame for the inside of the box lid (the ‘door’ part of the diorama). Cut out the center spaces to create window panes. -
Mushroom and plants:
Sculpt a half-mushroom shape (flat on the back) to mount on the door. Create a tiny pot and minuscule stems for the plant. Use a needle tool to drag texture down the mushroom stem for gills. -
Drying or baking:
Let all your clay pieces dry (if using air-dry) or bake them according to package instructions (if using polymer). Keep them flat to prevent warping.
Step 3: Painting the Details
-
Wood tones:
Paint the sculpted door and window frame in a warm golden ochre. Paint the stairs a sandy beige or light wood tone. -
Stonework and accessories:
Use a grey-brown wash for the stone border around the big door. Paint the mushroom cap red with white dots to match the box exterior, and paint the stem a creamy off-white. -
Greenery:
Paint the tiny potted plant green. For extra realism, I like to dry-brush a little lighter green on the tips to show highlights. -
Aging wash:
Once base colors are dry, apply a very diluted brown wash over the sculpted wood and stone textures, wiping it back quickly with a paper towel. This settles into the grooves and makes the sculpture pop.
Warped Pieces?
If your flat clay pieces curl while drying, simply sand the backs flat against gritty sandpaper until they sit flush against the wood.
Step 4: Assembly and Finishing
-
Installing the stairs:
Apply strong wood glue to the bottom and back of the stair piece. Press it firmly into the bottom right corner of the box interior. -
Mounting the door:
Glue the arched door sculpture directly onto the back wall, resting perfectly on the top step of your stairs. -
Decorating the lid:
Glue the window frame near the top of the teal-painted lid interior. Attach the mushroom and potted plant below it to create a balanced composition. -
Adding final touches:
Glue small bits of dried moss into the corners of the stairs and near the potted plant to simulate an overgrown forest floor. -
Hardware enhancement:
If your box has latch hardware, you can paint it bronze or gold to match the whimsical aesthetic. Add a tiny clay bead or brad to the sculpted door to serve as a doorknob.
Display your charming mini-world on a shelf where its secret interior can surprise curious guests