
Whenever I need a quick burst of studio happiness, I start sculpting ceramic food—it’s like making a little still-life you can actually hold. These clay ceramic food ideas go from classic sweets to full-on trompe-l’œil plating, so you can choose something cute, realistic, or delightfully weird.
Donut Trio Trompe-l’œil Plate
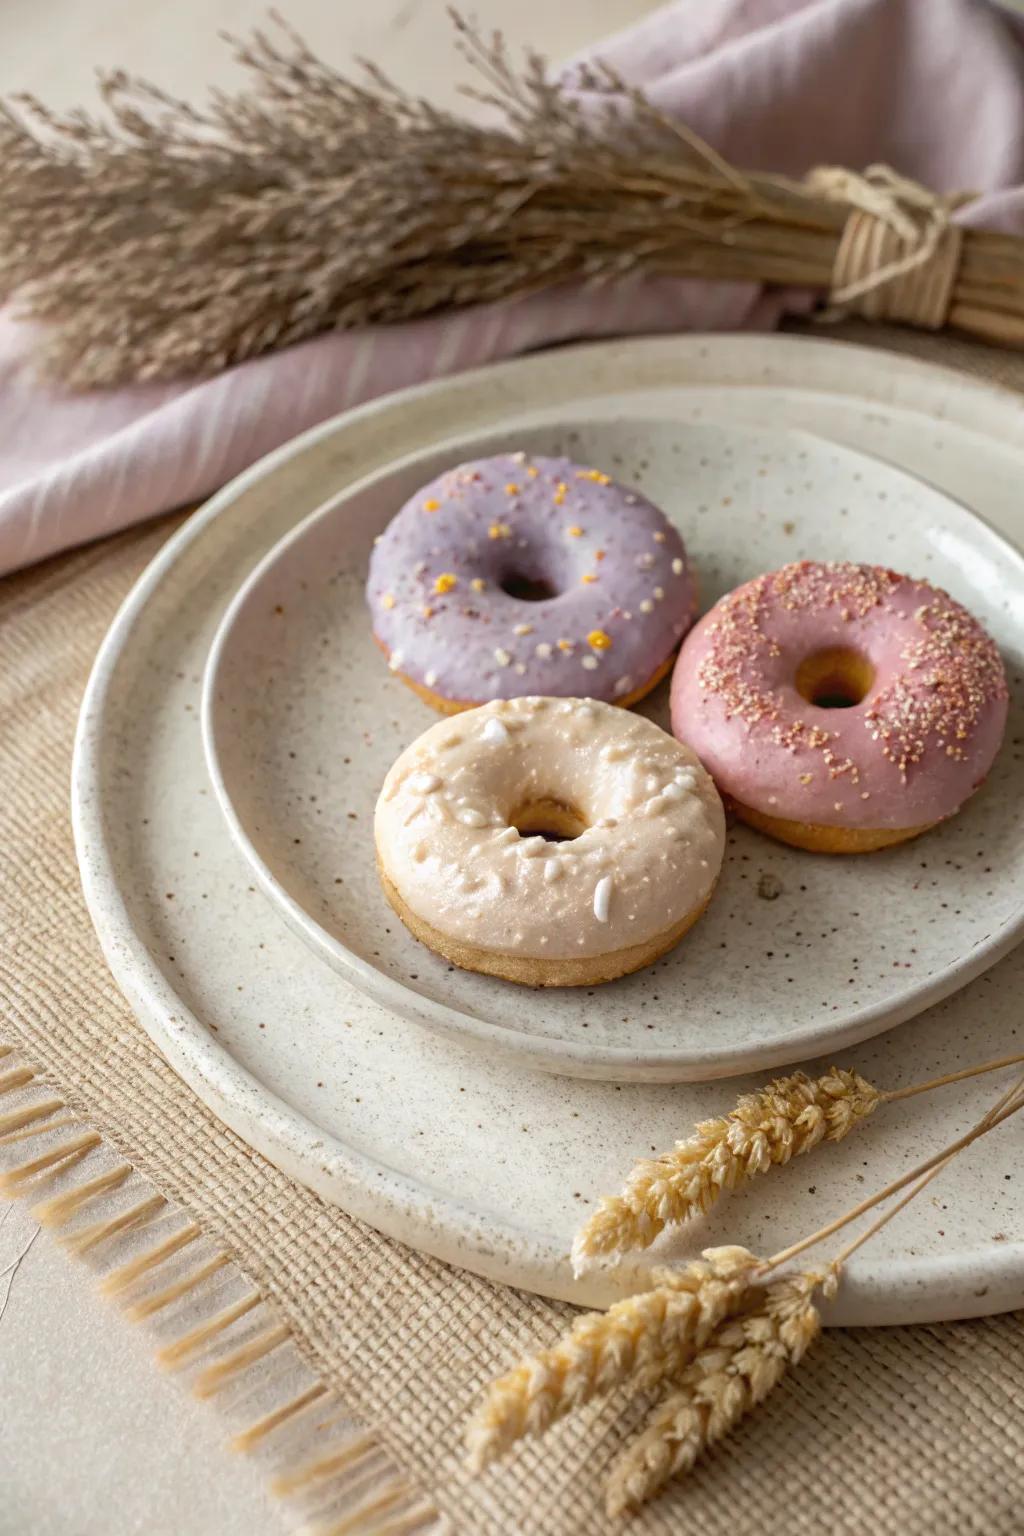
Create a delightful trompe-l’œil centerpiece with this trio of ceramic donuts resting on a speckled stoneware plate. This project combines hand-building techniques with creative glazing to mimic the texture of soft dough, glossy icing, and sugary sprinkles.
Step-by-Step Guide
Materials
- White stoneware clay or light-colored earthenware clay
- Rolling pin and guide sticks (approx. 1/4 inch)
- Circle cutters (3-inch diameter and 1-inch diameter)
- Needle tool
- Modeling tool or wooden rib
- Scoring tool or serrated kidney
- Slip (liquid clay)
- Sponge
- Underglazes (Purple, Pink, Beige/Cream)
- Clear glossy glaze
- Speckled matte white glaze (for the plate)
- High-fire wire loops (optional for hanging)
- Small fine-point brush
- Medium soft bristle brush
Step 1: Sculpting the Donuts
-
Prepare the Clay:
Begin by wedging your white stoneware clay thoroughly to remove air bubbles. This ensures your donuts shape evenly and don’t crack during firing. -
Roll Snakes:
Roll out a coil (snake) of clay approximately 1 inch thick. You want it to be plump, resembling a raised yeasted donut rather than a flat cake donut. -
Form the Circles:
Cut the clay coil into three 7-inch lengths. Curve each length into a circle, joining the two ends together. The diameter should end up around 3 inches. -
Join the Seams:
Score the ends of the coil with a serrated tool and apply a dab of slip. Press them firmly together. Smooth the seam completely with a modeling tool or your thumb so it vanishes. -
Refine the Shape:
Gently pat the donut shape. Unlike a perfect torus, real donuts have slight irregularities. Slightly flatten the bottom so it sits stable on a surface. -
Create the Bead:
Use a damp sponge to smooth the entire surface. If you want a ‘yeast ring’ look (the pale line in the middle of fried donuts), gently flatten the sides a tiny bit with a wooden rib. -
Dry and Bisque:
Allow the donuts to dry slowly under plastic for a day, then uncover until bone dry. Fire them to bisque temperature (likely cone 04, depending on your clay).
Glaze Viscosity Tip
For realistic icing drips, let your glaze sit open for an hour to thicken slightly. A thicker glaze won’t run too far and holds the illusion of heavy frosting!
Step 2: Creating the Serving Plate
-
Roll the Slab:
While the donuts dry, roll out a large slab of clay about 1/4 inch thick. Use a plate mold or a large bowl to drape the slab over to form a shallow rim. -
Refine the Rim:
Trim the edges with a needle tool while the wheel spins (or use a template if hand-building). Smooth the rim with a damp sponge or chamois for that professional, rounded edge. -
Bisque the Plate:
Dry and bisque fire the plate alongside your donuts.
Step 3: Glazing and Decoration
-
Base Glaze the Plate:
Apply 2-3 coats of a speckled matte white glaze to your bisque-fired plate. This creates the artisan ceramic look seen in the reference photo. -
Glaze the Donut ‘Dough’:
Mix a small amount of beige or light tan underglaze. Paint the bottom half of each donut and the very inner ring, leaving the top bare for the ‘icing’ layer. -
Purple Glaze Application:
For the first donut, apply a thick, opaque pastel purple glaze to the top half. Let the glaze drip slightly unevenly down the sides to mimic gravity pulling heavy icing. -
Pink Glaze Application:
Repeat the process for the second donut using a strawberry-pink glaze. Be generous with the application so the color is solid. -
Cream Glaze Application:
For the third donut, use a creamy beige or warm white glaze. Apply it thickly, allowing pooling in slight depressions for depth. -
Adding Sprinkles:
I prefer using actual sprinkles made of glaze for this part. Take tiny bits of dried glaze or underglaze chunks and press them into the wet glaze surface. For the pink donut, sprinkle dry glaze powder for a ‘sugar dust’ effect. -
Hand-Painting Details:
Alternatively, wait for the base glaze to dry, then use a fine-point brush to dab tiny dashes of white, orange, or yellow glaze on top to represent sprinkles. -
Final Clear Coat:
If your colored glazes aren’t naturally glossy, apply a thin layer of clear gloss glaze over just the ‘icing’ parts to make them look sticky and sweet. -
Final Firing:
Fire all pieces to the maturity temperature of your glaze (e.g., Cone 6). Ensure the donuts are stilted or the bottoms are wiped clean so they don’t fuse to the kiln shelf.
Fixing Cracks
If tiny cracks appear at the seam where you joined the donut ring, score deeply, add vinegar slip, and compress again. Do this before they are bone dry.
Now you have a permanent, calorie-free treat that adds a touch of playful sweetness to your table decor.


Sushi Set With Simple Details
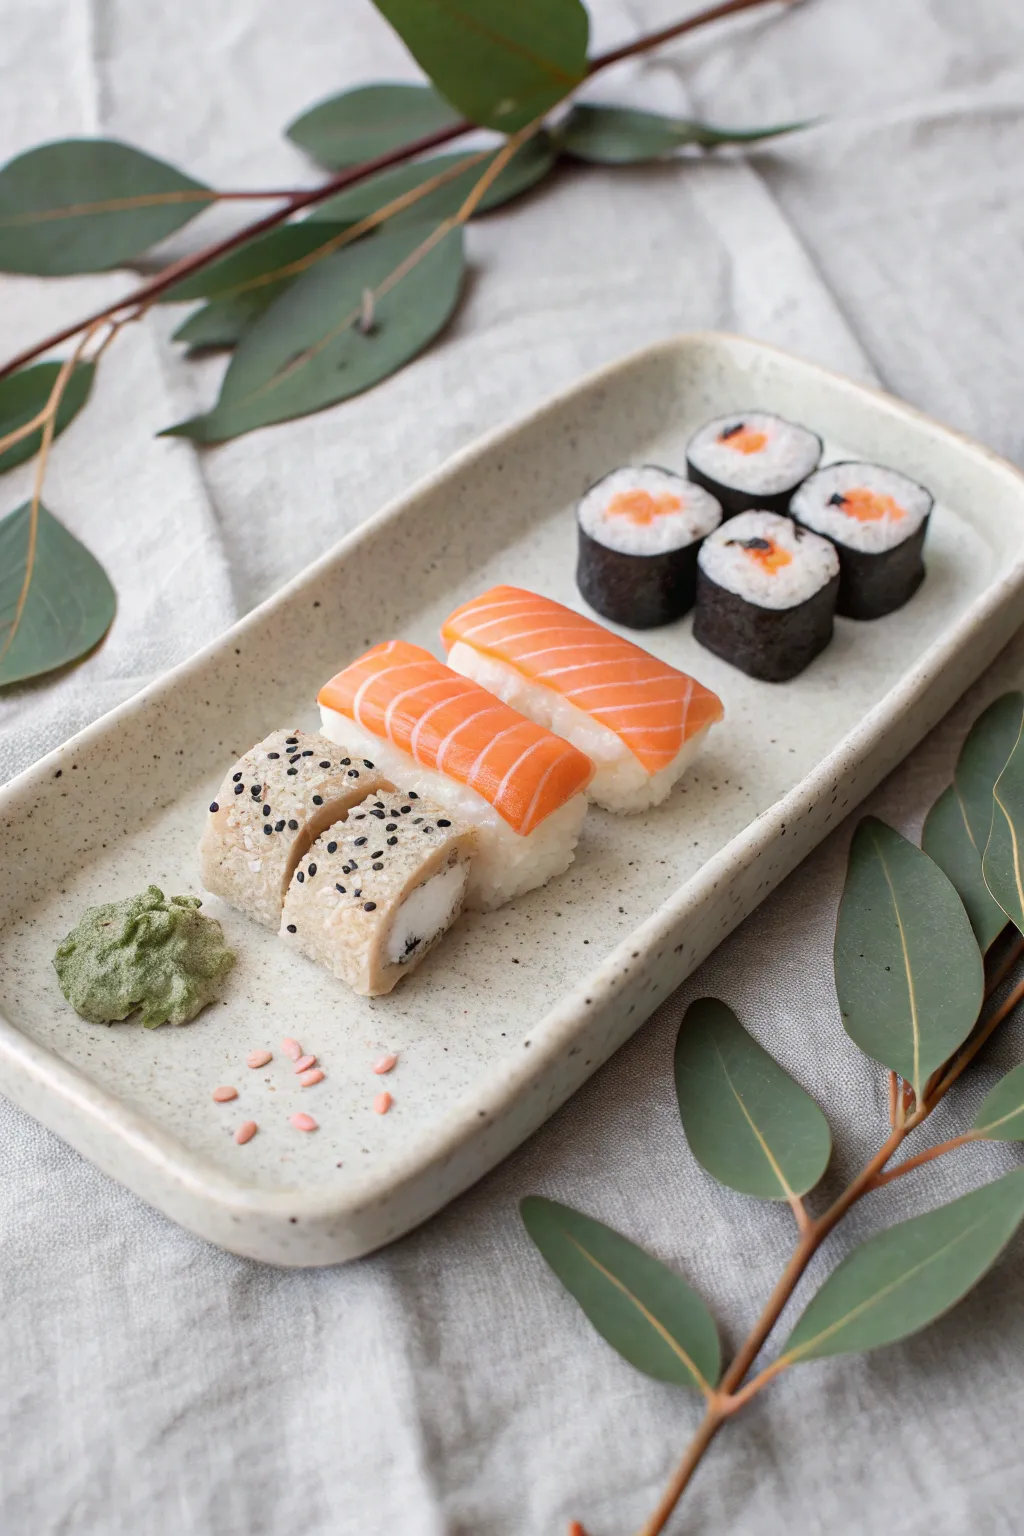
Create a deceptively realistic feast for the eyes with this polymer clay sushi set, perfect for home decor or display. From the translucent sheen of fresh salmon to the textured grains of rice, you’ll learn sculpting techniques that turn simple clay into an appetizing illusion.
Step-by-Step
Materials
- Polymer clay (white, translucent, orange, red, black, beige, green)
- Speckled pottery clay or stoneware clay (for the plate)
- Rectangular slab mold or rolling pin
- Liquid polymer clay (translucent)
- Texture tools (needle tool, toothbrush, sandpaper)
- Craft knife
- Rolling machine or acrylic roller
- Gloss varnish
- Matte varnish
- Black sesame seeds (real or clay)
- Ceramic kiln (for the plate) or oven (for polymer clay)
Step 1: Crafting the Speckled Ceramic Plate
-
Roll the slab:
Start by rolling out your speckled stoneware clay into an even slab, approximately 1/4 inch thick. If you don’t have speckled clay, wedge some grog or iron sand into plain white clay to achieve that organic look. -
Shape the form:
Cut a rectangle with rounded corners, about 6×10 inches. Gently curl up the edges to form a shallow lip, smoothing the rim with a damp sponge to remove any sharpness. -
Fire and glaze:
Once bone dry, bisque fire the plate. Apply a clear or milky white glaze (leaving the speckles visible) and fire again according to your clay’s specific temperature guide. Let it cool completely before adding the sushi.
Step 2: Sculpting the Sushi Rice Base
-
Mix the rice color:
Combine white polymer clay with a significant amount of translucent clay (about a 1:1 ratio). This mimics the slightly jelly-like, cooked appearance of real sushi rice. -
Create texture:
Instead of rolling individual grains, create a rough ‘rice block’ shape first. Then, use a needle tool or a stiff toothbrush to vigorously stipple the surface, pulling up tiny bits of clay to simulate fluffy distinct grains. -
Form the Nigiri blocks:
Shape two rectangular mounds with rounded tops for the salmon nigiri base. Keep the bottom flat so they sit securely on your ceramic plate.
Stubborn Seams?
If your Nori seams won’t stay closed, apply a tiny drop of liquid polymer clay or baby oil to the joining edges before pressing them together. Bending the clay slightly warms it for a better seal.
Step 3: Creating the Salmon Nigiri
-
Blend the salmon gradient:
Mix orange, specific amounts of red, and translucent clay. Create a ‘skinner blend’ or simply layer thin sheets of white clay between thicker sheets of orange to simulate the fat lacing found in salmon. -
Cut the filets:
Slice thin rectangular strips from your blended block. Place one strip gently over each rice mound, curving it down lightly over the sides. -
Add surface detail:
Use a soft tool to gently press subtle indentations into the orange clay, mimicking the muscle structure of fish.
Level Up: Fish Texture
Before baking, lightly press a piece of coarse sandpaper or a raw scouring pad onto the salmon surface. This micro-texture catches the gloss glaze later, creating realistic highlights.
Step 4: Building the Maki Rolls
-
Make the core:
Create small cylinders of ‘salmon’ or ‘vegetables’ utilizing scraps from the previous step. Wrap these tightly in a layer of your textured rice mixture. -
Wrap the Nori:
Roll out black clay as thin as paper. Wrap this strip around the rice cylinder, trimming the seam cleanly with a craft knife. -
Cut individual pieces:
Let the long roll rest in the fridge for ten minutes to firm up, then slice it into four equal rounds to prevent squishing the shape. -
Re-texture:
The cutting process smudges the rice texture, so go back in with your needle tool on the cut faces to redefine the individual grains.
Step 5: The Inside-Out Sesame Rolls
-
Assemble the roll:
Create a core of white ‘cream cheese’ clay and wrap it in a thin beige sheet (to act as the soy wrapper or fried coating). Surround this with a layer of rice clay. -
Apply sesame seeds:
Roll the entire log in black and white seeds. You can use real sesame seeds (they withstand baking temperatures) or tiny bits of baked black clay for longevity. -
Slice and shape:
Cut the log into two pieces. Gently press the sides to give them a slightly squared-off look, characteristic of uramaki.
Step 6: Finishing Touches
-
Sculpt wasabi and ginger:
Mix green clay with grit or sand for the wasabi texture and form a rough, pyramid-like blob. For ginger, use translucent pale pink clay rolled paper-thin and folded into an unruly pile. -
Arrangement:
Position all your sushi pieces, the wasabi, and scattered tiny flat pink discs (as garnish) permanently onto the ceramic plate using a thin layer of liquid polymer clay as glue. -
Bake the assembly:
Bake the entire ceramic plate with the polymer clay food on it. Follow the baking instructions for your specific brand of polymer clay (usually 275°F/135°C). -
Varnish:
Once cool, brush a high-gloss varnish only on the ‘fish’ parts to make them look wet and fresh. Use a matte varnish on the rice and nori to keep them looking natural.
Display your lifelike sushi platter on a coffee table and wait for a hungry guest to be tricked by your craftsmanship


Taco and Salsa Play-Food Set
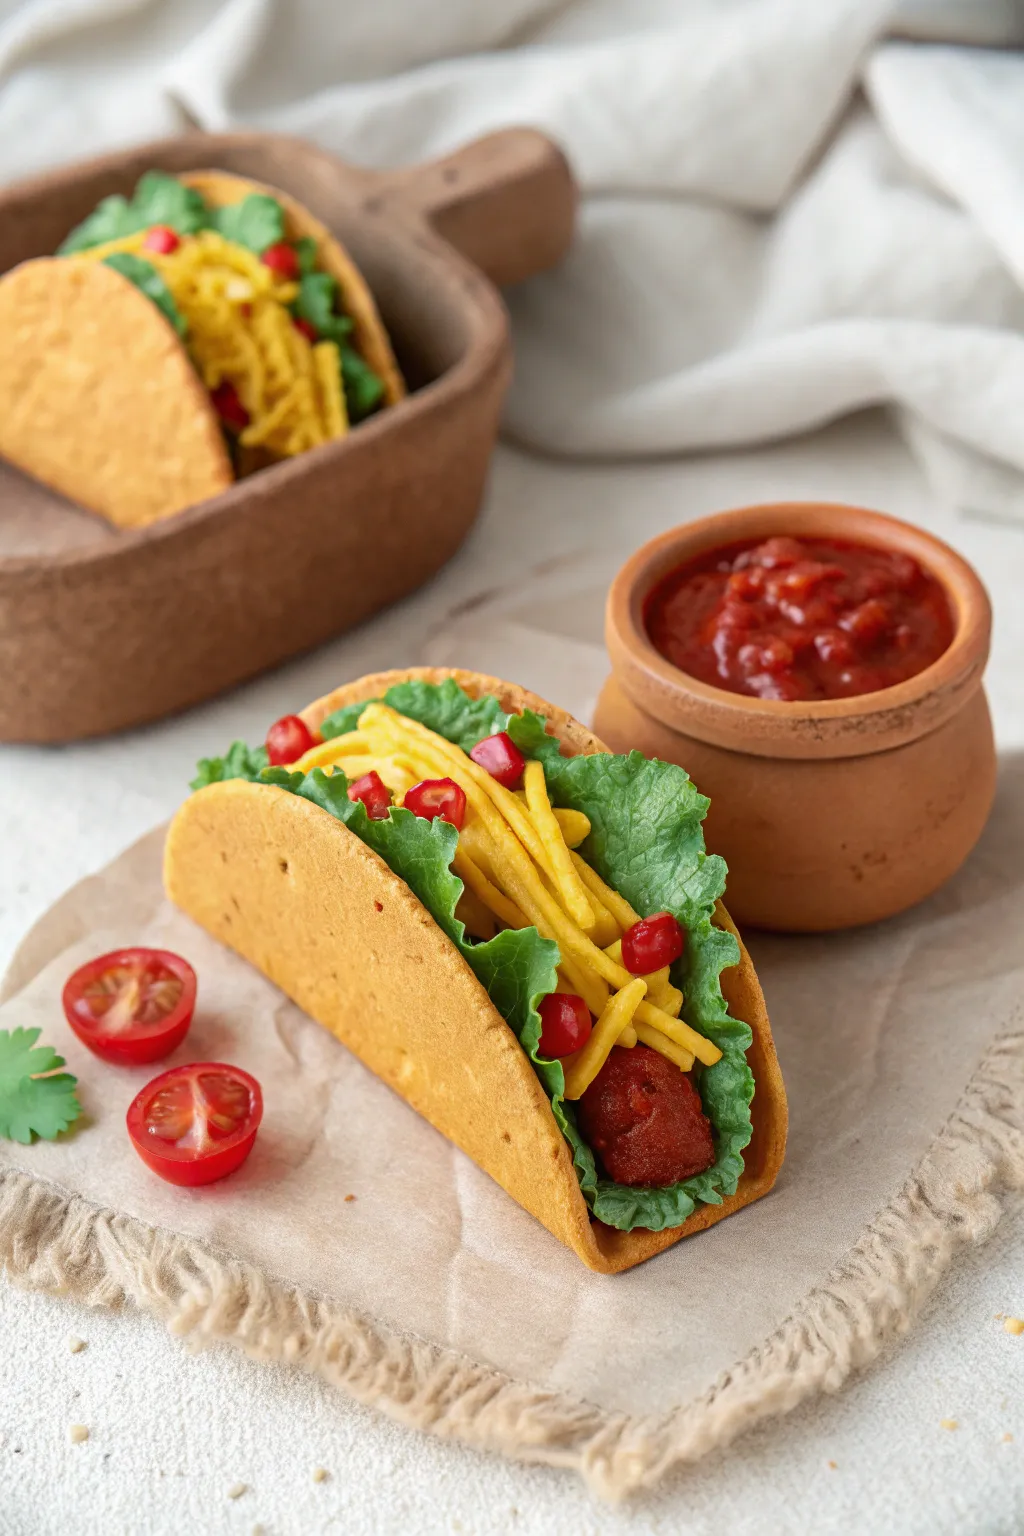
Create a deliciously deceptive taco set that looks good enough to eat but is crafted entirely from clay. This project focuses on building realistic textures, from the gritty corn shell to the glossy, rich salsa.
Step-by-Step Tutorial
Materials
- Polymer clay (yellow ochre, tan, translucent white, leafy green, bright red, deep red)
- Liquid polymer clay (translucent and red)
- Basic sculpting tools (needle tool, ball stylus)
- Texturing tools (toothbrush, coarse sandpaper, or crinkled aluminum foil)
- Circle cutter (approx. 4-5 inches diameter)
- Pasta machine or rolling pin
- Small glass or ceramic pot (for the salsa)
- Soft pastel chalks (orange, brown, red) and a brush
- Gloss varnish or UV resin
- Oven for baking polymer clay
Step 1: Crafting the Corn Shells
-
Mix the dough color:
Start by mixing yellow ochre clay with a small amount of tan and translucent white. This creates a realistic corn dough color that isn’t too plastic-looking. -
Roll and texture:
Roll the clay into a flat sheet, about 1/8 inch thick. Before cutting, press coarse sandpaper or a stiff toothbrush firmly over the entire surface to mimic the gritty texture of a corn tortilla. -
Cut the shape:
Use a large circle cutter to stamp out your tortilla shape. If the edges look too sharp, gently tap them with your finger to soften the cut. -
Pre-shade the shell:
Shave some orange and brown soft pastels into a powder. Using a dry brush, dust the edges and random spots on the surface to create baked-in toasted areas. -
Form the shell:
Gently fold the circle in half to create the taco shape, but don’t crease the bottom. Insert a crumpled piece of foil or a curved metal form inside to hold the opening wide while it bakes.
Texturing Tip
Add black pepper flakes to your dough! Mix actual ground black pepper or dried used coffee grounds into the yellow clay to mimic stone-ground cornmeal specs.
Step 2: Creating the Fillings
-
Sculpting the meat:
Mix dark brown and red clay to make a ‘ground beef’ color. Pinch off small, irregular chunks and press them together loosely to form a textured mass that fits into the bottom of your taco shell. -
Texturing the meat:
Take a needle tool or a ball of crinkled aluminum foil and aggressively stipple the surface of the meat chunks to give them that cooked, crumbly appearance. -
Making the lettuce:
Roll out a very thin sheet of leafy green clay. Tear erratic strips rather than cutting them, as torn edges look more organic. Frill the edges by pressing and dragging a toothpick along the rim. -
Arrange the base layers:
Place the meat inside the shell first, followed by the lettuce leaves. Arrange the lettuce so the frilly edges peek out generously over the top of the shell. -
Grating the cheese:
Condition yellow clay and roll it into a very thin snake, or partially bake a block of yellow clay and grate it with a real cheese grater for ultra-realism. Pile these strands on top of the lettuce and meat.
Step 3: The Salsa & Finishing Touches
-
Forming tomatoes:
Roll tiny spheres of bright red clay for cherry tomatoes. Cut them in half and use a needle tool to remove a tiny bit of the center, creating the seed cavity. -
Adding pomegranate seeds:
For the garnish seen in the photo, roll tiny teardrops of deep translucent red clay. I like to bunch a few together on top of the taco. -
Filling the salsa pot:
Chop up irregular chunks of red and deep red clay. Place them into your miniature ceramic pot until it’s nearly full. -
Creating the sauce:
Mix liquid polymer clay with red chalk shavings or alcohol ink until you have a thick, translucent red sauce. Pour this over the clay chunks in the pot, letting it settle into the crevices. -
Baking:
Bake the taco assembly and the salsa pot according to your clay manufacturer’s instructions (usually around 275°F/130°C for 15-30 minutes). Let them cool completely. -
Glazing:
Once cool, brush a high-gloss varnish or UV resin over the meat, the tomatoes, and especially the salsa in the pot to give them a permanent ‘wet’ look.
Level Up: The Slice
Create loose cherry tomato slices to scatter around the plate. Use translucent red clay for the flesh and paint tiny yellowish-white seeds inside before baking.
Display your culinary masterpiece on a wooden board for the ultimate trompe-l’œil effect.

Cheeseburger With Sesame Seed Details
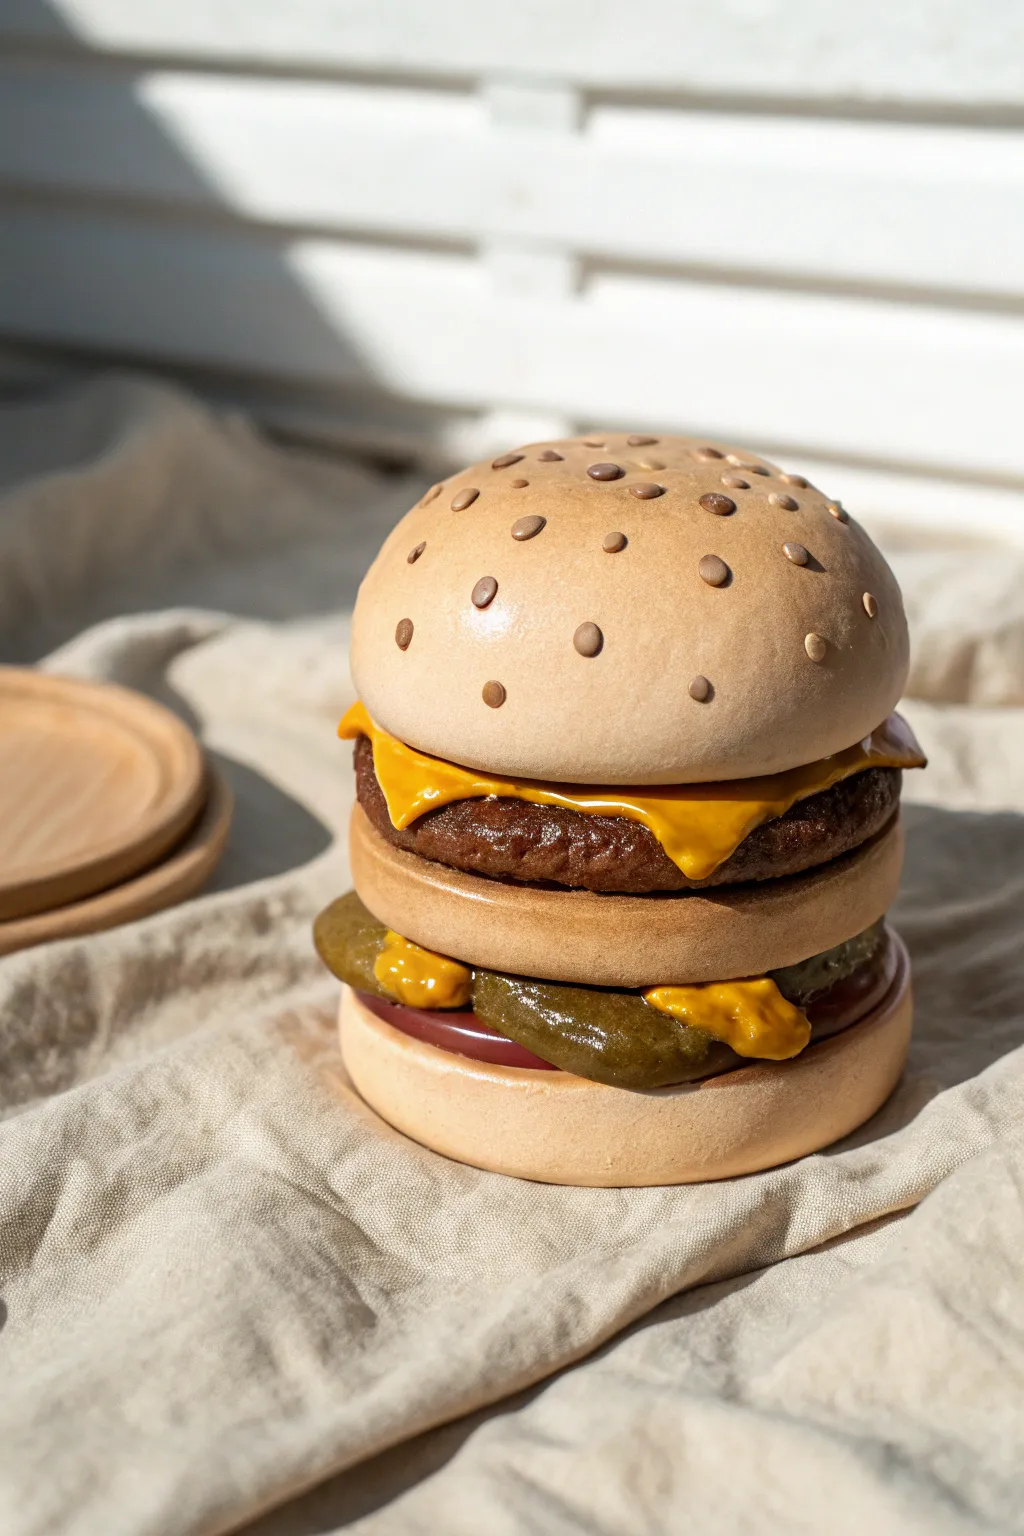
Sculpt a mouth-watering masterpiece that looks good enough to eat but will last forever as a quirky decor piece. This ceramic cheeseburger features realistic textures, from the sesame-studded bun to the melty cheese slices, all built in satisfying layers.
Step-by-Step
Materials
- Stoneware or earthenware clay (white or buff)
- Pottery wheel (optional, for buns)
- Rolling pin and canvas mat
- Needle tool
- Modeling tools (wooden rib, trimming loop)
- Sponge
- Scoring tool or serrated rib
- Slip (liquid clay)
- Underglazes: Light brown, dark brown, yellow-orange, green, red
- Clear matte glaze
- Small stiff paintbrush (for texturing)
Step 1: Shaping the Buns
-
Form the base bun:
Start by creating a flat, thick disc of clay about 4-5 inches wide and 0.75 inches thick. Smooth the edges to create a soft, rounded perimeter. -
Create the middle bun:
Form a second disc similar to the first, but slightly thinner. This acts as the separator layer, giving your sculpture that classic double-decker height. -
Sculpt the top bun:
Shape a dome for the top bun. You want a nice, high arch. Hollow out the underside slightly to reduce weight and prevent explosions in the kiln, ensuring the walls are an even thickness. -
Refine the surface:
Smooth all three bun pieces with a damp sponge to remove fingerprints. The clay should look soft and doughy.
Step 2: Crafting the Fillings
-
TEXTURE THE PATTY:
Roll a thick slab for the meat patty. Trim it to be slightly wider than the buns so it peeks out. Use a stiff bristled brush or a crumpled ball of foil to aggressively stipple the edges, mimicking ground beef texture. -
Make cheese slices:
Roll a very thin slab of clay and cut a square. Place it over the textured patty while the clay is soft, gently bending the corners down so they drape naturally as if melted. -
Form the pickles:
Create small, thick ovals for pickle slices. Use your needle tool to texture the edges with ridges, resembling crinkle-cut slices. -
Add sauce drips:
Roll tiny coils or blobs of clay to represent mustard or special sauce. I like to squash these slightly so they look like they are oozing out between layers. -
Create the tomato or onion layer:
Roll a flat disc for the bottom garnish layer (tomato or red onion). Keep the edges smooth and consistent.
Cracking Cheese?
If your thin cheese corners crack while drying, wrap the sculpture in plastic and spritz with water daily. Slow drying is crucial for pieces with varying thickness.
Step 3: Assembly & Details
-
Stack and score:
Begin assembly from the bottom up. Score and slip every contact point thoroughly. Start with the bottom bun, then the tomato layer, then the pickles and sauce. -
Add the middle section:
Place the middle bun on top of the pickles. Press down firmly but gently to ensure a good bond without deforming the shapes. -
Mount the patty and cheese:
Score and slip the top of the middle bun, then add your patty-and-cheese unit. Ensure the melted cheese corners are supported or attached to the bun below so they don’t break off. -
Cap it off:
Attach the top domed bun. Check the sculptural balance to make sure it isn’t leaning too far to one side. -
Add sesame seeds:
Roll tiny tear-drop shapes of clay. Score the top of the bun lightly and attach each seed individually, pressing them flat so they don’t pop off during firing.
Make it a Jar
Don’t score the middle bun to the top patty. Instead, add a flange (lip) to the middle bun so the top half lifts off, creating a secret cookie jar.
Step 4: Glazing & Finishing
-
Bisque fire:
Allow the entire piece to dry slowly under plastic for several days to equalize moisture, then bisque fire to cone 04. -
Paint the buns:
Apply a light tan underglaze to the buns. Sponge it back slightly to leave color in the pores but keep the ‘baked’ look subtle. -
Color the fillings:
Paint the patty dark brown, the cheese a rich yellow-orange, and the pickles an olive green. Use a translucent red for the tomato layer. -
Detail the seeds:
Carefully dab a lighter beige or white underglaze onto each sesame seed to make them pop against the tan bun. -
Final glaze fire:
Coat the entire piece in a clear matte glaze to protect it while maintaining a realistic food finish. Fire to the temperature appropriate for your clay body.
Place your finished ceramic burger in the kitchen or on a mantle to confuse and delight your guests

The Complete Guide to Pottery Troubleshooting
Uncover the most common ceramic mistakes—from cracking clay to failed glazes—and learn how to fix them fast.
Pizza Slice Wall Piece or Magnet
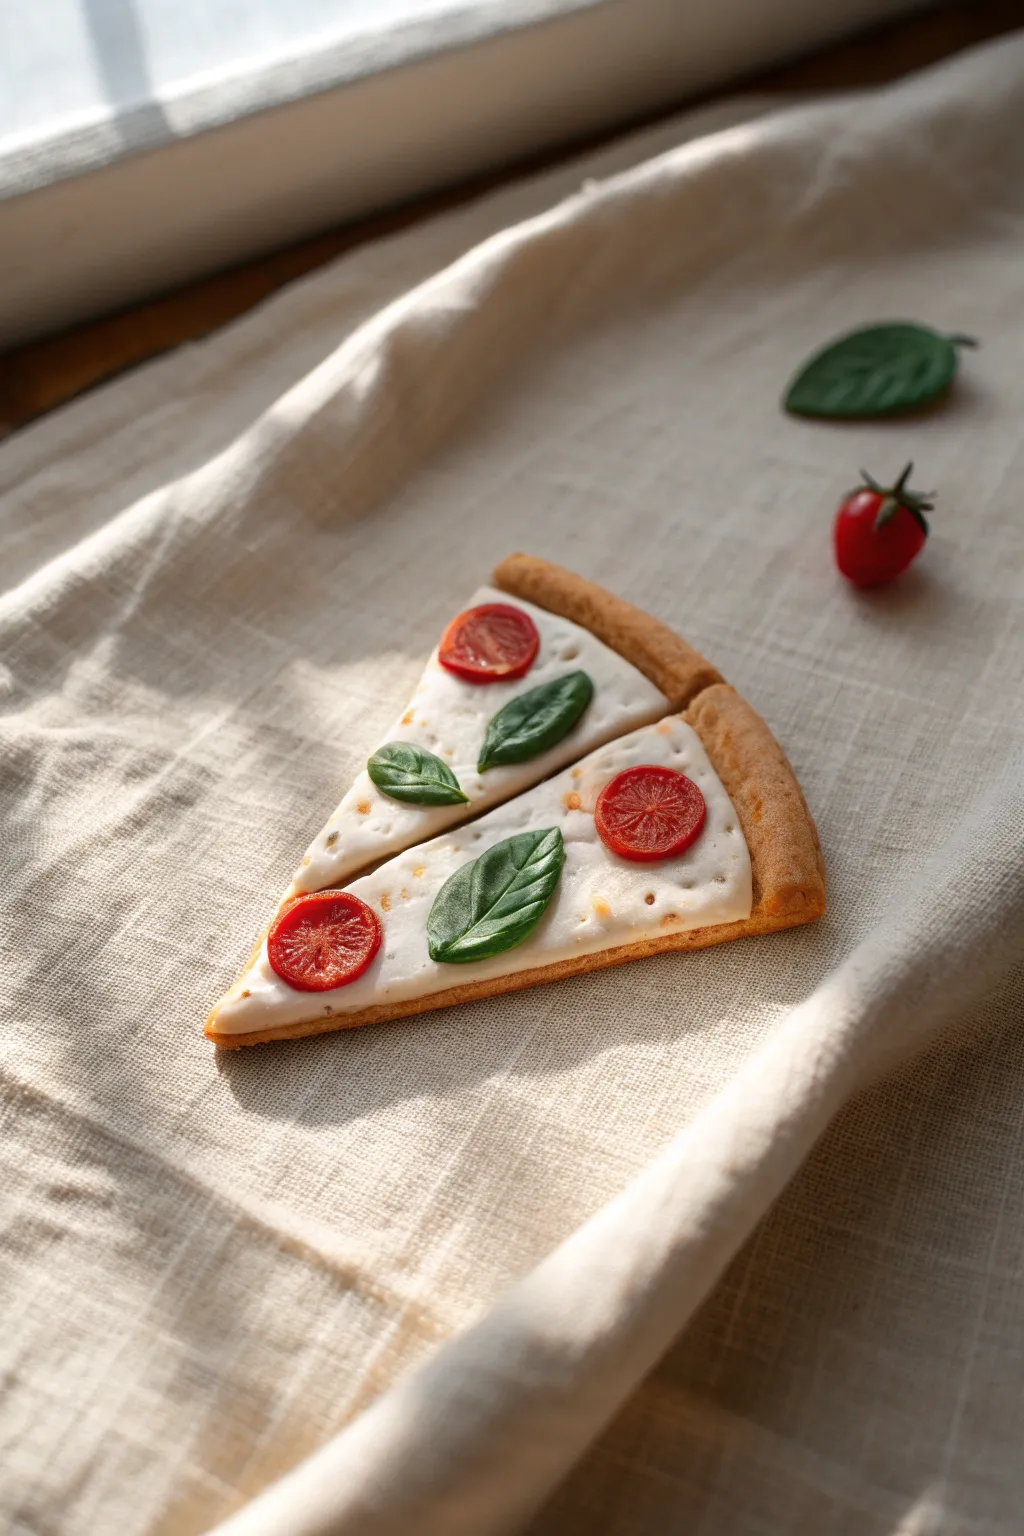
These charmingly realistic pizza slices capture the classic Margherita look with vibrant tomato rounds and fresh basil leaves nestled in melty cheese. The texture of the crust and the glossy finish on the toppings make them perfect as quirky fridge magnets or a unique piece of kitchen wall art.
Step-by-Step Tutorial
Materials
- Polymer clay (white, translucent, tan/ochre, red, green)
- Liquid polymer clay (Translucent)
- Pastel chalks (browns, oranges, yellows)
- Craft knife or scalpel
- Detailing needle tool
- Toothbrush (for texturing)
- Gloss varnish or UV resin
- Small magnets or picture hanger
- Rolling pin or pasta machine
Step 1: Forming the Crust
-
Mix the dough color:
Start by mixing translucent clay with a small amount of tan or ochre clay. You want a color that resembles raw dough but will bake into a golden bread shade. -
Shape the base:
Roll the clay out to about 1/4 inch thickness. Cut out a triangular wedge shape. Use your fingers to gently pinch and round the wider end to create a puffy crust rim. -
Texture the bread:
Using a clean toothbrush, firmly tap the entire surface of the clay, especially the crust rim. This creates that realistic baked bread porosity. -
Pre-shade the crust:
Shave some brown and orange pastel chalk into a fine powder. With a soft brush, dust the outer rim of the crust to simulate baking, focusing on the edges where the oven heat would hit hardest.
Fixing “Plastic” Cheese
If your cheese looks too opaque or white, mix in a tiny drop of yellow alcohol ink or more translucent clay to warm up the tone and increase depth.
Step 2: The Cheese Layer
-
Prepare the cheese mix:
Mix white clay with a good amount of translucent clay (about a 1:1 ratio). This ensures the cheese looks milky and melty rather than stark, opaque white. -
Apply the cheese:
Spread a thin layer of liquid polymer clay onto the flat part of your crust to act as glue. Place your cheese mixture on top, gently pulling and stretching it near the edges to mimic melted mozzarella. -
Add surface detail:
Use a needle tool or ball stylus to create small divots and undulations in the cheese surface, making it look bubbling and uneven. -
Color the cheese:
Lightly dust the cheese layer with very faint orange/yellow chalk powder. This gives it that greasy, baked-cheese glow.
Step 3: Toppings & Assembly
-
Create tomato slices:
Roll a small cane of red clay. Slice thin rounds off the end. Press them slightly flat so they don’t stick up too high. -
Texture the tomatoes:
Use a needle tool to create the internal seed cavities of the tomato slices. I find that pressing a rough texture into the center makes them look much juicier. -
Sculpt basil leaves:
Take tiny bits of green clay and flatten them into teardrop shapes. Use a needle tool to draw a central vein down the middle of each leaf. -
Place toppings:
Position your tomatoes and basil on the slice. Press them gently into the ‘cheese’ so they look embedded rather than just sitting on top. -
Bake:
Bake the piece according to your specific clay manufacturer’s instructions (usually around 275°F/130°C for 15-30 minutes).
Burnt Bits Effect
Use a tiny bit of dark brown acrylic paint on a sponge to dab microscopic ‘char’ spots on the crust bubbles or cheese edges for a wood-fired oven look.
Step 4: Finishing Touches
-
Add gloss:
Once cool, apply a high-gloss varnish or UV resin specifically to the tomato slices and the basil leaves. This gives them a fresh, wet appearance. -
Satin finish:
Apply a satin or matte varnish to the cheese area if desired, avoiding the crust to keep its dry, bready texture. -
Attach hardware:
Glue a strong magnet or a small hanging loop to the back of the slice using E6000 or super glue.
Now your kitchen has a delicious touch of Italian flair that will last forever
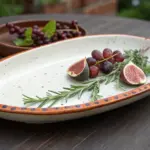
Pasta Plate With Matte–Shiny Contrast
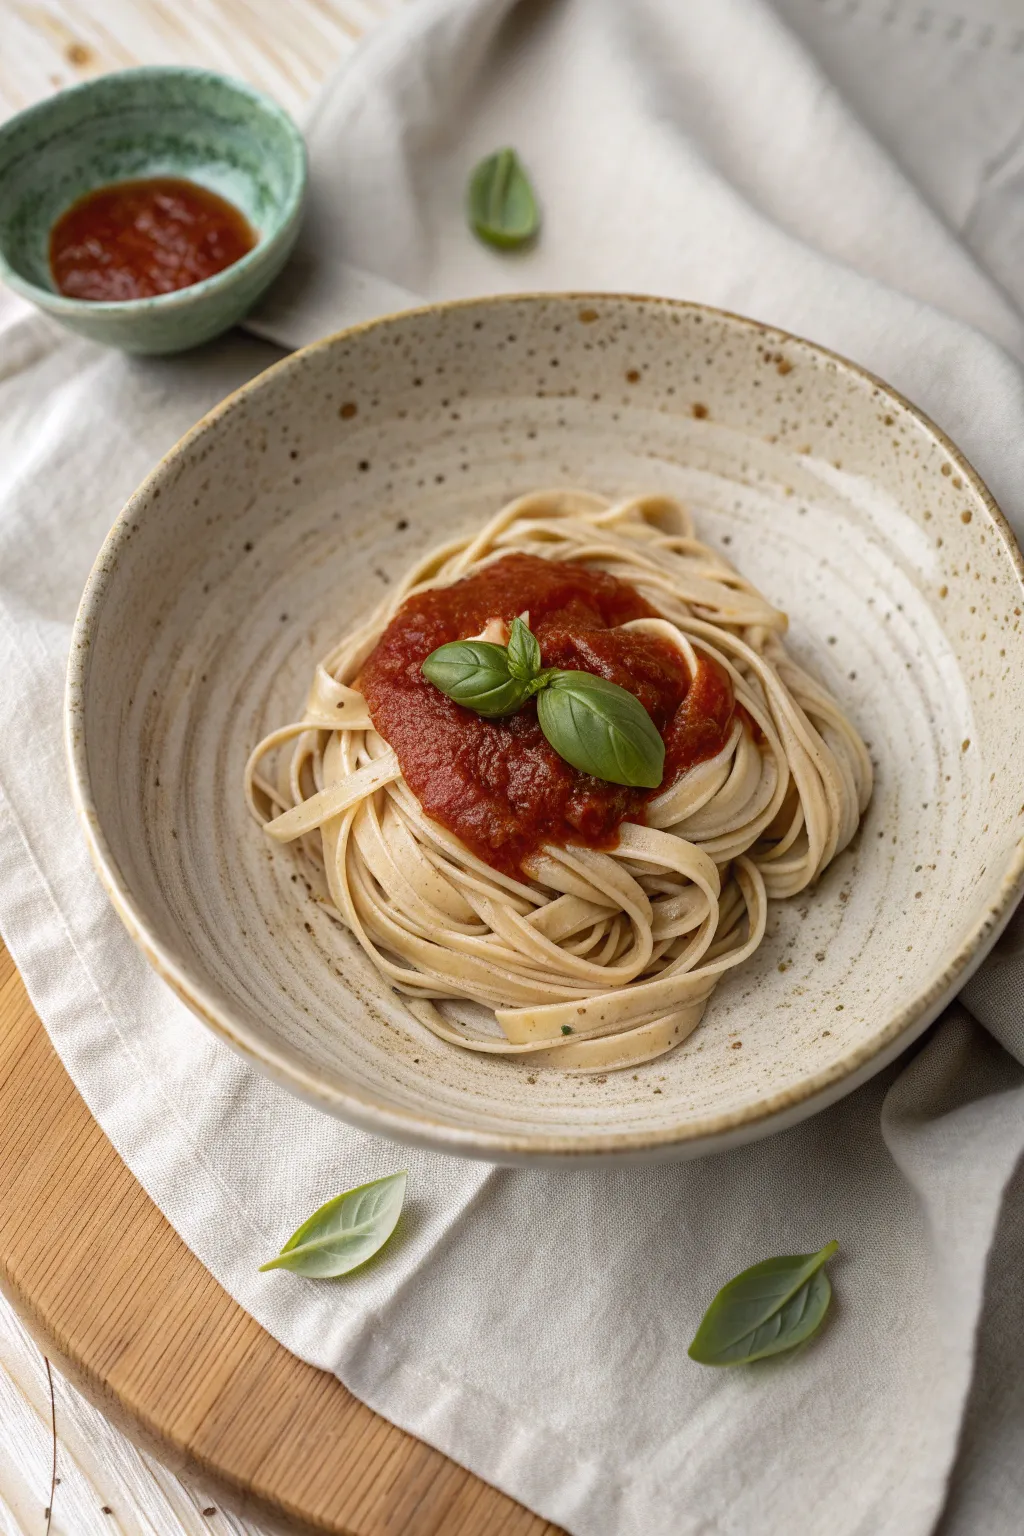
This project creates a deep, generous pasta bowl characterized by its organic shape and beautiful speckling. The contrast between the natural clay body and a simple glaze application gives it a timeless, handmade appeal perfect for everyday meals.
Detailed Instructions
Materials
- Stoneware clay with speckled grog (e.g., Laguma Speckle or Buff Speckle)
- Pottery wheel
- Throwing tools (sponge, wire cutter, wooden ribs)
- Trimming tools
- Underglaze pencil or iron oxide wash (optional)
- Clear or semi-transparent satin matte glaze
- Kiln
- Bat for wheel
Step 1: Throwing the Form
-
Prepare the clay:
Start by wedging about 2 to 2.5 pounds of speckled stoneware clay. Ensure it is fully de-aired to prevent bubbles during the throwing process. -
Center specifically:
Secure the clay to the wheel head. When centering, keep the mound relatively wide and low, as this will become a wide bowl rather than a tall cylinder. -
Open widely:
Open the clay, pulling the floor out until it is approximately 5-6 inches in diameter. Compress the floor thoroughly with a wooden rib to prevent S-cracks later. -
Pull the walls:
Pull the walls up and outward simultaneously. You are aiming for a wide, open curve rather than a steep cliff. The shape should feel like a deep basin. -
Refine the rim:
Use a chamois or a wet sponge to compress and round the rim. A slightly thicker rim adds to the rustic aesthetic and durability of the piece. -
Check the profile:
Use a kidney rib on the inside of the bowl to remove throwing lines and establish a smooth, continuous interior curve. This ensures food scoops out easily. -
Cut and dry:
Wire the pot off the bat but leave it in place until leather hard. Cover loosely with plastic if you need to slow down the drying process.
Maximize the Speckle
To get those distinct dark spots, use a clay body with heavy iron or manganese speckling. A transparent glaze amplifies them.
Step 2: Trimming and Bisque
-
Center for trimming:
Once the clay is leather hard, flip the bowl onto the wheel head. Tap center it or use a Giffin Grip to secure it. -
Define the foot:
Trim away excess weight from the bottom walls. Carve a distinct foot ring that elevates the bowl slightly, echoing the lifted shape seen in the reference image. -
Enhance surface texture:
I like to gently wipe the exterior with a damp sponge after trimming. This exposes more of the grog or speckles in the clay body before firing. -
Bisque fire:
Allow the bowl to bone dry completely. Load it into the kiln and bisque fire to Cone 04 (or your clay body’s specific recommendation).
Step 3: Glazing and Finishing
-
Clean the bisque:
Wipe the bisque-fired bowl with a damp sponge to remove any dust, which can cause crawling or pinholes in the glaze. -
Wax the foot:
Apply wax resist to the foot ring and the very bottom of the bowl to prevent glaze from fusing it to the kiln shelf. -
Glaze interior:
Pour a clear or semi-transparent satin matte glaze into the bowl. Swirl it quickly to coat the entire interior and pour out the excess. -
Glaze exterior:
For the exterior, dip the bowl or brush the glaze on. The goal is a uniform coat that allows the dark speckles of the clay to engage with the glaze. -
Iron oxide splatter (Optional):
If your clay isn’t naturally speckled enough, dip a toothbrush in diluted iron oxide wash and flick it gently over the glazed surface to create artificial speckles. -
Clean up:
Use a sponge to wipe back any glaze drips near the foot. Ensure the rim has a good coating but isn’t dripping. -
Glaze fire:
Load the kiln again and fire to the maturity temperature of your clay and glaze (typically Cone 5 or 6 for stoneware). Allow the kiln to cool slowly to prevent thermal shock.
Warped Rims?
If your bowl turns oval, you may have lifted it off the bat too early. Let it firm up to leather hard before moving it next time.
Now you have a stunning, restaurant-quality vessel ready to showcase your favorite pasta dish