If you’re craving fresh polymer clay inspiration, these fimo-style ideas are the kind of projects I love making when I want something cute, quick, and super satisfying. I pulled together beginner-friendly designs that start classic (jewelry and charms) and gently wander into more playful, “how is that even clay?” territory.
Marbled Statement Earrings
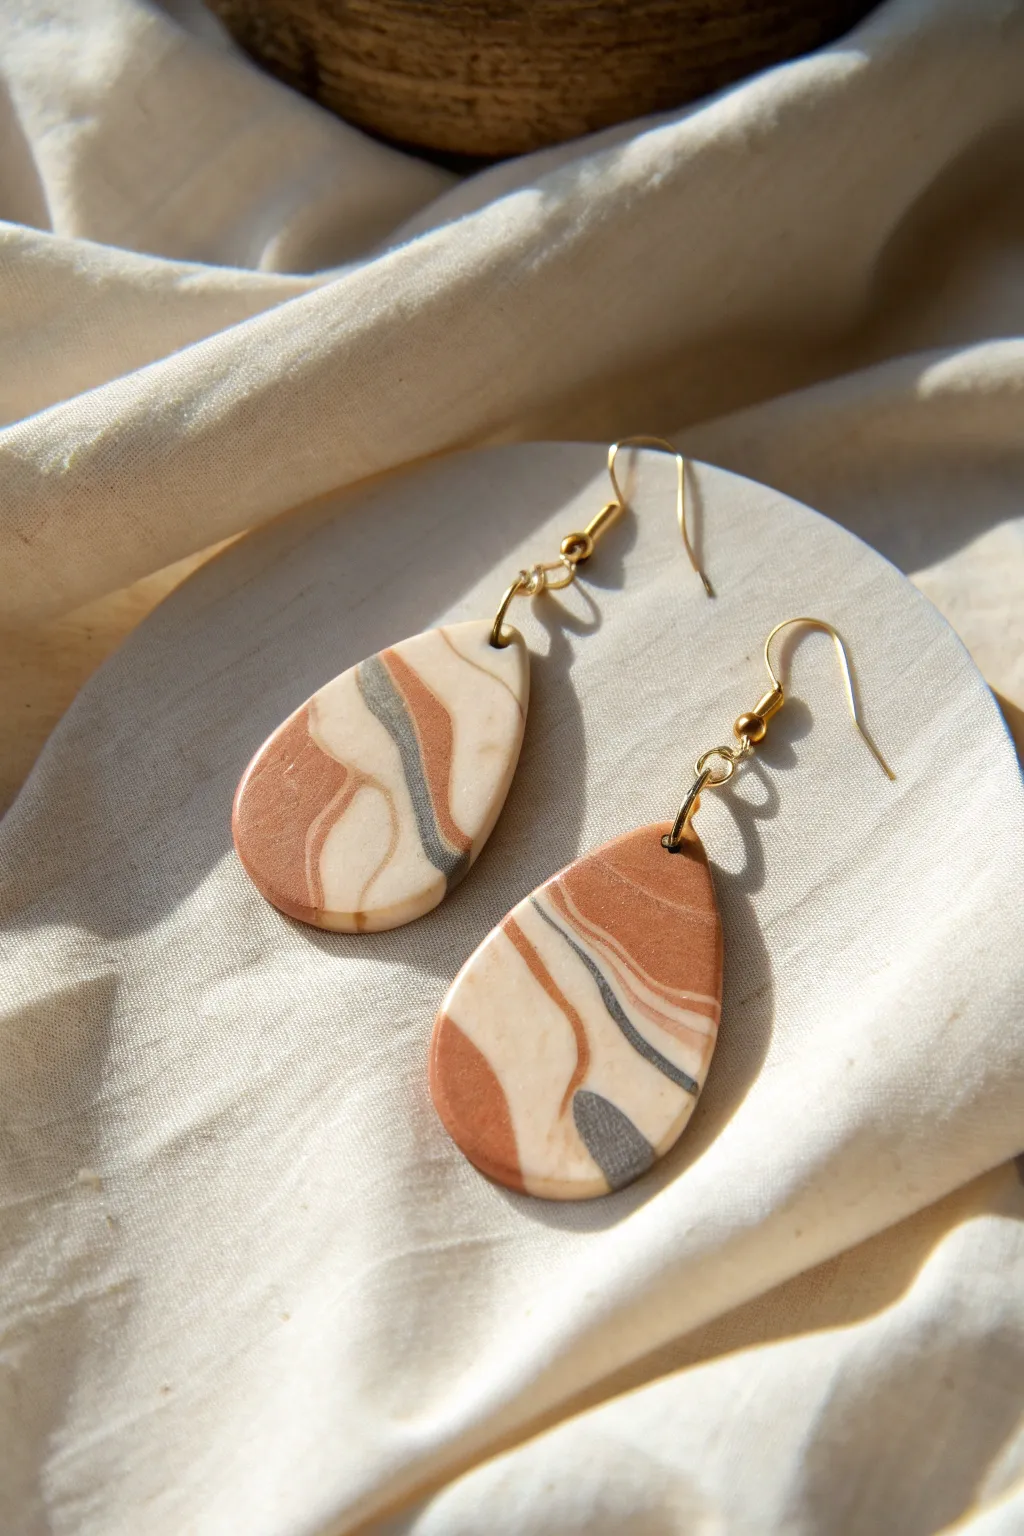
Create these sophisticated statement earrings featuring a dreamy organic marbling of terracotta, cream, and slate grey. The sleek teardrop shape and polished resin-like finish give them a high-end boutique look without the heavy price tag.
Step-by-Step Guide
Materials
- Polymer clay (terracotta/rust color)
- Polymer clay (cream or ecru color)
- Polymer clay (silver or dark grey)
- Acrylic rolling pin or clay pasta machine
- Teardrop-shaped clay cutter (approx. 1.5 – 2 inches)
- Tissue blade or X-Acto knife
- Ceramic tile or glass work surface
- Small round cutter or toothpick (for holes)
- Fine grit sandpaper (400-1000 grit)
- Parchment paper
- Jewelry pliers (round nose and flat nose)
- 2 Gold French hook ear wires
- 4 Gold jump rings (6mm or 7mm)
- Oven (for baking)
Step 1: Prepping the Palette
-
Condition the clay:
Begin by thoroughly kneading each block of clay separately. You want the clay to be warm and pliable so it won’t crack during the rolling process. -
Form the base logs:
Roll your cream clay into a thick log, about the width of your thumb. Roll the terracotta clay into a slightly thinner log. -
Prepare accent strands:
Roll the grey or silver clay into very thin snakes. Do the same with a small portion of both the cream and terracotta clay to create fine accent lines.
Air Bubble Blues?
If you see a tiny bubble on the surface before baking, gently pierce it with a needle and smooth the air out with your finger to flatten it.
Step 2: Creating the Marble Effect
-
Combine the colors:
Twist your thick cream and terracotta logs together like a candy cane. Fold the twisted log in half and twist again. -
Roll and fold:
Roll this combined log into a smooth sausage shape, fold it, and roll again. Stop before the colors fully blend; you want distinct patches of color, not a new solid mixture. -
Add detail lines:
Take your thin snakes of silver/grey and lay them lengthwise along your marbled log. This adds those sharp, defining veins seen in the photo. -
Compress the block:
Squish the log into a rectangular block shape. This helps adhere the thin accent lines into the main body of clay.
Step 3: Shaping and Cutting
-
Roll the slab:
Using your acrylic roller or pasta machine on a medium setting (approx. 3mm thick), roll the block out into a flat slab. Turn the slab as you roll to disrupt the pattern organically. -
Select the best area:
Examine your slab for the most pleasing pattern composition. Look for areas where the rust and cream swirl nicely with thin grey veins cutting through. -
Cut the shapes:
Place your teardrop cutter over the chosen area. Press down firmly and wiggle slightly to ensure a clean cut through the slab. Cut two distinct shapes. -
Smooth the edges:
Before baking, gently run your finger along the cut edges to soften any sharp ridges left by the cutter. I find this creates a much more professional finish than sanding alone. -
Piercing holes:
Use a small circular cutter or a toothpick to poke a hole at the very top of each teardrop. Ensure the hole is large enough for your jump rings but not too close to the edge.
Pro Tip: Glossy Finish
To get the glass-like shine seen in some boutique jewelry, coat the baked pieces with a thin layer of UV resin or polyurethane varnish.
Step 4: Baking and Assembly
-
Bake the clay:
Place your cutouts on a ceramic tile or a baking sheet lined with parchment paper. Bake according to the manufacturer’s instructions on your specific package of clay (usually around 275°F/130°C for 30 minutes). -
Cool and assess:
Let the pieces cool completely inside the oven or on a wire rack. They will be slightly flexible when hot but harden as they cool. -
Sand for perfection:
If there are any rough spots on the edges, wet sand them gently with fine-grit sandpaper under running water. -
Prepare the hardware:
Using two pairs of pliers, twist open your jump rings. Never pull them apart; always twist side-to-side to maintain their circular shape. -
Attach the hooks:
Slide the open jump ring through the hole in the clay. Add the ear wire hook onto the jump ring. -
Close and finish:
Twist the jump ring back into a closed position using your pliers, ensuring the gap is completely sealed so the hook doesn’t slip out.
Wear your new earthy, elegant creations with pride or gift them to someone special


Cute Mini Food Charms
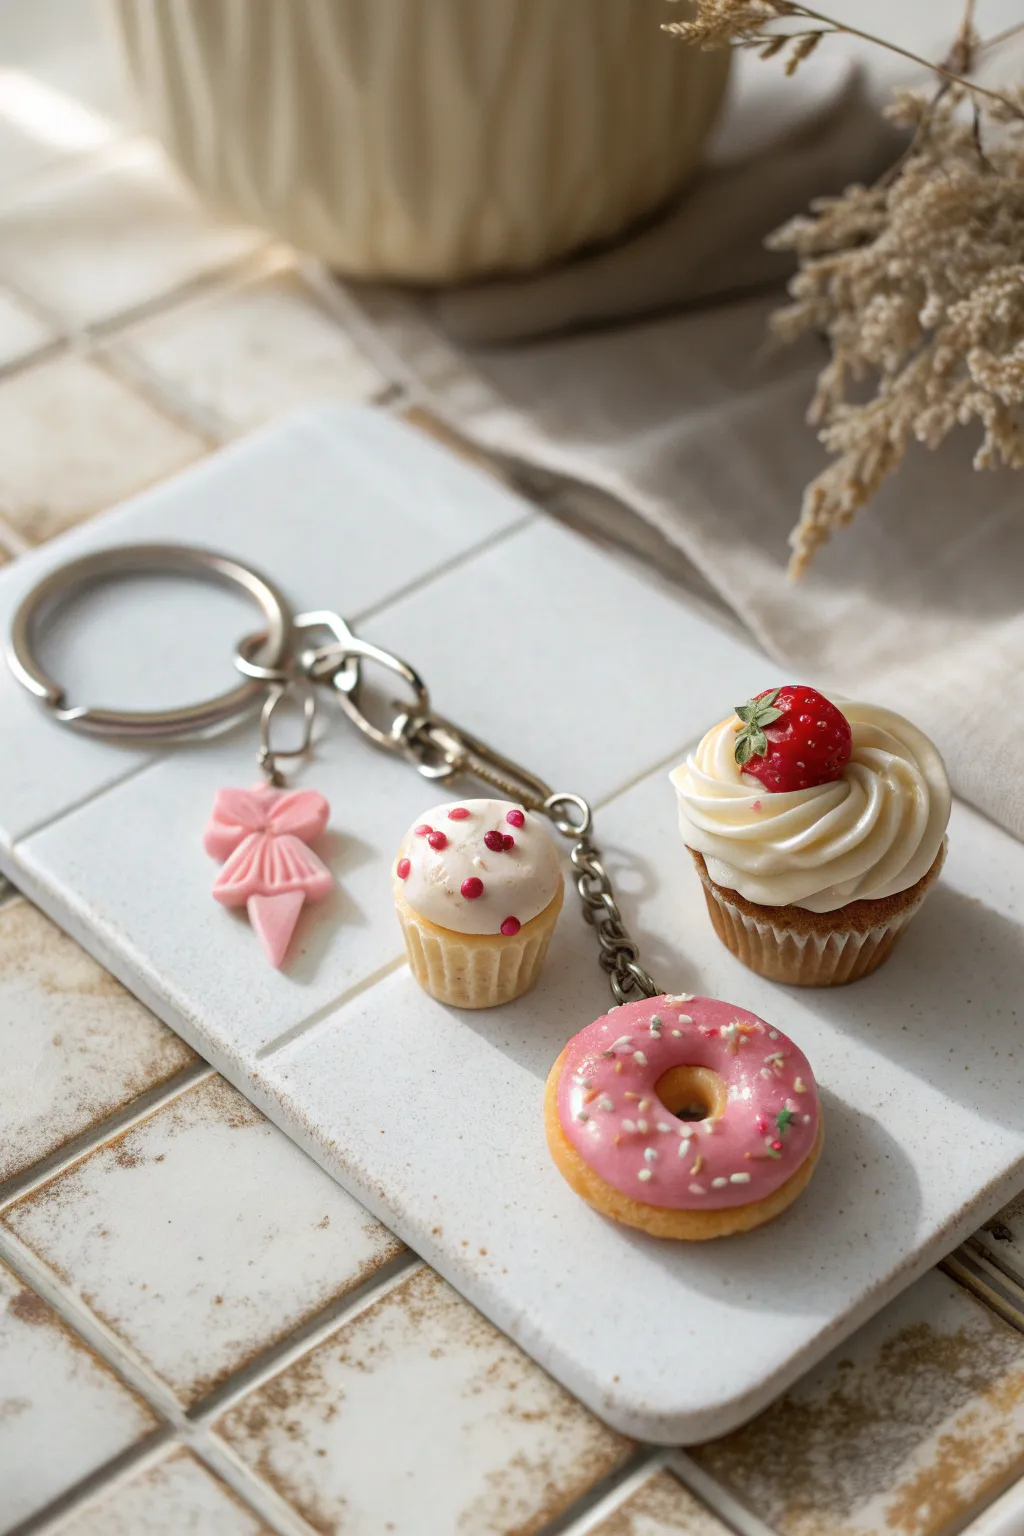
Carry a little sweetness wherever you go with this adorable dessert-themed keychain featuring a sprinkled donut, a strawberry-topped cupcake, and a mini muffin. These tiny polymer clay treats look realistic enough to eat but are sturdy enough for everyday use.
Step-by-Step Tutorial
Materials
- Polymer clay (beige/tan, white, pink, translucent, red, green)
- Liquid polymer clay (Translucent and/or White)
- Soft pastel chalks (oranges, browns) for shading
- Gloss varnish or UV resin
- Eye pins (silver or gold tone)
- Jump rings and keychain hardware
- Modeling tools (needle tool, ball tool)
- Small star piping tip (optional but helpful)
- Toothbrush or tinfoil ball for texturing
- Miniature sprinkles (polymer clay slices or microbeads)
- Pre-made pink bow charm (plastic or clay)
Step 1: Base Preparation
-
Mix the dough color:
Start by mixing beige, white, and a tiny dot of translucent clay to create a realistic ‘baked goods’ dough color. We need enough for the donut base and two cupcake bases. -
Shape the cupcake bases:
Roll two small balls of the dough mixture. Use a needle tool to gently press vertical lines all around the sides to mimic the ridges of a cupcake liner. -
Shape the donut base:
Roll another ball of dough into a slightly flattened disc. Use a ball tool or the end of a paintbrush to poke a hole through the center, smoothing the edges so they look round and fluffy. -
Texture the dough:
Take a clean toothbrush or a crumpled ball of aluminum foil and gently tap it over the surface of all three dough pieces. This realistic texture makes the clay look like baked sponge cake. -
Shade for a baked look:
Scrape some orange and brown soft pastel chalk into a powder. With a soft brush, gently dust the textured surfaces, focusing on the edges where a real pastry would brown in the oven.
Sticky Situation?
If your clay gets too soft and fingerprints are showing, pop the modeled pieces in the fridge for 10 minutes before texturing. Cold clay holds fine details much better.
Step 2: Decorating the Treats
-
Frost the donut:
Mix liquid polymer clay with a little pink solid clay (or pink chalk) until you have a thick, icing-like consistency. Carefully apply this to the top of your donut, letting it drip slightly down the sides naturally. -
Add donut sprinkles:
While the pink icing is still wet, gently drop tiny polymer clay sprinkles or microbeads onto the surface. I find using tweezers helps placement feel random but balanced. -
Make the strawberry cupcake frosting:
Condition white clay until very soft. Roll it into a thin ‘snake’ and twist it, or use a clay extruder with a star tip to create a realistic piped swirl. Coil this onto the larger cupcake base, building height as you go. -
Sculpt the strawberry:
Form a tiny teardrop shape from red clay. Use a needle to poke tiny seeds all over the surface. Create miniature leaves from green clay and attach them to the top, then place the berry onto the swirl frosting. -
Decorate the mini muffin:
Mix a small amount of white clay with liquid clay to make a thick white glaze. Spoon a dollop onto the smaller cupcake base, letting it settle on top. Add tiny pink sprinkles or microbeads for a pop of color.
Make It Scented
Mix a tiny drop of vanilla or strawberry fragrance oil into the clay before baking. Your charms won’t just look like treats, they’ll smell like a bakery too!
Step 3: Assembly & Finishing
-
Insert hardware:
Trim your eye pins to an appropriate length. Insert one eye pin vertically into the center of each charm. Adding a touch of liquid clay to the pin shaft acts as glue for a stronger bond. -
Bake carefully:
Place your charms on a tile or baking sheet. Bake according to your brand of polymer clay instructions (usually around 110°C/230°F for 30 minutes). Let them cool completely before handling. -
Apply varnish:
Once cool, brush a coat of gloss varnish or UV resin over the messy parts like the glazes, the strawberry, and the frosting to make them look wet and sugary. Keep the ‘cake’ parts matte. -
Assemble the chain:
Using two pairs of pliers, open your jump rings. Attach the donut, the two cupcakes, and your extra pink bow charm to the main keychain links. -
Final check:
Ensure all jump rings are closed tightly so no charms slip off. Give the keychain a gentle shake to make sure everything moves freely and sits nicely together.
Now you have a delicious-looking accessory ready to sweeten up your keys or bag


Round Animal Buddy Figurines
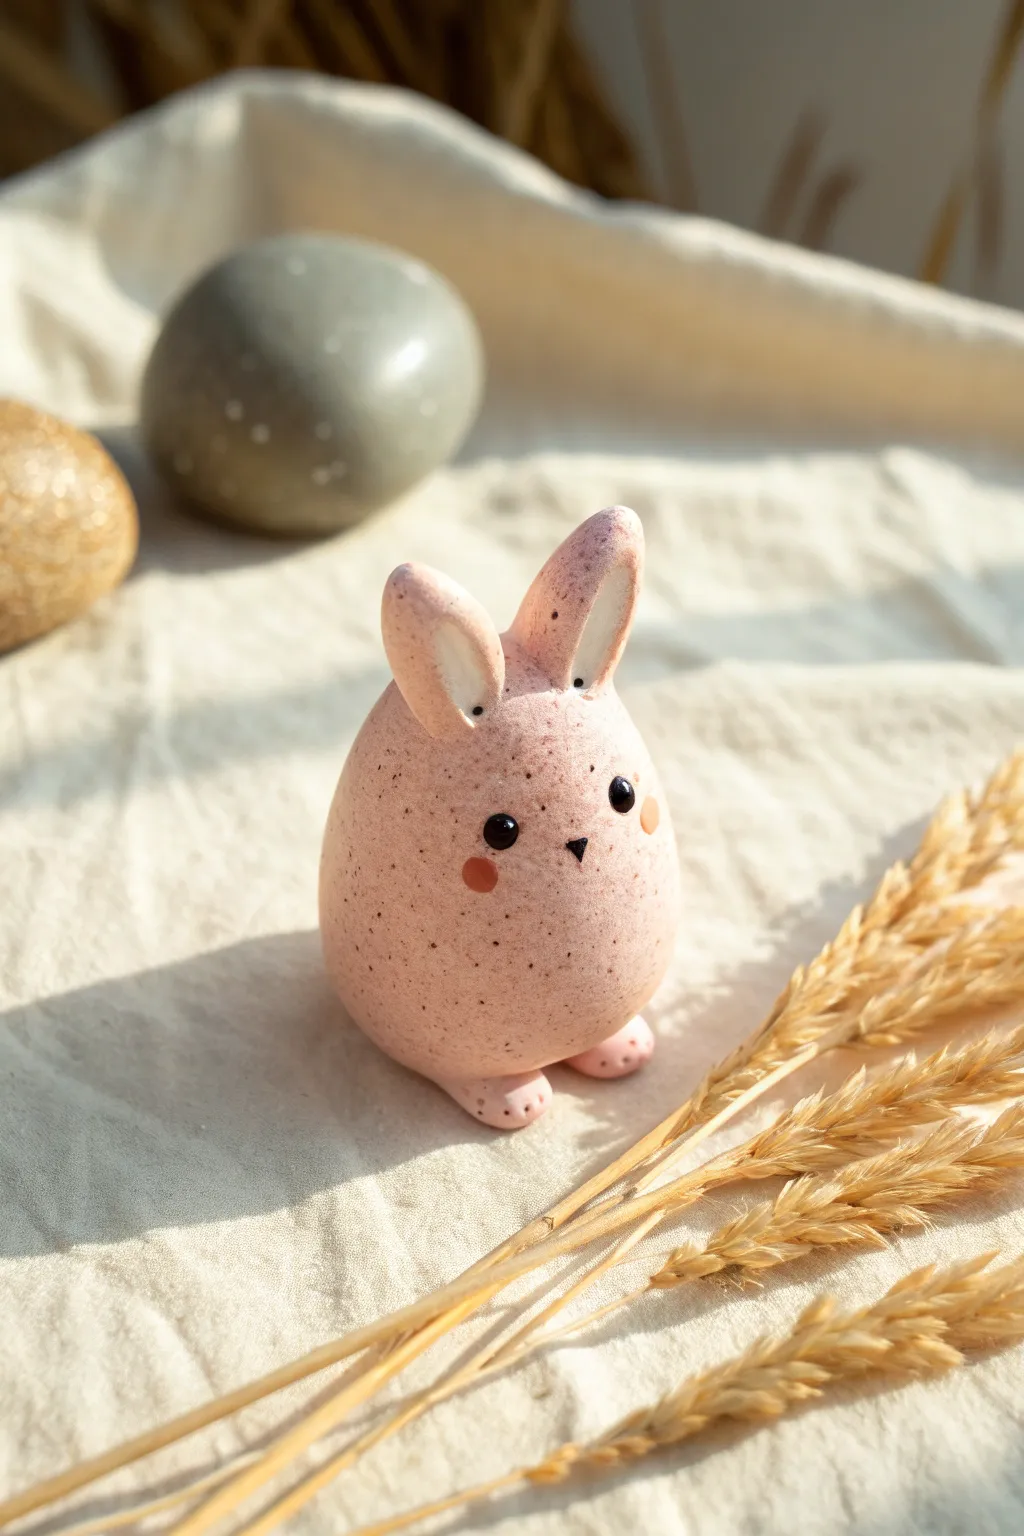
This adorable, minimalist bunny figurine combines the simple charm of a speckled egg with sweet animal features. Its soft pink hue and natural faux-stone texture make it a perfect decoration for spring or a cute desk buddy.
How-To Guide
Materials
- Polymer clay (chiffon pink or pale pink)
- Polymer clay (white)
- Black acrylic paint
- Fine-tipped paintbrush or dotting tool
- Old toothbrush or stiff bristle brush
- Brown acrylic paint (for speckling)
- Small ball tool or smooth blending tool
- Oven for baking
- Aluminum foil (optional, for armature)
Step 1: Fomring the Body
-
Condition the Clay:
Begin by softening a large chunk of pink polymer clay in your hands until it becomes pliable and warm. This ensures no cracks will form later. -
Shape the Base:
Roll the clay into a smooth ball between your palms to remove any lines or fingerprints. -
Create the Egg Shape:
Gently taper the top of the ball by rolling it slightly more on one side, creating a classic egg shape that is wider at the bottom and slightly narrower at the top. I like to tap the bottom gently on my work surface so the bunny sits flat.
Clean Clay Tip
Before rolling your initial ball, baby wipe your hands and work surface. Dust shows up easily on light pink clay, so keeping tools spotless is key.
Step 2: Ears and Feet
-
Prepare the Ears:
Roll two small, equal-sized logs of pink clay. Flatten them slightly to create long oval shapes for the bunny’s ears. -
Add Inner Ear Detail:
Take a tiny amount of white clay and flatten it into thin, smaller ovals. press these gently onto the front of your pink ear shapes. -
Attach the Ears:
Press the ears onto the top of the egg-shaped body. Use a blending tool or your finger to smooth the seam where the clay meets, ensuring a strong bond so they don’t pop off after baking. -
Form the Feet:
Roll two small balls of pink clay and flatten them slightly into discs for the feet. -
Attach the Feet:
Place the body onto the two discs so they peek out from the bottom front. Smooth the connection underneath to secure them. -
Add Toe Details:
Use a needle tool or a toothpick to gently press three small indents into the front of each foot to simulate toes.
Make it a Set
Make smaller versions in pale blue, mint green, or yellow to create a whole basket of pastel Easter ‘egg’ animals with different expressions.
Step 3: Creating the Stone Texture
-
Prepare Speckle Paint:
Dilute a small amount of dark brown acrylic paint with water until it has an ink-like consistency. -
Apply Speckles:
Dip an old toothbrush into the diluted paint. run your thumb across the bristles to flick a fine mist of paint droplets onto the raw clay bunny. This creates the faux-stone look. -
Inspect Coverage:
Check that the speckles are evenly distributed, aiming for a mix of tiny dots and slightly larger spots for a natural effect. Let this paint dry completely before baking.
Step 4: Baking and Finishing
-
Bake the Figurine:
Place your bunny on a baking tray (lined with parchment paper) and bake according to your polymer clay manufacturer’s instructions, usually around 230°F to 275°F (110°C – 135°C) for 30 minutes. -
Cool Down:
Allow the bunny to cool completely inside the oven or on a rack before handling it, as warm clay is fragile. -
Paint the Face:
Using a fine-tipped brush or a dotting tool, paint two small black circles for eyes situated widely apart. -
Add the Nose:
Paint a tiny, inverted triangle or heart shape in black between and slightly below the eyes for the nose. -
Add Cheeks:
Mix a tiny bit of red or orange paint with white (or use a coral color) and dab two soft, round cheeks below the eyes. -
Add Eye Shine:
Once the black eye paint is dry, add a minuscule dot of white paint to the upper corner of each eye to bring the bunny to life.
Place your finished bunny on a shelf or gift it to a friend as a charming handmade token


Kawaii Face Stud Earrings

Bring a little sunshine to cloudy days with these adorable kawaii cloud earrings. With their puffy white shapes and sweet smiling faces, these tiny polymer clay studs add a whimsical and charming touch to any outfit.
Detailed Instructions
Materials
- White polymer clay (Fimo Soft or similar)
- Black liquid polymer clay or black acrylic paint
- Pink acrylic paint or pink chalk pastel
- Gloss glaze (water-based polyurethane)
- Small dotting tool or toothpick
- Fine detail paintbrush (000 size)
- Earring stud posts (surgical steel or sterling silver)
- Jewelry glue (E6000 or strong superglue)
- Craft blade or X-Acto knife
- Ceramic tile or baking surface
- Oven
Step 1: Shaping the Clouds
-
Condition the clay:
Start by taking a small amount of white polymer clay and kneading it thoroughly in your hands until it becomes soft, warm, and pliable. This prevents cracks during baking. -
Divide into portions:
Roll the conditioned clay into a smooth ball, then use your craft blade to cut it into two equal halves. These will be the base for your pair of earrings. -
Form the base balls:
Roll each half into a small, smooth sphere similar in size to a pea. Flatten them slightly between your thumb and finger to create a thick disc shape. -
Create the puffy edges:
To make the cloud shape, take tiny pinches of fresh white clay and roll them into very small balls of varying sizes. You will need about 5-7 tiny balls per earring. -
Attach the puffs:
Press these tiny balls around the perimeter of your flattened base disc. Vary the sizes so the cloud looks organic and fluffy rather than perfectly symmetrical. -
Blend the seams:
Gently press the puff balls inward toward the center base to secure them. Use your finger or a smoothing tool to gently blend the backs where they join, ensuring structural integrity while keeping the front looking puffy and defined. -
Refine the shape:
Look at your clouds from the front. If any areas look too sharp or separated, tap them gently to round everything out. Place them on your ceramic baking tile.
Step 2: Adding the Kawaii Face
-
Add the eyes:
Dip a small dotting tool into black liquid clay or acrylic paint. Carefully press two small dots onto the lower half of the cloud to create the eyes. Space them somewhat wide apart for that maximum cute factor. -
Paint the smile:
Using your finest detail brush or a toothpick, draw a tiny, shallow ‘U’ shape directly between the eyes. A steady hand is key here; I sometimes brace my pinky against the table for stability. -
Create rosy cheeks:
Dip a clean dotting tool into pink acrylic paint. Place a small dot just below and to the outside of each eye. Alternatively, you can brush on a little pink chalk pastel dust for a softer blush effect. -
Inspect the details:
Before baking, check for any dust particles trapped in the white clay. Carefully lift them off with a piece of tape or a needle tool if necessary.
Keeping It Clean
White clay picks up dust easily! Wipe your hands and work surface thoroughly with a baby wipe before starting, and handle the clay as little as possible.
Step 3: Baking and Assembly
-
Bake the pieces:
Bake the clouds according to your polymer clay manufacturer’s instructions (usually around 110°C / 230°F for 15-30 minutes). Let them cool completely before moving them. -
Glaze the front:
Once cool, apply a thin coat of gloss glaze to the front and sides of the clouds. This seals the paint and gives the clay a polished, ceramic-like finish. Let this dry fully. -
Prepare the posts:
Rough up the flat pad of your earring posts slightly with sandpaper or a nail file. This texture helps the glue adhere better to the metal. -
Glue the posts:
Apply a small dab of strong jewelry glue to the back of each cloud. Press the earring post firmly into the glue. -
Allow to cure:
Let the glue cure for at least 24 hours before wearing the earrings to ensure the bond is permanent and secure.
Pro Tip: Eye Highlights
For extra sparkle, wait until the black eyes are dry, then add a microscopic dot of white paint to the upper right corner of each pupil.
Now you have a charming pair of handmade earrings ready to wear or gift to a friend

What Really Happens Inside the Kiln
Learn how time and temperature work together inside the kiln to transform clay into durable ceramic.
Fruit Slice Cane Beads

Brighten up your craft stash with these juicy, miniature fruit slice beads made from polymer clay canes. This project teaches you the satisfying art of cane-building to create detailed oranges, lemons, limes, and watermelons that can be sliced thin for endless uses.
Step-by-Step Guide
Materials
- Polymer clay (white, translucent, orange, yellow, green, red/pink, black)
- Acrylic rolling pin or pasta machine
- Tissue blade or very sharp craft knife
- Needle tool or toothpick
- Small round cutter (optional)
- Work surface (ceramic tile or glass mat)
Step 1: Building the Citrus Segments
-
Prepare the pith:
Start by conditioning white polymer clay until standardly soft. Roll it into a thin sheet using your pasta machine on a medium setting or your rolling pin. Determine the citrus color you want (e.g., orange) and roll a log of that color about 1/2 inch thick. -
Wrap the log:
Wrap the orange log completely in the thin sheet of white clay. Trim the excess so the edges butt up against each other perfectly without overlapping, and smooth the seam with your finger. -
Shape the wedge:
Gently pinch one side of the wrapped log to form a teardrop or triangle shape. This long triangular prism will become the individual juice sacs of your fruit. -
Reduce to size:
Gently stretch and roll this triangular log until it becomes quite long and thin. Cut this long cane into 8 equal lengths.
Step 2: Assembling the Whole Fruit Cane
-
Form the center:
Roll a very thin snake of white clay. Arrange your 8 triangular segments around this center wire, with the pointy ends facing inward. -
Fill the gaps (optional):
If there are gaps between the rounded outer edges of your segments, place small triangular snakes of translucent clay in between them to mimic the membrane, though simply pressing them together firmly often works for simpler stylized fruits. -
Outer wrapping:
Wrap the entire assembled circle first in a thin layer of white clay (the inner rind). Then, wrap that in a slightly thicker layer of the fruit skin color (e.g., green for lime, orange for orange). -
Reduce the cane:
This is the crucial step. Squeeze the cane from the center out, compressing it to remove air. Slowly roll and stretch the large cane until it shrinks to your desired diameter (about the size of a quarter or nickel).
Keep it round
When reducing (stretching) a round cane, don’t just roll it. Squeeze it gently all around its circumference periodically to prevent the center pattern from distorting into a spiral.
Step 3: Variations: Watermelon & Kiwi
-
Watermelon center:
For the watermelon, roll a thick log of pink or red clay. Wrap it in a thin layer of white, followed by a layer of green. -
Adding seeds:
Once reduced, you can slice the red cane and press tiny bits of black clay into the surface for seeds, or embed thin black clay snakes into the red log *before* wrapping for a more integrated look. -
Kiwi details:
For the kiwi seen in the mix, use a translucent white center, surrounded by a ring of green. I like to press a needle tool into the center area to create the seed texture pattern rather than building complex canes for the seeds.
Make them frosted
Before baking, dip your fruit slices into fine clear glitter or embossing powder. This creates a ‘sugared’ candy effect perfect for decorative embellishments.
Step 4: Slicing and Finishing
-
Chill the cane:
Before slicing, place your finished canes in the refrigerator for about 20 minutes. Firm clay slices much more cleanly without distorting the pattern. -
Slice thinly:
Using your sharpest tissue blade, cut consistent slices from the cane. Aim for a thickness of about 2-3mm for durable buttons. -
Add buttonholes:
If you want these to be functional buttons, take a needle tool or toothpick and pierce two or four symmetric holes in the center of each slice while the clay is still raw. -
Bake:
Arrange your slices on a baking sheet or tile. Bake according to your brand of clay’s instructions (usually 230°F – 275°F for 15-30 minutes). -
Cool and varnish:
Let the pieces cool completely. For that fresh fruit shine, apply a coat of gloss water-based varnish or UV resin to the surface.
Once baked and cooled, these sweet little slices are ready to be sewn onto garments or glued onto summer accessories
Sweet Pendant Necklaces

Create a charming collection of miniature pendants featuring a woodland mushroom, a sweet strawberry heart, and a sleeping star. These delicate polymer clay pieces add a touch of playful whimsy to any outfit and make perfect handmade gifts.
Step-by-Step Tutorial
Materials
- Polymer clay (Fimo Soft or Professional) in Red, White, Pale Pink, and Flesh/Beige
- Acrylic paints (Black, Red, Gold)
- Fine detail paintbrush or dotting tool
- Ceramic tile or glass work surface
- Clay roller or pasta machine
- Small heart cookie cutter (approx. 2-3cm)
- Small star cookie cutter (approx. 2-3cm)
- X-acto knife or clay blade
- Eye pins (gold or silver tone)
- Jewelry pliers (round nose and flat nose)
- Jump rings
- Fine link necklace chains
- Gloss varnish (optional, for finish)
Step 1: Sculpting the Mushroom Charm
-
Form the cap:
Take a pea-sized amount of red clay and roll it into a ball. Gently flatten the bottom and pinch the top slightly to create a dome shape. -
Create the stem:
Roll a smaller piece of white or flesh-colored clay into a short, thick cylinder. Widen the base slightly so it stands on its own. -
Connect the parts:
Press the stem firmly into the center of the underside of the red cap. You can smooth the seam with a blending tool if desired, but a simple press bond usually works for small charms. -
Add the spots:
Roll tiny, speck-sized balls of white clay. Press these randomly onto the red cap and flatten them completely so they look painted on. -
Insert hardware:
Trim an eye pin to about 1cm long. Pierce it straight down through the top center of the mushroom cap until the loop rests flush against the clay.
Step 2: Crafting the Strawberry Heart and Star
-
Prepare the slabs:
Condition the pale pink and white clay separately until soft. Roll each out to a consistent thickness of about 3-4mm. -
Cut the shapes:
Use your heart cutter on the pink clay and the star cutter on the white clay. Smooth any rough edges with your fingertip to round them off gently. -
Add texture to the heart:
Using a needle tool or toothpick, gently press small, short indentations all over the front of the pink heart to mimic strawberry seeds. -
Insert hardware:
Just like the mushroom, trim eye pins and insert them into the top center of the heart and the top point of the star. Ensure the wire goes deep enough for security. -
Bake the charms:
Place all three charms on a ceramic tile. Bake according to your clay manufacturer’s instructions (usually 110°C/230°F for 30 minutes). Let them cool completely.
Clean Clay Pro Tip
White clay picks up everything! Keep baby wipes nearby and clean your hands and tools thoroughly before handling lighter colors to avoid dust specks.
Step 3: Painting and Assembly
-
Detail the star:
Using a very fine brush or toothpick, dip into black acrylic paint. Dot two tiny eyes onto the white star charm. -
Add star features:
Add a tiny red dot for a nose or mouth. Create golden freckles by dotting gold paint around the cheeks. -
Highlight the strawberry:
I prefer to use a fine brush to fill the seed indentations on the heart with gold paint, wiping away excess from the surface if needed. -
Varnish (Optional):
For durability and shine, apply a thin coat of gloss varnish to the charms and let dry. -
Attach the jump rings:
Open a jump ring using two pairs of pliers (twist sideways, don’t pull apart). Slide it through the eye pin loop on a charm. -
Connect to chain:
Before closing the jump ring, slip the necklace chain into the ring. Close the jump ring securely by twisting it back.
Level Up: Texture
Before baking the mushroom stem, gently drag a toothbrush vertically along the white clay. It creates a realistic fibrous texture.
Wear your trio of sweet charms layered together or share them with friends for a coordinated look


The Complete Guide to Pottery Troubleshooting
Uncover the most common ceramic mistakes—from cracking clay to failed glazes—and learn how to fix them fast.
Stamped Name Tags and Charms

Create a personalized accessory with these warm, minimalist clay charms that evoke a rustic yet modern aesthetic. Using oven-bake clay in soft earth tones, you’ll craft a lovely cluster of monogrammed tags perfect for gifting or keeping your own keys organized.
Step-by-Step
Materials
- Polymer clay (Fimo/Sculpey) in muted earth tones: tan, terracotta, white, and sage green
- Rolling pin or acrylic roller
- Small oval clay cutter (approx. 1 inch)
- Letter and number rubber stamps
- Needle tool or a small stylus
- Toothpick or skewer (for holes)
- Parchment paper
- Baking sheet
- Sandpaper (fine grit)
- Small gold jump rings (4)
- Gold keychain clasp with swivel
- Jewelry pliers (flat nose and round nose)
- Gloss glaze (optional)
Step 1: Preparing the Clay Charms
-
Condition the Clay:
Begin by taking a small portion of your first clay color (e.g., the tan shade). Knead it thoroughly in your hands until it becomes soft, pliable, and warm to the touch. -
Roll Out the Slab:
Place the conditioned clay on a piece of parchment paper to prevent sticking. Use your acrylic roller to flatten the clay into an even slab, aiming for a thickness of about 3mm to 4mm—sturdy enough to not break but thin enough to look delicate. -
Cut the Shapes:
Press your oval cutter firmly into the rolled clay. Wiggle it slightly to ensure a clean cut, then lift it away. Repeat this process for each color of clay you wish to use (terracotta, white, and sage green). -
Smooth the Edges:
Once your shapes are cut, gently run your finger along the edges of the ovals to smooth out any harsh lines or jagged bits left by the cutter.
Step 2: Stamping and Texturing
-
Add Initial Lettering:
Select the rubber stamps for the initials or numbers you want to feature. Press the stamp gently but firmly into the center of the clay oval. Don’t push all the way through; you just want a clear impression. -
Create Decorative Dots:
Using a needle tool or a small ball stylus, gently press a series of dots along the bottom curve or side of the oval. You can create a pattern or keep it random for an organic look. -
Pierce the Hanging Hole:
Use a toothpick or a skewer to carefully poke a hole near the top of the oval. Make sure the hole is large enough for your jump rings to fit through later, and wiggle the tool slightly to ensure the opening is clean on both sides. -
Clean Up:
Inspect each charm for lint or fingerprints. I like to lightly brush them with a little baby oil or cornstarch if I see any smudges, which smooths the surface beautifully.
Stamp Stuck?
If your stamp sticks to the raw clay, lightly dust the rubber stamp surface with cornstarch or dip it in water before pressing it down for a clean release.
Step 3: Baking and Finishing
-
Bake the Clay:
Arrange the charms on a parchment-lined baking sheet. Bake according to the manufacturer’s instructions on your specific package of clay (usually around 230°F/110°C for 30 minutes). -
Cool Down:
Once baked, remove the tray from the oven and allow the charms to cool completely. The clay is fragile while hot, so don’t touch them until they are room temperature. -
Sand Edges (Optional):
If there are any rough spots on the edges after baking, use a piece of fine-grit sandpaper to gently buff them smooth. -
Add Jump Rings:
Use your two pairs of pliers to twist open a gold jump ring. Slide the ring through the hole you made in the clay charm. -
Attach to Keyring:
Before closing the jump ring, loop it onto the main gold keychain clasp mechanism. -
Secure the Charm:
Use your pliers to twist the jump ring back into a closed position, ensuring the ends meet perfectly so the charm doesn’t slip off. -
Assemble the Bundle:
Repeat the attachment process for the remaining three charms, clustering them together on the main ring or on individual links of the chain depending on your preference.
Keep it Clean
Keep baby wipes nearby to clean your hands between clay colors. This prevents dark lint or dye transfer onto lighter colors like white or sage green.
Enjoy the gentle click-clack of your new handmade charms every time you grab your keys