
If you can roll a slab and make a simple cube, you can make a seriously cute clay box. Here are my favorite easy clay box ideas that keep the build beginner-friendly and let the personality happen through lids, handles, and simple add-ons.
Classic Slab Cube With a Simple Lid
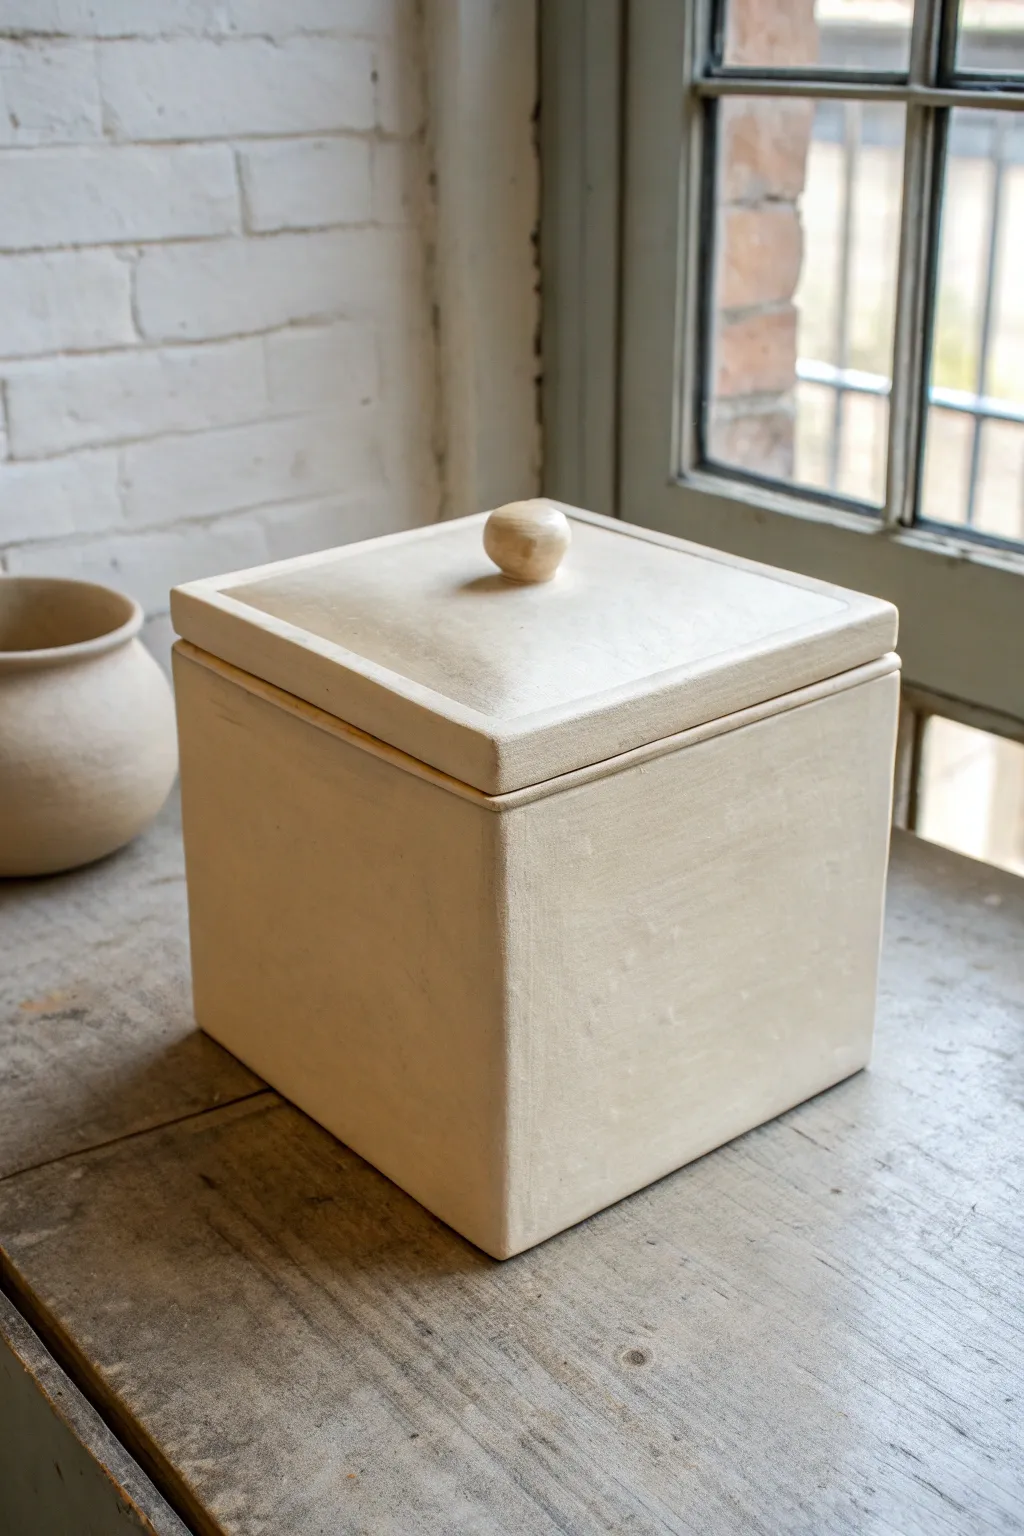
This project explores the timeless elegance of a slab-built box, featuring clean lines, a perfectly square body, and a simple knobbed lid. Its matte, stone-like finish and sturdy construction make it an ideal first project for mastering clay joinery.
Step-by-Step Tutorial
Materials
- Stoneware clay body (smooth or with grog)
- Rolling pin
- Two wooden thickness guides (slats)
- Fettling knife or sharp clay tool
- Ruler
- Paper or cardboard templates
- Serrated rib or scoring tool
- Slip (clay mixed with water)
- Wooden paddle
- Sponge
Step 1: Planning and Slab Preparation
-
Create templates:
Begin by deciding the dimensions of your box. Cut five identical square templates from stiff cardboard or thick paper for the base and four walls—for instance, 5×5 inches. Cut a sixth square slightly larger, about 5.5×5.5 inches, to serve as the lid. -
Roll the clay:
Wedge your clay thoroughly to remove air pockets. Place your wooden thickness guides on either side of the clay and use your rolling pin to create a large, even slab. Aim for a thickness of about 1/4 to 3/8 inch for sturdy walls. -
Smooth the surface:
Before cutting, take a rubber rib and compress the clay slab on both sides. This aligns the clay particles, reducing warping during drying and giving you that smooth, professional finish right from the start.
Pro Tip: Sharp Corners
Don’t over-handle the corners while the clay is soft. Wait until the box is leather hard, then use a rasp or Surform tool to gently shave the corners into crisp, sharp lines.
Step 2: Cutting and Sizing
-
Cut the components:
Lay your templates onto the slab. Using your fettling knife, cut around them cleanly. Keep the knife straight up and down to ensure 90-degree edges, which is crucial for square corners. -
Leather hard stage:
Let your cut slabs stiffen to a ‘leather hard’ state. They should be firm enough to hold their shape without slumping when lifted, but soft enough to be scored. I usually let them sit for a few hours or overnight under plastic if needed. -
Miter the edges:
For a seamless look like the reference image, bevel the vertical edges of your four wall pieces at a 45-degree angle. This creates stronger miter joints where the corners meet, rather than simple butt joints.
Level Up: Texture
Before assembling, press a piece of lace or textured fabric into the soft slab surfaces. This adds a subtle, tactile pattern while maintaining the box’s modern, minimalist silhouette.
Step 3: Assembling the Box Body
-
Score and slip:
Thoroughly score (scratch up) the mitered edges of your walls and the edges of your base piece. Apply a generous amount of clay slip to all scored areas. -
Attach the walls:
Attach one wall to the base first, pressing firmly. Add the second wall adjacent to it to form a corner. This corner provides stability. Continue adding the remaining walls, ensuring the corners are tight. -
Reinforce the interior:
Roll a very thin coil of clay. Press this coil into the interior seams where the walls meet the floor and each other. Blend this coil smooth with a wooden tool or your finger to ensure a leak-proof, strong bond. -
Paddle into shape:
Once assembled, the box might look slightly wonky. Use a wooden paddle to gently tap the exterior walls. This squares up the form, sharpens the corners, and compresses the joints.
Step 4: Creating the Lid
-
Prepare the lid slab:
Take your slightly larger square slab reserved for the lid. Check it against the finished box body to ensure it has a pleasing overhang or sits flush, based on your preference. -
Add a gallery or flange:
To keep the lid from sliding off, you need a catch mechanism. Measure the inner opening of your box. Cut a smaller square of clay that fits just inside this opening and score/slip it onto the underside of your lid slab. -
Shape the knob:
Roll a small ball of clay for the handle. Gently flatten the bottom and shape the top into a rounded, organic button shape as seen in the photo. Keep it simple to match the box’s aesthetic. -
Attach the knob:
Score the center of the lid top and the bottom of your knob. Apply slip and press the knob firmly into place. Clean up any excess slip immediately with a damp brush.
Step 5: Finishing Touches
-
Refine the surface:
Once the box is fully assembled and leather hard, use a damp sponge or a metal rib to smooth away any canvas textures or fingerprints. Pay special attention to the rim of the box so it feels nice to the touch. -
Dry slowly:
Place the lid on the box while it dries. This ensures they shrink at the same rate and fit perfectly. Cover loosely with plastic for the first day to prevent the corners from drying too fast and cracking. -
Firing:
Bisque fire the piece once bone dry. For glazing, you can choose to leave the exterior unglazed raw clay for that matte stone look, or apply a clear matte glaze to the interior for functionality.
Enjoy the satisfying weight and permanence of your new handmade ceramic box


Gallery-Lid Box That Nests Perfectly

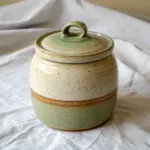
This minimalist square box features a perfectly fitted gallery lid and a charming cup-style handle, finished in a warm, speckled glaze. The design relies on precise slab building to create clean lines and that satisfying “clunk” when the lid settles into place.
Step-by-Step Tutorial
Materials
- Speckled stoneware clay (mid-fire)
- Rolling pin with guide strips (approx. 1/4 inch)
- Fettling knife or X-Acto blade
- Ruler and square tool
- Scoring tool (serrated rib or needle tool)
- Slip (clay mixed with water)
- Wooden paddle
- Sponge
- Loop tool for trimming
- Satin matte white glaze
Step 1: Creating the Base Box
-
Prepare your slabs:
Roll out a large slab of speckled clay to a consistent 1/4 inch thickness. Use a rib to compress the clay on both sides, removing any canvas texture and aligning the clay particles to prevent warping later. -
Cut the components:
Using your ruler and square, cut out five squares. You’ll need one base piece (e.g., 4×4 inches) and four side walls. For a box with mitered corners, cut the walls the same width as the base; for butt joints, adjust two walls to be slightly shorter. -
Let the clay set:
Allow your cut slabs to stiffen to a soft leather-hard stage. They need to hold their shape upright without slumping, but still be moist enough to join securely. -
Bevel the edges:
For the cleanest corners, miter the edges of your wall pieces at a 45-degree angle. This creates a stronger joint and a sharper visual corner than a simple butt joint. -
Score and slip:
Aggressively score the edges of the base and the mitered sides. Apply a generous amount of slip to the scored areas. -
Assemble the walls:
Attach the walls to the base and to each other. Press firmly to ensure a good bond, wiping away excess slip that squeezes out. Use a small wooden paddle to gently tap the walls straight and square. -
Reinforce the interior:
Roll a very thin coil of clay and press it into the interior seams of the box. Smooth this coil out with a modeling tool or your finger to ensure the joints won’t crack during drying.
Warping Woes?
If your lid rocks after drying, dry the box and lid together (with paper between) and weigh the lid down lightly with a sandbag to keep it flat.
Step 2: Constructing the Gallery Lid
-
Measure the lid slab:
Cut a square slab that is exactly the same dimensions as the outer perimeter of your box. This will be the top surface of the lid. -
Create the nesting flange:
Measure the *inner* dimensions of your box opening. Cut four strips of clay about 1/2 inch tall to form a smaller square that will fit snugly inside the box rim. This is the flange. -
Attach the flange:
Score and slip the underside of your lid slab. Attach the four flange strips so they form a square inset from the edge. Test the fit on your box *gently*—use a piece of newspaper between them so they don’t stick. -
Refine the fit:
If the flange is too tight, shave off small amounts of clay with a rasp or knife until it nests perfectly. I like to leave it just a hair loose to account for shrinkage. -
Make the handle:
Roll a small ball of clay and flatten it slightly. Use your thumb or a rounded tool to press an indentation into the center, creating a small cup or recessed cone shape. -
Attach the handle:
Score the center of the lid and the bottom of your cup handle. Press them together firmly and clean up the attachment point with a small brush.
Step 3: Refining and Glazing
-
Clean the edges:
Once bone dry, use a slightly damp sponge to soften any sharp corners on the box rim and lid edge. This helps the glaze break beautifully over the edges as seen in the photo. -
Bisque fire:
Fire the piece to cone 04 (or your clay’s specified bisque temperature). Ensure the lid is fired separately or on the box with wax resist to prevent sticking. -
Apply the glaze:
Pour a satin white glaze into the interior of the box and pour it out. Dip the exterior. For the lid, you can dip or brush the glaze. Wipe the bottom of the box and the flange clean. -
Glaze fire:
Fire to cone 5/6. The heat will bring out the iron specks in the clay body, which will show through the semi-opaque white glaze.
Pro Tip: Gallery Depth
Make your flange deeper than you think you need. A deep flange (at least 1/2 inch) prevents the lid from sliding off if the box is tipped.
Once cooled, your box is ready to hold loose tea, jewelry, or simply sit on a shelf looking perfectly squared away


Textured Slab Box With Patterned Sides
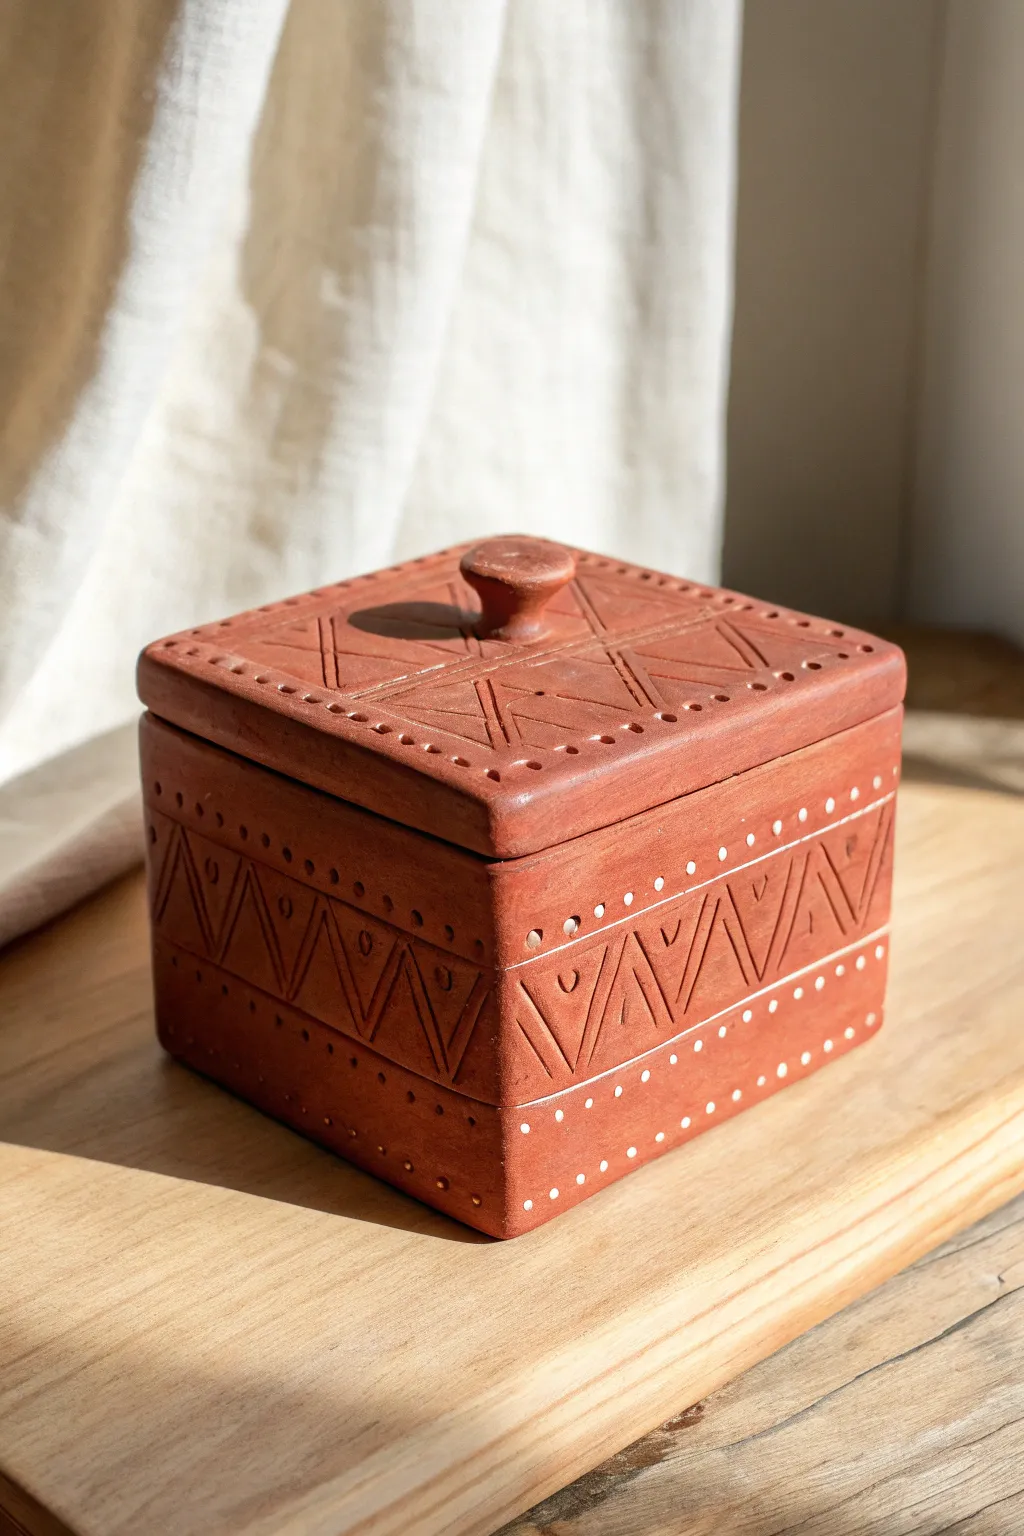
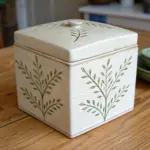
This rustic, square lidded box combines the simplicity of slab building with the charm of hand-carved details. With its warm terracotta tone and intricate linear engravings, it serves as both a functional storage piece and a striking decorative object.
Detailed Instructions
Materials
- Red earthenware clay (or polymer clay in terracotta color)
- Rolling pin
- Guide sticks or slats (approx. 1/4 inch thick)
- Fettling knife or craft knife
- Ruler or straight edge
- Slip and scoring tool (if using ceramic clay)
- Needle tool or toothpick
- Small carving loop tool
- Small round hole punch or dull pencil tip
- Sponge and water
- Kiln (if using ceramic clay) or oven (if polymer)
Step 1: Slab Preparation & Cutting
-
Roll out the clay:
Begin by wedging your red clay thoroughly to remove air bubbles. Roll it out into an even slab using guide sticks to ensure a consistent thickness of about 1/4 inch. I like to smooth the surface with a rib tool immediately after rolling to compress the clay particles. -
Measure your templates:
You will need five squares for the base box: one floor piece and four wall pieces. For a box like the one pictured, 4×4 or 5×5 inch squares work well. You also need a slightly larger square for the lid allowing for a small overhang. -
Cut the shapes:
Using a ruler and your fettling knife, carefully cut out your squares. Keep the knife upright for straight cuts, or bevel the edges at a 45-degree angle if you prefer mitered joints for a cleaner look. -
Firming up:
Let the slabs sit until they reach a ‘leather-hard’ state. This is crucial—they should be firm enough to stand up without slumping but still soft enough to score and join.
Clean Lines Pro-Tip
Wait until the clay is firmly leather-hard before carving. If the clay is too soft, the tools will drag and create messy, jagged edges rather than crisp geometric lines.
Step 2: Assembling the Box
-
Score and slip:
Rough up the edges of the base and the bottom edges of your wall pieces with a scoring tool. Apply clay slip (liquid clay) to these textured areas to act as glue. -
Join the walls:
Attach the first wall to the base, pressing firmly. Attach the second wall adjacent to the first, scoring and slipping the vertical seam where they meet. Continue until all four walls are up to form a cube. -
Reinforce the seams:
Roll a very thin coil of clay and press it into the interior corners of the box. Smooth this out with a modeling tool or your finger to ensure the joints are strong and won’t crack during drying. -
Make the lid gallery:
To keep the lid from sliding off, attach a smaller square of clay (or four small strips) to the underside of the lid slab. This inner rim should fit snugly inside the box opening. -
Add the knob:
Form a small knob shape—like a mushroom or a simple cylinder—and attach it to the exact center of the lid using the score and slip method.
Troubleshooting Warping
If your lid doesn’t fit after drying, it likely warped. Always dry the lid engaged on the box so they shrink together, and rotate the piece daily for even airflow.
Step 3: Carving the Patterns
-
Planning the design:
Lightly sketch your geometric pattern onto the leather-hard clay using a needle tool. Draw two horizontal bands around the box walls, and diagonal lines connecting them to form triangles. -
Carving the lines:
Using a needle tool or a fine carving tool, deepen the lines you just sketched. Go over them carefully to create a clean, visible groove. Create similar ‘X’ or diamond patterns on the top of the lid. -
Adding texture details:
Inside the triangles on the walls, carve smaller ‘V’ shapes or simple lines to echo the larger pattern. This repetition is key to the folk-art style. -
Punching the dots:
Use a small, dull tool like the end of a paintbrush or a specialized hole punch to press energetic rows of dots. Place them along the top rim of the lid and along the horizontal bands distinguishing the pattern sections. -
Refining the surface:
Once the carving is done, use a barely damp sponge to gently wipe across the surface. This removes any little clay burrs created by the carving tools without erasing your crisp lines.
Step 4: Finishing
-
Slow drying:
Place the lid on the box and loosely cover the entire piece with plastic. Let it dry very slowly over several days to prevent warping. -
Firing or baking:
If using ceramic clay, bisque fire the piece. Since the beauty here is the raw clay color, you can simply apply a clear matte glaze or leave the exterior unglazed and fire it a second time. If using polymer clay, bake according to package instructions. -
Optional accent:
To make the pattern pop, you can brush a white underglaze or acrylic wash into the crevices and wipe the surface back with a sponge, leaving the white only in the carved lines and dots.
Now you have a beautifully textured box ready to hold your small keepsakes

Gift Box With a Bow Handle
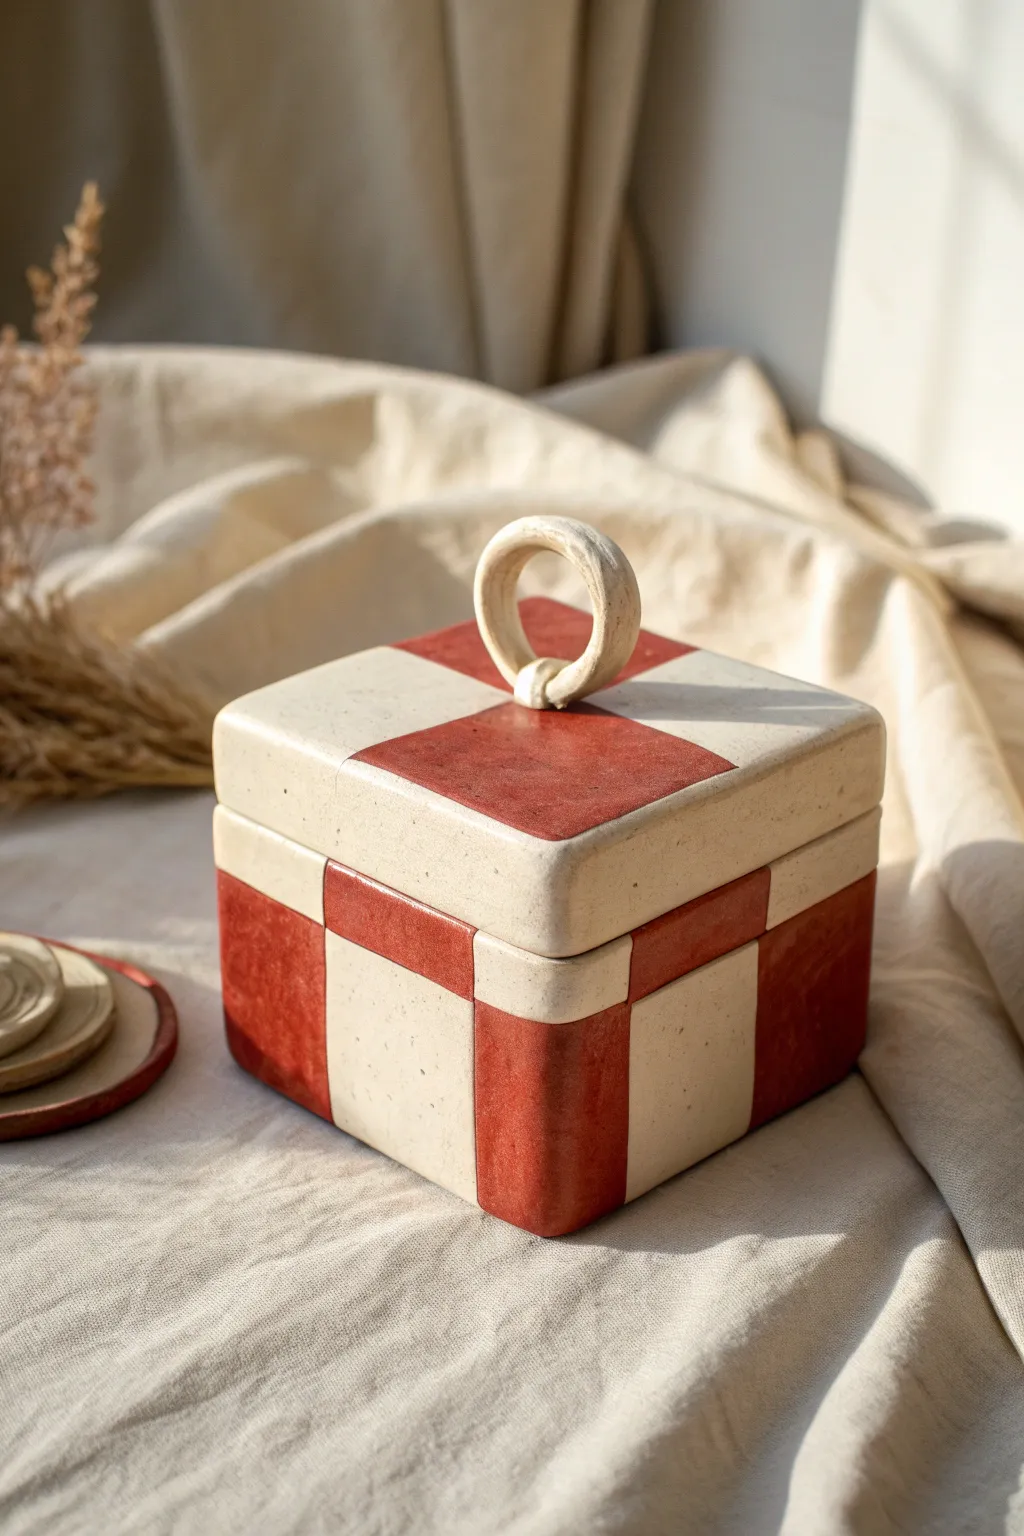
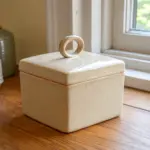
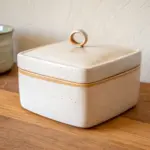
This charming trinket box mimics the look of a wrapped present with its playful checkerboard pattern and unique loop handle. The matte, earthy red and cream finish gives it a modern, organic feel that looks lovely on any vanity.
Detailed Instructions
Materials
- White modelling clay (air-dry or polymer, depending on kiln access)
- Rolling pin
- Clay knife or craft blade
- Ruler
- Slip (clay slurry) or liquid clay adhesive
- Sanding sponge or fine-grit sandpaper
- Acrylic paints (Terracotta Red and Cream/Off-White)
- Flat paintbrush
- Matte varnish or sealant
- Cardboard or template paper
Step 1: Forming the Base Box
-
Roll your slabs:
Start by rolling out your clay on a flat surface to an even thickness of about 1/4 inch. Consistent thickness is key for a sturdy box, so take your time here. -
Cut the template:
Create a square template from cardboard (suggested size: 4×4 inches) for the base and lid, and a rectangular template for the side walls (4 inches long by 3 inches high). This ensures every piece matches perfectly. -
Slice the base components:
Using your templates and a sharp clay knife, cut out one square for the floor of the box and four rectangular side panels. Keep your blade vertical to create straight, clean edges. -
Assemble the walls:
Score the edges of the base square and the bottom edges of the side walls with a needle tool or knife. Apply a bit of slip or adhesive to the rough areas. -
Join the sides:
Press the walls onto the base and join the vertical corners together. Smooth the seams on both the inside and outside using your finger or a modelling tool to make the connections invisible.
Warping walls?
If your clay walls start to sag inward while building, place a scrunched-up ball of newspaper or paper towel inside the box to support the shape while it dries enough to hold itself up.
Step 2: Creating the Lid and Handle
-
Cut the lid slab:
Using your square template again, cut a top piece for the lid. You’ll also need to cut four thin strips of clay to create an inner lip/flange that will keep the lid from sliding off. -
Attach the lid flange:
Attach the thin strips to the *underside* of the lid square, slightly indented from the edge, so they fit snugly inside the box walls. Score and slip these connections well. -
Form the loop handle:
Roll a small coil of clay and flatten it slightly into a thick ribbon. Curve it into a circle, overlapping the ends at the bottom to form a sturdy ring shape. -
Secure the handle:
Score the center of the lid and the bottom of your loop handle. Press the loop firmly onto the lid, blending the clay at the base with a small tool to ensure it won’t break off later. -
Smooth and dry:
Go over the entire piece with a slightly damp sponge to smooth out fingerprints. Let the clay dry completely according to the package instructions—I usually give it an extra day just to be safe.
Sgraffito Style
Instead of painting the grid, paint the whole box red first. Once dry, carve the cream lines purely by scratching off the top layer to reveal the white clay underneath for texture.
Step 3: Painting and Finishing
-
Sand for smoothness:
Once fully dry, gently sand any rough edges or sharp corners with intricate care. You want the box to feel soft to the touch. -
Mark the grid:
Lightly pencil a grid onto your box. To replicate this design, divide each side and the top into quarters to guide your painting. -
Paint the cream base:
Apply a coat of cream or off-white acrylic paint to the entire box first. This acts as a primer and ensures the lighter color is seamless. -
Apply the red checks:
Using a flat brush, paint alternating squares with the terracotta red paint. On the sides, paint vertical stripes that align with the corner checks, leaving the center panels cream. -
Refine the handle:
Paint the loop handle cream, perhaps adding a very subtle wash of watered-down brown paint to give it that organic, stone-like texture seen in the photo. -
Seal the work:
Finish by applying a matte varnish over the entire piece. This protects the paint from chipping and gives it a finished ceramic look without being too glossy.
Place your new handmade box on a shelf to hide small treasures or gift it to a friend

The Complete Guide to Pottery Troubleshooting
Uncover the most common ceramic mistakes—from cracking clay to failed glazes—and learn how to fix them fast.
Strawberry Box With Leafy Lid Handle
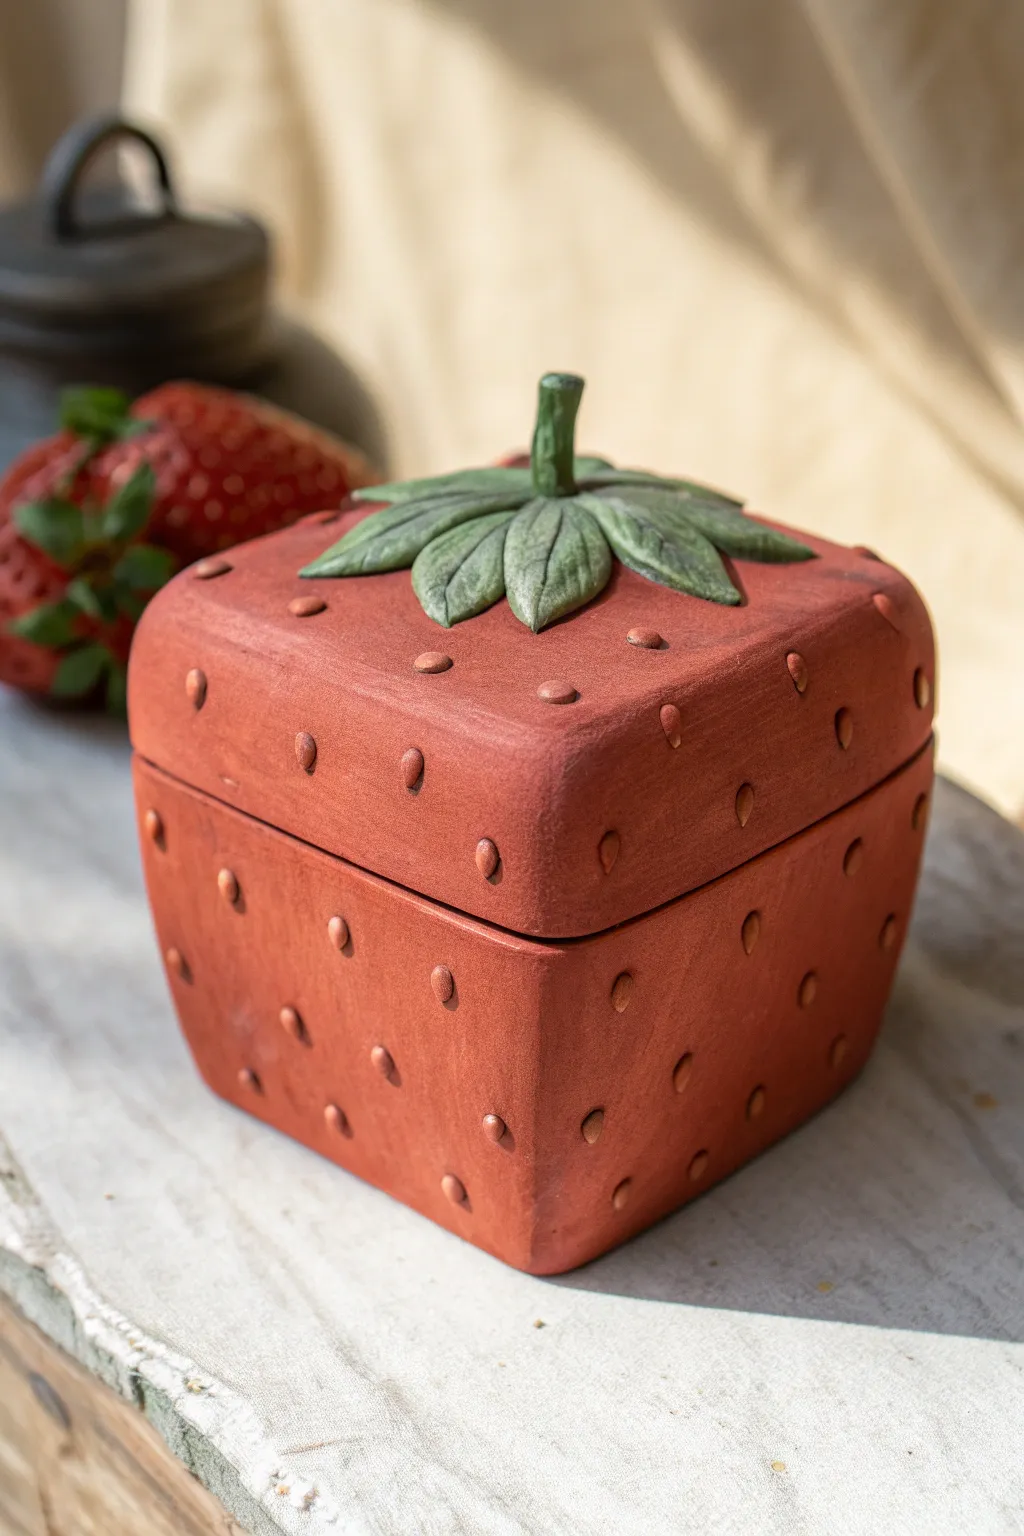
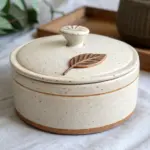
This whimsical lidded box reimagines the natural shape of a strawberry into a structured, cube-like form while retaining all the recognizable details. With its earthy terracotta finish, textured seeds, and leafy handle, it makes for a delightful keepsake container or sugar bowl.
How-To Guide
Materials
- Red earthenware or terracotta clay (or air-dry clay painted terracotta red)
- Green underglaze or acrylic paint (if using air-dry clay)
- Rolling pin
- Ruler
- Fettling knife or craft knife
- Clay scoring tool or fork
- Slip (clay and water slurry)
- Small sculpting tools
- Sponge
Step 1: Constructing the Base and Lid
-
Roll slabs:
Begin by rolling out your red clay into an even slab, approximately 1/4 inch thick. Aim for a consistent thickness to prevent warping later. -
Cut vessel walls:
Using a ruler and knife, cut five identical squares for the box base (four sides and one bottom). For a standard box, 3×3 or 4×4 inches works well. -
Cut the lid:
Cut a sixth square slightly larger than your base squares to serve as the lid. It should overhang just enough to sit comfortably or be trimmed later to fit flush. -
Score and slip edges:
Thoroughly score (scratch) the edges of the base and side panels where they will connect. Apply slip generously to these roughened areas to act as glue. -
Assemble the box:
Press the side walls onto the base and against each other to form a cube. Use a wooden tool or your finger to smooth the seams on both the inside and outside, ensuring strong bonds. -
Create the lid flange:
Roll a small coil of clay or cut thin strips. Attach these to the underside of your lid slab forming a square that fits snugly *inside* the box opening. This prevents the lid from sliding off. -
Round the corners:
Once the box is assembled and leather-hard, gently pat and smooth the sharp corners with a damp sponge or paddle to soften the boxy shape into something slightly more organic and fruit-like.
Seed Spacing Trick
Make a simple paper grid or use a checkered fabric scrap to gently impress a guide onto the clay before adding seeds. This keeps your spacing consistent without looking too rigid.
Step 2: Sculpting the Details
-
Form the stem handle:
Roll a short, thick coil of green clay (or red clay to be painted later) for the stem. Attach it securely to the direct center of the lid using the score and slip method. -
Create the leaves:
Flatten small pieces of clay into teardrop shapes to form the calyx (the green leafy top). I like to make about 5-6 leaves of varying sizes. -
Attach leaves:
Arrange the leaves radiating from the base of the stem. Press them down firmly onto the lid, allowing the tips to curl slightly upward or rest flat for texture. -
Carve leaf veins:
Use a needle tool or small knife to gently carve a central vein and smaller branching veins into each leaf for realistic detail. -
Make the seeds:
Roll many tiny, teardrop-shaped balls of clay. These will be the strawberry seeds (achenes). -
Attach seeds:
Score tiny spots all over the exterior of the box and lid. Press a seed into each spot, orienting them vertically. Ensure they are evenly spaced but not perfectly gridded. -
Refine seed divots:
To make the seeds look embedded, use a small rounded tool to gently press the clay around each seed, creating a slight depression or ‘dimple’ in the surface.
Step 3: Finishing Touches
-
Clean up:
Once the clay is bone dry, gently sand away any sharp burrs or rough patches, being careful not to dislodge the seeds. -
Bisque fire:
If using ceramic clay, fire the piece to bisque temperature (usually cone 04). -
Glaze or paint:
Apply a matte red underglaze to the body and a matte green to the leaves and stem. Wipe back slightly if you want to enhance the texture, or apply a clear matte glaze to seal it. -
Final fire:
Fire the piece again according to your clay and glaze specifications. If using air-dry clay, simply seal with a matte varnish after painting.
Make it a Set
Create a whole fruit salad set! Try making a rounder blueberry box providing a size contrast, or a triangular watermelon slice box using the same slab-building techniques.
Now you have a charming, functional piece of art that brings a touch of garden freshness to your shelf
Penguin Box With Triangle Beak and Feet
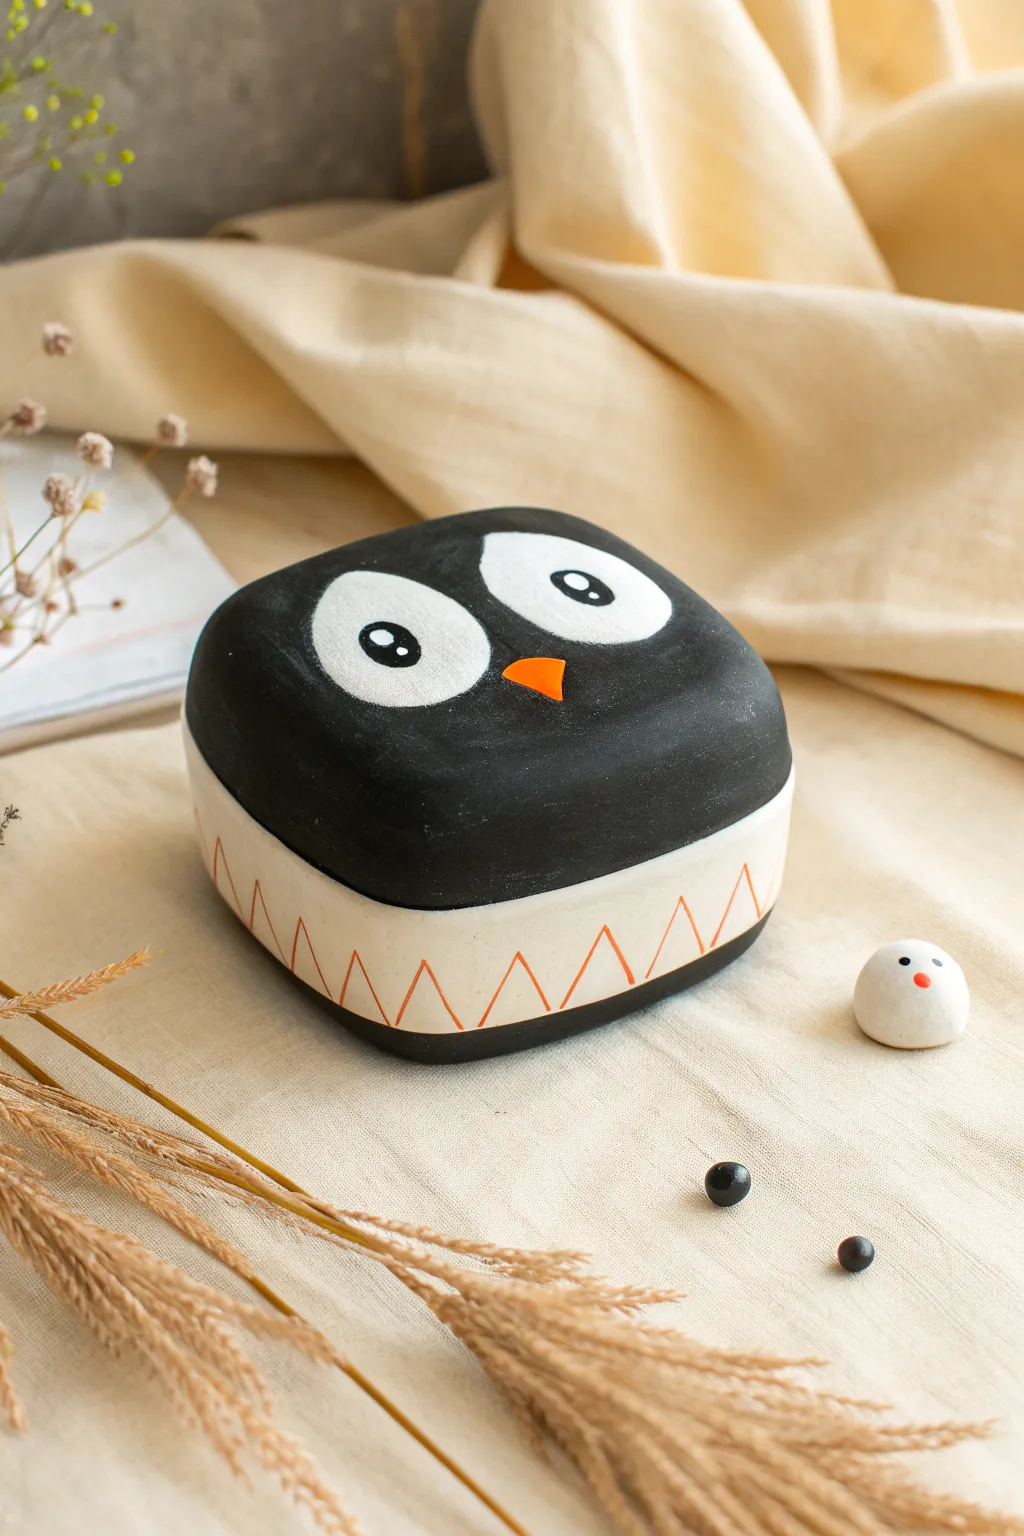
Keep your tiny treasures safe inside this adorable penguin-themed box. With its bold black-and-white design and playful geometric details, this hand-painted clay container adds a touch of whimsy to any desk or dresser.
Step-by-Step
Materials
- Air-dry clay (white)
- Acrylic paints (black, white, orange)
- Fine detail paintbrush
- Medium flat paintbrush
- Rolling pin
- Clay knife or craft blade
- Square cookie cutter (optional)
- Small bowl of water
- Sandpaper (fine grit)
- Varnish or sealant (matte or satin)
- Ruler
Step 1: Sculpting the Base and Lid
-
Prepare the Clay:
Start by conditioning a substantial chunk of white air-dry clay. Knead it in your hands until it is smooth, pliable, and free of cracks. -
Roll the Slabs:
Roll the clay out on a flat surface to an even thickness of about 1/4 inch. You’ll need enough surface area to cut two matching squares and four side strips. -
Cut the Base Shape:
Using a square cookie cutter or a ruler and craft knife, cut out a square for the base. Let’s aim for about 3×3 inches. Smooth the edges with a wet finger. -
Build the Walls:
Cut a long strip of clay (or four separate rectangular walls) about 1.5 inches tall. Attach this to the perimeter of your base square using the score-and-slip method: roughen the joining surfaces, add a little water or clay slurry, and press them together firmly. -
Smooth the Seams:
Use a modeling tool or your finger to blend the clay on the inside and outside seams until they are invisible. Gently round off the corners of the box so it isn’t perfectly sharp—this gives the penguin a softer look. -
Create the Lid:
Now, create the lid. I find it easiest to form a solid block of clay slightly larger than the box opening and hollow it out, or you can build a second, slightly larger shallow box that fits over the base. Ensure the fit is snug but not too tight, accounting for slight shrinkage as it dries. -
Round the Top:
Flip the lid upside down and smooth the top surface into a gentle, domed curve. The penguin’s head should look rounded, not flat like a table. Smooth all surfaces with a damn sponge. -
Dry Completely:
Set both pieces aside to dry. This usually takes 24-48 hours depending on humidity. Rotate them occasionally to ensure even drying.
Step 2: Painting and Details
-
Sand for Smoothness:
Once fully dry, lightly sand any bumps or rough fingerprints with fine-grit sandpaper. Wipe away the dust with a slightly damp cloth. -
Base Coat the Lid:
Using black acrylic paint, cover almost the entire lid. You can paint the sides of the lid black as well, bringing the color down to the rim. -
Paint the Upper Base:
For the bottom half of the box, paint a thick black stripe around the very bottom edge if you want a footer, or keep the bottom white like the photo. The example shows a black base rim, so paint the bottom-most section black. -
Add the Zig-Zag Pattern:
On the white section of the box base (the penguin’s belly area), use a fine brush and orange paint to create a zig-zag line all the way around. These represent the abstract texture of feathers or feet. -
Paint the Eyes:
On the black lid, paint two large, tilted white ovals for eyes. They should be positioned prominently on the front. -
Add Eye Details:
Once the white is dry, add large black circles inside the white ovals for pupils. Then, add a tiny white dot in each pupil for that sparkling ‘catchlight’ effect. -
The Beak:
Paint a small, inverted orange triangle right between the eyes for the beak. Make it bright and sharp. -
Seal the Project:
After all paint is completely dry, apply a coat of matte or satin varnish to protect your work from chipping and give it a finished professional look.
Smooth Operator
Use a damp sponge to smooth your clay before drying. It works better than sanding later and creates a porcelain-like finish.
Mix It Up
Try making a whole snowy family! Vary the sizes to create nesting dolls, or change the beak colors to differentiate them.
Now you have a charming little companion ready to guard your favorite trinkets


What Really Happens Inside the Kiln
Learn how time and temperature work together inside the kiln to transform clay into durable ceramic.
Cat Box With Pointy Ears on the Lid
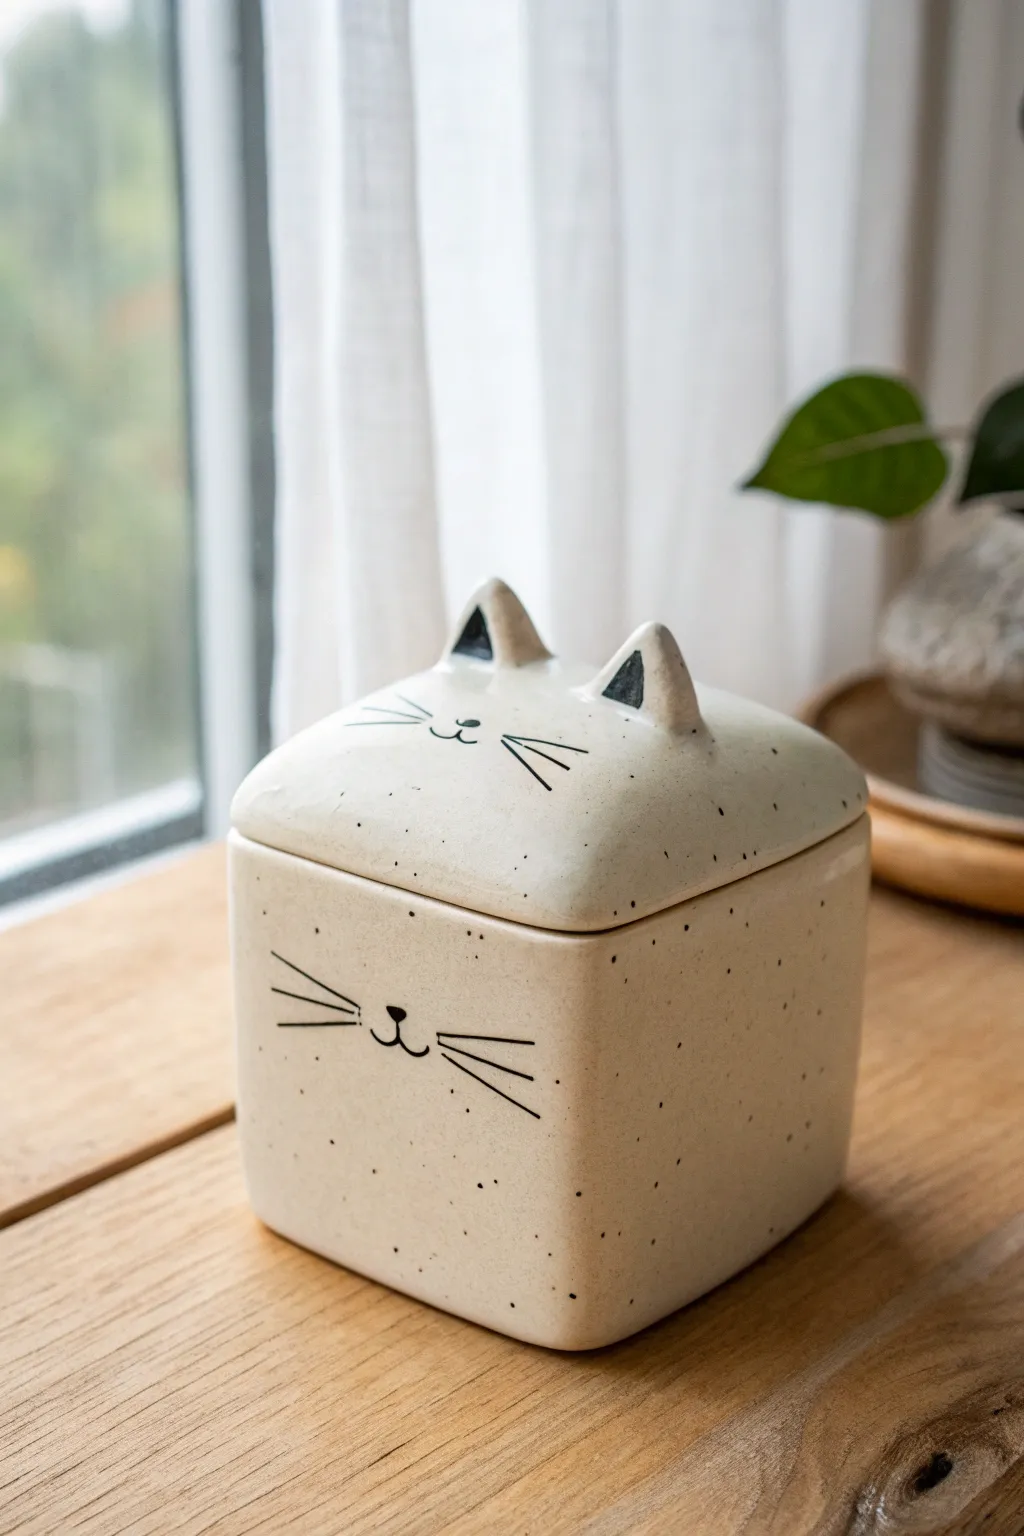
This charming ceramic box combines functional storage with whimsical design, featuring a minimalist cat face on both the base and the peaked lid. The creamy, speckled finish gives it a polished, pottery-studio look that is perfect for hiding away teabags or trinkets.
How-To Guide
Materials
- Speckled cream clay or stoneware clay (with iron spots)
- Rolling pin
- Guide sticks (approx. 5mm thick)
- Square paper template (approx. 4×4 inches)
- Potter’s knife or fettling knife
- Scoring tool or old fork
- Slip (clay mixed with water)
- Underglaze pencil or fine liner bottle (black)
- Clear or milky white glaze
- Sponge
- Kiln (if using firing clay) or oven (if using polymer clay)
Step 1: Forming the Box Body
-
Prepare your slabs:
Begin by rolling out your speckled clay into a smooth, even slab. I like to use wooden guide sticks on either side of the clay to ensure a uniform thickness of about 5mm. -
Cut the components:
Using your square paper template, cut out five identical squares from the slab. These will form the bottom and the four walls of your box. -
Dry to leather hard:
Let the square pieces sit out until they reach a ‘leather hard’ state. This means they are firm enough to hold their shape without slumping but still soft enough to join. -
Bevel the edges:
For cleaner corners, cut a 45-degree angle on the edges where the walls will meet each other. This creates a mitre joint, making the box stronger and the seams less visible. -
Score and slip:
Rough up the edges you plan to join using a scoring tool, then apply a generous amount of slip. Press the walls onto the base and against each other firmly to create a bond. -
Reinforce the seams:
Roll a very thin coil of clay and press it into the interior corners of the box. Smooth this coil out with a modeling tool or your finger to ensure the walls won’t separate. -
Smooth the exterior:
Use a rib tool or a slightly damp sponge to smooth the outside corners, softening the sharp edges into a gentle curve like the box in the photo.
Warped Walls?
If your box walls start bowing inward while drying, stuff the inside with crumpled newspaper to support the shape until the clay stiffens.
Step 2: Sculpting the Lid
-
Cut the lid base:
Cut another square slab slightly larger than your box opening to account for shrinkage or overhang, though for this flush look, aim for exact dimensions. -
Create the domed shape:
Place the lid slab on a foam pad or in your hand and gently press from the underside to create a subtle dome shape, rather than a flat wafer. -
Add the flange:
To keep the lid from sliding off, attach small strips of clay or a square ring to the underside of the lid, inset just enough to fit comfortably inside the box opening. -
Form the ears:
Hand-shape two small triangles of clay. Pinch them slightly to give them a 3D form rather than leaving them flat. -
Attach the ears:
Score and slip the top of the lid where the ears will sit. Press the ears on firmly and smooth the clay around the base so they look seamless.
Tail Handle
Sculpt a small, curved tail on the back of the box to act as a cute handle or just a fun 3D detail that adds character from every angle.
Step 3: Refining and Decorating
-
Final smoothing:
once the lid is leather hard, wipe down the entire piece with a damp sponge to remove any fingerprints or rough textures. -
Paint the face details:
Using a black underglaze with a fine brush or a liner bottle, carefully draw the whiskers, nose, and mouth on the front of the box. Repeat the face (eyes, nose, whiskers) on the lid for that double-faced effect. -
Detail the ears:
Paint small black triangles inside the sculpted ears to give them depth. -
Bisque fire:
Allow the piece to dry completely (bone dry) before firing it in the kiln for the first bisque firing. If using oven-bake clay, follow package instructions. -
Glazing:
Dip or brush the entire piece in a clear or milky white transparent glaze. This will seal the clay and make those cute black speckles pop. -
Final firing:
Fire the piece again according to your glaze’s temperature requirements to achieve that smooth, glossy finish.
Now you have an adorable ceramic companion ready to guard your desk treasures
Puffed-Body Box for a Soft, Chubby Shape
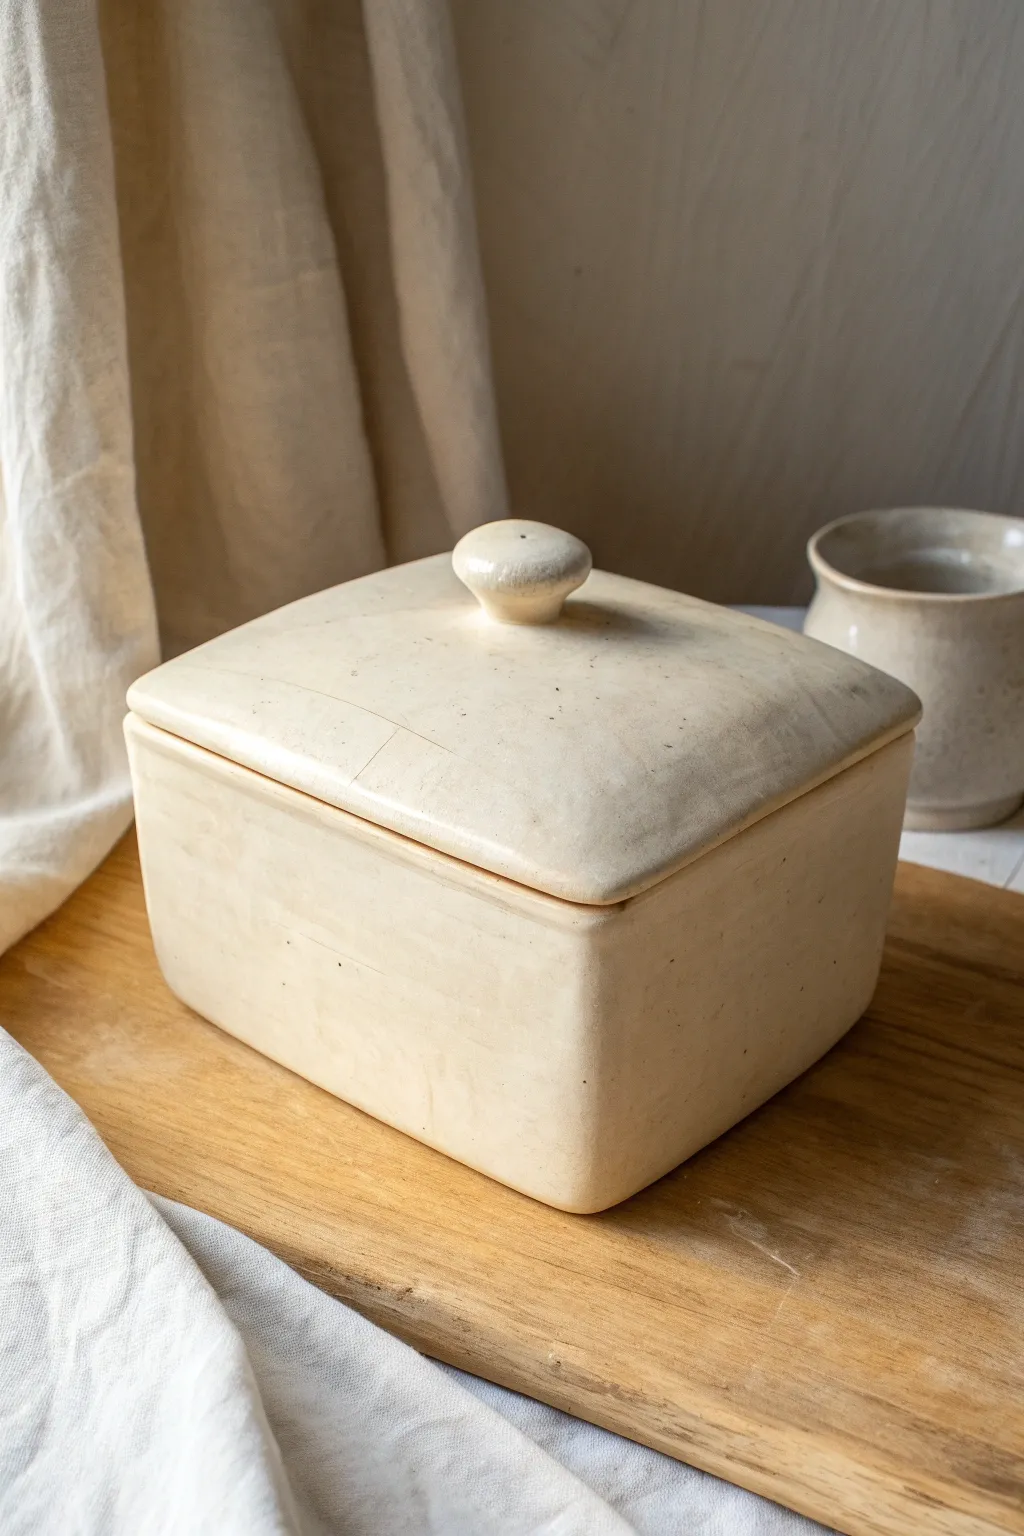
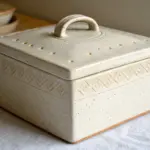
Soft curves and a gentle, pillowy form give this squared ceramic box a charming, chubby personality. The subtle convex walls create a tactile, hand-held feel that sets it apart from standard slab-built boxes, making it perfect for storing small treasures or butter.
Step-by-Step
Materials
- Stoneware clay (smooth, light-colored)
- Rolling pin
- Two 1/4-inch wooden slats (thickness guides)
- Fettling knife or needle tool
- Serrated rib or scoring tool
- Slip (clay mixed with water)
- Soft sponge
- Wooden paddle
- Small paintbrush
- Paper template (square)
- Bat or wooden board
Step 1: Creating the Soft Volume
-
Roll the slab:
Begin by rolling out a consistent slab of clay using your wooden slats as guides. You want a thickness of about 1/4 inch to ensure the walls are sturdy enough to hold the puffed shape without collapsing. -
Cut the components:
Using a square paper template (approx. 4×4 inches is a good start), cut out six identical squares. One will be the base, four will be walls, and the last will be the lid. -
Puff the walls:
Take the four wall squares and gently cradle each one in your palm. Lightly press your thumb from the inside center outward, or tap the center gently with a soft sponge, to create a subtle convex curve. Do not make it too dramatic; just a gentle ‘puff’ is enough. -
Bevel the edges:
Once the squares have stiffened slightly to soft leather-hard, cut a 45-degree bevel on the vertical edges of the four wall pieces. This miter joint will help the puffed corners meet cleanly.
Air Pillow Trick
To keep the walls ‘puffed’ while joining, seal the box fully (add lid early) to trap air. The internal pressure supports the walls while you paddle. Cut the lid loose later.
Step 2: Assembling the Body
-
Score and slip the base:
Score the perimeter of your base square and the bottom edge of your first wall piece. Apply a generous amount of slip to the scored areas. -
Attach the first wall:
Press the wall onto the base. Because the wall is curved, you may need to gently nudge the bottom edge straight so it sits flush against the flat base. -
Construct the box:
Repeat the scoring and slipping process for the remaining three walls. Attach them one by one, ensuring the beveled vertical edges lock together tightly at the corners. -
Reinforce the seams:
Roll extremely thin coils of clay. Place them into the interior seams where the walls meet the base and each other, then smooth them down with your finger or a rounded tool to strengthen the joints. -
Paddle for shape:
With the box assembled, use a wooden paddle to gently tap the exterior corners and walls. This unifies the connections and emphasizes that soft, chubby silhouette we are aiming for.
Textured Variance
Before assembling, gently roll raw canvas or linen onto the moist slabs. The fabric texture catches the glaze beautifully and enhances the soft, organic feel.
Step 3: Lid and Finishing
-
Prepare the lid slab:
Take your final square slab and repeat the ‘puffing’ technique, creating a gentle dome shape that mirrors the body of the box. -
Add a flange:
Flip the lid upside down. Measure the interior opening of your box. Roll four small coils or strips and attach them to the underside of the lid, inset just enough so they fit snugly fast the box opening to keep the lid from sliding off. -
Create the knob:
Roll a small ball of clay and slightly flatten the bottom to create a mushroom cap shape. This simple knob complements the rounded aesthetic of the box. -
Attach the knob:
Score and slip the center of the lid’s top surface and the bottom of the knob. Press firmly to attach. I usually run a damp brush around the connection point to smooth away any excess slip. -
Refine the surface:
Once the piece is fully leather-hard, use a damp sponge to smooth all sharp edges and remove any canvas marks. The goal is a surface that looks soft to the touch. -
Dry slowly:
Loosely cover the box and lid with plastic to let them dry slowly. Uneven drying can warp the lid, so keeping them together (with a piece of paper in between to prevent sticking) is often a smart move. -
Bisque and glaze:
Fire the piece to bisque temperature. For the glazing, choose a matte, creamy white or oatmeal glaze that breaks slightly over edges to highlight the puffed form and soft corners.
Enjoy the quiet, understated beauty of your handmade container once it emerges from the final firing