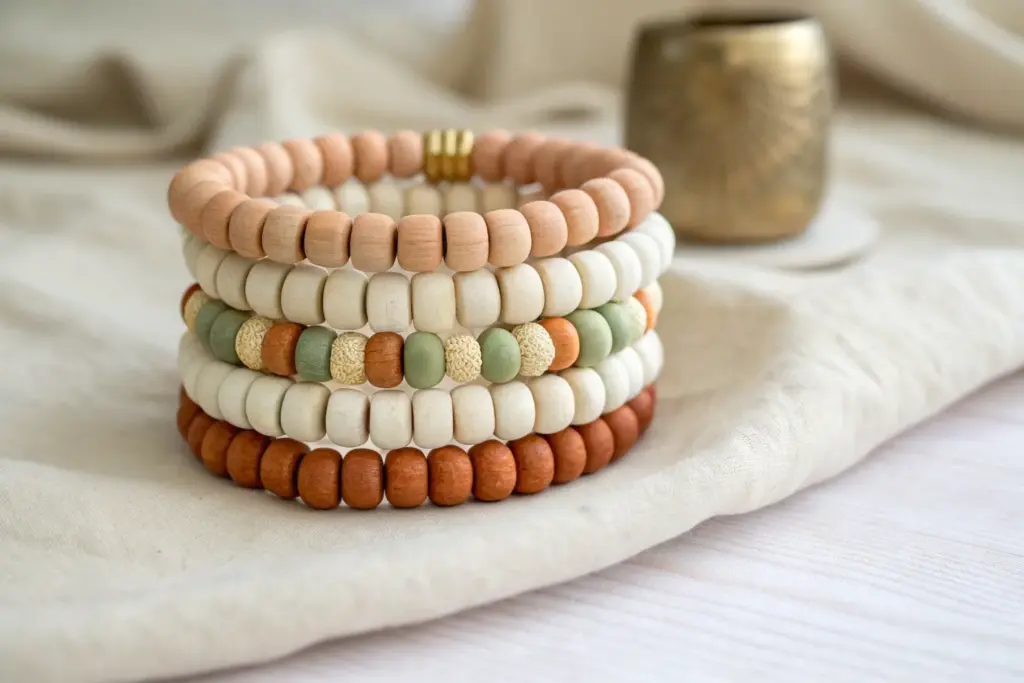
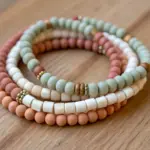
Whenever I’m staring at a pile of heishi clay beads, I like having a few reliable “pattern recipes” that make the final bracelet look polished on purpose. Here are my favorite clay bead pattern ideas, starting with the classics and drifting into the fun, unexpected combos I reach for in my studio.
Classic Solid-Color Strand
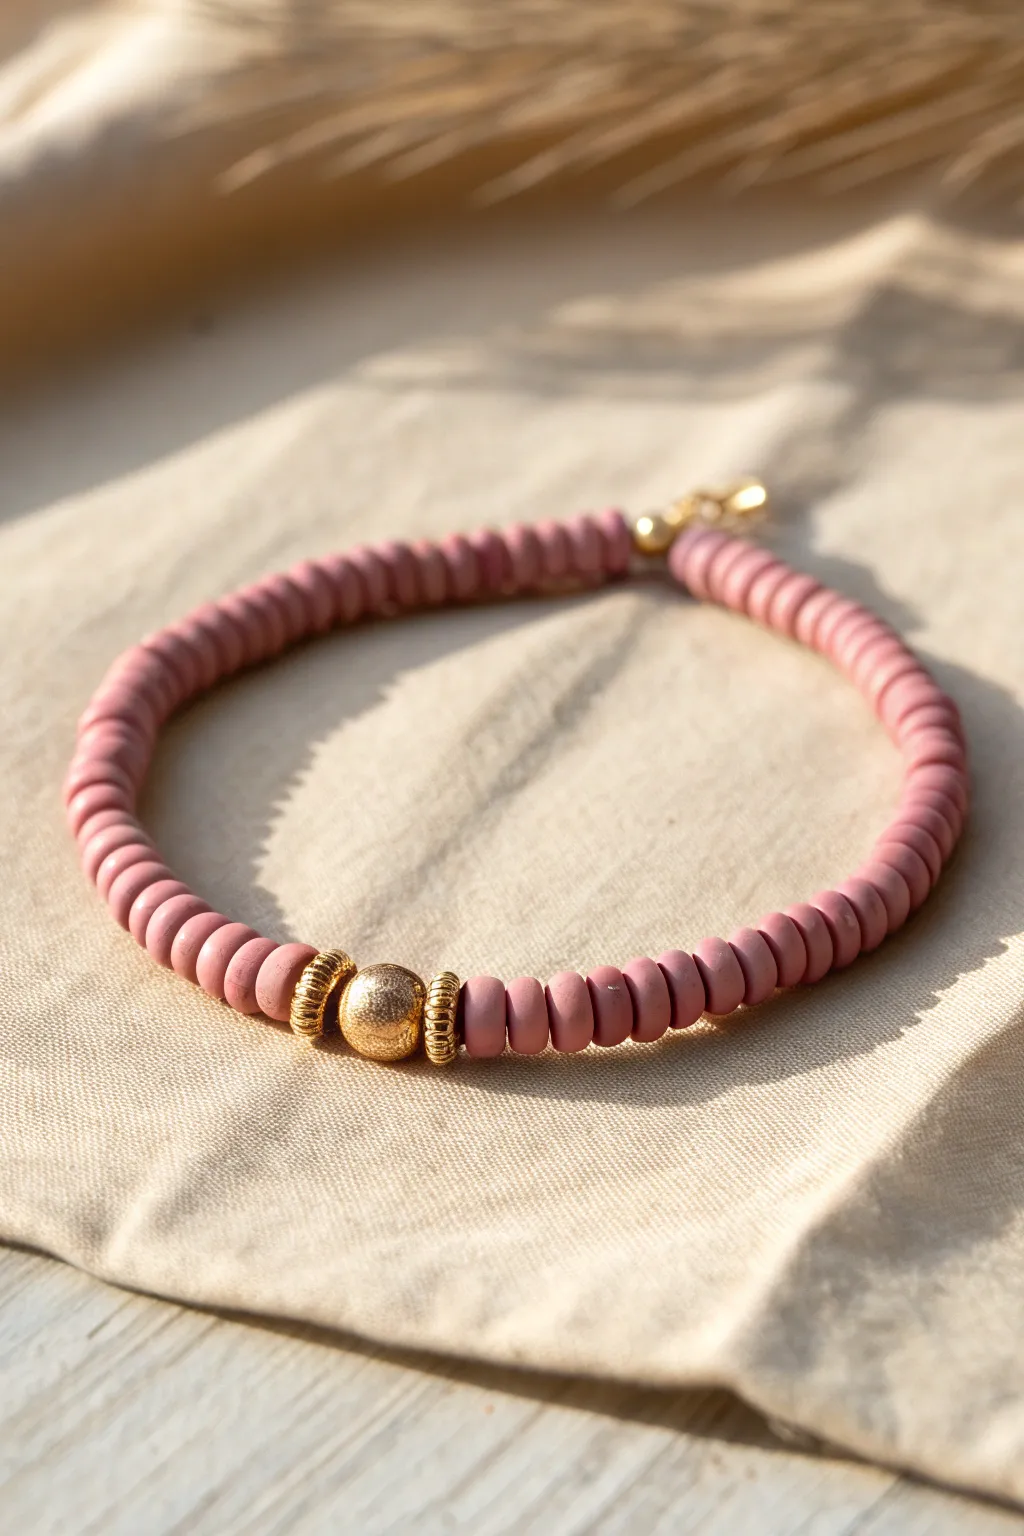
This elegant bracelet proves that sometimes simplicity makes the strongest statement. By pairing a continuous strand of earthy, matte mauve clay beads with a striking gold focal point, you create a sophisticated accessory perfect for everyday wear.
Step-by-Step
Materials
- 6mm dusty rose/mauve polymer clay heishi beads (approx. 1 strand)
- 0.8mm clear elastic stretch cord
- 1 large gold-tone round bead (approx. 8-10mm, stardust or brushed finish)
- 2 gold-tone decorative spacer beads (ribbed or corrugated discs)
- Gold-tone crimp bead cover (optional, for clasp finish)
- Gold-tone lobster clasp and jump ring (or closed jump ring)
- Jewelry glue (e.g., G-S Hypo Cement)
- Scissors or jewelry snips
- Bead stopper or tape
Step 1: Preparation & Sizing
-
Measure the cord:
Cut a piece of elastic cord about 10-12 inches long. This generous length gives you plenty of room to tie knots without struggling. -
Secure the end:
Attach a bead stopper to one end of the cord, or simply tape it down to your work surface so beads don’t slip off while you work. -
pre-stretch the elastic:
Give your cut elastic a few gentle tugs. Pre-stretching helps prevent the bracelet from loosening up significantly after the first few wears.
Step 2: Constructing the Strand
-
Start the first half:
Begin threading your dusty rose heishi beads onto the elastic. You will need enough to cover approximately half of your wrist circumference. -
Check the count:
Count the beads you have added so far. Later, you’ll want to match this number on the other side to ensure the gold focal point stays perfectly centered. -
Add first spacer:
Slide on one of the gold spacer beads. Looking at the reference, these are ribbed or corrugated disc beads which add nice texture against the smooth clay. -
Add the focal bead:
Thread on the large, round gold bead. This 8-10mm bead acts as your centerpiece, so ensure it sits snugly against the first spacer. -
Add second spacer:
Mirror your design by adding the second gold spacer bead immediately after the large focal bead. -
Finish the strand:
Thread on the remaining clay heishi beads. Use the same number of beads as you did in the first step to keep everything symmetrical. -
Verify the length:
Wrap the unfinished strand around your wrist to check the fit. It should sit comfortably without pinching your skin, as the knot will take up a tiny bit of space.
Knot Slipping?
If your elastic knot won’t hold tight while gluing, have a friend hold a finger on the knot, or use a pair of hemostats to clamp it while the glue cures.
Step 3: Closing the Bracelet
-
Prepare for the knot:
Remove the bead stopper or tape. Bring both ends of the elastic together carefully. -
Tie the knot:
Tie a surgeon’s knot (right over left, left over right, looping through twice on the second pass). Pull the elastic tight to secure the beads closely together. -
Apply adhesive:
I like to place a tiny drop of jewelry glue directly onto the knot. This prevents the slick elastic from slipping undone over time. -
Hide the knot:
If the hole of your nearest clay bead is large enough, gently tug the elastic to slide the knot inside the bead. -
Adding a clasp (Optional Variant):
The image shows a clasp finish. To achieve this instead of a continuous stretch loop, crimp a bead tip or clam shell onto each end of the elastic instead of knotting. -
Attach hardware:
Using jump rings, attach a lobster clasp to one crimp end and a closed jump ring to the other. -
Final trim:
Once the glue is fully dry or the crimps are secure, trim away any specific excess cord carefully with your scissors.
Gold Preservation
Coat your gold beads with clear nail polish or a jewelry protectant spray before stringing. This prevents tarnishing from skin oils and sweat.
Slip on your new bracelet and enjoy the subtle warmth of the matte clay against the gold shine


Three-Color Color-Block Repeat
This sophisticated beaded bracelet combines rust, sage, and speckled cream tones for a grounded, natural look. The design features a subtle color-blocking pattern separated by elegant gold spacers, making it perfect for everyday wear.
Detailed Instructions
Materials
- Polymer clay (terracotta, sage green, speckled beige)
- Small gold disc spacer beads (metal or heishi style)
- Clear elastic beading cord (0.7mm or 0.8mm)
- Bead roller tool (optional, for making perfect spheres)
- Oven for baking clay
- Pin or bead piercing tool
- Super glue or jewelry cement
- Scissors
Step 1: Making the Clay Beads
-
Condition the clay:
Start by warming up your polymer clay in your hands. Knead each color—terracotta, sage, and speckled beige—separately until they are soft and pliable. -
Portion the clay:
Pinch off small pieces of clay for each bead. Aim for pieces that are roughly the size of a large pea. It helps to roll a thin log of clay first and slice it into even segments to ensure consistent sizing. -
Roll spheres:
Roll each segment between your palms to create a smooth sphere. For a more uniform look, I utilize a bead roller tool here, but hand-rolling works perfectly fine if you take your time. -
Create texture (optional):
The beads in the image have a lovely matte, slightly earthy texture. You can achieve this by lightly rolling the unbaked spheres on a piece of coarse sandpaper or a textured sponge. -
Pierce holes:
Carefully pierce a hole through the center of each sphere using a pin or piercing tool. Gently twist the tool as you push through to avoid squashing the round shape. -
Bake carefully:
Arrange your beads on a baking sheet lined with parchment paper. Bake according to the manufacturer’s instructions for your specific brand of clay—usually around 275°F (135°C) for 15-30 minutes. -
Cool down:
Allow the beads to cool completely before handling them. They harden fully as they cool.
Sticky Situation
If your clay is too soft or sticky to roll into smooth spheres, pop it in the fridge for 10 minutes. Cooling it down firms it up, making it much easier to shape.
Step 2: Assembling the Bracelet
-
Measure the cord:
Cut a length of elastic cord about 10-12 inches long. This gives you plenty of extra room for tying knots later. -
Pre-stretch the elastic:
Give the elastic cord a few firm tugs. Pre-stretching prevents the bracelet from loosening up after you wear it a few times. -
Secure the end:
Place a piece of tape on one end of the cord or attach a bead stopper to prevent beads from sliding off while you work. -
Plan the pattern:
The pattern shown follows a loose repeat. Start with a sequence like: 1 cream, 1 green, 2 terracotta, 1 green. -
Insert gold spacers:
To break up the matte texture, add a gold spacer bead periodically. In this design, they are placed somewhat irregularly—try placing one after a group of three or four clay beads for a nice accent. -
Thread the beads:
String your beads onto the elastic following your chosen pattern until you reach the desired length (usually about 6.5 to 7 inches for an average wrist). -
Check the fit:
Wrap the strand around your wrist to check the sizing. While the elastic stretches, you don’t want the resting size to pinch your skin. -
Tie the knot:
Remove the tape/stopper and bring the two ends together. Tie a surgeon’s knot (looping the cord through twice) and pull it tight. -
Secure the knot:
Add a tiny dab of super glue or jewelry cement directly onto the knot. Let it dry for a minute or two. -
Hide the knot:
Trim the excess cord close to the knot, then gently pull the cord so the knot slides inside the hole of the nearest bead.
Perfectly Round
To avoid flat spots while baking, nestle your raw beads into a bed of cornstarch or baking soda on the tray. This cradles the shape while they harden in the oven.
Slip on your new bracelet and enjoy the organic, handmade touch it adds to your outfit


Confetti Mix With Anchor Sections
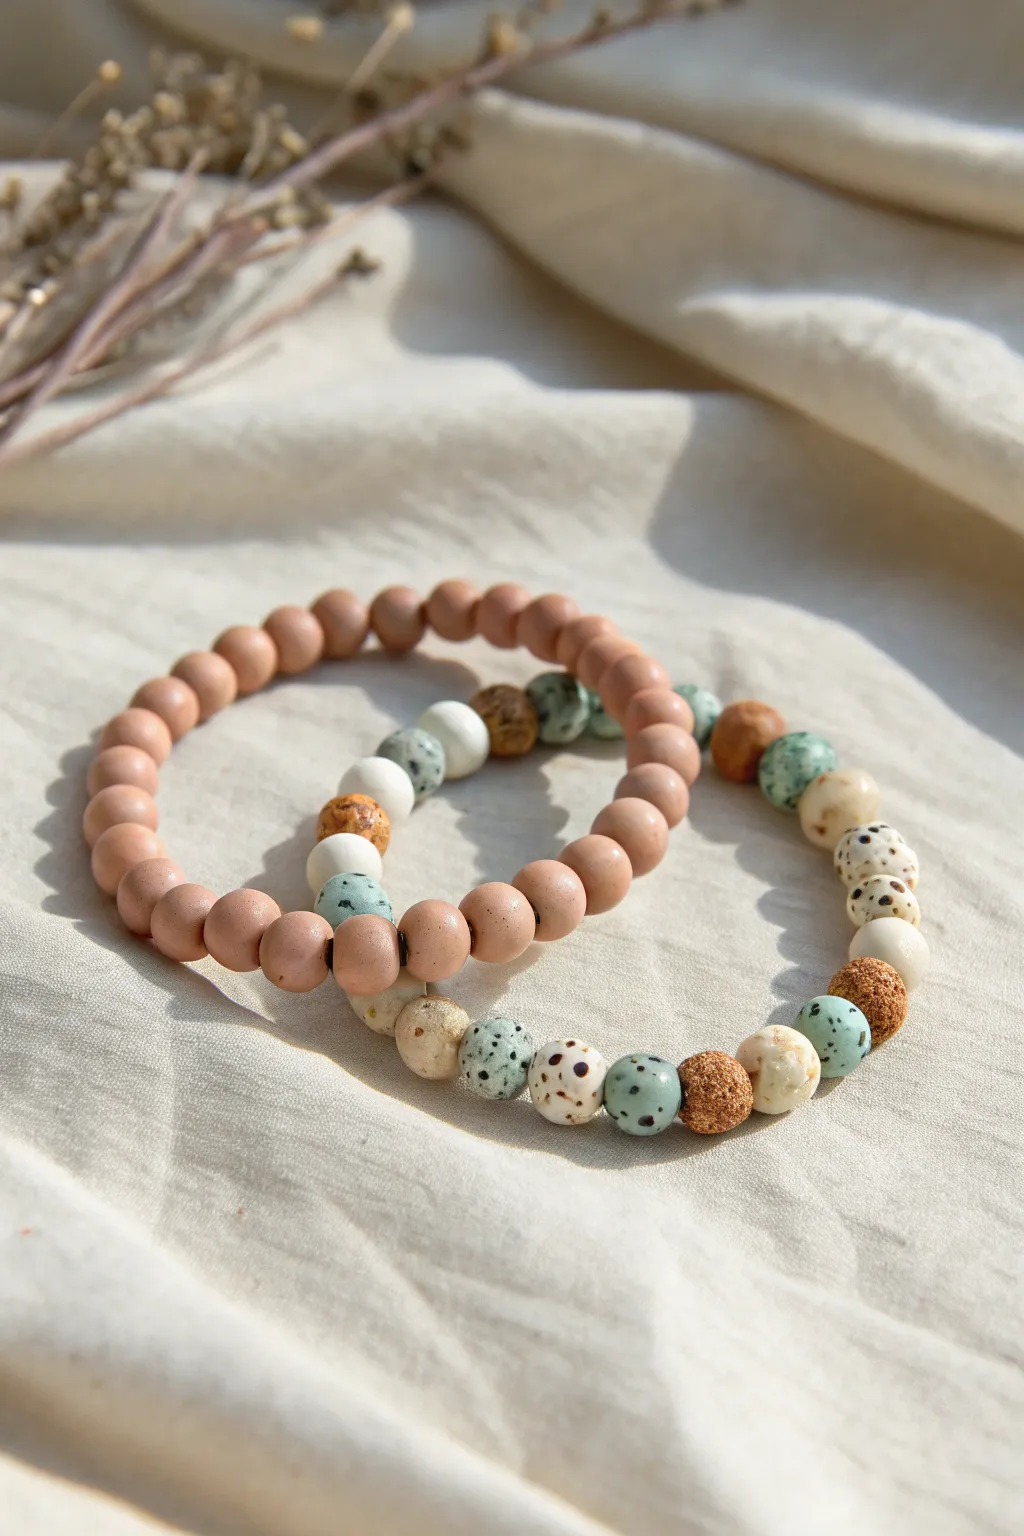
This project features a charming pair of stretch bracelets that play with texture and pattern. One bracelet offers a grounding, solid dusty rose tone, while the other mixes speckled, solid, and textured beads for a playful confetti look.
Step-by-Step Guide
Materials
- Polymer clay in dusty rose, white, mint green, sage green, and brown
- Acrylic paint (black and brown) for speckling
- Texture sponge or sandpaper
- Toothpicks or bead pins
- Baking sheet and parchment paper
- Elastic jewelry cord (0.8mm or 1mm)
- Super glue or jewelry cement
- Scissors
- Bead reamer (optional)
Step 1: Creating the Solid Rose Beads
-
Condition the clay:
Start by thoroughly conditioning your dusty rose polymer clay until it is soft and pliable. This ensures your beads won’t crack during baking. -
Roll a log:
Roll the conditioned clay into a long, even snake or log shape, roughly the thickness you want your final beads to be (about 8-10mm). -
Section the clay:
Using a blade, cut the log into equal-sized segments. Keeping these pieces uniform is key to a professional finish. -
Shape the spheres:
Roll each small segment between your palms to create smooth, round spheres. Aim for roughly 25-30 beads for a standard wrist size. -
Pierce the holes:
Gently pierce the center of each bead with a toothpick or bead pin. I like to twist the toothpick as I push it through to prevent flattening the bead’s shape.
Step 2: Crafting the Confetti Mix Beads
-
Prepare mixed colors:
Condition small amounts of white, mint green, and brown clay. You’ll need fewer of each color compared to the solid bracelet. -
Create speckled effects:
For the speckled beads (like the dalmatian-style ones), mix tiny bits of black clay or dried black paint flakes into white clay, or plan to paint speckles after baking. -
Texture the brown beads:
Roll your brown clay spheres. Before piercing, gently roll them over a piece of coarse sandpaper or a texture sponge to give them that organic, stone-like surface. -
Form the sage green beads:
Create smooth round beads using sage or mint green clay, following the same rolling and piercing method as before. -
Bake the beads:
Arrange all pierced beads on a parchment-lined baking sheet. Bake according to your polymer clay package instructions (usually 275°F/135°C for 15-30 minutes). -
Add painted details:
Once cooled, use a fine brush or a toothpick to dab tiny black or brown dots onto select white and mint beads to mimic the speckled egg look seen in the photo. -
Seal the paint:
Allow the paint to dry completely. If you want extra durability, apply a very thin layer of matte varnish to the painted beads.
Smooth Rolling Tip
To get perfectly round beads without fingerprints, wear latex gloves or roll the final shape under a flat piece of acrylic or glass.
Step 3: Assembly
-
Measure the cord:
Cut two lengths of elastic cord, about 10-12 inches each. Pre-stretch the cord by pulling on it gently a few times to prevent it from loosening later. -
String the solid bracelet:
Thread all your solid dusty rose beads onto one cord. Check the fit around your wrist and add or remove beads as necessary. -
Design the confetti pattern:
Lay out your mixed beads on a bead board or towel. Create a random but balanced pattern, alternating between textured brown, speckled white, and smooth mint beads. -
String the mixed bracelet:
Thread the patterned beads onto the second cord, ensuring the colors are distributed evenly so no two identical beads sit next to each other. -
Tie the knots:
From here, tie a strong surgeon’s knot (right over left, left over right) on each bracelet. Pull the knot tight. -
Secure and hide:
Dab a tiny drop of super glue on the knot. Once dry, trim the excess cord and gently tug the knot inside the hole of a neighboring bead to hide it.
Organic Texture Hack
Mix semi-dried coffee grounds or black pepper into your clay before baking for built-in, realistic speckles that won’t rub off.
Enjoy mixing and matching these earthy textures with your favorite outfits


Complementary Color Pop Pattern
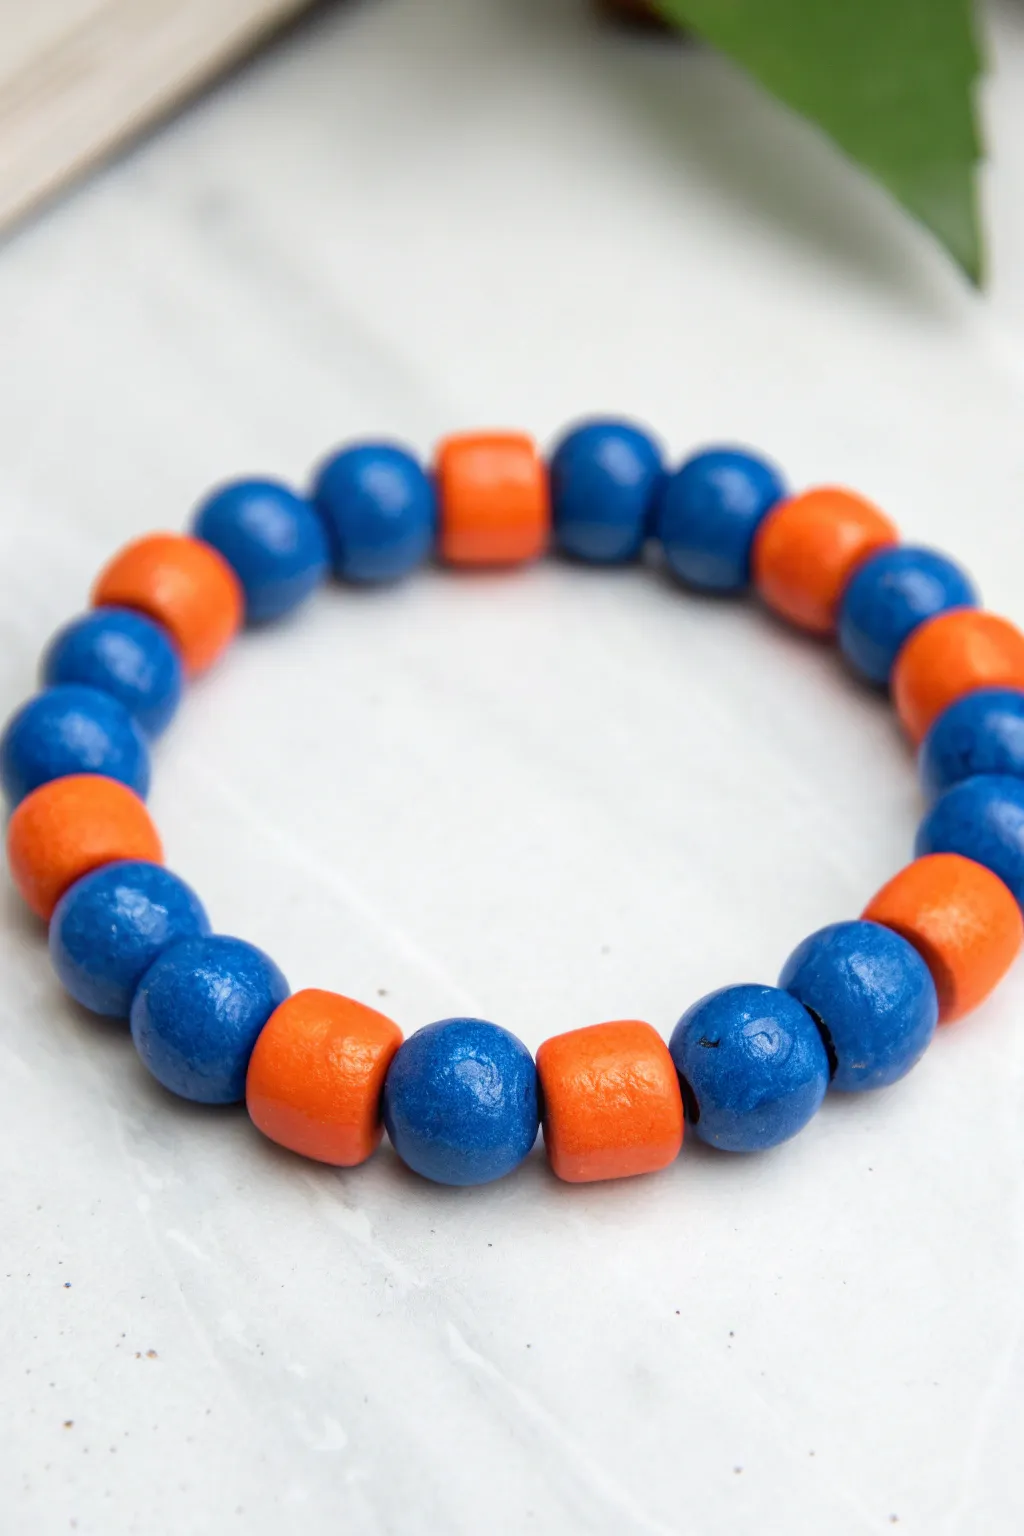
Embrace the vibrant energy of complementary colors with this bold blue and orange beaded bracelet. The mix of round blue beads and cylindrical orange spacers creates a playful rhythm that pops against any wrist stack.
Step-by-Step Guide
Materials
- Stretch cord (0.8mm or 1mm thickness)
- Round wooden or clay beads (approx. 8-10mm, royal blue)
- Cylindrical/barrel beads (approx. 8-10mm, bright orange)
- Scissors
- Hypo cement or clear jewelry glue
- Bead stopper or masking tape
Step 1: Preparation
-
Measure the wrist:
Before cutting anything, wrap a piece of string around your wrist to find the comfortable length. Add about 3-4 inches to this measurement to ensure you have plenty of slack for tying the final knot. -
Prepare the cord:
Cut your stretch cord to the measured length. Pre-stretch the cord by tugging on it gently several times; this helps prevent the bracelet from loosening up permanently after the first wear. -
Secure the end:
Attach a bead stopper to one end of the cord. If you don’t have one, a piece of masking tape folded over the end works perfectly to keep your beads from sliding off while you work.
Step 2: Creating the Pattern
-
Start the sequence:
Begin by threading two round blue beads onto the cord. Visualizing the pattern first helps, so you might want to lay them out on a bead board or towel before stringing. -
Add a contrasting pop:
Slide on one orange cylindrical bead. Notice how the flat edges of the cylinder sit flush against the round curve of the blue beads. -
Variable spacing:
Follow the orange bead with a single blue bead. -
Repeat the contrast:
Add another orange cylinder bead. This section creates an alternating 1-blue, 1-orange rhythm. -
Extend the blue section:
Add two more blue beads. This creates a small block of color that breaks up the alternating pattern for visual interest. -
Continue the pattern:
Continue stringing in this loose rhythm: a few blue beads (1-3) separated by single orange spacers. I find that keeping it slightly irregular gives it a more organic, handmade charm than a strict mathematical sequence. -
Check the fit:
Once you have strung about 6 inches of beads, wrap the beaded section around your wrist to check the size. Add or remove beads until the ends meet comfortably without stretching the cord.
Knot Slipping?
If the elastic feels slippery, try dusting the knot area with a tiny bit of rosin or roughing the cord ends slightly with sandpaper before tying for extra grip.
Step 3: Finishing Touches
-
Prepare for the knot:
Remove the bead stopper or tape carefully, holding both ends of the elastic firmly so the beads don’t escape. -
Tie the first knot:
Cross the ends and tie a simple overhand knot, pulling it down tight against the beads to remove any gaps. -
Secure with a surgeon’s knot:
For the second knot, create a loop but pass the tail end through the loop twice instead of once. This is a surgeon’s knot and offers extra security. -
Tighten firmly:
Pull the cords tight. You should feel the elastic stretch slightly as the knot locks into place. -
Apply adhesive:
Dab a tiny drop of Hypo cement or clear jewelry glue directly onto the knot. Be careful not to glue the knot to the adjacent beads, just seal the thread itself. -
Hide the knot:
Ideally, slide the adjacent orange cylinder bead over the knot while the glue is still slightly tacky to hide it inside the larger hole. -
Trim the excess:
Once the glue is fully dry (wait at least 15 minutes), use your scissors to trim the excess cord tails close to the bead/knot.
Pro Tip: Hiding Knots
Plan your pattern so an orange cylinder bead is at the end. Their larger internal holes make it much easier to hide the final knot than the smaller round beads.
Now you have a striking accessory ready to brighten up any outfit

The Complete Guide to Pottery Troubleshooting
Uncover the most common ceramic mistakes—from cracking clay to failed glazes—and learn how to fix them fast.
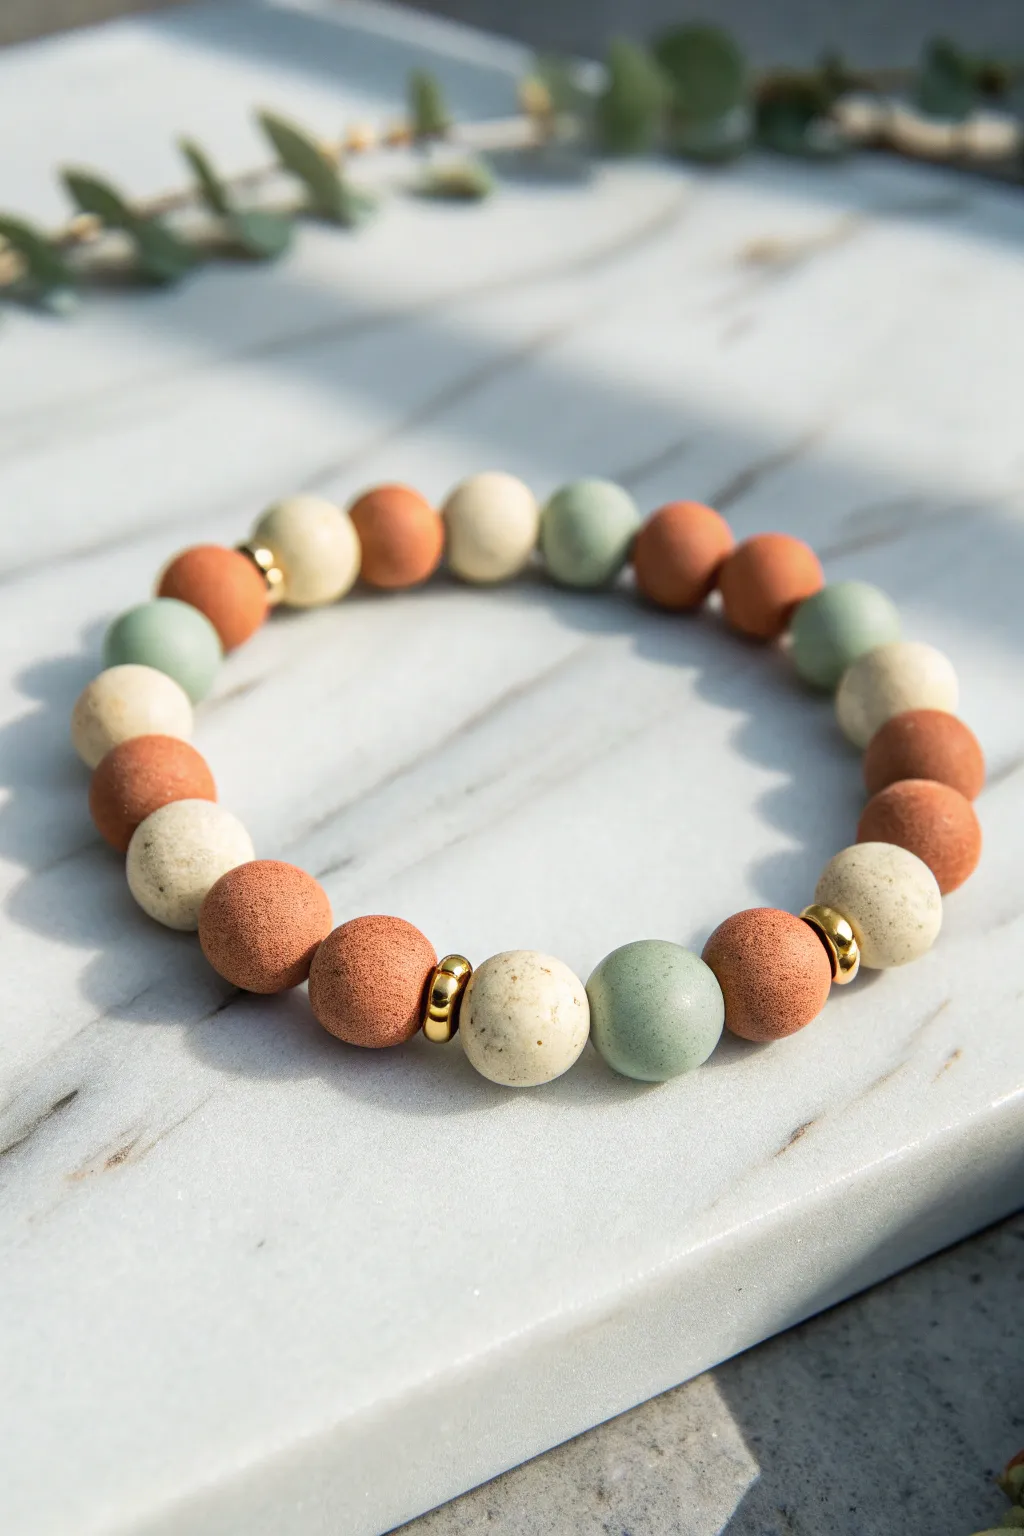
Gold Spacer Beads as Punctuation
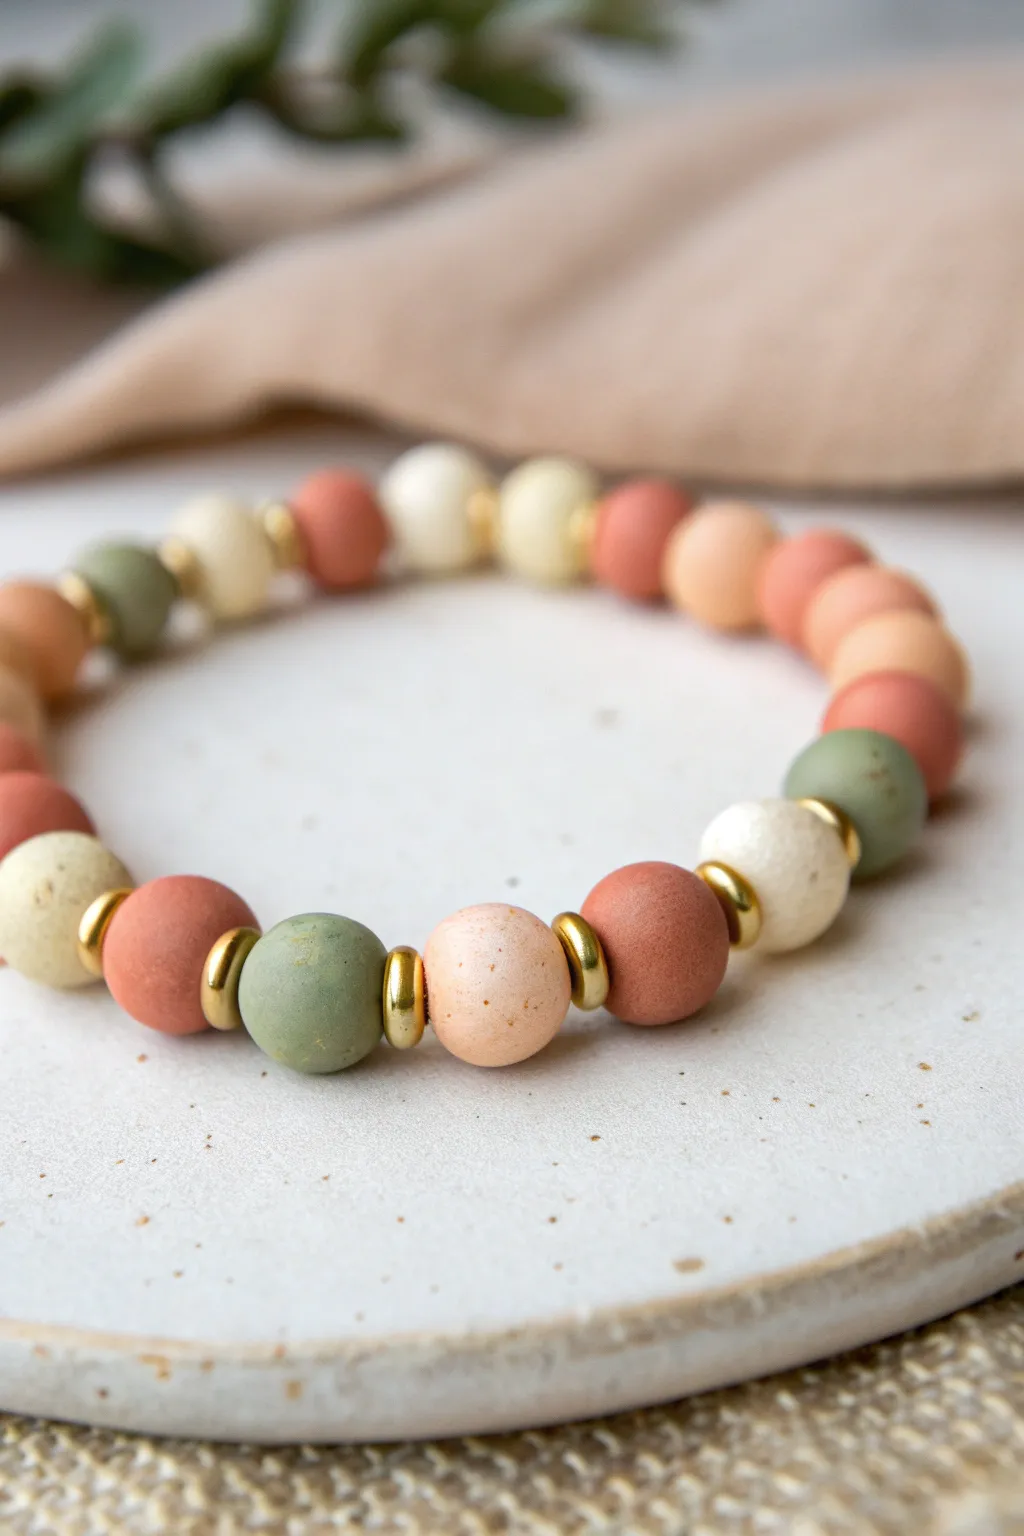
This bracelet combines matte polymer clay beads in soft, desert-inspired hues with the bright flash of gold spacers. The result is a sophisticated textural contrast that feels both organic and polished, perfect for everyday wear.
Step-by-Step Guide
Materials
- Matte polymer clay beads (8mm-10mm round) in: terracotta/rust, sage green, cream/ivory, and peach/sand
- Gold plated spacer beads (rondelle or disc shape, 4mm-6mm)
- Strong elastic bead cord (0.8mm or 1mm thickness)
- Jewelry glue or clear nail polish
- Scissors
Step 1: Planning Your Palette
-
Sort your colors:
Begin by separating your clay beads into color groups. You will need roughly equal amounts of terracotta, sage green, cream, and peach. -
Check the finishes:
Ensure your clay beads have a matte or slightly textured finish to contrast properly with the shiny gold. If they are too glossy, you can lightly buff them with fine steel wool. -
Prepare the spacers:
Gather your gold spacers. The ones in the example are substantial gold rondelles that act as punctuation marks, not just fillers.
Pro Tip: Contrast is Key
For the best look, pick clay beads with speckles or a stone-like texture. This matte surface makes the smooth, shiny gold spacers pop much more effectively.
Step 2: Stringing the Pattern
-
Cut the cord:
Cut a length of elastic cord about 10-12 inches long. This gives you plenty of slack for tying the final knot without struggling. -
Pre-stretch the elastic:
Give the cord a few firm tugs before you start. This simple trick prevents the bracelet from stretching out and becoming loose after the first few wears. -
Begin the sequence:
Start with a cream bead followed by a terracotta bead. I like to anchor the design with the darker colors early on. -
Add the first punctuation:
Slide on one gold spacer bead after your second clay bead. This sets up the ‘punctuation’ rhythm. -
Create a cluster:
String a sage green bead, another gold spacer, and then a peach bead. Notice how the gold frames the green bead. -
Establish the rhythm:
The pattern shown isn’t perfectly rigid 1-1-1. Try grouping two or three clay beads together, then inserting a gold spacer, then a single clay bead, then another gold spacer. -
Check the visual balance:
As you work, hold the ends of the cord together to see the loop. Ensure you aren’t clustering too many dark or light beads in one section. -
Focus on color neighbors:
Try to avoid placing the same color bead directly next to itself. Always separate them with a different hue or a gold spacer.
Step 3: Finishing Touches
-
Measure the length:
Wrap the unfinished strand around your wrist. It should sit comfortably without digging in, usually requiring about 6.5 to 7 inches of beads for an average wrist. -
Tie the knot:
Bring the two ends together. Tie a standard surgeon’s knot (right over left, left over right) and pull it tight. The elastic should stretch slightly as you pull. -
Secure the join:
Dab a tiny drop of jewelry glue or clear nail polish directly onto the knot. This prevents it from slipping over time. -
Hide the mechanics:
If hole size permits, gently tug the elastic so the knot slides inside the nearest large clay bead. -
Trim the excess:
Once dry, use sharp scissors to trim the tails of the elastic cord as close to the bead as possible without nicking the knot.
Level Up: Metal Mix
Try alternating gold and rose gold spacers throughout the strand. The warm tones of rose gold blend beautifully with the peach and terracotta clay beads.
Slip on your new bracelet to add a touch of warm, earthy sophistication to your outfit
Micro-Stripe Rhythm (1–1–1 Repeat)
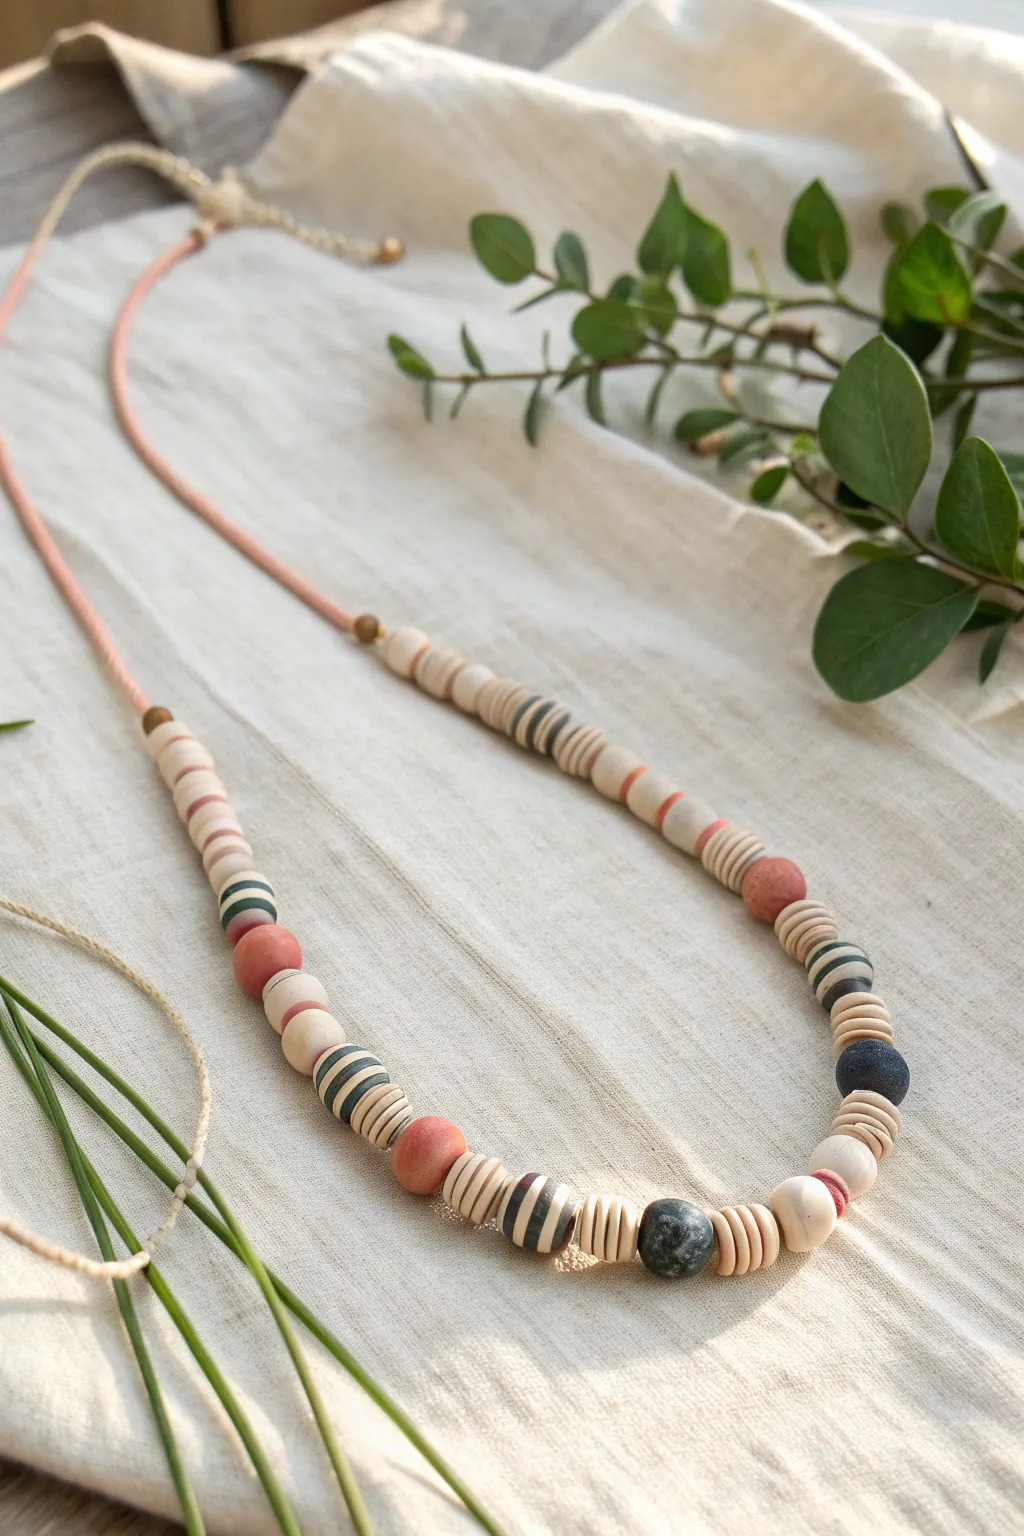
Create a stunning statement piece with this earthy, rhythmic necklace design. By focusing on a recurring pattern of hand-rolled beads in muted tones of cream, terracotta, and slate blue, you’ll craft an accessory that feels both modern and organic.
Detailed Instructions
Materials
- Polymer clay (cream, terracotta red, slate blue, black)
- Acrylic roller or pasta machine
- Tissue blade or craft knife
- Bead piercing pins or toothpicks
- Wet/dry sandpaper (400-800 grit)
- Baking sheet and parchment paper
- Pink or dusty rose leather cord (approx. 30 inches)
- Gold crimp ends and jump rings
- Lobster clasp and extension chain
- Jewelry pliers (flat nose and round nose)
- Matte water-based varnish (optional)
Step 1: Prepping the Clay Patterns
-
Conditioning:
Begin by thoroughly conditioning your cream, terracotta, slate blue, and black polymer clay until soft and pliable. -
Creating the stripe cane:
To make the striped beads, rollout a thin sheet of cream clay and an equally thin sheet of black clay using a roller or pasta machine on a low setting. -
Stacking layers:
Stack these alternating layers—cream, black, cream, black—until you have a block about 1/2 inch high. Compress the block gently to adhere the layers. -
Slicing stripes:
Use your tissue blade to slice thin, uniform cross-sections from your striped block. Each slice should reveal the beautiful fine lines.
Smooth Operator
To prevent flat spots while baking, arrange beads on a bed of cornstarch or accordion-folded cardstock so they don’t touch the flat metal tray directly.
Step 2: Forming the Beads
-
Rolling solid beads:
Roll small balls of the solid cream clay. Create varying sizes: some small spacers (about 6mm) and some slightly larger rounds. -
Creating textured spacers:
For the ribbed cream beads, roll a small cylinder and press the edge of a credit card or dull knife gently into the clay at even intervals to create ridges. -
Applying stripes:
Wrap your thin striped slices around a core ball of scrap or solid clay. Roll gently in your palms to smooth seams until the bead is round and the stripes flow seamlessly. -
Making accent beads:
Roll round beads from the terracotta and slate blue clay. Texture the blue beads slightly with coarse sandpaper for a stone-like effect if desired. -
Piercing:
Carefully pierce a hole through the center of each bead using a bead pin. Use a gentle twisting motion to avoid distorting the shape.
Step 3: Baking and Finishing
-
Baking:
Arrange beads on a parchment-lined baking sheet. Bake according to the manufacturer’s instructions (usually 275°F/135°C for 15-30 minutes). -
Cooling:
Allow the beads to cool completely in the oven before handling to ensure durability. -
Sanding:
Once cool, lightly sand any fingerprints or rough edges under running water using wet/dry sandpaper. -
Sealing (Optional):
I like to apply a very thin coat of matte varnish to protect the surface without making it too shiny, keeping that natural look.
Stone Effects
Mix cracked black pepper or dried tea leaves into your cream or grey clay before rolling. This creates a realistic, speckled organic stone texture.
Step 4: Assembly
-
Pattern layout:
Lay out your beads on a mat before stringing to establish the rhythm: alternate between striped beads, solid colors, and ribbed spacers. -
The central focal point:
Ensure the largest striped and slate blue beads are near the center, tapering to smaller cream beads as you move outward. -
Stringing:
Thread all beads onto the pink leather cord, centering the entire design. -
Attaching ends:
Place a gold crimp end over each tip of the leather cord. Use flat nose pliers to squeeze the crimp firmly shut. -
Adding hardware:
Open a jump ring and attach the lobster clasp to one crimp end. Repeat on the other side with the extension chain.
Enjoy wearing your new handcrafted accessory that looks like it came straight from a boutique


What Really Happens Inside the Kiln
Learn how time and temperature work together inside the kiln to transform clay into durable ceramic.
Chevron Illusion With Tapered Blocks
Embrace earthy tones and geometric flair with this polymer clay bracelet featuring a stunning chevron illusion. The unique tapered white beads interlock with a V-pattern, creating a seamless focal point that is both modern and rustic.
Detailed Instructions
Materials
- Polymer clay in terracotta brown
- Polymer clay in warm cream or off-white
- Acrylic roller
- Clay knife or tissue blade
- Pointed sculpting tool or toothpick
- Elastic beading cord (0.8mm or 1mm)
- Bead piercing pin or thick needle
- Super glue (gel type recommended)
- Baking sheet and parchment paper
- Sandpaper (optional, for finishing)
Step 1: Crafting the Chevron Focal Beads
-
Condition the white clay:
Start by conditioning your cream-colored polymer clay until it is soft and malleable. Roll it into a smooth log about 1 cm thick. -
Shape the log:
Gently press the log onto your work surface to flatten the bottom slightly, then form the top into a shallow triangular peak, creating a distinct triangular prism shape. -
Cut the segments:
Slice the prism into four equal segments, each about 1.5 cm long. These will be your main chevron beads. -
Cut the angles:
Using your blade, carefully slice one end of each segment at a sharp 45-degree angle. Repeat on the other end so the cuts are parallel, giving each bead a slanted, parallelogram profile from the side. -
Create the grooves:
Press the side of your blade or a sculpting tool into the top face of each bead to create a V-shaped groove. The point of the V should aim toward the flow of the chevron pattern. -
Make the brown inlay:
Condition a small amount of terracotta brown clay and roll it into a very thin snake. -
Inlay the pattern:
Lay pieces of the thin brown snake into the V-grooves you created. Press them gently to ensure they adhere, then carefully slice away any excess that hangs over the edges. -
Pierce the holes:
Using a bead pin, carefully pierce a hole lengthwise through each chevron bead. Rotate the pin as you push to prevent squishing the shape.
Step 2: Creating the Spacer Beads
-
Roll the remaining clay:
Roll your remaining terracotta brown clay into a thick slab, approximately 8mm to 1cm thick. -
Cut the cubes:
Use your blade to cut the slab into uniform 1cm strips, then cross-cut those strips to create rustic cube shapes. You will need about 15-20 depending on your wrist size. -
Soften the edges:
Pick up each brown cube and gently tap the corners with your finger to round them off slightly. I like to leave a few fingerprints for a natural, handmade texture. -
Make accent cubes:
Repeat the cube process with a small amount of the white clay to create 3-4 accent beads. -
Pierce the spacers:
Pierce a hole through the center of each cube bead. Ensure the holes are wide enough to accommodate your elastic cord.
Seamless Inlays
After placing the brown clay into the V-grooves, gently roll the entire bead on your work surface once. This flattens the inlay flush with the white clay.
Step 3: Baking and Assembly
-
Bake the beads:
Arrange all beads on a parchment-lined baking sheet. Bake according to your clay manufacturer’s instructions (usually 275°F/135°C for 15-30 minutes). -
Cool down:
Let the beads cool completely before handling. If the edges feel too sharp, lightly sand them with fine-grit sandpaper. -
String the focal section:
Cut a length of elastic cord. Thread the four chevron beads first, ensuring they nestle into each other to form the continuous arrow pattern. -
Add the rest:
String the brown and white cube beads onto the rest of the cord. You can alternate them randomly or create a pattern, like placing a white cube every five brown ones. -
Check the fit:
Wrap the strand around your wrist to check the size. Add or remove brown cubes as needed for a comfortable fit. -
Tie the knot:
Tie a strong surgeon’s knot (right over left, left over right) to secure the bracelet. Pull it tight. -
Secure and finish:
Place a tiny drop of super glue on the knot. Once dry, trim the excess cord ends and tuck the knot inside one of the bead holes if possible.
Distorted Holes?
If your beads are squishing while piercing holes, let the formed clay sit in the fridge for 15 minutes. The firmer clay resists deformation much better.
Wear your handcrafted piece with pride, knowing those intricate chevrons are entirely your own design.
Centered Charm With Mirror-Image Sides
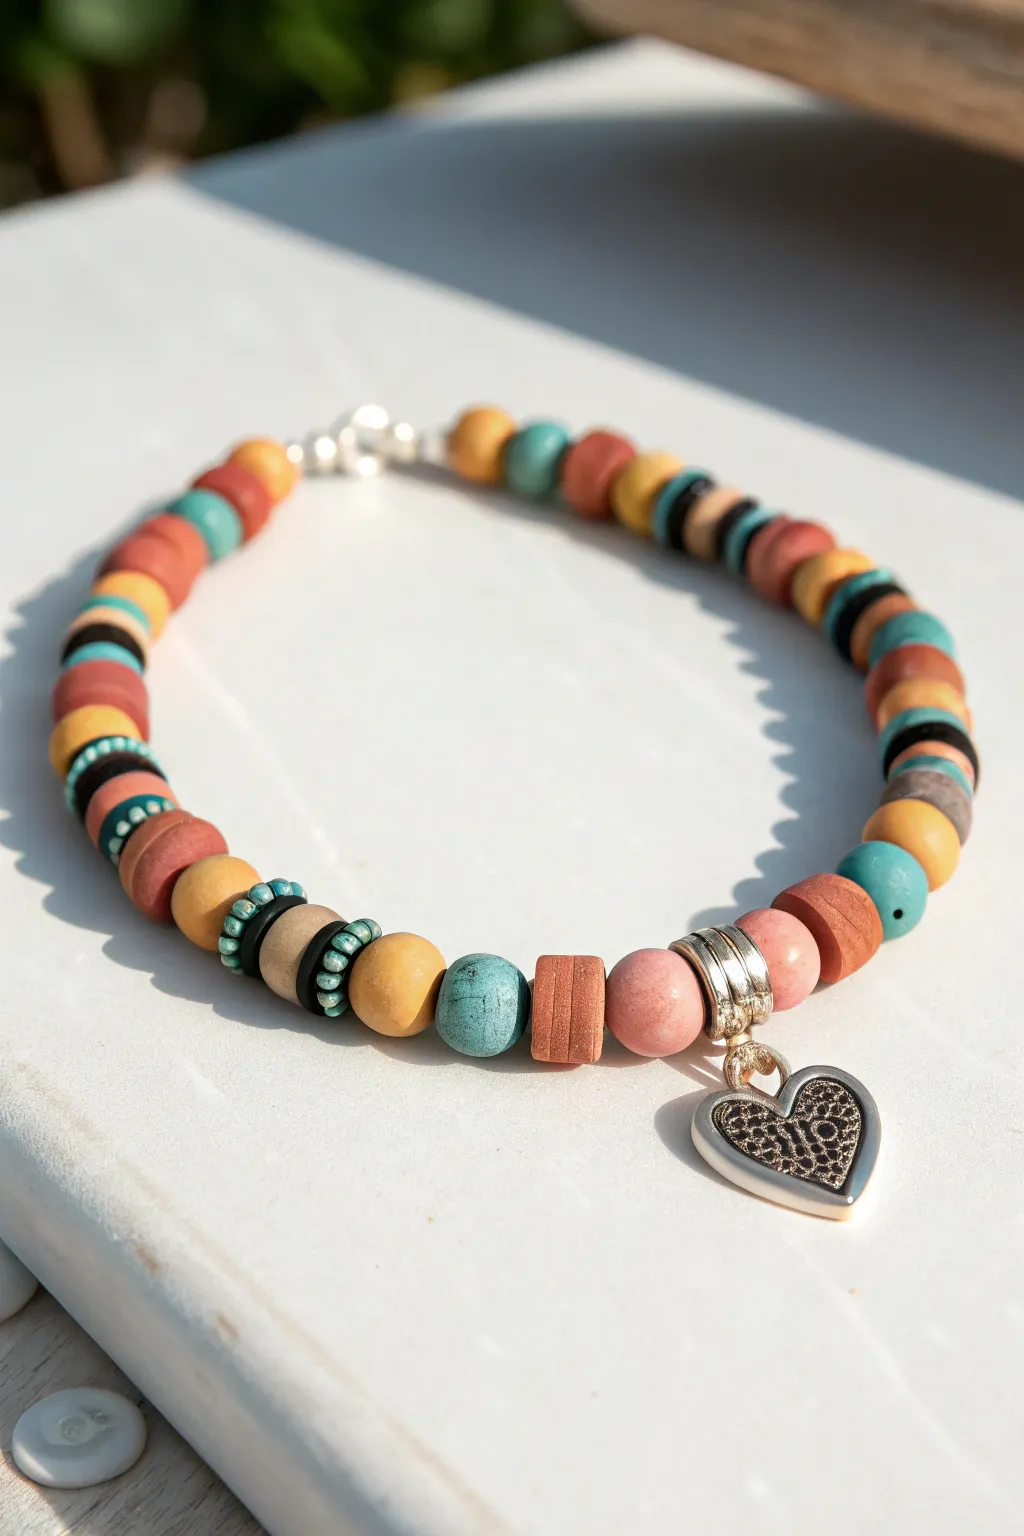
This rustic yet colorful bracelet combines earthy tones with a striking silver heart charm. The design uses a mirror-image beading pattern that draws the eye straight to the centerpiece, making it a perfectly balanced accessory.
Detailed Instructions
Materials
- Polymer clay beads (terracotta, mustard yellow, turquoise/teal, burnt orange, pale pink, black)
- Small black disc spacer beads
- Tiny teal seed beads
- Silver heart charm with filigree detail
- Two large silver bail beads or jump rings for the charm
- Elastic stretch cord (0.7mm or 0.8mm)
- Jewelry glue or clear nail polish
- Scissors
Step 1: Planning the Centerpiece
-
Prepare your workspace:
Lay out a bead design board or a soft towel. This prevents your round clay beads from rolling away while you plan the pattern. -
Start with the charm:
Select your silver heart charm. If it doesn’t have an attached bail, twist a jump ring through the charm’s loop. Close it securely using pliers if necessary. -
Add the bail beads:
Thread your elastic cord through the first silver bail bead, then the charm loop, and finally the second bail bead. This creates a metallic framed center for your focal point. -
Begin the mirror pattern:
On *both* sides of the silver bails, thread on a pale pink round clay bead. Working from the center out ensures your symmetry stays perfect. -
Add the terracotta texture:
Next, add a flat, disc-shaped terracotta bead on each side. These add a nice textural contrast to the round beads.
Keep it Symmetrical
Work both sides of the string simultaneously! Thread one bead on the left, then the matching one on the right immediately to avoid pattern mistakes.
Step 2: Developing the Pattern
-
Introduce the teal accent:
Thread a round teal/turquoise clay bead onto the left side, then repeat on the right side. -
Add warmth with yellow:
Follow the teal beads with a round mustard yellow bead on each side. -
Create the spacer section:
Now for the intricate detail: on each side, thread a black disc spacer, followed by about 4-5 tiny teal seed beads, and finish with another black disc spacer. -
Continue the colors:
Add a beige or light tan bead next to your spacer section on both ends. -
Repeat the spacer detail:
Recreate that detailed spacer section: one black disc, a small grouping of teal seed beads, and another black disc on each side. -
Build length with warm tones:
Add a yellow bead, followed by a terracotta red bead. At this point, I like to check the length against my wrist to see how much more is needed.
Knot Slipping?
If your elastic knot feels loose, try a drop of superglue. Be careful not to glue the bead to the cord itself, or the stretch will be compromised.
Step 3: Finishing the Strap
-
Establish the main repeating pattern:
From here outward, simply alternate your remaining round beads (teal, terracotta, yellow, black, and beige) in a random but balanced sequence until you reach your desired length. -
Pre-stretch the cord:
Once all beads are strung, gently pull on both ends of the elastic cord. This ‘pre-stretching’ prevents the bracelet from sagging later. -
Tie the knot:
Bring the two ends together at the back of the bracelet (opposite the charm). Tie a surgeon’s knot: loop right over left and pull, then left over right, looping it through twice before pulling tight. -
Secure the knot:
Apply a tiny dab of jewelry glue or clear nail polish to the knot to seal it permanently. -
Hide the end:
Once the glue is tacky but almost dry, trim the excess cord and gently tuck the knot inside the hole of the nearest large bead to hide it.
Now you have a beautifully balanced accessory ready to wear or gift

TRACK YOUR CERAMIC JOURNEY
Capture glaze tests, firing details, and creative progress—all in one simple printable. Make your projects easier to repeat and improve.
Mixed Disc and Rondelle Texture Repeat
Embrace earthy elegance with this textured bracelet that combines smooth polymer clay discs with rustic coconut shell rondelles. The varied thicknesses and materials create a sophisticated rhythm, perfect for distinct, elevated everyday wear.
Step-by-Step Tutorial
Materials
- Polymer clay heishi beads (6mm or 4mm) in terracotta/brick red
- Polymer clay heishi beads (6mm or 4mm) in cream/off-white
- Flat coconut shell or textured wood spacer beads (rondelles)
- Beading wire (flexible, 7-strand or similar)
- 2 Crimp beads
- 2 Crimp covers (gold tone)
- 2 Wire guards (gold tone, optional but recommended)
- Lobster clasp (gold tone)
- Extension chain and jump rings (gold tone)
- Flat nose pliers
- Crimping pliers
- Wire cutters
Step 1: Planning the Pattern
-
Analyze the pattern rhythm:
Before stringing, take a close look at the pattern. It’s not a strict 1-2-3 repeat. The design relies on ‘blocks’ of color separated by single textured spacers. Notice groupings like three terracotta beads, followed by a wooden spacer, then two cream beads. -
Lay out your design:
Use a bead board or a piece of felt to layout your beads. Aim for a mix of thicknesses. For example, stack 3 thin terracotta heishi beads to equal the width of one thicker cream stone bead. This variation is key to the organic look. -
Measure your wrist:
Measure your wrist and add about 1/2 to 3/4 inch for comfort. Since we are adding an extension chain, aiming for a 6.5-inch beaded section is usually a safe standard size.
Texture Pro-Tip
Mix materials! Don’t just use polymer clay. Real coconut shell, bone, or wood spacers provide the gritty, organic texture that makes this design look high-end rather than plastic.
Step 2: Starting the Strand
-
Cut the wire:
Cut a piece of beading wire about 10-12 inches long. You want plenty of extra room on both ends to work with the tools comfortably. -
Attach the first crimp:
Thread a crimp bead onto one end of the wire, followed by a wire guard. Loop the wire through the wire guard and back down through the crimp bead. -
Secure the loop:
Attaching the clasp or jump ring directly into the loop of the wire guard now makes things easier. Once positioned, use your crimping pliers to flatten or fold the crimp bead securely. Give it a gentle tug to ensure it holds. -
Cover the crimp:
Place a gold crimp cover over the smashed crimp bead. Use your flat nose pliers to gently close the cover until it looks like a round gold bead. This adds a professional finish.
Step 3: Stringing the Beads
-
Begin the sequence:
Start stringing your beads. Hide the tail of your beading wire by tucking it inside the first few beads. Start with a small gold spacer bead if you like, as seen in the photo near the clasp. -
Create the first color block:
Thread on a small stack of terracotta clay beads (about 3 or 4). Follow this with a single textured coconut shell spacer. -
Add contrast:
Next, add a block of the cream or white heishi beads. I like to vary the number here—maybe use 2 cream beads, then a coconut spacer, then switch back to a different color. -
Incorporate variegation:
Look closely at the reference image; some beads have subtle speckles or slightly different shades of beige. Mix these ‘imperfect’ beads in randomly to enhance the natural aesthetic. -
Check the length periodically:
Hold the strand up to your wrist or against a ruler occasionally. Stop adding beads when you are about 0.5 inches short of your total desired length to account for the clasp assembly.
Stiff Bracelet?
If the bracelet stands up in a circle rather than draping, you pulled the wire too tight before crimping. Leave a tiny hair’s breadth of slack near the crimp bead for flexibility.
Step 4: Finishing Touches
-
Prepare the end:
Once beading is complete, thread on a crimp bead and then a wire guard on the remaining open end. -
Add the hardware:
Loop the wire through the wire guard and attach your extension chain (or jump ring). Thread the wire back down through the crimp bead and through the last 2-3 beads of your bracelet. -
Tighten the slack:
Pull the wire specifically tight so there are no gaps between beads, but not so tight that the bracelet becomes stiff and rigid. It needs to drape naturally. -
Crimp and trim:
Flatten the crimp bead securely with your pliers. Trim the excess wire flush against the beads using sharp wire cutters. -
Final cover:
Place the second crimp cover over the crimp bead and gently close it with flat nose pliers to mirror the start. -
Connect the clasp:
Use jump rings to connect your lobster clasp to the first loop you created (if you didn’t attach it directly in step 3). Test the clasp to ensure everything feels secure.
Now you have a stunning, versatile accessory that pairs perfectly with linen textures and warm neutrals
Terrazzo-Style Statement Center With Solid Ends

Embrace the trendy, speckled aesthetic of terrazzo with this simple yet striking clay bead bracelet. By combining neutral cream tones with pops of orange and black, you’ll create a durable accessory that looks like polished stone but is light enough for everyday wear.
Step-by-Step Guide
Materials
- Polymer clay (white or cream)
- Polymer clay (black)
- Polymer clay (terracotta orange)
- Waxed cotton or hemp cord (1mm, beige)
- Acrylic roller or pasta machine
- Bead piercing pins or thick needle
- Sharp rigid blade or craft knife
- Wet/dry sandpaper (400-800 grit)
- Gloss glaze or polyurethane (water-based)
- Small paintbrush
- Oven for baking
Step 1: Preparing the Terrazzo Veneer
-
Condition the base:
Start by conditioning your white or cream polymer clay. Knead it in your hands until it is warm and pliable, then roll it into a thick log. -
Chop the colors:
Take very small amounts of the black and terracotta orange clay. Roll them into thin threads or flat sheets. -
Create the grit:
Using your rigid blade, chop the black clay into tiny, dust-like specks. These should be irregular and very small to mimic sediment. -
Create the chips:
Chop the orange clay into slightly larger, chunky pieces. Aim for sizes ranging from 1mm to 3mm for variety. -
Combine materials:
Scatter the black specks and orange chunks onto your work surface. Roll your white clay log over them to pick up the pieces, then fold and twist the log gently to distribute the colors throughout the clay body without blending them into a muddy mess.
Step 2: Forming the Beads
-
Measure the beads:
Cut your terrazzo clay log into roughly equal segments. For the bracelet shown, you will need about 14-16 segments. -
Roll spheres:
Roll each segment between your palms to create a smooth, round ball. I find that cupping my hands slightly helps keep the shape perfectly spherical. -
Make the end beads:
Take a small amount of plain terracotta clay and roll two smaller beads (about half the size of the terrazzo ones) for the closure accents. -
Pierce the holes:
Carefully insert a bead pin or thick needle through the center of each bead. Twist the pin gently as you push to avoid distorting the round shape. -
Bake:
Arrange your pierced beads on a baking sheet or tile. Bake according to your clay manufacturer’s instructions (usually around 275°F/135°C for 15-30 minutes).
Fixing Smears
If the clay colors smeared during rolling, sand the baked beads aggressively under water. This removes the surface smear and reveals the crisp, clean shapes of the colored chunks underneath.
Step 3: Finishing and Assembly
-
Sand for smoothness:
Once cool, submerge the beads in a small bowl of water and sand them with wet/dry sandpaper. This removes fingerprints and reveals the crisp edges of the colored chips. -
Glaze:
Apply a thin coat of water-based gloss glaze to each bead to give it that polished ceramic look. Let them dry completely on the pins. -
Cut the cord:
Cut a length of beige cord, approximately 18 inches long, to allow plenty of room for knotting. -
String first solid bead:
Thread one small solid orange bead onto the cord and slide it toward the center, leaving equal tail lengths. -
String terrazzo beads:
Thread all your terrazzo beads onto the cord. Ensure the black specks and orange dots are visible from all angles. -
String final solid bead:
Add the second small orange bead to the other end of the terrazzo sequence. -
Create the sliding knot:
Bring the two cord ends together to form a circle. Use a separate, shorter piece of cord to tie a square knot macramé closure (or ‘sliding knot’) over the two parallel cord ends. -
Secure the ends:
Tie a simple overhand knot at the very tip of each cord tail to prevent them from slipping through the clasp, then trim any excess.
Level Up: Stone Texture
For a more matte, natural stone feel, skip the glaze and buff the beads with a piece of denim or heavy canvas after sanding. The finish will feel incredibly smooth but look organic.
Now you have a chic, artisan-style bracelet that pairs perfectly with casual denim or summer linens