Matching clay bead bracelets are my favorite kind of “easy but meaningful” project—simple enough to make in one sitting, but personal enough to feel like a little promise you can wear. Here are my go-to matching set ideas using flat clay disc beads (Heishi beads), plus fun ways to tie two bracelets together without making them identical.
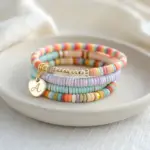
Color-Inverted Bestie Set
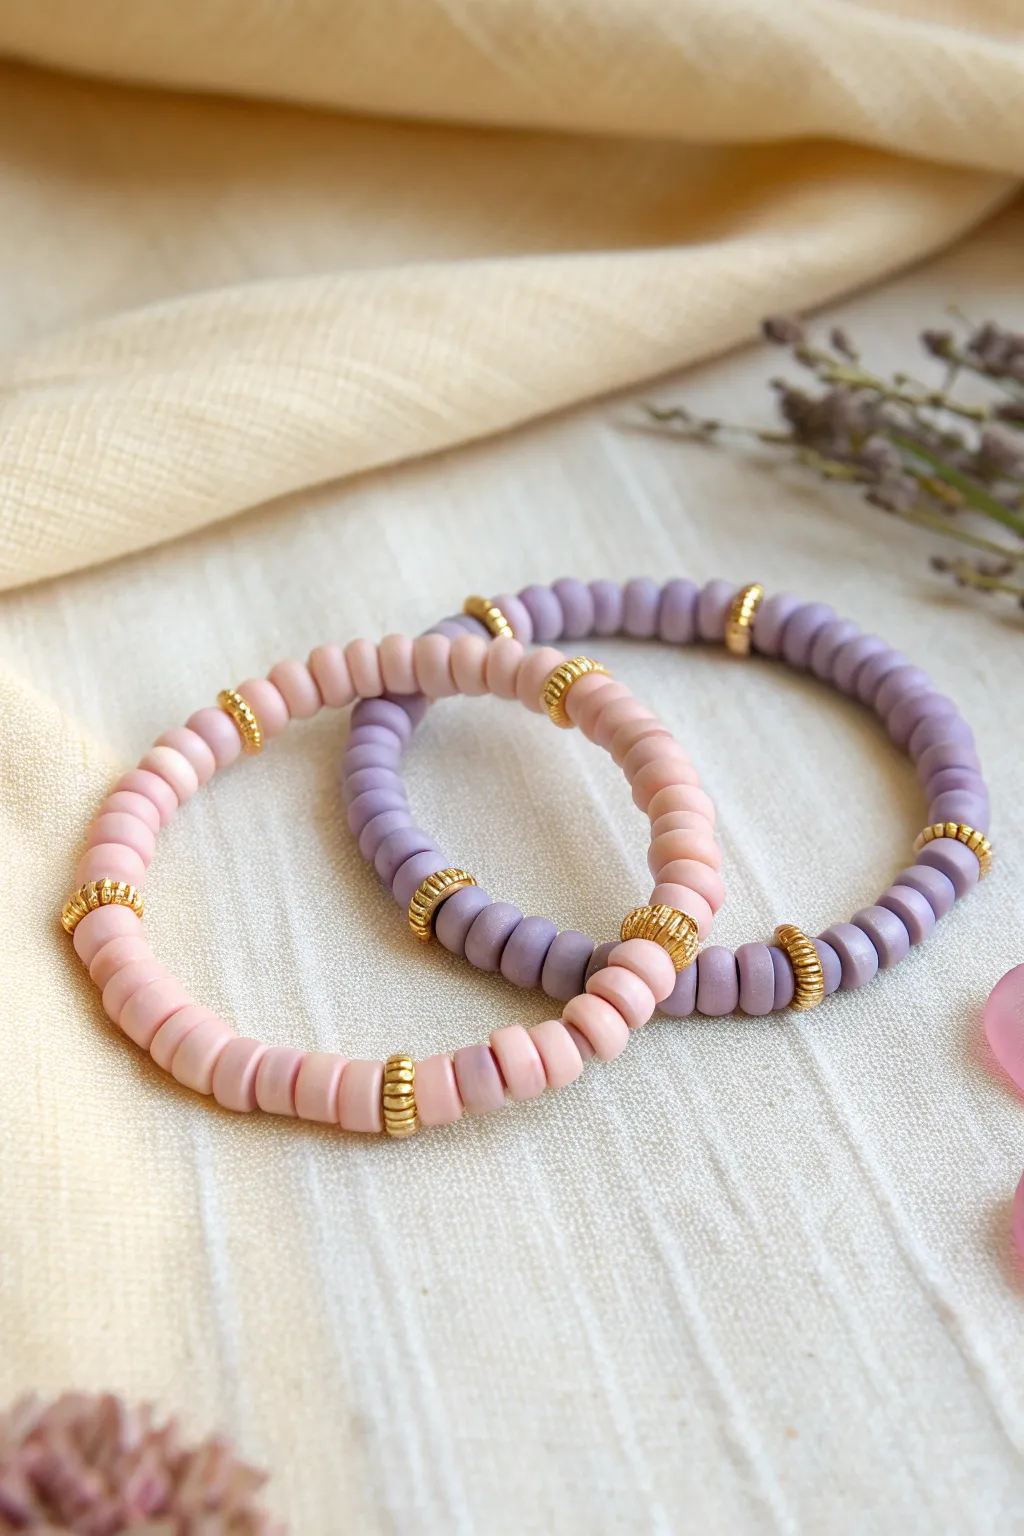
Celebrate friendship with this charming set of matching bracelets that play with contrasting soft pastels and elegant gold accents. The matte finish of the clay beads paired with the textured gold spacers creates a sophisticated yet playful look perfect for stacking or sharing.
How-To Guide
Materials
- 6mm Heishi polymer clay beads (light pink)
- 6mm Heishi polymer clay beads (lavender/lilac)
- 6mm Gold-plated disc spacer beads (textured/corrugated style)
- Clear elastic beading cord (0.7mm or 0.8mm)
- Jewelry glue or clear nail polish
- Scissors
- Bead stopper or tape
- Ruler or measuring tape
Step 1: Preparation & Planning
-
Measure your wrist:
Wrap a measuring tape comfortably around your wrist to find your size. For a standard fit, add about half an inch to this measurement. Cut a piece of elastic cord about 10-12 inches long to give yourself plenty of room for tying knots later. -
Secure the end:
Attach a bead stopper or simply place a piece of tape folded over one end of your elastic cord. This prevents your beads from sliding off while you design the pattern. -
Establish the pattern ratio:
Both bracelets follow a simple rhythm: a long segment of colored clay beads separated by a single gold spacer. Count out about 10-12 clay beads per section to see if you like that spacing length.
Step 2: Beading the Pink Bracelet
-
Begin the first segment:
Thread approximately 10 to 12 light pink heishi beads onto the cord. Ensure they sit flat against each other for that smooth, continuous look. -
Add the gold accent:
Slide on one textured gold spacer bead. These specific spacers have a ridged edge, which adds a lovely metallic pop compared to smooth washers. -
Repeat the sequence:
Continue adding segments of 10-12 pink beads followed by one gold spacer. Repeat this pattern until the bracelet reaches your desired length. -
Check the fit:
Wrap the unfinished strand around your wrist to check the size. Ideally, you want the pattern to end with a pink segment so that when you tie it, the gold spacers remain evenly distributed.
Seamless Spacing Tip
To ensure your pattern is perfectly symmetrical, start and end your bracelet with half-segments (e.g., 5 beads) so the final knot is hidden in the middle of a color block.
Step 3: Creating the Lavender Counterpart
-
Setup the second cord:
Cut another length of elastic and secure the end just like you did for the first bracelet. -
Invert the colors:
Follow the exact same numerical pattern you used for the pink bracelet—10 to 12 clay beads followed by one gold spacer—but use the lavender beads as your main color this time. -
Match the lengths:
Hold the two strands side-by-side occasionally as you bead. You want them to be identical in length so they stack perfectly on the wrist.
Knot Slipping?
If your elastic knot keeps coming undone before you can glue it, clamp it with a small binder clip or hemostat immediately after pulling tight while you fetch your glue.
Step 4: Finishing Touches
-
Pre-stretch the cord:
Before tying, give the ends of the elastic a gentle tug. This pre-stretching step helps prevent the bracelet from sagging or loosening permanently after the first time you wear it. -
Tie the surgeon’s knot:
Remove the bead stopper. Cross the left end over the right, then loop it through twice (instead of once like a regular shoelace knot). Pull tight. -
Secure the knot:
Make another simple overhand knot on top of the surgeon’s knot and pull firmly. The elastic should be taut, and the beads should meet seamlessly without gaps. -
Glue the knot:
Apply a tiny dab of jewelry glue or clear nail polish to the knot. I find a toothpick helps apply just the right amount without getting glue everywhere. -
Hide the mechanics:
Once the glue is tacky but not fully hard, try to slide the knot inside the hole of the nearest bead if the hole is large enough. If not, simply trim the excess string close to the knot after the glue dries completely.
Now you have a beautifully coordinated set ready to gift to your best friend or wear as a stylish stack


Matching Names With Heishi Borders
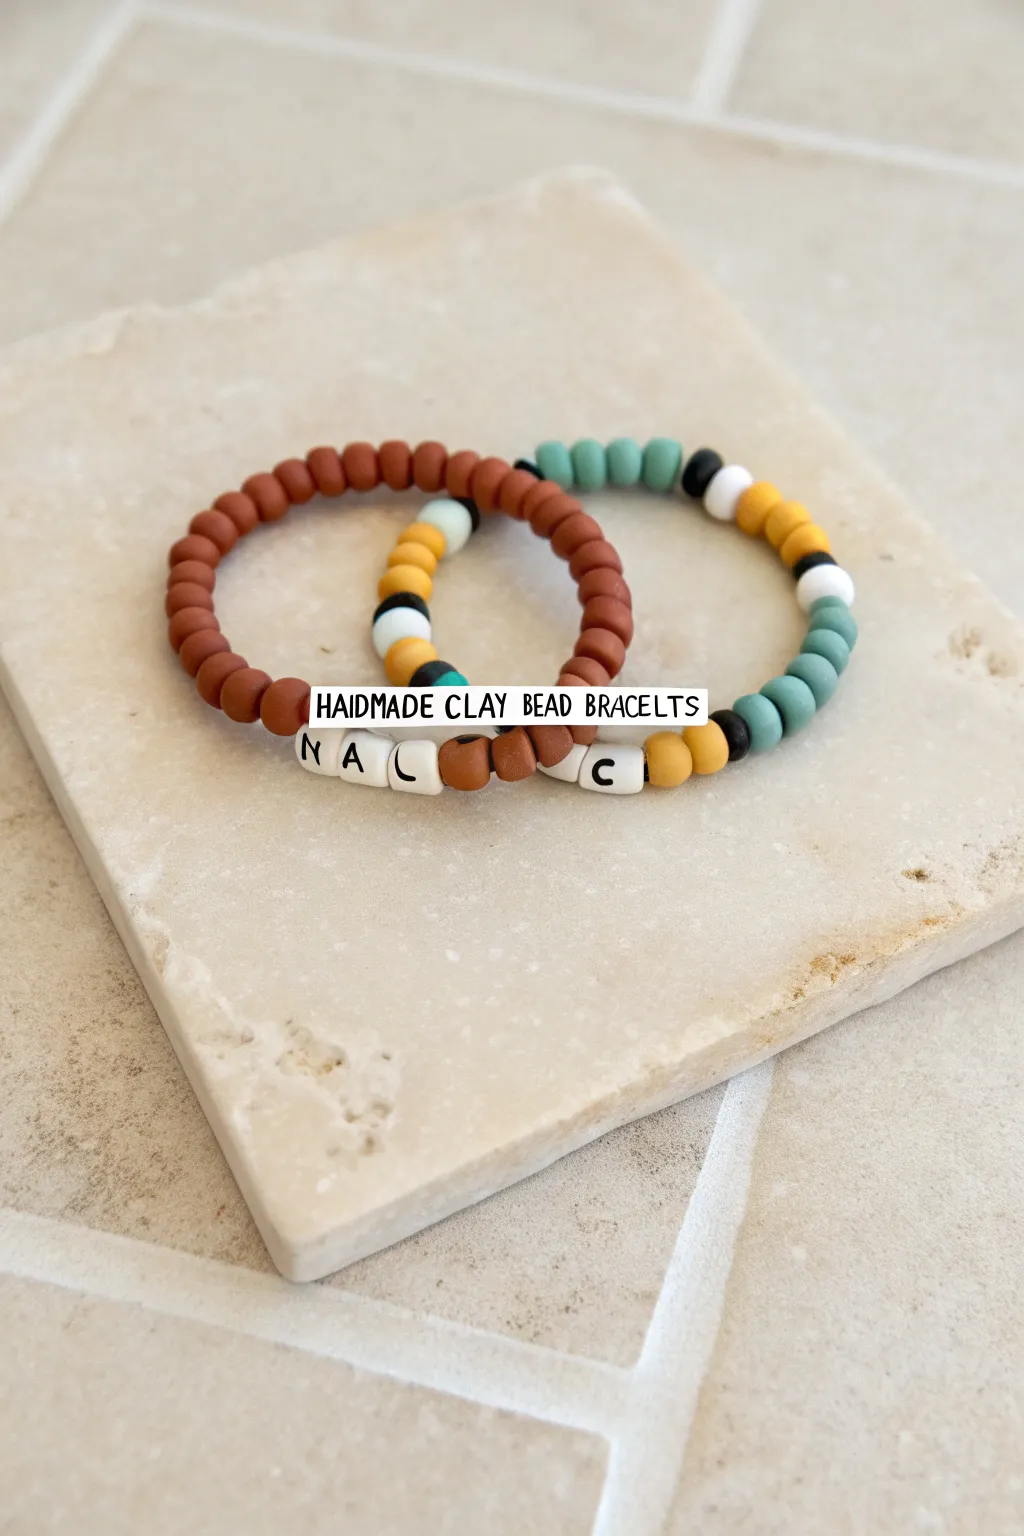
Create a charming set of matching bracelets that combine earthy terracotta tones with pops of teal, mustard, and black. These personalized accessories feature heishi clay beads and letter accents, perfect for swapping with a best friend or partner.
Step-by-Step Tutorial
Materials
- Heishi clay disc beads (terracotta/rust color)
- Heishi clay disc beads (teal/sage green color)
- Heishi clay disc beads (mustard yellow color)
- Heishi clay disc beads (black)
- Heishi clay disc beads (white)
- White round letter beads with black text
- 0.8mm clear elastic stretch cord
- Scissors
Step 1: Planning the Design
-
Measure your wrist:
Before cutting any cord, wrap a piece of string around your wrist to find a comfortable size. Add about 3-4 inches to this measurement to ensure you have plenty of slack for tying the final knot. -
Cut the elastic:
Cut two lengths of the clear elastic cord based on your measurement. I usually cut a little extra just to be safe—it’s easier to trim excess than to struggle with short ends. -
Stretch the cord:
Gently pull on the ends of your elastic cord to pre-stretch it. This crucial step helps prevent the bracelet from loosening up immediately after you wear it for the first time. -
Layout your letters:
Select the letter beads for your chosen names or initials. Lay them out on a bead board or flat surface to visualize the spacing. For this design, we are separating letters with a few clay beads.
Knot Security
Add a tiny dab of clear super glue or E6000 directly onto the knot before hiding it inside a bead. This permanently fuses the elastic so it won’t untie.
Step 2: Beading the Rust Bracelet
-
Start the rust colored base:
Begin threading the terracotta/rust colored heishi beads onto the first cord. You will want this color to make up about 80% of the bracelet’s length. -
Add the first letter:
Slide on your first letter bead. In the example, this is an ‘N’. -
Create a spacer:
Add two to three heishi beads after the letter to act as a spacer. You can use the main rust color or a contrasting white bead here depending on preference. -
Finish the name section:
Thread on the remaining letter beads, separating each with small groups of spacer beads. -
Build the colorful accent:
Opposite the letter section, create a striped pattern. Thread this sequence: 3 mustard beads, 1 black bead, 2 white beads, 1 black bead, and 3 teal beads. This creates the colorful border effect shown in the image. -
Complete the loop:
Finish filling the cord with more rust beads until the bracelet reaches your desired length.
Step 3: Beading the Teal & Yellow Bracelet
-
Start the second accent pattern:
For the partner bracelet, we will use a color block pattern. Start by threading about 10-12 teal/sage green beads. -
Add contrast stripes:
Add a thin separator: 1 black bead, 2 white beads, and 1 black bead. -
Switch to yellow:
Now thread on a section of mustard yellow beads, roughly the same length as your starting teal section. -
Insert the initial:
Place a single letter bead (like the ‘C’ shown) in the center of the design. -
Mirror the pattern:
Continue the pattern in reverse or repeat the color blocking around the rest of the bracelet, alternating sections of teal and mustard separated by the black/white stripe beads. -
Check length against the first:
Hold this second bracelet up against the first completed one to ensure they are roughly the same size before tying.
Uneven Strands?
If your heishi beads are varying thicknesses, measure length by inches rather than counting bead numbers to ensure your patterns stay symmetrical.
Step 4: Finishing Touches
-
Tie the first knot:
Bring the two ends of the elastic cord together. Tie a simple overhand knot, pulling it tight but being careful not to snap the cord. -
Secure with a surgeon’s knot:
For extra security, tie a surgeon’s knot. Loop the elastic through twice before pulling tight. This bulky knot is less likely to slip. -
Hide the knot:
Trim the excess elastic cord close to the knot. If the hole of a nearby bead is large enough, gently tug the elastic to slide the knot inside a bead to hide it. -
Final stretch test:
Give the finished bracelets a gentle tug to make sure the knots hold firm and the beads sit flush together.
Enjoy wearing your new custom stack or gifting the matching set to a friend


Mirror-Image Color Block Duo
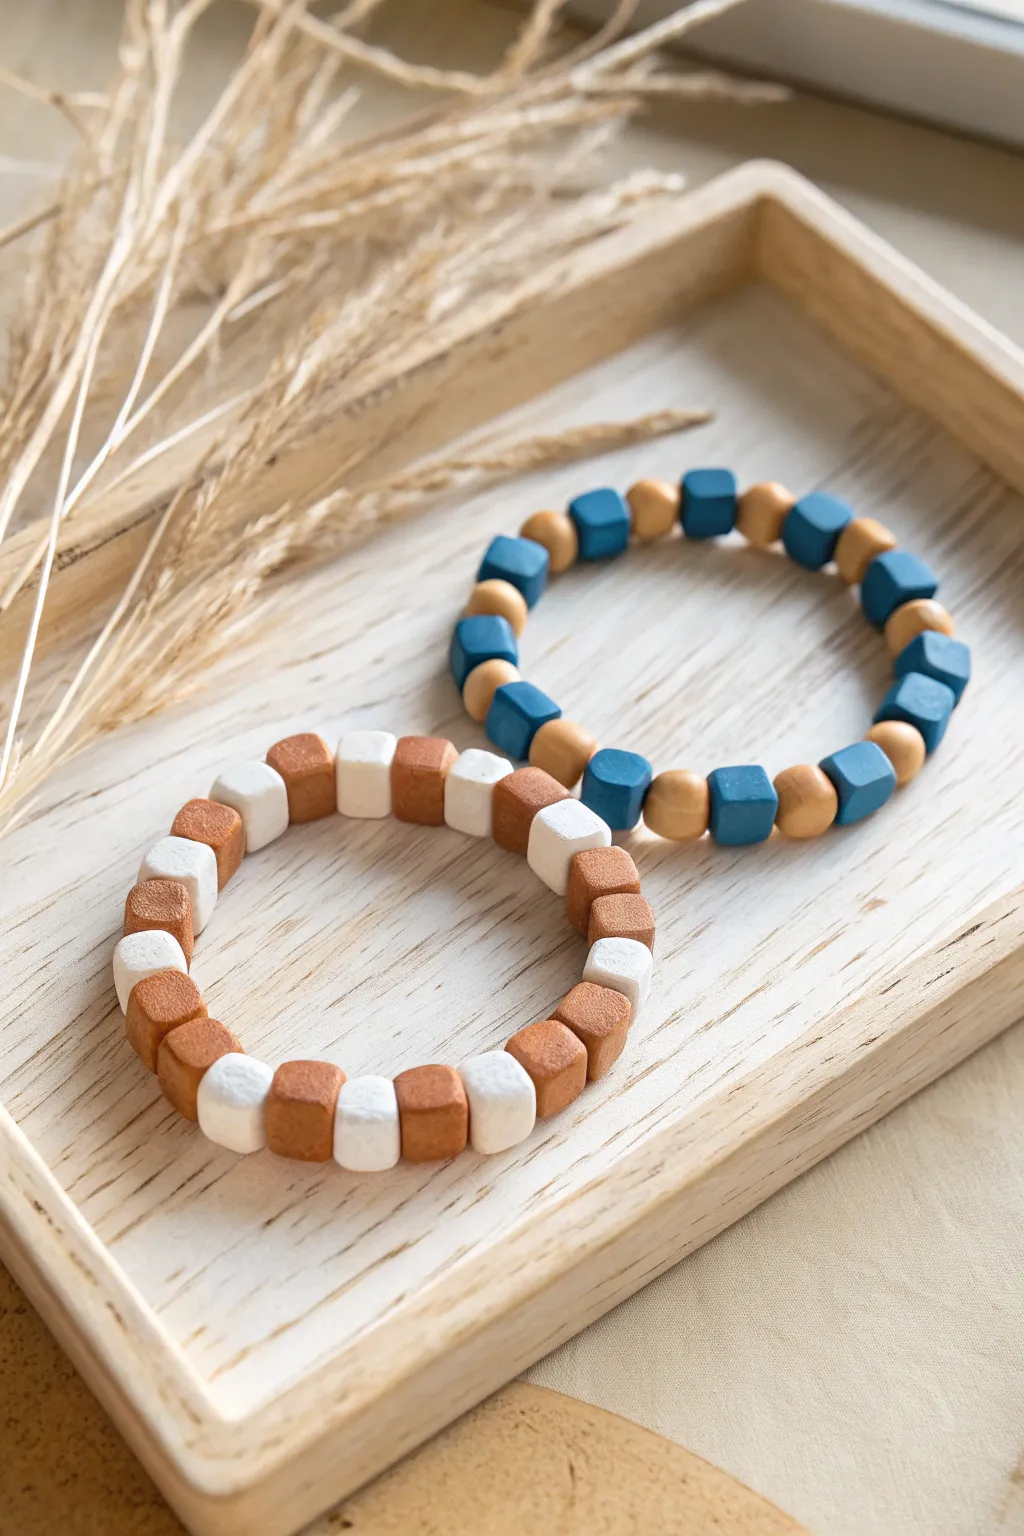
These complementary bracelets showcase a satisfying rhythmic pattern using square and round beads. The combination of alternating shapes and a warm versus cool color palette creates a sophisticated, modern accessory set perfect for sharing.
How-To Guide
Materials
- Polymer clay in three colors: white, terracotta (burnt orange), and teal blue
- Polymer clay in a neutral beige/wood tone (for the round beads)
- Elastic beading cord (0.8mm or 1mm)
- Small square clay cutter (approx. 8-10mm)
- Clay roller or pasta machine
- Blade or craft knife
- Jewelry bead reamer or large needle
- Baking sheet and parchment paper
- Super glue (gel formula recommended)
- Small scissors
Step 1: Crafting the Square Beads
-
Condition the clay:
Begin by conditioning your white, terracotta, and teal clay separately until they are soft and pliable. -
Roll into slabs:
Roll each color into a thick slab, aiming for a thickness of about 8mm so the resulting cubes are roughly uniform. -
Cut the cubes:
Using your small square cutter, punch out shapes from the slabs. Alternatively, cut long strips 8mm wide, then cross-cut them to create cubes. -
Refine the shape:
Gently tap the sides of each cube with your finger or a flat tool to sharpen the edges and ensure they aren’t slightly squashed. -
Pierce the holes:
Use a bead reamer or needle to carefully pierce a hole through the center of each cube. Twist the tool gently as you push through to avoid deforming the square shape.
Uneven Holes?
If holes distort while piercing, try refrigerating beads for 10 minutes first. The firmer clay resists squishing, keeping your geometric shapes crisp.
Step 2: Crafting the Round Beads
-
Prepare neutral clay:
Condition your beige or wood-tone clay. I find this color grounds the design beautifully. -
Create measured portions:
Roll the clay into a long snake and cut it into equal segments to ensure all your round beads end up the same size. -
Roll the spheres:
Roll each segment between your palms until you have a smooth, perfect sphere. These should be slightly smaller in diameter than your square beads. -
Pierce the rounds:
Poke a hole through the center of each sphere, again rotating the tool to keep the hole clean. -
Bake the beads:
Arrange all your beads on a parchment-lined baking sheet. Bake according to the manufacturer’s instructions for your specific brand of polymer clay.
Texture Twist
Before baking, gently roll the round beige beads over coarse sandpaper or a textured fabric to give them a stone-like, organic finish.
Step 3: Assembly
-
Measure the cord:
Cut two lengths of elastic cord, adding about 4 inches extra to your wrist measurement for easier knotting. -
Pre-stretch elastic:
Give the elastic cord a few firm tugs. This prevents the bracelet from stretching out permanently after the first wear. -
Pattern the first bracelet:
For the warm-toned bracelet, thread specific beads in an alternating pattern: one white square, one terracotta square. Repeat this all the way around without using the round beads. -
Pattern the second bracelet:
For the cool-toned bracelet, alternate shapes rather than just colors. Thread one teal square bead followed by one beige round bead. -
Check fit:
Wrap the unfinished strands around your wrist to check the size. Add or remove pattern repeats as necessary. -
Tie the knot:
Tie a surgeon’s knot (right over left twice, pull, then left over right) to secure the bracelet. -
Secure and trim:
Apply a tiny dot of super glue to the knot. Let it dry completely before trimming the excess cord close to the knot. -
Hide the knot:
Gently pull the elastic so the knot slides inside the hole of one of the square beads to conceal it.
Enjoy styling these versatile geometric pieces individually or stacked together for a color-blocked statement


Classic Pastel Twin Stack
These sweetly coordinated bracelets combine soft matte textures with just a hint of gold sparkle, perfect for layering or sharing with a best friend. By mixing mint, lavender, and peach tones, you create a harmonious stack that feels fresh and airy.
Detailed Instructions
Materials
- Matte acrylic or polymer clay round beads (8mm) in Mint Green, Lavender, and Pale Peach
- Gold-plated textured barrel spacer beads (approx. 6mm or 8mm)
- Strong elastic beading cord (0.8mm clear stretchy string)
- Jewelry glue or clear nail polish
- Scissors
- Bead stopper or simple masking tape
- Ruler or measuring tape
Step 1: Planning Your Stack
-
Measure your wrist:
Wrap a measuring tape loosely around your wrist to find your size. Add about 0.5 to 1 inch to this measurement depending on how loose you want the fit. -
Cut the cord:
Cut three lengths of elastic cord, making each one about 10-12 inches long. This extra length makes tying the knots much easier later. -
Secure the ends:
Place a bead stopper or a piece of masking tape on one end of each cord so your beads don’t slide off while you work.
Hiding the Knot
If using beads with larger holes, try to position your knot underneath one of the gold barrel beads. Their internal space is usually wider, making the knot invisible.
Step 2: Creating the Focal Bracelet
-
Start the pattern:
For the middle bracelet shown in the stack, begin by threading on about 8 to 10 lavender beads. -
Add the gold accent:
Slide on one gold textured barrel bead. This acts as a beautiful divider between the color transition. -
Switch colors:
String on three pale peach beads followed by about five mint green beads, creating a lovely color-blocked section. -
Complete the loop:
Finish the strand by adding the second gold barrel bead, then fill the remaining length with lavender beads until it fits your wrist perfectly.
Mix It Up
Add a single letter bead between the two gold spacers on the middle bracelet to customize it with an initial while keeping the pastel aesthetic.
Step 3: Assembling the Solid Strands
-
String the mint strand:
For the bracelet that sits closest to the hand, simply thread your mint green beads onto the second piece of elastic until you reach the desired length. -
String the mixed strand:
For the third bracelet, create a subtle mix. String a majority segment of pale peach beads—about half the bracelet length. -
Finish the third pattern:
Complete the rest of this third bracelet with mint green beads, creating a simple two-tone split without gold spacers for variety.
Step 4: Finishing Touches
-
Pre-stretch the cord:
Before tying, gently pull on the ends of the elastic cord for each bracelet. I find this helps prevent the bracelet from stretching out permanently later on. -
Tie the knot:
Remove the tape or stopper and tie a strong surgeon’s knot (right over left, left over right, loop through twice) for each bracelet. -
Hide the knot:
Pull the knot tight. Apply a tiny dot of jewelry glue to the knot for security and let it dry for a few minutes. -
Trim and tuck:
Trim the excess cord close to the knot, leaving just a tiny tail. Gently tug the bracelet so the knot slides inside the hole of a nearby bead to hide it.
You now have a soft, dreamy stack of bracelets ready to enhance any casual outfit

The Complete Guide to Pottery Troubleshooting
Uncover the most common ceramic mistakes—from cracking clay to failed glazes—and learn how to fix them fast.
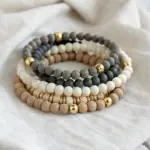
Neutral Minimalist Matching Set
Achieve an effortlessly chic look with this pair of complementary bracelets featuring matte polymer clay heishi beads in soothing cream and charcoal tones. The strategic placement of gold accents elevates the design, making these perfect for everyday wear or stacking with your favorite watch.
Step-by-Step Tutorial
Materials
- 6mm Polymer clay heishi beads (Cream/Beige)
- 6mm Polymer clay heishi beads (Charcoal Grey)
- 4mm Gold spacer beads (seamless round balls)
- Elastic cord (0.8mm crystal string)
- Jewelry glue or clear nail polish
- Scissors
- Bead stopper or tape
- Ruler or measuring tape
Step 1: Preparation & Planning
-
Measure your wrist:
Wrap a measuring tape comfortably around your wrist to find your size. Add about half an inch to this measurement to ensure the finished bracelet doesn’t pinch. -
Cut the cord:
Cut a piece of elastic cord about 10-12 inches long. Having extra length makes the final knotting process much less frustrating. -
Secure the end:
Attach a bead stopper or simply place a piece of tape on one end of your cord to prevent beads from sliding right off as you work. -
Pre-stretch the elastic:
Gently tug on your elastic cord a few times. This helps prevent the bracelet from stretching out permanently after the first wear.
Step 2: Creating the Cream Bracelet
-
Start the pattern:
Begin by threading approximately 10-12 cream heishi beads onto the cord. -
Add gold accent:
Slide on one gold round spacer bead. These gold accents break up the texture and add a subtle shine. -
Continue the sequence:
Repeat the pattern: add another set of 10-12 cream beads followed by a gold spacer. I like to visually check the spacing to ensure it looks balanced. -
Fill to length:
Continue this alternating pattern until the beaded section matches your wrist measurement. You want the ends to meet comfortably without gaps.
Knot Slipping?
If your elastic knot feels loose, try tying the elastic while it is stretched taught. This creates tension that locks the knot tighter once released.
Step 3: Creating the Charcoal Bracelet
-
Start with grey:
For the second bracelet, begin with a long section of charcoal grey heishi beads, covering about two-thirds of the bracelet’s length. -
Insert first gold spacer:
Add a gold spacer bead to mark the transition point. -
Create the contrast section:
Thread on a small section of cream beads—about 8 to 10 beads—to create the highlight feature. -
Finish the contrast:
Cap off the cream section with another gold spacer bead. -
Complete the circle:
Finish the strand by adding charcoal beads until you reach the desired length, mirroring the start.
Level Up: Texture Mix
Swap the round gold spacers for hexagon brass nuts or flat gold discs to give the bracelet a more industrial, modern geometric vibe.
Step 4: Finishing Touches
-
Check fit:
Wrap the beaded cord around your wrist one last time to double-check the sizing before committing to the knot. -
Tie the knot:
Remove the tape or stopper and tie a surgeon’s knot (right over left, left over right, loop through twice). Pull tight. -
Secure with glue:
Place a tiny drop of jewelry glue or clear nail polish directly onto the knot to seal it. -
Hide the knot:
Once the glue is tacky but not fully hard, slide a nearby gold bead or a larger-hole clay bead over the knot to conceal it. -
Final trim:
Trim the excess elastic cord close to the beads, being careful not to cut the main knot.
Enjoy styling your new minimalist stack with everything from casual denim to office wear
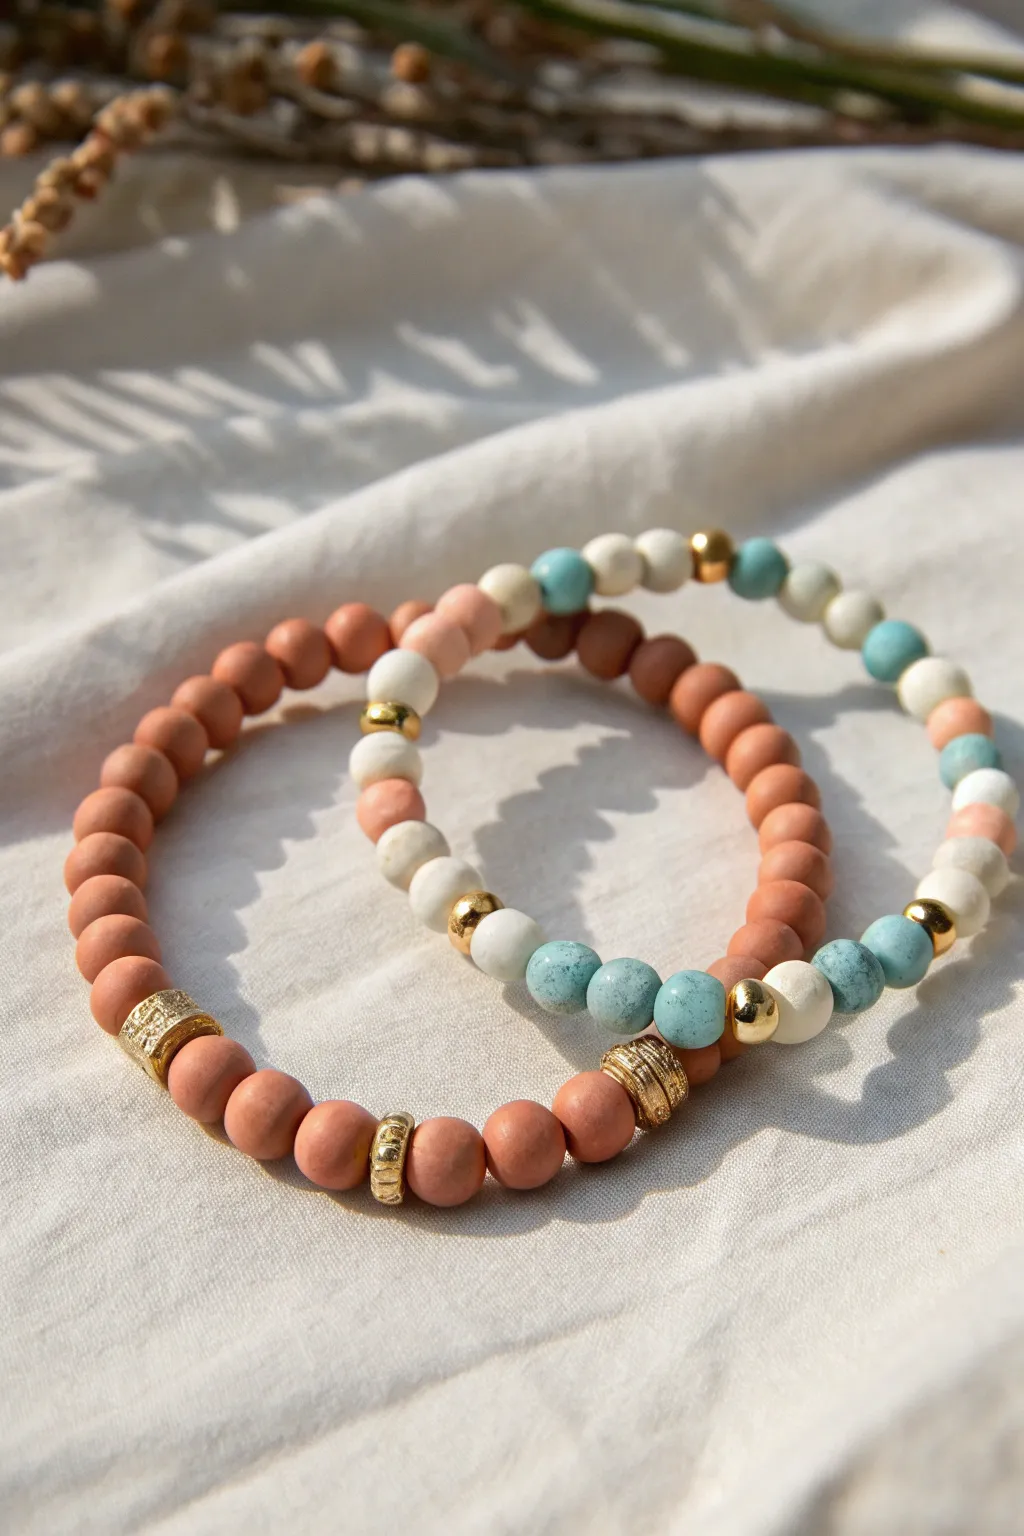
Ombré Gradient Companion Bracelets
Achieve a sophisticated, artisanal look with this pair of complementary bracelets featuring a soft ombré transition. By mixing solid polymer clay colors with swirled textures and pairing them with golden accents and creamy neutrals, you create a wearable set that feels both organic and elegant.
Step-by-Step Guide
Materials
- Polymer clay (coral/terracotta shade)
- Polymer clay (off-white/cream shade)
- Polymer clay (light peach/pink shade)
- Gold spacer beads (small discs or rondelles)
- Elastic cord (0.8mm or 1mm clear)
- Bead surfacing tool or sandpaper (fine grit)
- Toothpick or bead piercing pin
- Super glue or jewelry cement
- Scissors
Step 1: Creating the Clay Beads
-
Condition the clay:
Begin by warming up your clay blocks in your hands. You will need three primary distinct color pools: a deep coral/terracotta, a lighter peach, and a pure cream. -
Mix the ombré shades:
To get that subtle gradient seen in the outer bracelet, create an intermediate shade. Mix a small amount of the terracotta clay with a pinch of the peach clay. Knead until fully blended. -
Create the marbled effect:
For the textured coral beads, take a chunk of terracotta and a tiny spec of cream. Twist them together briefly—don’t overmix—to leave visible swirls that mimic natural stone. -
Roll spheres:
Pinch off equal-sized pieces of clay from your various color piles. Roll them between your palms to form smooth spheres approximately 8mm to 10mm in diameter. -
Texturize the surface:
For the rougher, stone-like beads shown on the left, gently roll the uncured clay spheres over a piece of sandpaper or a textured sponge. This removes the plastic shine and adds organic pitted details. -
Pierce the holes:
Using a toothpick or a bead pin, carefully pierce the center of each sphere. Rotate the bead as you push the tool through to prevent the shape from distorting. -
Bake the beads:
Arrange your beads on a baking sheet or dedicated clay tile. Bake according to the manufacturer’s instructions (usually around 275°F or 130°C for 15-30 minutes). -
Cool and inspect:
Let the beads cool completely before handling. Check for any sharp edges around the hole and smooth them down with sandpaper if necessary.
Stone Texture Secret
Roll your unbaked clay beads in coarse salt or sugar before baking. After baking, rinse the beads in water to dissolve the crystals, leaving perfect little craters.
Step 2: Designing the Pattern
-
Layout the gradient:
Lay out your beads for the first bracelet on a bead board or soft cloth. Arrange them to transition from the deep terracotta to the lighter peach, creating a color-blocked ombré effect. -
Plan the cream bracelet:
For the second bracelet, layout a majority of cream beads. Interperse sections of the coral and peach beads to visually link the two pieces together. -
Insert gold accents:
Place the gold spacer beads strategically. I like to use them to break up large blocks of color or to frame a specific focal bead.
Knot Keep Slipping?
If your elastic knot wont hold, try dabbing the knot with clear nail polish instead of super glue. It remains slightly flexible and is less likely to crack than brittle glue.
Step 3: Assembly & Finishing
-
Measure the elastic:
Cut a piece of elastic cord about 10-12 inches long. Pre-stretch the cord by pulling it firmly a few times; this prevents the bracelet from stretching out later. -
String the beads:
Thread the beads onto the elastic in your chosen order. Start with a bead that has a larger hole if possible, as this can help hide the knot later. -
Check the fit:
Wrap the strung beads around your wrist to ensure the size is comfortable. Add or remove a bead if the fit feels too tight or too loose. -
Tie the knot:
Tie a surgeon’s knot (right over left twice, then left over right) to secure the loop. Pull the elastic tight so the beads sit snugly against each other. -
Secure with glue:
Dab a tiny drop of super glue or jewelry cement onto the knot. Allow it to dry for a minute before trimming the excess cord. -
Hide the knot:
Gently tug the elastic so the knot slides inside the nearest bead hole, creating a seamless finish.
Now you have a stunning set of bracelets that bring a warm, earthy elegance to any outfit


What Really Happens Inside the Kiln
Learn how time and temperature work together inside the kiln to transform clay into durable ceramic.
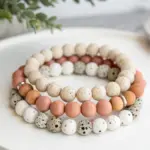
Warm-and-Cool Complementary Pair
Embrace earthy vibes with this duo of complementary stretch bracelets, pairing warm terracotta tones with cool splashes of teal and cream. The matte finish of the clay beads creates a gorgeous contrast against the shining gold accents, making them perfect for stacking or sharing.
Step-by-Step
Materials
- 8mm round polymer clay beads in matte terracotta
- 8mm round polymer clay beads in matte white
- 8mm round polymer clay beads in speckled teal/light blue
- Gold spacer beads: ribbed disc style
- Gold spacer beads: smooth round 4mm or 5mm
- Strong elastic cord (0.8mm or 1mm)
- Jewelry glue (e.g., G-S Hypo Cement)
- Scissors
Step 1: Planning & Measure
-
Determine size:
Begin by measuring your wrist with a flexible tape measure. Add about half an inch to this measurement to ensure the bracelet fits comfortably without pinching. -
Cut the cord:
Cut two lengths of elastic cord, making each roughly 12 inches long. Having this extra length makes tying the final knots much easier. -
Pre-stretch:
Give each piece of elastic a few gentle tugs. This crucial pre-stretching step helps prevent the finished bracelet from sagging after you wear it a few times. -
Secure the end:
For each cord, place a piece of tape or a binder clip on one end. This acts as a bead stopper so your design doesn’t slide off while you work.
Step 2: Creating the Solid Terracotta Bangle
-
Start the pattern:
Thread on approximately 8 to 10 terracotta beads to begin. Since wrist sizes vary, you may need to adjust this number slightly. -
Add gold accent:
Slide on one of the larger ribbed gold disc spacers. This creates a focal point and breaks up the solid color. -
Continue the base:
Add another section of terracotta beads, roughly 5 beads long. -
Second accent:
Place a second ribbed gold spacer. I like to space these accents asymmetrically so the design looks interesting from any angle. -
Finish length:
Continue stringing terracotta beads until you reach your target length, placing a third ribbed gold spacer near the end if desired.
Pro Tip: Hiding Knots
Plan your stringing so that a bead with a slightly larger hole (often the metal spacers) is at the end. It’s much easier to pull the knot inside a metal bead than a clay one.
Step 3: Creating the Mixed Pattern Bangle
-
Begin with white:
Start this second bracelet by stringing about 5 white matte beads. -
Transition with gold:
Add a small smooth round gold spacer bead, followed by a single teal bead, then another small gold spacer. -
The mixed section:
String a pattern of 3 terracotta beads, then repeat the gold spacer/teal bead combination. -
Color blocking:
Create a distinct section of just teal beads—about 4 or 5 in a row—to bring out that cool blue tone. -
Balancing the design:
Finish the strand by randomly alternating sections of white and terracotta beads, separating major color changes with your small gold round spacers.
Level Up: Texture Play
Swap out the smooth round gold spacers for geometric hexagon spacers or tiny crystal rondelles to add a bit of sparkle that catches the light differently.
Step 4: Finishing Touches
-
Check fit:
Wrap the unfinished strands around your wrist to verify the size. Add or remove a bead or two if it feels too loose or too tight. -
The surgeon’s knot:
Remove the tape or clip. Tie the ends together using a surgeon’s knot: it’s like a standard overhand knot, but you loop the elastic through twice before pulling tight. -
Secure with glue:
Dab a tiny drop of jewelry glue directly onto the knot. Let it dry for a moment before trimming the excess cord close to the knot. -
Hide the knot:
Ideally, your knot is small enough to be gently tugged inside the hole of the nearest bead, making the finish invisible.
Slip on your new bracelet stack and enjoy the earthy elegance of your handmade creation
Smiley Accent Matching Bracelets

These charming matching bracelets combine soft pastel tones with a pop of sunny gold to create a playful yet elegant accessory. The centerpiece of each design is a cheerful yellow smiley face charm, perfectly complemented by a mix of dusty pink, creamy white, and metallic gold beads.
Step-by-Step Guide
Materials
- Stretch cord (0.8mm-1mm clear elastic)
- Round beads (6mm or 8mm) in dusty pink/rose quartz color
- Round beads (6mm or 8mm) in creamy off-white or mother-of-pearl
- Gold spherical spacer beads (4mm or 5mm)
- 2 Yellow smiley face charms with gold rims (two-hole connector style works best, or single hole)
- Bead stopper or decorative tape
- Hypo-cement or clear jewelry glue
- Scissors
Step 1: Planning Your Pattern
-
Measure your wrist:
Cut a length of stretch cord about 10-12 inches long. This gives you plenty of extra room for tying knots later without struggling with slippery ends. -
Secure the end:
Attach a bead stopper or a piece of tape to one end of your cord to prevent your carefully arranged beads from sliding off while you work. -
Lay out the design:
Lay your beads out on a bead board or soft cloth before stringing. For the pink bracelet, aim for a pattern that alternates blocks of pink beads with gold spacers. For the white bracelet, plan for sections of cream beads interrupted by gold accents.
Step 2: Stringing the Pink Bracelet
-
Start with the smiley:
Thread your cord through the smiley face charm first. Since this is the focal point, centering your design around it often makes balancing the pattern easier. -
Add flanking accents:
Immediately add one gold spacer bead on either side of the smiley charm to frame it and make the yellow pop against the pink. -
Begin the pink pattern:
String approximately 6-8 pink beads. I like to check the length against my wrist periodically to ensure the proportions feel right. -
Insert a gold breaker:
Slide on a gold spacer bead to break up the color block, then add another section of pink beads. -
Create a variation section:
For visual interest, create a small section opposite the smiley charm using alternating cream and gold beads, or perhaps a few lighter pink shades if you have them. -
Finish the loop:
Continue stringing untill the bracelet reaches your desired length, ensuring the pattern ends symmetrically to where you started near the charm.
Knot Slipping?
If your elastic knot feels loose, try tying a standard overhand knot on top of your surgeon’s knot before gluing. The extra friction helps lock slippery stretch cord in place securely.
Step 3: Stringing the White Bracelet
-
Focus on the charm:
Just like the first bracelet, start by threading the second smiley face charm onto a new piece of pre-cut cord. -
Create the gold frame:
Add three small gold spacer beads on each side of the charm. This creates a more elongated metallic section that differentiates this bracelet from the pink one. -
Start the cream sections:
String a long section of your creamy white or pearlescent beads. These beads often have natural variations, so rotate them to find the prettiest side. -
Add gold interruptions:
Intersperse a single gold bead after every 5-7 cream beads to maintain the matching aesthetic with the first bracelet. -
Mix in pink accents:
Near the back of the bracelet (opposite the charm), string a few pink beads to tie the two designs together visually.
Personalize It
Swap the round beads for natural gemstones like rose quartz (for pink) or river shell pearls (for white) to elevate the look from playful craft to semi-fine jewelry.
Step 4: Securing the Bracelets
-
Pre-stretch the cord:
Before tying, give the ends of the cord a firm but gentle pull to pre-stretch the elastic. This prevents the bracelet from sagging after the first few wears. -
Tie the surgeon’s knot:
Remove the bead stopper and bring the ends together. Tie a surgeon’s knot: cross the ends, loop one through twice, and pull tight. -
Secure with glue:
Apply a tiny dab of jewelry glue or hypo-cement directly onto the knot. Let it dry for a few minutes to ensure a permanent bond. -
Hide the knot:
If possible, gently tug the bracelet so the knot slides inside the hole of a neighboring bead (the smiley charm or a larger bead usually works best for this). -
Trim excess cord:
Once the glue is fully set, use sharp scissors to trim the excess cord ends close to the knot without cutting the knot itself.
Now you have a coordinating set of bracelets that are sure to bring a smile to your day whenever you glance at your wrist

TRACK YOUR CERAMIC JOURNEY
Capture glaze tests, firing details, and creative progress—all in one simple printable. Make your projects easier to repeat and improve.
Secret Message Morse Code Duo
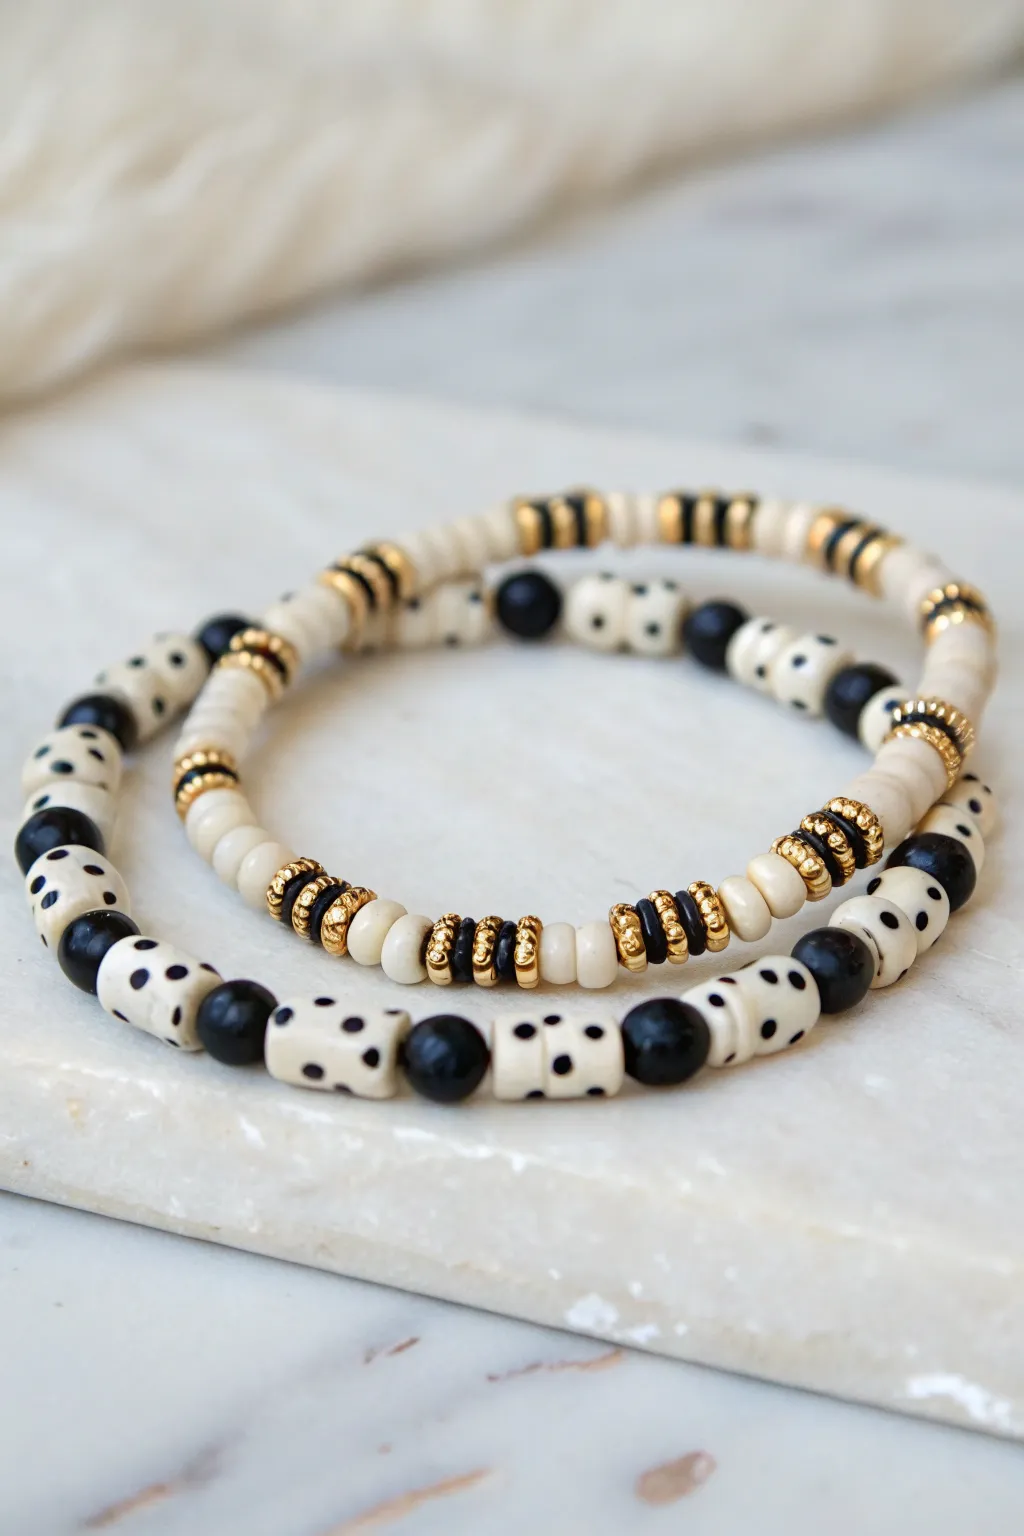
Create a striking pair of black and white bracelets that blend modern patterns with hidden meanings. This set features chunky cylindrical bone beads with playful polka dots alongside a sleek, gold-accented Morse code design, perfect for stacking or sharing.
Step-by-Step Guide
Materials
- Elastic stretch cord (0.8mm or 1mm)
- White bone or resin beads with black polka dots (cylindrical/tube shape)
- 6mm Round black onyx or glass beads
- 4mm Cream or white cylinder/heishi beads (clay or bone)
- 4mm Black heishi beads (clay or vinyl)
- Gold saucer spacer beads or fluted rondelles
- Jewelry glue or clear nail polish
- Scissors
Step 1: Planning Your Message
-
Decode the pattern:
For the Morse code bracelet (the thinner one), decide on your secret word or phrase. In this design, gold spacers act as the ‘dots’ and black heishi beads act as the ‘dashes’, separated by creamy white sections. -
Measure your wrist:
Wrap a piece of string around your wrist to find your size, then add about half an inch for a comfortable fit. Cut a piece of elastic cord about 10-12 inches long to give yourself plenty of room to tie knots later. -
Secure the end:
Place a piece of tape or a binder clip on one end of your elastic cord. This simple trick prevents your carefully strung beads from sliding off while you work.
Knot Slipping?
If your elastic knot feels loose, pre-stretch the cord firmly before stringing. This prevents it from stretching out later and slipping undone.
Step 2: Creating the Morse Code Bracelet
-
Start the base:
Begin threading your 4mm cream cylinder beads. String about 2 inches of these ‘filler’ beads to start the bracelet, creating a neutral background for your code. -
Add gold accents:
Introduce your first gold saucer bead. These textured gold pieces add a flash of elegance and serve to frame the darker focal beads. -
String a ‘dash’:
Thread on three or four black heishi beads consecutively. This little stack creates a distinct black block that represents a ‘dash’ in your Morse code pattern. -
Separate the code:
Add another gold saucer bead, followed by a small section of cream beads (about 3-4 beads) to create space before the next letter or symbol. -
String a ‘dot’:
For a ‘dot’, use a single gold spacer or perhaps a single black heishi bead framed by gold, depending on your preferred look. In the photo, the pattern alternates between solid black sections and gold-framed segments. -
Repeat and finish:
Continue this pattern—gold frame, black stack, gold frame, cream section—until you’ve spelled your word or covered the front of the wrist. Fill the rest of the length with plain cream beads until you reach your measured size.
Step 3: Crafting the Polka Dot Bracelet
-
Prepare the cord:
Cut a second piece of elastic cord, keeping it the same length as your first for consistency. Secure the end again. -
String a dot bead:
Start with one of the large cylindrical white beads featuring black polka dots. These are the showstoppers of the set. -
Add a spacer:
Follow the tube bead immediately with a round 6mm black bead. The contrast between the matte bone bead and the smooth black bead creates a lovely texture. -
Create the rhythm:
Establish a simple 1-to-1 repeating pattern: one white polka dot tube, one round black bead. I like to lay my beads out on a mat first to ensure the dots on the tube beads are facing roughly the same way. -
Check the fit:
Wrap the strand around your wrist occasionally. Since these beads are chunkier, they take up more inner circumference, so you might need a slightly longer strand than the thinner bracelet. -
Close the loop:
Once both ends meet comfortably around your wrist without stretching the cord too much, you are ready to tie off.
Level Up: Mixed Metals
Swap the gold saucer beads for silver or rose gold to match other jewelry, or mix metallic finishes for an eclectic, trendy stack.
Step 4: Finishing Touches
-
Tie the knot:
Remove the tape or clip. Bring the two ends of the elastic together and tie a surgeon’s knot (loop the clear end through twice before pulling tight). -
Secure with glue:
Dab a tiny drop of jewelry glue or clear nail polish directly onto the knot. This is crucial for longevity. -
Hide the knot:
While the glue is still tacky but not wet, gently pull the cord so the knot slides inside one of the bead holes (the large hole of the white tube bead is perfect for this). -
Trim excess:
Wait for the glue to dry completely—usually about 10 minutes—before trimming the excess cord ends close to the bead.
Wear your monochromatic stack together for a bold statement or gift the coded one to a friend who shares your secret
Date or Coordinates Number-Bead Set
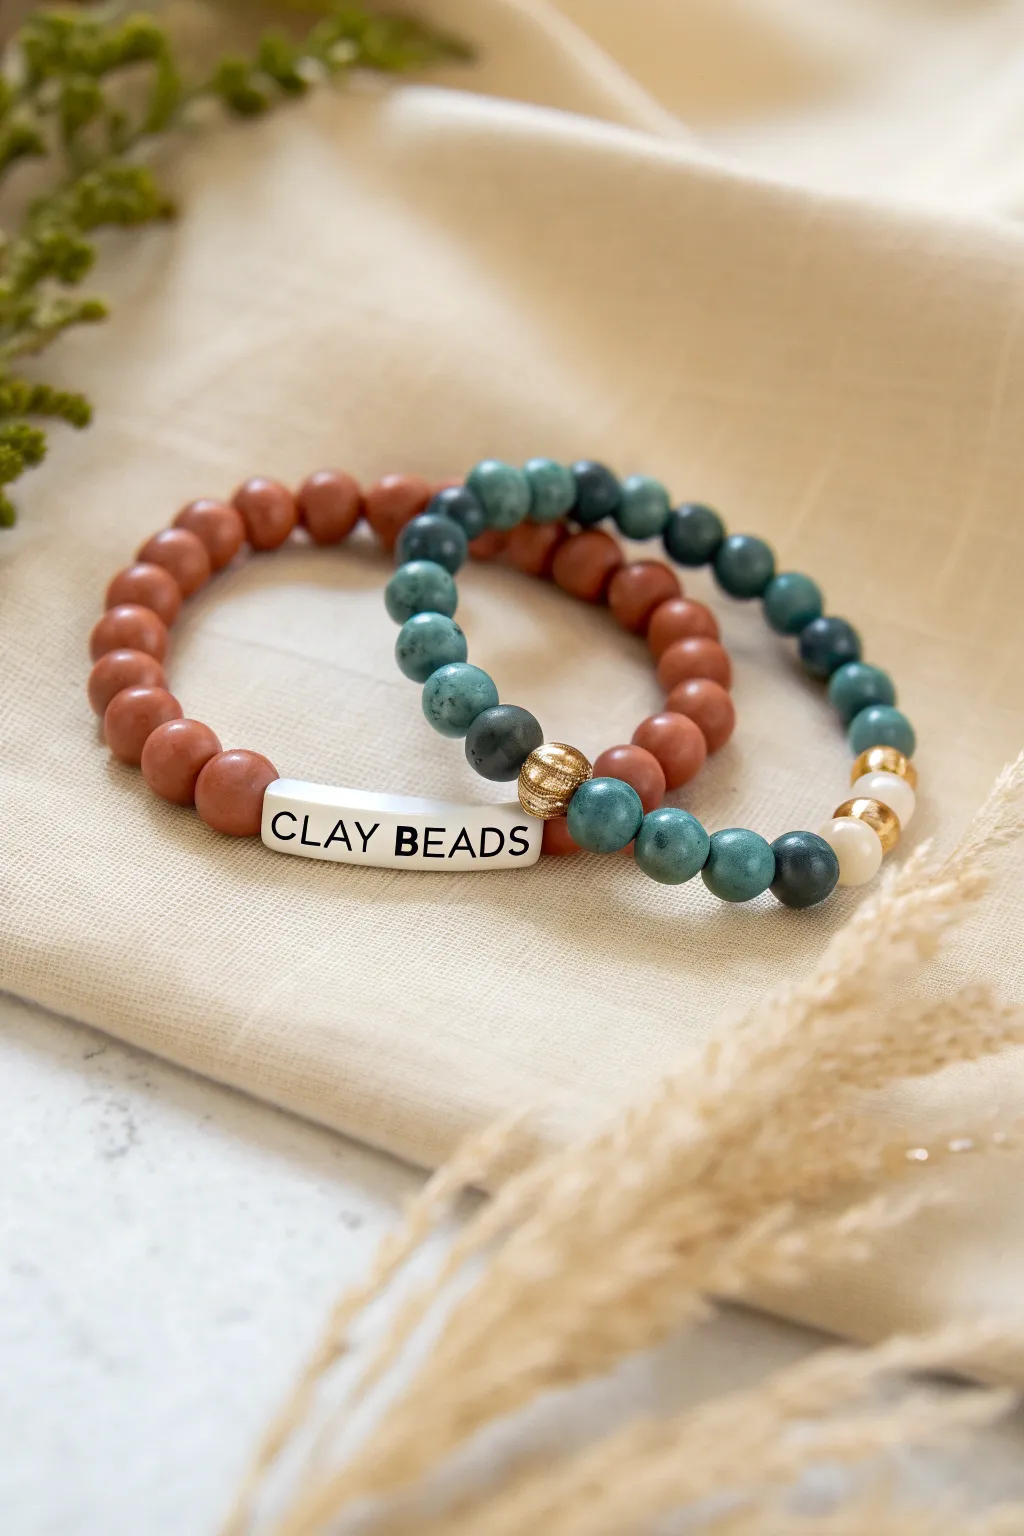
Achieve a sophisticated, bohemian look with this pair of complementary stretch bracelets featuring matte gemstones and a custom focal bead. The warm terracotta tones contrast beautifully with the cool, mottled teal beads, while gold accents tie the set together.
Step-by-Step
Materials
- 8mm matte terracotta/jasper round beads (approx. 20-25)
- 8mm matte teal/turquoise round beads (approx. 20-25)
- White rectangular letter bead or custom polymer bar bead reading ‘CLAY BEADS’
- 1 large gold textured round spacer bead (10mm)
- 2 small gold spacer beads
- 3 cream/white accent beads
- Strong elastic cord (0.8mm or 1mm recommended)
- Jewelry glue or clear nail polish
- Scissors
Step 1: Designing the Terracotta Bracelet
-
Measure and cut:
Cut a piece of elastic cord about 10-12 inches long. This extra length will give you plenty of room to tie a secure knot later without struggling. -
Secure the end:
Place a piece of tape or a bead stopper on one end of your cord to prevent beads from slipping off while you design your pattern. -
Start beading:
Thread on about 10 to 12 of the matte terracotta beads. The exact number will depend on your wrist size, but this should cover roughly half the bracelet’s circumference. -
Add the focal piece:
Slide on the white rectangular ‘CLAY BEADS’ bar bead. If the hole runs horizontally through the bar, ensure it sits flat against the round beads. -
Finish the loop:
Continue adding terracotta beads to the other side of the focal bead until you reach your desired length. A standard adult wrist is usually 7 inches.
Loose Elastic?
If your bracelet feels droopy, you didn’t pre-stretch the cord enough. Give the cord a firm few tugs before stringing. This ‘shocks’ the elastic into its final state.
Step 2: Designing the Teal Bracelet
-
Prepare the second cord:
Cut a second piece of elastic cord, again aiming for about 10-12 inches, and secure the end just like before. -
Create the teal section:
Thread on approximately 16-20 matte teal beads. This section will form the majority of the bracelet. -
Add the focal gold bead:
Slide on the large, textured gold spacer bead. This acts as a striking metallic centerpiece that breaks up the matte texture. -
Incorporate the cream accents:
Add a cream-colored bead, followed by a small gold spacer, another cream bead, a second gold spacer, and finally the third cream bead. -
Close the pattern:
If needed, add a few more teal beads to finish the loop, ensuring the total length matches your first bracelet for a cohesive fit.
Step 3: Finishing Touches
-
Pre-stretch the cord:
Before tying, gently pull on the ends of the elastic cord for both bracelets. I always do this to prevent the bracelet from stretching out and becoming loose after the first few wears. -
Tie the knots:
Remove the tape or bead stopper. Tie a simple overhand knot, followed by a sturdy surgeon’s knot (loop the elastic through twice instead of once) to secure the beads tightly together. -
Secure with glue:
Apply a tiny dab of jewelry glue or clear nail polish directly onto the knot. Let it dry completely before handling. -
Hide the knot:
Once the glue is dry, trim the excess elastic close to the knot. If the hole of a neighboring bead is large enough, gently tug the elastic to slide the knot inside the bead to hide it.
Make it Yours
Swap the ‘CLAY BEADS’ bar for a date (like ‘10.14.23’) or coordinates of a special place using individual number beads for a sentimental custom gift.
Enjoy wearing your new handcrafted stack or gift it to a friend who loves earthy accessories
Day-and-Night Matching Contrast Pair
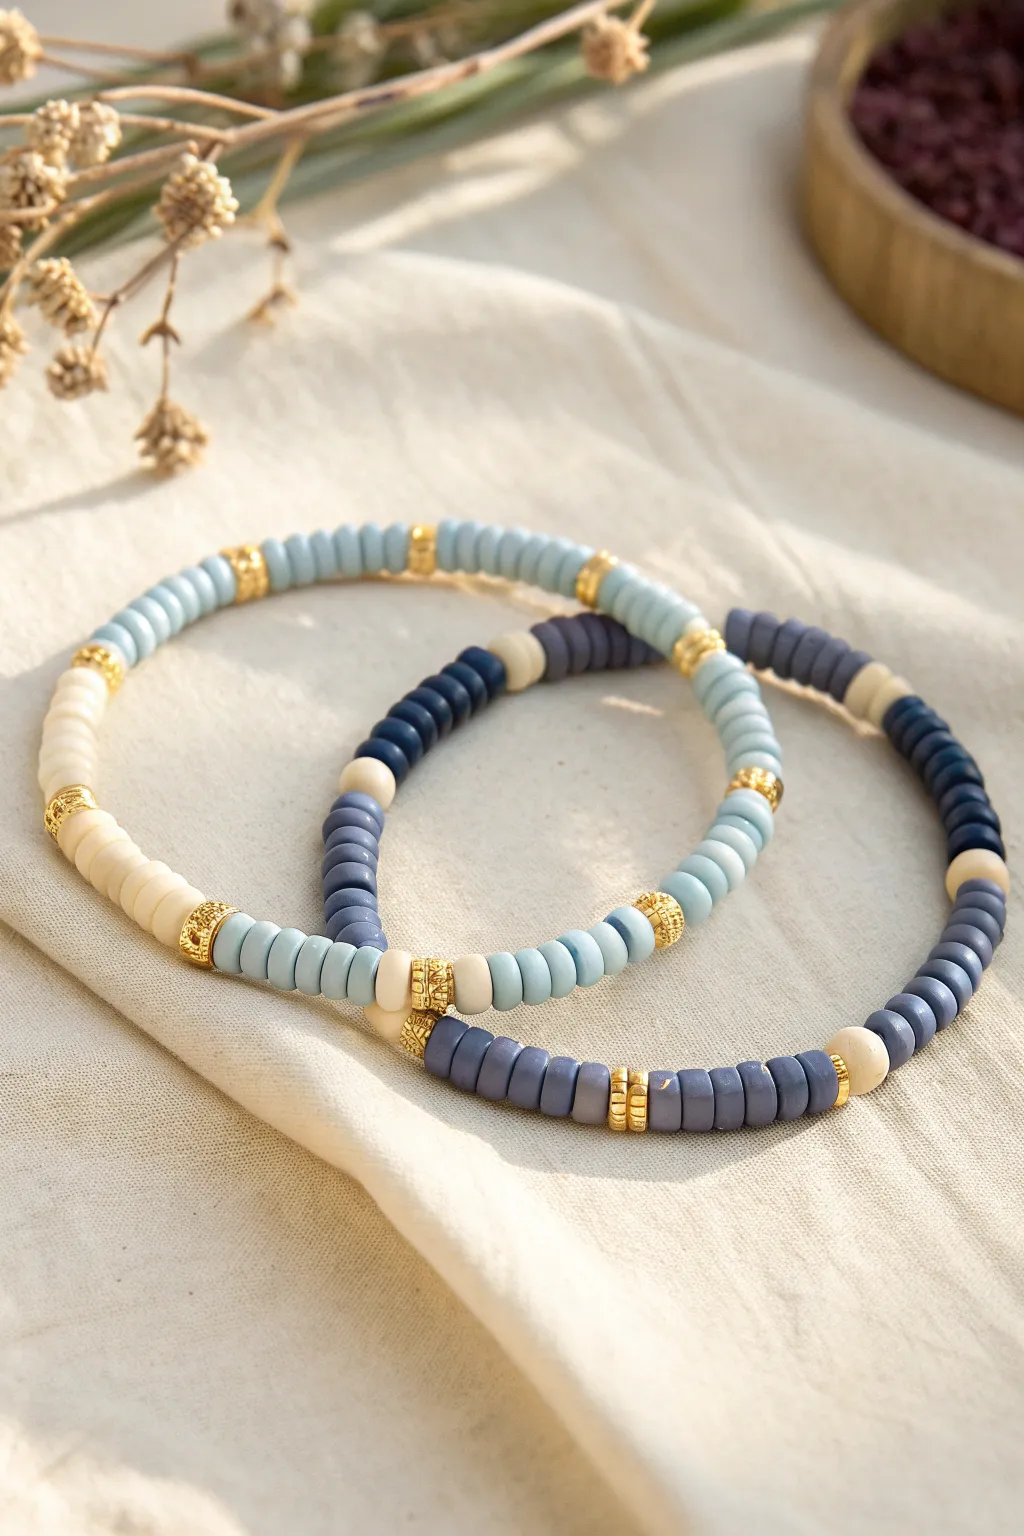
Capture the delicate balance between light and shadow with this ‘Day-and-Night’ bracelet set. Using flat clay heishi beads in contrasting soft pastels and deep moody tones, these matching accessories create a sophisticated stacked look.
How-To Guide
Materials
- 6mm Polymer clay heishi beads (light blue, cream, light grey, navy blue, slate blue)
- Gold spacer beads (textured rondelle or decorative ring style, approx 6mm)
- Strong elastic cord (0.8mm clear)
- Beading needle (optional but helpful)
- Precision scissors
- Hypo-cement or clear jewelry glue
- Measuring tape
- Tape or bead stopper
Step 1: Preparation & Planning
-
Measure your wrist:
Wrap a measuring tape comfortably around your wrist to find your size, then add about 0.5 inches for a comfortable fit. Cut a piece of elastic cord about 10-12 inches long for plenty of tie-off room. -
Secure the end:
Place a piece of tape or a bead stopper on one end of your elastic cord to prevent beads from sliding off while you work. -
Sort your palette:
Separate your heishi beads into two piles. For the ‘Day’ bracelet, focus on light blues and creams. For the ‘Night’ bracelet, gather your navy blues, slate greys, and utilize cream accents for continuity.
Knot Slipping?
If your elastic knot feels loose, try a surgeon’s knot: loop the cord through twice on the first pass instead of once for extra grip.
Step 2: The ‘Day’ Bracelet
-
Start the sequence:
Begin threading with a long section of light blue heishi beads, aiming for about 1.5 to 2 inches of solid color. -
Add gold accents:
Slide on one textured gold spacer bead. This will serve as a section divider. -
Create a cream segment:
Thread approximately 1 inch of cream or off-white clay beads. The contrast here should be soft and airy. -
Second gold accent:
Add another gold spacer bead to close off the cream section. -
Return to blue:
Continue with another long segment of light blue beads. I usually like to check the length against my wrist periodically here. -
Repeat the pattern:
Repeat the gold-cream-gold pattern at intervals until you reach the desired bracelet length, aiming for 3-4 distinct color blocks.
Step 3: The ‘Night’ Bracelet
-
Begin with depth:
On your second string, start with the slate blue or greyish-purple beads. Thread a section roughly 1.5 inches long. -
Transition with gold:
Add a gold spacer bead, matching the style used in the first bracelet for cohesion. -
Insert dark contrast:
Add a shorter segment, maybe 0.5 inches, of the darker navy blue beads. -
Lighten the mood:
Place a single cream bead, followed by a gold spacer. This tiny pop of white mimics the moon or stars in a night sky. -
Continue the dark sequence:
Resume with the slate blue beads, or alternate between navy and slate sections separated by gold spacers. -
Mirror the accent:
Ensure you include at least one segment of cream beads (about 0.5 inches) flanked by gold to tie the two designs together visually.
Add a Charm
Make the ‘Night’ bracelet special by attaching a small moon or star charm to one of the gold spacer rings using a jump ring.
Step 4: Finishing Touches
-
Check the fit:
Wrap both unfinished strands around your wrist to ensure they sit comfortably without pinching. -
Pre-stretch the elastic:
Gently pull tightly on both ends of the cord a few times. This pre-stretching prevents the bracelet from sagging later on. -
Tie the knot:
Remove the tape/stopper and tie a surgical knot (right over left, left over right). Pull tight. -
Secure with glue:
Apply a tiny dot of jewelry glue or hypo-cement to the knot. Let it dry completely before trimming. -
Hide the knot:
Trim the excess cord close to the knot, then gently slide a nearby heishi bead or gold spacer over the knot to conceal it.
Now you have a beautifully balanced set of bracelets that look stunning worn together or shared with a friend