I’m obsessed with how air dry clay bowls can go from a lump of clay to a cute little piece of functional decor in just a weekend. Here are my favorite air dry clay bowl ideas—starting with the classics and working up to the fun, unexpected ones.
Classic Stamped Trinket Bowl
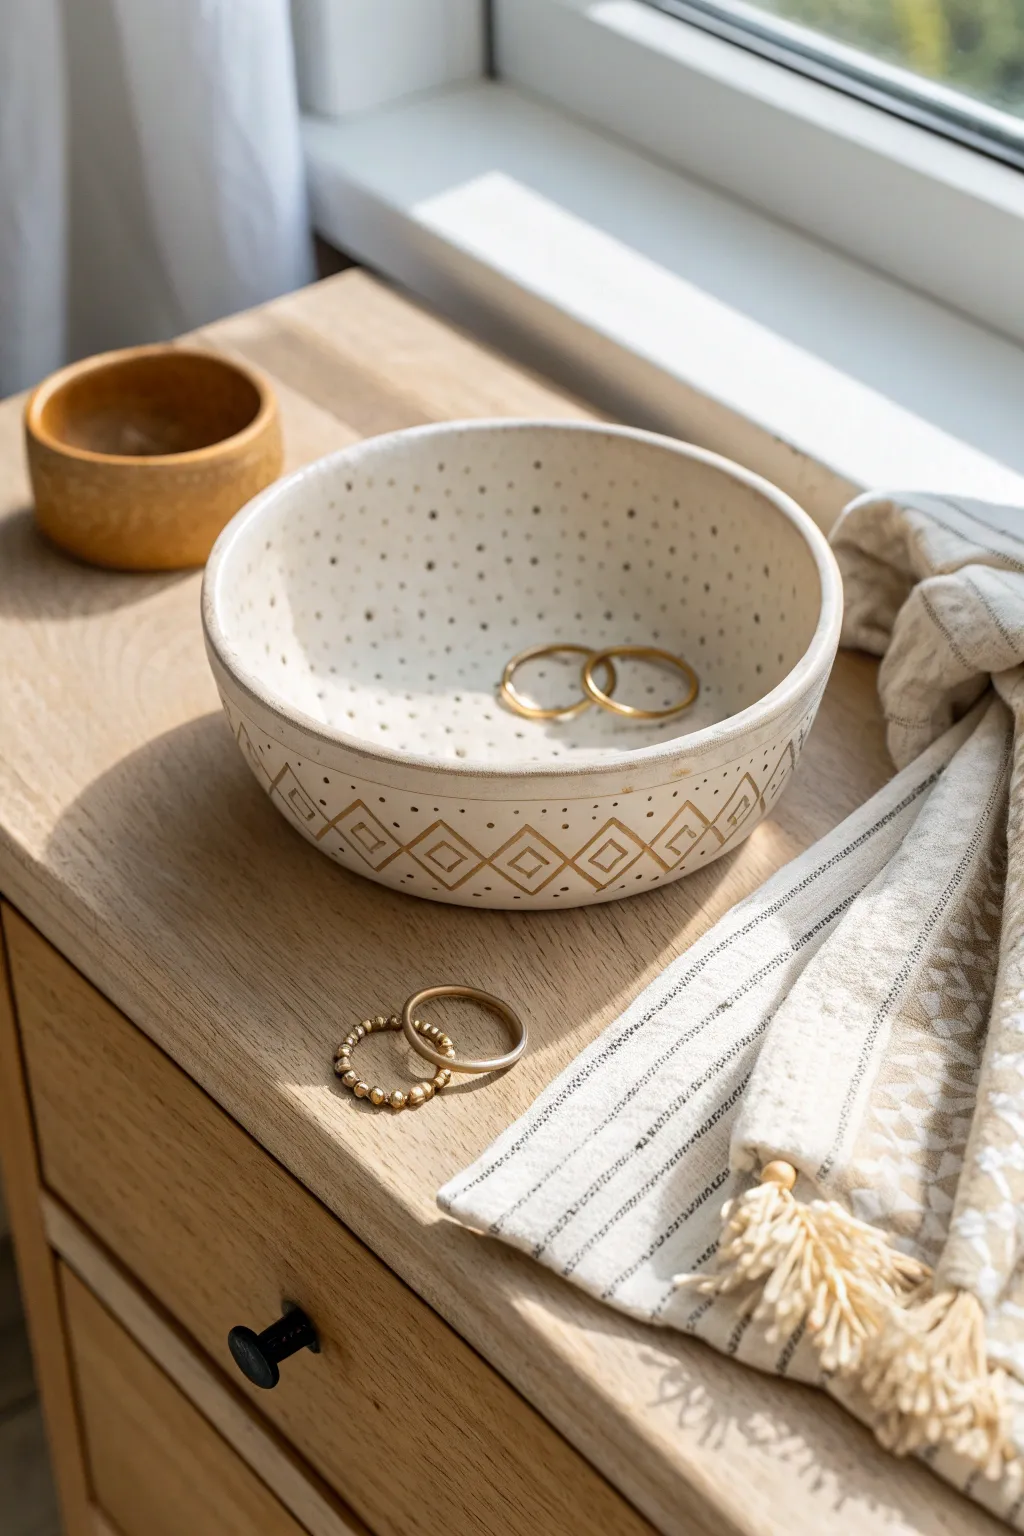
This elegant air dry clay bowl combines rustic charm with precise geometric detailing to create a stunning catch-all for your jewelry. With its creamy finish, delicate stippling, and diamond motif, it looks like a high-end ceramic piece straight from an artisanal boutique.
Detailed Instructions
Materials
- White or natural air dry clay (approx. 500g)
- Rolling pin
- Bowl for mold (approx. 6-inch diameter)
- Plastic wrap or cling film
- Craft knife or clay cutter
- Small square or diamond-shaped clay stamp (or a handmade linocut stamp)
- Needle tool or wooden skewer
- Sponge
- Fine-grit sandpaper (220 grit)
- Small bowl of water
- Matte white acrylic paint (optional)
- Clear matte varnish or sealant
Step 1: Prepping and Shaping
-
Condition the clay:
Start by kneading your block of air dry clay in your hands for a few minutes. You want it warm and pliable to prevent cracks from forming later. -
Roll it out:
Place the clay on a smooth surface or a silicone mat. Use your rolling pin to flatten it into an even circle, aiming for a consistent thickness of about 1/4 inch. -
Prepare your mold:
Take the bowl you’ve chosen as a mold and wrap the outside tightly with plastic wrap. This ensures your clay won’t stick to the surface as it dries. -
Drape the clay:
Carefully lift your clay circle and drape it over the upside-down bowl. Gently press the clay against the bowl’s form, smoothing it downwards with your palms. -
Trim the excess:
I usually leave a little overhang at first, but now you need to use your craft knife to trim the excess clay around the rim for a clean, straight edge. -
Smooth the surface:
Dip your finger into a little water and run it along the cut rim and the exterior surface to smooth out any fingerprints or rough textures.
Stamp Hack
Don’t have a diamond stamp? Carve a simple diamond shape into a small block of gum eraser using an X-Acto knife for a custom tool.
Step 2: Adding the Design
-
Mark the pattern guide:
Before stamping, lightly score a very faint line around the circumference of the bowl about an inch up from the bottom. This will help keep your diamond pattern straight. -
Stamp the diamonds:
Press your diamond-shaped stamp gently but firmly into the clay along the guideline. Space them evenly so the points of the diamonds almost touch. -
Connect the motif:
If your stamp is open-ended or faint, use your needle tool to deepen the lines connecting the diamonds, creating a continuous geometric band. -
Stipple the exterior:
Using the needle tool or a blunt toothpick, poke small, shallow holes around the diamond pattern. Add dots inside the diamonds and in the empty spaces above and below the band. -
Allow initial drying:
Let the bowl sit on the mold for about 24 hours until the outside feels leather-hard and holds its shape. -
Remove from mold:
Carefully pop the clay bowl off the mold and peel away the plastic wrap. The inside will still be slightly damp. -
Texture the interior:
While the inside is still somewhat soft, take your needle tool and continue the stippling pattern across the entire interior surface. Vary the spacing for a speckled, organic look.
Step 3: Finishing Touches
-
Full cure:
Set the bowl aside in a dry area for another 24-48 hours. Turn it over occasionally to ensure air reaches the bottom and the interior dries evenly. -
Sand for perfection:
Once bone dry, take your fine-grit sandpaper and gently buff the rim and any rough patches on the exterior. Be gentle around your stamped textures. -
Dust off:
Wipe the entire piece down with a slightly damp sponge or cloth to remove all sanding dust before sealing. -
Seal or paint:
The natural clay color is beautiful, but if you want a cleaner look, apply a thin wash of matte white acrylic paint. If you prefer the natural tone, skip straight to the clear matte varnish to protect the surface.
Antique It
After the white paint dries, rub a diluted brown acrylic wash into the stamped grooves and wipe away the excess for an aged, defined look.
Place this beautiful bowl on your nightstand to catch the morning light and your favorite rings


Simple Pinch-Pot Catchall
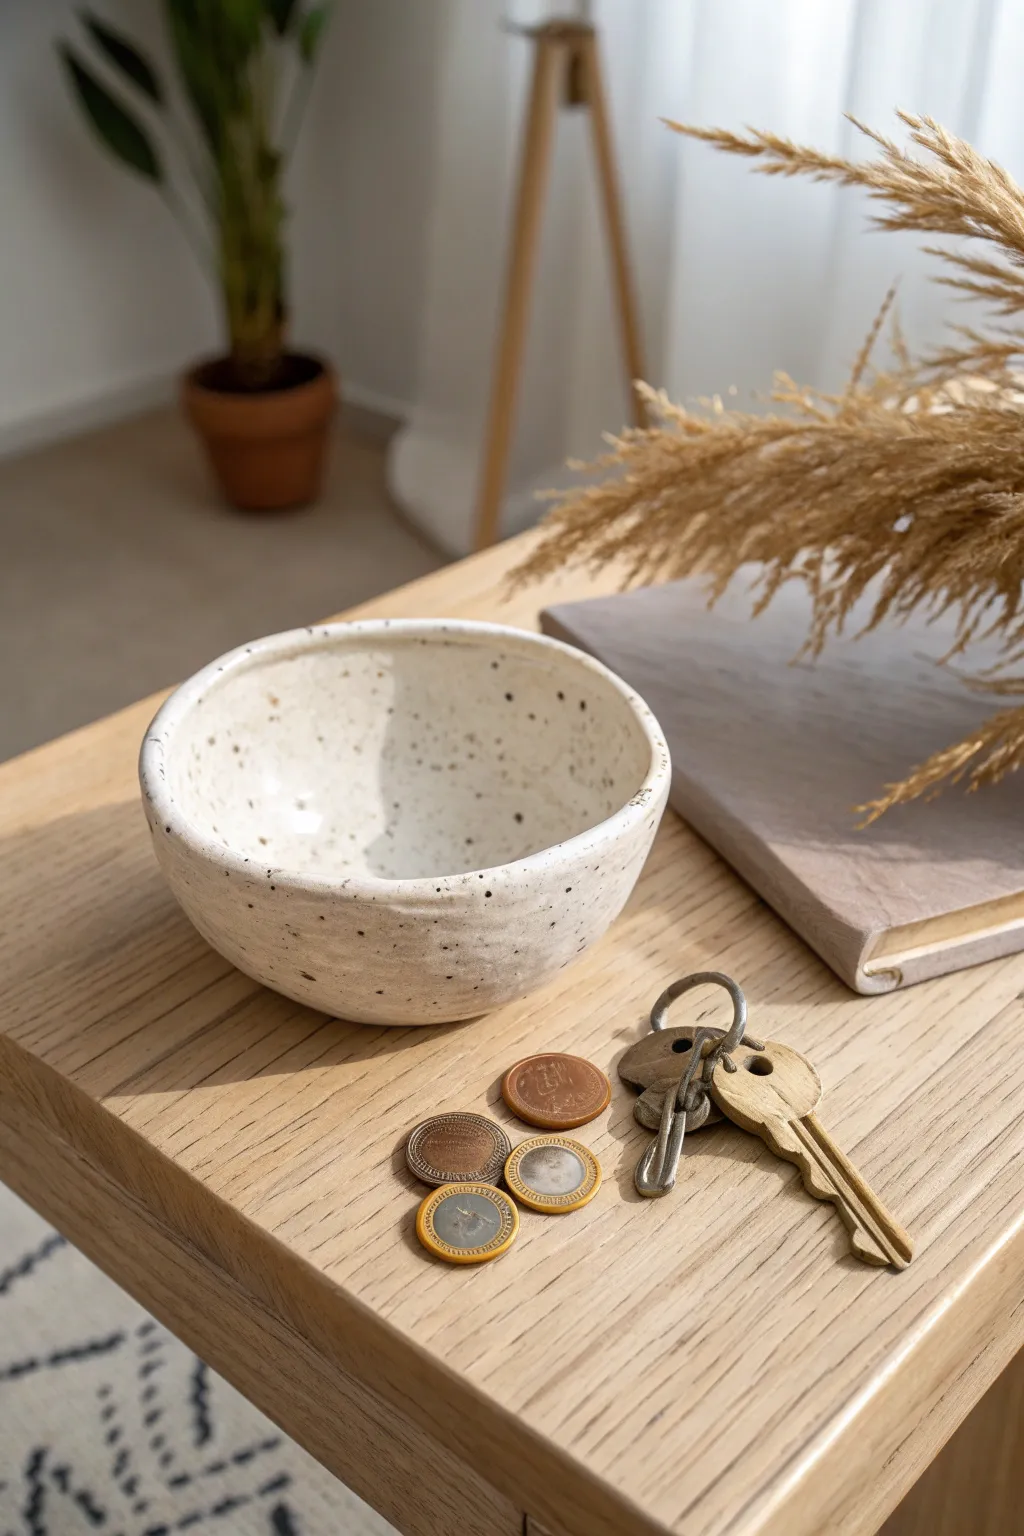
Embrace the beauty of imperfection with this lovely, speckled catchall dish. Its organic shape and faux-ceramic finish make it the perfect minimalist home for your keys, coins, or jewelry.
Step-by-Step
Materials
- White air-dry clay
- Small bowl of water
- Sponge
- Acrylic paint (warm white/cream)
- Acrylic paint (dark brown/black)
- Gloss varnish or sealant
- Old toothbrush or stiff paintbrush
- Fine-grit sandpaper
Step 1: Shaping the Clay
-
Prepare the Clay:
Start with a ball of air-dry clay roughly the size of a large orange. Knead it in your hands for a minute to warm it up and ensure there are no air bubbles inside. -
Form the Initial Hollow:
Hold the clay ball in one hand and push your thumb into the center, stopping about half an inch before you reach the bottom. This creates the foundational opening. -
Pinch the Walls:
Using your thumb on the inside and fingers on the outside, gently pinch and rotate the clay. Work your way from the bottom up to the rim in a spiral motion. -
Even Out Thickness:
Aim for a consistent wall thickness of about 1/4 inch. Don’t worry if the rim is slightly uneven; that wavy, organic look adds character to this specific style. -
Smooth the Surface:
Dip your finger or a small sponge into a little water and glide it over the clay surface. Smooth out any major cracks or deep fingerprints, but leave some texture for a rustic feel. -
Refine the Rim:
Run a damp sponge along the top rim to soften any sharp edges. The rim should feel rounded and inviting rather than jagged. -
Drying Time:
Set your bowl aside in a dry area away from direct sunlight. Let it dry completely for 24-48 hours until it turns chalky white and feels hard to the touch.
Smoother Surfaces
To get a polished look without sanding, burnish the clay effectively before it dries. Rub the ‘leather hard’ clay with the back of a spoon to compact the surface.
Step 2: Sanding and Finishing
-
Sand Imperfections:
Once fully dry, take a piece of fine-grit sandpaper and gently buff the surface. Focus on any sharp bumps or rough patches on the rim and exterior. -
Wipe Clean:
Use a dry cloth or soft brush to remove all the sanding dust from the bowl. This ensures your paint adheres smoothly. -
Base Coat:
Mix a warm white or cream acrylic paint. Apply two thin coats to the entire bowl (inside and out), allowing the paint to dry fully between layers. -
Prepare the Splatter:
In the meantime, dilute a small amount of dark brown or black acrylic paint with water until it has an inky, fluid consistency. -
Create the Speckles:
Dip an old toothbrush into the diluted dark paint. Hold it near the bowl and run your thumb across the bristles to flick tiny specks onto the surface. Rotate the bowl to get even coverage. -
Seal the Deal:
Once your speckles are bone dry, apply a coat of gloss varnish. This mimics the look of fired ceramic glaze and protects your catchall from wear.
Add Subtle Color
Instead of pure white, mix a tiny drop of beige or mocha acrylic into your clay before sculpting. This gives the base material a natural, stony undertone.
Place your new bowl on an entryway table and enjoy the organized charm it brings to your space


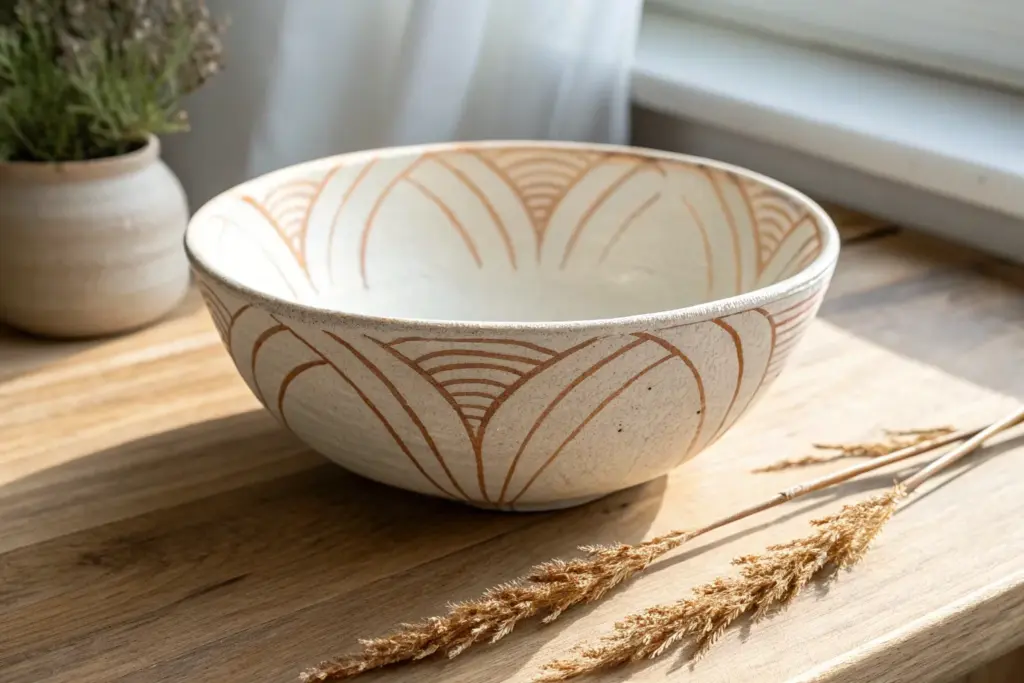
Smooth Molded Minimal Bowl
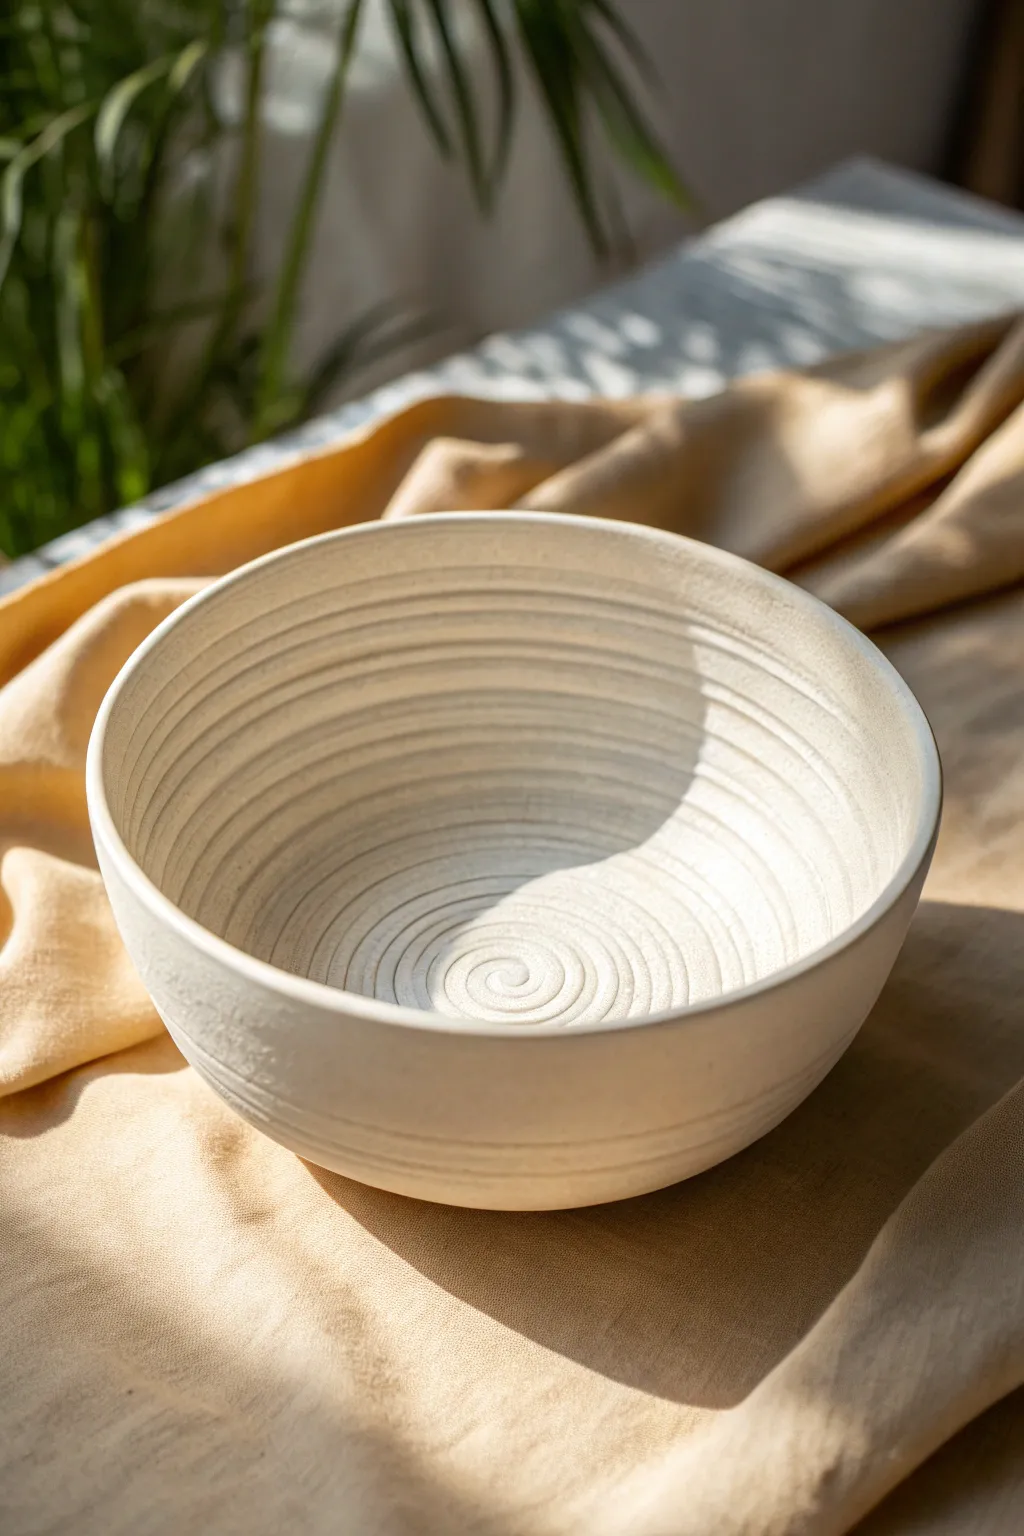
Capture the essence of zen simplicity with this beautifully textured bowl, featuring a hypnotic spiral pattern that radiates from the center. The creamy white finish and organic ridges create a tactile piece that looks like high-end wheel-thrown pottery but is easily achieved at home.
Step-by-Step Tutorial
Materials
- High-quality white air dry clay
- Rolling pin
- Clay cutting tool or knife
- Potter’s rib or smooth plastic card
- Bowl for use as a mold (smooth interior)
- Plastic wrap or cling film
- Sponge
- Bowl of water
- Fine grit sandpaper (220-400 grit)
- Matte varnish or sealant
Step 1: Preparation & Base
-
Prepare the Mold:
Select a medium-sized kitchen bowl to serve as your slump mold. Line the interior completely with plastic wrap, ensuring it is as smooth as possible to prevent sticking. -
Condition the Clay:
Take a large chunk of air dry clay and knead it well. Warm hands help make the clay pliable and reduce the chance of internal air bubbles. -
Roll the Slab:
Roll out a slab of clay to a uniform thickness of about 1/4 inch. Lift and rotate the clay occasionally so it doesn’t stick to your work surface. -
Cut the Base Circle:
Use a round cutter or trace a small circle (about 2-3 inches in diameter) onto the slab and cut it out. This forms the very bottom center of your bowl. -
Create the Spiral Tool:
To achieve the consistent ridge texture, you won’t coil the clay itself. Instead, create a texturing tool. Take a scrap piece of clay or a thick notched tool that can imprint parallel grooves.
Step 2: Forming the Bowl
-
Place the Base:
Gently place your clay circle into the bottom center of the plastic-lined mold bowl. -
Create Long Coils:
Roll out several long, even snakes of clay. They should be thinner than a standard coil pot—think pencil thickness or slightly thicker. -
Begin the Spiral:
Starting at the very center of your base circle, begin pressing a coil into the clay. I find it easiest to work from the absolute center and spiral outwards. -
Blend the Underside:
As you lay the coil down in a tight spiral, press it firmly against the previous ring. For structural integrity, you must smudge the coils together on the *backside* (the side touching the mold), but keep the interior texture distinct. -
Build Up the Walls:
Continue adding coils, spiraling up the sides of the mold. Ensure each new coil is pressed tightly against the one below it to prevent gaps. -
Refine the Spiral:
Once the bowl is fully lined with coils, use a damp finger or a rounded sculpting tool to gently smooth the valleys between the ridges without erasing the texture. You want a unified surface that retains the groove. -
Create the Rim:
When you reach the top of the mold, slice the excess clay horizontally to create a clean, flat rim. Smooth the sharp edge with a damp sponge.
Cracks Appearing?
If small cracks form while drying, mix a tiny bit of clay with water to make a ‘slip’ paste. Fill the crack, smooth it over, and cover the bowl loosely with plastic to slow the remaining drying time.
Step 3: Refining & Finishing
-
Initial Drying:
Let the bowl sit in the mold until it is leather hard—firm to the touch but not fully dry. This usually takes overnight. -
Remove from Mold:
Carefully lift the clay bowl out of the mold using the plastic wrap. Peel the plastic away gently. -
Smooth the Exterior:
The outside will likely show the smudged coil connections. Use a rib tool or a damp sponge to smooth the exterior walls until they are uniform and seamless. -
Add Exterior Texture (Optional):
If you want the exterior to match the interior spiral (like the reference), you can carve shallow grooves around the outside with a clay tool while holding the bowl steadily. -
Full Dry:
Allow the piece to dry completely on a wire rack for airflow. This often takes 24-48 hours depending on humidity. -
Sanding:
Using fine-grit sandpaper, gently sand the rim and any rough patches on the exterior. Avoid sanding the interior texture excessively. -
Sealing:
Apply a clear matte varnish to protect the clay while maintaining that natural, raw ceramic look.
Pro Tip: Consistent Coils
Use a clay extruder (a syringe-like tool) to create perfectly uniform coils. This ensures your spiral pattern is even and professional-looking without manual rolling.
Place your new textured bowl on a linen cloth or wooden table to admire the beautiful play of light across its ridges


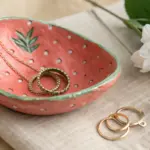
Soft-Rim Jewelry Dish
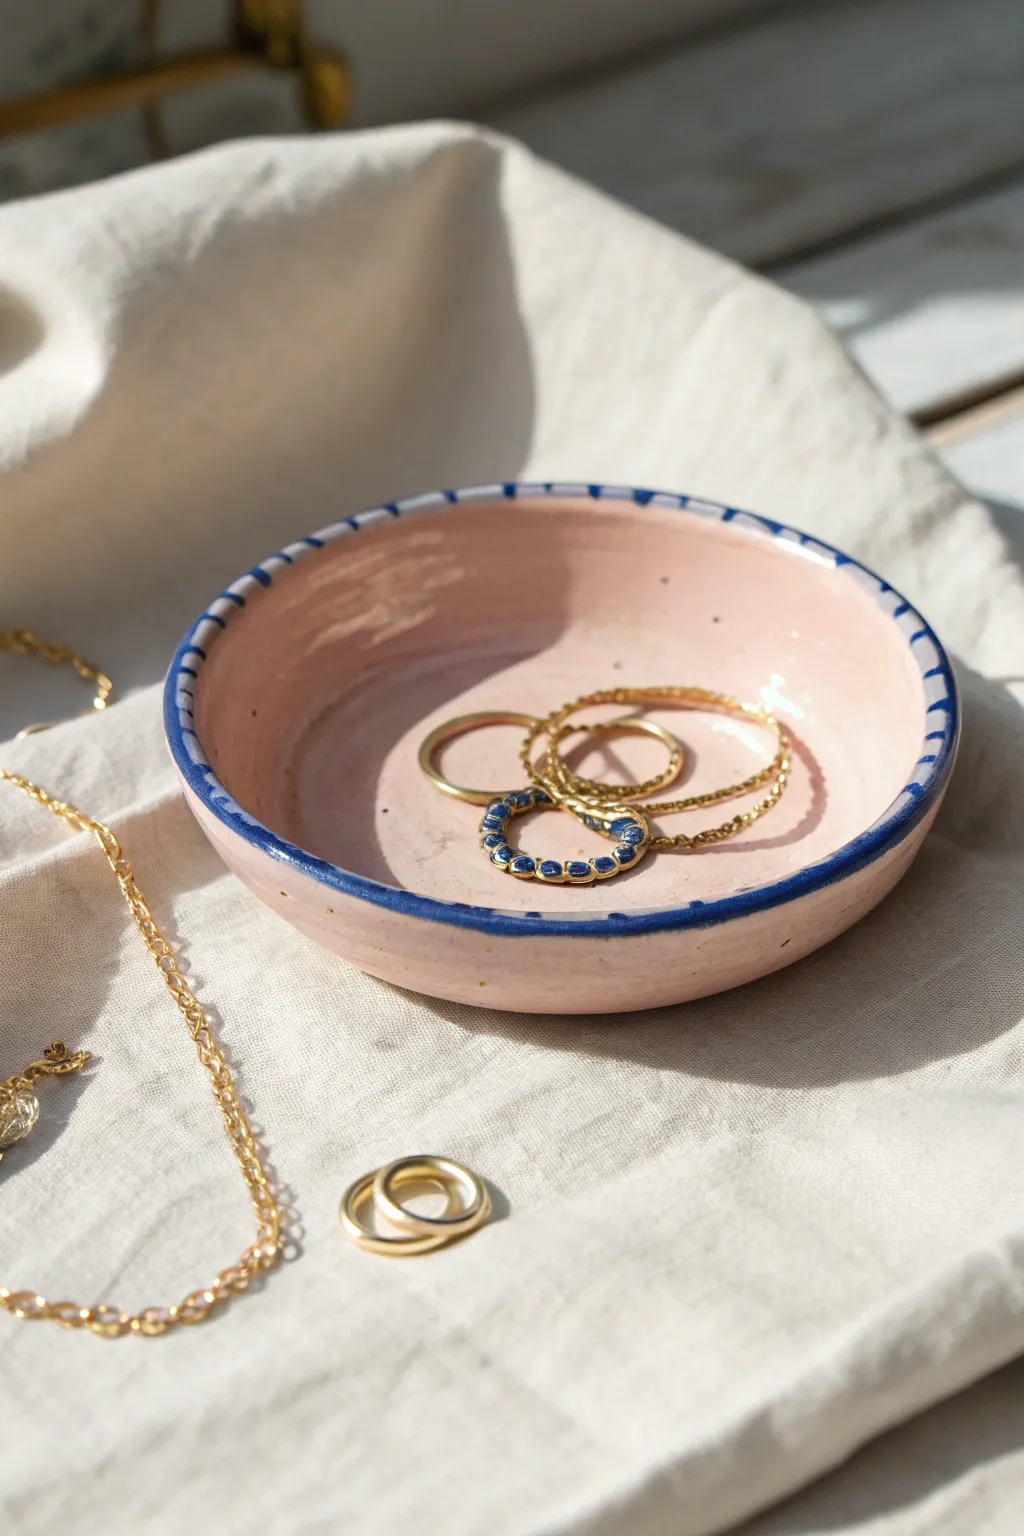
Embrace the imperfect charm of handmade pottery with this delicate pink jewelry dish featuring a classic blue-and-white striped rim. This project uses softer shaping techniques to create a cozy, organic feel perfect for holding your favorite rings.
Detailed Instructions
Materials
- White or terracotta air dry clay
- Rolling pin
- Small bowl or round cookie cutter (approx. 4-5 inches)
- Small knife or clay cutting tool
- Bowl of water
- Pink acrylic paint (pastel shade)
- Deep navy blue acrylic paint
- Fine liner paintbrush
- Flat shader paintbrush
- Gloss varnish or sealant
- Sandpaper (fine grit)
Step 1: Shaping the Clay
-
Prepare your clay:
Start with a handful of clay, kneading it well in your hands until it is warm, pliable, and free of air bubbles. -
Roll it out:
Using a rolling pin, flatten the clay to an even thickness of about 1/4 inch. If you want a more rustic look, don’t worry if it isn’t perfectly uniform. -
Cut the circle:
Place your small bowl or cookie cutter onto the clay and trace around it with a knife to cut out a perfect circle. -
Soften the edges:
Dip your finger in a little water and run it along the cut edge of the circle. This smooths out any sharp cuts and prevents future cracking. -
Form the curve:
Gently lift the edges of the circle upwards with your fingers, cupping the clay in your palm to create a shallow bowl shape. -
Thicken the rim:
For this specific chunky look, gently press down on the very top edge of the rim to flatten it slightly, making it look thicker and more substantial. -
Smooth the interior:
Use a damp sponge or wet finger to smooth the inside curve, ensuring there are no deep fingerprints left behind. -
Let it dry:
Place your bowl on a flat surface to dry. If you want a deeper curve, you can dry it inside a slightly larger bowl lined with paper towels. Allow 24-48 hours for complete drying.
Step 2: Painting and Finishing
-
Sand imperfections:
Once bone dry, lightly sand any rough spots on the rim or base. Wipe away the dust with a barely damp cloth. -
Base coat interior:
Mix your pastel pink paint. Apply two even coats to the entire interior of the bowl, letting the first coat dry completely before adding the second. -
Paint the exterior:
Continue painting the pink color around the outside and bottom of the bowl so the base color is uniform. -
Paint the rim line:
Using the deep navy blue paint and a fine liner brush, paint a thin, continuous line around the very outer edge of the rim, defining the bowl’s shape. -
Add the stripes:
With the same navy blue, carefully clear small, vertical dashes along the top face of the rim. Space them about a quarter-inch apart. -
Connect the pattern:
Extend these dashes slightly down the outer side of the bowl to meet the rim line you painted earlier, creating a wrapped effect. -
Dry the details:
Allow the painted details to dry fully. I usually give this at least an hour to ensure the blue doesn’t smudge during the next step. -
Apply varnish:
Coat the entire bowl with a high-gloss varnish. This mimics the look of ceramic glaze seen in the photo and protects your jewelry from any rough clay texture.
Cracking Up?
If you see tiny hairline cracks appearing as the clay dries, don’t panic. Mix a tiny bit of fresh clay with water to make a paste (slip) and fill them in before painting.
Make it Luxe
Swap the navy blue paint for a metallic gold leaf pen or liquid gilding paint. The gold rim against the soft pink creates an elegant, high-end look.
Now you have a sweet little landing spot for your daily treasures on your dresser or nightstand

What Really Happens Inside the Kiln
Learn how time and temperature work together inside the kiln to transform clay into durable ceramic.
Metallic Rim Accent Bowl

This elegant project elevates simple white air dry clay into a luxurious home accent by adding a striking metallic gold rim. The resulting piece features a beautiful contrast between the matte, textured white clay and the gleaming, festive edge, perfect for holding jewelry or trinkets.
How-To Guide
Materials
- White classic air dry clay
- Rolling pin
- Small bowl or sphere (for use as a mold)
- Plastic wrap
- Craft knife or clay cutter
- Fine grit sandpaper (220-400 grit)
- Sponge
- White acrylic paint (matte)
- Gold liquid gilding or metallic gold leaf paint
- Small flat paintbrush
- Fine detail paintbrush
- Clear sealant (varnish or Mod Podge)
Step 1: Shaping the Clay
-
Prepare your workspace:
Begin by cleaning a flat surface and laying down parchment paper or a canvas mat to prevent the clay from sticking. This ensures a smooth workflow from the start. -
Condition the clay:
Take a handful of white air dry clay and knead it well with your hands. You want it to be warm and pliable to minimize cracking later on. -
Roll out the slab:
Using your rolling pin, flatten the clay into an even circle. Aim for a thickness of about 1/4 inch; going too thin can make the bowl fragile. -
Add texture (optional):
If you want the subtle organic texture seen in the photo, gently press a crumpled piece of plastic wrap or a texture sponge over the surface of the slab before cutting. -
Prepare the mold:
Select a small bowl to use as your slump mold. Wrap the outside of this bowl tightly with plastic wrap to ensure your clay releases easily once dry. -
Form the bowl shape:
Gently lift your clay slab and drape it over the upside-down mold. Use your hands to smooth the clay down the sides, conforming it to the shape of the bowl underneath. -
Trim the edge:
Using a craft knife, trim the excess clay around the bottom edge of your mold to create an even rim. I prefer to leave a slightly wavy, organic line rather than making it perfectly straight for that handmade character. -
Refine the surface:
Dip your finger in a little bit of water and smooth out any harsh fingerprints or rough textures on the outside of the bowl while it’s still damp.
Smooth Operator
Use a damp makeup sponge to smooth the raw clay before drying. It works better than fingers for erasing prints.
Step 2: Drying and Finishing
-
Allow to dry:
Let the bowl sit on the mold for about 24 hours until the outside is firm. Then, carefully remove it from the mold and peel off the plastic wrap. -
Dry the interior:
Flip the bowl right-side up and let it continue drying for another 24-48 hours. The clay must be bone dry and chalky white before you proceed. -
Sand the imperfections:
Take your fine-grit sandpaper and gently sand the rim and any rough spots on the body. Be very gentle near the rim to avoid chipping the edge. -
Seal the surface:
To get that crisp white look, paint the entire bowl (inside and out) with a layer of white matte acrylic paint. This creates a uniform canvas. -
Apply the gold rim:
Dip a fine detail brush into your liquid gold gilding. Carefully paint along the very top edge of the rim. -
Thicken the accent:
Allow the paint to bleed slightly down the exterior for a thicker, more visible gold line. The irregularity here adds to the charm. -
Seal the piece:
Once the gold is fully dry, apply a coat of clear sealant or varnish over the entire piece to protect the paint and give it a finished sheen.
Marbled Magic
Knead a tiny drop of grey paint into the white clay before rolling it out to create a faux marble vein effect.
Place your new creation on a stack of books or a bedside table to instantly add a touch of handmade luxury to your room
Speckled Stoneware-Look Bowl
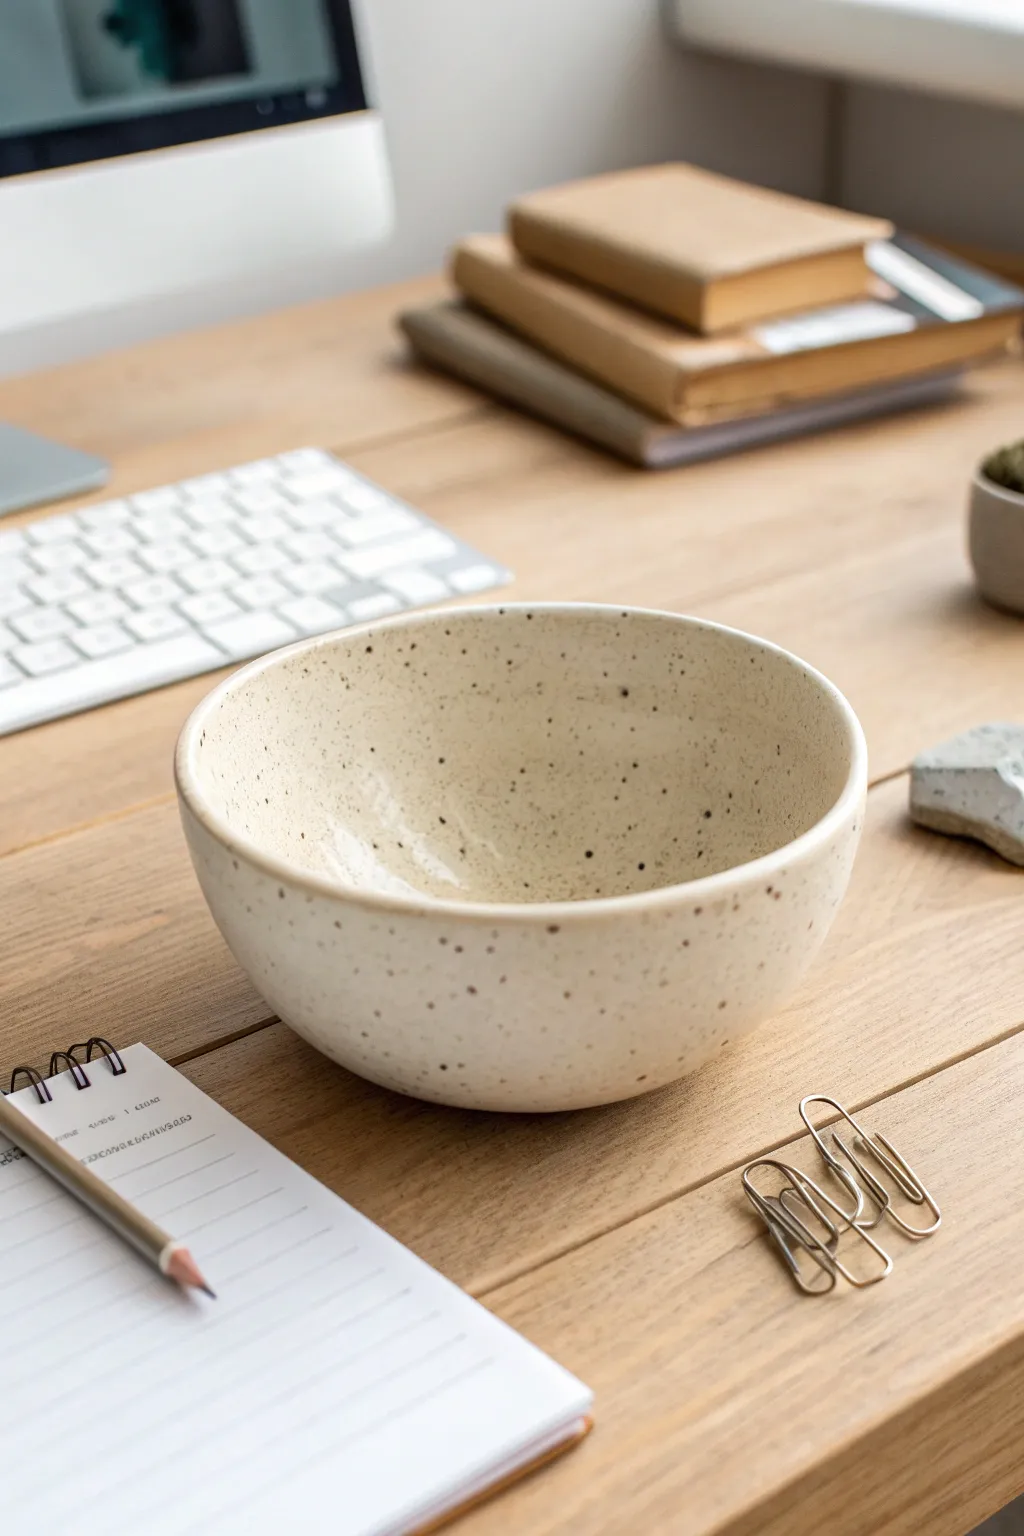
Achieve the high-end look of fired pottery without a kiln using simple air-dry clay and a clever painting technique. This project mimics the organic, uneven charm of hand-thrown stoneware with a realistic speckled finish that looks right at home on any modern desk.
Step-by-Step Guide
Materials
- White air-dry clay
- Rolling pin
- Smooth bowl (to use as a mold)
- Plastic wrap
- Craft knife
- Sponge or fine-grit sandpaper
- Acrylic paint (cream/off-white)
- Acrylic paint (dark brown/black)
- Old toothbrush
- High-gloss varnish or sealant
- Small cup of water
Step 1: Shaping the Clay
-
Prepare the Clay:
Cut off a generous chunk of white air-dry clay and knead it in your hands for a minute until it becomes pliable and warm, which helps prevent cracking later. -
Roll It Out:
Using a rolling pin, flatten the clay on a clean surface to an even thickness of about 1/4 inch. If the clay sticks, you can lay down a sheet of parchment paper underneath. -
Prepare the Mold:
Take a smooth bowl from your kitchen that matches the size and curve you want. Cover the exterior of this bowl tightly with plastic wrap to ensure the clay doesn’t fuse to it. -
Drape the Clay:
Carefully lift your rolled clay slab and drape it over the upside-down bowl mold. Gently press the clay against the bowl’s form, smoothing it down with your hands to remove air pockets. -
Trim the Edges:
Use a craft knife or a needle tool to trim away the excess clay around the rim of the bowl. Create a clean, straight line, or leave it slightly wavy for a more organic feel. -
Smooth the Surface:
Dip your finger in a little water and run it along the cut rim and the exterior surface to smooth out any fingerprints or rough textures. -
Initial Drying:
Let the clay sit on the mold for about 24 hours until it is firm enough to hold its shape but not fully bone dry. -
Remove and Dry Completely:
Carefully pop the clay off the mold and peel away the plastic wrap. Set the bowl right-side up to allow the interior to dry completely, which usually takes another 24 to 48 hours depending on humidity.
Natural Variations
Don’t aim for perfect symmetry when sanding the rim. A slightly undulating or uneven edge mimics the look of hand-thrown pottery and adds to the realistic aesthetic.
Step 2: Finishing and Painting
-
Sand for Perfection:
Once fully dry, use fine-grit sandpaper or a damp sanding sponge to smooth the rim and any bumps on the surface. Wipe away the dust with a barely damp cloth. -
Apply the Base Coat:
Mix a warm cream or off-white acrylic paint. Apply two to three thin, even coats to the entire bowl, letting each layer dry before adding the next to avoid streaks. -
Prepare the Speckle Paint:
Dilute a small amount of dark brown or black acrylic paint with water until it reaches an inky consistency. It needs to be thin enough to flick easily. -
The Splatter Technique:
Dip the bristles of an old toothbrush into the diluted dark paint. Hold the brush near the bowl and run your thumb across the bristles to flick tiny specks onto the surface. -
Control the Texture:
Vary your distance from the bowl to create different speckle sizes. I like to concentrate a few more specks near the bottom or rim for a natural pottery look. -
Let the Paint Cure:
Allow the speckles to dry completely. Since the dots are essentially watery paint, give them plenty of time so they don’t smear during the sealing process. -
Seal for Shine:
Apply a coat of high-gloss varnish or sealant. This is the secret step that transforms the matte paint into a finish that looks like glazed stoneware. -
Final Coat:
Apply a second coat of varnish for extra durability and depth. Ensure you cover the rim well, as this area gets the most wear.
Fixing Big Splatters
If you accidentally flick a large blob of paint onto the bowl, quickly dab it gently with a damp Q-tip to lift it, or just blend it out slightly so it looks like an intentional imperfection.
Now you have a stunning, minimalist vessel ready to hold your trinkets or desk supplies


The Complete Guide to Pottery Troubleshooting
Uncover the most common ceramic mistakes—from cracking clay to failed glazes—and learn how to fix them fast.
Terrazzo Chip Bowl
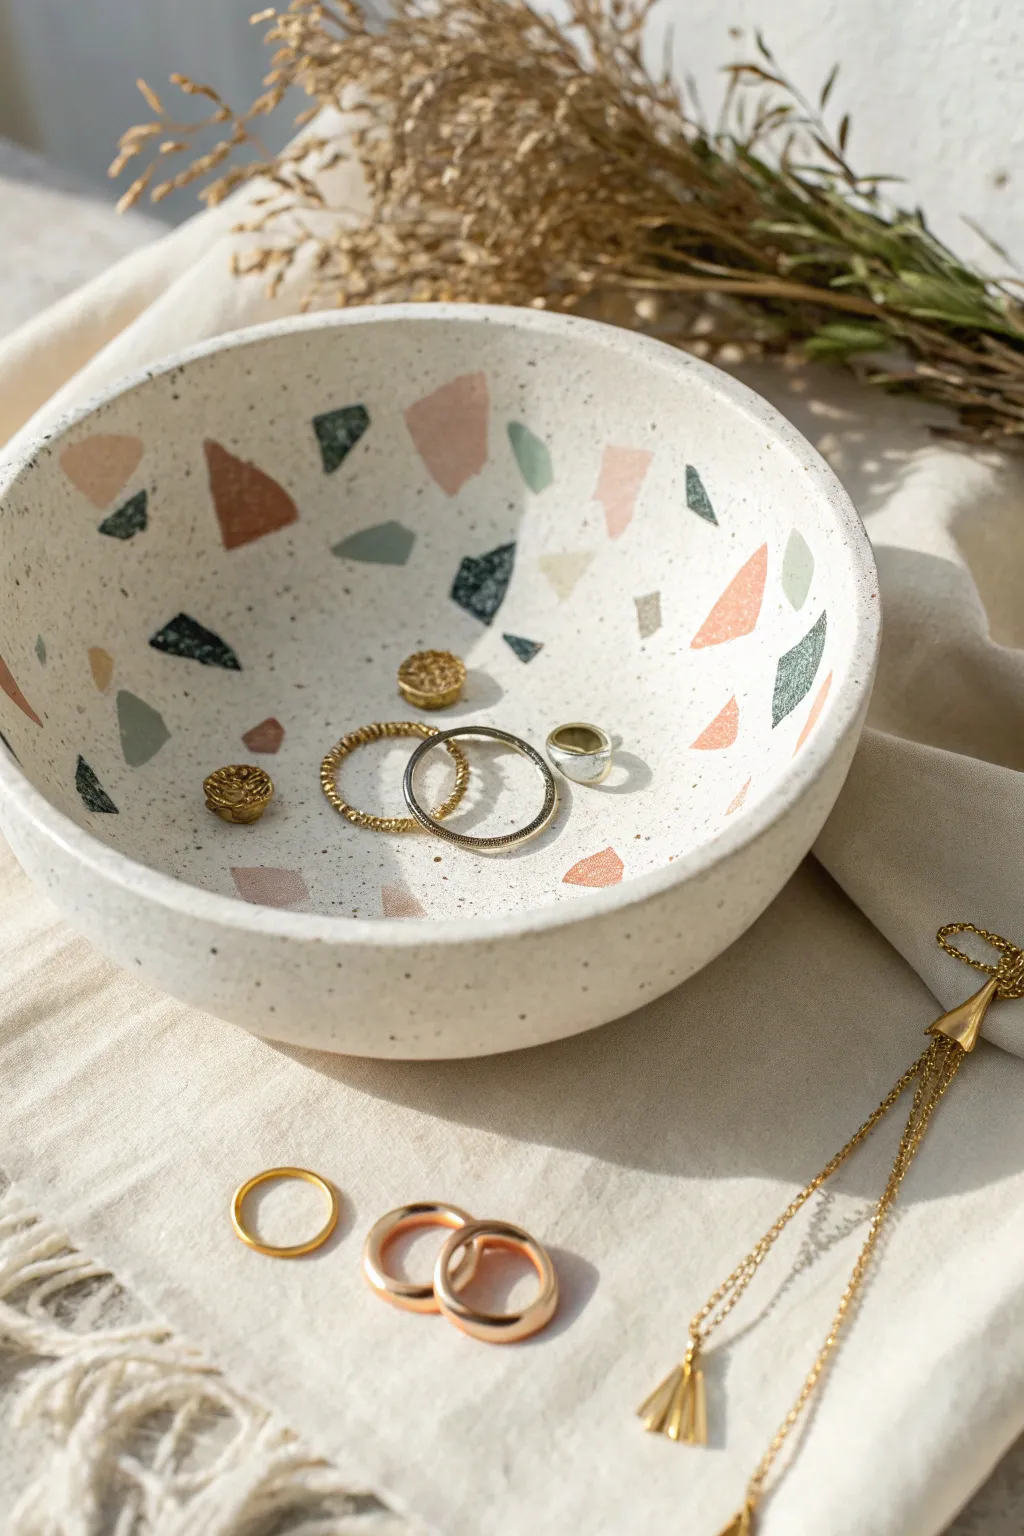
Bring the timeless elegance of Italian terrazzo into your home with this approachable air dry clay project. The finished bowl features a creamy white base speckled with organic, pastel-hued geometric fragments and fine black speckles.
Step-by-Step
Materials
- White air dry clay (2 separate blocks or portions)
- Acrylic paints (terracotta, light pink, sage green, dark green, black)
- Rolling pin
- Craft knife or scissors
- Small bowl (to use as a mold)
- Sandpaper (fine grit)
- Gloss or matte varnish/glaze
- Paintbrush (old toothbrush for speckling)
- Plastic wrap
- Water
Step 1: Creating the Chips
-
Prepare the colored clays:
Take small walnut-sized amounts of your plain white clay. You will need one portion for each color you plan to use for the terrazzo chips. -
Mix the pigments:
Knead acrylic paint into each small clay ball until the color is uniform. Aim for a palette of dusty pink, terracotta ore, sage, and deep forest green. -
Flatten the colors:
Roll each colored clay ball out until it is quite thin, about 1-2mm thick. The thinner the clay, the more realistic the stone chip effect will be later. -
Dry the sheets:
Let these thin colored sheets dry fully. Since they are so thin, this usually only takes an hour or two, unlike a full drying session. -
Create the chips:
Once the sheets are hard, break them apart into small, jagged geometric shards. You can use your fingers for random shapes or scissors for sharper angles.
Clean Sanding Tip
When sanding to reveal the chips, wear a mask and work outside. Wipe the surface frequently with a damp cloth to check your progress.
Step 2: Forming the Bowl
-
Roll the base:
Take your main block of white air dry clay and roll it out into a slab about 1/4 inch thick. Ensure it is wide enough to drape over your chosen mold bowl. -
Apply the chips:
Scatter your dry colored chips onto the wet white slab. Press them gently into the surface so they stick, but don’t bury them completely yet. -
Embed the pattern:
Run your rolling pin over the slab again with firm pressure. This forces the hard, dry chips into the soft white clay, creating a flush, smooth surface. -
Prepare the mold:
Cover your bowl mold with plastic wrap to prevent sticking. I find allowing a little slack in the plastic helps remove the clay later. -
Shape the clay:
Lift your terrazzo slab and gently drape it into the bowl mold. Press firmly against the sides to shape it, smoothing out any large wrinkles. -
Trim the rim:
Use a craft knife to trim the excess clay around the rim of the bowl for a clean edge. You can moisten your finger with water to smooth this cut edge. -
Dry properly:
Let the bowl sit in the mold for at least 24 hours. Once stiff, remove it from the mold and let the underside dry for another 24 hours.
Step 3: Finishing Touches
-
Sand for clarity:
Once bone dry, sand the entire surface of the bowl. This is the magic step that scrapes away the top layer of white clay to vividly reveal the sharp colors of the terrazzo chips. -
Dust off:
Wipe away all the clay dust with a slightly damp cloth or a dry brush to prep for the final details. -
Add the speckle:
Dip an old toothbrush into slightly watered-down black acrylic paint. Run your thumb over the bristles to flick tiny, concentrated black specks all over the interior and exterior. -
Seal the piece:
Apply two coats of a gloss or matte varnish to protect the clay and make the colors pop. Allow full drying time between coats.
Clay Cracking?
If small cracks appear while drying, mix a tiny amount of clay with water to make a paste (slip) and smooth it into the cracks with your finger.
Now you have a stunning, stone-effect vessel perfect for holding your favorite jewelry pieces
Marbled Swirl Bowl
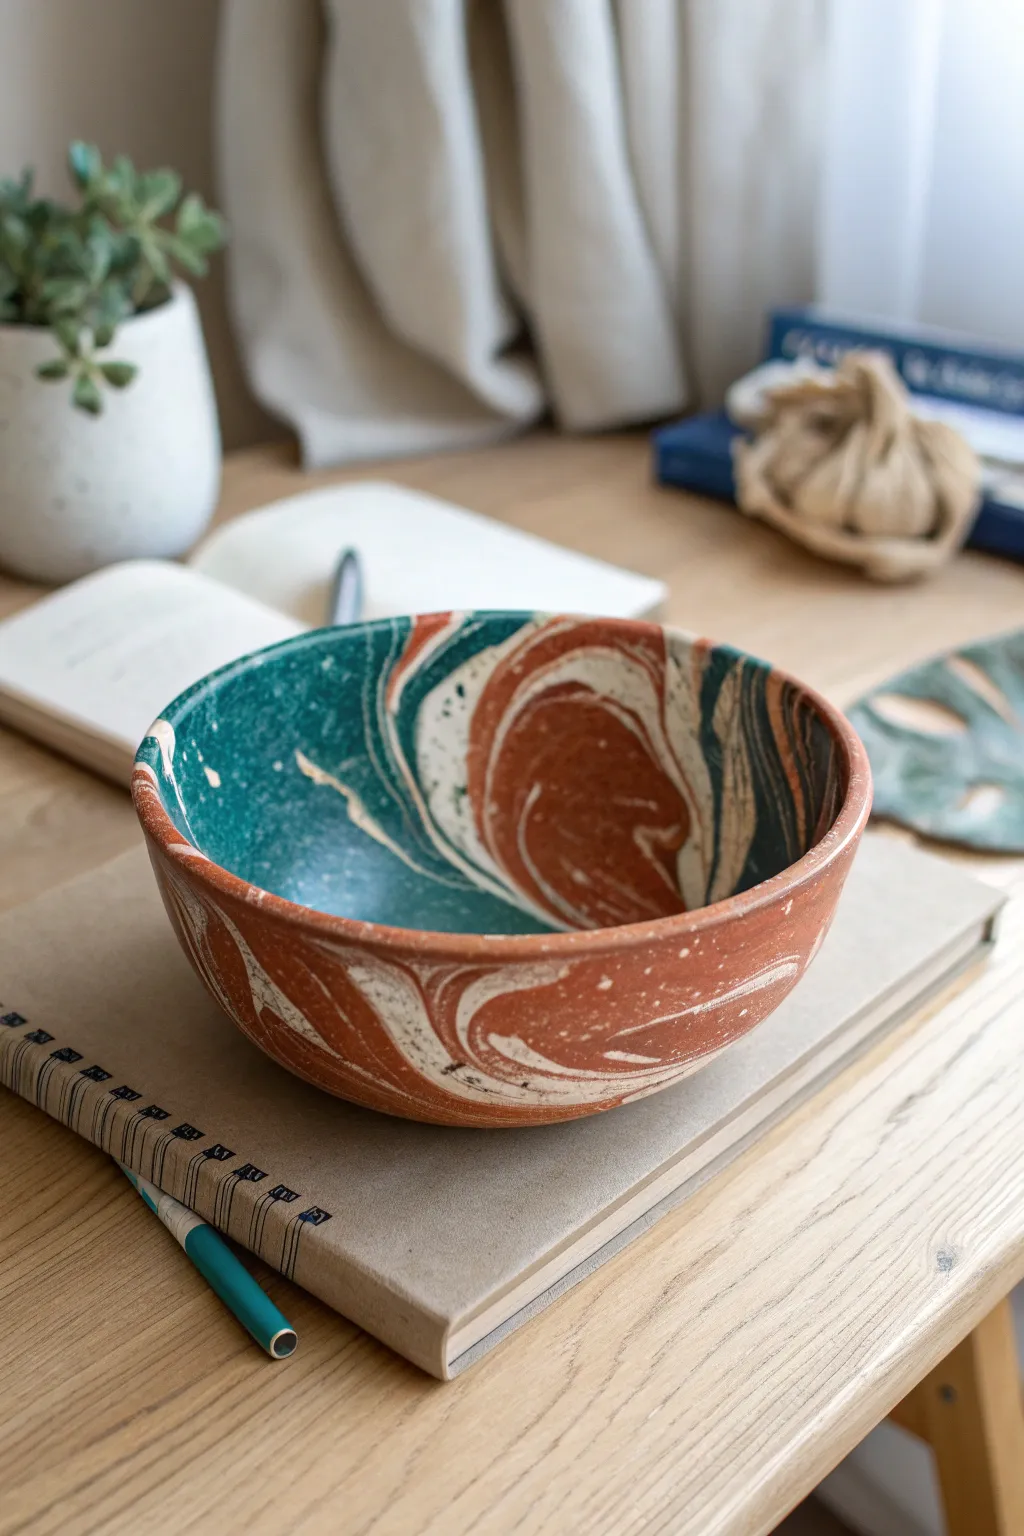
Capture the organic beauty of geological strata with this stunning marbled bowl project. By twisting terracotta, teal, and white clays together, you’ll create a functional piece of art that looks like it was carved from polished agate.
Step-by-Step Guide
Materials
- Air dry clay (Terracotta/Reddish-brown)
- Air dry clay (White)
- Acrylic paint (Teal/Dark Green) or pre-colored teal air dry clay
- Rolling pin
- Medium-sized mixing bowl (to use as a mold)
- Plastic wrap or cling film
- Sandpaper (fine grit)
- Glossy varnish or sealant for clay
- Knife or clay cutting tool
- Sponge and water
Step 1: Preparing the Colors
-
Color mixing:
If you don’t have pre-colored teal clay, tear off a chunk of white air-dry clay roughly the size of a tennis ball. Knead in teal acrylic paint until the color is fully saturated and uniform. Wear gloves to keep your hands clean. -
Portioning:
Prepare three balls of clay: one large terracotta ball (about 50% of your total volume), one white ball (25%), and one teal ball (25%). The terracotta acts as our warm, earthy base tone. -
Roll into logs:
On a clean, flat surface, roll each color ball into a distinctive ‘snake’ or log shape, about an inch thick. They don’t need to be perfectly even.
Step 2: Marbling the Clay
-
Combine the logs:
Press the three clay snakes together side-by-side to form one thick bundle. Gently squeeze them so they adhere to one another. -
Twist and turn:
Grip the ends of your combined clay bundle and twist them in opposite directions like you are wringing out a towel. This begins the initial swirl pattern. -
Fold and roll:
Fold the twisted log in half onto itself, then roll it back into a single log shape. I like to repeat this twist-fold-roll process about 2 or 3 times—any more than that, and the colors might get muddy and lose their definition. -
Form a slab:
Squash your marbled log into a flat, round-ish disc with the palm of your hand. -
Roll it out:
Using your rolling pin, roll the clay out into a slab approximately 1/4 inch thick. Move the roller in different directions to stretch the marble pattern organically.
Pattern Control
Don’t over-mix! The beauty lies in distinct bands of color. Stop twisting when you see thick, clear stripes before you start rolling flat.
Step 3: Shaping and Drying
-
Prepare the mold:
Take a standard kitchen mixing bowl that is the size you want your finish project to be. Flip it upside down so the bottom is facing up, or line the inside with plastic wrap if you prefer slumping. -
Drape the clay:
Gently lift your rolled slab and drape it inside the bowl (using the plastic wrap barrier so it doesn’t stick). Press the clay gently against the walls of the bowl to take its shape. -
Trim the edges:
With a sharp knife or clay tool, trim the excess clay around the rim to create a relatively even edge. It doesn’t have to be perfect; a little waviness adds character. -
Smooth the rim:
Dip your finger in a little water and run it along the cut rim to smooth out any sharp or jagged edges. -
Initial drying:
Let the bowl sit in the mold for about 24 hours. Placing it in a cool, dry spot away from direct sunlight helps prevent cracking. -
Remove from mold:
Once the clay is firm enough to hold its shape (leather hard), carefully remove it from the mold. Peel away the plastic wrap. -
Full cure:
Allow the bowl to dry completely freely standing, usually another 24 to 48 hours depending on humidity. Flip it occasionally so the bottom dries evenly.
Gold Accents
Paint the very rim of the bowl with liquid gold leaf after the varnish dries for a chic, high-end finish that highlights the curves.
Step 4: Finishing Touches
-
Sanding:
Once bone dry, take fine-grit sandpaper and lightly sand the rim and any rough patches on the surface to get a silky feeling. -
Cleaning:
Wipe away all sanding dust with a slightly damp sponge or cloth. -
Sealing:
Apply a coat of glossy varnish or sealant. This makes the colors pop—especially the contrast between the white and terracotta—and gives it that polished ceramic look shown in the photo.
Place your new creation on your desk to hold trinkets and enjoy the natural, stony vibes it brings to your space.

TRACK YOUR CERAMIC JOURNEY
Capture glaze tests, firing details, and creative progress—all in one simple printable. Make your projects easier to repeat and improve.
Two-Tone Dip-Dyed Bowl
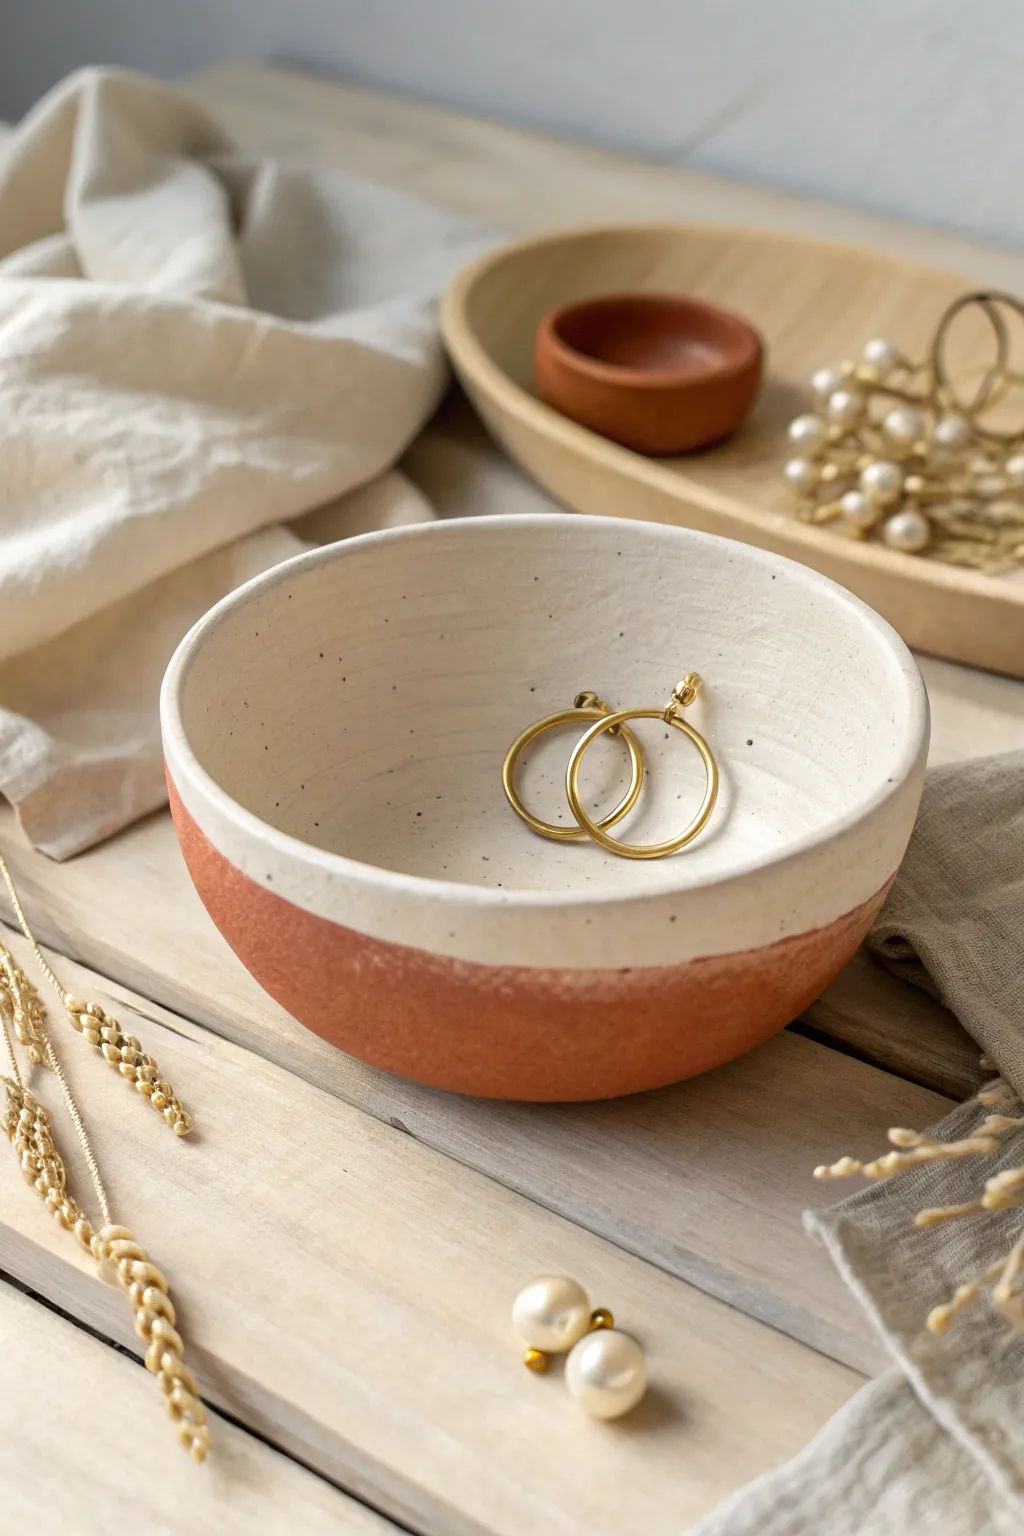
Achieve a stunning, earthy aesthetic with this simple two-tone bowl that mimics the look of high-end ceramic glazing. By leaving the base raw and texturized, you create a beautiful contrast against the smooth, creamy white interior.
Step-by-Step
Materials
- Terracotta colored air-dry clay
- Rolling pin
- Small bowl (to use as a mold)
- Plastic wrap (cling film)
- Small knife or clay cutting tool
- Sandpaper (fine grit)
- White acrylic paint
- Matte sealant or varnish
- Soft paintbrush
- Sponge or textured cloth (optional)
- Bowl of water
Step 1: Shaping the Clay Base
-
Condition the clay:
Begin by taking a handful of terracotta-colored air-dry clay. Knead it in your hands for a few minutes until it becomes warm, soft, and pliable, which helps prevent cracks later on. -
Roll out a slab:
Place the clay on a smooth surface. Using a rolling pin, flatten the ball into an even circle, aiming for a thickness of about 1/4 inch (approx. 6mm). -
Prepare the mold:
Select a small breakfast bowl to use as your slump mold. Turn it upside down and drape a layer of plastic wrap over it; this ensures your clay won’t stick to the actual dish. -
Drape the clay:
Gently lift your rolled clay circle and place it over the plastic-covered bowl mold. Let gravity help it settle, then use your fingers to gently smooth it down the sides. -
Trim the edges:
Once shaped to your liking, use a small knife or a clay needle tool to trim the uneven excess clay around the bottom edge creating a clean, straight rim. -
Texturizing (Optional):
For that rustic, handcrafted look seen in the photo, you can gently pat the exterior with a sponge or a crumpled textured cloth while the clay is still wet. -
Initial drying phase:
Leave the clay on the mold for at least 24 hours in a cool, dry place. Avoid direct sunlight, as drying too fast can cause warping. -
Remove from mold:
After the clay feels leather-hard and holds its shape, carefully lift it off the mold and peel away the plastic wrap. Turn it right-side up to let the interior dry completely.
Cracks happen
If small hairline cracks appear during drying, make a ‘slip’ paste by mixing a little clay with water. Smear it into the cracks and smooth it over with your finger.
Step 2: Sanding and Painting
-
Wait for full cure:
Allow the bowl to dry for another 24-48 hours until the clay turns a lighter, chalky shade of terracotta and is hard to the touch. -
Sand the rim:
Using fine-grit sandpaper, gently smooth out the rim of the bowl. You can leave the exterior slightly rough to maintain that tactile stone texture. -
Dust off:
Wipe the entire bowl down with a dry cloth or a soft brush to remove any clay dust before you start painting. -
Paint the interior:
Dip your soft brush into white acrylic paint. Apply the paint to the entire inside of the bowl, bringing the color just slightly over the rim. -
Create the dip line:
Carefully paint the rim’s exterior edge. Instead of painting the whole outside, paint a straight line around the circumference about half an inch down from the top, creating that ‘dipped’ look. -
Apply second coat:
Let the first layer dry completely. I usually find that a second or even third coat of white is necessary to get that opaque, creamy finish that covers the darker clay underneath. -
Speckle effect (Optional):
To mimic ceramic clay speckles, dip an old toothbrush in watered-down grey or black paint and lightly flick tiny droplets onto the white painted interior. -
Seal the piece:
Once all paint is dry, apply a matte sealant or varnish over the entire bowl (inside and out). This protects the clay from humidity and gives it a finished, professional sheen.
Add a gold rim
Elevate the look by painting a thin line of liquid gold leaf along the very top edge of the rim after the white paint has dried for a luxe finish.
Place your favorite jewelry inside your new bowl to see how beautifully the gold pops against the cream and terracotta tones
Hand-Painted Geometric Pattern Bowl
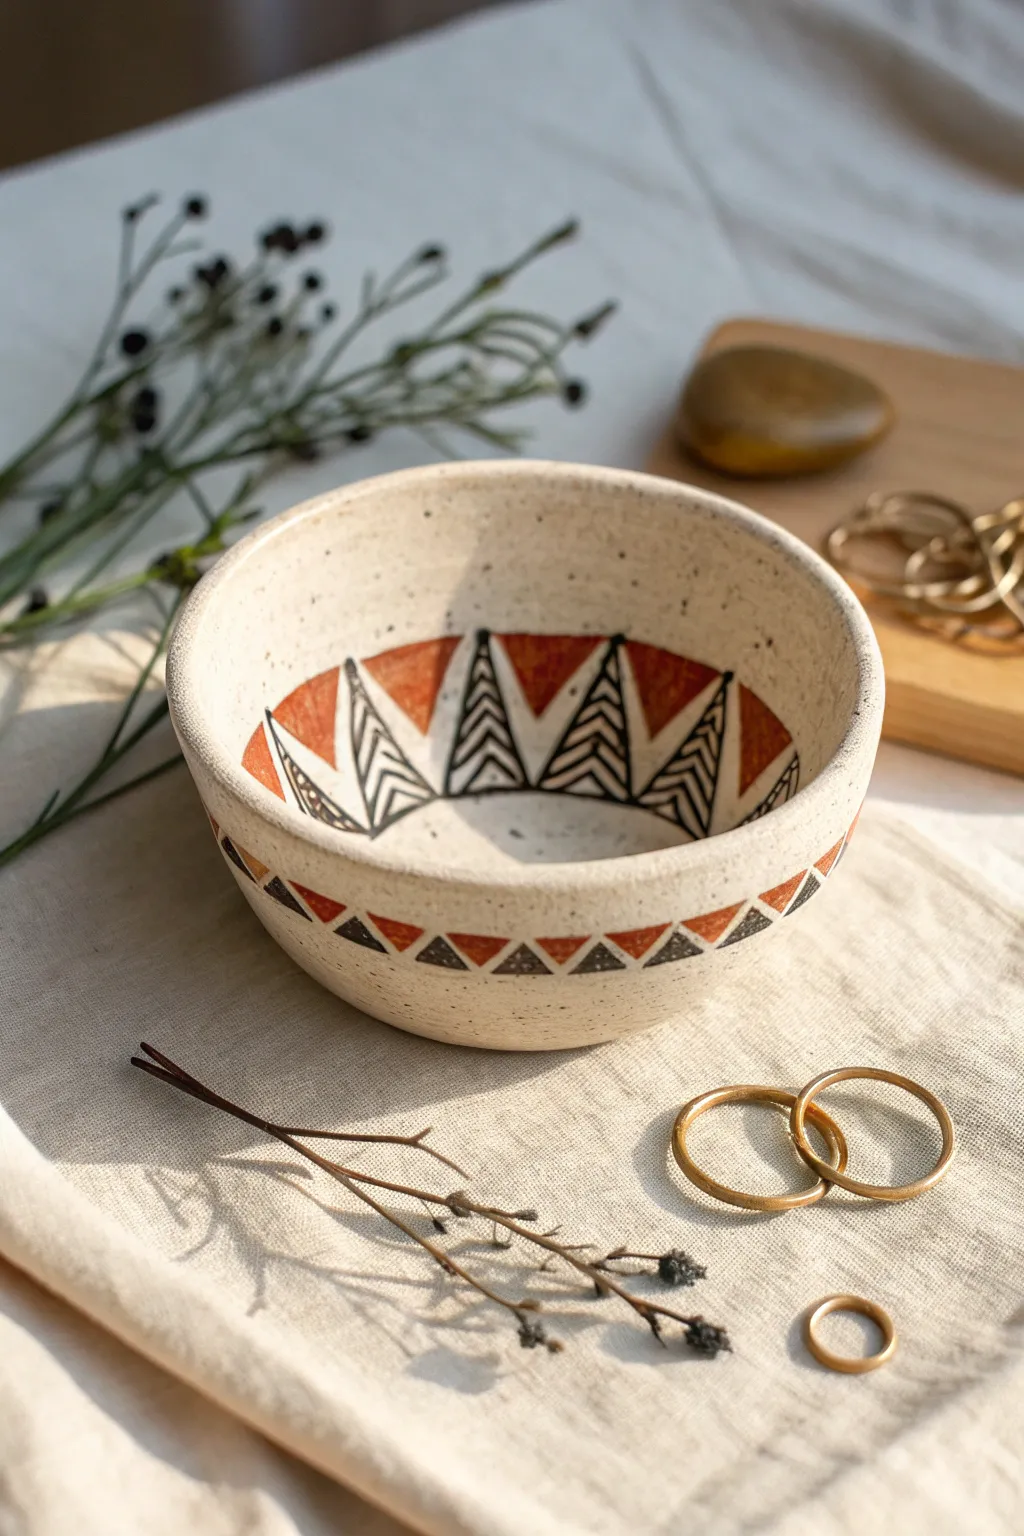
This earthy, minimalist bowl combines the raw texture of speckled clay with bold geometric patterns in rust and black. It is the perfect size for holding rings or small treasures, bringing a touch of ancient artistry to your modern dresser.
Step-by-Step Tutorial
Materials
- White or speckled air dry clay (approx. 500g)
- Small rolling pin
- Bowl for a mold (approx. 5-6 inches diameter)
- Sharp crafting knife or clay tool
- Sponge and water
- Fine-grit sandpaper (220 grit)
- Acrylic paints: Burnt Sienna (or Terracotta) and Black
- Fine detail paint brush (size 0 or 1)
- Flat shader brush (size 4)
- Pencil
- Matte or satin varnish/sealant
Step 1: Shaping the Clay Foundation
-
Condition the Clay:
Begin by kneading your air dry clay to warm it up and remove air bubbles. This ensures the clay is pliable and less prone to cracking later. -
Roll Out a Slab:
Roll the clay out evenly onto a canvas or cloth surface until it is about 1/4 inch thick. Aim for a consistent thickness to ensure even drying. -
Cut the Circle:
Place your guide bowl upside down on the clay slab. Using a sharp knife held vertically, cut around the rim of the bowl to create a perfect circle. -
Form the Shape:
Instead of pressing the clay *inside* the mold, draped the clay circle over the *outside* (bottom) of your guide bowl. Gently press it down to hug the curves. -
Smooth the Surface:
Dip your finger or a sponge in a tiny bit of water and smooth out any fingerprints or rough textures on the exterior. This will become the outside of your finished bowl. -
Initial Drying:
Let the clay sit on the mold for about 24 hours until it holds its shape but is still slightly damp (leather hard). Then, carefully pop it off the mold. -
Refine the Rim:
Now that it’s off the mold, inspect the rim. Smooth any sharp edges with a damp sponge or your finger to create that soft, rounded look seen in the photo. -
Full Cure:
Allow the bowl to dry completely upside down on a drying rack. This usually takes another 24-48 hours depending on humidity. The clay should turn a lighter white color.
Cracks? No Panic!
If tiny cracks appear during drying, create a ‘slip’ paste by mixing scraping dust with water. Fill the cracks, let dry, and sand smooth before painting.
Step 2: Sanding and Sketching
-
Sand for Smoothness:
Once fully bone dry, use fine-grit sandpaper to gently buff the entire surface. Pay special attention to the rim to ensure it feels smooth to the touch. -
Clean the Dust:
Wipe the bowl thoroughly with a slightly damp cloth or dry brush to remove all sanding dust. Paint won’t stick well if the surface is dusty. -
Draft the Exterior Pattern:
Lightly sketch a line around the exterior circumference, about half an inch up from the base. Draw a series of small, connected triangles along this line using a pencil. -
Draft the Interior Pattern:
Inside the bowl, mark a horizontal line about halfway down the wall. Sketch large, expansive triangles pointing downward towards the center based on the reference photo.
Faux Speckle Effect
To mimic the speckled clay look in the photo, flick a toothbrush loaded with watered-down brown paint over the dried white clay before sealing.
Step 3: Painting the Geometric Design
-
Paint Exterior Triangles:
Using your detail brush and black paint, outline and fill alternating small triangles on the outside rim. Leave every other triangle empty for now. -
Add Rust Accents:
Fill the remaining exterior triangles with Burnt Sienna or Terracotta paint. I find that two thin coats give a much smoother finish than one thick one. -
Outline Interior Shapes:
Moving to the inside, carefully outline your large main triangles in black. Create the striped look by painting a vertical line down the center of each triangle. -
Create the Chevrons:
Paint angled lines (chevrons) coming off the center line inside each main triangle. Keep the lines crisp and spaced evenly. -
Fill the Negative Space:
Paint the spaces *between* the chevron triangles with the rust color, filling the upper section of the interior wall to create a solid band of color interrupted by your black and white spikes. -
Touch Ups:
Use a very clean, damp brush or a white paint marker to tidy up any lines where the black or rust might have strayed. -
Seal the Piece:
Once the paint is fully dry, apply two coats of matte or satin varnish to protect the clay from moisture and give it a finished, ceramic-like sheen.
Place your beautiful new bowl on a sunny table and enjoy the warmth of your handiwork every time you organize your jewelry
Brushy Abstract Color-Wash Bowl
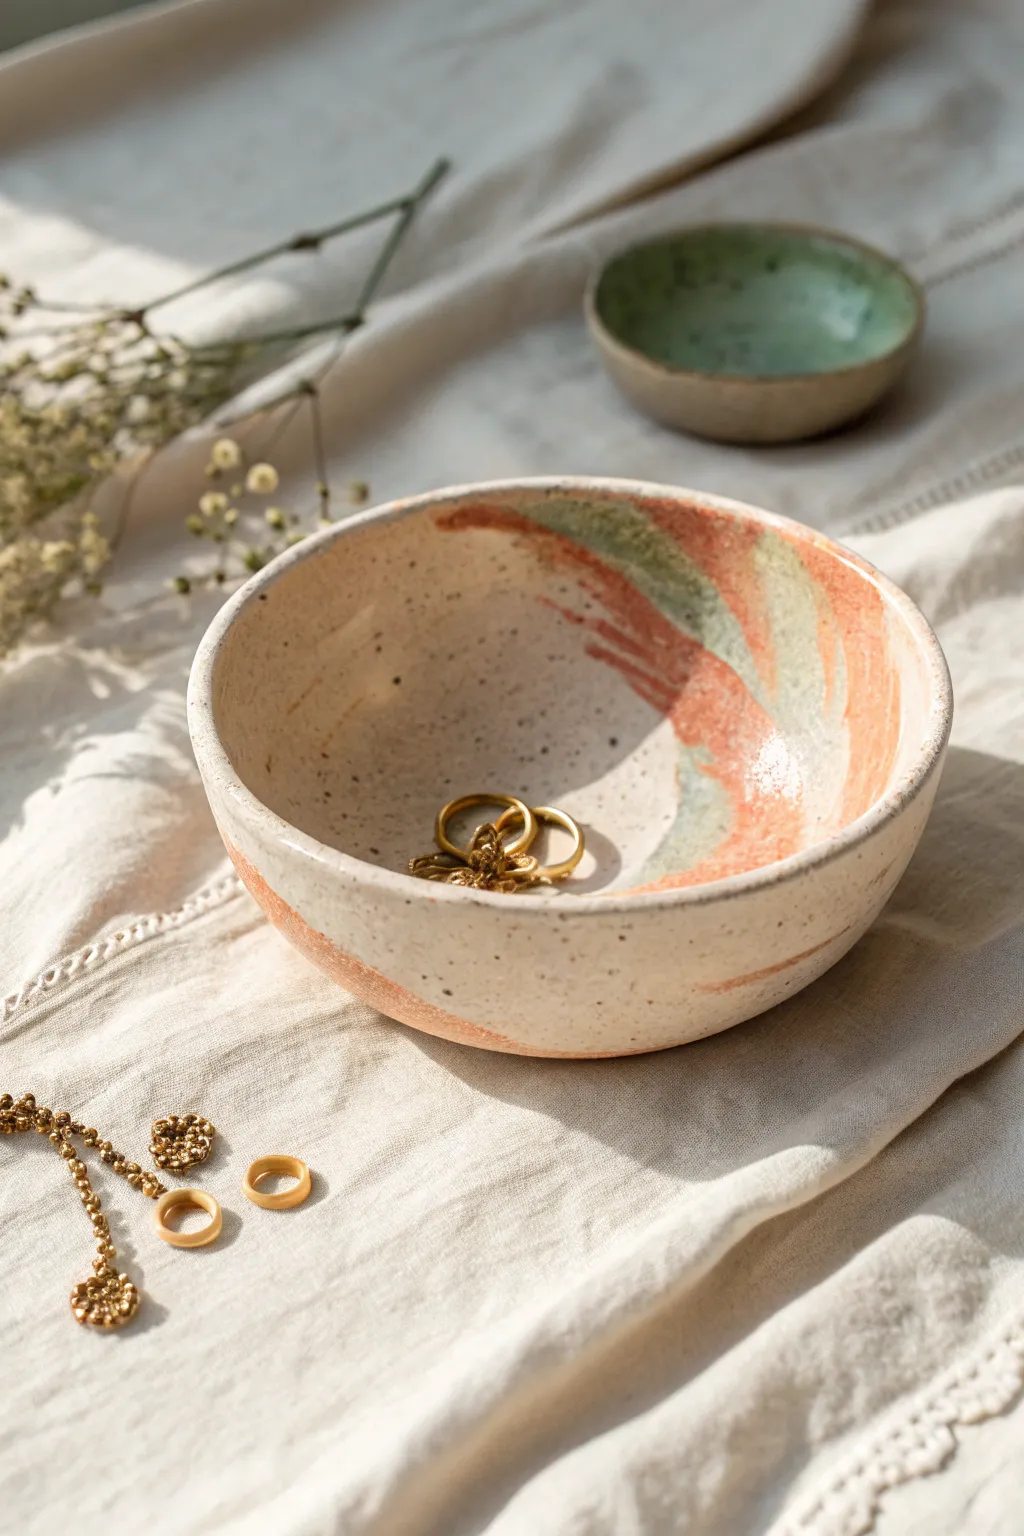
Capture the organic beauty of handmade ceramics without a kiln using this simple air dry clay technique. The result is a stunning, speckled jewelry dish featuring a creamy base and soft, painterly strokes of terracotta and sage.
Step-by-Step
Materials
- White or natural air dry clay
- Rolling pin
- Bowl to use as a mold (smooth interior)
- Plastic wrap (cling film)
- Sponge or fine grit sandpaper
- Craft knife or clay cutting tool
- Water in a small cup
- Acrylic paints: Cream/Off-White, Burnt Sienna/Terracotta, Sage Green, Dark Brown (for speckling)
- Medium soft paintbrush
- Old toothbrush (for the speckle effect)
- Glossy varnish or sealant (water-based polyurethane recommended)
Step 1: Forming the Bowl
-
Condition the clay:
Start by taking a generous handful of air dry clay and kneading it in your hands until it feels warm and pliable, removing any air bubbles. -
Roll out a slab:
Using a rolling pin, flatten the clay into an even slab, aiming for a thickness of about 1/4 inch (6mm). Rotate the clay occasionally to prevent sticking. -
Prepare the mold:
Select a kitchen bowl that has the curve you want. Line the inside of this bowl with plastic wrap; this ensures your clay won’t stick to the mold later. -
Shape the clay:
Gently lift your clay slab and press it into the lined bowl. Smooth it down from the center outwards to fit the curve. -
Trim the excess:
Use a craft knife to trim the excess clay around the rim of the bowl. You can run a damp finger along the cut edge to smooth out any roughness immediately. -
Initial drying:
Let the clay sit inside the mold for 24 hours. This allows it to stiffen into the correct shape without collapsing. -
Remove and dry completely:
Once the clay is firm enough to hold its shape, carefully lift it out of the mold using the plastic wrap. Peel off the plastic and let the bowl dry completely on a wire rack (usually another 24-48 hours).
Step 2: Refining and Painting
-
Sand for smoothness:
When bone dry, inspect the rim and surface. Use fine-grit sandpaper or a slightly damp sponge to buff away any sharp edges or uneven bumps. -
Apply the base coat:
Paint the entire bowl—inside and out—with a creamy off-white acrylic paint. You may need two coats for full opacity. -
Create the abstract swoosh:
Mix a terracotta or muted peach color. Verify your brush is slightly dry (not dripping) and paint a wide, curving stroke starting from the rim down into the basin. -
Add the secondary color:
While the first swoop is drying, mix a sage green tone. Paint a second, smaller curve that slightly overlaps or hugs the terracotta stroke. -
Soften the edges:
If I want a more watercolor look, I sometimes dip the brush in a tiny bit of water and feather the edges of the painted swooshes so they aren’t too harsh. -
Mix the speckle paint:
Dilute a small amount of dark brown acrylic paint with water until it has an inky consistency. -
Apply the speckles:
Dip an old toothbrush into the brown mixture. hold it over the bowl and run your thumb across the bristles to flick tiny splatters across the surface. -
Final drying time:
Allow all the paint layers to dry completely before touching the bowl further. -
Seal the piece:
Apply a coat of high-gloss varnish to the entire bowl. This protects the paint, gives it that ceramic sheen, and makes it durable for holding jewelry.
Cracking Issues?
If you spot tiny cracks as it dries, mix a small amount of fresh clay with water to make a paste (slip) and fill them in gently, then sand smooth once dry.
Make it Shine
For an ultra-glassy, professional ceramic look, use a two-part epoxy resin instead of varnish for your final topcoat.
Place your favorite rings inside and enjoy the handmade warmth this piece adds to your dresser
Botanical Leaf-Imprint Bowl
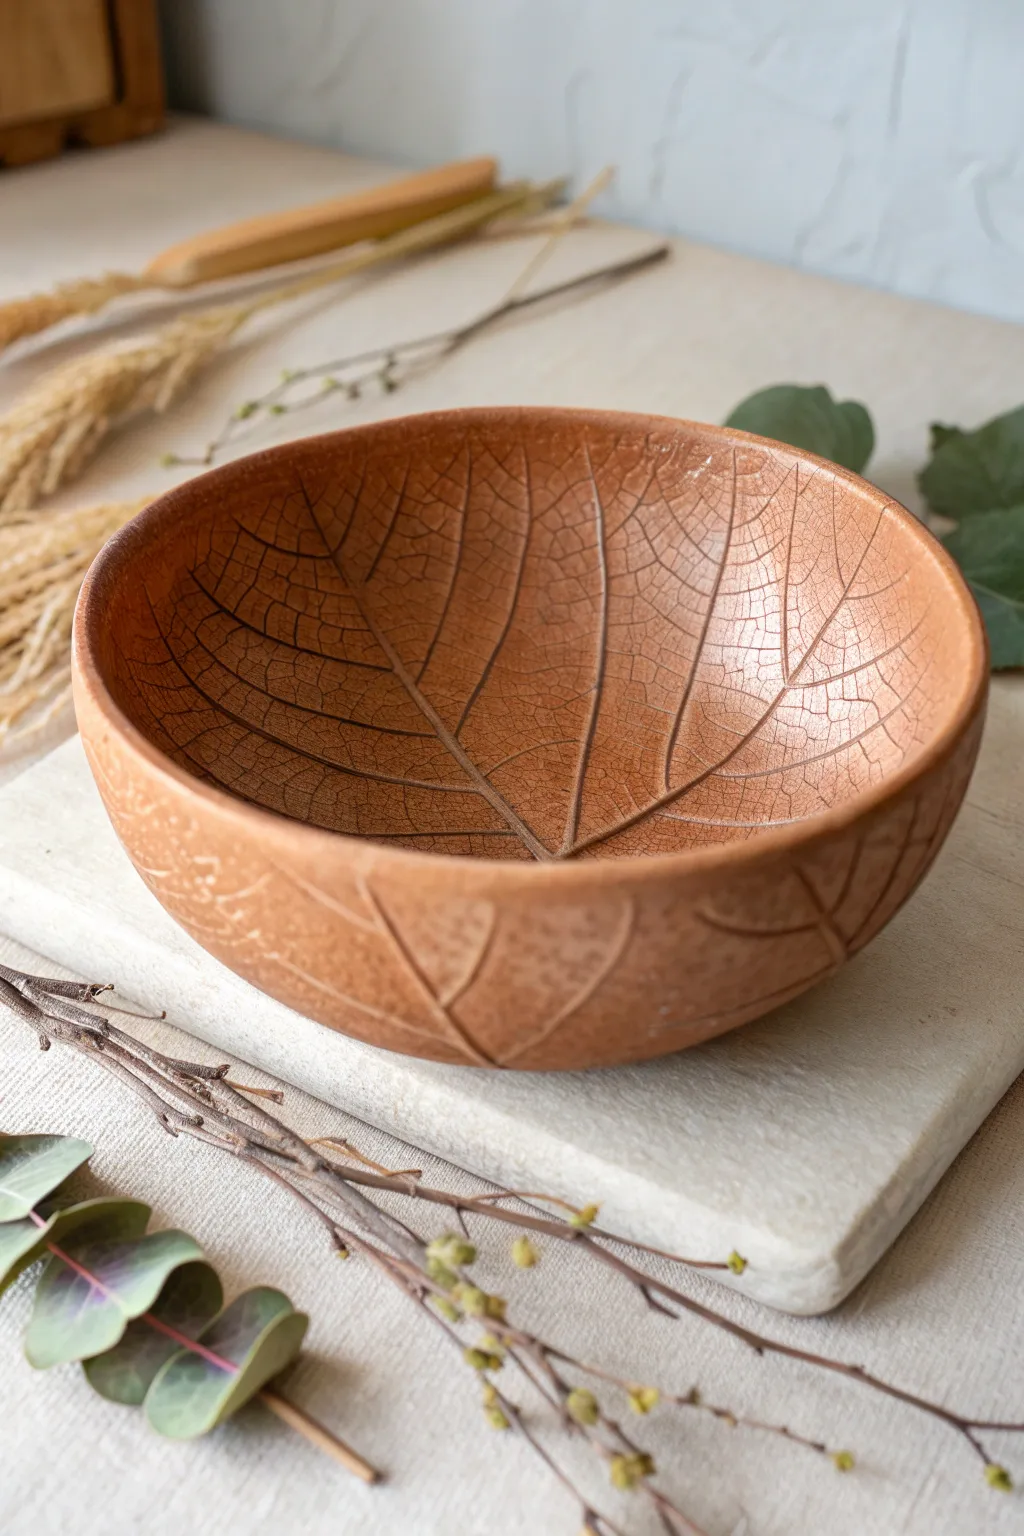
Bring the outdoors in with this stunning nature-inspired bowl, featuring intricate leaf veins pressed directly into warm, terracotta-colored clay. The result is a sophisticated, organic vessel that perfectly captures the delicate details of your favorite botanical finds.
Step-by-Step Tutorial
Materials
- Terracotta-colored air dry clay (e.g., DAS or Crayola)
- Large, fresh leaf with prominent veins (e.g., Hosta, Hydrangea, or Burdock)
- Rolling pin
- Parchment paper or canvas mat
- Sharp craft knife or clay needle tool
- Small bowl (for a mold support)
- Plastic wrap
- Sponge and water
- Fine grit sandpaper (220 or higher)
- Matte or satin varnish (optional)
Step 1: Preparation and Rolling
-
Prepare your workspace:
Lay down a piece of parchment paper or a canvas mat to prevent sticking. Taking a moment to tape down the corners helps keep everything stable while you work. -
Condition the clay:
Take a large chunk of terracotta air dry clay and knead it in your hands until it is warm, pliable, and free of cracks. -
Roll the slab:
Place the clay on your mat and roll it out into an even slab, aiming for a thickness of about 1/4 inch (6mm). Rotate the clay occasionally to ensure an even circle. -
Smooth the surface:
Use a slightly damp sponge to gently wide across the surface of the clay slab, removing any canvas texture or rolling pin marks. This creates a pristine canvas for your leaf.
Vein Definition Tip
Choose leaves with thick, stiff veins like hydrangea or rhubarb. Soft leaves like spinach won’t leave a deep enough impression to show clearly.
Step 2: Imprinting the Texture
-
Position the leaf:
Place your chosen leaf vein-side down onto the center of the clay slab. The vein side is usually the underside of the leaf and provides the crispest impression. -
Press the leaf:
Roll your rolling pin firmly over the leaf. Apply consistent pressure to push the veins deep into the clay, but be careful not to make the slab too thin. -
Check the impression:
Gently lift one corner of the leaf to peek at the texture. If it’s too faint, lay it back down and roll again with slightly more force. -
Remove the leaf:
carefully peel the leaf away from the clay to reveal the intricate botanical pattern.
Make it Metallic
After the clay dries, gently dry-brush a small amount of gold or copper paint over the raised areas of the texture for a luxe, gilded effect.
Step 3: Shaping and Drying
-
Cut the shape:
Place a bowl or a circular template over the imprinted clay—choose a size that captures the best part of the leaf design—and cut around it with a craft knife. -
Prepare the mold:
Take a separate bowl that has a nice curve and cover the *inside* with plastic wrap. This prevents the clay from sticking to the mold. -
Form the bowl:
Lift your clay circle carefully and gently slump it into the prepared bowl mold. Allow the clay to take the shape of the bowl’s interior. -
Refine the rim:
With a damp finger, smooth the cut edge of the rim while it is sitting in the mold to remove any sharp angles from cutting. -
Initial exterior texture:
Use a scrap piece of clay or a textured tool to gently press complementary leaf patterns onto the visible outside drying surface if you want the texture on both sides. -
Slow drying:
Let the bowl dry inside the mold for 24 hours. I prefer to cover it loosely with a plastic bag to prevent warping. -
Remove and complete drying:
Once the clay is leather-hard and holds its shape, carefully remove it from the mold and peel off the plastic wrap. Let it air dry completely on a wire rack for another 24-48 hours.
Step 4: Finishing Touches
-
Sand imperfections:
Once bone dry, use fine-grit sandpaper to gently smooth the rim and any rough spots on the exterior, being careful not to sand away the leaf texture. -
Enhance the details (Optional):
To make the veins pop, you can apply a very diluted wash of dark brown acrylic paint and wipe it back immediately with a damp cloth, leaving pigment only in the crevices. -
Seal the piece:
Apply a coat of matte spray varnish or a brush-on satin sealant to protect the clay and give it a finished, ceramic-like look.
Place your finished bowl on a coffee table or shelf to add a beautiful, earthy touch to your home decor
Lace-Textured Vintage Bowl
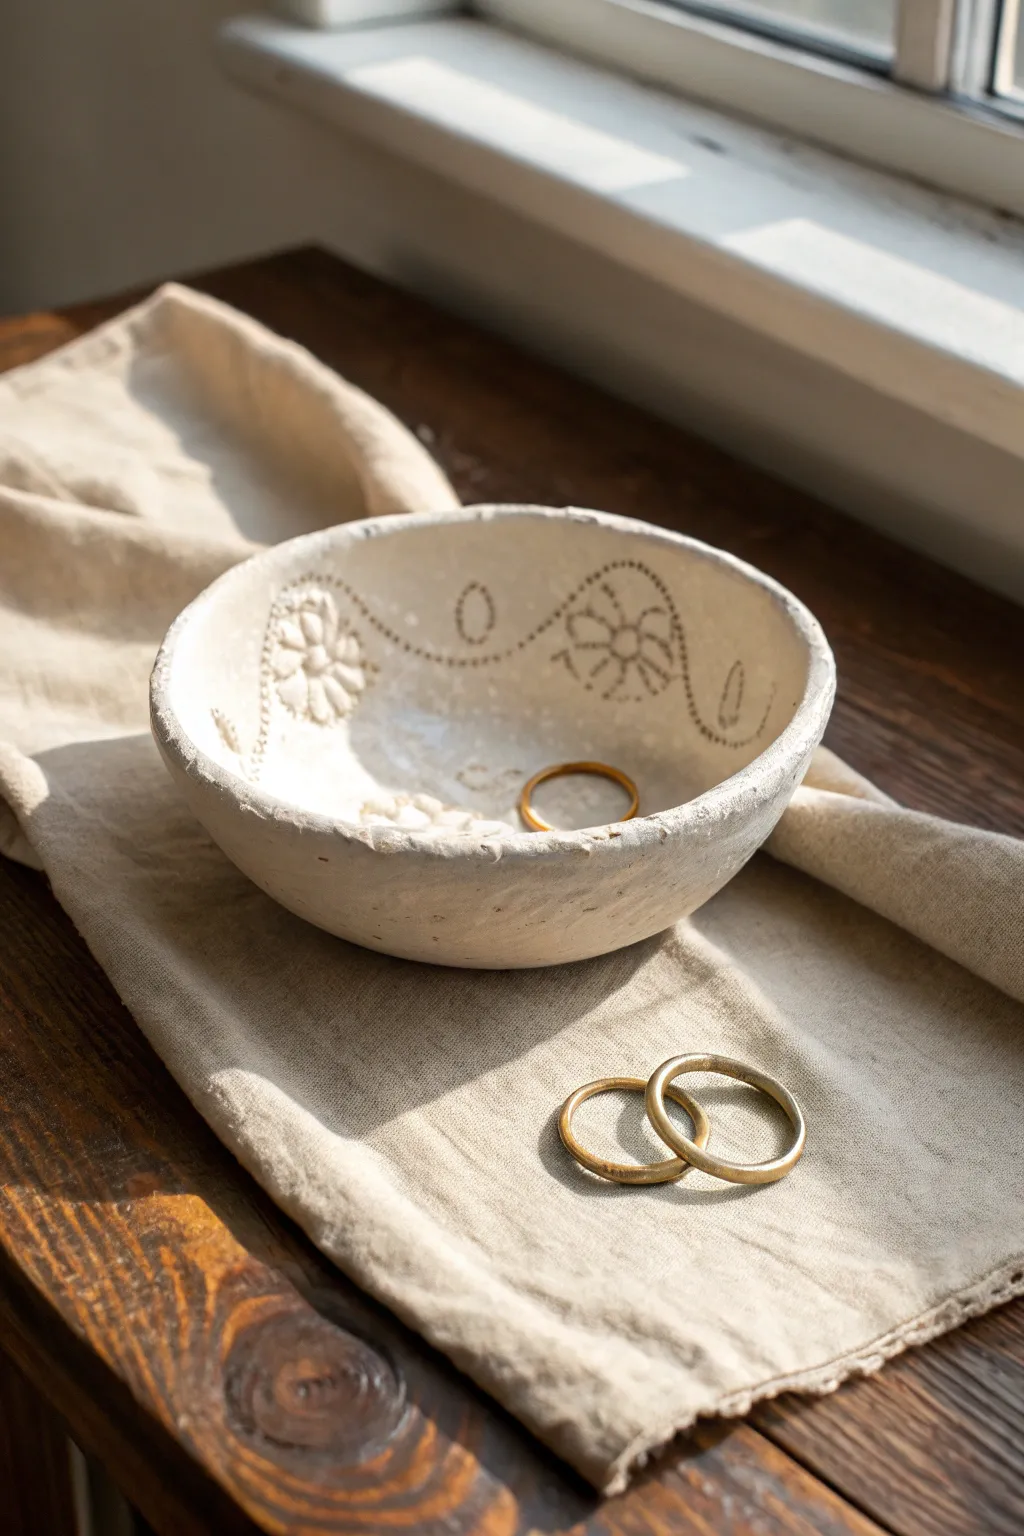
Capture the charm of vintage pottery with this deceptively simple air-dry clay project. By using lace or textured stamps to deboss patterns into the clay, you can create a delicate, organic vessel perfect for holding your favorite rings.
Step-by-Step Guide
Materials
- White creative air-dry clay
- Rolling pin
- Small bowl (to use as a mold)
- Vintage lace trim, doily, or floral stamps
- Clay knife or craft scalpel
- Sponge and water
- Fine-grit sandpaper
- Matte acrylic varnish or sealant
- Burlap or textured fabric (optional key for outer texture)
- Plastic wrap
Step 1: Prepping and Rolling
-
Prepare your workspace:
Begin by laying down a piece of burlap or heavily textured fabric on your work surface. This will imprint the subtle, organic texture onto the outside bottom of your bowl as you work. -
Condition the clay:
Take a handful of air-dry clay, about the size of a large orange. Knead it in your hands until it feels warm and pliable, eliminating any internal air bubbles. -
Roll out the slab:
Place the clay ball onto your textured fabric and use the rolling pin to flatten it. Aim for an even thickness of about 1/4 inch (approx. 5-6mm). Don’t make it too thin, or the rim might crack later. -
Cut the circle:
Using a bowl slightly larger than your intended finished size as a guide, place it upside down on the clay slab. Use your clay knife to cut around the perimeter to create a clean circle.
Clean Impressions
Dust your lace or stamp with a tiny bit of cornstarch before pressing it into the clay. This acts as a release agent and prevents the clay from getting stuck in the intricate details.
Step 2: Adding Texture and Shaping
-
Plan your pattern:
Before shaping, decide where you want your lace design. The reference photo shows a floral motif repeating around the inner rim. -
Imprint the design:
Gently press your lace trim or floral stamp into what will become the *inside* face of the clay circle. Use the rolling pin lightly over the lace to ensure a deep, clear impression without thinning the clay too much. -
Create the dotted details:
If your lace doesn’t have the dotted swags shown in the photo, use a dull needle tool or a toothpick to poke small, evenly spaced holes connecting the floral motifs. -
Prepare the mold:
Take the small bowl you selected as a mold and cover the inside with plastic wrap. This prevents sticking and makes removal easier. -
Shape the clay:
Carefully lift your clay circle and drape it *inside* the mold bowl (slump mold method). Press it gently against the sides so it takes the bowl’s curve. -
Refine the rim:
The rim in the photo has a rustic, uneven quality. Use your fingers to gently pinch and smooth the edge, allowing it to wave slightly rather than being perfectly flat. -
Smooth imperfections:
Dip your finger or a small sponge in water and very lightly smooth over any cracks that may have formed during bending. Be careful not to erase your lace texture.
Liquid Gold Rim
For a luxe touch, use a thin brush to apply liquid gold leaf paint specifically to the uneven rim of the bowl. This creates a stunning contrast with the matte rustic white clay.
Step 3: Drying and Finishing
-
Initial drying:
Let the clay sit in the mold for about 24 hours. Placing it in a cool, dry spot away from direct sunlight helps prevent cracking. -
Unmold the bowl:
Once the clay is visibly lighter and firm to the touch, carefully lift it out of the mold using the plastic wrap. Peel the plastic away. -
Complete drying:
Place the bowl upside down on a wire rack to allow air to circulate around the bottom. Let it dry for another 24-48 hours until bone dry. -
Sand the edges:
I usually take a piece of fine-grit sandpaper to the rim at this stage. You don’t want it sharp, but keep some of that hand-formed irregularity. -
Apply a wash (optional):
To highlight the texture, you can mix a tiny drop of brown paint with water and brush it into the grooves, then wipe the surface clean. This mimics the aged look in the image. -
Deepen the white:
If your clay dried greyish, paint the entire bowl with a layer of matte white acrylic paint, dabbing extra into the lace impressions. -
Seal the piece:
Finish with a coat of matte spray varnish or sealant. This protects the clay from moisture and gives it a finished, professional feel.
Now you have a charming, vintage-inspired vessel ready to hold your daily treasures
Pressed Fabric Weave Bowl
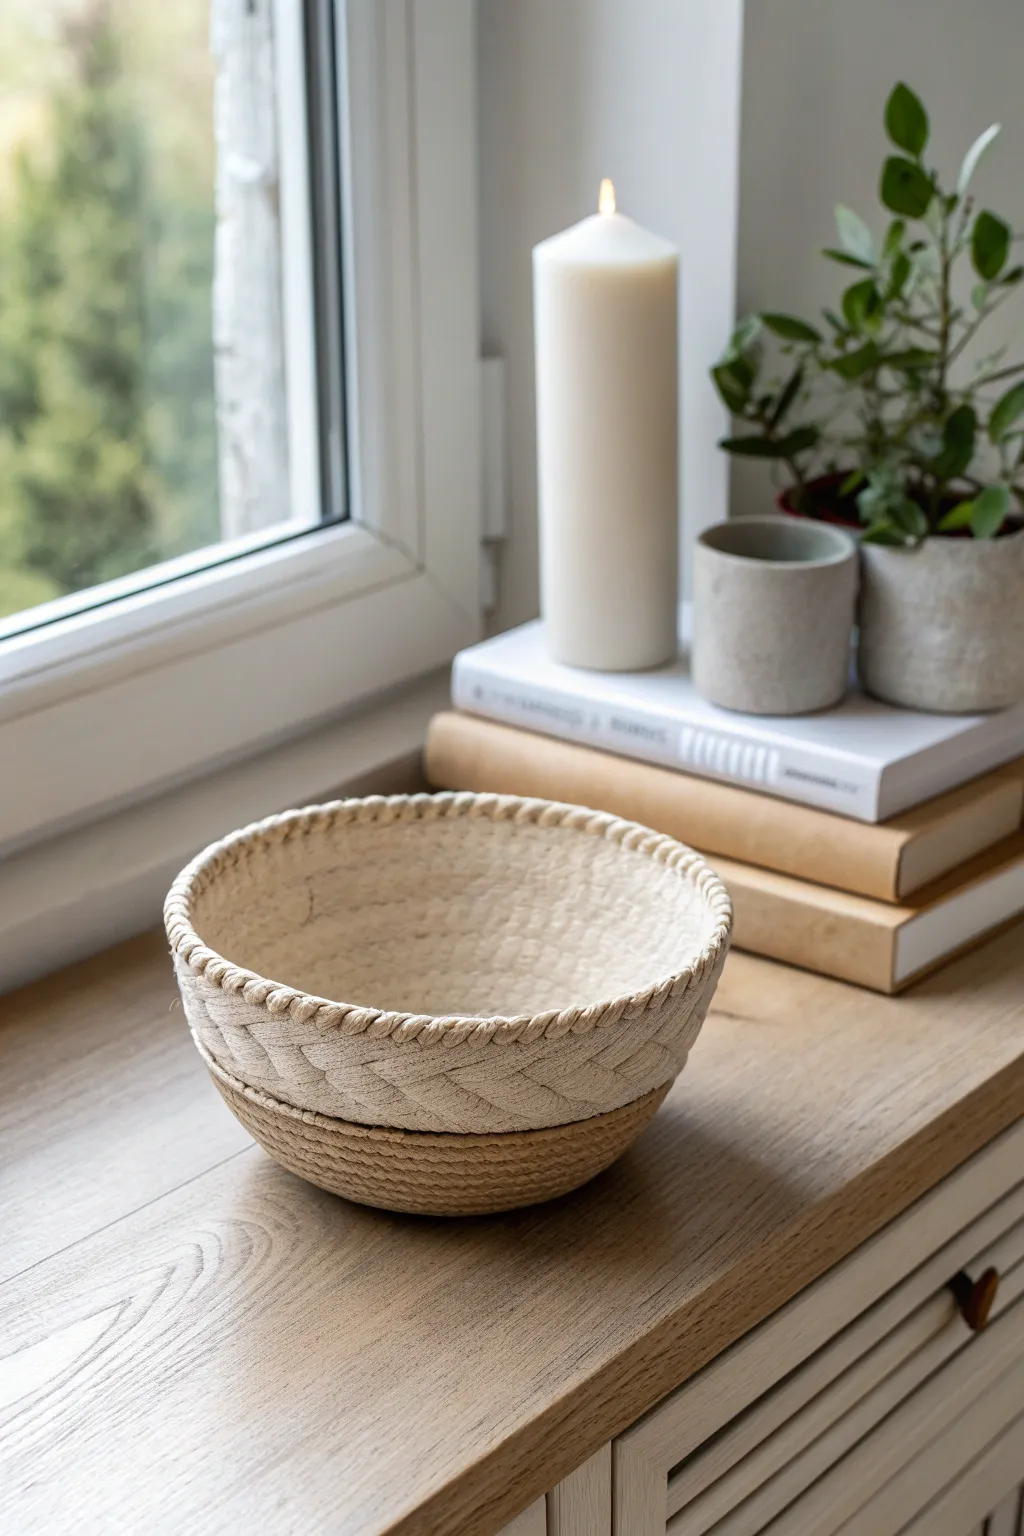
Achieve the rustic, cozy look of a woven rope basket using nothing more than air dry clay and some clever texturing techniques. This project creates a stunning two-toned vessel that mimics intricate braiding without tying a single knot.
How-To Guide
Materials
- White air dry clay (approx. 500g)
- Small bowl (to use as a mold)
- Plastic wrap or cling film
- Rolling pin
- Jute twine or rough rope (for texture imprint)
- Modeling tools (or a butter knife)
- Acrylic paints (creamy beige, light brown)
- Matte clear sealant spray
- Sponge or stiff brush for stippling
Step 1: Preparing the Base
-
Prepare the mold:
Select a bowl from your kitchen to use as a form. Cover the outside of the bowl completely with plastic wrap, smoothing out as many wrinkles as possible to ensure your clay releases easily later. -
Roll the slab:
Roll out a portion of your air dry clay on a clean surface to about a 1/4 inch thickness. You want it sturdy enough to hold its shape but thin enough to look delicate. -
Cut the base:
Place your mold upside down on the clay slab and cut a circle slightly larger than the flat bottom of your bowl. This will be the base of your clay vessel.
Texturing Shortcut
Instead of sculpting the braid pattern by hand, press an actual piece of cable-knit sweater or coarse placemat into the clay slab to instantly transfer the weave.
Step 2: Building the Lower Walls
-
Create coils:
Roll out long, even snakes of clay, roughly the thickness of a pencil. These will form the lower ‘rope’ section of the bowl. -
Texture the coils:
Before attaching them, gently press a piece of real jute twine or rough rope against the clay coils. Roll the twine over them to imprint that twisted fibrous texture directly into the clay surface. -
Stack the coils:
Begin stacking these textured coils around the base of your mold, slipping and scoring slightly between layers to join them. Build up about halfway up the side of the bowl. -
Smoothing the inside:
While the outside retains the rope texture, use your finger or a damp sponge to smooth the *inside* seams where the coils meet, ensuring structural integrity.
Step 3: Creating the Braided Upper Section
-
Prepare a flat strip:
Roll out a long, flat strip of clay long enough to wrap around the circumference of your bowl. This strip should be about 2 inches wide. -
Imprint the braid pattern:
Use a modeling tool to firmly press diagonal lines into the strip. Create a V-shape pattern (chevron) repeatedly across the strip to mimic a heavy braided knit texture. Go deep enough that the texture will catch the paint later. -
Refine the weave:
Use a needle tool or toothpick to add tiny scratches within each ‘strand’ of the braid pattern, simulating individual threads. -
Attach the upper rim:
Wrap this textured strip around the upper portion of the mold, joining it to the top of your coiled section. Slip and score the connection point thoroughly so it doesn’t crack apart. -
Finish the lip:
Add a final thin, rope-textured coil to the very top rim to hide the edge of the woven strip and give it a finished look.
Crack Control
If small cracks appear where the two textures join during drying, fill them immediately with a slurry made of clay scraps mixed with water, then smooth over.
Step 4: Finishing and Painting
-
Dry thoroughly:
Let the bowl dry on the mold for at least 24 hours. Carefully remove the mold and plastic wrap, then let it dry for another 24 hours until bone dry and white. -
Base coat:
Paint the entire bowl, inside and out, with a creamy off-white or light beige acrylic paint. Let this dry completely. -
The two-tone effect:
Mix a watery wash of light brown paint. Apply this wash only to the bottom coiled section. I find wiping it back immediately with a paper towel leaves color just in the deep crevices. -
Dry brushing:
Dip a dry stiff brush into a tiny amount of white paint and lightly brush over the top ‘braided’ section to highlight the raised texture, making it look like cotton. -
Seal the piece:
Once all paint is dry, spray the entire bowl with a matte clear sealant to protect the finish without making it look glossy or ceramic-like.
Place your new textured bowl on a console table or shelf to add a touch of handcrafted warmth to your decor
Scalloped Edge Trinket Bowl
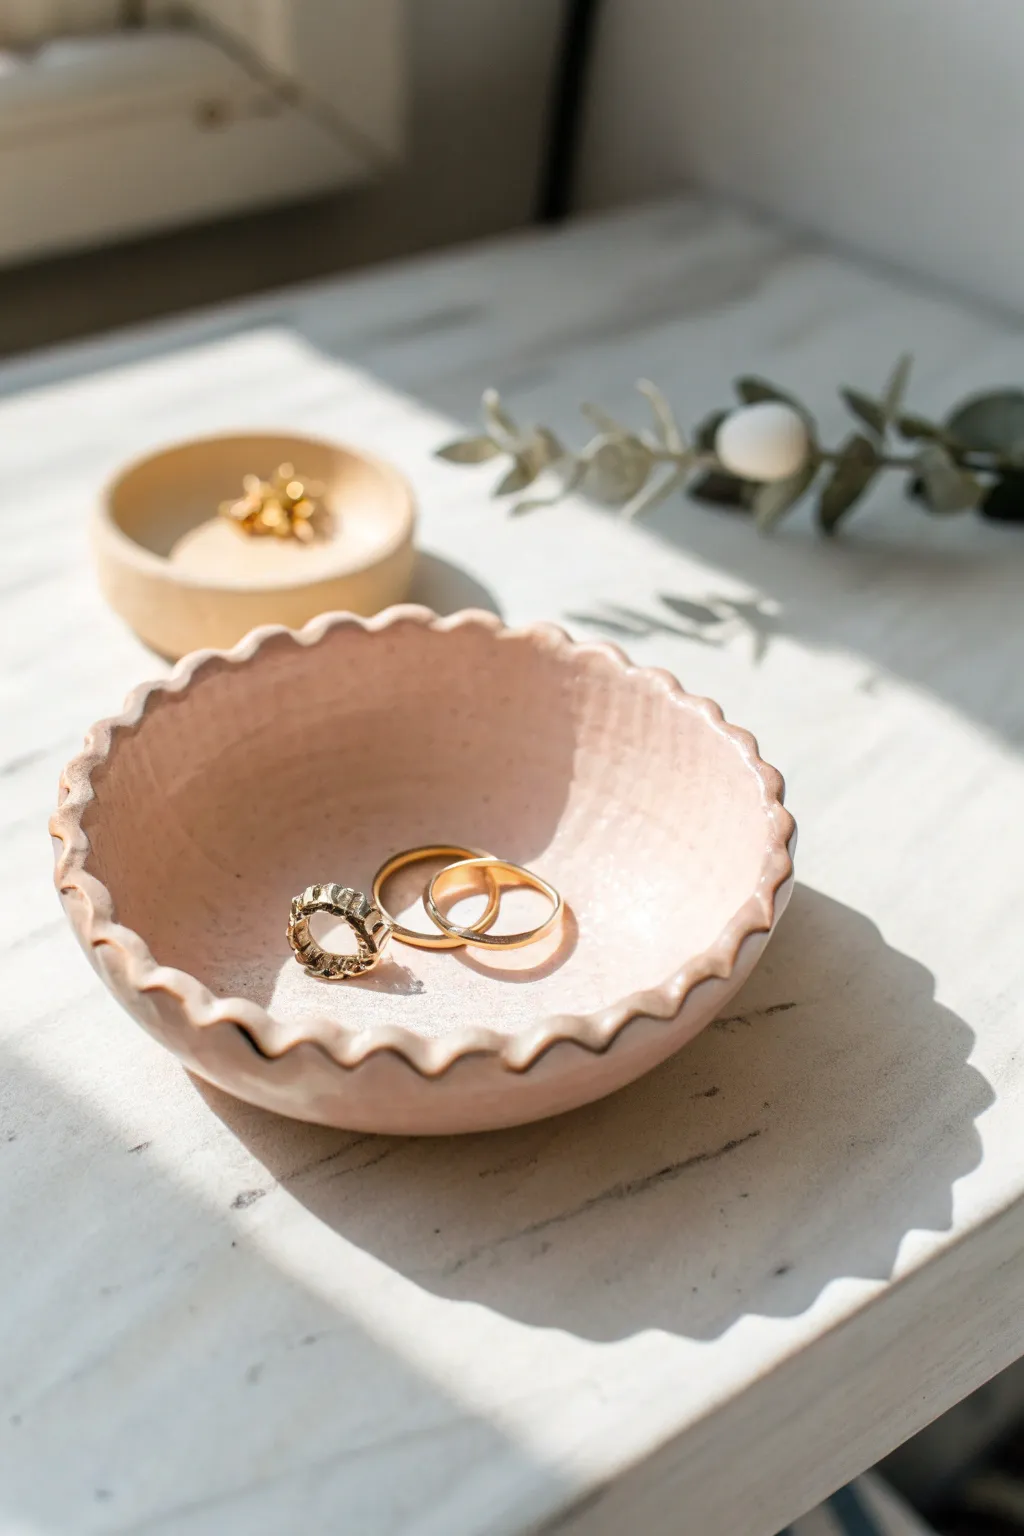
This charming project features a delicate fluted edge that gives the piece an organic, handmade feel perfect for holding your favorite rings. Finished with a soft blush glaze and a simple gold rim, it adds a touch of warm elegance to any bedside table.
Step-by-Step Guide
Materials
- White air dry clay
- Rolling pin
- Circle cutter or small bowl (appx. 4-5 inches diameter)
- Craft knife
- Small bowl for molding (to form the curve)
- Water and sponge
- Sandpaper (fine grit)
- Soft pink or blush acrylic paint
- Gloss varnish or sealant
- Gold acrylic paint or liquid gold leaf
- Fine detail paintbrush
- Flat paintbrush
Step 1: Shaping the Clay
-
Roll out the slab:
Take a handful of air dry clay and knead it briefly to warm it up. Roll it out on a smooth surface until you have an even slab that is roughly 1/4 inch thick. Try to keep the thickness consistent to prevent cracking later. -
Cut the circle:
Place your circle cutter or a small upside-down bowl onto the clay slab. Use your craft knife to trace around the edge and cut out a perfect circle, removing the excess clay. -
Create the scalloped edge:
With the clay circle lying flat, use your thumb and forefinger to gently pinch the outer rim. Push slightly inward with your finger while pinching to create a wave. Repeat this spacing evenly around the entire circumference. -
Refine the scallops:
Go back around the edge and smooth out any sharp pinch marks with a damp finger. You want the waves to look soft and rounded, like a flower petal or a pie crust. -
Form the bowl shape:
Carefully lift your clay circle and drape it inside your molding bowl. Let gravity pull it down gently into the curve. Adjust the scalloped edges so they sit evenly against the sides of the mold without folding over. -
Smooth the interior:
Dip a sponge lightly in water and gently wipe the inside of the clay bowl to remove any fingerprints or texture from the rolling pin. Don’t use too much water, or the clay will become mushy. -
Dry the clay:
Allow the clay to dry inside the mold for at least 24 hours. Once the top feels dry and stiff, I usually pop it out of the mold and let it dry upside down for another 12-24 hours to ensure the bottom hardens completely.
Cracks happen
If small cracks appear as the clay dries, mix a tiny bit of fresh clay with water to make a paste. Fill the crack, smooth it with your finger, and let it dry again.
Step 2: Finishing and Painting
-
Sand imperfections:
Once fully cured and bone dry, take a piece of fine-grit sandpaper and lightly sand the rim and bottom edges. Smooth out any rough patches until the surface feels silky to the touch. -
Wipe clean:
Use a dry cloth or a slightly damp paper towel to remove all sanding dust. You need a completely clean surface for the paint to adhere properly. -
Apply the blush base:
Using a flat paintbrush, apply your soft pink acrylic paint to the entire bowl. Start with the inside, let it dry, then flip it over to paint the outside. You may need two or three thin coats for full, opaque coverage. -
Paint the rim:
Dip a fine detail brush into your gold paint or liquid gold leaf. Carefully run the brush along the very top edge of the scallops. The irregular, handmade edge makes this forgiving—it doesn’t have to be a perfect line. -
Let paint cure:
Allow the paint to dry completely according to the bottle instructions. The gold leaf often dries quickly, but acrylics might need an hour or two. -
Seal the bowl:
Apply a coat of gloss varnish over the entire piece. This not only protects the paint from chipping but gives the bowl that ceramic-like shine seen in the photo. -
Final dry:
Let the varnish cure 24 hours before placing any jewelry inside ensuring the surface is hard and non-tacky.
Add texture
Before cutting your circle, press a piece of lace or a textured fabric into the raw clay slab. This leaves a beautiful imprinted pattern inside your bowl.
Place your new dish on your dresser to safely keep your favorite jewelry organized and accessible
Wavy Ruffled Rim Bowl

Capture the charm of handmade pottery with this textured air dry clay bowl featuring a distinctive wavy rim and a vintage inspired two-tone finish. The contrast between the warm terracotta interior and the textured creamy white exterior gives it a timeless, artisanal look that fits perfectly in any cozy home.
Detailed Instructions
Materials
- Air dry clay (terracotta color)
- Acrylic paint (cream or off-white)
- Matte sealant or varnish
- Rolling pin
- Medium-sized bowl (to use as a mold)
- Plastic wrap
- Modeling tools or a dull knife
- Sponge
- Fine-grit sandpaper
- Texture tool (optional, or a comb)
- Paintbrushes
Step 1: Forming the Base
-
Prepare the Clay:
Start by conditioning a large chunk of terracotta-colored air dry clay. Knead it in your hands until it becomes soft, pliable, and free of cracks. -
Roll the Slab:
On a clean surface or canvas mat, roll the clay out into a large, even circle. Aim for a thickness of roughly 1/4 inch to ensure the bowl is sturdy but not too heavy. -
Prepare the Mold:
Take your kitchen bowl that will serve as the mold. Cover the exterior completely with plastic wrap, smoothing out as many wrinkles as possible to prevent them from transferring to your clay. -
Shape the Bowl:
Gently lift your clay circle and drape it over the upside-down bowl mold. Carefully press the clay against the mold, starting from the center and working your way down to ensure a snug fit. -
Trim Excess Clay:
Using a knife or clay tool, trim around the bottom of the mold to establish an even edge. Don’t worry about making it perfect yet; we will add the ruffle detail later.
Uneven Ruffles?
If your ruffled edge looks messy or cracks while pinching, dip your fingers in a tiny bit of water to rehydrate the rim. Smooth the cracks instantly so they don’t widen as the clay dries.
Step 2: Adding Texture and Detail
-
Create Exterior Texture:
While the clay is still over the mold, use a modeling tool or the back of a butter knife to gently press vertical lines into the bottom half of the bowl. These fluted grooves add that distinct vintage character. -
Sculpt the Decorative Line:
Just above your vertical grooves, use a needle tool to carve a gentle, horizontal wavy line around the circumference of the bowl. This separates the textured base from the smooth upper section. -
Form the Ruffled Rim:
Now, focus on the rim. Use your thumb and forefinger to gently pinch the edge of the clay at regular intervals. Push out with your finger from the inside while pinching neatly to create a consistent pie-crust ruffle. -
Refine the Shape:
Go around the rim once more to smooth any rough spots. I like to dampen my finger slightly with water to buff out tiny cracks on the ruffled edge. -
Initial Drying:
Let the bowl sit on the mold for at least 24 hours until it holds its shape firmly. This prevents sagging when you remove the mold. -
Remove and Dry Completely:
Carefully remove the clay bowl from the mold and peel off the plastic wrap. Set the bowl upright on a drying rack to let air circulate around the interior. Allow it to dry for another 24-48 hours until fully hardened and light in color.
Step 3: Painting and Finishing
-
Sand Smooth:
Once fully dry, lightly sand any sharp edges or unwanted bumps with fine-grit sandpaper. Wipe away the dust with a slightly damp cloth. -
Painting the Exterior:
Dip a flat brush into cream or off-white acrylic paint. Paint the exterior of the bowl, stopping just below the ruffled rim. The goal is to leave the rim natural terracotta for contrast. -
Create a Distressed Look:
Before the white paint dries completely, use a slightly damp sponge to wipe away some paint from the raised areas of the vertical grooves. This reveals hints of the terracotta clay underneath, enhancing the rustic vibe. -
Define the Separation:
Use a small detail brush to tidy up the paint line where the cream body meets the unpainted terracotta rim. Follow the wavy line you carved earlier for a clean transition. -
Interior Finish:
The interior of the bowl should remain unpainted to show off the warm clay tone. If your construction clay wasn’t terracotta colored, paint the entire interior with a burnt orange or rust acrylic paint. -
Seal the Project:
Apply a coat of matte varnish or sealant over the entire bowl, inside and out. This protects the paint and clay from moisture and gives the piece a finished, professional sheen.
Speckled Finish
Mix a tiny amount of black or dark brown paint with water and flick it off an old toothbrush onto the cream section. This creates faux ceramic speckles for extra realism.
Place your finished bowl on a console table or shelf to add instant texture and warmth to your decor
Faceted Geometric Bowl
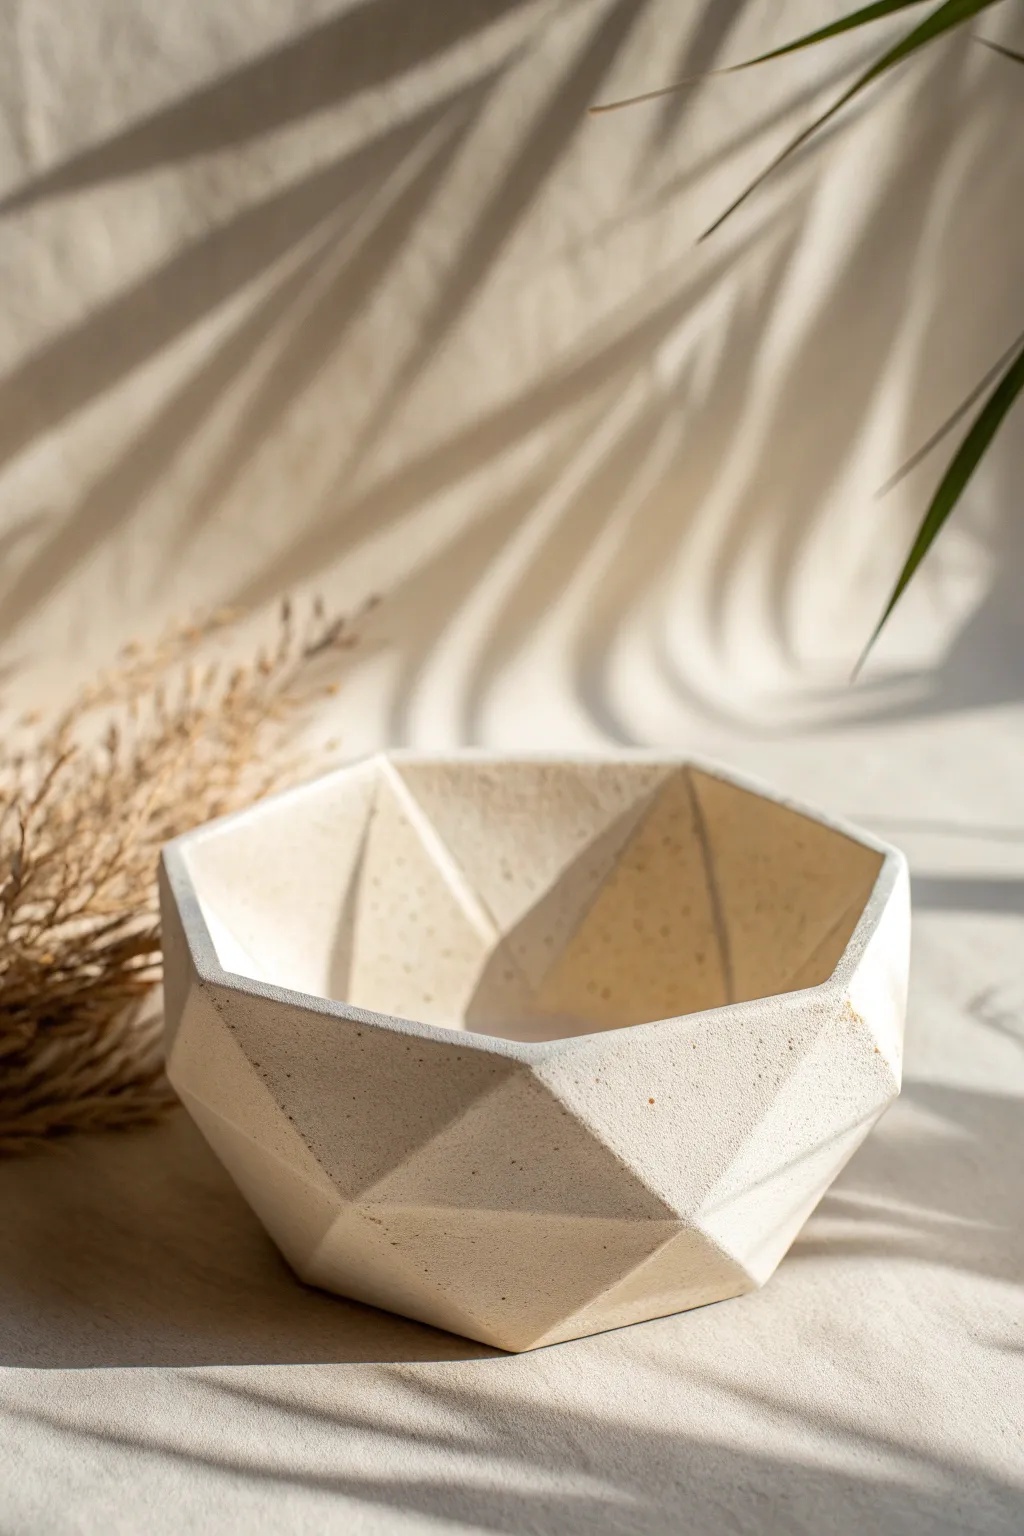
Embrace the beauty of sharp angles and clean lines with this stunning faceted bowl project. While it mimics the look of high-end concrete decor, you can achieve this sophisticated, matte aesthetic easily using air dry clay.
How-To Guide
Materials
- White air dry clay (2.2 lbs / 1kg block)
- Small bowl (for a mold support)
- Plastic wrap
- Rolling pin
- Sharp craft knife or X-Acto knife
- Ruler (preferably metal)
- Small disk of cardboard (approx. 3-4 inches diameter)
- Cup of water
- Sandpaper (fine and medium grit)
- Matte sealant or varnish
Step 1: Preparation & Base
-
Prepare your mold:
Select a simple kitchen bowl that has the general width you want for your finished piece. Flip it upside down and cover the exterior tightly with plastic wrap to prevent the clay from sticking. -
Condition the clay:
Take a generous amount of air dry clay—about the size of a grapefruit—and knead it in your hands to warm it up and remove air bubbles. -
Roll out a slab:
Roll the clay out onto a flat surface until it is roughly ¼ inch thick. Try to keep the thickness consistent, as this will strengthen your geometric walls. -
Create the base:
Use your cardboard disk as a template to cut out a perfect circle from the clay slab. This will serve as the flat bottom of your bowl. -
Connect to mold:
Place this clay circle onto the flat bottom of your upside-down bowl mold. Whatever overhangs is fine, just ensure it’s centered.
Step 2: Building the Facets
-
Cut triangular shapes:
From your remaining clay slab, use your ruler and knife to cut out several triangles. You’ll need isosceles triangles (two equal sides) of varying sizes, but aim for roughly 2-3 inches on the sides. -
Bevel the edges:
This is a crucial step: slice the edges of your clay triangles at a 45-degree angle. This allows the pieces to join together cleanly to form sharp corners rather than bulky seams. -
Attach the first row:
Score (scratch) the bottom of a triangle and the edge of your base. Add a dab of water (slip) and press the triangle onto the base, leaning it against the bowl mold for support. -
Continue the ring:
Repeat this process, attaching triangles side-by-side around the base. Ensure you score and slip the sides where the triangles touch each other. -
Blend interior seams:
Gently smooth the clay on the *inside* where the pieces join to reinforce the bond, but leave the outside seams sharp for now to maintain that faceted look. -
Add the upper tier:
Cut a second set of triangles, perhaps slightly wider or inverted, to create the top half of the bowl. Attach these to the tops of the first row, angling them slightly inward or outward depending on your desired shape. -
Establish the rim:
The top edge will naturally be uneven and jagged due to the triangle points. You can leave this for an organic look or use your knife to slice a straight, hexagonal rim like the reference photo.
Slumping Walls?
If the clay walls are collapsing, your clay might be too wet or the pieces too thin. Let the cut triangles sit for 15 minutes before assembling to firm up.
Step 3: Refining & Finishing
-
Initial dry time:
Let the clay sit on the mold for about 2-3 hours until it is leather-hard—firm enough to hold its shape but soft enough to carve. -
Sharpen the facets:
Remove the bowl from the mold. Use your craft knife to carefully shave down any bulging seams on the exterior, enhancing the decisive, sharp planes of the geometry. -
Full dry:
Allow the piece to dry completely for 24-48 hours. I find it helps to rotate it occasionally so air reaches all sides. -
Sanding for perfection:
Once bone dry, use medium grit sandpaper to flatten the planes. Tape your sandpaper to the table and rub the flat processing of the bowl against it to get truly flat, crisp facets. -
Detail sanding:
Switch to fine-grit sandpaper to smooth out the texture of the clay itself, removing fingerprints while being careful not to round over your sharp edges. -
Adding texture:
To mimic the stone look in the photo, you can flick a toothbrush with watered-down brown or grey acrylic paint across the surface to create subtle speckling. -
Seal:
Finish with a matte varnish to protect the clay while keeping that raw, stone-like appearance.
Sharper Edges
Don’t over-smooth the outside seams with water. Instead, add a tiny coil of clay to the *inside* seams for strength, keeping the outer angles distinct.
Now you have a strikingly architectural piece that looks right at home in a modern design magazine
Little Pedestal Ring Bowl
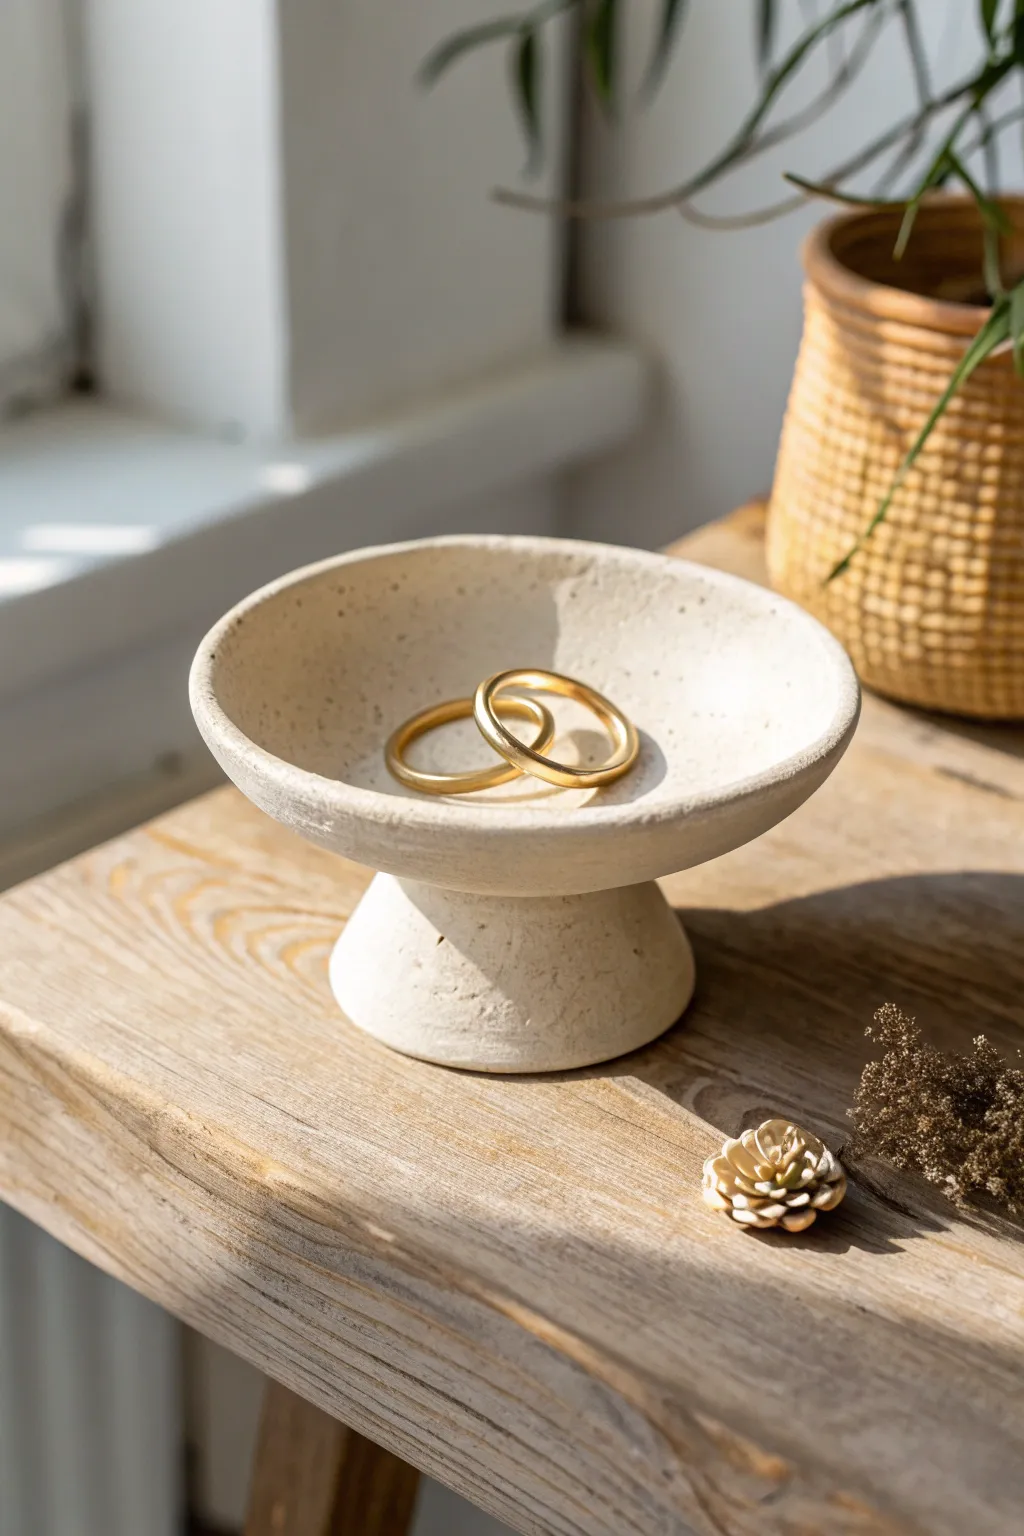
Elevate your jewelry storage with this charming footed dish that mimics the look of high-end speckled pottery. The raised pedestal base gives it a sculptural quality, while the textured finish adds gentle, organic warmth to any bedside table.
Step-by-Step
Materials
- White air dry clay
- Rolling pin
- Small circular cookie cutter (approx. 2 inches)
- Medium circular bowl or template (approx. 4-5 inches) for cutting
- Small bowl for molding (to shape the curve)
- Craft knife
- Sponge and water
- Old toothbrush
- Acrylic paint (cream or off-white)
- Acrylic paint (brown or taupe for speckles)
- Gloss or satin varnish
Step 1: Forming the Base Components
-
Condition the Clay:
Start by taking a handful of white air dry clay and kneading it in your hands until it becomes soft, pliable, and free of cracks. -
Roll the Slab:
Roll out the clay on a flat surface to a thickness of about 1/4 inch. Try to keep the thickness consistent so the bowl dries evenly later. -
Cut the Main Dish:
Place your medium circular template or bowl onto the rolled clay and trace around it with a craft knife to cut out your main circle. -
Shape the Dish Curve:
Gently lift the clay circle and place it inside your molding bowl. Press it down lightly so it takes the curved shape of the bowl bottom. -
Cut the Pedestal Base:
From the remaining rolled clay, use your small cookie cutter to punch out a smaller circle. This will become the foot of the pedestal. -
Create the Stem:
Roll a thick snake of clay, then flatten it slightly into a strip. Form this strip into a ring that matches the circumference of your small base circle.
Step 2: Assembly and Texture
-
Score and Slip the Stem:
Using your craft knife, scratch cross-hatch marks (scoring) on the top of the small base circle and the bottom of your clay ring. Apply a little water (slip) and press them together. -
Blend the Seams:
Use your finger or a modeling tool to smooth the clay where the ring meets the base, creating a seamless, tapered cone shape for sturdy support. -
Attach the Top Bowl:
Once the top dish has stiffened slightly in its mold but is still workable, score the underside center and the top of your pedestal base. Apply slip and press the two parts firmly together. -
Reinforce the Join:
I always take a moment here to roll a very thin coil of clay and wrap it around the connection point under the bowl, smoothing it out to ensure the bond is strong. -
Add Texture:
Before the clay dries, gently tap the entire surface with an old toothbrush or a stiff sponge. This creates the stone-like, pitted texture seen in the photo. -
The Long Dry:
Let the piece dry completely for 24-48 hours. Turn it upside down halfway through the process to ensure the bottom of the base dries thoroughly. -
Sand Imperfections:
Once fully dry, lightly sand the rim of the bowl if it feels too sharp, but leave the surface texture rough for character.
Wobbly Bowl?
If the bowl tilts while drying, prop it up with crumpled balls of paper towel or soft fabric underneath the rim to keep it level until it hardens.
Step 3: Finishing Effects
-
Base Coat Painting:
Mix a creamy off-white acrylic paint. Apply a solid coat over the entire piece, working it into the textures you created with the toothbrush. -
Create the Speckles:
Dilute a small amount of brown or taupe acrylic paint with water until it is quite fluid. -
Splatter Technique:
Dip your toothbrush into the diluted brown paint. Hold it near the bowl and run your thumb across the bristles to flick tiny speckles onto the surface. -
Clean the Rim:
If the splatter gets too heavy in one spot, quickly dab it with a paper towel to keep the look subtle and natural. -
Seal the piece:
Finish with a coat of satin or gloss varnish to protect the paint and give it that finished ceramic shine.
Make it Luxe
Paint the very edge of the rim with gold leaf paint or a metallic gold marker for a chic, high-contrast finish that highlights your jewelry.
Now you have a stunning, artisanal-style display piece ready to hold your favorite rings.
Nested Mini Bowl Set
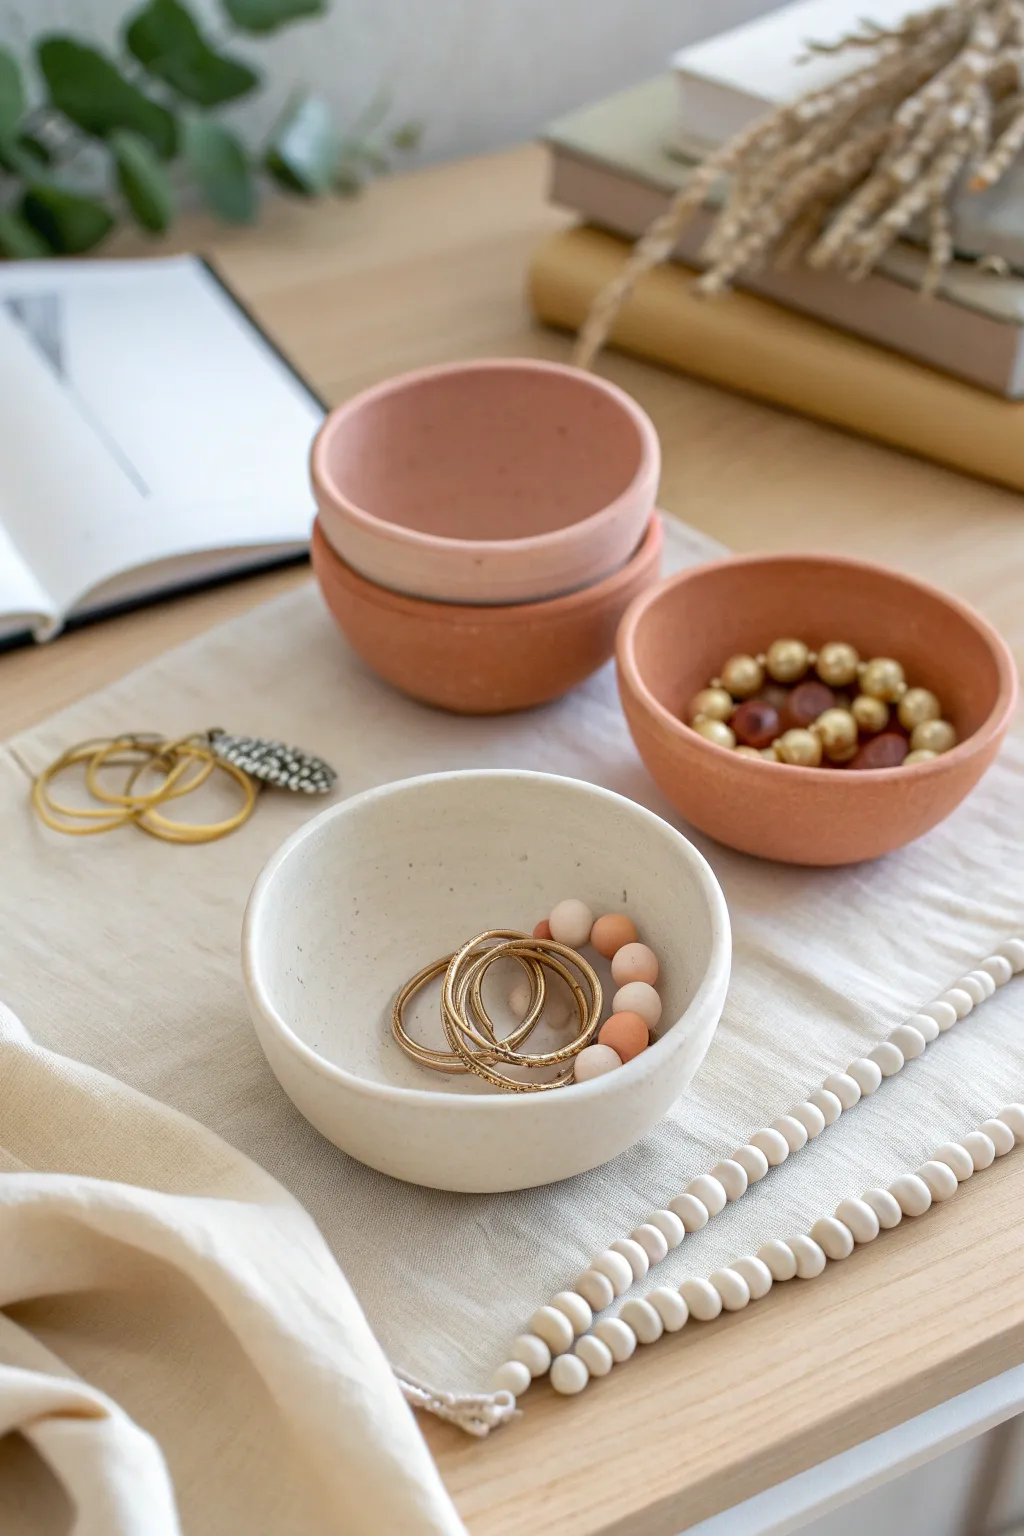
Create a soothing, minimalist set of nesting bowls perfect for organizing your everyday jewelry. With their organic textures and soft gradient of terracotta, peach, and cream tones, these handmade vessels add a touch of calm to any vanity or bedside table.
Step-by-Step Tutorial
Materials
- Air dry clay (white)
- Air dry clay (terracotta/red)
- Small rolling pin
- Small glass bowls or ramekins (for molds)
- Modeling tool or butter knife
- Sponge
- Fine grit sandpaper
- Matte spray varnish or sealant
- Bowl of water
Step 1: Preparing the Clay Colors
-
Condition the white clay:
Begin with a golf-ball-sized chunk of white air dry clay. Knead it in your warm hands until it feels pliable and smooth, removing any potential air pockets. -
Condition the terracotta clay:
Repeat the kneading process with a similar amount of terracotta-colored clay. This deep, earthy red will serve as the darkest tone in your set. -
Mix the blush tone:
To achieve the soft pinkish-peach bowl seen in the stack, take equal parts of white and terracotta clay. Knead them together thoroughly until the marble swirling disappears and you have a uniform, muted blush color.
Smooth Operator
Use a little vinegar on your finger instead of water when smoothing joins or cracks; it breaks down the clay slightly better for a seamless mend.
Step 2: Forming the Bowls
-
Roll out the slabs:
On a clean, flat surface or craft mat, roll out one of your clay balls to an even thickness of about 1/4 inch. Try to keep the pressure consistent so one side isn’t thinner than the other. -
Use a mold:
Select a small dipping bowl or ramekin to use as a form. Gently drape your rolled clay slab *inside* the bowl for a smooth interior finish, or over the *outside* of the upside-down bowl for a more handmade, organic exterior texture. -
Shape the clay:
Gently press the clay against the mold’s surface. I like to start from the center and work outward to avoid trapping air bubbles between the clay and the mold. -
Trim the excess:
Using a modeling tool or a simple kitchen knife, trim the excess clay around the rim of your mold to create a somewhat level edge. It doesn’t need to be perfect; a little waviness adds character. -
Smooth the edges:
Dip your finger in a little bit of water and run it along the cut rim of the clay bowl. This smooths out any sharp cuts or jagged bits left by the knife. -
Repeat for all colors:
Repeat the rolling, molding, and trimming process for the remaining clay colors so you have a complete set of three or four coordinating bowls.
Speckled Stone Effect
Knead in dried tea leaves, coarse pepper, or sand into the white clay before rolling it out to create realistic faux-stone speckles.
Step 3: Refining and Drying
-
Initial drying phase:
Let the bowls sit on or in their molds for about 2-3 hours until they hold their shape but aren’t fully dry. This prevents them from slumping. -
Remove from molds:
Carefully pop the clay forms off their molds. If they feel stuck, gently wiggle the edges until they release. -
Sponge finish:
Take a slightly damp sponge and wipe the surfaces of the semi-dry bowls. This is the secret to getting that smooth, stone-like texture without needing hours of sanding later. -
Final drying:
Place the bowls on a wire rack to allow air circulation underneath. Let them dry completely for 24-48 hours. They will lighten in color slightly as the moisture evaporates.
Step 4: Finishing Touches
-
Sand for perfection:
Once bone dry, take fine-grit sandpaper and gently buff the rims and any rough spots on the bottom. Wipe away the dust with a dry cloth. -
Seal the surface:
To protect your jewelry and the clay, spray the bowls with a light coat of matte varnish. This keeps the natural look but prevents moisture absorption. -
Arrange and use:
Nest the smaller blush bowl inside the larger terracotta one, and keep the white one separate for a balanced vignette.
Now you have a chic, functional display for your favorite rings.