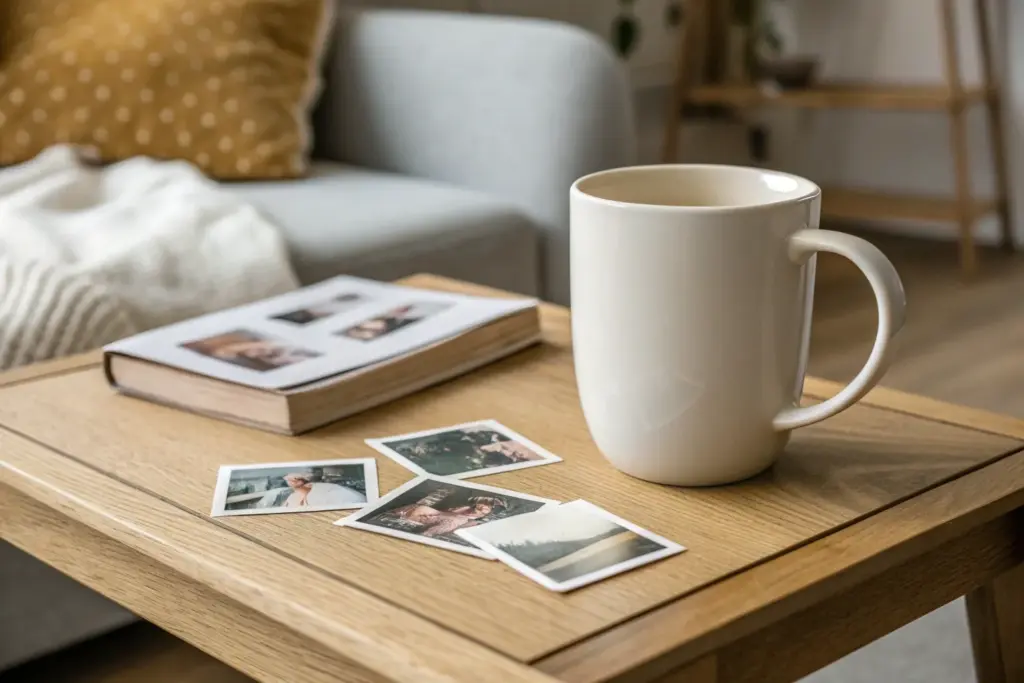
If you’ve ever held a plain mug and thought, “This needs a memory on it,” you’re in the right headspace. Here are my favorite mug design ideas with picture layouts and visual tricks that make a photo mug feel intentional, not just pasted-on.
Classic Centered Portrait
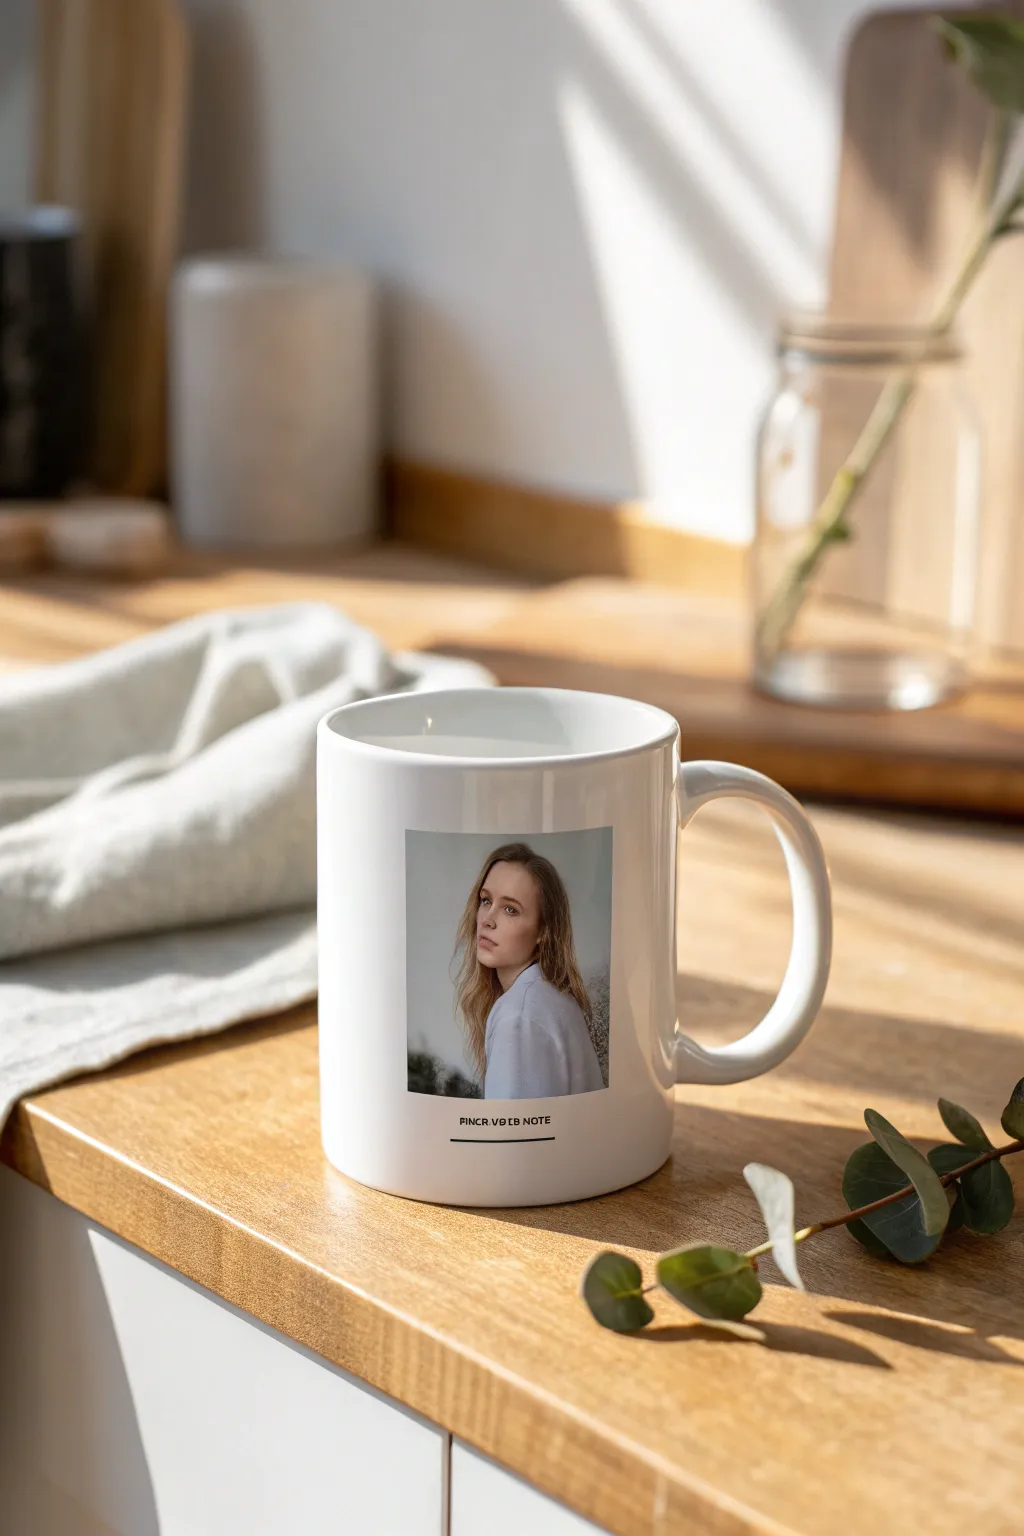
Transform a favorite photo into a piece of modern, functional art with this clean and sophisticated mug design. By focusing on a centered portrait with subtle typography, you create a polished look that feels high-end rather than homemade.
How-To Guide
Materials
- Blank white ceramic mug (sublimation coated)
- Sublimation printer
- Sublimation paper
- Heat press (mug press attachment)
- Heat-resistant tape
- High-resolution digital photo
- Graphic design software (Canva, Photoshop, or similar)
- Scissors or a paper trimmer
- Isopropyl alcohol and a lint-free cloth
Step 1: Digital Preparation
-
Measure your canvas:
Begin by measuring the printable area of your specific mug. While standard mugs have a distinct wrap area, for this centered design, you specifically need to know the height available to keep the image proportional. -
Set up the workspace:
Open your design software and create a new canvas. I usually set my canvas size to match the full wrap dimensions of the mug (approx. 8.5 x 3.5 inches for an 11oz mug) to help with precise centering. -
Import and crop the photo:
Import your chosen portrait. Crop the image into a neat vertical rectangle (roughly a 4:5 aspect ratio works beautifully here). Avoid cropping too close to the face perfectly; leave a little ‘breathing room’ around the subject. -
Add the text element:
Select a clean, sans-serif font like Helvetica, Montserrat, or Futura. Type your caption—a name, date, or short quote—in all caps. -
Position the typography:
Place the text directly centered underneath the photo. Keep the font size small; the elegance of this design comes from the text being understated and minimal. -
Create the accent line:
Draw a thin black line underneath the text. Ensure it is the same width as the text block, not the full width of the photo, to maintain visual balance. -
Check alignment:
Use the alignment tools in your software to ensure the photo, text, and line are perfectly centered on the canvas horizontally. -
Mirror the image:
This is crucial for sublimation: flip your entire design horizontally (mirror image) before printing.
Pro Tip: Alignment
To ensure your portrait is perfectly opposite the handle, lay the mug on its side. The handle should point strictly upward at 12 o’clock while you tape the design at 6 o’clock.
Step 2: Printing and Application
-
Print the transfer:
Load your sublimation paper into the printer, ensuring you are printing on the correct side. Print the design using high-quality settings. -
Trim the paper:
Once the ink is dry, cut out your transfer. You don’t need to cut right up to the image edge, but trimmer excess paper makes it easier to position on the curved surface. -
Clean the mug surface:
Wipe down the mug with isopropyl alcohol and a lint-free cloth. This removes invisible oils or dust that could cause spots in the final transfer. -
Position the design:
Wrap the paper around the mug. To find the true center opposite the handle, I like to fold the paper gently to find its midpoint and align that with the visual center of the mug. -
Secure the detailed area:
Tape the paper down firmly with heat-resistant tape. Pay special attention to the edges near the text and photo to prevent ‘ghosting’ (blurring). -
Preheat the press:
Set your mug press to 385°F (195°C) and the timer to usually around 180-200 seconds, depending on your specific machine’s manual. -
Press the mug:
Insert the mug into the press and close the clamp. The pressure should be firm but not enough that you struggle to close the machine. -
Cool and reveal:
When the timer beeps, remove the mug (careful, the handle will be hot!). Generally, you should peel the paper immediately while hot to stop the sublimation process. -
Final inspection:
Let the mug cool completely on a heat-safe surface before handling or washing.
Level Up: Color Grade
Apply a slight desaturation or a ‘matte’ filter to your photo before printing. This muted color palette mimics the look of high-end editorial layouts.
Enjoy your morning coffee with a personalized touch that feels like a boutique gallery piece


Full-Wrap Panorama Photo
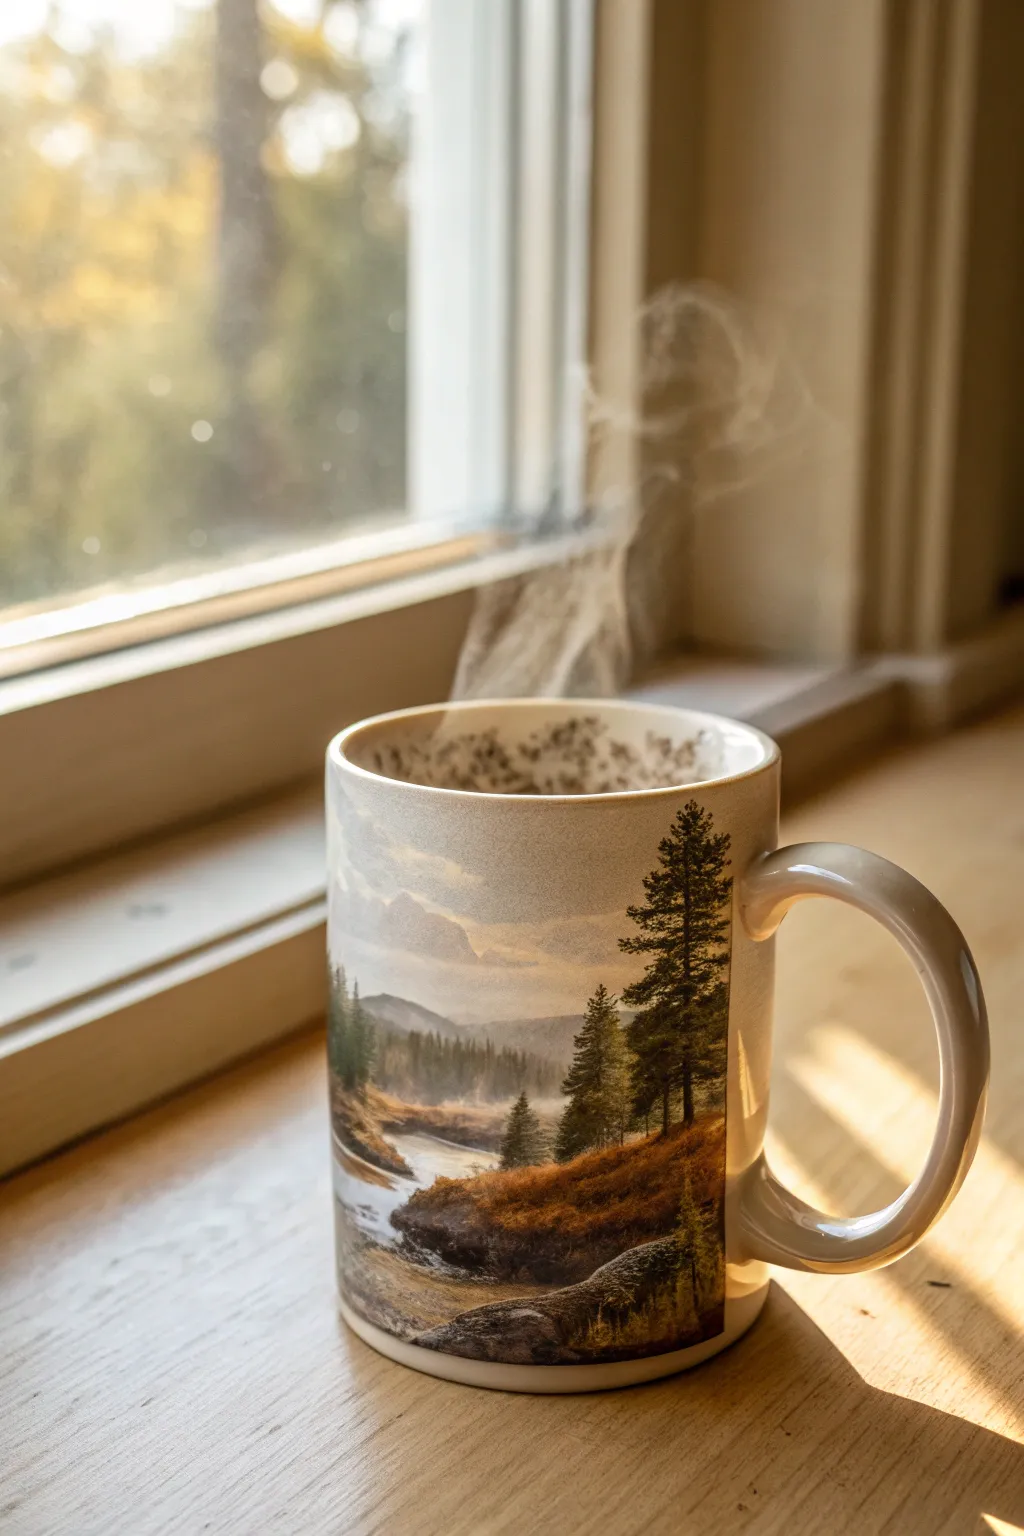
Bring the calming beauty of the great outdoors to your morning routine with this seamless panoramic photo mug. This project transforms a standard ceramic mug into a 360-degree canvas featuring misty mountains, pine forests, and a wandering river.
Step-by-Step Tutorial
Materials
- 11 oz or 15 oz white ceramic sublimation mug (polymer coated)
- Sublimation printer
- Sublimation paper (high release)
- Sublimation ink (CMYK)
- Heat resistant tape
- Mug press or convection oven with silicone mug wrap
- Panoramic high-resolution landscape photo
- Image editing software (Photoshop, GIMP, or similar)
- Scissors or a precision crafted trimmer
- Protective gloves
- Rubbing alcohol
- Lint-free cloth
Step 1: Preparing the Digital Canvas
-
Measure the mug surface:
Before diving into design, carefully measure the printable area of your ceramic mug. For a standard 11 oz mug, this is typically around 8.5 to 9 inches wide by 3.5 inches tall, but measuring your specific blank is crucial for a perfect full-wrap fit. -
Set up the workspace:
Open your image editing software and create a new document matching your measurements. Set the resolution to 300 DPI to ensure the final print is crisp and the details of the pine needles and water texture remain sharp. -
Select the panoramic image:
Import your landscape photo. For this project, choose a wide, horizontal shot featuring earthy tones—browns, deep greens, and soft blues—similar to the misty river scene shown. Ensure the image is wide enough to cover the canvas without excessive stretching. -
Adjust color saturation:
Sublimation printing often results in slightly muted colors compared to your screen. Bump up the vibrancy and saturation of your earth tones slightly; I find increasing the contrast around +10% helps the shadows in the trees pop against the ceramic.
Faded Edges?
If the design fades near the handle or rims, your press pressure might be uneven or the mug is tapered. Use a silicone wrap inside the press to distribute heat evenly.
Step 2: Printing and Trimming
-
Mirror the image:
This is the most critical step that is easy to forget: flip your entire design horizontally. Since you are placing the paper face-down on the mug, the text and orientation will correct itself during the transfer. -
Print the transfer:
Load your sublimation paper into the printer, ensuring you are printing on the correct side (usually the brighter white or slightly tacky side). Print using your ‘Best Quality’ or ‘Photo’ settings to capture the subtle gradients in the misty sky. -
Trim the edges:
Once the ink is dry, use scissors or a trimmer to cut out your design. Trim as close to the printed edge as possible, especially top and bottom, to make aligning it with the mug rim easier.
Add a Personal Touch
Before printing, overlay a semi-transparent inspirational quote or a name in a script font over the sky portion of the landscape for a custom gift.
Step 3: Application and Pressing
-
Clean the mug surface:
Wipe the mug down thoroughly with a lint-free cloth and a bit of rubbing alcohol. This removes any invisible oils or dust that could cause white spots or inconsistent ink transfer. -
Wrap and align:
Center your printed paper around the mug body. Pull it tight—any slack can cause ‘ghosting’ or blurry images. Make sure the paper is equidistant from the top rim and the bottom edge. -
Tape securely:
Using heat-resistant tape, secure the seam where the paper ends meet near the handle. I like to add extra tape along the top and bottom rims to seal the paper tightly against the ceramic curve. -
Pre-heat the press:
Turn on your mug press and set it to the manufacturer’s recommended settings, typically around 385°F to 400°F (196°C – 204°C) with medium-heavy pressure. -
Insert the mug:
Place the mug into the press, ensuring the handle clears the heating element. Close the press. The wrap should be snug enough so the mug doesn’t shift, but not so tight you fear breaking the handle. -
Time the transfer:
Set your timer according to your paper/mug instructions, usually between 180 and 240 seconds. Keep an eye on the temperature drop when you insert the cold mug; the timer should start once it climbs back near the target temp.
Step 4: Finishing Touches
-
Remove from heat:
When the timer beeps, put on your heat-resistant gloves. Carefully release the pressure and remove the mug by the handle. It will be extremely hot. -
Peel immediately:
Quickly peel off the tape and the paper while the mug is still hot. Removing it now prevents ‘ghosting’ where shifting gas can blur the image as it cools. -
Cool down:
Place the mug on a heat-resistant surface or a cooling rack. Avoid dunking it in cold water unless your specific mug substrate recommends it, as thermal shock can crack the ceramic.
Now pour a fresh cup of coffee and enjoy the view of your beautiful handmade creation.


Four-Photo Grid Collage
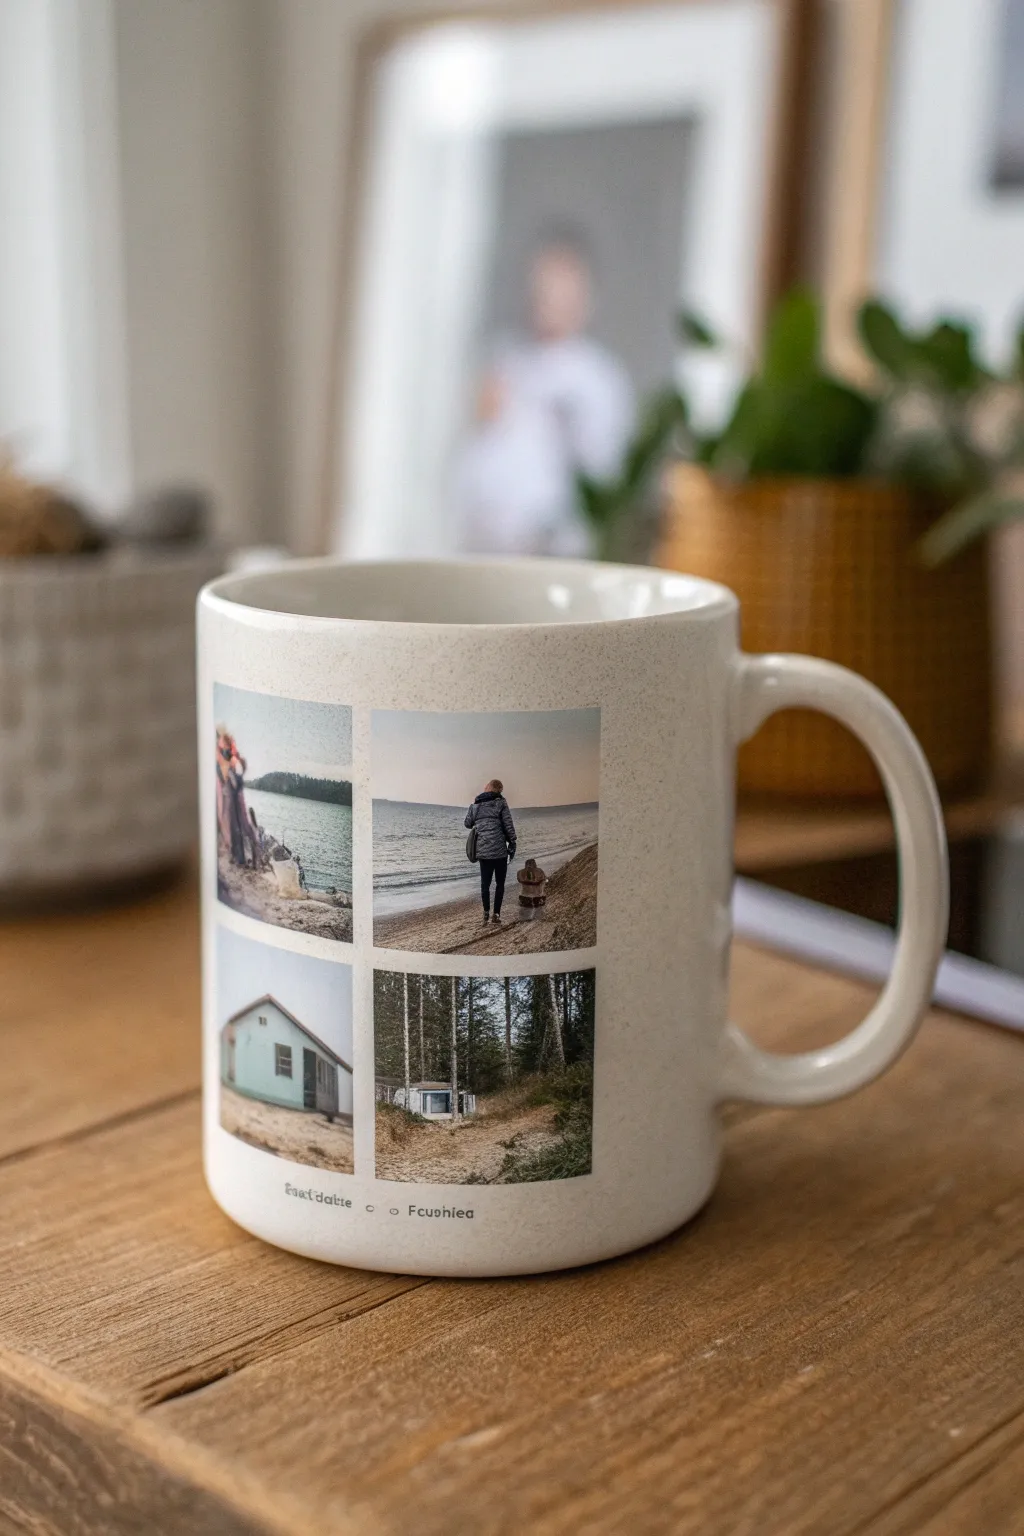
Transform your favorite snapshots into a functional keepsake with this clean, gallery-style mug design. The classic 2×2 grid layout allows you to tell a mini-story from a trip or event while maintaining a minimalist aesthetic on a standard ceramic mug.
Detailed Instructions
Materials
- Blank white ceramic mug (sublimation coated)
- Sublimation printer
- Sublimation paper
- Sublimation ink
- Heat resistant tape
- Mug heat press
- Computer with photo editing software (Canva, Photoshop, etc.)
- Four digital photos
- Scissors or paper trimmer
- Rubbing alcohol and lint-free cloth
Step 1: Designing the Layout
-
Open your software:
Launch your preferred design software and create a new canvas. Set the dimensions to match the printable area of your specific mug. A standard simple mug wrap size is often 8.5 x 3.5 inches, but measure your mug’s height and circumference to be sure. -
Curate your photos:
Select four high-resolution images that share a similar color palette or theme. In the example, notice how the muted blues, grays, and natural tones tie the beach and forest scenes together. -
Create the grid:
Arrange the four images in a square 2×2 configuration. Leave a small, uniform white gap (about 2-3mm) between the photos to create that distinct windowpane look. -
Add a caption:
Below the grid, type a small caption or date using a simple sans-serif font. Keep the text small and centered under the photo block for a subtle, professional finish. -
Mirror the design:
Before printing, horizontally flip (mirror) your entire design. This is crucial for sublimation, or your text will appear backward on the finished mug.
Blurry Edges?
If your grid lines look fuzzy, the paper likely shifted during pressing. Use more heat tape next time, or increase the clamp pressure slightly.
Step 2: Preparing the Mug
-
Clean surface:
Wipe down the exterior of the mug with rubbing alcohol and a lint-free cloth. I always do this to remove invisible oils or dust that could cause spots in the final transfer. -
Print the transfer:
Print your mirrored design onto sublimation paper using high-quality settings. Ensure you are printing on the correct side of the paper. -
Trim the paper:
Cut away the excess margin around your design, leaving just enough edge to handle the paper without touching the ink.
Step 3: Pressing the Design
-
Position the transfer:
Wrap the paper around the mug, centering the grid relative to the handle. The paper should be tight against the ceramic. -
Secure with tape:
Use heat-resistant tape to secure the paper firmly. Tape down all four corners and the edges to prevent ‘ghosting’ (blurring caused by the paper shifting during pressing). -
Pre-heat the press:
Turn on your mug press. Common settings for ceramic mugs are usually around 385°F to 400°F (195°C – 204°C) for roughly 180-240 seconds, but check your specific mug manufacturer’s instructions. -
Insert the mug:
Once the press is at temperature, slide the mug in. Ensure the handle is centered in the opening so the heating element wraps evenly around the image area. -
Apply pressure:
Close the press with firm, medium-heavy pressure. The mug shouldn’t move, but you shouldn’t have to struggle excessively to close the clamp.
Creative Twist
Apply a vintage filter to all four photos before printing. Sepia or black-and-white grids look incredibly chic and hide lower-resolution issues.
Step 4: Finishing Touches
-
Remove and cool:
When the timer goes off, carefully remove the mug using a heat-resistant glove—it will be extremely hot. -
Peel immediately:
Quickly peel off the tape and paper while the mug is still hot. Hesitating here can sometimes lead to ink bleeding as the mug cools. -
Cool down:
Place the mug on a heat-resistant mat or cooling rack. Let it cool naturally to room temperature to ensure the gloss finish sets perfectly.
Now you have a permanent, dishwasher-safe gallery of your favorite moments ready for your morning coffee


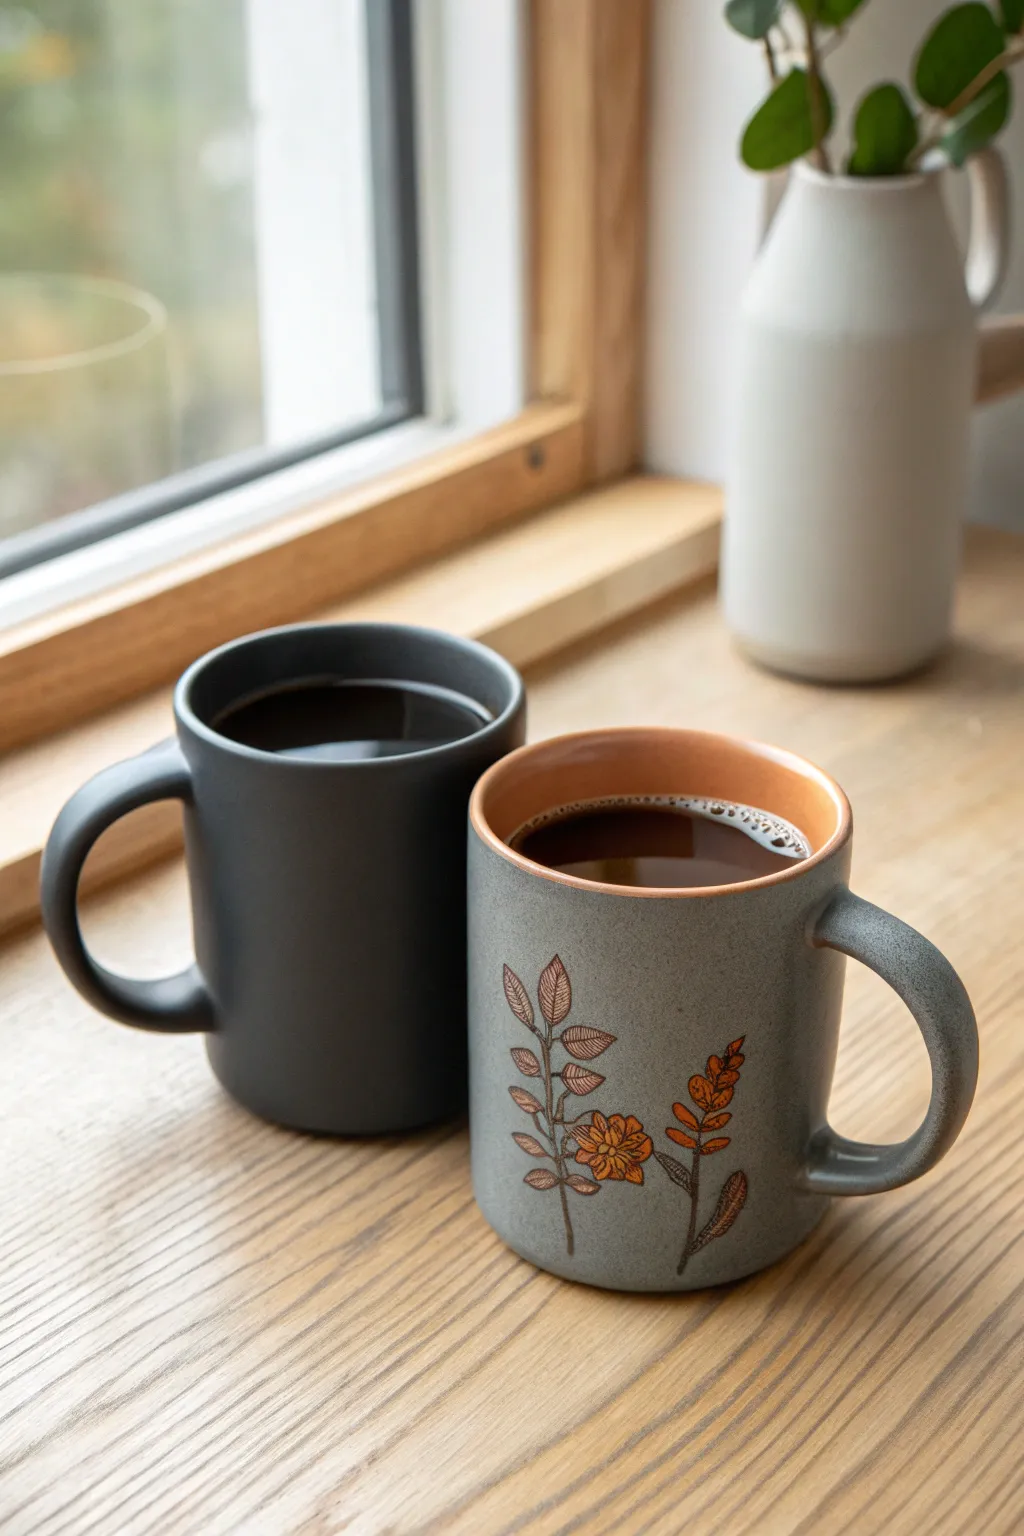
Two-Sided Picture Pair
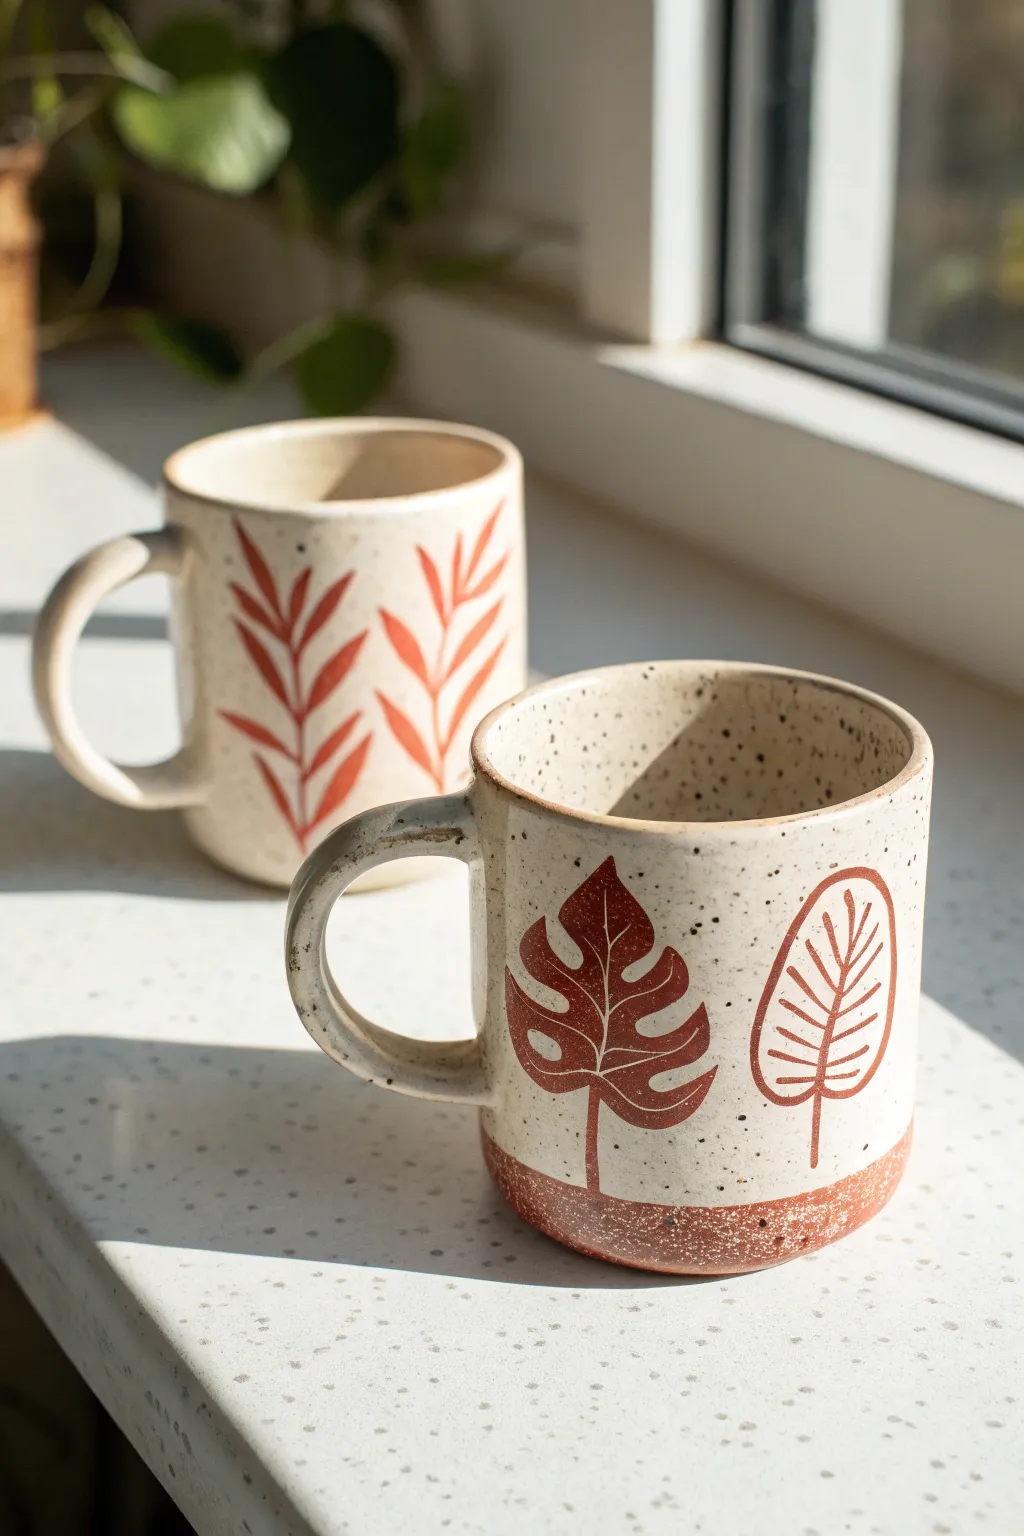
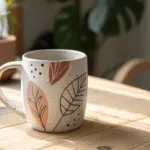
Bring the warmth of nature into your morning routine with these hand-painted ceramic mugs featuring earthy botanical motifs. The speckled clay body and rusty red designs create a cozy, organic aesthetic perfect for slow mornings by the window.
Step-by-Step Guide
Materials
- Bisque-fired ceramic mug blanks (speckled clay body preferred)
- Underglaze (terra cotta or rust red color)
- Small round detail brush (size 1 or 2)
- Clear dipping glaze (glossy or satin)
- Damp sponge
- Pencil
- Kiln (or access to a pottery studio firing service)
- Wax resist (optional)
Step 1: Preparation & Sketching
-
Clean the bisque:
Start with your bisque-fired mug. Wipe it down gently with a damp sponge to remove any dust or oils from handling, which can repel glaze later. -
Draft the design:
Lightly sketch your botanical designs onto the mug surface using a regular pencil. Don’t worry about the graphite marks; they will burn off completely in the kiln. -
Plan the layout:
For the foreground mug style, plan for large, distinct leaves like Monstera or stylized palm fronds spaced evenly around the cup. For the background mug style, sketch vertical climbing vines with smaller leaves. -
Create the base line:
If you want the exposed clay look at the bottom shown on the foreground mug, use a pencil to mark a line about half an inch up from the base.
Clean Lines Pro Tip
If you make a mistake with underglaze, let it dry fully, then scratch it gently off the bisque with a needle tool or stiff brush instead of wiping, which can smear.
Step 2: Painting the Motifs
-
Load your brush:
Shake your rust-colored underglaze well. Dip your small round brush, ensuring it’s saturated but not dripping. -
Outline the shapes:
Carefully trace over your pencil lines with the underglaze. Keep your hand steady and use the very tip of the brush for stems and leaf veins. -
Fill in the solid leaves:
For the Monstera leaf design, fill in the sketched outline completely. Apply two to three coats of underglaze here to ensure the color is opaque and solid after firing. -
Paint the open leaves:
For the stylized palm or fern shape, paint the outline and the central veins, but leave the spaces between veins unpainted to let the speckled clay show through. -
Add base detail:
If you marked a bottom line, paint the area below it with the rust underglaze to create a dipped effect, or leave it bare if your clay body is naturally reddish. -
Tidy up:
Use a clean, damp brush or a small scratching tool to clean up any smudges or sharpen the edges of your leaves.
Level Up: Texture
Before the first bisque firing, carve the veins of the leaves into the clay with a sgraffito tool. The glaze will pool in these recesses for added depth.
Step 3: Glazing & Firing
-
Let it dry:
Allow the underglaze to dry completely. It should look chalky and matte. -
Apply wax resist:
If you want the bottom rim to be unglazed (which prevents sticking to the kiln shelf), brush a coat of wax resist onto the very bottom foot of the mug. -
Prepare the clear glaze:
Stir your clear dipping glaze thoroughly. If you are using a brushing glaze instead, pour some into a small container. -
Glaze the interior:
Pour clear glaze inside the mug, roll it around to coat the entire inner surface, and pour the excess out. I usually do this quickly to avoid soaking the clay too much. -
Glaze the exterior:
Using tongs or your hand (if you masked the foot), dip the entire mug into the clear glaze bucket for about 3 seconds. Lift it out and let the excess drip off. -
Check for pinholes:
Once the glaze is dry on the pot, gently rub any pinholes or thick drips with your finger to smooth them out. -
Fire the kiln:
Load the mugs into the kiln for a glaze firing. Follow the cone rating specific to your clay and glaze combination (commonly Cone 5 or 6 for stoneware). -
Cool and finish:
Allow the kiln to cool completely before opening. Remove your mugs and sand the bottom foot lightly if there are any rough clay burrs.
Enjoy your morning coffee in a unique piece of art that feels as natural as the plants it portrays

The Complete Guide to Pottery Troubleshooting
Uncover the most common ceramic mistakes—from cracking clay to failed glazes—and learn how to fix them fast.
Picture Plus Short Quote
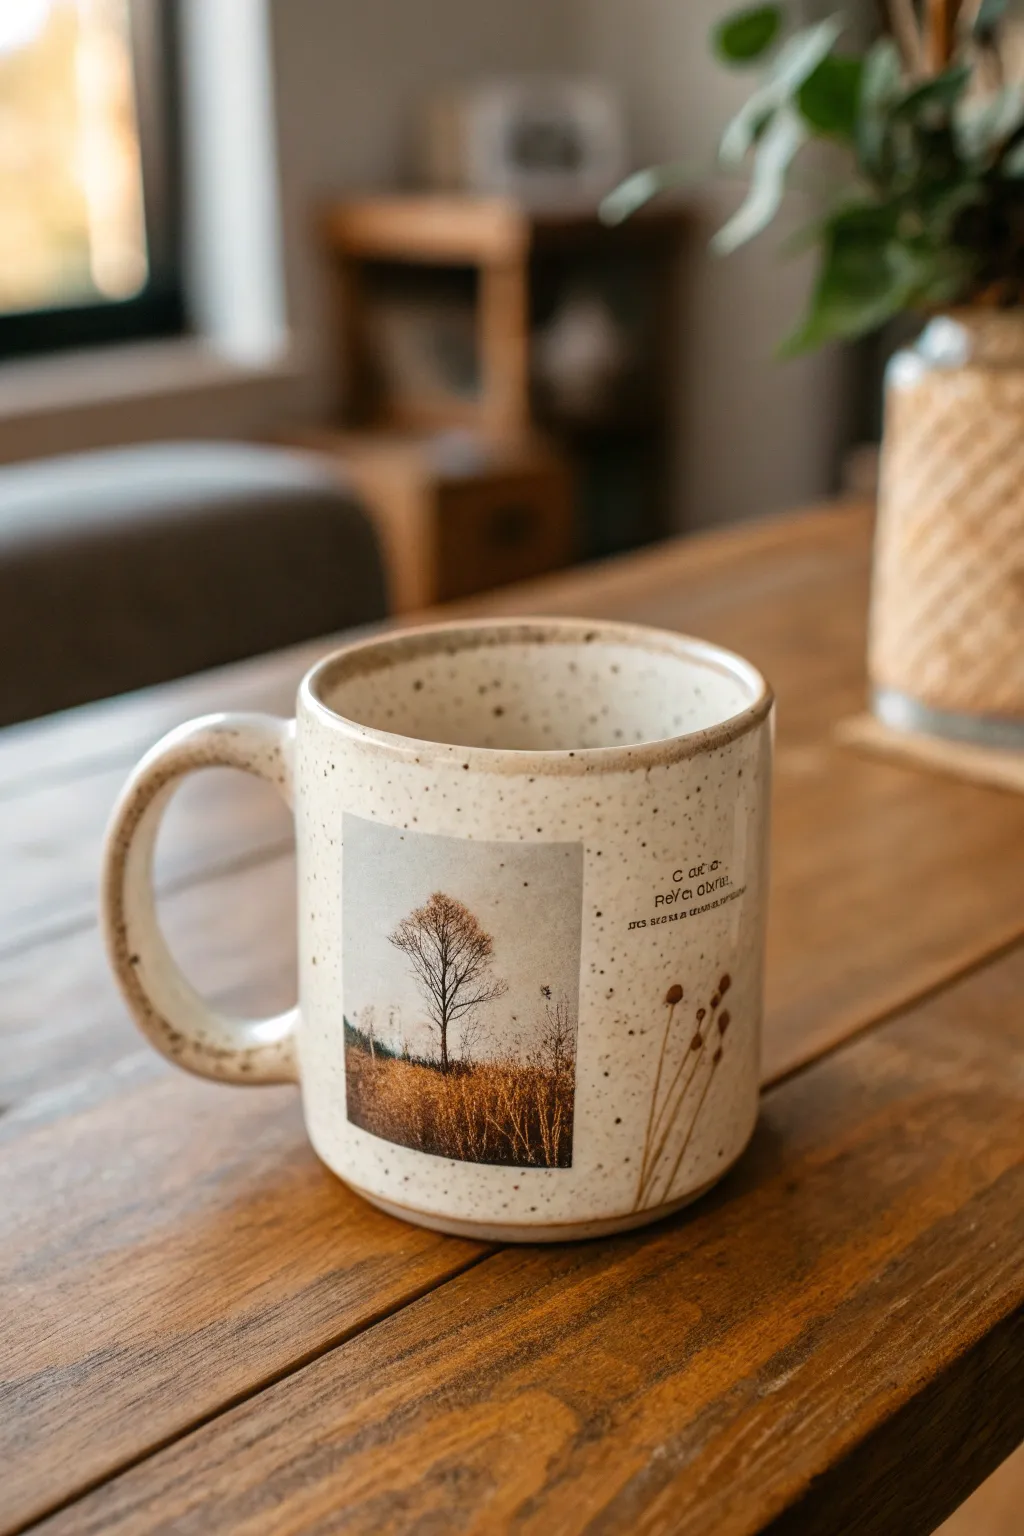
This project combines the rustic charm of speckled ceramic with the crisp storytelling of photography. By using waterslide decal paper, you can seamlessly transfer a moody landscape photo and delicate text onto a mug for a professional, kiln-fired look right from your kitchen oven.
How-To Guide
Materials
- White or cream speckled ceramic mug (must have straight sides)
- Inkjet or Laser waterslide decal paper (clear backing)
- Inkjet or Laser printer
- Clear acrylic spray sealant (for inkjet paper only)
- Scissors or precision craft knife
- Small bowl of lukewarm water
- Paper towels or lint-free twist cloth
- Rubbing alcohol
- Squeegee or old credit card
- Oven
Step 1: Designing & Printing
-
Select your image:
Choose a high-contrast photograph with a clear subject; the barren tree in a golden field shown here works perfectly against the speckled background. -
Add your text elements:
In a photo editing program, place a small, serif font quote to the right of your image. Add a simple line-drawing graphic, like the dried flowers shown, to bridge the gap between photo and text. -
Size the design:
Measure your mug’s printable area. Resize your digital canvas so the photo is roughly 2.5 inches tall, ensuring it fits comfortably below the rim. -
Print the decal:
Load your waterslide decal paper into the printer. Ensure you are printing on the glossy or ‘sticky’ side. Print on the highest quality photo setting. -
Seal the ink (Inkjet only):
If using an inkjet printer, take the printed sheet to a well-ventilated area. Apply three light, even coats of clear acrylic spray, letting the paper dry for 15 minutes between each coat to lock in the ink.
Step 2: Applying the Decal
-
Clean the surface:
Wipe the mug down thoroughly with rubbing alcohol to remove any oils or fingerprints, which guarantees the decal adheres properly. -
Trim the design:
Cut out your design. I like to cut a precise square for the photo, but trim closer around the text and flower graphic to minimize the visible film edge. -
Soak the decal:
Submerge your cut decal into the bowl of lukewarm water. Watch closely; it usually takes 30-60 seconds for the film to begin separating from the backing paper. -
Position on the mug:
Wet the surface of the mug slightly where the image will go. Slide the decal film gently off the backing paper and directly onto the ceramic. -
Smooth out bubbles:
While the decal is still wet and movable, make your final alignment adjustments. Use a squeegee or soft cloth to gently push water and air bubbles out from the center toward the edges. -
Clean the edges:
Gently dab away excess water with a paper towel. Ensure the corners of the photo are perfectly flat against the curve. -
Let it cure:
Allow the mug to dry completely at room temperature for at least 4 hours, or preferably overnight, to ensure all moisture has evaporated from under the film.
Seamless text trick
For text, trim the decal paper as close to the letters as possible. The less clear film surrounding the words, the more they will look professionally printed.
Step 3: Baking & Finishing
-
Prepare the oven:
Place the mug into a cold oven. Do not preheat, as sudden temperature changes can crack the ceramic. -
Bake the design:
Set the oven to 230°F (110°C). Once it reaches temperature, bake for 15-20 minutes. This hardens the decal film onto the glaze. -
Cool down slowly:
Turn the oven off and leave the door slightly ajar. Let the mug cool down completely inside the oven before removing it. -
Final inspection:
Check the edges of your photo. If they look perfectly flush and the finish feels hard, your custom art mug is ready for use.
Vintage vibe filter
Apply a sepia or warm desaturation filter to your photo before printing. This matches the tones of the coffee and the speckled ceramic for a cohesive look.
Now you have a personalized vessel perfect for slow mornings and warm drinks
Soft-Edge Frame Around the Photo
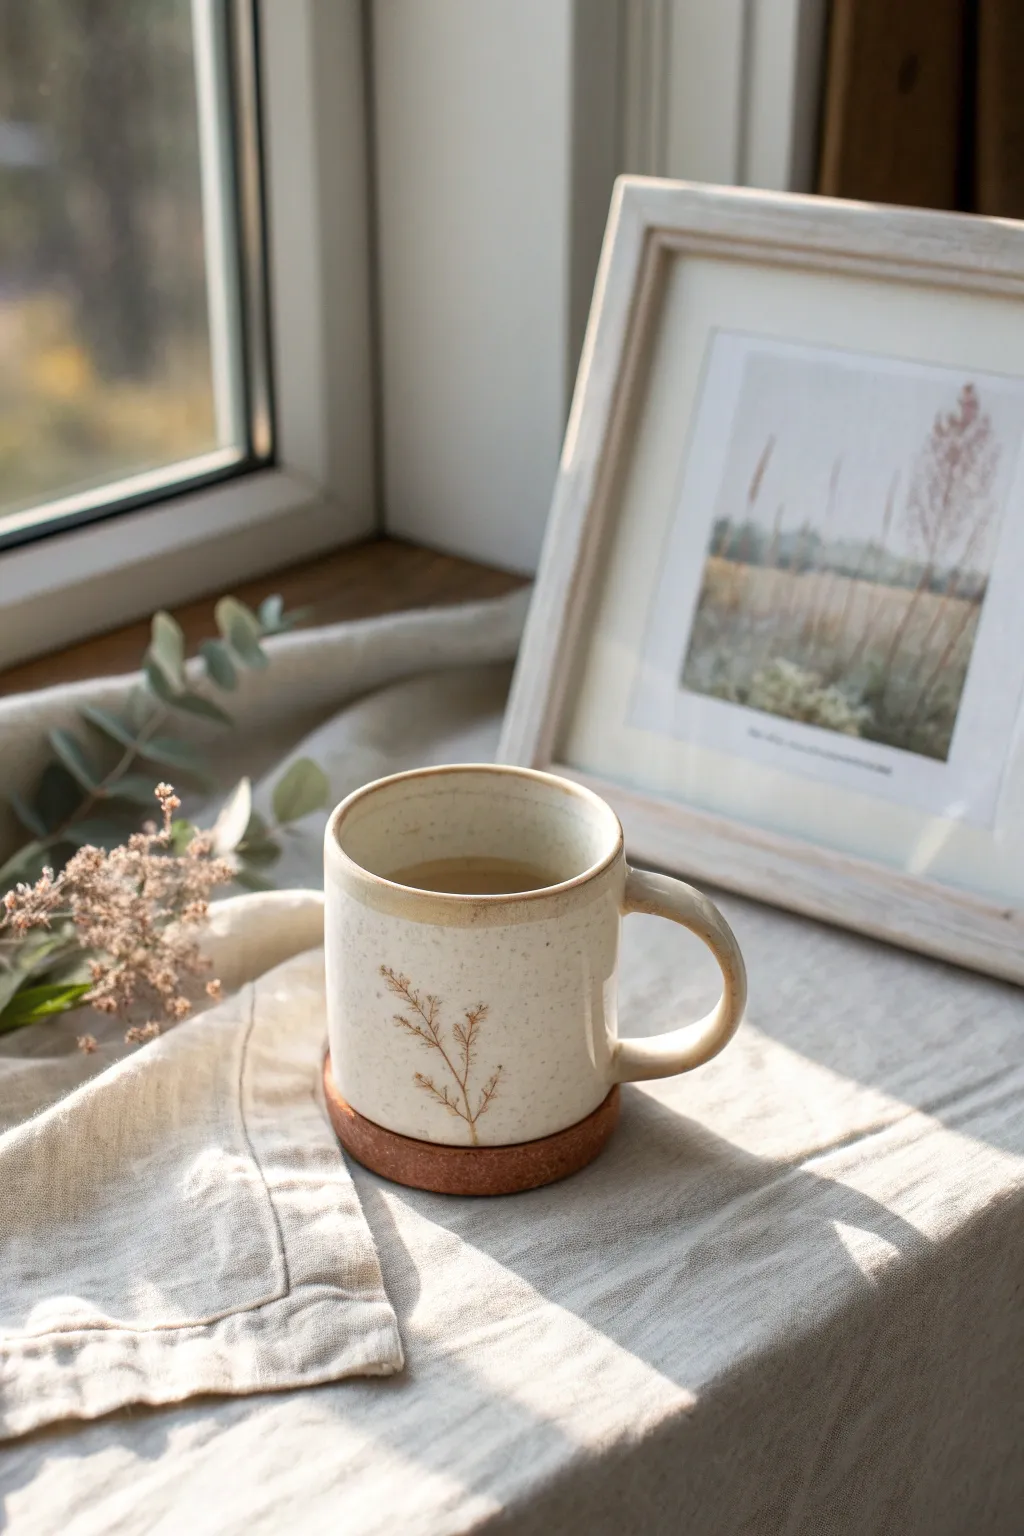
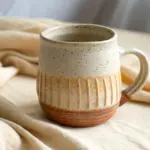
Embrace the tranquility of nature with this hand-illustrated ceramic mug project. The design features a warm, speckled cream glaze finish accented by a delicate, sepia-toned botanical sprig and a rustic, soft-edged rim.
Step-by-Step
Materials
- Cone 5/6 clear glaze
- Bisque-fired ceramic mug (wheel-thrown or slip-cast)
- Speckled buff clay body (or speckled underglaze additive)
- Sepia or iron oxide underglaze pencil/fine brush
- Cream or off-white dipping glaze
- Iron oxide wash or dark brown glaze for rim
- Sponge
- Small fine-point detail brush
- Kiln access
Step 1: Preparation & Base Glazing
-
Clean the bisque:
Start by wiping down your bisque-fired mug with a damp sponge. This removes any dust or oils from handling that might resist the glaze application. -
Check for imperfections:
Run your finger over the surface to find any sharp burrs or rough spots. Lightly sand these down if necessary, performing this step outside or while wearing a mask to avoid inhaling clay dust. -
Mask the foot:
Apply wax resist to the bottom foot of the mug. This prevents glaze from sticking to the kiln shelf later and saves you time on cleanup. -
Mix the base glaze:
Thoroughly mix your cream-colored dipping glaze. If you want that lovely speckled look and aren’t using a speckled clay body, now is the time to mix in a speckling additive (like granular ilmenite or manganese) into the bucket. -
Dip the mug:
Using glazing tongs or a firm hand grip, dip the entire mug into the cream glaze for about 3 seconds. Lift it out and shake it gently to remove excess drips. -
Clean the rim:
Once the glaze is dry to the touch, gently sponge off the very top edge of the rim if you plan to add a distinct contrasting band, though layering is also an option.
Fix Smudged Lines
If your oxide lines smudge on the powdery unfired glaze, don’t wipe it! Let it dry, then scratch the mistake off gently with a needle tool.
Step 2: detail Work & Finishes
-
Plan the botanical:
Sketch your plant design on paper first. The image shows a simple, airy sprig with a central stem and small off-shooting branches, mimicking dried grass or etched wildflowers. -
Paint the stem:
Using a very fine liner brush and your iron oxide wash (or a dark brown underglaze), paint a thin, slightly curved vertical line for the main stem. Keep your hand loose to mimic natural growth. -
Add the branches:
Paint short, upward-angled strokes extending from the main stem. Vary the length and spacing to keep it looking organic rather than perfectly symmetrical. -
Detail the tips:
At the end of each small branch, dap tiny dots or minute dashes. This creates the texture of seeds or tiny floral buds characteristic of dried meadow grasses. -
Create the rim effect:
To get that soft, brownish rustic edge, load a sponge or a wider brush with iron oxide wash or a toasted brown glaze. Gently dab or wipe it along the rim, allowing it to bleed slightly down the inner and outer edge. -
Inspect the foot:
Before firing, check the bottom of the mug again. Wipe away any wayward glaze droplets that might have snuck past your wax resist. -
Final dry:
Let the mug dry completely for at least 24 hours. Moisture trapped in the clay walls can cause issues during the firing process. -
Fire the kiln:
Load the mug into the kiln and fire to the temperature specified by your clay and glaze manufacturer (typically Cone 5 or 6 for stoneware durability).
Add a Cork Base
Glue a circular sheet of thin cork to the bottom of the finished fired mug. It protects tables and adds a cozy, mixed-material aesthetic.
Pour yourself a hot drink and enjoy the serene, earthy vibe of your new favorite mug


What Really Happens Inside the Kiln
Learn how time and temperature work together inside the kiln to transform clay into durable ceramic.
Circle Snapshot Medallions
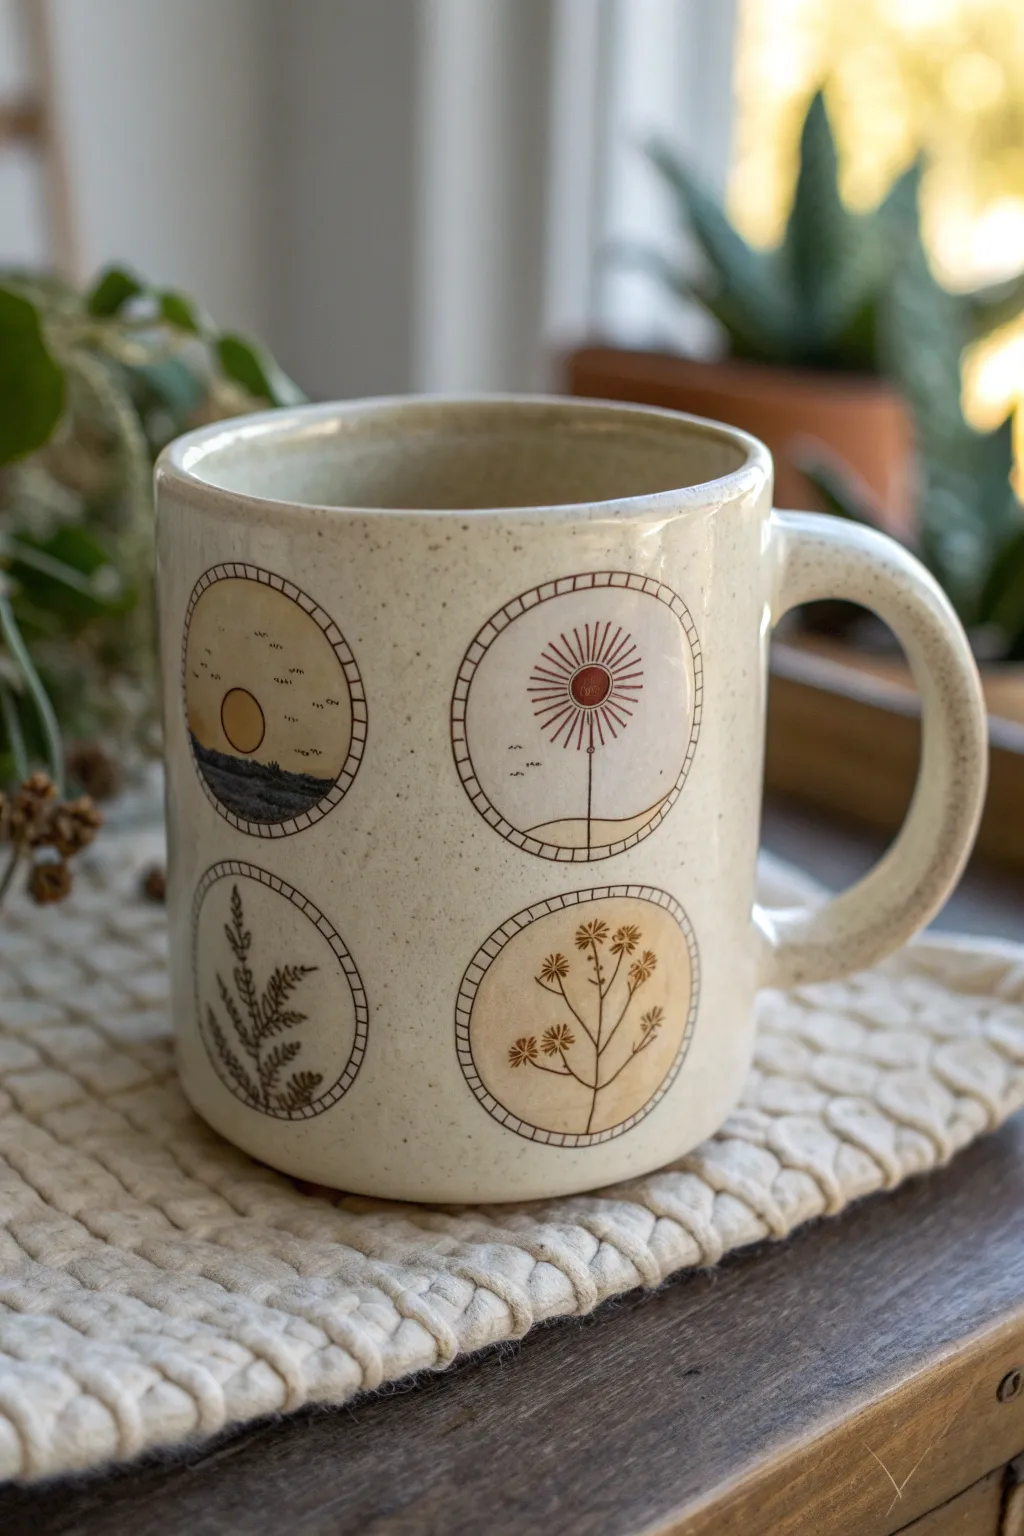
Capture the serenity of nature with this minimalist ceramic project featuring four delicate circular vignettes. The design combines earthy tones and fine line work to create a warm, speckled mug perfect for morning coffee.
How-To Guide
Materials
- Blank bisque-fired ceramic mug (preferably speckled stoneware clay)
- Underglaze pencil (black or dark brown)
- Underglazes (mustard yellow, burnt orange, terracotta, sage green, dark blue)
- Fine detail paintbrushes (sizes 00 and 000)
- Clean sponge
- Clear transparent glaze (food safe)
- Compass or circle stencil (approx. 1.5 inch diameter)
- Pencil for sketching
- Kiln access (or a pottery studio service)
Step 1: Preparation & Layout
-
Clean surface:
Begin by wiping down your bisque-fired mug with a damp sponge to remove any kiln dust or oils from your hands, ensuring a clean surface for adhesion. -
Mark placement:
Using a regular pencil, lightly mark four evenly spaced points around the circumference of the mug’s body. These will be the centers of your medallions. -
Outline circles:
Use a circle stencil or a compass to lightly sketch four circles of equal size (about 1.5 inches) onto the mug. The graphite will burn off in the kiln. -
Create borders:
Draw the permanent borders using the black underglaze pencil. Create a double ring—one outer circle and one slightly smaller inner circle—leaving a few millimeters of space between them for hatch marks later.
Clean Lines Pro-Tip
If using liquid underglaze for fine lines instead of a pencil, mix in a tiny drop of water or gum solution. This helps the paint flow smoothly off the brush for crisp, unbroken lines.
Step 2: Painting the Motifs
-
Sketch the designs:
Lightly sketch your four motifs inside the circles with a regular pencil: a sunrise over hills, a radiating sunburst, a fern frond, and a flowering wildflower stalk. -
Base colors: Landscape:
For the landscape medallion, paint the bottom hill area with a thin wash of dark blue underglaze. Paint the sun circle with a solid coat of mustard yellow. -
Base colors: Sunburst:
Move to the sunburst medallion. Paint a small central circle in terracotta underglaze. Add a faint wash of cream or very pale yellow to the background if desired. -
Base colors: Florals:
For the two floral medallions, apply a very diluted wash of mustard yellow or beige to the background of the circles to give them that warm, aged paper look seen in the photo. -
Drying time:
Let all the base colors dry completely until they are chalky to the touch. This usually takes about 15-20 minutes.
Step 3: Fine Line Detailing
-
Outline the landscape:
Using the underglaze pencil or a liner brush with black underglaze, add tiny birds and horizon lines to the landscape circle. Keep the lines crisp. -
Detail the sunburst:
Carefully draw radiating lines extending from the center of the sunburst medallion. Vary the lengths to create interest, and add a straight vertical stem line downward. -
Draw the fern:
For the fern medallion, draw a central stem curve. Add small, leaf-like dashes branching off the stem, keeping the strokes loose and organic. -
Define the wildflowers:
Outline the wildflower stems and add small cluster details at the tips. Use a tiny dot of rusty orange underglaze for the flower centers. -
Hatch the borders:
Go back to your double-ring borders. Draw small, evenly spaced perpendicular lines connecting the inner and outer rings to create a ‘stitched’ or ladder effect.
Level Up: Texture
Instead of drawing the border hatch marks, use a small carving tool to physically scratch these lines into the clay before the first bisque firing for a tactile, recessed feel.
Step 4: Glazing & Firing
-
Clear glaze application:
Once all underglaze details are perfectly dry, dip the entire mug into a clear, food-safe transparent glaze. Ensure an even coat and shake off drips gently. -
Wipe the foot:
Use a wet sponge to completely wipe any glaze off the bottom foot of the mug so it doesn’t stick to the kiln shelf. -
Final fire:
Fire the mug in the kiln according to the clay and glaze manufacturer’s instructions (typically Cone 5 or 6 for stoneware) to finish the piece.
Enjoy sipping from your custom mug that perfectly balances rustic charm with precise botanical art
Monogram Letter With Photo Fill
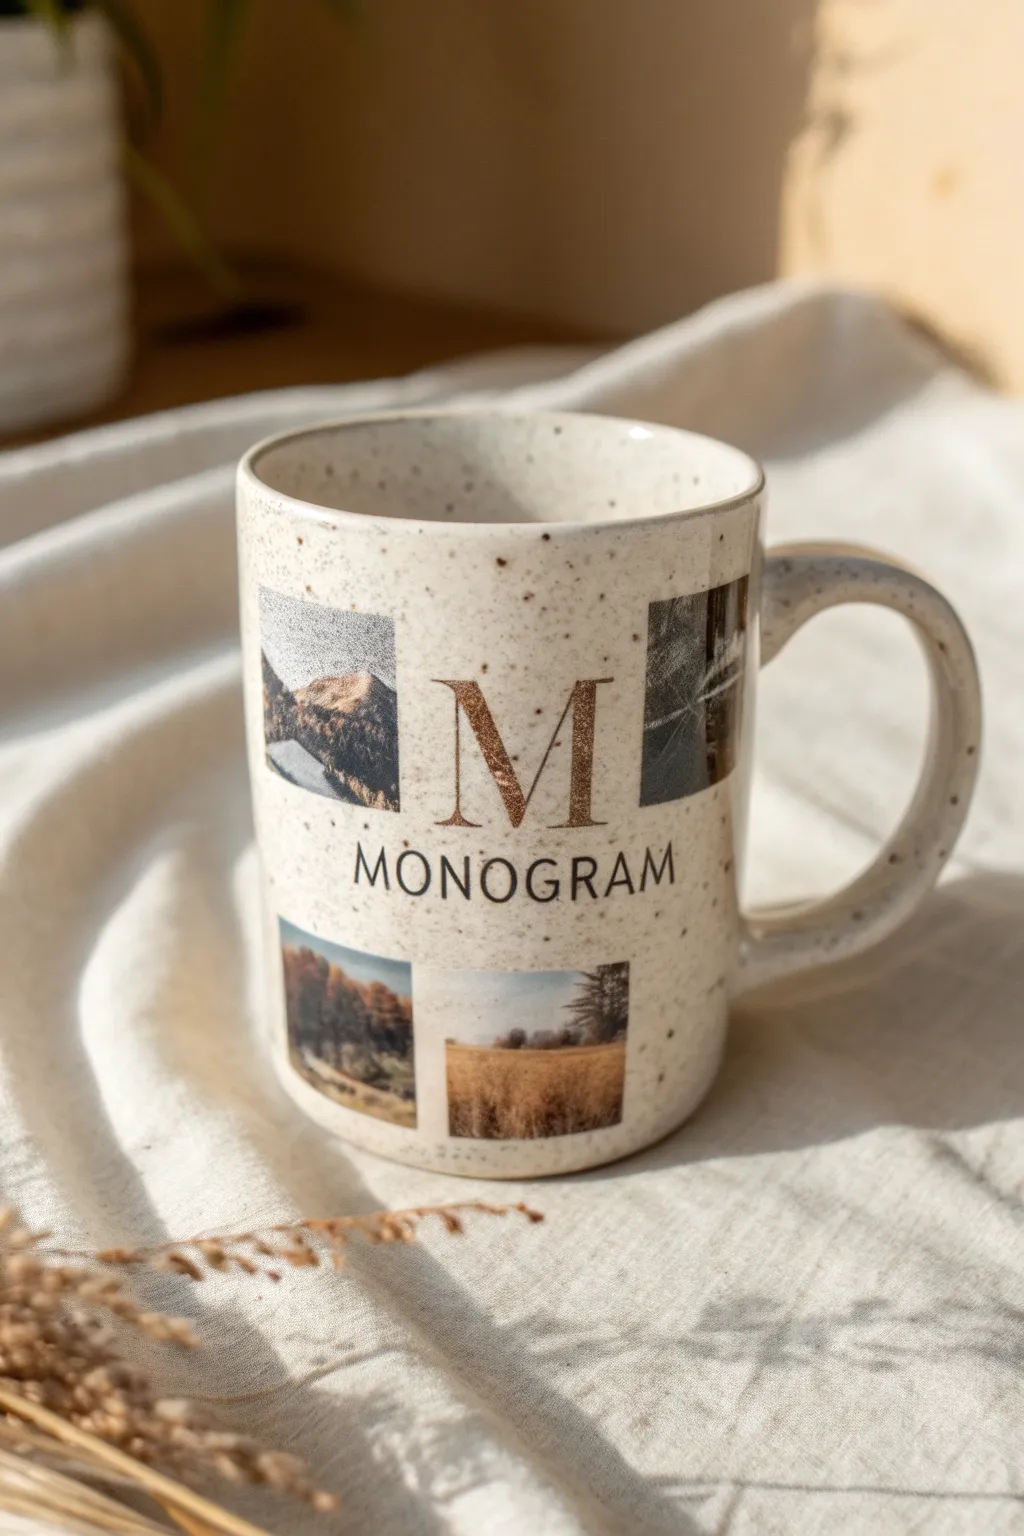
Transform a simple ceramic mug into a personalized keepsake featuring a clear monogram surrounded by cherished snapshots. This design elevates the classic photo mug with a clean, grid-like layout and elegant typography that complements the speckled finish of the ceramic.
Step-by-Step
Materials
- White or cream speckled ceramic mug (sublimation-ready)
- Sublimation printer
- Sublimation paper
- Heat resistant tape
- Mug press or convection oven suitable for sublimation
- Graphic design software (Canva, Photoshop, etc.)
- 4 high-quality digital photos
- Soft cloth
- Rubbing alcohol
- Scissors
Step 1: Designing the Template
-
Measure your canvas:
Start by measuring the printable area of your specific mug. A standard 11oz mug typically has a printable area of about 8.5 x 3 inches, but double-check your mug’s curvature limitations. -
Set up the digital file:
Open your design software and create a new canvas matching your measurements. Set the resolution to 300 DPI to ensure your photos print with crystal-clear sharpness. -
Create the central focal point:
Type a large serif letter (like the ‘M’ shown) in the center of the canvas. Choose a font with varying line weights for an elegant look. I often change the text color to a soft brown or gold texture to match the rustic vibe. -
Add the subtitle text:
Directly below the large initial, type the full name or word (e.g., ‘MONOGRAM’) in a smaller, clean sans-serif font. Ensure it is perfectly centered under the main letter. -
Create image placeholders:
Draw four square frames around the central text. Place two on the left side (stacked vertically) and two on the right side. Leave equal spacing between the photos and the central text. -
Insert your photos:
Drag and drop your chosen landscape and nature photos into the square frames. Adjust the cropping so the best part of the image is visible within the square boundaries. -
Finalize the color palette:
Apply a subtle filter to your photos if needed to ensure they share a similar warm or earthy tone, creating a cohesive aesthetic with the text color.
Fixing Ghosting
If the image looks blurry or doubled, the paper shifted during pressing. Use way more heat tape next time to lock it down.
Step 2: Printing and Preparation
-
Mirror the design:
Before printing, flip your entire design horizontally. This is crucial for sublimation; if you forget this, your text will appear backward on the finished mug. -
Print the transfer:
Load your sublimation paper into the printer, ensuring you are printing on the correct side (usually the brighter white or tacky side). Print using high-quality settings. -
Trim the paper:
Once the ink is dry, use scissors to trim the excess paper around the design. Leave a small margin of white space to make handling easier. -
Clean the mug surface:
Wipe the mug down thoroughly with a soft cloth and a little rubbing alcohol. This removes unseen oils or dust that could cause faint blue spots or uneven transfer.
Make It Golden
Use a glitter texture overlay on the ‘M’ letter in your digital file to fake a metallic gold look without needing foil.
Step 3: Applying the Heat
-
Position the design:
Wrap the printed paper around the mug, ink side facing the ceramic. Center the handle with the gap in the paper to ensure the design sits evenly on the front. -
Secure firmly:
Use heat-resistant tape to secure the paper tightly. Tape the edges and under the rim. Any gaps or looseness can lead to ‘ghosting,’ where the image looks blurry. -
Press the mug:
Place the mug into your mug press, which should be preheated to approximately 380°F – 400°F (193°C – 204°C). Press for about 180-240 seconds with medium-heavy pressure. -
Cool down:
Using heat-resistant gloves, remove the mug from the press. Carefully peel away the tape and paper immediately to stop the sublimation process. -
Final reveal:
Set the mug on a heat-safe surface to cool completely. The colors will look vibrant and permanent once firmly set into the coating.
Enjoy your beautiful new custom mug with your morning coffee

TRACK YOUR CERAMIC JOURNEY
Capture glaze tests, firing details, and creative progress—all in one simple printable. Make your projects easier to repeat and improve.
Then-and-Now Timeline Strip
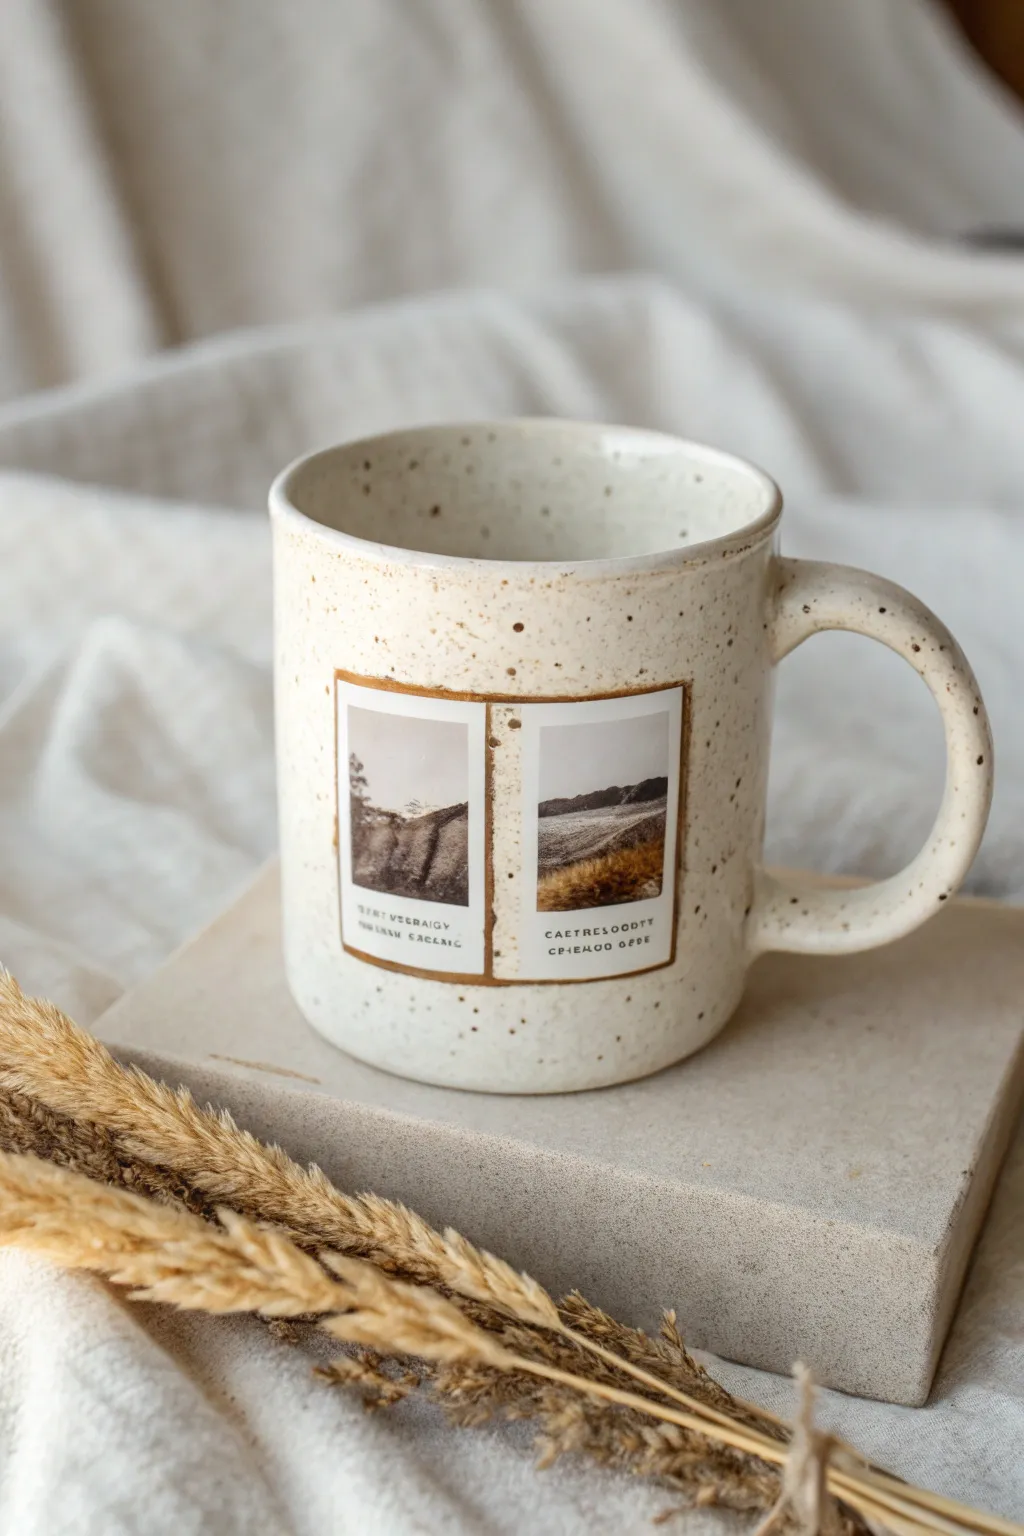
Transform a plain ceramic mug into a nostalgic keepsake by combining a custom speckled finish with a vintage-style photo transfer. This then-and-now timeline strip design evokes the charm of old polaroids, making it a perfect personalized gift.
How-To Guide
Materials
- Plain white ceramic mug
- Ceramic paint (Cream/Off-white)
- Ceramic paint (Dark Brown/Espresso)
- Waterslide decal paper (or ceramic transfer paper)
- Inkjet or Laser printer
- Clear acrylic sealant spray
- Paintbrush (flat, medium size)
- Old toothbrush or stiff bristle brush
- Bowl of water
- Sponge or squeegee tool
- Scissors or craft knife
- Rubbing alcohol
- Oven (for curing)
Step 1: Preparing the Base
-
Clean the surface:
Before doing anything, wipe down the entire mug with rubbing alcohol to remove oils and fingerprints. This ensures the paint and decals adhere perfectly. -
Apply the base coat:
Paint the entire exterior of the mug with a creamy off-white ceramic paint. You might need two thin coats rather than one thick one to avoid drips. Let it dry completely between layers. -
Create the speckled effect:
Dip an old toothbrush into your dark brown ceramic paint. Hold the brush a few inches from the mug and run your thumb across the bristles to flick tiny specks of paint onto the surface. -
Refine the texture:
Rotate the mug as you splatter to ensure even coverage. If you get a blob that is too big, quickly dab it with a paper towel to blend it out or wipe it away. Let the speckled paint dry for at least 24 hours.
Step 2: Designing the Timeline Strip
-
Select your photos:
Choose two images for your ‘then and now’ concept. Using photo editing software, resize them to fit side-by-side within a rectangle that is roughly 2 inches high by 3.5 inches wide. -
Add the vintage border:
Create a border around your photos in the software. Give it a slightly distressed, brownish-gold tone to match the mug’s aesthetic. Add caption text underneath each photo if desired. -
Print the decal:
Print your design onto waterslide decal paper. Ensure you print on the glossy side. Allow the ink to dry fully before handling. -
Seal the ink:
Take your printed sheet outside and spray it with clear acrylic sealant. This prevents the ink from running when it touches water. Apply three light coats, letting each dry for 15-20 minutes. -
Trim the design:
Cut out your timeline strip precisely, leaving a very small margin (about 1mm) around the colored border.
Decal Wrinkling?
If the decal wrinkles while smoothing, wet your finger slightly and gently work the wrinkle out. Don’t pull dry film or it will tear.
Step 3: Application and Curing
-
Soak the decal:
Submerge your cutout decal in a bowl of lukewarm water for about 30-60 seconds until the backing paper starts to slide easily. -
Position on the mug:
Place the decal against the mug where you want the design to sit. Gently slide the white backing paper out from underneath while holding the clear film in place. -
Smooth it out:
I prefer using a small rubber squeegee or a damp sponge for this part; gently push out all water and air bubbles from the center toward the edges. This is crucial for a smooth finish. -
Clean up edges:
Gently dab away excess water with a paper towel. Ensure the corners are fully adhered to the ceramic surface. -
Final cure:
Following the instructions on your specific ceramic paint and decal paper, bake the mug in an oven. Typically, this involves placing the mug in a cold oven, heating to 350°F, baking for 30 minutes, and cooling inside the oven.
Textured Touch
For a tactile feel, dab a tiny bit of clear 3D glaze over the photos after baking to give them a raised, glossy ‘photo paper’ texture.
Your personalized timeline mug is now ready to hold warm memories along with your morning coffee
Couple Photo With Heart Cutout Window
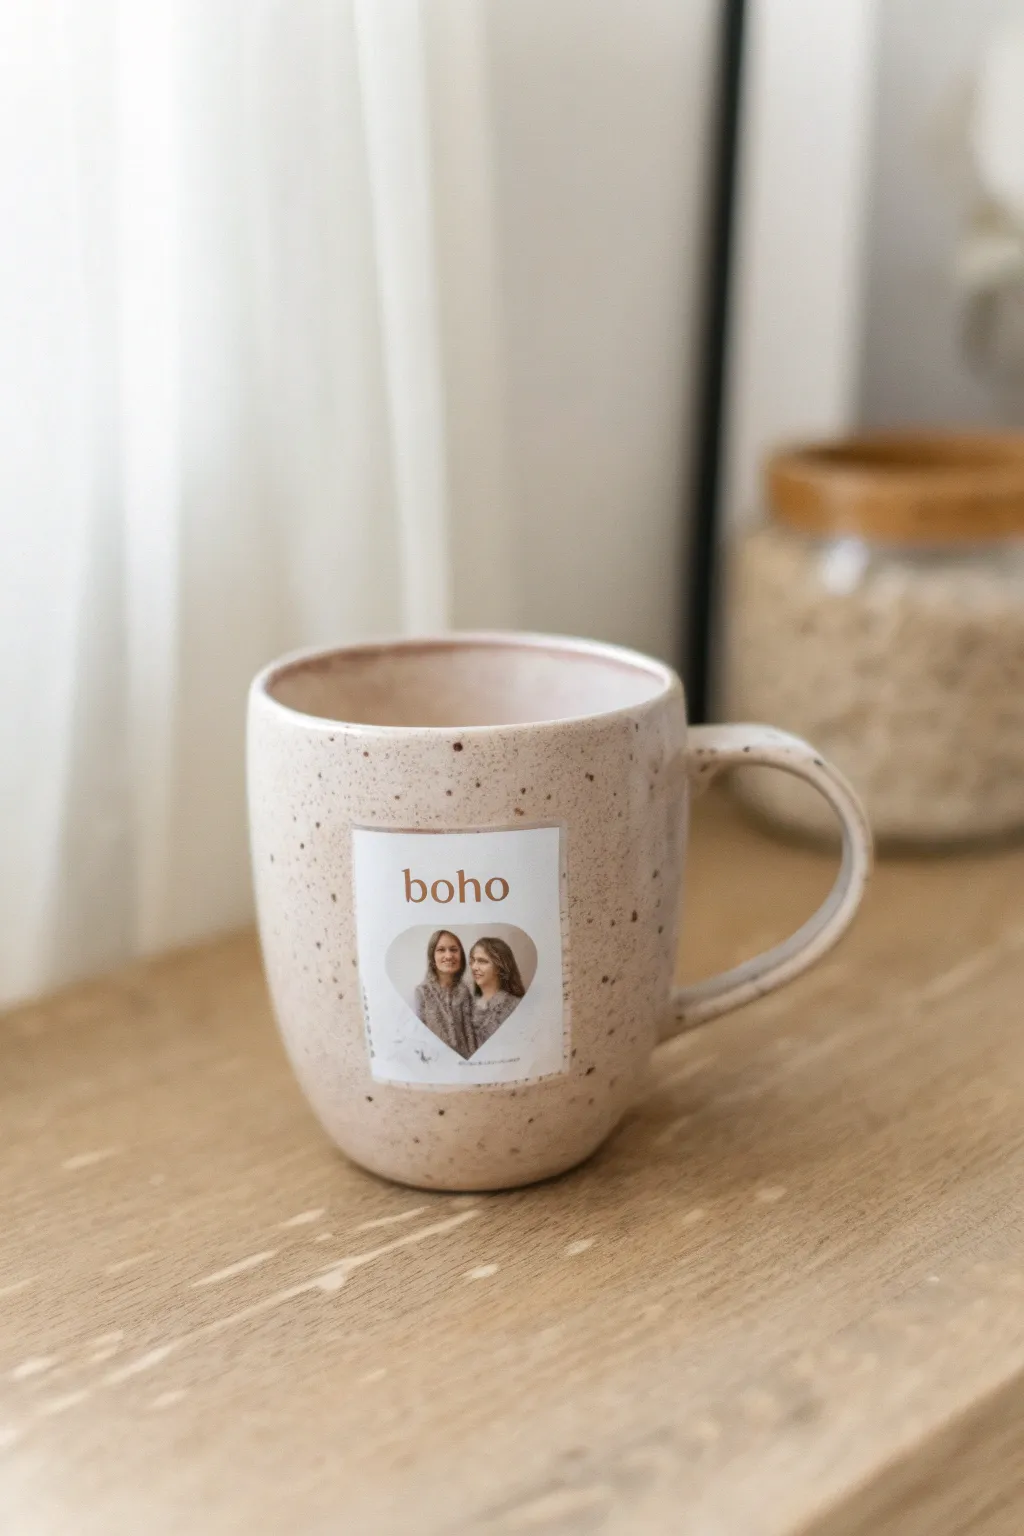
Transform a simple speckled mug into a personalized keepsake with this minimalist photo decal. The design features a clean white background, aesthetic typography, and a sweet heart-shaped window for your favorite couple photo.
Step-by-Step
Materials
- Speckled ceramic mug (beige or cream)
- Waterslide decal paper (ensure compatibility with your printer type: Inkjet or Laser)
- Inkjet or Laser printer
- Clear acrylic sealant spray (for Inkjet paper only)
- Scissors or craft knife
- Small bowl of lukewarm water
- Lint-free cloth or paper towel
- Photo editing software (Canva, Photoshop, etc.)
- Digital photo of the couple
Step 1: Designing the Label
-
Set up your canvas:
Open your design software and create a new project. A standard rectangular size like 2 inches wide by 2.5 inches tall works well for most mugs, but measure your mug’s surface first to be sure. -
Insert the shape:
Place a heart shape in the lower center of your rectangle. This will act as your photo frame. -
Add the photo:
Import your couple photo and use a ‘clipping mask’ or ‘crop to shape’ tool to fit it perfectly inside the heart. Adjust the photo so faces are centered and visible. -
Add the text:
Above the heart, type the word ‘boho’ using a clean, serif font. Change the text color to a warm, earthy brown to match the aesthetic. -
Finalize the background:
Ensure the background behind the text and heart is set to pure white. Add a very faint grey border around the rectangle if you need a cutting guide, though I prefer to leave it borderless for a cleaner look.
Ink Running?
If the ink blurs when soaking, you likely didn’t use enough acrylic spray. Ensure you apply 3 solid coats and let them dry completely before dipping in water.
Step 2: Printing and Sealing
-
Print the design:
Load your waterslide decal paper into the printer. Print on the glossy side. Select ‘Photo’ or ‘Best Quality’ within your printer settings for sharp details. -
Dry the ink:
Let the printed sheet sit undisturbed for at least 10-15 minutes or until the ink is completely dry to the touch. -
Apply sealant (Inkjet only):
If using an Inkjet printer, take the paper to a well-ventilated area. Spray an even coat of clear acrylic sealant over the design. Let it dry for 5 minutes, then repeat for a total of 3 coats. -
Cut out the decal:
Once fully dry, use scissors to cut out the rectangular label. Trim carefully along the edges of the white rectangle to keep the lines sharp.
Step 3: Application
-
Soak the decal:
Submerge your cut-out decal into a small bowl of lukewarm water. Watch for the paper to curl up and then flatten out again, which usually takes about 30-60 seconds. -
Check readiness:
Gently try to slide the clear film layer against the white paper backing using your thumb. If it slides easily, it is ready to apply. -
Clean the mug:
Wipe the surface of the mug with rubbing alcohol or a damp cloth to remove any oils or dust. Dry it thoroughly. -
Position the decal:
Place the wet decal (still on the backing) against the mug surface. Gently slide the white backing paper out from underneath while holding the film layer in place. -
Smooth it out:
Once the backing is removed, position the label exactly where you want it. It will slide slightly while wet. -
Remove water and bubbles:
Use a damp paper towel or a rubber squeegee to gently press from the center of the decal outward. This removes excess water and air bubbles trapped underneath. -
Final drying:
Let the mug cure for at least 24 hours. For extra durability, some decal papers allow baking in the oven at low heat (check your specific paper’s instructions).
Make it Last
To make the mug dishwasher safe, apply a layer of food-safe Mod Podge or a dishwasher-safe varnish over the entire dried decal as a final step.
Enjoy sipping your morning coffee while admiring your custom-made boho masterpiece
Pet Portrait With Simple Border
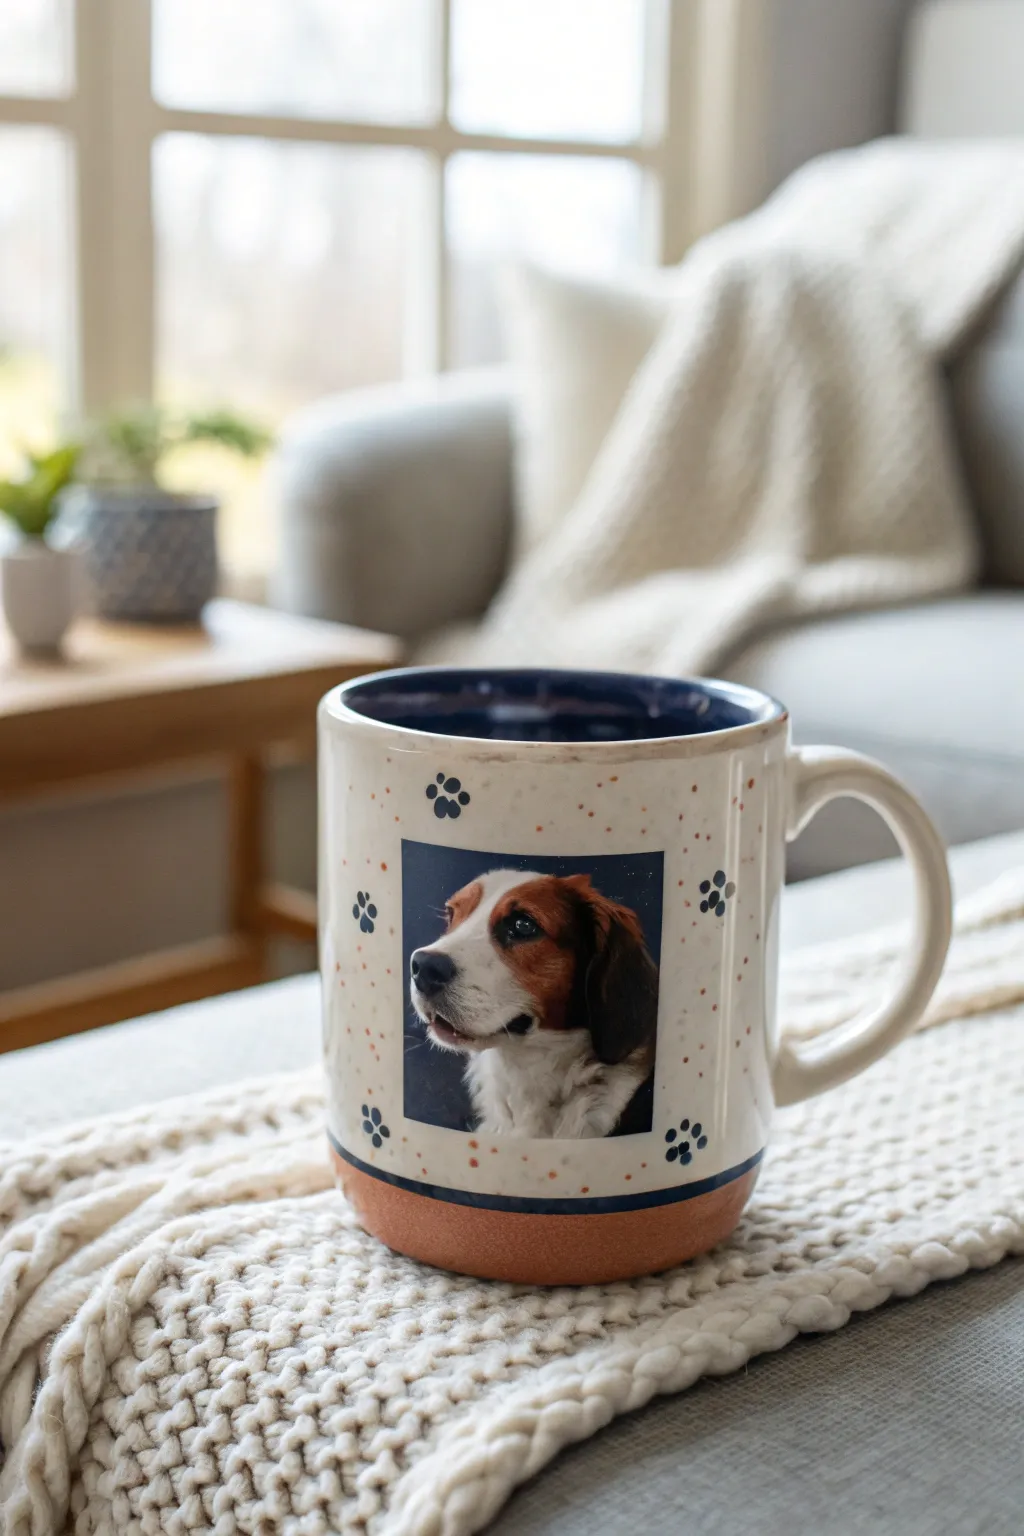
Immortalize your furry best friend with this delightful personalized mug project that combines a clean photo transfer with hand-painted accents. The result is a charming, speckled keepsake featuring paw prints and subtle earthy tones that framed your pet’s portrait perfectly.
Detailed Instructions
Materials
- Blank white ceramic mug (straight-sided works best)
- Waterslide decal paper (for inkjet or laser, matching your printer)
- Clear acrylic sealant spray
- Ceramic or porcelain paints (terracotta, navy blue, black)
- Small flat brush
- Fine detail brush or dotting tool
- Rubbing alcohol
- Lint-free cloth
- Bowl of lukewarm water
- Scissors
- Oven (for curing)
Step 1: Preparing the Canvas
-
Clean surface:
Before doing anything else, wipe down the entire exterior of the mug with rubbing alcohol on a lint-free cloth. This removes any invisible oils or dust that could prevent the decal or paint from adhering properly. -
Mask the base:
To create the distinct terracotta bottom shown in the photo, use painter’s tape to mask off the bottom half-inch to inch of the mug. Ensure the tape line is perfectly straight and pressed down firmly to prevent leaks.
Step 2: Painting the Base & Accents
-
Paint the bottom:
Load your flat brush with terracotta-colored ceramic paint. Apply an even coat to the exposed base area below your tape line. You might need two coats for full opacity; let the first coat dry for about 20 minutes before adding the second. -
Add the speckled effect:
Mix a tiny amount of the terracotta paint with water to thin it slightly. Dip a stiff-bristled brush or a toothbrush into it, and flick the bristles with your thumb to splatter tiny dots across the main white body of the mug. -
Paint the rim:
Using a steady hand and a small brush, paint a thin navy blue line around the very bottom edge where the white meets the terracotta (once the tape is removed) or along the top rim if you wish to match the interior color. -
Dry time:
Allow all paint to dry completely according to the manufacturer’s instructions, usually at least one hour, before proceeding to the decal step.
Decal ripping?
If the decal tears easily, you likely didn’t use enough acrylic spray layers. Add one extra coat of sealant next time and let it cure longer before soaking.
Step 3: Creating the Photo Decal
-
Edit and print:
Crop your pet’s photo into a square on your computer. Print onto the waterslide decal paper using your highest quality print settings. If you are using an inkjet printer, let the ink dry for 10-15 minutes. -
Seal the ink:
Take the printed sheet outside or to a well-ventilated area. Spray a thin, even coat of clear acrylic sealant over the image. Let it dry for 5 minutes, then repeat this process two more times for a total of three coats. This is crucial to prevent the ink from running in the water. -
Cut the decal:
Once fully dry, cut out your square photo. Leave a very small margin (about 1-2mm) of white space around the printed edge to ensure the water doesn’t seep into the ink layers on the sides.
Level Up: 3D Texture
Use a specialized ‘puff paint’ for ceramics when adding the paw prints. This creates a raised, tactile texture that makes the design fun to touch.
Step 4: Application & Finishing Touches
-
Soak the decal:
Submerge the cutout decal into a bowl of lukewarm water. Watch it closely; after about 30-60 seconds, the film should start to slide easily against the paper backing. -
Apply to mug:
I prefer to wet the surface of the mug slightly before placing the decal. Slide the film off the backing paper directly onto the center of the mug. Position it carefully while it’s still wet and movable. -
Smooth it out:
Using a damp paper towel or a squeegee tool, gently smooth the decal from the center outward to push out all air bubbles and excess water. Be gentle to avoid tearing the film. -
Paint paw prints:
Once the decal is set and dry to the touch, use a fine detail brush or a dotting tool dipped in black or navy ceramic paint. Create small paw prints around the photo frame: one larger central dot for the pad and three or four smaller dots for the toes. -
Cure the project:
Let the mug sit for 24 hours to fully dry. Then, place the mug in a cold oven and turn the heat to 350°F (175°C). Bake for 30 minutes, then turn the oven off and let the mug cool completely inside the oven before removing.
Now you have a wonderful, personalized vessel for your morning coffee that celebrates your furry friend.
Kids’ Drawing Plus Photo Duo
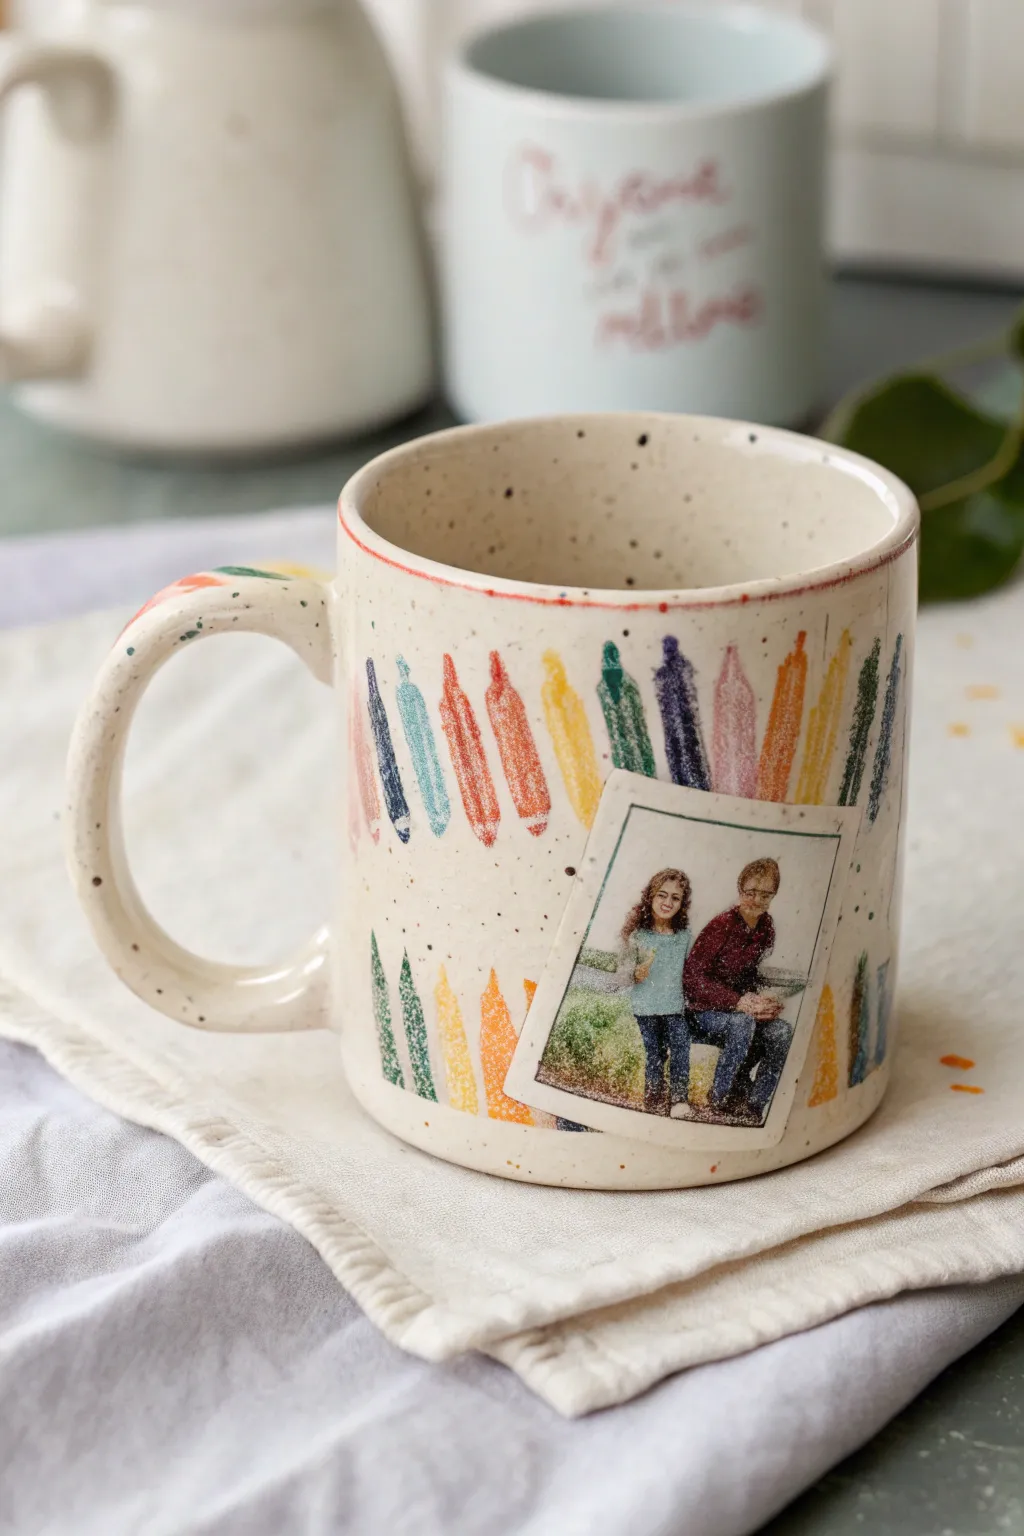
Turn a simple ceramic mug into a nostalgic keepsake by combining a playful, hand-drawn crayon motif with a cherished family memory. This project mimics the look of a child’s drawing tacked up on the fridge, complete with a charming Polaroid-style photo transfer.
Step-by-Step Tutorial
Materials
- White or cream ceramic mug (bisque or glazed)
- Ceramic paint markers (various bright colors)
- Waterslide decal paper (for inkjet or laser printer)
- Clear acrylic spray sealant
- Rubbing alcohol
- Cotton pads
- Digital family photo
- Scissors or precision craft knife
- Bowl of water
- Soft cloth or paper towel
- Oven (for baking the paint)
Step 1: Prepping the Surface
-
Clean the mug:
Before adding any design, wipe the entire outer surface of your mug with rubbing alcohol on a cotton pad. This removes invisible oils and fingerprints that could prevent the paint markers from adhering properly. -
Plan the layout:
Visualize where your photo will sit before you start drawing. You want the crayon design to serve as a background pattern, so leave a slight mental gap or plan to layer the photo over the drawing later.
Decal Tearing?
If your decal tears while sliding it off, you likely didn’t spray enough clear coat layers. Add one more layer of sealant next time to make the film sturdier.
Step 2: Drawing the Crayon Border
-
Outline the crayons:
Starting near the top rim, use ceramic paint markers to draw vertical crayon shapes. Each shape should have a pointed triangle top and a long rectangular body. I like to vary the heights slightly to give it a loose, hand-drawn feel. -
Fill in the color:
Color inside your outlines using scribbly, textured strokes rather than solid blocks of ink. This mimics the waxy texture of real crayon drawings. -
Create the repeating pattern:
Alternate colors—red, blue, yellow, green, purple—all the way around the top section of the mug. Create a second row of crayon tips peeking up from the bottom edge of the mug to frame the design. -
Add rim details:
Run a thin line of red or orange marker along the very top rim of the mug. Don’t worry if it’s not perfect; a shaky line adds to the charm. -
Decorate the handle:
Add a few stray crayon strokes or swipes of color to the top of the handle to tie the whole piece together. -
Let the paint dry:
Allow the marker design to dry completely for at least 24 hours. This is crucial before baking or applying the decal. -
Bake to set:
Place the mug in a cold oven, then heat to 350°F (175°C). Bake for 30 minutes, then turn the oven off and let the mug cool down completely inside to prevent cracking.
Step 3: Adding the Polaroid Photo
-
Edit your photo:
On your computer, crop your chosen image into a square format. Add a white border around it, making the bottom border significantly thicker to imitate an instant film photo. -
Print the decal:
Print your edited creative onto waterslide decal paper. Ensure you are printing on the glossy side. Allow the ink to dry fully if using an inkjet printer. -
Seal the decal:
Take the printed sheet to a well-ventilated area and spray it with three thin, even coats of clear acrylic sealant, letting it dry for 10 minutes between each coat. -
Cut out the image:
Once the sealant is dry, cut precisely around the white border of your faux Polaroid. -
Soak the decal:
Submerge the cutout into a bowl of lukewarm water for about 30-60 seconds, or until the film starts to slide easily off the paper backing. -
Apply to the mug:
Position the decal over the crayon background. Gently slide the paper backing out from underneath while smoothing the film onto the ceramic surface. -
Smooth it out:
Use a damp paper towel or a soft squeegee to gently press from the center outward, removing all water bubbles and wrinkles. Be gentle to avoid tearing the thin film. -
Final drying time:
Let the decal set and dry completely for another 24 hours. Depending on your decal paper brand, a final gentle bake (at lower heat) or a coat of decoupage medium may be recommended to seal it permanently.
Vintage Vibe
For an older look, edit your photo with a sepia or grain filter before printing. Use a slightly muted color palette for the crayon drawings to match.
Now you have a personalized mug that perfectly captures a sweet moment in time
Seasonal Picture With Tiny Icon Scatter
Transform a plain speckled ceramic mug into a nostalgic fall keepsake by combining a central scenic photograph with delicate hand-drawn accents. This project blends the sharp realism of a photo transfer with the whimsical charm of tiny, scattered leaf illustrations.
How-To Guide
Materials
- Speckled cream or off-white ceramic mug
- High-quality waterslide decal paper (laser or inkjet compatible)
- Clear acrylic spray sealant
- Bowl of lukewarm water
- Squeegee or soft rubber rib
- Pebeo Porcelaine 150 paints (Rust red, Olive green, Ochre yellow, Gold)
- Fine detail paintbrush (size 00 or 000)
- Rubbing alcohol and cotton pads
- Domestic oven for baking
Step 1: Preparing the Photo Decal
-
Select your image:
Choose a high-resolution vertical or square photo that captures a seasonal mood, like the winding autumn forest road shown in the example. -
Resize and print:
Scale the image on your computer to fit the face of your mug, typically around 2.5 to 3 inches tall. Print this onto your waterslide decal paper according to the manufacturer’s settings for ‘glossy photo paper’. -
Seal the print:
If using an inkjet printer, take the printed sheet to a well-ventilated area and spray it with three thin, even coats of clear acrylic sealant. -
Allow for drying:
Let the sealant dry completely for at least 30 minutes between coats to prevent the ink from bleeding when submerged later. -
Trim the decal:
Cut out your photo carefully using sharp scissors or a craft knife. For this specific design, keep the edges crisp and straight to maintain that polaroid-style square look.
Decal durability pro-tip
For maximum longevity, apply a layer of food-safe decoupage glue specifically designed for ceramics (like Mod Podge Dishwasher Safe) over the decal before baking.
Step 2: Applying the Centerpiece
-
Clean the surface:
Wipe the mug thoroughly with rubbing alcohol on a cotton pad to remove any oils or fingerprints, ensuring a strong bond. -
Soak the decal:
Place your trimmed decal into a bowl of lukewarm water for about 30-60 seconds, or until the film begins to slide easily off the paper backing. -
Position on mug:
I usually hold the backing paper against the mug’s center, slide the film off gently with my thumb, and position it squarely on the face of the mug. -
Smooth it out:
Using a squeegee or a damp paper towel, firmly smooth out the decal from the center toward the edges to remove all water and air bubbles. -
Dry the decal:
Let the mug sit for at least 4 hours (or overnight) to ensure the decal is bone dry before you start painting around it.
Step 3: Painting the Icon Scatter
-
Plan your scatter:
Visualize a loose boundary around the photo where you want your icons to float. You want them to frame the image without crowding it. -
Paint olive branches:
Dip your fine liner brush into olive green glass paint. Paint simple, stylized branches with three or four thin lines acting as needles or leaves. -
Add rust leaves:
Switch to a rust-red color. Paint small, single leaf shapes—simple ovals with pointed tips—scattered diagonally near the corners of the photo. -
Detail the veins:
Once the rust leaves are tacky-dry, use a very fine touch of darker paint or a micro-tip black porcelain marker to draw a simple central vein line on them. -
Introduce golden touches:
Using ochre or gold paint, add tiny five-point stars and small dots randomly in the empty spaces to create a magical ‘dust’ effect. -
Clean up edges:
If any paint smears or goes astray, quickly wipe it away with a Q-tip dipped in rubbing alcohol while it is still wet.
Level up your design
Add a hidden detail by painting a small matching leaf or star icon on the inside rim of the mug or at the very bottom of the handle for a sweet surprise.
Step 4: Curing the Artwork
-
Initial dry time:
Allow the painted mug to dry for 24 hours. The porcelain paint needs to fully set before heat curing. -
Prepare for baking:
Place the mug into a cold oven. Do not preheat, as sudden temperature changes can crack the ceramic. -
Bake carefully:
Set the oven to 300°F (150°C) and bake for 35 minutes. Turn the oven off and leave the mug inside to cool down gradually with the oven door closed. -
Final check:
Once cool, verify that the decal hasn’t yellowed and the paint feels hard and glossy to the touch.
Now you have a perfectly customized autumn mug ready for warm cider or coffee
Heat-Reveal Hidden Picture Surprise
Transform a plain mug into a magical morning surprise with this heat-sensitive paint project. At first glance, it appears as a sleek, solid matte black vessel, but once hot coffee is poured in, the dark coating vanishes to reveal a delicate, hand-painted floral design beneath.
How-To Guide
Materials
- White or light grey ceramic mug
- Thermochromic pigment powder (black, 31°C activation)
- Clear epoxy resin (food-safe for outer coating) or dishwasher-safe decoupage glue
- Ceramic paints (orange, brown, dark grey)
- Fine detail paintbrushes (size 0 and 00)
- Small mixing cups
- Popsicle sticks for stirring
- Rubbing alcohol
- Lint-free cloth
- Oven (for baking ceramic paint)
Step 1: Painting the Base Design
-
Prep the surface:
Begin by thoroughly cleaning your ceramic mug with rubbing alcohol and a lint-free cloth. This removes any oils or fingerprints that could prevent the paint from adhering properly. -
Draft the stems:
Using a size 0 brush and dark brownish-grey ceramic paint, carefully sketch the main stems of your floral design. I like to start from the bottom edge and curve upwards naturally, mimicking how a wildflower grows. -
Paint the leaves:
Add small, teardrop-shaped leaves along the stems. Keep the paint application thin and even. For the veined look seen in the photo, paint the leaf outline first, let it dry slightly, and then add delicate internal lines. -
Add floral details:
Switch to your orange ceramic paint for the flower accents. Paint small clusters of blooms or buds near the top of your stems. You can layer a darker orange over a lighter base to create depth and dimension. -
Cure the base layer:
Allow the painted design to dry completely for at least 24 hours. Once dry, bake the mug in your oven according to the ceramic paint manufacturer’s instructions to set the design permanently.
Step 2: Mixing the Magic Layer
-
Measure the resin:
In a small mixing cup, pour a small amount of clear epoxy resin or your chosen glossy sealant. You only need enough to cover the exterior where the design sits. -
Add the pigment:
Gradually stir in the black thermochromic pigment powder. A standard ratio is about 1 part powder to 4 parts medium, but check your pigment’s specific instructions for the most opaque coverage. -
Check consistency:
Mix slowly to avoid creating air bubbles until you have a smooth, consistent black paste. It should be thick enough to cover the design but fluid enough to brush on smoothly.
Uneven Fade?
If the reveal looks patchy, your pigment layer might be uneven. Apply thinner, multiple coats rather than one thick gloop to ensure a smooth transition.
Step 3: Applying the Disguise
-
Apply the first coat:
Using a soft, wide brush, apply the black mixture over the entire exterior of the mug. Work quickly to ensure an even coat without streaks. -
Check opacity:
Let this layer dry or cure partially. If you can still see the floral design ghosting through, you will need a second coat. The goal is a solid matte black finish when cool. -
Refine the rim:
Carefully clean up the top rim of the mug if any black paint went over the edge. A clean line at the lip makes the finished product look much more professional. -
Final cure:
Allow the thermochromic layer to cure fully. If using resin, this may take 24-48 hours. Ensure the mug stays in a dust-free environment during this time. -
Test the reveal:
Once fully cured, pour hot water into the mug. Watch as the black fades away to reveal your beautiful floral artwork underneath.
Design Your Border
Leave a small unpainted border at the lip and handle. Paint doesn’t stick well to high-touch areas, and this creates a deliberate ‘framed’ look.
Now you have a mysterious mug that saves its beauty for your morning coffee routine