Whenever I’m teaching kids in my studio, air dry clay is my go-to because it’s forgiving, easy to shape, and still feels like “real” clay. Here are my favorite easy air clay ideas for kids—the kind that look adorable even if your little artist is brand-new to sculpting.
Pinch Pot Treasure Bowls
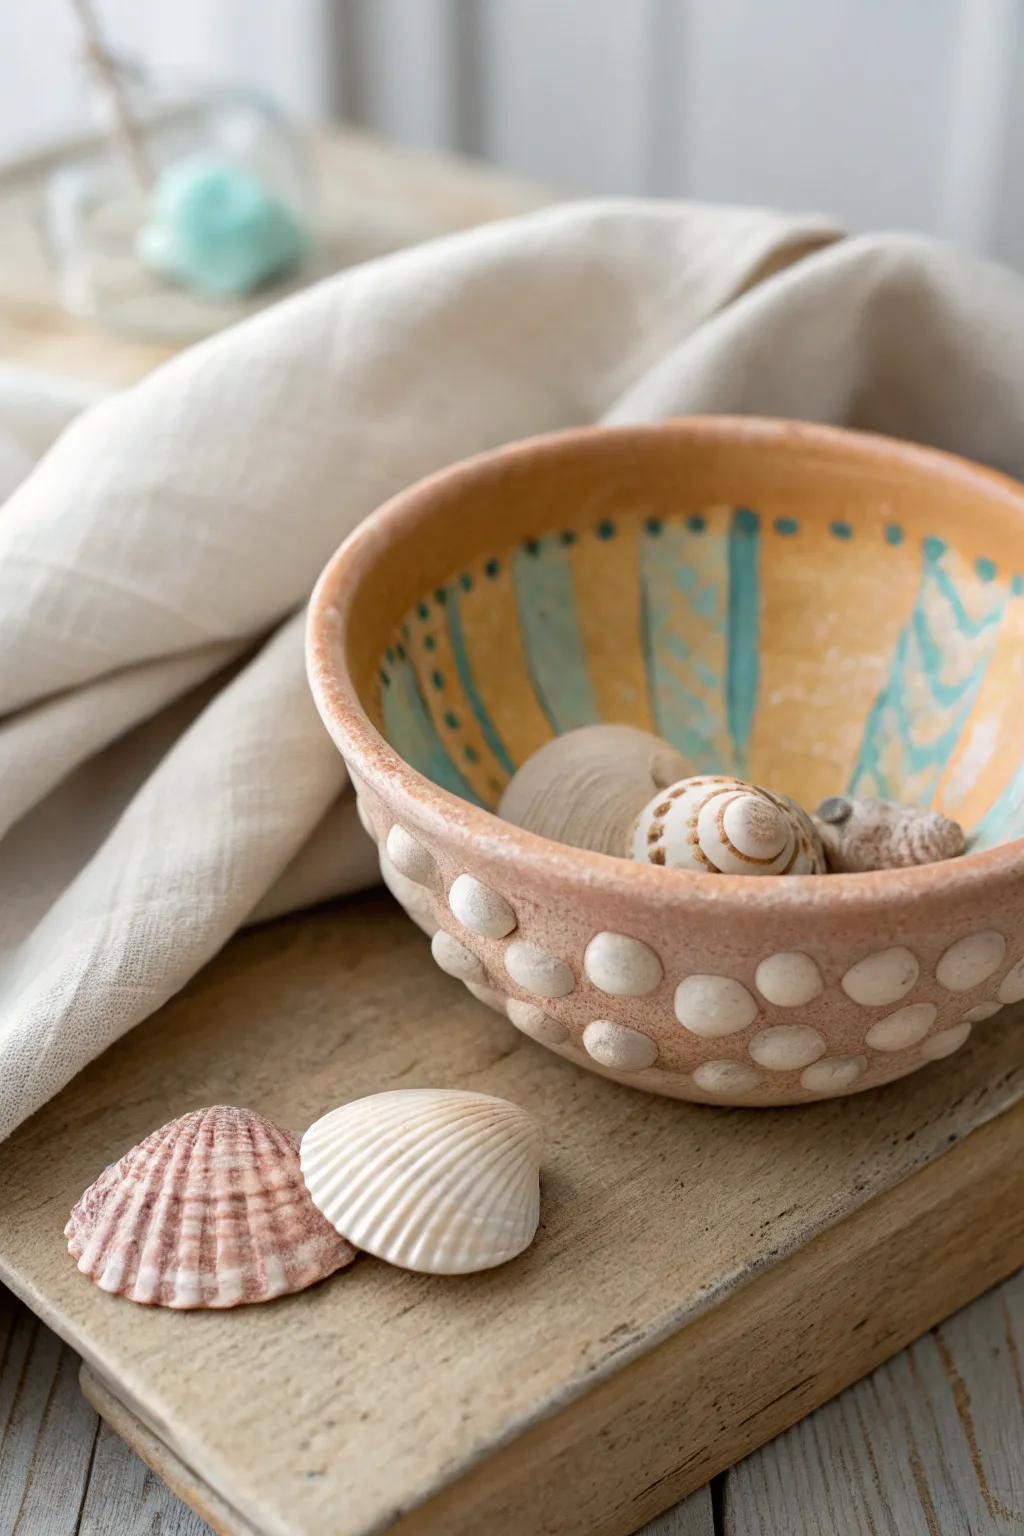
Capture the feeling of a beach vacation with this charming terracotta-style bowl. Featuring tactile raised dots on the outside and a bright, hand-painted interior, it is the perfect vessel for holding tiny seashells or trinkets.
Step-by-Step Tutorial
Materials
- Terracotta-colored air dry clay
- White or cream air dry clay
- Acrylic paints (sunny yellow, turquoise/teal, white)
- Small round paintbrush
- Fine detail paintbrush
- Water cup for smoothing
- Sculpting sponge (optional)
- Matte varnish or sealant
Step 1: Sculpting the Bowl
-
Create the base:
Start with a ball of terracotta air-dry clay roughly the size of a tennis ball. Ensure it is smooth and free of cracks by rolling it firmly between your palms. -
Open the pot:
Push your thumb deep into the center of the ball, stopping about a half-inch from the bottom to create the base thickness. -
Pinch the walls:
Gently pinch the clay between your thumb (inside) and fingers (outside), rotating the ball as you go. Work your way from the bottom up to the rim. -
Shape carefully:
Aim for a wall thickness of about a quarter-inch. Flaring the rim slightly outwards gives it that classic open bowl shape seen in the photo. -
Smooth the surface:
Dip your finger in a little water and run it over any cracks or uneven areas on the terracotta clay to create a smooth, rustic finish.
Step 2: Adding Texture
-
Roll small spheres:
Take your white air-dry clay and roll lots of tiny balls, each about the size of a small pea. You’ll need enough to cover the lower half of the bowl. -
Attach the first row:
Press a row of white clay balls firmly onto the terracotta surface, starting near the bottom base. If the clay is dry, dab a tiny bit of water on the spot first to act as glue. -
Flatten slightly:
Once attached, gently press each white ball with your thumb to flatten it into a soft, rounded bump rather than a protruding sphere. -
Add upper rows:
Continue adding rows of these white dots until you reach halfway up the side of the bowl. Offset the rows slightly so the dots sit in the gaps between the ones below. -
Final smooth:
Run a barely damp finger over the white dots to bond the edges slightly to the terracotta body and remove any fingerprints. -
Dry completely:
Set your bowl aside in a dry, airy spot. Depending on humidity, this could take 24 to 48 hours to cure fully.
Loose Dots?
If the white dots fall off after drying, don’t panic. A small dab of standard white craft glue will reattach them permanently without showing.
Step 3: Painting the Interior
-
Base coat:
Paint the entire inside of the bowl with a sunny yellow acrylic paint. You may need two coats to get an opaque, bright finish. -
Paint vertical stripes:
Using a turquoise or teal paint mixed with a little water for flow, paint vertical stripes from the rim down toward the center. -
Create organic lines:
Don’t worry if the lines aren’t perfectly straight; a wavy, hand-painted look adds to the charm. I like to vary the width of the stripes for a more artistic feel. -
Add decorative dots:
Dip the back end of your paintbrush (the non-brush handle side) into the teal paint and stamp a row of dots around the inner rim. -
Chevron details:
Paint simple chevron or ‘V’ shapes between the stripes for extra detail, mimicking the patterns found on sea urchins or shells. -
Seal the work:
Once the paint is totally dry, apply a coat of matte varnish to protect your new treasure bowl.
Smooth Rim Tip
To get a nice even rim, gently turn the bowl upside down and tap it lightly on your table while the clay is still wet to level the top edge.
Fill your new bowl with your favorite beach finds or little keepsakes to complete the look


Round Little Animal Figures
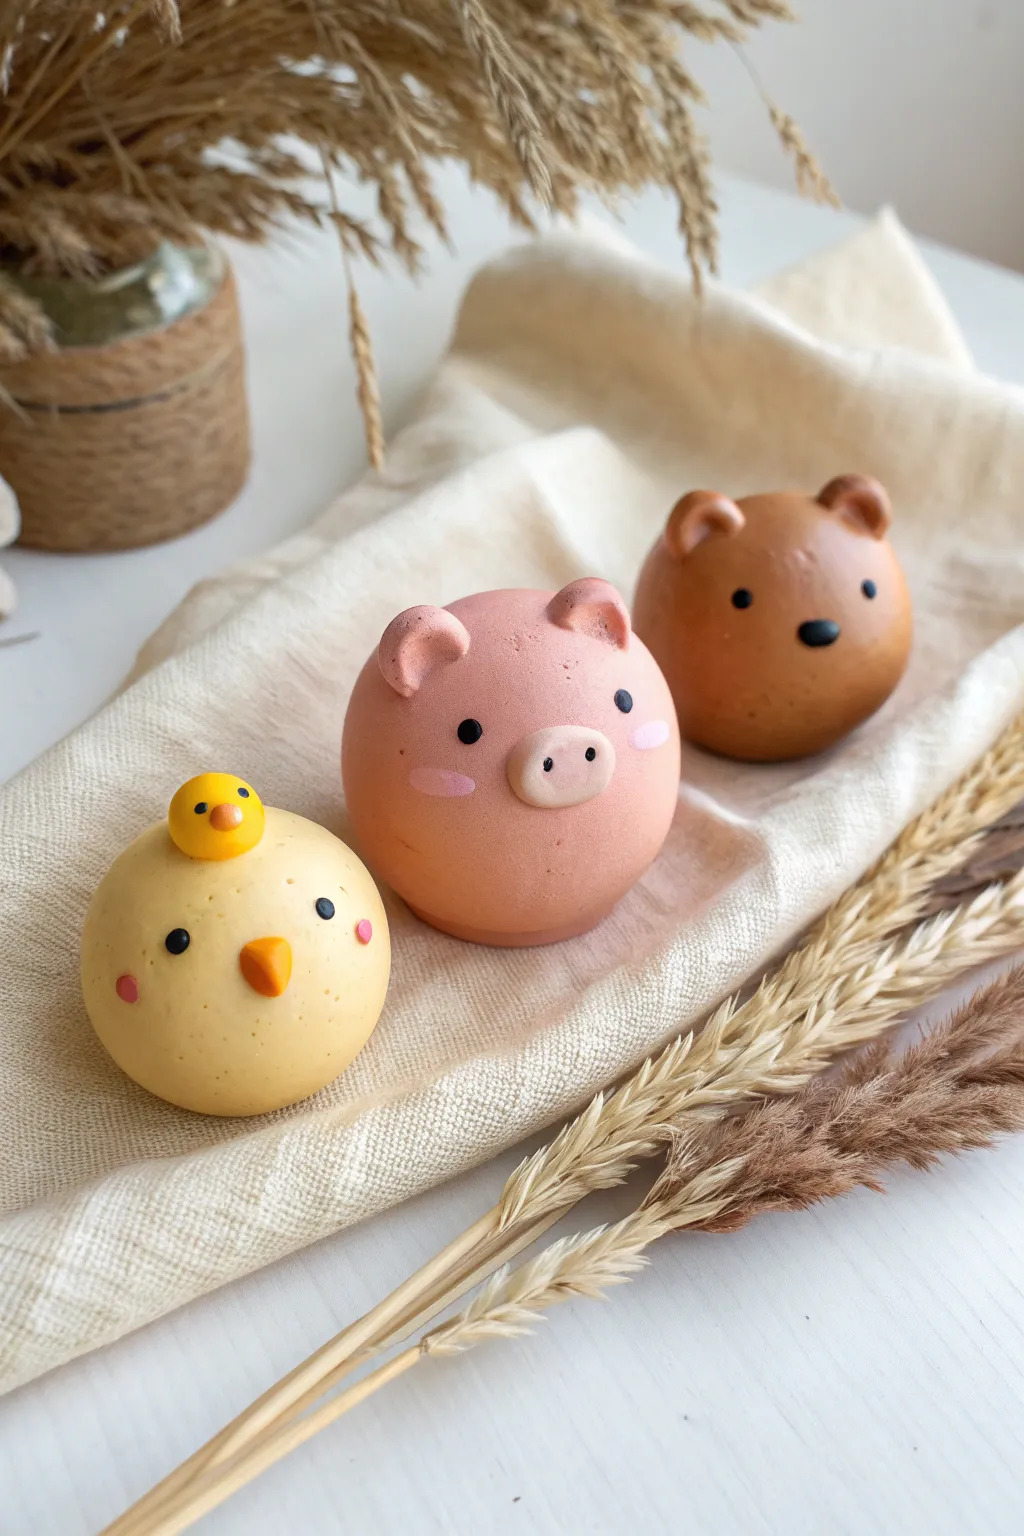
These perfectly spherical animal friends—a cheerful chick, a rosy pig, and a cozy bear—are simpler to make than they look. Using basic shapes as a foundation, you’ll create a charming set of smooth, matte-finish figures that look beautiful on a desk or shelf.
Step-by-Step
Materials
- Air dry clay (white or pre-colored)
- Acrylic paints (yellow, pink, brown, black, orange)
- Fine-grit sandpaper (optional)
- Small detail paintbrush
- Ball stylus tool or toothpick
- Water for smoothing
- Rolling pin (optional)
- Matte varnish (optional)
Step 1: Preparation & Base Shapes
-
Prepare the clay:
Start by kneading your air dry clay until it is soft and free of cracks. If you are using white clay, separate it into three equal portions. -
Mix colors (if using white clay):
If you started with white clay, mix a drop of yellow acrylic paint into the first ball, light pink into the second, and a warm brown into the third. Knead until the color is completely uniform. -
Roll spheres:
Roll each portion of clay between your palms on a flat surface to create three perfectly smooth spheres. These will be the bodies of your animals. -
Check stability:
Gently tap the bottom of each sphere against the table to create a tiny flat spot. This ensures your animals won’t roll away once they are finished.
Smooth Surface Secret
Keep a small bowl of water nearby. Dip your finger slightly and run it over the clay sphere while rolling to eliminate every tiny crack before adding details.
Step 2: Sculpting the Chick
-
Form the mini chick:
Roll a very tiny ball of yellow clay, much smaller than the body. Attach this to the top of the large yellow sphere to create the ‘baby chick’ sitting on top. -
Add the beak:
Shape a tiny triangle of orange clay. Press it gently into the center of the main yellow sphere’s face. -
Create tiny beaks:
Make an even smaller orange triangle for the baby chick on top and attach it carefully.
Parts Falling Off?
If ears or beaks won’t stick, scratch both connecting surfaces with a toothpick (scoring) and add a tiny dab of water or white glue before pressing them together.
Step 3: Sculpting the Pig
-
Make the snout:
Take a small pinch of pink clay and flatten it into a small oval disc. Press this onto the front of the pink sphere for the snout. -
create nostrils:
Using a ball stylus tool or the end of a small paintbrush, impress two small indentations into the oval snout. -
Add ears:
Form two small triangles of pink clay. Gently curl the top tip of each triangle slightly forward to give them a floppy look, then attach them to the top of the head. -
Smooth the seams:
I like to use a barely damp paintbrush to blend the seams where the ears meet the head so they look like one solid piece.
Step 4: Sculpting the Bear
-
Form the ears:
Roll two small balls of brown clay. Press your thumb or a styling tool into the center of each to create a cup shape. -
Attach ears:
Press these cupped shapes onto the top sides of the brown sphere. Blend the clay at the base to secure them. -
Add a nose:
Roll a tiny oval of black clay (or paint it later) and press it into the center of the face for the nose. -
Drying time:
Allow all three figures to dry completely for 24-48 hours. Turn them occasionally so the bottoms dry evenly.
Step 5: Painting & Finishing
-
Draw eyes:
Using a fine detail brush or a black paint marker, add two small black dots for eyes on all three main animals, and two tiny dots for the baby chick. -
Add cheeks:
Dip the back end of your paintbrush in pink paint and stamp little rosy cheeks onto the chick and pig. -
Create highlights:
If you want extra cuteness, add the tiniest fleck of white paint inside the black eye dots for a sparkle effect. -
Seal the work:
Once the paint is fully dry, coat the figures with a matte varnish to protect the surface and keep that smooth, soft look.
Now you have a trio of adorable, round friends ready to brighten up your room


Ladybug and Bug Magnets

These adorable little bugs bring a pop of bright red cheer to your fridge or magnetic board. Using air dry clay, you can mold perfect, smooth pebbles that transform into classic ladybugs with just a bit of paint.
Step-by-Step Tutorial
Materials
- White or terracotta air dry clay
- Acrylic paints (bright red, black, white)
- Paintbrushes (medium flat brush and small detail brush)
- Small round magnets
- Strong craft glue or hot glue
- Glossy varnish or Mod Podge (optional)
- Water cup and paper towels
Step 1: Shaping the Clay
-
Portion the clay:
Start by pinching off a small amount of air dry clay, roughly the size of a walnut or a large grape. Knead it in your hands for a few seconds to warm it up and make it pliable. -
Roll a sphere:
Roll the clay between your palms to create a smooth, tight ball. Aim to remove any cracks or seams during this rolling process. -
Flatten the base:
Place the ball on your work surface and gently press down with the palm of your hand. You want a domed shape that is flat on the bottom, resembling a natural river stone. -
Smooth the surface:
Dip your finger in a tiny bit of water and run it over the dome to smooth out any fingerprints or tiny cracks. A smooth canvas makes painting much easier later. -
Let it dry:
Set your clay shape aside to dry completely. Depending on the brand and humidity, this usually takes 24 to 48 hours. The clay will lighten in color and feel hard when ready.
Step 2: Painting the Body
-
Base coat:
Load a medium flat brush with bright red acrylic paint. Cover the entire domed surface of the dried clay. If your clay was dark, I find a second coat really helps the red pop. -
Wait for drying:
Allow the red paint to dry fully to the touch before moving on to the next color so you don’t smudge the details. -
Paint the head:
Using black paint, create a semi-circle at the front of the shape for the ladybug’s face. Fill in this area completely with black. -
Draw the center line:
Switch to a fine detail brush or a black paint pen. Carefully draw a straight line running from the center of the black head down to the back tail of the ladybug. -
Add the spots:
Dip the handle end of a paintbrush into black paint to use as a stamp. Dot several spots onto the red wings to make perfect, uniform circles.
Smooth Operator
If your dried clay has rough spots, use fine-grit sandpaper to gently buff the surface before painting for a glass-smooth finish.
Step 3: Finishing Touches
-
Create the eyes:
Once the black head is dry, use a smaller tool (like a toothpick or small brush handle) dipped in white paint to dot two eyes onto the black section. -
Add pupils:
After the white dots dry, add tiny black distinct dots in the center of the white circles to give the ladybug a looking direction. -
Seal the project:
To get that shiny, beetle-shell look shown in the photo, apply a coat of glossy varnish or Mod Podge over the entire top surface. This also protects the paint from chipping. -
Attach the magnet:
Flip the ladybug over once everything is dry. Apply a dab of strong glue to the flat bottom and press your magnet firmly into place. -
Final cure:
Let the glue set according to the manufacturer’s instructions before sticking your new friend to the fridge.
Rainbow Bugs
Don’t stop at red! Create a whole family using yellow, orange, or even glittery blue paint for a fantasy garden collection.
Now you have a charming little garden guardian ready to hold up your notes and photos


Leaf and Flower Nature Imprint Tiles
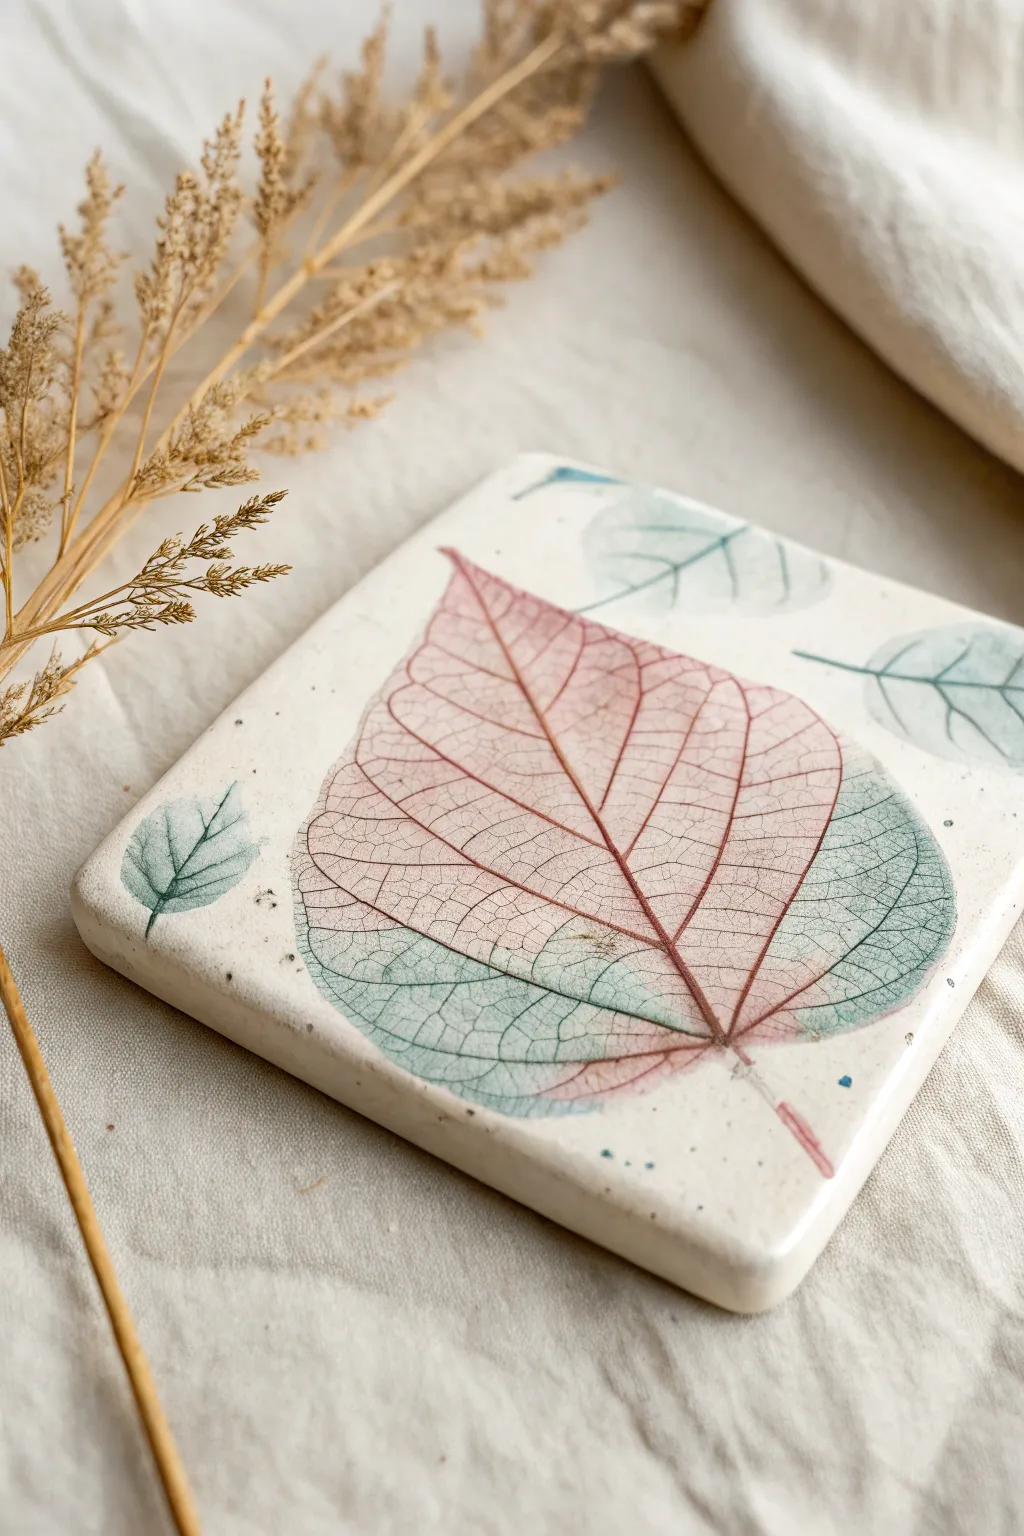
Bring the beauty of a fall forest indoors with this uniquely delicate clay tile. The combination of gentle leaf impressions and soft watercolor washes creates a sophisticated, fossil-like effect that looks far more complex than it actually is.
Step-by-Step
Materials
- White air-dry clay
- Rolling pin
- Craft knife or square clay cutter
- Real leaves (linden or hydrangea leaves work well for this shape)
- Parchment paper or work mat
- Watercolor paints (shades of pink, red, sage green)
- Small round paintbrush (size 2 or 4)
- Fine-grit sandpaper (optional)
- Matte spray varnish or Mod Podge
Step 1: Shaping the Clay Base
-
Prepare your surface:
Lay down a sheet of parchment paper or a silicone work mat to prevent sticking. This makes it much easier to move the tile later without warping the soft clay. -
Roll the slab:
Take a handful of white air-dry clay and knead it briefly until pliable. Roll it out into an even slab, aiming for a thickness of about 1/4 inch to ensure durability. -
Cut the square:
Using a craft knife (adult supervision required) or a square cookie cutter, cut a neat square shape from your clay slab. Smooth the cut edges gently with a little water on your fingertip to remove any roughness. -
Select your leaf:
Choose a fresh leaf with prominent veins. While dry leaves are crunchy, fresh leaves press cleanly without crumbling. A heart-shaped leaf creates the beautiful focal point seen in the example.
Step 2: Creating the Impression
-
Position the main leaf:
Place your large leaf vein-side down exactly where you want it on the clay. Off-centering it slightly can create a nice artistic composition. -
Press the design:
Using your rolling pin, roll firmly over the leaf one or two times. You want to press the veins deep into the clay, embedding the leaf flush with the surface. -
Add background leaves:
To mimic the example, take smaller leaves and press them lightly into the corners or background areas. Press these lighter than the main leaf so they appear more distant. -
Peel and reveal:
Carefully find the stem or edge of the embedded leaves and slowly peel them away. You should be left with a crisp, detailed negative impression of the veins. -
Refine the surface:
If pealing the leaf raised any jagged clay edges, gently tap them down with a smooth finger. Don’t erase the texture, just soften any sharp spikes.
Clay sticking?
If your leaf refuses to peel off easily, let the clay dry for just 10-15 minutes with the leaf still embedded. The clay shrinks slightly as it dries, often popping the leaf loose on its own.
Step 3: Drying and Painting
-
Let it cure:
Allow the tile to dry completely, which usually takes 24 to 48 hours. I suggest flipping it gently halfway through so the bottom dries evenly and prevents curling. -
Sand edges (optional):
Once fully hard, check the corners. If they feel sharp, give them a very light rub with fine-grit sandpaper for a professional finish. -
Prepare watery paints:
Dilute your pink and sage green watercolors with plenty of water. The look we are aiming for is translucent and ghostly, not opaque or heavy. -
Paint the main leaf:
Load your brush with watery pink paint. Gently touch the center of the distinct leaf impression, letting the paint flow naturally into the deep vein grooves. -
Add color variation:
While the pink is still damp, drop in touches of watery sage green on the edges of the leaf. Watch as the colors bleed slightly where they meet, creating that lovely gradient. -
Paint background leaves:
Paint the smaller background leaf impressions with a very pale, watered-down blue or green. Keep these much lighter to push them visually into the background. -
Add speckles:
Dip a brush in dark paint, hold it over the tile, and tap the handle against another brush to splatter tiny dots across the surface for an organic, stone-like texture. -
Seal the art:
Once the paint is bone dry, spray the tile with a matte varnish or brush on a thin layer of matte Mod Podge to protect the watercolor from moisture.
Vein Definition Tip
If your leaf imprint looks too faint after rolling, don’t re-roll. Instead, lightly trace the major vein lines with a needle tool or toothpick to deepen them before the clay dries.
Now you have a stunning botanical tile that captures the fleeting beauty of a leaf forever

The Complete Guide to Pottery Troubleshooting
Uncover the most common ceramic mistakes—from cracking clay to failed glazes—and learn how to fix them fast.
Heart Trinket Trays
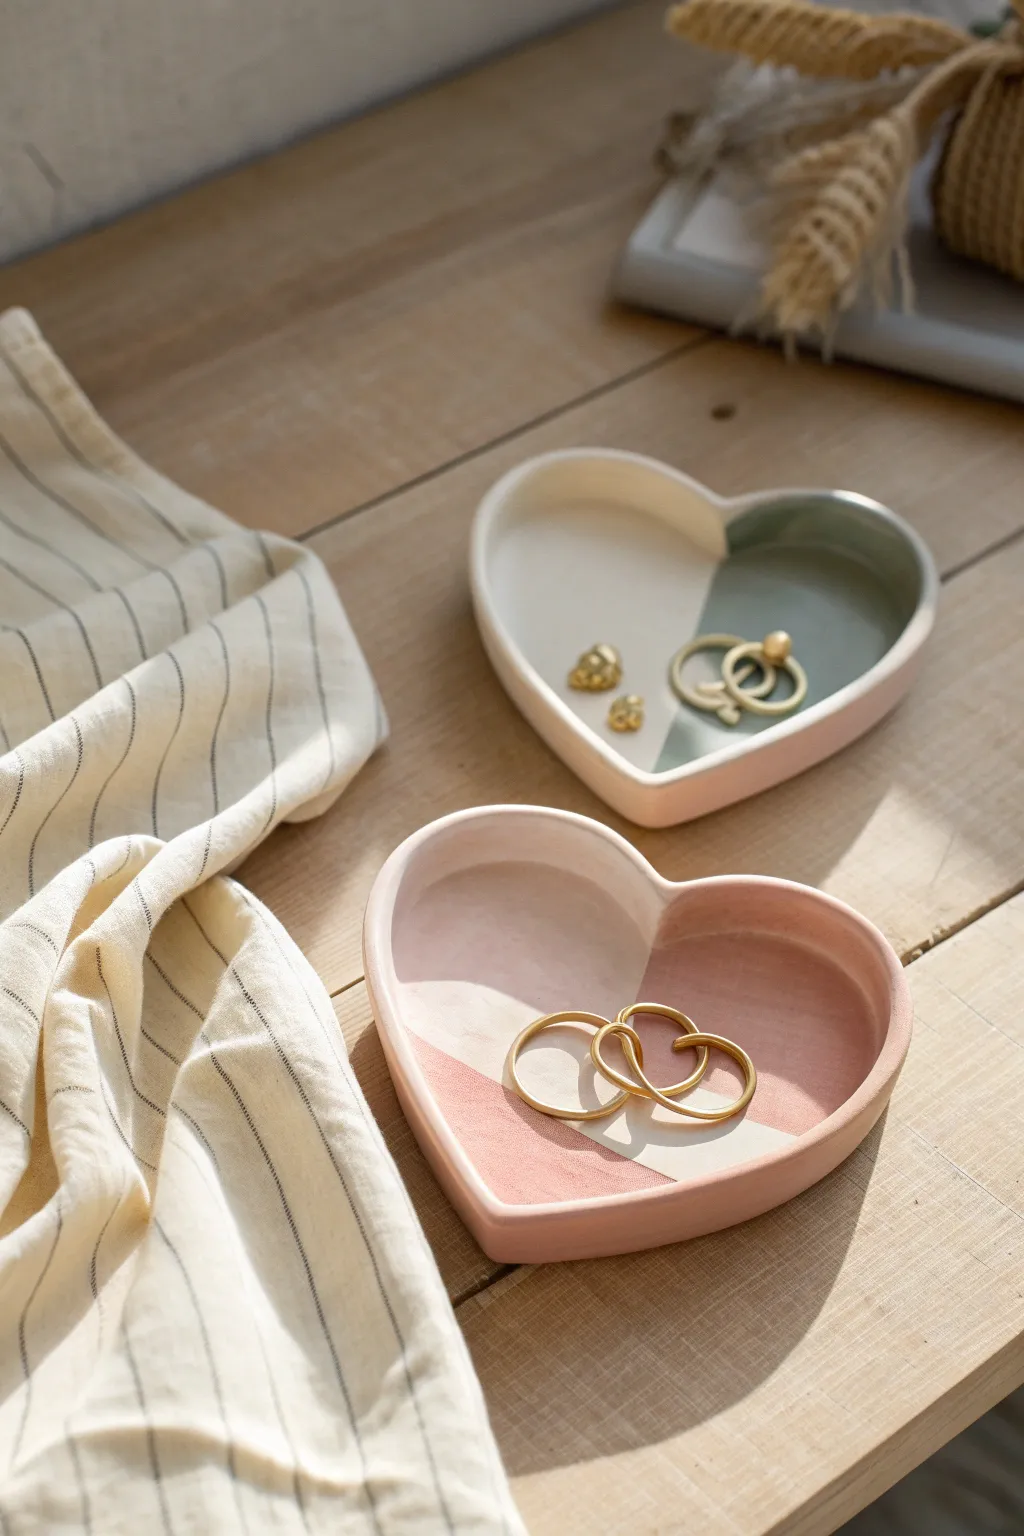
These sophisticated little trays look like high-end ceramics but are surprisingly easy to make at home. With a stylish two-tone geometric design, they are perfect for holding rings, earrings, or small treasures.
Step-by-Step Guide
Materials
- White air-dry clay (smooth texture)
- Rolling pin
- Heart-shaped cookie cutter (large) or paper template
- Craft knife or clay knife
- Small bowl of water
- Fine grit sandpaper (300-400 grit)
- Acrylic paints (pale pink, deep rose, sage green, and white)
- Small flat paintbrush
- Painter’s tape or washi tape
- Matte or satin sealant/varnish
Step 1: Shaping the Clay
-
Prepare the workspace:
Lay down a piece of parchment paper or a silicone mat to prevent your clay from sticking. Take a handful of air-dry clay and knead it briefly until it feels pliable and warm. -
Roll the slab:
Use your rolling pin to flatten the clay into an even slab. You want it to be about 1/4 inch thick—thick enough to be sturdy, but distinct enough to look refined. -
Cut the heart shape:
Press a large heart-shaped cookie cutter firmly into the clay. If you don’t have a cutter, place a paper template on the clay and carefully trace around it with a craft knife. -
Create the rim:
To create the raised edge, gently curve the outer rim of the heart upwards with your fingers. Pinch and smooth the clay as you go to create a continuous lip around the perimeter. -
Smooth the surface:
Dip your finger in a tiny bit of water and run it over any rough edges, cracks, or fingerprints. The water acts like an eraser for imperfections. -
Final shaping:
Check the symmetry of your heart. I often gently tap the bottom of the tray on the table to flatten the base, ensuring it sits level once dry. -
Drying time:
Set the tray aside in a dry, cool place. Let it dry completely for 24-48 hours. Flip it over halfway through the drying process so the bottom gets air exposure too.
Fixing Paint Bleed
If paint seeps under the tape, wait for it to dry fully. Then, use a small brush with the base color to carefully paint over the mistake and straighten the line
Step 2: Sanding and Painting
-
Sand for smoothness:
Once bone dry, take your fine-grit sandpaper and gently buff the entire surface. Focus on the rim to make it look like professionally thrown pottery. -
Wipe clean:
Use a barely damp cloth or dry paper towel to remove all the clay dust before you start painting. -
Base coat:
Paint the entire interior and rim with a base color. For the green tray shown, use an off-white or cream; for the pink tray, use a very pale blush pink. Let this dry completely. -
Tape the design:
Apply a strip of painter’s tape diagonally across the heart. Press the edge of the tape down firmly with your fingernail to prevent paint bleed. -
Apply the accent color:
Paint the exposed half of the heart with your darker contrasting color (sage green or deep rose). Apply thin, even layers rather than one thick gloop. -
Remove tape:
Peel off the tape while the paint is still slightly wet. This helps achieve that crisp, sharp line between the two colors. -
Paint the exterior:
Paint the outside walls and bottom of the tray. You can match the base color (like the pink tray) or use a coordinating tone. -
Touch-ups:
If any lines look wobbly, use a small detail brush to fix them. I find a steady hand and very little paint on the brush works best here. -
Seal the piece:
Finish with a coat of matte or satin varnish to protect the paint and give the tray a finished, ceramic-like sheen.
Add some sparkle
For an extra fancy touch, paint the very top rim of the heart with liquid gold leaf or metallic gold paint after the other colors have dried
Place your finished tray on a bedside table or vanity to organize your favorite dainty jewelry pieces
Handprint Keepsake Dishes
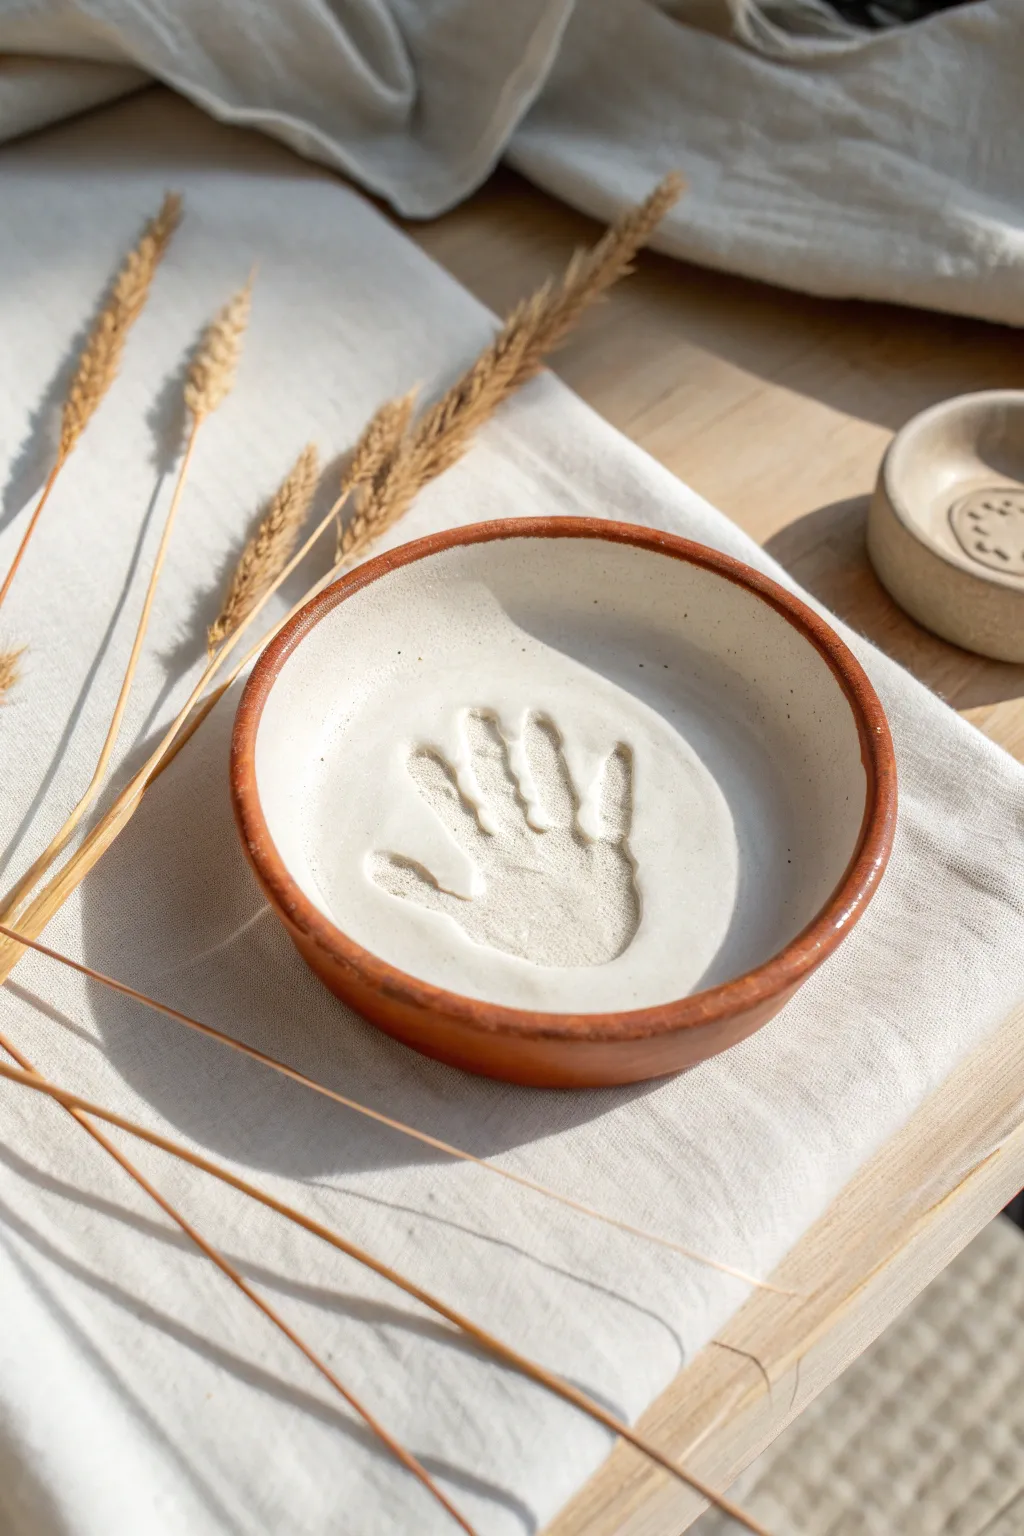
This charming keepsake features a rustic terracotta-hued rim surrounding a creamy white interior where a tiny handprint is preserved forever. The natural, earthy contrast makes it a beautiful piece of decor that fits perfectly with organic, minimalist styles.
How-To Guide
Materials
- Air dry clay (terracotta color)
- Air dry clay (white)
- Rolling pin
- Small bowl (for use as a mold)
- Knife or clay cutting tool
- Sponge
- Water
- Plastic wrap
- Fine grit sandpaper
- Clear matte acrylic sealer/varnish
Step 1: Creating the Two-Tone Base
-
Prepare the terracotta clay:
Start by taking a generous ball of the terracotta-colored clay. Knead it well until it is soft, pliable, and free of any air bubbles. -
Roll the outer shell:
Roll the terracotta clay out into a circle about 1/4 inch thick. This will form the exterior shell of your dish. -
Prepare the white clay:
Take a slightly smaller amount of white air dry clay and knead it until soft. -
Check for cracks:
I always check the edges of my clay slab for small cracks now; smoothing them with a wet finger before proceeding saves time later. -
Layer the clays:
Roll the white clay out thinly. Place this white sheet directly on top of your terracotta circle. Use the rolling pin to gently press them together so they bond without getting too thin. -
Cut the circle:
Place a bowl or round template upside down on your layered clay. Use a knife to cut a perfect circle around it, removing the excess trim.
Fixing Shallow Prints
If the impression isn’t deep enough on the first try, don’t worry. Use a little water to smooth the clay back over and re-roll slightly with a small jar before trying again.
Step 2: Shaping and Printing
-
Prepare the mold:
Take your molding bowl and cover the inside lightly with plastic wrap to prevent sticking. -
Form the dish:
Lift your two-tone clay circle and gently drape it inside the bowl, with the white side facing up. Press it gently against the bottom and sides to take the bowl’s shape. -
Smooth the interior:
Use a damp sponge to smooth the white interior surface, ensuring it is flawless and ready for the impression. -
Position the hand:
Guide your child’s hand into the center of the bowl. Ensure their fingers are spread comfortably apart. -
Press for the impression:
Press down firmly on the center of the palm and then individually on each finger to get a deep, clear impression. -
Remove hand:
Gently lift the hand straight up to avoid smudging the edges of the print. -
Refine the rim:
While the clay is still in the mold, use a damp finger or sponge to smooth the top rim, highlighting that nice terracotta ring contrasting against the white interior.
Step 3: Finishing Touches
-
Initial dry:
Let the dish dry inside the mold for about 24 hours so it holds its shape. -
Remove and dry completely:
Carefully pop the dish out of the mold and remove the plastic wrap. Let it air dry on a wire rack for another 24-48 hours until fully hardened. -
Sand edges:
Once bone dry, take fine-grit sandpaper and very gently sand the rim and any rough spots on the exterior to give it a professional finish. -
Seal the piece:
Brush a thin coat of clear matte acrylic sealer over the entire dish to protect the clay and give it a slight sheen without looking glossy. -
Final cure:
Allow the sealer to cure completely according to the bottle instructions before displaying.
Add a Golden Touch
Use a tiny detail brush and metallic gold paint to retrace the very bottom of the handprint crevices after drying, making the hand shape pop.
This simple yet elegant dish captures a moment in time beautifully


What Really Happens Inside the Kiln
Learn how time and temperature work together inside the kiln to transform clay into durable ceramic.
Name and Initial Ornaments
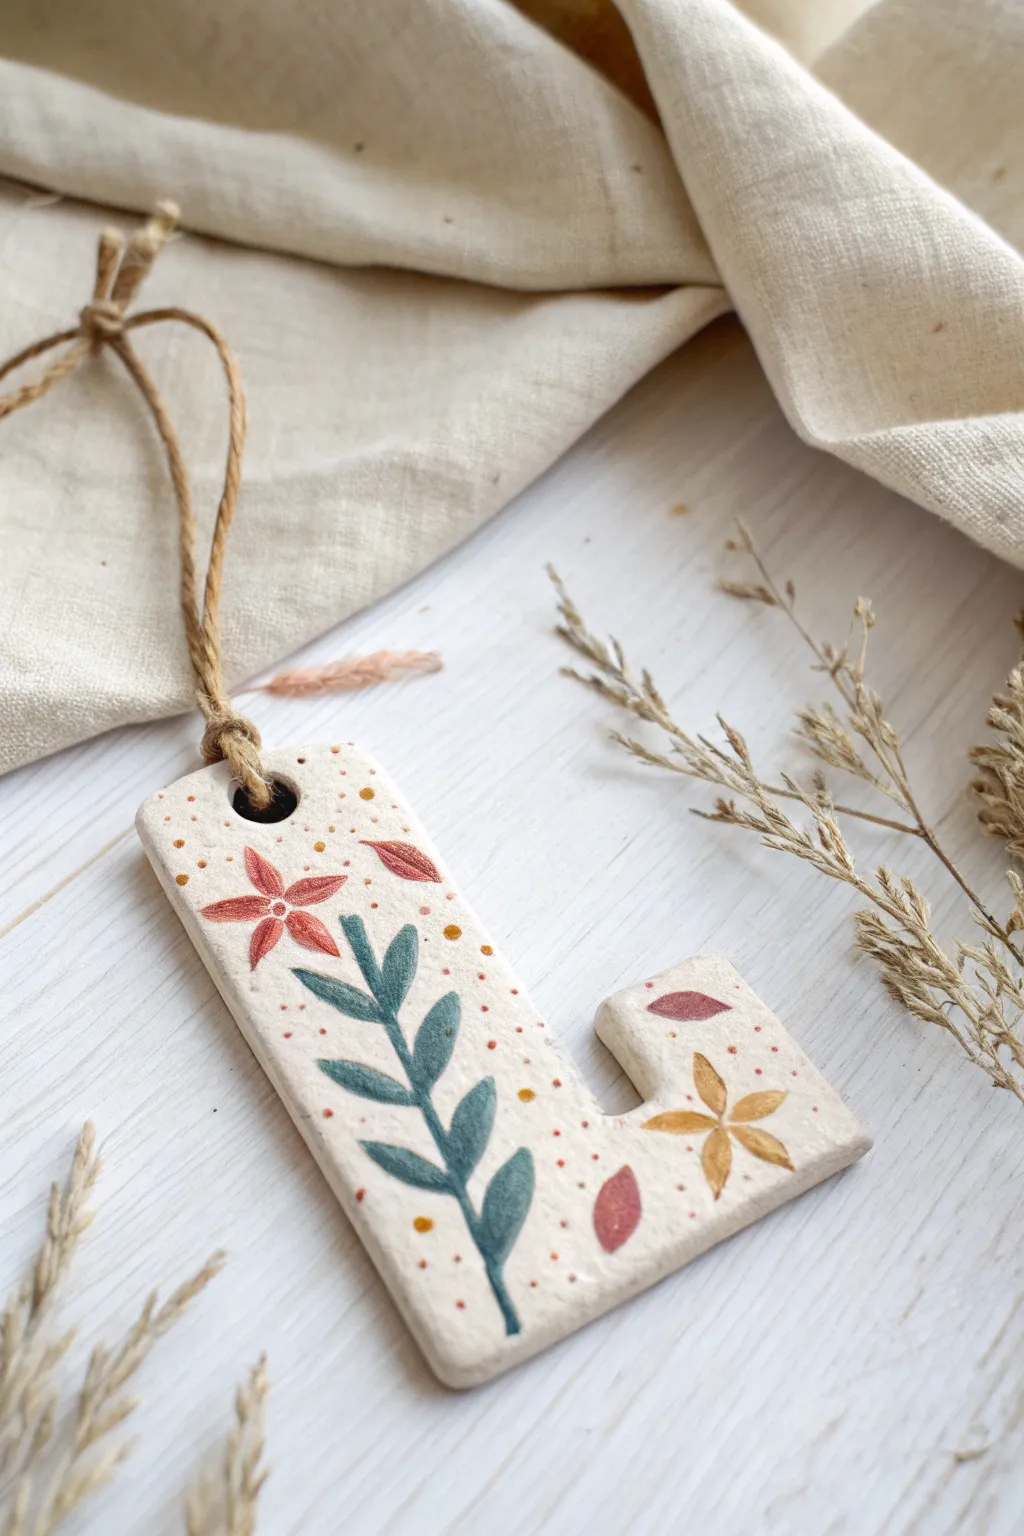
Create a personalized keepsake with this charming L-shaped initial ornament, featuring delicate hand-painted floral motifs on a textured clay base. The soft speckles and muted colors give it a lovely rustic feel, perfect for gift-giving or hanging on a door handle.
Step-by-Step
Materials
- White air-dry clay (or salt dough)
- Letter template (printed or hand-drawn)
- Rolling pin
- Parchment paper or canvas mat
- Craft knife or plastic clay tool
- Drinking straw or small round cutter
- Fine grit sandpaper
- Acrylic paints (terracotta red, sage green, mustard yellow, brown)
- Very fine round paintbrush (size 0 or 00)
- Jute twine
- Clear matte varnish (optional)
Step 1: Shaping the Letter
-
Prepare your workspace:
Lay down a sheet of parchment paper or a canvas mat to prevent sticking. Take a handful of air-dry clay and knead it briefly until it’s smooth and pliable. -
Roll out the slab:
Using your rolling pin, flatten the clay to an even thickness of about 1/4 inch (6mm). If you want that rustic texture shown in the photo, you can gently tap the surface with a toothbrush or a crumpled piece of foil. -
Trace and cut:
Place your paper letter template gently onto the clay. Carefully trace around the outline with a craft knife or plastic cutting tool to cut out your initial. Remove the excess clay. -
Refine the edges:
Dip your finger in a little bit of water and gently smooth out any rough or jagged edges created during cutting. The corners should be slightly softened, not razor-sharp. -
Create the hanging hole:
Before the clay starts to dry, use a drinking straw or a small round tool to punch a hole at the top of the letter. Ensure it’s not too close to the edge so the clay doesn’t crack later. -
Drying time:
Let the letter dry completely on a flat surface. Depending on humidity and thickness, this usually takes 24-48 hours. Flip it over halfway through to ensure the back dries evenly.
Clay Cracking?
Cracks often happen if the clay dries too fast. Dry your piece away from direct sunlight or heaters. If a small crack appears, fill it with a slip (wet clay paste) and smooth over before painting.
Step 2: The Painting Phase
-
Sand for smoothness:
Once bone dry, inspect your letter. If there are any stray bumps, very lightly buff them away with fine-grit sandpaper. Wipe away the dust with a dry cloth. -
Add the speckles:
To mimic the speckled stoneware look, dilute a tiny bit of brown paint with water. Dip an old toothbrush in it and flick the bristles with your thumb to mist the clay with tiny brown dots. -
Paint the main stem:
Using your fine detail brush and sage green paint, draw a long, slightly curved line going up the vertical part of the letter. This will be the central vein for your leaves. -
Add leaves:
Paint small, almond-shaped leaves branching off the main stem. Alternate sides as you go up. Fill them in solid with the same sage green color. -
Paint the top flower:
Near the hole at the top, paint a five-petaled flower using the terracotta red. Start from the center and pull your brush outward for each petal to get that tapered look. -
Add accent petals:
Paint a few single ‘floating’ petals or leaves around the empty spaces using the terracotta red to balance the design. I like to place these near the corners. -
Paint the lower flower:
If your letter has a horizontal base (like the L shown), paint a second flower there using mustard yellow paint. Give it a slightly different shape, perhaps with four longer petals. -
Add tiny details:
Using the tip of your brush or a toothpick, add tiny dots of orange or red around the vines and flowers to fill empty white space and add whimsy. -
Seal (optional):
If you want to protect your painting, apply a thin coat of matte varnish once the paint is completely dry. -
Final assembly:
Cut a length of jute twine, thread it through the hole, and tie a secure knot to create the hanging loop that completes the rustic aesthetic.
Gift Tag Upgrade
Make these smaller to use as reusable gift tags! You can write the recipient’s full name on the back with a fine-tip permanent marker or carve the year into the back before drying.
Now you have a beautiful, custom initial ornament ready to display or give to a friend
Patterned Pencil Cups
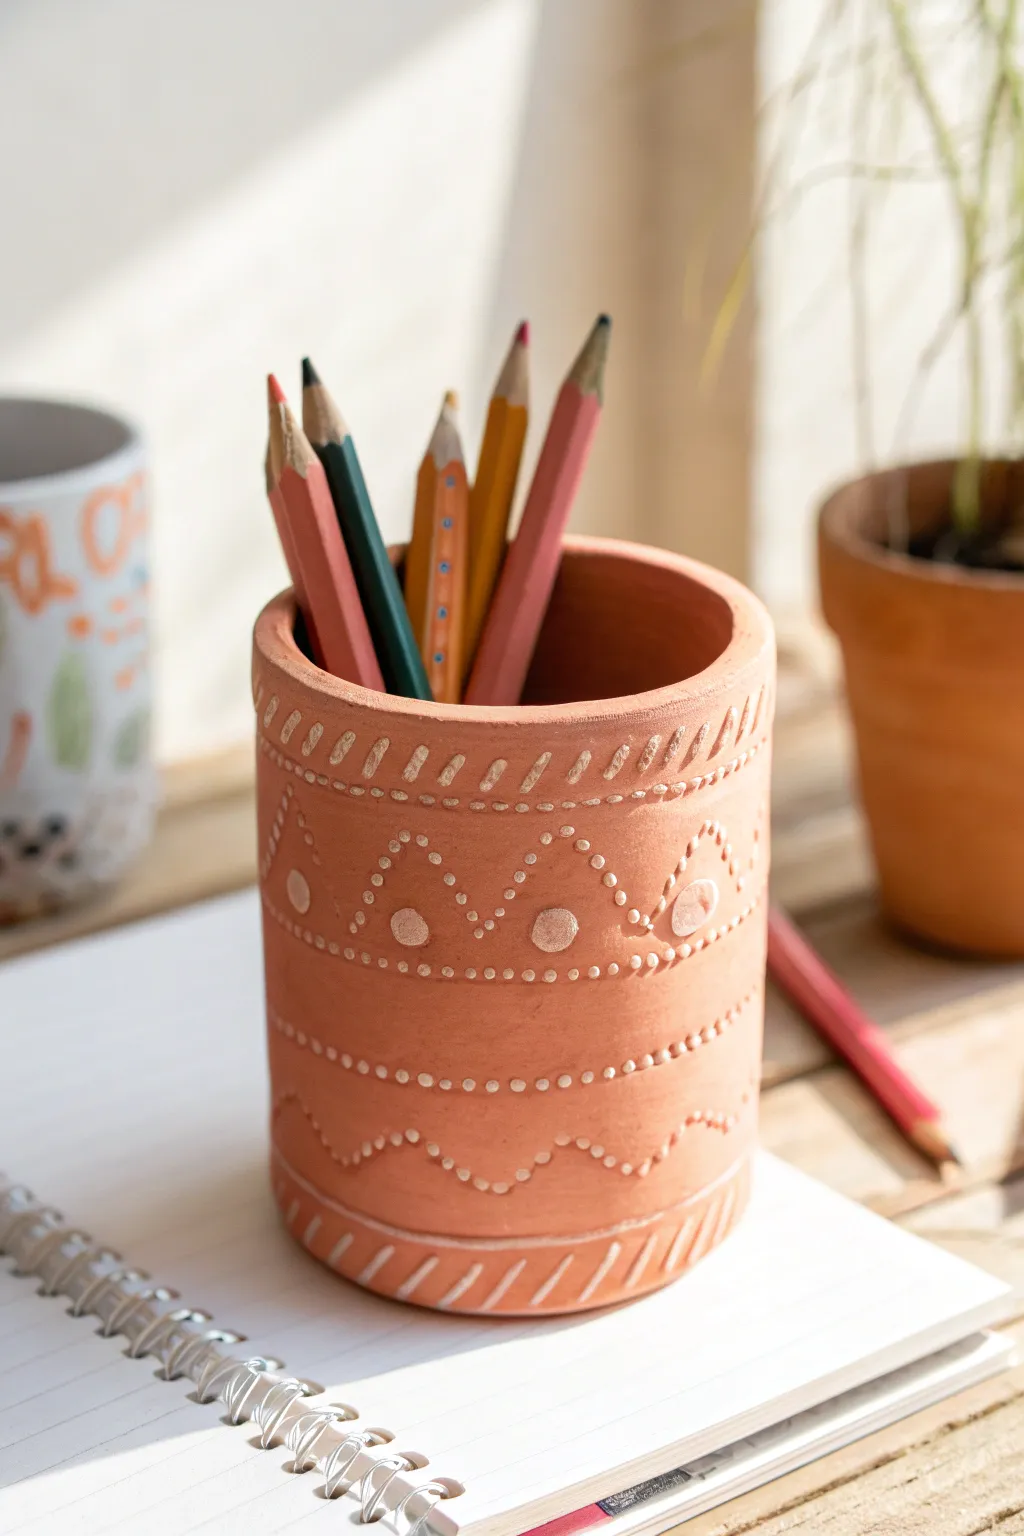
Turn a simple lump of clay into a functional piece of art with this charming pencil holder. Featuring a warm terracotta tone and delicate, white-impressed patterns, it brings a touch of handcrafted boho style to any desk.
Step-by-Step Tutorial
Materials
- Terracotta air-dry clay (or white clay painted later)
- Rolling pin
- Cylinder mold (glass jar or cardboard tube)
- Craft knife or plastic clay tool
- Small bowl of water
- White acrylic paint
- Fine-point paintbrush or toothpick
- Carving tools (toothpick, small dotting tool, or skewer)
- Clear matte varnish (optional)
Step 1: Forming the Cup
-
Roll the base:
Start by taking a medium sized ball of terracotta air-dry clay. Roll it out on a flat surface until it is about 1/4 inch thick. Use your cylinder mold (like a jar) to trace and cut out a circle for the base. -
Create the walls:
Roll out a larger slab of clay, keeping the thickness consistent with the base. This long rectangle needs to be tall enough for your pencils and long enough to wrap completely around your mold. -
Wrap the mold:
Carefully wrap the clay rectangle around your cylinder mold. I like to wrap a piece of parchment paper around the mold first so the clay slides off easily later. -
Join the seam:
Where the two ends of the clay rectangle meet, score the edges by making little scratch marks, add a drop of water, and press them firmly together to create a seamless cylinder. -
Attach the base:
Place the cylinder on top of your circular base. Smooth the clay from the walls down onto the base using your thumb or a smoothing tool to seal the bottom completely. -
Smooth the surface:
Dip your finger in a little water and run it over the entire surface of the cup to remove fingerprints and minor cracks, ensuring a nice canvas for your patterns.
Clean Lines Pro-Tip
For super neat patterns, use household items like pen caps, straw ends, or paper clips to stamp consistent shapes instead of drawing them freehand.
Step 2: Adding the Patterns
-
Plan your design:
Look at the image for inspiration. The design relies on horizontal bands of distinct patterns—diagonal dashes, zig-zags, and dots. -
Carve the top rim:
Using a small carving tool or toothpick, gently press diagonal hatch marks around the upper rim. Below that, create a dotted line by pressing the tip of your tool gently into the clay. -
Create the central zig-zags:
Move down to the middle section. Use a dotting tool or the back of a paintbrush to press circles into the clay. Connect these circles with dotted lines to create the geometric peaks shown in the photo. -
Add lower details:
Near the bottom, carve a wavy line or another zig-zag pattern using dots. Finish the bottom edge with another row of diagonal hatch marks to mirror the top rim. -
Remove the mold:
Once the clay has stiffened slightly (usually after an hour), carefully slide the cylinder mold out. If you leave it in too long while the clay shrinks, the cup might crack. -
Let it dry:
Allow the cup to dry completely for 24-48 hours. Turn it upside down halfway through so the bottom dries evenly.
Step 3: Finishing Touches
-
Prepare the paint:
Squeeze a small amount of white acrylic paint onto a palette or paper plate. You won’t need much, as this step is just for highlighting the texture. -
Highlight the grooves:
Using a very fine brush or a toothpick, carefully paint inside the carved lines and dots you created. The white paint should sit inside the indentations. -
Clean up edges:
If you get paint on the smooth surface, quickly wipe it away with a slightly damp cloth or your finger, leaving the white only in the recessed patterns. -
Optional sealing:
To protect your pencil cup from scratches, brush on a coat of clear matte varnish once the paint is fully dry.
Level Up: Color Pop
Instead of classic white, try painting the indented patterns with neon pink or gold metallic paint for a modern, high-contrast look.
Fill your new handmade cup with your favorite drawing tools and admire your work

TRACK YOUR CERAMIC JOURNEY
Capture glaze tests, firing details, and creative progress—all in one simple printable. Make your projects easier to repeat and improve.
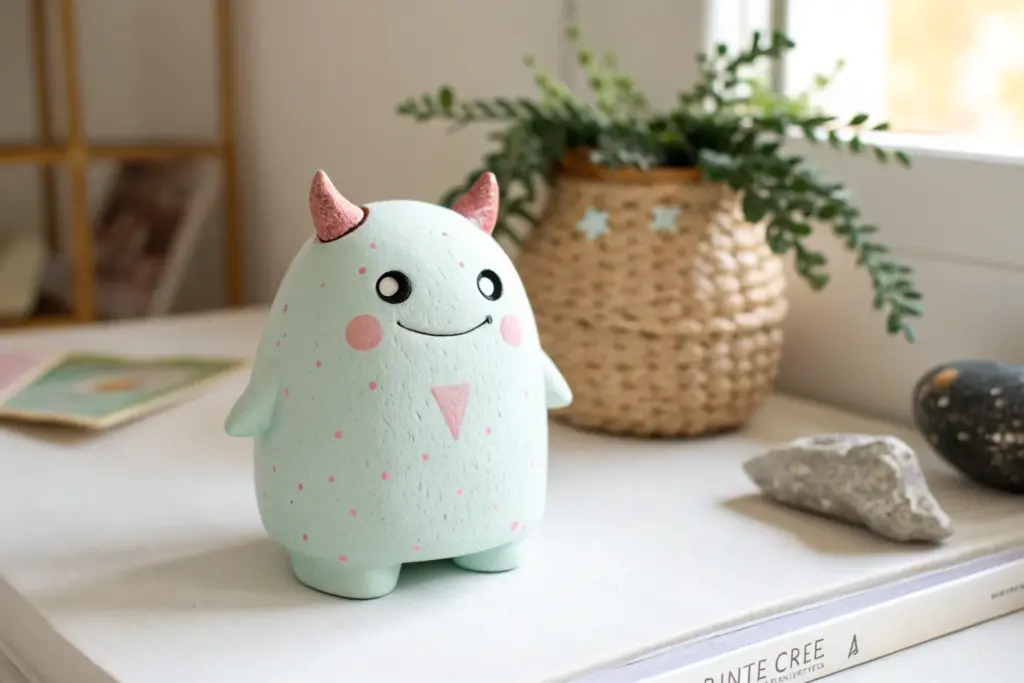
Googly-Eyed Clay Monsters
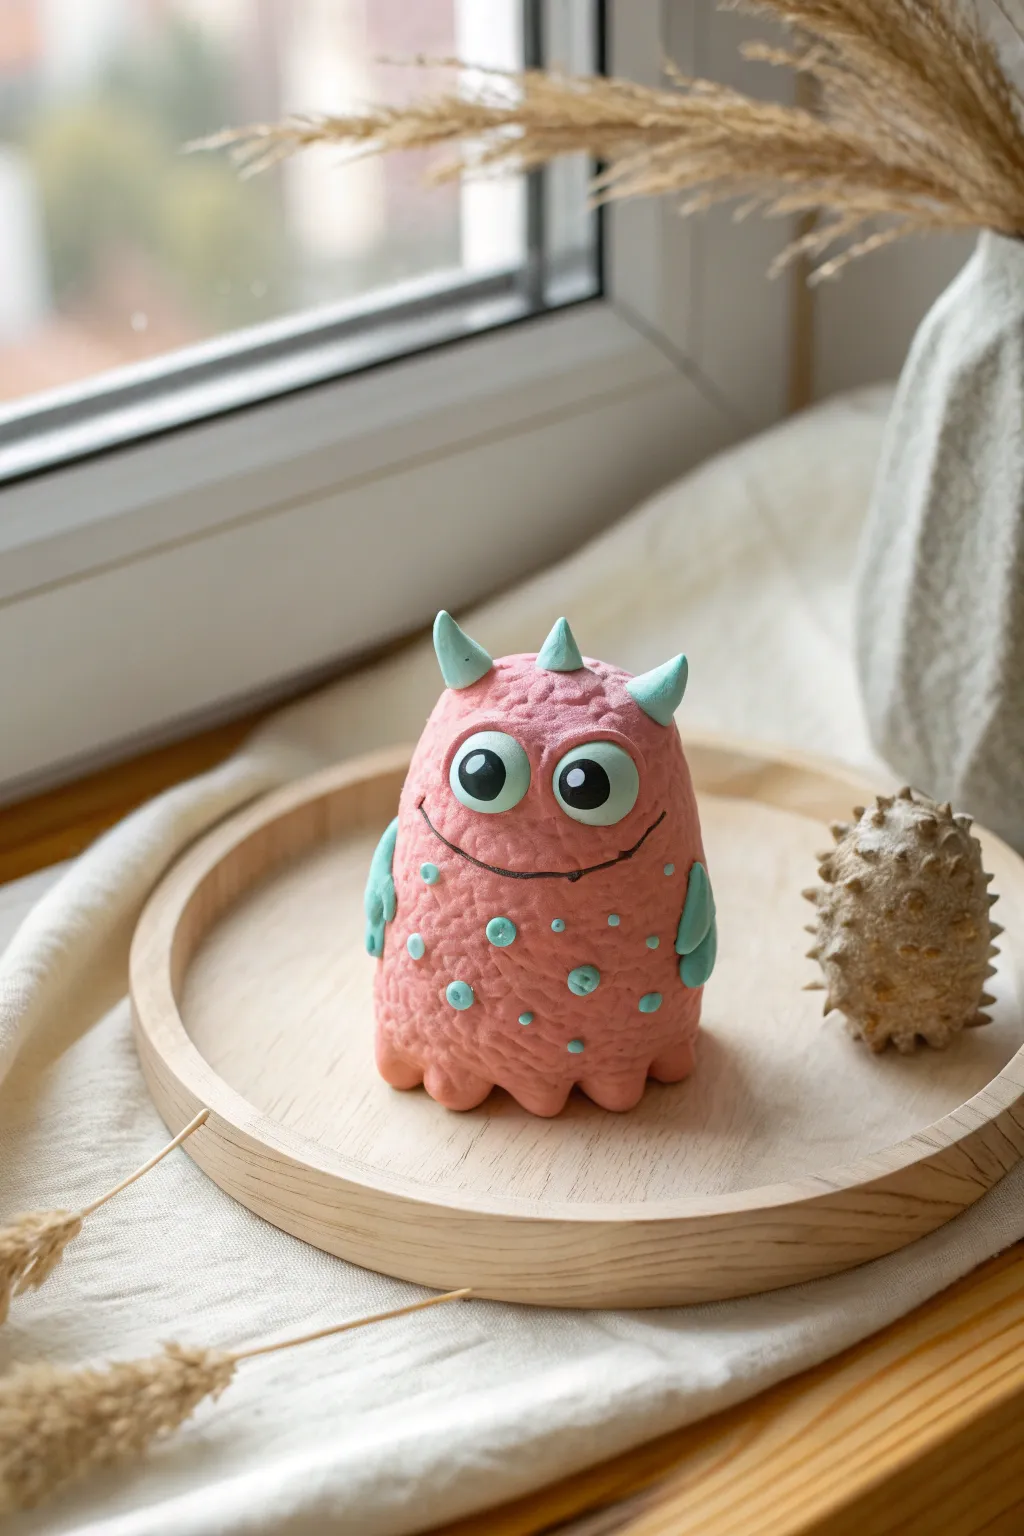
This adorable pink monster features a unique, pitted texture that gives him a fuzzy or bumpy appearance. With his teal horns, tiny arms, and big expressive eyes, he makes for a perfect desk companion or windowsill decoration.
Step-by-Step
Materials
- Pink air-dry clay (or polymer clay)
- Teal or light blue clay
- White clay
- Black clay
- Black clay marker or fine-tip paint pen
- Texture tool (like a rough stone, stiff brush, or crumpled foil)
- Clean work surface
Step 1: Shaping the Body
-
Create the base:
Start with a generous handful of pink clay. Roll it into a smooth ball to remove any large cracks, then gently elongate it into a tall gumdrop or oval shape. -
Flatten the bottom:
Press the shape gently onto your work surface to create a flat base so the monster stands upright on its own. -
Form the feet:
Along the bottom edge, use your fingertip or a rounded tool to gently press in indentations, carving out little rounded humps to suggest multiple tiny feet or a ruffled skirt edge. -
Add texture:
I like to use a texturing tool here for that specific look. Take a rough stone, a wire brush, or a ball of crumpled aluminum foil and press it repeatedly all over the pink body surface to create a pitted, organic texture.
Texturing Trick
A clean, dry toothbrush is perfect for making that fuzzy, pitted skin texture if you don’t have a specialized tool handy.
Step 2: Adding Facial Features
-
Create eye sockets:
Using your thumb or a large ball tool, press two shallow indentations into the upper half of the face where the eyes will go. This helps them sit securely. -
Form the eyes:
Roll two medium-sized balls of white clay. Flatten them slightly and press them into the eye sockets you just made. -
Add the irises:
Roll two smaller balls of teal clay. Flatten these into discs and press them onto the center of the white eyes. -
Add the pupils:
Roll two tiny dots of black clay. Press these into the center of the teal discs. Add a teeny-tiny speck of white clay to each black pupil for a lifelike reflection highlight. -
Draw the month:
Use a thin clay tool to carve a gently curved smile line below the eyes. Once the clay is slightly dry, trace this line with a black marker or paint pen to make the smile pop.
Make Him Friendly
Give your monster a personality upgrade by making him hold a tiny clay heart, flower, or sign in one of his teal hands.
Step 3: Horns, Arms & Details
-
Shape the horns:
Roll three small pieces of teal clay into cones. Attach two to the sides of the head and one in the center top. -
Make the arms:
Create two small oblong shapes from teal clay. Press them onto the sides of the body, curving them slightly downward. -
Create spots:
Roll several tiny balls of teal clay. Scatter them randomly across the monster’s belly and press them flat so they look like polka dots. -
Detail the spots:
Use a needle tool or toothpick to poke a small hole in the center of each teal spot and arm for extra detail. -
Final smooth:
Check all your attachments. If the clay feels dry, use a tiny drop of water to help the horns and arms stick securely before letting the project dry completely.
Set your monster on a shelf to dry fully and enjoy his cheerful, goofy grin every day
Tiny Fairy Doors and Houses

Create a cozy home for your garden fairies with this adorable yellow cottage featuring a scalloped pink roof and a charming teal door. This freestanding air dry clay project stands out with playful painted details like pink polka dots and a tiny house number.
Detailed Instructions
Materials
- Air dry clay (white)
- Acrylic paints (yellow, coral pink, teal/mint, brown, white, gold)
- Clay sculpting tools (knife, needle tool)
- Rolling pin
- Small paintbrushes (flat and fine liner)
- Water cup for smoothing
- Sandpaper (fine grit)
- Matte sealant or varnish
Step 1: Sculpting the Structure
-
Preparing the base:
Start by taking a medium-sized ball of clay and rolling it into a smooth sphere to remove any air pockets. -
Shaping the walls:
Mold the sphere into a rounded cube shape, slightly wider at the bottom, form the walls of the house. Flatten the bottom so it stands upright securely. -
Adding the roof:
Roll out a slab of clay about 1/4 inch thick. Cut a rectangle long enough to drape over the top of your house shape, extending slightly past the edges to create an overhang. -
Attaching components:
Designate the front of the house. Score the top of the walls and the underside of the roof piece with a needle tool. Apply a little water or slip (clay mixed with water) and press the roof firmly onto the walls. -
Sculpting the chimney:
Roll a small cylinder of clay and attach it to the peak of the roof. Use your tool to flatten the top slightly so it looks like a stovepipe. -
Forming the doorstep:
Create a small, flat oval of clay and attach it directly in front of where the door will be, pressing it down to create a stone landing pad.
Step 2: Adding Details
-
Outlining the door:
Use a needle tool or small knife to deeply incise an arch shape on the front for the door frame. Make it wide enough to look like a stone archway. -
Carving the wood planks:
Inside the door arch, carve vertical lines to simulate wooden planks. Add a tiny ball of clay for the doorknob. -
Creating windows:
Use a small circular cutter or a bottle cap to lightly impress a circle on the front gable and one on the side wall. Press a tiny coil of clay around each to make the window frame. -
Detailing the stones:
For the door arch, use your knife to press horizontal lines across the frame, creating the look of stacked stone blocks. -
Drying:
Allow your house to dry completely for 24-48 hours. I like to turn it occasionally to ensure the bottom dries evenly.
Clean Lines Hack
Use a black permanent marker instead of paint for the tiny details like roof scallops, window panes, and the house number. It’s much easier to control than a brush.
Step 3: Painting and Finishing
-
Base coat:
Once dry and lightly sanded, paint the main walls a sunny yellow. You may need two coats for opaque coverage. -
Painting the roof:
Paint the roof and its overhang with a coral pink shade. Let the paint dry completely before adding patterns. -
Detailing the door:
Paint the door planks a soft teal or mint green. Use a brown wash (brown paint thinned heavily with water) over the stone archway and doorstep to highlight the texture. -
Adding roof scallops:
With a fine liner brush and black or dark brown paint, draw scalloped ‘U’ shapes across the roof to mimic shingles. Add a row of white or light pink dots along the bottom edge. -
Window details:
Paint the window interiors orange or gold to look like warm light. Paint the frames teal to match the door, and add a black cross for the window panes. -
Final decorative touches:
Paint small pink polka dots randomly on the yellow walls. Using your finest brush, paint a tiny number, like ‘5’, on the door in black. -
Sealing:
Protect your work with a coat of matte varnish, which will keep the colors bright and protect the clay from moisture.
Cracks While Drying?
If small cracks appear as the clay shrinks, don’t panic. Mix a tiny bit of fresh clay with water to make a paste and fill the cracks, then sand smooth once dry.
Now you have a charming little cottage ready to welcome neighborhood fairies to your shelf or garden
Starfish and Seashell Charms
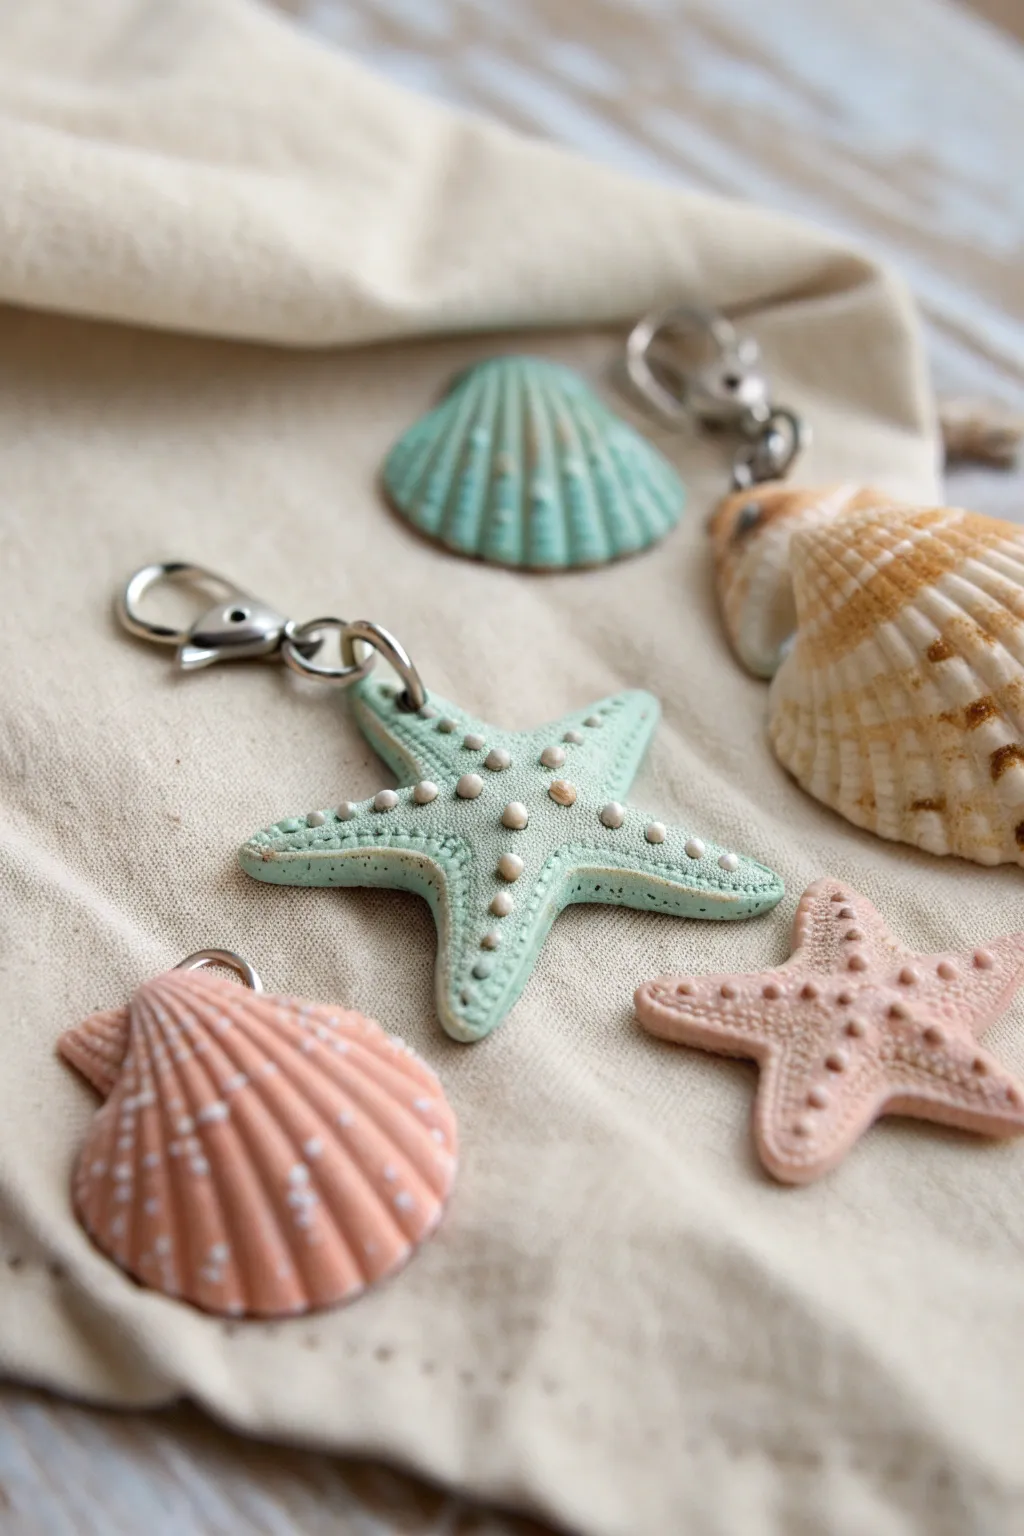
These delightful pastel charms capture the magic of the ocean with realistic textures and soft, speckled details. Perfect as keychains or zipper pulls, this project transforms simple air-dry clay into durable, wearable art that looks freshly washed ashore.
Step-by-Step Guide
Materials
- White or pre-colored air-dry clay (mint green, peach, beige)
- Clay sculpting tools (needle tool, ball stylus)
- Real seashells (optional, for texture)
- Acrylic paints (pastel mint, peach, tan, white)
- Small paintbrush
- Old toothbrush
- Clear matte varnish or sealant
- Jump rings and lobster clasps
- Jewelry pliers
- Rolling pin
- Parchment paper
Step 1: Sculpting the Shapes
-
Prepare the Clay:
Start by conditioning your air-dry clay. If you are using white clay, you can either knead in a tiny drop of acrylic paint now to tint it pastel, or paint it later. Roll a small ball of clay between your palms until smooth. -
Form the Starfish Base:
For the starfish, flatten the ball slightly and pinch out five points to create a star shape. Gently pull and smooth the arms, making them slightly rounded at the tips rather than sharp. It doesn’t have to be perfectly symmetrical; nature rarely is. -
Shape the Scallop Shell:
For the shell charms, roll a ball and flatten it into a fan shape. Press the bottom edge flat to create the hinge area of the shell. You want a thickness of about 1/4 inch so it’s sturdy enough for a keychain. -
Add Shell Texture:
Use a needle tool or a plastic knife to press vertical lines radiating from the bottom center to the top edge of the fan shape to mimic ridges. Alternatively, press a real scallop shell into the clay to create an instant, realistic mold. -
Texturize the Starfish:
Take a ball stylus tool or the rounded end of a paintbrush and press a line of small indentations down the center of each starfish arm. Poke tiny holes gently over the rest of the surface to give it that porous, organic coral texture. -
Create the Hanger Hole:
Before the clay starts to dry, use a straw or a larger needle tool to poke a clean hole through the top of one starfish arm or the top edge of the shell. Make sure the hole isn’t too close to the edge to prevent breakage later. -
Smooth the Edges:
I always like to dip a finger in a little water and run it along the edges of the clay to smooth out any cracks or rough spots. Let the pieces dry completely on parchment paper for 24-48 hours, flipping them occasionally.
Cracked Clay Fix
If you see cracks forming as the clay dries, mix a tiny bit of fresh wet clay with water to make a paste (slip). Fill the cracks with this paste and smooth it over with your finger.
Step 2: Painting and Finishing
-
Base Coat Painting:
If you didn’t use colored clay, paint your dried charms with matte acrylics. Use a soft mint green for the starfish and a warm peach color for the shell. Give them two thin coats for opaque coverage. -
Adding Dimension:
To make the textures pop, mix a darker version of your base color with a lot of water to create a ‘wash.’ Brush this over the piece and quickly wipe the surface with a paper towel. The paint will stay in the grooves and holes, adding depth. -
Highlighting Details:
For the starfish, use a very small brush to dot white paint onto the raised bumps in the center of the arms. This mimics the bony ossicles found on real sea stars. -
Creating the Speckle Effect:
Dip an old toothbrush into slightly watered-down white paint. Run your thumb across the bristles to flick tiny speckles onto the charms. This gives them a sandy, weathered look. -
Sealing the Clay:
Once all paint is totally dry, apply a coat of matte varnish or sealant. This is crucial for protecting the clay from moisture and keeping the colors vibrant. -
Attaching Hardware:
Open a jump ring with your jewelry pliers by twisting the ends away from each other (not pulling apart). Loop it through the hole you made in the clay. -
Adding the Clasp:
Before closing the jump ring, slide on the loop of your lobster clasp. Use the pliers to twist the jump ring back into a closed circle, ensuring the gap is tight so the charm won’t slip off. -
Final Check:
Give the hardware a gentle tug to ensure it is secure. Your ocean-inspired charm is now ready to clip onto a backpack or use as a keychain.
Natural Texture Hack
Press a piece of coarse sandpaper or a textured stone gently onto the damp clay surface before painting. It instantly adds a hyper-realistic gritty, sandy finish without extra tools.
Enjoy carrying a little piece of the beach with you wherever you go
Cutout Window Suncatcher Shapes
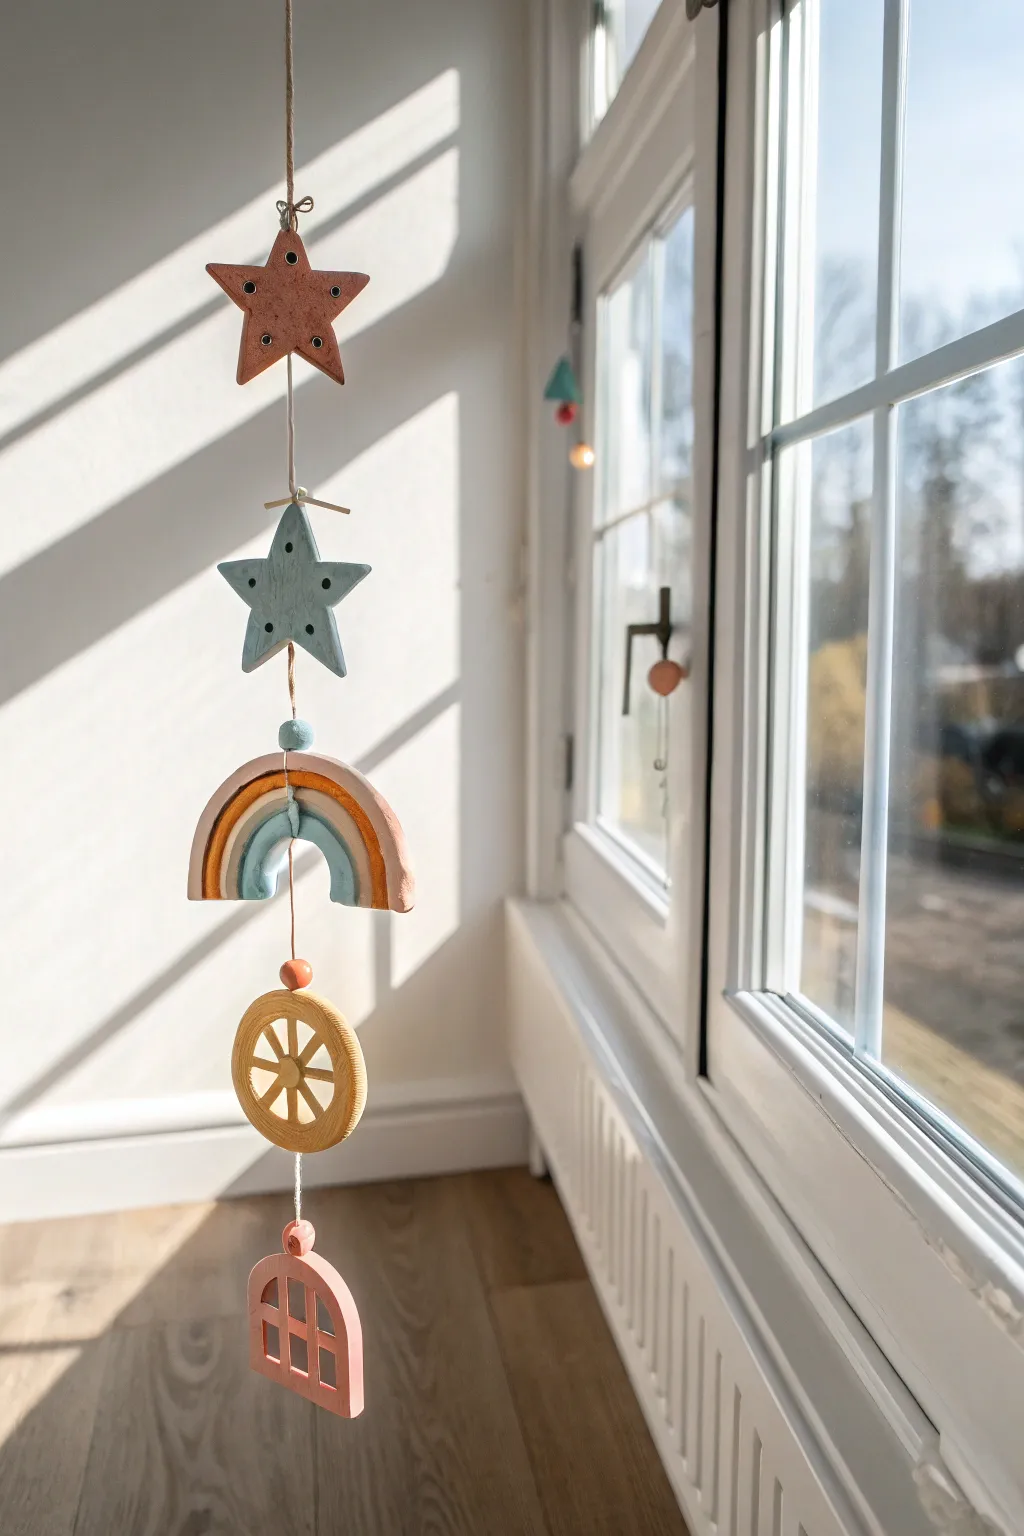
Bring a little magic to your window with this charming hanging mobile made from air-dry clay. Featuring stars, rainbows, and architectural shapes in soft pastel tones, it catches the light beautifully and adds a playful touch to any room.
Step-by-Step Tutorial
Materials
- White air-dry clay (or polymer clay)
- Rolling pin
- Parchment paper or silicone mat
- Cookie cutters (star, circle, arch/rainbow)
- Craft knife or clay tools
- Acrylic paints (pastel pink, dusty blue, mustard yellow, white)
- Fine grit sandpaper
- Small round paintbrushes
- Twine or jute cord
- Wooden beads (assorted sizes)
- Skewer or toothpick (for holes)
- Clear matte varnish (optional)
Step 1: Shaping the Clay Elements
-
Prepare your workspace:
Lay down parchment paper or a silicone mat to prevent sticking. Take a handful of air-dry clay and knead it briefly until it’s smooth and pliable. -
Roll out the slab:
Use your rolling pin to flatten the clay to an even thickness of about 1/4 inch (6mm). Try to keep it uniform so the pieces dry at the same rate. -
Cut the first star:
Use a star-shaped cookie cutter to press out your first shape. If the edges are rough, gently smooth them with a wet finger. -
Create the second star:
Cut a second, identical star from the clay slab. Set these aside on a flat surface. -
Shape the rainbow:
Cut an arch shape (or use a large circle cutter and cut it in half). Use a craft knife to gently etch two curved lines into the surface to define the rainbow bands, being careful not to cut all the way through. -
Form the sun wheel:
Cut a circle shape. Using a smaller circle cutter, remove the center to make a ring. Then, carefully cut a starburst or spoke pattern out of the remaining ring, leaving the outer rim intact. -
Carve the window:
Cut an arch shape similar to the rainbow. Use a craft knife or small square cutter to remove four rectangular sections, creating a windowpane grid. -
Add hanging holes:
Before the clay begins to dry, use a skewer to poke holes. For the top star, you need a hole at the top and bottom point. For the middle pieces, poke holes at the top center and bottom center. The bottom window piece only needs a hole at the top. -
Add decorative texture:
For the stars, use the blunt end of a small paintbrush or a dotting tool to press small indentations into the clay surface for added texture.
Curling Clay?
If your flat pieces start curling up as they dry, place a heavy book on top of them (with parchment paper in between) once they are mostly dry but still slightly flexible.
Step 2: Drying and Decorating
-
Let it dry completely:
Allow your clay pieces to dry on a flat surface for 24-48 hours. I find flipping them over halfway through the drying process helps keep them perfectly flat. -
Sand for smoothness:
Once fully hard, gently run fine-grit sandpaper over the edges to remove any sharp burrs or irregularities. -
Paint the stars:
Paint the top star a soft dusty pink and the second star a muted blue-grey. Avoid painting inside the indented dots to let the natural clay color or shadow create depth. -
Paint the rainbow:
Paint the distinct bands of your rainbow using mustard yellow, dusty blue, and keep one band natural or paint it white. -
Paint the final pieces:
Coat the wheel shape in mustard yellow and the window shape in the same soft pink as the top star. Let all paint dry completely. -
Seal the pieces:
Apply a coat of clear matte varnish if you want to protect the paint and make dusting easier later on.
Texture Tip
Instead of painting dots, try pressing tiny seed beads into the wet clay stars before drying. They will stay embedded and add a lovely mixed-media element.
Step 3: Assembly
-
Start the stringing:
Cut a long length of twine (about 3 feet). Tie a loop at the very top for hanging. -
Thread the first star:
Thread the twine through the top hole of the pink star, run it down the back, and out through the bottom hole. Tie a small knot underneath or add a dab of glue to keep it in place. -
Add spacing beads:
Thread a wooden bead onto the twine and secure it with a knot about 2 inches below the first star. This acts as a stopper for the next piece. -
Attach remaining shapes:
Continue this pattern: thread a shape, secure it, leave a gap of twine, add a bead, and repeat until the window piece hangs at the bottom. Trim any excess twine.
Hang your new creation in a sunny spot and enjoy the cozy, handcrafted vibe it brings to your space.
Kid-Made Domino Tiles
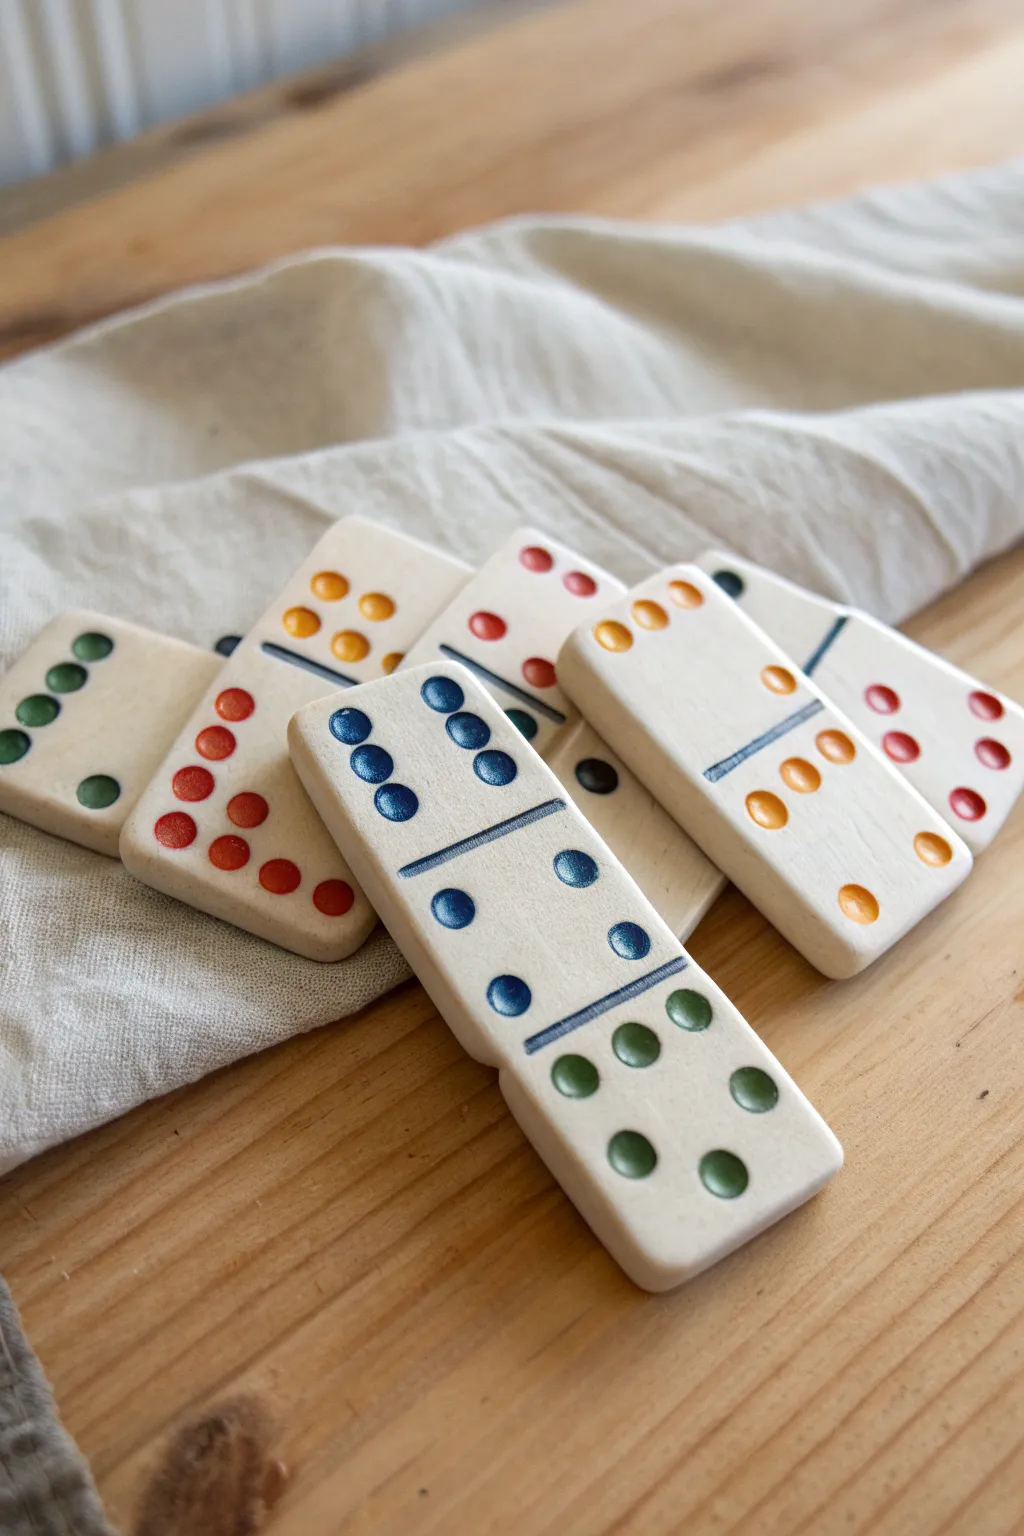
Transform simple air-dry clay into a classic game set that’s as beautiful to display as it is to play. These chunky, handmade tiles feature satisfyingly tactile indented dots painted in a vibrant rainbow palette.
Step-by-Step Guide
Materials
- White or cream air-dry clay
- Rolling pin
- Rectangle cookie cutter or ruler and craft knife
- Sandpaper (fine grit)
- Acrylic paints (rainbow colors)
- Small paintbrush (size 0 or 1)
- Round tool for indenting (like the back of a paintbrush or a ball stylus)
- Butter knife or clay tool for scoring lines
- Clear matte or satin sealant (optional)
Step 1: Shaping the Tiles
-
Prepare the clay slab:
Begin by kneading your air-dry clay until it is smooth and pliable. This removes air bubbles and prevents cracking. Roll it out into an even slab that is roughly 1/4 to 1/3 inch thick. -
Cut the rectangles:
Using a rectangular cookie cutter creates the most uniform shape, but you can also measure and cut 1×2 inch rectangles using a ruler and craft knife. You will need 28 tiles for a standard double-six set. -
Smooth the edges:
Dip your finger in a little water and gently run it along the cut edges of each rectangle. This softens the sharp corners and gives the tiles a more polished, stone-like feel. -
Score the center line:
Using the back of a butter knife or a clay tool, gently press a horizontal indentation across the center of each tile to divide it into two squares. Just press down; don’t cut all the way through. -
plan the pips:
Before pressing dots into the clay, lightly mark where they should go with a pencil tip to ensure your spacing is symmetrical. Follow the standard domino pattern layout (0-0 through 6-6). -
Create the indentations:
Take a round tool—the handle end of a paintbrush works perfectly for this—and press firmly into your guide marks to create clean, circular divots for the pips. Rotate the tool slightly as you press to keep the walls of the hole smooth. -
Final smoothing:
Check the back of the tiles; sometimes pressing the dots deforms the flatness. Gently press the tile flat against your work surface again to correct any warping. -
Let them dry:
Place the tiles on a wire rack or a sheet of parchment paper to dry. Flip them over halfway through the drying process to ensure both sides dry evenly. This usually takes 24-48 hours depending on humidity.
Curling Corners?
If your clay tiles start curling upward while drying, place a lightweight book or board on top of them once they are partially dry to weigh them down gently.
Step 2: Adding Color
-
Sand for perfection:
Once fully dry, the clay might have rough spots. I like to take a piece of fine-grit sandpaper and lightly buff the edges and surface until they feel smooth and pleasant to hold. -
Select your palette:
Choose a specific color for each number, like the example image: yellow for 1s, orange for 2s, red for 3s, blue for 4s, etc. This helps with quick recognition during gameplay. -
Paint the pips:
Load a small detail brush with acrylic paint. Carefully dab a pool of paint into each indented dot. Try to keep the paint inside the divot; if you slip, quickly wipe the surface with a damp paper towel. -
Paint the divider:
Using a thin brush and a dark color like navy blue or black, paint the scored line across the center of the tile. A steady hand is key here. -
Clean up mistakes:
If paint has dried on the surface where you don’t want it, use your sandpaper to gently scratch it off, revealing the clean white clay underneath. -
Seal the deal:
To protect your game from dirty fingers and chips, apply a coat of clear matte or satin sealant. Spray sealant is easiest for an even coat, but a brush-on varnish also works well.
Deep & Durable
Make your pip indentations deeper than you think you need. Paint fills space, and shallow divots lose their satisfying tactile quality once painted.
Gather your family around the table and enjoy a game night with your custom handmade set
Mini “Small World” Play Figures
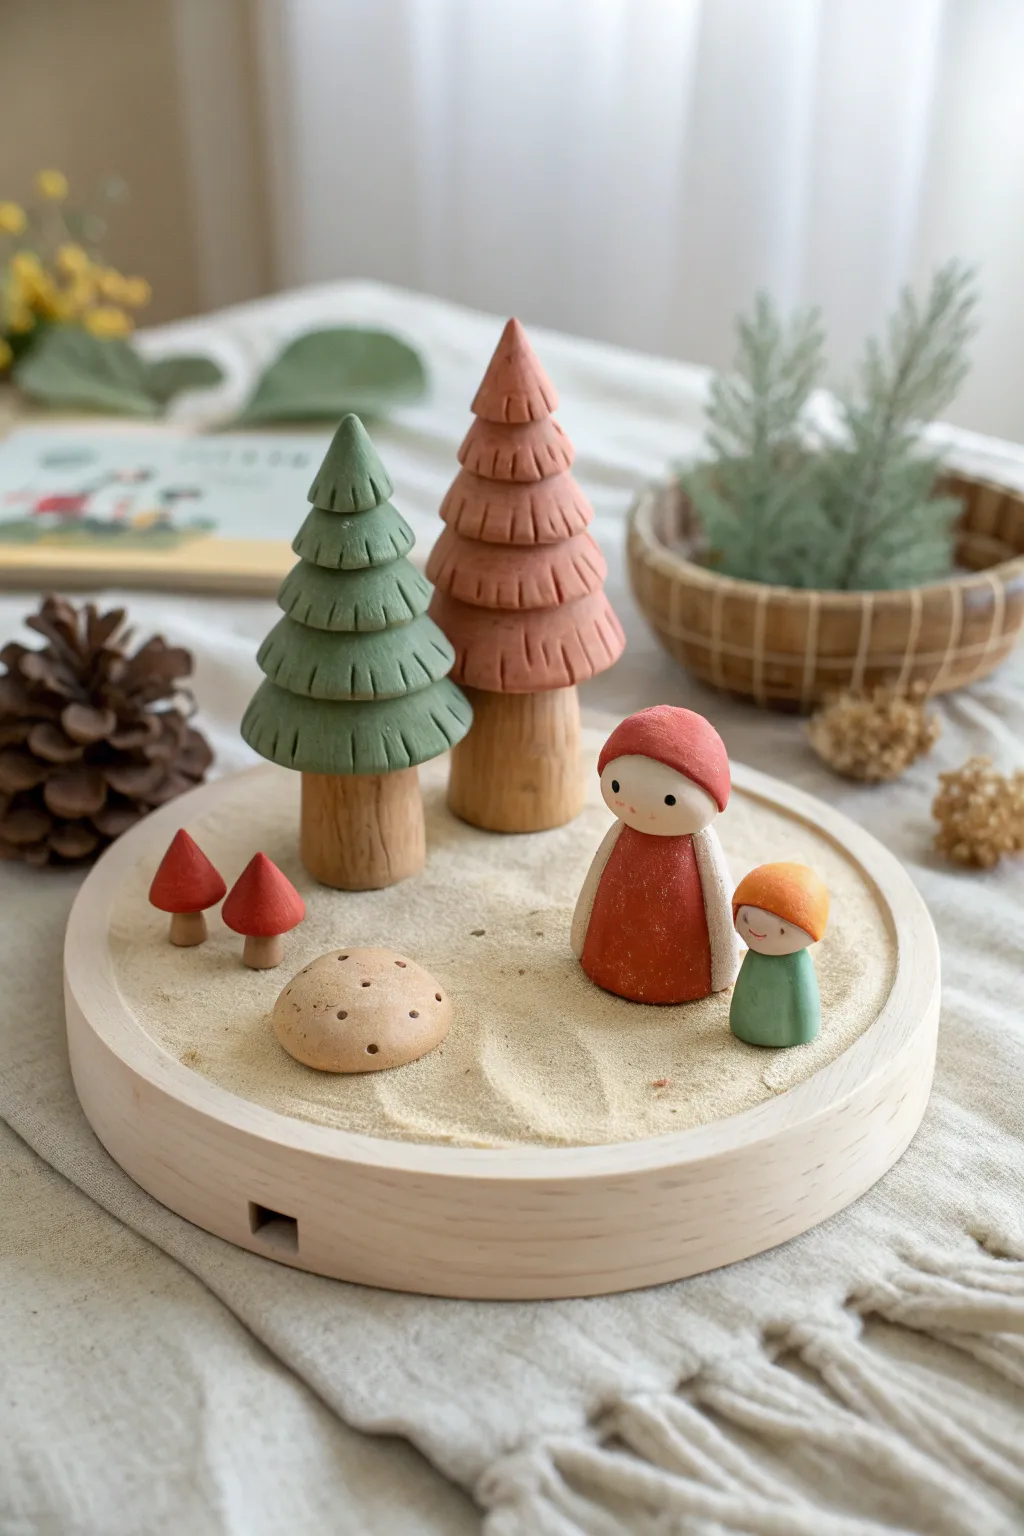
Create a tiny, enchanting forest scene that fits perfectly on a tabletop, inviting imaginative play with simple, sturdy figures. This project uses air dry clay to craft minimalist trees, people, and mushrooms, all set within a calming sensory sand base.
Step-by-Step
Materials
- Air dry clay (white or terracotta)
- Acrylic paints (sage green, muted red, orange, skin tone, beige)
- Fine grit sandpaper
- Small rolling pin
- Sculpting tool or plastic knife
- Wooden circular tray or sturdy box lid
- Fine play sand
- Small detail paintbrush
- Matte spray varnish (optional)
Step 1: Sculpting the Trees
-
Form the trunks:
Start by rolling two cylinders of clay for the tree trunks. Make them thick and sturdy, roughly 1.5 to 2 inches tall. Press the bottoms firmly onto your work surface to ensure they stand distinctively flat. -
Texture the bark:
Use a sculpting tool or a toothpick to scratch vertical lines up and down the trunks, giving them a rustic, wood-grain texture. -
Create the foliage cones:
Roll out clay into flat sheets about 1/4 inch thick. Cut out graduated circles—you’ll need smaller ones for the top and larger ones for the bottom. Drape these circles over the trunks or stack cone shapes to create the tiered pine look. -
Detail the branches:
Take your sculpting tool and press vertical indentations all around the edge of each foliage tier to simulate pine needles. Don’t worry about perfection; uneven spacing adds natural charm.
Cracked Clay?
Cracks happen if clay dries too fast. Mix a tiny bit of fresh clay with water to make a ‘slip’ paste, fill the crack, smooth it over, and let it re-dry.
Step 2: Crafting the Characters & Accessories
-
Shape the main bodies:
Roll a smooth, cone-shaped piece of clay for the larger figure’s body. Repeat this process to make a smaller, squat cone for the child figure. -
Add heads and hoods:
Roll small spheres for heads. For the larger figure, flatten a separate piece of clay into a pancake and drape it over the head to form a hood, smoothing the clay at the neck so it joins seamlessly with the body. -
Attach the heads:
Score (scratch) the top of the body and the bottom of the head, wipe with a little water, and press them firmly together to bond. -
Make the mushrooms:
Roll tiny stems and attach small caps. For the two standing mushrooms, keep the caps pointed. For the ground mound, create a flattened dome shape directly on the table. -
Texture the mound:
Use the tip of a toothpick to poke random holes or dots into the top of the flattened ground mound for texture. -
Dry thoroughly:
Set all pieces aside in a safe, dry spot. Let them harden completely for at least 24-48 hours, turning them occasionally so the bottoms dry out.
Step 3: Painting and Assembly
-
Sand for smoothness:
Once bone dry, gently rub the figures with fine-grit sandpaper to remove any rough fingerprints or sharp clay ridges. -
Paint the trees:
Paint the tree trunks a light, natural beige. For the foliage, use a muted sage green for one tree and a dusky pink or terracotta for the other. I find applying two thin coats gives the smoothest matte finish. -
Color the figures:
Paint the larger figure’s dress and hood in a deep red. Paint the face a pale skin tone. For the smaller figure, use sage green for the body and bright pumpkin orange for the hair or hat. -
Add facial details:
Using your tiniest brush or the tip of a toothpick, dot two small black eyes on the faces. You can add a tiny curved line for a smile if you wish, or keep them neutral. -
Finish the mushrooms:
Paint the standing mushroom caps red and the stems beige. Paint the ground mound a sandy beige color, possibly adding darker specks inside the pre-poked holes. -
Seal the work:
If these will be played with frequently, mist them with a matte spray varnish to protect the paint from chipping. -
Prepare the tray:
Choose a shallow wooden tray or box lid. Ensure it is clean and dry before filling it. -
Arrange the scene:
Pour fine play sand into the tray, smoothing it out. Nestle your finished clay figures into the sand to create your small world.
Weight & Stability
Embed a small coin or washer into the base of your standing figures while the clay is wet. This lowers the center of gravity so they won’t tip over in the sand.
Now you have a serene little pocket of nature ready for display or gentle storytelling play