Whenever I need something lightweight, strong, and super forgiving, I reach for paper clay. It’s one of my favorite ways to get that sculptural wow-factor—whether you’re going for cute characters or sleek modern décor—without needing a kiln.
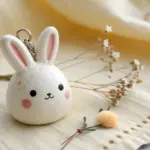
Simple Animal Figurines

This charming little rabbit figurine captures a rustic, handcrafted feel with its textured surface and simple painted details. It’s an approachable project perfect for beginners to paper clay sculpting.
Step-by-Step Guide
Materials
- Paper clay (air-dry)
- Aluminum foil
- Water in a small cup
- Basic sculpting tools (or a toothpick/skewer)
- Acrylic paints: warm white, soft pink, black
- Paintbrushes: medium flat brush, fine detail brush
- Sandpaper (fine grit, optional)
- Matte sealant spray
Step 1: Building the Armature
-
Shape the core:
Begin by crumpling aluminum foil into two distinct shapes: a larger, squat oval for the body and a slightly smaller, round sphere for the head. -
Connect the forms:
Press the head piece firmly onto the body piece. You can use a toothpick or a bit of hot glue to secure them together if they feel wobbly, but usually, the clay will hold them later. -
Form the ears:
Twist two smaller strips of foil into long, flattened tear-drop shapes for the ears. They should be tall and upright. -
Attach the ears:
Push the base of each foil ear into the top of the foil head. Using a dab of hot glue here is very helpful to keep them standing straight while you work.
Step 2: Sculpting with Clay
-
Cover the form:
Take small chunks of paper clay and flatten them into pancakes. Press these over your foil armature, smoothing the seams together with a bit of water on your finger. -
Smooth the transition:
Pay special attention to the neck area where the head meets the body. Add a little extra clay here to create a sturdy, seamless join, blending upwards and downwards. -
Refine the shape:
Use your palms to gently roll and smooth the body and head, aiming for a rounded, organic look. The texture doesn’t need to be perfectly porcelain-smooth; a little roughness adds character. -
Ear detailing:
Cover the foil ears with a thin layer of clay. Shape them so they are slightly concave on the front face, giving them that classic bunny ear scoop. -
Adding arms:
Roll two small sausage shapes of clay for the arms. Press them onto the sides of the body, blending the top and back edges into the torso while leaving the front edge slightly defined. -
Paw details:
Using a sculpting tool or toothpick, gently press two or three small vertical lines into the bottom of each arm to suggest paws. -
Tail time:
Roll a small ball of clay and attach it to the lower back of the bunny. Blend the edges thoroughly so it doesn’t pop off when dry. -
Texture check:
Before drying, check the surface. If you want a smoother finish, smooth it with a wet finger. I personally like to leave faint finger marks to enhance the handmade aesthetic. -
Dry completely:
Let the sculpture dry for at least 24-48 hours. It should feel lightweight and look chalky white when fully dry.
Loose Ears?
If the clay ears keep drooping while you work, prop them up from behind with a small cardboard box or extra crumpled foil until the clay begins to firm up.
Step 3: Painting and Finishing
-
Base coat:
Paint the entire bunny with a warm white acrylic paint. You might need two coats to get a solid, opaque finish that covers the raw clay color. -
Inner ears:
Mix a very watery wash of soft pink paint. Gently paint the inside of the ear indentations, letting the color fade out near the edges for a natural look. -
Rosy cheeks:
With an almost dry brush and a tiny amount of pink paint, lightly dab circular cheeks onto the face. Keep it subtle. -
Nose and mouth:
Using your finest detail brush, paint a tiny pink ‘Y’ shape for the nose and mouth. Keep the lines very delicate. -
The eyes:
Paint two vertical oval shapes in black for the eyes. Add a tiny white dot in the upper corner of each black oval to serve as a highlight, bringing the character to life. -
Seal:
Once the paint is fully dry, spray the figurine with a matte sealant to protect the surface and unify the sheen.
Seasonal Details
Customize your bunny for different seasons! Sculpt a tiny carrot for it to hold, or paint a little scarf around its neck for a winter version.
Place your finished bunny near a window or on a shelf to enjoy its sweet, rustic presence


Sitting Cat With Textured Fur
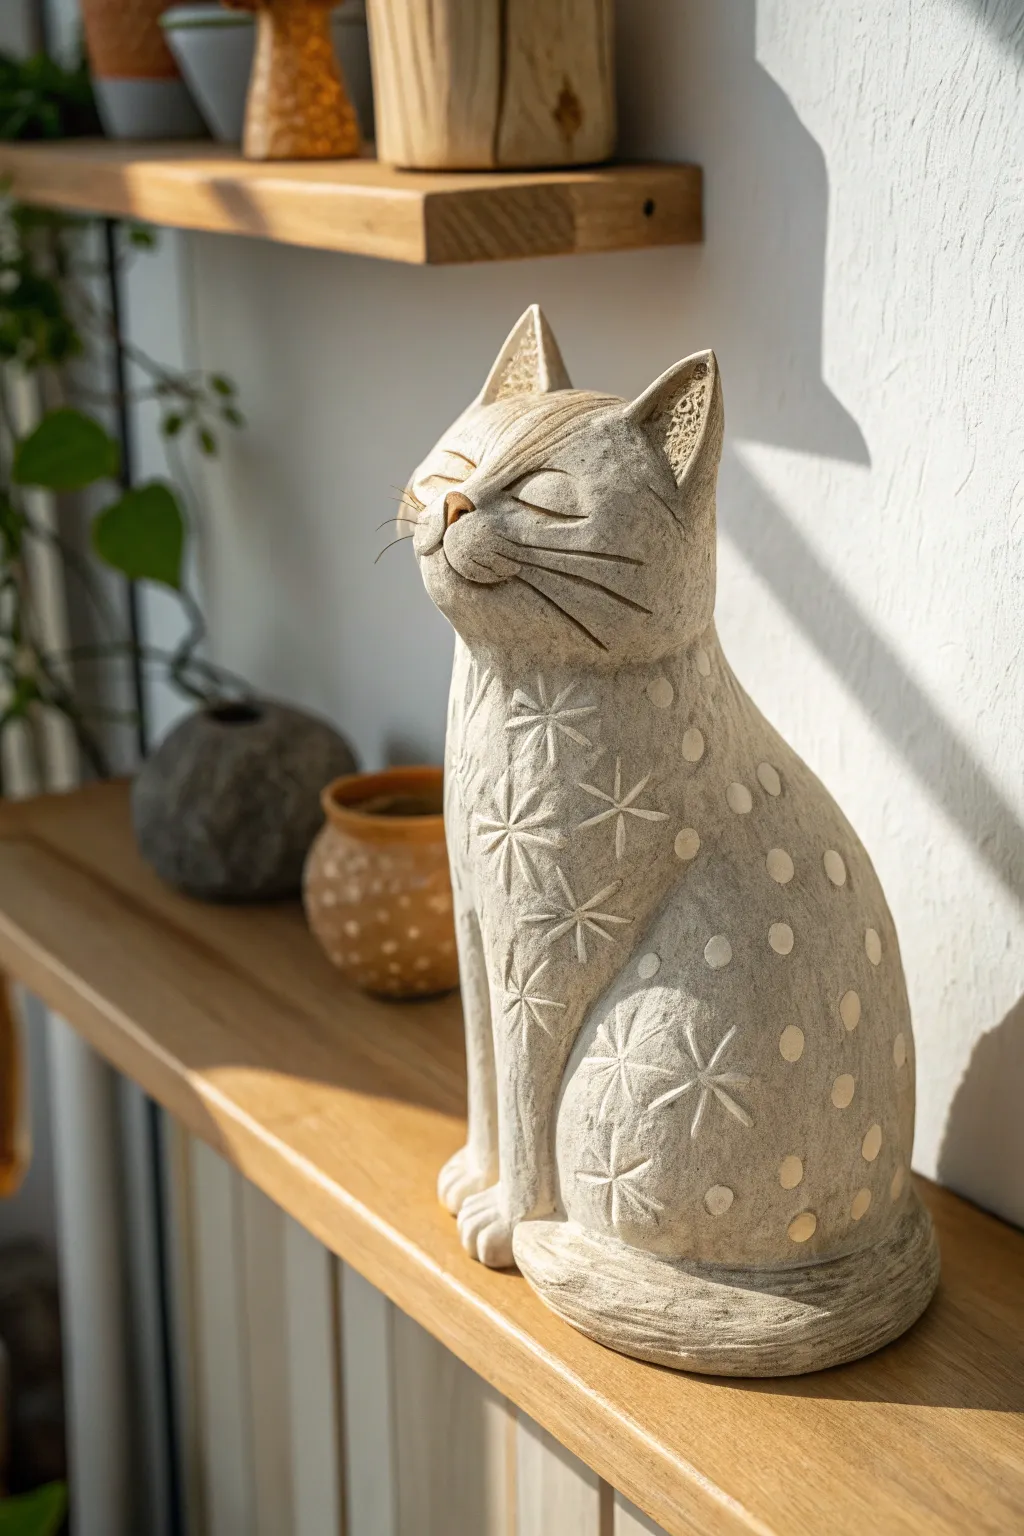
Capture the serenity of a sunbathing feline with this textured paper clay project. The finished piece features a lovely stone-like finish adorned with hand-carved stars and polka dots, perfect for brightening up any shelf.
Step-by-Step Tutorial
Materials
- Air-dry paper clay (white or natural)
- Aluminum foil
- Masking tape
- Sculpting water
- Needle tool or toothpick
- Small carving loop tool
- Sponge
- Acrylic paints (Cream, beige, white, taupe)
- Matte varnish
- Sandpaper (fine grit)
Step 1: Building the Armature
-
Form the core:
Crumple aluminum foil into a large teardrop shape for the body and a smaller sphere for the head. The body should be wider at the bottom to provide a stable base. -
Connect the parts:
Press the head sphere onto the narrower top of the body teardrop. Secure them tightly with masking tape, wrapping around the neck area multiple times to ensure stability. -
Details and pose:
Create two small triangular foil shapes for the ears and a long, curved snake of foil for the tail. Tape the ears to the top of the head and wrap the tail around the base of the body.
Step 2: Sculpting the Form
-
Apply the clay base:
Flatten pieces of paper clay into pancakes about 1/4 inch thick. Wrap these sheets around your foil armature, smoothing the seams together with a little water on your fingers. -
Refine the shape:
Build up the chest area to give the cat a proud, upright posture. Add two long sausage mechanics of clay to the front to suggest the front legs, blending the top seamlessly into the shoulder area. -
Define the face:
Add extra clay to the muzzle area to create cheeks. Use your thumbs to gently press indentations for the eye sockets just above the cheeks. -
Shape the ears:
Refine the clay over the foil ears, pinching them to create a sharp, triangular point. Use a modeling tool to hollow out the inner ear slightly. -
Add the nose:
Roll a tiny triangle of clay and press it into the center of the muzzle for the nose. Smooth the edges so it doesn’t look stuck on. -
Initial smoothing:
Use a damp sponge to wipe over the entire sculpture. This removes fingerprints and creates a unified surface before the detailing phase.
Cracks happen!
If small cracks appear during drying, create a slip by mixing clay with water into a paste. Fill the cracks, smooth over, and let dry again.
Step 3: Carving and Texturing
-
Carve the expression:
Using a needle tool, draw two gentle, U-shaped curves for the closed sleeping eyes. Carve whiskers lines radiating from the muzzle area. -
Create the star pattern:
On the chest and front legs, use your needle tool to incise eight-pointed star or flower shapes. Press deeper in the center and drag the tool outward for clean lines. -
Add the dots:
For the polka dots on the back and sides, use the end of a paintbrush handle or a small loop tool to gently press circular indentations into the damp clay. -
Texture the surface:
Take a stiff-bristled brush or a crumpled ball of foil and lightly tap the rest of the body to create a subtle, stony texture that mimics fur. -
Dry completely:
Let the sculpture dry for at least 24-48 hours. I find that turning it upside down halfway through helps the base dry thoroughly.
Sharper Details
Wait until the clay is ‘leather hard’ (firm but cool to the touch) before carving. The clay won’t drag, giving you much crispier lines.
Step 4: Painting and Finishing
-
Base coat:
Paint the entire cat with a creamy off-white acrylic paint. You may need two coats to fully cover the greyish tone of dried paper clay. -
Warm wash:
Mix a very watery beige or taupe paint. Brush this over the textured areas and immediately wipe it back with a rag. The darker paint will stay in the carved stars and dots, highlighting the design. -
Dry brushing:
Dip a dry brush into pure white paint, wipe most of it off on a paper towel, and lightly graze it over the raised surfaces to accentuate the texture. -
Seal the work:
Finish with a coat of matte varnish to protect the surface and give it that soft, ceramic look.
Now you have a peaceful, handcrafted companion that brings a sense of calm to any room


Long-Leg Dog With a Wire Armature
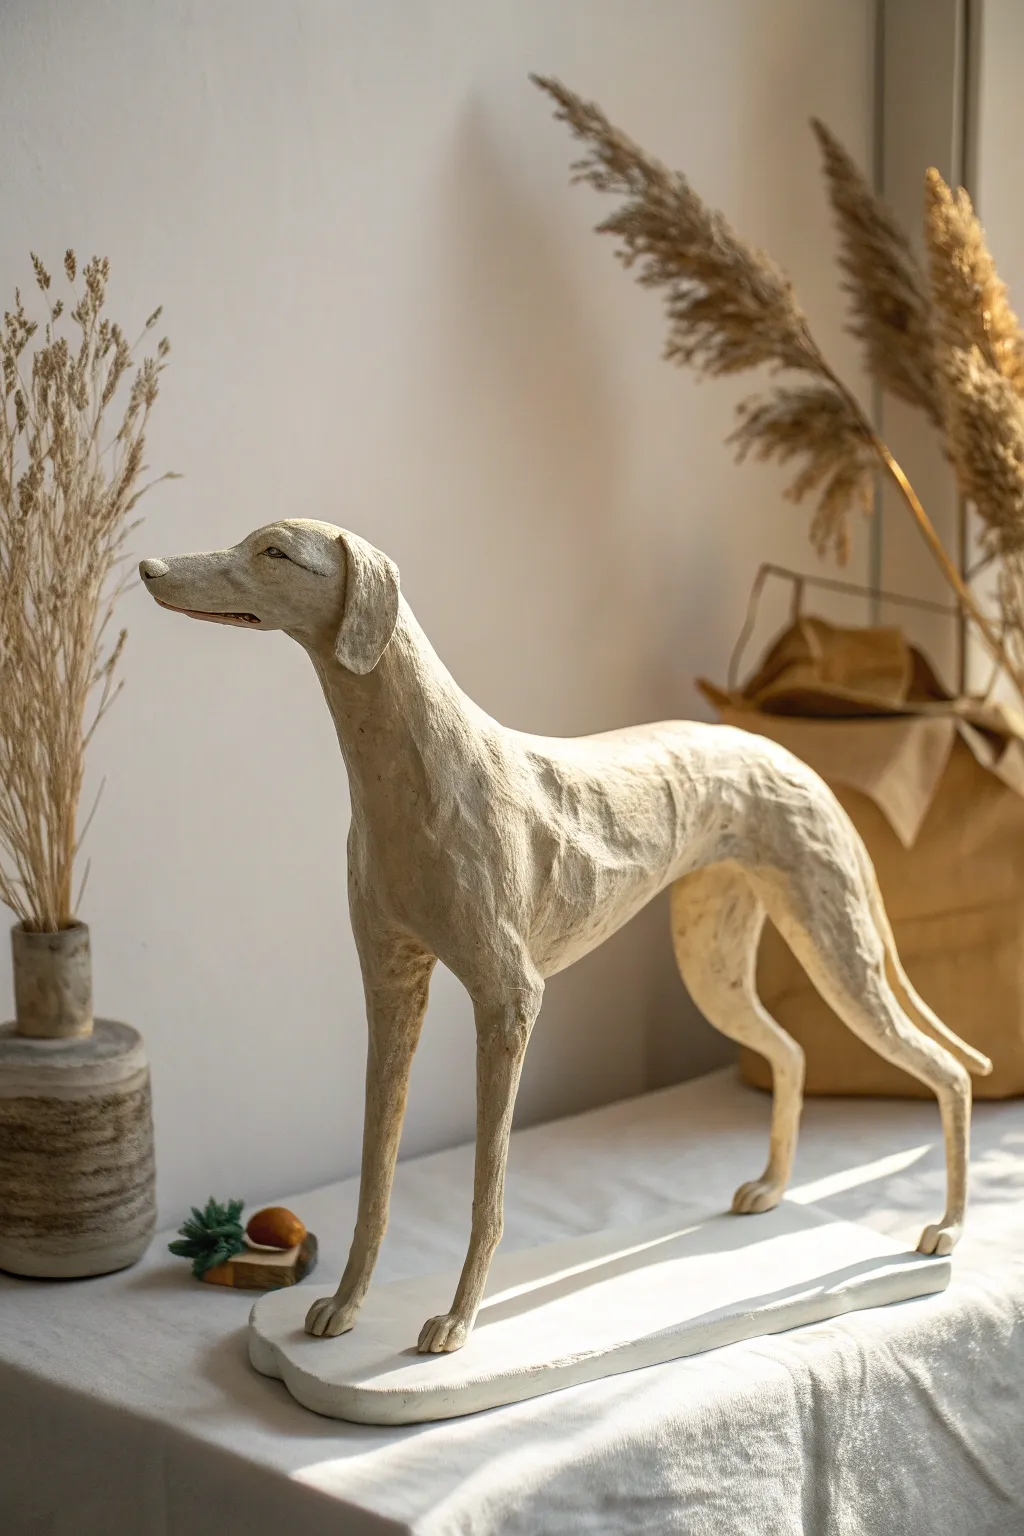
Capture the elegance of a greyhound with this striking paper clay sculpture, featuring sleek lines and a wonderfully textured finish. The project relies on a sturdy wire armature to support those characteristically long, slender legs, resulting in a sophisticated piece perfect for display.
How-To Guide
Materials
- Paper clay (air-dry)
- Strong armature wire (12-gauge or similar)
- Thinner binding wire
- Aluminum foil
- Masking tape
- Wooden base board
- Drill with bit matching wire gauge
- Sculpting tools (wooden and metal loop)
- Fine grit sandpaper
- Acrylic paints (cream, light brown, pink)
- Matte varnish
- Pliers and wire cutters
Step 1: Building the Skeleton
-
Prepare the base:
Start by selecting your wooden base. Mark four points for the paws where the legs will anchor. Drill holes at these marks slightly deeper than needed to ensure the armature stands securely. -
Form the spine and legs:
Cut two long lengths of heavy armature wire. Fold each into an upside-down ‘U’ shape. One will serve as the front legs and shoulders; the other will be the hind legs and hips. Twist a central spine wire to connect these two ‘U’ shapes, determining the length of the dog’s back. -
Shape the neck and head:
Extend the wire from the shoulder area upwards to form the neck. Create a loop at the end for the head, shaping it into a long snout profile typical of a sighthound. -
Create the tail wire:
Attach a separate piece of wire to the rear hip area for the tail, giving it a gentle, natural curve downward. -
Anchor to the base:
Insert the wire legs into your pre-drilled holes in the wooden base. Secure them with glue if necessary (epoxy works well here) so the skeleton doesn’t wobble while you work.
Wire Strength Pro-Tip
Twist two strands of thinner wire together with a drill to create a ‘textured’ armature wire. This extra grit helps the foil and clay grip much better so layers don’t slide off.
Step 2: Bulking out the Form
-
Add foil bulk:
Crumple aluminum foil tightly around the wire spine, ribcage, and neck. Sighthounds have deep chests and very slender waists, so pack the foil densely around the chest area and keep the flank area thin. -
Wrap the limbs:
Wrap thinner strips of foil around the leg wires. Be careful not to make them too thick yet; the clay will add volume later. -
Secure with tape:
Wrap the entire foil form tightly with masking tape. This smooths down sharp foil edges and provides a surface the paper clay will adhere to readily. -
Pose adjustment:
Before adding clay, check the pose from all angles. The dog should look alert, with a natural arch in the back and a slight tilt to the head. Bend the taped armature now if adjustments are needed.
Step 3: Sculpting with Clay
-
Apply the base layer:
Roll out thin sheets or snakes of paper clay. Press them firmly onto the taped form, covering the entire body. I like to work from the feet up to ensure stability. -
Define the muscles:
Add small overlapping patches of clay to build up muscle groups, particularly on the shoulders and hindquarters. Use a sculpting tool or your thumb to blend the edges, leaving some texture visible for that organic look. -
Sculpt the head:
Refine the long snout. Add small triangles of clay for the ears, folding them slightly back or to the side. Use a small tool to carve the eye sockets and the line of the mouth. -
Refine the legs:
Keep the legs slender but define the joints—the ‘knees’ and hocks. Smooth the clay down to the paws, shaping individual toes that grip the base. -
Texture the surface:
Instead of smoothing everything perfectly with water, allow some of the clay’s natural roughness to remain. You can lightly drag a stiff brush or a serrated tool over the wet clay to mimic the texture of fur or weathered stone. -
First drying phase:
Allow the sculpture to dry completely. This may take 24-48 hours depending on humidity. Rotate it occasionally if possible to ensure even drying.
Level Up: Collar Detail
Before the clay is fully dry, sculpt a thin collar or bandana around the neck. Paint it a contrasting color like deep red or gold for a pop of personality.
Step 4: Finishing Touches
-
Sanding and filling:
Once dry, use fine-grit sandpaper to knock back any overly sharp ridges or unwanted bumps. If cracks appeared during drying, fill them with a fresh slurry of paper clay and let dry again. -
Painting the wash:
Mix a watery wash of cream and very light brown acrylic paint. Apply this over the whole dog, wiping it back with a rag immediately. This technique leaves darker pigment in the crevices and texture, highlighting the sculpt. -
Detailing the face:
Use a fine brush to paint the nose a soft dark grey or brown, and add a touch of pinkish-brown inside the ear folds and the corner of the mouth to give it life. -
Base integration:
Paint the wooden base white or cover it with a thin layer of white smoothing clay to create a clean, gallery-style platform that matches the dog’s minimalist aesthetic.
Place your elegant hound on a mantelpiece where the light can catch the subtle textures of your handiwork


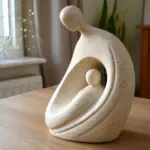
Whimsical Giraffe Character
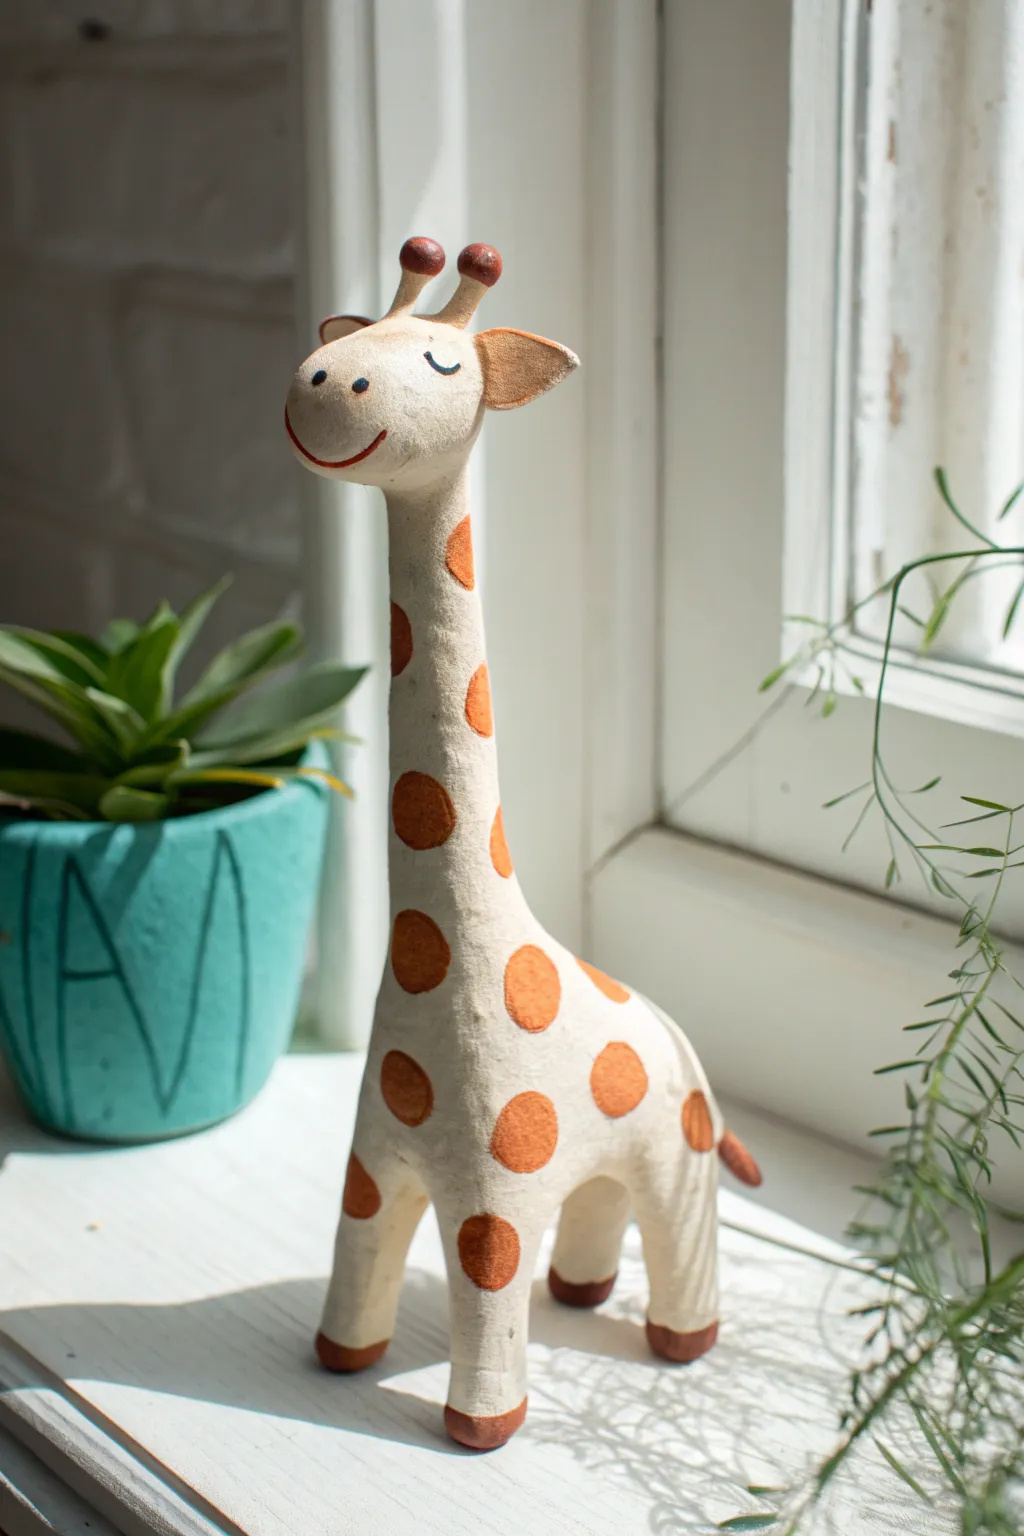
Create a charming, elongated giraffe figure that brings a touch of serenity to any windowsill. This sculpture utilizes paper clay to achieve a soft, matte texture that perfectly complements the character’s peaceful expression and simple spotted pattern.
Step-by-Step Guide
Materials
- Paper clay (air-dry)
- Aluminum foil
- Masking tape
- Rigid wire (14-16 gauge) for armature
- Wire cutters
- Sandpaper (fine grit)
- Acrylic paints (cream/off-white, terracotta orange, dark brown)
- Small round paintbrushes
- Matte varnish (optional)
- Water cup
Step 1: Building the Skeleton
-
Form the core wire:
Cut a length of wire roughly 12 inches long. Bend it into an inverted ‘U’ shape to form the front legs and the tall loop for the neck. Make sure the neck loop is significantly tall to get that signature giraffe look. -
Add the hind legs:
Cut a second, shorter piece of wire. Twist it around the base of the neck loop on the first wire, angling it backwards to create the spine and down for the rear legs. -
Bulk up with foil:
Crumple aluminum foil tightly around your wire armature. Focus on creating a solid oval mass for the body and a slender, tapering cylinder for the long neck. -
Shape the head:
Crumple a separate, small oval ball of foil for the head. Press it slightly flat on the bottom. Tape this securely to the very top of your neck wire. -
Secure the form:
Wrap the entire foil structure in masking tape. This smooths out sharp foil edges and gives the paper clay a surface to grip onto. Ensure the legs are even so it stands on its own.
Cracking Clay?
Minor cracks are normal as paper clay shrinks. To fix, mix a small slurry of fresh clay and water, press it into the cracks, and smooth over with a damp finger.
Step 2: Clay Sculpting
-
Apply the base layer:
Roll out a thin sheet of paper clay or flatten small chunks in your hands. Cover the entire taped armature, blending the seams with a little water on your finger. -
Refine the neck:
Pay special attention to the neck; roll it gently between your palms to ensure it is smooth and cylindrical without being too lumpy. -
Detail the head:
Add a tiny bit more clay to the front of the face to create a subtle snout. Use a modeling tool or a paintbrush handle to create small indentations for where the horns (ossicones) will go. -
Add ears and horns:
Shape two tiny teardrops for ears and attach them to the sides of the head using slip (watered-down clay). Roll two tiny coils for the horns and attach them to the top of the head. -
Smooth the surface:
Once the main shapes are done, dip your finger in water and smooth the entire surface. You want a matte, organic finish, so it doesn’t need to be perfectly porcelain-smooth. -
Dry completely:
Let the sculpture dry for 24-48 hours. I find turning it upside down halfway through helps the belly dry evenly. -
Sand imperfections:
If there are rough ridges you dislike, gently sand them down with fine-grit sandpaper. Wipe away the dust with a damp cloth.
Make it a Family
Create a second, smaller giraffe looking upward to stand next to this one. Varying the neck angles creates a sweet interaction between the two figures.
Step 3: Painting & Finishing
-
Base coat:
Paint the entire giraffe with a creamy off-white acrylic paint. You may need two thin coats for full coverage. -
Paint the spots:
Using the terracotta orange paint, dab on irregular circular spots. Keep them spaced out and vary the sizes. Make the spots on the neck slightly more elongated. -
Detail the features:
Paint the tips of the horns, the insides of the ears, and the hooves with the same terracotta or a slightly darker brown. -
Draw the face:
With a very fine brush and dark brown paint (or a fine-tip marker), paint two small curves for closed, sleepy eyes and a simple curved line for the smile. -
Add the nostrils:
Dot two tiny specks of dark brown on the snout for nostrils. -
Tail touch:
If you added a small clay tail previously, paint the tip brown. If not, you can glue a small piece of twine or cord to the back and paint it to match. -
Seal (optional):
For durability, apply a coat of matte varnish. Avoid glossy finishes as they detract from the soft, paper-like aesthetic.
Place your finished giraffe near a plant to give it a natural habitat to enjoy

The Complete Guide to Pottery Troubleshooting
Uncover the most common ceramic mistakes—from cracking clay to failed glazes—and learn how to fix them fast.
Mini Bust With Expressive Features

Capture quiet emotion with this paper clay bust, featuring elongated features and a textured, stone-like finish. The piece rests on a simple wooden block, highlighting the subtle blue eyes and weathered patina of the sculpture.
Step-by-Step Tutorial
Materials
- Air-dry paper clay (e.g., Creative Paperclay)
- Armature wire (aluminum, approx. 3mm gauge)
- Aluminum foil
- Wooden block base (approx. 4×4 inch)
- Sculpting tools (needle tool, loop tool, wooden rib)
- Water spray bottle
- Acrylic paints (Titanium White, Payne’s Gray, Cerulean Blue, Alizarin Crimson, Raw Umber)
- Fine grit sandpaper
- Matte varnish
- Epoxy glue or heavy-duty construction adhesive
- Paintbrushes (soft round, detail liner, flat shader)
Step 1: Building the Armature
-
Construct the core:
Cut a length of armature wire about 12 inches long. Twist the bottom portion into a flat loop or spiral that can eventually be glued or inserted into your base, leaving a straight vertical stem for the neck. -
Form the head shape:
At the top of the wire stem, create a loop roughly the size of a small egg to support the head. This doesn’t need to be perfect, just a stable loop. -
Bulk up with foil:
Crumple aluminum foil tightly around the wire loop to create the cranial mass. Shape it into an oval, pressing firmly so it’s dense and won’t compress later when you add clay. -
Refine the foil form:
Continue adding foil to build the neck and shoulder area. Ensure the neck is relatively slender compared to the head for that elegant look seen in the photo.
Step 2: Sculpting the Form
-
Apply the base layer:
Roll out sheets of paper clay to about 1/4 inch thickness. Wrap these around your foil armature, pressing firmly to ensure the clay adheres to the foil texture. -
Rough out the features:
Add small balls of clay to mark the location of the nose, chin, and cheekbones. Keep the face elongated; place the eyes slightly higher than halfway to achieve the stylized aesthetic. -
Sculpt the nose and mouth:
Build up a long, straight nose bridge. Use a small wooden tool to carve the nostrils. For the mouth, add a small coil and shape the lips with a downward curve to convey a solemn expression. -
Shape the eyes:
Carve out socket hollows first, then place small spheres inside for eyeballs. Roll tiny snakes of clay for upper and lower lids, smoothing them onto the face to create a heavy-lidded, sleepy look. -
Model the hair:
Apply flattened strips of clay over the top and back of the head. Use a damp sculpting tool to carve deep grooves, simulating strands of hair pulled back into a loose bun or chignon. -
Refine the neck and shoulders:
Smooth the clay down the neck, creating subtle depressions for the collarbones. I like to leave the bottom edge slightly rough and uneven where it meets the block, giving it an excavated artifact feel. -
Texture and dry:
Before the clay hardens, tap the surface lightly with a coarse sponge or crumpled foil to remove fingerprints and add stone texture. Let the sculpture dry completely (24-48 hours).
Keep it workable
Paper clay dries faster on the outside. Keep a spray bottle handy to mist your work periodically, or drape a damp paper towel over the face while working on the hair to prevent cracking.
Step 3: Finishing and Mounting
-
Sand the surface:
Once bone dry, use fine-grit sandpaper to smooth out any unwanted harsh ridges, focusing on the cheeks and forehead while leaving the hair texture rough. -
Base coat painting:
Mix Titanium White with a tiny dot of Raw Umber and Payne’s Gray to create a pale, stony off-white. Paint the entire bust with this mixture. -
Add the wash:
Dilute Payne’s Gray and Raw Umber with water to create a thin wash. Brush this over the sculpture, letting it settle into the hair grooves and facial recesses, then wipe the high points clean with a rag. -
Paint facial details:
Using a detail brush and watered-down Cerulean Blue, tint the irises. Add a very sheer glaze of Alizarin Crimson to the lips and the rim of the eyelids for a lifelike flush. -
Highlighting:
Dry brush pure Titanium White over the highest points—the nose tip, brow bone, and hair strands—to make the texture pop. -
Seal the work:
Apply a coat of matte varnish to protect the paint without adding an artificial shine. -
Prepare the base:
Sand your wooden block until smooth. You can leave it raw wood for contrast or stain it lightly. -
Final assembly:
Drill a hole in the wooden block if you left a wire stem, or use heavy-duty epoxy to glue the flat bottom of the bust securely to the center of the wooden plinth.
Make it antique
For an older, dug-up look, rub a little dry grey pastel dust into the deep crevices of the hair and neck after the paint is dry, then seal it with a spray fixative.
Place your finished sculpture near a window where natural light can play across the textured features you created
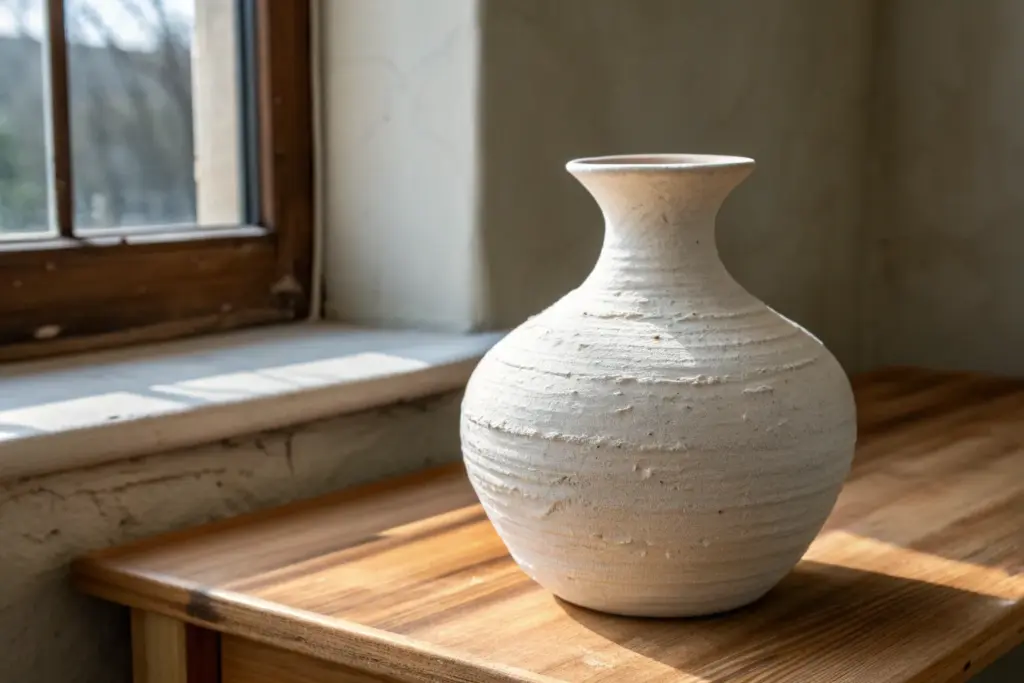
Face Vase Lookalike
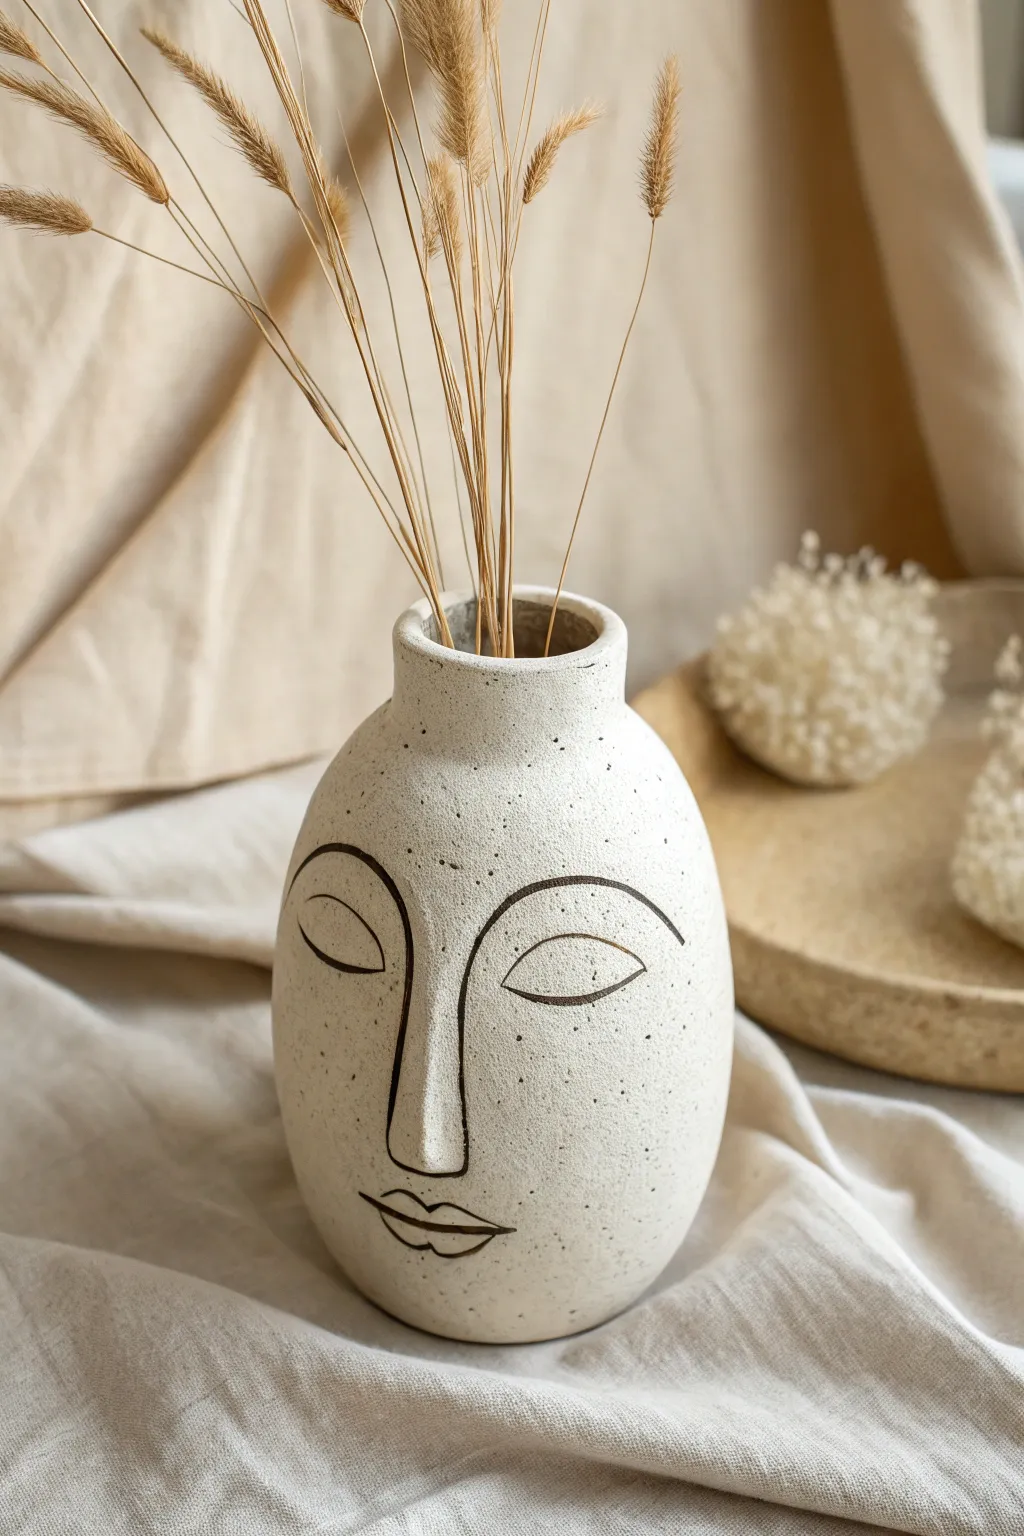
This project transforms simple paper clay into a stunning faux-ceramic vessel with a trendy, minimalist aesthetic. The key lies in achieving that speckled, stone-like texture and the clean, continuous-line facial features.
How-To Guide
Materials
- Air-dry paper clay (white or light grey)
- Glass jar or bottle (as a hidden armature)
- Rolling pin
- Water and a small sponge
- Sculpting tools (needle tool, rib tool)
- Dark brown or black acrylic paint
- Fine liner brush (size 0 or 00)
- Toothbrush (old)
- Matte varnish or sealant
- Sandpaper (fine grit)
Step 1: Forming the Base
-
Prepare the Armature:
Begin by selecting a glass jar or bottle that has the general shape you want for the vase’s body. Ensure it is clean and dry. This internal support is crucial because paper clay isn’t waterproof on its own, so the glass holds the actual water or stems. -
Condition the Clay:
Take a large chunk of paper clay and knead it thoroughly until it is soft and warm. Smooth clay prevents cracks later on. -
Roll a Slab:
Roll your clay out into a large, even slab, approximately 1/4 inch thick. Aim for a rectangular shape that is long enough to wrap entirely around your chosen glass vessel. -
Wrap the Vessel:
Carefully lift the clay slab and wrap it around the glass jar. Press the two ends together firmly to create a seam. I like to score the edges (scratch them up a bit) and add a dab of water before pressing them together for a stronger bond. -
Smooth the Seam:
Use your fingers or a dampened rib tool to smooth out the vertical seam until it is invisible. Blend the clay downwards to cover the bottom edge of the glass as well.
Step 2: Refining the Shape
-
Build the Neck:
If your glass jar has a wide mouth but you want the tapered neck shown in the image, roll a thick coil of clay. Place this coil on the upper rim of your clay-covered jar. -
Blend the Neck:
Use your thumb to blend the coil downward onto the main body and upward to form a smooth, narrowing neck. Keep your fingers wet to help slide the clay. -
Sculpt the Nose:
Roll a small, tapered snake of clay for the nose bridge. Attach it vertically to the front center of the vase using the score-and-slip method. Smooth the edges so the nose looks like it is rising naturally out of the surface, rather than just stuck on. -
Texture the Surface:
Before the clay dries, take a slightly damp sponge and dab it all over the vase. This removes fingerprints and creates a natural, slightly organic texture similar to the reference photo. -
Slow Drying:
Allow the vase to dry completely. This can take 24-48 hours depending on humidity. Rotate it occasionally so all sides dry evenly. Don’t rush this with heat, or cracks may appear.
Seamless Blending Tip
Keep a small bowl of ‘slip’ (clay dissolved in water to a yogurt consistency) nearby. Use this as glue for joining clay pieces.
Step 3: Finishing Touches
-
Sand for Smoothness:
Once bone dry, use fine-grit sandpaper to gently smooth any rough patches, particularly around the rim and the nose bridge. Wipe away the dust with a dry cloth. -
Create the Speckles:
Dilute a small amount of dark brown or black acrylic paint with water until it is very runny. Dip an old toothbrush into this mixture. -
Splatter Technique:
Hold the toothbrush near the vase and run your thumb across the bristles to flick tiny specks of paint onto the surface. Practice on a paper towel first to control the spray density. You want a subtle, stone-like effect. -
Draft the Face:
Lightly sketch the facial features—eyes, eyebrows, mouth, and the outline of the nose—using a pencil. The style relies on fluid, connected lines, so keep it loose. -
Paint the Lines:
Using a fine liner brush and un-thinned dark acrylic paint, carefully trace over your pencil lines. Vary the pressure slightly to create line weight variation, making the drawing feel expressive. -
Seal the Work:
After the paint is fully dry, apply a coat of matte spray varnish or brush-on sealant. This protects the clay surface and the paint work without making it too shiny. -
Adding Florals:
Fill your new vase with dried bunny tails or wheat stalks to complete the serene, earthy look.
Make it Functional
Use a taller wine bottle as your base instead of a jar to create a floor vase version perfect for pampas grass.
You now have a chic, artisan-style piece of decor ready for display


What Really Happens Inside the Kiln
Learn how time and temperature work together inside the kiln to transform clay into durable ceramic.
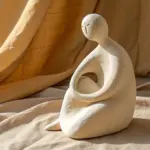
Body-Shaped Vessel Sculpture
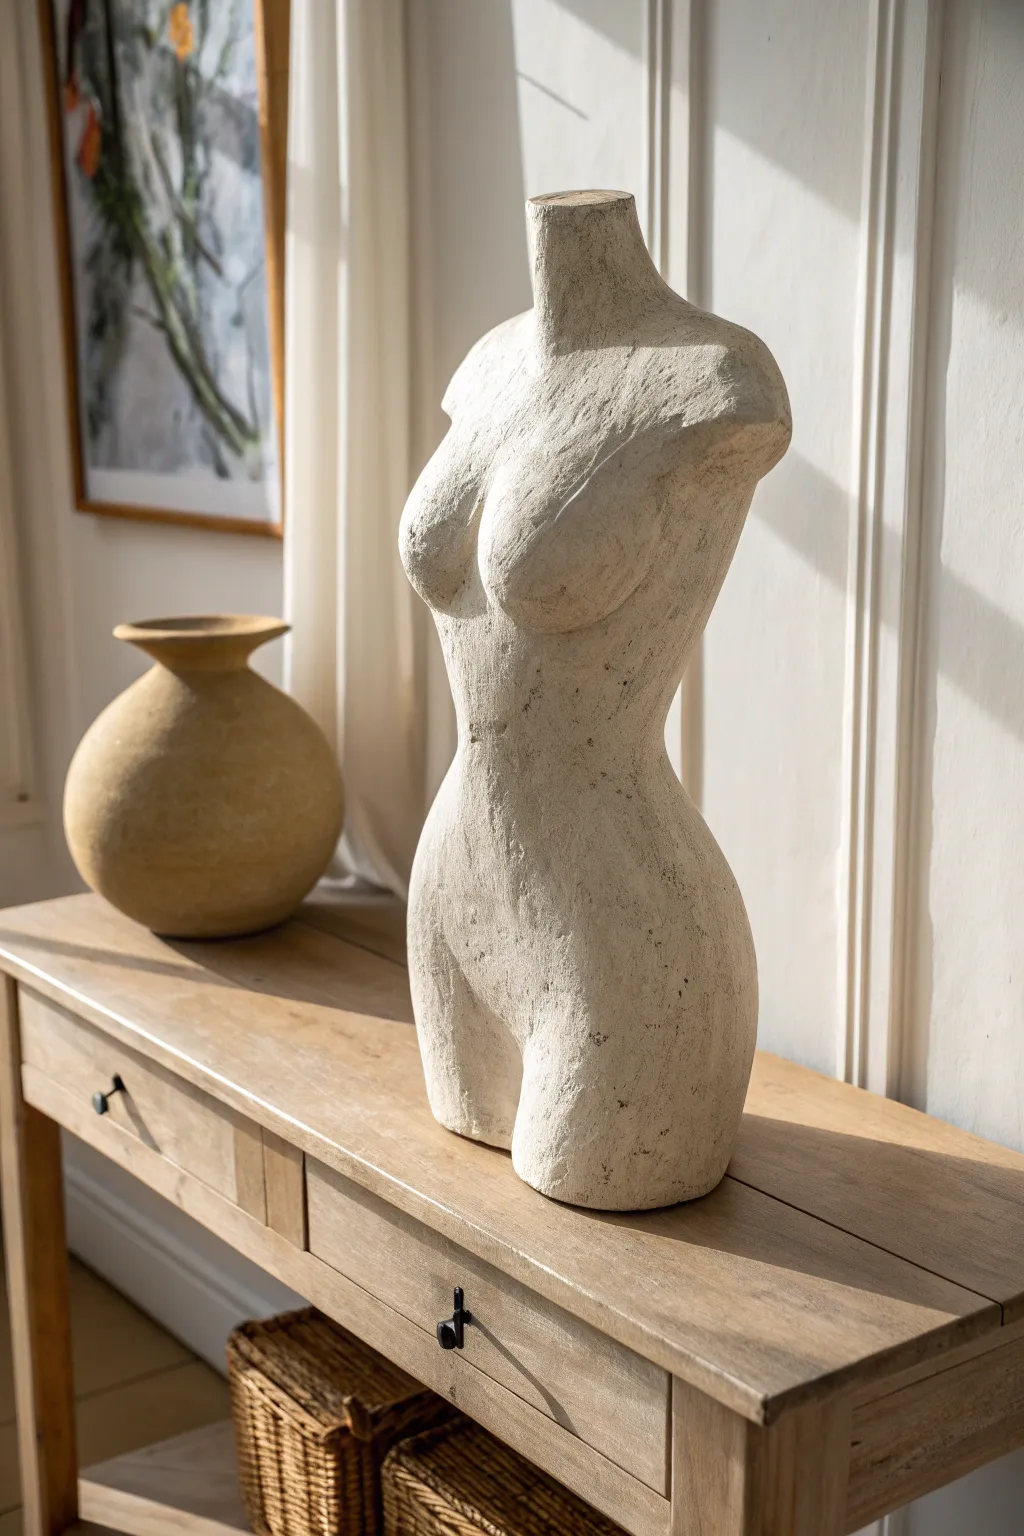
Capture the timeless elegance of classical sculpture with this textured female torso made from paper clay. The finish mimics the look of weathered stone or antique plaster, making it a sophisticated addition to any sunlit console table.
Step-by-Step Tutorial
Materials
- Paper clay (air dry)
- Aluminum wire (heavy gauge for armature)
- Aluminum foil
- Painter’s tape or masking tape
- Wooden base or scrap wood for support while sculpting
- Sculpting tools (loop tool, needle tool, wooden rib)
- Spray bottle with water
- Fine and medium grit sandpaper
- Gesso or white primer
- Acrylic paints (warm white, beige, raw umber)
- Sea sponge or rough stippling brush
Step 1: Building the Armature
-
Form the spine:
Begin by twisting two lengths of heavy-gauge aluminum wire together to create a sturdy central spine. Secure this vertically into a temporary wooden base to keep your hands free. -
Shape the volume:
Crumple large balls of aluminum foil and press them firmly around the wire to build the core shape of the torso. Focus on creating the basic masses for the hips, waist, and chest area. -
Refine the silhouette:
Wrap the foil tightly with masking tape. This not only secures the foil but smooths out sharp crinkles. Check the silhouette from all angles to ensure an exaggerated hourglass figure typical of classical forms.
Cracks Appearing?
Paper clay often shrinks and cracks as it dries. Don’t panic! Simply fill cracks with a fresh slurry of wet clay and water, then smooth over.
Step 2: Sculpting the Form
-
Apply the base layer:
Flatten pieces of paper clay into pancakes about 1/4 inch thick. Press these onto your foil armature, covering the entire surface. Use your thumbs to mesh the seams together securely. -
Build the anatomy:
Reference anatomical photos or the image provided to add volume where needed. Add small snakes of clay to build up the bust, the curve of the hips, and the slight protrusion of the abdomen. -
Smooth and unify:
Dip your fingers in water and run them over the clay to smooth out major bumps. I like to use a wooden rib tool here to compress the clay and define the waistline curve. -
Define the neckline and edges:
Use a knife or needle tool to cut a clean, straight line across the neck and the thighs where the sculpture ends. Smooth these cut edges so they look deliberate, like a fragment of a larger statue. -
Add texture:
Before the clay dries, gently dab the surface with a coarse sponge or crumpled tin foil. This creates that pitted, stone-like texture evident in the photo. -
Dry thoroughly:
Let the sculpture dry completely. This can take 24-48 hours depending on thickness. Rotate it occasionally so all sides get airflow.
Step 3: Finishing and Patina
-
Sand for character:
Once bone dry, sand the surface. Don’t aim for perfection; sand down the high spots but leave some of your texture pits. This contrast mimics aged stone. -
Prime the surface:
Coat the entire sculpture with gesso. This seals the paper clay and provides a bright, toothy surface for your paint. -
Base coat application:
Mix a warm white acrylic paint with a tiny drop of beige. Paint the entire torso with this mixture. -
Create the antique wash:
Dilute raw umber paint with a lot of water to create a thin wash. Brush this over the sculpture, letting it settle into the pits and textures. -
Wipe back:
Immediately use a damp cloth to wipe away most of the brown wash from the raised areas (the chest, hips, and stomach). The dark color will remain in the crevices, highlighting the texture. -
Dry brush highlights:
Load a dry brush with pure white paint and lightly whisk it over the highest points of the sculpture. This enhances the form and mimics the way light hits stone.
Creating Weight
To make the sculpture feel heavier like real stone, mix a handful of fine sand into your final layer of wet clay or paint.
Place your finished torso near a window to let the natural shadows play across its textured curves
Organic Arch Table Sculpture
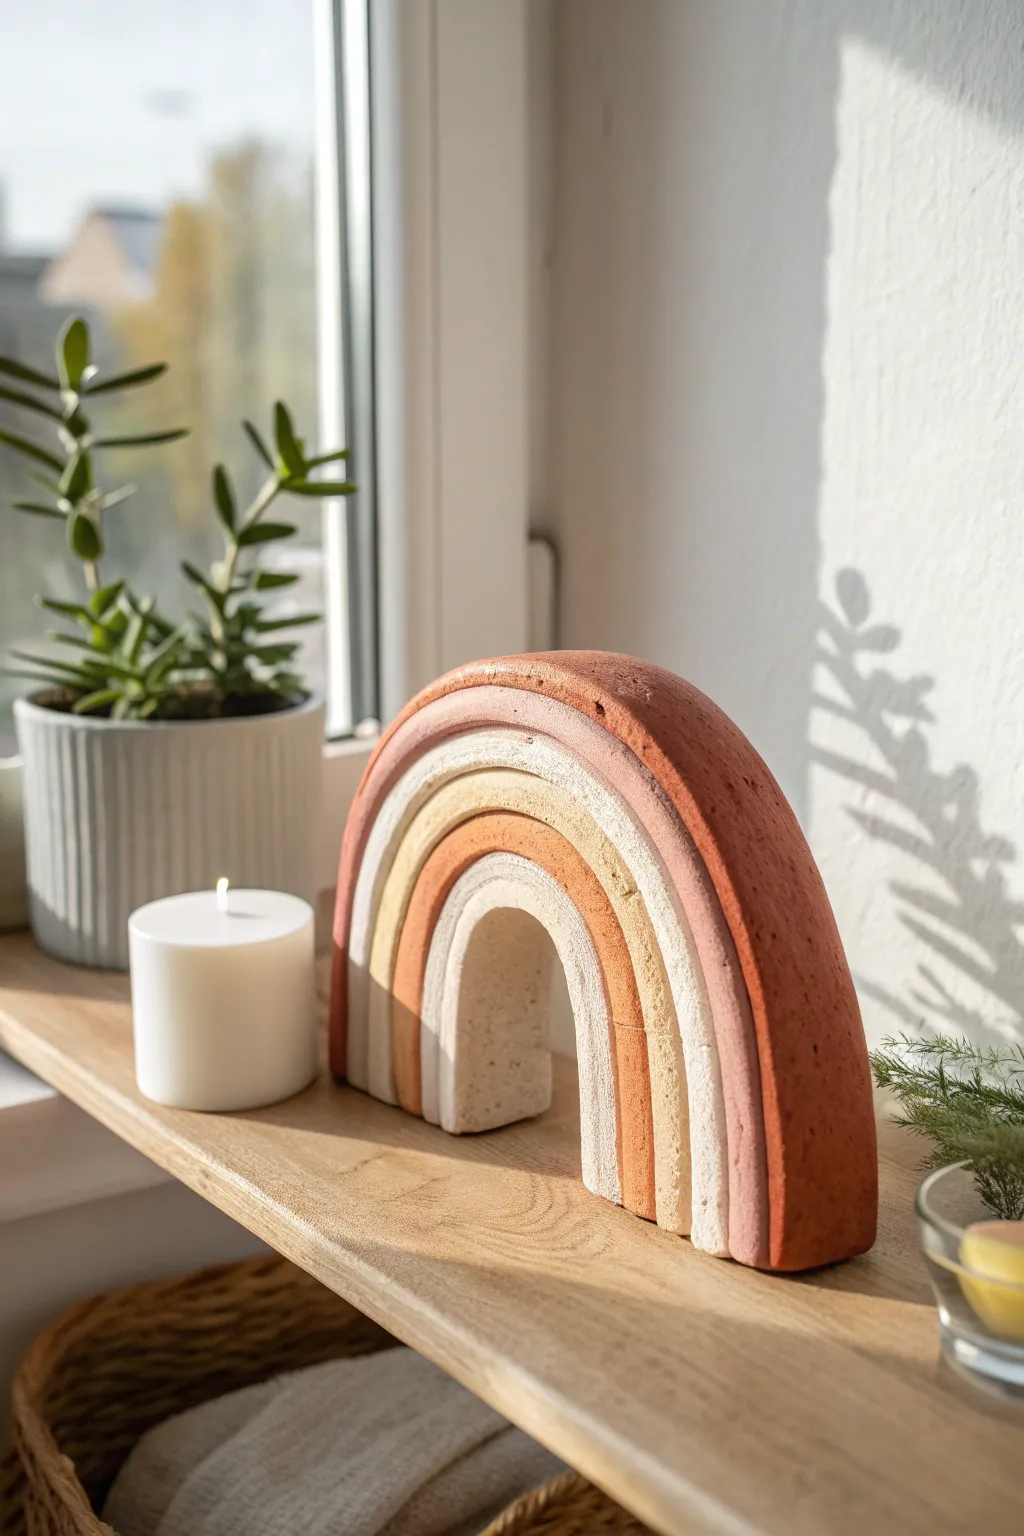
Bring warmth to any shelf with this beautifully textured, minimalist rainbow arch made from versatile paper clay. Its organic, slightly rough finish and soothing palette of terracottas, creams, and ochres make it a stunning modern decor piece.
Step-by-Step
Materials
- Air-dry paper clay (white or natural)
- Acrylic paints (terracotta, burnt sienna, ochre, cream, white)
- Rolling pin
- Sharp craft knife or clay slicing tool
- Fine-grit sandpaper (120-220 grit)
- A smooth work surface (silicone mat or parchment paper)
- Small cup of water
- Ruler
- Sponge or stiff bristle brush for texturing
Step 1: Shaping the Arches
-
Roll the base slab:
Begin by taking a large chunk of paper clay and rolling it out into a thick, even slab, approximately 3/4 inch thick. Aim for a consistent thickness so your arches stand up straight later. -
Cut the strips:
Using a ruler and a sharp craft knife, cut four to five long strips of clay. You can vary the width slightly for an organic look, but keeping them around 1 inch wide usually works best for structural stability. -
Form the smallest arch:
Take the shortest strip and gently bend it into a tight U-shape to form the center arch. Stand it up on its edge to ensure the bottom feet are flat. -
Layer the subsequent arches:
Take the next strip and drape it over your first arch to measure the length needed. Trim any excess clay at the feet so it sits flush with the first arch, then gently press the layers together. -
Continue building the stack:
Repeat the process with the remaining strips, working from the inside out. For this specific look, aim for about five concentric layers, making sure the outermost layer is the largest. -
Flatten and secure:
Once all layers are stacked, gently press down on the entire arch from the top to ensure the layers adhere to one another. You can use a tiny bit of water between layers as ‘glue’ if the clay feels too dry. -
Texturizing surface:
Before the clay dries, take a dry sponge or a stiff brush and dab the front and back surfaces. This creates that lovely organic, stone-like pitted texture seen in the photo. -
The drying phase:
Lay the rainbow flat on its back to dry. This prevents it from slumping due to gravity. Let it dry completely for 24-48 hours, flipping it over halfway through to ensure even drying.
Fixing Cracks
If small shrinkage cracks appear during drying, make a paste of fresh clay and water (slip). Press it into the cracks and smooth over before painting.
Step 2: Refining and Painting
-
Smooth the edges:
Once fully hard, inspect the edges. Use fine-grit sandpaper to gently smooth down any sharp burrs or uneven spots on the bottom feet so it stands perfectly upright. -
Dust off:
Wipe the sculpture down with a dry cloth or a soft brush to remove dust from sanding. Do not wet it again, as paper clay can reactivate. -
Mix your palette:
Prepare your acrylic colors. You want a gradient of earthy tones: a deep rust red, a lighter terracotta, a warm golden ochre, a soft beige, and a creamy off-white. -
Paint the outer layer:
Start with the outermost arch using the darkest color (deep rust or burnt sienna). Apply the paint somewhat dryly to let the clay texture show through. -
Paint the middle sections:
Move inward, painting the next arch in the lighter terracotta, followed by the ochre and beige. Use a small angled brush to get crisp lines between the arches without bleeding. -
The center arch:
Finish with the smallest, innermost arch in the lightest cream or off-white shade. I often mix a little white into the beige for a softer transition. -
Adding dimension:
To enhance the stone effect, you can lightly dry-brush a tiny amount of white paint over the textured areas of the darker arches. This highlights the pitting and makes it look more like ceramic. -
Final seal:
Though not strictly necessary for a decorative shelf item, a coat of matte varnish will protect the paint and keep dust from settling into the texture.
Add a Little Sparkle
Mix a small amount of baking soda into your acrylic paint. This creates an even grittier, terra-cotta texture that looks incredibly high-end.
Now you have a timeless, handcrafted sculpture perfect for styling your favorite nook

TRACK YOUR CERAMIC JOURNEY
Capture glaze tests, firing details, and creative progress—all in one simple printable. Make your projects easier to repeat and improve.
Abstract Stacked Pebble Totem
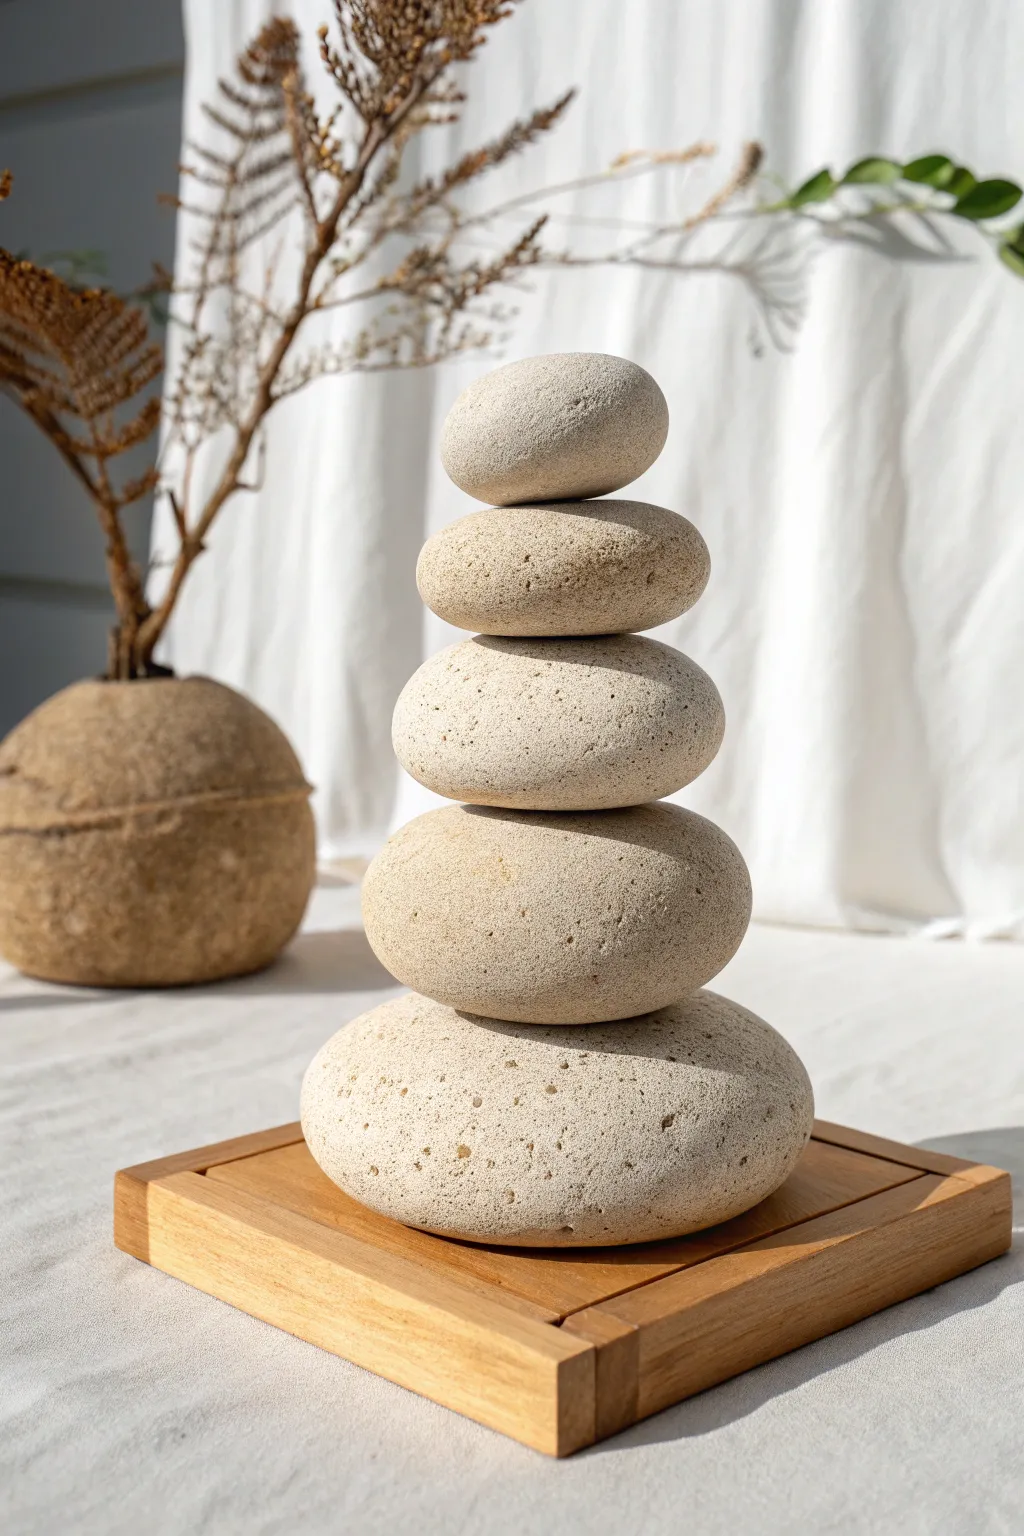
Achieve a moment of calm with this minimalist sculpture that perfectly mimics the look of natural river stones using versatile paper clay. The organic, speckled texture and balanced form create a sophisticated decorative piece that brings a sense of serenity to any space.
Step-by-Step Guide
Materials
- Air-dry paper clay (white or natural)
- Acrylic paints (beige, warm grey, white, raw umber)
- Fine sand or used coffee grounds (for texture)
- Aluminum foil
- PVA glue or clay slip
- Wooden base or coaster
- Sandpaper (medium and fine grit)
- Old toothbrush or stiff bristle brush
- Matte spray varnish
- Strong craft adhesive (e.g., E6000)
Step 1: Foil Armatures
-
Create the cores:
Begin by crumpling aluminum foil into five separate balls. You need graduated sizes: one large base, three medium sizes that get progressively smaller, and one small top piece. -
Shape the ovals:
Compress and roll each foil ball firmly against your work surface to flatten them into smooth, disc-like oval shapes. They should look like flattened river stones, not perfect spheres. -
Check the stack:
Test stack your foil shapes to ensure the proportions look pleasing. The base should be wide enough to support the tower, and the top should be the smallest.
Step 2: Sculpting the Stones
-
Prepare the clay:
Knead a generous amount of paper clay. To get that realistic gritty stone texture right from the start, I like to mix in a small pinch of fine sand or dried coffee grounds directly into the clay body. -
Cover the base:
Flatten a pancake of clay and wrap it around your largest foil armature. Press it firmly to remove air pockets, aiming for a layer about 1/4 inch thick all around. -
Refine the shape:
Dip your fingers in a little water and smooth the clay surface. Gently tap the stone on the table to flatten the bottom slightly—this is crucial for stability. -
Create the set:
Repeat this process for the remaining four stones. As you sculpt, continually test-stack them to make sure they sit naturally on top of one another without wobbling excessively. -
Add surface texture:
While the clay is still wet, take an old toothbrush and gently stipple the surface. This removes fingerprints and adds a natural, porous stone look. -
Drying time:
Let the stones dry completely. This usually takes 24-48 hours depending on humidity. Rotate them occasionally so the bottoms dry evenly.
Cracks happen
If minor cracks appear as the clay dries, don’t panic. Mix a small amount of fresh clay with water to make a paste and fill the cracks, then sand smooth once dry.
Step 3: Sanding & Painting
-
Sand for smoothness:
Once bone dry, use medium grit sandpaper to knock down any large bumps or sharp ridges. Follow up with fine grit for a smooth, sea-worn finish. -
Base coat:
Mix a light beige acrylic paint with a warm grey. Apply a solid base coat to all stones. Don’t worry about it being perfectly opaque; a little variation adds realism. -
Splatter effect:
Dilute a small amount of raw umber paint with water until it’s inky. Dip a toothbrush in it and flick the bristles to spray fine speckles over the stones. This mimics the mineral flecks found in real rock. -
Dry brushing:
Take a dry brush with a tiny amount of off-white paint and lightly sweep it over the tops and sides of the stones to highlight the texture.
Make it heavy
For a heavier, more realistic feel, embed a real rock or a heavy metal washer inside the foil core of the bottom-most stone before wrapping it in clay.
Step 4: Assembly
-
Initial seal:
Spray all stones with a matte varnish to protect the paint job before assembly. -
Prepare the base:
Clean your wooden coaster or base. Apply a generous dot of strong adhesive to the center. -
Stack and glue:
Place the largest stone on the base. Apply glue to the top center of this stone, then place the next size up. Continue until the smallest stone crowns the top. -
Final cure:
check the alignment from all sides to ensure it isn’t leaning unintentionally. Let the adhesive cure fully overnight before moving your sculpture.
Place your finished totem in a spot with soft light to really emphasize those beautiful organic textures you’ve created
Mushroom Cluster Sculpture
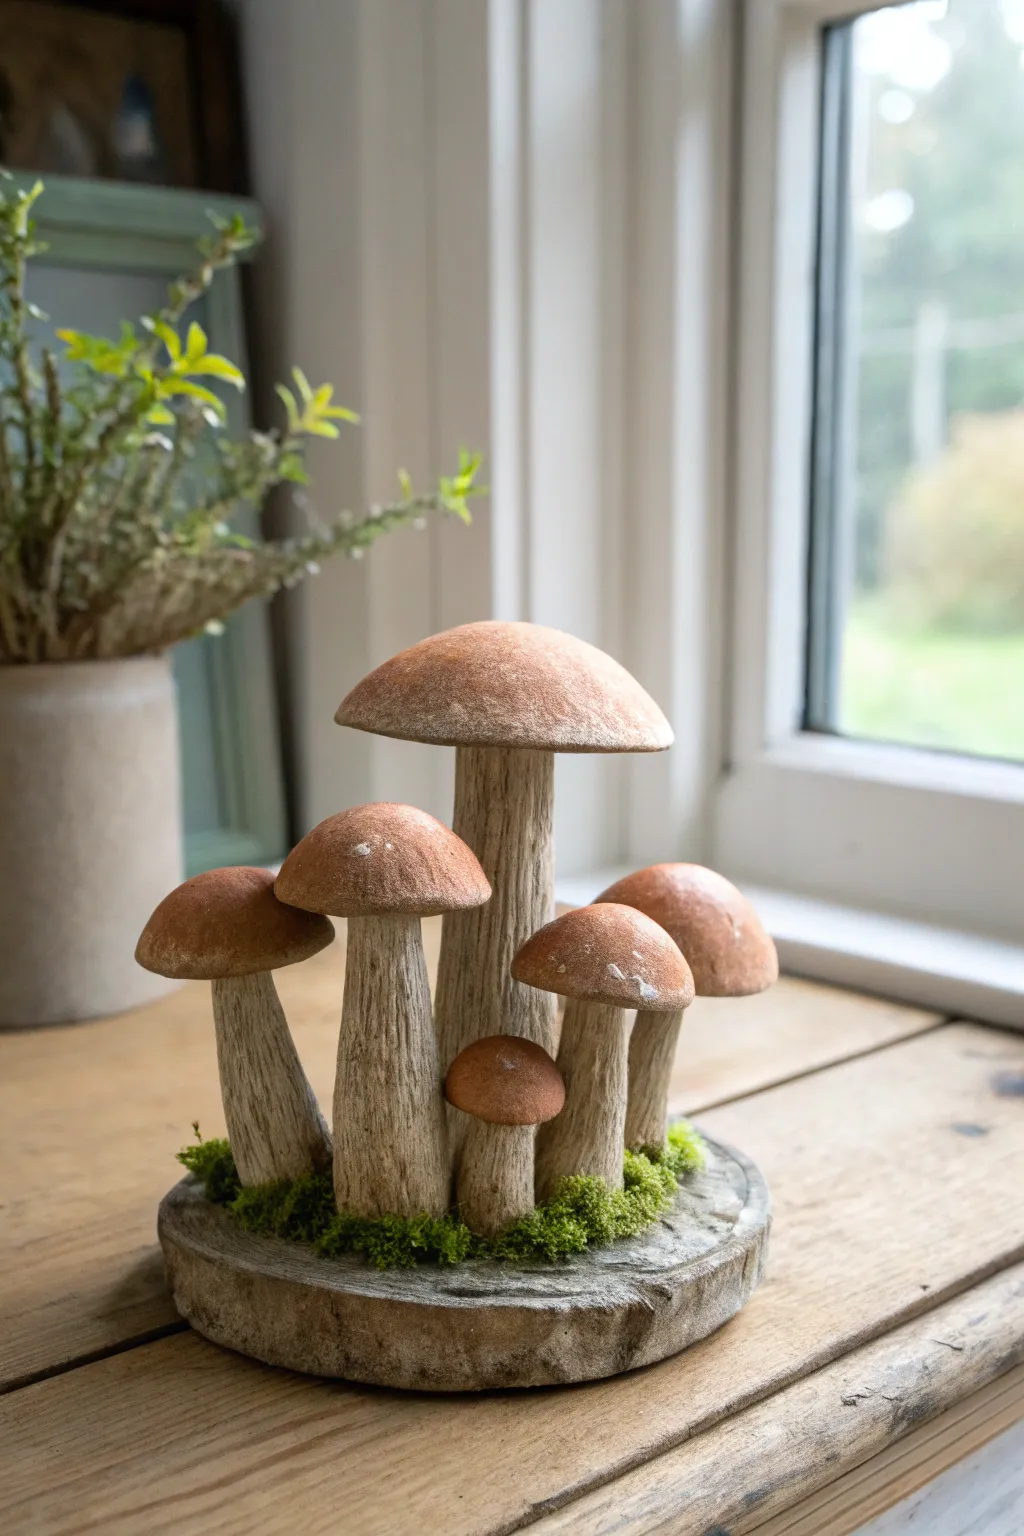
Bring a touch of woodland whimsy indoors with this rustic sculpture featuring a family of bolete-style mushrooms. Using paper clay, you’ll sculpt textured stems and smooth caps, mounting them on a sturdy base for a charming, earthy display.
Detailed Instructions
Materials
- Paper clay (air-dry clay)
- Aluminum foil
- Floral wire or armature wire (16-18 gauge)
- Round wooden plaque or sturdy cardboard disk (for base core)
- Acrylic paints: Burnt Umber, Raw Sienna, Yellow Ochre, White, Moss Green
- Texture tools: Toothbrush, needle tool, or wire brush
- Sculpting tools: Smooth kidney tool, clay knife
- Tacky glue or PVA glue
- Dried hobby moss or reindeer moss
- Matte varnish spray (optional)
Step 1: Building the Armature
-
Prepare the Base:
Start with your circular base. If using wood, sand it lightly. If using cardboard, layer three circles together for thickness. Coat the entire base surface with a thin layer of PVA glue. -
Create Wire Stems:
Cut five to six lengths of wire, varying from 2 to 6 inches tall. These will be the cores of your mushroom stems. Twist the bottom inch of each wire into a small spiral or loop to create a ‘foot’. -
Anchor the Wires:
Position the wire loops onto your base in a pleasing, slightly off-center cluster. Secure them firmly using hot glue or a large dollop of paper clay pressed over the wire loops and smoothed onto the base. -
Foil Bulking:
Crumple aluminum foil tightly around each wire to build the mass of the stems. Make the foil thicker at the bottom and slightly tapered toward the top, mimicking the distinctive swollen stalk of a porcini mushroom. -
Cap Armatures:
Form separate, flattened domes out of foil for the mushroom caps. Press a small indentation into the center of the underside of each cap so it will sit securely on the wire stem later.
Crack Control
Paper clay shrinks when drying, which can cause cracks. If you spot fissures, mix a ‘slip’ of clay and water to fill them in, then smooth over.
Step 2: Sculpting the Mushrooms
-
Cladding the Stems:
Roll out sheets of paper clay to about 1/4 inch thickness. Wrap the clay around your foil stems, smoothing the seam with a little water. Blend the clay seamlessly into the base. -
Texturing the Stalks:
Paper clay is fantastic for texture. While the clay is wet, use a needle tool or a stiff wire brush to drag vertical lines up the stems. This replicates the fibrous look of real mushroom stalks. -
Sculpting the Caps:
Cover your foil cap domes with a smooth layer of clay. Focus on keeping the top surface exceptionally smooth; use a little water on your finger to buff out any fingerprints. -
Assembly:
Apply a dab of slip (clay mixed with water) or glue to the top of the exposed stem wires. Press the clay caps onto the wires. Smooth the clay from the underside of the cap slightly down onto the stem to bond them, or leave them distinct for a sharp gill line. -
Covering the Base:
Add a layer of clay over the rest of the base, giving it a rough, stone-like texture. You can press a real rock or crumpled foil into the wet clay to create organic pitting.
Step 3: Painting and Finishing
-
Base Coat:
Once fully dry (allow 24-48 hours), paint the entire sculpture with a wash of watered-down Burnt Umber. Wipe it back with a rag immediately so the dark paint stays only in the deep textures of the stems and base. -
Dry Brushing the Stems:
Take a dry brush with a mix of White and Raw Sienna. Lightly flick it over the textured stems. I find this step magical as it instantly unifies the texture and makes it look like organic matter. -
Painting the Caps:
Paint the tops of the caps with a gradient. Start with Burnt Umber at the very center, blending out to a lighter Ochre or warm tan at the edges. Stipple the paint slightly for a velvety look. -
Finishing the Base:
Paint the base in shades of grey and limestone white to resemble a stone slab. Let everything dry completely. -
Adding Moss:
Apply tacky glue generously around the base of the mushroom stems and in patches along the rim of the base. Press clumps of dried moss into the glue to hide the transition between stem and ground.
Velvet Touch
For ultra-realistic caps, dust the wet paint on the mushrooms with a tiny pinch of cocoa powder or loose pigment for a fuzzy, matte finish.
Place your finished sculpture near a window or on a bookshelf to enjoy a permanent piece of nature
Moon and Stars Wall Hanging Relief
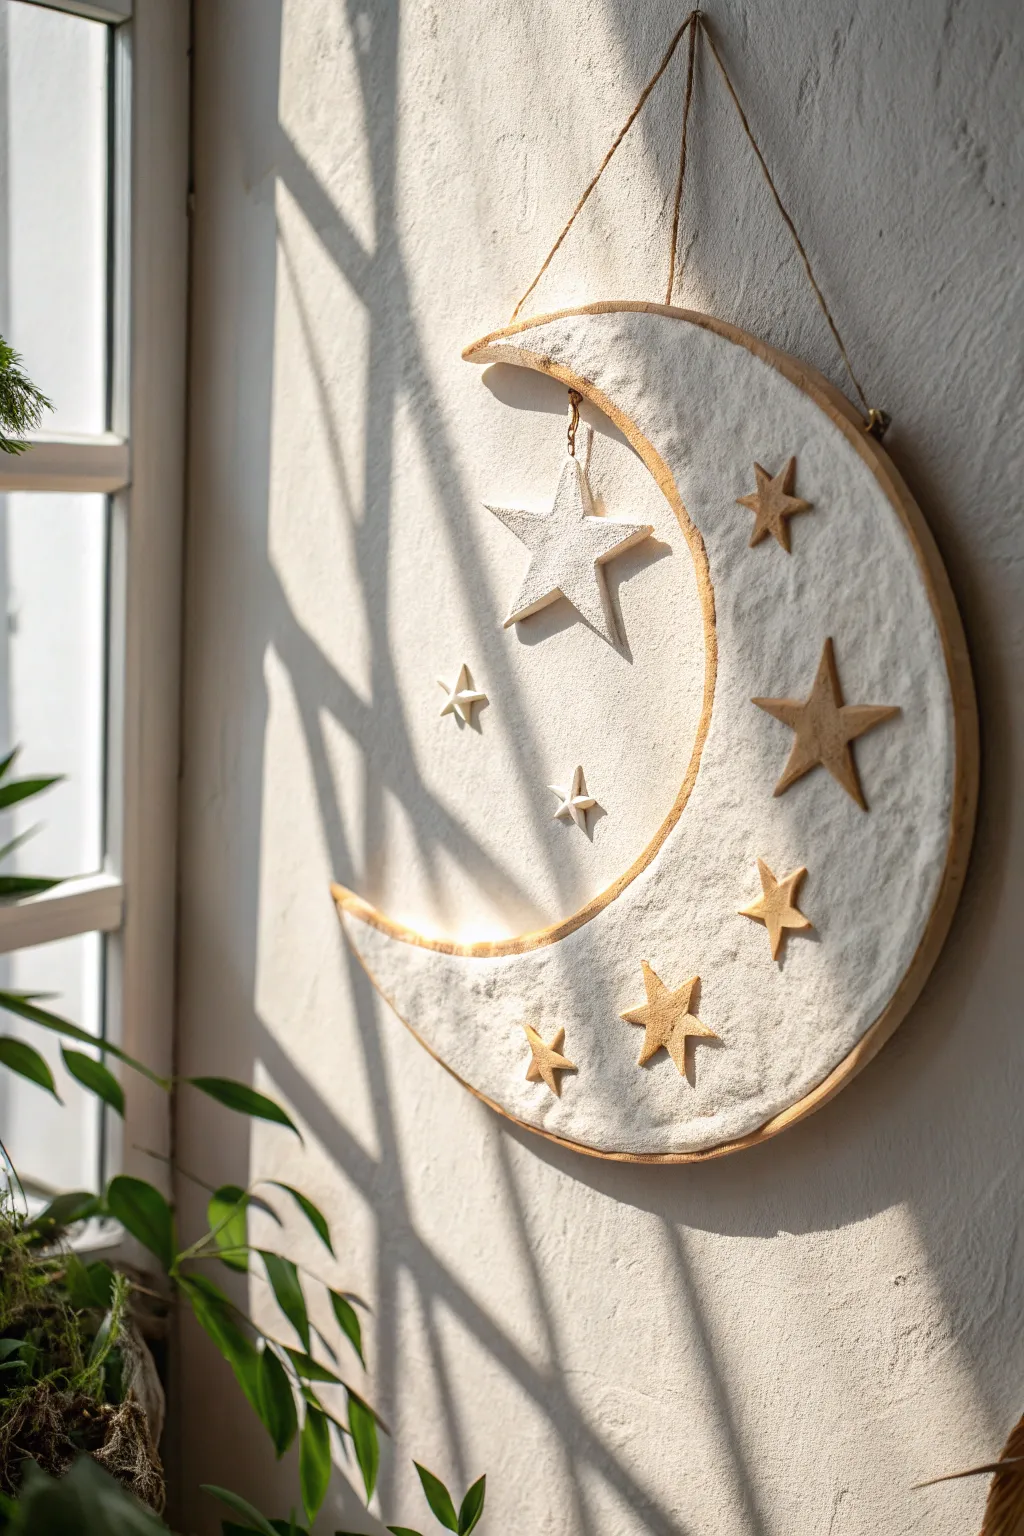
Bring the calming beauty of the night sky into your home with this textured moon and stars relief sculpture. Combining the rustic warmth of wood with the soft, tactile finish of paper clay creates a dreamy piece perfect for a nursery or cozy corner.
Step-by-Step
Materials
- Paper clay or cellulose-based air-dry clay (white)
- Wooden crescent moon panel or sturdy cardboard base
- Rolling pin
- Parchment paper
- Craft knife or clay sculpting tools
- Star-shaped cookie cutters (various sizes)
- Texture tool (sponge, stiff brush, or crumpled foil)
- PVA glue or heavy body gel medium
- Jute twine or rustic string
- Small eye hook or screw eye
- Sandpaper (fine grit)
- Optional: Antique wax or diluted brown paint for aging stars
Step 1: Base Preparation
-
Prepare your crescent form:
Begin with a pre-cut wooden crescent moon shape. If you cannot find one, trace a large crescent onto thick cardboard or thin plywood and cut it out carefully. Clean the surface to ensure the clay adheres well. -
Attach the hanging eyelet:
Before adding clay, screw a tiny eye hook into the inner curve of the crescent’s top arch. This will hold the dangling star later. If using cardboard, poke a hole and secure a wire loop with strong glue. -
Prime the surface:
Brush a thin layer of PVA glue over the entire front surface of the crescent. This helps the paper clay grip the base, preventing it from lifting as it dries.
Step 2: Sculpting the Moon
-
Roll out the clay:
On a sheet of parchment paper, roll out a large portion of your paper clay to a thickness of about 1/4 inch. Aim for a piece slightly larger than your crescent base. -
Apply the clay layer:
Carefully lift the clay sheet and press it onto the glue-coated crescent base. Gently smooth it down with your fingers to remove air pockets. -
Trim the edges:
Use a sharp craft knife to trim the excess clay flush with the edge of the wooden base. I like to leave just a sliver of the wood showing at the very edge for a framed look, as seen in the photo. -
Create surface texture:
While the clay is wet, take a damp sponge or a ball of crumpled aluminmum foil and press it repeatedly into the surface. This creates the pitted, moon-rock texture essential to the look.
Cracking Clay?
Paper clay naturally shrinks. If cracks appear while drying, mix a small amount of fresh clay with water to make a paste and fill the cracks, then smooth over.
Step 3: Crafting the Stars
-
Cut out clay stars:
Roll out leftover clay slightly thinner than the moon base. Use different sizes of star cutters to create about 6-8 stars. If cutting by hand, keep the points sharp for a crisp silhouette. -
Texture the stars:
Apply the same textured finish to the stars using your sponge or foil. They should match the surface quality of the moon. -
Form the dangling star:
Select a medium-sized star for the hanging element. Carefully push a small hole through one of the star’s points using a needle tool or toothpick. Ensure the hole is large enough for your twine. -
Create the mounting stars:
For the stars that will sit on the moon, you can choose to paint them slightly darker now with a wash of brown paint to mimic wood, or sculpt them from a wood-colored clay. Alternatively, stain them after drying.
Make it Glow
Embed tiny battery-operated fairy lights into the clay before it dries, poking the bulbs through to the front for a moon that actually lights up at night.
Step 4: Assembly and Finishing
-
Dry all components:
Allow the moon base and all loose stars to dry completely. Paper clay can take 24-48 hours depending on humidity. Flip the loose stars occasionally to prevent warping. -
Sand edges:
Once bone dry, lightly sand the edges of the moon and stars to remove any sharp burrs or roughness while keeping the surface texture intact. -
Attach the surface stars:
Arrange the stars on the moon relief. Use strong craft glue to secure them in place. The image shows a scattering of different sizes, mostly on the right side of the crescent. -
Tie the dangling star:
Thread a short piece of jute twine through the hole in your prepared star. Tie the other end to the eye hook you installed earlier on the moon’s inner curve. -
Add the main hanger:
Attach a long loop of jute twine to the top of the moon for wall mounting. You can drill two small holes at the top tips or staple the string to the back.
Hang your lunar creation near a window to catch the shifting shadows throughout the day
Botanical Relief Tiles
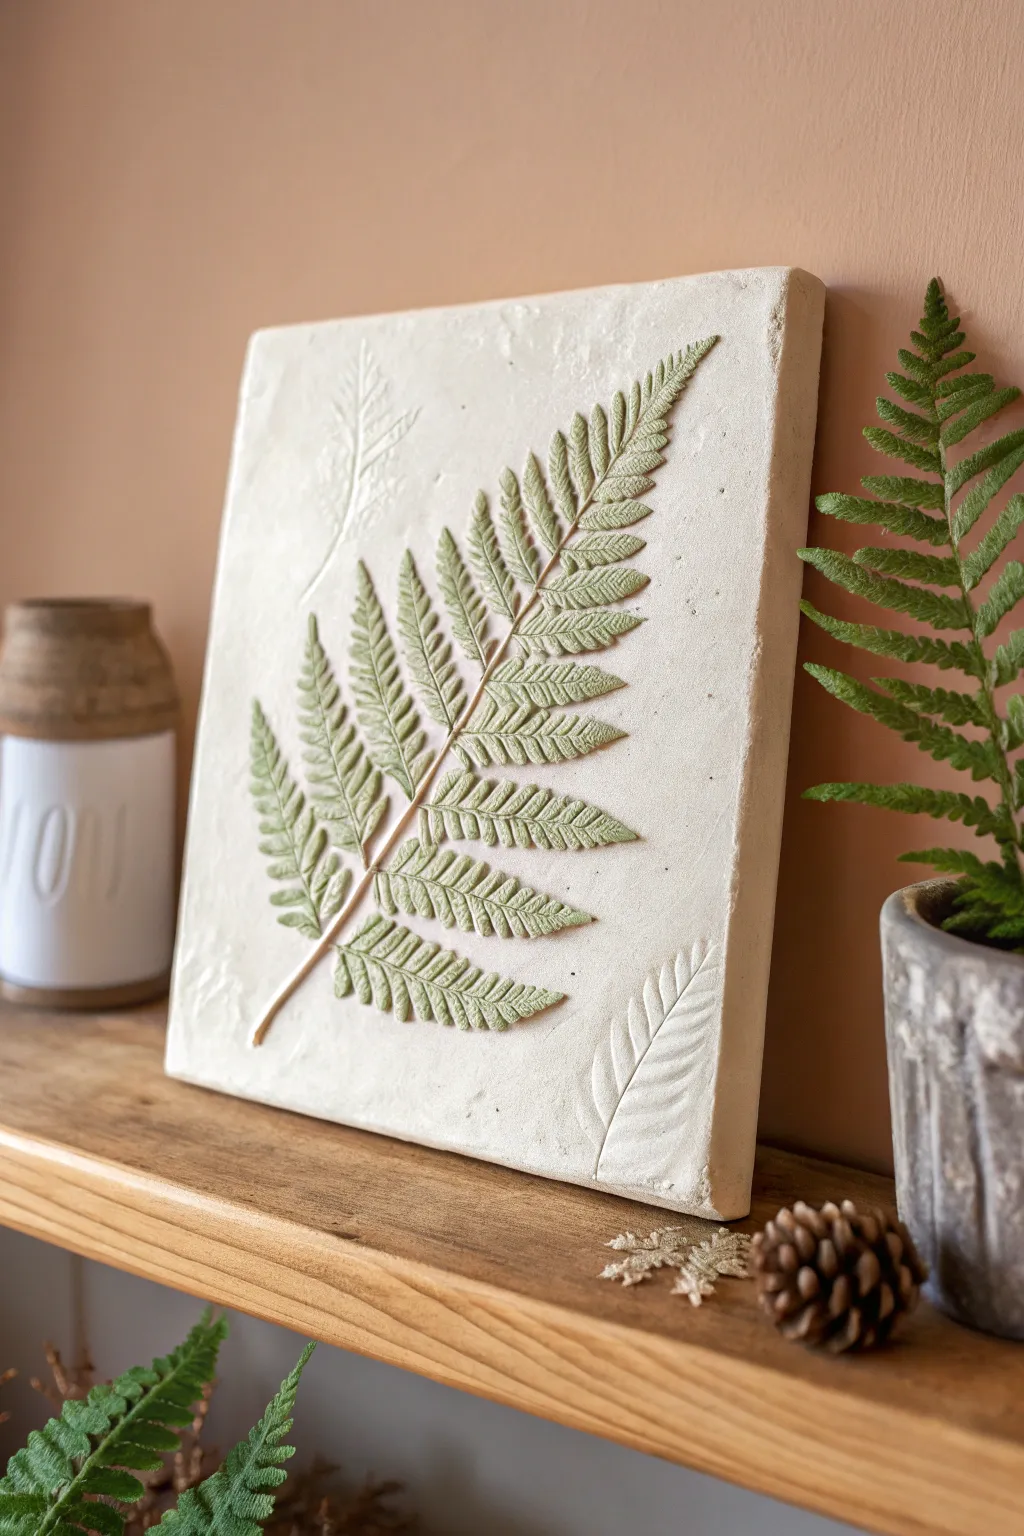
Capture the delicate details of nature with this elegant botanical relief tile project. By pressing a fresh fern frond into soft paper clay, you’ll create a raised, fossil-like impression that brings a touch of calm greenery into your home.
Step-by-Step Guide
Materials
- White air-dry paper clay
- Rolling pin or smooth glass bottle
- Two 1/2 inch thick wooden slats (for depth guides)
- Fresh fern fronds (firm leaves work best)
- Craft knife or metal ruler
- Fine-grit sandpaper
- Green acrylic paint (olive or sage tones)
- Small flat brush
- Dry brush or soft cloth for wiping
- Clear matte varnish (spray or brush-on)
- Parchment paper or non-stick mat
Step 1: Shaping the Slab
-
Prepare your workspace:
Lay down a sheet of parchment paper or a non-stick mat on a flat, sturdy surface. This prevents the clay from sticking and makes it easier to move later. -
Condition the clay:
Take a large handful of paper clay and knead it well in your hands. You want it to be pliable and free of cracks, but try not to incorporate too many air bubbles. -
Set your thickness:
Place your two wooden slats on either side of the clay ball. These will act as rails for your rolling pin to ensure the tile is perfectly even. -
Roll the slab:
Roll the clay out using the wooden slats as guides. Roll smoothly back and forth until the pin rests on the wood and the clay surface is completely flat. -
Level the surface:
If there are any small bumps or canvas textures from your rolling pin, gently smooth them out with a slightly damp finger or a rib tool. -
Cut the square:
Using a metal ruler and a craft knife, cut the slab into a clean, precise square. I like to make mine about 6×6 or 8×8 inches, saving the scraps for smaller test tiles.
Step 2: Creating the Impression
-
Arrangement:
Place your best-looking fern frond diagonally across the clay slab. Position it so the tip and stem extend slightly over the edges, creating a natural, ‘captured’ look. -
Add secondary details:
If you wish, place faint partial leaves in opposite corners for balance, pressing them much more lightly than the main focal leaf. -
Press the botanical:
Gently place a piece of parchment paper over the fern. Using your rolling pin, roll firmly over the leaf once. Avoid rolling back and forth multiple times, as the leaf might shift and blur the image. -
Reveal the texture:
Remove the parchment paper and carefully lift the fern leaf by its stem. Peel it away slowly to reveal the deep impression left in the clay. -
Refine the edges:
If pressing the leaf distorted the square shape of your tile, use your ruler to gently nudge the sides back into straight lines before the clay hardens.
Clean Release
If your clay is sticky, lightly dust the back of your leaf with cornstarch or baby powder before pressing. This ensures the vegetation peels away without tearing the clay.
Step 3: Finishing Touches
-
Drying time:
Let the tile dry completely. This can take 24-48 hours depending on humidity. Flip it gently halfway through the drying process to prevent warping. -
Sand the surface:
Once bone dry, use fine-grit sandpaper to smooth out any rough edges on the sides of the tile. Keep the textured leaf area untouched. -
Apply the wash:
Mix a small amount of olive green acrylic paint with water to create a thin wash. Paint this over the indented leaf area, letting it settle into the deep veins. -
Wipe back:
Before the paint dries, quickly wipe the surface with a damp cloth or sponge. This leaves pigment in the recesses while revealing the white clay on the ridges, highlighting the texture. -
Seal the work:
Protect your finished relief with a coat of clear matte varnish. This preserves the color and gives the clay a lovely, finished sheen without being too glossy.
Frame It Up
Make a set of three tiles and mount them inside a deep shadow box frame. Use strong adhesive to float the heavy tile on the backing board for a museum-quality display.
Display your botanical relief on a shelf or mantelpiece to enjoy a permanent piece of the forest floor.
Textured Coral-Inspired Form
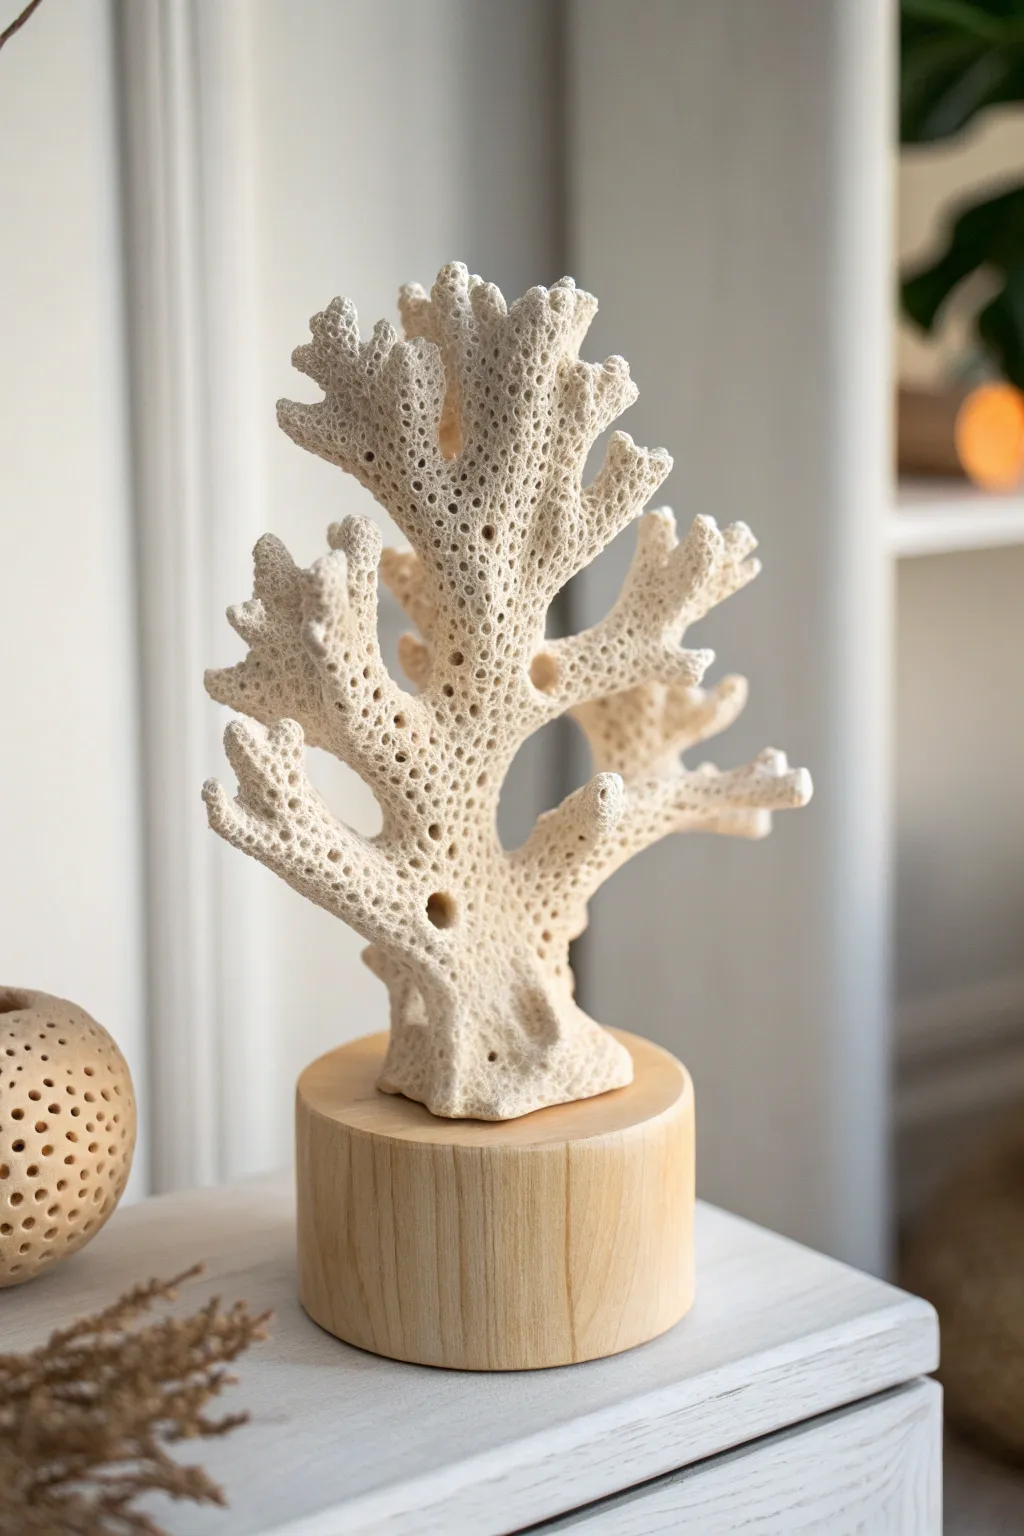
Transform simple paper clay into a stunningly realistic organic coral form that captures the beauty of the ocean floor without harming a single reef. This project focuses on building distinct branching structures and replicating that signature pitted texture for a high-end coastal decor piece.
Step-by-Step
Materials
- Air-dry paper clay (white or natural stone color)
- Strong armature wire (12-14 gauge)
- Thinner flexible wire (20 gauge)
- Wire cutters and needle-nose pliers
- Aluminum foil
- Masking tape
- Various poking tools (toothpicks, skewers, knitting needle, sculpting stylus)
- Natural wood block base
- Drill with bit matching your main wire gauge
- Strong adhesive (E6000 or 5-minute epoxy)
- Acrylic paints (bone white, cream, light taupe)
- Matte spray varnish
Step 1: Building the Skeleton
-
Prepare the base:
Begin by selecting your wooden base. Drill a hole in the center of the block deep enough to securely hold your main armature wire. -
Form the main trunk:
Cut a piece of thick armature wire for your main central ‘trunk’ and glue it firmly into the drilled hole. Allow the glue to set completely before twisting or bending. -
Attach branches:
Cut several shorter lengths of heavy wire for the main offshoots. Twist thinner flexible wire around the trunk and these new branches to secure them in place at different heights. -
Refine the branching:
Create smaller sub-branches by twisting thinner wire onto the larger limbs. Ensure you spread them out in an irregular, organic fan shape rather than making them perfectly symmetrical. -
Add bulk:
Wrap strips of aluminum foil tightly around the wire structure. This bulks out the form so you use less clay and keeps the sculpture lightweight. -
Secure the foil:
Cover the aluminum foil completely with masking tape. This smooths down any sharp foil edges and gives the paper clay a better surface to grip onto.
Step 2: Sculpting and Texturing
-
Apply the first layer:
Roll your paper clay into thin sheets or snakes. Press the clay firmly onto the taped armature, covering the entire structure from the base of the trunk to the tips of the branches. -
Blend the seams:
Use a little water on your fingertips to smooth out any seams where clay pieces join. I find it easiest to work in sections—bottom to top—so I don’t accidentally squash my work. -
Refine the shape:
While the clay is still wet, gently squeeze the branches to create varied thicknesses. The tips should be slightly blunt and rounded, not sharp. -
Start the texture:
Now for the fun part: creating the pores. Take a medium-sized sculpting tool or the end of a paintbrush and press deeper, larger holes randomly across the surface. -
Detail the pores:
Using a smaller tool like a bamboo skewer, poke hundreds of medium-sized holes around the larger ones. Don’t worry about being neat; nature is chaotic. -
Add micro-texture:
Finally, take a toothpick or a stiff brush and stipple the remaining smooth areas to create tiny pinholes. This dense texturing is key to the realistic coral look. -
Dry partially:
Let the sculpture sit for an hour or so until the surface firms up slightly but isn’t hard. -
Check for cracks:
As paper clay dries, it shrinks and might crack. Smooth a small slurry of clay and water into any fissures that appear before letting it dry completely (24-48 hours).
Crumbly Clay?
If your paper clay feels too dry or cracks instantly while sculpting, knead in a few drops of water or a dab of PVA glue to restore elasticity.
Step 3: Finishing
-
Base coat:
Paint the entire sculpture with a bone-white acrylic paint. Make sure to work the bristles into all those deep texture holes. -
Add depth:
Mix a very watery wash of light taupe paint. Brush it over the sculpture and immediately wipe the raised surfaces with a damp rag, leaving the darker color just in the deepest pits. -
Dry brush highlights:
Using a dry, stiff brush, lightly dust pure white paint over the very tips and highest ridges of the texture to make the details pop. -
Seal the work:
Protect your faux coral with two light coats of matte spray varnish to prevent dust from settling permanently into the clay pores.
Texturing Tip
Group your poke holes in irregular clusters rather than spreading them evenly; this mimics natural growth patterns better.
Place your finished sculpture on a shelf or mantle where the light can catch all those intricate details you created
Faceted Geometric Head Sculpture
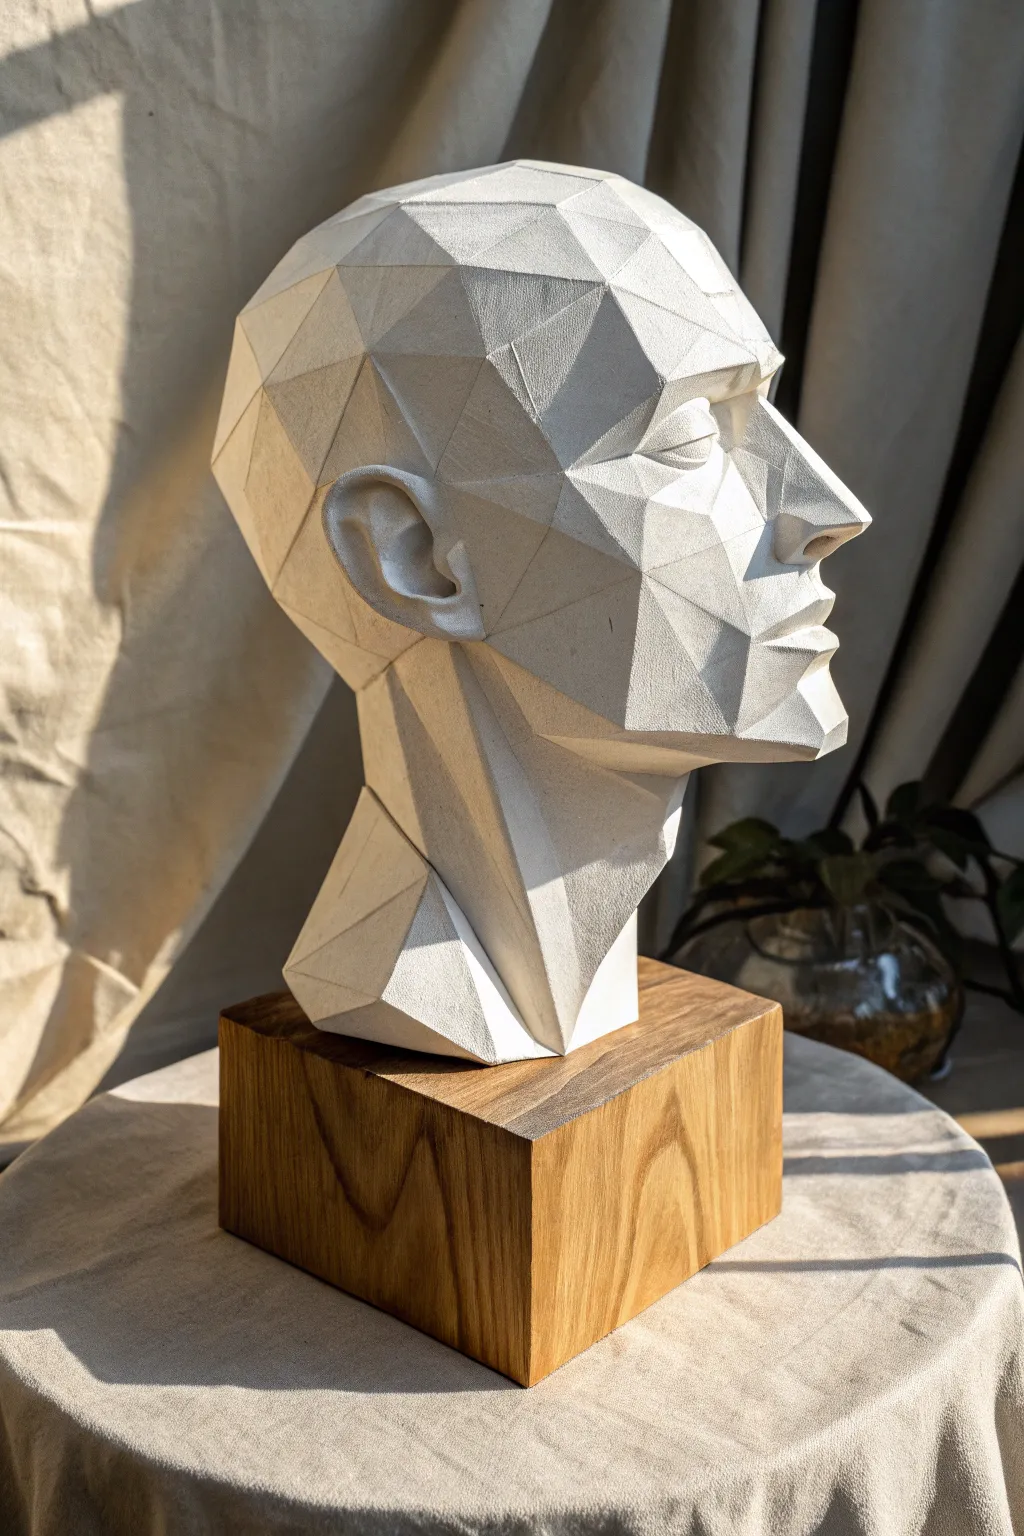
Capture the striking interplay of light and shadow with this contemporary low-poly bust, rendered in the unique texture of paper clay. This project bridges the gap between digital aesthetics and organic sculpting, resulting in a sophisticated centerpiece that looks like carved stone.
Step-by-Step Tutorial
Materials
- Paper clay (air-dry formula, approx. 1kg)
- Rigid foam block or Styrofoam (for the armature)
- Wooden dowel (1-inch diameter)
- Wooden cube base (e.g., oak or walnut, 4×4 inch)
- Craft knife and extra blades
- Sandpaper geometric block (or sanding sponge)
- Metal kidney scraper or dull knife
- Water spray bottle
- Reference images of a planar/planar analysis head
- PVA glue
- White acrylic gesso (optional)
- Fine-grit sandpaper (220-400 grit)
Step 1: Armature & Base
-
Prepare the base:
Begin by drilling a hole in the center of your wooden cube base equal to the diameter of your dowel. Secure the dowel into the hole using wood glue, ensuring it stands perfectly vertical. -
Carve the core foam:
Cut your rigid foam into a rough head and neck shape. It doesn’t need detail, but it must be smaller than the final sculpture (about 1 inch inward on all sides) to allow for the clay layer. -
Mount the foam:
Impale the foam head onto the dowel. If the fit is loose, add some glue to keep it from spinning while you work. The neck portion of the foam should sit slightly above the wooden base to leave room for the clay chest/neck termination. -
Seal the foam:
Apply a thin layer of PVA glue over the entire foam surface. This helps the paper clay adhere properly without the foam sucking moisture out of the clay too quickly.
Sharp Edge Secret
To get ultra-crisp edges between planes, wait until the clay is bone dry and use a fine-grit sanding block. Sand each plane individually back and forth, never across the ridge.
Step 2: Building the Form
-
Bulk application:
Start applying the paper clay in chunks, covering the foam completely. Aim for a distinct thickness of at least half an inch. Push the clay firmly to remove air pockets. -
Establish primary planes:
Before detailing, block out the major geometric masses: the jawline, the cheekbones, the nose bridge, and the forehead slant. Use your hands to slap the clay into flat, rough planes rather than rounding them. -
Define the profile:
Looking from the side, build up the nose, lips, and chin. Remember, we are aiming for a low-poly look, so the nose shouldn’t be rounded; think of it as a pyramid with cut sides. -
Refine the neck angles:
Add extra clay to the neck to create the strong, angular muscular structure (sternocleidomastoid) seen in the reference. Sharpen the transition where the neck meets the wooden base.
Step 3: Refining the Facets
-
Leather-hard stage:
Let the sculpture dry until it is leather-hard (firm but can still be carved with a fingernail). This is crucial for getting sharp geometric edges. -
Slice the planes:
Using a sharp craft knife or a wire sculpting tool, begin shaving off thin slices of clay to create the facets. Each cut should create a flat surface. Don’t smooth the edges between cuts; keep them sharp. -
Sculpt the eye sockets:
Instead of carving round eyes, carve angled recesses. Create a distinct plane for the upper eyelid, the lower lid, and the brow bone. -
Detail the ear:
For the ear, use small, distinct cuts to suggest the helix and tragus. Avoid organic curves; try to represent the ear anatomy using only 5-7 flat planes. -
Check symmetry:
Rotate the piece frequently. Use a metal kidney scraper to flatten any planes that have accidentally become slightly curved or organic looking. -
Surface texturing:
Paper clay naturally has a beautiful, slightly fibrous texture. If you smoothed it too much, press a piece of canvas or rough fabric gently against the semi-wet clay to bring back that stone-like grain.
Metallic Transformation
Instead of leaving it white, spray paint the finished bust in matte black, then dry-brush with gold or bronze paint. This makes the facets pop and mimics cast bronze.
Step 4: Finishing
-
Full drying:
Allow the sculpture to dry completely. This may take 2-4 days depending on thickness and humidity. The clay will turn a bright, chalky white. -
Sanding sharp edges:
Use a sanding block to very gently sand the flat planes. The goal is not to round the edges, but to make the flat surfaces perfectly smooth and crisp. -
Dusting off:
Use a soft brush or compressed air to remove all clay dust from the crevices and texture. -
Protective coating:
While the raw paper clay looks great, I find sealing it helps longevity. Apply a matte spray varnish or a very thin wash of white gesso to seal the surface without filling in the texture. -
Base finish:
If the wooden base got messy during the process, sand it down and apply a fresh coat of oil or wax to contrast deeply with the white sculpture.
Now step back and admire how the light catches every plane of your modern sculpture
Hollow Mask With Painted Details

This striking wall mask combines primitive aesthetics with modern geometric patterns, creating a captivating piece of home decor. Using paper clay allows for a lightweight, textured finish that perfectly mimics the look of aged stone or pottery without the kiln.
How-To Guide
Materials
- Paper clay (store-bought or homemade)
- Plastic face mask form (or cardboard and foil to make an armature)
- Plastic wrap
- Rolling pin
- Sculpting tools (or a butter knife and toothpick)
- Bowl of water
- Acrylic paints (Cream/Off-White, Terracotta/Burnt Sienna, Dark Brown/Black)
- Paintbrushes (flat and detail)
- Jute twine or rustic rope
- Sandpaper (medium grit)
- Matte sealant spray
Step 1: Forming the Base
-
Prepare the armature:
If using a plastic mask form, cover it tightly with plastic wrap to prevent sticking. Alternatively, create an elongated oval shape using crumpled newspaper or cardboard, covering it with painter’s tape and plastic wrap to create a convex base. -
Roll out the clay:
Roll your paper clay out on a flat surface to a uniform thickness of about 1/4 inch. It shouldn’t be too thin, or it might crack during drying. -
Drape the clay:
Carefully lift the clay sheet and drape it over your prepared form. Press it gently against the armature to establish the general curve of the face. -
Shape the outline:
Trim the excess clay from the edges using a knife to create a clean, elongated oval shape. Smooth the cut edges with a finger dipped in a little water.
Cracks happen!
Paper clay shrinks as it dries. If cracks appear, mix a slurry of fresh clay and water (like a paste) and fill the cracks. Let it dry again before painting.
Step 2: Sculpting Features
-
Build the nose:
Form a triangular wedge of clay for the nose. Score the back of the wedge and the attachment point on the mask, dab with water, and press firmly into place. Smooth the seams so the nose feels integrated, not just stuck on. -
Carve the eyes:
Using a knife or sculpting loop, cut out almond-shaped openings for the eyes. Position them symmetrically on either side of the nose bridge. -
Refine the surface:
Paper clay naturally has a lovely texture, but you can smooth out unwanted bumps with a damp sponge. Leave some irregularities to maintain that hand-carved stone look. -
Create hanging holes:
Poke two holes near the top temples of the mask using a straw or pencil. Make sure they are large enough to thread your jute twine through later. -
Dry thoroughly:
Allow the mask to dry completely. This takes patience—usually 24 to 48 hours depending on humidity. I like to flip it gently halfway through so the inside dries evenly.
Step 3: Painting and Finishing
-
Sand and prep:
Once fully dry and hard, lightly sand any sharp edges. Remove the armature carefully. -
Base coat:
Paint the entire mask with a cream or off-white acrylic paint. This provides a neutral canvas for the geometric designs. Let it dry. -
Sketch the design:
Lightly trace your geometric patterns with a pencil. Draw triangles along the outer rim, almond shapes around the eyes, and sweeping curves on the forehead and cheeks. -
Paint the dark details:
Using a thin brush and dark brown or black paint, outline the eyes, fill in the nose area, and paint the lips. Add the defining lines between your geometric sections. -
Add warm tones:
Fill in the triangles and cheek accents with a terracotta or burnt sienna color. This earthy red contrasts beautifully with the cream base. -
Distress (Optional):
For an aged look, you can lightly dry-brush some of the dark paint over the textured areas or sand back the paint slightly in high spots. -
Seal the work:
Spray the mask with a matte sealant to protect the paint and reinforce the paper clay structure. -
Attach the hanger:
Cut a length of jute twine. Thread the ends through the holes from front to back and knot them securely on the inside to create the hanging loop.
Make it Ancient
Mix coffee grounds or sand directly into your wet clay before sculpting. This adds incredible grit and texture that looks exactly like weathered sandstone.
Hang your mask in a well-lit spot to let the shadows play across those bold geometric angles
Paper-Decoupage Wrapped Sculpture
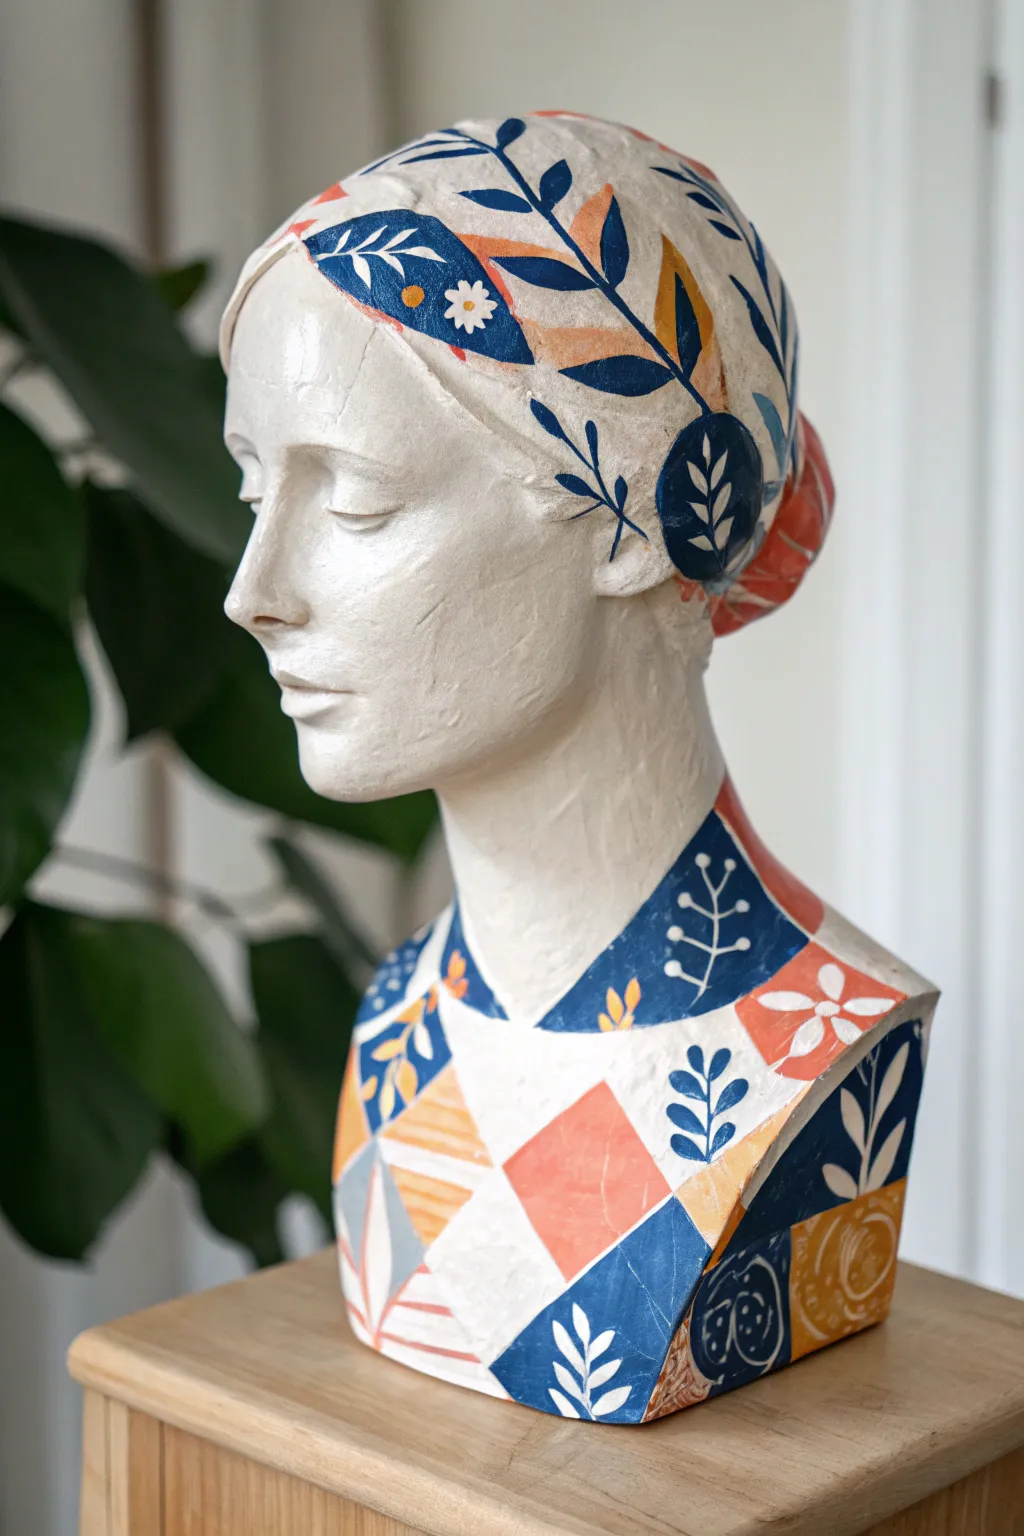
Transform a simple sculpted form into a stunning, patterned work of art by combining the tactile charm of paper clay with vibrant decoupage techniques. This serene bust features a patchwork of botanical and geometric designs that brings a modern folk-art aesthetic to classic sculpture.
Step-by-Step Tutorial
Materials
- Paper clay or air-dry clay
- Wire armature and aluminum foil (for the core)
- Sculpting tools (spatulas, loop tools)
- White acrylic gesso or primer
- Patterned decoupage paper or napkins (blue botanical, orange geometric)
- Decoupage glue (like Mod Podge)
- Soft synthetic brushes
- Scissors and precision craft knife
- Clear matte varnish
- Fine grit sandpaper (220 grit)
Step 1: Sculpting the Base Form
-
Build the Armature:
Create a basic structural support using stiff wire bent into the shape of a head and neck, then bulk it out firmly with crumpled aluminum foil. This saves clay and keeps the sculpture lightweight. -
Apply the Initial Clay Layer:
Roll out sheets of paper clay to about 1/4 inch thickness and wrap them over your foil core, pressing firmly to remove air pockets and smoothing the seams with a little water. -
Define the Features:
Add small snakes of clay to build up the nose, brow bone, and chin. Focus on achieving a serene, classical profile rather than hyper-realism. -
Sculpt the Eyes and Mouth:
Use a small loop tool to carefully carve out the eyelids and the line of the mouth, keeping the eyes closed for a peaceful expression. -
Form the Hair Bun:
Add a rounded mound of clay at the back of the head to represent a low bun, blending the edges smoothly into the skull. -
Dry Completely:
Allow the sculpture to dry for at least 24-48 hours. I find that turning it occasionally helps it dry evenly without cracking. -
Sand and Refine:
Once bone dry, use fine-grit sandpaper to smooth out any rough fingerprints or bumps on the face and neck, creating a porcelain-like finish.
Step 2: Applying the Patterned Surface
-
Prime the Surface:
Coat the entire sculpture with white acrylic gesso. This seals the clay and provides a bright white background that makes the decoupage colors pop. -
Plan Your Patterns:
Select papers with contrasting patterns—blue botanical leaves and orange geometric shapes work beautifully. Tear or cut them into irregular patches and strips. -
Create the Headscarf:
Start applying the floral patterned paper to the top of the head using decoupage glue. Overlap pieces slightly to create the look of a wrapped scarf. -
Define the Hairline:
Carefully trim the edges of the paper where it meets the forehead and ears to create a clean, intentional hairline. -
Decorate the Clothing Area:
For the bust’s base, apply larger geometric shapes (diamonds or squares) in orange and blue. Arrange them in a patchwork style, leaving thin white lines between some shapes for visual interest. -
Smooth Out Bubbles:
As you glue each piece down, use your brush or a soft cloth to gently press from the center outward, eliminating any air bubbles or wrinkles. -
Refine Edges:
If paper hangs over the bottom edge of the sculpture, use a sharp craft knife to trim it flush once the glue is nearly dry. -
Seal the Artwork:
Apply two coats of clear matte varnish over the entire piece, allowing drying time between coats. This protects the paper and unifies the sheen of the different materials.
Wrinkle Rescue
If stubborn wrinkles appear while gluing paper, dampen your finger slightly and gently massage the wrinkle flat. Don’t over-wet or the paper may tear.
Antique Finish
For a vintage look, dilute a tiny drop of brown paint in your varnish to create a subtle glaze. This settles into textures and ages the piece beautifully.
Place your finished sculpture in naturally lit spot where the patterns can be admired
Wire and Paper Clay Line Drawing Figure
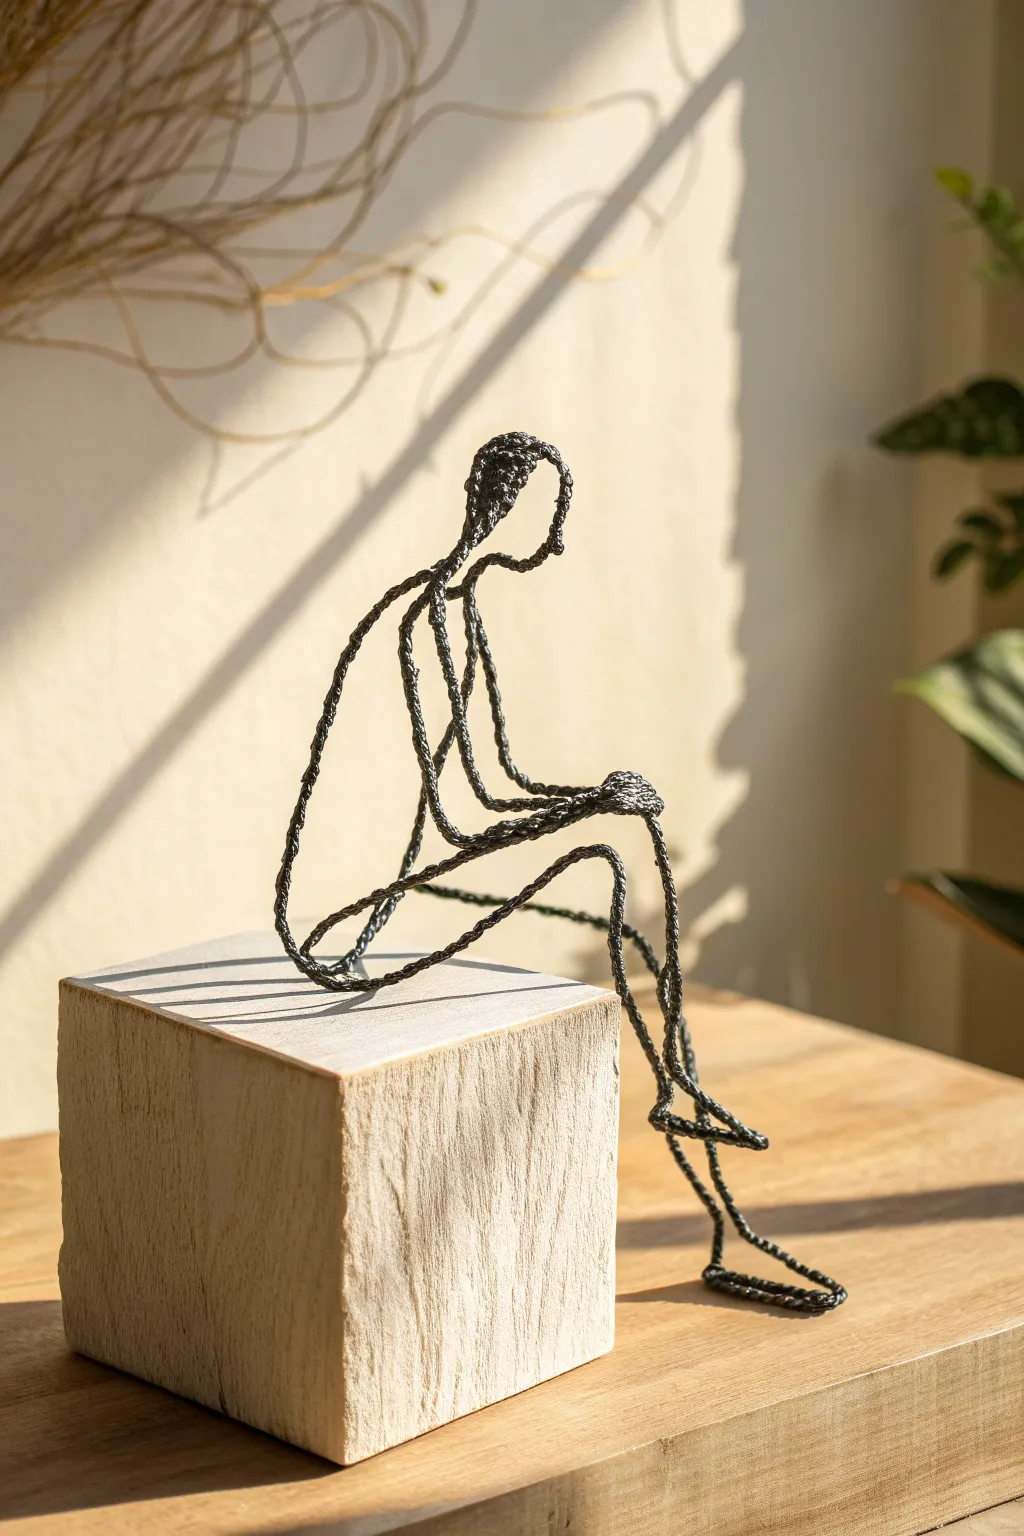
This elegant project captures the essence of the human form using the concept of a ‘line drawing in space.’ By combining sturdy wire armature with a thin layer of paper clay, you’ll create a textured, rugged silhouette that sits strikingly on any shelf edge.
Detailed Instructions
Materials
- 16-gauge galvanized steel wire (armature)
- 24-gauge thin craft wire (wrapping)
- Paper clay (air-dry variety)
- Needle-nose pliers
- Wire cutters
- Wooden block or shelf edge (for posing)
- Black acrylic paint (matte finish)
- Small stiff paintbrush
- Bowl of water
- Sealant spray (matte, optional)
Step 1: Building the Wire Skeleton
-
Form the spine and head:
Cut a long length of 16-gauge wire (about 20 inches) to start the main body. Create a loop at one end for the head, twisting it closed at the ‘neck’ area. -
Shape the torso and legs:
Bend the wire down from the neck to form the spine, curving it gently for the back. At the hips, bend the wire forward to create the thighs. -
Create the seated posture:
Using your wooden block as a guide, bend the wire at the ‘knees’ so the lower legs dangle over the edge. This is crucial for balance later. -
Add the arms:
Cut a separate piece of wire for the arms and shoulders. Twist the center of this piece around the neck/shoulder area of your main spine wire to secure it. -
Position the limbs:
Bend the arm wires so the ‘hands’ rest gently on the knees or lap. Simplicity is key here, so you don’t need detailed fingers; a simple loop or bend suffices. -
Thicken the armature:
To give the paper clay something to grip, loosely wrap the thinner 24-gauge wire around the main limbs and torso. This acts like rebar for your clay.
Step 2: Applying Paper Clay
-
Prepare the clay:
Take a small ball of paper clay and knead it with a drop of water until it’s very pliable. I like to keep my hands slightly damp to prevent sticking. -
Wrap the wire:
Pinch off tiny pieces of clay and press them along the wire armature. You aren’t trying to hide the wire completely; you want a rough, organic texture. -
Keep it thin:
Aim for a very slender profile. The clay layer should only be a few millimeters thick, maintaining that ‘sketchy’ line quality. -
Refine the joints:
Pay attention to where the limbs connect. Smooth these transitions slightly so they look structural rather than just two wires twisted together. -
Add surface texture:
Before the clay dries, run a stiff dry brush or a crumpled piece of foil along the surface to create pitted, uneven texture. -
Check the balance:
Place the wet sculpture back on your block. Ensure it sits naturally without tipping. Adjust the legs while the clay is still flexible if needed. -
Let it cure:
Allow the sculpture to dry completely. This usually takes 24 hours depending on humidity. Rotate it occasionally so all sides get air.
Grip It Tight
If the clay slips off the smooth wire, wrap the wire tightly with masking tape first. The paper texture of the tape bonds perfectly with paper clay.
Step 3: Finishing and Painting
-
Apply base coat:
Once dry, paint the entire figure with black matte acrylic paint. Dab the brush into the crevices to ensure no white clay shows through. -
Check for gaps:
Hold the sculpture up to the light to spot any missed patches of raw clay and touch them up with paint. -
Dry brushing (optional):
If you want a metallic look, lightly dry brush a tiny amount of bronze or silver over the highest textures, though solid black offers a classic silhouette. -
Seal the work:
Spray the figure with a matte sealant to protect the paint and strengthen the dried paper clay against humidity.
Metallic Illusion
Mix graphite powder into your black paint or rub a soft pencil lead over the dried black surface to make the figure look like heavy cast iron.
Place your contemplative figure on a bookshelf or mantle where the light can cast interesting shadows through its open form
Sculptural Bookends With Bold Shapes
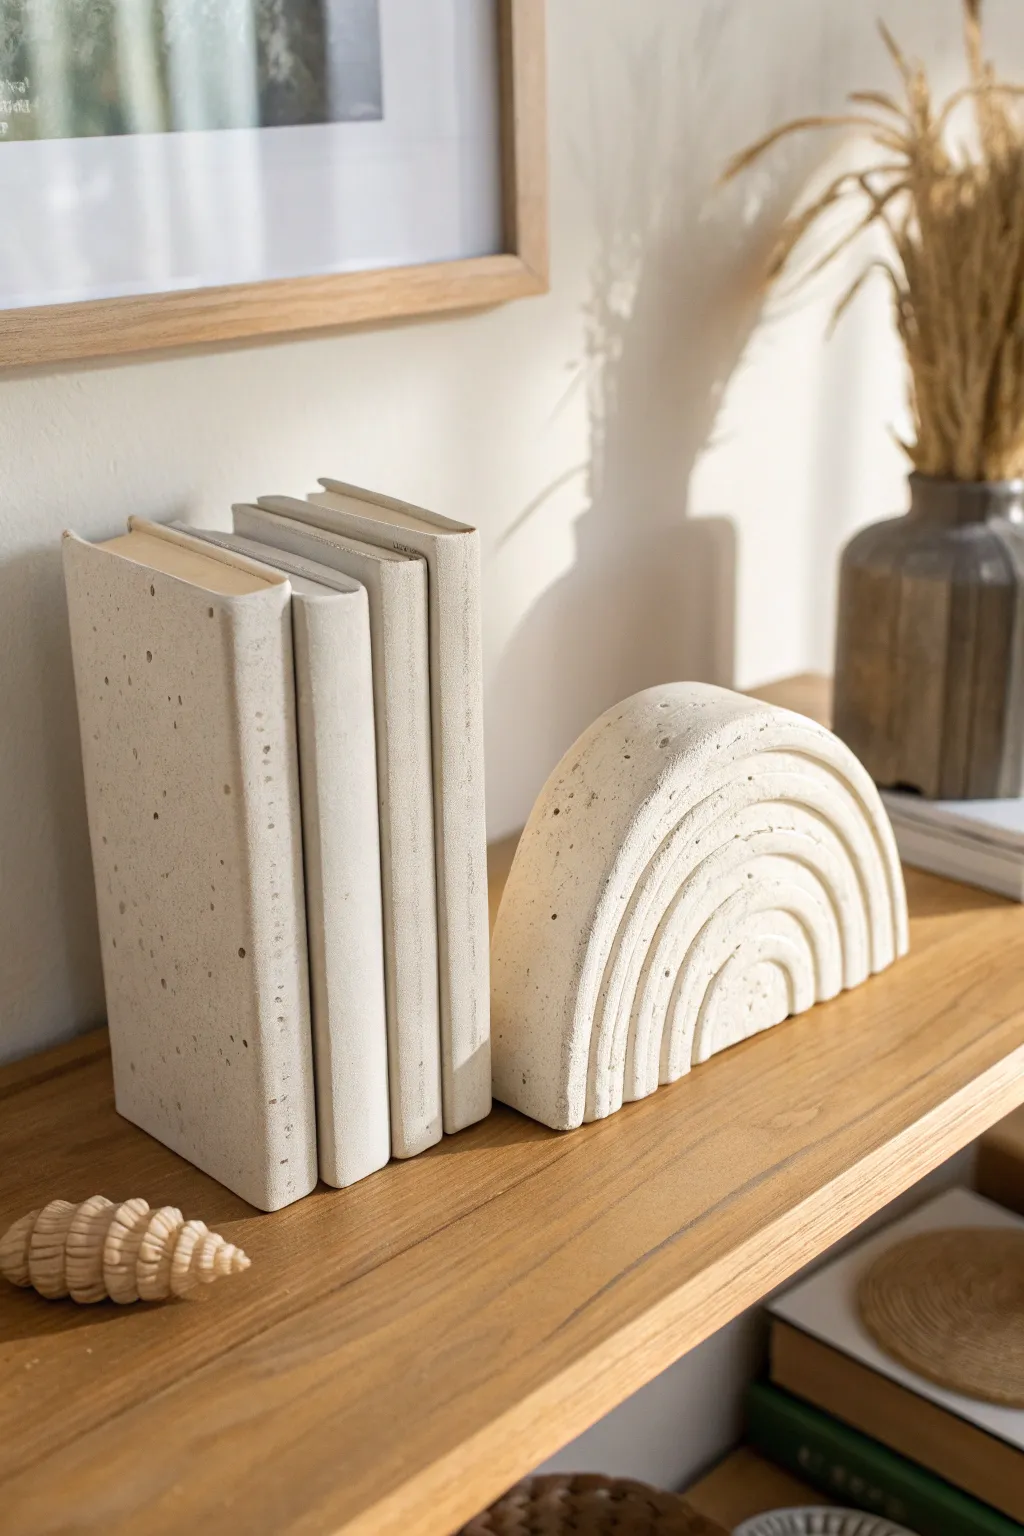
Bring an organic, structural element to your shelves with these heavy-duty paper clay bookends that mimic the look of carved limestone. One side features a minimalist block form while the other showcases a trendy, textured rainbow arch, both unified by a speckled, matte stone finish.
How-To Guide
Materials
- Paper clay (air dry)
- Cardboard or sturdy cardstock (for armatures)
- Masking tape
- Rolling pin
- PVA glue
- Craft knife
- Sandpaper (medium and fine grit)
- Acrylic paint (creamy white, beige, diluted brown/grey for speckling)
- Old toothbrush (for speckling)
- Matte sealant spray
- Flat sculpting tool or butter knife
Step 1: Building the Rainbow Armature
-
Trace and cut the profile:
Begin by drawing a semi-circle arch shape on your cardboard to determine the height and width of your rainbow bookend; cut out two identical pieces of this arch shape to serve as the front and back faces. -
Create the depth:
Cut several rectangles of cardboard that match the desired depth of your bookend (around 2-3 inches works well for stability) and are flexible enough to curve. -
Assemble the hollow form:
Tape the depth strips between your two arch faces using masking tape, creating a hollow 3D semi-circle box; ensure the bottom is flat and sturdy as this will sit on the shelf. -
Add internal weight:
Before sealing the final edge completely, fill the hollow cardboard form with clean stones, dried beans, or sand sealed in a bag to give the bookend the necessary weight to hold books upright.
Cracks appeared?
Paper clay shrinks when drying. If cracks form, mix a small slurry of fresh clay and water to create a paste, fill the cracks, and smooth it over with a damp finger.
Step 2: Sculpting the Rainbow Texture
-
Roll out the clay sheets:
Roll your paper clay out on a flat surface to a uniform thickness of about 1/4 inch, which will cover your cardboard armature. -
Cover the armature:
Apply a thin layer of PVA glue to the cardboard, then drape your clay sheets over the form, pressing firmly to eliminate air bubbles and smoothing the seams where the clay pieces meet. -
Shape the arches:
While the clay is still pliable, use a loop tool or the back of a sculpting spatula to carve deep, concentric grooves into the front face of the arch, creating the distinct rainbow ridges. -
Refine the ridges:
Gently smooth the raised sections of the arches with a damp finger to round them off, ensuring they look intentional and organic rather than sharp. -
Add surface texture:
For that stone-like effect, tap the surface randomly with a crumpled ball of aluminum foil or a stiff-bristled brush to create small pits and imperfections.
Natural Texture
Mix dried tea leaves or sand directly into your wet clay before sculpting. This adds grit and natural color variation without you needing to paint faux speckles later.
Step 3: Creating the Block Bookend
-
Construct the block armature:
Similar to the rainbow, build a rectangular box from cardboard that mimics the size of a thick hardcover book or a stack of papers. -
Weighted filling:
Don’t forget to fill this armature with weights as well; a light bookend won’t be functional. -
Cladding the block:
Coat the rectangular box in a generous layer of paper clay, keeping the sides as flat and perpendicular as possible for a clean, graphic look. -
Defining the edges:
Use a straight edge or a ruler to gently press against the wet clay sides to sharpen the corners, though a slightly softened corner contributes to the aged stone aesthetic.
Step 4: Finishing and Coloring
-
Let it dry completely:
Allow the sculptures to air dry for at least 24 to 48 hours; turn them occasionally to ensure even drying on all sides. -
Sand for stone texture:
I like to sand the surfaces lightly once dry to knock down any unintended lumps, but leave the texture you created in the earlier steps intact. -
Paint the base coat:
Mix a creamy, off-white acrylic paint and cover both bookends entirely; a matte finish paint works best here. -
Create the speckles:
Dilute a small amount of grey or brown paint with water. Dip an old toothbrush into this mixture and flick the bristles with your thumb to spray fine speckles across the surface. -
Seal the work:
Once the paint is fully dry, spray the entire piece with a matte clear coat to protect the clay and prevent the paint from chipping.
Place your new sculptural pieces on a wooden shelf to create a warm, curated vignette in your home
Cutout Shadow-Box Sculpture Scene
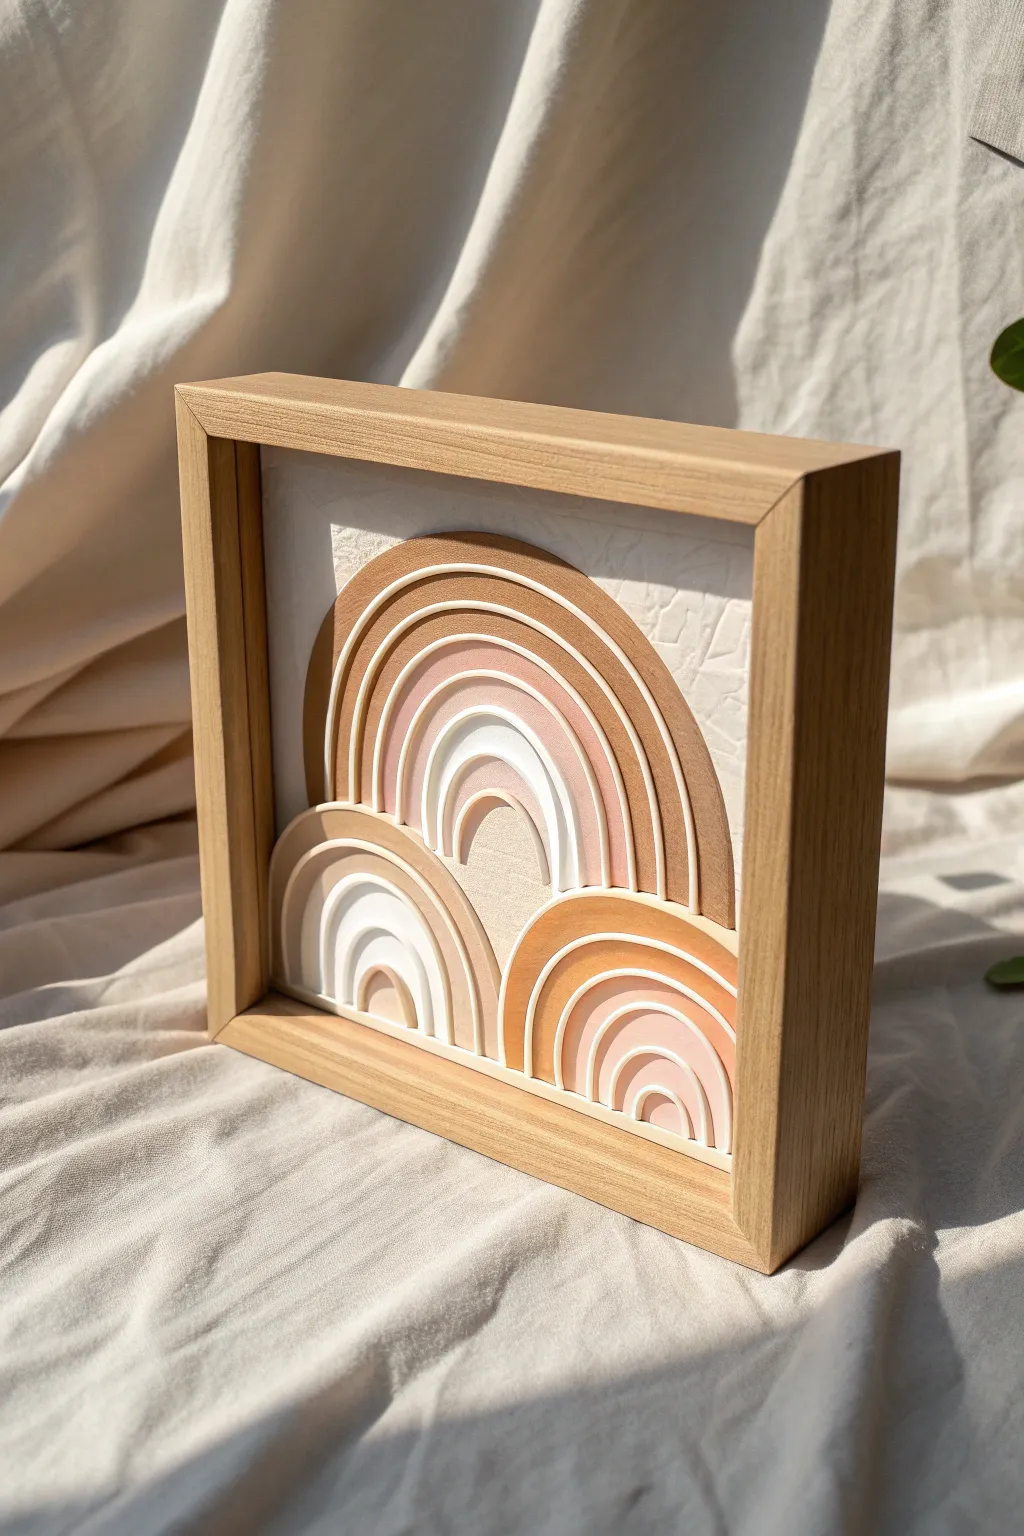
This minimalist, modern artwork combines warm, earthy tones with tactile dimensions to create a serene focal point for any room. Using simple paper clay techniques and layering, you can build a sophisticated shadow box that plays with light and shadow beautifully.
Detailed Instructions
Materials
- White air-dry paper clay (or polymer clay)
- Deep wood shadow box frame
- Rolling pin
- Textured rolling pin or fabric (for backing)
- Circle cutters or sharp craft knife
- Ruler and compass
- Acrylic paints (terracotta, beige, blush pink, white)
- Fine grit sandpaper
- White craft glue or heavy-duty mounting tape
- Cardstock or heavy cardboard (for backing)
Step 1: Preparation and Base Layer
-
Prepare the backing:
Begin by cutting a piece of heavy cardboard or cardstock to fit perfectly inside your shadow box frame. Check the fit before proceeding to ensure it sits flat against the back. -
Texture the background clay:
Roll out a thin sheet of white paper clay large enough to cover your backing board. To achieve the subtle texture seen in the photo, gently press a piece of rough linen or a crumpled paper towel into the clay surface. -
Mount the background:
Apply glue to the cardboard backing and carefully lay your textured clay sheet on top. Trim any excess clay from the edges using a sharp craft knife so it fits snugly in the frame later. -
Draft the arches:
On a separate piece of paper, sketch your arch design. Plan for one large central arch unit and two smaller units at the bottom corners. Use a compass to ensure your curves are perfectly circular.
Clean Cuts Pro-Tip
For the cleanest possible edges on your clay strips, let the rolled slab sit for 15-20 minutes before cutting. Slightly firmer clay drags less under the knife than fresh, wet clay.
Step 2: Creating the Arches
-
Roll the clay coils:
Knead your paper clay until pliable. Roll out a flat, even slab about 1/4 inch thick. I find using chopsticks as depth guides on either side helps keep the thickness consistent. -
Cut the primary strips:
Using your paper sketch as a template or a ruler, cut long, even strips of clay. Some should be wider (about 1/2 inch) for the main colored bands, and others very thin (1/16 inch) for the white dividing ridges. -
Form the large central rainbow:
Start shaping the largest outer arch of the central design on your work surface. Curve the wide strip carefully. Nest a thin strip immediately inside it, followed by the next wide strip. -
Assemble the smaller units:
Repeat the process for the two smaller corner rainbows. Ensure the curvature matches your sketches so they will touch the main arch correctly when assembled. -
Clean the edges:
Once your shapes are formed but still wet, use a damp finger or clay tool to smooth any rough cuts on the flat surfaces. Ensure the bottom edges of the arches are cut completely straight. -
Initial drying:
Let all your clay pieces dry completely on a flat surface. Depending on humidity, this can take 24-48 hours. Using a wire rack helps air circulate underneath.
Level Up: Lighting
Add a small, battery-operated LED strip inside the top inner rim of the shadow box. This creates dramatic shadows downward over the arches, emphasizing the 3D relief effect.
Step 3: Sanding and Painting
-
Smooth the imperfections:
Once fully bone-dry, gently sand the edges and surfaces with fine-grit sandpaper to remove any lint or uneven bumps. -
Mix your palette:
Prepare your acrylic colors. You’ll need a gradient of earthy tones: a deep terracotta brown, a medium warm beige, a soft blush pink, and pure white for the smallest inner arches and dividing lines. -
Paint the layers:
Paint the arches carefully. The outermost bands should be the darkest terracotta, fading to lighter shades as you move inward. Keep the very thin separator strips and the innermost arch centers pure white. -
Dry and touch up:
Allow the paint to dry fully. If the colors look streaky, apply a second thin coat for an opaque, matte finish.
Step 4: Final Assembly
-
Dry fit the composition:
Place your cured clay background into the frame (or on the table) and arrange your painted arches on top to finalize their positioning. The smaller arches should slightly overlap or comfortably sit in front of the large one. -
Glue the centerpiece:
Lift the large central arch unit and apply strong white craft glue to the back. Press it firmly onto the textured background. -
Layer the bottom arches:
Glue the two smaller bottom arches in place. If you want extra depth, you can use pieces of foam tape behind these to make them stand out slightly more than the back layer. -
Seal the piece:
If desired, spray a very light coat of matte varnish over the clay to protect it from dust, but keep it light to maintain the natural paper texture. -
Frame it up:
Once all glue is cured, insert the backing board with the attached sculpture into the wood shadow box and secure the back clips.
Hang your new sculptural art piece in a spot where natural light can rake across the surface to highlight all that beautiful texture