Whenever I need a quick mood-boost in the studio, I reach for cute clay projects—tiny, sweet, and totally doable in an afternoon. These ideas lean into simple shapes, kawaii faces, and little details that make your pieces feel like they have a personality.
Smiley Ring Dish
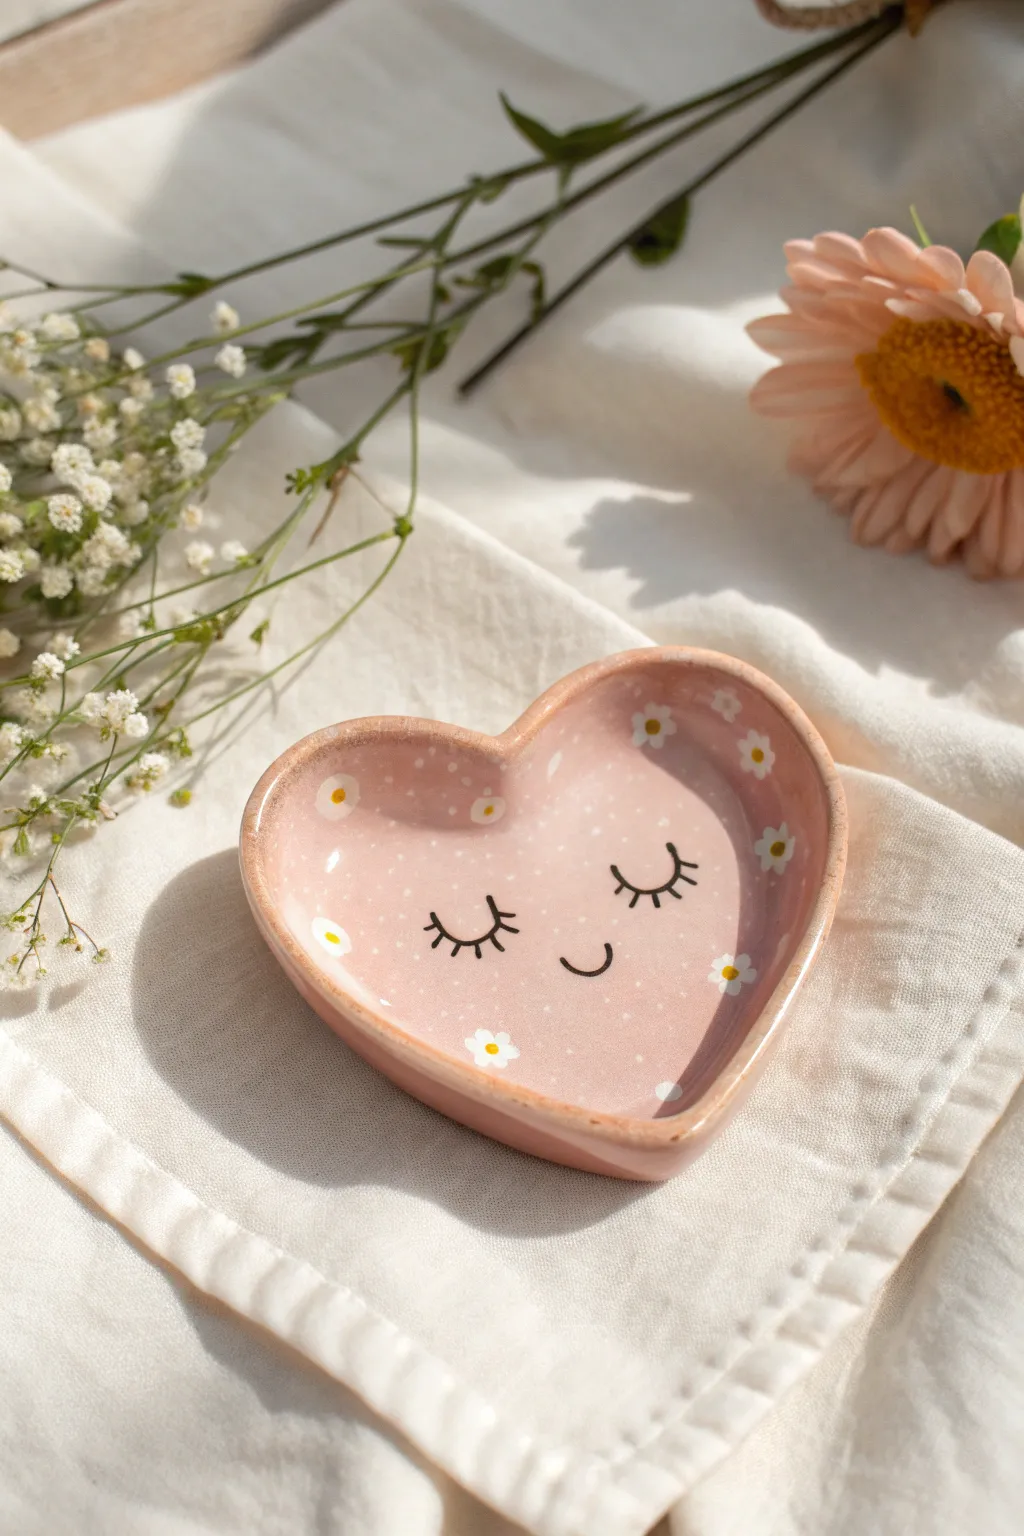
This adorable ring dish combines a soft pink heart shape with a charming sleepy face and delicate daisies. It is the perfect beginner clay project that balances simple shaping techniques with fun, illustrative details.
Step-by-Step Guide
Materials
- Air-dry clay (white) or polymer clay
- Rolling pin
- Heart-shaped cookie cutter (medium to large)
- Small bowl or sponge (for drying shape)
- Sandpaper (fine grit)
- Acrylic paints: Blush Pink, White, Yellow, Black
- Fine detail paintbrushes (size 0 and size 2)
- Dotting tool or toothpick
- Clear gloss varnish or glaze
- Water cup and paper towels
Step 1: Shaping the Heart
-
Condition the Clay:
Begin by taking a handful of your clay and kneading it in your hands until it becomes warm, soft, and pliable. This prevents cracks later on. -
Roll it Out:
Place the clay on a clean, flat surface. Use your rolling pin to flatten it to an even thickness of about 1/4 inch (6mm). Rotate the clay as you roll to ensure it doesn’t stick. -
Cut the Shape:
Press your heart-shaped cookie cutter firmly into the rolled clay. Wiggle it slightly to ensure a clean cut, then remove the excess clay from around the heart. -
Smooth the Edges:
Dip your finger in a tiny bit of water and run it gently along the cut edges of the heart to smooth out any roughness or sharp crumbs left by the cutter. -
Create the Curve:
Pick up the clay heart gently. To give it a dish shape, curl the edges upward slightly. I like to lay the clay inside a small, shallow bowl to help it hold this curved form while it dries. -
Dry Time:
Allow the clay to dry completely according to the package instructions. For air-dry clay, this usually takes 24-48 hours. Ensure it is fully hardened before moving to the next phase.
Cracked edges?
If edges crack while curving the clay, dip your finger in water (or liquid clay for polymer) and smooth the fissure immediately before drying.
Step 2: Painting and Details
-
Sand for Smoothness:
Once fully dry, check for any rough spots. Use fine-grit sandpaper to gently smooth the rim and surface, wiping away the dust with a slightly damp cloth afterward. -
Base Coat:
Mix a soft blush pink using white and a tiny drop of red acrylic paint. Apply two even coats to the entire top surface of the dish, letting the first coat dry before adding the second. -
Draw the Face:
Using your finest detail brush (size 0) and black paint, carefully paint two curved lines for the closed eyes in the center. Add three small lashes to each eye. -
Add the Smile:
Paint a small, simple ‘u’ shape between and slightly below the eyes for a sweet, contented smile. -
Flower Centers:
Dip a dotting tool or the back of a paintbrush into yellow paint. Place small dots randomly around the face to serve as the centers of your daisies. -
Petal Painting:
Using a small brush and white paint, create five small teardrop shapes or simple dots around each yellow center to form the flower petals. -
Optional Polka Dots:
If you have empty spaces that look too bare, add tiny white dots using the tip of a toothpick to add texture to the background. -
Seal the Deal:
Once all paint is completely dry, apply a coat of clear high-gloss varnish. This protects the paint from chipping and gives the dish that finished ceramic look.
Golden Touch
For a luxe finish, paint the rim of the heart with metallic gold leaf paint after the pink base coat is dry but before varnishing.
Now you have a charming little spot to keep your favorite rings safe


Cute Animal Trinket Tray
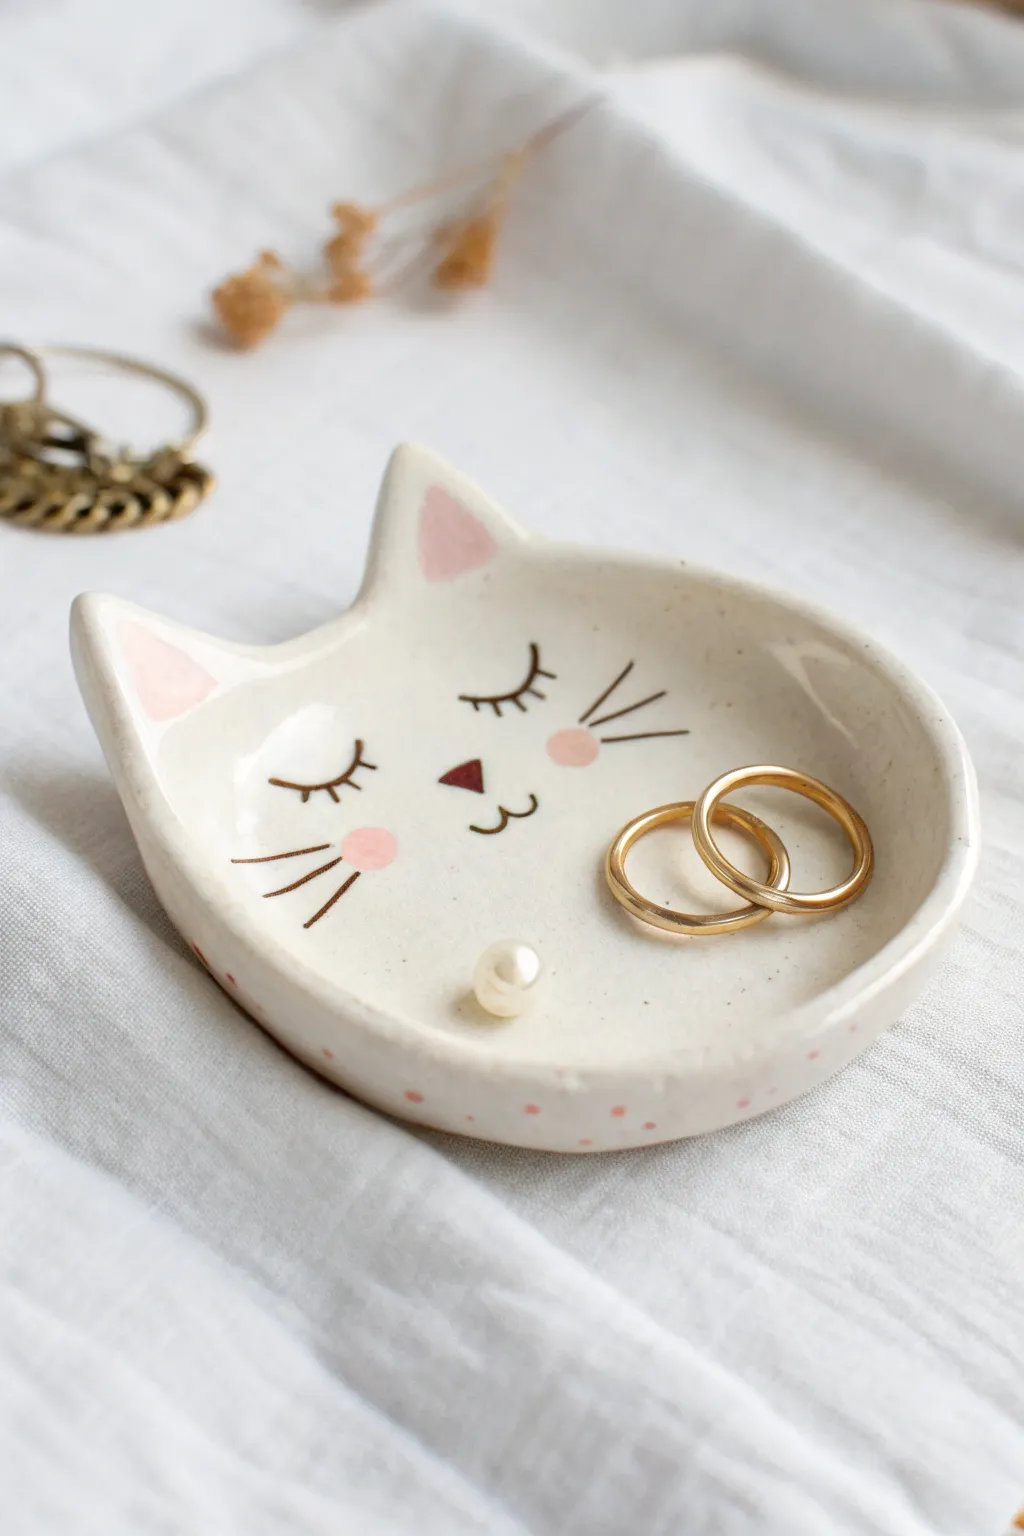
Keep your favorite rings and small treasures safe within this adorable feline friend. With its gentle sleeping face and soft pink accents, this handmade clay dish adds a touch of whimsy to any bedside table.
Step-by-Step
Materials
- Air-dry clay (white) or polymer clay
- Rolling pin
- Clay knife or craft knife
- Small bowl of water (for smoothing)
- Fine-grit sandpaper
- Acrylic paints: Black, Soft Pink, Burgundy/Dark Red
- Fine detail paintbrushes (including a liner brush)
- Gloss varnish or clear sealant
- Paper template (optional)
Step 1: Shaping the Base
-
Condition the clay:
Start by taking a handful of clay and kneading it in your hands until it becomes soft, pliable, and free of cracks. Warm clay is much easier to work with and less prone to tearing. -
Roll it out:
Using your rolling pin, flatten the clay into an even slab about 1/4 inch thick. Try to keep the pressure consistent so you don’t have lumpy areas. -
Cut the shape:
You can freehand a circle shape with two triangular ears at the top, or trace around a circular object and add the ears yourself. Use your craft knife to cut out the silhouette cleanly. -
Smooth the edges:
Dip your finger in a little water and run it along the cut edges to round them off. This removes any sharp angles or crumbs left by the knife. -
Curve the rim:
Gently lift the edges of the clay upwards to create a shallow bowl shape. Use your thumbs to press into the center while pulling the sides up slightly with your fingers. -
Refine the form:
Work around the rim again, ensuring the transition from the flat base to the raised edge is smooth. Make sure the ears are standing up slightly but blended seamlessly into the rim. -
Let it dry completely:
Place your dish in a warm, dry spot. Depending on your clay type and humidity, this could take 24-48 hours. Don’t rush this part, or the paint might crack later. -
Sand for perfection:
Once fully dry, take your fine-grit sandpaper and gently buff away any fingerprints or rough spots on the rim and surface until it feels silky smooth.
Smooth Surface Secret
Before painting, wipe the dried clay with a slightly damp sponge. This removes sanding dust that can make your paint look gritty or bumpy.
Step 2: Painting the Details
-
Paint the inner ears:
Mix a small amount of the soft pink paint. Carefully fill in the triangles of the ears, leaving a clean white border around the outside. -
Add rosy cheeks:
Using the same soft pink, paint two small circles on the cheeks. I like to dilute the paint just slightly here so the edges don’t feel too harsh. -
Create the polka dots:
Dip the handle end of a paintbrush into the pink paint. Gently dot it along the outside rim of the dish to create the decorative spotted pattern. -
Draw the nose:
Switch to your burgundy or dark red paint. In the center of the face, paint a small, inverted triangle with soft, rounded corners for the nose. -
Paint the eyes:
Using your finest liner brush and black paint, draw two downward curves for the sleeping eyelids. Add three small lashes to the outer corner of each eye. -
Add the mouth:
Beneath the nose, paint a small ‘w’ shape using the black paint to create the classic cat smile. Keep the lines thin and delicate. -
finish the whiskers:
Finally, add three straight lines extending from each cheek area for the whiskers. Try to keep them symmetrical on both sides. -
Seal the dish:
Once all paint is bone dry, apply two coats of gloss varnish. This protects the paint from scratches and gives the ceramic a beautiful, finished shine.
Gold Glam Upgrade
Instead of pink dots, paint the rim with metallic gold leaf paint. This simple switch instantly transforms the playful dish into an elegant jewelry holder.
Enjoy displaying your rings on your new handmade pottery piece


Face Pinch-Pot Planter
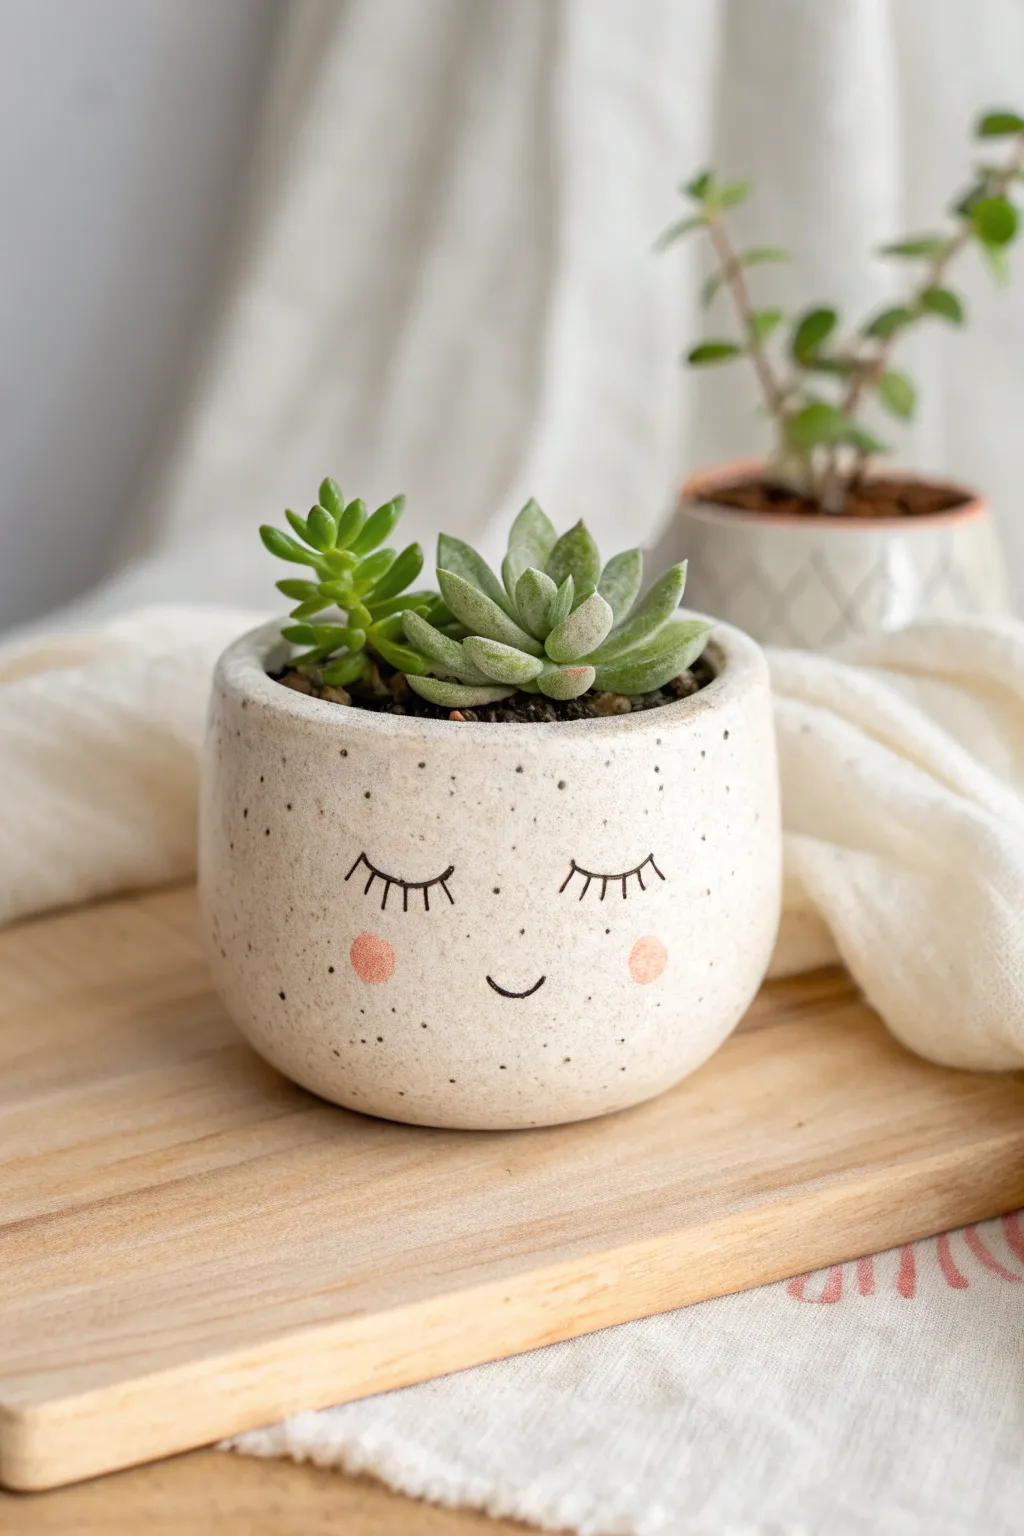
Give your succulents a sweet new home with this adorable face planter featuring closed eyes and rosy cheeks. The speckled clay body adds a natural, rustic texture that perfectly complements the simple, illustrative facial features.
How-To Guide
Materials
- Speckled stoneware clay (or white polymer clay with faux speckles)
- Small rolling pin
- Pin tool or needle tool
- Rib tool (wooden or silicone)
- Sponge
- Black underglaze or acrylic paint (if using air-dry clay)
- Pink underglaze or acrylic paint
- Small detail paintbrush
- Round sponge dabber
- Clear glaze (or varnish for non-fired clay)
Step 1: Shaping the Pot
-
Prepare the Clay:
Start with a ball of clay roughly the size of a tennis ball. Wedging it well ensures there are no air bubbles, and rolling it between your palms creates a smooth, even sphere. -
Create the Opening:
Hold the ball in one hand and gently press your thumb into the center, stopping about a half-inch from the bottom to create a sturdy base. -
Pinch the Walls:
Slowly rotate the ball while pinching the clay between your thumb and fingers. Work your way from the bottom up, aiming for an even wall thickness of about 1/4 inch all around. -
Flatten the Bottom:
Gently tap the pot on your work surface to create a flat, stable base so it won’t tip over once your plant is inside. -
Refine the Shape:
Use a damp sponge to smooth out any finger marks. If you want the sides straighter like the photo, gently paddle the outside with a flat wooden tool or roll a rib tool over the surface. -
Create a Drainage Hole:
If this will hold a live plant, use a small circular cutter or a straw to punch a drainage hole in the center of the bottom.
Step 2: Adding the Face
-
Smooth the Canvas:
I like to run a slightly damp rib tool over the ‘face’ side one last time to ensure the surface is perfectly smooth for painting details later. -
Dry to Leather Hard:
Let the pot dry until it is leather hard—firm enough to handle without deforming, but cool to the touch. This step is crucial for clean painting. -
Sketch the Face:
Lightly trace the position of the eyes and mouth with a dull pencil. The graphite will burn off in the kiln, or can be erased if using air-dry clay. -
Paint the Lashes:
Using a fine detail brush and black underglaze, paint two downward curves for the closed eyes. Add small, consistent tick marks below each curve for the eyelashes. -
Add the Smile:
Paint a very small, simple ‘U’ shape centered between the eyes for the mouth, keeping the line weight delicate. -
Rosy Cheeks:
Dip a small round sponge dabber into pink underglaze. Dab off the excess on a paper towel, then gently press circle stamps onto the cheeks for that soft, blushed look.
Clean Lines
For the crispest eyelashes, use an underglaze slightly watered down to an ink-like consistency. It flows off the brush smoother than thick paint.
Step 3: Finishing Touches
-
Bisque Fire or Dry:
If using ceramic clay, bisque fire the piece to cone 04. If using polymer or air-dry clay, follow the manufacturer’s drying or baking instructions. -
Apply Glaze:
Dip the entire pot into a clear glaze to seal it and make the speckles pop. Wipe the bottom clean with a sponge so it doesn’t stick to the kiln shelf. -
Final Fire:
Fire the piece again to the maturation temperature of your specific clay body (e.g., cone 5 or 6). For non-ceramic options, apply a coat of waterproof varnish.
Add Legs
Before drying, roll three tiny balls of clay and score-and-slip them to the bottom to give your little face pot tripod feet for extra height.
Pop in your favorite small succulent and enjoy your cheerful handmade companion


Mushroom Plant Buddy
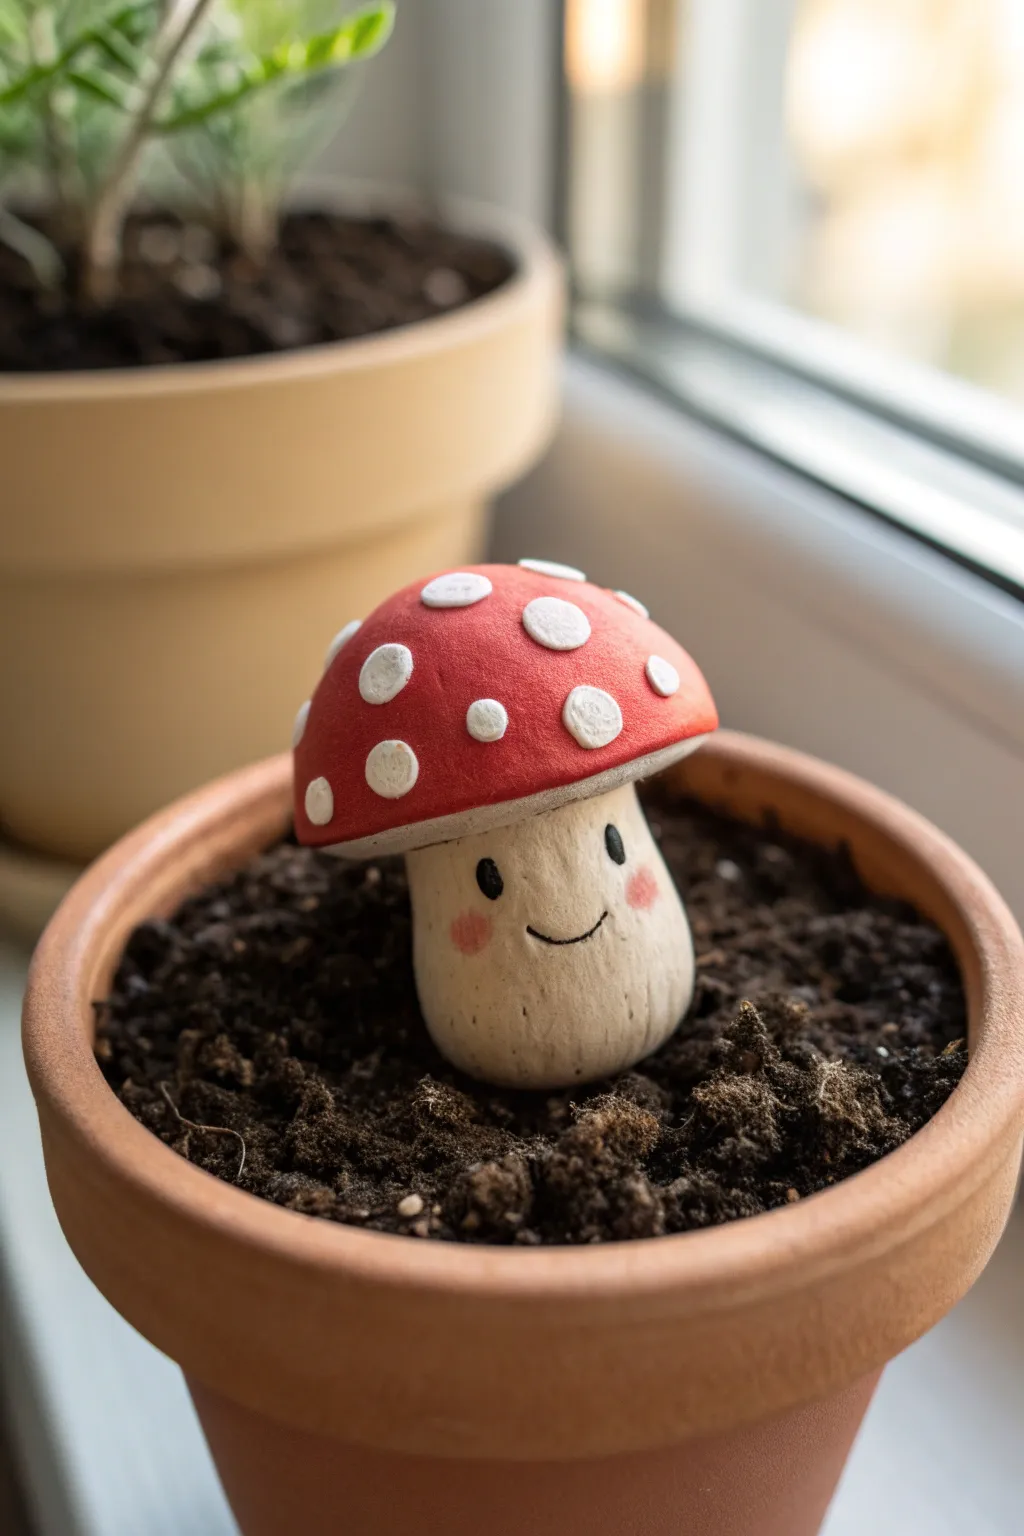
Add a whimsical touch to your indoor garden with this adorable, smiling mushroom friend. Sculpted from simple shapes and painted with cheerful details, this little guardian sits perfectly in the soil to keep your houseplants company.
Step-by-Step
Materials
- White or beige polymer clay (or air-dry clay)
- Red polymer clay (optional, if not painting)
- Acrylic paints (Red, White, Black, Pink)
- Fine detail paintbrush
- Aluminum foil
- Sculpting tools (needle tool, ball stylus)
- Clear matte or satin varnish
- Toothpick or short wire (for armature)
Step 1: Sculpting the Stalk
-
Create the Core:
Start by crumpling a small piece of aluminum foil into a thick cylinder shape. This acts as a lightweight core and saves clay. -
Condition the Clay:
Warm up your beige or white clay in your hands until it is soft and pliable. Roll it into a smooth ball slightly larger than your foil core. -
Form the Stalk Body:
Flatten the ball slightly and wrap it completely around the foil cylinder. Roll it back and forth on your work surface to smooth out any seams. -
Shape the Base:
Gently tap the bottom of the cylinder against your table to create a flat standing surface so your mushroom won’t tip over. -
Taper the Neck:
Pinch the top of the cylinder slightly to narrow it where the cap will sit, creating a slight mushroom shape. -
Add Texture:
Using a needle tool or a stiff toothbrush, lightly scratch vertical lines up and down the stalk create a natural, earthy texture. -
Insert Support:
Push a toothpick or a small piece of wire halfway into the top of the stalk. This will help hold the heavy cap in place.
Uneven Paint?
If your painted dots look streaky, don’t overload the brush. Instead, apply multiple thin layers, letting each one dry completely before adding the next.
Step 2: Creating the Cap
-
Shape the Dome:
Take a larger ball of clay (either red or white) and flatten the bottom against your palm while rounding the top to form a classic mushroom cap shape. -
Refine the Edge:
Smooth the bottom edge of the cap with your finger so it isn’t sharp. I like to curve the underside slightly inward. -
Attach Cap to Stalk:
Push the cap onto the exposed toothpick sticking out of the stalk. Press down firmly but gently to secure the two pieces together. -
Create the Dots:
Roll several tiny, unequal balls of clay. Flatten them into thin discs and press them randomly all over the cap’s surface. -
Texture the Dots:
Gently dab the surface of the flattened dots with a stiff brush or a piece of sandstone to give them a textured, organic look rather than perfect smoothness.
Glow Up
Use glow-in-the-dark polymer clay for the polka dots on the cap. When the lights go out, your plant buddy will gently illuminate your shelf.
Step 3: Baking and Painting
-
Bake the Piece:
Bake your creation according to the instructions on your specific package of clay. Let it cool completely before moving to the next step. -
Base Coat (If Needed):
If you used all white clay, paint the cap a bright, matte red and the stalk a creamy beige. Let the paint dry fully. -
Paint the Dots:
Carefully paint the raised polka dots white using a small brush. You may need two coats for a solid, crisp white. -
Paint the Face:
Using your finest brush and black paint, make two small oval eyes midway up the stalk. Paint a thin, U-shaped mouth between them. -
Add Cheeks:
Dip a dry brush or cotton swab into a tiny bit of pink paint. Dab off the excess, then gently blush the cheeks under the eyes. -
Seal the Project:
Apply a coat of matte or satin varnish to protect the paint from moisture, especially since this little guy will live near plant soil.
Nestle your new friend into the soil of your favorite potted plant and enjoy the instant charm it adds

The Complete Guide to Pottery Troubleshooting
Uncover the most common ceramic mistakes—from cracking clay to failed glazes—and learn how to fix them fast.
Fruit Magnets With Faces
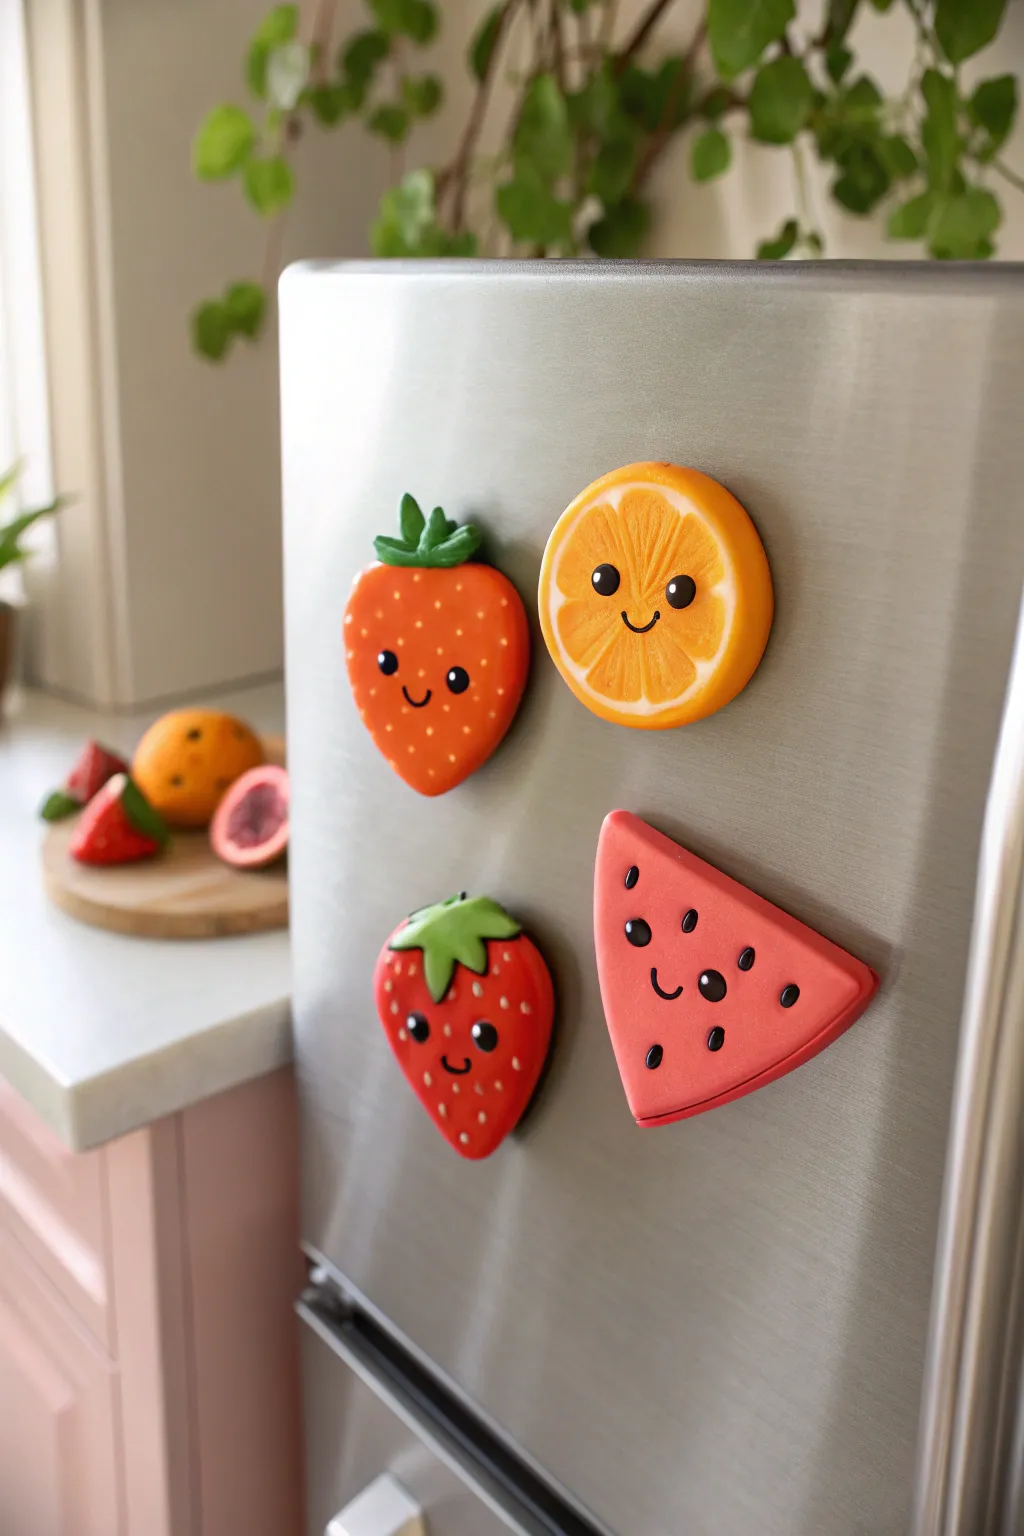
Brighten up your kitchen with these adorable, kawaii-style fruit magnets sculpted from polymer clay. This set features sweet strawberries, a zesty orange slice, and a happy watermelon wedge, all sporting charming little smiles.
Step-by-Step Tutorial
Materials
- Polymer clay (red, orange, translucent/white mix, leaf green, black)
- Round Neodymium magnets (strong hold)
- Clay tools (needle tool, dotting tool, flexible blade)
- Acrylic rolling pin
- Liquid polymer clay or bake-and-bond
- Gloss glaze (optional)
- Super glue (cyanoacrylate)
- Oven for curing
Step 1: Sculpting the Strawberries
-
Shape the base:
Condition a piece of red clay about the size of a walnut and roll it into a smooth ball. -
Form the strawberry:
Gently taper the bottom of the ball to create a rounded heart or strawberry shape, then use your palm to flatten the back slightly so it will sit flush against the fridge. -
Create the leaves:
Roll out a small amount of green clay and use a small star cutter or your needle tool to cut out a leafy calyx shape. -
Attach the greenery:
Press the green leaf shape firmly onto the top of the red berry, smoothing the edges downward slightly to clasp the fruit. -
Add texture:
Use a needle tool or small dotting tool to gently press seed indentations all over the red surface, avoiding the center area where the face will go. -
Make the face:
Roll two tiny specks of black clay for eyes and press them into the center. Roll a very thin thread of black clay for the smile and curve it into a ‘U’ shape below the eyes.
Step 2: Crafting the Orange Slice
-
Mix the interior color:
Blend bright orange clay with a little translucent or white clay to create a lighter, fleshy tone for the inside of the fruit. -
Construct the cane:
Form a thick cylinder of the light orange mix, then wrap it in a thin sheet of the original bright orange clay to clear the peel. -
Define the segments:
Use your needle tool to press radial lines into the flat face of the slice, mimicking the segments of a citrus fruit. -
Shape the slice:
Flatten the cylinder into a thick disk. If you prefer details like the photo, add tiny white lines between segments for extra realism before flattening. -
Add features:
Just like the strawberry, add two small black clay balls for eyes and a thin black clay smile in the center of the slice.
Sticky Situation?
If the clay gets too soft and sticky to hold detail, pop it in the fridge for 10 minutes. This firms up the clay, making it easier to carve sharp details.
Step 3: Forming the Watermelon
-
Create the wedge:
Shape pink or red clay into a thick triangle with rounded corners. -
Add the rind:
Roll a snake of light green or white clay, flatten it, and wrap it along the bottom edge of the triangle. Add a second, thinner layer of darker green if you want a detailed rind. -
Seed the melon:
Roll teardrop shapes out of black clay and press them flat onto the red surface to create the seeds. -
Finalize the face:
Place the signature face low on the wedge, centered between seeds, using the same black clay technique.
Glaze Hack
Use UV resin instead of glaze for an instant, ultra-durable, glass-like finish. Just cure it under a UV lamp for 2 minutes.
Step 4: Baking and Assembly
-
Check for lint:
Before baking, wipe the surface of your clay gently with a bit of rubbing alcohol or baby oil to remove any dust or fingerprints. -
Bake carefully:
Bake your pieces according to the clay manufacturer’s instructions, usually around 275°F (130°C) for 15-30 minutes depending on thickness. -
Cool slightly:
Let the pieces cool completely before handling to prevent cracking. -
Secure the magnets:
Apply a drop of super glue to the back of each fruit and press a strong neodymium magnet firmly into place. -
Seal (Optional):
For a shiny finish like the photo, brush a coat of gloss glaze over the fruit parts, leaving the faces matte if desired.
Now your fridge is ready to greet you with a friendly fruity smile every time you reach for a snack
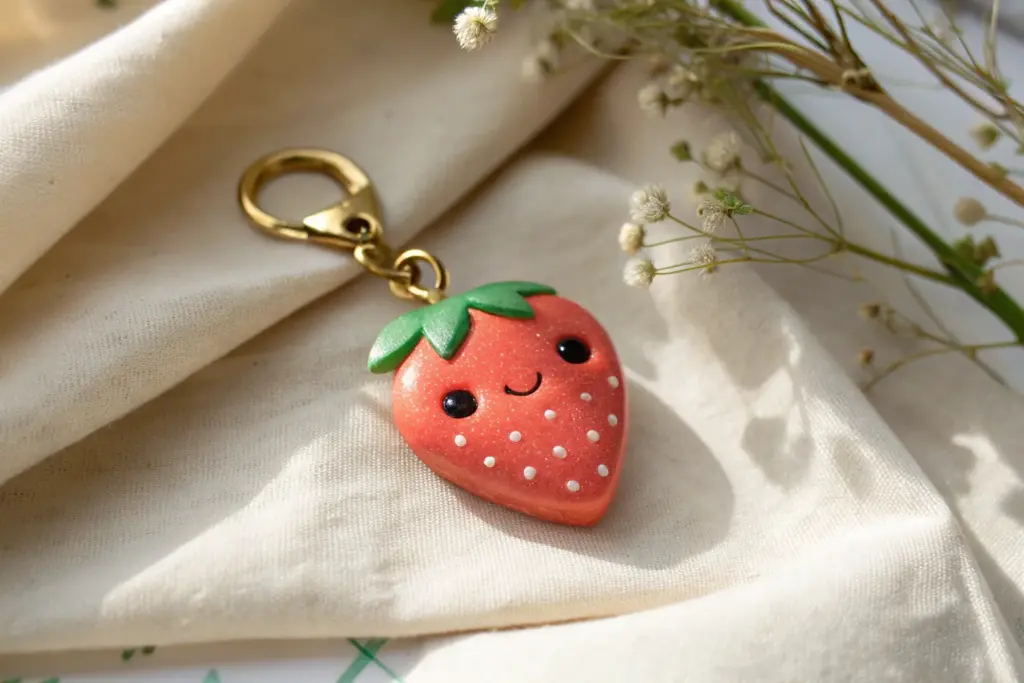
Mini Dumpling Charm
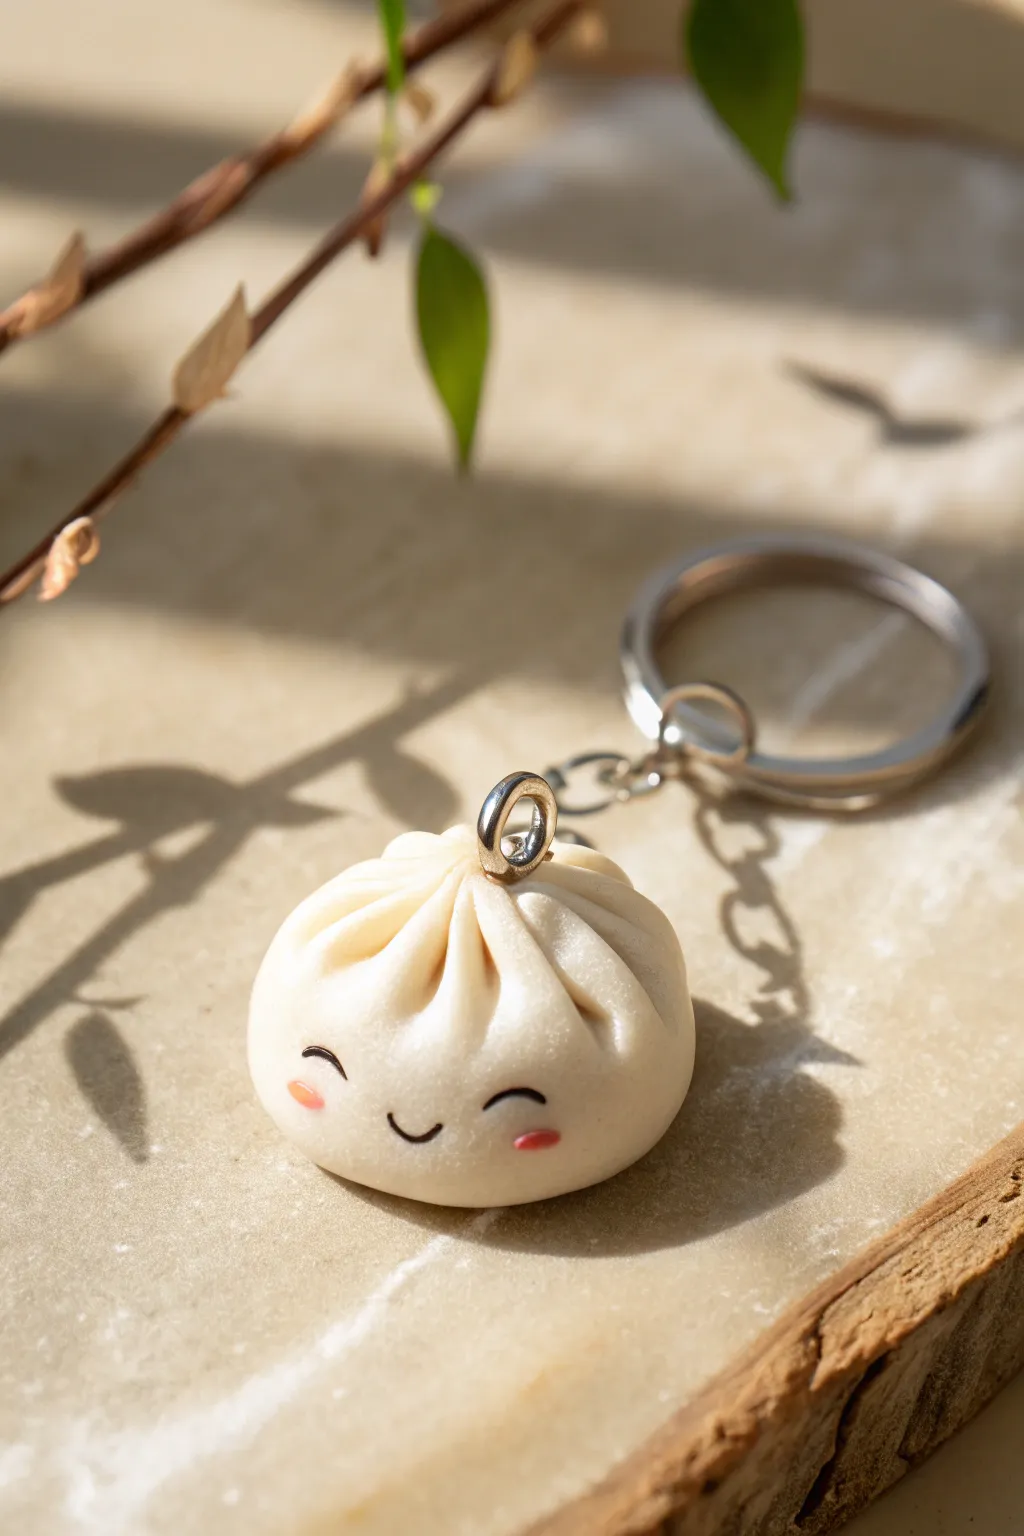
This adorable little xiao long bao charm brings a smile to your face with its cheerful expression and petite size. Fashioned from polymer clay, the glossy finish and realistic dumpling pleats make it an irresistible addition to any set of keys.
How-To Guide
Materials
- White or translucent white polymer clay
- Small amount of black acrylic paint
- Small amount of pink acrylic paint or soft pastels
- Fine detail paintbrush or toothpick
- Clay sculpting tool (needle tool or thin blade)
- Eye pin or screw eye pin
- Keychain ring and chain
- Gloss glaze or UV resin
- Oven for baking
Step 1: Shaping the Base
-
Condition the clay:
Start by kneading your white polymer clay until it is soft and pliable. If you want a more realistic steamed dough look, mix in a tiny pinch of translucent clay. -
Form the initial ball:
Roll a piece of clay about the size of a large marble into a smooth sphere. Ensure there are no cracks or air bubbles on the surface. -
Flatten the bottom:
Gently press the ball onto your work surface to create a flat bottom while keeping the top rounded and dome-like.
Fixing Smudges
If you smudge the face paint, don’t panic. Use a Q-tip dipped in a tiny bit of rubbing alcohol or nail polish remover to gently wipe away the mistake before trying again.
Step 2: Creating the Pleats
-
Mark the center:
Identify the very top center of your dome; this is where all your pleats will meet. -
Start the first fold:
Using your needle tool or the edge of a thin blade, gently press a line from the base up towards the center point, creating an indentation. -
Pinch and curve:
Next to your indentation, slightly pinch the clay to form a ridge. Curve this ridge slightly towards the center to mimic the twisting motion of folding a dumpling. -
Repeat around the circumference:
Continue making indentations and pinching ridges all around the dome. Aim for about 10-12 evenly spaced pleats. -
Gather the top:
At the very top where all ridges meet, gently pinch and twist the clay together to form a small, swirled peak. -
Smooth the shape:
I like to use a soft silicone tool or just my fingertip to gently smooth out any harsh tool marks, keeping the puffy look intact.
Step 3: Adding Hardware & Baking
-
Insert the eye pin:
Trim an eye pin to size and insert it straight down into the center peak of the dumpling. If needed, add a tiny dab of liquid clay or Bake & Bond to the shaft for security. -
Bake the clay:
Place your dumpling on a baking tile or parchment paper. Bake according to your clay manufacturer’s instructions (usually 275°F/135°C for 15-30 minutes). -
Cool down:
Allow the piece to cool completely before moving on to painting. Painting on hot clay can cause the paint to dry too fast and clump.
Steamer Basket
Create a mini bamboo steamer basket out of tan clay to hold your dumpling. Use a texture tool to create a woven pattern on the bottom for an adorable display base.
Step 4: Bringing it to Life
-
Paint the eyes:
Using a very fine detail brush and black acrylic paint, carefully draw two small, downward-curving arcs for the happy closed eyes. Place them low on the dumpling’s ‘face’ for extra cuteness. -
Add the smile:
Paint a tiny ‘U’ shape right between the eyes for the mouth. -
Blush the cheeks:
Dip a toothpick or very small dotting tool into pink paint and dab two small ovals onto the cheeks, just outside the eyes. -
Seal carefully:
Once the paint is fully dry, coat the entire dumpling with a gloss glaze or UV resin. This protects the face and gives it that delicious ‘steamed’ sheen. -
Attach the keychain:
Use pliers to open the jump ring on your keychain assembly, loop it through the eye pin on the dumpling, and close it securely.
Now you have a charming little pocket-sized companion to keep your keys company


What Really Happens Inside the Kiln
Learn how time and temperature work together inside the kiln to transform clay into durable ceramic.
Bunny Keychain Buddy
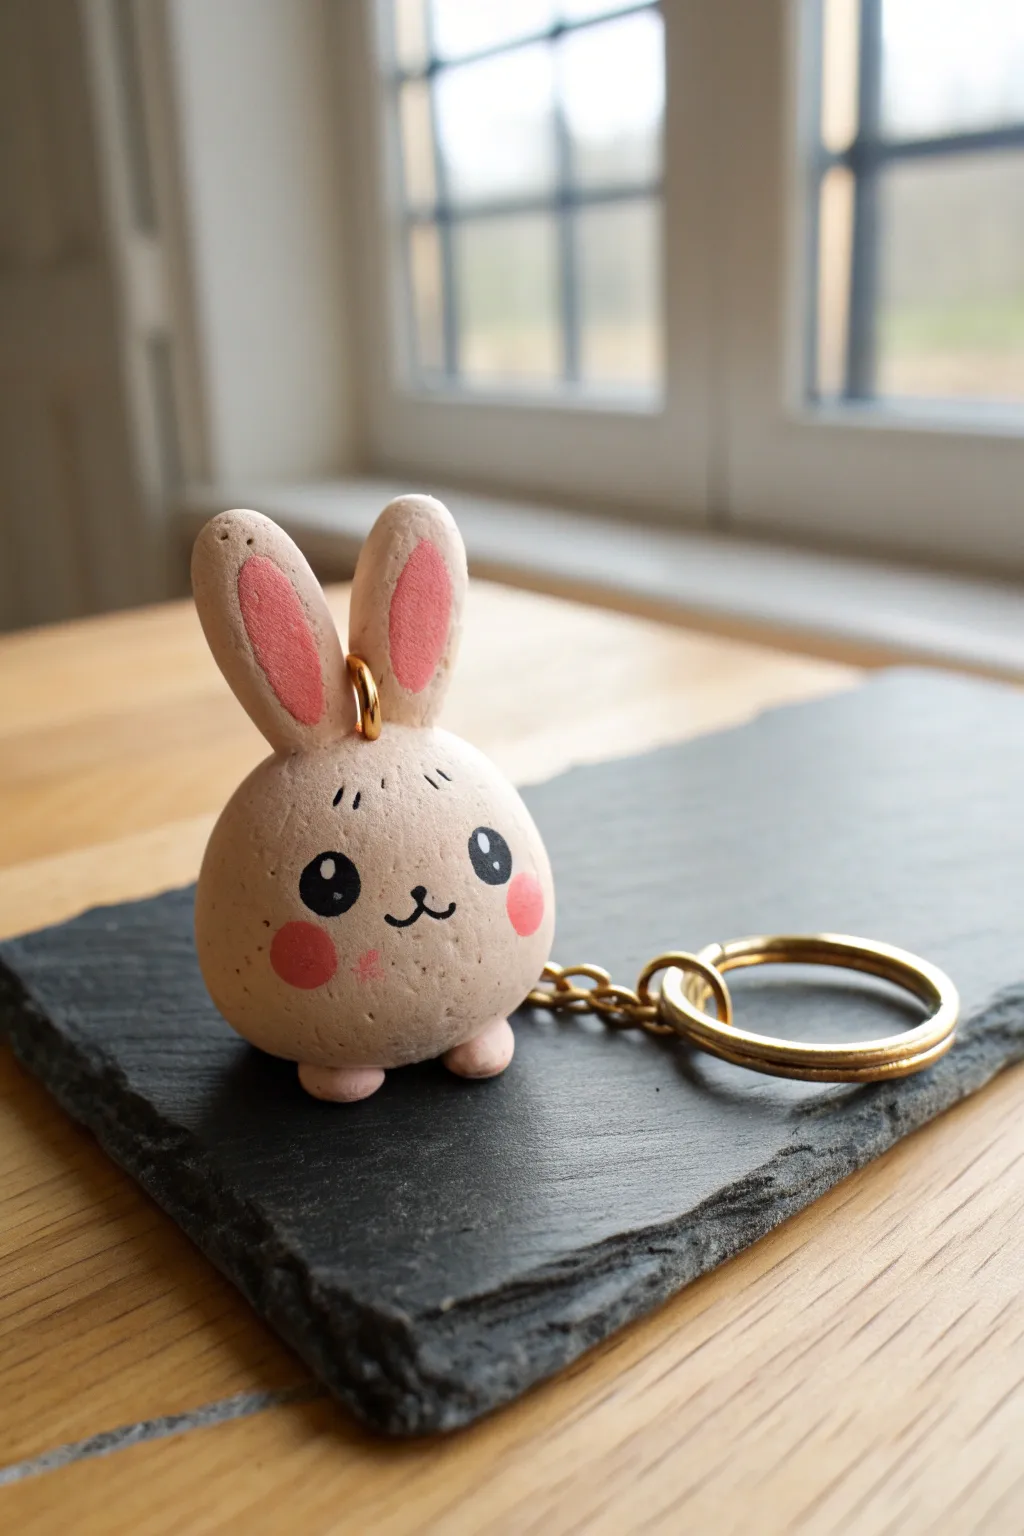
This adorable, chubby bunny keychain is the perfect beginner polymer clay project, featuring a simple spherical body and sweet painted details. With its soft beige finish and sturdy gold hardware, it makes for a charming handmade gift or a cute addition to your own keys.
Step-by-Step Tutorial
Materials
- Beige polymer clay
- Pink acrylic paint
- Black acrylic paint
- White acrylic paint
- Fine detail paintbrush
- Dotting tool or toothpick
- Gold screw eye pin
- Gold keychain ring with chain
- Modeling tools (or a smooth pen cap)
- Pliers
- Oven (for baking clay)
- Gloss or matte varnish (optional)
Step 1: Sculpting the Base
-
Condition the clay:
Start by taking a chunk of beige polymer clay and kneading it in your hands until it becomes soft, pliable, and free of cracks. -
Form the body:
Roll the clay into a smooth ball about the size of a walnut. Use the palm of your hand to ensure it is perfectly spherical. -
Create the base:
Gently tap the bottom of the ball against your work surface to create a slightly flattened area so the bunny can sit upright without rolling away. -
Make the feet:
Roll two very small balls of the same beige clay, roughly the size of peppercorns. Slightly flatten them into oval shapes. -
Attach the feet:
Press the two small feet onto the bottom front of the spherical body. Smooth the seams gently with a modeling tool or your fingertip to bond the clay together.
Sticky Fingerprints?
If you notice fingerprints on your unbaked clay, lightly brush the surface with a little baby oil or cornstarch before baking to smooth them out completely.
Step 2: Adding Ears and Hardware
-
Shape the ears:
Take two equal pieces of beige clay and roll them into small logs. Taper one end of each log to create a teardrop or long oval shape. -
Flatten the ears:
Gently press down on the tapered logs to flatten them. They should be relatively thick to withstand daily use as a keychain. -
Attach the ears:
Place the ears on top of the head, spacing them slightly apart. Use a blending tool or toothpick to smooth the bottom of the ears into the head clay for a secure bond. -
Insert the eye pin:
Take a gold screw eye pin and push it centrally into the top of the head, right between the ears. Twist it slightly to ensure the threads grip the clay. -
Remove and replace hardware:
I like to carefully unscrew the eye pin, add a tiny dab of liquid clay or super glue to the hole, and screw it back in. This ensures it won’t pull out later. -
Bake carefully:
Bake the bunny according to your clay package instructions (usually 275°F/135°C for 15-30 minutes). Let it cool completely before handling.
Step 3: Painting and Assembly
-
Paint the inner ears:
Using a fine brush and pink acrylic paint, fill in the center of the ears with an elongated oval shape, leaving a beige border around the edges. -
Paint the cheeks:
Dip a dotting tool or the back of a paintbrush into the pink paint and stamp two perfectly round circles on the cheeks. -
Draw the eyes:
With black paint and a very fine brush, paint two large oval eyes. Take your time here to get them symmetrical. -
Add eye highlights:
Once the black paint is dry, use a toothpick with white paint to add a tiny ‘sparkle’ dot in the top corner of each eye. -
Create the face details:
Using the finest brush you have or a black micron pen, draw a tiny ‘w’ shape for the mouth and three small sketch-lines above the eyes for eyebrows. -
Seal the piece:
Apply a coat of varnish over the painted areas (or the whole bunny) to protect the design from chipping. -
Attach the keychain:
Use pliers to open the jump ring on your gold keychain hardware, loop it through the eye pin on the bunny’s head, and close it securely.
Pro Tip: Eye Placement
When painting the face, place the eyes lower on the sphere than you think you should. Low-set eyes instantly make characters look cuter and more ‘kawaii’.
Now you have a sweet little pocket friend ready to guard your keys
Pastel Flower Earrings
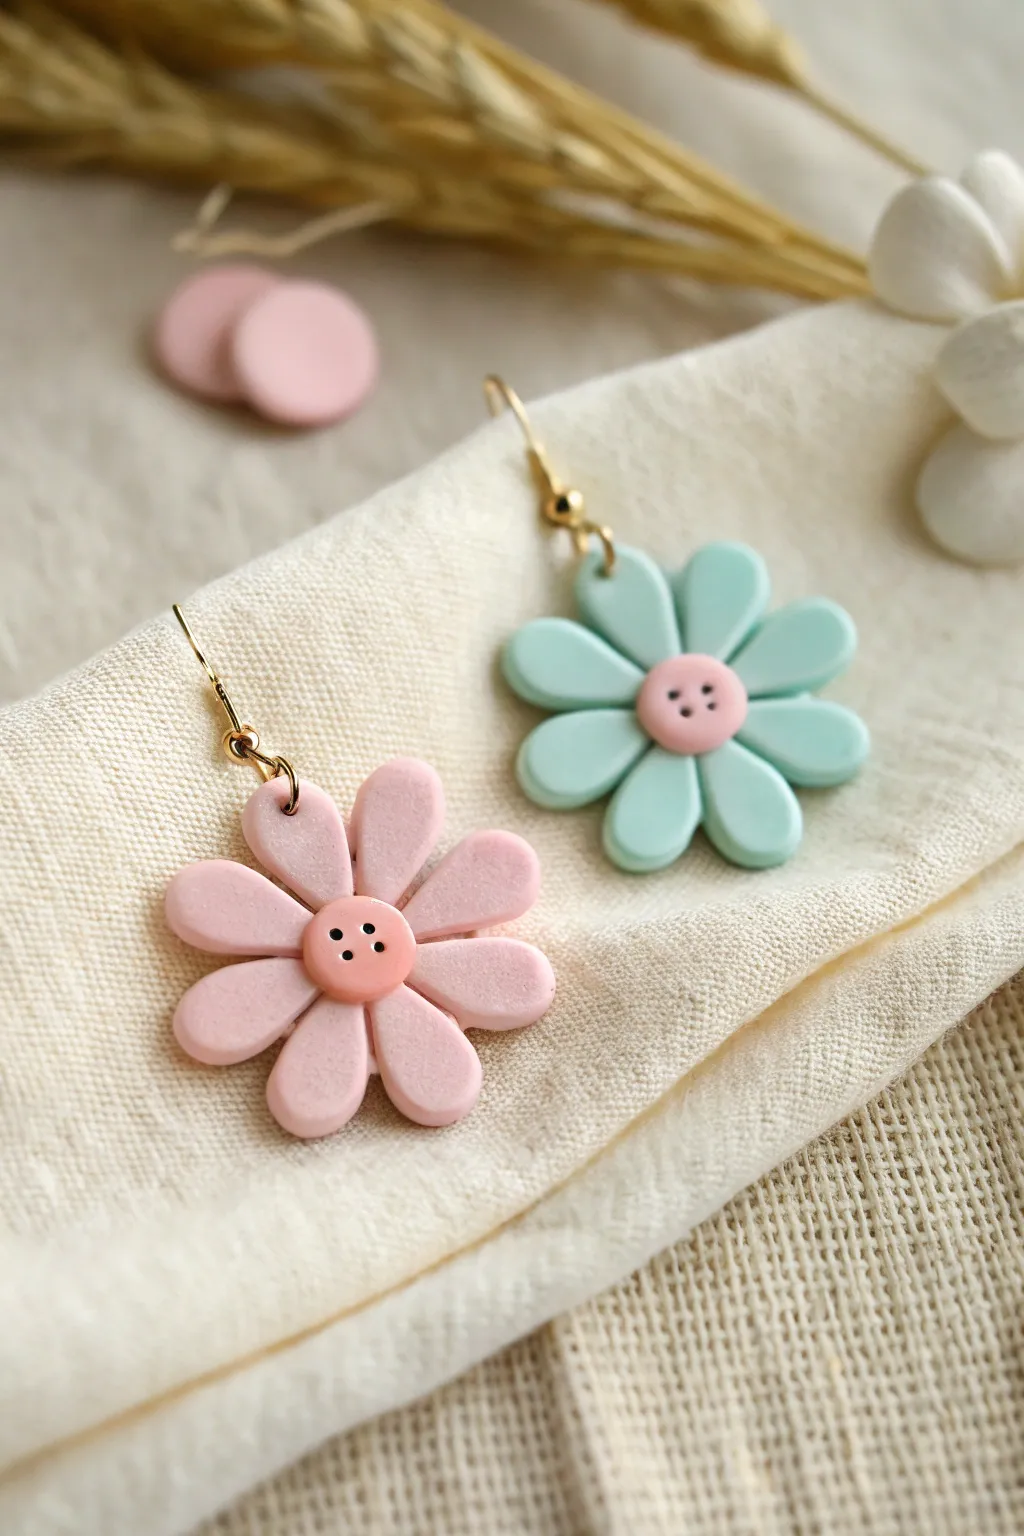
Brighten up any outfit with these delightful, daisy-inspired earrings featuring soft pastel hues and charming button centers. This polymer clay project captures a sweet, spring-like aesthetic with its matte finish and playful, rounded petals.
Step-by-Step Guide
Materials
- Polymer clay in pastel pink and mint green
- Polymer clay in a slightly darker pink (for the centers)
- Clean work surface or ceramic tile
- Small circle cutter (approx. 1/2 inch) or a straw
- Teardrop cutter (small) or craft knife for cutting petals
- Needs or toothpick for detailing
- Roller or pasta machine
- Gold earring hooks (fishhook style)
- Jump rings (4-6mm)
- Jewelry pliers (round nose and flat nose)
- Oven for baking
- Super glue or liquid polymer clay (optional)
- Small hand drill or pin vice
Step 1: Prepping Your Palette
-
Condition the clay:
Begin by thoroughly kneading your pastel pink and mint green clays separately until they are soft and pliable. Warm clay is much less likely to crack during forming. -
Roll out slabs:
Using your acrylic roller or pasta machine, roll the conditioned clay out to an even thickness of about 3mm. You want them sturdy but not too heavy for your ears. -
Mix the center color:
For the button centers, condition the slightly darker pink clay. If you don’t have a darker shade, simply mix a tiny dot of red into your pastel pink to deepen it just a notch.
Fingerprint Fix
Noticed fingerprints on your petals? Before baking, lightly brush the raw clay with a little baby oil or cornstarch to smooth them away instantly.
Step 2: Forming the Flowers
-
Cut the petals:
Use a small teardrop cutter to punch out eight petals for the pink flower and eight for the mint flower. If you don’t have a cutter, I like to cut small uniform rectangles and hand-shape them into rounded teardrops. -
Create the base:
Cut a small, thin circle of scrap clay for each flower to serve as a base plate. This won’t be seen, so the color doesn’t matter. -
Arrange the pink flower:
Gently press the pointy ends of your eight pink petals onto the center of one base circle, arranging them in a radial Starburst pattern. Ensure the petals touch each other slightly for structural integrity. -
Arrange the mint flower:
Repeat the previous step with the mint green petals on the second base circle. Use a tool to gently smooth the center joins flat, as this area will be covered. -
Make the button centers:
Roll two small balls of the darker pink clay and flattened them into thick discs. Place one firmly into the center of each flower, covering where the petals meet. -
Add button details:
Using a needle tool or toothpick, carefully poke four holes into the center pink discs to mimic the look of a sewing button. Don’t go all the way through the earring; just create deep indentations.
Step 3: Assembly & Baking
-
Piercing the top petal:
Choose one petal on each flower to be the ‘top.’ Use a needle tool to pierce a hole near the outer edge of this petal. Make sure the hole is large enough for your jump ring to pass through later. -
Bake the pieces:
Place your flowers on a ceramic tile or baking sheet lined with parchment paper. Bake according to your specific brand of clay’s instructions (usually 275°F/135°C for 15-30 minutes). -
Cool down:
Allow the flowers to cool completely inside the oven or on the counter before handling. Polymer clay is strongest once it has fully cooled and cured. -
Attach jump rings:
Using two pairs of pliers, twist open a jump ring laterally. Thread it through the hole you pierced in the top petal. -
Add the hook:
While the jump ring is still open, slide on the loop of your gold earring hook. Ensure the front of the hook faces the same direction as the front of the flower. -
Close the hardware:
Twist the jump ring closed securely so there is no gap. Repeat the assembly process for the second earring.
Matte Finish Tip
To get that soft, non-shiny look shown in the photo, avoid glazing your pieces. Sand lightly after baking if needed, or leave raw for a natural matte texture.
Now you have a charming set of handmade accessories ready to wear or gift.

TRACK YOUR CERAMIC JOURNEY
Capture glaze tests, firing details, and creative progress—all in one simple printable. Make your projects easier to repeat and improve.
Rainbow Arch Shelf Sitter
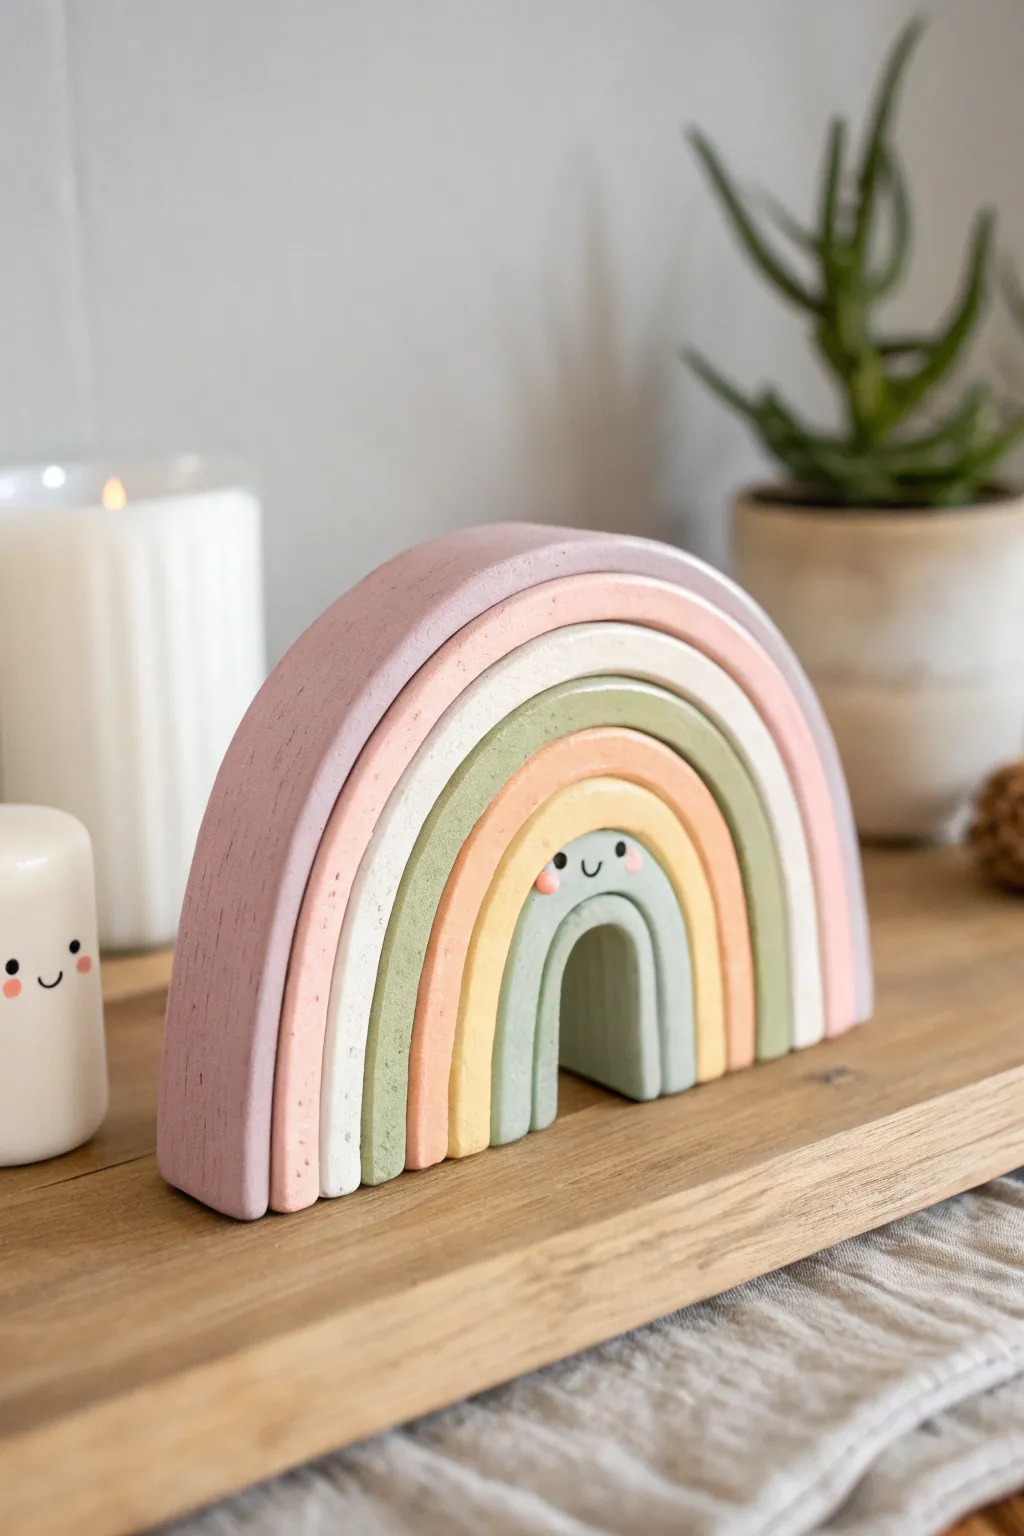
Brighten up any shelf or desk with this adorable, minimalist rainbow arch set. Featuring soft pastel hues and a sweet little face on the smallest arch, this project uses air-dry or polymer clay to create a charming, stackable decorative piece.
Step-by-Step
Materials
- Polymer clay or air-dry clay (approx. 500g)
- Acrylic paints (muted mauve, soft pink, cream, sage green, apricot, pale yellow, mint/light blue)
- Rolling pin
- Sharp craft knife or clay slicer
- Sandpaper (fine grit)
- Small detail paintbrush
- Black and pink fine-tip markers or paint pens
- Matte varnish or sealant
- Ruler
- Cardboard or cardstock (for templates)
Step 1: Creating the Arches
-
Prepare your templates:
First, we need to create the shapes. Draw a series of nesting semi-circles on cardstock. The largest should be about 6-7 inches wide at the base, and each subsequent arch should be slightly smaller to fit inside the previous one. Aim for roughly 1 inch thick bands. -
Condition the clay:
Take your clay and knead it thoroughly until it is soft and pliable. If you are using polymer clay, the warmth of your hands will make this easier. -
Roll out a slab:
Roll the clay into a large, even slab. You want this to be quite thick so the rainbow stands up on its own—aim for a thickness of about 3/4 inch to 1 inch. -
Cut the shapes:
Place your cardstock templates onto the clay slab perfectly straight. Use your sharp craft knife to trace around them carefully. Cut out about 6 nesting arches. -
Refine the edges:
Once the shapes are cut, use your finger or a little water (for air-dry clay) or baby oil (for polymer) to smooth down any rough cut edges. -
Test the fit:
Before they dry or bake, gently stack the arches inside one another to ensure they fit nicely. Don’t press them together; just check the sizing. -
Dry or Bake:
If using polymer clay, bake according to the package instructions (usually 275°F for 15-30 minutes). If using air-dry clay, let the pieces sit in a dry, ventilated area for 1-2 days, flipping them occasionally for even drying.
Step 2: Sanding and Painting
-
Sand for smoothness:
Once your arches are fully hardened, use fine-grit sandpaper to remove any bumps or unevenness on the surface. Focus on the flat faces and rounded tops. -
Select your palette:
You’ll need six distinct pastel colors. Mix your acrylics to get that muted, boho look. Think dusty rose, cream, sage, light apricot, and pale blue-grey. -
Paint the largest arch:
Start with the outermost arch. Apply a coat of the dusty mauve or darkest pink color. Ensure you paint the front, back, and the outer curved edge. Let it dry completely before doing a second coat. -
Paint the middle layers:
Work your way inward, painting the next arches in soft pink, cream, sage green, and apricot. Keep your brush strokes smooth to avoid texture. -
Paint the smallest arch:
The tiniest, innermost arch gets the pale blue-grey or mint color. This one needs to be painted carefully as it will feature the face.
Smooth Operator
Use a damp sponge to smooth air-dry clay before it dries. It saves tons of sanding time later and gives a porcelain finish.
Step 3: Adding Details
-
Draft the face:
Once the paint is bone dry, lightly pencil in a small face on the top curve of the smallest arch. A simple curve for a smile and two small eyes works best. -
Paint the eyes and mouth:
Using a very fine detail brush and black paint (or a black paint pen), trace over your pencil lines. Keep the lines thin for a delicate look. -
Add rosy cheeks:
Dip the end of a paintbrush handle or a dotting tool into pink paint. Gently dab two small dots on either side of the smile for cheeks. -
Seal the project:
To protect your paint job and give it a finished look, apply a coat of matte varnish over all sides of each arch. I find a matte finish looks much more modern than glossy for this style. -
Final assembly:
Once the varnish is dry, stack your arches together on your shelf. You can arrange them perfectly aligned or slightly staggered for a playful effect.
Texture Play
Before baking/drying, gently press a textured sponge or fabric onto the clay surface to give it a faux-stone or concrete look.
Enjoy styling your new handmade rainbow on a bookshelf or bedside table for a cozy touch
Cloudy Mirror Frame

Bring a touch of dreaminess to your vanity with this adorable cloud-shaped mirror frame. Featuring sparkling golden stars and a sweet blushing face, this chunky, textural piece transforms a simple glass insert into a charming piece of room decor.
How-To Guide
Materials
- White polymer clay (approx. 450-500g) or air-dry clay
- Small arched mirror insert (glass or acrylic)
- Gold glitter polymer clay or gold star embellishments
- Rolling pin
- Craft knife or scalpel
- Sandpaper (fine grit)
- Black acrylic paint
- Pink acrylic paint
- Fine detail paintbrush
- Super glue or strong craft adhesive (if needed)
- Gloss varnish (optional)
Step 1: Shaping the Cloud Base
-
Condition the Clay:
Begin by thoroughly conditioning your white polymer clay. Knead it in your hands until it is warm, pliable, and free of cracks. A well-conditioned clay is essential for a smooth finish later. -
Roll the Slab:
Place the clay on a clean work surface or silicone mat. Using a rolling pin, roll it out into a thick slab, aiming for a consistent thickness of about 1/2 inch (1.2 cm). You want it chunky enough to stand upright on its own. -
Trace the Shape:
Place your arched mirror in the center of the slab to gauge the size. Lightly sketch a bubbly cloud outline around the mirror using a needle tool or toothpick, leaving a generous margin of clay around the glass. -
Cut the Outline:
Remove the mirror and carefully cut along your traced cloud outline using a craft knife. Keep the cuts clean and vertical so the edges don’t slope too much. -
Create the Mirror Recess:
Place the mirror back onto the center of the clay shape. Press it down firmly to create an impression, then carefully cut out the inner shape. For a secure fit, I prefer to cut slightly inside the line so the mirror fits snugly. -
Smooth the Edges:
Dip your finger in a tiny bit of water (for air-dry clay) or baby oil (for polymer clay) and smooth out all the cut edges. Round off the harsh corners to give the cloud a soft, puffy appearance.
Pro Tip: Texture Trick
To get a subtle stone-like texture on the white cloud, gently tap the surface with a clean toothbrush or crumpled foil before baking. It hides fingerprints perfectly!
Step 2: Adding Details & Assembly
-
Make the Stars:
Using gold glitter clay, roll out a thin sheet and use tiny star cutters to punch out several stars. Alternatively, shape small balls of gold clay and press them into five-point stars by hand. -
Apply the Stars:
Press the gold stars gently into the white clay frame. Place them randomly around the border. Don’t forget to add a few tiny gold dots or balls for extra sparkle. -
Bake or Dry:
If using polymer clay, bake the frame (without the mirror if it’s not oven-safe, though glass usually is) according to the package instructions—typically 275°F (135°C) for 15-30 minutes. If using air-dry clay, let it dry flat for 24-48 hours. -
Sand for Perfection:
Once fully cured and cooled, inspect the edges. If there are any rough spots or fingerprints, lightly sand them away with fine-grit sandpaper for a professional finish. -
Insert the Mirror:
If you didn’t bake the mirror into the clay, apply a strong adhesive like E6000 or super glue to the back edge of the inner frame cutout and press the mirror firmly into place. -
Back Support (Optional):
For extra stability, you can glue a piece of study cardboard or felt to the back of the mirror area to hold it in place securely.
Troubleshooting: Mirror Fit
If the clay shrank and the mirror won’t fit, don’t force it! Sand the inner rim of the frame with coarse sandpaper/file until the opening is wide enough to slide the glass in.
Step 3: Painting the Face
-
Paint the Cheeks:
Mix a soft pastel pink using acrylic paint. Paint two large ovals on the bottom corners of the cloud for the blushing cheeks. You may need two coats for opacity. -
Paint the Smile:
Using a very fine liner brush and black acrylic paint, carefully draw a thin, curved line between the cheeks for the smile. -
Add the Eyes:
Dip the back end of a paintbrush into black paint and dot two small eyes just above the cheeks. This ensures perfectly round circles. -
Seal the piece:
To protect your paint and give the clay a finished look, apply a coat of matte or gloss varnish over the white clay parts, avoiding the mirror surface itself.
Now you have a sweet, handmade reflection to greet you every morning
Turtle Jewelry Box
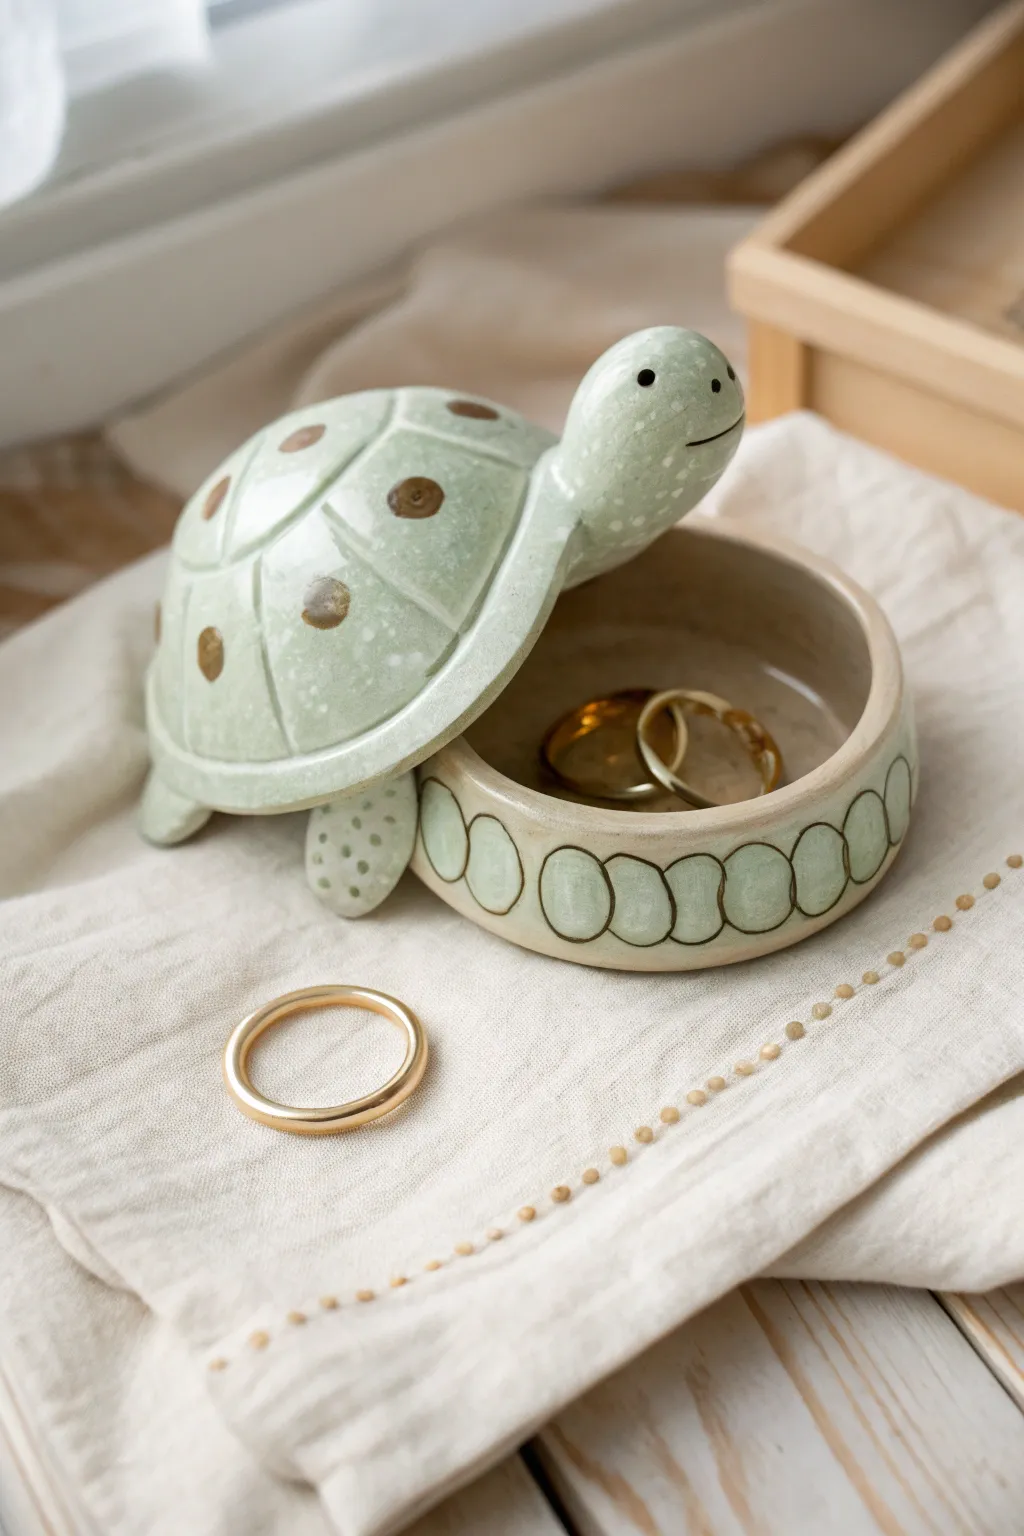
Keep your favorite rings safe inside this adorable ceramic turtle, whose shell lifts off to reveal a secret compartment. With its soft celadon green glaze and charming hand-painted details, this functional sculpture brings a touch of whimsy to any dresser.
Step-by-Step
Materials
- White or light-buff earthenware clay (approx. 1 lb)
- Pottery wheel (optional) or rolling pin for slab building
- Modeling tools (needle tool, rib, scoring tool)
- Slip (clay mixed with water)
- Sponge
- Soft paintbrushes
- Celadon or light green glossy glaze
- Brown underglaze or oxide wash
- Clear glaze (optional, depending on green glaze used)
Step 1: Forming the Base
-
Create the heavy base:
Start with a ball of clay about the size of a large orange. You can throw a small, shallow bowl on the wheel with thick walls, or use the pinch pot method to create a round, sturdy bowl shape. -
Refine the rim:
Flatten the top rim of your bowl so it is perfectly level. This is crucial for the lid to sit correctly later. A width of about 1/4 inch consists of a good resting surface. -
Carve the rim pattern:
Using a needle tool, gently incite a series of connected ovals around the exterior vertical wall of the bowl. These should look like the underbelly scales of the turtle. -
Smooth the interior:
Take a damp sponge and thoroughly smooth the inside of the bowl. You want a snag-free surface so your jewelry doesn’t get scratched.
Wobbly Lid Fix
If the lid rocks after bisque firing, use wet sanding paper or a grinding stone on the rim. gently rotate the lid against the stone until it sits flat.
Step 2: Sculpting the Turtle Lid
-
Shape the shell dome:
Creating the lid requires a pinch pot that generally matches the diameter of your base. Invert it so it forms a dome. Test the fit against the base frequently as you work. -
Form the head and neck:
Roll a thick coil of clay for the neck, tapering it slightly into a rounded head. Score and slip this securely onto one side of the shell dome, smoothing the connection point seamlessly. -
Add the feet:
Fashion four small, triangular flippers. Attach them to the underside of the shell rim—two near the front and two near the back—so they overhang slightly and act as tabs to help you lift the lid. -
Define the face:
Use a small tool to poke two eyes and carve a gentle, curved smile into the turtle’s face. Keep the expression simple and sweet. -
Decorate the shell:
Using a modeling tool, carve the classic tortoise-shell pattern. Draw a central hexagon (or roughly circular shape) and radiate lines outward to create the surrounding plates. -
Add texture:
Add tiny pressed dots or stippling to the neck and flippers for a scaly skin texture. I like to use the dull end of a small paintbrush for uniform textural dots. -
Dry and Bisque:
Allow both pieces to dry slowly under plastic to prevent warping, especially where the lid meets the base. Once bone dry, fire the pieces to bisque temperature (usually cone 04).
Pro Tip: Better Fit
Add a small unparalleled flange (a ring of clay) to the underside of the lid. This inner ring will sit inside the bowl base, preventing the turtle from sliding off.
Step 3: Glazing and Finishing
-
Apply the spots:
Using a small detail brush AND brown underglaze, paint circles in the center of each shell plate segment. These don’t need to be perfect circles; organic blurry edges look more natural. -
Highlight the carving:
Dilute a bit of the brown underglaze with water to make a wash. Brush this into the incised lines on the base (the belly scales) and the shell lines, then wipe away the excess with a damp sponge, leaving color only in the grooves. -
Glaze the body:
Dip or brush the entire piece (except the bottom of the base and the contact rim where the lid sits) in a semi-transparent light green celadon glaze. This transparency allows the brown underglaze and clay texture to show through. -
Clean the contact points:
Wipe the rim of the base and the underside of the lid completely clean of glaze. If glaze remains here, the lid will fuse shut during firing. -
Final Fire:
Fire the piece to the maturity temperature of your glaze (likely cone 5 or 6). Once cool, you can lightly sand the unglazed rim if it feels rough.
Place your little guardian on a nightstand to watch over your treasures while you sleep
Chubby Toothbrush Holder Critter
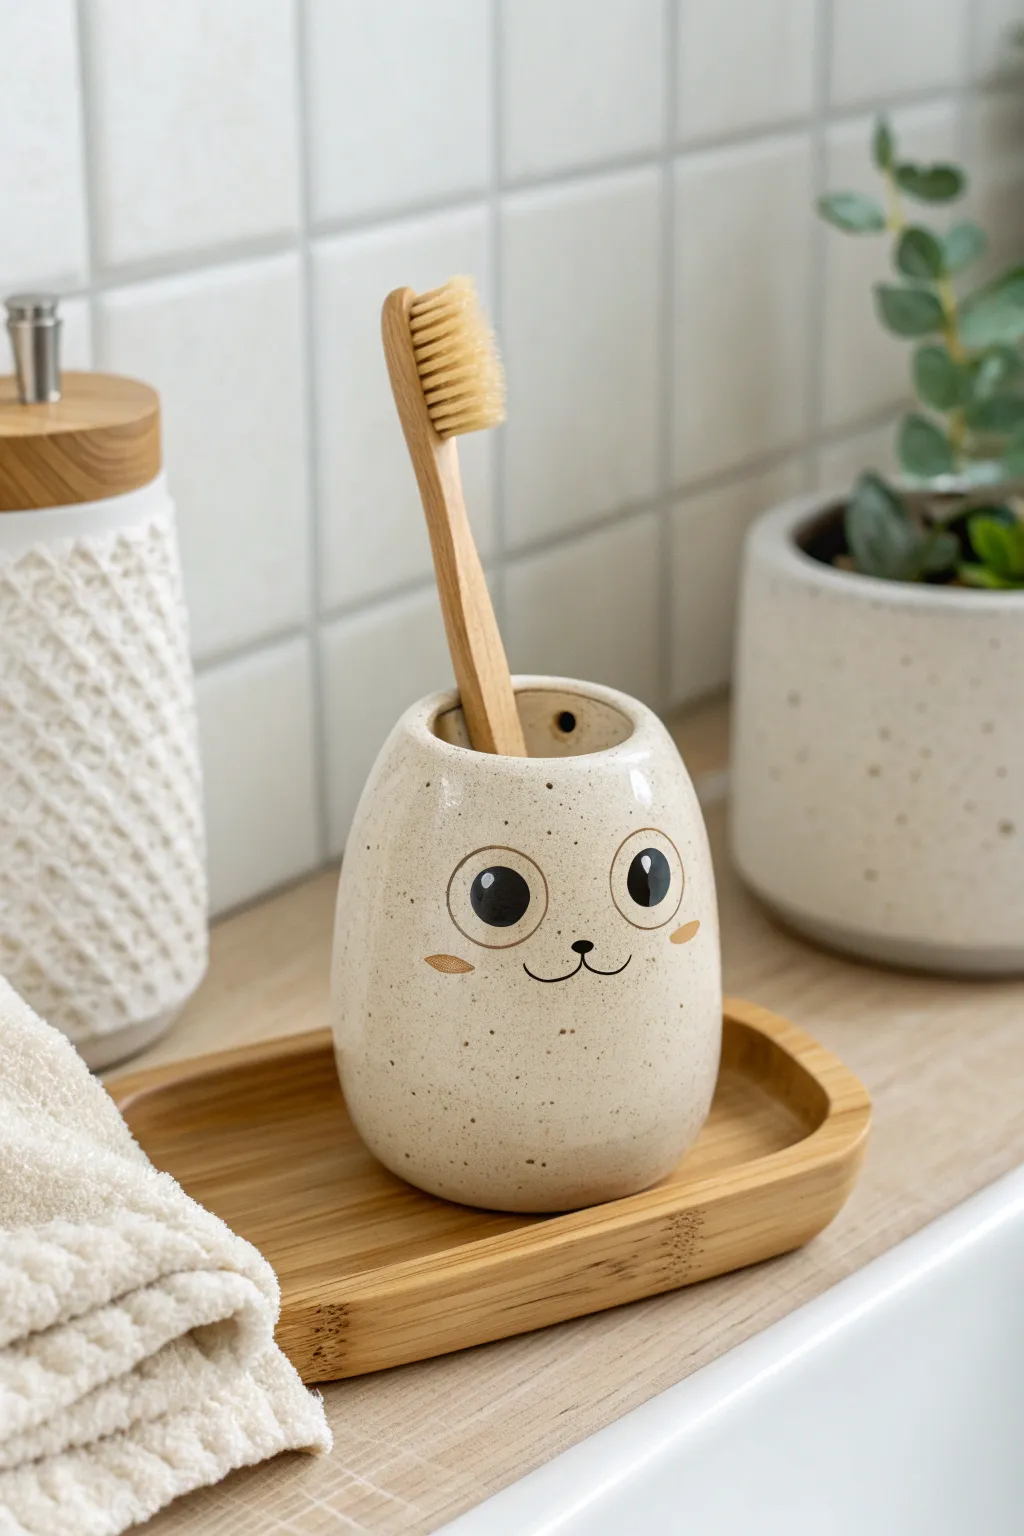
Brighten up your morning routine with this adorable, speckled ceramic friend. This chubby toothbrush holder features a simple, hand-drawn face and a natural, stone-like finish that fits perfectly in any modern bathroom.
Detailed Instructions
Materials
- White stoneware or polymer clay (stone effect)
- Pottery wheel (optional) or rolling pin
- Cylindrical mold (like a drinking glass or jar)
- Clay sculpting tools (sponge, needle tool, rib)
- Underglaze (black and terracotta/brown)
- Fine detail brush
- Clear waterproof glaze
- Kiln (if using stoneware) or Oven (if using polymer clay)
- Sandpaper (fine grit)
Step 1: Forming the Body
-
Prepare the Clay:
Begin by wedging your clay thoroughly to remove air bubbles. Since we want that lovely speckled look, I recommend starting with a speckled buff clay body or mixing fine sand into plain white clay. -
Create the Base Shape:
If throwing on a wheel, pull a cylinder that is slightly wider at the bottom and tapers gently inward at the top. Aim for a height of about 4-5 inches. -
Hand-building Alternative:
For hand-building, roll a slab of clay to 1/4 inch thickness. Cut a rectangle and wrap it around a cylindrical form, scoring and slipping the seam to join it. -
Add the Bottom:
Cut a circle for the base and attach it firmly to the bottom of your cylinder. Smooth the connection point so the seam disappears completely on the outside. -
Shape the Curve:
Using a rib tool or your fingers, gently push the walls outward from the inside to create that chubby, rounded belly shape. It should look slightly inflated. -
Refine the Rim:
Smooth the top rim with a damp sponge. You want a soft, rounded edge rather than a sharp one, as this makes it easier to clean later. -
Piercing the Top (Optional):
If you want drainage or separate holes for multiple brushes, you can create a lid insert now, but the project shown is an open cup style, so simply ensure the opening is wide enough for your brush. -
Drying:
Let the piece dry slowly to a leather-hard state. This is crucial before painting so the surface is firm enough to take fine details.
Pro Tip: Eye Placement
Place the eyes slightly lower on the pot than you think they should be. This “low face” technique instantly makes characters look younger and cuter.
Step 2: Adding the Personality
-
Smoothing the Canvas:
Once leather-hard, sponge down the surface one last time to ensure it is perfectly smooth. Any bumps now will compete with the face details later. -
Drafting the Face:
Lightly sketch the position of the eyes and mouth with a pencil. The graphite will burn off in the kiln, so don’t worry about mistakes. Place the eyes wide apart for maximum cuteness. -
Painting the Eyes:
Using a fine detail brush and black underglaze, paint two large solid circles for the eyes. Keep the paint opaque but not too thick. -
Adding Highlights:
This is the most important step for life: leave a tiny circle of unpainted clay (or paint a white dot) in the upper right of each black eye. This ‘catchlight’ wakes up the character. -
The Smile and Nose:
Paint a tiny dot for the nose between the eyes. From the nose, draw two small, upturned hooks to create the classic ‘cat’ smile. -
Rosy Cheeks:
Using a terracotta or light brown underglaze, paint small, horizontal ovals on the outer edges of the cheeks. It gives the critter a shy, sweet expression. -
Bisque Firing:
If using ceramic clay, fire the piece to cone 04 (bisque). Prepare your glazes while the kiln cools.
Step 3: Glazing and Finishing
-
Applying Clear Glaze:
Dip the entire piece into a clear transparent glaze. Ensure the coat is even so it doesn’t cloud the face details. -
Creating the Speckles:
If your clay body wasn’t naturally speckled, load an old toothbrush with iron oxide wash or brown glaze. Flick the bristles to spatter tiny dots across the surface. -
Final Firing:
Fire the piece again to the maturity temperature of your clay (usually Cone 5 or 6 for stoneware). This vitrifies the clay, making it waterproof and bathroom-safe. -
Sanding the Bottom:
Once cool, use wet/dry sandpaper to smooth the unglazed foot ring on the bottom so it won’t scratch your countertops.
Level Up: Mix & Match
Create a whole set by making smaller versions for Q-tips or cotton pads using different facial expressions—one winking, one sleeping, and one surprised.
Now you have a charming functional art piece ready to greet you every morning