When I’m craving a quick win in the studio, air dry clay is my go-to because it turns into something cute or useful without any fancy equipment. Here are my favorite ideas to make with air dry clay, starting with the classics and ending with a few delightfully unexpected projects.
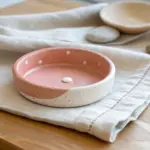
Stamped Trinket Dish
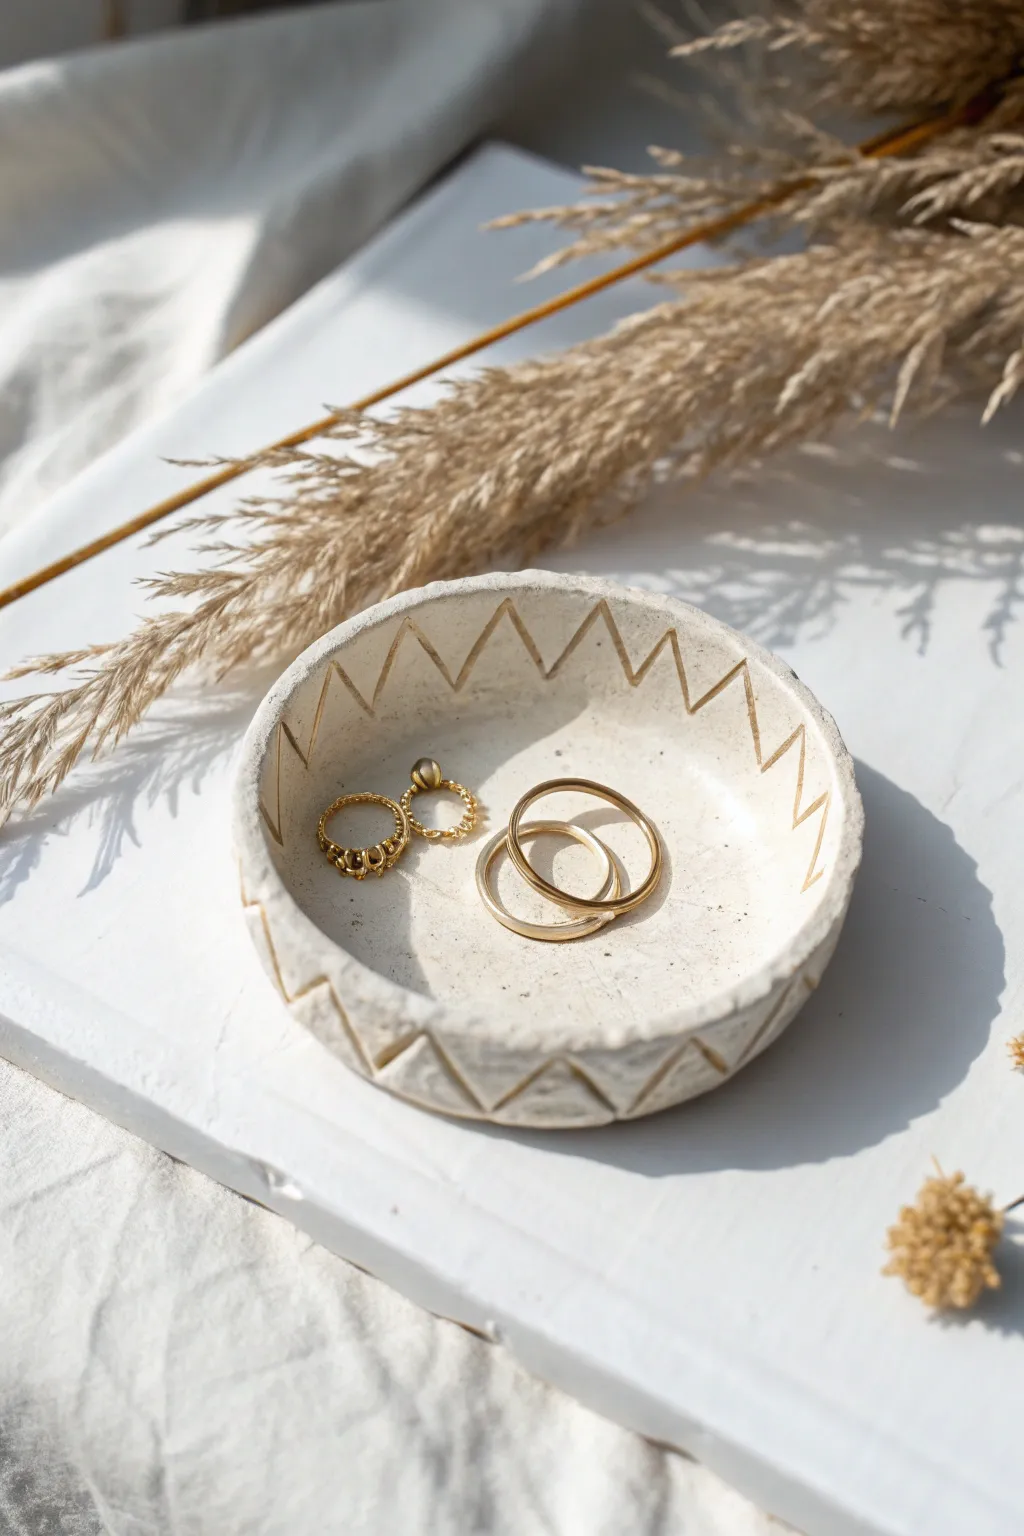
This minimalist little bowl features a hand-carved zigzag pattern accented with gold, creating the perfect spot to rest your favorite rings. It has a lovely organic feel that looks high-end but is decidedly simple to make at home.
Step-by-Step
Materials
- White air dry clay
- Rolling pin or smooth glass jar
- Small bowl (approx. 4 inches) to use as a form
- sharp knife or clay cutting tool
- Carving tool or toothpick
- Fine-grit sandpaper
- Gold acrylic paint or liquid gilding
- Fine detail paintbrush
- Small sponge
- Water
- Varnish or sealant (glossy or matte)
Step 1: Shaping the Base
-
Condition the CLay:
Start by taking a handful of air dry clay and kneading it in your hands to warm it up. This conditioning process helps prevent cracks later on. -
Roll it Out:
On a clean, flat surface, roll the clay out into an even slab. Aim for a thickness of about ¼ inch (approx. 6mm) so the dish is sturdy but not clunky. -
Cut the Circle:
Find a bowl or round object that is slightly larger than your desired finished size. Place it upside down on the clay slab and use your knife to cut around it, creating a perfect circle. -
Smooth the Edges:
Dip your finger in a little bit of water and run it along the cut edge of the clay circle to smooth out any roughness or sharp bits. -
Form the Dish:
lift the clay circle and gently press it into your form bowl. You can drape it *inside* a bowl for a smooth interior, or *over* an upside-down bowl. I prefer pressing it inside a bowl lined with plastic wrap to easily lift it out later. -
Define the Rim:
While the clay is in the mold, use your fingers to gently pinch and flatten the top rim slightly so it has a distinct, flat edge surface for carving later.
Step 2: Carving and drying
-
Initial Drying:
Let the clay sit in the form for about 1-2 hours until it is leather-hard. It needs to be firm enough to hold its shape but soft enough to carve into. -
Remove from Mold:
Carefully remove the semi-dry clay dish from your bowl form. If still too soft, let it sit for another 30 minutes. -
Mark the Pattern:
Using a toothpick or a clay needle tool, lightly sketch a zigzag pattern that runs along the inside wall and up over the rim. Don’t press hard yet; just mark your spacing. -
Carve the Lines:
Once happy with the spacing, use a carving tool (or press harder with your toothpick) to engrave the V-shapes deeply. The line should continue from the inside wall up to the very top edge. -
Clean the Grooves:
Sometimes carving creates little clay crumbs. Use a soft, dry brush to sweep these out of the grooves before the clay hardens completely. -
Full Dry Method:
Place the dish in a safe spot to dry completely. This usually takes 24-48 hours depending on humidity. Rotate it occasionally to ensure even airflow.
Cracks happen!
If small cracks appear while drying, mix a tiny bit of fresh clay with water to make a paste (slip). Fill the crack with this paste, smooth it over, and let it dry again.
Step 3: Finishing Touches
-
Sand for Perfection:
Once fully bone dry and white, take your fine-grit sandpaper and gently sand the rim and rubbing away any bumps or fingerprints. Be gentle with the carved areas. -
Wipe Clean:
Use a slightly damp sponge or cloth to wipe away all the sanding dust. You need a clean surface for the paint to adhere properly. -
Paint the Details:
Dip a fine detail brush into your gold paint. Carefully fill in the carved zigzag grooves. Don’t worry if you get a little outside the lines; you can scrape it off gently once dry or paint over it. -
Seal the Dish:
After the gold paint is fully dry, apply a coat of varnish or sealant over the entire dish. This protects the clay from moisture and gives it a finished look. -
Final Cure:
Let the sealant cure according to the manufacturer’s instructions before placing any jewelry inside.
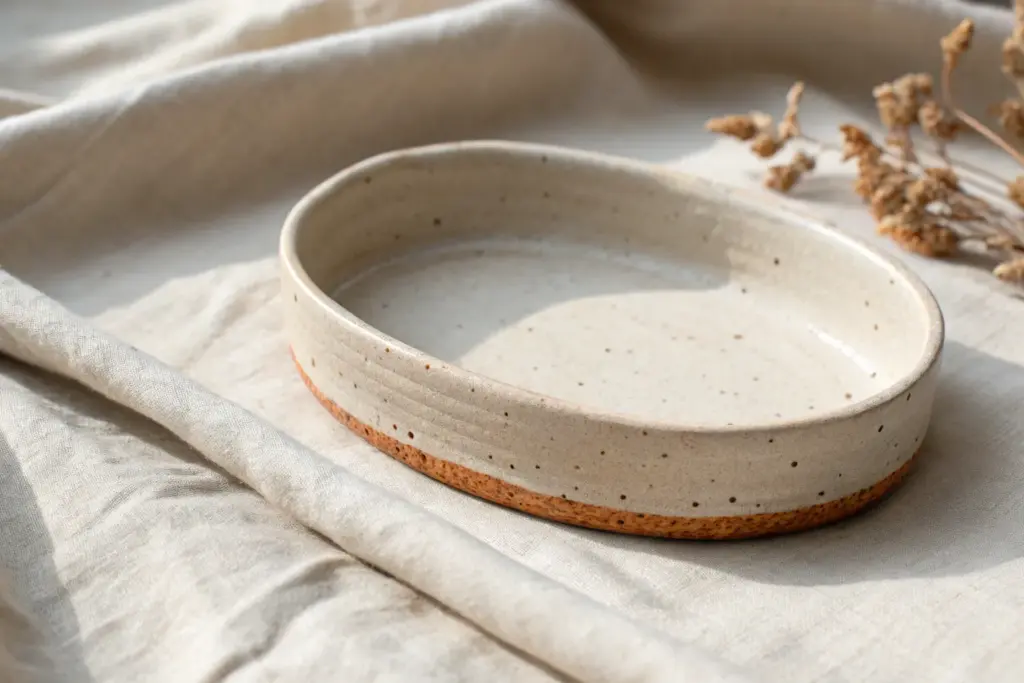
Stone Effect
Before drying, gently press a textured sponge or coarse fabric onto the exterior of the bowl. This gives it a faux stone or rough ceramic look that contrasts nicely with the smooth interior.
Now you have a chic, custom piece to organize your daily treasures


Simple Pinch Pot Bowl
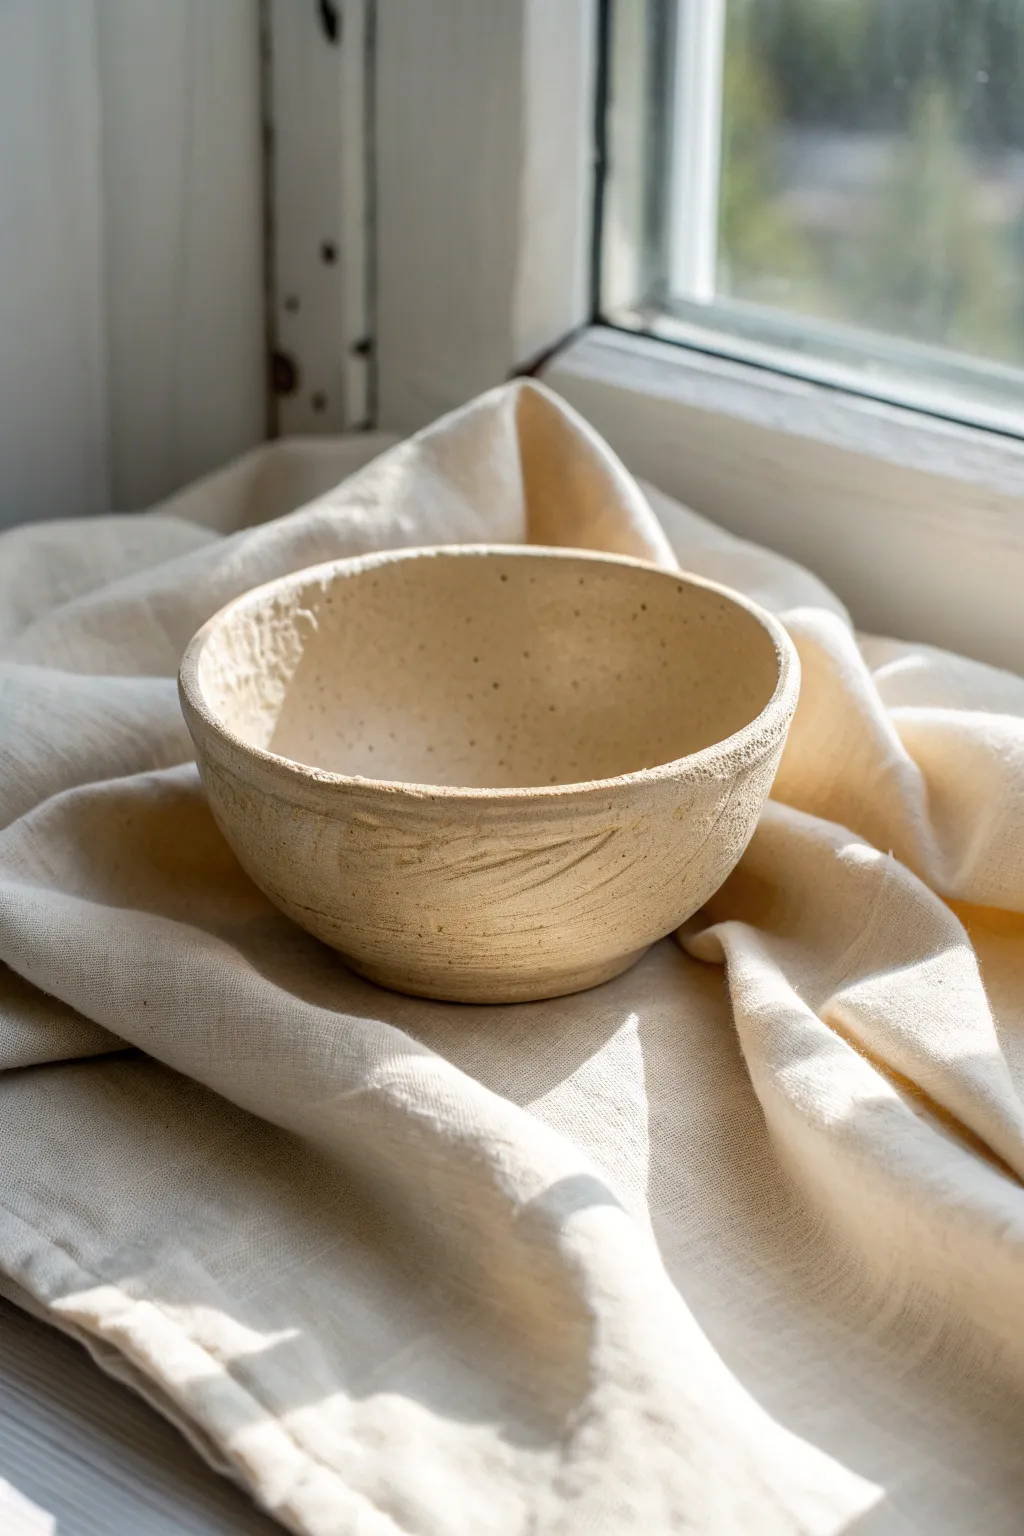
This charming, rustic pinch pot bowl embraces imperfections with a lovely earthy texture. It features a natural cream finish with soft speckling and simple carved lines that give it a handmade artisan feel.
Step-by-Step Tutorial
Materials
- White or cream-colored air dry clay
- Small bowl of water
- Sponge
- Modeling tool or butter knife
- Old toothbrush (optional for speckling)
- Brown acrylic paint (diluted)
- Matte varnish or sealant
Step 1: Forming the Base
-
Condition the Clay:
Begin by taking a lump of air dry clay about the size of a tennis ball. Knead it in your hands for a minute or two to warm it up and make it pliable, removing any air bubbles. -
Roll a Sphere:
Roll the clay between your palms or on a flat surface until you have a smooth, round ball. -
Create the Opening:
Hold the ball in one hand and gently press your thumb into the center of the sphere. Push down until you are about half an inch from the bottom, being careful not to breakthrough. -
Pinch the Walls:
Starting from the bottom where your thumb is, gently pinch the clay between your thumb and fingers while rotating the ball. Work your way up the sides slowly to thin out the walls. -
Shape the Bowl:
Continue pinching and turning until you achieve an even thickness of roughly ¼ inch throughout. Aim for a wide, open bowl shape rather than a tall cup. -
Flatten the Bottom:
Gently tap the base of your bowl against your table to create a flat, stable bottom so it sits without wobbling.
Cracking Up?
If small cracks appear while drying, mix a tiny bit of fresh clay with water to make a paste (slip) and fill them in, then smooth over.
Step 2: Texturing and Refining
-
Smooth the Rim:
Dip your finger in a little water and run it along the rim to smooth out any large cracks. Don’t make it too perfect; a slightly uneven edge adds to the rustic charm seen in the photo. -
Add Surface Texture:
Instead of smoothing the outside perfectly, use a slightly rough sponge or a crumpled piece of foil to dab against the clay surface. This mimics the stone-like texture. -
Carve Subtle Lines:
Using a modeling tool or the dull edge of a butter knife, gently carve a few horizontal, sweeping distinct lines into the lower half of the bowl’s exterior. Keep them shallow and organic. -
Refine the Interior:
Use a damp sponge to smooth the inside of the bowl. You want the inside to be fairly smooth while the outside retains its character. -
Drying Phase:
Set the bowl aside to dry in a cool, dry place. I usually let it sit for 24-48 hours depending on humidity, flipping it occasionally to ensure the bottom dries evenly.
Step 3: Finishing Touches
-
Sand Imperfections:
Once fully dry, you can lightly sand any sharp edges on the rim with fine-grit sandpaper, but leave the main body texture intact. -
Create a Wash:
Mix a tiny drop of brown acrylic paint with plenty of water to create a very thin, tea-colored wash. -
Apply the Wash:
Brush this wash over the textured outside, letting it settle into the carved lines and rough patches. Quickly wipe away excess from the high points with a paper towel to highlight the texture. -
Splatter Effect:
Dip an old toothbrush into slightly thicker brown paint. Run your thumb across the bristles to flick tiny speckles onto the bowl’s surface for that speckled ceramic look. -
Seal the Project:
Finish by applying a coat of matte varnish or sealant to protect the clay and give it a finished, professional appearance.
Make it Shine
For a glazed ceramic look without a kiln, use a high-gloss varnish on the inside of the bowl only, keeping the outside matte.
Place your new textured bowl on a sunny windowsill or use it to hold small trinkets on your desk


Bubble Edge Coasters
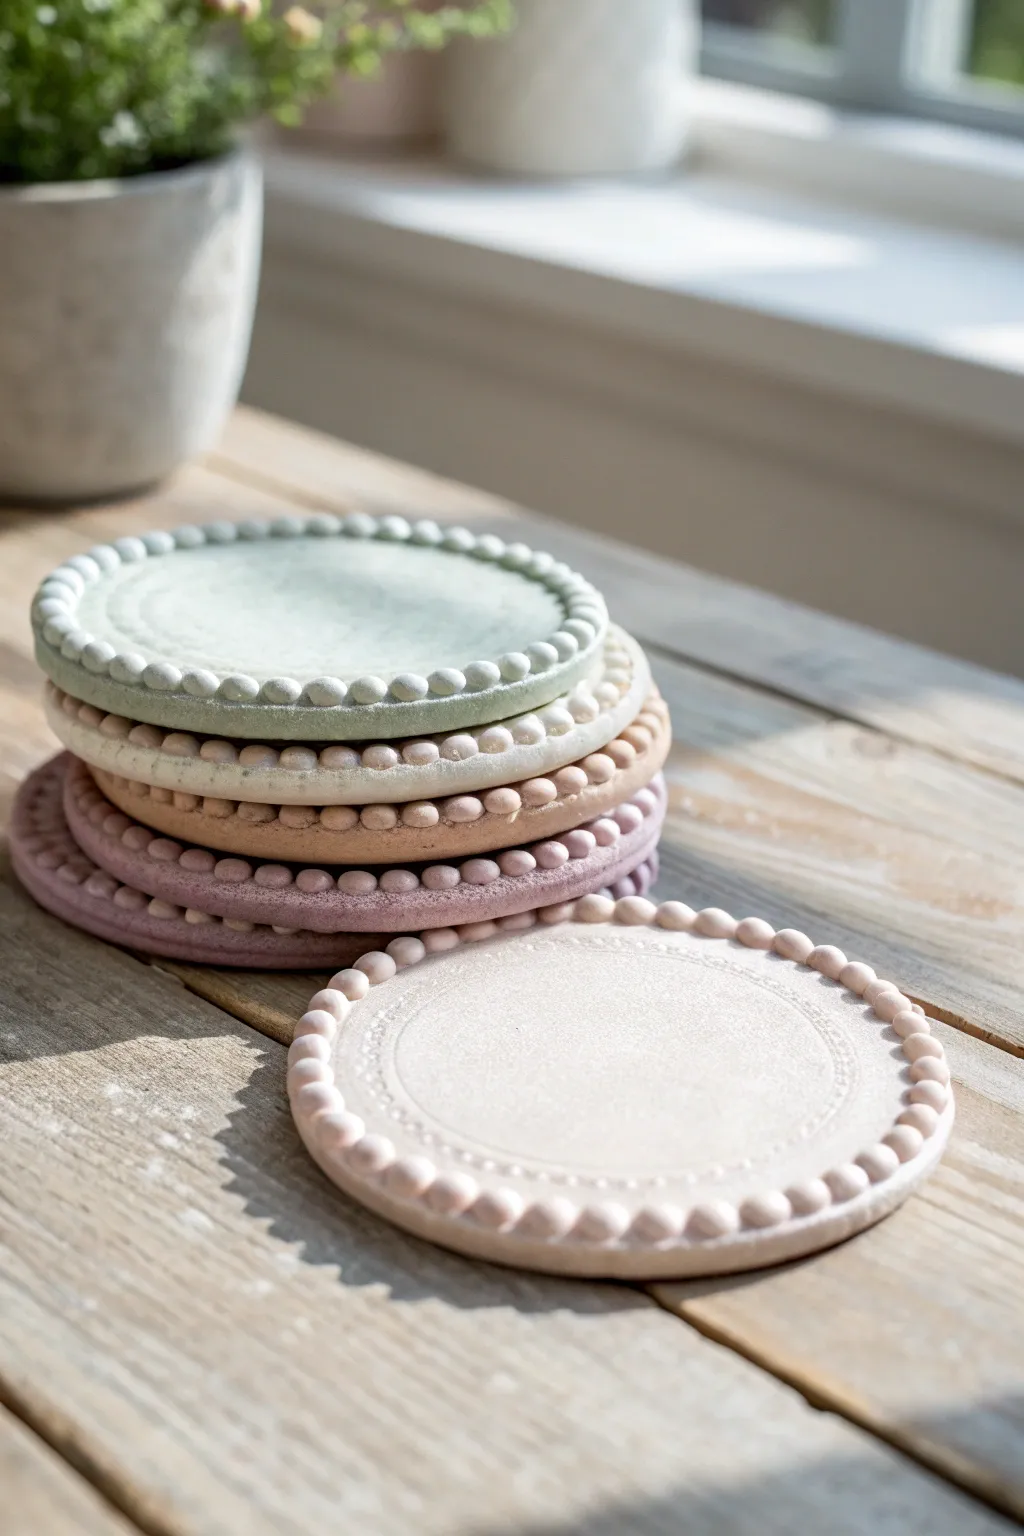
These charming coasters feature a delightful beaded rim that adds a playful texture to their minimalist design. Finished in soft, matte pastel shades, they bring a touch of whimsy and handmade warmth to any coffee table or desk.
How-To Guide
Materials
- Air dry clay (white or terracotta)
- Rolling pin
- Circle cutter or a round bowl (approx. 4 inches diameter)
- Small circle cutter or piping tip (approx. 0.5 cm)
- Small cup of water
- Craft knife
- Sandpaper (fine grit)
- Acrylic paints (pastel mint, cream, mauve, terracotta)
- Matte acrylic sealer or varnish
- Paintbrushes
- Parchment paper or silicone mat
Step 1: Forming the Base
-
Condition the clay:
Start by taking a handful of air dry clay and kneading it in your hands until it becomes soft, pliable, and free of any cracks. -
Roll out the slab:
Place the clay on a sheet of parchment paper. Use your rolling pin to flatten it into an even slab, aiming for a thickness of about 1/4 inch (6mm) to ensure durability. -
Cut the main circle:
Press your large circle cutter or round bowl firmly into the clay to cut the coaster base. Remove the excess clay from around the circle. -
Smooth the edges:
Dip your finger in a little water and run it along the cut edge of the circle to smooth out any roughness or sharp debris from the cutting process.
Cracked beads?
If beads separate while drying, mix a tiny bit of fresh clay with water to make a paste (slip) and adhere them back, then sand smooth.
Step 2: Creating the Bubble Rim
-
Roll small spheres:
Take the excess clay and roll it into a long, thin snake. Cut this snake into many tiny, equal-sized pieces. -
Shape the beads:
Roll each tiny piece between your thumb and forefinger to create uniform little spheres or ‘bubbles.’ You will need roughly 40-50 per coaster, depending on the size. -
Score the edge:
Using your craft knife or a needle tool, gently scratch or score the outer top rim of your clay circle where the beads will sit. -
Attach the bubbles:
Dab a small amount of water onto the scored rim. One by one, press the clay spheres onto the edge, ensuring they touch each other and adhere firmly to the base. -
Blend lightly:
I find it helpful to use the back of a small paintbrush or a modeling tool to gently press the bottom of each sphere into the base slightly, ensuring a seamless bond without flattening the top.
Step 3: Refining and Drying
-
Add surface detail (Optional):
If you want the subtle inner ring texture seen in the photo, gently press a slightly smaller bowl or lid into the center of the coaster, just enough to leave a faint impression. -
Dry slowly:
Set the coasters aside on a flat surface away from direct sunlight. Let them dry for 24-48 hours. Turning them over halfway through helps prevent warping. -
Sand for smoothness:
Once fully cured and hard, use fine-grit sandpaper to gently smooth the flat surfaces and the tops of the beads if any became pointy. -
Dust off:
Wipe the coasters down with a thoroughly dry cloth or a soft brush to remove all sanding dust before painting.
Level Up: Stone Look
Mix baking soda into your acrylic paint before applying. This creates a grainy, ceramic-like texture for a faux-stone effect.
Step 4: Painting and Sealing
-
Apply base color:
Select your pastel acrylic paints. Apply a thin, even coat over the entire coaster, working the brush into the crevices between the bubble beads. -
Second coat:
Allow the first layer to dry completely, then apply a second coat for opaque, solid coverage. The matte look relies on good coverage without visible brushstrokes. -
Dry paint:
Let the paint dry for at least an hour or until it is no longer cool to the touch. -
Seal the coaster:
Apply a matte acrylic sealer or varnish. Since these will hold drinks, consider doing two coats to protect against moisture.
Stack your finished coasters to admire the lovely gradient of pastel edges before putting them to use


Ring Cone Holder
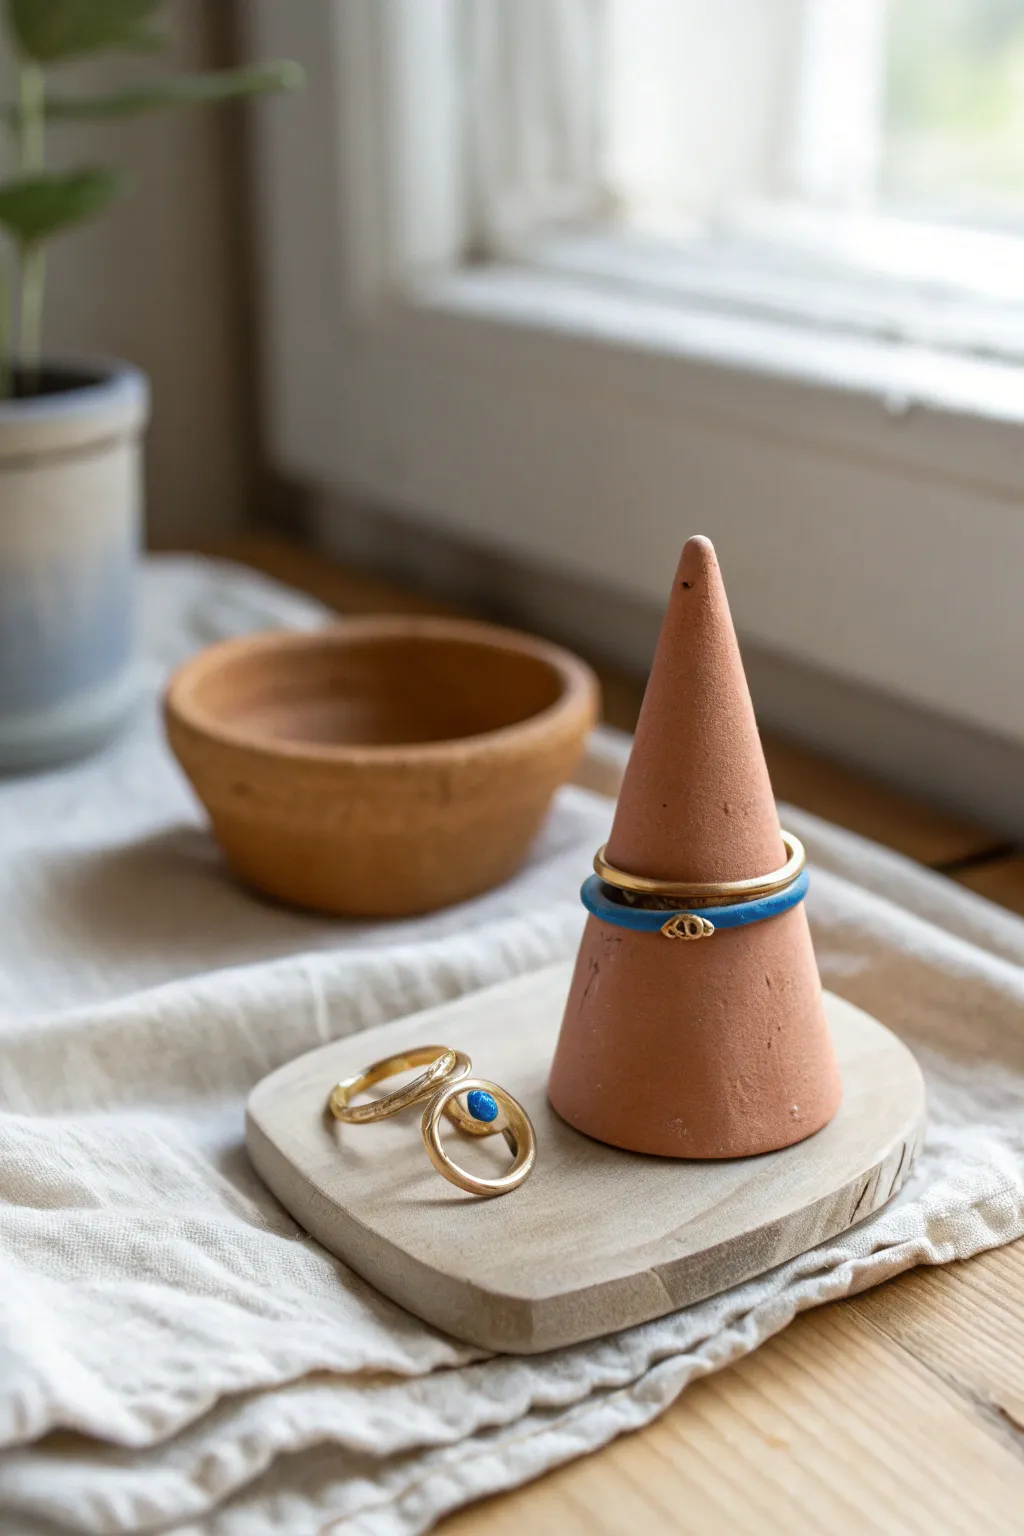
Keep your favorite rings organized with this minimalist, earthy display piece that combines a sleek cone with an organic tray base. The faux terracotta finish gives it a warm, artisanal look that feels right at home on any bedside table or vanity.
Step-by-Step Guide
Materials
- Air dry clay (white or terracotta colored)
- Acrylic paint (burnt sienna, orange, and brown for terracotta mix)
- Matte sealant or varnish
- Rolling pin
- Sharp crafting knife
- Small bowl of water
- Fine-grit sandpaper
- Paintbrush
Step 1: Shaping the Components
-
Prepare the clay:
Begin by kneading a fist-sized ball of air dry clay until it feels soft, warm, and pliable. Getting rid of air bubbles now ensures a smoother finish later, so take your time working it. -
Form the cone shape:
Take about two-thirds of your clay and roll it into a ball, then gradually roll it against your work surface using the palm of your hand, applying more pressure on one side to create a tapered cone shape. -
Refine the cone:
Stand the cone upright and gently tap the bottom against the table to flatten it perfectly. Smooth the sides with a damp finger to remove any fingerprints or ridges, aiming for a height of about 3 to 4 inches. -
Roll out the base:
Take the remaining third of the clay and roll it out with a rolling pin until it is roughly ¼ inch thick. This will form the tray section for catch-all jewelry storage. -
Cut the organic shape:
Using your craft knife, cut a free-form, organic shape for the base. Avoid perfect circles or squares; a soft, rounded rectangle or bean shape looks more modern and natural. -
Smooth the edges:
Dip your finger in water and run it along the cut edges of the flat base to round them off. Sharp, jagged edges can become brittle once dry, so a smooth curve is both aesthetic and functional.
Cracking Up?
If small cracks appear during drying, don’t panic. Mix a small amount of fresh clay with water to make a thick paste and fill the cracks, then sand smooth once dry.
Step 2: Assembly and Drying
-
Score the attachment points:
Decide where you want your cone to sit on the base. Use your knife to gently scratch a hatching pattern (scoring) on the bottom of the cone and the corresponding spot on the base. -
Create slip:
Mix a tiny pinch of clay with water to create ‘slip’ (a glue-like paste). Dab this onto the scored areas to ensure a strong, permanent bond between the two pieces. -
Join the pieces:
Press the cone firmly onto the base. Use a modeling tool or your finger to blend the clay at the seam where the cone meets the tray, ensuring there remarkably isn’t a visible gap. -
Final smooth:
Do one last pass over the entire piece with a slightly damp sponge or finger to ensure everything is seamless and smooth before leaving it to dry. -
Let it dry completely:
Place the sculpture in a cool, dry spot away from direct sunlight. Let it cure for at least 24 to 48 hours. I find turning it gently every few hours helps it dry evenly without warping.
Step 3: Finishing Touches
-
Sand the surface:
Once fully dry and hard, use fine-grit sandpaper to buff away any minor bumps or rough textures. Wipe away the dust with a dry cloth. -
Mix the paint:
If you didn’t use pre-colored clay, mix burnt sienna with a touch of orange and brown acrylic paint to achieve that classic, warm terracotta hue. -
Apply the first coat:
Paint the entire piece with an even coat of your terracotta mix. A soft bristle brush helps avoid leaving visible brushstrokes. -
Add texture:
For a raw ceramic look, dab a paper towel onto the wet paint slightly to remove a bit of sheen and create a natural, earthy texture. -
Seal the project:
After the paint is bone dry, apply a matte varnish or sealant. This protects the clay from moisture and gives it a professional, finished appearance.
Make It Marble
Twist white and terracotta-colored clay together before rolling the cone to create a stunning, natural marble effect without needing any paint.
Now you have a stylish spot to keep your everyday jewelry safe and beautifully displayed

What Really Happens Inside the Kiln
Learn how time and temperature work together inside the kiln to transform clay into durable ceramic.
Mini Planter or Cachepot
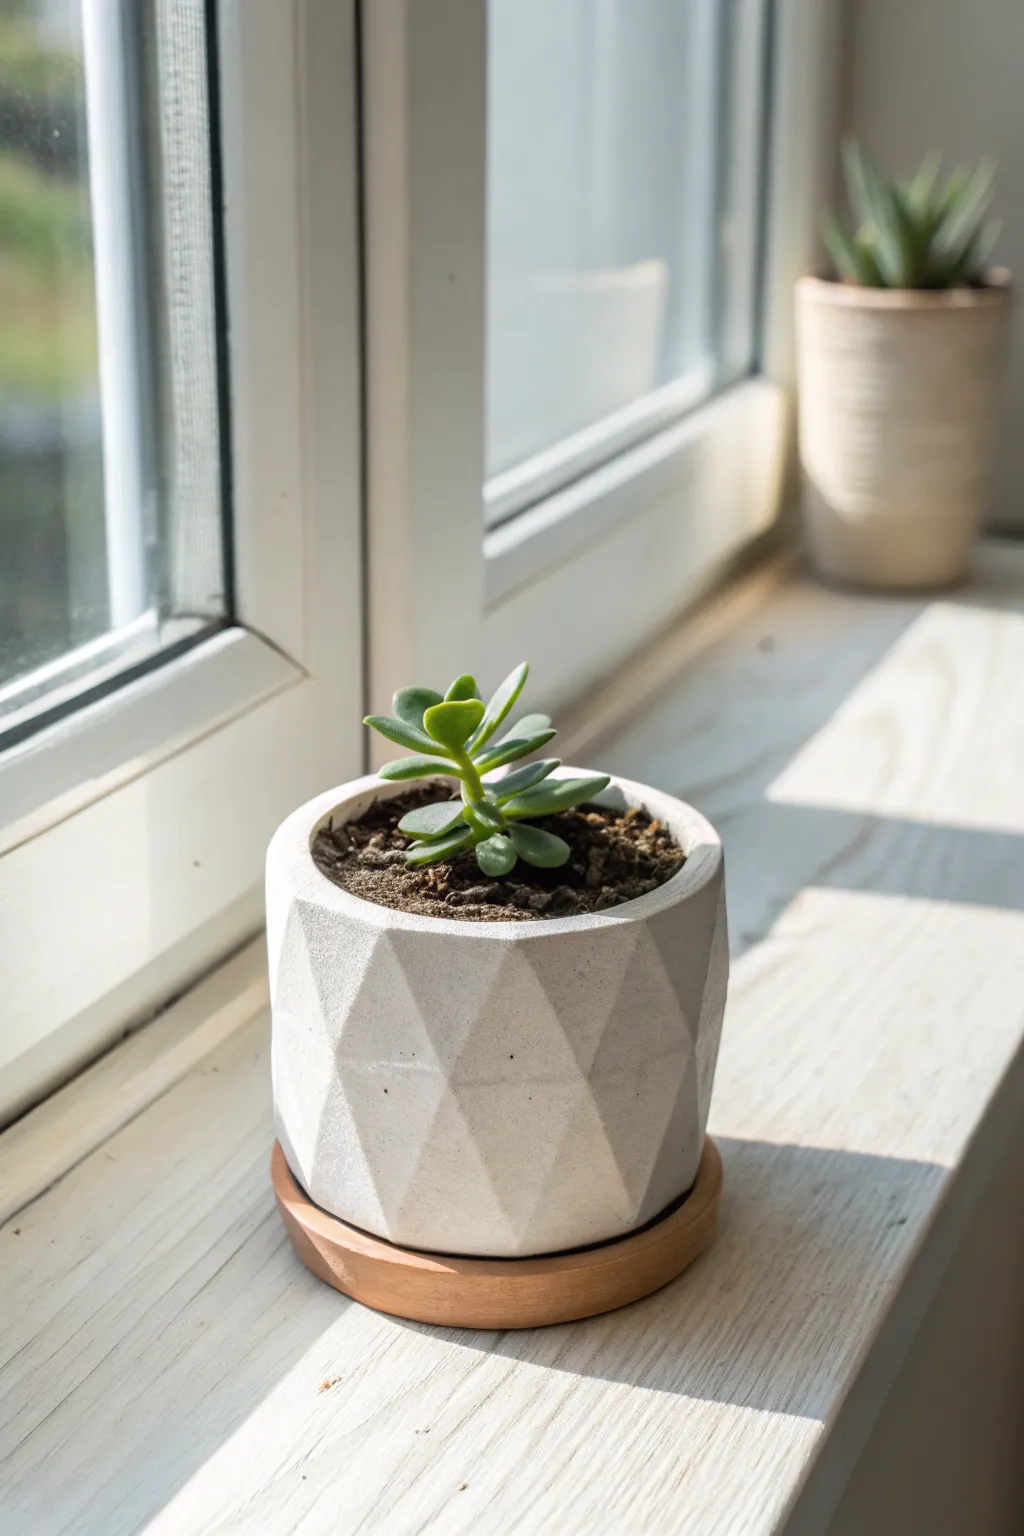
Embrace modern minimalism with this chic geometric planter that looks far more expensive than its humble air-dry clay origins. Its crisp, faceted sides catch the light beautifully, while the warm wooden base adds a natural touch perfect for housing your favorite baby succulent.
How-To Guide
Materials
- White extra-light air-dry clay (approx. 500g)
- Rolling pin
- Small cylindrical container or jar (to use as a mold)
- Craft knife or scalpel blade
- Ruler
- Sandpaper (medium and fine grit)
- Acrylic sealant (matte or satin)
- Small round wooden coaster or balsa wood sheet
- Water in a small cup
- Parchment paper
Step 1: Forming the Base Structure
-
Prepare your workspace:
Lay down parchment paper to prevent sticking. Take a large handful of air-dry clay and knead it briefly to warm it up and remove air bubbles. -
Roll out the slab:
Roll the clay into a long rectangular slab, aiming for a consistent thickness of about 1/4 inch (6mm). This thickness ensures the walls are sturdy enough to be carved later. -
Cut the clay strip:
Using your ruler and craft knife, cut a clean, long rectangle from the slab. Measure the height of your jar mold and make the strip slightly taller than the jar. -
Wrap the mold:
Wrap the clay strip around your cylindrical container. Where the ends meet, slice through both layers at an angle to create a seamless join. Score both cut edges, dab with water, and press them firmly together. -
Create the bottom:
Place your clay-wrapped cylinder onto a fresh piece of rolled clay. Trace around the bottom with your knife to cut a circle base. Score and slip (wet) the edges to attach the base securely to the walls. -
Smooth the seams:
Dip your finger in water and smooth out the visible seam on the side and the connection point at the bottom until the cylinder looks like one solid piece. Leave the jar inside for structural support if possible, or remove it gently if it’s tight.
Step 2: Carving the Geometry
-
Wait for leather-hard stage:
Let the cylinder dry for several hours until it is ‘leather hard’—firm to the touch but still carveable. If you try to carve wet clay, it will deform. -
Mark your guidelines:
Lightly sketch a diamond or triangular grid pattern onto the cylinder’s surface using a pencil. This doesn’t have to be perfect, but it helps keep your facets consistent. -
Begin slicing facets:
Using a very sharp craft knife or scalpel, carefully slice off thin sections of clay following your grid. Hold the blade at a shallow angle to create flat planes. -
Deepen the angles:
The goal is to create sharp ridges where the cuts meet. Don’t be afraid to cut deeper in the center of your marked shapes to accentuate the geometric look. Keep the rim somewhat thick and flat.
Clay Cracking?
Small cracks are common during drying. Mix a tiny bit of fresh clay with water to make a paste (slip) and fill cracks, then sand smooth once dry.
Step 3: Finishing Touches
-
Full drying:
Allow the carved pot to dry completely. This will take 24-48 hours depending on humidity. It should turn stark white and feel lightweight. -
Sand for sharpness:
Use medium-grit sandpaper to refine the flat planes of your facets. Switch to fine-grit to smooth the texture of the clay itself without rounding over your crisp edges. -
Seal the planter:
Apply 2-3 coats of acrylic sealant inside and out. Since air-dry clay is not waterproof, this step is vital to prevent the pot from dissolving when you water your plant. -
Prepare the base:
If you have a pre-made wooden coaster, sand it lightly. I like to stain mine slightly darker or simply seal it with a clear varnish to match the warm tone in the photo. -
Assemble:
Once everything is dry, place your pot onto the wooden saucer. Pot your succulent (keep it in its plastic nursery pot inside the clay vessel for extra safety) and display it in a sunny spot.
Use a Nursery Pot
Air-dry clay hates standing water. Keep your plant in a plastic nursery pot that fits inside your creation to catch excess moisture.
Now you have a stunning custom planter ready to bring a touch of greenery to your windowsill
Bud Vase Sleeve
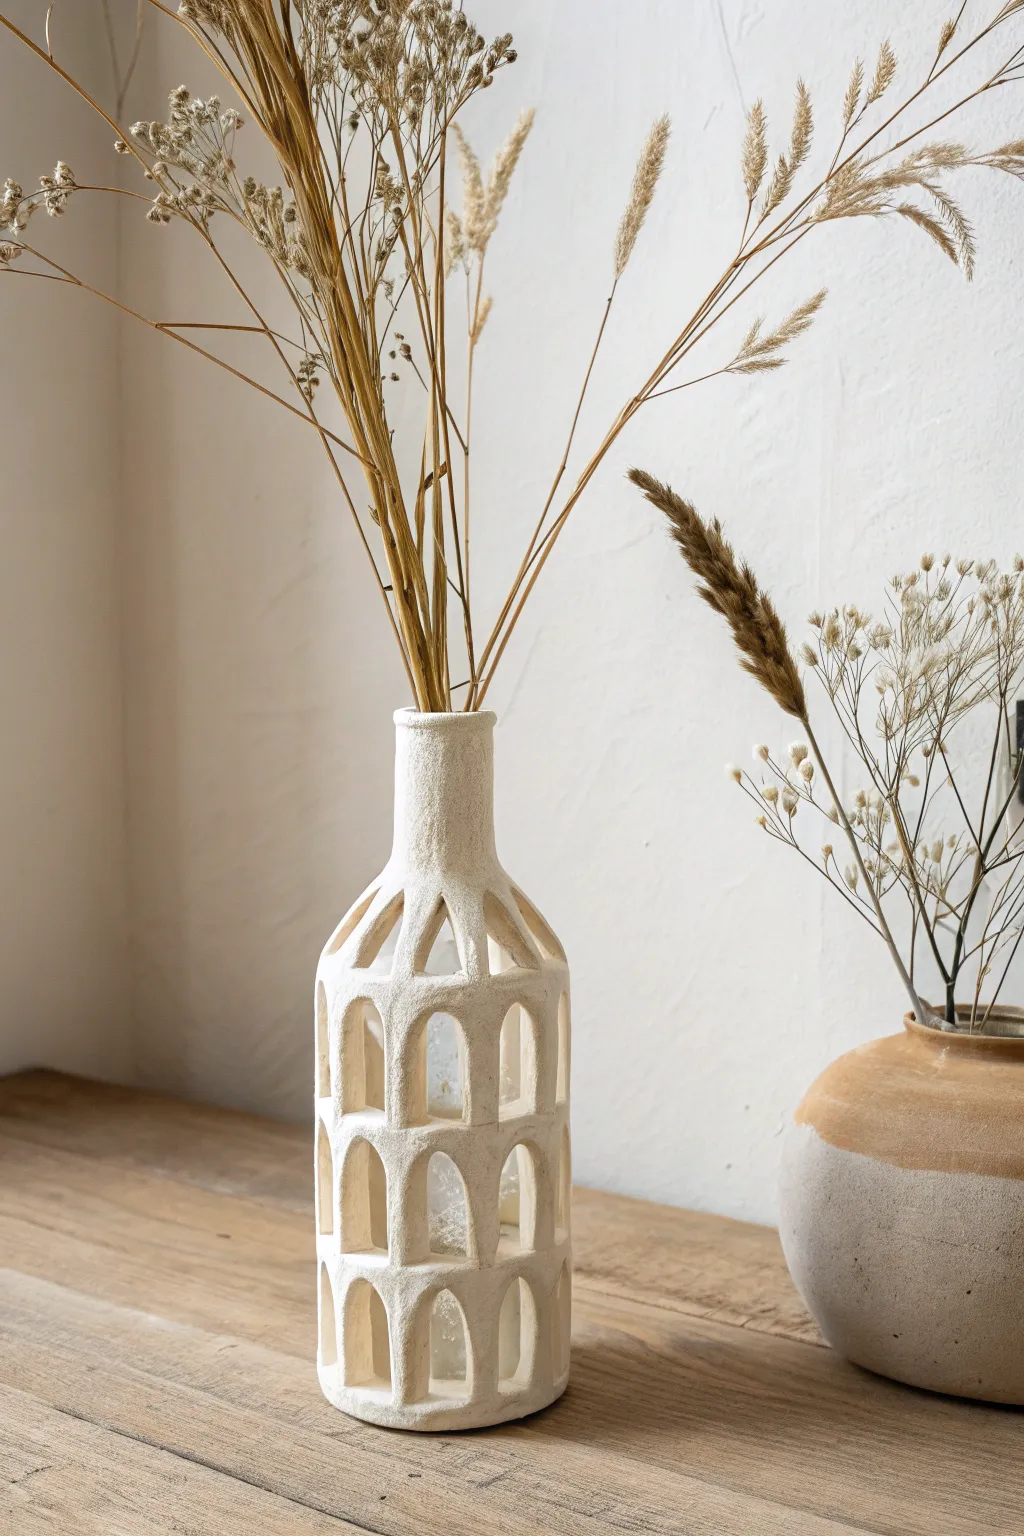
Transform a plain glass bottle into an architectural statement piece with this textured air dry clay sleeve. Featuring rows of Roman-style arches and a rough, sandy finish, this project adds an organic, old-world charm to your dried floral arrangements.
Step-by-Step
Materials
- White air dry clay (approx. 1kg)
- Glass bottle or jar (tall and cylindrical)
- Rolling pin
- Parchment paper or non-stick mat
- Ruler
- Craft knife or scalpel
- Clay sculpting tools (needle tool, smoothing tool)
- Small bowl of water
- Sponge
- Baking soda (for texture)
- White acrylic paint (optional)
Step 1: Preparing the Clay Sheet
-
Roll the slab:
Begin by kneading your air dry clay until it is soft and conditioned. Roll it out on parchment paper into a large, even rectangular slab about 1/4 inch thick. -
Measure the bottle:
Measure the circumference and height of your chosen glass bottle. Add about 1/2 inch to the circumference measurement to ensure a loose, sleeve-like fit rather than a tight skin. -
Trim to size:
Using a ruler and craft knife, cut your clay slab into a rectangle that matches your measurements. Don’t discard the scraps yet; you’ll use them later for the neck. -
Wrap the form:
Carefully pick up the clay slab and wrap it around the glass bottle to check the fit. Mark where the seam should be, ensuring there is a little wiggle room between the clay and the glass.
Keep it Loose
Make sure the clay sleeve isn’t too tight against the glass. As clay dries, it shrinks. If it’s wrapped tightly around a rigid glass form, the tension will cause the clay to crack.
Step 2: Sculpting the Arches
-
Grid the design:
Lay the clay slab flat again. Lightly score a grid pattern with a needle tool to guide your cutouts. For the look in the photo, you will want three horizontal rows of arches. -
Sketch the arches:
Within your grid squares, lightly sketch the arch shapes. The bottom two rows should be standard rounded arches, while the top row can taper inward slightly. -
Cut the openings:
Use a sharp craft knife or scalpel to carefully cut out the negative space inside the arches. I find it helpful to cut the straight sides first, then connect them with the curved top. -
Smooth the edges:
Dip your finger in water and gently run it along the cut edges of every arch to remove sharp burrs and soften the look. -
Create the cylinder:
carefully lift the pierced slab and wrap it around the bottle again. Score and slip the vertical seam where the edges meet, blending the clay together until the join is invisible.
Sagging Arches?
If the clay is too soft and the arches slump while standing, let the slab dry flat for 15-20 minutes after cutting but before rolling securely into a cylinder.
Step 3: Forming the Neck
-
Shape the shoulder:
Gently curb the top edge of the clay cylinder inward towards the bottle neck. You may need to cut small V-shaped notches and smooth them over to reduce bulk as the clay tapers in. -
Roll the neck piece:
Roll a smaller rectangular strip of clay from your scraps. This should be tall enough to cover the bottle’s neck and wide enough to wrap around it. -
Attach the neck:
Score and slip the bottom of this new strip and attach it to the tapered shoulder of your main cylinder. Blend the seam thoroughly with a modeling tool so it looks like one continuous piece. -
Refine the rim:
Smooth the top rim of the vase neck. You can leave it slightly uneven for a rustic look or trim it perfectly straight depending on your preference.
Step 4: Finishing and Texture
-
Initial drying:
Let the piece dry for about 30 minutes to firm up slightly before adding the final texture. -
Create the texture paste:
Mix a small amount of baking soda into white acrylic paint (or a water/clay slip mixture) until you have a gritty, thick paste. -
Apply texture:
Using a sponge or an old stiff brush, dab this textured mixture all over the exterior of the vase. This replicates the sandy, stone-like finish seen in the inspiration image. -
Dry completely:
Allow the vase to dry fully for 24-48 hours. Keep it away from direct sunlight to prevent cracking. -
Final check:
Once dry, verify the glass insert still slides in easily (if you removed it) or is secure. Your architectural vase is now ready for dried stems.
Place this on a sunny shelf where the light can pass through the cutouts, casting beautiful shadows across your room


The Complete Guide to Pottery Troubleshooting
Uncover the most common ceramic mistakes—from cracking clay to failed glazes—and learn how to fix them fast.
Modern Photo and Card Holder
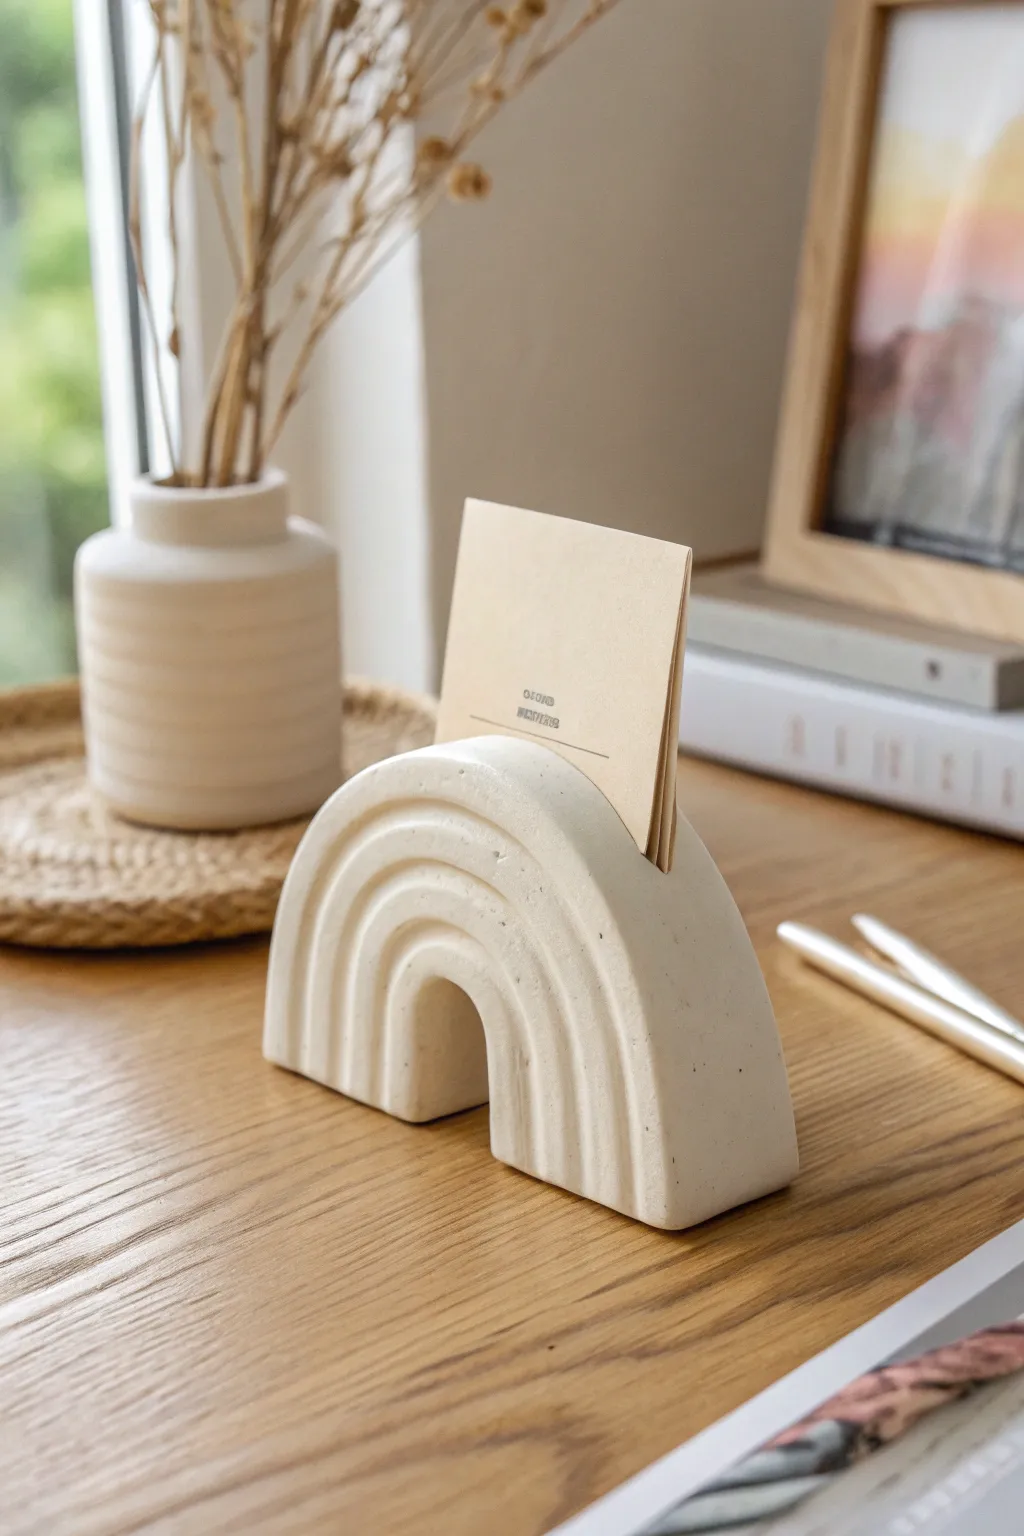
Add a touch of Scandi-minimalism to your desk with this sleek, arch-shaped card holder. Its textured stone finish and gentle curves make it the perfect functional sculpture for displaying photos or holding important notes.
Step-by-Step Guide
Materials
- White air dry clay (approx. 500g)
- Acrylic rolling pin
- Sharp crafting knife or clay blade
- Ruler
- Water in a small cup
- Sandpaper (medium and fine grit)
- Cream or off-white acrylic paint
- Baking soda (for texture)
- Matte sealant spray or varnish
- Paintbrush
Step 1: Shaping the Rainbow Arch
-
Condition the clay:
Begin by taking a substantial chunk of air dry clay and kneading it in your hands until it becomes warm, soft, and pliable. -
Roll a thick slab:
Using your acrylic roller, roll the clay out into a thick, even slab. Aim for a thickness of about 1 inch (2.5 cm) to ensure the holder is stable enough to stand upright. -
Cut the base shape:
Use a ruler and your blade to cut a clean rectangle from the slab. The length of the rectangle determines the height of your arch, so aim for roughly 7-8 inches long. -
Form the arch:
Gently bend the rectangle into a ‘U’ shape to create the arch. Stand it up on your work surface to check stability; the bottom edges should sit flush against the table. -
Smooth the seams:
Dip your finger in a little water and smooth out any small cracks that appeared during bending. Don’t use too much water, or the clay will become mushy.
Step 2: Carving the Details
-
Mark the slot:
Locate the exact center top of your arch. Use your knife or a ruler edge to gently impress a line where the card slot will go. -
Cut the card slot:
Carefully cut a slit into the top of the arch. It needs to be about half an inch deep. I find wiggle the blade slightly helps widen it just enough to hold thick cardstock. -
Clean the slot edges:
Use a damp paintbrush or smoothing tool to refine the edges of the cut so they look intentional and smooth, not jagged. -
Sketch the rainbow lines:
Lightly trace three concentric arches on the face of the clay using a needle tool or a dull pencil. These will be your carving guides. -
Carve the grooves:
Using a loop tool or the tip of a modeling tool, carve out the grooves following your traced lines. Make them deep enough to create shadow but keep the ridges rounded. -
Refine the ridges:
Dip your finger in water again and run it along the carved grooves to soften the sharp edges, giving the piece that soft, molded look. -
Final smooth:
Give the entire piece one last check, smoothing out fingerprints and ensuring the bottom is flat so it won’t wobble.
Cracking Up?
If small cracks appear while drying, don’t panic. Make a thick paste of clay and water (slip) to fill the cracks, let dry, and sand smooth.
Step 3: Finishing Touches
-
Allow to dry:
Let the piece dry completely for 24-48 hours. Turn it over gently halfway through so the bottom dries evenly. -
Sand for perfection:
Once bone dry, use medium grit sandpaper to remove any major bumps. Follow up with fine grit sandpaper for a silky smooth finish. -
Mix textured paint:
Mix your off-white acrylic paint with a teaspoon of baking soda. This creates a faux-ceramic or stone texture. -
Apply the paint:
Paint the entire holder with your textured mixture. Dab the brush slightly rather than dragging it to enhance the stone effect. -
Seal the piece:
After the paint is dry, apply a coat of matte varnish or spray sealant to protect the finish without adding unwanted shine.
Clean Lines Tip
For perfectly parallel rainbow grooves, use a different sized jar lid or circle cutter to lightly impress guide lines before carving.
Place your favorite photo in the slot and admire your modern, handmade accessory
Taper Candle Holder
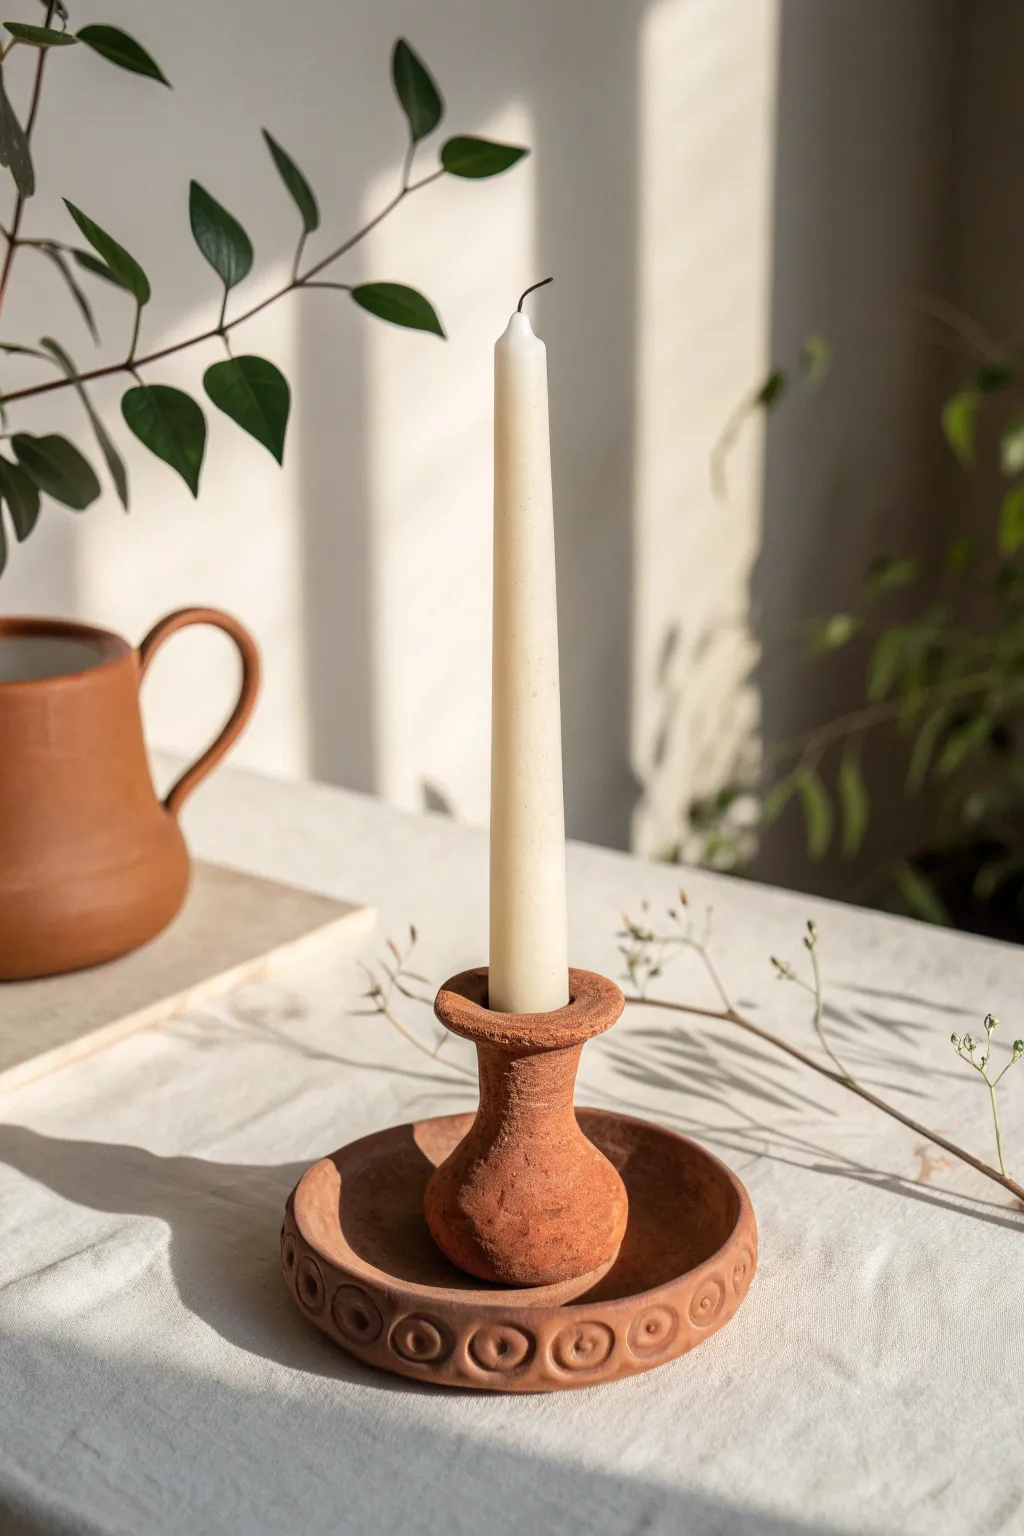
Embrace the warmth of natural textures with this earthy, terracotta-style candle holder. Its primitive charm comes from the textured finish and the repetitive stamped pattern along the rim, making it a perfect centerpiece for a cozy table setting.
Step-by-Step Tutorial
Materials
- Terracotta-colored air dry clay
- Rolling pin
- Clay knife or craft knife
- Small circular clay cutter or bottle cap (approx. 3-4 inches diameter)
- Small cylinder tool (marker cap or straw) for stamping
- Taper candle (for sizing)
- Small sponge
- Water cup
- Needle tool or toothpick
- Fine-grit sandpaper
Step 1: Creating the Saucer Base
-
Prepare the slab:
Start by kneading a workable chunk of your terracotta air dry clay to warm it up. Roll it out into an even slab about 1/4 inch thick. -
Cut the base circle:
Using a large circular cutter, a bowl, or just a steady hand with a knife, cut out a circle roughly 4 inches in diameter. This will serve as your saucer. -
Form the rim:
Roll a long, thin coil of clay, roughly the thickness of a pencil. Score the outer edge of your base circle and apply a little water to create slip. -
Attach the coil:
Place the coil on top of the scored edge to create a raised rim. Press it down firmly to adhere, blending the inside seam down onto the base so it connects seamlessly. -
Smooth the exterior:
Blend the outside seam of the coil downward as well. I find using a slightly damp finger makes this blending process much smoother and eliminates cracks. -
Add the decorative pattern:
Take a small circular tool, like the cap of a marker or a specialized clay stamp. Press it gently into the textured rim at even intervals to create the distinctive ‘bullseye’ pattern shown in the photo.
Step 2: Forming the Candle Cup
-
Roll the central cylinder:
Take a fresh ball of clay and roll it into a thick cylinder. You want it to be roughly 2 inches tall and slightly wider than your taper candle. -
Hollow the center:
Gently press your thumb or a tool into the top of the cylinder to open it up. Don’t go all the way through; leave a solid base at the bottom. -
Size it perfectly:
Test the fit with your actual taper candle. Wiggle it in slightly to ensure the opening is just loose enough to accommodate the candle but tight enough to hold it upright. Remove the candle before proceeding. -
Shape the waist:
Gently pinch the middle of the cylinder to create an hourglass shape. The top should flair out slightly, and the bottom should bulb out before tapering in at the waist. -
Create the flared lip:
Flatten the top rim of the holder so it flares outward, creating a wide, flat lip similar to the reference image.
Wobbly Candle?
If the hole shrinks too much after drying, don’t force the candle in. Instead, use a craft knife to gently shave away the inside of the holder until the candle fits snugly.
Step 3: Assembly and Finishing
-
Prepare connection points:
Score the center of your saucer base and the bottom of your candle holder column. Dab a bit of water or slip on both rough areas. -
Join the pieces:
Press the column firmly into the center of the saucer. Use a sculpting tool or your finger to smooth the clay where the column meets the base, ensuring a strong bond. -
Add texture:
To mimic the rustic, sandy look of the original, take a dry sponge or a crumpled piece of foil and gently tap it all over the surface of the clay. This removes fingerprints and adds that aged character. -
Final shaping check:
Double-check that your column is standing straight up. If it leans, nudge it back into alignment while the clay is still wet. -
Let it dry:
Allow the piece to dry slowly away from direct sunlight for 24-48 hours. Turn it occasionally to ensure the bottom dries evenly. -
Refining:
Once fully bone dry, use fine-grit sandpaper to gently smooth any sharp edges on the rim or the lip, but leave the surface texture intact.
Sponge It Up
Use a nearly dry, coarse kitchen sponge to dab the surface of the wet clay. This mimics the gritty texture of real groggy terracotta clay without needing a kiln.
Place your favorite taper candle inside and enjoy the warm, handmade atmosphere this piece brings to your room

TRACK YOUR CERAMIC JOURNEY
Capture glaze tests, firing details, and creative progress—all in one simple printable. Make your projects easier to repeat and improve.
Desk Organizer Catchall Tray
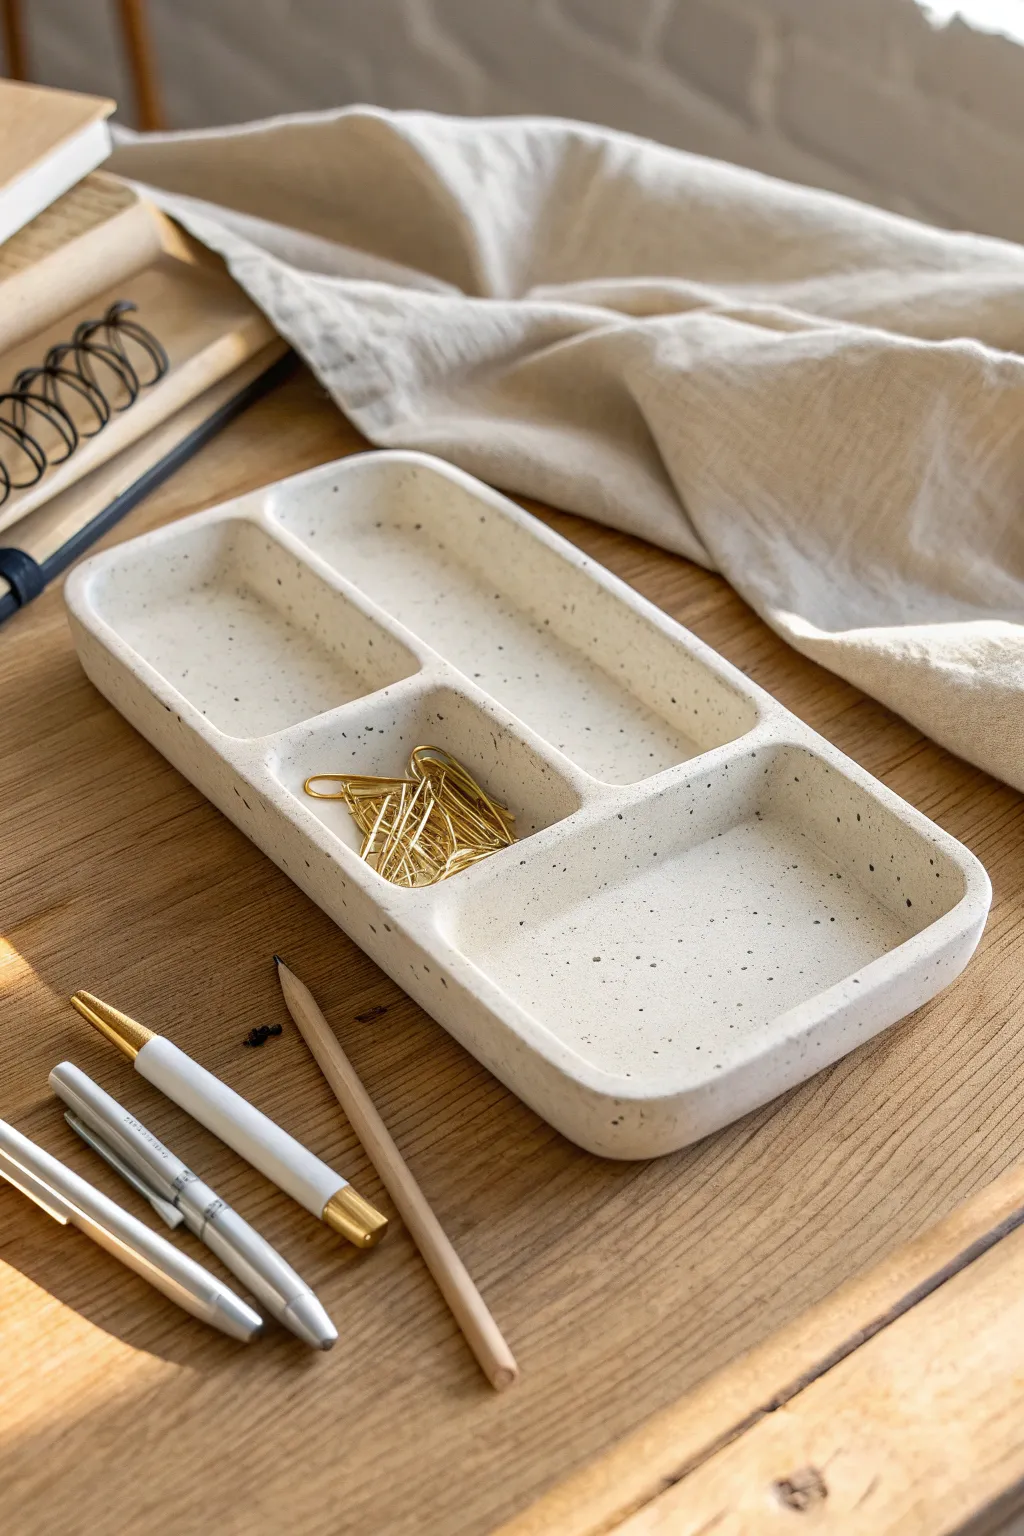
Bring calm organization to your workspace with this sleek, compartmented catchall tray. Its smooth, rounded edges and subtle speckled finish give it a high-end, modern ceramic look without the need for a kiln.
Detailed Instructions
Materials
- White air dry clay (about 1 lb)
- Non-stick rolling pin
- Clay knife or craft blade
- Ruler
- Small bowl of water
- Sponge or smoothing tool
- Fine-grit sandpaper
- Acrylic paint (cream or off-white)
- Black acrylic paint (for speckles)
- Stiff bristle brush or old toothbrush
- Matte varnish or sealant
Step 1: Shaping the Base
-
Prepare the Clay:
Start by conditioning your air dry clay, kneading it until it is soft, pliable, and free of cracks. If it feels too dry, dip your fingers in water and work it in. -
Roll the Slab:
Roll the clay out into a large, even slab approximately 1/4 inch thick. Aim for a rectangular shape to minimize waste. -
Cut the Base:
Using your ruler and clay knife, cut a clean rectangle for the base. A size of roughly 9 inches by 4 inches works well for pencils and small clips, but you can adjust this to fit your specific desk space. -
Create the Outer Walls:
Cut long strips of clay from your remaining slab, also about 1/4 inch thick and roughly 1 inch high. You will need enough length to go around the entire perimeter of your base.
Cracks Appearing?
If small cracks appear while drying, mix a tiny bit of fresh clay with water to make a paste. Fill the cracks, smooth it out, and let it dry again before sanding.
Step 2: Assembling the Tray
-
Score and Slip:
To attach the walls, score (scratch) the edges of the base and the bottom of your wall strips. Apply a little water or liquid clay slip to the scored areas to act as glue. -
Attach Perimeter Walls:
Press the wall strips firmly onto the base edge. Where the ends of the strips meet, score and slip those joints as well to create a continuous border. -
Add Dividers:
Cut smaller strips of clay to create the inner compartments. Measure the interior width and place one divider horizontally to create a long section for pens. Use a smaller vertical piece to split the remaining space into two squares. -
Smooth the Seams:
This step makes the piece look seamless. Use a sculpting tool or your finger to smudge the clay from the walls down onto the base, and from the base up onto the walls, blending the seams until they disappear. -
Round the Corners:
Gently press and mold the sharp exterior corners and the tops of the walls to create soft, rounded edges similar to the photo. I find using a slightly damp sponge helps perfect these curves.
Step 3: Refining and Drying
-
Wait for Drying:
Place the tray on a wire rack or a piece of cardboard to dry. This usually takes 24-48 hours depending on humidity. Flip it over halfway through once the top is firm to let the bottom dry evenly. -
Sand for Smoothness:
Once fully dry and bone-white, take your fine-grit sandpaper and gently sand the entire piece. Focus on the rim and corners to ensure they feel buttery smooth to the touch. -
Wipe Down:
Use a barely damp cloth or a dry tack cloth to remove all the sanding dust from the tray before painting.
Add Texture
Before the clay dries, gently press a piece of canvas or linen fabric onto the exterior walls. This leaves a subtle woven texture that contrasts beautifully with the smooth inside.
Step 4: Finishing Touches
-
Base Coat:
Paint the entire tray with a cream or warm off-white acrylic paint. You may need two coats for full, opaque coverage. -
Create the Speckles:
Dilute a small amount of black acrylic paint with water until it is inky. Dip a stiff brush or toothbrush into the mix. -
Flick the Paint:
Hold the brush over the tray and flick the bristles with your thumb to spray tiny droplets onto the surface. Test on a paper scrap first to control the droplet size. -
Seal the Tray:
After the paint is completely dry, apply a matte varnish. This protects the clay from moisture and gives it that finished, store-bought quality.
Now you have a custom organizer ready to declutter your desk with style
Earring Stand With Pegs
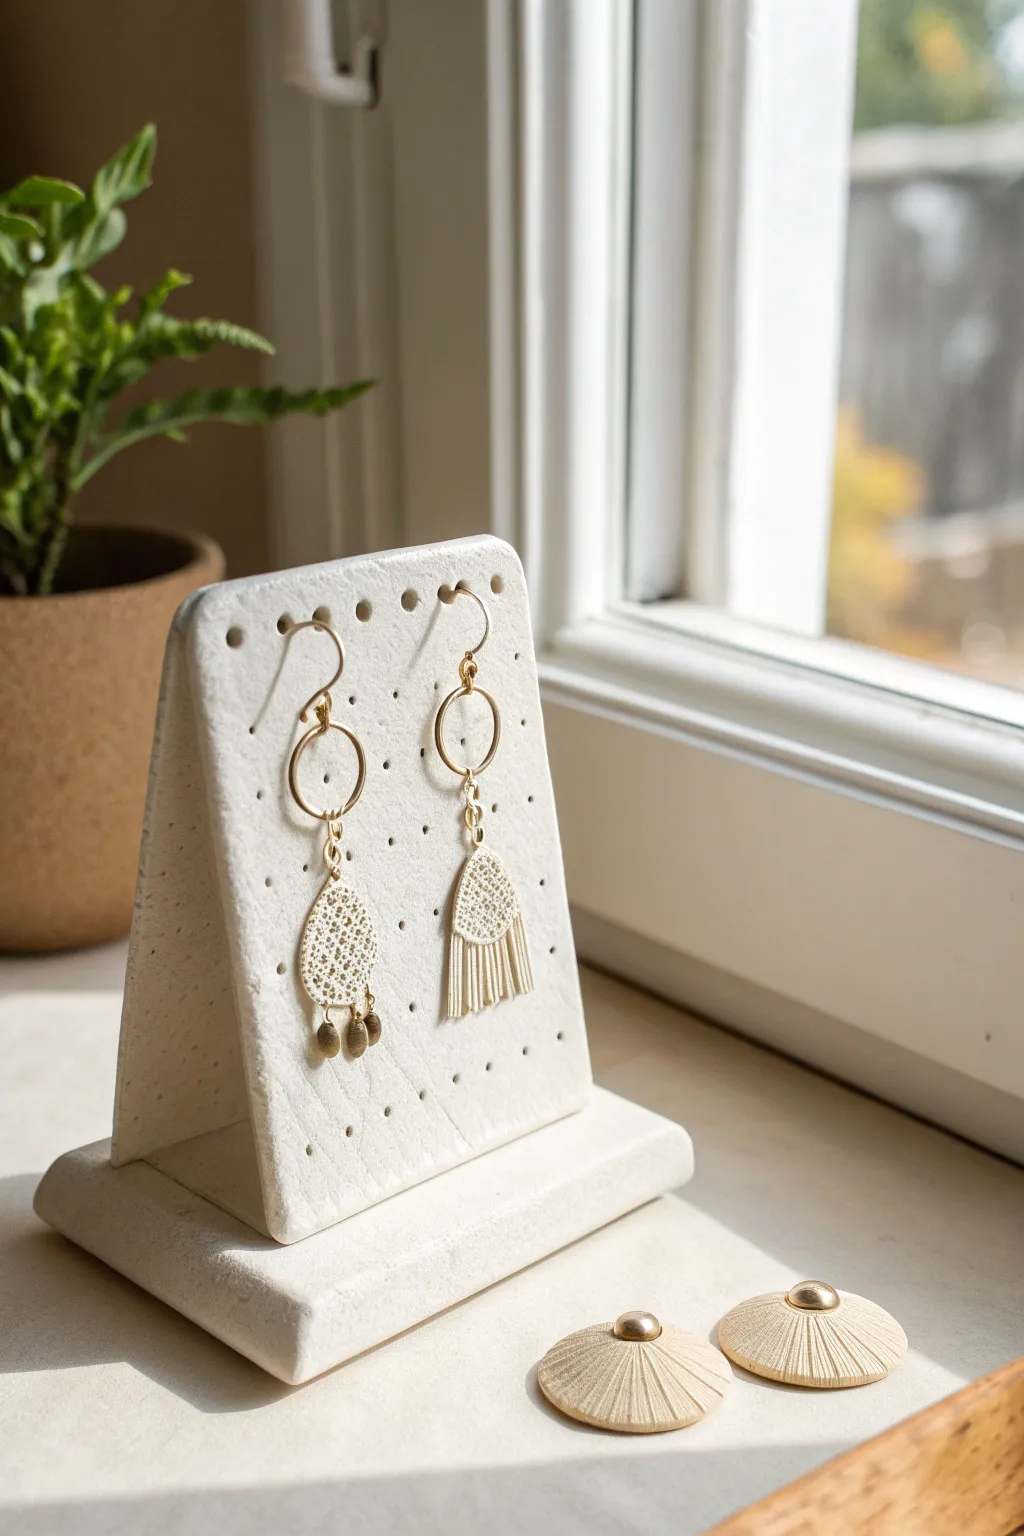
Elegantly minimalist, this angled earring stand mimics the look of high-end speckled stoneware but is crafted easily from air dry clay. Its clean lines and functional design make it a perfect vanity addition for organizing your favorite dangling pairs.
Step-by-Step Tutorial
Materials
- White air dry clay (approx. 500g)
- Black pepper or dried coffee grounds (for speckled effect)
- Rolling pin
- Sharp craft knife or clay blade
- Two wooden rulers or depth guides (approx. 5mm thick)
- Toothpick, skewer, or 3mm drill bit
- Fine-grit sandpaper
- Water and small sponge
- Ruler
- Wax paper or parchment paper
- Strong craft glue or clay slip
Step 1: Preparation & Rolling
-
Mix the texture:
Start by pinching off a large ball of white air dry clay. To achieve that faux-stone speckled look, knead in a generous pinch of coarse black pepper or dried coffee grounds until it is evenly distributed throughout the clay. -
Prepare the workspace:
Lay down parchment paper or wax paper to prevent sticking. Place two wooden rulers on either side of your clay ball to act as depth guides, ensuring your slab will be perfectly even. -
Roll the slab:
Using your rolling pin, roll the clay out between the guides until you have a smooth, uniform slab approximately 5mm thick.
Cracks Appearing?
If hairline cracks appear at the seams while drying, mix a small amount of fresh clay paste (slip) and fill the crack immediately, then smooth it over with a damp finger.
Step 2: Cutting Components
-
Measure the upright piece:
Using a ruler and a craft knife, cut a rectangle approximately 4 inches wide by 5 inches tall. This will be the main display board for the earrings. Clean up any rough edges with a slightly damp finger. -
Cut the base:
Cut a second, slightly larger rectangle for the base, about 5 inches wide by 3 inches deep. You want this piece heavy enough to provide stability. -
Create the support triangle:
Cut a right-angled triangle from the remaining clay. The hypotenuse (long side) isn’t critical, but the upright side should be about 3 inches tall, and the base side about 1.5 inches. This will hide behind the board to hold it at an angle. -
Add texture:
If your rolling pin smoothed the surface too much, gently dab the surface with a piece of crumpled foil or a stiff brush to bring back a subtle, stone-like texture.
Step 3: Drilling & Assembly
-
Mark hole positions:
Take your upright rectangular piece. Using a ruler, lightly mark pairs of dots where you want your earrings to hang. Spacing them about 1.5 inches apart usually works well for standard earrings. -
Pierce the holes:
Use a skewer or a 3mm drill bit to create holes at your marks. Twist the tool gently as you push through to keep the holes clean. Make sure they are large enough for earring hooks to pass through easily. -
Score the connection points:
On the base rectangle, mark where the upright piece will sit (centered, slightly back from the front edge). Use your knife to cross-hatch or ‘score’ this area. Do the same to the bottom edge of the upright piece. -
Make clay slip:
Mix a tiny scrap of clay with water until it forms a paste (slip). Apply this liberally to your scored areas. -
Attach the upright:
Press the upright piece firmly onto the base. At the same time, attach the support triangle behind it using the same scoring and slip method. The triangle should connect the back of the upright board to the base. -
Smooth the seams:
Use a modeling tool or your finger with a little water to blend the clay at the seams where the pieces join. I find that taking extra time here ensures a bond that won’t crack later. -
Adjust the angle:
Check the stand from the side profile. Ensure it leans back slightly for stability but isn’t tilting too far. Prop it up with a small box or book if needed while it sets.
Pro Tip: Clean Holes
Instead of punching holes while wet, wait until the clay is bone dry and use a hand drill with a small bit. This creates perfectly crisp circles without deforming the clay slab.
Step 4: Finishing Touches
-
Re-pierce holes:
Sometimes handling the clay can distort the holes. Gently re-insert your skewer into each hole to ensure they remain open and round. -
Slow drying:
Place the stand in a cool, dry area away from direct sunlight. To prevent warping, cover it loosely with a plastic bag for the first 24 hours to slow the drying process. -
Final dry:
Remove the plastic and let it dry completely for another 24-48 hours. The clay should turn purely white and feel hard to the touch. -
Sand and smooth:
Once fully dry, take fine-grit sandpaper and gently smooth any sharp corners or rough edges on the base and sides. Be careful not to scratch the main face too deeply. -
Seal (Optional):
For a finished look, apply a coat of matte varnish. This will protect the clay from moisture and keep the speckled pepper pieces from falling out over time.
Once sealed and dry, your speckled display is ready to showcase your collection beautifully
Geometric Dangle Earrings
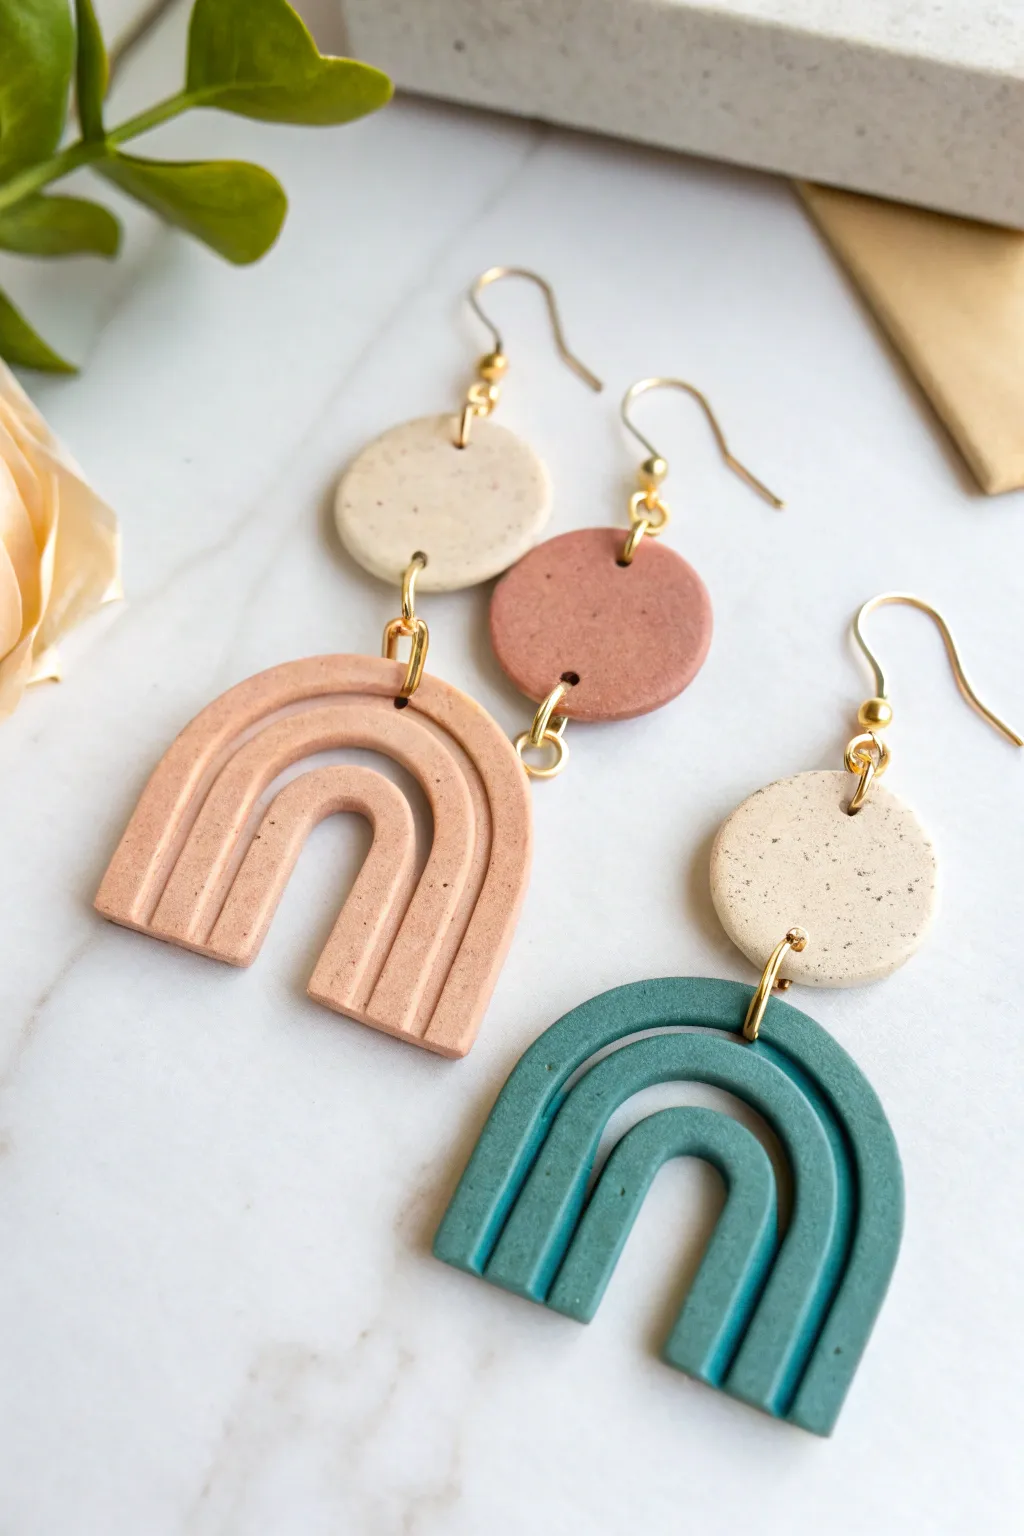
Create a stunning set of statement jewelry with these geometric dangle earrings, featuring trendy arches and speckled textures. The soft matte finish and gold hardware give them a professional, boutique-quality look that pairs perfectly with casual or dressy outfits.
Step-by-Step Guide
Materials
- Air dry clay (white or pre-colored)
- Acrylic paint (terracotta, teal, beige)
- Rolling pin or smooth glass bottle
- Circle cutters (two sizes: approx. 1 inch and 0.5 inch)
- Craft knife or clay blade
- Toothpick or small needle tool
- Fine grit sandpaper
- Gold jump rings (6mm and 8mm)
- Gold earring hooks
- Flat nose jewelry pliers
- Gloss or matte varnish (optional)
- Dried coffee grounds or black pepper (for speckling)
- Parchment paper
Step 1: Preparing the Clay
-
Condition the clay:
Start by kneading your air dry clay until it feels soft and pliable. If you are using white clay and want to color it beforehand, mix in a small drop of acrylic paint now, kneading until the color is uniform. -
Add texture:
To achieve that organic, speckled stone look seen in the photo, sprinkle a tiny pinch of dried coffee grounds or coarse black pepper into the clay. Fold and knead until the specks are evenly distributed. -
Roll it out:
Place your clay on a sheet of parchment paper to prevent sticking. Use your rolling pin to flatten the clay to an even thickness, roughly 1/8th of an inch thick. Try to keep it consistent so the earrings hang evenly.
Fixing Cracks
If tiny cracks appear while drying, don’t panic! Mix a tiny bit of fresh clay with water to make a paste (slip) and fill in the cracks. Smooth it over and let dry again.
Step 2: Cutting and Shaping
-
Cut the circles:
Using your medium-sized circle cutter (approx. 1 inch), punch out two circles for the top pieces. For the variation with the smaller connector circle, punch out smaller discs now as well. -
Form the arches:
Cut out two larger circles or rough rectangles for your arches. Using a craft knife, trim these pieces into U-shapes. You can freehand this, or create a paper template first to ensure both earrings match perfectly. -
Refine the arch shape:
Once the basic U-shape is cut, use your smaller circle cutter to remove the inner negative space of the arch, creating a smooth curve at the top. -
Carve the details:
Take your needle tool or the back of your craft knife and gently press two parallel curved lines into the surface of the arch. Don’t cut all the way through; just create deep indentations to mimic the rainbow layers. -
Pierce holes:
Using a toothpick or needle tool, carefully poke holes where the jump rings will go. You’ll need one hole at the bottom of the circle pieces and one at the top center of the arches. Ensure the hole is not too close to the edge to prevent breakage. -
Smooth the edges:
Dip your finger in a little bit of water and run it gently along the cut edges of all your clay pieces to smooth out any roughness or loose bits before drying.
Step 3: Drying and Assembly
-
Let it dry:
Lay all pieces flat on parchment paper in a cool, dry place. Allow them to dry for at least 24-48 hours. I usually flip them over halfway through the drying process to ensure the backs dry evenly. -
Sand for perfection:
Once fully cured, use fine-grit sandpaper to gently buff the edges and surface. This removes any fingerprints or jagged edges left from cutting. -
Paint (if needed):
If you didn’t pre-color your clay, now is the time to paint. Apply thin layers of matte acrylic paint in terracotta or teal. Let the first coat dry completely before adding a second. -
Seal:
To protect your jewelry, apply a thin coat of matte or satin varnish. This helps seal the paint and adds durability. -
Open jump rings:
Using two pairs of pliers (or your fingers and pliers), twist the jump rings open laterally—never pull them apart outward, as this weakens the metal. -
Connect pieces:
Thread an open jump ring through the hole in the arch and the corresponding hole in the circle piece. Close the ring securely using your pliers. -
Attach hooks:
Open the loop at the bottom of your earring hook (or add a small jump ring if needed) and attach it to the top of the clay circle. Close the loop tight.
Pattern Play
Before cutting your shapes, press a piece of lace or a textured leaf into the clay surface. This imprints a subtle, beautiful pattern that pops when painted.
Now you have a chic pair of handmade earrings ready to wear or gift.
Letter and Number Ornaments
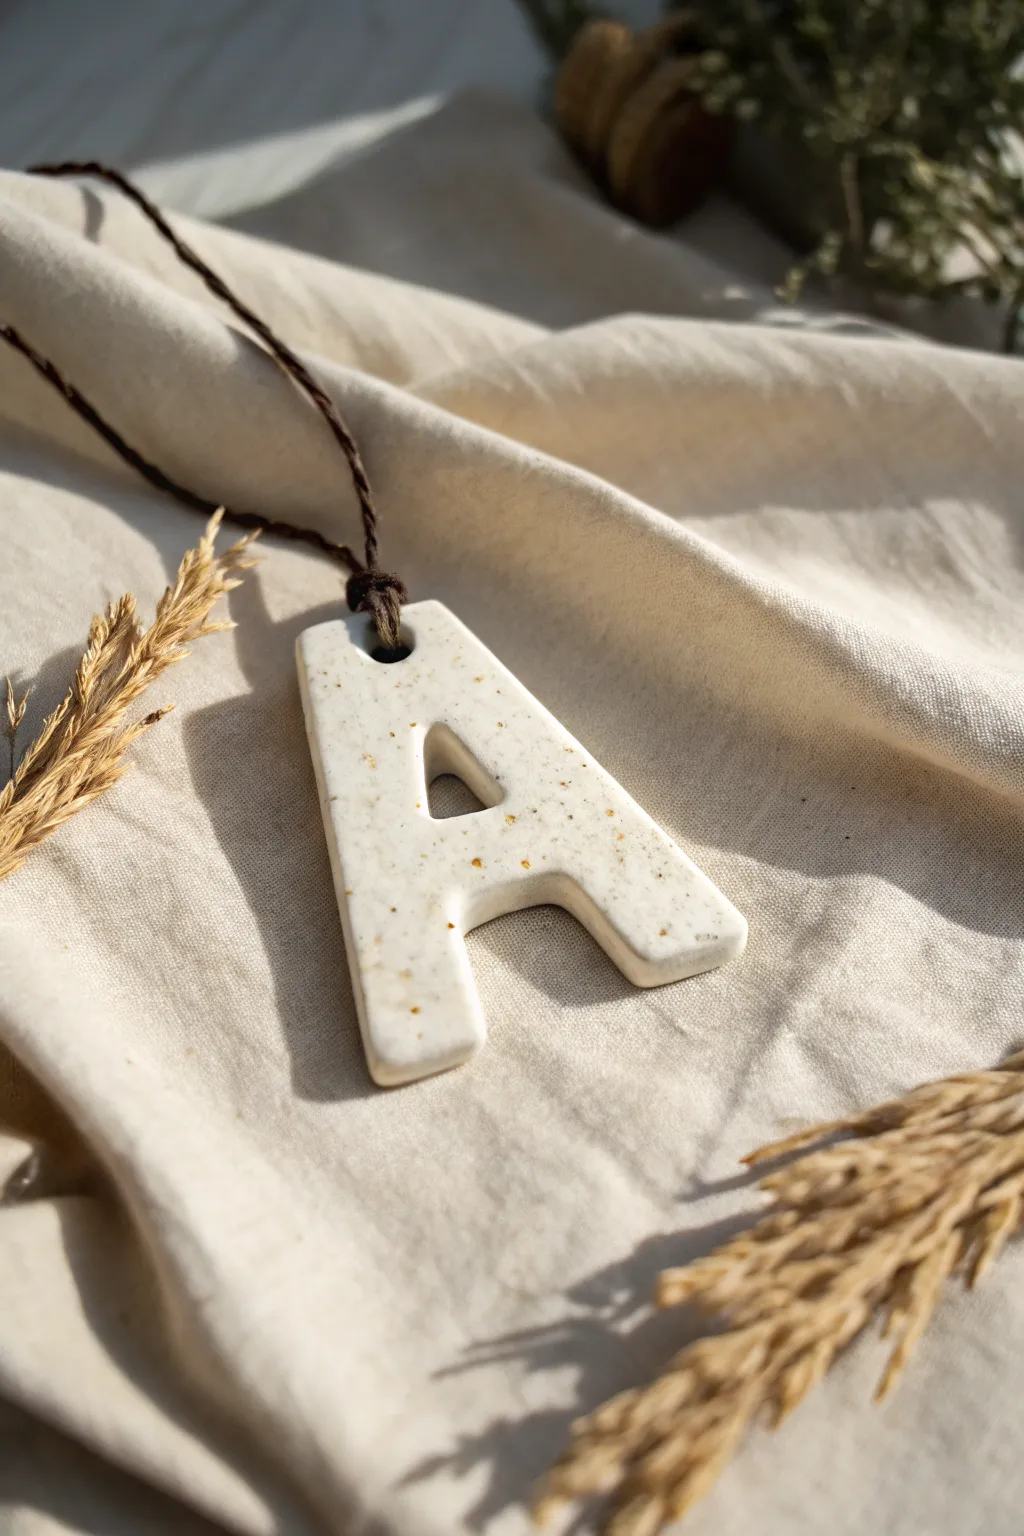
Create a personalized, high-end looking pendant without the need for a kiln using this clever air dry clay technique. The result is a smooth, creamy white letter with beautiful faux-stone speckles that looks just like fired stoneware.
Step-by-Step
Materials
- White smooth air dry clay
- Rolling pin
- Letter template (printed on paper) or letter cookie cutter
- Craft knife or scalpel
- Ground dried spices (nutmeg, cinnamon, or dried tea leaves)
- Small paintbrush
- Water
- Straw or cocktail stick
- Fine grit sandpaper (400-600 grit)
- Gloss varnish or resin (optional)
- Dark brown cord
Step 1: Preparing the Clay
-
Condition the clay:
Begin by taking a handful of white air dry clay and kneading it in your hands to warm it up and make it pliable. -
Add the speckles:
To achieve that authentic ceramic look without glaze, sprinkle a small pinch of ground nutmeg, cinnamon, or crushed loose tea leaves directly onto your clay ball. -
Knead thoroughly:
Continue kneading the spices into the clay until they are evenly distributed throughout the mass, appearing as random organic speckles. -
Roll it out:
Use your rolling pin to flatten the clay to a uniform thickness, ideally around 5-7mm thick for durability.
Clay Tip: Spice Caution
Use spices sparingly. Too much organic material can sometimes cause mold in air dry clay over time if not sealed properly. A little goes a long way for the speckled look.
Step 2: Shaping the Letter
-
Place your template:
If you are using a paper template, cut it out and place it gently on top of your rolled clay slab. -
Cut the outline:
Hold your craft knife vertically and carefully trace around the outside of the letter ‘A’, using smooth, continuous motions to avoid jagged edges. -
Cut the interior:
Carefully cut out the inner triangle of the ‘A’. I find it helpful to lift the excess clay out with the tip of the knife to avoid denting the main shape. -
Create the hole:
Before the clay starts to dry, use a straw or a cocktail stick to poke a hole at the top center of the letter for the cord. -
Smooth the edges:
Dip your finger in a tiny bit of water and run it along all the cut edges to round them off and remove any sharp corners.
Level Up: Gold Dipped
Tape off the bottom third of the letter diagonally and paint it with liquid gold leaf or metallic acrylic paint for a modern, mixed-materials aesthetic.
Step 3: Finishing Touches
-
Initial drying:
Place the letter on a piece of parchment paper or a wire rack to dry. Flip it over after about 12 hours to ensure even drying on both sides. -
Sand the surface:
Once fully cured (usually 24-48 hours), gently buff the surface and edges with fine grit sandpaper to make it buttery smooth. -
Dust off:
Wipe away any sanding dust with a slightly damp cloth or a dry soft brush. -
Seal (Optional):
For a glossy finish like the one in the photo, apply a coat of gloss varnish or a thin layer of UV resin to simulate glazed pottery. -
Attach the cord:
Cut a length of dark brown cord and fold it in half. -
Create a lark’s head knot:
Push the folded loop through the hole in the pendant from front to back. -
Secure the knot:
Thread the loose ends of the cord through the loop and pull tight to secure the pendant.
Now your faux-ceramic monogram is ready to be worn or wrapped as a thoughtful handmade gift
Cute Face Magnets
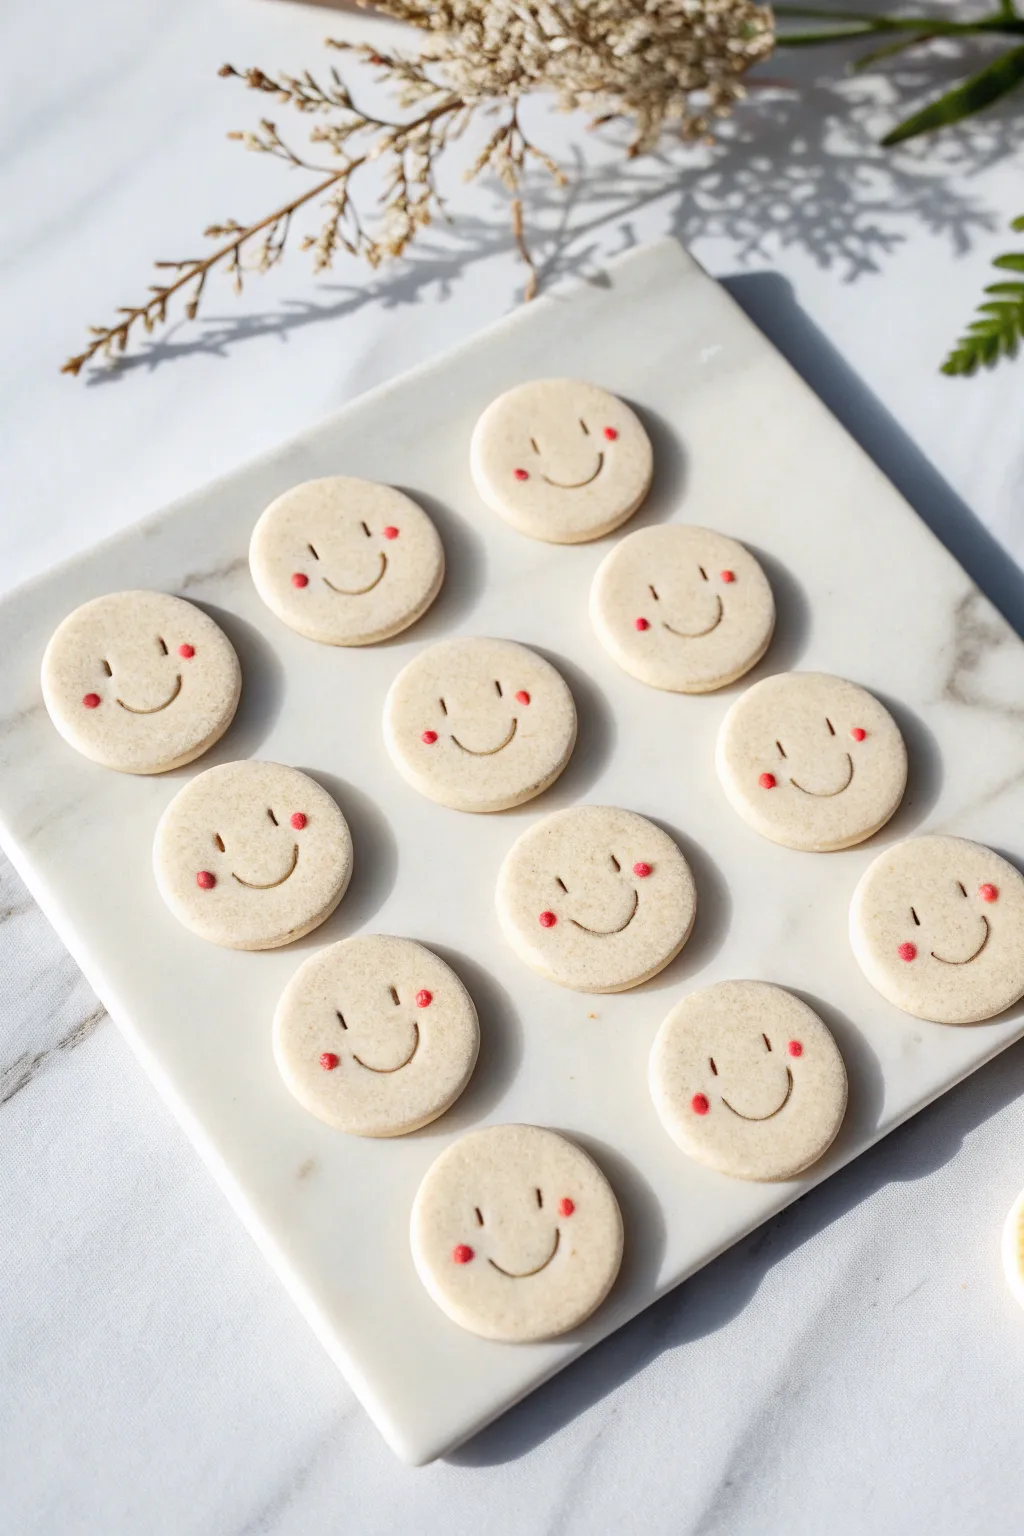
These adorable magnets look good enough to eat, mimicking the warm, textured appearance of classic shortbread cookies with a minimalist twist. With their cheerful expressions and rosy cheeks, they add a touch of sweetness to any fridge or magnetic board.
How-To Guide
Materials
- White air dry clay
- Rolling pin
- Circle cookie cutter (approx. 1.5 – 2 inches)
- Sandpaper (fine grit)
- Toothpick or needle tool
- Acrylic paint (warm beige/tan, classic red, black)
- Small paintbrush (detail brush)
- Ball stylus tool (optional, for cheeks)
- Strong round magnets
- Super glue or E6000
- Matte sealant spray
Step 1: Shaping the Base
-
Condition the clay:
Start by kneading a chunk of air dry clay until it feels pliable and warm in your hands, removing any air bubbles. -
Roll it out:
Roll your clay out onto a smooth surface until it is an even thickness, roughly 1/4 inch thick. Don’t go too thin, or the final piece will look brittle rather than like a plump cookie. -
Create the texture:
The key to the ‘cookie’ look is texture. Gently press a piece of fine sandpaper or a clean textured fabric onto the surface of the clay to give it that baked, slightly grainy appearance. -
Cut the shapes:
Use your circle cutter to punch out your rounds. If the edges are ragged, gently tap them with your finger to smooth them down without erasing your surface texture.
Texturing Trick
Use an actual toothbrush to gently stipple the wet clay surface. This mimics the porous texture of baked goods perfectly.
Step 2: Sculpting the Faces
-
Mark the eyes:
While the clay is still soft, use a needle tool or toothpick to gently press two small vertical dashes for eyes. Don’t drag the tool; press straight down and lift to keep the lines clean. -
Carve the smile:
For the mouth, use the same tool to press a curved line below the eyes. I find pressing a series of tiny connecting dots helps create a smooth curve before gently smoothing the line out. -
Dry completely:
Place your clay rounds on a wire rack or parchment paper. Let them dry for at least 24-48 hours, flipping them once halfway through to ensure the backs dry evenly.
Make ‘Em Sweet
Before the clay dries, dust the edges lightly with real cornstarch or baby powder to simulate a dusting of confectioner’s sugar.
Step 3: Painting and Finishing
-
Mix the cookie color:
Mix a tiny drop of brown or yellow ochre into white acrylic paint to create a very pale, warm beige ‘dough’ color. -
Apply the base coat:
Paint the entire front and sides of the dried clay discs. The paint should be slightly watered down so it settles into the texture you created earlier. -
Highlight the smile:
Dip a very fine detail brush into diluted black or dark brown paint. Carefully trace inside the indented lines of the eyes and smile to make them pop. -
Add the cheeks:
Using the back of a paintbrush or a ball stylus tool, dip into red paint and stamp two small, perfect dots on either side of the smile. -
Seal the surface:
Once the paint is fully dry, take the pieces outside and apply a light coat of matte sealant spray. This protects the paint while keeping that non-shiny, biscuit-like finish. -
Attach the magnet:
Flip the dried ‘cookies’ over. Apply a strong dab of super glue or E6000 to the center of the back. -
Final assembly:
Press a round magnet firmly into the glue and let it cure fully according to the glue instructions before placing them on your fridge.
Now you have a batch of permanent cookies that bring a smile every time you reach for the fridge
Window Suncatcher Hanging
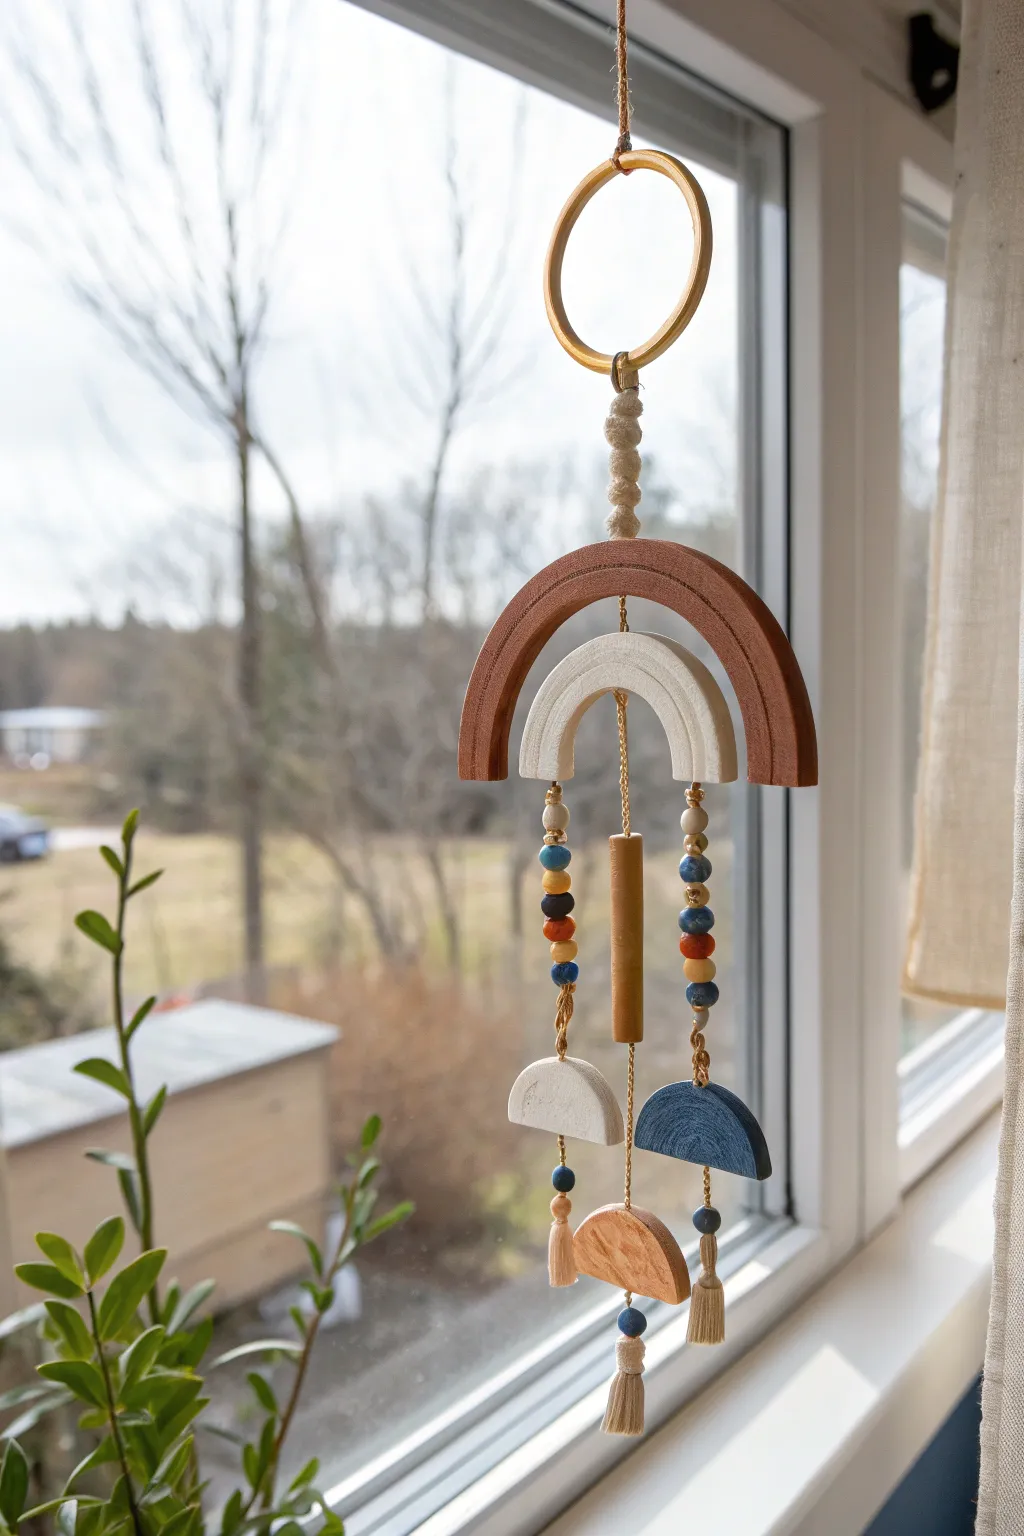
Bring a warm, earthy vibe to your windowsill with this multi-piece clay mobile featuring rainbow arches and hanging charms. The combination of painted clay, natural wood beads, and soft tassels creates a delightful play of textures and shapes against the sunlight.
Detailed Instructions
Materials
- Air dry clay (white)
- Small rolling pin
- Craft knife or clay cutter
- Circle cookie cutters (nested sizes) or large lids
- Sandpaper (fine grit)
- Acrylic paints (terracotta, cream/off-white, navy blue)
- Paintbrushes (flat and detail)
- Gold craft wire (20-22 gauge) or eye pins
- Jewelry pliers (round nose and wire cutters)
- Gold chain (fine links)
- Gold jump rings
- Wooden beads (assorted colors including blue, orange, natural)
- Large gold metal ring (approx. 2-3 inches)
- Macramé cord or embroidery floss (beige/tan)
- Wooden tube bead or dowel piece (approx. 2 inches long)
- Awl or toothpick
Step 1: Shaping the Clay Elements
-
Roll the slab:
Begin by rolling out your air dry clay on a smooth surface until it is an even thickness, roughly 1/4 inch thick. Ensuring the slab is uniform helps prevent cracking as it dries. -
Cut the large outer arch:
Use a large circle cutter or trace around a bowl to cut a large circle. Then, use a slightly smaller cutter to remove the center, creating a ring. Cut this ring in half to create two arches—you’ll use one for the top rainbow piece. -
Cut the inner arch:
Repeat the previous process with smaller cutters to create the smaller, inner rainbow arch that will nest inside the larger one. -
Cut the bottom semi-circles:
Cut three small circles using a small cutter or lid. Slice each one exactly in half to create six semi-circle shapes. You will need three of these for the bottom tier of the suncatcher. -
Add connection holes:
While the clay is still wet, use an awl or toothpick to poke holes for the wire. The large top arch needs a hole at the top center and one on each bottom leg. The inner arch needs a hole at the top center. The three semi-circles each need a hole at the top. -
Smooth and dry:
Dip your finger in a little water and smooth out any rough edges on your clay pieces. Lay them flat on a piece of parchment paper to dry completely, which usually takes 24-48 hours depending on humidity.
Step 2: Finishing and Painting
-
Sand imperfections:
Once fully cured, gently sand the edges with fine-grit sandpaper to ensure a clean, professional finish. -
Paint the large arch:
Paint the large outer arch with a warm terracotta or burnt sienna acrylic paint. I usually apply two thin coats for opaque coverage. -
Paint the remaining pieces:
Paint the smaller inner arch a creamy off-white. For the three bottom semi-circles, paint one cream, one navy blue, and one a lighter terracotta or natural clay tone.
Clay Cracking?
If small cracks appear as the clay dries, mix a tiny amount of fresh clay with water to make a paste (slip) and fill them in before painting.
Step 3: Assembly
-
Prepare the beaded chains:
Cut three lengths of gold chain, each about 4 inches long. On two of the chains (for the sides), thread an assortment of small wooden in a pattern: natural wood, blue, dark blue, orange, blue. -
Center bead assembly:
For the middle chain, thread your long wooden tube bead onto the chain so it hangs vertically. -
Attach chains to arches:
Using gold jump rings, attach the inner cream arch inside the large terracotta arch. The chain holding the tube bead should hang from the center of the inner arch. -
Attach side chains:
Attach the two beaded chains to the bottom holes of the large terracotta arch legs. -
Make tassels:
Create three small tassels using beige embroidery floss or thin macramé cord. Wrap the cord around a fork 15 times, tie off the top, travel down slightly to tie the neck, and cut the bottom loops. -
Connect bottom tier:
Using jump rings, attach the painted semi-circles to the bottom of your three chains. Finally, attach a tassel to the bottom of each semi-circle (you can glue the tassel cord to the back or drill a tiny hole). -
Top loop assembly:
Wrap macramé cord around the connection point of your large gold ring to create a textured loop. Attach this ring to the top of your large terracotta arch using a short length of chain or a jump ring.
Pro Tip: Balanced Hanging
Before gluing or twisting final jump rings closed, hold the mobile up to check the balance. Adjust bead placement if it lists to one side.
Hang your finished masterpiece in a sunny window and enjoy the beautiful interplay of shadow and color
Tiny Animal Figurines
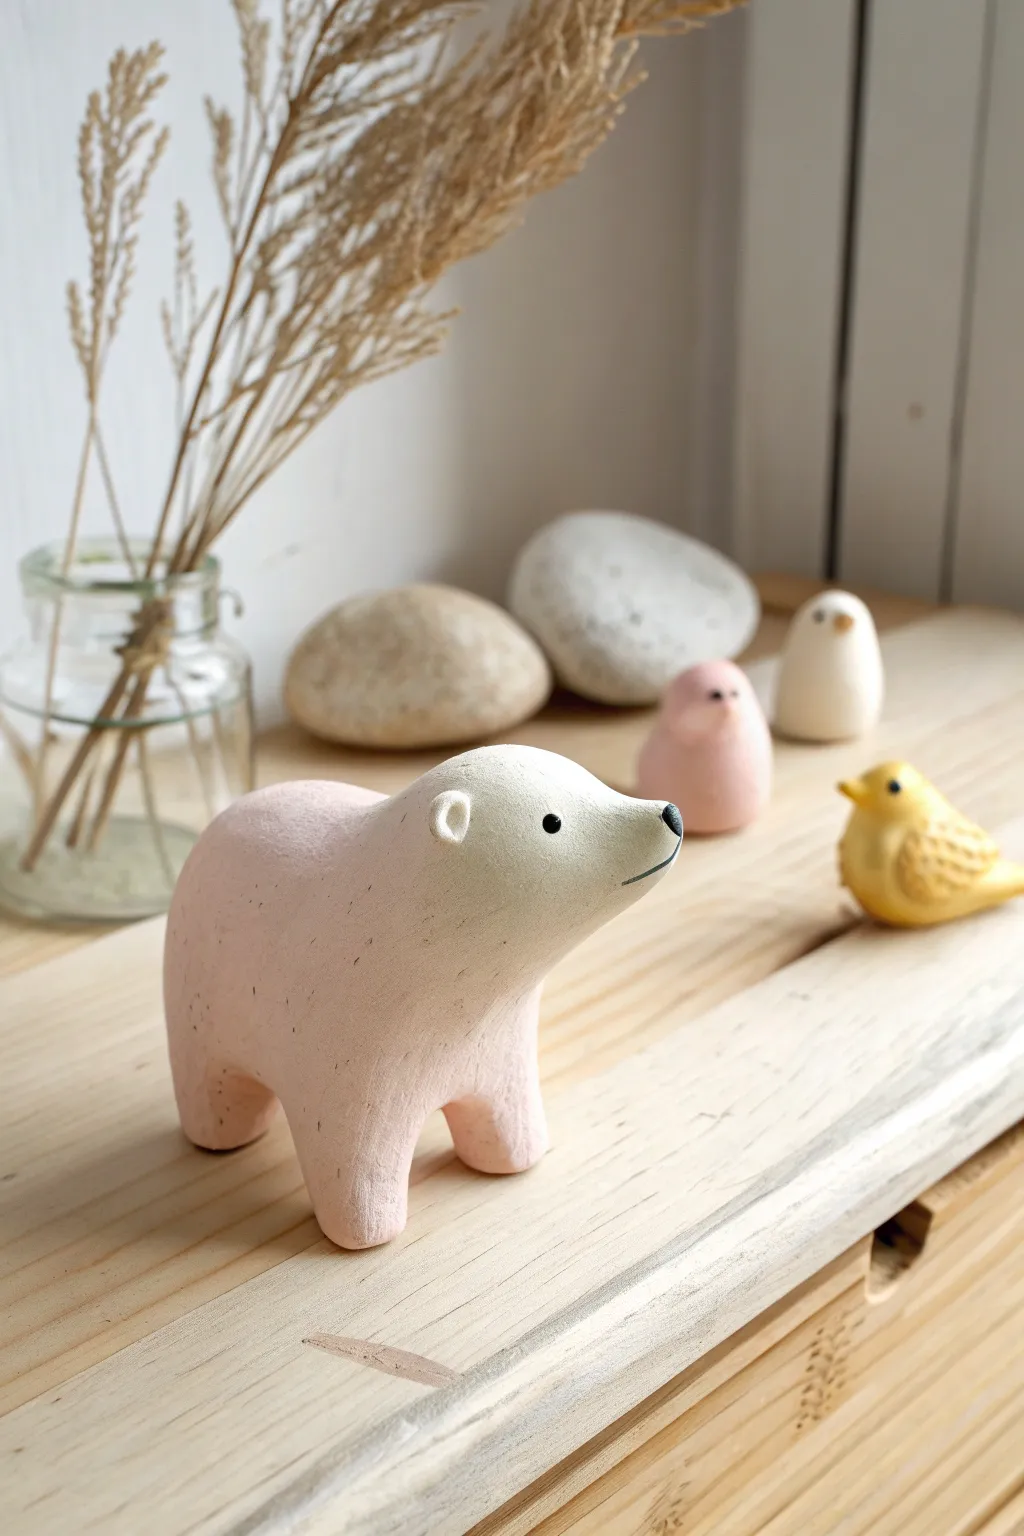
This charming little bear figurine features a dreamy soft ombre effect, transitioning from natural white to a blushing pink. Its simplified, rounded shape makes it a soothing and modern decorative piece perfect for a nursery or desk shelf.
Step-by-Step Tutorial
Materials
- Air dry clay (white)
- Acrylic paints: Black, White, Soft Pink (or red mixed with white)
- Makeup sponge or small dense foam sponge
- Fine detail paintbrush (size 0 or 00)
- Small bowl of water
- Smoothing tool or your finger
- Micro-fiber cloth / paper towel
- Fine grit sandpaper (optional)
Step 1: Sculpting the Form
-
Condition the clay:
Begin with a golf-ball-sized amount of white air dry clay. Knead it in your hands until it feels warm and pliable, which helps prevent cracking later on. -
Shape the body:
Roll your clay into a smooth, oval-shaped log. Use your palms to gently flatten the bottom so it can stand upright stably. -
Pull out the legs:
Rather than attaching separate legs, gently pinch and pull four short, stout leg shapes directly from the bottom of the main oval. This integrated technique makes the figure stronger. -
Refine the stance:
Press the bear down onto your work surface firmly to ensure all four feet are level. Tap the sides to square off the body slightly if you prefer a blockier look. -
Form the head:
Pinch the front end of the oval to extend it into a snout. Smooth the neck area so there is no harsh transition; the head should flow seamlessly from the back. -
Add the ears:
Roll two very tiny balls of clay. Press them gently onto the top of the head. Use a sculpting tool or the back of a paintbrush to create a small indentation in the center of each ear. -
Smooth the surface:
Dip your finger in a tiny bit of water and rub it over the entire sculpture to erase fingerprints and smooth out any bumps. Let the bear dry completely, ideally for 24-48 hours depending on your humidity.
Sponge Tactics
Use a cosmetic wedge sponge for the gradient. Its tight pores create a smoother, airbrushed look compared to a standard kitchen sponge.
Step 2: Painting the Ombre Effect
-
Sand imperfections:
Once fully dry, check for rough spots. A quick pass with fine-grit sandpaper can make the surface perfectly matte and smooth for painting. -
Prepare the pink paint:
Squeeze a small amount of soft pink acrylic paint onto your palette. If it’s too bright, mix in a dash of white to get that gentle pastel tone. -
Start the gradient:
Dip your makeup sponge into the pink paint and dab off the excess on a paper towel until the sponge is almost dry. This dry-sponging technique is key for a soft look. -
Apply the color:
Gently dab the sponge starting at the bear’s rear legs and rump. Build up the color opacity at the back, making it solid pink. -
Fade the transition:
As you move toward the middle of the body and front legs, use a lighter touch with less paint on the sponge. I find this creates a misty, fading effect where the pink disappears into the white clay. -
Leave the head white:
Stop sponging before you reach the neck area. The head and snout should remain the natural white of the clay (or painted white if you prefer a starker finish).
Step 3: Adding Details
-
Paint the eyes:
Using your finest detail brush and black acrylic paint, add two small dots for eyes on either side of the head. Keep them simple and widely spaced for a cute expression. -
Add the nose:
Paint a small, soft triangle or oval at the very tip of the snout in black. A slightly rounded shape looks friendlier than a sharp triangle. -
Create the mouth:
With the very tip of your brush, draw a thin, delicate line extending down from the nose and curving slightly to one side for a subtle smile. -
Optional highlights:
If you want extra life in the eyes, add the tiniest speck of white paint to the top corner of each black eye dot once the black is fully dry. -
Seal the piece:
To protect that soft matte finish, apply a coat of matte varnish spray or brush-on matte medium. Avoid glossy finishes to maintain the organic, stone-like aesthetic.
Make a Bird Friend
Use a simple teardrop shape to create matching birds like the background ones. Omit legs and just paint a yellow beak for a minimal companion.
Place your new pastel bear on a bookshelf or windowsill where the light can catch its gentle colors