Clay cacti are my go-to project when I want something cute, low-pressure, and instantly display-worthy. You can keep them simple with basic shapes or get fancy with texture, color, and tiny accessories—either way, they’re impossible not to love.
Barrel Cactus With Ribbed Lines
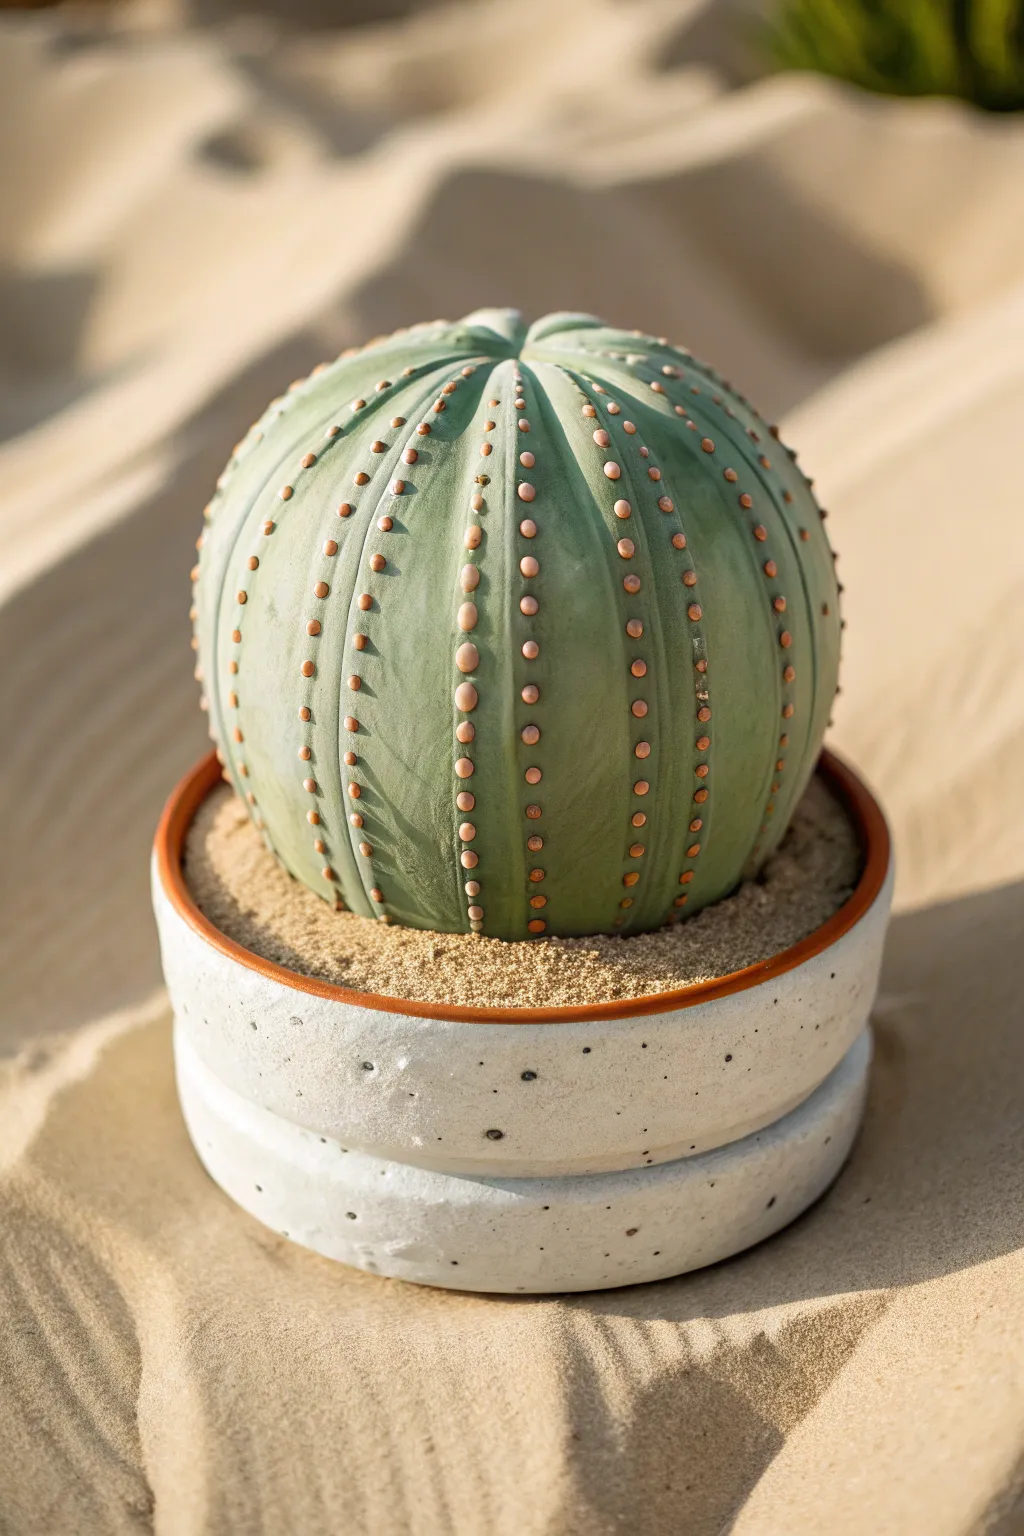
This project captures the sun-baked elegance of a barrel cactus using polymer clay without needing a single drop of water. With its smooth, ribbed body and dotted areoles, this faux succulent sits perfectly in a textured white pot, creating a serene desert vibe for your desk or shelf.
Step-by-Step Tutorial
Materials
- Sage green polymer clay (approx. 4oz)
- Light terracotta or peach polymer clay (small amount)
- White polymer clay with speckles (or plain white + black pepper)
- Translucent liquid sculpey or strong craft glue
- Mod Podge (matte finish)
- Fine grit sandpaper
- Needle tool or toothpick
- Clay sculpting tools (ribbon tool and ball stylus)
- Rolling pin
- Fine sand (craft sand or clean beach sand)
- Small round cookie cutter or jar lid (approx. 3-inch diameter)
- Oven for baking
Step 1: Prepping the Base and Body
-
Condition the green clay:
Start by warming the sage green clay in your hands until it’s soft and pliable. If the color seems too bright, I like to mix in a tiny pinch of brown or grey to give it that dusty, realistic plant look. -
Form the main sphere:
Roll the conditioned green clay into a large, smooth ball. It doesn’t need to be perfectly spherical; a slightly flattened top and bottom will help it sit better in the pot. -
Create guidelines:
Using a needle tool, lightly mark a center point on the very top of your sphere. This will be the anchor for your vertical ribs. -
Sculpt the ribs:
Take a ribbon tool or the side of a knitting needle and press vertical indentations from the top center down to the bottom. Space these evenly around the sphere to create distinct, puffy segments. -
Refine the shape:
Gently smooth the indentations with your finger to remove harsh lines. The goal is to make the segments look plump and organic, like a pumpkin or a melon.
Uneven Ribs?
If your vertical lines look wobbly, use a piece of dental floss stretched taut to press the initial guidelines into the raw sphere before carving with tools.
Step 2: Adding the Spines
-
Prepare the spine dot clay:
Condition the light terracotta or peach clay. Roll it into a very thin snake, roughly the thickness of a piece of spaghetti. -
Slice small discs:
Use a craft knife to slice the snake into tiny, uniform discs. You will need roughly 8-10 discs for each vertical rib on your cactus. -
Apply the areoles:
Starting at the top of a rib, press the tiny peach discs onto the green ridges. Space them evenly going down the side. Repeat this for every rib on the cactus. -
Shape the dots:
Using a small ball stylus or the back of a paintbrush, gently press into the center of each peach dot. This bonds the clay and gives it a slightly cratered look where spines would naturally emerge. -
Texture the green skin:
Take a piece of fine sandpaper or a stiff bristled brush and very lightly tap the green areas of the clay. This removes fingerprints and adds a matte, organic texture before baking.
Pro Tip: Realistic Skin
Dust a tiny amount of white cornstarch or baby powder over the green clay before texturing. It softens the color and prevents tools from sticking.
Step 3: Creating the Pot
-
Form the pot base:
Roll out your speckled white clay into a thick slab, about 1/4 inch thick. If you don’t have speckled clay, mix coarse black pepper into white clay for a convincing stone effect. -
Cut the cylinder walls:
Cut a long rectangular strip for the wall of the pot and a circle for the base using your cutter. Wrap the strip around the base circle, smoothing the seams together on the inside. -
Double the rim:
To mimic the stacked look in the photo, roll slight indentations horizontally around the middle of the pot using a tool handle, or stack two shorter cylinders on top of each other. -
Add the rim detail:
Roll an extremely thin snake of the terracotta clay. Press this onto the very top rim of the white pot to create a contrasting lip. -
Structure the inside:
Fill the bottom half of the pot with scrap aluminum foil compressed into a ball. This saves clay and ensures the pot isn’t too heavy.
Step 4: Assembly and Baking
-
Position the cactus:
Place the cactus body onto the foil mound inside the pot. Ensure it sits straight and leaves a small gap (about 1/4 inch) between the cactus skin and the pot rim. -
Bake the project:
Bake the entire assembly according to your clay manufacturer’s instructions (usually 275°F for 15-30 minutes). Let it cool completely in the oven to prevent cracking. -
Secure the sand:
Once cool, brush a layer of craft glue into the gap between the cactus and the pot rim. Carefully pour fine sand over the glue, tilting the pot to ensure full coverage. -
Seal the sand:
Drip a mixture of water and glue (50/50 mix) over the sand to lock it in place so it won’t spill later. -
Final matte coat:
Brush a light coat of matte Mod Podge over the green part of the cactus to seal the surface and eliminate any unnatural polymer shine.
Place your finished piece in a sunny spot to enjoy the desert aesthetic without the prickly thorns


Kawaii Cactus With Sweet Face
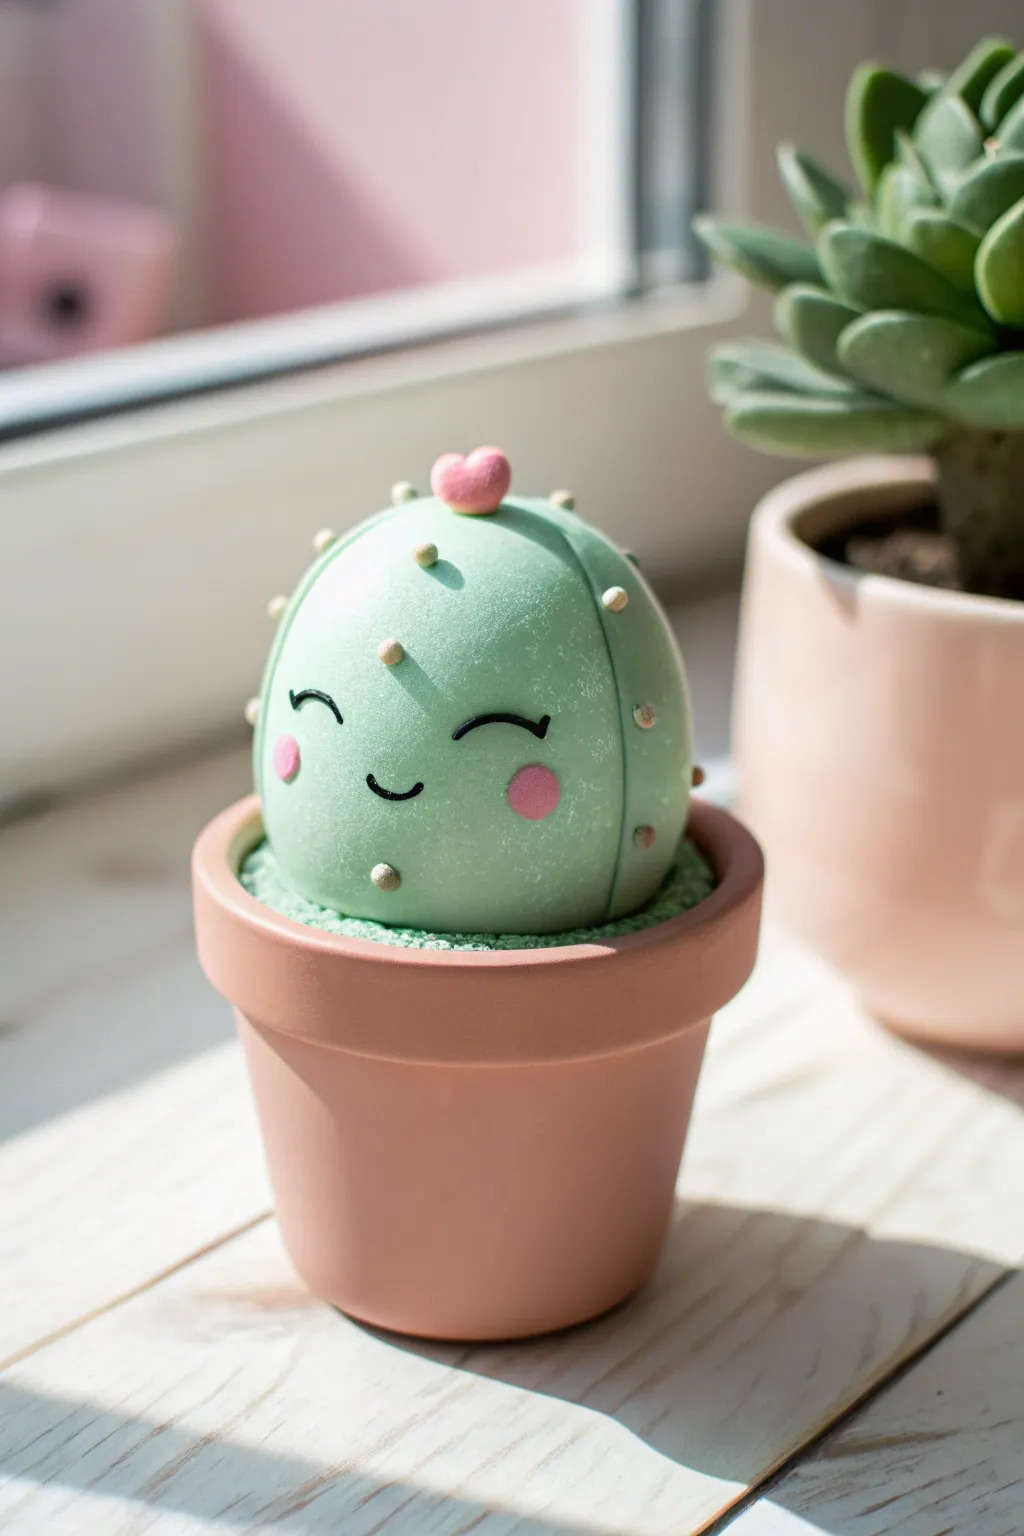
Bring a little prickly joy to your windowsill with this adorable clay creation featuring a sweet smiling face and a tiny pink heart. The soft pastel greens and simple round shape make this a perfect beginner-friendly project that practically radiates happiness.
Detailed Instructions
Materials
- Light green polymer clay (pastel shade)
- Terra cotta or warm brown polymer clay
- Pink polymer clay (for cheeks and heart)
- Black polymer clay (tiny amount for eyes/mouth)
- White or cream polymer clay (for cactus spines)
- Green or brown coarse sand (or textured clay for ‘dirt’)
- Ball stylus tool
- Needle tool or toothpick
- Baking sheet and parchment paper
- Gloss glaze (optional)
Step 1: Potting the Base
-
Shape the Pot Body:
Condition your terra cotta colored clay until it’s soft and pliable. Roll a smooth ball about the size of a golf ball, then gently flatten the bottom so it stands upright. Use your thumbs to pinch and pull the sides upwards to create a classic flower pot shape. -
Add the Rim:
Roll a separate snake of the same terra cotta clay. Wrap this strip around the top edge of your pot to create a distinct rim. Blend the seam at the back carefully so it looks seamless and smooth. -
Fill with Dirt:
Fill the inside of the pot with scrap clay to bulk it out, leaving just a bit of room at the top. Cover this filler with a thin layer of textured green clay or, for a realistic touch, press coarse sand into a thin layer of liquid clay to simulate the potting soil surface.
Step 2: Sculpting the Cactus
-
Roll the Body:
Take your light pastel green clay and roll a perfectly smooth sphere. This will be the main body of your cactus, so ensure there are no cracks or fingerprints. It should be sized to fit snugly just inside the rim of your pot. -
Create Sections:
Using a needle tool or the back of a knife, gently press vertical indentation lines around the sphere. Don’t cut all the way through; you just want to suggest the segmented ribs of a cactus. -
Attach to Pot:
Place your green sphere onto the prepared ‘dirt’ base in your pot. Press it down gently to secure it, ensuring it sits centered and stable. -
Position the Spines:
Roll tiny, tiny balls of cream or white clay. Press these gently onto the vertical ribs you created earlier. Space them out evenly to look like soft spines. -
Make the Face:
Roll two excessively thin snakes of black clay. Curve them into ‘U’ shapes for the smiling eyes and press them onto the middle of the face. -
Add Expression:
Create a tiny ‘U’ shape for the mouth and place it centrally between the eyes. Add two small flattened circles of pink clay for the rosy cheeks on either side. -
Crown with Love:
Shape a small piece of pink clay into a puffy heart. Secure this right on top of the cactus head as a cute flowering detail.
Fixing Cracks
If you see cracks appearing while sculpting the main ball, your clay isn’t conditioned enough. Add a drop of clay softener or baby oil and knead well.
Step 3: Finishing Up
-
Check Details:
Before baking, do a final scan for lint or dust. I find a little bit of rubbing alcohol on a brush helps smooth away any accidental fingerprints. -
Bake:
Bake the entire piece according to your polymer clay package instructions. Usually, this is around 275°F (135°C) for 15-20 minutes, depending on the thickness. -
Cool Down:
Let the cactus cool completely on the baking sheet. It will be fragile while warm, so resist the urge to touch it until it hardens. -
Glaze (Optional):
For a polished look, apply a thin coat of gloss glaze to the eyes and the heart to make them shine, leaving the rest of the cactus matte.
Texture Time
Before baking, use an old toothbrush to gently tap the ‘dirt’ surface. This gives it a crumbly, realistic soil texture instantly.
Now you have a low-maintenance plant friend that will stay cute forever


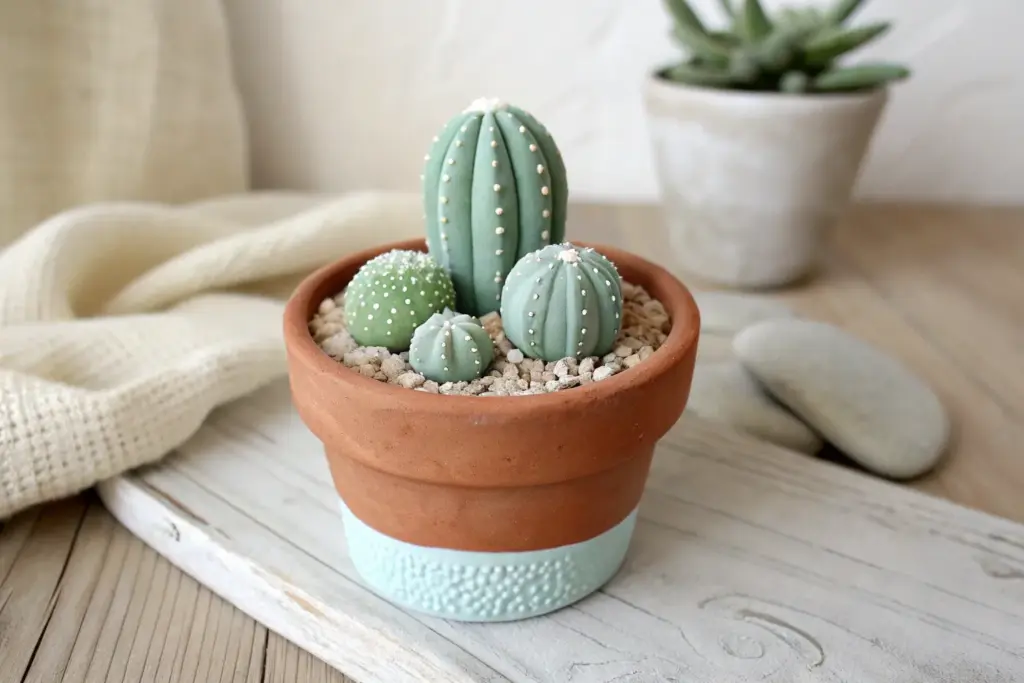
Cactus With Tiny Clay Flowers
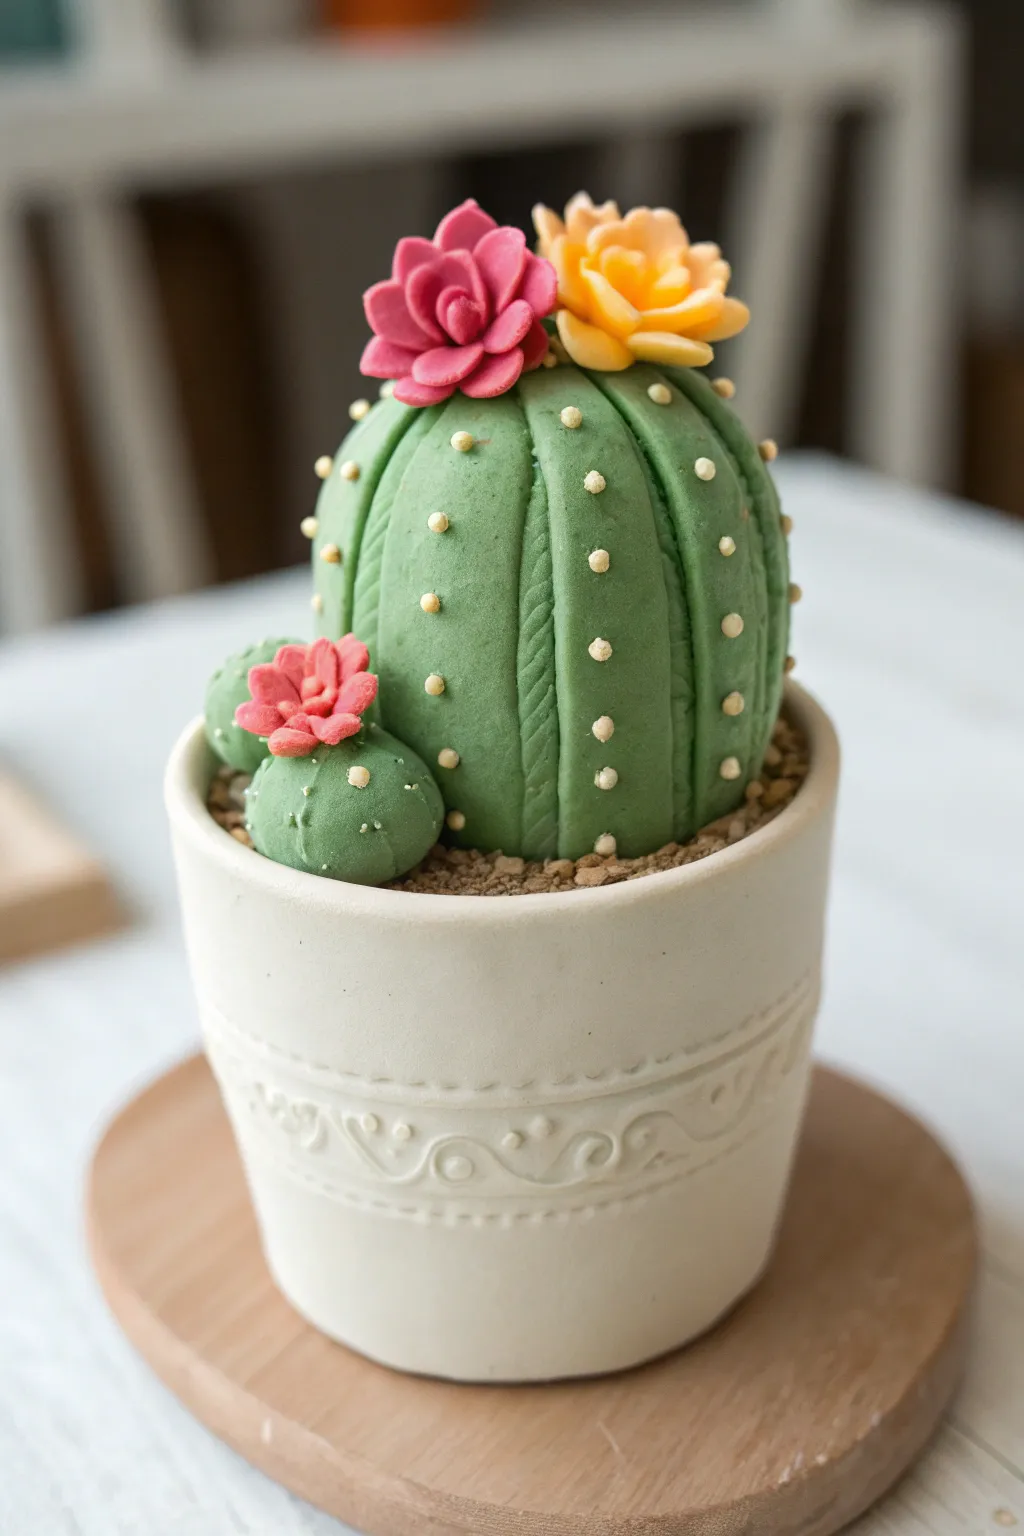
Bring the desert indoors without the prickly spines by crafting this adorable barrel cactus with vibrant blooms. This project captures the charm of a succulent garden with soft clay textures and delicate floral details perfect for a desk companion.
How-To Guide
Materials
- Green polymer clay (sage or leaf green)
- Pink polymer clay
- Yellow/Orange polymer clay
- White or cream polymer clay
- Brown polymer clay (or real soil/sand)
- Small ceramic pot (white)
- Needle tool or toothpick
- Clay sculpting tools (ball tool)
- Liquid polymer clay (optional adhesive)
- Soft pastel chalks (optional for shading)
- Translucent powder or cornstarch (to prevent sticking)
Step 1: Sculpting the Base
-
Prepare the pot:
Start by filling your small ceramic pot with a base of scrap clay or foil to bulk it out, leaving about half an inch from the top rim. This saves your good clay and keeps the project lightweight. -
Add the soil:
Roll out a sheet of brown clay and place it over your foil base, tucking it neatly against the inner rim of the pot. Texture this surface by stippling it with a toothbrush or ball of foil to mimic loose dirt. -
Form the main body:
Condition a large ball of green clay until soft and pliable. Roll it into a smooth, slightly squat sphere for the main barrel cactus shape. -
Create the ribs:
Using the side of a needle tool or a knitting needle, press vertical indentations all around the sphere. These lines should run from the top center down to the base to create the cactus’s distinct ribbed sections. -
Shape the sprout:
Create a much smaller sphere of green clay for the side sprout. Give it the same vertical rib detailing as the main body so they match perfectly. -
Assemble the cactus:
Place the large cactus ball into the center of your pot, pressing it gently onto the brown ‘soil’ base. Nest the smaller sprout right next to it, ensuring good contact between the clays.
Texturing Trick
Use coarse sandpaper or an old toothbrush to gently texture the green clay before adding spines. It removes fingerprints and adds an organic matte finish.
Step 2: Adding Details
-
Make the spines:
Roll tiny distinct balls of white or cream clay. These will be the areoles (spine clusters). They need to be very small, uniform spheres. -
Apply the spines:
Gently press these tiny white balls onto the ridges of your green cactus body. Space them evenly apart, traveling down each vertical rib. -
Texture the spines:
Take your needle tool and prick the center of each white dot. This pushes the clay in slightly and gives it a prickly texture without being sharp. -
Adding texture to the ribs:
For extra realism, I like to use a texturing tool to add faint, angled lines between the ribs, mimicking the natural growth patterns of a barrel cactus.
Step 3: Blooming Flowers
-
Create pink petals:
Roll very thin, small teardrop shapes from your pink clay. Flatten them gently with your finger or a ball tool to curve the edges slightly. -
Assemble the pink flower:
Arrange the petals in a circular overlapping pattern, starting with a tight center and working outward. Place this finished bloom on top of the main cactus body. -
Form the yellow flower:
Repeat the petal process with yellow and orange clay. Mixing these two colors slightly can create a beautiful variegated look for the petals. -
Position the blooms:
Cluster the yellow flower next to the pink one on the main cactus. Add a smaller pink bloom on top of the little side sprout for balance. -
Final touches:
Check all your attachment points. If the flowers feel loose, a drop of liquid polymer clay or ‘Bake and Bond’ under them will secure them permanently. -
Bake the project:
Bake the entire piece in your oven according to the manufacturer’s instructions for your specific brand of clay (usually around 275°F or 130°C for 15-30 minutes). Let it cool completely inside the oven to prevent cracking.
Realism Boost
Dust the centers of the flowers and the crevices of the cactus ribs with darker green or red soft pastel powder before baking for incredible depth.
Place your finished piece on a sunny windowsill where it can brighten your day without needing a single drop of water


Two-Tone Shaded Cactus Gradient
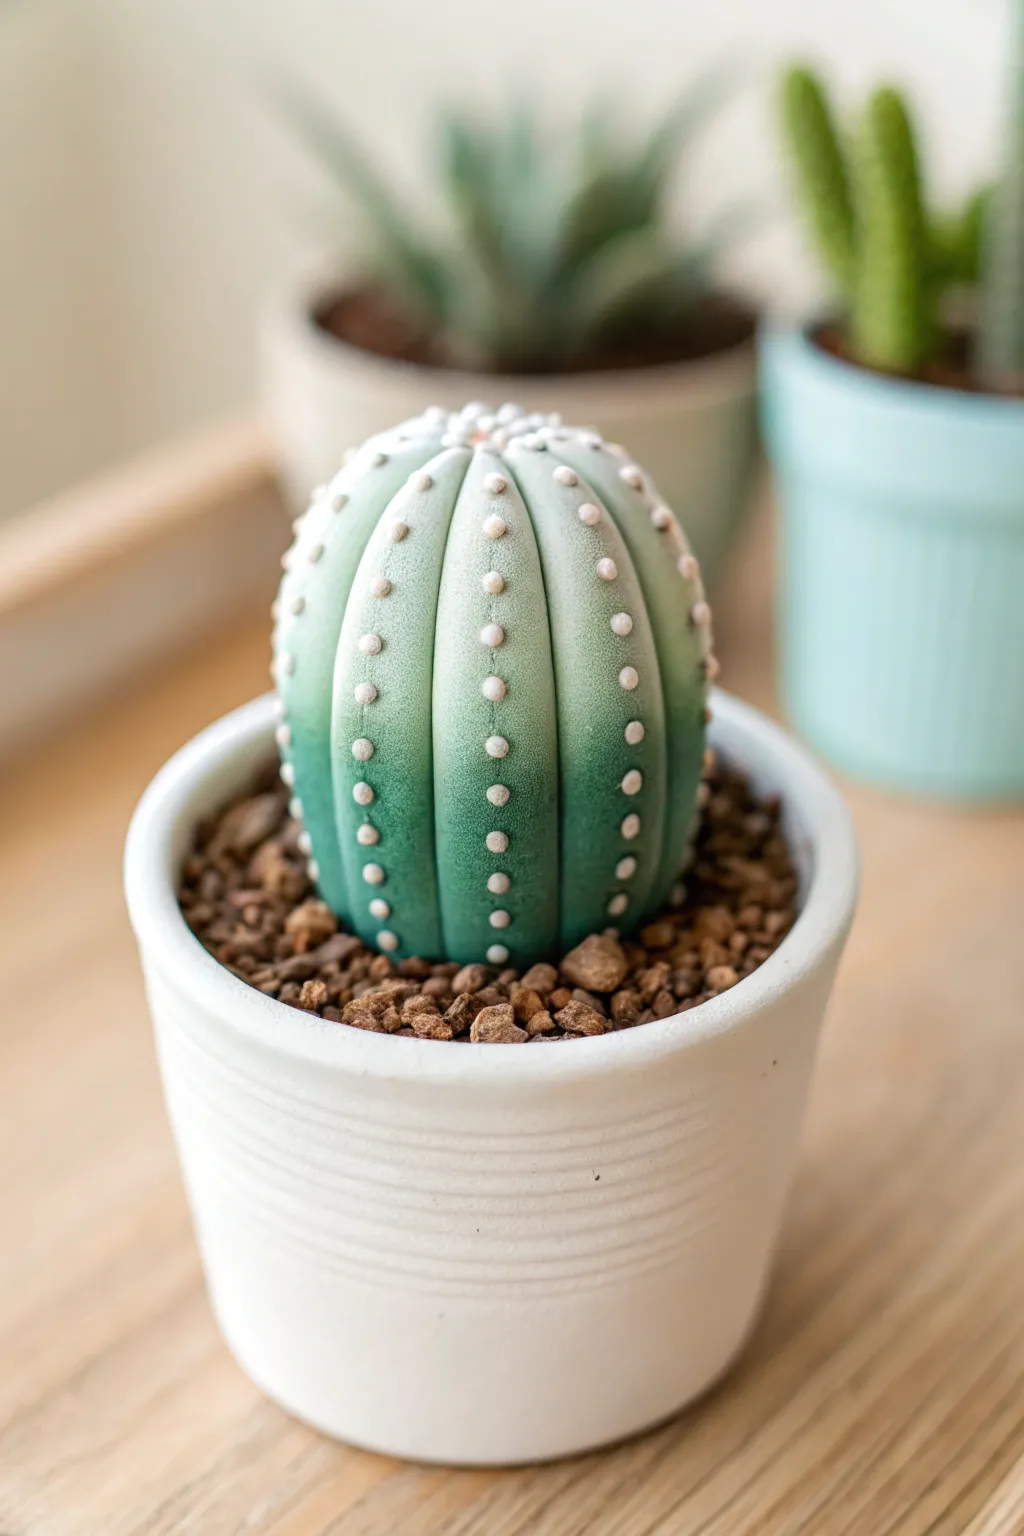
Capture the serene beauty of a desert sunrise with this stunning two-tone polymer clay cactus. The smooth gradient fade from deep teal to pale mint gives this piece a sophisticated, realistic touch that looks beautiful on any shelf.
Step-by-Step
Materials
- Polymer clay (Teal, White, and optional Translucent)
- Acrylic rolling pin or pasta machine
- Clay blade or tissue blade
- Needle tool or toothpick
- Small dotting tool
- Soft pastel chalks (Teal, Dark Green, White)
- Soft paintbrush
- Small terracotta or ceramic pot (approx. 2-3 inches)
- Dried coffee grounds or small decorative gravel for ‘soil’
- Craft glue or liquid clay
- Oven for baking
Step 1: Preparing the Gradient
-
Condition the clay:
Start by thoroughly conditioning your teal and white polymer clay separately until they are soft and pliable. Warm clay blends much smoother than cold clay. -
Create triangles:
Roll both colors into sheets of equal thickness. Cut a right-angled triangle from the teal sheet and an identical triangle from the white sheet. -
Form the rectangle:
Fit the two triangles together to form a rectangle, placing the hypotenuse of the teal against the hypotenuse of the white. -
Begin the Skinner Blend:
Fold the rectangle in half, bringing the bottom edge up to the top edge (keeping like colors together). Pass this through your pasta machine or roll it out with your rolling pin. -
Repeat rolling:
Continue folding in the same direction and rolling out about 15-20 times. You will see the seam disappear and a smooth gradient emerge from dark teal to white. -
Make the cane:
Once you are happy with the blend, roll the sheet up lengthwise like a jelly roll, with the white end on the inside if you want a lighter core, though for this project, we actually want the gradient vertical. So, actually accordion fold the sheet so the gradient runs top-to-bottom on your final block.
Step 2: Shaping the Cactus
-
Form the base ball:
Take a scrap ball of clay (or aluminum foil tightly compacted) to act as the core, roughly slightly smaller than your desired cactus size. This saves your precious gradient clay. -
Apply the gradient skin:
Slice a thick sheet from your gradient block. Wrap this sheet around your core ball, ensuring the teal is at the bottom and the white is at the top. Smooth the seams gently with your fingers until invisible. -
Refine the shape:
Roll the ball gently on your work surface to elongate it slightly into a rounded oval shape seen in the photo. The top should be slightly flatter than the bottom. -
Mark the segments:
Using the back of your clay blade or a needle tool, gently press vertical indentation lines from the bottom center to the top center. Create about 8-10 evenly spaced vertical lines. -
Deepen the ridges:
Use a modeling tool or your finger to smooth and round the clay between the indentation lines, creating puffy, convex ribs.
Clean Hands Tip
White clay attracts dust like a magnet! Keep a pack of baby wipes nearby and clean your hands and tools thoroughly before handling the white clay parts.
Step 3: Detailing and Assembly
-
Add pastel shading:
Shave a little teal and dark green pastel chalk into a powder. Use a soft brush to dust this powder into the deep crevices between the ribs. This enhances the 3D effect significantly. -
Add the spines:
Roll a very thin snake of pure white clay. Cut tiny, equal-sized bits from it. Roll these bits into tiny balls. -
Attach the spines:
Using your small dotting tool, press into the center of each rib to create a small divot, then place a white clay ball inside. Repeat in a vertical row up every rib. -
Texturize the surface:
For that realistic matte look, take an old toothbrush or stiff bristle brush and gently tap it over the entire surface of the cactus (avoiding the white dots) to give it a porous texture. -
Bake carefully:
Bake the cactus according to your clay package directions. I usually tent a piece of foil over the top to prevent the white clay from getting scorched or yellowing. -
Final potting:
Once cooled, glue the cactus into your small pot. Fill the surrounding space with dried coffee grounds mixed with glue (for realistic soil) or small gravel.
Make it Bloom
Before baking, add a tiny pop of color by creating a small clay flower in yellow or pink and attaching it to the very top center.
Place your everlasting succulent on a sunny windowsill and enjoy the desert vibes all year round

The Complete Guide to Pottery Troubleshooting
Uncover the most common ceramic mistakes—from cracking clay to failed glazes—and learn how to fix them fast.
White Spine Dots For Contrast
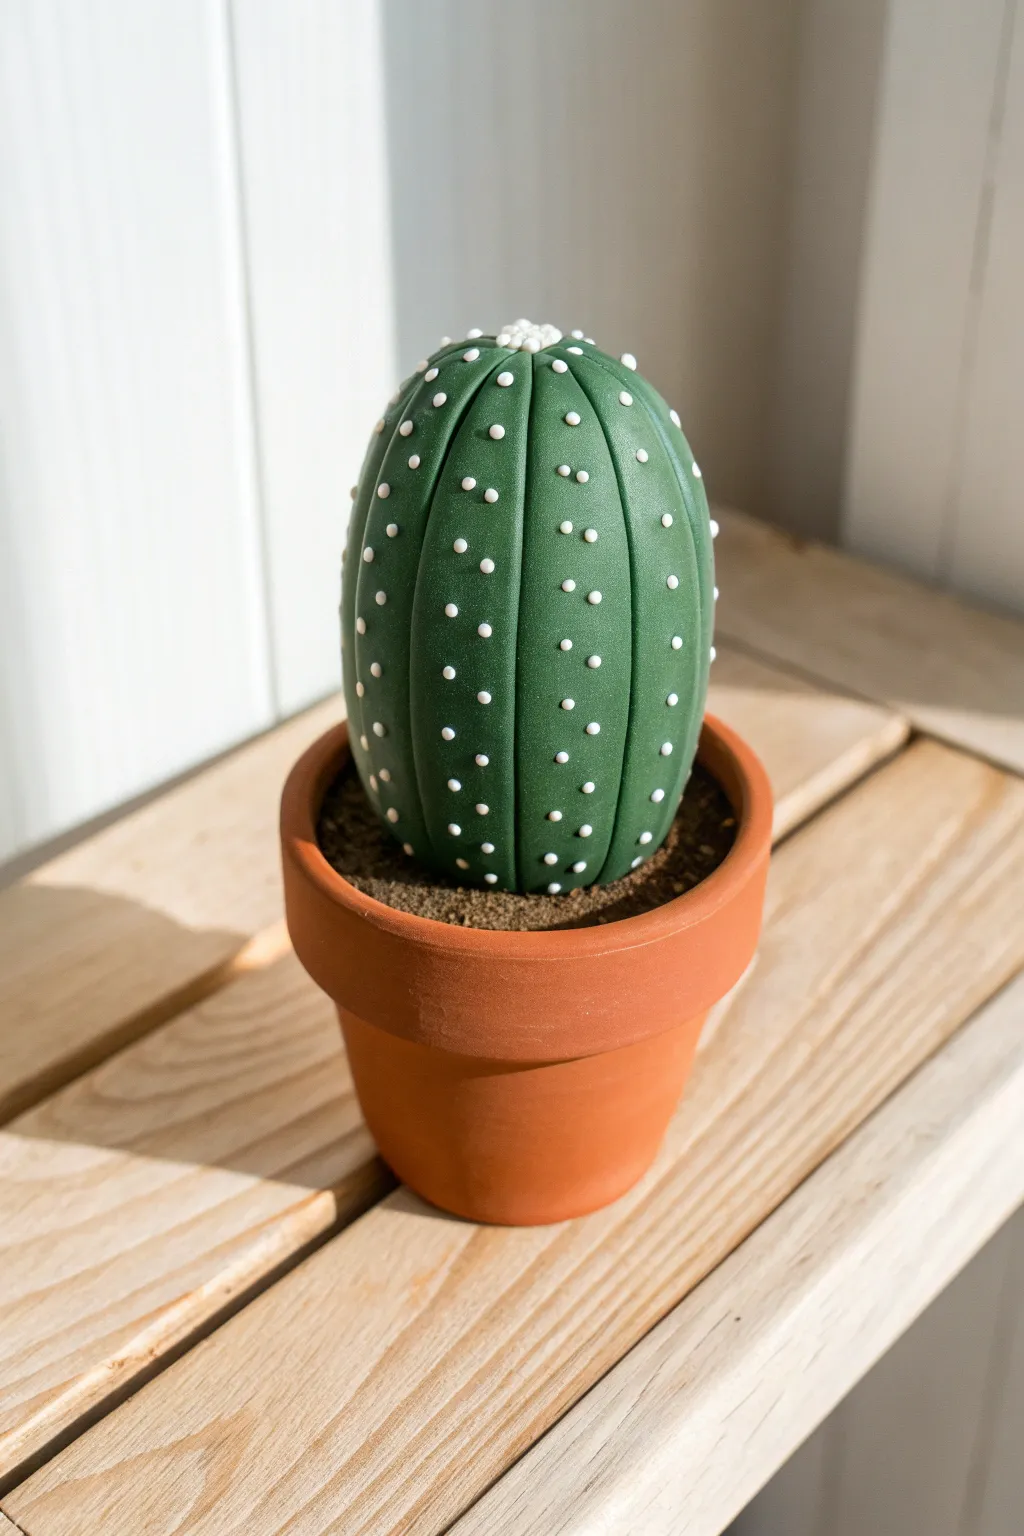
This charming, stylized cactus relies on crisp white details to pop against a deep green body, creating a clean and modern look. The project mimics the segments of a barrel cactus using polymer clay and simple texturing tools for a delightful desk companion.
Step-by-Step Tutorial
Materials
- Deep green polymer clay
- White polymer clay (or white acrylic paint)
- Small terracotta pot (approx 2-3 inches)
- Aluminum foil (for the core)
- Brown polymer clay or dried coffee grounds (for soil)
- Liquid polymer clay (optional)
- Needle tool or toothpick
- Clay blending tool or butter knife
- Gloss glaze (optional)
Step 1: Forming the Base
-
Create a foil core:
Crumple a piece of aluminum foil into a tight egg shape that fits comfortably inside your terracotta pot. This saves clay and keeps the cactus lightweight. -
Condition the green clay:
Warm up your deep green polymer clay by kneading it in your hands until it becomes soft and pliable, which prevents cracking later. -
Cover the core:
Flatten the green clay into a thick sheet and wrap it completely around your foil egg. Roll it gently between your palms to smooth out any seams or fingerprints. -
Shape the cactus:
Mold the green clay-covered ball into a slight oval, making sure it fits snugly into the opening of your pot. I like to test the fit frequently during this stage.
Smudge Control
White clay picks up lint easily. Wipe your hands and tools with a baby wipe before rolling the white dots to keep them bright and clean.
Step 2: sculpting the Segments
-
Mark the vertical lines:
Using a needle tool or the back of a butter knife, gently press vertical lines from the top center of the cactus down to the base. Space them evenly apart like sections of an orange. -
Deepen the grooves:
Go back over your initial lines with a modeling tool to make the indentations deeper and smoother, creating distinct, puffy ribs for the cactus body. -
Smooth the edges:
Use your finger or a soft blending tool to round off the harsh edges of the grooves so the segments look plump and organic. -
Prepare the soil base:
Fill the terracotta pot almost to the top with scrap clay or foil, topped with a layer of dark brown clay textured with a stiff brush to look like dirt. Alternatively, you can use liquid clay and coffee grounds later. -
Attach the body:
Press the green cactus body firmly onto the soil base inside the pot so it sits securely.
Variation Ideas
Try different colors for the ‘spines’ like soft pink or yellow, or shape the white dots into tiny teardrops for a sharper, prickly look.
Step 3: Adding the Details
-
Prepare tiny white dots:
Take a very small amount of white clay and roll it into a thin snake. Cut tiny, equal-sized bits off the snake. -
Isolate the top cluster:
Roll several white bits into tiny balls and press them together in a cluster at the very top center of the cactus to simulate new growth or a budding flower. -
Place the spines:
Roll the remaining white bits into small spheres. Gently press these onto the raised center of each green vertical segment. -
Create a pattern:
Arrange the white dots in straight vertical rows down each rib, keeping the spacing consistent for a neat, graphic look. -
Secure the dots:
Press each white dot slightly flat so it adheres well to the green clay; if they feel loose, a tiny dab of liquid clay acts as perfect glue. -
Texturizing the soil (Optional):
If you didn’t texture the brown clay earlier, dab some liquid clay around the base of the cactus and sprinkle dried coffee grounds or tea leaves for realistic ‘dirt’ texture.
Step 4: Baking and Finishing
-
Bake the project:
Place the entire pot with the clay inside into your oven. Bake according to the manufacturer’s instructions for your specific brand of clay—usually 275°F (135°C) for about 30 minutes per 1/4 inch of thickness. -
Cool completely:
Let the pot cool down slowly in the oven with the door cracked, or remove carefully and let sit until room temperature. -
Seal (Optional):
For a finished sheen like the photo, apply a thin coat of satin or gloss polyurethane varnish to the green parts of the cactus, avoiding the soil.
Place your finished zero-maintenance plant on a sunny windowsill or shelf for a permanent touch of greenery
Cactus Magnet Miniatures
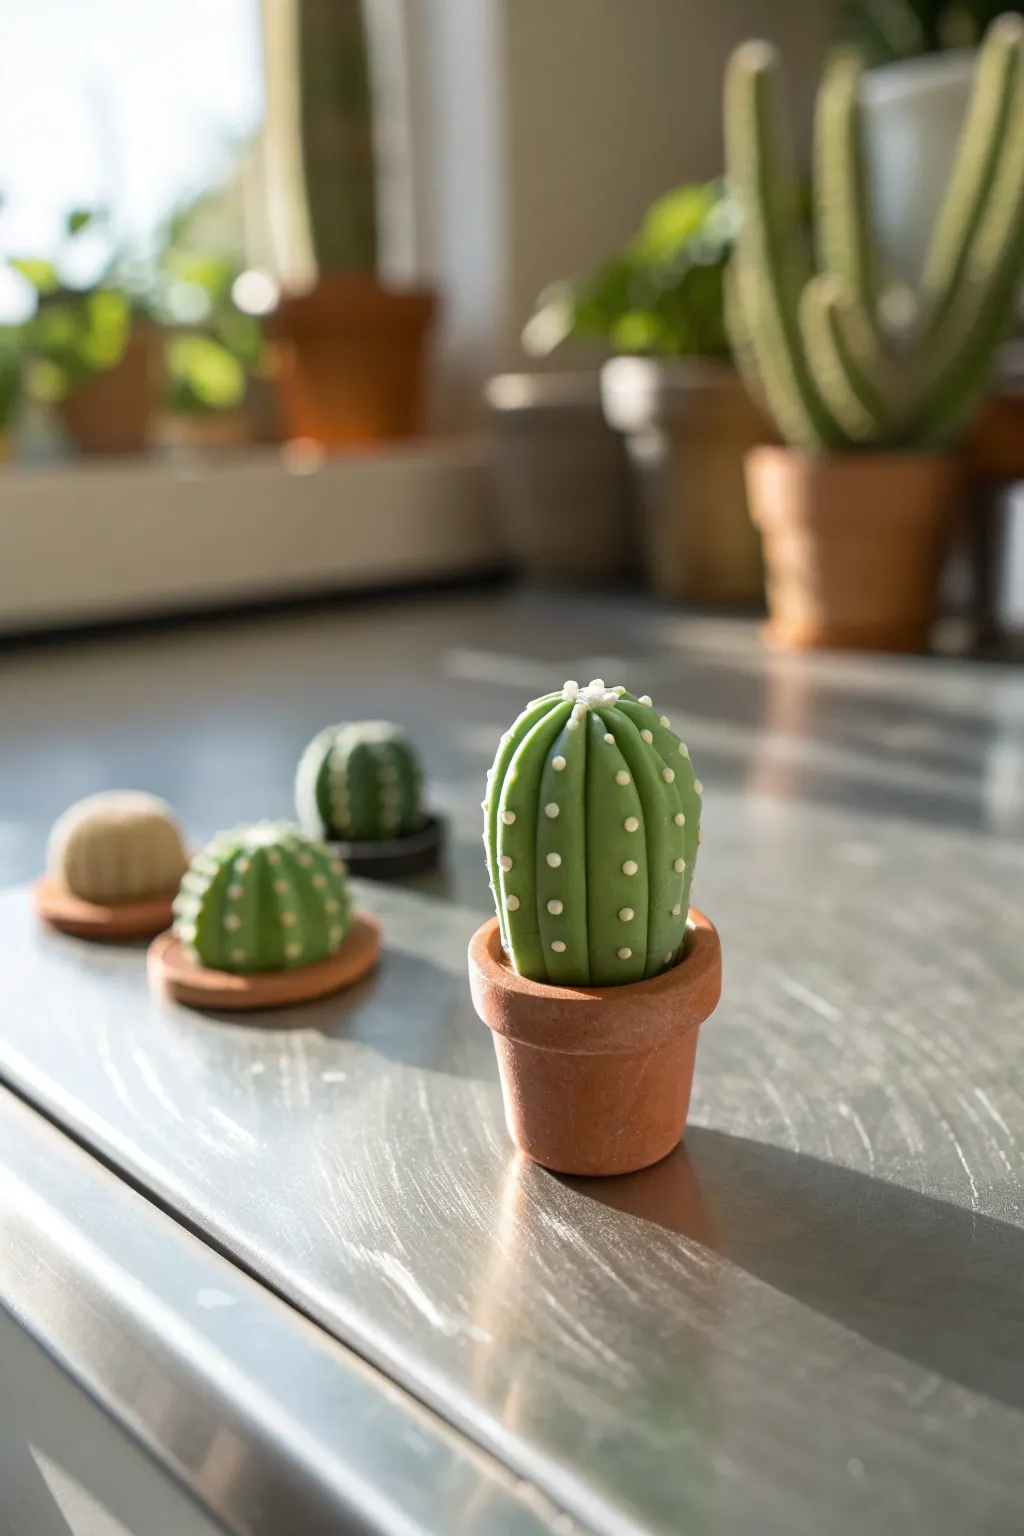
Bring the desert to your desktop with these unbelievably cute polymer clay miniatures. Modeled to look like tiny saguaros and barrel cacti, they feature clean lines, adorable white dots for spines, and rest in their own handcrafted terracotta-style pots.
How-To Guide
Materials
- Green polymer clay (medium shade)
- Terracotta or brown polymer clay
- White or light cream polymer clay
- Liquid polymer clay (translucent or white)
- Needle tool or toothpick
- Ball stylus tool
- Small circular cutter (approx. 1 inch)
- Blade or craft knife
- Ceramic tile or glass work surface
- Oven for baking polymer clay
- Clear matte varnish (optional)
Step 1: Shaping the Pot
-
Condition the clay:
Begin by conditioning the terracotta-colored clay in your hands until it is soft and pliable. Roll it into a smooth ball free of cracks. -
Form the base:
Place the ball on your work surface and press it down slightly to flatten the bottom. Use your thumb to create an indentation in the top center. -
Create the walls:
Gently pinch the sides of the clay upwards, turning the piece as you go, to form the pot shape. Aim for a slightly tapered look, wider at the top than the bottom. -
Make the rim:
Roll a small snake of terracotta clay. Flatten it slightly, then wrap it around the top edge of your pot to create the classic flowerpot rim. -
Smooth the seams:
Use your finger or a smoothing tool to blend the seam where the rim meets the pot so it looks like one solid piece. Ensure the pot has a flat bottom so it stands upright.
Step 2: Sculpting the Cactus
-
Prepare the green clay:
Condition your green clay thoroughly. Roll it into a smooth, slightly elongated egg shape that is proportionate to your pot. -
Create ribs:
Using the needle tool or the blunt side of a knife, gently press vertical lines from the top center down to the bottom of the cactus shape. Space these evenly around the circumference to create distinct ribs. -
Refine the shape:
Gently press between the indented lines to make the ribs puff out slightly, giving the cactus a plump, segmented appearance. -
Attach to the pot:
Apply a tiny drop of liquid polymer clay inside the terracotta pot to act as glue. Press the green cactus firmly into the pot. -
Texture the soil (optional):
If there is visible space around the cactus base, you can gently texture the brown clay with a needle tool to mimic soil.
Clean Hands Please
White clay picks up lint instantly! Always wash hands or use baby wipes before handling the white clay spines to keep them bright and clean.
Step 3: Adding Details
-
Prepare the spines:
Condition a very small amount of white clay. Roll it into an incredibly thin snake, almost like a thread. -
Cut miniature dots:
Slice tiny, uniformed bits off your white clay snake. These will become the individual spine clusters. -
Apply the spines:
Using the tip of your needle tool, pick up a tiny white dot and press it gently onto the raised ribs of the green cactus. I find it helpful to work in rows from top to bottom. -
Create a pattern:
Continue placing these white dots in regular intervals along all the vertical ribs. Ensure they stick well but retain a slightly raised, spherical shape. -
Top detail:
Add a small cluster of 3-4 tiny white dots at the very center apex of the cactus to depict new growth or a budding flower.
Fixing Falling Spines
If the tiny white dots fall off after baking, use a minuscule dab of superglue on a toothpick to reattach them securely.
Step 4: Baking and Finishing
-
Final check:
Inspect the piece for fingerprints. Lightly brush them away with a drop of baby oil or by gently smoothing with a finger. -
Bake:
Place the cactus on a ceramic tile or baking sheet. Bake according to your specific clay brand’s instructions (usually around 275°F/130°C for 15-20 minutes depending on thickness). -
Cool down:
Let the piece cool completely in the oven with the door slightly ajar to prevent thermal shock cracking. -
Seal (optional):
If desired, brush a thin coat of matte varnish over the piece to protect it, though the natural matte finish of the clay often looks best for this project.
Now you have a charming, zero-maintenance plant perfect for brightening up any small corner