When I’m teaching beginners, I always say the secret to cute clay projects is starting with simple shapes and stacking tiny wins. Here are my favorite modeling clay ideas you can build step by step, from classic little animals and foods to a few studio-style “wow” projects.
Simple Cute Cat Figurine
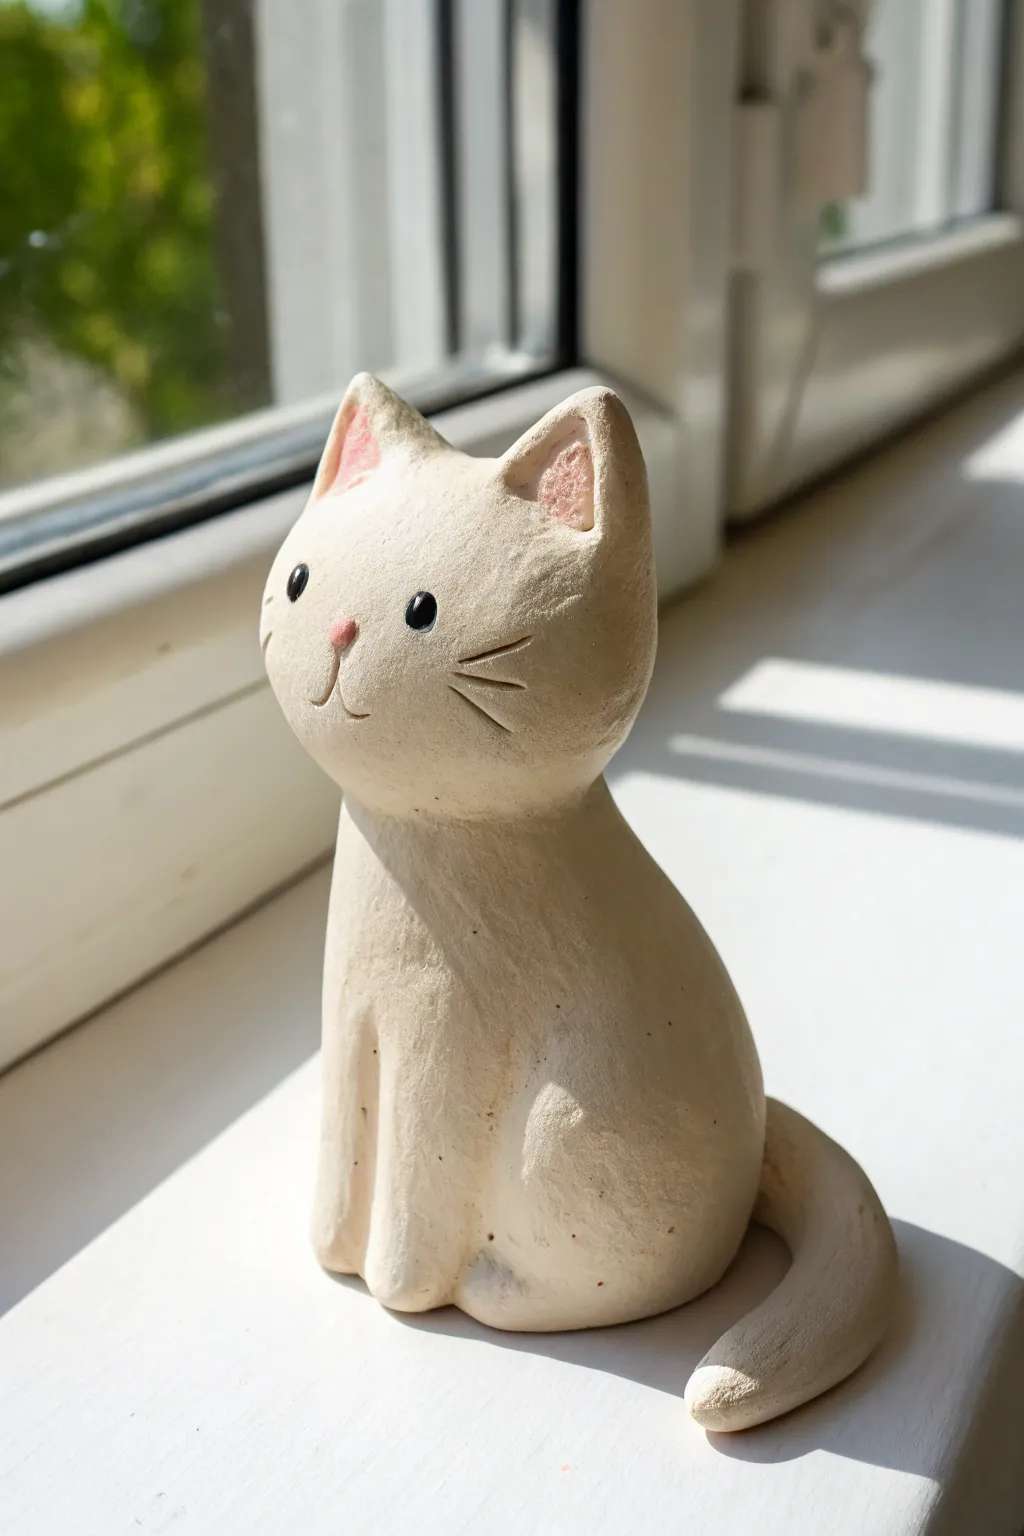
Create a charming, minimalist cat companion for your windowsill using air-dry or polymer clay. This project features a smooth, monolithic shape with subtle painted details and a lovely matte finish that mimics the look of carved stone.
Detailed Instructions
Materials
- Air-dry clay or white polymer clay (approx. 200g)
- Small bowl of water (for smoothing)
- Modelling tools (needle tool and smooth spatula)
- Fine-grit sandpaper
- Acrylic paints: Cream/Beige, Pink, Black
- Fine detail paintbrush
- Matte sealant or varnish
Step 1: Forming the Main Body
-
Condition the Clay:
Begin by kneading your clay thoroughly until it is warm, pliable, and free of cracks. A warm lump of clay is much easier to shape smoothly. -
Shape the Base Cone:
Roll a large ball of clay and then gently roll one end against your work surface to create a teardrop or rounded cone shape. This will be the body of the cat. -
Create the Head:
Roll a second, smaller ball for the head. It should be slightly oval-shaped horizontally to give the cat a cute, chubby cheek look. -
Attach Head to Body:
Score the top of the body cone and the bottom of the head with a needle tool. Apply a little water (or liquid clay if using polymer) and press them firmly together. -
Blend the Seams:
Using your thumb or a modeling tool, drag clay across the seam connecting the head and body until the neck transition is smooth and seamless. I like to keep the neck slightly thick for structural stability.
Step 2: Refining Features
-
Form the Ears:
Pinch two small triangles of clay. Gently curve them forward and press a small indentation into the center of each with your pinky or a rounded tool. -
Attach the Ears:
Score and slip the ears onto the top of the head. Blend the clay down the back of the head so they become part of the main sculpture rather than just sitting on top. -
Shape the Front Legs:
Instead of adding separate legs, use a modeling tool to crave two vertical lines into the front of the body chest area. Soften the edges to suggest the front paws merging into the sitting posture. -
Add the Tail:
Roll a tapered snake of clay. Attach the thicker end to the base of the back and curve the tail around the side of the body, pressing it flush against the cat so it doesn’t break off later. -
Smooth the Surface:
Dip your finger in water and gently run it over the entire sculpture to remove fingerprints and bumps. The goal is a matte, stone-like finish. -
Dry or Bake:
If using air-dry clay, let it sit for 24-48 hours until fully hard. If using polymer clay, bake according to the package instructions.
Smoother Transitions
Use a slightly wet paintbrush instead of your finger to smooth hard-to-reach crevices around the ears and tail for a seamless look.
Step 3: Painting and Finishing
-
Sand Imperfections:
Once fully cured, gently sand any rough spots or sharp ridges with fine-grit sandpaper. Wipe away the dust with a barely damp cloth. -
Base Coat:
Paint the entire figurine with a cream or beige acrylic paint. You may need two thin coats for full coverage; let the first coat dry completely before applying the second. -
Paint the Face:
Using your finest brush, paint two small black ovals for eyes. Add a tiny dab of white in the upper corner of each eye for a reflective highlight. -
Add Pink Details:
Mix a soft pink shade. Paint a small inverted triangle for the nose and gently fill in the inner triangular depressions of the ears. -
Define Whiskers and Mouth:
With a steady hand or a very fine marker, draw three short lines on each cheek for whiskers and a small ‘w’ shape extending down from the nose for the mouth. -
Seal the Work:
Finish by applying a coat of matte varnish. This protects the paint and gives the piece that soft, ceramic texture seen in the photo.
Add Texture
While the clay is wet, gently pat the surface with an old toothbrush or a ball of foil to give it a realistic ‘stone’ texture before painting.
Place your finished kitty on a sunny window ledge to enjoy the light hitting its sweet face


Round Frog With Big Eyes
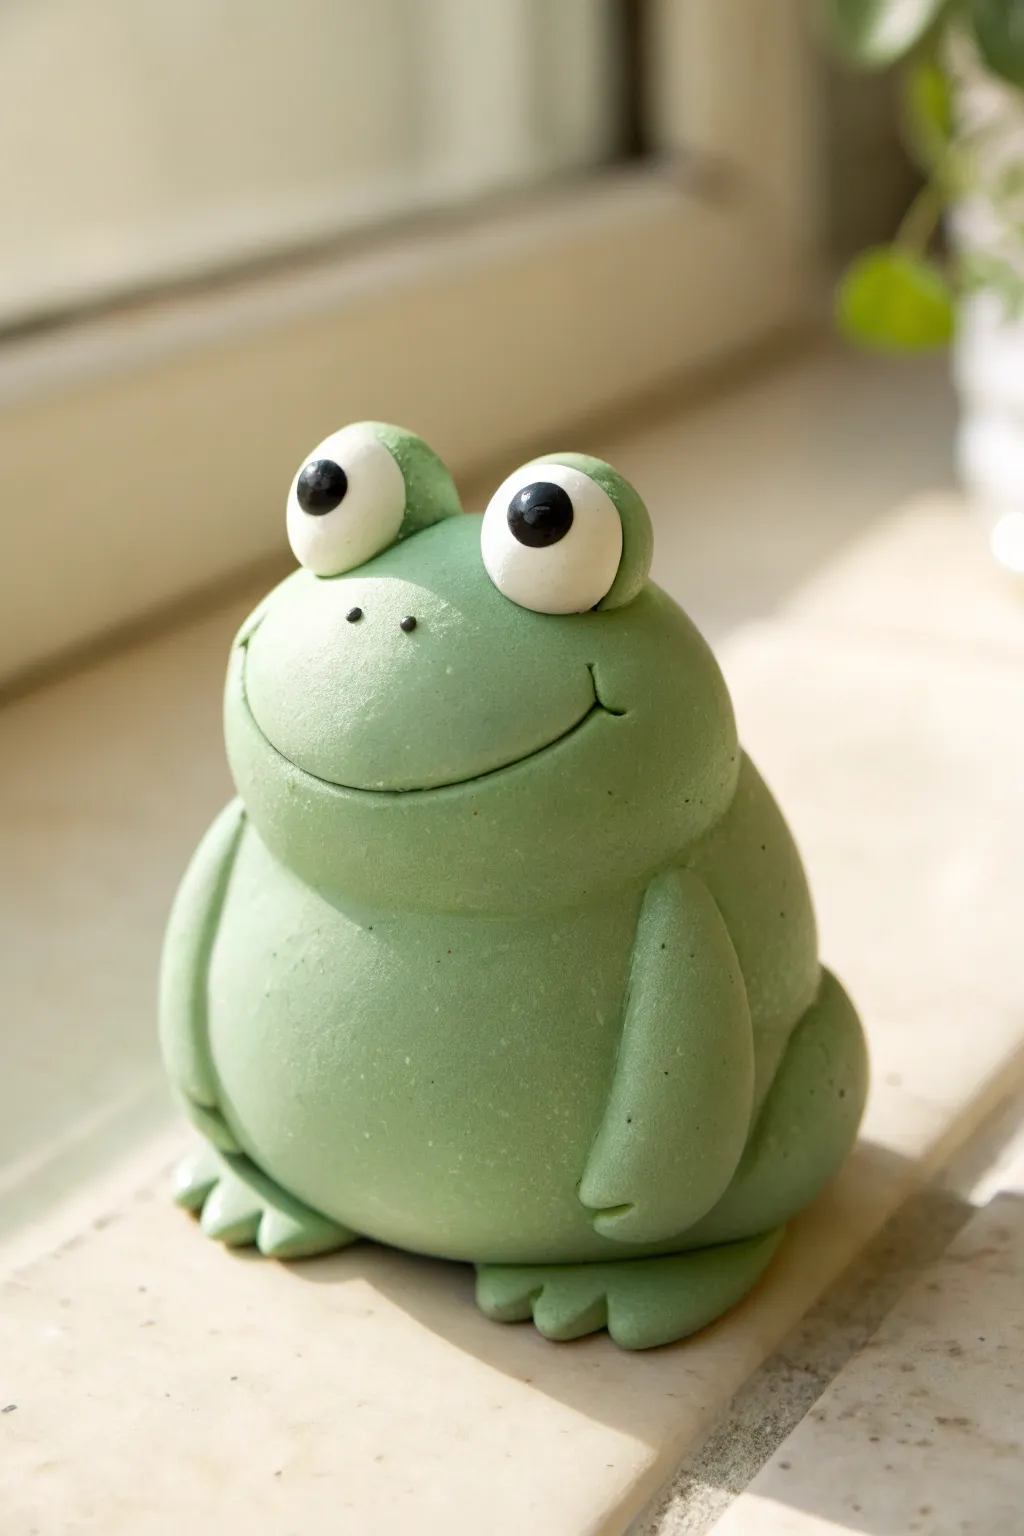
This adorable, chubby frog sits patiently with a wide smile and bright eyes, ready to bring a touch of whimsy to your shelf. With its simple, rounded shapes and smooth green finish, this project is perfect for beginners looking to practice creating character with minimal details.
How-To Guide
Materials
- Green modeling clay (polymer clay, air-dry clay, or fondant)
- White modeling clay
- Black modeling clay
- Modeling tools (or a toothpick)
- Rolling pin (optional)
- Clean work surface
Step 1: Shaping the Body and Head
-
Mix the green:
Start by conditioning your green clay until it is soft and pliable. If the green is too dark, mix in a little white clay to achieve that soft, pastel froggy green shown in the photo. -
Form the base:
Take a large portion of the green clay and roll it into a smooth ball. Gently flatten the bottom against your work surface so it sits stable without rolling away; this will be the frog’s chubby belly. -
Create the head:
Roll a second, slightly smaller ball of green clay for the head. Press it gently to flatten it just a bit into an oval shape, rather than a perfect sphere. -
Attach the head:
Place the head piece on top of the body piece. Press down firmly to adhere them, blending the seam slightly at the back if you want a smoother look, or leave it distinct for that ‘stacked’ appearance. -
Smooth the surface:
Use your finger to gently rub away any fingerprints on the main body. A smooth, matte finish is key to this character’s charm.
Smooth Operator
To get perfectly smooth eyes without fingerprints, lightly wet your fingertip with water (for air-dry clay) or baby oil (for polymer clay) before pressing the white balls into place.
Step 2: Adding Life with Facial Features
-
Carve the smile:
Using a curved modeling tool or the side of a toothpick, press a wide, U-shaped smile into the face. Make small indentations at the corners of the mouth to give it that happy, secure expression. -
Add nostrils:
Poke two tiny, shallow holes just above the smile for the nostrils. Keep them small and spaced slightly apart. -
Shape the eye sockets:
Take two small balls of green clay and press them onto the top of the head to form the eyelids or eye mounds. Smooth the bottom edges into the head so they look like bumps rising from the skull. -
Make the whites:
Roll two balls of white clay that are slightly smaller than the green eye mounds. Press them firmly onto the front of the green mounds so they bulge out slightly. -
Add the pupils:
Roll two tiny specks of black clay. Position them in the center of the white eyes and press flat. I find placing them slightly cross-eyed or looking upward adds a lot of cute personality.
Step 3: Limbs and Details
-
Form the arms:
Roll two sausage shapes from the green clay, tapering one end of each slightly. These will be the arms. -
Attach the arms:
Press the arms vertically against the sides of the body. The top of the arm should blend into the ‘shoulder’ area where the head meets the body. -
Detail the hands:
At the bottom of the arms, make two small cuts with your tool to create three simple fingers resting on the belly. -
Create the feet:
Roll two flat ovals of green clay. Similar to the hands, cut notches into one side of each oval to create webbed toes. -
Position the feet:
Slide these feet under the front of the body, positioning them so the toes peek out. Press the body down gently to secure the bond. -
Make the legs:
Roll two larger, flattened teardrop shapes for the hind legs. Attach them to the lower back sides of the body, wrapping them forward slightly effectively hugging the bottom. -
Final check:
Look over your frog from all angles. Smooth out any accidental nicks and ensure all limbs are securely attached before setting it aside to cure or dry.
Cracked Clay?
If your clay starts cracking while rolling the initial balls, it needs more conditioning. Warm it up by rolling it briskly in your palms for a few minutes; add a drop of oil if needed.
Now you have a cheerful green companion to brighten up your desk space


Ladybug Made From Two Balls
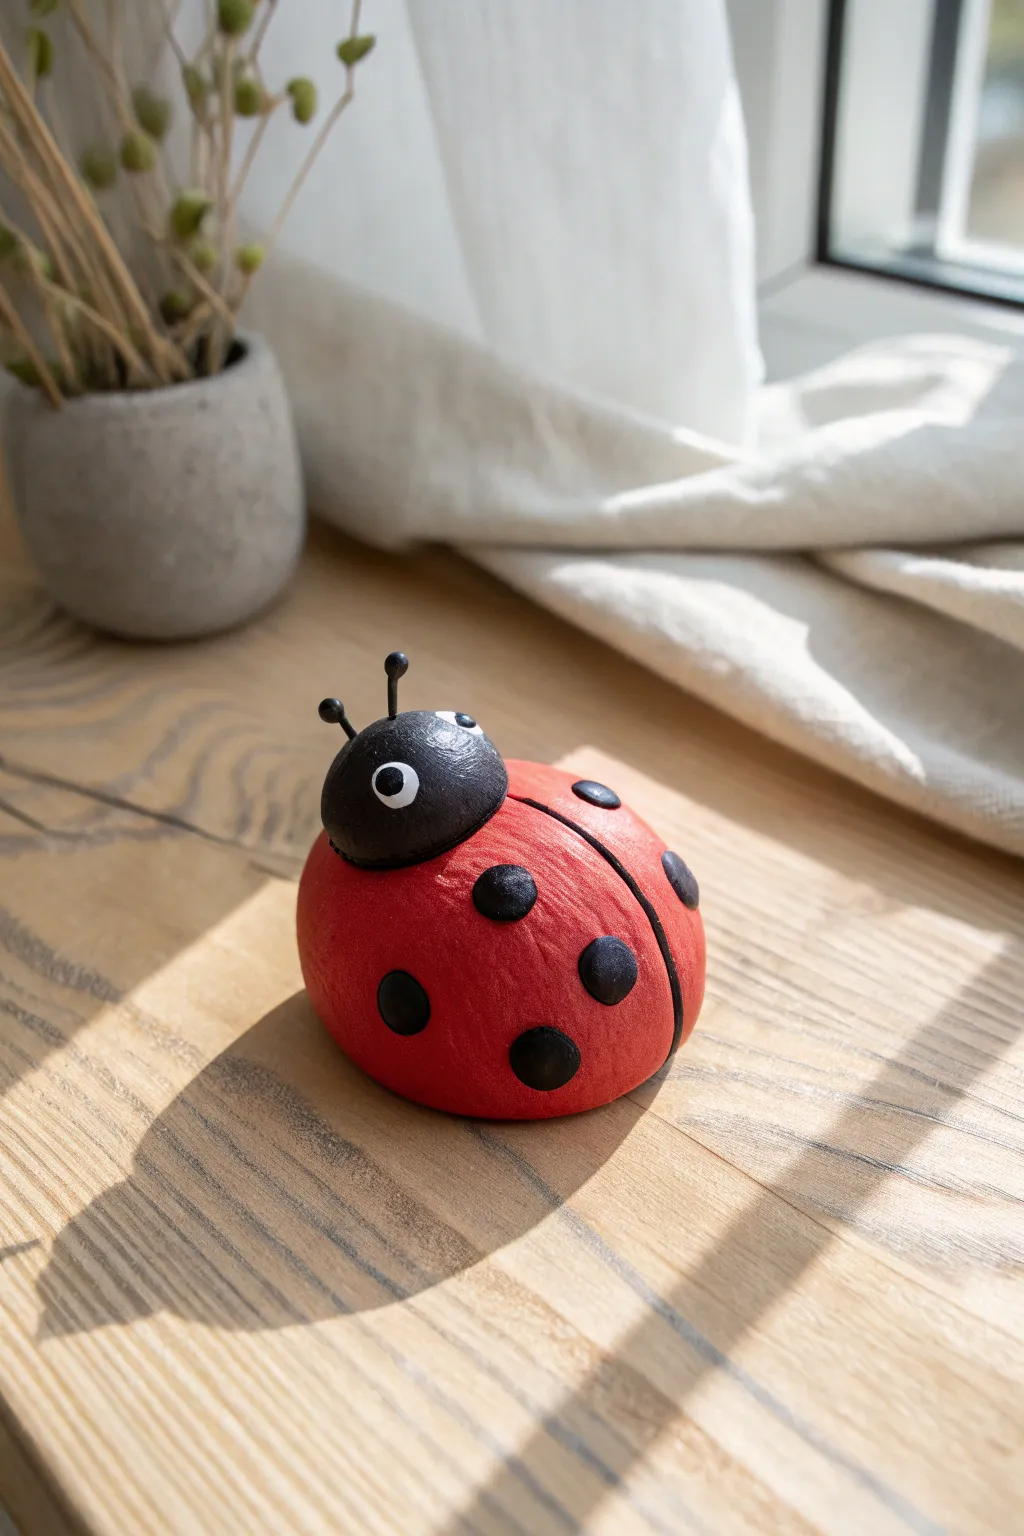
Bring a little bit of garden charm indoors with this adorable, chunky ladybug figurine. With its smooth red body and friendly eyes, this project is perfect for beginners looking to practice shaping basic spheres into something delightful.
Step-by-Step Guide
Materials
- Red modeling clay (polymer or air-dry)
- Black modeling clay
- White modeling clay
- Modeling tools (or a toothpick and plastic knife)
- Aluminum wire or stiff black floral wire (for antennas)
- Clear varnish (optional, for shine)
Step 1: Body Construction
-
Form the main sphere:
Start by taking a generous amount of red clay and rolling it into a large, smooth ball. This will be the main body of your ladybug, so ensure it’s free of cracks. -
Flatten the base:
Gently press the red ball onto your work surface to create a flat bottom. This ensures your ladybug sits stable and doesn’t roll away. -
Define the wings:
Using a modeling tool or the back of a butter knife, press a line straight down the center of the red dome, starting from where the head will attach and stopping near the bottom. Don’t cut all the way through; just create a clear indentation. -
Create the head:
Roll a smaller ball of black clay. It should be roughly one-third the size of the red body. -
Shape the head:
Slightly flatten the back of the black ball so it can sit flush against the red body. I usually press a small thumbprint into the red body first to create a nesting spot for the head. -
Attach the head:
Firmly press the black shape onto the front of the red body. Smoothen the seam gently with your finger or a tool to ensure a strong bond.
Seamless Connection
To keep the head from falling off later using a short piece of toothpick or wire as a hidden dowel connecting the black head to the red body works wonders.
Step 2: Adding Details
-
Prepare the spots:
Roll several tiny balls of black clay. You’ll want about 6 to 8 of them, varying slightly in size for a natural look. -
Flatten the spots:
Gently squish each black clay ball between your fingers to create flat discs. -
Apply the spots:
Press the black discs onto the red wings. distribute them evenly on both sides of the central line, wrapping some slightly down the sides. -
Create the eyes:
Roll two very small balls of white clay and press them flat against the black head. -
Add pupils:
Take two minuscule specks of black clay and place them onto the white eye circles. This brings the character to life instantly. -
Make the antennas:
Cut two short pieces of black wire, about an inch long each. If you don’t have wire, you can roll thin snakes of black clay, though wire is more durable. -
Cap the antennas:
Roll two tiny black clay balls and stick them onto the very tips of your wire pieces. -
Insert antennas:
Push the wire ends into the top of the head. Angle them slightly outward for a curious expression. -
Final smooth:
Check over your ladybug for any fingerprints. You can gently buff them out with a tiny bit of water (if using air-dry clay) or baby oil (if using polymer). -
Finish the project:
If using polymer clay, bake according to the package instructions. If using air-dry, let it sit undisturbed for 24 hours. A coat of gloss varnish makes the shell look realistically shiny.
Creative Leaf Base
Make a textured green leaf out of clay for your ladybug to sit on. Use a real leaf to stamp veins into the clay before placing your bug on top.
Place your little beetle on a sunny windowsill where it can keep your houseplants company


Tiny Panda Head Charm
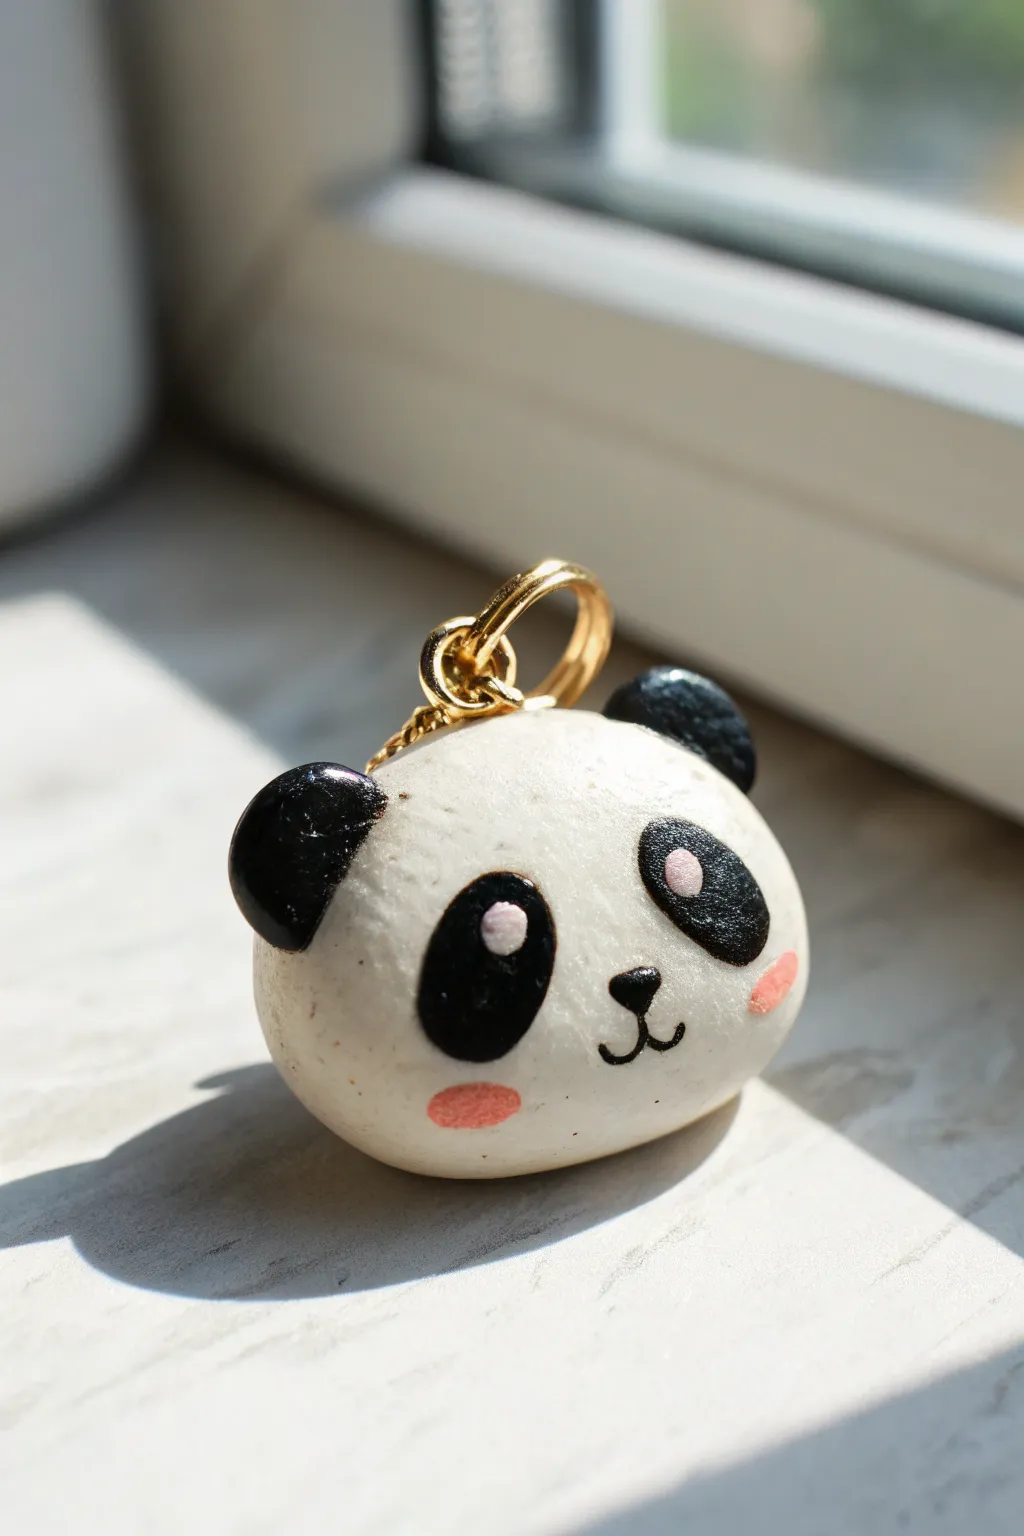
Create a delightfully round and simple panda face charm that fits right in your palm. With its smooth finish and adorable painted details, this little friend is perfect for keychains or phone accessories.
How-To Guide
Materials
- White polymer clay or air-dry clay
- Black polymer clay (or black acrylic paint)
- Clear varnish or glaze (glossy)
- Small gold screw eye pin
- Gold jump ring
- Pliers
- Acrylic paints (black, white, pink)
- Fine detail paintbrush or dotting tool
- Baking sheet/parchment paper (if using polymer clay)
Step 1: Shaping the Head
-
Prepare the base:
Start with a chunk of white clay roughly the size of a walnut. Condition it by kneading it in your hands until it becomes soft and pliable, which prevents cracking later. -
Roll the sphere:
Roll the clay between your palms to form a perfectly smooth sphere. -
Flatten slightly:
Gently press the sphere onto your work surface just enough to create a slightly flattened oval shape, resembling a mochi or a bean bun, rather than a perfect ball. -
smooth imperfections:
Dip your finger in a tiny bit of water (for air dry) or baby oil (for polymer) and gently rub away any fingerprints or lint to ensure a porcelain-like finish.
Step 2: Adding Ears & Hardware
-
Form the ears:
Take two tiny pea-sized pieces of black clay. If you don’t have black clay, you can use white clay here and paint it later. -
Attach the ears:
Press the small black balls onto the upper left and right sides of the white head. I usually like to position them slightly further back to keep the face area open. -
Secure the blend:
Use a modeling tool or your fingertip to gently smudge the seam where the ear meets the head so they don’t pop off later. -
Insert the eye pin:
Take your gold screw eye pin and carefully twist it into the very top center of the head. Screw it down until only the loop is visible. -
Cure the clay:
Bake the piece according to your polymer clay package instructions, or let it dry completely for 24-48 hours if using air-dry clay.
Paint smudged?
If you make a mistake while painting the face, don’t panic. Use a damp Q-tip to gently wipe away the wet acrylic paint immediately, or wait for it to dry and scrape it off lightly to try again
Step 3: Painting the Face
-
Draft the eyes:
Once the clay is fully hardened and cool, use a very light pencil mark to outline where the large black eye patches will go. They should slope downwards slightly. -
Paint eye patches:
Using a fine brush and black acrylic paint, fill in the oval eye patches. Try to keep the edges smooth and rounded. -
Add the nose:
Paint a small, inverted triangle or oval for the nose right between the eye patches, slightly lower down. -
Draw the mouth:
Using the very tip of your finest brush or a black fine-liner pen, draw a small ‘w’ shape connected to the nose for the smile. -
Add eye highlights:
Dip a dotting tool or a toothpick into white paint. Add a small white dot in the upper corner of each black eye patch to bring the panda to life. -
Paint rosy cheeks:
Mix a soft pink color or use neat pink paint. Apply two small horizontal ovals underneath the eyes for a blushing effect. -
Final gloss:
Once the paint is totally dry, coat the entire charm in a layer of glossy glaze. This protects the paint and gives it that professional, shiny look seen in the photo.
Make it fuzzy
Instead of a glossy glaze, dab the white areas with a stiff brush while the clay is soft to create a textured ‘fur’ effect, then use a matte varnish for a velvety finish
Step 4: Final Assembly
-
Prepare the jump ring:
Use your pliers to gently twist open a gold jump ring sideways. -
Attach ring:
Loop the open jump ring through the eye pin on top of your panda’s head. -
Seal it up:
Twist the jump ring closed again with the pliers, ensuring the gap is perfectly aligned and shut tight so your charm stays secure.
Now you have a sweet little panda companion ready to hang on your accessories

The Complete Guide to Pottery Troubleshooting
Uncover the most common ceramic mistakes—from cracking clay to failed glazes—and learn how to fix them fast.
Snail With a Swirled Shell
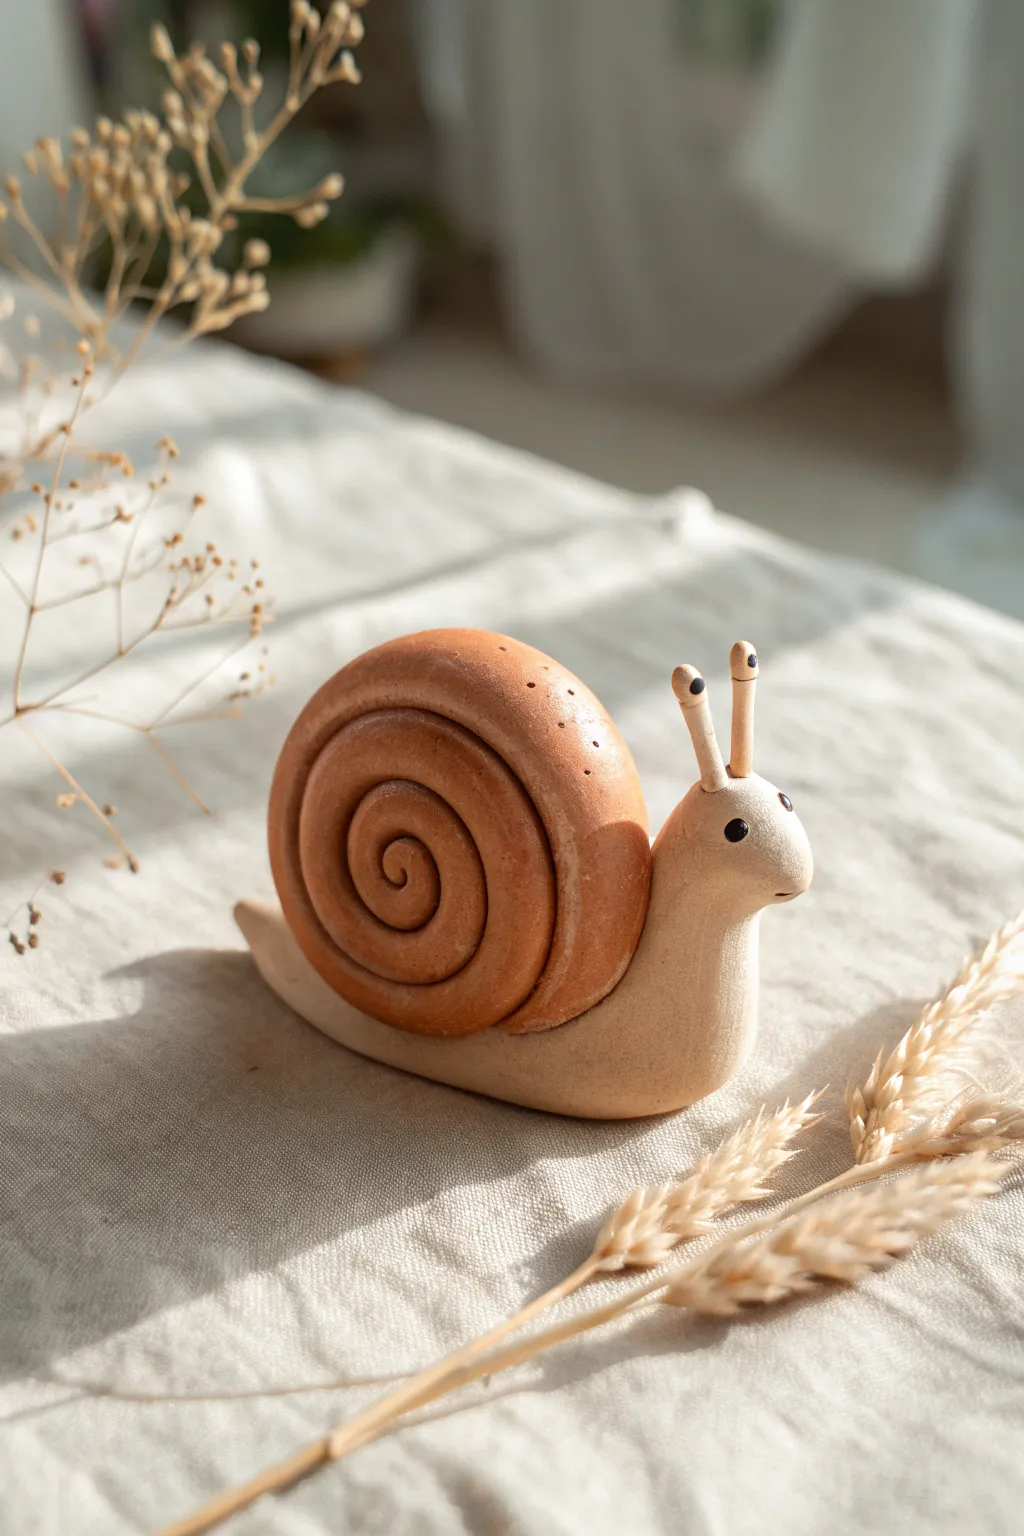
This charming snail project focuses on clean lines and natural earth tones, creating a minimalist sculpture that looks beautiful on a shelf. The distinctive swirled shell and sweet, simple face give it a timeless character perfect for beginners and experienced crafters alike.
Detailed Instructions
Materials
- Light beige or cream polymer clay (for the body)
- Terracotta or warm brown polymer clay (for the shell)
- Black acrylic paint or a tiny bit of black clay
- Small ball stylus tool
- Rolling pin or clay roller
- Needle tool
- Soft paintbrush (optional for smoothing)
- Matte varnish (optional)
Step 1: Body Building
-
Body Base:
Start by conditioning a medium-sized ball of light beige clay until it’s soft and pliable. Roll it into a thick log shape, tapering one end slightly to form the tail. -
Head Shape:
Gently pinch and mold the thicker end of the log to lift it upwards, creating the snail’s neck and head. Smooth the transition so it curves naturally. -
Flattening the Base:
Press the bottom of the body gently onto your work surface to create a flat base. This ensures your snail will stand upright without tipping over. -
Eye Antennas:
Roll two very small, thin cylinders of beige clay for the eye stalks. Attach these to the top of the head, blending the clay at the join so they look seamless. -
Optional Toppers:
If you want the exact look from the photo, add tiny, slightly wider beads of clay to the very tips of the antennas before baking.
Step 2: Sculpting the Shell
-
Main Coil:
Take your terracotta or brown clay and roll it into a very long, even snake. The length determines how big your swirl will be. -
Tapering:
Taper one end of your snake so it gets gradually thinner. This thinner end will be the center of the spiral. -
The Perfect Spiral:
Starting with the thin tapered end, tightly roll the snake into a flat spiral disc. Try to keep the coils touching without squishing them together too hard. -
Shell Shaping:
Once rolled, gently cup the spiral in your hand to give it a slight dome shape, rather than keeping it perfectly flat. This adds dimension. -
Texture Details:
Using a needle tool, you can add tiny pinprick dots randomly on the upper curve of the shell for a bit of organic texture. -
Attachment:
Score the back of the snail body slightly to create grip. Press the shell firmly onto the body’s back. I always check from the front to make sure it’s centered.
Shell Slipping Off?
If the heavy shell keeps sliding off the body before baking, insert a small piece of toothpick or wire between the body and shell to act as an internal anchor.
Step 3: Finishing Touches
-
Eye Sockets:
Using a small ball stylus, make shallow indentations on the side of the head where the eyes will go. -
Adding Eyes:
Place tiny balls of black clay into these sockets, or wait until after baking to paint them on with a fine-tip brush. -
Antenna Details:
Don’t forget the tiny black dots on the tips of the antennas. A speck of black paint works best here for precision. -
Mouth Line:
Use a needle tool or a thin blade to carefully press a horizontal line for the mouth, giving it a slight curve for a smile if desired. -
Baking:
Bake the piece according to your clay manufacturer’s instructions. Usually, this is around 275°F (130°C) for 15-30 minutes. -
Cooling:
Allow the snail to cool completely in the oven with the door cracked open to prevent cracking. -
Final Polish:
If you want a protective finish, apply a thin coat of matte varnish, avoiding the eyes if you want them to remain glossy.
Nature Inspired
For a ‘Level Up’, gently press actual leaves or coarse fabric onto the shell before baking to imprint a subtle, natural texture onto the clay surface.
Place your finished snail near a potted plant or on a windowsill to enjoy its calm, earthy vibes
Mini Dinosaur With Stubby Legs
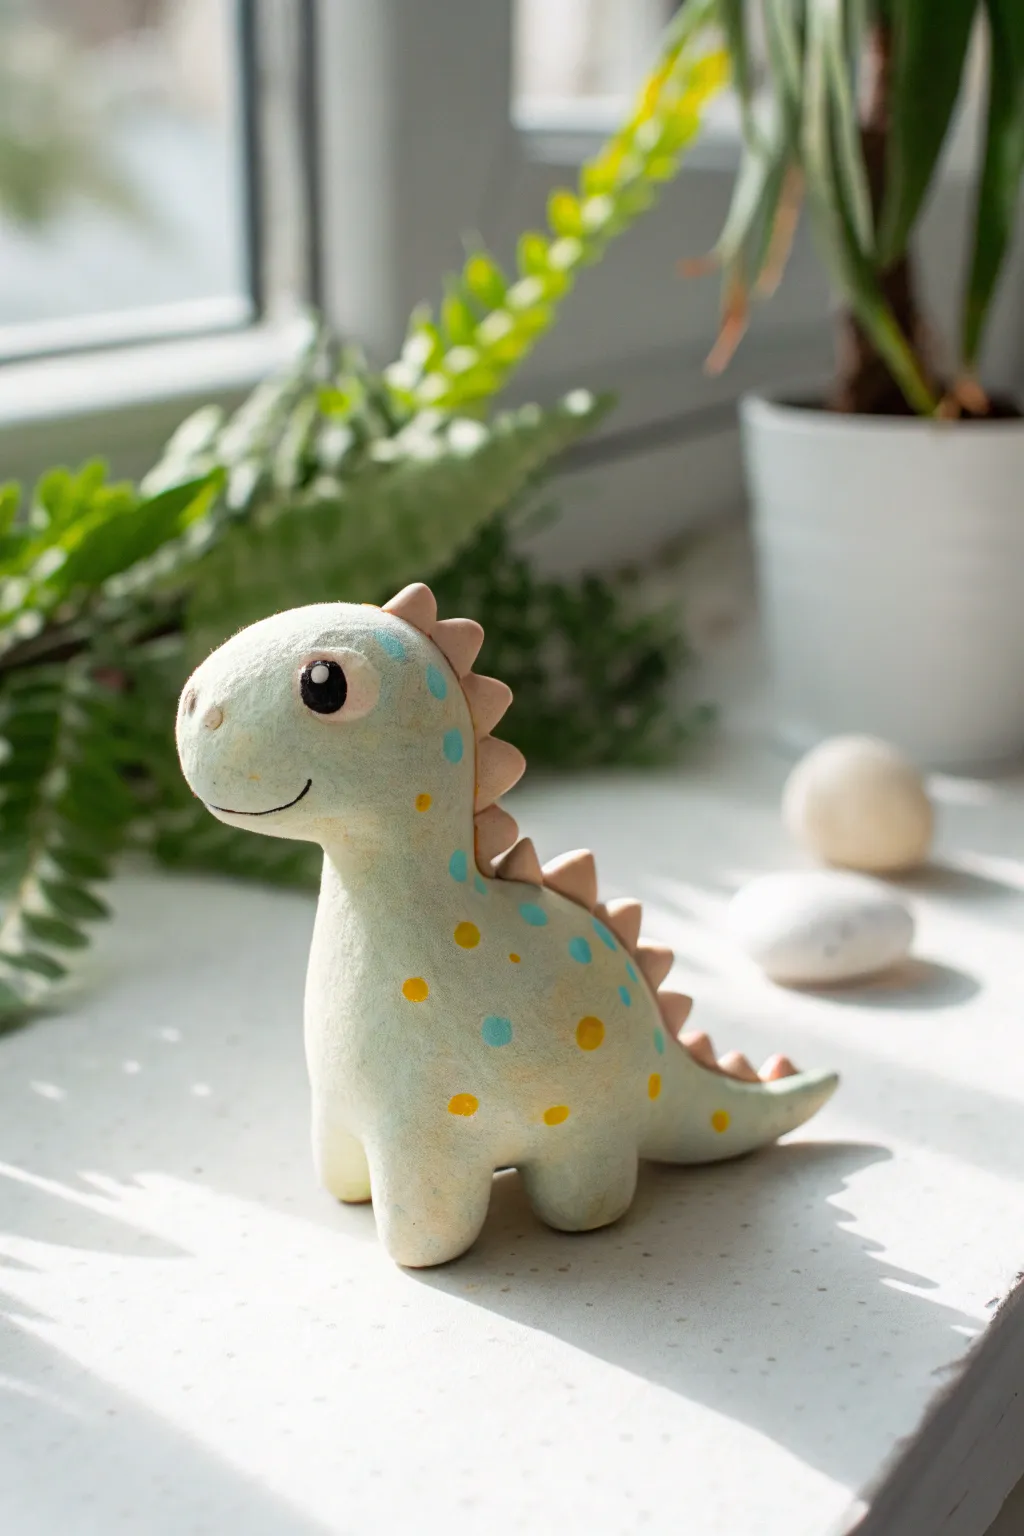
This adorable mini dinosaur features a soft turquoise body with cheerful yellow and blue dots, perfect for brightening up any shelf. Its stubby legs and gentle smile give it a friendly character that’s fun to sculpt.
How-To Guide
Materials
- Light turquoise clay (air-dry or polymer)
- Pale pink or salmon clay
- Yellow acrylic paint or paint pen
- Blue acrylic paint or paint pen
- Black acrylic paint
- White acrylic paint
- Needle tool or toothpick
- Ball tool (small)
- Small paintbrush
- Matte varnish (optional)
Step 1: Shaping the Base
-
Form the main body:
Start with a medium-sized ball of turquoise clay. Roll it into a smooth pear shape, keeping the bottom wider for the body and slightly tapering the top for the neck. -
Create the head:
Take a slightly smaller ball of the same turquoise clay and gently flatten one side. Attach this to the tapered neck of your pear shape, blending the clay seams carefully with your thumb or a modeling tool until invisible. -
Sculpt the legs:
Roll four small, equal-sized cylinders of turquoise clay. These should be short and stubby. Press them firmly onto the bottom of the body, two at the front and two at the back. -
Refine the stance:
Gently press the entire figure down onto your work surface to flatten the bottoms of the feet, ensuring the dinosaur stands stably on its own. -
Add the tail:
Roll a cone of turquoise clay. Attach the wider end to the lower back of the body, smoothing the join. Curving the tail slightly to one side adds a bit of dynamic movement.
Step 2: Adding Details
-
Make the spine spikes:
Roll out a small amount of pale pink clay into a thin snake. Pinch off tiny pieces and roll them into small triangles or cones. -
Attach the spikes:
Starting from the top of the head and working down to the tail tip, press the pink triangles onto the center of the dinosaur’s back. Space them evenly for a clean look. -
Sculpt the face:
Using a needle tool, carefully crave a gentle, upward-curved line for the smile on the snout. -
Create eye sockets:
Use a small ball tool to make shallow indentations where you want the eyes to act as a guide for painting later. -
Dry or bake:
If using polymer clay, bake according to manufacturer instructions. If using air-dry clay, let it dry completely for 24-48 hours before painting.
Cracking Clay?
If using air-dry clay, smooth water over cracks as they appear. If cracks form after drying, fill them with a loose paste made of fresh clay and water.
Step 3: Painting and Finishing
-
Paint the eyes:
Fill the eye indentations with black paint. Once dry, add a tiny white dot in the upper corner of each eye for a reflective highlight. -
Add the spots:
Using a small brush or the back of a paintbrush handle, dot yellow spots randomly across the body. Allow them to dry briefly. -
Layer second colors:
Add smaller blue dots interspersed among the yellow ones. I find keeping the dots slightly different sizes makes the pattern look more organic. -
Create texture:
To mimic the stone-like texture in the photo, you can lightly dab a dry sponge with very diluted white paint over the body, avoiding the painted spots. -
Seal the work:
Once all paint is fully dry, apply a coat of matte varnish to protect your new prehistoric friends and unify the finish.
Make it a Trio
Create a whole family by making two more dinos in varying sizes. Try diff pastel body colors like lilac or mint green, but keep the spot colors consistent.
Now you have a charming little dinosaur companion ready to guard your houseplants


What Really Happens Inside the Kiln
Learn how time and temperature work together inside the kiln to transform clay into durable ceramic.
Chubby Bird With a Tiny Beak
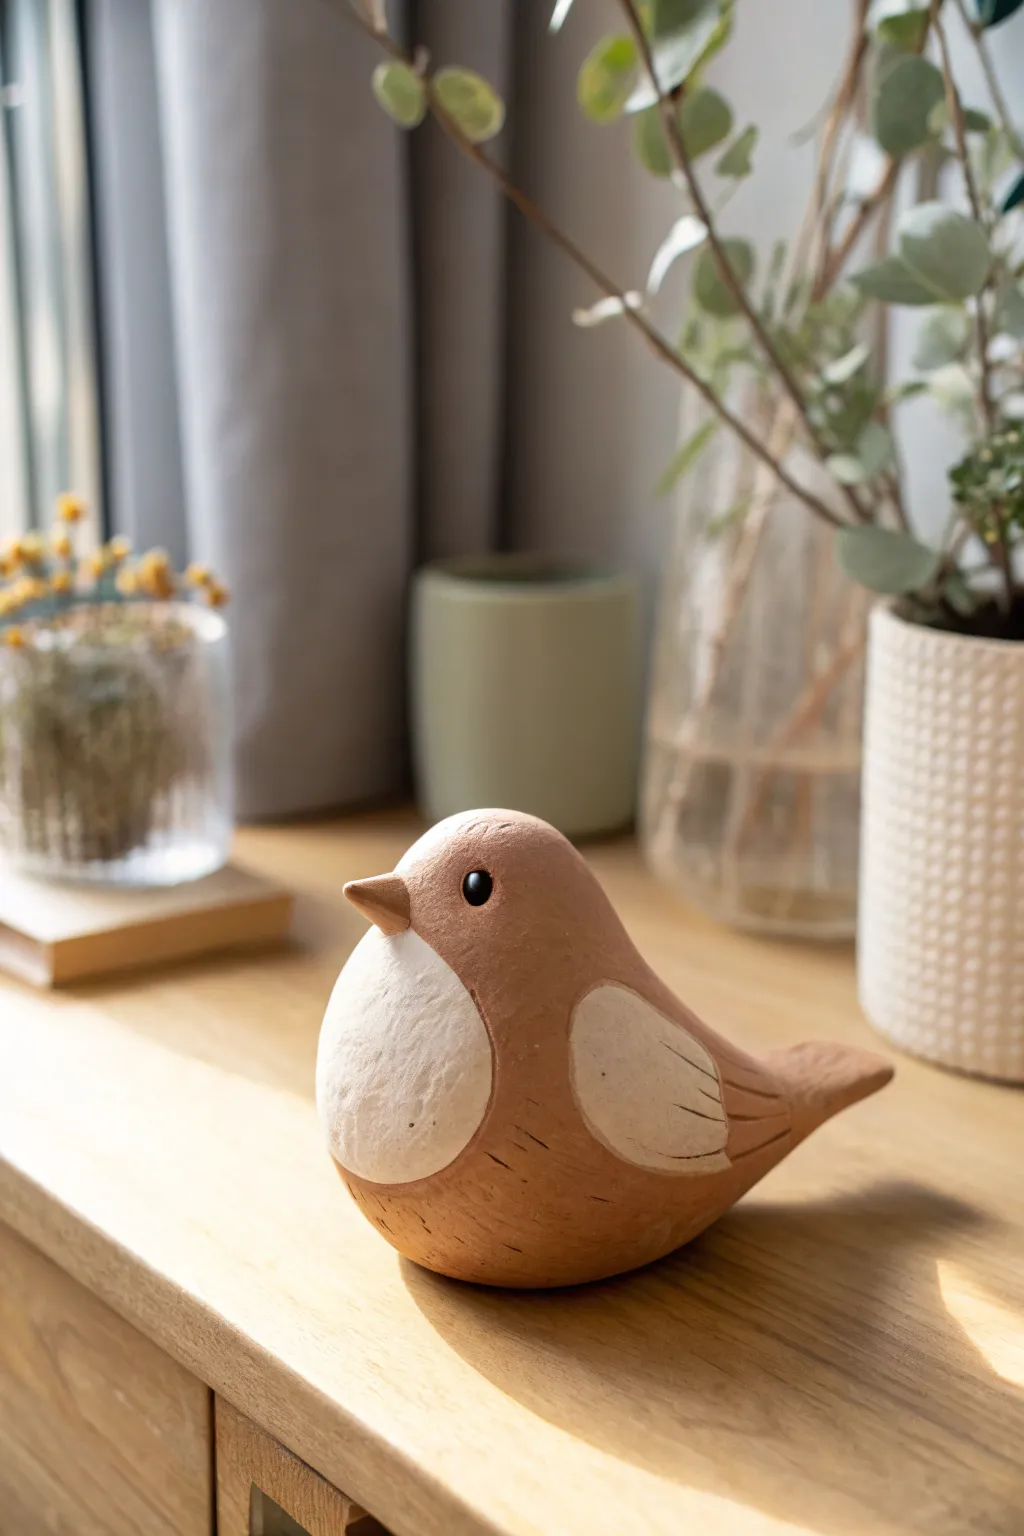
This charming little bird brings a touch of nature indoors with its warm, earthy tones and pleasantly round shape. Using polymer clay or air-dry clay, you’ll sculpt a stylized robin-like figure that feels both modern and hand-carved.
Step-by-Step
Materials
- Terracotta-colored polymer clay (or air-dry clay mixed with brown/orange acrylics)
- White or cream-colored polymer clay
- Small black bead or black clay for the eyes
- Sculpting tools (needle tool, small ball stylus)
- Texture sponge or stiff bristle brush
- Acrylic rolling pin
- Cutting blade
- Matte varnish (optional)
Step 1: Forming the Base Body
-
Condition the Clay:
Begin by kneading your terracotta-colored clay until it is soft and malleable. If it feels too stiff, the heat from your hands will eventually make it workable. -
Shape the Main Ball:
Roll a palm-sized amount of clay into a smooth, tight sphere. Ensure there are no cracks or seams visible on the surface. -
Create the Teardrop:
Gently roll one side of the sphere against your work surface to elongate it slightly into a fat teardrop shape. This taper will become the tail section. -
Flatten the Base:
Press the bottom of the teardrop firmly onto your flat work surface. The bird needs a stable, flat bottom so it won’t wobble when displayed. -
Define the Head:
Instead of adding a separate head, use your thumb to gently press an indentation about one-third of the way down from the thicker end. This subtle curve separates the head area from the body while keeping it one cohesive piece.
Step 2: Adding Details and Features
-
Prepare the Belly Patch:
Condition a piece of cream or white clay. Roll it into a ball, then flatten it into a thin oval distinctively smaller than the bird’s chest area. -
Attach the Belly:
Place the white oval onto the front of the bird’s chest. Gently press the edges to blend them into the bird’s body, ensuring it looks like an inset patch of feathers rather than a sticker. -
Texture the White Clay:
Using a stiff bristle brush or a texture sponge, dab the white belly patch repeatedly. This creates a fluffy, feathery texture that contrasts nicely with the smoother body. -
Form the Beak:
Pinch a tiny amount of the terracotta clay into a small, sharp cone. I find it easier to shape this on the table rather than in my fingers. -
Attach the Beak:
Press the cone onto the center of the face area. Smooth the attachment point with a small tool so the beak flows seamlessly from the head. -
Insert the Eyes:
Use a ball tool to make small indentations for the eyes. Insert a small black bead or a tiny ball of black clay into these sockets.
Wing Won’t Stick?
If the white clay patches won’t adhere to the body, apply a tiny smear of liquid polymer clay (or PVA glue for air-dry clay) as a bonding agent before pressing them down.
Step 3: Wings and Final Texturing
-
Create Outline for Wings:
Use a needle tool to lightly sketch a curved wing shape on the side of the bird’s body. The wing should start near the ‘shoulder’ and sweep back toward the tail. -
Add the Wing Patch:
Take another small piece of cream clay, flatten it into a teardrop, and press it into the wing area you just outlined. -
Detail the Feathers:
Use your needle tool or a knife to carve three or four simple lines into the white wing patch to represent flight feathers. -
Carve Body Texture:
add sketchy, carved lines to the main terracotta body—especially near the tail and under the wings—to mimic the look of carved wood. -
Refine the Tail:
Pinch the tail end slightly to sharpen it and add a few horizontal indentation lines across the top for detail. -
Final Smoothing:
Check for fingerprints. If you find any, lightly brush them away with a drop of baby oil or water on your finger. -
Bake or Dry:
Follow the manufacturer instructions for your specific clay. If baking polymer clay, create a foil nest to support the curvy shape in the oven.
Rustic Speckles
Mix black pepper or dried tea leaves into your terracotta clay before sculpting. This adds a beautiful, organic speckled granite effect to the finished bird.
Once cooled or fully dried, your little bird is ready to perch on a shelf or windowsill
Cherry Pair Magnet

Brighten up your fridge with this juicy-looking pair of cherries that look good enough to eat. With their high-gloss finish and realistic leaf textures, this simple clay project adds a pop of vibrant red to any magnetic surface.
Step-by-Step Tutorial
Materials
- Red polymer clay
- Green polymer clay
- Gloss glaze or polyurethane varnish
- Small round magnet
- Super glue
- Texture tool or needle tool
- Small soft paintbrush
- Rolling pin or smooth round marker
- Sharp blade or clay knife
Step 1: Shaping the Fruit
-
Condition the clay:
Start by kneading a chunk of red polymer clay until it is soft, pliable, and easy to work with. Warm clay is much easier to smooth out. -
Divide the clay:
Split your conditioned red clay into two equal portions. Roll each piece between your palms to create smooth, round spheres about the size of a large marble. -
Refine the shape:
While holding the sphere, gently press the top slightly to flatten it just a tiny bit, giving it that characteristic heart-like cherry shape rather than a perfect ball. -
Create the stem indent:
Use the rounded end of a paintbrush handle or a ball tool to press a small indentation into the top center of each cherry. This is where the stems will attach later.
Sticky Situation?
If fingerprints are marring your smooth fruit, lightly brush the raw clay with a little baby oil or cornstarch before baking to smooth them out.
Step 2: Creating Stems and Leaves
-
Roll the stems:
Take a small amount of green clay and roll it into a very thin, long snake. Cut two pieces, each about 1.5 to 2 inches long. -
Attach the stems:
Place one end of a green stem into the indentation of a red cherry. Gently press the clay around the base of the stem to secure it. Repeat for the second cherry. -
Join the stems:
Bring the top ends of the two stems together. Press them together firmly so they fuse into a single junction point, creating the classic cherry pair look. -
Shape the leaves:
Form two small teardrop shapes from the remaining green clay. Flatten them slightly with your finger or a roller to create the leaf base. -
Texture the leaves:
Using a needle tool or a dull knife edge, gently press a central vein line down the middle of each leaf. Then, add small diagonal lines branching out to create realistic leaf veins. -
Attach the leaves:
Press the base of each leaf onto the junction where the two stems meet. Angle them outwards slightly for a natural appearance. -
Add the stem cap:
Roll a tiny ball of green clay and flatten it onto the very top where the stems join, covering the seam for a clean finish. I usually pinch the sides slightly to make it look woody.
Step 3: Finishing Touches
-
Bake the clay:
Place your creation on a baking sheet or ceramic tile. Bake according to your specific polymer clay package instructions (usually around 275°F/135°C for 15-30 minutes). -
Cool completely:
Remove the cherries from the oven and let them cool down fully before handling. The clay is fragile while hot. -
Apply the glaze:
Using a soft brush, apply a thick coat of gloss glaze to the red fruit parts only. This mimics the shiny skin of a real cherry. Let the glaze dry completely. -
Prepare the magnet:
Flip the cherry pair over to find the flattest spot on the back. Apply a drop of strong super glue to this area. -
Attach the magnet:
Press your round magnet firmly into the glue. Hold it in place for a few seconds to ensure a strong bond.
Make it Sparkle
For extra dimension, mix a tiny pinch of red glitter into the red clay before rolling. It gives the cherries a deep, juicy shimmer under the glaze.
Once the glue sets, your deliciously shiny cherry magnet is ready to hold your favorite notes

TRACK YOUR CERAMIC JOURNEY
Capture glaze tests, firing details, and creative progress—all in one simple printable. Make your projects easier to repeat and improve.
Easy Fruit Slice Coasters
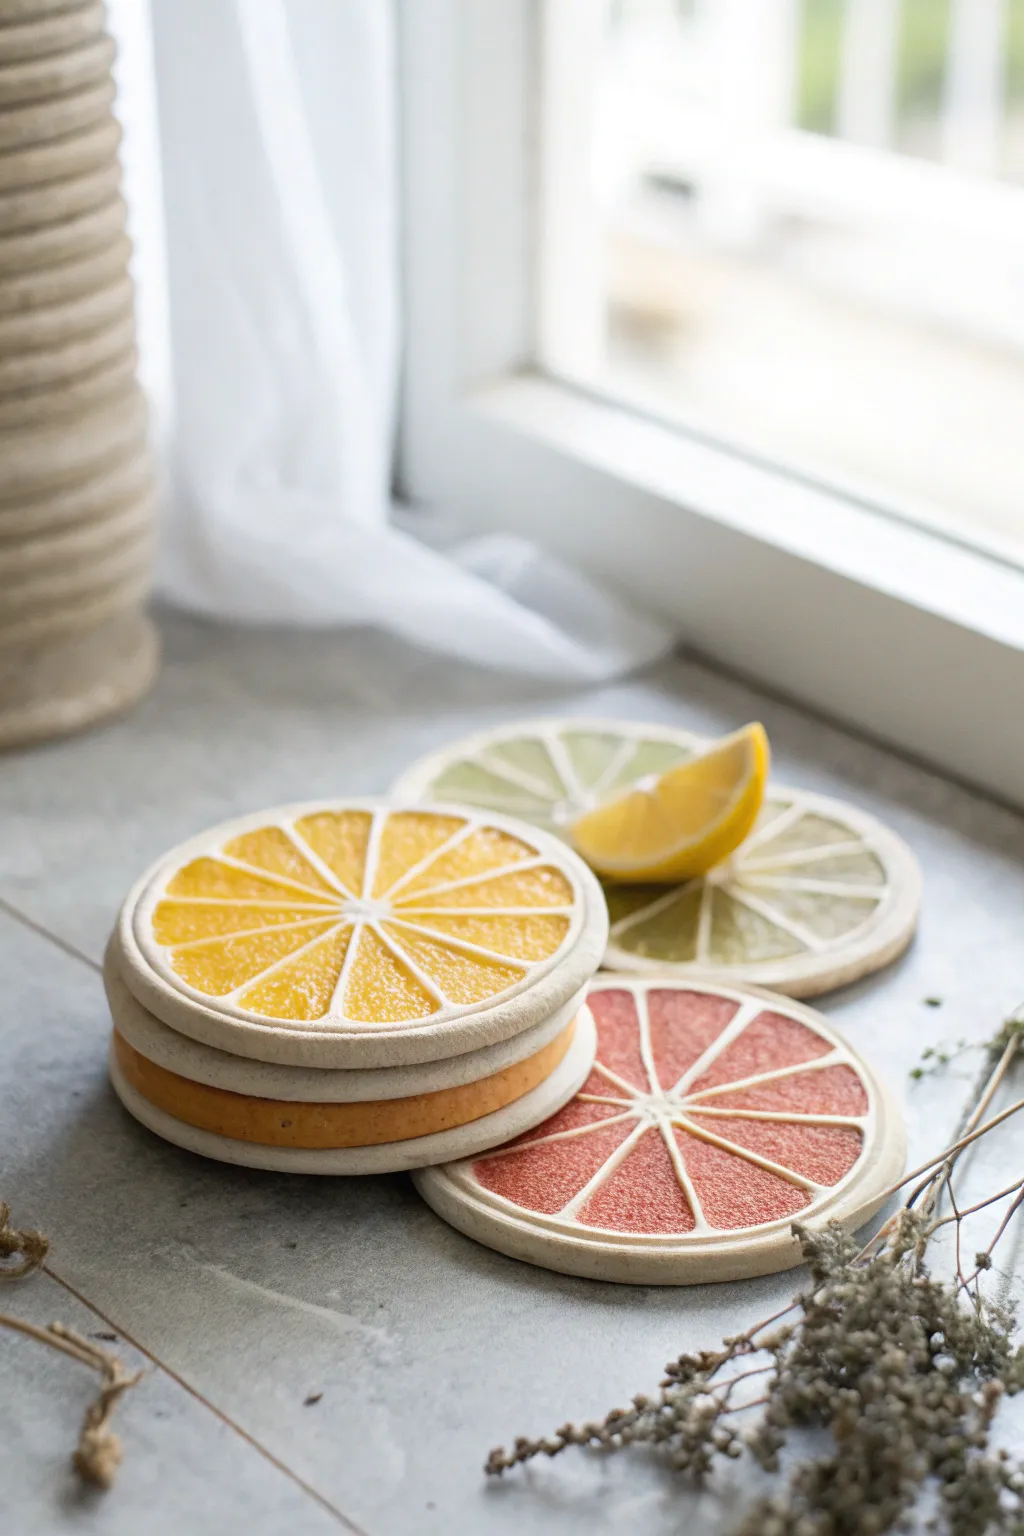
Brighten up your table setting with these juicy, vibrant fruit slice coasters that look good enough to squeeze. These simple clay creations mimic the texture of fresh citrus, featuring realistic segments and a textured rind perfect for holding your favorite cold drinks.
Detailed Instructions
Materials
- Air-dry clay (white)
- Acrylic paints (yellow, orange, red, green, white)
- Round cookie cutters (approx. 3.5 inches)
- Rolling pin
- Sandpaper (fine grit)
- Small craft knife or clay tool
- Detail paintbrush
- Flat shader paintbrush
- Old toothbrush or stiff bristle brush
- Clear waterproof varnish or sealant (matte or satin finish)
- Parchment paper
Step 1: Shaping the Base
-
Prepare the Clay:
Start by kneading a large ball of white air-dry clay until it is pliable and smooth. Rolling it in your warm hands helps remove any cracks. -
Roll the Disk:
Place the clay on a sheet of parchment paper and use a rolling pin to flatten it to a consistent thickness of about 1/4 inch. Keep it relatively thick so the coaster is sturdy. -
Cut the Circles:
Use your round cookie cutter to punch out perfect circles. If you want a variety of fruits, cut out three circles to make an orange, a grapefruit, and a lime. -
Smooth the Edges:
Dip your finger in a little bit of water and run it along the cut edge of the clay circles to round them off gently, removing any sharp ridges left by the cutter.
Juicy Texture Trick
Don’t press too hard with the toothbrush! Light, rapid tapping creates the best ‘pulp’ effect without destroying the clay structure.
Step 2: Creating the Texture
-
Mark the Center:
Find the rough center of your circle and make a small indentation using the back of a paintbrush handle to mark the core of the fruit. -
Define the Segments:
Using a craft knife or a thin clay tool, lightly score lines radiating from the center to the edge, dividing the circle into equal pie slices. Aim for about 10–12 segments per coaster. -
Carve the Pith:
Carefully carve out shallow triangular shapes within each marked segment, leaving raised lines in between to represent the white pith. -
Add Citrus Texture:
This is my favorite part for realism: take an old toothbrush or stiff brush and gently tap the depressed areas inside the segments to create a pitted, juicy texture. -
Texture the Rind:
Roll the outer edge of the coaster (the vertical side) along a piece of rough sandpaper or tap it with the toothbrush to give the ‘peel’ a realistic, porous look. -
Dry Completely:
Let the coasters dry on a flat surface for 24–48 hours. Flip them occasionally to ensure even drying and prevent warping.
Make it a Set
Create a matching holder! Make a simple clay cylinder or open bowl painted like a wooden crate to store your fruit stack when not in use.
Step 3: Painting and Finishing
-
Paint the Base:
Once dry, paint the entire raised pith network (the lines and the rim) with white acrylic paint. You can do the whole coaster white first for a brighter top coat. -
Mix Fruit Colors:
Prepare your fruit colors. Mix yellow and orange for the orange slice, red with a touch of white for grapefruit, and light olive green for the lime. -
Fill the Segments:
Using a small detail brush, carefully paint the textured insides of the segments with your chosen fruit color. Don’t worry if you get some on the white ridges; we can fix that shortly. -
Add Depth:
While the paint is still wet, dab a tiny bit of darker shade near the center or corners of segments to create a juicy, dimensional look. -
Clean Up the Pith:
After the colored segments dry, go back over the raised dividing lines and the outer rim with a steady hand and white paint to make the separation crisp again. -
Paint the Rind:
Paint the vertical outer edge of the coaster to match the fruit color inside, leaving the top rim white. -
Seal the Coaster:
Since these are for drinks, protect your work by applying two coats of waterproof varnish. A matte finish looks most like real fruit skin, but gloss makes it look wet and fresh.
Enjoy your refreshing new decor that brings a permanent slice of summer to your coffee table
Marbled Slab Earrings
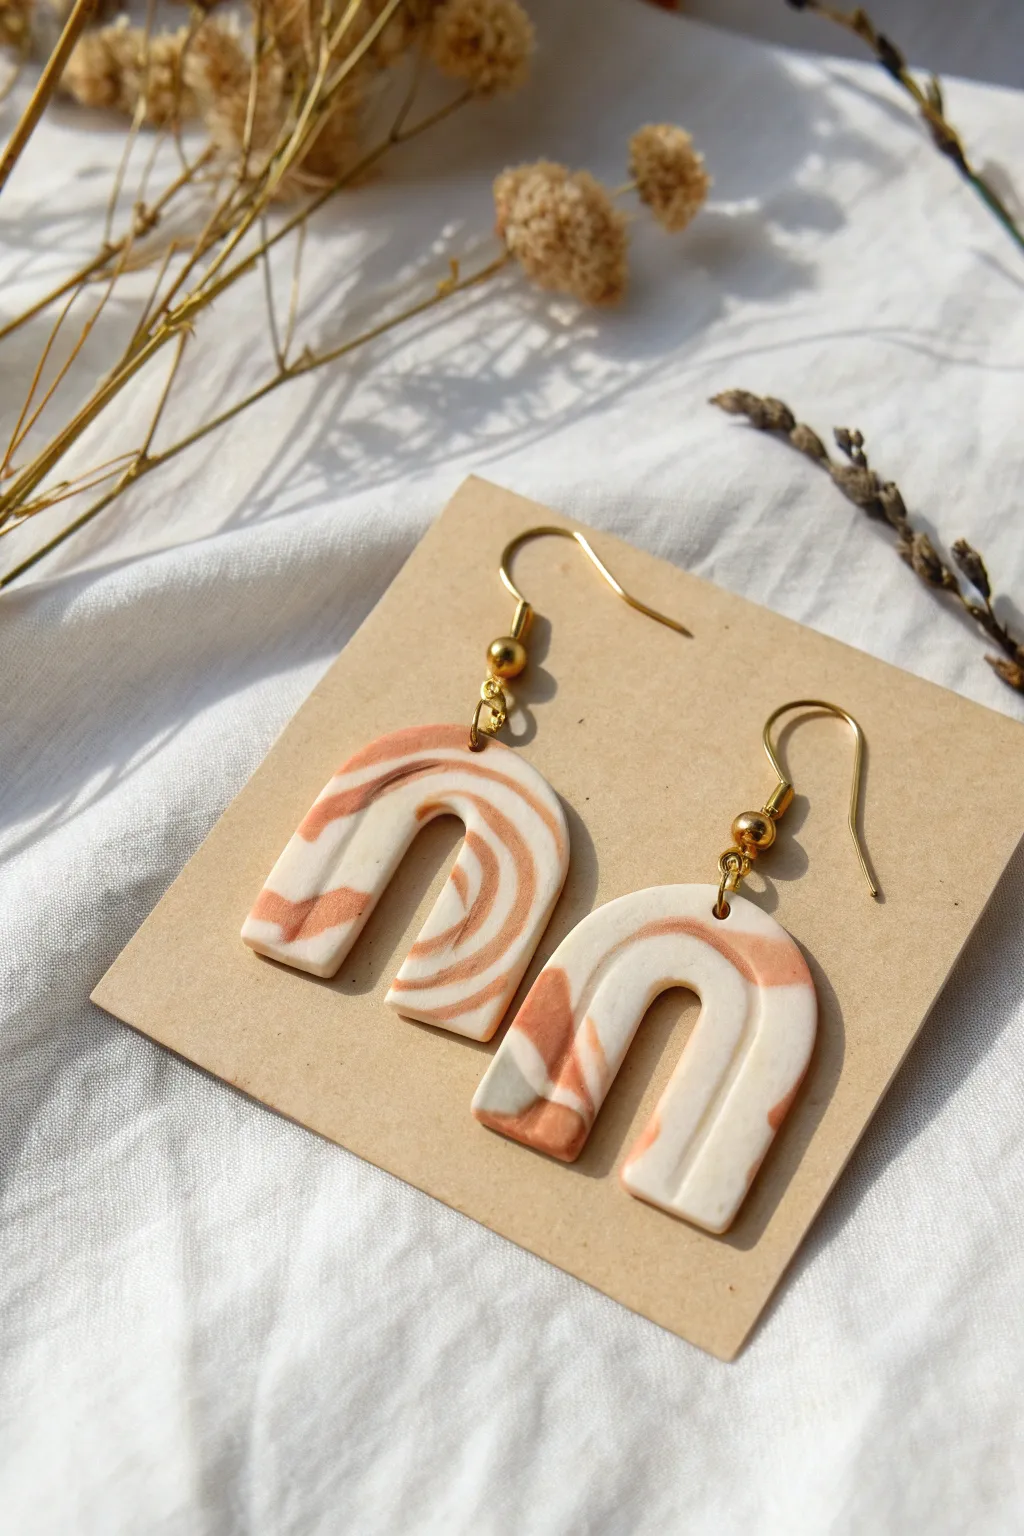
Create a stunning set of polymer clay earrings featuring a warm, organic marbled pattern of cream and terracotta. These lightweight arches offer a modern, handmade aesthetic perfect for adding an earthy touch to any outfit.
Step-by-Step Guide
Materials
- White or cream polymer clay
- Terracotta or rust-colored polymer clay
- Translucent polymer clay (optional, for depth)
- Acrylic roller or pasta machine
- U-shaped or rainbow arch clay cutters
- Tissue blade or X-Acto knife
- Hand drill or pin vibe
- Jump rings (gold)
- Fishhook earring wires (gold)
- Flat-nose pliers
Step 1: Creating the Marbled Slab
-
Condition the clay:
Start by kneading your white (or cream) and terracotta clays separately until they are soft and pliable. If you want a bit of depth, mix a small amount of translucent clay into the white. -
Form logs:
Roll each color into a long, thin snake or log shape. You’ll want more white than terracotta to achieve the look in the photo, so make the white log thicker. -
Twist together:
Hold the ends of the two logs together and twist them around each other like a candycane. -
Fold and roll:
Fold the twisted log in half, roll it into a ball, and then roll it back into a snake. Repeat this process of folding, twisting, and rolling 2-3 times. Be careful not to overmix; you want distinct streaks, not a solid new color. -
Create the slab:
Once you have a nice mix, roll the clay out into a flat slab about 3mm thick using your acrylic roller or pasta machine. I find rotating the clay as I roll helps keep the pattern interesting. -
Check the pattern:
Examine your slab. If you don’t like the marbling in one area, you can slice a thin layer off the top with your tissue blade to reveal a potentially better pattern underneath.
Smooth Cut Tip
Place a piece of cling wrap over the clay slab before pressing your cutters down. This creates a beautifully domed, rounded edge on your shapes instead of a sharp, harsh angle.
Step 2: Cutting and Baking
-
Cut the shapes:
Press your U-shaped cutter firmly into the best part of the marbled slab. Cut two identical shapes. -
Smooth the edges:
Gently lift the shapes. Use your fingertip dipped in a tiny bit of water or cornstarch to gently smooth any rough edges or fingerprints on the clay. -
Create holes:
Before baking, use a needle tool or toothpick to poke a hole at the very top center of each arch. Ensure the hole is large enough for your jump rings. -
Bake:
Place the pieces on a ceramic tile or baking sheet lined with parchment paper. Bake according to the manufacturer’s instructions for your specific brand of clay (usually around 275°F/135°C for 15-30 minutes). -
Cool down:
Let the earrings cool completely in the oven with the door slightly ajar. This helps prevent cracking from thermal shock.
Add Gold Flakes
For a touch of elegance, press tiny pieces of gold leaf foil onto the clay slab before cutting your shapes. It adds a lovely shimmer that complements the terracotta tones.
Step 3: Assembly
-
Sand edges (optional):
If there are any rough spots after baking, lightly sand the edges with fine-grit sandpaper for a professional finish. -
Buff surface:
Rub the surface briskly with a piece of denim or a soft cloth to give the matte clay a subtle, natural sheen. -
Open jump rings:
Use two pairs of pliers to twist open your jump rings. Remember to twist the ends away from each other (front to back), rather than pulling them apart horizontally. -
Connect hardware:
Slide the open jump ring through the hole in the clay arch, then add the loop of the fishhook earring wire. Close the jump ring securely by twisting it back into place. -
Final check:
Ensure all metal connections are tight and secure so the clay piece doesn’t slip off while wearing.
Wear your new handmade statement earrings with pride or package them on a card for a beautiful gift
Fairy House Wrapped on a Can Shape
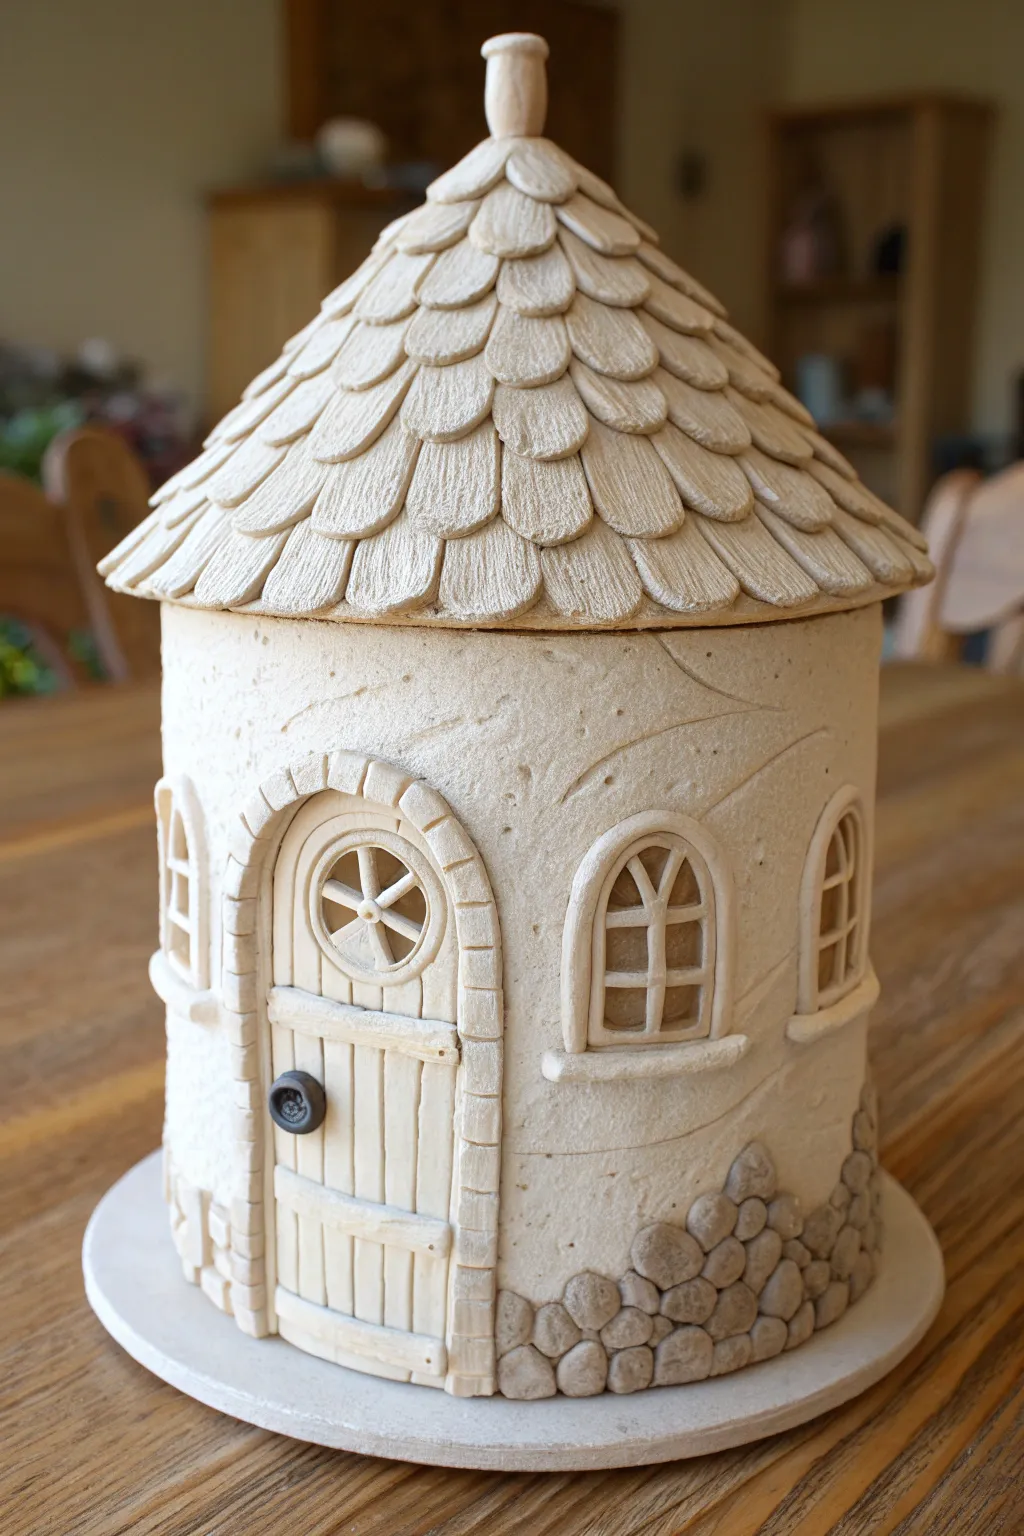
Transform a simple recycling bin find into an enchanting fairy dwelling with this detailed modeling clay project. This cozy cottage features distinct textures, from the weathered stone foundation to the delicate, leaf-like roof shingles.
Step-by-Step Guide
Materials
- Clean, empty tin can (soup or bean size)
- Air-dry modeling clay (white or cream)
- Rolling pin
- Clay carving tools (knife, needle tool)
- Cardboard or cardstock
- PVA glue or craft glue
- Texture sponge or foil ball
- Small round cutter or bottle cap
- Water for smoothing
Step 1: Base Structure & Foundation
-
Prepare the core:
Clean and dry your tin can thoroughly. To help the clay adhere better, I like to scuff the metal surface slightly with sandpaper, or you can coat it with a thin layer of PVA glue and let it get tacky. -
Wrap the walls:
Roll out a large slab of clay to about 1/4 inch thickness. Wrap this around the can, trimming the excess and smoothing the seam with a bit of water until it’s invisible. -
Texturize the surface:
Gently press a texture sponge or a crumpled ball of aluminum foil against the clay walls to create a stucco-like, organic finish. Don’t press too hard; you just want surface detail. -
Create the stone base:
Roll many small balls of clay in varying sizes. Flatten them slightly into irregular shapes to resemble river stones. -
Attach the stones:
Using a tiny dab of water or slip (clay mixed with water), attach these stones to the bottom inch of the can, fitting them together like a puzzle to form a sturdy foundation.
Step 2: Door & Windows
-
Cut the openings:
Decide where your door and windows will go. Use a needle tool to lightly trace their outlines directly onto the soft clay walls. -
Form the door frame:
Roll a thin snake of clay and flatten it into a strip. Arch this over your traced door area. Use a knife to lightly score lines across the strip to simulate brickwork. -
Sculpt the door planks:
Fill the space inside the arch with a flat piece of clay. Use a knife tool to score vertical lines for wooden planks and add a horizontal cross-beam near the bottom. -
Add door details:
Creating the round window is easier with a small cutter or cap. Press it into the upper door, leaving the inner clay in place, then add thin strips for the window pane spokes. Add a tiny clay ball for the doorknob. -
Construct side windows:
Roll thin snakes of clay to form arched frames for the windows. Place them on the walls, then add very thin vertical and horizontal clay strips inside the frames to create a grid pattern. -
Add window sills:
Shape small rectangles of clay and attach them beneath each window frame to serve as protruding window sills.
Clay Shrinkage
Air-dry clay shrinks as it dries. If gaps appear between the can and clay, fill them with a “slip” paste made of clay scraps and water.
Step 3: The Shingled Roof
-
Make the roof cone:
Form a cone shape using cardboard or cardstock that is slightly wider than your can. Glue it securely and place it on top of the can structure. -
Cover the cone:
Roll out a thin sheet of clay and drape it over the cardboard cone, trimming the excess at the bottom so it slightly overhangs the walls. -
Create individual shingles:
Roll out more clay and cut out dozens of small, teardrop or U-shaped shingles. They don’t need to be perfect; variation adds character. -
Applying shingles:
Start at the very bottom edge of the roof. Attach a row of shingles using water, overlapping them slightly. Work your way upward, row by row, ensuring the row above covers the gaps of the row below. -
Texture the shingles:
Once a few rows are applied, use a needle tool or knife to gently scratch vertical grain lines into each shingle for a wood-like appearance. -
Finishing the peak:
When you reach the top, pinch the final shingles together. Roll a small cylinder of clay and attach it to the very tip to act as a chimney or decorative finial.
Shingle Shaping Tip
Instead of cutting each shingle individually, roll a long strip, scallop one edge with a round cutter, and slice it into sections.
Step 4: Final Touches
-
Refine details:
Look over the entire piece. Use a damp brush to smooth out any unwanted fingerprints or rough edges on the door frame or window sills. -
Base plate:
If desired, place the finished house on a rolled-out circular disc of clay to act as a permanent stand, smoothing the connection between the base and the stone foundation. -
Dry thoroughly:
Let the project dry slowly away from direct heat sources to prevent cracking. This usually takes 24-48 hours depending on humidity.
Once fully dry, your fairy house is ready for a coat of paint or can be left natural for a rustic stone look