If you love making a whole collection at once, polymer clay slabs are where the magic happens. I’m sharing my favorite slab ideas that look amazing as a full sheet and still read beautifully once you cut them into earrings and pendants.
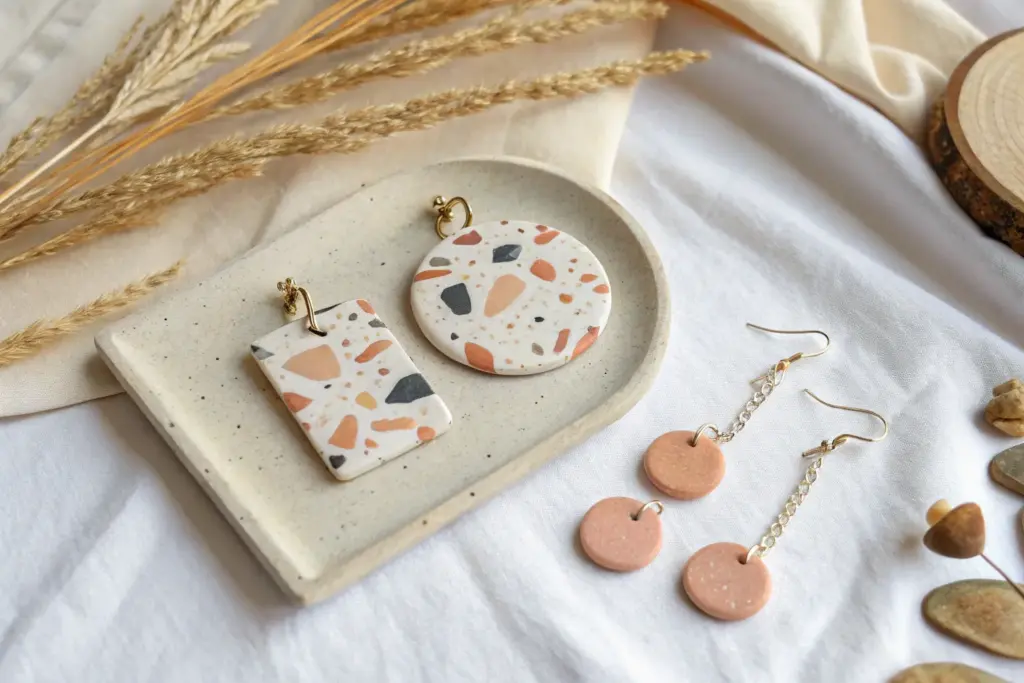
Terrazzo Scrap-Chip Slab
This trendy terrazzo effect transforms colorful clay scraps into modern, high-end jewelry components using a simple layering method. The result features a creamy white base speckled with organic fragments of terracotta, mustard, sage green, and black for a sophisticated, stone-like finish.
Detailed Instructions
Materials
- Polymer clay (White or light vanilla for the base)
- Polymer clay scraps (Terracotta, mustard yellow, teal/sage green, black)
- Acrylic rolling pin or pasta machine
- Tissue blade or flexible clay slicer
- Circle cutters (large and small)
- Small triangle cutter (optional)
- Parchment paper or ceramic tile
- Jump rings and earring hooks
- Jewelry pliers
- Small hand drill or pin vise
- Sandpaper (various grits from 400 to 1200)
Step 1: Preparing the Terrazzo Chips
-
Condition the colors:
Start by conditioning your colored clay scraps—terracotta, mustard yellow, teal, and black—until they are soft and pliable. -
Create thin sheets:
Roll each colored piece into a very thin sheet. If using a pasta machine, use one of the thinnest settings; if rolling by hand, aim for cardstock thickness. -
Tear into pieces:
Gently tear the thin sheets of rolled clay into small, irregular fragments. Don’t worry about uniform size; variety adds to the natural stone look. -
Chop the scraps:
Using your tissue blade, further chop these torn pieces into tiny, confetti-like chips. Keep some chunks slightly larger and mince others into fine specks. -
Separate colors:
Keep your chopped piles of colors separate for now so you can control the distribution later.
Stone Effect Tip
Add a tiny pinch of translucent clay or black pepper into your white base clay before rolling. This mimics natural stone grit and adds depth.
Step 2: Constructing the Slab
-
Prepare the base:
Condition a large block of white or vanilla-colored clay. Roll this out to a medium thickness (about 3-4mm), which will serve as your main slab canvas. -
Scatter the chips:
Begin sprinkling your colored chips onto the white base. I like to start with the larger chunks of terracotta and teal, spacing them out randomly. -
Fill the gaps:
Layer in the smaller mustard and black specks, filling the white negative space around the larger pieces until you are happy with the density. -
Press gently:
Place a sheet of parchment paper over the slab and use your fingers to gently press the chips down so they stick to the surface. -
Roll flat:
With the parchment paper still on top, use your acrylic roller to firmly roll over the slab. This forces the colorful chips flush into the white base. -
Check for smoothness:
Remove the paper and inspect the surface. Run the roller over it again directly (or pass it through the pasta machine once on a thicker setting) to ensure the surface is completely level and unified.
Step 3: Cutting and Assembly
-
Cut the shapes:
Use your circle cutters to punch out the main earring components. For the design shown, you’ll need two large circles and two smaller circles for tops. -
Create variation:
If you have leftover slab material, cut a few freeform shapes or soft triangles to create matching pendants or stud earrings. -
Smooth the edges:
Before baking, gently run your finger along the cut edges of the clay to smooth out any harsh lines or burrs from the cutters. -
Bake the pieces:
Bake according to your specific clay brand’s instructions (usually 275°F/130°C for 30-60 minutes). Consider baking on a piece of cardstock to prevent shiny spots. -
Sand and buff:
Once cooled, wet-sand the pieces under water using increasing grits of sandpaper to reveal the sharp, crisp edges of the terrazzo chips. -
Drill holes:
Use a small hand drill or pin vise to create holes near the top edge of your large circles and the bottom edge of your small circles. -
Assemble jewelry:
Open a jump ring with pliers, thread it through the holes to connect the large and small circles, and close it securely. Attach ear wires to the top circles.
Make it Shine
After sanding, coat your finished pieces with a thin layer of UV resin or glossy polyurethane varnish to make the terrazzo colors pop vividly.
Now you have a stunning set of faux-stone jewelry ready to wear or gift to a friend


Easy Two-Color Marble Slab
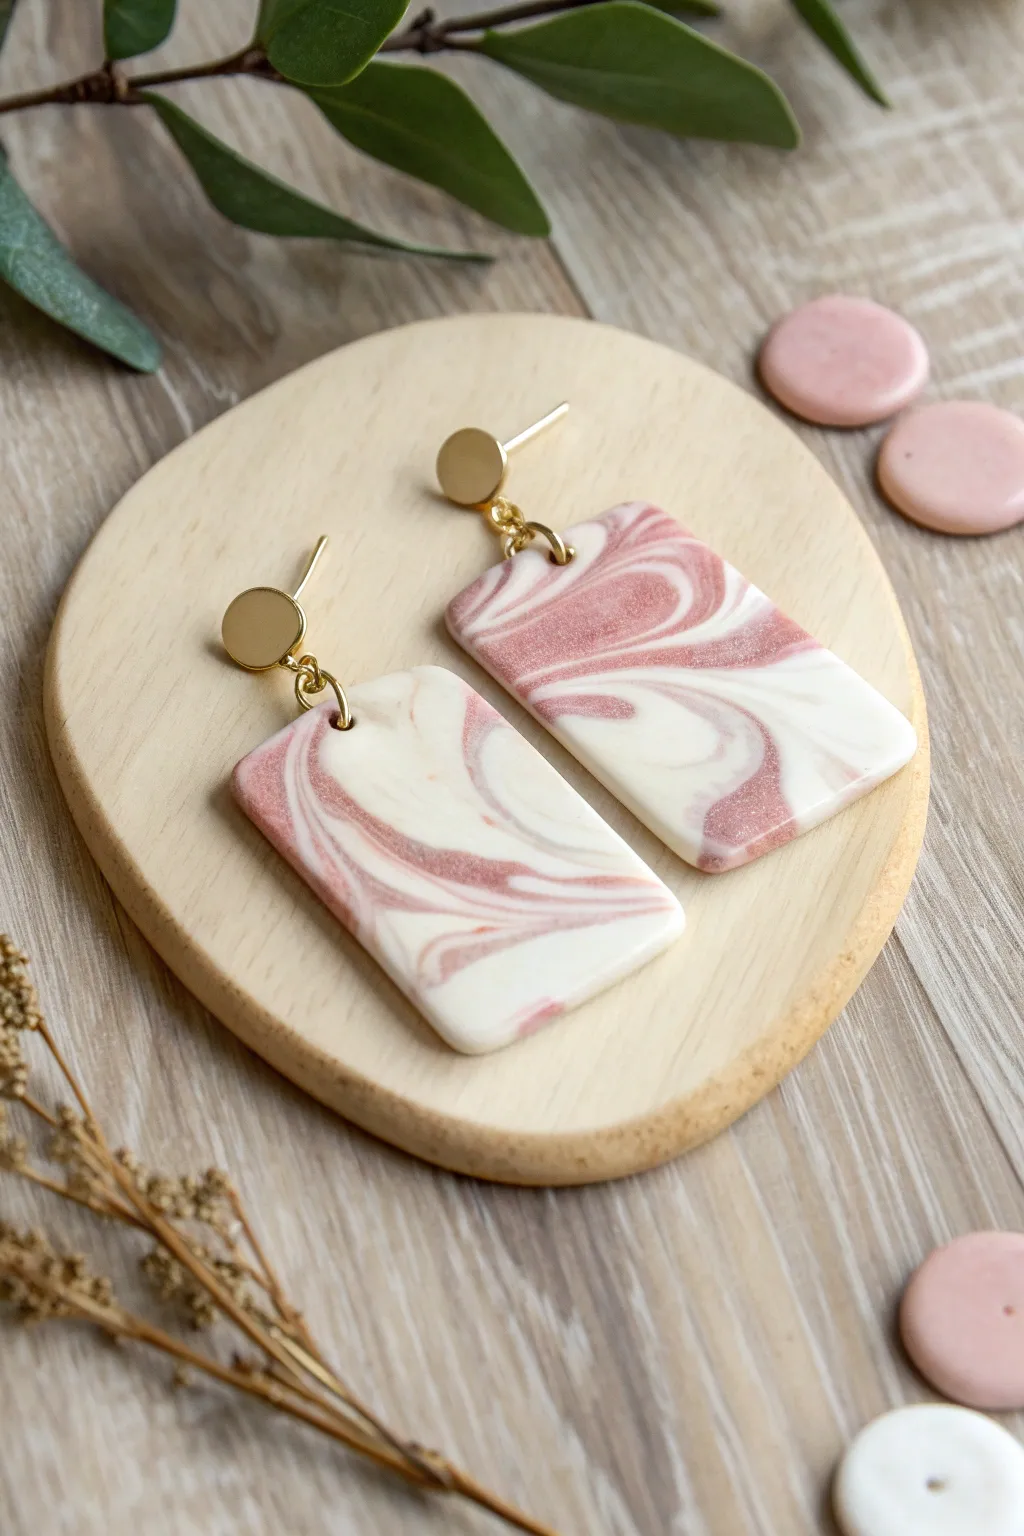
Create a sophisticated, natural stone look with this incredibly simple two-color marbling technique. The soft dusty rose swirls against a creamy white background create chic, minimalist earrings perfect for everyday wear.
Step-by-Step Tutorial
Materials
- White polymer clay (cernit or sculpey)
- Dusty rose or mauve polymer clay
- Acrylic roller or pasta machine
- Tissue blade for slicing
- Rectangle clay cutter (approx. 1.5 inches)
- Small round cutter (for post attachment)
- Hand drill or dremel with 1mm bit
- Sandpaper (400-1000 grit) or buffing tool
- 2 Gold flat-pad stud earring posts
- 2 Gold jump rings (6-8mm)
- Jewelry pliers
- Super glue or UV resin
- Ceramic tile or baking sheet
- Oven
Step 1: Conditioning & Color Prep
-
Condition the white clay:
Begin by thoroughly conditioning your white polymer clay until it is soft and pliable. Roll it into a smooth log about 3 inches long. -
Prepare the accent color:
Condition the dusty rose clay similarly. Roll this into a much thinner snake—about one-quarter the thickness of your white log. -
Combine the colors:
Lay the thin pink snake lengthwise along the white log. Gently twist the two colors together to form a candy-cane stripe pattern. -
Fold and roll:
Fold the twisted log in half and roll it out again into a single log. Repeat this folding and twisting motion 2-3 times, but be careful not to over-blend; you want distinct streaks, not a new solid color. -
Create a ball:
Once the striations look promising, roll the entire log into a smooth ball. This helps randomize the internal pattern.
Too Blended?
If your colors turned into solid pink, you over-mixed. Stop twisting sooner next time. The distinct lines come from stopping before the clay is fully homogenized.
Step 2: Creating the Slab
-
Flatten the marble:
Place the ball on your work surface or tile. Use your acrylic roller to flatten the ball into a sheet approximately 3mm thick. You can also run it through a pasta machine on a medium setting. -
Inspect the pattern:
Look at your slab. If the swirls aren’t organic enough for your taste, you can slice a thin layer off the top with your tissue blade to reveal the pattern underneath, or gently distort the clay with your fingers. -
Smooth the surface:
Very gently glide your roller over the surface one last time to ensure it is completely even and free of fingerprints.
Clean Edges Pro-Tip
Place a piece of plastic wrap (cling film) over the clay slab before pressing your cutter down. This creates a beautiful, soft beveled edge that requires almost no sanding.
Step 3: Cutting & Baking
-
Cut the shapes:
Press your rectangle cutter firmly into the slab to cut out two identical shapes. Try to capture the most interesting parts of the swirl pattern. -
Refine the edges:
Before lifting the cutter completely, give it a tiny wiggle to separate the edges. After removing the cutter, gently smooth any jagged edges with your fingertip. -
Make the holes:
Use a toothpick or a small detail tool to poke a hole at the top center of each rectangle for the jump ring. Ensure the hole is big enough for your hardware to move freely. -
Bake the pieces:
Place your tile with the cut pieces into the oven. Bake according to your customized clay brand’s instructions (usually 275°F/135°C for 30-45 minutes).
Step 4: Finishing & Assembly
-
Sand and buff:
Once completely cool, wet sand the edges and surface with fine-grit sandpaper to remove any lint or rough spots. I like to finish with a quick buff using a denim cloth for a soft matte sheen. -
Attach the posts:
Take your gold flat-pad posts. Apply a small dot of super glue or UV resin to the pad and press it firmly onto the back of a small distinct gold circle component (if using separate studs) or directly prepare your ear wires. -
Connect the components:
Use two pairs of jewelry pliers to twist open a gold jump ring. Thread it through the hole in your clay rectangle and the loop on your stud component. -
Twist to close:
Gently twist the jump ring closed again until the ends meet perfectly, ensuring there is no gap for the clay to slip through.
Now you have a stunning set of faux-stone earrings ready to complement any outfit


Floral Appliqué Garden Slab
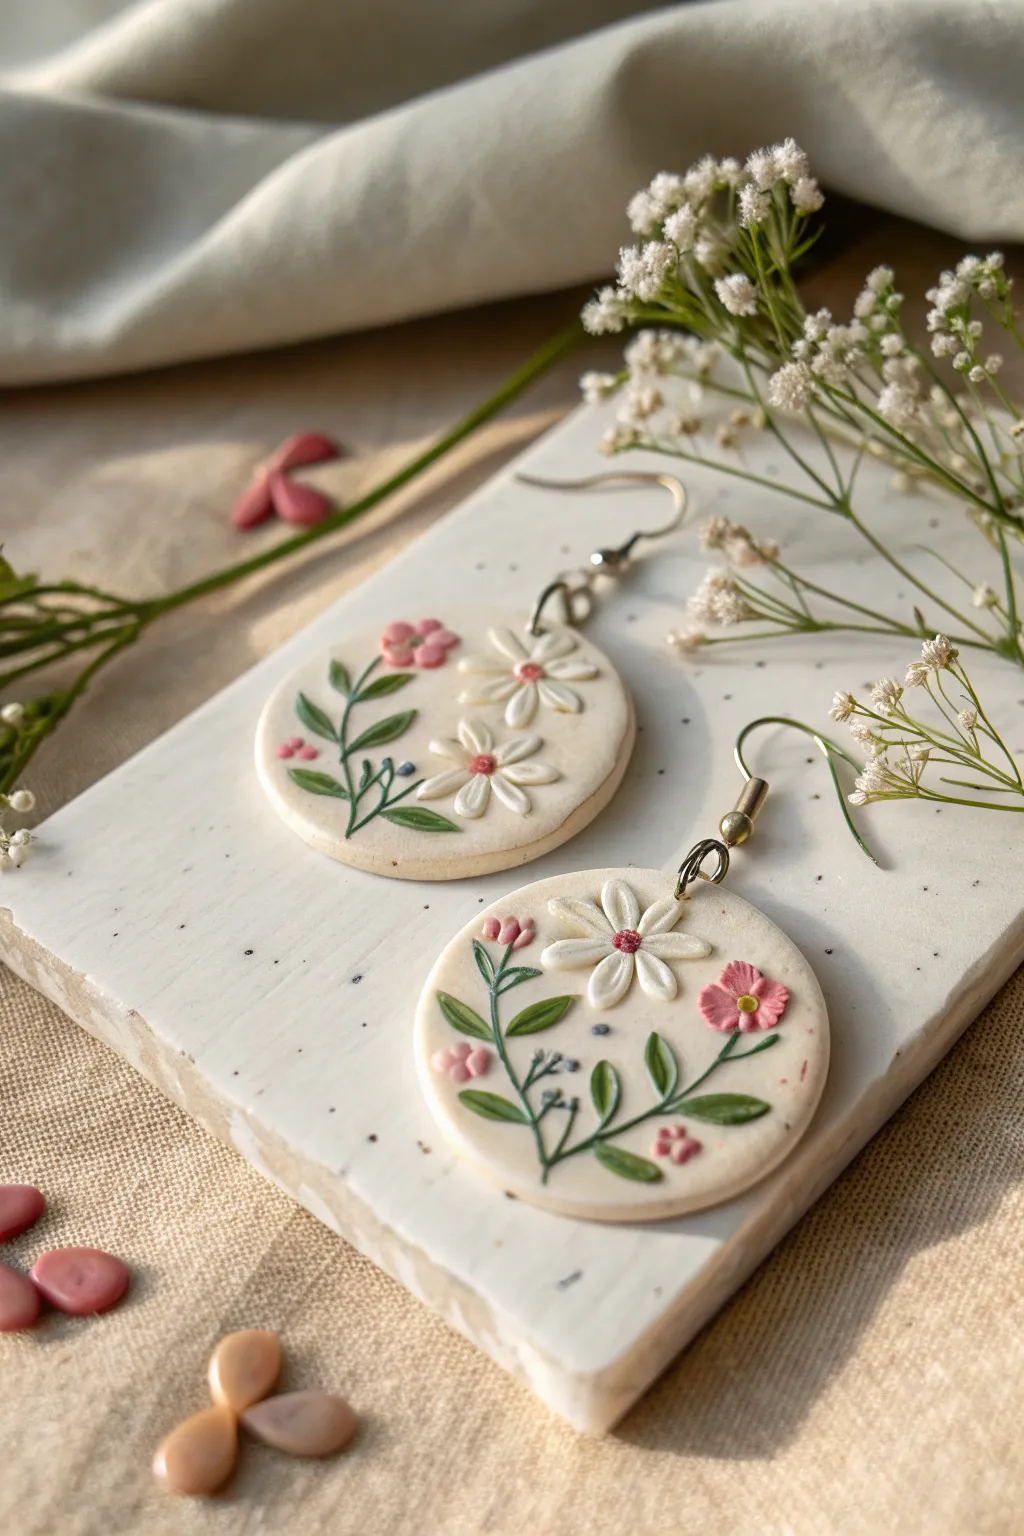
Capture the delicate beauty of a spring garden with these charming botanical earrings. This technique involves creating a miniature raised relief design on a smooth, cream-colored clay canvas for a sophisticated, handcrafted look.
Step-by-Step
Materials
- Polymer clay in Cream/Beige (base)
- Polymer clay in White, Sage Green, and Dusty Rose/Pink
- Rolling pin or pasta machine
- Circle clay cutters (approx. 1.5 inch diameter)
- Needle tool or toothpick
- Ball stylus tool (small)
- Liquid polymer clay (translucent)
- Exacto knife or flexible blade
- Ceramic tile or baking sheet
- Earring hardware (jump rings and hooks)
- Jewelry pliers
- Hand drill or dremel (if baking before drilling)
Step 1: Base Preparation
-
Condition the Clay:
Begin by conditioning your cream-colored clay until it is soft and pliable. Use a rolling pin or pasta machine to roll it out to a uniform thickness, about 3mm thick. -
Cut the Canvases:
Use your circle cutter to punch out two identical discs. Place them directly onto your baking tile or sheet so you don’t have to move them later and risk distorting the shape. -
Texture the Surface (Optional):
For a subtle speckled pottery look like in the image, you can gently mix tiny specks of black pepper or brown clay into your cream base before cutting, or leave it smooth and creamy.
Step 2: Sculpting the Botanicals
-
Create Stems:
Roll extremely thin snakes of sage green clay for the stems. Cut small segments and gently press them onto the clay discs in a flowing, curved arrangement. -
Form the Leaves:
Roll tiny balls of green clay into teardrop shapes. Place them along the stems and use your needle tool to press a central vein into each leaf, which simultaneously secures it to the base. -
Make the Daisy Petals:
For the white daisies, roll five or six tiny rice-grain shapes. Arrange them in a star pattern on the clay base. Use the needle tool to press an indentation down the center of each petal to add dimension. -
Add Flower Centers:
Place a tiny ball of pink or contrasting clay in the center of your daisy petals. Use a needle tool to stipple it, giving it a pollen-like texture. -
Craft Tiny Rose Buds:
For the smaller pink flowers, flatten a tiny ball of dusty rose clay and gently curve it. Press these onto the stems, using the ball stylus to create a small cupped indentation in the middle. -
Refine the Details:
Check your composition. I like to use a clean needle tool to gently nudge petals or leaves into better positions if they look too crowded. -
Add Micro Details:
Roll barely-there specks of deep blue or grey clay to mimic tiny buds or berries. Press these into the empty spaces near the leaves for extra visual interest.
Sticky Situation?
If tiny clay petals stick to your fingers instead of the base, use a needle tool to pick them up plus a dab of liquid clay on the base to act as glue.
Step 3: Finishing and Assembly
-
Create Hanging Holes:
Before baking, use a straw or small round tool to punch a hole near the top edge of each circle. Ensure the hole is large enough for your jump rings. -
Bake:
Bake the pieces according to your polymer clay brand’s specific temperature and time instructions. Usually, this is around 275°F (135°C) for 30-45 minutes. -
Cool Down:
Allow the earrings to cool completely inside the oven or on the tile. Moving them while hot can cause warping. -
Drill (Alternative):
If you forgot to make holes before baking, use a small hand drill or rotary tool to carefully drill a hole at the top of the cooled disc. -
Seal (Optional):
While polymer clay is durable, a very light coat of water-based matte varnish can protect the tiny floral details from getting dirty over time. -
Attach Hardware:
Open a jump ring with your jewelry pliers using a twisting motion (never pull apart). Thread it through the clay hole and attach the earring hook. -
Secure and Close:
Close the jump ring tightly, ensuring the ends meet perfectly flush so the hook doesn’t slip out.
Pro Tip: Clean Slate
Keep a baby wipe or piece of scrap clay nearby. Clean your hands and tools between colors to avoid transferring green or pink lint onto the cream base.
Wear your miniature garden masterpieces with pride and enjoy the compliments on your intricate handiwork


Abstract Blob-and-Line Slab
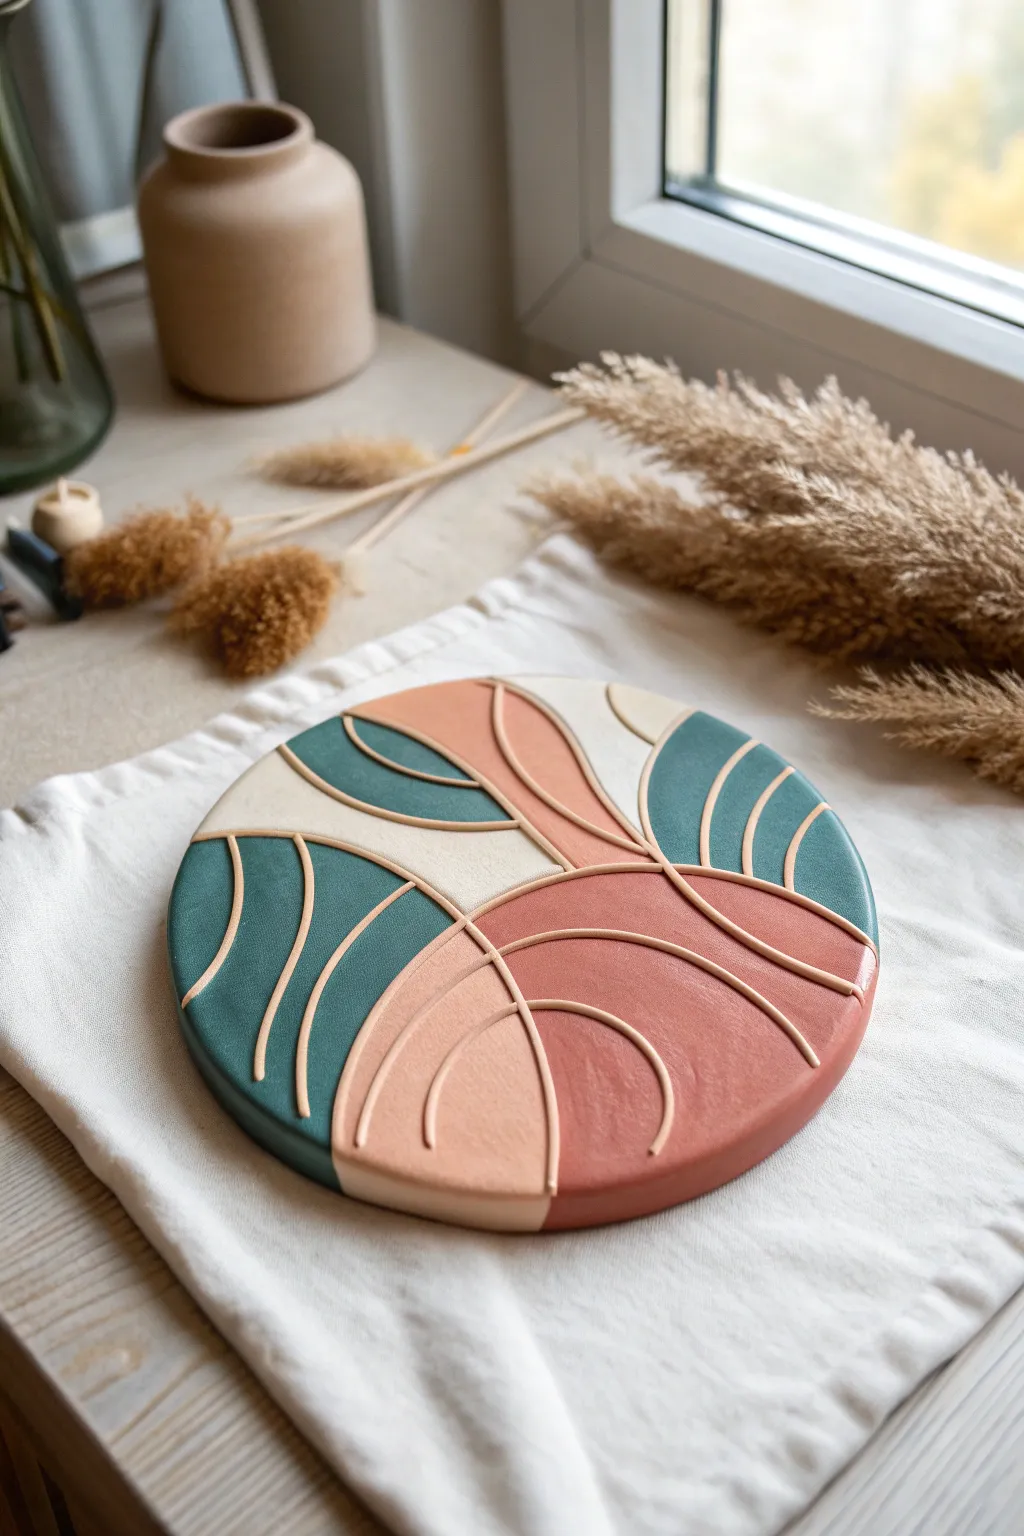
Capture the essence of modern organic design with this striking polymer clay slab featuring fluid lines and earthy tones. This project combines geometric arches with soft, blob-like segments, creating a dimensional piece perfect for coasters or wall hangings.
How-To Guide
Materials
- Polymer clay (Terracotta/Rust, Deep Teal/Green, Peach/Blush, Cream/White)
- Acrylic rolling pin or pasta machine
- Clay slicer blade (rigid)
- Small round clay extruder or hand-rolling surface
- Circular clay cutter (approx. 4-5 inches diameter)
- Precision craft knife (X-Acto)
- Parchment paper or ceramic tile surface
- Oven for baking
Step 1: Base Preparation
-
Condition the Grid:
Begin by conditioning all four colors of your polymer clay separately until they are soft and malleable. This prevents cracking and ensures smooth seams later. -
Roll the Sheets:
Roll out each color into a flat sheet of uniform thickness, roughly 3mm (or setting 1 on most pasta machines). -
Plan the Pattern:
Lightly sketch your desired curved grid on a piece of paper first if you want a guide. The design relies on intersecting curves that create segments. -
Cut Organic Segments:
Using your craft knife, freehand cut curved, organic shapes from the different colored sheets. Think of puzzle pieces—arches, swoops, and rounded triangles. -
Assemble the Slab:
fit the cut pieces together on your work surface or parchment paper. Gently press the seams together where the colors meet so they bond into a single flat sheet. -
Smooth the Seams:
Place a piece of parchment paper over your assembled slab and gently roll over it with your acrylic roller to flatten the joins and secure the bond. -
Cut the Circle:
Position your large circular cutter over the most interesting part of your pattern slab and press down firmly to cut out your perfect round base.
Step 2: Adding Dimension
-
Extrude the Lines:
For the raised lines, use a clay extruder with a small round disc to create long, uniform ‘snakes’ of the cream or peach clay. I prefer mixing a custom light peach for this step to unify the palette. -
Apply Main Dividers:
Gently lay the extruded clay ropes precisely over the seams where your color blocks meet. Do not press down hard yet. -
Create Inner Arches:
Cut shorter lengths of the clay rope and place them inside the larger color blocks, following the curve of the main dividers to create rainbow-like arches. -
Trim Excess:
Use your precision knife to trim the clay ropes exactly at the edge of the circle so they look clean and intentional. -
Secure the Lines:
Once you are happy with the placement, extremely gently press the ropes down to adhere them to the base slab without flattening their round profile.
Seamless Rolling
When rolling across the seams to flatten your base, roll in multiple directions. This prevents the shapes from distorting too much in one direction.
Step 3: Finishing
-
Texture Check:
Inspect the surface for fingerprints. If found, lightly buff them out with a tiny bit of baby oil or cornstarch on your finger. -
Bake:
Bake the piece according to your specific clay brand’s instructions (usually around 275°F/130°C for 30 minutes). I suggest tenting with foil to prevent scorching. -
Cool Down:
Let the piece cool completely inside the oven or on the tile to keep it perfectly flat. -
Sand Edges:
If the outer rim feels sharp or rough after baking, gently sand the edge with fine-grit wet/dry sandpaper for a professional finish.
Trapped Air Bubbles?
If you see a bubble under the clay sheet before baking, pierce it gently with a needle tool and smooth the air out with your finger so it lays flat.
Once cooled, your geometric clay slab is ready to be styled on a coffee table or hung as modern art

What Really Happens Inside the Kiln
Learn how time and temperature work together inside the kiln to transform clay into durable ceramic.
Classic Checkerboard Slab
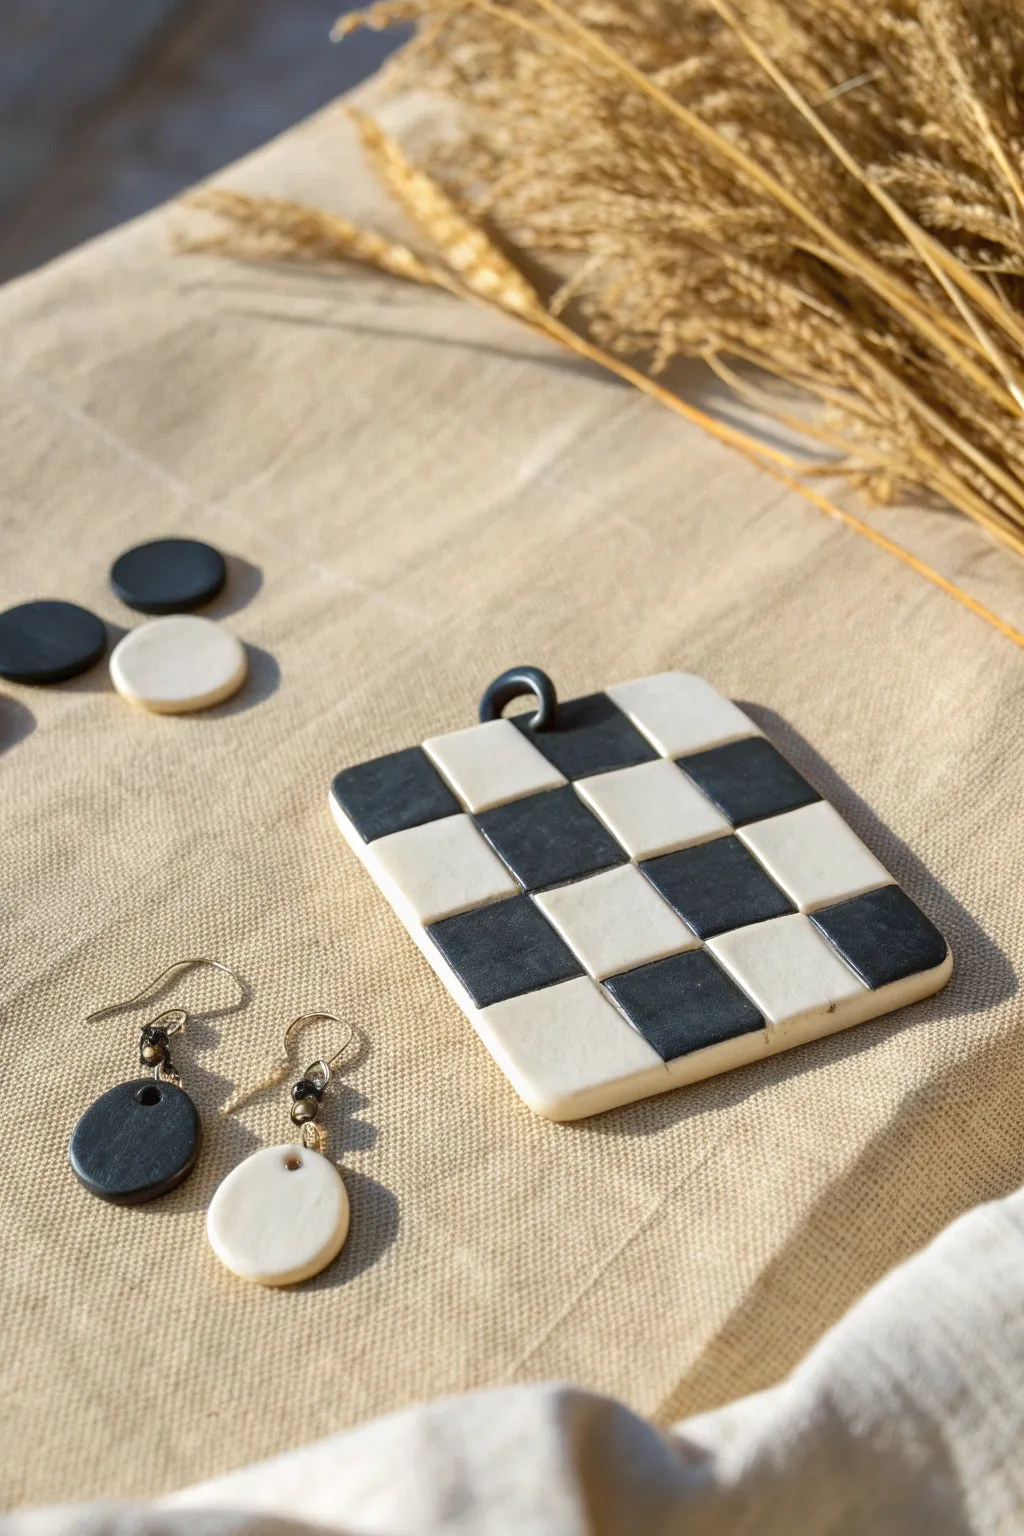
Create a bold statement piece with this monochromatic polymer clay pendant, featuring a sharp black and white checkerboard pattern. This design balances classic geometry with a soft, rounded finish, perfect for hanging on a simple cord or chain.
Step-by-Step Guide
Materials
- Black polymer clay
- White or cream polymer clay
- Clay roller or pasta machine
- Flexible tissue blade
- Rigid slicing blade or craft knife
- Ruler
- Square cookie cutter (approx 2 inches)
- Small circle cutter (optional for finding placement)
- Ceramic tile or glass work surface
- Oven for baking
Step 1: Clay Conditioning & Base Prep
-
Condition the clays:
Begin by thoroughly conditioning both your black and white polymer clay separately. Knead them until they are soft, pliable, and free of cracks. Ensure your hands are clean when switching from black to white to avoid color transfer. -
Roll out sheets:
Using your roller or pasta machine on a medium setting (around 2-3mm thick), roll out a sheet of white clay and a sheet of black clay. These will become your checkerboard components. -
Prepare a base sheet:
Roll a second sheet of either white or black clay on a slightly thinner setting. This will act as the backing slab for your pattern.
Step 2: Creating the Grid
-
Cut strips:
Use your rigid blade and a ruler to cut long, even strips from both the black and white thick sheets. Aim for strips that are roughly 1cm wide. Precision here is key for tidy squares later. -
Refrigerate briefly:
I like to pop these strips in the fridge for about 10 minutes. Chilled clay cuts much cleaner and distorts less, which helps keep those edges sharp. -
Assemble strip canes:
Lay the strips side-by-side, alternating black and white. Press them gently together on their long edges to form a single striped sheet. -
Slice crosswise:
Cut across your striped sheet perpendicularly to create new strips that consist of alternating black and white squares. -
Form the checkerboard:
Arrange these new multi-colored strips onto your prepared base sheet. Offset every other strip by one square so the black blocks align with white ones, creating the classic check pattern. -
Compress the pattern:
Once assembled, cover the slab with a piece of parchment paper. Use an acrylic roller to gently but firmly roll over the surface. This bonds the squares together and smooths the top without distorting the grid too much.
Distorted Squares?
If your squares are squishing into diamonds when you cut, your clay is too warm. Let it rest in the fridge for 15 minutes before the final slicing to regain firmness.
Step 3: Shaping & Finishing
-
Cut the pendant shape:
Position your square cutter over the best part of your pattern. Press down firmly to cut out the main pendant body. Use a tissue blade to lift the excess clay away. -
Round the edges:
Use your fingertip to gently smooth and round the sharp cut edges of the square. This gives the piece a soft, stone-like feel rather than a harsh factory-cut look. -
Create the loop:
Roll a small snake of black clay. Form it into a ‘U’ shape or a small loop. -
Attach the bail:
Press this loop firmly onto the top center edge of your square pendant. You can blend the clay slightly at the back to ensure a strong bond. -
Utilize scraps:
With the leftover clay from your initial sheets, use small circle cutters to create matching earring components like the simple discs shown in the reference. -
Punch holes:
If making earrings, use a needle tool or toothpick to create small holes near the top edge of each circle before baking. -
Final smooth:
Give the surface one last check for fingerprints. A tiny bit of baby oil on your finger can help buff away any unwanted texture. -
Bake:
Place your pieces on a ceramic tile or baking sheet. Bake according to your clay manufacturer’s instructions, usually around 275°F (130°C) for 30-45 minutes. -
Cool and sand:
Allow the pieces to cool completely in the oven. For a matte finish, lightly sand the edges with high-grit wet/dry sandpaper.
Pro Tip: Seamless Join
Apply a tiny drop of liquid polymer clay (Bake & Bond) between the loop and the pendant body to ensure the bail never snaps off after baking.
Now you have a strikingly modern accessory ready to wear or gift.
Leopard Spot Tear-and-Press Slab
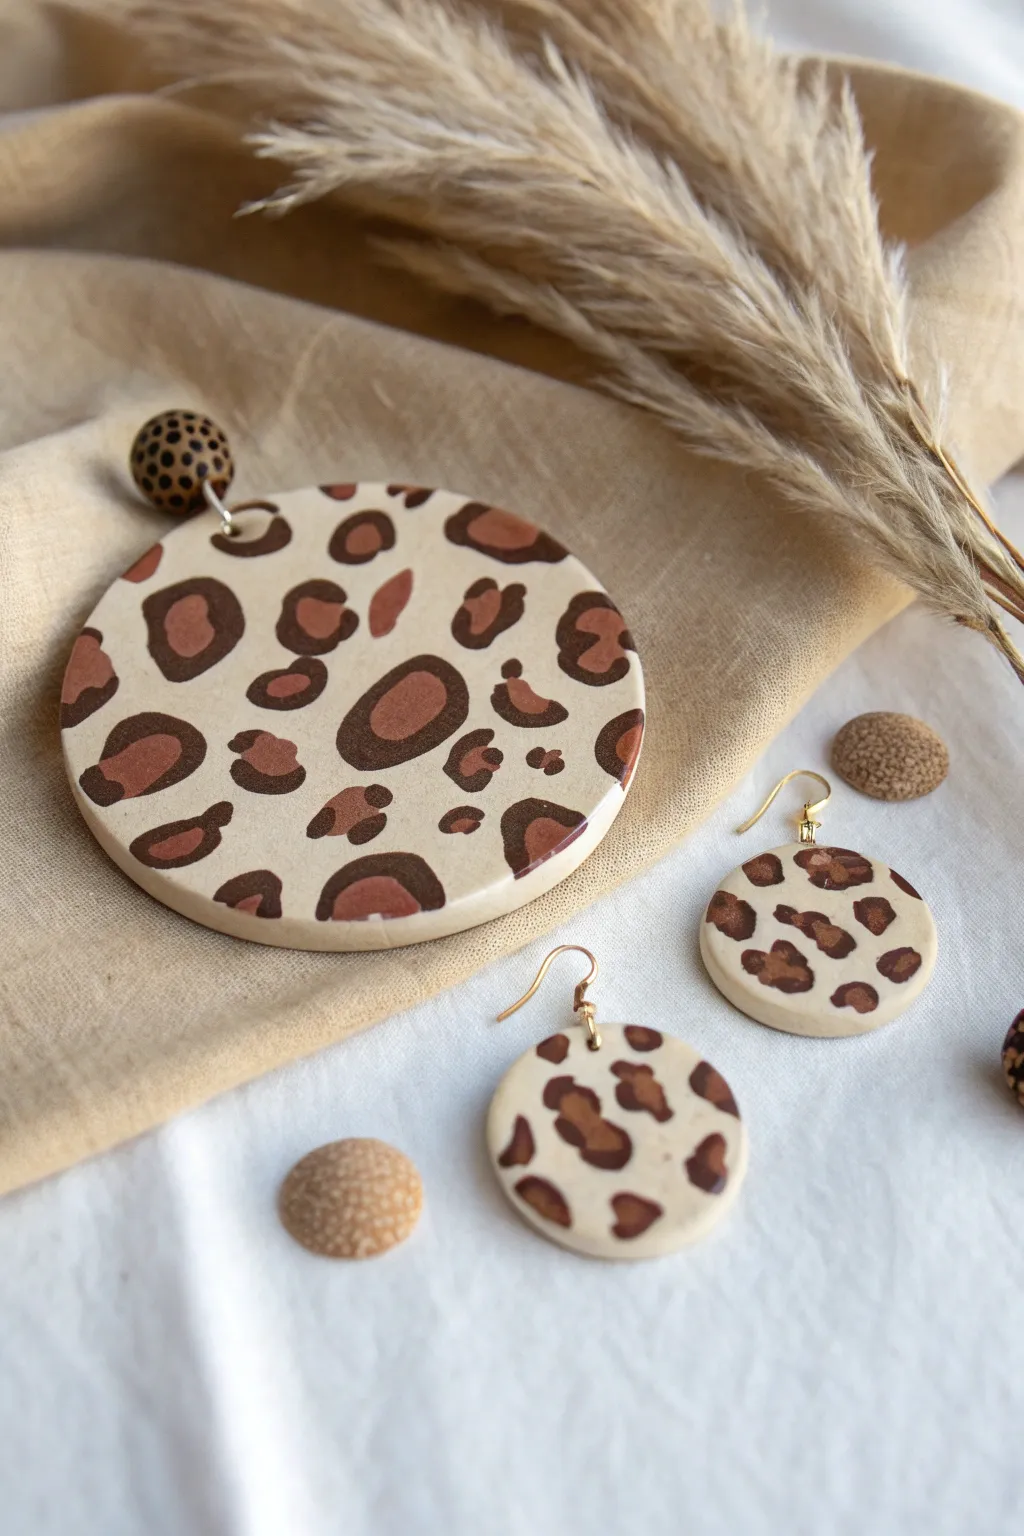
Create a classic, warm-toned leopard print design using a simple tear-and-press technique that feels organic and handcrafted. This project combines geometric stud tops with stylish circle drops for a coordinated jewelry set that mimics natural animal prints.
Detailed Instructions
Materials
- Polymer clay in beige/ecru (base)
- Polymer clay in dark espresso brown
- Polymer clay in terracotta or cinnamon
- Acrylic rolling pin or pasta machine
- Circle cutters (various sizes)
- Needle tool or toothpick
- Jewelry pliers
- Jump rings and earring hooks
- Tissue blade
- Gloss or matte varnish (optional)
- Small round bead mold or hand-rolling surface
Step 1: Creating the Base Slab
-
Condition the Clay:
Begin by thoroughly conditioning your beige polymer clay until it is soft and pliable. This ensures a smooth canvas for your pattern. -
Roll the Base Sheet:
Roll the beige clay into a flat, even sheet. A thickness setting of roughly 3mm (or setting 1 on most pasta machines) works well for earrings. -
Prepare the Spot Colors:
Condition the terracotta and dark brown clays separately. Roll them into thin snakes or small logs for easy access.
Step 2: Building the Leopard Pattern
-
Form the Center Spots:
Tear off small, irregular bits of the terracotta clay. Flatten them slightly with your fingertips. -
Apply Centers to Base:
Press these terracotta bits onto your beige slab in a random, scattered arrangement. Leave plenty of space between them for the outlines. -
Create the Outlines:
Tear very small pieces of the dark brown clay. Roll them into tiny, thin worms or crescents. -
Border the Spots:
Place the dark brown pieces around the terracotta spots. You don’t need to circle them completely; use two or three disjointed pieces to frame each spot for a natural look. -
Add Filler Spots:
Take tiny leftover bits of dark brown clay and press them into the empty beige spaces as solid, smaller spots to balance the pattern density. -
Flatten the Slab:
Once you are happy with the arrangement, cover the clay with a piece of parchment paper or plastic wrap. -
Roll Smooth:
Gently use your acrylic roller over the paper to press the spots firmly into the base. Roll until the surface is completely flat and the spots are flush with the background.
Natural Variety
Vary the size of your terracotta spots. Having a mix of large and small ‘islands’ makes the leopard print look less manufactured and more realistic.
Step 3: Cutting and Finishing
-
Cut Out Shapes:
Use your circle cutters to punch out your earring shapes. Try different sizes for the studs versus the pendants. -
Create Stud Components:
For the geometric studs shown (like the spotted ball), roll a small ball of beige clay and press tiny brown dots onto it, then roll it again until smooth. -
Piercing Holes:
Use a needle tool to create holes for your jump rings near the top edge of your circles. Do this before baking to avoid cracking later. -
Bake:
Bake the pieces according to the manufacturer’s instructions for your specific brand of clay, usually around 275°F (130°C) for 30 minutes. -
Sand and Buff:
Once cool, use fine-grit sandpaper to smooth any rough edges. I sometimes buff the surface with denim for a soft satin sheen. -
Assembly:
Use pliers to open jump rings and connect the circle drops to your earring hooks or stud components.
Smudged Spots?
If your brown outlines smear into the beige while rolling, let the clay cool down in the fridge for 10 minutes before the final roll. Firm clay holds detail better.
Wear your wild new accessories with pride knowing you built that pattern from scratch


The Complete Guide to Pottery Troubleshooting
Uncover the most common ceramic mistakes—from cracking clay to failed glazes—and learn how to fix them fast.
Confetti Sprinkle Slab
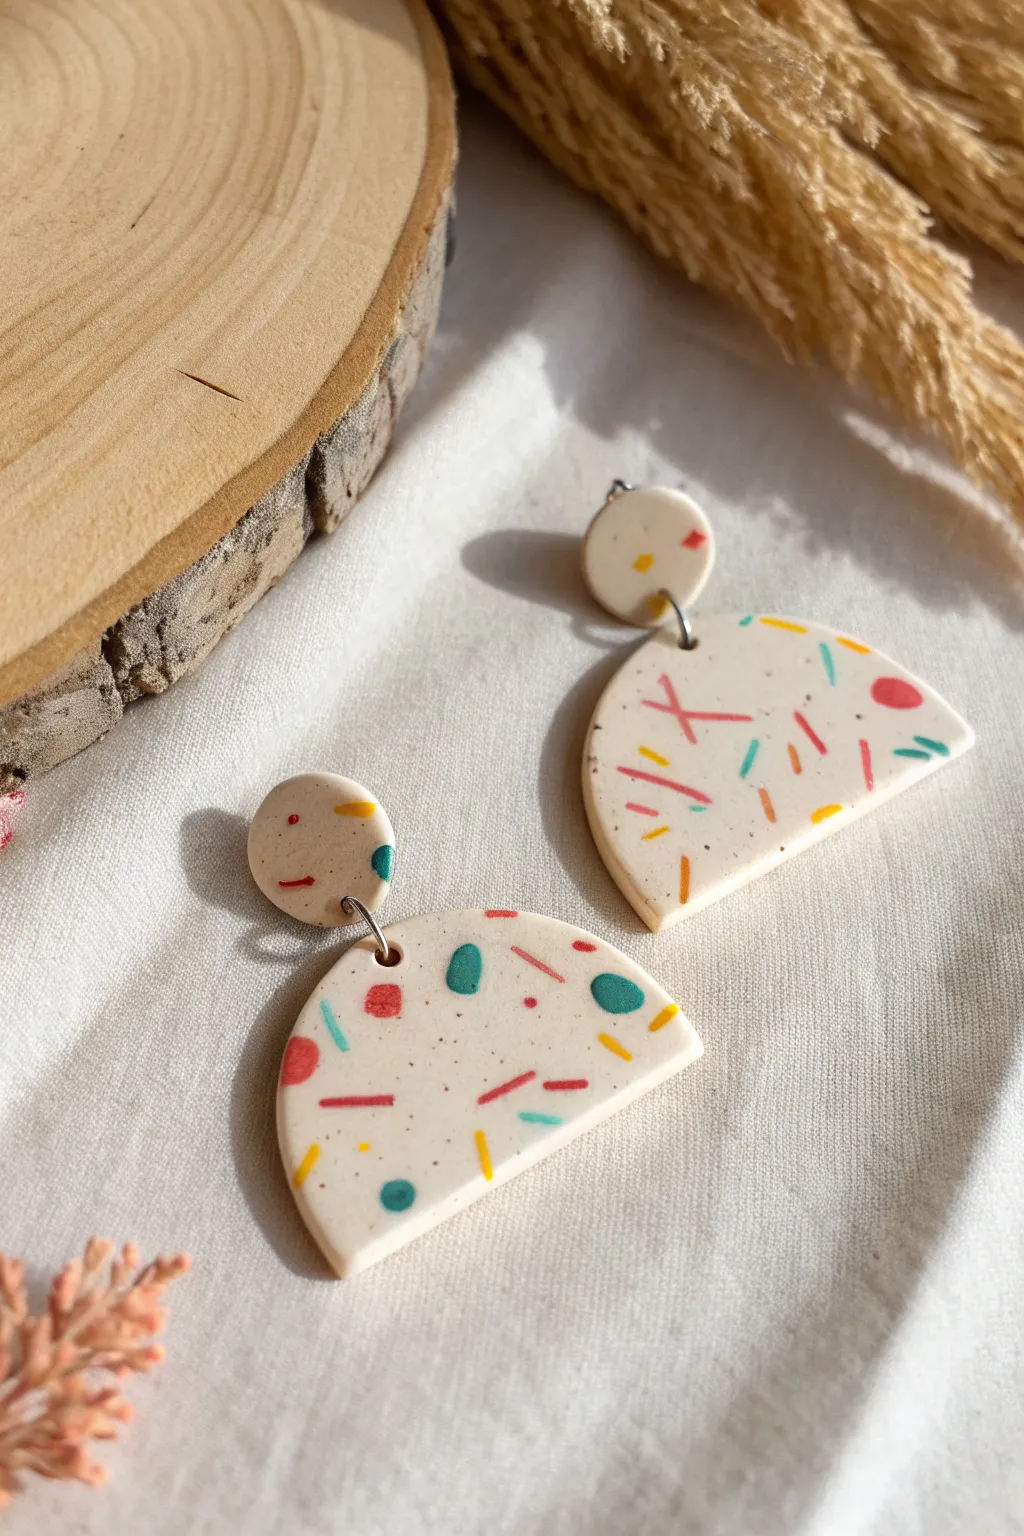
Bring the celebration to your accessories with these cheerful, confetti-patterned earrings. The clean cream base highlights the playful pop of primary-colored sprinkles, creating a versatile design that works for both everyday wear and special occasions.
How-To Guide
Materials
- White or cream polymer clay (base)
- Red polymer clay
- Teal/Turquoise polymer clay
- Yellow polymer clay
- Orange polymer clay
- Acrylic rolling pin or pasta machine
- Tissue blade
- Earring cutters (small circle and large half-circle/arch)
- Black pepper or brown acrylic paint (optional for speckles)
- Jump rings (silver or gold)
- Earring posts and backs
- Jewelry pliers
- Hand drill or pin vice
- Fine grit sandpaper
- UV resin or gloss varnish (optional)
Step 1: Preparing the Confetti Slab
-
Condition the Base:
Begin by thoroughly conditioning your white or cream polymer clay until it is soft and pliable. Roll it out into a smooth, even sheet about 3mm thick using your acrylic roller or the medium setting on a pasta machine. -
Create the Speckles:
To achieve the tiny stone-like texture visible in the background, you can lightly dust the clay with ground black pepper. Alternatively, mix in a tiny crumb of brown clay or dried brown paint flakes for a granite effect. -
Prepare the Colored Clay:
Condition small amounts of red, teal, yellow, and orange clay. These will become your sprinkles, so you only need a very small amount of each color. -
Make the Sprinkles:
Roll each colored piece of clay into extremely thin snakes or threads. The thinner you roll them, the more delicate your final confetti will look. -
Chop the Colors:
Use your tissue blade to chop these thin snakes into tiny, varying lengths. Aim for a mix of short dashes and tiny dots to create a random, organic pattern. -
Apply the Confetti:
Scatter the chopped colored pieces randomly over your white base sheet. I like to drop them from a small height to ensure the spacing feels natural rather than placed. -
Add Larger Accents:
Roll tiny balls of the colored clay and flatten them slightly with your finger. Place these larger dots sporadically among the sprinkles for visual interest. -
Embed the Design:
Once you are happy with the arrangement, cover the clay with a piece of parchment paper or plastic wrap. Gently roll over the surface with your acrylic roller to embed the colored pieces flat into the base slab.
Smear Campaign
If your colored sprinkles smear when rolling the slab flat, your roller was likely dragging. Use a vertical pressing motion or place plastic wrap over the clay before rolling.
Step 2: Cutting and Baking
-
Cut the Shapes:
Look for the most pleasing areas of your pattern. Use your cutters to punch out two small circles for the tops and two large half-circles for the bottoms. -
Smooth the Edges:
Before baking, gently run your finger along the cut edges of the clay shapes to soften any harsh lines or remove loose bits of clay. -
Make Holes:
Use a tool or a toothpick to poke a small hole near the bottom edge of the circle stud and the top center of the half-circle. Ensure the hole is large enough for your jump rings. -
Bake:
Place your pieces on a ceramic tile or baking sheet lined with parchment paper. Bake according to the manufacturer’s instructions for your specific brand of clay (usually around 275°F or 130°C for 15-30 minutes). -
Cool Down:
Allow the pieces to cool completely inside the oven or on a cooling rack before handling them to prevent warping.
Terrazzo Twist
Instead of rolling thin snakes for sprinkles, chop your colored clay into irregular chunks and mix them into the white base for a chunky terrazzo stone effect.
Step 3: Assembly and Finishing
-
Sand the Edges:
If there are any rough spots on the sides, use fine-grit sandpaper or a buffing block to smooth them out under running water. -
Drill Holes (if needed):
If your pre-poked holes closed up during baking, use a small hand drill or pin vice to reopen them carefully. -
Connect the Pieces:
Open a jump ring with your jewelry pliers using a twisting motion (never pull apart). Thread the jump ring through the hole in the half-circle and the hole in the circle stud, then close it securely. -
Attach the Posts:
Adhere the earring posts to the back of the small circles using strong jewelry glue or a small dab of liquid polymer clay (which would require re-baking). -
Seal (Optional):
If you prefer a glossy finish, apply a thin layer of UV resin or glaze. However, the matte look of the raw clay works beautifully for this modern terrazzo style.
Wear your new confetti creations with pride and enjoy the pop of color they add to your day
Ombre Gradient Slab
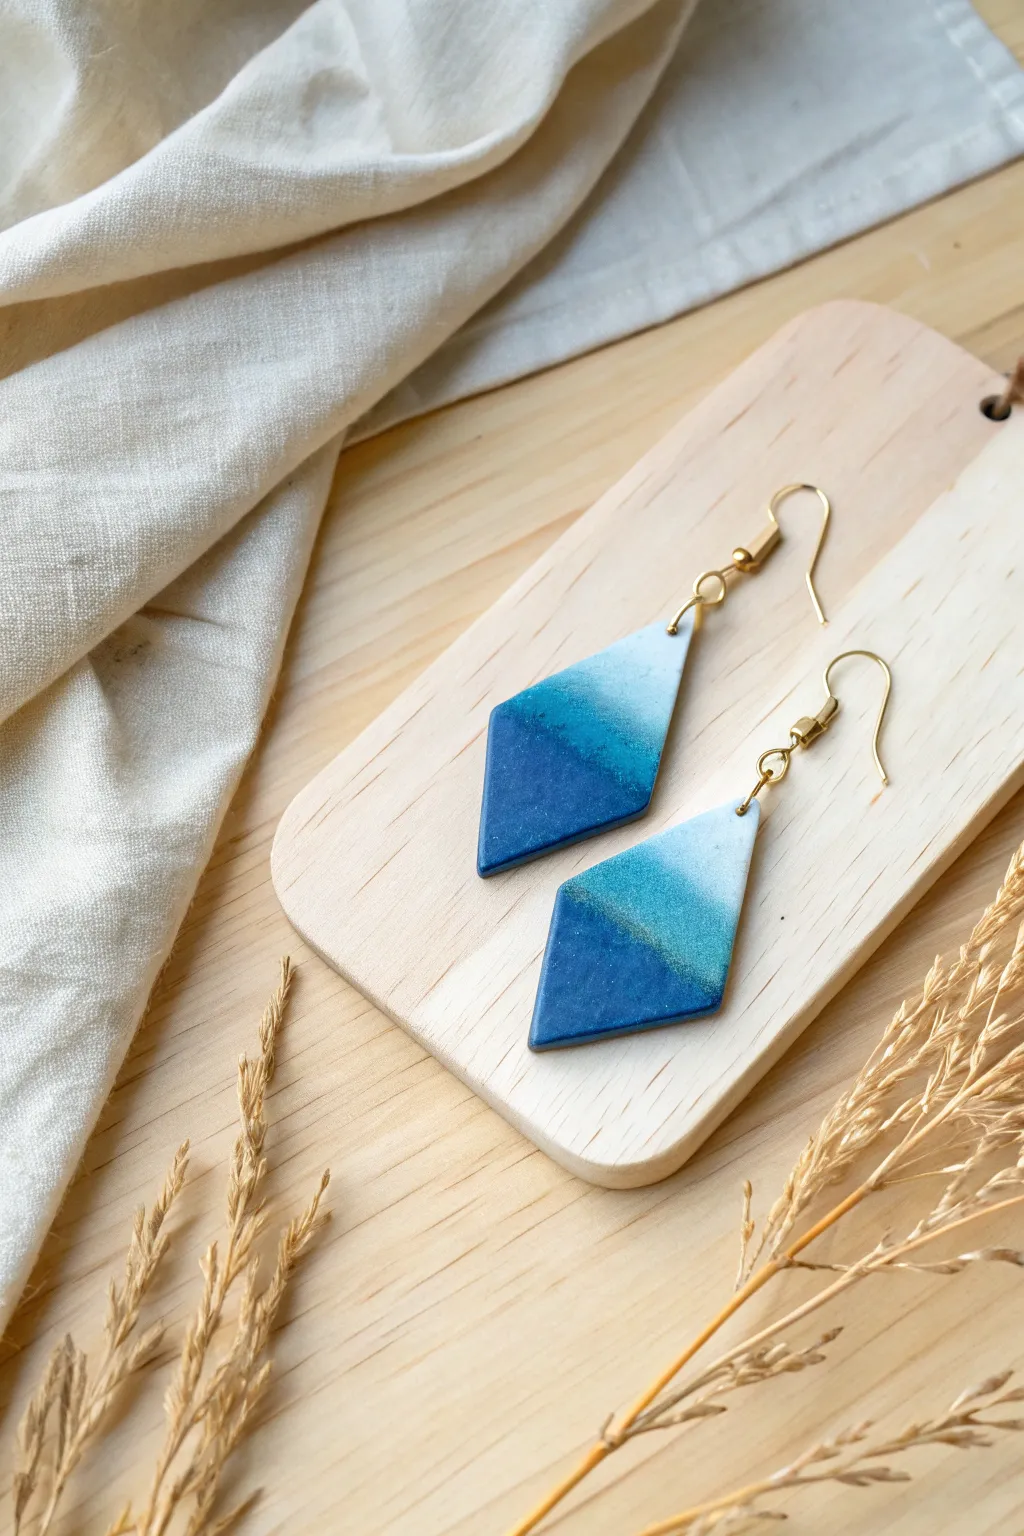
Capture the soothing tranquility of the sea with these elegant diamond-shaped earrings, featuring a seamless gradient from deep navy to crisp white. This project uses a classic Skinner blend technique to achieve that perfect, misty transition between shades.
Step-by-Step Guide
Materials
- Polymer clay (Navy Blue, Turquoise/Teal, White)
- Pasta machine or rolling pin
- sharp tissue blade
- Diamond-shaped clay cutter
- Hand drill or needle tool
- Sandpaper (various grits)
- UV resin or clear varnish (optional)
- Gold jump rings
- Gold fishhook ear wires
- Jewelry pliers
Step 1: Creating the Ombre Slab
-
Condition the clay:
Start by thoroughly conditioning your three colors of clay—navy blue, teal, and white—until they are soft and pliable. Roll each color into a sheet of equal thickness. -
Cut triangles:
Cut a right-angled triangle from each color sheet. The size depends on how large you want your gradient slab to be, but ensure they are roughly the same size. -
Arrange the blend:
Lay the triangles together to form a rectangle or square sheet. Place the teal in the middle, navy on one side, and white on the other, pressing the seams gently so they stick together. -
Fold and roll:
Fold the sheet in half, matching like colors to like (white to white, navy to navy). Feed the clay into your pasta machine or roll it flat with a roller, moving from the light side to the dark side. -
Repeat the Skinner blend:
This is the meditative part. Continue folding matching colors together and rolling vertically through the machine. You’ll need to do this 15-20 times. Slowly, the harsh lines between colors will disappear. -
Check the transition:
Stop when you have a smooth, seamless gradient running from deep blue to bright white. The transition should look misty, not striped. -
Final sheet thickness:
Once blended, run the clay through the machine one last time on your desired thickness setting for earrings (usually around 2-3mm).
Seamless Blending
If your gradient looks muddy, wipe your roller or pasta machine blades between passes to prevent dark pigment from staining the white section.
Step 2: Cutting and Baking
-
Position the cutter:
Take your diamond cutter and hover over the slab. Orient it so the bottom point is in the darkest blue and the top point reaches into the white. I find lining them up vertically emphasizes the gradient best. -
Cut the shapes:
Press the cutter firmly into the clay. Lift carefully. If the clay sticks to the surface, slide your tissue blade underneath to release it. Cut two identical shapes. -
Smooth the edges:
Before baking, use your fingertip to gently smooth the cut edges. This saves a lot of sanding time later. -
Drill holes:
Use a needle tool to poke a small hole at the very top (white) point of each diamond. Make sure the hole is big enough for your jump rings. -
Bake:
Place the cutouts on a ceramic tile or baking sheet. Bake according to your brand of polymer clay instructions (typically 275°F/135°C for 30 minutes). Let them cool completely before handling.
Add Some Sparkle
Mix just a pinch of translucent glitter clay into the teal or white section before blending for a shimmering ‘sun on water’ effect.
Step 3: Finishing and Assembly
-
Sand for perfection:
Wet sand the edges and surface lightly with fine-grit sandpaper to remove any fingerprints or lint. Buff against a piece of denim or a soft cloth for a natural matte sheen. -
Optional glaze:
If you prefer a high-gloss look like polished sea glass, apply a thin layer of UV resin or gloss varnish and cure tightly. -
Open jump rings:
Using two pairs of pliers, twist (don’t pull) a gold jump ring open. -
Attach hardware:
Slide the open jump ring through the hole in the clay piece, and then add your fishhook ear wire. -
Close and secure:
Twist the jump ring closed securely so there is no gap. Repeat for the second earring.
Wear your new gradient earrings with pride and enjoy the subtle nod to the ocean colors

TRACK YOUR CERAMIC JOURNEY
Capture glaze tests, firing details, and creative progress—all in one simple printable. Make your projects easier to repeat and improve.
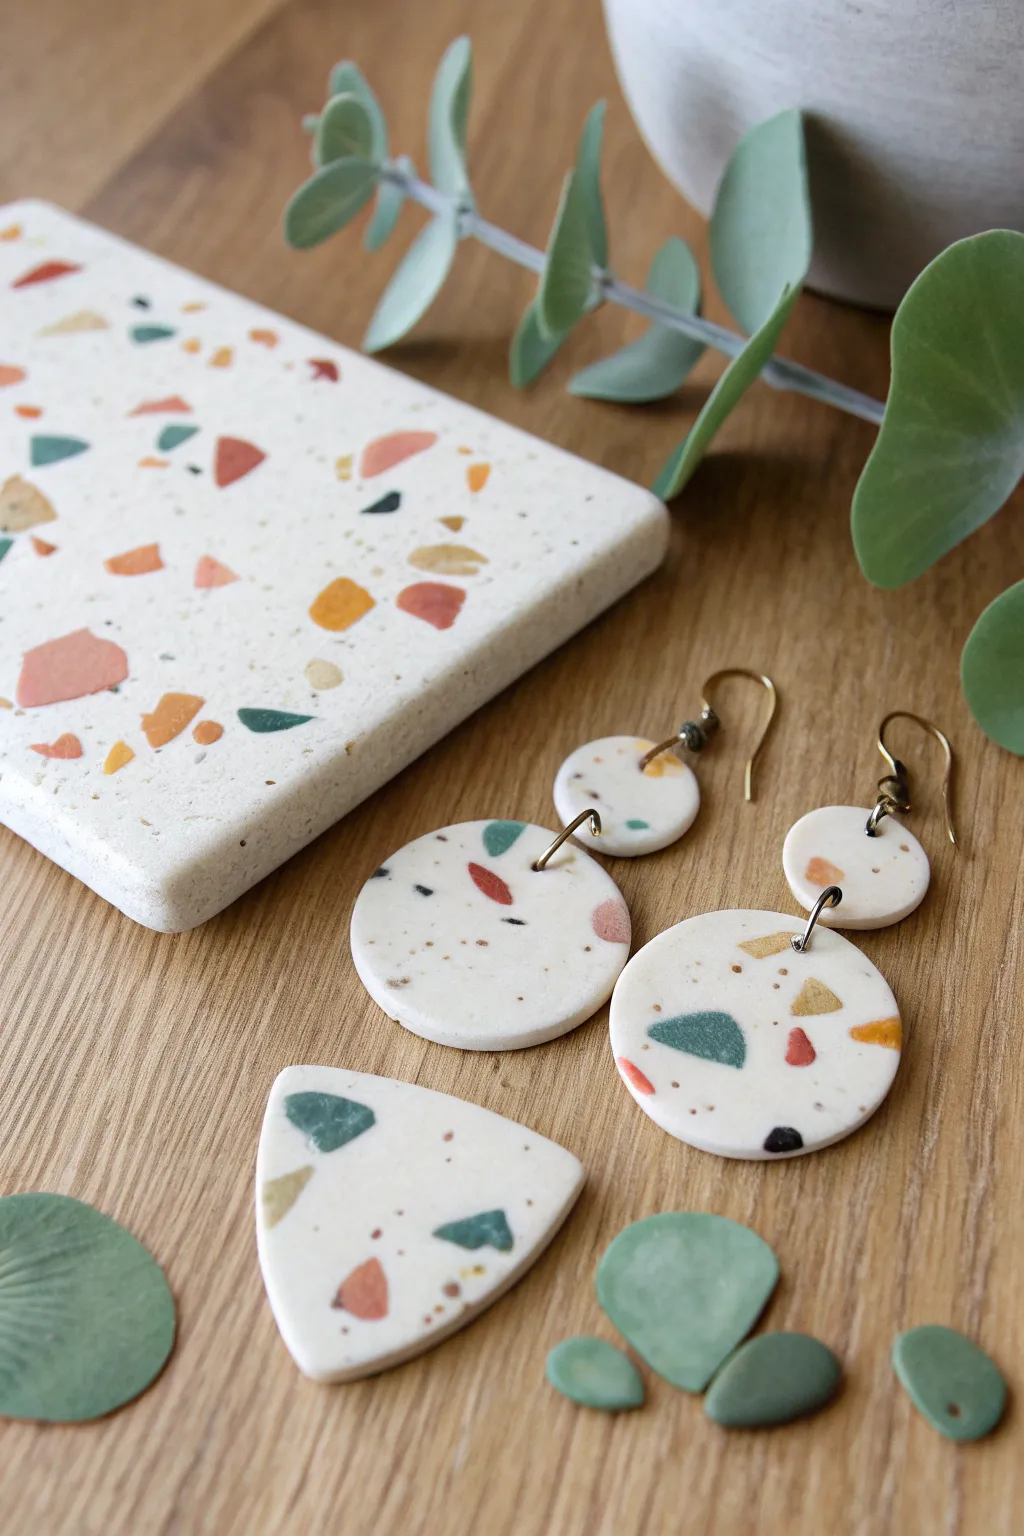
Cane-Slice Mosaic Slab
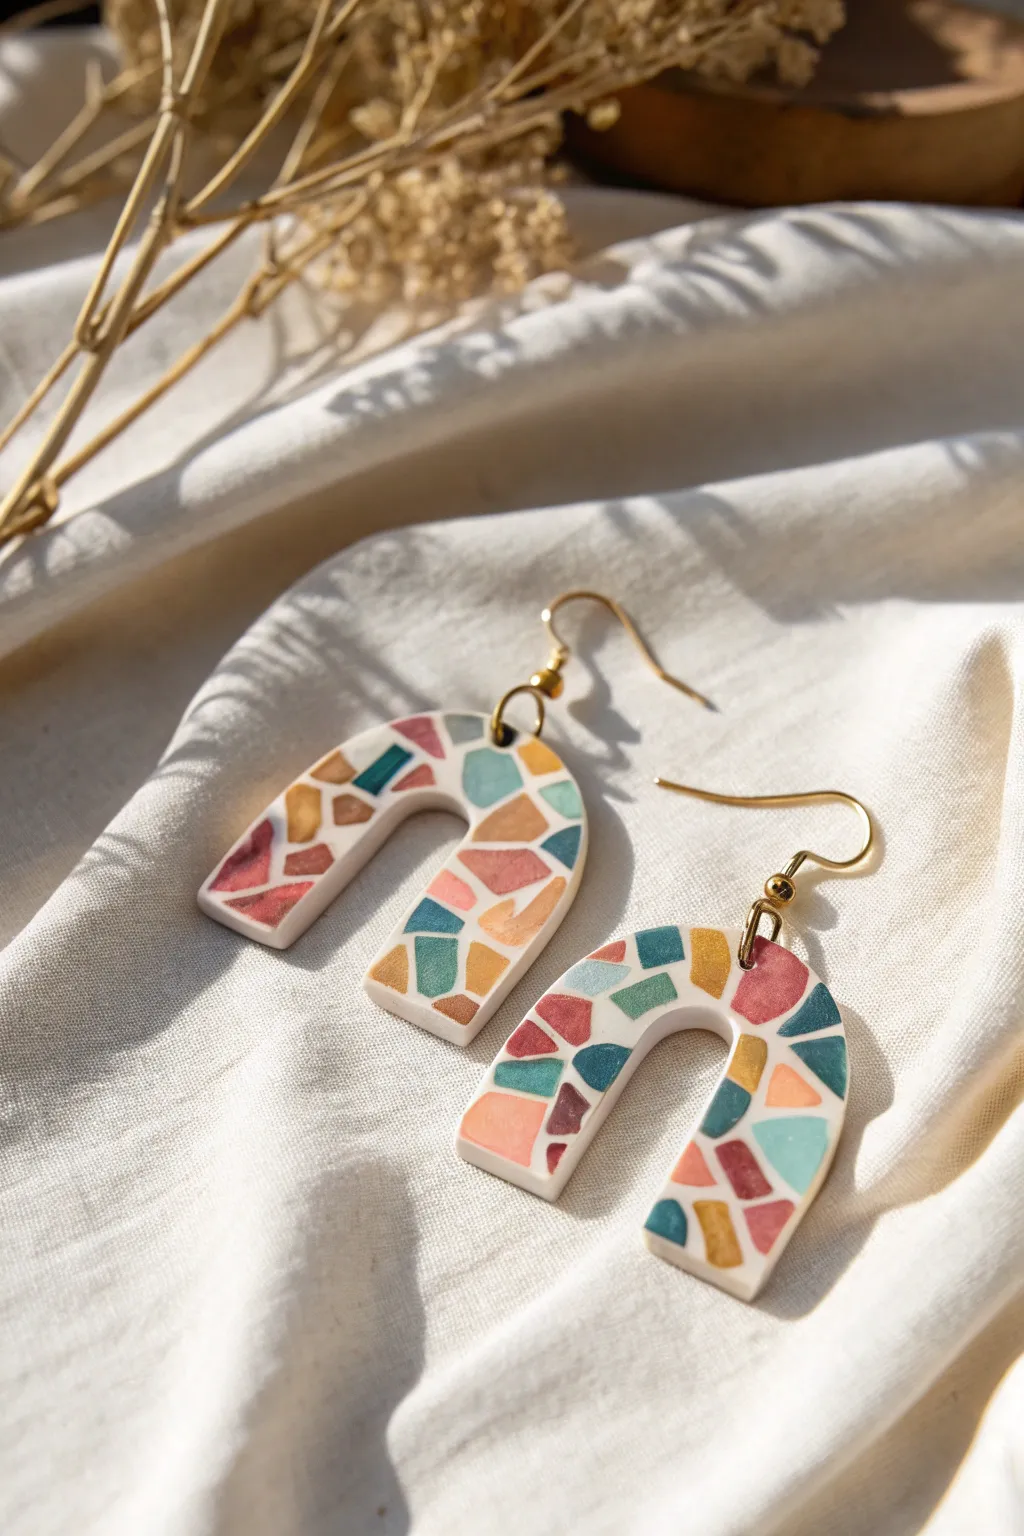
Create a stunning set of arch earrings that mimic the playful, fragmented look of terrazzo tiles. This technique uses small, irregular chips of colored clay on a white base to form a vibrant, modern mosaic pattern.
Step-by-Step
Materials
- Polymer clay (white for the base)
- Polymer clay (assorted colors: teal, rust, ochre, dusty pink, navy blue)
- Acrylic rolling pin or pasta machine
- Tissue blade or flexible clay slicer
- Arch-shaped clay cutter (U-shape)
- Parchment paper or ceramic tile
- Gold jump rings (6mm or 7mm)
- Earring hooks (gold)
- Jewelry pliers (flat nose and round nose)
- Hand drill or dremel with small bit
- Fine grit sandpaper (400-1000 grit) – optional
- UV resin or polyurethane varnish (for a glossy finish) – optional
Step 1: Preparation & Color Mixing
-
Condition the Base:
Begin by thoroughly conditioning your white polymer clay until it is soft and pliable. Run it through your pasta machine on a medium-thick setting (about 2-3mm), or roll it out evenly with an acrylic roller. This will be your main slab canvas. -
Prepare Color Palette:
Select your accent colors. For this look, aim for a muted, earthy palette: teal, rust, ochre, dusty pink, and a deep navy. Condition a small amount of each color. -
Create Thin Sheets:
Roll each colored piece into a very thin sheet. You want these to be significantly thinner than your white base, almost paper-thin if possible, as they will be layered on top.
Step 2: Creating the Mosaic Slab
-
Cut Mosaic Chips:
Using your tissue blade, cut the thin colored sheets into small, irregular geometric shapes. Think trapezoids, triangles, and wonky rectangles. Avoid perfect squares to keep the organic terrazzo feel. -
Arrange the Pattern:
Place the white base slab on your work surface (a ceramic tile works great here). Start gently placing the colored chips onto the white clay. Leave white space between each piece to create that classic grout-line effect. -
Fill the Canvas:
Continue adding chips until the entire slab is covered in a pleasing, random arrangement. I like to rotate the colors as I go to ensure no two identical shades are touching. -
Embed the Chips:
Once you are happy with the arrangement, cover the slab with a piece of parchment paper. Use your acrylic roller to firmly roll over the slab. This presses the chips into the base clay, making the surface flush and level. -
Smooth the Surface:
Remove the paper and inspect the surface. If it’s uneven, roll it gently again. You want a smooth, unified sheet of clay where the colored pieces feel like part of the white base, not just sitting on top.
Sticky Cutters?
If your clay sticks inside the cutter, place a sheet of plastic cling wrap over the clay slab before pressing the cutter down. This creates a lovely domed edge and prevents sticking.
Step 3: Cutting & Baking
-
Cut the Shapes:
Position your U-shaped arch cutter over the most attractive parts of your pattern. Press down firmly to cut out your earring shapes. If the clay sticks, you can dip the cutter in a little cornstarch first. -
Refine Edges:
Lift the shapes gently. Use your finger or a soft silicone tool to smooth any rough edges caused by the cutting process before baking. -
Bake:
Place your clay pieces on a parchment-lined baking sheet or ceramic tile. Bake according to the manufacturer’s instructions for your specific brand of clay—usually between 265°F and 275°F (130°C to 135°C) for about 45-60 minutes. -
Cool Down:
Allow the pieces to cool completely in the oven or on the counter. Do not handle them while hot, as the clay is still fragile.
Pro Tip: Depth
For a ‘stone’ effect, mix translucent clay into your colored chips. When baked, the light hits them differently, adding visual texture that looks like real embedded minerals.
Step 4: Finishing & Assembly
-
Sand and Buff:
If there are any uneven spots or fingerprints, lightly sand the surface and edges with fine-grit sandpaper under running water. Buff with a soft cloth for a matte finish. -
Drill Holes:
Using a small hand drill or rotary tool, carefully drill a hole at the top center of each arch. Ensure the hole is large enough for your jump rings but not too close to the edge. -
Attach Hardware:
Open a gold jump ring using two pairs of pliers (twist sideways, don’t pull apart). Thread it through the drilled hole. -
Add Earring Hook:
Before closing the jump ring, slide on the loop of your earring hook. Make sure the hook is facing the correct direction so the decorative side faces forward. -
Close and Secure:
Twist the jump ring back into a closed position, ensuring the ends meet perfectly so the hook doesn’t slip out.
Now you have a chic, modern pair of earrings that look like tiny pieces of art ready to wear
Raised Polka Dot Slab
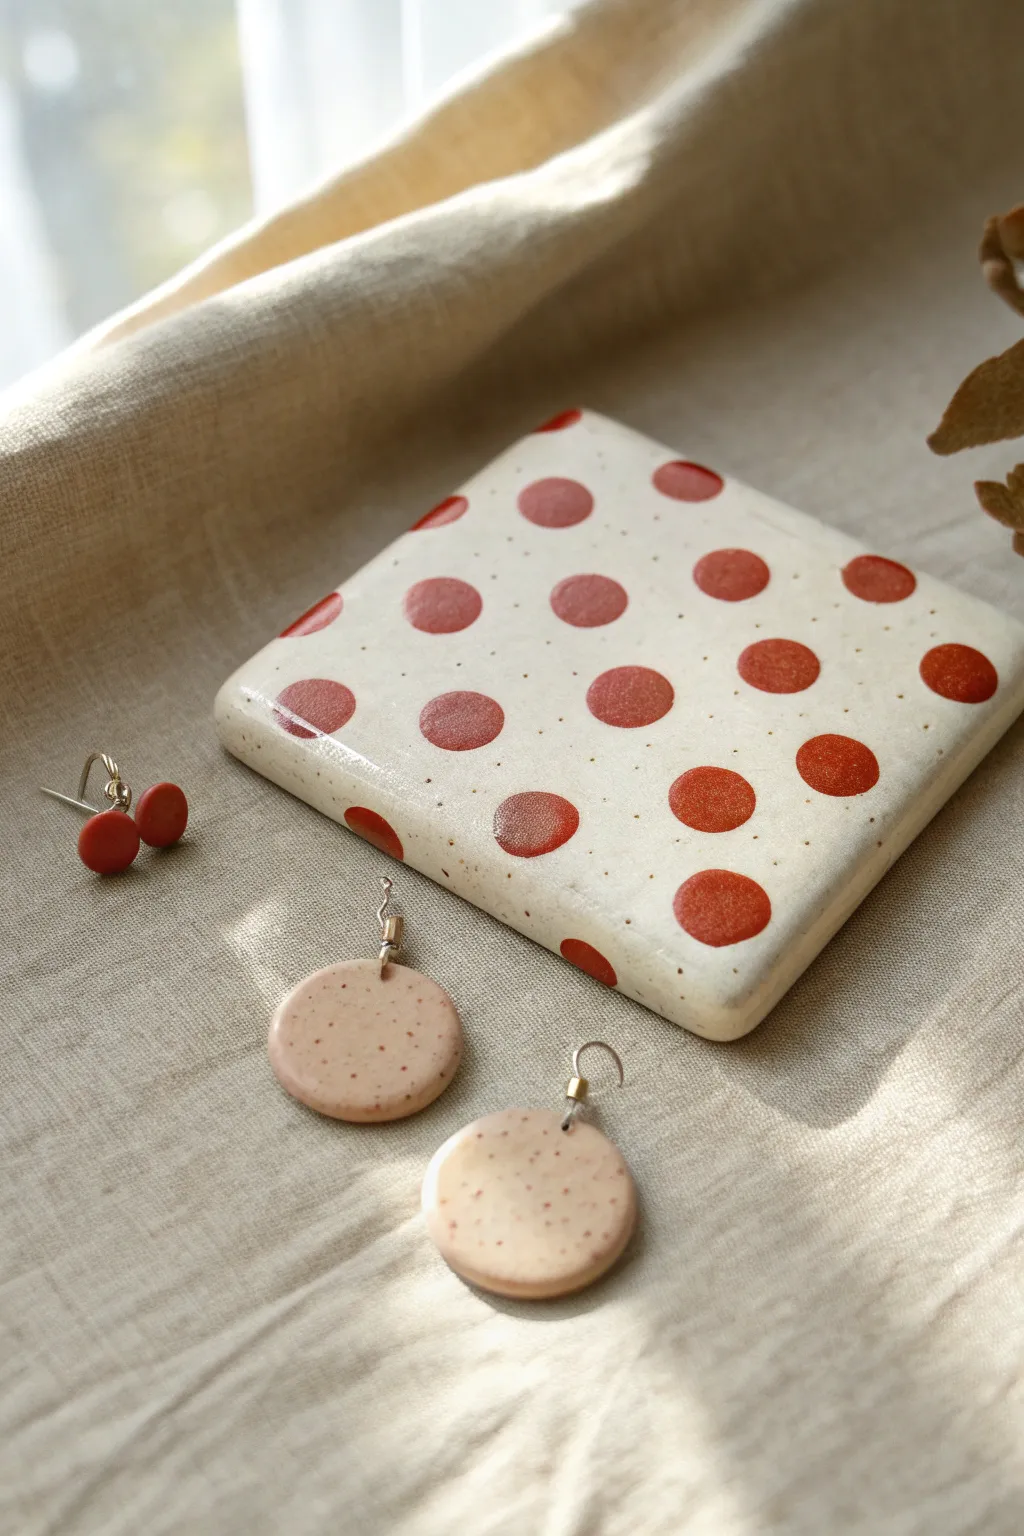
This project combines a classic cream-colored speckled clay with bold, glossy red accents for a retro-modern aesthetic. The finished slab features raised polka dots that add tangible texture, perfect for a coaster or jewelry components like the earrings shown.
Step-by-Step
Materials
- Polymer clay (translucent or white)
- Speckling agents (crushed black pepper, dried tea leaves, or fine glitters)
- Red polymer clay for dots
- Acrylic rolling pin or pasta machine
- Small circle cutters (various sizes)
- Square clay cutter or blade
- Liquid polymer clay (clear)
- Needle tool
- UV resin or polyurethane gloss varnish
- Fine grit sandpaper (for finishing edges)
- Tile or glass baking surface
Step 1: Preparing the Speckled Base
-
Condition the base clay:
Start by thoroughly conditioning your white or translucent polymer clay until it is soft and pliable. Warm clay prevents cracking later on. -
Create the speckled mix:
If you aren’t using pre-speckled clay, flatten your conditioned clay and sprinkle your chosen speckling agent (pepper or dried tea leaves work wonderfully for this organic look) over the surface. -
Incorporate the speckles:
Fold the clay over the speckles and roll it out. Repeat this folding and rolling process multiple times until the particles are evenly distributed throughout the batch. -
Roll the final slab:
Roll out the speckled clay to a thickness of approximately 3mm to 4mm. This substantial thickness gives the final coaster a quality, weighty feel. -
Cut the shape:
Use a square cutter or a sharp craft blade to cut out the base shape. For the rounded corners seen in the photo, gently smooth the sharp vertices with your finger.
Clean Edges Pro Tip
Before baking, wipe the slab edges with a bit of rubbing alcohol on your finger or a brush. This smooths out micro-tears from cutting without needing to sand later.
Step 2: Adding the Polka Dots
-
Condition the red clay:
Condition your red polymer clay next. Ensure your hands are clean or wipe them down with a baby wipe to avoid transferring the red pigment to your light base. -
Roll the red sheet:
Roll the red clay into a thin sheet, slightly thinner than your base slab, around 1mm to 2mm thick. -
Cut the circles:
Using a small circular cutter, punch out numerous red dots. You can use varied sizes if you want an eclectic look, though the example uses uniform circles. -
Arrange the pattern:
Place the red circles onto the cream base in a staggered grid pattern. Leave even spacing between them. -
Adhere the dots:
Gently press each red dot onto the slab. If the clay is fresh, they should stick on their own; if not, a tiny smear of liquid clay on the back helps bond them. -
Smooth the edges (Optional):
If distinct fingerprints appear on the red dots, lightly tap them with a piece of plastic wrap over your finger to smooth them without flattening the raised profile.
Step 3: Baking and Finishing
-
Texture details:
Before baking, use a needle tool to add tiny, nearly invisible indentations if you want extra rustic texture, though the speckles usually provide enough visual interest. -
Bake the piece:
Bake the slab on a tile according to your brand of clay’s instructions—usually around 275°F (135°C) for 30-45 minutes. Tent with foil to prevent the cream clay from yellowing. -
Cool and sand:
Allow the piece to cool completely in the oven. Once cool, use fine-grit sandpaper to smooth just the outer edges of the square slab for a professional finish. -
Apply gloss finish:
To achieve the wet look seen in the photo, apply a layer of UV resin or high-gloss polyurethane varnish. I prefer to carefully brush this over the tops of the red dots specifically to make them pop. -
Final cure:
Cure the resin under a UV lamp or let the varnish dry completely in a dust-free area.
Sticky Cutter Fix
If your small circle cutter keeps trapping the red dots inside, dip the cutter into a small pile of cornflour or water before each cut to act as a release agent.
Now you have a stunning, tactile piece of art ready to display or use
Wavy Stripe Slab
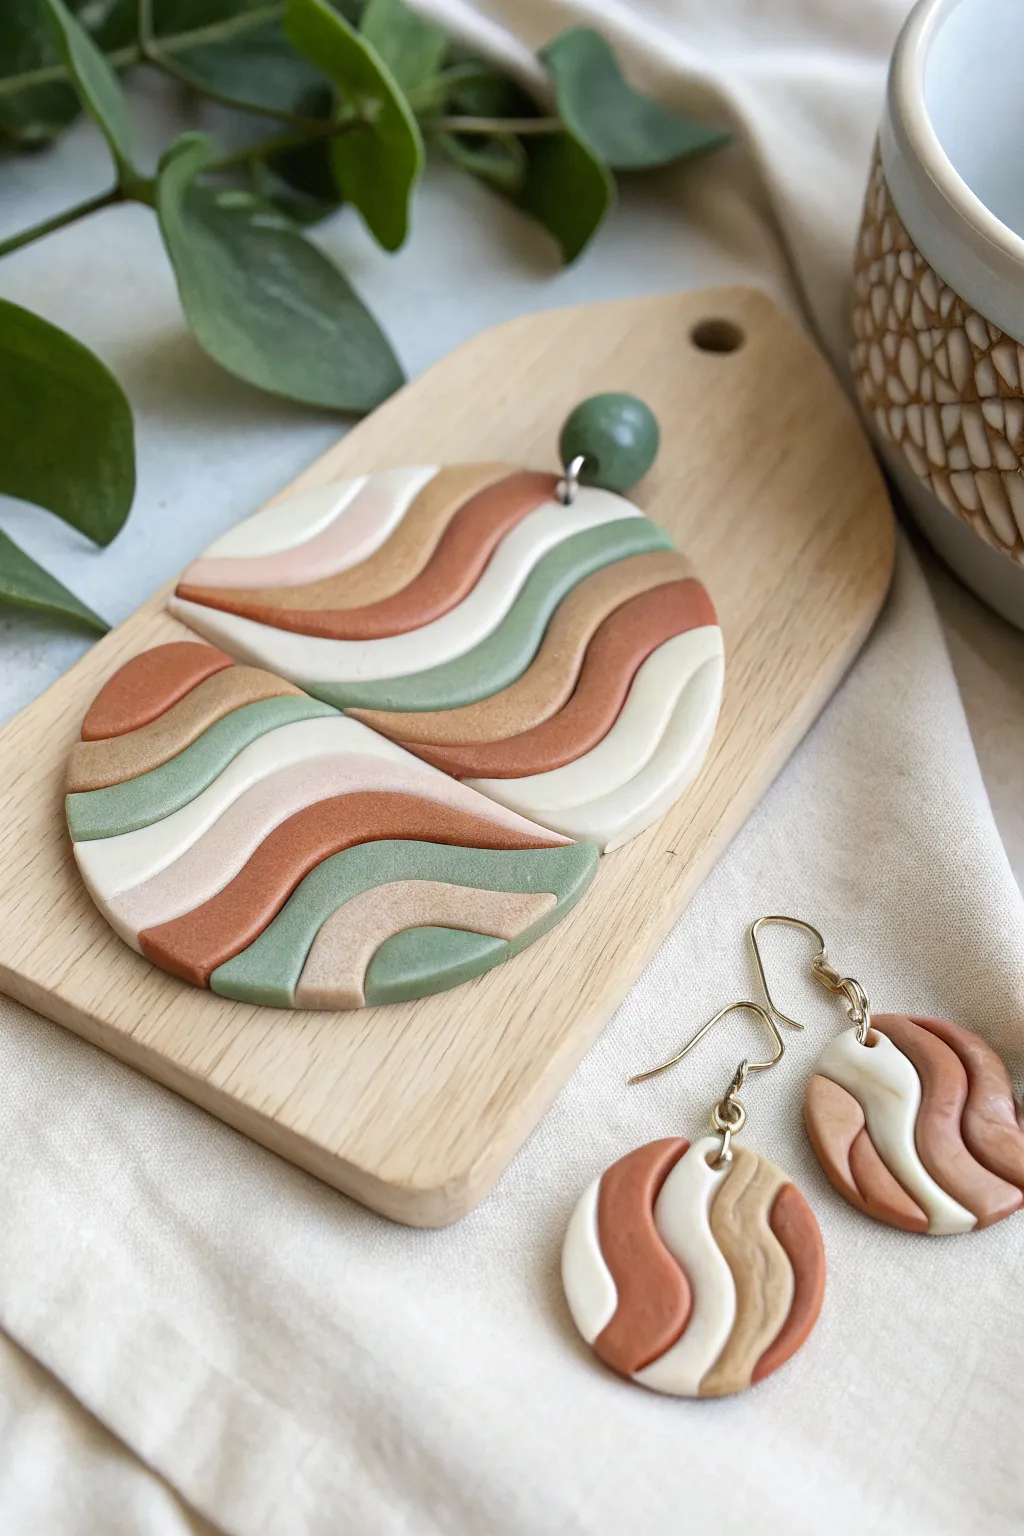
Capture the organic flow of nature with this retro-inspired wavy slab technique featuring soothing earth tones. The gentle, undulating curves create a sophisticated pattern perfect for statement earrings or pendants.
How-To Guide
Materials
- Polymer clay in terracotta, sage green, beige, and cream/white
- Acrylic rolling pin or pasta machine
- Tissue blade or flexible clay slicer
- Circle cutters (various sizes)
- Small ball tool for piercing
- Ceramic tile or glass work surface
- Jump rings and earring findings
- Pliers
- Wet sandpaper (optional for finishing)
Step 1: Preparing the Clay
-
Color Conditioning:
Begin by conditioning each color of clay separately until it is soft and pliable. Use your hands to warm the clay, kneading it thoroughly to prevent air bubbles later. -
Rolling Sheets:
Roll each color out into a sheet of uniform thickness. A medium setting on a pasta machine works best, or about 2-3mm thick if using a hand roller.
Smudged Colors?
If colors smear during rolling, your clay might be too warm. Pop the slab in the fridge for 10 minutes before cutting shapes to get crisp, clean lines.
Step 2: Creating the Wave Block
-
Stacking Layers:
Stack the different colored sheets on top of each other. The order doesn’t strictly matter, but alternating light and dark colors creates the best contrast. -
Compressing:
Gently press the stack together with your acrylic roller to ensure the layers adhere without trapping air. You want a solid block of striped clay. -
The Wave Cut:
Using a ripple blade or by manually bending a flexible tissue blade, slice vertically down through the stack to create a wavy edge. Remove the excess. -
Slicing Strips:
Cut parallel wavy slices from your stack. Each slice should be about 2-3mm thick. Try to keep your blade perpendicular to the work surface for clean, uniform strips.
Step 3: Restoring the Slab
-
Aligning the Pattern:
Lay your wavy strips flat onto your work surface, side-by-side. Carefully nudge them together so the curves nest into one another seamlessly. -
Joining Seams:
Once arranged, place a piece of parchment paper over the slab. Use your acrylic roller or a burnishing tool to gently smooth the joined seams until the surface is flat and the strips are bonded.
Make it Shine
After baking and sanding, apply a thin layer of UV resin or verify gloss varnish to the surface. It makes the earth tones pop and adds durability.
Step 4: Cutting and Baking
-
Cutting Shapes:
Position your circle cutters over the most interesting parts of the pattern. Press down firmly to cut your shapes. I find twisting the cutter slightly before lifting helps release the clay cleanly. -
Adding Holes:
Use a small ball tool or a toothpick to poke holes for your jump rings near the top edge of each shape. Make sure the hole is large enough to accommodate your hardware. -
Baking:
Place your cut shapes on a ceramic tile or baking sheet lined with parchment. Bake according to the manufacturer’s instructions for your specific brand of clay—usually around 275°F (135°C) for 30 minutes.
Step 5: Finishing Touches
-
Sanding:
Once cooled, inspect the edges. If there are any rough spots, gently wet sand them with fine-grit sandpaper for a professional finish. -
Assembly:
Using two pairs of pliers, twist open a jump ring (don’t pull it apart). Thread it through the clay piece and attach your earring hook or stud component. -
Closing:
Twist the jump ring closed securely until the ends meet perfectly, ensuring your new jewelry stays put.
You now have a stunning set of geometric, nature-inspired jewelry ready to wear
Retro Geometric Shape Slab
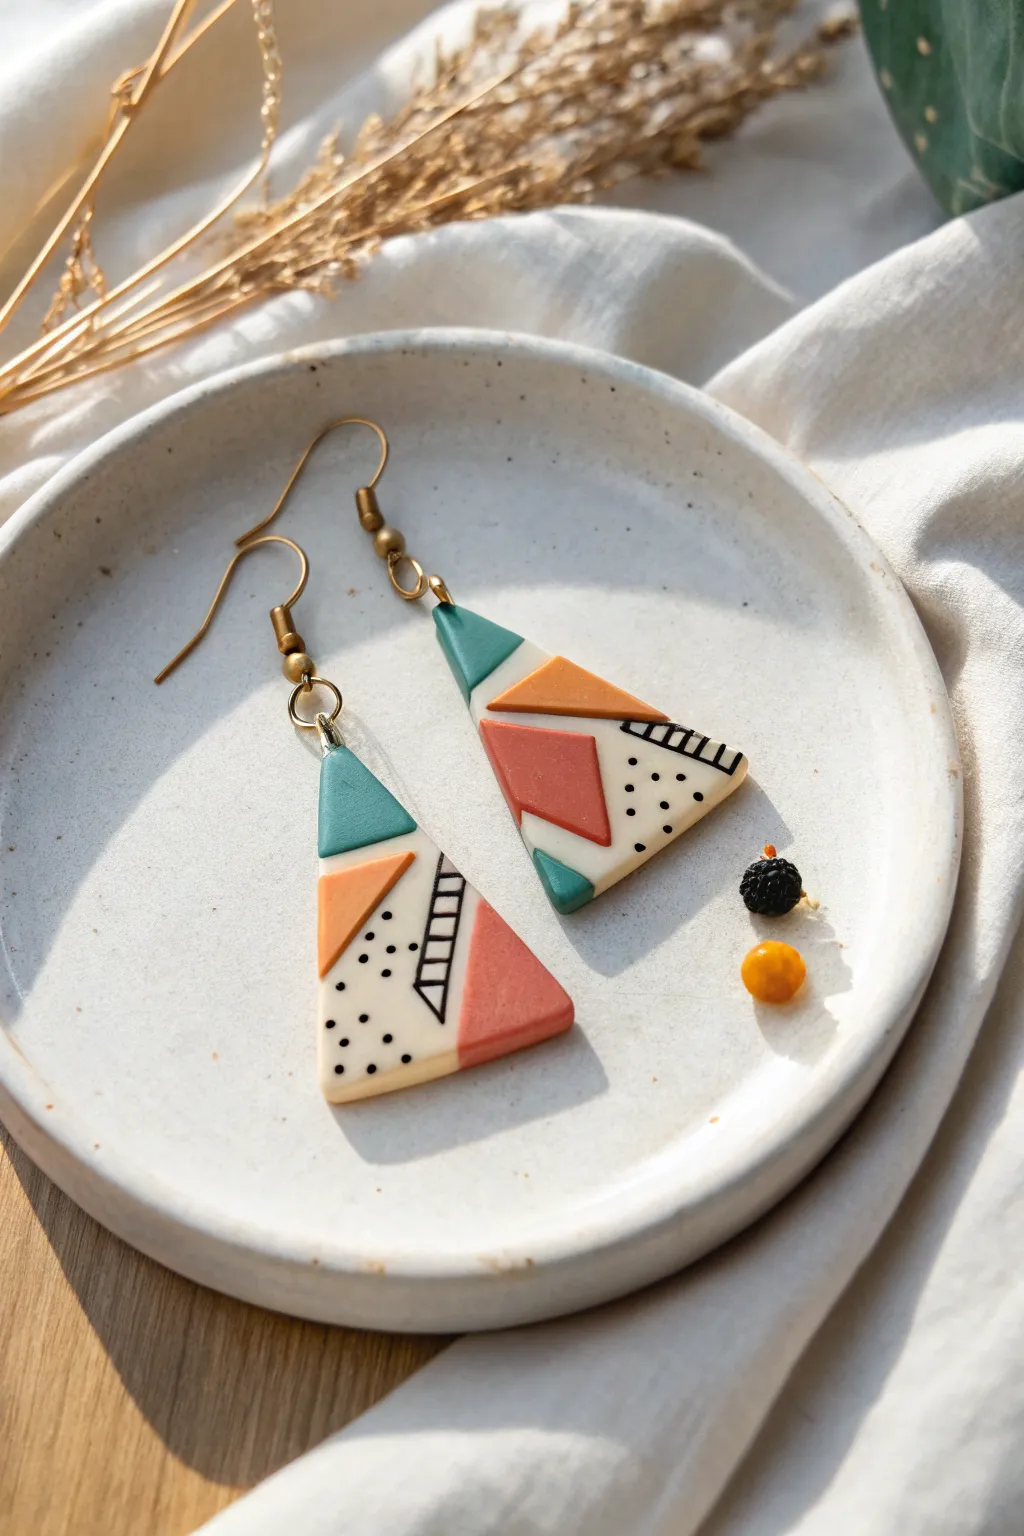
Embrace the playful asymmetry of the 80s and 90s with these retro-geometry earrings, featuring bold color blocking and graphic micro-details. The design combines soothing earth tones with sharp black line work for a sophisticated yet funky statement piece.
Step-by-Step Guide
Materials
- Polymer clay in cream/white, teal, orange, and terracotta/rust
- Rolling pin or clay machine
- Sharp tissue blade
- Black acrylic paint or black polymer clay for detailing
- Fine detail paintbrush or needle tool
- Small triangle cutter (approx 1.5-2 inches)
- Hand drill or small hole cutter
- Jump rings (gold finish)
- Earring hooks (gold finish)
- Jewelry pliers
- Oven for baking
Step 1: Prepping the Base Slab
-
Condition the clay:
Begin by thoroughly conditioning your cream-colored polymer clay until it is soft and pliable. This will be your main canvas, so ensure there are no air bubbles trapped inside. -
Roll the base sheet:
Roll the cream clay out into a smooth, even sheet. Aim for a thickness of about 3mm—thick enough to be sturdy but light enough for comfortable wear. -
Prepare accent colors:
Condition small amounts of the teal, orange, and terracotta clay. Roll these out to the exact same thickness as your cream base sheet to ensure a level surface later.
Clean Lines Hack
Wipe your tissue blade with a little baby oil or cornstarch before cutting your slabs. This prevents drag and keeps your geometric cuts crisp and distortion-free.
Step 2: Creating the Geometric Pattern
-
Cut geometric shapes:
Using your tissue blade, cut random, sharp-edged geometric shapes from your colored sheets. Think triangles, trapezoids, and irregular polygons. Keep them relatively small compared to your final earring size. -
Arrange the collage:
Place the colored shapes onto the cream base sheet. Arrange them in a loose, abstract pattern, leaving plenty of ‘negative space’ (cream background) visible between them. -
Burnish the slab:
Place a piece of parchment paper over your patterned slab. Gently roll over it with your roller to press the seams together and make the surface completely flat and unified. -
Cut the earring shapes:
Position your triangle cutter over an interesting section of the slab where multiple colors intersect. Press down firmly to cut your two earring shapes. -
Smooth the edges:
Gently gently run your finger along the cut edges of the triangles to soften any sharp ridges or remove stray clay bits.
Step 3: Adding Graphic Details
-
Add black accents:
You can use black paint after baking, but I find adding black clay details now creates a cleaner look. Roll a tiny snake of black clay extremely thin for lines. -
Apply grid lines:
Place the thin black clay threads onto the cream sections to create ladder or grid patterns. Press them gently to adhere. -
Create dot patterns:
For the polka dots, either roll tiny balls of black clay and press them flat onto the cream areas, or save this step for post-bake painting if you want finer control. -
Make the holes:
Use a toothpick or small hole cutter to create a hole at the top point of each triangle for the hardware. -
Bake the pieces:
Bake the clay according to the manufacturer’s instructions (usually 275°F for 30 minutes). Let them cool completely before handling.
Smudged Colors?
If you accidentally smear a darker color onto the cream background, use a q-tip dipped in rubbing alcohol or acetone to gently wipe the surface clean before baking.
Step 4: Finishing and Assembly
-
Paint details (optional):
If you didn’t add the black details with clay, use a very fine brush and black acrylic paint to add the dots and lines now. Let the paint dry fully. -
Sand for perfection:
Once cool (and dry), lightly sand the edges and back with fine-grit sandpaper if needed to ensure a professional finish. -
Open the jump rings:
Use two pairs of pliers to twist a jump ring open. Never pull them apart; always twist sideways to preserve the circle’s shape. -
Attach the hardware:
Slide the open jump ring through the hole in the clay triangle, then add the earring hook. Twist the jump ring closed securely.
Now you have a stunning pair of retro geometric earrings ready to add a pop of artistic flair to any outfit
Faux Tile Grout-Line Slab
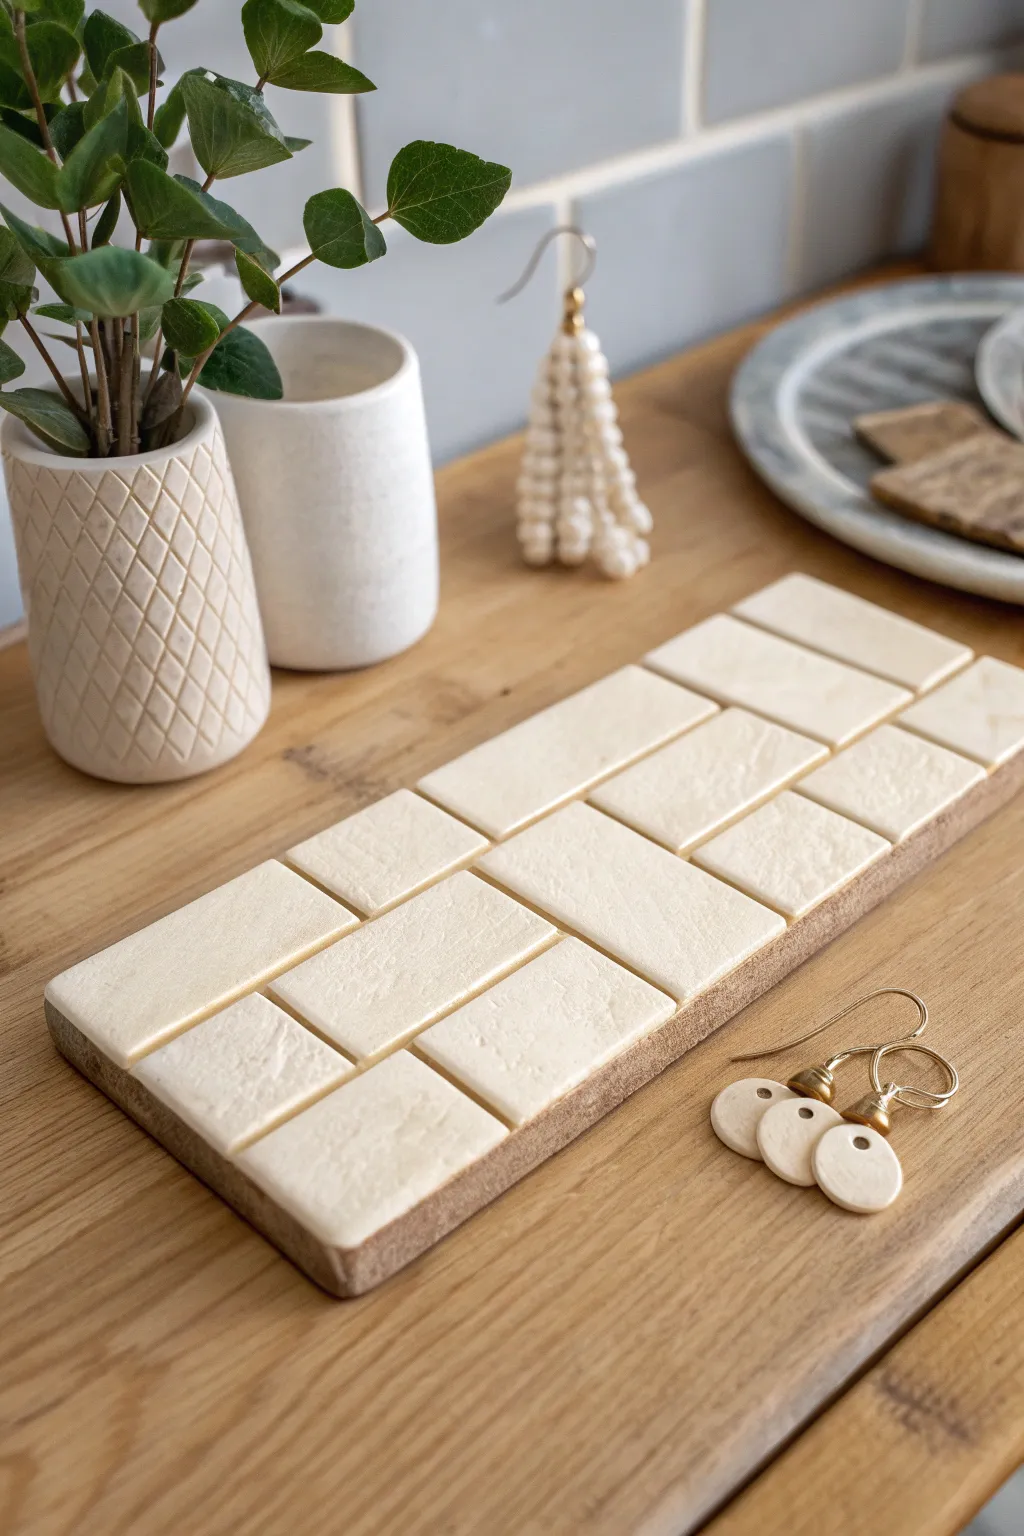
Achieve the clean, sophisticated look of modern interior design with this clever polymer clay technique. By creating faux grout lines and a textured surface, you can transform a simple clay slab into a stunning, architectural piece ready for jewelry making.
Step-by-Step
Materials
- Cream or off-white polymer clay (Premo or souffle)
- Tan or light brown polymer clay (for the base/grout)
- Acrylic rolling pin or pasta machine
- Tissue blade or rigid clay slicer
- Coarse sandpaper or a stiff bristle brush (for texture)
- Ruler
- Grid paper or a craft mat with measurements
Step 1: Preparing the Base
-
Condition the base clay:
Start by conditioning your tan or light brown clay until it is soft and pliable. This color will serve as your ‘grout’ lines, so choose a shade that contrasts slightly with your tile color for a natural look. -
Roll out the base sheet:
Roll the tan clay into a flat, even sheet. Aim for a thickness of about 2mm to 3mm (setting 3 or 4 on most pasta machines) to ensure the slab has enough stability. -
Trim the base:
Using your tissue blade, trim the edges of the base sheet to create a rough rectangle. It doesn’t need to be perfect yet, just large enough to accommodate your tile design.
Clean Cuts Only
Chill your rolled clay sheet in the fridge for 10 minutes before cutting the tiles. Firm clay resists dragging and yields much sharper, cleaner rectangles.
Step 2: Creating the Tiles
-
Condition the tile clay:
Thoroughly condition your cream or off-white clay. Ensure there are no air bubbles trapped inside, as these can distort the smooth tile surface later. -
Roll the tile sheet:
Roll out the cream clay into a sheet that is slightly thicker than your base layer, perhaps around 3mm to 4mm. This added height gives the tiles dimension. -
Texture the surface:
Gently press a piece of coarse sandpaper or a stiff bristle brush onto the surface of the cream sheet. This subtle texture mimics the look of natural stone or ceramic glaze. -
Measure your tiles:
Decide on the size of your subway tiles. Mark straight lines on the clay sheet using a ruler and a needle tool or the back of your blade as a guide. -
Cut the individual tiles:
Carefully slice the clay into individual rectangles using your tissue blade. Keep your cuts as straight and perpendicular as possible for a neat finish. -
Soften the edges:
I find it helpful to gently tap the cut edges of each tile with my finger to remove sharpness. This makes them look more like fired ceramic pieces.
Step 3: Assembly & Finishing
-
Arrange the first row:
Place your first row of cream tiles onto the tan base sheet. Leave a small, uniform gap (about 1-2mm) between each tile to let the tan ‘grout’ show through. -
Offset the pattern:
For the second row, offset the tiles so the vertical grout line sits in the middle of the tile below it, creating the classic subway brick bond pattern. -
Check alignment:
Use your ruler to gently nudge any crooked tiles back into place. Keeping the horizontal grout lines straight is key to the illusion. -
Continue the pattern:
Repeat the process until the entire base sheet is covered with your tile pattern. If you have partial gaps at the edges, cut smaller tile pieces to fill them. -
Secure the bond:
Once arranged, place a piece of parchment paper over the slab and run the roller gently over the top. Use very light pressure—just enough to help the layers adhere without squishing the grout lines. -
Final trim:
Use your rigid blade to cut the outer edges of the entire slab clean and straight, cutting through both the tile and base layers simultaneously. -
Final texture check:
If handling the clay smoothed out your texture too much, give it one last light press with your sandpaper or texture tool. -
Bake:
Bake the slab according to the manufacturer’s instructions for your specific brand of clay. Usually, this means 275°F (135°C) for about 30-45 minutes.
Antique The Grout
After baking, rub brown acrylic paint into the cracks and wipe the surface clean. This enhances the depth and makes the grout lines pop visually.
This architectural slab is now ready to be cut into unique, modern jewelry components.
Negative-Space Inlay Slab
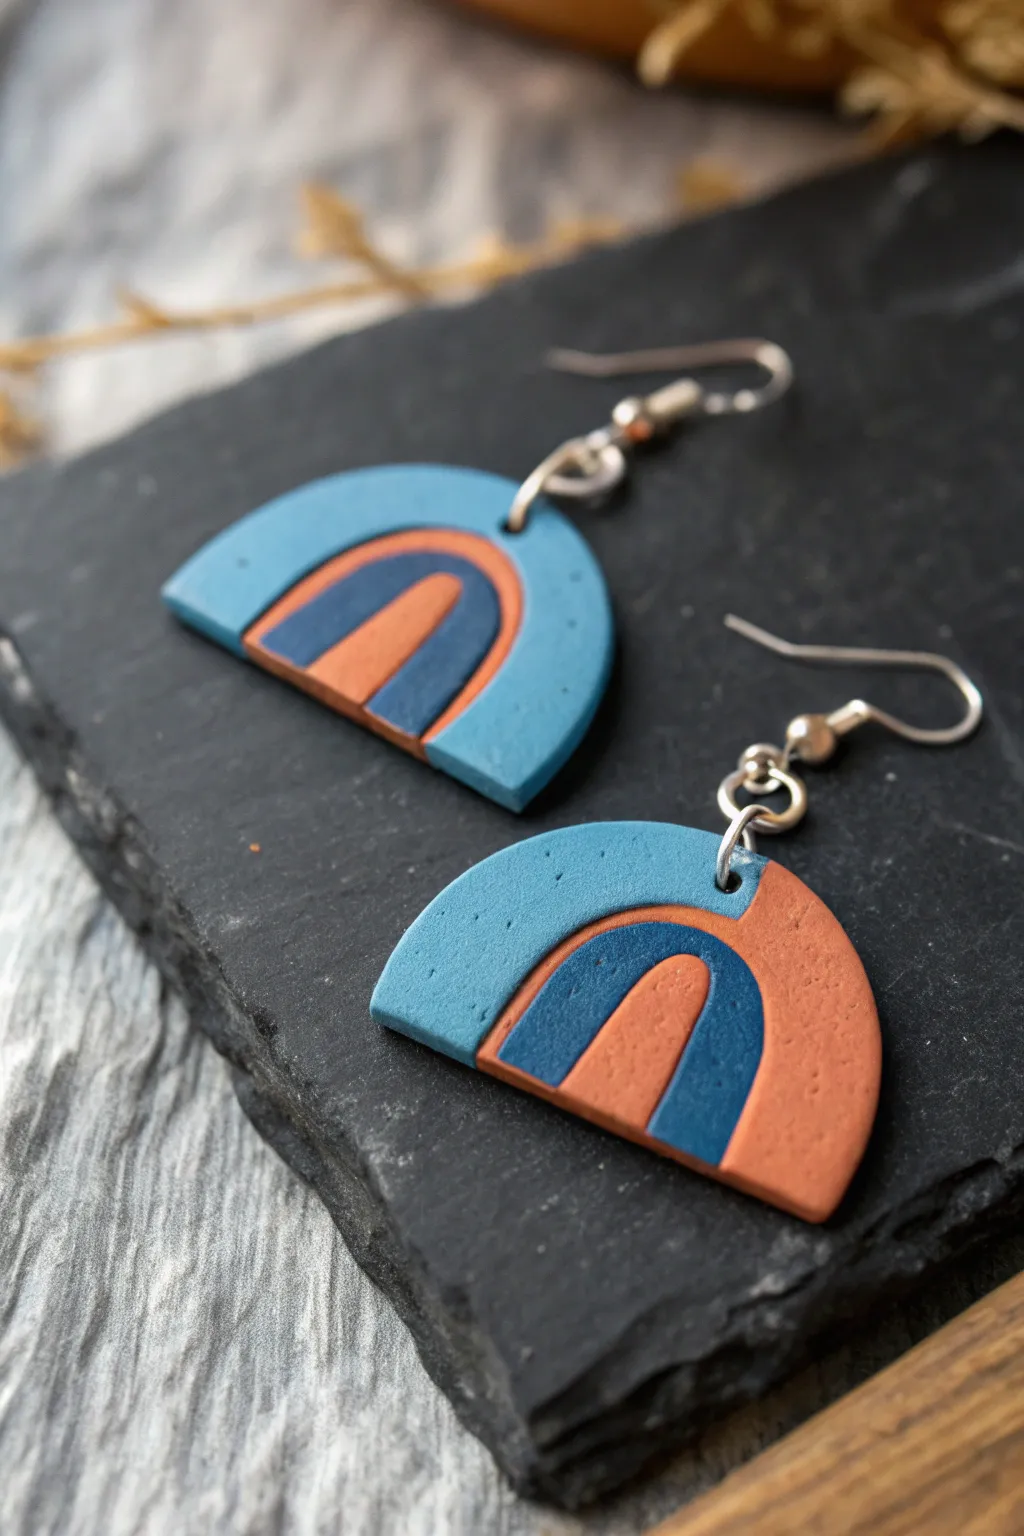
These striking polymer clay earrings feature a modern color palette of muted teal, navy, and terracotta arranged in a clean, geometric arch design. Using the negative-space inlay technique, you’ll achieve a seamless, perfectly smooth surface where the colors look like they were painted on, but are actually solid clay inlaid together.
Detailed Instructions
Materials
- Polymer clay (Teal blue, Navy blue, Terracotta/Rust orange)
- Acrylic rolling pin or pasta machine
- Tissue blade (flexible and rigid)
- Circle cutters (nested set of 3 sizes)
- Smooth ceramic tile or glass work surface
- Dremel or hand drill with small bit
- Jump rings (silver)
- Earring hooks (silver)
- Needle nose pliers
- Fine grit sandpaper (400-1000 grit)
Step 1: Creating the Base & Cutouts
-
Condition the Clay:
Begin by conditioning each color of polymer clay separately until it is soft and pliable. Use your hands or a pasta machine to ensure there are no air bubbles. -
Roll Specific Sheets:
Roll out a sheet of the teal blue clay on the thickest setting of your pasta machine or to about 3-4mm thick using a rolling pin. This will form the main body of the earring. -
Prepare Inlay Colors:
Roll out the navy blue and terracotta clay sheets to the exact same thickness as the teal sheet. Uniform thickness is crucial for a smooth inlay. -
Cut the Base Shape:
Use a large circle cutter to punch out two circles from the teal clay. Cut these circles in half using your rigid tissue blade to create four semi-circles (you will use two for the project). -
Create Negative Space:
Take a medium-sized circle cutter and center it over the flat bottom edge of your teal semi-circle. Cut and remove this piece to create an arched ‘window’ or negative space.
Uneven Seams?
If gaps appear between inlaid pieces, place the slab on a piece of paper and gently push the outer edges inward to compress the design before rolling it flat.
Step 2: Inlaying the Pattern
-
Cut the Second Arch:
From your terracotta sheet, cut a circle using that same medium-sized cutter. Cut this circle in half. -
Fit the Piece:
Place the terracotta semi-circle into the negative space you created in the teal piece. Gently push the seams together with your fingers so they fuse. -
Create Inner Negative Space:
Now, use a small circle cutter on the terracotta section you just added. Center it on the bottom edge and remove the clay, creating a new, smaller empty window. -
Cut the Inner Arch:
From the navy blue sheet, cut a circle using the small cutter and slice it in half. -
Complete the Inlay:
Insert this small navy semi-circle into the empty space in the terracotta section. Ensure everything fits snugly. -
Final Center Cut:
For the smallest detail, use a tiny cutter or straw to remove the very center of the navy arch if you want a tri-color look, and replace it with a tiny piece of terracotta, creating the central ‘sun’ shape.
Step 3: Refining and Assembly
-
Smooth the Slab:
Place a piece of deli paper or plastic wrap over your assembled arches. Gently roll over the surface with your acrylic roller to bond the seams without smearing the colors. -
Final Shape Cut:
Use your large circle cutter or a specialized arch cutter to re-cut the outer perimeter, ensuring the edges are crisp and clean after all the manipulation. -
Bake:
Transfer the pieces to a baking sheet lined with paper. Bake according to your clay manufacturer’s instructions, usually around 275°F (135°C) for 30-45 minutes. -
Cool and Sand:
Let the pieces cool completely. If the surface isn’t perfectly flush, wet sand the face of the earrings with fine-grit sandpaper until seamless. -
Drill Holes:
Mark the top center of each arch. Use a hand drill or Dremel to carefully drill a hole for the hardware. -
Attach Hardware:
Open a jump ring with your pliers (twist, don’t pull). Thread it through the drilled hole and attach the earring hook before closing the ring securely.
Level Up: Texture
Before baking, lightly press a piece of coarse sandpaper or a texture sponge over the surface to give the clay a stone-like, matte finish.
Wear your new geometric masterpieces with pride, knowing you built that intricate pattern completely by hand
Sgraffito Line-Art Slab
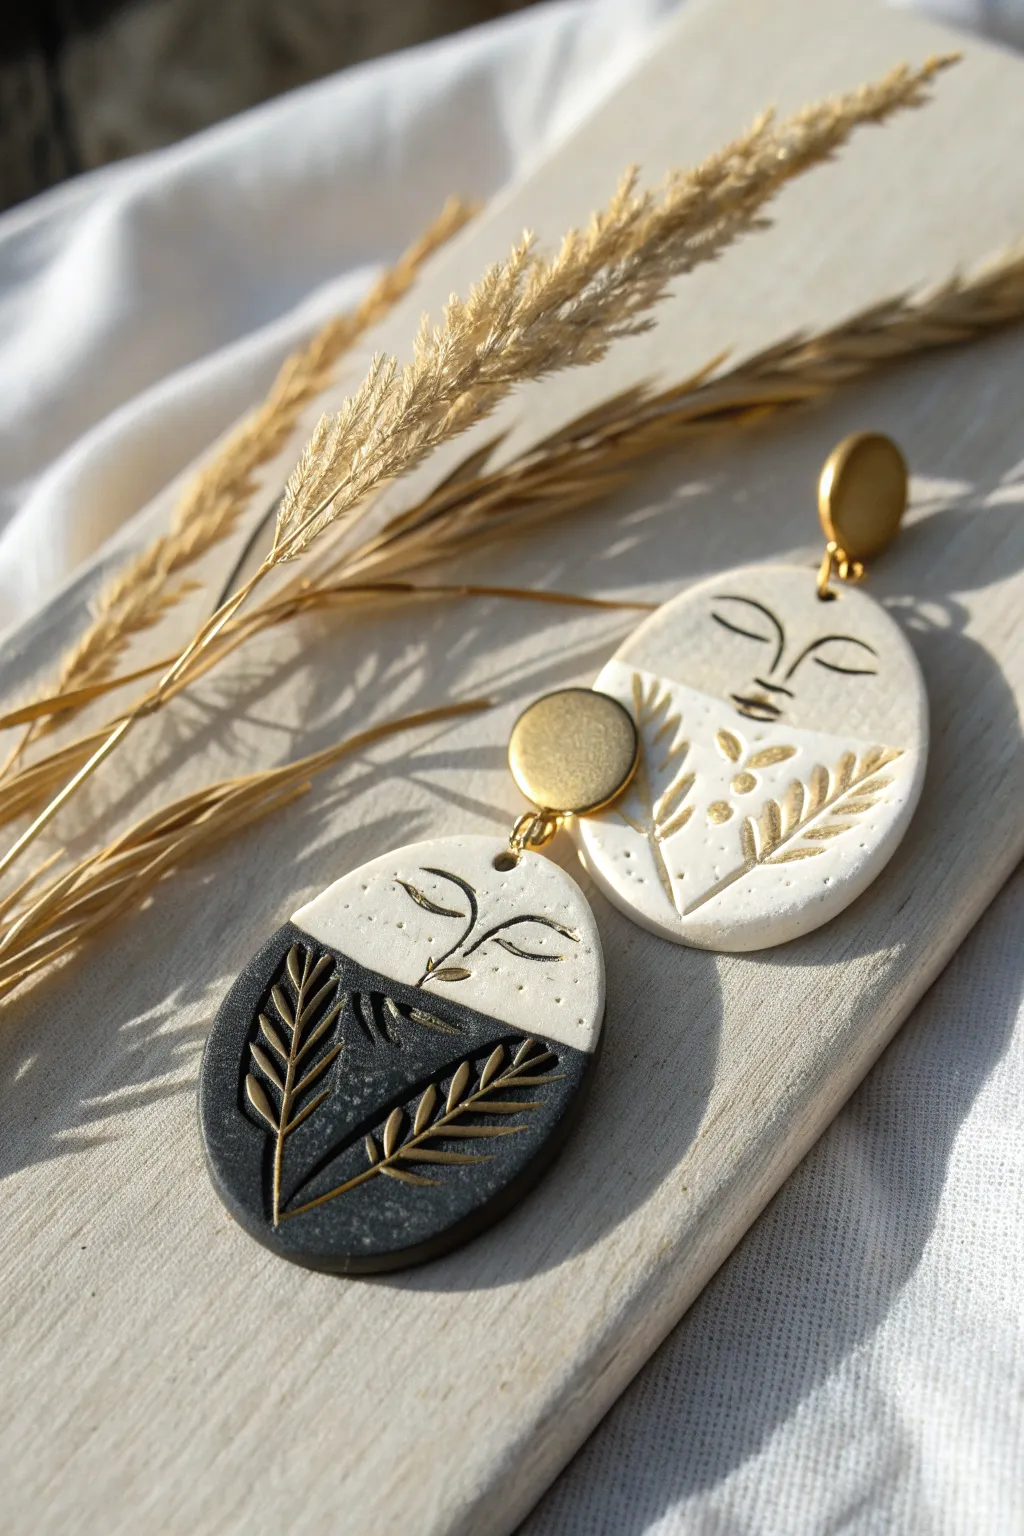
These striking polymer clay earrings combine serene line-art faces with organic botanical motifs for a modern, earthy aesthetic. The sgraffito technique allows the golden clay underneath to shine through, creating a beautiful contrast against the matte white and black surfaces.
Step-by-Step Tutorial
Materials
- White polymer clay
- Black polymer clay
- Gold polymer clay (metallic finish)
- Gold acrylic paint
- Fine detail paintbrush
- Acrylic rolling pin
- Clay slicer or craft knife
- Oval clay cutter (medium size)
- Needle tool or toothpick
- Small round circle cutter (for stud tops)
- Super glue (gel type recommended)
- Gold earring posts and jump rings
- Hand drill or pin vibe
- Pliers
- Fine grit sandpaper (optional)
Step 1: Preparing the Base Slab
-
Condition the clay:
Begin by thoroughly conditioning your white, black, and gold polymer clay separately until they are soft and pliable. This prevents cracks during baking. -
Roll the main slabs:
Roll out a sheet of white clay and a sheet of black clay to a medium thickness (around 3mm). These will be your main surface layers. -
Create the split slab:
For the black and white earring, use your clay slicer to cut a clean, diagonal line across both the white and black sheets. Press the two contrasting diagonal pieces together gently on your work surface to create a single, two-tone sheet. -
Cut the ovals:
Using your oval cutter, cut one shape from the pure white sheet and one shape from your new split-tone sheet. Smooth the edges of the cut shapes with your fingertip to remove any stray bits of clay.
Step 2: Applying the Sgraffito Design
-
Mark the guide lines:
Lightly trace your design onto the raw clay using the very tip of a needle tool. Draw a curved line separating the ‘face’ area on the top half from the ‘botanical’ area on the bottom. -
Carve the faces:
Gently press your needle tool into the clay to carve the sleeping eyes, nose line, and simple mouth. You want deep, clean grooves, but don’t cut all the way through the slab. -
Carve the botanicals:
On the bottom half (the ‘shirt’ area), use the needle tool to carve leaf or wheat shapes. Press slightly harder here to make wider indentations for the gold paint later. -
Create texture:
Add tiny dot indentations around the botanical shapes for extra texture and interest, just as seen in the white earring design. -
Make the stud tops:
Roll out a small amount of gold clay and cut two small circles for the earring posts. Alternatively, you can use white clay and paint it gold later. -
Pierce holes:
Use a toothpick or small tool to poke a hole at the very top of each oval for the jump ring. Ensure the hole is big enough for your hardware.
Clean Lines Pro-Tip
If you accidentally smudge paint on the white clay, a Q-tip dipped in a tiny bit of rubbing alcohol or acetone cleans it up instantly without damaging the cured clay.
Step 3: Baking and Assembly
-
Bake the pieces:
Place your clay pieces on a ceramic tile or baking sheet lined with parchment paper. Bake according to your specific brand of polymer clay instructions (usually 275°F/130°C for 30 minutes). -
Cool down:
Let the pieces cool completely inside the oven or on a wire rack. Don’t handle them while hot as they are still slightly flexible and can warp. -
Paint the grooves:
Dip a fine brush into gold acrylic paint and fill the carved lines of the face and the botanical shapes. I find it easiest to be generous with the paint here. -
Wipe the surface:
Before the paint dries completely, take a slightly damp paper towel or baby wipe and gently wipe the surface of the clay. This removes paint from the flat top layer but leaves it trapped in the carved grooves. -
Paint the stud tops:
If you didn’t use gold clay for the tops, paint your small baked circles with a coat or two of gold acrylic paint. -
Attach posts:
Use a dab of gel super glue to secure the metal earring posts to the back of the small gold circles. Let this dry fully. -
Connect the parts:
Using pliers, create a small hole in the bottom of the stud circle (if you haven’t already drilled one) and connect it to the main oval pendant using a gold jump ring.
Uneven Seams?
If the seam between your black and white clay separates during cutting, place a piece of parchment paper over it and gently rub with an acrylic roller to bond them.
Enjoy styling these unique, artful earrings with your favorite casual outfit
Metallic-Fleck Night Sky Slab
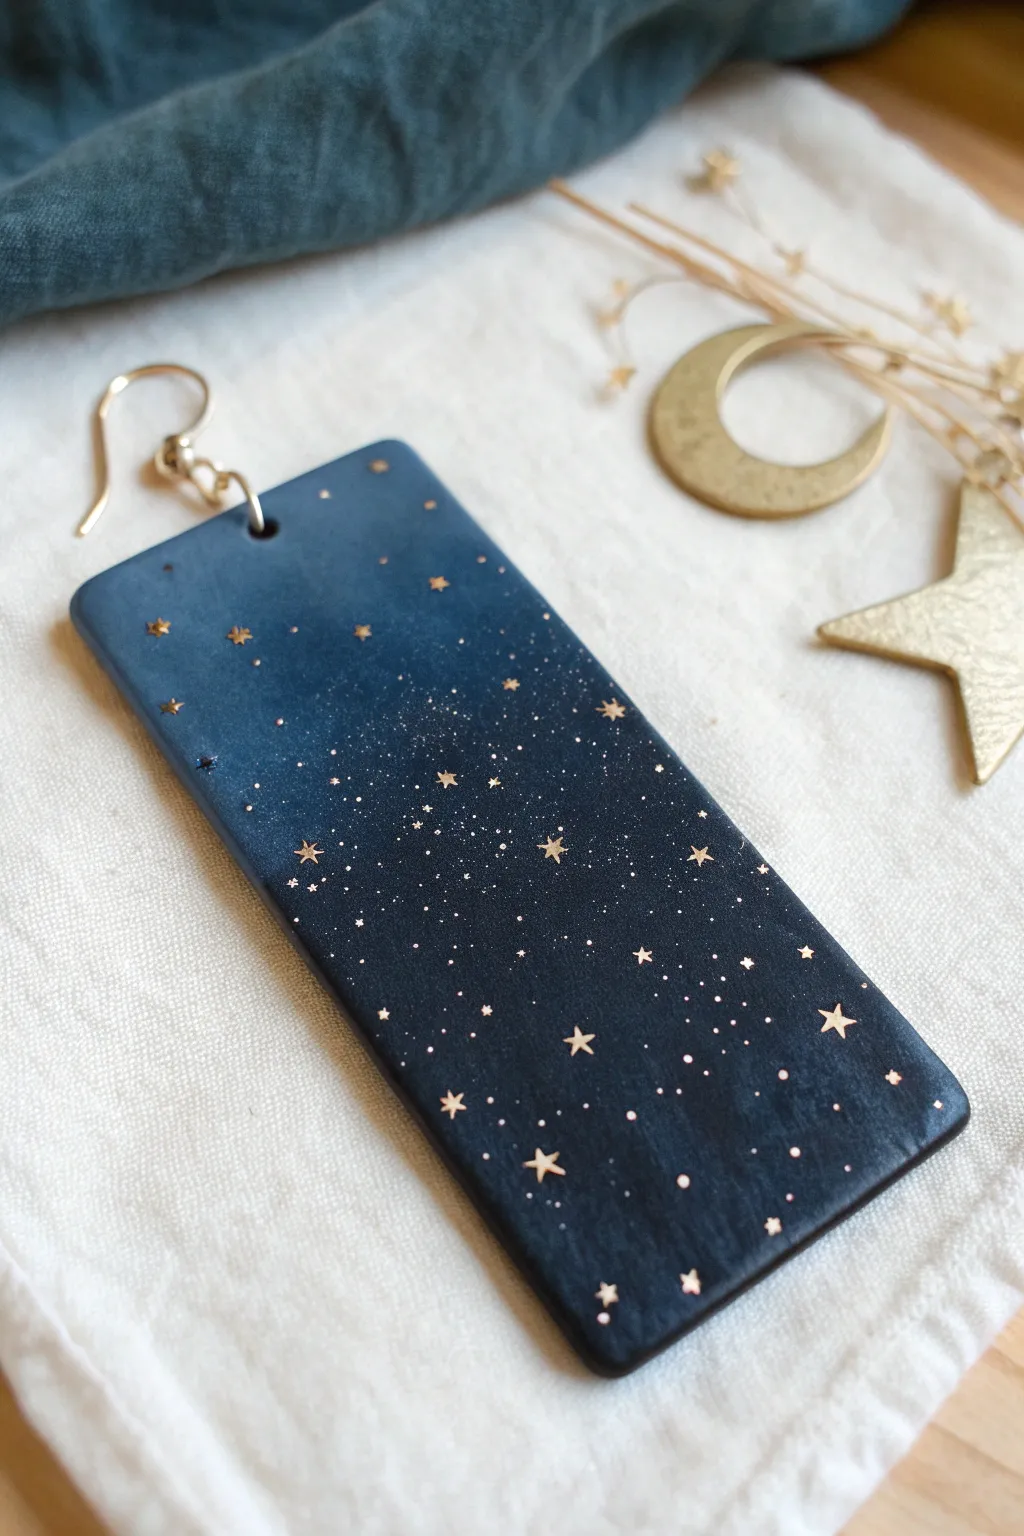
Capture the magic of a clear midnight sky with this celestial polymer clay slab. Deep indigo blends seamlessly into jet black, creating a moody canvas for scattered metallic stars that catch the light beautifully.
Step-by-Step Guide
Materials
- Navy blue polymer clay
- Black polymer clay
- Acrylic roller or pasta machine
- Tissue blade or sharp craft knife
- Gold acrylic paint
- Fine detail paintbrush (00 or 000 size)
- Toothbrush or stiff bristle brush
- Rectangular clay cutter
- Hand drill or pin vibe
- Jump rings and earring hooks
- Pliers
- Fine grit sandpaper (optional)
Step 1: Creating the Night Sky Base
-
Condition the clay:
Begin by thoroughly conditioning your navy blue and black polymer clay separately until they are soft and pliable. Warm clay blends much smoother. -
Form triangles:
Roll each color into a sheet of equal thickness. Cut a right-angled triangle from the blue and a matching one from the black. -
Combine the colors:
Fit the two triangles together to form a rectangle, pressing the diagonal seam gently so they stick. -
Start the Skinner blend:
Fold the rectangle in half, matching color to color (blue to blue, black to black). Pass this through your pasta machine or roll it out with an acrylic roller. -
Repeat the fold:
Fold the sheet again in the same direction—bottom to top—keeping the colors aligned. I usually repeat this process about 15-20 times until the line between the colors disappears and becomes a smooth gradient. -
Final sheet thickness:
Once you are happy with the ombre effect, roll the slab out to your final desired thickness, usually around 3mm for earrings. -
Check for bubbles:
inspect the surface for any air bubbles. If you find one, gently pierce it with a needle and smooth the air out with your finger.
Paint Smearing?
If the gold paint smears when cutting, wait longer for it to dry, or lightly cover the slab with a piece of cling film before pressing the cutter down.
Step 2: Adding the Stars
-
Splatter the Milky Way:
Dip a toothbrush or stiff brush into gold acrylic paint. Run your thumb across the bristles to flick a fine mist of tiny gold specks across the darker middle section of the gradient, mimicking a distant galaxy. -
Hand-paint larger stars:
Using your finest detail brush, carefully paint small five-pointed stars. Vary their sizes slightly, placing a few larger ‘hero’ stars near the edges. -
Add detail dots:
dipping the very tip of a toothpick or dotting tool into the gold paint, add distinguishable individual dots among the mist to create the look of closer stars. -
Allow to dry:
Let the paint dry completely before moving on. Wet paint can smear when you use the cutters.
Pro Tip: Depth
For a 3D effect, mix a tiny pinch of fine glitter into the black clay before blending. It adds a subtle shimmer beneath the painted stars.
Step 3: Cutting and Finishing
-
Cut the shape:
Position your rectangular cutter over the most interesting part of the gradient—I aim to capture the transition from blue to black. Press down firmly and lift. -
Bake the pieces:
Place your cut shapes on a ceramic tile or baking sheet lined with parchment paper. Bake according to your clay manufacturer’s instructions (usually 275°F/135°C for 30-45 minutes). -
Cool and sand:
Allow the pieces to cool completely. If the edges are sharp, gently sand them with fine-grit sandpaper under running water. -
Drill holes:
Mark the center top of the rectangle with a needle tool. Use a hand drill or pin vise to create a hole for your hardware. -
Assemble the jewelry:
Twist open a jump ring using two pairs of pliers. Thread it through the hole in the clay and attach your earring hook, then twist the ring closed.
Wear your new galaxy earrings to add a touch of cosmic sparkle to any outfit
Translucent Window Layer Slab
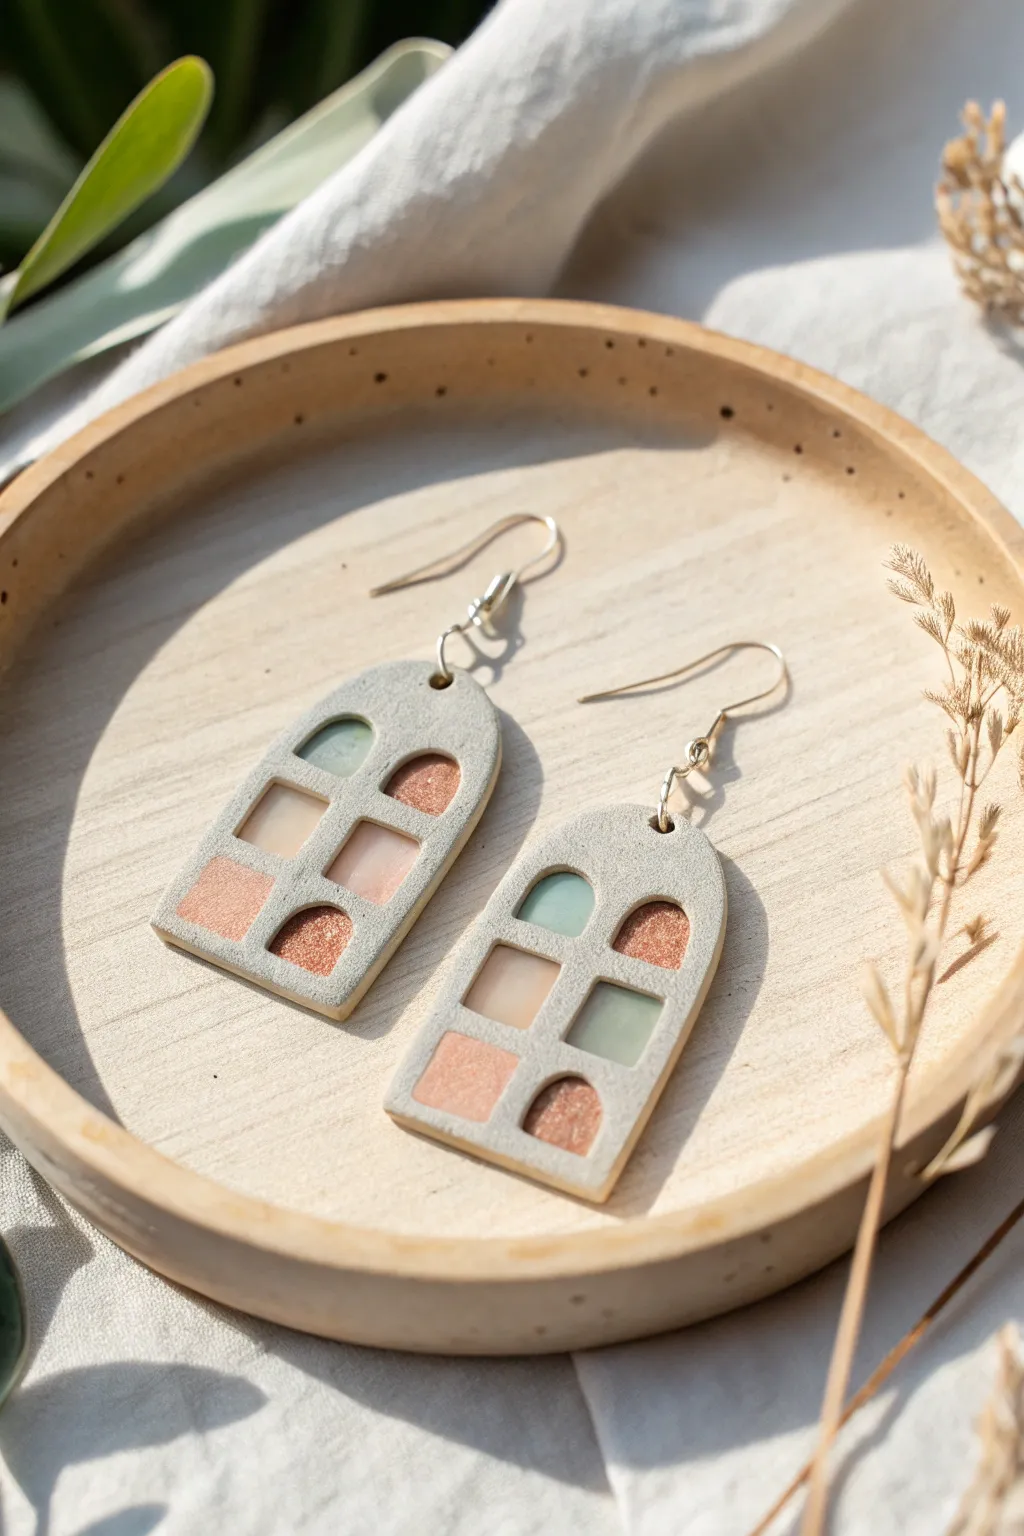
These elegant arch earrings feature a beautiful interplay of textures, combining a speckled stone effect with soft, translucent window inlays that catch the light. The ‘window slab’ technique creates a sophisticated, stained-glass appearance perfect for adding an artistic touch to your jewelry collection.
Detailed Instructions
Materials
- Polymer clay (Speckled grey/granite effect)
- Polymer clay (Translucent white)
- Polymer clay (Pastel colors: soft green, peach, terracotta)
- Liquid polymer clay (translucent)
- Gold leaf or metallic foil (copper/rose gold)
- Acrylic roller or pasta machine
- Grid paper
- Sharp craft knife or scalpel
- Tissue blade
- Arch-shaped cutter
- Small square and arch micro-cutters
- Sandpaper (various grits)
- Dremel or hand drill
- Jump rings and earring hooks
- Flat-nose pliers
Step 1: Preparing the Clay Base
-
Conditioning the main clay:
Start by thoroughly conditioning your speckled grey or granite-effect clay until it is pliable. Roll it out into a slab that is approximately 3mm thick. This will form the sturdy frame for your windows. -
Cutting the windows:
Place your clay slab on a tile or glass work surface. Using your micro-cutters (small squares and arches), punch out a pattern of holes in the slab where you want your colored ‘glass’ to be. Don’t remove the slab from the surface yet; keep the negative space intact. -
Preparing the translucent mix:
Condition your translucent clay. To achieve the soft, milky look seen in the photo, mix a very small amount of your pastel colors (green, peach) into separate balls of translucent clay. You want a ratio of about 1 part color to 4 parts translucent. -
Adding metallic details:
For the shimmering sections, mix some copper or rose gold metallic leaf into a small portion of translucent clay. don’t over-mix; leaving larger flakes creates a beautiful suspended texture.
Step 2: Creating the Window Inlay
-
Filling the windows:
Roll your colored translucent mixes to the exact same thickness as your main grey slab. Use the same micro-cutters to cut out shapes that correspond to the holes in your grey slab. -
Inserting the glass:
Carefully place the colored cutouts into the matching holes in the grey slab. Gently press them in with your finger to ensure they make contact with the edges. The fit should be snug, like puzzle pieces. -
Bonding the seams:
Apply a tiny amount of translucent liquid polymer clay along the seams between the grey frame and colored inserts. This acts as a grout and strengthens the bond during baking. -
Smoothing the surface:
Place a piece of parchment paper over the entire patterned slab. Use your acrylic roller to burnish the clay, rolling firmly in all directions to merge the seams and ensure a completely flat, unified surface.
Clean Cuts
If your micro-cutters are sticking and deforming the windows, dip them in cornstarch or water before cutting. This helps the clay release cleanly without dragging.
Step 3: Cutting and Finishing
-
Cutting the final shape:
Position your large arch cutter over the patterned area you’ve created. Try to center your window design nicely within the frame before pressing down firmly to cut the final earring shape. -
Adding texture (optional):
To enhance the stone effect, you can gently tap a toothbrush or stiff bristles over the grey areas of the clay, avoiding the translucent windows. This adds a realistic, porous stone texture. -
Baking:
Bake the pieces according to the manufacturer’s instructions for your specific brand of clay. I usually tent foil over the tray to prevent any scorching of the translucent colors. -
Sanding and buffing:
Once cool, use wet/dry sandpaper starting at 400 grit and moving up to 1000 grit. Focus on the edges and the back. For the translucent windows, a light buffing will help them catch the light better. -
Drilling holes:
Mark a spot at the very top center of the arch. Using a hand drill or Dremel with a small bit, carefully drill a hole for your jump ring. -
Assembly:
Open a jump ring with your pliers (twist, don’t pull apart) and thread it through the drilled hole. Attach your earring hook, close the ring, and your sophisticated window slab earrings are ready to wear.
UV Resin Finish
For a truly glass-like finish, apply a thin layer of UV resin only over the colored window sections and cure under a UV lamp. This makes the ‘glass’ pop against the matte stone frame.
Now you have a stunning pair of earrings that look like tiny architectural masterpieces
Mini Landscape Illustration Slab
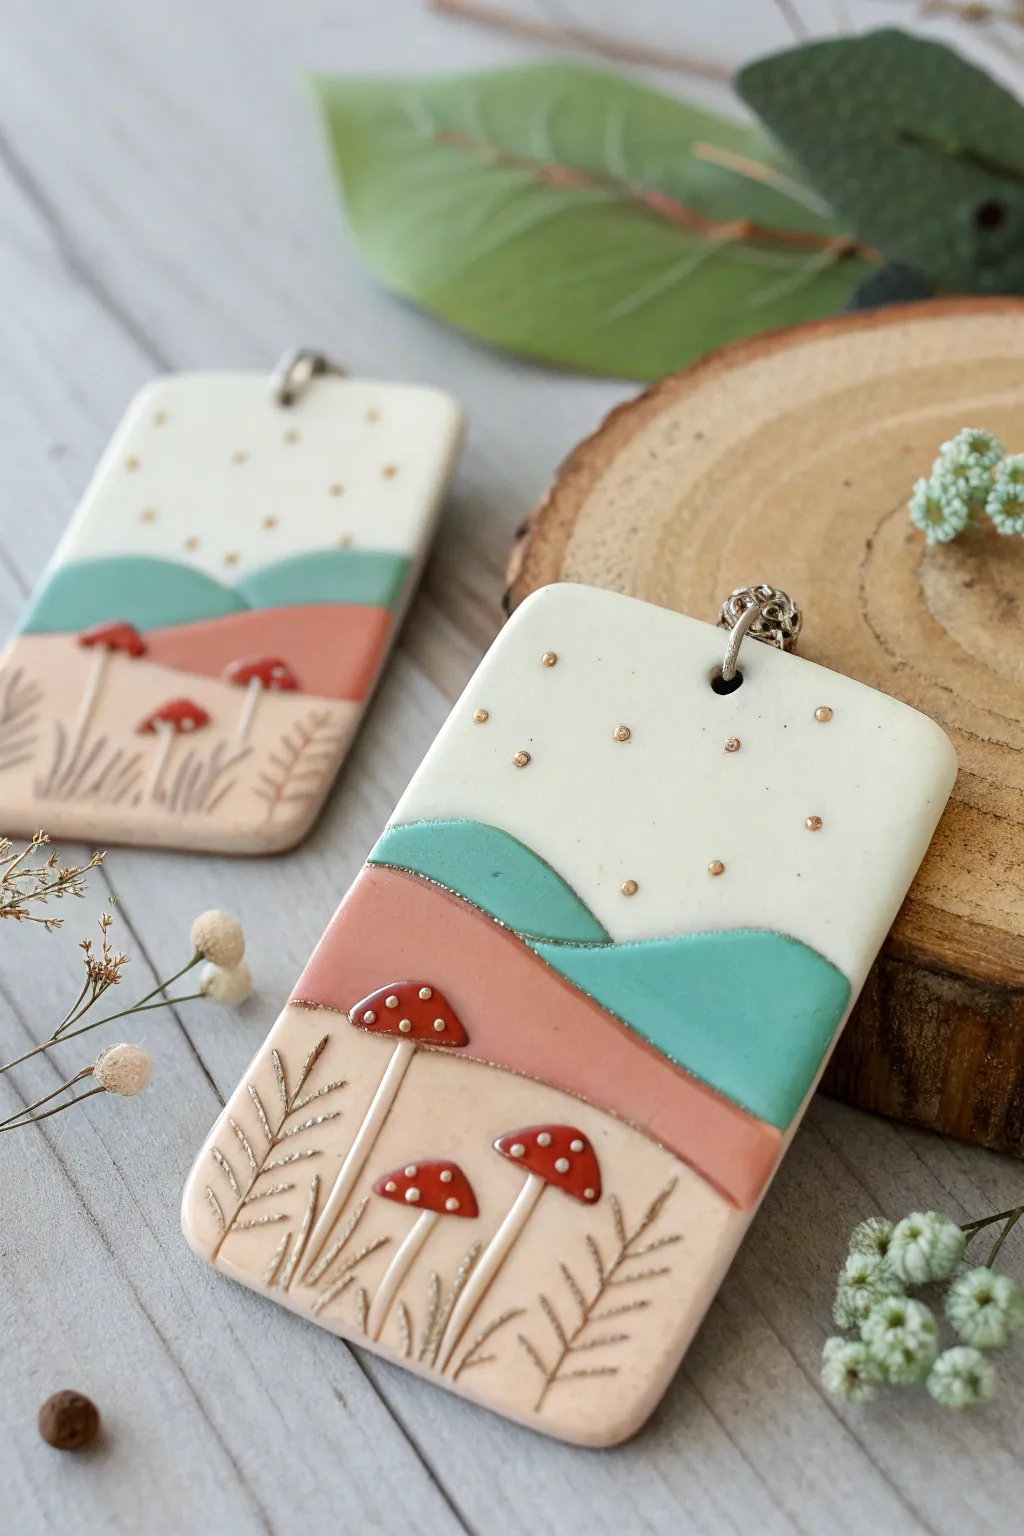
Capture the magic of a tiny world with these layered landscape pendants, featuring rolling pastel hills and charming red toadstools. This project combines slab-building techniques with delicate embossing to create a wearable piece of art that feels like a illustration come to life.
Step-by-Step Guide
Materials
- Polymer clay (White, Beige/Sand, Terracotta Pink, Teal, Red)
- Acrylic roller or pasta machine
- sharp tissue blade
- Rectangular clay cutter (approx. 1.5 – 2 inches tall)
- Needle tool or fine embossing tool
- Small ball stylus
- White acrylic paint or liquid clay
- Detail paintbrush
- Jewelry findings (jump rings, necklace cord)
- Hand drill or punch tool
- Tile or baking surface
- Gold mica powder (optional for speckles)
Step 1: Base and Sky
-
Condition the clay:
Start by thoroughly conditioning your white polymer clay until it is soft and pliable. This will form the largest portion of your background, representing the sky. -
Roll the base sheet:
Roll the white clay out to a medium thickness (about 2-3mm). This needs to be sturdy enough to be the pendant backing but thin enough to accommodate layers on top. -
Cut the shape:
Use your rectangular cutter to punch out the main pendant shape from the white sheet. Leave the clay on your work tile so you don’t distort the rectangle. -
Add texture to the sky:
Using a very small ball stylus or a needle tool, gently press tiny indentations into the upper half of the white rectangle. These will be our distant stars or magical dust. -
Highlight the stars:
I like to take a tiny bit of gold mica powder on my finger or a brush and lightly tap it into those indentations to make them shimmer.
Uneven Layers?
If your landscape layers look bulky, you probably didn’t roll the colored clay thin enough. Use the thinnest setting on your pasta machine for overlay pieces.
Step 2: Layering the Landscape
-
Create the teal hills:
Roll out a small amount of teal clay very thinly. Use your tissue blade to cut a wavy, organic line across the top edge to mimic rolling hills. -
Place the middle ground:
Lay this teal strip across the middle of your white rectangle. Trim the sides flush with the rectangle’s edges using your tissue blade. -
Add the pink layer:
Repeat the process with the terracotta pink clay, rolling it thin and cutting a slightly flatter wavy line for the top edge. -
Position the pink hills:
Place the pink layer directly below the teal layer, slightly overlapping the bottom of the teal clay to create depth. Trim the sides flush. -
Form the foreground:
Finally, roll out the beige/sand clay. This section should cover the bottom third of the pendant. Cut a straight bottom edge and a slightly curved top edge. -
Secure the foreground:
Apply the beige layer at the very bottom, overlapping the pink layer slightly. Gently roll over the entire piece with an acrylic roller just enough to bond the layers without flattening the texture too much.
Step 3: Details and Finishing
-
Add mushroom caps:
Roll tiny balls of red clay (about 3mm) and flatten them slightly into semicircles. Press these onto the beige ground layer where the hills meet the earth; create a cluster of three for visual interest. -
Create mushroom stems:
Roll out incredibly thin snakes of white or very light beige clay. Cut small lengths and attach them beneath the red caps to form delicate stems. -
Emboss the foliage:
Use a needle tool to scratch fern-like patterns into the beige clay on either side of the mushrooms. Press gently to create ‘V’ shapes that look like stylized grass. -
Add mushroom spots:
Using the smallest dotting tool or a toothpick, apply tiny dots of white liquid clay or white acrylic paint onto the red mushroom caps. -
Create the hanging hole:
Use a small circular cutter or a straw to punch a hole at the very top center of the pendant for your jump ring. -
Bake:
Bake the piece according to your clay manufacturer’s instructions (usually 275°F/130°C for 30 minutes). Let it cool completely inside the oven to prevent cracking. -
Optional gloss:
If desired, apply a thin layer of UV resin or gloss glaze over the mushrooms to make them pop against the matte background. -
Assembly:
Open a jump ring with pliers, slide it through the hole, and attach your necklace cord or chain.
Clean Cuts
Before cutting your final rectangle shape or trimming edges, place the clay in the fridge for 10 minutes. Cold clay cuts cleanly without dragging or distorting.
Now you have a serene little landscape to wear close to your heart