Whenever I need a fun little adrenaline rush in the studio, I reach for creepy clay projects—they’re the perfect mix of playful and unsettling. Here are my favorite ideas you can totally pull off at a hobbyist scale, whether you’re using polymer, air-dry, or ceramic clay.
Stitched Jack-O’-Lantern Faces
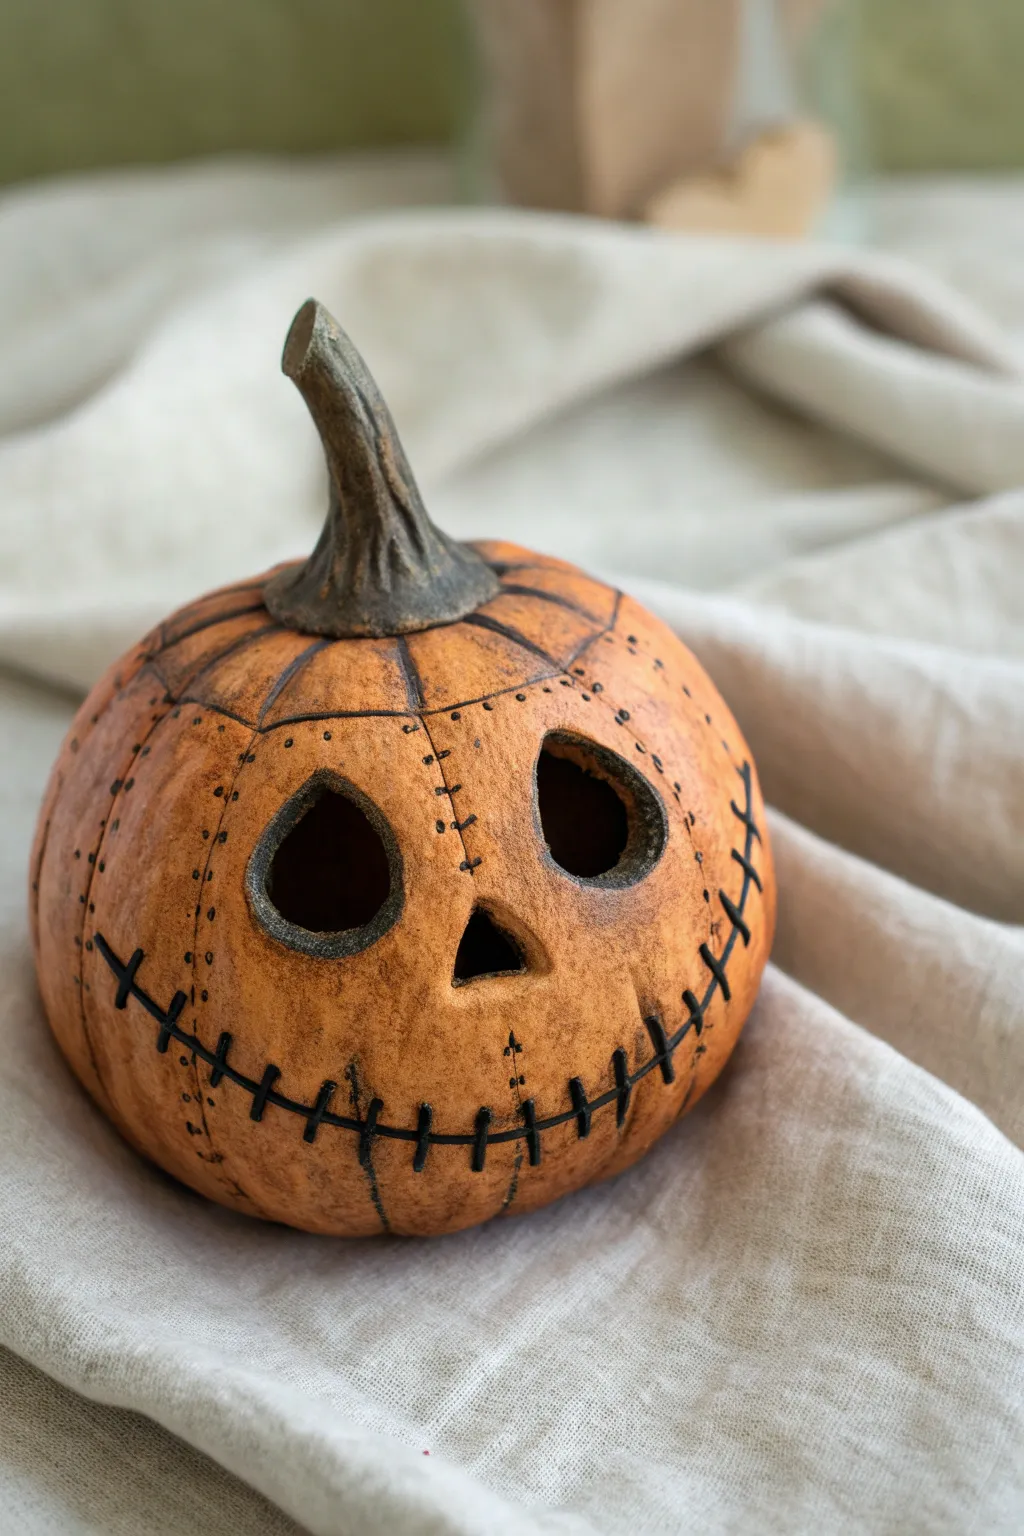
This rustic, Tim Burton-esque pumpkin features a uniquely textured surface that mimics stitched leather or fabric patches. With its hollow eyes and prominent stitch marks, it balances creepy and cute perfectly for your Halloween shelf decor.
How-To Guide
Materials
- Air-dry clay (terracotta or white)
- Acrylic paints (orange, brown, black, dark green)
- Clay sculpting tools (needle tool, ball stylus)
- Aluminum foil
- Water and sponge
- Paintbrushes (flat brush and fine liner)
- Matte varnish or sealant
Step 1: Sculpting the Base
-
Form the core:
Ball up a piece of aluminum foil into a shape slightly wider than a tennis ball to act as an armature. This saves clay and keeps the pumpkin lightweight. -
Cover with clay:
Roll out a slab of clay to about 1/4 inch thickness. Wrap this evenly around your foil ball, smoothing out seams with a little water on your finger. -
Shape the pumpkin:
Gently press the top and bottom to flatten the sphere slightly. Use the side of your finger or a modeling tool to press vertical indentations around the shape to create the pumpkin’s ribs. -
Open the top:
If you want this to be a lantern, carve a circular hole in the top now so you can remove the foil later. If it’s just a figurine, you can skip this, but you’ll need to scoop out clay for the face features.
Needle Tool Tip
For the tiny stitch holes, try using a mechanical pencil with the lead retracted (just the metal tip) to get perfectly uniform, small circles.
Step 2: Adding the Face and Stem
-
Carve the eyes:
Using a knife tool, cut out two large, teardrop-shaped holes for eyes. Smooth the inner edges with a damp brush so they aren’t sharp or ragged. -
Create the nose:
Cut a small, triangular hole simply placed between the eyes. Keep it proportionally small to emphasize the oversized eyes. -
Form the stem:
Roll a coil of clay that is thick at the base and tapers to a twist at the top. Attach this firmly to the center of the pumpkin, blending the clay downwards onto the pumpkin shoulders. -
Texture the stem:
Use a needle tool to scratch deep, twisting vertical lines into the stem to simulate dried wood grain.
Clay Cracking?
If small cracks appear while drying, mix a tiny bit of clay with water into a paste (slip) and brush it into the cracks, then smooth it out.
Step 3: Creating the Stitched Details
-
Draw the patches:
Lightly etch faint lines across the pumpkin surface using a needle tool. These should look like seams where different pieces of ‘skin’ meet, cutting across the ribs rather than following them. -
Etch the smile:
Carve a long, horizontal line for the mouth. Unlike a traditional jack-o’-lantern, don’t cut this all the way through; just etch a deep groove across the lower face. -
Add stitch holes:
Use a small needle tool to poke tiny, paired holes along the patch lines you drew earlier. This creates the illusion that the pumpkin has been sewn together. -
Sculpt the main stitches:
Roll tiny, very thin threads of clay. Lay them across the mouth groove vertically, pressing them down to look like thick thread holding the lips shut. -
Dry completely:
Let the pumpkin dry for at least 24-48 hours. If you used foil inside without an opening, the drying time might be longer.
Step 4: Painting and Finishing
-
Base coat:
Paint the entire pumpkin body with a muted, earthy orange acrylic paint. Paint the stem a dark, muddy green or brown. -
Apply a wash:
Mix brown paint with water to create a thin wash. Brush this over the entire pumpkin, letting it settle into the grooves, eye sockets, and stitch holes. -
Wipe back:
Before the wash dries, wipe the raised surfaces with a paper towel or sponge. This leaves the dark color in the crevices, creating an aged, dirty look. -
Highlighting details:
Use a fine liner brush and black paint to carefully trace the ‘seam’ lines and paint the vertical stitches over the mouth to make them pop. -
Dry brushing:
Lightly dip a dry brush into a lighter orange or yellow paint. Wisps of this color brushed over the high points of the cheeks and ribs add dimension and texture. -
Seal the work:
I usually finish with a coat of matte varnish to protect the paint and unify the finish without making it look like plastic.
Now you have a marvellously stitched pumpkin ready to haunt your home


Mini Skulls With Grimy Wash
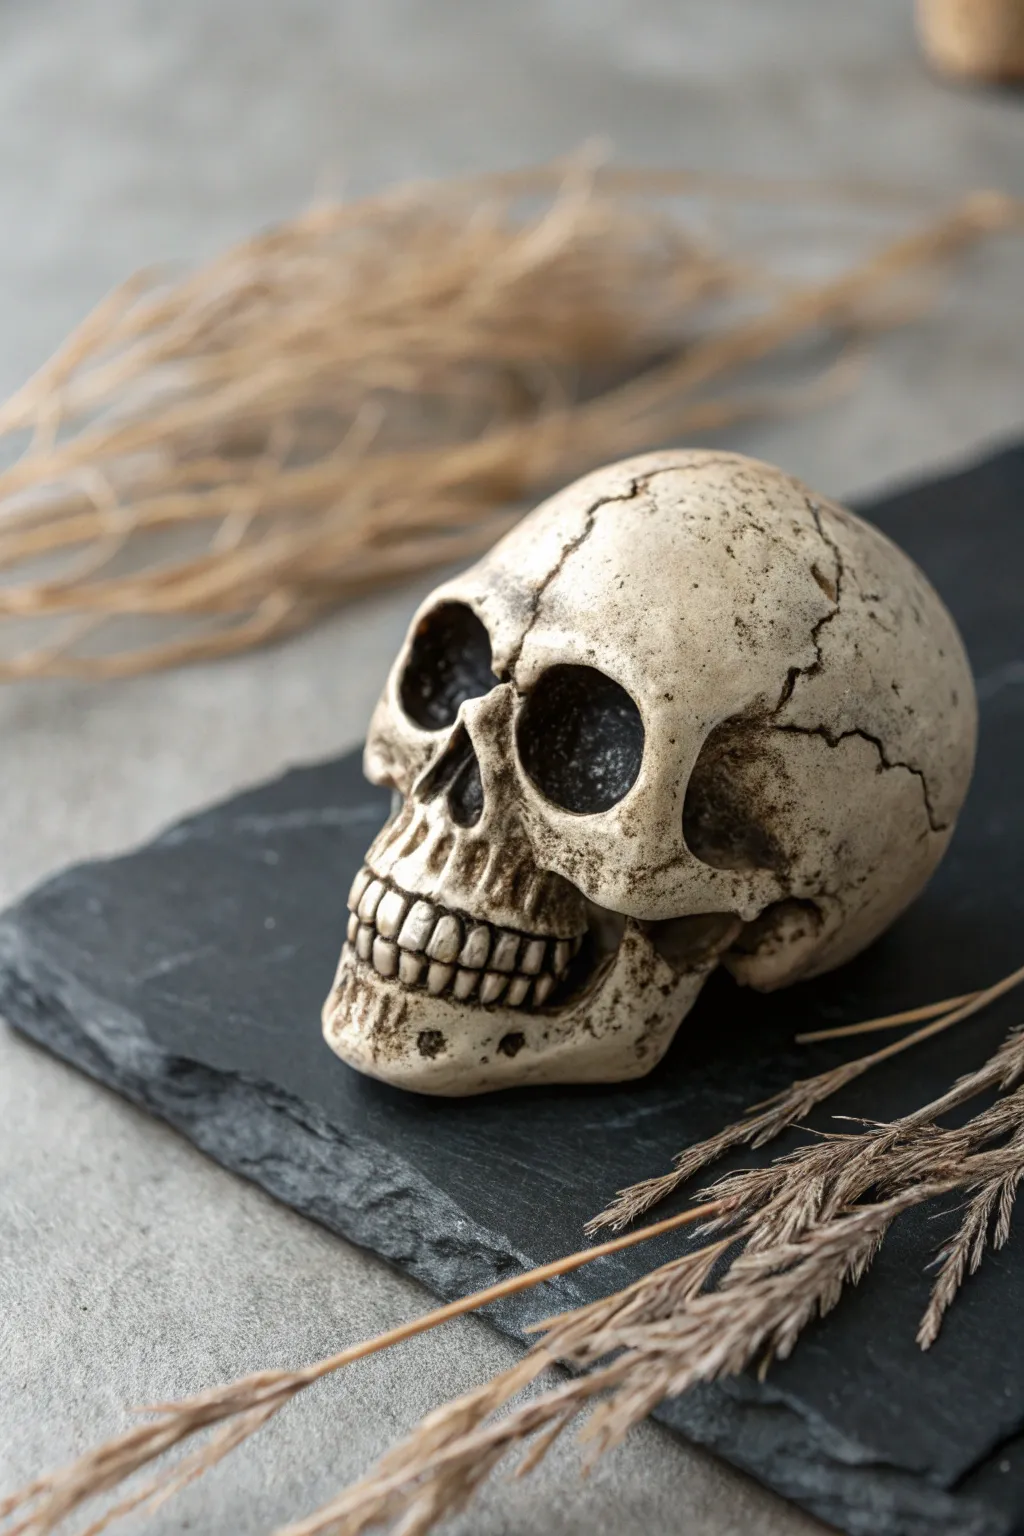
Create a hauntingly realistic miniature relic perfect for Halloween decor or gothic crafting. This project transforms simple polymer clay into an ancient-looking bone artifact using detailed sculpting and strategic paint washes.
Step-by-Step Guide
Materials
- White or beige polymer clay
- Sculpting tool set (ball stylus, needle tool, rubber shaper)
- Black acrylic paint
- Brown acrylic paint (Burnt Umber)
- Water container and paper towels
- Small soft brush
- Fine detail brush
- Aluminum foil
- Oven for baking
Step 1: Forming the Base Structure
-
Create the core:
Begin by crumbling a small piece of aluminum foil into a tight, slightly elongated ball. This saves clay and prevents the skull from being too heavy. -
Cover with clay:
Condition your white or beige polymer clay until it is soft and pliable. Roll it into a sheet about 1/4 inch thick and wrap it completely around your foil core, smoothing out any seams. -
Shape the cranium:
Roll the clay-covered ball in your palms to smooth it, then gently pinch the lower half to narrow it, forming the jaw area while keeping the top round and bulbous for the cranium.
Step 2: Sculpting the Features
-
Mark the eye sockets:
Using your thumbs or a large ball tool, press deeply into the clay slightly below the midpoint of the face to create two large, hollow eye sockets. They should be somewhat irregular, not perfect circles. -
Form the nasal cavity:
Between and slightly below the eyes, press an inverted heart or triangle shape. Use a needle tool to refine the edges, making the bone look sharp around the nasal opening. -
Refine the cheekbones:
Push clay upwards from the jaw area towards the eye sockets to create prominent zygomatic arches (cheekbones). Smooth the transition into the side of the skull. -
Define the jaw:
Flatten the sides of the lower jaw slightly and use a rubber shaping tool to create the hollows just behind the teeth area.
Make It Ancient
Mix a tiny pinch of baking soda into your acrylic wash. It adds a gritty, calcified texture that settles into the cracks as it dries, mimicking centuries of decay.
Step 3: Adding Teeth and Texture
-
block out the teeth:
Roll a very thin snake of clay and press it onto the upper jaw line. Do the same for the lower jaw if you want a closed mouth look. -
Carve individual teeth:
Using a needle tool or a very fine blade, press vertical lines into the strip to separate individual teeth. I find it helpful to wiggle the tool slightly to round the edges of each tooth. -
Add cracks and damage:
Take a needle tool and drag jagged lines across the cranium to mimic cranial sutures. Press deeper in some spots to simulate chips or old fractures. -
Surface texturing:
Gently tap the surface of the clay with an old toothbrush or stiff bristle brush. This removes fingerprints and adds a porous bone texture. -
Bake the clay:
Bake the skull according to your clay package instructions. usually 275°F (135°C) for 15-30 minutes. Let it cool completely before painting.
Glow From Within
Before baking, drill a small hole in the bottom. Insert a tiny LED tea light or fairy light after painting to make the eyes glow ominously in the dark.
Step 4: The Grimy Wash Finish
-
Prepare the wash:
Mix a small amount of black and burnt umber acrylic paint with water. You want a very watery consistency, almost like tinted water rather than paint. -
Apply the first coat:
Generously brush the watery mix over the entire skull. Don’t worry about being neat; you want the liquid to flow into every crack, eye socket, and tooth gap. -
Wipe back:
Immediately take a damp paper towel and wipe the surface of the skull. This removes paint from the high points (like the forehead and cheekbones) while leaving dark pigment in the recesses. -
Deepen the shadows:
Use a fine detail brush with slightly thicker black paint to darken the deepest parts of the eye sockets and the nasal cavity for a hollow look. -
Detail the sutures:
Run a fine line of the dark wash directly into the cranial cracks you carved earlier. If it spills over, just tap it with your paper towel to blend it out. -
Final tooth staining:
Dab a tiny bit of the brown wash at the gum line where the teeth meet the bone. This makes them look aged and clearly defines them from the jaw. -
Seal (Optional):
If you want a matte finish, leave it as is. For extra durability, apply a clear matte varnish, avoiding the deep recesses to keep the contrast high.
Now you have a brilliantly weathered artifact ready to add a touch of gothic mystery to your shelf


Creepy Ghosts With Hollow Eyes
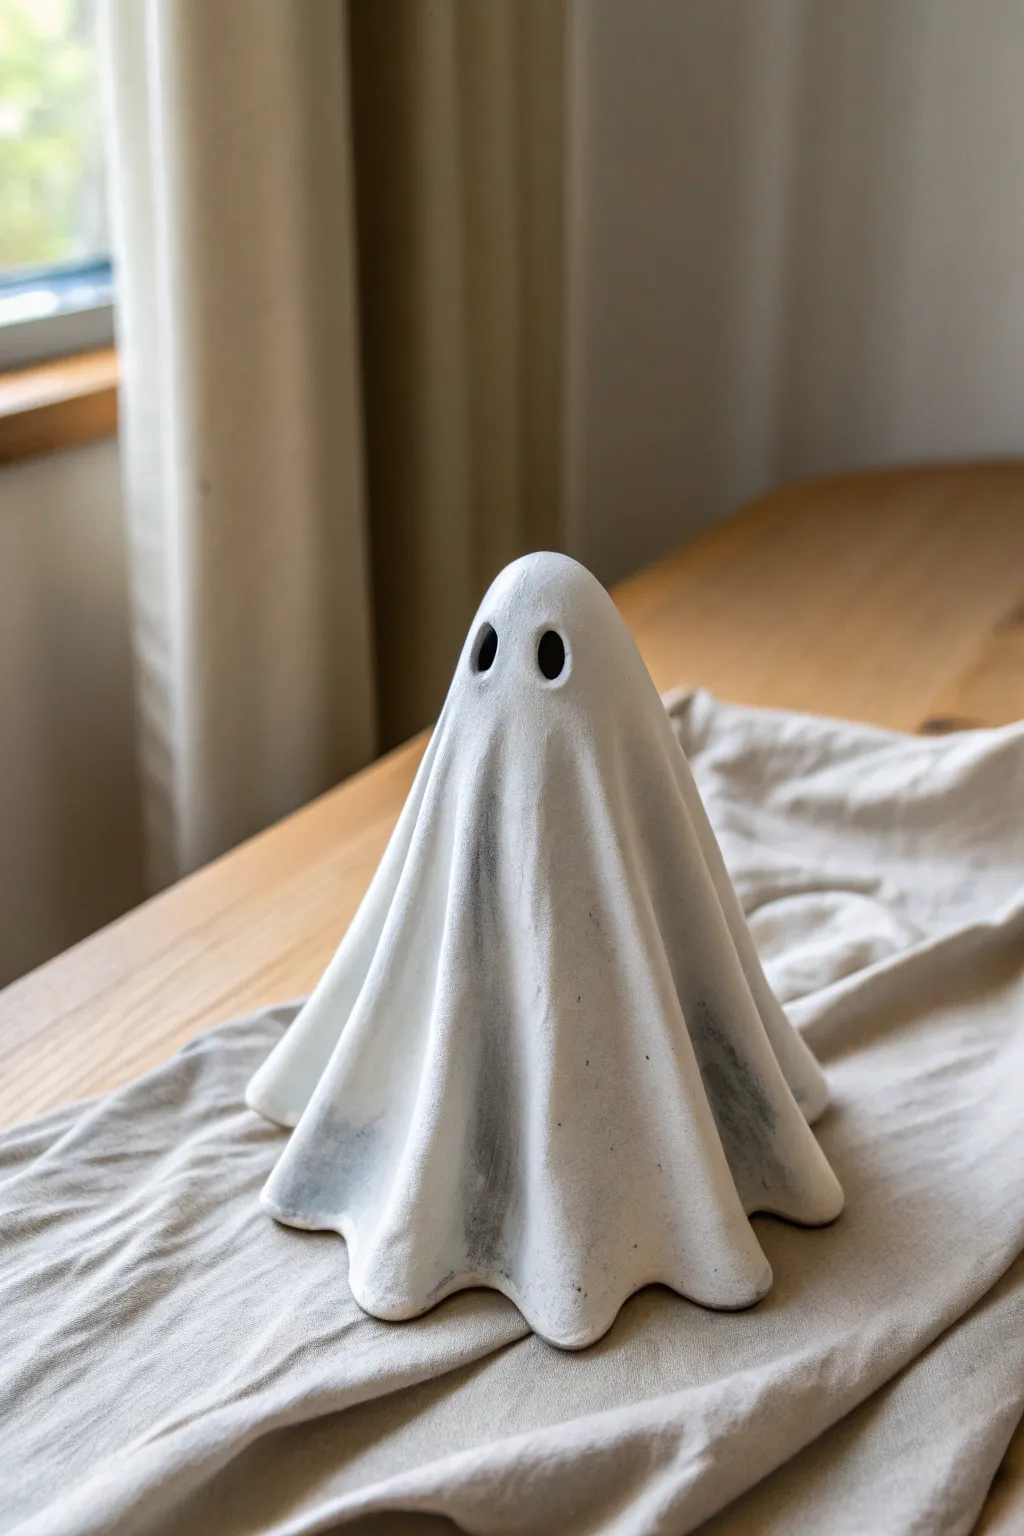
Capture the classic spooky aesthetic with this handcrafted clay ghost, featuring eerie hollow eyes and realistic fabric folds. The finished piece has a weathered, matte texture that makes it look like a vintage ceramic decoration found in a haunted attic.
How-To Guide
Materials
- White air-dry clay (or polymer clay)
- Aluminum foil
- Rolling pin
- Sculpting tool (tapered point or knitting needle)
- Small bowl of water (for smoothing)
- Fine-grit sandpaper
- Circular clay cutter or straw (for eyes)
- Acrylic paint (black and watery grey)
- Paintbrushes (soft bristle)
- Matte sealant or varnish
Step 1: Forming the Core Structure
-
Create the Armature:
Start by crumpling a sheet of aluminum foil into a cone-like shape. This will be the support structure underneath your ghost. Make the base wide enough to stand stable and the top rounded for the head. -
Smooth the Foil:
Press the foil firmly against a table to flatten the bottom. Use your thumbs to smooth out any sharp crinkles on the cone so they won’t poke through thin clay later. -
Condition the Clay:
Take a large chunk of white air-dry clay and knead it in your hands until it is warm, pliable, and free of cracks. If it feels dry, dip your fingers in water and work it in. -
Roll the Sheet:
Use a rolling pin to flatten the clay into a large, even circle. Aim for a thickness of about 1/4 inch—not too thin, or it will tear, but thin enough to drape naturally. -
Cover the Armature:
Gently lift your clay circle and center it over the top of your aluminum foil cone. Treat it like a real fabric sheet, letting gravity help you.
Smoother Drapes
For softer, more natural fabric folds, lightly dust the foil armature with cornstarch before draping the clay. This prevents sticking and lets the material slide into shape.
Step 2: Sculpting the Features
-
Drape the Folds:
Guide the clay down the sides of the cone. Use your fingers to manually pinch and accentuate the vertical folds, creating deep, wavy ripples at the bottom hem. -
Refine the Silhouette:
Gently smooth the top of the head so it is distinct but rounded. Pull the bottom edges of the clay outward slightly so the ghost flares at the base like a dress. -
Create the Eye Sockets:
Position your eye holes about one-third of the way down from the top. Using a small circular cutter or a wide straw, press firmly into the clay to remove two clean circles. -
Clean Up Edges:
Enhance the darkness of the eyes by gently pressing a rounded tool or your pinky finger into the sockets to smooth the inner edges, ensuring no rough clay bits remain visible. -
Final Smoothing:
Dip your finger in water and run it over the entire surface of the ghost to erase fingerprints and cracks. Pay close attention to the peaks of the folds. -
Initial Drying:
Allow the sculpture to dry in a cool, dry place for at least 24-48 hours. I like to rotate it occasionally so air reaches all sides evenly.
Glow From Within
Before drying, cut a hole in the back base and remove the foil after the outer shell hardens. Place a battery-operated tea light inside to make the eyes glow.
Step 3: Finishing Touches
-
Sanding:
Once fully dry, use fine-grit sandpaper to gently buff away any remaining imperfections or bumps, focusing on the bottom hem and the top of the head. -
Painting the Void:
Take a small brush with pure black acrylic paint and carefully fill inside the eye holes. Paint slightly onto the inner rim of the clay so the white disappears into the void. -
Creating Depth:
Mix a very watery wash of grey paint. Brush this into the deep recesses of the folds and immediately wipe the high points with a paper towel. This leaves shadows in the creases. -
Weathering the Hem:
Apply a slightly darker grey or diluted black wash just along the very bottom edge of the ghost, simulating dirt or dust gathered from trailing on the ground. -
Sealing:
Finish the piece with a coat of matte varnish or sealant. This protects the clay and gives it that smooth, finished ceramic look without being overly shiny.
Place your finished ghost on a shelf or mantle where the light can catch the subtle folds and shadows you created


Spiderweb Trinket Dish
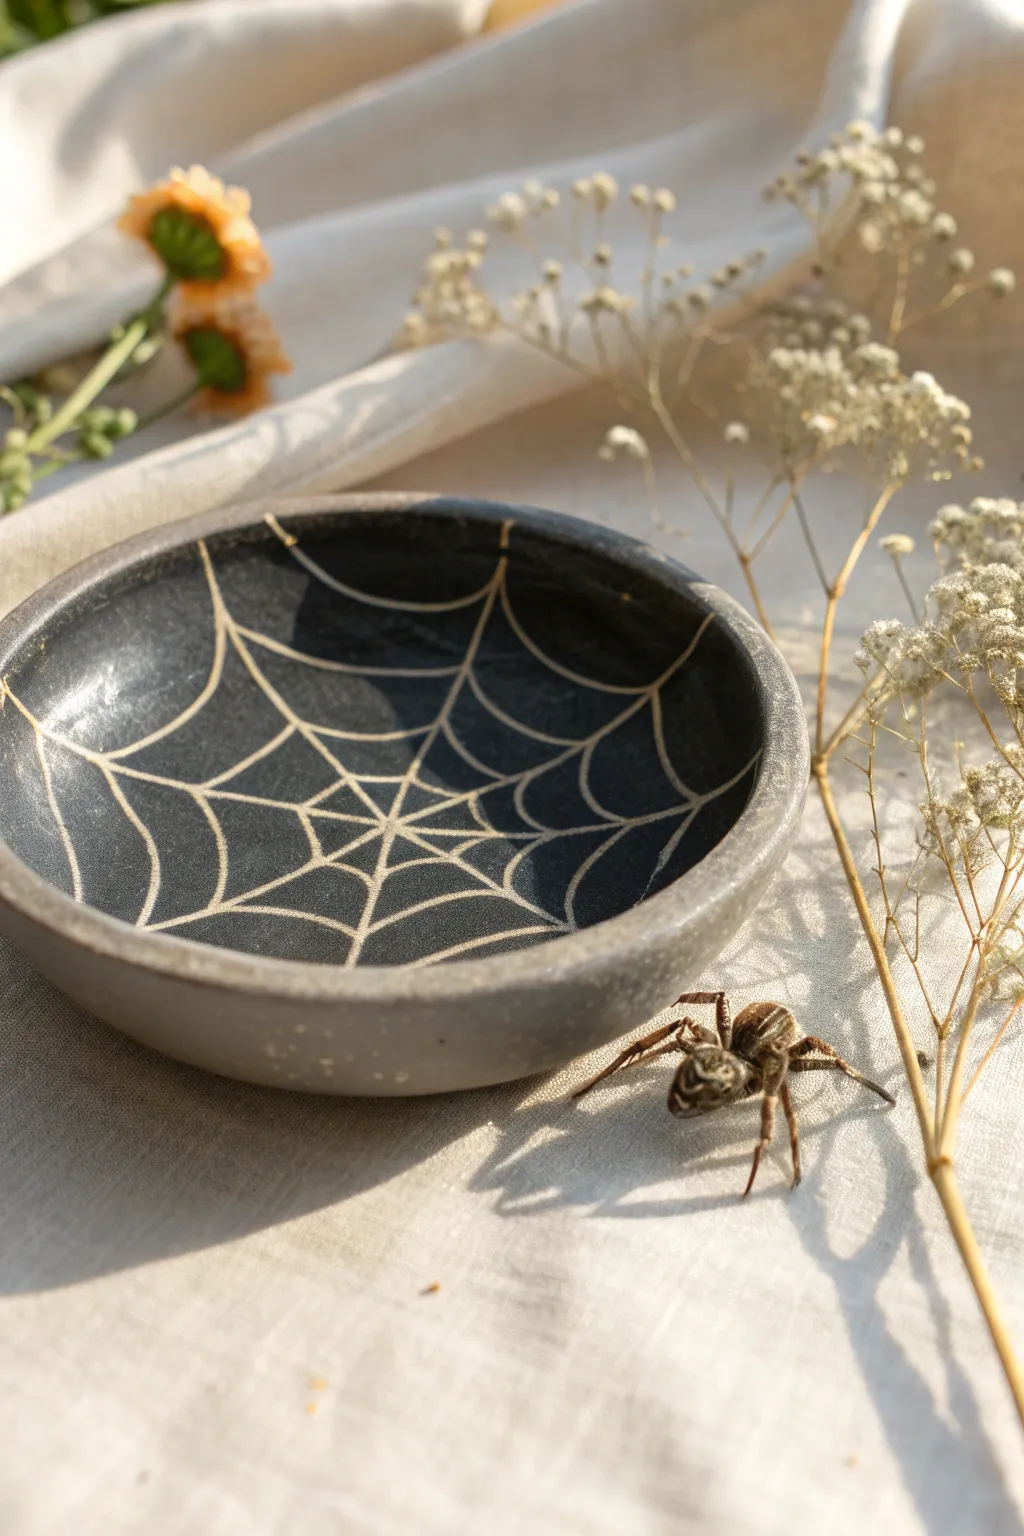
This eerie yet elegant trinket dish captures the delicate geometry of a spiderweb in contrasting stoneware tones. The dark, matte finish provides the perfect backdrop for a carved sgraffito design that will hold your smallest treasures in spooky style.
Step-by-Step Tutorial
Materials
- Black polymer clay or air-dry clay (approx. 200g)
- White acrylic paint
- Rolling pin
- Small bowl or round cutter (approx. 4-5 inches)
- Needle tool or fine carving tool
- Sponge
- Fine-grit sandpaper
- Matte varnish or sealant
- Small paintbrush
Step 1: Forming the Dish
-
Condition the clay:
Begin by kneading your black clay thoroughly until it is soft, pliable, and free of any air bubbles. Warm clay is much less likely to crack during forming. -
Roll the slab:
Use your rolling pin to flatten the clay into a smooth, even slab about 1/4 inch thick. Rotate the clay frequently to ensure it doesn’t stick to your work surface. -
Cut the circle:
Place your bowl or circle cutter onto the clay and press down firmly to cut out a perfect circle. Remove the excess clay and smooth the edges with your finger. -
Shape the curvature:
Gently lift the clay circle and press it into a slightly larger bowl or mold to give it a curved, dish-like shape. Alternatively, you can pinch up the sides by hand to create a raised rim like the one in the photo. -
Smooth the rim:
Dip your finger or a small sponge in a little water (if using air-dry clay) or baby oil (for polymer) and run it along the rim to create a soft, rounded lip.
Step 2: Carving the Web
-
Mark the center:
Using your needle tool, make a very tiny prick in the exact center of the dish. This will be the anchor point for your web design. -
Draw radial lines:
Lightly etch straight lines radiating from the center point out to the rim, like slicing a pie. Aim for 7 to 9 lines for a realistic asymmetry. -
Connect the webbing:
Start near the center and draw curved lines connecting the radial spokes. The curves should swoop inward toward the center, creating that classic draped web look. -
Expand the pattern:
Continue adding rows of connected webbing, moving outward until you reach the rim. The spaces between the lines should get slightly larger as you move away from the center. -
Deepen the grooves:
Once you are happy with the light sketch, go back over the lines with your carving tool, pressing deeper to create distinct grooves. These channels will hold the paint later. -
Clean up burrs:
Inspect the grooves for any little crumbs of clay or rough edges and gently brush them away with a soft, dry brush.
Messy Lines?
If the paint wiped out of the grooves too much, let it dry completely, then re-apply. Wait until the surface paint is tacky, not wet, before wiping again.
Step 3: Finishing Touches
-
Bake or dry:
If using polymer clay, bake according to the package instructions. For air-dry clay, let it sit undisturbed for 24-48 hours until completely hardened. -
Sand the surface:
Once fully cured, use fine-grit sandpaper to gently smooth the rim and the outside of the bowl. Wipe away all dust with a damp cloth. -
Fill the grooves:
Dilute your white acrylic paint slightly with water. Paint over the carved lines, ensuring the paint gets deep into the grooves. Don’t worry about being messy here. -
Wipe the surface:
Before the paint dries completely on the surface, take a slightly damp sponge or paper towel and wipe across the top of the dish. This removes the surface paint while leaving the white pigment trapped in the recessed web lines. -
Seal the work:
Finish by applying a coat of matte varnish to the entire dish to protect the paint and give the clay a professional, stone-like finish.
Glow Up
Mix glow-in-the-dark powder into your white paint or use phosphorescent acrylics to make the spiderweb design illuminate when the lights go out.
Your spooky, minimalist dish is now ready to hold jewelry or decorative creepy crawlies on your vanity

The Complete Guide to Pottery Troubleshooting
Uncover the most common ceramic mistakes—from cracking clay to failed glazes—and learn how to fix them fast.
Coffin-Shaped Keepsake Box

Craft a somber yet useful keepsake box that mimics the look of seasoned slate or dark granite. This project features a distinctive coffin silhouette, textured matte glazing, and subtle oxide detailing for a truly aged appearance.
Detailed Instructions
Materials
- Dark stoneware clay (or black clay body)
- Slab roller or rolling pin
- Fettling knife or X-Acto knife
- Paper template (coffin shape)
- Scoring tool (serrated rib or needle tool)
- Slip (clay mixed with water)
- Wooden modeling tools
- Small drill bit or needle tool (for decorative holes)
- Matte black or charcoal glaze
- Iron oxide wash or orange underglaze
- Fine sponge
- Canvas work surface
Step 1: Slab Construction
-
Roll the slabs:
Begin by rolling out your dark clay into an even slab, approximately 1/4 inch thick. Compress the slab on both sides with a rib to prevent warping later. -
Cut the shapes:
Using your paper template, cut out two identical coffin shapes for the floor and the lid. Then, cut long rectangular strips for the walls of the box and the rim of the lid. Ensure the wall strips are tall enough for your desired depth. -
Stiffen the clay:
Let the cut pieces sit until they are leather-hard. This is crucial for maintaining the sharp geometric angles of the coffin shape without sagging. -
Prepare the joins:
Score the edges of the base piece and the bottom edges of your wall strips aggressively. Apply a generous amount of slip to these scored areas. -
Assemble the box walls:
Attach the wall strips to the base. I like to cut the corners at a 45-degree angle (mitered joints) for a cleaner seam, but butt joints work too. Smooth the interior seams with a wooden tool and a small coil of clay for reinforcement.
Step 2: Lid Fabrication
-
Create the lid rim:
Take the second coffin-shaped slab (the lid top) and attach a short strip of clay around its perimeter, angling it slightly inward or straight down depending on your preference. This creates the ‘cap’ look. -
Add the gallery:
To ensure the lid stays on, you need a locking mechanism. Either add a small inner flange to the lid or build a recessed gallery on the top rim of the box base. The image shows a flat placement, so ensure the contact points are perfectly level. -
Refine the edges:
Once assembled, use a damp sponge to smooth any sharp edges on both the box and the lid. The transition from the top plane to the side slope should be distinct but not razor-sharp.
Warped Lid Woes?
If the lid rocks after firing, use grinding paste and water between the lid and box. Rub them together in a circular motion to grind the connection flat.
Step 3: Detailing & Decoration
-
Imprint the texture:
While the clay is still leather-hard, use a small, blunt tool end or a customized stamp to press a row of small indentations along the perimeter of the lid and the base. Spacing them evenly is key for that industrial, riveted look. -
Bisque fire:
Allow the piece to dry slowly under plastic to prevent warping, then bisque fire it according to your clay body’s specifications.
Velvet Lining
Glue deep red or crushed purple velvet to the interior floor after the final firing. It adds a luxurious, vampire-coffin vibe to the finished piece.
Step 4: Glazing & Finishing
-
Wax resist:
Apply wax resist to the contact points where the lid meets the box. This visible unglazed strip (seen as a tan line in the photo) adds a nice earthy contrast. -
Apply base color:
Dip or brush the exterior with a matte charcoal or stony black glaze. If you want the speckled look, choose a glaze with additives or use a clay body with grog that will show through. -
Add the accents:
Using a fine detail brush, dab a small amount of iron oxide wash or bright orange underglaze into each of the indented dots you created earlier. This provides that rusty, aged rivet effect. -
Wipe back:
If the orange spills over the dots, gently wipe the surface with a barely damp sponge, leaving the color only inside the depressions. -
Final fire:
Glaze fire the piece to the appropriate cone temperature (likely Cone 5 or 6). Once cool, sand the unglazed contact rim lightly if it feels rough.
Now you have a brooding, heavy vessel perfect for storing jewelry or mementos that are better left buried.
Bandage-Wrapped Mummy Holder
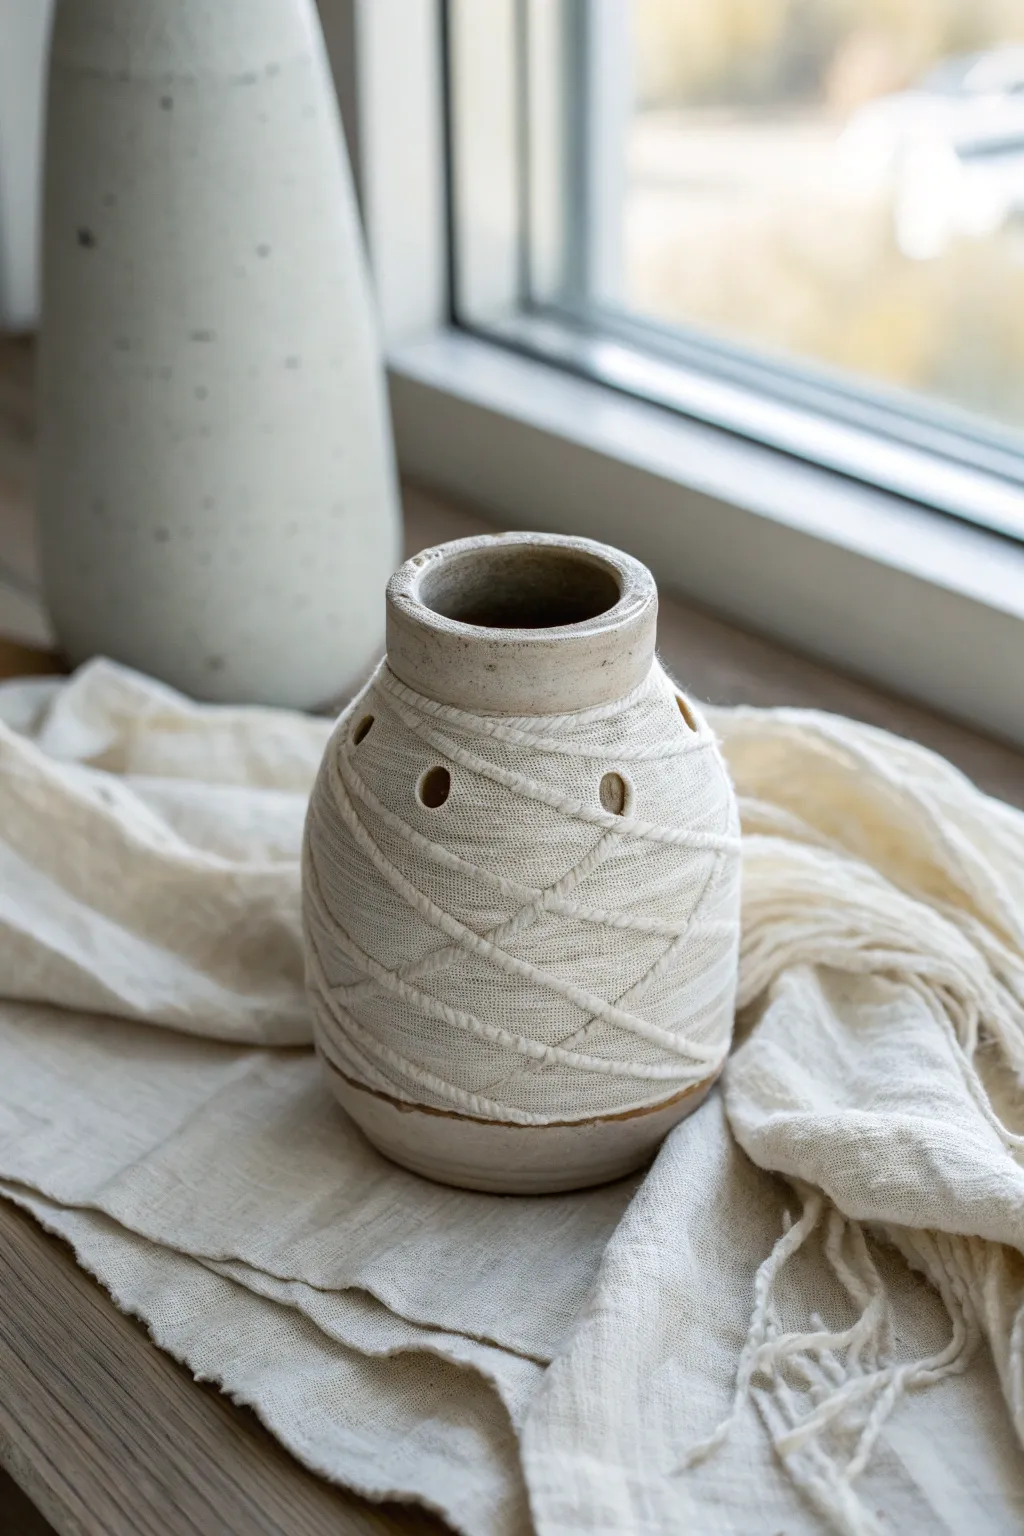
Bring a touch of ancient mystery to your decor with this textured clay vessel that mimics the look of a wrapped mummy. Integrating real fabric strips directly into the clay surface creates a hauntingly beautiful and tactile finish perfect for the spooky season.
How-To Guide
Materials
- Air-dry clay (stone gray or off-white)
- Small glass jar or smooth cylinder (as a mold)
- Cotton gauze or cheesecloth strips
- Rolling pin
- Clay knife or fettling tool
- Sponge
- Water bowl
- Circular clay cutter or straw (approx. 1/4 inch)
- Textured fabric (optional, for subtle underlying texture)
- Clear matte sealant spray
Step 1: Forming the Base Vessel
-
Prepare the workspace:
Begin by covering your work surface with canvas or parchment paper to prevent sticking. Take a large ball of air-dry clay and knead it until it is pliable and smooth. -
Roll the slab:
Roll the clay out into a long rectangular slab, approximately 1/4 inch thick. Aim for a length that is slightly longer than the circumference of your glass jar mold. -
Create the cylinder:
Wrap the clay slab around your glass jar mold. Be sure to place a piece of paper or plastic wrap between the glass and the clay so you can remove the mold later. -
Seal the seam:
Where the two ends of the clay meet, score the edges with a tool and apply a little water (slip). Press them firmly together and smooth the seam with your finger or a rib tool until it vanishes. -
Shape the shoulder:
Gently gently press the clay inward near the top of the jar to taper the form, creating a rounded shoulder that leads up to the neck. -
Form the neck:
Add a thick coil of clay to the top opening or shape the existing slab upward to create a distinct, sturdy rim about 1 inch high. Smooth this connection thoroughly. -
Refine the surface:
Use a damp sponge to wipe down the entire exterior, removing fingerprints and creating a uniform, natural stone-like texture.
Step 2: Adding the Mummy Texture
-
Prepare the fabric strips:
Cut your cotton gauze or cheesecloth into long, thin strips varying between 1/4 inch and 1/2 inch in width. Fray the edges slightly for a rougher look. -
Embed the first layer:
Press a strip of gauze into the wet clay at a diagonal angle. Use your rolling pin or thumb to push the fabric flush with the clay surface so it feels inlaid rather than just sitting on top. -
Wrap and weave:
Continue adding strips, crisscrossing them randomly to mimic bandages. I prefer to leave small gaps between wraps to let the clay body peek through. -
Add thicker cord accents:
Twist a few pieces of gauze into tight cords and press these into the clay in a spiral pattern over the flat strips. This creates the raised ridge detail seen in the reference. -
Secure the fabric:
Dab a small amount of slip or water over the fabric edges if they are lifting, blending the clay slightly over the ends of the strips to lock them in place. -
Create the vents:
Using a small circular cutter or the end of a straw, punch 4-5 holes evenly spaced around the upper shoulder of the vessel. This adds visual interest and allows light to escape if using an LED candle. -
Texturize the rim:
Lightly distress the top rim with a stiff brush or tool to match the weathered aesthetic of the wrapped body.
Ancient Washes
For an aged look, dilute brown acrylic paint with water. Brush it over the dry fabric/clay, then wipe it back immediately with a rag.
Step 3: Finishing Touches
-
Remove the mold:
Once the clay has stiffened slightly (leather hard) but isn’t fully dry, carefully slide the glass jar mold out of the center. -
Clean the interior:
Reach inside and smooth any rough seams or clay burrs at the bottom join to ensure the vessel sits flat. -
Dry completely:
Let the piece air dry for 24-48 hours. Keep it away from direct heat to prevent the clay from cracking as it shrinks. -
Seal the piece:
Coat the entire exterior with a clear matte spray sealant. This protects the embedded fabric from moisture and dust over time.
Loose Bandages?
If fabric strips peel up while drying, brush a mix of 50/50 white glue and water over them to adhere them firmly to the clay body.
Now you have a wonderfully weathered artifact ready to hold your spooky seasonal treasures


What Really Happens Inside the Kiln
Learn how time and temperature work together inside the kiln to transform clay into durable ceramic.
Patchwork Franken-Style Monster Bust

This evocative sculpture reimagines the classic monster as a soulful, patchwork creation stitched together from disparate parts. With its distinctive leather-like textures, faux stitching, and subtle celadon green glazing, this bust makes for a sophisticated and eerie centerpiece.
Step-by-Step Guide
Materials
- White earthenware or stoneware clay (sculpting body)
- Wooden armature stand
- Newspaper or aluminum foil (for bulking)
- Modeling tools (loops, ribs, needle tool)
- Slip and scoring tool
- Rolling pin
- Canvas mat
- Underglazes: Celadon Green, Tan/Beige, Terracotta/Rust
- Iron Oxide wash or Dark Brown transparent stain
- Clear matte or satin glaze
- Small sponges and detail brushes
Step 1: Building the Core Form
-
Prepare the Armature:
Start by securing a lump of clay onto your armature stand to form the base. Crumple newspaper or foil into a vague head-and-shoulders shape and tape it around the armature upright; this reduces weight and clay usage. -
Apply the Base Layer:
Roll out slabs of clay about 1/2 inch thick. Drape these over your foil core, pressing them together firmly to create the basic bust silhouette—head, neck, and upper shoulders. -
Rough Out Facial Features:
Build up the facial structure by adding large pellets of clay for the brow ridge, nose, cheekbones, and chin. Focus on a gaunt, stylized anatomy rather than strict realism. The jaw should be strong, and the nose prominent.
Step 2: Patchwork Sculpting
-
Define the Skull Cap:
Roll out a distinct, thin slab of clay. Cut it into a rounded cap shape and adhere it to the top of the head using slip and scoring. This creates a physical ‘step’ down to the forehead, emphasizing the surgical nature of the character. -
Map the Segmentation:
Using a needle tool, lightly draw the geometric patch lines across the chest, shoulders, and neck. Think of a diamond patterns or a harlequin design. I like to let the clay stiffen slightly before this step so the lines stay crisp. -
Create the Seams:
Along every drawn line and around the skull cap, press a series of small, evenly spaced indentations. These will become the stitch holes. -
Add Tension Wrinkles:
Carve deep, radiating lines around the eyes and corners of the mouth. These aren’t just aging wrinkles; make them look like the ‘skin’ is being pulled tight against the bone structure. -
Sculpt the Stitches:
Roll tiny, thin spaghetti-like coils of clay. Cut them into small segments and press them across the seam lines you created earlier. Use a small tool to flatten the ends slightly so they look like flat leather lacing rather than round thread. -
Refine the Eyes:
Sculpt the eyelids heavy and half-closed to give him a weary, melancholy expression. Deeply recess the pupil area or leave it blank for a statue-like effect.
Stitches Falling Off?
If your tiny stitch coils dry too fast and won’t stick, dip each one in vinegar before placing. The acid breaks down the clay surface slightly, acting as a super-glue for small attachments.
Step 3: Texturing and Firing
-
Leather Texture:
Gently paddle the surface or press a textured fabric (like coarse linen or leather) against the clay patches to remove the smooth ‘clay’ look and add organic imperfection. -
Hollow and Dry:
If you built over a solid core, slice the bust in half (or use the bottom hole) to remove the foil/newspaper once the clay is leather hard. Reattach securely with slip. Let the piece dry completely slowly to avoid cracks. -
Bisque Fire:
Fire the piece to cone 04 (or your clay’s bisque temperature) to prepare it for glazing.
Pro Tip: Varying Texture
Make the ‘skin’ patches differ slightly. Smooth the green face area with a rubber rib, but leave the beige skull cap rougher. This contrast emphasizes that he is made of different parts.
Step 4: Glazing and Finishing
-
Base Colors:
Apply your underglazes in sections. Use the Celadon Green for the face and neck. Use Tan/Beige for the skull cap and shoulder segments. Alternate with the Rust/Terracotta color on the diamond shape on the chest. -
Highlighting the Stitches:
Carefully paint the raised stitch details with a dark brown or oxide wash to make them pop against the lighter skin tones. -
Antiquing Wash:
Apply an Iron Oxide wash or a diluted dark stain over the entire piece, settling into the cracks, wrinkles, and texture. Wipe back the high points with a damp sponge. This creates that ‘dirty,’ aged look. -
Final Glaze and Fire:
Brush on a thin layer of clear matte or satin glaze to seal the surface without making it too glossy. Fire to the final temperature required by your clay and glaze body.
Place your finished bust in soft lighting to let the shadows play across those textured scars and stitches.
Eyeball Charms and Pendants
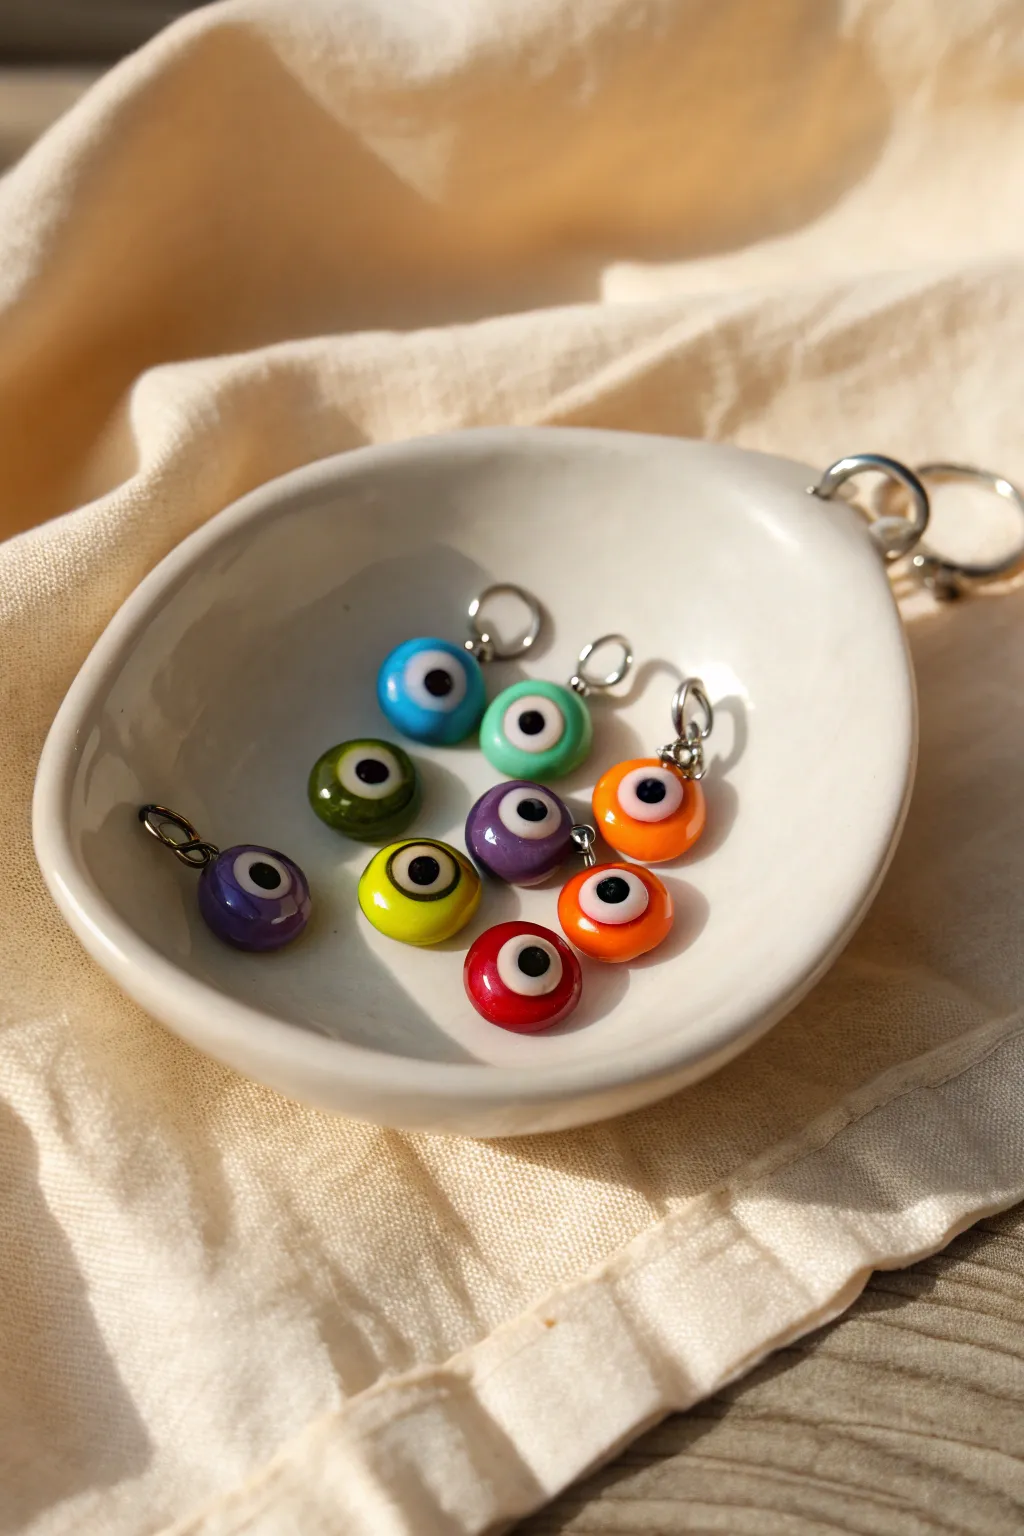
These miniature charms offer a playful yet slightly unnerving take on the classic evil eye talisman, perfect for jewelry or keychains. Their slick, high-gloss finish makes them look almost like hard candy, hiding the simple clay layering technique beneath.
Step-by-Step
Materials
- Polymer clay in various colors (blue, red, green, purple, yellow, orange)
- White polymer clay
- Black polymer clay
- Liquid polymer clay (translucent)
- UV resin or high-gloss polymer clay glaze
- Small eye pins or screw eyes
- Jump rings
- Needle tool or toothpick
- Small round cutter (approx. 1cm) or straw
- Even smaller round cutter (or piping tip)
- Baking sheet and parchment paper
- Oven
Step 1: Forming the Base
-
Condition the Clay:
Begin by kneading your chosen base colors (blue, red, green, etc.) until they are soft and pliable. Do the same for the white and black clay to ensure smooth blending later. -
Create the Eyeball Spheres:
Roll small balls of your colored clay, roughly the size of a pea or a large blueberry. Try to keep them consistent in size if you are making a matching set. -
Flatten the Base:
Gently press each colored ball down onto your work surface to create a flattened disc shape rather than a perfect sphere. This ‘button’ shape helps them sit flat as pendants. -
Insert the Findings:
While the clay is still raw, carefully insert a small metal eye pin into the top edge of each disc. I find using a dab of liquid clay on the screw threads helps secure it permanently during baking.
Step 2: Layering the Iris
-
Prepare the Sclera (White Part):
Roll out a thin sheet of white polymer clay. Using a small round cutter or the end of a drinking straw, punch out small circles. -
Attach the White Layer:
Place one white circle into the center of each colored base disc. Press it down gently with your thumb so it adheres fully without distorting the round shape too much. -
Create the Pupil:
Roll out a very thin sheet of black clay. Use an even smaller cutter, like the tip of a piping bag or a small straw, to cut out tiny black dots. -
Center the Pupil:
Position the black dot directly in the center of the white circle. This creates the classic ‘staring’ eye look. -
Smoothing the Levels:
To make the eye look like one cohesive unit rather than stacked stickers, gently roll the handle of a paintbrush or a smooth acrylic roller over the surface to press the layers flush with each other.
Clean Edges Pro Tip
Wear latex gloves while flattening the clay to avoid fingerprints, or lightly dust your fingertips with cornstarch for a perfect, smudge-free matte surface.
Step 3: Baking and Finishing
-
Bake the Charms:
Arranged your unfinished charms on a parchment-lined baking sheet. Follow the temperature and time instructions on your specific brand of polymer clay packaging. -
Cool Down:
Once baked, turn off the oven and let the charms cool completely before handling them. They are fragile while warm. -
Prepare the Resin:
For that wet, glossy look seen in the photo, set up a workspace with UV resin or a high-gloss polyurethane varnish. -
Apply the Domed Finish:
Carefully drip a small amount of resin onto the center of the charm. Use a toothpick to guide the liquid to the edges without letting it spill over the sides. -
Curing:
Place under a UV lamp to cure (or let air dry if using varnish). The resin creates a magnifying dome effect that enhances the layers beneath. -
Add Hardware:
Using pliers, open a jump ring and thread it through the eye pin you baked into the clay earlier. -
Final Assembly:
Close the jump ring securely. Your charms are now ready to be threaded onto a necklace, bracelet, or keychain.
Level Up: Glow Eyes
Swap the white clay for glow-in-the-dark polymer clay. In daylight, it looks standard, but in the dark, the eye will glowing an eerie green.
Now you have a handful of watchful eyes ready to be turned into spooky-season jewelry

TRACK YOUR CERAMIC JOURNEY
Capture glaze tests, firing details, and creative progress—all in one simple printable. Make your projects easier to repeat and improve.
Creepy Crawly Bug Magnets
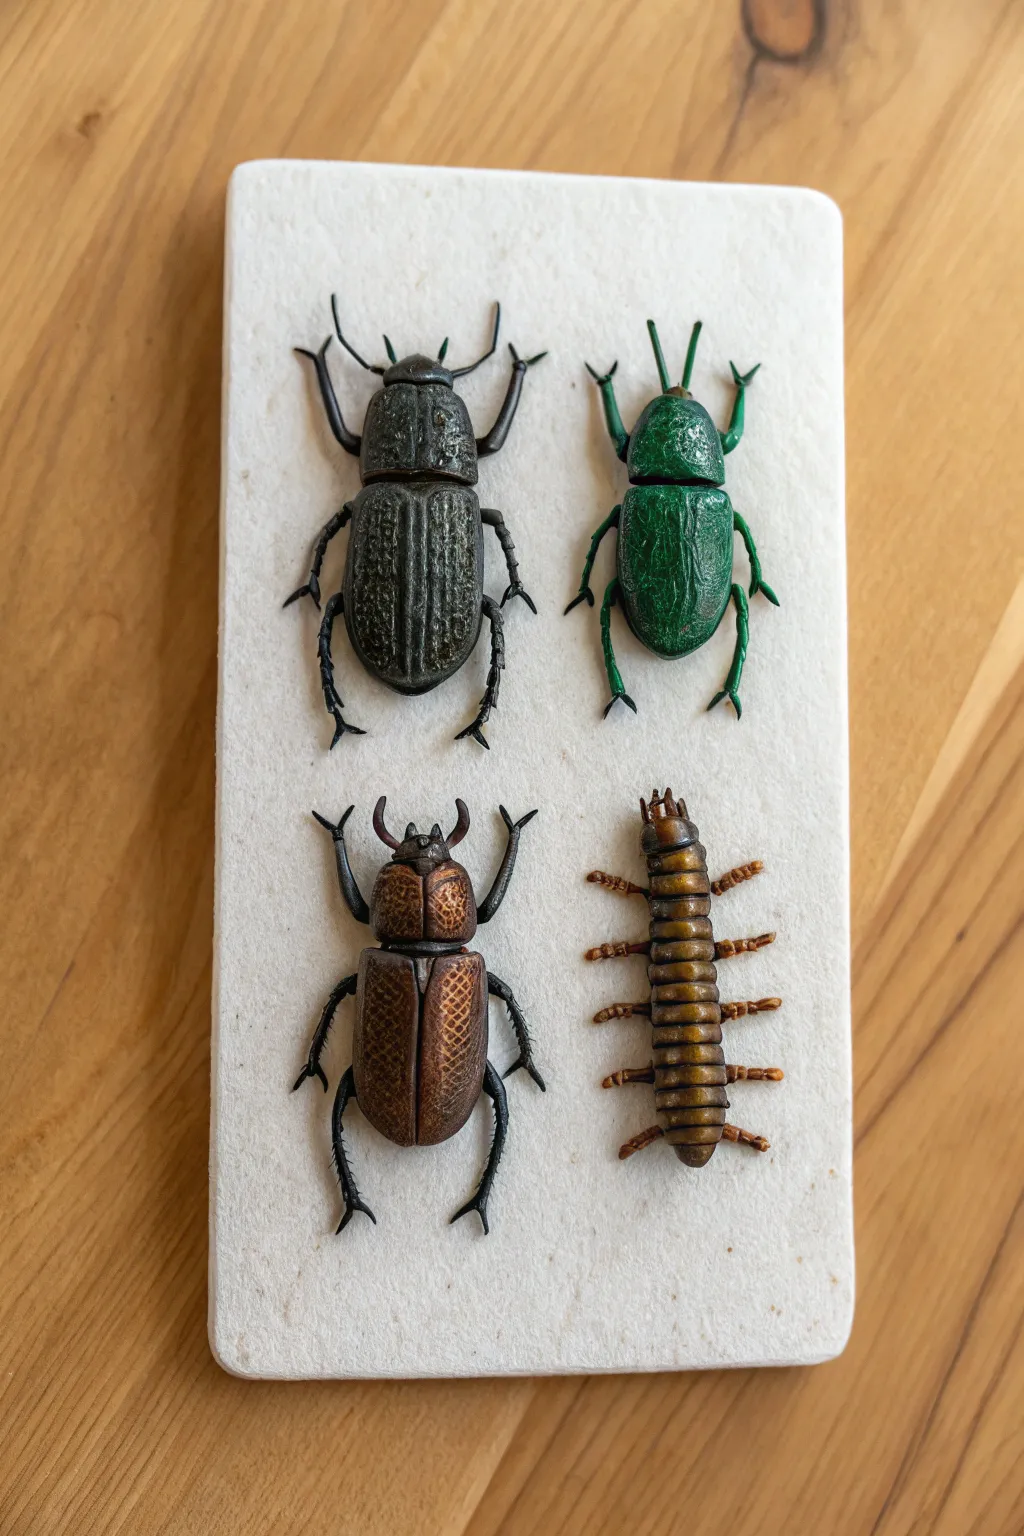
Transform simple polymer clay into a collection of strikingly realistic insect specimens for your fridge or metal board. These creepy crawlies feature metallic finishes and fine textures that make them look like tiny, preserved treasures.
Step-by-Step Tutorial
Materials
- Polymer clay (black, brown, and translucent)
- Small disk magnets (4-8 count)
- Metallic mica powders (copper, emerald green, gunmetal/silver)
- Sculpting tools (needle tool, small ball stylus)
- Soft paintbrush for powder application
- Liquid polymer clay (or strong craft glue)
- Glossy polyurethane varnish (optional)
- White rectangular clay slab or store-bought stone tile for display (optional)
- Wire cutters
- Thin crafting wire (black) for legs and antennae
Step 1: Sculpting the Centipede Body
-
Form the segments:
Start with a small amount of brown polymer clay. Roll about 10-12 tiny, pea-sized balls, making them progressively smaller towards one end to create a tapered effect. -
Assemble the larva:
Press the balls gently together in a line to form a segmented worm shape. Use your thumb to flatten the bottom slightly so it will sit flush against the magnet later. -
Add texture:
Take a needle tool and press a small indentation across the center of each segment to mimic the armored plating of a larva or centipede. Pinch the head segment slightly to differentiate it. -
Create the legs:
Roll very thin snakes of clay for the many legs. Cut them into short sections and attach a pair to the underside of each segment, pressing them gently into the main body.
Wire Trick
Use a dab of liquid polymer clay on the tips of the wire legs before inserting them. This bonds the metal to the clay during baking so legs don’t fall out.
Step 2: Shaping the Beetles
-
Base forms:
For the beetles, start with a marble-sized ball of black clay for the abdomen and a smaller ball for the thorax (upper body). Flatten the larger ball into an oval and the smaller one into a rounded crescent shape. -
Connect the parts:
Press the thorax firmly against the top of the abdomen. For the head, add a tiny flattened sphere at the very top. -
Detailing the wings:
Use a needle tool or a craft knife to score a line straight down the center of the abdomen to create the split elytra (wing cases). I like to gently round the edges of this cut to make the shells look distinct. -
Texturing:
For the dark textured beetle, use a needle tool to press vertical rows of tiny dots or lines down the wing cases. leave the green beetle’s shell mostly smooth but slightly pitted for a different species look. -
Adding legs and antennae:
Cut thin black craft wire into small jointed segments. Carefully insert three legs on each side of the body and two antennae into the head. Bending them at sharp angles adds realism.
Step 3: Metallic Finishes
-
Choosing colors:
Select your mica powders. Use gunmetal for the textured beetle, emerald green for the smooth one, and a copper/bronze mix for the third beetle and the centipede. -
Application:
Dip a soft, dry paintbrush into the mica powder. Gently brush the powder over the raw clay. The clay’s natural tackiness will grab the pigment. -
Highlighting:
Rub the powder harder on the raised areas (like the center of the centipede segments) to make them shine, while leaving the deep crevices darker for contrast.
Presentation
Create a ‘specimen board’ by rolling out a rectangle of white granite-effect clay. Bake it, then attach a magnet to the back and stick your bugs to the front.
Step 4: Baking and Assembly
-
Embedding magnets:
Before baking, flip your insects over. Press a small magnet firmly into the underside of each bug to create a recess. Remove the magnet before baking so it doesn’t lose strength in the heat. -
Baking:
Place your bugs on a baking sheet lined with parchment paper. Bake according to your polymer clay package instructions (usually 275°F/135°C for 15-30 minutes). -
Cooling:
Allow the pieces to cool completely. The clay will harden as it returns to room temperature. -
Attaching magnets:
Place a drop of super glue or strong adhesive into the recesses you created earlier. Press the magnets back into place and hold for a few seconds. -
Optional glaze:
If you want a ‘wet’ or extra shiny look, brush a coat of gloss polyurethane varnish over the bug shells. This also helps seal the mica powder.
Arranging your new collection on the fridge creates a miniature museum display right in your kitchen
Haunted House Tealight Shrine
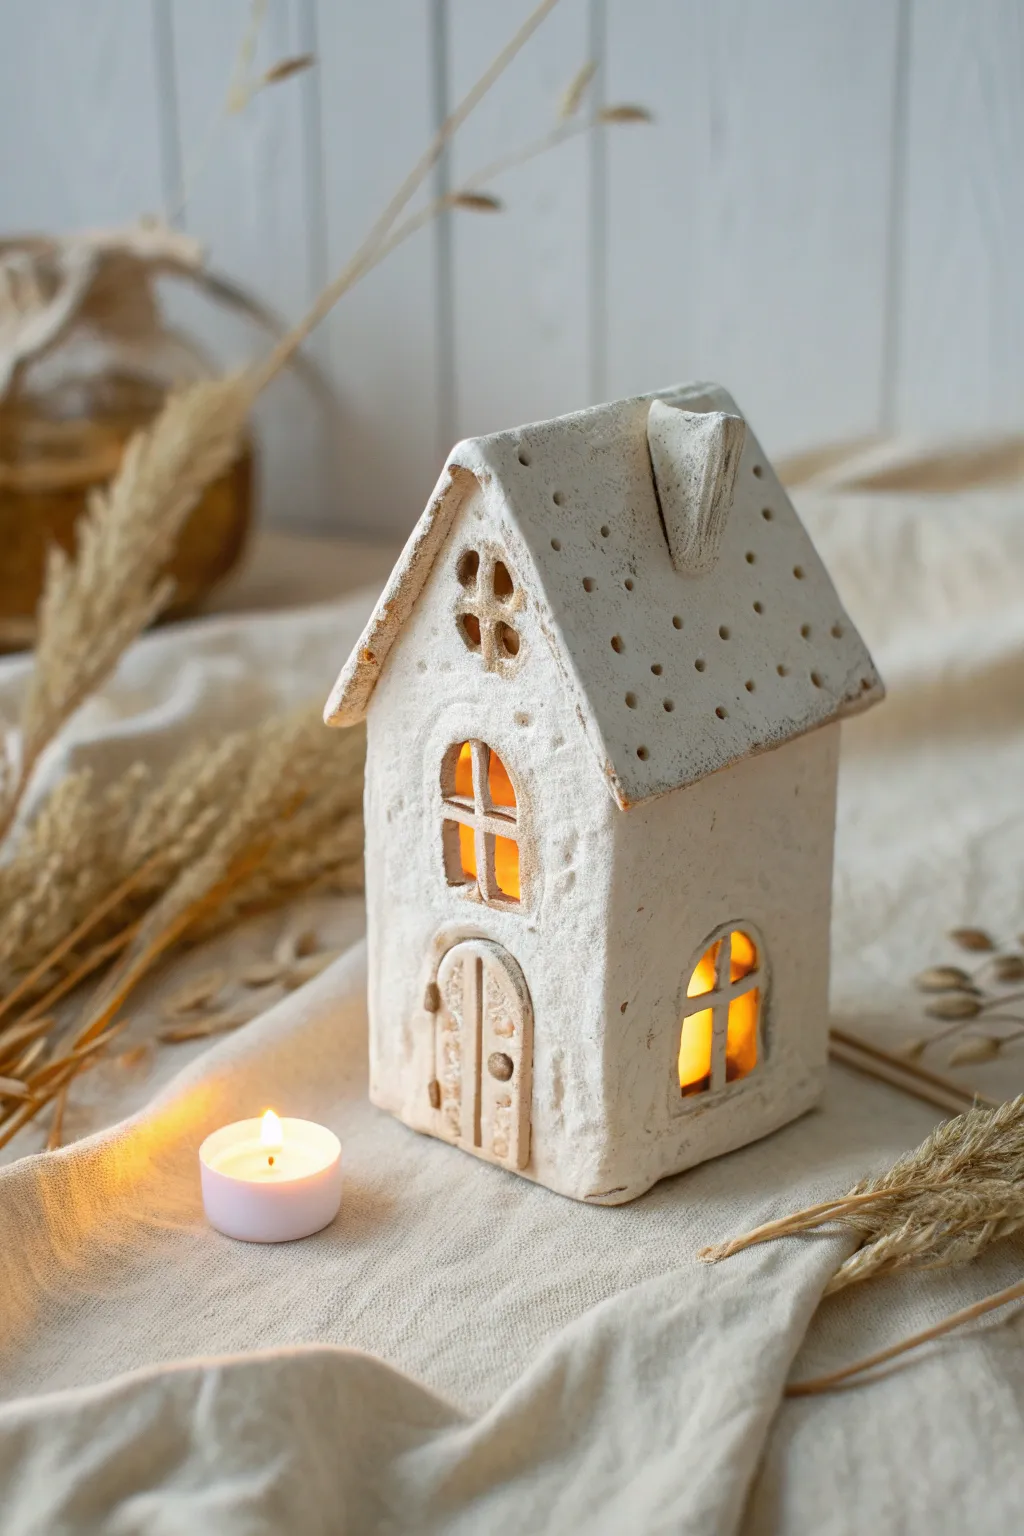
This rustic, textured clay house serves as a charming haunted shrine when illuminated from within by a flickering tealight. Its rough-hewn walls, cut-out windows, and dotted roof create a cozy yet slightly eerie atmosphere perfect for subtle spooky decor.
Step-by-Step
Materials
- Air-dry clay (white or light grey)
- Rolling pin
- Craft knife or scalpel
- Texturing tools (sponge, crumpled foil, or toothbrush)
- Small wooden skewer or toothpick
- Ruler
- Slip (clay mixed with water)
- Sandpaper (fine grit)
- White acrylic paint (matte)
- Brown antique wax or watered-down brown acrylic paint
- Battery-operated tealight
Step 1: Planning and Cutting
-
Prepare the Clay:
Begin by conditioning your air-dry clay, kneading it until it is soft and pliable. Roll it out into a slab that is approximately 1/4 inch thick, ensuring an even surface. -
Measure the Walls:
Using a ruler, cut two rectangles for the side walls (about 3 inches wide by 4 inches tall) and two pentagon shapes for the front and back facades (3 inches wide, rising to a peak at 6 inches tall). -
Create Texture:
Before assembling, press a crumpled ball of foil or a coarse sponge gently into the surface of all cut pieces. This gives the house that weathered, stucco-like appearance seen in the photo. -
Cut the Openings:
On the front panel, carefully cut out an arched doorway and a four-pane window above it. I find it easiest to cut the main opening first, then add the crossbars later, but cutting the negative space around a cross shape works best for stability. -
Side Windows:
Cut arched windows on the side panels. Keep them relatively low so the candlelight shines through effectively. -
Roof Panels:
Cut two rectangular slabs for the roof. They should be slightly wider than the house to allow for an overhang and long enough to meet at the peak.
Step 2: Assembly and Details
-
Score and Slip:
Score (scratch) the edges of the walls where they will join. Apply a generous amount of slip to these rough edges to act as glue. -
Construct the Base:
Stand the walls up and press the scored edges together. Use a small tool or your finger to smooth the seams on the inside and outside, blending the clay so the joints disappear. -
Add the Roof:
Score the top peaks of the house and the undersides of the roof panels. Press the roof pieces into place, ensuring they meet at the top ridge. -
Create the Chimney:
Fashion a small, angled chimney from a scrap of clay. Score and attach it to one side of the roof slope. -
Detail the Roof:
Use a toothpick or skewer to poke small, random holes all over the roof surface. These mimic tiles or wormwood and allow extra specks of light to escape. -
Door details:
Make a separate slab for the door that fits inside the archway. Lightly carve a vertical line down the middle for planks and add tiny clay balls for doorknobs and hinges.
Sturdy Structure
If your walls are sagging during assembly, prop them up with crumpled paper towels or small cardboard boxes inside the house until the clay stiffens.
Step 3: Finishing Touches
-
Drying Time:
Allow the house to dry completely. This usually takes 24-48 hours depending on humidity; turn it occasionally to ensure airflow. -
Refining Edges:
Once bone dry, lightly sand any sharp or uneven edges, but leave the main surface texture rough. -
Base Coat:
Paint the entire house, inside and out, with matte white acrylic paint. You may need two coats for full coverage. -
Antiquing:
To get that aged look, brush on a brown antique wax or very diluted brown paint. Wipe it off almost immediately with a paper towel, leaving the dark color trapped only in the textures and holes. -
Final Illumination:
Place a battery-operated tealight inside to bring your haunted shrine to life.
Mossy Makeover
Dab bits of dried moss or lichen onto the roof and corners with clear glue to make the cottage look like an abandoned ruin in the woods.
Watching the warm glow flicker through the tiny windows brings a magical feeling to any dark corner of your room
Bat Wing Wall Hanging
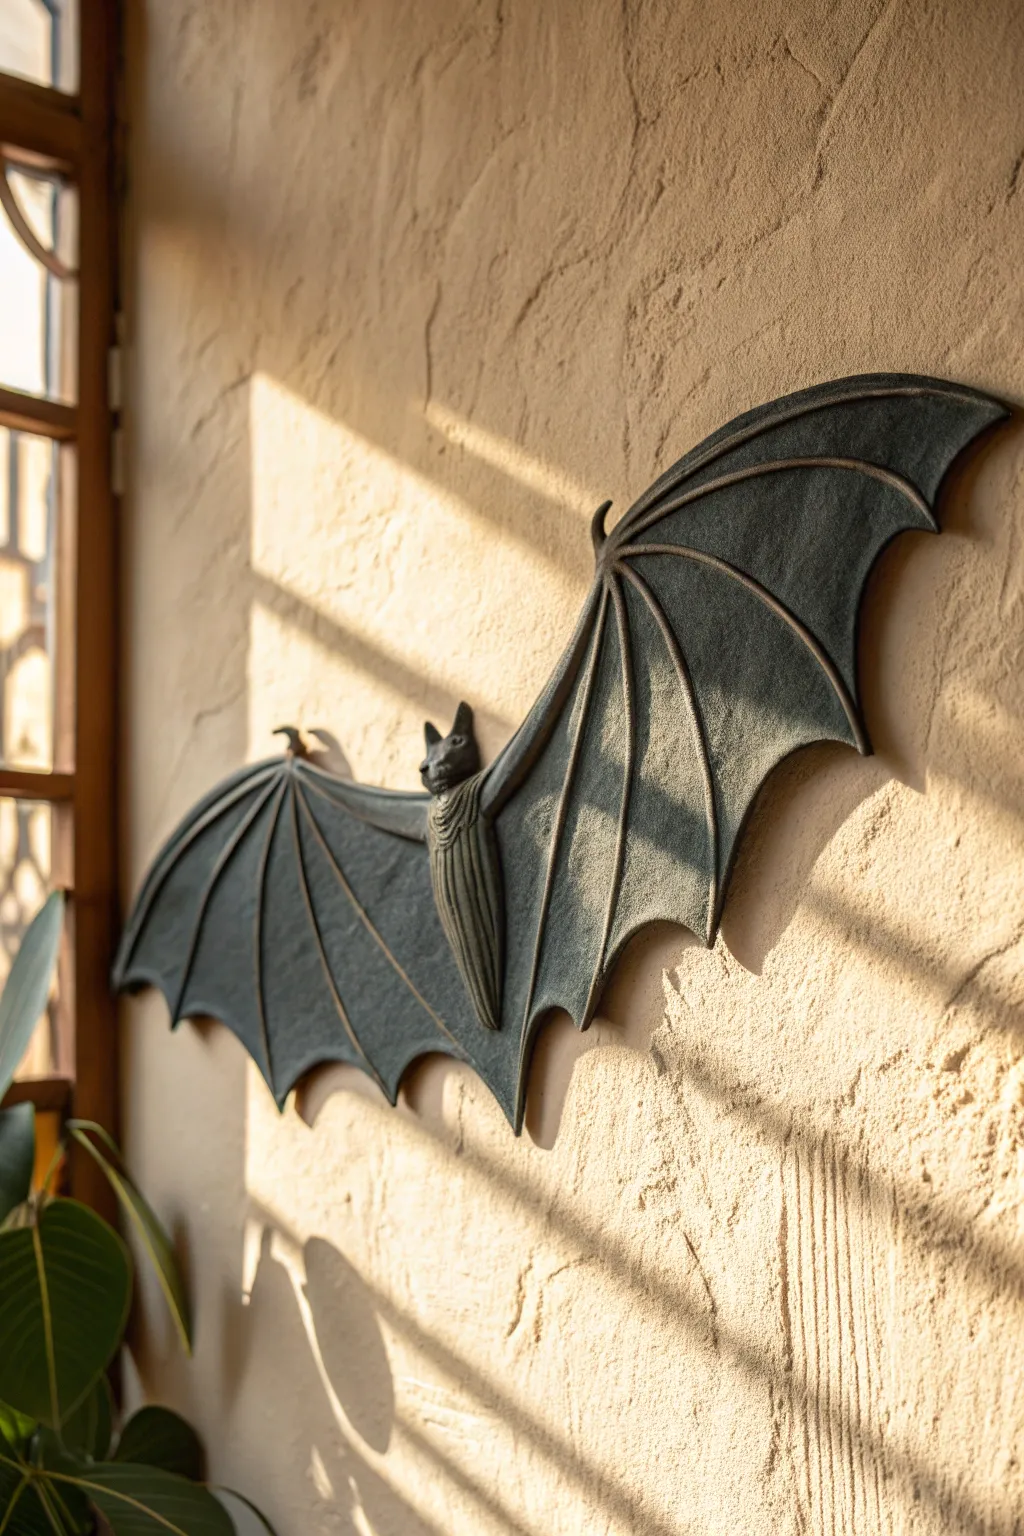
Embrace the gothic elegance of the night with this striking bat wall sculpture that mimics the look of heavy cast iron. This project uses clay to capture intricate wing webbing and a stoic expression, creating a dramatic focal point that plays beautifully with natural light.
Step-by-Step Guide
Materials
- High-quality air-dry clay (black or grey preferred)
- Large rolling pin
- Cardboard or cardstock (for template)
- Craft knife or scalpel
- Sculpting tools (needle tool, ball stylus, rubber shaper)
- Aluminum foil
- Armature wire (2mm gauge)
- Black acrylic paint
- Metallic bronze or iron rubbing wax/paste
- Matte spray varnish
- Strong mounting adhesive or integrated wire loop
- Sandpaper (fine grit)
Step 1: Preparation and Template
-
Draft your design:
Sketch a bat silhouette on a large piece of cardstock. Focus on a wide wingspan—about 18-24 inches looks impressive—with distinct scalloped edges on the wings. -
Cut the template:
Carefully cut out your paper bat shape. This will serve as your guide to ensure symmetry, which is crucial for the finished look. -
Build the armature:
Twist armature wire to follow the top ridge of the wings and the central body area. This internal skeleton prevents the long wings from drooping. -
Bulk the body:
Crumple a small amount of aluminum foil into an elongated oval for the body and a smaller round shape for the head. Secure this to the center of your wire frame.
Step 2: Sculpting the Form
-
Roll the clay base:
Roll out a slab of clay approximately 1/4 inch thick. Make sure it’s wide enough to accommodate your entire template. -
Trace and cut:
Place your template on the clay slab and trace around it with a needle tool, then cut away the excess clay with your craft knife. -
Embed the armature:
Press your wire and foil armature gently into the back of the clay cutout. Add strips of fresh clay over the wire to sandwich it securely, smoothing the seams so they disappear. -
Shape the body:
Add a layer of clay over the foil body core. Sculpt vertical grooves into the chest area to mimic the texture of bat fur or folded skin. -
Detail the head:
Shape pointed ears and a small snout. I find using a rubber sculpting tool helps blend the neck seamlessly into the shoulders.
Fixing Wing Warps
If wings curl up while drying, dampen the concave side slightly with a sponge and place a weighted board on top overnight to flatten it back out.
Step 3: Structuring the Wings
-
Define the bones:
Roll thin snakes of clay to act as the ‘finger’ bones of the wings. Lay them radiating from the shoulders down to the points of the scalloped bottom edge. -
Blend the boning:
Use a modeling tool to blend the edges of these clay snakes into the main wing slab, leaving a raised ridge in the center to simulate the skeletal structure. -
Texture the membrane:
Between the wing bones, use a damp sponge or a texture tool to create a slightly leathery surface, rather than leaving it perfectly smooth. -
Refine edges:
Smooth the outer edges of the wings with a little water on your finger to remove any sharp cut marks. -
Add hanging mechanism:
If you aren’t using adhesive later, embed a strong wire loop into the back of the heavy central body section now. -
Slow drying:
Let the piece dry flat on a board. To prevent warping, place a light weight (like a book on parchment paper) on the wingtips or flip the piece carefully once a day. Allow 48-72 hours for full drying.
Texturing Tip
Press a piece of crumpled plastic wrap or coarse sandpaper into the wet clay of the wing membranes to instantly create realistic, leathery skin texture.
Step 4: Finishing Effects
-
Sand imperfections:
Once fully cured, gently sand any rough rough spots or fingerprints, particularly around the head and wing tips. -
Base coat:
Paint the entire sculpture with a solid coat of matte black acrylic paint. Ensure you get into every groove and texture. -
Metallizing:
Using your finger or a dry cloth, lightly buff a metallic bronze or iron wax over the raised areas—the wing bones, ears, and chest ridges. -
Enhancing depth:
The wax catches the high points while leaving the recesses black, creating that heavy, cast-metal illusion instantly. -
Seal:
Spray the finished piece with a matte varnish to protect the paint job and strengthen the clay surface against humidity.
Hang your new gothic guardian in a spot where the late afternoon sun casts long shadows across the wall
Potion Bottles With Drippy “Wax” Tops
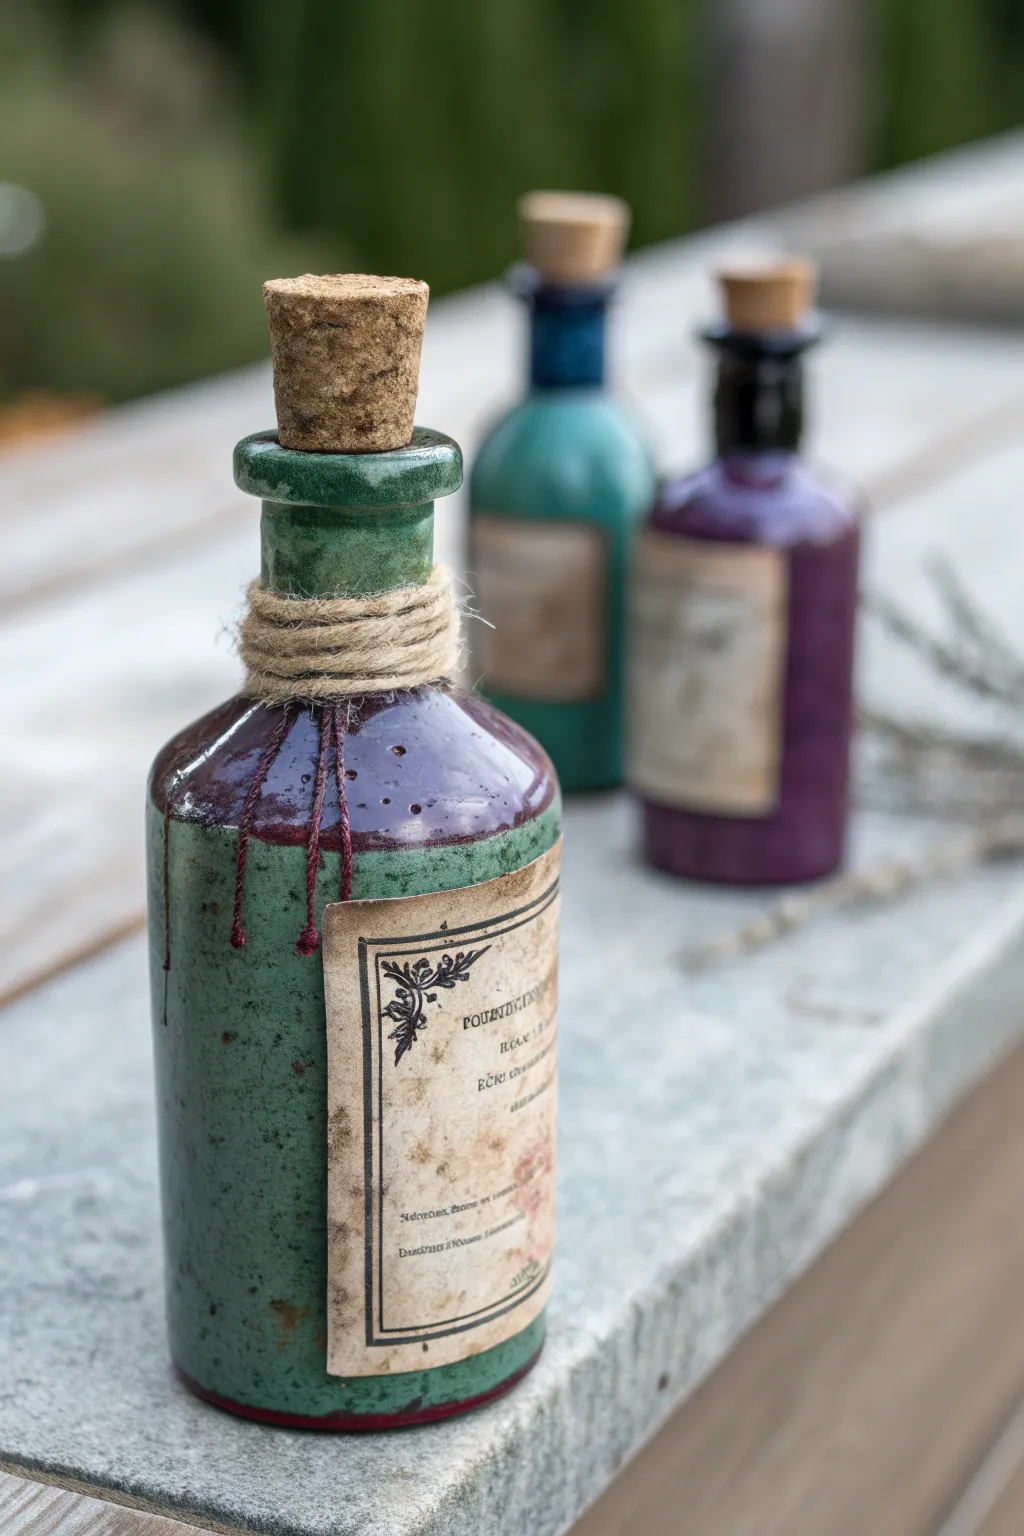
Transform plain glass bottles into ancient, mystical vessels that look like hand-thrown pottery using polymer clay and clever painting techniques. This project creates a wonderfully textured, age-worn finish complete with drippy wax seals and vintage apothecaries labels.
Detailed Instructions
Materials
- Glass bottle (recycled soy sauce or hot sauce bottles work well)
- Polymer clay (white or beige)
- Liquid polymer clay (optional, for smoother adhesion)
- Rolling pin or pasta machine
- Craft knife
- Jute twine
- Acrylic paints (Dark Green, Deep Purple, Burnt Umber, Black)
- Paintbrushes (flat brush and a textural sponge)
- Gloss varnish or resin (for the ‘wet’ drip look)
- Matte varnish (for the bottle body)
- Printed vintage label on regular paper
- Tea or coffee (for aging the label)
- PVA glue or Mod Podge
- Cork stopper to fit bottle size
Step 1: Clay Base & Drip Texture
-
Prepare the bottle:
Clean your chosen glass bottle thoroughly with alcohol to remove oils. If you have liquid polymer clay, brush a very thin layer over the glass to help the solid clay stick better. -
Sheet the clay:
Condition your polymer clay and roll it out into a seamless sheet about 1/8 inch thick. It needs to be large enough to wrap around the entire body of the bottle. -
Wrap the bottle:
Carefully wrap the clay sheet around the bottle. Trim the excess with a craft knife and pinch the seams together. Smoothen the seam with your finger or a clay tool until it disappears. -
Sculpt the neck:
Wrap clay up the neck of the bottle. Create a slightly thickened rim at the very top to mimic the lip of hand-thrown pottery. -
Add the drip effect:
Roll very thin snakes of clay and press them vertically onto the shoulder of the bottle. Blend the tops of these snakes into the clay body so they look like glaze or wax dripping down naturally. -
Texturize the surface:
Use a toothbrush or a crumpled ball of aluminum foil to gently tap texture into the entire clay surface. This gives it a stone-like or fired ceramic appearance rather than smooth plastic. -
Bake carefully:
Bake the bottle according to your clay manufacturer’s instructions (usually 275°F/135°C for 15-30 minutes). Let it cool completely in the oven to prevent the glass from cracking due to thermal shock.
Air Bubbles?
If you see bubbles trapped under the clay before baking, pierce them with a needle tool and smooth the air out to prevent cracking.
Step 2: Refining & Painting
-
Base coat:
Apply a coat of dark green acrylic paint over the main body of the bottle. Don’t worry about perfect coverage; a little patchiness adds to the aged look. -
Contrast color:
Paint the top section—where the faux drips are—with a deep purple. Allow the purple to overlap slightly onto the green to mimic a heavy glaze application. -
Add speckling:
Mix a small amount of black or dark brown paint with water. Dip a toothbrush in it and flick the bristles to splatter tiny specks across the entire surface. This creates a realistic ceramic glaze effect. -
Apply finishes:
Once dry, coat the main green body with a matte varnish. For the purple ‘drip’ section, use a high-gloss varnish or a thin layer of UV resin to make it look permanently wet and glassy.
Step 3: Labeling & Final Touches
-
Age the label:
Print your vintage design. Tear the edges instead of cutting them for a worn look. Dab the paper with wet tea or coffee and let it dry to brown the paper. -
Attach the label:
Use PVA glue or Mod Podge to adhere the label to the bottle. Gently press it into the texture of the clay. -
Grunge the corners:
Here I prefer to dab a tiny bit of Burnt Umber paint on my finger and smudge it over the edges of the label and the bottle neck to simulate grime and age. -
Wrap the twine:
Cut a length of jute twine. Apply a small dot of glue to the bottle neck and wrap the twine tightly around it several times. -
Insert cork:
Place your cork stopper into the opening. If it’s too clean, you can stain the top of the cork with the same tea or coffee mixture used on the label.
Level Up: Wax Seal
Melt real sealing wax or a crayon over the twine and cork area, letting it drip down the neck for extra authenticity.
Now you have a mysterious vessel ready for your Halloween display or alchemist’s shelf
Teethy Succulent Planter
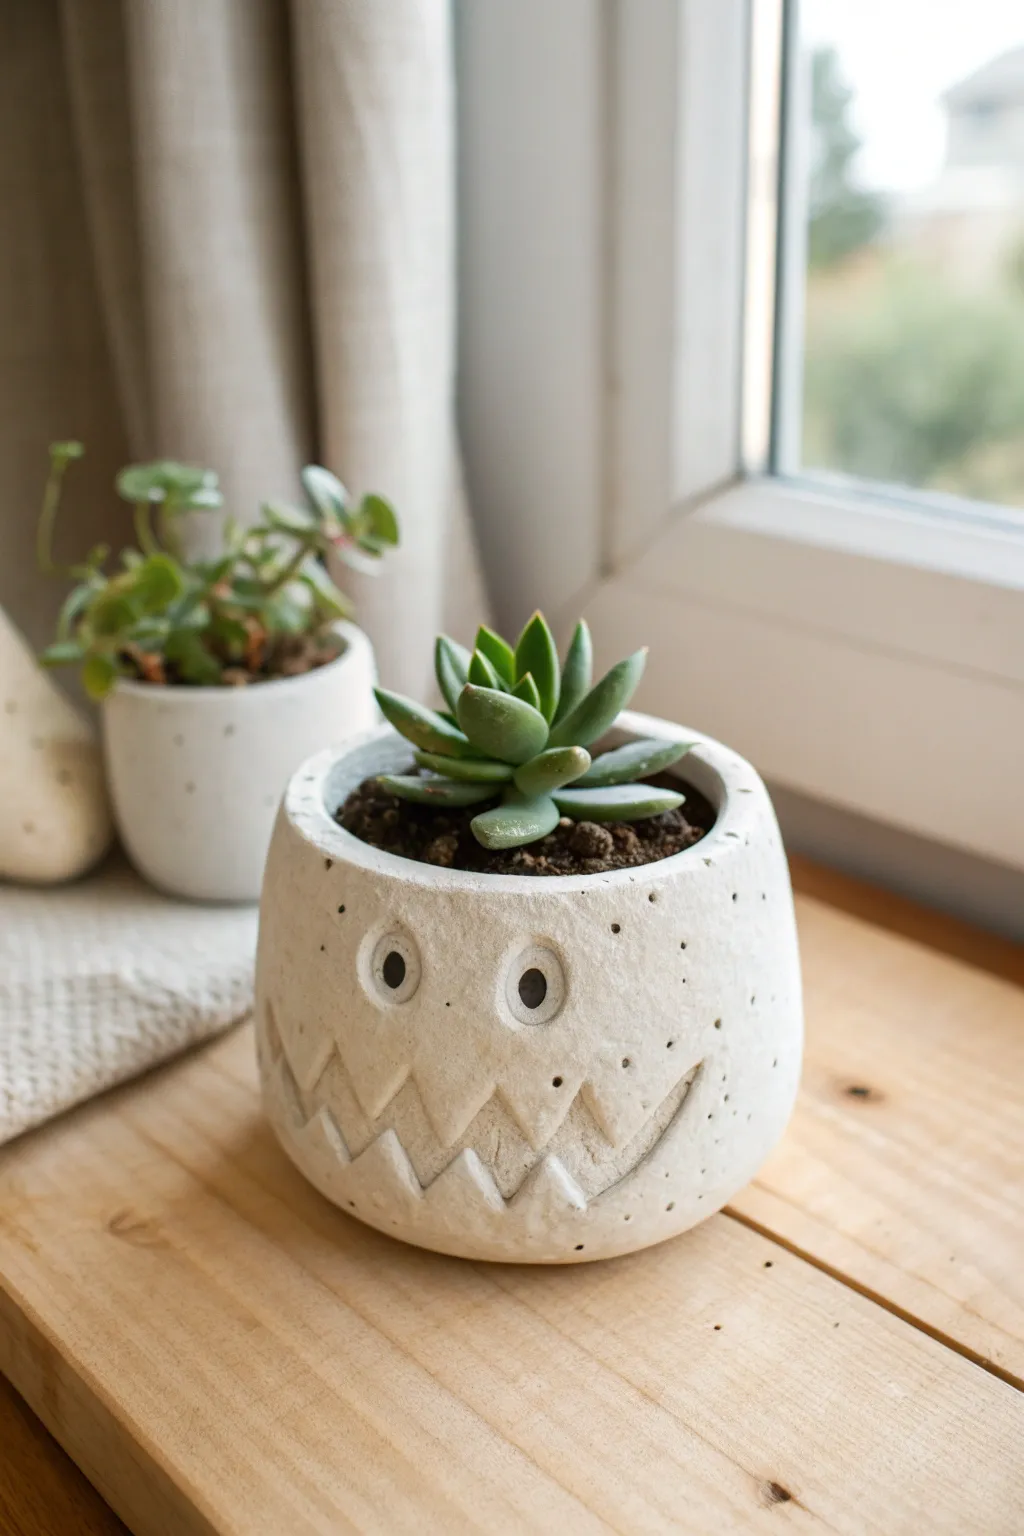
Give your houseplants a playful bite with this charmingly spooky monster planter. Featuring a toothy grin carved directly into white clay and dotted with tiny pinprick textures, this little character adds personality to any windowsill garden.
How-To Guide
Materials
- Air-dry clay (white) or polymer clay
- Rolling pin
- Clay carving tools (needle tool, small loop tool)
- Small circle cutter or straw
- Black acrylic paint
- Clear matte sealant or varnish
- Fine-grit sandpaper
- Water and sponge (for smoothing)
- Small succulent plant and soil
- Small paintbrush
Step 1: Shaping the Base
-
Prepare the Clay:
Start by conditioning your clay with your hands until it is pliable and smooth. Roll it into a large ball, roughly the size of a grapefruit, ensuring there are no major cracks. -
Form the Pinch Pot:
Insert your thumb into the center of the ball and gently pinch the clay between your thumb and fingers, rotating as you go. Work your way up the sides to create an even, cup-like shape. -
Refine the Wall Thickness:
Continue pinching until the walls are about a quarter-inch thick. You want the pot to be sturdy but not overly heavy. Keep the bottom slightly thicker for stability. -
Flatten the Bottom:
Gently tap the base of your pinch pot against your work surface to create a flat bottom so it sits securely without wobble. -
Smooth the Rim:
Use a damp sponge or your finger dipped in water to smooth out the top rim. I like to keep the rim slightly rounded rather than sharp for a softer, organic look.
Cracks Appearing?
If small cracks form while drying, mix a tiny bit of clay with water to make a paste (slip) and fill them in. Smooth repeatedly with a damp finger.
Step 2: Carving the Face
-
Outline the Smile:
Using a needle tool, lightly sketch a wide, U-shaped smile onto the front of the pot. Don’t cut deep yet; just make a guideline for where the mouth will go. -
Draft the Teeth:
sketch a zigzag line inside your U-shape to distinguish the top teeth from the bottom teeth. Draw sharp triangular peaks for that monster look. -
Carve the Relief:
Using a small loop tool, carefully carve away a shallow layer of clay from the teeth area, or recess the line between the lips and teeth to make the mouth pop. -
Define the Teeth:
Go back in with your needle tool and deepen the zig-zag line between the upper and lower teeth. You want a deep groove here to separate them clearly. -
Add Eye Sockets:
Press two small indentations above the mouth for the eyes using your thumb or a ball tool. They should be relatively wide-set. -
Create Pupils:
inside each eye indentation, use a small circle cutter or a straw to press a distinct ring. Then, use a small tool to excavate a tiny hole in the very center for the pupil.
Pro Tip: Drainage
Since this is for a live plant, poke a hole in the bottom center before drying. If you forget, use a Nursery pot liner instead of planting directly!
Step 3: Texturing and Finishing
-
Add Surface Texture:
Take your needle tool and gently poke random, shallow holes all over the exterior of the pot. This stippling effect gives the ‘skin’ a porous, stone-like texture. -
Smooth Imperfections:
Do a final pass with a slightly damp sponge to soften any sharp carving ridges, blending the texture so it looks worn rather than freshly cut. -
Dry the Pot:
Allow the clay to dry completely according to the package instructions. If using air-dry clay, this usually takes 24-48 hours. Turn it occasionally to ensure even drying. -
Sand for Smoothness:
Once bone dry, use fine-grit sandpaper to gently smooth the rim and any rough patches on the bottom, being careful not to sand away your stippled texture. -
Paint the Details:
Dip a fine-tip paintbrush into black acrylic paint. Carefully fill in the pupils of the eyes to make them stare, and if desired, darken the deep groove between the teeth slightly for contrast. -
Seal the Project:
Apply a coat of clear matte varnish or sealant to the entire pot inside and out. This creates a barrier against moisture, which is crucial for planters. -
Plant Your Succulent:
Once the sealant is fully cured, fill the pot with succulent soil and nestle your small plant inside. Brush off any stray dirt from the white rim.
Place your little monster in a sunny spot and enjoy its quirky smile every day
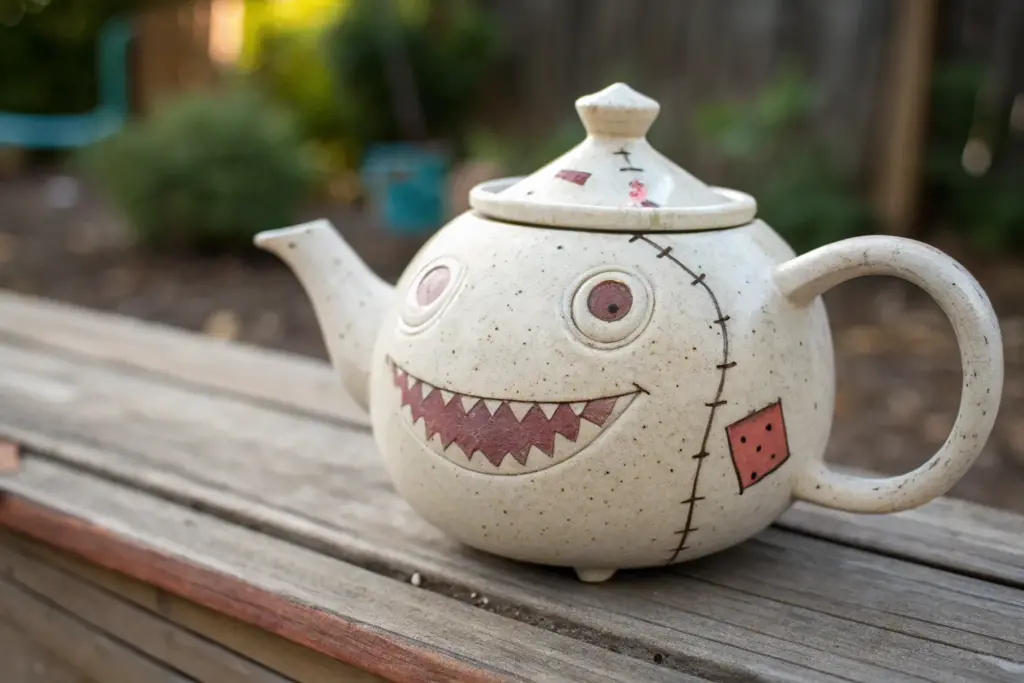
Stitched Teapot With a Hidden Mouth
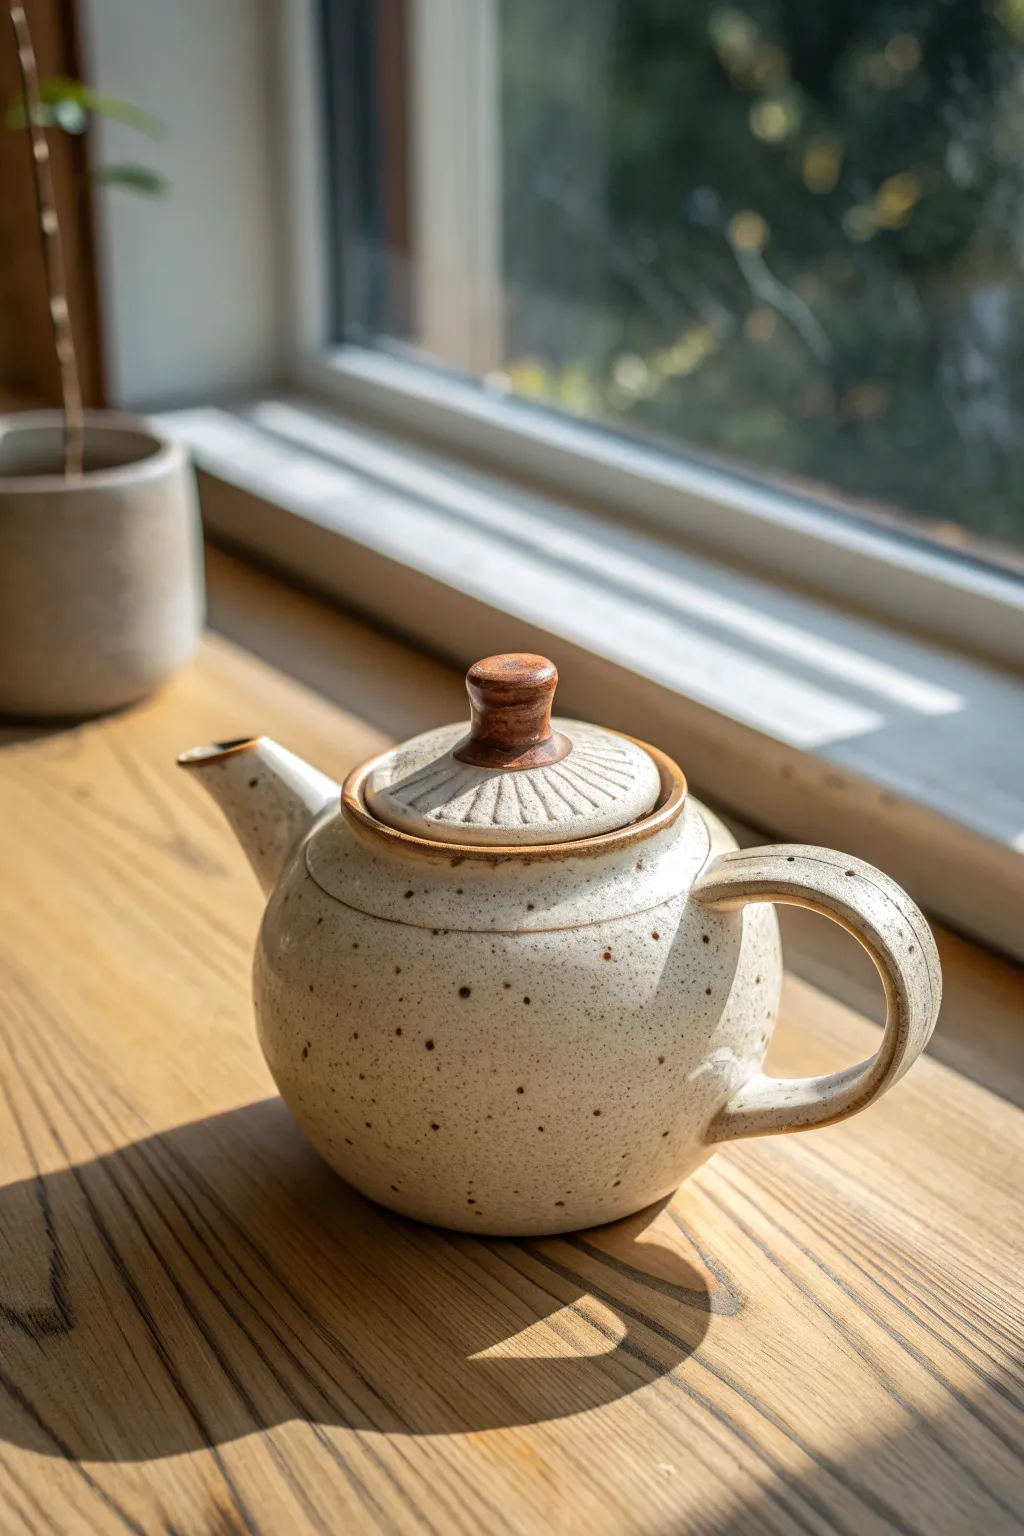
At first glance, this is a charming, speckled ceramic vessel perfect for afternoon tea, but the secret lies in what comes next—the transformation into something unsettling. This tutorial focuses on building the flawless, innocent base structure that will serve as the perfect camouflage for your darker modifications later.
Step-by-Step Guide
Materials
- Stoneware clay (speckled or flecked)
- Pottery wheel
- Throwing tools (rib, sponge, wire cutter)
- Trimming tools
- Needle tool
- Scoring tool or serrated rib
- Slip
- Rolling pin (for the handle/spout if hand-building)
- Brown iron oxide wash or stain
Step 1: Throwing the Body
-
Centering clay:
Start with about 2-3 lbs of speckled stoneware clay. Center it firmly on the wheel head, ensuring it feels stable and symmetrical before you begin opening. -
Opening and raising:
Open the clay and pull the walls up into a cylinder. As you pull, gently shape the belly by pushing outward from the inside while supporting the outside, creating a rounded, bulbous form. -
Collaring the neck:
Slowly collar the top inward to narrow the opening. Keep the rim slightly thickened to support the lid later. Use a rib to smooth the exterior curve and compress the clay particles. -
Measuring the gallery:
Using a caliper or just your eye, gauge the size of the opening. If you want a recessed lid, create a gallery (a small shelf) inside the rim now using a square-edged tool.
Pro Tip: Lid Fit
Make your lid 1-2mm wider than you think necessary. Clay shrinks, and it’s easier to sand down a too-tight lid after firing than fix a loose one.
Step 2: Creating Components
-
Throwing the lid:
Using a smaller amount of clay (throw ‘off the hump’ if you prefer), create a shallow dome shape that fits your gallery measurements perfectly. Add a solid knob of clay in the center for the handle. -
Sculpting the lid knob:
Refine the knob into a small, ergonomic hourglass shape while the wheel is spinning. This will eventually be stained darker than the rest of the pot. -
Texturing the lid:
While the clay is still leather hard, use a modeling tool to carve radiating lines from the knob to the edge of the lid. This adds a nice tactile contrast to the smooth body. -
Pulling the handle:
Pull a strap of clay for the handle. I like to make it slightly wide and flat for better grip. Curve it into a ‘C’ shape and let it set up until it holds its form without sagging. -
Creating the spout:
Throw a small, tapering cylinder on the wheel (or hand-build a cone). Cut the attachment angle to match the curve of the teapot’s belly.
Step 3: Assembly and Finish
-
Trimming the base:
Once the teapot body is leather hard, flip it over and trim a clean foot ring. This lifts the form and gives it a professional profile. -
Attaching the spout:
Hold the spout up to the body to check placement. Trace the outline, score the area, add slip, and press the spout firmly in place. Smooth the seam so it looks seamless. -
Making the flow hole:
Before the spout is fully sealed, use a drill bit or hole cutter to create the strainer holes inside the body wall behind where the spout attaches. -
Attaching the handle:
Score and slip the opposite side of the pot. Attach the handle directly opposite the spout, ensuring the top attachment is strong enough to support the weight of a full pot. -
Refining the surface:
Wipe down the entire piece with a slightly damp sponge to expose the natural grog or speckles in the clay. Smooth away any rough fingerprints. -
Applying oxide:
Apply a brown iron oxide wash or stain specifically to the lid knob and the very rim of the lid. Wipe it back slightly so it stains the clay rather than sitting on top like a glaze. -
Bisque firing:
Allow the teapot to dry slowly under plastic to prevent handle cracks. Once bone dry, bisque fire it to prepare for glazing. -
Glazing:
Dip or spray the exterior with a semi-opaque white or cream glaze that allows the clay’s iron speckles to bleed through during the final firing.
Troubleshooting: Spout Drips
If your teapot dribbles, the spout edge isn’t sharp enough. After glazing, wipe the very tip of the spout clean to create a sharp ‘cutoff’ edge for the liquid.
Now that you have this perfectly innocent teapot, you are ready to carve into the side for the ‘hidden mouth’ modification phase
Brain-Texture Cup or Planter
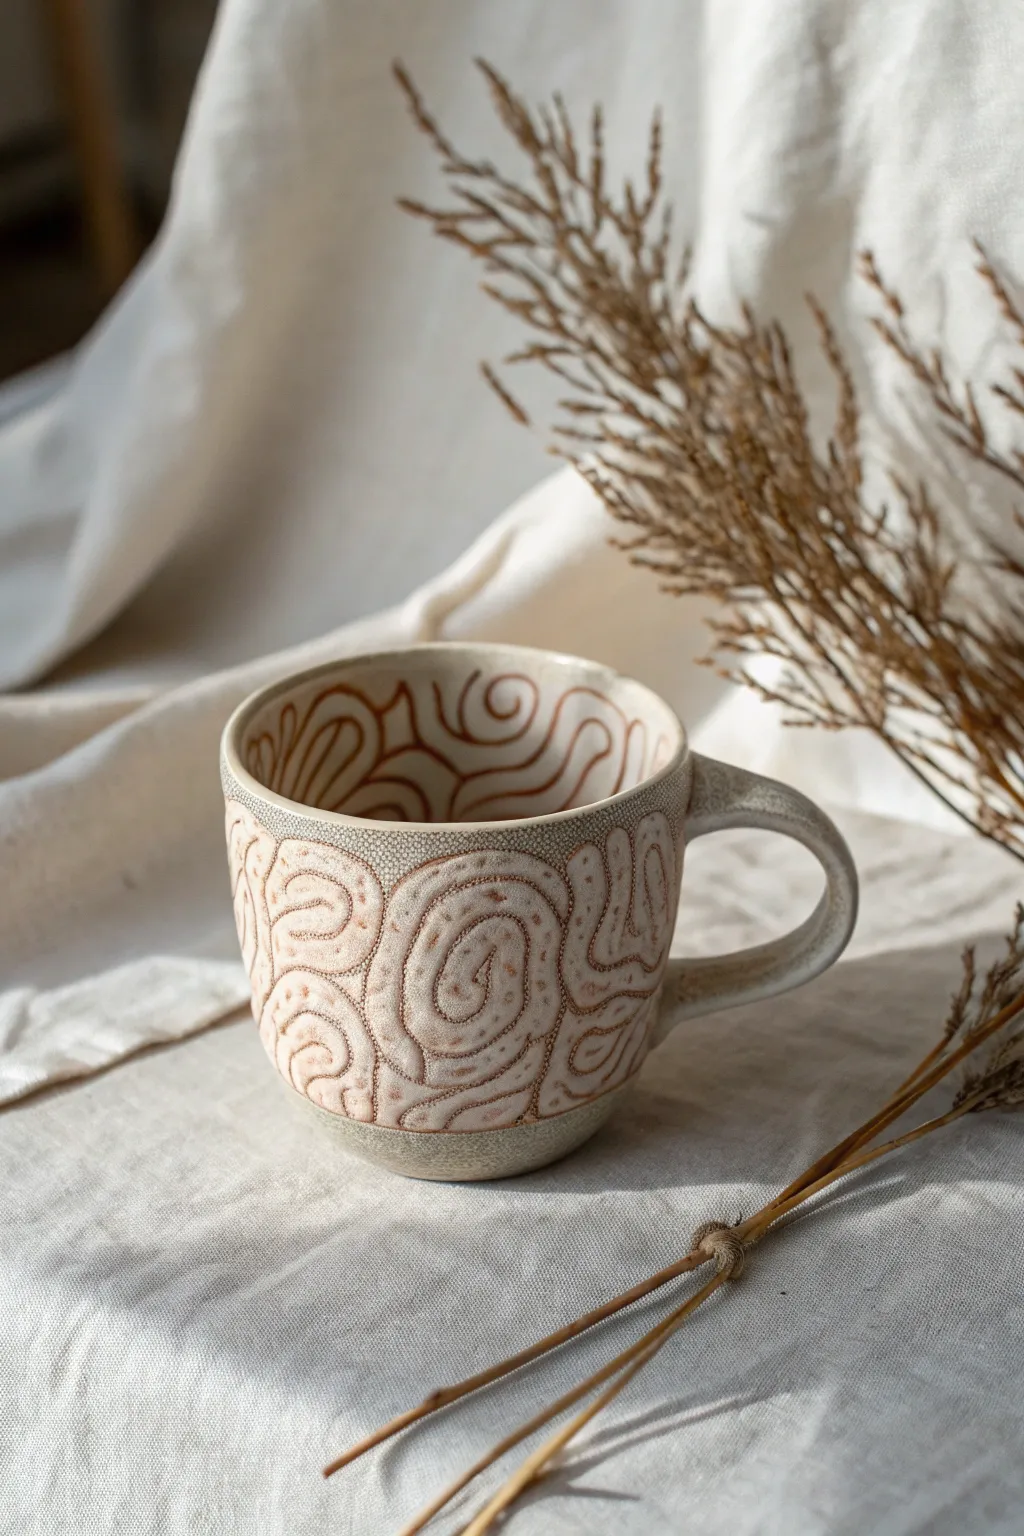
This intriguing ceramic piece balances on the edge of elegant and unsettling with its intricate, brain-like winding patterns. Using a sgraffito-style carving technique, you will reveal the dark clay body beneath a creamy surface to create organic, convoluted pathways that wrap seamlessly around the form.
How-To Guide
Materials
- Stoneware clay (speckled or tan variety recommended)
- White or cream underglaze (or slips)
- Pottery wheel (or slab roller for hand-building)
- Wire cutter
- Rib tools (metal and rubber)
- Loop tool for trimming
- Sgraffito tool or small loop carving tool
- Needle tool
- Clear matte glaze
- Sponge and water bucket
- Soft fan brush
Step 1: Forming the Vessel
-
Prepare the Clay:
Begin by wedging about 1 to 1.5 pounds of speckled stoneware clay to remove air bubbles. This ensures a consistent canvas for your detailed carving later. -
Throw or Build the Cylinder:
Throw a simple, straight-walled cylinder on the wheel, focusing on achieving an even wall thickness. If you prefer hand-building, roll a slab and form a clean cylinder, smoothing the seam invisible. -
Shape the Curve:
Gently belly out the bottom half of the cup to give it a soft, rounded base that tapers slightly toward the rim. This rounded shape enhances the organic feel of the ‘brain’ texture. -
Refine the Rim:
Compress the rim with a chamois or your finger to make it smooth and drinkable. A slightly thickened rim adds visual weight and durability. -
Dry to Leather Hard:
Set the piece aside until it reaches a solid leather-hard state. It needs to be firm enough to handle without warping but soft enough to carve into.
Smooth Operator
Work with the underglaze while the pot is leather hard. If the clay gets too dry, the underglaze will chip rather than carve smoothly.
Step 2: Surface Preparation & Handle
-
Trim the Foot:
Place the cup back on the wheel (or use a banding wheel) to trim away excess clay from the bottom, creating a neat foot ring that elevates the form. -
Pull and Attach Handle:
Pull a traditional strap handle and attach it firmly to the side of the cup. Score and slip both attachment points well, then smooth the joints so the handle looks like it grew out of the mug. -
Apply Underglaze:
Using a soft fan brush, apply 2-3 coats of white or cream underglaze to the entire exterior surface (and the interior rim if desired). Let each coat dry until matte before adding the next. -
Wait for Stability:
Allow the underglaze to dry completely so it doesn’t smear when you touch it. The clay underneath should still be slightly damp (leather hard) to allow for smooth carving.
Step 3: Carving the Texture
-
Plan the Layout:
Lightly sketch the winding, maze-like pattern onto the surface with a pencil. The pencil lines will burn off in the kiln, so don’t worry about mistakes. -
Carve the Outlines:
Using a sharp sgraffito tool or a fine loop tool, carve along your pencil lines. Cut through the white underglaze to reveal the darker raw clay body beneath. Keep your lines consistent in width. -
Create the Pathways:
Continue carving concentric, wobbly shapes that interlock but never touch. Think of the convolutions of a brain or intestines—tightly packed, curving forms that fill all available negative space. -
Texture the Interior Spaces:
Inside the white shapes you’ve outlined, use a needle tool or a very fine point to stipple tiny dots or very short dashes. I find this subtle texture mimics organic tissue and adds immense depth. -
Carve the Interior Rim:
Don’t stop at the outside! Carry the carving pattern over the rim and down into the top inch of the interior for a continuous, immersive design. -
Clean Up Burrs:
Once the carving is bone dry, gently brush away any clay crumbs or sharp burrs with a stiff bristle brush. Avoid sanding, as it scares the underglaze.
Pink Matter
Tint your white slip with a tiny amount of red mason stain to get a pale, fleshy pink color for a much more realistic and unsettling brain effect.
Step 4: Firing and Finishing
-
Bisque Fire:
Fire the piece to cone 04 (or your clay body’s bisque temperature). This sets the shape and underglaze permanently. -
Wax Resist:
Apply wax resist to the foot ring specifically to prevent glaze from sticking to the kiln shelf. -
Glaze Application:
Dip the mug into a clear matte glaze. A glossy glaze can cause glare that hides the texture, while a matte finish feels more stone-like and tactile. -
Final Fire:
Fire the mug to maturity (usually cone 6 or 10 depending on your clay). Ensure the kiln is well-ventilated for clean glaze results.
Fill your new vessel with a dark red tea to truly embrace the spooky aesthetic.
Two-Faced Mask Tile
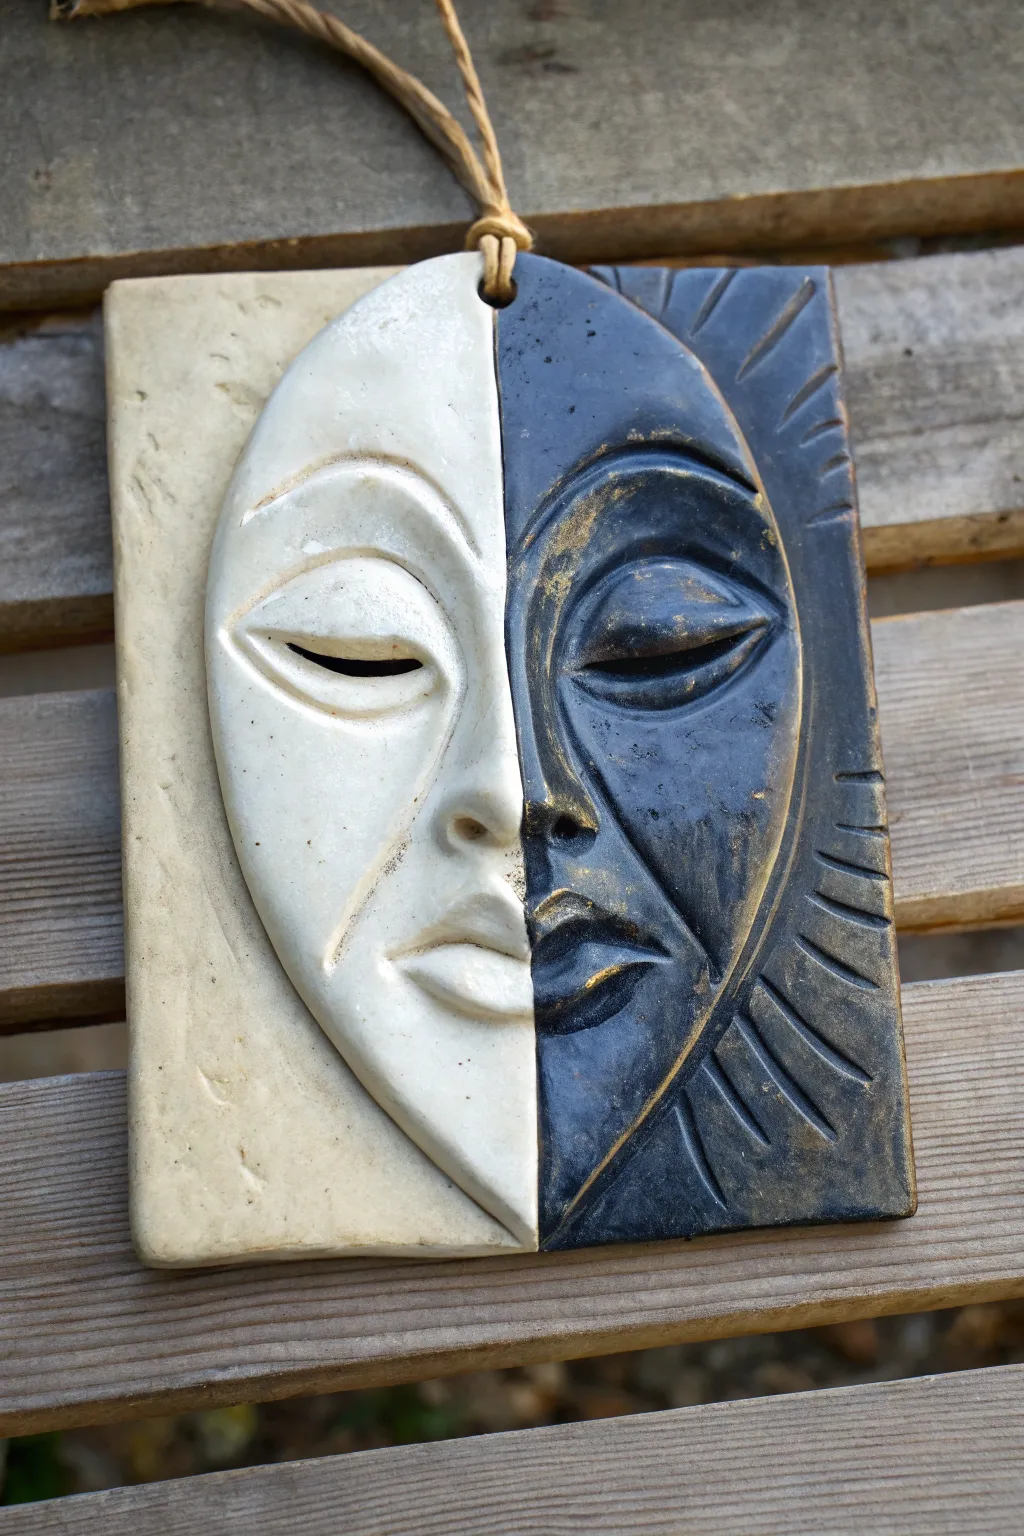
Embrace the duality of light and shadow with this striking split-face wall hanging. Featuring a serene white visage merged with a midnight-hued celestial twin, this clay project combines smooth sculpting with bold glazing techniques for a truly mystical finish
Step-by-Step Guide
Materials
- White earthenware clay (rolled slab)
- Clay carving tools (needle tool, loop tool)
- Rolling pin
- Guide sticks or canvas mat
- Slip and scoring tool
- White opaque glaze
- Black or very dark navy glaze
- Gold luster or metallic acrylic paint (for dry brushing)
- Hemp twine or leather cord
- Clay sponge
Step 1: Base Construction
-
Prepare the slab:
Roll out your white clay on a canvas mat to a thickness of about 3/8 inch. Use guide sticks if you have them to ensure an even surface. -
Cut the rectangle:
Measure and cut a clear rectangle, roughly 5×7 inches. Smooth the cut edges with a damp sponge to remove any sharp burrs or crumbs. -
Create the hanging loop:
Using a small loop tool or piercing tool, create a hole at the top center of the rectangle. Make it slightly larger than you think you need, as clay shrinks when fired.
Step 2: Sculpting the Face
-
Shape the face mound:
Roll a separate oval of clay, smaller than your rectangle, and flatten it slightly to form a dome. This will be the base for the face. -
Attach the dome:
Score the center of your rectangular slab and the back of your dome. Apply slip generously and press the dome firmly onto the slab. -
Blend the edges:
Use a modeling tool or your thumb to drag the clay from the edge of the dome onto the slab, creating a seamless transition where the face meets the background. -
Establish the centerline:
Lightly draw a vertical line straight down the middle of the oval face to divide the two personalities. We want symmetry in placement, but contrast in texture. -
Form the nose and mouth:
Add small coils of clay to build up the nose bridge and lips. Blend these thoroughly. The nose should straddle your center line perfectly. -
Carve the eyes:
Use a small loop tool to carve out the eye sockets. Roll two small almond shapes for the eyelids and attach them, keeping the eyes ‘closed’ for a meditative look. -
Refine the left side:
On the left side (the ‘light’ side), use a damp sponge to make the skin perfectly smooth. Define the eyebrow arch gently with a modeling tool. -
Texture the right side:
On the right side (the ‘dark’ side), emphasize the eyebrow arch more structurally. Carve radiating lines into the background of the tile on this side to mimic sun rays.
Uneven Glaze Lines?
If your glaze line wobbles down the center, use wax resist down the middle line before glazing. Paint one side, let it dry, then paint the other for a crisp edge
Step 3: Glazing and Finishing
-
Bisque fire:
Allow the piece to dry slowly under plastic for several days to prevent warping, then bisque fire according to your clay’s instructions. -
Apply the white glaze:
Carefully paint 2-3 coats of opaque white glaze on the left half of the face and the background on that side. Keep a steady hand at the centerline. -
Apply the dark glaze:
Coat the right half of the face and the textured background with a dark navy or black glaze. Ensure the glaze gets into the carved ray grooves. -
Glaze fire:
Fire the piece again to the temperature required by your glazes. -
Add metallic accents:
Once cooled, I like to use a dry brush with a tiny amount of gold acrylic or luster to highlight the raised textures on the dark side, specifically the eyebrow and sun rays. -
Attach the cord:
Thread a loop of rustic hemp twine through the top hole and knot it securely.
Antique It
After the final firing, rub a diluted brown acrylic wash over the white side and wipe it back immediately. This settles into crevices for an aged, excavated look
Now hang your mysterious dual-sided creation where the light can catch those golden details
Creepy Cute Monster Under a Mushroom
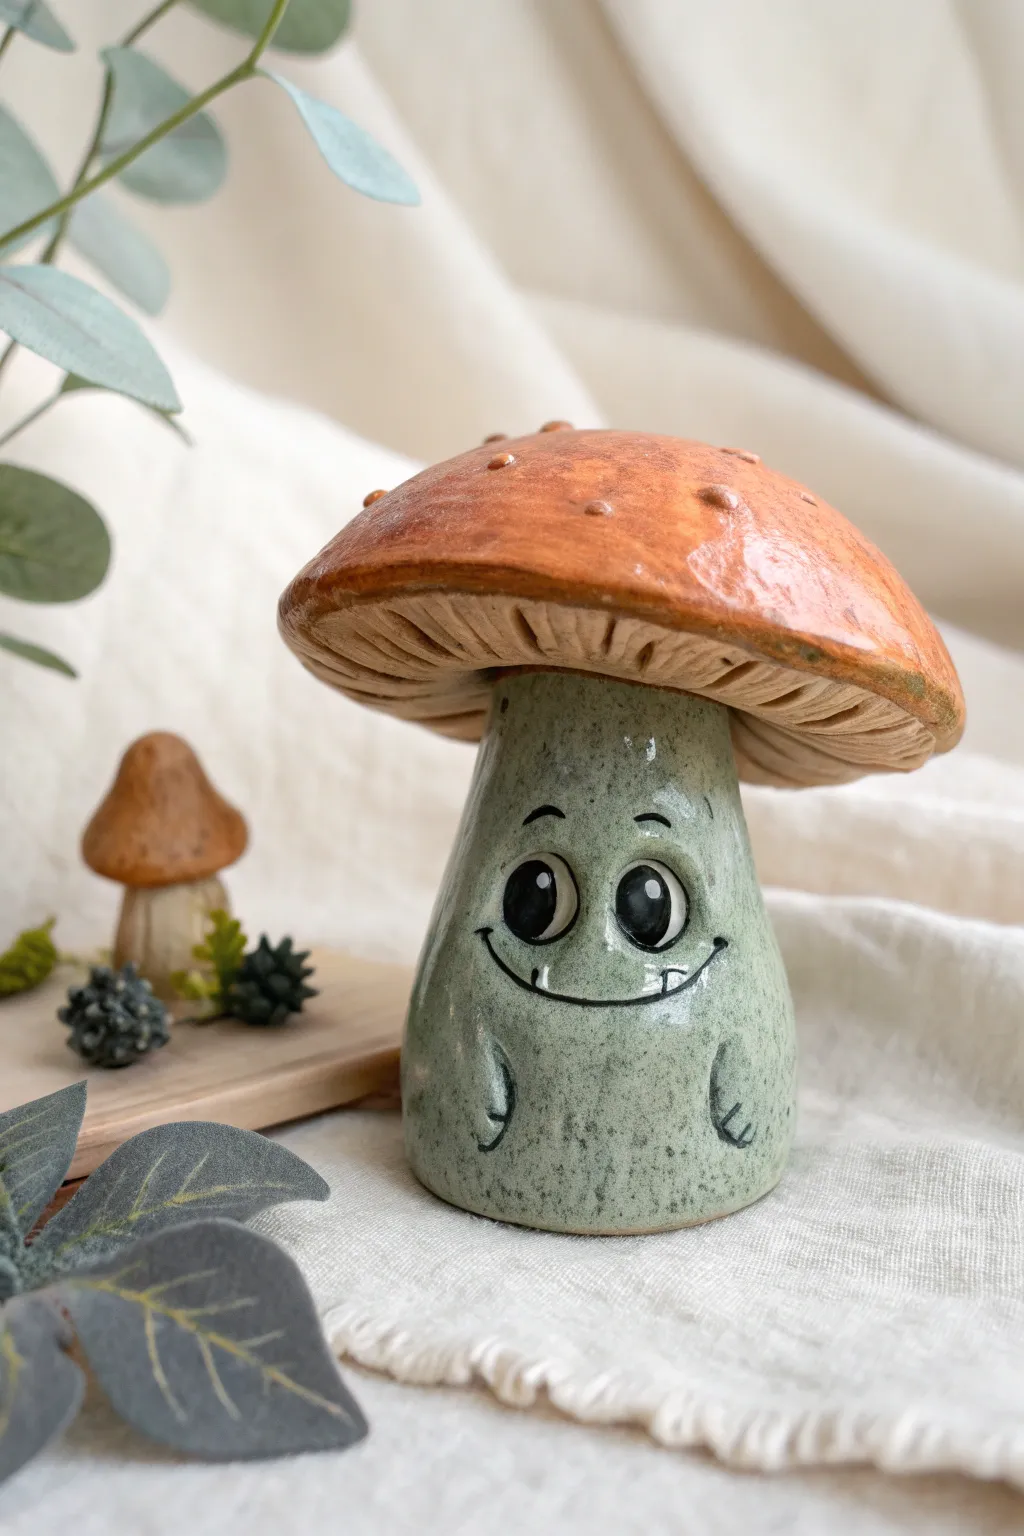
This whimsical little character combines the charm of a woodland toadstool with a playfully mischievous monster face. With its speckled green stalk and warm, textured caps, this ceramic piece makes a delightful, slightly spooky addition to any shelf or garden pot.
How-To Guide
Materials
- Earthenware or stoneware clay (white or light buff)
- Pottery tools (needle tool, rib, sponge)
- Slip and scoring tool
- Rolling pin
- Underglazes: Leaf green, speckled grey/black (if not using speckled clay), burnt orange, brown, black, white
- Clear transparent glaze (glossy)
- Kiln (or access to a firing service)
- Small paintbrushes (detail and shader)
- Wooden modeling tool
Step 1: Sculpting the Stalk
-
Form the base:
Start with a ball of clay roughly the size of a tangerine. Roll it on your work surface to create a cylinder that is slightly wider at the bottom than the top, forming a sturdy, cone-like stalk. -
Hollow it out:
Gently press your thumb into the bottom of the stalk and pinch the walls upwards to hollow it out slightly. This reduces weight and helps prevent explosions in the kiln, but keep the walls fairly thick for stability. -
Smooth the surface:
Use a damp sponge or a flexible rib tool to smooth the outside of the stalk. You want a clean canvas for the face, but a little organic waviness is perfectly fine. -
Add arm details:
Take two tiny pieces of clay and roll them into small coils. Attach these to the lower sides of the stalk using slip and scoring to create little arms resting against the belly.
Hollow Stalk Tip
Don’t skip hollowing the stalk! A solid lump of clay this thick is difficult to dry evenly and is very prone to cracking or exploding during the bisque firing.
Step 2: Creating the Cap
-
Roll out the cap:
Roll out a slab of clay about 1/4 inch thick. Cut out a circle that is significantly wider than your stalk—remember, the cap needs to overhang generously. -
Shape the dome:
Gently drape the clay circle over a curved mold or press it into a shallow bowl to create a domed shape. Smooth the edges with a sponge so they are rounded, not sharp. -
Carve the gills:
Flip the cap over. Using a needle tool or a wooden modeling tool, carve deep, radiating lines from the center to the edge to mimic mushroom gills. The texture should be quite rough and organic. -
Add warts:
Roll tiny, irregular balls of clay and attach them randomly to the top of the cap using slip. Press them down slightly so they look like natural growths rather than beads.
Runny Glaze Fix
If your clear glaze tends to run, leave a slightly larger margin of unglazed clay at the bottom of the stalk, or use a ‘cookie’ (a flat piece of scrap clay with kiln wash) under your mushroom.
Step 3: Assembly and Face
-
Attach cap to stalk:
Score the top of the stalk and the center of the gill side of the cap. Apply slip and press them firmly together. You may need to add a small coil of clay at the connection point underneath for extra support. -
Outline the features:
Use a needle tool to lightly sketch the placement of the large oval eyes, eyebrows, and the wide, grinning mouth directly onto the stalk. -
Sculpt the eyes:
Press slightly into the eye area to create depth. Roll two small, flattened ovals of clay and attach them into these depressions for the eyeballs. -
Refine the expression:
Carve the mouth line deeper. I prefer to use a fine tool to sculpt two tiny, triangular teeth poking up from the bottom lip for that ‘creepy cute’ vibe. -
Bisque fire:
Allow the piece to dry completely (bone dry) for several days. Fire it in the kiln to cone 04 (or your clay’s specific bisque temperature).
Step 4: Glazing
-
Base coat the stalk:
Apply a pale green underglaze to the entire stalk. If your clay doesn’t have natural speckles, flick a toothbrush loaded with diluted black underglaze to create a speckled texture. -
Glaze the cap:
Paint the top of the cap with a warm, burnt orange underglaze. Let the color flow over the textured warts. You can dab a little lighter orange on the very top for a highlight. -
Detail the gills:
Brush a diluted brown underglaze into the gill lines underneath, then wipe the surface gently with a damp sponge. This leaves the dark color in the crevices while keeping the ridges lighter. -
Paint the face:
Carefully paint the eyeballs white. Once dry, add large black pupils and a tiny white reflection dot in each. Use a thin liner brush with black underglaze to outline the eyes, eyebrows, mouth, and teeth. -
Final Coat:
Apply two to three coats of clear glossy glaze over the entire piece. Avoid the very bottom where it sits on the kiln shelf. -
Glaze fire:
Fire the piece again to the maturation temperature of your glaze and clay body (typically cone 5 or 6 for stoneware).
Once cooled, your charmingly eerie mushroom is ready to guard your houseplants with a smile
Skull-and-Mushroom Diorama Base
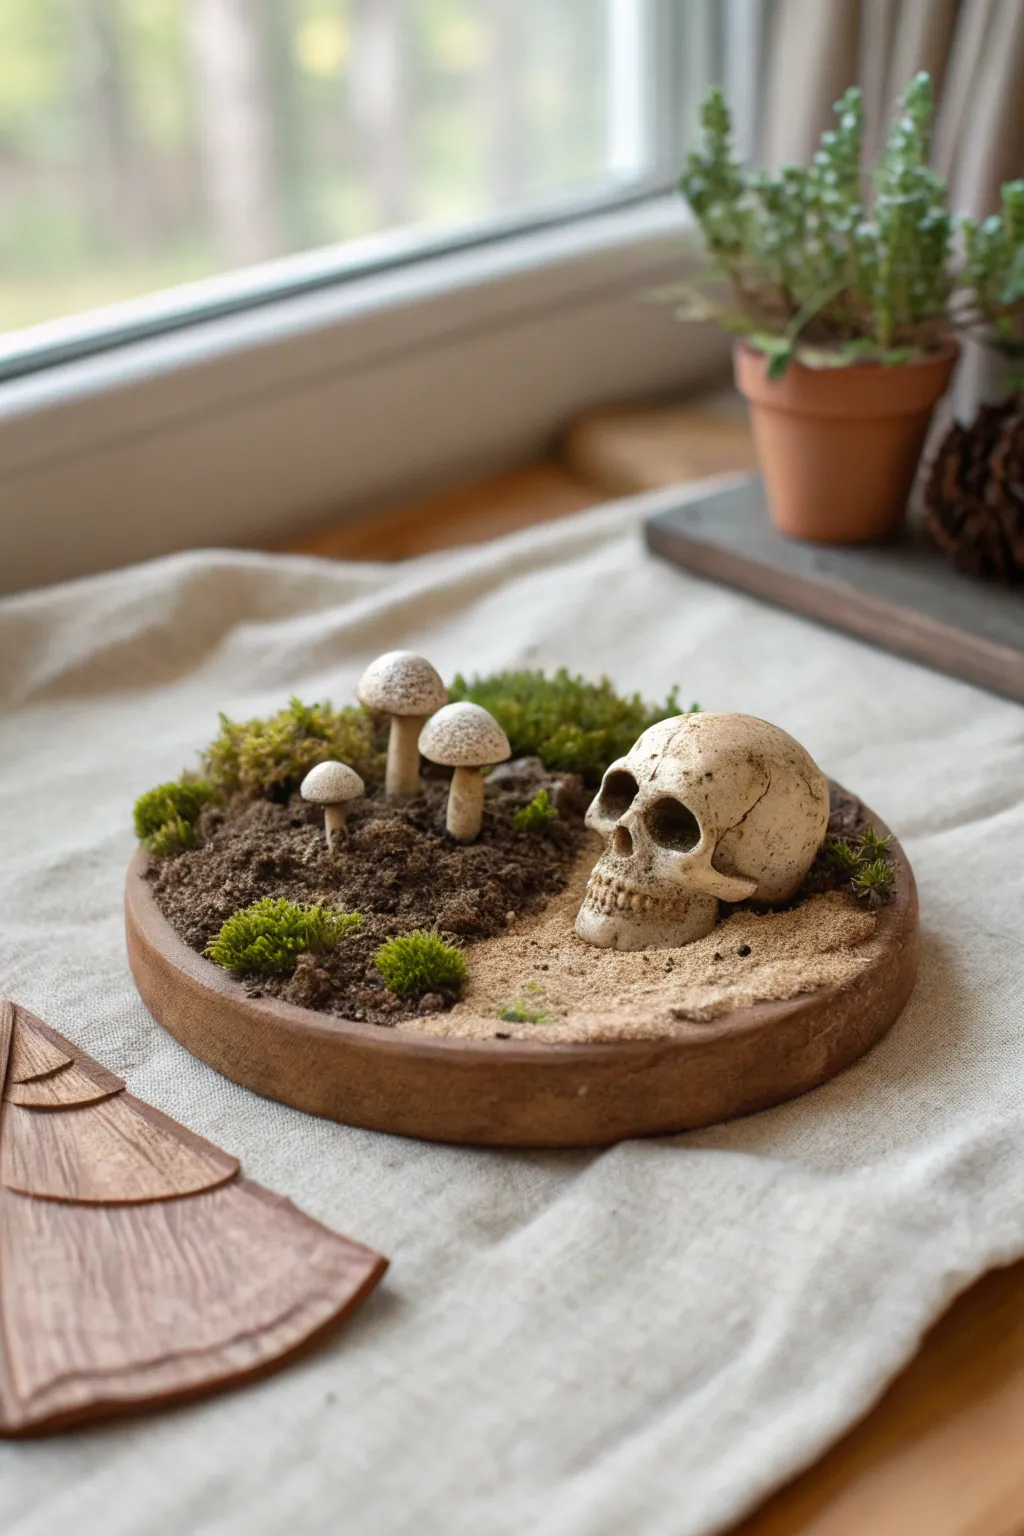
This hauntingly beautiful desktop piece combines the earthy charm of a forest floor with a touch of the macabre. You will sculpt realistic mushrooms and a miniature skull, arranging them on a contrasting bed of soil and sand inside a wooden base.
Step-by-Step
Materials
- Polymer clay (white, beige, or bone-colored)
- Round wooden coaster or shallow tray (approx. 4-5 inches)
- Acrylic paints (browns, burnt umber, black, cream)
- Texture paste or real dried potting soil mixed with glue
- Fine sand (beige or light tan)
- Dried moss (preserved moss bits)
- Sculpting tools (needle tool, small ball stylus)
- Tacky glue or heavy gel medium
- Paintbrushes (fine detail and old flat brush for texture)
- Aluminum foil (optional, for bulking just in case)
Step 1: Sculpting the Skull
-
Form the basic cranium:
Start with a ball of beige or bone-colored polymer clay about the size of a walnut. Roll it until smooth, then slightly flatten the sides to mimic the shape of a human skull. -
Define the jawline:
Pinch the lower front half of the sphere gently to extend it downward, creating the maxilla (upper jaw) area. It doesn’t need a lower jaw for this ‘buried’ look. -
Hollow the sockets:
Using a large ball stylus or the round end of a paintbrush, press firmly into the front of the face to create two deep eye sockets. Make them slightly irregular for an aged look. -
Carve the nose:
Use a needle tool or small sculpting blade to cut an upside-down heart shape for the nasal cavity between the eyes. -
Add teeth details:
Score vertical lines along the bottom edge of the maxilla to represent teeth. I like to use a needle tool to slightly round off the tops of these scored sections so they look like individual teeth rather than a solid block. -
Texture and age:
Lightly tap the surface with a stiff brush or sandpaper to give the ‘bone’ a pitted, weathered texture. Add fine cracks with a needle tool.
Fixing “Plastic” Bones
If the skull looks too shiny or plastic after baking, buff it with ultra-fine steel wool to matte the finish before applying your paint wash.
Step 2: Crafting the Mushrooms
-
Shape the stems:
Roll three small logs of beige clay. Make them varying heights, slightly thicker at the base and tapering gently toward the top. -
Create the caps:
Form three half-spheres for the mushroom caps. Press your thumb into the flat side to create a slight indentation where the stem will join. -
Assemble mushrooms:
Press the stems firmly into the indented caps. Smooth the seam with a silicone tool or your finger so the join is seamless. -
Texturing the caps:
Use a toothbrush or stiff bristle brush to tap the tops of the caps, giving them a porous, organic texture. -
Baking:
Bake all your clay pieces (skull and mushrooms) according to the package instructions. Let them cool completely before painting.
Level Up: Roots
Glue tiny dried roots or thin twine fibers coming out of the soil near the mushrooms to mimic mycelium threads for extra biological realism.
Step 3: Painting and Patina
-
Base wash:
Dilute brown acrylic paint with water to create a wash. Brush this over the entire skull and mushrooms, ensuring it gets into the deep recesses like eye sockets and texture pits. -
Wipe away excess:
Quickly wipe the high points with a paper towel or rag. The dark paint stays in the cracks, revealing the details and aging the bone instantly. -
Mushroom detailing:
Stipple a darker brown paint onto the very tops of the mushroom caps to simulate dirt or coloration variance. Keep the stems lighter.
Step 4: Assembly and Scenery
-
Prepare the base:
Take your wooden coaster. Decide on the layout: one side for dark earth, the other for lighter sand. -
Apply the soil texture:
Mix dark brown paint with texture paste (or real dried coffee grounds and glue) to create a thick, muddy sludge. Spread this generously on the left two-thirds of the base. -
Create the sandy patch:
Brush a layer of tacky glue on the remaining third of the base. Sprinkle fine beige sand heavily over the glue and press it down gently. -
Embedding the elements:
While the soil mixture is still wet, press the base of your mushrooms into the ‘dirt’ so they look like they are growing out of it. Glue the skull onto the transitional area between the sand and soil. -
Blending the ground:
Sprinkle a little loose sand near the skull’s jaw so it looks partially buried. Dab a bit of the dark soil mix onto the skull’s surface for an excavated feel. -
Adding moss:
Tear small clumps of preserved green moss. Glue these sporadically around the base of the mushrooms and behind the skull to add vibrant life to the dead scene.
Place your completed diorama near a window or bookshelf to add a quiet, mysterious narrative to your room
Mix-and-Match Creepy Head Collection
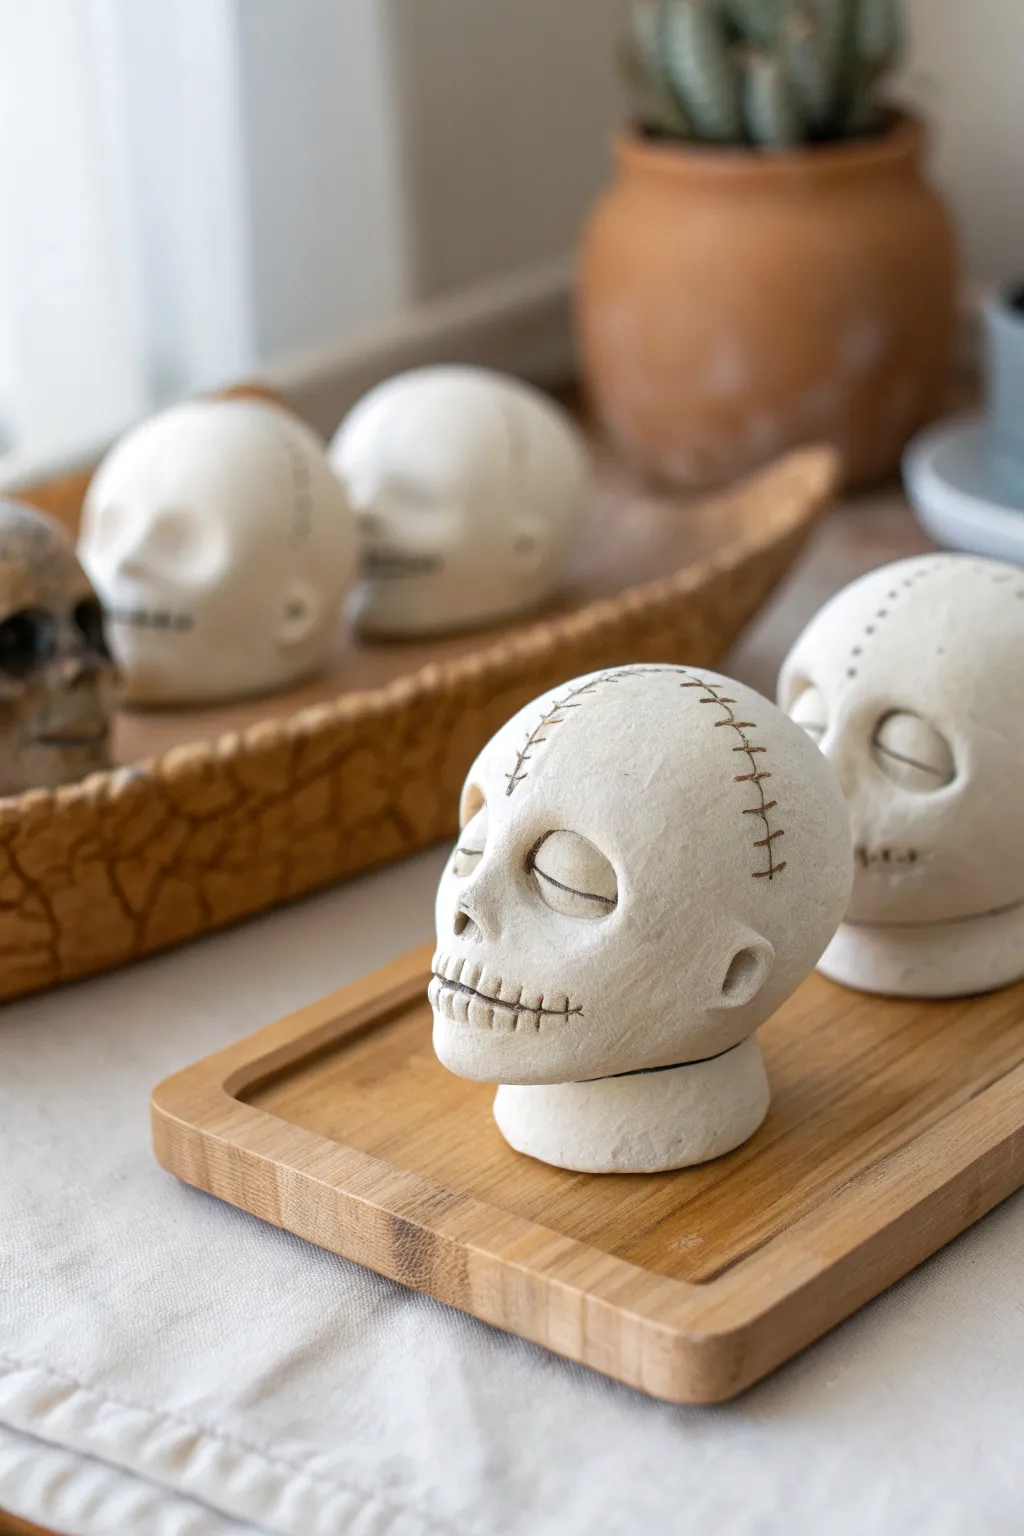
Create your own curious collection of stitched-up craniums with this simple clay project. These small, bone-colored heads feature charmingly eerie details like sewn mouths and cranial sutures, perfect for adding a touch of the macabre to any shelf.
How-To Guide
Materials
- White air-dry clay or polymer clay
- Sculpting tools (needle tool, small ball stylus)
- Water (for smoothing)
- A smooth work surface
- Aluminum foil (for armature core)
- Acrylic paint (burnt umber or black)
- Paper towels or a rag
- Matte spray varnish
Step 1: Forming the Base
-
Create the core:
Crumple a piece of aluminum foil into a tight ball, slightly smaller than a golf ball. This core saves clay and keeps the head lightweight. -
Cover the core:
Roll out a sheet of white clay to about 1/4 inch thickness. Wrap it completely around your foil ball, ensuring there are no air pockets against the foil. -
Shape the skull:
Roll the clay-covered ball in your palms to smooth it. Gently pinch and pull the lower third to form a slight jawline, giving the sphere a more elongated, skull-like shape. -
Add a neck:
Roll a thick, short cylinder of clay (about the width of a quarter). Flatten the top and bottom, then press the skull shape firmly onto this neck stand. Use a little water or slip to bond them if using air-dry clay.
Keep it clean
Keep baby wipes handy while sculpting white clay. Dust and lint love to stick to it, and keeping your hands clean ensures a pure bone-white finish before painting.
Step 2: Sculpting the Features
-
Mark the eye sockets:
Use your thumbs or a large ball tool to press two deep indentations into the center of the face for eye sockets. Keep the brow ridge slightly pronounced. -
Form the nose:
Instead of adding clay, subtract it. Use a small loop tool to carve out a triangular cavity for the nose, leaving a small bridge in the center if you like that detailed look. -
Sculpt the eyelids:
Roll two small balls of clay, flatten them into discs, and place them inside the sockets. Smooth the edges into the surrounding clay so they look like closed, heavy eyelids. -
Refine the mouth area:
Score a horizontal line across the lower jaw for the mouth. It doesn’t need to be perfectly straight; a slight curve adds character. -
Add ears:
Attach small C-shaped crescents of clay to the sides of the head. Blend the back edge into the skull while leaving the front edge defined.
Step 3: Detailing and Texture
-
Create the stitches:
Use a needle tool or knife to draw a long line across the top of the skull, running from the forehead to back. Make small perpendicular hatch marks across this line to mimic crude surgical stitches. -
Sew the mouth:
Add similar vertical hatch marks across the mouth line. Vary the spacing slightly to make it look hand-sewn. -
Refine the surface:
Dip your finger in water and gently smooth out any fingerprints or unwanted rough patches, but be careful not to erase your stitching details. -
Let it dry:
Allow your sculpture to dry completely. For air-dry clay, this usually takes 24-48 hours. If using polymer, bake according to the package instructions.
Cracking clay?
If you see cracks forming as the clay dries, dip a brush in a slurry of clay and water (slip) and paint it into the crack, then smooth it over with your finger.
Step 4: The Antique Finish
-
Prepare the wash:
Mix a small amount of burnt umber or black acrylic paint with water until it has the consistency of ink or thin milk. -
Apply the wash:
Brush the watery paint over the entire head, ensuring it gets deep into the stitch marks, nose cavity, and mouth lines. -
Wipe it back:
Immediately use a damp paper towel or rag to wipe the paint off the surface. The dark color will remain trapped in the crevices, highlighting your details. -
Seal the work:
Once the paint is fully dry, spray the piece with a matte varnish to protect the surface and give it a finished, professional look.
Arranging these little heads in a group creates a quirky conversation piece tailored to your style