When I’m in the studio, ceramic jewelry is my favorite way to turn a small pinch of clay into something you can actually wear out the door. Below are my go-to kiln-fired ideas—starting with the classics and slowly sliding into the “oh wow, I need to try that” territory.
Classic Tiny Ceramic Studs
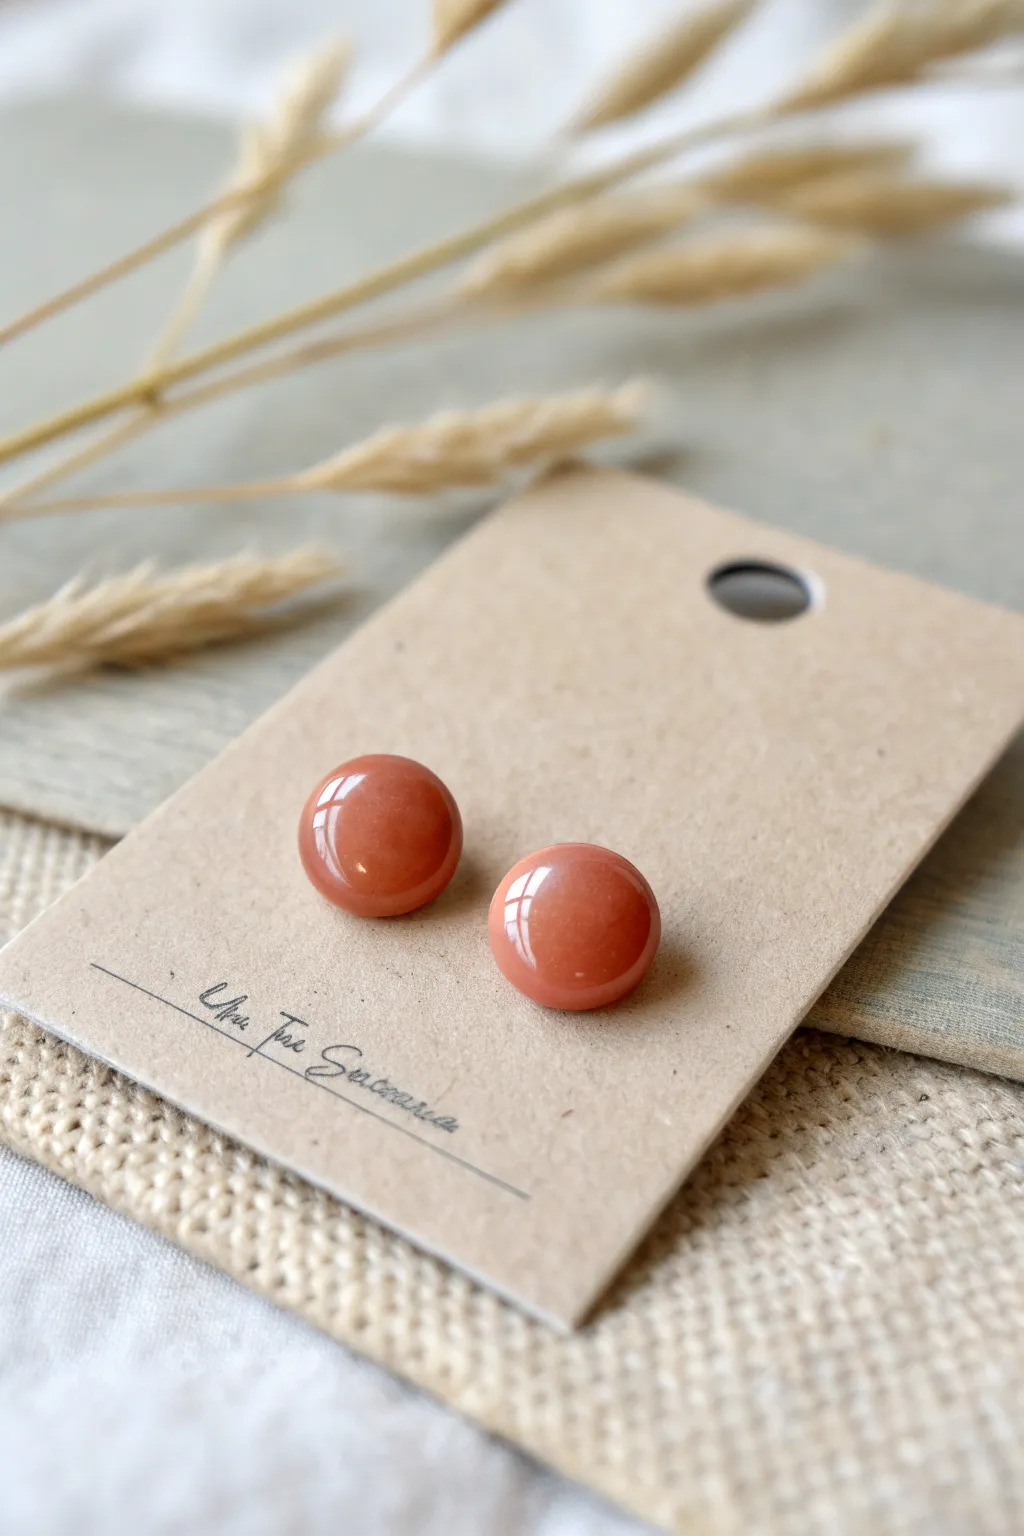
These understated earrings celebrate the natural beauty of clay with a perfect, high-gloss finish. The warm, coral-terracotta hue makes them a versatile everyday accessory that feels both earthy and polished.
Detailed Instructions
Materials
- White earthenware or polymer clay (terracotta color)
- Small circle cutter (approx. 8-10mm)
- Smooth ceramic tile or glass workspace
- Sandpaper (fine grit, 400-800)
- Glossy glaze (for ceramic) or UV resin (for polymer)
- Kiln (for ceramic) or Oven/UV Lamp (for polymer)
- Earring posts (surgical steel or sterling silver)
- Strong jewelry adhesive (E6000)
- Soft paintbrush
- Clean sponge and water
Step 1: Shaping the Clay
-
Prepare your clay:
Begin by conditioning your clay thoroughly. If using ceramic clay, wedge it well to remove air bubbles. If using polymer, knead it until it’s soft and pliable in your hands. -
Roll out a slab:
Roll your clay out to a uniform thickness of about 4-5mm. I find using playing cards or thickness guides on either side of your roller helps keep the surface perfectly level. -
Cut the circles:
Use your small circle cutter to punch out two identical shapes. Press straight down and lift straight up to avoid distorting the perfectly round edge. -
Smooth the edges:
Dip your finger in a little water (for ceramic) or baby oil (for polymer) and gently run it around the cut edge of the circle. You want to soften that sharp angle into a gentle curve. -
Check surface quality:
Examine the tops of the studs closely. Any fingerprint or lint right now will show up later, so smooth the dome surface gently until it creates a flawless, slight curve.
Dome It Up
Surface tension is your friend. When applying glaze or resin, let the liquid pool slightly in the center to create a higher, more reflective dome shape.
Step 2: Firing and Refining
-
First firing / baking:
If using ceramic clay, let the pieces dry completely to the ‘bone dry’ stage, then bisque fire them in your kiln according to the clay manufacturer’s cone rating. For polymer, bake according to package directions. -
Sanding for perfection:
Once cool, take your fine-grit sandpaper and gently buff the edges and surface. This step is crucial for that professional, manufactured look. -
Clean the dust:
Wipe the studs down with a damp sponge or cloth to remove every speck of sanding dust. Dust particles are the enemy of a glossy finish.
Step 3: Glazing and Assembly
-
Apply colour (if needed):
If your clay body wasn’t already tinted, apply a coat of terracotta or coral underglaze now. Let it dry completely before moving to the gloss step. -
The glossy topcoat:
For ceramics, apply a clear transparent glaze. Use a soft brush and apply a thick, even droplet that covers the top and sides but doesn’t run underneath. For polymer, apply a dome of UV resin. -
Final cure:
Ceramics go back into the kiln for the glaze firing. Polymer pieces under resin go under a UV lamp for 2-4 minutes until hard and tack-free. -
Prepare the posts:
Rough up the flat pad of your metal earring posts with sandpaper. This creates a texture that helps the glue grip the metal securely. -
Attach the hardware:
Place a small dot of strong jewelry adhesive on the back of the ceramic stud. Press the earring post firmly into the center. -
Allow to cure:
Leave the earrings upside down (post facing up) undisturbed for fully 24 hours to ensure the bond is permanent before wearing.
Stuck to the Tray?
If glaze runs down the side during firing, your stud will stick to the kiln shelf. Always wipe a tiny rim of bare clay at the very bottom edge before firing.
Pair these with a soft linen shirt for an effortlessly polished look


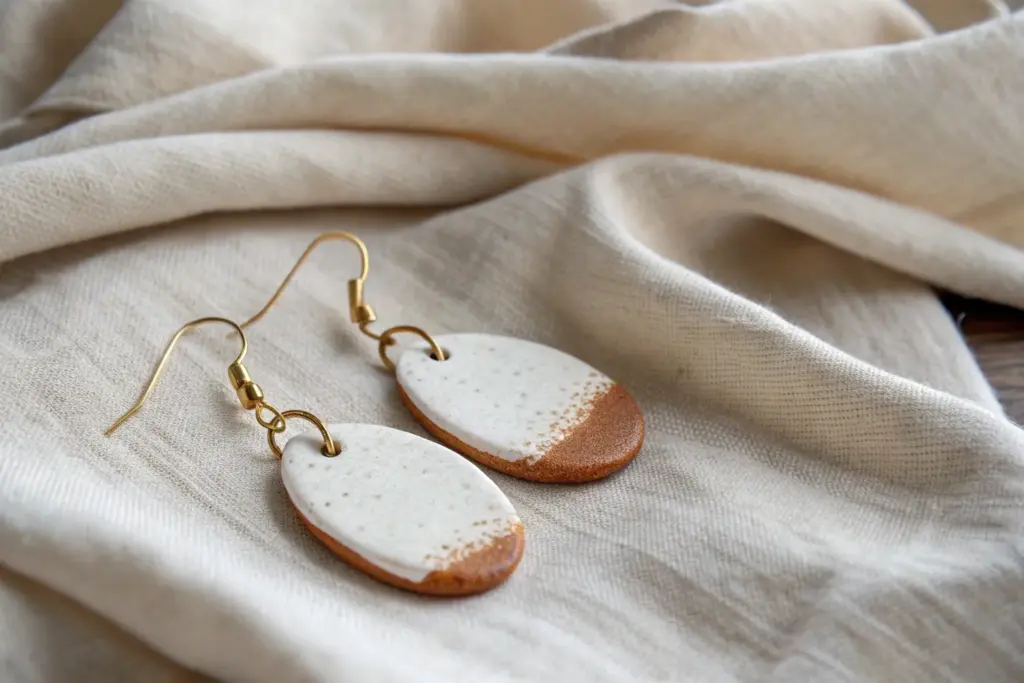
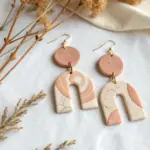
Modern Arch Dangle Earrings

Embrace minimalist elegance with these cream-colored ceramic arch earrings featuring delicate speckling that mimics natural stone. This modern, geometric design pairs a soft, neutral palette with a classic gold finish for a versatile accessory suitable for any occasion.
How-To Guide
Materials
- White or cream polymer clay (or air-dry clay)
- Fine black pepper or dried coffee grounds (for speckling)
- Acrylic roller
- U-shaped clay cutter (or a craft knife and template)
- Needle tool or small drill bit
- Sandpaper (fine grit)
- Glossy glaze or polyurethane varnish
- Small paintbrush
- 4 Gold jump rings (6-7mm)
- 2 Gold fish hook ear wires
- Jewelry pliers (flat nose and round nose)
- Tile or parchment paper for baking
Step 1: Clay Preparation
-
Conditioning the base:
Begin by conditioning your block of white or cream polymer clay with your hands until it is soft and malleable. If the clay feels stiff, the heat from your palms will help loosen it up. -
Adding texture:
To achieve the stone-like speckle seen in the image, sprinkle a tiny pinch of ground black pepper or very fine dried coffee grounds onto the flattened clay. Fold the clay over itself to trap the particles. -
Integrating the speckles:
Knead the clay thoroughly until the speckles are evenly distributed throughout the mass. Add more particles gradually if you want a denser granite look, but remember that a little goes a long way. -
Rolling it out:
Use your acrylic roller to flatten the clay into a slab. Aim for a consistent thickness of about 3mm to 4mm—thick enough to be sturdy, but thin enough to be lightweight for your ears.
Step 2: Shaping & Baking
-
Cutting the arches:
Press a U-shaped clay cutter firmly into the slab to cut out two identical arch shapes. If you don’t have a cutter, I like to use a paper template and carefully trace around it with a sharp craft knife. -
Smoothing edges:
Before baking, gently run your finger along the cut edges of the clay to smooth out any harsh lines or burrs left by the cutter. This reduces the amount of sanding needed later. -
Creating holes:
Using a needle tool, pierce a hole at the very top center of each arch. Ensure the hole is approximately 2-3mm from the edge so the clay doesn’t break, but large enough to fit your jump rings. -
Curving the shape (Optional):
For a slight dimensional effect like real ceramic, you can drape the pieces over a curved object during baking, or simply leave them flat on a ceramic tile for the classic look shown here. -
Baking:
Place your clay pieces on a ceramic tile or baking sheet lined with parchment paper. Bake according to the specific manufacturer’s instructions on your clay package (usually around 275°F or 130°C for 15-30 minutes). -
Cooling down:
Once the baking cycle is complete, turn off the oven and let the pieces cool completely inside or on a wire rack before handling them to ensure maximum strength.
Clean Cuts Pro Tip
Place a sheet of plastic cling wrap over your clay slab before pressing down your cutter. This creates naturally rounded, ‘domed’ edges on your shapes.
Step 3: Finishing Touches
-
Sanding imperfections:
Dip your fine-grit sandpaper in a little water and gently sand the edges of the cured clay to make them perfectly smooth. Rinse off any residue and pat dry. -
Glazing:
Apply a thin, even coat of glossy glaze or polyurethane varnish using a soft brush. This seals the specks and gives the ‘ceramic’ shine seen in the photo. Let this layer dry fully. -
Back sealing:
Don’t forget to glaze the back of the earrings as well for a professional finish. Allow the pieces to cure completely according to your glaze instructions.
Level Up: Color Pop
Before glazing, paint a thin stripe of gold leaf or metallic paint along the bottom edge of the arch for a chic, mixed-material aesthetic.
Step 4: Assembly
-
Opening jump rings:
Take your flat nose pliers and twist two jump rings open. Remember to twist the ends away from each other laterally rather than pulling them apart to preserve the circle shape. -
Attaching the hardware:
Thread an open jump ring through the hole at the top of a clay arch. -
Securing the hook:
Slide the loop of a gold fish hook ear wire onto the open jump ring alongside the clay piece. -
Closing up:
Use your pliers to twist the jump ring back into a closed position, ensuring the ends meet perfectly without a gap so the clay piece doesn’t slip off. -
Repeat:
Repeat the assembly process for the second earring to complete the pair.
Enjoy wearing your handcrafted, stone-look ceramic arches that perfectly bridge the gap between rustic texture and modern design


Organic Teardrop Pendant Necklace
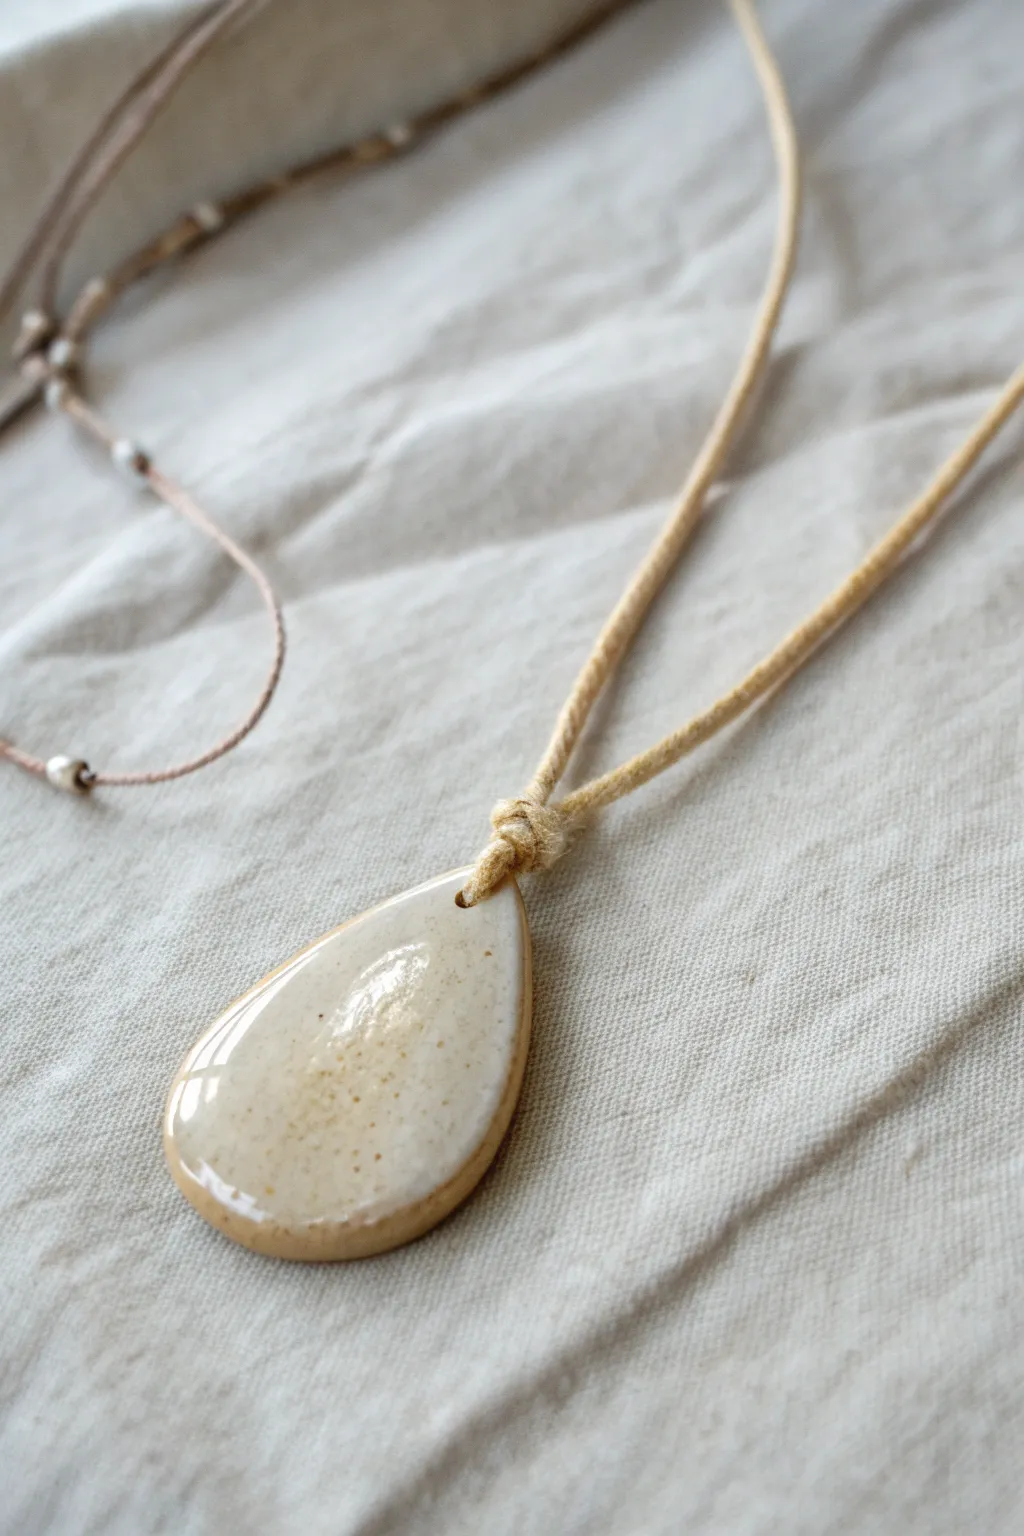
Embrace the beauty of earthy simplicity with this elegant ceramic pendant. Featuring a soft teardrop shape and a creamy, speckled glaze finish, this piece highlights the natural warmth of the clay body beneath.
Step-by-Step
Materials
- Cone 5/6 Stoneware clay (buff or speckled tan)
- Small rolling pin
- Fettling knife or needle tool
- Paper template (teardrop shape)
- Potter’s sponge
- Drill bit or straw (approximately 3mm)
- Fine grit sanding screen
- Cream or oatmeal colored reactive glaze
- Fan brush
- Kiln (or access to a firing service)
- Beige waxed cotton cord or hemp cord
- Scissors
Step 1: Shaping the Clay
-
Prepare the slab:
Begin by wedging a small handful of stoneware clay to remove air bubbles. Roll it out into a smooth slab about 1/4 inch thick. I like to flip the clay over once or twice during rolling to ensure it doesn’t stick to the work surface. -
Cut the shape:
Place your paper teardrop template onto the clay slab. Using a needle tool or fettling knife, carefully trace and cut around the template. Keep the cut as vertical as possible for clean edges. -
Soften the edges:
Dip your finger or a small sponge in water and gently run it along the cut edges of the pendant. You want to round them off significantly to achieve that soft, organic look seen in the photo, removing any sharp angles. -
Refine the surface:
Inspect the face of the pendant. Smooth out any canvas texture or fingerprints with a damp sponge or a rubber rib tool. -
Create the hole:
At the tapered top of the teardrop, pierce a hole for the cord. A drinking straw works well for a uniform circle, or use a drill bit twisted by hand. -
Clean the hole:
Smooth the clay displaced by the hole creation immediately so it doesn’t create a sharp snag point later. -
Dry slowly:
Place the pendant on a ware board and cover loosely with plastic. Allow it to bone dry slowly over a day or two to prevent warping.
Step 2: Firing and Glazing
-
Bisque fire:
Once bone dry, fire the piece to bisque temperature (usually Cone 06/04) in a kiln. -
Sanding:
After the bisque fire, lightly sand any remaining rough spots, especially around the edges, using a sanding screen over a trash can or outside. -
Wash the piece:
Wipe the bisque ware down with a clean, damp sponge to remove sanding dust which can resist the glaze. -
Apply wax resist:
Paint a thin line of wax resist along the very bottom edge and the back of the pendant to prevent it sticking to the kiln shelf. -
Glaze application:
Stir your cream reactive glaze thoroughly. Applying 2-3 flowing coats to the front and sides of the pendant is key. Leave the glaze slightly thinner near the edges to let the clay color break through, as seen in the inspiration image. -
Clear the hole:
Double-check that the stringing hole is free of glaze. If it’s clogged, use a needle tool to clear it. -
Final smooth:
Before the glaze dries completely, you can gently tap down any high brush strokes with a fingertip for a glassy surface. -
Glaze fire:
Fire the pendant to the glaze’s maturity temperature (likely Cone 5 or 6). Allow the kiln to cool completely before opening.
Sticky Situation
If glaze accidentally drips into the hole during firing, use a diamond-tipped bead reamer tool under running water to carefully grind out the excess glass.
Step 3: Assembly
-
Cut the cord:
Measure a length of beige waxed cotton cord, approximately 24-30 inches depending on your desired hanging length. -
Thread the pendant:
Feed one end of the cord through the hole in the pendant from front to back. -
Secure with a knot:
Tie a simple overhand knot or a slip knot right above the pendant. The knot should sit snugly against the top of the ceramic tear, securing it in place. -
Finish the ends:
Tie the loose ends of the necklace together with a sturdy knot or attach jewelry findings if you prefer a clasp closure.
Glaze Testing
Test your glaze on a vertical test tile first. You want a glaze that breaks over edges but doesn’t run so much that it drips off the pendant during firing.
Wear your handcrafted pendant as a daily reminder of simplicity or gift it to someone who appreciates natural textures


Simple Strung Ceramic Bead Necklace
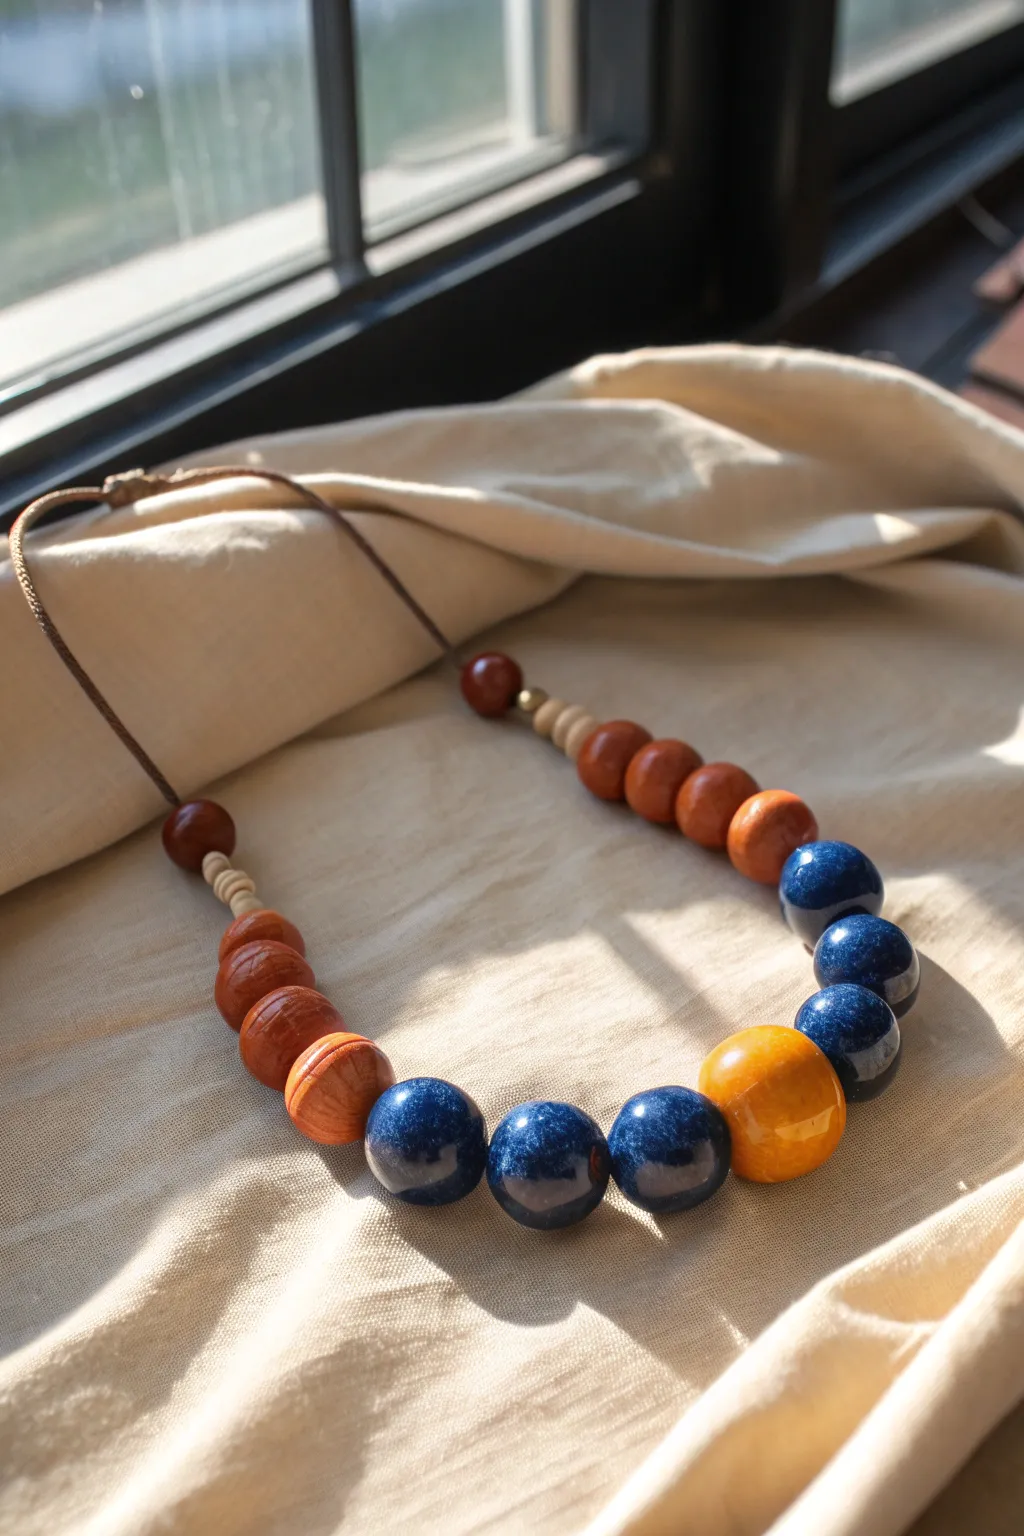
Embrace earthy elegance with this chunky beaded necklace that pairs warm terracotta tones with glossy deep blues and a single pop of mustard yellow. The varied textures of matte and high-gloss glazes strung on a simple cord create a sophisticated yet relaxed accessory perfect for everyday wear.
Step-by-Step Guide
Materials
- Polymer clay or low-fire ceramic clay (white or terracotta)
- Ceramic high-gloss glazes (Deep Blue, Mustard Yellow)
- Wood finish stain or terracotta acrylic paint (for the faux wooden beads)
- Small raw wood spacer beads (light maple color)
- Dark brown waxed cotton cord (1.5mm or 2mm thickness)
- Pottery kiln (if using real ceramic) or standard oven (if polymer)
- Bead piercing tool or skewers
- Small paintbrush
- Scissors
Step 1: Shaping the Beads
-
Mix your clay:
If using ceramic clay, wedge it thoroughly to remove air bubbles. For polymer clay, condition it by kneading until soft and pliable. -
Form the large rounds:
Roll roughly 12 spheres of clay approximately 20mm in diameter. These will be your main colorful and wood-look beads. Try to keep them relatively uniform, though slight handmade variations add charm. -
Create the focal bead:
Select one of your spheres to be the slightly larger, central focal bead. Ensure it is perfectly round and smooth. -
Pierce the holes:
Using your piercing tool or a skewer, create holes through the center of each bead. Make the holes slightly larger than your cord thickness to simulate that chunky ‘large-hole’ bead look seen in the photo. -
Clean up edges:
Smooth around the bead holes with a damp finger or sponge to remove any sharp ridges created during piercing. This prevents the cord from fraying later. -
First firing (Bisque):
If using real ceramic, fire the greenware to bisque temperature. If using polymer, bake according to the package directions, then let cool completely.
Uneven Glaze?
If your glaze pools or drips, wipe the bead bottom with a damp sponge before firing. Suspending beads on a kiln-safe bead rack ensures perfectly round, mark-free coverage.
Step 2: Glazing and Finishing
-
Glaze the blue beads:
Select 6 of your fired beads. Apply three even coats of Deep Blue high-gloss glaze. Allow each coat to dry before applying the next to ensure a rich, speckled finish like the reference. -
Glaze the yellow bead:
Take your focal bead and apply the Mustard Yellow high-gloss glaze using the same layering technique. This single bead will add that striking asymmetrical element. -
Create the ‘wood’ effect:
For the remaining 5 terra-cotta/wood-look beads, you can either leave terracotta clay unglazed and wax it, or paint white polymer clay with a brown wood stain. I prefer rubbing the stain with a cloth for a natural, matte grain look. -
Final firing:
Fire the glazed ceramic beads in the kiln according to your glaze instructions. If using polymer with paint/glaze effects, seal them with a compatible varnish and let dry.
Natural Wood Look
To make the matte beads look more like the reference wood, lightly sand the cured surface with 400-grit paper before staining. This adds texture that catches the stain beautifully.
Step 3: Assembly
-
Measure the cord:
Cut a length of dark brown waxed cotton cord, approximately 30 inches long, or longer if you prefer an adjustable fit. -
Start the sequence:
Thread the cord. We will build from one side to the other. Start with a small raw wood spacer, followed by a ‘wood’ look ceramic bead. -
Build the left side:
String two more ‘wood’ beads, then transition to the color by adding three Deep Blue beads. -
Place the focal point:
Slide on the single Mustard Yellow bead. This marks the visual center, though the design is intentionally slightly unbalanced. -
Finish the right side:
Follow the yellow bead with the remaining three Deep Blue beads, then the last two ‘wood’ beads. -
Add final spacers:
Place a raw wood spacer at the very end of the bead sequence on this side to mirror the start. -
Secure the ends:
Tie a simple sliding knot or an overhand knot at the ends of the cord to complete the necklace loop.
Enjoy wearing your handcrafted necklace that bridges the gap between rustic charm and modern art

The Complete Guide to Pottery Troubleshooting
Uncover the most common ceramic mistakes—from cracking clay to failed glazes—and learn how to fix them fast.
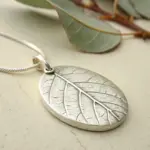
Leaf-Imprint Botanical Pendants
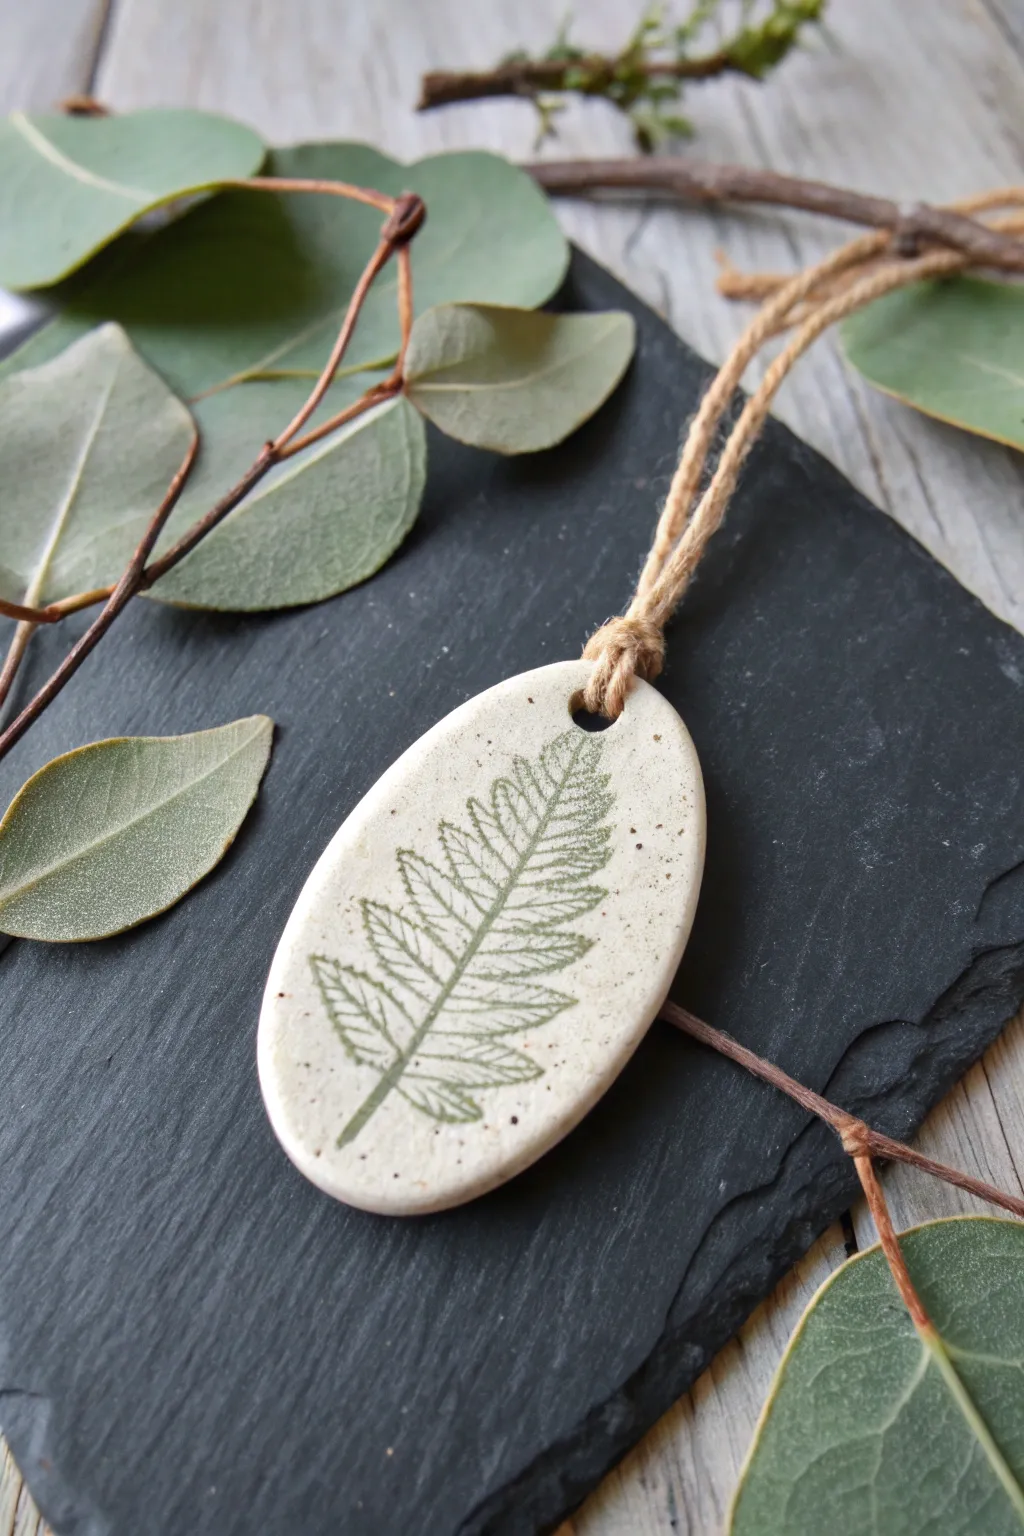
Capture the ephemeral beauty of a fern frond forever in white clay with this elegant, rustic pendant project. The final piece features a perfect botanical stain in soft earthy greens, suspended on natural jute twine for an organic, grounded aesthetic.
How-To Guide
Materials
- White polymer clay or low-fire white earthenware clay
- Fresh fern leaf (flat and pliable)
- Green acrylic paint or underglaze (forest green/moss green)
- Small rolling pin or acrylic roller
- Oval shape cutter (approximately 2.5 inches long)
- Straw or small circular cutter (for the hole)
- Fine-grit sandpaper
- Matte varnish or sealant
- Natural jute twine
- Paper towel or damp sponge
- Parchment paper or smooth work surface
Step 1: Shaping the Canvas
-
Condition the clay:
Begin by warming and kneading a small ball of white clay in your hands until it becomes soft, pliable, and free of any air bubbles. -
Roll out the slab:
Place the clay on a smooth surface or parchment paper. Use your rolling pin to flatten it into an even slab, aiming for a thickness of about 1/4 inch (6mm). -
Position the botanical:
Take your fresh fern frond and lay it gently on top of the clay slab. Ensure the veined side is facing down for the deepest impression. -
Imprint the leaf:
Gently roll over the leaf with your rolling pin once. Apply firm, even pressure to embed the leaf into the clay surface without distorting the slab’s thickness too much. -
Cut the shape:
Position your oval cutter over the most attractive part of the imprint. Press down firmly to cut the shape, then lift away the excess clay from around the cutter. -
Remove the leaf:
Carefully use a needle tool or tweezers to lift the stem of the fern and peel the leaf away from the clay. Do this slowly to keep the impression crisp. -
Pierce the hanging hole:
Use a straw or a small circular tool to punch a clean hole near the top edge of the oval. Make sure it’s centered and not too close to the very edge. -
Smooth the edges:
Dip your finger in a little water (or cornstarch for polymer clay) and gently run it along the cut edges to soften any sharpness.
Freshness Matters
Use a freshly picked leaf rather than a dried one. Dried leaves tend to crumble when rolled into the clay, leaving debris that is difficult to pick out of the fine impression lines.
Step 2: Firing and Finishing
-
Bake or fire:
If using polymer clay, bake according to package directions (usually 275°F/135°C for 15-30 minutes). If using ceramic clay, let it dry completely and fire in a kiln. -
Sand for smoothness:
Once cool, check the edges again. I like to use fine-grit sandpaper here to create a buttery smooth finish on the rim and back. -
Apply the color wash:
Dilute your green paint slightly with water. Brush it liberally over the entire impressed area, ensuring the pigment gets deep into the veins. -
Wipe back the excess:
Immediately take a damp paper towel or sponge and wipe across the surface. This removes paint from the high points but leaves the green color trapped in the leaf impression. -
Add speckles (optional):
To mimic the stone-like look in the image, flick a tiny bit of diluted brown or black paint onto the pendant using an old toothbrush for a speckled effect. -
Seal the piece:
Once the paint is fully dry, apply a thin coat of matte varnish to protect the surface and the paint job without making it look glossy or plastic. -
Attach the cord:
Cut a length of natural jute twine. Fold it in half to find the center loop. -
Create a lark’s head knot:
Push the folded loop through the pendant hole from front to back. Pull the loose ends of the twine through that loop and tighten it securely against the top of the ceramic piece.
Unwanted Stickiness
If the clay sticks to your roller or work surface, lightly dust the clay and tool with cornstarch before rolling. This acts as a release agent and burns off baking.
Wear your new piece of nature-inspired art with a cozy sweater or gift it to a plant-loving friend
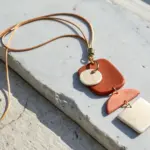
Minimal Bar Earrings and Pendants
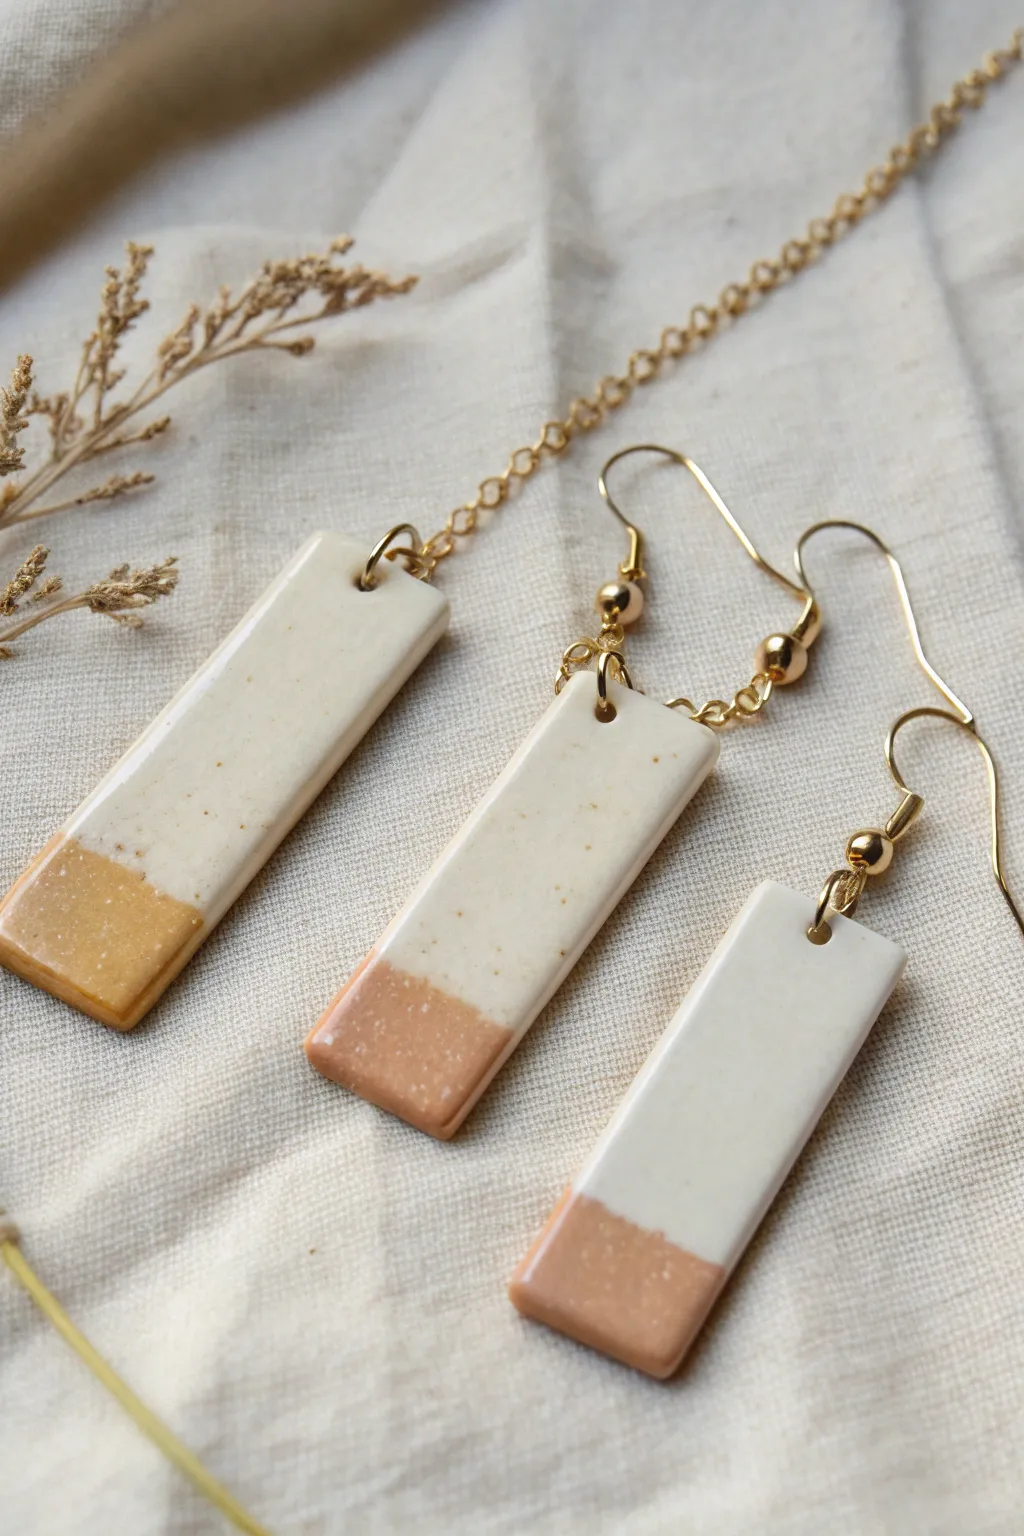
These elegant earrings and matching pendant combine the earthy warmth of speckled clay with a rich, glossy glaze. Their minimalist shape makes them perfect for everyday wear, while the two-tone palette adds a touch of modern sophistication.
Detailed Instructions
Materials
- White stoneware clay with speckles or white polymer clay with inclusions
- Rolling pin
- Sharp clay blade or tissue blade
- Ruler
- Small circle cutter or straw (for holes)
- Sandpaper (fine grit)
- Terra cotta or caramel-colored glaze (low-fire)
- Transparent clear glaze
- Kiln (if using stoneware) or Oven (if using polymer)
- Gold plated earring hooks
- Gold plated jump rings
- Gold plated jewelry chain
- Jewelry pliers (flat nose and round nose)
- Small paintbrush
Step 1: Shaping the Clay
-
Condition the body:
Begin by working your clay until it is pliable and smooth. If using stoneware, wedge it thoroughly to remove air bubbles. For polymer clay, knead it warm preventing cracks. -
Roll the slab:
Use your rolling pin to flatten the clay into an even slab. Aim for a thickness of about 3mm to 4mm—thick enough to be sturdy but light enough for comfortable earrings. -
Cut the strips:
Using a ruler and your sharp blade, cut long, straight strips of clay. Ensure the width is consistent for all pieces, roughly 1cm wide. -
Measure the length:
Cut the strips into uniform rectangular bars. For the set shown, the bars are approximately 3.5cm to 4cm long. It helps to use the first cut piece as a template for the others. -
Piercing holes:
Use a small straw or a specialized hole cutter to create a hole at the very top center of each bar. Ensure the hole is large enough for your jump rings but not so close to the edge that it creates a weak point. -
Refining edges:
Gently smooth the cut edges with your fingertip or a damp sponge to soften the sharp corners. This gives the final piece a more polished, professional finish. -
Bisque firing (Ceramic only):
If working with real ceramic clay, let the pieces dry completely to the bone-dry stage, then load them into the kiln for a bisque fire.
Warped Pieces?
If your thin clay bars curl during drying, dry them slowly between two pieces of drywall or wood boards to weigh them down and keep them perfectly flat.
Step 2: Glazing and Firing
-
Taping off:
To get that crisp line between the two colors, I like to use a thin strip of wax resist or masking tape across the bar, marking off the bottom third. -
Applying the color:
Dip the bottom third of the bar into the caramel or terra cotta colored glaze. If painting by hand, apply two to three even coats to ensure opacity. -
Clear coating:
Once the colored section is dry, dip the entire piece (or brush it) with a clear, glossy transparent glaze. This seals the raw speckled clay at the top and adds a unified shine. -
Final wipe:
Double-check that no glaze has clogged the jump ring holes. If it has, use a pin tool to carefully clear it out. -
Final firing (or baking):
Fire the ceramic pieces in the kiln according to your glaze instructions. If using polymer clay, bake in your home oven at the manufacturer’s recommended temperature, then coat with a gloss varnish after cooling.
Add Gold Lustre
For extra luxury, paint a thin line of real gold lustre over the border where the two fired glaze colors meet, then fire one last time.
Step 3: Assembly
-
Open jump rings:
Using two pairs of pliers, twist your gold jump rings open laterally (never pull them apart outward) to preserve their shape. -
Attach earring hooks:
Slide the open jump ring through the hole in the ceramic bar, then thread on the loop of the earring hook. Close the jump ring securely so there is no gap. -
Create the pendant:
For the necklace, attach a jump ring to the top of the third ceramic bar. Thread your gold chain directly through this ring before clasping it shut. -
Final polish:
Wipe the finished jewelry with a soft cloth to remove any fingerprints and check that all metal connections are tight and secure.
Wear your new modern jewelry set with a simple white top to let those warm earth tones really shine


What Really Happens Inside the Kiln
Learn how time and temperature work together inside the kiln to transform clay into durable ceramic.
Negative-Space Cutout Shapes
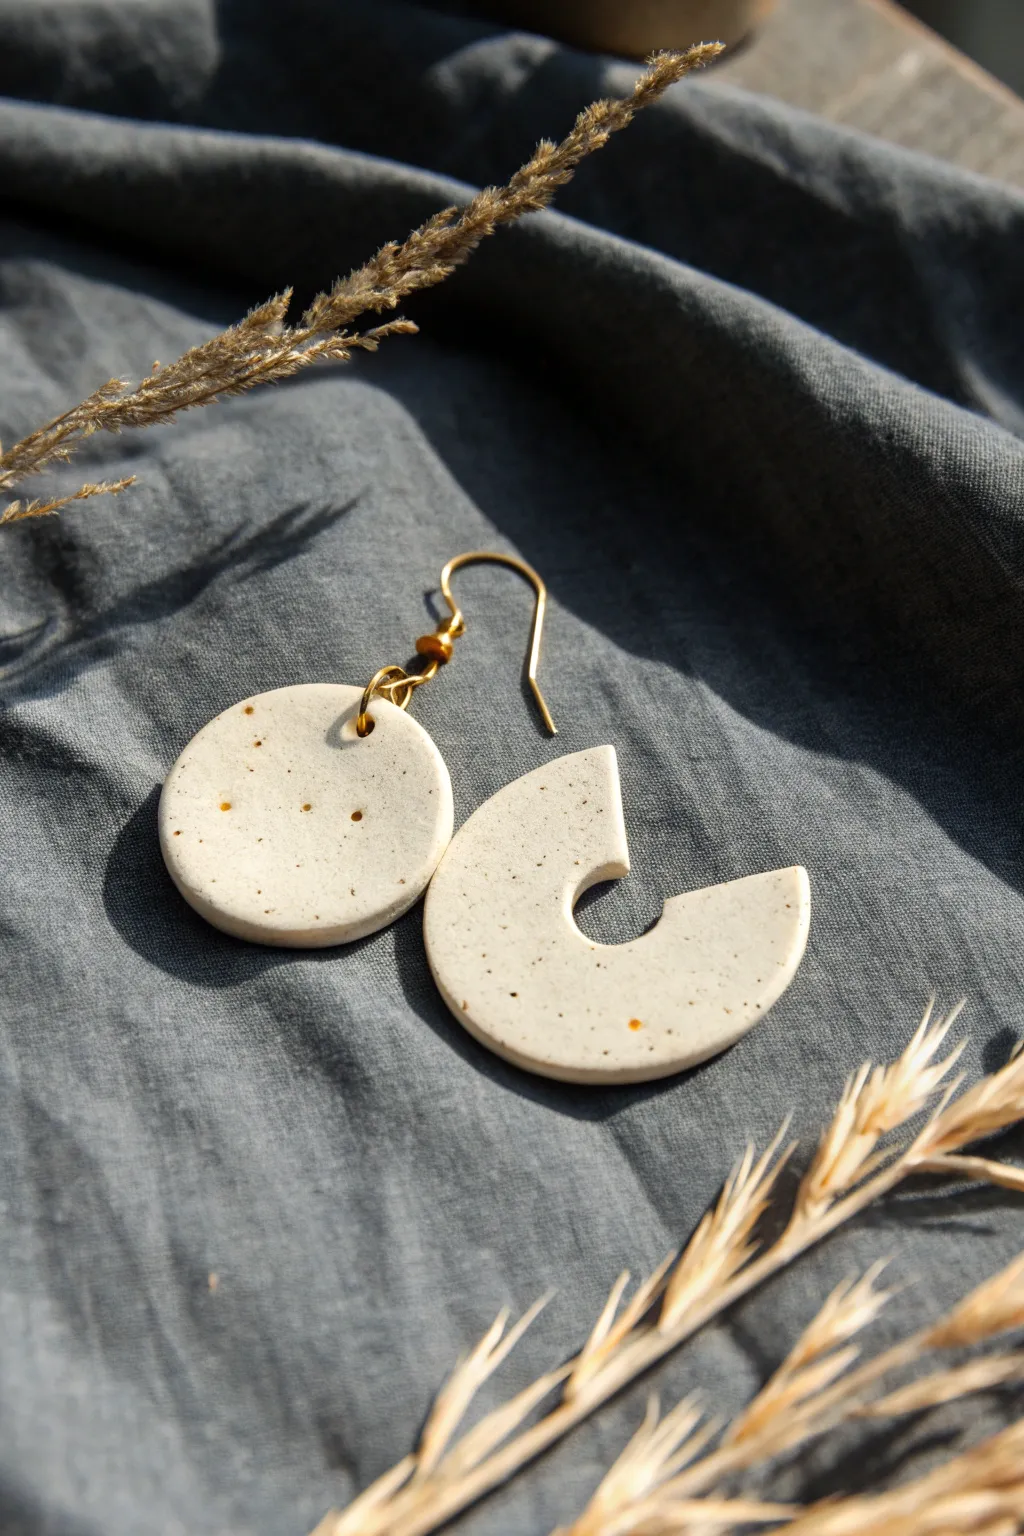
Embrace minimalist geometry with these elegant earrings that play with positive and negative space. The speckled clay finish offers a natural, stoneware aesthetic while the cutout design keeps them modern and lightweight.
How-To Guide
Materials
- Speckled granite polymer clay (e.g., Fimo or Sculpey Premo)
- Acrylic rolling pin
- Circle clay cutter (approx. 1.25 inches)
- Small circle clay cutter (approx. 0.5 inches)
- Clay knife or craft blade
- Hand drill or needle tool
- Sanding paper or nail buffer
- Gold-tone earring hooks (french hooks)
- Jump rings (gold tone)
- Jewelry pliers (round nose and flat nose)
- Baking sheet and parchment paper
- Smooth work surface (ceramic tile or glass mat)
Step 1: Preparation and Rolling
-
Condition the Clay:
Begin by taking a chunk of your speckled granite polymer clay and kneading it in your hands. You want it to be warm and pliable, which prevents cracking later on. -
Flatten Roughly:
Press the conditioned clay into a rough pancake shape on your smooth work surface to prepare it for rolling. -
Roll to Thickness:
Use your acrylic rolling pin to smooth the clay into an even sheet. Aim for a thickness of about 3mm—thick enough to be durable, but thin enough to be lightweight for ears. -
Check for Bubbles:
Inspect the surface for any air pockets. If you spot one, gently pierce it with a needle tool and smooth it over with your finger.
Clean Cuts Only
To prevent the clay from sticking inside your cutters, dip the rim of the cutter into cornstarch or water before pressing it into the clay slab.
Step 2: Cutting the Geometric Shapes
-
Cut the Base Circles:
Using your larger circular cutter, press firmly into the clay sheet to punch out two identical circles. Lift the excess clay away from the shapes. -
Create the First Cutout:
Take your smaller circle cutter and position it off-center on one of the large clay circles. You want to create a ‘C’ shape or crescent, depending on how deep you cut. -
Remove the Negative Space:
Press down and remove the small inner circle. This creates the negative space element seen in the bottom piece of the earring shown. -
Design the Top Piece:
For the top connecting piece, you can reuse the small circle you just cut out, or cut a fresh small circle from the scrap clay. Ensure it is perfectly round. -
Pierce the Holes:
Use a needle tool to poke holes for the jump rings. On the top small circle, place one hole near the edge. On the larger ‘C’ shape piece, place a hole at the top center of the arch. -
Final Smoothing:
Before baking, gently run your finger dipped in a little cornstarch or water around the cut edges to soften any sharpness left by the cutters.
Step 3: Baking and Assembly
-
Bake the Pieces:
Transfer your clay shapes to a parchment-lined baking sheet. Bake according to the manufacturer’s instructions on your specific package of clay (usually 275°F for 15-30 minutes). -
Cool Down:
Once bakes, let the pieces cool completely on the baking sheet to ensure they harden properly. -
Sand the Edges:
If there are any rough spots post-baking, use fine-grit sandpaper or a buffer to smooth the rims. I personally like to do this under running water to keep dust down. -
Open the Jump Ring:
Using two pairs of pliers, twist a jump ring open (twist front-to-back, never pull apart sideways). -
Connect the Pieces:
Thread the jump ring through the hole of the ‘C’ shape and then through the hole of the small top circle. Close the jump ring securely. -
Attach the Hook directly:
There is a second hole needed at the top of the small circle. If you forgot to pierce it before baking, use a small hand drill now. Attach the earring hook directly through this top hole, or use a second jump ring for extra movement.
Mix It Up
Try rotating the negative space cutout. Instead of a centered hole, punch the inner circle closer to the edge to create thinner, delicate crescent moons.
Now you have a stunning pair of architectural earrings ready to wear or gift
Open Hoop Ceramic Earrings
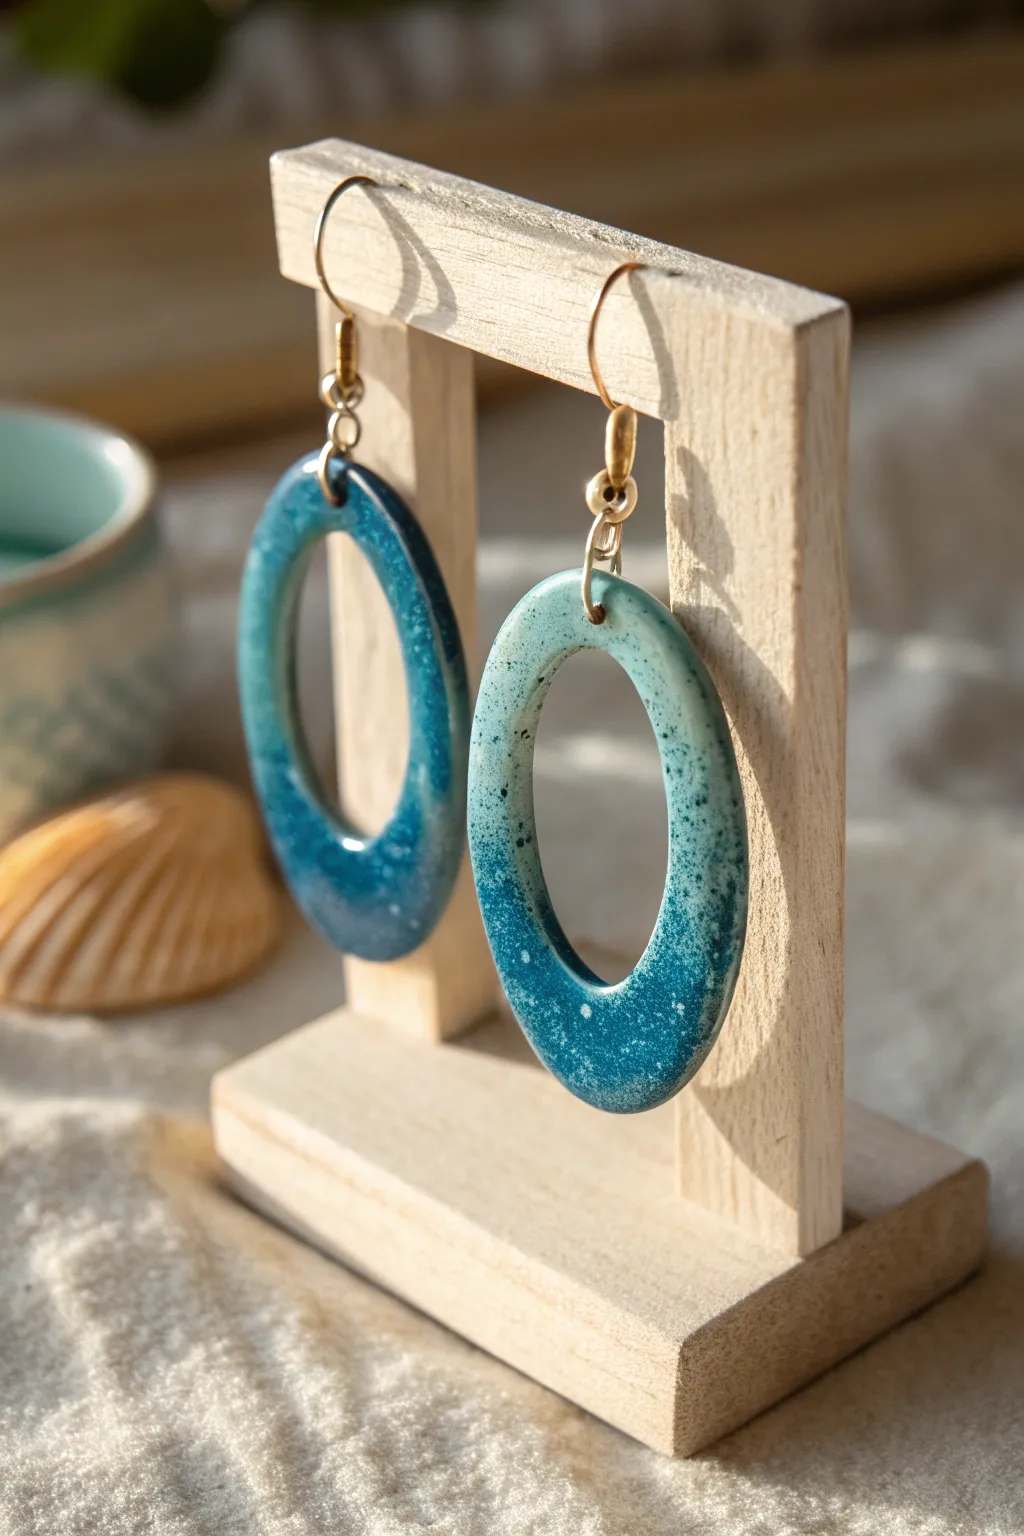
These striking ceramic open hoop earrings capture the essence of a tranquil sea with their speckled turquoise-to-teal gradient. The simple oval shape allows the rich, reactive glaze to take center stage, creating a modern yet organic piece of wearable art.
Detailed Instructions
Materials
- White earthenware or stoneware clay slab (approx. 3mm thick)
- Oval clay cutters (one large approx. 4cm, one smaller approx. 2cm)
- Needle tool or small drill bit (approx. 1.5mm)
- Sanding sponge or fine-grit sandpaper
- Bisque firing kiln access
- Laguna ‘Peacock’ or similar speckled teal reactive glaze
- Dark blue or teal underglaze (optional for deepening the gradient)
- Soft fan brush and small detail brush
- Glaze firing kiln access
- Bead rack or kiln stilts for firing
- 2 Gold-filled ear wires (French hooks)
- 2 Gold jump rings (6mm)
- 2 small decorative gold bead connectors (optional)
- Jewelry pliers (flat nose and round nose)
Step 1: Shaping the Clay Body
-
Roll the slab:
Start with wedged clay to remove air bubbles. Roll it out into a smooth, even slab about 3mm thick. If you want a textured back, roll it onto a canvas sheet; for smooth, use a silicone mat. -
Cut the outer shape:
Using your larger oval cutter, press firmly into the clay to cut two identical oval shapes. Release them gently from the surface. -
Create the hoop:
Take the smaller oval cutter and aim for the upper-middle section of your large oval pieces. Press down to remove the center, creating the open loop effect shown in the hoop design. -
Smooth the edges:
Dip your finger in a little water and very gently run it along the cut edges to soften the harsh angles. This makes the final glaze break more beautifully over the rim. -
Pierce the connection point:
Using a needle tool, create a hole at the very top center of each oval. Ensure the hole is at least 2mm from the edge to prevent cracking, but large enough to accommodate your jump rings after shrinkage. -
Dry and refine:
Allow the clay pieces to dry to the ‘bone dry’ stage between two boards to keep them flat. Once dry, use fine sandpaper to gently smooth away any remaining burrs or rough spots. -
Bisque fire:
Fire the greenware pieces in a kiln to cone 04 (or according to your clay’s specifications) to harden them into bisque.
Step 2: Glazing the Gradient
-
Clean the bisque:
Wipe the fired bisque pieces with a damp sponge to remove any kiln dust, which can prevent glaze from adhering properly. -
Apply base glaze:
Stir your speckled teal reactive glaze thoroughly. Using a soft fan brush, apply one even coat over the entire front surface of the earring. I find it helpful to glaze the back first if you are glazing both sides, letting it dry before flipping. -
Create the gradient:
To achieve the darker bottom effect, dip the bottom half of the oval into the glaze container for a second coat. Let it dry for a minute. -
Deepen the dip:
Dip just the bottom quarter of the oval into the glaze again for a third layer. This thick application encourages the glaze to pool and darken at the bottom. -
Speckle effect:
If your glaze isn’t naturally speckled, load a stiff brush with a darker iron-oxide wash or dark blue glaze and flick the bristles to splatter tiny dots onto the surface. -
Glaze fire:
Place the earrings on a bead rack or specialized jewelry stilt so they hang freely and the glaze doesn’t fuse to the shelf. Fire to the glaze’s recommended temperature (usually cone 05/06 or cone 5/6 depending on your materials).
Glaze Thickness Tip
Keep glaze thinner near the hole! If applied too thickly at the top, the glaze might fill in the hole during firing, making assembly impossible without re-drilling.
Step 3: Jewelry Assembly
-
Prepare findings:
Once the ceramic pieces are cool, gather your gold findings. Use two pairs of pliers to twist open a 6mm jump ring laterally (never pull it apart). -
Attach the connector:
Thread the open jump ring through the hole in the ceramic oval. Slide on your decorative connector or small chain link before closing the jump ring securely. -
Add the ear wire:
Open the loop at the bottom of your French hook ear wire. Attach it to the top of your connector piece. -
Check alignment:
Hold the earring up to ensure the ceramic oval hangs facing forward. If it twists, you may need to add a second small jump ring to rotate the orientation 90 degrees. -
Final polish:
Gently wipe the ceramic surface with a soft cloth to remove fingerprints and make the glossy glaze shine.
Warping Woes?
If your ovals warp during drying, sandwich them between two pieces of drywall or untreated wood boards. This ensures even moisture evaporation and flat results.
Now you have a stunning pair of custom ceramic earrings ready to wear or gift

TRACK YOUR CERAMIC JOURNEY
Capture glaze tests, firing details, and creative progress—all in one simple printable. Make your projects easier to repeat and improve.
Sgraffito Linework Beads
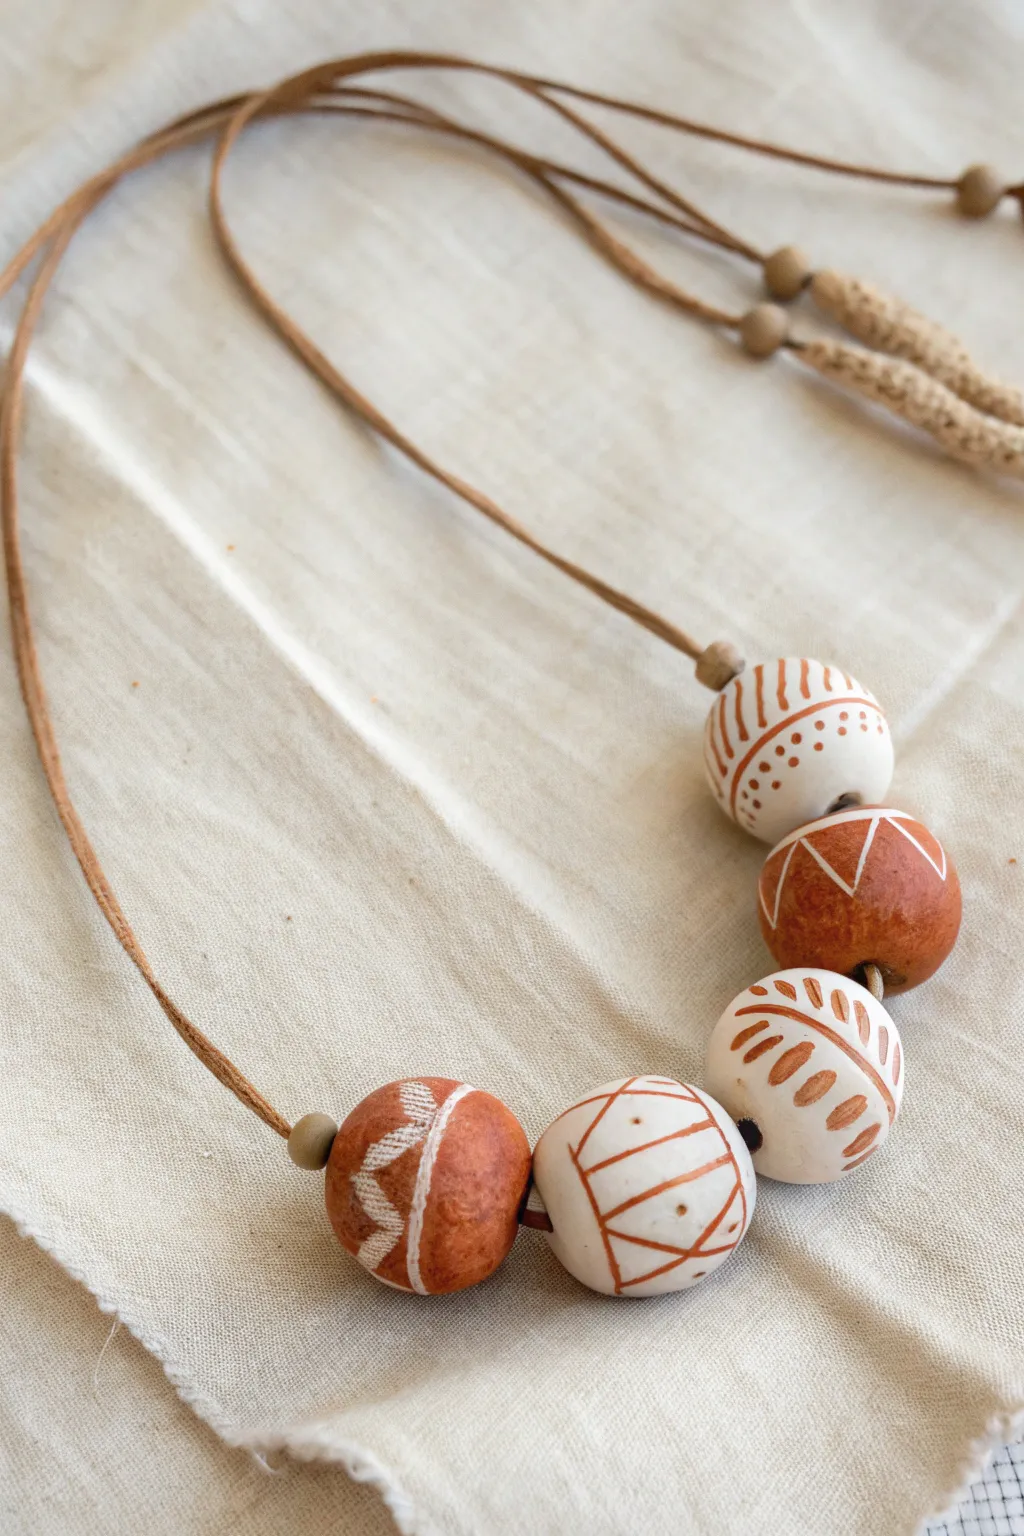
These striking geometric beads play with alternating contrasts, mixing white clay with terracotta slip and terracotta clay with white slip for a harmonious earthy palette. Simple leather cording lets the bold sgraffito and mishima patterns take center stage.
Step-by-Step
Materials
- White earthenware or stoneware clay body
- Terracotta (red) earthenware clay body
- Terracotta underglaze or slip
- White underglaze or slip
- Loop tool or needle tool for carving
- Bead piercing tool or bamboo skewer
- Synthetic sponge
- Fine grit sandpaper
- Clear matte glaze (optional)
- Leather cord (round, approx 2mm)
- Small wooden accent beads
Step 1: Forming the Beads
-
Roll the clay:
Begin by wedging both your white and terracotta clay bodies separately to remove air bubbles. Pinch off roughly 1-inch chunks of clay. -
Shape spheres:
Roll the chunks rapidly between your palms to create smooth, even spheres. You will need three white spheres and two terracotta spheres for the pattern shown in the example. -
Pierce the holes:
While the clay is leather hard (stiff but still cool to the touch), carefully twisting your bead piercing tool or skewer through the center of each sphere. Rotate the bead as you pierce to ensure the hole is centered. -
Smooth the openings:
Gently smooth the clay around the exit and entry holes with a fingertip to remove any sharp burrs created by the piercing tool.
Smudged Lines?
If your inlay wipes away messily, the sponge is too wet. Squeeze it out thoroughly. You want to abrade the surface clay, not wash it.
Step 2: Decorating the White Beads
-
Draft the pattern:
Take your three white clay beads. Using a needle tool, lightly scratch your geometric designs into the surface. Create a mix of patterns: vertical stripes, chevrons, and leaf-like dashes. -
Carve the lines:
Deepen these lines significantly using a small loop tool or drag the needle tool firmly. You want a distinct groove that can hold slip. -
Apply contrasting slip:
Paint terracotta slip or underglaze liberally over the carved white beads, ensuring the liquid fills every groove completely. It will look messy at this stage, but that is expected. -
Reveal the inlay:
Once the slip is leather hard, use a clean, slightly damp sponge to wipe away the excess surface slip. The terracotta color will remain trapped in the carved lines, revealing the white clay body underneath. This is the Mishima technique.
Texture Twist
For a more tactile finish, skipping sanding after the bisque fire creates a raw, stony feel that contrasts beautifully with the smooth leather.
Step 3: Decorating the Terracotta Beads
-
Coat the surface:
Take your two terracotta beads and paint a section or band of white underglaze/slip where you plan to have patterns. You can mask off areas if you want crisp transitions, or just paint the general area. -
Allow to set:
Wait until the white slip layer has dried to a leather-hard state so it won’t smear when touched. -
Carve the Sgraffito:
Using a sharp carving tool, scratch through the layer of white slip to reveal the red clay body underneath. Try a zig-zag pattern or simple triangles to match the geometric theme. -
Clean up:
Gently brush away the clay crumbs produced by carving with a soft, dry brush. Do not use water here or you might smudge the white lines.
Step 4: Firing and Assembly
-
Bisque fire:
Let all beads dry completely (bone dry) before loading them into the kiln. Fire to cone 04 (or according to your clay’s specifications). -
Sand and finish:
After firing, lightly sand the bead surfaces under running water to smooth them out. If you prefer a protective finish, apply a thin coat of matte clear glaze and fire again, or leave them raw for a natural texture. -
Cut the cord:
Cut a generous length of leather cord, long enough to slip over your head comfortably. -
String the beads:
Thread the beads onto the cord. I like to alternate the white and terracotta beads, placing small wooden spacer beads at the very ends of the ceramic row to keep them grouped nicely. -
Tie the knot:
Secure the ends of the necklace with a sliding knot or a simple Overhand knot to complete the piece.
Wear these sculptural beads as a striking statement piece that celebrates natural clay tones
Marbled Ceramic Statement Pendants
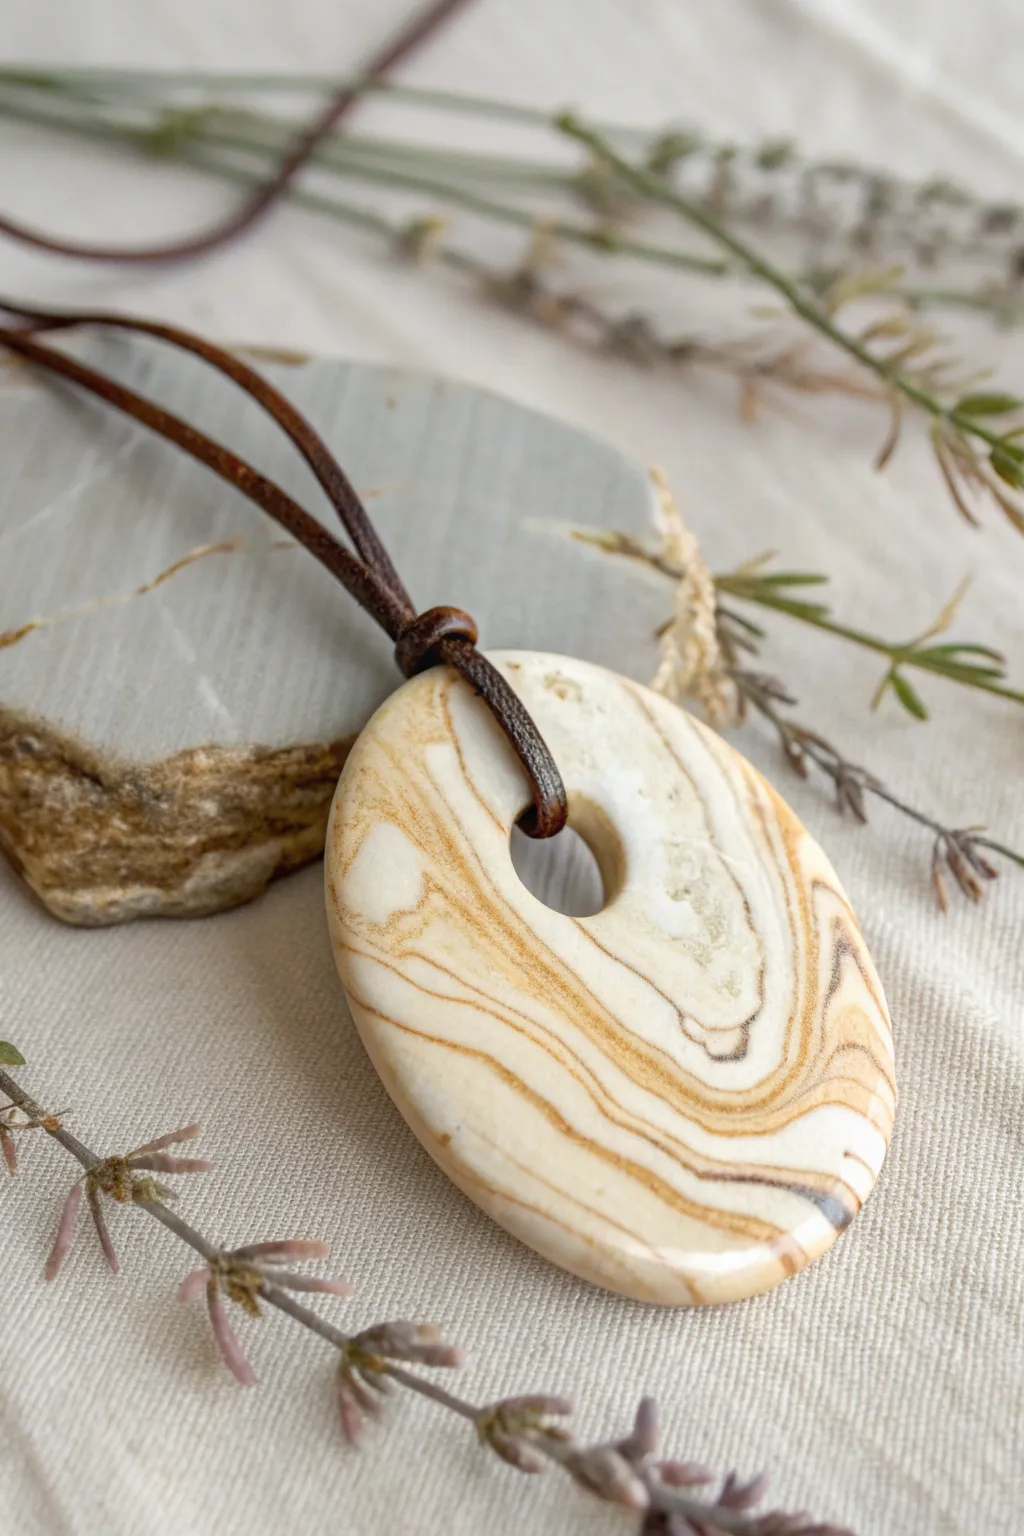
Capture the organic beauty of sedimentary rock with this marbled ceramic pendant. Using a simple nerikomi-inspired technique, you’ll blend beige and brown clays to create a unique, swirling statement piece that hangs simply on a leather cord.
How-To Guide
Materials
- White polymer clay or low-fire white ceramic clay
- Beige/tan polymer clay or ceramic clay
- Dark brown polymer clay or ceramic clay
- Rolling pin or clay machine
- Oval clay cutter (approx. 2-3 inches)
- Round cutter or straw (for the hole)
- Smooth work surface (ceramic tile or glass)
- Fine-grit sandpaper (400-1000 grit)
- Gloss varnish or resin (optional, for shine)
- Leather cord (dark brown, 2mm)
- Oven (if using polymer) or Kiln (if using stoneware)
Step 1: Creating the Marbled Slab
-
Condition the Clays:
Start by thoroughly kneading each color of clay separately until they are soft, pliable, and warm to the touch. This prevents cracking and ensures they blend smoothly. -
Form Logs:
Roll each color into a long, snake-like log. Make the white log the thickest (about 1 inch diameter), the beige medium thickness, and the brown the thinnest to mimic fine veins. -
Twist Together:
Hold the three logs together and twist them tightly into one large rope. Fold the rope in half and twist again. Repeat this twist-and-fold process about 4-5 times. -
Check the Pattern:
Stop twisting before the colors completely mix into a muddy shade; you want distinct striations. Roll the twisted rope into a ball or a thick block. -
Slice the Block:
Using a tissue blade or sharp knife, slice thin layers off your clay block to reveal the internal cross-section of the marbling. This is where the magic happens and the pattern is revealed. -
Assemble the Sheet:
Lay your sliced cross-sections side-by-side on your work surface, slightly overlapping, until you have an area large enough for your cutter. -
Roll Smooth:
Use your acrylic roller to flatten the assembled slices into a single, cohesive sheet. Roll in different directions to stretch the marble lines organically.
Clean Cuts Only
To avoid distorting your oval shape when cutting, place a piece of plastic wrap over the clay before pressing the cutter down. This creates beautifully rounded, professional edges.
Step 2: Shaping and Finishing
-
Cut the Shape:
Place your large oval cutter over the section of clay with the most pleasing pattern. Press down firmly to cut out the pendant shape. -
Smooth the Edges:
Before removing the cutter, run your finger along the top edge to gently domed slight softness. Remove the cutter and smooth any rough sides with your fingertip. -
Create the Suspension Hole:
Use a medium-sized round cutter or a sturdy straw to punch a hole near the top third of the oval. Ensure it is large enough for your leather cord to pass through eventually. -
Bake or Fire:
If using polymer clay, bake according to the package instructions (usually 275°F for 30 mins per 1/4 inch). If using ceramic clay, follow your specific kiln firing schedule. -
Quench (Polymer Only):
I like to plunge the hot polymer pieces directly into ice water immediately after baking; this helps increase the translucent depth and strength of the clay. -
Sand for Smoothness:
Once cool, wet-sand the pendant starting with 400 grit and working up to 1000 grit. This reveals the true clarity of the pattern and removes fingerprints. -
Buff or Glaze:
Buff the piece vigorously with a denim cloth for a natural sheen, or apply a thin coat of gloss varnish if you prefer a high-shine, polished stone look. -
Attach the Cord:
Cut a length of leather cord. Fold it in half and push the loop through the pendant hole from front to back. -
Secure the Knot:
Thread the loose ends of the cord through the loop and pull tightly to create a Lark’s Head knot, securing the pendant firmly in place.
Gold Leaf Accents
Before rolling your marbled block flat, press small flakes of gold or copper leaf onto the clay. Roll it in to embed the metal for a luxurious, geode-like sparkle.
Wear your new stone-effect pendant with pride as a natural, grounding accessory
Two-Tone Dip-Glazed Earrings
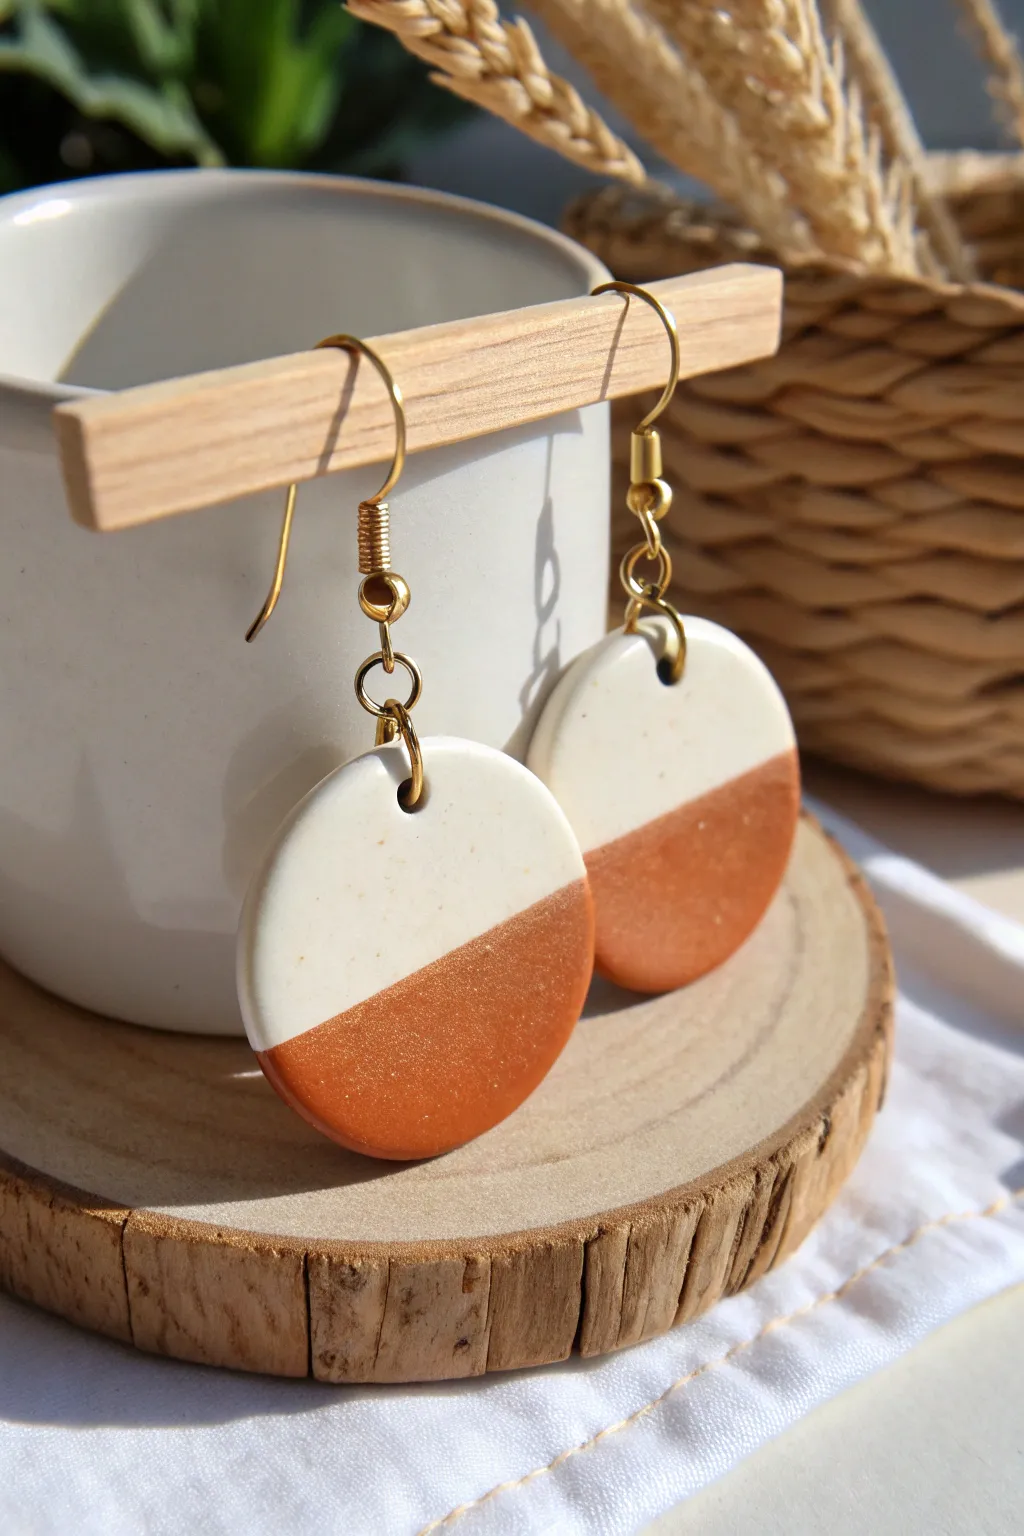
These elegant earrings combine rustic warmth with modern minimalist design through a striking two-tone finish. Featuring a soft cream base dipped for a sharp metallic copper contrast, this project perfectly mimics the look of high-end studio pottery.
Step-by-Step Tutorial
Materials
- Polymer clay (white or translucent white)
- Acrylic paint (burnt metallic orange or copper)
- Gloss varnish or resin (optional for shine)
- Gold-tone earring hooks with ball coil
- Gold-tone jump rings (6mm)
- Round clay cutter (approx. 1.25 inch)
- Acrylic rolling pin
- Hand drill or needle tool for piercing
- Painter’s tape or Washi tape
- Small flat paintbrush
- Fine-grit sandpaper (400-600 grit)
- Parchment paper or ceramic tile
Step 1: Shaping the Clay Base
-
Condition the clay:
Begin by warming the white polymer clay in your hands, kneading it until it becomes soft and pliable. This conditioning stage is crucial to prevent cracks during baking. -
Roll out the slab:
Use your acrylic roller to flatten the clay into an even slab. Aim for a thickness of about 3mm to 4mm—thick enough to feel substantial like ceramic, but light enough for comfortable wear. -
Cut the shapes:
Press your round cutter firmly into the clay to create two perfect circles. Lift the excess clay away first before gently removing the circles from your work surface. -
Pierce the holes:
While the clay is still raw, use a needle tool to create a small hole near the top edge of each circle. Make sure the hole is large enough to fit your jump rings later. -
Smooth the edges:
Dip your finger in a little water or baby oil and gently run it around the circumference of the discs to smooth out any rough texture left by the cutter. -
Speckle effect (optional):
To mimic the natural ceramic look in the photo, you can lightly sprinkle ground black pepper or dried vanilla bean specks onto the clay and gently roll over it once more to embed them. -
Bake the pieces:
Place your clay discs on a ceramic tile or parchment-lined baking sheet. Bake according to the manufacturer’s instructions on your clay package, usually around 275°F (135°C) for 15-30 minutes.
Step 2: Creating the Dipped Look
-
Sand and prep:
Once the pieces have cooled completely, lightly sand the edges with fine-grit sandpaper if needed. Wipe away any dust with a damp cloth. -
Tape the line:
Apply a strip of painter’s tape across each circle slightly below the middle line. Press the edge of the tape down firmly with your fingernail to ensure a crisp, bleed-free line. -
Painting the base:
Load your flat brush with metallic copper acrylic paint. Paint the exposed bottom section of the clay, brushing from the tape downward to avoid pushing paint under the adhesive edge. -
Second coat:
Let the first layer dry to the touch, then apply a second coat for a rich, opaque metallic finish. I usually find two coats provide that deep, glazed ceramic appearance. -
Reveal the line:
Carefully peel back the tape while the second coat is still slightly tacky. This prevents the dried paint from cracking along the edge. -
Glazing (Optional):
If you want a true high-gloss ceramic look, apply a layer of UV resin or clear gloss varnish over the entire piece. Cure or dry completely.
Tape Trick
Before painting, run a burnishing tool or spoon edge over the tape line. This seals it tightly against the texture and stops the paint from bleeding.
Step 3: Assembly
-
Open the jump rings:
Using two pairs of pliers, twist a gold jump ring open sideways (never pull it apart). -
Connect the hardware:
Thread the open jump ring through the hole in your clay disc, then loop on the gold earring hook. -
Close and secure:
Twist the jump ring back into a closed position, ensuring the ends meet perfectly so the charm doesn’t slip off. -
Final check:
Repeat for the second earring and verify that both pieces hang at the same length with the painted sections facing forward.
Go Geometric
Instead of a straight horizontal line, tape off a diagonal angle or a chevron V-shape for a funky, geometric take on the classic dipped style.
Now you have a stunning pair of faux-ceramic earrings ready to elevate your everyday outfit
Crackle Glaze Highlight Pendants
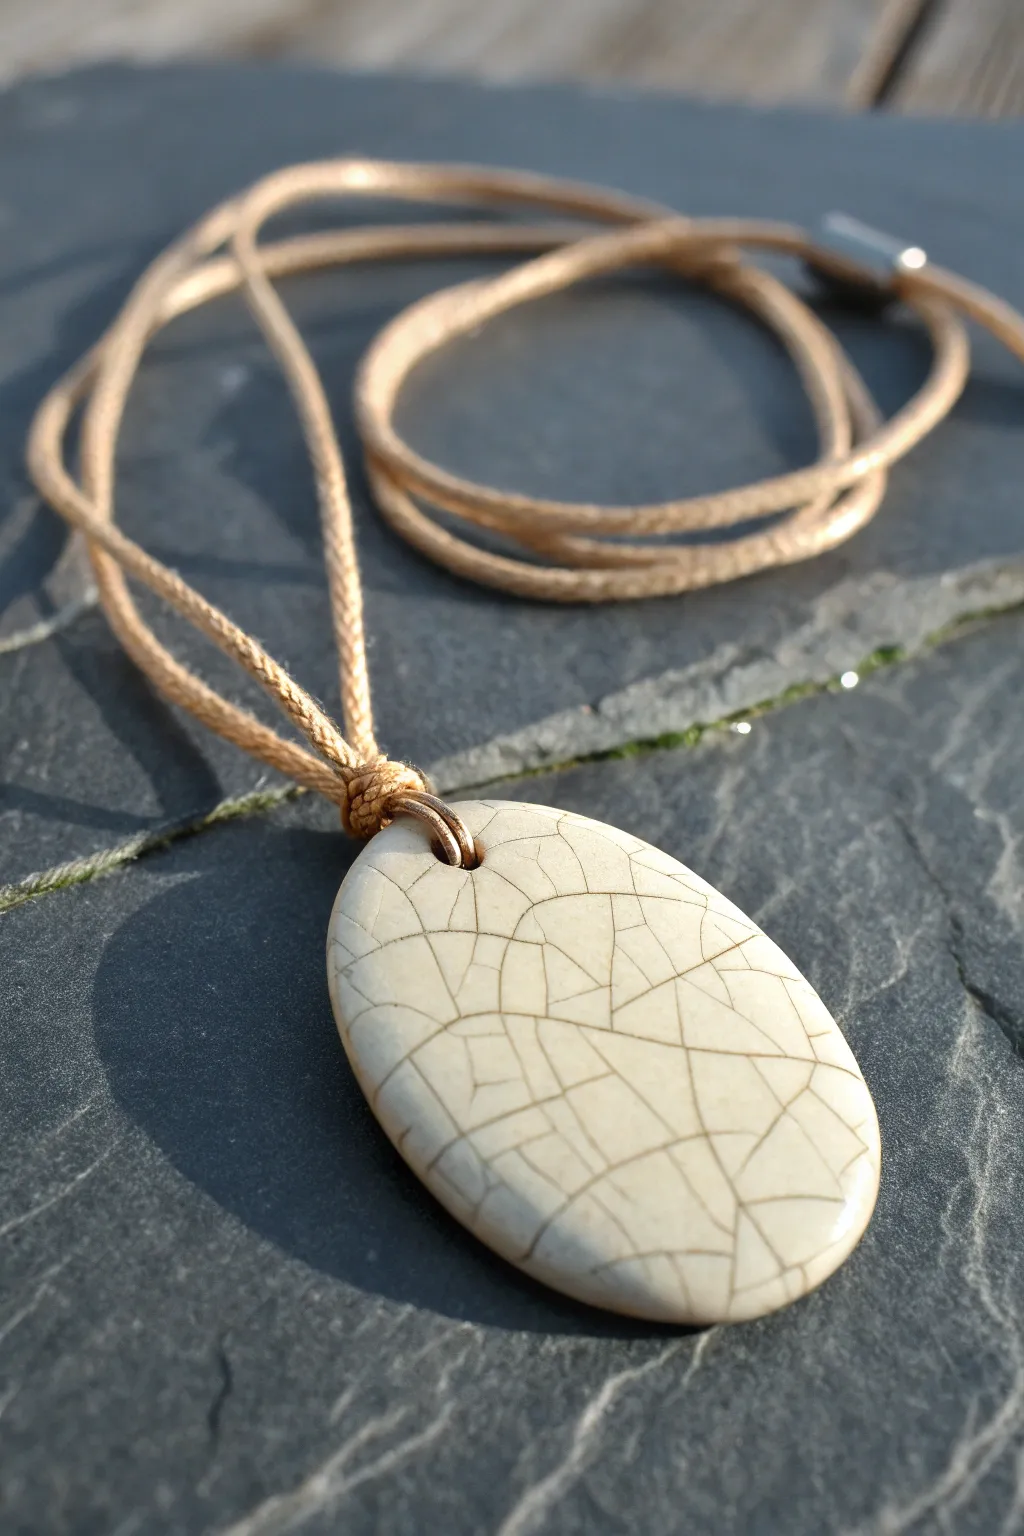
Capture the elegance of aged porcelain with this striking ceramic pendant, featuring a deliberate crackle glaze effect that turns imperfections into a focal point. The organic web of dark lines against the creamy white surface creates a sophisticated, ancient aesthetic that looks beautiful on a simple cord.
Step-by-Step Tutorial
Materials
- High-fire white stoneware or porcelain clay
- Oval clay cutter (approx. 2 inches long)
- Sandpaper/sponge for smoothing
- Clear crackle glaze (low-fire or high-fire depending on your clay)
- Black India ink or dark acrylic wash
- Clean, soft cloth or rag
- Kiln
- Drill bit or straw for hole punching
- Waxed cotton or hemp cord (beige/tan)
- Jewelry clasp and end caps
Step 1: Shaping the Clay Body
-
Roll the slab:
Begin by rolling out your white stoneware or porcelain clay on a canvas board to a thickness of about 1/4 inch. Ensure the thickness is even to prevent warping during drying. -
Cut the shape:
Using your oval cutter, press firmly into the clay to cut out your pendant shape. If you don’t have a cutter, you can trace a paper template and cut around it with a needle tool. -
Refine the edges:
Dip your finger in a little water and gently run it along the cut edges to round them off. Hard edges can become sharp after firing, so softening them now is crucial for wearable jewelry. -
Create the suspension hole:
While the clay is still leather-hard, punch a hole near the top edge using a small straw or a specialized drill tool. Make sure the hole is large enough to accommodate your cord, keeping in mind the clay will shrink slightly. -
Dry and bisque fire:
Allow the piece to dry slowly under plastic for a day, then fully air dry. Once bone dry, load it into the kiln for a bisque firing (usually to Cone 04) to prepare it for glazing.
Step 2: Glazing and Crazing
-
Apply the crackle glaze:
Brush or dip your bisque-fired pendant into a clear crackle glaze. Two to three coats usually work best to develop a thick enough layer for substantial cracks to form. -
Wipe the foot:
Ensure the back of the pendant (or just the very bottom edge if you are using a jewelry stilt) is wiped clean of glaze so it doesn’t fuse to the kiln shelf. -
Glaze fire:
Fire the piece again according to your glaze’s instructions (typically Cone 06 for low-fire or Cone 6 for mid-range). The specific cooling rate can affect the crackle size, but a standard cycle usually works well. -
Inspect the craze:
Once cool, remove the pendant. You should see a network of fine, invisible fissures in the glass surface. Sometimes you can hear it ‘tinking’ as it cools. -
Highlight the cracks:
Brush a generous amount of black India ink or a watered-down dark acrylic paint over the entire glazed surface. Let it sit for a few seconds to seep into the microscopic fissures. -
Reveal the pattern:
I like using a slightly damp cloth to wipe away the excess ink on the surface. The dark pigment will remain trapped in the cracks, revealing the spiderweb pattern. -
Clean and seal:
Polish the surface with a dry cloth to remove any lingering haze. The ink is trapped under the surface tension of the cracks and generally doesn’t need a sealer, but a light coat of wax can add sheen.
Ink Won’t Stick?
If the ink wipes away completely, the fissures aren’t open enough. Place the pendant in the freezer for 15 minutes, then run under warm water to thermal shock the glaze and force cracks.
Step 3: Assembly
-
Measure the cord:
Cut a length of beige waxed cotton or hemp cord, approximately 24 to 30 inches long, depending on your desired drop length. -
Attach the pendant:
Fold the cord in half to find the center. Thread the folded loop through the pendant hole from front to back. -
Secure the Lark’s Head knot:
Pass the two loose ends of the cord through the loop you just pushed through the hole and pull tight. This creates a secure, clean-looking knot at the top of the pendant. -
Finish the ends:
Cleanly cut the ends of the cord and use a dab of jewelry glue to secure them into metal end caps or crimp beads. Attach a clasp and jump ring to complete the necklace.
Add Metallic Flair
Instead of black ink, rub gold leaf paint or metallic luster powder into the cracks for a true Kintsugi look. Use an oil-based metallic wash for better adhesion and shine.
This ancient-looking technique yields a completely unique pattern every time, giving you a one-of-a-kind wearable art piece
Reactive Glaze “Galaxy” Earrings
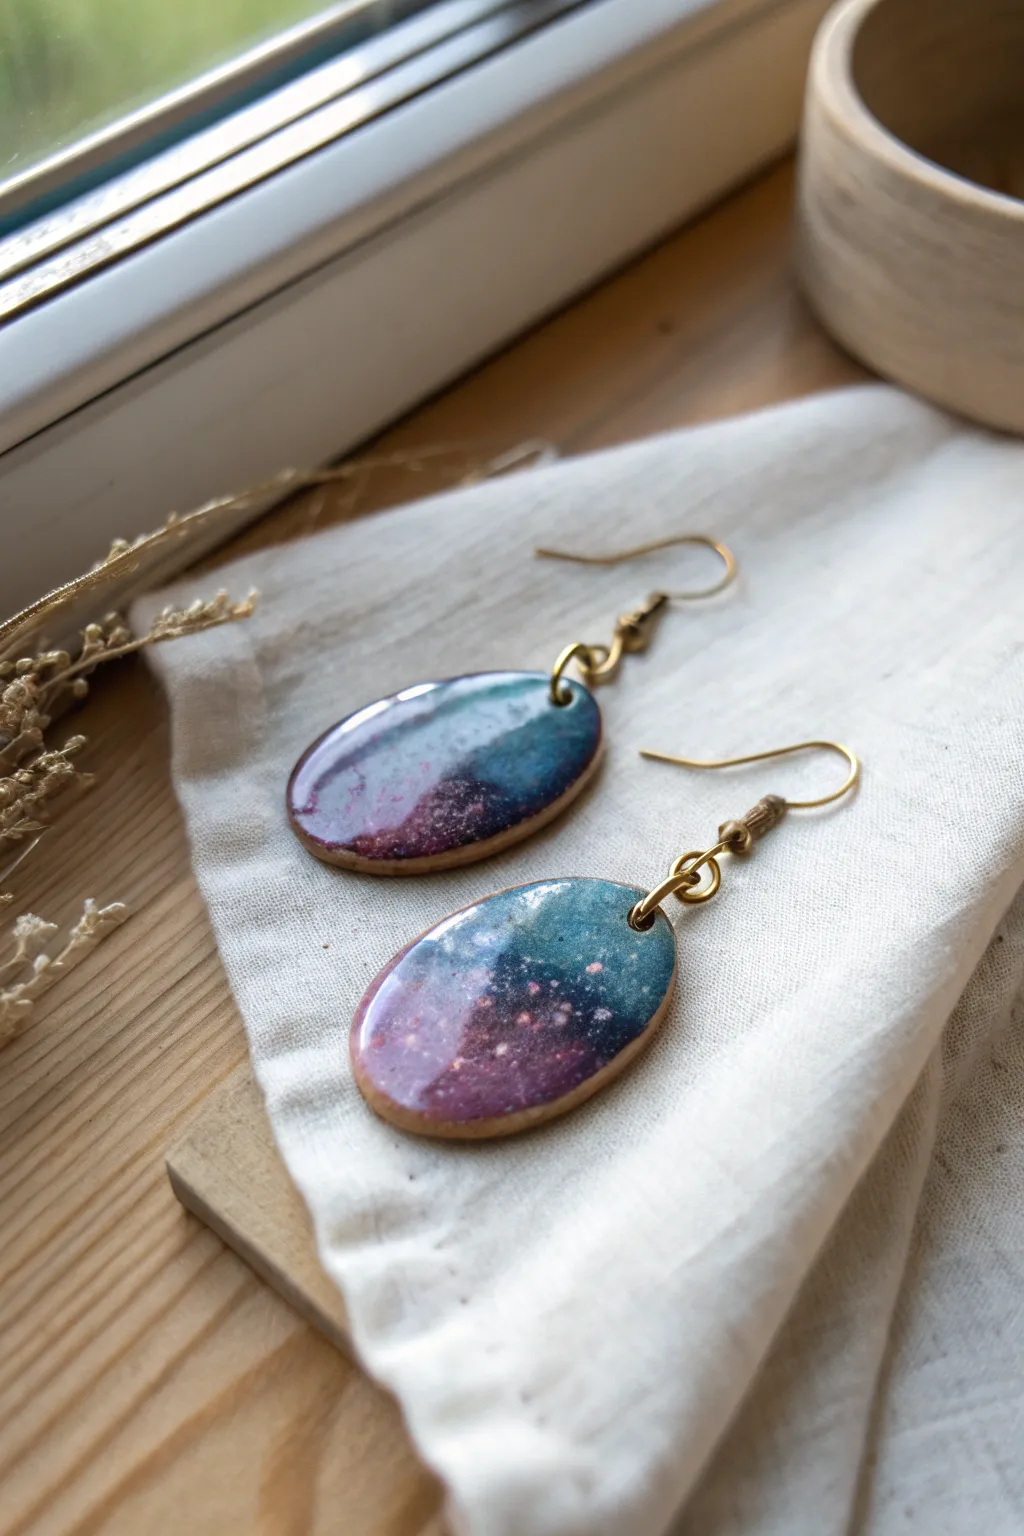
Capture the mysteries of the cosmos in a wearable form with these stunning galaxy-inspired earrings. Using a simple reactive glazing technique, you can achieve a depth of color that mimics a starry nebula on a sleek ceramic oval.
Detailed Instructions
Materials
- Low-fire white ceramic clay
- Oval clay cutter (approx. 1.5 inch)
- Needle tool or small drill bit
- Rolling pin
- Sponge
- Kiln (or access to a firing service)
- Deep purple glazes (Mayco or Amaco recommended)
- Teal or turquoise reactive glaze
- White glaze
- Stiff bristle brush (toothbrush works well)
- Soft fan brush
- Gold-plated earring hooks
- Jump rings (6mm)
- Jewelry pliers
Step 1: Shaping the Clay
-
Roll out the slab:
Begin by wedging your white clay to remove air bubbles, then roll it out into a smooth slab approximately 1/8 to 1/4 inch thick. Keep the thickness consistent for even drying. -
Cut the shapes:
Using your oval cutter, press firmly into the clay to create two identical shapes. If you want a matched set, double-check that your clay texture is smooth before cutting. -
Smooth the edges:
Dip a small sponge in water and gently run it along the cut edges of the ovals. This softens the sharp angles left by the cutter which makes the glaze flow nicer later. -
Pierce the holes:
Use a needle tool to create a small hole at the top center of each oval. Make sure the hole is big enough to fit your jump rings, keeping in mind clay shrinks slightly when fired. -
Bisque fire:
Allow the pieces to dry slowly until bone dry, then bisque fire them to cone 04. This prepares the porous surface to accept your galaxy glazes.
Starry Splatter Tip
Test your splatter technique on a piece of paper first. The distance and speed of your flick determine if you get tiny distant stars or large nearby planets.
Step 2: Creating the Galaxy
-
Base coat application:
Apply two generous coats of the deep purple glaze to the front face of the bisque-fired oval. Let the first coat dry to the touch before adding the second. -
Adding the nebula:
While the purple is still slightly damp, blob on patches of the teal or turquoise reactive glaze. I like to focus this color on just one side or corner to create a drifting cloud effect rather than covering the whole piece. -
Blending the boundaries:
Gently tap the areas where the purple and teal meet with a soft brush to encourage them to mingle, which creates those beautiful new hues during firing. -
Creating stars:
Dip a stiff bristle brush or an old toothbrush into thinned white glaze. Hold it over the pieces and flick the bristles with your thumb to splatter tiny white dots across the surface. -
Check the back:
Ensure the back and the drilled holes are completely free of glaze. Wipe them clean with a sponge if any drips occurred. -
Glaze fire:
Fire the pieces again to the temperature specified by your glaze manufacturer (usually cone 05/06 for low fire). This is where the magic happens and the colors melt together.
Step 3: Assembly
-
Adding jump rings:
Once cool, use two pairs of pliers to twist open a gold jump ring. Thread it through the ceramic hole and close it securely. -
Connect the hook:
Open the loop at the bottom of the earring hook (or add a second jump ring if needed for orientation) and attach it to the first ring. -
Final polish:
Wipe the finished ceramic with a soft cloth to remove fingerprints and make that glossy galaxy finish shine.
Troubleshooting Cracks
If your clay cracks while drying, you likely let it dry too fast. Cover your next batch with plastic sheet lightly to slow the moisture evaporation.
You now have a miniature universe dangling from your ears, ready to add a spark of wonder to your daily style
Luster-Edge Accent Charms
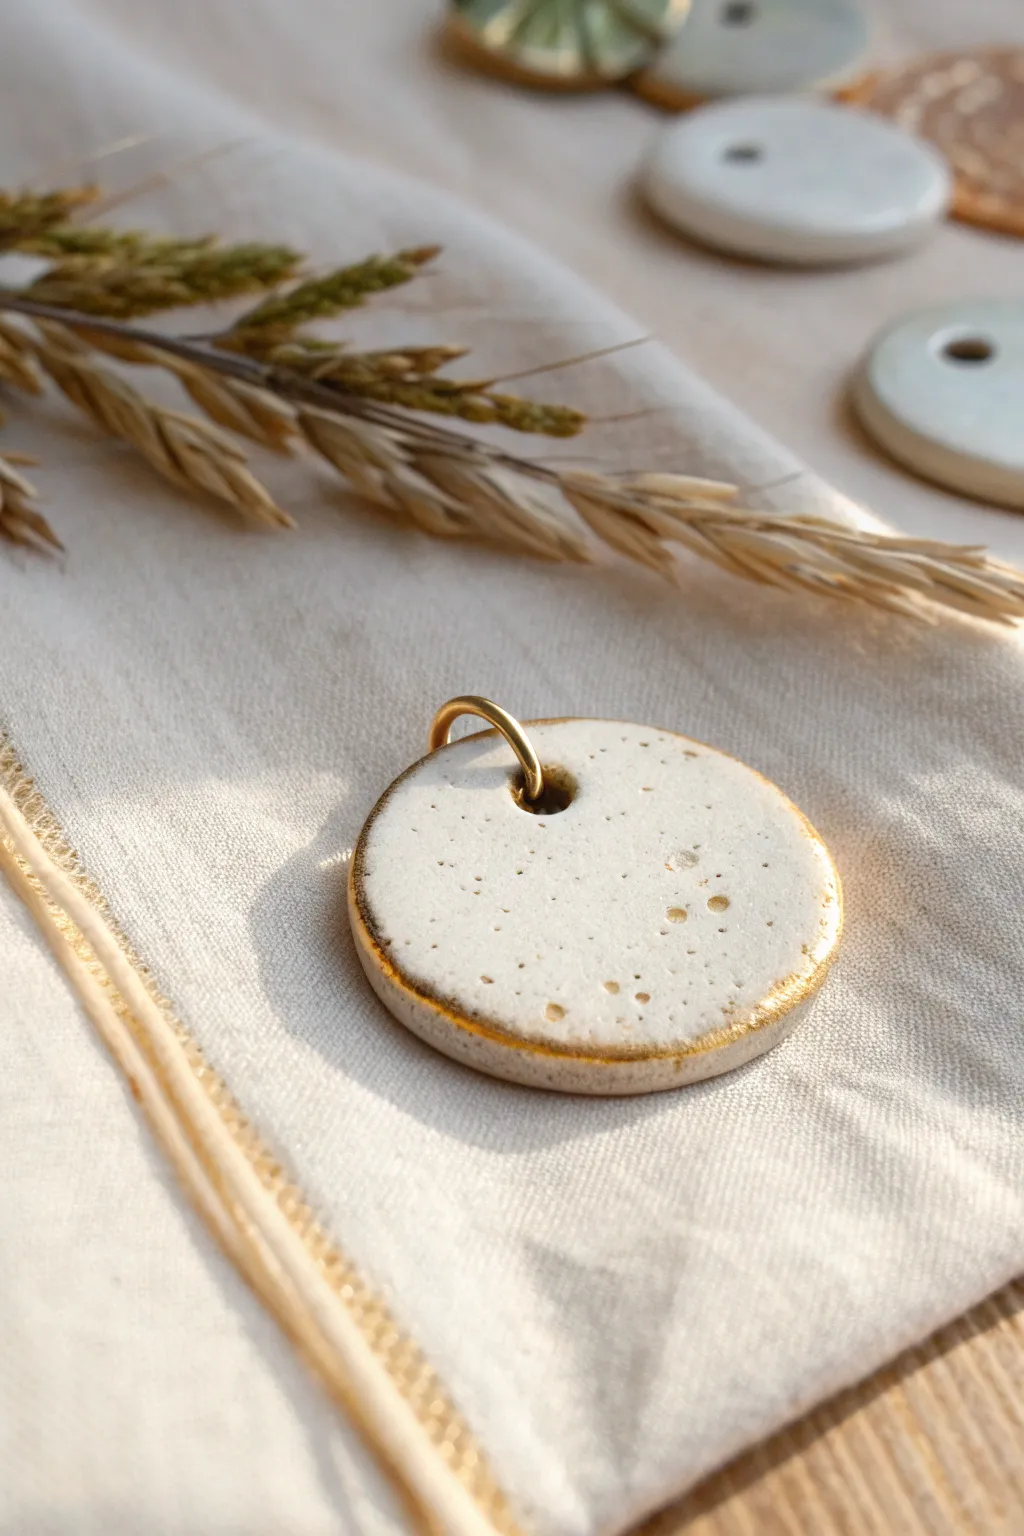
These elegant porcelain charms combine the rustic charm of speckled clay with the luxurious touch of real gold luster. The result is a minimalist yet striking pendant perfect for necklaces or earrings, featuring a clean white glaze that lets the clay’s texture shine through.
Step-by-Step
Materials
- White or speckled stoneware clay (preferably grogged for texture)
- Rolling pin and guide sticks (about 3-4mm thickness)
- Round cookie cutter or clay cutter (approx. 2-3cm diameter)
- Small straw or piercing tool (2-3mm diameter)
- Sponge and water
- Bisque kiln firing
- Glossy white or transparent speckled glaze
- Glaze kiln firing
- Gold overglaze luster (e.g., 22k gold)
- Small detail brush (specifically for luster)
- Luster kiln firing
- Gold plated jump ring
Step 1: Shaping and Bisque Firing
-
Prepare the clay slab:
Begin by wedging your stoneware clay thoroughly to remove air bubbles. Roll it out into a smooth slab using guide sticks to ensure an even thickness of about 3mm to 4mm. I find this thickness is substantial enough to be durable but light enough for jewelry. -
Cut the shapes:
Using your round cutter, press firmly into the clay to create your pendant discs. If the clay sticks to the cutter, you can lightly dust the clay surface with cornstarch first. -
Create the hanging hole:
While the clay is still soft, use a small straw or a piercing tool to make a hole near the top edge. Ensure the hole is large enough to accommodate your jump ring, keeping in mind that clay shrinks during firing. -
Refine the edges:
Once the pieces are leather-hard (firm but cool to the touch), smooth the rim with a damp sponge. Gently round off the sharp corners so the glaze will break beautifully over the edge later. -
First firing:
Allow the pieces to dry completely until bone dry. Fire them in the kiln to bisque temperature (usually cone 04 or 06, depending on your clay body).
Don’t Waste Gold
Gold luster is expensive! Dedicate one specific brush solely for gold work and never wash it with water. Clean it in luster essence (thinner) to preserve the precious metal residue.
Step 2: Glazing the Base
-
Clean and prep:
Wipe the bisque-fired pieces with a damp sponge to remove any kiln dust. This ensures the glaze adheres properly without crawling. -
Apply the glaze:
Dip the pendant into a glossy white glaze. If you are using a transparent glaze over speckled clay, ensure the application is even but not too thick, or it might obscure the specks. -
Clean the hole:
Immediately after dipping, use a small tool or a twisted intricate sponge to clear any glaze out of the hanging hole. If glaze remains there, it will fuse shut during firing. -
Wipe the back:
Clean the back of the pendant completely with a damp sponge so it can sit flat on the kiln shelf without sticking. Alternatively, you can stilt them if you want the back glazed. -
Glaze firing:
Fire the pieces to the maturity temperature of your clay and glaze combination (typically cone 5 or 6). Let the kiln cool completely before unloading.
Step 3: Applying the Gold Luster
-
Prepare for luster:
Work in a well-ventilated area and wear a mask, as luster fumes are strong. Ensure the glazed surface is perfectly clean and free of fingerprints or oils. -
Apply the rim:
Dip a dedicated fine-point brush into your gold luster. Holding the pendant steady, carefully paint a thin line along the very edge of the circle. Let the brush naturally follow the curve. -
Add gentle texture:
To mimic the organic look in the reference, don’t make the line perfectly uniform. Allow the gold to be slightly thicker in some spots or gently feather it inward just a fraction of a millimeter. -
Detail the hole:
Paint a very small amount of luster around the opening of the hole. This creates a cohesive look where the metal hardware will eventually sit. -
Third firing:
Fire the pieces one final time to the specific luster temperature (usually cone 018 to 019). This is a much lower temperature than the previous firings. -
Assembly:
Once cool, inspect the gold. It should be bright and metallic. Open a gold jump ring using two pliers (twisting, not pulling apart) and thread it through the pendant hole to finish.
Make it Organic
Instead of a perfect circle, use your fingers to gently pinch or warp the rim while the clay is wet. This enhances the handmade aesthetic and catches the light differently.
Enjoy wearing your new handcrafted porcelain charm or gift it to someone special who appreciates subtle luxury
Smooth Ceramic Rings With Bold Shapes
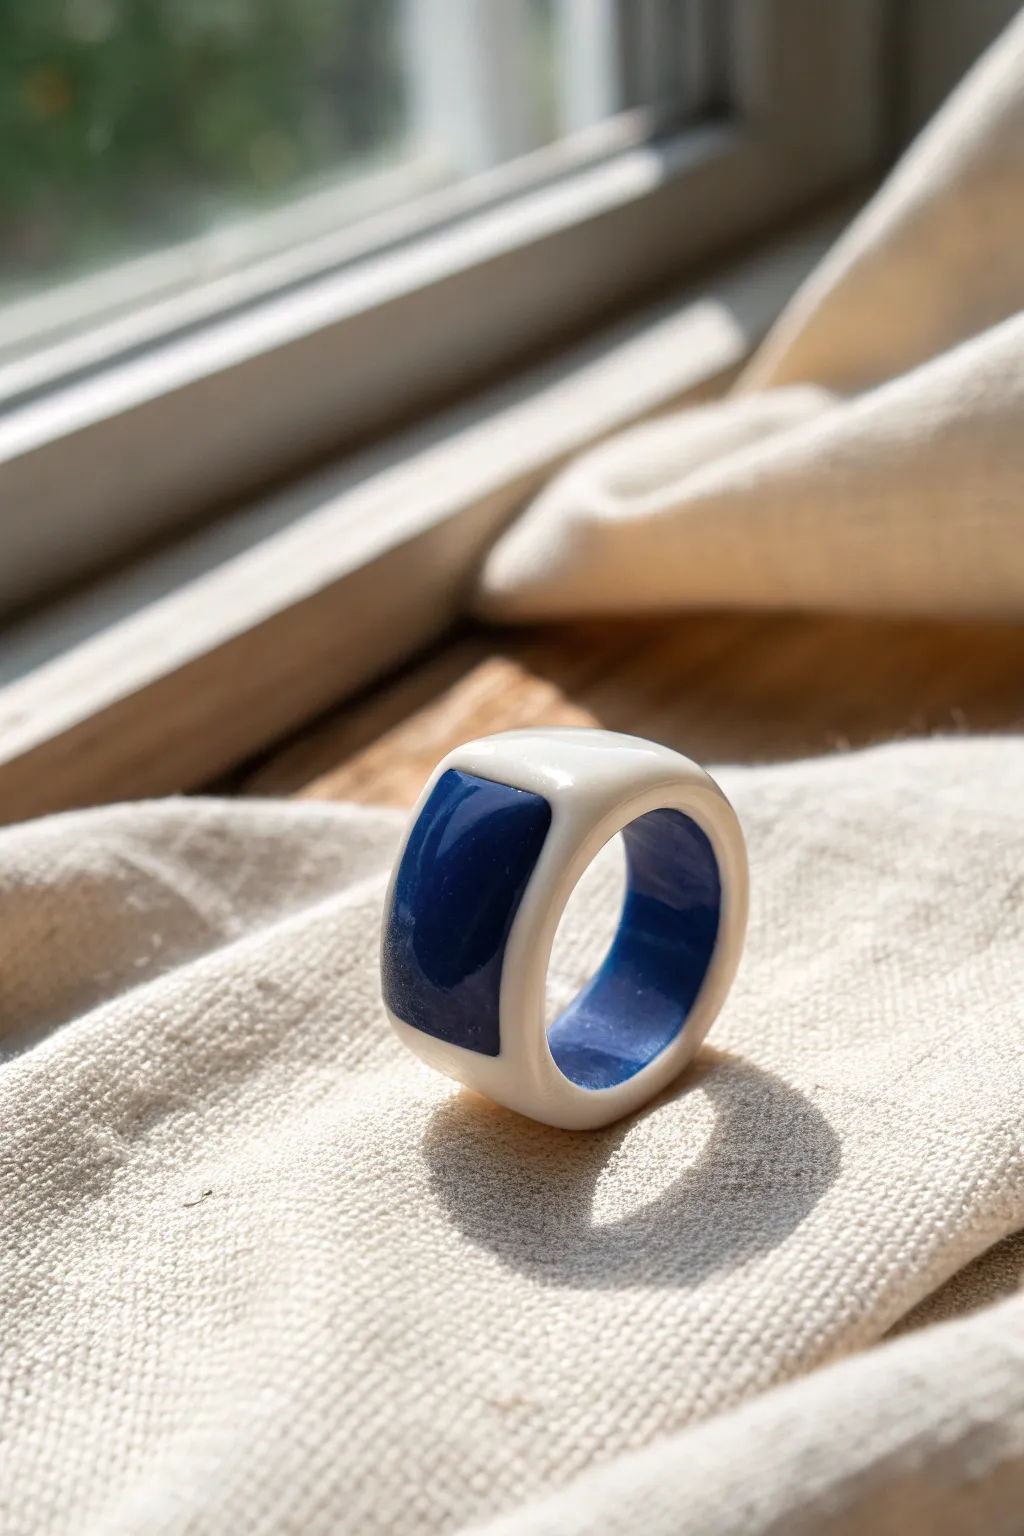
This chunky, statement ring combines a smooth, rounded square profile with a striking block of deep cobalt blue. The contrast between the milky white porcelain and the rich glossy glaze creates a sophisticated, modern piece that feels substantial yet comfortable to wear.
Step-by-Step Tutorial
Materials
- White porcelain clay or high-fire white stoneware
- Rolling pin
- Two wooden slats (approx. 5-6mm thick)
- Ring sizing mandrel or dowel (wrapped in paper)
- Needle tool
- Fettling knife or scalpel
- Flexible metal kidney rib
- Soft sponge
- Carving tool (small loop tool)
- Cobalt blue underglaze
- Clear gloss glaze
- Small synthetic brush
- Wax resist
- Kiln
Step 1: Shaping the Clay Base
-
Prepare the slab:
Begin by wedging your white porcelain clay thoroughly to remove air bubbles. Place it between your two wooden slats and roll it out into a smooth, even slab. Porcelain can be fussy about drying, so try to work relatively quickly. -
Cut the strip:
Measure the width you want for your ring band—this example is quite chunky, about 12-15mm wide. Use your fettling knife and a ruler to cut a clean, straight strip from the slab. -
Form the ring:
Wrap a piece of paper around your ring mandrel at the correct size size (accounting for shrinkage). Wrap the clay strip around the mandrel, cutting the ends at a 45-degree angle where they overlap to create a stronger join. -
Join the seam:
Score the angled ends with your needle tool and apply a tiny dab of slip or water. Press the ends together firmly and smooth over the seam with your finger or a rib until it is invisible. -
Establish the shape:
While the clay is still leather-hard on the mandrel, gently tap the top surface on your work table to flatten it slightly. This creates the ‘signet’ style platform for the blue block design.
Porcelain Smoothness
For that ultra-smooth finish, burnish the bone-dry clay with the back of a spoon or a polished stone before the bisque fire. This compresses the particle.
Step 2: Refining and Carving
-
Dry to leather hard:
Let the ring stiffen up until it’s leather hard. It should be firm enough to hold its shape without warping, but soft enough to carve. -
Smooth the edges:
Remove the ring from the mandrel. Use a damp sponge to soften the sharp edges of the band, rounding the rims slightly for a comfortable fit. -
Define the inlay area:
On the flattened top section, lightly mark a rectangle with your needle tool. This will be the home for that bold blue section. -
Carve the recess:
Using a small loop tool, carefully carve out the marked rectangle to a depth of about 1mm. I find it helps to keep the edges as crisp and 90-degree vertical as possible to prevent glaze from running over later. -
Bisque fire:
Let the ring dry completely (bone dry). Fire it in the kiln to a bisque temperature (usually cone 04 or 06, depending on your clay body).
Step 3: Glazing and Finishing
-
Clean the bisque:
Wipe the bisque-fired ring with a damp sponge to remove any kiln dust ensuring the glaze will adhere properly. -
Apply interior color:
Using a small brush, carefully apply three coats of cobalt blue underglaze to the *interior* of the ring band. Let each coat dry before applying the next. -
Fill the top block:
Paint the same cobalt blue underglaze into the recessed rectangle on top. Be precise at the edges; wipe away any smudges on the white clay immediately with a damp Q-tip. -
Wax resist:
Once the underglaze is dry, apply wax resist carefully over the blue areas (both inside and the top rectangle) if you want to dip the rest, or simply leave the white clay bare if you are brushing a clear glaze. -
Apply clear glaze:
Apply a clear gloss glaze over the entire piece. If you waxed the blue, the clear glaze will bead off those spots—just be sure to wipe any droplets off the wax. -
Ready for the kiln:
Wipe the bottom edge or place the ring on a stilt so it doesn’t fuse to the kiln shelf. I prefer using a dedicated bead rack for rings to ensure even heat circulation. -
Glaze fire:
Fire the ring to the maturation temperature of your clay and glaze (likely cone 5/6 or cone 10).
Metallic Accent
After the final glaze firing, apply a gold or platinum luster overcoat to just the rim of the blue rectangle and fire again at a lower temperature (cone 018).
Slip on your new statement ring and enjoy the satisfying weight of handmade ceramic jewelry
Porcelain Bangles and Thin Cuffs

These elegant bangles combine the timeless purity of white porcelain with organic touches of gold marbling. The result is a smooth, sophisticated piece of jewelry that looks effortlessly chic stacked or worn solo.
Step-by-Step
Materials
- White porcelain clay (or high-quality white polymer clay for a no-kiln alternative)
- Gold luster overglaze (or gold leaf flakes if using polymer)
- Clean working surface (canvas or ceramic tile)
- Rolling pin
- Sharp blade or fettling knife
- Bangle mandrel or a sturdy cardboard tube
- Soft sponge
- Fine-grit sandpaper
- Kiln (if using real ceramic clay)
- Clear glaze (optional for a glossy finish)
Step 1: Shaping the Form
-
Condition the clay:
Begin by thoroughly wedging your white porcelain clay to remove any air bubbles. Porcelain can be finicky, so take your time to ensure the consistency is smooth and pliable. -
Create a coil:
Roll a portion of the clay into a thick, even snake. Aim for a diameter of about 1/2 to 3/4 inch, depending on how chunky you want the final bangle to be. -
Measure the length:
Wrap the coil around your wrist loosely to estimate the size, or use a specific bangle mandrel. Cut the coil slightly longer than the circumference needed to allow for blending. -
Form the ring:
Bring the two ends of the coil together on your mandrel or tube. Score both ends with your needle tool or blade to create texture. -
Join the seam:
Apply a tiny amount of slip (liquid clay) to the scored ends and press them firmly together. Smooth the clay over the seam using your thumb or a modeling tool so the join becomes invisible. -
Uniform smoothing:
With the clay still on the mandrel (or carefully removed if it holds its shape), gently roll and pat the bangle to ensure the thickness is consistent all the way around.
Step 2: Adding the Gold Detail
-
Incorporate texture:
Before firing, if you want the gold to sit in recesses, you can gently distress the surface now with a textured tool. For the smooth look in the photo, proceed to drying. -
Slow drying:
Allow the bangle to dry slowly under loose plastic. Porcelain shrinks and can warp, so slow drying is crucial to maintain that perfect circle. -
Bisque fire:
Once bone dry, fire the bangle in the kiln to a bisque temperature (usually cone 04). This hardens the clay but leaves it porous. -
Sanding:
After the bisque fire, use wet fine-grit sandpaper to smooth out any tiny imperfections or sharp edges left from the forming process. I prefer to do this under running water to minimize dust. -
Glaze firing (Optional):
If you want a fully glossy white base, apply a clear glaze now and fire again. For a matte stone-like finish similar to unglazed porcelain, skip this step. -
Apply gold luster:
Using a very fine brush, paint delicate, organic streaks of gold luster onto the fired surface. Mimic natural marble veins by varying the pressure and direction of your strokes. -
Add speckles:
Dot tiny amounts of luster randomly around the veins to create that scattered, natural mineral appearance shown in the image. -
Final firing:
Place the bangle back in the kiln for a low-fire luster firing (usually cone 018-019). Ensure proper ventilation as lusters fume.
Porcelain Polish Tip
For a silky smooth finish without glaze, sand your bone-dry porcelain with a piece of grand-mother’s nylon stocking before the first firing.
Step 3: Alternative: Polymer Clay Method
-
Marbling technique:
If using polymer clay, mix small flakes of gold leaf directly into the white clay before rolling your coil. Twist the clay to break up the leaf into organic veins. -
Baking:
Cure the polymer clay bangle according to the manufacturer’s instructions, usually around 275°F (135°C). -
Finishing:
Sand the cured piece with high-grit wet/dry sandpaper and buff to a shine to mimic the look of polished porcelain.
Level Up: Texture Play
Carve shallow grooves into the raw clay before firing. Once fired, fill these grooves with the gold luster for an inlaid ‘kintsugi’ effect.
Slip on your finished bangle to add a touch of handcrafted luxury to your daily outfit
Mixed-Media Ceramic and Fiber Earrings
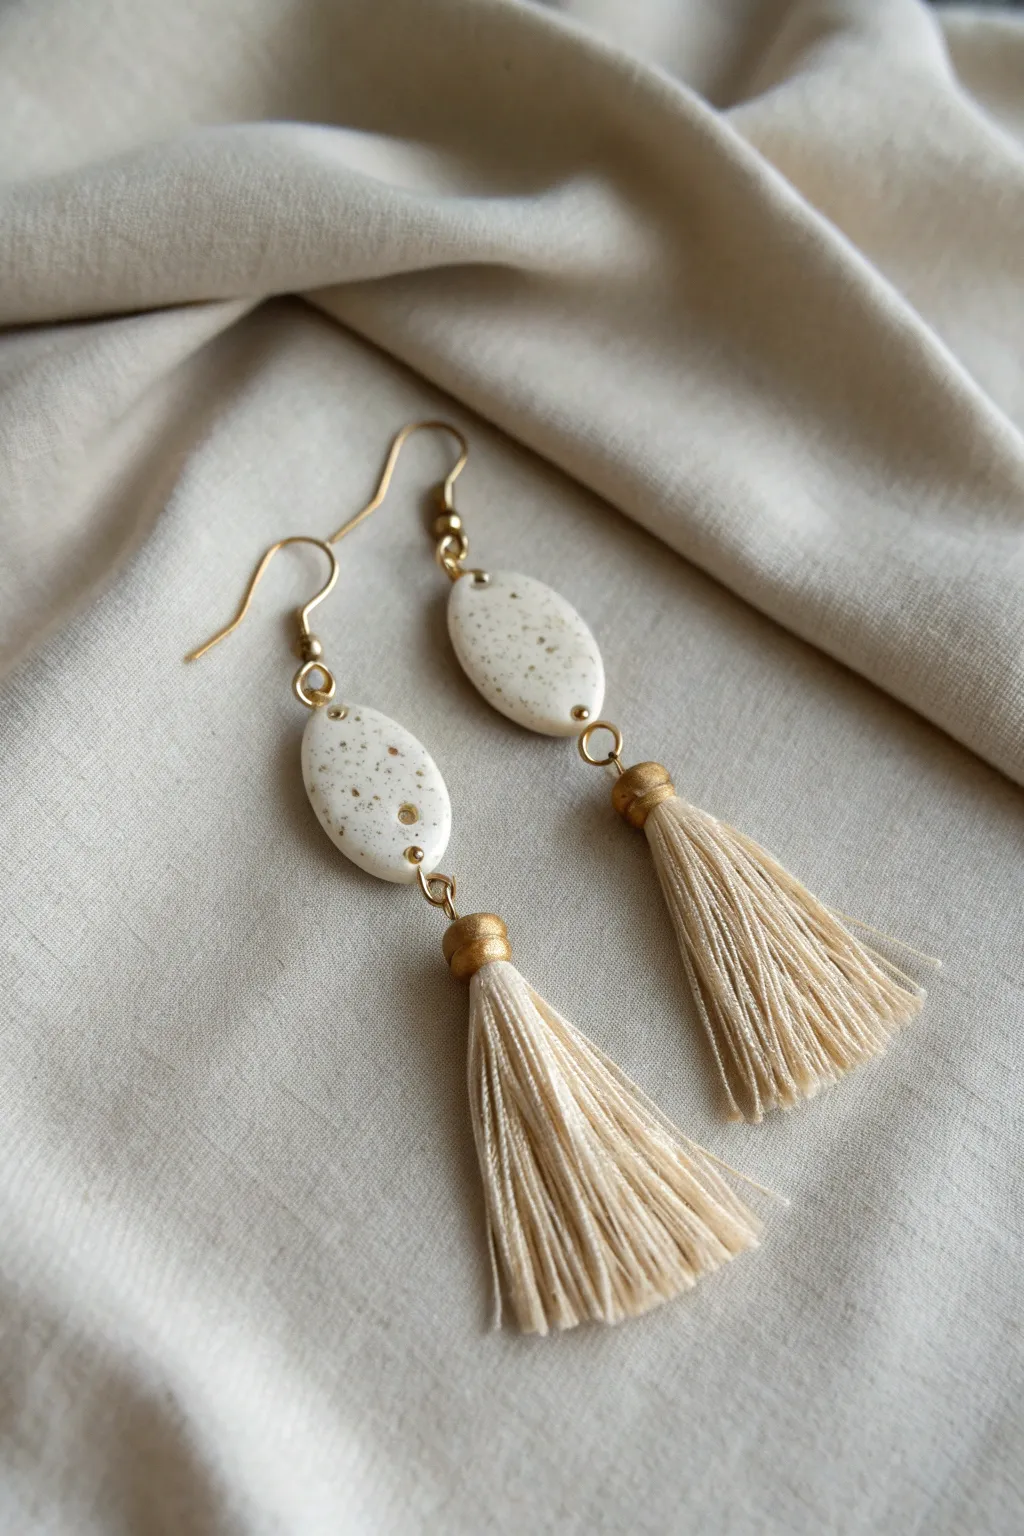
Embrace the harmony of textures with these elegant earrings that combine the smooth coolness of speckled ceramic with the soft sway of fiber tassels. The minimalist cream and gold palette creates a versatile accessory that feels both earthy and sophisticated.
Detailed Instructions
Materials
- White or cream polymer clay (or air-dry clay)
- Speckled clay add-in (cinnamon, black pepper, or faux speckle sand)
- Gold acrylic paint or gold leaf pen
- Oval clay cutter (approx. 2cm)
- Two gold earring hooks (fishhook style)
- Four gold jump rings (4-6mm)
- Gold jewelry wire (24 gauge) or eye pins
- Beige or cream embroidery floss or silk thread
- Two large, gold-painted wooden beads or gold spacer beads
- Round-nose pliers
- Chain-nose pliers
- Wire cutters
- Small paintbrush
- Gloss varnish or resin (optional)
Step 1: Crafting the Ceramic Components
-
Prepare the Clay:
Begin by conditioning your white clay until it is soft and pliable. If you are using plain clay, knead in a small pinch of ‘speckle’ material like ground black pepper or specialized crafting sand to achieve that organic, stoneware look. -
Roll and Cut:
Roll the clay out on a smooth surface to a uniform thickness of about 3-4mm. Use your oval cutter to punch out two identical shapes. Smooth any rough edges with your finger. -
Create Attachment Holes:
Using a needle tool or a narrow toothpick, carefully pierce a hole at the very top and very bottom of each oval. Ensure the holes are large enough to fit your jump rings comfortably. -
Texture and Detail:
For added visual interest, you can gently press a small, blunt tool into the face of the clay to create subtle indentations, or leave them smooth. The image shows a small, intentional indentation near the bottom. -
Bake or Dry:
Cure the clay according to the manufacturer’s instructions. If using polymer clay, bake in the oven; for air-dry clay, let it sit for 24 hours. Once cool, I like to sand the edges lightly for a professional finish. -
Add Gold Accents:
Using a fine brush and gold acrylic paint, dab a tiny dot onto the indentations you created or simply add a few random gold speckles to mimic pyrite inclusions.
Pro Tip: Perfect Tassels
To keep tassel threads perfectly straight, lightly dampen them and wrap the tassel in a small strip of paper while it dries. This trains the fibers to hang without frizz.
Step 2: Making the Tassels
-
Wrap the Floss:
Wrap your embroidery floss around a piece of cardboard (about 1.5 inches wide) roughly 20-30 times, depending on how full you want the tassels. -
Secure the Top:
Slide a small piece of wire or thread under the wrapped bundle at one end and tie it tightly to secure the top loop. Leave long tails if using wire, as this will pass through the bead. -
Cut the Loops:
Slide the bundle off the cardboard and use sharp scissors to cut the loops at the opposite end, creating the fringe. -
Add the Gold Bead Cap:
Thread the top wire (or tying thread) of the tassel up through the large gold bead. Pull the tassel knot tightly inside the bead so the thread fibers disappear into it, creating a clean cap. -
Form a Loop:
With the wire emerging from the top of the gold bead, use your round-nose pliers to create a wrapped loop. This will be the connection point for your ceramic piece.
Step 3: Assembly
-
Connect Tassel to Ceramic:
Open a jump ring using two pairs of pliers (twist sideways, don’t pull apart). Thread it through the loop on your tassel bead and the bottom hole of your ceramic oval. Close the ring securely. -
Connect Earring Hook:
Open the loop on your earring hook (or use a second jump ring if the hook loop is solid). Connect this to the top hole of the ceramic oval. -
Check Orientation:
Hold the earring up to ensure the ceramic oval faces forward. If it twists sideways, you may need to add an extra jump ring to rotate the orientation. -
Trim Tassels:
Finally, give your tassels a haircut. Comb the threads straight with a fine comb or needle, then trim the bottom in a straight line or a slight V-shape for a polished look.
Troubleshooting: Fragile Holes
If the clay breaks near the hole after baking, the hole was likely too close to the edge. For a fix, glue a flat-pad bail to the back instead of re-drilling.
Enjoy wearing your handcrafted mixed-media earrings that perfectly bridge the gap between rustic charm and modern design
Tiny Sculptural Motif Pendants
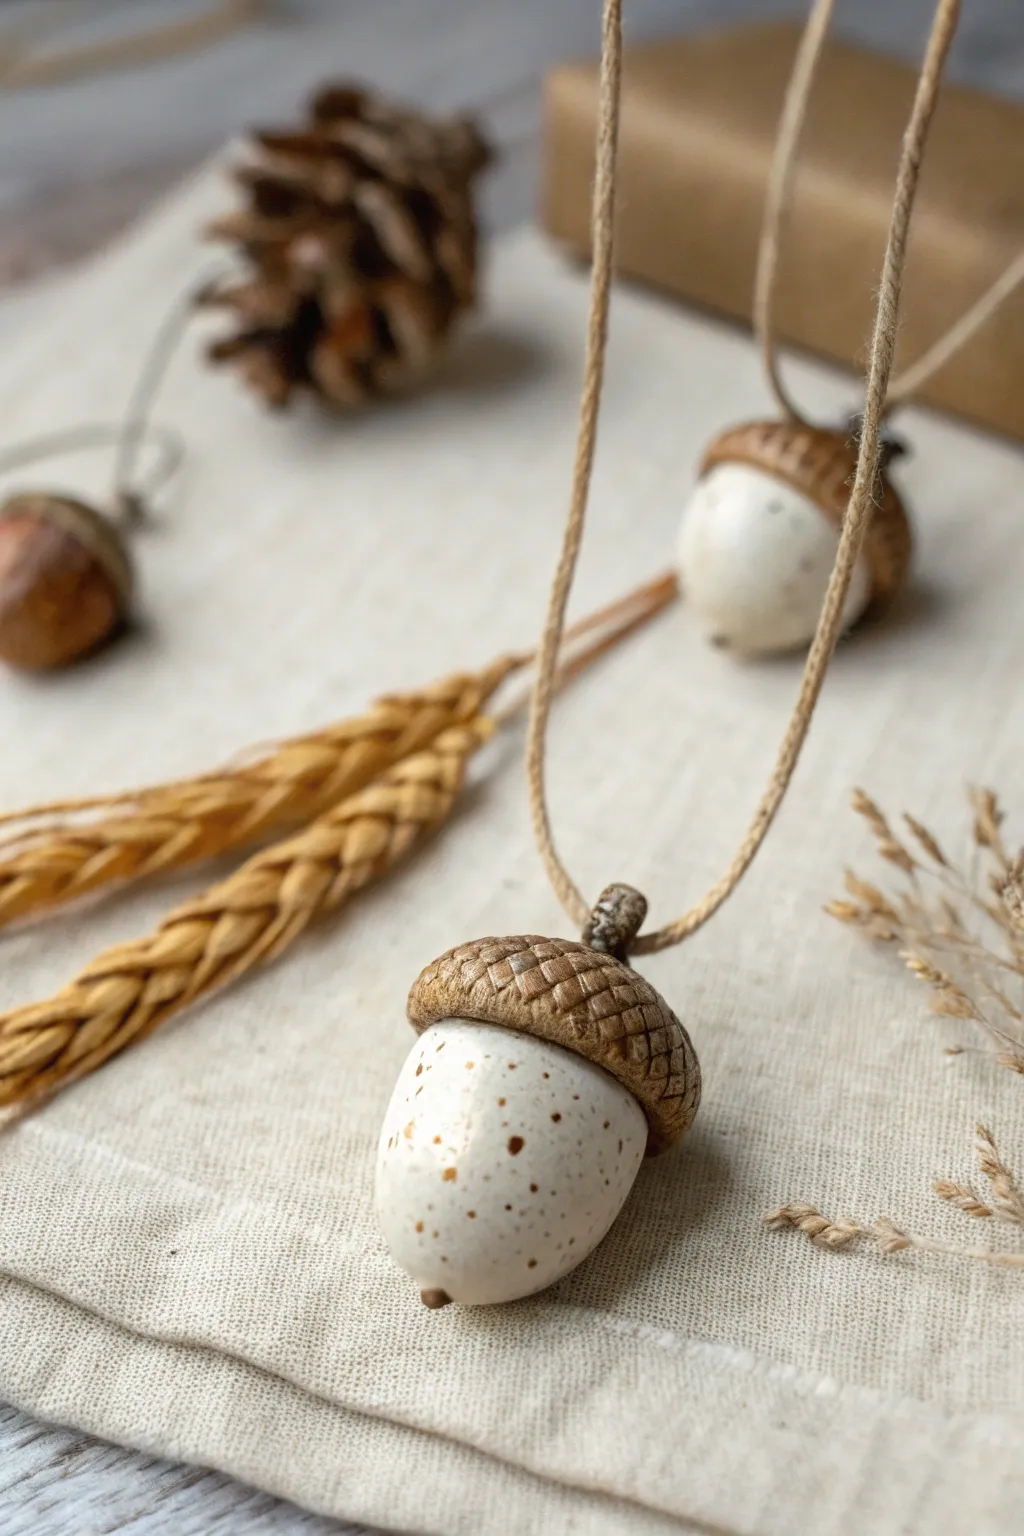
These charming acorn pendants capture the essence of woodland foraging with a refined, artistic twist. Combining smooth, speckled white clay with textured brown tops creates a delightful contrast perfect for autumn accessorizing.
Step-by-Step Tutorial
Materials
- White polymer clay or low-fire white earthenware clay
- Brown polymer clay or terracotta clay (for the caps)
- Brown acrylic paint or liquid clay dye (for speckling)
- Toothbrush or stiffness bristle brush
- Sculpting needle tool or toothpick
- Small eye pins or wire for the loop
- Gloss glaze or varnish (optional)
- Hemp cord or jute twine for stringing
- Oven (for polymer) or kiln (for ceramic)
- Glue (E6000 or similar strong adhesive)
Step 1: Forming the Base
-
Preparation:
Begin by conditioning your white clay until it is soft and pliable. If you are using ceramic clay, ensure it is wedged properly to remove air bubbles. -
Shaping the Nut:
Roll a small ball of white clay, roughly the size of a large marble. Gently roll one side between your palms to taper it slightly, forming that classic oval acorn nut shape. -
Smoothing:
Check the surface for fingerprints or imperfections. Gently buff them out with your fingertip or a slightly damp sponge if using ceramic clay. -
Adding Speckles:
Before baking or firing, create the speckled effect. Dip a toothbrush into watered-down brown acrylic paint (for polymer) or brown underglaze (for ceramic). Flick the bristles to spatter tiny dots onto the white nut. -
Setting the Base:
Allow the speckles to dry completely. If working with polymer clay, you can proceed immediately; for ceramic clay, let this base reach a leather-hard state.
Step 2: Creating the Textured Cap
-
Sizing the Cap:
Take a smaller amount of brown clay and roll it into a ball. Flatten it into a thick disc that is just slightly wider than the top of your white nut base. -
Fitting:
Gently press the brown disc onto the rounded top of the white nut. Mold the edges down slightly so it cups the top of the acorn securely. -
Initial Texturing:
Using a needle tool, lightly score a grid pattern across the entire surface of the brown cap. I find it easiest to do all the diagonal lines one way first, then cross them. -
Refining the Scale Pattern:
deepen the grid lines to create raised diamond or square shapes. You can gently press the center of each tiny square to make the ‘scales’ puff out slightly, mimicking a real acorn cupule. -
Adding the Stem:
Roll a very tiny snake of brown clay. Cut a short segment and attach it to the very center of the cap. -
Securing the Stem:
Blend the bottom of the stem into the cap using a small tool so it doesn’t pop off later. Add a little texture to the stem to match the rustic look. -
Creating the Loop:
Insert a metal eye pin through the center of the stem and cap, pushing it down into the white body of the acorn for stability. If using ceramic, construct a small clay loop instead or leave a hole for wire later.
Natural Texture Hack
Instead of carving, press a piece of coarse sandpaper or a real acorn cap into the brown clay to instantly transfer realistic, organic textures.
Step 3: Finishing and Assembly
-
Baking or Firing:
Follow the manufacturer’s instructions for your specific clay. For polymer, bake at the recommended temperature on a parchment-lined tray. For ceramic, proceed with bisque and glaze firings. -
Cooling Down:
Let the pieces cool completely. If you used polymer clay, the metal pin might be loose after baking; pull it out gently, add a drop of superglue, and reinsert it. -
Highlighting Texture:
To make the cap texture pop, mix a tiny bit of dark brown or black paint with water. Brush it over the cap and wipe away the excess immediately, leaving darkness in the crevices. -
Sealing:
Apply a coat of satin or gloss varnish to the white nut part to make it look like smooth porcelain. You can leave the cap matte for a nice textural contrast. -
Stringing:
Cut a length of hemp cord or jute twine. Thread it through the eye pin loop at the top of the acorn. -
Knotting:
Tie a secure overhand knot right above the acorn stem to keep the pendant centered, or leave it free-floating depending on your preference. -
Final Adjustments:
Check the length of the necklace and tie off the ends. Your woodland treasure is now ready to wear.
Speckles Smearing?
If your paint speckles smudge during the glazing process, seal the paint first with a very thin layer of spray matte fixative before brushing on gloss varnish.
Enjoy wearing this little piece of nature that captures the cozy feeling of autumn all year round