Whenever I want a handmade gift that feels personal (but still totally doable in one sitting), I reach for clay bead bracelets—they’re cheerful, comfy, and easy to customize. Here are my favorite teacher bracelet ideas, starting with the classics everyone recognizes and ending with a few fun curveballs.
Classic Pencil Pattern Bracelet
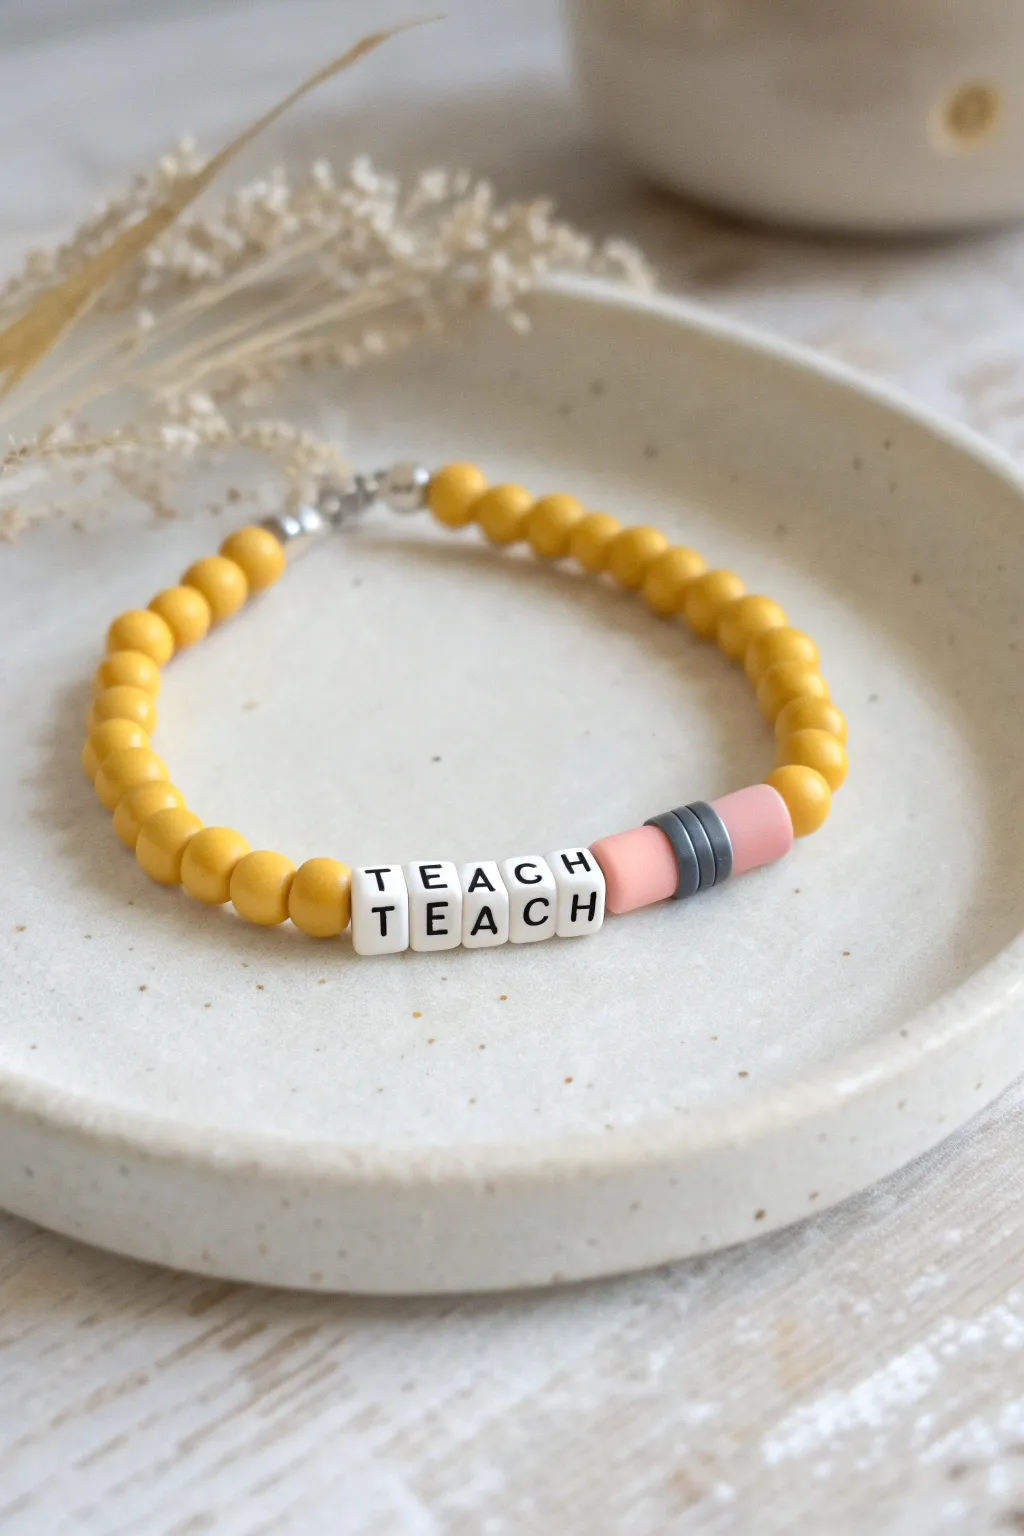
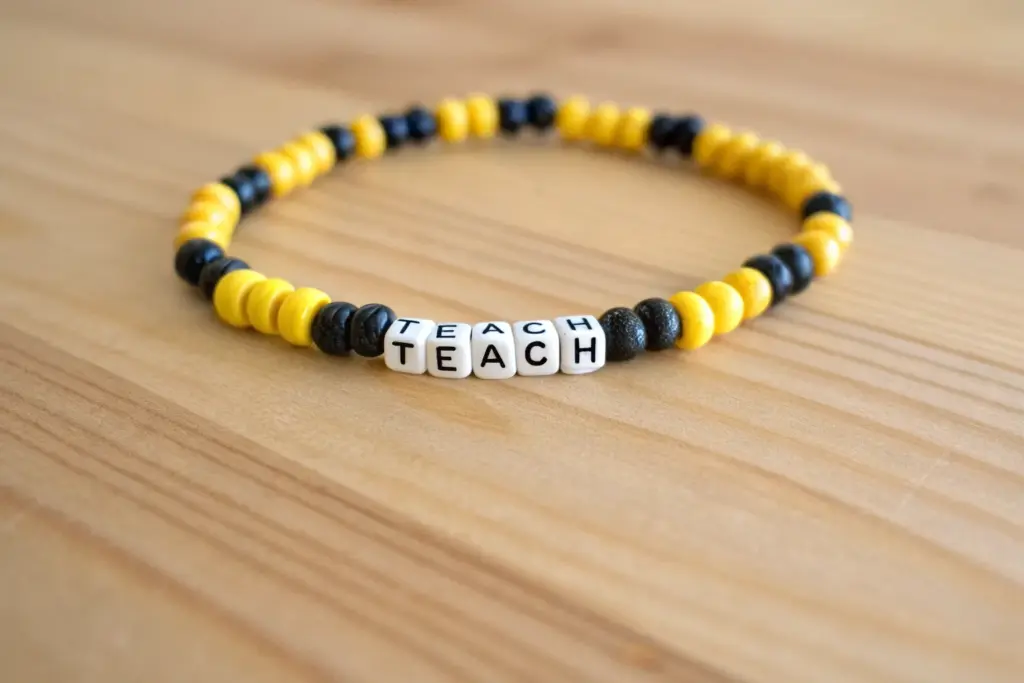
Celebrate the educators in your life with this charming “TEACH” beaded bracelet that cleverly mimics the look of a classic number 2 pencil. With sunny yellow beads and a playful eraser tip accent, this accessory is as thoughtful as it is stylish.
Step-by-Step
Materials
- Stretch cord (0.8mm or 1mm thickness)
- Yellow round beads (polymer clay or matte plastic, approx. 6mm or 8mm)
- White square letter beads (T, E, A, C, H)
- Pink tube bead or Heishi bead stack (eraser color)
- Grey/Silver flat disc beads or spacer beads (ferrule color)
- Bead stopper or masking tape
- Scissors
Step 1: Preparation
-
Measure your cord:
Cut a length of stretch cord approximately 10-12 inches long. This generous length gives you plenty of room to tie knots without struggling against tension later. -
Secure the end:
Attach a bead stopper or simply place a piece of masking tape folded over one end of your cord. This prevents your beads from sliding right off as you work. -
Plan your layout:
Lay out your beads on a bead board or soft cloth before stringing. Arrange the ‘TEACH’ letters in the center, flanked by the ‘pencil’ components to ensure everything is spelled correctly.
Use matte beads
For a more authentic pencil look, choose matte yellow beads rather than glossy ones. The matte finish mimics the painted wood texture of a real pencil much better.
Step 2: Creating the Pencil Feature
-
Start with the letters:
Thread the letter beads onto the cord first: T, E, A, C, H. By centering the word first, you can easily balance the rest of the bracelet. -
Add the ferrule:
Slide on your grey or silver disc beads immediately after the ‘H’. Use 3-4 thin disc beads to mimic the metal band of a pencil. -
Add the eraser:
Thread on your pink eraser component next to the silver bands. A small pink tube bead works perfectly, or stack 3-4 pink heishi beads to create that classic eraser look.
Step 3: Filling the Band
-
Begin the yellow section:
Start adding your round yellow beads on the side closest to the ‘T’. Add about 10-12 beads here initially. -
Complete the loop:
Add yellow beads to the other side (after the pink eraser section). Continue adding yellow beads until the strand reaches your desired wrist size, usually around 6.5 to 7 inches total. -
Check the fit:
Wrap the unfinished strand around your wrist to check the sizing. The ends should meet comfortably without stretching the cord yet.
Add an apple charm
Before tying your final knot, slip a tiny enamel apple charm or a gold star charm onto the bracelet for an extra pop of teacher appreciation flair.
Step 4: Finishing Touches
-
Pre-stretch the cord:
Give the ends of the cord a few gentle tugs. Pre-stretching helps prevent the bracelet from sagging or loosening permanently after the first wear. -
Tie the knot:
Remove the bead stopper and tie a surgeon’s knot (right over left, left over right twice). Pull the cord ends tight to secure the beads. -
Secure with glue:
I like to dab a tiny drop of flexible jewelry glue or G-S Hypo Cement on the knot for extra security. Let it dry for a few minutes. -
Hide the knot:
If one of your yellow beads has a large enough hole, gently tug the cord so the knot slides inside the bead, hiding it from view. -
Trim excess cord:
Use your scissors to trim the remaining cord tails close to the knot (or the bead hiding the knot), being careful not to snip the main bracelet strand.
This delightful bracelet is now ready to be gifted or worn as a badge of honor in the classroom


Apple Charm Appreciation Bracelet
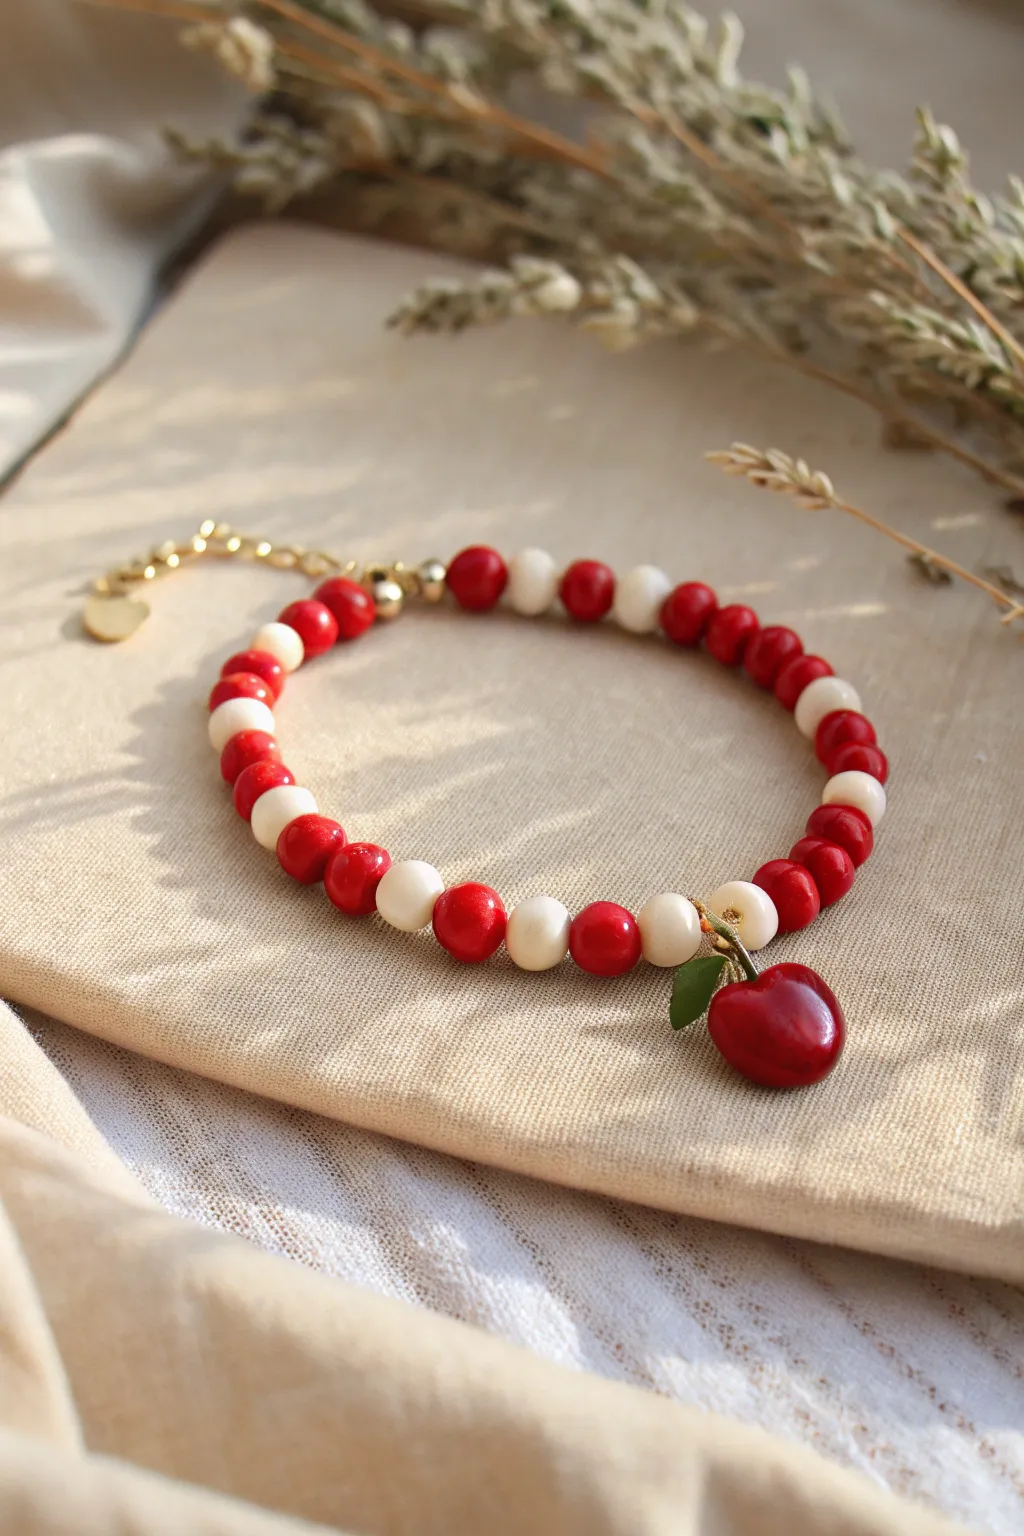
Celebrate your favorite educator with this charming beaded bracelet that perfectly balances vintage warmth with a playful touch. Featuring alternating ruby red and creamy white beads, the design is anchored by an adorable glossy apple charm that makes it the quintessential appreciation gift.
Detailed Instructions
Materials
- Red round beads (approx. 6mm, wood or polymer clay)
- White or cream round beads (approx. 6mm, wood or polymer clay)
- Gold finish lobster clasp
- Gold finish extension chain with heart drop
- 2 Gold crimp beads
- 2 Gold wire guardians (optional but recommended)
- 2 Gold jump rings (4mm or 5mm)
- Apple charm (glossy red with green leaf)
- Beading wire (gold or clear)
- Jewelry pliers (flat nose and cutting)
- Crimping tool (or flat nose pliers)
Step 1: Preparation & First Anchor
-
Measure your wire:
Cut a length of beading wire approximately 9-10 inches long. This gives you plenty of extra room to work with the clasps without feeling cramped. -
Thread the crimp bead:
Slide one gold crimp bead onto the end of your beading wire. -
Attach the clasp:
Thread the wire through the loop of your lobster clasp. If you are using a wire guardian for extra durability, thread the wire up through one side of the horseshoe shape and down the other before attaching the clasp to the guardian’s loop. -
Secure the loop:
Pass the tail end of the wire back through the crimp bead, creating a small loop that holds the clasp securely. Pull the wire tight enough to be secure but loose enough that the clasp can wiggle. -
Crimp firmly:
Use your crimping tool or flat nose pliers to flatten the crimp bead securely. Give the wire a gentle tug to ensure it won’t slip out. -
Hide the tail:
If you have a decorative crimp cover, you can add it now. Otherwise, simply trim the excess wire tail close, or leave about half an inch to tuck into the first few beads.
Pro Tip: Bead Selection
For that organic look shown here, try using dyed wooden beads instead of plastic. Their slight texture variations add warmth and a higher-quality feel especially suited for gifts.
Step 2: Creating the Pattern
-
Start the sequence:
Begin threading your beads. Start with the pattern seen on the left side of the bracelet: one red bead, followed by one white bead, then two red beads. -
Establish the rhythm:
Continue this alternating rhythm. The pattern in the image generally follows a 2-red, 1-white sequence, though you can adjust this to 1-red, 1-white if you prefer a more symmetrical candy-cane look. The key is consistency. -
Check length periodically:
Wrap the strand around your wrist occasionally. Stop when you have beaded approximately half of the desired bracelet length. -
Add the focal point:
Slide on your apple charm. It should sit freely on the wire between beads. Ensure the apple is facing the correct direction so the leaf points upwards when worn. -
Finish the bead strand:
Resume your beading pattern on the other side of the apple charm. Try to mirror the pattern you started with so the bracelet looks balanced when closed.
Step 3: Closing & Finishing
-
Prepare the final crimp:
Once you reach your desired length (usually about 6.5 to 7 inches for an average wrist), slide on your second gold crimp bead. -
Add the extension chain:
Thread the wire through the first link of your gold extension chain. Just like before, if you are using a wire guardian, thread it on now to protect the wire from abrasion against the chain. -
Loop back:
Pass the wire end back down through the crimp bead and through the last one or two beads on your strand to hide the tail. -
Tighten the slack:
Pull the wire taut so there are no large gaps between beads near the clasp, but leave just a tiny bit of wiggle room so the bracelet remains flexible and drapes nicely. -
Final crimp:
Firmly flatten the crimp bead with your pliers to lock everything in place. -
Trim excess:
Use your flush cutters to trim the remaining wire tail as close to the beads as possible so no sharp end pokes out.
Level Up: Pattern Play
Add tiny gold spacer beads between every set of red and white beads. This adds a subtle shimmer that matches the gold hardware and elevates the piece from craft to chic.
Now you have a thoughtful, handcrafted gift ready to brighten any teacher’s day


Simple “TEACHER” Word Bracelet
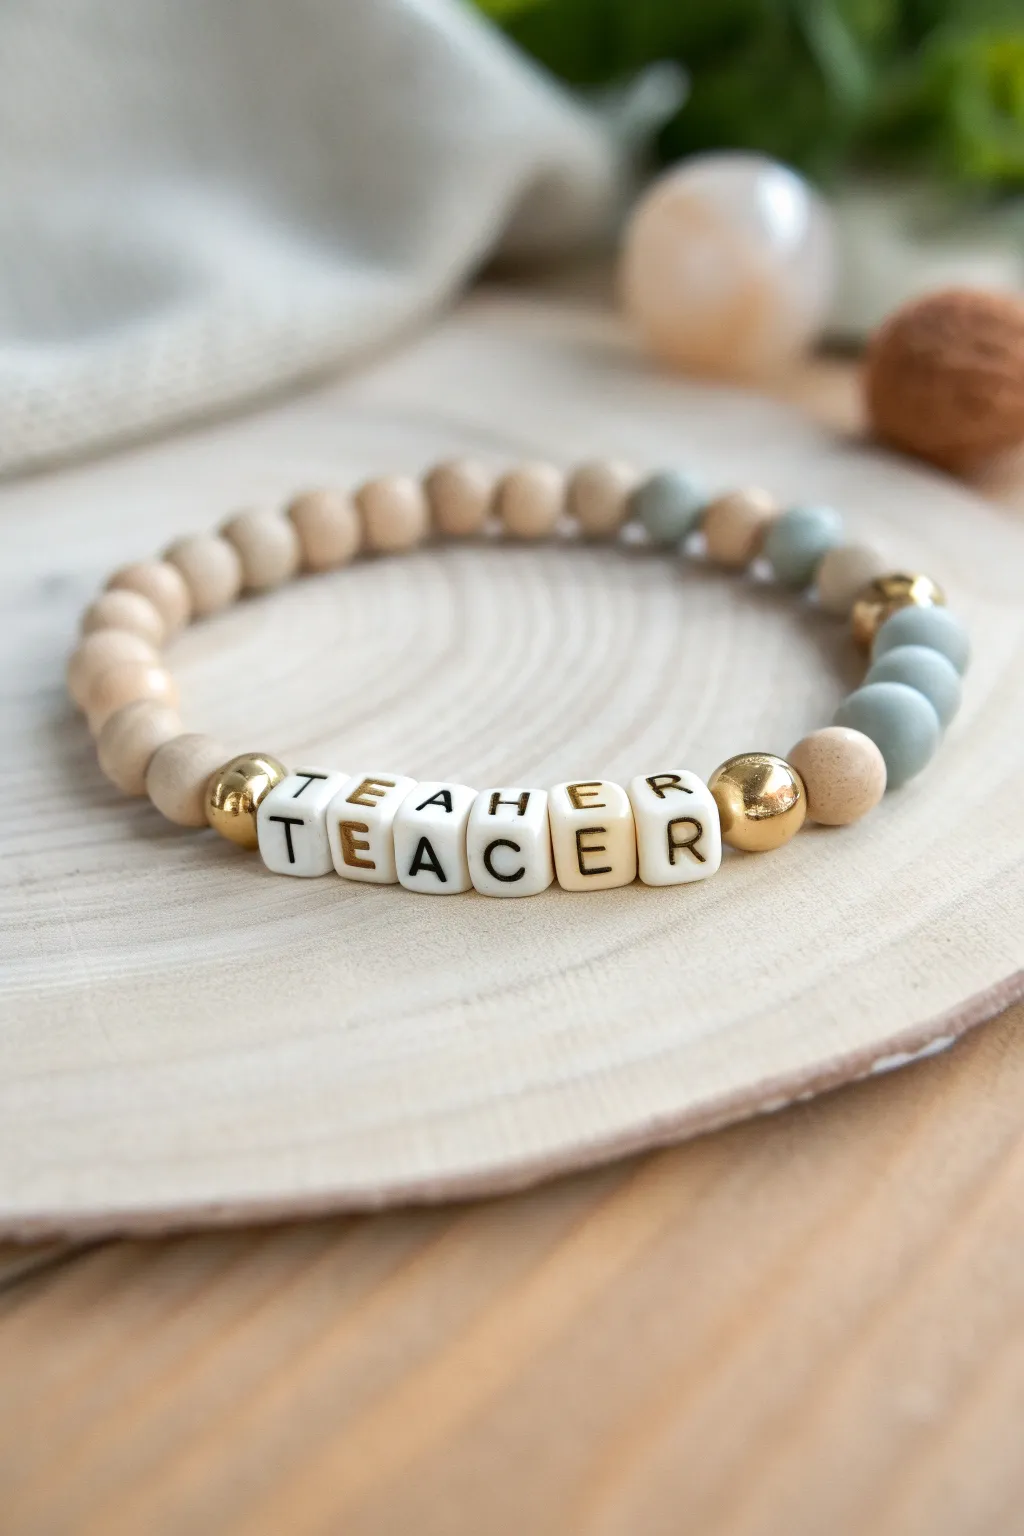
This elegant bracelet combines the rustic warmth of natural wood with soft sage greens and bright gold accents. It’s a perfect, understated accessory that celebrates the profession in a stylish, neutral palette.
Step-by-Step Guide
Materials
- Stretch cord (0.8mm or 1mm clear elastic)
- 6mm or 8mm natural unfinished wood beads (round)
- 6mm or 8mm matte sage green or grey-blue acrylic/clay beads
- Square white letter beads with black lettering
- Small gold spacer beads (metal or acrylic)
- Two large 8mm gold accent beads (optional)
- Scissors
- Bead stopper or simple binder clip
- Jewelry glue or clear nail polish
Step 1: Planning the Design
-
Measure your materials:
Cut a length of stretch cord about 10-12 inches long. This gives you plenty of extra room for tying knots later without struggling. -
Secure the end:
Attach a bead stopper or simply clip a binder clip to one end of the cord to prevent beads from sliding off while you work. -
Verify the spelling:
Lay out your letter beads on a flat surface first. Double-check your spelling for ‘TEACHER’ (or a specific name) so you don’t have to restring later. -
Test the layout:
Arrange the word in the center and plan your pattern radiating outward: a gold spacer, then the sage beads, then back to wood. This helps visualize the symmetry.
Wood Bead Care
Unfinished wood beads can absorb oils. Rub them lightly with beeswax or coconut oil before stringing to seal them and deepen their color.
Step 2: Stringing the Beads
-
Start with the wood:
Begin threading the natural wood beads onto the cord. For an average wrist, start with about 12-15 wood beads, depending on their size. -
Add first accent gold:
Slide on a larger gold accent bead to mark the transition from the back of the bracelet to the front focal area. -
Add the color block:
String 3-4 of the matte sage green beads. This adds a lovely soft contrast to the wood. -
Transition to text:
Place a smaller gold spacer bead right before your letters start to frame the word. -
Spell it out:
Thread your letter beads in order. Ensure they are all facing the same direction so the text is legible. -
Finish the focal point:
Add the second small gold spacer bead, followed by 3-4 more sage green beads to mirror the other side. -
Complete the loop:
Add your second large gold accent bead, then finish with any remaining wood beads needed to reach the desired wrist size.
Step 3: Closing the Bracelet
-
Check the fit:
Wrap the unfinished strand around your wrist. It should sit comfortably without pinching, but not droop excessively. -
Pre-stretch the cord:
I always give the ends a gentle tug before tying. This pre-stretches the elastic so the bracelet doesn’t loosen up permanently after the first wear. -
Tie the knot:
Remove the bead stopper and tie a surgeon’s knot (loop the cord through twice on the first pass, then tie a standard overhand knot on top). -
Secure with glue:
Dab a tiny drop of jewelry glue or clear nail polish onto the knot. Let it dry for a few minutes to ensure it won’t slip. -
Hide the knot:
Once dry, trim the excess cord ends close to the knot. Gently pull the cord so the knot slides inside the hole of the nearest large bead to hide it.
Variation Idea
Swap the sage green beads for school colors (like maroon or navy) to make this a spirited gift for a specific school district teacher.
This sophisticated bracelet creates a thoughtful, handmade gift suitable for the classroom or weekend wear


Lined Notebook Paper Stripe Bracelet
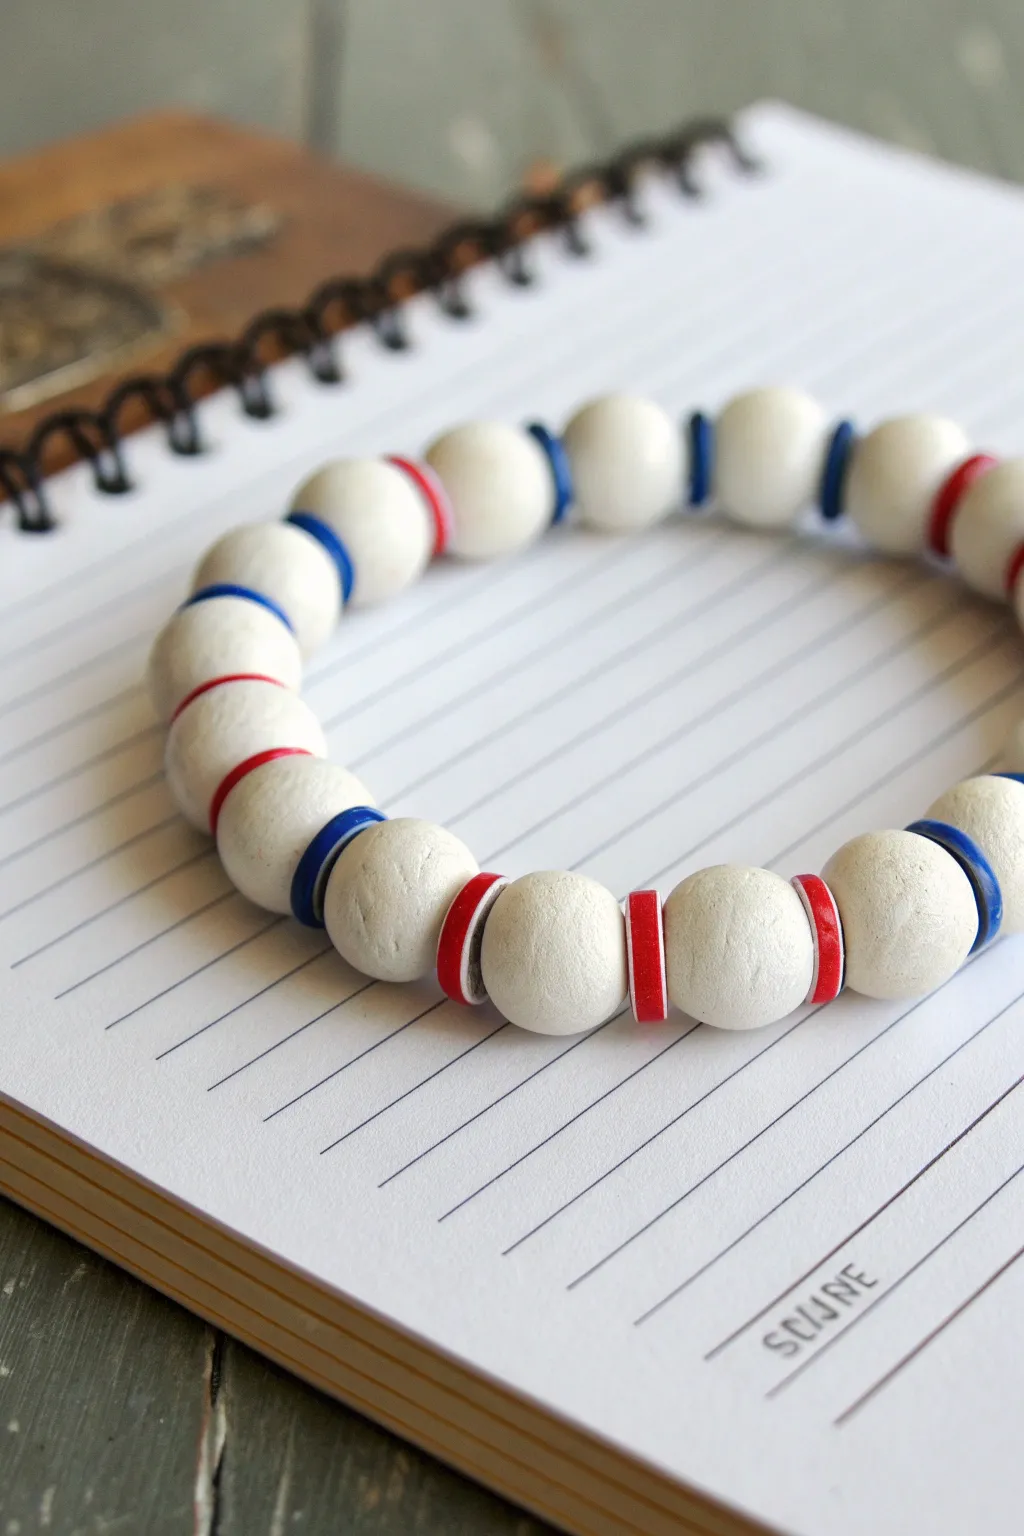
Capture the nostalgic feel of fresh lined paper with this clever teacher-themed bracelet. Using simple white clay beads accented by thin red and blue spacers, you can wear a subtle nod to the classroom on your wrist every day.
Detailed Instructions
Materials
- White polymer clay (or air-dry clay)
- Red polymer clay
- Blue polymer clay
- Elastic stretch cord (0.7mm or 0.8mm)
- Bead rolling tool (optional, or use palms)
- Clay cutting blade or sharp craft knife
- Toothpick or bead piercing tool
- Toaster oven or standard oven (for baking)
- Parchment paper
- Super glue or jewelry knot cement
- Acrylic roller or rolling pin
- Ruler
Step 1: Creating the White Paper Beads
-
Condition the white clay:
Start by kneading the white polymer clay in your hands until it becomes soft and pliable, which prevents cracking later. -
Roll a log:
Roll the white clay into a long snake or log shape on your work surface, trying to keep the thickness consistent, about 1/2 inch in diameter. -
Measure and cut segments:
Using your blade, slice the log into equal segments. For a chunky look like the photo, aim for pieces that are roughly 1/2 inch long. -
Form the spheres:
Take each white segment and roll it between your palms to create a smooth, round ball. I find a light touch helps keep them perfectly spherical without flat spots. -
Pierce the holes:
Gently twist a toothpick or piercing tool through the center of each white bead. Make sure the hole is wide enough for your elastic to pass through easily. -
Smooth the edges:
Check the area around the holes for any jagged clay bits and smooth them down with your finger so the bead sits flush.
Clean Hands Tip
Work with the white clay first, then blue, then red. Dark pigments can transfer easily to your hands and ruin the crisp white beads.
Step 2: Making the Line Spacers
-
Roll out colored clay:
Roll out a small amount of blue clay and a small amount of red clay into flat sheets. You want these to be quite thin, roughly 2-3mm thick. -
Cut small circles:
Use a very small circular cutter (or the end of a metal straw) that matches the diameter of your white beads to punch out small discs. -
Pierce the centers:
Just like the white beads, carefully poke a hole in the center of each red and blue disc. These thin spacers can be delicate, so work slowly. -
Bake the beads:
Arrange all your white spheres and colored discs on a parchment-lined baking sheet. Bake according to your clay package instructions (usually 275°F for 15-30 minutes). -
Cool completely:
Let the beads cool fully before handling. They harden as they cool, so don’t test them while they are hot.
Texture Twist
Before baking, gently roll the white beads over a finer sandpaper to give them a matte, paper-like texture instead of a glossy finish.
Step 3: Assembly
-
Cut the elastic:
Cut a piece of elastic cord about 10-12 inches long. This gives you plenty of extra room for tying knots later. -
Pre-stretch the cord:
Give the elastic a few firm tugs to pre-stretch it; this prevents the bracelet from sagging after you wear it a few times. -
Start the pattern:
Begin threading your beads. To mimic the notebook paper pattern, thread one white bead, then one blue spacer. -
Add the margin line:
Continue the white-blue pattern for most of the bracelet length. Just once or twice in the sequence, swap the blue spacer for a red one to represent the margin line. -
Check the size:
Wrap the strand around your wrist to check the fit. Add or remove bead sets until it sits comfortably. -
Tie the knot:
Tie a surgeon’s knot (right over left, left over right) and pull tight. Make sure the beads are snug against each other with no gaps. -
Secure and trim:
Add a tiny drop of super glue or jewelry cement to the knot. Let it dry for a moment, then trim the excess cord ends close to the knot. -
Hide the knot:
Gently pull the knot inside one of the large white beads to hide it from view for a seamless finish.
Now you have a charming accessory perfect for the classroom or grading papers at home

The Complete Guide to Pottery Troubleshooting
Uncover the most common ceramic mistakes—from cracking clay to failed glazes—and learn how to fix them fast.
Personalized “Mrs./Mr.” Name Bracelet
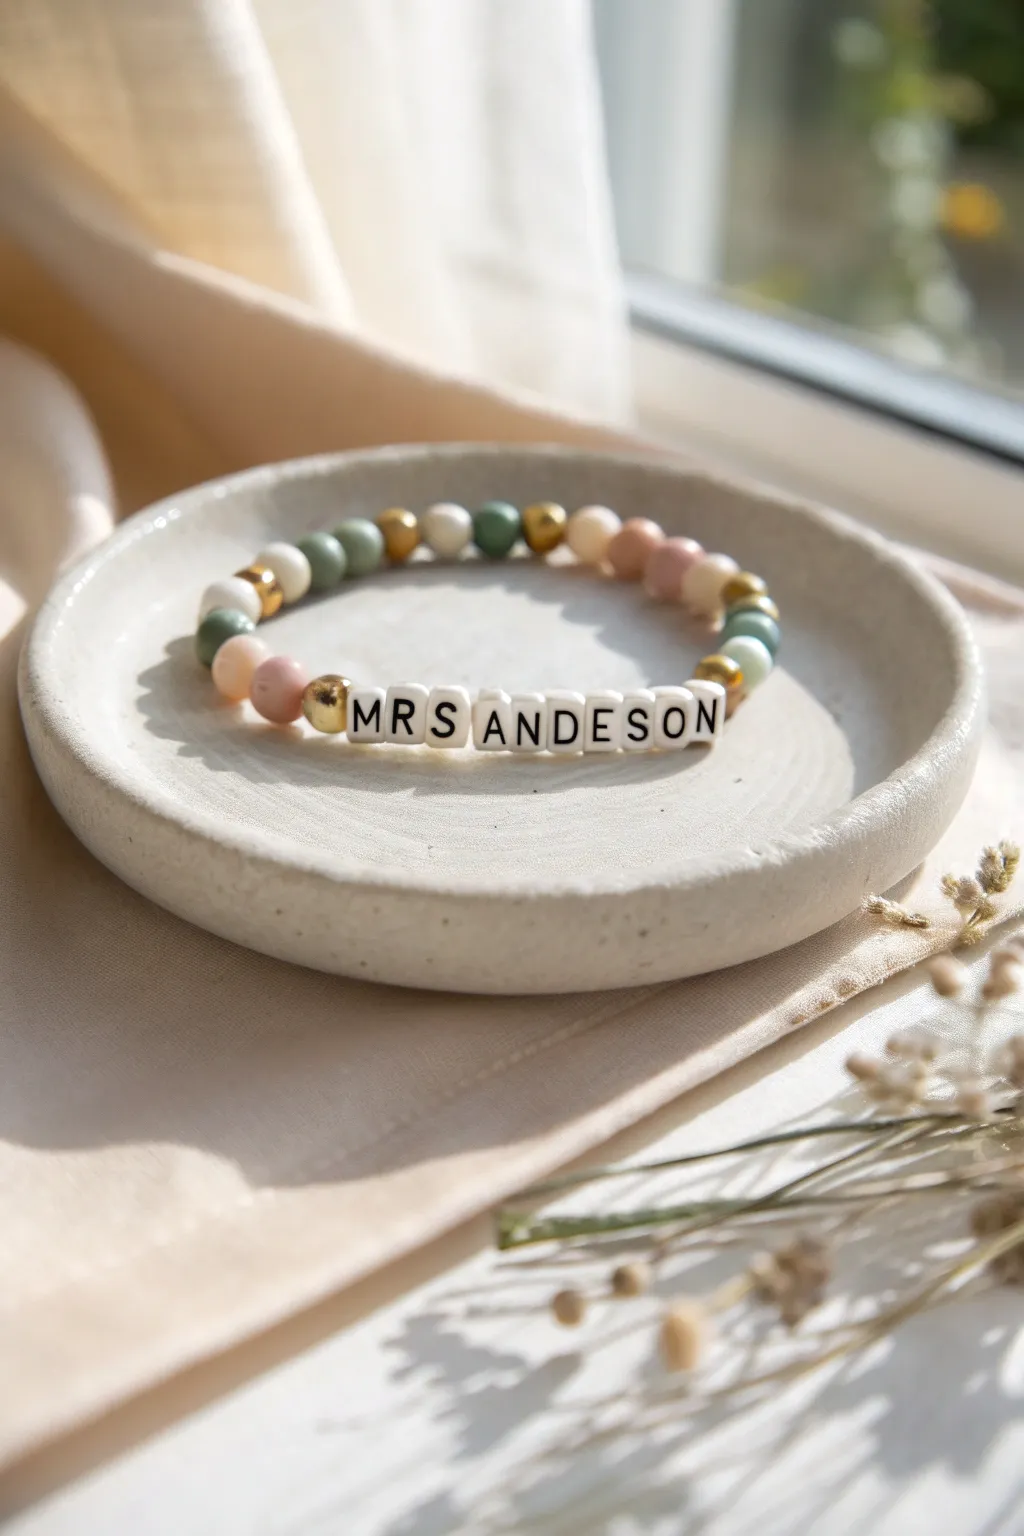
Create a heartfelt and personalized gift for your favorite educator with this lovely beaded bracelet featuring their name. The design combines earthy greens, soft pinks, and creams with metallic gold accents for a sophisticated yet playful accessory.
Step-by-Step
Materials
- Elastic stretch cord (0.7mm or 0.8mm)
- Round polymer clay beads (8mm-10mm) in Sage Green
- Round polymer clay beads (8mm-10mm) in Blush Pink
- Round polymer clay beads (8mm-10mm) in Cream or Off-White
- Square white alphabet beads with black lettering
- Gold spacer beads (small round or faceted)
- Small bead stopper or binding clip
- Super glue or E6000 (optional)
- Scissors
Step 1: Planning and Preparation
-
Measure the wrist:
Before cutting any cord, determine the size you need. An adult wrist is typically 6.5 to 7.5 inches. Cut a piece of elastic cord about 10-12 inches long to give yourself plenty of room for tying knots later. -
Secure the end:
Attach a bead stopper or a simple binding clip to one end of your cut elastic. This prevents your beads from sliding off while you design your pattern. -
Layout your name:
Select the alphabet beads needed for your teacher’s name (e.g., ‘MRS ANDERSON’). Lay them out flat on your workspace to double-check the spelling. -
Insert spacing beads:
If there is a space in the name (like between ‘MRS’ and the surname), decide if you want to use a gold spacer bead or a plain clay bead as the separator. In the example, the letters run consecutively, which keeps the focal point tight.
Loosey Goosey?
If the bracelet feels too loose, remove 1-2 beads before tying the final knot. Remember elastic stretches over time, so a snug fit is better initially.
Step 2: Stringing the Design
-
Start the pattern:
Begin stringing your beads on the side that will sit opposite the name initially to hide the knot later, or start near the name if you prefer symmetry. The pattern shown uses a mix of sage green, blush pink, and cream beads. -
Add gold accents:
Intersperse the colored clay beads with gold spacer beads. A good rhythm is to place a gold bead every 2-3 colored beads to add a touch of shine without overwhelming the soft colors. -
Center the name:
Thread your alphabet beads onto the cord. Ensure they are facing the correct direction so the name reads left-to-right when worn. -
Frame the name:
Add a gold spacer bead immediately before the first letter and immediately after the last letter. This acts as a beautiful frame that highlights the text. -
Finish the loop:
Continue the pattern of alternating colored clay beads and gold spacers on the other side of the name until the bracelet reaches your desired length. -
Check the fit:
carefully wrap the unfinished bracelet around your wrist (or a sizing cone) to ensure the ends meet comfortably without gaps, but aren’t too loose.
Add a Charm
Make it extra special by attaching a small apple or ruler charm to the gold spacer bead next to the name for a thematic teacher touch.
Step 3: Securing the Bracelet
-
Pre-stretch the cord:
Give the ends of the elastic a gentle tug. Pre-stretching helps prevent the bracelet from sagging or loosening permanently after the first few wears. -
Remove the stopper:
Carefully take off the bead stopper while holding both ends of the cord firmly. -
Tie the first knot:
Cross the ends and tie a simple overhand knot, pulling it down tight against the beads so there is no slack. -
Tie a surgeon’s knot:
For the second knot, loop the cord end through the loop twice instead of once before pulling tight. This extra friction secures the elastic much better than a standard knot. -
Apply adhesive:
I like to place a tiny dot of super glue or jewelry glue directly onto the knot. This is optional but provides extra insurance against unraveling. -
Hide the knot:
If one of the beads near the knot has a large enough hole, gently pull the elastic so the knot slides inside that bead, hiding it from view. -
Trim excess:
Using sharp scissors, trim the excess cord ends close to the knot (or the bead hiding the knot), being careful not to nick the main structural cord.
Now you have a charming, personalized gift ready to make a teacher smile
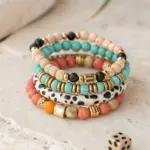
Subject Teacher Color-Coded Bracelet
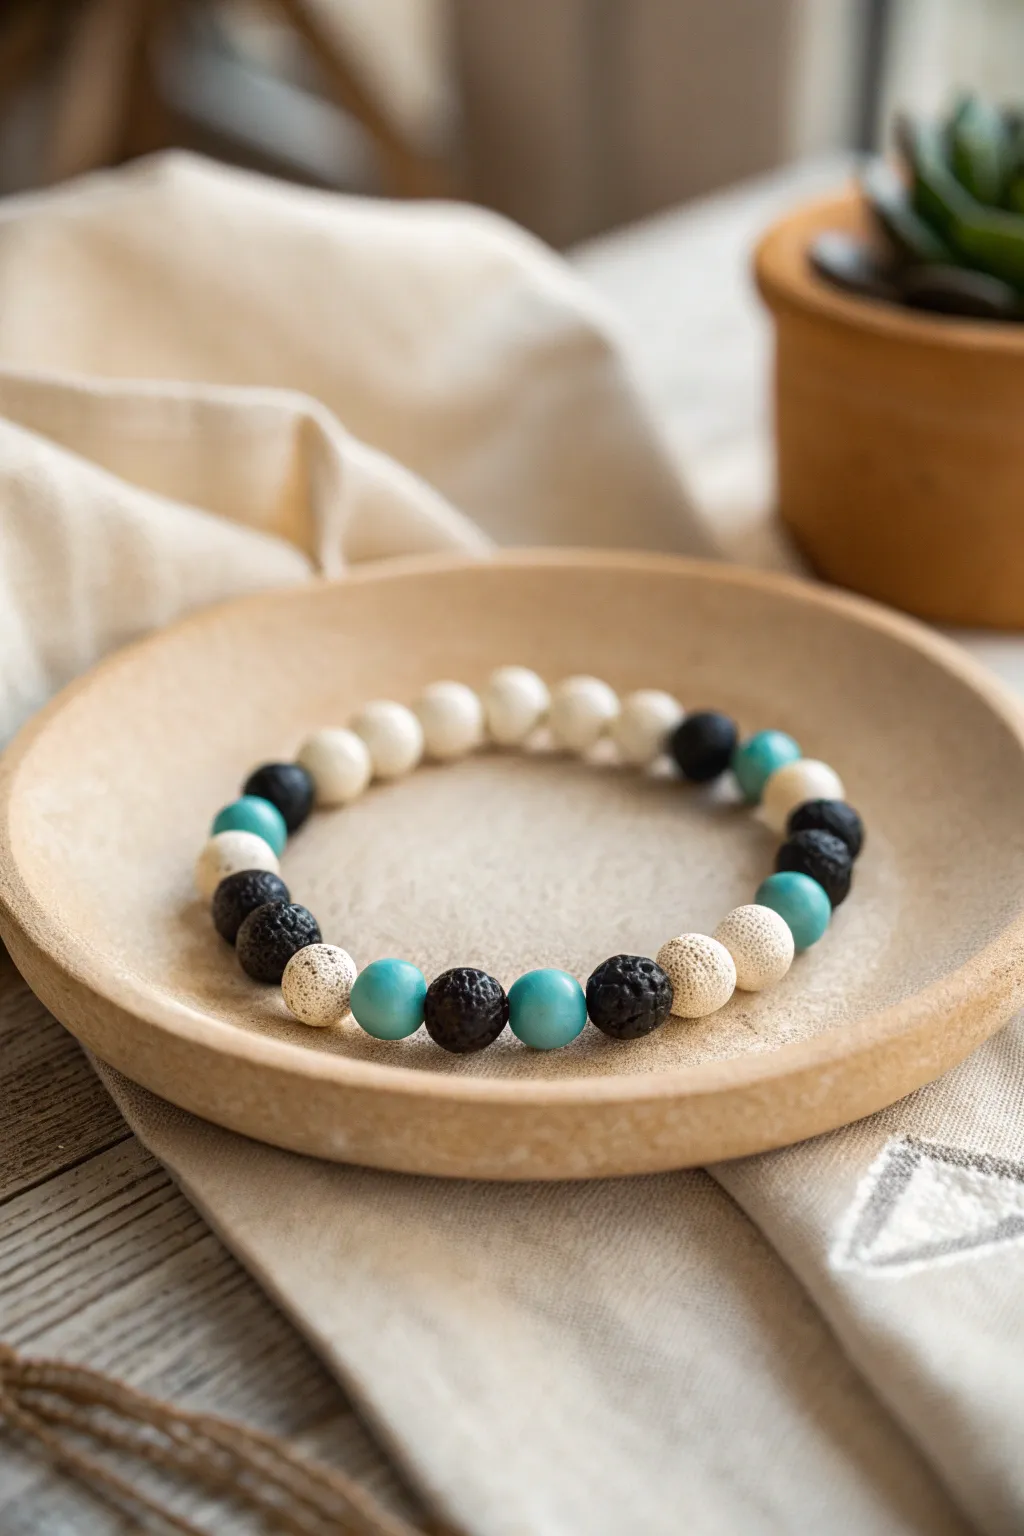
This elegant beaded bracelet combines the rustic texture of porous lava rock with the smooth, cool finish of turquoise gemstone or polymer clay beads. The alternating pattern of cream, charcoal black, and blue-green creates a sophisticated accessory that can subtly represent school colors or a favorite subject theme for a teacher.
Detailed Instructions
Materials
- 8mm white lava rock beads (or textured polymer clay beads)
- 8mm black lava rock beads
- 8mm smooth turquoise or teal beads (gemstone, glass, or polymer clay)
- Strong elastic bead cord (0.8mm or 1.0mm recommended)
- Bead stopper or masking tape
- Scissors
- Jewelry glue or clear nail polish
Step 1: Planning the Design
-
Measure your wrist:
Before you begin stringing, wrap a piece of string or a flexible measuring tape around your wrist to find the circumference. Add about 0.5 to 0.75 inches to this number so the bracelet fits comfortably without being too tight. -
Lay out the pattern:
On a bead board or a clean cloth, arrange your beads to visualize the pattern shown in the image. This specific design uses an asymmetrical color-blocking technique rather than a perfectly repeating sequence. -
Create the white block:
Group approximately 7 to 8 white lava beads together. This will form the largest solid section of the bracelet. -
Establish the transition:
To transition from the white block, place one black lava bead, followed by one turquoise bead, and then another white lava bead. This breaks up the solid color gently. -
Form the mixed pattern:
For the rest of the bracelet, create an alternating pattern. I usually place a black lava bead, followed by a turquoise bead, repeating this sequence around the remaining circumference. -
Refine the sequence:
Looking at the image, notice there’s a small cluster of two white beads flanked by black beads on the opposite side. Play with the arrangement until you have a satisfying balance of dark and light textures.
Step 2: Stringing the Beads
-
Prepare the cord:
Cut a piece of elastic cord about 10-12 inches long. This extra length is essential for tying the knot securely later. Pre-stretch the elastic slightly by giving it a few gentle tugs to prevent the bracelet from sagging after wear. -
Secure the end:
Place a bead stopper or simply fold a piece of masking tape over one end of the cord. This prevents your beads from sliding off while you work. -
Start stringing:
Begin threading your beads onto the cord, following the layout you designed. Start with the block of white beads first, as hiding the knot inside one of these porous beads is often easier. -
Check the length:
Once all beads are strung, wrap the strand around your wrist to check the fit. There should be no gaps between beads, but it shouldn’t squeeze your skin. -
Add or remove spacers:
If the size needs adjusting, add an extra black or turquoise bead to the mixed section, or remove one from the white block.
Aromatic Addition
Since lava beads are porous, you can add a drop of essential oil to the white or black beads. It turns the bracelet into a calming diffuser for stressful teaching days.
Step 3: Finishing Touches
-
Prepare for the knot:
Remove the bead stopper or tape carefully, holding both ends of the elastic firmly. -
Tie the surgeon’s knot:
Cross the ends over each other like a regular shoelace knot. Then, loop one end through the crossover a second time before pulling tight. This extra loop creates friction that holds the elastic in place. -
Tighten securely:
Pull the cords tight, but be careful not to snap the elastic. You want the beads to pull together snugly so no cord is visible between them. -
Secure with glue:
Apply a tiny drop of jewelry glue or clear nail polish directly onto the knot. Let this sit for a minute to become tacky and start setting. -
Hide the knot:
While the glue is still slightly pliable, gently tug the cord so the knot slides inside the hole of the adjacent white lava bead. This makes for a seamless professional finish. -
Trim the excess:
Once the glue is fully dry (check your glue’s instructions, usually 10-15 minutes), use sharp scissors to trim the excess cord as close to the bead hole as possible without cutting the knot itself. -
Final inspection:
Roll the bracelet in your hands to ensure the tension is even and the knot is completely hidden inside the bead.
Knot Keep Slipping?
If the elastic is slippery, dust the ends with a tiny bit of cornstarch or baby powder before tying. The powder adds grip, helping the knot hold tight while you apply glue.
Enjoy wearing your custom-designed bracelet or wrap it in tissue paper for a thoughtful handmade gift


What Really Happens Inside the Kiln
Learn how time and temperature work together inside the kiln to transform clay into durable ceramic.
Heart-Studded “Thank You” Bracelet
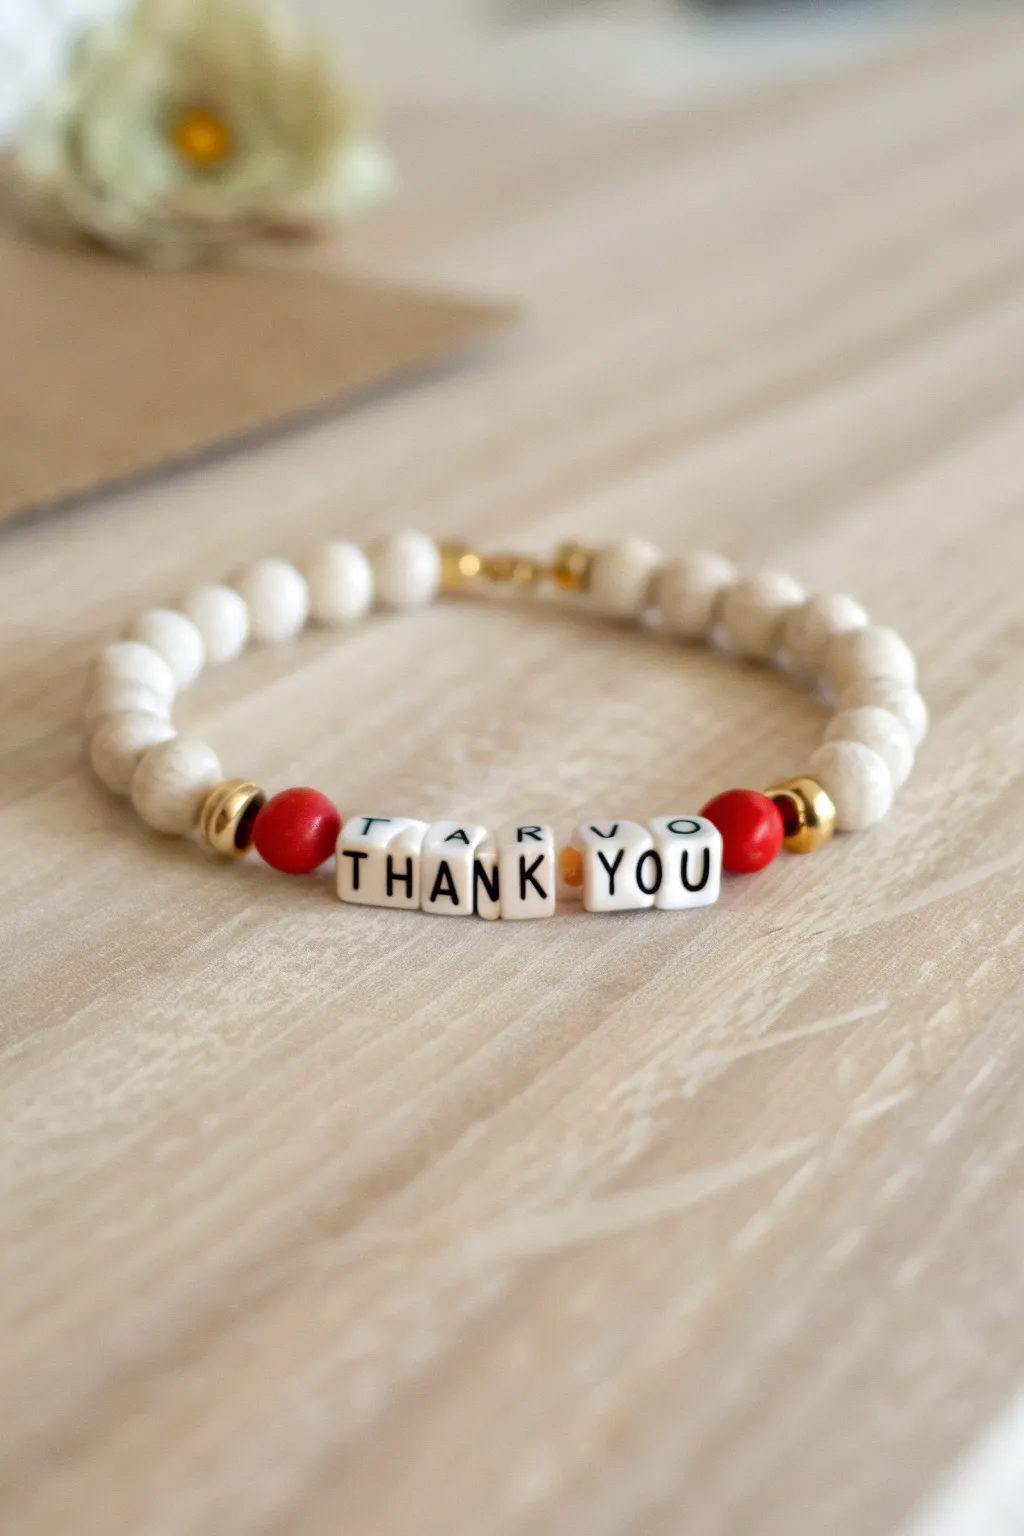
Show your gratitude with this elegant yet simple beaded bracelet featuring a heartfelt message. The combination of natural white wood beads, striking red accents, and gold spacers creates a sophisticated look any teacher would love to wear.
Step-by-Step
Materials
- White round wood beads (approx. 8mm – 10mm)
- Red round wood or clay beads (approx. 8mm)
- Square white letter beads with black text
- Gold tone metal spacer beads (round or saucer shape)
- Gold crimp beads
- Elastic jewelry cord (0.7mm or 0.8mm)
- Scissors
- Jewelry glue or clear nail polish
- Pliers (optional, for crimping)
- Bead stopper or tape
- Tape measure
Step 1: Preparation & Layout
-
Measure the cord:
Cut a piece of elastic cord about 10-12 inches long. This gives you plenty of extra room to tie the knot later without struggling. -
Secure the end:
Place a bead stopper or a piece of tape on one end of the cord to prevent your beads from sliding off while you work. -
Pre-stretch the cord:
Gently pull on the elastic cord focused on the middle section. Pre-stretching helps prevent the bracelet from loosening up after it’s been worn a few times. -
Plan your message:
Lay out your letter beads on a flat surface to spell ‘THANK YOU’. Ensure the orientation is correct before stringing.
Knot Slipping?
If the elastic knot slips while tying, try adding a drop of glue to the cord *before* you pull the final knot tight. Also, double surgeon’s knots hold best.
Step 2: Stringing the Beads
-
Start the pattern:
Begin by threading the white round wood beads. String approximately 8-10 white beads, depending on the wrist size you are aiming for. -
Add the first crimp:
Thread a small gold crimp bead onto the cord. This will act as part of the closure later, or can simply be a decorative separator near the back. -
Continue with white beads:
Add the remaining white beads for the back section of the bracelet. You want enough white beads so that they cover about two-thirds of the wrist. -
Add first gold accent:
Slide on one gold spacer bead. This metallic touch acts as a transition point before the color pop. -
Add the red bead:
Thread one red round bead. This adds a lovely pop of color that frames the message perfectly. -
String the first word:
Carefully thread the letters T, H, A, N, K in order. Double-check that all letters are facing the same direction. -
Add the spacer:
Between the words, I like to use a single gold spacer bead or a small white bead if preferred, though simply pushing the letters together works too as seen here. -
String the second word:
Continue stringing the letters Y, O, U, checking the letter orientation again to ensure readability. -
Finish the focal point:
Mirror the other side by adding the second red bead, followed immediately by the second gold spacer bead.
Step 3: Finishing Touches
-
Check the fit:
Wrap the unfinished strand around your wrist (or a sizing cone) to check for length. Add or remove white beads from the back section if adjustments are needed. -
Prepare to knot:
Remove the bead stopper or tape. Bring both ends of the elastic cord together, ensuring there is no slack between the beads. -
Tie the knot:
Tie a secure surgeon’s knot. To do this, cross the ends, loop one through twice, pull tight, and then tie a standard overhand knot on top. -
Hide the knot:
Ideally, you want the knot to sit inside one of the larger hole beads. Gently pull the cord so the knot slides inside the adjacent white bead or gold crimp bead. -
Secure with glue:
Apply a tiny dab of jewelry glue (or clear nail polish) to the knot before sliding it into the bead to keep it permanently secure. -
Trim excess cord:
Once the glue is dry, use your scissors to trim the excess cord ends close to the bead, being careful not to cut the main knot.
Letter Orientation
Some letter beads have text on all four sides. Rotate them before stringing to ensure your message reads horizontally rather than vertically stacked.
Now you have a thoughtful, handmade gift ready to brighten a teacher’s day
Three-Piece School Supplies Stack
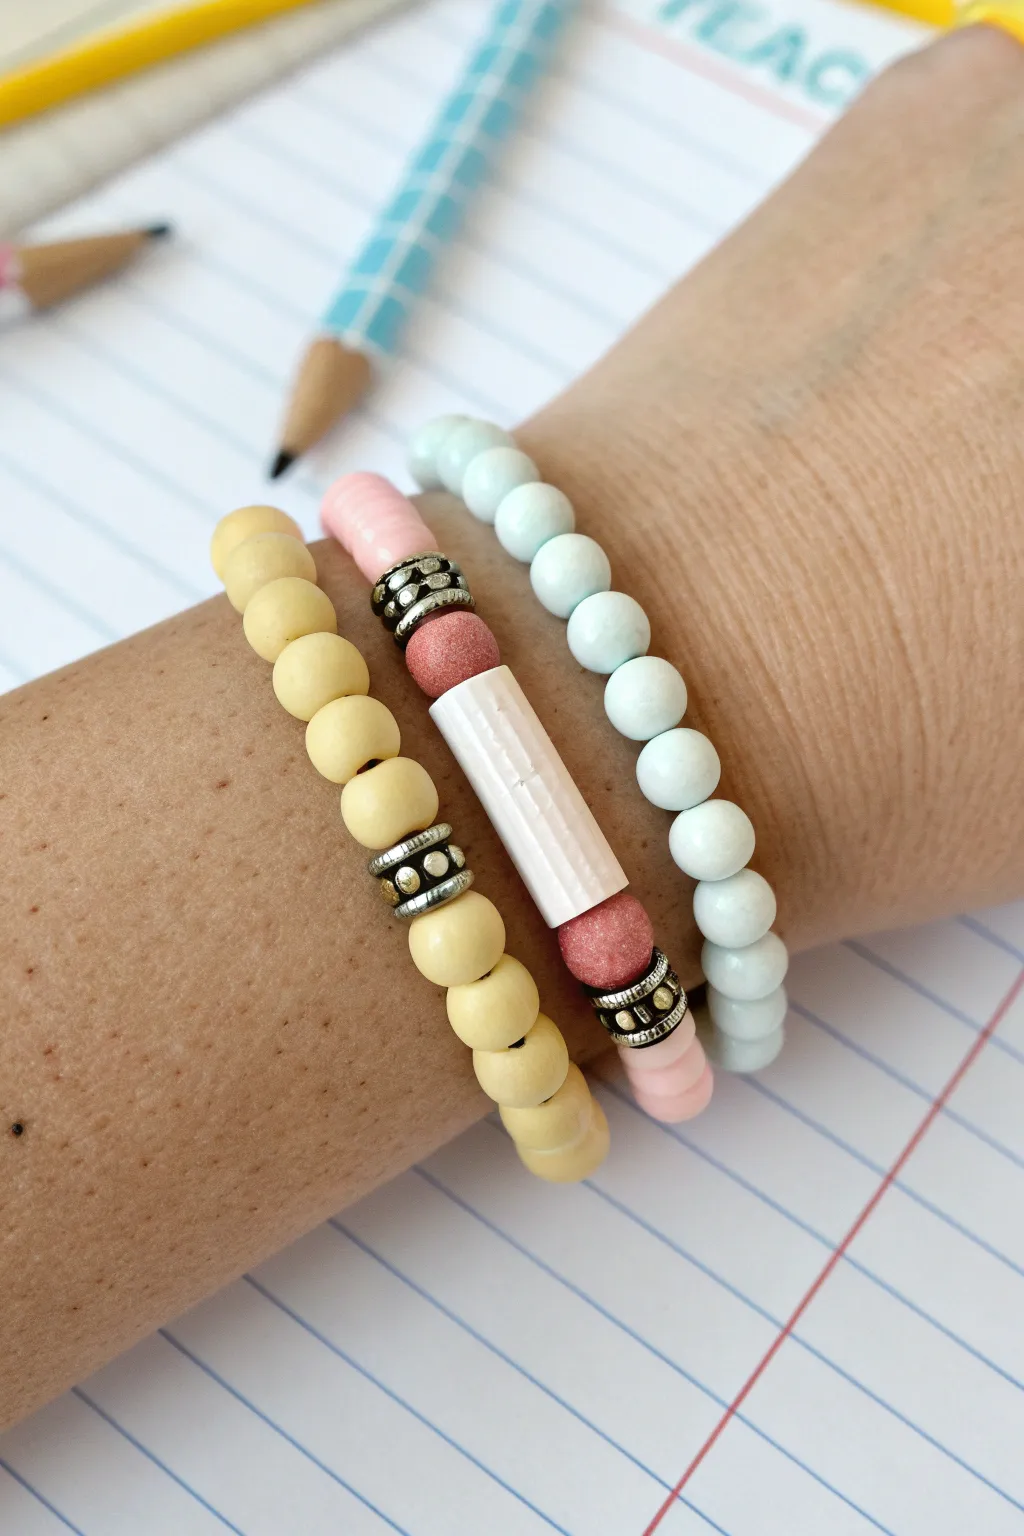
Celebrate clear skies and crisp notebook paper with this clever trio of bracelets that subtly mimics classic school supplies. The centerpiece features a whimsical pencil design flanked by sunny yellow and airy blue strands for a cohesive, teacher-themed stack.
Step-by-Step Guide
Materials
- Elastic cord (0.7mm or 0.8mm)
- Matte yellow round beads (approx. 8mm)
- Matte baby blue round beads (approx. 8mm)
- Flat pink heishi/clay disc beads
- Silver spacer beads with textured dot detail
- Two terracotta or reddish-pink round beads (for the eraser ends)
- One long white tube bead (approx. 20-25mm)
- Pencil
- Ruler
- Scissors
- Super glue or jewelry cement
Step 1: Yellow ‘No. 2’ Bracelet
-
Measure and Cut:
Cut a piece of elastic cord about 10-12 inches long. This gives you plenty of extra room for tying knots later. -
Start the Pattern:
Thread on about 8 to 10 matte yellow round beads to form the first section of the bracelet strand. -
Add Spacer Accent:
Slide on one of the textured silver spacer beads. This breaks up the yellow and adds a metallic touch reminiscent of a pencil ferrule. -
Finish Beading:
Continue adding yellow beads until the strand reaches your desired wrist size (usually 6.5 to 7 inches for an average wrist). Add one final silver spacer bead if you want symmetry, or keep it simple with just one. -
Tie Off:
Tie a secure surgeon’s knot (right over left, left over right, loop through twice). Pull tight, dab with a tiny drop of glue, and trim the excess cord once dry.
Step 2: The Pencil Design Centerpiece
-
Prepare the Cord:
Cut another 12-inch length of elastic cord for the most intricate bracelet of the set. -
Thread the Band:
Start by stringing the pink flat heishi beads. You’ll need enough to cover about two-thirds of the bracelet’s circumference. -
Begin the Pencil Detail:
Once the pink band is long enough, slide on a textured silver spacer bead, followed by one reddish-pink round bead to represent the worn eraser end. -
Create the Barrel:
Thread the long white tube bead next. If your tube bead is plain, you can use a pencil to lightly draw faint gray lines on it to mimic the hexagonal shape of a pencil, although a plain white cylinder works perfectly too. -
Finish the Pencil:
On the other side of the white tube, mirror the design: add the second reddish-pink round bead, followed by the second silver spacer bead. -
Check the Fit:
Wrap the strand around your wrist to check the size. If it’s too tight, add a few more pink heishi beads to the ends; if too loose, remove a few. -
Secure the Knot:
Tie your surgeon’s knot firmly, burying the knot inside the hole of the heishi beads if possible for a seamless finish. Glue and trim.
Pre-stretch Pro Tip
Before adding any beads, give your elastic cord a firm tug a few times. This pre-stretching prevents the bracelets from sagging or loosening up after you wear them for the first time.
Step 3: Blue Sky Solid
-
Cut Final Cord:
Snip your third and final piece of elastic cord. -
String Blue Beads:
This strand is the simplest. String the matte baby blue round beads continuously. -
Sizing Check:
I always like to hold this bracelet up against the yellow one to ensure they are exactly the same size before tying. -
Final Knot:
Tie off the blue strand with a strong knot, apply your adhesive, and trim the ends. -
Completing the Stack:
Slide all three bracelets onto your wrist, placing the pencil-themed one in the center for the best visual balance.
Make it Personal
Use a fine-point permanent marker to write the teacher’s name or ‘Ms. Teacher’ on the white tube bead in a script font before stringing it.
Wear your new customized stack with pride or gift it to a favorite educator to brighten their school day

TRACK YOUR CERAMIC JOURNEY
Capture glaze tests, firing details, and creative progress—all in one simple printable. Make your projects easier to repeat and improve.
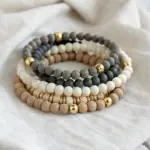
Chalkboard Palette Bracelet
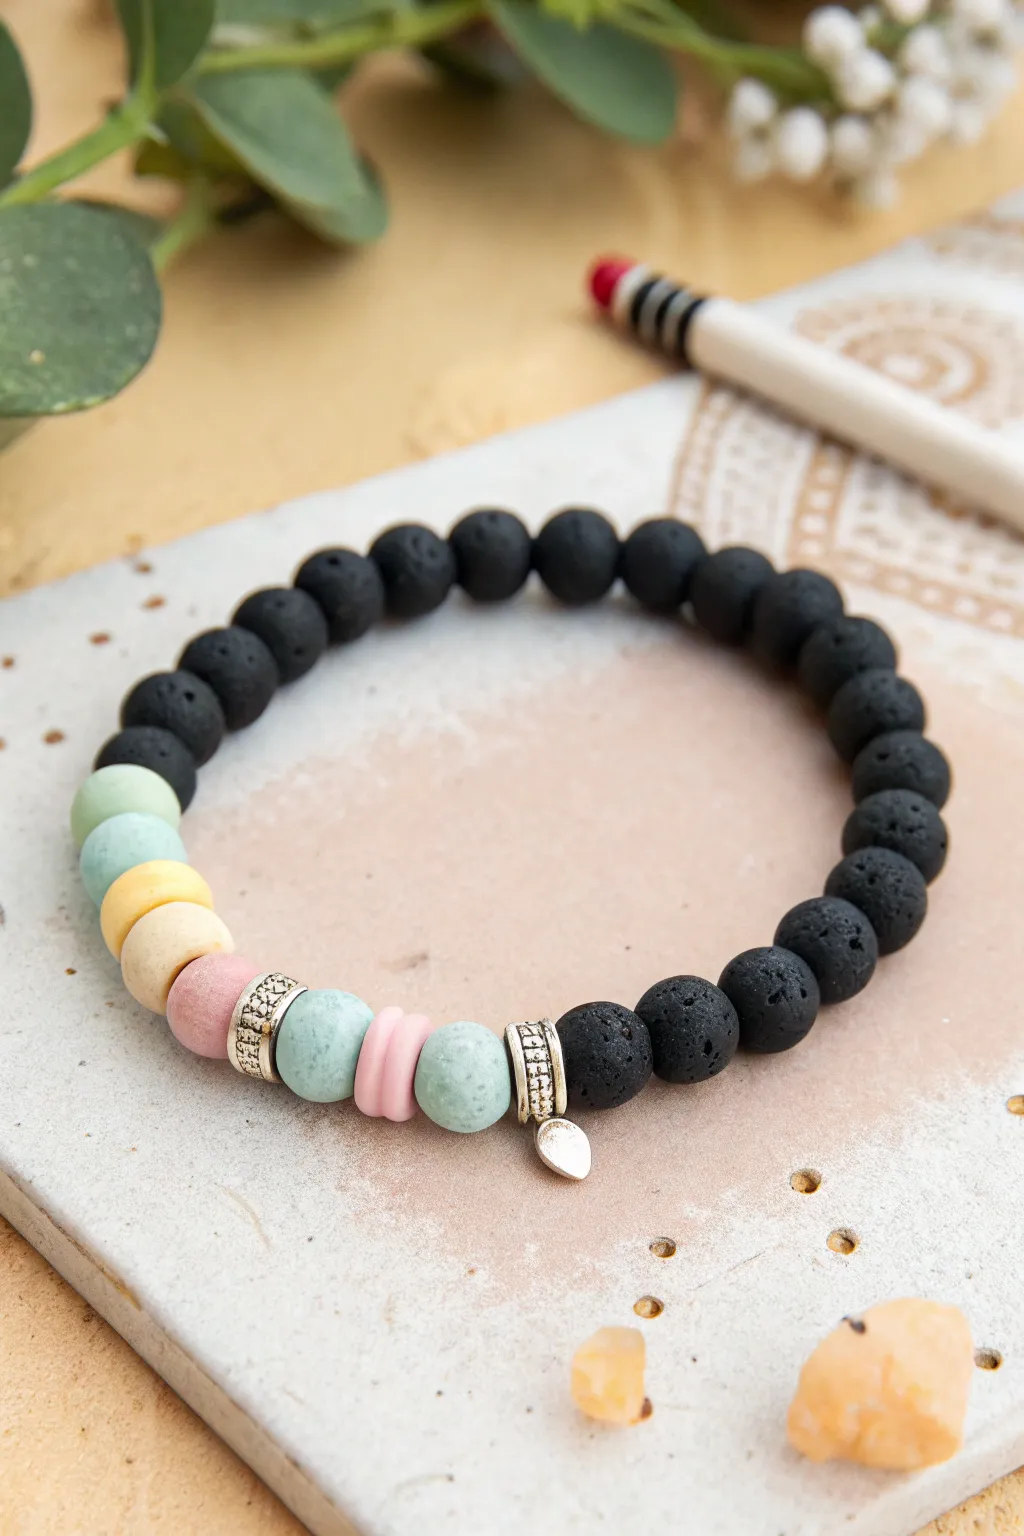
Function meets style in this thoughtful accessory that pairs porous black lava stone with soft pastel accents. The contrasting textures create a unique “chalkboard” aesthetic, while the lava beads double as a natural diffuser for your favorite essential oils.
Step-by-Step Tutorial
Materials
- 8mm black lava stone beads (approx. 20-22 beads)
- Round polymer clay or matte ceramic beads in pastel colors (mint, light blue, yellow, peach, pink)
- Disc-shaped polymer clay spacer beads (pink)
- Tibetan silver spacer beads with loop (for charm)
- Tibetan silver decorative spacer beads (cylinder style)
- Small silver leaf charm
- Jump ring (4mm or 5mm)
- Strong elastic cord (0.8mm or 1mm)
- Beading needle (optional but helpful)
- Jewelry glue or clear nail polish
- Scissors
Step 1: Planning the Design
-
Measure your wrist:
Before you begin, wrap a piece of string around your wrist to find your comfortable size. Add about half an inch to this measurement to account for the bulk of the 8mm beads. -
Layout the focal section:
Using a bead design board or a soft towel, lay out your central pastel pattern first. Start with a mint green bead, followed by light blue, yellow, peach, and a round pink bead. -
Add detail elements:
To frame this colorful section, plan the placement of your metallic accents. Notice how the image uses silver spacers to bracket the colored section, creating a professional finish. -
Arrange the lava beads:
Fill out the rest of the circle with the textured black lava beads until you reach your desired bracelet length. I usually verify the count here to ensure it fits perfectly before threading.
Loose Knot?
If your elastic knot feels insecure, try a surgeon’s knot. It’s like a square knot, but you loop the elastic through twice on the first pass for extra friction.
Step 2: Stringing the Beads
-
Prepare the elastic:
Cut a piece of elastic cord about 12 inches long. This generous length makes tying the final knot much easier than struggling with short ends. -
Stretch the cord:
Give your elastic cord a few firm tugs. Pre-stretching prevents the bracelet from sagging or loosening shortly after you first wear it. -
Begin threading:
Start by threading the Mint Green and Light Blue round beads onto the cord. If the holes are tricky, a collapsible eye needle works wonders here. -
Continue the sequence:
Add the Yellow and Peach round beads. Follow this with a Pink round bead. -
Insert first silver spacer:
Slide on a decorative cylindrical silver spacer. This marks the transition between the round pastels and the upcoming disc beads. -
Add texture variation:
Thread a round Light Blue bead, followed by two flat pink disc spacers, and then another round Light Blue bead. -
Add the charm carrier:
Add the silver spacer bead that has the small loop attached. This will hold your leaf charm later. -
Finish the bead stringing:
String all the remaining black lava beads onto the cord. Double-check your pattern against your original layout to ensure no beads were missed.
Color Match
Customize the pastel section to match school colors or use darker primary colors for a traditional ‘box of crayons’ vibe that fits an art teacher perfectly.
Step 3: Finishing Touches
-
Tie the knot:
Bring the two ends of the elastic together. Tie a standard square knot (right over left, left over right) and pull it tight. -
Secure the knot:
Add a tiny drop of jewelry glue or clear nail polish to the knot itself. I like to let this dry briefly, just for a minute or two, to ensure it doesn’t slip. -
Hide the knot:
Trim the excess elastic ends close to the knot, but not touching perfectly flush. Gently pull the elastic so the knot slides inside the hole of the adjacent black lava bead. -
Attach the charm:
Using pliers, open a small metal jump ring by twisting it sideways. Loop it through the leaf charm and the silver carrier bead loop, then twist it closed. -
Add essential oil (Optional):
If gifting this to a teacher, you can place a drop of calming lavender or peppermint oil onto one of the black lava beads. It absorbs instantly and diffuses the scent throughout the day.
This calming, tactile bracelet is now ready to support its wearer through even the busiest school days
Ruler-Inspired Measurement Stripes
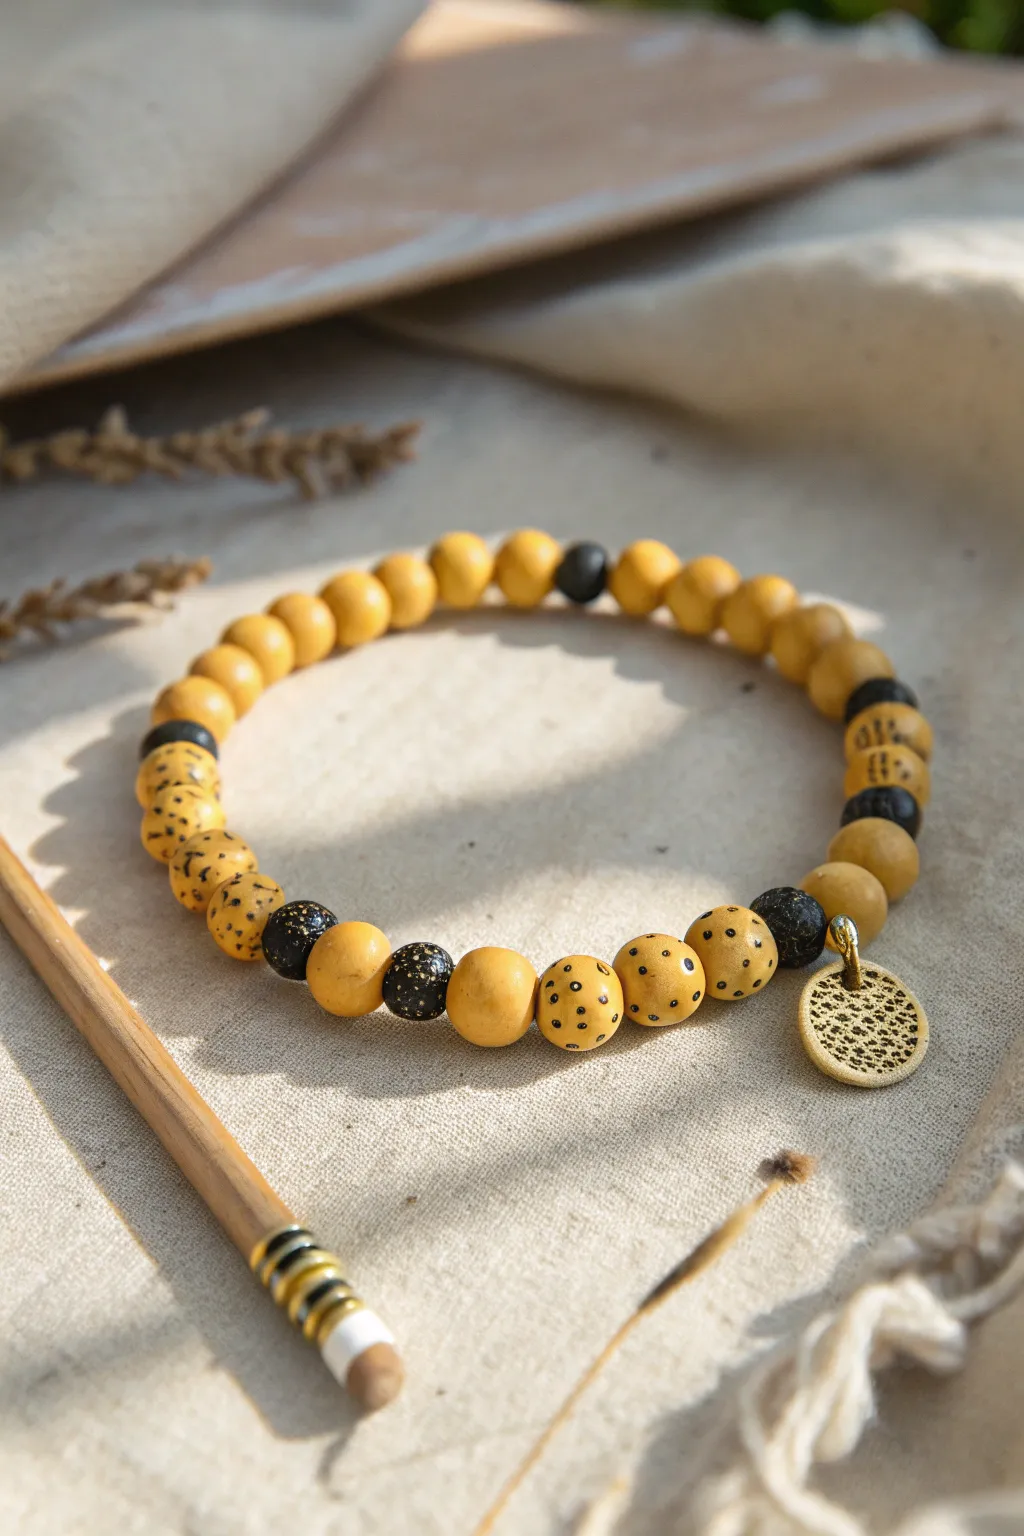
Celebrate the classroom with this clever wrist accessory that mimics the classic look of a wooden ruler. Featuring golden-yellow clay beads detailed with measurement tick marks and accented by chalkboard-black spacers, this bracelet is a stylish nod to school days and perfect for any educator.
How-To Guide
Materials
- Polymer clay (golden yellow/ochre color)
- Polymer clay (black)
- Acrylic paint (black)
- Sculpting tools (needle tool or toothpick)
- Small paintbrush (fine tip)
- Gold round charm (textured or plain)
- Gold jump ring
- Elastic stretch cord (0.8mm or 1mm)
- Superglue or specialized jewelry knot cement
- Bead piercing pin or thick needle
- Baking sheet and parchment paper
- Gold foil leaf (optional, for black bead texture)
Step 1: Shaping the Beads
-
Condition the yellow clay:
Start by warming up your golden-yellow polymer clay in your hands until it is soft and pliable. Roll it into a smooth, even log on your work surface to ensure consistent bead sizes. -
Cut equal sections:
Using a blade, slice the log into equal-sized small chunks. Aim for enough pieces to create roughly 20-25 beads, depending on your wrist size. -
Roll the yellow spheres:
Roll each yellow chunk between your palms to create perfectly round spheres. These should be approximately 8-10mm in diameter. -
Create the black accent beads:
Repeat the process with the black clay, but make fewer beads—you only need about 4-6 of these for contrast. I like to make these slightly smaller or textured for variety. -
Texture the black beads:
To mimic the texture shown in the photo, lightly tap the surface of the black beads with a stiff brush or a crumpled ball of foil before baking. You can also press tiny bits of gold leaf into them for sparkle. -
Pierce the holes:
Carefully pierce the center of each bead with your piercing pin. rotate the bead as you push the tool through to prevent it from squishing out of shape.
Clean Lines Hack
Use a super-fine tip permanent marker instead of paint for the ruler markings. It offers more control and dries instantly without smudging.
Step 2: Painting the Measurements
-
Bake the beads:
Place all your beads on a parchment-lined baking sheet. Bake according to the clay manufacturer’s instructions (usually around 275°F/135°C for 15-30 minutes) and let them cool completely. -
Prepare the paint:
Squeeze a tiny drop of black acrylic paint onto a palette. You need a very detail-oriented consistency, so ensure it isn’t too watery. -
Select the ruler beads:
Choose about 8-10 of your yellow beads to be the ‘ruler’ segments. Leave the remaining yellow beads plain. -
Add dots and dashes:
On the selected beads, use the fine-tip brush or a toothpick to paint tiny dots or small dashes. Mimic the look of inch and millimeter marks found on a wooden ruler. -
Create variation:
Don’t make them all identical. Paint some with a single row of dots, and others with small vertical lines or grouped markings to represent different measurements. -
Seal the paint:
Once the paint is fully dry, you can lightly coat the painted beads with a matte varnish to protect the design, though this is optional.
Step 3: Assembly
-
Cut the elastic:
Cut a length of elastic cord about 10-12 inches long. This gives you plenty of extra room to tie the knot comfortably later. -
Pre-stretch the cord:
Give the elastic cord a few firm tugs. This pre-stretching prevents the bracelet from loosening up immediately after you wear it. -
Plan the layout:
Lay your beads out on a mat. Group the plain yellow beads together, then intersperse the black beads and the painted ‘ruler’ beads in a pattern that pleases you. -
String the beads:
Thread the beads onto the elastic cord according to your layout. Keep the tension even as you go. -
Add the charm:
Before tying off, slide the gold jump ring with the charm attached onto the cord. Position it between a black bead and a ruler bead for a nice focal point. -
Tie the knot:
Tie a surgeon’s knot (a square knot with an extra loop) to secure the bracelet. Pull it tight. -
Secure and trim:
Apply a tiny dab of superglue or knot cement to the knot. Let it dry, then trim the excess cord ends and tuck the knot inside a neighboring bead hole if possible.
Bead Hole Blockage?
If paint clogs the bead hole, don’t force the needle. Use a small hand drill or twist a drill bit by hand to clear the dried paint gently.
Slip this charming bracelet on your wrist and enjoy a little artisan flair in your daily wardrobe
Crayon Box Brights Bracelet
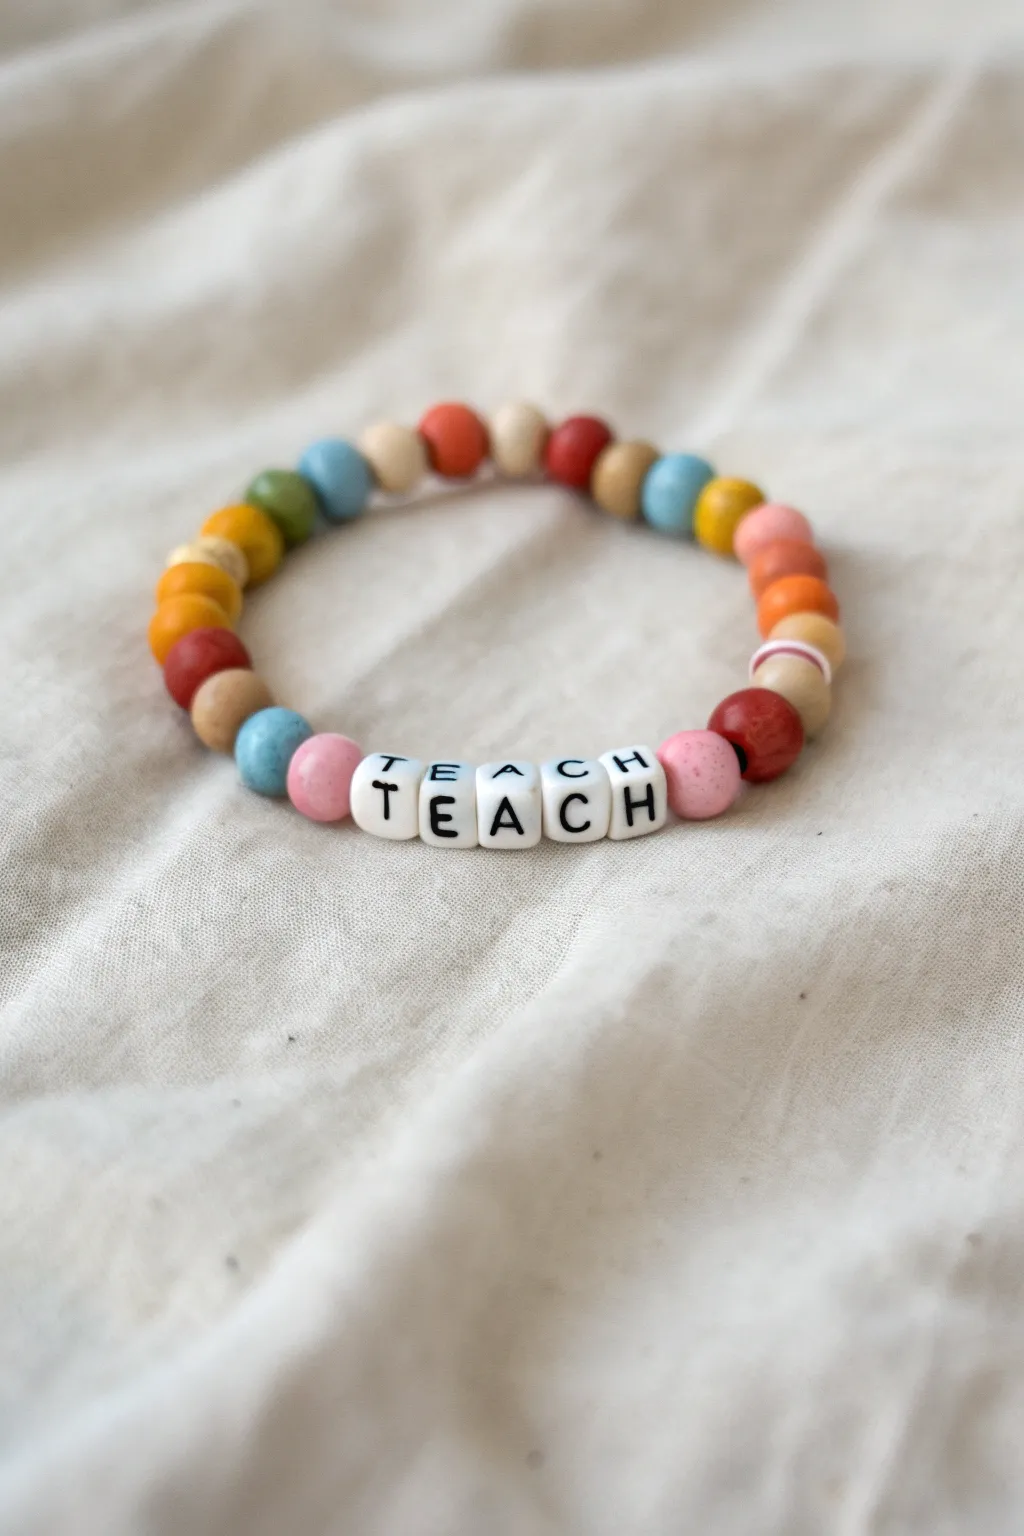
Capture the nostalgic joy of a fresh box of crayons with this colorful beaded bracelet. Featuring a playful mix of primary and secondary colors alongside classic wooden accents, this accessory is a perfect, heartfelt gift for any educator.
How-To Guide
Materials
- White elastic cord (0.8mm or 1mm thickness)
- Square white letter beads spelling ‘TEACH’
- 10mm round wooden beads (painted)
- Colors needed: Light pink, dark pink, red, orange, yellow, bright green, olive green, light blue, medium blue, teal, mustard yellow
- Natural unfinished wooden beads (10mm)
- Scissors
- Bead stopper or masking tape
- Clear jewelry adhesive (e.g., E6000 or GS Hypo Cement)
Step 1: Planning and Sorting
-
Measure the wrist:
Before you begin stringing, you need to know the target size. Measure the wrist and add about half an inch for a comfortable fit. For a standard adult bracelet, 7 inches is a safe average to aim for. -
Prepare the workspace:
Lay out a bead mat or a soft towel to prevent your beads from rolling away. This texture helps keep your design in order as you lay it out. -
Sort your crayon colors:
Gather your painted wooden beads. You want a spectrum that mimics a crayon box: vibrant reds, oranges, yellows, greens, and blues, plus a few pinks for softness. -
Isolate the neutrals:
Set aside your natural, unfinished wooden beads. These will act as spacers to break up the bright colors and give the bracelet an organic, classroom-style feel. -
Locate the letters:
Find the specific letter beads needed to spell ‘TEACH’. Check them for any printing defects to ensure your focal point is crisp and clear.
Knot Slipping?
If the elastic knot won’t hold tight, try dusting the cord ends with a little cornstarch or baby powder before tying to add grip.
Step 2: Designing the Pattern
-
Start the layout:
Place the five ‘TEACH’ letter beads in the center of your workspace. This central word anchors the entire design. -
Select flanking beads:
Choose two softer colored beads, like light pink, to place immediately on either side of the word. This frames the text gently without overpowering it. -
Create the color run:
Begin laying out the rest of the beads in a random but balanced ‘rainbow’ order. I like to alternate between warm tones (reds, oranges) and cool tones (blues, greens) to keep it dynamic. -
Integrate natural wood:
Intersperse the natural unfinished wood beads every 3-4 colored beads. This prevents the bracelet from looking too chaotic and adds a nice texture change. -
Check the length:
Line up all your selected beads against a ruler to ensure the total length matches your target measurement from earlier.
Customize It
Swap the generic ‘TEACH’ for the teacher’s actual last name (e.g., MRS. SMITH) for a truly personalized gift.
Step 3: Stringing and Finishing
-
Secure the cord end:
Cut a piece of elastic cord about 10-12 inches long. Isolate one end with a bead stopper or a piece of masking tape to stop beads from sliding off. -
String the focal point first:
Thread the word ‘TEACH’ onto the cord first. This ensures the text remains central while you build up the sides evenly if you decide to adjust the pattern. -
Add the remaining beads:
String the rest of your pattern, following natural order or the layout you designed. Keep the tension loose so the beads can rotate and sit comfortably. -
Pre-stretch the elastic:
Once all beads are on, hold both ends of the elastic and give it a few gentle tugs. This pre-stretching prevents the bracelet from sagging later. -
Tie the knot:
Remove the tape or stopper. Bring the ends together and tie a surgeon’s knot (right over left, left over right, loop through twice) for maximum security. -
Apply adhesive:
Dab a tiny drop of clear jewelry adhesive onto the knot. Wait a moment for it to tack up before letting the beads touch it. -
Hide the knot:
Ideally, slide the knotted section inside the hole of the nearest wooden bead to conceal it. If the hole is too small, simply trim the excess string close to the knot. -
Final trim:
Using sharp scissors, carefully snip off the remaining tail ends of the elastic, being extremely careful not to nick the main cord.
Slip this cheerful bracelet onto your wrist or gift box it to brighten a favorite teacher’s day
Gift-Card Backing With Teacher Pun
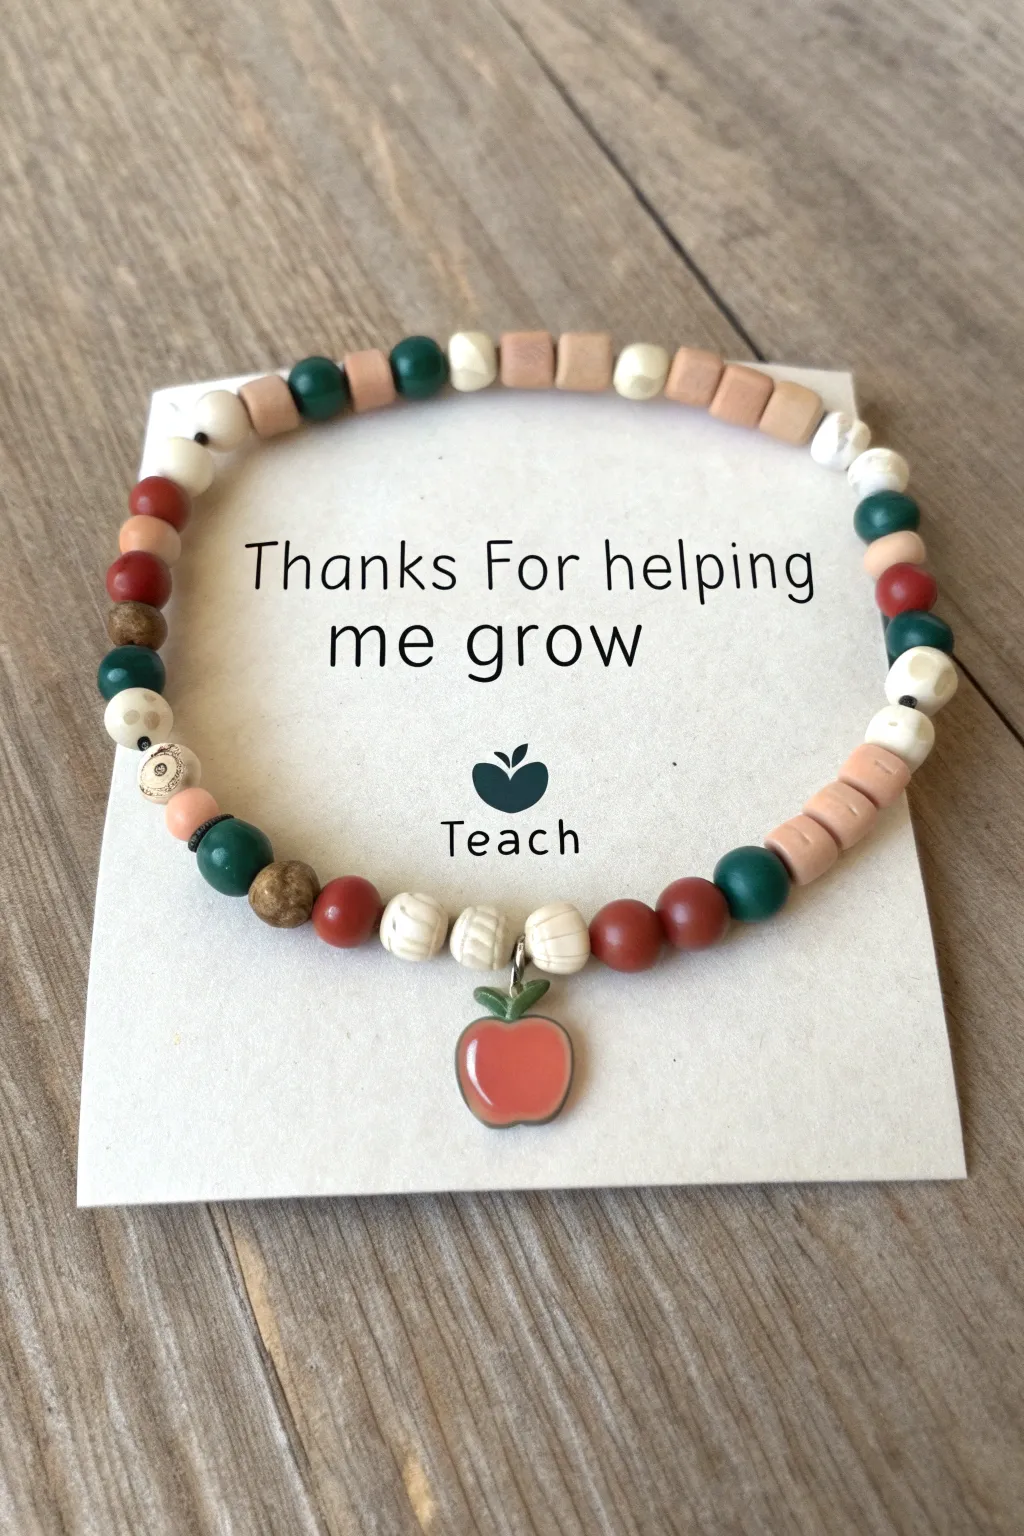
Create a heartfelt gift for your favorite educator with this charming beaded bracelet featuring earthy tones and a classic apple motif. Mounted on a custom card, it transforms a simple piece of jewelry into a meaningful keepsake that says “Thanks for helping me grow.”
How-To Guide
Materials
- Elastic stretch cord (0.7mm or 0.8mm)
- Red wooden or clay round beads (approx 6-8mm)
- Green wooden or clay round beads (approx 6-8mm)
- White or cream patterned round beads (approx 6-8mm)
- Natural wood round spacer beads
- Peach/tan Heishi disc beads or small wooden cube beads
- Enamel apple charm with jump ring
- White heavy cardstock paper
- Scissors
- Jewelry glue or clear nail polish
- Printer (for the card design)
- Masking tape (optional)
Step 1: Designing the Card Backing
-
Setup your digital canvas:
Open a word processing or design program and create a square or rectangle roughly 4×4 inches. This size provides enough room for the bracelet to sit comfortably without crowding the text. -
Add the main message:
Type ‘Thanks For helping me grow’ in a clean, sans-serif font like Century Gothic or similar. Center the text in the upper third of your square so it will appear inside the bracelet loop. -
Insert the graphic element:
Place a simple apple icon or silhouette below the text in the center. Underneath the icon, add the word ‘Teach’ or ‘Teacher’ in a smaller font size to anchor the design. -
Print and cut:
Print your design onto heavy white cardstock. I find that standard printer paper is too flimsy, so aim for at least 80lb cover stock. Cut out the square card carefully. -
Create the slits:
Using scissors, cut two small, angled slits on the left and right edges of the card, about halfway down. These slots will hold the bracelet in place later.
Knot Slipping?
If your elastic knot keeps slipping undone before you can glue it, try dabbing the knot with water before pulling tight. The friction helps the knot grip itself better while you apply glue.
Step 2: Assembling the Bracelet
-
Prepare your cord:
Cut a length of elastic cord about 10-12 inches long. Is helpful to pre-stretch the elastic slightly by pulling on it firmly a few times to prevent sagging later. -
Secure the end:
Tape one end of the elastic cord to your table or use a bead stopper clip. This prevents your beads from sliding off while you work. -
Start with the focal point:
Thread the apple charm onto the center of the cord. Flank the charm with three beads on each side: a white pattern bead, a red round bead, and a green round bead. -
Build the pattern outwards:
Continue the pattern by adding a section of the peach/tan disc beads. Use about 4-5 of these flat beads to create a textural break from the round beads. -
Add mixed rounds:
After the flat beads, add a random or alternating mix of the red, green, white, and natural wood round beads. Continue this until the bracelet measures about 6.5 to 7 inches in total length. -
Check fit and symmetry:
Bring the ends together to see if the apple charm sits directly opposite the closure point. Adjust beads as necessary to ensure the design feels balanced. -
Tie the knot:
Tie the ends together using a surgeon’s knot (right over left, left over right twice). Pull the elastic tight so the knot is secure but the beads aren’t buckling. -
Secure and trim:
Apply a tiny dot of jewelry glue or clear nail polish to the knot. Let it dry completely, then trim the excess cord ends close to the knot. -
Hide the knot:
Gently tug the bracelet until the knot slides inside the hole of one of the larger adjacent beads to conceal it.
Make It Personal
Swap the peach heishi beads for letter beads to spell out the teacher’s name (e.g., MRS SMITH). This personalization makes the bracelet a specific keepsake rather than a general gift.
Step 3: Final Presentation
-
Mount the bracelet:
Slide your finished bracelet onto the cardstock backing. Tuck the elastic strand into the slits you cut earlier on the sides of the card. -
Adjust placement:
Rotate the bracelet so the apple charm hangs at the bottom center, and the text ‘Thanks For helping me grow’ is clearly visible in the open space of the loop.
Your thoughtful handmade gift is now ready to make a teacher smile