If you’ve been craving fresh clay birdhouse inspiration, you’re in the right headspace—this is one of my favorite projects because it’s equal parts sculptural and practical. I pulled together a mix of classic shapes and more playful ceramic birdhouse twists so you can pick what matches your style (and your patience level).
Classic Slab Cottage Birdhouse
This charming ceramic birdhouse features a timeless cottage design with a realistic wood-grain texture and scalloped roof shingles. Built using traditional slab techniques, it combines a rustic aesthetic with durable stoneware to create a cozy home for your garden visitors.
Step-by-Step
Materials
- Stoneware clay (buff or speckled)
- Rolling pin
- Two wooden guide strips (1/4 inch thick)
- Fettling knife or needle tool
- Serrated rib or clay scoring tool
- Slip (clay mixed with water)
- Wooden dowel (approx. 1/4 inch diameter)
- Circle cutter (1 1/2 inch) or template
- Wide bristle brush or textural rib tool
- Ruler
- Small round cutter or U-gouging tool (for shingles)
- Sponge
Step 1: Preparing and Cutting Slabs
-
Roll the clay:
Begin by wedging your clay to remove air bubbles. Place the clay between your two wooden guide strips and roll it out until it is an even 1/4 inch thick slab. -
Add texture early:
Before cutting into shapes, drag a serrated rib or a stiff-bristled brush vertically across the entire slab to create a faux wood-grain texture. I find doing this now ensures the pattern continues seamlessly. -
Cut the walls:
Using a ruler and fettling knife, cut out your four walls. You will need two rectangles for the sides (approx. 4×5 inches) and two pentagons for the front and back (4 inches wide, 5 inches high, peaking at 7 inches). -
Cut the base:
Cut a square base that is slightly larger than the footprint of your walls (approx. 5×5 inches) to create a small ledge typical of cottage designs. -
Create the roof slabs:
Cut two rectangular slabs for the roof. Note that one should be slightly wider than the other (by the thickness of the slab) so they overlap correctly at the peak. Make them long enough to provide a nice overhang.
Step 2: Assembling the Structure
-
Prepare the edges:
Score the edges of the base and the bottom edges of all four wall pieces using your serrated tool. Apply slip generously to the scored areas. -
Erect the walls:
Attach the wall panels to the base one by one. Score and slip the vertical seams where the walls meet. Press them firmly together, smoothing the inside seams with a coil of clay if necessary for reinforcement. -
Cut the entrance:
On the front peaked wall, locate the center. Use a 1 1/2 inch circular cutter to remove the hole. Smooth the raw edges with a damp sponge. -
Add the perch:
Roll a small coil to match the size of your wooden dowel, or create a clay perch. Drill a small hole just below the entrance, insert the perch with slip, and smooth the connection point. -
Detail the entrance:
Roll a very thin coil of clay and attach it around the circular opening to create a raised rim, mimicking a door frame. Blend the outer edge into the wall slightly.
Clean Cuts Pro Tip
Let your slabs firm up to a ‘leather-hard’ state before assembling. If the clay is too soft, the walls will sag and buckle under the weight of the roof.
Step 3: Roofing and Finishing
-
Attach the roof panels:
Score and slip the top angled edges of the front and back walls. Place the roof panels on top, ensuring they meet at the peak and overhang the sides symmetrically. -
Add shingle details:
Instead of individual tiles, we will carve the suggestion of shingles. Use a U-shaped gouge or the bottom of a small round cutter to impress scalloped lines across the roof panels in overlapping horizontal rows. -
Reinforce the ridge:
Roll a thin strip of clay and place it over the very peak of the roof where the two slabs meet. Texture this to match the rest of the wood grain. -
Final smoothing:
Check all corners and visible seams. Use a barely damp sponge to soften any sharp burrs, but be careful not to wipe away your wood texture. -
Drying:
Loosely cover the birdhouse with plastic for the first 24 hours to let the moisture equalize, preventing warping. Then uncover and allow to dry completely to the bone-dry stage. -
Firing:
Bisque fire the piece. Since the goal is a natural look, you can leave the exterior unglazed or apply a matte iron oxide wash before the final glaze firing to enhance the wood grain texture.
Level Up: Functional Lid
Make the roof removable for cleaning! Instead of scoring the roof to the walls, attach flanges to the underside of the roof slab that fit snugly inside the walls.
Once fired, this durable stoneware cottage will be ready to weather the seasons in your garden


Round Pinch-Pot Nest Birdhouse
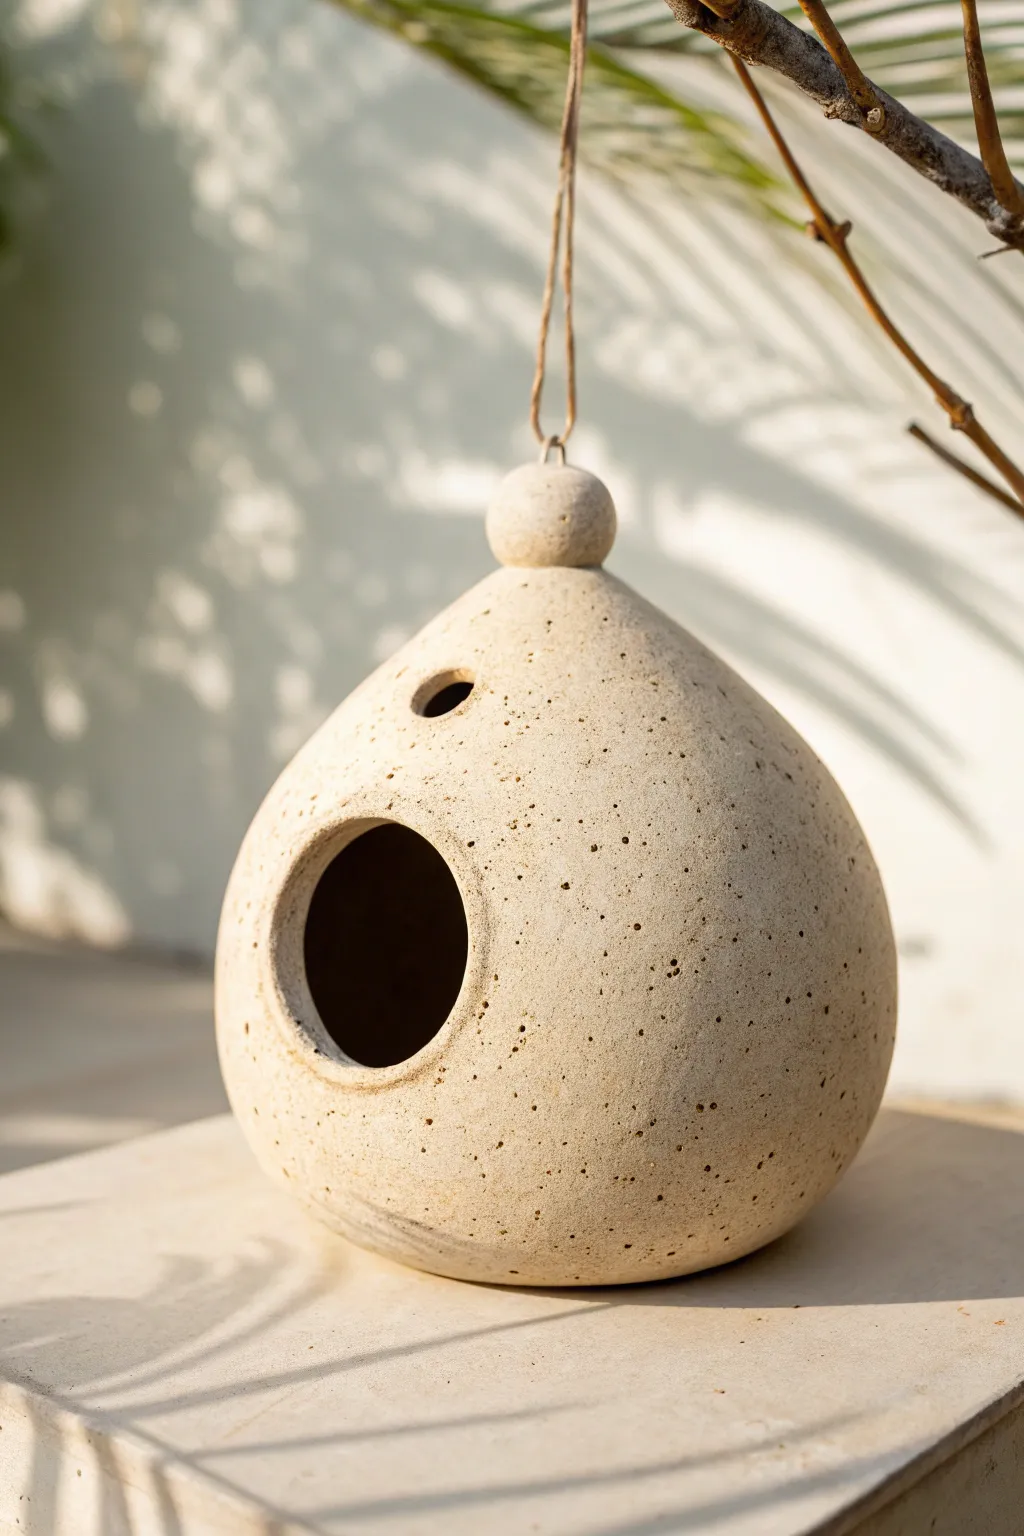
This rustic, speckled birdhouse mimics the organic shape of a natural nest with its rounded, teardrop form and textured finish. Created using simple pinch-pot techniques, it offers a charming, minimalist home for your feathered garden visitors.
How-To Guide
Materials
- Stoneware clay (speckled or buff)
- Small bowl of water
- Scoring tool or fork
- Wooden modeling tool or spoon back
- Circular cookie cutter (approx. 1.5 – 2 inches)
- Small drill bit or straw (for hanging hole)
- Sponge
- Jute twine or leather cord
- Kiln (if firing) or oven (if using polymer/oven-bake clay)
Step 1: Forming the Base
-
Prepare the Clay:
Start by wedging your clay to remove any air bubbles. Divide the clay into two equal balls, roughly the size of a large orange or grapefruit, depending on how big you want the final house to be. -
Create First Pinch Pot:
Take one clay ball and push your thumb into the center, stopping about half an inch from the bottom. Slowly pinch and rotate the clay between your thumb and fingers to open up a bowl shape. -
Even Out Walls:
Continue pinching until the walls are an even thickness of about 1/4 to 3/8 inch. Repeat this process with the second ball of clay to create two matching bowl shapes. -
Score the Edges:
Use a scoring tool or a fork to scratch up the rims of both pinch pots. This rough texture is crucial for a strong bond. -
Slip and Join:
Dab a little water or clay slip onto the scored edges. Press the two bowls together rim-to-rim to form a closed hollow sphere. Wiggle them slightly to lock the scored clay together. -
Seal the Seam:
Using your thumb or a wooden tool, smear clay across the seam line to fully connect the two halves. Smooth it out until the seam is invisible and you have a perfect sphere.
Step 2: Shaping and Refining
-
Shape the Teardrop:
Gently paddle or press the sphere to perfect the roundness, then start shaping one end into a slight cone or point to create the teardrop top. I find gently rolling the top portion between my hands works best here. -
Add the Top Knob:
Roll a small ball of clay, about the size of a walnut. Score and slip the top point of your birdhouse and attach this ball securely to create the finial where the string will attach. -
Create the Hanger:
While the top knob is still workable, use a straw or small tool to bore a clean hole horizontally through it. Wiggle it slightly to ensure the hole is wide enough for your twine. -
Cut the Entrance:
Choose a spot on the side of the sphere for the door. Use a circular cutter to press a hole into the clay. Remove the cutout carefully. -
Add Ventilation:
Using a smaller tool or the back of a paintbrush, punch a small ventilation hole near the top, just below the neck of the teardrop. This helps keep air circulating inside. -
Smooth the Edges:
Dip a sponge in water and wring it out well. Gently wipe the rim of the entrance hole and the ventilation hole to smooth any sharp edges that could hurt a bird’s feathers.
Air Pocket Prevention
Before joining your pinch pots, poke a tiny pinhole in one bowl. This lets trapped air escape as you seal them, preventing the sphere from blowing out or warping.
Step 3: Finishing Touches
-
Texture the Surface:
To get that stone-like look, you can gently tap the surface with a stiff bristled brush or a real stone. If you are using speckled clay, wiping it with a damp sponge will reveal the grit beautifully. -
Dry Slowly:
Loosely cover the birdhouse with plastic for the first day to let the moisture even out. Then uncover and let it dry completely until bone dry. -
Fire the Piece:
Bisque fire the piece in a kiln. For the look in the photo, leave the exterior unglazed (raw clay) and fire to the clay’s maturity temperature. Alternatively, apply a clear matte glaze. -
String It Up:
Once fired and cooled, thread a sturdy piece of jute or natural twine through the top loop. Knot it securely.
Cracking at the Seams?
If the seam cracks while drying, the clay was likely too dry when joined. Score deeply, add more slip, and compress the join firmly with a rib tool.
Hang your new handcrafted shelter in a quiet corner of the garden and wait for the first residents to arrive


Upside-Down Flowerpot Birdhouse Look

Transform humble garden staples into a charming shelter for your backyard friends with this creative heavy-duty birdhouse. The natural terracotta finish blends beautifully into any garden setting while offering a sturdy home that withstands the elements.
Step-by-Step
Materials
- 1 large terracotta pot (standard shape)
- 1 large terracotta saucer (slightly larger than the pot’s rim)
- 1 smaller terracotta saucer or shallow bowl (for the roof cap)
- Power drill with masonry bit (sized for bird entry)
- Small masonry bit (for hanging holes)
- Thick jute twine or natural rope
- Outdoor construction adhesive or strong ceramic glue
- Sandpaper
- Small dowel or rope knot (optional for perch)
- Eye protection
Step 1: Preparing the Entrance
-
Mark the entry point:
Turn your main terracotta pot upside down. About halfway up the side (which would be the middle of the pot’s wall), mark a circle for the bird entrance. A diameter of about 1.25 to 1.5 inches usually works well for common garden birds. -
Safety first:
Before drilling, put on your safety glasses. Terracotta can chip or create dust, so it’s important to protect your eyes. -
Drill the entrance hole:
Using a masonry bit or circle cutter specifically meant for ceramic/stone, carefully drill out your marked circle. Apply steady, gentle pressure rather than forcing it, to prevent the pot from cracking. -
Drill the hanging holes:
At the very top of your upside-down pot (the base with the drainage hole), drill two smaller holes on opposite sides of the drainage hole if you plan to thread the rope through the roof itself, or prepare for the rope to go through the central drainage hole. -
Smooth the edges:
Once the hole is drilled, use sandpaper to gently smooth the rough edges of the entrance. This protects the birds from sharp ceramic shards.
Step 2: Assembling the Base and Body
-
Prepare the bottom saucer:
Take the large terracotta saucer that will serve as the floor. Apply a ring of waterproof construction adhesive around the inner area where the pot’s rim will sit. -
Attach the body:
Place the upside-down drilled pot onto the saucer. The rim of the pot should sit securely inside the saucer’s lip. Press down firmly to ensure a good bond. -
Let it cure:
Allow the adhesive to set according to the manufacturer’s instructions. A rock-solid base is crucial for the safety of the nest inside. I usually leave it overnight just to be safe. -
Add a perch (optional):
If you want the little rope detail shown in the image below the hole, drill a tiny hole just under the entrance. Thread a short piece of twine through and knot it on the inside to secure it, leaving a small nub on the outside.
Cracked Pot Danger
If the pot cracks while drilling, use painter’s tape over the drilling area first. Keep the drill at a slow speed and spray a little water to keep the ceramic cool and reduce stress.
Step 3: Creating the Roof and Hanging Mechanism
-
Prepare the roof cap:
Take the smaller terracotta saucer or bowl. If it doesn’t have a center hole, carefully drill one now using a masonry bit. This needs to align roughly with the drainage hole of the main pot. -
String the rope:
Cut a long length of thick jute rope. Fold it in half to create a loop at the top for hanging. -
Thread the assembly:
Feed the loose ends of your rope down through the hole in the small roof saucer, and then continue feeding them down through the drainage hole of the main pot body. -
Secure the rope internally:
Inside the birdhouse, tie a very large, sturdy double knot (or tie the rope around a washer or small stick) that is too big to fit back through the hole. This will support the weight of the entire house. -
Attach the roof cap:
Apply adhesive to the top flat surface of your main pot. Slide the roof saucer down the rope until it rests on the glue. -
Add decorative twine:
To finish the look and hide the gap where the rope exits the roof, wrap extra jute twine around the base of the rope handle, coiling it tightly against the terracotta roof. Secure this coil with a dab of glue.
Clean-Out Hatch
Don’t glue the bottom saucer! Instead, use heavy-duty wire hooks or clips to attach the base. This lets you unclip and remove the floor for easy seasonal cleaning between nests.
Hang your new terracotta creation from a sturdy branch and watch as your garden birds inspect their potential new residence


Hanging Sphere Birdhouse With Drain Holes
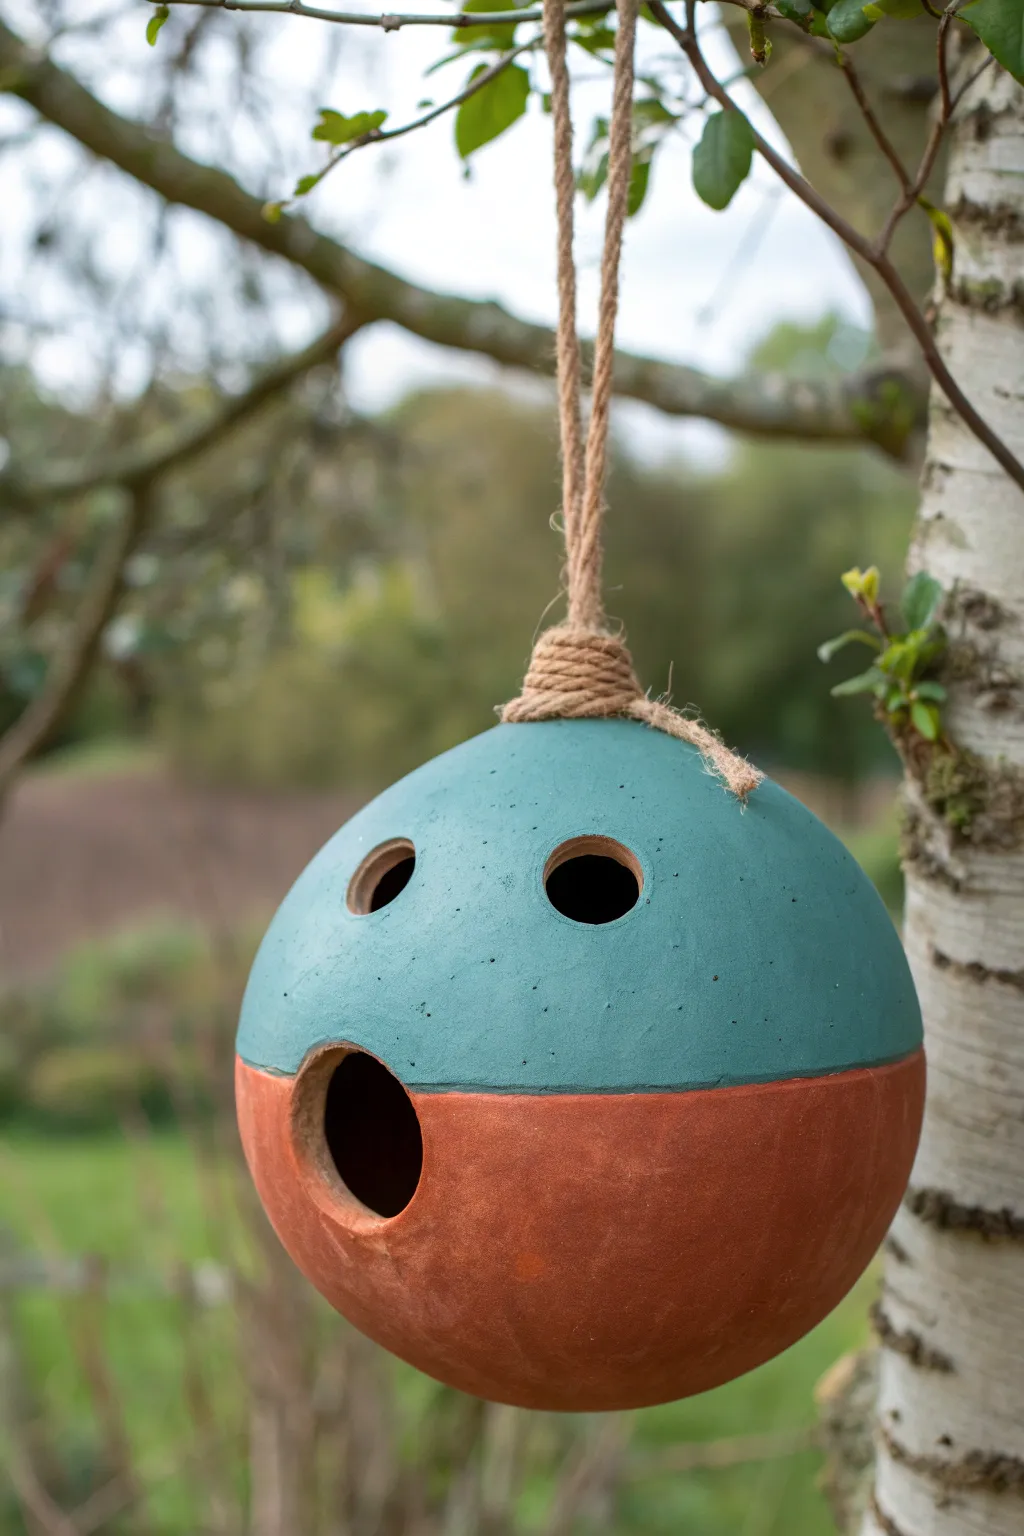
This charming, modern birdhouse blends rustic warmth with a pop of contemporary color through its distinct spherical design. The dual-tone finish highlights the natural beauty of the clay while adding a stylish accent perfect for any garden setting.
Step-by-Step Tutorial
Materials
- Earthenware clay or terracotta clay designed for firing
- Pottery wheel (or slab roller/hand-building tools for coil method)
- Spherical mold (if hand-building)
- Pottery knife or needle tool
- Circle cutters (various sizes)
- Sponge
- Jute rope or twine
- Teal or turquoise ceramic glaze
- Wax resist (optional)
- Kiln access
- Sandpaper or sanding sponge
Step 1: Forming the Sphere
-
Prepare the clay:
Begin by wedging your terracotta clay thoroughly to remove any air bubbles. This is crucial for structural integrity during firing. -
Throwing the base:
If using a wheel, center a ball of clay and throw a closed-form sphere. Alternatively, create two pinch pots or thrown bowls of equal diameter. -
Joining the halves:
If working with two hemispheres, score the rims of both bowls heavily. Apply slip to the scored areas and press them together firmly to create a hollow ball. -
Refining the join:
Smooth over the seam on the outside using a rib tool until it is completely invisible. The surface should be perfectly round and uniform. -
Compressing:
Gently paddle the exterior with a wooden paddle to ensure the sphere shape is consistent and to compress the clay walls.
Step 2: Shaping Features
-
Cutting the entrance:
Once the clay is leather hard, use a large circle cutter or a stencil and knife to cut the main entrance hole on the lower half of the sphere. Smooth the edges with a damp sponge. -
Adding ventilation:
Cut two smaller circular holes on the upper half of the sphere. These serve as ventilation and decorative ‘eyes’ for the design. -
Creating the hanger loop:
Fashion a sturdy loop of clay at the very top of the sphere for the rope to pass through later, or simply create a hole at the apex if you plan to knot the rope inside. -
Drainage check:
Don’t forget to poke a few very small holes in the absolute bottom of the sphere to allow rainwater to escape. -
Smooth finishing:
Take a moment to sponge down the entire piece, softening any sharp edges around the cutouts. This protects the birds entering and exiting.
Clean Lines
For a razor-sharp transition between the glaze and bare clay, apply a line of automotive detailing tape before waxing. It adheres better than standard tape.
Step 3: Color & Firing
-
Bisque firing:
Allow the clay to bone dry completely, which may take several days depending on humidity. Fire the piece to a bisque temperature suitable for your specific clay body. -
Masking the design:
To achieve the clean line seen in the image, apply wax resist or masking tape around the equator of the sphere, covering the bottom half that will remain unglazed. -
Glazing:
Dip the top half of the sphere into a teal or turquoise matte glaze. Alternatively, brush the glaze on carefully, ensuring an even coat. -
Clean up:
Wipe away any glaze drips that may have crossed onto the bottom terracotta section using a clean, damp sponge. -
Glaze firing:
Load the kiln again and fire to the maturity temperature of your glaze and clay body. -
Final assembly:
Once cool, cut a length of thick jute rope. Fold it in half and knot it creatively at the top, securing it to the clay loop or through the top hole.
Texture Twist
Before the clay dries, gently press a piece of burlap or lace onto the bottom half. This adds tactile contrast to the smooth, glazed upper section.
Hang your new spherical sanctuary from a sturdy branch and wait for the first visitors to arrive

The Complete Guide to Pottery Troubleshooting
Uncover the most common ceramic mistakes—from cracking clay to failed glazes—and learn how to fix them fast.
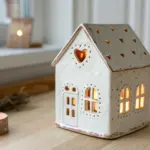
Removable Roof Cleaning-Friendly Birdhouse
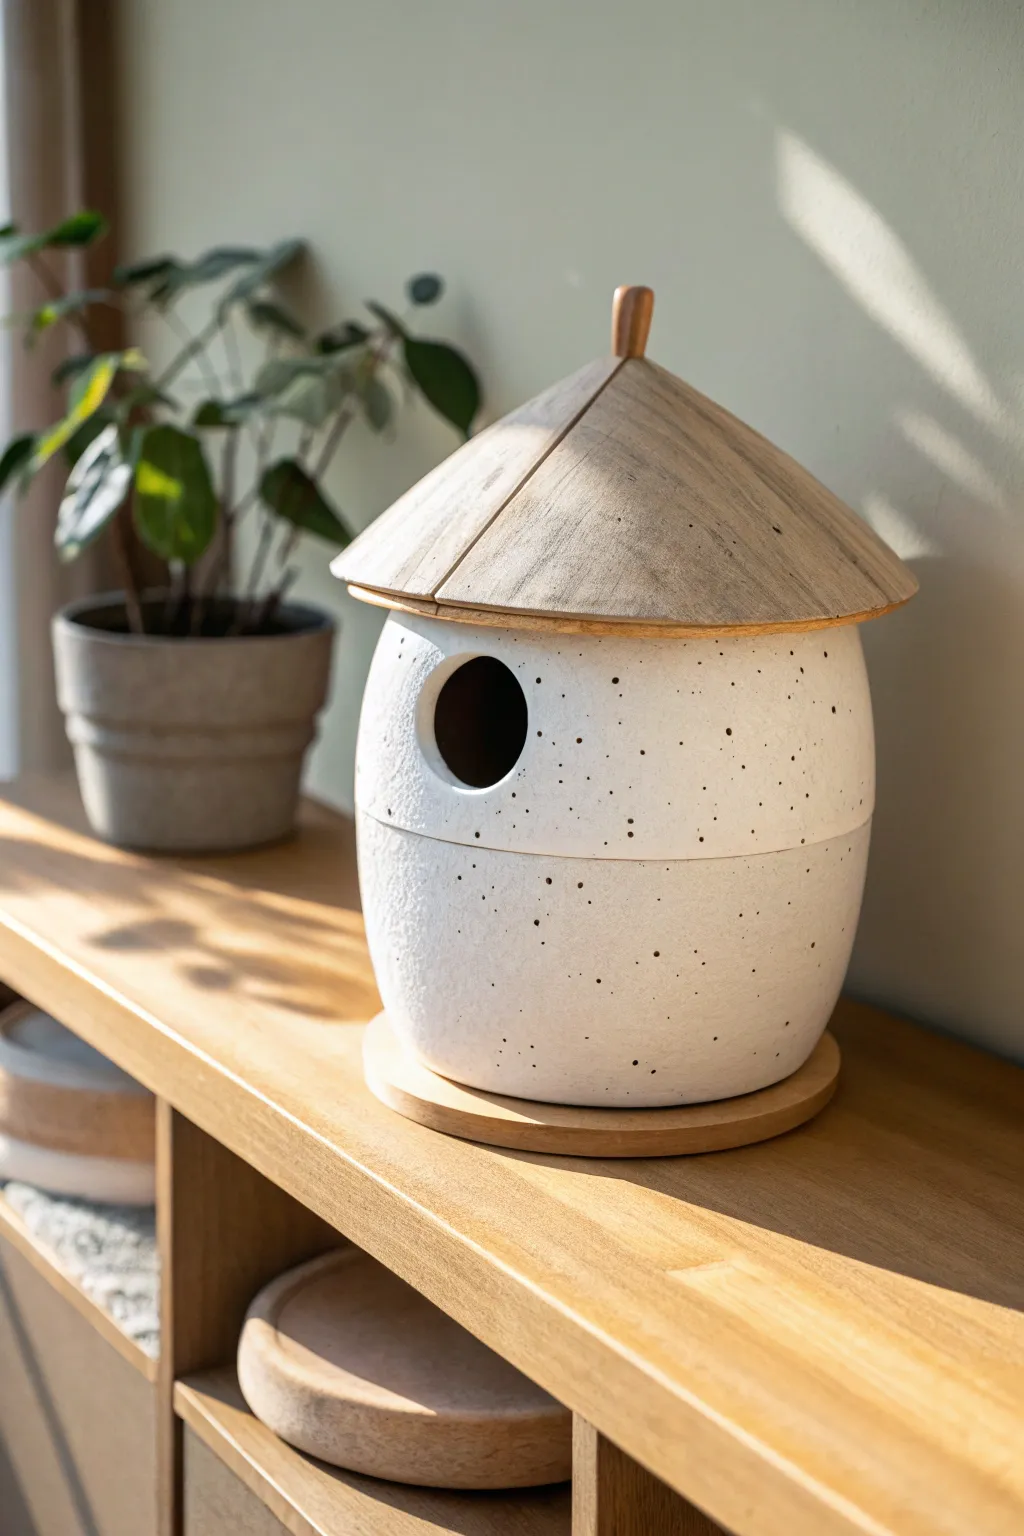
This elegant birdhouse combines the rustic charm of speckled stoneware with clean, modern lines. Its removable wooden roof not only adds a warm textural contrast but also makes seasonal cleaning effortless for bird lovers.
How-To Guide
Materials
- White stoneware clay with speckles (or grog)
- Pottery wheel (or materials for hand-building coils)
- Wooden bat
- Pin tool and sponge
- Wire clay cutter
- Wooden modeling tools
- Circle cutter (approx. 1.5 inch diameter)
- Light-colored hardwood (like oak or beech) for the roof
- Wood lathe or carving tools
- Sandpaper (various grits)
- Wood glue
- Clear matte varnish (outdoor safe) or tung oil
Step 1: Creating the Clay Body
-
Design the base shape:
Begin by wedging your speckled white clay thoroughly to remove air bubbles. Center about 3-4 pounds of clay on your pottery wheel. -
Throw the cylinder:
Open the clay and pull up the walls to create a cylinder that is approximately 6 inches wide and 7 inches tall. Aim for an equal wall thickness of about 1/4 inch. -
Shape the belly:
Gently gently belly out the form from the inside using a rib tool, creating a soft, egg-like curve that tapers slightly inward at the top rim. -
Create the shelf detail:
About halfway up the form, use a wooden modeling tool to press a subtle horizontal groove around the exterior; this mimics the look of a two-piece construction. -
Cut the entrance:
Once the clay is successfully thrown but still soft, use your circle cutter or a sharp knife to cut a clean 1.5-inch hole in the upper third of the vessel for the bird entrance. -
Refine the rim:
Ensure the top rim is perfectly flat and level so the wooden roof will sit flush later. You can use a needle tool to slice off any unevenness while the wheel spins slowly. -
Create the bottom tray (optional):
If you want a matching ceramic base instead of wood, throw a simple flat disc plate slightly wider than the birdhouse bottom. -
Dry and fire:
Let the piece dry slowly under plastic to the leather-hard stage, trim the bottom, then allow to fully bone dry. Bisque fire, then fire to maturity without glaze to keep the raw, speckled stone look.
Step 2: Crafting the Wooden Roof
-
Select your timber:
Choose a piece of light hardwood that complements the white clay. I prefer oak for its durability and grain pattern. -
Turn the conical shape:
Mount a block of wood on a lathe. Turn it into a shallow cone shape that extends about an inch past the diameter of your clay vessel’s rim. -
Carve the underside:
carefully hollow out a small lip or groove on the underside of the roof that fits snugly inside the clay rim; this keeps the roof from sliding off in the wind. -
Add texture:
Use a carving tool to etch subtle vertical lines radiating from the center to the edge, simulating the look of planks or shingles. -
Cut the segments (optional detail):
For the specific look in the photo, you can saw a single straight line through the radius to give the illusion of folded construction, though a solid turned piece is more weather-resistant. -
Make the finial:
Turn or carve a small, simple dowel-like knob for the very top. Drill a small hole in the roof apex and glue this finial securely in place. -
Construct the base plate:
Cut a simple wooden disc slightly larger than the clay base. This acts as a footer to keep the ceramic off the shelf or surface. -
Sand and finish:
Sand all wooden parts until smooth. Apply several coats of outdoor-safe matte varnish or tung oil to protect the wood from the elements. -
Final Assembly:
Once everything is dry and cured, place the ceramic body on the wooden base and set the roof on top. No glue is needed for the roof, allowing for easy cleaning access.
Clean lines tip
Use a barely damp sponge to smooth the cut edges of the entrance hole while the clay is leather hard to prevent sharp snags.
Shrinkage check
Clay shrinks when fired! Make your roof slightly larger than you think you need, or measure for the wood turning AFTER the clay is fired.
Now you have a serene, functional sculpture that the local birds will be thrilled to call home
Minimal Modern Cube Birdhouse
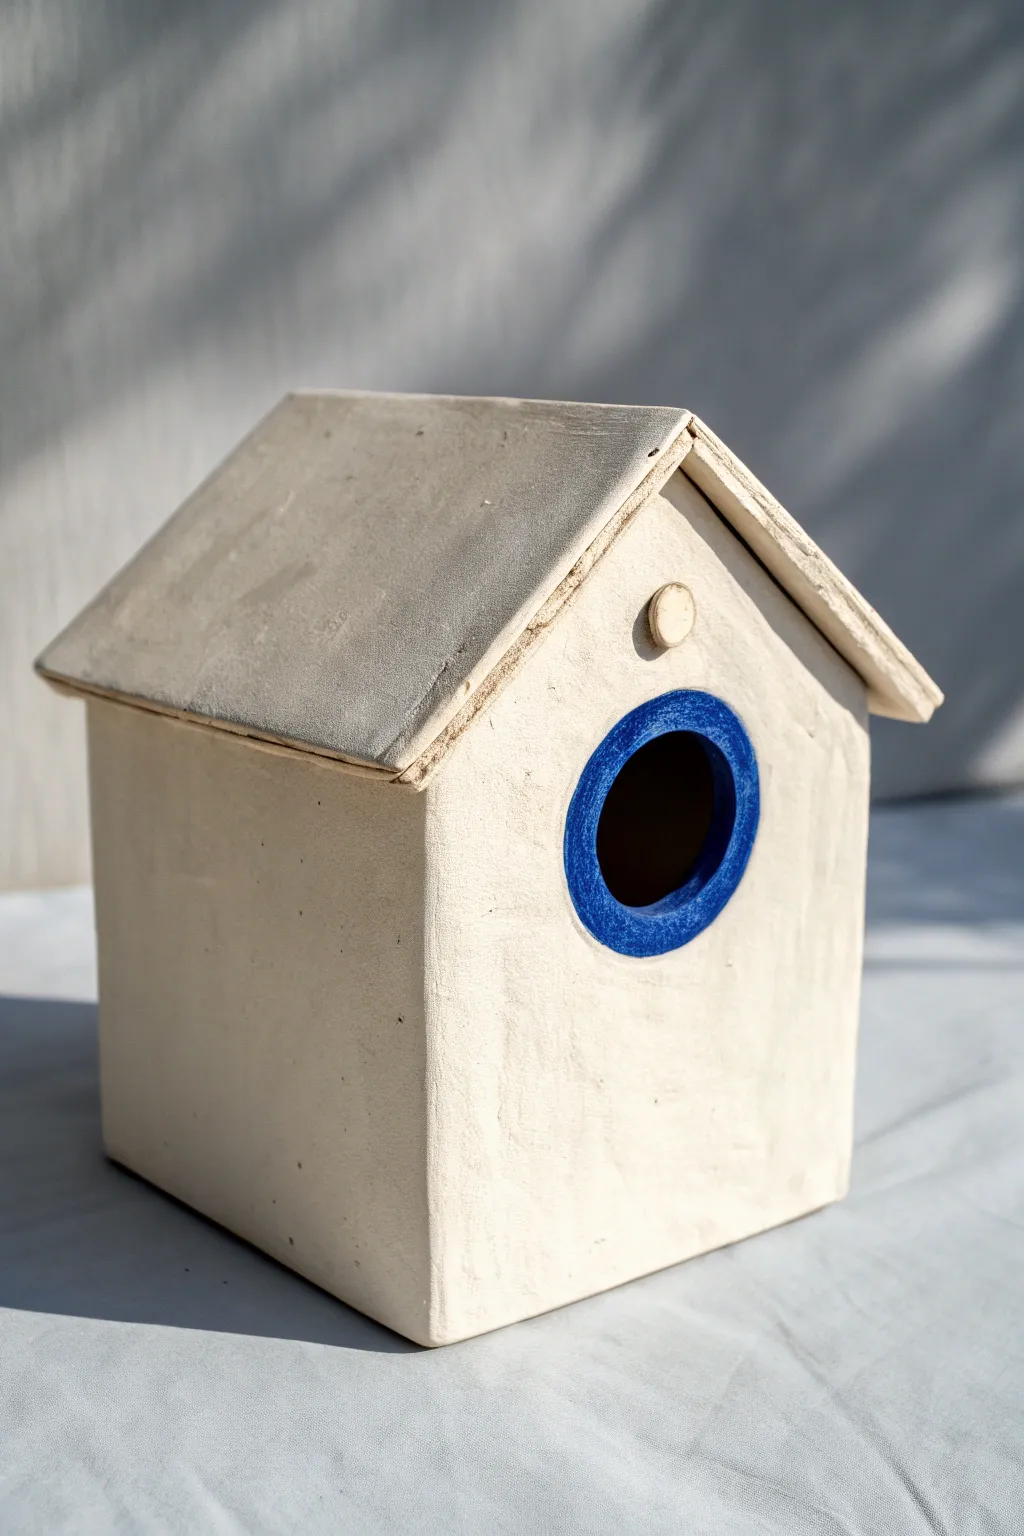
Embrace clean lines and simplicity with this modern slab-built birdhouse. Featuring a crisp white clay body and a striking cobalt blue accent ring, this project combines functional design with contemporary aesthetics.
Step-by-Step Guide
Materials
- Light-colored stoneware or earthenware clay (with smooth grog)
- Rolling pin
- Canvas mat or cloth (to prevent sticking)
- Ruler
- Fettling knife or needle tool
- Slip and scoring tool (fork or serrated rib)
- Clay hole cutter (1.5 inch / 3.8 cm)
- Small round cutter (for the decorative button)
- Wooden paddle or flat board
- Sponge
- Underglaze (Cobalt Blue)
- Clear matte glaze (optional, interior only)
- Kiln
Step 1: Preparing the Slabs
-
Roll the clay:
Begin by wedging your clay thoroughly to remove air bubbles. Roll it out on your canvas mat into a large, consistent slab approximately 1/4 inch thick. I like to flip the slab once or twice during rolling to ensure the texture is even on both sides. -
Measure the walls:
Using a ruler, measure and cut the four main wall panels. For a cube-like base, cut two squares (e.g., 5×5 inches) for the sides, and two pentagonal shapes for the front and back (5 inches wide, 5 inches high at the shoulder, peaking at 7 inches for the roofline). -
Cut the roof and floor:
Cut a square floor piece that fits inside your walls (slightly smaller than 5×5 inches if building walls around it, or exactly 5×5 if building on top). Cut two rectangular panels for the roof, ensuring they are long enough to create a slight overhang. -
Leather hard stage:
Set all your cut pieces aside on a flat ware board. Let them dry slowly until they reach a leather-hard state—firm enough to hold their shape without bending, but still soft enough to join.
Clean Seams
After joining walls, run a credit card or rubber rib firmly over the corner seams. This compresses the clay molecules and prevents cracks from forming during drying.
Step 2: Assembly and Construction
-
Bevel the edges:
For cleaner seams, cut the vertical edges of your wall pieces at a 45-degree angle. This mitering allows the corners to meet flush. -
Score and slip:
Rough up the edges you plan to join using a serrated rib or needle tool. Apply a generous amount of clay slip (liquid clay) to the scored areas. -
Construct the base:
Attach the four walls to the floor base first. Press the seams firmly together. Use a small coil of clay on the inside corners to reinforce the joints, smoothing it out with your thumb or a modeling tool. -
Square up the shape:
once the walls are up, use a wooden paddle or a flat board to gently tap the sides. This ensures the house is perfectly square and the walls are straight. -
Cut the entrance:
On the front panel, determine the center point vertically. Use your circular hole cutter to remove a clean circle about 2/3 of the way up the wall.
Step 3: Roof and Details
-
Attach the roof:
Score and slip the top angled edges of the front and back panels. Place your roof slabs on top. I prefer to join the roof peak first, then lower it onto the house structure to ensure the pitch is correct. -
Add the decorative vent:
Roll a small ball of clay and flatten it slightly, or use a very small round cutter. Attach this small ‘button’ centered above the entrance hole using slip. -
Create the door frame:
Roll a thin coil of clay and attach it around the rim of the entrance hole to create a subtle raised lip, or simply compress the edges of the cut hole with a damp sponge for a smooth finish. -
Refine the surface:
Use a damp sponge to wipe down the entire birdhouse, smoothing away any fingerprint marks, harsh canvas textures, or excess slip at the seams.
Hanging Hack
Before the roof goes on, punch two small holes in the back wall about 2 inches apart. This allows you to thread heavy-gauge wire through later for secure mounting.
Step 4: Finishing and Glazing
-
Bisque fire:
Allow the birdhouse to dry completely (bone dry). This may take several days depending on humidity. Fire it in the kiln to a bisque temperature suitable for your clay body. -
Apply the accent color:
Once bisqued, mix your Cobalt Blue underglaze. Using a small brush, carefully paint a thick ring around the entrance hole inside the indentation or lip area. Apply 2-3 coats for opaque coverage. -
Wipe back mistakes:
If you get any blue on the white face of the house, use a clean, damp sponge to wipe it away immediately, keeping the lines crisp. -
Final firing:
Leave the exterior unglazed for that raw, matte stone look shown in the image. If you wish, glaze only the interior to make it easier to clean later. Fire the piece one final time to maturity.
Hang your minimalist creation in a protected spot and wait for your first avian tenants to move in.


What Really Happens Inside the Kiln
Learn how time and temperature work together inside the kiln to transform clay into durable ceramic.
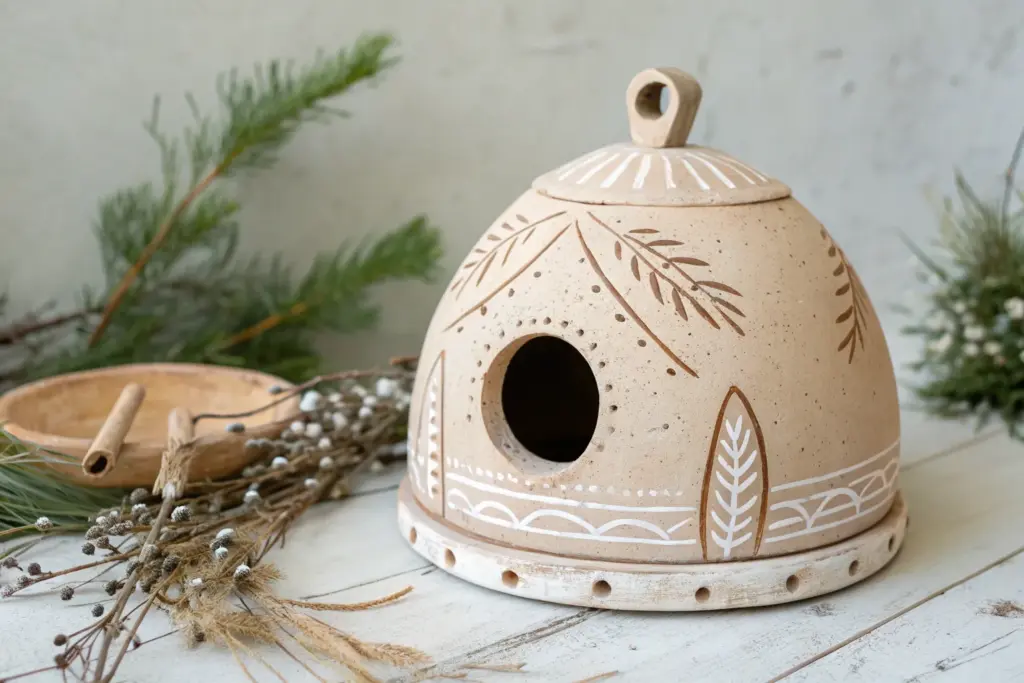
Coil-Built Hobbit-Style Birdhouse
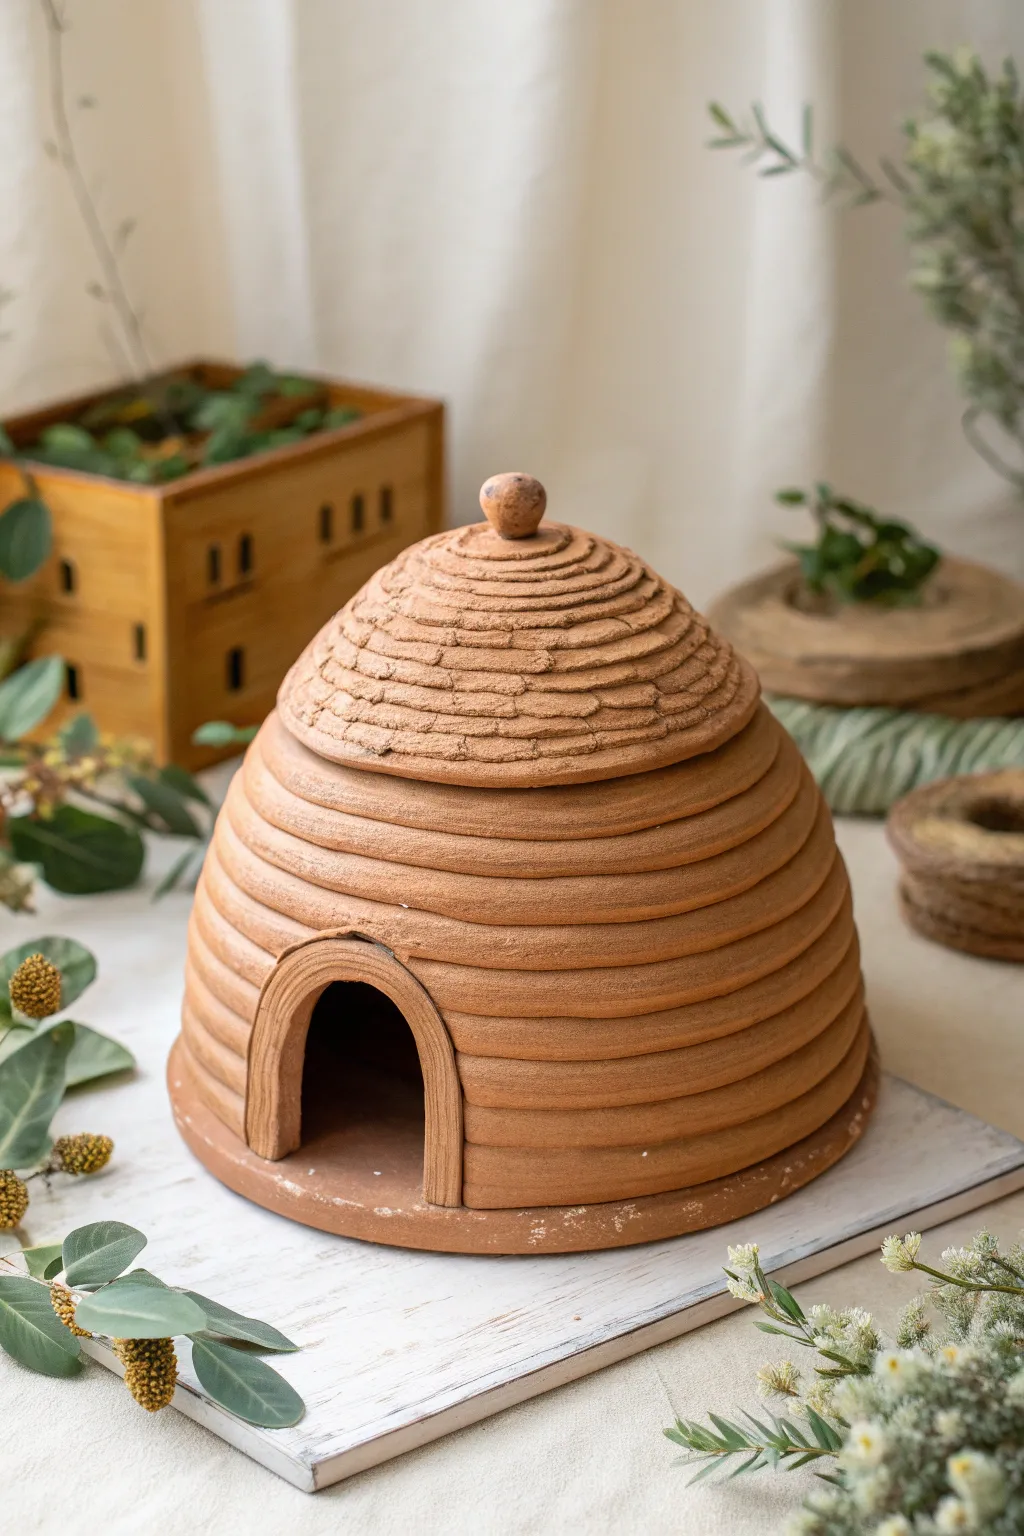
This charming, dome-shaped birdhouse mimics the cozy aesthetic of a traditional straw beehive or ‘skep’ using earthy coil-building techniques. Its tiered roof and arched doorway invite small garden birds into what feels like a handmade fairy dwelling.
Step-by-Step
Materials
- Earthenware or stoneware clay (terracotta color)
- Potter’s wheel (or banding wheel for hand-building)
- Clay knife or fettling knife
- Scoring tool (or an old fork)
- Slip (clay mixed with water)
- Wooden modeling tool
- Sponge
- Small round knob tool or pebble (for the top)
- Rolling pin (if not using an extruder)
Step 1: Base and Body Construction
-
Forming the foundation:
Begin by rolling out a flat slab of clay approximately 1/4 inch thick. Cut out a perfect circle, roughly 8-10 inches in diameter, to serve as the sturdy floor of your birdhouse. -
Creating the coils:
Role out several long, even ropes (coils) of clay. Aim for a thickness similar to a thick marker or a thumb to ensure the walls are substantial enough to hold the dome shape. -
Starting the walls:
Score the outer edge of your base and apply a bit of slip. Lay your first coil along this edge, pressing it firmly down. You don’t need to smooth the outside entirely; the defined coil lines are key to the ‘beehive’ look. -
Building upward:
Continue stacking coils one on top of another. For the first 3-4 layers, stack them directly vertically to create a short straight side before you start curving inward. -
Merging the interior:
While keeping the outside coiled texture visible, use your thumb or a modeling tool to smooth and blend the coils together on the *inside* of the pot. This structural bonding prevents the house from cracking apart. -
Shaping the dome:
As you add subsequent coil layers, place each one slightly further inward than the one below it. This gradual stepping will create the rounded, beehive dome shape.
Sagging Walls?
If your dome starts to slump while building, let the lower coils stiffen up for an hour or use a hairdryer on ‘low’ to firm the clay before adding more height.
Step 2: Creating the Entrance
-
Cutting the door:
Once the walls are about 3-4 inches high, use your fettling knife to carefully cut out an arched doorway. Remove the clay sections where the coils were just laid. -
Refining the arch:
Roll a flat, rectangular strip of clay. Drape this strip over the cut archway to create a smooth doorframe, blending it into the surrounding coils on the interior. -
Detailing the frame:
Use a small tool to incise a line tracing the shape of the arch on the exterior face of the frame, giving it a distinct architectural border.
Level Up: Hanging Style
Before firing, puncture three evenly spaced holes near the base lip or under the roof overhang. After firing, thread sturdy hemp rope through to hang it from a branch.
Step 3: Roof and Finishing Details
-
Closing the dome:
Continue coiling until the opening at the top is small enough to be capped. I prefer to stop when the opening is about 4 inches wide to create a separate lid piece, but you can also build it as one solid unit. -
Forming the lid:
Create a separate, smaller dome shape using the same coil technique, or pinch a solid ball of clay into a bowl shape that fits perfectly over your top opening. -
Texturing the roof:
Using a wooden tool, press small, overlapping dimples or scale-like textures into the clay of the lid section to mimic shingles or packed straw. -
Adding the finial:
Roll a small ball of clay into a knob shape. Score the top center of the roof and slip the knob into place as a handle or decorative finial. -
Smoothing the base:
Using a barely damp sponge, run it around the bottom edge of the foundation to ensure there are no sharp edges that could snag on the surface it sits on. -
Final drying:
Let the piece dry slowly under loose plastic for a few days to equalize moisture before firing it in the kiln according to your clay body’s instructions.
Once fired, this earthy home will be ready to welcome its first feathered tenants into the garden
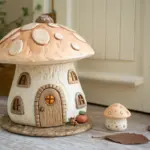
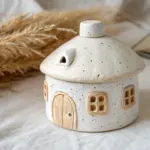
Fairy Mushroom Roof Birdhouse
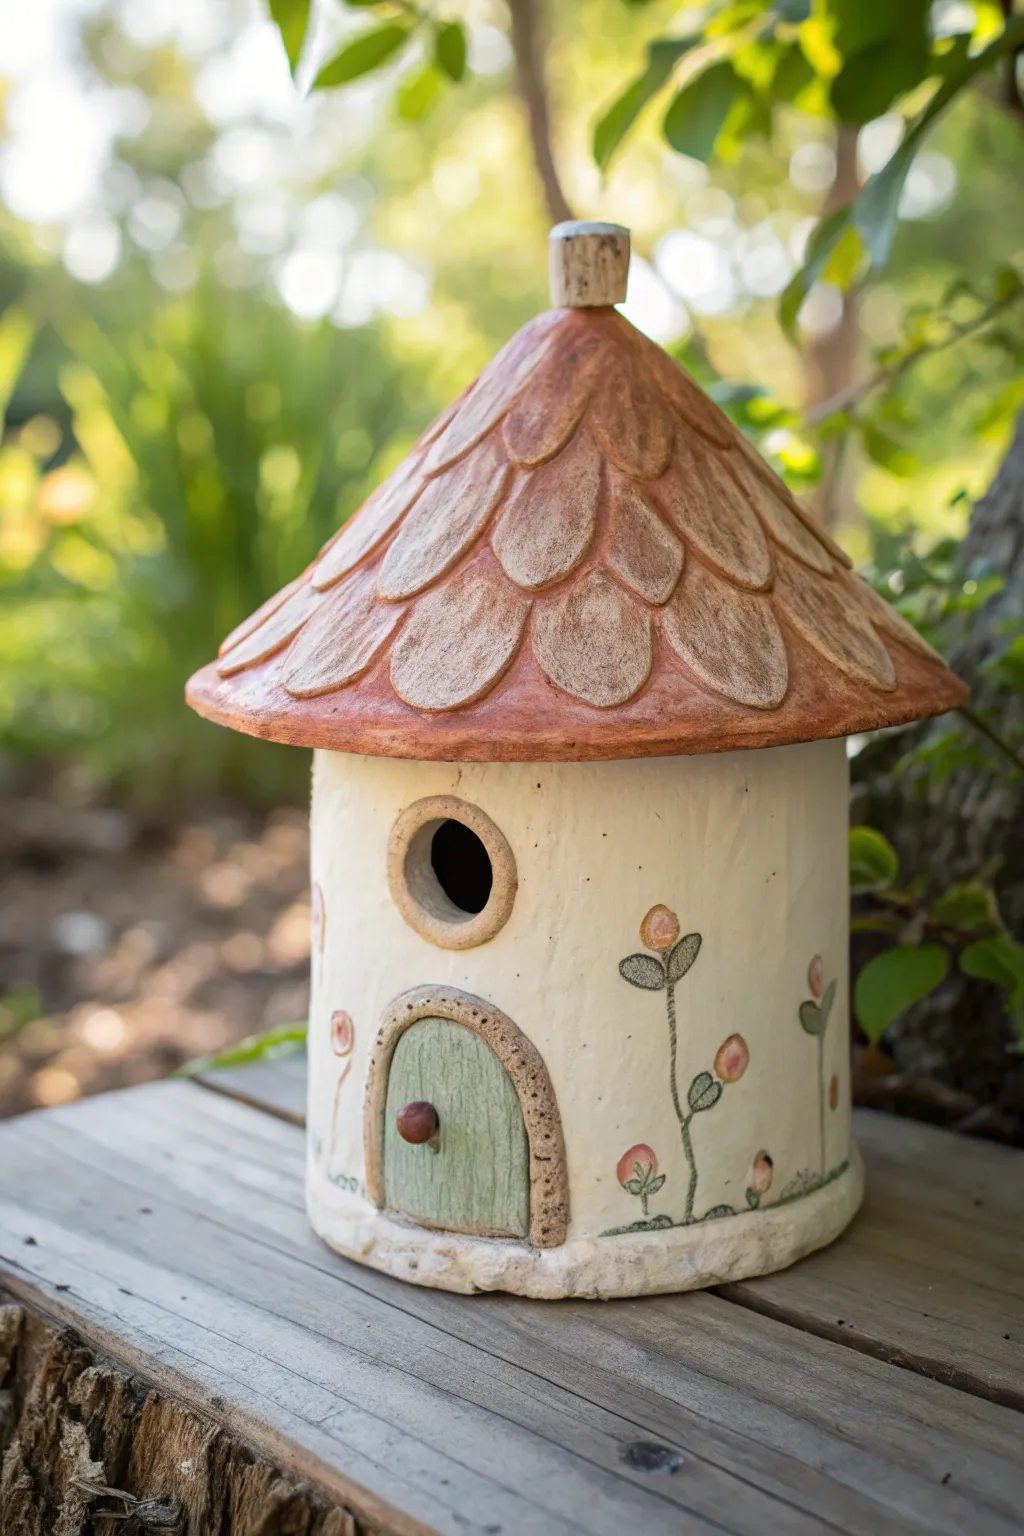
Bring a touch of woodland magic to your garden with this adorable mushroom-roofed birdhouse. Featuring a scalloped clay roof and hand-painted floral accents, this project is perfect for creating a cozy home for your feathered neighbors.
How-To Guide
Materials
- White or cream stoneware clay (cone 5-6 recommended)
- Small rolling pin
- Clay knife or fettling knife
- Circular cookie cutter (approx. 1.5 inch)
- Leaf-shaped cutter or tear-drop cutter
- Slip and scoring tool
- Underglazes: terra cotta/rust, sage green, soft pink, dark green
- Clear matte glaze
- Clay carving tools or needle tool
- Round paintbrushes (small and medium)
- Cardboard or paper (for templates)
- Sponge
Step 1: Building the Structure
-
Roll the base walls:
Start by rolling out a medium-sized slab of clay to about a 1/4-inch thickness. You will need a rectangle approximately 12 inches long and 6 inches high to form the main cylinder of the house. -
Form the cylinder:
Stand the rectangle up and curve it into a cylinder, overlapping the ends slightly. Score and slip the seam thoroughly to join them, pressing firmly to ensure a strong bond that won’t crack during firing. -
Create the floor:
Roll out a separate piece of clay, slightly thicker than the walls. Place your cylinder on top and trace around it, then cut out the circle. Score and slip the bottom edge of the cylinder and attach it to this floor base. -
Cut the entry hole:
About two-thirds of the way up the wall, use your circular cutter to punch out the main entrance hole for the birds. Smooth the raw edges with a slightly damp sponge. -
Add the door frame:
Roll a small coil of clay and shape it into an arch near the bottom of the house. Flatten it slightly and texture it with a needle tool to mimic stone or wood grain. Fill the inside of the arch with a thin slab of clay to create the ‘door’. -
Create the entryway rim:
Roll a thin coil and attach it around the circular bird entrance hole. Blend the outer edge onto the main wall, leaving the inner edge raised for a finished rim look.
Loose Roof Fit?
If the roof slides around, add a small clay flange or ‘gallery’ to the underside of the roof rim. This inner ridge will sit inside the cylinder walls and lock it in place.
Step 2: Sculpting the Mushroom Roof
-
Form the roof cone:
Create a paper cone template that is wider than your cylinder base. Roll out a slab of clay, cut out the cone shape, and join the seam to create a pointed hat for your house. -
Cut the shingles:
Using a tear-drop or leaf-shaped cutter, cut out numerous small clay tiles. If you don’t have a cutter, you can hand-cut these shapes for a more organic, rustic feel. -
Apply the shingles:
Starting at the bottom rim of the roof cone, slip and score each shingle, layering them upwards. Overlap the rows slightly as you move toward the peak so water will run off naturally. -
Top it off:
At the very peak of the roof, add a small cylinder or knob of clay to cover the point where the shingles meet. This mimics the stem or cap of a mushroom. -
Dry fit:
Gently place the roof on the body to ensure it fits. I prefer to fire the roof and body separately so I can glaze the inside easily, but check the fit now while the clay is still workable.
Step 3: Decorating and Glazing
-
Outline the flowers:
Once the clay is leather hard, use a pencil to lightly sketch climbing floral vines on the sides of the house. The graphite will burn off in the kiln. -
Carve details:
Use a needle tool or small loop tool to carve slight indentations for the flower stems and the door details, adding texture to the surface. -
Bisque fire:
Allow the piece to dry completely (this may take a week) and then bisque fire it to cone 04. -
Paint the roof:
Apply a rust or terracotta-colored underglaze to the roof shingles. Wipe back slightly with a sponge if you want the texture of the clay to show through on the high points. -
Detail the door:
Paint the door slab a soft sage green and the surrounding stone arch in a natural beige or brown. Don’t forget to add a tiny dot of brown for the doorknob. -
Paint the vines:
Using a fine brush, paint delicate green stems and leaves. Add soft pink or coral circles for the flower buds at the ends of the stems. -
Final glaze and fire:
Apply a clear matte glaze over the entire exterior (and interior if desired) to seal the work. Fire to cone 5 or 6, depending on your clay body’s specifications.
Level Up: Texture
Before painting the white walls, dab them with a stiff, dry brush or a natural sea sponge. This creates a stucco-like texture that looks amazing under the matte glaze.
Now you have a charming, fairy-tale home ready to welcome your garden birds

TRACK YOUR CERAMIC JOURNEY
Capture glaze tests, firing details, and creative progress—all in one simple printable. Make your projects easier to repeat and improve.
Leaf-Covered Garden Camouflage Birdhouse
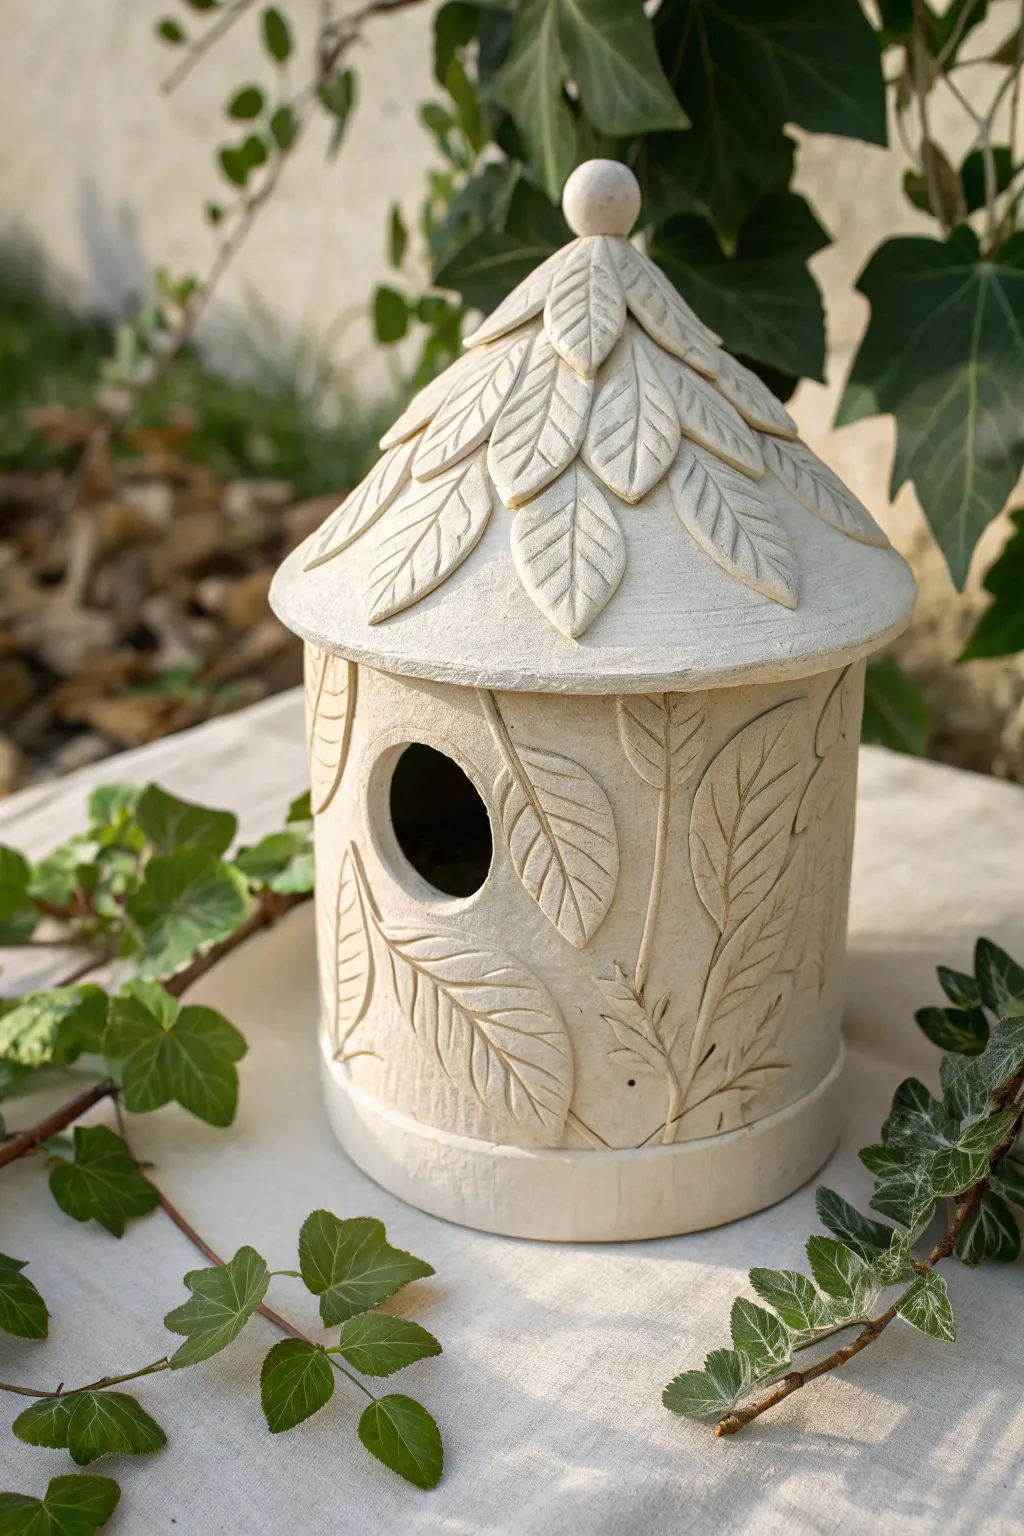
This charming project combines slab-building techniques with delicate appliqué to create a nature-inspired home for your garden visitors. The textured leaf design mimics foliage, offering a subtle camouflage that blends beautifully with ivy and greenery.
Step-by-Step Guide
Materials
- Stoneware or earthenware clay (white or light grog)
- Rolling pin
- Canvas work surface
- Circular cookie cutters or templates (approx. 4-inch diameter)
- Needle tool
- Fettling knife
- Scoring tool or serrated rib
- Slip (clay and water slurry)
- Leaf-shaped cutter or paper template
- Modeling tool or wooden skewer
- Small spherical object (marble or clay ball)
- Sponge
Step 1: Building the Structure
-
Roll the Slabs:
Begin by wedging your clay to remove air bubbles. Roll out a large, even slab approximately 1/4-inch thick. You will need enough clay for the cylinder body, the base, and the roof cone. -
Cut the Base and Wall:
Cut a circle for the base (about 4 inches wide). Measure the circumference of this circle, then cut a rectangular strip that length to serve as the walls. Height can be flexible, but 5-6 inches is a good standard. -
Form the Cylinder:
Score the edges of the base and the bottom edge of the rectangular strip. Apply slip generously. Wrap the rectangle around the base, joining the vertical seam firmly. -
Secure the Seams:
Use your fingers or a modeling tool to smooth the join inside and out so the seam disappears. Reinforce the bottom interior seam with a thin coil of clay if needed. -
Cut the Entry Hole:
Decide on the placement of your entry hole, keeping it centered on what will be the ‘front.’ Use a circular cutter or freehand a circle with a needle tool, smoothing the rough edges with a damp sponge. -
Create the Cone Roof:
Roll a separate slab and cut a circle slightly larger than your cylinder’s diameter. Cut a wedge (like a slice of pie) out of the circle. Bring the cut edges together to form a cone shape, score, slip, and join.
Step 2: Applying the Foliage
-
Crafting Leaves:
Roll out a thinner slab of clay for the decoration. Use a leaf cutter or hand-cut almond shapes. You will need dozens of these, varying slightly in size for a natural look. -
Adding Veins:
Before attaching, take each leaf and use a needle tool or skewer to gently press a central vein and smaller branching veins into the surface. This texture is crucial for the final look. -
Roof Layout:
Start applying leaves to the roof at the bottom rim. Score and slip the back of each leaf, overlapping them slightly as you work your way up toward the peak, creating a shingled effect. -
Body Decoration:
For the main body, you don’t need full coverage. Apply larger leaves climbing up the sides like vines. I find it helpful to lightly sketch the ‘vine’ path on the cylinder first before attaching the clay leaves. -
Carving Stems:
Once the main leaves are placed on the body, roll extremely thin coils to connect them, or simply carve stem lines directly into the cylinder’s surface to visually connect the floating leaves. -
Adding the Finial:
Create a small ball of clay and attach it to the very peak of the roof cone. This covers the join where the roof leaves meet and adds a finished knob.
Sticky Situation
If your leaves keep falling off as you work vertically, your slip might be too watery. Try making a thicker ‘joining paste’ or hold the leaf in place for 10 seconds.
Step 3: Finishing Touches
-
Refining Edges:
Check the entry hole again; ensure no leaf edges are obstructing the entrance. Smooth any sharp points with a barely damp sponge. -
Drying:
Place the roof gently on top of the body to ensure they dry together and fit perfectly, but place a small piece of paper between them so they don’t stick. Dry slowly under loose plastic to prevent warping. -
Firing:
Bisque fire the piece. For the finish shown, leave the clay unglazed if it is a nice white stoneware, or apply a matte white underglaze, then fire to the clay’s maturity temperature.
Color Wash
After bisque firing, apply a diluted black iron oxide wash and wipe it back with a sponge. This will darken the veins and textures while keeping the surface pale.
Hang your finished house in a sheltered spot and wait for your first feathered tenant to move in
Carved Wildflower Relief Birdhouse
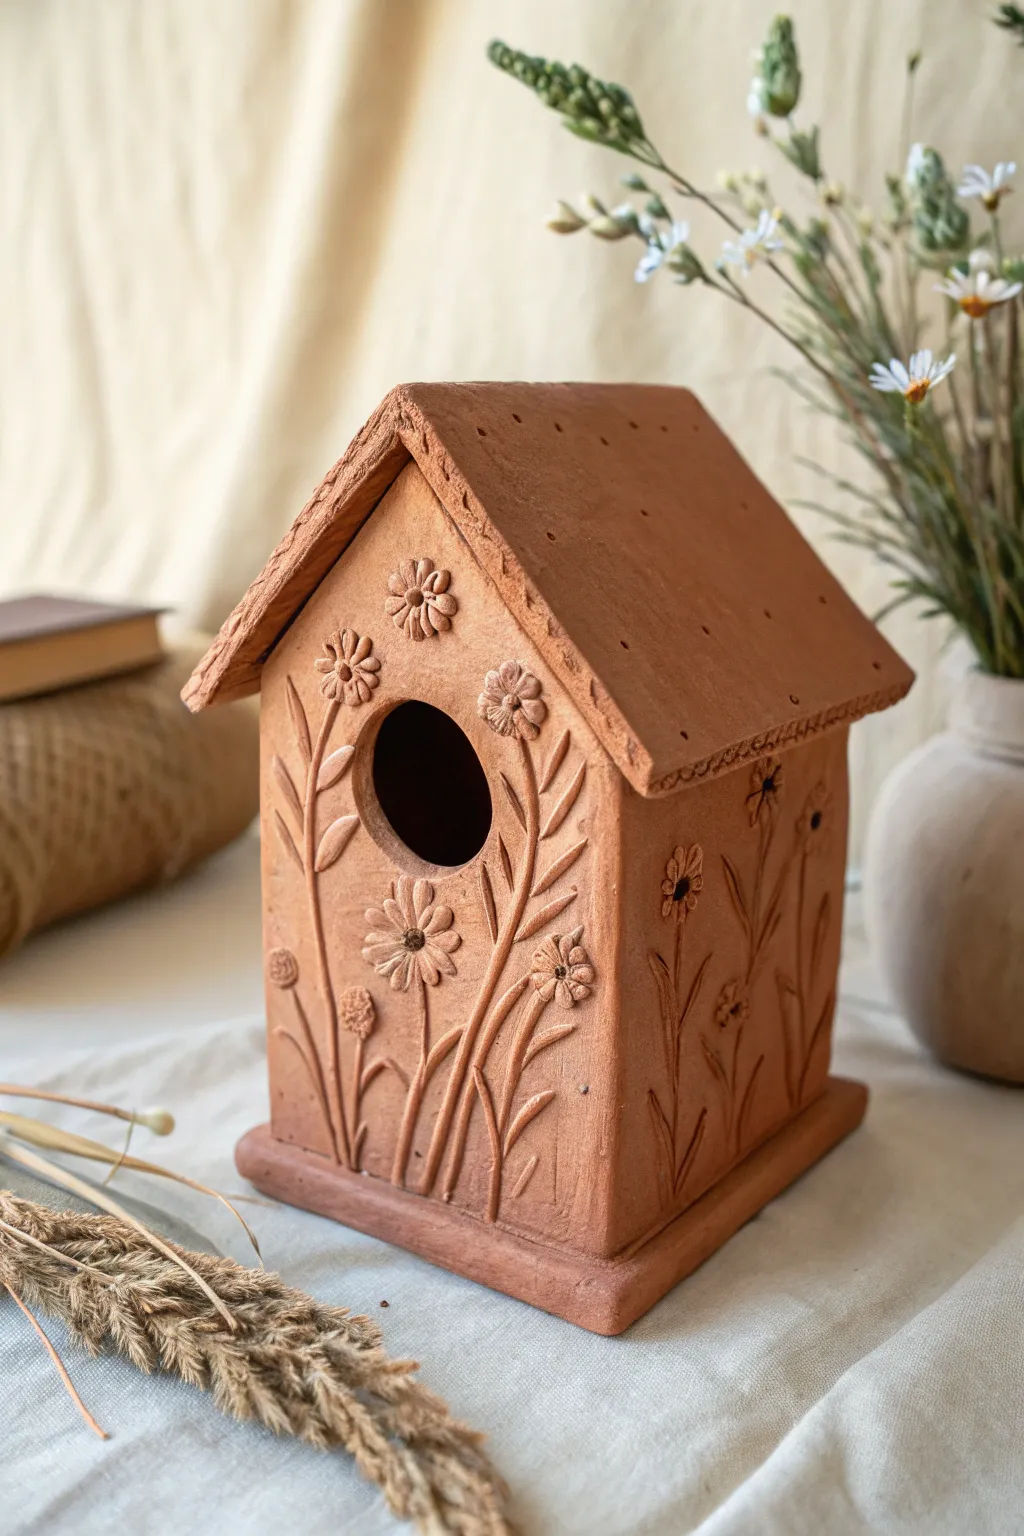
This charming project combines functional pottery with botanical artistry, resulting in a warm, terracotta birdhouse adorned with delicate relief carvings. The unglazed finish highlights the natural beauty of the clay and the intricate wildflower details growing up the walls.
Step-by-Step Tutorial
Materials
- Terracotta or red earthenware clay (mid-fire or low-fire)
- Rolling pin with guide strips (approx. 1/4 inch thick)
- Slab roller (optional)
- Clay knife or fettling knife
- Paper templates (front/back pentagons, side rectangles, roof rectangles, base square)
- Scoring tool or serrated rib
- Slip (clay mixed with water)
- Circular cookie cutter (approx. 1.5 – 2 inches)
- Modeling tools (needle tool, small ball stylus, carving loop)
- Sponge
- Ruler
Step 1: Preparing the Slabs
-
Roll out the clay:
Begin by rolling out a consistent slab of terracotta clay, aiming for a thickness of about 1/4 inch. Using guide sticks or a slab roller ensures the walls will be even and sturdy enough to support the structure. -
Cut the components:
Place your paper templates onto the slab. You will need: two pentagon shapes for the front and back (building up to a peak), two rectangular side walls, two roof panels that are slightly wider than the walls for overhang, and one solid base piece. -
Create the entrance:
On the front pentagon piece, use your circular cookie cutter to punch out the entrance hole. Position it centrally, leaving enough room below for the flower stems to ‘grow’ upwards. -
Texture the leather hard stage:
Let the slabs dry until they reach a ‘leather hard’ state—firm enough to hold shape but soft enough to carve. I like to smooth the surface with a damp sponge during this wait to remove any canvas texture from the rolling process.
Step 2: Wildflower Relief Carving
-
Sketch the design:
Lightly trace your floral design onto the leather-hard slabs using a needle tool. Focus on long, flowing stems creating vertical movement up the front and sides. -
Add clay for relief:
Roll tiny coils and small balls of fresh soft clay. Score the traced lines lightly, add a dab of water or slip, and press these coils onto the surface to build up the stems and leaves. -
Sculpt the blooms:
For the daisy-like flowers, press small balls of clay onto the surface. Use a modeling tool to flatten them slightly and carve radiant lines for petals. Press a tiny center into each flower for the pistil. -
Refine the details:
Use a small loop tool or stylus to carve distinct veins into the added leaves and define the separation between petals. The goal is a raised ‘bas-relief’ look, not just incised lines. -
Texture the centers:
Take a needle tool and stipple (poke repeatedly) the center of the larger flowers to create a pollen-like texture.
Keep it Clean
Wipe your sculpted flowers with a barely damp sponge just before drying. This smooths sharp sculpted ridges that can become brittle and break off after firing.
Step 3: Assembly
-
Score and slip edges:
Thoroughly score (scratch) and apply slip to the vertical edges of your side walls and the corresponding edges of the front and back panels. -
Construct the box:
Join the four walls together on top of the base slab. Press the seams firmly together. Reinforce the inside corners with a thin coil of clay, smoothing it out so it disappears. -
Attach the roof:
Score and slip the top angled edges of the front and back panels. Place the two roof slabs on top, ensuring they meet at the peak and overhang slightly at the eaves. -
Seal the roof peak:
Where the two roof panels meet, blend the clay together seamlessly or add a decorative coil along the ridge to ensure it is watertight. -
Add roof texture:
Use a needle tool or a stiff brush to create a subtle pitted texture on the roof surface, mimicking weathered stone or shingle grit. Add a few deeper pinholes near the peak for ventilation.
Uneven Seams?
If walls won’t align perfectly, your clay might be too soft. Let the slabs firm up for another 30 minutes, or bevel the edges at a 45-degree angle for a tighter miter joint.
Step 4: Finishing and Firing
-
Pedestal base detail:
If you want the flanged base look seen in the reference, attach an additional, slightly larger thick slab to the bottom, smoothing the transition where the house meets this pedestal. -
Slow drying:
Cover the birdhouse loosely with plastic to let it dry very slowly. This is crucial for box forms to prevent warping or cracking at the seams. -
Bisque fire:
Once bone dry, bisque fire the piece to the appropriate temperature for your clay body (usually cone 04). -
Final firing:
For the natural terracotta look, you can leave it unglazed and fire it to maturity (often cone 06 to cone 6 depending on the clay). If it will live outdoors, firing to the clay’s vitreous point ensures it won’t absorb water and crack in frost.
Once fired, this piece becomes a permanent, weatherproof shelter that blends beautifully into any garden setting
Two-Tone Glaze Roof Birdhouse
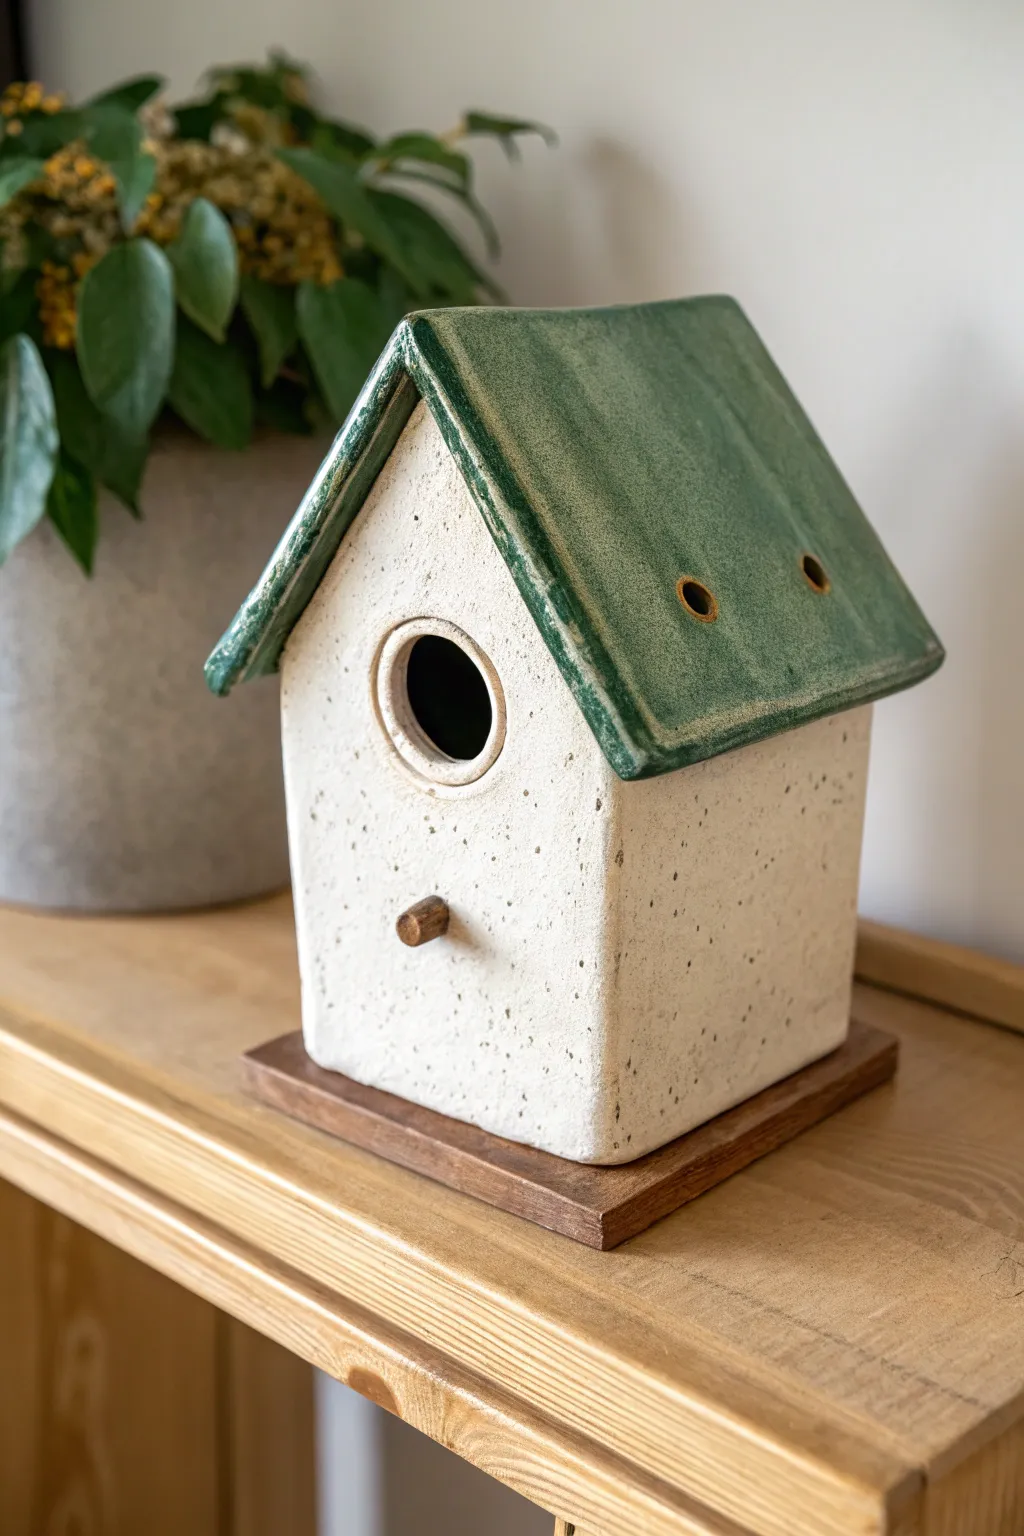
This charming ceramic birdhouse features a natural, speckled clay body contrasted with a glossy, deep green roof for a rustic yet polished look. The simple A-frame shape and wooden accents make it a timeless addition to any garden shelf or indoor display.
Detailed Instructions
Materials
- Speckled stoneware clay (white or light cream firing)
- Rolling pin and guide strips (approx. 1/4 inch)
- Clay knife or needle tool
- Ruler or straight edge
- Slip and scoring tool (serrated rib)
- Circle cutter (approx. 1.5 inch diameter)
- Small drill bit tool or straw (for vent holes)
- Wooden dowel (approx. 1/4 inch diameter)
- Thin wooden plank (slightly larger than birdhouse base)
- Dark green gloss glaze
- Clear matte glaze (optional)
- Epoxy or strong craft glue
- Sponge and water
Step 1: Forming the Structure
-
Roll Your Slabs:
Begin by rolling out your speckled clay into an even slab using your rolling pin and guide strips. Aim for a thickness of about 1/4 inch to ensure the walls are sturdy enough to support the roof without sagging. -
Cut Wall Panels:
Using a ruler and knife, cut out four pieces for the walls. You will need two rectangular side panels and two pentagon-shaped pieces for the front and back faces (rectangular bottom with a triangular peak). -
Prepare the Entrance:
On the front panel, use your circle cutter to create the main entrance hole centered in the upper half. Save a small coil of clay to create a smooth, rounded rim around this opening later, or smooth the cut edges now with a damp sponge. -
Assemble the Walls:
Score the vertical edges of all four wall panels and apply clay slip. Stand the walls up and press the scored edges together firmly to create the main house box. Use a small coil of clay on the interior seams to reinforce the joints. -
Refine the Shape:
Once the box is assembled, use a paddle or flat board to gently tap the sides, ensuring they are straight and the corners are square. Smooth away any exterior seam lines with your finger or a rib tool. -
Add the Perch Hole:
Below the main entrance, poke a small hole sized precisely to fit your wooden dowel perch. Ensure the hole goes all the way through but don’t insert the wood yet; clay shrinks during firing, so make this hole slightly larger than your dowel.
Warping Walls?
If your walls slump during assembly, the clay is too wet. Let your slabs sit out until ‘leather hard’ (stiff but still cold to touch) before standing them up.
Step 2: Creating the Roof
-
Cut Roof Slabs:
Cut two rectangular slabs for the roof. These should be long enough to overhang the front and back peaks slightly, and wide enough to overhang the side walls. -
Attach the Roof:
Score and slip the top angled edges of the front and back wall peaks. Place the roof slabs on top, ensuring they meet at the center ridge. I find it helpful to support the overhangs with crumpled newspaper while the clay stiffens. -
Seal the Ridge:
Join the two roof panels at the top ridge securely. You can pinch them together for a textured look or smooth a coil over the seam for a clean line. This peak needs to be watertight. -
Add Ventilation:
Using a small drill tool or a drinking straw, punch two small ventilation holes on one or both sides of the roof slope. This prevents the house from becoming too hot if placed in the sun. -
Create the Door Rim:
Roll a very thin coil of clay and attach it around the main entrance hole using slip. Smooth it inward and outward to create a defined, slightly raised rim that looks professional and finished. -
Slow Dry and Bisque:
Loosely cover the birdhouse with plastic to let it dry very slowly, which prevents warping. Once bone dry, fire it to bisque temperature according to your clay body’s instructions.
Step 3: Glazing and Assembly
-
Wax the Body:
Apply wax resist to the entire outer body of the house (the walls) if you want to keep the raw speckled clay look shown in the image. This prevents glaze from adhering to the white sections. -
Glaze the Roof:
Brush or pour a deep green gloss glaze onto the roof. Apply 2-3 coats for opacity. Because of the texture, the glaze will naturally break over the edges (like the ridge), creating that beautiful lighter green highlight. -
Glaze Fire:
Fire the piece again to the maturation temperature of your glaze and clay. Ensure the bottom of the walls are wiped clean of any glaze drip so it doesn’t stick to the kiln shelf. -
Attach the Base:
Cut your thin wooden plank to be slightly wider than the ceramic house base. Sand and stain it a dark walnut color to match the aesthetic. -
Final Assembly:
Use strong epoxy to glue the fired ceramic house onto the wooden base. Finally, insert your small wooden dowel into the perch hole, securing it with a dab of glue if the fit is loose.
Hanging Option
Before the clay dries, create two holes in the back wall. After firing, thread sturdy wire through them to mount the house flush against a tree or fence post.
Place your finished birdhouse on a shelf among potted plants to enjoy the organic contrast between the clay and the greenery
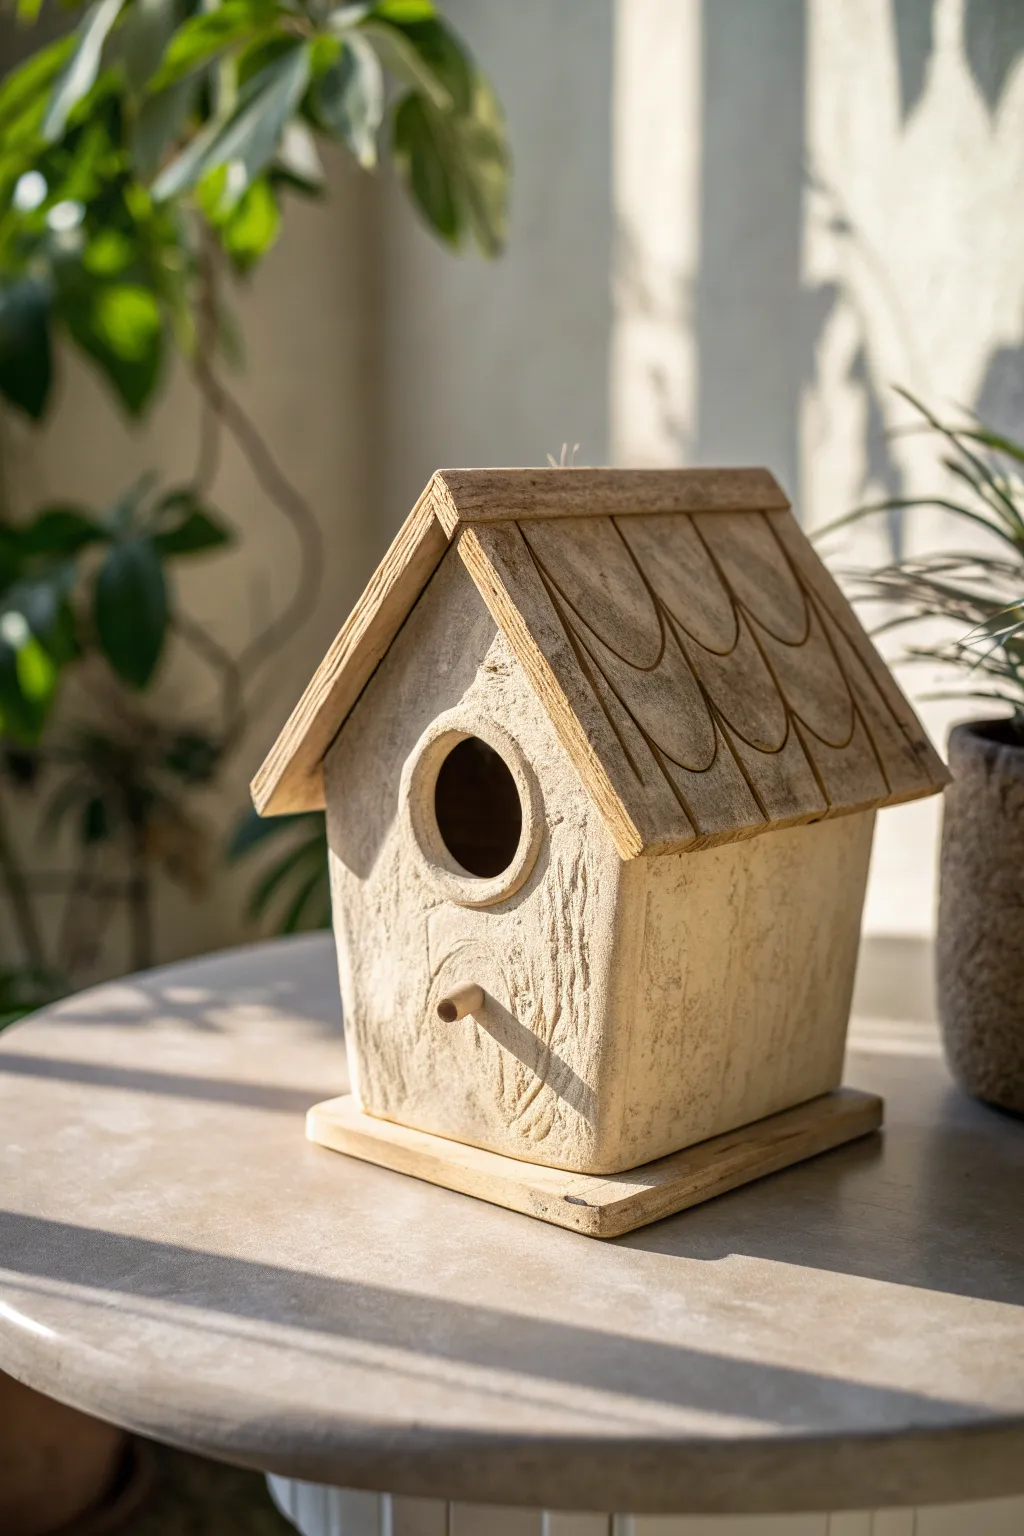
Speckled Rustic Birdhouse With Matte Finish
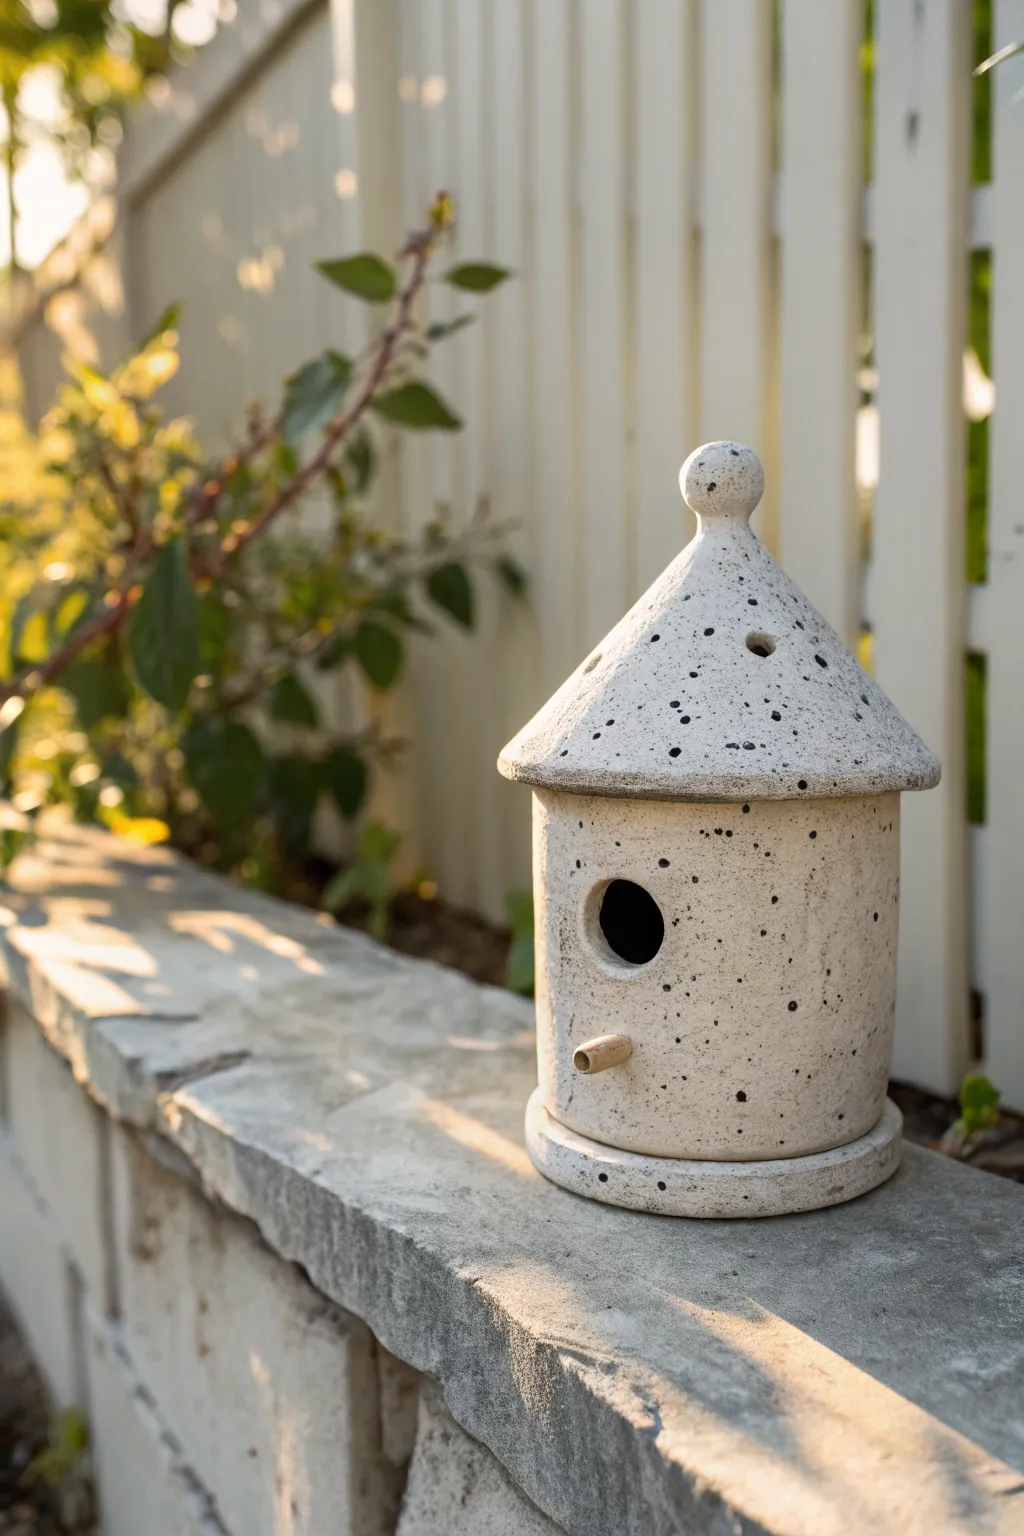
Embrace a charmingly rustic aesthetic with this hand-built clay birdhouse, featuring a speckled matte finish that mimics the look of a speckled egg. Its simple, cylindrical form and conical roof create a timeless garden accent that blends beautifully with nature.
Step-by-Step Guide
Materials
- Speckled stoneware clay (white or cream)
- Rolling pin
- Canvas mat or cloth
- Needle tool
- Fettling knife
- Slip (clay and water mixture)
- Scoring tool (or serrated rib)
- Cylindrical form (like a PVC pipe or large rolling pin) for structural support
- Small circular cookie cutter (approx. 1.25 inch)
- Thin wooden dowel (or twig) for the perch
- Sponge
- Matte clear glaze
Step 1: Building the Main Body
-
Roll the Slab:
Begin by rolling out a slab of speckled stoneware clay to an even thickness of about 1/4 inch. Ensure your work surface is covered with canvas to prevent sticking. -
Cut the Rectangle:
Measure and cut a rectangle from the slab. The height should be approximately 6-7 inches, and the length should equal the circumference of your desired width plus a little overlap. -
Cut the Floor:
Using a circle cutter or a template, cut a circular base from the remaining slab that matches the diameter of your cylinder. -
Form the Cylinder:
stand the rectangular slab up and curve it into a cylinder. You can wrap it loosely around a PVC pipe or similar form to help maintain a perfect circle. -
Score and Slip the Seam:
Score the overlapping edges of the vertical seam thoroughly. Apply slip, press the edges together firmly, and smooth the join inside and out so the seam disappears. -
Attach the Base:
Score and slip the bottom edge of your cylinder and the outer rim of the circular floor base. Press them together firmly. -
Add the Base Rim:
To mimic the ‘plateau’ look in the photo, roll a thick coil of clay. Attach it around the very bottom exterior of the cylinder, blending the top edge of the coil into the wall but leaving the bottom edge distinguishable. -
Cut the Entrance:
Use a small circle cutter (about 1.25 to 1.5 inches) or a knife to cut the bird entrance hole about two-thirds of the way up the wall. Smooth the raw edges with a damp sponge.
Clean Edges Matter
Use a damp chamois or soft sponge to wipe the rim of the entrance hole and the roof edge. Sharp edges can be dangerous for birds entering and exiting.
Step 2: Constructing the Roof
-
Create a Template:
For the conical roof, it’s best to make a paper template first. Cut a circle slightly larger than your birdhouse diameter, then cut a wedge out (like a slice of pie) to allow it to cone up. -
Cut the Roof Slab:
Using your template, cut the roof shape from a fresh 1/4-inch slab of clay. -
Form the Cone:
Bring the straight edges of the roof slab together to form a cone. Score and slip the seam, then smooth it extensively so it looks seamless. -
Add the Finial:
Roll a small ball of clay for the decorative knob. Attach it securely to the peak of the roof using the score and slip method. -
Attach Roof to Body:
Score the top rim of the cylinder and the underside of the roof where they will meet. Join them securely. I usually reinforce the inside seam with a thin coil of clay for extra durability. -
Ventilation Holes:
Use a small drill bit or needle tool to poke a few ventilation holes under the roof overhang to keep the interior cool.
Step 3: Finishing Touches
-
Refining the Surface:
Once the clay is leather-hard, use a metal rib to smooth the exterior walls. This compacts the clay and creates a nice canvas for the speckles. -
Adding the Perch:
Poke a small hole below the entrance for the perch. You can insert a small cylinder of clay now and fire it, or leave the hole empty to glue in a wooden dowel after firing. -
Drying:
Let the birdhouse dry very slowly under loose plastic for several days to prevent the seams from cracking. -
Bisque Fire:
Fire the piece in a kiln to bisque temperature (usually Cone 04) to prepare it for glazing. -
Glazing:
Apply a matte clear glaze. The beauty of this piece relies on the natural clay body, so a transparent matte glaze will seal the surface while letting the natural speckles show through. -
Final Fire:
Fire again to the maturity temperature of your clay (likely Cone 5 or 6 for stoneware) to finish the piece.
Cleanout Door
Before attaching the base, cut a hole in it and create a plug or stopper. This allows you to clean out old nests at the end of the season easily.
Place your finished birdhouse in a quiet garden spot and wait for your feathered neighbors to move in
Birdhouse With Built-In Perch Options
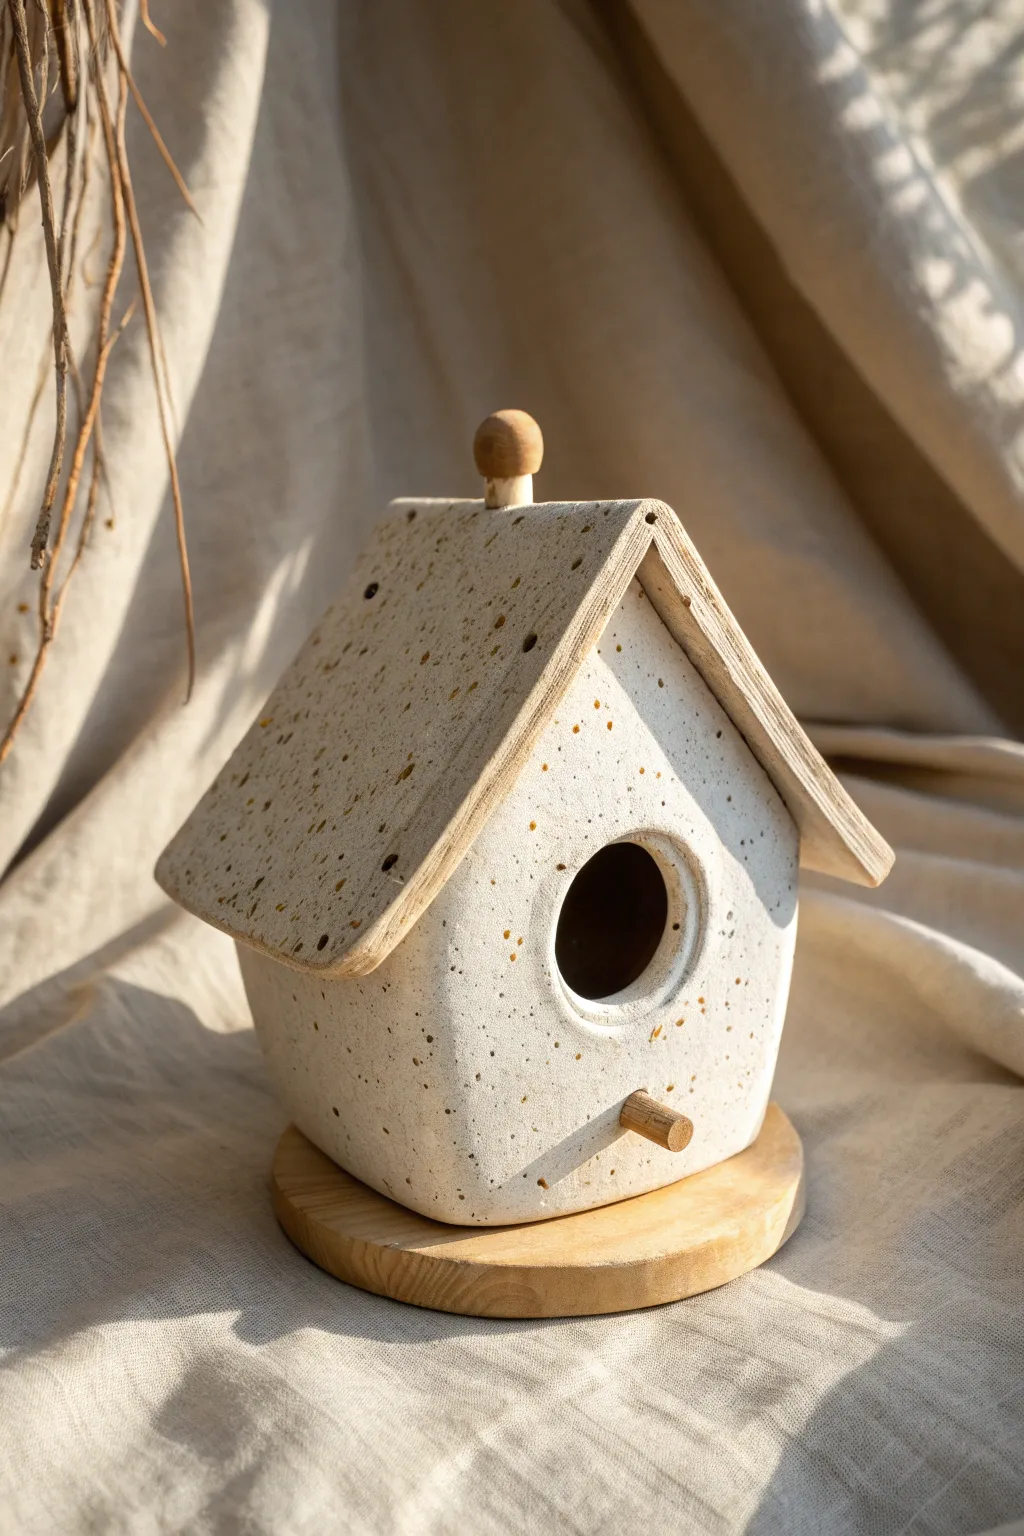
This charming clay birdhouse combines rustic textures with modern simplicity, featuring a creamy speckled glaze and warm wood accents. The unique design incorporates a built-in perch system that is securely integrated during the building process for durability and style.
How-To Guide
Materials
- Light-colored stoneware clay (with grog for stability)
- Slab roller or rolling pin
- Clay knife or fettling knife
- Paper templates (roof panels and body walls)
- Circular clay cutter (approx. 1.5 inches)
- Small wooden dowel (1/4 to 1/2 inch diameter)
- Slip and scoring tool
- Cream or oatmeal speckled glaze
- Wooden disk or coaster (for base)
- Wooden bead or small finial
- Strong epoxy glue
- Sponge and water
- Soft brush for glazing
Step 1: Forming the Clay Body
-
Roll the Slabs:
Begin by rolling out your clay to a consistent thickness of about 1/4 inch. If you want that organic look shown in the photo, don’t worry if the surface isn’t perfectly machine-smooth. -
Cut the Walls:
Using paper templates, cut out four wall panels. The front and back panels should have a pentagon shape (square bottom with a triangle top for the roof peak), while the side panels are simple rectangles. Keep the clay leather-hard for better stability. -
Cut the Entrance:
On the front panel, use your circular cutter to create the entrance hole. Position it centrally, slightly above the midline of the wall. -
Create the Perch Socket:
Directly below the entrance hole, carefully poke a hole sized to fit your wooden dowel. Do not insert the wood yet; this hole is just a placeholder to ensure the clay shrinks to the right size during firing. -
Assemble the Walls:
Score the edges of your wall panels and apply slip generously. Press the seams together firmly to create the main house structure, smoothing the clay on both the inside and outside to reinforce the bond.
Step 2: Roof and Refining
-
Cut Roof Panels:
Based on the angle of your front panel’s peak, cut two rectangular roof slabs. They should be slightly wider than the house to allow for an overhang. -
Attach the Roof:
Score and slip the top edges of your house walls. Place the roof slabs on top, ensuring they meet at the peak. Pinch the clay at the peak gently to seal it. -
Refine the Surface:
Using a slightly damp sponge, smooth over all sharp edges, especially around the entrance hole and the roof overhangs to give it a soft, finished look. -
Top Finial Hole:
Create a small hole at the very peak of the roof where the wooden knob will eventually sit. This allows trapped air to escape and provides an anchor point later. -
Dry and Bisque Fire:
Allow the piece to dry slowly under plastic to prevent warping. Once bone dry, bisque fire it according to your clay’s specific temperature guide.
Clean Connections
Use a small drill bit or a twisted piece of sandpaper to gently clean out the perch hole after the final firing. This ensures the dowel fits snugly without cracking the ceramic.
Step 3: Glazing and Final Assembly
-
Apply Glaze:
Brush or dip the bisqued house in a cream or oatmeal speckled glaze. Avoid getting glaze inside the perch hole or the finial hole, as this will make final assembly difficult. I like to wax these holes before glazing to keep them clean. -
Glaze Fire:
Fire the piece for a second time to mature the glaze and the clay body. -
Prepare Wood Base:
Sand your wooden disk base until smooth. If you plan to hang the birdhouse outdoors, seal the wood with a weather-proofing oil or varnish. -
Attach the House to Base:
Apply a strong epoxy or construction adhesive to the bottom rim of the ceramic house and press it firmly onto the center of the wooden disk. Let it cure completely. -
Insert the Perch:
Cut your wooden dowel to a short length (about 1.5 inches exposed). Apply a dab of glue to one end and insert it into the pre-made hole below the entrance. -
Add the Finial:
Finally, glue the small wooden bead or finial into the hole at the roof’s peak to cap off the design.
Texture Play
Before assembling the leather-hard slabs, gently roll a textured fabric or canvas over the clay to give the glaze more surface area to ‘break’ over, enhancing the speckled effect.
With the final wooden accents glued in place, your handcrafted ceramic birdhouse is ready to welcome its first feathered visitors
Stacked Pod Apartment Birdhouse
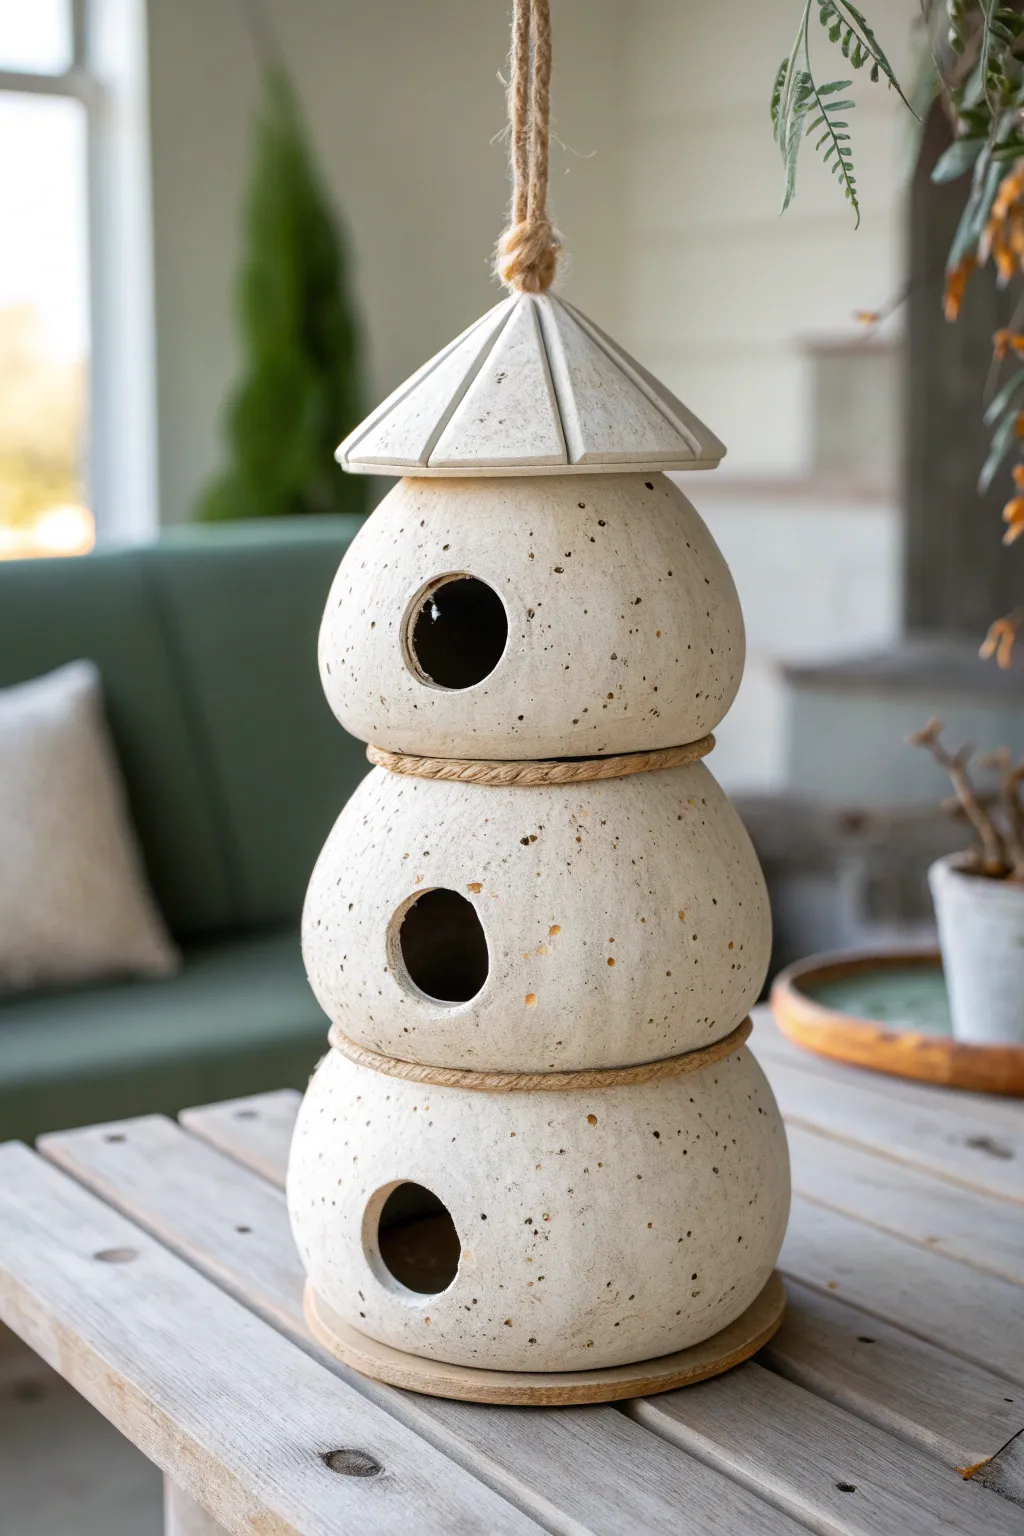
This whimsical, tiered birdhouse combines organic forms with architectural charm, mimicking the look of natural stacked stones or gourds. Crafted from white stoneware clay with a speckled finish, this ‘apartment complex’ offers three separate cozy dwellings for your garden visitors.
How-To Guide
Materials
- White or speckled stoneware clay (approx. 5-7 lbs)
- Pottery wheel or rolling pin and slump molds
- Pin tool
- Scoring tool (ribbed kidney or needle tool)
- Slip (clay and water slurry)
- Circle cutter (approx. 1.5 inch diameter)
- Jute rope or twine
- Wooden sculpting tools
- Sponge
- Kiln
- Clear matte glaze (optional)
Step 1: Creating the Pods
-
Review clay consistency:
Begin by wedging your clay thoroughly to remove air bubbles. You want a consistency that is firm enough to hold a shape but pliable enough to form spheres without cracking. -
Form the base shapes:
You need three spherical forms. You can throw three closed forms on the wheel, or create two pinch pots for each tier and join them together to make a hollow ball. Make them slightly graduated in size, with the largest at the bottom. -
Flatten the contact points:
Once the spheres are leather-hard, gently tap the top and bottom of the lower and middle spheres against a flat surface. Tap only the bottom of the top sphere. This creates stable platforms for stacking. -
Refine the texture:
Use a damp sponge or a soft rib to smooth out the joins. For this specific look, don’t over-smooth; a slightly organic, hand-built texture adds character. -
Cut the entrances:
Using a circle cutter or a steady hand with a knife, cut a circular opening into the front of each pod. Place them slightly off-center or centered depending on your preference, but ensure they are large enough for small birds. -
Smooth the edges:
Use a damp finger to round off the sharp cut edges of the entrance holes. This protects the birds’ feet and wings from injury.
Air Venting
Make small, hidden holes in the surfaces connecting the pods (before joining) so air can escape between chambers during firing.
Step 2: Constructing the Roof
-
Form a cone:
Roll out a slab of clay about 1/4 inch thick. Cut out a circle, remove a pie-shaped wedge, and join the edges to form a wide, shallow cone that fits proportionally over your top pod. -
Add the ridges:
Roll thin coils of clay. Score and slip them vertically down the sides of the roof cone to create the raised ridges shown in the image. Smooth them down so they integrate with the main roof shape. -
Create the hanging loop:
Fashion a sturdy loop of clay at the very peak of the roof. Make the hole large enough to accommodate the thick rope you will use later. -
Check the fit:
Place the roof onto the top pod to ensure the diameter is correct. Usually, I like to make the roof hang over the edge slightly for better rain protection.
Step 3: Assembly and Firing
-
Stack and join:
Score and slip the flattened connection points between the pods heavily. Press them together firmly to ensure a permanent bond. Join the roof to the top pod in the same manner. -
Create rope channels:
Using a wooden tool, carve a shallow groove or channel into the clay at the seam where each pod meets the one below it. This will help hold the decorative rope in place later. -
Dry slowly:
Cover the entire structure loosely with plastic. Let it dry very slowly over several days to prevent the seams from cracking due to uneven shrinkage. -
Bisque fire:
Once bone dry, fire the piece to bisque temperature (usually cone 04 or 06). This hardens the clay. -
Glaze application:
To achieve the stone-like finish, leave the exterior unglazed (if the clay is vitreous) or apply a very thin wash of matte white glaze that lets the clay speckles show through. -
Final firing:
Fire the birdhouse to the maturity temperature of your clay body (likely cone 5/6 or cone 10).
Structural Pro-Tip
Keep clay wall thickness consistent (approx. 1/4 to 3/8 inch). If the bottom walls are too thin, the weight of the upper pods may cause sagging.
Step 4: Finishing Touches
-
Add decorative rope:
Glue a length of jute rope into the grooves you created between the tiers using a strong outdoor-safe adhesive. -
Attach the hanger:
Thread a thick piece of jute rope through the top loop. Tie a secure knot, creating a rustic looking hanger for your new bird apartment.
Hang this charming triple-decker by a sturdy branch or hook and watch your local wrens move in.
Character Face Tree Guardian Birdhouse
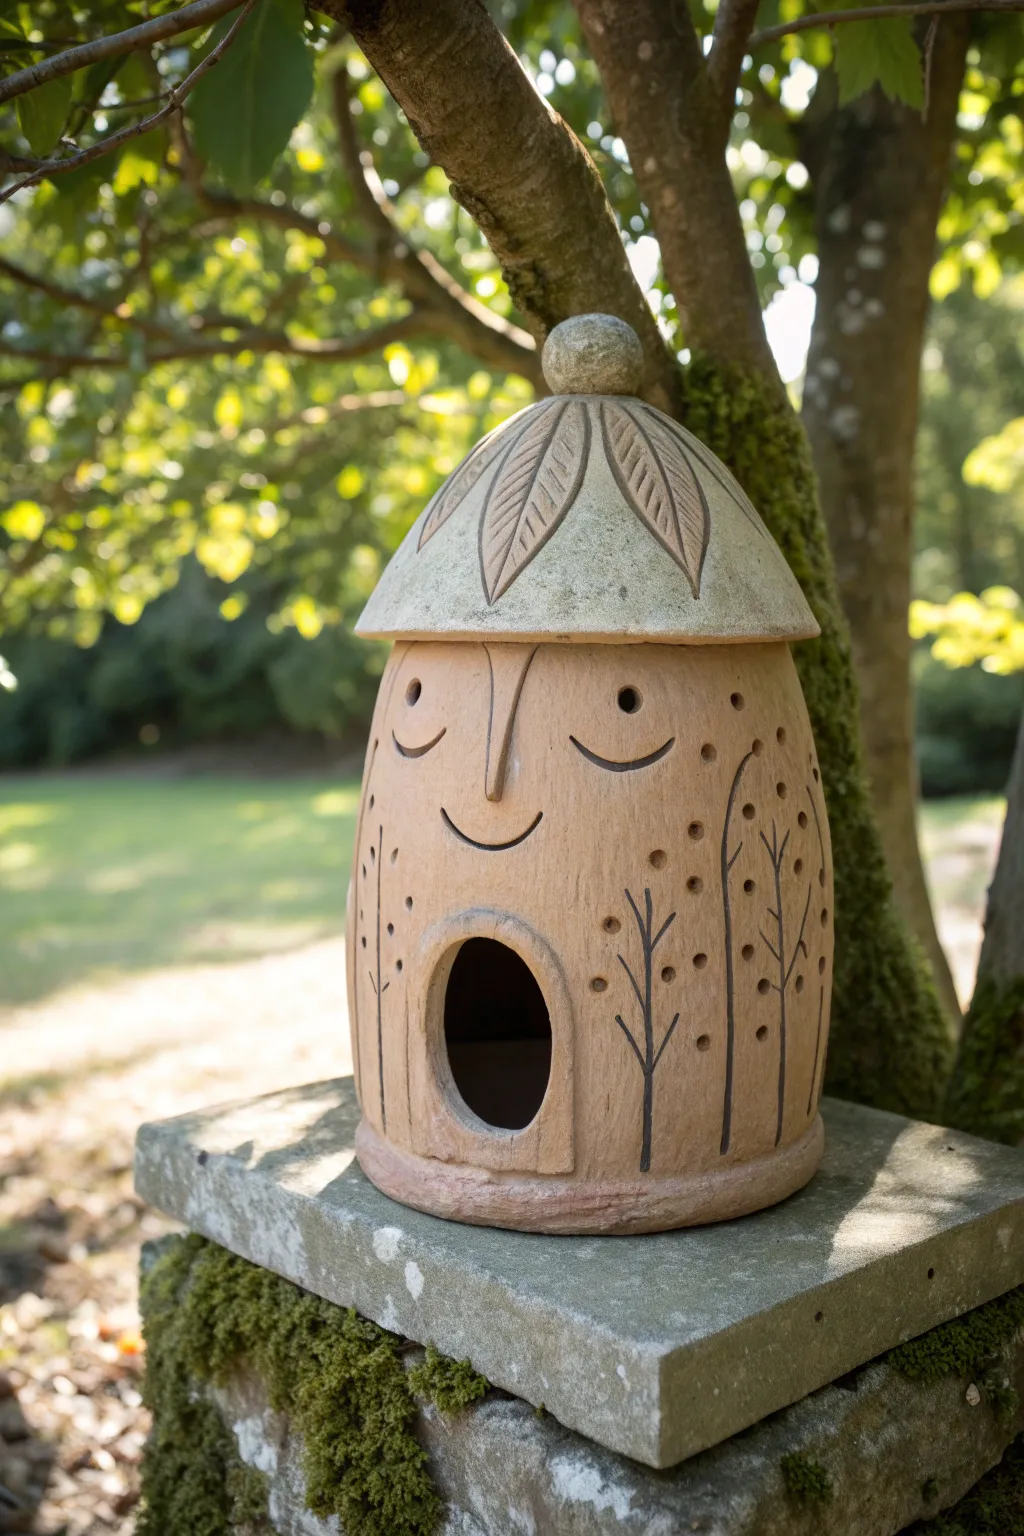
This charming, terracotta-hued birdhouse features a gentle, smiling face and stylized tree etchings that make it feel like a natural part of the garden. With its removable textured lid and sturdy cylindrical body, it serves as both a functional shelter for small birds and a delightful piece of garden art.
Step-by-Step Tutorial
Materials
- Terracotta stoneware clay (approx. 5-7 lbs)
- Pottery wheel (or rolling pin for hand-building)
- Clay carving tools (needle tool, loop tool)
- Small round cookie cutter (approx. 1.5 – 2 inches)
- Sponge
- Wire cutter
- Fettling knife
- Slip and scoring tool
- Kiln for firing
Step 1: Forming the Body
-
Throw or Build the Cylinder:
Begin by wedging your clay thoroughly to remove air bubbles. Center about 4-5 lbs on the wheel and open it up to create a floor about 1/2 inch thick. Pull the walls upward to create a straight-sided cylinder roughly 8-10 inches tall and 6 inches wide. Alternatively, roll out a large slab and form it into a cylinder around a form. -
Shape the Shoulders:
If throwing, gently collar the top rim inward slightly to create a rounded shoulder where the lid will eventually sit. Ensure the rim is thick enough to support the lid. -
Create the Gallery:
Using a wooden modeling tool or your fingers, press into the inner rim to create a small ledge (gallery). This will help the lid sit securely without sliding off. -
Smooth the Surface:
While the wheel is spinning slowly, use a metal rib to smooth the outer walls, removing finger ridges to create a clean canvas for your carving later. Cut the piece from the bat with a wire tool.
Clean Cuts
When cutting the entry hole, support the clay wall from the inside with your other hand. This prevents the wall from collapsing inward under the pressure of the cutter.
Step 2: Creating the Lid
-
Throw the Dome:
With the remaining clay, throw a shallow bowl or dome shape upside down on the wheel. Measure it frequently with calipers to ensure the outer diameter matches the shoulder of your cylinder body. -
Add a Knob:
While the clay is still plastic, attach a small ball of clay to the center top of the dome (which is the bottom while throwing) to act as a handle or finial. Alternatively, throw this shape directly from the hump if you are comfortable with that technique. -
Refine the Fit:
Once the lid has stiffened slightly to leather-hard, trim the underside to ensure it fits perfectly onto the gallery of the main body.
Step 3: Sculpting the Face and Details
-
Wait for Leather Hard:
Allow both pieces to dry to a firm leather-hard stage. This is crucial; if the clay is too wet, the carving will be messy, but if it is too dry, it will chip. -
Carve the Entry Hole:
Decide on the ‘front’ of your guardian. Using a small round cutter or a needle tool, cut a circular opening about 1.5 to 2 inches in diameter near the bottom third of the cylinder. This is the bird’s door. -
Define the Nose:
Above the door, carve two vertical lines that start wide and converge slightly to form a long, abstract nose bridge. This naturally leads the eye up the piece. -
Add the Smile:
Directly under the nose and above the door, carve a simple, curved line for the smile. I like to add tiny perpendicular tick marks at the ends of the smile to give it personality. -
Etch the Eyes:
On either side of the nose bridge, carve two semi-circles for cheeks or closed eyes, adding a small dot or pupil indentation above them for an awake but peaceful expression. -
Detail the Sides:
Moving to the sides and back of the cylinder, use a needle tool to scratch in thin, vertical lines representing tree trunks. Add small ‘V’ shapes for branches coming off these trunks. -
Add Texture:
Use the rounded end of a tool to press random dot patterns around the tree branches, mimicking falling leaves, snow, or magical spores.
Nature’s Patina
After the final firing, rub plain yogurt on the exterior and place it in a shady, damp spot in your garden. This encourages moss growth for an ancient, forest-dweller look.
Step 4: Finishing the Lid
-
Carving Leaves:
On the domed lid, use a loop tool to carve large, leaf-shaped outlines radiating from the center knob down to the rim. -
Vein Detailing:
Inside each leaf shape, use a needle tool to scratch a central vein and delicate diagonal veins. This texture contrasts beautifully with the smooth face below. -
Smoothing Edges:
Go over all your cut edges, especially the bird entry hole, with a damp sponge or your finger to remove sharp burrs that could hurt the birds.
Step 5: Firing
-
Drying:
Place the lid on the body (to prevent warping) and cover loosely with plastic to dry slowly for several days until bone dry. -
Bisque Fire:
Fire the piece in a kiln to cone 04 (or your clay’s specific bisque temperature). -
Glazing (Optional) or Final Fire:
To match the reference, leave the clay unglazed for a natural terracotta look, perhaps applying a light oxide wash to the carved lines to make them pop. Fire to the final maturity temperature of your clay (e.g., Cone 5/6 for stoneware) to create a vitrified, weather-resistant home.
Place your finished guardian in a quiet nook of the garden and wait for your first feathered tenants to move in