If you’re craving a project that’s cute, quick, and totally doable, polymer clay animals are where it’s at. I lean on simple shapes and tiny details so you can make a whole little world of critters without stressing the sculpting.
Chibi Cat Figurines
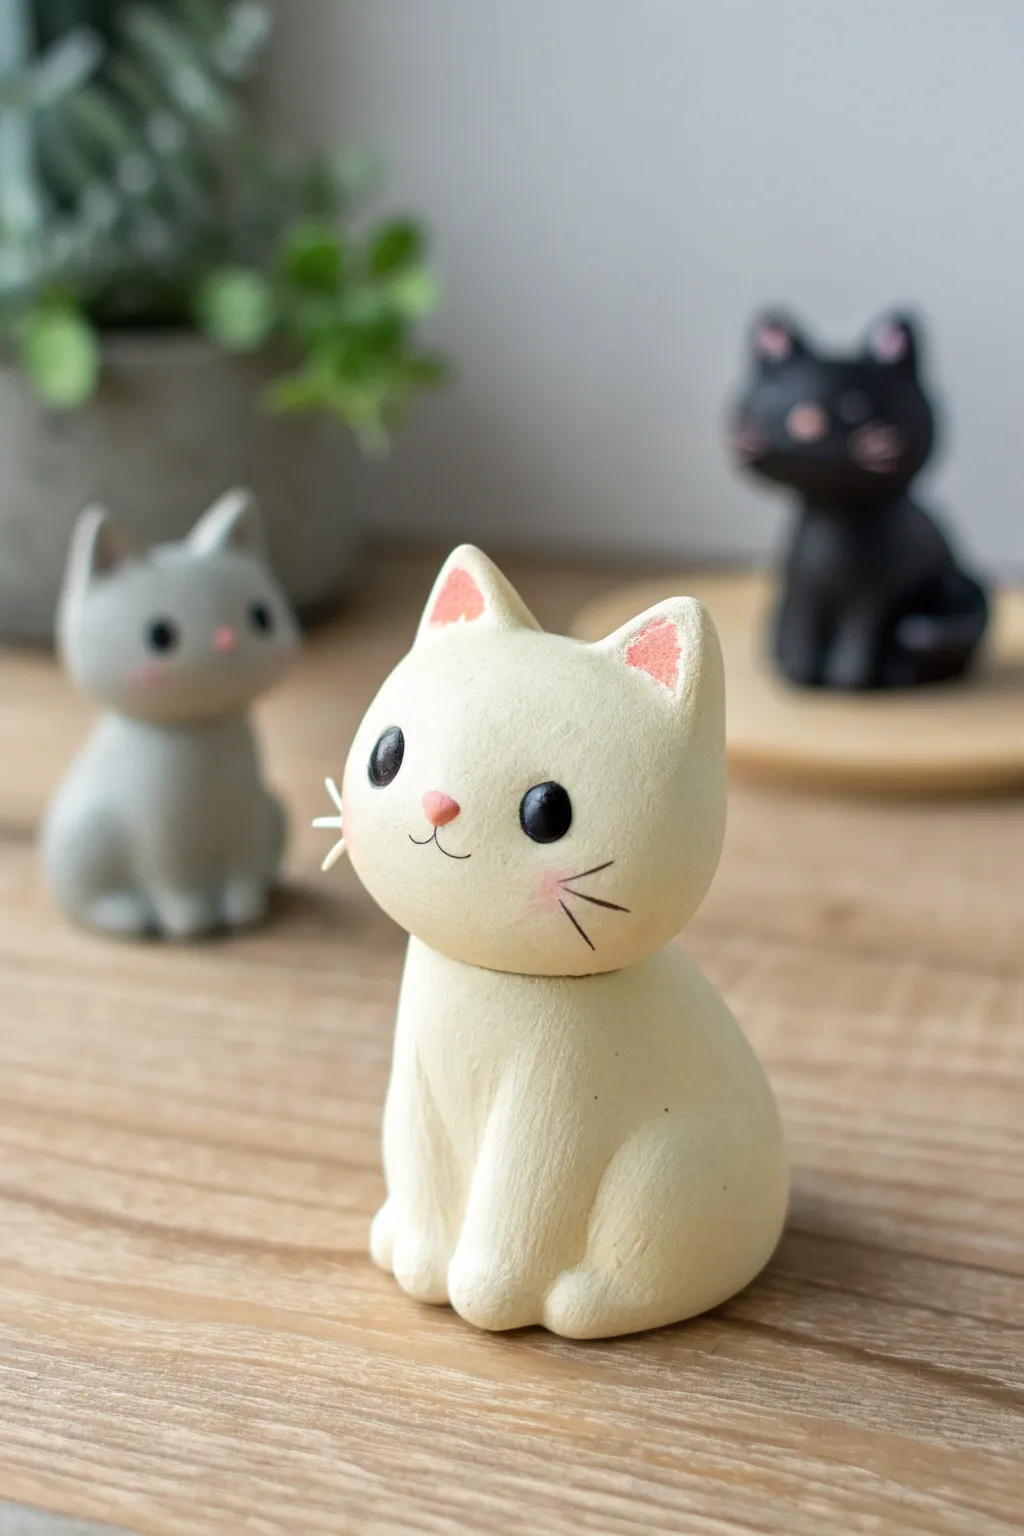
These adorable chibi-style cats are perfect for beginners, featuring simple shapes that come together to create a charming desk companion. The design focuses on clean lines, a matte textured finish, and sweet, minimalist facial features.
How-To Guide
Materials
- Cream or off-white polymer clay
- Pink polymer clay (very small amount)
- Black polymer clay or black acrylic paint
- Needle tool or toothpick
- Ball stylus tool (small)
- White whiskers (monofilament, thin wire, or stiff paintbrush bristles)
- Craft knife
- Soft pastel chalks (pink)
- Small fluffy paintbrush
- Oven for baking
Step 1: Shaping the Base
-
Condition the Clay:
Begin by kneading your cream-colored polymer clay until it is soft, pliable, and free of any air bubbles. -
Form the Body:
Roll a smooth ball of clay about the size of a large walnut. Shape it into a slightly flattened teardrop or gumdrop shape to form the main body, ensuring the bottom is flat so it stands securely. -
Form the Head:
Roll a second ball of clay, slightly larger than the body, to create the head. Gently flatten it just a tiny bit so it isn’t a perfect sphere, but more of a rounded oval. -
Connect Head and Body:
Press the head firmly onto the narrow top of the body piece. I find that inserting a small piece of toothpick or wire between the two pieces adds internal stability.
Clean Clay Pro-Tip
White and cream clay easily pick up dust. Keep a pack of wet wipes or acetone nearby to clean your hands and tools often, ensuring your kitty stays spotless.
Step 2: Adding Features
-
Shape the Ears:
Create two small triangles of cream clay. Pinch them slightly to curve them, then attach them to the top of the head, blending the back seams with your finger or a smoothing tool. -
Detail the Ears:
Take two tiny triangles of pink clay, flatten them, and press them into the center of the cream ears for the inner ear detail. -
Create the Legs:
Roll two small logs of cream clay for the front legs. Attach them vertically to the front of the body, blending the upper portion into the chest so only the bottom paws stick out. -
Shape the Haunches:
Roll two slightly flattened balls for the rear haunches. Press these against the sides of the body towards the bottom to suggest the cat is sitting. -
Define the Paws:
Use your needle tool or a knife to gently press two vertical indentations into the bottom of each front leg and rear haunch to simulate toes. -
Create the Tail:
Roll a tapered snake of clay. Attach the thicker end to the lower back of the figurine and curve the tail around the side of the body, blending the connection point.
Head Too Heavy?
If the head keeps tilting or falling off before baking, use a crumpled core of aluminum foil inside the head to reduce weight and save clay.
Step 3: Face and Finishing
-
Make the Eye Sockets:
Use a ball stylus to press two indentations into the face where the eyes will go. Spacing them widely apart enhances the ‘chibi’ cuteness. -
Insert the Eyes:
Roll two tiny balls of black clay and press them firmly into the sockets. Alternatively, you can bake the piece first and paint the eyes black later. -
Add the Nose:
Place a minuscule triangle of pink clay between and slightly below the eyes for the nose. -
Scribe the Mouth:
Using your sharpest needle tool, carefully etch a small ‘w’ shape extending down from the nose to create the mouth. -
Add Blush:
Scrape a little pink soft pastel into a powder. Use a small dry brush to gently dust pink ‘blush’ onto the cheeks and lightly into the ears. -
Insert Whiskers:
Before baking, use a needle to poke three tiny holes on each cheek. Insert your whisker material (like stiff bristles) now if they are heat-safe, or glue them in after baking. -
Draw Whiskers (Alternative):
If you prefer the painted look shown in the image, use a very fine brush and brown or black paint to draw three delicate lines on each cheek after baking. -
Bake:
Bake the figurine according to your clay manufacturer’s instructions, typically between 230°F and 275°F (110°C – 135°C) for about 30 minutes.
Once cooled, your cute ceramic-style kitty is ready to sit proudly on your shelf or desk


Puppy Faces With Big Ears
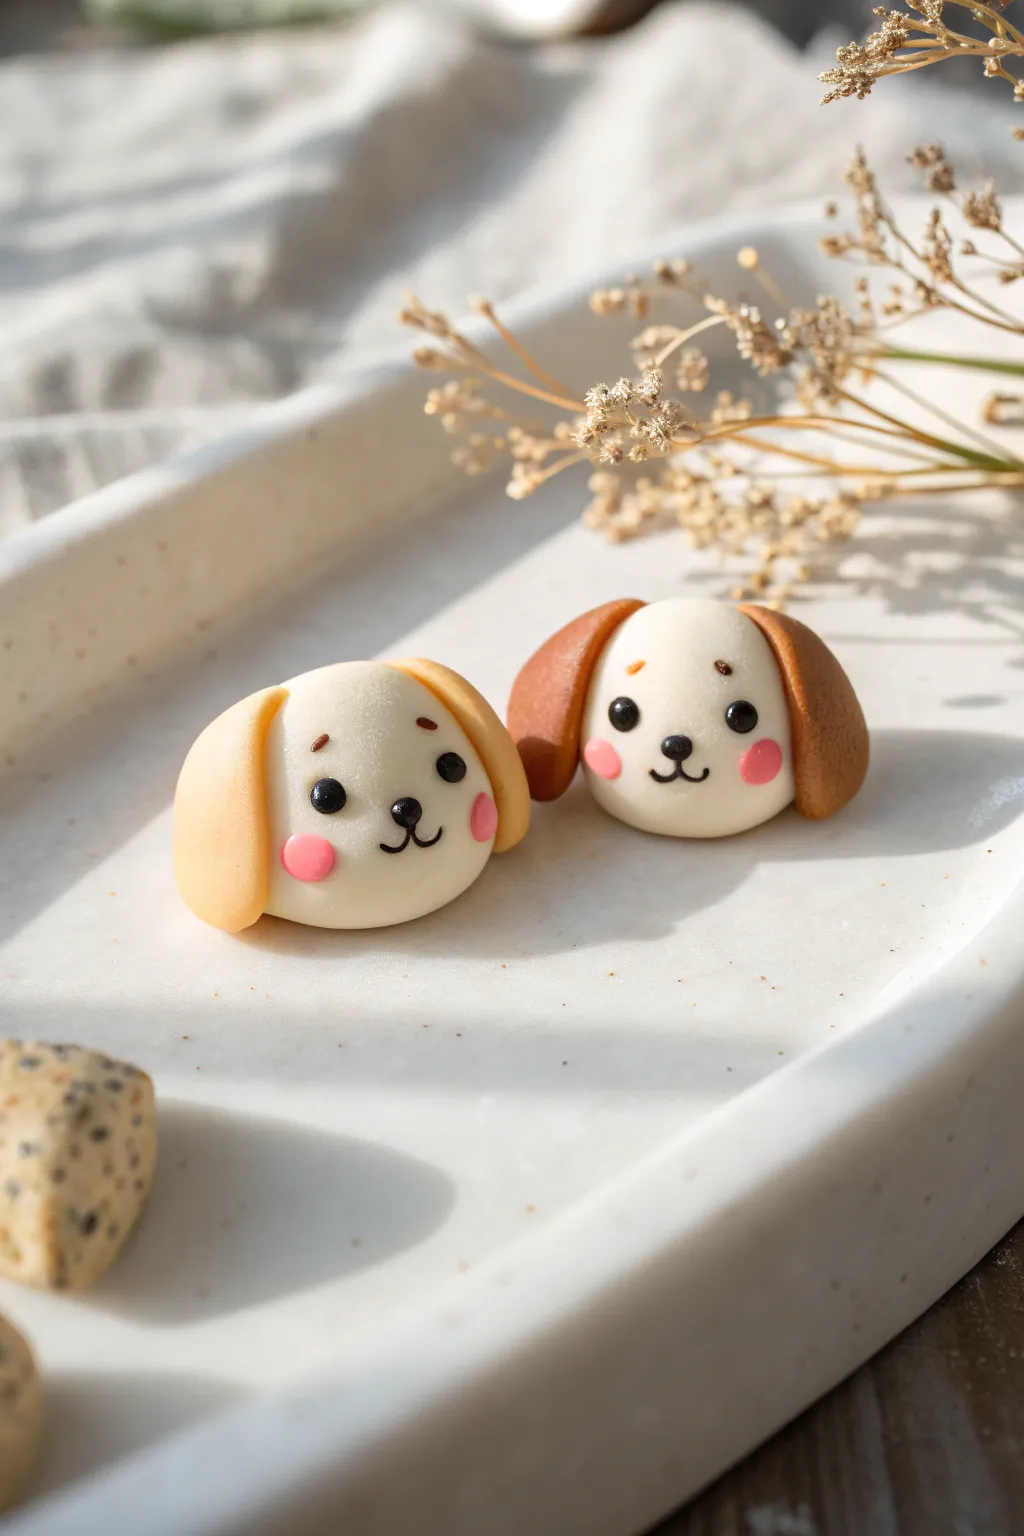
These delightfully sweet puppy faces are perfect for beginners looking to master simple shapes and expressive detailing. With their floppy ears and rosy cheeks, these little charms make wonderful beads, cabochons, or miniature desk companions.
Step-by-Step
Materials
- White polymer clay (soft consistency)
- Light tan polymer clay
- Medium brown polymer clay
- Black polymer clay
- Pink polymer clay
- Dotting tools (various sizes)
- Needle tool or toothpick
- Sharp clay blade or X-Acto knife
- Ceramic tile or glass work surface
- Oven for baking
Step 1: Shaping the Head
-
Condition the white clay:
Begin by kneading a small amount of white polymer clay until it is soft, pliable, and free of cracks. Warm clay is much easier to smooth. -
Roll the base shape:
Roll the white clay into a smooth ball about the size of a large grape. Ensure there are no seam lines visible. -
Create a dome:
Gently press the ball onto your work surface to flatten the bottom, creating a smooth dome shape. This will be the puppy’s face. Keep the top rounded and smooth.
Clean Clay Tip
White clay picks up everything! Keep a pack of baby wipes nearby to clean your hands and tools diligently before touching the white clay after handling darker colors.
Step 2: Adding the Ears
-
Prepare ear clay:
Take a small amount of the tan or brown clay (depending on which puppy version you are making) and condition it well. -
Form teardrop shapes:
Divide the colored clay into two equal pea-sized balls. Roll each ball into a teardrop shape that is slightly flattened. -
Attach the ears:
Press the rounded, wider end of the teardrop against the side of the white head dome. Curve the ear slightly downward so it hugs the side of the face. -
Blend the seams:
Use a smooth tool or your finger to gently blend the clay where the ear meets the head at the back so it is secure, but leave the front distinct to look floppy.
Turn it into Jewelry
Before baking, insert a long headpin horizontally through the puppy’s head (ear to ear) to create a bead, or vertically to create a charm for a necklace.
Step 3: Creating the Face Details
-
Position the eyes:
Take two excessively tiny pieces of black clay and roll them into balls. Place them on the upper third of the white face, spacing them apart generously. -
Embed the eyes:
Gently press the black balls into the white clay using a flat tool so they sit flush with the surface but remain round. -
Make the nose:
Roll a slightly larger ball of black clay for the nose. Position it centered between and slightly below the eyes. -
Shape the nose:
Press the nose down gently, shaping it into a soft triangle or rounded oval depending on the expression you want. -
Add eyebrows:
Roll two microscopic threads of brown clay. Curve them slightly and place them high above the eyes to give the puppy a sweet, surprised expression. -
Create the mouth:
Roll a very thin snake of black clay. Cut two tiny curved segments and attach them under the nose to form a ‘w’ shape for the smile. -
Alternative mouth method:
If handling tiny snakes of clay is tricky, I sometimes prefer to gently indent the mouth lines using a needle tool instead.
Step 4: Finishing Touches
-
Apply rosy cheeks:
Take two small balls of pink clay and flatten them into thin discs. Press these onto the face, just below and to the side of the eyes. -
Smooth the surface:
Do a final check for fingerprints. If you see any, lightly brush them away with a drop of baby oil on your finger or a soft brush. -
Bake the piece:
Place your puppy faces on a ceramic tile or baking sheet. Bake according to your brand of polymer clay instructions (usually around 275°F/130°C for 15-30 minutes). -
Cool and seal:
Let the pieces cool completely in the oven. Once cool, you can apply a matte varnish to protect the details, though the natural matte finish of clay looks great on its own.
Now you have a set of undeniably cute puppy faces ready to brighten up any craft display


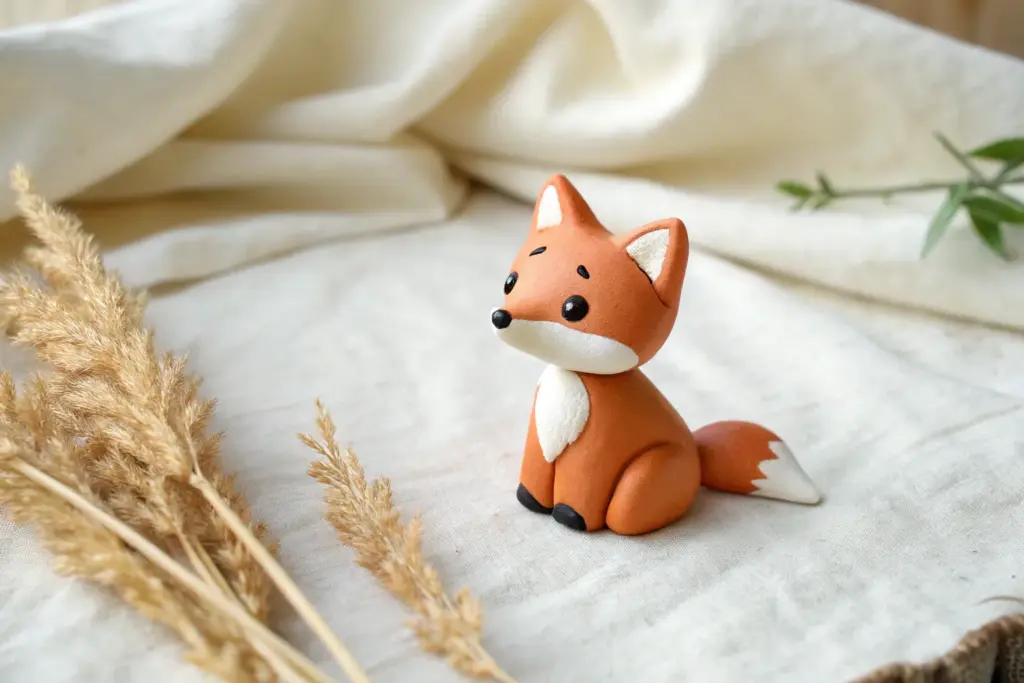
Tiny Foxes With Curled Tails
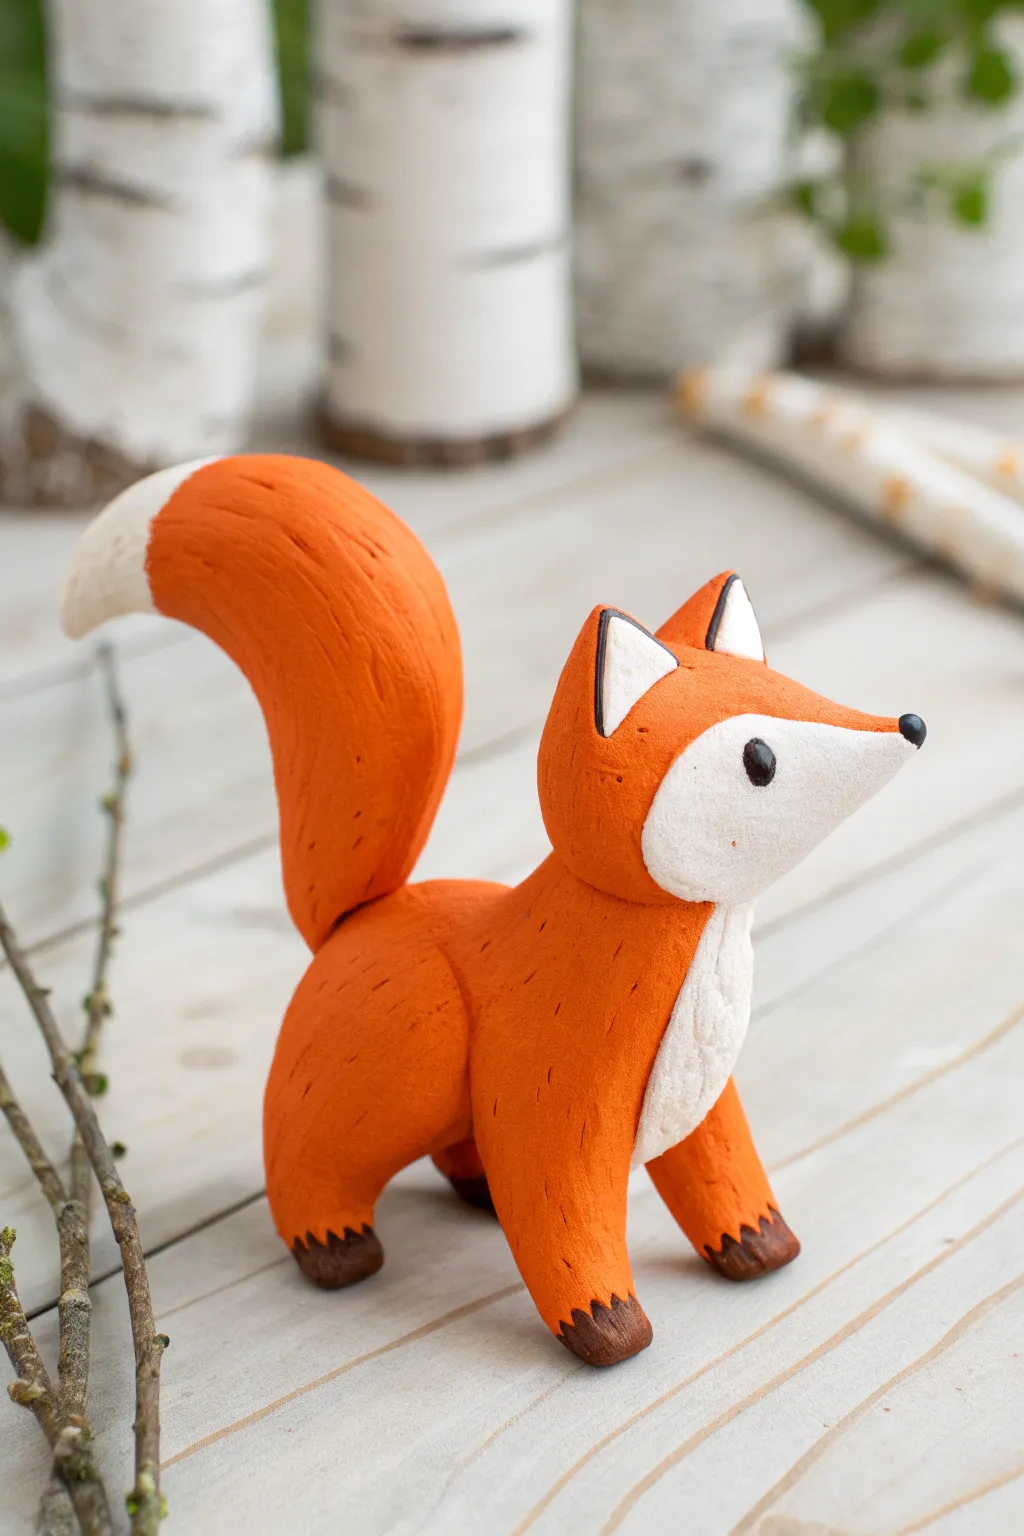
Capture the charm of the forest with this adorable polymer clay fox, featuring a playful curled tail and sweet expressive face. This project uses simple shapes and careful texturing to create a hand-carved wood effect that adds wonderful rustic character.
Detailed Instructions
Materials
- Orange polymer clay
- White or cream polymer clay
- Black polymer clay
- Needle tool or toothpick
- Small ball stylus tool
- Clay roller or pasta machine
- Basic sculpting tools
- Oven for baking
- Aluminum foil (optional, for armature)
Step 1: Shaping the Body and Head
-
Form the Torso:
Start by conditioning your orange clay until it is soft and pliable. Roll a medium-sized ball into a smooth oval shape, slightly thicker at what will become the chest area. This forms the main body. -
Create the Head:
Roll a slightly smaller ball of orange clay for the head. Gently pinch the front of the ball to pull out a snout shape, creating a teardrop form that is rounded at the back and pointed at the nose. -
Attach Head to Body:
Place the head onto the wider end of your body oval. Blend the clay at the neck seam slightly with a modeling tool to secure it, but keep the distinction between head and body visible. -
Add White Face Mask:
Take a small pinch of white clay and flatten it into a thin heart shape or rounded triangle. Press this onto the face area so it covers the cheeks and underside of the snout. -
Refine the Snout:
Smooth the edges of the white clay so it sits flush against the orange. Gently curve the snout upward just a tiny bit to give the fox a perky, attentive look.
Keep it Clean
White clay picks up lint easily! Always wipe your hands and tools with a baby wipe before switching from dark colors (like the orange or black) to the white clay pieces.
Step 2: Legs and Tail
-
Sculpt Front Legs:
Roll two small logs of orange clay for the front legs. Attach them to the upper chest area, blending the clay at the shoulder joint so they look like they are emerging naturally from the body. -
Form Hind Legs:
Create two shorter, thicker teardrop shapes for the haunches. Press these onto the sides of the rear body to create the powerful hind leg muscle, adding smaller clay logs beneath them for the feet. -
Shape the Tail:
Roll a large, thick cone of orange clay for the tail—it should be quite substantial compared to the body. Gently curve the tip into a question-mark shape. -
Add the White Tip:
Before attaching the tail, take a small cone of white clay and press it onto the pointed end of the tail. Roll it gently between your fingers to seam the two colors together smoothly. -
Attach the Tail:
Press the thick base of the tail firmly onto the rear of the body, angling it upwards so it curls over the fox’s back. You might need to blend the clay upwards from the body to support the weight.
Step 3: Details and Texturing
-
Create Ears:
Form two small, flattened triangles from orange clay. Add smaller white triangles to the centers for the inner ear. Press these firmly onto the top of the head. -
Add Black Accents:
Roll extremely tiny bits of black clay. Place one on the very tip of the snout for the nose. Flatten two larger circles for the eyes and press them onto the white face mask area. -
Detail the Feet:
Add small, flat triangles of dark brown or black clay to the tips of each paw to represent the darker fur often found on fox feet. -
Outline the Ears:
Roll skinny snakes of black clay and border the outer edges of the ears to define their shape clearly. -
Create Fur Texture:
Using a needle tool, create short, small dashed indentations all over the orange parts of the body. I find that varying the direction slightly makes the fur look more organic and fluffy. -
Texturize the Chest:
For the white chest area, use a slightly different stroke—perhaps small ‘v’ shapes or scallops—to distinguish the fluffier chest fur from the sleek back fur. -
Final Check:
Look over your fox from all angles. Ensure the fox stands stably on all four legs. If it’s tipping, gently press the body down onto your work surface to flatten the bottom of the feet slightly. -
Bake:
Bake your creation according to the manufacturer’s instructions for your specific brand of polymer clay. Let it cool completely before handling.
Tail Drooping?
If the heavy tail sags during sculpting, prop it up with a small piece of crumpled aluminum foil or a folded piece of cardstock while baking to hold the curve in place.
Place your finished fox on a shelf or among some plants to add a touch of woodland magic to your home


Sleepy Bears in Neutral Tones
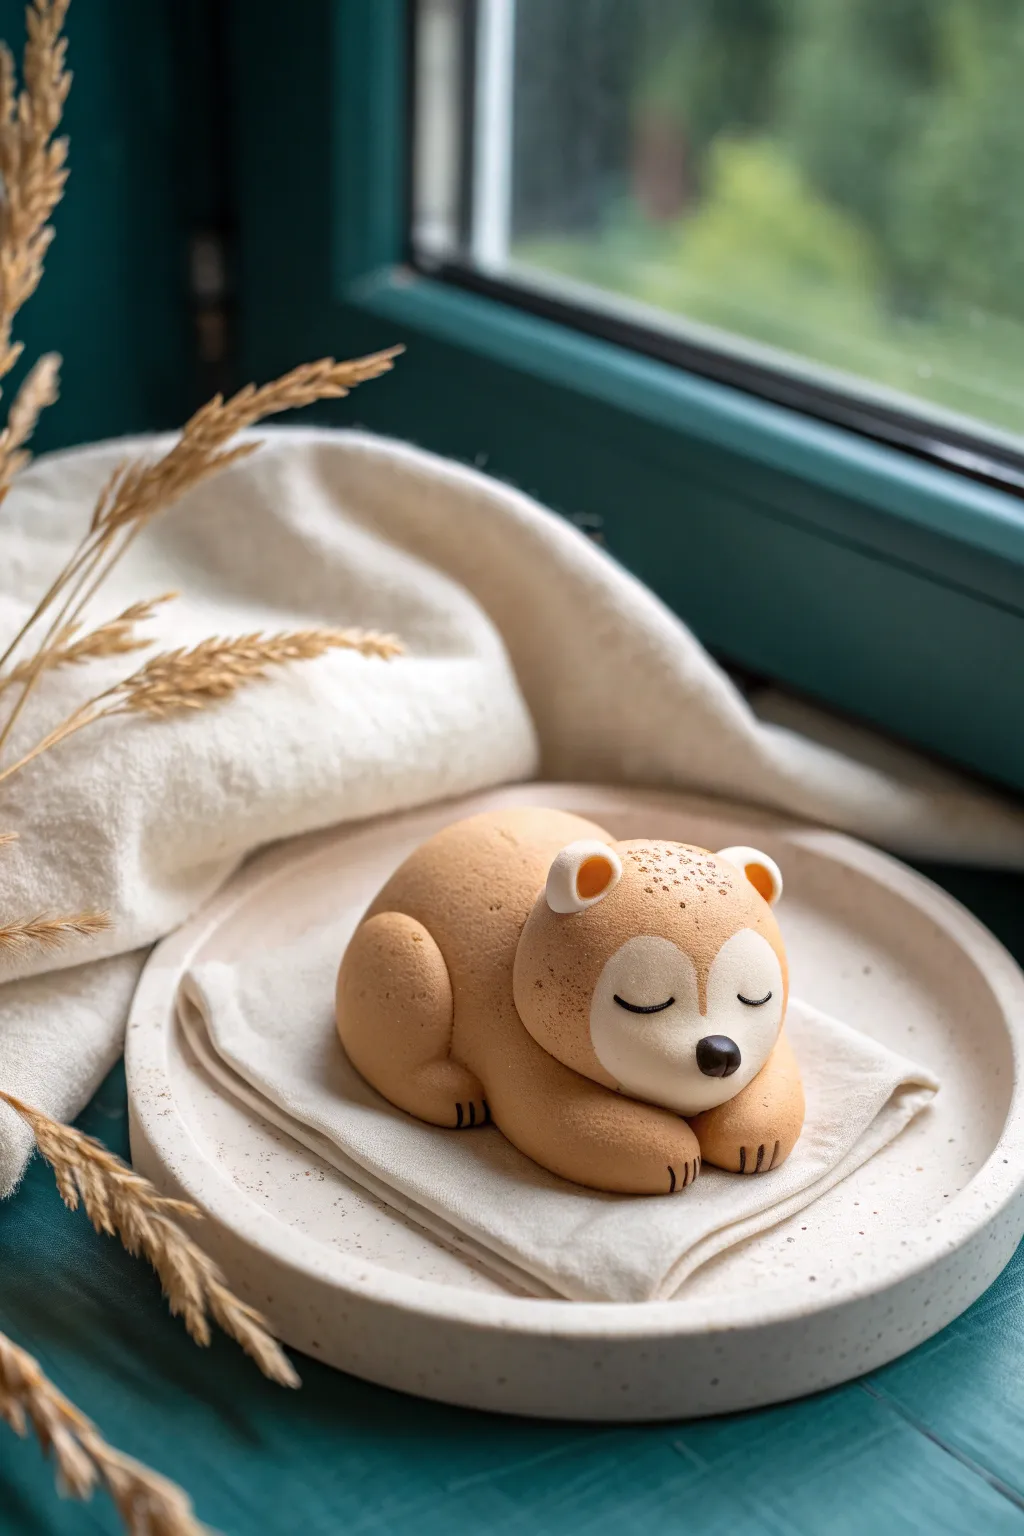
Create a serene atmosphere with this adorable, sleeping bear sculpture that looks soft enough to be a marshmallow. Its gentle curves and warm, neutral palette make it a perfect minimalist decoration or a sweet gift.
How-To Guide
Materials
- Polymer clay (light beige/tan)
- Polymer clay (white)
- Polymer clay (dark brown or black)
- Sculpting tool with a curved edge
- Soft pastel chalks (brown/burnt sienna) for shading
- Soft paintbrush for pastels
- Needle tool
- Ceramic tile or baking mat
- Oven
Step 1: Shaping the Base
-
Mix the perfect tan:
Start by conditioning your beige clay. If it’s too dark, mix in some white to achieve that soft, biscuit-like color shown in the reference. -
Form the body:
Roll a large ball of the beige clay into a smooth oval. Gently flatten the bottom against your work surface so it sits stable without rolling away. -
Create the head:
Roll a slightly smaller ball for the head. Press it gently onto one end of the oval body, blending the clay at the neck seam underneath so it looks like one cohesive form. -
Sculpt the rear leg:
Take a medium-sized piece of beige clay and shape it into a teardrop. Press this onto the side of the body near the back, curving it forward to mimic a haunch. -
Add the front paws:
Roll two small sausages of beige clay. Attach these directly under where the chin will rest, positioning them side-by-side as if the bear is hugging its own paws while sleeping.
Step 2: Adding Details & Features
-
Create the lighter face mask:
Roll a very thin sheet of white clay. Cut a heart-shaped piece (without the sharp point at the bottom) and gently press it onto the front of the face to create the muzzle area. -
Smooth the seams:
Use your finger or a silicone tool to feather the edges of the white clay into the beige so the transition is smooth, not raised. -
Shape the ears:
Form two tiny beige balls and flatten them slightly. Press a smaller white ball into the center of each. Pinch one side and attach them to the top of the head. -
Add the nose:
Roll a tiny speck of dark brown or black clay into a triangle with rounded corners. Place this right at the tip of the white muzzle. -
Sculpt the eyes:
Roll two impossibly thin threads of dark clay. Curve them into ‘U’ shapes and place them on the white mask to create sleeping eyelids. Alternatively, you can paint these on after baking. -
Detail the paws:
Using a needle tool or a dull knife, gently press three vertical indentations into the end of each paw and the back foot to suggest toes.
Clean Clay Tips
White clay picks up dust easily. Keep a scrap piece of white clay handy to roll between your hands before working on the face specificially to clean off lint.
Step 3: Finishing Touches
-
Apply shading:
Scrape some brown pastel chalk into a fine dust. Using a soft, dry brush, gently dust the top of the head, the back, and the edges of the ears to create a toasted, baked look. -
Add freckles:
With a very fine tool or toothbrush, you can lightly speckle the forehead area with the pastel dust or diluted brown paint for texture. -
Final smooth:
Give the entire piece a final check. Smooth out any fingerprints very gently with a drop of baby oil on your finger if needed. -
Bake carefully:
Bake according to your clay manufacturer’s instructions. A lower temperature for a longer time often helps prevent white clay from scorching.
Texture Twist
Before baking, gently dab the beige areas with a clean toothbrush or stiff bristle brush. This creates a soft ‘fur’ texture that looks amazing with the pastel shading.
Once cooled, place your sleepy bear on a shelf or desk for a permanent sense of calm

The Complete Guide to Pottery Troubleshooting
Uncover the most common ceramic mistakes—from cracking clay to failed glazes—and learn how to fix them fast.
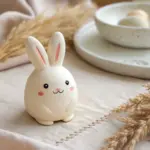
Bunny Minis With Pink Noses
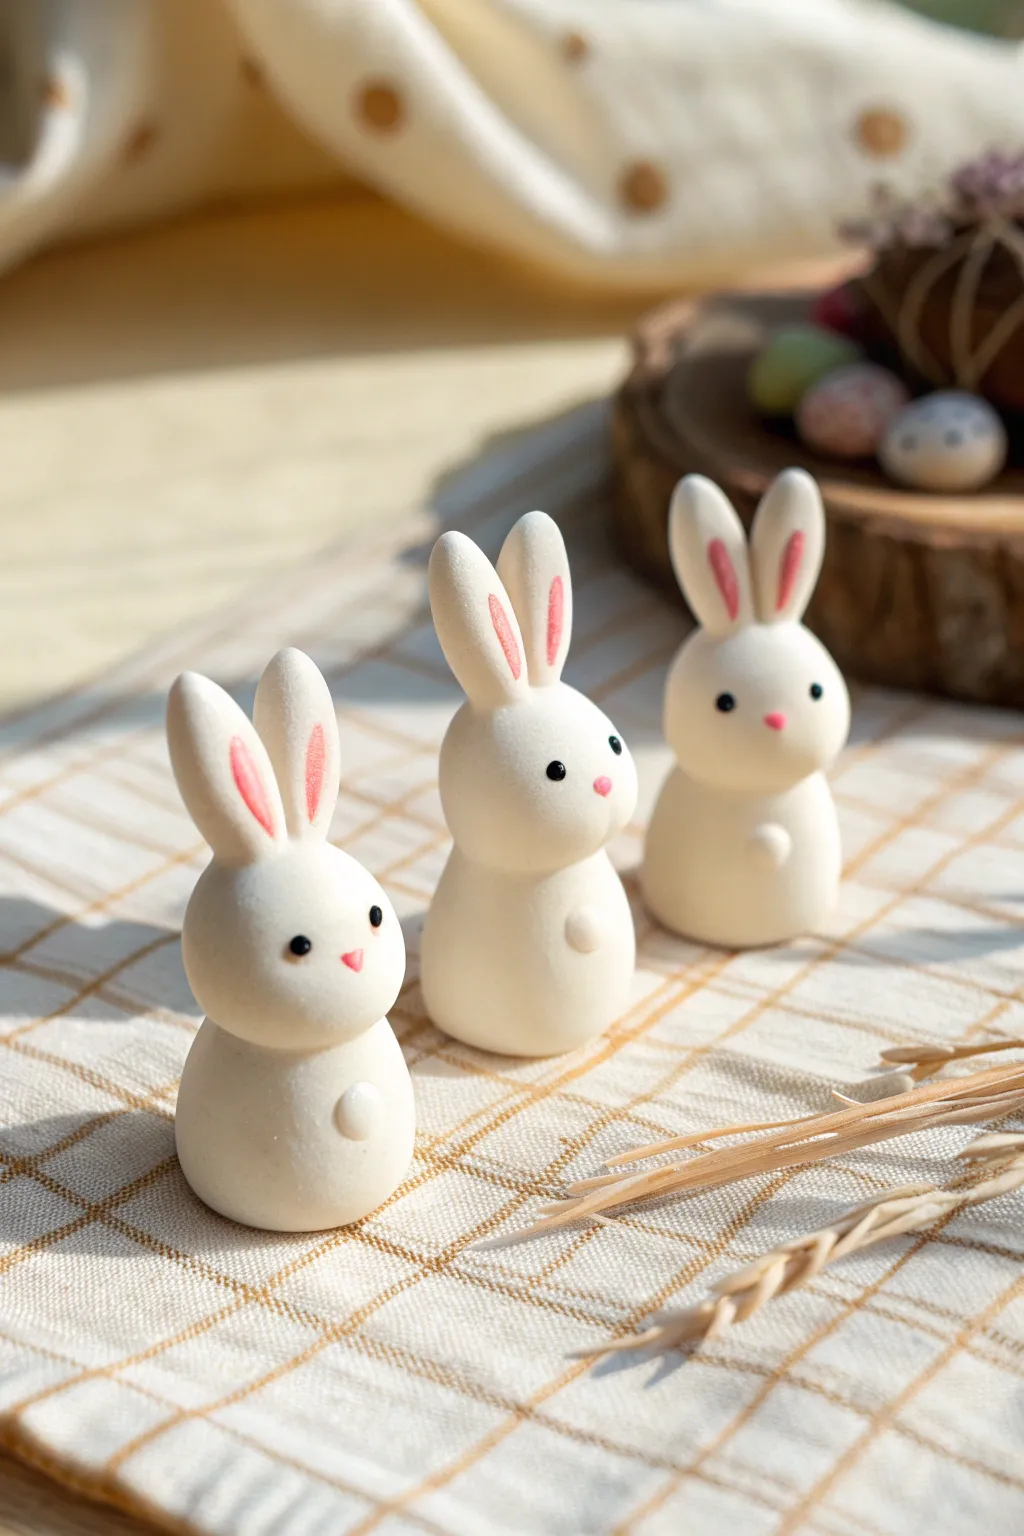
Create a sweet little family of bunnies with this simple yet charming polymer clay project. These miniature figures rely on basic shapes and minimal details, making them perfect for beginners who want a clean, modern aesthetic.
Step-by-Step
Materials
- White bright polymer clay
- Pink soft pastel chalk (or pink polymer clay)
- Black acrylic paint
- Pink acrylic paint
- Small dotting tool or toothpick
- Small soft paintbrush
- Hobby knife or clay blade
- Baking sheet and parchment paper
- Oven (for curing)
- Clear matte varnish (optional)
Step 1: Shaping the Bodies
-
Condition the clay:
Start by kneading your white polymer clay until it is soft, warm, and pliable. This prevents cracks and makes shaping much easier. -
Divide the clay:
Separate your clay into three equal portions for the bodies, reserving a smaller amount for the heads, ears, and tails. -
Form the base:
Roll one body portion into a smooth ball between your palms. -
Create a teardrop shape:
Gently roll one side of the ball to taper it slightly, forming a fat teardrop or gumdrop shape. Flatten the bottom exclusively by tapping it on your work surface so the bunny sits upright without wobbling. -
Repeat for the trio:
Repeat this process for the other two bunnies, trying to keep them roughly the same size for a cohesive set.
Clean Clay Trick
White clay picks up dust instantly. Keep a pack of baby wipes nearby and clean your hands and tools thoroughly before starting the shaping process.
Step 2: Heads and Details
-
Roll the heads:
Take three smaller pieces of white clay and roll them into perfect spheres. These should be slightly smaller than the body pieces. -
Attach the heads:
Place a head gently onto the top of a body piece. Use your finger or a clay tool to smooth the seam slightly if you want a seamless look, or simply press firmly to bond them while keeping the distinct shapes. -
Make the tails:
Roll three tiny balls of white clay for the tails. Press one onto the lower back of each bunny body. -
Form the arms:
Roll three tiny balls of white clay—even smaller than the tails. Flatten them slightly into discs and press one onto the center chest of each bunny to clear distinct little paws.
Fixing Fingerprints
If you see fingerprints on your smooth bunnies before baking, lightly brush them with a tiny amount of baby oil or cornstarch to smooth the surface again.
Step 3: Ears and Expressions
-
Shape the ears:
Roll six small logs of white clay. Taper both ends of each log to create a long, pointed oval or grain-of-rice shape. -
Add pink shading:
I like to use dry chalk pastel for a soft look here. Scrape a little pink pastel into a powder. Use a small soft brush to dust the pink powder onto the center of each ear shape before attaching them. -
Attach the ears:
Press two ears onto the top of each head. You can vary the angles—have some straight up and others slightly tilted for personality. -
Bake the clay:
Preheat your oven according to the clay manufacturer’s instructions (usually around 275°F or 130°C). Bake your bunnies on a parchment-lined sheet for roughly 15-20 minutes. Let them cool completely. -
Paint the eyes:
Dip a fine dotting tool or the tip of a toothpick into black acrylic paint. Carefully place two small dots for eyes on the face. -
Paint the nose:
Using a clean tool, place a tiny dot of pink acrylic paint just below and between the eyes for the nose. -
Allow to dry:
Let the paint dry fully before handling. If desired, coat with a clear matte varnish for protection.
Set your finished trio on a shelf or gift them to a friend for a tiny dose of happiness
Owls Made From Two Shapes
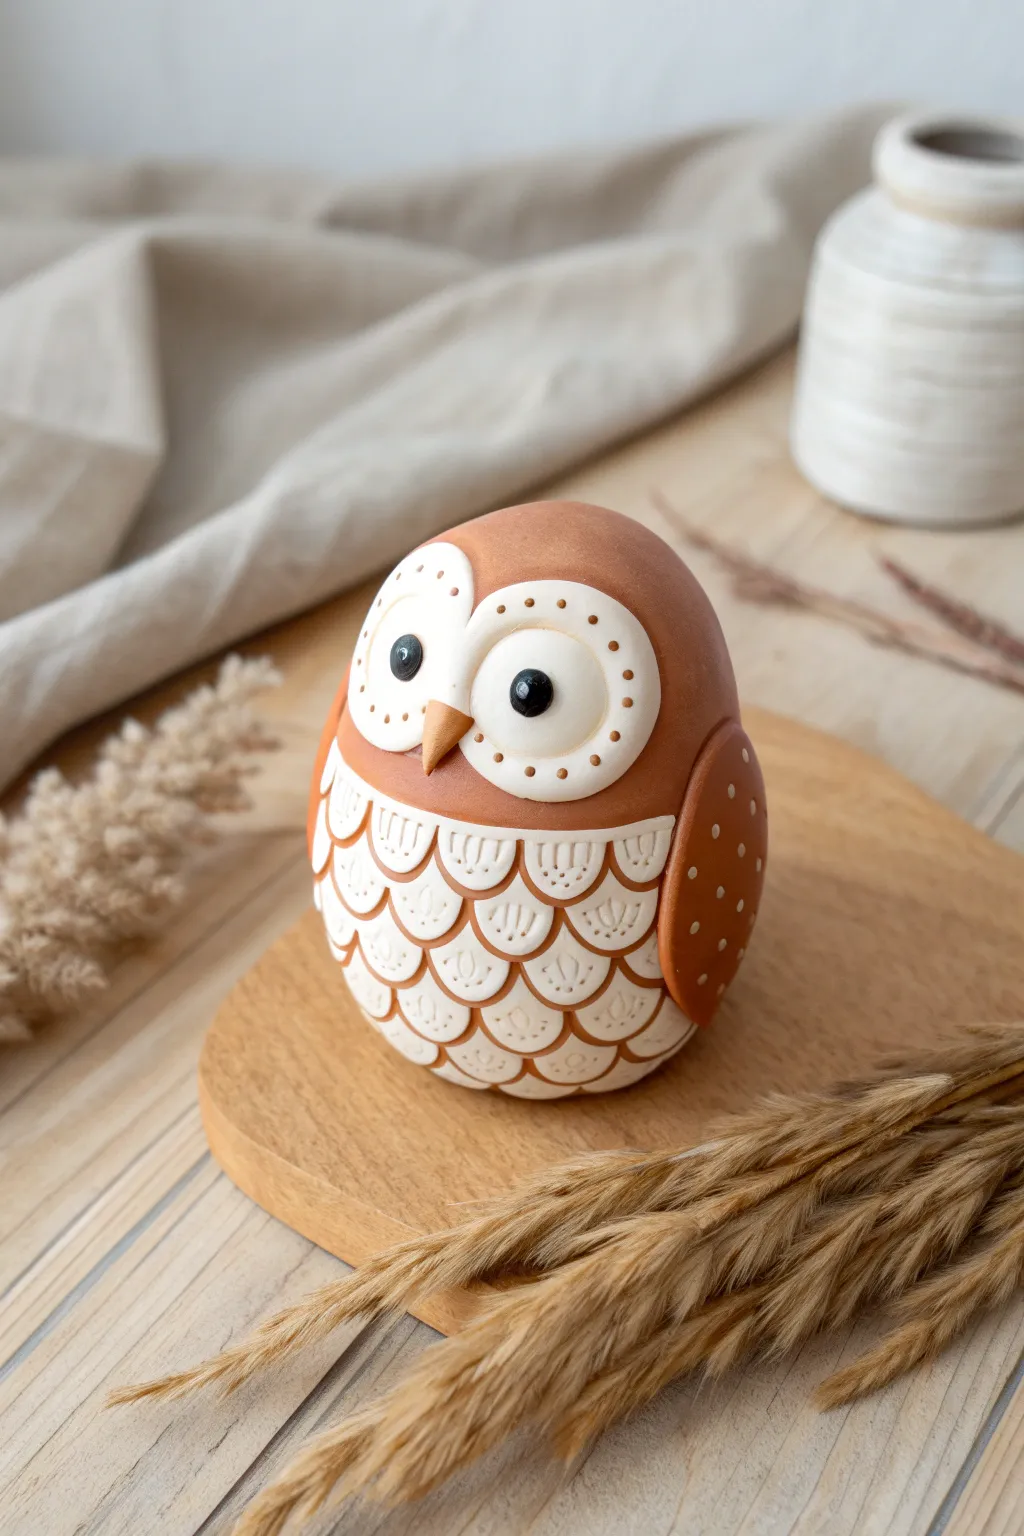
This charming woodland creature combines the rustic look of terracotta-colored clay with delicate white lace details to create a cozy, decorative figurine. By starting with a simple egg shape and adding layered textures, you’ll craft a sweet owl that looks like a high-end ceramic piece.
Step-by-Step Tutorial
Materials
- Polymer clay in Terracotta (reddish-brown)
- Polymer clay in White
- Polymer clay in Black
- Small amount of golden-brown clay (for the beak)
- Dotting tools (various sizes)
- Needle tool or toothpick
- Small round cutter (approx. 0.5 inch / 1.25 cm)
- Larger round cutter (approx. 1 inch / 2.5 cm)
- Half-circle cutter or U-shaped sculpting tool
- Acrylic rolling pin
- Work surface (tile or glass)
Step 1: Shaping the Base
-
Create the body core:
Start by conditioning a large block of Terracotta clay until it’s soft and pliable. Roll it into a smooth ball, ensuring there are no air bubbles trapped inside. -
Form the egg shape:
Gently taper the top of the ball to create a smooth, standing egg shape. The bottom should be slightly flattened so the owl stands securely on your work surface. -
Prepare the belly canvas:
Using your thumb, press a very shallow, large indentation into the lower front of the egg where the belly feathers will go. This helps the white clay sit flush rather than bulging out too much.
Step 2: Creating the Feather Texture
-
Apply the white belly:
Roll out a sheet of white clay to about 2mm thickness. Cut an oval shape that fits the indentation you made and gently press it onto the body, smoothing the edges to blend them slightly. -
Cut the feather scales:
Roll out a thin sheet of Terracotta clay. Using a small U-shaped cutter or by hand-cutting small crescents, create multiple rows of scale-like shapes. -
Layer the feathers:
This step requires patience: Using a U-shaped tool or a small cutter, impress a scalloped pattern directly into the white clay belly. Start from the bottom and work your way up in overlapping rows to create the look of plumage. -
Add detail to feathers:
Inside each white scallop, use a needle tool to press three or four tiny vertical lines. This mimics the delicate texture of real feathers.
Keeping White Clay Clean
White clay picks up dust instantly. Wash your hands thoroughly and wipe down your work surface and tools with baby wipes right before handling the white parts.
Step 3: The Face and Wings
-
Form the eye mask:
Roll two equal-sized balls of white clay and flatten them into thick discs. Press these side-by-side near the top of the body, overlapping slightly in the center to form a figure-eight mask. -
Indent the eye sockets:
Press a larger ball tool into the center of each white disc to create a concave socket for the eyes to sit in. -
Add eye details:
Place a small black ball of clay into each socket. Then, use a needle tool to add a tiny white reflection dot if you like, or simply leave them glossy black. -
Dot the mask:
Using a fine dotting tool or toothpick, carefully poke a ring of tiny holes around the perimeter of the white eye mask for a decorative border. -
Sculpt the beak:
Fashion a small, sharp cone from the golden-brown clay. Attach this right in the center where the two eye discs meet, pointing downwards. -
Shape the wings:
Create two large teardrop shapes from the Terracotta clay. Flatten them slightly, but keep them fairly thick to match the body’s rustic style. -
Decorate the wings:
Before attaching, use a medium dotting tool to press a pattern of shallow divots into the wings. You can add tiny balls of white clay into these divots for extra contrast, or leave them as texture. -
Attach wings:
Press the rounded end of each wing onto the owl’s shoulders, smoothing the seam so they curve naturally around the body.
Squashed Bottom Feathers?
If the bottom feather rows get squashed while working on the face, place the owl on a small jar lid or a dedicated baking tile so you don’t have to touch the base.
Step 4: Baking and Finishing
-
Final smooth check:
Inspect your owl from all angles. Smooth out any unintentional fingerprints with a drop of baby oil on your finger. -
Bake the piece:
Bake according to your clay manufacturer’s instructions (usually 275°F/130°C for 15-30 minutes per 1/4 inch of thickness). Support the back with batting if needed to prevent flat spots. -
Cool and seal:
Let the owl cool completely in the oven. Once cool, I like to apply a matte varnish to protect the surface while keeping that natural ceramic look.
Start building your own parliament of ceramic-style owls using different earth tones for a varied display


What Really Happens Inside the Kiln
Learn how time and temperature work together inside the kiln to transform clay into durable ceramic.
Turtles With Patterned Shells
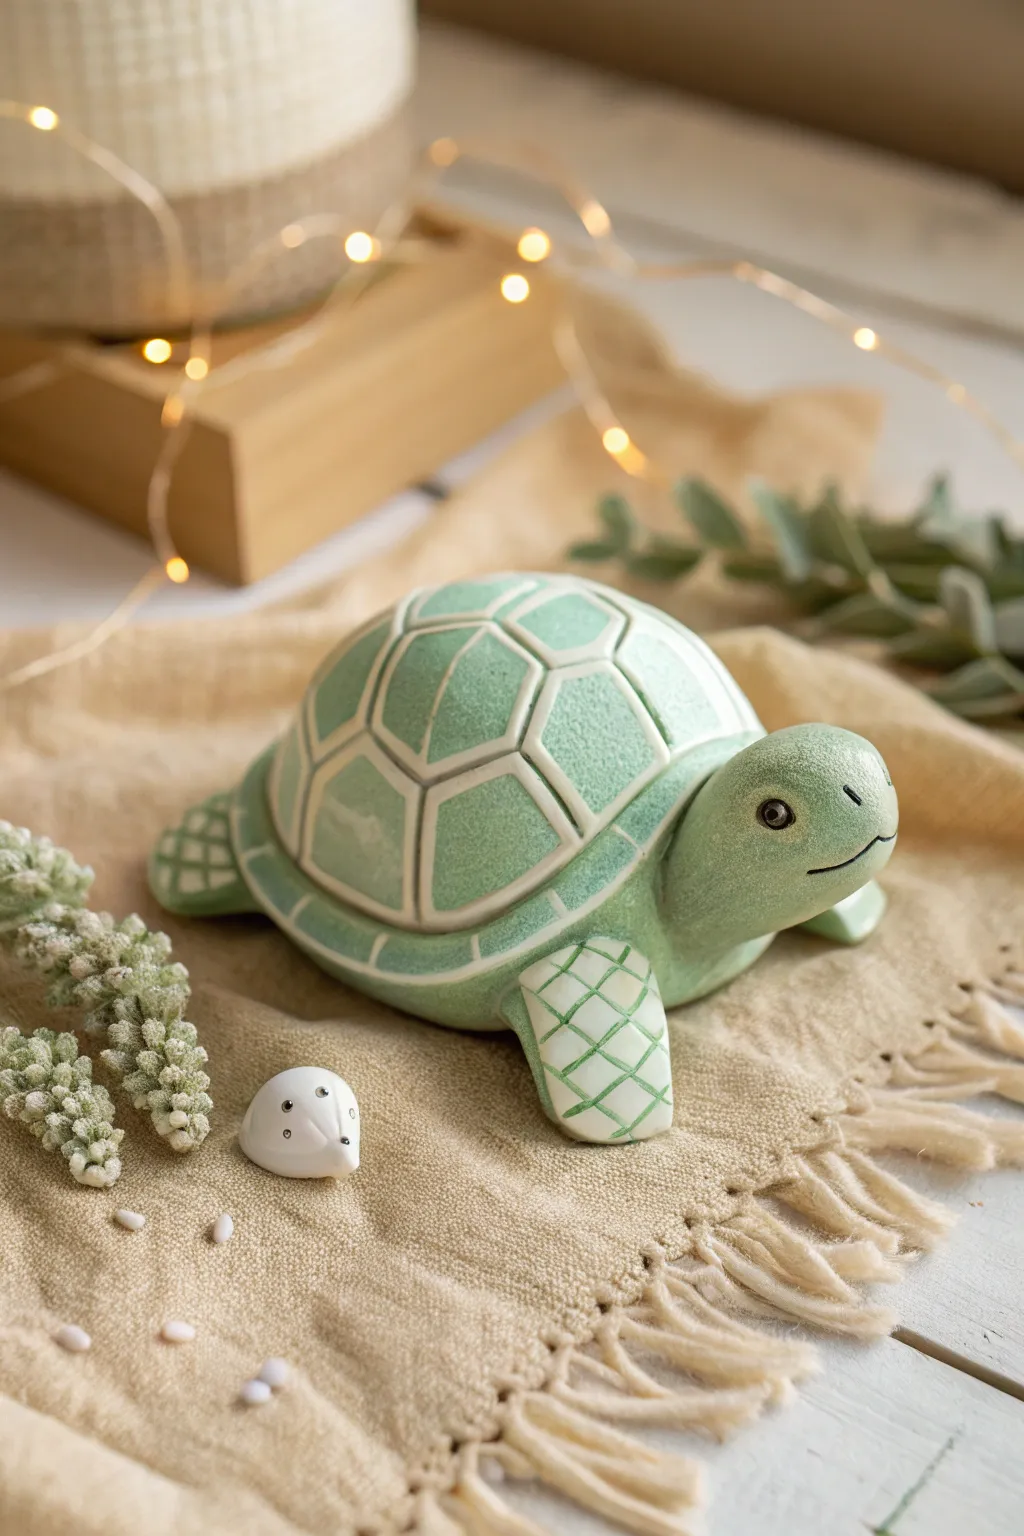
This serene, mint-green turtle project combines the smooth charm of stylized animal figures with a satisfying geometric shell pattern. By using simple texturing techniques, you’ll create a finish that mimics the look of carved stone or matte ceramic rather than shiny plastic.
Step-by-Step
Materials
- Polymer clay (Mint Green and White)
- Acrylic roller
- Pointed sculpting tool or clay needle
- Ball stylus tool
- Small stiff-bristle brush (or old toothbrush)
- Detail knife (like an X-Acto)
- Black acrylic paint or tiny black glass beads (for eyes)
- Oven for baking
Step 1: Shaping the Base
-
Prepare the clay:
Start by conditioning a large portion of mint green clay. If you want a more ‘stone-like’ appearance, try mixing in a tiny pinch of white or translucent clay that hasn’t been fully blended, or use a granite-effect clay. -
Form the body:
Roll a smooth, flattened dome shape for the main shell. It should be round but slightly wider at the base, resembling a classic turtle carapace. -
Shape the head:
Create a separate, slightly teardrop-shaped piece for the head. Smooth the wider end to be the face, and taper the neck slightly where it will join the shell. -
Create the flippers:
Fashion four flipper shapes—two larger for the front and two smaller for the back. Flatten them into paddles, keeping the edges soft rather than sharp. -
Assemble the body parts:
Gently press the neck and flippers onto the underside of the shell dome. Use your thumb or a modeling tool to blend the clay seams underneath so the turtle feels solid.
Step 2: Applying the Geometric Pattern
-
Prepare the white lines:
Roll out a thin sheet of white clay. Use your knife to cut very thin, uniform strips—these will be the grout lines of the shell. -
Map the shell:
You can lightly sketch the geometric pattern onto the green shell with a needle tool first. A central pentagon or hexagon usually works best as a starting point. -
Apply the first strip:
Lay a white strip along your central guide lines. Press it gently into the clay so it adheres but doesn’t flatten completely. -
Complete the tessellation:
Continue adding white strips to form the geometric plates radiating outward. The pattern doesn’t need to be mathematically perfect; a little organic variation adds character. -
Pattern the flippers:
Don’t forget the limbs! Add a simple crisscross or grid pattern of white strips to the tops of the front flippers to match the shell aesthetic. -
Flush the surface:
Once all white lines are placed, gently roll over the entire shell with your acrylic roller or smooth it with your finger. You want the white clay to become embedded into the green, creating a smooth, single surface.
Stone effect pro-tip
For an authentic stone look, gently dab the surface with a damp sponge before baking. This removes the ‘plastic’ sheen and leaves a slight, natural-looking texture.
Step 3: Texturing and Details
-
Add stone texture:
Take your stiff-bristle brush or toothbrush and gently stipple the green areas of the shell and skin. Avoid damaging the white lines, but a little texture crossover helps the stone effect. -
Sculpt the face:
Use a needle tool or knife to carefully carve a horizontal mouth line that curves slightly up at the cheek for a gentle smile. -
Add the eyes:
Use a ball stylus to make small indentations for the sockets. Place a tiny black bead in each, or bake first and paint the eyes in later with a fine-tip brush. -
Final smoothing:
Check for any fingerprints. If found, buff them away with a drop of baby oil on your finger before baking. -
Bake the project:
Bake the turtle according to your clay package instructions. I suggest propping up the head with a bit of polyester batting or folded paper so it doesn’t droop in the heat. -
Optional matte finish:
Once cool, the clay will be naturally matte, but you can add a coat of matte varnish if you want extra durability without adding artificial shine.
Lines won’t stick?
If the thin white strips keep falling off as you work, lightly brush the green clay base with a tiny amount of liquid polymer clay or ‘Bake and Bond’ to act as glue.
Place your finished geometric turtle on a shelf or desk for a peaceful, stony companion that never needs feeding
Whales With Blush Cheeks
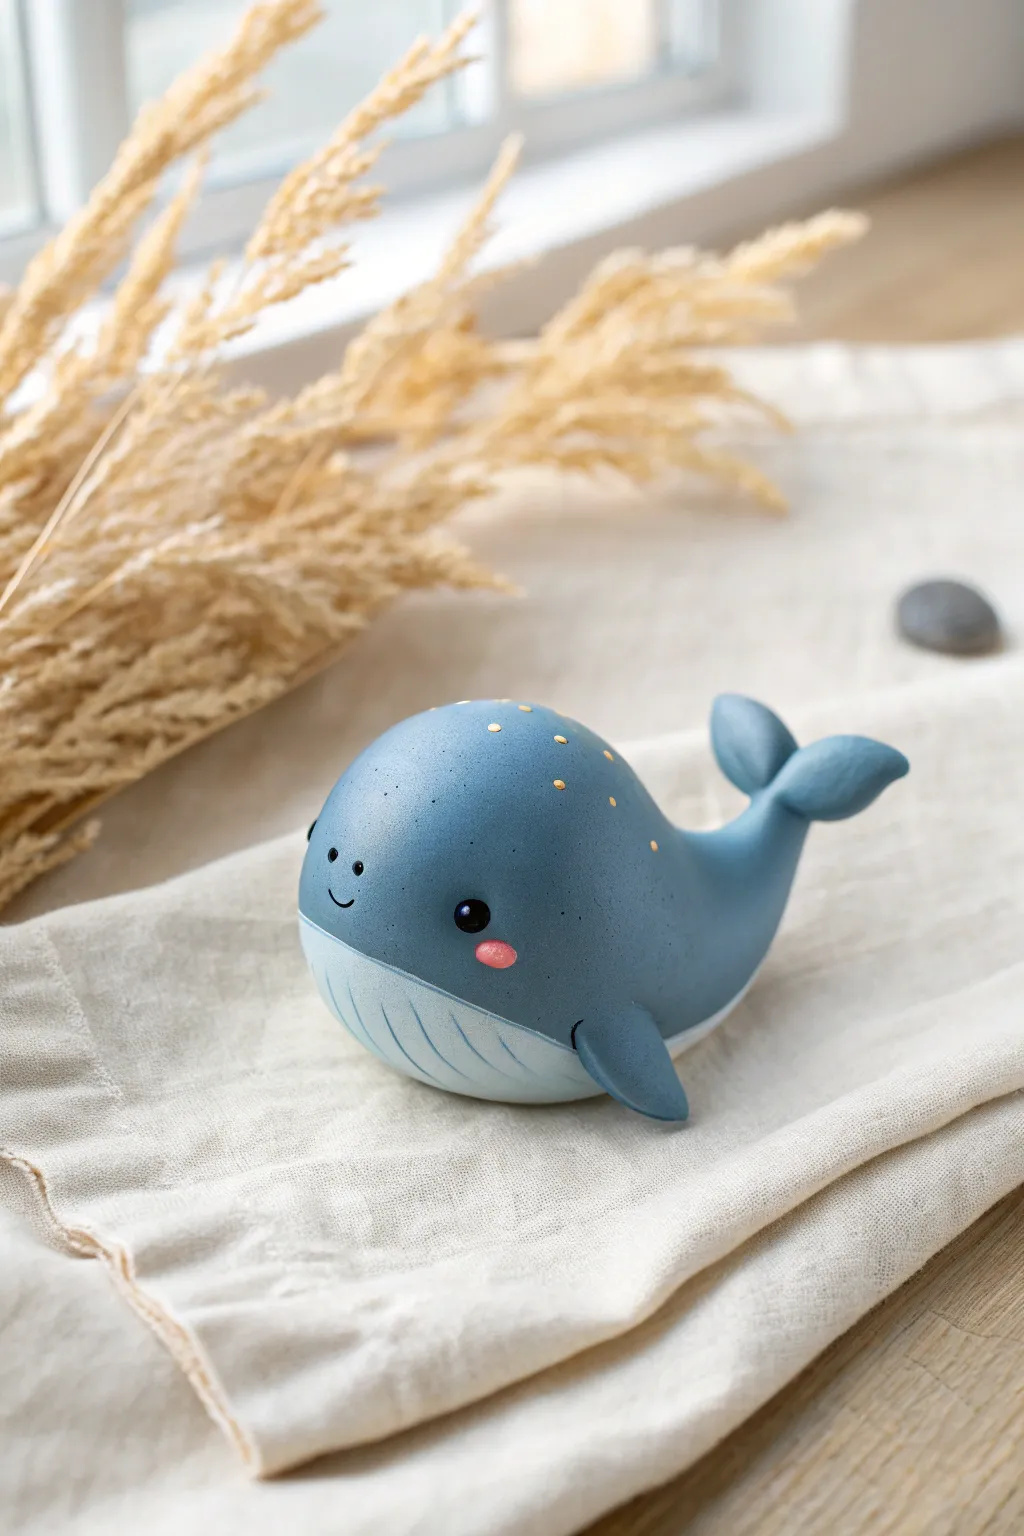
Dive into sculpting with this adorable, minimalistic blue whale figurine that captures hearts with its simple charm and sweet expression. The smooth matte finish and tiny golden speckles give it a whimsical, starry-ocean vibe perfect for a shelf friend.
How-To Guide
Materials
- Polymer clay (slate blue/grey-blue)
- Polymer clay (very pale blue or off-white)
- Polymer clay (black and pink)
- Needle tool or toothpick
- Ball stylus tool
- Curved clay blade or craft knife
- Acrylic paint (gold)
- Fine detail paintbrush
- Oven for baking
Step 1: Shaping the Body
-
Create the base form:
Start with a large ball of slate blue clay. Roll it between your palms until it is completely smooth and free of cracks, then gently taper one side to form a teardrop shape. -
Curve the tail:
Take the tapered end and gently curve it upwards. This will become the tail section. Flatten the very tip slightly to prepare it for the flukes. -
Form the head shape:
The front of the teardrop should be bulbous and rounded. Press it gently against your work surface just enough to create a stable bottom so the whale doesn’t roll over, but keep the overall roundness intact.
Uneven Belly Lines?
If your carved lines look messy, lay a piece of plastic wrap over the clay before pressing your tool in. This softens the edges for a smoother, cushiony look.
Step 2: Adding the Belly
-
Prepare the belly clay:
Roll out a thin sheet of the very pale blue or off-white clay. It should be quite thin, about 1-2mm. -
Cut the belly shape:
Cut an oval shape from the pale sheet. It needs to cover the bottom front section of the whale, extending slightly up the sides. -
Attach and blend:
Press the pale oval onto the underside of the whale’s head. Smooth the edges gently with your finger so it adheres well, but leave a distinct line where the colors meet rather than blending them fully together. -
Texture the belly:
Using a needle tool or the back of a craft knife, gently press curved, parallel lines into the pale belly clay. These represent the throat grooves of the whale. Make them curve with the form of the body.
Make it a Charm
Before baking, insert a screw eye pin into the top of the head. Add a jump ring after baking to turn your whale into a keychain or necklace pendant.
Step 3: Fins and Flukes
-
Create the tail flukes:
Make two small, flattened teardrops from the slate blue clay. Attach them to the upturned tip of the tail, pressing them together at the center point. -
Shape the flukes:
Smooth the seams where they join the body. Gently curl the tips of the flukes upward for a dynamic, swimming look. -
Make the side fins:
Form two smaller flattened triangles or teardrops from the slate blue clay. These will be the pectoral fins. -
Attach the fins:
Position the fins on either side of the body, just where the pale belly line ends. Curve them slightly backward against the body for a streamlined appearance.
Step 4: Face and Details
-
Mark eye sockets:
Use a ball stylus to make two small indentations on the head for the eyes. Spacing them widely apart adds to the cute factor. -
Insert the eyes:
Roll two tiny balls of black clay and press them into the sockets. For extra sparkle, you can add a microscopic dot of white clay or paint later. -
Add the blush:
Take a tiny amount of pink clay, flatten it into a small oval, and press it onto the cheek area just below the eye. Blend the edges very softly if you want a subtle look, or leave it distinct like a sticker. -
Carve the smile:
Using a curved blade or a needle tool, carefully press a small, curved smile line near the front of the face. -
Final smooth:
Give the entire piece a once-over. Use a tiny bit of baby oil on your finger to smooth out any fingerprints before baking. -
Bake:
Bake the figurine according to your clay manufacturer’s instructions. Usually, this is around 275°F (130°C) for 15-30 minutes depending on thickness.
Step 5: Finishing Touches
-
Cool down:
Allow the whale to cool completely before handling. -
Gold speckles:
Dip a fine paintbrush or a toothpick into gold acrylic paint. Add tiny dots across the top of the whale’s back, mimicking stardust or sparkling water droplets.
Now you have a serene little ocean friend to brighten your desk

TRACK YOUR CERAMIC JOURNEY
Capture glaze tests, firing details, and creative progress—all in one simple printable. Make your projects easier to repeat and improve.
Octopus With Curly Tentacles
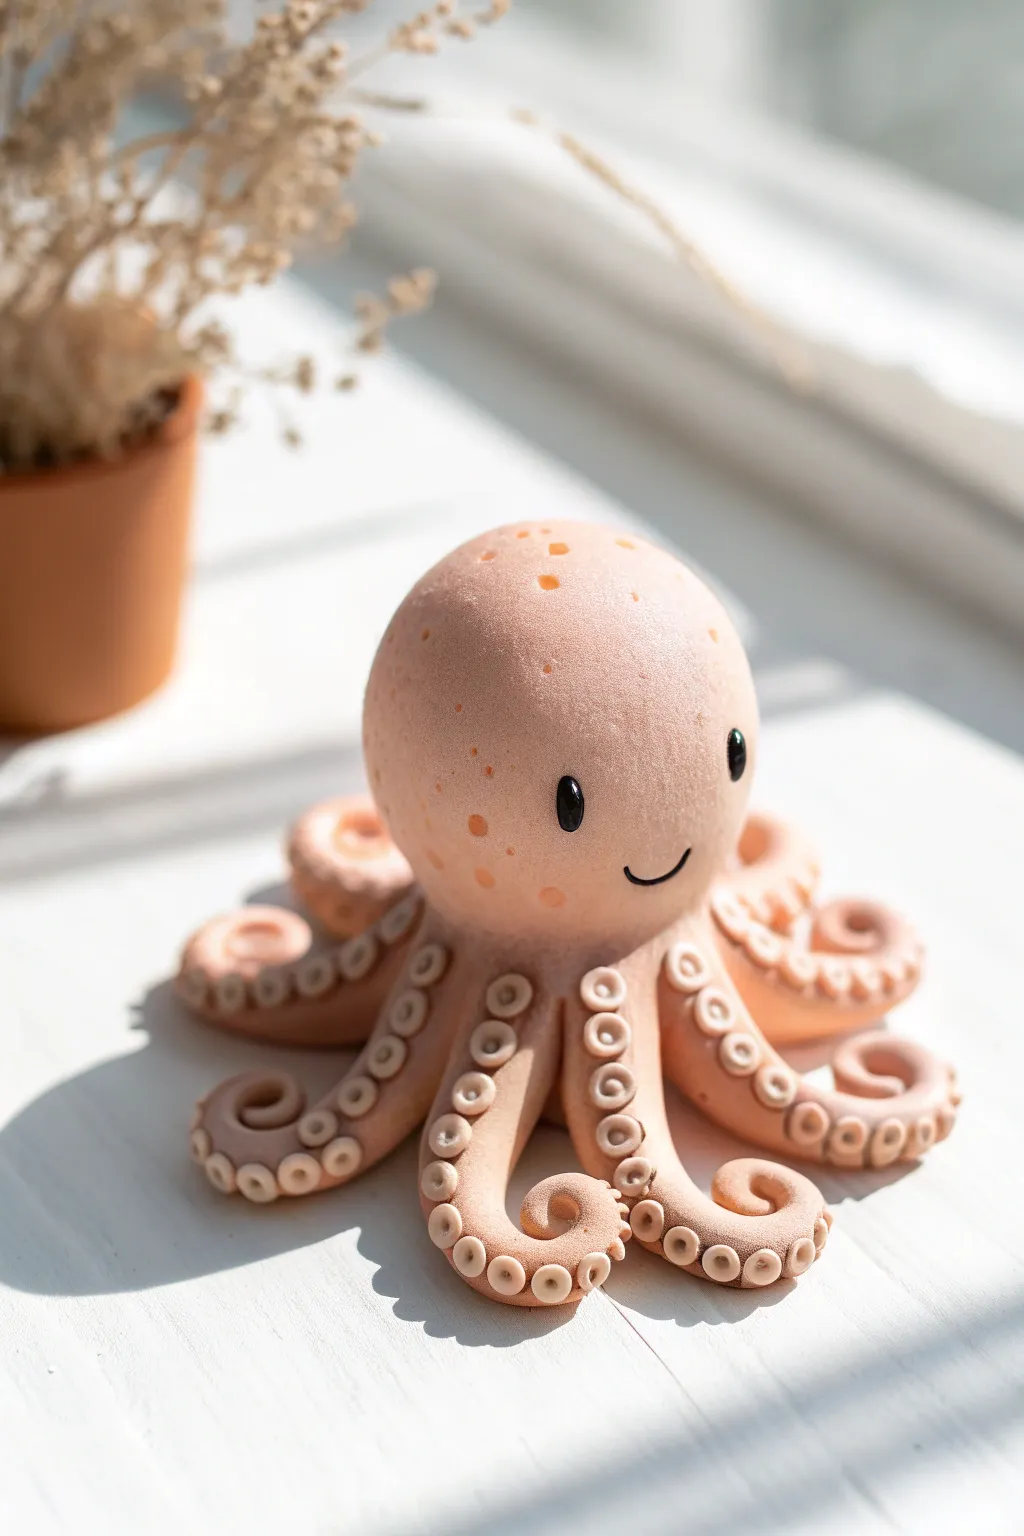
This adorable octopus figurine features a unique soft matte texture and charmingly coiled tentacles lined with intricate suckers. Its simple rounded head and sweet expression make it a delightful project for crafters looking to practice stylized sculpting.
Detailed Instructions
Materials
- Polymer clay (pale peach or soft salmon color)
- Black polymer clay (tiny amount for eyes)
- A toothbrush or stiff bristle brush
- Small ball stylus tool
- Needle tool or toothpick
- Acrylic roller
- Blade or craft knife
- Baking sheet and parchment paper
- Oven (per clay instructions)
Step 1: Sculpting the Head
-
Prepare the clay:
Begin by conditioning your peach-colored clay thoroughly until it is soft and pliable. Roll a large portion into a smooth, seamless ball about the size of a golf ball or slightly larger, depending on your desired final size. -
Shape the dome:
Gently press the ball onto your work surface to flatten the bottom, creating a dome shape. Smooth out any fingerprints to ensure the curve of the head is perfectly round. -
Add texture:
Take a clean toothbrush or a stiff bristle brush and gently tap it all over the surface of the head. This creates the soft, skin-like texture seen in the photo rather than a shiny smooth finish. -
Create larger pores:
Use a needle tool or the tip of a toothpick to prick slightly larger, random holes near the top of the head to mimic natural sea sponge textures or freckles.
Pro Tip: Seamless Blending
Use a drop of liquid polymer clay or ‘bake and bond’ on the join points of the tentacles. This acts like glue and ensures the legs won’t snap off after baking.
Step 2: Creating the Tentacles
-
Divide clay segments:
Roll out eight equal-sized ropes of clay. These should be thicker at one end (where they attach to the body) and taper down to a fine point at the tip. -
Texture the tentacles:
Before attaching them, lightly texture the top/outer surface of each tentacle with your toothbrush to match the head. -
Form the suckers:
Roll many tiny balls of the same peach clay. The size should graduate from larger to smaller to match the tapering of the tentacle. -
Attach suckers:
Press the tiny balls in a single row along the underside of each tentacle. I find it easiest to work on one tentacle at a time so the clay doesn’t dry out. -
Indent the suckers:
Use your small ball stylus to press into the center of each tiny ball. This creates the classic donut-shape of an octopus sucker and helps bond the clay pieces together. -
Curl the tips:
Gently curl the tapered end of the tentacle upward or inward. Vary the tightness of the curls for a natural, flowing look. -
Attach to body:
Press the thick end of each tentacle underneath the main head dome. Space them evenly around the circumference. Blend the clay seams underneath where they won’t be seen. -
Set the pose:
Arrange the tentacles on your baking surface so they flow outwards like a flower, ensuring the curls hold their shape.
Step 3: Face and Finishing
-
Make the eyes:
Roll two very small ovals of black clay. Flatten them slightly and press them onto the face area. Place them relatively wide apart for a cute, kawaii look. -
Add eye shine:
If you want extra life in the expression, add a tiny speck of white clay or white acrylic paint to the corner of the black eyes (optional). -
Carve the mouth:
Use a needle tool or a small curved blade to gently impress a simple U-shape smile between and slightly below the eyes. -
Final texture check:
Inspect the join areas. If you smoothed any texture away while attaching pieces, lightly re-tap those areas with your toothbrush. -
Bake carefully:
Bake the figurine according to your clay manufacturer’s specific instructions. Since this is a thicker piece, ensure the oven is fully preheated to prevent cracking. -
Cool down:
Let the octopus cool completely in the oven with the door slightly ajar to avoid thermal shock.
Level Up: Pastel Shading
Before baking, brush dry soft pastels (orange or pink) onto the tips of the tentacles and cheeks. This creates a soft, blushing gradient effect.
Place your finished octopus on a sunny shelf or use it as a cheerful desk companion to brighten your workspace
Frogs With Simple Lily Pads
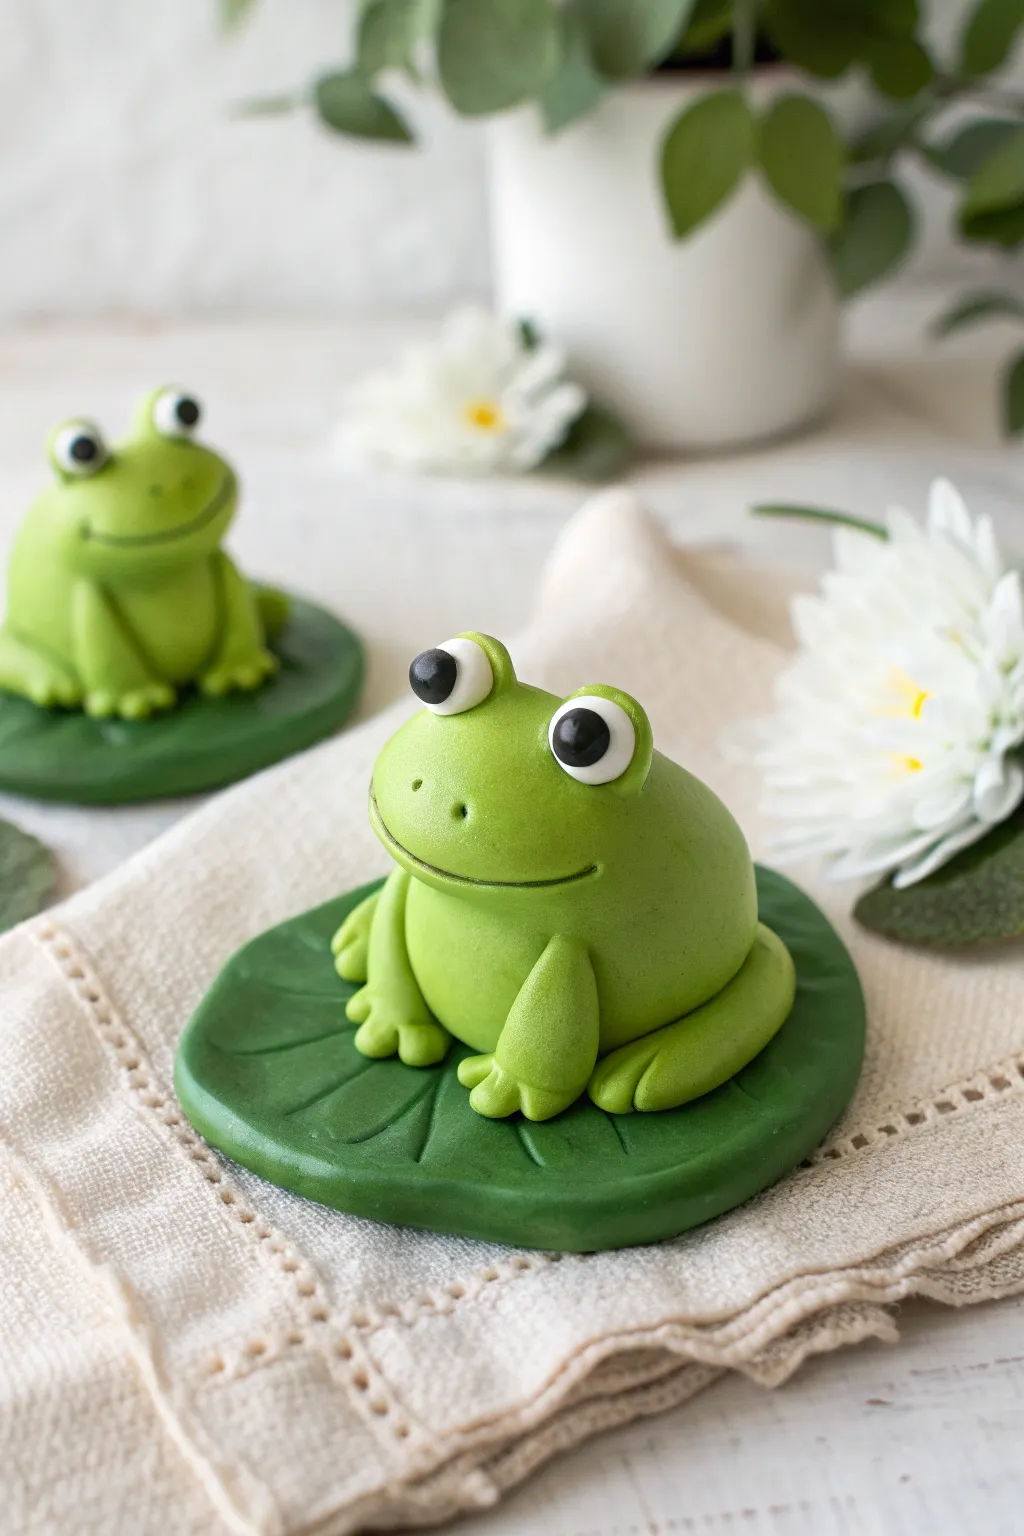
These charming polymer clay frogs sit comfortably on their own lily pads, bringing a touch of pond life to your desk or shelf. Their rounded forms and oversized eyes give them an adorably friendly expression that’s perfect for beginners to sculpt.
Step-by-Step Tutorial
Materials
- Lime green polymer clay (frog body)
- Dark green polymer clay (lily pad)
- White polymer clay (eyes)
- Black polymer clay (pupils)
- Needle tool or toothpick
- Ball stylus tool (medium size)
- Clay roller or acrylic rolling pin
- Blade or craft knife
- Circle cutter (approx. 2-3 inches)
Step 1: Sculpting the Lily Pad Base
-
Prepare the base color:
Condition a ball of dark green polymer clay until it is soft and pliable, ensuring there are no air bubbles trapped inside. -
Roll out the pad:
Flatten the dark green ball with your acrylic roller until it is about 1/4 inch thick. Aim for an even thickness throughout. -
Cut the shape:
Use your circle cutter to punch out a clean, round disc. If the edges are sharp, gently tap them with your finger to soften the look. -
Add texture:
With a needle tool, draw veins radiating from a slightly off-center point on the disc out to the edges. Press gently—you just want lines, not deep cuts. -
Create the notch:
Make a small V-shaped cut on one edge of the circle to give it that classic lily pad shape, smoothing the cut edges with your fingertip.
Step 2: Forming the Frog’s Body
-
Shape the main body:
Roll a large ball of lime green clay. Gently shape it so it’s slightly pear-shaped—wider at the bottom for stability. -
Refine the head:
Since the head and body are one piece, use your thumb to slightly smooth and define the upper portion where the face will be, keeping it rounded. -
Place on the pad:
Position your frog body onto the lily pad, placing it near the center but slightly back so there is room for the front feet. -
Make the thigh muscles:
Roll two medium-sized balls of lime green clay. Flatten them slightly into ovals and press them against the sides of the frog’s lower body for the hind legs. -
Sculpt the front legs:
Roll two elongated teardrop shapes of lime green clay. Attach these to the front of the body, merging the thinner top end into the chest area. -
Detail the toes:
Use your needle tool to making two or three small indentations at the end of each front leg and hind leg to imply toes.
Sticky Situation?
If your clay gets too soft and sticky to hold detail, pop it in the fridge for 10 minutes. The slight chill firms it up, making sculpting toes and eyes much easier.
Step 3: Adding the Face & Details
-
Create the mouth:
Use your needle tool or a flexible clay blade to gently press a wide, curving smile horizontally across the face. -
Add nostrils:
Prick two tiny holes with a needle tool just above the mouth line for the nose. -
Form the eye sockets:
Roll two small balls of lime green clay and place them on top of the head. Blend the bottom edges into the head so they look attached, not just resting there. -
Insert the whites:
Press a medium-sized ball stylus into the center of each green eye socket to create a cup. Roll two balls of white clay and place them firmly into these indentations. -
Place the pupils:
Roll tiny specks of black clay. Gently press these onto the center of the white eyeballs. Flatten them slightly so they look like painted pupils. -
Final inspection:
Check your frog from all angles. Smooth out any unintentional fingerprints with a drop of baby oil or clay softener on your fingertip. -
Bake:
Bake the project according to your clay manufacturer’s instructions, usually at 275°F (130°C) for about 15-20 minutes depending on thickness.
Make It Shine
After baking and cooling, brush a high-gloss glaze solely on the black pupils and white eyes. This creates a wet, lifelike look while keeping the body matte.
Once cooled, your little green friend is ready to guard your succulents or sit happily on a windowsill
Snails With Rainbow Swirl Shells
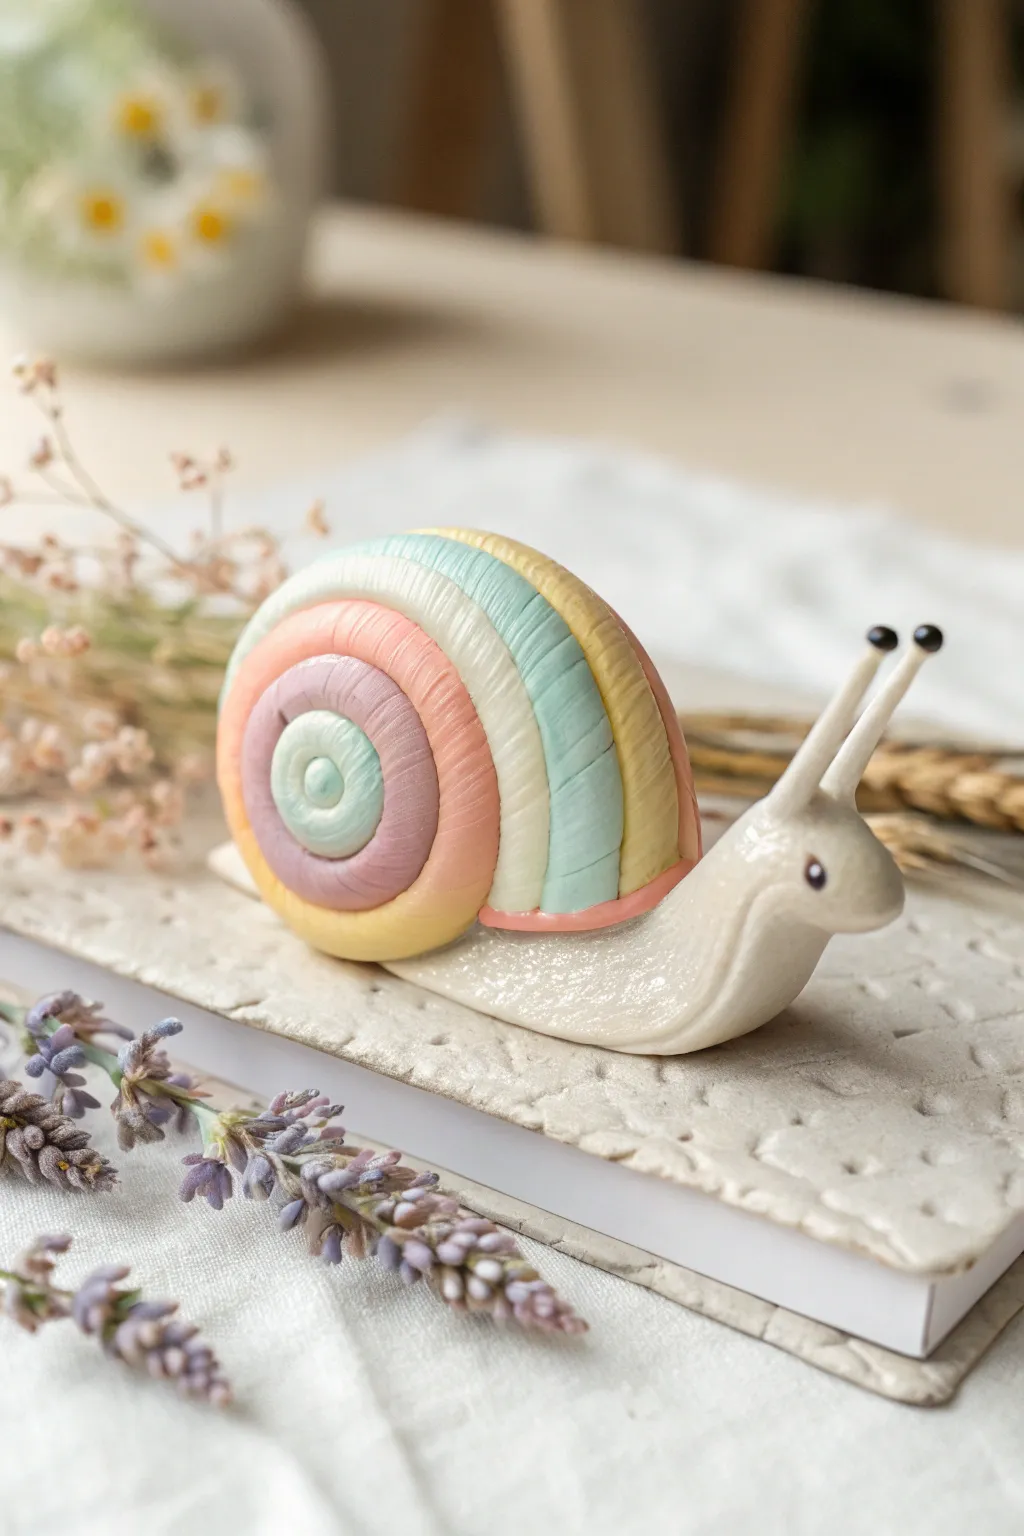
Bring a touch of whimsical spring magic to your desk with this adorable polymer clay snail featuring a soft, pastel rainbow shell. Its pearlescent body and cheerful antennae make it a charming project that looks complicated but is built from simple shapes.
Detailed Instructions
Materials
- Polymer clay (white, pastel pink, peach, yellow, mint green, baby blue)
- Pearl mica powder or pearlescent white acrylic paint
- Small black glass beads or black clay (for eyes)
- Liquid polymer clay (for bonding)
- Sculpting tools (needle tool, ball stylus, rubber shaper)
- Ceramic tile or glass work surface
- Clear matte or satin varnish (optional)
- Pasta machine or acrylic roller
Step 1: Creating the Snail Body
-
Condition the Clay:
Start by thoroughly conditioning a lump of white polymer clay until it is soft and pliable. If the clay feels stiff, warm it in your hands for a few minutes to prevent cracking later. -
Shape the Base:
Roll the white clay into a tapered log, keeping one end thicker for the head and the other tapering down to a gentle point for the tail. The overall length should be about 3-4 inches. -
Form the Head:
Gently pinch and lift the thicker end to create an upright neck and head area. Smooth out any fingerprints to ensure a seamless curve from the back to the neck. -
Add Pearlescent Shimmer:
Before baking, lightly brush the entire white body with pearl mica powder. This gives that glimmery, slime-trail effect. If you don’t have powder, you can paint it with pearlescent acrylics after baking. -
Sculpt Antennae:
Roll two very thin, short snakes of white clay. Attach them to the top of the head, blending the clay at the base so they stand up firmly but look organic. -
Insert Eyes:
Press two tiny black glass beads into the ends of the antennae for the eyes. Alternatively, roll tiny balls of black clay and press them securely into place. -
Add Facial Detail:
Using a small dotting tool or a toothpick, press a tiny indentation on the side of the head below the antennae to create a blushing cheek or simple eye socket effect.
Clean Clay Pro-Tip
Keep baby wipes handy! Pastel clay, especially white and baby blue, picks up dust easily. Wipe your hands and work surface thoroughly between every color change.
Step 2: Building the Rainbow Shell
-
Prepare Pastel Colors:
Condition small amounts of mint green, baby blue, pastel pink, peach, and yellow clay. If your colors are too bright, mix them with a significant amount of white to achieve the soft, candy-like palette shown. -
Roll the Strands:
Roll each color into an even snake. Try to keep them uniformly thick—about the width of a pencil. I like to use an acrylic block to roll them out to ensure they are perfectly round. -
Start the Coil:
This shell isn’t a single log; it’s made of concentric arches. Start with a small center spiral or button using the mint green clay. This will form the very center ‘hub’ of the shell. -
Layer the First Arches:
Wrap a strip of baby blue clay over the top of the green center, trimming the ends so they sit flat at the bottom. Smooth the seam where the blue meets the green gently. -
Continue the Rainbow:
Add the next layer using the pink clay, forming a larger arch over the blue. Ensure complete contact between layers by gently pressing them together without flattening the round profile of the snakes. -
Finish Shell Layers:
Continue adding the peach, yellow, and finally the outer mint/blue bands. Build the shell outwards until it looks proportional to the body you created earlier. -
Add Texture:
Using a needle tool or a dull knife, gently score fine lines across the colored bands. This mimics the natural growth ridges of a real snail shell. -
Clean the Bottom:
Slice the bottom of the shell flat with a rigid blade. This creates a stable surface for the shell to sit on the snail’s back.
Level Up: Garden Base
Don’t stop at the snail. Create a textured slate or leaf base using darker clay, and dry brush it with white paint to create a realistic textured surface for your snail to slide on.
Step 3: Assembly and Baking
-
Attach Shell to Body:
Apply a small amount of liquid polymer clay to the back of the snail body. Press the flat bottom of the shell firmly onto the liquid clay to secure it. -
Secure the Seam:
Use a rubber shaping tool to gently blend a tiny bit of the white body clay up against the bottom rim of the shell if needed, ensuring there are no gaps. -
Final Check:
Look over the sculpture for lint or fingerprints. Use a bit of baby oil on your finger to smooth out any imperfections before it goes into the oven. -
Prop for Baking:
Because the head is lifted, support the neck with a crumpled piece of tissue paper or a cornstarch bed so it doesn’t droop in the heat. -
Bake:
Bake according to your clay manufacturer’s instructions (usually 275°F/130°C for 15-30 minutes). Let it cool completely in the oven to prevent thermal shock cracks.
Place this cheerful little gastropod near a potted plant or on a windowsill to catch the light
Butterflies With Pressed Wings

This stunning butterfly project captures the delicate beauty of nature with a vibrant pink-to-turquoise gradient effect. Using careful layering and texturing techniques, you’ll create realistic wing veins and a shimmering golden body that elevates this piece from simple craft to elegant art.
Step-by-Step Guide
Materials
- Polymer clay (translucent white, fuchsia pink, turquoise/teal, gold)
- Acrylic paints (white, gold)
- Fine detail paintbrush
- X-Acto knife or clay blade
- Ball stylus tool
- Needle tool or toothpick
- Thin crafting wire (black or dark brown)
- Liquid polymer clay (optional)
- Glossy varnish or UV resin
- Clean ceramic tile or glass work surface
Step 1: Creating the Wing Cane
-
Prepare the gradient:
Begin by conditioning your fuchsia and turquoise clays. Create a ‘Skinner blend’ (a smooth gradient) by rolling a triangle of fuchsia and a triangle of turquoise together through a pasta machine or by hand until the transition is seamless. -
Add structure:
Once your gradient sheet is ready, cut it into strips. Stack these strips to create a block where the color flows from pink on one side to blue on the other. -
Form the wing slabs:
Slice four moderately thick slabs from your gradient block. Two should be slightly larger for the forewings, and two slightly smaller for the hindwings. The pink side will be the inner part of the wing, closest to the body.
Step 2: Shaping and Texturing
-
Cut the wing shapes:
Using a reference image or template, use your blade to trim the slabs into organic butterfly wing shapes. Smooth the cut edges gently with your finger to remove sharp angles. -
Impress the veins:
Take a needle tool and gently press lines radiating from the inner corner of the wing outward. Make these indentations deep enough to see but be careful not to slice all the way through the clay. -
Soften the texture:
Use a ball stylus to gently run over the areas between the vein lines. This creates a pillowed, ‘pressed’ fabric look that gives the wings dimension. -
Assemble the wings:
On your baking tile, arrange the four wings so they meet in the center. I find it helpful to overlap the forewings slightly over the hindwings for a natural pose.
Uneven Gradients?
If your gradient looks choppy, keep folding and rolling the clay sheet in the same direction. It can take 20+ passes through a pasta machine to get a perfect blend
Step 3: The Body and Details
-
Form the body:
Roll a small log of gold polymer clay. Taper one end slightly for the tail and keep the head end rounded. -
Texture the torso:
Place the gold log over the center junction of the wings. Use a needle tool to press horizontal ridges down the length of the body to mimic overlapping segments. -
Insert antennae:
Cut two short pieces of dark crafting wire. Dip the ends in a tiny bit of liquid clay (if you have it) and insert them into the head of the butterfly. Add tiny balls of black clay to the tips if desired. -
Add wing details:
Using a small ball tool, make shallow divots along the outer turquoise edges of the wings. These will hold the decorative dots.
Pro Tip: Wing Lift
Bake your butterfly on a curved surface, like a soda can or curved ceramic tile, to give the wings a natural, fluttery lift instead of laying flat
Step 4: Baking and Finishing
-
First bake:
Bake the piece according to your clay manufacturer’s instructions (usually 275°F/135°C for 15-30 minutes). Let it cool completely. -
Apply the wash:
Dilute a small amount of white acrylic paint with water. Brush this wash over the textured wings, letting it settle into the vein crevices. Quickly wipe away the excess on the surface with a damp paper towel to highlight the texture. -
Highlight the dots:
Use a fine brush to paint tiny gold dots into the divots you made on the wing edges. You can also add very small black or dark brown accents near the dots for contrast. -
Seal the piece:
For a protective finish, coat the wings with a thin layer of glossy varnish or UV resin. This will make the colors pop and protect the paint wash.
Display your beautiful creation on a decorative plate or attach a magnet to the back for whimsical decor
Raccoons With Mask Markings
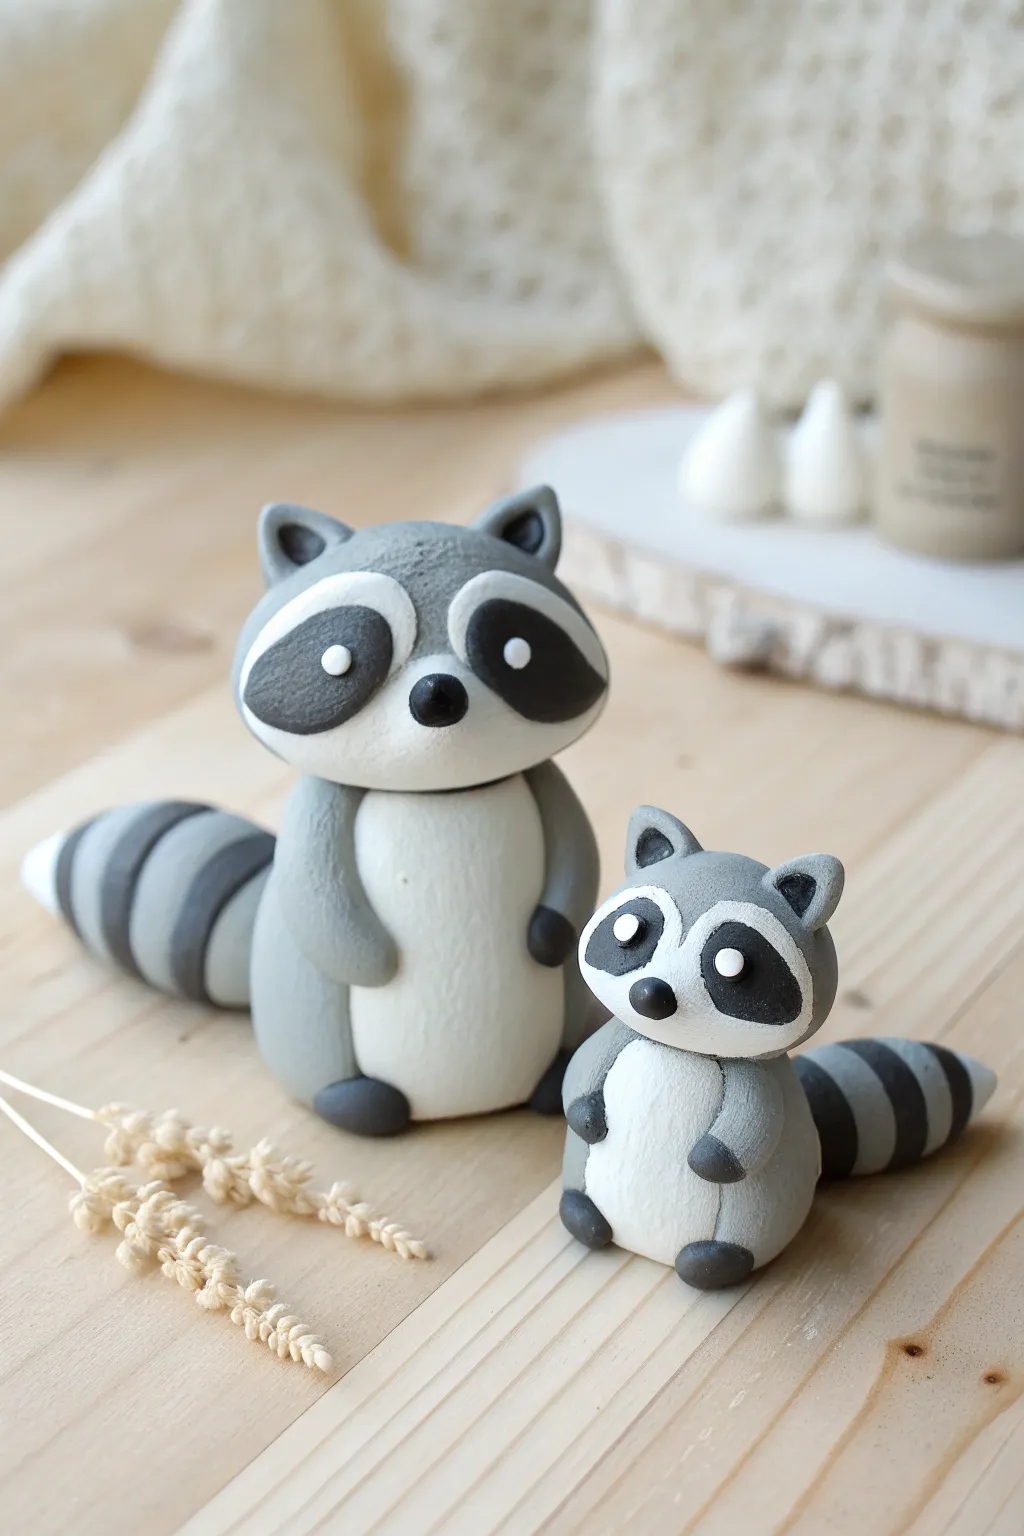
These charming polymer clay raccoons feature signature eye masks and striped tails, making for an adorable pair of woodland friends. Their simplified, rounded shapes are perfect for beginners looking to master animal features and clean color blocking.
Detailed Instructions
Materials
- Polymer clay in grey, white, and black
- Ball stylus tool (large and small)
- Needle tool or toothpick
- Rolling pin or pasta machine
- Craft knife or scalpel
- Clean work surface (ceramic tile or glass)
- Small dotting tool
- Oven for baking
Step 1: Shaping the Bodies
-
Mix the grey base:
Start by conditioning your grey clay until it is soft and malleable. Roll two smooth balls, one significantly larger for the parent raccoon and a smaller one for the baby. -
Form the torso:
Shape both balls into rounded teardrop or pear shapes. Flatten the bottom slightly so they can stand upright securely on your work surface. -
Create the white bellies:
Roll out a thin sheet of white clay. Cut two ovals that are slightly narrower at the top. Smooth these onto the front of each grey body, blending the edges gently with your finger so they don’t look too bulky.
Clean Clay Pro-Tip
White clay picks up lint easily. Always wash your hands and wipe your tools with a baby wipe before switching to the white clay sections to keep them pristine.
Step 2: Crafting the Heads
-
Form the head shapes:
Roll two slightly flattened oval shapes from grey clay for the heads. The larger head should be proportionate to the larger body, slightly wider than the torso. -
Add the eye patch base:
Roll a very thin sheet of white clay. Cut out two kidney-bean or butterfly shapes (one for each head) that span across the face area where the eyes will go. Press these onto the grey heads. -
Create the black masks:
Using black clay, shape two flattened teardrops for each raccoon. Place these angled downwards over the white patches to create the classic bandit mask look. -
Insert the eyes:
Press a small indentation into the center of each black eye patch. Roll tiny balls of white clay and place them into these dents to create bright, alert eyes. -
Add the nose:
Roll a small ball of black clay for the nose and press it firmly into the center of the face, just below where the black eye masks meet. -
Shape the ears:
Create small grey triangles for the ears. Use a small ball tool to indent the centers, then attach them to the top of the heads. You can add a tiny speck of darker clay inside the ear for depth if you like. -
Attach heads to bodies:
If the clay is soft, simply press the heads onto the bodies. For extra security, I prefer to insert a small piece of toothpick or wire into the neck to act as a supportive armature.
Step 3: Limbs and Tails
-
Make the arms:
Roll four sausage shapes from grey clay (two large, two small). Round off one end of each for the paw. Attach these to the sides of the bodies, curving them slightly forward over the white belly. -
Add the feet:
Form small black ovals for the feet. Flatten them slightly and attach them to the bottom front of the body, tucking them just under the white belly area. -
Prepare the tails:
Roll two tapered logs of grey clay for the tails. Prepare several small, thin strips of black clay. -
Stripe the tails:
Wrap the black strips around the grey tails at even intervals. Roll the entire tail gently on your work surface to embed the stripes until the surface is smooth and seamless. -
Attach the tails:
Press the wider end of the tail onto the back of each raccoon. Curve the tail around the side of the body so it is visible from the front. -
Add texture (optional):
For a fur effect, you can use a needle tool or a stiff brush to gently stipple the grey areas of the clay, avoiding the smooth eyes and nose. -
Bake the figures:
Bake your creations according to the manufacturer’s instructions for your specific brand of polymer clay. Let them cool completely before handling.
Level Up: Accessories
Add personality by giving the raccoons distinct accessories. Try sculpting a tiny trash can, an apple core, or a miniature backpack for the smaller raccoon.
Set your finished duo on a shelf or desk for a touch of forest charm
Mini Safari Animal Set
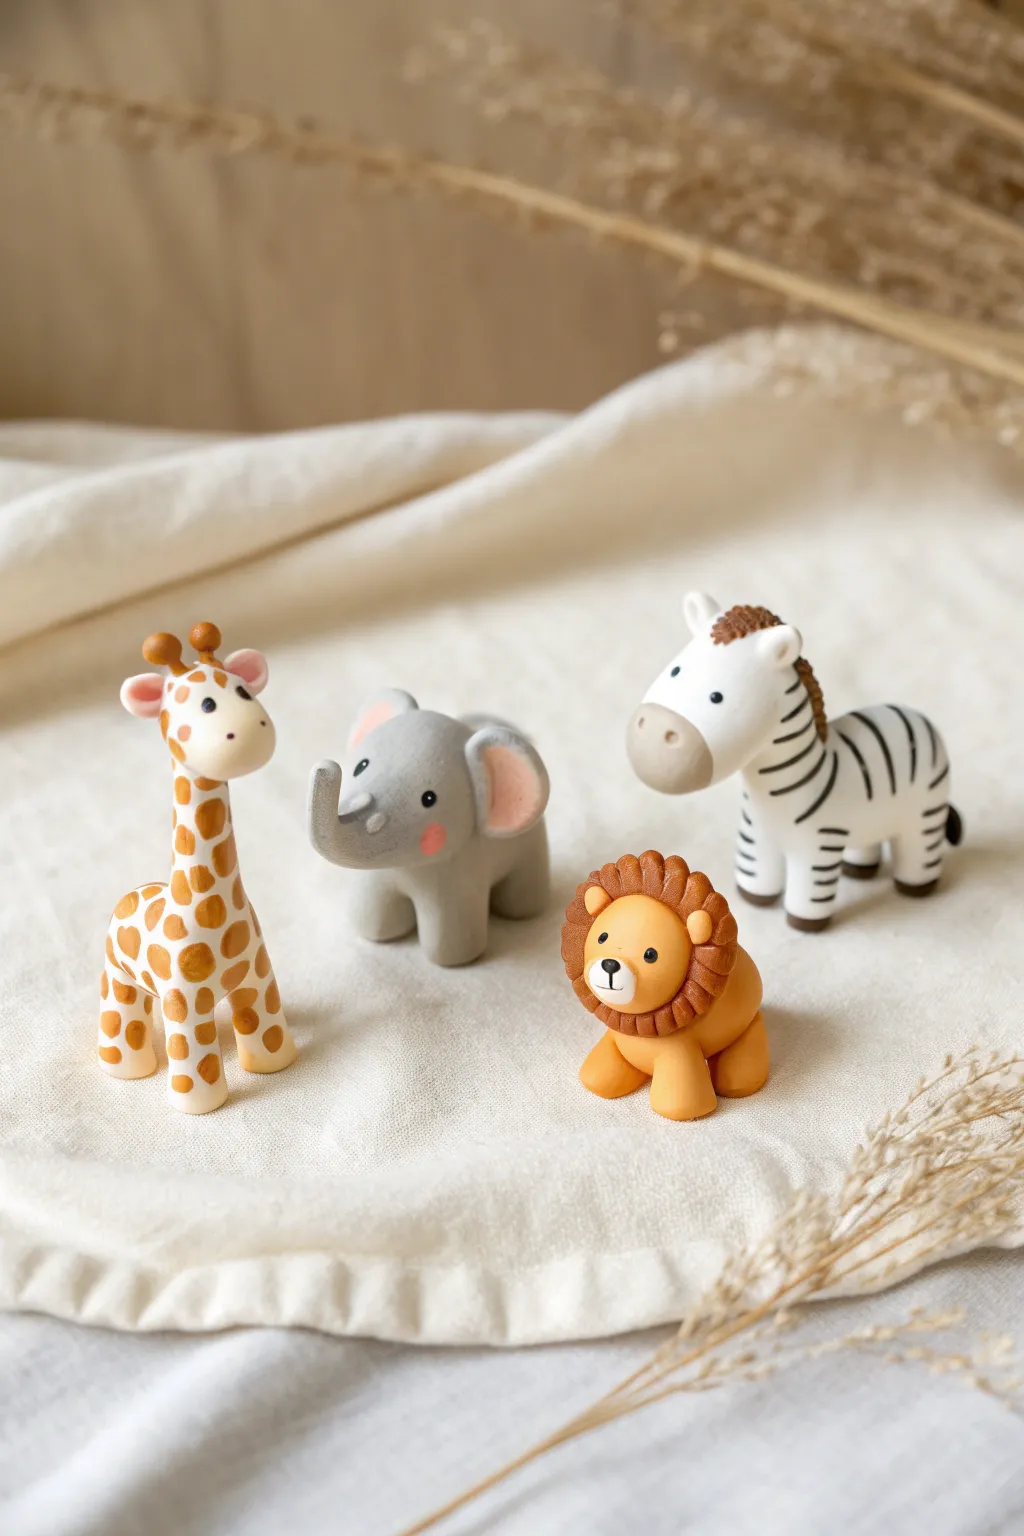
Bring the savannah to your desk with this adorable quartet of miniature animals crafted from polymer clay. These simplified, round shapes make them perfect for beginners, resulting in sturdy and charming little figures.
Step-by-Step
Materials
- Polymer clay (white, grey, tan, brown, black, orange/gold, pale pink)
- Clean working surface (ceramic tile or glass)
- Basic sculpting tools (ball tool, needle tool)
- Rolling pin or pasta machine
- Baking sheet and parchment paper
- Oven (for curing)
Step 1: The Gentle Giraffe
-
Body mechanics:
Start with white clay and roll a medium-sized ball for the body and a taller, thicker cylinder for the neck. Smoothly blend the neck onto the body so no seam is visible. -
Head and features:
Roll a slightly flattened oval for the head and attach it to the neck. Add a smaller white oval to the snout area. Use your ball tool to indent eye sockets. -
Spots and horns:
Take small bits of tan or light brown clay. Roll them into tiny balls, flatten them, and press them all over the body and neck to create spots. Add two tiny brown logs for ossicones (horns) and small pink-lined ears. -
Cute face:
Place tiny black clay beads into the eye sockets. Use a needle tool to gently poke nostrils into the snout.
Step 2: The Little Elephant
-
Grey base:
Using grey clay, form a stout, rounded rectangle for the body. Pull four short stumps from the corners for legs, or attach four small balls and blend them seamlessy. -
Trunk and head:
Roll a grey sphere for the head. Attach a small, curved snake of clay to the center for the trunk, curling it slightly upward at the tip. -
Big ears:
Flatten two discs of grey clay. Press smaller, pale pink flattened discs onto the centers for the inner ear. Attach these securely to the sides of the head. -
Final details:
Add tiny black eyes and use a needle tool to scratch little wrinkles on the trunk. A tiny dab of pink clay on the cheeks adds a sweet touch.
Clean Clay Tip
White clay picks up everything! Wipe your hands and tools with a baby wipe or rubbing alcohol before handling the white clay, or sculpt the light figures first.
Step 3: The King of the Jungle
-
Golden body:
Roll golden-orange clay into a rounded shape for the body and four smaller balls for paws. Attach the paws to the base of the body. -
The mane event:
For the mane, roll many small balls of dark brown clay. Press them in a ring around a central golden face disc, using a tool to texture each brown puff slightly if desired. -
Face assembly:
Attach the mane-and-face assembly to the body. Add a small white muzzle area, a tiny black triangular nose, and two small black eyes. -
Tail time:
Don’t forget to roll a thin golden snake for a tail with a tiny brown teardrop shape at the end, attaching it to the back.
Turn them into Charms
Before baking, insert a small metal eye pin into the top of each animal’s back. Once baked, you can attach them to a keychain or necklace.
Step 4: The Zippy Zebra
-
White structure:
Similar to the giraffe or horse shape, create a white body and a head with a distinct snout area. I find smooth blending at the neck is crucial here for durability. -
Signature stripes:
Roll very thin snakes of black clay. Lay them across the back, neck, and legs, gently rolling over them to embed the black clay flush with the white surface. -
Mane and snout:
Add a grey oval for the snout. For the mane, use dark brown or black clay to create a small ridge running down the back of the neck. -
Finishing up:
Add ears, black eyes, and bake the entire set according to your clay manufacturer’s instructions, usually around 275°F (135°C) for 15-30 minutes.
Enjoy your new tiny herd of handmade creations
Woodland Friends With Tiny Props
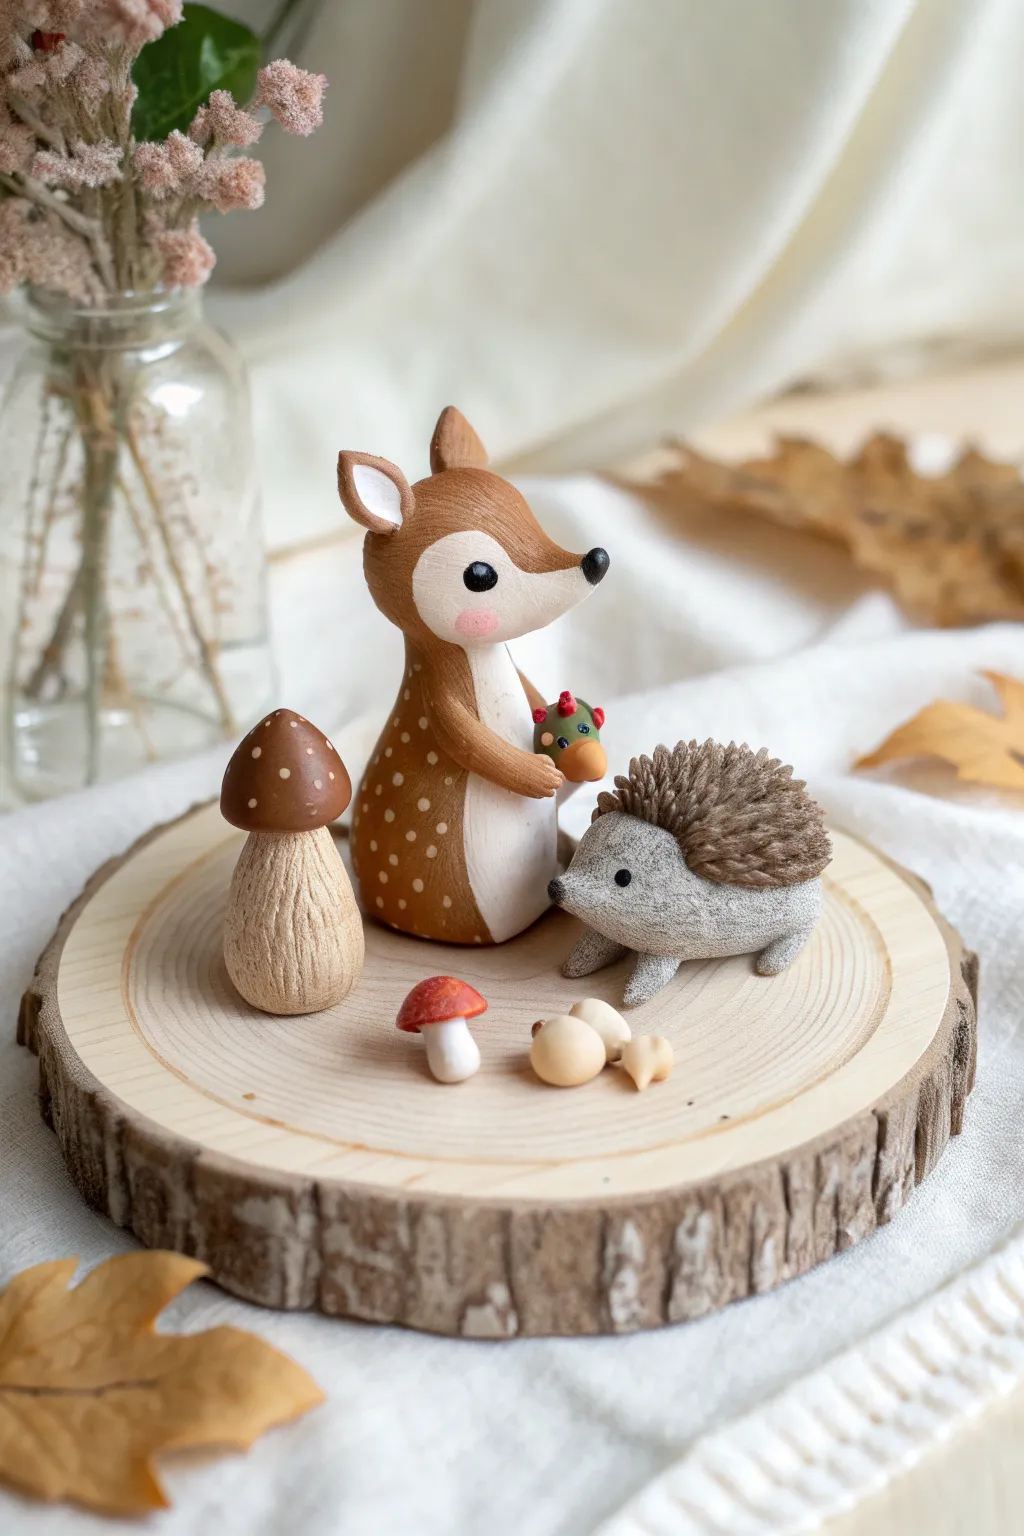
Create a charming whimsical display featuring a sweet fawn and a textured hedgehog sharing a quiet moment in the forest. This project combines simple shapes with detailed texturing techniques to bring a miniature woodland world to life on a rustic wood slice.
Detailed Instructions
Materials
- Polymer clay (brown, white, grey, beige, red, green)
- Small wood slice (approx. 4-5 inches diameter)
- Needle tool and ball stylus tool
- Texture tools (or a stiff toothbrush/sandpaper)
- Small scissors or embroidery scissors
- Acrylic paints (black, white, pink)
- Fine detail paintbrush
- Liquid polymer clay (optional, for adhesion)
- Toothpicks or wire (for internal armature support)
- Matte varnish
Step 1: Sculpting the Fawn
-
Form the Body:
Start with a medium ball of brown clay and shape it into a smooth pear or teardrop shape for the body. Flatten the bottom so it stands securely and gently curve the narrower top part slightly forward. -
Add the White Chest:
Roll a thin sheet of white clay and cut a long oval shape. Press this onto the front of the brown body, smoothing the edges with your finger until the seam is seamless. -
Shape the Head:
Create a separate rounded triangle shape for the head. Refine the snout by pinching it gently and lifting it upwards. Using a toothpick or short wire piece for support, attach the head to the neck. -
Create Facial Features:
Press a small heart-shaped piece of lighter beige or white clay onto the face area. Use a ball tool to indent eye sockets, insert small black clay beads, and add a tiny black nose to the snout tip. -
Attach Ears and Limbs:
Mold two teardrop shapes for ears, indenting the centers with a tool, and attach them to the top of the head. Roll two small logs for arms and attach them at the shoulders, curving them forward as if holding something. -
Detailing the Spots:
Roll tiny specks of white clay into balls and press them flat onto the brown fur on the back and sides to create the iconic fawn spots.
Step 2: Crafting the Hedgehog
-
Base Body Shape:
Form a rounded oval from grey clay. Pull one end slightly to form a subtle snout, keeping the shape low and grounded. -
Creating the Spines:
Fashion a ‘cap’ of dark brown clay that covers the back and top of the head. Using small scissors or a needle tool, snip into the clay repeatedly or drag deep short lines to create a dense, spiky fur texture. -
Adding the Face:
Use a needle tool to poke small eye holes on the grey face area. Insert tiny black balls for eyes and a tiny black dot for the nose. -
Legs and Feet:
Add four small, stubby logs of grey clay to the bottom for legs, blending the clay upwards into the body so no seams show.
Sticky Situation?
If fingerprints are ruining your smooth surfaces, lightly brush the raw clay with baby oil or cornstarch before baking to smooth them out completely.
Step 3: Making the Mushrooms & Props
-
Large Mushroom Stem:
Roll a thick cylinder of beige clay that widens at the base. Use a needle tool to scratch vertical lines up the stem for a bark-like texture. -
Large Mushroom Cap:
Form a dome from chocolate brown clay. Decorate it with tiny, flattened dots of lighter brown clay. Attach the cap to the stem, perhaps tilting it slightly for character. -
Tiny Toadstools:
Make miniature versions using white stems and bright red caps. These add a nice pop of color to the foreground. -
Sculpting the Gift:
Create a tiny spherical object—like a green apple or a bundle—using contrasting clay colors. Carefully place this between the fawn’s hands.
Level Up: Seasonal Vibes
Add tiny real dried moss or miniature faux autumn leaves around the base of the wood slice to ground the figures in a realistic environment.
Step 4: Assembly and Finishing
-
Baking:
Place all clay pieces on a baking tile or parchment paper. Bake according to your brand’s specific instructions (usually 275°F/130°C for 15-30 minutes per 1/4 inch thickness). -
Painting Details:
Once cool, use a fine brush to paint tiny white highlights on the eyes. Apply a very diluted pink wash to the fawn’s cheeks for a blush effect. -
Arrangement:
Arrange your figures on the wood slice. To make the scene permanent, glue the figures down with strong craft glue or epoxy. -
Varnishing:
Apply a coat of matte varnish to the clay pieces to protect the paint and give them a finished, professional look without making them look like plastic.
Now you have a serene little forest moment captured forever on your shelf
Animals in Cozy Seasonal Accessories
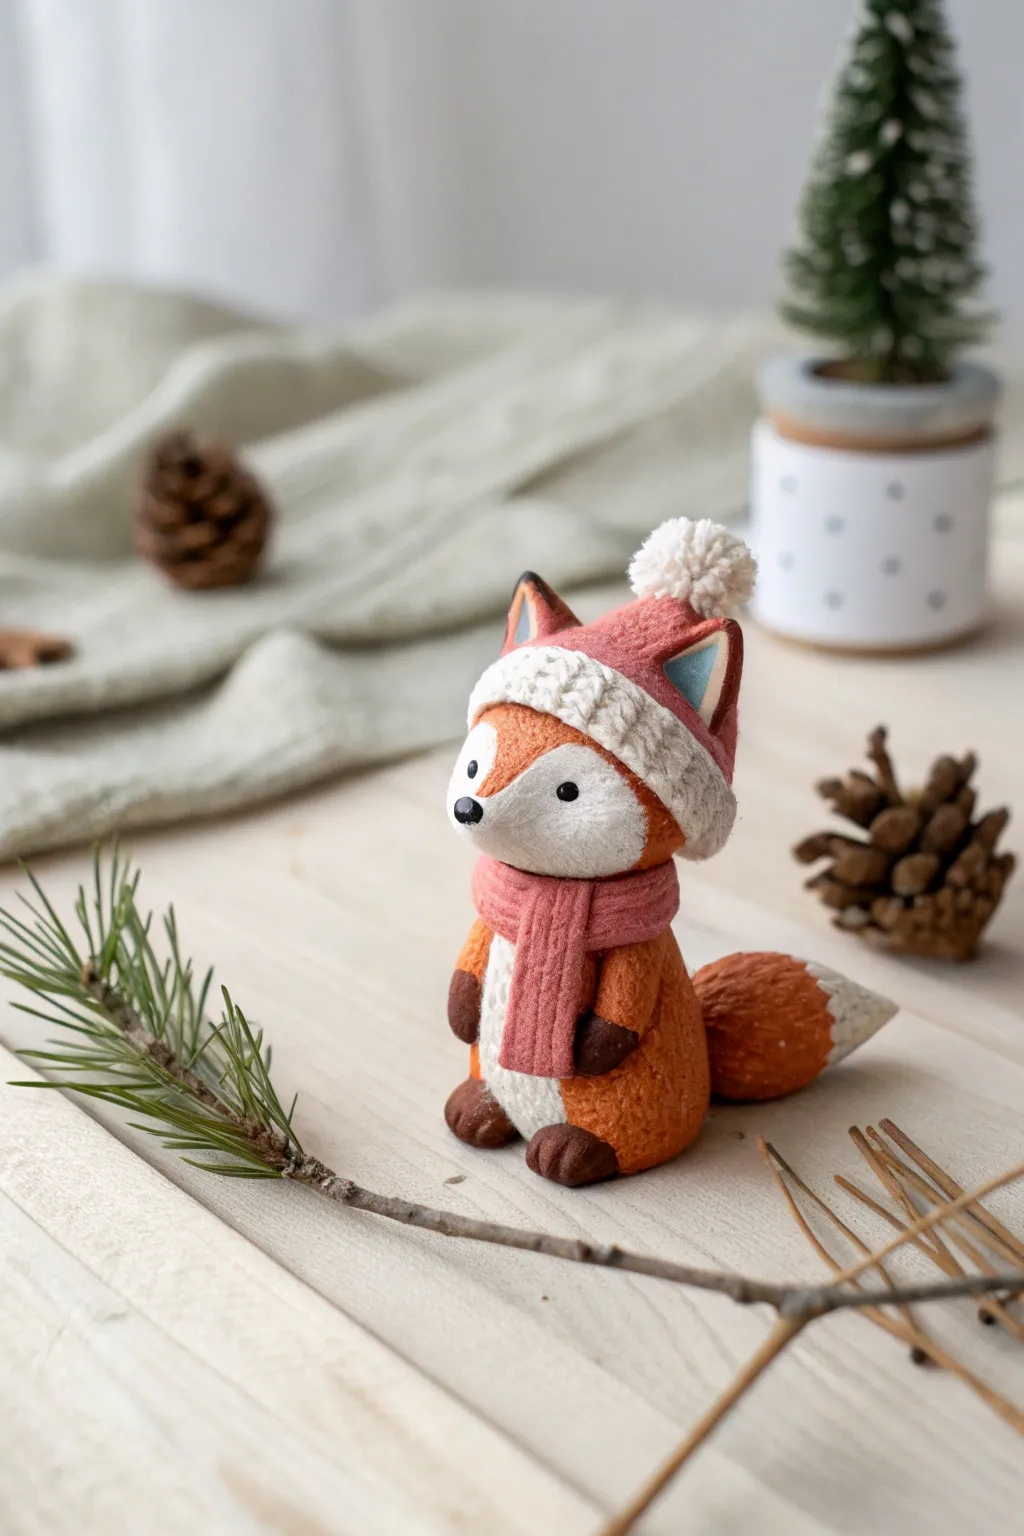
This adorable polymer clay fox brings cozy winter vibes to your shelf with its miniature hat and scarf. The unique finish mimics the look of felted wool or carved wood, giving it a soft, organic texture that sets it apart from typical smooth clay projects.
Step-by-Step
Materials
- Polymer clay (orange, white, dark pink/red, dark brown, black)
- Texturizing tool (stiff bristle brush, toothbrush, or sandpaper)
- Needle tool or toothpick
- Ball stylus tool
- Blade for cutting clay
- Oven for baking
- Pastel chalks (optional, for shading)
Step 1: Sculpting the Body and Head
-
Form the base shape:
Start with a medium ball of orange clay for the body. Roll it into a rounded pear shape, flattening the bottom so it sits securely on your work surface. -
Shape the head:
Create a slightly smaller rounded triangle shape for the head. Gently press it onto the top of the body, blending the connection point at the neck slightly to secure it. -
Add the white chest:
Roll a thin sheet of white clay and cut an oval shape. Press this onto the front of the body to form the fox’s chest furn. Smooth the edges so it merges seamlessly with the orange clay. -
Create the face mask:
Take a small amount of white clay and shape it into a wide heart or rounded ‘M’ shape. apply this to the lower half of the face to create the muzzle area. -
Add facial features:
Roll a tiny ball of black clay for the nose and place it at the tip of the white muzzle. Use a ball tool to make slight indentations for the eyes, then insert two small black clay beads. -
Attach the ears:
Form two small triangles of orange clay. Press a smaller triangle of pink or dark clay into the center of each for the inner ear. Attach these to the top of the head.
Step 2: Adding Textures and Limbs
-
Create the signature texture:
Before adding accessories, use a stiff toothbrush or a texturing tool to gently stipple the entire orange and white surface of the fox. This gives it the fuzzy, felt-like appearance seen in the photo. Avoid the nose and eyes. -
Form the legs and paws:
Roll two small sausage shapes of orange clay for the arms and press them to the sides of the body. Add tiny dark brown balls to the ends for paws. -
Add feet:
Create two dark brown oval shapes for the feet and press them onto the bottom front of the body, texturing them lightly to match the rest of the figure. -
Attach the tail:
Roll a teardrop shape of orange clay for the tail. Add a white clay tip to the end. Texture the tail thoroughly and attach it to the back of the body, curling it around to one side.
Pro Tip: Fur Texture
For realistic fur texture without special tools, scrunch up a ball of aluminum foil and roll it gently over the unbaked clay surface.
Step 3: Dressing the Fox
-
Make the hat base:
Fashion a cone shape from dark pink or red clay. Place it on the head between the ears, slightly squashing it down so it looks like it’s being worn, not just balancing. -
Create the knit brim:
Roll a thick snake of white clay. Flatten it slightly and wrap it around the base of the hat. Use a needle tool to press vertical lines all around it to simulate a ribbed knit texture. -
Add the pom-pom:
Roll a ball of white clay and place it on the tip of the hat. Use your needle tool to poke it repeatedly all over, creating a fluffy, yarn-like texture. -
Craft the scarf:
Roll a long, flat strip of the dark pink clay. Wrap it around the fox’s neck. Cut a separate shorter strip for the hanging tail of the scarf and attach it under the loop. -
Detail the scarf:
Use the needle tool to add vertical lines along the scarf to mimic knitting, similar to the hat brim but perhaps finer lines. Add small fringe cuts at the bottom of the scarf tail. -
Final touches and bake:
Check over your figurine for any fingerprints (smooth them or add texture over them). Bake according to your clay manufacturer’s instructions, usually at 275°F (130°C) for about 15-20 minutes.
Level Up: Winter Scene
Create a display base using a wood slice. Add mini bottle brush trees and sprinkle artificial snow glue around your fox’s feet.
Once cooled, your cozy little fox is ready to bring warmth to your winter decor
Food-Hybrid Animal Characters
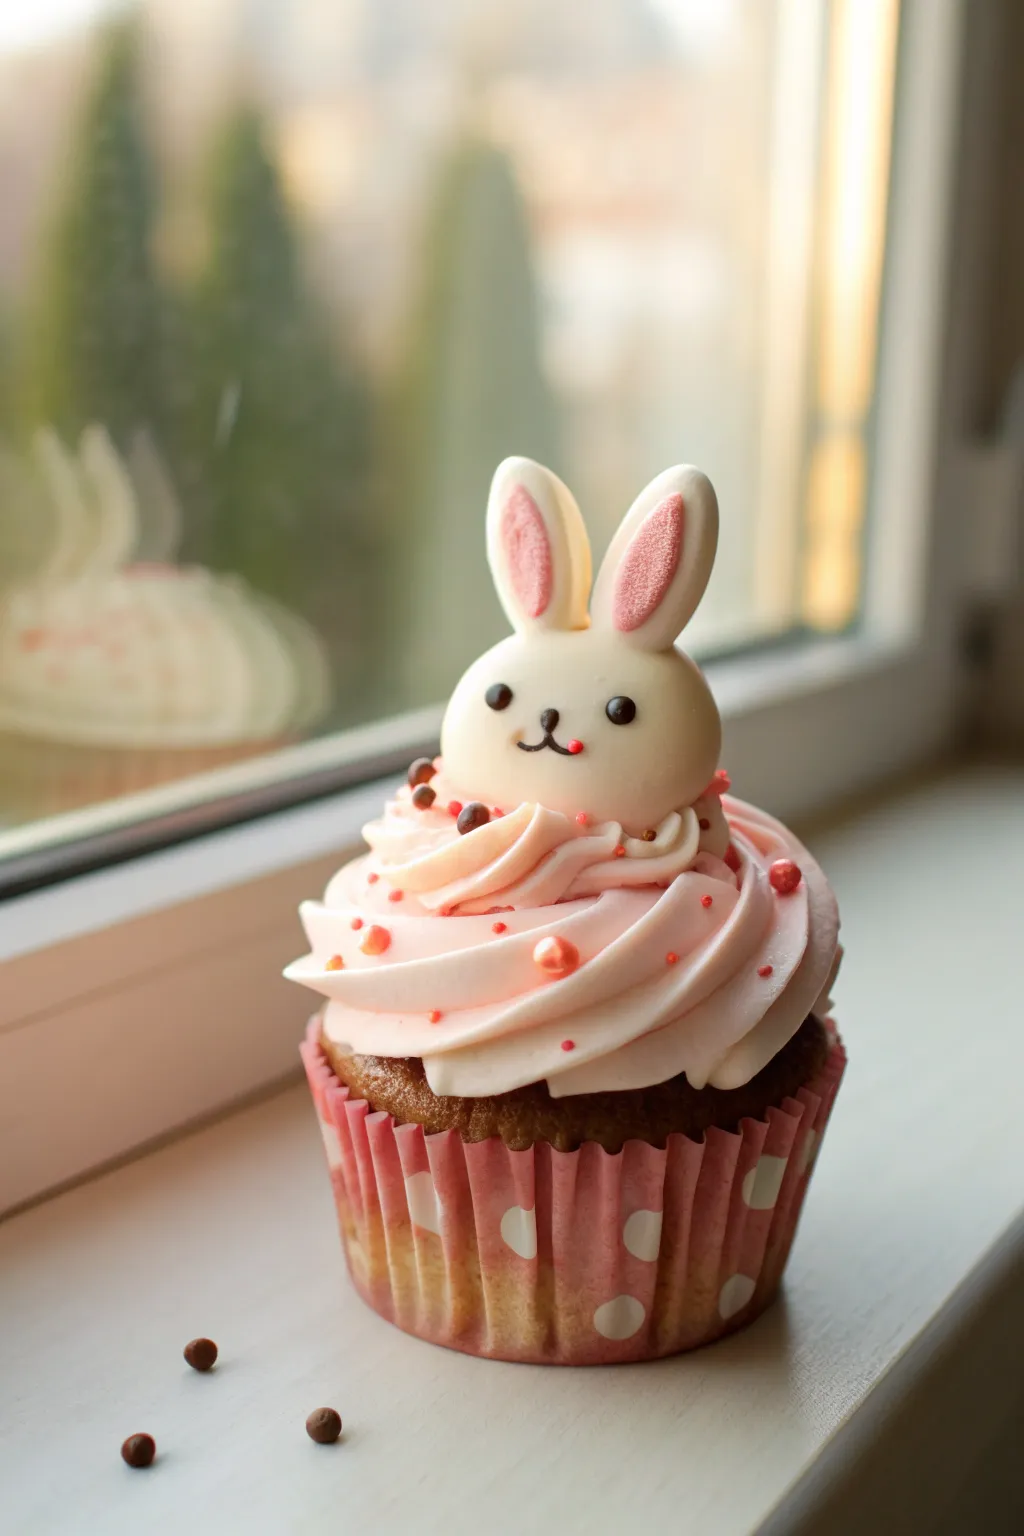
This adorable project combines the sweetness of a bakery treat with the charm of a woodland creature. You’ll create a realistic-looking cupcake base topped with swirled frosting and a cute, simplistic bunny face.
Step-by-Step Tutorial
Materials
- Polymer clay (white, baby pink, translucent white, caramel/light brown, dark brown)
- Liquid polymer clay (translucent or white)
- Soft pastels (pink, orange, brown)
- Small paintbrush
- Dotting tool or ball stylus
- Needle tool
- Clay cupcake mold or silicone mini-cupcake liner
- Extruder with star tip (optional but recommended for frosting)
- Pink microbeads or nail art sprinkles
- Gloss glaze (optional)
Step 1: Baking the Base
-
Mix the batter color:
Start by mixing translucent white clay with a small amount of caramel/light brown to create a realistic, slightly airy cake color. The translucency helps mimic the texture of baked sponge. -
Texture the cake:
Roll the clay into a ball and press it into your cupcake mold or shape it by hand into a muffin top shape. Use a needle tool or a crumpled ball of aluminum foil to texture the surface, giving it that crumbly, baked appearance. -
Create the liner:
Roll out a thin sheet of pink clay. Cut a strip long enough to wrap around the base of your cake. Accordion-fold the strip to mimic a paper liner and wrap it around the bottom half of your textured cake. -
Add polka dots:
Before attaching the liner fully, punch out tiny circles of white clay using a small straw or cutter. Press them gently onto the pink liner strip and roll it flat again so the dots are flush with the surface. -
Pre-bake the base:
To keep the texture safe while you work on the frosting, bake this base according to your clay manufacturer’s instructions for about 10-15 minutes. Let it cool completely.
Sticky Situation?
If your frosting clay is too sticky to handle, put it in the fridge for 10 minutes. This firms it up just enough to keep the star shape sharp while you coil it.
Step 2: Frosting & Topper
-
Prepare the frosting:
Condition your baby pink clay until it is very soft. Mix it with a few drops of liquid polymer clay to create a ‘frosting’ consistency—stiff enough to hold peaks but soft enough to pipe or extrude. -
Pipe the swirl:
Using an extruder with a star tip, push out a long rope of the pink clay mixture. Coil this rope onto your cooled cupcake base, starting wide at the bottom and tapering up to a peak in the center. -
Shape the bunny head:
Roll a smooth ball of white clay. This will be the bunny’s head. Place it gently onto the top of your frosting peak, pressing down slightly so it nests securely. -
Form the ears:
Shape two smaller teardops of white clay. Flatten them slightly. Use a smaller tool to press an indentation into the center of each ear. Fill this indent with a tiny bit of pink clay or brush it with pink pastel dust for the inner ear. -
Attach the ears:
Press the ears onto the top of the white head. You can blend the seams at the back with a silicone tool if you want a seamless look, or leave them distinct.
Level Up: Scent it!
Mix a tiny drop of vanilla or strawberry scent oil into the clay before baking. Your charm will smell just as sweet as it looks!
Step 3: Character Details
-
Add facial features:
Roll two tiny micro-balls of black or dark brown clay for the eyes. Gently press them into the face. Add a small ‘Y’ shape or a tiny triangle for the nose and mouth area using dark brown clay or paint. -
Blush the cheeks:
Scrape a bit of pink soft pastel into a powder. Use a dry paintbrush to gently dust rosey cheeks onto the bunny’s face. I like to do this before the final bake so the pigment sets into the clay. -
Sprinkle decorations:
While the frosting clay is still uncured, gently press pink microbeads or tiny hand-rolled balls of dark pink clay into the swirls to look like sprinkles. -
Final texture check:
Use a toothbrush or texture tool to gently tap the white bunny head if you want it to look like a marshmallow or sugar candy, or leave it smooth for a fondant figurine look. -
Final Bake:
Bake the entire piece again for the full recommended time (usually 30 minutes per 1/4 inch of thickness). Let it cool completely inside the oven if possible to prevent cracking. -
Glazing:
Once cool, consider adding a touch of gloss glaze only to the eyes and nose to make them look wet and lively.
Display your sweet creation on a miniature plate or turn it into a delightful charm for a necklace
Stacked Animal Totem Minis
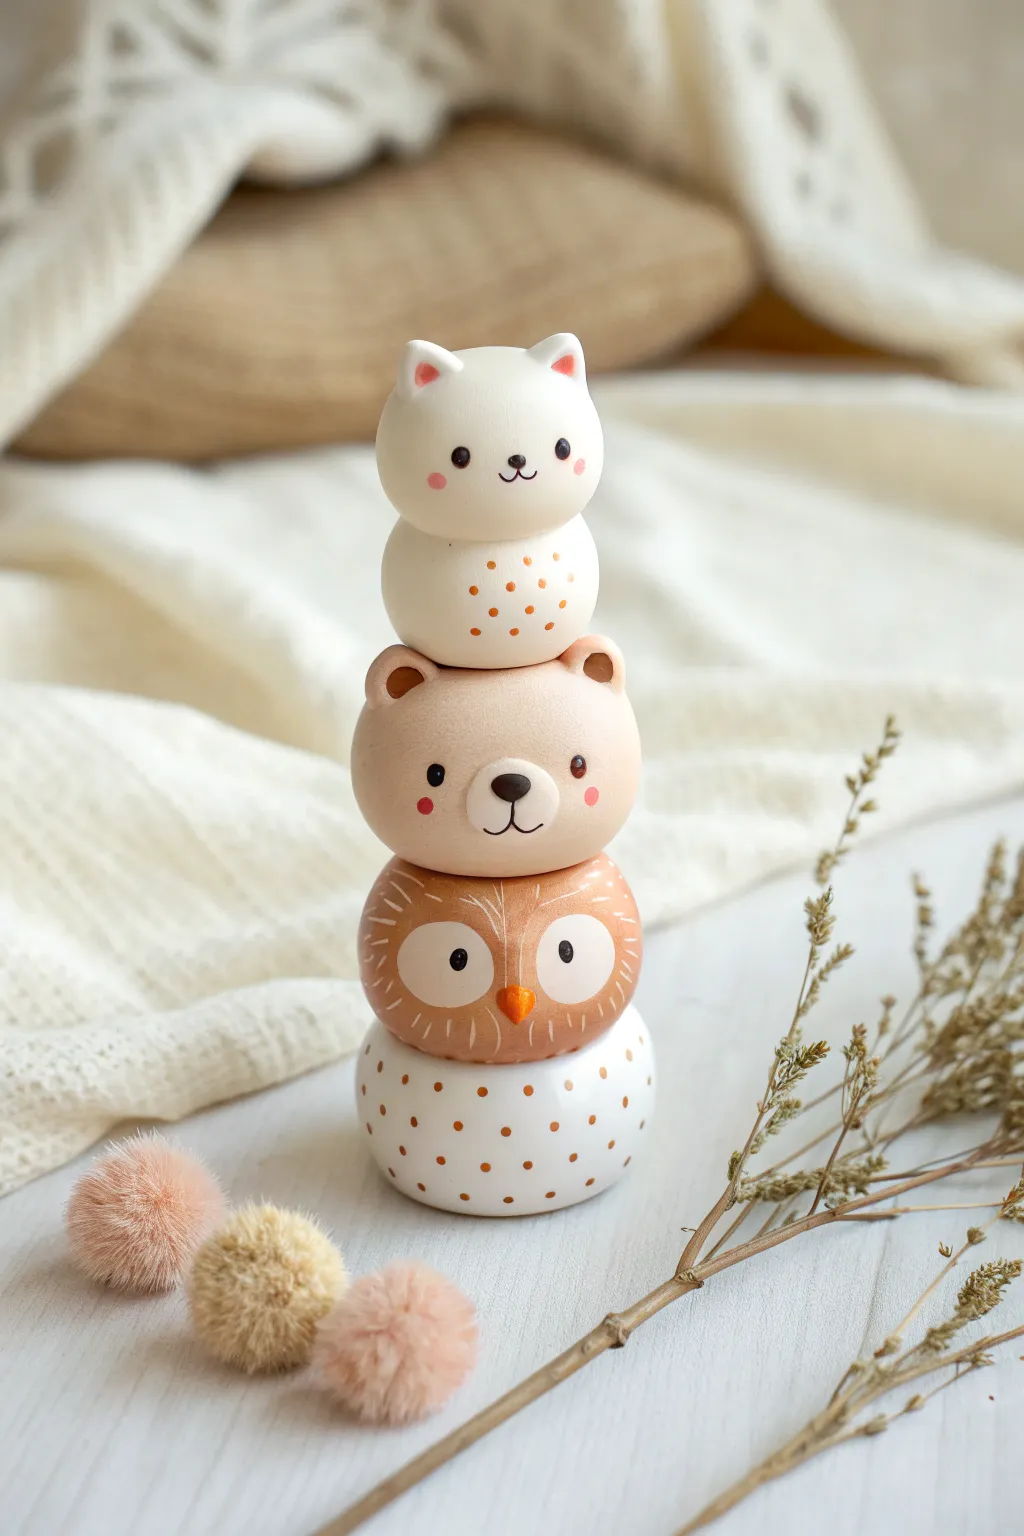
This charming desk companion stacks three adorable forest friends—an owl, a bear, and a kitty—atop a patterned base. The minimalist, rounded shapes and soft matte finish give this polymer clay project a modern and cozy aesthetic perfect for fall decor.
Detailed Instructions
Materials
- Polymer clay in white, light tan/beige, warm brown, orange, and pink
- Acrylic craft paint in dark brown and gold
- Fine-point detail paintbrush or dotting tool
- Clay blade or craft knife
- Needle tool
- Aluminum foil (for core structure)
- Baking sheet and parchment paper
- Polymer clay oven or toaster oven
- Matte varnish (optional)
Step 1: The Patterned Base
-
Form the Core:
Start by rolling a small ball of aluminum foil, about 1 inch in diameter, compressing it tightly so it is dense and smooth. -
Cover the Base:
Sheet out some white polymer clay to a medium thickness. Wrap this sheet around your foil ball, smoothing the seams completely until you have a perfect, seamless sphere. -
Flatten for Stacking:
Gently press the sphere onto your work surface to create a flat bottom heavily enough so it stands stable. Press the top lightly to create a flat surface for the next tier to rest on. -
Add Polka Dots:
Using a dotting tool or the back of a small paintbrush dipped in warm brown paint (or tiny flat circles of brown clay), add a regular pattern of small dots around the circumference of the white base.
Step 2: The Wise Owl
-
Shape the Owl Head:
Roll a ball of warm brown clay, slightly smaller than your base. Shape it into a smooth, slightly flattened sphere. -
Create the Eyes:
Make two flat discs of light tan clay. Press these firmly onto the front of the brown sphere to serve as the eye patches, ensuring they touch in the middle. -
Add Beak and Details:
Form a tiny triangle from orange clay for the beak and place it centrally where the eye patches meet. Using a needle tool, gently scratch fine vertical lines into the brown clay around the eyes to simulate feathers. -
Stack the Owl:
Place the finished owl head onto the prepared white base. Press gently to bond the raw clay pieces together.
Clean Clay Pro-Tip
Keep a pack of baby wipes or rubbing alcohol nearby. Clean your hands thoroughly when switching from the dark brown owl clay to the white kitty clay to prevent lint transfer.
Step 3: The Friendly Bear
-
Form the Bear Head:
Take your light tan clay and roll another smooth sphere, making it just slightly smaller than the owl head below it. -
Sculpt the Snout:
Roll a smaller, brighter white or very pale cream ball of clay and flatten it onto the lower center of the face for the snout area. -
Attach Ears:
Create two tiny balls of tan clay. Press a small indentation into each using a ball tool to make the inner ear, then attach them to the top of the bear’s head. -
Stack the Bear:
Center the bear head on top of the owl. I find a gentle twisting motion helps adhere the layers without squashing the shapes too much.
Level Up: Seasonal Swaps
Make the sections interchangeable! Instead of bonding the clay, bake pieces separately with magnets embedded in the flat connection points so you can swap the animals.
Step 4: The Kitty Topper
-
Create the Kitty Body:
For the top tier, you’ll need two parts. First, roll a white ball for the body and slightly taper the top. Add tiny gold or brown painted dots to its belly area now if painting creates a cleaner look than clay dots. -
Shape the Kitty Head:
Roll a second, slightly smaller white ball for the head. Pinch two small triangles of white clay and attach them for ears. Add tiny bits of pink clay inside the ears for detail. -
Assemble the Cat:
Attach the kitty’s head to its body, then place the entire cat figure on top of the bear’s head. -
Secure the Totem:
Check the stability of your stack. If it feels wobbly, you can insert a piece of wire or a toothpick down through the centers (before baking) to act as an internal spine.
Step 5: Baking and Finishing
-
Bake the Piece:
Place your totem on parchment paper and bake according to your clay manufacturer’s instructions (usually 275°F/130°C for 15-30 minutes per ¼ inch of thickness). -
Cool Down:
Let the sculpture cool completely inside the oven or on the counter. The clay is fragile while hot. -
Paint Facial Features:
Using a very fine brush and dark brown or black acrylic paint, add the tiny eyes, noses, and mouths to each animal. Don’t forget the rosy pink cheeks using a wash of diluted pink paint. -
Seal the Work:
Once the paint is fully dry, apply a coat of matte varnish to protect the surface and remove any fingerprints.
Display your stacked woodland friends on a shelf or desk for a daily dose of cuteness