Painting is where air dry clay really starts to look like your style instead of just “a lump that dried.” Here are my favorite air dry clay painting ideas—from classic, can’t-miss looks to artsy finishes that make simple shapes feel extra special.
Classic Solid-Color Trinket Dish
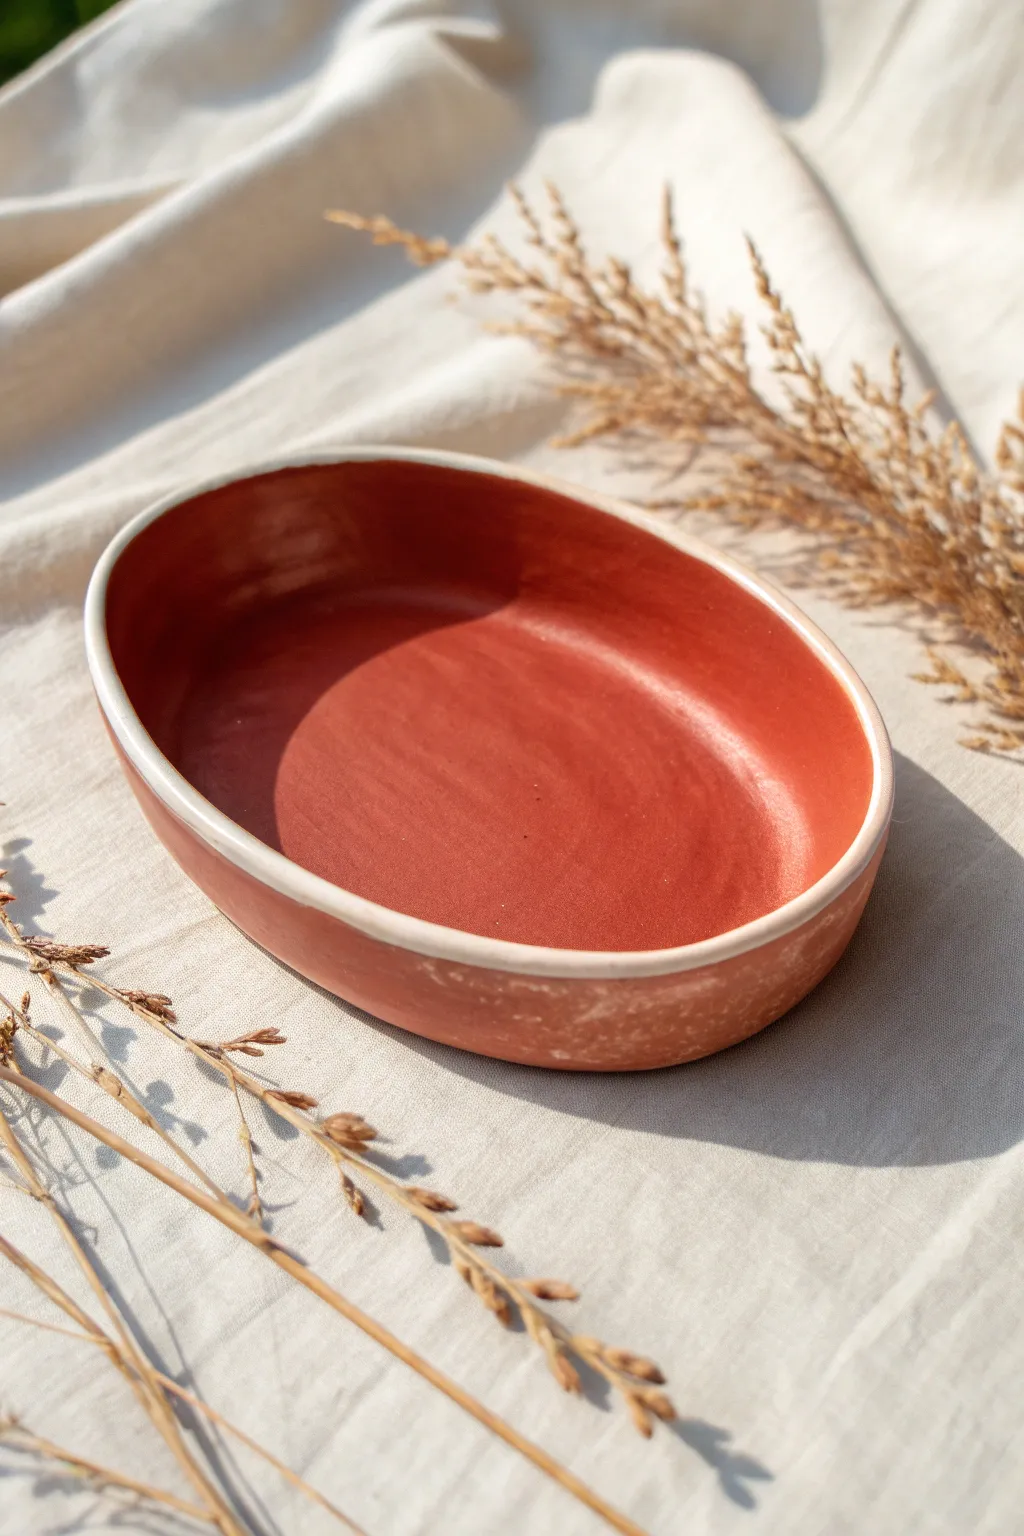
This project captures the rustic warmth of pottery without the need for a kiln, thanks to a beautiful faux-terracotta finish. The sleek oval shape and contrasting white rim create a modern, classic trinket dish perfect for holding jewelry or keys.
Step-by-Step Guide
Materials
- Air dry clay (white)
- Acrylic rolling pin
- Oval template (paper or cardstock)
- Craft knife or clay tool
- Bowl of water and sponge
- Fine-grit sandpaper (200-400 grit)
- Acrylic paint (Burnt Sienna or Terracotta)
- Flat paintbrush
- Gloss or satin varnish
Step 1: Shaping the Clay
-
Prepare your workspace:
Start by laying down a non-stick mat or parchment paper to prevent your clay from adhering to your table. -
Roll the slab:
Take a generous ball of white air dry clay and roll it out evenly until it is about 1/4 inch thick. Aim for a consistent thickness to prevent cracking later. -
Cut the shape:
Place your oval paper template onto the rolled clay. Use a craft knife to trace around the edge, cutting out a clean oval shape. -
Smooth the edges:
Dip your finger in a little water and run it along the cut edge to soften any sharp corners left by the knife. -
Form the walls:
I like to gently pinch the edges upward to create the dish’s depth. Work your way around the oval multiple times, slowly raising the rim. -
Refine the curve:
Smooth the transition between the base and the wall using a damp sponge. Ensure the inside curve is seamless and distinct. -
Final smoothing:
Do a final pass with slightly damp fingers to remove any visible fingerprints or dents from the pinching process. -
Let it dry:
Allow the dish to dry completely for 24-48 hours. Flip it over halfway through so the bottom dries evenly.
Step 2: Painting and Finishing
-
Sand for perfection:
Once fully dry and hard, use fine-grit sandpaper to buff the rim and outside walls until they feel silky smooth. -
Clean dust:
Wipe the entire piece with a slightly damp cloth or dry brush to remove all sanding dust before painting. -
Paint the interior:
Load a flat brush with Burnt Sienna acrylic paint. Apply it to the inside of the dish, using long, deliberate strokes that follow the oval curve. -
Paint the exterior:
Continue painting the outside walls with the same reddish-brown color, stopping just short of the very top rim. -
Highlight the rim:
Carefully leave the top edge of the rim unpainted to expose the raw white clay color, or paint it off-white if you accidentally covered it. -
Create texture (optional):
While the paint is wet, you can drag a nearly dry brush over the paint to create faint streaks, mimicking the look of wheel-thrown pottery. -
Dry the paint:
Let the acrylic paint dry completely, which should only take about 15-20 minutes. -
Seal the piece:
Apply a coat of gloss or satin varnish over the entire painted area to deepen the terracotta color and give it a ceramic-like shine.
Fixing Cracks
If small cracks appear while drying, don’t panic. Create a ‘slip’ by mixing a little clay with water into a paste, fill the crack, let dry, and sand smooth.
Natural Speckles
Mix dried tea leaves or coffee grounds into your white clay before rolling it out to create an organic, speckled stone effect in the unpainted rim.
Now you have a stunning, earth-toned dish that looks like it came straight from a pottery studio


Simple Painted Stripes on a Bowl
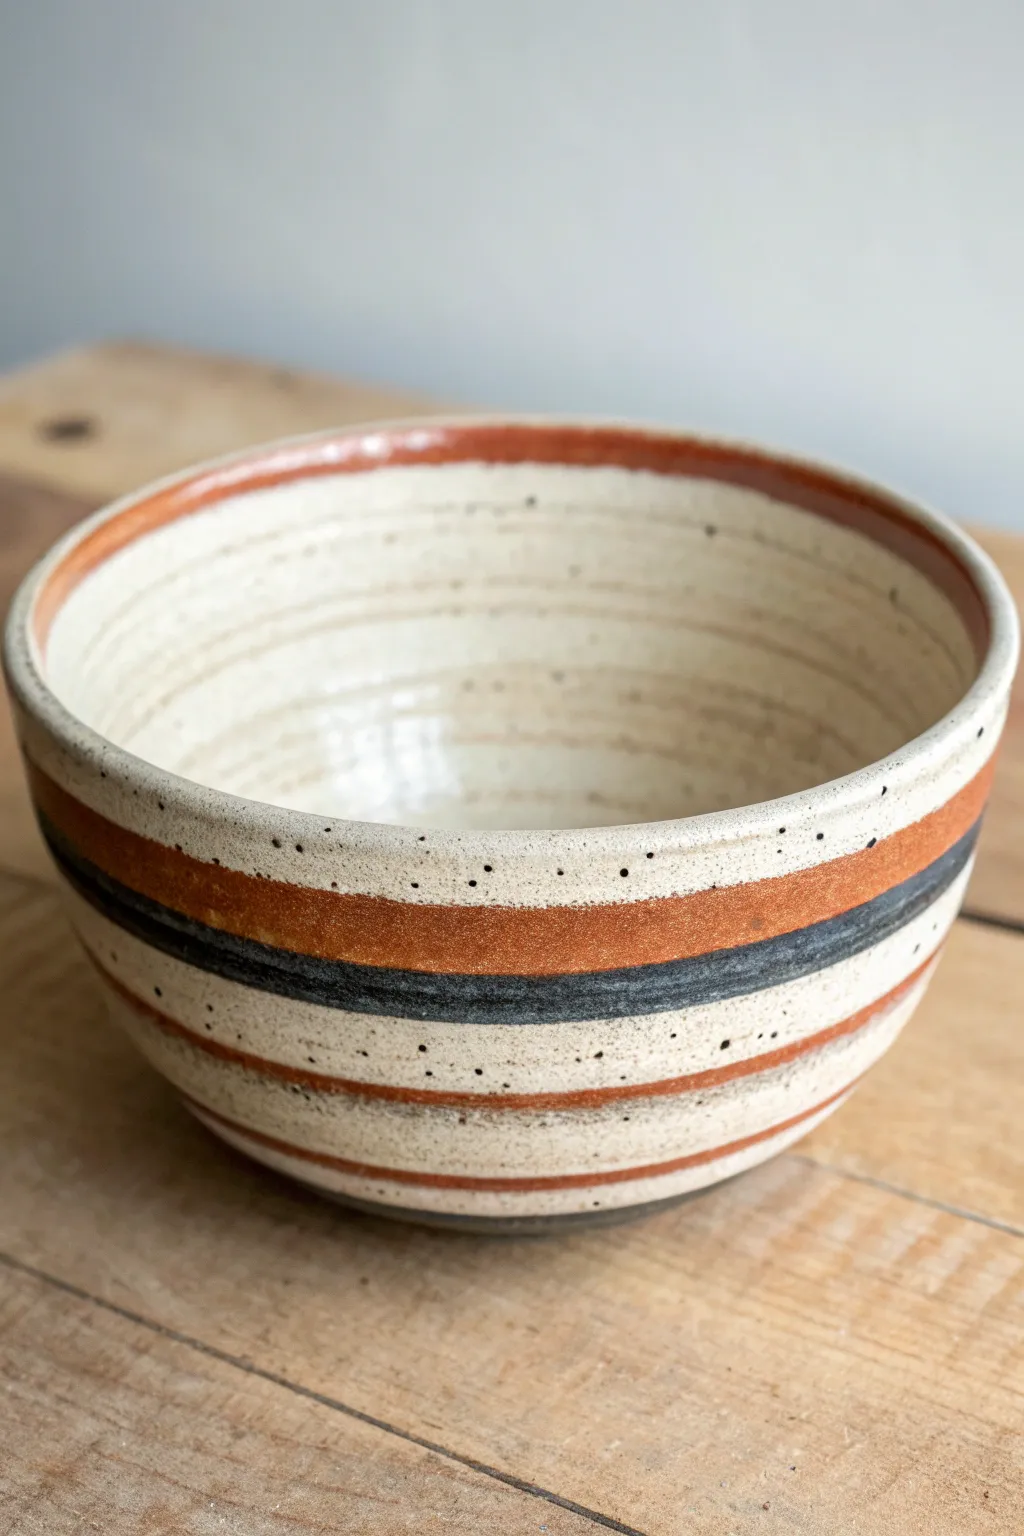
Recreate the rustic charm of wheel-thrown pottery using simple air-dry clay and a clever painting technique. This project mimics the look of speckled stoneware with warm terracotta and slate blue bands, perfect for holding keys or baubles.
Step-by-Step
Materials
- Air-dry clay (white or light grey)
- Small bowl (to use as a mold)
- Rolling pin
- Craft knife or clay tool
- Sandpaper (fine grit)
- Acrylic paints: Cream/Off-white, Burnt Sienna (terracotta), Slate Blue/Black
- Stiff bristle toothbrush
- Small to medium flat paintbrushes
- Gloss varnish or sealant
- Plastic wrap
- Water cup and sponge
Step 1: Forming the Bowl
-
Prepare the workspace:
Lay down a clean working surface or mat. Take your mold bowl and line the inside with plastic wrap, ensuring it’s as smooth as possible to prevent sticking. -
Roll out the clay:
Roll your air-dry clay into a slab approximately 1/4 inch thick. Aim for an even thickness throughout so it dries uniformly. -
Drape and shape:
Place the clay slab inside your lined mold bowl. Gently press the clay against the sides, smoothing it out with a damp sponge to remove fingerprints. -
Trim the excess:
Use your craft knife to slice off the excess clay hanging over the rim of the bowl. Run a damp finger along this cut edge to round it off slightly, imitating a thrown pottery rim. -
Dry completely:
Let the bowl sit in the mold for about 24 hours until it’s firm enough to hold its shape. Remove it from the mold and let it air dry for another 24-48 hours until bone dry and white. -
Sand for smoothness:
Gently sand the rim and any uneven spots on the surface. Wipe away all dust with a barely damp cloth.
Pottery Wheel Trick
Place your bowl on a lazy Susan while painting stripes. Spin the turntable slowly while holding your brush steady for cleaner, more continuous lines.
Step 2: Painting the Base & Speckles
-
Apply the base coat:
Paint the entire bowl (inside and out) with a creamy off-white acrylic paint. You might need two coats for full opacity. -
Mix the speckle paint:
Water down a tiny amount of black or dark brown acrylic paint until it has an inky consistency. -
Add texture:
Dip a stiff toothbrush into the watery paint. Run your thumb over the bristles to flick tiny speckles onto the bowl. This creates that authentic stoneware clay look. -
Let it set:
Allow the speckles to dry completely so they don’t smear during the striping phase.
Raw Clay Texture
Leave the very bottom of the bowl unpainted and unvarnished. This rough texture mimics the ‘foot’ of real stoneware left unglazed in the kiln.
Step 3: Adding the Stripes
-
Paint the top band:
Mix a warm Burnt Sienna color. Using a flat brush, paint a band just below the rim on the exterior. It doesn’t have to be perfectly straight; a little wobble adds to the handmade feel. -
Paint the rim:
Using that same terracotta color, carefully paint the very top edge of the rim and extend it slightly into the interior bowl curve. -
Add the contrast stripe:
Mix a slate blue or charcoal grey. Paint a thinner band below the terracotta one. I like to leave a small gap of the cream base showing between the stripes. -
Paint lower stripes:
Add one or two more thin terracotta bands near the bottom of the bowl. -
Create interior rings:
Dilute a light beige or grey paint heavily with water. Paint faint, concentric circles inside the bowl to mimic the throwing lines left by potter’s fingers.
Step 4: Finishing Up
-
Seal the piece:
Once all paint is totally dry, apply a high-gloss varnish. This mimics the fired glaze of real ceramics. -
Add a second coat:
Apply a second coat of varnish for extra durability and shine.
Now you have a stunning faux-ceramic piece that looks like it came straight from the kiln studio


Polka Dots for Instant Cute Factor
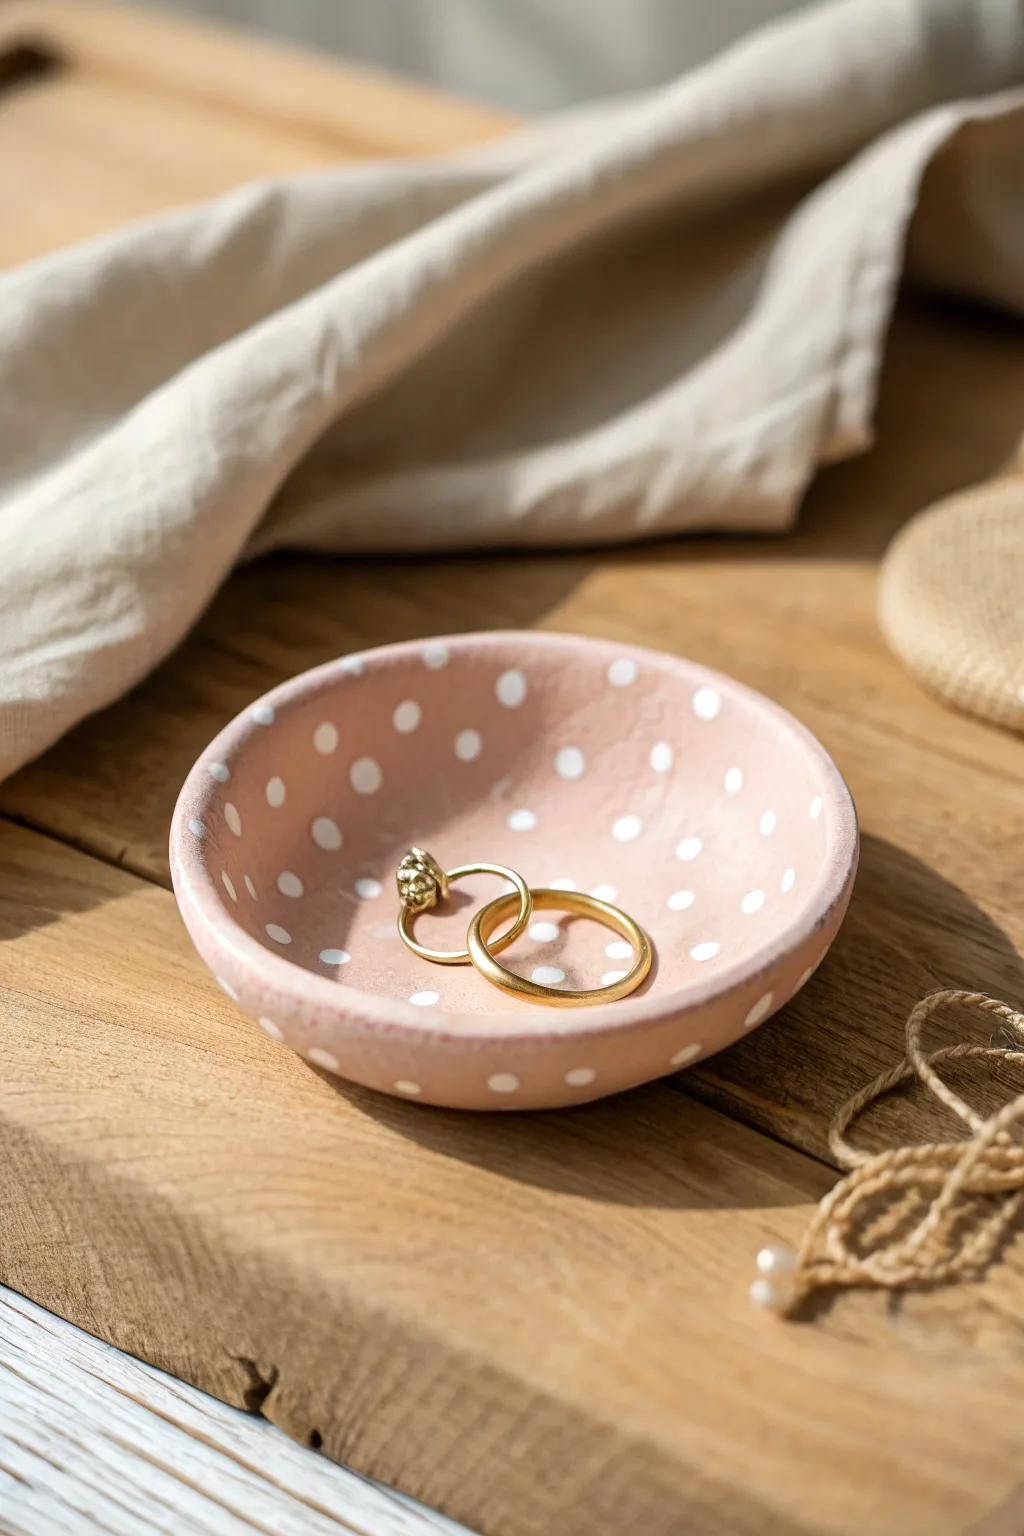
Transform a simple pinch pot into a charming home for your favorite jewelry with this sweet and simple design. The soft, dusty terracotta-pink base paired with irregular white polka dots gives this piece a lovely organic feel that looks effortlessly chic on any dresser.
Step-by-Step Tutorial
Materials
- Air dry clay (white or terracotta)
- Acrylic paint: Dusty rose/terracotta pink
- Acrylic paint: Titanium white
- Rolling pin
- Small bowl or cookie cutter (approx. 4-inch diameter)
- Craft knife
- Sponge or fine-grit sandpaper
- Small round paintbrush (size 2 or 4)
- Detail paintbrush or dotting tool
- Clear acrylic varnish (matte or satin)
- Water cup and palette
Step 1: Shaping the Clay
-
Condition the clay:
Start by taking a handful of air dry clay and kneading it in your hands until it feels soft, pliable, and free of air bubbles. -
Roll out the slab:
Place the clay on a smooth surface or canvas mat. Use a rolling pin to flatten it into an even slab, aiming for a thickness of about 1/4 inch. -
Cut the circle:
Place your small bowl upside down or use a large cookie cutter on the clay slab. Trace around it with a craft knife to cut out a perfect circle. -
Form the curve:
Gently lift the clay circle. Using your fingertips, pinch the edges upward slightly, turning the circle as you go to create a shallow, curved bowl shape. -
Smooth the edges:
Dip your finger in a tiny bit of water and run it along the rim of the bowl to smooth out any cracks or sharp edges created by the knife. -
Let it dry:
Set your dish aside in a safe spot to dry completely. This usually takes 24-48 hours depending on humidity; turn it over halfway through to ensure the bottom dries evenly.
Uneven Dots?
Don’t stress perfection! Use the handle end of different sized paintbrushes dipped in paint to “stamp” more consistent circles than painting by hand.
Step 2: Refining and Painting
-
Sand for smoothness:
Once fully dry, the clay will be white and hard. Use fine-grit sandpaper to gently buff away any bumps or rough patches on the surface and rim. -
Wipe clean:
Use a slightly damp sponge or cloth to wipe away all the clay dust from sanding. A clean surface is crucial for smooth paint application. -
Mix the base color:
On your palette, mix your dusty rose color. I like to add a tiny touch of brown to a standard pink to get that warm, earthy terracotta tone seen in the photo. -
Apply the first coat:
Using the larger round brush, paint the entire inside and outside of the bowl. Don’t forget the bottom rim! -
Apply the second coat:
Let the first layer dry to the touch (about 15-20 minutes). Apply a second coat to ensure fully opaque, rich coverage. -
Prepare the dots:
Squeeze a small amount of titanium white acrylic paint onto your palette. It should be thick enough to hold its shape but fluid enough to leave the brush easily.
Clay Cracking?
If small cracks appear while drying, mix a tiny bit of fresh clay with water to make a paste and fill them in easily before painting.
Step 3: Adding the Details
-
Start the pattern:
Using a small detail brush or the back end of a paintbrush, dip into the white paint and place your first dot near the center of the bowl. -
Fill the interior:
Continue adding white dots in a random, scattered pattern across the inside of the bowl. Keep the spacing fairly consistent but avoid making it look like a rigid grid. -
Paint the rim:
Add dots specifically along the top edge of the rim. Some dots can wrap slightly over the edge for a playful, hand-painted look. -
Paint the exterior:
Continue the pattern on the outside of the bowl. Varying the size of the dots slightly adds to the organic charm. -
Let the paint cure:
Allow the polka dots to dry completely. This might take a bit longer than the base coat if the paint was applied thickly. -
Seal the dish:
Apply two coats of clear acrylic varnish (matte or satin finish works best here) to protect the paint and give the dish a finished, professional look.
Now your adorable handmade trinket dish is ready to hold your treasures or be gifted to a friend


Hand-Painted Floral Coasters
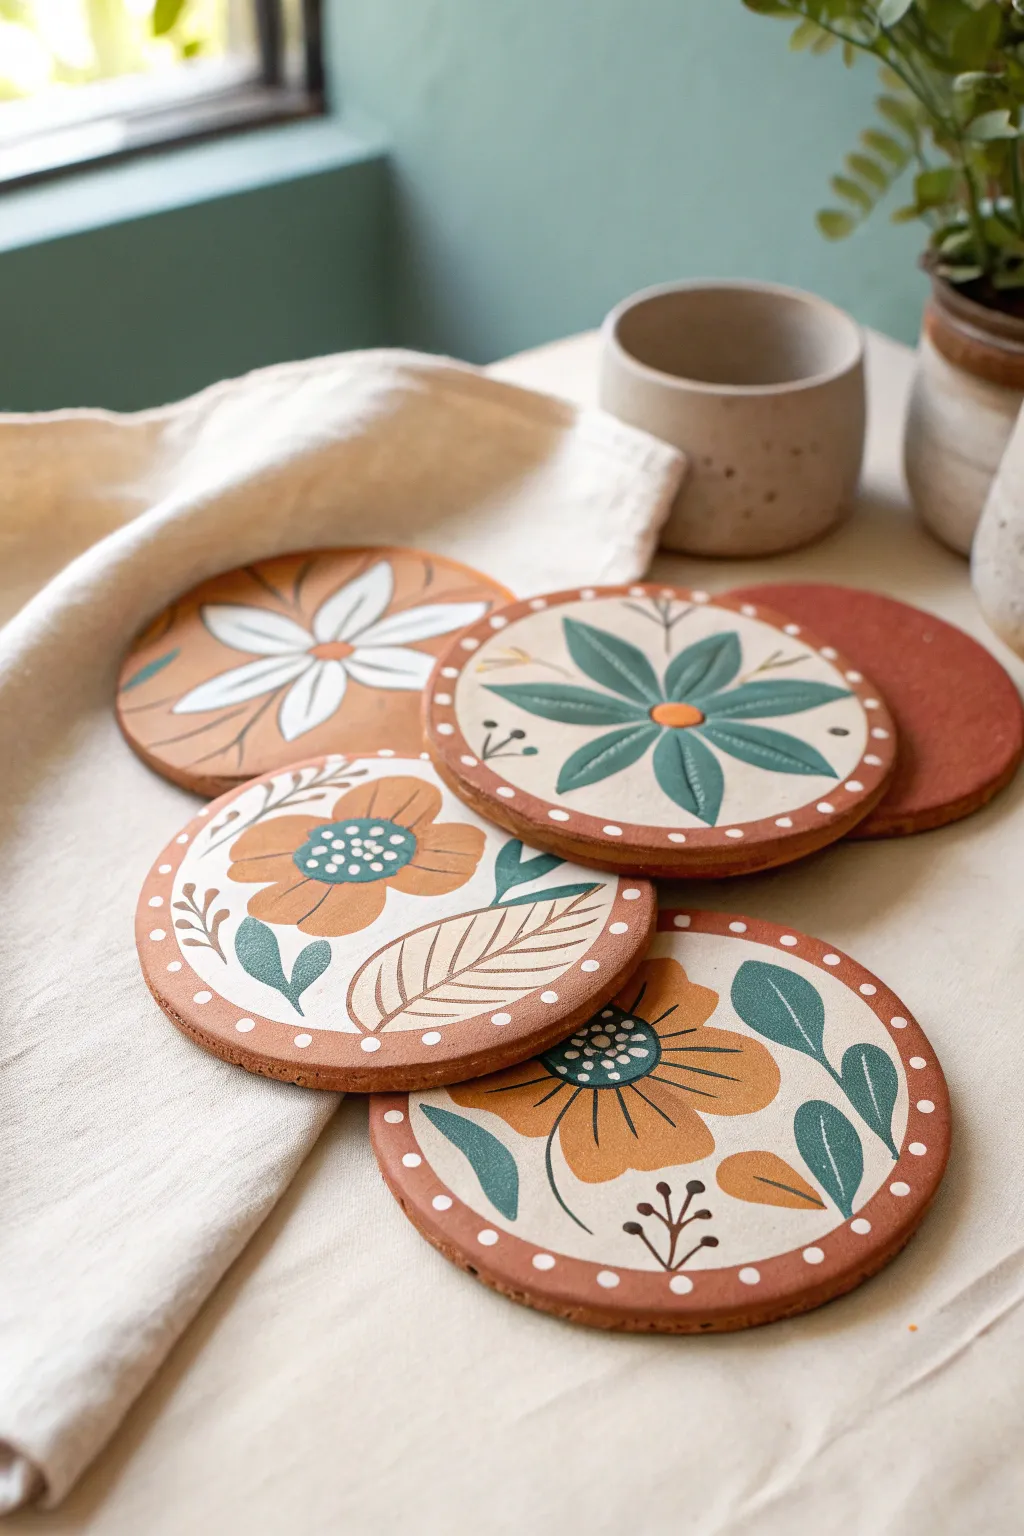
Bring a touch of handcrafted warmth to your coffee table with these charming terracotta-style coasters featuring folk art florals. The contrast between raw reddish-brown clay and the muted teal, ochre, and cream paint creates a cozy, artisanal look that feels both vintage and modern.
How-To Guide
Materials
- Terracotta-colored air dry clay
- Rolling pin
- Circle cookie cutter (approx. 4 inches) or a bowl to trace
- Sandpaper (fine grit)
- Acrylic paints: White/Cream, Teal/Sage Green, Yellow Ochre, Dark Brown
- Small round paintbrushes (sizes 0, 2, and 4)
- Dotting tool or toothpick
- Matte spray varnish or Mod Podge for sealing
- Parchment paper or canvas cloth (for rolling surface)
Step 1: Shaping the Base
-
Prepare the workspace:
Lay down a sheet of parchment paper or a canvas cloth on a flat surface. This prevents the clay from sticking and picking up unwanted textures. -
Condition the clay:
Take a handful of terracotta air dry clay and knead it briefly in your hands until it warms up and feels pliable, removing any air bubbles. -
Roll the slab:
Using a rolling pin, roll the clay out to an even thickness of about 1/4 inch. Try to keep it consistent so your cups sit flat later. -
Cut the circles:
Press your circle cutter firmly into the clay to cut out your coaster shapes. If you don’t have a cutter, place a bowl upside down and trace around it with a craft knife. -
Optional detail:
For the specific border look shown in one of the designs, you can gently imprint a smaller circle slightly inside the edge, or leave them perfectly flat. -
Smooth the edges:
Dip your finger in a little water and run it along the cut edges to smooth out any roughness or loose bits of clay. -
Let them dry:
Place the coasters on a flat wire rack or a piece of parchment to dry. This usually takes 24-48 hours depending on humidity. Flip them over halfway through to ensure even drying and prevent curling.
Uneven drying?
If your clay curls up at the edges while drying, gently weigh the coasters down with a heavy book (sandwiched between parchment paper) during the last few hours of the drying process.
Step 2: Painting the Folk Designs
-
Sand for smoothness:
Once fully dry and hard, use fine-grit sandpaper to gently buff the surface and edges. Wipe away the dust with a barely damp cloth. -
Base coat (optional):
If your clay dried a pale color and you want that rich terracotta look shown in the photo, paint a base layer of burnt sienna or terracotta acrylic paint over the top surface. Let dry. -
Block out the flower shapes:
Start with the main flower petals. For the white daisy design, paint large, teardrop-shaped petals radiating from the center using white or cream paint. -
Add secondary colors:
For the other coasters, use yellow ochre to paint large, rounded flower blooms. Keep the paint application somewhat thick to get solid coverage over the dark background. -
Paint the leaves:
Using teal or sage green paint and a size 4 brush, add simple leaf shapes. Some can be broad and rounded, while others should be slender and pointed. I find varying the leaf shapes adds to the folk-art charm. -
Add details:
Switch to a fine liner brush (size 0). Add veins to the leaves and darker center details to the flowers using dark brown or a deep green. -
Create the heavy centers:
Paint the centers of the ochre flowers with a dark teal circle. Once dry, add tiny white dots on top to mimic stamens. -
Add stem accents:
Paint thin, dark stems with little berries or buds branching off the main flowers to fill the empty space. -
The dotted border:
Dip a dotting tool or the back end of a paintbrush handle into white paint. Carefully stamp dots around the perimeter of the coaster, spacing them as evenly as possible.
Make it Waterproof
Standard varnish resists water, but for heavy usage, use a dishwasher-safe sealer or a thin layer of two-part resin. This makes them truly waterproof against heavy condensation.
Step 3: Finishing and Sealing
-
Check your work:
Look over your designs for any spots that need a second coat of paint for opacity, especially the white petals. -
Seal the coasters:
Apply a coat of matte varnish or sealer. This is crucial for coasters as it protects the clay from moisture dripping off cold drinks. -
Create a backing:
For extra protection for your table, cut a circle of felt or cork slightly smaller than the coaster and glue it to the bottom.
Now you have a set of unique coasters ready to catch drips and compliments alike

What Really Happens Inside the Kiln
Learn how time and temperature work together inside the kiln to transform clay into durable ceramic.
Modern Geometric Trinket Dish Interior
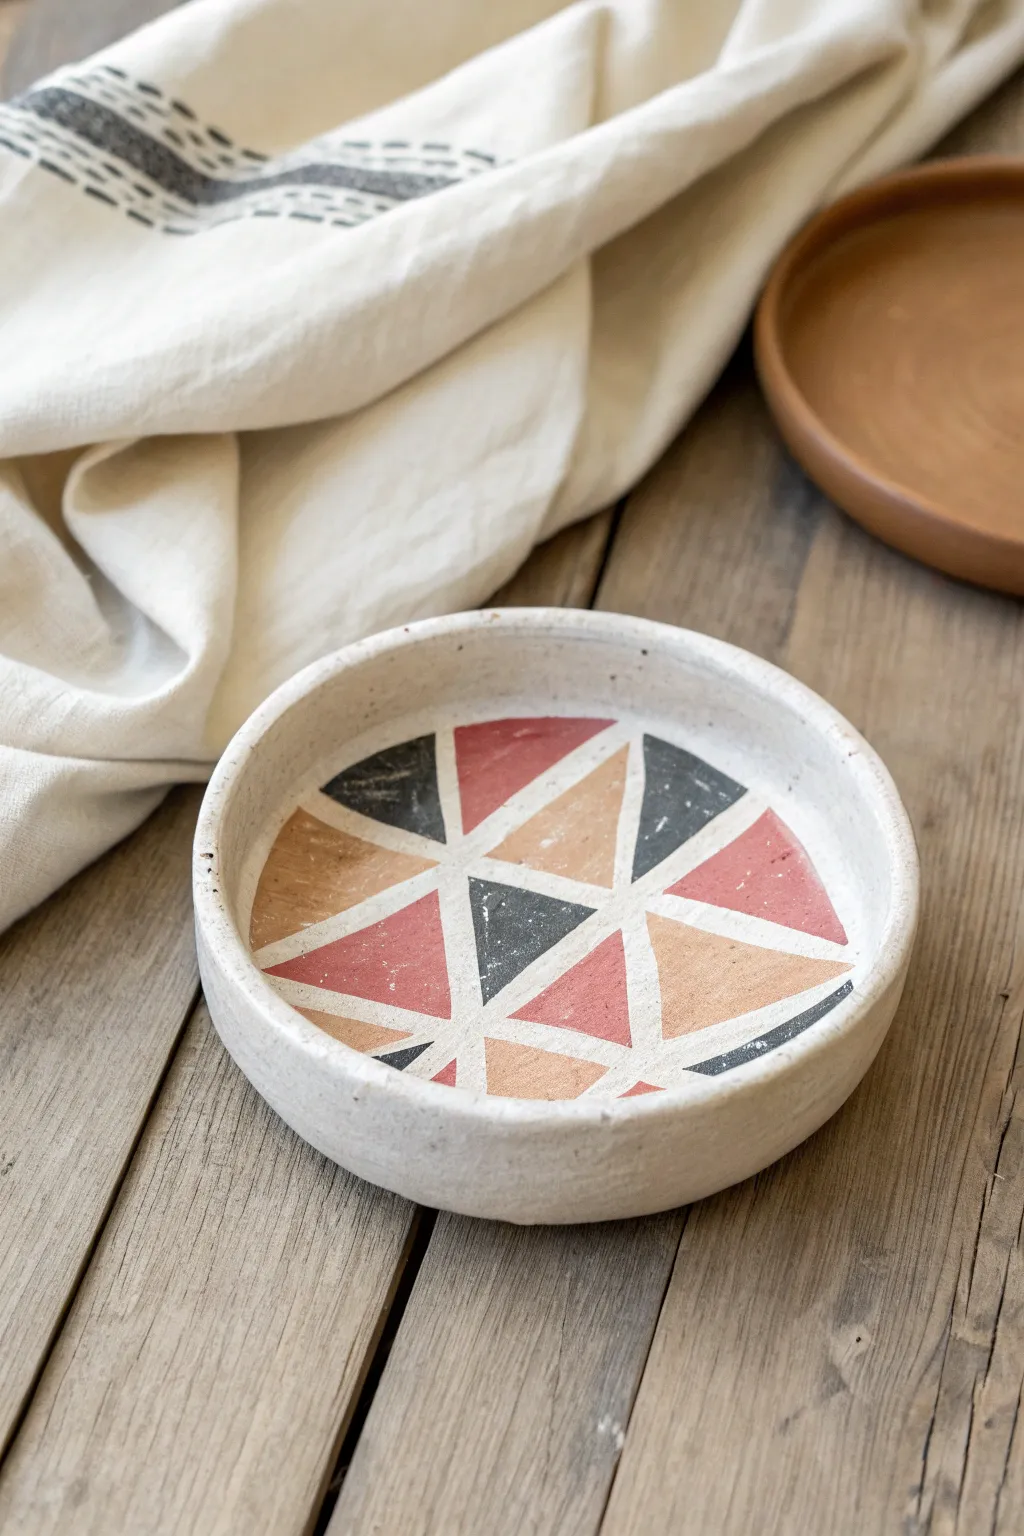
Bring the warmth of desert hues to your vanity with this earthy, geometric trinket dish. The project combines a modern repeating triangle pattern with the charming, imperfect texture of air-dry clay for a piece that feels both organic and thoughtfully designed.
Step-by-Step
Materials
- White smooth air-dry clay
- Rolling pin
- Bowl or circular template (approx. 5-6 inches)
- Craft knife
- Small bowl of water
- Sponge or fine-grit sandpaper
- Acrylic paints (Terracotta, Peach/Beige, Charcoal Grey)
- Flat shader brush (size 4 or 6)
- Detail round brush (size 0 or 1)
- Ruler
- Pencil
- Matte varnish or sealant
Step 1: Sculpting the Dish
-
Prepare the Clay:
Begin by kneading a fist-sized ball of white air-dry clay. Work it in your hands until it is pliable, warm, and free of any air bubbles that might cause cracking later. -
Roll the Slab:
On a clean, flat surface, roll the clay out into an even slab. Aim for a thickness of about 1/4 inch; going too thin can make the base fragile, while too thick may lead to uneven drying. -
Cut the Circle:
Place your circular template or bowl upside down on the slab. Use your craft knife to trace around the edge, cutting out a clean circle. -
Create the Wall:
Gather the remaining scraps and roll them into a long, even coil or ‘snake’ about the thickness of your pinky finger. This will become the dish’s vertical wall. -
Attach the Coil:
Score the outer edge of your clay circle and the underside of the coil with cross-hatching marks. Dab a little water on the scored areas to act as glue. -
Blend the Seams:
Place the coil onto the edge of the circle base. Using your thumb or a modeling tool, firmly smooth the clay down from the coil onto the base on both the inside and outside until the seam is invisible. -
Refine the Shape:
Once the wall is attached, use a wet finger or damp sponge to smooth out any fingerprints. Ensure the rim is generally level, though a little organic waviness adds character. -
Dry Completely:
Set the dish aside in a cool, dry place. Allow it to air dry for 24-48 hours. I find turning it over halfway through the drying process helps the bottom dry evenly.
Clean Lines
If you struggle with steady hands, use thin washi tape or painter’s tape to mask off the geometric lines before painting for crisp edges.
Step 2: Painting the Design
-
Prep the Surface:
Once bone dry, lightly sand any rough patches on the rim or interior with fine-grit sandpaper. Wipe away all dust with a barely damp cloth. -
Sketch the Grid:
Using a ruler and pencil, lightly draw a six-pointed ‘pie’ shape, dividing the circle into six equal wedges meeting at the center. -
Create the Triangles:
Within each wedge, draw intersecting diagonal lines to break the large triangles into smaller ones. Reference the photo to create a tessellated look where triangles nest against each other. -
Mix Your Palette:
Prepare your acrylic paints. You’ll need a terracotta red, a soft peach or beige, and a deep charcoal. If your paints are too bright, mix in a tiny dot of brown to mute them. -
Paint the Peach:
Start with the lightest color. Using your flat shader brush, fill in select triangles with the peach tone. Leave a small gap of unpainted white clay between shapes to create the ‘grout’ lines. -
Add the Terracotta:
Switch to the reddish terracotta hue. Paint adjacent triangles, ensuring the colors are balanced across the dish. Use the detail brush to keep the edges sharp near the white lines. -
Add Contrast:
Fill in the remaining designated triangles with charcoal grey. This dark tone grounds the design and makes the warmer colors pop. -
Weather the Look:
To mimic the rustic texture in the photo, you can dry-brush a tiny bit of white paint over the colored areas once they are dry, or lightly sand the painted surface to destress it. -
Seal the Work:
Finish by applying a coat of matte varnish over the entire interior to protect your paint job from scratches and dust.
Metallic Accent
Swap the charcoal grey paint for liquid gold leaf or metallic copper paint to turn this rustic dish into a glamorous jewelry holder.
Now you have a stylish, handcrafted spot to keep your rings and keys organized
Minimal Line Art on Tiny Vases
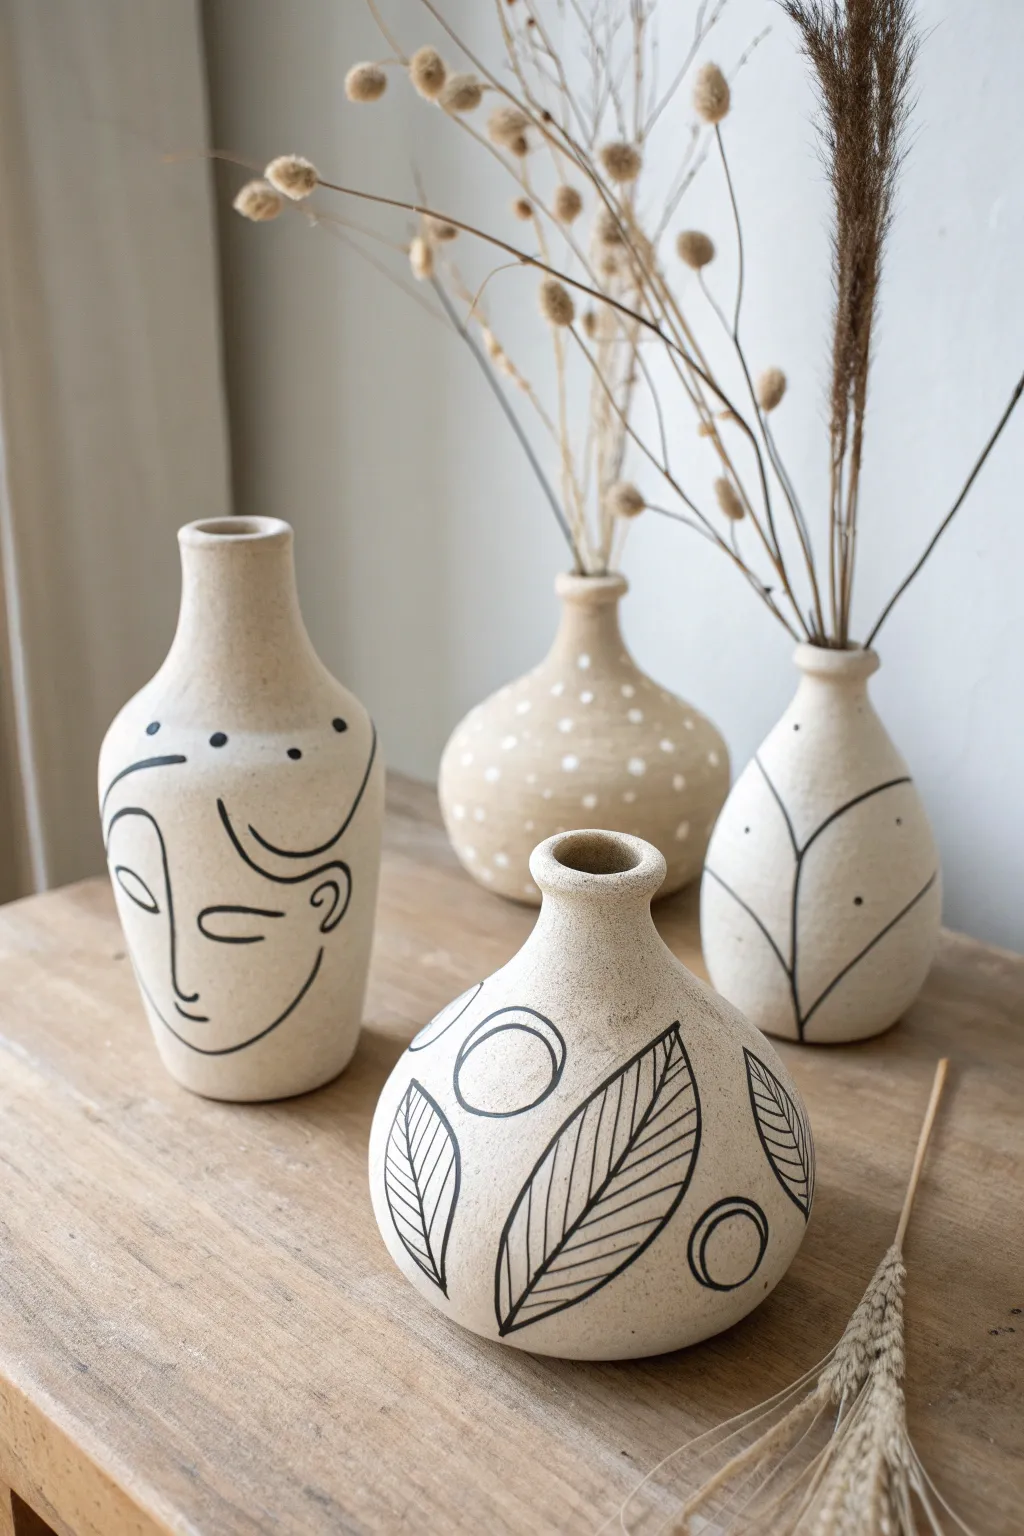
Embrace the understated beauty of nature with this set of miniature clay vases featuring crisp black line art and rustic textures. These neutral-toned pieces combine organic shapes with minimalist botanical and facial illustrations, making them perfect shelf accents for a calm, modern space.
Step-by-Step Tutorial
Materials
- Air-dry clay (white or terra cotta)
- Small rolling pin
- Clay carving tools or a butter knife
- Sponge and water
- Acrylic paint (beige/sand color and bone white)
- Black paint marker (fine tip) or fine liner brush with black acrylic paint
- White paint marker or small round brush (for the dots)
- Fine-grit sandpaper
- Matte varnish or sealant
- Dried grasses or bunny tails (for styling)
Step 1: Shaping the Clay
-
Knead and warm:
Begin by taking a handful of air-dry clay and kneading it in your hands to warm it up and make it pliable. This helps prevent cracks later on. -
Form the base:
Roll the clay into a smooth ball, then flatten the bottom slightly against your work surface so it stands upright securely. -
Create the pinch pot:
Push your thumb deep into the center of the ball. Gently pinch and rotate the clay between your thumb and fingers, working the walls upward to create a hollow vessel. -
Shape the neck:
For the tall vases, gently squeeze the upper portion of the clay inward to form a narrower neck. I find wet fingers help smooth the clay as you pull it upwards. -
Flare the rim:
Once the neck is formed, use your thumbs to gently press the very top edge outward, creating a small, flared rim. -
Vary the shapes:
Repeat this process to make multiple vases. Make one taller with a slender neck (for the face design) and others shorter and rounder (for the botanical designs) to mimic the variety in the photo. -
Smooth the surface:
Dip a small sponge in water and run it over the exterior of each vase to smooth out fingerprints and join lines. Let the clay dry completely for 24-48 hours.
Uneven Drying?
If your clay cracks while drying, mix a small amount of fresh clay with water to create a ‘slip’ paste. Fill the cracks, smooth over, and let dry again.
Step 2: Painting the Base
-
Sand imperfections:
Once the vases are bone dry, gently sand any rough spots or bumps with fine-grit sandpaper to create a clean canvas for your art. -
Mix the base color:
Mix beige and a touch of white acrylic paint to achieve a soft, sandy ‘biscuit’ tone. Aim for a matte finish that mimics unglazed pottery. -
Apply base coats:
Paint the entire exterior of each vase. Apply two coats if necessary for opaque coverage, allowing the first layer to dry completely before adding the second.
Textured Finish
For a truly rustic pottery look, mix a teaspoon of baking soda into your acrylic base paint. It creates a grainy, stoneware-like texture.
Step 3: Adding the Designs
-
Plan the face design:
On the tallest vase, lightly sketch a continuous line face using a pencil. Focus on sweeping curves for the nose and jawline, keeping the eyes simple and closed. -
Ink the face:
Using a fine-tip black paint marker, trace over your pencil lines. Add varied line weights—make the hair outline slightly thicker and the facial features delicate. -
Draw the botanical vase:
For the short, round vase, draw large leaf shapes. Use bold black outlines for the leaves and add interior diagonal lines for the veins. Add circle accents in empty spaces for balance. -
Create the branch vase:
On a medium-sized vase, start a vertical line from the base up to the neck. Branch out symmetrical, curved lines to create a simplified stem pattern. Add tiny dots at the end of the stems. -
Add polka dots:
For the fourth vase (the background one), skip the black ink. Instead, use a white paint marker or the end of a paintbrush to dab small, irregular white dots all over the beige surface. -
Seal the work:
Once all paint is perfectly dry, apply a coat of matte varnish. This protects the paint from chipping and gives the vases a professional, cohesive finish. -
Style with dried florals:
Finish the look by placing a few stems of dried bunny tails or ornamental grass into each vase.
Now you have a stunning gallery of miniature pottery ready to display on your mantel or desk


The Complete Guide to Pottery Troubleshooting
Uncover the most common ceramic mistakes—from cracking clay to failed glazes—and learn how to fix them fast.
Checkerboard Catchall Tray
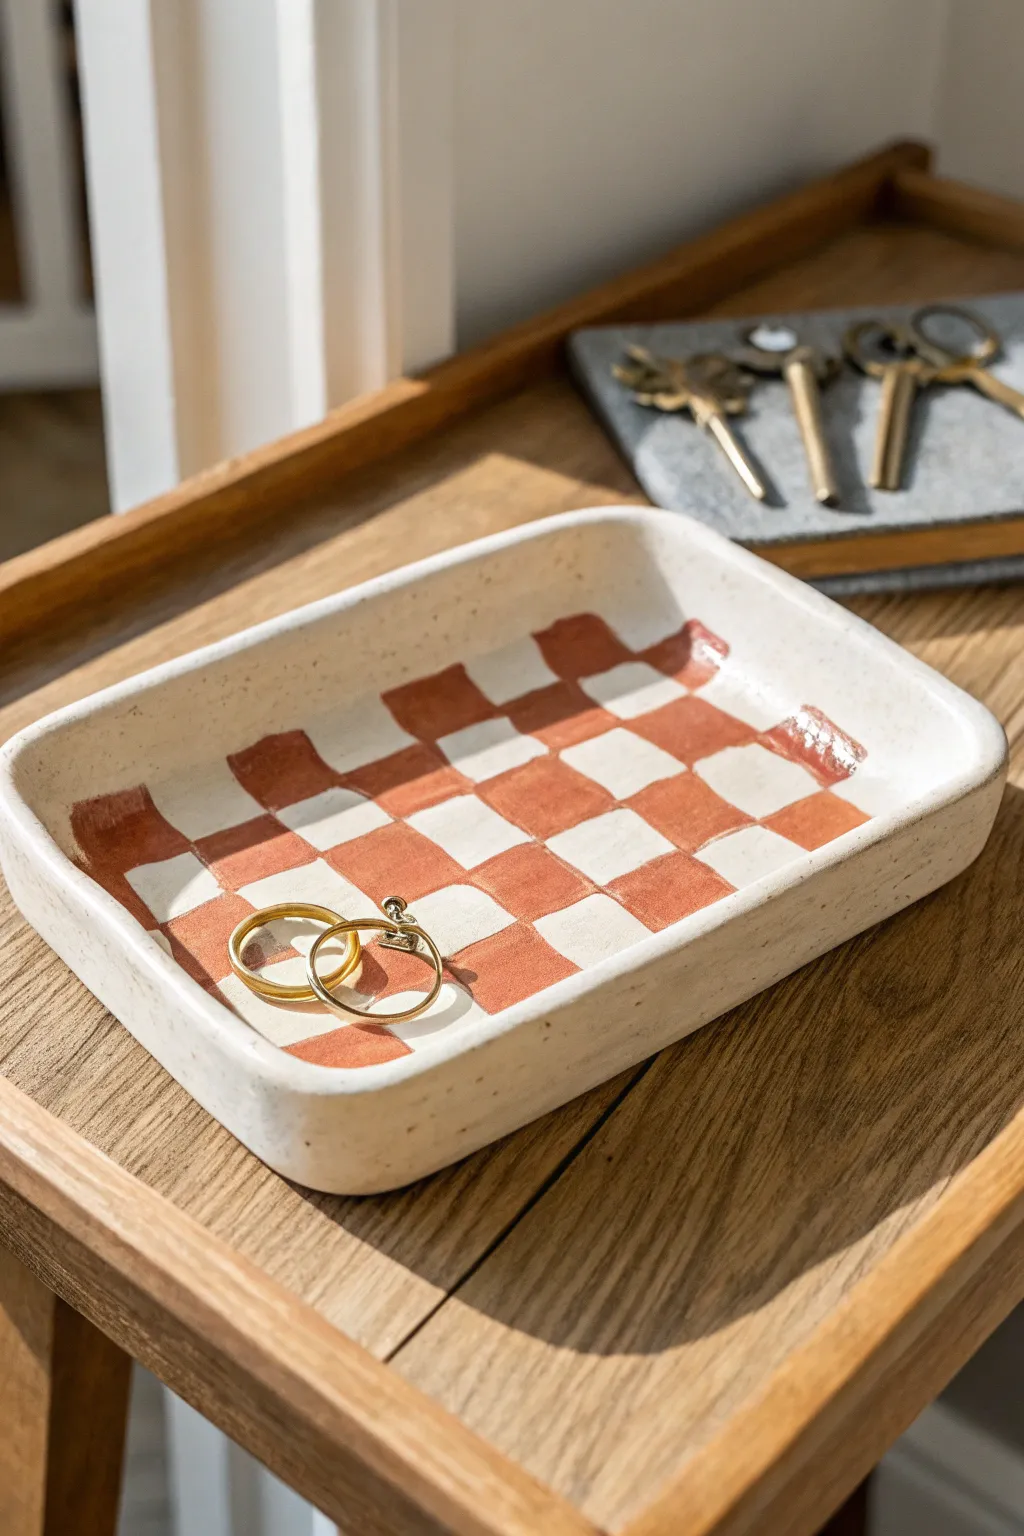
This trendy catchall tray combines the earthy warmth of terracotta with a classic checkerboard pattern for a piece that feels both modern and handmade. The natural, imperfect lines give it a charming organic look that looks perfect on an entryway table.
Step-by-Step
Materials
- Air dry clay (white or stone color)
- Acrylic paint (terracotta/burnt sienna and warm cream)
- Rolling pin
- Clay knife or craft knife
- Small bowl of water
- Fine grit sandpaper
- Flat shader brush (size 6 or 8)
- Ruler
- Pencil
- Gloss or matte varnish (sealer)
Step 1: Shaping the Clay
-
Condition the Clay:
Start by grabbing a large handful of air dry clay. Knead it in your hands for a minute or two to warm it up and make it pliable, which helps prevent cracks later on. -
Roll the Slab:
On a clean, flat surface, use your rolling pin to flatten the clay into an even slab. Aim for a thickness of about 1/4 inch so the base is sturdy but not too heavy. -
Cut the Rectangle:
Use a ruler and your clay knife to cut a clean rectangle from the slab. A size of roughly 5×7 inches works well for a trinket tray. -
Create the Sidewalls:
Roll out a long snake or coil of clay, keeping it about the thickness of a pencil. This will become the rim of your tray. -
Attach the Walls:
Score the outer edges of your rectangle base and the underside of your clay coil with a knife. Dab a little water on the scored areas to act as glue. -
Blend the Seams:
Place the coil on top of the rectangle’s edge. Using your thumb or a modeling tool, firmly smooth the clay downwards on the outside and inside so the coil blends seamlessly into the base. -
Smooth the Form:
Dip your finger in water and run it over the rim and walls to smooth out any fingerprints. I find it helpful to gently pinch the corners to round them off slightly for that soft look shown in the photo. -
Dry Completely:
Set the tray aside in a cool, dry place. Let it dry for at least 24-48 hours until it is completely hard and turns white.
Pro Tip: Seamless Walls
When blending the coil wall to the base, support the outside with one hand while smoothing the inside effectively. This prevents the wall from collapsing outward.
Step 2: Painting the Pattern
-
Sand Imperfections:
Once fully dry, take your fine grit sandpaper and gently buff away any rough spots on the rim or surface. Wipe away the dust with a damp cloth. -
Base Coat:
Paint the entire tray, inside and out, with your warm cream acrylic paint. Apply two coats if necessary for full coverage, letting it dry between layers. -
Grid the Design:
Very lightly sketch a grid inside the tray using a pencil and ruler. Don’t worry about perfect geometric precision; the hand-drawn look is part of the charm. -
Mix the Color:
Prepare your terracotta color. If you don’t have a pre-mixed tube, mix burnt sienna with a touch of red and a tiny bit of white to get that soft, earthy hue. -
Paint First Checks:
Using a flat shader brush, fill in every other square with the terracotta paint. Start from the center and work your way out to avoid smudging. -
Extend the Pattern:
Continue the pattern up the sides of the interior walls. The checks should naturally flow up the rim, creating a ‘wobbly’ but cohesive grid. -
Refine Edges:
If you want cleaner lines, you can touch up the cream squares with a small brush, but leaving slight brushstroke textures adds to the artisanal aesthetic. -
Seal the Piece:
Once the paint is bone dry, apply a coat of varnish. A semi-gloss finish will protect the paint from chipping and give it a slight ceramic sheen.
Level Up: Speckled Effect
Before sealing, flick a toothbrush loaded with diluted brown paint over the tray. This creates faux ceramic speckles for even more texture.
Place your jewelry or keys inside and enjoy your stylish new organizer
Color-Blocked Rainbow Wall Hanging
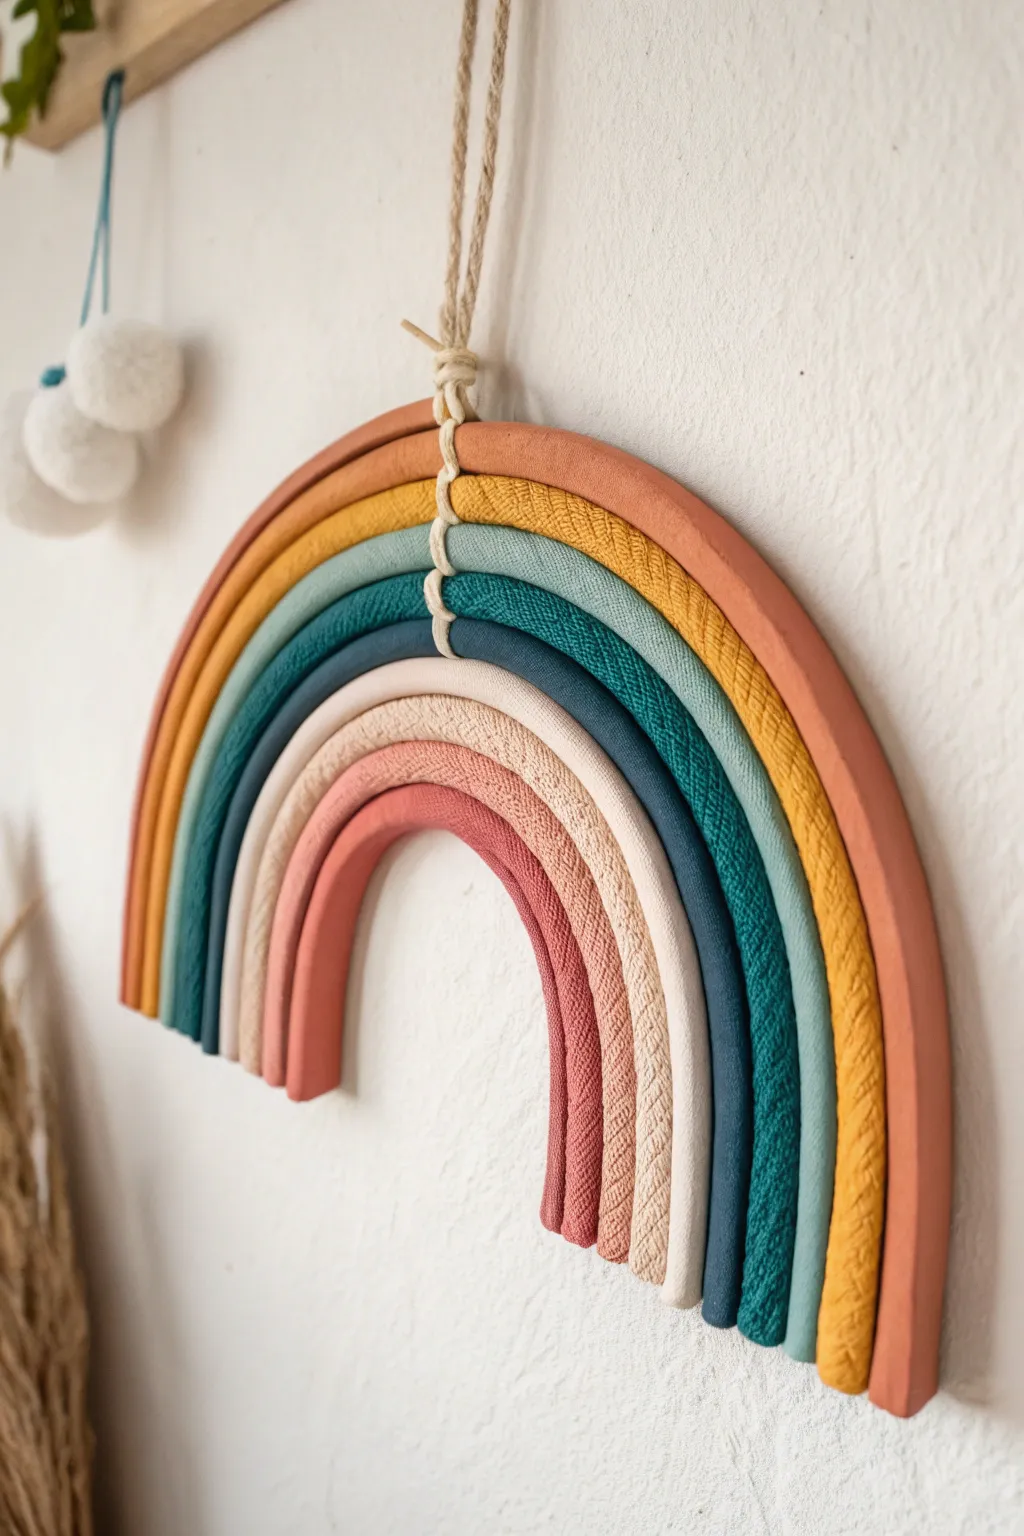
Bring warmth and texture to your walls with this unique take on the classic macrame rainbow. By using air-dry clay, you can achieve clean, color-blocked arches with imprinted textures that mimic woven fabric.
Step-by-Step Tutorial
Materials
- Air dry clay (white or terracotta)
- Acrylic paints (terracotta, mustard yellow, teal, navy blue, beige, dusty pink, coral)
- Small rolling pin
- Fabric scraps or burlap (for texture)
- Knife or clay cutting tool
- Water cup and sponge
- Strong craft glue or hot glue gun with glue sticks
- Durable twine or macrame cord (natural color)
- Paintbrushes (flat and detail)
- Sandpaper (fine grit)
- Ruler
Step 1: Shaping the Arches
-
Condition the Clay:
Begin by taking a large chunk of air-dry clay and kneading it in your hands until it becomes soft, pliable, and free of cracks. -
Roll the Coils:
Divide your clay into seven portions, gradually decreasing in size. Roll each portion into a long, even snake or coil on a flat surface. -
Form the Rainbow Shape:
Start with the smallest coil to create the innermost arch. Bend it into a ‘U’ shape. Then, take the next size up and curve it snugly around the first one. Continue this process until all seven arches are nested together. -
Add Texture:
This is where the magic happens. Select alternating coils (like the 2nd, 4th, and 6th arches) to texture. Press a piece of burlap or coarse fabric firmly onto the surface of the wet clay to imprint a woven pattern. -
Keep Some Smooth:
Leave the remaining coils smooth for a nice visual contrast against the textured ones. Use a slightly damp sponge to wipe away fingerprints on these smooth sections. -
Trim the Ends:
Place a ruler across the bottom of your rainbow shape. Use your knife to slice straight across all the coils at once, ensuring the bottom is perfectly flush and flat. -
Separate and Dry:
Carefully separate the arches slightly so they don’t stick together while drying. I usually let them sit for at least 24-48 hours, flipping them once halfway through to ensure the undersides dry completely. -
Sand Imperfections:
Once fully cured and hard, gently sand any rough edges or uneven spots, particularly on the smooth arches and the cut bottoms.
Clean Lines
If you’re struggling to get perfectly smooth coils, roll the clay between two guide sticks of the same thickness. This ensures consistent diameter along the entire length.
Step 2: Painting and Assembly
-
Base Coat:
Apply a coat of white gesso or primer if you are using grey clay, though this is optional for white clay. It helps the colors pop. -
Apply Colors:
Paint each arch a distinct color. Following the reference, use terracotta for the outer arch, followed by mustard yellow, light teal, dark teal, dark navy blue, beige, dusty pink, and coral for the center. -
Highlight Texture:
For the textured arches, paint them solidly first. Once dry, you can lightly dry-brush a slightly lighter shade over the top to catch the raised ‘woven’ details. -
Seal the Project:
Apply a matte varnish specifically for the smooth arches if you want a subtle sheen, or leave them raw for a more organic look. Let the paint dry completely. -
Assemble the Arches:
Arrange the arches back into their nested rainbow formation. Run a bead of strong craft glue or hot glue along the inner curve of the largest arch and press the next arch into it. Repeat until the whole rainbow is a solid unit. -
Attach the Hanger:
Cut a length of thick twine or macrame cord. Fold it in half to create a loop. Tie a knot about two inches down to secure the loop. -
Secure the Knot:
The unique detail in this project is the knot visible at the top. pass the loose ends of your twine through the gaps between the top two arches or glue the knot directly to the top center, ensuring the tails run down the back for support. -
Add Decorative Ties:
To mimic the image, wrap a small piece of thinner twine around the center of the top three arches, tying them together visually. Secure this with a dab of glue on the back.
Go Botanical
Instead of fabric texture, press dried flowers or leaves into the wet clay for a nature-inspired imprint before painting your rainbow.
Hang your beautiful new artwork in a nursery or living space to add a handmade touch of joy

TRACK YOUR CERAMIC JOURNEY
Capture glaze tests, firing details, and creative progress—all in one simple printable. Make your projects easier to repeat and improve.
Ombre Fade on Mini Pots
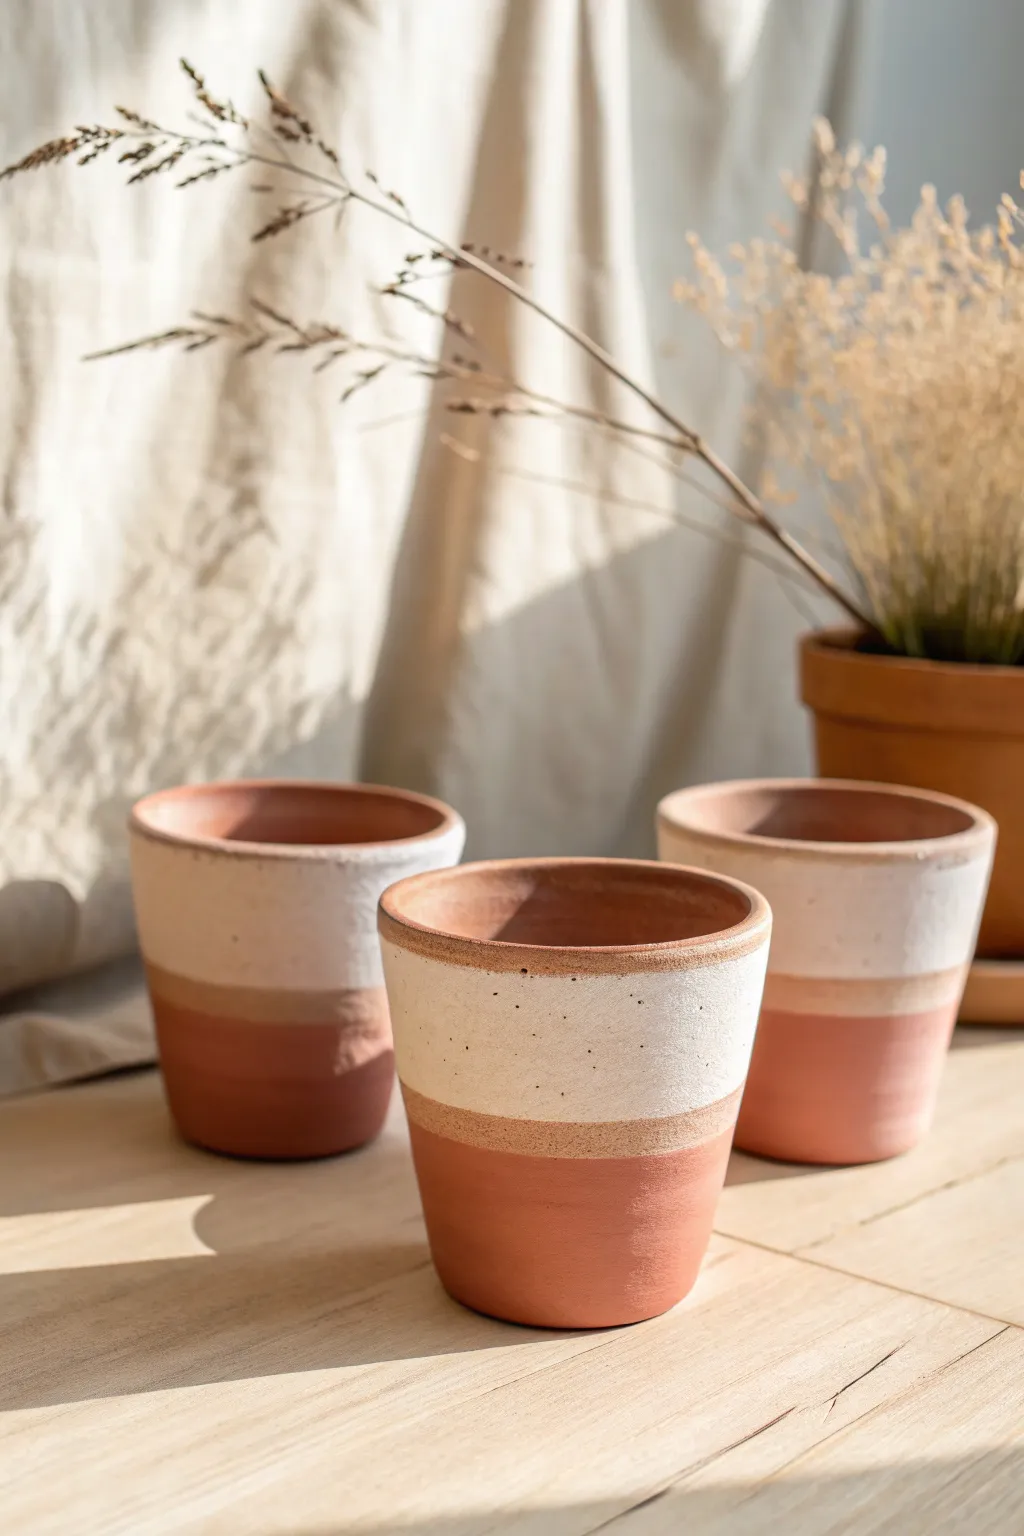
Transform regular clay pots into trendy, minimalist decor pieces featuring a soft color-blocked design. This project mimics the look of high-end ceramic studio pottery using simple acrylic paints and a clever speckling technique.
Detailed Instructions
Materials
- Small terracotta pots (or air dry clay pots you’ve made)
- White or cream acrylic paint
- Beige or sand-colored acrylic paint
- Soft flat paintbrush (medium size)
- Old toothbrush
- Palette or paper plate
- Masking tape or painter’s tape
- Brown or dark grey acrylic paint (for speckles)
- Matte finish sealant spray or varnish
Step 1: Preparation & Base Coat
-
Clean the surface:
Ensure your pots are completely free of dust or oils. If you are using raw terracotta, wipe them down with a damp cloth and let them dry fully. -
Tape the bottom line:
Decide where you want the raw clay look to end and the painted section to begin. This looks best about one-third of the way up from the bottom. Apply a ring of masking tape around the pot to create a crisp line. -
Seal the tape edge:
Press down firmly on the edge of the tape with your fingernail to prevent paint from bleeding underneath. -
Mix the sandy hue:
Prepare a beige or sand color on your palette. If you only have white and brown, mix a small drop of brown into white until you get a warm, earthy tone. -
Paint the middle section:
Paint a band around the pot directly above your tape line, extending upwards about an inch. Don’t worry about the top edge of this band being perfect; we want a soft transition later.
Uneven Splatter?
If the toothbrush flicks large blobs instead of mist, your paint is too thick. Add more water to the mix and test on cardboard first until you get a fine spray.
Step 2: Creating the Fade
-
Whiten the top:
Dip your brush into the white or cream paint. Start painting from the top rim downwards. -
Paint the rim:
Don’t forget to paint the top lip on the inside of the pot for a finished look, extending down just an inch inside. -
Blend the meeting point:
Where the white paint meets the wet beige paint, gently stroke the brush back and forth horizontally. This blends the two colors slightly, creating a softer transition rather than a hard line. -
Second coat:
Allow the paint to dry to the touch (about 10-15 minutes), then add a second coat of white to the top section if the coverage looks thin. -
Refine the transition:
If the line between white and beige got too messy, I usually go back with a slightly dry brush of beige and dab lightly over the transition zone to re-establish that sandy warmth.
Keep it Matte
Avoid glossy varnishes for this project. A matte finish spray keeps the pottery looking natural and earthy, enhancing that high-end studio ceramic vibe.
Step 3: Detailing & Finishing
-
Prepare the speckle mix:
Dilute a very small amount of dark brown or dark grey paint with a drop of water. It should be fluid, like ink. -
Load the tool:
Dip the bristles of an old toothbrush into your diluted paint mixture. You don’t need much—wiping excess off on paper towel helps. -
Apply the speckles:
Hold the toothbrush a few inches away from the painted section of the pot. Run your thumb across the bristles to flick tiny droplets of paint onto the white and beige areas. -
Check consistency:
Rotate the pot carefully to ensure the speckling is relatively even all around. Aim for fine mist-like dots rather than large globs. -
Remove tape:
Once the paint is dry but not fully cured (about 20 minutes later), carefully peel off the masking tape to reveal the clean line against the raw clay bottom. -
Seal the work:
Protect your paint job with a matte sealer. This is crucial if you plan to put real plants inside, as moisture can bubble acrylic paint over time.
Let your pots cure overnight before popping in a succulent or dried floral arrangement
Terrazzo Speckles for a Trendy Look
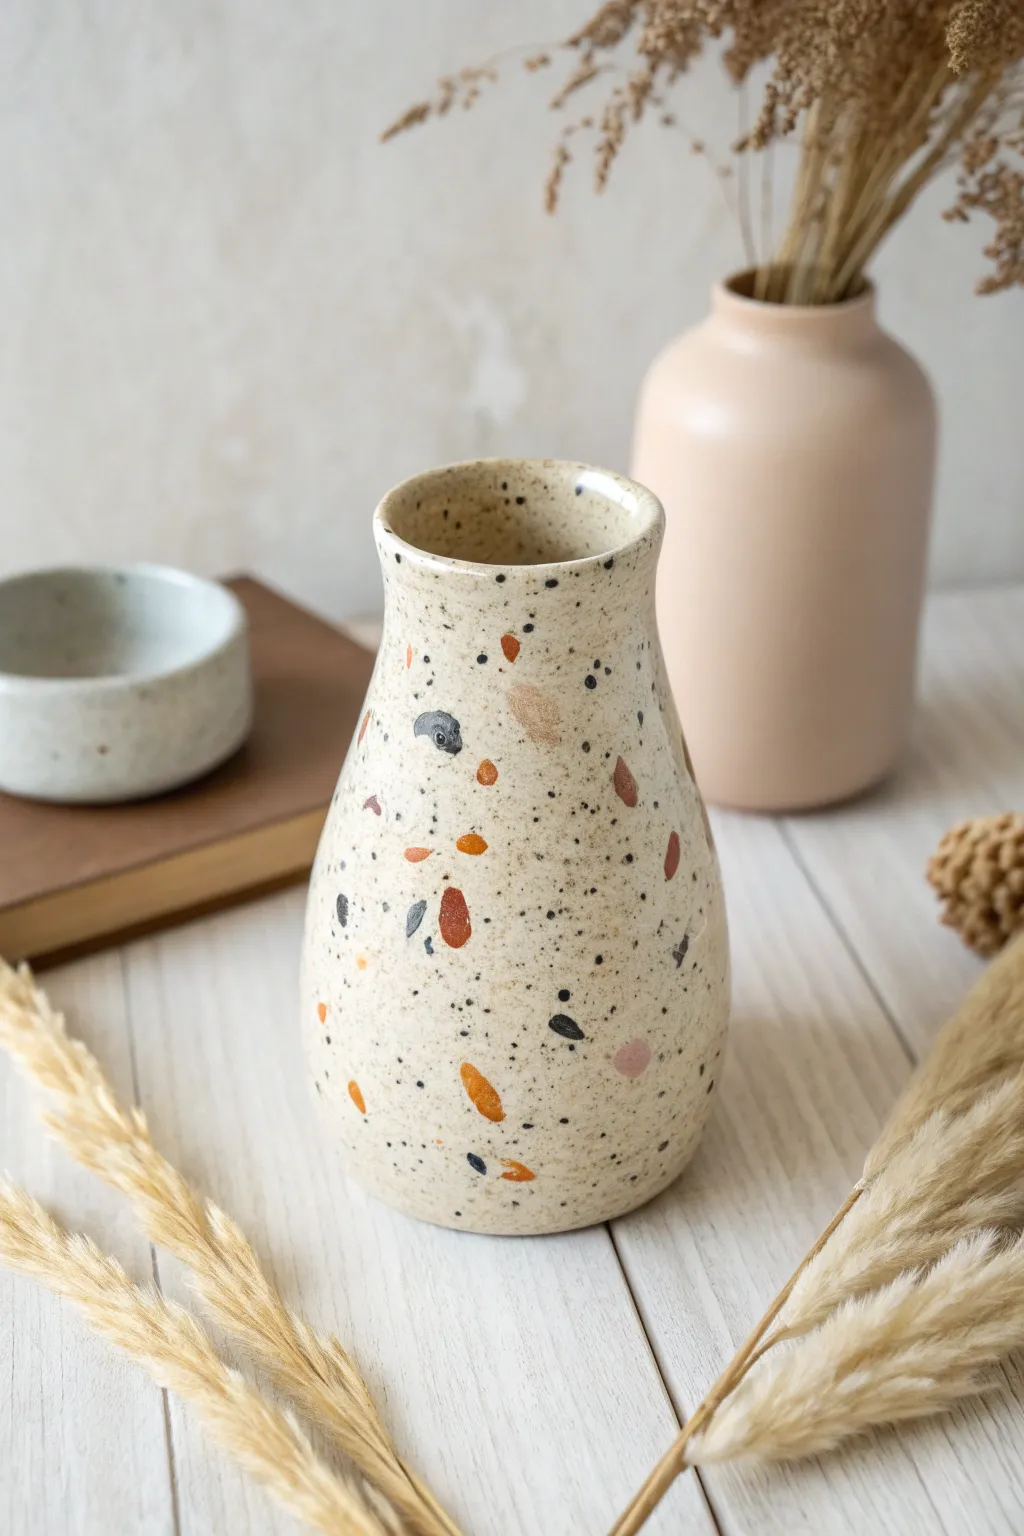
Bring the high-end look of terrazzo stone into your home without the heavy price tag using simple painting techniques. This project transforms a basic air dry clay vase into a chic, speckled masterpiece that mimics polished aggregate set in concrete.
How-To Guide
Materials
- Air dry clay (white or light grey)
- Acrylic rolling pin
- Clay carving tools or knife
- Sponge or sandpaper (fine grit)
- Water in a small cup
- Acrylic paints: Cream/Off-white (base), Terracotta/Rust, Burnt Umber, Slate Grey, Black
- Small round paintbrushes (sizes 0 and 2)
- Old toothbrush (for splattering)
- Palette or paper plate
- Gloss or satin varnish/sealant
- Glass jar or bottle (optional, to use as an armature)
Step 1: Sculpting the Base Form
-
Prepare the clay:
Begin by conditioning your air dry clay, kneading it in your hands until it becomes soft, pliable, and free of cracks. -
Create the base cylinder:
Roll out a slab of clay to about a 1/4 inch thickness. Wrap this slab around a glass jar or bottle to use as a temporary support, or free-hand a cylinder shape by joining the edges. -
Blend the seam:
Use a little water on your finger to smooth the seam where the clay edges meet so the join becomes invisible. -
Shape the neck:
Gently pinch and gently squeeze the upper portion of the cylinder to taper it inward, creating the vase’s neck. -
Flare the rim:
At the very top, press your thumb on the inside edge and gently push outward to create a subtle, smooth lip. -
Smooth the surface:
Dip a sponge in water and squeeze it out well, then wipe down the entire exterior to remove fingerprints and bumps. -
Dry completely:
Set the vase aside in a dry area away from direct sunlight. Let it cure for 24-48 hours until it turns chalky white and hard.
Uneven Splatter?
If the toothbrush leaves big blobs, practice on a piece of scrap paper first. Keep the brush drier; too much water creates runny drips rather than fine mist.
Step 2: Painting the Terrazzo Effect
-
Apply the base coat:
Paint the entire vase with a cream or warm off-white acrylic paint. You may need two coats for full opacity, allowing drying time in between. -
Mix your ‘stone’ colors:
Prepare your palette with small blobs of Terracotta, Slate Grey, Burnt Umber, and a softer pink-beige. -
Paint large chips:
Using a size 2 round brush, paint irregular, angular shapes scattered across the surface. These represent the larger stone chunks in terrazzo. I like to rotate the vase often so the pattern looks random. -
Vary the colors:
Switch colors frequently as you add these larger shapes, ensuring that no two identical colors are clumped too closely together. -
Add medium details:
Switch to a smaller brush and add medium-sized dots and smaller irregular shapes to fill the larger gaps between the big ‘stones’. -
Create fine speckles:
Dilute a small amount of black paint with a drop of water until it is inky. -
Splatter technique:
Dip an old toothbrush into the diluted black paint. Hold it near the vase and run your thumb across the bristles to flick tiny, natural-looking speckles onto the surface. -
Refine the look:
If any splatters are too big, simply dab them up quickly with a paper towel or paint over them with the base cream color once dry. -
Seal the piece:
Once the paint is bonedry, apply a coat of gloss or satin varnish. This protects the paint and mimics the polished finish of real terrazzo stone.
Layering Pro-Tip
Let the large painted shapes dry completely before doing the splatter step. This keeps the black speckles distinct and prevents muddy smears on your colorful ‘stones’.
Now you have a trendy decorative piece that adds a modern artistic touch to any shelf or table
Leaf Impressions With a Dark Wash
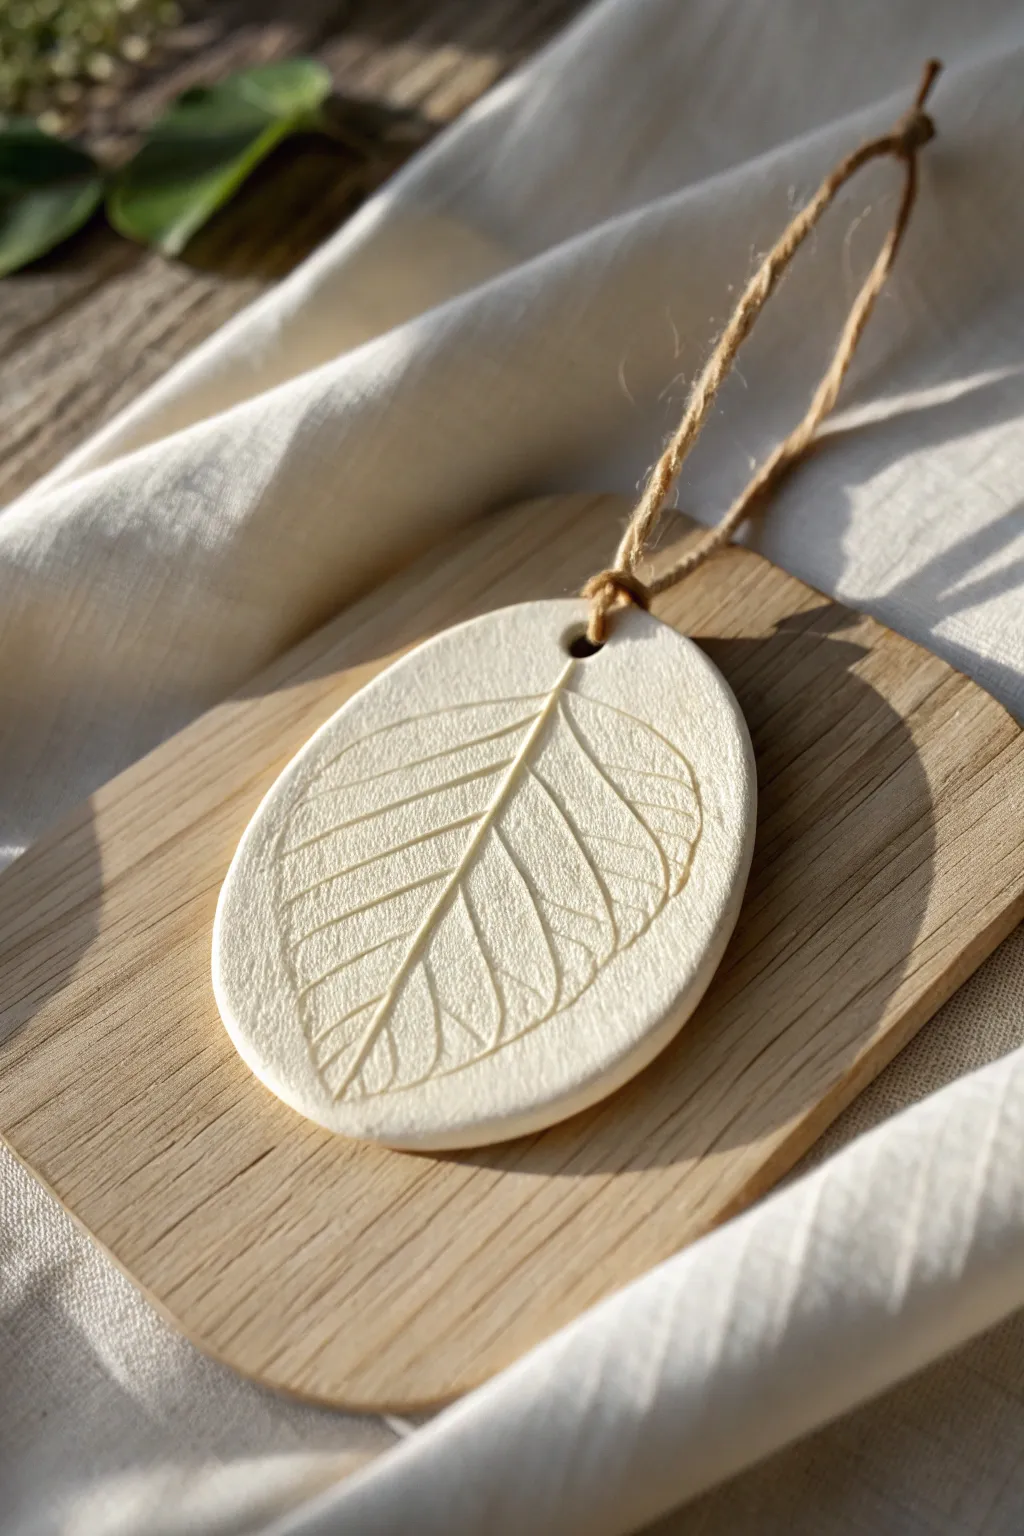
Capture the delicate beauty of nature with this minimalist air dry clay project. By pressing a real leaf into smooth clay, you’ll create a sophisticated, fossil-like relief that makes for stunning wall art or a unique gift tag.
Step-by-Step Tutorial
Materials
- White or cream air dry clay
- Fresh leaf with prominent veins (e.g., hydrangea, beech, or mint)
- Rolling pin or smooth glass jar
- Oval cookie cutter (or a knife and template)
- Parchment paper or non-stick mat
- Straw or small circular cutter for the hole
- Jute twine or hemp cord
- Fine grit sandpaper (220 grit or higher)
- Cup of water and a sponge
Step 1: Preparing the Clay Canvas
-
Condition the clay:
Begin by taking a handful of air dry clay and kneading it in your hands until it is warm, pliable, and free of any air bubbles. -
Roll out the slab:
Place your clay on a sheet of parchment paper. Roll it out to an even thickness of about 1/4 inch (6mm). If you want a smoother surface, dip your finger in water and gently glide over the clay to remove any surface cracks. -
Select your leaf:
Choose a fresh leaf rather than a dried one, as dried leaves will crumble. Turn the leaf over to check the back; the underside usually has more prominent veins which will create a deeper, clearer impression. -
Position the leaf:
Place the leaf vein-side down onto the center of your rolled clay slab. Think about the composition; centering it usually works best for this oval shape.
Stuck Leaf?
If the leaf refuses to peel off easily, let the clay dry for about 10-15 minutes. As the moisture evaporates, the leaf will usually lift on its own.
Step 2: Creating the Impression
-
Embed the leaf:
Take your rolling pin and roll firmly over the leaf once or twice. You want to press it deeply enough to capture the fine details, but not so hard that you thin the clay out drastically. -
Remove the leaf:
Use the stem or a pair of tweezers to carefully lift the leaf away from the clay. Peel it back slowly to reveal the intricate impression left behind. -
Cut the shape:
Position your oval cookie cutter over the impression so the leaf fits nicely within the frame. Press down firmly to cut the shape. -
Clean the edges:
Remove the excess clay from around the oval. If the edges are ragged, dip your finger in a little water and smooth them down gently while the clay is still wet. -
Create the hanging hole:
Using a plastic straw or a small circular tool, punch a hole near the top of the oval. Make sure it isn’t too close to the edge to prevent cracking.
Highlight With Wash
To evolve the look, mix brown acrylic paint with water (1:1 ratio). Brush it into the veins, then immediately wipe the surface with a damp cloth.
Step 3: Finishing Touches
-
Dry the piece:
Leave the ornament to dry on a flat surface in a cool place away from direct sunlight. I like to flip the piece over halfway through the drying process (usually after 24 hours) to prevent it from warping. -
Sand for perfection:
Once fully cured (usually 24-48 hours), check the edges for any sharp spots. Use fine-grit sandpaper to gently buff the rim until it feels smooth to the touch. -
Optional sealing:
To protect that raw, matte look shown in the image, you can leave it bare or apply a very thin coat of matte varnish. -
Add the hanger:
Cut a length of jute twine roughly 8 inches long. -
Knot the cord:
Thread one end of the twine through the hole in your ornament. -
Secure the loop:
Bring the ends of the twine together and tie a simple overhand knot near the top to create a loop for hanging, trimming any excess ends if necessary.
Hang your new botanical relief in a window or on a handle to bring a touch of the outdoors inside
Metallic Rim and Edge Accents
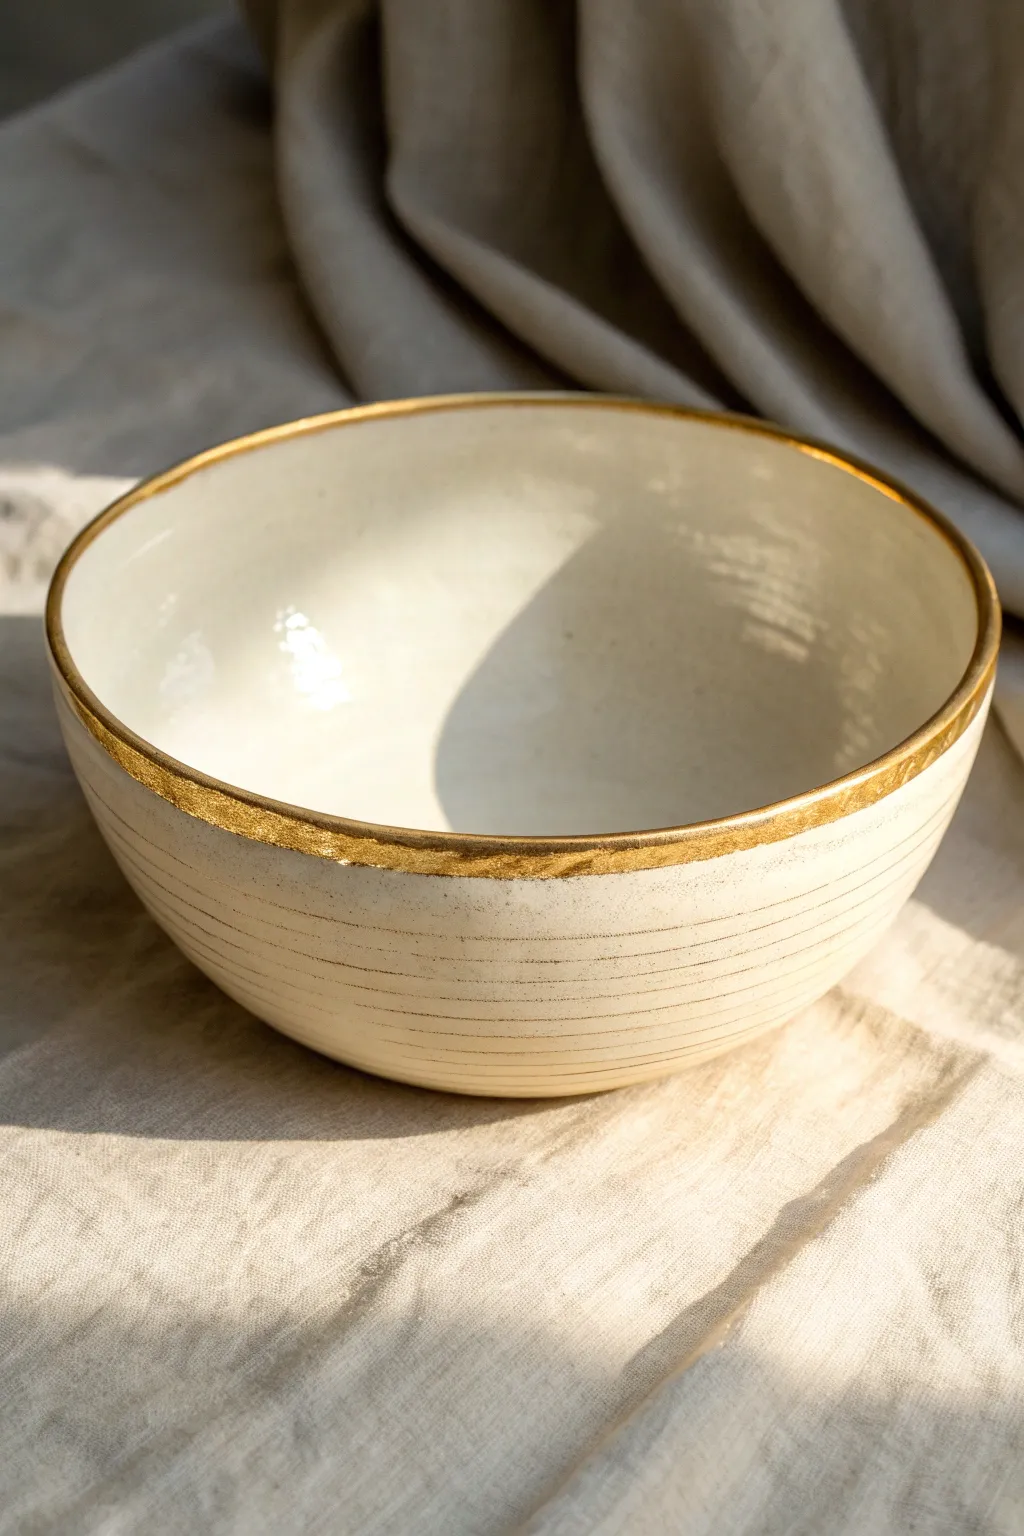
Elevate a simple handmade bowl with a touch of luxury using a brilliant metallic gold rim. This project combines rustic, carved textures with an elegant finish, creating a piece that looks like high-end ceramic studio pottery.
How-To Guide
Materials
- White beautiful air-dry clay (smooth texture)
- Rolling pin
- Bowl mold (existing bowl to shape over)
- Plastic wrap
- Sponge and water
- Pottery needle tool or toothpick
- Fine grit sandpaper (220-400 grit)
- White acrylic paint (warm or creamy white)
- High-gloss varnish or sealant
- Liquid gilding paint or gold leaf pen
- Small flat brush
- Soft round brush
Step 1: Shaping the Clay Base
-
Prepare your clay:
Start with a generous ball of white air-dry clay. Knead it in your hands for a few minutes to warm it up and ensure it’s pliable and free of air bubbles. -
Roll out a slab:
Using a rolling pin, roll the clay out on a flat surface to an even thickness of about 1/4 inch. If you want a more organic look, slight variations in thickness are fine. -
Prepare your mold:
Take a kitchen bowl that has the shape you want to replicate. Cover the outside of the bowl tightly with plastic wrap to prevent the clay from sticking. -
Form the bowl:
Drape your clay slab over the upside-down bowl. Gently press the clay against the sides, smoothing it down with your hands to conform to the shape. -
Trim the edges:
Use a knife or clay tool to trim away the excess clay at the bottom (which is currently the top of your workspace) to create an even rim. Don’t worry about perfection yet; we’ll sand it later. -
Smooth the surface:
Dip a sponge lightly in water and run it over the exterior of the clay to smooth out any fingerprints or canvas marks.
Step 2: Adding Texture and drying
-
Create the carved lines:
While the clay is still leather-hard (firm but not dry), place the bowl on a banding wheel or a lazy susan if you have one. Hold a needle tool or toothpick steady against the side. -
Spin and carve:
Slowly rotate the bowl while keeping your hand steady to carve thin, horizontal grooves around the exterior. Repeat this from the base up to the rim, spacing the lines irregularly for a hand-thrown look. -
Initial drying phase:
Let the clay sit on the mold for about 24 hours until it holds its shape firmly. Removing it too early can cause warping. -
Remove from mold:
Carefully lift the clay off the mold and peel away the plastic wrap. Set the bowl right-side up to allow the interior to dry completely. This usually takes another 24-48 hours depending on humidity. -
Refine the rim:
Once fully bone dry, use fine-grit sandpaper to gently smooth the top rim. I like to round the edge slightly so it isn’t sharp or boxy. -
Sand the body:
Lightly sand the exterior and interior to remove rough patches, being careful not to sand away your carved lines entirely. Wipe away all dust with a barely damp cloth.
Clean Lines Tip
To get straighter carved lines without a pottery wheel, rest your hand on a stack of books at the right height while you rotate the bowl manually.
Step 3: Painting and Gilding
-
Apply the base coat:
Paint the entire bowl, inside and out, with a creamy white acrylic paint. You may need two thin coats for opaque coverage. Let the paint dry fully between layers. -
Seal with gloss:
To mimic the look of glazed ceramic, apply two coats of high-gloss varnish. This seals the clay and gives it that shiny, finished surface seen in the reference image. -
Prepare the gold:
Shake your liquid gilding paint well. Liquid gilding creates a much more brilliant, metallic shine than standard gold acrylic paint. -
Paint the rim:
Load a small flat brush with the gold. Carefully paint the top edge of the rim. Allow the brush to naturally slip slightly over the edge onto the interior and exterior to create an organic, uneven gold band. -
Add detail:
If you want a heavier gold look, thicken the line in certain spots. The goal is a wabi-sabi finish, so shaky hands actually help here. -
Final cure:
Let the gilding dry completely according to the manufacturer’s instructions. Keep in mind that decorative air-dry clay bowls are for dry use only (trinkets, keys), not for food.
Textured Gold
Instead of liquid gilding, try applying gold leaf sheets with sizing glue for a flaky, antique texture that catches light beautifully.
Now you have a stunning, faux-ceramic bowl perfect for holding jewelry or decorative dried flowers
Faux Stoneware Speckle Finish
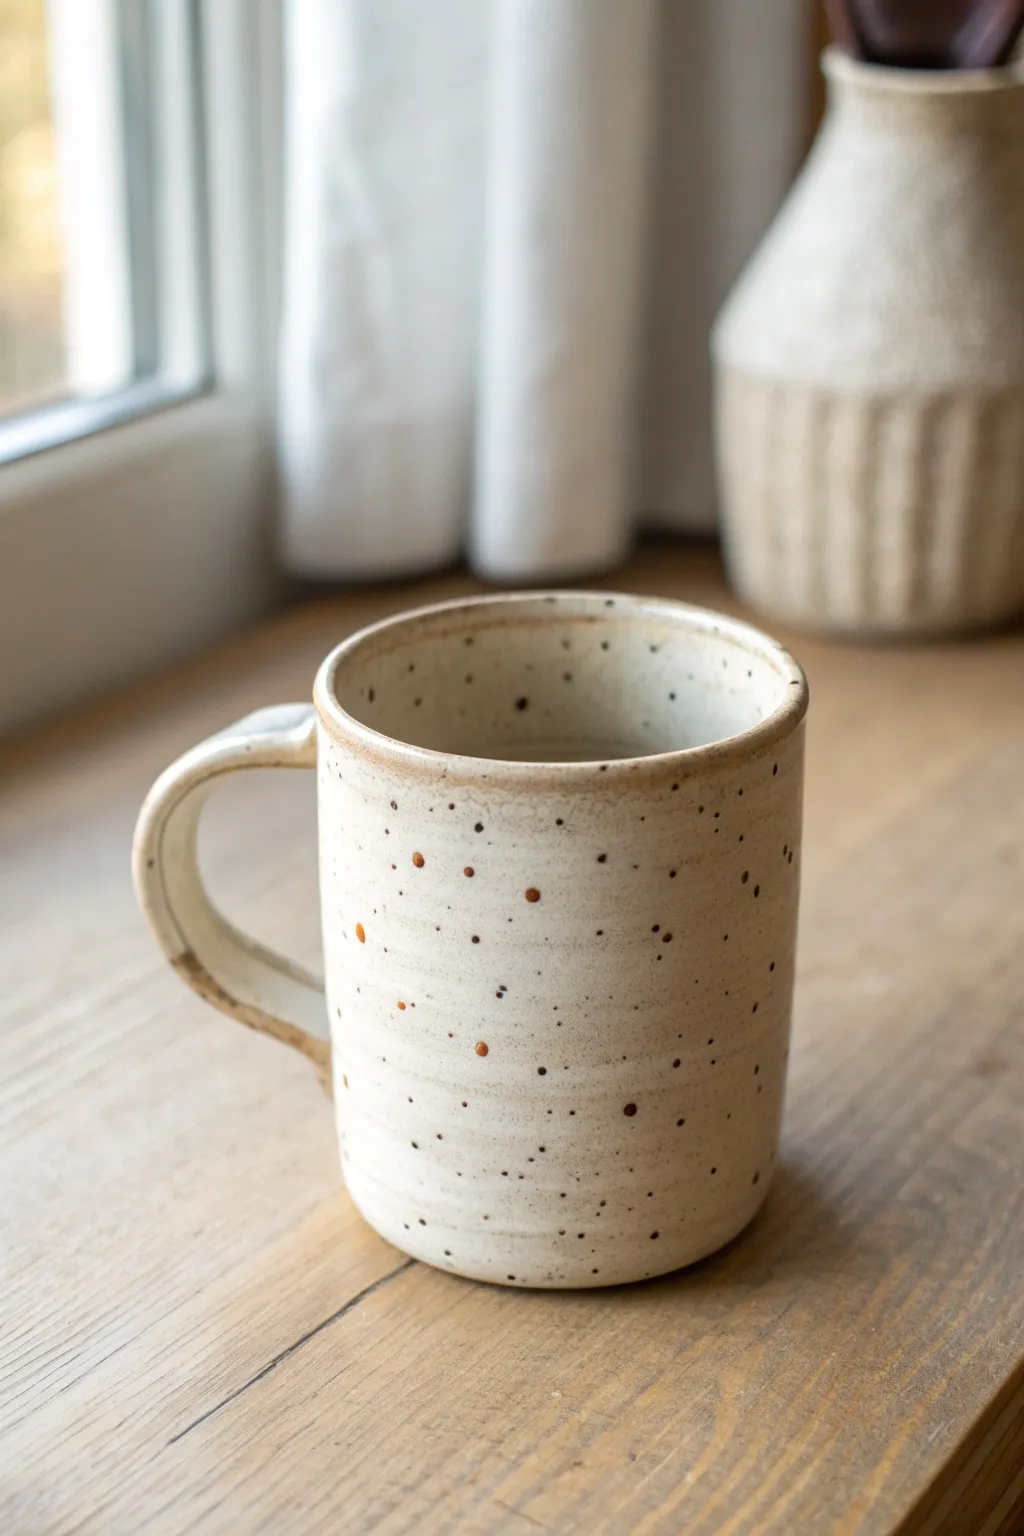
Transform a basic white ceramic mug into an earthy, artisan piece that looks freshly wheel-thrown. This painting technique uses clever layering and splattering to mimic the cozy, imperfect charm of speckled stoneware pottery.
Step-by-Step Tutorial
Materials
- Plain white or light cream ceramic mug (matte finish preferred)
- Sandpaper (medium grit)
- Acrylic paints: warm white/cream, burnt sienna, dark chocolate brown, black
- Glazing medium or gloss varnish
- Old toothbrush or stiff bristle brush
- Soft synthetic flat brush (medium size)
- Small round detail brush
- Water jar and paper towels
- Painter’s tape (optional)
- Cardboard box or splatter guard
Step 1: Preparation & Base Coat
-
Surface Prep:
Begin by thoroughly washing and drying your mug to remove any oils. If the existing glaze is very shiny, lightly scuff the surface with medium-grit sandpaper to give the paint something to grip onto. -
Mix the Base Color:
Create a warm, creamy stoneware base color. Mix your white acrylic paint with just a tiny drop of burnt sienna. You want an off-white, oatmeal tone rather than a stark, clinical white. -
First Coat Application:
Apply the first layer of your cream mixture using the flat brush. Don’t worry about perfect smoothness just yet; distinct brushstrokes can actually add to the hand-thrown pottery aesthetic. -
Dry and Repeat:
Allow the first coat to dry completely for about 20 minutes. Apply a second coat to ensure full opacity, making sure you cover the handle and the top rim thoroughly. -
Adding Texture (Optional):
While the second coat is still slightly tacky, I like to drag a dry brush horizontally around the mug’s body. This mimics the subtle ridges often left by fingers during the wheel-throwing process.
Step 2: Creating the Stoneware Look
-
Rim Detailing:
Mix a small amount of warm light brown paint. Using a relatively dry brush, lightly dab or distressed-paint along the very top rim of the mug to simulate where clay might be thinner or toasted by the kiln. -
Handle Accents:
Apply faint traces of this same light brown wash to the crevices where the handle meets the mug, adding depth and shadow. -
Preparing for Speckles:
Set up a splatter station by placing the mug inside a cardboard box. This part can be messy, and you only want speckles on the mug, not your walls. -
Mixing the Speckle Paint:
Water down a small amount of dark chocolate brown paint until it has an inky consistency. It should be fluid enough to fly off bristles but not so watery that it drips immediately. -
The Toothbrush Method:
Dip an old toothbrush into the thinned brown paint. Point the bristles toward the mug and run your thumb firmly across them to flick a fine mist of paint. -
Varying the Density:
Rotate the mug as you splatter. Create some areas with denser speckling and others that are more sparse to keep the look organic and random. -
Adding Larger Spots:
Switch to your small detail brush. Dip it in un-thinned burnt sienna or dark brown and manually dot a few larger ‘imperfections’ onto the surface. -
Softening the Spots:
While the larger manual dots are wet, lightly tap them with a clean finger to flatten them out so they look baked into the clay rather than sitting on top. -
The Black Accent Layer:
Repeat the toothbrush flicker technique, but this time use thinned black paint and do it very sparsely. This adds depth and simulates different minerals in the clay body.
Uneven Splatter?
If you get a giant blob of paint instead of a mist, quickly dab it away with a damp paper towel before it dries. You can touch up the cream base afterward.
Step 3: Sealing and Finish
-
Drying Time:
Let the paint and splatter cure completely. This usually takes at least an hour, or you can use a hairdryer on a cool setting to speed things up carefully. -
Applying the Glaze:
Mix a high-gloss varnish or dedicated glazing medium. Apply a smooth, even coat over the entire painted surface to give it that true ceramic shine. -
Double Sealing:
Once the first gloss layer is dry, apply a second coat. This not only enhances the ‘wet clay’ look but also protects your paint job from scratches. -
Final Cure:
Let the mug cure for the time recommended on your varnish bottle before handling or displaying. Note that unless you used specific fired ceramic paints, this piece is likely for decor only.
Go Matte
For a more rustic, raw-clay aesthetic, skip the gloss varnish and use a matte sealer instead. This creates a trendy, unglazed stoneware texture.
Place your new artisan-style mug on a sunny shelf and enjoy the warmth of handmade pottery without the kiln
Watercolor-Like Soft Blends on Clay
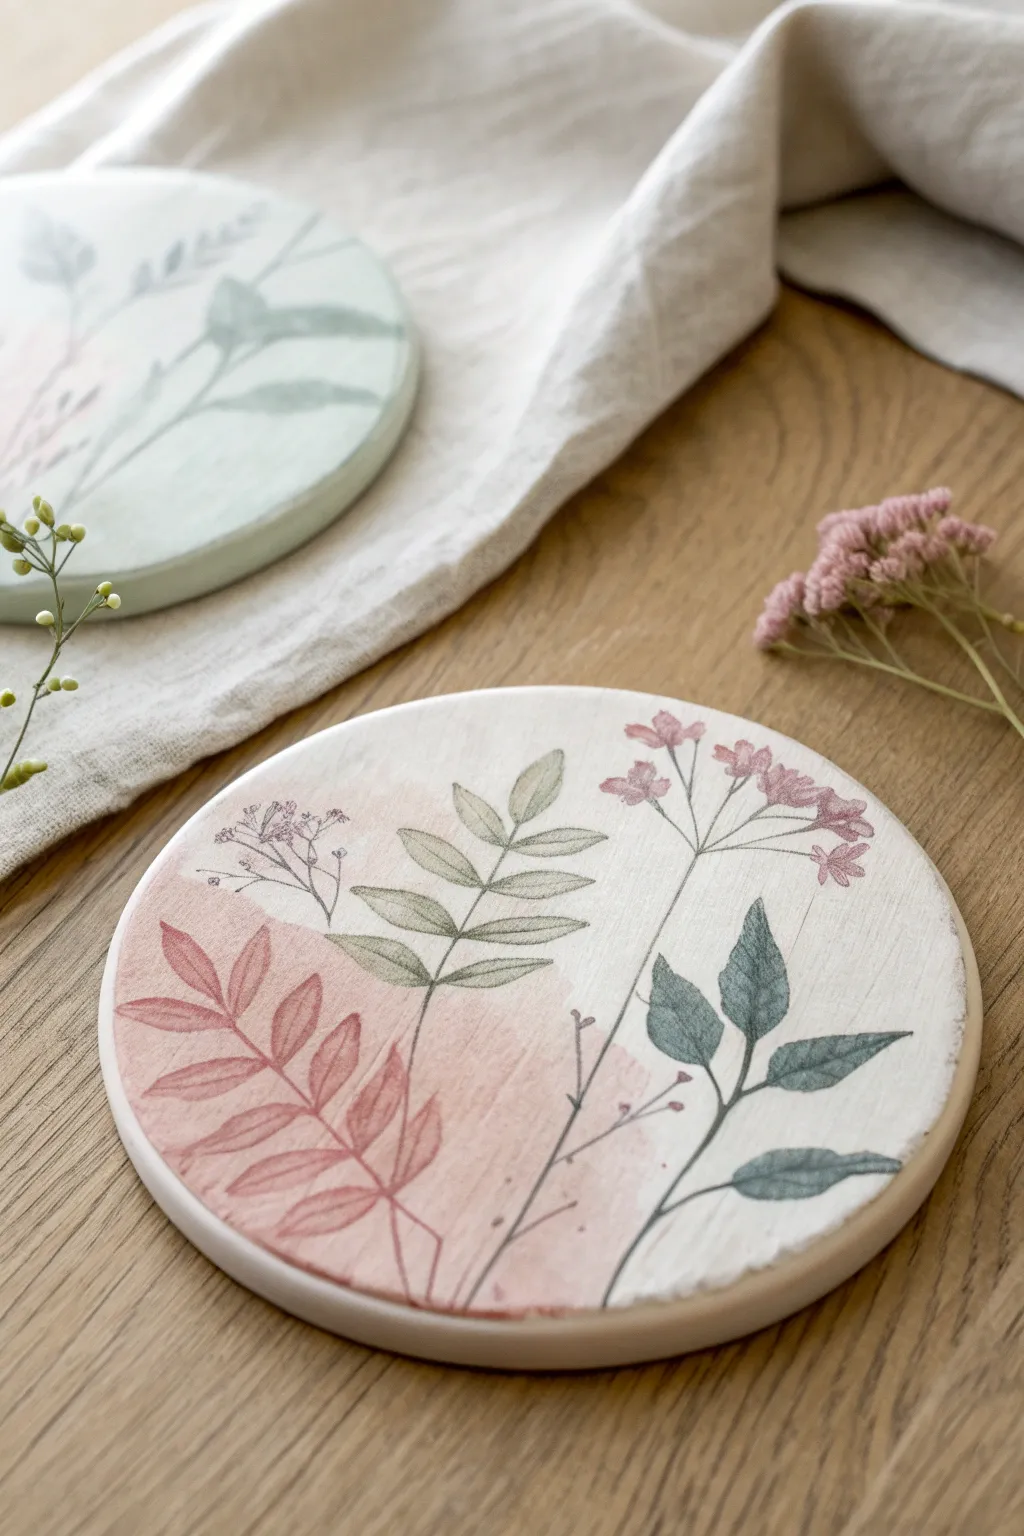
Transform a simple disc of air dry clay into a delicate piece of home decor with this tutorial. These coasters feature soft, blended washes of color and fine botanical line work that mimics the look of a vintage field guide.
How-To Guide
Materials
- White air dry clay
- Rolling pin
- Round cookie cutter (approx. 4 inches)
- Fine grit sandpaper
- Watercolors or diluted acrylic paints (pink, sage green, darker green)
- Soft round paintbrush (size 4 or 6)
- Fine liner brush or extra-fine archival ink pen (black or dark grey)
- Matte spray varnish or sealant
- Water cup and paper towels
Step 1: Shaping the Canvas
-
Roll out the clay:
Begin by kneading your air dry clay until it is smooth and pliable. Roll it out on a non-stick surface to an even thickness of about 1/4 inch. If you want perfectly uniform coasters, placing two wooden guides or dowels on either side of the clay helps keep the rolling pin level. -
Cut the shape:
Use your large round cookie cutter to punch out a circle. If you don’t have a cutter, trace around a bowl with a craft knife for a clean edge. -
Smooth the edges:
Dip your finger in a little bit of water and run it along the cut edge of the clay circle to smooth out any roughness or jagged bits. This small step makes the final product look much more professional. -
Let it dry completely:
Place the clay circle on a wire rack or a piece of parchment paper to dry. Flip it over occasionally to ensure even drying and prevent curling. This usually takes 24-48 hours depending on humidity. -
Sand for smoothness:
Once bone dry, take your fine grit sandpaper and gently buff the surface and edges. You want a silky smooth surface so your paint glides on effortlessly.
Water Control is Key
Air dry clay softens if it gets too wet. Use a ‘dry brush’ technique where you blot excess water on a paper towel before touching the clay surface.
Step 2: Creating the Watercolor Effect
-
Mix a watery wash:
Prepare a very diluted wash of pink or peach paint. You want this to be translucent, more like tinted water than solid paint. If you are using acrylics, mix a tiny dot of paint with plenty of water. -
Apply the background wash:
Using a soft round brush, paint an irregular patch of the pink wash onto the lower left section of the coaster. Don’t try to make a perfect shape; let the edges be naturally soft and feathery. -
Soften the edges:
While the paint is still wet, dip a clean brush in plain water and gently drag it along the edges of your pink patch. This helps fade the color into the white clay seamlessly. -
Let the wash set:
Allow this background color to dry completely. Since air dry clay is porous, it absorbs water quickly, so this shouldn’t take long. I like to wait about 15 minutes just to be safe.
Step 3: Painting the Botanicals
-
Plan your composition:
Visualize where your stems will go. In the example, there is one main central stem, a pink leafy branch over the wash, and a darker green branch on the right. You can lightly sketch this with a pencil if you’re nervous. -
Paint the pink leaves:
Using a slightly more concentrated pink mix than your background wash, paint a fern-like branch directly over the pink background patch. The tone-on-tone effect adds lovely depth. -
Add the central green stem:
Mix a soft sage green. Paint a central stem rising from the bottom center, adding small, oval-shaped leaves branching off symmetrically. Keep the paint fluid but not dripping. -
Create the flowering branch:
To the right of the center, paint a thin, tall stem. Top it with clusters of tiny pink dots or simple 5-petal shapes to represent small wildflowers. Connect them to the main stem with hair-thin lines. -
Paint the dark contrast leaves:
Mix a darker, blue-green shade. On the right side, paint a branch with larger, bolder leaves. This darker value provides a necessary visual anchor for the lighter pastel elements. -
Add fine details:
Once the main paint shapes are dry, you can go back in with a very fine detail brush (or an archival ink pen) to add thin stems, veins in the leaves, or definition to the flower petals. This sharpens the soft watercolor look. -
Seal the artwork:
Because moisture can ruin air dry clay and reactivate watercolors, sealing is crucial. In a well-ventilated area, apply 2-3 light coats of matte spray varnish to protect your coaster without adding unwanted gloss.
Fixing Wobbly Lines
If a painted stem gets too thick or wobbly, wait for it to dry fully, then gently scrape the excess paint away with a craft knife or fine sandpaper.
Now you have a stunning, nature-inspired coaster ready to protect your tabletops with style
Dry-Brushed Highlights on Texture
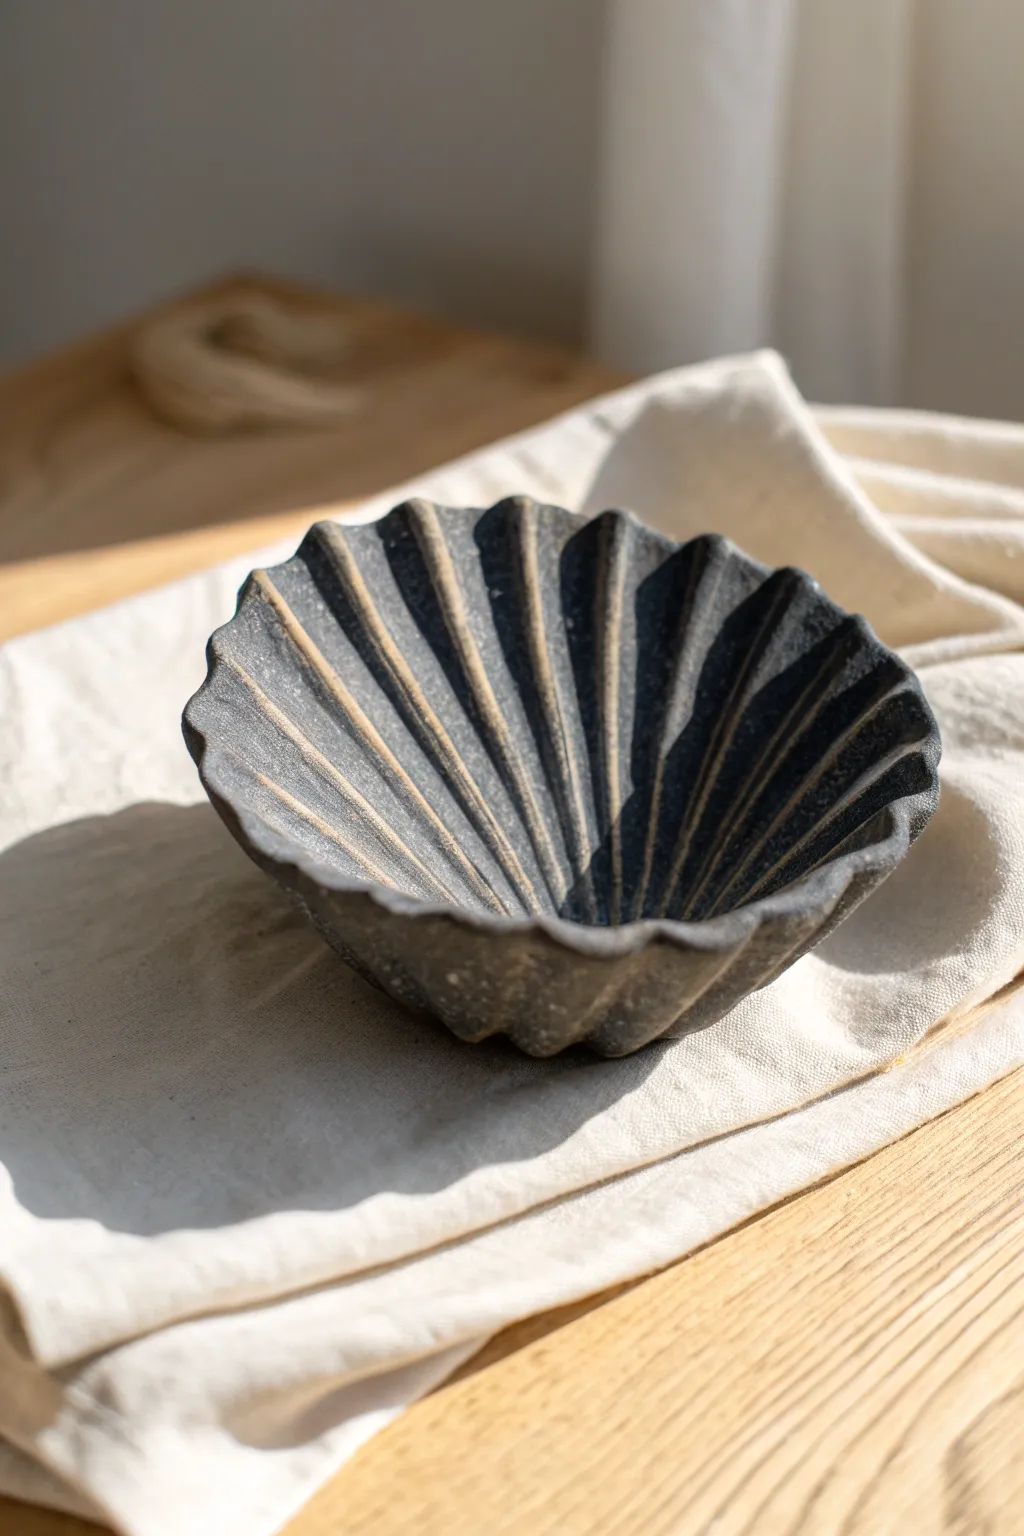
This project transforms simple air dry clay into a stunning, sculptural bowl that mimics the look of carved stone. By using a scalloped form and a clever dry-brushing technique, you’ll achieve rich depth and texture that looks far more expensive than it is.
Step-by-Step
Materials
- Air dry clay (white or grey)
- Small bowl or existing scalloped dish (to use as a mold)
- Rolling pin
- Plastic wrap (cling film)
- Black acrylic paint
- Burnt umber or dark brown acrylic paint
- Cream or light beige acrylic paint
- Stiff bristle paintbrush (flat)
- Fine grit sandpaper
- Matte varnish or sealant
- Clay cutting tool or craft knife
- Cup of water
- Sponge
Step 1: Forming the Bowl
-
Prepare the Clay:
Start by conditioning a large chunk of air dry clay in your hands until it becomes soft and pliable. If it feels too dry, mist it lightly with water, but avoid making it sticky. -
Roll the Slab:
Roll the clay out on a flat surface to an even thickness of about 1/4 inch. For a uniform thickness, which helps prevent cracking later, you can place two pencils or dowels on either side of the clay as guides for your rolling pin. -
Prepare the Mold:
Take a bowl that has the general shape you want. If you have a scalloped bowl, that’s perfect; if not, a plain round bowl works, and you will sculpt the ridges yourself. Cover the inside of the bowl with plastic wrap to prevent sticking. -
Drape the Clay:
Gently lift your rolled clay slab and drape it into the prepared bowl mold. Press it gently against the bottom and sides to take the shape of the vessel. -
Trim the Excess:
Use your craft knife to trim the excess clay around the rim. You can cut a wavy, undulating edge now to mimic the organic feel of a shell. -
Sculpt the Ridges:
If your mold wasn’t already scalloped, use your fingers or a modeling tool to press vertical indentations from the center of the bowl up to the rim. Create distinct ‘peaks’ and ‘valleys’ to give it that ribbed shell structure. -
Refine the Rim:
Smooth the cut edges of the rim with a damp sponge. The edge should feel soft and worn, not sharp or freshly cut. -
Let it Dry:
Allow the clay to dry completely inside the mold. This usually takes 24-48 hours. I find it helpful to rotate the bowl occasionally so air reaches all parts.
Stone Texture Trick
Mix a teaspoon of baking soda into your black base paint. This adds a gritty, realistic texture that catches the dry brushing even better.
Step 2: Painting and Finishing
-
Sand and Smooth:
Once fully dry and removed from the mold, gently sand any rough spots or sharp edges with fine-grit sandpaper. Wipe away all dust with a slightly damp cloth. -
Apply the Base Coat:
Mix black acrylic paint with a small amount of burnt umber to create a warm, dark charcoal color. Apply this to the entire bowl, inside and out, ensuring you get into every crevice. -
Dry the Base:
Let the dark base coat dry completely. It must be bone dry before the next step, or the colors will muddy together. -
Prepare the Highlight Color:
Put a small amount of cream or light beige paint on your palette. -
Load the Brush:
Dip a stiff, flat paintbrush into the cream paint, then wipe almost all of it off onto a paper towel. The brush should feel nearly dry to the touch. -
Dry Brush the Texture:
Lightly sweep the brush across the raised ridges of the bowl. Do not press hard; you only want the paint to catch on the high points, leaving the dark ‘valleys’ untouched. This creates the stone illusion. -
Build the Highlight:
Continue adding light layers until you achieve the desired contrast. Focus heavily on the the very top rim where light would naturally hit. -
Seal the piece:
Once the paint is cured, apply a coat of matte varnish. This protects the finish without adding an artificial shine, preserving the stony look.
Gilded Edge
For a luxe upgrade, use a gold leaf pen or gold metallic wax just along the very top rim of the scallops after sealing.
Place your new faux-stone bowl on a console table or shelf to add an instant touch of organic elegance to your decor
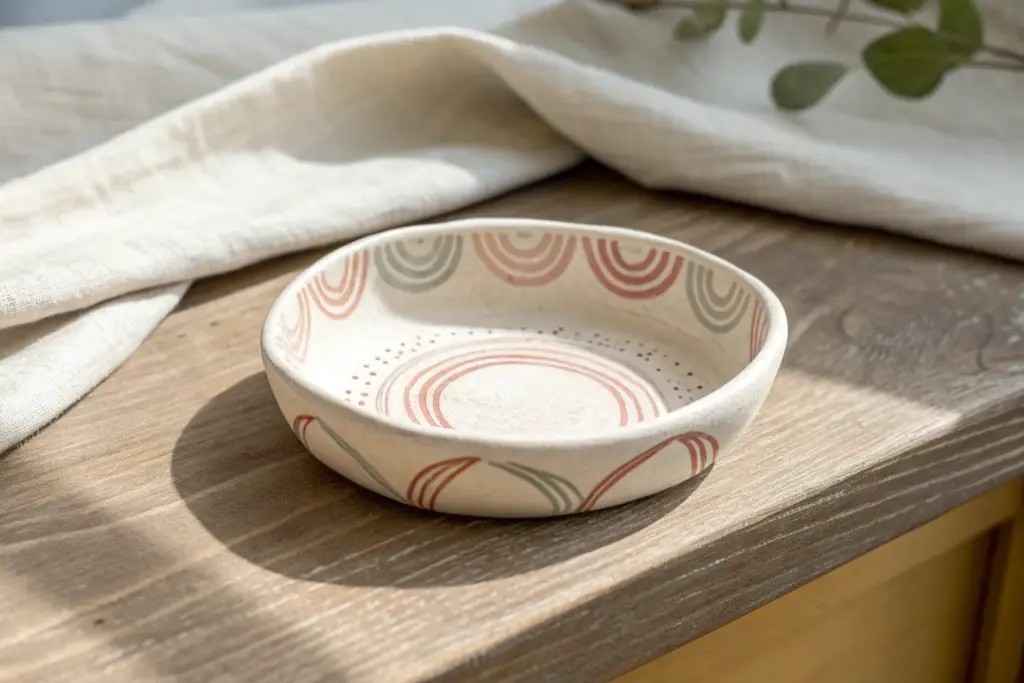
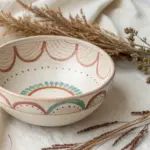
Painted Sgraffito Scratch-Through Patterns
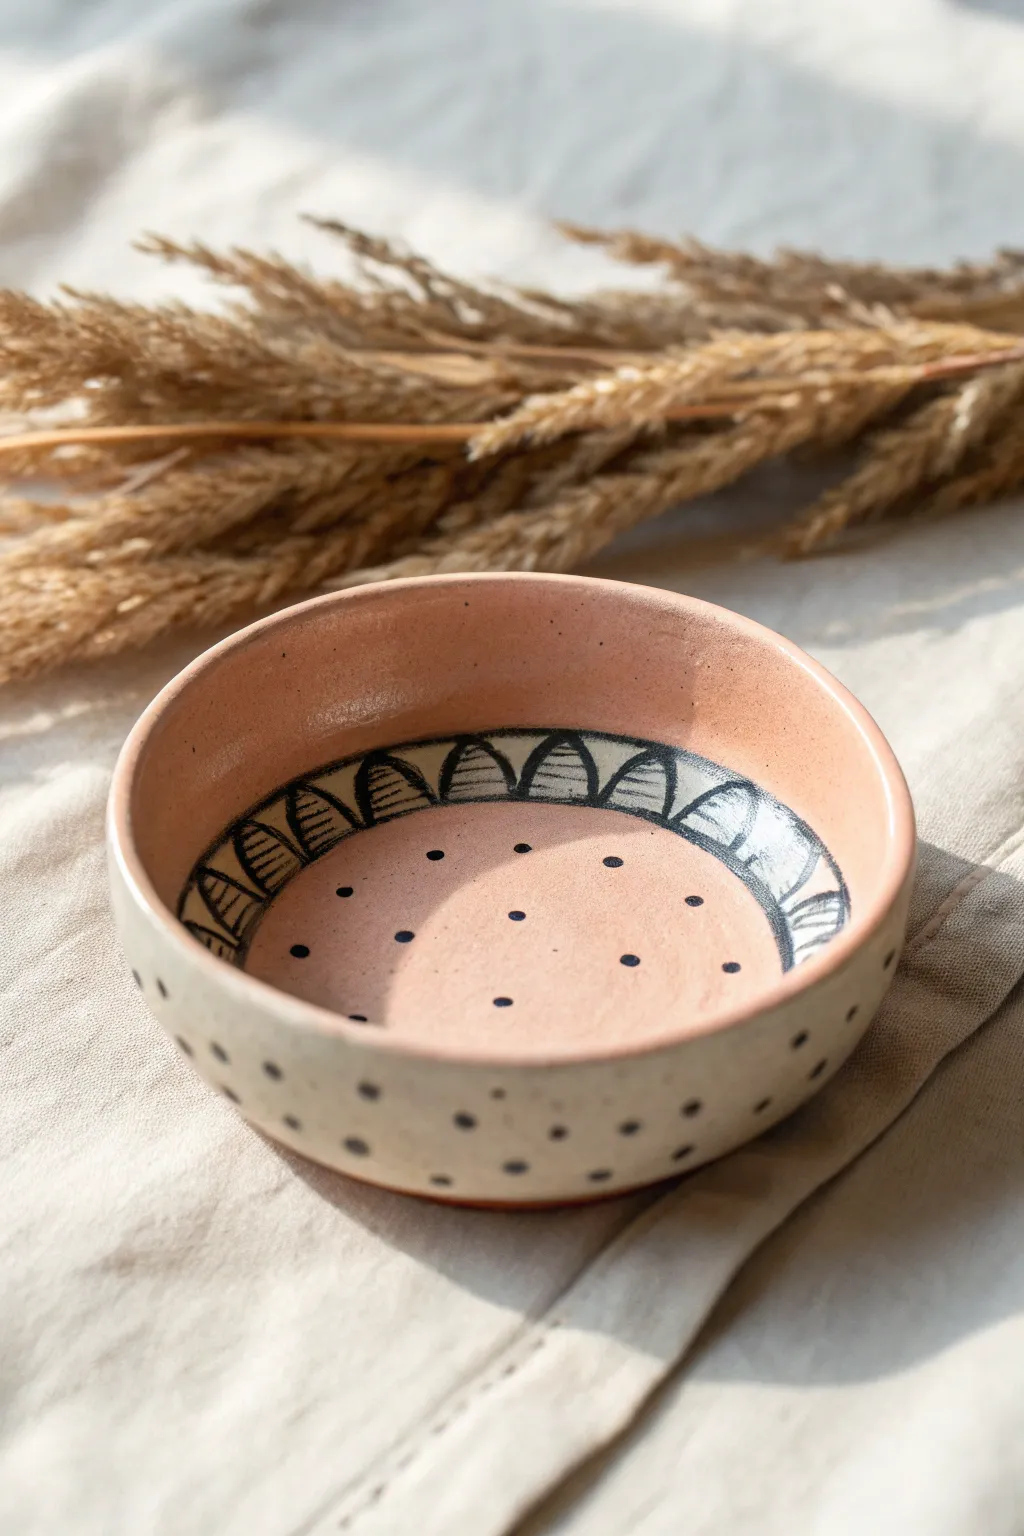
Capture the rustic elegance of wheel-thrown pottery using simple air-dry clay and a clever scratching technique. This bowl features a warm, earthy interior with stylized black leaf motifs and a creamy, speckled exterior that looks professionally glazed.
Detailed Instructions
Materials
- Air-dry clay (white or terracotta)
- Small rolling pin
- Bowl for mold (wrapped in plastic wrap)
- Acrylic paints (Terracotta/Salmon Pink, Cream/Off-White, Black)
- Sponge or small foam brush
- Fine detail paintbrush
- Carving tool or wooden skewer
- Sandpaper (fine grit)
- Gloss varnish or sealant
- Water cup and paper towels
Step 1: Shaping the Clay Base
-
Prepare the clay slab:
Begin by conditioning a handful of air-dry clay until it is soft and pliable. Roll it out on a flat surface to an even thickness of about 1/4 inch. Creating a consistent thickness now prevents cracking later. -
Mold the shape:
Drape your clay slab over a plastic-wrapped bowl (your mold) or press it inside the bowl, depending on the size you want. Gently smooth the clay against the mold to remove air pockets. -
Trim the edges:
Use a craft knife or a needle tool to trim the excess clay around the rim of the bowl to create a clean, even edge. You can use a slightly damp sponge to round off the sharpness of the rim. -
Dry completely:
Let the clay dry for at least 24-48 hours. I find it helpful to flip the bowl halfway through the drying process to ensure the bottom dries as evenly as the sides. -
Sand for smoothness:
Once fully cured, use fine-grit sandpaper to smooth out any bumps or rough textures on the surface and the rim. Wipe away dust with a slightly damp cloth.
Paint Texture Tip
If the black paint dries too hard to scratch cleanly, dampen the area slightly with a wet brush before scratching to soften it up.
Step 2: Adding Color & Pattern
-
Base coat the interior:
Mix a warm terracotta or salmon-pink acrylic shade. Paint the entire interior of the bowl with an even coat. You may need two layers for full opacity. -
Base coat the exterior:
Flip the bowl and paint the exterior with a creamy off-white color. Bring this color just slightly over the rim to meet the pink interior, creating a soft transition. -
Paint a black band:
With the interior paint dry, use a medium brush to paint a thick black band around the inner wall of the bowl. Make it roughly 1 to 1.5 inches wide. -
Scratch the design (Sgraffito):
While the black paint is semi-dry or just freshly dry, use a sharp craving tool or skewer to scratch through the black layer. Draw repeated arches or semi-circles to mimic petals or leaves, revealing the pink paint underneath. -
Add petal details:
Inside each scratched arch, scratch vertical hatch marks. This texture mimics the traditional sgraffito technique used in ceramics. -
Add interior dots:
Using the back end of a paintbrush dipped in black paint, dot the center pink area of the bowl in a random, scattered pattern. -
Paint exterior dots:
Repeat the dotting process on the cream exterior using black paint. Space these dots out more widely than the interior ones for a varied look. -
Detail the rim:
If needed, touch up the meeting point of the interior and exterior colors on the rim. A slightly imperfect, hand-painted line adds to the organic charm.
Step 3: Sealing and Finishing
-
Let paint cure:
Allow all paint layers to dry completely. If the black paint is thick, give it extra time to avoid smearing during the varnishing step. -
Apply gloss varnish:
Apply a coat of high-gloss varnish to the entire piece. This is crucial for mimicking the shiny, glazed look of fired ceramic. -
Second coat:
For extra durability and shine, add a second layer of varnish once the first is dry to the touch.
Level Up: Rim Detail
Mix a tiny amount of brown into your cream paint and sponge it lightly on the rim for a darker, toasted ‘fired clay’ edge effect.
Now you have a stunning faux-ceramic bowl perfect for holding trinkets or keys
3D Clay Relief on a Painted Background
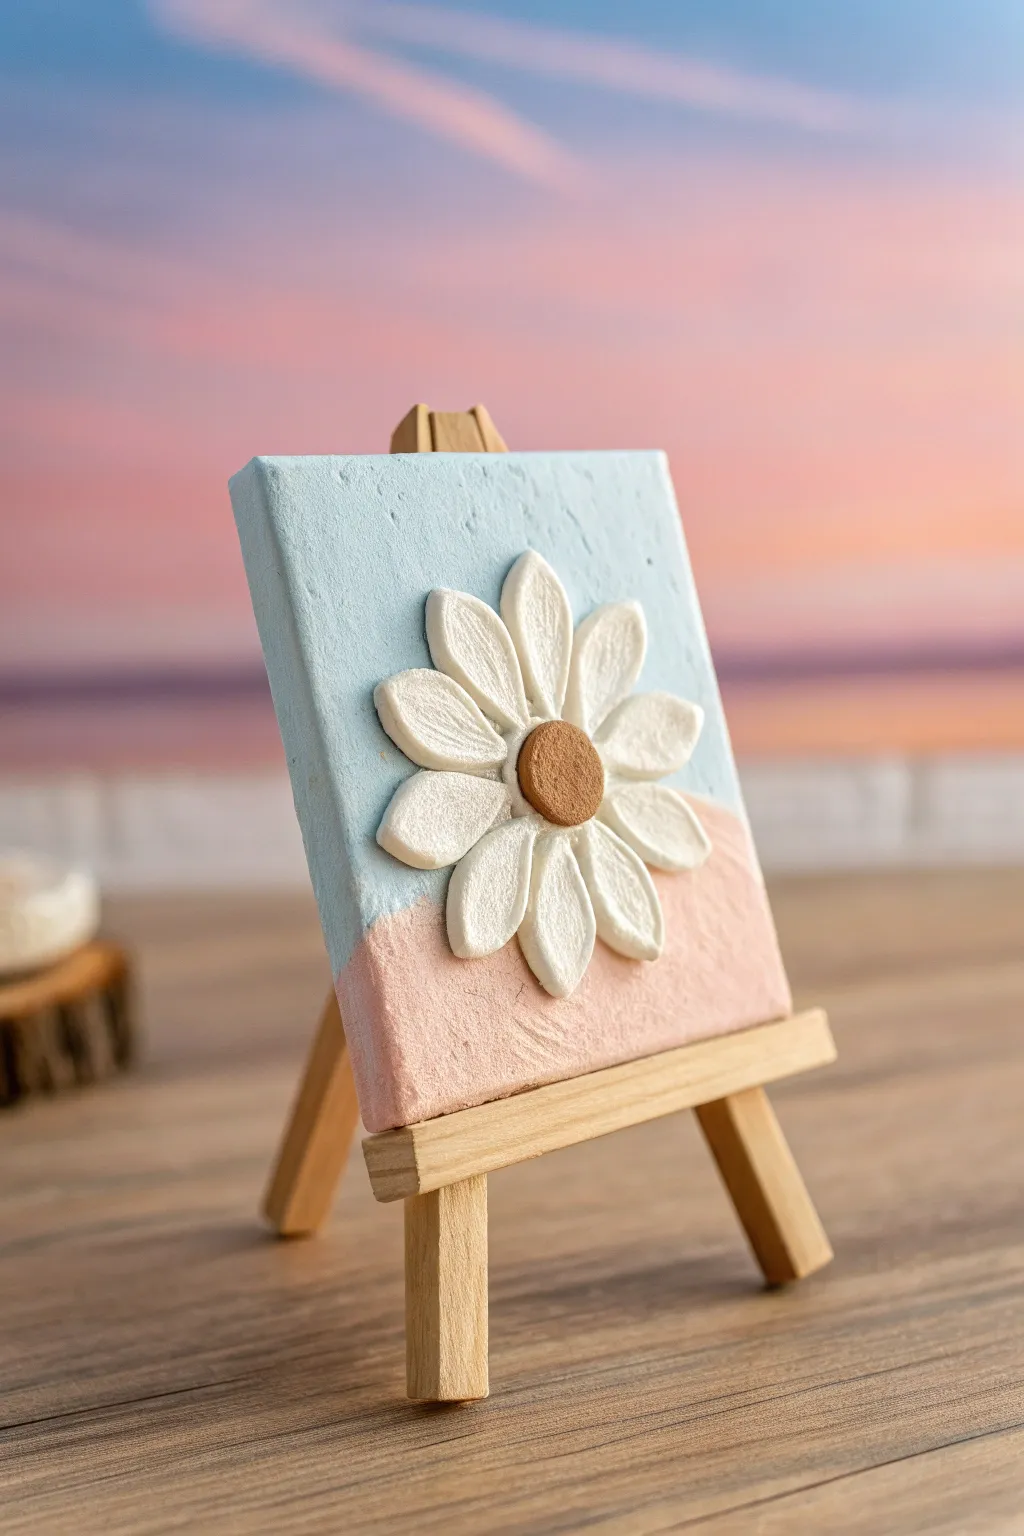
This charming little project combines the texture of sculpture with the vibrant colors of painting. Featuring a raised white daisy on a split-tone pastel background, this piece brings a delightful tactile element to a miniature canvas.
Step-by-Step Tutorial
Materials
- Small rectangular canvas (approx. 3×4 inches) or canvas board
- Mini wooden easel
- Air dry clay (white)
- Acrylic paints: Light Blue (Sky Blue), Peach (or soft pink), White, Brown
- Flat paintbrushes (small and medium)
- Clay sculpting tools or a simple toothpick
- Rolling pin (or a smooth round marker)
- Parchment paper or non-stick mat
- Craft glue or strong PVA glue
- Bowl of water
- Matte varnish (optional)
Step 1: Preparing the Canvas Base
-
Prepare your background colors:
Mix your acrylic paints on a palette. You’ll need a soft, airy light blue and a warm, dusty peach tone. If your colors are too vibrant, mix in a generous amount of white to achieve that pastel aesthetic. -
Paint the bottom section:
Using a flat brush, paint the bottom third of the canvas with your peach color. It doesn’t need to be a perfectly straight line—a slightly rough, textured edge adds character. -
Paint the top section:
Fill the remaining upper two-thirds of the canvas with the light blue paint. Carefully bring the blue down to meet the peach section, ensuring full coverage so no white canvas shows through. -
Add texture (optional):
For a more rustic look like the example, dab the wet paint slightly with a dry brush or sponge to give the background a bit of grit before letting it dry completely.
Smooth Petals
Does your clay stick to your fingers? rare. Lightly dust your fingertips with cornstarch or dip them in water before shaping the small petals to get a smooth, fingerprint-free finish.
Step 2: Sculpting the Daisy
-
Condition the clay:
Take a small chunk of white air dry clay and knead it in your hands until it is soft, pliable, and crack-free. -
Shape the petals:
Pinch off roughly 10-12 small, equal-sized pieces of clay. Roll each piece into a small ball, then flatten and elongate them into teardrop shapes to form the petals. -
Detail the petals:
Using a sculpting tool or the back of a knife, press a gentle indentation down the center of each petal to give them a realistic, grooved look. -
Make the center:
Roll a slightly larger ball of clay for the flower center. Gently flatten it into a thick disc. -
Texture the center:
Use a toothbrush or a stippling tool to tap texture onto the surface of the center disc, creating that fuzzy pollen effect.
Custom Colors
Try switching the palette for different seasons. Use burnt orange and cream backgrounds with a yellow flower center for a cozy autumn vibe.
Step 3: Assembly and Finishing
-
Position the flower:
Before gluing, arrange your clay petals in a circle on the dried canvas where the two paint colors meet, placing the center disc last to check the spacing. -
Glue the petals:
Lift one petal at a time, apply a small dot of craft glue to the back, and press it firmly onto the canvas. I find it easiest to glue opposite petals first (12 o’clock, then 6 o’clock) to keep the flower symmetrical. -
Attach the center:
Apply glue to the back of the textured center disc and press it firmly into the middle of your petal ring, slightly overlapping the inner edges of the petals. -
Paint the center:
Once the clay has formed a skin or dried slightly, carefully paint the center disc with brown acrylic paint. Use a tiny brush to avoid getting brown on the white petals. -
Final drying:
Allow the entire piece to sit undisturbed for 24 hours so the clay can fully cure and harden. -
Seal (optional):
Finish with a coat of matte varnish over the clay parts to protect them from moisture and dust. -
Display:
Place your finished mini masterpiece onto the wooden easel to complete the look.
Now you have a sweet, dimensional piece of art that looks lovely on a desk or shelf
Faux Tile Look With Painted “Grout” Lines
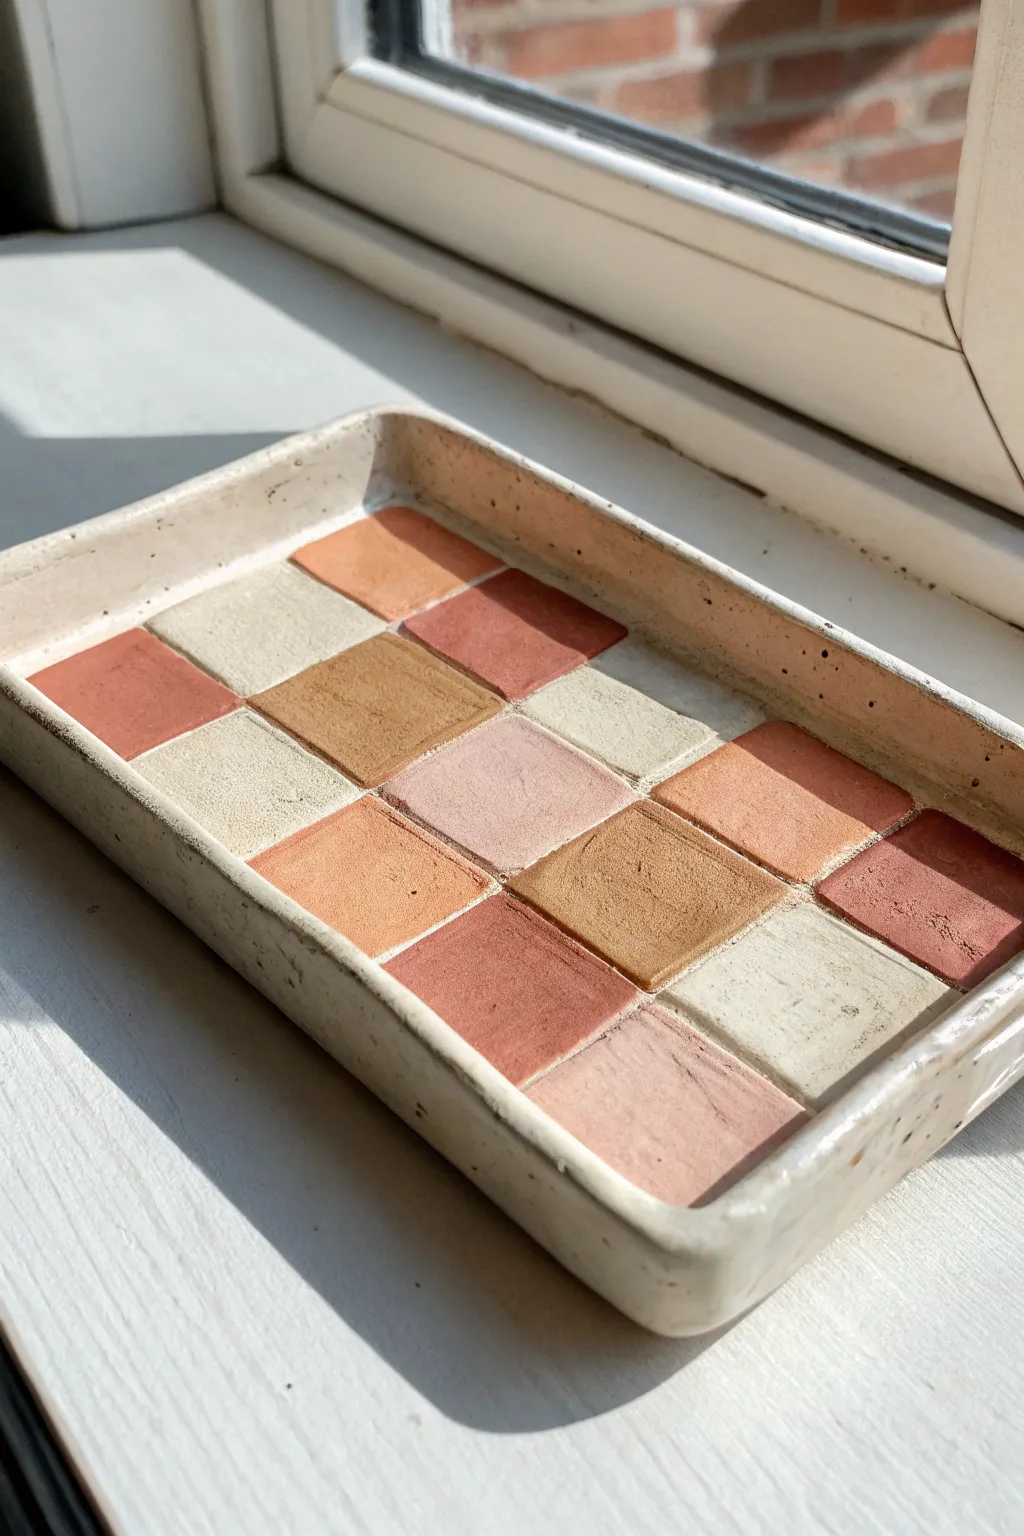
Transform a simple slab of air-dry clay into a trendy, mosaic-inspired catchall tray without cutting a single actual tile. This project uses warm earthy tones and clever scoring techniques to mimic the look of traditional ceramic tiling.
Detailed Instructions
Materials
- Air-dry clay (white or light grey)
- Rolling pin
- Rolling guides or wooden slats (approx. 1/4 inch thick)
- Ruler
- Clay knife or butter knife
- Small bowl of water
- Sponge
- Acrylic paints (terracotta, beige, dusty rose, cream)
- Fine detail paintbrush
- Medium flat paintbrush
- Sandpaper (fine grit)
- Gloss or satin varnish/sealant
Step 1: Shaping the Tray Base
-
Roll out the slab:
Start by conditioning your clay with warm hands until it is pliable. Place it between two rolling guides to ensure an even thickness and roll it out into a large rectangle, roughly 1/4 inch thick. -
Cut the rectangle:
Using a ruler and your clay knife, cut a neat rectangle from the rolled slab. I find a size of about 5×8 inches works well for a desk tray, but you can adjust this to your needs. -
Form the walls:
Cut four long strips of clay from your remaining scraps, about 3/4 inch high. Score the bottom of these strips and the outer edge of your rectangular base with a needle tool or an old fork. -
Attach the sides:
Apply a little water to the scored areas to create a ‘slip’ and press the strips firmly onto the base to create the tray walls. Smooth the seams on both the inside and outside using your finger and a bit of water so the walls become one with the base. -
Round the corners:
Gently gently press the corners where the walls meet to round them off slightly. This gives the tray a softer, more organic ceramic look rather than a sharp boxy feel.
Cracked Grout?
If small cracks appear in the grout lines while drying, mix a paste of fresh clay and water. Fill the cracks, smooth with a wet finger, and let dry again before painting.
Step 2: Creating the Tile Grid
-
Measure the grid:
Before the clay dries, use your ruler to lightly mark out a grid of squares inside the tray. A 3×5 or 4×6 pattern fits nicely depending on your tray’s dimensions. -
Score the grout lines:
Using the back of your knife or a dedicated sculpting tool, firmly press into the clay along your marked lines. You want to create deep indentations to simulate grout lines, but be careful not to cut all the way through the base. -
Refine the edges:
Run a damp finger or a small wet brush along the ‘grout’ lines you just made to smooth out any rough crumbs of clay. This helps the squares look like individual tiles. -
Add texture (optional):
To mimic the speckled stoneware look in the photo, you can lightly flick a stiff toothbrush with watered-down brown paint over the wet clay now, or wait to do this during the painting phase. -
Let it dry completely:
Set the tray aside in a cool, dry place. Allow it to air dry for at least 24 to 48 hours. Turn it over halfway through the drying process to ensure the bottom dries evenly and to prevent warping.
Step 3: Painting and Finishing
-
Sand imperfections:
Once the tray is bone dry, use fine-grit sandpaper to gently smooth the top rim of the walls and any rough patches on the ’tiles.’ Wipe away the dust with a barely damp cloth. -
Paint the base color:
Paint the entire tray, including the grout lines and the outside walls, with a creamy off-white or light beige acrylic paint. This acts as your ‘grout’ color and primes the surface. -
Mix your palette:
Prepare your tile colors. You’ll want a harmonious palette: burnt orange (terracotta), a sandy beige, a dusty pink, and a muted cream. Mixing a tiny bit of brown into each color helps unify the earthy tone. -
Paint the tiles:
Using a small flat brush, carefully paint each square in the grid. Alternate colors randomly to create a checkerboard effect. I like to leave a tiny gap between the paint and the indented line so the cream base coat remains visible. -
Add speckles:
If you didn’t texture the clay earlier, dilute some dark brown or black paint with water. Load an old toothbrush and run your thumb across the bristles to flick tiny speckles over the entire painted tray. -
Seal the project:
After the paint is fully dry, apply two coats of gloss or satin varnish. This protects the paint from scratches and gives the tray that distinctively shiny, ceramic-like finish.
Level Up: Realism
Mix baking soda into your acrylic paint for the ’tiles.’ This creates a gritty, stone-like texture that contrasts beautifully with the smooth, painted grout lines.
Place your finished tray on a sunny windowsill or desk to organize your favorite trinkets in style
Celestial Night-Sky Paint Effects
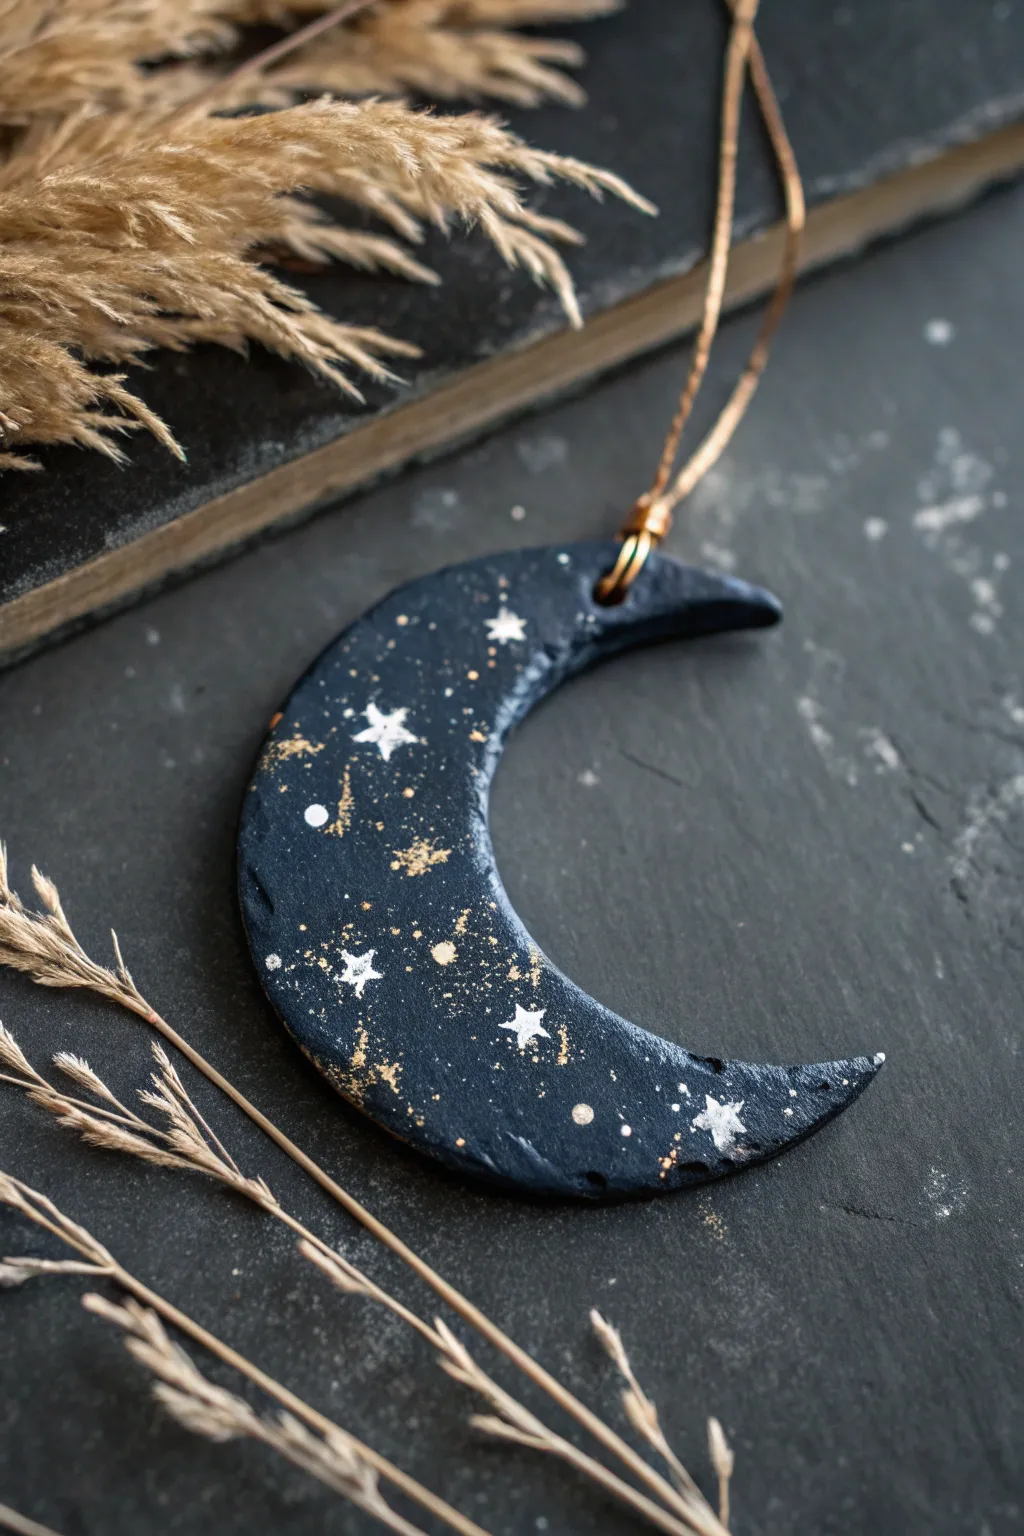
Capture the magic of a starry midnight sky with this elegant crescent moon ornament. Using simple painting techniques on air-dry clay creates a deep, cosmic effect with shimmering gold highlights.
How-To Guide
Materials
- Air-dry clay (white or terracotta)
- Acrylic paint (deep midnight blue or black)
- Acrylic paint (titanium white)
- Metallic gold acrylic paint
- High-gloss varnish or sealant
- Rolling pin
- Circular cookie cutter or jar lid (approx. 3-4 inches)
- Small round cookie cutter or knife
- Fine detail paintbrush (size 0 or 00)
- Old toothbrush or stiff bristle brush
- Straw or skewer (for hole punching)
- Gold cord or ribbon
- Sandpaper (fine grit)
Step 1: Shaping the Moon
-
Condition the Clay:
Begin by kneading a handful of air-dry clay until it is soft, warm, and pliable. This prevents cracks from forming later. -
Roll It Out:
Roll the clay onto a smooth surface to a thickness of about 1/4 inch. Try to keep the thickness even for sturdy structural integrity. -
Cut the Outer Circle:
Use your larger circular cutter or a jar lid to stamp out a perfect circle from the rolled clay. -
Create the Crescent:
Position the same circular cutter slightly off-center over your clay circle to cut away a section, leaving behind a crescent moon shape. Alternatively, use a smaller cutter to bite out the inner curve. -
Smooth the Edges:
Dip your finger in a little bit of water and run it gently along the cut edges of the moon to soften any sharp ridges or burrs. -
Punch a Hole:
Use a straw or skewer to create a clean hole at the top tip of the crescent. Ensure it’s not too close to the edge to prevent breaking. -
Dry Completely:
Place the moon on a flat surface or a drying rack. Let it dry for 24-48 hours, flipping it halfway through to ensure even drying.
Sticky Situation?
If your clay sticks to the table while rolling, lay down a piece of parchment paper or wax paper under the clay. This creates a non-stick surface and makes it easy to move the moon for drying.
Step 2: Painting the Cosmos
-
Sand Imperfections:
Once fully bone dry, lightly sand the surface if there are any rough spots, but don’t worry about perfection; a little texture adds to the stone-like look. -
Base Coat:
Paint the entire surface, including the sides and back, with deep midnight blue or black acrylic paint. You may need two coats for opaque coverage. -
Paint the Stars:
Using your finest detail brush and titanium white paint, carefully paint small five-pointed stars scattered across the surface. -
Add Distant Stars:
Dot the tip of your brush or a toothpick onto the surface to create tiny white dots representing distant stars among the larger ones. -
Prepare Gold Splatter:
Dilute a small dollop of metallic gold paint with a few drops of water until it reaches a milky consistency. -
Splatter Effect:
Dip an old toothbrush or stiff brush into the gold mix. Hold it over the moon and flick the bristles with your thumb to spray a fine mist of gold dust over the dark background. -
Gold Details:
I like to add a few larger, deliberate gold spots near the white stars to simulate glowing nebulas or star clusters. -
Varnish:
Allow the paint to dry completely. Apply a coat of high-gloss varnish to seal the clay and make the colors pop, resembling a polished stone. -
String It Up:
Thread a piece of gold cord or ribbon through the hole and tie a secure knot to finish your celestial ornament.
Gilded Edges
Make the piece feel more luxurious by painting the thin side edges of the moon with solid metallic gold paint. This creates a beautiful frame for your night sky scene.
Hang your moon in a window or on a wall to bring a touch of starlight into your home space