Any time I’m teaching a clay class, piggy banks are the project that gets everyone instantly excited—because they’re functional, cute, and basically a blank canvas. Here are my favorite creative clay piggy bank directions, starting with the classics and moving into the fun “wait, you can do that?” ideas.
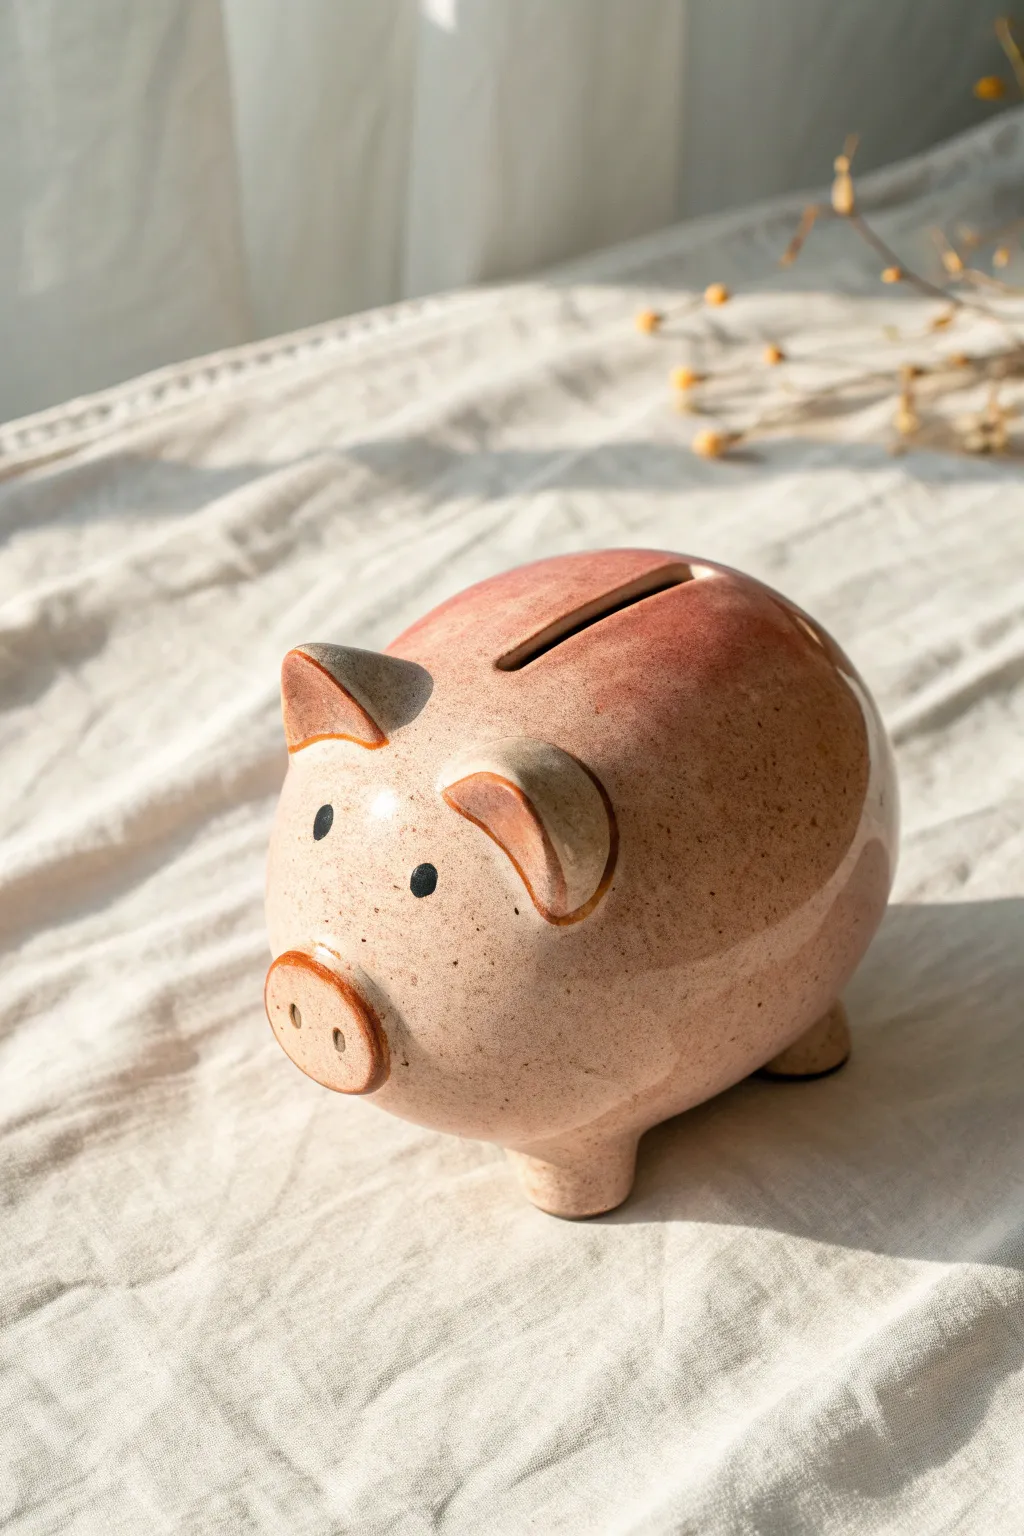
Classic Round Pig With a Clean Coin Slot
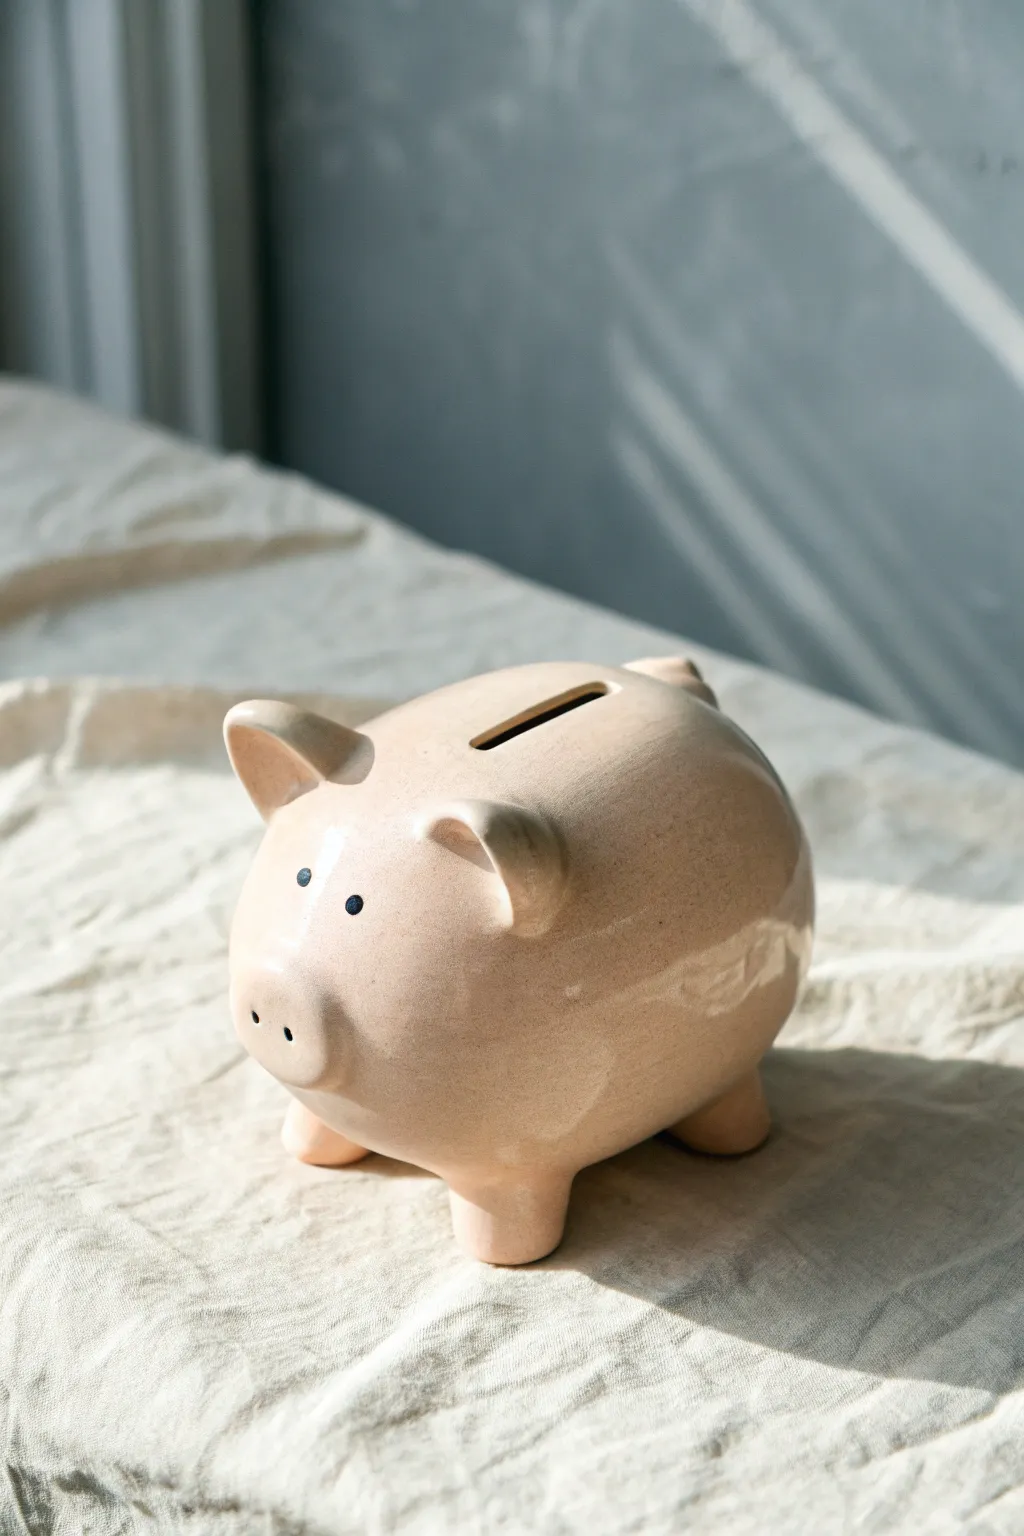
Embrace the timeless appeal of a classic piggy bank with this clean, rounded design. Its soft peach glaze and simple features make it a charming, modern addition to any shelf while still capturing that nostalgic feel.
Step-by-Step Guide
Materials
- Earthenware or stoneware clay (approx. 2-3 lbs)
- Potter’s wheel (optional, can be hand-built)
- Sponge
- Pin tool or needle tool
- Fettling knife
- Loop tool for trimming
- Wooden modeling tool
- Slip (clay and water slurry)
- Scoring tool (or fork)
- Glossy light peach/flesh-tone glaze
- Small amount of black underglaze or glaze
- Fine detail brush
- Kiln
Step 1: Forming the Body
-
Throw the body:
Begin by wedging your clay thoroughly to remove air bubbles. Center the clay on the potter’s wheel and open it up. Unlike a bowl, you want to bring the walls up and then curve them inwards to create a completely enclosed hollow sphere. Close the top gently, sealing the air inside to keep the shape firm. -
Smooth the surface:
While the sphere is still spinning slowly, use a metal rib to smooth the exterior, removing any throwing lines for that perfectly round, modern look shown in the photo. -
Dry to leather hard:
Remove the sphere from the wheel and let it dry until it is leather hard. This makes it sturdy enough to handle without deforming but soft enough to carve and attach parts. -
Trim the base:
Turn the sphere over (you might need a dimpled chuck) and trim away excess weight from the bottom, ensuring the curve is continuous.
Air Pressure Tip
When attaching the hollow sphere’s parts, poke a tiny needle hole in the bottom (hidden between legs) to let expanding air escape during firing, preventing explosions.
Step 2: Adding Features
-
Shape the legs:
Roll four equal-sized balls of clay for the feet. Flatten them slightly into stout, tapered cylinders. They should be substantial enough to support the body’s weight. -
Attach the legs:
Determine the bottom of your pig. Score the attachment points heavily and apply slip. Press the four legs firmly onto the body, blending the seams with a wooden tool until they look like they grew out of the form. -
Create the snout:
Form a flattened oval of clay for the nose. Score and slip the front center of the pig and attach the snout. Smooth the edges down so it transitions seamlessly into the face. -
Detail the snout:
Using the back of a small drill bit or a round tool, press two distinct nostrils into the snout. Make them deep enough to be visible after glazing. -
Sculpt the ears:
Cut two triangular shapes from a slab of clay. Gently pinch them to create a slight curve. I like to dampen my fingers slightly here to keep the edges smooth. -
Attach the ears:
Score and slip the locations for the ears on the upper sides of the head. Attach them, blending well. Gently curl the tips forward slightly to give the pig an attentive expression.
Slumping Legs?
If the legs start to splay under the body’s weight, prop the belly up on a soft foam block or a bunched-up towel while the connections stiffen up.
Step 3: Finishing Touches
-
Cut the slot:
Locate the very top center of the pig’s back. Using a sharp fettling knife, carefully cut a clean, rectangular slot large enough for coins. Smooth the raw edges of the cut with a damp sponge. -
Final smoothing:
Wipe the entire piece down with a tightly squeezed damp sponge to remove any fingerprints or rough textures. The surface needs to be pristine for the glossy glaze. -
Bisque fire:
Allow the pig to dry completely (bone dry). Fire it in the kiln to a bisque temperature (usually Cone 04 or 06). -
Glaze application:
Dip or brush the entire pig with a glossy light peach or flesh-tone glaze. Ensure an even coat. If brushing, apply 2-3 coats, letting each dry in between. -
Paint the eyes:
Using a very fine detail brush and black underglaze (or glaze), paint two small, simple dots for eyes just above the snout height. Symmetry is key here. -
Glaze fire:
Fire the pig again to the maturity temperature of your chosen glaze (e.g., Cone 5/6). This will seal the clay and create that high-shine finish.
Once cooled, your sleek new piggy bank is ready to start guarding your savings with style


Chubby Pig With Painted Face Details
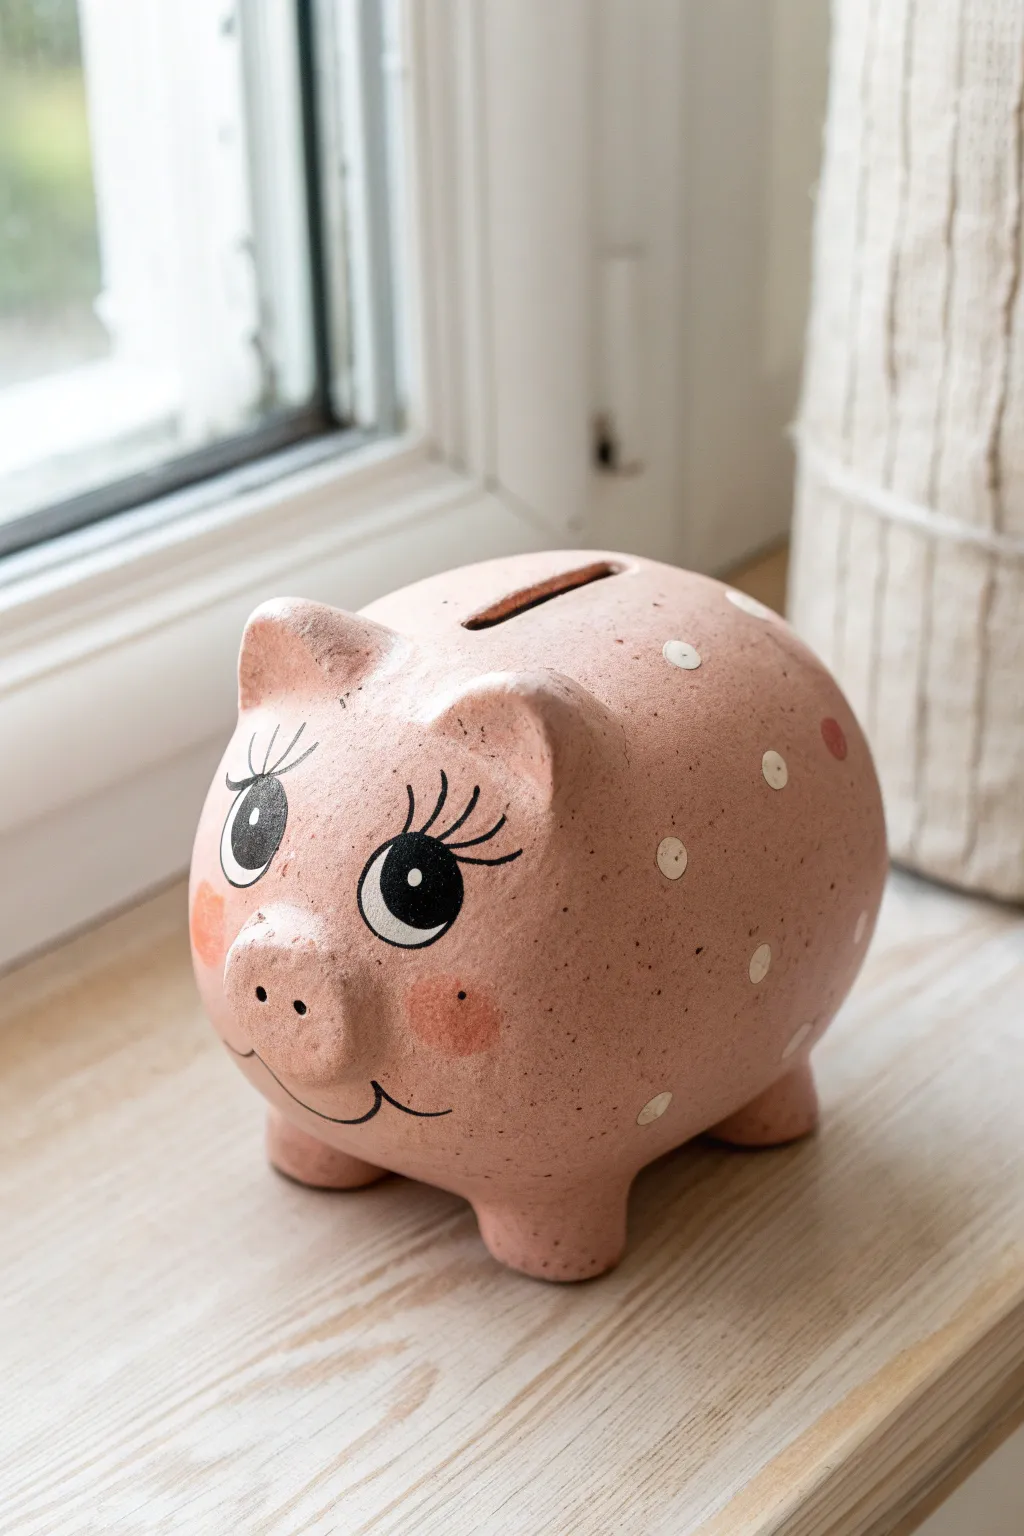
This charmingly rotund piggy bank features exaggerated eyelashes and sweet polka-dotted sides, giving it a playful and rustic personality. Without needing a pottery wheel, this project relies on simple hand-building techniques to create a classic shape that is perfect for saving coins.
Detailed Instructions
Materials
- Air-dry clay or kiln-fire clay (approx. 2-3 lbs)
- Small bowl or balloon (for armature/support)
- Clay carving tools (needle tool, loop tool)
- Rolling pin
- Slip and score tool (or old toothbrush)
- Sponge
- Acrylic paints (Soft Pink, White, Black, Rose)
- Fine detail paintbrush
- Round paintbrush for dots
- Matte or satin sealant
Step 1: Building the Body
-
Form the base sphere:
Start by creating two pinch pots of equal size. If you want a larger pig, you can drape slabs of clay over a balloon or a small bowl to create two hemispheres. -
Join the halves:
Score the edges of your two hemispheres thoroughly and apply slip. Press them together firmly to create a hollow sphere, then smooth the seam completely so it is invisible. -
Add the snout:
Roll a small ball of clay and flatten it slightly into a thick disk. Score and slip the back of the disk and attach it low on the front of the body. Use your thumb to blend the edges of the snout into the face for a seamless connection. -
Create the nostrils:
Using the back of a paintbrush or a rounded tool, press two distinct indentations into the snout disk. -
Sculpt the ears:
Shape two triangular wedges of clay. Pinch them slightly to give them a curve, resembling a real pig’s ears. Attach them near the top of the head, blending the clay downwards onto the body to secure them. -
Attach the legs:
Roll four short, stout cylinders of clay. Attach these to the bottom of the sphere as legs. Press the body down gently onto a flat surface to ensure the pig stands level. -
Refine the surface:
Take a damp sponge and smooth over the entire surface. While you want it clean, a slightly textured, pitted surface adds to the rustic charm, so don’t worry about perfection. -
Cut the coin slot:
Once the clay has stiffened slightly (leather hard), use a fettling knife or needle tool to carefully cut a rectangular slot in the very top of the back.
Smoother Connections
When attaching the ears and snout, roll a tiny ‘snake’ or coil of clay and place it around the joint. Smear this coil into both pieces to act as a strong glue and filler.
Step 2: Decorating and Painting
-
Dry thoroughly:
Allow the clay to dry completely according to your material’s instructions. If using kiln clay, fire it to bisque; if air-dry, wait 24-48 hours until bone dry. -
Base coat:
Paint the entire pig with a soft, dusty pink color. You may need two coats for opaque coverage. -
Speckle the surface:
To achieve that textured, organic look shown in the image, mix a tiny bit of brown or dark grey into your pink paint. Flick a toothbrush loaded with this mixture over the pig to create subtle speckles. -
Paint the eyes:
Using a fine detail brush and black paint, draw large oval outlines for the eyes. Fill the pupils with black, leaving a large white crescent shape and a small white dot for the highlight to create a cartoonish reflection. -
Add lashes and smile:
With the finest brush tip, paint long, dramatic eyelashes extending from the top of the eye. Sweep a thin black line under the snout for a simple smile. -
Apply blush cheeks:
Mix a rosy, darker pink paint. Dab a round circle of this color on the cheeks, just below the eyes. -
Add polka dots:
Using the back end of a paintbrush or a dotting tool, stamp white circles randomly across the body. Add a few darker pink dots interspersed among the white ones for variety. -
Seal the piece:
Finish by applying a coat of matte or satin sealant to protect the paint and give the piggy bank a durable finish.
Cork It Up
During the building phase, cut a round hole in the belly and fit it with a rubber stopper or cork. This makes your bank reusable so you don’t have to smash it to get the money.
Now your adorable handmade piggy bank is ready to start looking after your spare change


Standing Pig on Four Sturdy Legs
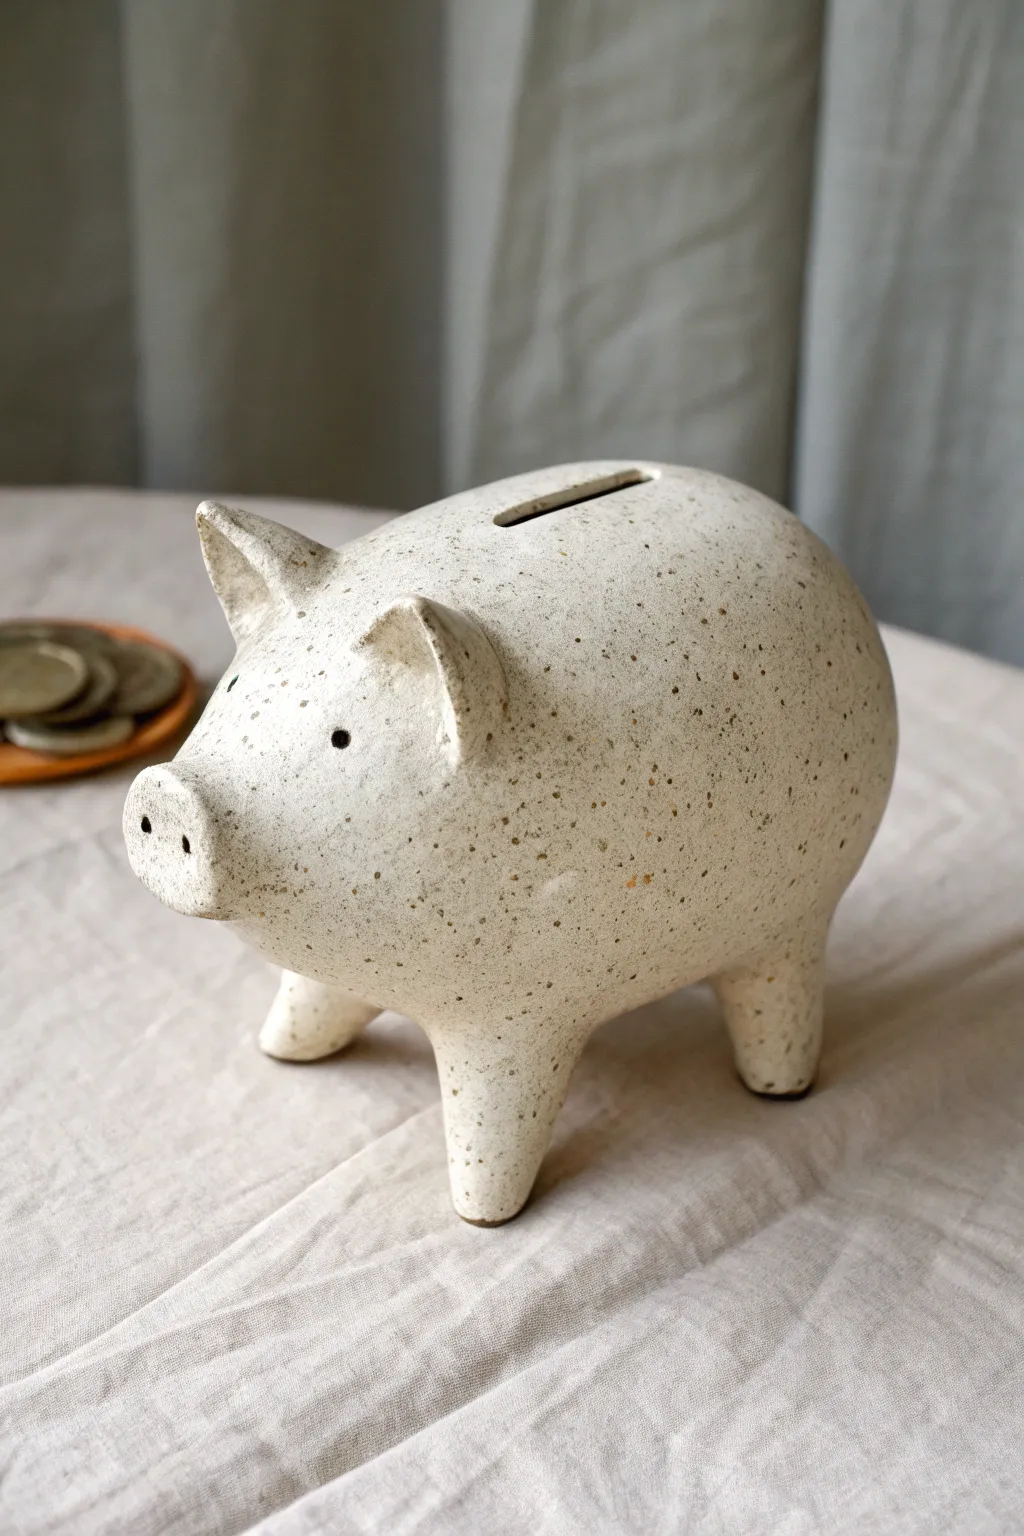
This minimalist piggy bank charm lies in its simple, rounded form and the beautiful, earthy speckles throughout the clay body. Eschewing cartoony features for sleek lines, this standing pig relies on four sturdy, cone-shaped legs to give it a grounded and timeless pottery feel.
How-To Guide
Materials
- Speckled Stoneware Clay (or plain clay with grog)
- Pottery Wheel (optional) or Rolling Pin for slab building
- Kidney Rib Tool (smooth)
- Fettling Knife
- Scoring Tool and Slip
- Wooden Modeling Tools
- Hole Cutter or Drill Bit (for eyes)
- Clear Glaze (matte finish recommended)
- Kiln
Step 1: Forming the Body
-
Throw or Build the Cylinder:
Begin by creating a hollow, enclosed form. If throwing on the wheel, throw a closed cylinder and refine it into a large egg shape. If hand-building, use two pinch pots joined together or wrap a slab around a mold to create a smooth, elongated oval. -
Smooth the Surface:
Whether wheel-thrown or hand-built, the body needs to be completely seamless. Use a kidney rib tool to compress the clay and smooth out any join lines or finger marks, ensuring the shape is symmetrical and pleasingly plump. -
Let it Stiffen:
Allow the body to dry to a ‘leather-hard’ stage. This is crucial because the legs need to support the weight of the body without the form collapsing or sagging.
Sagging Belly?
If the belly sags when you flip it onto its legs, stuff the hollow body with crumpled newspaper before closing the form or attaching legs. This supports the shape while it dries.
Step 2: Adding the Legs
-
Shape the Legs:
Roll out four substantial cone shapes from the same clay. These should be wider at the top and taper slightly towards the bottom, resembling sturdy little pegs. -
Positioning:
Turn your leather-hard body upside down. Mark four spots where the legs will go. I find it helpful to place the back legs slightly wider apart for better stability. -
Score and Slip:
Aggressively score both the attachment points on the body and the tops of the legs. Apply a generous amount of slip to both surfaces. -
Attach and Blend:
Press the legs firmly onto the body. Using a wooden tool or your thumb, drag clay from the leg onto the body to create a seamless bond. Smooth this transition until it looks like the legs grew naturally out of the torso. -
Leveling Check:
Flip the pig onto its feet gently. Give it a light tap to ensure all four legs are touching the table evenly. Adjust the angle if it wobbles.
Curly Tail Upgrade
Add a classic pigtail by rolling a very thin coil of clay. Wrap it around a pencil to create a tight spiral, then score and slip it onto the pig’s rear for a playful detail.
Step 3: Creating the Face & Details
-
Form the Snout:
Roll a small ball of clay and flatten the front to create a snout shape. Score and slip the front of the pig’s face and attach this piece. -
Define Nostrils:
Using the back of a small paintbrush or a detail tool, press two distinct, round indentations into the flat snout for nostrils. -
Craft the Ears:
Cut two small triangles from a slab of clay. Soften the edges with a damp sponge. Gently curve them to give them a cupped, realistic ear shape. -
Attach Ears:
Score the top of the head and attach the ears. They should sit fairly high up and point slightly forward and outward to give the pig an alert expression. -
Eye Placement:
Use a small hole cutter or the end of a drill bit to press in two simple, small circles for eyes. Keep them relatively small to maintain the minimalist aesthetic.
Step 4: Final Touches & Firing
-
Cut the Coin Slot:
Carefully cut a rectangular slot in the very top of the back using a sharp fettling knife. Clean up any burrs or rough edges around the slot with a sponge. -
The Cork Hold (Optional):
If you want the bank to be reusable, cut a larger hole in the belly now while the clay is leather hard. Ensure you have a cork stopper size in mind before cutting. -
Bisque Fire:
Allow the pig to dry completely slowly to avoid cracking, especially around the leg joins. Fire to cone 04 (or your clay’s bisque temperature). -
Glazing:
Dip or brush the entire piece in a clear matte glaze. The clear glaze will seal the clay while allowing the natural speckles of the stoneware to be the star of the show. Wipe the bottom of the feet clean. -
Final Fire:
Fire the pig to the maturity temperature of your clay body (likely Cone 5 or 6). Once cool, it’s ready to start saving.
This simple speckled companion will look lovely on a shelf while guarding your spare change


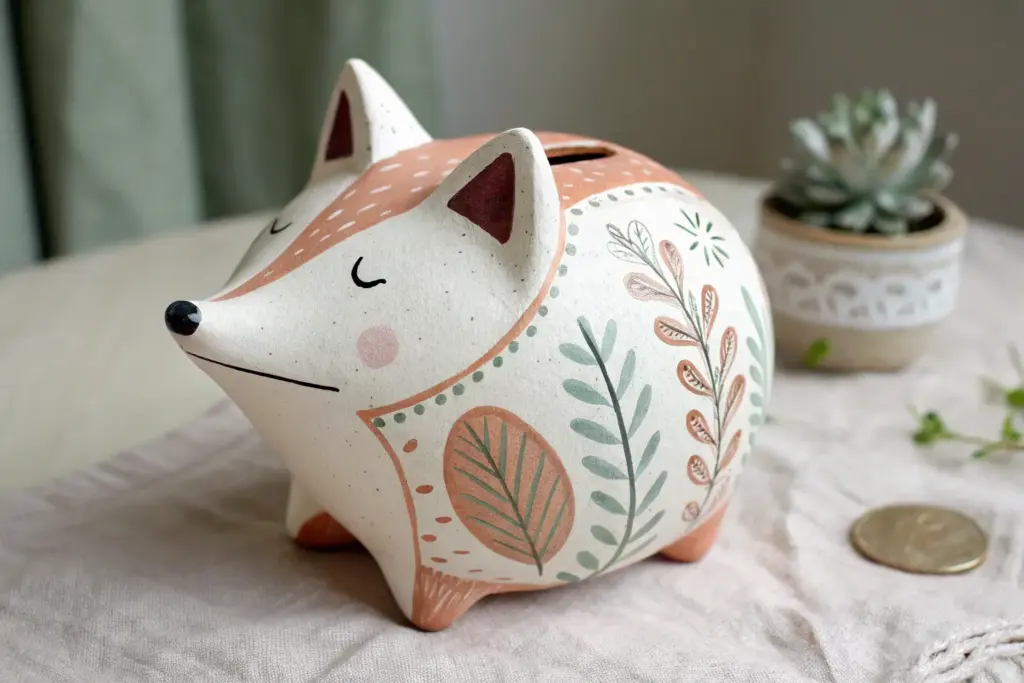
3D Floral Pig With Added Clay Blossoms

Transform a plain ceramic piggy bank into a blooming masterpiece by sculpting delicate 3D flowers and leaves directly onto its surface. This project combines simple clay modeling with soft, pastel paints for a charming, tactile finish that adds personality to any nursery or shelf.
How-To Guide
Materials
- Plain ceramic piggy bank (white or cream)
- Air-dry clay (white)
- Acrylic paints (sage green, peach, mustard yellow, cream)
- Clear matte varnish or sealant
- Sculpting tools (needle tool, small ball stylus)
- Small rolling pin
- PVA glue or heavy-duty craft glue
- Fine grit sandpaper
- Small paintbrushes (detail and flat shader)
- Palette for mixing
Step 1: Preparation and Base Layer
-
Prepare the surface:
Begin by cleaning the ceramic piggy bank with a damp cloth to remove any dust or oils. If the surface is very glossy, lightly sand the area where you plan to attach the flowers to help the clay adhere better. -
Base coat application:
If your piggy bank isn’t already the desired cream color, apply two thin coats of cream acrylic paint to the entire body, letting it dry completely between layers. This creates a uniform canvas for your artwork. -
Map out the design:
Lightly sketch the placement of your floral cluster on the side of the pig using a pencil. You don’t need detailed drawings, just simple circles for flowers and lines for leaves to guide your sculpting.
Clay Cracking?
If small cracks appear as the clay dries, mix a tiny bit of fresh clay with water to make a paste (slip). Brush this into the cracks and smooth it out with your finger.
Step 2: Sculpting the Foliage
-
Form the leaves:
Take small pinches of air-dry clay and roll them into teardrop shapes. Flatten them gently with your thumb or a rolling pin until they are about 2-3mm thick. -
Add texture:
Using a needle tool or a craft knife, press a central vein down the middle of each leaf, followed by smaller diagonal veins radiating outward. This texture adds crucial realism to the final piece. -
Attach the leaves:
Apply a small dab of PVA glue to the back of each leaf and press them onto the pig’s side, following your sketched guide. Curve the tips slightly to give them movement rather than laying them perfectly flat.
Level Up: Metallic Touch
Brush a very light layer of gold gilding wax or metallic acrylic paint onto the edges of the petals and leaf veins for an elegant, antique finish.
Step 3: Creating the Blooms
-
Sculpt the main rose:
For the large focal flower, roll a thin strip of clay and coil it loosely to form the center bud. Then, shape several small, flat ovals for petals. -
Assemble the rose layers:
Attach the petals around the center coil, overlapping them slightly. Gently curl the edges of the outer petals backward. Use a little glue to secure the flower onto the pig, nestled among the leaves. -
Create the smaller blossoms:
For the simple five-petal flowers, roll five tiny balls of clay, flatten them, and arrange them in a circle. Use a ball stylus to press into the center of each petal to cup them slightly. -
Add flower centers:
Roll tiny balls of clay and texture them by stippling with a needle tool. Glue these into the centers of your smaller flowers. -
Make the buds:
Form small rounded cones for flower buds and attach them near the edges of the arrangement to fill in gaps. Smooth any seams where clay meets clay using a damp paintbrush. -
Final drying time:
Allow the sculpted clay elements to dry completely. This usually takes 24 hours, depending on the thickness of your clay and humidity.
Step 4: Painting and Finishing
-
Paint the leaves:
Mix a muted sage green acrylic paint. Carefully paint the leaves, ensuring you get paint into the recessed vein lines. I like to wipe the surface lightly with a dry cloth immediately after painting to highlight the texture. -
Paint the main rose:
Paint the large rose using a soft peach or salmon pink shade. Use a slightly darker shade in the deep crevices of the petals to create depth and dimension. -
Color accents:
Paint the smaller five-petal flowers in warm tones like mustard yellow or terracotta orange. Keep the smallest buds or secondary flowers a creamy white or pale yellow. -
Piggy details:
Using a fine detail brush and black paint, add two small dots for eyes. Add two tiny vertical dashes of terracotta or pink on the snout for nostrils to bring the character to life. -
Add shine to the eyes:
Once the black eye paint is dry, add a minuscule dot of white paint to each eye to create a ‘sparkle’ reflection. -
Seal the project:
Once all paint is fully cured, apply a coat of clear matte varnish over the entire pig, but pay special attention to sealing the clay parts to protect them from moisture and chipping.
Now you have a charming, handcrafted vessel ready to keep your savings safe

The Complete Guide to Pottery Troubleshooting
Uncover the most common ceramic mistakes—from cracking clay to failed glazes—and learn how to fix them fast.
Bold Folk-Art Floral Painted Pig
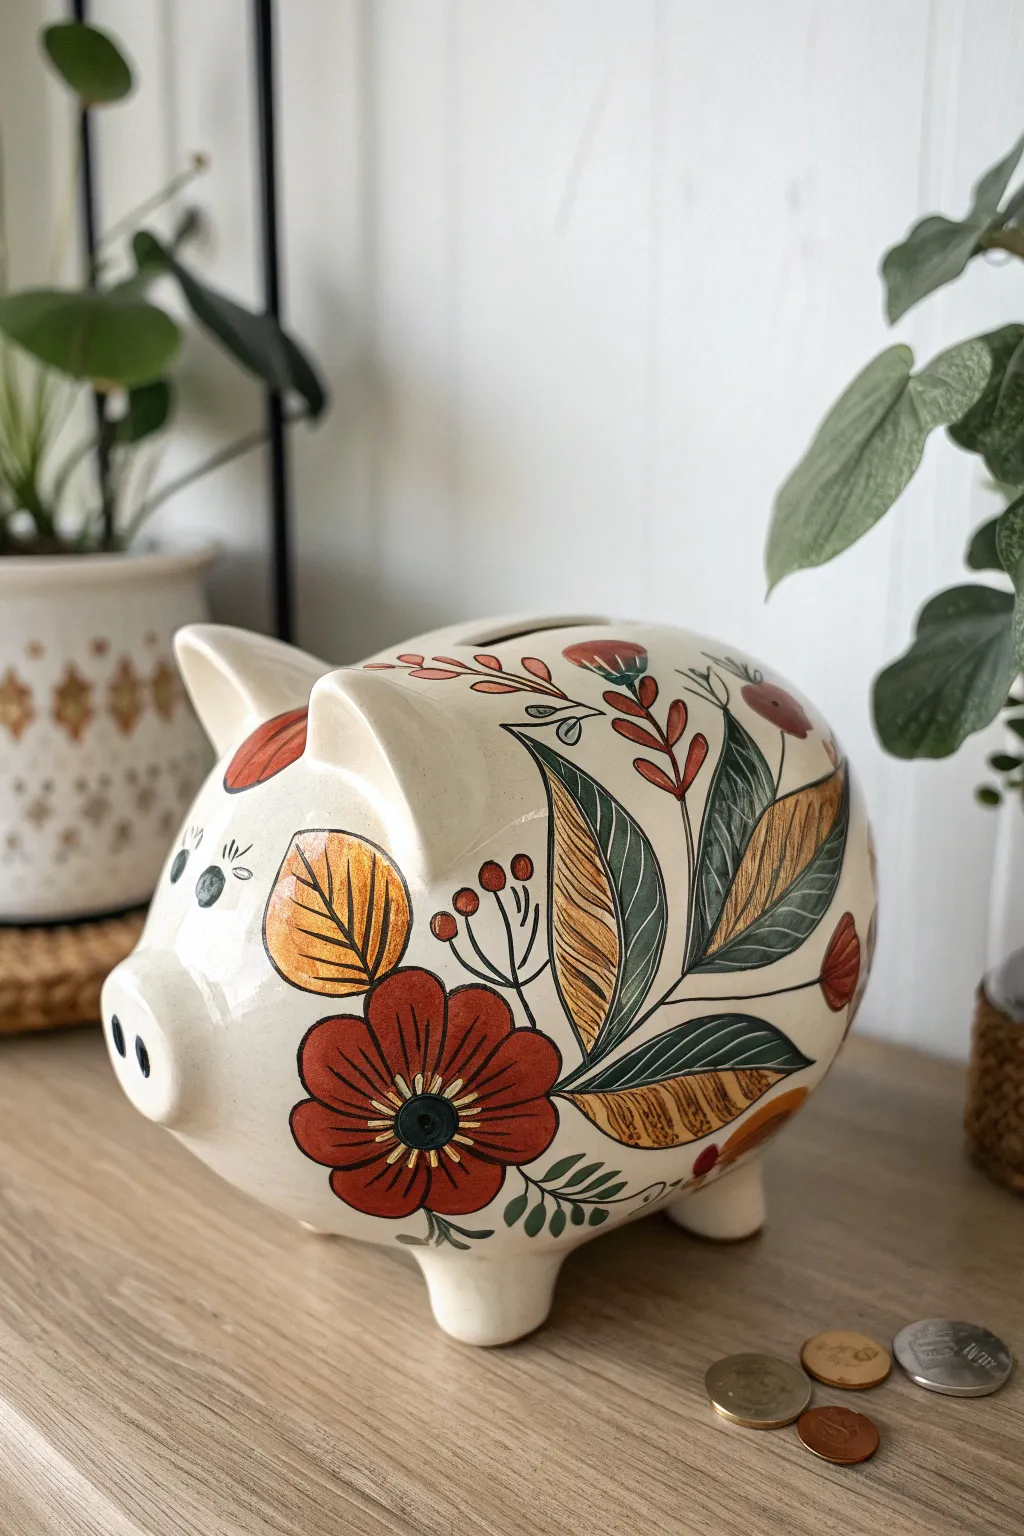
Transform a plain ceramic piggy bank into a stunning decor piece with this bold, nature-inspired folk art design. The combination of earthy reds, mustards, and greens against creamy white creates a warm, vintage aesthetic that looks hand-painted by an old-world artisan.
Step-by-Step Guide
Materials
- Bisque or glazed white ceramic piggy bank
- Acrylic paints (Terracotta/Rust Red, Mustard/Ochre, Forest Green, Sage Green, Black)
- Small round paintbrushes (sizes 0, 2, and 4)
- Fine liner brush (size 00 or 000)
- Pencil for sketching
- Eraser
- Palette or paper plate
- Water cup and paper towels
- Gloss or satin clear sealant (spray or brush-on)
- Gold paint pen (optional for accents)
Step 1: Planning the Layout
-
Clean surface:
Begin by wiping down your piggy bank with a damp cloth to remove any dust or oils. If the surface is very slick or glazed, you might want to give it a very light sanding with fine-grit sandpaper to help the paint adhere, though high-quality acrylics often stick well to clean ceramic. -
Sketch the main motifs:
Lightly sketch your floral design directly onto the pig using a pencil. Note the positioning in the reference image: a large statement flower sits on the flank just behind the front leg, and long sweeping leaves wrap around the body towards the back. -
Add secondary elements:
Sketch the smaller details, like the rounded leaf shape on the cheek, the little patch of berries on the ear, and the smaller buds near the top slot. Don’t worry about perfection; pencil lines can be erased or painted over.
Smooth Lines Trick
If your hand shakes while outlining with the liner brush, rest your pinky finger on the pig’s surface for stability. Thinning black paint with a drop of water helps it glide smoother.
Step 2: Blocking in Color
-
Paint the main flower:
Using your size 4 brush, fill in the large flower petals with your terracotta or rust red paint. Make the petals broad and rounded. You may need two coats to get full opacity. -
Fill the large leaves:
Paint the long, sweeping leaves. In the design shown, there’s a mix of solid green leaves and ‘striped’ leaves. For the striped ones, paint a base of mustard yellow. For the solid ones, use your forest green. -
Add cheek and ear details:
Paint the leaf shape on the pig’s cheek with mustard yellow. Move to the ear and paint a semi-circle or patch in rust red, along with any other scattered berries or buds you sketched. -
Detailing the greenery:
Switch to sage green or a lighter mix of your forest green to add the smaller sprigs and vine accents near the belly and feet. -
Let it dry completely:
Allow all the base colors to dry thoroughly. This is crucial because the next step involves fine line work that will smudge if the paint is even slightly tacky.
Make It Personal
Instead of traditional floral colors, use a monochromatic blue palette for a ‘Delftware’ pottery look, or swap the black outlines for gold leaf pen for a luxurious finish.
Step 3: Defining the Folk Art Style
-
Outline the flower:
Load your fine liner brush with black paint. Thin the paint slightly with a drop of water to make it flow like ink. Carefully outline each petal of the main rust-red flower. -
Create the flower center:
Paint a solid black circle in the center of the main flower. Once dry, add a tiny dot of mustard or white in the very middle to create depth. -
Detail the yellow leaves:
On the mustard yellow leaves (the cheek and the large back leaf), use the liner brush to paint thin, angled hatching lines to mimic leaf veins. This texture is key to the folk-art look. -
Outline the green leaves:
Outline the solid green leaves with black. Add a central vein line down the middle of each green leaf for definition. -
Add stems and connections:
Connect your flowers and leaves with thin black stems. I find that keeping these lines slightly organic and wavy looks better than rigid straight lines. -
Paint the eyes and nose:
Paint simple, illustrative eyes with eyelashes using the liner brush. Two vertical oval strokes usually work well for the nostrils on the snout. -
Add final flourishes:
Look for empty spaces and add tiny red berries or small green leaves to balance the composition. Use gold paint or a gold pen to add tiny accents inside the flower petals if you want extra shimmer.
Step 4: Sealing and Finishing
-
Check for errors:
Look over your work. Use a tiny bit of white paint to clean up any smudged outlines or to sharpen the edges of your design. -
Apply sealant:
Once the paint is cured (wait at least 24 hours to be safe), apply a clear gloss or satin varnish. A spray sealant is often easier to apply evenly without dragging the brush strokes.
Now your piggy bank is ready to start collecting coins in beautiful, artistic style
Farm Scene Story Pig With Hand-Painted Illustration
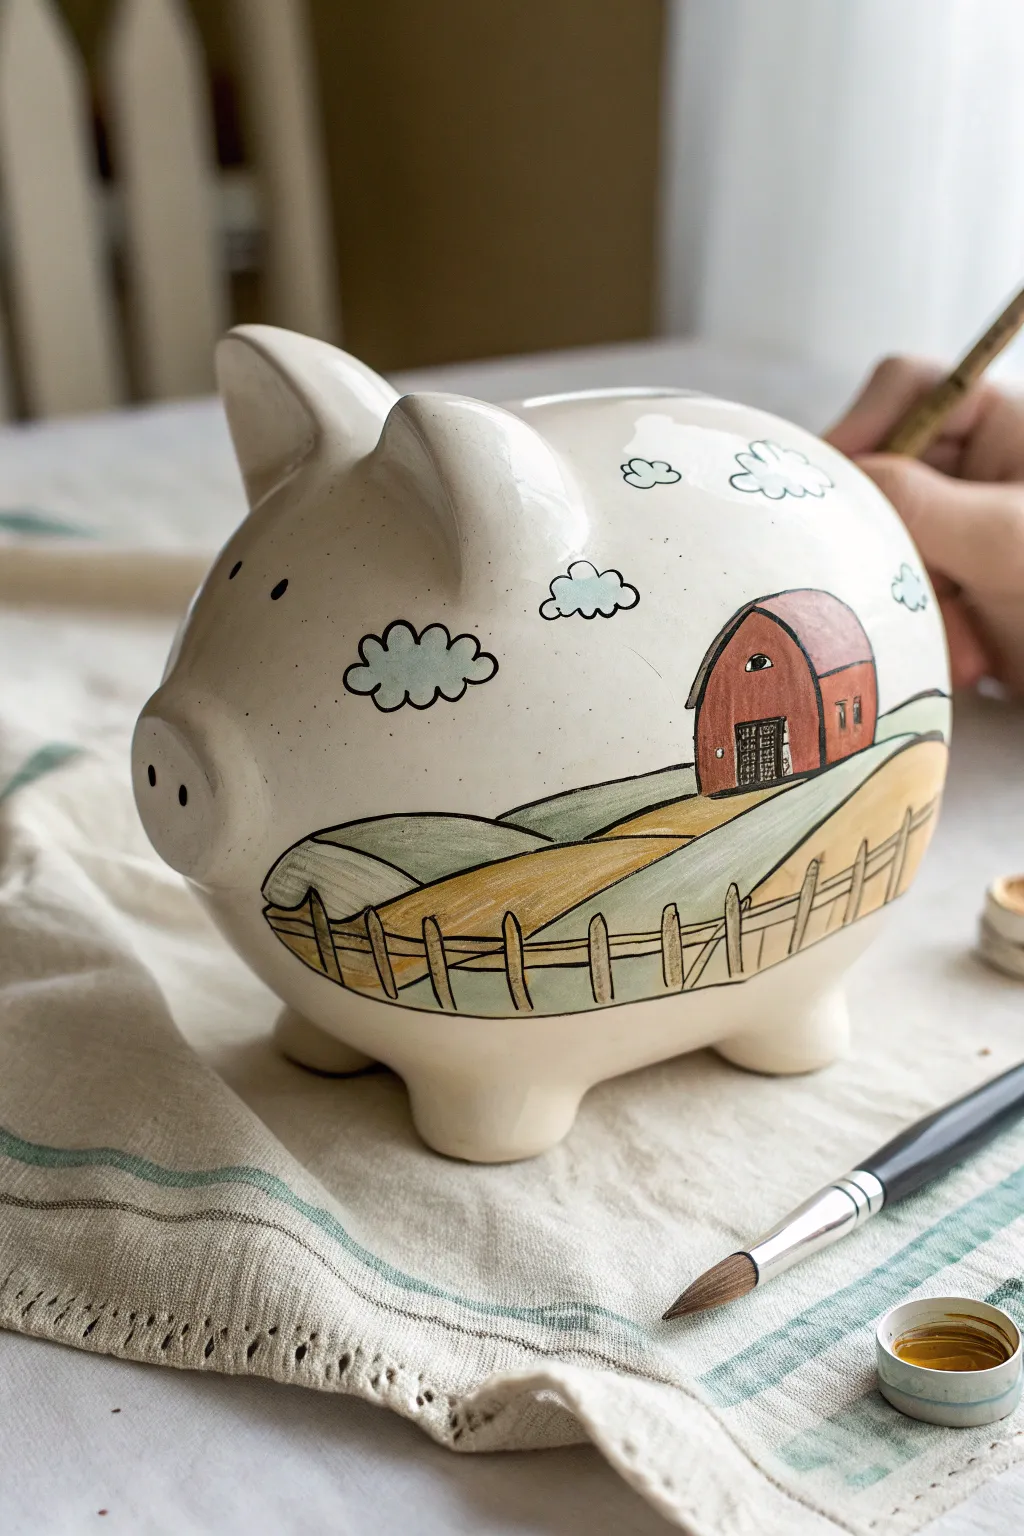
Bring a touch of pastoral charm to your savings with this hand-painted ceramic piggy bank featuring a classic red barn and rolling fields. The simple yet striking farm scene uses clean lines and soft colors to create a heartwarming keepsake perfect for a shelf or nursery.
Step-by-Step
Materials
- Bisque ceramic piggy bank
- Pencil
- Eraser
- Ceramic underglazes or acrylic paints (Red, Tan/Yellow Ochre, Sage Green, Dark Brown, Black, White)
- Fine liner brush (size 00 or 0)
- Round brush (size 4 or 6)
- Palette or small plate
- Water cup
- Clear gloss glaze or sealant (spray varnish for acrylics)
- Paper towels
Step 1: Sketching the Scene
-
Prepare surface:
Begin by wiping down your bisque piggy bank with a slightly damp sponge to remove any dust. This ensures your paint adheres smoothly. -
Rough landscape:
Using a pencil, lightly sketch a horizon line that curves gently across the side of the pig’s body. Let the line dip and rise to suggest rolling hills. -
Add the road:
Draw two converging lines starting wide at the bottom near the pig’s belly and narrowing as they approach the horizon line. This creates a dirt path leading toward the barn. -
Place the barn:
Sketch a simple barn shape near the top of the road. Draw a rectangle for the base and a angled roof. Add a smaller, lean-to section on the side for dimension. -
Detail sketching:
Lightly pencil in the rectangular barn doors, a small hayloft window, and a few windows on the side. Add cloud shapes floating near the top section.
Steady Hand Trick
Rest your pinky finger against the dry surface of the pig while painting fine lines. This anchors your hand and drastically reduces shakiness for crisp details.
Step 2: Blocking in Color
-
Painting the barn:
Mix a rusty red color using red with a tiny touch of brown. Using your round brush, fill in the main body of the barn. Be careful around the doors. -
Roof details:
Paint the roof using a lighter touch, perhaps mixing a bit of grey or brown to differentiate it from the walls. Leave the window spaces unpainted for now. -
Fields and road:
Use a golden tan or yellow ochre color to paint the road and the fields on the right side. Apply the paint in smooth strokes following the curve of the land. -
Green hills:
Switch to a diluted sage green for the hills on the left side. I find it helpful to keep this color somewhat translucent to suggest distance. -
Clouds:
Mix a very pale blue or use white with a hint of blue to fill in the cloud shapes. Keep the edges soft if possible.
Make it Personal
Paint a tiny mailbox by the road with the recipient’s initials on it, or date the project inside one of the clouds for a hidden time-capsule effect.
Step 3: Line work & Details
-
Outline preparation:
Ensure all your base colors are completely dry before starting the line work. The black paint will bleed if the base is wet. -
Inking the barn:
Using your finest liner brush and thinned black paint (or an ink-like consistency), carefully outline the barn, roof, and doors. -
Adding texture:
Paint small vertical lines on the barn walls to suggest wood planks. Fill in the window panes with black. -
Define the landscape:
Outline the road and the separation between the green and gold fields. Keep your hand steady but allow for slight variation to mimic natural terrain. -
Fence posts:
Paint small vertical strokes along the bottom edge of the scene for fence posts. Connect them with two horizontal rails using thin lines. -
Cloud outlines:
Outline the clouds with a wiggly, scalloped line to give them a fluffy appearance. -
Final touches:
Dot the pig’s eyes and snout with black paint. If using underglazes, fire the piece; if using acrylics, spray with a clear sealant once dry.
Now your piggy bank is ready to start collecting coins for your next big adventure


What Really Happens Inside the Kiln
Learn how time and temperature work together inside the kiln to transform clay into durable ceramic.
Marbled Pig With Swirled Color
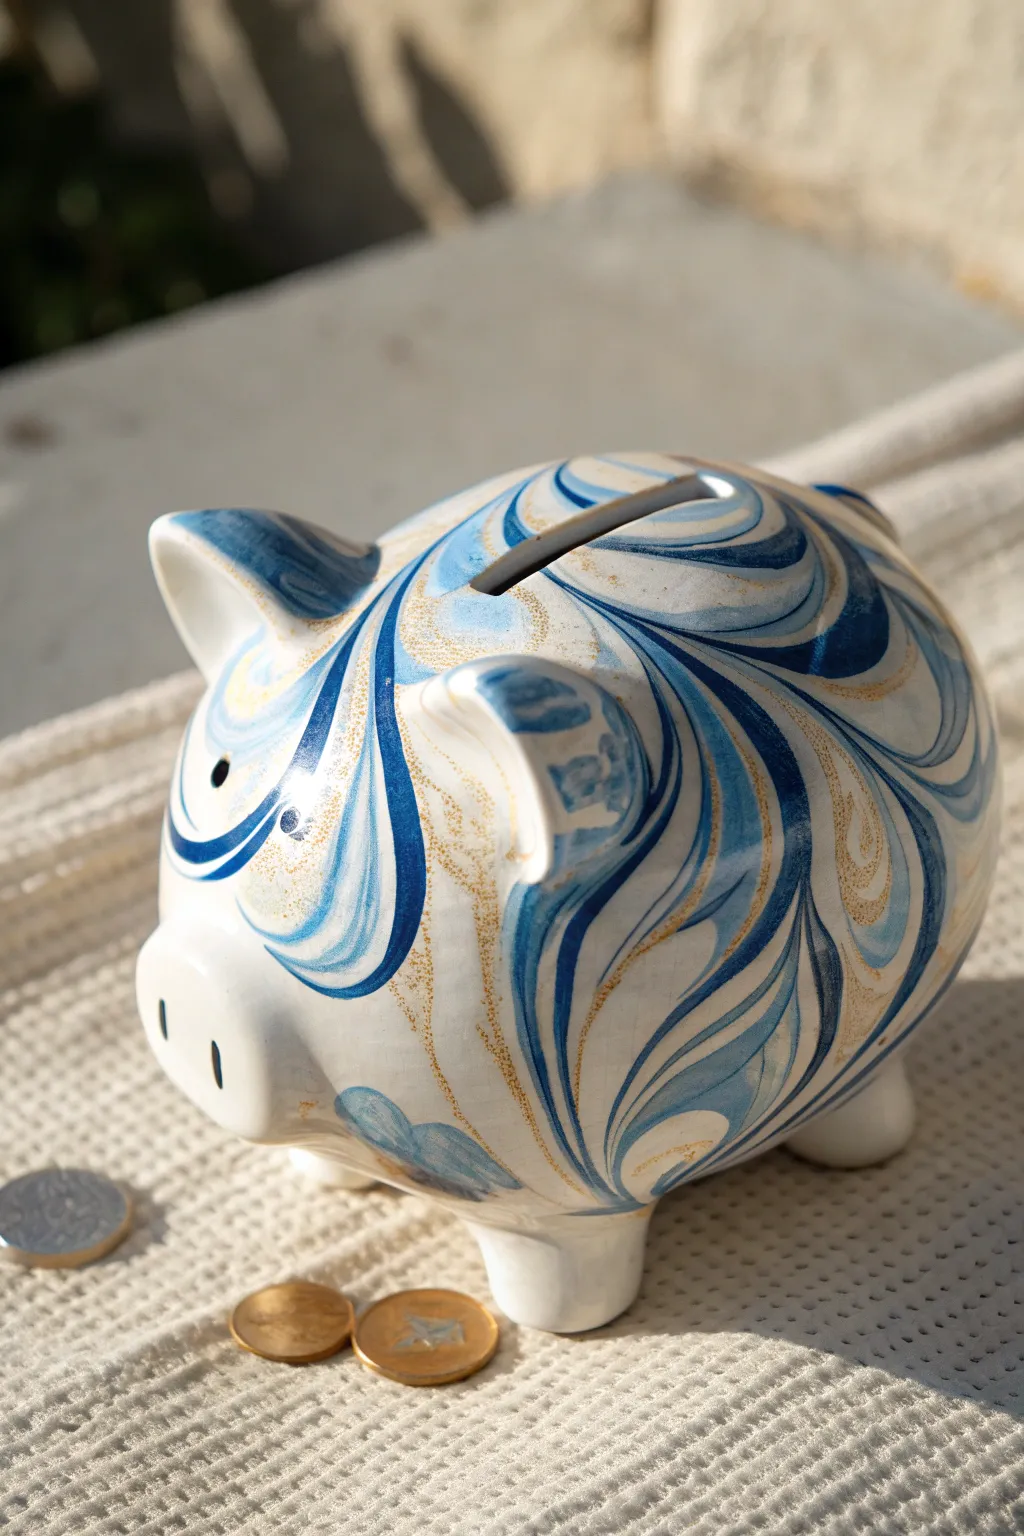
Transform a plain white ceramic piggy bank into a high-end decor piece with this surprisingly achievable marbling technique. The finished result features sweeping currents of ocean blue and teal, accented by delicate veins of shimmering gold that catch the light beautifully.
Step-by-Step Tutorial
Materials
- White ceramic piggy bank (glazed)
- Rubbing alcohol
- Cotton pads
- Enamel or multi-surface acrylic paints (White, Navy Blue, Teal/Light Blue)
- Metallic gold paint
- Marbling medium or pouring medium
- Large plastic container (for dipping) OR disposable cups (for pouring)
- Painter’s tape
- High-gloss clear sealant (spray)
- Wooden stir sticks
- Gloves
Step 1: Prep and Prime
-
Clean the surface:
Before adding any color, wipe down the entire piggy bank with rubbing alcohol on a cotton pad to remove dust, oils, and fingerprints. -
Protect the opening:
Use a small strip of painter’s tape to cover the coin slot on top and the stopper on the bottom. This prevents paint from dripping inside the bank.
Step 2: Creating the Marbled Effect
-
Mix your base paints:
In separate disposable cups, mix your navy blue, teal, and gold paints with a pouring medium. Follow the ratio on your medium bottle, but typically you want a consistency like warm honey. -
Prepare the pour:
Since the pig is a 3D object, I find the ‘dirty pour’ method works best here. Take a clean, empty cup and pour a small amount of white paint into the bottom. -
Layer the colors:
Slowly pour the navy blue on top of the white, followed by the teal, and finally a drizzle of gold. Repeat these layers until the cup is nearly full. -
Don’t overmix:
Resist the urge to stir the cup. The beauty of marbling comes from the distinct separation of colors. -
Pour over the pig:
Place your piggy bank on a raised surface above a tray (an upside-down cup works as a pedestal). Begin pouring the layered paint slowly over the pig’s back near the coin slot. -
Guide the flow:
Physically pick up the pig (wearing gloves) and gently tilt it back and forth. You want the paint to stretch and swirl down the sides, creating those long, elegant curved lines. -
Check the ears and nose:
Ensure the paint wraps around the ears and snout. You can use a popsicle stick to gently guide paint into tricky crevices without disrupting the pattern too much. -
Add gold accents:
While the paint is still wet, you might notice the gold getting lost. Dip a toothpick or thin brush into your metallic gold paint and drag it lightly through the wet blue swirls to create defined veins. -
Create negative space:
If the design is too heavy, you can wipe away paint from the snout or feet with a damp cloth to reveal the white ceramic underneath, balancing the design.
Muddy colors?
If your blues are turning gray or brown, you likely over-stirred the cup or tilted the pig too aggressively. Keep movements slow to maintain distinct color bands.
Step 3: Finishing Touches
-
Initial dry time:
Let the piggy bank sit undisturbed on its drying pedestal for at least 24 hours. The thick poured paint needs significant time to cure. -
Remove tape:
Once the paint is dry to the touch but not fully cured (around the 6-hour mark), carefully peel off the painter’s tape from the coin slot to ensure a clean edge. -
Clean the feet:
Check the bottom of the feet where drips may have gathered. Sand these drips down gently if needed so the pig stands flat. -
Apply sealant:
To get that glassy, professional look shown in the photo, spray the entire project with two coats of high-gloss clear acrylic sealer. -
Final cure:
Allow the clear coat to dry fully according to the can’s instructions before handling or adding coins.
Add some texture
Sprinkle fine gold glitter over the wet paint along the gold veins. It adds a physical texture that catches light differently than the metallic paint.
Your stylish new piggy bank is now ready to hold your savings in artistic flair
Speckled Terrazzo Pig With Confetti Clay Bits
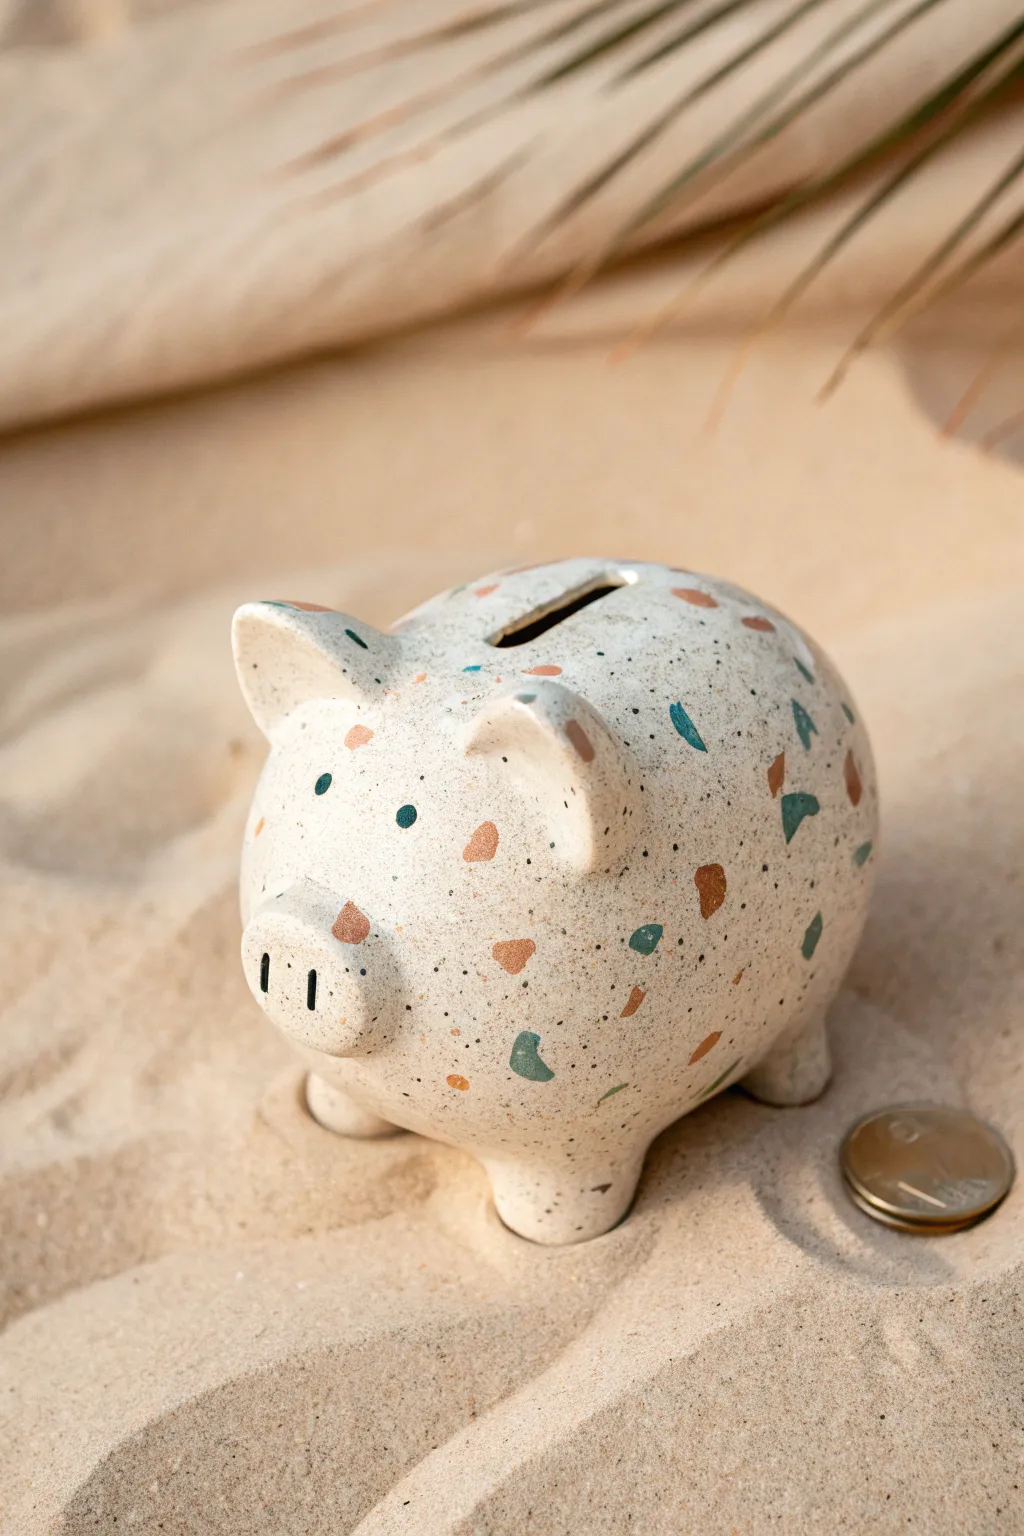
Bring the beach vibes home with this delightful speckled piggy bank that mimics the look of trendy terrazzo stone. Using polymer clay and a clever confetti technique, you’ll create a modern, textured finish that transforms a simple savings jar into a piece of decor.
Step-by-Step Guide
Materials
- Oven-bake polymer clay (white or beige for the base)
- Small amounts of colored polymer clay (terracotta, teal, navy blue)
- Black pepper or dried coffee grounds (for speckling)
- Rolling pin or clay machine
- Piggy bank hollow form (heat-safe ceramic or glass) OR aluminum foil/masking tape for armature
- Ceramic sculpting tools
- X-Acto knife or clay blade
- Liquid polymer clay (optional, for bonding)
- Matte varnish (optional)
Step 1: Preparing the Confetti Clay
-
Condition the base:
Start by conditioning a large block of your white or beige clay until it is soft and pliable. This will be the main body color. -
Add some grit:
To achieve that realistic sandy stone texture, sprinkle a generous pinch of coarse black pepper or dried coffee grounds into the conditioned base clay. -
Mix the inclusions:
Fold and knead the clay repeatedly until the specks are evenly distributed throughout the white block. Set this aside. -
Create color chips:
Take your colored clays (terracotta, teal, navy) and roll them out into very thin sheets. Bake these thin sheets for 5-10 minutes just to harden them slightly. -
Chop the confetti:
Once the colored sheets are cool, use your blade to chop them into irregular geometric shards. Aim for a variety of sizes, from tiny specks to larger chunks. -
Embed the color:
Take your raw speckled base clay and press the baked colored shards directly into it. Don’t mix too much or the colors will smear; you want distinct chunks. Roll over it with a rolling pin to push the shards flush with the surface.
Sticky Situation
If the terrazzo chips keep falling out while rolling, lightly brush the raw base clay with liquid polymer clay before pressing the chips in. This creates a stronger bond.
Step 2: Sculpting the Piggy
-
Cover your armature:
If using a heat-safe ceramic form, coat it lightly with liquid clay first. If building from scratch, crumple aluminum foil into a large oval body shape and wrap tightly with masking tape. -
Apply the clay sheet:
Sheet your prepared terrazzo clay to about 1/4 inch thickness. Carefully drape it over your form, smoothing seams with your finger or a sculpting tool so they disappear. -
Cut the coin slot:
While the clay is still on the form, use your knife to slice a clean rectangular slot at the top center of the back. Check that a coin fits through easily. -
Form the legs:
Roll four short, stout cylinders from the terrazzo clay. Attached them to the bottom of the pig, blending the clay upwards into the body so they are secure. -
Check for wobble:
Stand the pig on a flat surface. Adjust the legs slightly by pressing them down until the body sits level and stable. -
Add the snout:
Roll a small flattened circle of clay for the nose. Attach it to the front face, blending the edges for a seamless transition. -
Detail the nostrils:
Use a small dotting tool or the back of a paintbrush to indent two vertical ovals into the snout for nostrils. I like to darken these slightly with a tiny bit of black pastel powder for depth. -
Sculpt and attach ears:
Shape two triangles from your clay. Gently curve them forward to give the pig an alert expression and blend them onto the head above the eyes. -
Define the eyes:
Press two tiny balls of dark clay (teal or navy) into the face for eyes. Use a tool to press them flat so they look inlaid like the rest of the terrazzo.
Step 3: Finishing Touches
-
Texture check:
Before baking, give the whole pig a once-over. If you want a rougher stone feel, gently press a coarse sponge against the surface. -
Bake the project:
Bake according to your clay manufacturer’s instructions (usually 275°F/135°C for 30 minutes per 1/4 inch of thickness). Support the belly with fiberfill or paper towels so it doesn’t sag. -
Sand and buff:
Once fully cooled, lightly sand the surface with fine-grit wet sandpaper. This exposes the colored chips more clearly and enhances the terrazzo effect. -
Seal:
Apply a coat of matte varnish if you want to protect the finish without making it shiny.
Pro Tip: Cleaner Cuts
Chill your clay in the fridge for 10 minutes before cutting the coin slot. Firmer clay resists dragging and results in a much sharper, cleaner opening.
Now you have a stylish spot to stash your coins for your next vacation

TRACK YOUR CERAMIC JOURNEY
Capture glaze tests, firing details, and creative progress—all in one simple printable. Make your projects easier to repeat and improve.
Faux-Fur Pig With Stippled Texture

Achieve a unique, tactile finish with this charming clay project that mimics the look of textured stone or stippled skin using a simple needle technique. Its earthy beige tone and minimalist features make it a sophisticated addition to any windowsill or shelf.
Step-by-Step Guide
Materials
- Air-dry clay or polymer clay (beige or light terracotta color)
- Clean rolling pin
- Aluminum foil (for armature)
- Needle tool or toothpick
- Pottery sponge
- Sculpting tools (rib tool, smoothing tool)
- Black acrylic paint
- Fine detail paintbrush
- Craft knife
- Water (for smoothing)
Step 1: Forming the Base
-
Create the armature:
Begin by crumpling aluminum foil into a large oval shape. This acts as the core of your pig to save clay and reduce weight. Ensure it is tightly packed so the clay has a firm surface to adhere to. -
Roll out the clay sheet:
Roll your chosen clay into a uniform sheet, approximately 1/4 inch thick. Make sure the sheet is large enough to cover the entire foil armature. -
Cover the armature:
Drape the clay sheet over the foil egg. Wrap it entirely, pressing seams together firmly. -
Smooth the body:
Use your thumbs or a wooden rib tool to blend the seams until they vanish completely. The surface should be a smooth, solid oval. -
Shape the legs:
Roll four small, equal-sized cones of clay. Attach them to the bottom of the body, blending the edges upwards so the legs look integrated rather than just stuck on. Flatten the bottoms so the pig stands stable.
Uneven Texture?
If the stippling pushes up ridges of clay around the holes, let the clay firm up slightly (about 30 minutes) before texturing. A light sanding after drying also smooths sharp bumps.
Step 2: Sculpting Features
-
Add the snout:
Roll a small ball of clay and flatten it slightly into a disc. Attach this to the front of the body, blending the back edges into the face while keeping the front distinct. -
Add the ears:
Cut two small triangles from your leftover clay sheet. Bend them slightly to give them a natural curve and attach them near the top front of the head. Smooth the join lines carefully. -
Refine the shape:
Here, I like to take a damp sponge and gently wipe the entire surface to remove any fingerprints and ensure all additions are seamlessly blended. -
Cut the coin slot:
Using your craft knife or a wide modeling tool, carefully cut a rectangular slot into the top center of the pig’s back. Ensure it is wide enough for the thickest coin you plan to save.
Weight Balance
Before the clay dries, gently tap the pig on a flat surface. This flattens the feet evenly, ensuring your bank won’t wobble once it’s full of heavy coins.
Step 3: Texturing and Finishing
-
Begin the stippling process:
This is the most time-consuming but rewarding part. Take your needle tool and begin poking shallow holes into the clay surface. -
Create variation:
Vary the depth and spacing of your pokes slightly. Denser clusters of dots can create shading effects, while sparser areas keep the surface interesting. -
Cover the surface:
Work your way across the entire body, ears, and snout. Be careful not to alter the main shape of the pig while pressing into the clay. -
Detail the snout:
Use a slightly larger tool or the back of a paintbrush to create two distinct indentations for the nostrils on the snout. -
Let it dry:
Allow the clay to dry completely according to the manufacturer’s instructions. If using polymer clay, bake it in the oven as directed. -
Paint the eyes:
Once fully cured and cool, dip a fine detail brush (or the tip of a toothpick) into black acrylic paint. clear Apply two small, solid black dots for the eyes. -
Optional wash:
If you want to highlight the texture, you could apply a very watered-down brown wash and wipe it off immediately, leaving darker pigment in the stippled holes.
Now you have a delightfully textured companion ready to guard your savings
Sgraffito Pig With Scratch-Reveal Designs
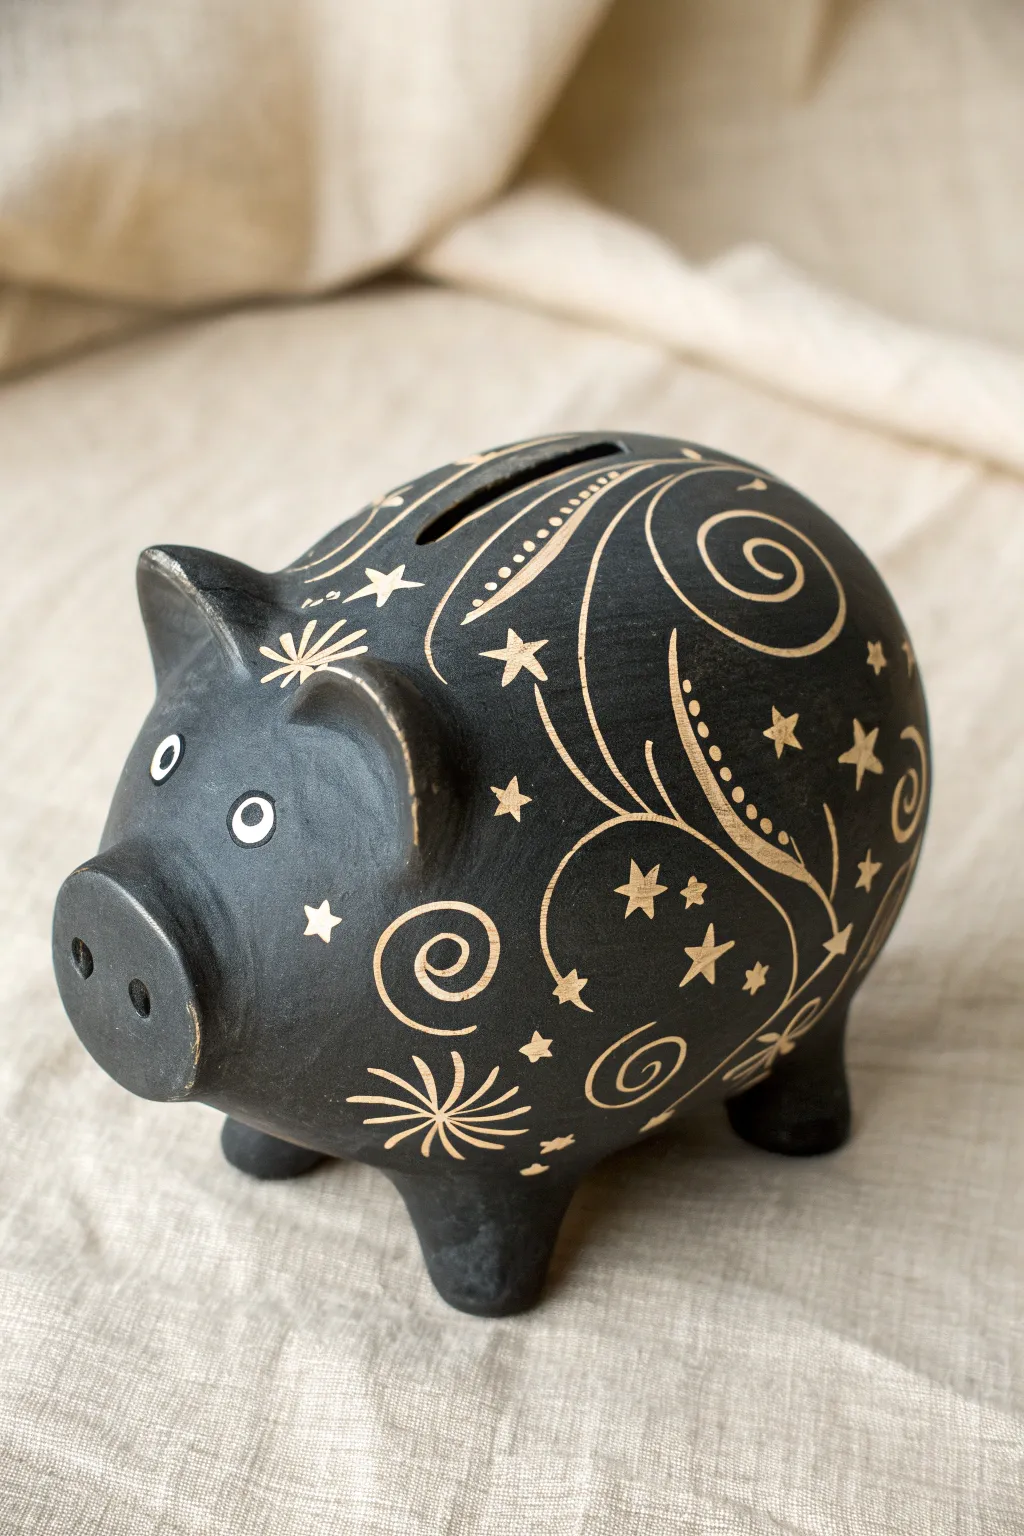
Transform a simple clay piggy bank into a whimsical piece of celestial art using the sgraffito technique. This method involves scratching through a top layer of black slip or underglaze to reveal the natural clay body underneath, creating a striking high-contrast design.
Detailed Instructions
Materials
- Leather-hard clay piggy bank (or bisque ware for glaze sgraffito)
- Black underglaze or black slip
- Soft fan brush or wide hake brush
- Needle tool or sgraffito tool set (loop tools)
- Pencil (optional)
- Damp sponge
- Clear glaze (optional for final finish)
Step 1: Preparation and Coating
-
Surface Prep:
Begin with your clay piggy bank in a leather-hard state. It should be firm enough to handle without deforming but soft enough to carve into. Gently wipe the surface with a barely damp sponge to remove any dust or stray clay crumbs. -
Underglaze Application:
Load a soft fan brush with black underglaze. Apply a smooth, even coat over the entire exterior of the pig, ensuring you get into the crevices around the ears, snout, and legs. -
Second Coat:
Allow the first layer to dry until it’s no longer shiny. Apply a second coat of black underglaze running in a perpendicular direction to the first coat. This cross-hatching technique ensures solid coverage without brushstrokes showing through. -
Checking Consistency:
Check for any thin spots where the clay color might be peeking through. Dab a little extra underglaze on these areas if needed. Let the pig dry back to a firm leather-hard state; the surface should be dry, but the clay underneath cool to the touch. -
Planning the Eyes:
Determine the placement for the eyes. You won’t carve these yet, but visualize where they sit low on the face for that cute, slightly puzzled look.
Smear Prevention
If you smear black dust into your white lines, wait for the piece to dry completely. Then, scratch the line again lightly; the smeared dust usually sits just on the surface and flakes right off.
Step 2: Carving the Design
-
Mapping the Flow:
Using a dull pencil or just light pressure with your finger, you can faintly sketch out the main swooping lines of the design on the black surface. This helps establish the flow before you commit to cutting. -
Start with Swirls:
Take a fine-point loop tool or sgraffito tool. Begin carving the large, elegant swirls on the pig’s flank. Apply consistent pressure to scratch away the black layer, revealing the light clay beneath. -
Refining the Lines:
Go back over your main swirl lines if necessary to thicken them slightly. The lines should taper elegantly at the ends, mimicking a brushstroke. -
Adding Stars:
Scatter five-pointed stars around the open spaces. Use sharp, straight cuts for the star points to keep them crisp. Vary the sizes, placing larger stars near the main swirls and smaller ones in the background. -
The Dotted Details:
Create the decorative dotted lines that follow the curves of your swirls. Simply press the tip of a needle tool or small loop tool gently into the surface in a row. -
Burst Designs:
Carve the sunburst or flower-like motifs near the bottom legs and shoulder. Start from a center point and scratch lines radiating outward. -
Carving the Eyes:
Carefully carve two solid white circles for the eyes. Once the white circle is cleared, add a small dot of black underglaze back into the center for the pupil, or carefully leave a black circle uncarved if you have a steady hand. -
Snout Details:
Define the snout by carving a thin line around its edge if it was painted over. Ensure the nostrils remain dark and distinct.
Gilded Galaxy
For a steeper upgrade, use gold luster on the stars after the final glaze firing. You’ll need a third, low-temperature firing, but the real gold shine against the black background is stunning.
Step 3: Finishing Touches
-
Cleanup:
As you carve, little crumbs of black and white clay will accumulate. Do not brush them away with your hand, as this can smear the black pigment into your white lines. Instead, use a large, soft, dry makeup brush to flick the crumbs away. -
Final Inspection:
Look over the entire piece. Use a needle tool to sharpen the points of any stars that look blunt or to fix any jagged edges on your swirl lines. -
Bisque Fire:
Once the pig is bone dry, fire it to bisque temperature (usually Cone 04) to set the design and prepare it for glazing. -
Clear Glaze:
After the bisque firing, dip the pig into a clear, transparent glaze. This will seal the surface and make the black deep and glossy while protecting the raw clay areas. -
Final Firing:
Fire the piece again to the appropriate temperature for your clear glaze (usually Cone 05 or 06). Let the kiln cool completely before retrieving your finished starry bank.
Now you have a stunning, hand-carved bank ready to hold your coins or sit proudly on a shelf
Metallic-Accent Pig With a Shiny Finish
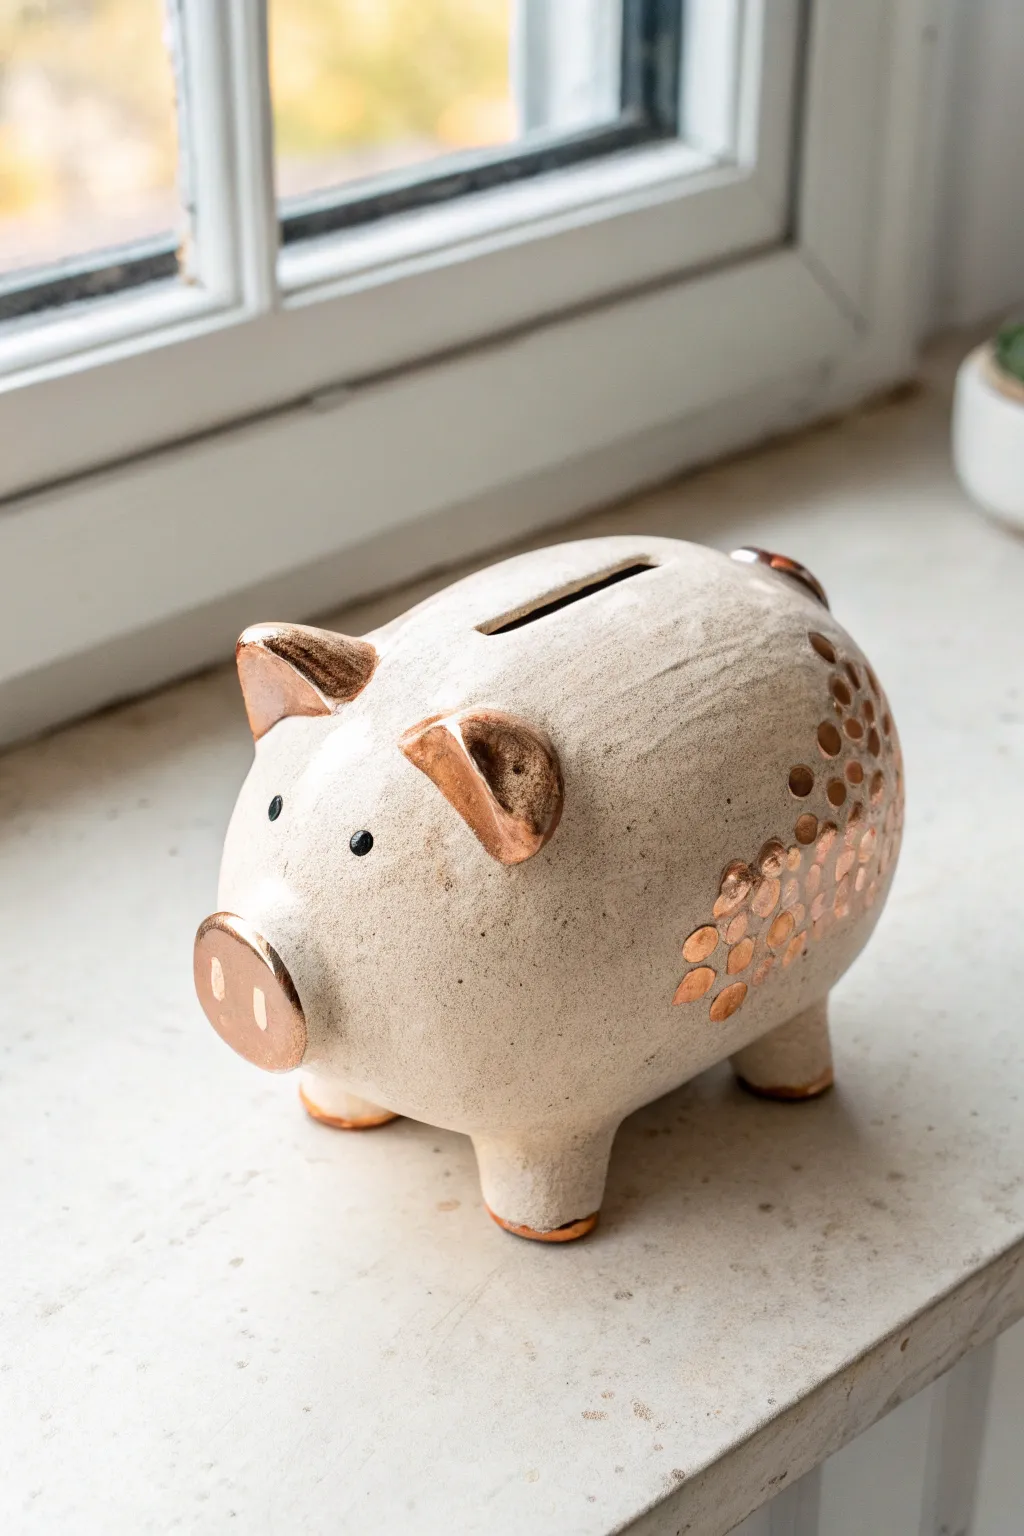
This charming piggy bank combines an earthy, hand-built aesthetic with touch of modern elegance. The speckled cream glaze contrasts beautifully with metallic copper-gold accents on the ears, snout, and tail, creating a piece that feels both artisanal and luxe.
Step-by-Step
Materials
- Earthenware or stoneware clay (white or light buff)
- Clay sculpting tools (rib, needle tool, sponge)
- Small bowl of water
- Rolling pin
- Newspaper or paper towels
- Speckled cream or oatmeal stoneware glaze (brush-on)
- Metallic copper or rose gold ceramic luster (or metallic acrylic paint for a non-fired version)
- Soft synthetic brushes (flat and round)
- Kiln (if firing)
- Clear gloss sealant (if using acrylics)
Step 1: Shaping the Base
-
Prepare the Body:
Start by wedging a substantial ball of clay to remove air bubbles. Shape it into a smooth, large oval form, roughly the size and shape of a honeydew melon, to serve as the pig’s body. -
Hollow the Form:
If you are working solid, carefully slice the oval in half, hollow out the inside with a loop tool leaving 1/4 inch walls, and score and slip the edges to reattach them. Alternatively, build the body using pinch pot construction. -
Smooth the Seams:
If you reattached halves, use a rib tool and a slightly damp sponge to completely smooth over the seam so it’s invisible. The surface should be slightly earthy and textured, not perfectly manufactured. -
Create the Snout:
Roll a small sphere of clay and flatten it slightly into a disc. Attach this to one end of the oval using the score-and-slip method to create the snout. -
Add Nostrils:
Using the back of a small paintbrush or a rounded sculpting tool, press two indents into the snout disc to form the nostrils. -
Form the Ears:
Shape two triangular wedges for ears. Gently curve them forward slightly. Attach them near the top front of the head, blending the clay at the base for a strong bond. -
Attach Legs:
Roll four short, stout cylinders for legs. Attach them to the belly of the pig, ensuring they are even so the pig stands stable. I find it helpful to wiggle the pig gently on the table to level the feet. -
Cut the Coin Slot:
Once the clay is leather hard, use a sharp fettling knife or needle tool to cut a rectangular slot in the center of the pig’s back. Smooth the rough edges with a damp finger or sponge.
Clean Lines
When painting the nose, use a small flat brush and rest your pinky finger on the pig’s cheek to stabilize your hand.
Step 2: Adding Details & Firing
-
Create the Scale Pattern:
Using a small U-shaped loop tool or simply your thumb, lightly press a repeating scale or dot pattern onto the rear quarters of the pig. This adds texture that will catch the glaze later. -
Refine the Surface:
Before firing, give the entire piece a final sponge wipe to soften any sharp edges. Let the pig dry completely (bone dry) before bisque firing. -
Bisque Fire:
Fire the piece in the kiln to cone 04 (or according to your clay’s instructions) to harden it into bisque ware. -
Apply Base Glaze:
Brush 2-3 coats of a speckled cream or oatmeal glaze over the entire pig. Avoid clogging the coin slot. Let each coat dry fully before adding the next. -
Glaze Fire:
Fire the pig again to the maturity temperature of your chosen glaze (typically cone 5 or 6 for stoneware). Let it cool completely.
Step 3: Metallic Accents
-
Prepare Metallic Luster:
If using real ceramic gold/copper luster, work in a well-ventilated area. This is an overglaze that requires a third, lower-temperature firing. -
Paint the Snout:
Carefully paint the metallic luster onto the flat disc of the snout. A steady hand is key here for a clean edge. -
Detail the Ears and Feet:
Paint the metallic accent onto the inner ears and the tips of the feet (hooves). Just a small touch on the feet is enough to ground the piece. -
Highlight the Rear Texture:
Dab dots of metallic luster onto the textured pattern you created on the pig’s rear. Don’t cover the whole area; random, varied dots look more organic. -
Final Eyes:
Use a tiny dot of black glaze or enamel for the eyes. Position them wide apart for a cute expression. -
Final Firing (or Sealing):
Fire the piece a third time to cone 018 (or as luster directs). If you used metallic acrylic paint instead of luster, simply let the paint dry and seal the painted areas with gloss varnish.
Creative Cork
Don’t forget to cut a hole in the belly for a cork stopper! Do this at the leather-hard stage so you can retrieve your savings later.
Enjoy watching your savings grow inside your stylish new handmade bank
Faceted Geometric Pig for a Modern Look
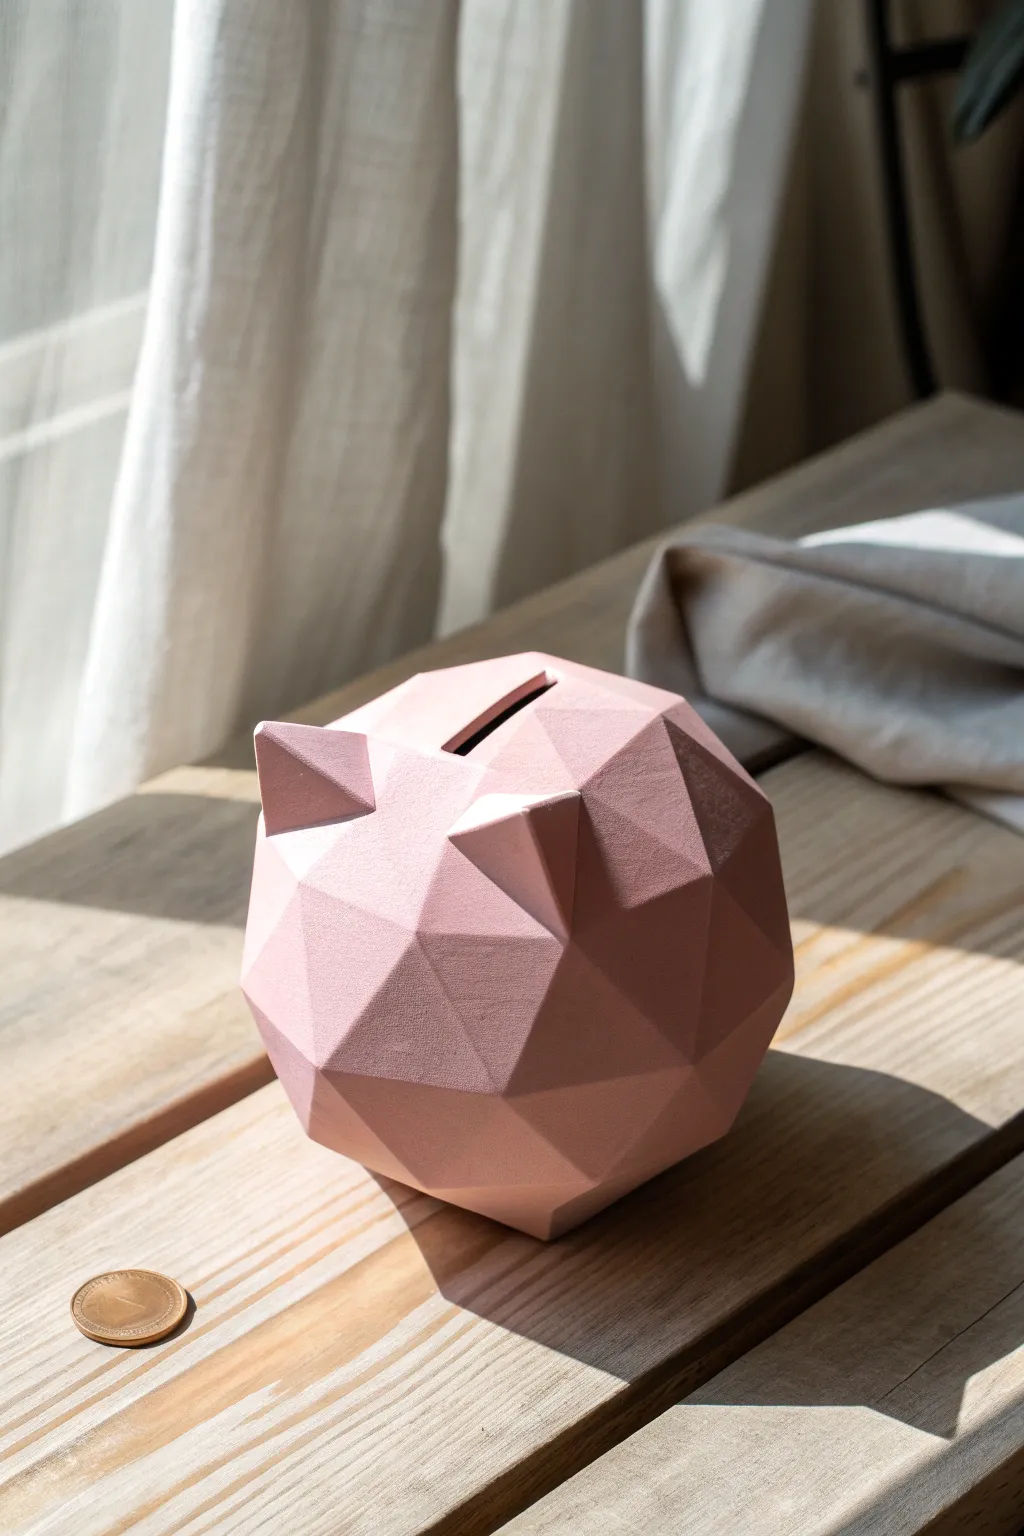
Ditch the traditional round curves for this sleek, low-poly inspired piggy bank design that adds a contemporary touch to saving money. The striking geometric facets catch the light beautifully, creating a project that looks high-end but is achievable with patient shaping.
Step-by-Step Tutorial
Materials
- White or terracotta air-dry clay (approx. 2 lbs)
- Geometric templates or paper mache craft form (optional but helpful)
- Rolling pin
- Sharp craft knife or clay blade
- Flat, metal sculpting rib or sturdy ruler
- Slip (clay mixed with water)
- Sanding sponge (medium and fine grit)
- Acrylic paint (Dusty Pink or Millennial Pink)
- Matte spray sealant
- Soft synthetic paintbrush
Step 1: Forming the Base Structure
-
Prepare the core:
Begin with a solid sphere of clay roughly the size of a grapefruit. You can also work over a tinfoil armature to save weight and clay; simply crumple foil into a tight ball and cover it with a 1/2-inch layer of clay. -
Smooth the surface:
Roll the sphere gently on your work surface to ensure it is relatively round, then smooth out any major fingerprints or cracks with a damp finger. It doesn’t need to be perfect since we are slicing it later. -
Establish the base:
Tap the bottom of the sphere firmly against the table to create a flat area. This ensures your piggy bank will sit stable and not roll away. -
Map out the facets:
Before cutting, lightly score lines across the sphere with a needle tool to plan where your geometric planes will be. Think in terms of triangles and pentagons connecting to form the round shape.
Crisp Edges
To get ultra-sharp edges between facets, sand the dry clay against a flat sheet of sandpaper taped to the table, rather than holding the paper in your hand.
Step 2: Sculpting the Geometric Planes
-
First slice:
Using a very sharp craft knife or a wire clay slicer, make your first planar cut. Slice off a curve of the sphere to leave a flat surface. Keep the off-cuts; you may need them for ears. -
Continue faceting:
Work your way around the sphere, slicing adjacent flat planes. The goal is to have the edges of the cuts meet sharply. Vary the size of the cuts for a more organic, faceted gemstone look. -
Refine the planes:
Once the general shape is cut, take a flat metal rib or a sturdy ruler and press it gently against each facet to flatten it completely. This crispness is key to the modern aesthetic. -
Carve the interior:
If you worked with a solid clay ball (no armature), slice the top ‘lid’ off carefully. Use a loop tool to hollow out the inside until the walls are about 1/4 inch thick, then score and slip the lid back on seamlessly. -
Open the coin slot:
While the clay is leather-hard, use your knife to cut a rectangular slot in the top facet. Ensure it’s wide enough for your largest intended coin.
Cracked Seams?
If the ear seams crack during drying, fill the gap with a mixture of vinegar and spare clay, smooth it over, and let it dry again before sanding.
Step 3: Adding Details and Finishing
-
Shape the ears:
Take two small scraps of clay and form them into triangular pyramids. These should match the angular style of the body. I find cutting these from a block is easier than molding them. -
Attach the ears:
Score the attachment points on the body and the bottom of the ears. Apply a little clay slip and press them firmly onto the upper facets. Smooth the seam with a modeling tool so they look integrated. -
Refine edges:
Go over the entire piece one last time. Use a barely damp sponge to clean up any crumbs, but be careful not to round over your sharp geometric edges. -
Allow to dry:
Let the piggy bank dry slowly away from direct sunlight for 2-3 days. Turn it occasionally to ensure even airflow. -
First sanding:
Once bone dry, use a medium-grit sanding sponge to sand each facet flat. This removes any warping that happened during drying. -
Final smooth:
Switch to a fine-grit sandpaper to polish the surface. Wipe away all dust with a tack cloth or slightly damp paper towel. -
Painting:
Apply two to three coats of dusty pink acrylic paint. Use a soft brush to minimize stroke marks, allowing full drying time between layers. -
Sealing:
Finish with a matte spray sealant to protect the paint while maintaining that velvety, non-reflective stone look.
Now you have a stylish spot to stash your spare change that doubles as modern decor
Easy-Access Pig With a Removable Belly Stopper
This charming piggy bank features a classic rounded form with a warm, speckled glaze that feels both rustic and modern. Its smooth finish and adorable hand-formed details make it a delightful addition to any shelf, complete with that all-important stopper for easy access to your savings.
Step-by-Step Guide
Materials
- Stoneware clay (smooth with grog optional)
- Pottery wheel (optional, can be hand-built)
- Rib tool
- Needle tool
- Modeling tool or wooden knife
- Sponge
- Scoring tool
- Slip
- Hole cutter or fettling knife (for coin slot)
- Speckled tan glaze
- Clear glaze (optional)
- Rubber or cork stopper (size of your choice)
Step 1: Forming the Body
-
Prepare the clay:
Begin by wedging your clay thoroughly to remove air bubbles. Since this is a hollow form, I like to ensure the consistency is very even to prevent cracking later. -
Create the main shape:
If throwing on the wheel, throw a closed form that resembles a large egg. If hand-building, create two deep pinch pots of equal size. -
Join the halves:
For the pinch pot method, score the rims of both pots aggressively and apply slip. Press them together firmly to create a sealed, hollow oval. -
Refine the surface:
Wait until the clay is leather hard. Use a rib tool to smooth over the seam completely until invisible, paddling the shape gently to get that perfect piggy roundness.
Step 2: Adding Features
-
Shape the snout:
Roll a small ball of clay and flatten it slightly into a thick disk. Score and slip the front of the body and attach this disk securely. -
Define the nostrils:
Use the back of a paintbrush or a medium-sized modeling tool to press two distinct indentations into the snout disk. Don’t punch all the way through. -
Attach the ears:
Form two triangular wedges of clay. Curve them slightly to create a cupped shape. Score and slip the attachment points on the head, placing them high and slightly forward. -
Smooth the ears:
Blend the clay from the base of the ears onto the body using a wooden tool to seamless transition from head to ear. -
Add the legs:
Roll four short, sturdy cylinders of clay. Attach them to the belly area, ensuring they are level so the pig stands stable without wobbling. -
Add the eyes:
Use a small circular tool or the end of a chopstick to impress two small dots for eyes. Alternatively, you can paint these on later with underglaze.
Uneven Wobble?
If the pig rocks after attaching legs, gently tap the pig downward onto a flat wooden board while the clay is still soft to level all four feet at once.
Step 3: Functional Details
-
Cut the coin slot:
Once the clay is firm leather hard, use a fettling knife or specialized slot tool to cut a clean rectangular opening on the very top of the back. -
Create the access hole:
Flip the pig over carefully. Use a circle cutter that matches the size of your purchased rubber stopper to cut a perfectly round hole in the belly. -
Smooth edges:
Using a damp sponge, carefully round off the sharp edges of the coin slot and the belly hole to prevents chips later. -
Bisque fire:
Allow the pig to dry slowly and completely before firing it in the kiln to cone 04 (or your clay’s specified bisque temperature).
Curly Tail Twist
Make a thin coil of clay and wrap it around a pencil handle to create a spring shape. Attach this to the rear for a classic, 3D curly tail.
Step 4: Glazing and Finishing
-
Apply wax resist:
Wax the bottom of the feet and the rim of the belly hole where the stopper will sit. This ensures the stopper fits snugly without glaze interference. -
Glaze application:
Dip or brush on your speckled tan glaze. Ensure an even coat. If you want the ears and snout to have that darker accent seen in the image, apply a slightly thinner coat there or wipe it back gently. -
Detail the eyes:
If you didn’t impress the eyes, use a tiny amount of black underglaze or glaze to paint two small dots. -
Glaze fire:
Fire the piece to maturity (Cone 5/6 for most stoneware). Avoid placing it too close to other pots in case the glaze runs. -
Final assembly:
Once cool, pop your rubber stopper into the belly hole.
Start saving your coins in your new handmade friend