If you love that crisp, colorful preppy clay bead look, bracelets are the quickest little project to make your whole day feel brighter. These ideas are all about easy stacks, clean color “recipes,” and a few playful accents that make your wrist look styled without trying too hard.
Classic Pastel Heishi Stack
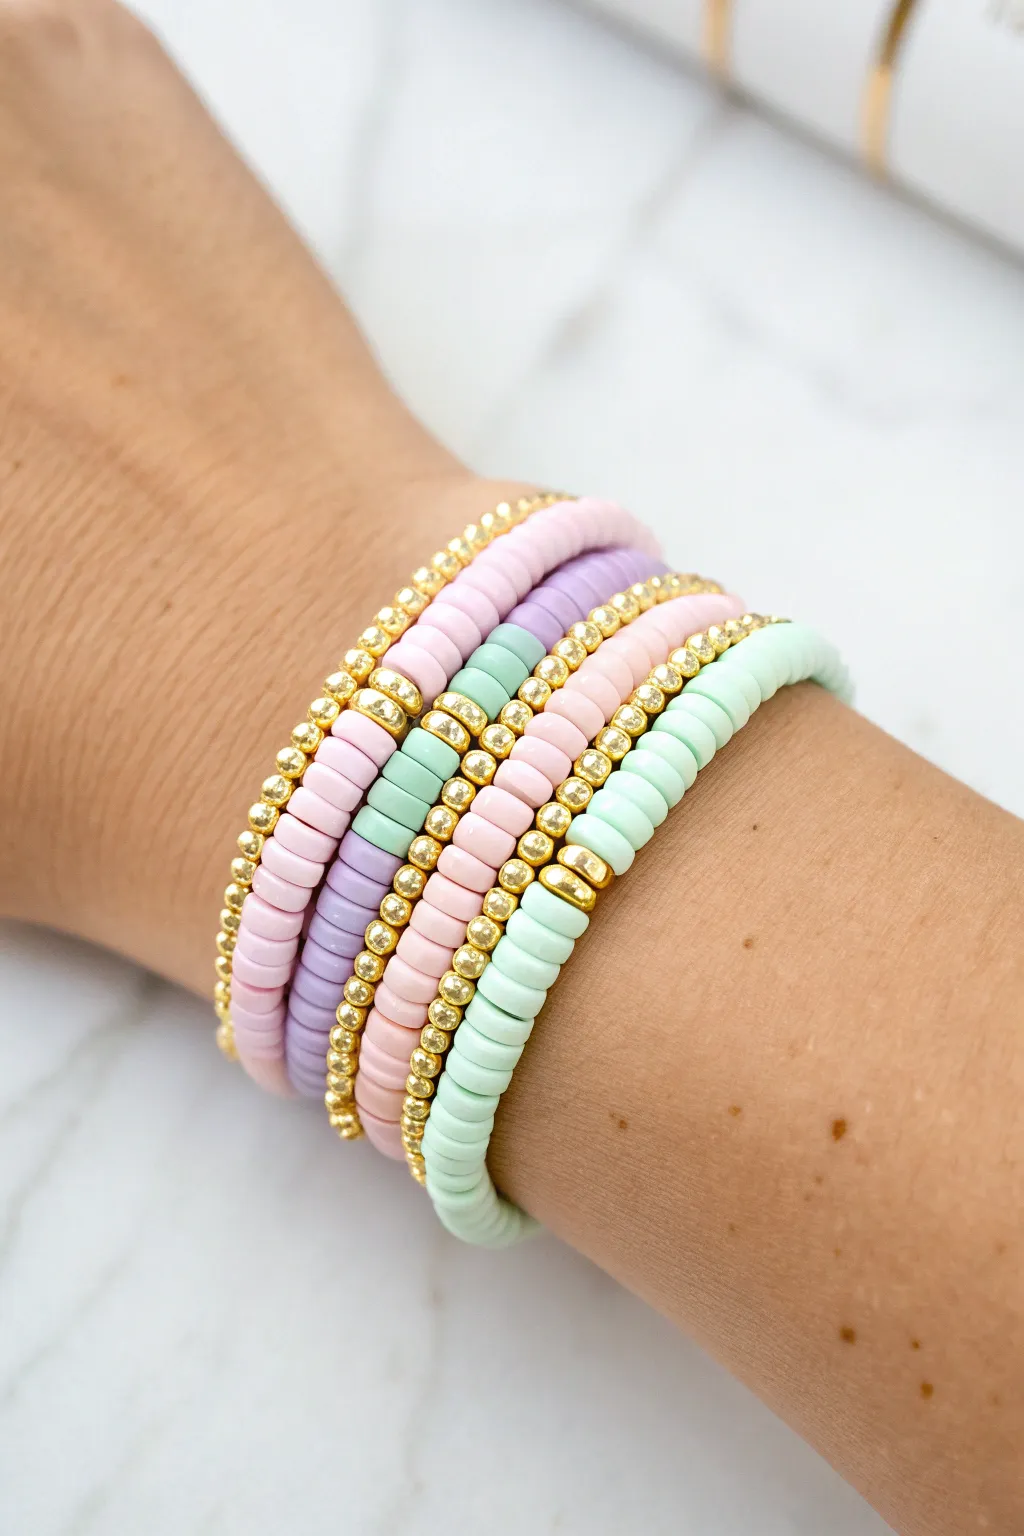
This charming bracelet stack combines soft, sorbet-colored clay heishi discs with shining gold spacers for a sophisticated yet playful look. The mix of blush pink, lavender, and mint green creates a refreshing palette perfect for adding a touch of preppy elegance to any outfit.
How-To Guide
Materials
- 6mm flat clay heishi beads (blush pink)
- 6mm flat clay heishi beads (lavender)
- 6mm flat clay heishi beads (mint green)
- 3mm or 4mm gold spherical spacer beads (plated or brass)
- 0.8mm clear elastic stretch cord
- Super glue or jewelry cement
- Scissors
- Tape or a bead stopper clip
- Measuring tape
Step 1: Preparation
-
Measure your wrist:
Wrap a measuring tape comfortably around your wrist to find your size. Add about 0.5 inches to this measurement to ensure the bracelets fit comfortably without digging into your skin. -
Cut the cord:
Cut three lengths of elastic cord, each about 10-12 inches long. Having this extra length makes tying the final knots much easier than struggling with short ends. -
Secure the ends:
Place a piece of tape or a bead stopper clip on one end of each cord. This simple step prevents your carefully strung beads from sliding right off while you work.
Gold Bead Longevity
To prevent tarnishing, verify you are using gold-filled or high-quality plated brass beads. Avoid plastic gold-coated beads as the finish rubs off quickly.
Step 2: The Pink & Gold Bracelets
-
Start the first pink strand:
Begin your first bracelet by threading on about an inch of solid blush pink clay beads. This solid section will sit at the back of your wrist. -
Create the heavy gold section:
Transition into a pattern of alternating beads: slide on one gold spacer, then one pink clay bead. Repeat this sequence for about 2 inches. -
Finish the first strand:
Complete the rest of the strand with solid pink clay beads until you reach your desired length. -
Start the second pink strand:
For the second pink bracelet, we will use a lighter gold accent. Start with 1.5 inches of solid pink clay beads. -
Add spaced accents:
Thread on three gold spacer beads, followed by one pink clay bead, then three more gold spacers. Follow this with another inch of pink clay beads. -
Complete the second pattern:
Continue this random or spaced pattern, or simply fill the rest with pink clay beads for a simpler look, ensuring the total length matches your first bracelet.
Step 3: The Lavender & Mint Strands
-
Begin the purple mix:
For the lavender bracelet, start with a solid section of lavender clay beads about 1.5 inches long. -
Insert the color block pattern:
Create a visual break by threading on a pattern: one gold spacer, three mint green beads, one gold spacer, then back to lavender. -
Continue the pattern:
Repeat this sequence (lavender section, gold knot, mint section, gold knot) around the bracelet. I like to vary the length of the lavender sections slightly for an organic feel. -
String the mint green bracelet:
On your final cord, string primarily mint green heishi beads. -
Add gold clusters:
Interject groups of 3-5 gold spacer beads every inch or so to tie this bracelet in with the others in the stack.
Uneven Stack?
If your bracelets hang unevenly, one might be tighter than the others. Ensure you count the exact length rather than bead count, as bead thickness varies.
Step 4: Finishing Touches
-
Pre-stretch the cords:
Before tying, hold both ends of a bracelet and give the cord a gentle tug. This pre-stretching prevents the elastic from sagging later on. -
Tie the knots:
Tie a sung surgeon’s knot (looping the line through twice) for each bracelet. Pull it tight enough so there are no gaps between beads, but not so tight that the bracelet buckles. -
Secure with glue:
Dab a tiny drop of super glue or jewelry cement directly onto the knot. Let it dry completely before touching it. -
Trim the excess:
Once the glue is dry, use your scissors to trim the excess cord ends close to the knot. -
Hide the knot:
If the hole of your clay bead is large enough, gently slide a bead over the knot to conceal it for a truly professional finish.
Enjoy mixing and matching your new pastel stack with your favorite summer outfits to show off your handiwork


Preppy Pink-and-Green Color Block
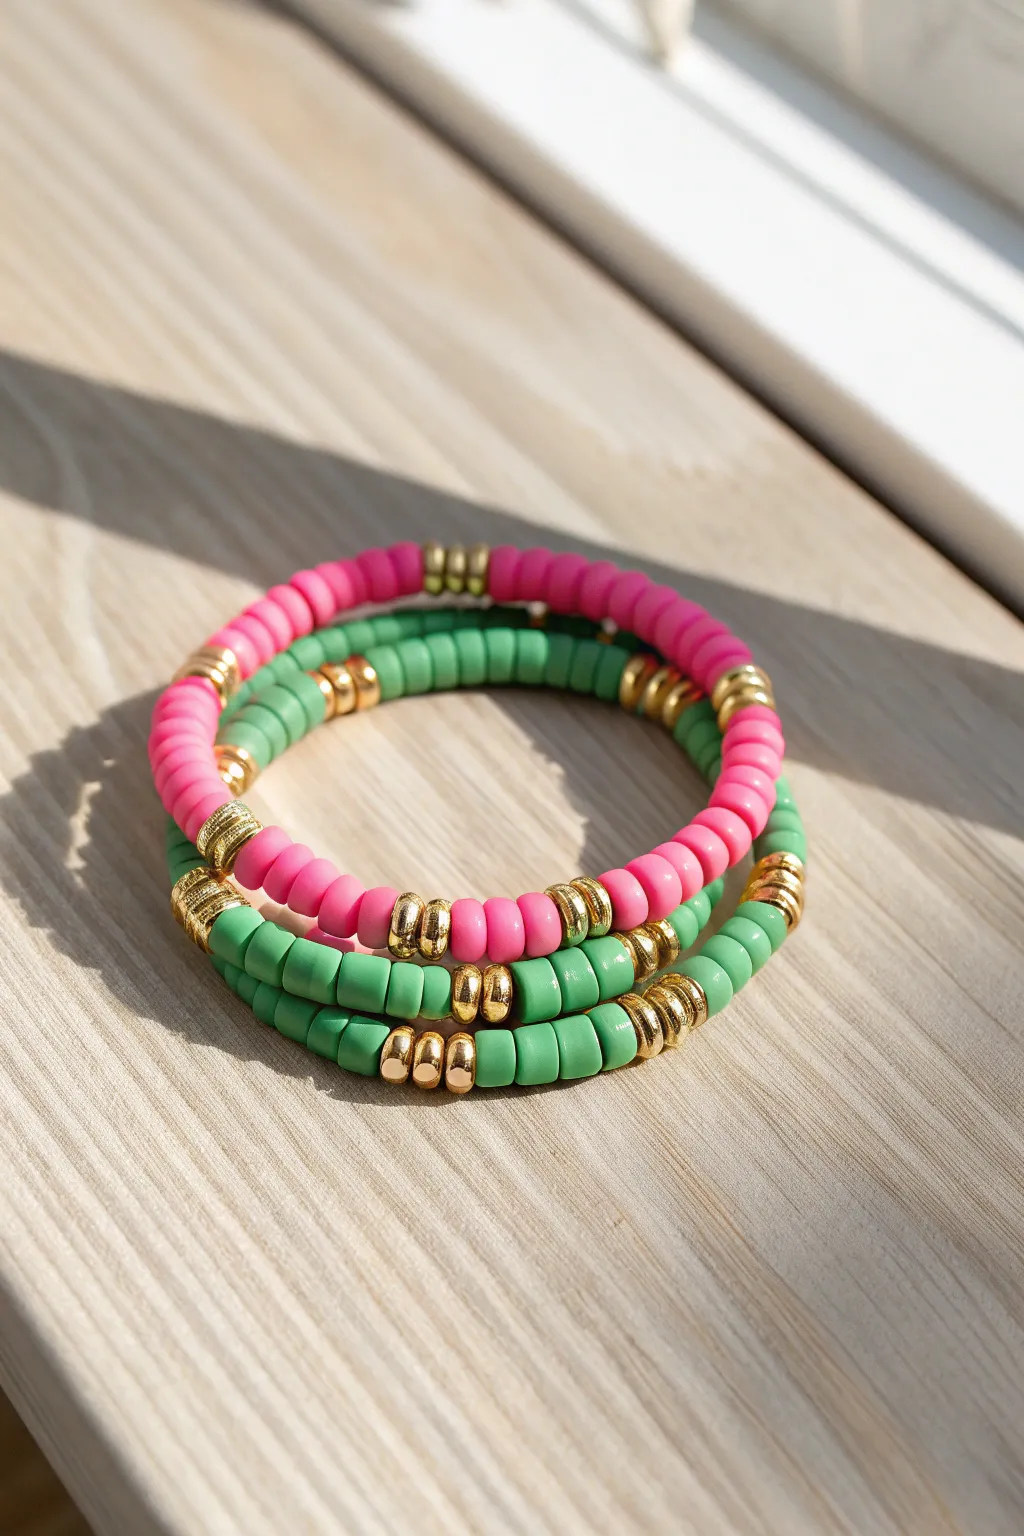
Embrace the classic preppy aesthetic with this vibrant set of three color-blocked bracelets. Featuring a mix of hot pink and kelly green clay beads accented with shining gold spacers, this stack adds a perfect pop of color to any outfit.
Detailed Instructions
Materials
- Hot pink flat clay heishi beads (6mm)
- Kelly green flat clay heishi beads (6mm)
- Gold rounded disc spacer beads (6mm)
- Gold faceted rondelle spacer beads (optional variation)
- Elastic stretch cord (0.8mm or 1mm)
- Beading needle (optional but helpful)
- Super glue or jewelry cement
- Scissors
- Tape or bead stopper
Step 1: Planning and Prep
-
Measure your wrist:
Before cutting any string, wrap a measuring tape around your wrist to find your size. Add about 6-8 inches of extra length to the elastic cord to ensure you have plenty of room for tying the knots later. -
Prepare the cord:
Cut three lengths of elastic cord based on your measurement. Pre-stretch the elastic by pulling it firmly a few times; this prevents the bracelets from stretching out permanently after the first wear. -
Secure the ends:
Place a piece of tape or a bead stopper on one end of each cord. This simple step saves you the heartbreak of watching your design slide right off the other end while you work.
Knot Slipping?
If your elastic knot keeps undoing itself before the glue sets, try tying the cord while it is still under slight tension using a ‘surgeon’s knot’—looping through twice creates necessary friction.
Step 2: Creating the Green-Dominant Bracelet
-
Start the main color block:
Begin by threading approximately 2 inches of the kelly green clay beads onto the cord. Keep the tension consistent so the beads sit flush against each other. -
Add first gold accent:
Slide on three gold rounded disc spacers. These specific spacers add a chunky, metallic shine that breaks up the matte texture of the clay. -
Insert the contrast color:
Thread on a small section of pink beads—aim for about 5 to 7 beads here—to create a distinct stripe. -
Close the accent section:
Add another set of three gold spacers to frame the pink section. -
Repeat the pattern:
Continue adding long sections of green beads separated by the gold-pink-gold accent pattern until you reach your desired length.
Step 3: Creating the Pink-Dominant Bracelet
-
Mirror the design:
For the second bracelet, you will reverse the colors. Start with about 2 inches of hot pink clay beads as your base. -
Construct the accent:
Slide on three gold spacers, followed by 5-7 green beads, and finish with three more gold spacers. -
Complete the strand:
Repeat this pink-dominant pattern until the strand matches the length of your first green bracelet.
Level Up Your Look
Add a personalized touch by swapping one of the clay bead sections for gold letter beads to spell out a name or a short phrase within the color block pattern.
Step 4: Creating the Mixed Stripe Bracelet
-
Alternate colors:
For the third bracelet shown in the bottom of the stack, create equal blocks. Thread about 1 inch of green beads, followed by three gold spacers. -
Switch to pink:
Thread 1 inch of pink beads, followed by three gold spacers. I find that keeping these blocks shorter makes the stack look more dynamic. -
Finish the pattern:
Continue alternating green and pink blocks, always separating them with your gold trio, until the bracelet is complete.
Step 5: Finishing Touches
-
Check the fit:
Wrap each unfinished strand around your wrist to double-check the size. Add or remove a few clay beads if necessary to ensure a comfortable fit. -
Tie the surgeon’s knot:
Remove the tape/stopper. Cross the ends, loop one side over twice (instead of once like a normal knot), and pull tight. Repeat this process to secure it firmly. -
Secure with glue:
Dab a tiny drop of super glue or jewelry cement onto the knot. Let it dry completely before trimming the excess string close to the knot. -
Hide the knot:
Gently tuck the knot inside one of the gold spacer beads or the hole of a clay bead to make the finish invisible.
Stack them all on one wrist for a bold statement or share them with friends for a coordinated look


Navy, White, and Gold “Tennis Club” Stripes
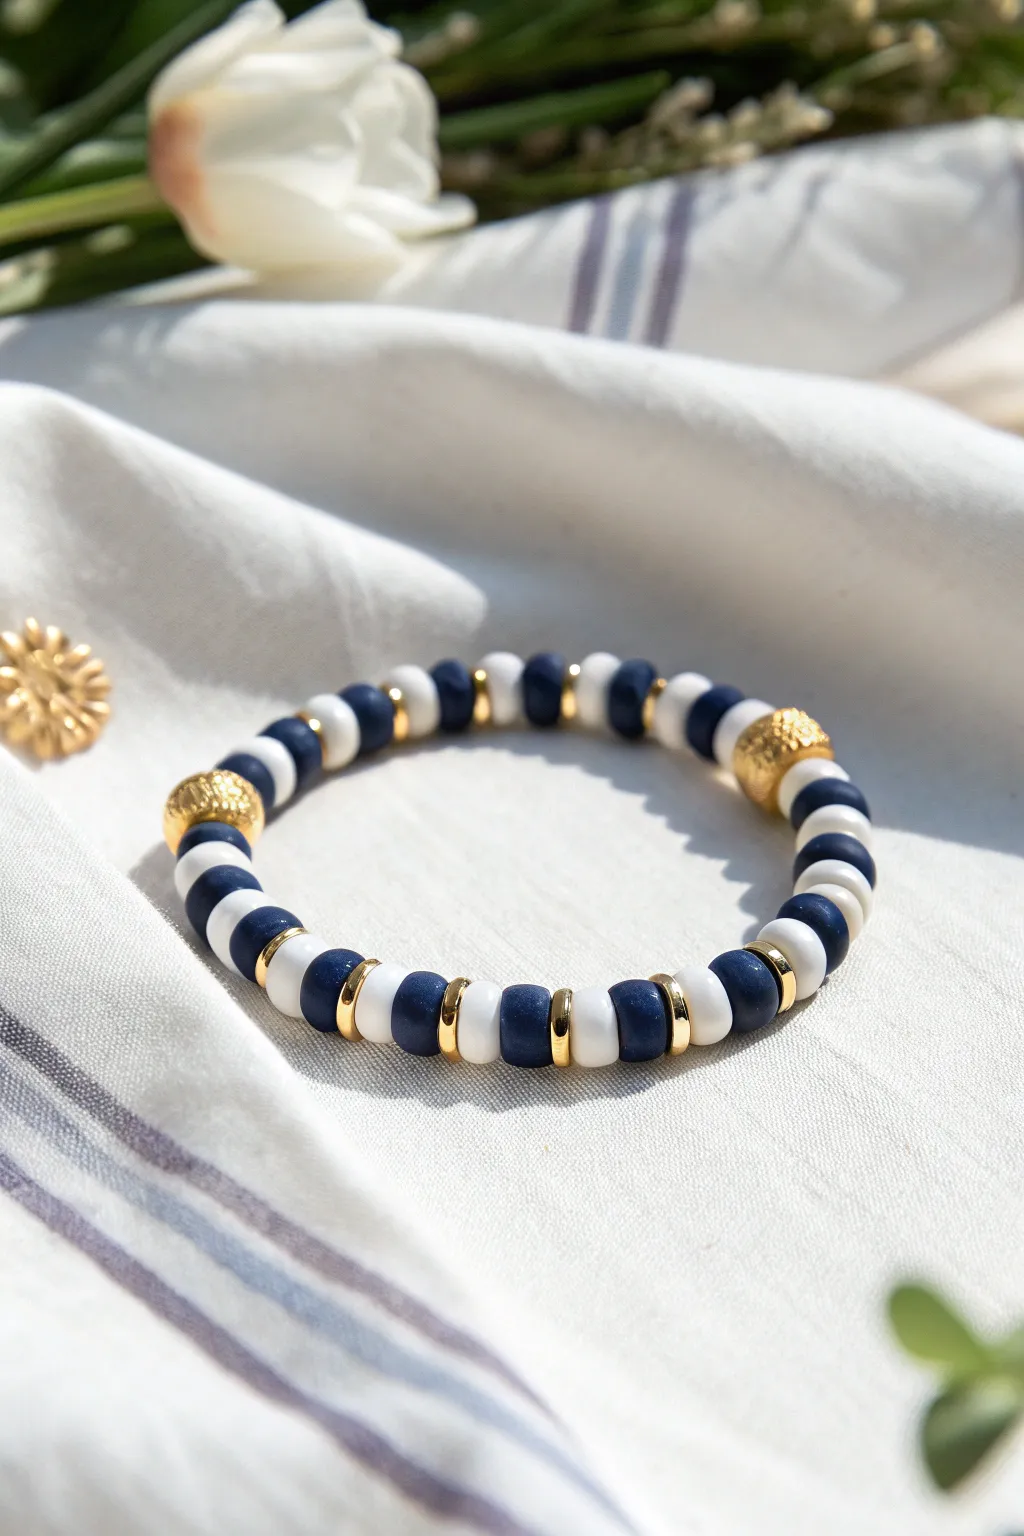
Channel country club chic with this sophisticated stacker, blending deep navy and creamy white tones with luxe gold accents. The unique rhythm of the metallic spacers and texturized focal beads gives this piece a high-end, store-bought finish that is surprisingly easy to achieve at home.
Step-by-Step Tutorial
Materials
- Navy blue polymer clay heishi beads (6mm or 4mm)
- Cream or off-white polymer clay heishi beads (6mm or 4mm)
- Small gold disc spacer beads (flat, polished finish)
- 2 Large gold textured round beads (approx 8mm, matte or stardust finish)
- Strong elastic bead cord (0.7mm or 0.8mm)
- Super glue or jewelry cement (e.g., G-S Hypo Cement)
- Scissors
- Bead stopper or masking tape
- Measuring tape
Step 1: Planning and Prep
-
Measure your wrist:
Wrap a measuring tape loosely around your wrist to find your size. Add about 0.5 inches to this number to account for the bulk of the clay beads. -
Cut the cord:
Cut a piece of elastic cord about 10-12 inches long. This extra length makes tying the knot much less frustrating later on. -
Secure the end:
Place a bead stopper or a piece of masking tape on one end of your cord to prevent your hard work from sliding off as you string. -
Sort your beads:
Pour small piles of your navy, cream, and gold spacers onto a bead mat or into small dishes. Having them separated speeds up the patterning process significantly.
Knot Slipping?
If your elastic is too slick and knots won’t hold, try sanding the very ends of the cord lightly with a nail file before tying. This texture helps the knot grip.
Step 2: Creating the Pattern
-
Start the sequence:
Begin by threading alternating sections of color. Add three navy clay beads followed by one flat gold spacer bead. -
Switch colors:
Next, thread three cream clay beads followed by another flat gold spacer bead. This establishes your primary A-B pattern. -
Continue the rhythm:
Repeat this pattern—three navy, gold spacer, three cream, gold spacer—until you have completed about one-third of your total bracelet length. -
Add the first focal bead:
After a gold spacer, instead of returning directly to clay beads, slide on one of your large, textured gold round beads. This adds a beautiful visual weight to the design. -
Resume patterning:
Continue your alternating three-bead color blocks separated by spacers. This middle section should be the longest part of the bracelet. -
Insert second focal bead:
Once you are about two-thirds of the way through your measured length (or roughly opposite where the first focal bead will sit), thread the second large textured gold bead. -
Finish the strand:
Complete the remaining length with your alternating navy and cream pattern until the strand reaches your target measurement. -
Check the fit:
Carefully wrap the strand around your wrist. The ends should meet comfortably without stretching the elastic, but it shouldn’t drape too loosely.
Step 3: Securing the Bracelet
-
Pre-stretch the cord:
Gently give the two ends of the elastic a few tugs. This pre-stretching step is crucial to prevent the bracelet from growing loose the first time you wear it. -
Tie the surgeon’s knot:
Tie a standard overhand knot, but loop the end through the circle a second time before pulling tight. This creates a secure surgeon’s knot. -
Tighten firmly:
Pull the cords tight, ensuring there are no gaps between the beads. I find it helps to rock the cord back and forth slightly while pulling to seat the knot deeply. -
Add adhesive:
Apply a tiny dab of jewelry glue directly onto the knot. You only need a drop; too much glue can make the surrounding elastic brittle. -
Hide the knot:
If the hole of your nearest bead is large enough (often the clay beads work well for this), gently tug the elastic so the wet knot slides inside the bead to hide it. -
Final trim:
once the glue has fully dried (wait at least 15 minutes), use your scissors to trim the excess cord tails as close to the bead as possible.
Level Up: Charm It
Attach a small gold tennis racket or anchor charm on a jump ring next to one of the large textured gold beads for an even preppier, personalized touch.
Slip on your new accessory and enjoy the classic, sporty elegance it adds to your outfit


Sunset Ombre Heishi Gradient
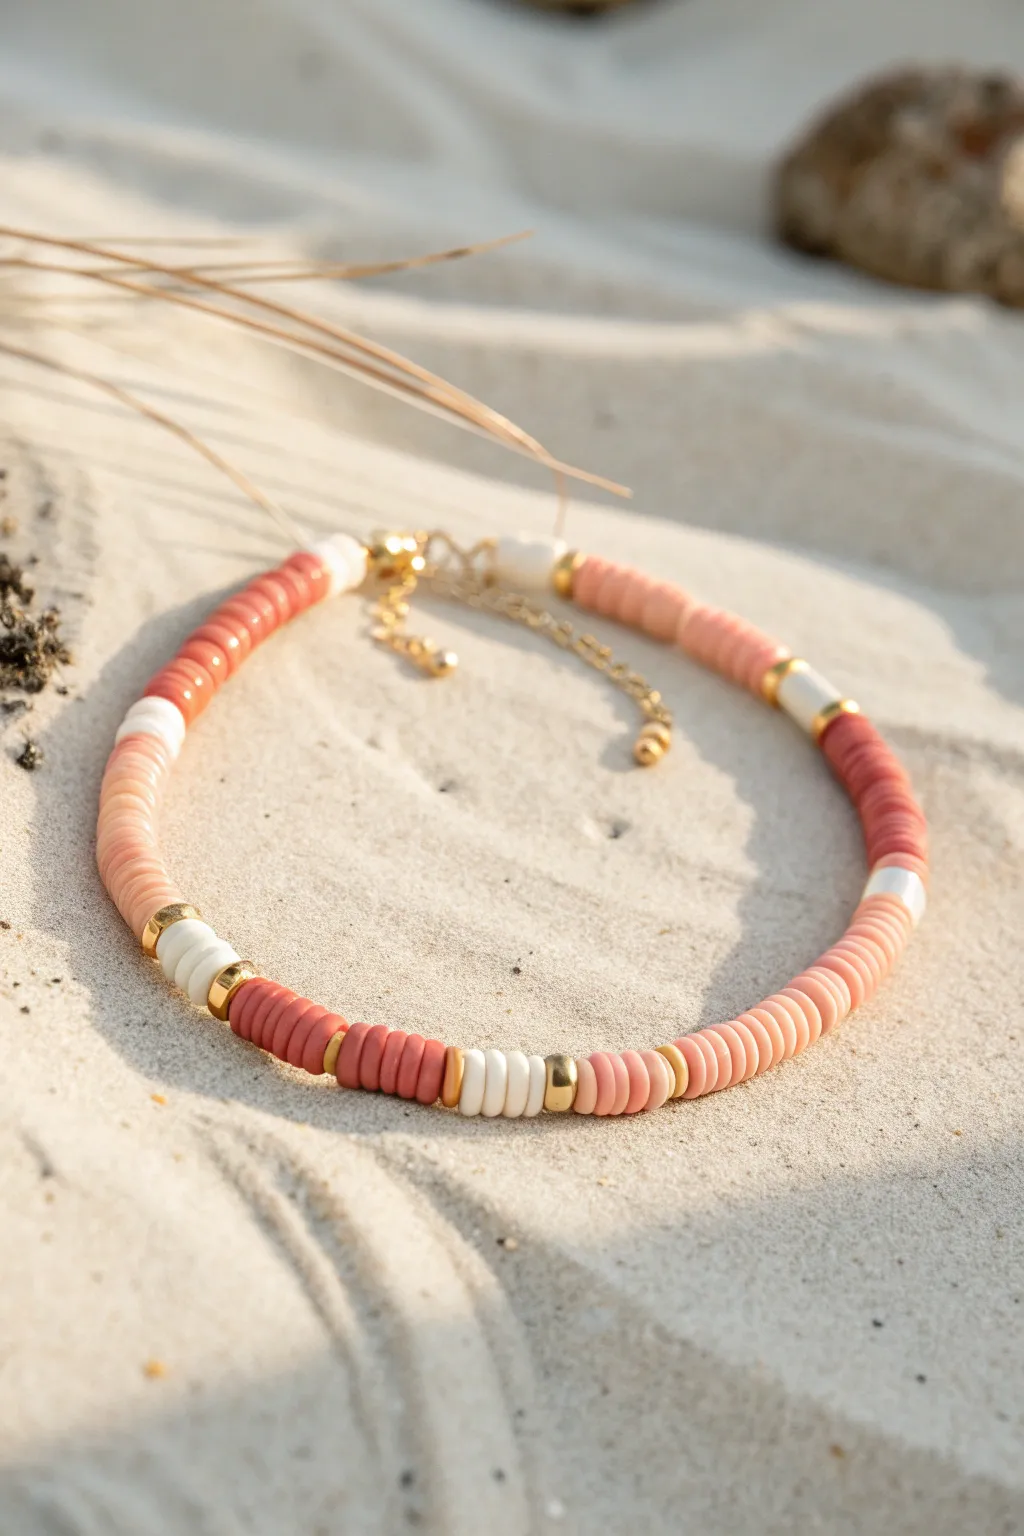
Capture the warmth of golden hour with this stunning heishi bead bracelet, featuring a gradient of terracotta, peach, and cream tones punctuated by gold accents. The design uses alternating blocks of color and metallic spacers to create a modern, high-end look perfect for summer layering.
Step-by-Step
Materials
- 6mm polymer clay heishi beads (Terracotta/Brick Red)
- 6mm polymer clay heishi beads (Peach/Coral)
- 6mm polymer clay heishi beads (Cream/Off-White)
- 3-4mm gold-plated rondelle spacer beads
- Gold tone crimp beads (2mm)
- Gold tone wire guards (optional but recommended for durability)
- Gold tone jump rings (4-5mm)
- Gold tone lobster clasp
- Gold tone extender chain (optional)
- Beading wire (0.38mm or 0.45mm, 7-strand or highly flexible)
- Wire cutters
- Flat nose pliers
- Crimping pliers
- Bead stopper or tape
Step 1: Preparation & First Termination
-
Measure and Cut Wire:
Cut a piece of beading wire approximately 10-12 inches long. This generous length gives you plenty of room to work with the clasp mechanism without struggling. -
Secure the End:
Thread a crimp bead onto one end of the wire, followed by a wire guard. Loop the wire through the wire guard and back through the crimp bead. -
Attach the Clasp:
Slide your lobster clasp onto the wire guard loop before tightening the wire. Pull the tail end of the wire so the loop is snug but not tight against the clasp. -
Crimp to Finish:
Use your crimping pliers to flatten or fold the crimp bead securely. I prefer to trim the excess tail wire close to the crimp now, but you can also leave a small tail to tuck into the first few beads.
Stiff Bracelet Solution
If your bracelet feels rigid, you pulled the wire too tight before crimping. Leave a tiny gap (about 1mm) of wire exposed near the crimp to ensure the beads can drape naturally.
Step 2: Stringing the Ombré Pattern
-
Start with Peach:
Begin your pattern by threading on approximately 10-12 peach-colored heishi beads. This creates the first soft segment of the gradient. -
Add the First Accent:
Slide on one gold rondelle spacer, followed by a block of 3 cream-colored beads, and then another gold rondelle spacer. -
Transition to Darker Clay:
Add a segment of the darker terracotta/brick red heishi beads. Use about 8-10 beads for this section to balance the visual weight. -
Second Gold Accent:
Thread on a single gold rondelle spacer. -
Cream Highlight:
Add a short block of 3 cream beads, creating a high-contrast ‘stripe’ against the darker colors. -
Closing the Accent:
Finish this specific focal section with another single gold rondelle spacer. -
Return to Peach:
Thread on another long section of the peach-colored beads (10-12 beads). Keep checking the length against your wrist as you go. -
Repeat the Pattern:
Repeat the sequence: Gold Spacer -> 3 Cream Beads -> Gold Spacer -> 8-10 Terracotta Beads -> Gold Spacer -> 3 Cream Beads -> Gold Spacer. -
Continue Stringing:
Continue this alternating block pattern until the bracelet is about 0.5 inches shorter than your desired finished length. -
Check Symmetry:
Try to end your pattern symmetrically if possible. If you started with a peach block, ending with a peach block often looks best visually.
Pro Tip: Batching Beads
Pre-stack your clay bead ‘sandwiches’ (the cream sections with gold ends) on a spare headpin before stringing. This lets you visualize the color balance before committing to the wire.
Step 3: Final Closure
-
Prepare the End Crimp:
Thread a crimp bead onto the remaining wire tail followed by a wire guard. -
Add the Ring:
Before looping the wire back, slide a jump ring or the start of your extender chain onto the wire guard loop. -
Loop and Tighten:
Thread the wire back through the crimp bead and through the last few beads on your strand. Pull tight to remove slack, but ensure the bracelet remains flexible and isn’t stiff. -
Secure the Crimp:
Use your crimping pliers to secure the final crimp bead firmly. -
Trim Excess:
Using your flush cutters, snip the remaining wire tail as close to the beads as possible so no sharp end pokes out. -
Attach Extender (Optional):
If you just added a jump ring, use flat nose pliers to attach your chain extender now for an adjustable fit.
Enjoy wearing your warm, sunset-inspired accessory or stack it with gold chains for extra shine

The Complete Guide to Pottery Troubleshooting
Uncover the most common ceramic mistakes—from cracking clay to failed glazes—and learn how to fix them fast.
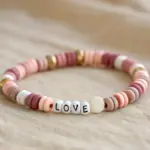
Letter Bead Name Bracelet With Preppy Palette
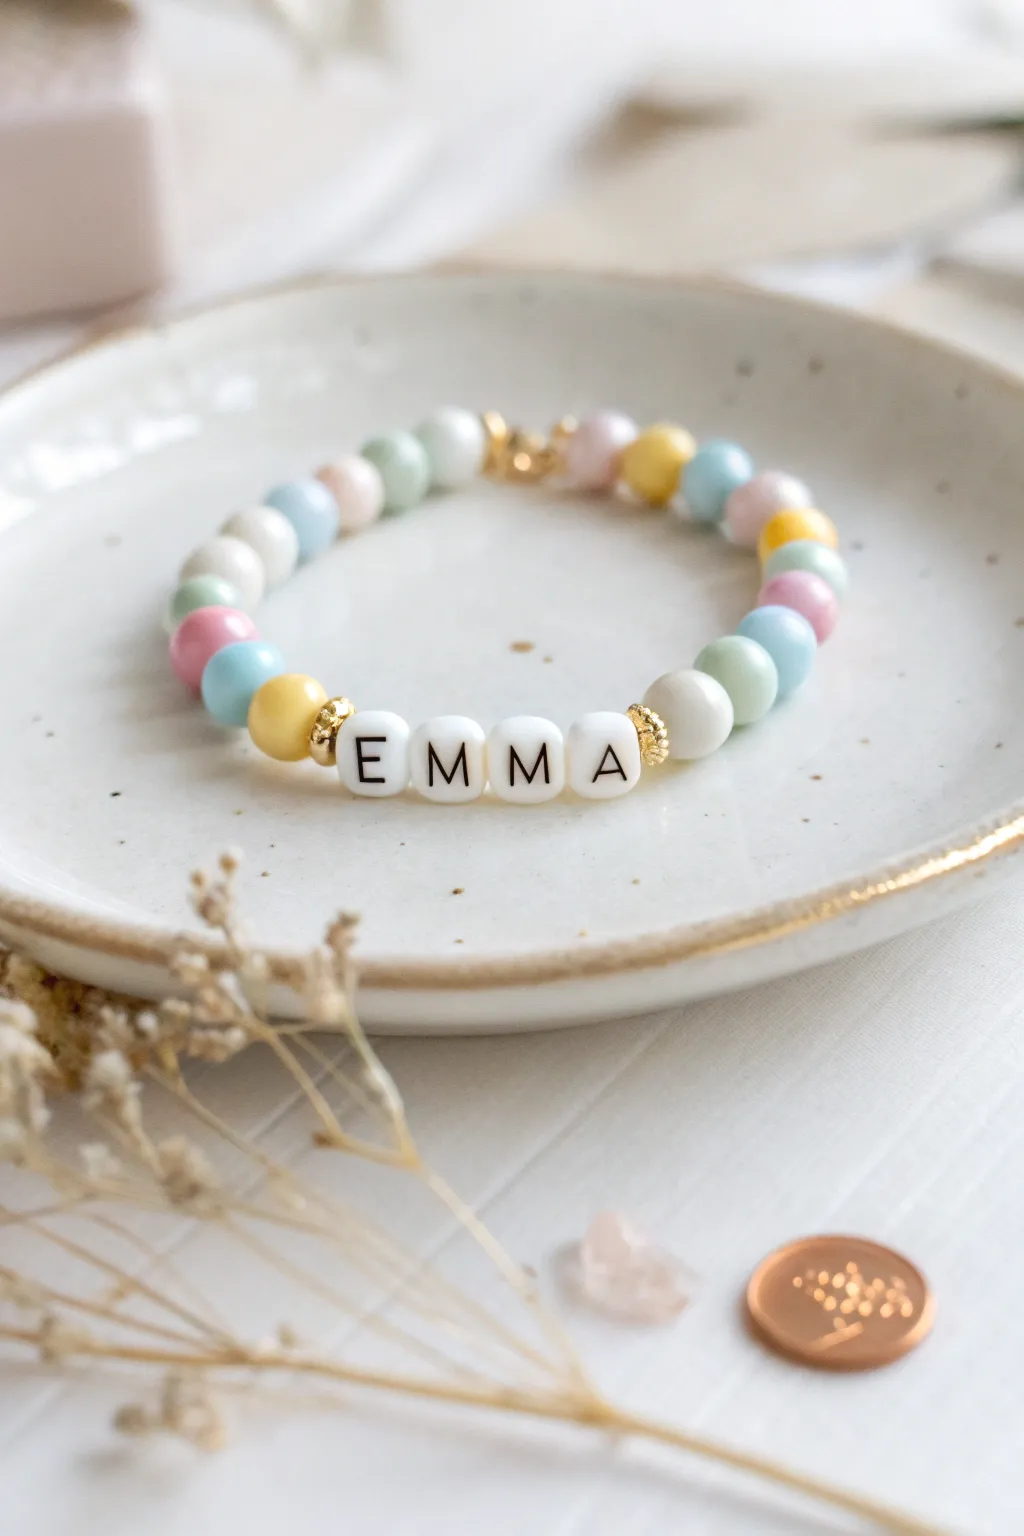
This charming beaded bracelet blends a soft, preppy pastel palette with personalized flair, making it a perfect accessory for stacking or gifting. The combination of milky round beads and bold letter blocks creates a playful yet polished look that works for any age.
Detailed Instructions
Materials
- Elastic stretch cord (0.7mm or 0.8mm transparent)
- Pastel round beads (8mm acrylic or glass imitation jelly/jade style) in: baby blue, pale pink, butter yellow, mint green, and white
- Square white letter beads with black text (spelling your chosen name, like ‘EMMA’)
- Gold tone spacer beads (daisy or textured ring shape, approx 4-5mm)
- Gold tone crimp bead covers (optional, for a pro finish)
- Jewelry glue (like E6000 or Hypo Cement)
- Scissors
Step 1: Planning and Layout
-
Measure your wrist:
Before cutting anything, wrap a piece of string or a flexible measuring tape around your wrist to find your size. Add about half an inch to this measurement for a comfortable fit. -
Cut the cord:
Cut a length of elastic cord about 10-12 inches long. Having this extra length makes tying the final knot much easier without fumbling. -
Pre-stretch the elastic:
Gently pull safely on the elastic cord a few times. This pre-stretching prevents the bracelet from drooping or loosening shortly after you start wearing it. -
Lay out the pattern:
Use a bead design board or a piece of felt to arrange your beads before stringing. Start with the centerpiece: the name ‘EMMA’ (or your choice). -
Add accent spacers:
Place one gold spacer bead immediately to the left of the first letter and one to the right of the last letter. This frames the name beautifully.
Knot Slipping?
If your elastic knot feels slippery, tighten it while the glue is wet. Try using a ‘gs hypo cement’ tube for precision; the fine tip helps place glue exactly inside the knot.
Step 2: Stringing the Beads
-
Secure the end:
Place a piece of tape or a binder clip on one end of your elastic cord so the beads don’t slide off while you work. -
String the name section:
Thread the first gold spacer, followed by the letters E-M-M-A, and then the second gold spacer onto the cord. Center this group roughly on the strand. -
Establish the color pattern:
The pattern shown follows a random but balanced sequence. Try alternating between white, mint, pink, blue, yellow, and repeating. Avoid placing two of the same color next to each other. -
String the right side:
Add about 8-10 pastel beads to the right side of the name section, following your decided pattern. I like to end with a colored bead rather than a white one to create contrast. -
String the left side:
Add the remaining beads to the left side of the name to balance it out. Check the length frequently by wrapping it around your wrist. -
Check the symmetry:
Ensure the name stays centered relative to where the knot will be (at the back of the wrist). You might need to add or remove beads from either side to get the fit perfect.
Add a Charm
Elevate the design by attaching a small gold charm, like a heart or star, to a jump ring. Attach this ring over the gold spacer bead for a dangling element.
Step 3: Finishing Touches
-
Prepare to knot:
Once you are happy with the length and design, verify that the beads aren’t too tight; there should be just a tiny bit of give so the bracelet can bend. -
Tie the first knot:
Remove the tape or clip. Bring the two ends together and tie a simple overhand knot, pulling it gently but firmly down to sit against the beads. -
Tie a surgeon’s knot:
For maximum security, tie a surgeon’s knot next. Cross the strands, loop one end through twice instead of once, and pull tight. This creates a bulkier but much stronger knot. -
Secure with glue:
Dab a tiny drop of jewelry glue directly onto the knot. Be careful not to get glue on the colored beads, as it can cloud the finish. -
Hide the knot:
If one of your adjacent beads has a large enough hole (often the gold spacer or a white bead is best for this), gently tug the elastic so the knot slides inside the bead to vanish. -
Trim the excess:
Once the glue is dry—usually after 10 to 15 minutes—use your scissors to trim the excess cord ends as close to the bead as possible without snipping the knot itself.
Now you have a sweet, personalized accessory ready to add a pop of color to any outfit
Smiley Focal Bead Pop
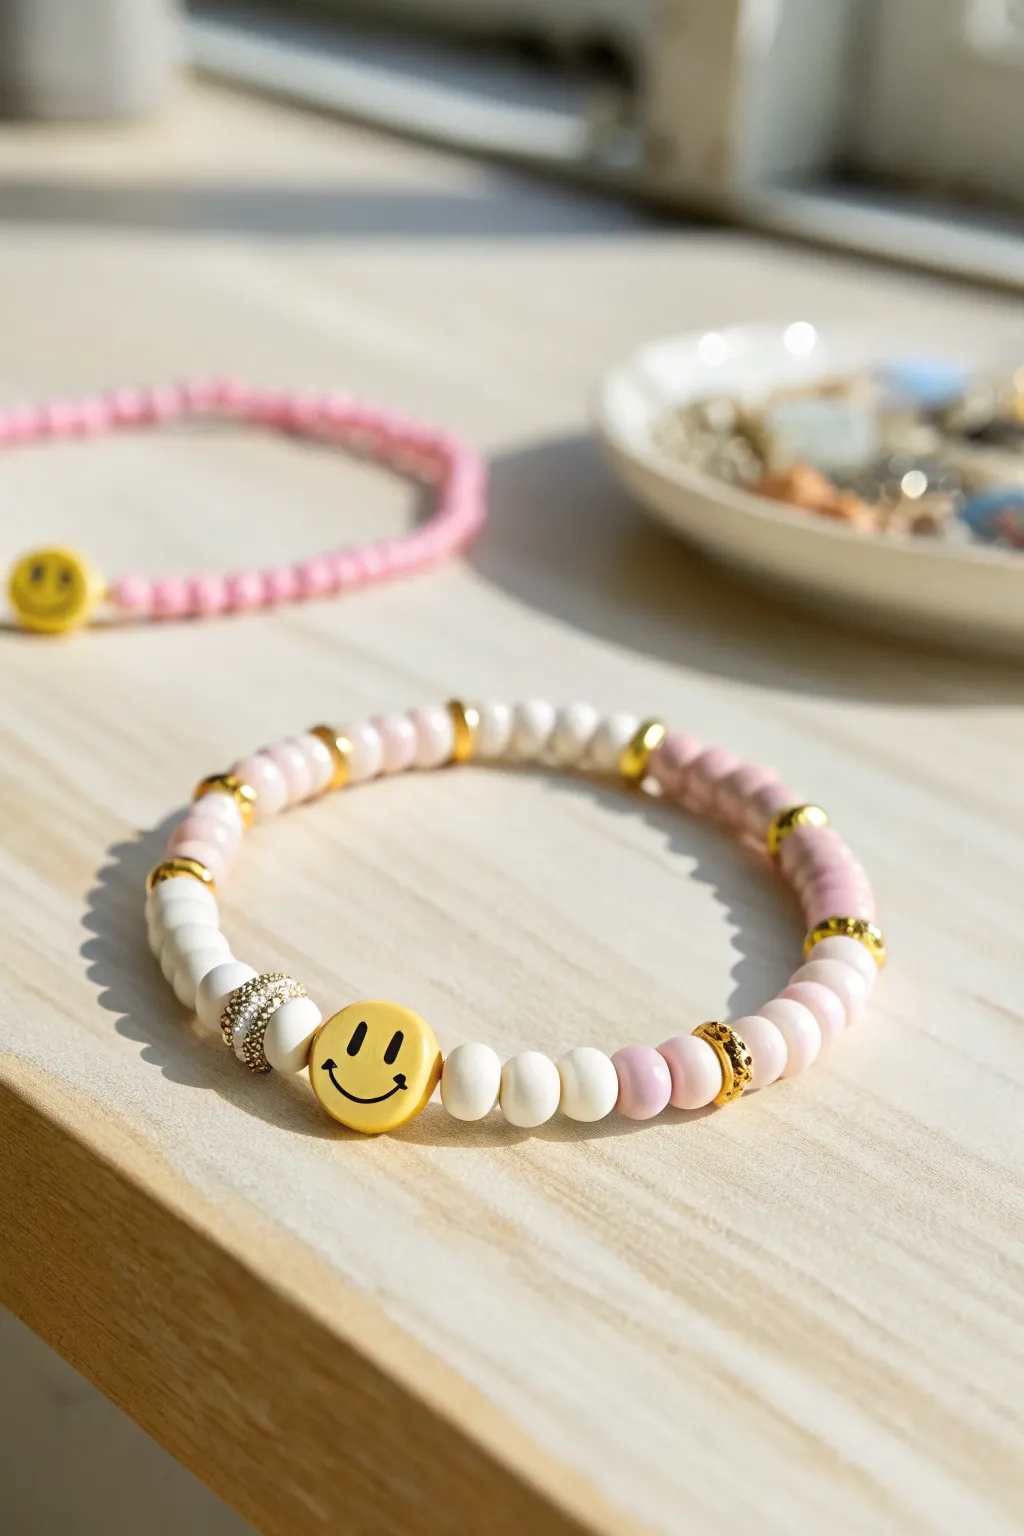
Bring a little joy to your wrist stack with this cheerful design that centers around a classic yellow smiley face. Combining soft pink and white clay heishi beads with shimmering gold spacer accents gives it a perfect balance of playful and polished.
Step-by-Step Guide
Materials
- Elastic cord (0.8mm clear stretch string)
- 6mm polymer clay heishi beads (opaque white)
- 6mm polymer clay heishi beads (light baby pink)
- 6mm polymer clay heishi beads (blush/medium pink)
- 10mm yellow smiley face flat round bead
- Gold rondelle spacer beads (approx. 4-5mm)
- Gold flat round spacer beads (approx. 4mm)
- Gold rhinestone-encrusted pave bead or textured metal spacer (for accent near center)
- Jewelry glue (GS Hypo Cement or superglue)
- Scissors
Step 1: Preparation
-
Measure your wrist:
Before cutting anything, wrap a piece of string around your wrist to find your size, then add about an inch for comfort. -
Cut the elastic:
Cut a length of elastic cord about 10-12 inches long. Having extra length makes tying the final knot much less frustrating. -
Stretch the cord:
Gently pull on either end of your elastic string a few times. This ‘pre-stretching’ helps prevent the bracelet from sagging or loosening immediately after you finish it. -
Secure the end:
Place a piece of tape or a bead stopper on one end of the cord so your beads don’t slide right off while you work.
Sticky Situation
Does your knot keep slipping undone before you can glue it? Try a surgeon’s knot: loop the elastic through twice on the first pass instead of once for extra friction.
Step 2: Stringing the Pattern
-
Start with the focal bead:
Thread the yellow smiley face bead onto the center of your cord. This will help you keep the design symmetrical as you build outwards. -
Create the left side accent:
On the left side of the smiley face, thread one white clay bead, followed by your special textured gold or rhinestone-encrusted spacer bead. -
Continue the left pattern:
Add two more white clay beads to the left side. -
Create the right side accent:
On the right side of the smiley face, thread three simple white clay beads. Notice the asymmetry in the photo—one side has the fancy spacer, the other is plain white. -
Add first gold spacers:
Add a flat gold spacer bead to both the far left and far right ends of your current strand. -
Begin the pink sections:
On both sides, add a section of about 3-4 pink clay beads. You can mix the blush and light pink tones here for a subtle gradient effect. -
Insert gold breaks:
Slide a gold rondelle spacer onto each side to break up the color blocks. -
Build the white sections:
Add about 4-5 white clay beads on each side, followed by another gold spacer. -
Fill the back:
Continue alternating small sections of pink and white clay beads (separated by gold spacers) until the bracelet reaches your desired length. Typically, the back section is less detailed since it sits on the underside of your wrist. -
Check the fit:
Wrap the unfinished strand around your wrist to ensure it fits comfortably without gaps. Add or remove a few clay beads from the ends if necessary.
Step 3: Finishing Touches
-
Tie the knot:
Remove the tape or stop-bead. Bring both ends together and tie a standard square knot (right over left, left over right). -
Tighten securely:
Pull the elastic ends firmly to tighten the knot. I find it helpful to pull gently on the bracelet strands themselves near the knot to settle it. -
Apply adhesive:
Dab a tiny drop of jewelry glue directly onto the knot. This prevents the slick elastic from untying itself over time. -
Hide the knot and trim:
Once the glue is tacky or dry, trim the excess string close to the knot. If the hole of a neighboring bead is large enough, gently tug the knot inside it to hide it completely.
Gold Preservation
To keep those gold spacers shiney longer, coat them with a thin layer of clear nail polish before stringing. This helps prevent tarnishing from skin oils.
Now slip on your new accessory and enjoy that pop of happiness every time you check the time


What Really Happens Inside the Kiln
Learn how time and temperature work together inside the kiln to transform clay into durable ceramic.
Evil Eye Accent for Preppy-Boho Mix
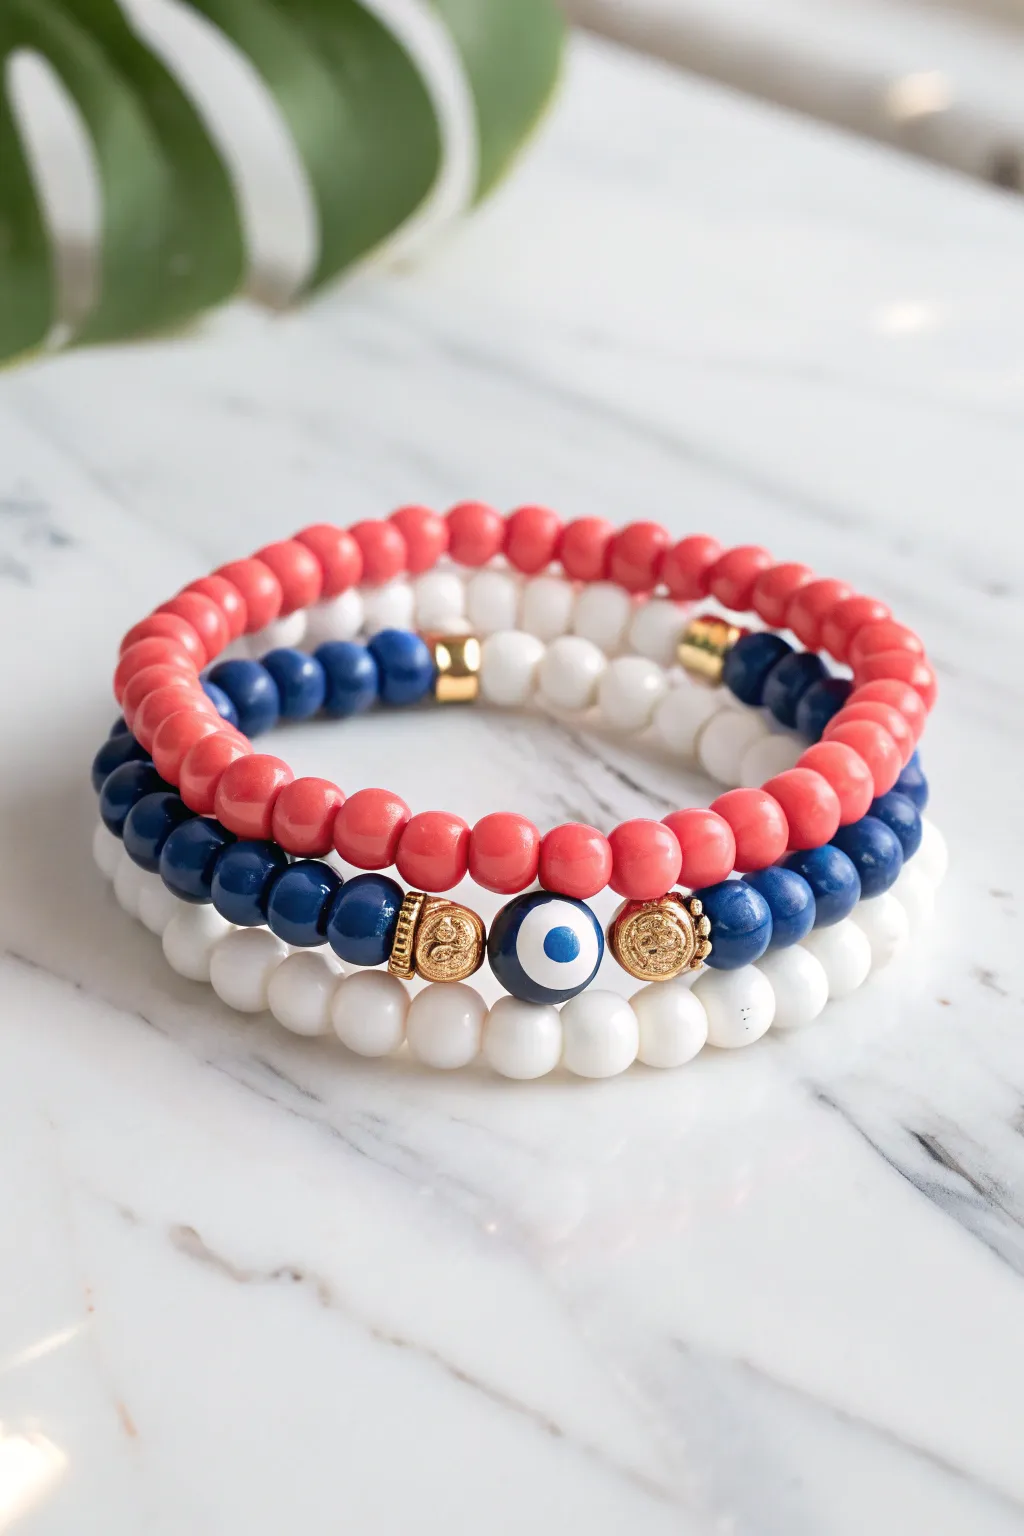
This trio of bracelets combines classic patriotic hues with a boho-chic evil eye accent for a perfectly preppy summer accessory. The mix of matte glass beads and gleaming gold spacers creates a polished look that feels effortless and stackable.
How-To Guide
Materials
- Elastic cord (0.7mm or 0.8mm)
- 6mm or 8mm round coral-red glass or ceramic beads
- 6mm or 8mm round navy blue wooden or dyed stone beads
- 6mm or 8mm round white glass or shell beads
- 1 large (10-12mm) flat round evil eye bead (navy blue and white)
- 2 ornate gold-tone spacer beads or rondelles (approx. 8mm)
- 2 small gold spacer beads (optional, for the white strand)
- Super glue or jewelry cement
- Scissors or bead snippers
- Beading needle (optional)
- Tape or binder clips
Step 1: Preparation
-
Measure your wrist:
Wrap a piece of string or a measuring tape around your wrist to determine the desired length. Add about 0.5 inches for a comfortable fit. -
Pre-cut the elastic:
Cut three pieces of elastic cord, each about 10-12 inches long. This generous length makes tying the final knots much easier. -
Secure the ends:
Place a piece of tape or a binder clip on one end of each elastic strand so your beads don’t slide off while you work. -
Pre-stretch the cord:
Gently tug on each piece of elastic several times. This prevents the bracelet from stretching out and becoming loose after you wear it.
Step 2: The Navy Evil Eye Bracelet
-
Start the pattern:
Begin threading the navy blue beads onto your first cord. Fill about half the length needed for your wrist. -
Add the first gold accent:
Slide on one of the ornate gold spacer beads. Ensure the pattern or texture faces outward if it’s directional. -
Thread the focal bead:
Add the large flat evil eye bead. Orient it so the eye design is facing the same direction as the bracelet’s outer surface. -
Complete the center:
Slide on the second ornate gold spacer bead to bracket the evil eye symmetrically. -
Finish the navy strand:
Continue adding navy beads until you reach your measured length. Check the fit by wrapping it around your wrist.
Knot Slipping?
If your elastic knot keeps slipping undone before you can glue it, try rubbing the ends with a little beeswax or tying the knot while the elastic is under tension.
Step 3: The Coral and White Bracelets
-
Create the red strand:
Take the second cord and thread on the coral-red beads. This is a solid color strand, so just fill it until it matches the length of the navy bracelet. -
Start the white strand:
For the third bracelet, thread your white beads onto the final cord. -
Optional gold detail:
If you wish to mimic the photo exactly, you can hide two small gold spacers among the white beads, or keep it solid white for a cleaner look. -
Check consistency:
Lay all three unknotted strands next to each other to ensure they are approximately the same length.
Mix Your Metals
Swap the gold spacers for antique silver or rose gold to change the vibe. Using textured or hammered metal beads adds an expensive, store-bought finish.
Step 4: Finishing Touches
-
Tie the first knot:
Remove the tape/clip. Bring the two ends of the elastic together and tie a standard overhand knot, pulling it tight close to the beads. -
Secure with a surgeon’s knot:
Tie a second knot, but loop the elastic end through twice before pulling tight. This extra loop adds significant security. -
Glue the knot:
Apply a tiny dab of jewelry cement or super glue directly onto the knot. I like to let this dry for a few minutes before trimming. -
Hide the knot:
If the hole of a neighboring bead is large enough, gently tug the elastic so the knotted section pulls inside the bead, hiding it from view. -
Trim excess cord:
Once the glue is fully cured, snip the excess elastic ends close to the knot, being careful not to cut the main cord.
Stack these three beauties together for an instant pop of color and protection.
All-White Heishi With Gold Spacers
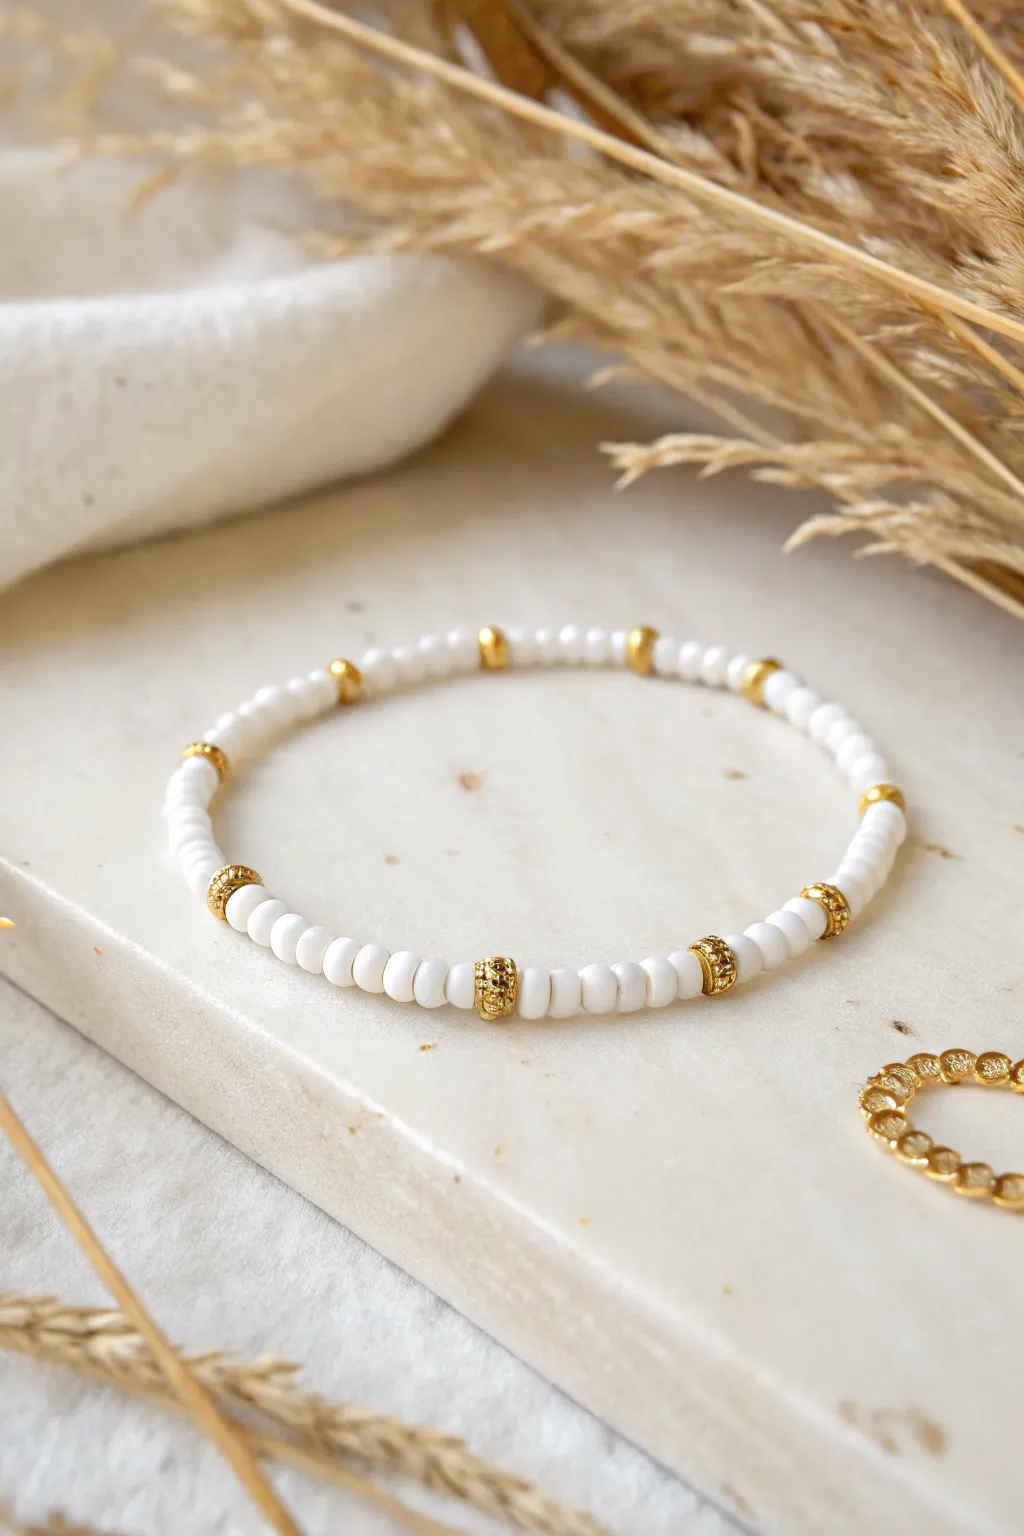
This chic bracelet combines the minimalist calm of white Heishi-style beads with the luxurious warmth of textured gold accents. It is a versatile piece that stacks beautifully or stands alone for a subtle statement.
Step-by-Step
Materials
- White Heishi beads (4mm – 6mm)
- Small gold nugget spacer beads
- Gold rondelle spacer beads (textured)
- Stretch cord (0.8mm or 1mm)
- Super glue or jewelry cement
- Scissors
Step 1: Planning and Preparation
-
Measure your wrist:
Before cutting any cord, measure your wrist and add about half an inch for a comfortable fit. The stretch cord will give you flexibility, but you don’t want it tight. -
Cut the cord:
Cut a piece of stretch cord about 10-12 inches long. This extra length makes it much easier to tie the finishing knot without struggling. -
Pre-stretch the cord:
Give the elastic a few gentle tugs. Pre-stretching helps prevent the bracelet from sagging or loosening up immediately after you wear it. -
Secure the end:
Place a piece of tape or a bead stopper on one end of the cord to stop your beads from sliding off while you work.
Loose Ends?
If your knot feels bulky and won’t hide inside a bead, try a dab of clear nail polish to seal it, then trim closely after it hardens completely.
Step 2: Creating the Pattern
-
Start with white beads:
Begin by threading on a set of 4 to 5 white Heishi beads. This establishes the clean, white foundation of the design. -
Add a gold accent:
Slide on one gold spacer bead. You can alternate between the simpler gold nugget spacers and the more detailed, textured rondelle spacers to mimic the varied look in the photo. -
Vary the spacing:
Continue threading white beads. To recreate the organic feel of the original, don’t keep the count perfectly identical. Thread 3 white beads, then a gold spacer, then perhaps 6 white beads. -
Mix your spacers:
Occasionally use a textured gold rondelle spacer instead of a plain smoother one. This adds visual interest and catches the light differently. -
Check the length:
Wrap the strand around your wrist occasionally to check the sizing. You want the beads to touch comfortably without gaps.
Make It Yours
Swap the random pattern for a strict sequence (e.g., 5 white, 1 gold) or add a single letter bead in the center for a personalized initial bracelet.
Step 3: Finishing Touches
-
Prepare to tie:
Once you have reached your desired length, ensure your pattern ends on a white bead section so the knot isn’t pressed directly against a gold spacer. -
Remove the stopper:
Carefully remove the tape or bead stopper from the end, holding both ends of the elastic firmly. -
Tie a surgeon’s knot:
Cross the ends, wrap one side under twice, and pull tight. Then cross again and tie a standard overhand knot on top to secure it. -
Apply glue:
Dab a tiny drop of super glue or jewelry cement directly onto the knot. Be careful not to get glue on the beads themselves. -
Hide the knot:
While the glue is still tacky but not wet, slide a bead over the knot if the hole allows, or simply trim the excess string close to the knot once fully dry.
Enjoy styling your new bracelet with other gold accessories for a sophisticated, layered look

TRACK YOUR CERAMIC JOURNEY
Capture glaze tests, firing details, and creative progress—all in one simple printable. Make your projects easier to repeat and improve.
Neon Preppy “Pool Day” Stack
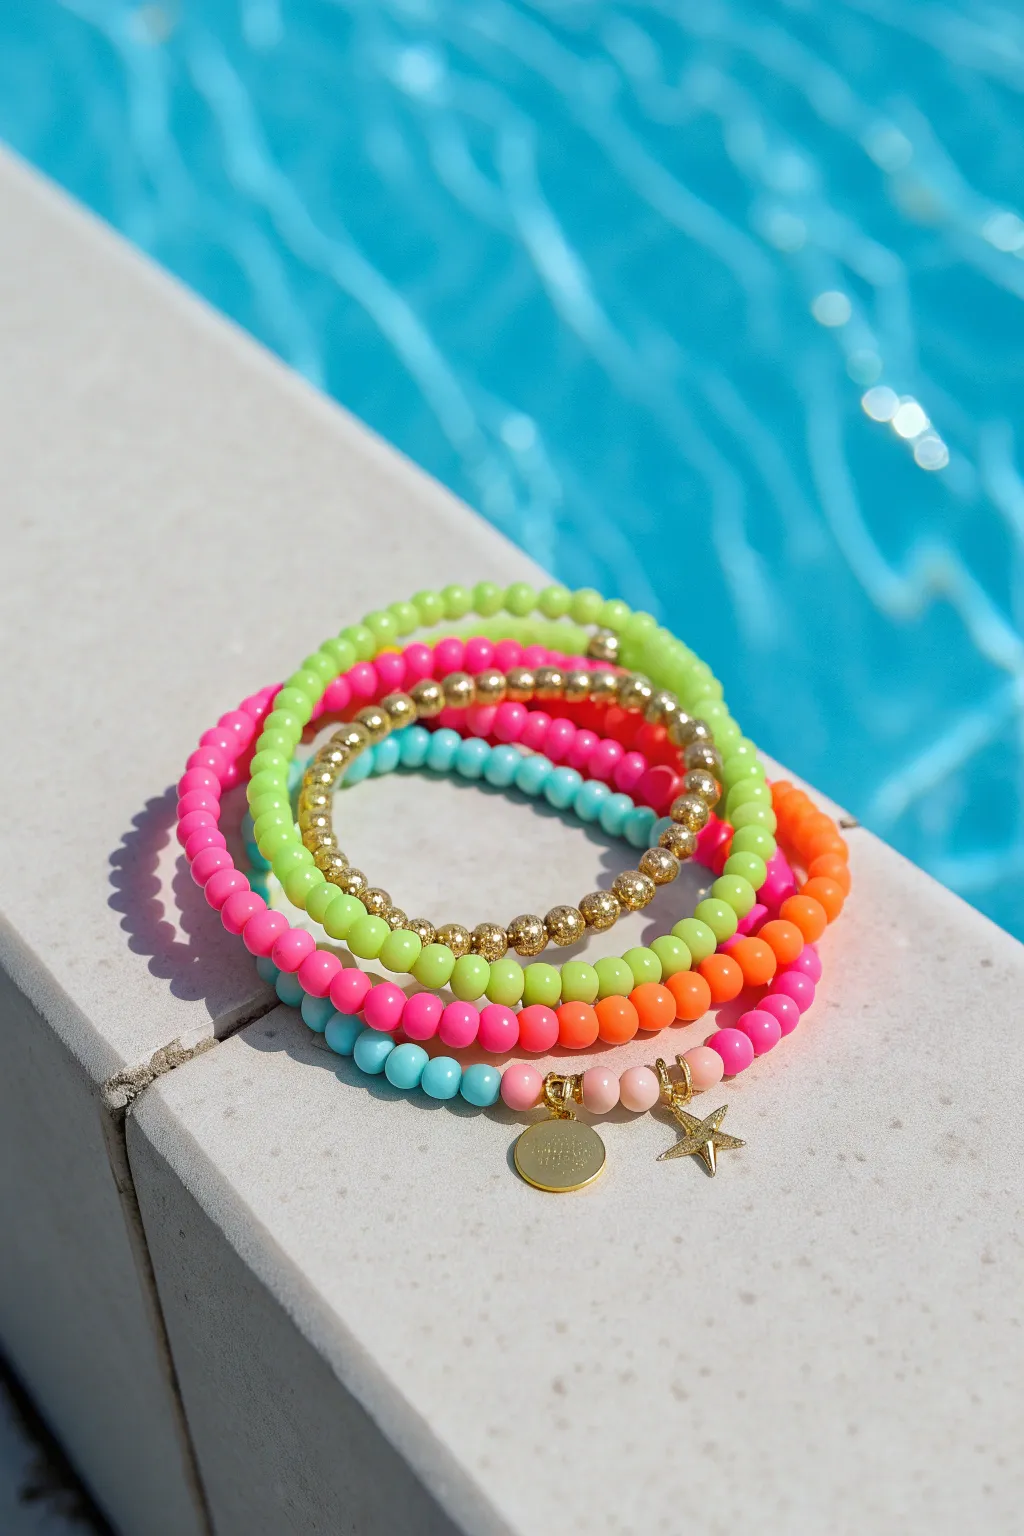
Capture the electric energy of summer with this blindingly bright bracelet stack that screams ‘pool day.’ Featuring neon rounds, gold accents, and cute beachy charms, these bracelets are designed to be worn all at once for maximum impact.
Step-by-Step Guide
Materials
- Neon pink acrylic round beads (6mm or 8mm)
- Neon lime green acrylic round beads (6mm or 8mm)
- Neon orange acrylic round beads (6mm or 8mm)
- Teal/Cyan acrylic round beads (6mm or 8mm)
- Gold tone metallic round beads (6mm or 8mm)
- Assorted glossy pink beads (pale pink, coral pink) for the charm bracelet
- Strong elastic cord (0.8mm or 1.0mm recommended)
- Gold tone jump rings (open)
- Gold star charm
- Gold disc charm (stamped or plain)
- Jewelry adhesive or clear nail polish
- Scissors
- Flat nose pliers (for jump rings)
- Bead stopper or tape
Step 1: The Solid Color Basics
-
Measure the elastic:
Cut five strands of elastic cord, each about 10-12 inches long. This gives you plenty of room to tie knots later without struggling. -
Secure the ends:
Place a bead stopper or a piece of tape on one end of each elastic strand so your beads don’t roll away while you work. -
String the hot pink strand:
For the first bracelet, string purely neon hot pink beads until you reach your desired wrist length, usually about 6.5 to 7 inches for an average fit. -
Create the lime layer:
Repeat the process on the second strand using only the neon lime green beads. Check the length against the pink one to ensure they will stack uniformly. -
Make the gold accent:
Thread the gold tone metallic beads onto the third strand. These add a crucial bit of shine to break up the bright colors. -
Tie them off:
For each of these three simple strands, tie a secure surgeon’s knot (right over left, left over right). Pull tight to secure.
Stretchy Science
Pre-stretch your elastic cord by pulling it firmly a few times before beading. This prevents the bracelets from stretching out and becoming loose after only a few wears.
Step 2: The Mixed & Charmed Layers
-
Pattern the mixed strand:
For the fourth bracelet, create a color-blocked pattern. String about 10 neon orange beads, followed by 10 lime green beads. -
Finish the mixed pattern:
Continue the pattern by adding a section of teal beads, then finish loosely with pink or another neon shade like yellow if you have it, until the length matches the others. -
Design the charm base:
On the final elastic strand, create a gradient or mixed effect using various shades of pink—hot pink, coral, and pale pink. -
Add jump rings to charms:
Using your flat nose pliers, carefully open two gold jump rings. Slide the gold star charm onto one and the gold disc charm onto the other. -
Attach charms to the bracelet:
While constructing the pink gradient bracelet, slide the jump rings (with charms attached) directly onto the elastic cord between two beads where you want the focal point to be. -
Close the rings:
Use the pliers to close the jump rings securely so the charms don’t slip off the cord.
Step 3: Final Security
-
Knot the final bracelets:
Tie surgeon’s knots on the mixed color bracelet and the charm bracelet, pulling the elastic taut to ensure there are no gaps between beads. -
Apply adhesive:
Dab a tiny drop of jewelry glue or clear nail polish onto every knot in the stack. I usually let this dry for about 15 minutes to guarantee strength. -
Hide the knots:
Once the glue is tacky or dry, trim the excess elastic tails close to the knot. -
Tuck it away:
Gently pull the knot inside the hole of the nearest bead to hide it from view, giving your stack a professional, seamless finish.
Glow Up
Swap the standard neon beads for UV-reactive or glow-in-the-dark beads. Your stack will look great in the sun and even cooler during evening pool parties.
Slip these on your wrist and head out to enjoy the sunshine with your new waterproof accessories
Checkerboard-Inspired Color Rhythm
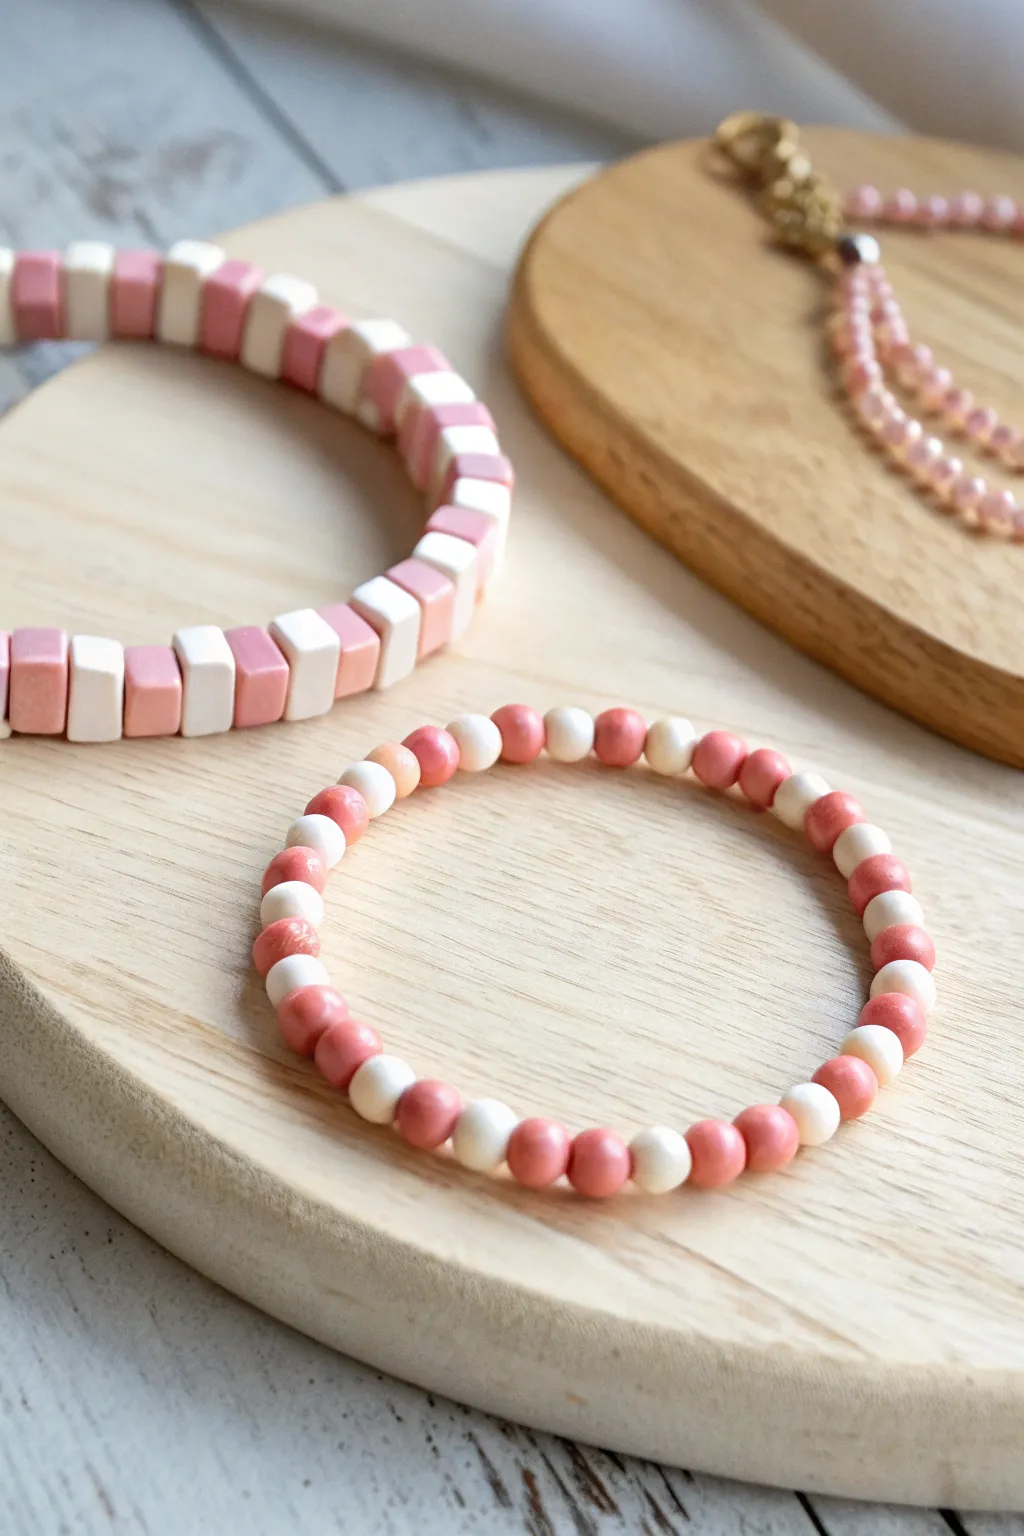
Embrace a playful rhythm with this charming stretch bracelet that features an alternating pattern of pink and white round beads. The result is a simple yet striking accessory that mimics a checkerboard vibe in a softer, circular form.
How-To Guide
Materials
- 6mm round wood or acrylic beads (Light Pink)
- 6mm round wood or acrylic beads (Cream White)
- 0.8mm clear elastic stretch cord
- Hypo-cement or jewelry glue
- Scissors
- Tape or a bead stopper
- Beading needle (optional)
Step 1: Setting Up
-
Measure your wrist:
Wrap a piece of string or a flexible measuring tape around your wrist where you want the bracelet to sit. Note the measurement and add about 1 inch (2.5 cm) to account for the bead bulk. -
Cut the cord:
Cut a length of 0.8mm elastic stretch cord that is at least 4 inches longer than your final bracelet length measurement. This extra length is crucial for tying the knot comfortably later. -
Pre-stretch the elastic:
Hold the ends of your cut cord and give it a few firm (but not breaking) tugs. This “pre-stretching” prevents the bracelet from stretching out permanently after you wear it a few times. -
Secure the end:
Attach a piece of tape or a bead stopper to one end of the cord. This simple step saves you from the frustration of beads sliding right off as you work.
Knot Security
When tightening your final knot, pull on all four strands (the two tails and the two bracelet sides) individually to ensure the knot is extremely compact.
Step 2: Creating the Pattern
-
Start the sequence:
Begin by threading two pink beads onto the cord. If the bead holes are small, you might find a collapsible beading needle helpful here. -
Add contrast:
Follow the two pink beads with one cream white bead. This creates the beginning of your 2-1 rhythm. -
Establish the rhythm:
Continue this specific pattern: two pink beads, followed by one white bead. Repeat this sequence consistently. -
Check the fit:
Periodically wrap the beaded cord around your wrist to check the sizing. Stop adding beads when the bracelet fits comfortably without gaps, but isn’t tight. -
Verify the pattern end:
Aim to finish your strand so the pattern is continuous. Since you started with two pink beads, try to end with a single white bead for a seamless look when connected.
Step 3: Finishing Touches
-
Prepare to tie:
Remove the tape or bead stopper carefully while holding both ends of the elastic securely. -
Tie the first knot:
Cross the ends and tie a simple overhand knot. Pull it tight enough to bring the beads together so there are no gaps, but not so tight that the bracelet buckles. -
Secure with a surgeon’s knot:
For the second knot, make a loop as if doing another overhand knot, but pass the tail end through the loop twice instead of once. Pull this knot firmly down on top of the first one. -
Apply adhesive:
Apply a tiny dot of jewelry glue or Hypo-cement directly onto the knot. Wait a moment for it to tack up slightly. -
Hide the knot:
While the glue is still wet, gently slide the knot inside the hole of the nearest bead. This creates a professional, seamless finish. -
Let it cure:
Allow the bracelet to sit undisturbed for the glue manufacturer’s recommended drying time, usually at least 24 hours for full strength. -
Trim the excess:
Once fully dry, use sharp scissors to trim the excess elastic tails as close to the bead hole as possible without nicking the knot itself.
Bead Hole Size Issues
If the knot won’t hide inside a bead hole, widen the hole slightly using a bead reamer tool, or just dab clear nail polish on the knot to seal it and trim closely.
Your new rhythmic bracelet is ready to add a pop of patterned fun to your wrist stack
Asymmetrical Heart Off-Center Detail
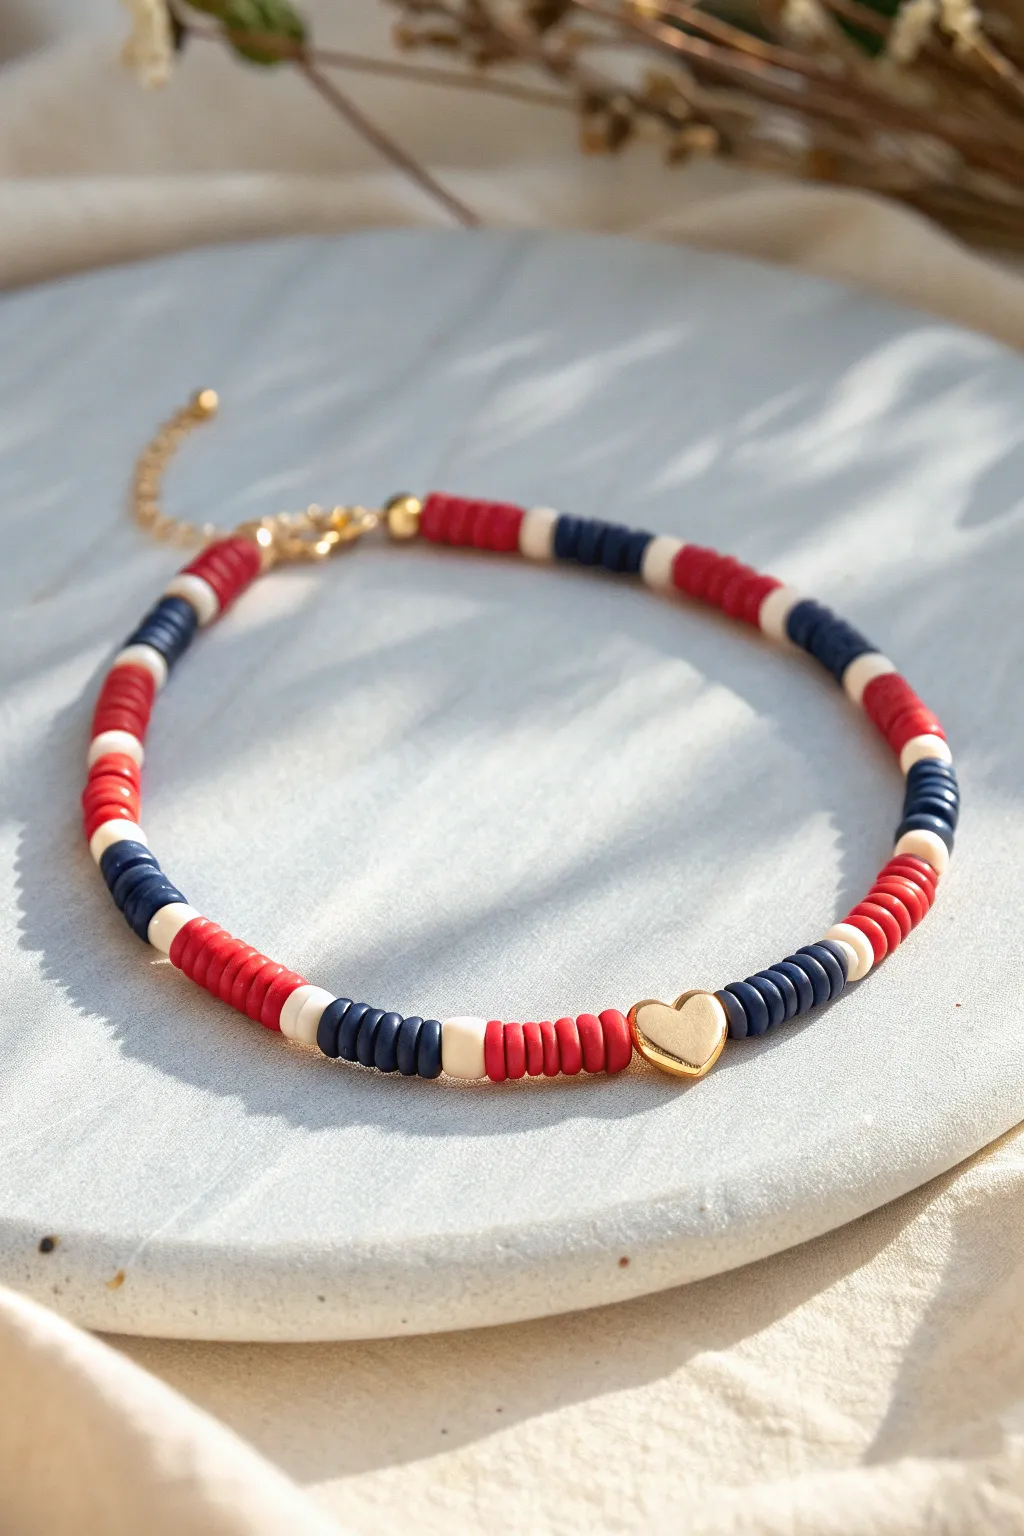
Capture the essence of classic Americana with this charming heishi bead bracelet featuring a patriotic palette of navy, red, and cream. The simple color-blocking pattern leads the eye to a delicate gold heart accent, making it a perfect preppy accessory for everyday stacking.
Detailed Instructions
Materials
- 6mm polymer clay disc beads (Red, Navy Blue, Cream/White)
- Small gold heart charm bead (vertical hole)
- Stretch cord (0.8mm or 1mm)
- Jewelry glue or clear nail polish
- Scissors
- Tape or bead stopper
- Optional: 2 gold crimp bead covers
- Optional: Gold jump ring and clasp (if making non-stretchy version)
Step 1: Preparation
-
Measure your wrist:
Wrap a piece of string around your wrist to find your comfortable size, then cut your stretch cord about 3-4 inches longer than this measurement to give yourself plenty of room for tying knots later. -
Secure the end:
Attach a piece of tape or a bead stopper to one end of your cord. This simple step saves you the heartbreak of watching your beads slide right off while you work.
Knot Security
Use a surgeon’s knot (looping the thread twice instead of once on the first pass) for extra grip on slippery elastic cord.
Step 2: Creating the Pattern
-
Start with the focal point:
Thread your gold heart bead onto the cord first. Slide it down to the taped end; this will serve as the center or slightly off-center focal point of your design. -
Begin the first block:
On the right side of the heart, thread on about 5 to 7 navy blue clay discs. The exact number isn’t strict, but keep it consistent for the main sections. -
Add a spacer:
Thread a single cream or white clay bead next. This acts as a crisp divider between your color blocks. -
Add a red section:
Thread on a block of red clay discs. Aim for a similar length to your blue section, usually around 5-7 beads. -
Insert another spacer:
Add another single cream bead to bookend the red section.
Texture Twist
Replace the single cream spacer bead with a flat gold disc bead or a tiny freshwater pearl to add a touch of luxe texture.
Step 3: Continuing the Rhythm
-
Establish the pattern:
Continue this alternating pattern: a block of blue, a cream spacer, a block of red, a cream spacer. I like to lay my beads out on a mat first to visualize the rhythm before stringing. -
Work on the other side:
Once you have built up a few inches on one side of the heart, remove the tape gingerly and start adding beads to the other side of the heart. For this specific look, start with a red block on the left side of the heart so the heart is framed by different colors (blue on right, red on left). -
Check the length:
Continue the pattern on both sides until you reach your desired total length. Wrap it around your wrist occasionally to check the fit. -
Adjust near the clasp:
If you are running out of space, it’s okay if the pattern cuts off abruptly at the back. The focus is mainly on the front section with the heart. -
Optional gold accents:
If you look closely at the inspiration, you might see small gold spacer beads near the clasp. Feel free to add 1-2 small gold round beads at the very ends of your strand for a professional finish.
Step 4: Finishing Touches
-
Pre-stretch the cord:
Before tying, give the ends of the cord a firm (but gentle!) tug. This pre-stretching prevents the bracelet from loosening up immediately after you wear it. -
Tie the knot:
Tie a standard square knot (right over left, left over right). Pull it tight so the beads urge close together without buckling. -
Secure the knot:
Dab a tiny drop of jewelry glue or clear nail polish onto the knot. This is crucial for longevity with stretch cord. -
Hide the mechanics:
If the hole of one of your adjacent beads is large enough, gently tuck the knot inside it. Alternatively, cover the knot with a gold crimp cover for a polished look. -
Trim the excess:
Once the glue is fully dry, trim the excess cord close to the knot with sharp scissors.
Slip on your new bracelet and enjoy that effortless nautical vibe all year round
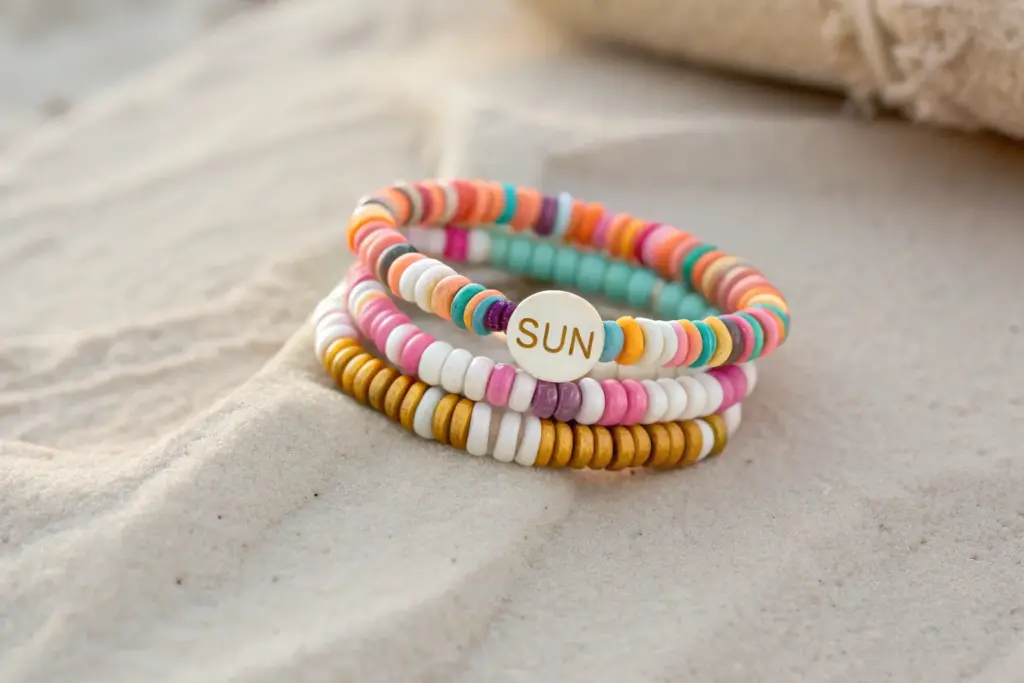
Charm Cluster “Preppy Souvenir” Bracelet
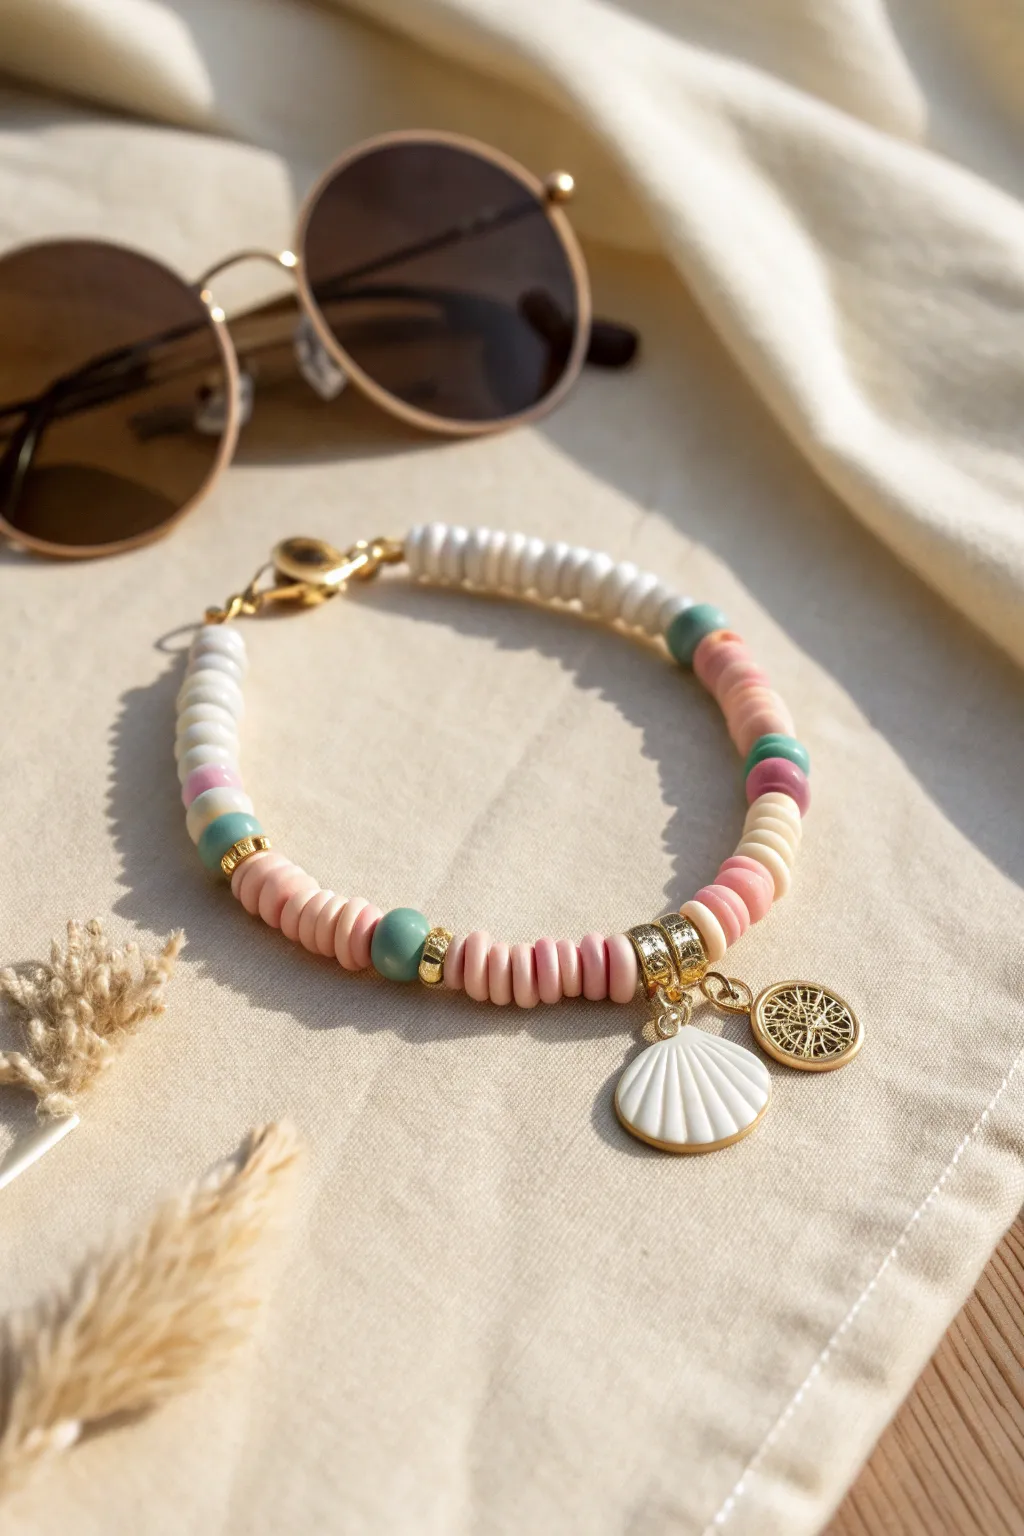
Capture the essence of a sun-soaked afternoon with this charming clay bead bracelet. Featuring a delightful mix of pastel discs, gold accents, and a distinct shell charm, it feels like a wearable memento from a perfect beach day.
How-To Guide
Materials
- Polymer clay heishi beads (white, pale pink, peach, mint green, dusty rose)
- Gold-tone spacer beads (small rings)
- Gold-tone textured rondelle spacer beads (larger)
- Gold-plated enamel scallop shell charm (white)
- Small gold filigree coin charm
- Gold jump rings (4mm and 6mm)
- Elastic beading cord (0.8mm clear)
- Two pairs of jewelry pliers (flat nose)
- Gold crimp bead covers (optional but recommended)
- Gold-tone lobster clasp
- Jewelry glue (e.g., G-S Hypo Cement)
- Scissors
Step 1: Stringing the Sequence
-
Prepare your cord:
Cut a piece of elastic cord about 10-12 inches long. This generous length makes it much easier to tie the knots later without fumbling. Pre-stretch the cord slightly by pulling on it gently a few times to prevent it from sagging later. -
Secure the start:
Attach a piece of tape to one end of the cord or attach a bead stopper so your beads don’t slide off while you work. -
Begin the white section:
Start by threading on roughly 18-20 white clay heishi beads. This solid block of white creates a clean, classic foundation for one side of the bracelet. -
Add a color pop:
Transition into color by adding: one mint green bead, one pale pink, and back to white for about 5-6 beads. This creates a subtle gradient effect. -
Introduce the first gold accent:
Slide on a small gold ring spacer, a mint green bead, and another small gold spacer. Gold spacers really elevate the look from a kid’s craft to jewelry. -
Build the pink section:
Thread on a longer sequence of pink tones. Start with 6-8 peach-colored beads, followed by a single mint bead for contrast. -
Create the focal bead section:
Add a gold textured rondelle spacer. This is visually heavier and marks the center ‘zone’ of the bracelet. Follow it with about 10-12 dusty rose clay beads. -
Add the charm hanger:
Slide onto the cord two large gold jump rings (or a bail carrier if you prefer). These will hold your charms later. I find placing them directly on the cord now is easier than forcing them between tight beads later. -
Finish the bead pattern:
Close the focal section with another decorative gold spacer. Continue with a mix of peach, mint, and pale pink beads, mirroring the randomness of the other side until the bracelet reaches your desired wrist size (usually 6.5 to 7 inches).
Knot Slipping?
If your elastic knot feels insecure, try a ‘square knot’ followed by a ‘surgeon’s knot.’ Always stretch the knot tightly after gluing to ensure it’s fully seated inside a bead.
Step 2: Finishing and Charms
-
Check the fit:
Wrap the unfinished strand around your wrist. The ends should meet comfortably without pulling the elastic too tight. -
Tie the knot:
Remove the tape/stopper. Tie a standard surgeon’s knot: cross left over right and loop through once, then right over left and loop through twice. Pull all four tails tightly to secure. -
Glue and trim:
Dab a tiny drop of jewelry glue onto the knot. Let it dry for a a minute, then trim the excess cord ends carefully. -
Optional clasp addition:
Instead of a simple enclosed circle, you can tie each end of the cord to a jump ring and lobster clasp set using crimp beads for a more traditional closure, as seen in the photo. If doing this, use crimp covers to hide the metal crimps. -
Prepare the shell charm:
Using your two pairs of pliers, twist open a small jump ring. Hook it through the loop on the white scallop shell charm. -
Attach the shell:
Hook that jump ring onto one of the larger rings or the cord space you prepared in the center of the bracelet. Twist the jump ring closed securely so the gap disappears. -
Add the coin charm:
Repeat the process with the gold filigree coin charm, attaching it next to the shell. The slight jingle of the two charms hitting each other is part of the charm.
Mix It Up
Swap the shell for a freshwater pearl or a tiny starfish charm. You can also mix in letter beads to spell ‘SUMMER’ or ‘BEACH’ amidst the pink section.
Slip this on with your favorite sundress and enjoy the beachy vibes all year round
Monochrome Pastel With One Contrast Stripe
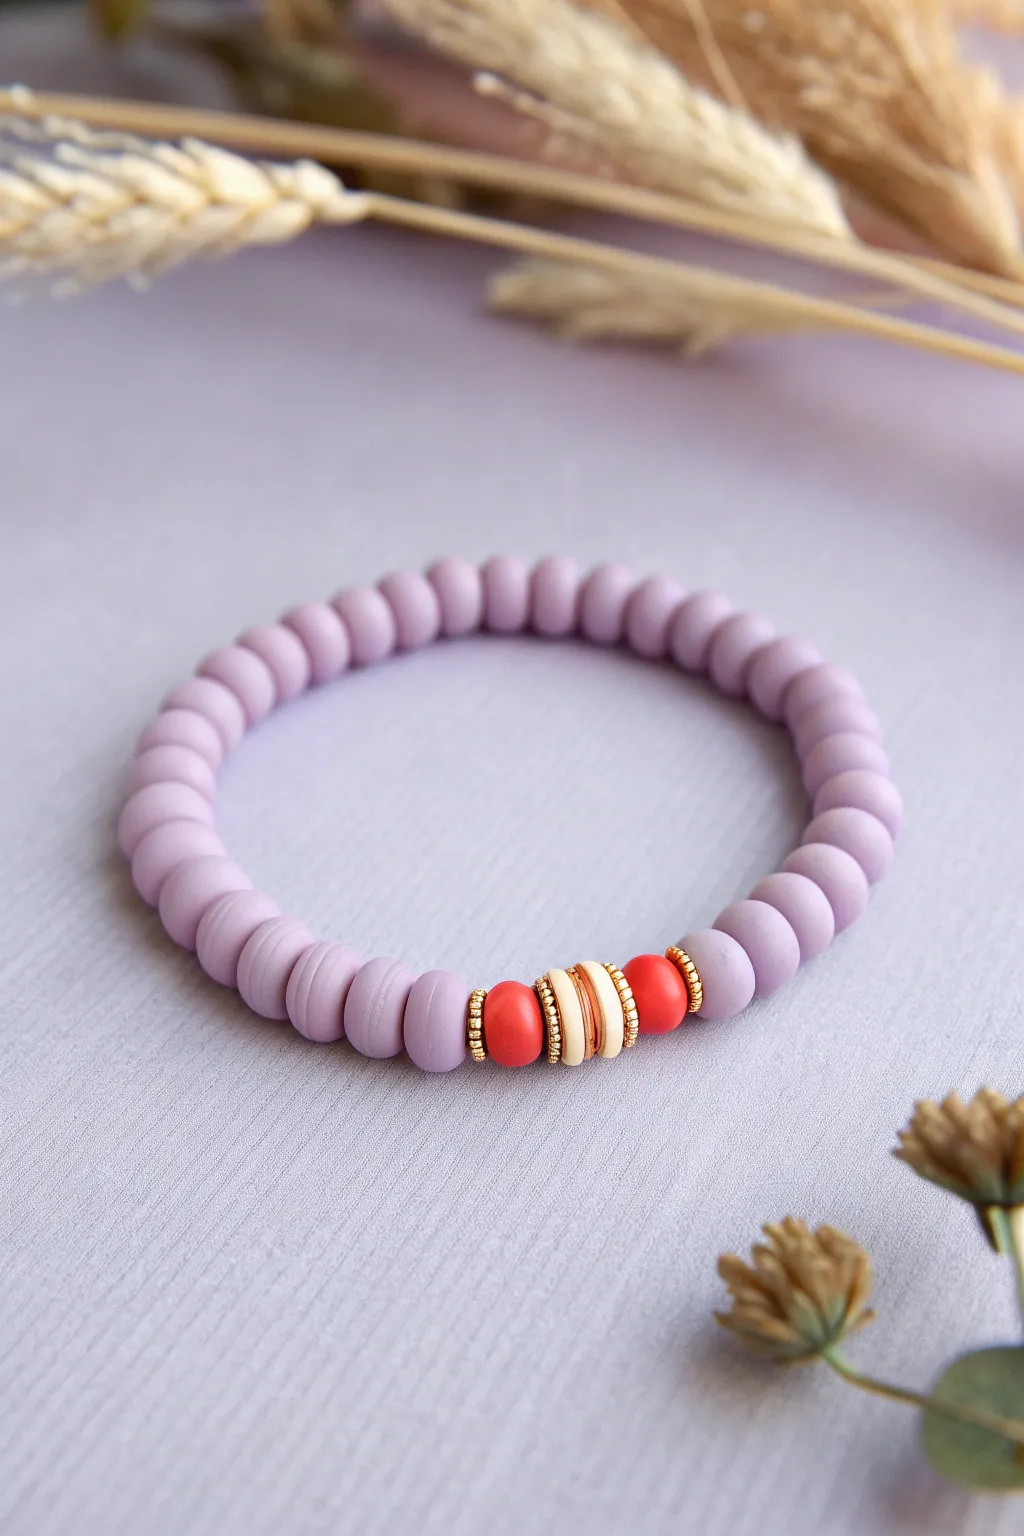
This chic monochrome bracelet features soft lilac clay beads with a striking “stripe” of contrast that draws the eye. The combination of matte textures with flashes of gold and bright coral creates a sophisticated preppy look perfect for stacking.
Step-by-Step
Materials
- Matte lilac flat clay heishi beads (6mm)
- Bright coral red round beads (6mm, matte or clay)
- Cream/white flat clay heishi beads
- Gold daisy spacer beads (4mm)
- Gold flat disc spacer beads (5mm)
- Elastic stretch cord (0.8mm recommended)
- Jewelry glue or clear nail polish
- Scissors
- Bead stopper or tape
Step 1: Setting the Foundation
-
Measure your wrist:
Wrap a piece of string around your wrist to find your size, then add about half an inch for a comfortable fit. Cut a length of elastic cord about 10-12 inches long to give yourself plenty of room for tying knots later. -
Secure the end:
Place a bead stopper or a piece of masking tape on one end of the elastic cord. This prevents your beads from sliding off while you design the pattern. -
Start with the base color:
Begin threading on your lilac clay beads. You’ll want to string approximately half of the total lilac beads needed for your bracelet size at this stage.
Step 2: Creating the Focal Point
-
First gold accent:
Once your first section of lilac is complete, add one gold daisy spacer bead. The texture of the daisy spacer adds a nice visual break before the bold colors start. -
Add first coral pop:
Thread on one bright coral red round bead. Unlike the flat discs, this bead has a rounder profile which adds dimension to the focal section. -
Build the center stripe:
Add a flat gold disc spacer next. This acts as a separator between the red and white sections. -
The white centerpiece:
Thread on 3-4 cream or white flat clay beads. These create the crisp central stripe that defines the ‘preppy’ aesthetic. -
Mirror the design:
After the white section, add another flat gold disc spacer to frame the center. -
Second coral pop:
Add your second bright coral red round bead. -
Closing gold accent:
Finish the focal point by adding one final gold daisy spacer bead.
Knot Security
Use a surgeon’s knot (looping the elastic through twice on the first tie) instead of a simple square knot. It creates friction that holds slippery elastic much better.
Step 3: Finishing the Loop
-
Complete the lilac base:
Continue stringing the remaining lilac clay beads until the bracelet reaches your desired total length. -
Check the fit:
Wrap the unfinished strand around your wrist to check the size. Usually, I like a slightly snug fit for these, but add or remove lilac beads until it feels right for you. -
Pre-stretch the cord:
Gently pull on both ends of the elastic cord a few times. This pre-stretching step is crucial because it prevents the bracelet from sagging or loosening up immediately after you wear it. -
Tie the knot:
Remove the tape or bead stopper. Tie a standard square knot (right over left, left over right) and pull it tight. -
Secure tightly:
Tie a second overhand knot on top of the square knot for extra security. Pull the cords firmly until you feel the knot lock into place. -
Apply adhesive:
Dab a tiny drop of jewelry glue or clear nail polish directly onto the knot. Allow it to dry completely before touching it again. -
Hide the knot:
Trim the excess elastic close to the knot, leaving about 1mm. Gently wiggle adjacent beads to slide them over the knot, hiding it inside one of the bead holes.
Wonky Pattern?
If the clay discs look uneven or wavy, compress the strand tightly before tying the final knot. Packing them snugly straightens the discs into a uniform tube shape.
Enjoy styling your new bracelet alongside your other favorite wrist accessories
Preppy “Fruit Sorbet” Color Recipe
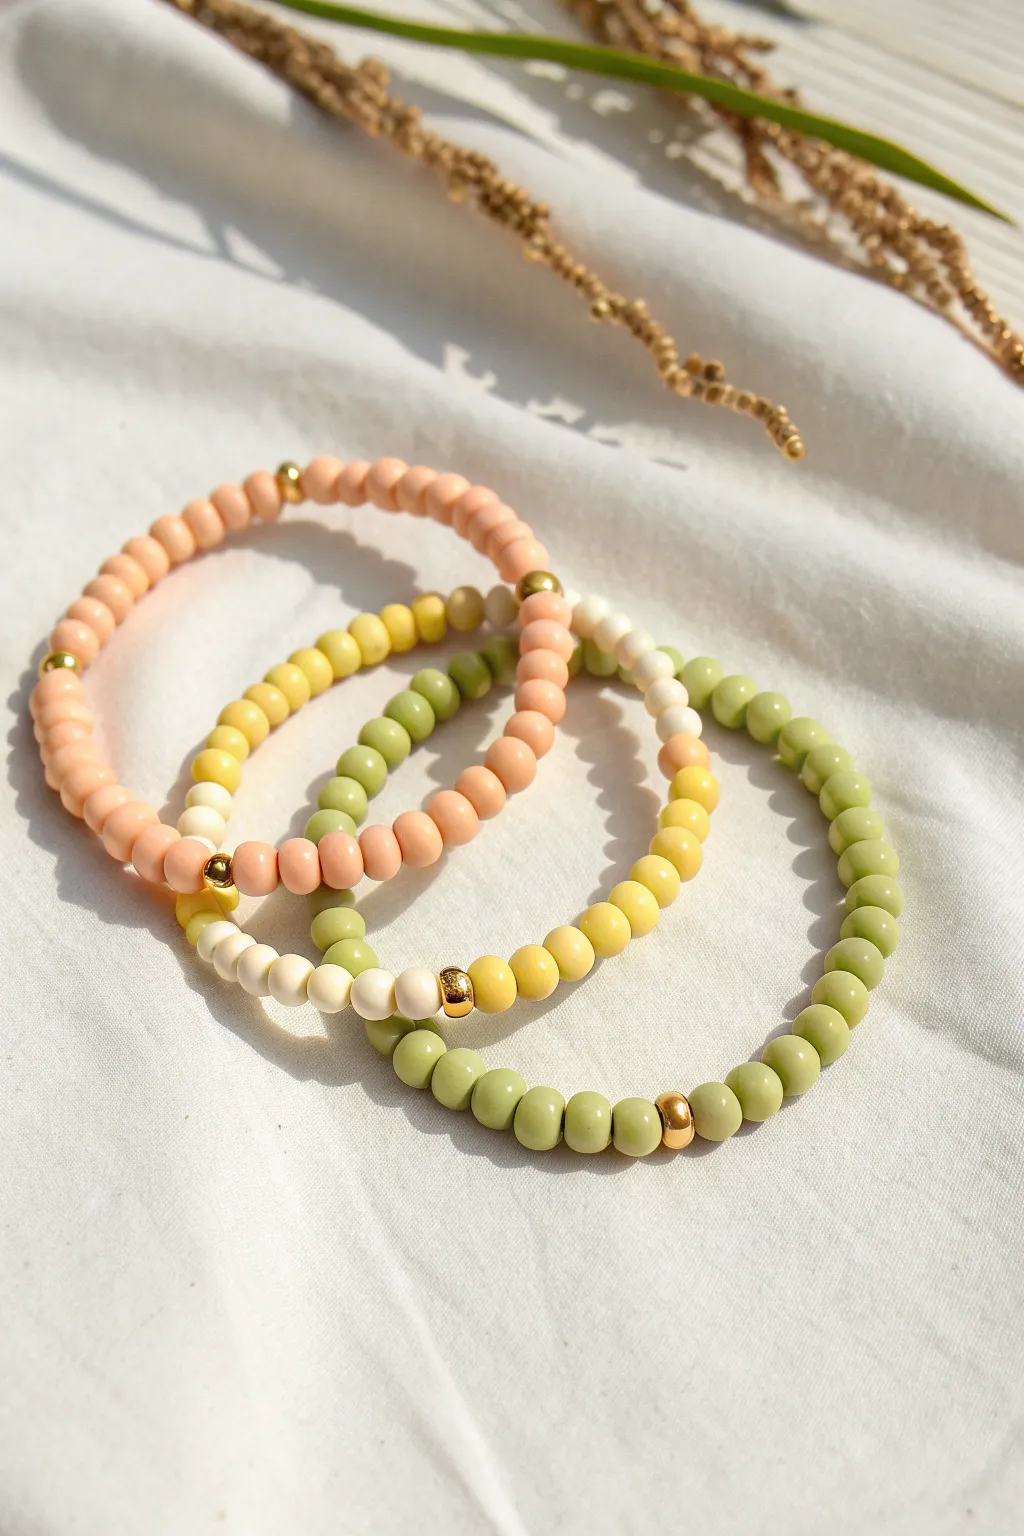
These delightful bracelets capture the essence of a summer afternoon with their soft pastel palette of peach, lemon, and pistachio tones. The subtle gold accents add a touch of preppy elegance, making them perfect for stacking or wearing individually.
Detailed Instructions
Materials
- 6mm round ceramic or opaque glass beads (Peach/Salmon color)
- 6mm round ceramic or opaque glass beads (Soft Butter Yellow)
- 6mm round ceramic or opaque glass beads (Sage/Pistachio Green)
- 6mm round ceramic or opaque glass beads (Cream/Off-White)
- 3mm-4mm gold spacer beads (round or saucer shape)
- 0.8mm clear elastic stretch cord
- Jewelry glue or clear nail polish
- Scissors
Step 1: Planning Your Palette
-
Select your mood:
Begin by separating your beads into three distinct color families. For this look, we are using a monochromatic approach for the first bracelet (peach), and a two-tone ombre effect for the yellow and green bracelets. -
Measure the cord:
Cut three lengths of elastic cord, each measuring about 10-12 inches. I always cut a bit more than I think I need to make tying the final knot easier. -
Pre-stretch the elastic:
Hold the ends of one cord segment and give it a few firm (but not snapping) tugs. This crucial step prevents the bracelet from stretching out permanently the first time you put it on.
Knot Security Trick
When tightening your final knot, pull the elastic cords away from each other firmly until you feel the knot ‘lock’ into place; the elastic will thin slightly.
Step 2: Creating the Peach Bracelet
-
Secure the end:
Place a piece of tape or a bead stopper on one end of your first cord to stop beads from sliding off while you work. -
Start the pattern:
Thread approximately 10 to 12 peach beads onto the cord. -
Add a gold accent:
Slide on one gold spacer bead. This breaks up the solid color block and adds that signature preppy shine. -
Continue the sequence:
Repeat the pattern of 10-12 peach beads followed by a gold spacer until you reach your desired wrist size (usually about 6.5 to 7 inches for an average wrist).
Step 3: Creating the Yellow Ombre Bracelet
-
Design the transition:
For the second bracelet, we will mix the butter yellow beads with cream beads for a softer look. -
String the yellow section:
String about 15 yellow beads, followed by a gold spacer. -
Add the cream section:
add a small section of 5 cream beads, followed by another gold spacer. -
Mix and match:
Alternate between long sections of yellow and short sections of cream, separating each distinct color block with a gold spacer bead.
Spacing Issues
If your bracelet feels too tight but adding another big bead makes it loose, add 2-3 extra gold spacers together. They act as perfect micro-adjusters.
Step 4: Creating the Green & Yellow Mixed Bracelet
-
Prepare the third cord:
Secure the end of your final piece of elastic. -
Create the green base:
String a long section of sage green beads, roughly covering half the length of the bracelet. -
Transition through gold:
Add a gold spacer bead as a bridge between your colors. -
Finish with yellow:
Complete the rest of the strand using yellow beads, creating a distinct half-and-half color block effect.
Step 5: Finishing Touches
-
Check the fit:
Wrap each unfinished strand around your wrist to ensure it sits comfortably without digging in. -
Tie the surgeon’s knot:
Remove the tape or stopper. Cross the ends, loop one side under twice, and pull tight. This extra loop makes the knot much more secure than a standard square knot. -
Secure with glue:
Place a tiny dab of jewelry glue or clear nail polish directly onto the knot. Let it dry completely before touching it. -
Hide the knot:
Trim the excess clear cord carefully. If the hole is large enough, gently tug the knot inside one of the adjacent beads to hide it from view.
Now you have a refreshing set of sorbet-inspired bracelets ready to brighten up any outfit
Mixed Texture Stack With Pearl-Look Beads
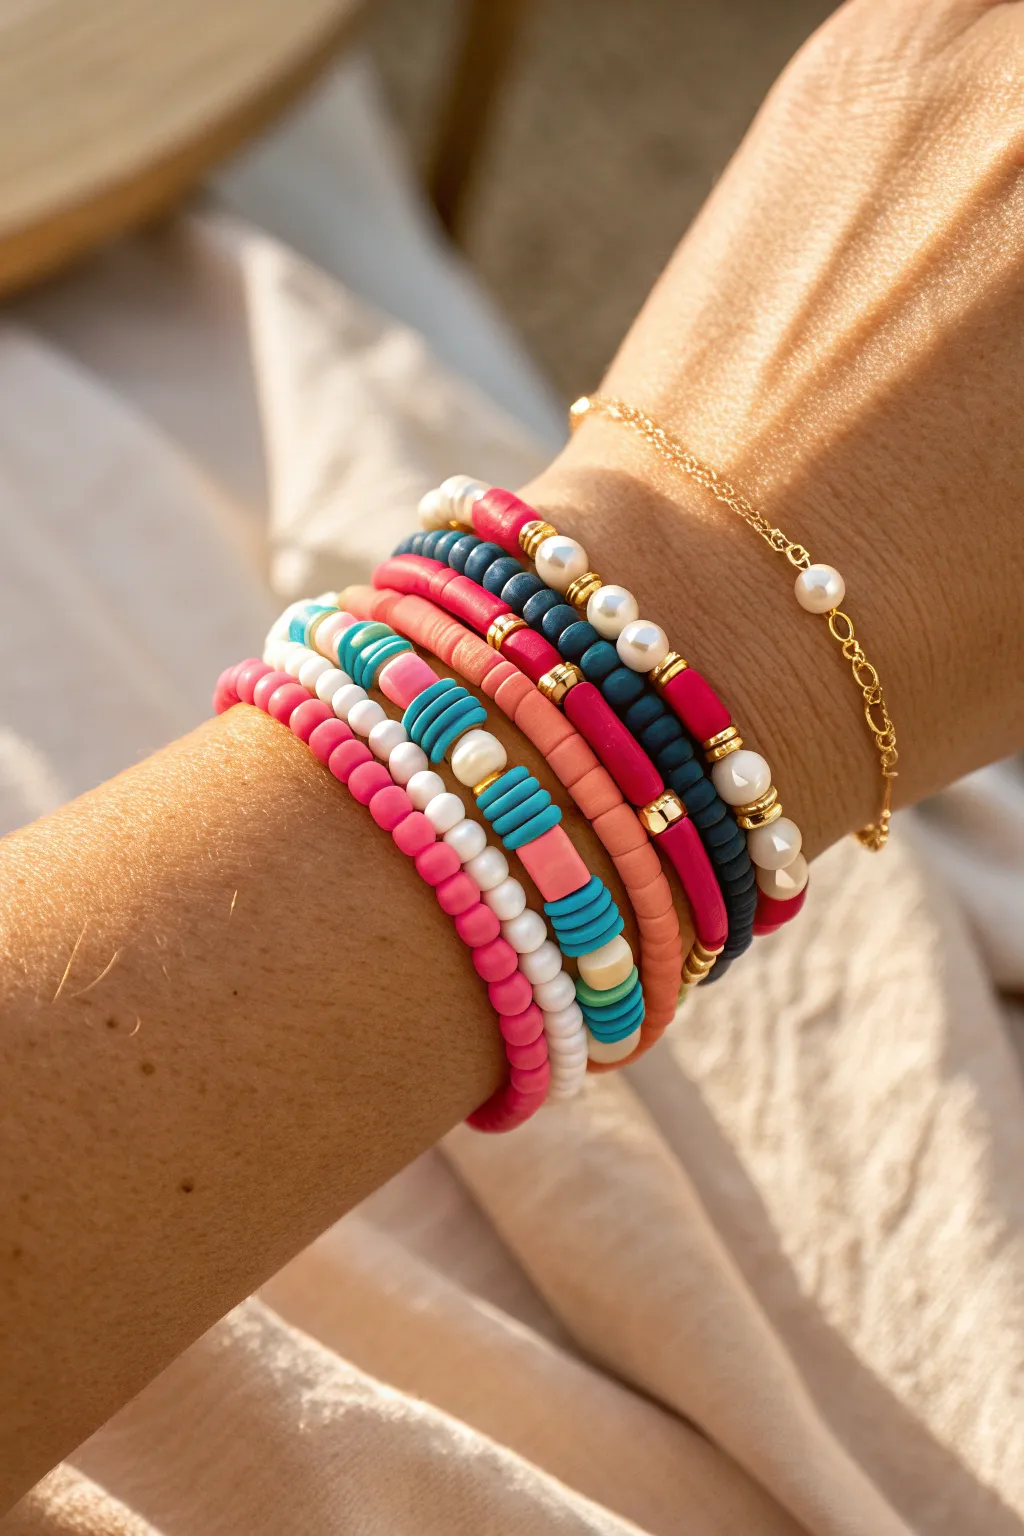
Capture the essence of a beach day with this vibrant stack of mixed-texture bracelets. This project combines colourful clay heishi beads with elegant pearl accents and gold spacers for a versatile, preppy look that shines in the sun.
Step-by-Step
Materials
- Flat clay heishi beads in hot pink, peach/coral, navy blue, white, turquoise, and teal
- Small round gold spacer beads (approx. 3-4mm)
- Faux pearl beads (approx. 4-6mm)
- Small gold bead caps or textured spacers
- Elastic stretch cord (0.8mm recommended)
- Delicate gold chain (approx. 7 inches)
- Gold jump rings (4mm)
- Gold lobster clasp
- Jewelry pliers (flat nose and chain nose)
- Super glue or jewelry cement
- Scissors
Step 1: The Solid Pink Foundation
-
Measure and Cut:
Cut a length of elastic cord about 10-12 inches long. This gives you plenty of extra room for tying knots comfortably without losing beads. -
String the Pinks:
Thread on your hot pink clay heishi beads. Continue adding beads until the strand measures the circumference of your wrist. -
Secure the Knot:
Tie a surgeon’s knot (right over left, left over right twice). Pull tight to secure, add a dab of super glue to the knot, let it dry, and trim the excess cord.
Knot Slipping?
If your elastic knots keep coming undone before glueing, try pre-stretching the clear cord firmly before you start beading. This stops it from relaxing later.
Step 2: The Mixed Stripe Bracelet
-
Create Sections:
Cut a new piece of elastic. Start by stringing about 1 inch of white heishi beads. -
Add Colorful Stripes:
Add a distinctive color block section: 5 turquoise beads, followed by a gold spacer, a pink block bead (or square bead), another gold spacer, and 5 more turquoise beads. I like to center this section so it sits on top of the wrist. -
Finish the Pattern:
Fill the rest of the bracelet length with alternating sections of white and beads, perhaps adding a small pearl or gold accent bead randomly for texture. -
Close the Loop:
Tie off with a secure surgeon’s knot and glue as before.
Step 3: The Coral & Gold Accent
-
Base Color:
On a new elastic cord, string a continuous length of peach or coral colored heishi beads. -
Insert Gold Spacers:
Every inch or so, substitute a clay bead for a small gold disc spacer or a tiny gold bead to break up the solid color and add shine. -
Finalize:
Check the fit against your wrist, then knot and glue securely.
Hiding the Knot
For a pro finish, slide your final knot inside the hole of a nearby bead. If the hole is too small, use a gold crimp cover over the knot instead.
Step 4: The Navy & Pearl Statement
-
Start the Dark Strand:
Begin threading navy blue clay heishi beads onto your elastic. -
Focus Feature:
Create a focal point by adding a sequence: gold spacer, hot pink clay bead section (about 5-8 beads), gold spacer. -
Add Pearls:
Further down the strand, intersperse 3-4 faux pearls separated by gold spacers. The contrast between the dark navy and the white pearls is key here. -
Complete the Circle:
Finish stringing until the proper length is reached, knot tightly, glue, and trim.
Step 5: The Delicate Gold Chain
-
Size the Chain:
Measure a length of delicate gold chain against your wrist. It should be slightly looser than the elastic bracelets. -
Add the Pendant:
Using your pliers, open a jump ring and attach a single small pearl bead (if it has a loop) or thread a pearl onto a headpin and create a loop to attach it to the center of the chain. -
Attach Hardware:
Attach a jump ring to one end of the chain and a jump ring with a lobster clasp to the other end using your flat nose pliers.
Slide on your new stack and enjoy the perfect pop of color for any outfit