If you’ve ever looked at a plain ceramic bowl and thought, “Okay… but what do I do on the surface?”—same. Here are my favorite ceramic bowl decoration ideas, from classic glaze looks to playful painted designs that make every bowl feel personal.
Painted Rim Stripes
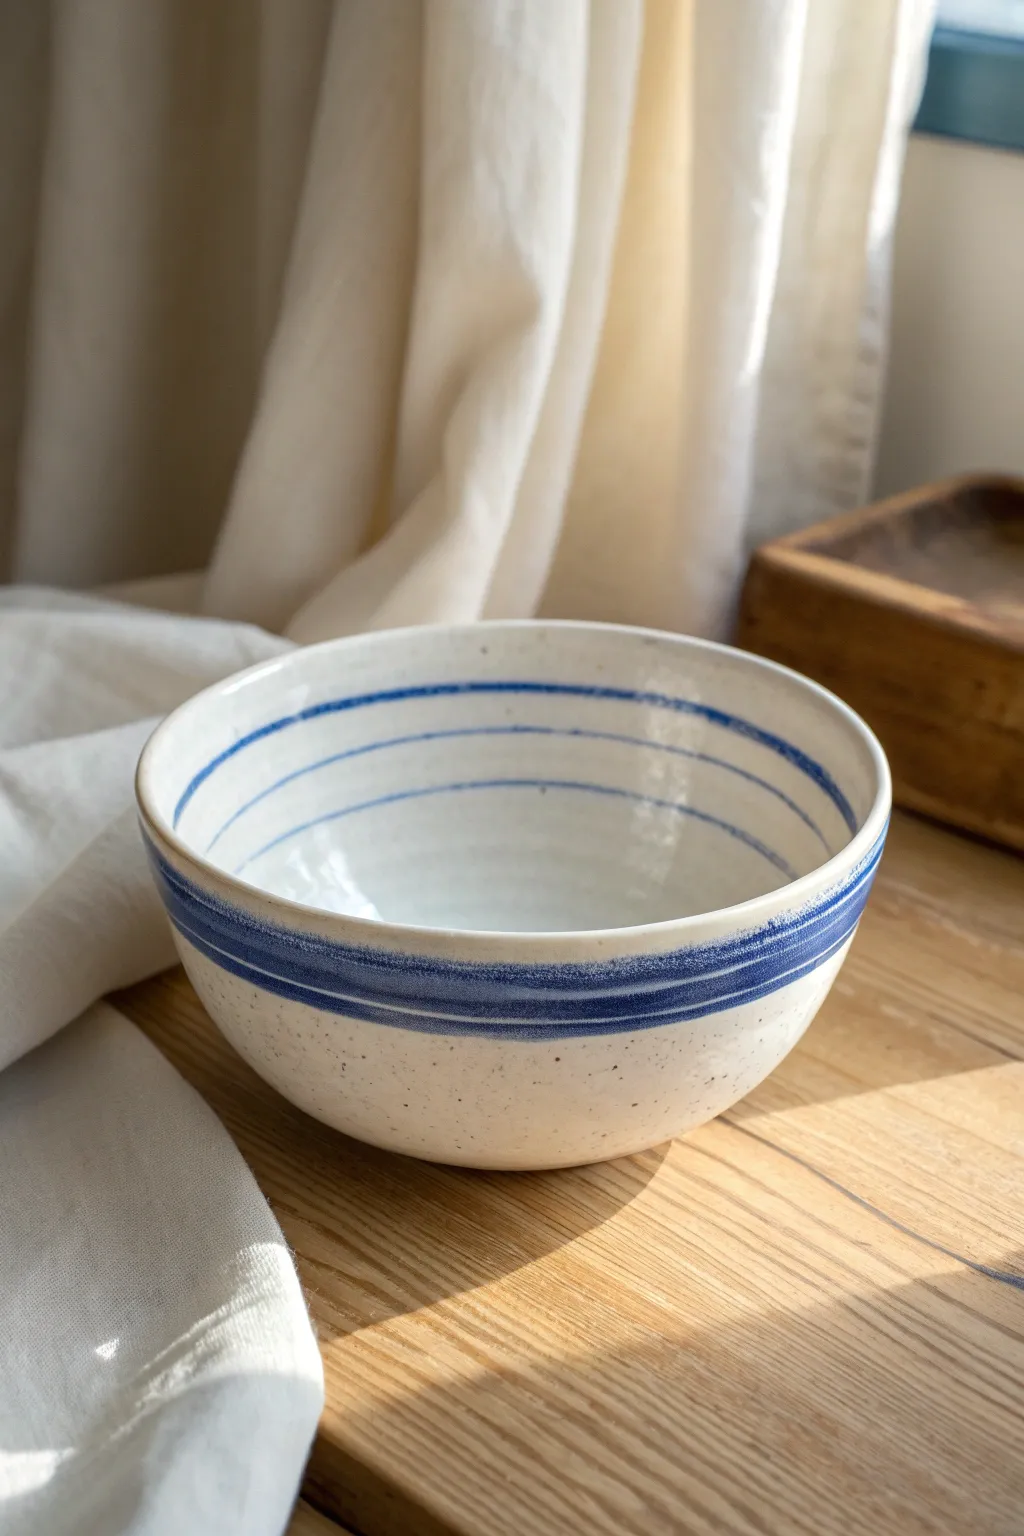
Transform a plain ceramic bisque bowl into an artisanal treasure with this simple yet striking stripe design. Using underglazes and a pottery wheel, you’ll create fluid, organic lines that highlight the bowl’s form while maintaining a charming, handmade quality.
Step-by-Step Guide
Materials
- Bisque-fired ceramic bowl (speckled clay body preferred)
- Cobalt blue underglaze
- Pottery wheel (banding wheel works, but electric is easier for smooth lines)
- Medium soft-bristle brush (for outer band)
- Fine liner brush (for inner stripes)
- Clear transparent glaze
- Sponge and water bucket
- Kiln access
Step 1: Preparation
-
Clean the Bisque:
Before applying any color, ensure your bisque-fired bowl is free from dust or kiln debris. Wipe the entire surface gently with a slightly damp sponge. This ensures the underglaze adheres properly without crawling. -
Center the Bowl:
Place your bowl on the center of the pottery wheel head. To check if it’s centered, spin the wheel slowly and hold a finger steady near the rim; adjust until the distance between your finger and the pot remains constant as it spins. -
Secure the Piece:
Once perfectly centered, use three small clay lugs (wads of damp clay) pressed against the foot of the bowl to secure it firmly to the wheel head so it doesn’t fly off during painting.
Wobbly Lines?
If your hand shakes, try holding your breath for the moment the brush touches the clay, or brace your painting hand with your other hand for support.
Step 2: Painting the Exterior
-
Load the Brush:
Shake your cobalt blue underglaze thoroughly. Dip your medium soft-bristle brush into the jar, ensuring it holds a generous amount of pigment but isn’t dripping uncontrollably. -
Set the Speed:
Start the wheel spinning at a slow, consistent speed. You don’t want it moving too fast, or the paint might splatter. -
Positioning:
Anchor your elbow against your body or on a knee for stability. Bring the brush tip just close enough to hover near the exterior rim of the bowl. -
Applying the Main Band:
Gently touch the brush to the spinning bowl about an inch below the rim. Apply steady pressure to create a thick, solid band. Let the wheel rotate fully several times to build up opacity. -
Refining the Edge:
While the wheel is still spinning, gently manipulate the brush angle to feather the edges slightly if you want that rustic, brushed look seen in the photo. I tend to let the brush run dry near the bottom of the stripe for a textured fade. -
Adding Thin Accents:
Using the very tip of the same brush or switching to a smaller round brush, touch the surface just below your main band to create a second, thinner accompanying stripe.
Mix It Up
Try layering a second, lighter blue or a watery green quickly over the first stripe while it’s wet for a watercolor-style bleed effect.
Step 3: Painting the Interior
-
Switch Brushes:
Swap to your fine liner brush for the interior work. These lines need to behave a bit more delicately than the bold outer band. -
First Interior Stripe:
With the wheel spinning slowly, carefully rest your hand on a bridge or steady your arm. Touch the tip of the liner brush to the inside wall, roughly half an inch down from the rim. -
Creating the Rings:
Apply the pigment in a continuous motion. Don’t worry if the line wavers slightly; these organic imperfections add character. Create two parallel lines near the top rim. -
Lower Interior Stripe:
Move your brush further down into the bowl’s curve to add the third, lower stripe. Keep your hand extremely steady as the curve can be tricky to navigate. -
Drying Time:
Allow the underglaze to dry completely. It should lose its sheen and look chalky. This usually takes about 15-20 minutes depending on humidity.
Step 4: Glazing and Firing
-
Dip Glazing:
Once the decoration is dry, dip the entire bowl into a bucket of clear transparent glaze. Use tongs to hold the foot, immersing the bowl quickly (in and out in 3 seconds) to get an even coat. -
Clean the Foot:
Use a sponge to wipe away any glaze from the bottom foot ring of the bowl. Any glaze left here will fuse the bowl to the kiln shelf. -
Final Fire:
Load the bowl into the kiln and fire it to the recommended temperature for your clay and glaze combination (typically Cone 5 or 6 for stoneware).
Enjoy using your beautifully striped bowl for your morning cereal or as a stunning display piece.


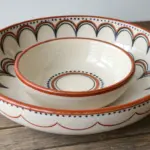
Two-Tone Dip-Glaze Look
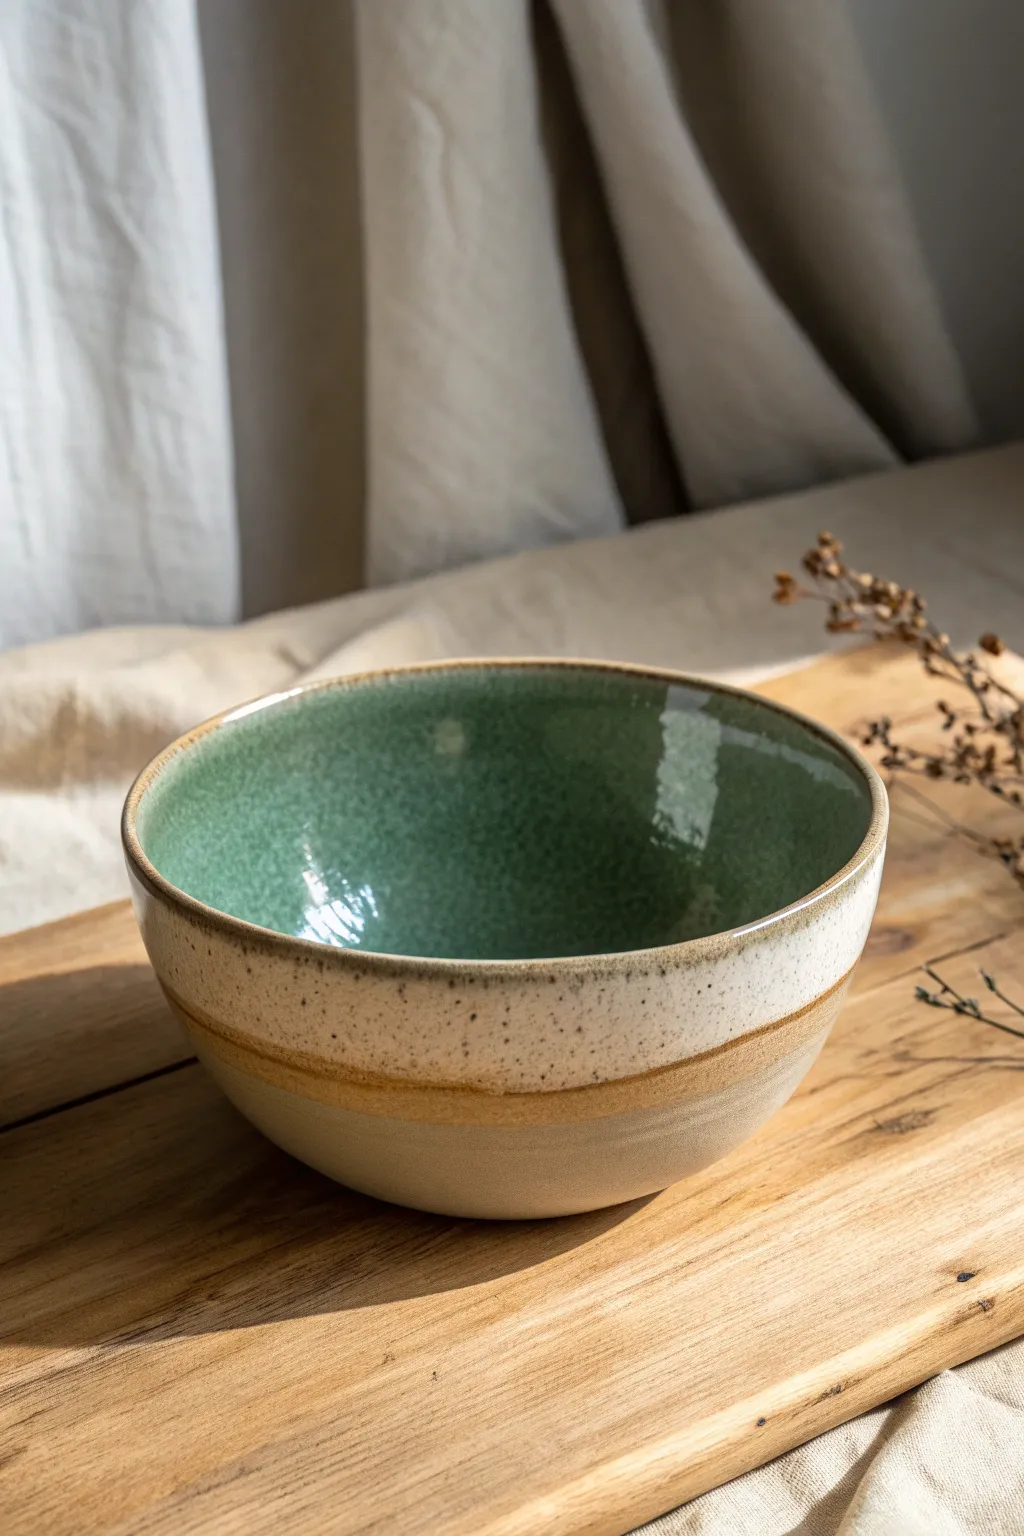
Achieve a sophisticated, professional pottery look with this two-tone glazing technique that combines rustic speckled clay with a vibrant, glossy interior. The contrast between the matte, raw exterior band and the pooled green inside creates a stunning piece perfect for serving or display.
Step-by-Step Tutorial
Materials
- Bisque-fired ceramic bowl (stoneware or speckled clay body recommended)
- Glossy green glaze (Celadon or similar translucent green)
- Matte white or cream speckled glaze
- Wax resist (liquid wax emulsion)
- Glaze brush (fan brush or wide soft bristle)
- Sponge
- Bucket of water
- Clean towel
- Kiln (or access to a firing service)
Step 1: Preparation & Waxing
-
Clean the bisque:
Before you begin, wipe down your bisque-fired bowl with a damp sponge to remove any dust or kiln wash residue. This ensures your glaze adheres perfectly to the clay surface. -
Define the bottom band:
Visualize the unglazed band at the bottom of the bowl. Using a brush or sponge applicator, apply a layer of wax resist to the bottom foot and up the side of the bowl about 1-2 inches. This area will remain bare raw clay. -
Dry the wax:
Allow the wax resist to dry completely. It should feel dry to the touch and slightly tacky but solid.
Step 2: Interior Glazing
-
Prepare the green glaze:
Stir your glossy green glaze thoroughly. Ensure there are no clumps and the consistency is similar to heavy cream for the best coverage. -
Pour the interior:
Pour a generous amount of the green glaze directly into the center of the bowl. -
Swirl and coat:
Pick up the bowl and slowly rotate it, tilting completely around so the glaze coats the entire interior surface right up to the rim. -
Dump excess:
Once coated, quickly pour the excess glaze back into your bucket. Give the bowl a little shake as you pour to break the surface tension and prevent a thick drip at the rim. -
Clean the rim:
If any green glaze splashed onto the top rim or the outside, use a damp sponge to wipe it away cleanly. We want a sharp transition.
Uneven Glaze Line?
If your dipped line is wavy, hold the bowl steady on a banding wheel. Spin the wheel and hold a damp sponge against the glaze edge to create a perfect, clean horizontal line.
Step 3: Exterior Glazing
-
Prepare the white glaze:
Stir your matte white or cream speckled glaze. This glaze needs to be stable so it doesn’t run too much during firing. -
Invert and dip:
Hold the bowl by the foot (which is waxed). Turn it upside down and dip the exterior into the white glaze bucket. -
Control the depth:
Stop dipping just before you hit the wax line you created earlier. You want a distinct band of white glaze that stops before the raw clay bottom. -
Alternative: Brushing:
If you don’t have a dipping container large enough, you can brush the white glaze onto the exterior. Apply 3 even coats, letting each dry slightly in between, stopping just above your wax line. -
Tidying the intersection:
I like to take a damp sponge and carefully clean up the line where the white glaze meets the wax resist. A clean line here makes the finished piece look much more professional. -
Check the rim:
Ensure the white exterior glaze meets the green interior glaze at the rim without overflowing. You can leave a tiny sliver of raw clay at the very lip for a framed look, or let them touch.
Speckle Magic
To enhance the rustic look, use a clay body with heavy grog or iron speckles. These will bleed through the cream glaze, adding texture and visual interest.
Step 4: Firing
-
Final dry:
Let the fully glazed bowl dry for at least 24 hours. The glazes should be powdery and dry to the touch. -
Load the kiln:
Place the bowl in the kiln. Since the foot is waxed and unglazed, you don’t need stilts, but ensure no glaze is touching the kiln shelf. -
Glaze fire:
Fire the kiln to the cone temperature recommended for your specific clay and glaze combination (commonly Cone 5 or 6 for stoneware). -
Cool down:
Allow the kiln to cool completely before opening. This prevents thermal shock which could crack your beautiful new bowl.
Now you have a stunning custom bowl ready to act as a centerpiece on your dining table

Classic Speckled Glaze
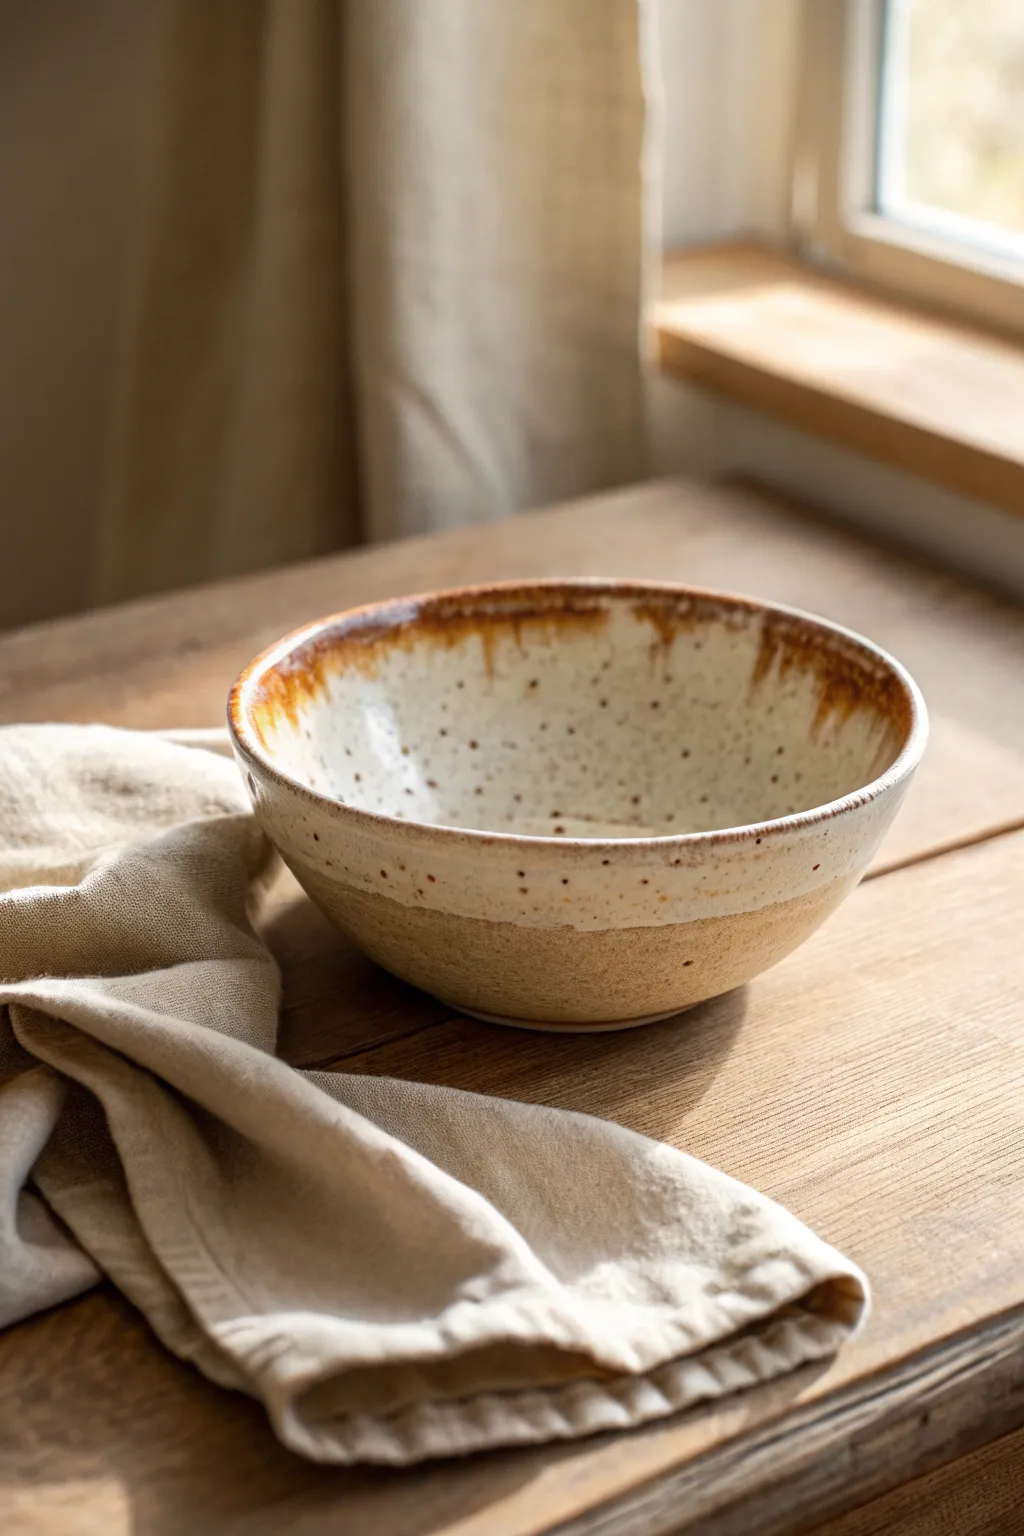
Achieve a timeless, farmhouse-inspired look with this hand-thrown bowl featuring a classic speckled cream glaze. The design showcases the raw beauty of the clay body at the base, topped with a glossy, drip-effect rim that adds organic warmth to any table setting.
Step-by-Step Guide
Materials
- Speckled buff stoneware clay (e.g., Laguna B-Clay with specks or similar)
- Pottery wheel
- Throwing tools (sponge, needle tool, wire cutter, ribs)
- Trimming tools
- Glossy white or cream glaze (compatible with your clay’s firing range)
- Honey or amber colored fluxing glaze (for the rim)
- Wax resist
- Soft fan brush
- Kiln
Step 1: Throwing and Shaping
-
Prepare the Clay:
Begin by thoroughly wedging about 1.5 to 2 pounds of speckled buff stoneware clay. This ensures all air bubbles are removed and the particles are aligned for easier throwing. -
Center on the Wheel:
Secure the clay ball to the center of your wheel head. Using water and steady pressure, center the clay until it spins without wobbling. -
Open the Form:
Create an opening in the center of the mound, diving down until you leave about a half-inch thickness for the foot of the bowl. -
Pull the Walls:
Slowly pull the clay upward and outward to create the bowl shape. Aim for a gentle curve that widens significantly at the rim, keeping the walls even in thickness. -
Refine the Curve:
Use a smooth kidney rib on the interior to compress the clay and define the bowl’s continuous curve. I like to make sure the inside is perfectly smooth now, as it’s harder to fix later. -
Finish the Rim:
Use a chamois or a piece of plastic to compress the rim, rounding it off slightly so it is smooth to the touch. -
Wire Off:
Run a wire cutter underneath the base of the bowl to separate it from the wheel head, then carefully set it aside to dry to a leather-hard state.
Step 2: Trimming and Bisque Firing
-
Center for Trimming:
Once leather-hard, place the bowl upside down on the wheel. Secure it with clay lugs or a Giffin Grip. -
Define the Foot:
Trim away excess clay from the exterior bottom to create a defined foot ring. This elevates the bowl and gives it a professional profile. -
Smooth the Exterior:
Use a metal rib to smooth any trimming marks on the exterior wall. Leave the texture natural if you prefer a rougher hand-feel. -
Bisque Fire:
Allow the bowl to dry completely (bone dry). Load it into the kiln and bisque fire to Cone 04 (or your clay’s specific bisque temperature).
Layering Flux
For better drips on the rim, apply the amber glaze slightly heavier than normal. The thicker application encourages movement during the firing.
Step 3: Glazing and Final Firing
-
Apply Wax Resist:
Paint a band of wax resist around the bottom third of the bowl’s exterior and the entire foot ring. This ensures the raw speckled clay remains visible on the base. -
Dip the Interior:
Pour your glossy white or cream glaze inside the bowl, swirl it to coat the entire interior surface, and pour out the excess quickly. -
Dip the Exterior:
Holding the bowl by the foot, dip the exterior into the cream glaze just until the glaze meets the wax line. Shake gently to remove drips. -
Add the rim effect:
Take a brush loaded with a honey or amber-colored fluxing glaze. Paint a thick, uneven band along the very top edge of the rim, allowing it to naturally overlap the white glaze. -
Clean the Foot:
Use a damp sponge to wipe any stray glaze droplets off the waxed bottom area and the foot ring to prevent it sticking to the kiln shelf. -
Glaze Fire:
Load the glazed bowl into the kiln and fire to the maturity temperature of your clay and glaze (typically Cone 5 or 6 for stoneware). The rim glaze should melt and interact with the cream base to create the rusty dribbles.
Running Drips
If the rim glaze runs too far down, it might stick to the shelf. Leave an extra half-inch of unglazed space near the foot as a safety margin.
Once cooled, your bowl will be ready to hold soup, salad, or simply look beautiful on your shelf


Polka Dots With Wax Resist
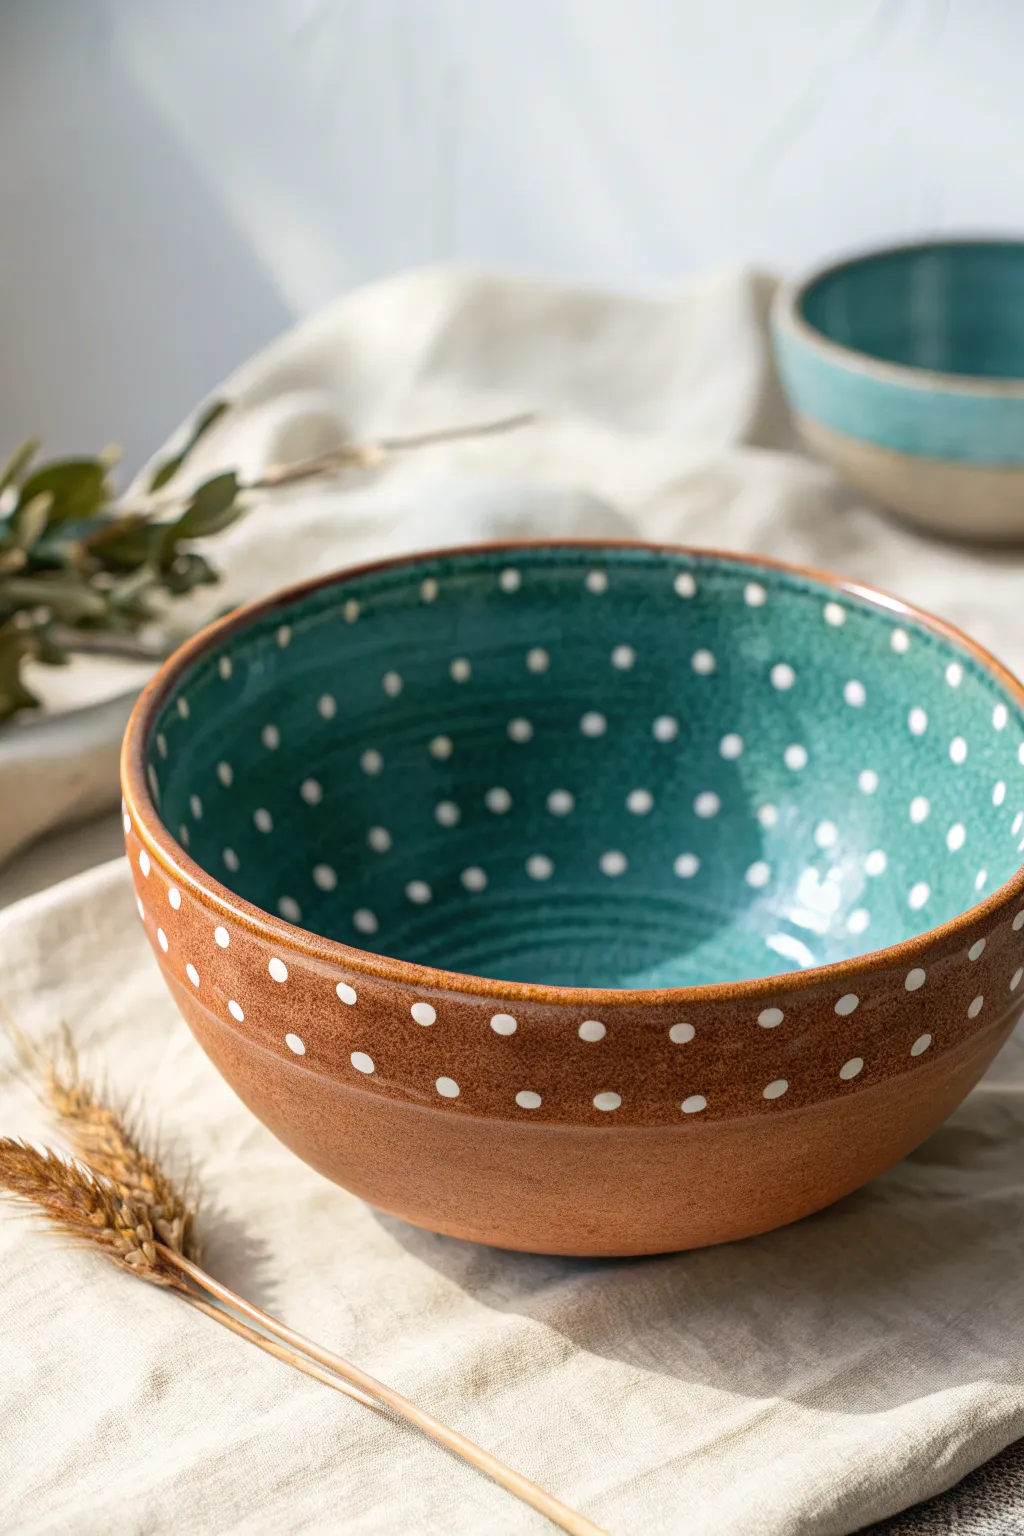
This charming bowl combines the warmth of earthy clay with a vibrant splash of teal, tied together by playful polka dots. Using wax resist creates crisp, organic circles that reveal the clay body beneath the glaze.
Detailed Instructions
Materials
- Bisque-fired ceramic bowl (red or brown stoneware clay)
- Liquid wax resist (or heavy crayon for a rougher look)
- Fine-tip applicator bottle or small round brush
- Teal or turquoise glaze (cone 5/6 recommended)
- Clear transparent glaze (optional, for exterior)
- Clean sponge
- Bucket of water
- Damp cloth
Step 1: Preparation & Waxing
-
Clean surface:
Begin with a clean bisque-fired bowl. Wipe it down swiftly with a damp sponge to remove any kiln dust or oils from your hands, ensuring the glaze will adhere properly. -
Plan your pattern:
Visualize where you want your dots. For this specific look, you will place dots covering the entire interior surface and a band around the upper rim of the exterior. -
Apply interior wax dots:
Pour a small amount of liquid wax resist into a fine-tip applicator bottle. Carefully squeeze small, evenly spaced dots onto the inside of the bowl. Start from the center bottom and spiral outwards towards the rim. -
Vary spacing:
Don’t worry about perfect geometric precision; a hand-applied look adds character. Aim for roughly 1 inch of spacing between dots for a balanced pattern. -
Apply exterior wax dots:
Flip the bowl over or hold it steadily. Apply the same wax dots to the top 2 inches of the exterior wall, creating a decorative band that mirrors the inside. -
Dry the wax:
Let the wax resist dry completely. This usually takes about 15-20 minutes depending on the brand. The wax will often turn darker or more transparent when fully dry.
Clean Resist Lines
If the glaze beads up stubbornly on the wax, wait until the glaze is powdery dry, then use a dry stiff brush to flick the specks off the wax dots.
Step 2: Glazing
-
Prepare the glaze:
Stir your teal glaze thoroughly. It should be the consistency of heavy cream to ensure opaque coverage without running excessively. -
Pour the interior:
Pour a generous amount of teal glaze into the bowl. Quickly rotate and tilt the bowl to coat the entire interior surface, allowing the glaze to roll over the wax dots. -
Drain excess:
Pour the remaining glaze back into your bucket. Give the bowl a firm shake while upside down to encourage excess glaze to drip off the wax dots immediately. -
Dip the rim:
Hold the bowl by the foot (the bottom base). Carefully dip the top rim of the bowl into the teal glaze, submerging it just enough to cover the exterior band of wax dots you created earlier. -
Clean the wax spots:
Once the glaze loses its wet sheen (but isn’t bone dry), take a damp sponge or a soft cloth. Gently wipe the surface of the wax dots. The glaze should wipe off the wax easily, revealing the clean clay body underneath. -
Check the exterior base:
Ensure the bottom portion of the exterior—the unglazed terracotta section—is clean. Wipe away any accidental drips with a sponge. -
Clear glaze option:
The image shows a raw clay texture on the bottom, but if you prefer a sealed surface, you can brush a thin layer of clear matte glaze over the unglazed exterior clay, avoiding the teal section.
Layered Detail
Try painting white underglaze dots first, letting them dry, and then applying wax over them. This creates bright white dots instead of raw clay color.
Step 3: Firing
-
Final drying:
Allow the bowl to dry completely overnight. The moisture from the glazing process needs to evaporate fully before firing. -
Load the kiln:
Place the bowl on a kiln shelf. Since the rim is glazed, do not stilt it upside down; fire it sitting on its unglazed foot ring. -
Glaze fire:
Fire the kiln to the maturity temperature of your clay and glaze (typically Cone 5 or 6 for stoneware). Follow a medium speed firing schedule to prevent thermal shock.
Enjoy using your new handcrafted bowl for warm soups or as a stunning centerpiece.

The Complete Guide to Pottery Troubleshooting
Uncover the most common ceramic mistakes—from cracking clay to failed glazes—and learn how to fix them fast.
Simple Sgraffito Lines
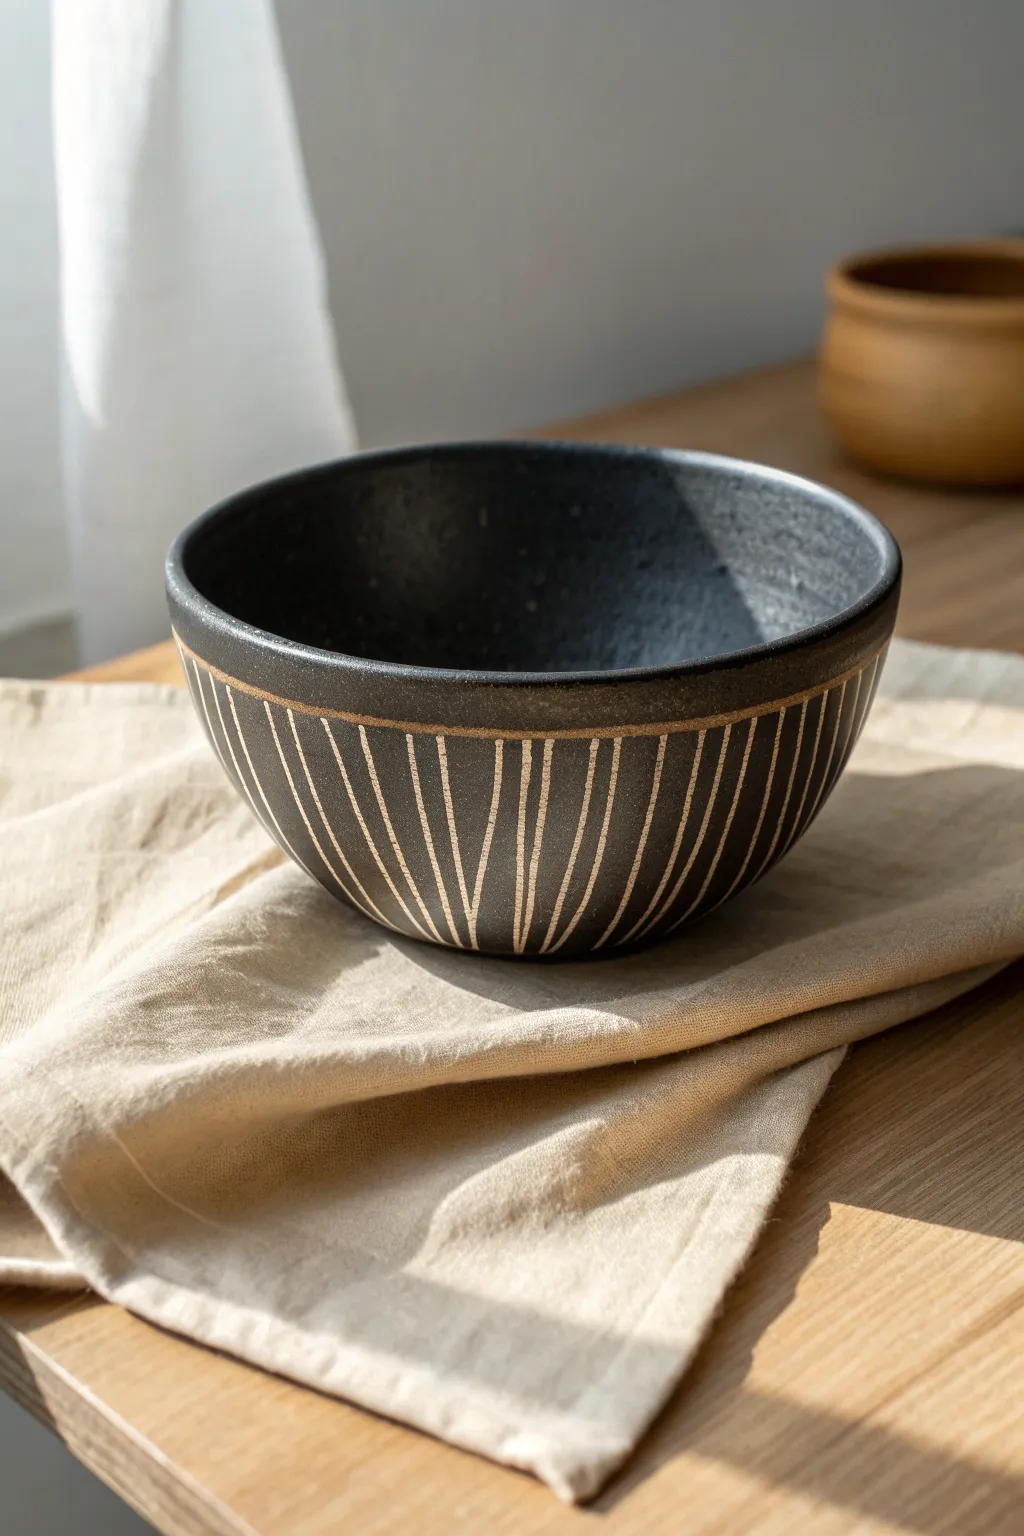
Embrace the elegance of simplicity with this sgraffito project, where crisp, rhythmic lines cut through distinct black underglaze to reveal the warm clay body beneath. The resulting contrast creates a piece that feels both rustic and decidedly modern.
Step-by-Step Guide
Materials
- Leather-hard stoneware bowl
- Black underglaze (velvet finish recommended)
- Wide hake brush or soft fan brush
- Loop tool or sgraffito carving tool (fine point)
- Damp sponge
- Transparent matte or satin glaze
Step 1: Preparation and Application
-
Check clay consistency:
Ensure your thrown or hand-built bowl is at the perfect leather-hard stage. It should be firm enough to handle without warping but soft enough to carve into smoothly. -
Clean the surface:
Gently wipe the exterior of the bowl with a barely damp sponge to remove any dust or grog bumps that might interfere with a smooth underglaze application. -
Apply the first coat:
Using a soft fan brush or hake brush, apply an even coat of black underglaze to the exterior. Long, sweeping strokes work best to minimize brush marks. -
Dry and repeat:
Let the first coat dry until it loses its sheen. Apply a second coat, moving your brush perpendicular to the first layer to ensure opaque, solid coverage. I like to apply a third thin coat just to be safe. -
Wait for the perfect texture:
Allow the underglaze to dry to a ‘waxy’ touch. If it’s too wet, the lines will be messy; if too dry, the clay will chip.
Chipped Lines?
If your lines are chipping or jagged rather than smooth, the clay is likely too dry. Mist the surface slightly and cover with plastic for an hour to rehydrate.
Step 2: Carving the Design
-
Carve the rim band:
Place your bowl on a banding wheel if you have one. Hold your small loop tool steady about an inch below the rim and slowly rotate the wheel to carve a continuous horizontal line around the circumference. -
Start the vertical lines:
Begin carving vertical lines from the bottom of the bowl upward, stopping exactly at the horizontal band you just created. -
Vary the line grouping:
Instead of perfect spacing, carve your lines in loose V-shapes or slightly fanned groups. The goal is an organic, hand-drawn look rather than geometric perfection. -
Control the depth:
Press firm enough to cut through the black layer and slightly into the clay body, but avoid gouging deep trenches. -
Clean as you go:
Small crumbs of clay called ‘burrs’ will accumulate. Don’t brush them away with your hand, as you might smear the black. Blow them off gently or use a very soft, dry brush. -
Complete the circumference:
Continue working your way around the bowl, maintaining a consistent rhythm with your carving strokes until the pattern meets the beginning.
Color Pop
Swap the clear glaze for a translucent celadon. The carved lines will pool with color while the black underglaze remains dark, adding depth and a subtle tint.
Step 3: Finishing Touches
-
Bisque fire:
Once the bowl is bone dry, load it into the kiln for a bisque firing to set the shape and the underglaze design. -
Wipe down:
After firing, wipe the bisque-ware with a damp sponge to remove any firing dust or remaining clay burrs. -
Glaze application:
Dip the bowl into a clear matte or satin glaze. A glossy glaze works too, but a lower sheen tends to complement the rustic texture of the exposed clay lines better. -
Final fire:
Fire the bowl again to the maturation temperature of your specific clay and glaze combination.
Your finished bowl will have a stunning, tactile quality that begs to be held and used
Botanical Clay Imprints
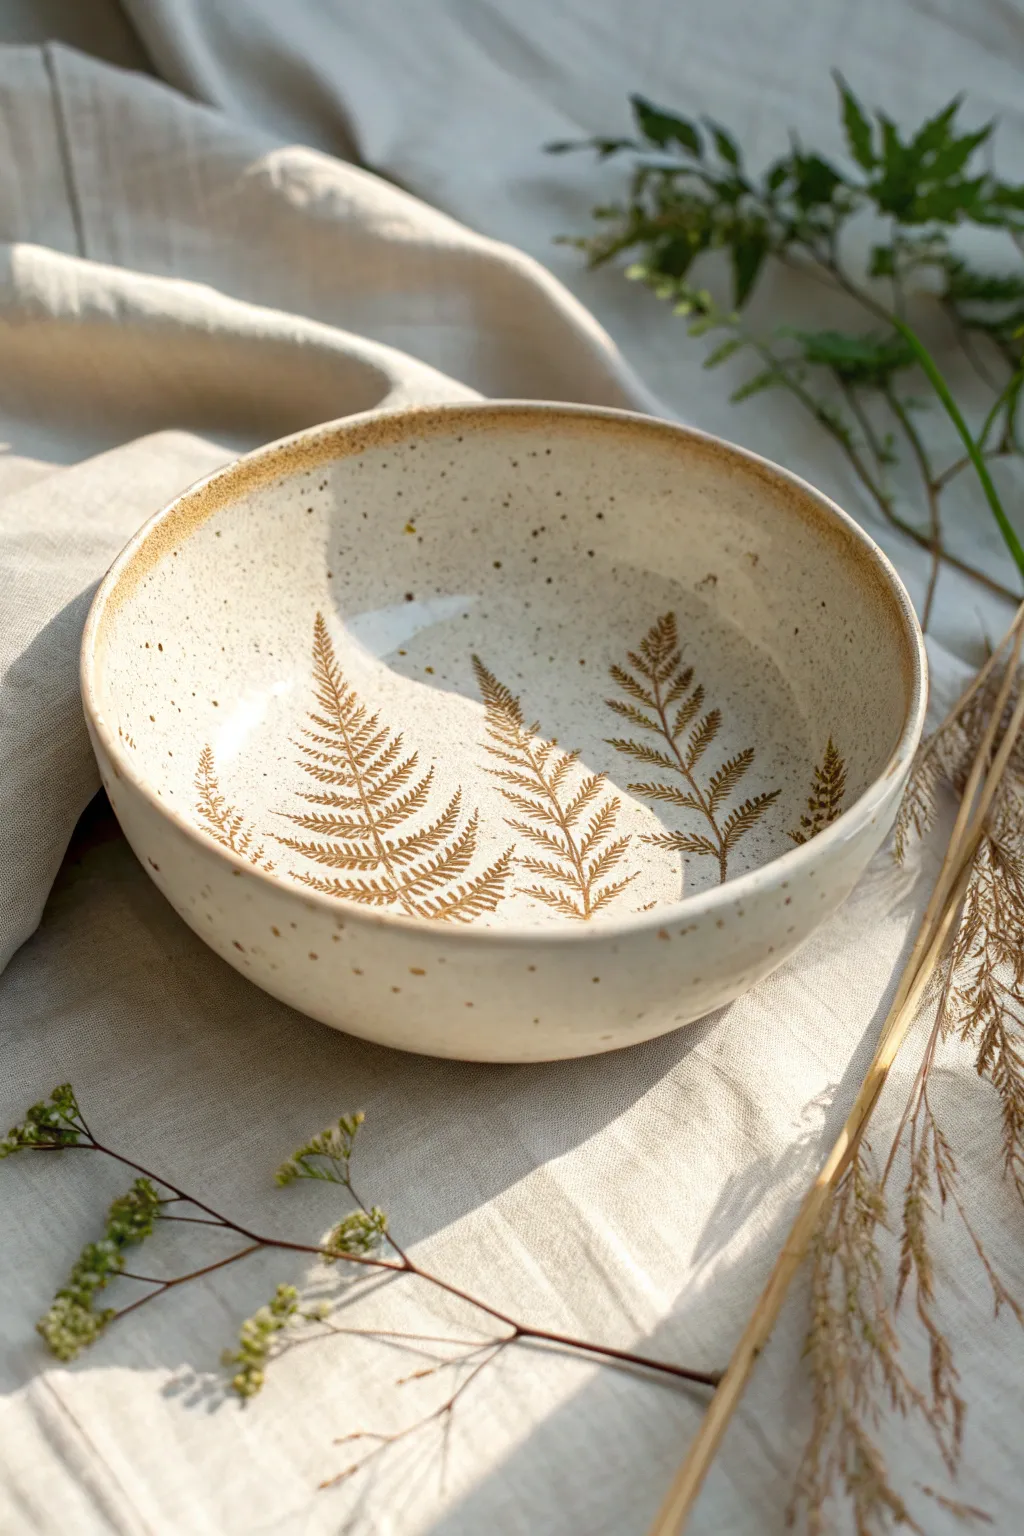
Capture the fleeting beauty of nature with this rustic ceramic bowl project, featuring delicate fern fronds impressed directly into the clay surface. The result is a stunning, speckled vessel with a warm, organic feel that brings a touch of the outdoors to your table.
Detailed Instructions
Materials
- Stoneware clay (speckled or buff)
- Fresh fern fronds (flat and sturdy)
- Rolling pin
- Canvas mat or cloth for rolling
- Bowl mold or large existing bowl
- Fettling knife or needle tool
- Rib tool (wooden or silicone)
- Sponge
- Iron oxide wash (Red Iron Oxide mixed with water)
- Clear or transparent matte glaze
- Paintbrush (soft bristle)
- Kiln access
Step 1: Preparation & Rolling
-
Wedge the clay:
Begin by wedging your speckled stoneware clay thoroughly to remove any air bubbles and ensure the moisture is evenly distributed. -
Roll the slab:
On a canvas-covered surface, roll out the clay into a smooth, even slab about 1/4 inch thick. Turn the slab occasionally to prevent it from sticking to the fabric. -
Smooth the surface:
Use a flexible rib tool to compress the clay surface gently. This removes canvas texture and creates a pristine canvas for your botanical prints.
Leaves Sticking?
If leaves tear when peeling, they may be too dry. Use fresh, supple greens. If needed, a tiny mist of water on the leaf before rolling helps release it cleanly.
Step 2: Botanical Impressions
-
Arrange the ferns:
Select fresh, pliable fern fronds. Lay them out on your slab in a pleasing composition, keeping in mind that this flat circle will curve into a bowl shape later. -
Press the leaves:
Gently embrace the textures by rolling your rolling pin directly over the ferns. Apply firm, steady pressure to embed the leaves flush with the clay surface without thinning the slab too much. -
Reveal the texture:
Carefully peel back the fern leaves one by one. You should see a deep, detailed impression of the veins and leaflets left behind in the clay.
Level Up: Color Gradient
Instead of just oxide, daub small amounts of green undercover into the fern impressions before glazing for a subtle, mossy tint within the brown lines.
Step 3: Shaping the Bowl
-
Cut the rough shape:
Using a needle tool, cut a large circle around your botanical design. It doesn’t need to be perfect yet, just large enough to fit your mold. -
Transfer to mold:
Lift the slab carefully and drape it inside your chosen bowl mold (a bisque mold or a plaster slump mold works best). I find gently gravity-dropping it into the center helps align the pattern. -
Compress and shape:
Use a soft sponge or your fingers to gently press the clay against the mold walls, ensuring the curve is smooth. Be careful not to smudge your fern impressions. -
Trim the rim:
Once the clay is settled, use your needle tool or fettling knife to trim the excess clay from the rim for a clean, even edge. -
Refine the edge:
Smooth the cut rim with a damp sponge or a chamois cloth to round it off slightly, preventing any sharp edges after firing.
Step 4: Finishing & Glazing
-
Bisque fire:
Allow the bowl to dry slowly and completely to the bone-dry stage. Fire it in the kiln to a bisque temperature (usually cone 04). -
Apply oxide wash:
Mix red iron oxide with water to create a thin wash. Brush this freely over the impressed fern areas. -
Wipe back:
Take a damp sponge and wipe the oxide off the surface of the bowl. The color will remain trapped in the deep crevices of the fern print, highlighting the texture. -
Glaze application:
Dip the bowl into a clear or transparent matte glaze. Alternatively, pour the glaze inside and swirl it to coat the interior evenly. -
Rim detailing:
The image shows a toasted rim; the iron oxide will naturally interact with many glazes to create this, or you can sponge a tiny bit of extra oxide on the very edge for that browned look. -
Final firing:
Fire the bowl again to the maturity temperature of your clay and glaze (often cone 5 or 6 for stoneware).
Once cooled, your bowl is ready to hold fresh fruit or simply be admired for its preserved natural details


What Really Happens Inside the Kiln
Learn how time and temperature work together inside the kiln to transform clay into durable ceramic.
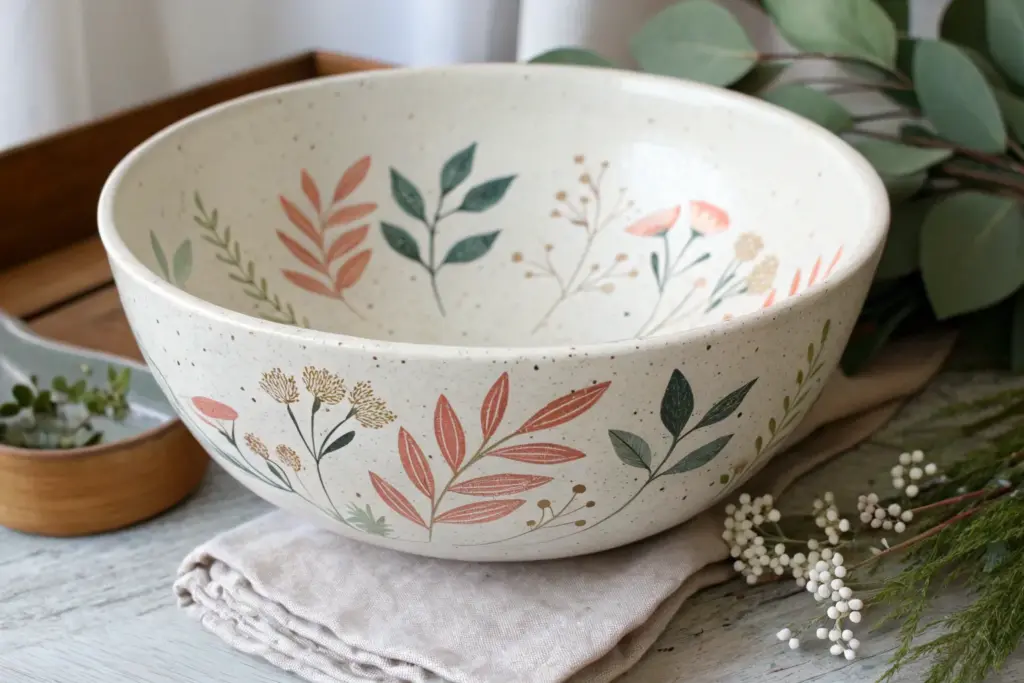
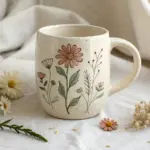
Delicate Wildflower Painting
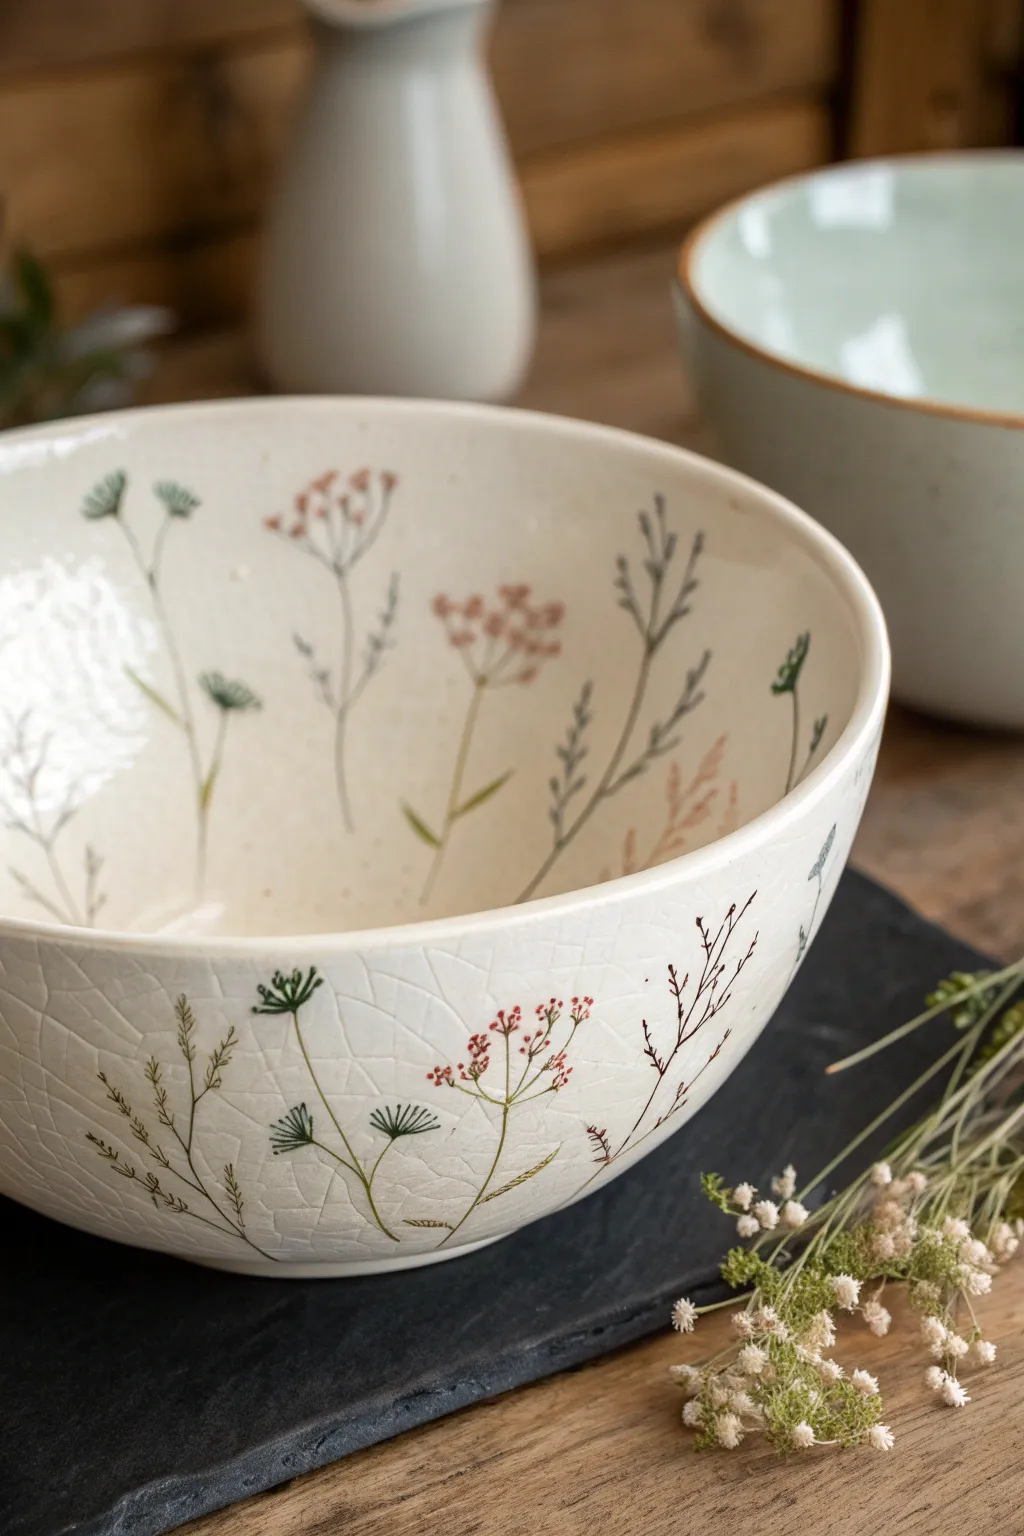
Capture the ethereal beauty of a summer field with this delicate ceramic painting project. Using fine lines and muted earth tones, you’ll transform a plain bowl into a piece of functional art that celebrates wild flora.
How-To Guide
Materials
- Plain white or cream ceramic bowl (glazed or unglazed bisque)
- Ceramic high-fire paints or porcelain specialty paints (pebeo porcelaine 150)
- Fine liner brushes (sizes 000, 00, and 0)
- Rubbing alcohol and cotton pads
- Paper palette or small tile for mixing
- Pencil (optional for light sketching)
- Oven (domestic or kiln, depending on paint choice)
Step 1: Preparation & Planning
-
Select your canvas:
Choose a ceramic bowl with a rustic or imperfect finish if possible. The example shows a bowl with a subtle crackle glaze, which adds immense character, but a standard matte white bowl works beautifully too. -
Clean the surface:
Wipe the entire bowl, inside and out, with rubbing alcohol on a cotton pad to remove any oils or fingerprints. This is crucial for ensuring the paint adheres properly. -
Study the composition:
Notice how the flowers in the image aren’t crowded. Visualize stems rising from the bottom, reaching upwards towards the rim with plenty of negative space between them.
Step 2: Painting the Stems
-
Mix your greens:
On your palette, mix an olive green and a grey-green. Avoid bright, artificial greens; muted tones look more organic. -
Start with the main stems:
Using your thinnest liner brush (size 000), paint faint, wavy lines starting from the base of the bowl. Vary the heights—some should stop midway up the bowl, others should nearly touch the rim. -
Add gentle curves:
Avoid perfectly straight lines. Let the stems curve slightly as if swaying in a breeze to create movement. -
Branch out:
Add tiny off-shoot branches to your main stems. Keep these strokes incredibly light and delicate.
Mastering the Crackle
Can’t find a crackle-glaze bowl? Carefully paint faint, grey geometric ‘cracks’ across the surface before adding florals for that vintage texture.
Step 3: Adding Foliage & Flora
-
Paint feathery leaves:
For the fern-like plants, use short, rhythmic strokes pulling away from the stem. Paint these in pairs or alternating patterns up the stalk. -
Create seed heads (dill/fennel style):
Switch to a darker green or brownish-black. Paint an umbrella shape of tiny lines radiating from the top of a stem, then add tiny dots at the end of each radiating line. -
Add rust-colored blooms:
Mix a muted terracotta or rust color. Find a bare stem and dab tiny clusters of dots at the top to simulate dried wildflowers or yarrow. -
Introduce lavender sprigs:
With a grey-purple or muted blue paint, create small, vertical dashes near the top of a stem to mimic lavender or wheat shapes. -
Layer the interior:
Don’t forget the inside of the bowl. Repeat these motifs on the inner walls, ensuring the stems ‘grow’ upwards from the center bottom towards the rim. -
Vary the opacity:
I like to water down the paint slightly for some stems to make them look further away, creating a sense of depth.
Paint Beading Up?
If paint beads on the glazed surface, the bowl is too slick. Wipe it again with alcohol, or lightly sand the area with very fine grit sandpaper.
Step 4: Refining & Curing
-
Detail work:
Go back with your darkest green or brown. Add tiny connecting nodes where leaves meet stems, or deepen the base of the plants for visual weight. -
Clean up mistakes:
If you smudge a line, quickly wipe it away with a damp Q-tip or a brush dipped in alcohol before it sets. -
Initial drying:
Let the bowl sit undisturbed for at least 24 hours. This allows the paint to cure on the surface before baking. -
Bake to set:
Place the bowl in a cold domestic oven. Set the temperature to 300°F (150°C) or follow your specific paint manufacturer’s instructions. -
Baking process:
Bake for 35 minutes. Turn the oven off and—crucially—leave the bowl inside until the oven is completely cool to prevent the ceramic from cracking.
Now you have a stunning, nature-inspired vessel ready to hold fruit or simply be admired on a shelf
Single Motif in the Center
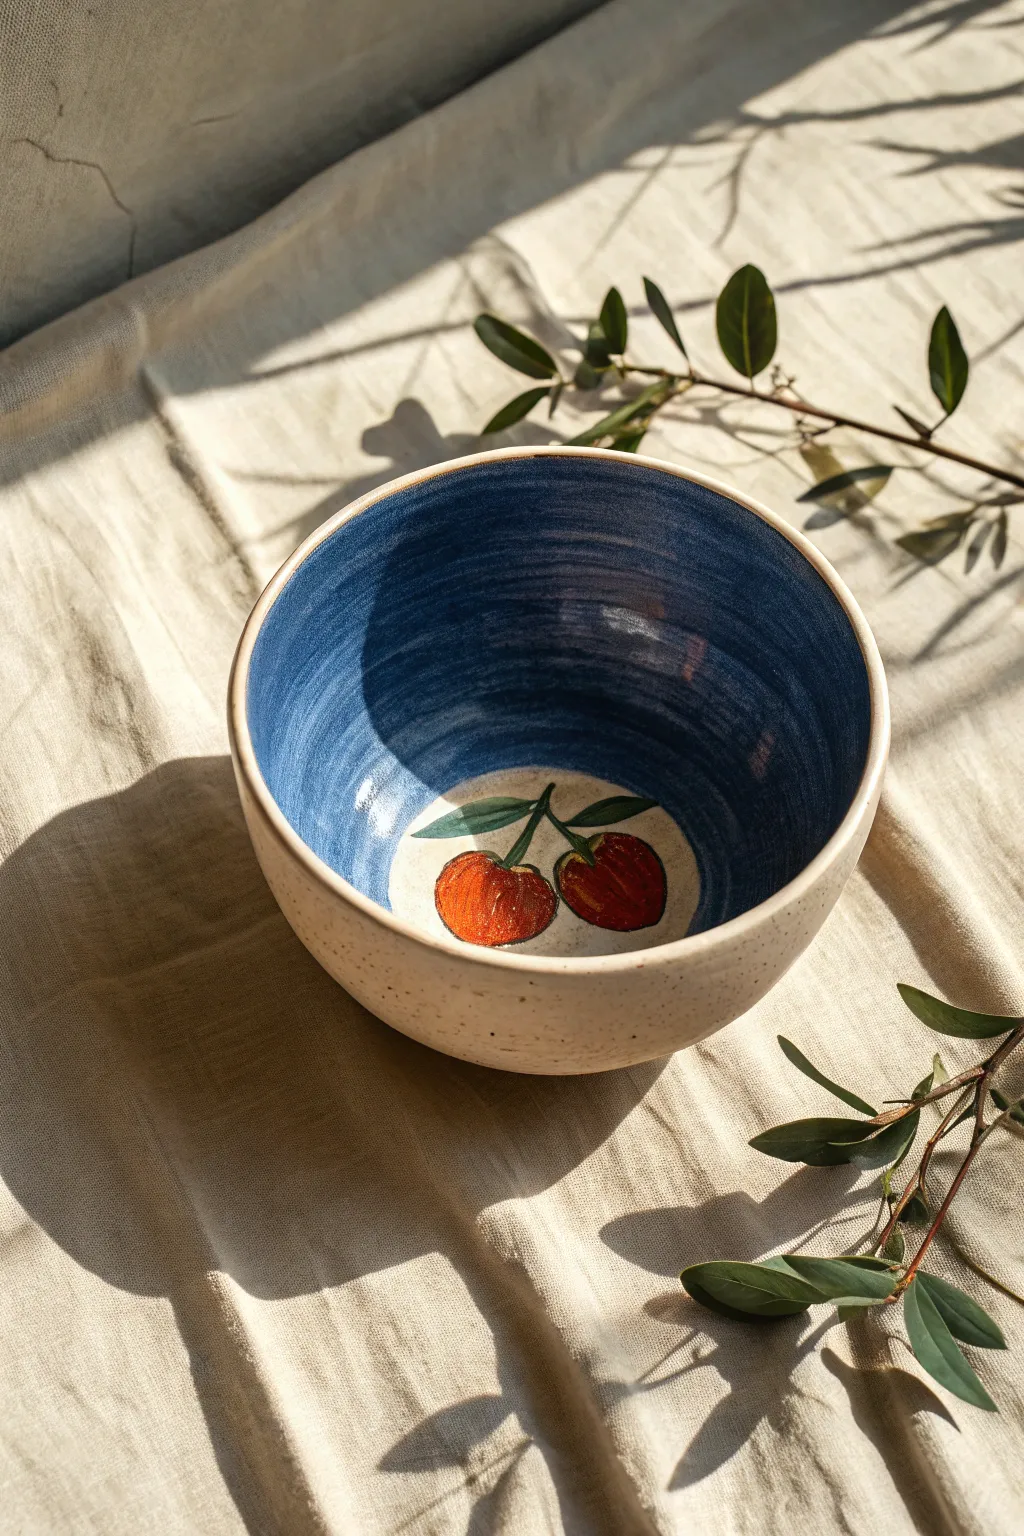
This tutorial guides you through creating a charming ceramic piece that hides a sweet surprise at the bottom. The contrast between the moody, deep blue sides and the bright pop of red cherries creates a stunning visual depth perfect for your morning cereal or favorite soup.
Detailed Instructions
Materials
- Bisque-fired ceramic bowl (low profile, wide rim recommended)
- Underglaze (Deep Navy Blue)
- Underglaze (Bright Red or Vermillion)
- Underglaze (Forest Green)
- Underglaze (Dark Brown or Black for stems)
- Clear transparent dipping or brushing glaze
- Wide hake brush or fan brush
- Small round detail brush (size 1 or 2)
- Medium flat shader brush
- Pencil
- Wax resist (optional but helpful)
- Damp sponge
Step 1: Preparation and Planning
-
Clean the bisque:
Begin by wiping down your bisque-fired bowl with a damp sponge. This is crucial as it removes any kiln dust or oils from your hands that might repel the glaze. -
Map the center:
Look straight down into the bowl to find the absolute center. Using a pencil, lightly sketch a circle roughly 3 inches in diameter at the bottom. This will be your ‘window’ for the cherry motif. -
Sketch the cherries:
Inside your circle, lightly draw two overlapping heart-shaped cherries. Add two stems meeting at the top and two leaves branching out. Don’t worry about pencil marks; they burn off in the kiln.
Too Many Brushstrokes?
If the blue looks too streaky, your underglaze is likely too dry. Add a few drops of water or gum solution to improve flow and settle the texture.
Step 2: Painting the Fruit Interior
-
Base coat for cherries:
Dip your medium flat shader brush into the bright red underglaze. Apply a smooth base coat to both cherry shapes, staying within your penciled lines. -
Adding dimension:
While the red is still slightly damp, dip just the tip of your brush into a tiny bit of darker red or brown. Sweep it along the bottom curve of the cherries to create a shadow effect. -
Painting the leaves:
Switch to your small round brush and the forest green underglaze. Paint the leaves carefully, using the tip of the brush to create crisp points at the ends. -
Stem work:
With the very tip of your detail brush and the dark brown underglaze, connect the cherries to the leaves with thin, confident lines. A shaky hand actually adds organic character here. -
Protecting the motif:
Once the cherry illustration is completely dry to the touch, carefully apply a layer of wax resist over the painted fruit and the surrounding cream-colored circle you want to preserve. This makes the next step much easier.
Pro Tip: Highlight Pop
Add a tiny dot of white underglaze on the upper left curve of each cherry before glazing. This ‘reflection’ makes the fruit look juicy and spherical.
Step 3: Creating the Blue expanse
-
Prepare the blue underglaze:
Pour your deep navy blue underglaze onto a palette. Determine viscosity; if it’s too thick, the brush textures won’t show nicely. It should be like heavy cream. -
Loading the wide brush:
Fully saturate your wide hake or fan brush with the blue underglaze. You want enough load to make a long stroke without stopping. -
Apply the first layer:
Start at the rim and stroke downwards toward the center wax circle. Lift the brush as you approach the cherry motif to create that feathery, washed edge visible in the photo. -
Work around the bowl:
Rotate the bowl in your hand or on a banding wheel. Continue applying downward strokes, overlapping them slightly to ensure full coverage but maintaining the visible brush texture. -
Refine the edge:
If you didn’t use wax resist, you’ll need to be very careful near the center circle. I like to slow down here and use the edge of the brush to create an intentional, slightly uneven border around the art. -
Build color depth:
Apply a second and third coat of blue. Allow the underglaze to dry until matte between coats. Vary your starting points slightly to avoid ridges. -
Clean up the exterior:
Check the outside of the bowl. If any blue dripped over the rim, wipe it away with a damp sponge to keep the exterior raw and speckled.
Step 4: Final Glazing
-
Clear glaze application:
Once all underglaze is bone dry, dip the entire bowl into your clear transparent glaze. Use tongs or dip half-and-half if you don’t have enough depth. -
Clean the foot:
Wipe the bottom foot ring of the bowl completely clean with a sponge so it doesn’t stick to the kiln shelf. -
Final smooth:
Check for any drips or thick spots in the clear glaze and gently smooth them with your finger. The glaze will look powdery now but transparent later. -
Fire:
Fire the piece according to your clay and glaze specifications (likely Cone 5 or 6 for stoneware).
Unload the kiln and enjoy the delightful contrast of your hidden fruit garden every time you finish a meal

TRACK YOUR CERAMIC JOURNEY
Capture glaze tests, firing details, and creative progress—all in one simple printable. Make your projects easier to repeat and improve.
Fruit Slice Color Blocking
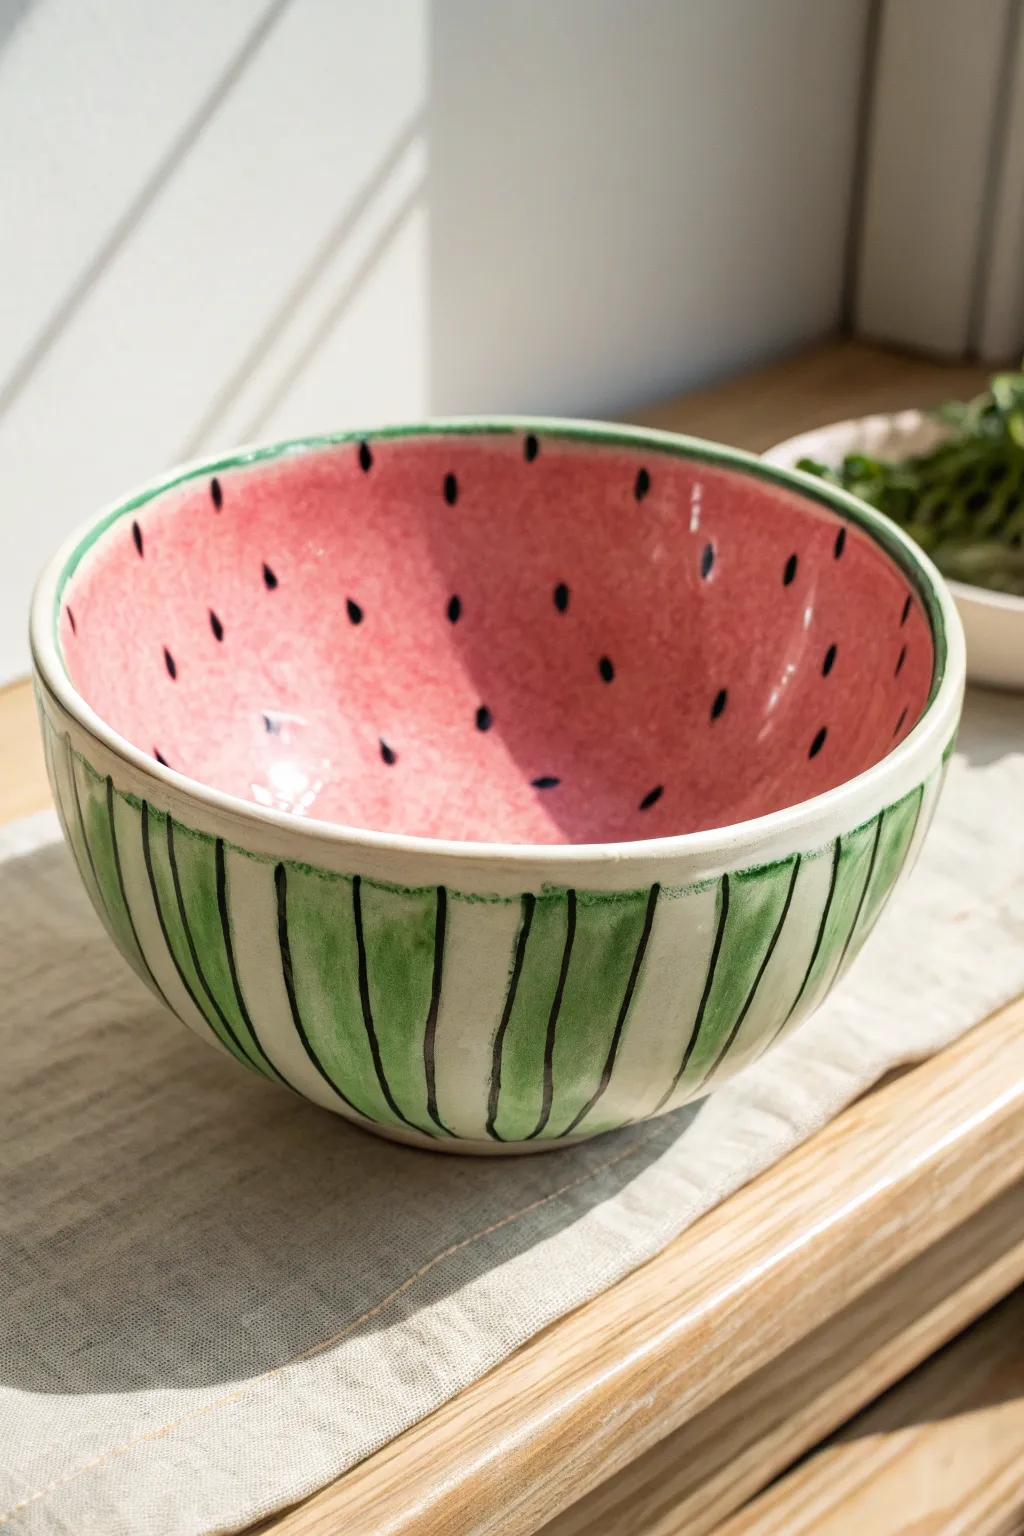
Transform a plain bisque bowl into a refreshing summer statement piece with this juicy watermelon design. The combination of a vibrant speckled pink interior and an organic, striped green exterior creates a playful trompe-l’oeil effect perfect for fruit salads or ice cream.
How-To Guide
Materials
- Bisque-fired ceramic bowl (medium size)
- Underglaze (bright watermelon pink)
- Underglaze (leaf green)
- Underglaze (jet black)
- Clear transparent dipping glaze
- Soft fan brush
- Medium round brush (size 4 or 6)
- Fine liner brush (size 0 or 1)
- Sponge
- Water container
- Lazy susan or banding wheel (optional)
Step 1: Preparation and Base Coats
-
Clean the bisque:
Wipe down your bisque bowl with a damp sponge to remove any dust or debris. This ensures the underglaze adheres properly and prevents pinholing later. -
Mix the pink:
Shake your watermelon pink underglaze thoroughly. If it feels too thick, thin it slightly with a drop of water until it has the consistency of heavy cream. -
Apply interior base:
Using the soft fan brush, apply the first coat of pink to the entire inside of the bowl. Bring the color right up to the rim, but leave the very top edge clean. -
Dry and repeat:
Let the first coat dry until it loses its sheen. Apply a second and third coat to ensure a solid, opaque color. I find three thin coats are better than two thick ones to avoid cracking. -
Clean the rim:
Use a damp sponge or a clean brush to wipe away any pink that accidentally got onto the rim or the exterior. The rim should remain the natural white of the clay to represent the rind.
Step 2: Painting the Exterior Rind
-
Plan the stripes:
Visualize the vertical stripes on the outside. They don’t need to be perfectly straight; organic, slightly wavy lines look more natural for a watermelon. -
Paint green stripes:
Load your medium round brush with leaf green underglaze. Paint vertical stripes from the bottom of the bowl up to the rim. Leave gaps of white space between the green stripes. -
Adjust stripe width:
Vary the pressure on your brush to make some parts of the stripe slightly wider or narrower. The green shouldn’t be a solid block; let the brush texture show a little. -
Layer the green:
Once the green stripes are touch-dry, go back and add a second coat to deepen the color, but feel free to leave some areas slightly translucent for a watercolor effect. -
Add definition lines:
Switch to your fine liner brush and black underglaze. Carefully paint thin, slightly shaky vertical lines along the edges of the green stripes. These act as the dark veins of the watermelon rind. -
Highlight the stripes:
Add a few broken black lines right through the center of some green stripes to add depth and texture.
Seed placement secret
Don’t paint seeds at the very bottom center of the bowl. Start about one-third of the way up the wall so they are visible even when the bowl has a small amount of food in it.
Step 3: Detailing and Glazing
-
Paint the seeds:
Back on the inside of the bowl, use the fine liner brush and black underglaze to paint teardrop-shaped seeds. Scatter them randomly, avoiding a rigid pattern. -
Orient the seeds:
Make sure the pointed end of the teardrop usually creates the ‘top’ of the seed. Angle them slightly differently as you move around the curve of the bowl. -
Rim detail:
For a finished look, paint a very unifying, thin green line along the very outer edge of the rim, separating the pink interior from the striped exterior. -
Final drying:
Allow all the underglaze work to dry completely. The surface should be chalky and dry to the touch before moving to glazing. -
Clear glaze application:
Dip the entire bowl into clear transparent glaze. Use dipping tongs or dip half-and-half, ensuring you overlap slightly if doing it in two stages. -
Clean the foot:
Wipe the bottom foot ring of the bowl completely clean with a sponge so it doesn’t stick to the kiln shelf. -
Fire:
Fire the bowl in the kiln according to your clay and glaze specifications (usually Cone 5 or 6 for stoneware).
Uneven is better
For the green stripes, intentionally wobble your hand slightly. Perfectly straight lines look manufactured; shaky lines mimic the organic growth pattern of real fruit rinds.
Enjoy serving your favorite snacks in this delightful, summery creation that looks good enough to eat
Geometric Color Blocks
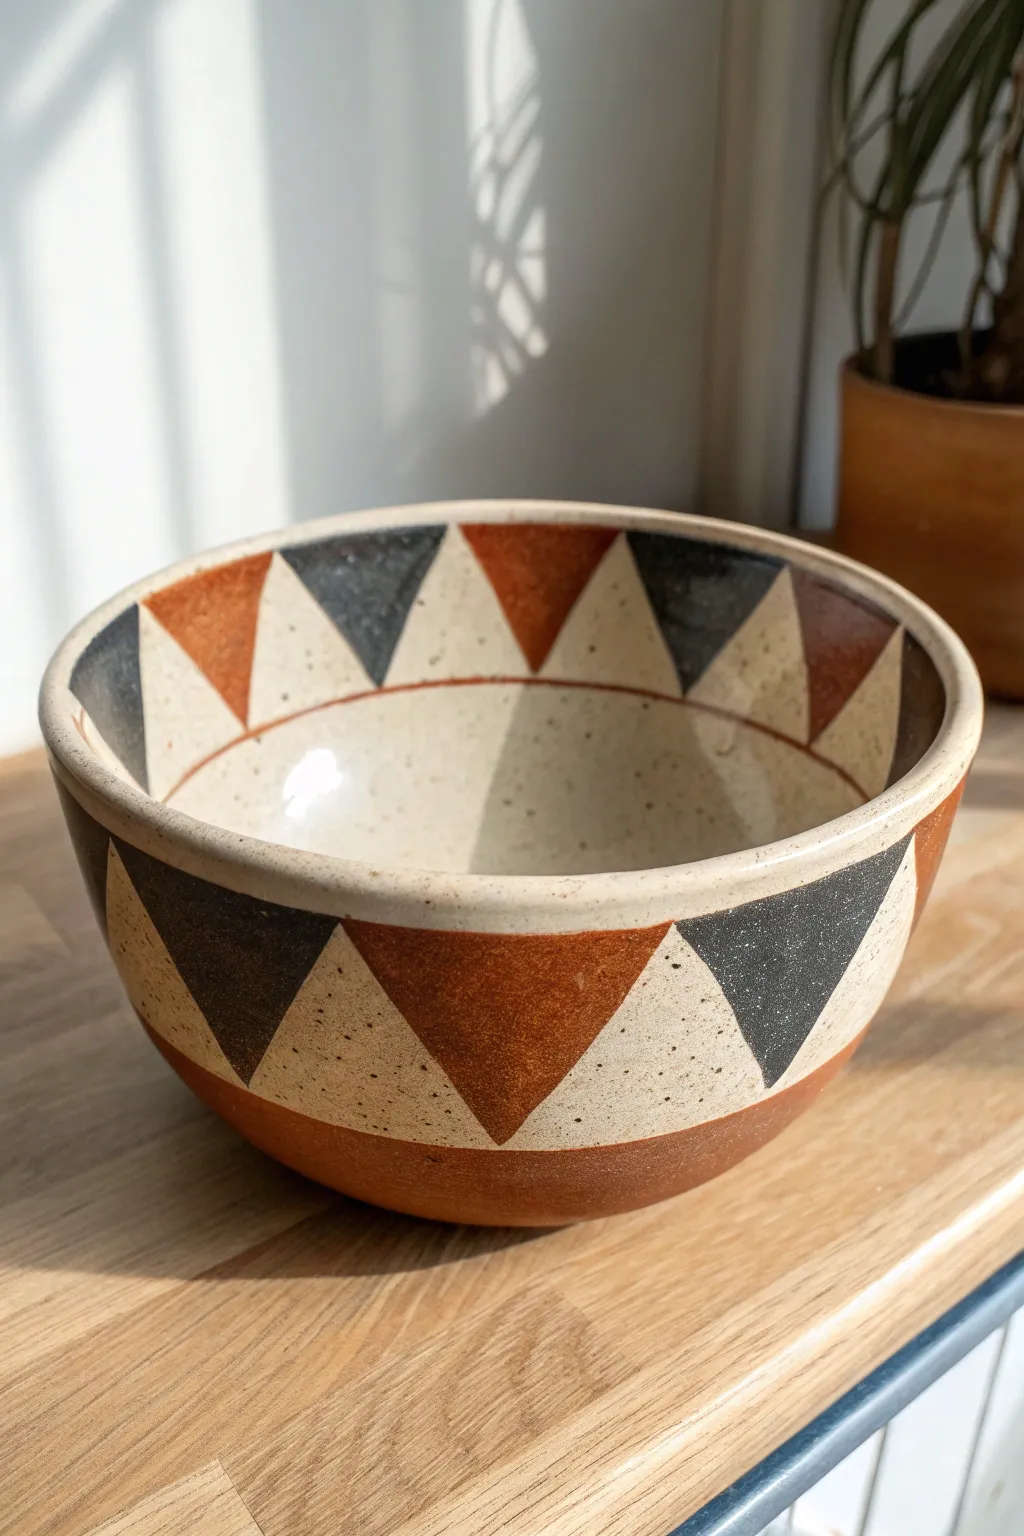
This project features a stunning interplay of earthy tones and sharp geometry, creating a piece that feels both modern and distinctly handcrafted. The repeating triangle motif wraps around the rim inside and out, offering a satisfying rhythm against the speckled cream clay body.
Detailed Instructions
Materials
- Bisque-fired ceramic bowl (wheel-thrown or hand-built)
- Speckled cream or white underglaze (or use a speckled clay body and clear glaze)
- Rust/Terracotta underglaze
- Charcoal/Slate black underglaze
- Pencil for sketching
- Flexible ruler or measuring tape
- Flat shader brush (small to medium)
- Fine liner brush
- Wax resist (optional but recommended)
- Clear transparent glaze
Step 1: Planning the Geometry
-
Measure the Circumference:
Start by measuring the circumference of your bowl’s rim using a flexible measuring tape. You need to divide this number by an even integer to determine the width of your triangles. -
Calculate Triangle Width:
Aim for triangles that are roughly 1.5 to 2 inches wide at the base. Divide your total circumference by your chosen width to see if it fits evenly; adjust the width slightly until you have a perfect set of segments. -
Mark the Rim:
Using a pencil, make small tick marks along the top edge of the rim to indicate where the points of the triangles will land. Remember to alternate: one point up, one point down. -
Establish the Bottom Line:
Decide how deep you want the pattern to go. Use a banding wheel to spin the bowl while holding your pencil steady to draw a horizontal guide line around the exterior, about 2 inches down from the rim. -
Connect the Dots:
Draw the diagonal lines connecting your rim tick marks to the bottom guide line, creating a zigzag pattern. Repeat this process on the interior rim, ensuring the interior and exterior patterns align.
Step 2: Applying the Underglaze
-
Outline the Shapes:
Dip a fine liner brush into the charcoal underglaze. Carefully outline the triangles that will be painted black. I find that outlining first helps prevent the colors from muddying later. -
Fill the Dark Triangles:
Switch to a small flat shader brush. Fill in every *other* triangle with the charcoal/slate underglaze. Apply 2-3 coats for solid opacity, letting each coat dry to the touch before adding the next. -
Outline the Rust Shapes:
Clean your brushes thoroughly. Now, use the rust/terracotta underglaze and your liner brush to outline the remaining empty triangles. -
Fill the Rust Triangles:
Fill these remaining triangles with the rust color, again applying 2-3 even coats. Be careful at the borders where the rust meets the black; a steady hand helps keep the points sharp. -
Paint the Base:
The bottom portion of the bowl features a solid band of rust. Use a larger brush and the banding wheel to apply a thick band of rust underglaze starting from the bottom of your triangle pattern down to the foot. -
Clean Up Edges:
If any underglaze smudged onto the cream clay areas, gently scratch it off with a needle tool or an X-Acto knife once it is bone dry for a crisp line.
Fixing Smudges
Smudged a line? Don’t wipe it while wet, which drives pigment into the clay pores. Let it dry completely, then scrape it gently off the surface with a sharp knife.
Step 3: Finishing and Firing
-
Dry Completely:
Allow the underglaze decoration to dry completely, preferably overnight. The moisture needs to evaporate fully to prevent crawling during glazing. -
Bisque Fire (If Greenware):
If you applied this to greenware, fire the piece to bisque temperature (usually cone 04/06). If you applied to bisque, skip this step. -
Clear Glaze Application:
Dip the entire bowl into a clear transparent glaze. If you used a speckled clay body, this will make those beautiful iron spots pop through the cream sections. -
Wipe the Foot:
Use a damp sponge to meticulously wipe any glaze off the very bottom foot of the bowl so it doesn’t fuse to the kiln shelf. -
Glaze Fire:
Fire the bowl to the maturity temperature of your clay and glaze (typically Cone 5/6 or Cone 10).
Use Tape for Precision
For razor-sharp straight lines without a steady hand, use thin automotive masking tape or dedicated ceramic tape to mask off the triangles before painting.
Now you have a striking geometric vessel ready for your morning cereal or to display on a shelf
Mandala Dot Medallion
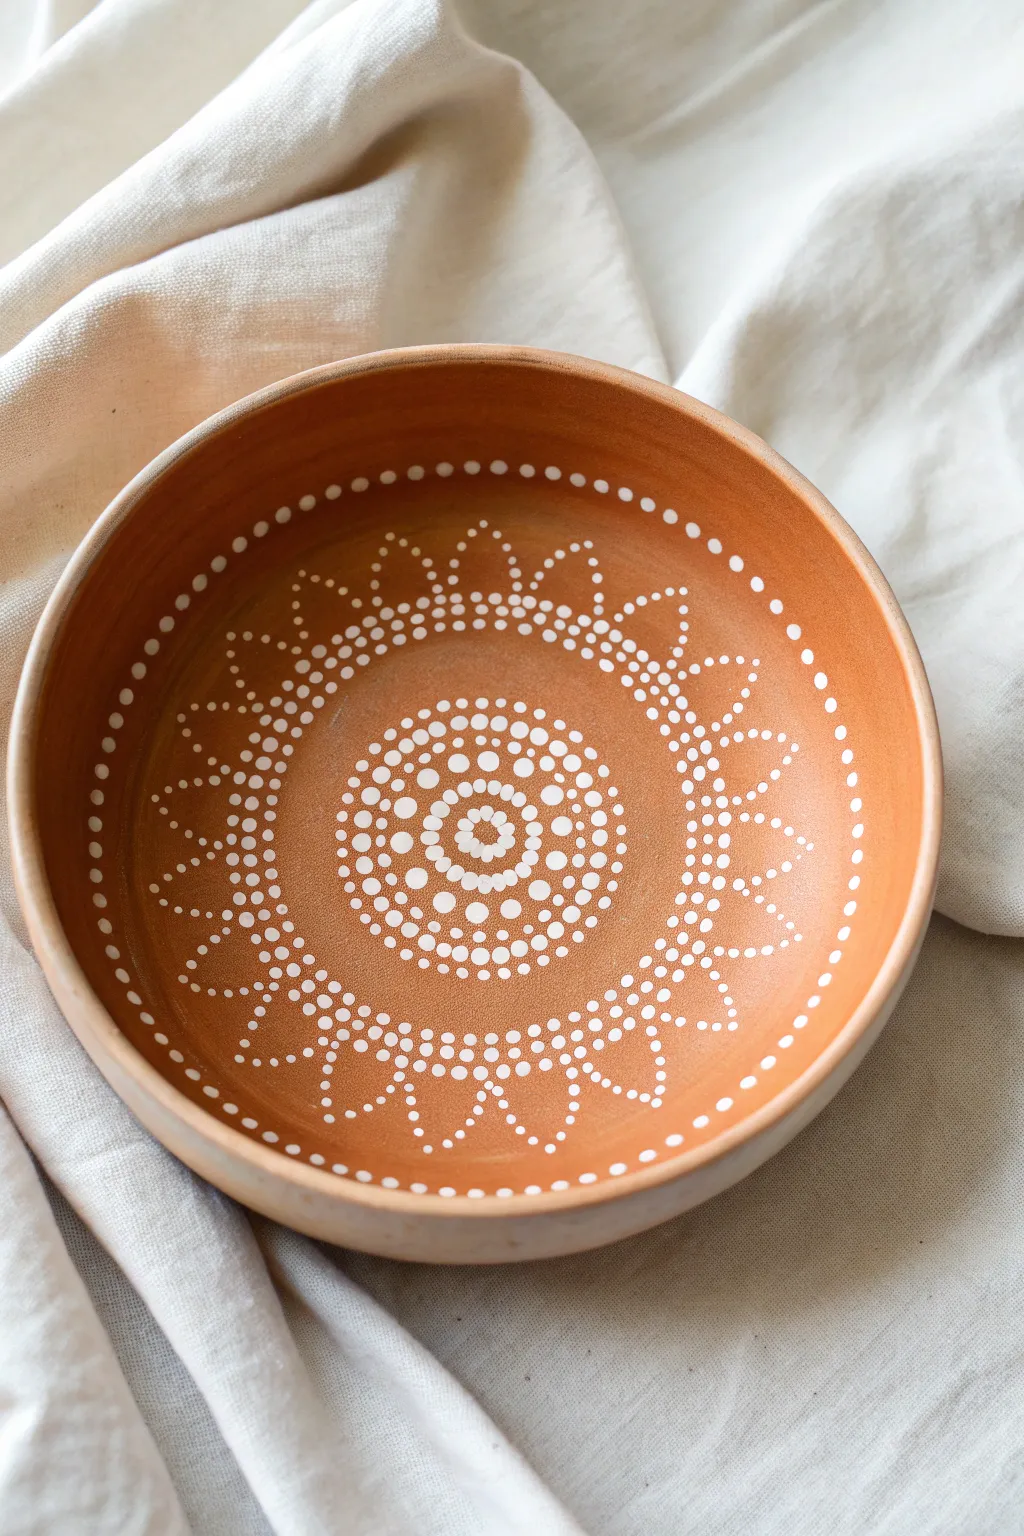
Transform a simple terracotta bowl into a stunning centerpiece using nothing but white acrylic paint and patience. This project features a radiating sunburst-style mandala design that builds outward from the center, creating a delicate lace-like effect against the warm clay background.
Step-by-Step Tutorial
Materials
- Shallow terracotta bowl (unglazed interior preferred)
- White multi-surface acrylic paint or heavy-body acrylic
- Set of dotting tools (various sizes from stylus to 6mm rod)
- Damp cloth or paper towel
- Cotton swabs (for cleanup)
- Matte spray sealant (optional)
- Pencil and ruler (optional for guidelines)
Step 1: Preparation & Center
-
Clean the surface:
Wipe the inside of your terracotta bowl with a damp cloth to remove any dust or ceramic residue. Let it dry completely before starting, as moisture can prevent the paint from adhering properly. -
Start the center:
Locate the absolute center of your bowl. Using a medium-sized dotting tool (about 3mm), place a single dot right in the middle. This will anchor your entire design. -
Create the first ring:
Switch to a slightly smaller tool. Place a tight circle of small dots immediately around your center dot. Try to keep them evenly spaced and touching neither the center dot nor each other. -
Expand the core:
Using a slightly larger tool than the previous step, create a second ring of dots. Position these dots in the “valleys” between the dots of the previous row to start an expanding grid pattern. -
Build the medallion body:
Continue adding concentric rings, gradually increasing the dot size for the next two rows. I like to keep the spacing consistent here to create a solid-looking central medallion. -
Add a definition ring:
To define the edge of the central medallion, use a very small tool to create a ring of tiny dots. This change in scale creates visual separation before we start the petal patterns.
Step 2: Petal Patterns
-
Mark petal points:
Visualize a ring about an inch outside your central medallion. Place a medium-sized dot at regular intervals around this imaginary ring—these will be the tips of your first inner petals. -
Connect the inner petals:
working from one of your “tip” dots back toward the center medallion, walk down a line of gradually smaller dots on both sides until you reach the base. This creates a pointed arch shape. -
Fill the gaps:
Repeat this arch process for all the guide dots you placed. You should now have a flower-like shape surrounding your central core. -
Start the outer sunburst:
Move outward again, this time about halfway up the wall of the bowl. Place larger “tip” dots aligned with the valleys of your first flower layer. -
Form the large arches:
Just like before, create large, sweeping arches connecting these new tip dots down toward the previous layer. Use a “walking the dots” technique: dip once for the top dot, then use the remaining paint on the tool to make naturally shrinking dots down the side. -
Add the crown detail:
At the very peak of each large arch, add a single, tiny dot just above the main tip dot to give it a sharp, refined point.
Oops! Smudged a dot?
Don’t panic! Let the smudge dry completely, then gently scrape it off with a craft knife or toothpick. It pops right off the clay surface cleanly
Step 3: Rim & Finishing
-
Create the rim border:
Near the top rim of the bowl, place a ring of medium-sized dots. Space them widely—about a finger-width apart. -
Connect the rim design:
Between each of the rim dots, place a small arch of tiny dots that curves downward, swooping toward your main sunburst design below. This connects the rim to the rest of the pattern. -
Review and correct:
Look over the bowl for any uneven spacing. If paint is still wet, you can wipe mistakes with a damp cotton swab. If dry, carefully scrape it off with a toothpick. -
Let it cure:
Allow the paint to dry for at least 24 hours. Because the paint is applied thickly in dots, the surface may feel dry while the center is still wet. -
Seal the work:
Once fully cured, apply a light coat of matte spray sealant to protect the design, especially if you plan to use the bowl for holding non-food items like keys or jewelry.
Pro Tip: Consistency
If your paint forms peaks (hershey kisses) instead of domes, mix in a tiny drop of pouring medium or water to smooth it out before dotting
Your beautiful terracotta bowl is now ready to display on a coffee table or shelf
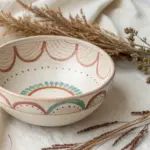
Scallops or Fish-Scale Pattern
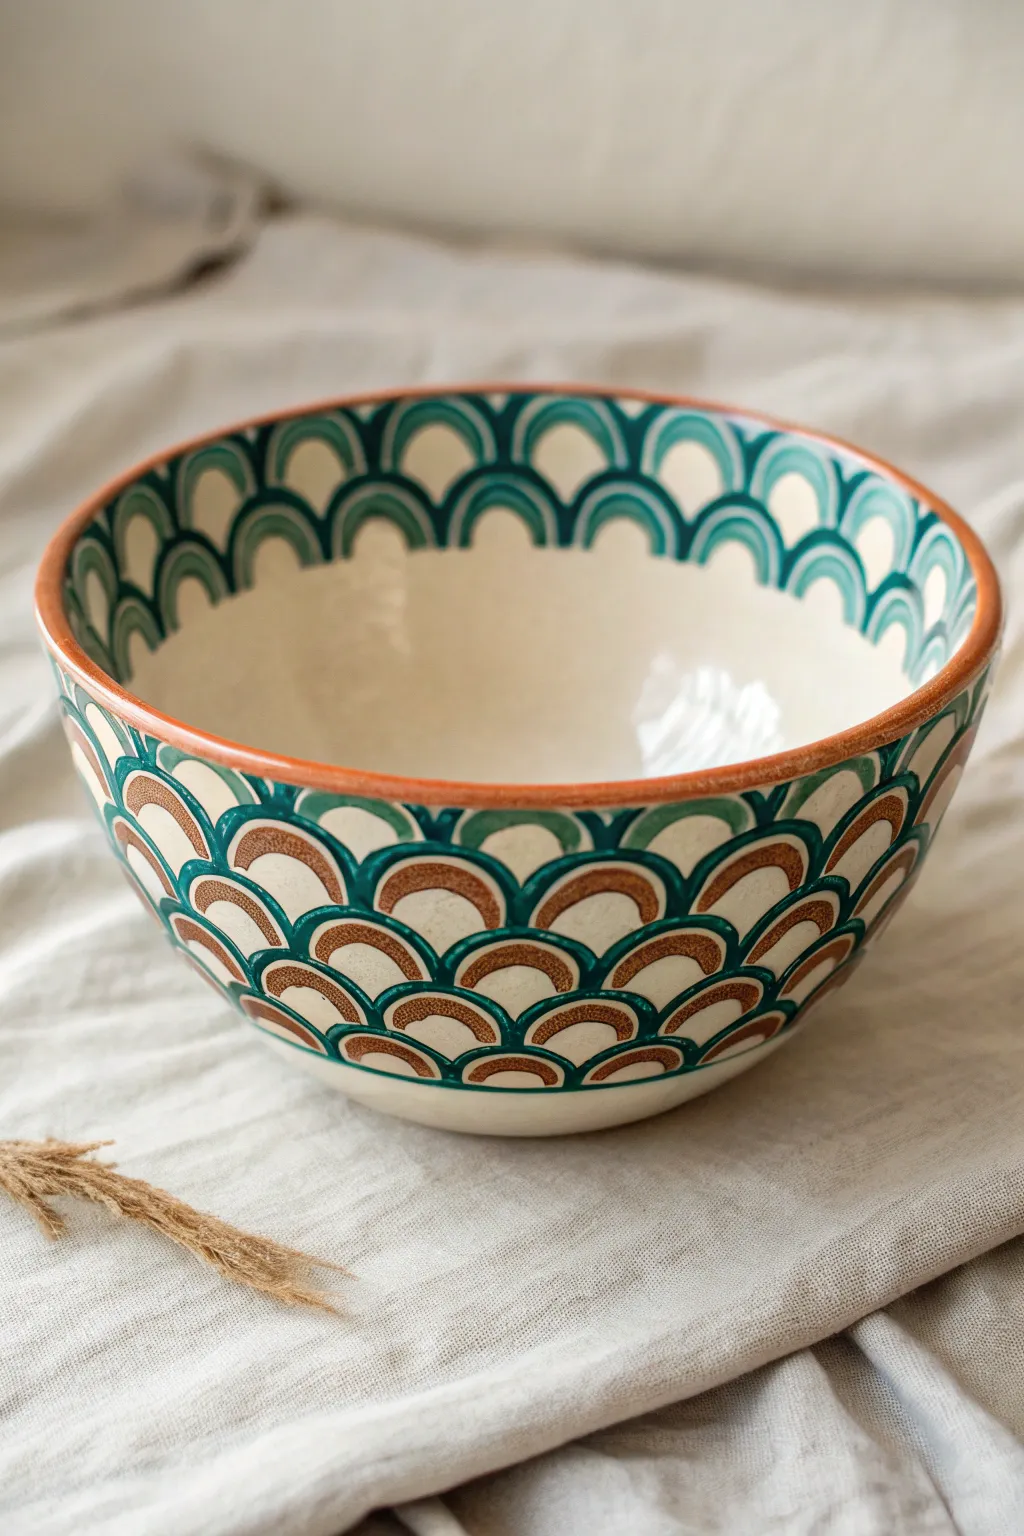
Transform a plain bisque bowl into a coastal treasure with this mesmerizing fish-scale design. Using a combination of underglazes, you can achieve a rhythmic, repeating pattern that feels both ancient and refreshingly modern, perfect for holding fruit or acting as a centerpiece.
Detailed Instructions
Materials
- Bisque bowl (pre-fired ceramic blank)
- Pencil
- Underglaze pencil (optional)
- Teal or deep sea-green underglaze
- Terracotta or rust-brown underglaze
- Fine liner brush (size 0 or 1)
- Round brush (size 4 or 6)
- Clear dipping or brushing glaze
- Damp sponge
- Kiln access (or use air-dry clay and acrylics for a decorative-only version)
Step 1: Preparation & Mapping
-
Clean the bisque:
Begin by wiping down your bisque bowl with a damp sponge. This removes any dust from the shelf that could repel your glaze later. -
Establish the rim:
Using a round brush and your terracotta underglaze, paint a solid band along the very top edge of the rim. This frames the piece and gives you a definitive starting line. -
mark the first row:
Lightly sketch the first row of scallops just under the exterior rim using a pencil. These should be semi-circles that touch each other side-by-side. Don’t worry about pencil marks; they burn off in the kiln. -
Create the grid:
Map out the subsequent rows. The peak of each new scallop in the second row should align with the valley where two scallops meet in the row above. Continue this offset brick-laying pattern all the way to the base. -
Sketch the interior:
Repeat the mapping process on the inside, but limit the pattern to just the upper third of the bowl, leaving the bottom center plain creamy white for a clean look.
Scale Consistency
Cut a small semi-circle template from thin cardboard or cardstock to trace if you struggle with freehand drawing. This ensures every scale is identical.
Step 2: Painting the Exterior
-
Outline the scales:
Load your fine liner brush with the teal underglaze. Carefully trace over your pencil lines on the exterior, creating uniform, arched outlines for every scale. -
Thicken the intersections:
I like to go back and slightly thicken the V-shape where the scales meet. This adds a bit of dimension and makes the pattern pop. -
Mix the wash:
Dilute your terracotta underglaze slightly with water on a palette to create a semi-transparent wash. You want the color to have depth but not be solid like the rim. -
Fill the centers:
Using the round brush, paint a curved swoop of the terracotta wash inside each exterior scale. Leave a small negative space between the brown fill and the teal outline to keep the design crisp. -
Add a second coat:
Once the first layer of brown is dry to the touch, add a second, smaller swoop near the bottom of the scale to create a gradient effect.
Step 3: Interior & Finishing
-
Outline the interior:
Switch back to the fine liner and teal underglaze. Trace the interior scallop pattern you sketched earlier. -
Add inner details:
Instead of filling these with brown, paint a second, smaller teal arch inside each scale. This ‘double rainbow’ look keeps the inside feeling lighter and airier. -
Check for smudges:
Inspect the creamy white negative spaces. If you’ve accidentally smudged any pigment, gently scrape it away with a craft knife or clean it with a stiff, damp brush. -
Dry completely:
Allow the underglaze to dry fully, usually overnight. The colors will look chalky and pale at this stage. -
Apply clear glaze:
Dip the entire bowl into a clear glaze (or brush on 3 even coats). This will seal the porous bisque and make the colors vibrant. -
Fire:
Load the piece into the kiln and fire according to your clay and glaze specifications (typically Cone 06 or Cone 6).
Gradient Magic
For a deeper look, sponge a tiny bit of darker brown or black underglaze at the very bottom of each exterior scale before applying the clear glaze.
Once fired, the glossy finish will make your sea-inspired pattern shine with depth and character
Raised Slip-Trailed Details
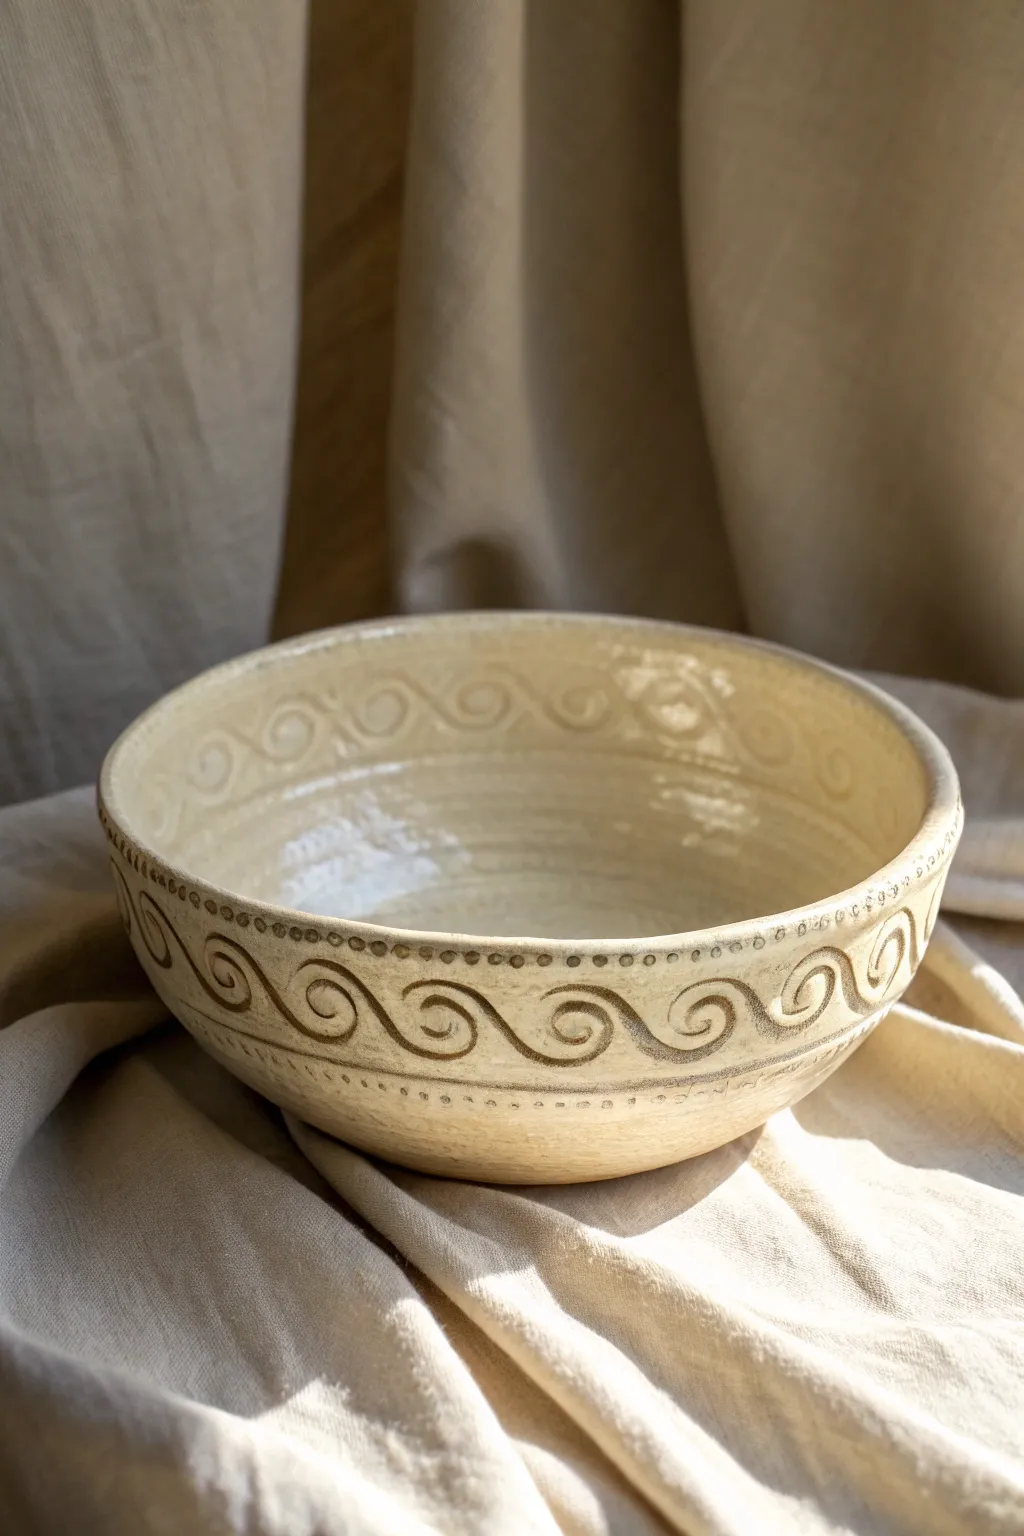
This elegant project transforms a simple wheel-thrown or hand-built bowl into a tactile masterpiece using the ancient technique of slip trailing. The creamy glaze pooling around raised scrollwork creates a sophisticated, tone-on-tone effect that feels both rustic and refined.
Step-by-Step Guide
Materials
- Leather-hard clay bowl (clean surface)
- Thick decorating slip (matching clay body)
- Slip trailer bulb or bottle with fine tip
- Damp sponge
- Needle tool
- Soft fan brush
- Transparent or cream-colored glaze (cone appropriate for your clay)
- Banding wheel
Step 1: Preparation and Mapping
-
Assess the surface:
Ensure your bowl is at a perfect leather-hard stage—firm enough to handle without warping, but damp enough that the slip will adhere properly. -
Clean the canvas:
Gently wipe the exterior with a barely damp sponge to smooth out any throwing lines or grog that might interfere with your tiny nozzle. -
Center the piece:
Place your bowl upside down or right-side up on a banding wheel, ensuring it is perfectly centered to make drawing continuous lines easier. -
Mark the boundaries:
While spinning the banding wheel slowly, use a needle tool to very lightly scribe two horizontal lines around the bowl’s belly. These will serve as the top and bottom guides for your wave pattern. -
Space the pattern:
Lightly mark vertical tick marks along your guide lines to help space out the peaks and valleys of your wave pattern evenly.
Step 2: Slip Trailing the Design
-
Test the flow:
Squeeze a small amount of slip onto a scrap piece of clay first. You want a consistency like thick yogurt—if it’s too runny, the lines will flatten; too stiff, and they will break. -
Draft the main wave:
Starting at one tick mark, squeeze the bulb with consistent pressure to draw a continuous scrolling wave line between your two scribed guides. Move the banding wheel with your off-hand to help maintain a steady pace. -
Connect the scrolls:
Ensure that as you complete each ‘S’ or wave shape, it flows seamlessly into the next, maintaining a rhythmic, repetitive motion around the entire circumference. -
Add the upper border:
This is where I hold my breath a little—carefully trail a row of tiny, distinct dots just above the upper scribed line. Try to keep the spacing uniform. -
Add the lower border:
Repeat the dotting process below the bottom wave line. The goal is to frame the scrolling centerpiece perfectly. -
Check the interior:
If you wish to mirror the design inside, repeat the wave pattern along the upper inner rim, though you may want to skip the dots to keep food surfaces smoother. -
Clean up peaks:
If your slip trailing left any sharp ‘Hershey’s Kiss’ peaks on the dots, let them stiffen slightly and then gently tap them down with a finger.
Slip Consistency Trick
Add a few drops of sodium silicate or deflocculant to your slip. This allows it to flow smoothly from the nozzle without needing to add too much water, reducing shrinkage.
Step 3: Finishing and Glazing
-
Slow drying:
Cover the bowl loosely with plastic. The added slip has a higher moisture content than the bowl, so slow drying is crucial to prevent the decoration from cracking off. -
Bisque fire:
Once bone dry, fire the piece to bisque temperature (usually Cone 06 or 04 depending on your clay). -
Prepare the glaze:
Mix a transparent or semi-opaque cream glaze. A glaze that breaks over textures is ideal, as it will highlight the raised slip lines while pooling in the recesses. -
Apply the glaze:
Dip or brush the glaze onto the bowl. Ensure the coating isn’t too thick, or you risk obscuring the delicate relief work you just created. -
Refine the surface:
Once the glaze is dry on the pot, check for pinholes around the raised slip areas and gently smooth them over with a fingertip. -
Final Fire:
Glaze fire the piece to maturity. The heat will melt the glaze, causing it to hug the raised slip decoration and reveal that beautiful textural contrast.
Go for Contrast
Use a darker clay body for the bowl and a white porcelain slip for the decoration. Under a clear glaze, the white waves will pop dramatically against the dark background.
This technique yields a sophisticated vessel that invites touch and adds classic charm to any table setting
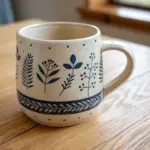
Mishima Inlay Linework
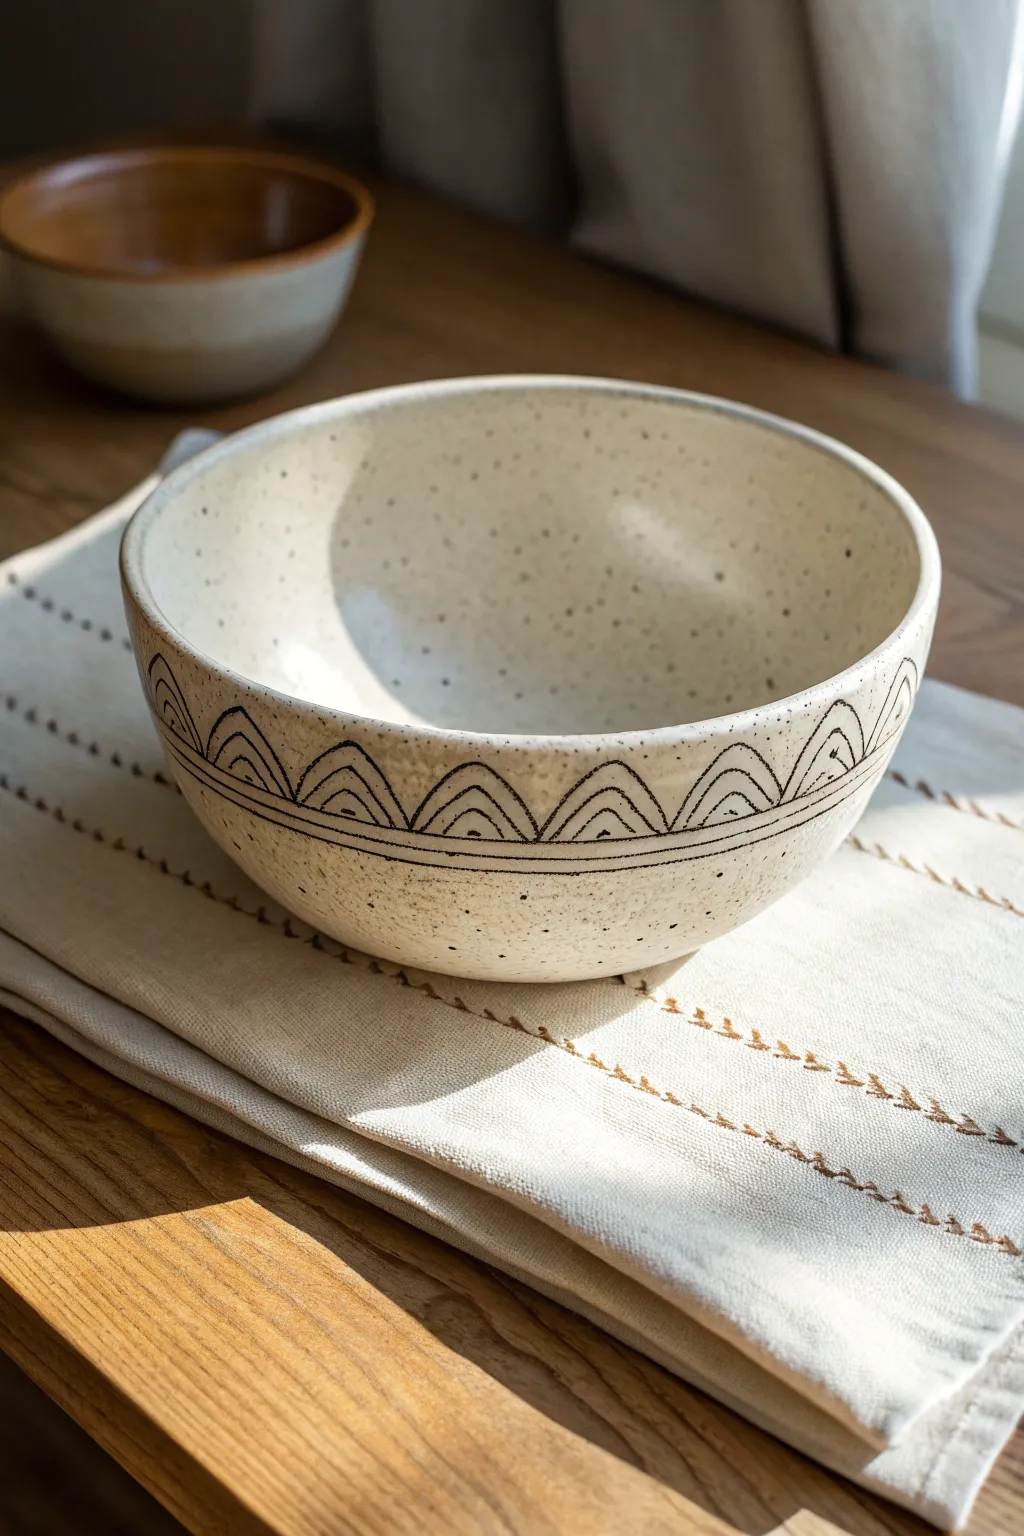
This project explores the traditional Korean technique of Mishima to create a beautifully understated bowl featuring crisp, dark linework against a creamy, speckled clay body. The graphic scalloped pattern ringing the exterior adds a modern folk-art touch to a classic rounded form.
Detailed Instructions
Materials
- Stoneware clay (preferably a speckled buff body)
- Pottery wheel (or slab roller/molds for handbuilding)
- Throwing tools (sponge, wire, ribs)
- Leather-hard stage bowl
- Wax resist (emulsion)
- Sharp needle tool or X-Acto knife
- Small carving loop tool (optional)
- Black underglaze or black slip
- Stiff paintbrush
- Metal rib or clean scouring pad
- Clear matte or transparent glaze
- Kiln
Step 1: Forming the Base
-
Throw the bowl:
Begin by wedging your speckled clay to remove air bubbles. Center the clay on your wheel and open it up, pulling the walls into a gentle, hemispherical curve. Aim for a medium wall thickness to allow for carving later. -
Refine the shape:
Use a smooth kidney rib to compress the inside curve and the exterior wall. A smooth surface is crucial for clean inlay lines later, so take your time here. -
Dry to leather hard:
Cut the bowl from the bat and allow it to dry slowly until it reaches a leather-hard state. It should be firm enough to handle without deforming, but soft enough to carve into easily. -
Trim the foot:
Center the bowl upside down on the wheel and trim a clean foot ring. Ensure the exterior surface where you plan to decorate is smooth and free of grog drag marks.
Step 2: Carving the Design
-
Apply wax resist:
Coat the exterior area where the pattern will go with a layer of wax resist. This step is the secret to crisp lines; it protects the negative space from staining when you wipe back the slip later. -
Mark guide lines:
Once the wax is dry to the touch, place the bowl on a banding wheel. Using a needle tool, lightly etch two parallel horizontal rings around the bowl—one near the rim and one about an inch lower—to define the border of your design. -
Sketch the arches:
Using the needle tool again, carve a row of half-circles (scallops) sitting on the bottom line. I find it easiest to mark the center point of each arch first to keep the spacing consistent. -
Create the inner and outer details:
Carve a second, smaller arch inside each large one to create a rainbow effect. Then, carve a third, larger arch over the top of the initial set, connecting the peaks. -
Deepen the lines:
Go over your traced lines firmly. You need to cut through the wax and slightly into the clay body. The cut should be deep enough to hold underglaze but not so deep it compromises the wall structure. -
Clean the burrs:
Carving through wax often leaves little clay crumbs or burrs. Gently brush these away with a soft, dry brush, being careful not to smudge or damage the wax edges.
Smudged Lines?
If your lines look blurry after wiping back, your sponge was likely too wet. Let the piece dry for 20 mins, then try again with a barely damp, firm scouring pad to clean the surface.
Step 3: Inlay and Finishing
-
Apply the contrasting slip:
Generously paint black underglaze or slip over the carved lines. Don’t worry about being neat; the wax will resist most of it, but ensure the carved crevices are completely filled. -
Wait for the slip to stiffen:
Let the black slip dry until it loses its sheen. If you wipe it too soon, you might pull the color out of the grooves. -
Scrape back the excess:
Using a metal rib or a slightly damp scouring pad, scrape or wipe away the excess slip from the surface. The wax layer makes this incredibly satisfying, as the black wipes off the surface easily, leaving crisp dark lines embedded in the clay. -
Bisque fire:
Allow the bowl to dry completely (bone dry) before loading it into the kiln for a bisque firing. -
Apply glaze:
Once bisqued, dip or brush a clear matte or transparent glaze over the entire bowl. This will seal the piece and allow the natural speckles of the clay body to shine through alongside your inlay. -
Final firing:
Fire the bowl to the maturity temperature of your clay and glaze (likely Cone 5 or 6 for stoneware) to finish the piece.
Pro Tip: Wax First
Applying wax BEFORE carving is the real game-changer here. It prevents the black slip from staining the pours of the surrounding clay, ensuring high-contrast, razor-sharp results.
Now you have a stunning, food-safe bowl ready for your next meal or display.
Soft Ombre Wash Inside
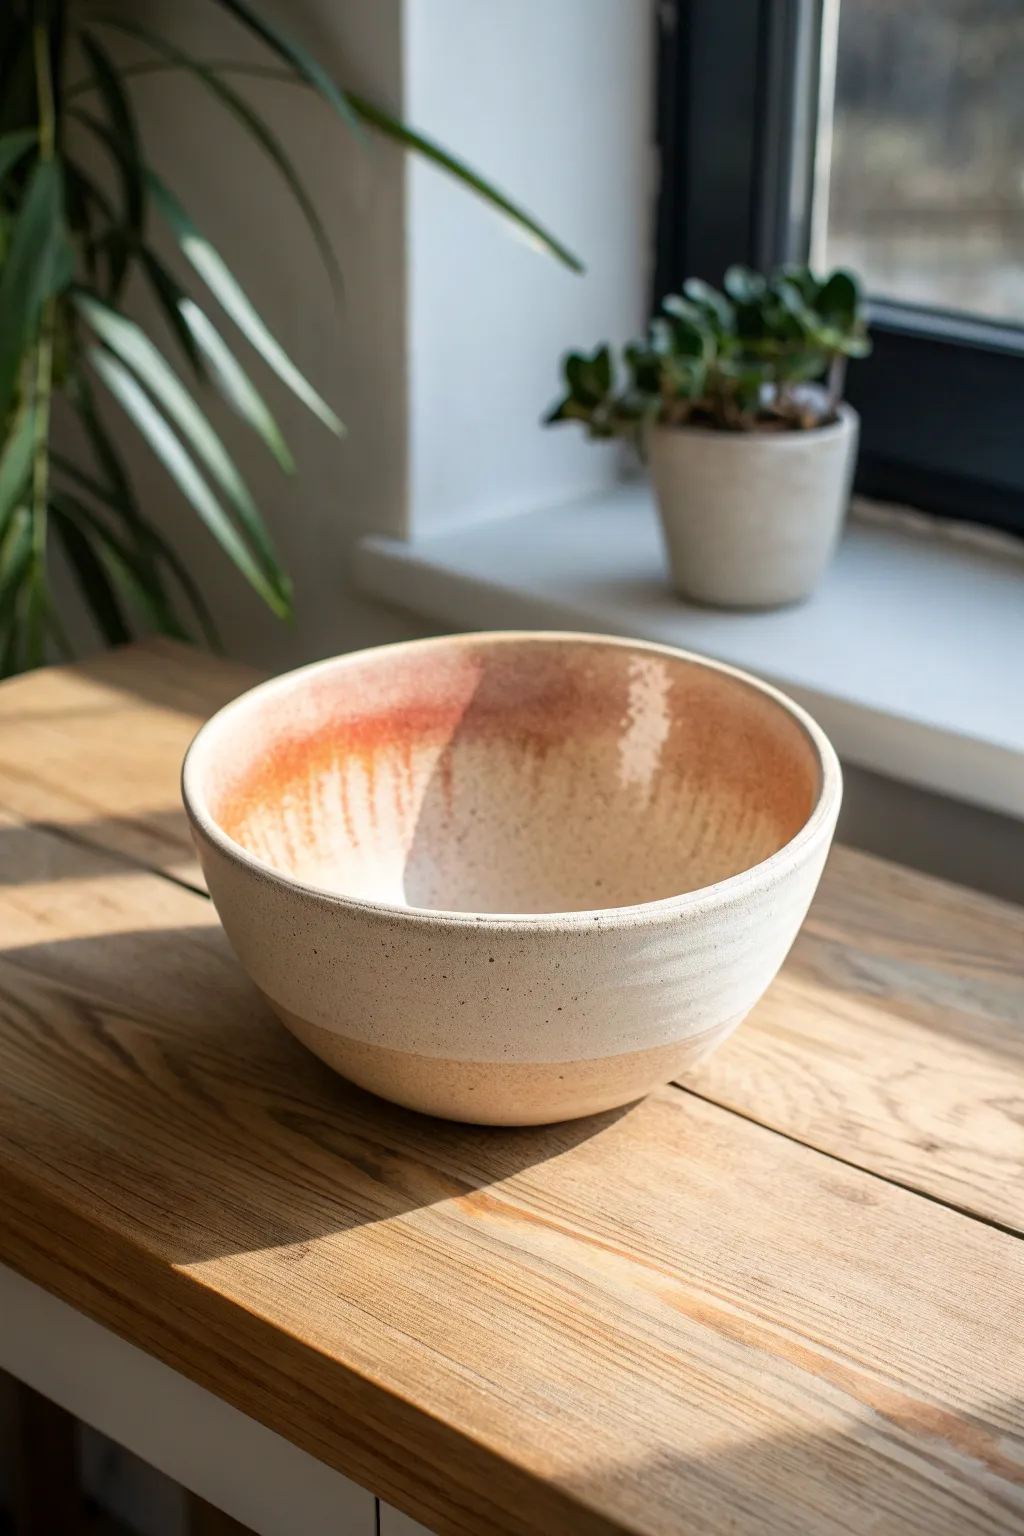
This project transforms a simple ceramic bowl into a piece of functional art with a warm, glowing interior reminiscent of a sunset. The technique uses a subtle wash to create a soft gradient that feels organic and handcrafted, contrasting beautifully with the raw, speckled clay exterior.
Step-by-Step Guide
Materials
- Bisque-fired ceramic bowl
- Liquid wax resist
- Cream or oatmeal speckled glaze (base)
- Terra cotta or iron red glaze
- Fan brush
- Soft round watercolor brush
- Sponge
- Water container
- Clean towel
Step 1: Preparation & Exterior
-
Clean the bisque:
Start by wiping down your bisque-fired bowl with a damp sponge to remove any kiln dust or oils from your hands, which can prevent the glaze from adhering properly. -
Wax the foot:
Apply a coat of liquid wax resist to the bottom foot of the bowl and about 1/4 inch up the side. This saves time on cleanup later and ensures the bowl won’t stick to the kiln shelf. -
Dip the exterior:
Holding the bowl by the rim, dip just the exterior into your cream or oatmeal speckled glaze bucket. A quick 3-second dip is usually sufficient. -
Clean the rim:
While the exterior glaze is still damp, carefully wipe any excess off the rim with a sponge so you have a clean starting point for the interior work.
Drips running too far?
If the wash runs too quickly to the center, your brush is too wet. Blot the brush on a dry towel before touching the clay to control the flow better.
Step 2: Creating the Ombre Wash
-
Glaze the interior base:
Pour a small amount regarding the cream speckled glaze inside the bowl. Roll it around to coat the entire interior surface thoroughly, then pour out the excess. -
Initial drying:
Allow the base coat to dry until it loses its sheen but is still cool to the touch. This stage is crucial for the next layer to bleed slightly without running uncontrollably. -
Mix the wash:
Dilute a small amount of your terra cotta or iron red glaze with water. You want a consistency similar to skim milk or a watercolor wash, not full-strength glaze. -
Apply the rim color:
Load a fan brush with your diluted red wash. Hold the brush against the upper inner rim of the bowl and slowly spin your banding wheel or turn the bowl by hand. -
Create the drip effect:
Instead of a solid line, press the brush slightly harder at random intervals to release more liquid, allowing gravity to pull gentle drips down toward the center. -
Feathering the edge:
Immediately switch to a clean, damp round brush. Gently feather the bottom edge of the red band you just painted, blending it downward into the cream base to soften the transition. -
Second pass for depth:
I find that adding a second, slightly more concentrated layer just at the very top edge deepens the gradient effect beautifully. -
Clean up the rim again:
Take a damp sponge and do a final clean of the very top lip of the bowl to ensure a sharp, professional finish where the interior and exterior meet.
Pro Tip: Sponge Blending
For an even softer gradient, use a slightly damp natural sea sponge to dab the transition line between colors rather than a brush.
Step 3: Firing
-
Final drying:
Let the piece dry completely for at least 24 hours. The added moisture from the wash technique means it needs extra time to prevent steam issues in the kiln. -
Check the foot:
Before loading, double-check the foot ring. Even with wax resist, small beads of glaze can linger, so wipe it clean one last time. -
Fire the kiln:
Load the bowl into your kiln and fire to the cone temperature specified by your clay and glaze manufacturer (typically Cone 5 or 6 for stoneware).
Once cooled, your bowl will reveal a stunning, warm glow that makes even a simple breakfast feel like a special occasion
Carved Fluting With a Color Accent
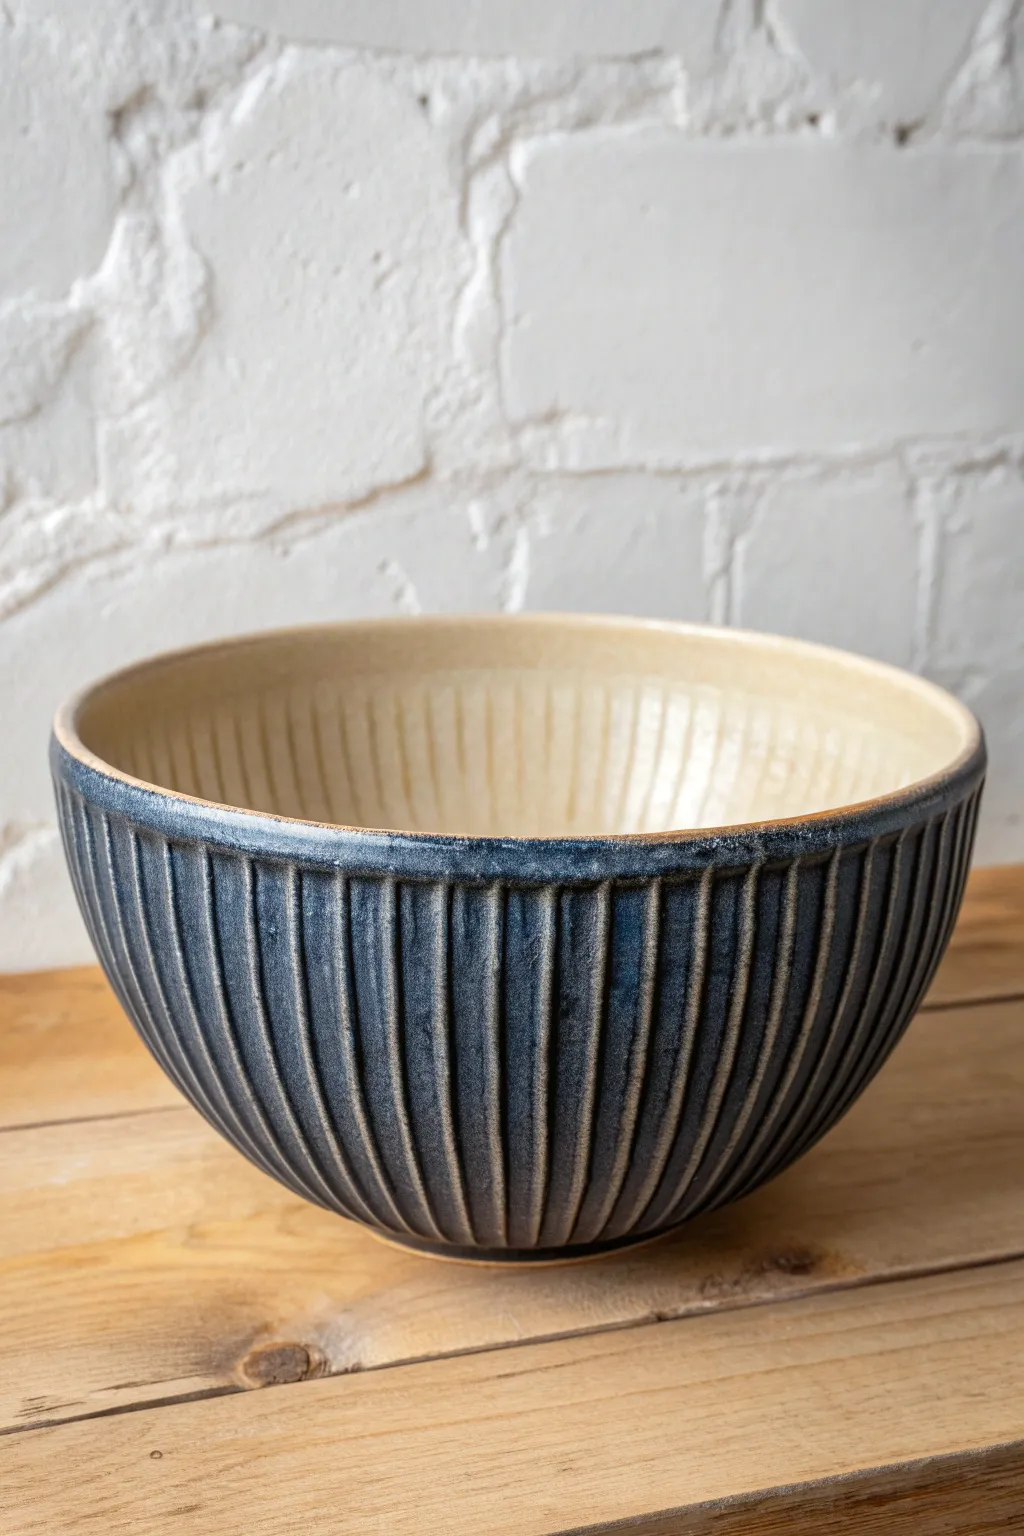
This project combines precise vertical carving with a reactive glaze to create a stunning textural contrast. By carving a simple bowl and applying a deep semi-transparent blue, you achieve a piece where the glaze pools in the recesses and breaks beautifully over the sharp ridges.
How-To Guide
Materials
- Stoneware clay body (buff or light speckle)
- Pottery wheel and throwing tools
- Wire texturing tool or fluting tool (u-shaped loop tool)
- Trimming tools
- Bisque firing kiln access
- Glaze firing kiln access
- Deep blue/charcoal reactive glaze (semi-transparent)
- Cream or clear interior glaze
- Wax resist
- Sponge
Step 1: Throwing and Shaping
-
Center and open:
Begin with about 2-3 pounds of stoneware clay centered on your wheel. Create a wide, evenly curved bowl shape, keeping the walls slightly thicker than usual (about 1/4 inch) to accommodate the carving later without cutting through. -
Define the rim:
Use a rib to compress and smooth the rim. A distinct, slightly thickened rim works well here as a stopping point for your carving lines. -
Refine the curve:
Use a metal nesting rib on the interior to ensure a perfectly smooth, continuous curve. This interior surface needs to remain untouched during the exterior carving. -
Dry to leather hard:
Cut the bowl from the bat and let it dry slowly to a firm leather-hard stage. The clay needs to be firm enough to hold its shape while being handled upside down, but soft enough to carve cleanly.
Divide and Conquer
Before carving, divide the rim into 4 or 8 equal sections with small marks. This helps you keep your vertical lines straight and ensures you don’t start slanting as you work around the pot.
Step 2: Carving the Fluting
-
Trim the foot:
Secure the bowl upside down on the wheel. Trim a definitive foot ring. Make sure the transition from the foot to the wall is smooth, as your carving lines will likely end near this point. -
Mark your guidelines:
While the pot is spinning slowly, I like to lightly mark a horizontal line just below the rim and just above the foot to act as start and stop guides for the fluting tool. -
Test your tool:
Before committing, test your fluting tool on a scrap piece of clay to gauge the width and depth of the groove. A medium U-shaped loop tool is ideal for the look in the photo. -
Carve the first channel:
Starting from your top guideline (near the rim), drag the tool downward in a straight, confident motion toward the foot. Maintain consistent pressure to keep the depth uniform. -
Create the pattern:
Place your tool exactly next to the previous cut, leaving a very thin ridge of uncarved clay between them. Carve the next channel. Repeat this all the way around the bowl. -
Refine the ridges:
Once the carving is complete, you likely have some sharp burrs or clay crumbs. Wait until the bowl is bone dry, then use a stiff brush or a slightly damp sponge to gently soften the sharpest edges without erasing the texture. -
Bisque fire:
Fire the bowl to cone 04 (or your clay’s specific bisque temperature) to prepare it for glazing.
Step 3: Glazing and Finishing
-
Clean the bisque:
Wipe the bisqued bowl with a damp sponge to remove any dust that might interfere with glaze adhesion. -
Glaze the interior:
Pour a creamy off-white or light tan glaze into the interior. Roll it around to coat evenly and pour out the excess. Wipe any drips off the rim immediately. -
Wax the foot:
Apply wax resist to the bottom of the foot ring and a few millimeters up the side to ensure the glaze doesn’t run onto the kiln shelf. -
Prepare the exterior glaze:
Stir your deep blue/charcoal glaze thoroughly. For fluted pieces, the glaze needs to be fluid enough to settle in the grooves but stable enough not to run off completely. -
Apply exterior glaze:
Dip the exterior of the bowl into the dark glaze, stopping right at the rim where it meets the interior glaze. Hold it there for 3-4 seconds to build up a good thickness. -
Check the break:
Once the glaze is dry to the touch, you can gently rub the high points of the ridges with a clean finger or sponge to slightly thin the glaze there. This encourages the ‘breaking’ effect where the clay color shows through. -
Clean the rim:
If the exterior glaze overlapped the interior glaze at the rim, clean it up with a damp sponge for a crisp line. -
Glaze fire:
Fire the piece to maturity (often Cone 6 or 10 depending on your clay). The heat will cause the dark glaze to flow into the carved recesses, highlighting the vertical rhythm of your work.
Celadon Magic
Try using transparent celadon glazes (like jade or amber) instead of dark blue. These glazes naturally pool in textures, making the fluting look like gem-like facets.
Once cooled, your bowl will have a wonderful tactile quality that invites people to pick it up and feel the texture
Stencil-Like Negative Space
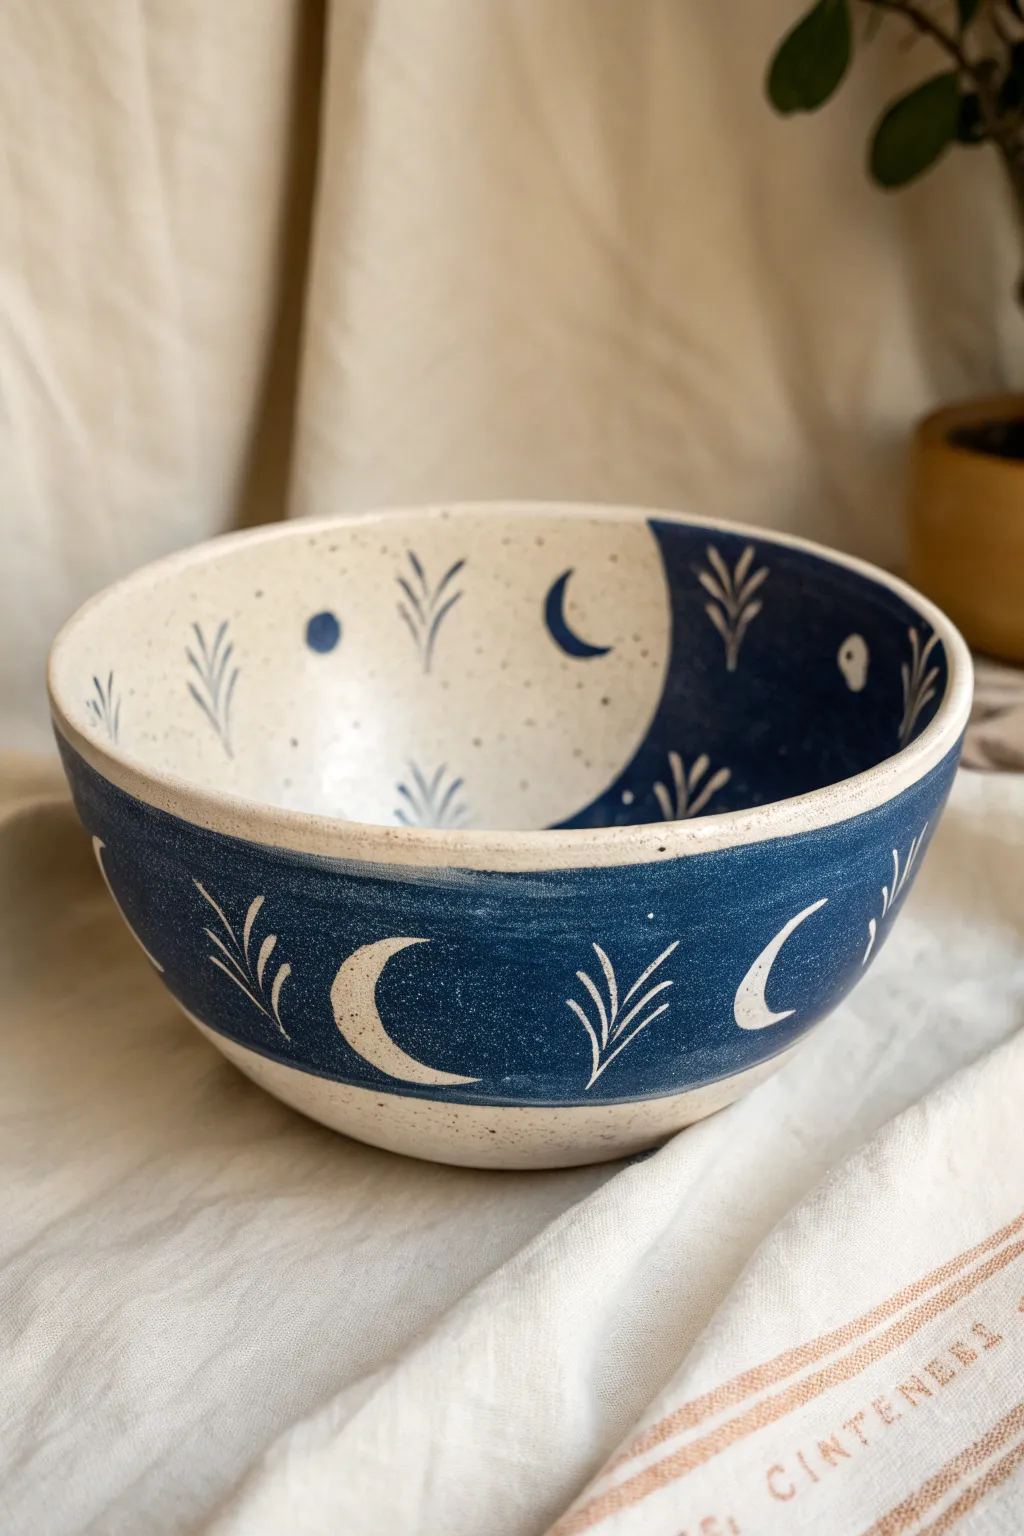
Embrace the balance of day and night with this stunning two-toned ceramic bowl featuring a yin-yang inspired composition. By utilizing wax resist and sgraffito-like carving techniques, you can achieve crisp white motifs dancing against a deep indigo sky.
Step-by-Step
Materials
- Bisque-fired ceramic bowl (stoneware or earthenware)
- Deep indigo or navy blue underglaze
- Clear transparent glaze (cone 5/6 recommended)
- Wax resist (liquid latex or wax emulsion)
- Fine-tipped liner brush
- Medium flat brush or fan brush
- Carving tool or sgraffito needle tool
- Pencil
- Sponge and water bucket
Step 1: Preparation and Mapping
-
Clean surface:
Begin by wiping down your bisque-fired bowl with a damp sponge. This removes any dust that could prevent the glaze or wax from adhering properly. -
Map the divide:
Using a light pencil, sketch a curved, S-shaped line across the inside of the bowl to divide it into two sections, mimicking a yin-yang symbol. Continue this division line horizontally around the exterior midpoint of the bowl if you want the two-tone effect outside as well. -
Sketch motifs:
Lightly draw your crescent moons, small dots, and leafy sprig patterns in the desired locations. Plan for one half of the interior to be white-on-blue and the other blue-on-white.
Clean Resist Lines
If your wax resist feels too thick or clumpy, dilute it slightly with a drop of water. This helps it flow smoothly off the brush for sharper moon tips.
Step 2: Wax Resist Application
-
Apply wax to ‘white’ areas:
Dip your fine-tipped liner brush into the wax resist. Carefully paint over the designs on the side of the bowl that will eventually be blue. These waxed areas will repel the color, leaving the clay body visible. -
Define the negative space side:
On the opposite side (the light side), use the wax resist to paint the entire background, carefully painting *around* your pencil sketches of moons and leaves. This creates the inverse effect where the background stays white. -
Protect the exterior band:
If copying the image exactly, paint a band of wax along the bottom rim of the exterior to keep the foot of the bowl unglazed and tidy. -
Dry thoroughly:
Allow the wax resist to dry completely. It should feel firm to the touch and usually turns slightly darker or transparent depending on the brand.
Starry Night Effect
Flick a stiff toothbrush loaded with watered-down white underglaze over the blue section before the clear glaze for a speckled galaxy effect.
Step 3: Underglaze and Carving
-
Apply the first coat:
Load your medium flat brush with deep indigo underglaze. Paint a smooth, even coat over the entire interior of the bowl and the upper band of the exterior. -
Watch the resist work:
You will see the underglaze bead up and pull away from the waxed areas. If small beads of blue stick to the wax, gently wipe them away with a damp sponge or fingertip while the paint is still wet. -
Layer up:
Apply a second and third coat of underglaze, allowing slight drying time between each, until you have an opaque, solid blue color. -
Clean lines:
Once the underglaze is semi-dry (leather hard), take your carving tool and gently scratch through any blurry edges where the blue paint meets the white design. This sharpens the ‘negative space’ look. -
Detailing the positive side:
On the light side of the bowl interior (where you waxed the background), use your fine liner brush to fill in the moons and leaves with blue underglaze if the initial resist step didn’t define them sharply enough. -
Refining the exterior:
Use a carving tool to scratch stylized leaf veins or outlines into the blue band on the exterior to match the interior style (sgraffito technique).
Step 4: Glazing and Firing
-
Bisque fire (Optional):
Some artists prefer to do a second bisque firing here to set the underglaze, which burns off the wax. If you skip this, proceed directly to glazing. -
Apply clear glaze:
Dip the entire bowl into a clear transparent glaze, or brush it on carefully. Ensure the glaze covers both the painted blue areas and the raw clay designs. -
Wipe the foot:
Flip the bowl over and wipe the very bottom foot ring clean with a sponge to prevent it from sticking to the kiln shelf. -
Final fire:
Fire the piece in the kiln according to the clay and glaze specifications (typically Cone 5 or 6 for stoneware).
Now you have a perfectly balanced celestial bowl ready for your morning cereal or evening soup
Storybook Animal Surprise
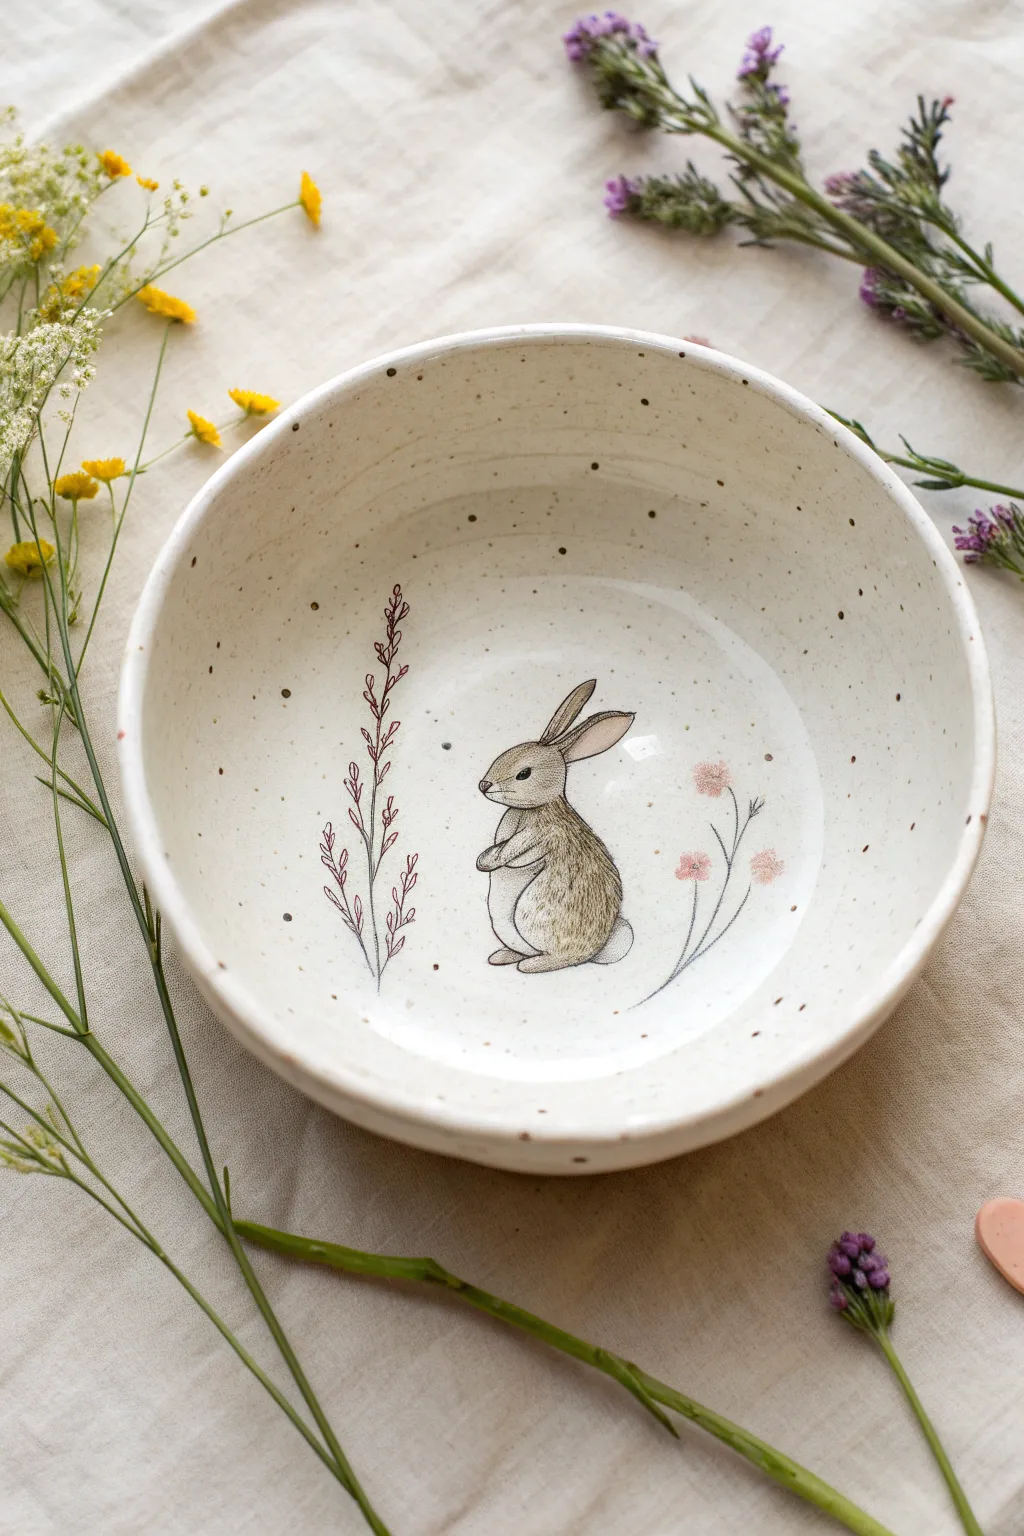
Transform a simple ceramic bowl into a whimsical keepsake with this delicate illustration of a bunny discovering a garden. The combination of speckles, fine line work, and soft washes creates a vintage storybook aesthetic perfect for spring decor or thoughtful gifting.
Detailed Instructions
Materials
- Bisque-fired ceramic bowl (creamy white clay body)
- Underglaze pencil (black or dark brown)
- Underglaze paints (mocha brown, beige, dusty rose, sage green)
- Fine liner brush (size 0 or 00)
- Small round brush (size 2)
- Speckle underglaze or watered-down brown underglaze
- Old toothbrush (for splashing)
- Clear dipping glaze
- Kiln access
Step 1: Preparation & Speckling
-
Clean surface:
Begin with a clean, bisque-fired bowl. Wipe it down gently with a damp sponge to remove any dust, which ensures the underglaze adheres properly. -
Mix speckle splash:
Dilute a small amount of dark brown underglaze with water until it reaches an inky consistency. Alternatively, use a specialized speckle glaze. -
Apply speckles:
Dip an old toothbrush into your brown mixture. Hold it over the bowl and run your thumb across the bristles to flick tiny distinct dots onto the interior surface. -
Control the density:
Rotate the bowl as you flick to get even coverage, aiming for a random, organic look rather than a uniform pattern. Let this dry completely before moving on.
Smudge Prevention
To seal a dusty underglaze pencil drawing without smearing it, dab a layer of gum solution over the lines before applying your final clear glaze.
Step 2: Illustrating the Bunny
-
Draft the outline:
Using a very light touch with a pencil, sketch the basic oval shape for the bunny’s body and head in the center bottom of the bowl. Note that graphite will burn off in the kiln. -
Underglaze outline:
Switch to your underglaze pencil or a liner brush with black underglaze. carefully trace your sketch, defining the ears, the curve of the back, and the little paws held at the chest. -
Base coat:
With the size 2 round brush, apply a watered-down wash of beige underglaze to the bunny’s body. I like to keep this very sheer so the speckles underneath still faintly show through. -
Add fur texture:
Once the base is dry to the touch, use the liner brush and mocha brown underglaze to paint tiny, short strokes mimicking fur, following the curve of the animal’s body. -
Darken details:
Deepen the color around the eye, the inside of the ear, and the paws using a slightly less diluted brown to create dimension. -
The tail:
Leave the tail area mostly unpainted or use a tiny dot of white underglaze to make it pop against the creamy clay body.
Hidden Message
Paint a tiny matching element, like a single flower or a carrot, on the very bottom outside of the bowl for a secret detail only the washer sees.
Step 3: Floral Elements
-
Left side foliage:
On the left of the bunny, paint a tall, slender vertical stem using a dusty rose or brownish-red hue. Keep the line extremely thin. -
Adding leaves:
Add small, teardrop-shaped leaves climbing up the stem in the same reddish hue. Keep them sparse to maintain the delicate aesthetic. -
Right side flowers:
On the right side, paint two simple stems curving slightly outward. Tip these with small, soft pink circles to represent blossoms. -
Flower centers:
Dot the center of your pink blossoms with a tiny speck of dark brown to tie the color palette together.
Step 4: Glazing & Firing
-
Final drying:
Allow the entire illustration to dry fully. It should look chalky and matte. -
Clear glaze application:
carefully dip the bowl into a clear transparent glaze. Ensure you don’t smudge the underglaze pencil lines, which can sometimes be fragile before firing. -
Clean the foot:
Wipe the bottom foot ring of the bowl with a sponge to remove any glaze so it doesn’t stick to the kiln shelf. -
Final fire:
Fire the bowl in the kiln according to the specific temperature requirements of your clay and glaze combination.
Now you have a charming piece of functional art ready to hold soup or cereal.
Decorative Fillers That Match the Glaze
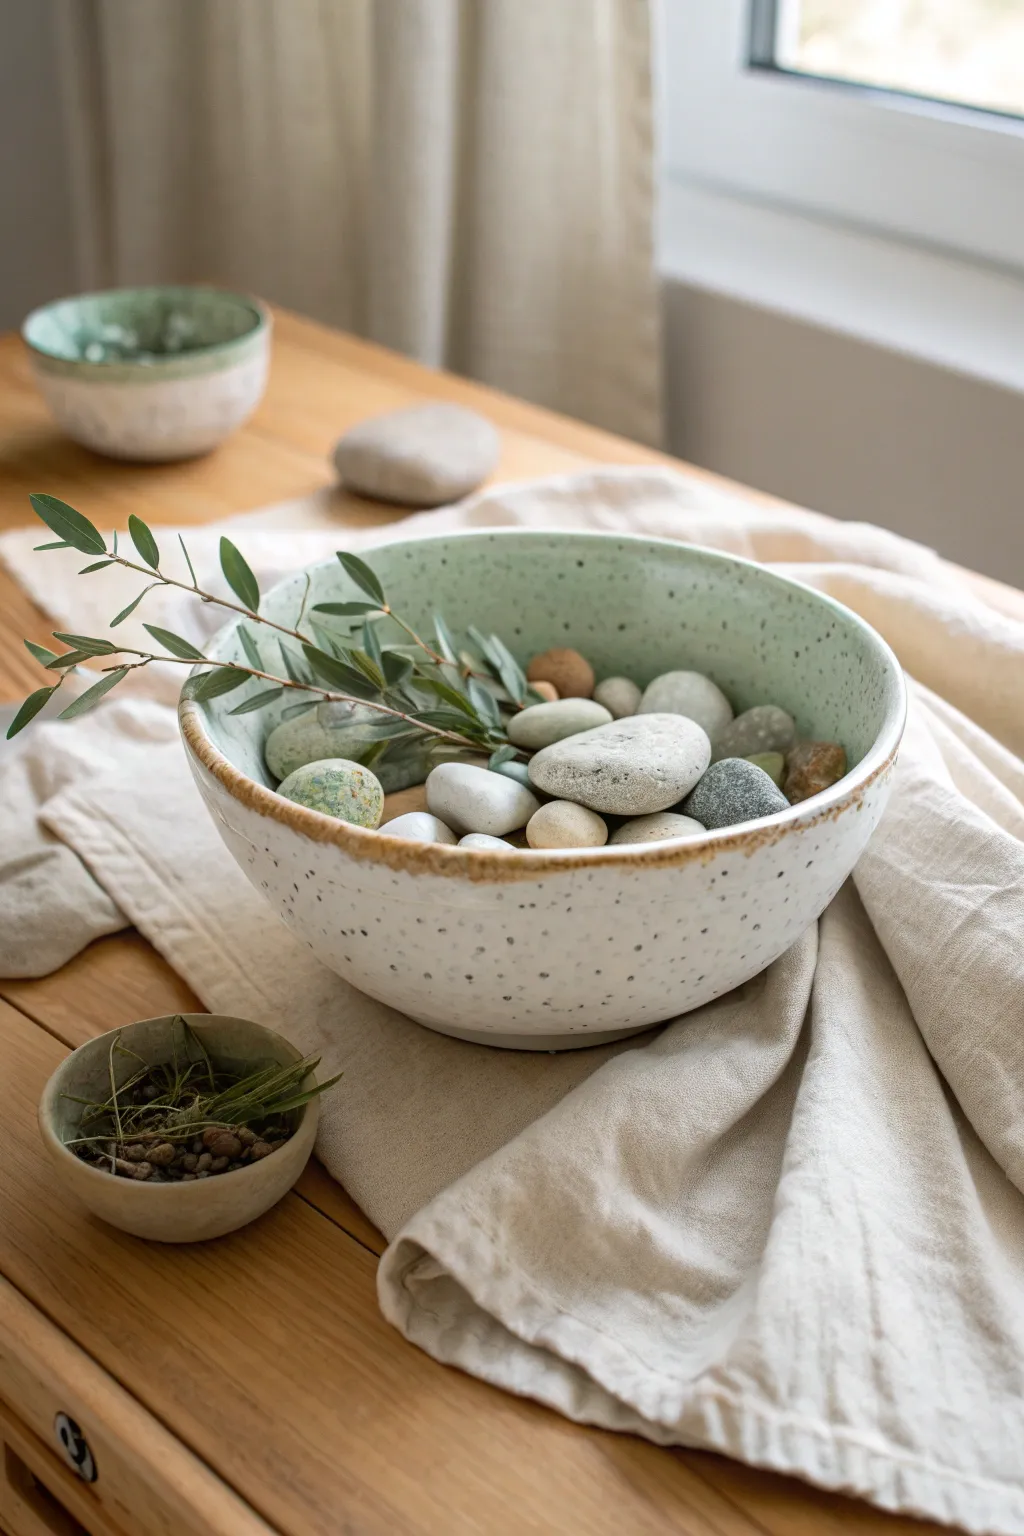
Bring a touch of nature indoors with this calming ceramic bowl arrangement that perfectly balances smooth textures and organic forms. The speckled glaze of the bowl is echoed by the natural variation in river stones and fresh greenery for a harmonious centerpiece.
How-To Guide
Materials
- Large, wide-rimmed ceramic bowl (speckled or light-colored glaze)
- Collection of smooth river rocks (varying sizes, 1-3 inches)
- Small pebbles or gravel (for base layer)
- Fresh olive branches or eucalyptus sprigs
- Soft, lint-free cloth
- Water for cleaning stones
- Optional: Floral frog or small oasis block (hidden)
Step 1: Preparing the Elements
-
Clean and sort stones:
Begin by thoroughly washing your river rocks in warm water to remove any dust or soil. Allow them to dry completely on a towel. Sort them by size and color to make the arrangement process smoother later on. -
Select your greenery:
Inspect your olive branches or eucalyptus. Trim off any yellowing or damaged leaves. You want stems that are flexible but sturdy enough to hold their shape when resting among the stones. -
Clean the vessel:
Wipe down the inside and outside of your ceramic bowl with a damp cloth. A pristine surface ensures the focus remains on the textural interplay between the glaze and the fillings.
Step 2: Building the Foundation
-
Create a base layer:
If your bowl is very deep, you might want to fill the bottom inch with smaller, less attractive pebbles or gravel. This saves your best stones for the visible top layer and provides a stable bed. -
Position anchor stones:
Select 3-4 of your largest, most interesting stones. Place them off-center in the bowl to create focal points. Avoid perfect symmetry; a natural, scattered look is more pleasing to the eye. -
Fill the gaps:
Begin adding medium-sized stones around your anchor stones. Tingle them slightly so they nestle together naturally rather than sitting precariously on top of one another.
Wobbly Stones?
Stones shifting too much? Use small dabs of museum putty or floral clay underneath the top layer rocks to keep them securely in place without permanent glue.
Step 3: Arranging the Top Layer
-
Showcase special textures:
Now, take your most beautiful stones—perhaps ones with unique veining or a color that matches the bowl’s rim—and place them prominently on top. I like to make sure the smoothest faces are pointing upward. -
Vary the heights:
Ensure the surface isn’t perfectly flat. Allow some stones to sit slightly higher than others to create gentle undulations, mimicking a riverbed. -
Check color distribution:
Step back and look at the color balance. If you have a dark grey stone on the left, try to place a smaller dark accents on the right to lead the eye across the composition. -
Leave breathing room:
Don’t overfill the bowl to the very brim. Leaving a little bit of the inner ceramic glaze visible near the rim creates a nice framing effect for your arrangement.
Scent Infusion
Add a few drops of essential oil like cedarwood or lemongrass directly onto porous lava rocks hidden in the base layer for a subtle, natural room fragrance.
Step 4: Adding the Organic Touch
-
Insert the main stem:
Take your longest branch of greenery. Gently wedge the cut end between two heavy stones deep in the bowl so it stays secure. Angle it so it sweeps over the edge of the bowl. -
Add supporting sprigs:
Tuck one or two smaller sprigs near the base of the main stem to hide the cut end and add volume. These should look like they are naturally growing out from beneath the rocks. -
Adjust the flow:
Bend the leaves or stems slightly if needed. You want the greenery to look relaxed and draped, complementing the curve of the bowl rather than sticking straight up. -
Final polish:
Give the exposed stones one last wipe with a dry cloth to remove any fingerprints from handling. If you want a ‘wet look,’ you can very lightly mist them with water, though a matte dry look is often more serene.
Enjoy the peaceful atmosphere this simple yet elegant natural arrangement brings to your table