Whenever I’m stuck on what to make next, I start by mapping out a simple clay bead bracelet pattern—just color, rhythm, and a couple of cute accents. Here are 19 easy “recipe-style” arrangements using flat heishi clay beads, spacers, and focal beads you can copy bead-for-bead.
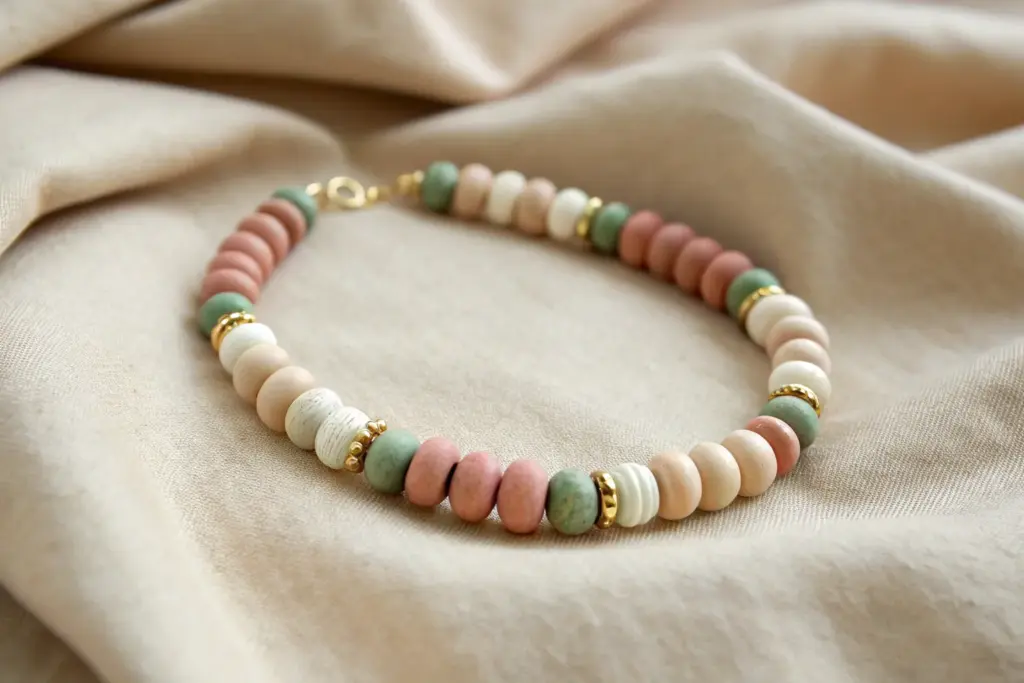
Two-Color Alternating Stripe

This rustic yet refined bracelet combines the warmth of terracotta tones with crisp cream details in an alternating pattern. The texture plays a key role here, mixing smooth matte finishes with hand-painted stripes and subtle carved details.
Step-by-Step Tutorial
Materials
- Polymer clay (terracotta or reddish-brown color)
- Polymer clay (white or cream color)
- Acrylic paint (cream/white)
- Fine-point paintbrush
- Bead reamer tool or toothpick
- Elastic stretch cord (0.8mm or 1mm)
- Needle tool or sharp carving tool
- Gloss or satin varnish (optional for sealing)
- Beading needle (optional)
- Clay roller (optional)
- Oven for baking
Step 1: Creating the Clay Beads
-
Condition the Clay:
Begin by thoroughly conditioning your terracotta-colored polymer clay until it is soft and pliable. Warm clay is essential for preventing cracks during the rolling process. -
Measure Uniform Portions:
Pinch off small pieces of clay. To ensure all your beads are roughly the same size (about 12-14mm), I find it helpful to roll the clay into a log first and cut equal segments. -
Roll the Solid Beads:
Take roughly half of your segmented pieces and roll them rapidly between your palms to create perfectly smooth spheres. These will be your solid terracotta accent beads. -
Prepare the Stripe Base Beads:
Roll the remaining segments into spheres just like the first batch. These will become the base for your white-striped beads. -
Create the Texture Beads:
Select 3-4 of your solid spheres. Using a needle tool, gently scratch or carve horizontal lines or tiny symbols into the surface to mimic the carved look of the focal beads in the image. -
Form the Cream Beads:
Using your white or cream polymer clay, roll out several smaller spheres. If you want the textured look shown in the photo, roll these slightly gently over a textured surface (like sandpaper) before baking. -
Create the Relief Stripe Beads:
For the beads with raised cream stripes, roll very thin snakes of cream clay. Wrap them carefully around a terracotta bead base and roll gently to adhere them without flattening the stripe completely. -
Pierce the Holes:
Use a bead reamer or toothpick to carefully poke a hole through the center of every bead. Rotate the bead as you push through to avoid deforming the round shape. -
Bake the Clay:
Arrange all beads on a parchment-lined baking sheet. Bake according to your clay manufacturer’s instructions (usually 275°F/135°C for 15-30 minutes). -
Cool Completely:
Allow the beads to cool fully before handling. They are fragile when hot and harden as they cool down.
Consistent Sizing
Use a small circular cookie cutter on a flat sheet of clay to punch out equal circles before rolling. This guarantees every bead ball starts with the exact same volume of clay.
Step 2: Decorating and Assembly
-
Paint the Stripes:
Take the cooled solid terracotta beads designated for striping. Using a fine paintbrush and cream acrylic paint, carefully paint vertical stripes around the bead. You don’t need to be perfect; a hand-painted look adds character to this rustic style. -
Highlight Texture:
If you carved any beads, do a light dry-brushing of darker brown paint over the crevices, then wipe the surface immediately. This brings out the carved details. -
Seal the Paint:
Once the paint is totally dry, you can apply a light coat of satin varnish to protect the stripes from chipping, though leaving them matte keeps the natural pottery vibe. -
Cut the Elastic:
Cut a length of elastic cord about 10-12 inches long. This gives you plenty of slack for tying the knot later. -
Pre-stretch the Cord:
Give your elastic cord a few firm tugs. This pre-stretching step is crucial to prevent the bracelet from loosening immediately after you wear it. -
Plan Your Pattern:
Lay your beads out on a mat. Mimic the layout in the image: alternate solid terracotta beads, cream-striped beads, and solid cream beads, placing the unique carved beads as focal points. -
String the Beads:
Thread the beads onto the elastic cord according to your pattern. Ensure the holes are clean so the cord passes through easily. -
Size Check:
Wrap the strand around your wrist to check the fit. Add or remove beads as necessary for a comfortable fit. -
Tie the Knot:
Tie a surgeon’s knot (right over left, left over right twice). Pull the cord ends firmly to secure the knot tight against the beads. -
Add a Drop of Glue:
Place a tiny drop of super glue or jewelry cement on the knot for extra security. Let it dry for a moment. -
Hide the Knot:
Trim the excess cord ends and gently tug the elastic so the knot slides inside the hole of the nearest bead, hiding it from view.
Fixing Smudged Stripes
If your painted cream stripes become messy, wait for the acrylic to dry completely. Then, gently scrape away the excess paint with a toothpick or fingernail to sharpen the line edges.
Wear your new handcrafted accessory with pride knowing you mastered the art of pattern and texture


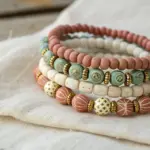
Bold Color-Block Bands
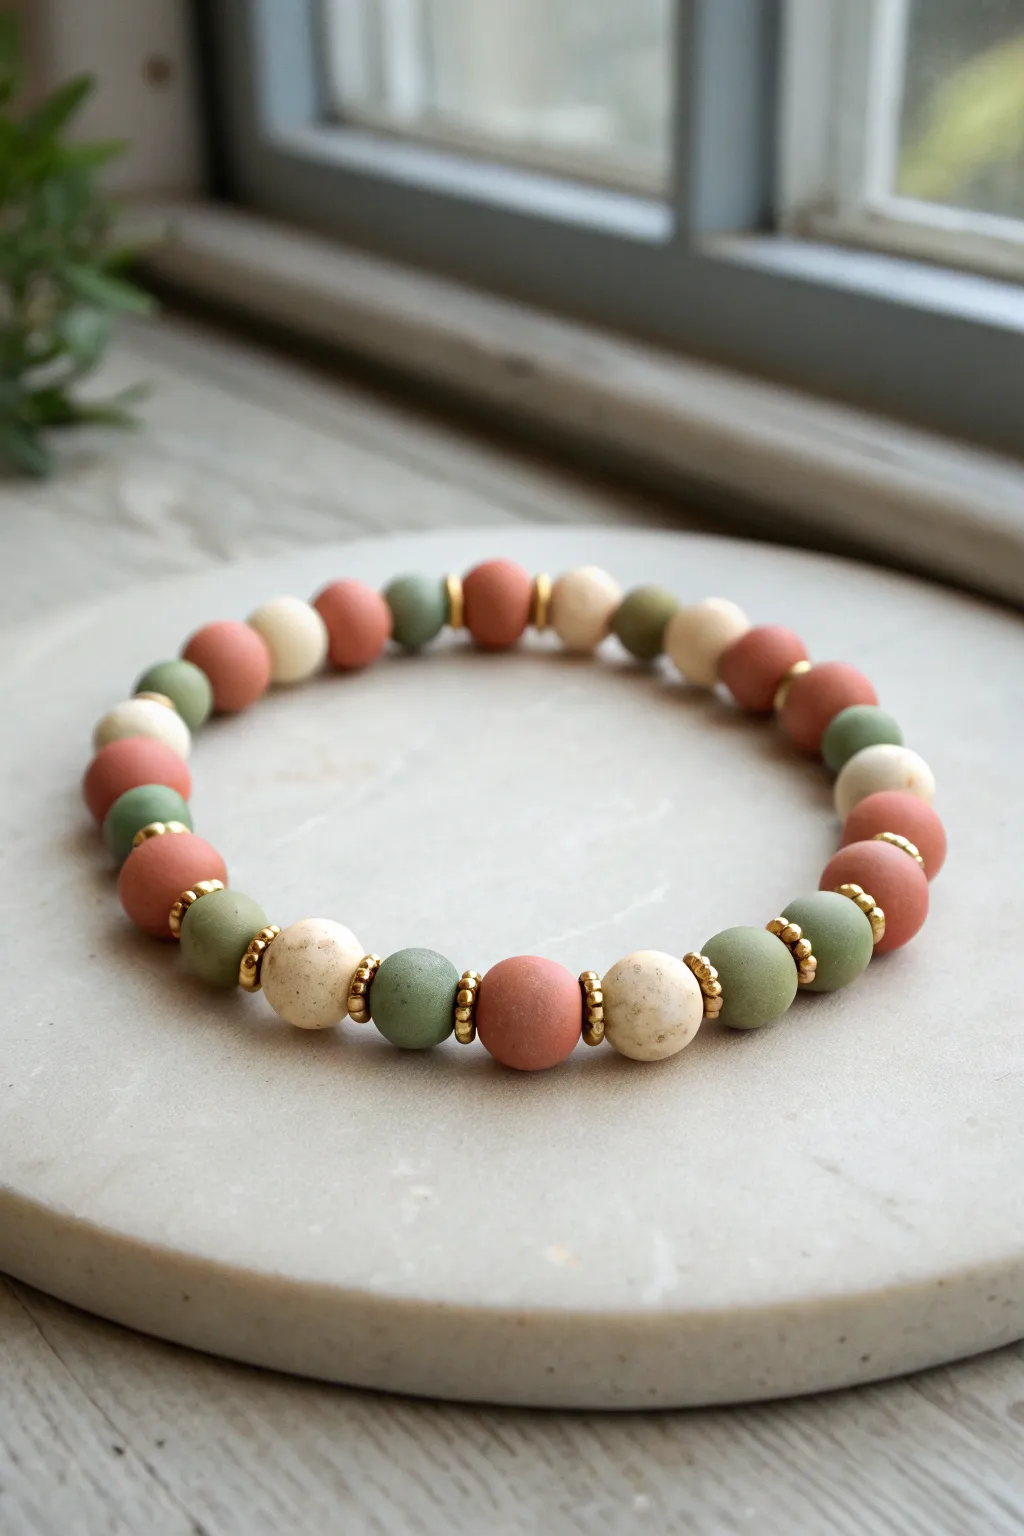
This sophisticated bracelet combines the gentle matte texture of polymer clay with the subtle shine of metallic accents. The muted palette of terracotta, sage green, and cream creates a versatile accessory that feels both modern and timeless.
Step-by-Step Guide
Materials
- Matte polymer clay beads (8mm round) in: Terracotta/Dusty Rose, Sage Green, and Cream/Off-White
- Gold finish metal spacer beads (small rondelle or disc shape, 3-4mm)
- Strong elastic stretch cord (0.8mm or 1mm thickness)
- Beading needle (collapsible eye or fine wire)
- Jewelry glue or clear nail polish
- Scissors or wire cutters
- Bead storage board or a soft towel (to prevent rolling)
- Tape or binder clip
Step 1: Planning and Preparation
-
Assess your sizing:
Before cutting any cord, measure your wrist with a flexible measuring tape. For a standard fit, add about half an inch to your wrist measurement. This ensures the bracelet is snug but comfortable enough to roll over your hand. -
Sort your palette:
Separate your beads into piles of terracotta, sage green, and cream. Having them clearly separated on your workspace makes the random-but-balanced aesthetic much easier to achieve. -
Prepare the cord:
Cut a piece of elastic cord approximately 10-12 inches long. This generous length gives you plenty of room to tie the knot at the end without struggling. -
Pre-stretch the elastic:
Hold both ends of the cut cord and give it a few firm (but not forceful) tugs. I always do this to help prevent the bracelet from stretching out and becoming loose after the first few wears. -
Secure the end:
Attach a piece of tape or a binder clip to one end of the cord. This acts as a ‘bead stopper’ so your beautifully arranged pattern doesn’t slide right off while you work.
Step 2: Creating the Pattern
-
Understand the rhythm:
Study the photo carefully. The pattern relies on pairing colored beads with gold spacers, but not after every single bead. Notice how sometimes two colored beads (like cream and green) sit next to each other, while others are separated by a gold accent. -
Start stringing:
Thread your elastic through the beading needle. Begin by adding a single cream bead followed immediately by a gold spacer. -
Build the first segment:
Add a sage green bead, then another gold spacer, followed by a terracotta bead. This establishes your primary color trio. -
Vary the sequence:
Continue adding beads, but start to introduce subtle irregularities. For instance, string a green bead and a cream bead directly next to each other without a gold spacer in between to break up the uniformity. -
Add gold accents strategically:
Place gold spacers typically on either side of the terracotta beads to make that warm red hue pop, as seen in the reference image. -
Check the symmetry:
Every five or six beads, pause and look at the strand. You aren’t aiming for a strict A-B-C pattern, but rather a balanced distribution of the three matte colors along the length. -
Test the length:
Wrap the unfinished strand around your wrist to check the fit. Add or remove beads until the ends meet comfortably without stretching the cord tight.
Hiding the Mechanics
Ensure one of the bead holes next to your knot is large enough to swallow it. If the clay bead holes are too small, gently reaming one with a bead reamer can make space for the knot.
Step 3: Finishing Touches
-
Prepare to tie:
Once you are happy with the length, remove the tape or clip. Bring the two ends of the pattern together, ensuring there are no large gaps between beads. -
Tie the knot:
Tie a standard square knot (right over left, left over right). Pull the elastic tight; you usually want to pull it taut enough that the knot almost disappears inside the hole of the adjacent bead. -
Secure with adhesive:
Apply a tiny dot of jewelry glue or clear nail polish directly onto the knot. This is crucial for longevity with elastic cord. -
Hide the knot:
While the glue is still tacky, gently tug the cord so the knot slides inside the hollow center of one of the larger clay beads. -
Trim the excess:
Once the glue is fully dry (give it a few minutes), use your scissors to sniff off the excess cord tails as close to the bead as possible without nicking the knot itself.
Knot Slipping?
If your square knot won’t hold tight, try a Surgeon’s Knot instead. Loop the cord through twice on the first pass before tying the second part. It adds friction.
Slip on your new bracelet and enjoy the organic, handcrafted feel of those matte clay textures.


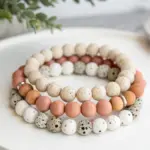
All-One-Color Minimal Stack
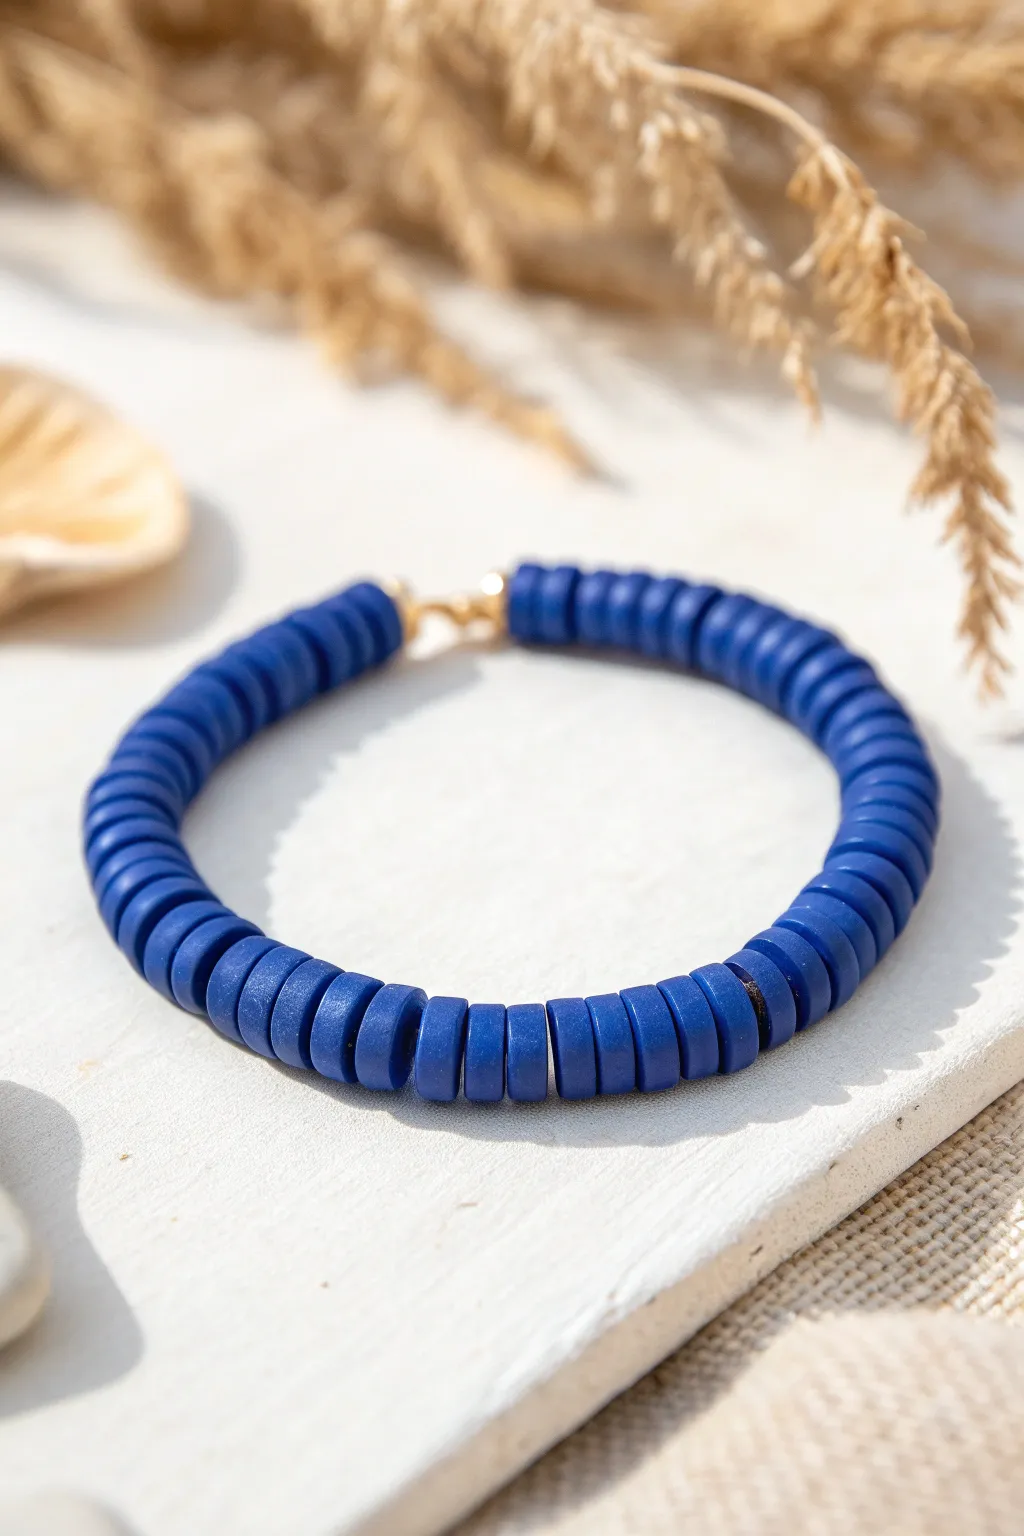
Embrace simplicity with this strikingly minimal bracelet featuring uniform navy blue heishi beads. The matte texture creates a sophisticated, modern look that works beautifully alone or as a grounding foundation for a colorful stack.
Step-by-Step Tutorial
Materials
- Navy blue polymer clay heishi beads (6mm or 8mm)
- Strong elastic cord (0.8mm clear)
- Gold crimp bead covers (optional but recommended)
- Gold jump rings (open)
- Gold lobster clasp
- Jewelry pliers (flat nose)
- Scissors or bead snips
- Bead stopper or binder clip
- Super glue or jewelry cement
Step 1: Preparation
-
Measure your wrist:
Wrap a flexible measuring tape or a piece of string around your wrist to find your size. Add about half an inch to this measurement to ensure the bracelet isn’t too tight. -
Prepare the cord:
Cut a length of elastic cord about 10-12 inches long. Having extra length makes tying the final knots much easier. -
Pre-stretch the elastic:
Gently tug on the elastic cord several times. Pre-stretching prevents the bracelet from drooping or becoming loose immediately after you finish making it. -
Secure the end:
Attach a bead stopper or a simple binder clip to one end of the cord so your beads don’t slide off while you are working.
Smooth Seams
Cut the elastic at a sharp 45-degree angle. This creates a needle-like point that makes threading the thicker clay beads significantly faster and easier.
Step 2: Stringing the Design
-
Check your beads:
inspect your strand of navy blue clay beads. Discard any that are broken, chipped, or significantly thinner than the others to ensure a uniform look. -
Start threading:
Begin sliding the blue heishi beads onto the elastic cord one by one. I find it therapeutic to pick them up directly with the cord tip rather than using my fingers. -
Maintain consistency:
Keep adding beads until the strand reaches your desired length minus the space the clasp will take up (usually about half an inch). -
Test the fit:
Wrap the beaded strand around your wrist to check the sizing. Remember that the clasp will add a tiny bit of length.
Step 3: Adding the Clasp
-
Attach the first loop:
Thread the end of the elastic through a gold jump ring or directly through the loop of a crimp bead. If using a jump ring, tie a secure surgeon’s knot around it. -
Secure the knot:
Place a tiny drop of super glue on the knot. Let it dry for a moment before trimming the excess tail close to the knot. -
Hide the knot:
If possible, slide the knot inside the first clay bead or cover it with a gold crimp cover for a professional finish. -
Attach the other end:
Repeat the process on the other side of the bracelet, tying the elastic around the loop of the gold lobster clasp. -
Tighten appropriately:
Ensure there is no gaps between the beads, but don’t pull so tight that the bracelet puckers or curves rigidly. It should drape naturally. -
Final glue application:
Apply a small dab of glue to this second knot as well. Allow the glue to cure completely according to package instructions. -
Trim excess:
Once the glue is fully hardened, carefully snip off any remaining elastic tail ends.
Gold Accent Remix
Swap out just three center blue beads for round gold spacers. This adds a focal point while keeping the minimalist monochromatic aesthetic intact.
Step 4: Finishing Touches
-
Check connections:
Use your flat nose pliers to ensure any jump rings are closed tightly so the elastic doesn’t slip out. -
Inspect the roll:
Gently roll the beads between your fingers to ensure they sit flat against each other and verify the texture is consistent all around.
Enjoy styling your new minimalist bracelet as a standalone statement or part of a larger set


Monochrome Ombre Fade

Embrace the natural warmth of wooden textures with this understated bracelet project. The design relies on a subtle, randomized fade between cream, tan, and coffee-toned clay or wooden beads, finished with a classic, adjustable leather sliding knot.
How-To Guide
Materials
- Matte polymer clay or wooden beads (8mm or 10mm round)
- Colors: Pale Cream/Sand, Warm Tan, Medium Brown, Dark Chocolate
- Estimated count: 22-26 beads total (depending on wrist size)
- 1mm to 1.5mm round leather cord or waxed cotton cord (dark brown)
- Scissors
- Measuring tape
- Super glue or jewelry cement (optional, for knot security)
- Large-eye needle (optional, if cord fits through beads easily)
Step 1: Planning the Gradient
-
Measure the cord:
Cut a length of leather cord approximately 24 inches long. This generous length gives you plenty of room to work the knots comfortably without feeling cramped. -
Sort your beads:
Separate your beads by shade. You should have four distinct groups: cream, light tan, medium brown, and dark brown. Lay them out on a bead mat or soft towel to prevent them from rolling away. -
Design the pattern:
Before stringing, lay the beads out in a line to visualize the fade. I like to create a soft, non-linear ombre. Instead of blocking colors solidly, mix the transition zones—place a tan bead between two creams, and a medium brown between tans, so the color shift feels organic. -
Refine the sequence:
Aim for a sequence like this: 3 Cream -> 1 Tan -> 2 Cream -> 3 Tan -> 1 Medium Brown -> 4 Medium Brown -> 3 Dark Brown. This ‘mixed’ method prevents stripey banding.
Knot Security
Leather cord can be slippery. When tightening your sliding knot, pull firmly but test the slide mechanism frequently. A dab of clear nail polish on the cut ends prevents fraying better than glue sometimes.
Step 2: Stringing the Bracelet
-
Prepare the cord tip:
If your leather cord is fraying, dab a tiny drop of superglue on the very end and roll it between your fingers (carefully!) to create a stiff, needle-like tip. Let it dry for a minute. -
Start stringing:
Thread your beads onto the cord in the order you designed. Slide them all down to the middle of the cord length. -
Check the fit:
Wrap the beaded section around your wrist. The ends of the bead line should just barely touch or have a tiny gap. Add or remove a bead or two if the sizing feels too loose or too tight. -
Secure the beads:
Tie a simple overhand knot with the leather cord snug against the first bead and another knot snug against the last bead. This keeps the beads centered and contained.
Texture Twist
Mix materials for depth! Swap three or four of the wooden beads for lava stone beads in a matching shade. The porous texture of the lava contrasts beautifully with the smooth wood.
Step 3: Creating the Sliding Knot
-
Position the ends:
Cross the two tail ends of the cord over each other to form a circle. The tails should be pointing in opposite directions. -
Cut a knotting cord:
Cut a separate piece of leather cord, about 10-12 inches long. This will be used to tie the sliding square knot or macramé knot over the overlapped main cords. -
Start the square knot:
Place the center of your short cord *under* the two overlapped main bracelet cords. Bring the left side over the main cords, and the right side over the left tail, under the main cords, and up through the loop on the left. -
Tighten the first half:
Pull both ends of the knotting cord evenly to tighten. It shouldn’t be so tight that the main cords can’t slide, but snug enough to hold. -
Complete the knot:
Now mirror the move: bring the right side over the main cords, left side over the right tail, under, and up through the right loop. Pull tight. -
Repeat the process:
Continue tying square knots for about half an inch (usually 3-4 full knots). The knot shown in the image is a wrapped barrel knot, which is an alternative: simply wrap the extra cord tightly around the main cords 4-5 times and tuck the end back under the coils. -
Trim and glue:
Trim the excess ends of the *knotting* cord very close to the knot. Apply a tiny dot of glue to the cut ends to seal them, being extremely careful not to glue the main sliding cords.
Step 4: Finishing Touches
-
Knot the tails:
Adjust the bracelet to its widest necessary opening (to fit over your hand). Tie a decorative overhand knot at the end of each main tail cord so they can’t slip back through the sliding clasp. -
Optional accent beads:
String one small leftover bead onto each tail before tying the final knot for a polished look. -
Final trim:
Trim any excess leather beyond the final tail knots, leaving about a quarter-inch tuft.
Wear your new earthy bracelet solo or stacked with other textures for a relaxed, bohemian vibe

The Complete Guide to Pottery Troubleshooting
Uncover the most common ceramic mistakes—from cracking clay to failed glazes—and learn how to fix them fast.
Black-and-White Graphic Repeat

Achieve a sleek, modern aesthetic with this striking black-and-white graphic bracelet. Using flat clay heishi beads, you’ll create a sophisticated accessory that balances solid blocks of color with an eye-catching striped rhythm.
Step-by-Step Guide
Materials
- 6mm flat clay heishi beads (black)
- 6mm flat clay heishi beads (white)
- 0.8mm or 1mm beige or light brown waxed cotton cord
- Scissors
- Tape or a clipboard
- Super glue or clear jewelry adhesive (optional)
Step 1: Preparation & First Knot
-
Measure and Cut:
Cut a piece of waxed cotton cord to approximately 12-14 inches long. This generous length gives you plenty of room to tie off the adjustable knots later without struggling with short ends. -
Create a Stop Knot:
Tie a simple overhand knot about 3 inches from one end of the cord. This will act as a stopper for your beads while you work. -
Secure Your Workspace:
Tape the short end of the cord (above the knot) to your table or clamp it into a clipboard. Keeping tension on the string makes threading these flat beads much faster.
Keep it straight
If your striped section looks uneven, check bead thickness. Clay beads vary! Sort through your stash to find black and white beads of matching thickness for the cleanest stripes.
Step 2: Building the Pattern
-
Start with White:
Begin threading by adding about 4 to 5 white heishi beads. This creates a small, clean cap at the beginning of the design near the closure. -
The Solid Black Section:
Thread on a long continuous section of black beads. Aim for about 2 to 2.5 inches of solid black. This will form one complete side of the bracelet. -
Transition to Striping:
After your solid black section, add a small block of 4 to 5 white beads. This acts as a visual break before the striped pattern begins. -
The Graphic Stripe Sequence:
The striped section is the focal point. Thread 1 black bead, followed by 1 white bead. Repeat this alternating single-bead pattern until you have about 1.5 inches of striping. -
Check the Pattern:
Pause to look at your stripes. The black beads are quite thin, so ensure they aren’t doubling up accidentally; you want a crisp ‘piano key’ effect. -
End with Solid Black:
Finish the main beadwork by adding another solid section of black beads, mirroring the length of the first black section (about 1.5 to 2 inches). -
Final White Cap:
Conclude the beading with a small group of 4 to 5 white beads to match the very beginning of the bracelet.
Make it yours
Swap the monochrome palette for navy and cream for a nautical look, or use bright neon spacers in the striped section for a pop of unexpected 80s flair.
Step 3: Finishing the Adjustable Closure
-
Tie the Closing Knot:
Push all beads snugly together—but not so tight that the bracelet becomes stiff. Tie an overhand knot flush against the last white bead to secure the strand. -
Form the Circle:
Bring the two ends of the cord together to form the bracelet circle. Cross the tails over each other. -
Macramé Sliding Knot Setup:
Cut a fresh, separate piece of cord about 6 inches long. Place this new piece under the crossed bracelet tails. -
Tie Square Knots:
Using the new short piece, tie a series of 3 or 4 square knots (macramé technique) around the two main bracelet cords. This creates your sliding mechanism. -
Trim Sliding Knot Ends:
Trim the excess tails of the sliding knot cord very close to the knot itself. I usually add a tiny dot of super glue here to ensure it doesn’t unravel. -
Decorative End Knots:
Tie a small knot at the very end of each main bracelet tail cord so they can’t slip through the sliding closure. -
Final Trim:
Trim any excess cord past those decorative end knots for a tidy finish.
Slip on your chic new bracelet and enjoy the modern edge it adds to your wrist stack
Primary Color Pop Sequence
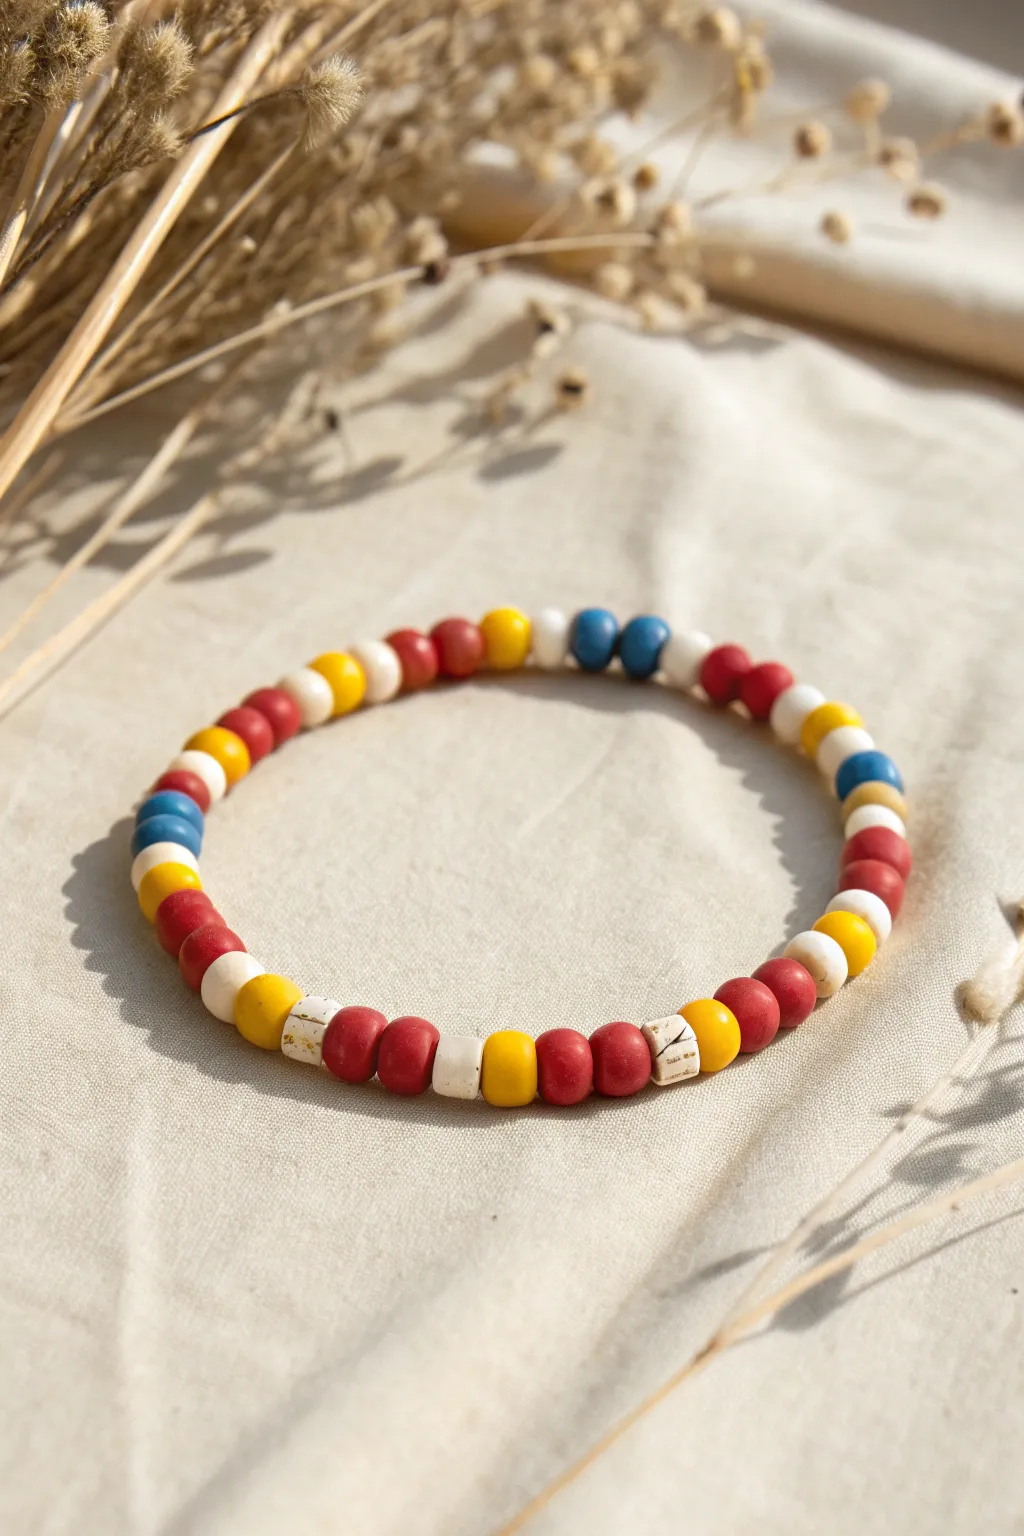
Embrace a playful, primary color palette with this lively beaded bracelet. Featuring matte clay beads in rich reds, sunny yellows, and deep blues, this accessory is broken up by unique textured white spacer beads for a modern, handcrafted feel.
Detailed Instructions
Materials
- Red polymer clay beads (6mm round)
- Yellow polymer clay beads (6mm round)
- Blue polymer clay beads (6mm round)
- White polymer clay beads (6mm round)
- White/Speckled polymer clay tube beads (approx. 4mm long)
- Elastic cord (0.8mm crystal string)
- Jewelry glue or clear nail polish
- Scissors
- Bead stopper or tape
- Ruler
Step 1: Preparation
-
Measure your cord:
Cut a piece of elastic cord about 10-12 inches long. This gives you plenty of extra room for tying knots later without struggling with short ends. -
Secure the end:
Attach a bead stopper to one end of your cord, or simply tape it down to your work surface. This prevents your beads from sliding off while you design your pattern. -
Pre-sort your beads:
Pour out small piles of your red, yellow, blue, and white round beads. Locate your special white tube beads and keep them handy for the focal points.
Knot Security
If the knot won’t fit perfectly inside a bead, choose a tube bead to place over the knot. Their holes are often slightly larger and more forgiving than round clay beads.
Step 2: Beading the Primary Sequence
-
Start the main pattern:
Begin threading your beads. I like to start with a small repeating block: thread one red, one yellow, and one white round bead. -
Add a blue accent:
After your first block, add two blue beads followed by a white bead to break up the warmth of the red and yellow. -
Continue the flow:
Thread a sequence of red-red-white-yellow-white. Notice how the white beads act as a palate cleanser between the strong primary colors. -
Insert the first tube bead:
Once you have about 2 inches of round beads strung, slide on your first white tube bead. This change in shape adds a nice tactile variety. -
Build the second section:
Resume with round beads: add a red, then a yellow, then a red. Follow this with another white tube bead to create symmetry near the center of the design. -
Create a blue block:
Thread a sequence of white, blue, blue, white. This mirrors the blue accent you added earlier, keeping the design balanced but not perfectly repetitive. -
Fill in the length:
Continue adding beads using a loose pattern of 2-3 colorful beads separated by a single white bead. Aim for a mix like yellow-red-white or red-white-yellow. -
Add the final tube bead:
towards the end of your strand, add one last white tube bead sandwiched between two red round beads. -
Check the fit:
Wrap the strand around your wrist. The ends should touch comfortably without stretching the elastic. Add or remove a few round spacer beads if you need to adjust the size.
Step 3: Finishing Touches
-
Pre-stretch the cord:
Gently pull on both ends of the elastic cord a few times. This pre-stretching step helps prevent the bracelet from sagging or loosening after you’ve worn it for a while. -
Tie the knot:
Remove your bead stopper. Tie a simple overhand knot, followed by a double surgeon’s knot (loop the thread through twice) to secure the bracelet. -
Secure with glue:
Apply a tiny dab of jewelry glue or clear nail polish directly onto the knot. Let this dry completely before moving on. -
Hide the knot:
Trim the excess cord tails close to the knot. Gently pull the bracelet so the knot slides inside the hole of one of the adjacent beads, hiding it from view.
Texture Twist
Swap the plain white round beads for small wooden spacers or even metallic gold balls to give the bracelet an earthier or more glamorous vibe.
Enjoy wearing your vibrant new accessory that brings a splash of color to any outfit


What Really Happens Inside the Kiln
Learn how time and temperature work together inside the kiln to transform clay into durable ceramic.
Pastel Sorbet Mix Pattern
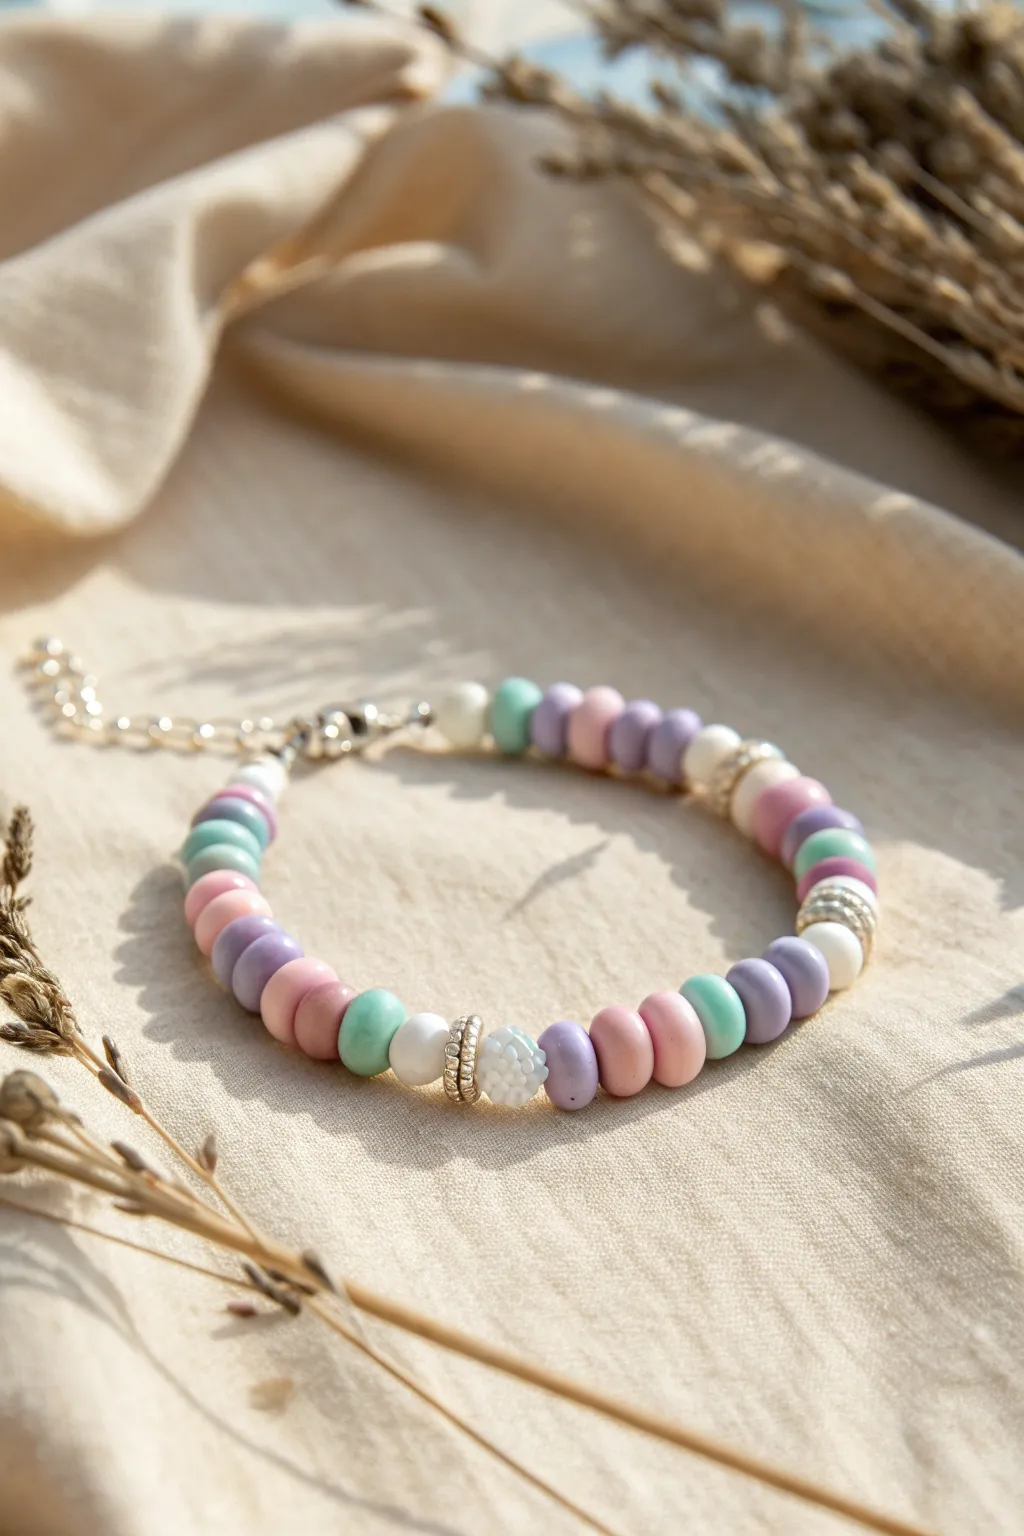
This sweet, candy-colored bracelet features soft matte pastels broken up by delicate spacer beads and occasional focal points. The combination of mint, lavender, pink, and white polymer clay heishi beads creates a look reminiscent of summer sorbet.
How-To Guide
Materials
- Polymer clay heishi disc beads (6mm) in: pastel pink, lavender/lilac, mint green, white
- Silver-tone metal spacer beads (thin, textured rings)
- Small white textured focal bead (berry or flower shape)
- Elastic beading cord (approx 0.8mm clear)
- Silver-tone lobster clasp
- Silver-tone extension chain
- 2 Silver-tone crimp tubes or knot covers
- Jump rings (4mm or 5mm)
- Jewelry pliers (flat nose)
- Scissors or jewelry cutters
- Super glue or jewelry cement
Step 1: Preparation
-
Measure and cut cord:
Cut a piece of elastic cord about 10-12 inches long. This gives you plenty of extra room to work with the clasp mechanism without struggling against tension. -
Pre-stretch the elastic:
Before adding any beads, give your elastic cord a few firm tugs. This pre-stretching helps prevent the bracelet from sagging or expanding permanently after you wear it a few times. -
Secure the end:
Attach a bead stopper or simply place a piece of tape on one end of the cord so your beads don’t slide off while you are designing the pattern.
Loose Beads?
If your pattern has gaps, the elastic isn’t tight enough before crimping. Ask a friend to hold the beads taut while you secure the final crimp tube.
Step 2: Beading the Pattern
-
Start the sequence:
Looking at the bracelet closure as the starting point, begin by threading on three white heishi beads, followed by a silver spacer, and then a sequence of colors: mint, lavender, pink. -
Establish the main rhythm:
The core pattern relies on blocks of color. Thread on 3 pink beads, then 3 lavender beads. -
Add a spacer break:
Slide on one silver textured spacer ring, followed by 3 white beads, and another silver spacer ring. This metallic break adds a touch of elegance to the matte clay. -
Continue the color blocks:
Resume the color sequence with 3 pink beads, 3 lavender beads, and 3 mint beads. -
Insert the focal section:
About halfway through the bracelet, create a unique focal point. Thread on a silver spacer, one white bead, another silver spacer, and then the special textured white berry/flower bead. -
Mirror the focal support:
Immediately following the textured bead, add a silver spacer, one white bead, and another silver spacer to frame the center element symmetrically. -
Resume the pattern:
Go back to your color blocking: 3 mint beads, 3 lavender, 3 pink. I find checking the length against my wrist frequently helps ensure the pattern stays balanced. -
Add another metallic detail:
Insert a silver spacer, 3 white beads, and a final silver spacer. -
Finish the bead strand:
Complete the strand with a final run of colors—lavender, mint, pink—ending with 2-3 white beads to match the beginning of the bracelet.
Step 3: Finishing Touches
-
Prepare the first crimp:
Slide a crimp tube onto the end of the elastic. Loop the elastic through the small ring on your lobster clasp, then thread the elastic back through the crimp tube. -
Secure the clasp:
Pull the elastic tight so the loop is small but the clasp still moves freely. Use your flat nose pliers to flatten the crimp tube firmly creates a secure hold. -
Attach the extension chain:
Repeat the crimping process on the other end of the bracelet, this time attaching the extension chain instead of the clasp. -
Knot for extra security:
Tie a simple overhand knot with the tail of the elastic right against the crimp bead for insurance. -
Glue and trim:
Apply a tiny dot of jewelry glue to the knots/crimps. Once dry, trim the excess elastic tail close to the bead, tucking the end inside the adjacent white beads if possible.
Level Up: Gold Dip
Swap the silver spacers for gold-plated discs and use a gold clasp. The warmth of the gold makes the pastel pink and lavender pop even more for a luxe look.
Now you have a refreshing splash of color ready to brighten up any outfit
Neutral With Gold Punctuation
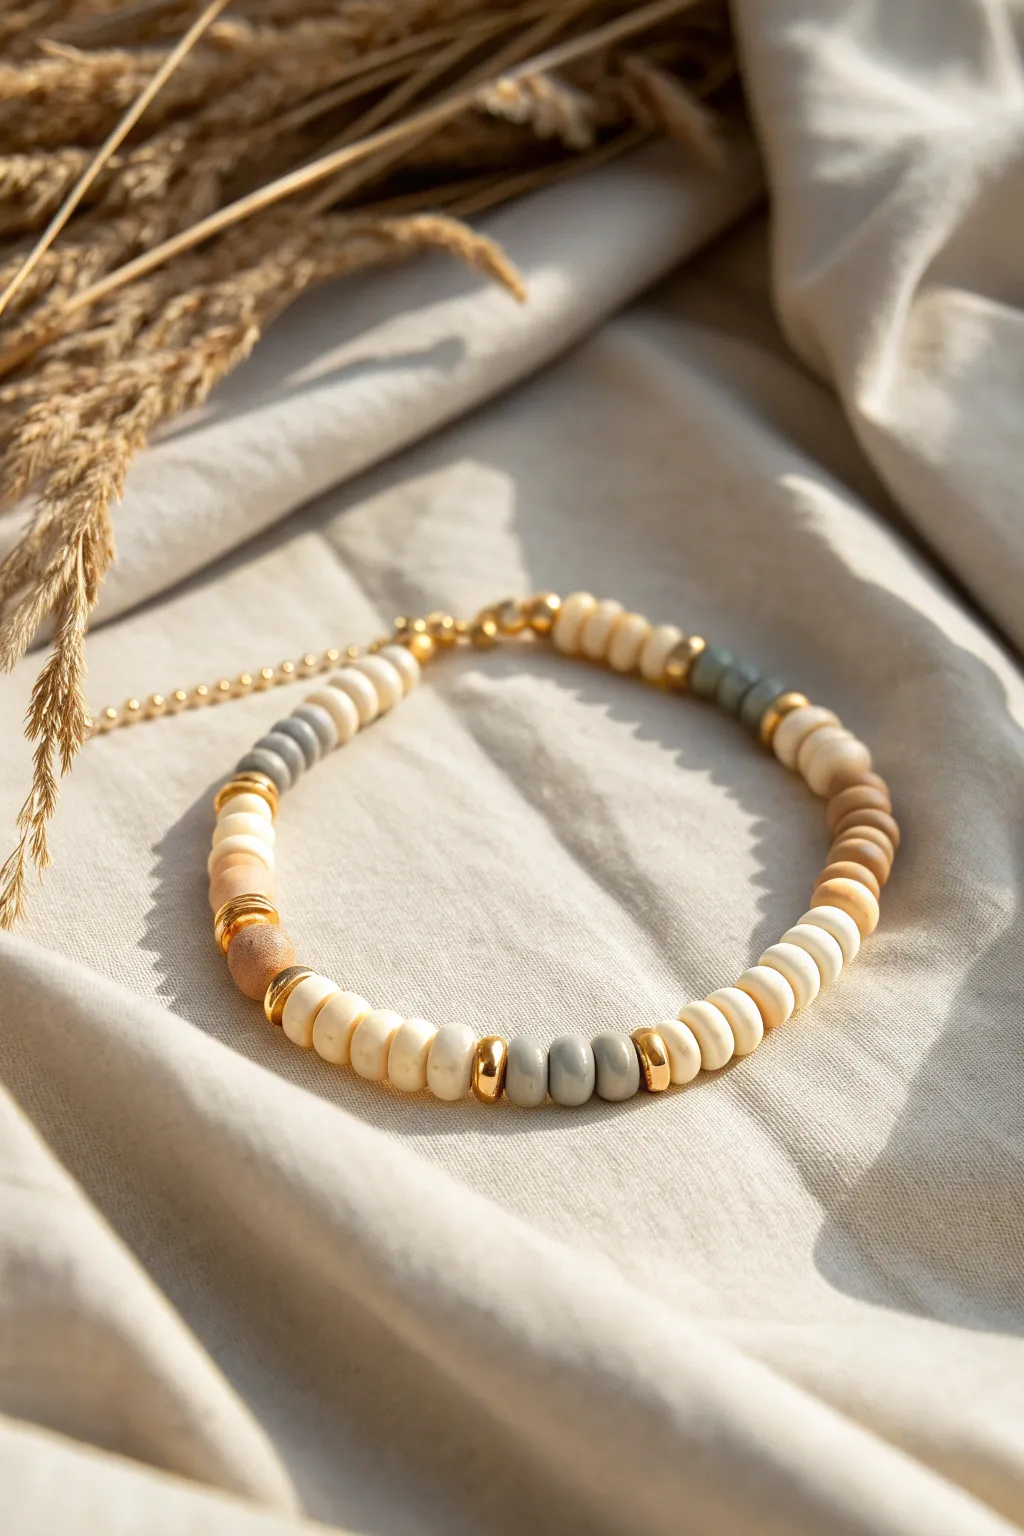
This elegant bracelet design elevates humble clay beads into a chic accessory by pairing creamy neutrals with rich metallic accents. The gentle gradation from white to grey, punctuated by shining gold spacers, creates a versatile piece perfect for everyday wear.
Step-by-Step Tutorial
Materials
- Heishi clay beads in cream/off-white
- Heishi clay beads in warm beige/tan
- Heishi clay beads in cool grey
- Heishi clay beads in dark grey/charcoal
- Heishi clay beads in light wood/brown tone
- Gold tone metal spacer beads (thick, rounded rondelle shape)
- Gold tone crimp beads and crimp covers
- Gold tone lobster clasp
- Gold tone extension chain
- Strong beading wire (e.g., Tiger Tail, 0.38mm or 0.45mm)
- Wire cutters
- Flat nose pliers
- Bead stopper or masking tape
Step 1: Preparation and Segment 1
-
Measure and Cut Wire:
Cut a length of beading wire approximately 10 inches long. This gives you plenty of extra room for finishing the ends without struggling. -
Secure one End:
Attach a bead stopper or a piece of masking tape to one end of the wire so your beads don’t slide off while you work. -
Start the Pattern:
Begin threading your beads with a section of the cream-colored heishi beads. Add about 10-12 of these to create a solid base section. -
The First Gold Accent:
Slide on one of the thick gold spacer beads. These act as the ‘punctuation’ for the pattern. -
Create the Grey Trio:
Immediately follow the gold spacer with three grey clay beads. I find that using just three creates a nice, distinct color block without overwhelming the gold. -
Close the Segment:
Add a second gold spacer bead to bracket the small grey section.
Uneven Tension?
If the bracelet feels stiff or kinks, you likely pulled the wire too tight before crimping. Leave a tiny 1-2mm gap of slack wire before crushing the crimp.
Step 2: Building the Central Pattern
-
Cream Section 2:
Thread on another long section of cream beads, roughly matching the length of your first section (10-12 beads). -
Introduce Warm Tones:
For a subtle gradient, switch to a slightly warmer beige or light tan bead color. Thread about 5-6 of these. -
Metallic Break:
Add a single gold spacer followed by a single wooden or dark brown clay bead for contrast, and then another gold spacer. -
Cream Section 3:
Add another main stretch of the cream-colored beads. -
The Dark Grey Accent:
Slide on a gold spacer, followed by three dark charcoal or dark grey beads, and finish with another gold spacer. -
Transition to Tan:
Add a medium section (about 8 beads) of the cream color, then transition into a block of tan/beige beads (about 6 beads).
Texture Play
Swap the smooth gold spacers for hammered metal or fluted beads. This adds a subtle vintage texture that contrasts beautifully with the matte clay.
Step 3: Finishing the Design
-
Final Grey Accent:
Create one last accent segment: Gold spacer, three light grey beads, Gold spacer. -
Complete the length:
Finish the beading with a final section of cream beads until the bracelet reaches your desired length (usually around 6.5 to 7 inches excluding the clasp). -
Attach the Clasp:
On the finishing end, thread on a crimp bead. Loop the wire through the ring of your lobster clasp and thread it back through the crimp bead. -
Secure the Crimp:
Pull the wire snug (but not too tight, or the bracelet will be stiff). Use your flat nose pliers to flatten the crimp bead securely. -
Finish the First End:
Trim the excess wire close to the crimp. If you are using a crimp cover, place it over the flattened crimp and gently close it with pliers to make it look like a gold bead. -
Attach the Extension Chain:
Remove your bead stopper from the starting end. Repeat the crimping process on this side, but loop the wire through your extension chain instead of a clasp. -
Final Trim:
Trim the remaining tail wire closely and cover the crimp if desired. Your neutral stack bracelet is ready to wear.
Enjoy styling this versatile piece individually or stacking it with gold chains for a modern textured look

TRACK YOUR CERAMIC JOURNEY
Capture glaze tests, firing details, and creative progress—all in one simple printable. Make your projects easier to repeat and improve.
Symmetric Word Center Pattern
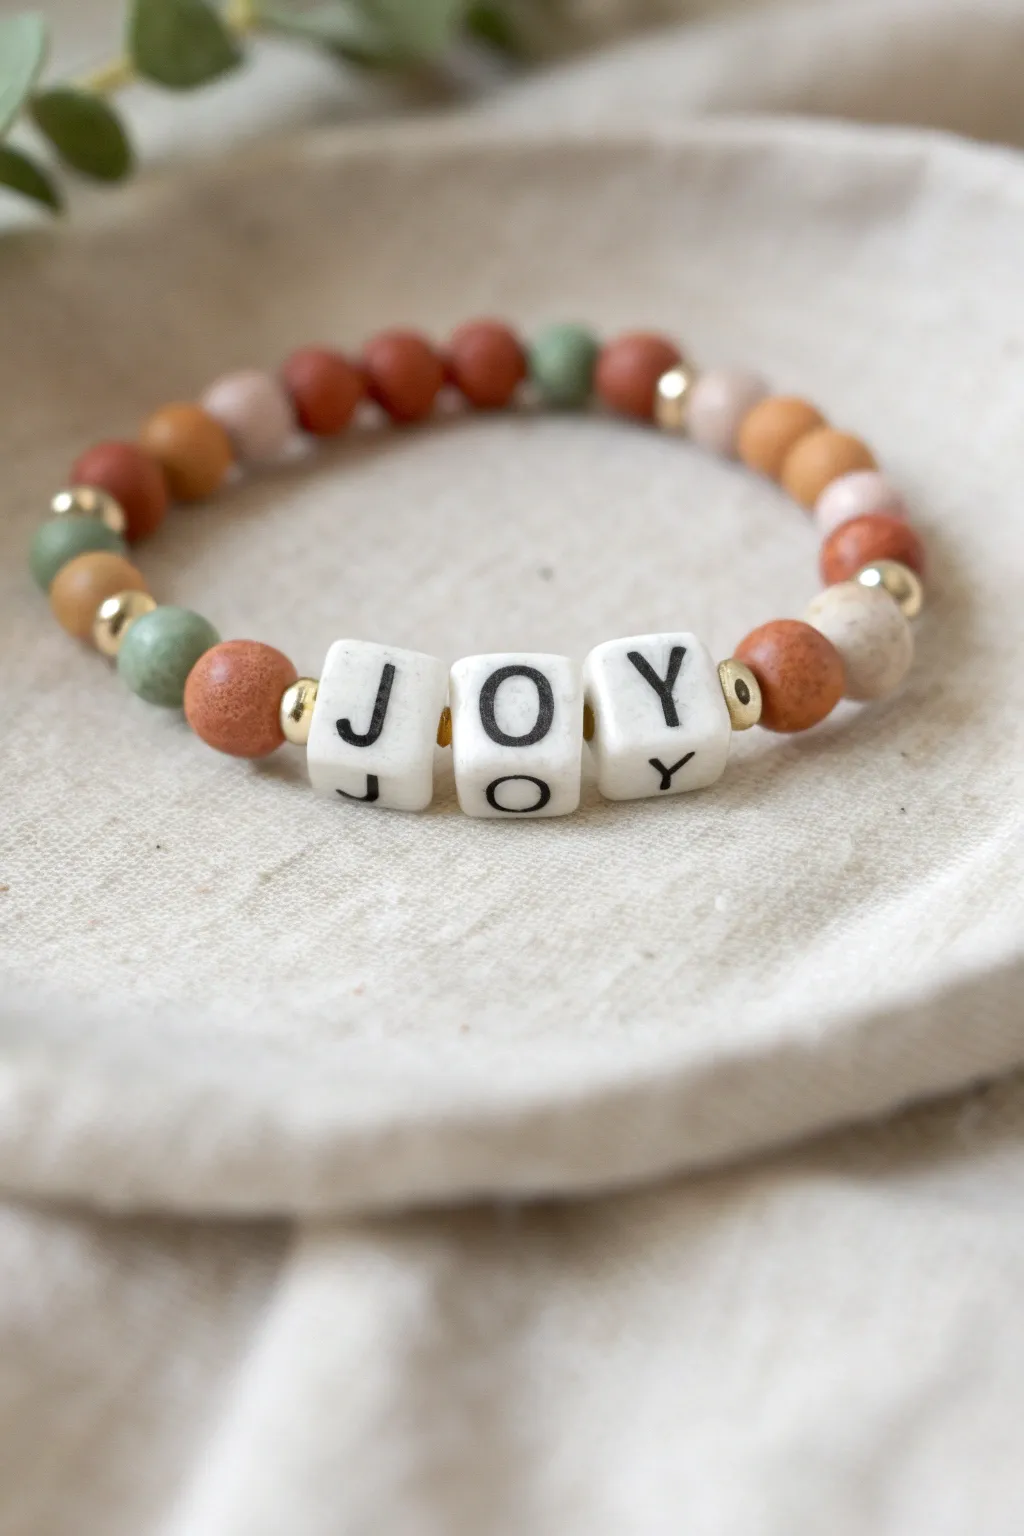
This rustic, nature-inspired bracelet combines matte clay textures with elegant gold accents to frame a simple, uplifting message. The warm terracotta, sage, and sand tones create a grounding accessory perfect for wearing your daily intention.
Detailed Instructions
Materials
- 0.8mm elastic stretch cord (clear)
- White square letter beads (J, O, Y)
- 6mm round matte polymer clay or ceramic beads (Terracotta/Rust)
- 6mm round matte polymer clay or ceramic beads (Sage Green)
- 6mm round matte polymer clay or ceramic beads (Sand/Beige)
- 6mm round matte polymer clay or ceramic beads (Caramel/Brown)
- 4mm gold spacer beads (round or heishi style)
- Standard jewelry glue or clear nail polish
- Scissors
Step 1: Planning and Centerpiece
-
Measure your wrist:
Cut a piece of elastic cord about 10-12 inches long. This generous length prevents bead spillage and makes tying the final knot much easier. -
Pre-stretch the cord:
Gently pull on the ends of your elastic cord a few times. Pre-stretching ensures the bracelet won’t sag or loosen immediately after you wear it. -
Secure one end:
Place a piece of tape on one end of the cord or attach a bead stopper clip to prevent your beads from sliding off while you work. -
Start the center:
Thread a single gold spacer bead onto the cord, followed by your square ‘J’ letter bead. -
Complete the word:
Add the ‘O’ and ‘Y’ beads next. Finish the centerpiece by adding a second gold spacer bead after the ‘Y’ so the word is bookended by gold.
Knot Slipping?
If your square knot feels loose, try a surgeon’s knot instead. Loop the elastic through twice on the first pass before tightening for extra grip.
Step 2: Creating the Pattern
-
Begin the right side:
Immediately after the right gold spacer, thread a rust/terracotta colored clay bead. -
Add a speckled accent:
Follow the rust bead with a beige or speckled sand-colored bead to introduce texture. -
Introduce contrast:
Add another rust bead, followed by a gold spacer bead to break up the matte textures. -
Continue the sequence:
Thread a caramel/brown bead, then a sage green bead. I usually like to add another gold spacer here to keep the rhythm consistent. -
Mirror the left side:
Go back to the start of your word (the ‘J’ side). Thread a rust/terracotta bead next to the gold spacer. -
Build the left pattern:
Add a sage green bead next, followed by a gold spacer. Note that this pattern isn’t perfectly symmetrical; the random, organic feel is part of the charm. -
Extend the design:
Continue adding beads in a random mix of caramel, rust, beige, and sage, placing a gold spacer roughly every 3-4 clay beads. -
Check the fit:
Wrap the unfinished strand around your wrist. The ends should touch comfortably without stretching the elastic too tight. Add or remove beads as needed.
Natural Variation
Don’t stress over perfect symmetry. Alternating warm and cool matte tones randomly creates that authentic earthy aesthetic seen in the photo.
Step 3: Finishing Touches
-
Tie the knot:
Remove the tape or clip. Bring the two ends together and tie a standard square knot (right over left, left over right). -
Tighten securely:
Pull all four strands (the two loose tails and the bracelet loop sides) firmly to tighten the knot completely. -
Secure with glue:
Dab a tiny drop of jewelry glue or clear nail polish directly onto the knot. Let this dry for at least 15 minutes. -
Hide the knot:
Trim the excess string close to the knot, leaving about 2mm. Gently slide an adjacent bead over the knot to conceal it inside.
Enjoy wearing your handcrafted reminder of joy and grounding energy
Single Charm Centerpiece Frame
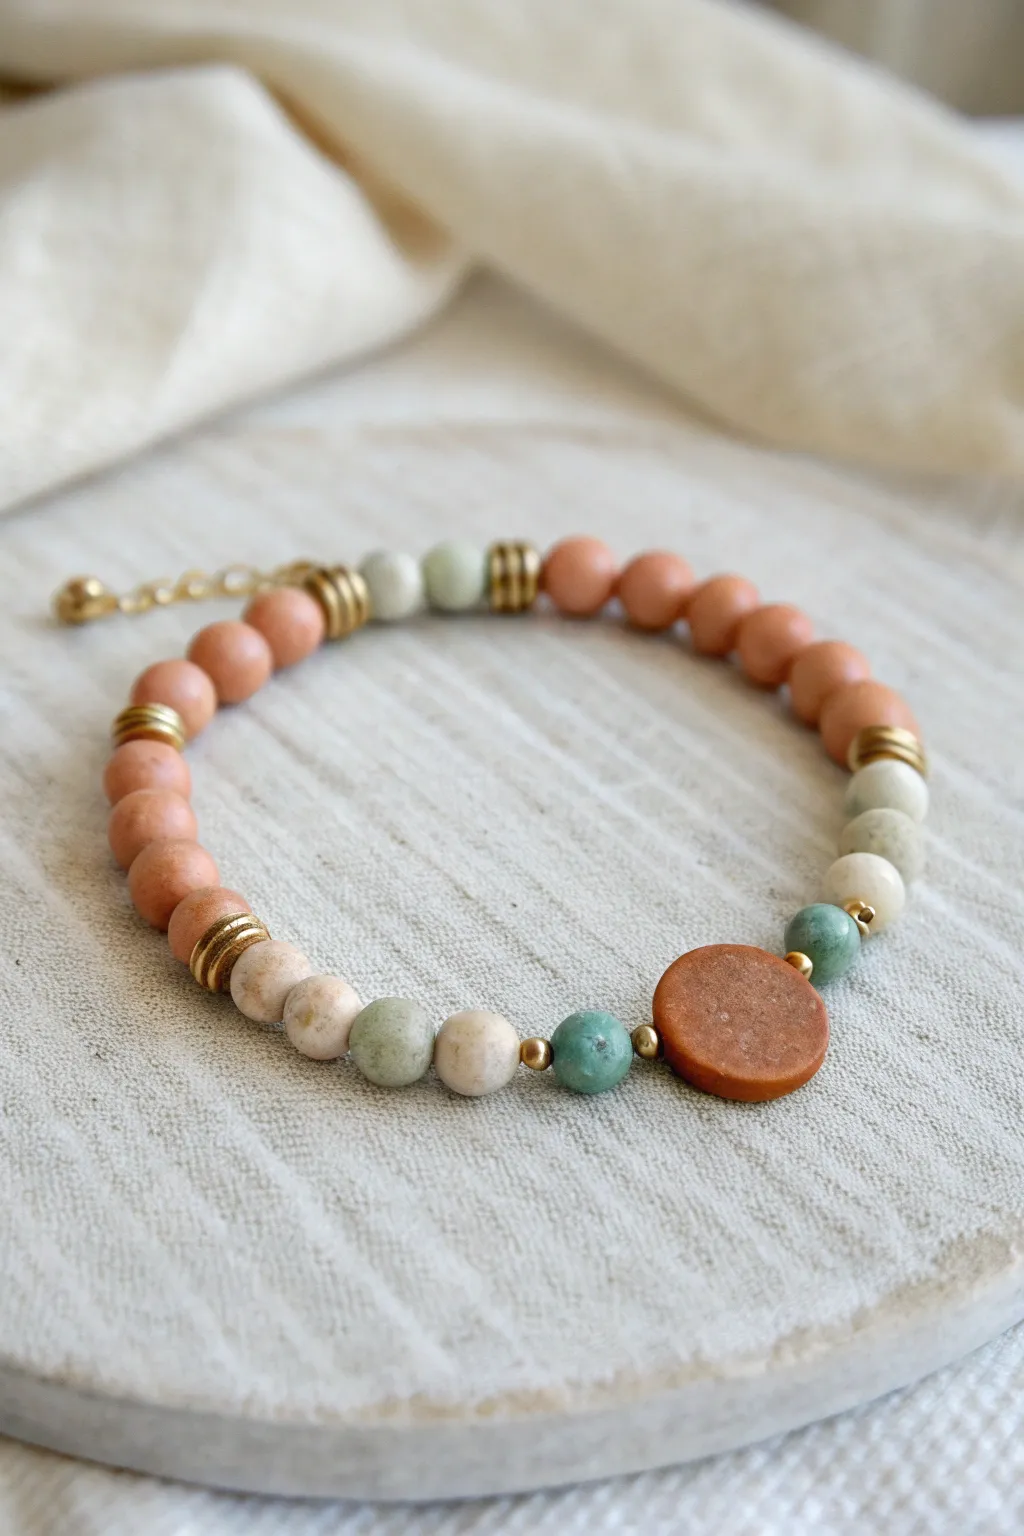
Capture the warmth of late afternoon light with this earthy, textured bracelet design. Centered around a flat terracotta disc, this piece balances matte clay tones in peach and sage with elegant cream speckles and flashes of gold.
Step-by-Step Tutorial
Materials
- Stretch cord (0.7mm or 0.8mm)
- 6mm-8mm peach/terracotta matte round beads (polymer clay or stone)
- 6mm speckled cream/beige round beads (jasper or ceramic)
- 6mm sage green round beads (quartz or jade)
- Gold tone heishi spacer beads or textured rings (approx. 4-5mm)
- Small gold bead stoppers or crimps
- Gold spacer balls (2mm-3mm)
- Large flat terracotta/clay disc bead (approx. 12-14mm) for the focal point
- Gold-plated chain extender and clasp (lobster claw)
- Jewelry glue (e.g., G-S Hypo Cement)
- Scissors or jewelry snips
- Small pliers (flat nose)
Step 1: Planning the Layout
-
Measure your wrist:
Wrap a piece of string around your wrist to find your comfortable size, then add about half an inch for ease. Lay this length out on your bead board or a soft work mat to visualize the final circumference. -
Center the focal point:
Start your design in the middle. Place the large flat terracotta disc bead at the center of your workspace. -
Frame the charm:
On either immediate side of the flat disc, place a small 2mm gold ball spacer. This subtle metal touch separates the focal bead from the rest of the strand and adds a hint of shine. -
Build the symmetrical core:
Next to the gold balls on both sides, add a sage green bead. Following the green, add a speckled cream bead. This creates a soft transition zone around the bold centerpiece.
Step 2: Creating the Pattern
-
Start the main strand:
Working outwards from your central design, place a gold spacer ring (the textured heishi style) next to the cream beads on both sides. -
Add the peach segments:
Thread on four or five peach-colored matte beads. These form the primary body of the bracelet and give it that warm, clay-like aesthetic. -
Insert gold breaks:
After the block of peach beads, add three gold spacer rings stacked together. Stacking them creates a wider, cuff-like metal accent that looks intentional and high-end. -
Add the secondary color block:
Following the triple gold stack, add a shorter sequence of two varied beads—perhaps a speckled cream and a sage green—to break up the pattern before returning to the main peach color. -
Continue the pattern:
Repeat the sequence—three gold rings, followed by a long run of peach beads—until you reach the ends of your measured length. I like to lay everything out flat first to ensure the symmetry matches perfectly before I start stringing.
Loose Beads?
If the design feels floppy, you may have left too much slack near the crimps. Use crimp covers to fill gaps, or re-string, pulling tighter before crimping.
Step 3: Assembly and Finishing
-
Prepare the cord:
Cut a length of stretch cord about 10-12 inches long. This extra length makes tying the knot significantly easier than working with a short tail. Pre-stretch the cord by pulling it gently a few times to prevent sagging later. -
String the beads:
Begin threading your beads. If you are adding a clasp, start with a crimp bead and your clasp hardware on one end. If making a simple stretch bracelet, just start stringing your pattern. For the design shown, we are using a clasp and extender. -
Attach the first connector:
Thread on a crimp bead, loop the wire through the ring of your lobster clasp, and thread it back through the crimp bead. Use your flat nose pliers to flatten the crimp bead securely. -
Transfer the pattern:
Carefully thread all your laid-out beads onto the cord, maintaining the order: peach run, triple gold stack, mixed accents, triple gold stack, peach run, gold ring, cream/green/gold ball section, FOCAL DISC, gold ball/green/cream section, and reverse. -
Check the fit:
Wrap the strung beads around your wrist one last time. It should sit comfortably without pinching or leaving large gaps. -
Attach the extender chain:
On the finishing end, thread on a crimp bead, loop through the jump ring of your extender chain, and go back through the crimp. Pull tight so there is no slack in the beads, but not so tight the bracelet buckles. -
Secure the crimp:
Flatten the final crimp bead with pliers. Trim the excess wire tail close to the crimp. -
Hide the mechanics:
If possible, gently slide the bead nearest the crimp over the hardware to conceal it for a cleaner look. You can create a knot cover or use a larger hole bead at the ends for this purpose.
Style Upgrade
Replace the flat terracotta disc with a coin pearl or a hammered gold disc for a more glamorous, evening-ready version of this earthy design.
Wear your new bracelet stacked with other gold chains for a chic, layered bohemian look
Beachy Blues With Shell Accent
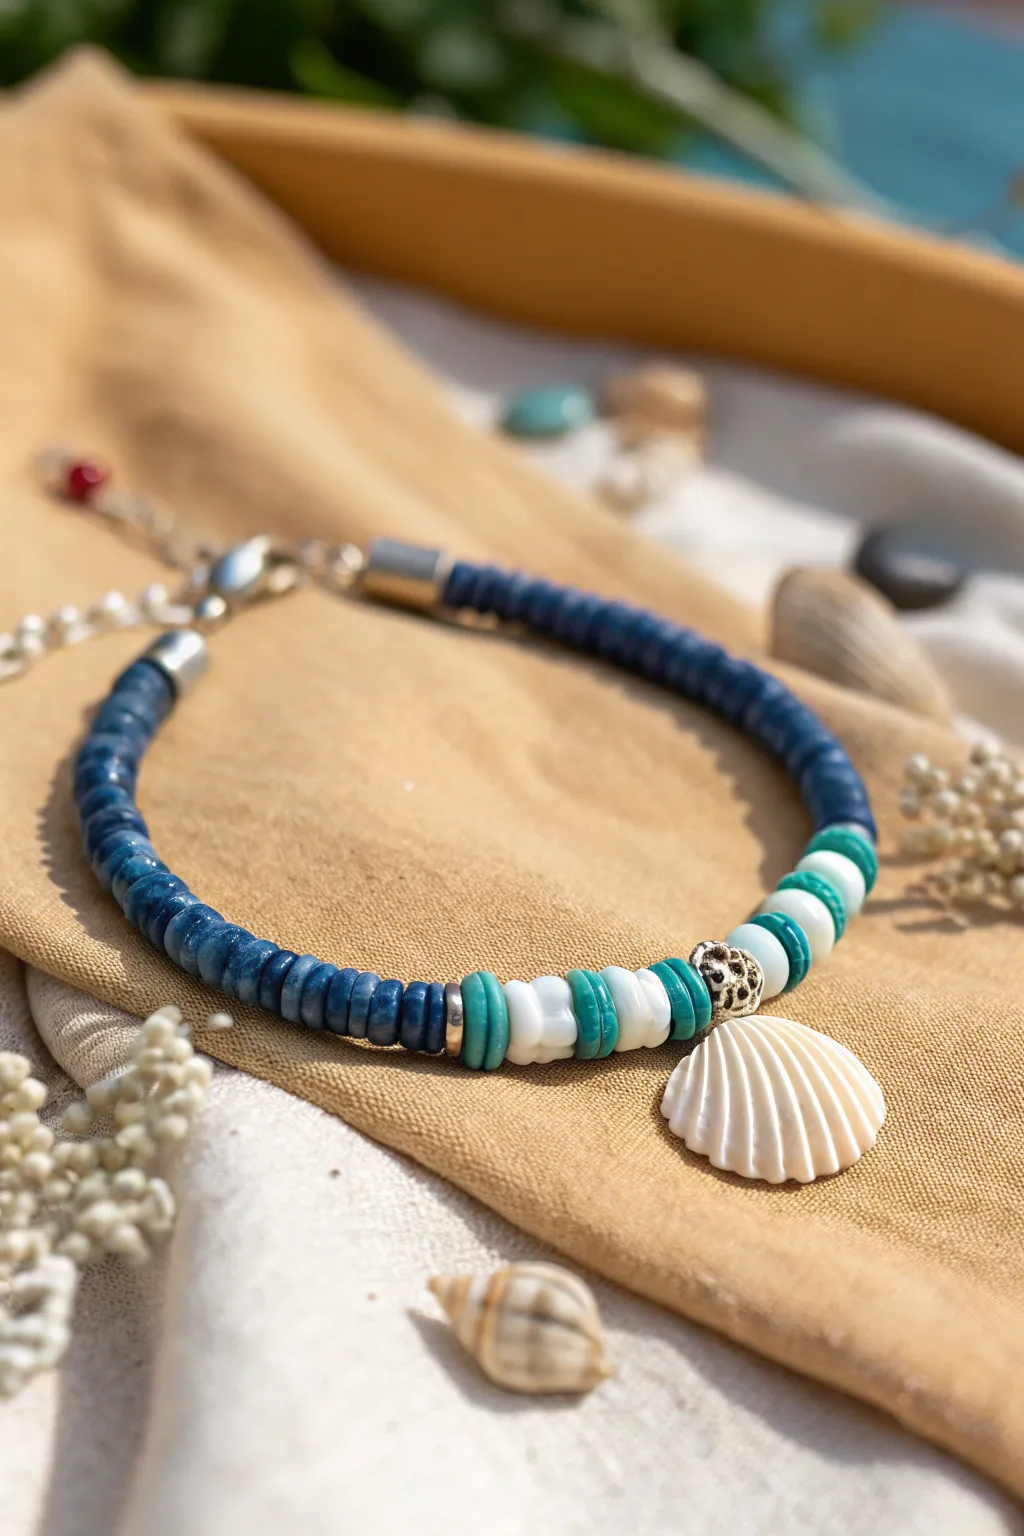
Capture the spirit of the seaside with this stunning anklet or bracelet design that pairs deep indigo hues with crisp whites and teals. The standout feature is a beautifully detailed shell charm that dangles playfully, making it the perfect accessory for your next coastal getaway.
Step-by-Step Guide
Materials
- Navy blue heishi clay beads (approx. 6mm)
- Teal/turquoise heishi clay beads
- White heishi clay beads
- White scallop shell charm
- Silver ornate charm bail or large jump ring
- Silver crimp beads (2)
- Silver crimp covers (2) (optional)
- Silver jump rings (5mm)
- Lobster clasp and extension chain
- Beading wire (7-strand or 19-strand)
- Crimping pliers
- Wire cutters
- Chain nose pliers
Step 1: Setting the Foundation
-
Measure and Cut:
Begin by measuring your ankle or wrist. Add about 1.5 inches to this measurement to account for the clasp and some movement. Cut a length of beading wire accordingly. -
Attach the First Clasp:
Thread a crimp bead onto one end of the beading wire. Loop the wire through the small ring on your lobster clasp or extension chain finding. -
Secure the Loop:
Pass the wire tail back through the crimp bead. Use your crimping pliers to flatten the crimp bead securely, ensuring the wire is locked in place. -
Cover the Crimp:
If you are using a crimp cover, place it over the flattened crimp bead and gently close it with your pliers to make it look like a smooth silver bead. This adds a professional finish.
Natural Selections
For a truly authentic beach feel, verify your shell charm is real shell rather than plastic; the natural ridges catch the light much better.
Step 2: Creating the Pattern
-
Start the Navy Section:
Begin threading the navy blue heishi beads onto the wire. You need to create a long, solid section of this color. I find it easiest to pick up several at a time if the needle or wire is stiff enough. -
Check the Length:
Continue adding navy beads until you have covered slightly more than one-third of your total desired length. This creates the asymmetrical look seen in the photo. -
Begin the Teal Accent:
Now, transition to the accent colors. Add three teal heishi beads. -
Add White Contrast:
Follow the teal beads with three white heishi beads. This creates a bold blocky stripe pattern. -
Repeat the Stripe:
Add another set of three teal beads, followed by another set of three white beads. -
Prepare for the Centerpiece:
Add one final group of three teal beads. You should now have five small blocks of color (Teal-White-Teal-White-Teal).
Make It Adjustable
Attach a 2-inch chain extender to the receiving end of the clasp so the bracelet can also be worn as a looser anklet depending on your mood.
Step 3: Adding the Shell and Finishing
-
Prepare the Charm:
If your shell charm doesn’t have a bail attached, carefully open a silver jump ring or bail and attach it to the hole in the shell. -
String the Centerpiece:
Place a decorative silver spacer or bead with a wide hole onto the wire, followed by your prepared shell charm, and then another matching silver spacer. -
Mirror the Pattern:
Now, reverse the pattern you created on the other side of the shell. Add three teal beads, then three white beads. -
Continue the Mirror:
Add three teal beads, followed by three white beads, and finish the accent section with a final set of three teal beads. -
Finish with Navy:
Fill the rest of the beading wire with the navy blue heishi beads until you reach the end, matching the length of the first navy section. -
Add the End Hardware:
Thread a crimp bead onto the wire, followed by the jump ring for your clasp connection. -
Final Secure:
Pass the wire back through the crimp bead and pull tight, leaving just a little wiggle room for the beads to move. Crimp the bead shut and trim the excess wire close to the bead.
Now you have a piece of wearable ocean art that captures the deep blues and bright whites of the shoreline
Fruit-Focused Color Frame
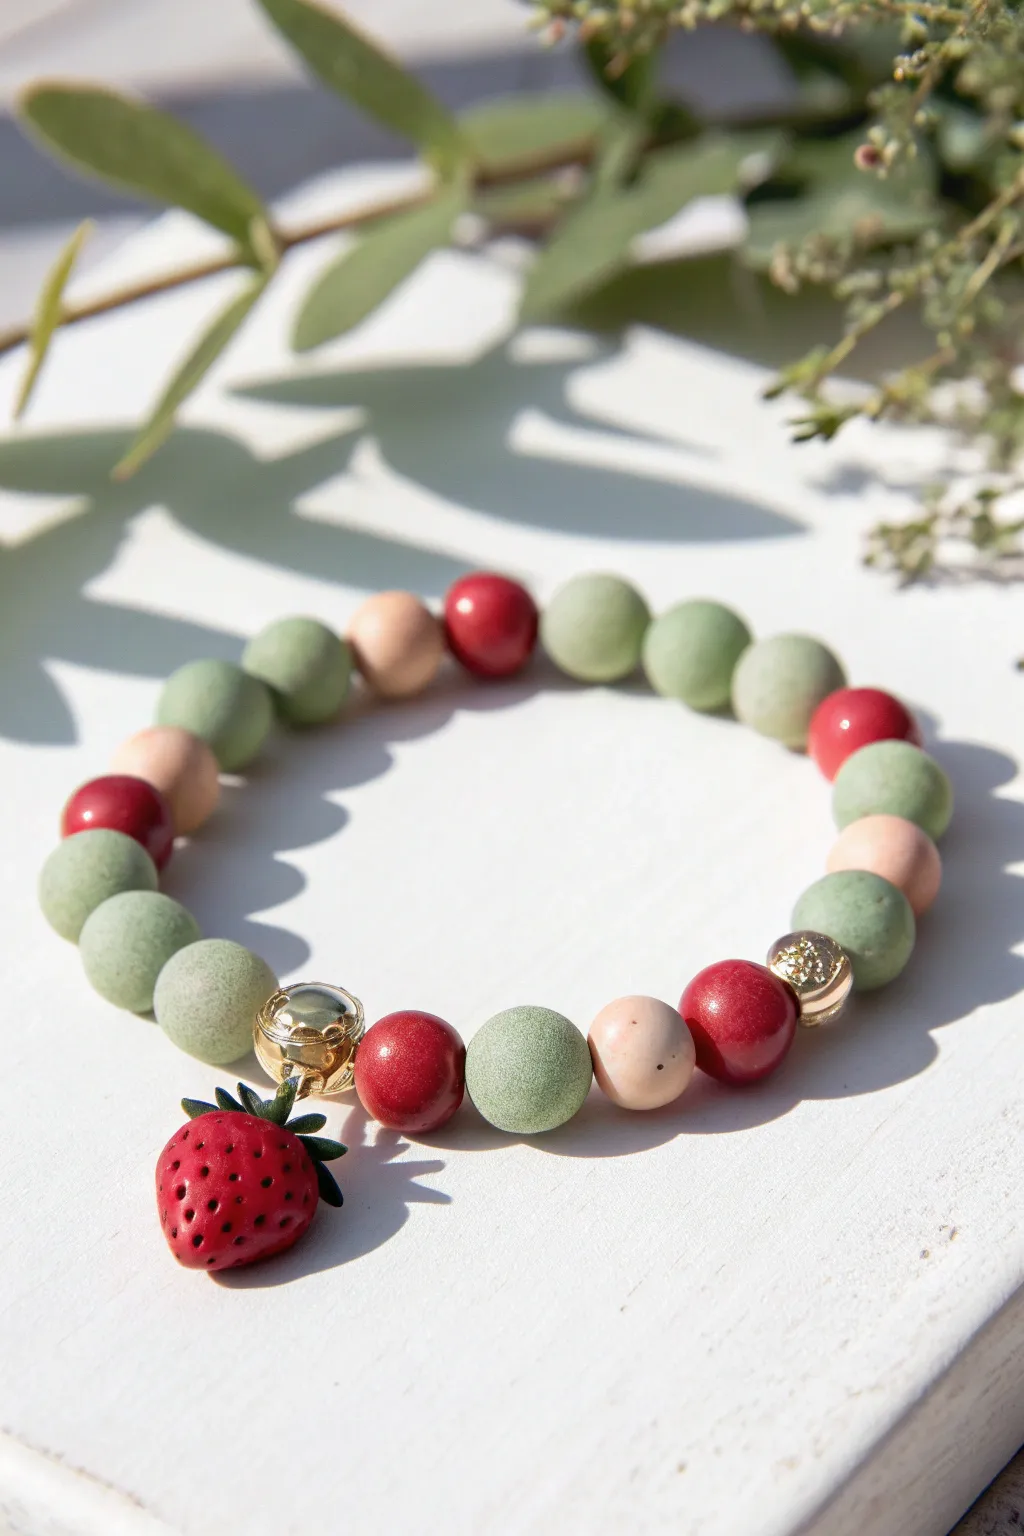
This delightful bracelet captures the essence of a summer picnic with its matte sage, cream, and red beads anchored by a realistic strawberry charm. The balanced pattern and subtle gold accents create a sophisticated yet playful accessory perfect for everyday wear.
Detailed Instructions
Materials
- 10mm round matte polymer clay or wood beads (Sage Green)
- 10mm round matte polymer clay or wood beads (Dusty Pink/Cream)
- 10mm round matte polymer clay or wood beads (Deep Red)
- Polymer clay (Red and Green) for the charm
- 2 Gold spacer beads (approx. 6-8mm)
- 1 Gold bail or large jump ring
- Elastic stretch cord (0.8mm or 1mm)
- Jewelry glue or clear nail polish
- Headpin and eye pin (gold)
- Needle tool or toothpick
- Scissors
Step 1: Sculpting the Strawberry Charm
-
Form the Base:
Take a small amount of red polymer clay, about the size of a dime, and condition it until soft. Roll it into a smooth ball and then gently tape one end to form a teardrop or classic strawberry shape. -
Create the Seeds:
Using a needle tool or toothpick, gently press small indentations all over the surface of the strawberry. Don’t go too deep; you just want to create the texture of seeds. -
Add the Leafy Top:
Condition a tiny piece of green clay. Flatten it into a small, thin star shape or cut out tiny triangles. Press this onto the wider, top end of your red strawberry. -
Secure the Hardware:
Carefully insert a gold headpin or eye pin through the center of the green leaves and down into the red fruit body. Ensure the loop at the top sits flush against the leaves so it can hang later. -
Bake the Charm:
Bake your clay strawberry according to the manufacturer’s instructions (usually around 275°F/130°C for 15-30 minutes). Let it cool completely before handling.
Knot Slipping?
If your elastic knot keeps slipping undone before you can glue it, try rubbing the ends of the cord with a little beeswax or even plain bar soap to add friction.
Step 2: Assembling the Bracelet Strand
-
Prepare the Cord:
Cut a piece of elastic cord about 10-12 inches long. I always cut extra to make knotting easier at the end. Pre-stretch the cord by pulling it firmly a few times to prevent sagging later. -
Start the Pattern:
Begin threading your beads. Start with your specific pattern to frame the large red beads. A good sequence based on the photo is: one red, one cream, one sage green. -
Build the Main Body:
Continue the pattern. Notice the variation: sometimes two greens are next to each other, or a cream separates them. The photo shows an irregular but balanced mix, mostly heavy on the sage green. -
Midpoint Check:
Wrap the strand around your wrist to check the sizing. For an average adult wrist, you’ll likely need about 6.5 to 7 inches of beads total. -
Position the Focal Section:
Decide where your charm will hang. Thread one large gold spacer bead, followed by a cream bead, then a red bead, another sage, and finally the second gold spacer bead. This creates a metallic ‘frame’ for the charm area. -
Add the Charm:
Slide your gold bail or large jump ring onto the cord right next to one of the gold spacer beads. Attach your cooled homemade strawberry charm to this bail.
Step 3: Finishing Touches
-
Tie the Knot:
Bring the two ends of the elastic cord together. Tie a simple overhand knot, pulling it tight to bring the beads close together without bunching. -
Secure with a Surgeon’s Knot:
For extra security, tie a surgeon’s knot: cross the threads, loop one end through the circle twice, and pull tight. This prevents the smooth elastic from slipping. -
Glue the Knot:
Apply a tiny dot of jewelry glue or clear nail polish to the knot. Let it dry for a minute or two to ensure it won’t come undone. -
Hide the Knot:
Trim the excess cord ends to about 2mm. Gently tug the cord so the knot slides inside the hole of the nearest large bead (ideally a gold one or one with a larger hole).
Make It Glossy
Coat the tiny clay strawberry in a high-gloss glaze or UV resin after baking. This makes it look like fresh, wet fruit and protects the paint or clay.
Now you have a sweet, handmade accessory ready for your next sunny outing
Preppy Brights With Smiley Focal
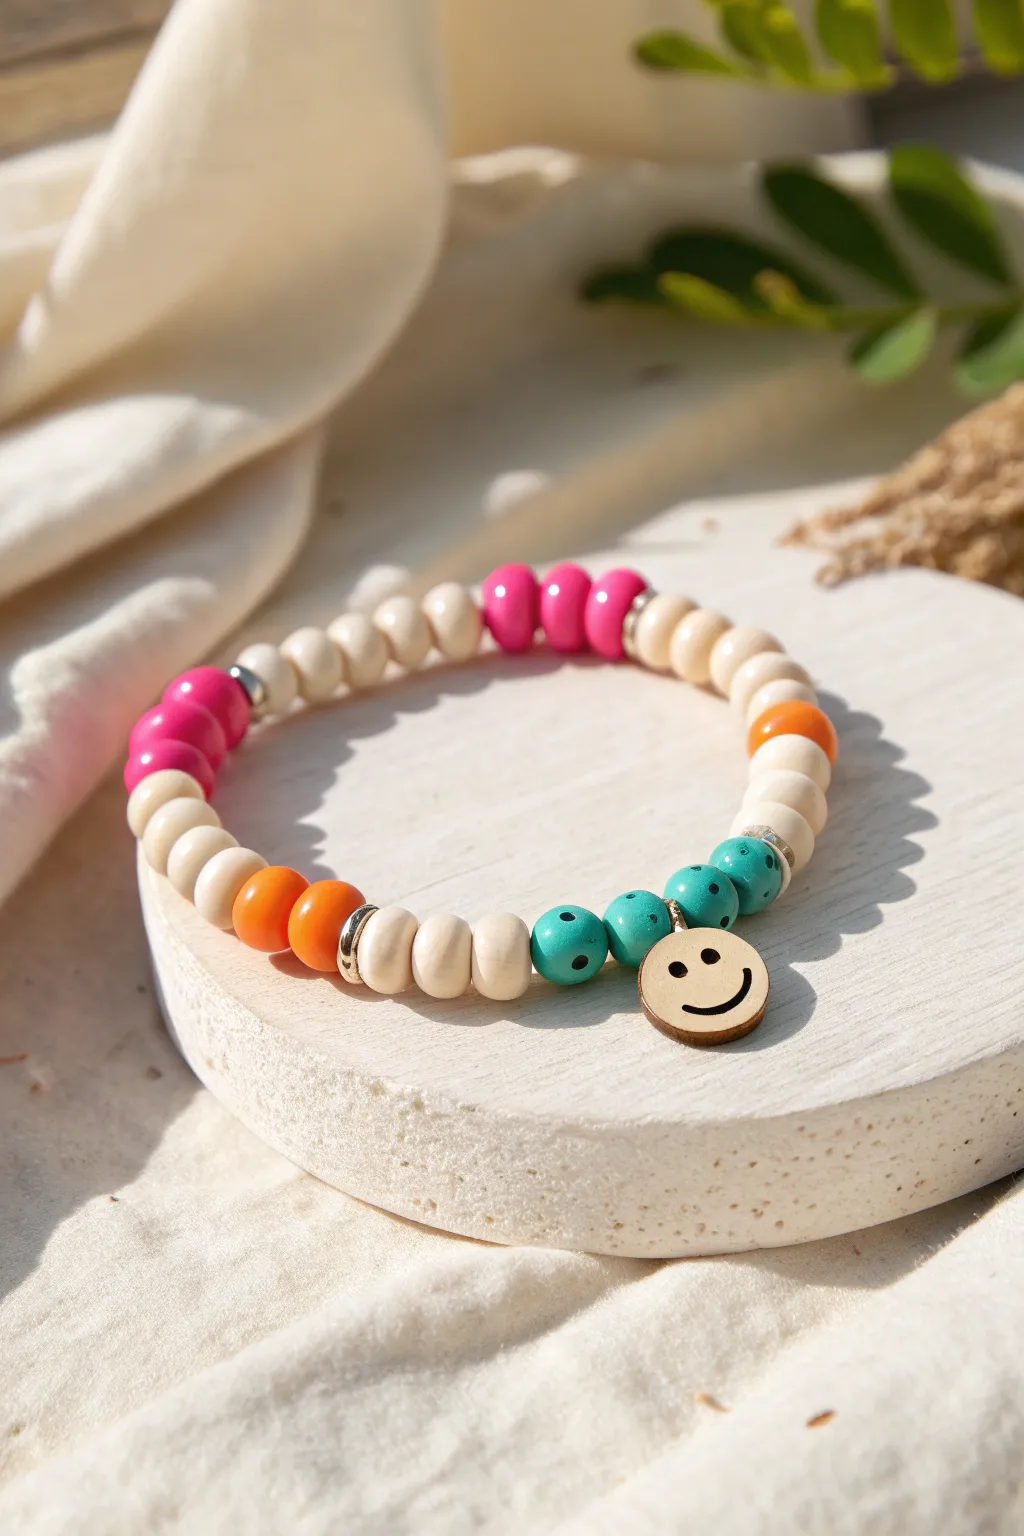
This cheerful bracelet combines a natural wood aesthetic with pops of vibrant color and a whimsical smiley face charm. It’s the perfect accessory to add a touch of playful preppy style to your wrist stack while keeping things grounded with organic textures.
Step-by-Step Guide
Materials
- Elastic cord (0.7mm or 0.8mm clear stretch cord)
- Natural wood beads (approx. 8mm round)
- Hot pink wood or acrylic beads (8mm round)
- Bright orange wood or acrylic beads (8mm round)
- Turquoise/Teal wood beads (8mm round)
- Smiley face wooden charm with a jump ring
- Silver spacer beads (small, ring-shaped)
- Detailed turquoise beads with black dots (optional variant for texture)
- Scissors
- Jewelry glue or clear nail polish
- Bead stopper or tape
Step 1: Preparation & First Section
-
Measure and Cut:
Begin by cutting a piece of elastic cord about 10-12 inches long. This gives you plenty of extra room for tying the knots later. -
Secure the End:
Attach a bead stopper explicitly to one end of your cord, or simply tape it down to your table to prevent beads from sliding off as you work. -
Start with Neutrals:
Thread on four or five natural wood beads to start the pattern. This establishes the creamy, neutral base of the design. -
Add the Pink Pop:
Slide on one tiny silver spacer bead, followed by three hot pink beads. These should be vibrant and saturated. -
Close the Pink Section:
Finish this color block by adding another silver spacer bead immediately after the third pink bead.
Knot Security
Pre-stretch your elastic cord by pulling it firmly a few times before beading. This prevents the bracelet from stretching out and becoming loose after just a few wears.
Step 2: Building the Pattern
-
Middle Neutral Segment:
String on a longer section of natural wood beads. Based on the photo, aiming for about 8 to 10 beads here creates a nice separation between the color blocks. -
Add Orange Accents:
Place one orange bead onto the cord. Follow it with a few natural wood beads—I usually use about four here—and then add a second orange bead. This asymmetry adds interest. -
Transition to Turquoise:
Thread a silver spacer bead, followed by three natural wood beads, and another silver spacer to frame the upcoming focal section.
Step 3: The Focal Point & Completion
-
Teal Beads Installation:
Add four teal or turquoise-colored beads. If you have beads with small black dot detailing like in the image, use those here for extra texture. -
Attach the Charm:
Find the center of your teal bead group (between the second and third bead). Prepare your smiley charm by ensuring it is on a secure jump ring. -
String the Smiley:
Slip the jump ring of the smiley charm directly onto the elastic cord so it rests comfortably between the teal beads. -
Finish the Loop:
Check the length of the bracelet by wrapping it around your wrist. If you need more length, add a few more natural wood beads to the ends until it fits comfortably. -
Prepare for Knotting:
Remove your bead stopper or tape carefully, bringing the two ends of the elastic cord together. -
Tie the Knot:
Tie a secure surgeon’s knot. This involves looping the cord through twice on the first pass before pulling tight, then tying a standard overhand knot on top. -
Secure and Trim:
Apply a tiny drop of jewelry glue or clear nail polish to the knot to seal it. Let it dry for a moment, then trim the excess cord tails close to the knot. -
Hide the Knot:
Gently tug the bracelet so the knot slides inside the hole of one of the adjacent wooden beads to conceal it.
Level Up The Look
Replace the smiley face with an initial charm for a personalized gift, or use gold spacer beads instead of silver for a warmer, sun-kissed aesthetic.
Enjoy wearing your happy new accessory combined with other textures for a truly unique stack
Pearl-and-Clay Texture Repeat
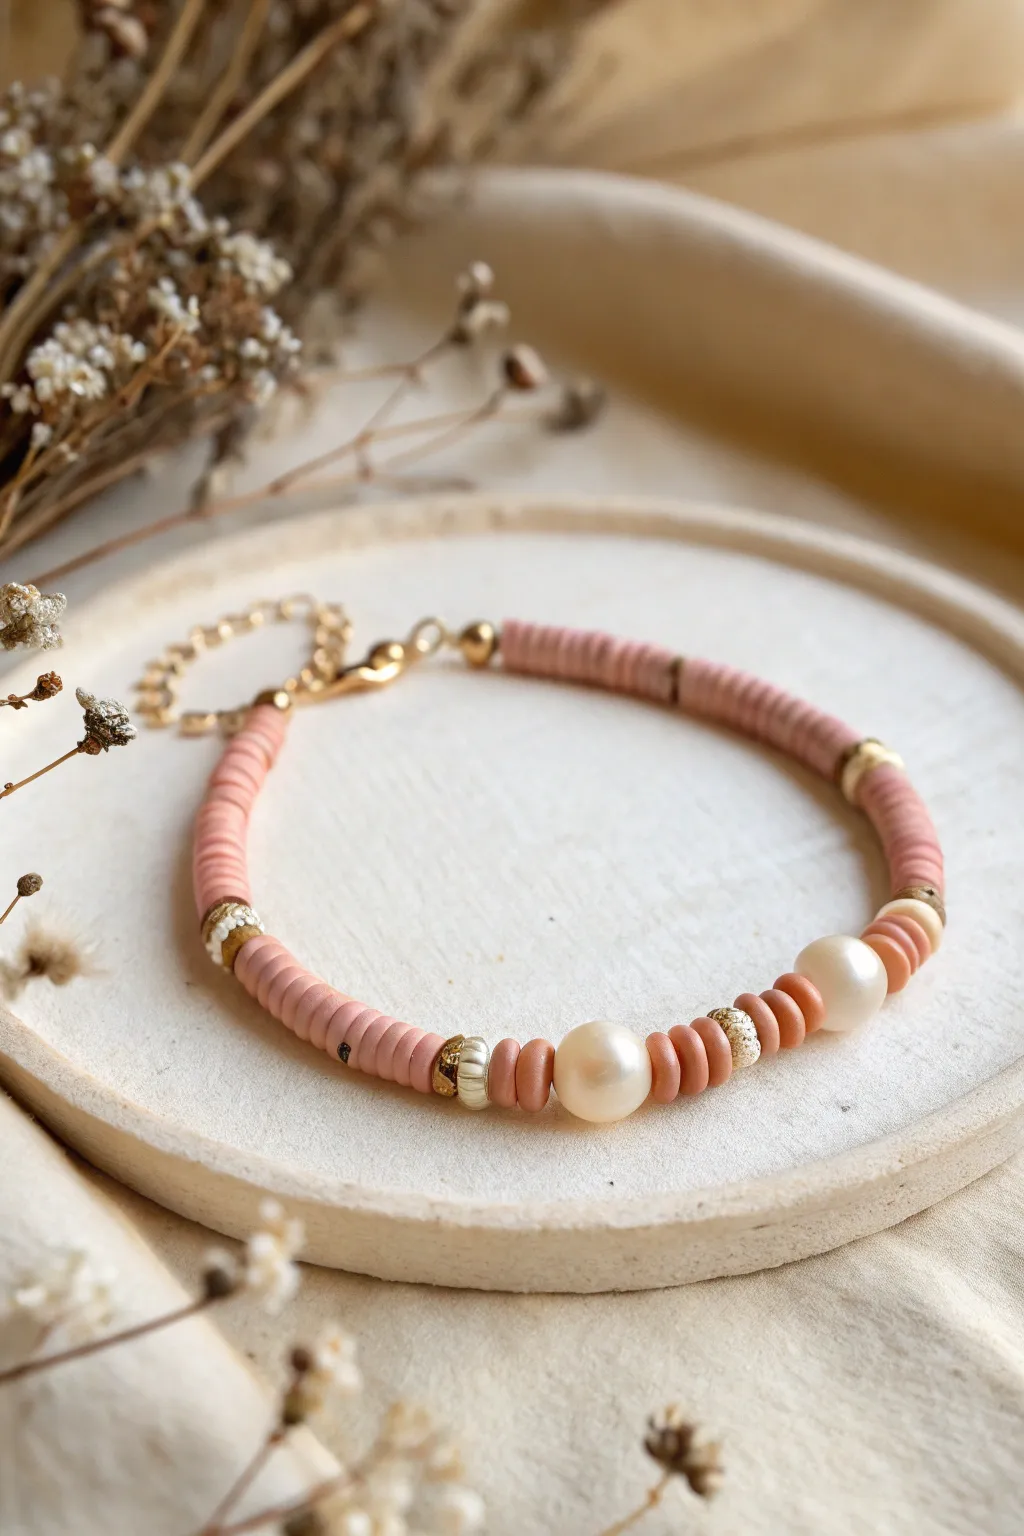
This elegant bracelet balances the organic imperfection of freshwater pearls with the structured rhythm of clay heishi beads. The soft, dusty pink hue combined with gold accents creates a sophisticated piece perfect for stacking or wearing solo.
Step-by-Step
Materials
- Dusty pink polymer clay heishi beads (6mm)
- 2 Large freshwater pearls (approx. 8-10mm)
- Gold seed beads or tiny heishi spacers
- Gold plated crimp beads
- Gold plated crimp covers
- Gold plated lobster clasp
- Gold plated extension chain
- Strong beading wire (e.g., Beadalon 19 or 49 strand)
- Flat nose pliers
- Wire cutters
- Crimping pliers (optional but recommended)
Step 1: Setting the First Clasp
-
Measure and Cut Wire:
Cut a length of beading wire approximately 10 inches long. This gives you plenty of extra room to maneuver your tools without risking the beads sliding off the ends. -
Thread the Crimp:
Slide a crimp bead onto one end of the wire, followed by the jump ring attached to your lobster clasp. Loop the wire back through the crimp bead to create a secure loop. -
Secure the End:
Using your crimping pliers or flat nose pliers, flatten the crimp bead tightly. Ensure the loop is small enough that the clasp has movement but isn’t dangling loosely. -
Hide the Crimp:
Place a gold crimp cover over the flattened crimp bead. Gently squeeze it shut with pliers until it looks like a round gold bead, being careful not to crush it into an oval shape.
Stiff Bracelet?
If your finished bracelet feels rigid or kinks up, you crimped too tightly. Leave a millimeter of slack in the wire before the final crimp to ensure fluid drape.
Step 2: Designing the Pattern
-
Start the Sequence:
Begin stringing your dusty pink clay beads. Add about 2 to 2.5 inches of just these pink discs to form the side of the bracelet that will sit near the clasp. -
First Gold Accent:
Slide on a gold spacer bead or a thick gold heishi bead to break up the color. -
Add Texture:
Thread on a small group of white or cream accent beads—you can use tiny shell chips, white seed beads, or a contrasting white heishi bead here—followed by another gold spacer. -
Central Clay Section:
Add a shorter section of the pink clay beads, roughly 1 inch long. This builds the bridge toward the focal point. -
The Focal Area Setup:
Now, add a textured gold bead, followed by a thin white spacer bead or disk. -
Placing the Pearls:
Thread on three to four pink clay beads, and then your first large freshwater pearl. The juxtaposition of the matte clay and shiny pearl is the key to this look. -
Center Spacing:
Add about four to five pink clay beads, a textured gold bead, and then four to five more pink beads to create separation between the two pearls. -
Second Pearl:
Slide on the second freshwater pearl. Follow it with a small cluster of pink beads (3-4) and a final white/gold spacer combination to mirror the other side. -
Finish the Strand:
Complete the beading by filling the rest of the wire with the solid pink clay beads until the bracelet reaches your desired length (usually about 6.5 to 7 inches excluding the clasp).
Step 3: Closing the Bracelet
-
Prepare the End:
Slide a crimp bead onto the open end of the wire. -
Attach Extension Chain:
Thread the wire through the last link of your extension chain or a closed jump ring. -
Create the Loop:
Pass the wire back down through the crimp bead and through the first few clay beads on the strand. Pull tight so there are no gaps in your beadwork, but allow a tiny bit of slack so the bracelet doesn’t become stiff. -
Final Crimp:
Flatten the crimp bead securely with your pliers. -
Cover and Trim:
Apply the final crimp cover over the flattened bead, shaping it into a sphere. Trim the excess wire tail flush against the beads so it doesn’t poke the wearer.
Mix It Up
Swap the central clay beads between the pearls for tiny gold balls or real gemstone chips like rose quartz to elevate the texture even further.
Now you have a beautifully textured accessory ready to add a soft touch of color to your outfit
Spacer-Heavy Sparkle Line
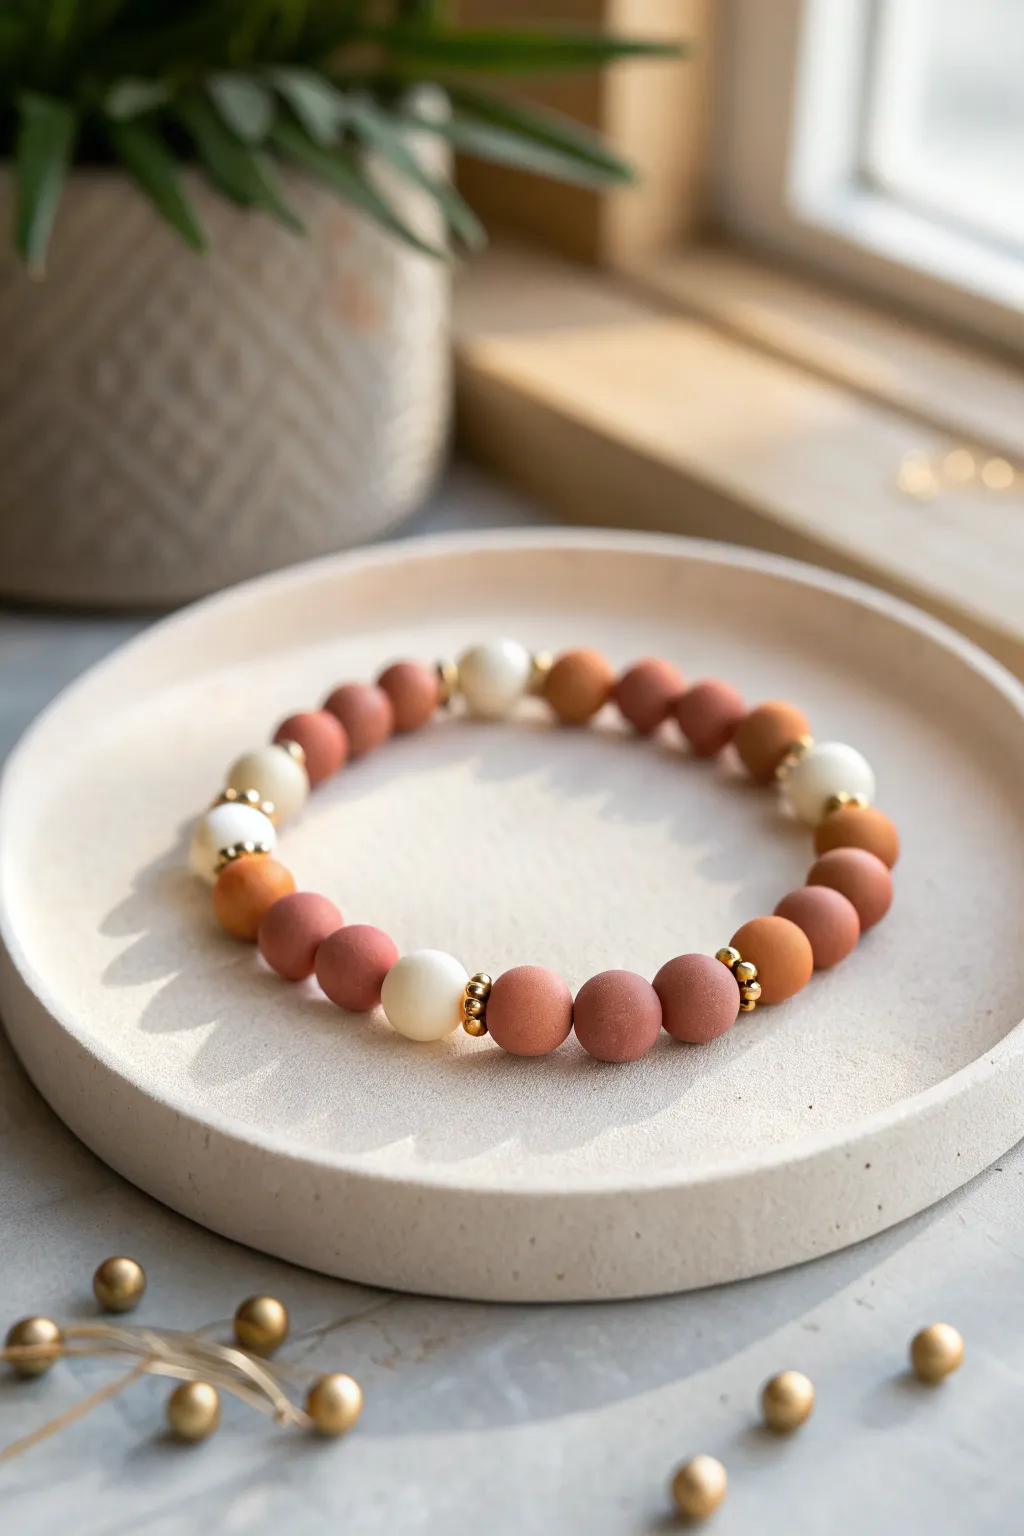
Embrace warm, earthy tones with this sophisticated clay bead bracelet featuring a rhythmic pattern of matte terracotta, dusty rose, and cream beads. The subtle twinkle of gold spacers adds just the right amount of polish without overwhelming the natural aesthetic.
Detailed Instructions
Materials
- Polymer clay round beads (8mm or 10mm): Terracotta/rust color
- Polymer clay round beads (8mm or 10mm): Dusty rose/mauve color
- Polymer clay round beads (8mm or 10mm): Cream or off-white color
- Gold tone spacer beads (3mm or 4mm, metallic)
- Small gold disc spacers or rondelles (optional)
- Strong elastic cord (0.8mm or 1mm transparent)
- Super glue or jewelry cement
- Scissors
- Bead design board or shallow tray
- Tape or binder clip
Step 1: Planning the Design
-
Measure your wrist:
Before separating any beads, wrap a measuring tape or piece of string loosely around your wrist to determine the desired length. Add about half an inch to this measurement for a comfortable fit that isn’t too tight. -
Lay out the pattern:
Using a bead design board or a soft cloth on a table, begin laying out the beads to visualize the final look. -
Establish the color rhythm:
For this specific look, aim for a pattern centered around the cream accent beads. Group the clay beads in sets of three or four of the same color (rust or dusty rose) between the cream focal points. -
Insert the gold spacers:
Place gold spacer beads strategically. The key to this ‘sparkle line’ look is flanking the cream beads and occasional colored sections with gold spacers to create definition and shine.
Sticky Situation
If the knot won’t fit inside the clay bead hole, use a bead reamer or a thick needle to gently widen the opening of that specific bead before stringing.
Step 2: Stringing the Beads
-
Prepare the elastic:
Cut a piece of elastic cord about 12 inches long. This extra length makes tying the final knot significantly easier than struggling with short ends. -
Secure the end:
Attach a piece of tape or a binder clip to one end of the elastic cord to prevent beads from sliding off as you work. -
Stretch the cord:
Pre-stretch the elastic by pulling on it gently a few times. This crucial step prevents the finished bracelet from sagging or loosening after the first few wears. -
Start with a spacer:
Thread a small gold spacer bead onto the cord first. This helps hide the final knot inside a bead hole later. -
Add the first color block:
Thread on three dusty rose/mauve beads. I find that keeping these color blocks consistent creates a more professional look than random mixing. -
Create a focal point:
Slide on a gold spacer, followed by a cream bead, and then another gold spacer. This ‘sandwich’ technique highlights the lighter bead. -
Add the second color block:
Thread on three terracotta/rust colored beads to contrast with the previous mauve section. -
Repeat the pattern:
Continue alternating your color blocks (mauve then rust), separating them with the gold-cream-gold combination. -
Check the length:
Periodically wrap the strand around your wrist. Stop adding beads when the ends meet comfortably without gaps, remembering the elastic will stretch slightly.
Matte Magic
Can’t find the perfect matte beads? Use standard glossy polymer clay beads and gently buff them with fine-grit sandpaper for that soft, earthy texture.
Step 3: Finishing Touches
-
Remove the anchor:
Carefully remove the tape or clip from the end of the cord, holding both ends securely so no beads escape. -
Tie the first knot:
Bring the two ends together and tie a simple overhand knot. Pull it tight, ensuring no gaps remain between the beads. -
Secure with a surgeon’s knot:
Tie a second knot, but this time loop the elastic end through the loop twice before pulling tight. This is a surgeon’s knot and is very secure. -
Apply adhesive:
Place a tiny drop of jewelry glue or super glue directly onto the knot. Be careful not to glue the knot to the adjacent beads just yet. -
Hide the knot:
While the glue is still tacky but not wet, pull the elastic so the knot slides inside the hole of the nearest bead (preferably a large clay one, not a spacer). -
Trim the excess:
Once dry, use small scissors to trim the excess elastic tails as close to the bead hole as possible without nicking the main cord.
Enjoy styling your new bracelet solo or as part of a stacked set for a bohemian chic vibe
Asymmetrical Center-Heavy Design
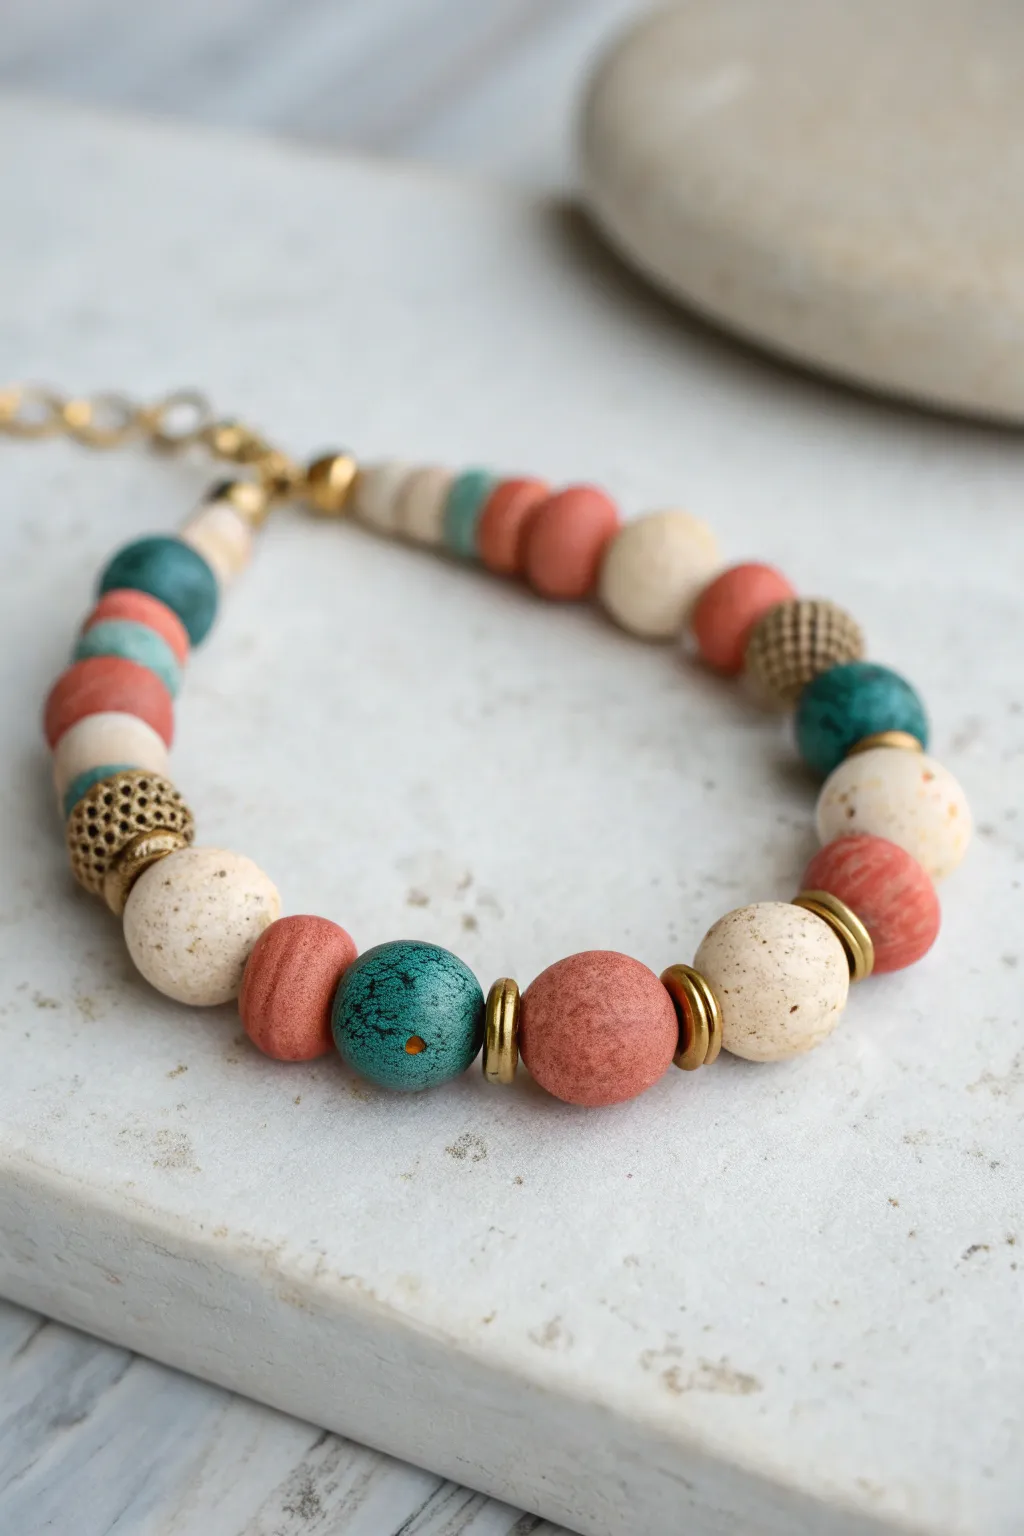
This rustic piece blends warm terracotta tones with pops of teal and speckled white for a grounded, artisanal look. The design uses larger beads at the center to create varying weights and textures, offering a sophisticated twist on a simple stringing project.
How-To Guide
Materials
- Polymer clay (terracotta, turquoise/teal, white)
- Black pepper or dried herbs (for speckling)
- Textured brass spacer beads (rondelle style)
- Gold filigree or textured metal beads (approx. 6mm and 8mm)
- Beading wire (flex wire, 0.015 or 0.018 inch)
- Crimp tubes (2mm) and crimp covers
- Wire guardians
- Gold finish lobster clasp and extension chain
- Flat nose pliers and crimping pliers
- Needle tool or toothpick (for piercing holes)
- Sandpaper (fine grit)
- Oven for baking clay
Step 1: Crafting the Clay Beads
-
Mix the Speckled Clay:
Start by conditioning your white polymer clay until soft. To achieve that organic, pottery-like finish, knead in a pinch of ground black pepper or mixed dried herbs until evenly distributed. -
Form the Focal Beads:
Roll two large round beads (approx. 10mm) from the terracotta clay and two slightly smaller ones (approx. 8mm) from your speckled white clay. These will be the anchors of your central section. -
Create Accent Beads:
Roll a medium turquoise bead (8mm) and several smaller ‘filler’ beads in all three colors ranging from 4mm to 6mm. Varying the sizes intentionally is key to the organic look. -
Add Texture (Optional):
I like to gently press a dense foam sponge or sandpaper against the raw clay beads to remove fingerprints and give them a stone-like surface texture. -
Pierce and Bake:
Using your needle tool, carefully pierce holes through the center of each bead. Twist the tool as you push to avoid squishing the shape. Bake according to your clay package instructions and let them cool completely.
Hole Sizing Check
If your wire won’t pass through a baked bead, gently use a small handheld twist drill or a bead reamer to widen the channel without cracking the clay.
Step 2: Arranging the Design
-
Lay Out the Pattern:
Before stringing, lay your beads on a bead board or cloth. Place the largest terracotta bead near the center, flanked by the textured brass spacers. -
Build the Central Cluster:
On one side of the center, place the large turquoise bead followed by a brass spacer and the large speckled white bead. On the other side, place a textured gold accent bead followed by a terracotta bead. -
Create the Asymmetry:
Continue outward, but avoid mirroring the sides perfectly. On the left, stack flat disc beads or smaller rounds. On the right, use a large gold filigree bead as a secondary focal point. -
Taper the Ends:
As you move toward the clasp ends, transition to smaller 4-6mm beads in alternating colors (cream, teal, terracotta) to ensure the bracelet sits comfortably against the underside of the wrist.
Step 3: Assembly
-
Prepare the Wire:
Cut a piece of beading wire about 10-12 inches long. This gives you plenty of room to work without beads sliding off. -
Start Stringing:
Thread your beads onto the wire following the pattern you laid out. Adjust the arrangement if needed once you see them nestled together. -
Secure the First End:
Slide on a crimp tube, followed by a wire guardian. Thread the wire through the loop of the extension chain, back through the guardian, and down into the crimp tube. -
Crimp and Cover:
Use crimping pliers to flatten the tube securely. Trim the excess wire tail close to the crimp. If desired, gently close a crimp cover over the flattened tube for a polished gold finish. -
Finish the Second End:
Repeat the crimping process on the other end, attaching the lobster clasp this time. Pull the wire ensuring there is no slack, but leave a tiny bit of wiggle room so the bracelet stays flexible. -
Final Polish:
Double-check your connections. If your handmade clay beads have any rough edges around the holes, give them a quick buff with fine-grit sandpaper.
Glazing Option
Create contrast by applying a satin varnish only to the turquoise beads while leaving the terracotta and speckled white beads matte and natural.
Now you have a beautifully balanced, artisan-style bracelet ready to wear or gift
Morse Code Dot-and-Dash Pattern
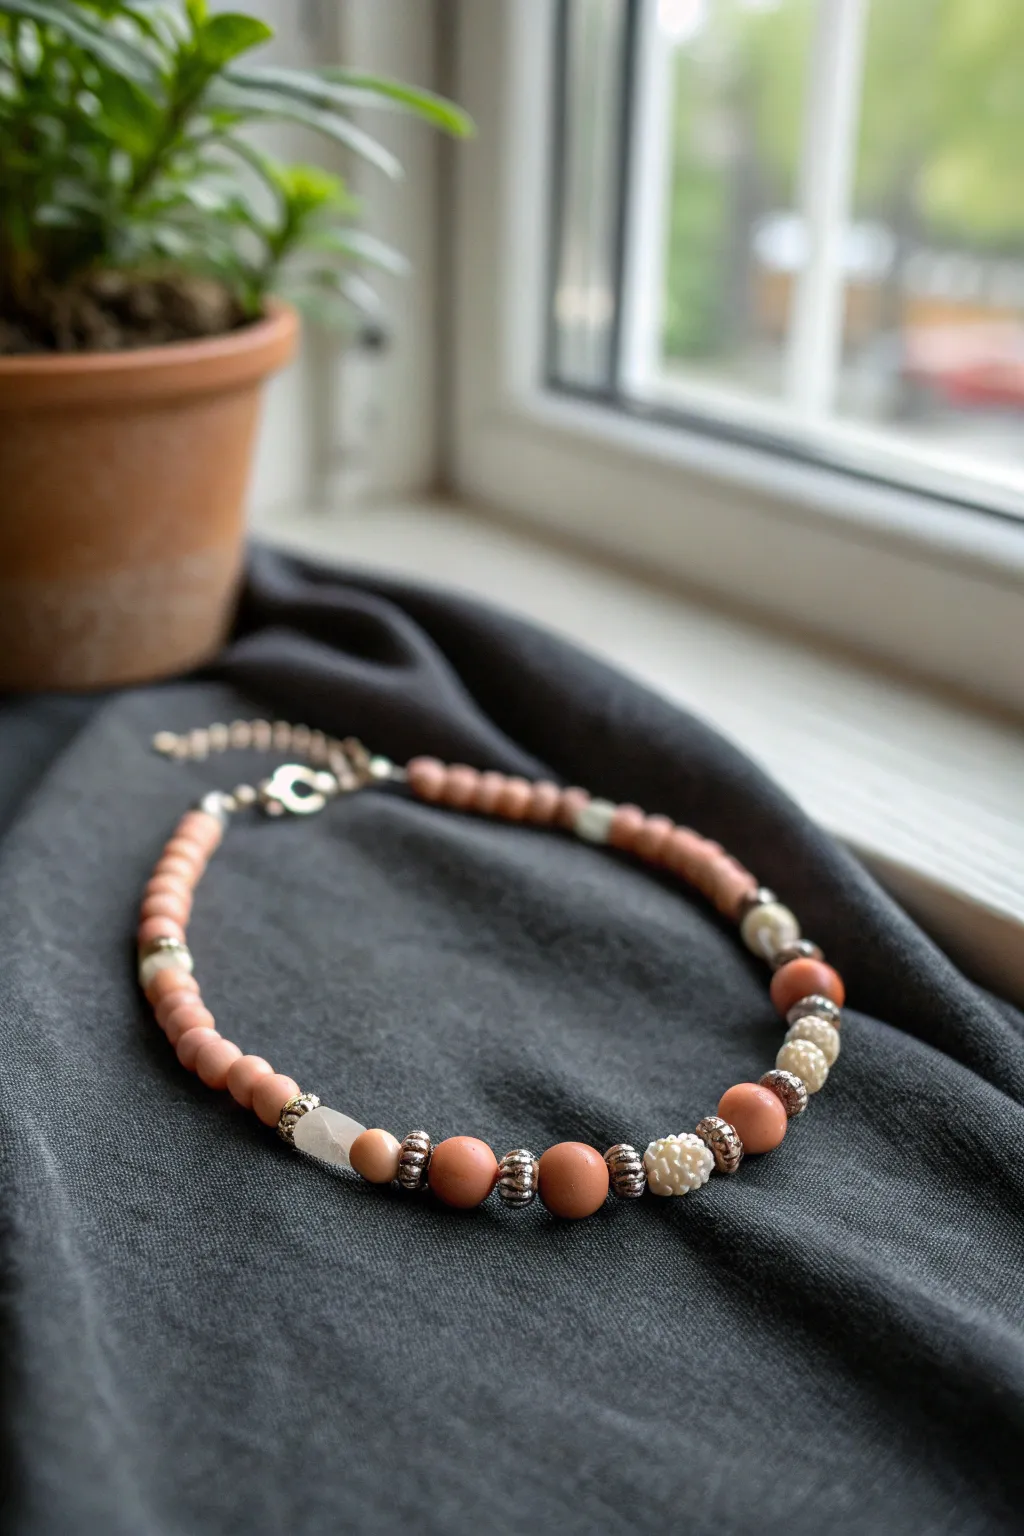
Create a meaningful accessory with this elegant bracelet that uses different bead shapes to spell out a hidden word in Morse code. The combination of earthy terracotta tones, textured silver spacers, and creamy accents gives it a sophisticated, organic look perfect for everyday wear.
Step-by-Step Tutorial
Materials
- Small round terracotta polymer clay beads (approx. 4-6mm)
- Medium round terracotta polymer clay beads (approx. 8mm)
- Textured silver spacer beads or rondelles
- Cream or white textured accent beads (round or floral carved)
- Small semi-precious stone bead (like rose quartz or moonstone)
- Beading wire or strong nylon cord
- Crimp beads
- Clasp (lobster claw or spring ring)
- Jump rings
- Extension chain
- Crimping pliers
- Wire cutters
Step 1: Planning Your Message
-
Choose your word:
Select a short, meaningful word or name you want to encode. For this tutorial, we will use the bead arrangement visible in the photo as our guide, which creates a lovely rhythmic pattern regardless of the specific letters. -
Map the code:
Decide which beads will represent dots and which will represent dashes. In this design, the silver spacers act as the separators or ‘dots’, while the larger terracotta and cream beads act as the ‘dashes’ or main letter components. -
Test the layout:
Lay out your beads on a bead board or a soft cloth before stringing. This lets you visualize the spacing and ensure your ‘message’ fits the length of the bracelet.
Uneven Tension?
If the bracelet feels stiff and kinks up, you crimped it too tightly. Leave a 1-2mm gap of bare wire near the clasp before crimping to allow the beads to move and drape naturally.
Step 2: Starting the Strand
-
Cut the wire:
Cut a piece of beading wire approximately 10-12 inches long. This gives you plenty of extra room to work with the clasp without struggling. -
Attach the first clasp component:
Thread a crimp bead onto one end of the wire, followed by a jump ring attached to your clasp. Loop the wire back through the crimp bead. -
Secure the start:
Use your crimping pliers to flatten the crimp bead securely. I like to give a gentle tug to make sure it’s holding firm before trimming the excess tail wire.
Step 3: Beading the Pattern
-
Begin with the base:
Start stringing the smaller terracotta clay beads. Add about 10-15 of these simple round beads to create a neutral ‘strap’ section that will sit at the back of the neck or wrist. -
Add first accent:
Slide on a small silver spacer, followed by a cream-colored textured bead, and another silver spacer. This marks the transition into the main focal section. -
Start the Morse pattern:
Thread on a medium-sized terracotta bead. Follow it immediately with a textured silver spacer. -
Create the center arrangement:
Add a creamy white textured bead (perhaps a carved flower or rough texture) followed by a silver spacer. Then add a large smooth terracotta bead, another silver spacer, and another large terracotta bead. -
Add the gemstone focus:
Place a small, irregular semi-precious stone (like the pale rose quartz seen in the image) next to a silver spacer to add an asymmetrical, organic touch to the design. -
Mirror or continue:
Continue your pattern. You can either mirror the design from the center out or continue your specific Morse code sequence until you reach the other side of the focal area. -
Finish the focal section:
End the main design section with a silver spacer and a cream accent bead to balance the look found at the start. -
Complete the strand:
Finish stringing by adding the remaining small terracotta beads. Ensure the length of this section matches the first side so the focal point sits centered.
Add a Charm
Personalize it further by attaching a tiny metal charm (like a star or initial) to the end of the extension chain. It acts as a cute dangle that hangs down the wrist.
Step 4: Finishing Touches
-
Check the fit:
Wrap the unfinished strand around your wrist to check the size. Remember the clasp will add about half an inch of length. -
Prepare the end clasp:
Thread a crimp bead onto the end of the wire, followed by the jump ring for your extension chain. -
Loop and secure:
Pass the wire back through the crimp bead and pull it taut, leaving just a tiny bit of slack so the bracelet remains flexible and doesn’t become rigid. -
Crimp and trim:
Flatten the final crimp bead with your pliers. Trim the excess wire flush with the bead so no sharp ends are poking out. -
Attach the extension chain:
Connect your extension chain to the jump ring. The chain adds versatility and a professional finish, allowing the bracelet to fit various wrist sizes comfortably.
Now you have a stylish, personalized piece of jewelry that carries a hidden message wherever you go