If you’re craving a clay session that feels like a mini beach day, ocean clay ideas are the perfect place to start. I love how sea-inspired shapes and textures let you play with color, pattern, and little storytelling details all at once.
Starfish Trinket Dish
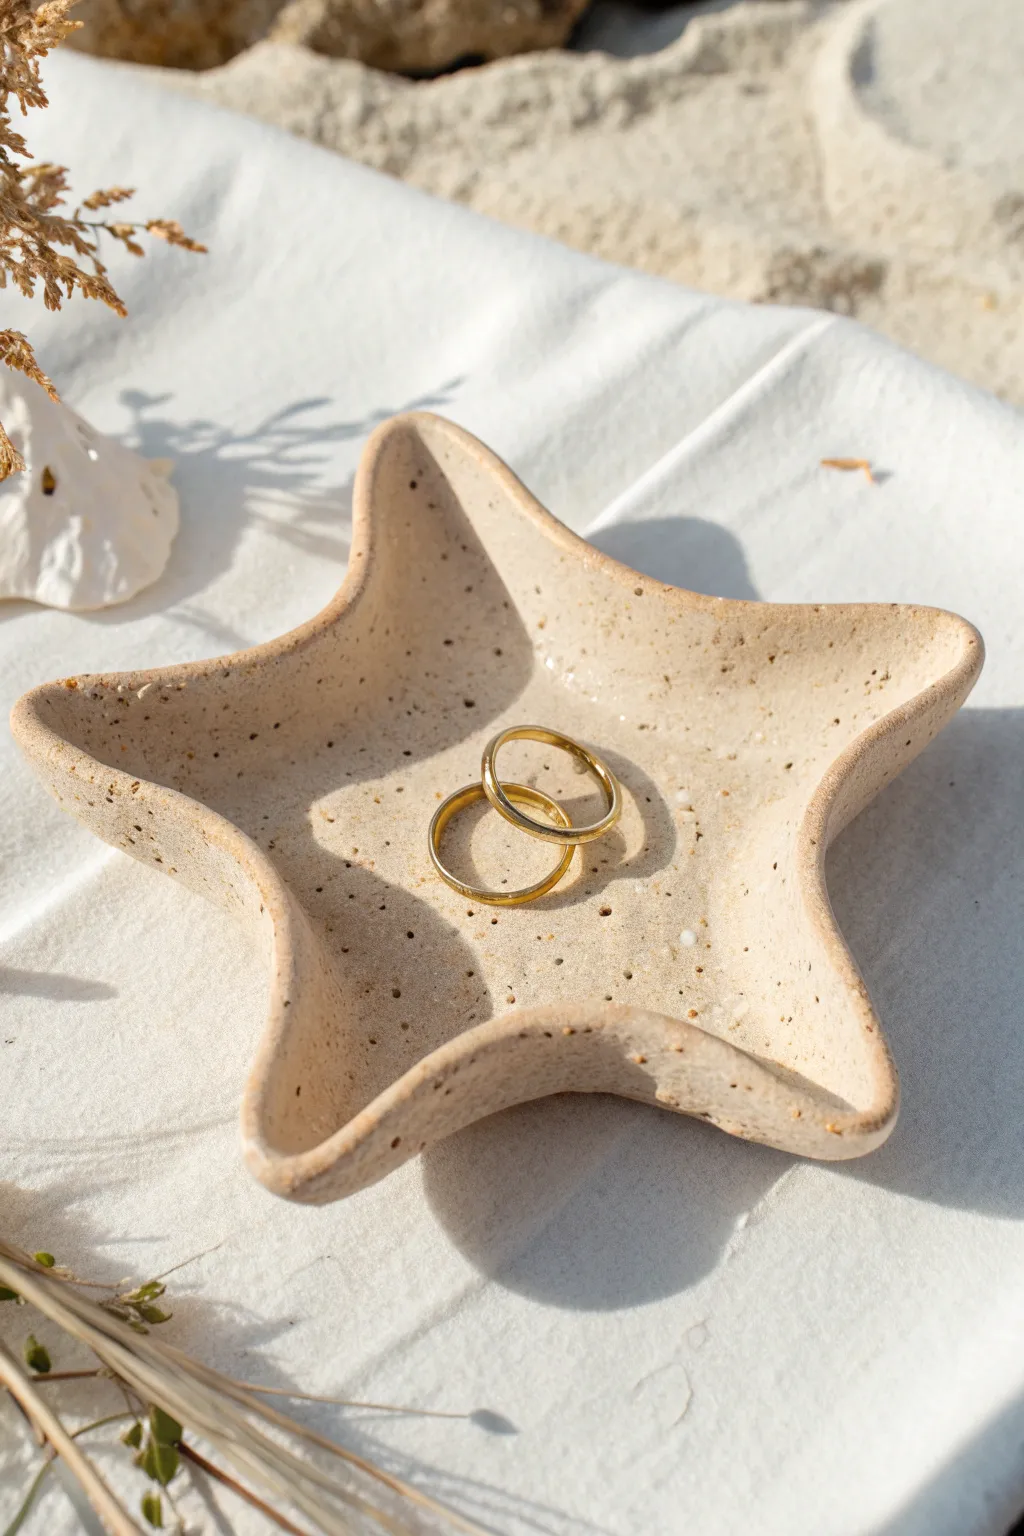
Capture the essence of the shore with this minimalist, speckled clay trinket dish. Shaped like a starfish with organic, lifted edges, this piece perfectly mimics the texture of wet sand and serves as a lovely home for your everyday jewelry.
Detailed Instructions
Materials
- Polymer clay (white or beige)
- Speckled clay addition (e.g., Fimo Effect Granite or black pepper)
- Rolling pin or acrylic roller
- Paper starfish template (printed or hand-drawn)
- Craft knife or clay blade
- Small bowl or curved baking form
- Fine-grit sandpaper
- Matte varnish or glaze (optional)
Step 1: Preparation and Shaping
-
Create the sandy blend:
Begin by conditioning your base clay. If you don’t have pre-speckled ‘granite’ style clay, you can mix a tiny amount of black clay or even cracked black pepper into beige clay to achieve that authentic sandy texture seen in the photo. -
Roll the slab:
Roll out your conditioned clay on a smooth work surface until it is about 1/4 inch thick. Aim for an even thickness so the final dish sits flat. -
Apply the template:
Place your paper starfish template gently onto the clay slab. Lightly rub over it with your finger to ensure it doesn’t shift while cutting. -
Cut the shape:
Using a craft knife, carefully trace around the template. Keep your blade vertical to ensure clean, straight edges rather than beveled ones. -
Soften the edges:
Remove the excess clay and lift your starfish shape. Dip your finger in a little bit of baby oil or water (depending on clay type) and gently smooth the cut edges to remove any sharpness. -
Add texture (optional):
If your clay is too smooth, lightly tap the surface with an old toothbrush or a piece of sandpaper to enhance the grainy, stone-like appearance.
Cracked edges?
If edges crack while curving the clay, your clay was likely too dry. Smooth cracks with a drop of baby oil or liquid clay before baking to fuse them back together.
Step 2: Forming and Baking
-
Shape the curve:
To give the dish its cupped shape, drape the clay starfish into a shallow, oven-safe bowl. Alternatively, I like to rest the center on a small mound of aluminum foil and let the arms drape down naturally. -
Refine the arms:
Gently curl the very tips of the starfish arms upward slightly. This prevents rings from sliding off and adds movement to the piece. -
Check for symmetry:
Rotate your forming bowl to ensure the curve is relatively even, though a little asymmetry adds to the organic, washed-up-on-the-beach look. -
Bake the clay:
Place the clay (still on its form) onto a baking sheet. Bake according to your specific clay manufacturer’s instructions, usually around 230°F to 275°F for 15-30 minutes. -
Cool down:
Let the dish cool completely inside the oven or on a wire rack before handling. The clay is most fragile when hot.
Make it Luxe
Paint the very rim of the starfish with liquid gold leaf after baking. This adds an elegant contrast to the rustic, speckled sand texture.
Step 3: Finishing Touches
-
Sand the rim:
Once cool, use fine-grit sandpaper to go over the rim of the dish one last time, smoothing out any rough spots or fingerprints. -
Clean surfaces:
Wipe the dish down with a slightly damp cloth to remove any sanding dust. -
Seal (Optional):
For a natural, stonelike finish similar to the reference, leave the clay matte. If you want durability, apply a very thin layer of matte varnish.
Now you have a serene little piece of the ocean to hold your most treasured rings


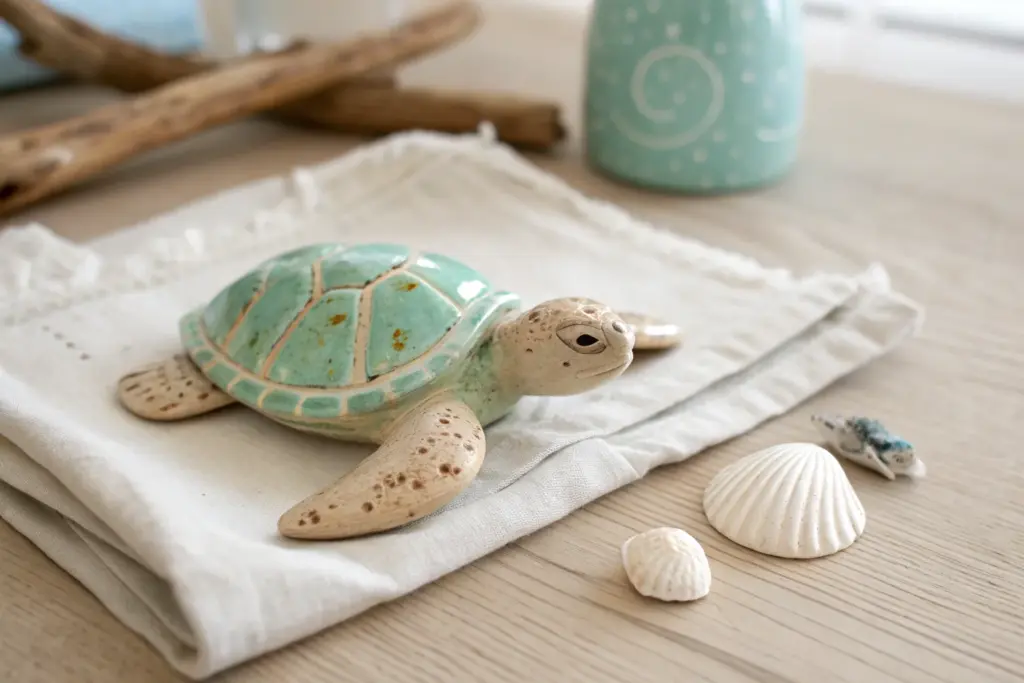
Sea Turtle Ring Holder
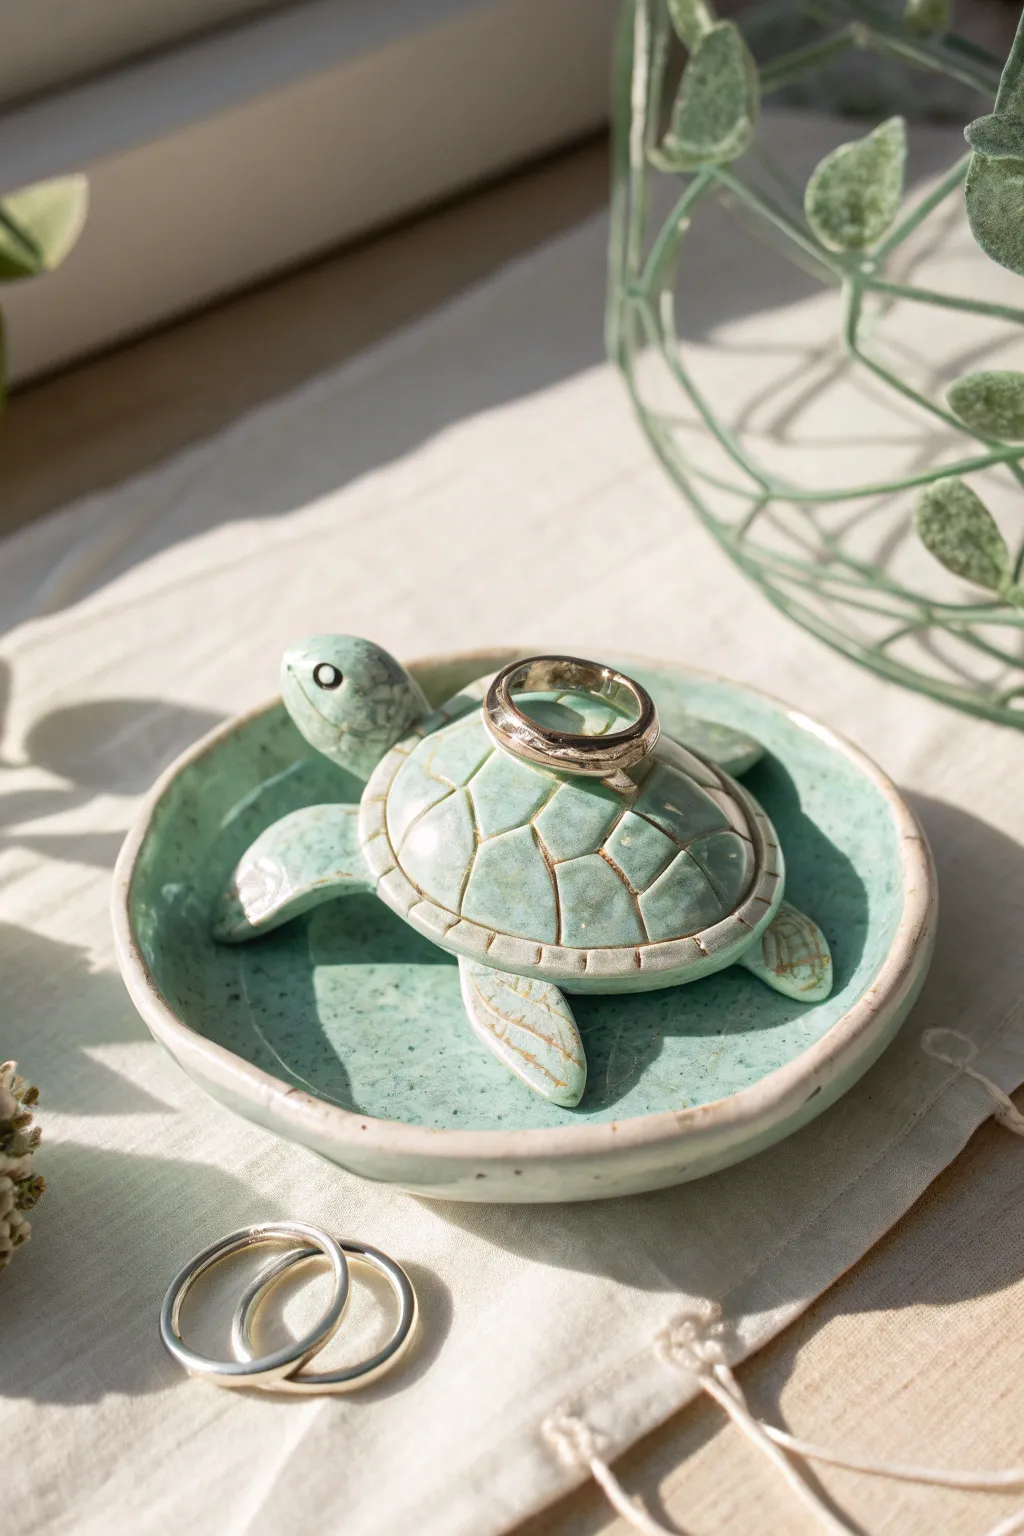
This charming ring holder combines a shallow trinket dish with a sculpted sea turtle centerpiece, perfect for keeping your favorite jewelry safe. The piece features a glossy, speckled sea-green glaze that gathers beautifully in the textured details of the shell and flippers.
How-To Guide
Materials
- Light-colored stoneware clay (or polymer clay if not firing)
- Pottery wheel (optional) or rolling pin for the base
- Modeling tools (needle tool, small loop tool, sponge)
- Slip and scoring tool
- Sea-green celadon or translucent speckled glaze
- Oxide wash (iron or manganese) for detailing
- Small paintbrush
- Kiln (if using ceramics)
Step 1: Forming the Base Dish
-
Prepare the clay:
Begin with a ball of clay about the size of a tennis ball. Wedging it thoroughly removes air bubbles and ensures a smooth consistency for sculpting. -
Form the shallow bowl:
You can throw a small, shallow saucer on the wheel, approximately 4-5 inches in diameter. Alternatively, roll out a slab to 1/4 inch thickness and gently press it into a small foam mold or slump mold to create a gentle curve. -
Refine the rim:
While the clay is still leather-hard, smooth the rim with a damp sponge. You want a slightly thickened, rounded edge that feels pleasant to the touch. -
Trim the foot:
If wheel-thrown, trim a small foot ring on the bottom. If hand-built, simply smooth the underside with a rib tool to ensure it sits flat on a table surface.
Hollow It Out
If your turtle shell is thicker than 1 inch, hollow out the underside before attaching it to the dish. This prevents trapped air explosions in the kiln.
Step 2: Sculpting the Turtle
-
Shape the shell:
Roll a separate ball of clay into a smooth dome shape for the shell. It should be proportional to the dish, roughly 1.5 to 2 inches wide. -
Position the shell:
Place the dome in the exact center of your dish. Lightly mark the position, then score both the bottom of the turtle and the dish surface. -
Attach the body:
Apply slip to the scored areas and press the shell firmly onto the dish. Use a small modeling tool to blend the bottom edge of the shell seamlessly into the floor of the bowl so they become one unit. -
Add the head:
Roll a small, tapered cylinder for the head and neck. Attach it to the front of the shell with slip and scoring, slightly lifting the head so the turtle looks like it’s swimming upward. -
Create the flippers:
Shape four flat, teardrop-shaped pieces for the flippers. The front two should be larger than the rear two. Attach these to the sides of the shell, smoothing the joints carefully. -
Add the tail:
Form a tiny triangular point for the tail and attach it to the rear of the shell, blending it well.
Make It Gold
After the final heavy glaze firing, apply a low-fire gold luster overglaze to the rim of the dish and the ridges of the shell for a luxurious touch.
Step 3: Detailing and Glazing
-
Carve the scutes:
Using a needle tool, gently carve the hexagonal pattern (scutes) onto the shell. Don’t cut too deep; just create clearly defined grooves for the glaze to pool in later. -
Texture the skin:
Add subtle lines or wrinkles to the neck and flippers using a dull point tool to mimic the texture of turtle skin. -
Sculpt the face:
Press small indentations for the eyes. You can add tiny balls of clay inside the sockets for eyeballs, poking a pupil into the center of each. -
Bisque fire:
Allow the piece to dry slowly and completely to avoid cracking, then bisque fire it to cone 04. -
Apply oxide wash:
Brush an iron oxide or dark stain wash into the carved lines of the shell and skin textures. I prefer to wipe away the excess with a damp sponge, leaving the dark color only in the recesses. -
Glaze application:
Dip or brush the entire piece with a translucent sea-green glaze. A celadon type works best as it breaks clearly over the textures, showing the clay body on high points and darkening in the grooves. -
Final wipe:
Carefully wipe the glaze off the bottom of the dish (the foot ring) to prevent it from sticking to the kiln shelf. -
Run the glaze firing:
Fire the piece to the maturity temperature of your chosen clay and glaze (typically cone 5 or 6 for stoneware) to achieve that durable, glassy finish.
Once cooled, your little turtle is ready to hold your rings or simply swim on your dresser as a beautiful accent piece


Mini Octopus Figurine
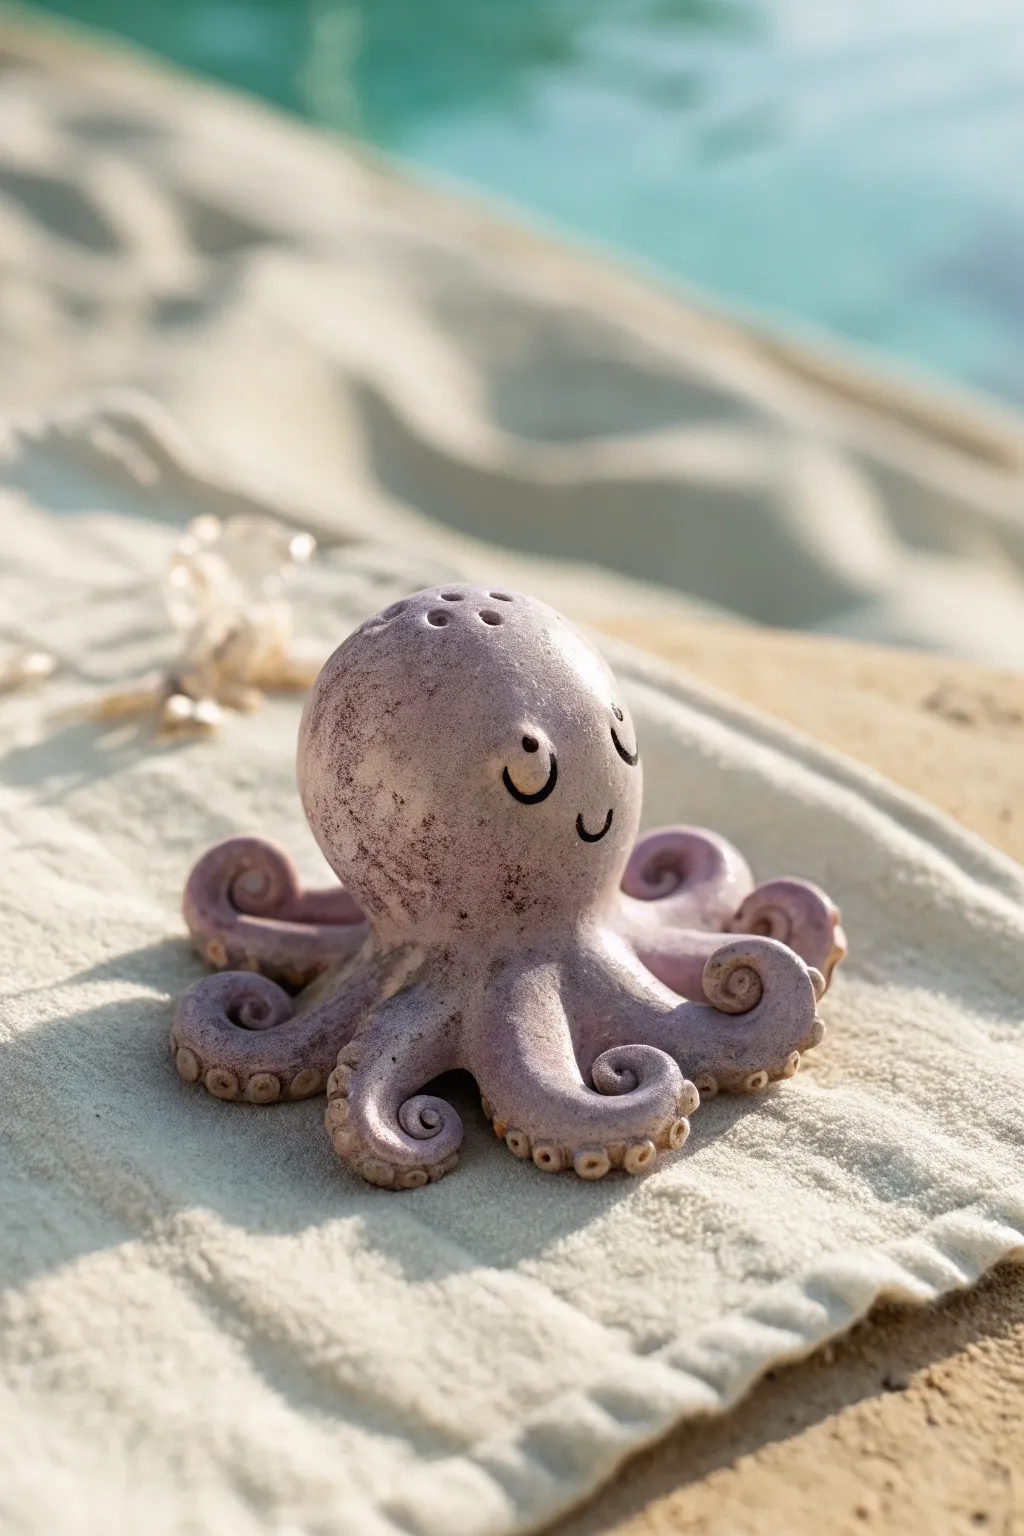
Capture the spirit of the seaside with this adorable, dusty-lilac octopus figurine. Featuring curled tentacles and a friendly, minimalist face, this project creates a charming desk companion or a beach-themed decoration with a lovely speckled finish.
Detailed Instructions
Materials
- Polymer clay (lilac/light purple)
- Black acrylic paint
- Fine-point detail brush or toothpicks
- Ball stylus tool (medium size)
- Needle tool
- Brown/umber acrylic paint (for antiquing)
- Paper towel or sponge
- Work surface (tile or glass mat)
- Oven (for baking polymer clay)
Step 1: Forming the Body
-
Mix the Base Color:
Start by conditioning your polymer clay. If you don’t have this exact dusty lilac shade, mix a small amount of grey or brown into a bright purple to desaturate it, giving it that natural, ceramic look. -
Roll the Head:
Take a walnut-sized portion of clay and roll it into a smooth ball. Gently taper one end slightly to create a very subtle egg shape—this will be the octopus’s head. -
Add Texture Holes:
Using a needle tool or the smallest end of a stylus, poke three or four small, shallow holes at the very top of the head to mimic sea sponge textures or blowholes.
Stone Texture Tip
Before baking, gently dab the surface with an old toothbrush or a crumpled ball of aluminum foil. This subtle roughness mimics real stone or coral.
Step 2: Creating the Tentacles
-
Prepare Clay Logs:
Roll out eight smaller logs of clay for the tentacles. They should be thicker at the base and taper down to a point at the end, roughly 2 inches long each. -
Attach the Tentacles:
Flip the head upside down and press the thick ends of the tentacles onto the bottom center. Blend the clay seams smooth so the legs look like they grow seamlessly from the body. -
Curl the Tips:
Turn the octopus upright. Take the tip of each tentacle and curl it tightly inwards, creating a spiral shape similar to a fiddlehead fern. Vary the direction slightly for a natural look. -
Position the Legs:
Arrange the legs so they splay out radially, supporting the head. Ensure the curled tips are visible and resting nicely on your work surface.
Tentacles Drooping?
If the legs sag before baking, support the head with a ball of aluminum foil or paper towel underneath until the clay hardens in the oven.
Step 3: Adding Details
-
Create Suckers:
Roll tiny spheres of clay, about the size of a pinhead. You will need roughly 3-5 for each tentacle tip. -
Attach Suckers:
Press these tiny spheres in a row along the bottom/outer curve of each curled tentacle. -
Indent the Suckers:
Use your needle tool or a small ball stylus to press into the center of each tiny sphere, turning them into little donut shapes representing the suction cups. -
Initial Bake:
Bake the figurine according to your clay manufacturer’s instructions (usually 275°F for 15-30 minutes). Let it cool completely.
Step 4: Finishing Touches
-
Paint the Face:
Using a very fine brush and black acrylic paint, draw two simple ‘U’ shapes for the eyes and a smaller ‘U’ for the smile. Keep the lines thin for a cute, minimalist expression. -
Antiquing Wash:
Dilute a small amount of brown or umber acrylic paint with water. Brush this wash over the entire figurine, making sure it gets into the crevices of the suckers and texture holes. -
Wipe Away Excess:
Immediately wipe the wet paint off the surface with a paper towel. The brown paint should remain only in the textures and deeper spots, giving it that weathered, faux-stone appearance. -
Add Splatter Effect:
I like to load a toothbrush with a slightly thicker brown paint and flick the bristles to create tiny speckles across the head, enhancing the organic feel. -
Final Seal:
Once the paint is fully dry, you can leave it matte for the natural look shown, or add a thin layer of matte varnish for protection.
Place your little ocean friend on a sandy surface or shelf to enjoy a bit of coastal charm every day


Whale With Marbled Waves
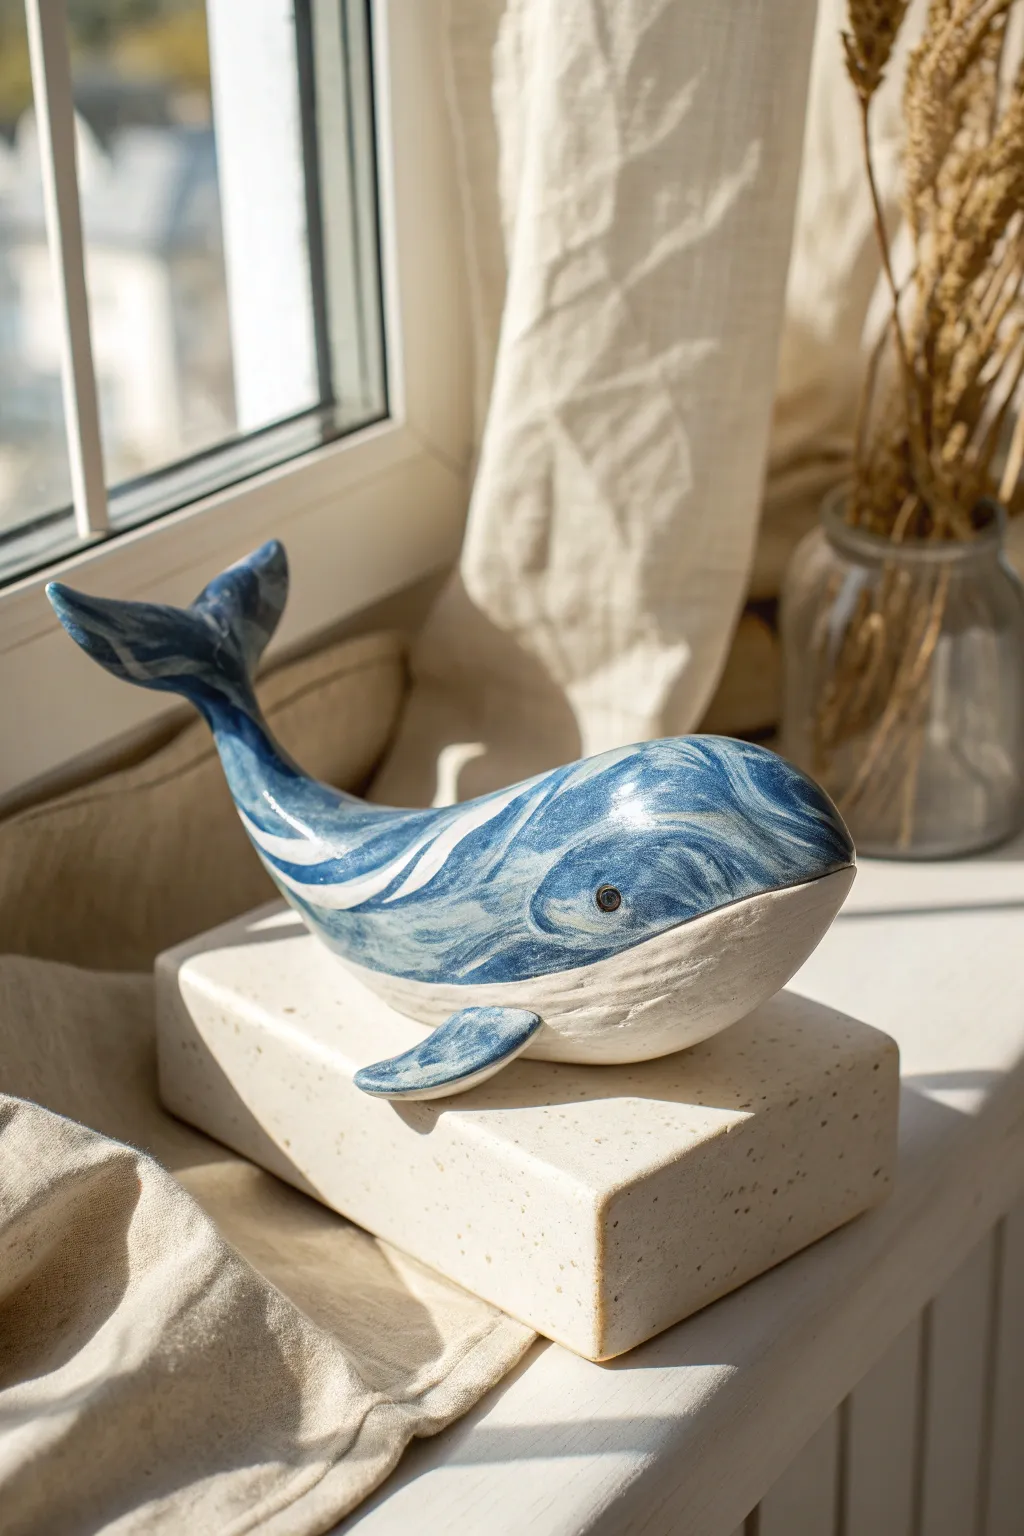
Capture the fluid movement of the ocean in sculptural form with this glossy ceramic whale. The distinctive glazed finish creates a sense of rolling waves crashing across the whale’s back, contrasting beautifully with its matte, stone-like belly.
Step-by-Step Guide
Materials
- White stoneware clay or polymer clay (if not firing)
- Pottery tools (needle tool, rib tool, sponge)
- Slip (liquid clay) and scoring tool
- Underglazes: Dark blue, light blue, white
- Clear gloss glaze
- Medium soft paintbrush
- Fan brush
- Kiln (or oven if using polymer)
Step 1: Sculpting the Body
-
Form the basic shape:
Start with a large lump of clay and roll it into a smooth, thick teardrop shape. This will form the main body of the whale, tapering towards the tail. -
Define the head:
Gently blunt the wider end of the teardrop to create the rounded snout. Use your thumbs to create slight indentations for the eyes on either side. -
Curve the spine:
To give the whale a sense of movement, gently arch the back upwards and curve the tail section upwards. -
Shape the tail flukes:
Flatten the tapered end of the tail horizontally. Use a needle tool to cut a ‘V’ notch in the center, then smooth and round the edges to create the two distinct flukes.
Step 2: Adding Details
-
Attach the fins:
Roll two small pieces of clay into flattened triangles. Score and slip the sides of the body where the pectoral fins belong, then firmly press the fins on, blending the seams until they are invisible. -
Add texture to the belly:
Unlike the smooth back, the belly should have slight texture. Use a damp sponge or a rough tool to gently dab the underside, creating a matte, organic surface. -
Create the eyes:
Use a small ball tool or the end of a paintbrush to press deep sockets for the eyes. Roll tiny balls of clay and insert them into the sockets. -
Refine and smooth:
Before drying, use a soft, damp sponge to wipe down the entire upper body, removing any fingerprints. The smoother the clay, the better the glaze will flow later. -
Dry and Bisque Fire:
Allow the piece to dry slowly under plastic to prevent cracking. Once bone dry, bisque fire it in the kiln according to your clay’s specific cone rating.
Uneven Glaze?
If your blue streaks look too stiff, try thinning your underglaze slightly with water. This helps the colors flow together more naturally for that fluid look.
Step 3: Painting the Marbled Effect
-
Base coat the pattern:
Using a medium brush, apply a coat of white underglaze in sweeping, curved strokes along the sides and back where you want the ‘waves’ to be. -
Apply the blues:
While the white is still slightly wet or just tacky, brush on streaks of light blue and dark blue. Follow the natural curve of the whale’s body, swirling the brush to mimic turbulent water. -
Marbling the glaze:
I prefer to use a slightly damp fan brush here to drag the wet colors into each other. Don’t overmix; you want distinct streaks of white cutting through the blue. -
Detail the eye:
Carefully paint the eye solid black or dark brown, with a tiny rim of white if desired for realism. -
Leave the belly:
Leave the belly unglazed (or use a matte white underglaze) to maintain the contrast between the shiny ‘ocean’ back and the matte underbelly.
Sculpt a Base
Make a simple rectangular block from leftover clay to serve as a pedestal. Glaze it in a speckled white to resemble a sandy ocean floor or sea stone.
Step 4: Finishing
-
Clear glaze application:
Once the underglaze design is completely dry, apply 2-3 coats of clear gloss glaze over the painted areas only. Avoid the belly if you want that textural contrast. -
Final Fire:
Glaze fire the piece to the appropriate temperature for your materials. The gloss glaze will melt and seal the marbled design, making it look like wet, shimmering water.
Place your finished whale near a window where the light can catch the glossy curves of its back

The Complete Guide to Pottery Troubleshooting
Uncover the most common ceramic mistakes—from cracking clay to failed glazes—and learn how to fix them fast.
Jellyfish Charm or Pendant
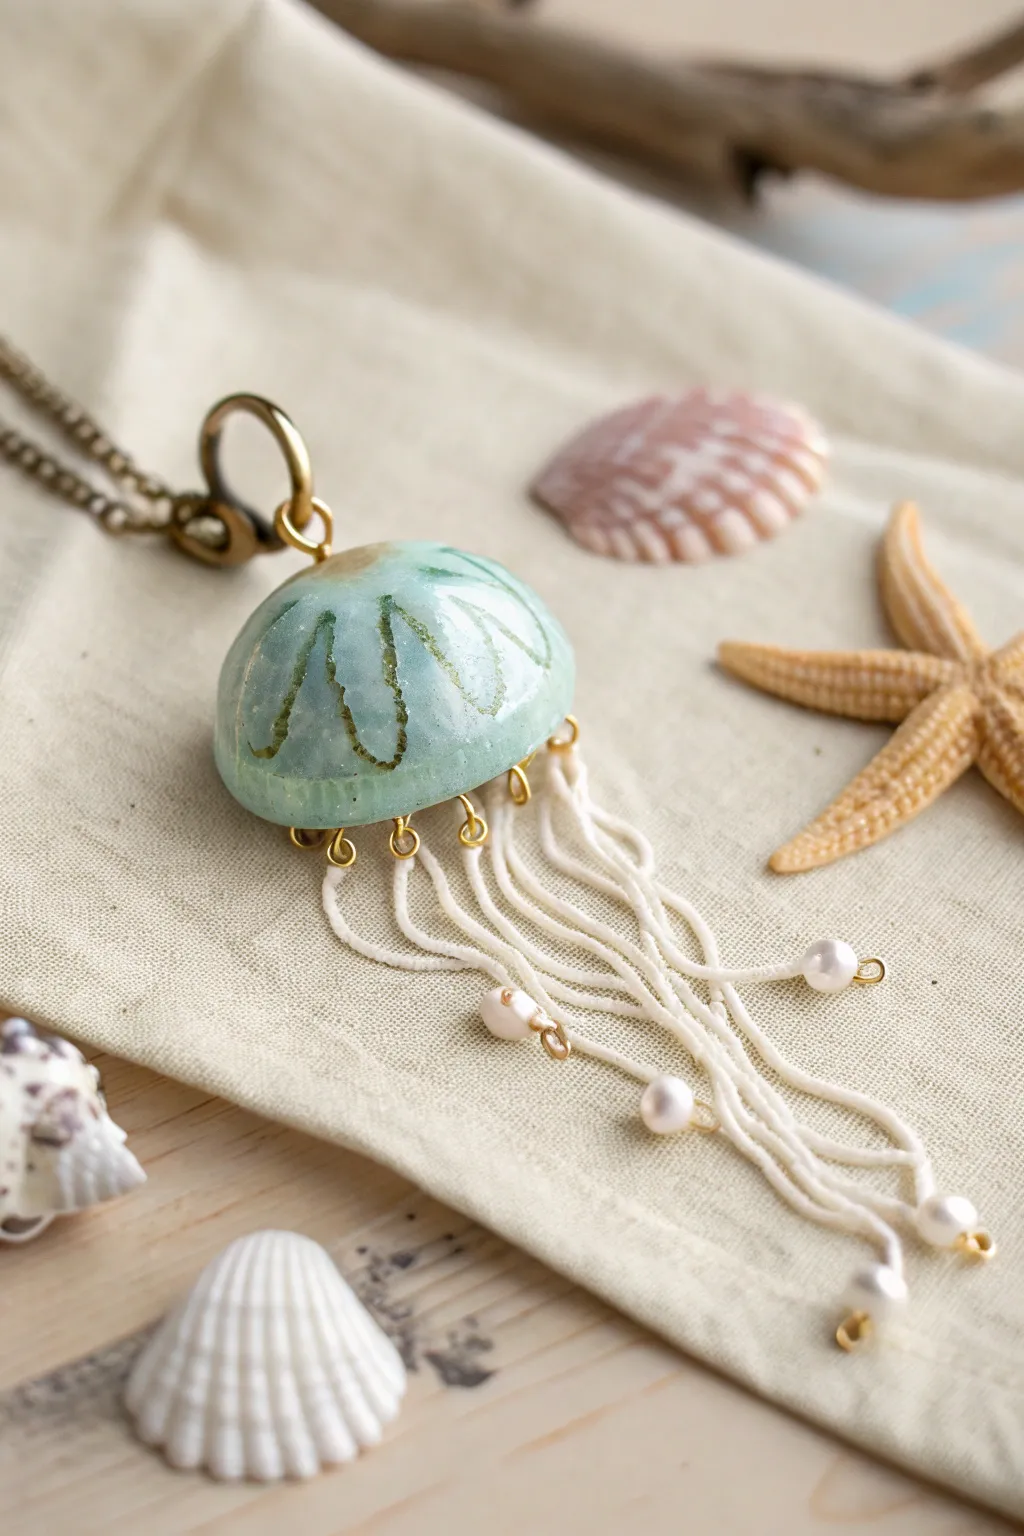
Capture the magic of the deep sea with this enchanting jellyfish pendant, featuring a glazed ceramic-style dome and elegant trailing tentacles. The combination of translucent turquoise clay and delicate pearl accents gives it a washed-ashore treasure aesthetic perfect for summer jewelry.
How-To Guide
Materials
- Polymer clay (translucent white and turquoise/teal)
- Glossy glaze or UV resin
- Gold or bronze acrylic paint
- Paintbrush (fine tip)
- Small eye pins (approx. 6-8 pieces)
- Large jump ring and necklace chain (bronze tone)
- Waxed cotton cord or thick embroidery floss (cream/white)
- Small pearls or white beads
- Needle tool or toothpick
- Super glue or jewelry adhesive
- Round nose pliers
- Wire cutters
- Oven for baking
Step 1: Sculpting the Bell
-
Mix the Clay:
Begin by conditioning your polymer clay. Mix a small amount of turquoise into a larger amount of translucent white. You want a pale, sea-glass look rather than an opaque solid color, so keep the mix slightly marbleized for depth. -
Form the Dome:
Roll a ball of clay about the size of a large walnut. Gently press it onto your work surface to flatten the bottom while keeping the top rounded and smooth, creating a classic dome shape. -
Add Texture Details:
Using a needle tool, carefully etch jagged, wave-like lines radiating from the center top down toward the rim. These incisions will hold paint later to define the jellyfish’s segments. -
Create Attachment Points:
Flip the dome over. Trim the eye pins so the stems are short (about 1/4 inch). Insert 6-8 distinct eye pins into the flat bottom of the clay along the outer rim. These will hold your tentacles. -
Add the Top Loop:
Insert one larger eye pin or a bent piece of wire into the very top center of the dome. This will be the main bail for your necklace chain. -
Bake the Piece:
Bake the clay dome according to the manufacturer’s instructions for the specific brand you are using. Usually, this is around 275°F (135°C) for 15-30 minutes. Let it cool completely.
Step 2: Finishing the Dome
-
Secure the Metal:
Once cool, gently pull the eye pins out. Add a tiny drop of super glue to the holes and re-insert the pins to ensure they are permanently bonded. -
Antiquing the Lines:
Dilute a small amount of gold or bronze acrylic paint with water. Wash this over the etched lines on the dome. Wipe away the excess on the surface with a damp paper towel, leaving the gold settled deep in the grooves. -
Glazing:
Apply a thick coat of gloss glaze or UV resin over the entire top of the dome. This mimics the wet, shiny look of a real jellyfish and enhances the translucency of the clay.
Glazing Pro Tip
Apply the glaze in two thin layers rather than one thick one. This prevents drips and creates a deeper, glass-like finish that makes the carved gold lines really pop.
Step 3: Creating the Tentacles
-
Prepare the Cords:
Cut 6-8 strands of cream waxed cord, each about 4-5 inches long. Different lengths add a natural, organic feel. -
Thread the Beads:
Thread a small pearl onto the end of each cord. If the hole is large, tie a double knot below the pearl to secure it. For variety, you can add pearls midway up some strands too. -
Secure the Ends:
Add a tiny dab of glue to the knots at the bottom of the cords to prevent fraying, then trim any excess tail thread close to the knot. -
Attach to Dome:
Take the top end of a cord and feed it through one of the eye pins on the bottom of the dome. -
Knotting:
Fold the cord over the eye pin loop and tie it securely to itself with a strong knot. Use a dot of glue on this knot as well for durability, trimming the short tail. -
Final Assembly:
Repeat this for all tentacles. Finally, attach a large jump ring to the top loop of the dome and thread your chain through it.
Go Glow-in-the-Dark
Mix a pinch of glow-in-the-dark powder into your translucent clay before sculpting. Your jellyfish will look elegant by day and bioluminescent by night
Wear your new ocean treasure proudly or gift it to a fellow sea lover
Crab Pinch Pot Buddy
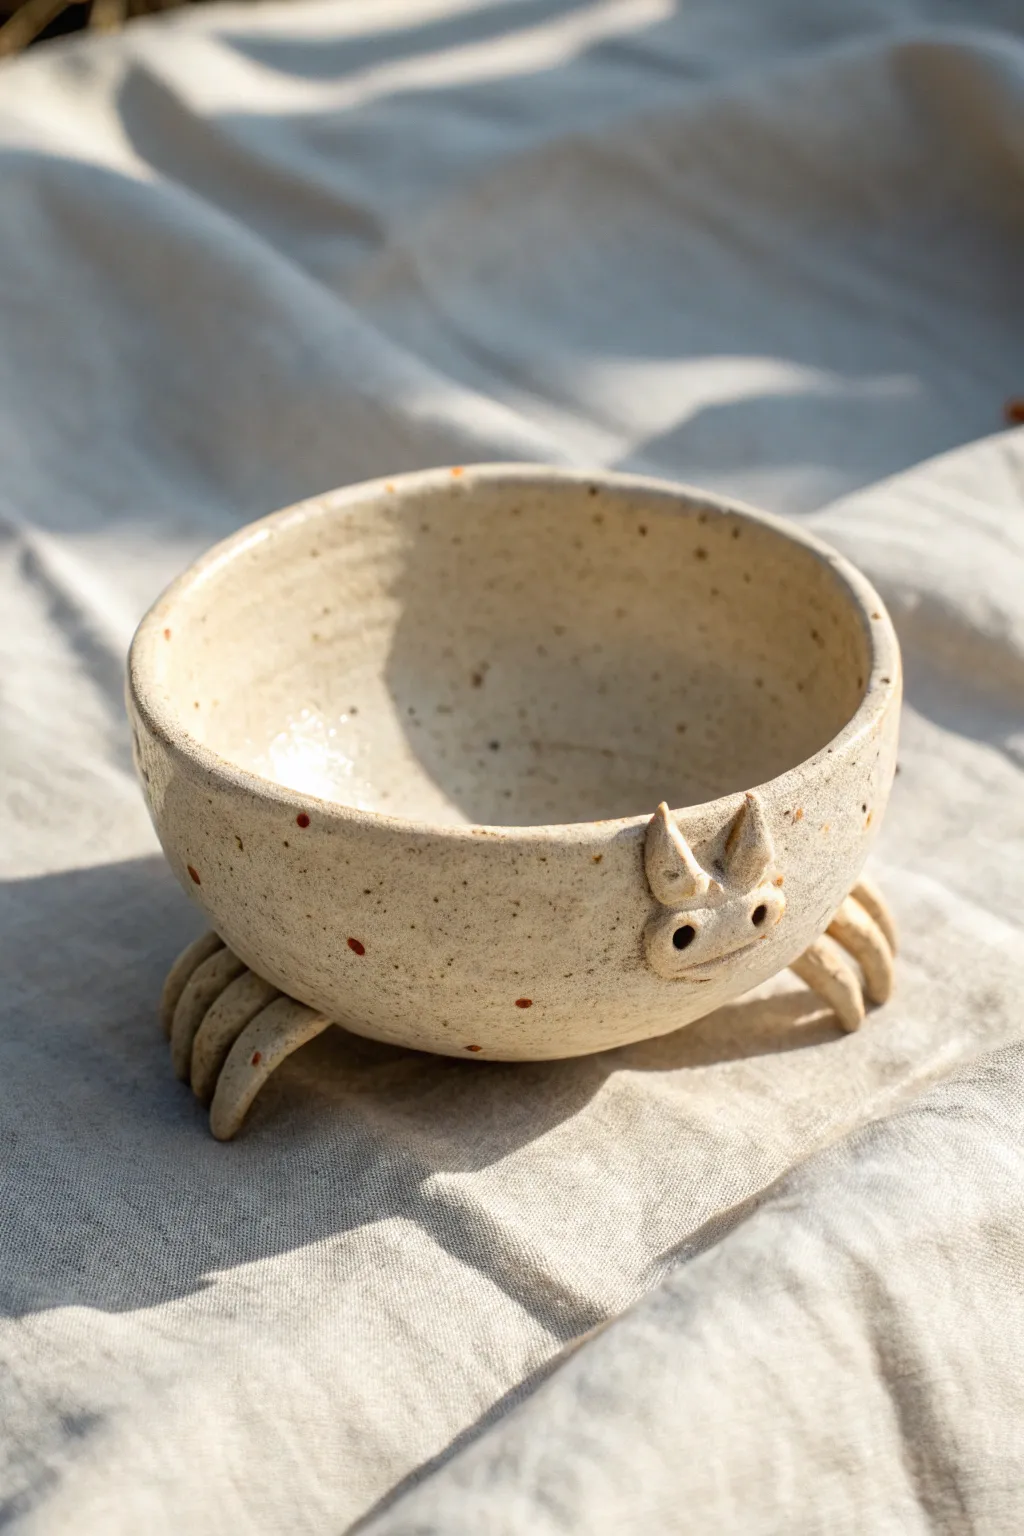
This charming little ceramic bowl combines a classic pinch pot with sculptural elements to create a functional crab friend. With its speckled cream glaze and supportive claw legs, it’s perfect for holding small trinkets or serving snacks.
Step-by-Step Guide
Materials
- Speckled aesthetic stoneware clay (e.g., Laguna Speckled Buff)
- Wooden modeling tool
- Pin tool or needle tool
- Scoring tool (or serrated rib)
- Slip (clay and water mixture)
- Small sponge
- Clear or transparent glossy glaze
- Optional: Red underglaze for subtle spots
- Kiln access
Step 1: Forming the Body
-
Prepare the Clay:
Start by wedging a ball of speckled clay roughly the size of a large orange. Ensure there are no air bubbles, as these can cause issues later in the kiln. -
Start the Pinch Pot:
Hold the clay ball in one hand and push your thumb into the center, stopping about a half-inch from the bottom. This establishes the interior depth. -
Pinch the Walls:
Gently pinch the clay between your thumb and fingers, rotating the ball as you go. Work from the bottom up to thin the walls evenly, aiming for a consistent thickness of about 1/4 inch. -
Shape the Rim:
Once the walls are raised, gently tap the rim on your work surface to level it, or use a damp sponge to smooth and round the edge for a finished look.
Step 2: Creating the Legs
-
Roll Coils for Legs:
Roll out a few thick coils of clay, slightly thinner than your pinky finger. You will need enough length to create six separate leg segments. -
Cut and Shape Legs:
Cut six short segments, each about 1.5 to 2 inches long. Gently curve them to mimic crab legs and round off one end of each segment. -
Group the Legs:
Bundle the legs into two groups of three. Arrange them so they fan out slightly, creating a stable tripod-like base on each side. -
Attach the Leg Clusters:
Score the side of the pot near the bottom and the attachment points of your leg clusters. Apply slip generously and press the leg groups firmly onto the pot so they support its weight.
Leg Stability
If the legs sag under the bowl’s weight while wet, prop them up with varied sizes of crumpled newspaper or cosmetic sponges until the clay stiffens to leather hard.
Step 3: Sculpting the Face
-
Make Eye Stalks:
Form two small, triangular cones of clay for the crab’s eye stalks. They should be relatively short and sturdy. -
Attach the Eyes:
Score and slip the front of the pot, just under the rim. Attach the cones securely, blending the clay at the base so they look seamless. -
Define the Eyes:
Use the back of a small paintbrush or a modeling tool to press circular indentations into the center of the eye stalks to create pupils. -
Add a Smile:
Using a pin tool or needle tool, gently carve a wide, shallow line beneath the eyes to give your crab a subtle smile.
Get Creative
Try modeling the front two legs into larger pincers rather than walking legs. You can curve them upward to hold a spoon or chopstick rest.
Step 4: Finishing Touches
-
Wait for Leather Hard:
Allow the piece to dry until it is leather hard. This is when the clay is firm but still cold to the touch. I find this stage best for the final clean-up. -
Smooth the Surface:
Use a damp sponge to wipe away any rough joining marks or fingerprints, ensuring the transition between the legs and body is smooth. -
Add Speckles (Optional):
If you want extra detail, dab tiny dots of red underglaze randomly on the lower half of the shell to mimic organic markings. -
Bisque Fire:
Once bone dry, fire the piece to bisque temperature (usually Cone 04) to prepare it for glazing. -
Glaze Application:
Dip or brush a clear, glossy glaze over the entire piece. If you used speckled clay, the natural spots will show through beautifully. -
Final Fire:
Fire the piece again to the maturation temperature of your specific clay body (often Cone 5 or 6). Once cooled, your crab buddy is ready for duty.
Place your finished crab on a sunny shelf to bring a bit of the ocean into your home


What Really Happens Inside the Kiln
Learn how time and temperature work together inside the kiln to transform clay into durable ceramic.
Coral Reef Texture Tile
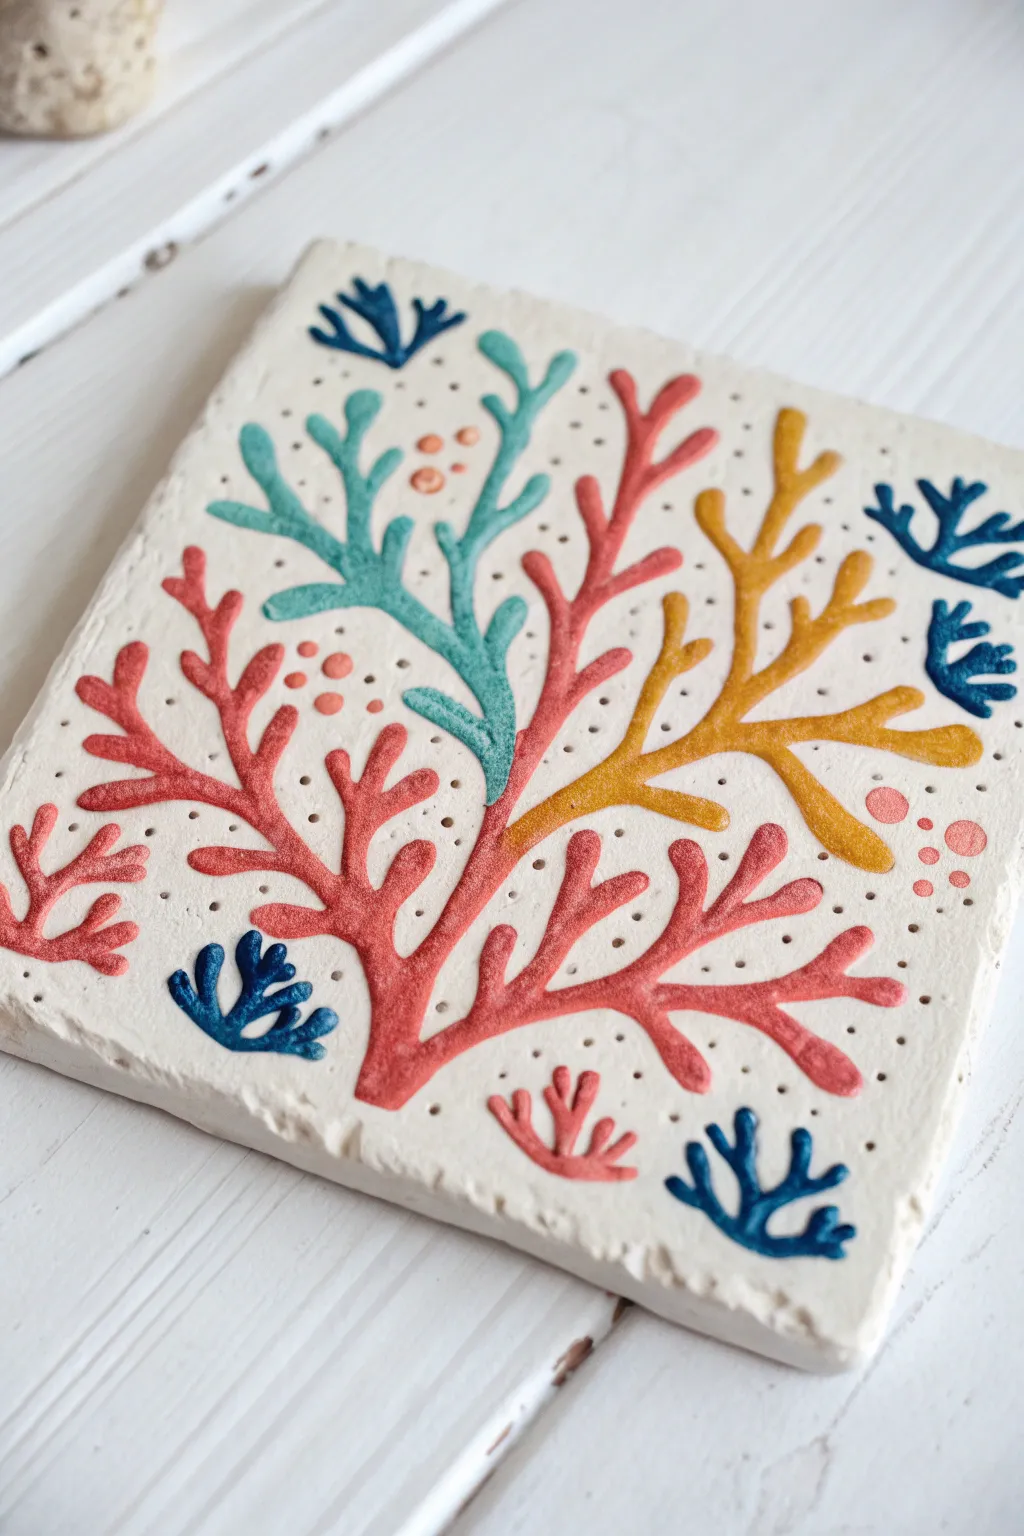
Capture the vibrant life of the ocean floor with this charming relief-style clay tile. Featuring stylized coral branches in bold reds, teals, and mustards against a textured white background, this project combines simple sculpting with careful painting for a stunning decorative piece.
How-To Guide
Materials
- Air-dry clay or polymer clay (white)
- Rolling pin
- Square cookie cutter or knife and ruler
- Sculpting tools (needle tool, small ball stylus)
- Acrylic paints (Coral red, Teal, Mustard yellow, Navy blue)
- Fine detail paintbrushes
- Sandpaper (fine grit)
- Matte or satin varnish (optional)
- Parchment paper or smooth work surface
Step 1: Base Preparation
-
Condition the clay:
Start by taking a substantial chunk of white clay and kneading it in your hands until it becomes warm, soft, and pliable. This prevents cracks later on. -
Roll the slab:
Place the clay on a sheet of parchment paper. Use a rolling pin to flatten it into an even slab, aiming for a thickness of about 1/4 to 1/2 inch to give the tile some weight. -
Cut the shape:
Using a square cookie cutter or a sharp knife with a ruler, cut a perfect square from your slab. Smooth the cut clay edges with your finger and a little water to soften any sharpness. -
Transfer the design:
Lightly sketch your coral design onto the wet clay using a needle tool. Draw a large central branching coral structure first, then fill the empty corner spaces with smaller, fan-like coral shapes.
Uneven Clay Surface?
If your background looks bumpy after drying, use a slightly damp sponge to smooth it out before painting, acting purely as a ‘wet sander’ technique.
Step 2: Sculpting the Relief
-
Create main branches:
Roll thin coils of fresh clay for the large central coral. Place them over your sketched lines, pressing them gently onto the base so they adhere without smashing them flat. -
Build the structure:
Continue adding clay coils to form the secondary branches of the red and teal corals ensuring they connect seamlessly to the main stems. I find using a little clay slip helps bond these pieces securely. -
Add side corals:
For the mustard yellow section on the right, apply slightly thicker coils that taper at the ends. Overlap the bottom of this section slightly with the main red branch for depth. -
Fill the corners:
Roll very tiny, short coils or tear-drop shapes for the small floating coral bits in the top corners and along the bottom edge. -
Refine the edges:
Use a small sculpting tool or the back of a paintbrush to smooth the edges where the raised coral meets the flat background, ensuring there are no gaps. -
Texture the background:
With a needle tool or a small stylus, poke tiny random holes into the flat white background areas around the coral. Vary the spacing to simulate bubbles or sand texture. -
Add detail dots:
Roll tiny spheres of clay and press them flat into the negative spaces to create scattered ‘bubble’ accents, grouping them in clusters of two or three. -
Dry the tile:
Allow the sculpted tile to dry completely. For air-dry clay, this might take 24-48 hours. Flip it occasionally to ensure even drying and prevent warping.
Step 3: Painting & Finishing
-
Sand imperfections:
Once fully cured, lightly sand any rough edges or fingerprints on the raised coral using fine-grit sandpaper. Blow away the dust. -
Paint the main coral:
Load a fine brush with coral-red acrylic paint. Carefully paint the largest branching structure, coating the top and sides of the raised clay fully. -
Apply teal tones:
Switch to a teal or sea-green shade for the upper-left branch. Use a steady hand to keep the paint from bleeding onto the white background. -
Paint remaining branches:
Fill in the right-side branch with a warm mustard yellow. Paint the smallest disconnected coral pieces in navy blue or a lighter pink for variety. -
Highlight the dots:
Using a very small detail brush, paint the flat ‘bubble’ circles you added earlier in soft pink or pastel orange tones. -
Clean up:
If any paint strayed onto the white background, touch it up with white acrylic paint once the colored sections are dry. -
Seal the piece:
Finish by applying a coat of matte varnish over the entire face of the tile to protect the paint and give the clay a unified, professional finish.
Level Up: Glossy Accents
For a ‘wet’ look, skip the matte varnish on the coral parts and use a high-gloss glaze on just the colored sections to make them pop against the matte base.
Display your finished tile on a small easel or mount it in a shadow box to bring a permanent piece of the reef into your home
Underwater Wall Medallion
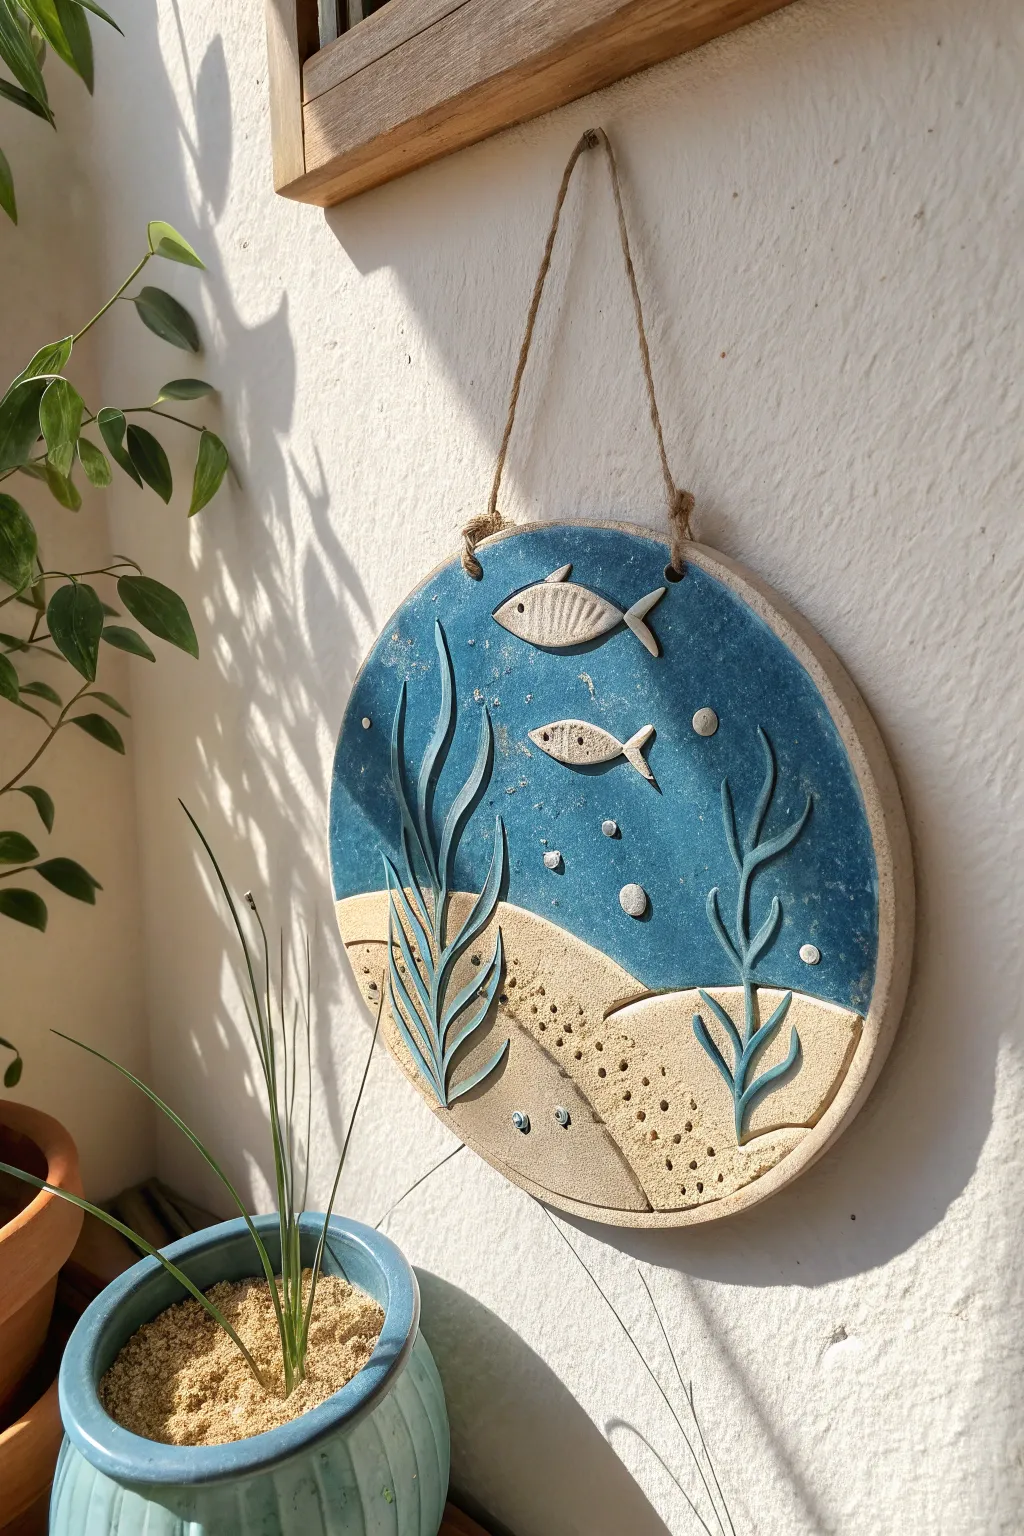
Capture the calm of the ocean floor with this beautiful relief-sculpted wall hanging. Featuring textured sandy dunes, swaying seaweed, and swimming fish against a deep blue sea, this circular medallion brings a touch of coastal charm to any room.
Step-by-Step Guide
Materials
- Stoneware clay (groggy or speckled works well for sand texture)
- Rolling pin and canvas mat
- Circular template or large plate (approx. 8-10 inches)
- Fettling knife or needle tool
- Underglaze or glaze (Deep Ocean Blue, Seaweed Green)
- Clear glaze (optional)
- Small sponges and paintbrushes
- Sculpting tools (rib tool, loop tool)
- Texture tools (sandpaper, rough sponge, or a toothbrush)
- Hole punch or straw for hanging holes
- Jute twine for hanging
Step 1: Base Construction
-
Prepare the slab:
Begin by rolling out a consistent slab of stoneware clay, approximately 1/4 to 1/3 inch thick. Use a canvas mat to prevent sticking and ensure an even surface. -
Cut the circle:
Place your circular template or a large dinner plate over the slab. Trace around it with a needle tool or fettling knife to create a perfect circle, then smooth the outer rim with a damp sponge. -
Establish the horizon:
Lightly trace a curved line across the lower third of the circle to mark where the sandy bottom meets the water. You can add a second, overlapping curve to create depth in the sand dunes. -
Add hanging holes:
Before the clay hardens, use a straw or a small hole punch to create two holes near the top edge, spaced about 4-5 inches apart. These will hold the twine later.
Warp Prevention
To keep the large flat circle from curling as it dries, place a weighted bag of rice or sand gently in the center while it dries to the leather-hard stage.
Step 2: Sculpting the Scene
-
Texture the sand:
For the bottom section, create a sandy texture. I like to press a rough sponge or a stiff toothbrush into the clay to simulate grains of sand. You can also poke small indentations with a needle tool for extra detail. -
Create the seaweed:
Roll thin coils of clay and flatten them slightly. Arrange these vertically, originating from the sand line, letting them curve naturally like plants swaying in water. -
Shape the fish:
Cut simple, flat fish shapes from your leftover slab scraps. Give them a slightly almond-shaped body and a small triangular tail. -
Attach the elements:
Score and slip the back of the seaweed and fish, then press them firmly onto the medallion. Use a modeling tool to blend the bottom of the seaweed stems into the sand. -
Detail the fish:
Using a needle tool, gently carve circular eyes, gill lines, and a cross-hatched scale pattern onto the fish bodies. -
Add bubbles:
Roll tiny balls of clay, flatten them into small discs, and attach them randomly around the fish as air bubbles. Make a small indentation in the center of some for dimension.
Add Sparkle
Press small pieces of crushed clear glass into the bubbles or the water background before the final firing to create pockets of melted, watery shimmer.
Step 3: Finishing and Firing
-
Bisque fire:
Allow the piece to dry slowly under plastic to prevent warping. Once bone dry, bisque fire it according to your clay body’s specifications (usually Cone 04). -
Apply the ocean blue:
Brush three coats of deep blue glaze onto the background ‘water’ area. Be careful to work around the fish and seaweed initially. -
Shadow the seaweed:
Paint the seaweed strands. You can use a darker blue or a translucent green glaze here; wiping away the high points slightly with a sponge can create a nice outline effect against the blue water. -
Glaze the sand:
For the sand dunes, apply a matte beige or sandy-colored glaze. If you used speckled clay, a transparent glaze here will let the natural speckles look like pebbles. -
Highlight the fish:
Leave the fish unglazed if you want a raw clay look, or apply a white wash. Wipe back the glaze on the fish so it stays in the carved lines, highlighting the scales. -
Final wipe:
Use a damp sponge to clean any stray glaze off the rim of the circle to frame the image cleanly. -
Glaze fire:
Fire the piece again to your glaze temperature (e.g., Cone 5/6). -
String it up:
Once cool, thread a length of rustic jute twine through the top holes and knot it securely.
Hang your finished ocean medallion in a sunny spot where the light can catch the textures of the reef

TRACK YOUR CERAMIC JOURNEY
Capture glaze tests, firing details, and creative progress—all in one simple printable. Make your projects easier to repeat and improve.
Seahorse Coil Sculpture
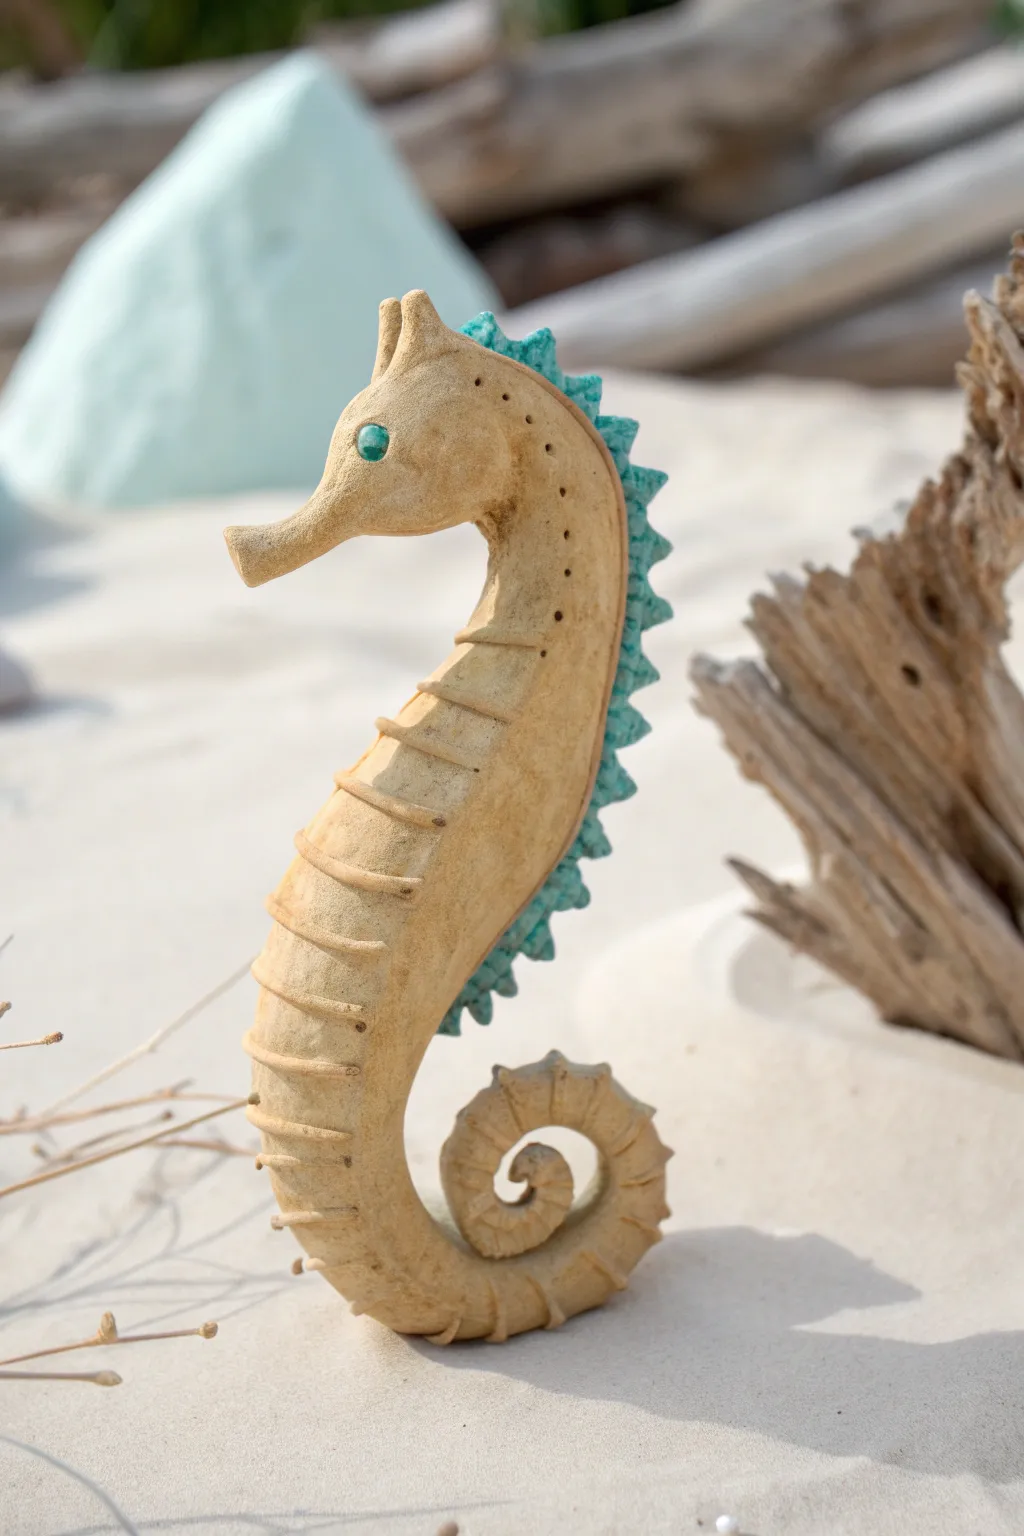
Capture the magic of the deep sea with this elegant seahorse sculpture, featuring a textured sandstone finish and a vibrant turquoise spine. This project combines simple coil techniques with detailed sculpting to create a stunning piece of coastal decor perfect for a shelf or mantelpiece.
Step-by-Step Tutorial
Materials
- Air-dry clay or polymer clay (stone or beige color)
- Turquoise clay (or turquoise acrylic paint)
- Small green glass bead or rhinestone (for the eye)
- Clay sculpting tools (modeling tool, needle tool)
- Wire armature wire or sturdy aluminum foil
- Rolling pin
- Slip (clay and water mix) or liquid clay adhesive
- Texture sponge or stiff brush
Step 1: Building the Core Form
-
Create the armature:
Begin by twisting a length of sculpting wire into the classic ‘S’ shape of a seahorse. Create a loop at the bottom for the tail curl and a slight bend at the top for the head. -
Bulk up the body:
Crumple aluminum foil tightly around your wire armature to build the core shape. Make sure the chest area is thicker and tapers down into a thin, curled tail. -
Cover with clay:
Roll out a sheet of your beige clay to about 1/4 inch thickness. Wrap this around your foil core, smoothing the seams together with a bit of water or slip until the foil is completely hidden. -
Refine the silhouette:
Use your fingers to smooth the clay surface. Gently pinch the snout area to elongate it and define the curve of the neck, ensuring the transition from head to body is graceful.
Slumping sculpture?
If the clay is too heavy and the seahorse leans over, prop it up against a mug or heavy object while it dries. A thicker internal wire helps maintain the upright posture.
Step 2: Adding the Segments
-
Roll clay coils:
Roll several thin snakes of beige clay. These will become the distinct horizontal ridges along the seahorse’s body. -
Attach the belly ridges:
Starting at the neck and working down to the tail, press these thin coils horizontally across the front of the body. Space them evenly. -
Smooth the ridges:
Use a modeling tool to blend the top edge of each coil into the body, leaving the bottom edge raised. This creates that armored, segmented look characteristic of seahorses. -
Texturize the surface:
Take a coarse sponge or a stiff-bristled brush and gently tap it all over the beige clay. This removes fingerprints and gives the piece a natural, sandy, stone-like texture.
Dry Brushing Magic
Once fully dry, lightly dry-brush white acrylic paint over the turquoise spikes. This highlights the texture and makes it look like sun-bleached coral.
Step 3: Spines and Details
-
Prepare the spine clay:
If using different colored clays, switch to your turquoise clay now. Roll a long, triangular prism shape that runs the length of the seahorse’s back. -
Attach the dorsal ridge:
Score the back of the seahorse and apply a little slip. Press the turquoise strip firmly along the entire back curve. -
Sculpt the spikes:
Using a needle tool or knife, cut notches into the turquoise ridge to create individual triangular spikes. Use your fingers to pinch and sharpen the tips of each spike. -
Create texture on the spikes:
Use the needle tool to prick small holes or divots into the turquoise clay, giving it a porous, coral-like appearance. -
Form the head crest:
Add a small, separate ridge of turquoise or beige clay to the top of the head to form the coronet (the crown-like structure). -
Insert the eye:
Press a small indentation into the side of the head. Push your green glass bead or rhinestone into the clay so it sits securely. -
Detail the snout:
Add a tiny coil to the very end of the snout to create the mouth. You can also add small pinholes along the jawline for extra realism. -
Final shaping:
Check the balance of your sculpture. Ensure the tail curl is flat enough at the bottom to support the seahorse standing upright, or create a small clay base if needed.
Enjoy displaying your beautiful marine creation
Manta Ray Trinket Tray
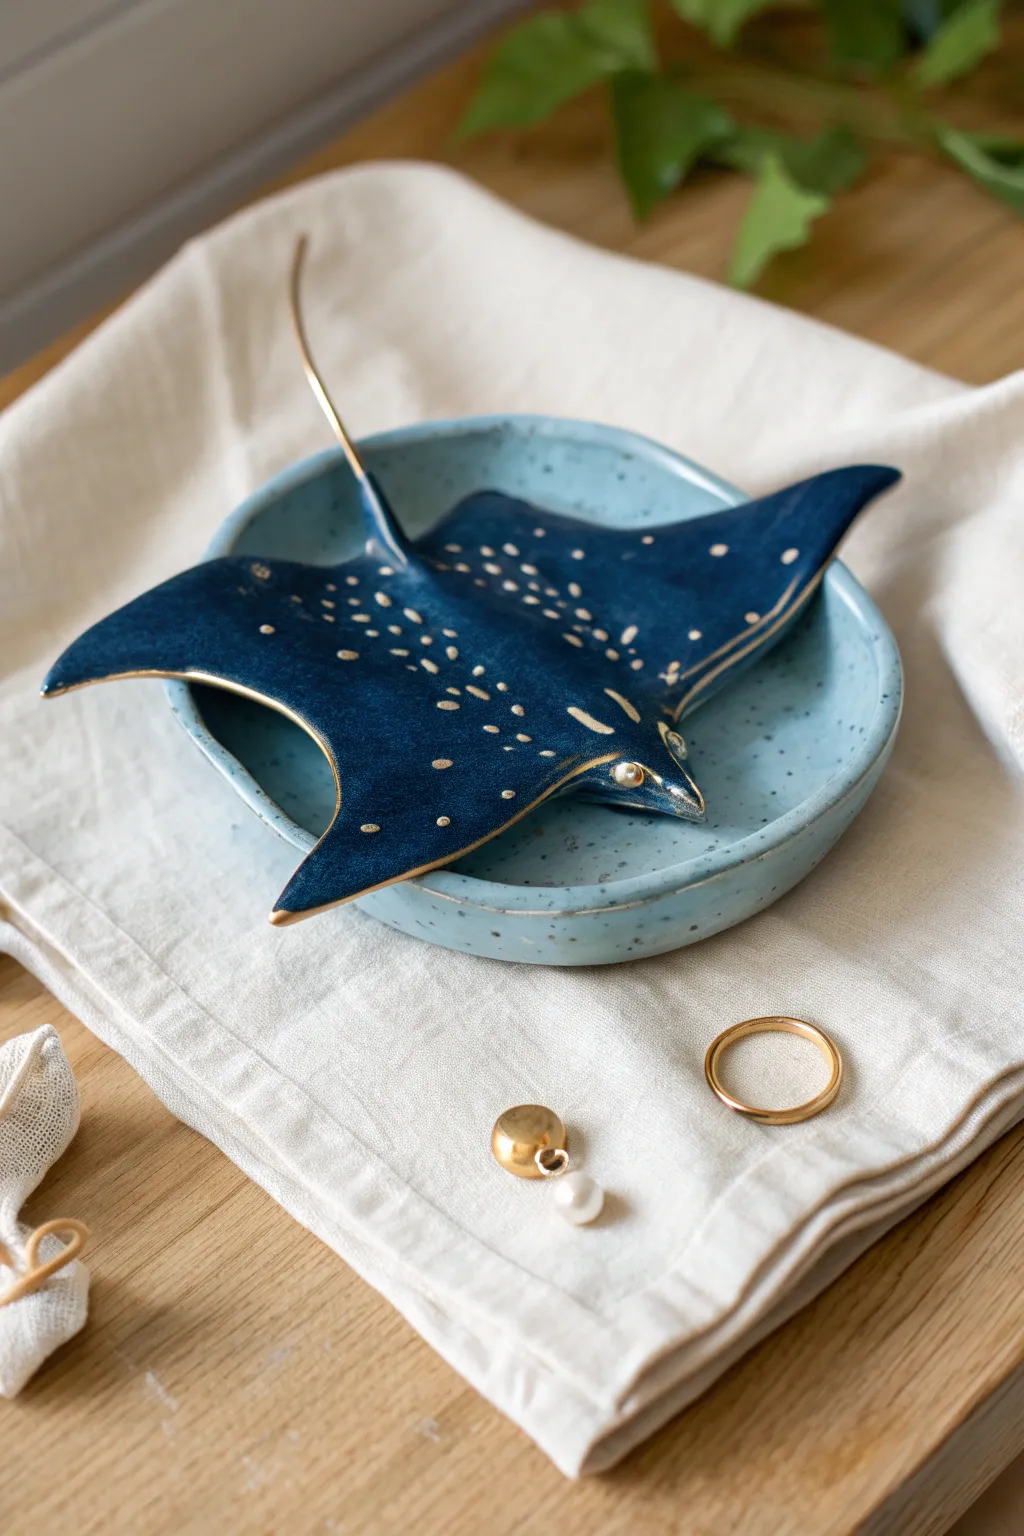
Capturing the serene beauty of the deep sea, this stunning two-piece trinket tray features a speckled blue dish topped with a sculpted manta ray. The rich indigo glaze and delicate gold leaf accents make it an eye-catching home for your favorite rings and small treasures.
How-To Guide
Materials
- White sculpture clay or polymer clay
- Rolling pin
- Small bowl (to use as a mold)
- Clay carving tools (needle tool, modeling tool)
- Water and sponge (for smoothing)
- Underglaze (Light Blue Speckled, Deep Indigo)
- Clear glaze
- Gold luster or liquid gold leaf
- Fine liner brush
- Kiln (if using ceramic clay) or Oven (if using polymer)
Step 1: Sculpting the Base Dish
-
Roll the slab:
Begin by rolling out a portion of your clay into a smooth, even slab, approximately 1/4 inch thick. Aim for a consistent thickness to prevent cracking during drying. -
Cut the circle:
Use a round cookie cutter or trace around a small bowl to cut a perfect circle from your clay slab. This will be the foundation of your catch-all dish. -
Form the shallow bowl:
Gently press your clay circle into a shallow, concave form. If you want a uniform shape like the example, drape the clay inside a small bowl lined with plastic wrap or over a plaster mold. -
Refine the rim:
Smooth out the rim of the dish with a slightly damp sponge or your finger, ensuring there are no sharp edges. Set this aside to dry to a leather-hard state while we work on the star of the show.
Tail Trouble?
If the thin clay tail keeps breaking off during the sculpting phase, try sculpting it around a thin piece of high-temp wire (nichrome) for internal structure.
Step 2: Creating the Manta Ray
-
Shape the body:
Form a second piece of clay into a flattened diamond or kite shape. Gently pull and stretch the side corners to create the iconic sweeping wingspan of a manta ray. -
Sculpt the cephalic fins:
At the head of the ray, carefully pinch and roll the front two points inward to create the distinct cephalic lobes (the little horns) near the mouth. -
Add the tail:
Roll a very thin, tapered coil of clay for the tail. Score and slip (add a bit of water or vinegar for polymer) the connection point, then attach the tail securely to the back of the body. -
Refine the curve:
I like to gently drape the wings over a curved object, like a rolling pin or the side of a bowl, so the ray looks like it is gliding through water rather than lying flat. -
Dry and Bisque Fire:
Allow both pieces to dry completely. If working with ceramic clay, load them into the kiln for a bisque fire. For polymer clay, follow the baking instructions on your package.
Step 3: Glazing and Detailing
-
Glaze the dish:
Apply 2-3 coats of a light speckled blue glaze to the round dish. This creates the ‘water’ effect for the base. -
Glaze the ray:
Apply a deep indigo or navy blue glaze to the entire top surface of the manta ray. Leave the underside unglazed or use a wax resist if you plan to fire it directly on a shelf. -
Glaze fire:
Once the glaze is dry, fire the pieces again according to your glaze’s cone requirements. This will vitrify the clay and make the colors pop. -
Apply gold accents:
After the final firing (or after your paint dries if using polymer), use a fine liner brush dipped in gold luster or liquid gold leaf. Paint a thin line along the rim of the wings, the cephalic fins, and coat the entire tail. -
Dotted details:
Using the very tip of your brush or a dotting tool, carefully add the galaxy-like pattern of gold spots across the manta ray’s back, concentrating them near the spine. -
Final cure:
If using real gold luster, return the piece to the kiln for a low-temperature luster firing. If using liquid gold leaf, simply allow it to cure fully in a dust-free area.
Oceanic Depth
Layer a translucent gloss glaze over the dark blue underglaze before firing. This adds optical depth, making the ray look wet and freshly emerged from the sea.
Place your finished ray loosely atop the dish for a modular piece, or glue them together for a permanent sculpture
Hammerhead Shark Figurine
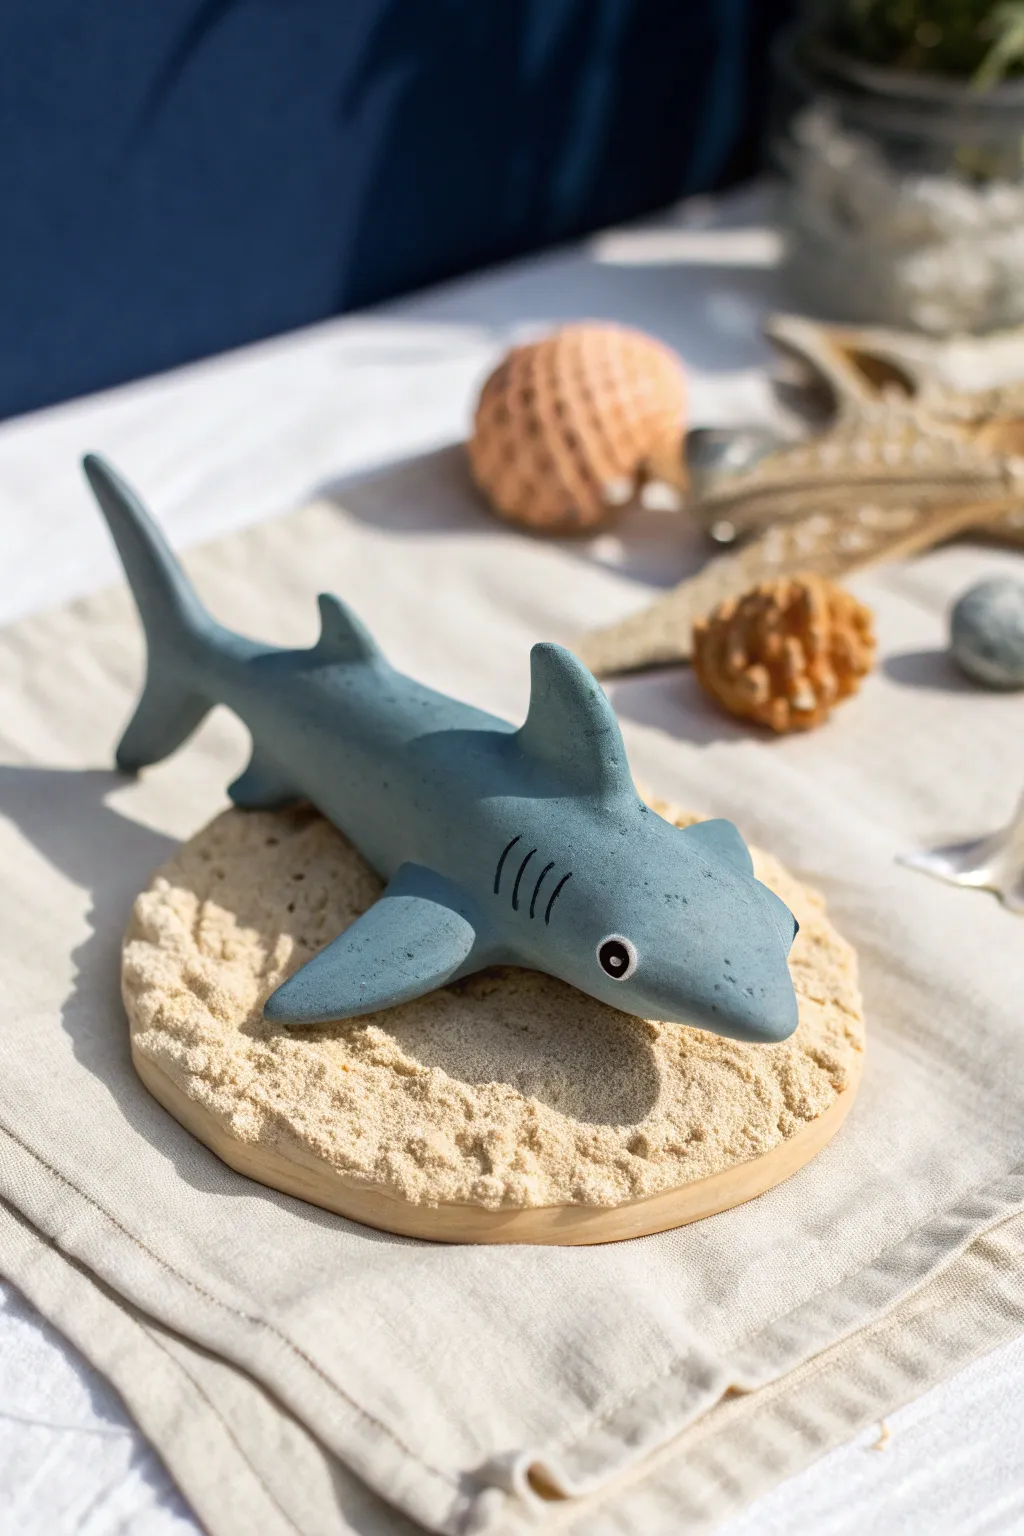
This charming project captures the sleek silhouette of a hammerhead shark in a stylized, matte-finish clay sculpture. Perched on a textured sandy base, the figurine features a soft blue-grey palette that looks perfect on any ocean-themed shelf.
Step-by-Step Tutorial
Materials
- Polymer clay (blue-grey, white, black, beige/sand)
- Wooden circular display base
- Sculpting tools (needle tool, blending tool)
- Black acrylic paint (optional)
- Craft sand or gritty texture medium
- Craft glue
- Aluminum foil (for armature)
- Matte varnish or sealant
Step 1: Forming the Body
-
Prepare the core:
Start by crumpling a small piece of aluminum foil into a long, tapered cigar shape. This saves clay and keeps the figurine lighter. -
Condition the clay:
Take your blue-grey polymer clay and warm it in your hands until it is pliable. Roll it into a smooth sheet or thick log. -
Cover the armature:
Wrap the clay around your foil core, smoothing the seams completely so the foil is hidden. Extend the tail end into a long, narrowing point. -
Lift the tail:
Gently curve the tail section upward to mimic the swimming motion seen in the photo.
Smooth Moves
Use a tiny amount of baby oil on your fingertips while smoothing the clay. It melts away fingerprints instantly for a flawless finish.
Step 2: Sculpting the Head & Fins
-
Shape the hammerhead:
Roll a separate log of blue-grey clay and flatten it slightly. Attach this horizontally to the front of the nose, blending the clay smoothly into the main body to create the iconic T-shape. -
Create the dorsal fin:
Fashion a triangular piece of clay for the large dorsal fin. Attach it securely to the top center of the back, blending all edges downward so it looks seamless. -
Add pectoral fins:
Form two long, flattened triangles for the side fins. Press them onto the lower sides of the body, just behind the head, angling them slightly backward. -
Form the tail fins:
Add the vertical tail fin at the very tip of the body. Make the top lobe significantly longer than the bottom lobe, blending the connection point carefully. -
Refine the shape:
Go over the entire figure with your fingers or a silicone smoothing tool to remove any fingerprints and ensure the silhouette flows naturally.
Make Waves
After baking, dry brush a little white acrylic paint onto the sand texture. It highlights the peaks and makes the seabed look more realistic.
Step 3: Adding Details
-
Make the gills:
Using a needle tool or a thin blade, gently press four vertical curved lines into the side of the body, just behind the head, to represent the gills. -
Create the eyes:
Roll tiny balls of white clay and flatten them onto the sides of the hammerhead. Add a smaller pupil using a speck of black clay or a dot of paint. -
Bake the shark:
Place your shark on a baking sheet. I like to prop the tail and fins with extra foil so they don’t droop in the oven. Bake according to your clay manufacturer’s instructions.
Step 4: Creating the Base
-
Prepare the stand:
Take your wooden circular base. Coat the top surface generously with craft glue. -
Apply texture:
Press a layer of beige clay onto the wood, texturing it with a stiff brush or ball of foil to look like sand. Alternatively, mix real craft sand with paint and apply it directly. -
Final assembly:
Once the shark has cooled completely, use a strong adhesive to mount it onto the sandy base. -
Seal:
Finish the shark with a matte varnish to protect the surface and give it that soft, professional look visible in the reference.
Place your little predator on a shelf or desk to bring a calm, aquatic vibe to your space
Sea Urchin and Shell Bowl Set
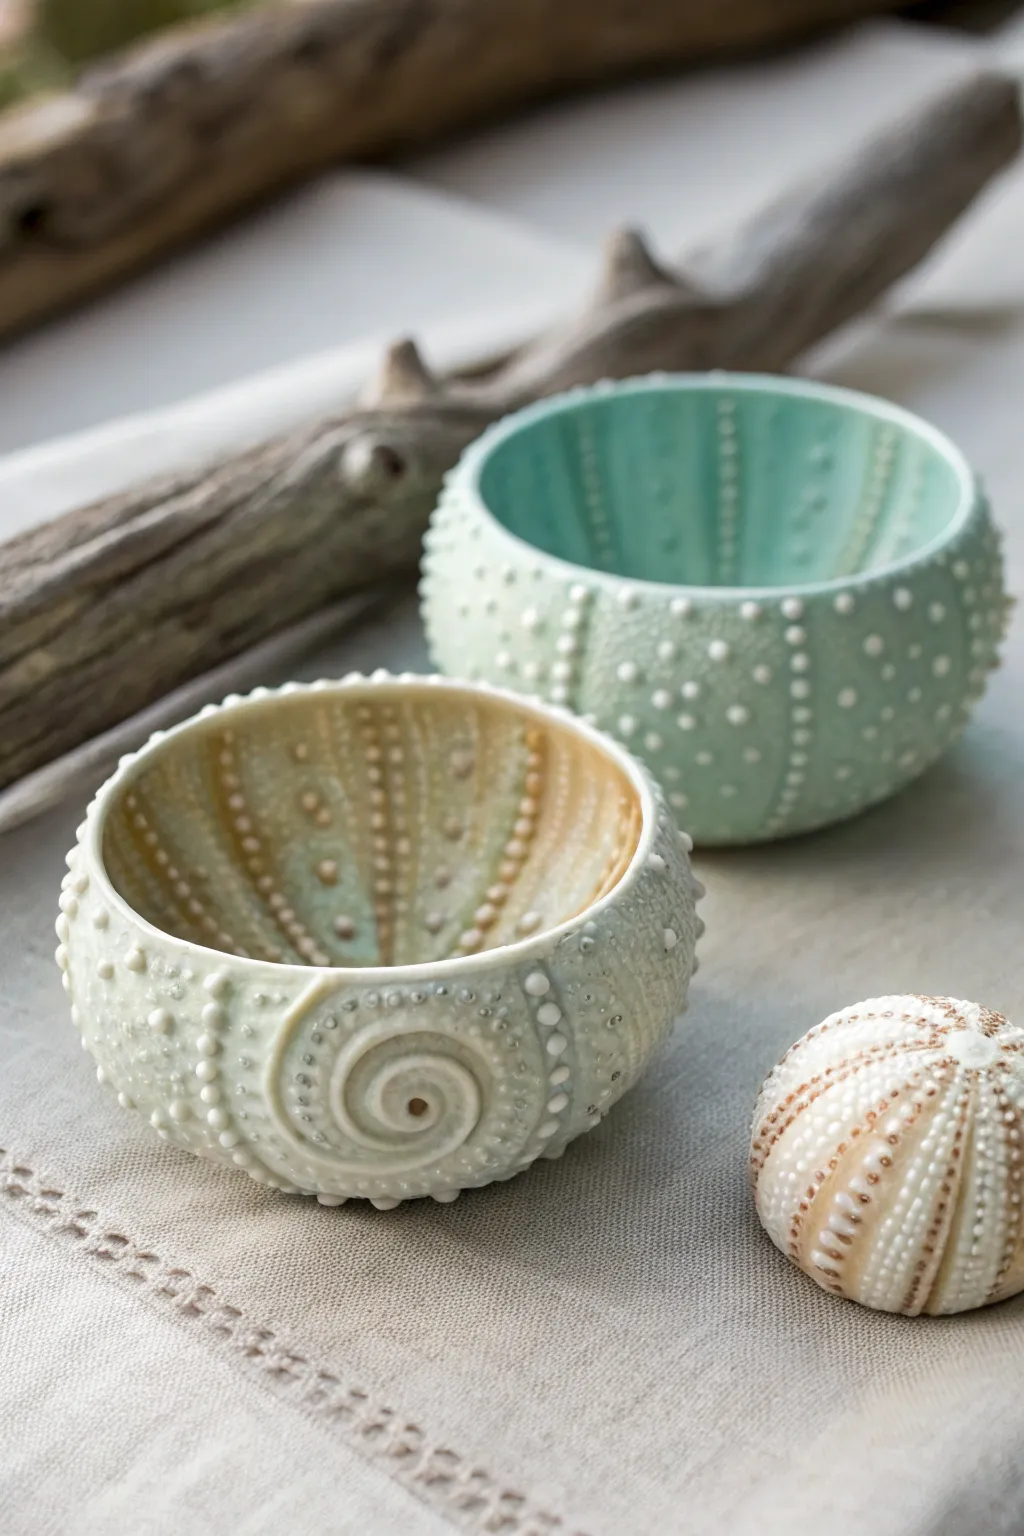
Capture the delicate beauty of marine life with this project, creating urchin-inspired bowls that feature intricate dot patterns and organic spiral textures. The result is a stunning set of functional decor pieces with a soft, matte finish that mimics real shell and bone.
How-To Guide
Materials
- White stoneware or polymer clay
- Ball tool stylus set (various sizes)
- Small bowl or hemisphere mold (for shaping)
- Pottery sponge
- Underglaze (pale mint green, soft peach, beige)
- Clear matte glaze or satin varnish (if using polymer)
- Needle tool
- Paintbrush (soft bristle)
- Slip (liquid clay) for joining
Step 1: Forming the Base
-
Prepare the Clay:
Wedge your white clay thoroughly to remove air bubbles. Roll it out into a smooth slab approximately 1/4 inch thick, ensuring even thickness throughout. -
Cut and Shape:
Cut a circle from the slab that matches the size of your intended bowl. I like to drape the clay gently inside a hemisphere mold or a small bowl lined with plastic wrap to create a perfect half-sphere shape. -
Smooth the Edges:
While the clay is in the mold, trim any excess from the rim to create a clean, level and slightly rounded edge. Use a damp sponge to smooth out any imperfections.
Use Slip for Speed
Instead of rolling tiny balls, fill a slip trailer bottle with thick slip (liquid clay). Squeeze gently to create uniform raised dots directly on the surface.
Step 2: Texturing the Surface
-
Marking Sections:
Lightly sketch vertical lines with a needle tool to divide the bowl’s exterior into segments, mimicking the five-part symmetry often found in sea urchins. -
Creating the Spiral:
On the beige bowl, create a focal point by rolling a tiny coil of clay. Attach it to the side using slip and scoring, winding it into a tight spiral to represent a growth pattern. -
Adding Raised Dots:
This is the most time-consuming but rewarding part. Roll hundreds of tiny clay balls in varying sizes. You’ll need very small ones for detailed lines and slightly larger ones for emphasis. -
Attaching the Texture:
Score the surface lightly where lines of dots will go. Using a small brush, apply a dab of slip or water, then press the tiny clay balls onto the bowl in vertical rows following your guide lines. -
Refining the Dots:
Take a small ball stylus tool and gently press into the center of select larger dots to create a ‘crater’ effect, which adds realism to the urchin texture. -
Inner Texture:
For the interior, use a larger stylus tool to embrace the negative space. Gently press rows of indentations inside the bowl that mirror the exterior lines. -
Create the Closed Shell:
To make the small accompanying urchin, form a hollow sphere of clay. Texture it similarly with vertical rows of slip-trailed dots or attached clay balls, radiating from the top center.
Dots Falling Off?
If attached clay balls pop off during drying, the base clay was likely too dry. Score the surface more aggressively and use vinegar-based slip for a stronger bond.
Step 3: Coloring and Finishing
-
Initial Drying:
Allow the clay to dry to a leather-hard state. This is crucial so you don’t smudge your intricate dot work while painting. -
Applying Underglaze:
For the turquoise bowl, wash a diluted coat of pale mint green over the entire exterior. For the beige bowl, use a soft peach or sand tone, focusing on the spaces *between* the dots. -
Wiping Back:
Once the underglaze is touch-dry, use a slightly damp sponge to gently wipe across the raised dots. This removes the color from the high points, leaving the white clay exposed while the color remains in the crevices. -
Highlighting:
Use a fine brush to add tiny accents of darker beige or rust color to the very centers of the spiral or specific dot rows to create depth. -
Bisque Fire:
Fire the pieces in a kiln according to your clay body’s instructions (usually Cone 04 for earthenware). -
Glazing:
Apply a clear satin or matte glaze. Avoid high-gloss finishes, as the natural sea urchin look relies on a softer, bone-like sheen. -
Final Fire:
Perform the final glaze firing. If using polymer clay instead of ceramics, bake according to package directions and finish with a matte varnish.
Now you have a set of coastal-inspired bowls perfect for holding jewelry or simply admiring on a shelf
Kelp Forest Candle Holder
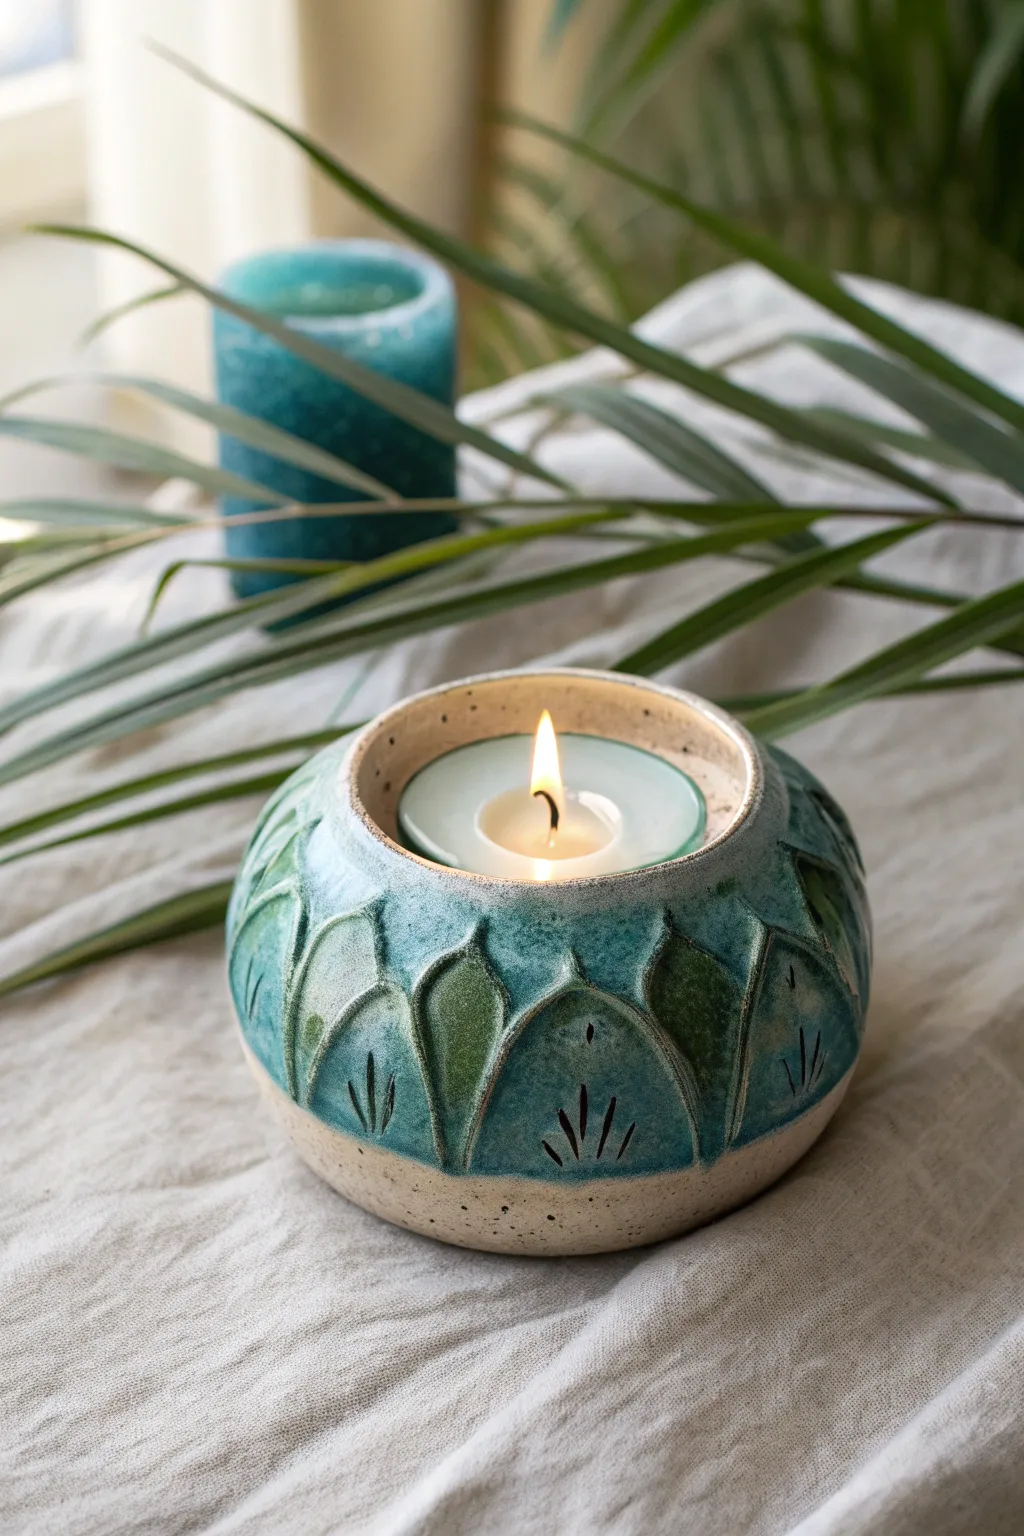
Bring the calming depths of the ocean into your home with this handcrafted ceramic votive holder, featuring a cozy speckled clay body adorned with stylized kelp frond carvings. The piece balances earthy stoneware textures with a glossy, variegated teal and moss-green glaze that glows beautifully when lit.
Step-by-Step
Materials
- Speckled stoneware clay (mid-fire)
- Pottery wheel (or coil-building tools)
- Needle tool
- Loop carving tool (small)
- Small sponge
- Rib tool (metal or wood)
- Teal reactive glaze
- Moss green glaze
- Wax resist
- Tea light candle
- Kiln for bisque and glaze firing
Step 1: Throwing the Form
-
Wedge the clay:
Start with a ball of speckled stoneware clay about the size of a large orange. Wedge it thoroughly to remove air bubbles and align the clay particles. -
Center specifically:
Center the clay on your wheel head. Since this is a low, enclosed form, ensure your base is wider than you might expect, roughly 4-5 inches depending on your final shrinkage rate. -
Open deeply:
Open the clay, leaving a floor thickness of about 1/2 inch to allow for trimming later. Pull the floor out until the interior diameter fits a standard tea light with room to spare. -
Pull the walls:
Pull the walls up into a basic cylinder first. Keep the walls roughly 1/4 inch thick to support the carving work later. -
Shape the belly:
Using a rib tool on the inside, gently push the walls outward to create a rounded, bulbous belly, curving the clay back inward at the top. -
Collar the rim:
Slowly collar the top rim inward so it creates a distinct enclosure. I find it helpful to compress the rim frequently here to prevent cracking. -
Define the gallery:
Create a slight recessed gallery or simply smooth the opening so a tea light can easily be dropped in. The final opening should be approximately 2.5 to 3 inches wide.
Glaze Control Tip
For better definition, brush a thin layer of wax resist over the carved dividing lines before glazing. This prevents the teal glaze from obscuring the leaf separation.
Step 2: Carving the Kelp Motif
-
Trim the foot:
Once leather hard, trim the bottom to create a clean, distinct foot ring. This lifts the heavy form visually off the table. -
Mark the spacing:
Use a needle tool or a decorating disk to lightly mark vertical guidelines around the pot. Aim for about 8-10 sections for the kelp leaves. -
Outline the leaves:
Lightly sketch deep U-shapes or spade shapes around the belly of the pot. These should touch at the widest point and taper toward the top and bottom. -
Carve relief:
Using a loop tool, carve away a small amount of clay *between* the leaf shapes to make them stand out in relief. Alternatively, trace the outlines deeply to create separation channels. -
Add texture:
At the base of each ‘leaf’ shape, use a small sharp tool to incise three small vertical lines. These mimic the veins of sea plants or decorative accents. -
Smooth the burs:
Once bone dry, gently rub the carved areas with a fine sponge or soft finger to remove any sharp clay crumbs or burs before the first firing. -
Bisque fire:
Fire the piece to cone 04 (or your clay body’s bisque temperature).
Step 3: Glazing
-
Wax the bottom:
Apply wax resist generously to the foot ring and slightly up the bottom edge. Also, wax the very top rim if you want to leave the raw speckled clay exposed there for contrast. -
Apply base color:
Dip the top two-thirds of the pot into a reactive teal glaze. Hold it for 3 seconds to get good coverage, then shake gently to remove drips. -
Accent the leaves:
Using a brush, dab a moss green glaze into the centers of the leaf shapes. Because the form is curved, the glazes will melt and pool together in the kiln. -
Highlight the carving:
Make sure the glaze doesn’t completely fill the incised lines at the bottom of the leaves; you want those to break the surface tension so the dark clay body shows through. -
Clean the distinct line:
Use a damp sponge to wipe the glaze off the bottom third of the pot, creating a clean, straight line where the glaze ends and the raw clay begins. -
Final fire:
Fire to cone 5/6 (mid-fire stoneware). The reactive glazes will interact with the speckles in the clay to create that sandy, underwater texture.
Rim Too Small?
If you collared the rim too small for a candle, don’t panic. Use a heat gun to slightly dry the shoulder, then carefully trim the opening wider with a needle tool while spinning.
Place a tea light inside and watch the flickering shadows dance through your handmade kelp forest
Ocean Wave Spoon Rest
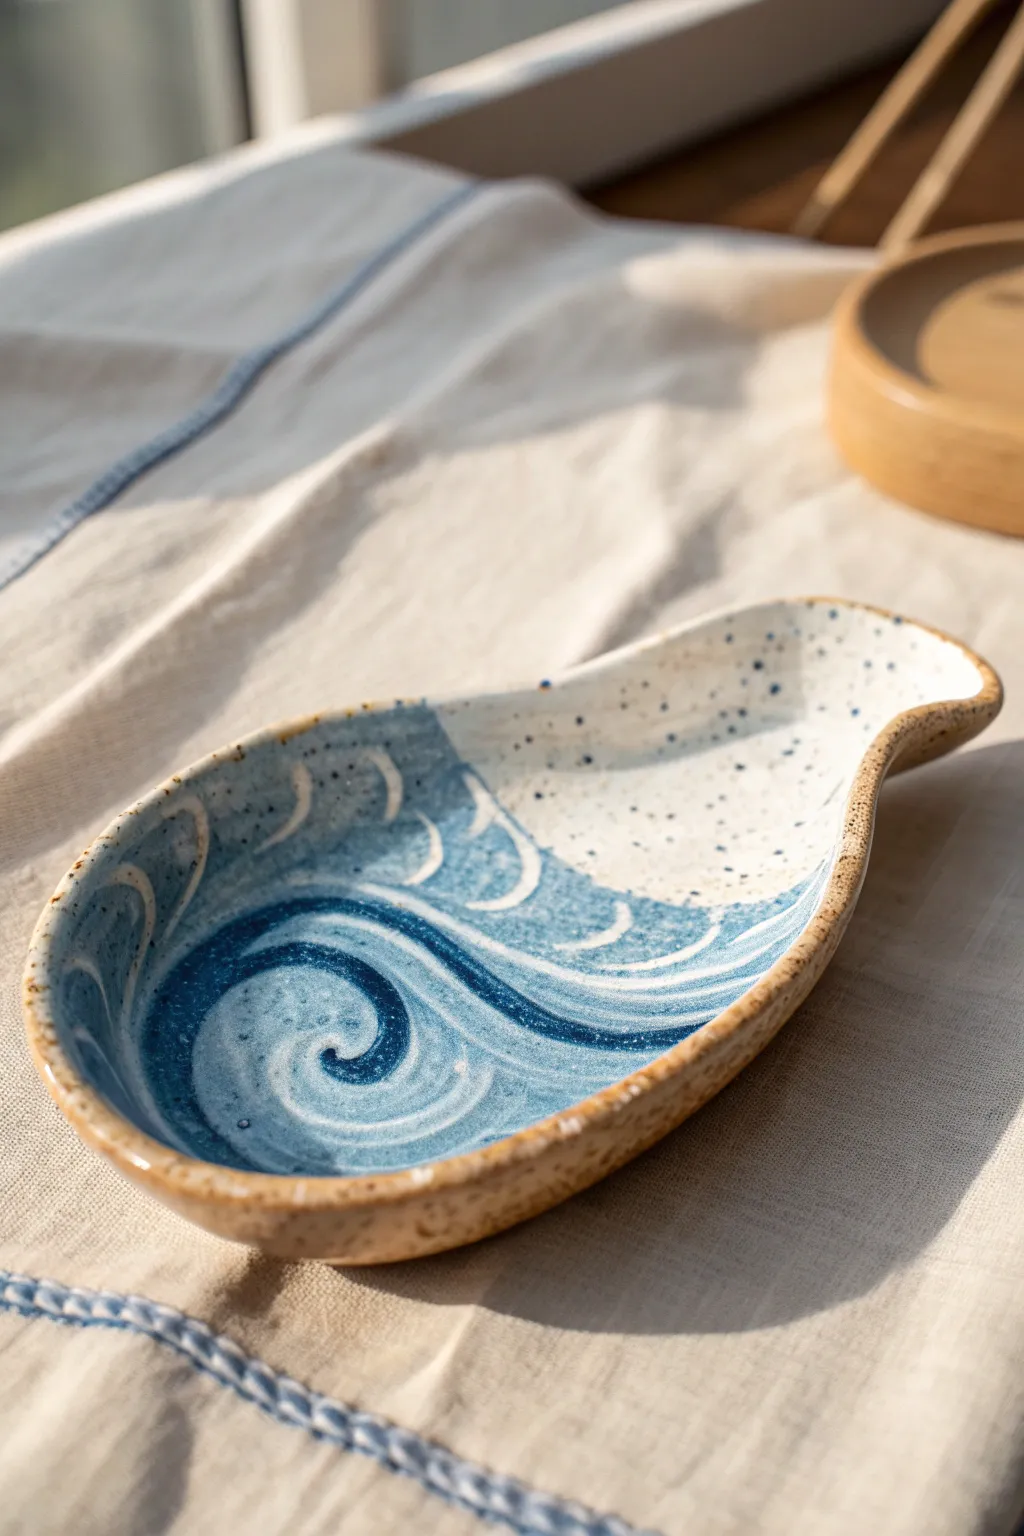
Bring the calming energy of the sea into your kitchen with this stoneware spoon rest featuring a stylized crashing wave. The speckled clay body peeking through the white and blue glazes gives it a lovely sense of depth and sandy texture.
Detailed Instructions
Materials
- Speckled stoneware clay (approx. 1 lb)
- Small rolling pin
- Pin tool or clay knife
- Spoon rest template (paper or cardstock)
- Small sponge
- Wax resist
- Dark blue underglaze
- White underglaze
- Detail brush
- Clear transparent glaze
- Rib tool
- Pottery wheel (optional, can be hand-built)
Step 1: Forming the Base
-
Roll the slab:
Start by wedging your speckled stoneware clay thoroughly to remove air bubbles. Roll it out into an even slab, approximately 1/4 inch thick. I find turning the clay frequently helps maintain an even thickness. -
Cut the shape:
Lay your pear-shaped template onto the slab. Using your pin tool or knife, trace and cut around the template. Smooth the raw edges gently with your finger to remove any sharp burrs. -
Shape the curvature:
To give it functionality, gently lift the edges of the wide part of the spoon rest to create a shallow bowl. You can press the clay into a foam mold or just use your hands to pinch up the rim slightly. -
Form the spout:
At the narrow end, create the small spout or handle rest. Pinch the clay upward to create a cradle for the spoon handle, ensuring it’s slightly higher than the bowl section. -
Smooth the surface:
Use a damp sponge or a soft rib tool to smooth the interior surface. This is crucial as any heavy texture will make the spoon rest harder to clean later. -
Bisque fire:
Allow the piece to dry slowly to the bone-dry stage. Once completely dry, load it into the kiln for a bisque firing (usually Cone 04).
Bleeding Lines?
If glaze creeps under your wax resist, your wax layer might be too thin. Apply two thin coats rather than one thick glob for sharper lines.
Step 2: Designing the Wave
-
Clean the bisque:
Wipe the fired bisque ware with a clean, slightly damp sponge to remove any kiln dust. This ensures the glaze adheres properly. -
Draft the wave:
Lightly sketch your wave design onto the bisque with a pencil. Focus on a large, swirling spiral in the bottom left, with crests reaching up towards the narrow neck. -
Wax the resist areas:
This is the trickiest part: using a fine brush and wax resist, paint the lines that you want to remain raw clay color. This creates the ‘white foam’ outlines of the wave. Paint the spiral and the scalloped edges of the wave crests. -
Wax the speckles:
To mimic sea spray, flick or dot small amounts of wax resist onto the upper right section (the ‘sky’ or ‘sand’ area) of the spoon rest. -
Dry the wax:
Let the wax resist dry completely. It should feel hard to the touch, usually taking about 15-20 minutes.
Step 3: Glazing and Finishing
-
Apply blue underglaze:
Using a medium brush, apply the dark blue underglaze inside the wave shape. The wax lines will repel the paint, keeping your design crisp. -
Add depth:
While the blue is still slightly wet, you can blend in a lighter blue or white near the center of the spiral to create a gradient effect, enhancing the sense of movement. -
Apply white underglaze:
Paint white underglaze on the upper section (the neck area) where you applied the speckle wax. This creates the contrasting background for your spray dots. -
Wipe back excess:
Once the underglaze is dry, take a slightly damp sponge and very gently wipe over the waxed lines. This removes any stray droplets of color sitting on top of the wax. -
Clear coat:
Check the rim; leave the rim unglazed for a nice raw clay frame, or apply clear glaze carefully. Then, dip or brush the entire interior with a transparent clear glaze. -
Final wipe:
Flip the piece over and meticulously wipe the bottom foot ring clean of any glaze to prevent it from sticking to the kiln shelf. -
Glaze fire:
Fire the piece to maturity (Cone 5 or 6 depending on your clay body). The wax will burn away, revealing the raw speckled clay lines beneath the glossy glaze.
Clean Lines Pro Tip
Use a liquid latex resist instead of wax for the intricate wave lines. You can peel it off before firing for strictly defined raw clay edges.
Once cooled, you will have a durable, ocean-inspired piece ready to catch messy spoons and brighten your countertop
Message-In-A-Bottle Mini Scene
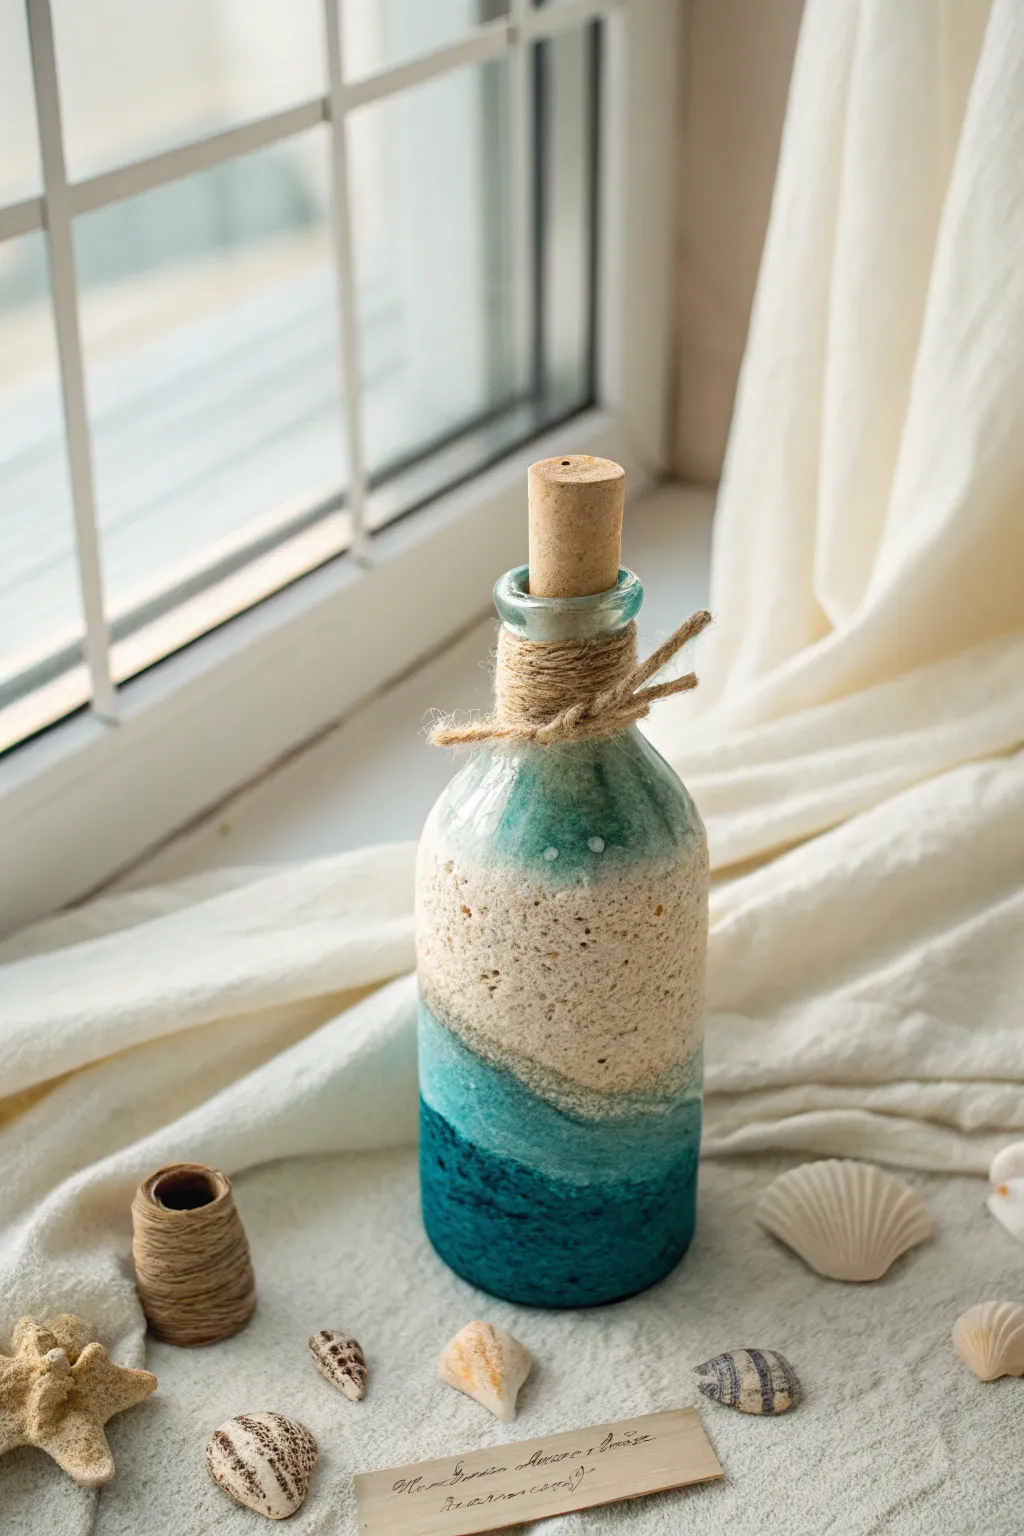
Transform a plain glass vessel into a slice of the seashore with this textured art project. By layering polymer clay or textured pastes, you will capture the soothing gradient of deep ocean waves crashing onto a sandy beach.
How-To Guide
Materials
- Clean glass bottle with cork stopper
- Polymer clay (Deep Teal, Turquoise, White, Beige/Sand)
- Fingers or clay rolling tool
- Texture sponge or toothbrush
- Real sand (optional)
- White acrylic paint
- Matte varnish or sealant
- Jute twine
- Craft glue or hot glue gun
- Small sea shells (for styling)
Step 1: Preparation and Base Layering
-
Clean the surface:
Begin by thoroughly cleaning your glass bottle with rubbing alcohol to remove any oils or fingerprints. This ensures the clay adheres properly to the glass. -
Mix the deep ocean color:
Condition your Deep Teal polymer clay until it is soft and malleable. Roll it out into a thin sheet. -
Apply the bottom layer:
Wrap the teal clay around the bottom third of the bottle. Press it firmly against the glass, smoothing out any air bubbles with your thumbs. Create an uneven, wavy top edge to mimic water. -
Create the mid-tone transition:
Condition the Turquoise clay. You can mix a little white into it to create a softer sea-foam green. -
Add the middle wave:
Apply this lighter blue clay immediately above the teal layer. Roughly blend the seam where the two colors meet by dragging the clay slightly with your finger, creating an organic transition.
Step 2: Creating Texture and Shoreline
-
Form the sandy beach:
Mix your Beige and White clay to get a sandy tone. Apply this to the upper portion of the bottle, overlapping slightly with the turquoise layer. -
Texture the sand:
While the clay is still soft, press real sand into the beige clay for authentic grit, or use a stiff toothbrush to stipple the surface heavily. -
Detail the water texture:
Use a rough texture sponge on the blue sections. I find tapping gently creates better ‘foam’ effects than dragging. -
Enhance the wave crests:
Roll tiny, thin snakes of White clay. Press these onto the transitions between the blue colors to represent foaming wave crests. -
Smudge the foam:
Using a sculpting tool or your finger, smear the white clay downwards into the blue to make it look like crashing water. -
Bake the project:
Bake the bottle according to your polymer clay package instructions (usually 275°F/135°C for 15-30 minutes). Let it cool completely in the oven to prevent the glass from cracking.
Clay Slipping?
If the raw clay isn’t sticking to the smooth glass, brush a thin layer of PVA glue or liquid polymer clay (Bake & Bond) onto the glass before applying the colored sheets.
Step 3: Finishing Touches
-
Highlight with paint:
Once cool, dry-brush a tiny amount of White acrylic paint over the highest textured points of the sand and waves to make the details pop. -
Seal the work:
Apply a coat of matte varnish to the entire clay surface. This protects the finish and locks in any loose sand texturing. -
Prepare the neck:
Put a dab of glue at the top of the clay line near the neck of the bottle. -
Wrap the twine:
Wind the jute twine tightly around the neck, covering the glass from the top lip down to where the clay begins. -
Tie the knot:
Finish wrapping by tying a simple knot or bow with loose ends hanging down for a rustic look. -
Insert the cork:
Place the cork stopper in the bottle to complete the message-in-a-bottle aesthetic.
Hidden Treasures
Before baking, press tiny micro-shells or small glass beads into the ‘sand’ clay layer to look like treasures half-buried on the beach.
Place your finished ocean bottle near a window where the light can catch the textures of your handmade shoreline
Bioluminescent Deep-Sea Creatures

Brighten up the abyss with this charmingly stylized deep-sea anglerfish sculpted from polymer clay. The contrast between the matte charcoal body and the neon teal details mimics the eerie glow of bioluminescence perfectly.
Step-by-Step
Materials
- Black polymer clay (matte finish preferably)
- Teal or aqua light blue polymer clay
- Red-orange polymer clay
- Thick black craft wire (approx. 18-20 gauge)
- Sculpting tools (needle tool, small ball tool, clay knife)
- Texture sponge or stiff brush
- Black slate coaster or extra black clay (for the base)
- Liquid clay or bake-and-bond adhesive
- Oven for baking
Step 1: Sculpting the Base and Body
-
Prepare the Base:
Start by conditioning a chunk of black clay and flattening it into an irregular oval shape about 1/4 inch thick. This serves as the ‘sea floor’ rock. Alternatively, you can use a small piece of natural slate if it’s oven-safe. -
Texture the Rock:
Use a crumpled ball of aluminum foil or a coarse texture sponge to press roughness into the base, giving it a stony appearance. -
Form the Body:
Roll a large ball of black clay into a teardrop shape for the fish’s body. Flatten the bottom slightly so it sits stable, then place it firmly onto your base. -
Create the Mouth:
Using a clay knife, cut a deep, wide horizontal slit into the rounded front of the teardrop to form the mouth. Gently pry it open to create a gaping expression. -
Refine the Head:
Smooth out the area around the mouth, pushing the lower jaw slightly forward to give that classic, grumpy anglerfish underbite.
Drooping Fins?
If the fins are sagging before baking, prop them up with small pieces of folded cardstock or tissue paper. This supports the clay until the heat sets the shape permanently.
Step 2: Adding Fins and Texture
-
Make the Dorsal Fin:
Flatten a small piece of black clay into a triangle. Use your knife to cut jagged notches along the top edge, creating a spiky look. Attach this to the top center of the body. -
Add Pectoral Fins:
Create two smaller, fan-shaped triangles for the side fins. Notch the edges similarly to the dorsal fin and press them onto the sides of the body. -
Attach the Tail:
Form a final fan shape for the tail fin. Attach it securely to the pointed end of the teardrop body, blending the seams with a silicone tool or your finger so it looks like one solid piece. -
Texture the Skin:
Before adding details, lightly tap the entire black surface of the fish with a stiff brush or texture sponge. This matte, porous texture helps it look organic rather than plastic.
Step 3: Bioluminescent Details
-
Create the Eye:
Roll a small ball of teal clay and press it onto the side of the head. Add a tiny black dot in the center for the pupil. -
Detail the Fins:
Roll very thin ‘snakes’ of teal clay. Cut them into tiny segments and arrange them in lines radiating outward on the dorsal, pectoral, and tail fins to mimic glowing fin rays. -
Add Texture Details:
Use a needle tool to gently press stitch-like indentations across the teal fin stripes for extra definition. -
Add Red Spots:
Roll tiny spheres of red-orange clay. Press them gently onto the body in a random pattern, focusing on the upper back and sides. -
Insert the Teeth:
Roll extremely small cones of red-orange clay. Carefully place them inside the mouth using a needle tool, lining the bottom jaw.
Glow Up
Swap the standard teal clay for ‘Glow-in-the-Dark’ polymer clay. Charge it under a lamp, and your deep-sea creature will actually bioluminesce when you turn off the lights.
Step 4: Final Assembly
-
Insert the Lure:
Cut a distinct curve of black wire, about 2-3 inches long. Push one end deep into the forehead of the fish. I like to add a microscopic drop of liquid clay here for a permanent hold. -
Add the Bulb:
You can add a tiny ball of teal clay to the tip of the wire if desired, or leave the wire bare for a sleeker, silhouetted look as shown in the original design. -
Bake:
Bake the entire sculpture according to your polymer clay package instructions (usually 275°F/135°C for 15-30 minutes). Let it cool completely before handling.
Place your finished anglerfish on a shelf where it can keep a watchful eye on your room