
If you want an easy, festive project for the 4th of July, I always reach for clay heishi bead bracelets because they’re quick to make and so fun to stack. Here are 19 red, white, and blue ideas—starting with the classic crowd-pleasers and ending with a few creative twists I’d totally make in my studio.
Classic Red, White, and Blue Color Blocks

This striking bracelet trio features a classic Americana palette with a modern twist, using matte, almost frosted-looking beads for a sophisticated texture. The design alternates solid blocks of red, white, and blue, unified by a sparkling silver spacer accent on the blue strand.
Detailed Instructions
Materials
- 10mm round matte acrylic or polymer clay beads in Deep Red
- 10mm round matte acrylic or polymer clay beads in Stark White
- 10mm round matte acrylic or polymer clay beads in Navy Blue
- Strong elastic stretch cord (0.8mm or 1.0mm recommended)
- Rhinestone rondelle spacer beads (silver tone with clear crystals)
- Scissors
- Super glue or jewelry adhesive
- Bead stopper or masking tape
- Ruler or measuring tape
Step 1: Preparation and Design
-
Measure your wrist:
Wrap a measuring tape comfortably around your wrist to find your size. Add about 0.5 to 1 inch to this measurement to ensure the large 10mm beads won’t pinch or fit too tightly. -
Cut the cord:
Cut three lengths of elastic cord, each about 10-12 inches long. This extra length makes tying the final knots much easier than struggling with short ends. -
Secure the ends:
Place a bead stopper or a piece of masking tape on one end of each cord segment to prevent your beads from sliding off while you work. -
Pre-stretch the elastic:
Gently pull on each piece of cord a few times. Pre-stretching helps prevent the bracelets from sagging or loosening up immediately after you wear them.
Sticky Situation?
If the knot refuses to hide inside a bead, carefully enlarge the bead hole with a bead reamer tool, or simply rotate the knot to the underside of your wrist.
Step 2: Creating the Solid Color Strands
-
String the red strand:
Begin threading your matte red beads onto the first cord. Continue adding beads until you reach your desired length, checking the fit against your wrist occasionally. -
Check the fit:
Bring the two ends together to form a circle. The beads should sit comfortably without gaps, but shouldn’t slide around too loosely. -
Tie the knot:
Tie a surgeon’s knot (right over left, left over right, and loop through an extra time) to secure the bracelet. Pull the elastic tight so the knot compresses. -
String the white strand:
Repeat the stringing process with the white matte beads on the second cord. I find it helpful to match the bead count of the red bracelet exactly so they stack evenly. -
Secure the white bracelet:
Tie off the white strand with another secure surgeon’s knot, ensuring proper tension before tightening completely.
Step 3: Creating the Accent Strand
-
Start the blue pattern:
Thread approximately half of the needed blue beads onto your final cord. -
Add the focal point:
Slide on three rhinestone rondelle spacer beads. These silver accents will break up the blue block and add a touch of sparkle to the matte finish. -
Finish the blue sequence:
Continue threading the remaining blue beads until this bracelet matches the length of your red and white ones. -
Verify the arrangement:
Hold the loop up to see if the rhinestone spacers are positioned where you want them (usually centered opposite the knot). -
Knot the final strand:
Secure this last bracelet with a strong surgeon’s knot.
Star-Spangled Upgrade
Swap the silver rhinestone spacers for star-shaped hematite or metal beads to lean harder into the 4th of July theme without losing elegance.
Step 4: Finishing Touches
-
Apply adhesive:
Dab a tiny drop of super glue or jewelry adhesive onto each of the three knots. Be careful not to get glue on the beads themselves. -
Let it cure:
Allow the glue to dry completely according to the package instructions. This prevents the knots from slipping undone later. -
Hide the knots:
Once dry, trim the excess elastic tails close to the knot. Gently tug the bracelet to slide the knot inside the hole of an adjacent bead to hide it. -
Stack and style:
Roll the bracelets onto your wrist one by one—rolling prevents stretching—and arrange them with the white sandwiched between the red and blue for that classic flag motif.
Wear your new stack with pride and enjoy the satisfying matte texture against your skin


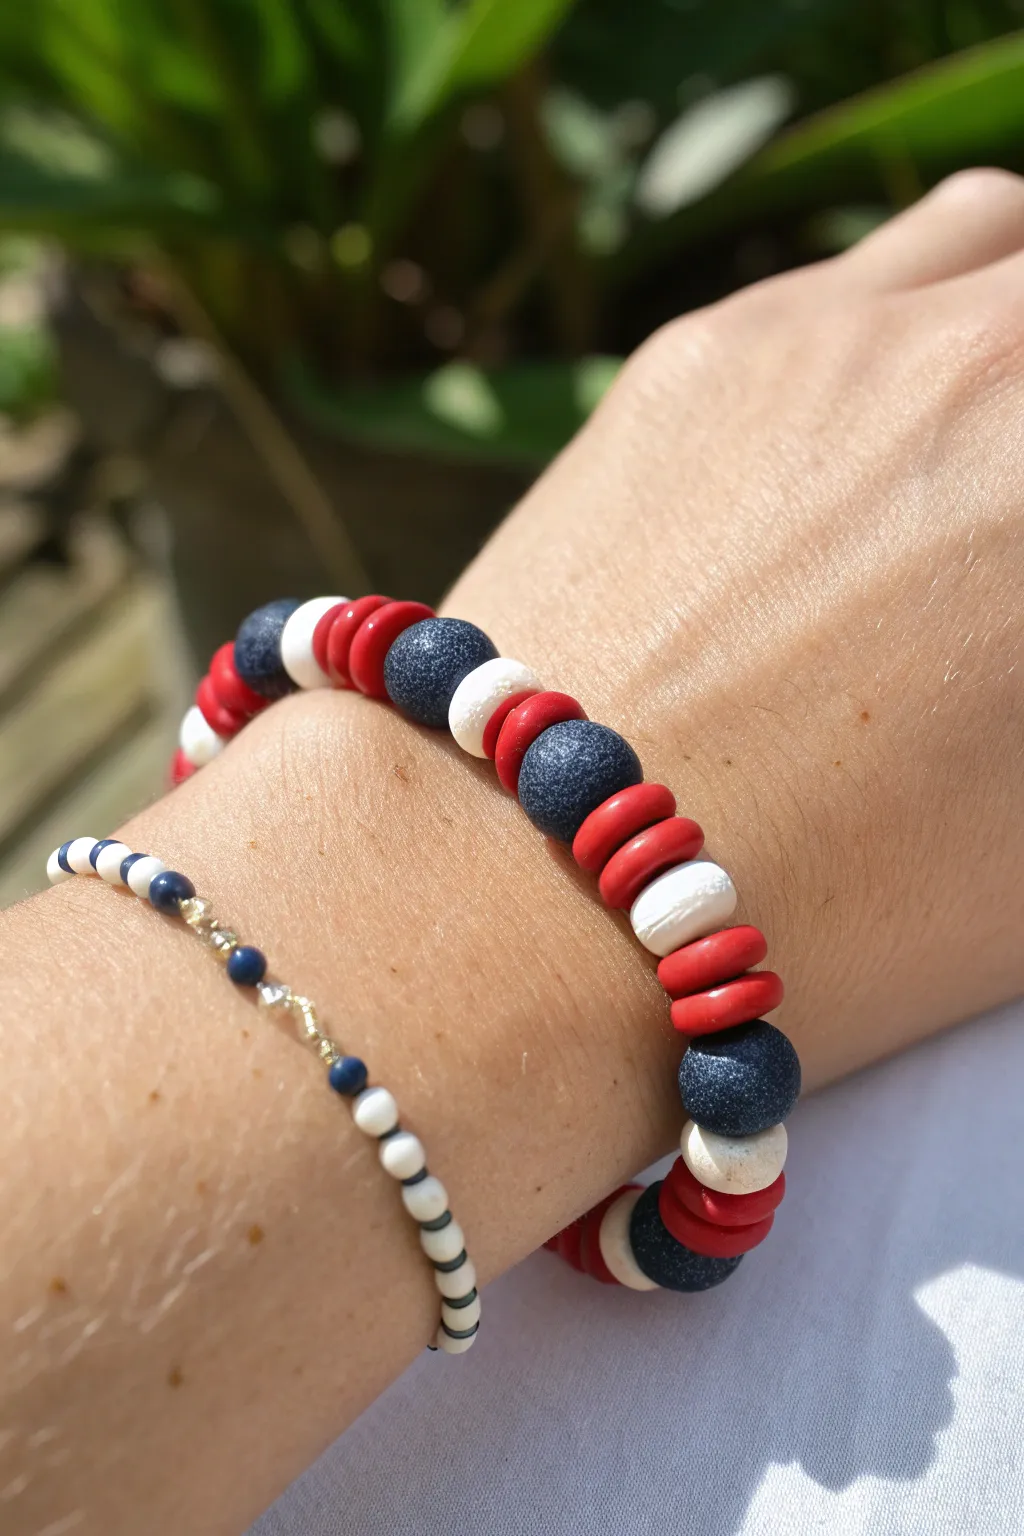
Stars-and-Stripes Flag-Inspired Pattern
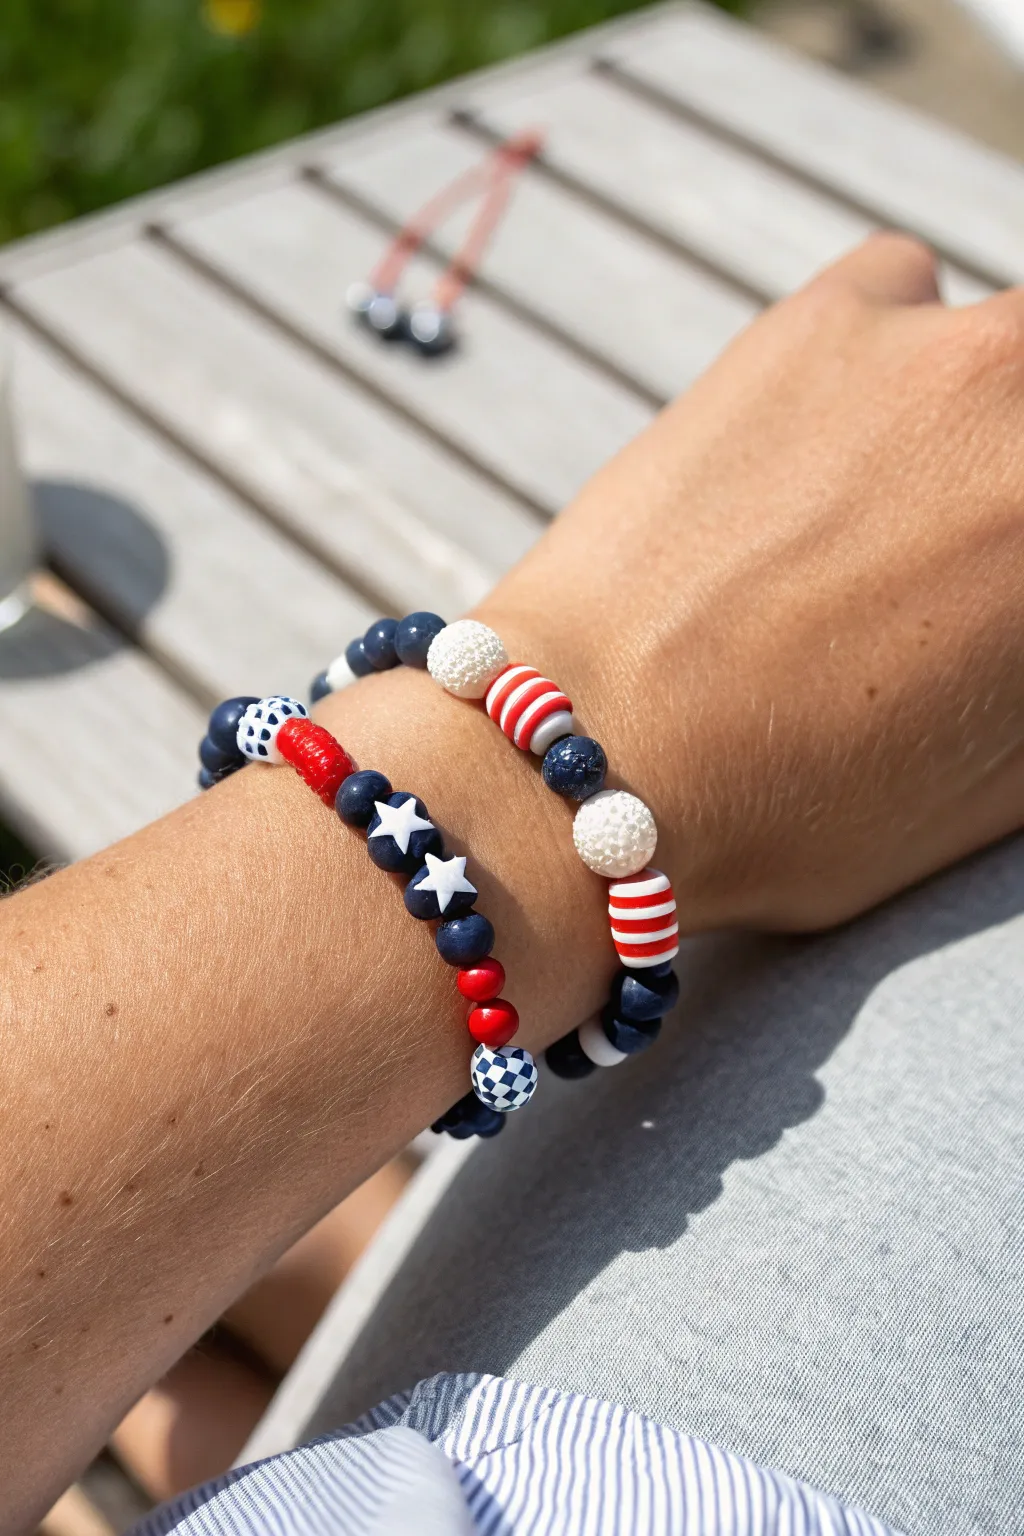
Celebrate Independence Day with this set of two coordinating bracelets that perfectly capture the spirit of the flag. One design highlights bold stars on a blue field, while the other mimics the classic red and white stripes for a festive stack you can wear all summer.
Step-by-Step
Materials
- Elastic cord (0.8mm or 1mm thickness)
- Ruler or tape measure
- Scissors
- Super glue or jewelry glue
- Navy blue round clay beads (matte or solid)
- Red round clay beads
- White round textured/bumpy beads (approx 8-10mm)
- Red and white striped fluted/grooved beads
- Blue beads with white stars (flat, star-shaped)
- Blue and white checkered bead (for the clasp cover)
- Blue and white speckled/terrazzo round beads
Step 1: Preparation
-
Measure your wrist:
Wrap a flexible tape measure or string around your wrist to find your measurement. Add about 0.5 to 1 inch to this length depending on how loose you want the fit. -
Cut the cord:
Cut two lengths of elastic cord, making sure each is about 3-4 inches longer than your target length. This extra slack is crucial for tying the final knot easily. -
Pre-stretch the elastic:
Give each piece of cord a few gentle tugs. Pre-stretching helps prevent the bracelets from loosening up immediately after you’ve made them.
Step 2: Bracelet 1: Star Spangled Blue
-
Secure the end:
Place a piece of tape or a binder clip on one end of your first cord to stop beads from sliding off while you work. -
Begin the blue field:
Thread on about 6-8 navy blue round beads to start the base of the bracelet. -
Add the stars:
Slide on a white star-shaped bead (blue with white star). Follow it immediately with a navy spacer bead. -
Create the star pattern:
Repeat the star and navy spacer pattern twice more, so you have three prominent stars separated by single blue beads. -
Transition to red:
Add a small section of red. Thread two small red round beads to create a pop of color after the blue field. -
Add the accent bead:
Slide on a blue and white checkered round bead. This acts as a fun focal point opposite the stars. -
Finish the loop:
Fill the rest of the cord length with navy blue beads until you reach the desired size. Check the fit around your wrist before tying.
Knot Slipping?
If the elastic feels slippery, try a surgeon’s knot. Loop the elastic through twice on the first pass of the knot instead of once for extra grip.
Step 3: Bracelet 2: Textured Stripes
-
Start the second cord:
Secure the end of your second elastic string just like the first one. -
Thread the stripe pattern:
Start with a red and white striped fluted bead. I find these add great visual texture compared to plain smooth beads. -
Add texture and contrast:
Next, add a dark blue sparkly or speckled bead, followed by a large white textured ‘berry’ style bead. -
Repeat the color block:
Add another dark blue speckled bead, then return to the red and white striped bead. This creates your main pattern block. -
Fill the back:
For the back section of the bracelet (the part under your wrist), use simpler beads like solid navy or white rounds to make it comfortable to rest your arm on tables. -
Check the stack:
Hold the unfinished bracelet next to your completed Star Spangled one to ensure they are roughly the same size.
Level Up: Charm It
Add a small silver star charm or a ‘USA’ letter bead charm on a jump ring between two navy beads for extra movement and sparkle.
Step 4: Finishing and Tying
-
Tie the knot:
Remove the tape/clip. Tie a square knot (right over left, left over right) on the first bracelet. Pull it tight. -
Secure with glue:
Place a tiny drop of jewelry glue or super glue specifically on the knot. Let it dry for a minute. -
Hide the knot:
If one of your beads has a large enough hole, gently tug the knot inside that bead to hide it. Trim the excess string close to the bead. -
Repeat for second bracelet:
Use the same tying and gluing method for your second bracelet, ensuring the knot is secure before trimming.
Slip on your new stack and enjoy the perfect patriotic accessory for your holiday weekend


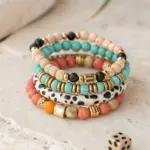
Simple Alternating Red-White-Blue Stripes

Celebrate Independence Day with this effortlessly chic bracelet stack featuring flattened clay disc beads in a classic Americana palette. The design relies on clean, alternating stripes of red, white, and blue paired with a contrasting all-white strand for a balanced, modern look.
How-To Guide
Materials
- White polymer clay heishi beads (disc beads, approx. 6mm)
- Red polymer clay heishi beads
- Blue polymer clay heishi beads
- Large round white wooden beads (approx. 8-10mm) for the accent bracelet
- Strong elastic stretch cord (0.8mm recommended)
- Super glue or jewelry cement
- Scissors
- Bead stopper or tape
- Ruler or measuring tape
Step 1: Planning and Preparation
-
Measure your wrist:
Wrap a measuring tape comfortably around your wrist to determine the circumference. Add about half an inch to this measurement to ensure the elastic bracelets fit comfortably without pinching. -
Cut the cord:
Cut three lengths of elastic cord, making each about 10-12 inches long. Having this extra length makes tying the final knots much easier than struggling with short ends. -
Secure the ends:
Attach a bead stopper or simply place a piece of folded tape at one end of each cord. This prevents your beads from sliding right off while you work on your pattern.
Knot Slipping?
If your elastic knot feels loose, try a surgeon’s knot instead. Loop the elastic through twice on the first pass (rather than once) before tightening it, creating extra friction.
Step 2: Creating the Striped Bracelet
-
Establish the pattern:
For the main patriotic bracelet, you will be creating small blocks of color. The pattern shown uses uniform groups of discs. -
String the white section:
Thread approximately 5 to 6 white heishi beads onto the elastic. Check that they sit flush against each other to form a solid white block. -
Add a red stripe:
Follow the white block with a single red heishi bead. This thin stripe acts as a separator. -
Build the next block:
Add another block of 5 to 6 white beads, keeping the count consistent with your first group. -
Create the blue section:
Now, thread on a block of blue beads. Based on the image, use about 3 to 4 blue beads, followed by a block of 3 to 4 red beads. -
Vary the sequence:
To recreate the exact look, switch up your stripes. After a long white section, create short alternating patterns: 2 red, 2 white, 2 blue, or simply alternate single contrasting colors like red and blue for a visual break. -
Check length:
Continue stringing these alternating sections until the beaded portion matches your wrist measurement.
Step 3: The All-White Accent Bracelet
-
Select the round beads:
For the background bracelet shown in the image, switch to the larger round white wooden beads. These provide a nice texture contrast to the flat clay discs. -
String the beads:
Thread the round wood beads onto your second piece of elastic cord. Because these beads are larger, this step goes very quickly. -
Verify fit:
Wrap the strand around your wrist to ensure it isn’t too bulky. Large beads sometimes require a slightly looser fit than flat discs.
Add Some Sparkle
Elevate the design by replacing the single red separator discs with gold spacer beads. This adds a sophisticated metallic shine that makes the red and blue pop even more.
Step 4: Finishing Touches
-
Pre-stretch the cord:
Before tying, give the ends of the elastic a gentle pull. This ‘pre-stretching’ helps prevent the bracelet from sagging later on. -
Tie the knot:
Remove the tape or stopper. Tie a standard square knot—right over left, then left over right—pulling it tight. -
Secure with glue:
I always add a tiny dot of jewelry cement or super glue to the knot for extra security. Let it dry for a minute or two. -
Hide the knot:
Trim the excess clear cord carefully. Ideally, slide the knot inside the hole of the nearest bead to hide it completely from view.
Stack your new creations together for a customized Fourth of July accessory that looks professionally made


Centered “USA” Letter Bead Bracelet
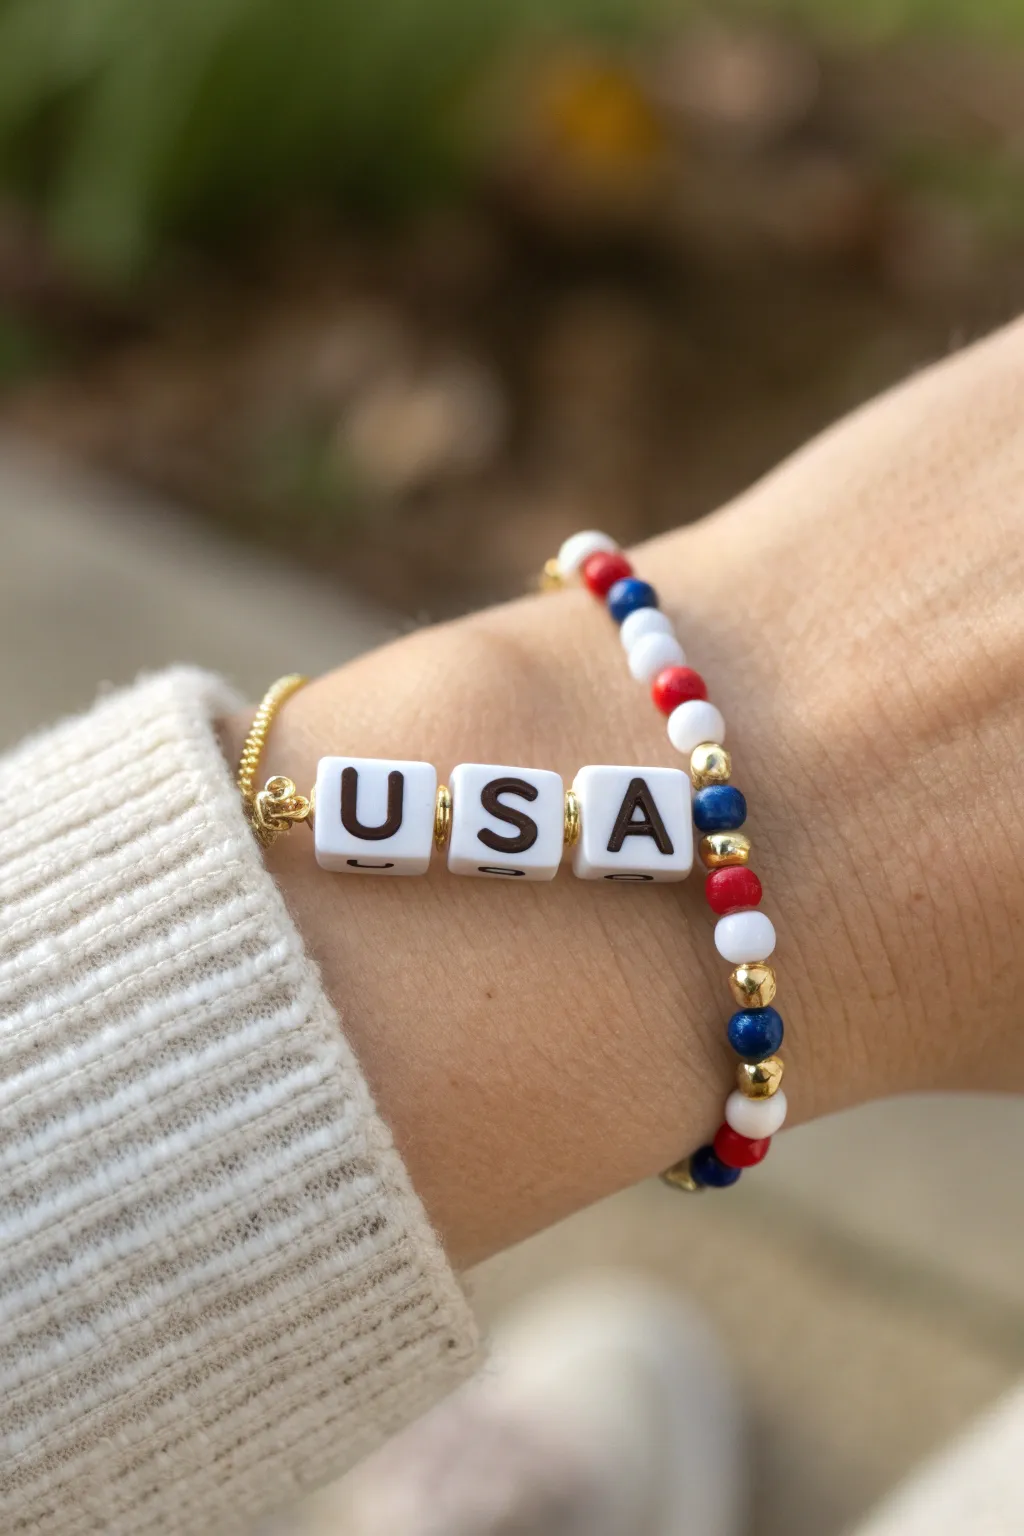
Show off your American pride with this simple yet classic beaded bracelet featuring a bold “USA” centerpiece. The combination of shiny gold accents with traditional red, white, and blue beads creates a timeless accessory perfect for Independence Day celebrations.
Step-by-Step Guide
Materials
- Stretch cord (0.8mm or 1mm thickness)
- Square white alphabet beads (letters U, S, A)
- Small round beads (approx. 4-6mm) in red, white, and navy blue (wood or acrylic work well)
- Small round gold spacer beads (same size as the colored beads)
- Gold tone crimp bead covers (optional, for finishing)
- Scissors
Step 1: Preparation
-
Measure your cord:
Cut a piece of stretch cord about 10-12 inches long. Having extra length makes it much easier to tie the finishing knot without struggling. -
Pre-stretch the string:
Gently pull on the ends of your cut cord a few times. This pre-stretching technique helps prevent the bracelet from sagging or loosening up after you wear it for the first time. -
Organize your pattern:
Before threading, lay your beads out on a bead board or a towel to visualize the sequence. Locate your specific ‘U’, ‘S’, and ‘A’ beads so they are ready to go.
Step 2: Creating the Centerpiece
-
Thread the first spacer:
Start by threading one small gold round bead onto the cord. Slide it to the center of your string. -
Add the first letter:
Thread the ‘U’ bead. Make sure the letter is facing the correct direction relative to how you want to read it on your wrist. -
Add a spacer:
Place another small gold round bead next to the ‘U’. These gold spacers act as separators that help the letters stand out clearly. -
Add the second letter:
Thread the ‘S’ bead, followed immediately by another gold spacer bead. -
Complete the word:
Thread the ‘A’ bead and finish the centerpiece section with one final gold spacer bead on the other side.
Knot Security Tip
Use a surgeon’s knot (looping the string through twice on the first pass) instead of a regular square knot. It holds elastic cord much tighter without slipping.
Step 3: Beading the Band
-
Establish the pattern:
Starting from one side of your centerpiece, begin the colored pattern: one blue, one gold, one white, one gold, one red, one gold. Repeat this specific sequence to match the photo’s style. -
Repeat on the other side:
Replicate this exact pattern on the other side of the ‘USA’ centerpiece. This ensures the word stays perfectly centered on your wrist. -
Check the fit:
Continue adding pattern sets to both sides until the bracelet wraps comfortably around your wrist. I prefer to leave a tiny bit of slack so it doesn’t pinch. -
Verify symmetry:
Ensure both ends finish at a similar point in the pattern sequence so the join looks seamless when tied.
Add Some Sparkle
Swap the plain gold round beads for gold rhinestone spacers or faceted crystals. This adds extra shimmer that catches the light during outdoor fireworks.
Step 4: Finishing Touches
-
Tie the knot:
Bring the two ends of the cord together and tie a standard square knot (right over left, left over right). Pull tight, but be careful not to snap the elastic. -
Secure the knot:
Tie a second overhand knot on top of the square knot for extra security. If you have jewelry glue, a tiny dot here helps keep it permanent. -
Hide the knot:
If one of your beads has a large enough hole (often the alphabet beads or the gold spacers do), gently tug the knot inside that bead to conceal it. -
Trim excess cord:
Using your scissors, trim the excess string ends close to the knot, being extremely careful not to cut the main bracelet cord.
Slip on your new patriotic accessory and verify the fit before heading out to your holiday barbecue

The Complete Guide to Pottery Troubleshooting
Uncover the most common ceramic mistakes—from cracking clay to failed glazes—and learn how to fix them fast.
Bold “4TH” Statement With Star Spacers
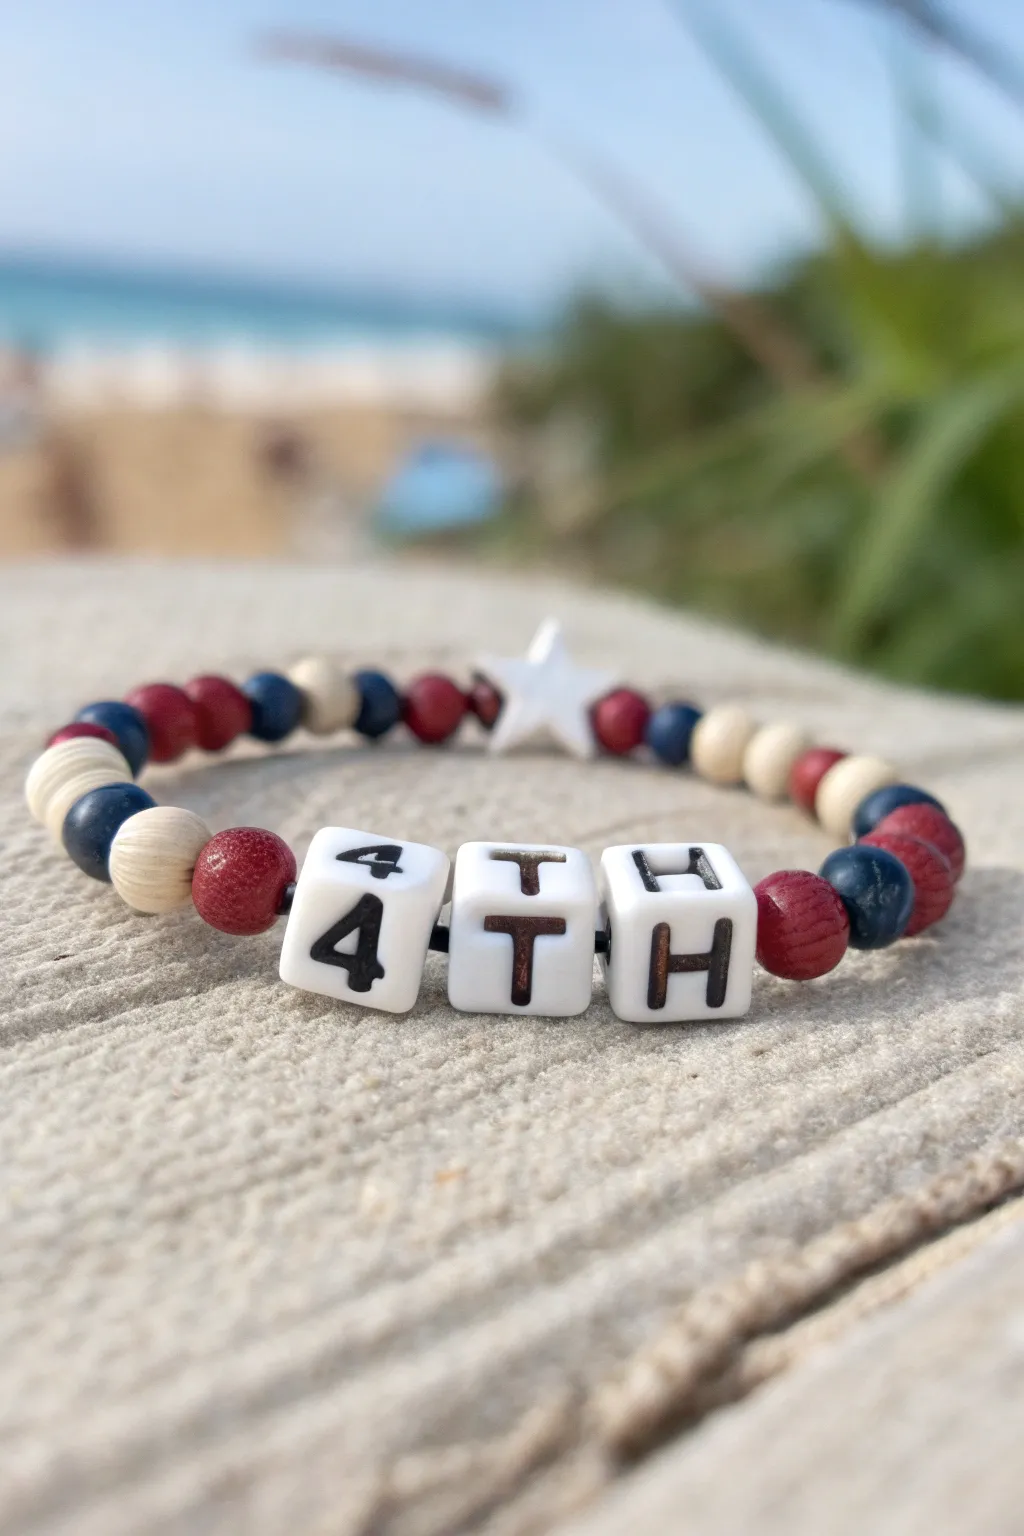
Celebrate Independence Day with a rustic yet bold accessory featuring a prominent ‘4TH’ centerpiece. This design mixes classic wooden textures with patriotic colors and a star charm for a festive, beachy vibe.
Step-by-Step
Materials
- Elastic stretch cord (0.7mm or 0.8mm)
- White or cream square letter beads (‘4’, ‘T’, ‘H’)
- Red wood beads (8mm)
- Dark blue wood beads (8mm)
- Natural/beige wood beads (8mm)
- White 5-point star bead or spacer (approx 10-12mm)
- Scissors
- Super glue or jewelry glue (optional but recommended)
- Tape or bead stopper
Step 1: Planning and Prep
-
Measure your wrist:
Wrap the elastic cord loosely around your wrist to approximate the size needed, then add about 3-4 inches of extra length to allow for safe knotting. -
Cut the cord:
Cut your measured length of elastic cord using sharp scissors to ensure a clean end that won’t fray. -
Secure the end:
Place a piece of tape or a bead stopper on one end of the cord so your beads don’t slide off while you are working. -
Sort your pattern:
Lay out your beads on a flat surface or bead mat before stringing to visualize the color distribution. The pattern generally alternates between clusters of red, white, and blue, but having it laid out helps avoid mistakes.
Wood Bead texture Tip
Since wooden bead holes can sometimes be rough or splintered inside, use a needle file or a sturdy pin to clear the hole before trying to thread your elastic through.
Step 2: Stringing the Centerpiece
-
Add the first letter:
Slide the white square bead with the number ‘4’ onto the cord. -
Add the second letter:
Follow immediately with the ‘T’ bead. Ensure it is oriented the same way as the ‘4’. -
Finish the word:
Add the ‘H’ bead to complete the text. Double-check that all letters are facing ‘up’ relative to the cord direction. -
Flank with red beads:
Place one red wooden bead on the immediate right of the ‘H’ and one red bead on the immediate left of the ‘4’ to frame the text vividly. -
Add contrast beads:
Slide a dark blue bead next to each of the red framing beads you just added.
Knot Slipping?
If your elastic knot feels insecure, try a square knot followed by an extra overhand knot. Pull all four strands (the loop sides and the tail ends) tight individually.
Step 3: Completing the Loop
-
Establish the pattern:
Begin stringing the rest of the bracelet using a loose pattern of 2-3 beads of the same color, followed by a contrasting color. The image uses small groups like two creamy whites, followed by a red and a blue. -
Incorporate the star:
Approximately halfway through the remaining length of the bracelet (opposite the ‘4TH’ text), thread on the white star bead. This acts as a secondary focal point. -
Continue beading:
Fill the rest of the cord with your red, white, and blue wooden beads until you reach your desired wrist size. -
Check the fit:
Wrap the unfinished strand around your wrist to check the length. It should sit comfortably without pinching your skin or dropping too low on the hand.
Step 4: Finishing Touches
-
Pre-stretch the cord:
Gently pull tightly on both ends of the elastic a few times. This pre-stretching prevents the bracelet from expanding and becoming loose shortly after you wear it. -
Tie the knot:
Remove the tape or stopper and tie a surgeon’s knot (right over left, left over right twice) to secure the loop. -
Secure with glue:
I always like to add a tiny dab of jewelry glue or super glue specifically to the knot to ensure it never slips undone. -
Hide the knot:
If one of your adjacent beads has a large enough hole, gently slide it over the knot while the glue is wet to hide it inside. -
Trim excess cord:
Once the glue is dry, trim the excess tails of the elastic cord close to the knot/bead.
Slip on your new creation and enjoy the patriotic flair it brings to your outfit
Navy Base With White Star Bead Pops

This elegant Fourth of July accessory combines deep matte navy beads with crisp white stars for a sophisticated take on patriotic style. A single touch of gold in the center adds a luxurious focal point to this stretchy, stackable design.
How-To Guide
Materials
- Matte navy blue round beads (8mm or 10mm)
- White star-shaped heishi or clay beads
- Gold tone metallic round spacer bead (matching size to the navy beads)
- Strong elastic bead cord (0.8mm recommended)
- Scissors
- Bead stopper or tape
- Super glue or jewelry cement (optional)
Step 1: Preparation & Design
-
Measure your wrist:
Wrap a flexible measuring tape around your wrist to find your size. Add about half an inch to this measurement to ensure the bracelet fits comfortably without pinching. -
Cut the cord:
Cut a piece of elastic cord about 10-12 inches long. Having this extra length makes the final knotting process much easier than working with a short tail. -
Pre-stretch the elastic:
Hold the cord at both ends and give it several firm tugs. This pre-stretching step helps prevent the bracelet from sagging or loosening after you wear it a few times. -
Secure the end:
Place a bead stopper or a piece of masking tape on one end of the cord to stop your beads from sliding off while you design.
Knot Slipping?
If your elastic knot feels slick and wants to undo itself, try tying the knot while the cord is under tension (stretched slightly). This friction helps it bite and hold.
Step 2: Beading the Pattern
-
Start the navy base:
Begin by threading on about 6 to 8 of the matte navy blue round beads. This section will sit on the underside of your wrist. -
Add the first star:
Slide on one white star bead. Ensure the points of the star are oriented so they lay flat against the round beads. -
Create spacing:
Add two more navy blue beads. This creates a small gap between the star motif and the central focal point. -
Add the gold center:
Thread on the single gold metallic bead. This will act as the shiny centerpiece of your design. -
Complete the central symmetry:
Add two more navy blue beads immediately after the gold bead. -
Add the second star:
Slide on another white star bead. I like to check here to make sure the pattern looks balanced on either side of the gold bead. -
Finish the strand:
Fill the rest of the cord with your remaining navy blue beads until you reach your desired length. Wrap it around your wrist to check the fit before tying.
Add Sparkle
Replace the solid gold center bead with a gold rhinestone spacer or a pave disco ball bead. This catches the light dramatically during outdoor holiday barbecues.
Step 3: Securing the Bracelet
-
Remove the stopper:
Carefully remove the bead stopper or tape from the end, holding both ends of the cord firmly so no beads escape. -
Tie the first knot:
Cross the two ends and tie a simple overhand knot. Pull it tight, bringing the beads together so there are no gaps. -
Tie a surgeon’s knot:
For the second knot, cross the ends again, but this time loop one end through the circle twice before pulling tight. This creates a secure surgeon’s knot. -
Secure with glue:
If you have jewelry cement or super glue, dab a tiny drop onto the knot. Let it dry completely for a minute or two. -
Hide the knot:
Trim the excess cord ends close to the knot, then gently pull the cord to slide the knot inside the hole of the nearest navy bead to hide it.
Enjoy wearing your patriotic bracelet stack all summer long


What Really Happens Inside the Kiln
Learn how time and temperature work together inside the kiln to transform clay into durable ceramic.
Red and White Candy-Stripe With Blue Accents
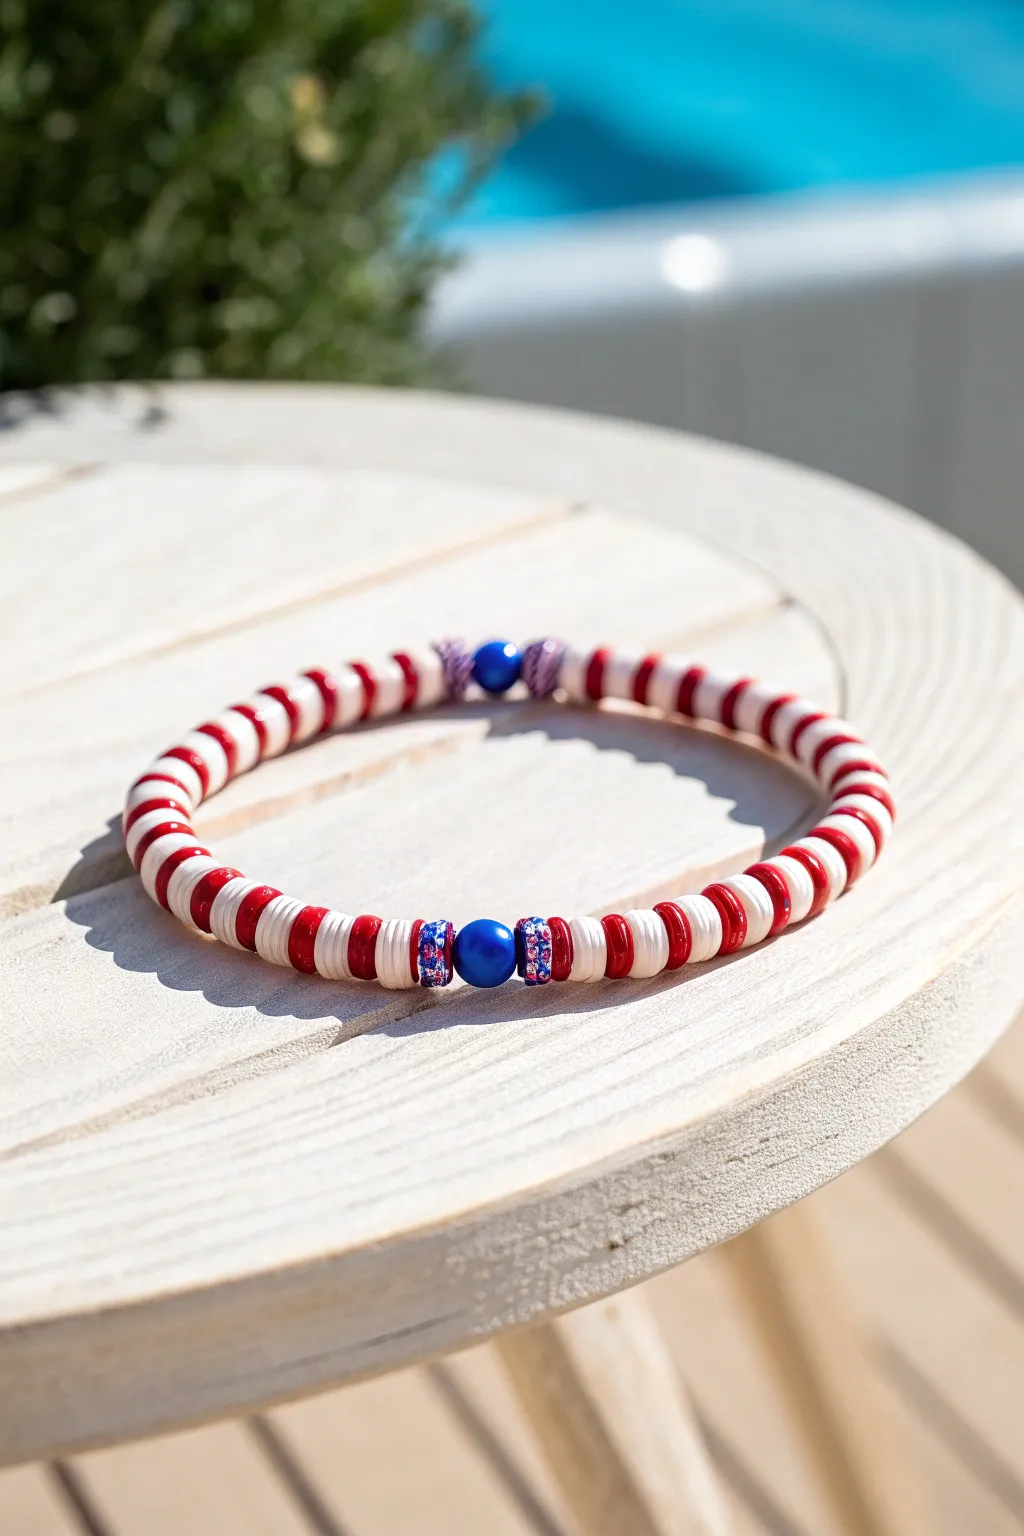
This festive bracelet captures the spirit of the Fourth of July with a classic red and white candy-stripe pattern accented by bold blue focal beads. The flat clay disc beads create a comfortable, stackable texture that looks great on its own or layered with other summer accessories.
Step-by-Step
Materials
- Red flat clay disc (heishi) beads (approx. 6mm)
- White flat clay disc (heishi) beads (approx. 6mm)
- 2 Large blue round beads (approx. 8-10mm)
- 4 Spacer beads with red, white, and blue rhinestone inlay (optional, or similar decorative spacers)
- Elastic beading cord (0.8mm or 1mm thickness)
- Scissors
- Super glue or jewelry cement (optional)
- Bead stopper or tape
- Measuring tape
Step 1: Setting up Your Workspace
-
Measure and Cut:
Begin by measuring your wrist to determine the needed bracelet size. Add about 3-4 inches to this measurement to ensure you have enough extra cord for tying the knot later. -
Prepare the Cord:
Cut your length of elastic cord. Before adding any beads, give the cord a gentle pre-stretch. This simple step helps prevent the bracelet from stretching out over time and becoming loose. -
Secure the End:
attach a bead stopper to one end of your cord. If you don’t have a stopper, a piece of masking tape folded over the end works perfectly to keep your beads from sliding off.
Knot Security
Use a surgeon’s knot rather than a standard square knot. By wrapping the ends through the loop twice, you create much more friction, preventing the slippery elastic from coming undone.
Step 2: Creating the Pattern
-
Start the First Half:
Thread on your clay heishi beads in an alternating pattern. Use two red discs followed by two white discs. Repeat this pattern for about 2.5 to 3 inches of length. -
Check the Stripes:
Pause to look at your stripes. The goal is a uniform candy-cane look, so ensure you haven’t accidentally slipped in an extra bead anywhere. -
Add the First Accent:
Slide on one of your decorative rhinestone spacers. These add a lovely sparkle next to the matte clay beads. -
Place the Focal Bead:
Thread one of the large blue round beads onto the cord. This will serve as a central focal point on one side of the wrist. -
Complete the Accent:
Add a second decorative rhinestone spacer immediately after the blue bead to frame it symmetrically. -
Continue the Stripes:
Resume your pattern of two red discs followed by two white discs. Continue this beading for another section equal in length to your first section.
Step 3: Finishing the Loop
-
Second Focal Point:
Once you have reached the opposite side of the bracelet, it’s time to add the second focal arrangement. Add a rhinestone spacer first. -
Add the Second Blue Bead:
Slide on the second large blue round bead. This placement ensures that no matter how the bracelet spins on your wrist, a blue accent is visible. -
Final Spacer:
Finish the bead stringing with the final rhinestone spacer. Double-check the total length against your wrist now, as it’s easier to adjust before tying. -
Check Fit:
Wrap the strand around your wrist. The ends should meet comfortably without gaps, but shouldn’t be tight enough to leave an impression on your skin.
Gaps Between Beads?
If you see cord showing between beads, your knot isn’t tight enough. Untie if possible, or start over, ensuring you pull the elastic taut (stretching it slightly) as you tie the final knot.
Step 4: Securing the Project
-
Tie the Knot:
Remove the bead stopper carefully. Bring both ends of the elastic together and tie a surgeon’s knot (loop the cord through twice before pulling tight) to secure it. -
Tighten Firmly:
Pull the cords firmly to tighten the knot. You want the beads to sit snugly against each other so the cord isn’t visible between them. -
Glue the Knot:
Apply a tiny dab of jewelry cement or super glue directly onto the knot. I prefer to let this dry for a minute while holding the cords away from the beads. -
Hide the Evidence:
If hole size permits, gently tug the knot inside the hole of the adjacent blue bead or spacer to hide it completely. -
Trim Ends:
Use your scissors to trim the excess elastic cord close to the knot, being careful not to nick the knot itself.
Now you have a spirited accessory ready for your independence day celebration
Metallic Spacer Glow-Up in Red, White, and Blue
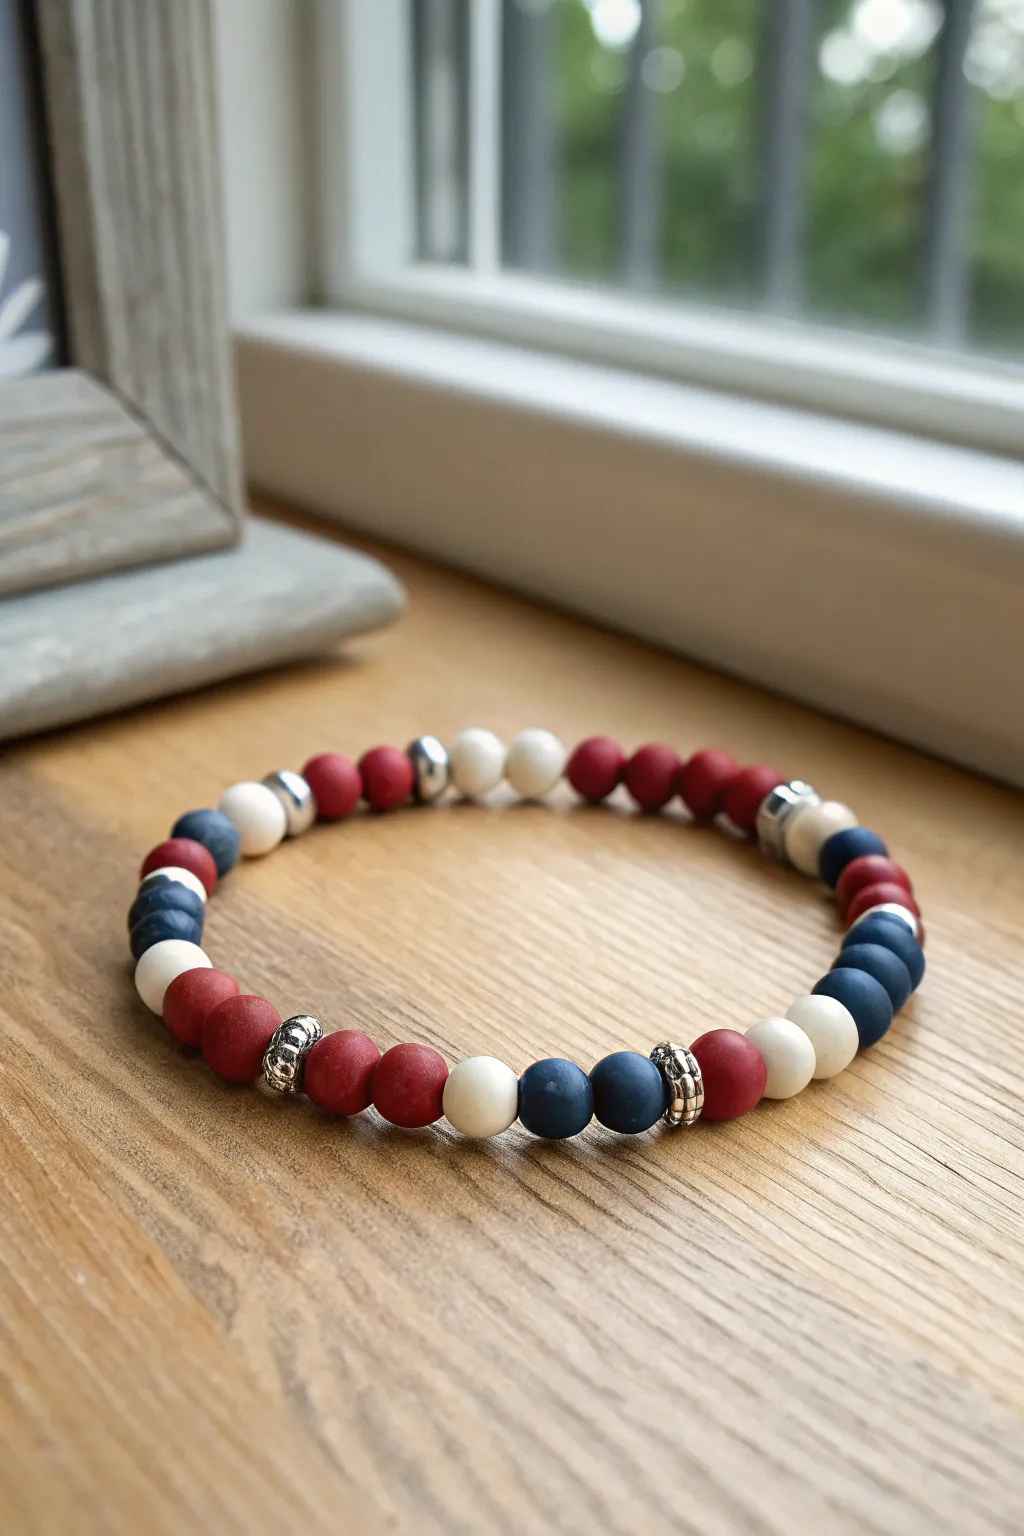
Elevate your standard patriotic stack with this sophisticated design that alternates matte red, white, and blue beads with shimmering silver accents. The contrast between the soft matte finish of the primary beads and the high-polish metallic spacers gives this bracelet a premium, boutique feel.
Step-by-Step Tutorial
Materials
- 8mm matte round beads in dark navy blue
- 8mm matte round beads in deep red
- 8mm matte round beads in cream or off-white
- Silver-tone floral or textured metal spacer beads (approx. 5-6mm)
- Silver-tone smooth finish spacer beads (approx. 4-5mm)
- 0.8mm clear elastic stretch cord
- Jewelry adhesive or clear nail polish
- Scissors
- Bead design board (optional but helpful)
- Tape or binder clip
Step 1: Preparation & Design
-
Measure your wrist:
Before cutting any cord, wrap a measuring tape around your wrist to find your size. Add about 1/2 inch to this measurement for a comfortable fit. -
Cut the cord:
Cut a piece of elastic cord roughly 10-12 inches long. Having this extra length makes tying the finishing knot much easier than fighting with short ends. -
Secure the end:
Pre-stretch your elastic cord by pulling it gently a few times to prevent sagging later. -
Anchor the cord:
Place a piece of tape or a binder clip on one end of the cord so your beads don’t slide right off while you work.
Knot Security
Pre-stretching your elastic cord is crucial! Give it 3-4 firm tugs before stringing beads. This prevents the bracelet from stretching out and becoming loose after just one wear.
Step 2: Beading Pattern
-
Start the sequence:
Begin by threading on two navy blue beads. This establishes the dark base tone for the pattern. -
Add first metallic accent:
Slide on one of the textured silver floral spacers. This breaks up the solid colors. -
Continue the pattern:
Follow the spacer with two deep red beads. -
Introduce white:
Thread on two cream/white beads next. You should now have a nice tri-color block. -
Add a smooth spacer:
Place a smooth silver spacer on the cord. Alternating between textured and smooth metals adds subtle visual interest. -
Repeat the color block:
Add two red beads, followed by two white beads. -
Insert second textured spacer:
Add another textured floral spacer here to mirror the first section. -
Create the heavy color section:
Thread on a longer sequence: two blue, two white, two red, two blue. This creates an asymmetrical, organic look rather than a strict repeating pattern. -
Check the length:
Wrap the unfinished strand around your wrist. If it doesn’t quite meet, continue adding pairs of colors separated by the occasional spacer until it fits comfortably.
Step 3: Finishing Touches
-
Prepare to tie:
Remove the tape or clip from the end carefully, holding both ends of the elastic firmly. -
Tie the knot:
Cross the ends and tie a surgeon’s knot. This is just a standard square knot, but loop the elastic through twice on the first pass for extra grip. -
Tighten securely:
Pull all four strands (the two tail ends and the two bracelet sides) gently but firmly to cinch the knot tight. -
Apply adhesive:
I always add a tiny drop of jewelry glue or clear nail polish directly onto the knot. This fuses the elastic so it won’t slip nicely. -
Hide the knot:
Once the glue is tacky (but not fully dry), carefully pull the elastic so the knot slides inside the hole of the nearest large bead to hide it. -
Trim the excess:
Wait for the glue to dry completely, then use your scissors to snip the excess cord ends as close to the bead as possible.
Texture Play
Swap the matte beads for frosted glass or lava stone beads to add an extra tactile element. You can even add a drop of essential oil to lava beads for a scented accessory.
Wear your new sophisticated stack with pride at your next summer barbecue

TRACK YOUR CERAMIC JOURNEY
Capture glaze tests, firing details, and creative progress—all in one simple printable. Make your projects easier to repeat and improve.
Blue Ombre Fade With White Breaks
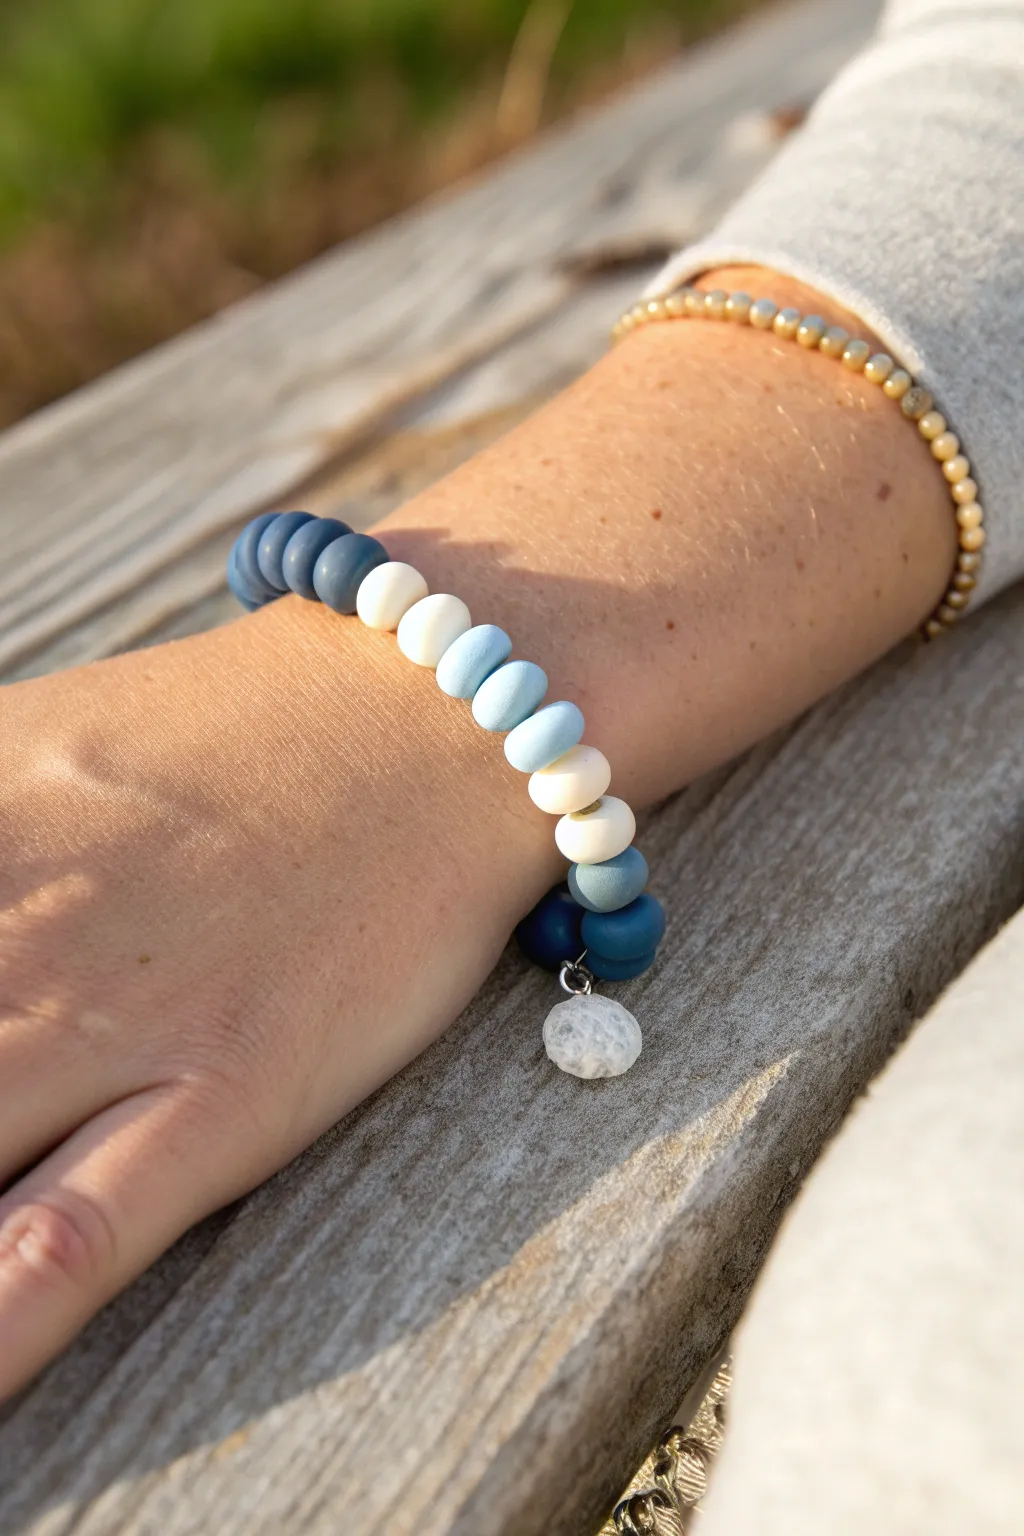
Capture the serene hues of a summer shoreline with this elegant clay bead bracelet. Featuring a smooth gradient of blues interrupted by crisp white segments and a delicate charm, this design offers a sophisticated take on patriotic colors.
Detailed Instructions
Materials
- Polymer clay heishi beads (flat disc beads) in the following colors: Navy Blue, Denim Blue (medium), Sky Blue (light), White
- Elastic stretch cord (0.8mm or 1mm transparent)
- Small silver jump ring (4mm or 5mm)
- Small clear/white translucent stone or crystal charm (shaped like a rounded nugget)
- Jewelry adhesive or clear nail polish
- Scissors
Step 1: Planning and Preparation
-
Measure your wrist:
Before cutting any cord, wrap a measuring tape around your wrist to find your size. Add about 1/2 inch to this measurement for a comfortable fit, or a bit more if you prefer a loose bangle style. -
Cut the cord:
Cut a length of elastic cord about 3-4 inches longer than your final bracelet size. This extra length makes tying the knot at the end much less frustrating. -
Stretch the elastic:
Give the cut piece of elastic a few gentle tugs. Pre-stretching the cord helps prevent the bracelet from sagging or loosening up after you wear it a few times. -
Secure the end:
Place a piece of tape over one end of the cord or attach a binder clip. This acts as a ‘bead stopper’ so your beautifully arranged pattern doesn’t slide right off while you work.
Knot Slipping?
If your elastic knot feels loose, try coating the cord ends in beeswax before tying. The wax adds grip and friction, helping the plastic cord hold the knot tightly.
Step 2: Creating the Ombre Pattern
-
Start with the darkest shade:
Begin threading your Navy Blue clay beads onto the cord. Keep adding them until you have a solid section of dark blue, roughly 1.5 to 2 inches long. -
Add a white break:
Interrupt the blue with a stark contrast by adding exactly two White beads. This creates the first ‘break’ in the pattern. -
Transition to medium blue:
Thread on your Denim Blue (medium blue) beads next. You want this section to be slightly shorter than the navy section, perhaps around an inch long, to start the fade effect. -
Add the second white break:
Slide on another set of two White beads to separate the medium blue from the upcoming lighter shade. -
Introduce the lightest blue:
Add your Sky Blue beads. Create a section equal in length to the denim blue section to maintain balance in the gradient. -
Create the focal point:
After the sky blue section, thread on about four White beads. This slightly longer white segment will serve as the bright center point near the charm. -
Reverse the gradient:
Now, mirror the pattern to complete the circle. Add a section of Sky Blue beads, followed by two White beads. -
Finish the beadwork:
Add your section of Denim Blue beads. Check the total length against your wrist; if you need more length, add more Navy Blue beads at the very end so they meet the starting navy beads seamlessly.
Step 3: Adding the Charm and Finishing
-
Prepare the charm:
Locate the center of your beads—specifically where the two navy ends will meet or near the focal white section depending on your preference. Slide your jump ring (with the translucent stone charm attached) onto the cord. -
Tie the initial knot:
Remove the tape or clip from the end. Bring both ends of the cord together and tie a simple overhand knot, pulling it tight against the beads. -
Secure with a surgeon’s knot:
For extra security, tie a surgeon’s knot. Make a loop like a normal knot, but pass the tail end through the loop twice instead of once before pulling tight. -
Apply adhesive:
Allow the knot to relax for a moment, then pull it tight again. Place a tiny dot of jewelry glue or clear nail polish directly onto the knot to seal it permanently. -
Hide the knot:
Once the glue is tacky but not fully hard, trim the excess cord ends close to the knot. Gently tug the bracelet so the knot slides inside the hole of the nearest Navy bead, hiding it from view.
Pro Tip: Seamless Look
When hiding the knot, pull it into a bead with a slightly larger hole if possible. Don’t force it into a tight bead, or the bead might crack under the pressure.
Now you have a stunning, beach-ready accessory that perfectly captures the cooling colors of the coast
Patriotic Confetti Mix With Random Stars
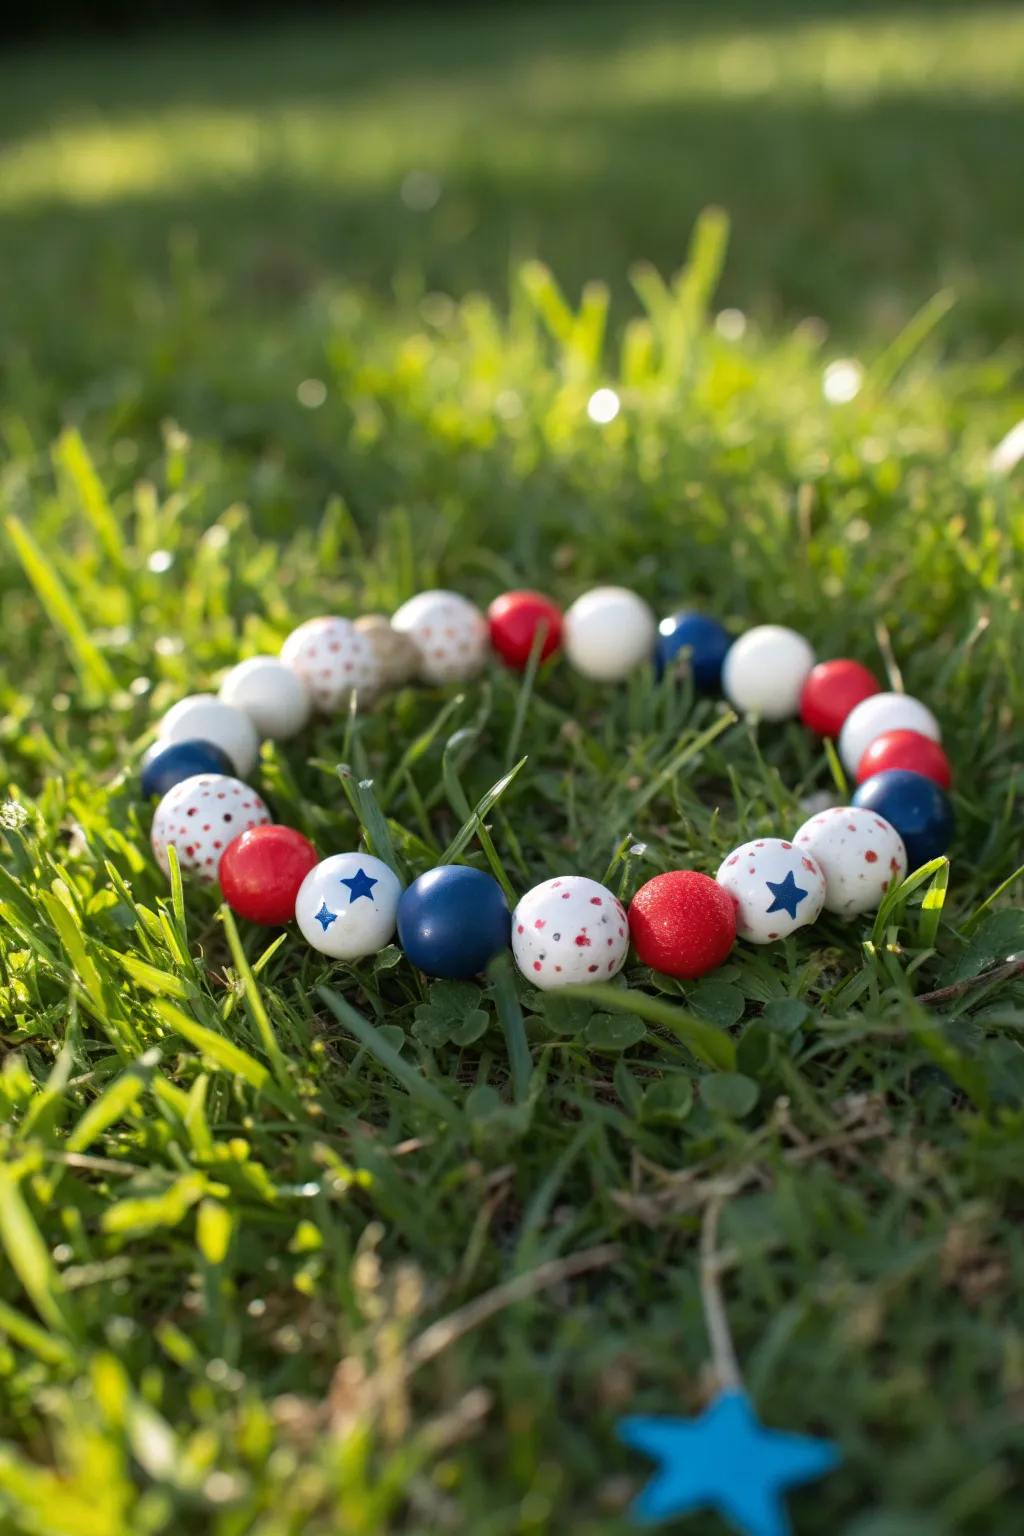
Celebrate Independence Day with this playful bracelet featuring a festive mix of red, white, and blue beads. The combination of solid colors, speckled confetti patterns, and bold star accents creates a spirited accessory that looks great stacked or worn solo.
How-To Guide
Materials
- Elastic cord (0.7mm or 0.8mm)
- Red wooden beads (10mm or 12mm)
- White wooden beads (10mm or 12mm)
- Blue wooden beads (10mm or 12mm)
- White wooden beads with red/blue speckles
- White wooden beads with blue stars
- Small gold accent bead (optional)
- Scissors
- Super glue or jewelry cement
- Clear nail polish (optional)
Step 1: Preparation
-
Measure the Cord:
Cut a piece of elastic cord about 10-12 inches long. This gives you plenty of extra room for tying knots without frustration. -
Pre-stretch:
Give the elastic a few gentle tugs before you start beading. This prevents the bracelet from loosening up significantly after the first wear. -
Secure the End:
Attach a piece of tape to one end of the cord or clip it with a binder clip to stop your beads from sliding off while you work.
Knot Slipping?
If your elastic knot feels insecure, dab it with clear nail polish and let it dry before trimming the ends. This hardens the knot and prevents untying.
Step 2: Designing the Pattern
-
Lay Out Your Design:
Arrange your beads on a flat surface or bead board first. This project relies on a ‘random’ look, but balancing the colors is key. -
Mix the Textures:
Alternate between your solid colors (red, white, blue) and the patterned beads. -
Place the Stars:
Insert the white beads with blue stars at irregular intervals. I like to space them out so there’s always one visible no matter how the bracelet turns. -
Add Confetti Beads:
Intersperse the speckled ‘confetti’ beads between solid colors to break up the blocks of primary colors. -
Check the Length:
Ensure you have enough beads to wrap around your wrist comfortably. Usually, 18-22 beads of this size work well for an average adult wrist.
Level Up
Attach a blue wooden star charm (like the one on the grass) using a jump ring for a dangling element that adds extra movement to your wrist stack.
Step 3: Assembly
-
Start Stringing:
Begin threading the beads onto the cord, following the pattern you laid out. -
The Gold Accent:
If you are including the single gold accent bead shown in the inspiration photo, thread it near where your knot will be; it can act as a nice cover or focal point. -
Double Check:
Once all beads are strung, wrap the strand around your wrist to verify the fit. It should sit comfortably without pinching.
Step 4: Finishing Touches
-
Prepare to Knot:
Remove the tape or clip from the end of the cord carefully. -
Tie the Knot:
Tie a surgeon’s knot (right over left, left over right) or a standard square knot. Pull it tight, ensuring no gaps remain between beads. -
Secure the Knot:
Add a tiny drop of super glue or jewelry cement directly onto the knot. This is crucial for longevity with elastic cord. -
Hide the Evidence:
If possible, gently tug the cord so the knot slides inside the hole of the nearest large bead to hide it. -
Trim the Excess:
Wait for the glue to dry completely, then use your scissors to snip off the excess cord close to the knot.
Wear your new bracelet with pride for a colorful, handmade touch to your holiday outfit
Mini Flag Panel Bracelet in the Center
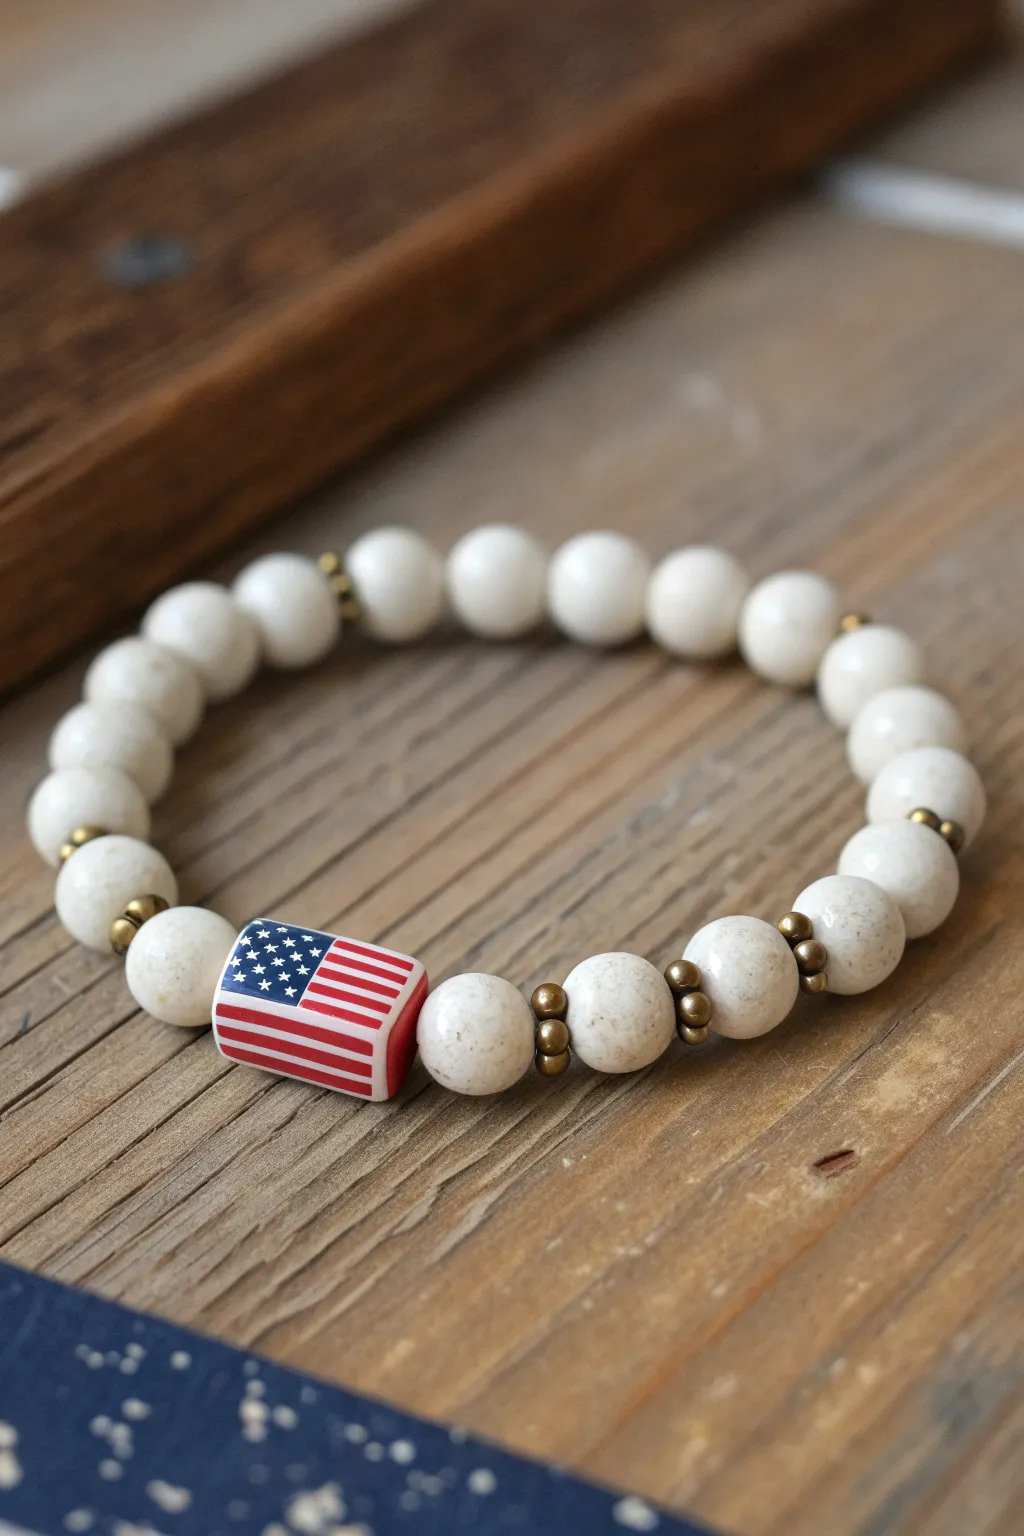
This elegant yet patriotic design features earthy cream-colored stone beads accented by subtle vintage brass spacers. The centerpiece is a striking rectangular clay bead displaying the American flag, blending rustic charm with national pride.
Step-by-Step Guide
Materials
- 1 strand of 10mm or 12mm white fossil or cream wood jasper round beads
- 1 rectangular polymer clay USA flag bead (approx. 10x15mm)
- Small antique brass or bronze heishi spacer beads (approx. 4-5mm)
- Strong elastic cord (0.8mm or 1.0mm thickness)
- Jewelry glue or clear nail polish
- Scissors
- Bead stopper or binder clip
- Tape measure
Step 1: Preparation & Setup
-
Measure your wrist:
Wrap a flexible tape measure around your wrist where you want the bracelet to sit. Note the measurement and add about 1/2 to 3/4 inch to account for the bulk of the large beads. -
Prepare the cord:
Cut a piece of elastic cord about 10-12 inches long. This extra length is crucial for tying a secure knot later without struggling. -
Pre-stretch the elastic:
Give your cut piece of elastic a few firm tugs. This pre-stretching helps prevent the bracelet from sagging out of shape after the first time you wear it. -
Secure one end:
Attach a bead stopper or a piece of tape to one end of the cord to stop your beads from sliding off as you work.
Stone Selection Tip
For that authentic mottled cream look, search specifically for “White Fossil Stone” or “Riverstone” beads rather than plain plastic or glass.
Step 2: Creating the Design
-
Thread the focal bead:
Begin by sliding the rectangular flag bead onto the center of the cord. This will act as your anchor for the symmetrical pattern. -
Add the first spacers:
On the left side of the flag bead, thread one white round bead. Then, place two brass spacers, followed by another white bead. -
Repeat on the right:
Mirror that pattern on the right side: add one white bead, followed by two brass spacers, then another white bead. These spacers frame the focal point beautifully. -
Continue the pattern:
Moving outwards on both sides, continue adding white beads. I prefer to add the brass spacer accents every second or third white bead depending on wrist size. -
Check the spacing:
In the reference image, notice the brass spacers appear near the focal bead and then again after three beads. Replicate this rhythm: Flag, 1 white bead, 2 spacers, 1 white bead, 2 spacers, 1 white bead, 2 spacers. -
Fill the back:
For the back section of the bracelet (the part opposite the flag), string simple white round beads without spacers to keep the design comfortable under the wrist. -
Size check:
Wrap the unfinished strand around your wrist to check the fit. The beads should meet comfortably without gaps, but it shouldn’t feel tight.
Vintage Vibe Upgrade
Swap the brass spacers for darkened copper or oxidised silver heishi beads to give the piece a cooler, more industrialized Americana aesthetic.
Step 3: Finishing Touches
-
Pre-knot tension:
Once all beads are strung, remove the stopper. Bring the two ends together and pull them tight to eliminate any slack between the beads. -
Tie the surgeon’s knot:
Cross the ends, wrap one side under twice (instead of just once like a normal knot), and pull tight. Repeat with another standard overhand knot on top to lock it. -
Apply adhesive:
Dab a tiny drop of jewelry glue or clear nail polish directly onto the knot. This prevents the slippery elastic from slowly undoing itself. -
Hide the knot:
Allow the glue to dry slightly—just until it’s tacky. Then, gently tug the cord so the knot slides inside the hole of the nearest large white bead. -
Trim excess cord:
Using sharp scissors, trim the tails close to the bead hole, being extremely careful not to nick the main knot.
Celebrate the holiday in style with this sophisticated take on red, white, and blue
Star Charm Drop on a Heishi Stack
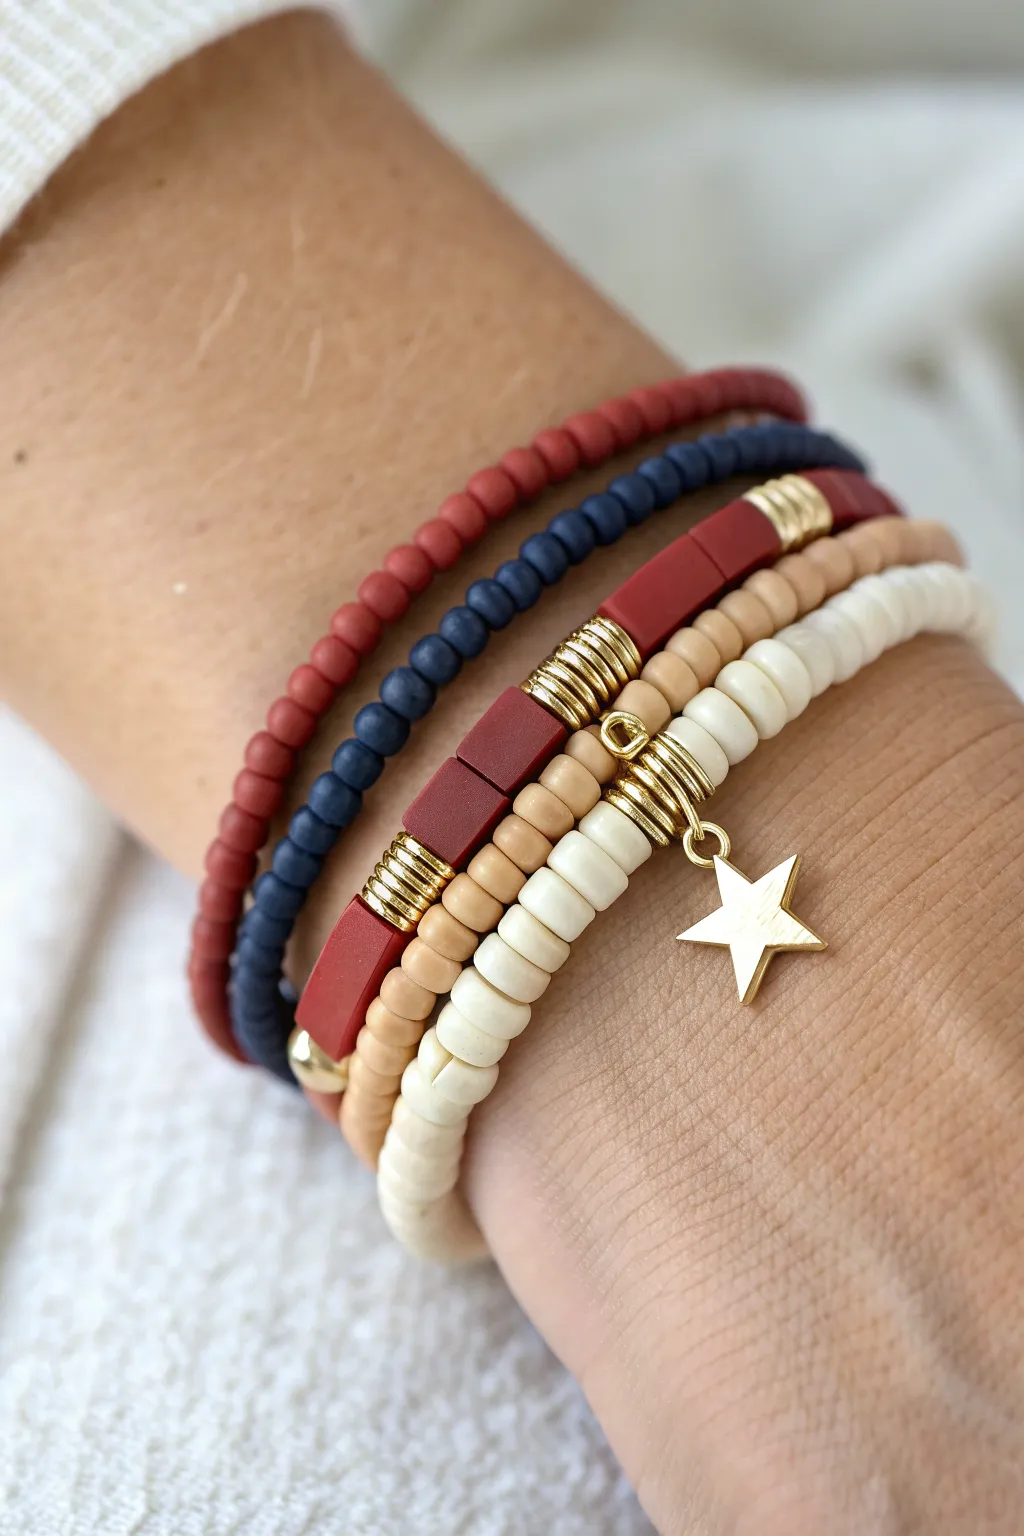
Celebrate Independence Day with this chic, patriotic bracelet stack that blends classic red, white, and blue in varied textures. The combination of simple seed beads, trendy Tila tiles, and a playful star charm makes for a sophisticated yet festive accessory.
Step-by-Step
Materials
- Matte red seed beads (size 8/0 or 6/0)
- Matte dark blue seed beads (size 8/0 or 6/0)
- Red Tila beads (2-hole rectangular tile beads)
- Beige or tan Heishi clay beads (4mm – 6mm)
- White or cream Heishi clay beads (4mm – 6mm)
- Gold coiled spacer beads or tube beads
- Gold star charm with jump ring
- Gold bail carrier bead (large hole spacer with loop)
- Elastic stretch cord (0.8mm recommended)
- Jewelry glue or clear nail polish
- Scissors
Step 1: The Solid Seed Bead Strands
-
Measure and Cut:
Cut a piece of elastic cord about 10 inches long. This generous length makes tying the final knots much easier. -
Pre-stretch the Cord:
Give the elastic piece a few firm tugs before you start beading. This simple trick prevents the bracelet from stretching out and becoming loose after the first wear. -
String the Red Beads:
Begin threading your matte red seed beads onto the cord. Continue until the strand measures approximately 6.5 to 7 inches, or comfortably fits around your wrist with a little ease. -
Secure the Knot:
Bring the ends together and tie a surgeon’s knot (right over left, left over right twice). Pull tight to secure the beads. -
Repeat for Blue:
Repeat the entire process with the matte dark blue seed beads to create your second solid-color bracelet.
Step 2: The Accent Tila Strand
-
Prepare the Pattern:
Lay out your design on a bead board or flat surface: sections of beige Heishi beads interrupted by a focal section of red Tila beads and gold coil spacers. -
Start Stringing:
Thread the elastic through a section of beige Heishi beads. I like to do about a third of the bracelet length here. -
Add Gold Accents:
Slide on a gold coiled spacer bead. These add a wonderful metallic texture that breaks up the matte clay. -
Thread the Tila Beads:
Add three to four red Tila (tile) beads. Since Tila beads have two holes, just thread the elastic through one of the holes so they sit flat like little bricks. -
Close the Pattern:
Add another gold coil spacer, then finish stringing the rest of the beige Heishi beads to complete the circle. -
Knot and Glue:
Tie off this strand with a secure surgeon’s knot. Apply a tiny dot of jewelry glue to the knot before trimming the excess cord.
Hiding the Knots
If the holes of your beads are large enough, gently tug the finished knot inside a neighboring bead to hide it completely for a professional finish.
Step 3: The Star Charm Strand
-
String the White Base:
On a new piece of pre-stretched elastic, begin stringing your cream or white Heishi beads. -
Insert the Bail:
Once you have reached the halfway point of your strand, slide on the gold bail carrier bead. This is the hardware that will hold your charm. -
Add Decorative Spacers:
For extra flair, flank the bail bead with gold coil spacers on either side before continuing with the rest of the white Heishi beads. -
Attach the Charm:
Using pliers or your fingers, gently open the jump ring on your gold star charm. -
Secure the Charm:
Loop the open jump ring through the small loop on the carrier bead you just strung, then squeeze the jump ring closed securely. -
Final Assembly:
Finish stringing any remaining white beads needed for fit, tie your final surgeon’s knot, glue, and trim.
Textured Twist
Swap smooth gold spacers for hammered gold discs or tiny gold stars between the clay beads to add even more dimension to your patriotic stack.
Slide on your new stack to add a handcrafted touch to your holiday outfit
Picnic Gingham-Inspired Red-White-Blue Pattern
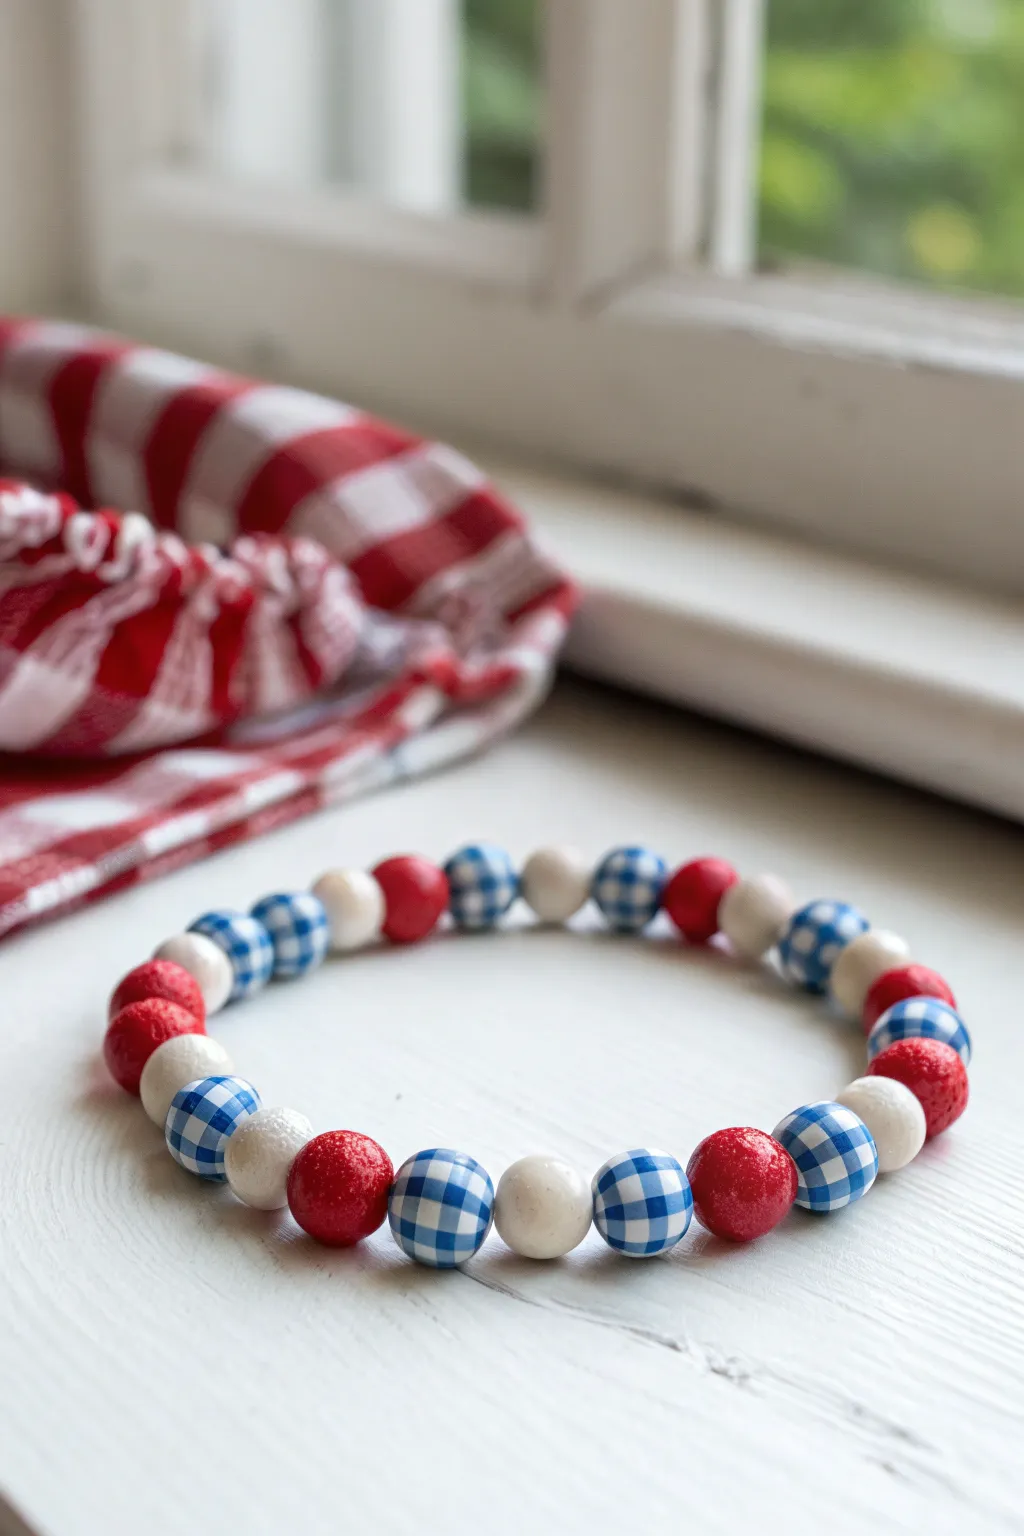
Capture the spirit of a summer afternoon with this delightful bracelet that pairs bold primary colors with a charming checkered print. The mix of solid red and white beads alongside blue gingham-patterned spheres creates a timeless Americana look perfect for your holiday celebrations.
Step-by-Step Guide
Materials
- 12mm or 14mm round wooden or polymer clay beads (solid red)
- 12mm or 14mm round wooden or polymer clay beads (solid white)
- 12mm or 14mm round wooden or polymer clay beads (blue and white gingham print)
- 0.8mm or 1mm clear elastic stretch cord
- Jewelry glue or clear nail polish
- Scissors
- Bead stopper or sturdy tape
- Tape measure
- Small toothpick (for glue application)
Step 1: Planning and Preparation
-
Measure your wrist:
Use your tape measure to find the circumference of your wrist. Add about 0.5 to 1 inch to this measurement depending on how loose you want the fit to be. -
Cut the cord:
Cut a length of elastic cord about 10-12 inches long. Having this extra length makes the final knotting process much easier than working with short ends. -
Pre-stretch the elastic:
Hold the cord ends and give them a few firm tugs. I always do this to ‘condition’ the elastic so it won’t stretch out and sag immediately after the first wear. -
Secure the end:
Place a bead stopper on one end of the cord, or tape it firmly to your table surface to prevent beads from sliding off while you work.
Hiding the Knot
Make sure your bead holes are large enough (2mm+) to hide the knot. If using clay beads with small holes, gently ream one bead with a tool to widen it slightly.
Step 2: Creating the Pattern
-
Establish the sequence:
The pattern shown relies on separating the solid colors with the patterned bead. The sequence is: Red Bead, Blue Gingham Bead, White Bead, Blue Gingham Bead. -
Thread the first section:
Slide on a solid red bead first. Ensure the hole is clear of any paint debris; if it’s blocked, poke it gently with a toothpick. -
Add the gingham accent:
Next, thread on one of the blue and white gingham beads. Orient the check pattern so it looks consistent if possible, though random rotation adds charm. -
Add the white contrast:
Slide on a solid white bead. This breaks up the darker colors and brightens the overall strand. -
Repeat the gingham:
Add another blue gingham bead. This completes one full repetition of the pattern unit. -
Check the length:
Continue repeating this four-bead sequence until the strand reaches your desired length. For most adult wrists, you will likely need 5 to 6 full repetitions. -
Verify the fit:
Wrap the unfinished strand around your wrist to check the size. Ideally, the ends should meet comfortably without gaps in the pattern.
Step 3: Finishing Touches
-
Prepare to knot:
Remove the bead stopper or tape. Bring the two ends of the cord together, ensuring there is no slack between the beads. -
Tie the first knot:
Tie a simple overhand knot. Pull it tight, but be careful not to snap the elastic. -
Secure with a surgeon’s knot:
For the second knot, make a loop as if doing another overhand knot, but pass the tail end through the loop twice instead of once. Pull tightly to secure. -
Apply adhesive:
Using a toothpick, dab a tiny drop of jewelry glue or clear nail polish directly onto the knot. This prevents it from slipping over time. -
Hide the knot:
While the glue is still slightly tacky but not wet, pull the knot gently inside the hole of the nearest bead to conceal it. -
Trim the excess:
Once the glue is fully dry, stick your scissors close to the bead hole and snip off the remaining tail ends of the elastic.
Star Spangled Flair
Add a single silver star charm on a jump ring between two beads to give the bracelet a metallic focal point without disrupting the pattern.
Slip on your new accessory and enjoy the classic picnic vibe it brings to your outfit
Firecracker Stripe With Skinny Spacer Lines
Celebrate with a bold, chunky texture by combining smooth clay disc beads with larger, stippled focal beads in classic red, white, and blue. This project creates a substantial wrist accessory that feels both modern and festive.
How-To Guide
Materials
- Red polymer clay heishi (disc) beads (approx. 6mm)
- White polymer clay heishi (disc) beads (approx. 6mm)
- Blue textured round beads (approx. 10mm) – speckled or stone-finish
- Strong elastic bead cord (0.8mm or 1mm)
- Super glue or jewelry cement
- Scissors
- Bead stopper or masking tape
- Ruler or measuring tape
Step 1: Preparation and Pattern Design
-
Measure your wrist:
Wrap a measuring tape loosely around your wrist to find your ideal size. Add about half an inch to this measurement to ensure the chunky beads sit comfortably without pinching. -
Cut the cord:
Cut a length of elastic cord about 10-12 inches long. This generous length gives you plenty of room to tie secure knots later. -
Secure the end:
Attach a bead stopper to one end of the cord, or simply tape it down to your work surface so beads don’t slide off while you string. -
Understand the sequence:
The pattern follows a repeating sequence: one large blue bead, two red heishi beads, one white heishi bead, and two red heishi beads. Lay this out on a bead board first if you want to visualize the spacing.
Knot Slipping?
If the elastic feels slippery, try a tiny dab of clear nail polish on the knot if you don’t have jewelry glue. Let it dry fully before hiding the knot in a bead.
Step 2: Stringing the Beads
-
Start with the focal bead:
Thread one of the large, blue textured round beads onto the cord. If the hole is large, make sure your knot at the end will be big enough or use a spacer bead later. -
Add red spacers:
Slide on two red polymer clay disc beads. These act as the ‘stripes’ flanking the white center. -
Place the white center:
Add a single white polymer clay disc bead. I find that using just one white bead here creates a sharper, cleaner separation between the red sections. -
Finish the segment:
Add two more red polymer clay disc beads to complete the red-white-red spacer segment. -
Repeat the loop:
Add the next large blue textured bead. Continue this entire repeating pattern (Blue Round -> 2 Red -> 1 White -> 2 Red) until you reach your desired length. -
Check the fit:
Wrap the unfinished strand around your wrist. The pattern should meet end-to-end comfortably. If you need to adjust size, add or remove a full segment to keep the pattern consistent.
Make it Sparkle
Replace the single white central disc bead with a gold or silver metal spacer bead or a rhinestone rondelle for a touch of patriotic glitter.
Step 3: Finishing Touches
-
Remove the stopper:
Carefully remove the bead stopper or tape, holding both ends of the elastic firmly so tension doesn’t snap the beads off. -
Pre-stretch the cord:
Give the elastic a few gentle tugs. This pre-stretching prevents the bracelet from sagging or loosening up immediately after you wear it. -
Tie the first knot:
Cross the left end over the right and pull tight to form a simple overhand knot. Pull it snugly against the beads. -
Tie a surgeon’s knot:
For the second knot, cross the ends again, but loop one end through the circle twice before pulling tight. This creates a secure surgeon’s knot. -
Add security:
Apply a tiny drop of super glue or jewelry cement directly onto the knot. Be careful not to glue the knot to the adjacent beads. -
Trim the excess:
Allow the glue to dry completely, then use your scissors to trim the excess cord ends close to the knot. -
Hide the knot:
If the hole of your large blue bead is wide enough, gently pull the Elastic so the knot slides inside the bead, hiding it from view.
Slip on your new stack and enjoy the festive texture this holiday weekend
White-Heavy Bracelet With Red and Blue “Sparks”

Embrace a subtle patriotic vibe with this clean, coastal-inspired design that lets white space do the heavy lifting. The design features long stretches of creamy white clay beads interrupted by tiny, elegant bursts of red, blue, and gold that pop like distant fireworks.
Step-by-Step Guide
Materials
- White or cream polymer clay heishi beads (4mm-6mm)
- Red polymer clay heishi beads (approx 4mm-6mm)
- Blue polymer clay heishi beads (approx 4mm-6mm)
- Gold tone crimp beads (2mm)
- Gold tone jump rings (4mm-6mm)
- Gold tone lobster clasp
- Gold tone extension chain
- Small textured or faceted gold accent beads (3-4mm)
- Beading wire (flex wire, usually 0.015-0.019 inch diameter)
- Crimping pliers
- Wire cutters
- Flat nose pliers
Step 1: Preparation & First Connection
-
Measure the wire:
Cut a length of beading wire approximately 9-10 inches long. This gives you plenty of extra room to work with the clasp ends comfortably. -
Secure the first end:
Thread a crimp bead onto one end of the wire, followed by a jump ring or the loop of your extension chain. -
Loop and lock:
Pass the tail end of the wire back through the crimp bead to create a small loop securing the chain. -
Crimp firmly:
Use your crimping pliers to flatten the crimp bead securely. Give the wire a gentle tug to ensure it holds tight. -
Hide the tail:
Trim the excess tail close to the crimp, or leave about half an inch to tuck into the first few beads.
Stringing Tip
To pick up clay disc beads faster, pour a small pile onto your work surface and ‘peck’ at them with the wire end rather than picking them up individually by hand.
Step 2: Creating the Pattern
-
Start with white:
Thread on a substantial section of white heishi beads. For this design, aim for about 15-20 white beads to start, creating a solid base. -
Create the first spark:
Add your first color accent: one red bead, followed by one blue bead. This minimal pairing keeps the look sophisticated. -
Return to neutral:
Add another long section of white beads. I usually count out about 20-25 beads here to create significant spacing between the color bursts. -
Add a gold accent:
For the center feature, thread on one red bead, then a textured gold spacer bead, and finally a blue bead. -
Assess the spacing:
Check your symmetry. The gold accent should sit roughly in the middle of the bracelet, or randomly if you prefer an asymmetrical look. -
Continue the white:
Add another block of 20-25 white heishi beads. -
Add the final spark:
Mirror your first accent by adding one red bead followed by one blue bead (or reverse the order for variety). -
Finish with white:
Thread on the final section of white beads until the bracelet reaches your desired wrist length, usually about 6.5 to 7 inches total.
Step 3: Finishing Touches
-
Prepare the closure:
Thread a crimp bead onto the remaining wire tail. -
Attach the clasp:
Slide on the jump ring attached to your lobster clasp. -
Loop back:
Feed the wire tail back through the crimp bead and through the last couple of white beads on the strand. -
Pull tight:
Pull the wire until the loop is small and the beads are snug, but ensure the bracelet remains flexible and not stiff. -
Final crimp:
Use the crimping pliers to flatten the final crimp bead securely. -
Trim excess:
Use flush cutters to trim the remaining wire tail as close to the beads as possible without nicking your work.
Level Up: Texture Mix
Swap the smooth gold spacer for a gold ‘stardust’ bead or a tiny freshwater pearl in the center cluster to add an elegant, organic touch to the patriotic theme.
Now you have a chic, understated accessory perfect for stacking or wearing solo for the holiday weekend
Double-Strand Patriotic Clay Bead Bracelet
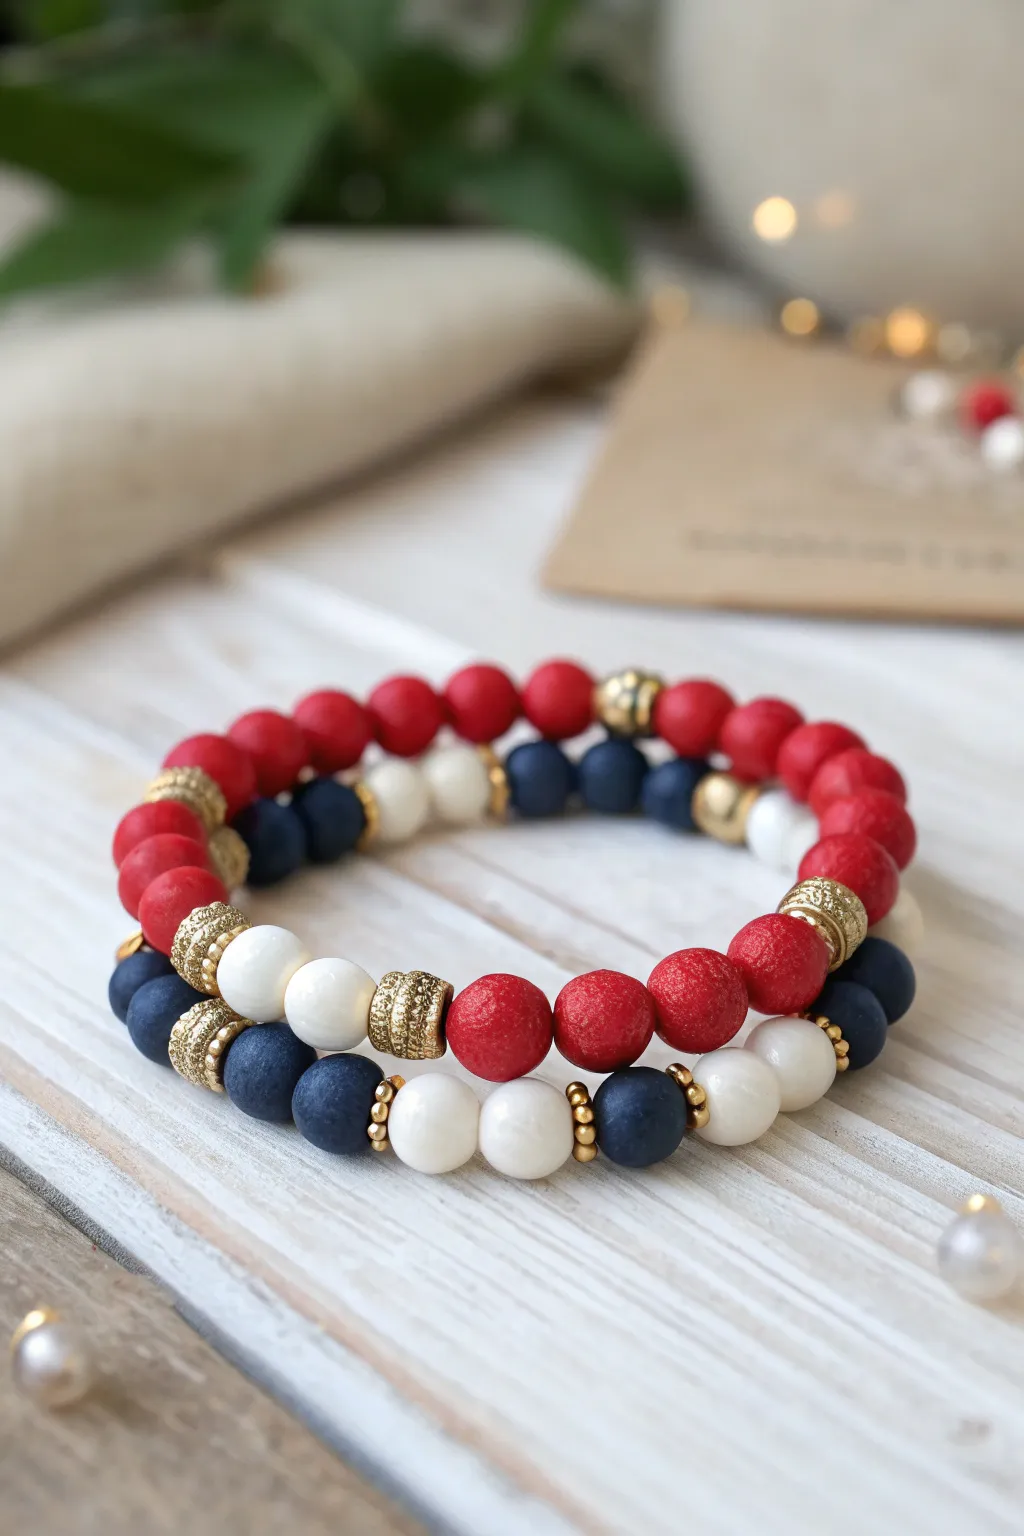
These beautifully coordinated bracelets use a sophisticated mix of matte red, navy blue, and pearlescent white beads to channel patriotic spirit. The design features elegant gold accents and spacers, elevating a simple stringing project into a chic accessory stack perfect for Independence Day.
Detailed Instructions
Materials
- Matte round beads (8mm) in red and navy blue (looks like polymer clay or matte agate)
- Pearlescent white round beads (8mm, likely shell or pearl)
- Gold textured drum beads or large rondelle spacers
- Small gold seed beads or tiny daisy spacers
- Strong elastic commanding cord (0.8mm or 1mm)
- Hypoallergenic jewelry glue
- Scissors or bead snips
- Bead stopper or tape
Step 1: Planning the Red & Navy Strand
-
Measure your cord:
Cut a piece of elastic cord about 10-12 inches long. This gives you plenty of slack for tying knots later. -
Secure the end:
Attach a bead stopper or a piece of tape to one end of the cord so your beads don’t slide off while you work. -
Start the red sequence:
Begin by stringing a sequence of purely matte red beads. Based on the image, you’ll need a long segment of just red—about 10 to 12 beads depending on wrist size. -
Add a focal transition:
After the red section, slide on one large gold textured drum spacer. -
Begin the blue segment:
Thread on a section of matte navy blue beads. Aim for about 3-5 blue beads to create a distinct color block. -
Incorporate white accents:
Between the blue and the next transition, add 2-3 pearlescent white beads to break up the darker colors. -
Close the loop:
Finish this strand with another gold textured spacer before checking the fit against your wrist.
Knot Slipping?
If your elastic knot feels loose, pull it tight while the glue is wet, then clamp a small binder clip over the knot while it dries to hold tension.
Step 2: Creating the Multi-Pattern Strand
-
Prep the second cord:
Cut a second length of elastic cord, securing the end just like the first one. -
Create the alternating pattern:
This strand relies on a pattern of ‘Blue – Gold Spacer – White – Gold Spacer’. Thread a navy bead, followed by a tiny gold seed bead spacer, then a white pearl bead, and another gold spacer. -
Continue the sequence:
Repeat this specific alternating pattern for about half the length of the bracelet. -
Add the red focal point:
To mirror the first bracelet, add a bold pop of red. Slide on a gold drum spacer, followed by 3-4 matte red beads. -
Finish the red section:
Cap off the red section with another gold drum spacer. -
Fill the rest:
Fill the remaining space on the cord with alternating blue and white beads, separated by larger gold textured spacers instead of the tiny seed beads for variety.
Add Sparkle
Swap one of the white pearl beads for a clear crystal disco ball bead to catch the sunlight during outdoor 4th of July festivities.
Step 3: Finishing Touches
-
Pre-stretch the elastic:
Before tying, give both bead strands a gentle tug. I find this helps prevent the bracelet from loosening up the first time you wear it. -
Tie the surgeon’s knot:
Remove the bead stoppers and tie the ends of the first bracelet together using a surgeon’s knot (loop the cord through twice before pulling tight). -
Secure with glue:
Dab a tiny drop of jewelry glue onto the knot. Let it dry completely before trimming. -
Hide the knot:
Trim the excess cord and gently pull the knot inside one of the larger beads or gold spacers to hide it. -
Repeat for the second strand:
Tie, glue, and trim the second bracelet to complete your patriotic stack.
Now you have a stunning, professional-looking stack to wear for the holiday