If you’ve got a little block of air-dry clay and a free afternoon, you’ve got everything you need to make something adorable (and actually useful). These easy dry clay ideas are the kind of projects I’d set out in my studio for beginners—simple shapes, big payoff, and lots of room to make them your own.
Classic Pinch-Pot Trinket Dish
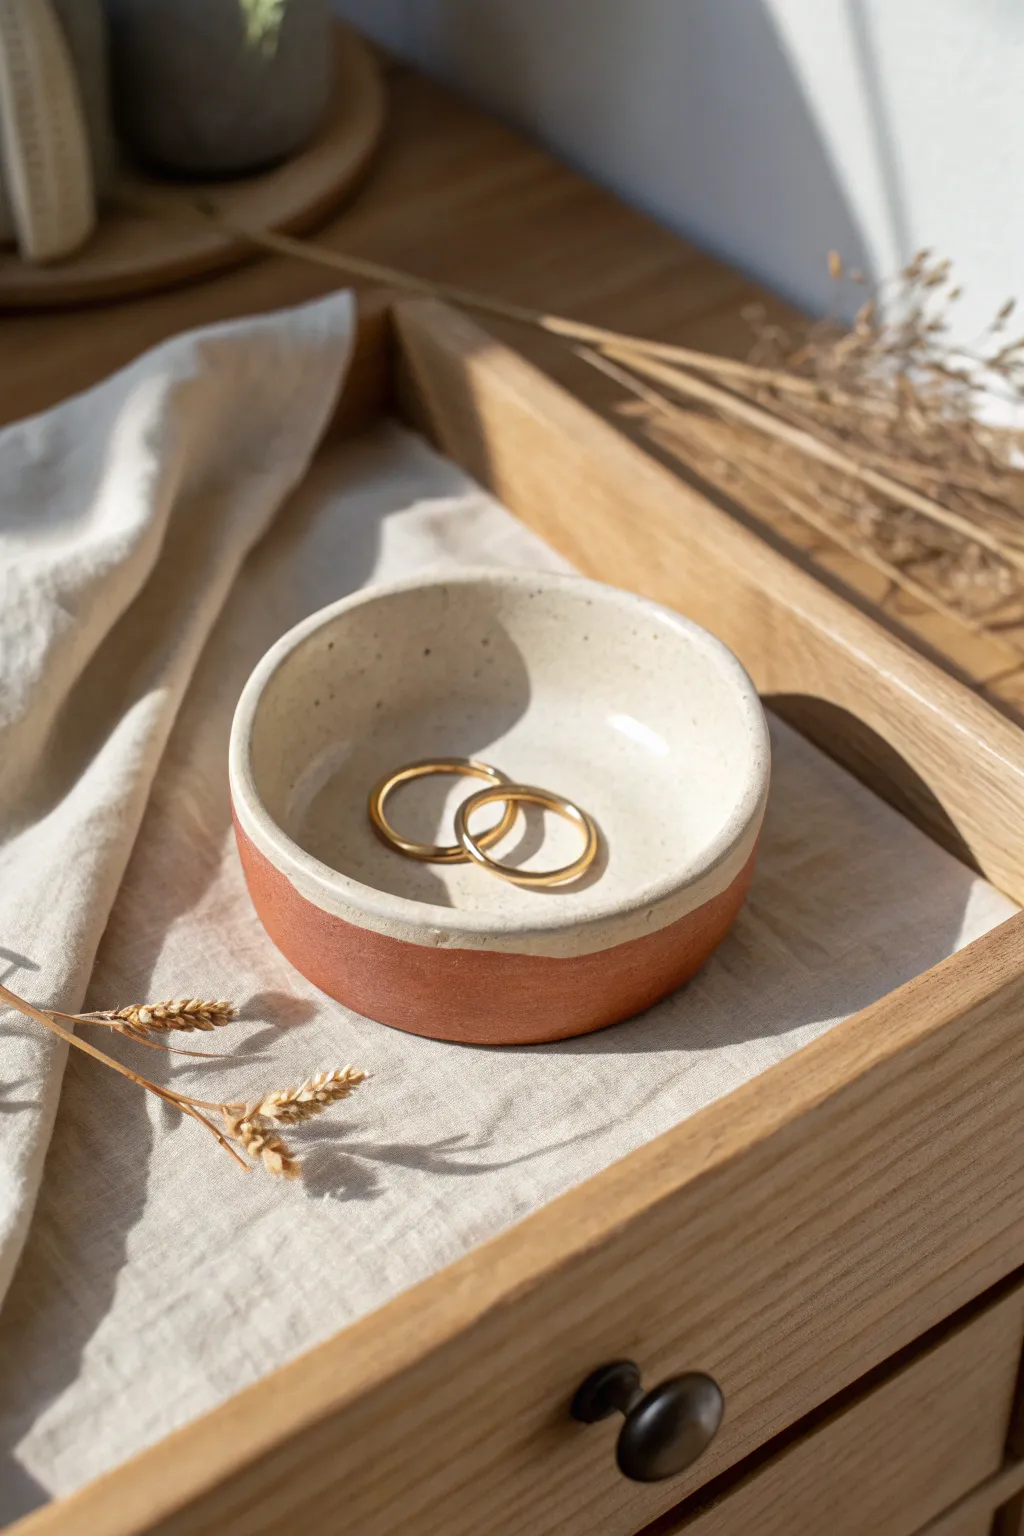
This charming little trinket dish combines the warmth of raw terracotta with a creamy, speckled glaze for a beautiful modern-rustic look. It’s the perfect size for holding your everyday rings or stud earrings on a bedside table.
Step-by-Step
Materials
- Air-dry clay (terracotta color)
- Acrylic paint (creamy white)
- Acrylic paint (black or dark brown for speckles)
- Small cup of water
- Sponge or sanding block
- Glossy varnish or sealant (Mod Podge or similar)
- Soft flat paintbrush
- Old toothbrush
- Rolling pin (optional)
- Painter’s tape or masking tape
Step 1: Forming the Basin
-
Prepare your clay:
Start with a ball of terracotta-colored air-dry clay about the size of a golf ball. Knead it in your hands for a minute to warm it up and ensure it’s pliable and free of air bubbles. -
Create the base:
Press your thumb into the center of the ball, but don’t push all the way through to the bottom. You want to leave a sturdy base about a 1/4 inch thick. -
Pinch the walls:
Using your thumb on the inside and fingers on the outside, gently rotate the ball while pinching the clay upwards. Aim for even thickness all around the rim as you work your way up. -
Shape the dish:
Continue pinching and turning until you have a shallow bowl shape. For this specific look, keep the walls relatively vertical rather than flared out, creating a small basin about 3 inches wide. -
Flatten the bottom:
Gently tap the bottom of the dish against your work surface to create a flat base so it won’t wobble. I find it helpful to press down lightly from the inside center as well. -
Smooth the surfaces:
Dip your finger in a tiny bit of water and run it over any cracks or rough spots on the clay. Smooth out the rim so it feels nice and rounded to the touch. -
Initial drying:
Set the dish aside to dry completely. Depending on your humidity and the clay brand, this usually takes 24 to 48 hours. The clay will lighten in color and feel hard when ready.
Step 2: Refining and Decorating
-
Sand for smoothness:
Once fully dry, use a fine-grit sanding block or sandpaper to gently buff the surface. Focus on the rim and the interior to get that professional, smooth ceramic look. -
Clean dust:
Wipe away all the sanding dust with a slightly damp sponge or cloth. The surface needs to be totally clean for the ‘glaze’ layer to adhere properly. -
Mask the raw edge:
To get that crisp line between the painted top and the raw bottom, apply a strip of painter’s tape around the outside of the bowl. Position it about halfway down the wall, pressing firmly to seal the edge. -
Paint the base color:
Paint the entire interior, the rim, and the exterior down to the tape line with your creamy white acrylic paint. You will likely need 2-3 coats for full opacity, letting each coat dry in between. -
Create the speckles:
Mix a tiny drop of water into black or dark brown acrylic paint. Dip an old toothbrush into this mixture, point it at the dish, and run your thumb across the bristles to flick tiny specks onto the white paint. Practice on paper first to control the spray. -
Remove the tape:
Carefully peel away the painter’s tape while the paint is still slightly tacky or just after it dries. This prevents the dried paint from chipping along the line. -
Seal the interior:
Apply a coat of glossy varnish or sealant only to the painted areas (inside and upper rim). This mimics the look of a fired ceramic glaze and protects the paint from scratching. -
Final drying:
Let the varnish cure completely according to the manufacturer’s instructions before placing any jewelry inside.
Smooth Operator
Use a little water on your finger while smoothing, but not too much! Excess water can weaken air-dry clay and cause cracking as it evaporates.
Uneven Rims?
If your rim looks wavy after drying, place a sheet of sandpaper flat on the table and rub the dish upside down against it in a circular motion.
Now you have a chic spot to keep your favorite rings safe and stylishly displayed


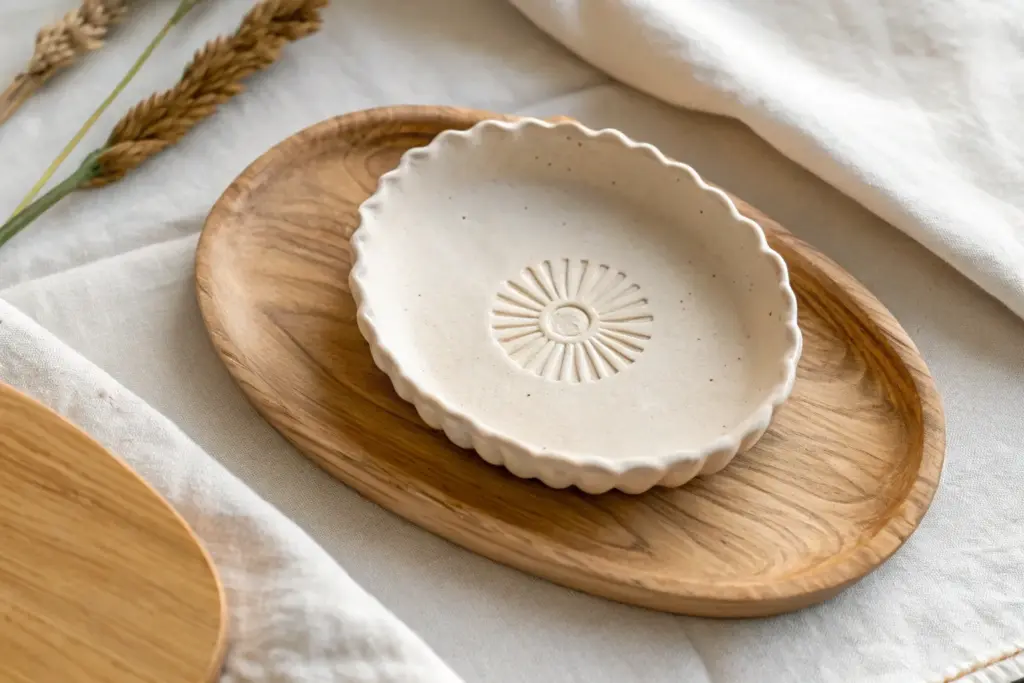
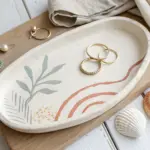
Leaf-Imprint Ring Dish

Capture the delicate beauty of nature with this elegant, leaf-imprinted ring dish. By pressing a real leaf into clay and highlighting the veins with a warm wash, you’ll create a sophisticated keepsake perfect for holding your favorite jewelry.
Step-by-Step Guide
Materials
- White or pale gray air-dry clay
- Rolling pin
- Fresh leaf with prominent veins (like hydrangea or beech)
- Parchment paper or craft mat
- Clay sculpting knife or X-Acto knife
- Small bowl (for shaping)
- Sandpaper (fine grit)
- Acrylic paint (cream or off-white)
- Brown or metallic gold acrylic paint (for the wash)
- Paper towels
- Soft paintbrush
- Clear matte varnish or sealer
Step 1: Preparation & Impression
-
Prepare your workspace:
Lay down a sheet of parchment paper on a flat surface to prevent the clay from sticking. This makes it much easier to move your piece later without warping it. -
Roll out the clay:
Take a handful of air-dry clay and knead it briefly until it’s pliable. Roll it out into a slab that is roughly 1/4 inch thick. Aim for an even thickness throughout to prevent cracking during the drying phase. -
Select and place your leaf:
Choose a fresh leaf that has thick, sturdy veins on the underside. Place the leaf vein-side down onto the center of your rolled clay slab. -
Make the impression:
Using your rolling pin, gently roll over the leaf once or twice. Apply firm, consistent pressure to ensure the veins are pressed deep enough into the clay to capture all those intricate details. -
Remove the leaf:
Carefully find the stem or edge of the leaf and slowly peel it away from the clay. You should now see a perfect negative imprint of the leaf structure.
Cracks showing?
If small hairline cracks appear while drying, mix a tiny bit of fresh clay with water to make a paste (slip) and adhere it into the crack, then smooth over.
Step 2: Shaping & Drying
-
Cut out the shape:
Use a clay knife or sharp blade to cut around the perimeter of the leaf imprint. I like to leave a small border of about 1/8 inch around the edge of the impression for a clean look. -
Smooth the edges:
Dip your finger in a little bit of water and gently run it along the cut edges of the clay to smooth out any roughness or sharp corners. -
Form the curve:
Carefully lift your clay leaf and place it inside a small bowl. Gently press the center down so the clay takes on the curved shape of the bowl. This creates the ‘dish’ form that will hold your rings. -
Let it dry:
Set the bowl aside in a dry area. Allow the clay to dry completely according to the package instructions, which usually takes 24 to 48 hours depending on humidity. -
Sand imperfections:
Once the clay is fully hardened and bone dry, remove it from the bowl. Use fine-grit sandpaper to lightly sand the edges until they feel completely smooth to the touch.
Step 3: Finishing Touches
-
Base coat painting:
Paint the entire dish, front and back, with a cream or off-white acrylic paint. This unifies the color and provides a primed surface for the next step. Let this coat dry completely. -
Create the wash:
Mix a small amount of brown or metallic gold paint with water until it has a thin, ink-like consistency. -
Apply the wash:
Brush the watered-down paint liberally over the textured side of the dish, ensuring the liquid flows into all the deep vein impressions. -
Wipe back:
Immediately take a damp paper towel and gently wipe across the surface of the dish. The goal is to remove the paint from the raised areas while leaving the dark pigment trapped in the recessed veins. -
Clean up edges:
If the wash smudged the edges too much, you can touch them up with your original base color for a crisp finish. -
Seal the piece:
Finish by applying a coat of clear matte varnish or sealer. This protects the clay from moisture and gives the dish a professional, durable finish.
Emphasize Texture
For deeper veins, use a leaf with a stiff structure like hydrangea or oak. Soft leaves like spinning or basil often won’t leave a distinct enough impression.
Now you have a charming, nature-inspired vessel to keep your most precious rings safe


Easy Flower-Shaped Coasters
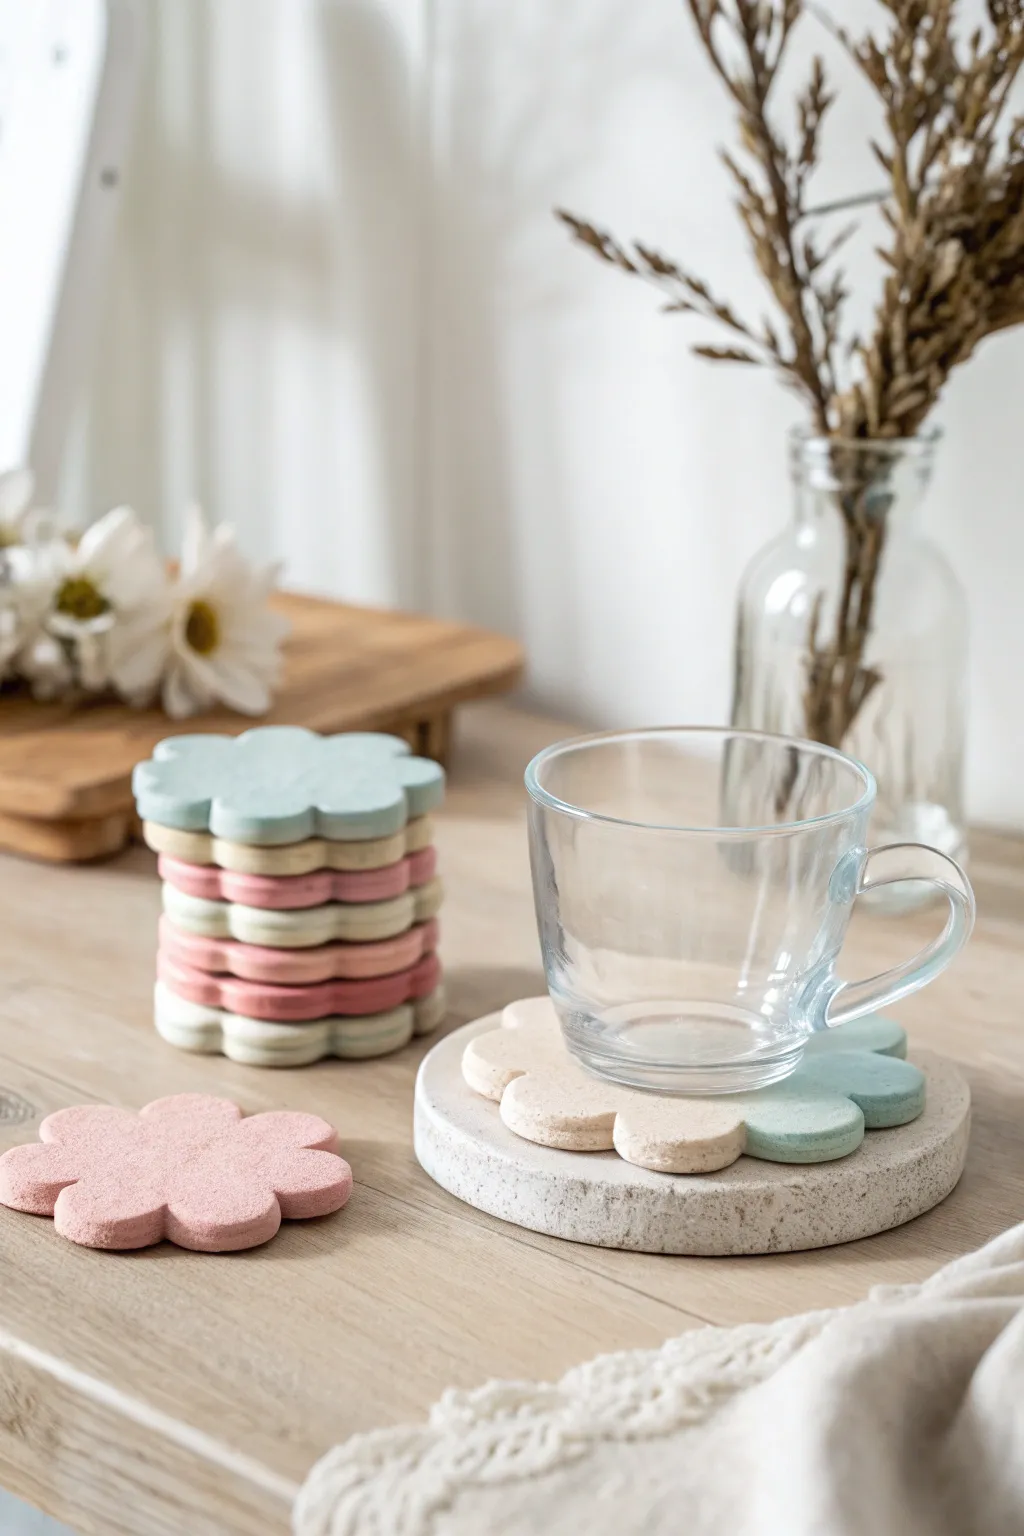
Brighten up your coffee table with a stack of these charming, scalloped coasters made from simple air-dry clay. Their matte, pastel finish and organic flower shape bring a touch of soft, modern whimsy to your daily tea ritual.
Step-by-Step Tutorial
Materials
- White air-dry clay (e.g., DAS or Crayola)
- Acrylic paints (pastel pink, mint green, cream)
- Rolling pin
- Parchment paper or non-stick craft mat
- Flower-shaped cookie cutter (approx. 3.5-4 inches)
- Fine-grit sandpaper (220-400 grit)
- Small bowl of water
- Sponge or paintbrush
- Matte sealant or varnish (waterproof is best)
- Optional: Clay roller guides or two wooden rulers
Step 1: Shaping the Flowers
-
Condition the Clay:
Cut off a chunk of air-dry clay and knead it in your warm hands for a minute or two. This softens the fibers and ensures a smooth, crack-free surface later on. -
Roll it Out:
Place the ball of clay onto your parchment paper. Using your rolling pin, flatten the clay to an even thickness of about 1/4 inch (6mm). Using depth guides here helps keep the coaster perfectly level for your mug. -
Cut the Shape:
Press your flower-shaped cookie cutter firmly into the clay. Give it a tiny wiggle to ensure it cuts all the way through, then lift the cutter straight up. -
Remove Excess:
Peel away the excess clay from around the flower shape. Save these scraps in an airtight bag or container right away so they don’t dry out while you work. -
Smooth the Edges:
Dip your finger in a small bowl of water and gently run it along the cut edges of the clay flower. This smooths down any harsh ridges left by the cutter giving it that soft, stone-like look. -
Flatten the Surface:
Check the surface for any fingerprints. You can gently buff them out with a slightly damp sponge or the back of a spoon to ensure a flat resting place for your cup. -
Create a Set:
Repeat the rolling and cutting process until you have a stack of coasters. The image shows a set of about 8-10, which allows for lovely color blocking when stacked.
Fixing Warped Clay
If your coasters curl up while drying, dampen the concave side slightly and weigh them down under a heavy book (with parchment paper in between) overnight to flatten them back out.
Step 2: Drying and Refining
-
Initial Drying:
Leg the clay flowers dry on a flat surface lined with parchment paper. Keep them away from direct sunlight or heat sources to prevent warping. -
Flip for Evenness:
After about 12 hours, I like to flip the coasters over. This exposes the bottom side to air, helping them dry evenly and stay flat. -
Full Cure:
Allow the coasters to dry completely for typically 24 to 48 hours. The clay will turn from a cool gray to a chalky white when fully dry. -
Sand for Smoothness:
Once fully dry, take your fine-grit sandpaper and lightly sand the edges and flat surfaces. Focus on the curves of the petals to make them feel professionally finished. -
Dust Off:
Wipe the coasters down with a dry cloth or a soft brush to remove all the sanding dust before painting.
Speckled Stone Effect
For a faux-stone look, dilute brown or black paint on a toothbrush and flick the bristles to spray tiny speckles over your painted coasters before sealing.
Step 3: Adding Color
-
Mix Pastel Colors:
On a palette, mix your acrylic paints. To achieve the dusty pastels seen in the photo, mix a tiny dot of color into a large amount of white paint. -
Paint the Top:
Apply an even coat of paint to the top surface and the sides of the coaster. Use long strokes to minimize texture. -
Dry and Repeat:
Let the first coat dry completely. If the color looks streaky, apply a second thin coat for opaque coverage. -
Paint the Bottom:
Flip the coasters and paint the bottom side as well, ensuring no raw clay is showing. This seals the clay better. -
Seal the Deal:
Finish with a matte waterproof varnish. This is crucial for coasters, as it protects the clay from condensation drips from cold drinks.
Stack your colorful creations on the table ready for your next relaxing cup of tea


Speckled Terrazzo-Style Coasters
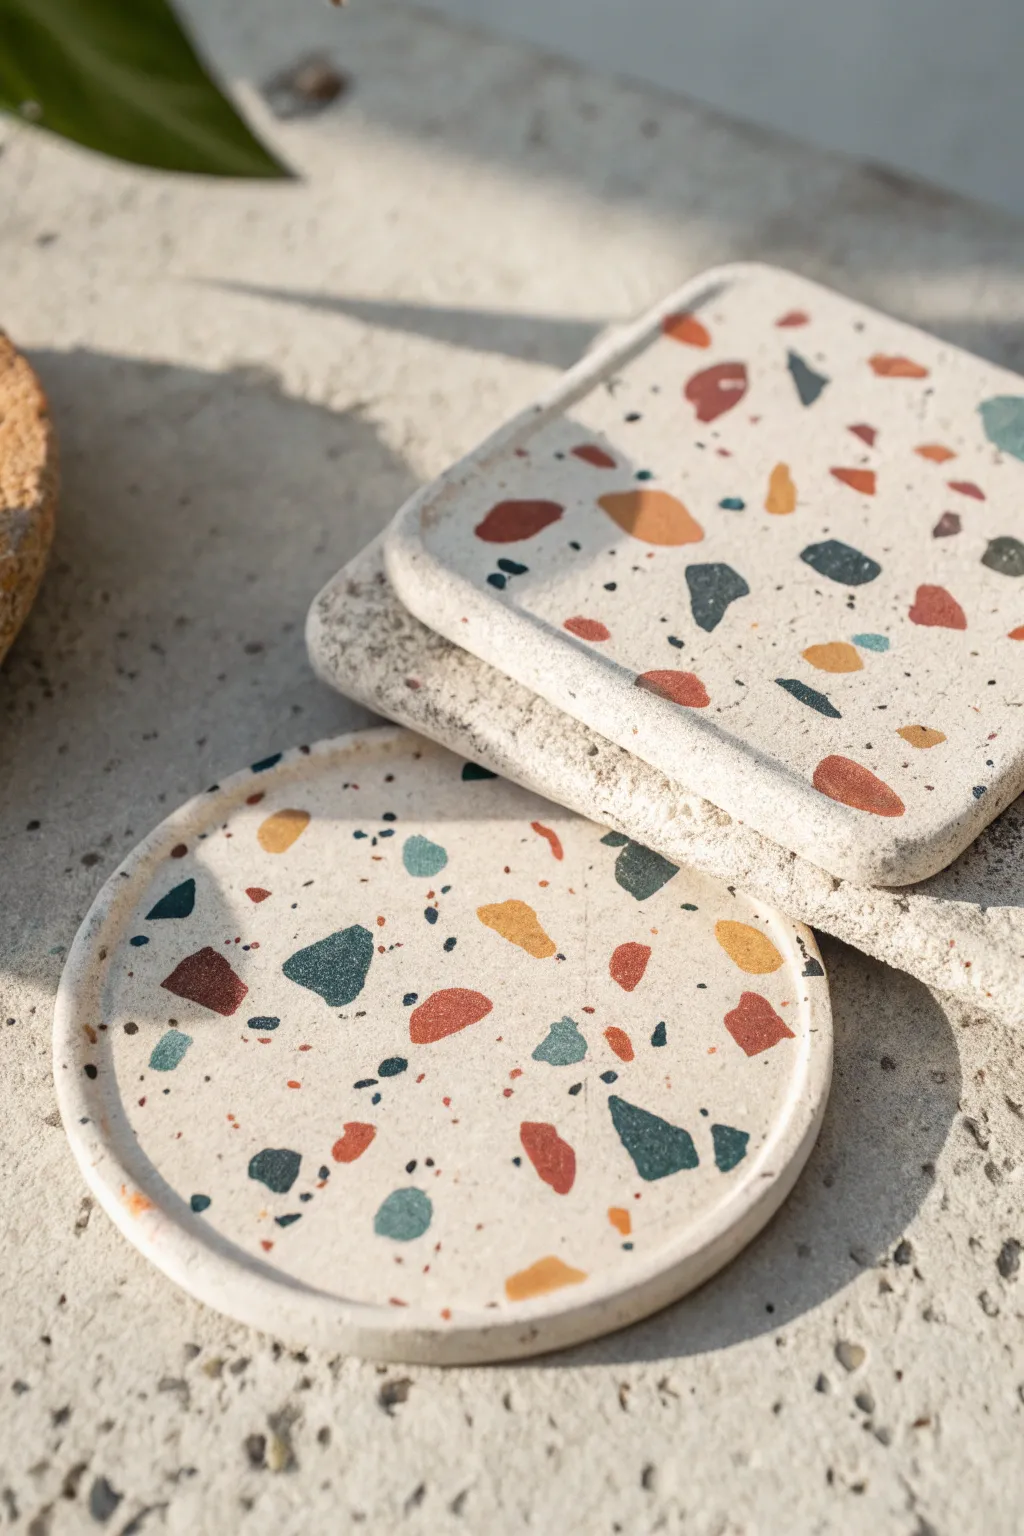
These trendy coasters feature a playful scattering of colorful speckles embedded in a creamy white base, mimicking the classic look of terrazzo stone. The raised rim detail not only looks stylish but also helps keep condensation from your drinks contained.
Step-by-Step Guide
Materials
- White air-dry clay (approx. 500g)
- Acrylic paints (terracotta, mustard yellow, teal, navy blue)
- Small rolling pin
- Parchment paper or craft mat
- Round and square cookie cutters (large) or a craft knife
- Small bowl of water
- Fine-grit sandpaper (220-400 grit)
- Gloss or matte varnish/sealant for clay
- Paintbrush
Step 1: Making the Colorful Chips
-
Color the Clay:
Take four small balls of white clay, roughly the size of large grapes. Flatten each one slightly in your palm. -
Mix the Pigments:
Add a drop of acrylic paint to each flattened disc—one terracotta, one mustard, one teal, and one navy. Fold the clay over the paint and knead thoroughly until the color is uniform. Wear gloves if you want to keep your hands clean. -
Flatten the Chips:
Roll each colored ball out very thinly on your parchment paper, until they are almost paper-thin (about 1-2mm). -
Create the Fragments:
Let these thin colored sheets sit for about 10-15 minutes to firm up slightly. Then, use your fingers or a craft knife to tear and cut them into small, irregular geometric shards. Vary the sizes from tiny specks to larger triangles.
Don’t Over-mix!
When rolling the colored chips into the base, roll just enough to make it flat. If you roll too much, the chips will smear and lose their crisp edges.
Step 2: Forming the Base
-
Roll the Base Slab:
Take a large chunk of plain white clay and knead it until soft. Roll it out on parchment paper to an even thickness of about 5mm. -
Scatter the Chips:
Sprinkle your colored clay fragments randomly over the white clay slab. I like to mix the colors evenly so no single area is too monochromatic. -
Embed the Pattern:
Gently roll over the slab again with your rolling pin. Press firmly enough to force the colored chips flush into the white clay surface, creating a smooth, flat terrazzo effect. -
Cut the Shapes:
Use your large cookie cutters or a craft knife to cut out your coaster shapes. The image shows both a circle and a rounded square. -
Create the Rims:
Roll thin snakes of plain white clay. Apply a little water to the outer edge of your coaster bases to act as glue. -
Attach the Borders:
Place the clay snakes along the wet edges. Gently press and smooth the seam between the base and the rim using your finger or a modeling tool so they become one solid piece. -
Refine the Edge:
Smooth out the top of the rim to make it even. You can lightly tap it flat against your work surface if needed.
Step 3: Finishing Touches
-
Initial Drying:
Place the coasters on a flat, clean surface to dry. Flip them over carefully every few hours to ensure they dry evenly and don’t warp. -
Full Cure:
Allow the clay to dry completely for 24 to 48 hours, depending on the thickness and humidity. -
Sanding:
Once fully hard, take your fine-grit sandpaper and gently sand the surface. This is the magic step that reveals the crisp edges of your colored chips and removes any milky film of white clay covering them. -
Dusting Off:
Wipe the coasters down with a thoroughly damp cloth or sponge to remove all clay dust. -
Sealing:
Apply a coat of varnish or sealant to protect the clay from moisture. This will also make the colors of the terrazzo chips pop more vibrantly. -
Final Coat:
Let the first coat dry, then add a second layer for extra durability, especially since these will be holding drinks.
Switch It Up
Add gold leaf flakes into the rolling phase for a touch of metallic luxury alongside the matte clay colors.
Now you have a stylish set of custom coasters ready for your coffee table

The Complete Guide to Pottery Troubleshooting
Uncover the most common ceramic mistakes—from cracking clay to failed glazes—and learn how to fix them fast.
Simple Pencil or Brush Cup
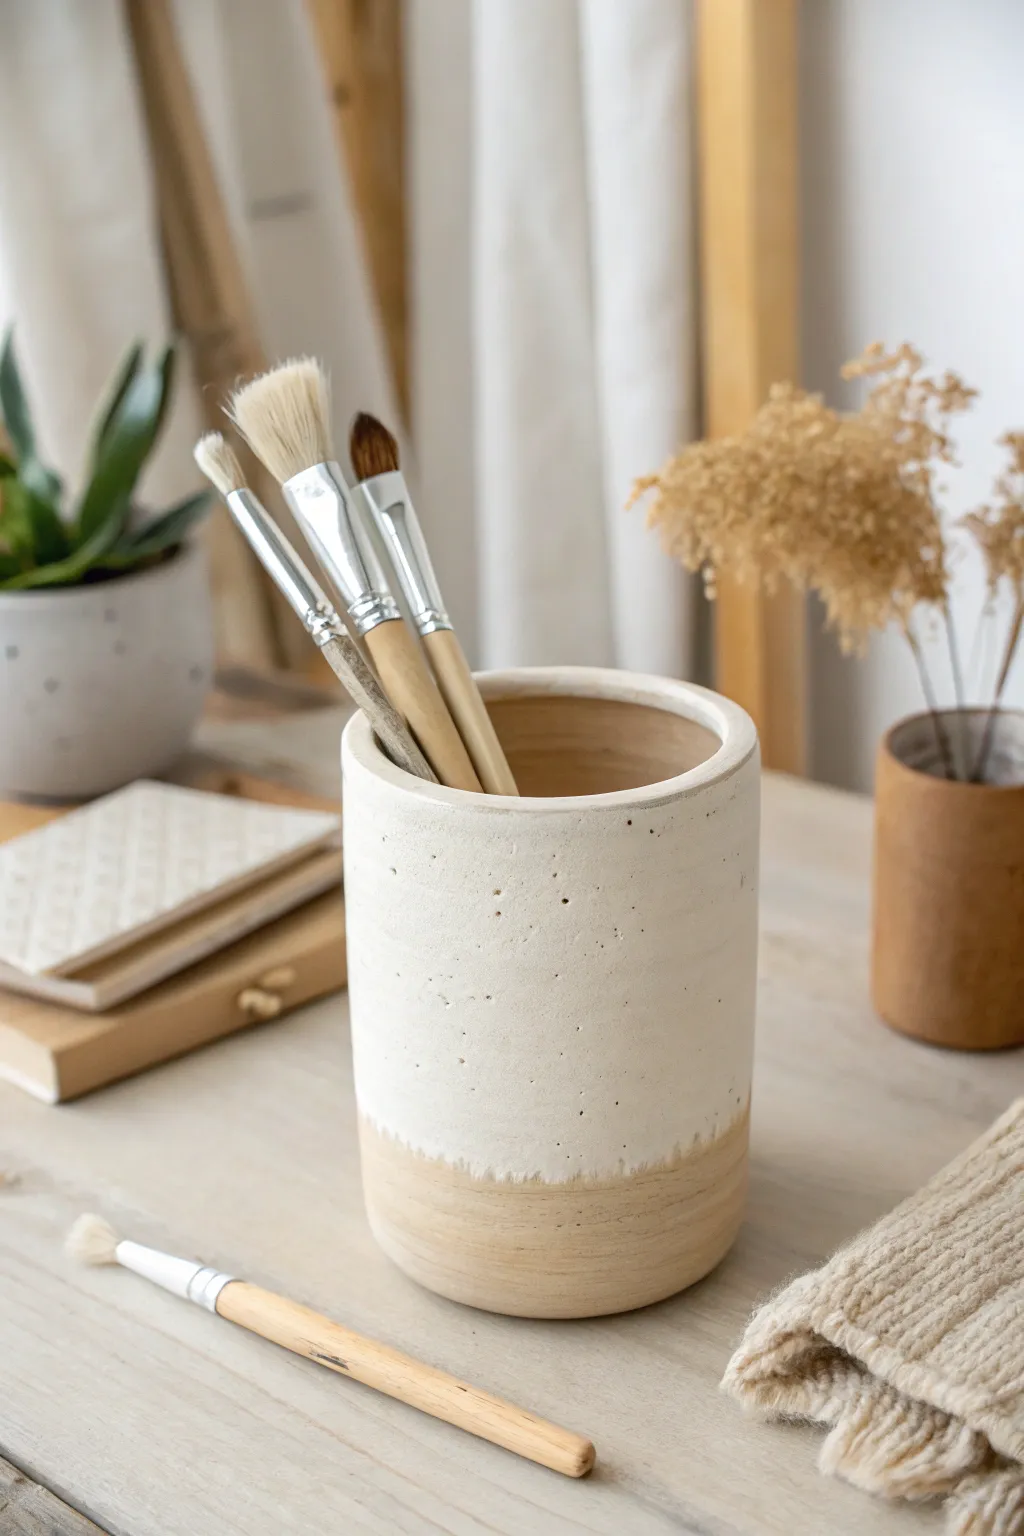
Achieve that trendy, modern ceramic aesthetic without a kiln using this straightforward dry clay project. This brush holder features a lovely natural base contrasted by a speckled, matte white glaze effect that brings texture and serenity to any workspace.
How-To Guide
Materials
- Air-dry clay (white or natural)
- Rolling pin
- Cutting mat or smooth surface
- Craft knife or clay cutter
- Cylindrical mold (like a cleaned tin can or glass jar)
- Parchment paper
- Small bowl of water
- Sponge or clay tools
- Fine-grit sandpaper
- Matte white acrylic paint
- Flat paintbrush
- Stiff bristle brush (optional for texture)
- Matte varnish or sealant
Step 1: Forming the Base
-
Prepare your workspace:
Lay down your mat or parchment paper to prevent sticking. Take a large ball of air-dry clay and knead it in your hands until it becomes soft, pliable, and free of air bubbles. -
Roll out the slab:
Using your rolling pin, flatten the clay into a long rectangular slab. Aim for an even thickness of about 1/4 inch to ensure stability for your cup. -
Measure the circumference:
Take your chosen cylindrical mold (a tin can works perfectly) and wrap a piece of paper around it to measure the length needed. Transfer this measurement to your clay slab. -
Cut the rectangle:
Use a sharp craft knife and a ruler to cut a clean, straight rectangle from the clay based on your measurements. Save the excess clay for the base. -
Cut the base circle:
Place your mold directly onto the remaining flattened clay and trace around the bottom with your knife to create a perfect circle that matches the cylinder’s diameter.
Seamless Seams Idea
Use a little vinegar instead of water when joining clay pieces. The acid breaks down the clay slightly, creating a stronger ‘slip’ that acts like superglue for a crack-free seam.
Step 2: Building the Cylinder
-
Wrap the mold:
Wrap your rectangular clay slab around the mold. I find it helpful to first wrap the mold in parchment paper so the clay slides off easily later. -
Join the seam:
Bring the two ends of the rectangle together. Score the edges (make scratch marks) and add a dab of water, then press them firmly together to create a seamless bond. -
Smooth the exterior:
Wet your finger or a clay tool and gently rub the seam until it disappears completely, blending the clay so it looks like a continuous piece. -
Attach the bottom:
Score the bottom edge of your cylinder and the outer edge of your circular base. Add water and press the cylinder onto the base. -
Blend the bottom seam:
Using a modeling tool or your finger, drag a little clay from the wall down onto the base to lock them together. Smooth out the join until invisible. -
Refine the rim:
Dip your finger in water and run it along the top rim to round off any sharp edges, giving it that soft, hand-thrown ceramic look. -
Remove the mold:
Carefully slide the internal mold out. If the clay feels too floppy, let it stiffen for 30 minutes before removing the support. -
Let it cure:
Allow the piece to dry completely in a safe spot for 24 to 48 hours, turning it occasionally to ensure even exposure to air.
Level Up: Speckled Effect
To get the black specks seen in pottery, flick a toothbrush loaded with watered-down brown paint over the white section before sealing for a faux stoneware finish.
Step 3: Finishing and Painting
-
Sand the flaws:
Once bone dry, take fine-grit sandpaper and gently buff away any bumps or fingerprints, paying special attention to the rim. -
Mix the paint:
Pour out some matte white acrylic paint. If you want that specific speckled texture seen in the photo, you can mix a tiny pinch of baking soda or sand into the paint. -
Apply the first coat:
Paint the upper three-quarters of the cup, leaving the bottom quarter raw and unpainted to create the two-tone dip effect. Don’t worry about a perfect line; a slightly organic edge adds character. -
Add texture:
While the paint is wet, stipple it slightly with a stiff dry brush to enhance the porous stone look. This mimics the flecks found in real ceramic glazes. -
Refine the dip line:
Use a smaller brush to touch up the transition line where the white paint meets the raw clay, feathering it slightly for a soft gradient if desired. -
Seal the piece:
Finish by applying a clear matte sealant over the entire piece—even the unpainted bottom—to protect the clay from moisture and dust.
Place your favorite brushes inside and enjoy the calm, organizational upgrade to your desk
Starry Incense Tray
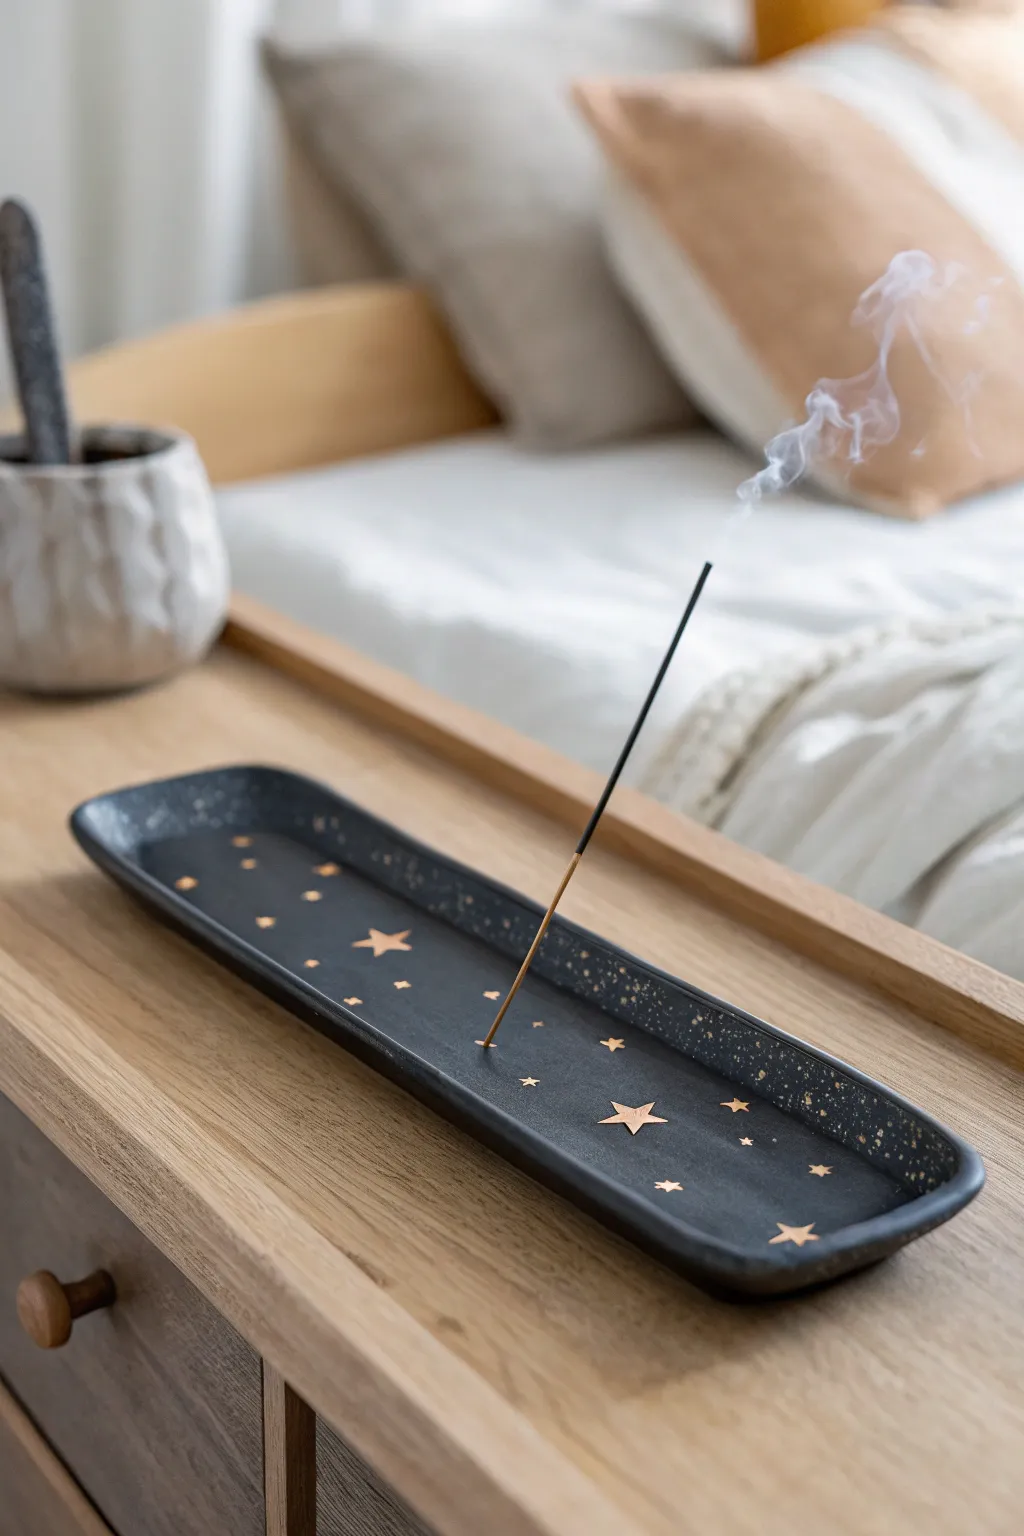
Bring a touch of the night sky into your home with this simple yet elegant incense holder. The deep midnight blue finish contrasted with shimmering gold stars creates a dreamy, celestial vibe perfect for relaxation.
Step-by-Step Guide
Materials
- Air-dry clay (white or grey)
- Rolling pin
- sharp craft knife or clay tool
- Small bowl of water
- Fine-grit sandpaper
- Acrylic paint (black or very dark midnight blue)
- Gold metallic paint pen or fine brush with gold acrylic
- Old toothbrush (for speckling)
- Gloss or satin varnish/sealant
- Ruler
- Incense stick (for sizing)
Step 1: Shaping the Clay
-
Condition the Clay:
Start by taking a good handful of air-dry clay and kneading it in your hands creates a pliable texture. Warm it up until it’s soft and smooth, ensuring there are no air bubbles trapped inside. -
Roll it Out:
Using your rolling pin, flatten the clay into an even slab. You want it to be about 1/4 inch thick—thick enough to be sturdy but not so chunky that it takes forever to dry. -
Cut the Base Shape:
Use a ruler and your craft knife to cut a long, narrow rectangle. A size of about 10 inches by 3 inches works well for standard incense sticks, but feel free to adjust to your space. -
Create the Walls:
Gather your excess clay and roll a long, thin snake or coil. This coil should be long enough to go around the entire perimeter of your rectangular base. -
Attach the Rim:
Score the edges of your base rectangle and the bottom of your clay coil by making little hatch marks with your knife. Dab a little water on the scored areas to act as glue. -
Blend the Seams:
Place the coil onto the edge of the base. Using your thumb or a modeling tool, firmly smooth the clay down from the coil onto the base (on both the inside and outside) until the seam disappears completely. -
Refine the Shape:
Gently pinch and shape the rim to create a slight upward curve, giving it that classic tray look. I like to dip my finger in water to smooth out any fingerprints or rough textures at this stage. -
Add the Incense Hole:
Before the clay dries, take an actual incense stick (or a skewer of similar thickness) and poke a hole into the clay at an angle. Make sure the hole isn’t too close to the edge so the ash falls inside the tray. -
Dry Completely:
Set your tray aside in a cool, dry place. Let it dry for at least 24-48 hours. Turn it over halfway through so the bottom dries evenly.
Step 2: Decorating the Night Sky
-
Sand for Smoothness:
Once bone dry, take your fine-grit sandpaper and gently sand away any rough edges or uneven bumps on the rim and surface. Wipe away the dust with a barely damp cloth. -
Base Coat:
Paint the entire tray—inside, outside, and bottom—with your black or midnight blue acrylic paint. You may need two coats to get that rich, opaque darkness. -
Create the Stars:
Using a gold paint pen or a very fine brush with gold paint, draw small five-point stars scattered across the inside of the tray. Vary their sizes slightly for a natural look. -
Add Tiny Details:
In the empty spaces between your main stars, add tiny dots or diamonds to represent distant stars, filling out your galaxy. -
The Speckled Effect:
Dip an old toothbrush into your gold paint (you might need to water it down slightly). Run your thumb across the bristles to flick a fine mist of gold specks over the rim and parts of the tray for a stardust effect. -
Seal the Tray:
Once the paint is fully dry, apply a coat of varnish. This protects the clay from ash and makes it easier to wipe clean later. -
Final Cure:
Let the varnish cure according to the bottle instructions before lighting your first incense stick to ensure the finish is hard and durable.
Angle Check
Make the incense hole slightly larger than the stick; clay shrinks as it dries and you don’t want the fit to be too tight.
Constellation Mapping
Instead of random stars, look up a real constellation like Orion or Cassiopeia and map it out on your tray for a personalized touch.
Enjoy the calming atmosphere your new handmade creation adds to your room


What Really Happens Inside the Kiln
Learn how time and temperature work together inside the kiln to transform clay into durable ceramic.
Minimal Photo or Card Holder
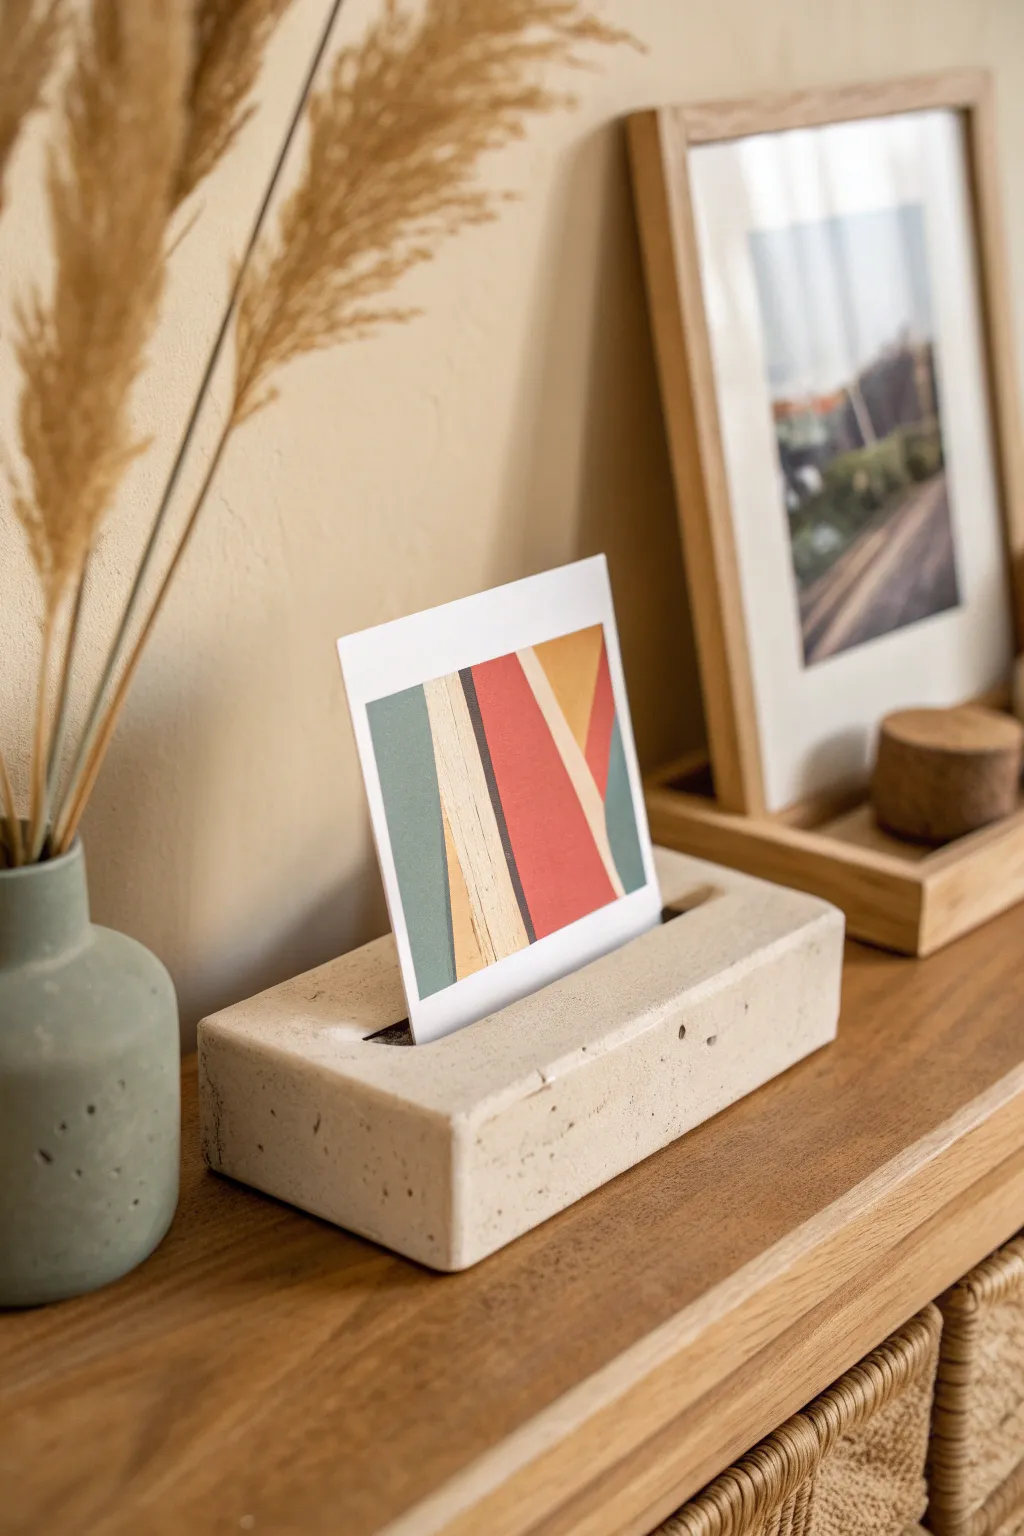
This ultra-minimalist card holder mimics the industrial look of poured concrete but uses much friendlier air-dry clay. Its solid, rectangular form and subtle pitted texture provide a grounding base for displaying your favorite photos, postcards, or table numbers.
How-To Guide
Materials
- White or light grey air-dry clay (stone effect clay works best)
- Rolling pin
- Sharp craft knife or clay blade
- Ruler
- Two long wooden spacers (about 1.5 – 2 inches thick) or a rectangular mold
- Coarse sandpaper or a stiff bristle brush
- Cardboard or plastic card (credit card thickness)
- Water and sponge
- Matte sealant spray
Step 1: Shaping the Block
-
Condition the clay:
Begin by kneading a large handful of air-dry clay until it is pliable and smooth. If you are using white clay and want a concrete look, you can knead in a tiny drop of black acrylic paint or grey pigment now, but don’t over-mix if you want a marbled effect. -
Form the basic rectangle:
Shape the clay into a rough rectangular brick with your hands. It needs to be substantial enough to stand on its own without tipping. -
Refine the shape:
Place the clay on your work surface. Use your wooden spacers or simply two heavy books wrapped in parchment paper as guides on either side to help you gently press or roll the top flat. The goal is a uniform height of about 1.5 to 2 inches. -
Square the edges:
Use a ruler and a sharp craft knife to slice off the rounded, uneven sides. You want sharp, crisp 90-degree angles to achieve that modern architectural look. -
Smooth the surfaces:
Dip your finger in a little water and run it over the cut sides to remove any drag marks from the knife. Keep the corners relatively sharp, though, rather than rounding them over.
Step 2: Texturing and Slotting
-
Create the texture:
To mimic the porous nature of concrete, take a stiff bristle brush or even a crumpled ball of aluminum foil and gently press it into random spots on the surface. I like to focus on the corners and edges for a weathered feel. -
Add deep pitting:
Use a toothpick or a needle tool to poke a few deeper, distinct holes. This recreates the air bubbles often found in cast cement blocks. -
Mark the slot position:
Find the center of your block’s top surface. Use your ruler to lightly mark a straight line where the photo will sit. -
Create the holding slot:
Take a piece of sturdy cardboard or an old plastic card. Press it firmly and evenly into the clay along your marked line. Rock it very slightly back and forth to widen the slot just enough so it isn’t too tight once the clay shrinks. -
Check the depth:
Ensure the slot is at least half an inch deep so it can hold larger cards securely. Remove the card carefully to avoid distorting the surrounding clay.
Stone Effect Hack
Mix dried tea leaves or black pepper into your white clay before shaping. The speckles create a convincing granite or concrete aggregate look instantly.
Step 3: Finishing Touches
-
Initial drying:
Let the block sit for 24 hours. Air-dry clay shrinks as it dries, so avoid placing it in direct sunlight which can cause cracking. -
Rotate for airflow:
Flip the block onto its side after the first day so the bottom can dry out completely. This thick block may take up to 48-72 hours to fully cure. -
Sand for imperfections:
Once fully hard, use coarse sandpaper to scuff up the flat surfaces slightly. This enhances the stone-like texture and removes any fingerprints. -
Dust off:
Wipe the piece down with a dry cloth or a soft brush to remove the clay dust from the sanding process. -
Seal the piece:
Spray the entire block with a matte clear coat. This protects the clay from moisture and prevents
Color Wash
Once dry, dilute grey acrylic paint with water (1:5 ratio) and wash over the block. Wipe it off immediately so the dark color only stays in the pits and holes.
Now you have a solid, stylish base to showcase your favorite memories
Initial and Name Tags
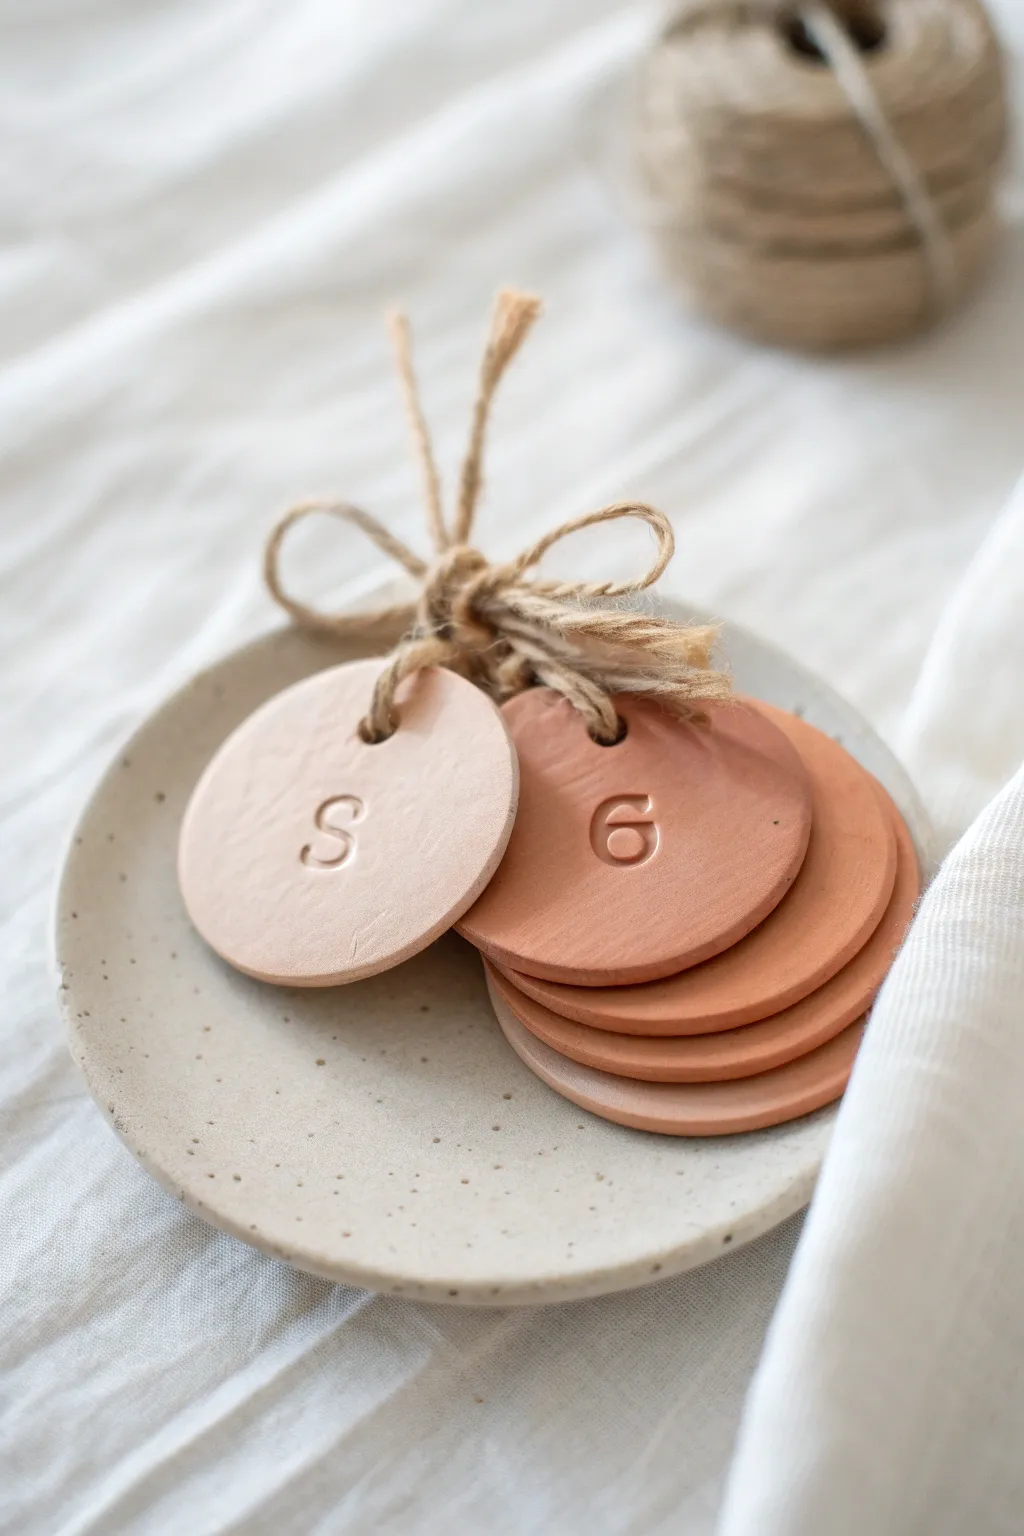
These minimalist clay tags add a personalized touch to gifts, table settings, or holiday decor with their warm, earthy tones and simple stamped letters. Using air-dry clay makes this project accessible and quick, yielding professional-looking ceramics without a kiln.
Step-by-Step
Materials
- White or terracotta air-dry clay
- Rolling pin
- Parchment paper or canvas mat
- Round cookie cutter (approx. 2 inches)
- Letter stamp set
- Drinking straw or small circular cutter
- Fine grit sandpaper
- Jute twine
- Small sponge and water bowl
- Acrylic sealer (optional)
Step 1: Shaping the Clay Base
-
Condition the clay:
Begin by taking a handful of air-dry clay and kneading it in your hands until it feels soft, warm, and pliable. This prevents cracks from forming later on. -
Prepare your surface:
Lay down a sheet of parchment paper or a canvas mat to prevent the clay from sticking to your table. I prefer canvas as it adds a nice texture to the back. -
Roll it out:
Use your rolling pin to flatten the clay. Aim for an even thickness of about 1/4 inch (6mm). If the clay is too thin, the tags may be brittle; too thick, and they get heavy. -
Smooth the surface:
Before cutting, lightly run a damp finger or a slightly moist sponge over the top of the clay slab to remove any rolling pin marks or large imperfections. -
Cut the circles:
Press your round cookie cutter firmly into the clay. Give it a tiny wiggle before lifting to ensure a clean cut. -
Remove excess clay:
Peel away the scrap clay from around your circles first, rather than trying to lift the soft circles immediately. This keeps them perfectly round.
Step 2: Detailing and Stamping
-
Smooth the edges:
Dip your finger in a little water and gently run it around the circumference of each clay circle to soften the sharp cut edge. -
Create the hanging hole:
Use a drinking straw to punch a hole near the top edge of each circle. Twist the straw as you push down, then pull up to remove the clay plug. -
Position your stamp:
Select your letter stamp. Hover it over the center of the clay circle to visualize the placement before committing. -
Stamp the initial:
Press the stamp straight down with firm, even pressure. Rock it very slightly to ensure the indentation is deep enough to read clearly. -
Check the impression:
Lift the stamp straight up. If there are any jagged edges where the clay displaced, gently tap them down with a fingertip.
Cracks while rolling?
If edges crack when rolling, your clay is too dry. Dip your fingers in water and knead it back into the clay until pliable again before re-rolling.
Step 3: Drying and Finishing
-
Initial drying:
Place the tags on a clean, flat surface to dry. Using a wire rack is ideal for air circulation, but parchment paper works too. -
Flip them over:
After about 12 hours, flip the tags over. This ensures the bottom dries evenly and prevents the edges from curling upward. -
Wait for full cure:
Allow the tags to dry completely for 24 to 48 hours. The clay will turn opaque and feel lighter when fully dry. -
Sand the imperfections:
Once bone dry, take fine-grit sandpaper and gently buff the edges or surface if any rough spots remain. -
Dust off debris:
Wipe the tags with a dry cloth or brush to remove any clay dust generated from sanding. -
Seal (Optional):
If you want to protect them from moisture or give them a slight sheen, brush on a thin layer of matte acrylic sealer. -
String them up:
Cut a length of jute twine, thread it through the hole, and tie a knot or a bow to finish the look.
Color Wash Effect
For the two-tone look seen here, use two different clay colors, or mix a tiny drop of acrylic paint into white clay before stamping for a custom hue.
Enjoy using these charming custom tags to elevate your next wrapped gift or organization project

TRACK YOUR CERAMIC JOURNEY
Capture glaze tests, firing details, and creative progress—all in one simple printable. Make your projects easier to repeat and improve.
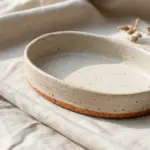
Beaded-Edge Mini Dishes
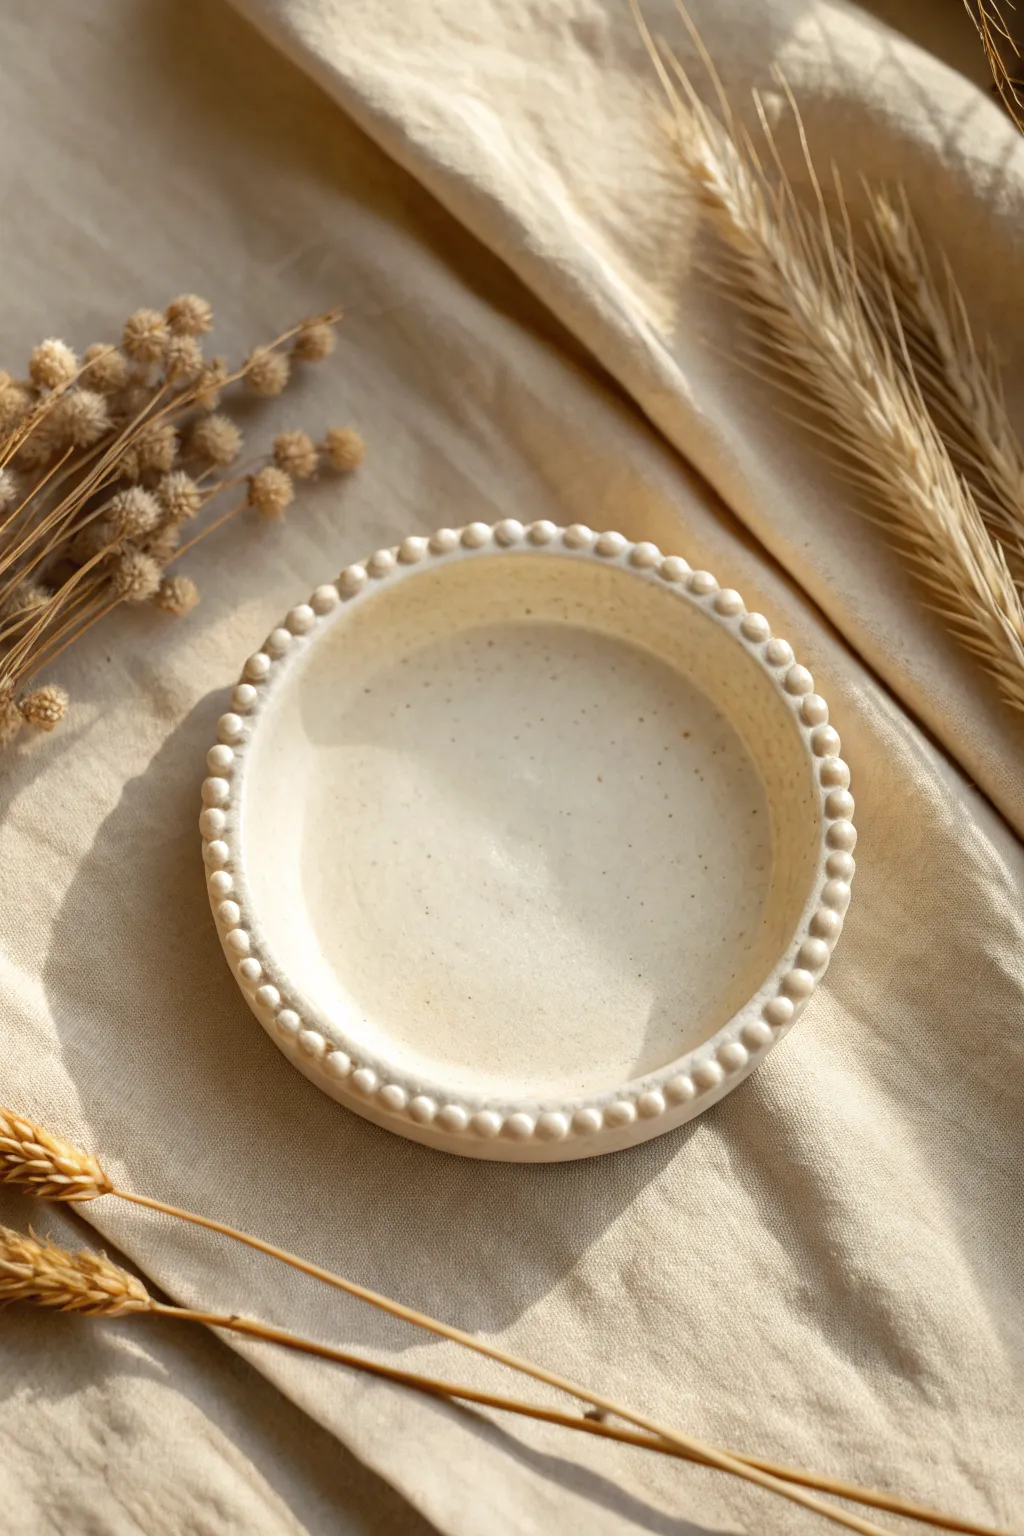
This charming trinket dish combines a modern minimalist shape with a delicate rustic texture. The beaded rim adds a touch of sweetness to the simple silhouette, while the speckled finish mimics the look of high-end ceramic stoneware.
How-To Guide
Materials
- Air-dry clay (white)
- Acrylic rolling pin
- Circle cutter or a small bowl (approx. 4-5 inches diameter)
- Craft knife
- Small cup of water
- Sandpaper (fine grit)
- Acrylic paint (cream/off-white)
- Acrylic paint (brown/tan for speckling)
- Old toothbrush or stiff fan brush
- Gloss or satin varnish
Step 1: Shaping the Base
-
Prepare the clay:
Begin by taking a handful of air-dry clay and kneading it in your hands until it becomes warm and pliable. This conditioning step is crucial to prevent cracks later on. -
Roll out the slab:
Place the clay on a smooth surface or canvas mat. Use your acrylic rolling pin to roll it out into an even slab, aiming for a thickness of about 1/4 inch. -
Cut the circle:
Press your circle cutter or an inverted small bowl firmly into the clay slab. Use the craft knife to trace around the bowl if you don’t have a cutter, removing the excess clay. -
Create the curve:
To give the flat circle a dish shape, gently curl the edges upward with your fingers. Alternatively, you can place the clay circle inside a slightly larger bowl lined with plastic wrap to help it hold a curved shape while it sets. -
Smooth the edges:
Dip your finger in a tiny amount of water and run it along the rim of the dish to smooth out any rough cuts or sharp edges.
Beads Falling Off?
If beads detach while drying, your clay was likely too dry when attaching. Use plenty of slip (water/clay paste) and ensure you score both surfaces rough texture before joining.
Step 2: Adding the Beaded Rim
-
Roll small spheres:
Take your excess clay and begin rolling tiny, pea-sized balls between your fingertips. You will need quite a few to encircle the entire rim, so I like to make a large batch all at once to ensure they are consistent in size. -
Score the connection points:
Use your craft knife or a needle tool to lightly scratch (score) the top edge of the dish rim where the beads will sit. Do the same to the bottom of each little clay ball. -
Apply slip:
Mix a tiny bit of clay with water to create a paste (slip). Dab this onto the scored rim to act as glue. -
Attach the beads:
Press each clay ball gently onto the rim, working your way around the circle. Ensure they are touching each other snugly. -
Secure the beads:
Once all beads are placed, use the back of a paintbrush handle or your finger to gently smudge the *underside* of the beads into the rim slightly. This bonds them firmly without ruining the round shape on top. -
Final smooth and dry:
Check for any cracks and smooth them with a damp brush. Set the dish aside in a cool, dry place for at least 24-48 hours until completely hard and white.
Pro Tip: Uniform Beads
To get perfectly equal-sized beads, roll a long ‘snake’ of clay first. Cut it into equal small segments with a blade, then roll each segment into a ball.
Step 3: Painting and Finishing
-
Sand imperfections:
Once fully dry, take a piece of fine-grit sandpaper and gently buff away any rough spots on the surface or the underside. -
Base coat:
Apply two coats of cream or off-white acrylic paint to the entire dish, allowing the first coat to dry before adding the second. -
Create the speckles:
Water down a small amount of brown or tan acrylic paint until it is very fluid. Dip an old toothbrush into the mixture. -
Splatter effect:
Hold the toothbrush over the dish and run your thumb across the bristles to flick tiny speckles of paint onto the surface. Practice on a paper towel first to control the spray. -
Seal the piece:
After the paint is completely dry, apply a coat of gloss or satin varnish to protect the dish and give it a finished, ceramic-like sheen.
Place this lovely dish on your bedside table to hold your favorite rings or earrings safely
Easy Geometric Clay Earrings
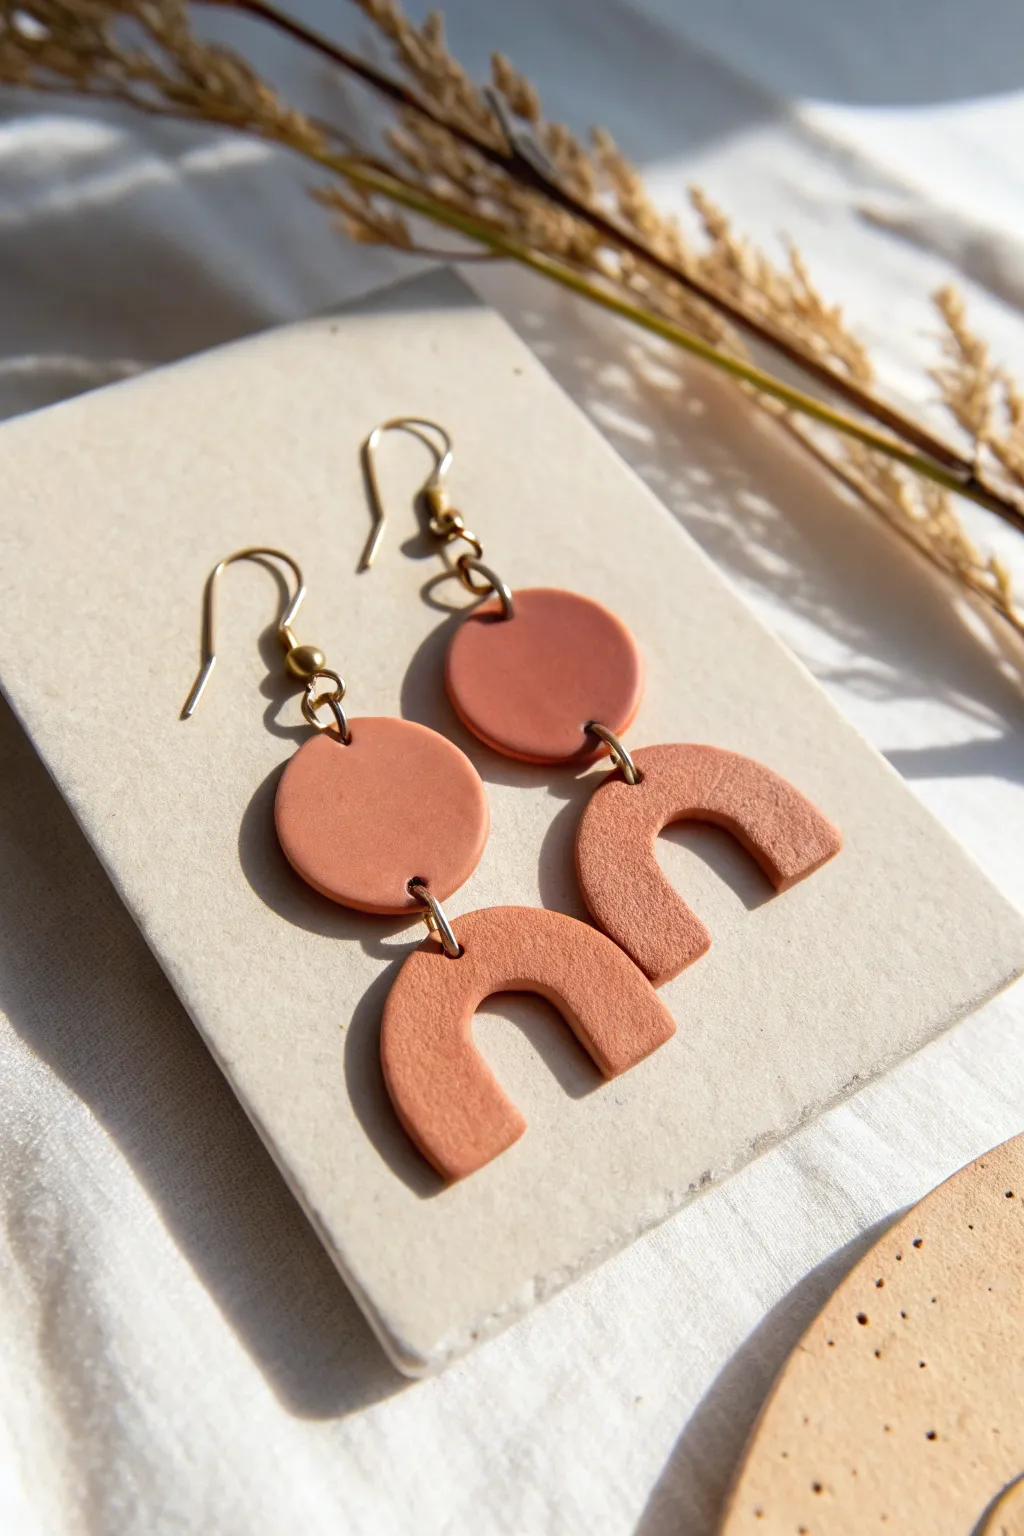
These minimalist geometric earrings combine a warm, earthy terracotta tone with a classic arch shape for a modern bohemian look. The matte finish and simple silhouette make them a versatile accessory that looks effortlessly chic.
Detailed Instructions
Materials
- Terracotta-colored air-dry clay or polymer clay
- Rolling pin or acrylic roller
- Circle clay cutter (approx. 15mm)
- Arch or U-shape clay cutter (approx. 25mm wide)
- Parchment paper or ceramic tile
- Needle tool or toothpick
- Fine-grit sandpaper (400-600 grit)
- 4 Gold jump rings (6mm or 7mm)
- 2 Gold kidney ear wires
- 2 pairs of flat-nose jewelry pliers
Step 1: Shaping the Clay Components
-
Condition the clay:
Begin by warming a small amount of terracotta clay in your hands. Knead it thoroughly until it is soft, pliable, and free of any air bubbles. -
Prepare your surface:
Lay down a sheet of parchment paper or work directly on a smooth ceramic tile. This prevents the clay from sticking and picking up dust. -
Roll out the slab:
Using your rolling pin, roll the clay out into an even slab. Aim for a consistent thickness of about 3mm—thick enough to be sturdy but light enough for comfortable wear. -
Cut the top circles:
Press your circle cutter firmly into the clay slab to create two identical circles. Lift the cutter straight up to ensure clean edges. -
Cut the arches:
Use your arch-shaped cutter to punch out two U-shapes adjacent to your circles. Creating them from the same slab ensures they are perfectly uniform in thickness. -
Smooth the edges:
Dip your finger in a tiny bit of water (for air-dry clay) or baby oil (for polymer clay) and gently run it along the cut edges to smooth out any roughness before drying. -
Pierce the holes:
Carefully poke a hole near the bottom edge of each circle and the top center of each arch using a needle tool. Ensure the hole is large enough for your jump rings to move freely. -
Add top holes:
Add a second hole at the very top of each circle component. This is where the ear wire will eventually attach.
Clay sticking to cutters?
If your clay won’t release from the metal cutters, dip the cutter into cornstarch or water before pressing it into the slab. This acts as a release agent for clean cuts.
Step 2: Finishing and Assembly
-
Dry or bake:
If using air-dry clay, let the pieces sit undisturbed for 24-48 hours. If using polymer clay, bake according to the manufacturer’s instructions on the package. -
Sand for perfection:
Once fully cured and cooled, take your fine-grit sandpaper and gently buff the edges and flat surfaces. This creates that professional, ultra-smooth matte finish seen in the photo. -
Clean off dust:
Wipe the pieces down with a slightly damp cloth or a baby wipe to remove any sanding dust residue. -
Open the jump rings:
Using two pairs of pliers, twist a jump ring open sideways (never pull it apart outwards) to preserve its circular shape. -
Connect the shapes:
Slide the jump ring through the bottom hole of a circle and the top hole of an arch, then twist the ring closed securely. -
Repeat connection:
Repeat the previous step for the second earring so you have two assembled clay dangles. -
Attach ear wires:
Open the loop on your kidney ear wire slightly if needed, or use a second small jump ring to connect the top hole of the circle to the ear hook. -
Final check:
Ensure all jump rings are tightly closed so your pieces don’t slip out, and give the earrings a final wipe to ensure they are ready to wear.
Pro Tip: Achieve uniform thickness
Place two stacks of playing cards or craft sticks on either side of your clay while rolling. The rolling pin will rest on them, ensuring your slab is perfectly level.
Enjoy styling these warm, geometric beauties with your favorite casual outfits
Tiny Charm Keychains
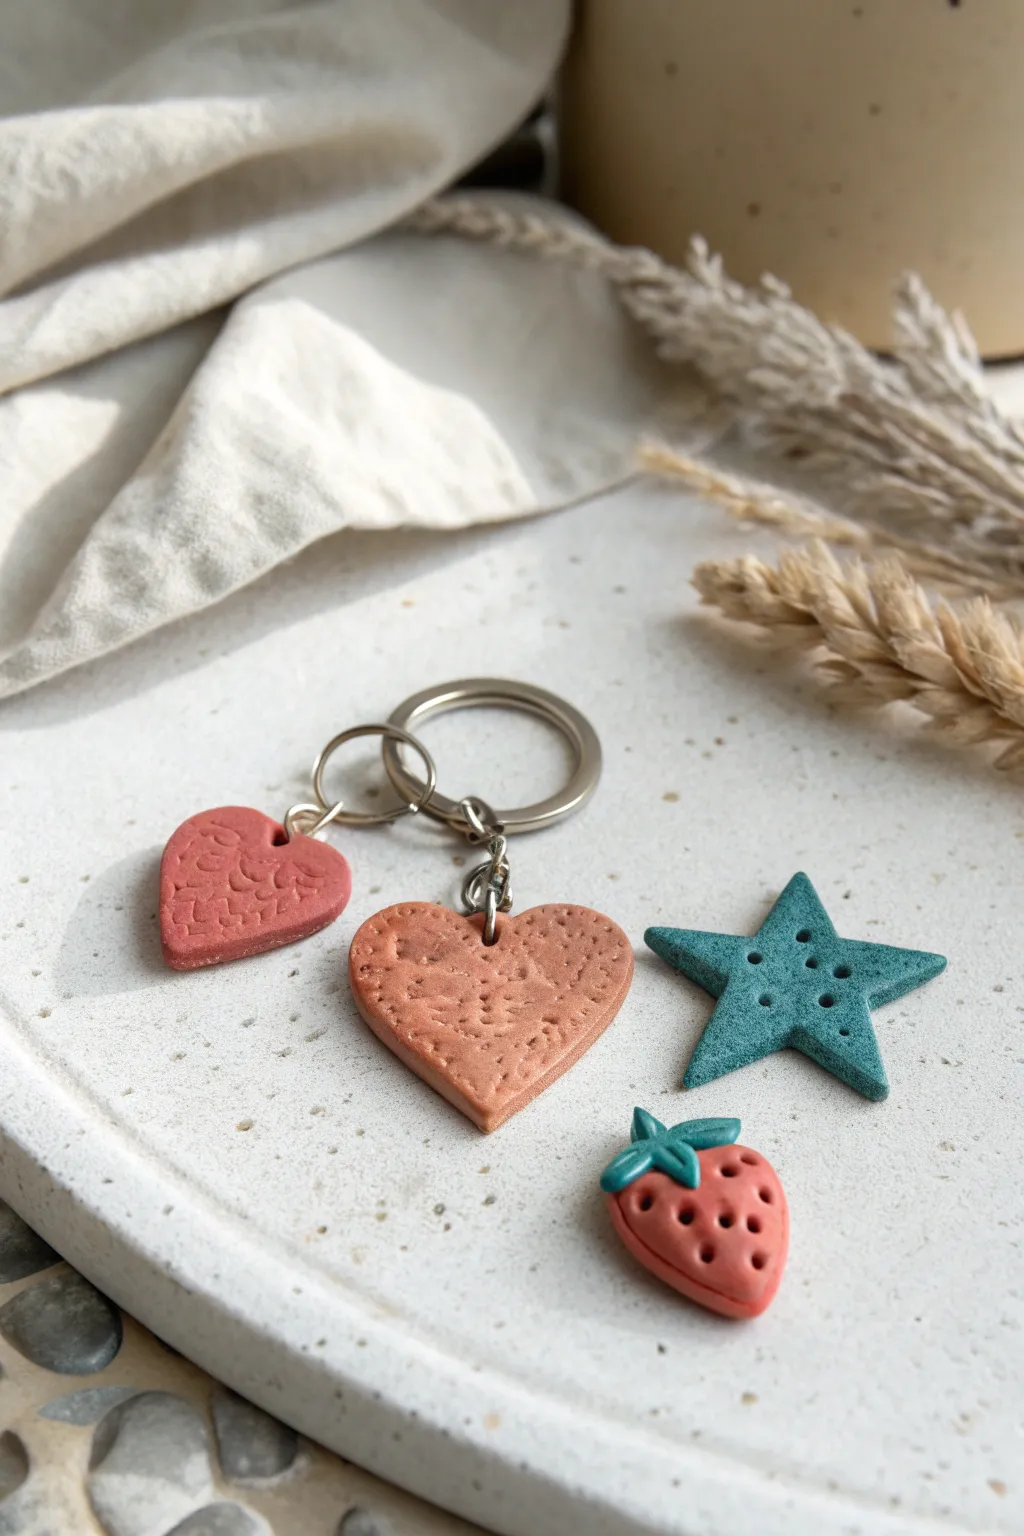
These delightful mini charms are the perfect beginner project to turn into personalized keychains. With their matte finish and simple indented textures, they offer a modern, handcrafted look that transforms easily from clay slab to wearable art.
Step-by-Step Guide
Materials
- Air-dry clay (terracotta, white, red, teal)
- Small rolling pin
- Wax paper or craft mat
- Small cookie cutters (heart, star, teardrop)
- Needle tool or toothpick
- Metal jump rings (approx 6-8mm)
- Split ring keychain bases
- Rough sandpaper or a textured sponge (optional)
- Jewelry pliers
- Green acrylic paint (if making the strawberry)
Step 1: Prepping and Rolling the Clay
-
Condition the clay:
Start by taking a small chunk of your chosen clay color. Knead it in your hands for a minute until it feels pliable and warm, which helps prevent cracking later on. -
Roll out a slab:
Place the ball of clay onto your wax paper or mat. Using a small rolling pin, roll it out until it is approximately 1/4 inch (about 5-6mm) thick. You want it substantial enough to hold the jump ring but not too bulky. -
Add surface texture:
Before cutting your shapes, you can create the subtle surface texture seen in the photo. Gently press a piece of rough sandpaper or a textured sponge onto the clay surface, or lightly tap it with your fingertips to remove that perfectly smooth, manufactured look.
Step 2: Shaping the Charms
-
Cut the heart shapes:
For the keychain shown, use a small heart cutter to punch out two shapes from the terracotta or brownish-pink clay. -
Add heart details:
Take your needle tool or a toothpick. Gently scratch tiny, random squiggles or dotted lines across the surface of the hearts to mimic the rustic pattern shown in the image. -
Cut the star shape:
Roll out a piece of teal or blue clay and cut a five-point star. Use the end of a small paintbrush or a knitting needle to press five distinct holes into the center of the star as a decorative element. -
Shape the strawberry body:
Roll a small ball of red or pink clay into a teardrop shape for the strawberry. Flatten it slightly so it isn’t round like a marble, but rather a thick, flat charm. -
Texture the strawberry:
Use your needle tool to poke small, scattered indentations all over the strawberry body to represent seeds. -
Create the leaves:
Fashion tiny teardrop shapes from a small bit of clay for the leaves. Press them onto the top of the strawberry. If using air-dry clay, a dab of water helps them stick; for polymer, just press firm. -
Pierce the attachment holes:
This is crucial: while the clay is still wet, use a toothpick or needle tool to poke a hole near the top of every charm. Make sure the hole is big enough for your jump rings to wiggle through freely.
Clean Cuts Every Time
If your clay sticks to the cutter, dip the cutter in a bit of cornstarch or flour before pressing it into the clay slab.
Step 3: Finishing and Assembly
-
Drying process:
Let your charms dry completely. I prefer to let them sit for at least 24 hours on a wire rack to ensure air circulation hits both sides. If using polymer clay, bake according to package instructions. -
Light sanding:
Once fully cured, check the edges. If there are any sharp or rough spots from the cutting process, gently sand them down with fine-grit sandpaper. -
Painting the details:
If you made the strawberry leaves from neutral clay, carefully paint them green now. You can also do a light wash of brown paint over the textured hearts and wipe it off quickly to highlight the grooves. -
Open the jump rings:
Using two pairs of jewelry pliers, twist a jump ring open. Never pull them apart horizontally; instead, twist the ends front-to-back to maintain the circle shape. -
Attach to keychain:
Thread the open jump ring through the hole in your charm, and loop it onto the split ring or keychain chain. Close the jump ring securely by twisting it back into place. -
Double up:
For the look in the photo, attach two heart charms to a single keychain ring. The clinking sound they make is quite satisfying. -
Final check:
Give the charms a gentle tug to ensure the jump rings are closed tight and won’t slip off during daily use.
Hole Too Small?
If the clay shrunk while drying and the hole closed up, use a small hand drill or a very sharp crafting awl to carefully widen it.
Clip your new handmade charms onto your keys or backpack and enjoy your custom accessory
Cute Fridge Magnets
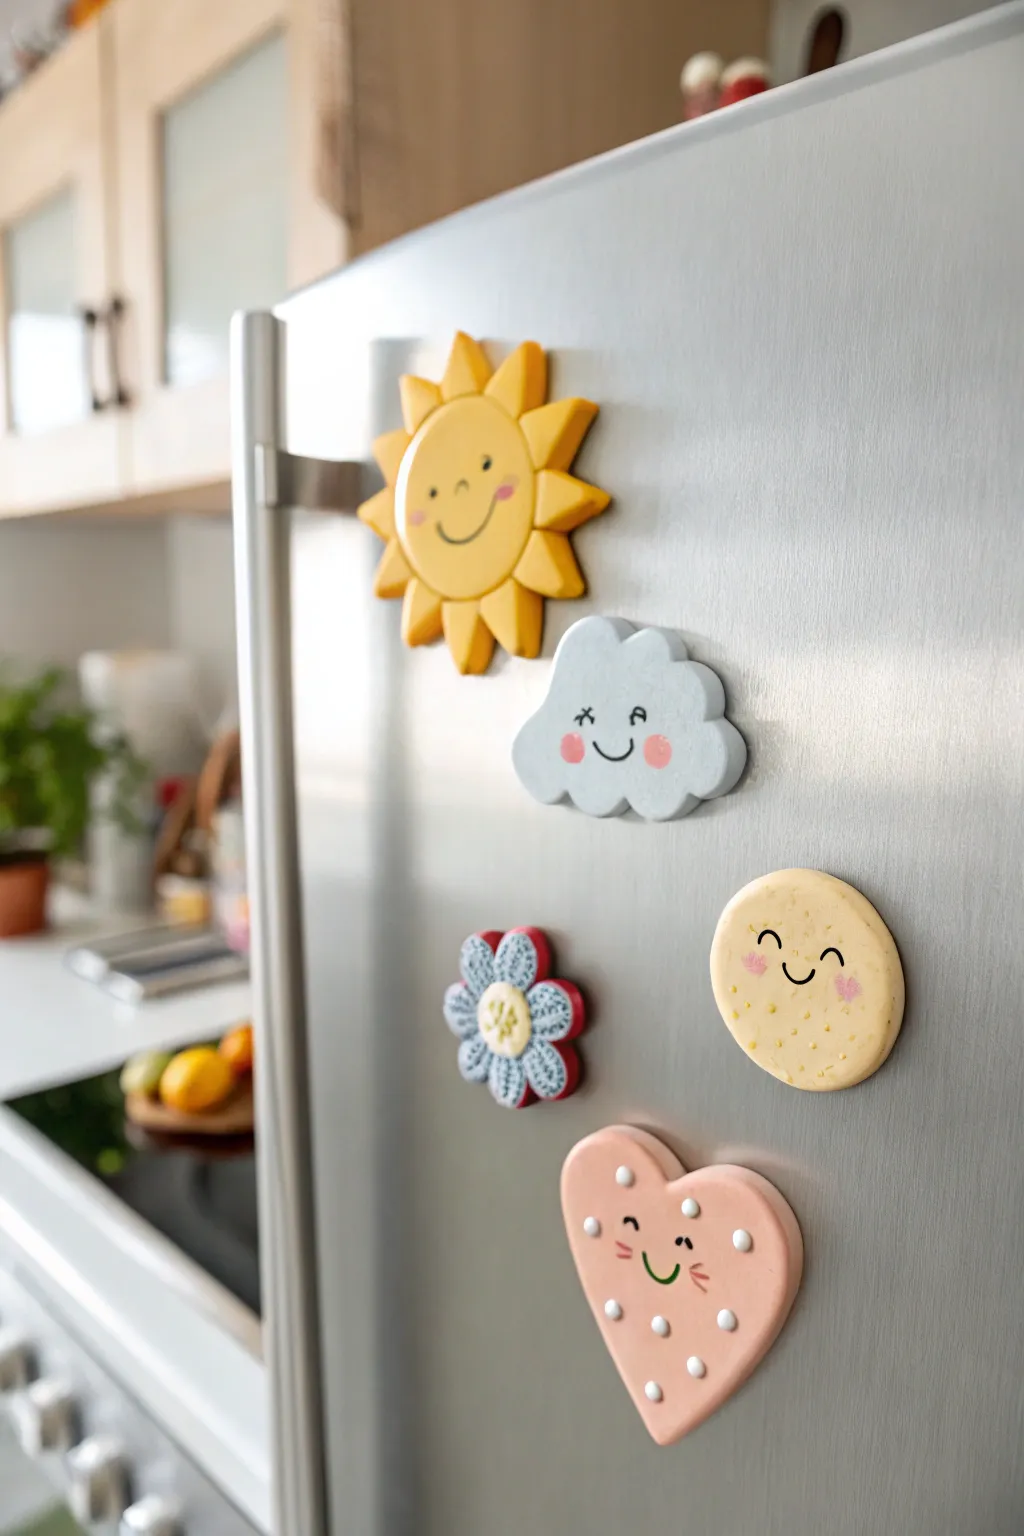
Brighten up your kitchen with these impossibly cute, clay-sculpted magnets featuring a cheerful sun, a happy cloud, a sweet biscuit, a floral bloom, and a loving heart. This project uses air-dry clay to create thick, rounded shapes with charmingly simple painted expressions.
Step-by-Step
Materials
- White air-dry clay (or polymer clay)
- Acrylic paints (yellow, light blue, pink, white, soft red, dark grey/black)
- Fine detail paintbrushes
- Rolling pin
- X-acto knife or clay cutting tool
- Cookie cutters (circle, heart, flower, cloud) or cardboard templates
- Strong round magnets
- Strong craft glue (E6000 or similar)
- Gloss or matte varnish (optional)
- Dotting tool or toothpick
Step 1: Sculpting the Base Shapes
-
Prepare the clay:
Begin by kneading your air-dry clay until it is smooth and pliable. This prevents cracks later on. -
Roll it out:
Roll the clay onto a smooth surface to a thickness of about 1/4 inch (6-7mm). You want these magnets to have a nice, chunky feel. -
Cut the sun:
If you don’t have a sun-shaped cutter, cut a simple circle first. Then, hand-cut small triangles for the rays and attach them around the circumference, blending the seams on the back. -
Create the cloud and flower:
Use a cloud-shaped cutter for the cloud magnet. For the flower, either use a cutter or form five small balls of clay, flattening them slightly and pressing them together in a ring. -
Form the heart and biscuit:
Cut out a classic heart shape. For the biscuit magnet (the round yellow one), cut a simple circle and gently pat the edges to round them off so it looks like a soft cookie. -
Smooth the edges:
Dip your finger in a tiny bit of water and run it along all the cut edges of your shapes to smooth out any roughness or sharp debris.
Smooth Operator
To get that ultra-smooth, plastic-like finish on air-dry clay, sand your dried pieces with fine-grit sandpaper (400 grit) before you start painting.
Step 2: Adding texture and details
-
Detail the sun:
Before the clay dries, use a modeling tool to deepen the crevices between the sun’s rays, giving it more dimension. -
Texture the flower:
For the flower magnet, take a toothpick or a texture tool and press small indentations or patterns into the petals to mimic the fabric-like look. -
Add biscuit crumbs:
Gently press a piece of rough sandpaper or a stiff brush against the round biscuit shape to give it a convincing baked texture. -
Let it dry:
Place all your shapes on a drying rack or parchment paper. Allow them to dry completely for 24-48 hours, flipping them occasionally for even drying.
Warping Woes?
If your clay shapes curl up while drying, it’s usually uneven moisture loss. Flip your pieces over every few hours during the drying process to keep them flat.
Step 3: Painting and Finishing
-
Base coat – Sun & Biscuit:
Once dry, paint the sun with a bright, sunny yellow. For the round biscuit, mix a pale cream-yellow color and apply an even coat. -
Base coat – Cloud & Heart:
Paint the cloud shape a soft, sky blue. Paint the heart a gentle pastel peach-pink. -
Base coat – Flower:
Paint the flower petals a medium blue and the center a contrasting yellow or white. -
Paint the faces:
Using your finest detail brush and black paint, carefully add the facial features. Give the sun, cloud, and biscuit simple arched eyes and U-shaped smiles. The cloud gets a fun winking expression. -
Add rosy cheeks:
With pink paint, add small oval blushes to the cheeks of every character. I find this step instantly brings them to life. -
Detailing the heart:
Use a dotting tool or the back of a brush to add small white polka dots all over the heart magnet. Add the face in between the dots. -
Attach magnets:
Once the paint is fully dry, flip the pieces over. Apply a dab of strong craft glue to the back of each shape and press a round magnet firmly into place. -
Seal (Optional):
To protect your paint job, finish with a coat of matte or satin varnish.
Pop these adorable characters onto your fridge and enjoy their cheery greetings every time you grab a snack
Plant Markers for Herbs
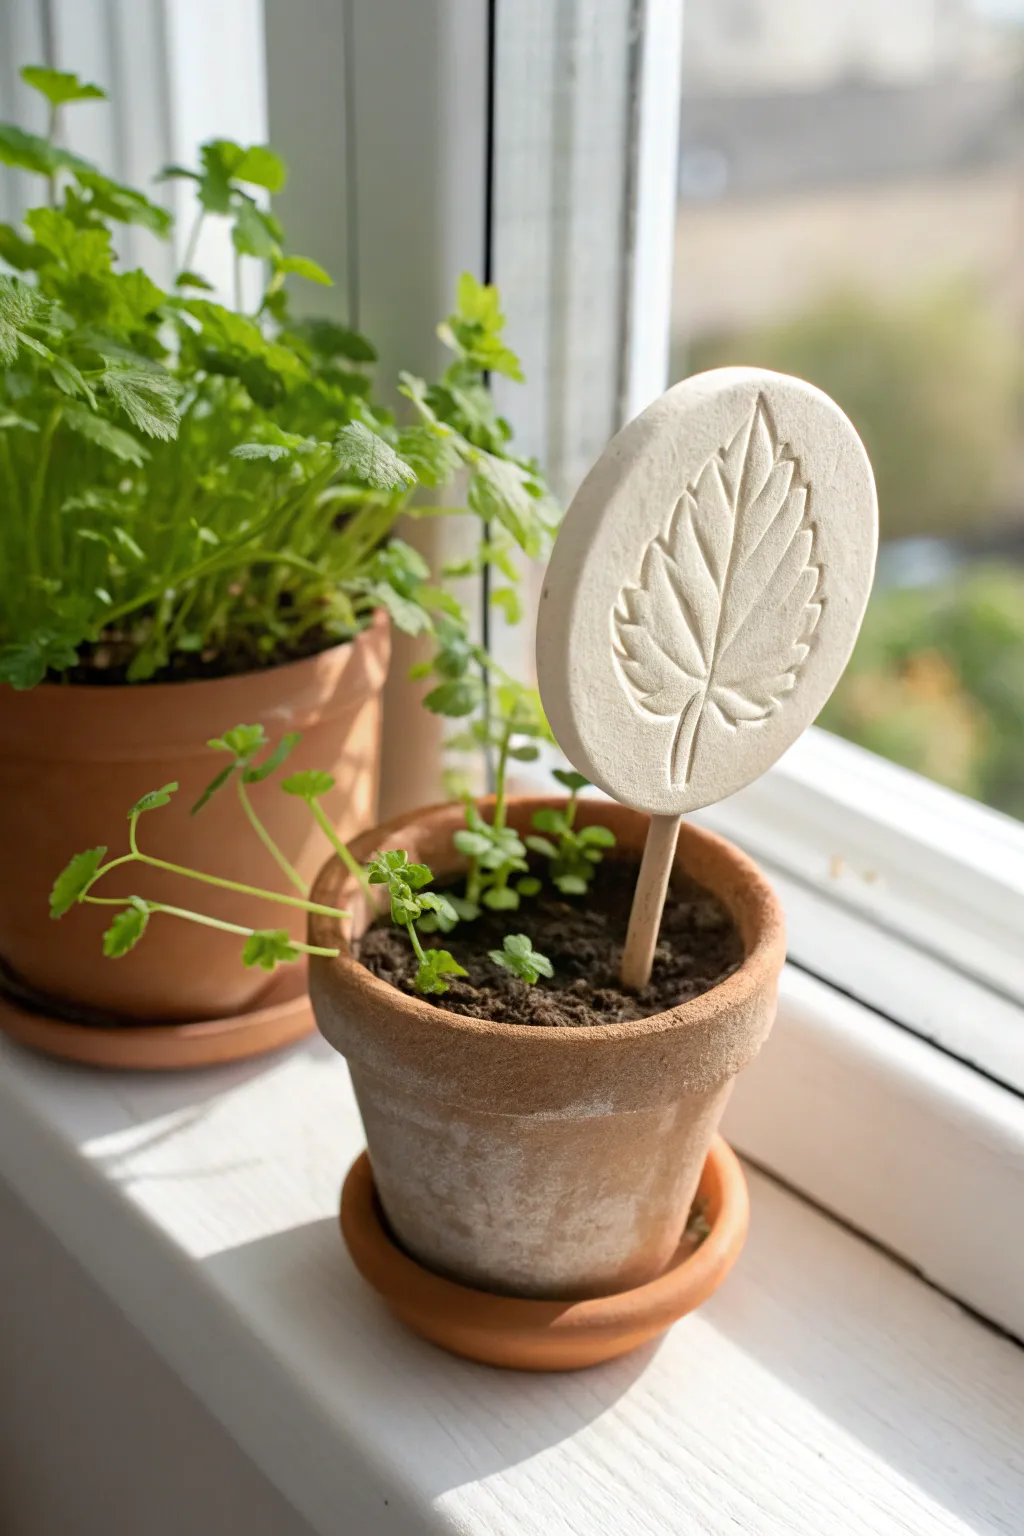
Bring a touch of minimalist charm to your windowsill garden with these easy-to-make clay plant markers. By pressing real leaves into air-dry clay, you capture organic details in a durable, decorative disc that clearly identifies your seedlings.
Step-by-Step Guide
Materials
- White polymer clay or air-dry clay
- Rolling pin or smooth glass jar
- Circle cookie cutter (approx. 2-3 inches)
- Fresh herb leaves (mint, parsley, or basil work well)
- Wooden dowels, skewers, or popsicle sticks
- Sandpaper (fine grit)
- Parchment paper or craft mat
- Clear acrylic sealant (matte or satin finish)
- Strong craft glue (optional)
Step 1: Preparation & Shaping
-
Prepare your workspace:
Lay down a sheet of parchment paper or use a dedicated silicone craft mat to prevent the clay from sticking to your table. -
Condition the clay:
Take a handful of white clay and knead it thoroughly in your hands until it becomes soft, pliable, and free of cracks. -
Roll it out:
Flatten the clay ball onto your work surface. Use a rolling pin to roll it into an even slab, aiming for a thickness of about 1/4 inch (6mm) to ensure sturdiness. -
Cut the shape:
Press your circle cookie cutter firmly into the clay slab. Wiggle it slightly to ensure a clean cut, then lift the cutter and remove the excess clay around the circle. -
Smooth the edges:
Dip your finger in a little water (for air-dry clay) or baby oil (for polymer clay) and gently run it along the cut edge of the circle to smooth out any roughness.
Sticky Leaf Syndrome
If the leaf sticks to the clay and won’t peel off cleanly, let the clay dry for about 10-15 minutes with the leaf on it, then try peeling again.
Step 2: Creating the Impression
-
Select your leaf:
Choose a fresh, sturdy leaf with prominent veins. The back side of the leaf usually has more texture, which creates a better impression. -
Position the leaf:
Place the leaf face-down (vein side down/stem side up) onto the center of your clay circle. -
Roll the impression:
Take your rolling pin and gently roll over the leaf *once* with firm, even pressure. Do not roll back and forth, as this can shift the leaf and blur the image. -
Remove the leaf:
Carefully find the stem end of the leaf and slowly peel it away from the clay to reveal the embossed design. -
Insert the stem hole:
While the clay is still soft, carefully insert the end of your wooden dowel or stick into the bottom edge of the circle. Push it in about 1/2 inch to create a socket.
Make the Veins Pop
After baking or drying, lightly brush a diluted specifically brown or green acrylic paint wash over the impression, then wipe the surface clean to darken just the veins.
Step 3: Drying & Assembly
-
Remove the stick for drying:
Gently pull the stick back out. Drying the clay with the stick inside can sometimes cause cracking as the clay shrinks. -
Let it cure:
Set the clay disc aside on a flat surface to dry completely. If using air-dry clay, this takes 24-48 hours; for polymer clay, bake according to package instructions. -
Flip occasionally:
If I’m using air-dry clay, I like to flip the disc over halfway through the drying process to prevent the edges from curling upward. -
Sand the finish:
Once fully cured and hard, check the edges for any sharp spots. Use fine-grit sandpaper to lightly buff the rim for a professional look. -
Attach the stick:
Apply a drop of strong craft glue into the hole you created earlier and re-insert the wooden stick. hold it straight for a moment while the glue tacks up. -
Seal the surface:
Brush a coat of clear acrylic sealant over the entire clay piece. This protects it from moisture when you water your plants. -
Final dry:
Allow the glue and sealant to dry completely before placing the marker into your herb pot.
Now your herb garden will look organized and stylish with these custom natural markers
Moon Phase Wall Hanging
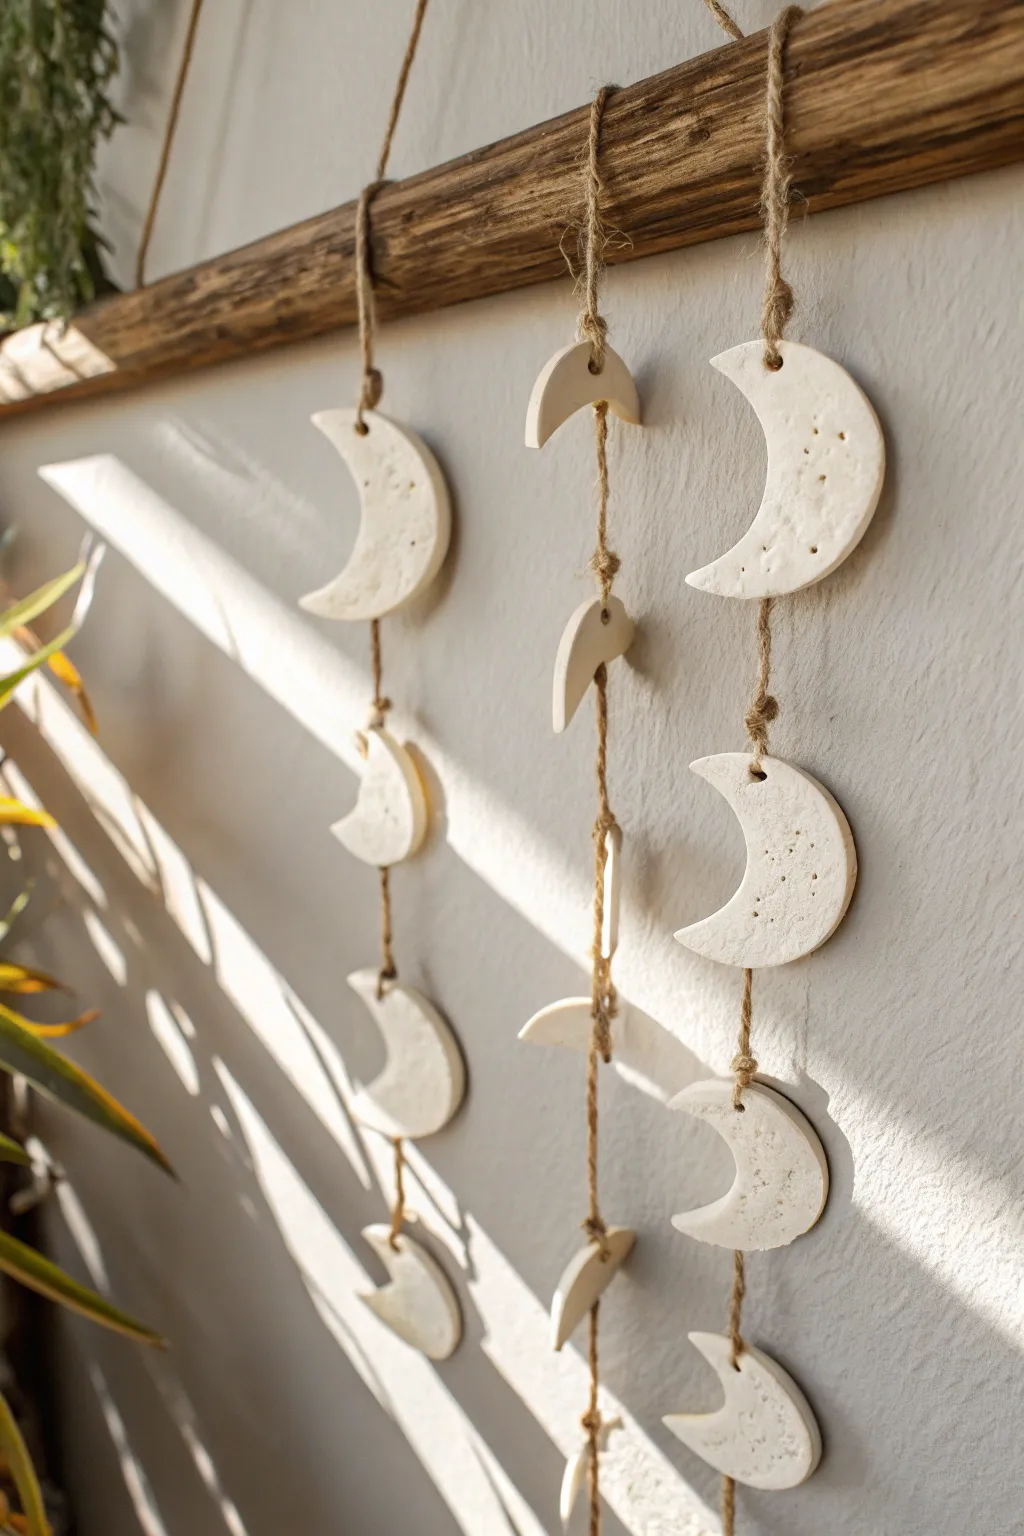
Bring a touch of celestial magic into your home with this textured, nature-inspired wall hanging. The raw look of air-dry clay combined with rustic jute twine creates a calming, bohemian piece that captures the mystery of the lunar cycle.
Detailed Instructions
Materials
- White stone-effect air-dry clay (or standard white clay)
- Rolling pin
- Circle cookie cutters (approx. 2-3 inch diameter)
- Knife or clay cutting tool
- Jute twine or hemp cord
- Rustic wooden branch or dowel (approx. 12-15 inches)
- Straw or skewer (for making holes)
- Sandpaper (fine grit)
- Parchment paper or craft mat
- Small bowl of water
- Texture tool (optional: toothbrush or stiff brush)
Step 1: Shaping the Moons
-
Prepare your workspace:
Lay down parchment paper on a flat surface to prevent sticking. Take a large handful of air-dry clay and knead it briefly until it is soft and pliable. -
Roll out the slab:
Using your rolling pin, flatten the clay to an even thickness of about 1/4 inch. Try to keep it consistent so all your moons dry at the same rate. -
Cut basic circles:
Use your circle cookie cutter to punch out several circles from the clay slab. These will serve as the base for your crescent shapes. -
Create crescent shapes:
To make a crescent, position the same circle cutter slightly off-center over one of your clay circles and press down again. This will cut away a portion, leaving you with a perfect moon crescent shape. -
Cut variation shapes:
Create a variety of phases. You can cut some circles directly in half for quarter moons, or leave a few whole for full moons. Aim for about 9-12 shapes total depending on how long you want your strands. -
Add texture:
For that stony, cratered look seen in the photo, gently tap the surface of your wet clay shapes with a toothbrush or stiff brush. You can also poke tiny, shallow indentations with a needle tool to mimic craters. -
Smooth the edges:
Dip your finger in a little water and gently run it along the cut edges of each moon to soften any sharp ridges or loose clay crumbs.
Crater Texture Tip
Sprinkle coarse salt or sand onto the wet clay and roll it lightly before cutting. It creates natural pits and texture once dry.
Step 2: Prep and Assembly
-
Punch hanging holes:
While the clay is still wet, use a straw or skewer to poke a hole near the top center and bottom center of each moon. Important: The bottom-most moon on each strand only needs one hole at the top. -
Check hole size:
Wiggle the straw slightly to ensure the hole is wide enough for your jute twine to pass through easily once the clay shrinks slightly during drying. -
Let them dry:
Place all your moon shapes on a flat surface to dry. I prefer to flip them over gently halfway through the drying process to keep them flat. Allow full drying time according to your package instructions (usually 24-48 hours). -
Sand for finish:
Once bone dry, take fine-grit sandpaper and lightly sand any rough edges or uneven spots to give them a polished, professional look. -
Cut the twine:
Cut three lengths of jute twine. Make them longer than your final desired length—about 30 inches each is a safe bet to allow for knots. -
Attach the first moon:
Start at the bottom of a strand. Tie a knot at the end of your twine, thread on your bottom moon (the one with only a top hole), and tie a knot directly above it to secure it in place. -
String the rest:
Move up the twine about 3-4 inches. Tie a knot, thread the next moon through its bottom hole and out its top hole. The knot supports the weight of the moon. Tie another knot right above the top hole to keep it from sliding up. -
Repeat for all strands:
Continue adding moons until you have three completed strands. You can vary the spacing or number of moons per strand for visual interest. -
Prepare the branch:
Tie a long piece of twine to both ends of your wooden branch to create the main hanger. -
Attach strands to branch:
Tie each of your three moon-filled strands onto the wooden branch. Space them evenly apart and adjust the lengths so they hang nicely together. -
Secure and trim:
Double knot the twine at the branch for security. Trim any excess tail ends of the twine for a neat finish.
Gilded Edges
Paint the edges of your dried moons with liquid gold leaf or metallic paint for a luxurious, shimmering contrast.
Hang your new mobile near a window to catch the shifting light throughout the day