There’s something ridiculously satisfying about making mini pottery—all the charm of classic pots, but in a sweet, tiny scale that feels like a little treasure. If you love tiny ceramics with big personality, these ideas will keep your studio time playful and totally addictive.
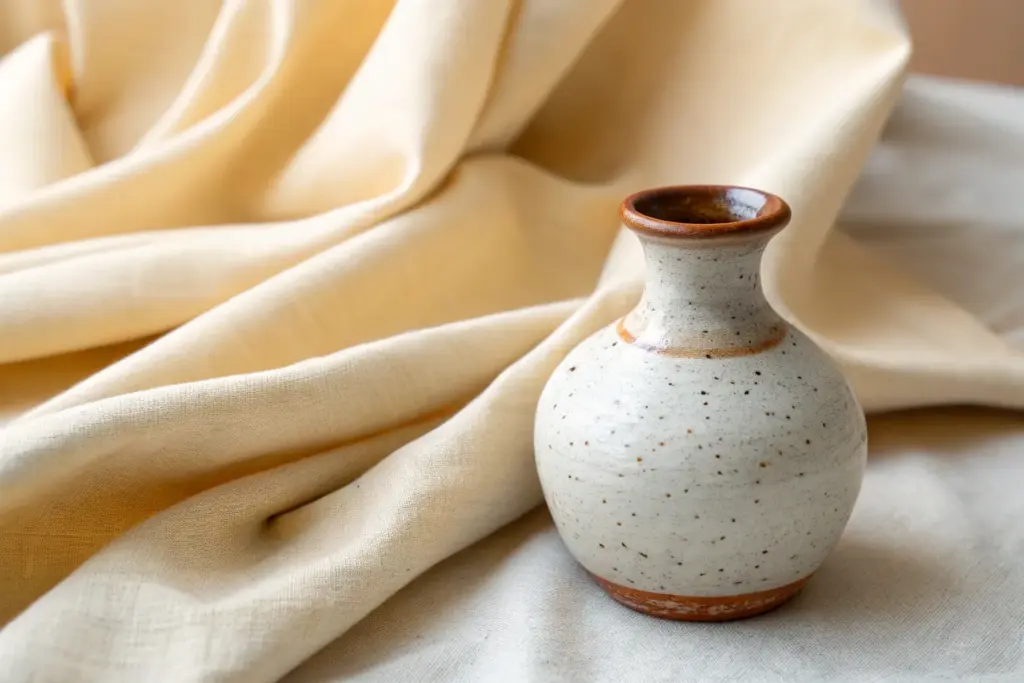
Mini Bud Vases With Tight Necks
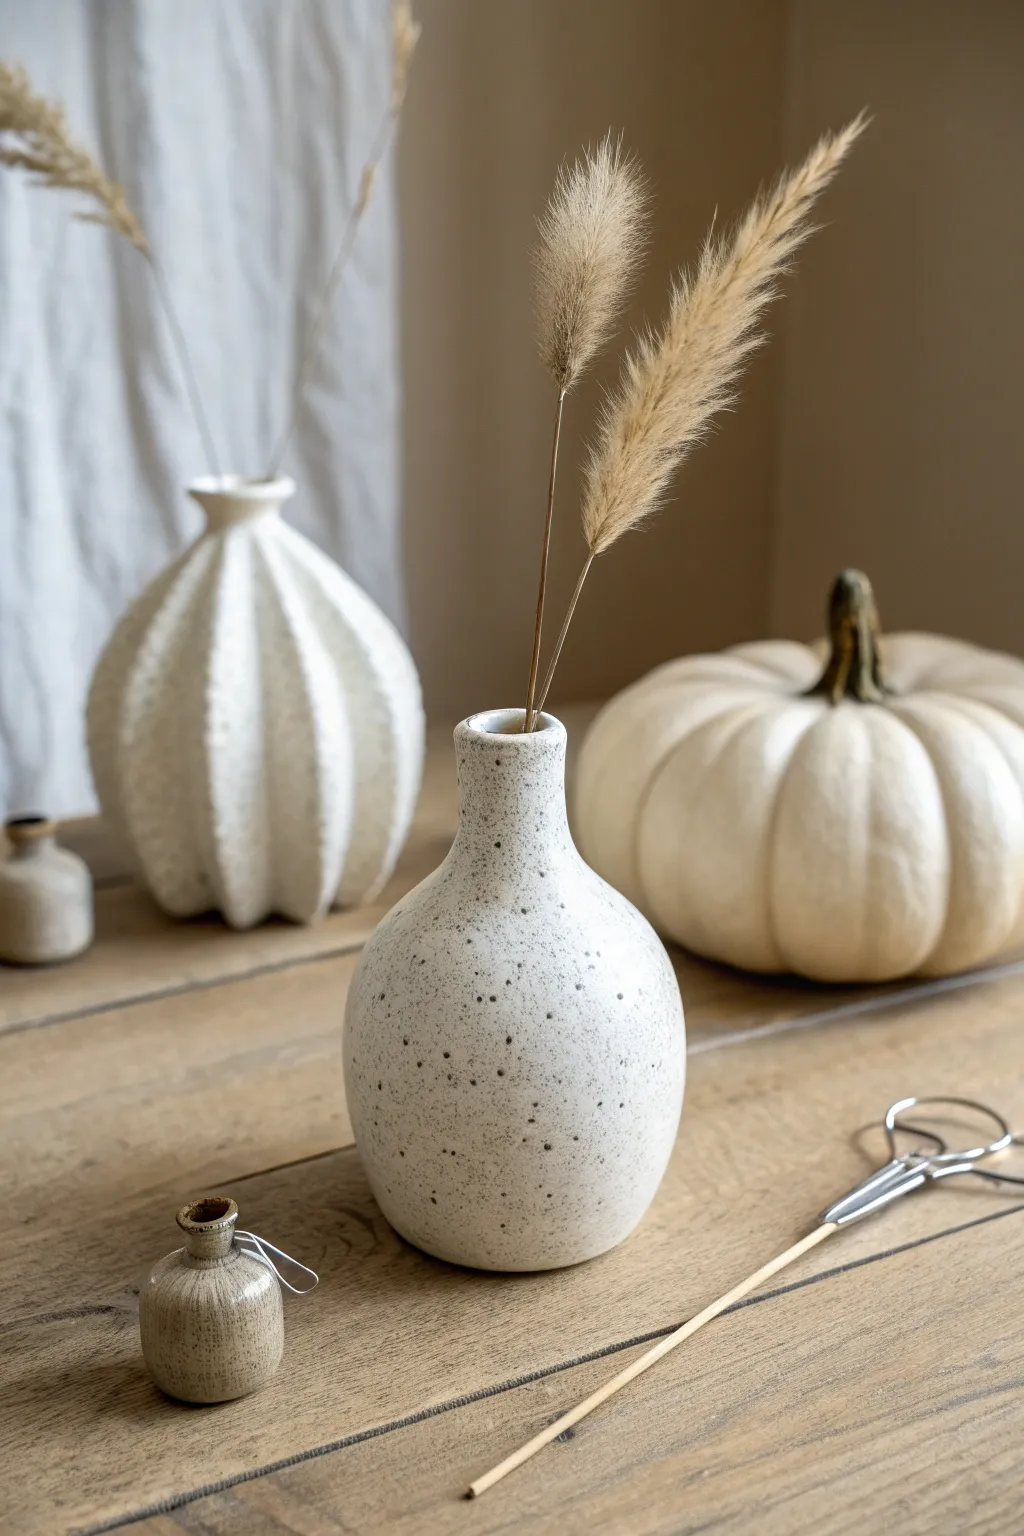
These charming mini bud vases feature a distinctively narrow neck and a beautiful speckled glaze that adds an organic, modern touch to any shelf. Their small scale makes them perfect for single stems of dried grass or delicate wildflowers, creating a minimalist yet impactful statement.
How-To Guide
Materials
- White stoneware or porcelain clay body
- Pottery wheel (or can be hand-built)
- Throwing tools: sponge, rib, wire cutter
- Needle tool
- Trimming tools
- Speckled white glaze (or white glaze with added manganese specs)
- Small kiln
- Fine sandpaper (optional, for post-firing)
Step 1: Throwing the Form
-
Prepare the Clay:
Start with a small ball of clay, roughly the size of a tangerine (about 0.5 to 0.75 lbs). Because the neck is tight, you won’t need much material. -
Center on the Wheel:
Throw the clay onto the wheel head and center it perfectly. Centering is crucial for these narrow forms; if it’s wobbly now, the neck will twist later. -
Open the Clay:
Drill down into the center with your thumbs, leaving about a quarter-inch for the base. Pull the floor out slightly, but keep the base relatively narrow to support the bulbous shape. -
Pull the Cylinder:
Cone the clay up and begin to pull a small cylinder. Focus on keeping the walls even from bottom to top. -
Shape the Belly:
Using a rib tool on the outside and your fingers inside, gently push the belly of the pot outward to create a rounded, bulbous bottom. I like to leave the clay slightly thicker near the top to provide material for the neck. -
Collar the Neck:
This is the critical step. With wet hands, gently encircle the top rim and apply inward pressure to ‘collar’ or choke the clay inward. Do this gradually. -
Refine the Neck:
After collaring, pull the clay upward again to thin out the gathered clay. Repeat collaring and pulling until you have a tight, narrow chimney. -
Finish the Rim:
Use a chamois or a small strip of plastic to compress and smooth the very top rim, ensuring it is rounded and pleasant to the touch. -
Cut Off:
Wire the pot off the wheel head and set it aside to dry to a leather-hard state.
Step 2: Trimming and Firing
-
Secure for Trimming:
Once leather hard, center the pot upside down on the wheel. You might need a chuck or a jar to support the neck if it’s too tall to sit flat on the wheel head. -
Trim the Foot:
Trim away excess weight from the bottom, creating a neat foot ring. The curve should flow uninterrupted from the foot up to the belly. -
Smooth the Surface:
Before firing, run a damp sponge over the surface to remove any harsh tool marks and bring out the grog if you are using a textured clay. -
Bisque Fire:
Load the kiln and fire to cone 04 (or your clay’s bisque temperature) to prepare the pottery for glazing.
Collaring Tip
When narrowing the neck, increase your wheel speed slightly. Centrifugal force fights against you, so faster spinning helps keep the clay centered as you squeeze it in.
Step 3: Glazing
-
Prepare the Glaze:
Mix your speckled white glaze thoroughly. If you are making your own, add granular manganese or ilmenite to a satin white base to get those lovely dark spots. -
Wax the Foot:
Apply wax resist to the bottom foot ring to prevent the pot from sticking to the kiln shelf. -
Pour the Interior:
Pour a small amount of glaze into the narrow neck, swirl it around to coat the inside, and pour the excess out quickly. -
Dip the Exterior:
Holding the pot by the foot (or using dipping tongs), dip the pot into the glaze bucket. A quick 3-second dip is usually sufficient for an even coat. -
Check the Rim:
Inspect the tight neck opening. If a bubble of glaze has formed across the hole, pop it gently with a pin. -
Glaze Fire:
Fire the piece to maturity (usually cone 6 or 10, depending on your clay). Let the kiln cool completely before unloading. -
Final Polish:
Sand the bottom foot with fine-grit sandpaper to ensure it won’t scratch your furniture.
Texture Play
Before the clay dries, gently tap the body with a wooden paddle or stick. This creates subtle, organic facets that break up the glaze and add visual interest.
Once cooled, fill your new fleet of mini vases with dried botanicals for a serene display.


Micro Pinch Bowls for Salt and Spices
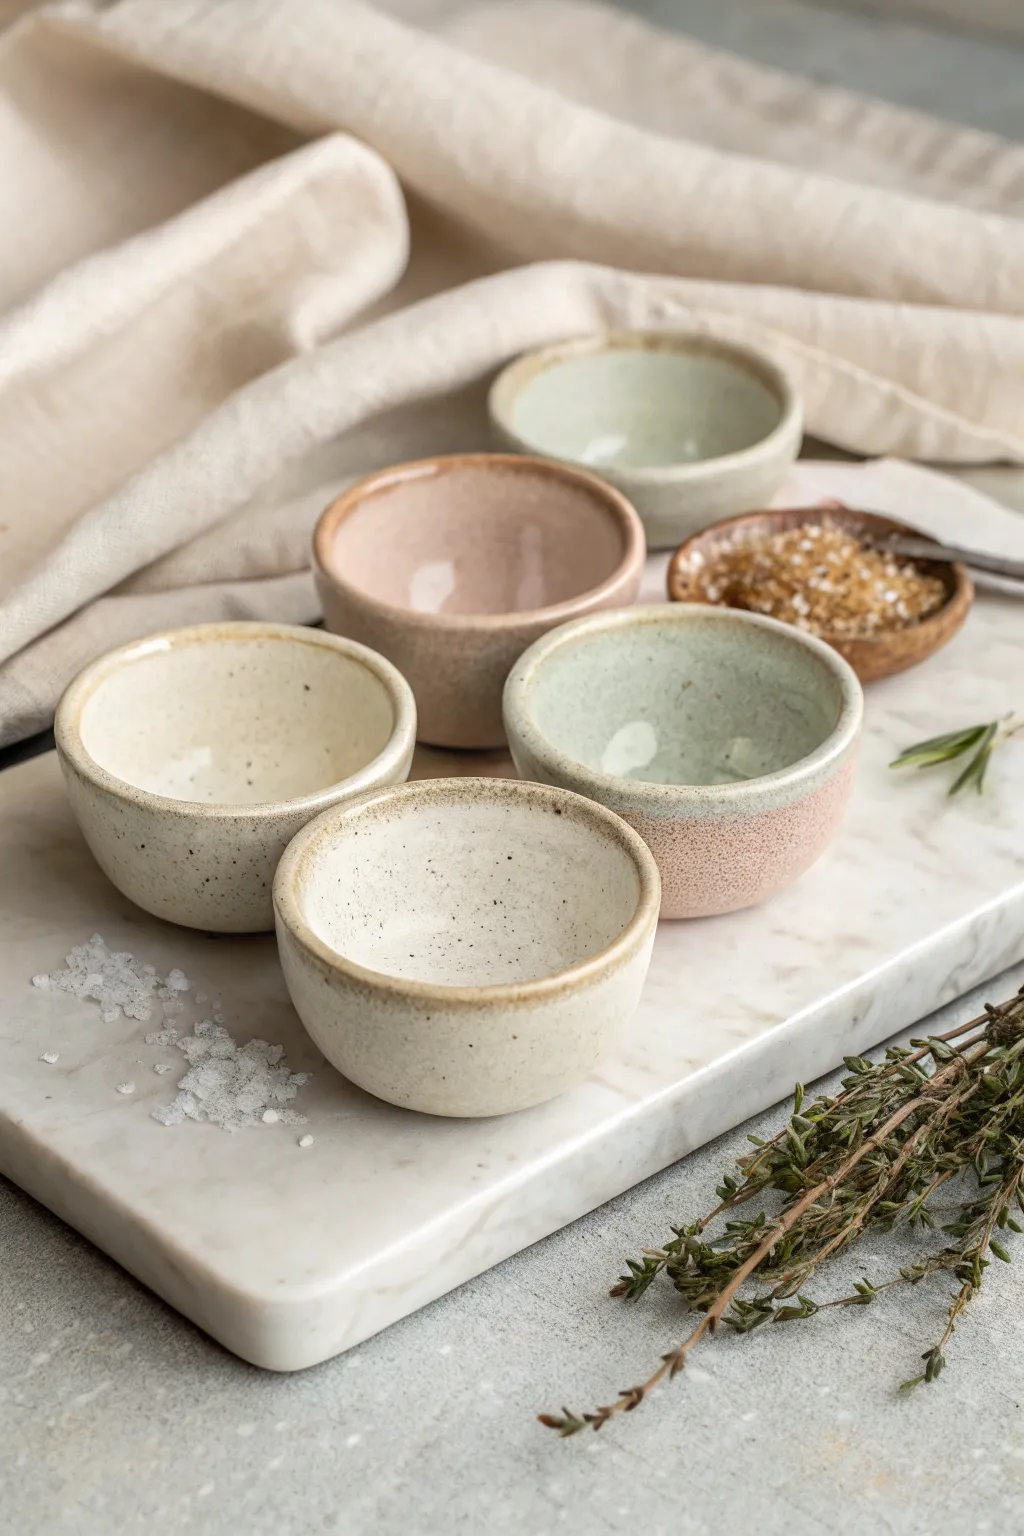
These charming, palm-sized pinch bowls are perfect for serving gourmet salts or spices. Their organic, slightly irregular shapes and speckled stoneware finish capture the essence of handmade pottery while providing an elegant addition to any table setting.
Step-by-Step Tutorial
Materials
- Speckled stoneware clay (approx. 1 lb)
- Pottery sponge
- Pin tool or needle tool
- Rib tool (smooth wood or silicone)
- Loop tool (for trimming)
- Water bowl
- Scoring tool (or fork)
- Canvas mat or work board
- Kiln (required for firing)
- Food-safe ceramic glazes (Cream, Pale Pink, Celadon Green)
Step 1: Shaping the Clay
-
Portion the clay:
Begin by separating your clay into small balls, roughly the size of a golf ball or slightly smaller. Each ball will become one micro bowl, so aim for consistency if you want a matching set. -
Establish the opening:
Hold a clay ball in the palm of your non-dominant hand. With your thumb, press gently into the center of the ball, pushing down about three-quarters of the way, being careful not to push through the bottom. -
Pinch the walls:
Using a rhythmic pinching motion between your thumb (inside) and fingers (outside), slowly rotate the ball. Gently thin the walls, moving from the bottom up towards the rim. -
Refine the thickness:
Continue pinching until the walls have an even thickness of about 1/4 inch. I like to keep the rim slightly thicker than the walls for better durability. -
Smooth the interior:
Dampen your pottery sponge slightly and wipe the inside of the bowl to compress the clay and remove fingerprint marks, creating a smooth, concave surface.
Cracking Issues?
If rims crack while drying, you likely pinched them too thin too fast. Keep the rim compressed and thicker during shaping, and slow down drying by covering with plastic.
Step 2: Finishing and Drying
-
Flatten the base:
Gently tap the bottom of the bowl on your work surface to create a flat, stable foot. You want it to sit level without rocking. -
Refine the rim:
Use your fingers or a small piece of chamois leather to compress and smooth the rim. This prevents sharp edges after firing and gives that professional, finished look. -
Clean up the exterior:
Run a rib tool gently around the outside to smooth any unwanted heavy texture, though leaving subtle finger marks can add to the handmade charm. -
Dry to leather hard:
Set the bowls aside on a ware board. Cover them loosely with plastic for the first day to equalize moisture, then uncover and let them dry until they reach the leather-hard stage. -
Trim the foot (optional):
If bulky, turn the bowl upside down and use a loop tool to carve a small foot ring. This elevates the form but isn’t strictly necessary for bowls this small. -
Bone dry:
Allow the bowls to dry completely until they are room temperature to the touch (bone dry) before the first firing.
Dual-Texture Design
For the pink/green bowl effect, wax the bottom half before dipping the top in celadon. Then, hand-paint a matte textured glaze on the bottom area for contrast.
Step 3: Glazing and Firing
-
Bisque fire:
Load the bone-dry bowls into the kiln and bisque fire them to Cone 04 (approx. 1945°F). This strengthens the clay for glazing. -
Wipe down:
Once cool, wipe the bisque ware with a damp sponge to remove any kiln dust that could prevent the glaze from adhering properly. -
Apply interior glaze:
Pour your chosen glaze (glossy cream or celadon) into the bowl, swirl it quickly to coat the entire interior, and pour out the excess. -
Dip the exterior:
Hold the bowl by the foot and dip the exterior into the glaze. For the two-tone look seen in the image, dip the top half in a glossy glaze and leave the bottom raw, or dip the bottom in a matte pink glaze. -
Clean the foot:
Wipe the bottom of the bowl absolutely clean with a sponge. Any glaze left on the bottom will fuse the bowl to the kiln shelf. -
Glaze fire:
Fire the bowls again, this time to the maturation temperature of your specific clay and glaze (typically Cone 5 or 6 for stoneware).
Now you have a stunning set of bespoke pinch bowls ready to elevate your spice collection or serve as perfect jewelry dishes


Tiny Footed Succulent Planters
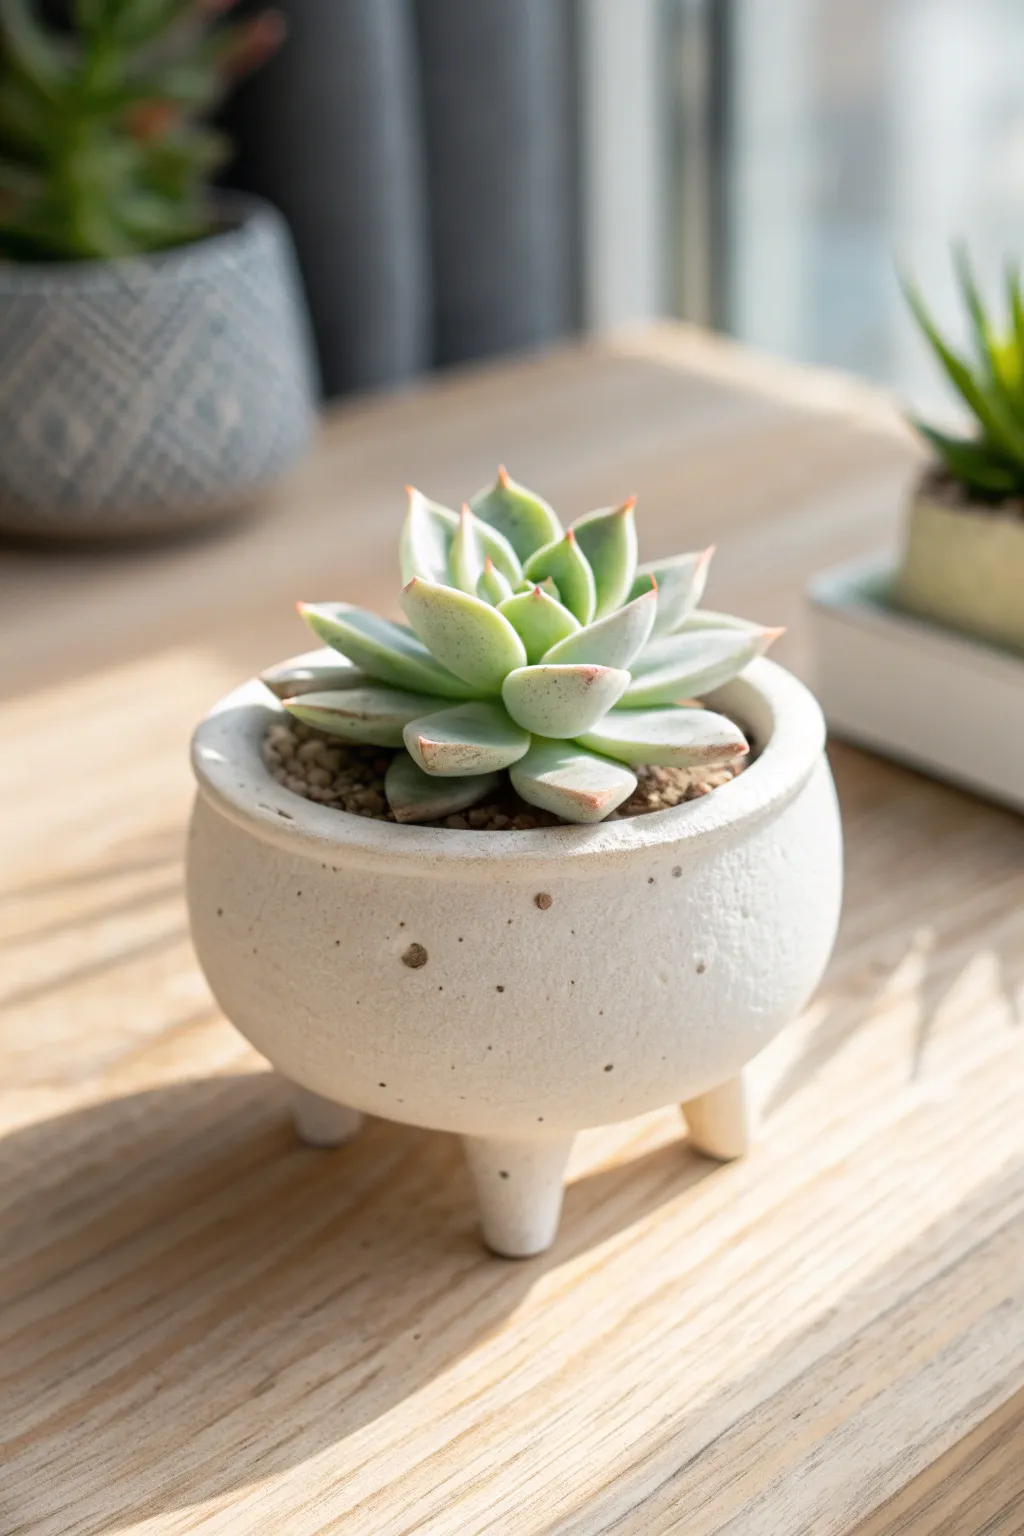
This adorable footed planter features a satisfyingly round belly and three sturdy little legs that elevate your favorite succulents. The speckled matte white finish gives it a modern, organic look that fits perfectly on any sunny windowsill.
How-To Guide
Materials
- White stoneware clay (preferably with grog/speckles)
- Pottery wheel (or can be hand-built with pinch/coil method)
- Wooden rib tool
- Pin tool
- Wire cutter
- Sponge
- Small loop tool for trimming
- Needle tool
- Scoring tool (or serrated rib)
- Slip
- Matte white glaze (speckled if using plain clay)
- Succulent soil and gravel for staging
- Small succulent
Step 1: Throwing the Form
-
Center the clay:
Start with a small ball of clay, roughly 1-1.5 lbs depending on how large you want the final pot. Center it firmly on the wheel head. -
Open the form:
Open the clay down to the base, leaving slightly more thickness at the bottom than usual (about 1/2 inch) to allow for trimming later. -
Establish the floor:
Pull the floor out to be relatively wide compared to the height. We want a bowl-like shape initially. -
Pull the walls:
Pull the walls up, keeping them thick enough to support a rounded belly. Aim for a height of about 3 inches. -
Shape the belly:
Using a wooden rib or your fingers inside the pot, gently push the walls outward to create a convex, rounded curve. I like to support the outside with a sponge to ensure the curve stays symmetrical. -
Define the rim:
Collar the top slightly inward to accentuate the roundness of the body. Use a chamois or sponge to compress and round the rim so it feels smooth to the touch. -
Cut off:
Run a wire tool under the pot to separate it from the wheel, but leave it on the bat to dry until leather hard.
Step 2: Adding Feet & Trimming
-
Trim the base:
Once leather hard, center the pot upside down on the wheel. Use a loop tool to round off the bottom curve so it matches the aesthetic of the sides. -
Create the feet:
Roll out a thick coil of clay. Cut three equal segments, roughly 1 inch long. Tap them on the table specifically to flatten one end and round the other into a stubby cone shape. -
Mark placement:
Flip the pot upside down. Mark three equidistant spots on the bottom curve where the feet will sit. Ensure they are wide enough apart for stability. -
Score and slip:
Aggressively score both the flat side of the feet and the marked spots on the pot. Apply a generous amount of slip to both surfaces. -
Attach the feet:
Press the feet firmly onto the pot. Give them a little wiggle to lock the clay particles together. -
Blend the seams:
Use a small modeling tool or your finger to smooth the clay where the foot meets the body. The transition should be seamless, looking like the foot grew out of the pot. -
Check for wobble:
Turn the pot right-side up and gently press down. If it wobbles, tap it lightly on the table to level the feet while the clay is still pliable. -
Drainage hole:
Don’t forget to use a hole punch or drill bit to create a drainage hole in the center of the pot’s floor.
Wobbly Pot?
If the feet dry unevenly and the pot rocks, gently sand the bottom of the tallest foot in a figure-8 motion on sandpaper after the bisque firing.
Step 3: Finishing
-
Bisque fire:
Let the piece dry completely (bone dry) before loading it into the kiln for the bisque firing (usually Cone 06 or 04). -
Glaze application:
Dip the pot into a matte white glaze. If your clay body doesn’t have natural speckles, choose a glaze that includes iron flecks or ‘speckled vanilla’ styled glazes to mimic the stone look. -
Wipe the feet:
Carefully wipe the glaze off the bottom of the feet with a damp sponge so they don’t stick to the kiln shelf. -
Final firing:
Fire the piece to the maturity temperature of your clay and glaze (typically Cone 5 or 6 for stoneware).
Make it Textural
Add sand or grog to your clay body before throwing. When you sponge the final piece, the texture will reveal itself for a rustic feel.
Once fired, fill your new creation with gritty soil and a beautiful Echeveria to complete the look


Mini Espresso Cups With Dainty Handles
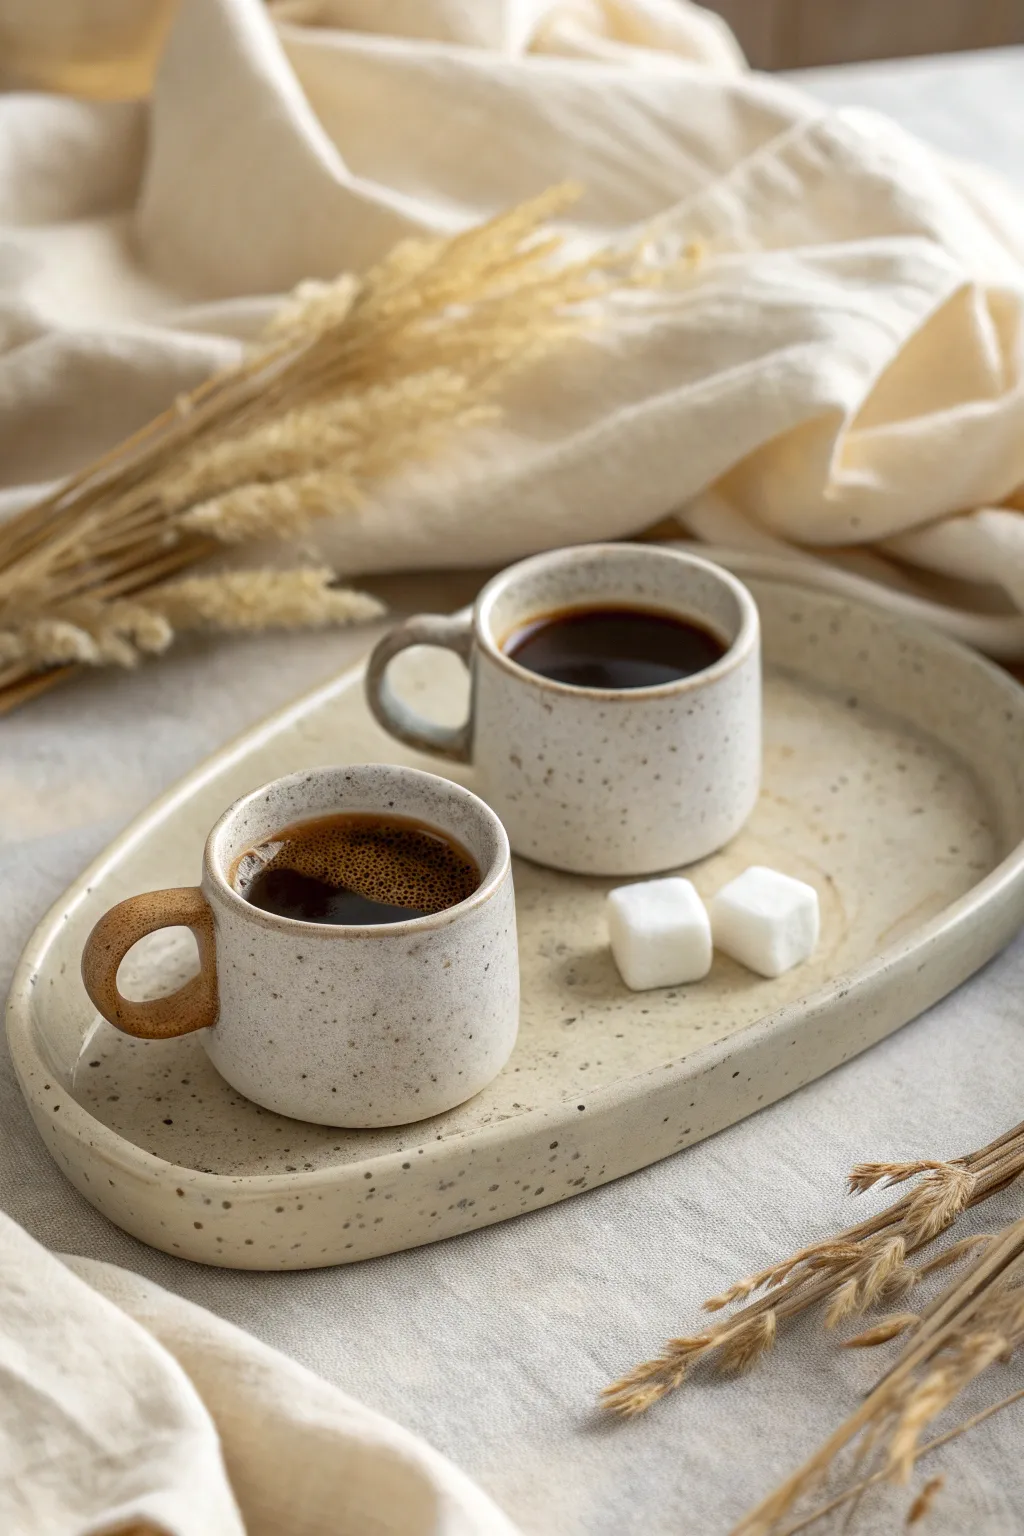
Embrace the imperfect beauty of hand-built ceramics with this set of petite espresso cups and a matching serving tray. The speckled clay bodies and uniquely shaped, delicate handles give this set a warm, artisanal feel that makes every sip feel special.
Detailed Instructions
Materials
- Speckled stoneware clay (mid-fire)
- Contrasting terracotta or red smooth clay (small amount)
- Pinch pot tools (rib, needle tool)
- Scoring tool and serrated kidney
- Slip (made from your main clay)
- Rolling pin with guide sticks (approx. 1/4 inch)
- Rectangle or oval template (paper or craft foam)
- Sponge for smoothing
- Clear matte or satin glaze
- Kiln access
Step 1: Forming the Cup Bodies
-
Prepare the Clay:
Begin by wedging your speckled stoneware clay thoroughly to remove air bubbles. Divide a portion into two equal balls, roughly the size of a tangerine (about 150-200g each). -
Open the Pinch Pot:
Hold one ball in your non-dominant hand. Gently press your thumb into the center, stopping about a quarter-inch from the bottom. This establishes your base thickness. -
Pinch the Walls:
Starting at the bottom and working upward in a spiral motion, gently pinch the clay between your thumb and fingers. Aim for an even thickness throughout the wall as you rotate the ball. -
Shape the Cylinder:
As you pinch upward, guide the clay into a slightly straighter, cylindrical shape rather than a bowl. We want these to look like miniature mugs. Gently tap the base on your table to flatten it slightly for stability. -
Smooth the Surface:
Using a slightly damp sponge or a soft rib tool, smooth the exterior and interior walls. I like to spend extra time here compressing the rim to prevent future cracking. -
Repeat for Second Cup:
Create the second cup using the same method. Don’t worry if they aren’t identical twins; fraternal twins have more character.
Step 2: Creating the Dainty Handles
-
Roll the Coils:
For the matching handle, roll a small coil of the speckled clay. For the contrast handle, roll a coil of the terracotta clay. Aim for a thickness slightly thinner than a pencil. -
Shape the Loops:
Cut the coils to roughly 2 inches long. Bend them into tight ‘C’ or ‘D’ shapes. The loop should be small enough to pinch with two fingers. -
Score and Slip:
Wait until the cups are leather hard. Score the attachment points on both the cup and the handle ends vigorously with your needle tool. Apply a generous dab of slip to the scored areas. -
Attach the Handles:
Press the handle firmly onto the lower half of the cup body. The placement in the photo is quite low, which adds to the ‘dainty’ aesthetic. Use a small wooden tool to blend the seams completely.
Don’t rush the dry
Handles often crack because they dry faster than the body. Wrap the handle tightly in a small strip of plastic while the rest of the cup dries to even out the moisture loss.
Step 3: Building the Tray
-
Roll the Slab:
Roll out a slab of speckled clay to about 1/4 inch thickness. Use guide sticks to keep it even. -
Cut the Shape:
Using your template, cut out an elongated oval shape. An organic, slightly asymmetrical oval looks wonderful here. -
Curve the Rim:
Gently lift the edges of the slab and use your fingers to curve them upward, creating a shallow lip that will contain spills. -
Refine the Edge:
Smooth the rim with a damp chamois or sponge. The edge should feel soft and rounded, visually matching the thick rims of your pinch pots.
Make it a set
Instead of just two cups, make a matching sugar bowl using the same pinch method, but pinch the opening slightly inward to create a narrow, rounded jar shape.
Step 4: Finishing and Firing
-
Slow Drying:
Cover your pieces loosely with plastic to let them dry slowly. This is crucial for handles to stay attached. Once bone dry, bisque fire them. -
Applying Glaze:
Dip or brush a clear matte or satin glaze over the entire piece (except the bottom). This highlights the natural speckles of the clay without hiding them. -
Final Fire:
Glaze fire according to your clay body’s temperature instructions (typically Cone 5 or 6 for stoneware).
Enjoy serving your morning espresso in these charming handmade vessels that celebrate the beauty of raw clay

The Complete Guide to Pottery Troubleshooting
Uncover the most common ceramic mistakes—from cracking clay to failed glazes—and learn how to fix them fast.
Tiny Saucers for Rings and Trinkets
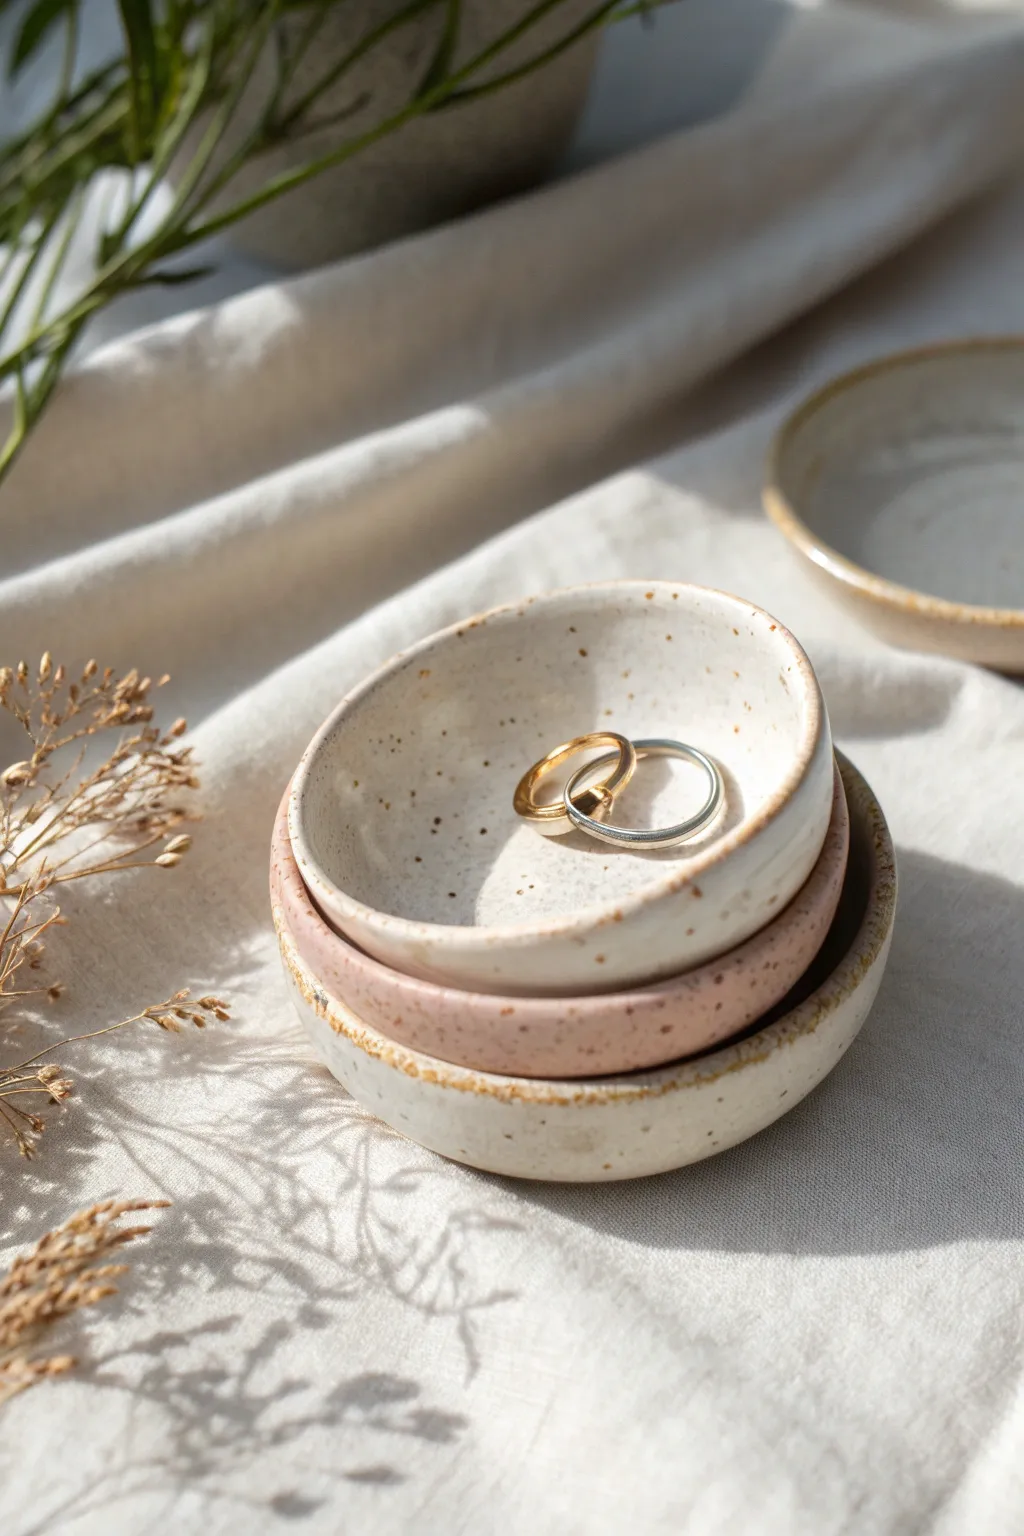
These miniature nesting bowls are perfect for organizing precious rings or tiny trinkets on your vanity. With their rustic speckled finish and soft, creamy glazes, they add a touch of handmade warmth to any surface.
Step-by-Step
Materials
- Speckled Stoneware Clay (or white clay with added speckles)
- Pottery Wheel (or can be hand-built)
- Sponge
- Wire Clay Cutter
- Rib tool (wood or metal)
- Trimming tools
- Cream Gloss Glaze
- Blush/Pale Pink Gloss Glaze
- Clear Glaze (optional)
- Kiln
Step 1: Planning and Throwing
-
Wedge the clay:
Start with small balls of speckled stoneware clay, roughly the size of a golf ball or slightly larger depending on your desired bowl size. Wedge them thoroughly to remove air bubbles. -
Center on the wheel:
Secure a small ball of clay onto the wheel head. Use water and firm pressure to center the clay, keeping a low profile since these are shallow dishes. -
Open the form:
Press your thumbs into the center to open the clay, leaving a slightly thicker bottom (about 1/4 inch) so you can trim a foot later. Widen the opening gently. -
Pull the walls:
With steady hands, pull the walls up just slightly—these are mini saucers, not tall cups. Aim for a wall height of about an inch to an inch and a half. -
Shape the curve:
Use a rib tool on the inside to create a smooth, continuous curve from the center to the rim. Flare the rim outward slightly for an open feel. -
Create the set:
Repeat this process two more times, making each subsequent bowl slightly different in diameter if you want them to nest or stack nicely like the photo. -
Cut off:
Run your wire cutter under the base of each thrown piece and carefully transfer them to a ware board to dry until leather hard.
Stacking Success
When throwing for a stacking set, use calipers to measure the rim of the bottom bowl so you know exactly how wide to make the foot of the bowl that sits inside it.
Step 2: Trimming and Refining
-
Center for trimming:
Once leather hard, place a bowl upside down on the wheel. Secure it with small clay lugs. Tap it to ensure it is perfectly centered. -
Trim the profile:
Use a sharp trimming tool to remove excess clay from the lower walls, defining the curve so it matches the interior shape. -
Carve a foot ring:
Carve a small, neat foot ring into the base. This gives the bowl lift and clean shadow lines when sitting on a table. -
Smoothing:
Before removing from the wheel, burnish the trimmed surface with a smooth stone or the back of a spoon to compress the grog and create a nice finish. -
Bisque fire:
Allow the greenware to dry completely (bone dry). Load them into the kiln for a bisque firing to cone 04 (or your clay body’s specifications).
Step 3: Glazing and Final Firing
-
Wax the feet:
Apply wax resist to the bottom foot ring of each bowl to prevent glaze from sticking to the kiln shelf. -
Glaze the cream bowls:
Dip the top and bottom bowls (from the stack idea) into a creamy white gloss glaze. Shake off excess gently. The speckles in the clay will burn through this glaze nicely. -
Glaze the pink bowl:
For the middle accent bowl, dip it into a blush or dusty pink gloss glaze. -
Check the rims:
If the glaze looks too thin on the rims, I sometimes dab a tiny bit of extra glaze there with a finger to ensure a soft edge. -
Clean up:
Use a damp sponge to wipe any stray glaze off the waxed foot rings perfectly clean. -
Glaze fire:
Fire the pieces again to the maturity temperature of your clay and glaze (often cone 5 or 6 for stoneware). -
Cooling:
Let the kiln cool naturally before opening to avoid thermal shock to your tiny ceramics.
Warped Rims?
Tiny bowls can warp easily if handled roughly while soft. If your rim isn’t round after cutting it off the wheel, wait until the clay is leather hard to gently nudge it back into a perfect circle.
Now you have a charming set of custom ceramics ready to hold your favorite jewelry pieces
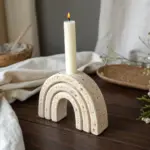
Mini Candlestick Holders
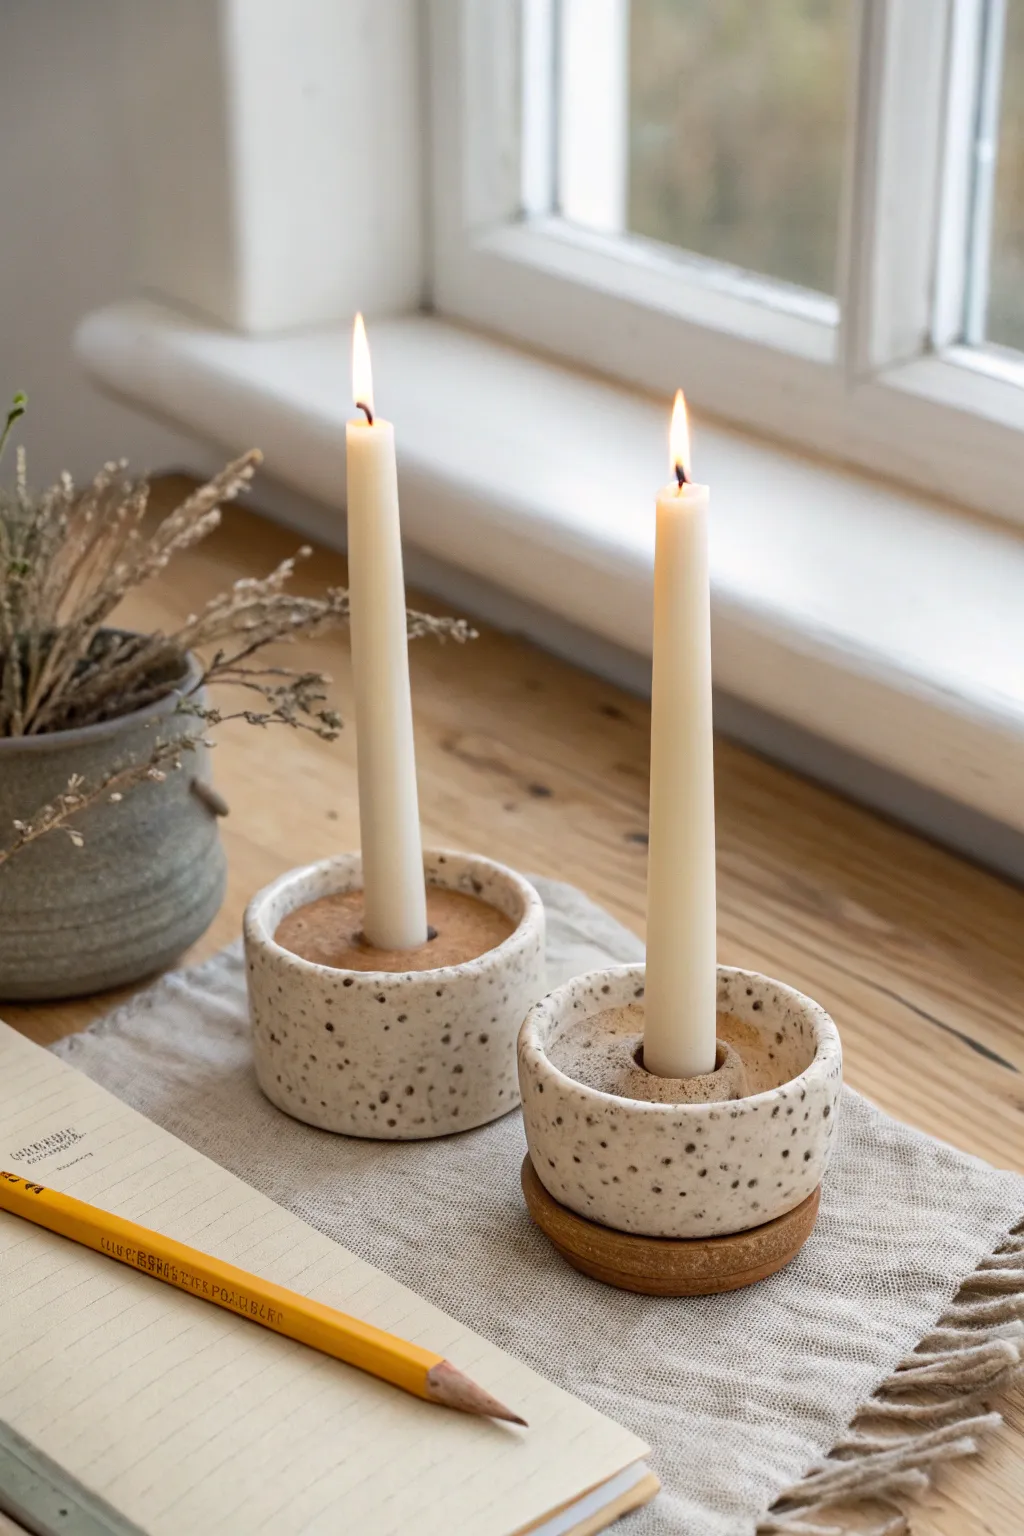
Create a cozy atmosphere with these minimalist ceramic candle holders that feature a lovely speckled texture and a creamy white glaze. Their simple cylindrical shape and sturdy base make them perfect for narrow windowsills or small table settings.
How-To Guide
Materials
- Speckled stoneware clay (white or buff)
- Rolling pin
- Canvas work surface or slab mat
- Circle cutter (approx. 3-4 inches diameter)
- Needle tool
- Smaller circle cutter (approx. 7/8 inch for candle socket)
- Scoring tool or old fork
- Slip (clay mixed with water)
- Sponge
- Fettling knife
- Rib tool (wooden or silicone)
- White or transparent satin glaze
Step 1: Forming the Base & Body
-
Prepare the slab:
Begin by wedging your speckled clay to remove air bubbles. Roll it out into an even slab that is approximately 1/4 inch thick. Compress the slab on both sides with a rib tool to prevent warping later. -
Cut the clay strips:
Measure and cut two rectangular strips from your slab. For the holders shown, a height of roughly 1.5 to 2 inches works well. The length should be the circumference of your desired circle plus a little extra for overlapping. -
Cut the base circles:
Using a circle cutter or a template and needle tool, cut two circles from the remaining slab. These will serve as the floor for your candle holders. -
Prepare the connection points:
Score the outer edge of your base circles and the bottom edge of your rectangular strips. Apply a generous amount of slip to the scored areas. -
Attach the walls:
Wrap the rectangular strip around the base circle. Gently press the scored edges together to form a cylinder. I find it helpful to nudge the clay together firmly to ensure a solid seal. -
Seal the seam:
Where the ends of the wall meet, cut through both layers at a diagonal angle (bevel cut) for a seamless join. Score, slip, and press the ends together, smoothing the seam with your finger or a rib.
Wobbly Candle?
Make the inner ring slightly tighter than you think necessary. Clay shrinks during firing, but if the hole ends up too big, use a drop of melted wax to secure the candle.
Step 2: Creating the Candle Insert
-
Add structure:
To hold the candle, you need a central support. Roll a thick coil or cut a smaller strip of clay about 1 inch tall. Form it into a small ring that fits the diameter of a standard taper candle (usually about 7/8 inch). -
Center the insert:
Score and slip the center of the interior floor of your main cylinder. Place your smaller ring inside, ensuring it is perfectly centered. -
Reinforce:
Use a small modeling tool or your finger to smooth the clay around the base of the inner ring, securing it to the floor. This inner wall is what keeps the candle upright. -
Fill the interior (optional):
The example image shows a solid-looking interior surface rather than a hollow cup. To achieve this, you can add a “roof” piece. Cut a donut-shaped ring that fits inside the outer wall and over the inner candle ring. -
Weld the top:
If using the donut piece, score and slip the top edges of both the outer wall and inner ring. Place the donut piece on top, welding the seams smooth so it looks like a solid block of clay with a hole in the middle.
Step 3: Finishing & Glazing
-
Smooth the exterior:
Once the leather-hard stage is reached, use a damp sponge to smooth out any rough edges, fingerprints, or seam lines. Pay attention to the rim, softening it so it isn’t sharp. -
Dry slowly:
Loosely cover your pieces with plastic to let them dry slowly. This helps prevent cracks where the different clay pieces are joined. -
Bisque fire:
Fire the bone-dry pieces in a kiln to cone 04 (or according to your clay’s specific bisque temperature). -
Clean surface:
Wipe the bisqued pieces with a damp sponge to remove kiln dust properly. -
Apply glaze:
Dip or brush on a semi-opaque white or satin clear glaze. The goal is to let the iron speckles in the clay body show through the glaze, creating that lovely spotted effect. -
Final wipe:
Wipe the very bottom of the holder clean of any glaze to prevent it from sticking to the kiln shelf. -
Glaze fire:
Fire the pieces again to your clay body’s maturity temperature (likely cone 5 or 6 for stoneware).
Coaster Base
For a mixed-material look like the second holder in the image, create a separate wooden coaster or cork disc slightly larger than the ceramic base to rest it on.
Enjoy the warm glow of your handmade pottery on a quiet evening


What Really Happens Inside the Kiln
Learn how time and temperature work together inside the kiln to transform clay into durable ceramic.
Thimble-Size Lidded Trinket Jars
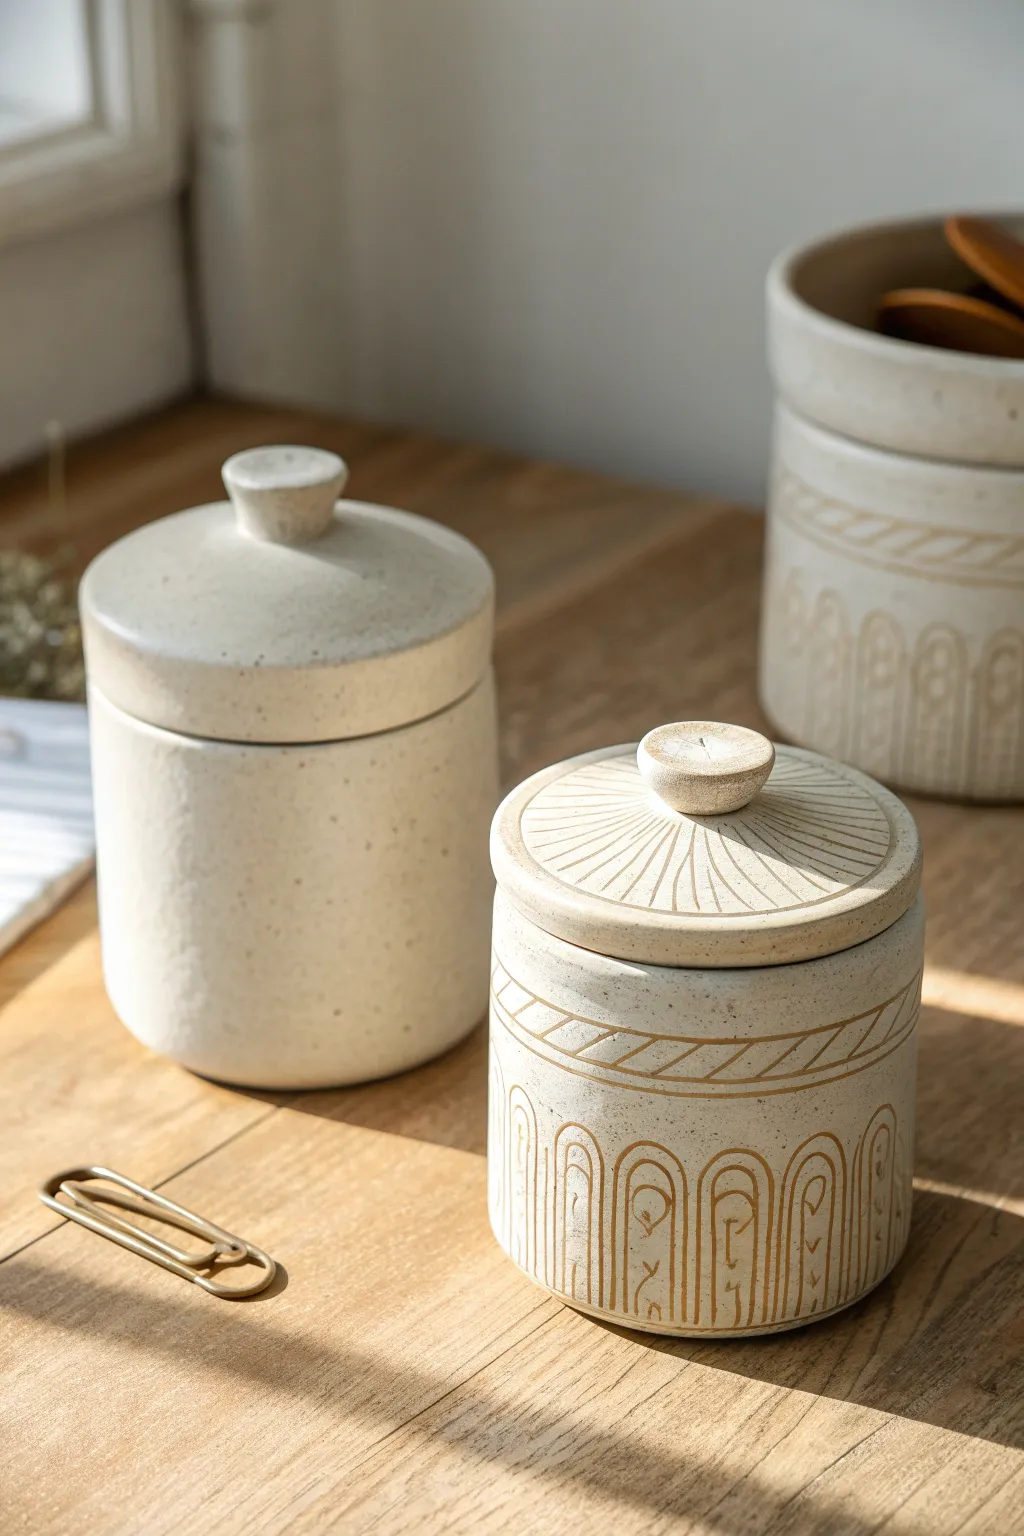
These charming, palm-sized vessels combine the rustic warmth of speckled clay with delicate sgraffito-style carvings. Whether you leave one plain to show off the stoneware’s natural beauty or etch intricate geometric arches into another, they make perfect homes for your tiniest treasures.
Detailed Instructions
Materials
- Speckled stoneware clay (white or light buff)
- Pottery wheel (or rolling pin/canvas for hand-building)
- Small throwing bats
- Wire cutter
- Needle tool
- Rib tool (metal or rubber)
- Carving tools (small loop tool and fine stylus)
- Callipers
- Sponge
- Clear matte glaze
Step 1: Throwing the Body
-
Prepare the Clay:
Wedge a small ball of speckled stoneware clay, roughly the size of a tangerine, to ensure air bubbles are removed and the consistency is even. -
Center and Open:
Throw the clay onto the wheel head and center it securely. Open the clay to form a flat floor, keeping the base slightly thicker to support the walls. -
Pull the Walls:
Gently pull the clay upward to form a cylinder. Aim for straight vertical walls about 2-3 inches high. Keep the rim slightly thickened for stability. -
Refine the Shape:
Use a rib tool to smooth the outside and remove throwing lines. If you want the slightly rounded bottom shown in the image, gently push the rib against the base of the wall to curve it inward. -
Measure the Gallery:
Before cutting the pot off, use your callipers to measure the inside diameter of the rim. This measurement is crucial for fitting your lid later. -
Cut and Dry:
Wire the pot off the bat and set it aside to stiffen to leather-hard.
Clean Lines
For crisper carvings, wait until the clay is a firm leather-hard. If the clay is too wet, the tool will drag and create burrs rather than clean incisions.
Step 2: Creating the Lid
-
Throwing off the Hump:
Center a larger mound of clay. Isolate a small amount at the top to form the lid. -
Shape the Knob:
Form a solid, mushroom-shaped knob first. This serves as the handle. Ensure the stem is thick enough to be durable. -
Form the Flange:
Flatten the clay below the knob into a disc. Use your callipers to check that the outer diameter matches the inner diameter of your jar. -
Refine the Edge:
Create a slight overhang or lip on the lid that will sit on top of the jar rim. Smooth the surface with a damp sponge. -
Detach:
Use a needle tool or wire to cut the lid from the hump. Lay it upside down carefully to dry to leather-hard.
Step 3: Carving and Finishing
-
Trimming:
Once leather-hard, place the jar upside down on the wheel (centering it with lugs of clay) and trim the excess clay from the bottom to create a neat foot. -
Check the Fit:
Test the lid on the jar. If it’s too tight, carefully sand or trim the flange slightly until it sits flush. -
Sketching the Design:
For the geometric variation, lightly scratch vertical guide lines around the body using a needle tool to space out your arches equally. -
Carving Arches:
Using a fine stylus or carving tool, incise tall, narrow arches around the base. Add inner contour lines inside each arch for depth. -
Adding Details:
Carve a horizontal band around the upper third of the jar. Fill this band with diagonal hash marks. I like to vary the pressure here to make the lines feel organic. -
Decorating the Lid:
On the lid, carve radiating lines extending from the central knob to the outer edge, mimicking a sunburst pattern. -
Bisque Fire:
Allow the pieces to dry completely (bone dry) before loading them into the kiln for a bisque firing. -
Glazing:
Dip or brush a clear matte glaze over the entire piece. The clear glaze will seal the clay while allowing the natural speckles and carved shadows to remain the focal point. -
Final Fire:
Fire the kiln to the maturity temperature of your clay body (likely Cone 5 or 6). Once cool, sand the bottom foot if necessary to keep it smooth.
Inlay Effect
Before the clear glaze, brush a dark underglaze into the carved lines and wipe back the surface with a damp sponge to make the geometric pattern pop.
Now you have a custom set of tiny jars ready for spices or jewelry
Mini Butter Keeper Sets
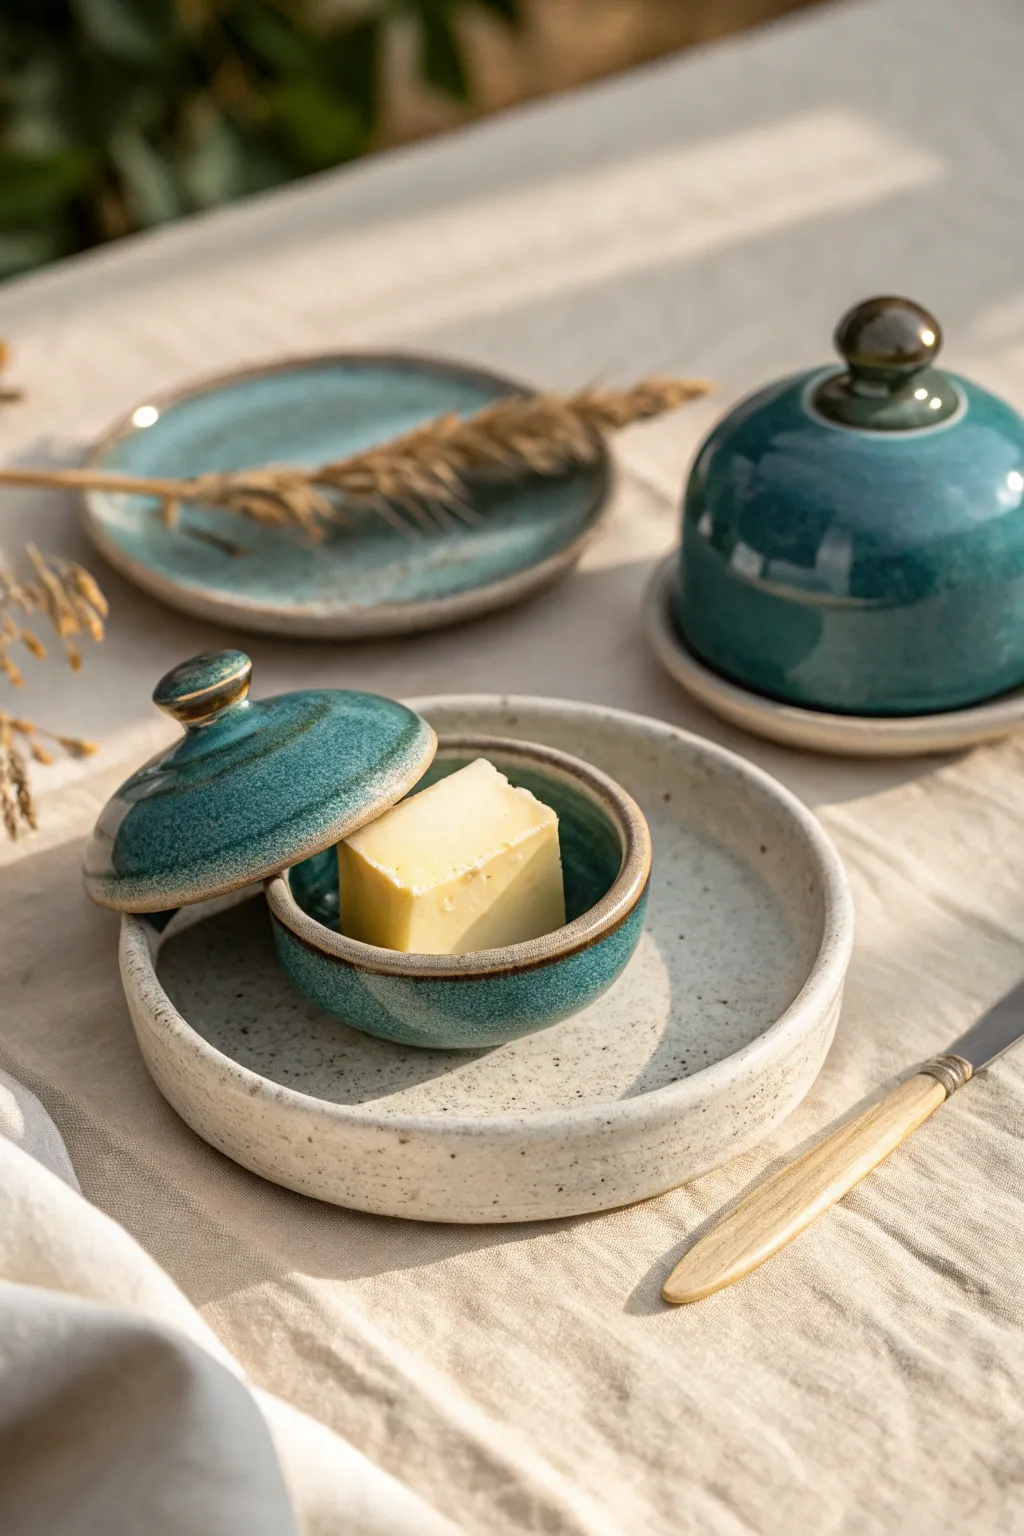
Create a charming tablescape with these miniature butter keeper sets, featuring a rustic speckled clay body and a deep teal glaze. This project combines wheel-thrown components to form a functional and adorable way to serve individual portions of butter or jam.
How-To Guide
Materials
- Speckled stoneware clay (white or buff)
- Pottery wheel
- Throwing tools (sponge, wire cutter, ribs)
- Trimming tools
- Calipers
- Teal reactive glaze
- Clear matte glaze (optional)
- Kiln for firing
Step 1: Throwing the Base Plates
-
Center the clay:
Start with a small ball of speckled clay, about 1 lb (450g). Center it firmly on the wheel head, ensuring it feels stable and even before proceeding. -
Open the form:
Open the clay wide and flat rather than deep. Compression is key here to prevent S-cracks later, so compress the bottom thoroughly with your sponge or a wooden rib. -
Establish the rim:
Pull up a very short wall, roughly half an inch high. Use a flat rib to square off the floor and create a crisp angle where the floor meets the wall. -
Finish the lip:
Round the rim gently with a chamois or sponge. The wall should be thick enough to look substantial but balanced with the overall small size.
Step 2: Throwing the Butter Cup
-
Center a smaller amount:
Use a smaller ball of clay, roughly 12 oz (350g). Center it perfectly, as small discrepancies show up easily on tiny forms. -
Open and pull:
Open the clay into a small bowl shape. Pull the walls straight up initially, keeping the bottom curve gentle. The diameter should be significantly smaller than your base plate. -
Shape the gallery (optional):
If you want the lid to sit inside, create a small gallery (a ledge) on the inner rim. Alternatively, simply measure the outer diameter with calipers now so you can match the lid to sit directly on top.
Rim Revival
To get that distinct brown line on the rim, wipe the glaze back about 2mm with a damp sponge. The thinner application breaks to brown during firing.
Step 3: Throwing the Bell Lid
-
Throw off the hump:
For tiny lids, I find it easiest to throw off the hump. Center a large mound of clay and isolate a small knob at the top. -
Form the bell shape:
Open the small knob downwards to create a dome. Shape it to resemble a small bell or upside-down bowl. Use your calipers to ensure the rim matches the butter cup’s rim perfectly. -
Create the handle:
While the clay is still attached at the top of the hump (which is actually the bottom of the lid), shape a distinct knob for a handle before cutting the piece free. -
Cut and refine:
Use a wire tool or needle tool to cut the lid from the hump. Set it aside to leather hard stage.
Texture Twist
Instead of leaving the plate plain, use a carving tool to create fluted texture on the exterior wall of the plate before firing.
Step 4: Trimming and Assembly
-
Trim the plate:
Once leather hard, flip the plate and trim a clean, flat foot. Smooth the bottom with a rib to reveal the clay’s grog and speckles. -
Trim the cup and lid:
Trim the bottom of the cup to have a rounded profile. Trim the rim of the lid if needed to ensure a tight fit with the cup. -
Bisque fire:
Load all dried greenware into the kiln and bisque fire to Cone 04 (or your clay’s specific bisque temperature).
Step 5: Glazing
-
Wax the plate:
Apply wax resist to the bottom of the plate. Dip the entire plate into a clear glaze or leave the raw speckled clay exposed (as seen in the image) for a rustic texture. -
Glaze the cup interior:
Pour your teal glaze inside the cup, swirl, and pour out. Wipe any drips off the rim immediately with a damp sponge. -
Dip the cup exterior:
Holding the cup by the foot (or using tongs), dip the exterior into the teal glaze. Stop just short of the rim to leave a thin line of raw clay exposed, creating that lovely brown halo effect. -
Glaze the lid:
Dip the lid into the teal glaze. I prefer to hold it by the very tip of the knob or use tongs. Ensure the handle gets fully coated. -
Final wipe:
Clean all foot rings and contact points thoroughly with a sponge to prevent sticking during the glaze firing. -
Glaze fire:
Fire to Cone 6 (or your glaze’s maturation temperature) in an oxidation atmosphere to achieve the rich color and semi-gloss finish.
Once cooled, your mini butter keeper is ready to add a touch of artisanal elegance to your breakfast table

TRACK YOUR CERAMIC JOURNEY
Capture glaze tests, firing details, and creative progress—all in one simple printable. Make your projects easier to repeat and improve.
Tiny Match Striker Pots
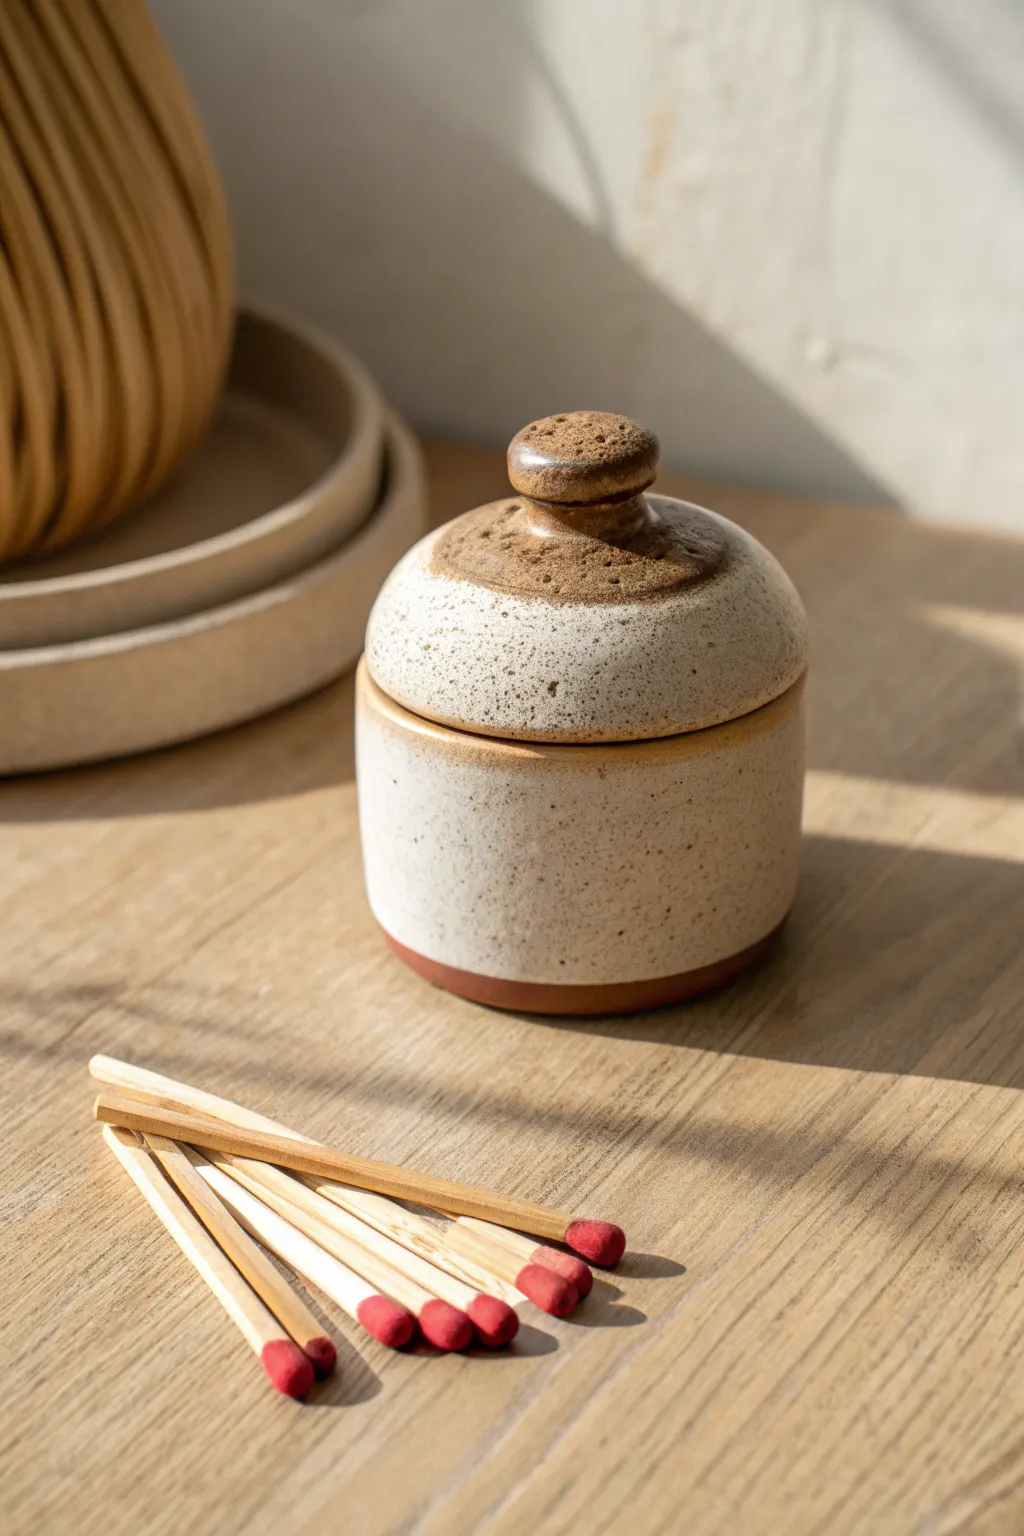
This miniature pottery piece combines rustic charm with functionality, featuring a speckled cream glaze and raw clay accents for striking matches. Its petite size makes it a perfect afternoon project that brings a cozy, handcrafted feel to any tabletop or mantel.
Detailed Instructions
Materials
- Stoneware clay (speckled or buff)
- Pottery wheel
- Throwing sponge
- Needle tool
- Wire cutter
- Ribs (metal and wood)
- Trimming tools
- Speckled cream or oatmeal glaze
- Wax resist
- Small paintbrush
- Kiln
Step 1: Throwing the Body
-
Prepare the clay:
Start with a small ball of stoneware clay, roughly the size of a tennis ball or smaller (about 0.5-0.75 lbs). Wedge it thoroughly to remove air bubbles and ensure consistency. -
Center and open:
Secure the clay to the wheel head and center it meticulously. Open the center, keeping the floor slightly thicker than usual to support the weight and allow for trimming later. -
Pull the walls:
Gently pull the walls up into a short cylinder. Since this is a mini pot, you only need about 2-3 inches of height. Aim for straight, vertical walls initially before shaping. -
Shape the base:
Use a wooden rib or your fingers to push the walls slightly outward from the inside, creating a subtle curve or belly while keeping the rim vertical. -
Create the gallery:
At the rim, use a tool or your thumb to press down and split the clay slightly, creating a small internal ledge (gallery) where the lid will sit. Compress this area well to prevent cracking. -
Refine and finish:
Smooth the exterior with a flexible rib to remove throwing lines for a modern look. Wire the pot off the wheel and set it aside to stiffen to leather-hard.
Safety Match Tip
Only ‘strike anywhere’ matches (usually with white tips) work on raw ceramics. Standard safety matches require the chemical strip from the box.
Step 2: Crafting the Lid
-
Measure the gallery:
Before throwing the lid, use calipers to measure the exact diameter of the gallery you created on the pot body. -
Throw off the hump:
For such a small lid, I find it easiest to center a larger mound of clay and throw just the top portion (‘off the hump’), using the measurement from your calipers as a guide. -
Form the dome:
Shape a gentle dome that mirrors the curve of the pot body. This will be the main visible surface of the lid. -
Create the knob:
Pinch the very top center of the dome to form a small, rounded knob. Define the undercut beneath the knob so it’s easy to grip. -
Cut and fit:
Carefully cut the lid from the mound using a needle tool, leaving enough clay underneath to trim a flange later.
Add Texture
Before firing, gently sand the raw clay areas meant for striking with coarse grit sandpaper. This increases friction and makes lighting matches much easier.
Step 3: Trimming and Assembly
-
Trim the pot body:
Once leather-hard, center the pot upside down on the wheel. Trim away excess weight from the bottom and crave a distinct foot ring, leaving a bit of the raw clay exposed at the bottom edge. -
Trim the lid:
Flip the lid upside down (support it in a chuck if needed) and trim the underside to remove weight. Carve a flange that fits snugly inside the gallery of the pot body. -
Texture the striker surface:
The unglazed clay will act as the striker. Ensure the bottom unglazed band on the pot is smooth but has enough tooth to ignite a strike-anywhere match. -
Bisque fire:
Once bone dry, load both pieces into the kiln and bisque fire them according to your clay body’s specifications (usually Cone 04 or 06).
Step 4: Glazing and Firing
-
Apply wax resist:
Paint a clean line of wax resist along the bottom 1/4 inch of the pot’s exterior and the entire foot ring. Also, wax the gallery area on the pot and the flange on the lid so they don’t fuse together. -
Wax the striker zone:
Crucially, apply wax resist to a circle on top of the lid (around the knob) or leave the knob itself unglazed. This raw surface is vital for striking matches. -
Dip the pot:
Dip the pot body into your cream speckled glaze. Shake gently to remove drips and wipe away any glaze that beaded on the waxed areas. -
Glaze the lid:
Dip the lid, ensuring the waxed top circle remains glaze-free. The contrast between the shiny glaze and the matte raw clay creates the beautiful texture shown. -
Final fire:
Place the pieces in the kiln for the glaze firing (typically Cone 5 or 6). Ensure the lid is not on the pot during firing to prevent sticking.
Fill your new vessel with matches and enjoy the satisfying scratch and flare of lighting a candle.
Mini Incense Cone Dishes
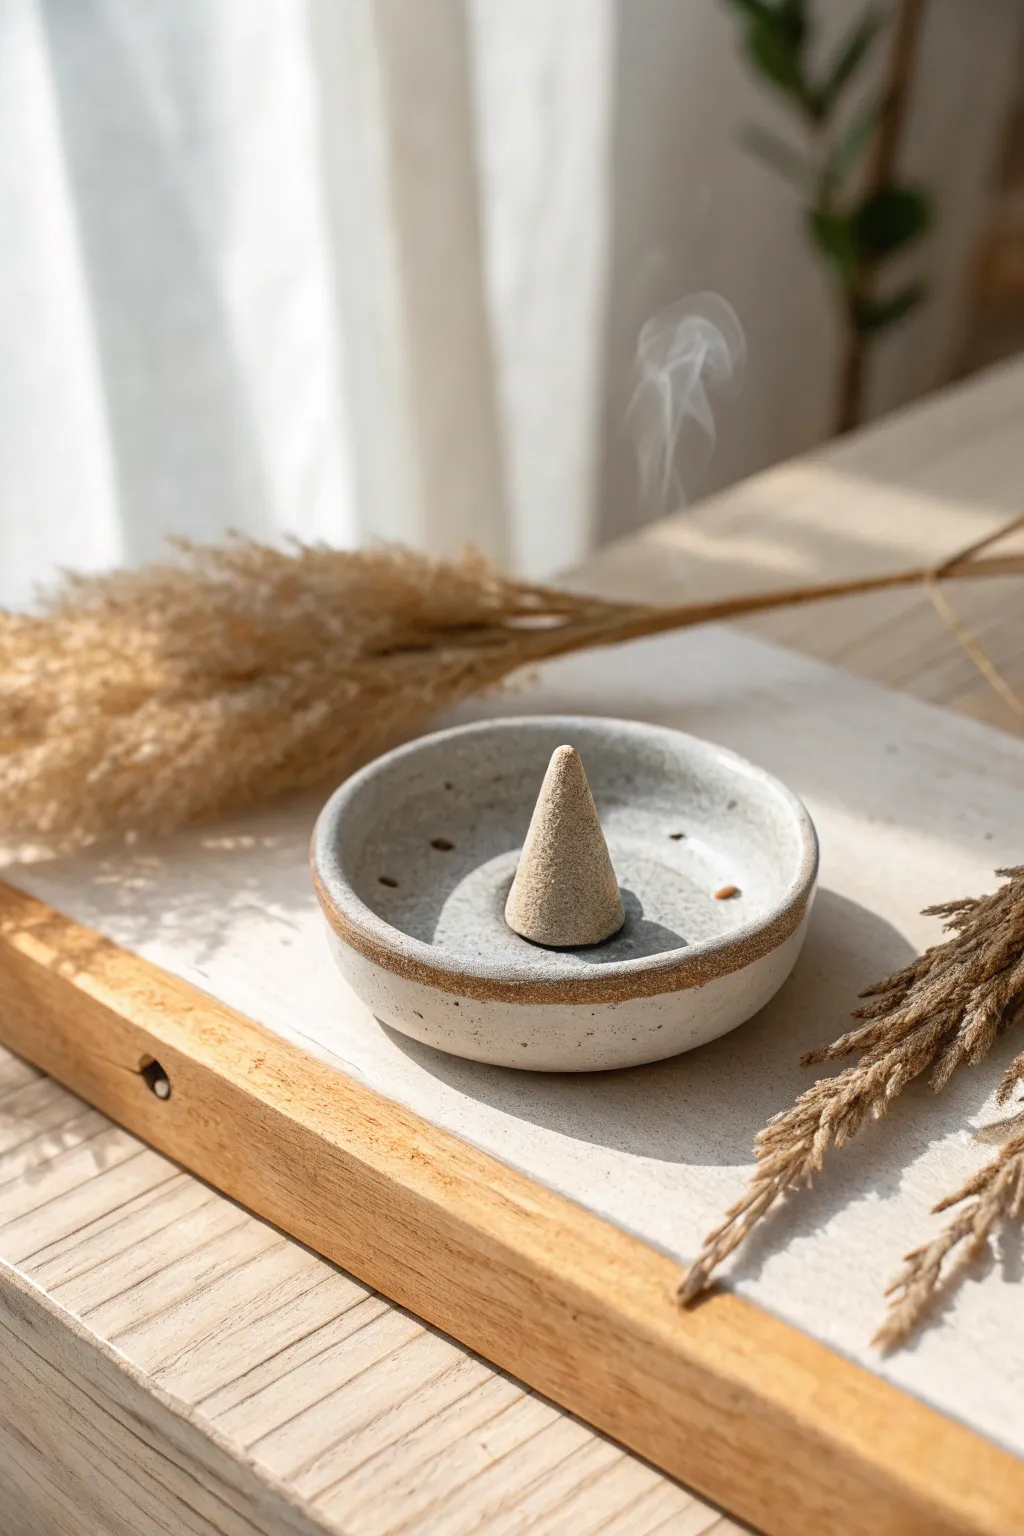
This minimalist little dish is the perfect resting place for your favorite incense cones, featuring a lovely contrast between raw clay and a creamy, speckled glaze. Its shallow, curved profile catches ash effectively while maintaining a sleek, modern aesthetic that fits on any tabletop.
Step-by-Step Guide
Materials
- Stoneware clay (smooth, light tan or buff color)
- Pottery wheel (or can be hand-built)
- Sponge
- Wire cutter
- Pin tool
- Rib tool (wooden or metal)
- Trimming tools
- Speckled white/cream glaze (cone 5/6)
- Wax resist (optional)
- Kiln
Step 1: Throwing the Form
-
Prepare the clay:
Start by wedging a small ball of stoneware clay, about the size of a tennis ball or slightly smaller. Ensure it is free of air bubbles before centering it on the wheel head. -
Open the clay:
Center the clay low and wide. Press your thumbs into the center to open it up, leaving a floor thickness of about a quarter-inch. -
Establish the floor:
Pull the opening outwards to create a flat, wide floor. Compress the bottom thoroughly with a rib tool to prevent S-cracks later during firing. -
Pull the walls:
Gently pull the clay outwards and slightly upwards. You aren’t aiming for height here; you want a shallow, saucer-like shape with walls that curve gently upward. -
Shape the rim:
Use a chamois or your sponge to round off the rim. A rounded rim is more durable and feels better to the touch than a sharp one. -
Refine the curve:
Use a rib on the interior to create a seamless, smooth curve from the floor to the rim. This makes cleaning ash out much easier later. -
Cut from the wheel:
Run a wire cutter underneath the pot to separate it from the wheel head, then carefully slide it onto a ware board to dry to a leather-hard state.
Step 2: Trimming and Finishing
-
Center for trimming:
Once leather-hard, place the dish upside-down on the wheel. Secure it with small clay lugs or tap center it if slightly damp. -
Trim the foot:
Trim away excess clay from the bottom to create a defined foot ring. I like to keep the foot fairly low for these small dishes so they sit stable on a surface. -
Clean the exterior:
Smooth the exterior wall with a metal rib to remove any grog or drag marks from the trimming tool. -
Bisque fire:
Allow the piece to dry completely (bone dry) before loading it into the kiln for a bisque firing to roughly Cone 04.
A Clean Sweep
Use a soft, dry brush to sweep ash out of the finished bowl. If the glaze is glossy, it swipes clean easily; matte glazes might hold onto ash dust more.
Step 3: Glazing
-
Clean the bisque:
Wipe the fired piece with a damp sponge to remove any dust, which ensures the glaze adheres properly. -
Apply wax resist:
Paint a line of wax resist around the exterior, about a half-inch up from the bottom. Also wax the entire bottom/foot. This creates the exposed raw clay line visible in the photo. -
Dip the glaze:
Dip the entire piece into a bucket of speckled cream or white glaze. Hold it there for 3-4 seconds to get an even coat. -
Clean the line:
As soon as the glaze dries to the touch, use a damp sponge to wipe away any glaze beads that sat on top of the wax resist, ensuring a crisp, clean line between glaze and clay. -
Check the interior:
Inspect the inside for pinholes. If you see any, gently rub them with a clean finger to smooth the powder over the hole. -
Glaze fire:
Load the piece into the kiln for the final glaze firing, according to your clay and glaze specifications (likely Cone 5 or 6).
Wobbly Rim?
If your rim warped during firing, use a diamond sanding pad or a wet sanding block on the high spots to level it out gently after it comes out of the kiln.
Light your incense cone, place it in the center, and enjoy the calm atmosphere your new handmade creation brings to the room
Mini Wall Pocket Vases
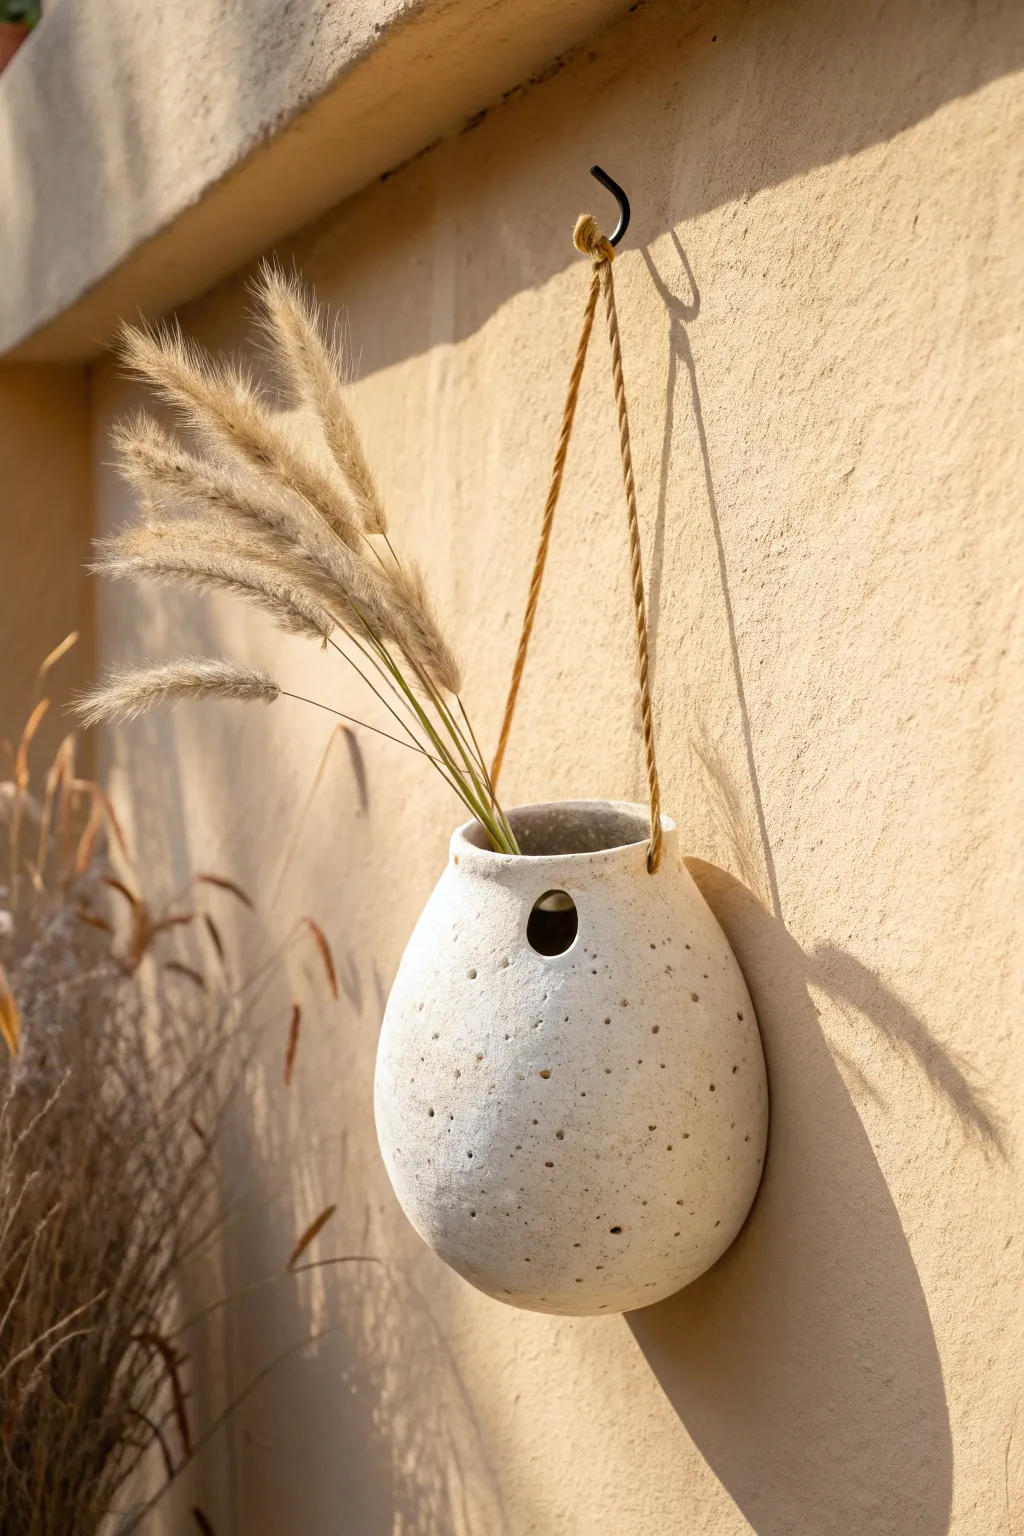
Bring a touch of organic warmth to your walls with this charming, egg-shaped hanging planter. Its textured, speckled white finish and simple jute suspension create a natural, rustic look perfect for holding dried botanicals or air plants.
How-To Guide
Materials
- White stoneware clay (preferably with grog for texture)
- Pinch pot tools (optional, fingers work well)
- Metal kidney scraper or rib
- Circular hole cutter or small cookie cutter (approx. 1/2 inch)
- Needle tool
- Sponge
- Matte white glaze (with speckles if clay is plain)
- Jute twine or hemp cord
- Rolling pin
- Kiln
Step 1: Forming the Body
-
Prepare the clay:
Start with a ball of clay roughly the size of a large orange. Wedge it well to remove air bubbles and ensure an even consistency. -
Begin the pinch pot:
Push your thumb into the center of the ball, leaving about a half-inch of thickness at the bottom. Gently pinch and turn the clay to open up the form. -
Shape the egg:
As you pinch the walls thinner, encourage the clay upwards and slightly inwards at the top. You want a bulbous bottom that tapers gently toward the rim, mimicking an egg shape. -
Refine the rim:
Once you have the desired height, use your fingers or a damp sponge to smooth the rim. It should be slightly narrower than the widest part of the ‘belly’. -
Smooth the exterior:
Using a flexible metal rib, gently scrape the outside of the pot while supporting the inside with your other hand. This removes fingerprint marks and creates that smooth, continuous curve seen in the photo.
Uneven Walls?
If your pinch pot feels lopsided, use a wooden paddle to gently tap the exterior while holding a smooth stone inside against the wall. This compresses the clay into shape.
Step 2: Adding Details
-
Create the hanging holes:
While the clay is leather hard, use a needle tool to pierce two small holes opposite each other near the rim. Make sure they are large enough to accommodate your jute twine after shrinkage. -
Add the feature cutout:
Using a small circular cutter or the backside of a piping tip, punch a clean circle in the upper third of the vase face. This decorative window adds visual interest and ventilation. -
Clean up edges:
Dip a small piece of sponge in water and carefully smooth the raw edges of your punched holes so they aren’t sharp after firing. -
Add texture:
I particularly like to use a stiff-bristled toothbrush or a needle tool to gently poke the surface repeatedly. Create small, random divots all over the exterior to mimic the natural pitting found on eggshells or stone.
Step 3: Firing and Finishing
-
Bisque fire:
Allow the piece to dry completely (bone dry) before loading it into the kiln for a bisque fire, usually to Cone 04. -
Glaze application:
Dip the piece into a matte white glaze. If your clay body doesn’t have natural speckles, choose a glaze that includes iron flecks or ‘speckle’ additives. -
Wipe the bottom:
Ensure the bottom of the vase is wiped clean of glaze so it doesn’t fuse to the kiln shelf, or use stilts if you glazed the entire underside. -
Glaze fire:
Fire the piece again to the maturation temperature of your specific clay and glaze combination (often Cone 5 or 6 for stoneware). -
Attach the suspension:
Cut a length of jute twine roughly 24 inches long. Thread one end through a side hole from the outside in, and tie a secure knot on the inside. -
Secure the loop:
Thread the other end of the twine through the opposite hole and adjust the loop length to your preference before tying the second knot inside the vase.
Golden Touch
After the final firing, use gold leaf size and a small sheet of gold leaf to apply a tiny, imperfect rim of gold around the circular cutout for a luxurious, modern accent.
Hang your new creation on a sunny wall and fill it with dried pampas grass for an instant textural upgrade
Mini Ring Cones and Jewelry Stands
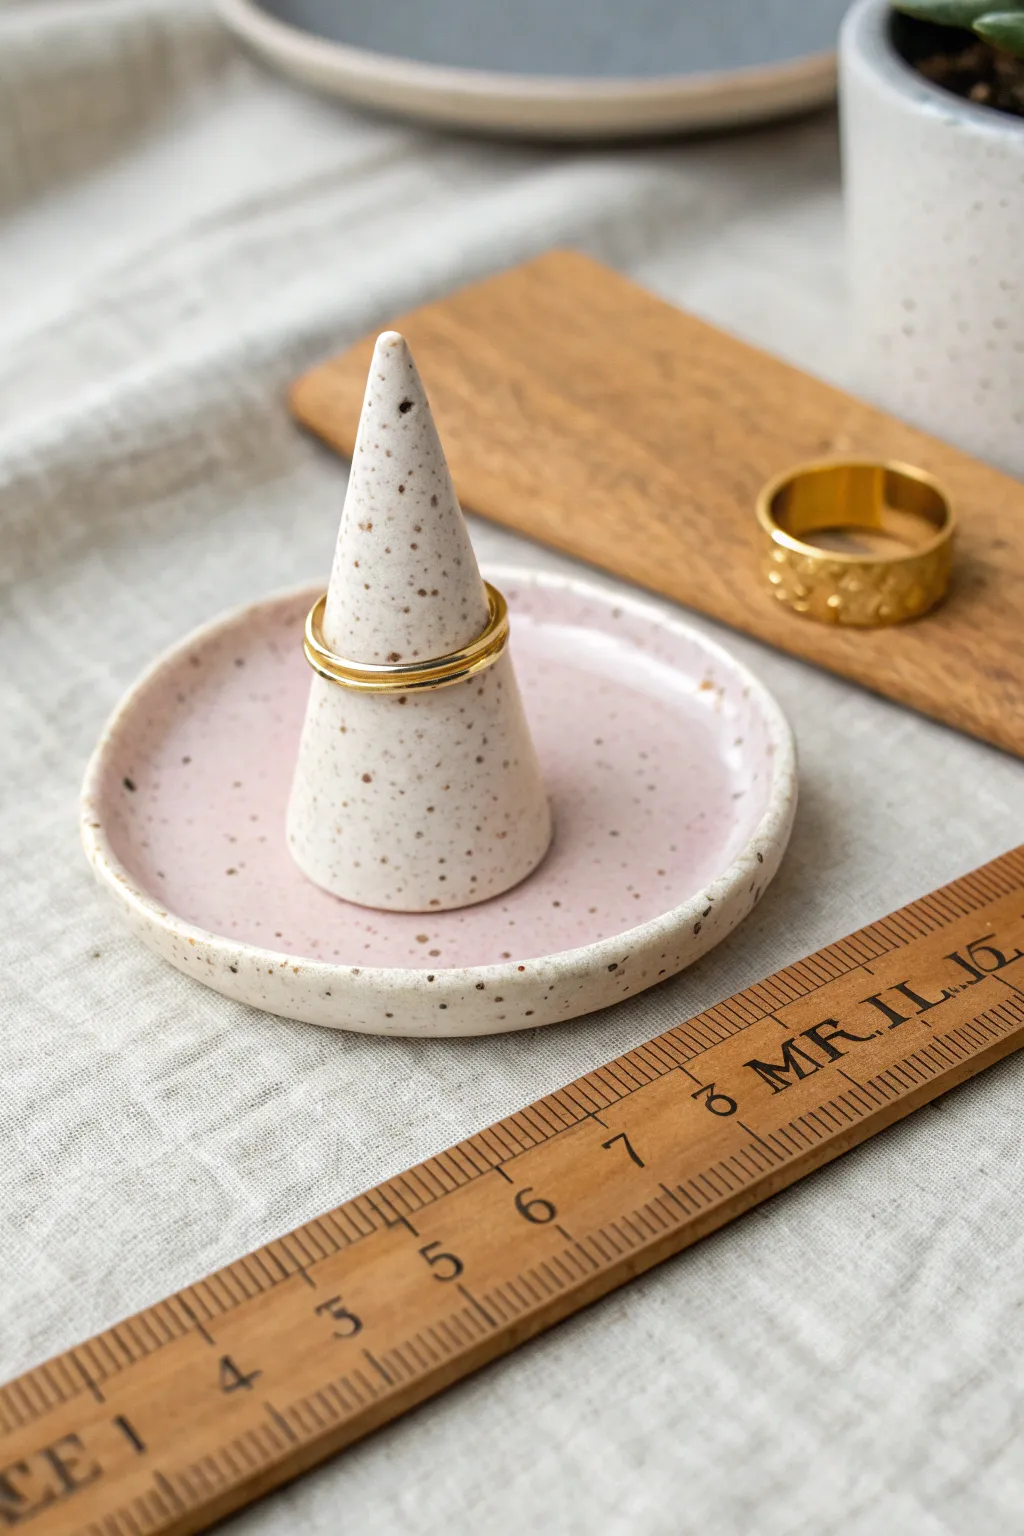
This charming two-piece jewelry stand combines a sturdy cone with a shallow catch-all dish, perfect for keeping your rings organized and accessible. The speckled clay body and soft pink glaze give it a modern, handmade aesthetic that looks beautiful on any nightstand.
Step-by-Step
Materials
- Speckled stoneware clay (white or buff)
- Small rolling pin
- Fettling knife or clay cutter
- Sponge
- Rib tool (kidney)
- Needle tool
- Scoring tool (or serrated rib)
- Slip (clay and water mixture)
- Small circle cutter (approx. 3-4 inches)
- Clear or soft pink reactive glaze
- Kiln
Step 1: Forming the Dish
-
Roll the slab:
Begin by rolling out a small amount of speckled clay into an even slab, aiming for a thickness of about 1/4 inch. -
Cut the base:
Use a circle cutter or trace around a small bowl to cut a perfect circle from your slab, roughly 3 to 4 inches in diameter. -
Smooth the edges:
Dip your finger in a little water or use a damp sponge to smooth out the cut edges of the circle, removing any sharp angles. -
Curve the form:
Gently lift the edges of the circle with your fingers to create a slight curve, forming a shallow saucer shape. Alternatively, press the clay gently into a shallow foam mold. -
Refine the surface:
Use a slightly damp sponge to wipe the surface smooth, removing any fingerprints or canvas texture marks.
Seamless Seams
Roll a very tiny, thin ‘worm’ of clay and wrap it around the base of the cone where it meets the dish. Blend it in for a stronger, invisible bond.
Step 2: Creating the Cone
-
Shape a clay coil:
Take a walnut-sized ball of clay and roll it between your palms to create a thick, short cylinder. -
Taper the form:
Place the cylinder on your work surface and roll it back and forth while applying more pressure to one end to create a tapered cone shape. -
Adjust the height:
Stand the cone up and check its height. It should be tall enough to hold rings but stable enough not to tip over; trim the bottom with a wire cutter if it’s too tall. -
Flatten the base:
Tap the wide base of the cone firmly on the table to ensure it is perfectly flat and will stand upright without wobbling. -
Smooth the point:
Use your fingers to round off the very tip of the cone slightly so it isn’t dangerously sharp.
Wobbly Cone?
If the cone leans during drying, prop it up with small chunks of foam or crumpled paper towels until the clay stiffens enough to hold its own weight.
Step 3: Assembly and Finishing
-
Score the connection points:
For a permanent attachment, scratch up the center of the dish and the bottom of the cone with a scoring tool. -
Apply slip:
Dab a small amount of clay slip onto the scored areas to act as glue. -
Attach the cone:
Press the cone firmly into the center of the dish. I like to give it a tiny twist as I press down to really lock the clay particles together. -
Clean up the seam:
Use a small modeling tool or a brush to smooth the seam where the cone meets the dish, blending the clay so it looks like one continuous piece. -
Bisque fire:
Allow the piece to dry completely (bone dry) before firing it in a bisque kiln according to your clay body’s specifications. -
Glaze application:
Dip or brush your soft pink glaze over the entire piece, ensuring an even coat that allows the clay’s natural speckles to show through. -
Wipe the foot:
Use a wet sponge to wipe all glaze off the very bottom of the dish to prevent it from sticking to the kiln shelf. -
Final firing:
Fire the piece again for the glaze firing, usually to Cone 5 or 6 depending on your materials.
Once cooled, your custom ring holder is ready to organize your favorite pieces with style
Mini Coil Pots With Textured Bands
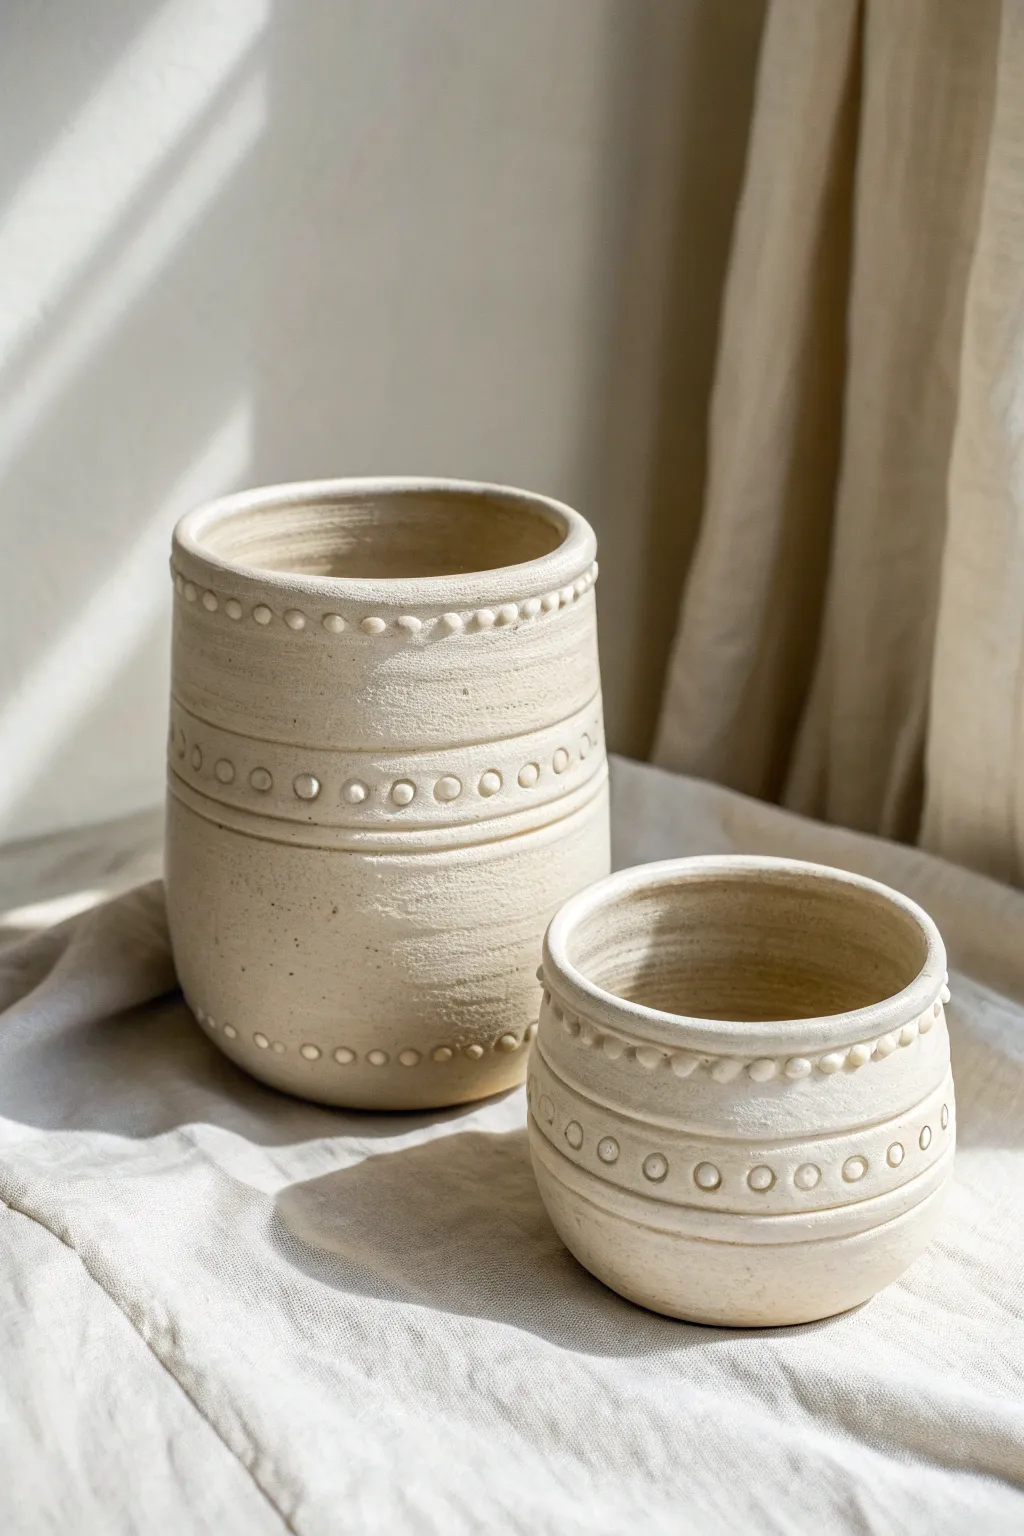
Capture the organic charm of hand-built pottery with these beige, speckled coil pots. Featuring distinct horizontal ridges and delicate, bead-like textures, they offer a tactile and earthy addition to any small shelf.
Step-by-Step
Materials
- Speckled stoneware clay (cream or light buff)
- Small bowl of water
- Pointed wooden modeling tool
- Metal kidney rib or old credit card
- Needle tool
- Sponge
- Cutting wire
- Wooden rolling pin (optional)
- Potter’s wheel or turntable (optional but helpful)
Step 1: Forming the Base
-
Prepare the Clay:
Begin by wedging a baseball-sized amount of speckled stoneware clay to remove any air bubbles. If the clay feels stiff, add a tiny bit of water, but keep it firm enough to hold its shape. -
Create the Slab Base:
Roll out a small slab of clay, approximately 1/4 inch thick. Use a round cookie cutter or a needle tool to cut two circles—one about 3 inches in diameter for the large pot, and one 2.5 inches for the smaller pot. -
Score and Slip:
Score the outer perimeter of your base circles heavily with a needle tool. Apply a small amount of water or slip to the roughed-up area to act as glue.
Cracks Appearing?
If you see cracks forming between coils as you smooth, the clay is too dry. Scrape the area deeper, apply vinegar or slip, and re-compress vigorously with a rib tool.
Step 2: Building the Walls
-
Roll Distinct Coils:
Roll out several long, even ropes (coils) of clay on your work surface. Aim for a thickness similar to a sharpie marker. -
Attach the First Layer:
Place your first coil onto the scored edge of the base. Gently press it down to adhere. Smear the clay from the inside of the coil down onto the base to lock it in place. -
Build Upwards:
Continue stacking coils one on top of another. For the taller pot, stack vertically to create a cylinder. For the shorter pot, angle the coils slightly outward then inward to create a rounded belly. -
Smooth the Inside:
After every 2-3 coils, stop to smooth the inside of the pot completely using your finger or a wooden tool. This strengthens the walls. -
Smooth the Outside Surface:
Using a metal rib or a credit card, gently scrape the exterior to blend the coils together into a smooth, seamless wall. I like to leave the surface slightly matte and imperfect to keep that hand-built feel.
Make It Functional
To turn these into planters, punch a hole in the bottom center of the base slab before attaching the first coil to ensure proper drainage for your plants.
Step 3: Adding the Textured Bands
-
Create the Bead Band:
Roll a very thin, spaghetti-like coil. Score a horizontal line around the rim of your pot and attach this thin coil. Instead of smoothing it flat, press down at regular intervals with the tip of a wooden tool to create the small raised ‘beads’ shown at the very top. -
Carve the Central Channel:
About midway down the taller pot (or lower on the short pot), use a loop tool or modeling tool to carve distinct parallel horizontal lines, creating a band that is roughly 1/2 inch wide. -
Apply the Dot Texture:
Within that central band, use the flat end of a small drill bit or a specialized circular stamp tool to press a row of circles into the clay. Ensure the spacing is even. -
Detail the Lower Band:
On the taller pot, repeat the ‘bead’ process near the bottom third. Roll tiny balls of clay, score the pot surface, and press each ball on individually for a raised texture, rather than carving them in.
Step 4: Finishing Touches
-
Refine the Rim:
Run a damp sponge over the top rim to soften any sharp edges. It should feel smooth to the touch. -
Clean the Base:
Use a modeling tool to create a slight undercut at the very bottom of the pot, giving it a lifted, shadow-line appearance. -
Slow Dry:
Loosely cover your pots with plastic to let them dry slowly. Uneven drying leads to cracks, especially where coils join. -
Bisque Fire:
Once bone dry, fire the pieces in a kiln to bisque temperature (usually cone 04). -
Glaze Application:
For the look in the image, you want a matte, dry finish. Apply a very thin wash of white underglaze and wipe most of it back, or use a matte transparent glaze that allows the clay speckles to show through. -
Final Fire:
Fire the pots again to the maturity temperature of your clay body (likely cone 5 or 6 for stoneware).
Now you have a charming set of textured pots ready to hold dried flowers or stand alone as sculpture
Micro Glaze Test Cups as Decor
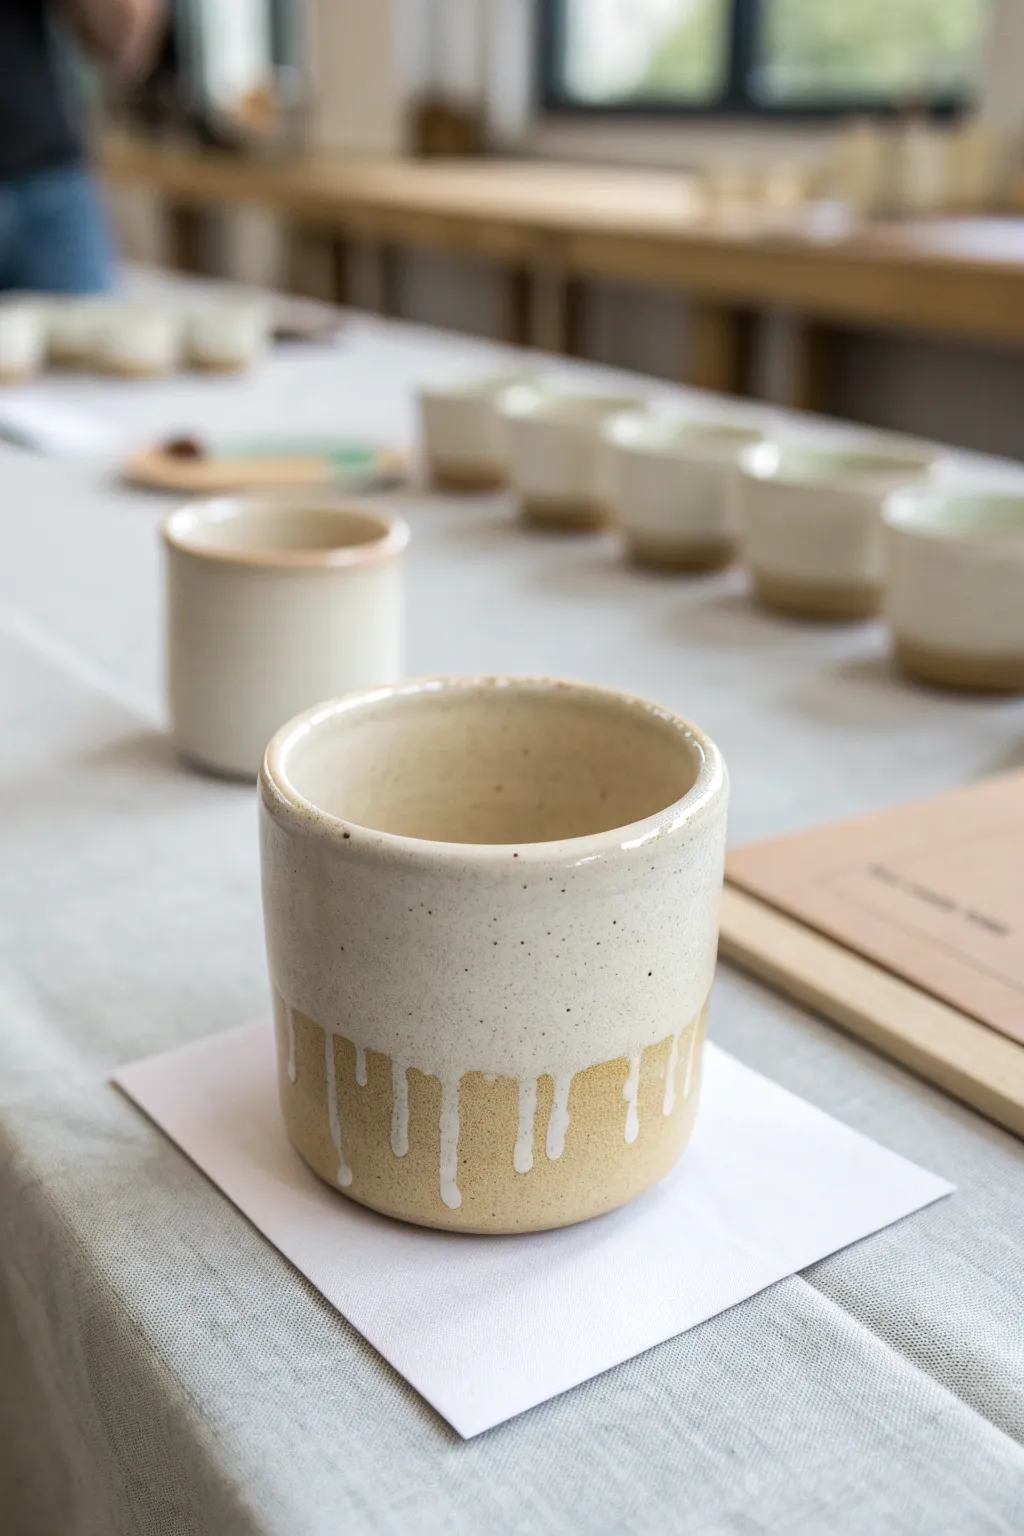
These miniature ceramic tumblers feature a stunning two-tone effect created by a thick, flowing top glaze over a speckled raw clay body. They serve beautifully as decor objects, glaze test tiles, or tiny succulent planters that bring handmade warmth to any shelf.
Step-by-Step Guide
Materials
- Speckled stoneware clay (mid-fire)
- Pottery wheel
- Throwing tools (sponge, wire cutter, rib, needle tool)
- Trimming tools
- Bisque firing kiln
- Glossy white glaze suited for your clay temperature
- Wax resist (optional)
- Glaze firing kiln
Step 1: Throwing the Forms
-
Weigh your clay:
Start by measuring out small balls of speckled stoneware clay, aiming for roughly 250-300 grams (about 0.5-0.7 lbs) per cup to keep them uniform. -
Center specifically:
Center the clay on your wheel, keeping the mound relatively narrow since these are cylindrical standing forms. -
Open the floor:
Open the clay to create a flat, interior bottom. Don’t go too wide; aim for a vertical lift rather than a bowl shape. -
Pull the walls:
Pull the walls straight up, maintaining an even thickness. These are simple cylinders, so focus on verticality and a consistent rim. -
Compress the rim:
Use a chamois or your sponge to gently round over the lip of the cup. This makes it pleasant to touch and more durable. -
Refine the shape:
Use a metal rib on the outside while supporting the inside with your hand to remove throwing lines and create a smooth, modern surface. -
Cut off:
Wire the pot off the wheel head and set it aside on a ware board to dry to leather-hard.
Step 2: Trimming and Bisque
-
Trim the foot:
Once leather hard, center the cup upside down on the wheel. Trim away excess weight from the bottom and carve a neat foot ring. -
Smooth the transition:
I like to run a damp sponge or a soft rib over the trimmed area to marry the texture of the trimmed clay with the thrown upper body. -
Dry completely:
Allow the cups to dry slowly until they are bone dry and no longer cool to the touch. -
Bisque fire:
Load the bone-dry cups into the kiln for a bisque firing (usually around Cone 04) to prepare them for glazing.
When Drips Run Too Far
If your test tile shows glaze running off the pot, slightly thin your glaze mixture with water or dip the cup for a shorter duration to reduce the volume applied.
Step 3: Glazing and Final Fire
-
Clean the bisque:
Wipe down the bisque-fired cups with a damp sponge to remove any kiln dust that might interfere with glaze adhesion. -
Prepare the glaze:
Mix your glossy white glaze thoroughly. For the drippy effect shown, the glaze needs to be slightly thicker than usual—think heavy cream consistency. -
Dip the rim:
Hold the cup by the foot and dip it upside down into the white glaze. Submerge it about two-thirds of the way down. -
Create the drips:
Hold the cup upside down for a few seconds, then flip it right-side up immediately. The gravity will pull the heavy bead of glaze downward, creating those organic drips. -
Clean the foot:
Ensure the bottom and the foot ring are perfectly clean of glaze. Any drips hitting the kiln shelf will ruin the piece. -
Final fire:
Load into the kiln for the final glaze firing (match the temperature to your clay and glaze, likely Cone 5 or 6). Ensure the cups aren’t touching each other.
Add Subtle Texture
Before the first firing, gently tap the leather-hard clay with a wooden paddle. This subtle faceting catches the melting glaze differently for varied drip patterns.
Set out your collection of test cups to admire the unique character of each drip formation
Mini Animal Figurines With Simple Shapes
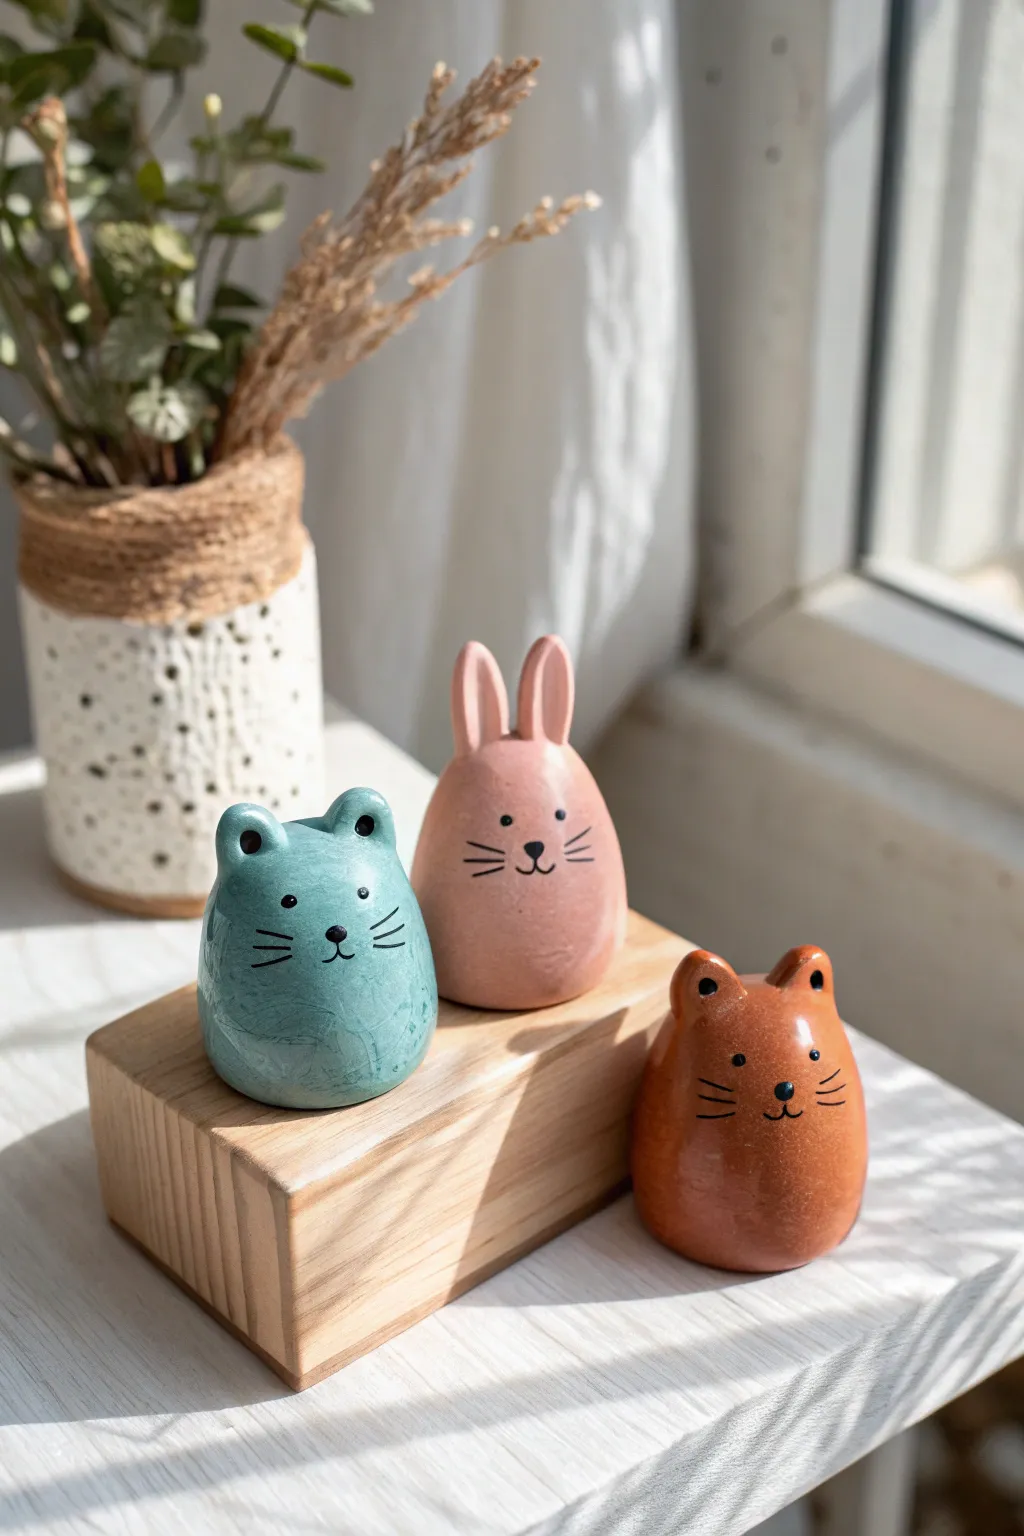
These charming, palm-sized figurines use a basic egg shape as a canvas for endless animal variations. With their smooth finish, pastel glazes, and minimalist faces, they make adorable desk companions or tiny planters.
Step-by-Step Tutorial
Materials
- White stoneware or porcelain clay
- Pottery wheel (optional, can be hand-built)
- Small kidney scraper or rib tool
- Needle tool
- Sponge
- Underglazes (teal, rosy pink, terracotta orange)
- Fine detail brush (liner brush)
- Black underglaze or oxide wash for details
- Clear transparent glaze
- Kiln
Step 1: Forming the Base Shape
-
Prepare the clay:
Start with a small ball of clay, roughly the size of a tangerine. Wedge it thoroughly to remove air bubbles, ensuring a smooth consistency for these delicate shapes. -
Shape the body:
If throwing on the wheel, center your clay and pull a small, enclosed form that narrows at the top. If hand-building, use the pinch pot method to create two small bowls, join them, and smooth the seam to create a hollow egg. -
Refine the curve:
Use a kidney scraper or a damp sponge to smooth the exterior. You want a continuous, organic curve that is slightly wider at the bottom for stability. -
Flatten the base:
Gently tap the bottom of your egg shape on a flat surface. This creates a stable footing so your figurine won’t wobble when displayed. -
Vent the form:
If you created a fully enclosed hollow form, use a needle tool to poke a hidden hole in the base. This allows air to escape during firing and prevents explosions.
Pro Tip: Surface Texture
Burnish the clay with the back of a spoon when leather hard before bisque firing. This creates an ultrasmooth, stone-like canvas for your paint.
Step 2: Adding Character Features
-
Sculpting bunny ears:
For the rabbit, roll two small coils of clay. Flatten them slightly and taper the ends. Score and slip the top of the head, then attach the ears upright, smoothing the clay downward to blend the seam flawlessly. -
Sculpting cat ears:
For the cats, form two small triangles. I find it helps to curve the triangles slightly forward to give them a more alert expression. Score, slip, and attach them to the top of the egg. -
Refine the attachments:
Use a small modeling tool or your fingertip to smooth the transition between the ears and head. The join should be invisible, looking as if the ears grew naturally from the form. -
Slow drying:
Cover your pieces loosely with plastic and let them dry slowly to the leather-hard stage. This prevents the delicate ears from cracking away from the body.
Step 3: Glazing and Decoration
-
Bisque fire:
Load the bone-dry pieces into the kiln for a bisque firing (usually Cone 04). Once cool, wipe them down with a damp sponge to remove any dust. -
Apply base color:
Brush on three even coats of your chosen underglaze. Use a soft teal for one cat, a warm terracotta for the other, and a dusty rose pink for the rabbit. Let each coat dry before applying the next. -
Paint the eyes:
Using a very fine liner brush and black underglaze, dot two small, wide-set eyes on the upper third of the face. Keep them simple dots for that ‘kawaii’ look. -
Add the nose:
Paint a tiny, inverted triangle or oval for the nose directly between and slightly below the eyes. -
Draw the mouth:
From the bottom of the nose, paint a small vertical line, then split it into two curved lines going outward to form the classic animal smile. -
Detail the whiskers:
With a steady hand, flick three quick, thin lines on each cheek. Quick strokes prevent shaky lines and keep the whiskers looking crisp. -
Clear glaze application:
Once the underglaze design is completely dry, dip the entire piece into a clear transparent glaze. Shake off excess drips immediately. -
Final firing:
Fire the pieces again to the maturity temperature of your clay and glaze (typically Cone 5 or 6). This will seal the surface and make the colors pop.
Level Up: Functional Art
Leave the top of the head open instead of closing the form. Now your cute figurine doubles as a minimalistic toothbrush holder or a bud vase.
Now you have a trio of smooth, expressive creatures ready to brighten up any windowsill
Tiny Pottery “Families” in Matching Sets
Create a charming family of miniature vessels that share a cohesive spirit through matching clay bodies and uniform glazes. This set features a speckled cream finish highlighted by warm, toasted terracotta rims, perfect for displaying tiny succulents or holding trinkets.
How-To Guide
Materials
- Speckled clay body (stoneware recommended)
- Pottery wheel (or hand-building tools if pinching)
- Metal rib
- Wire cutting tool
- Pin tool
- Trimming tools
- Sponge
- Cream or white matte glaze
- Iron oxide wash (or a rust-colored underglaze)
- Small kiln
Step 1: Planning and Weighing
-
Prepare your clay balls:
Since these are miniatures, you won’t need much clay. Weigh out four small balls of speckled clay: two at roughly 200g (for the larger jar and bowl), one at 150g (for the small bottle), and one at 100g (for the lidded jar base). -
Wedge thoroughly:
Even with small amounts, air bubbles are a disaster. Wedge each ball thoroughly to ensure even consistency before you begin throwing.
Step 2: Throwing the Forms
-
Throw the large jar:
Center your first 200g ball. Open the form and pull the walls up into a cylinder. Gently collar the neck inwards to create a slightly tapered jar shape, keeping the rim distinct and rounded. -
Create the mini bottle:
Using the 150g ball, throw a small cylinder. Belly out the bottom section slightly using a rib, then significantly collar the top neck in very tightly to create that distinct narrow opening typical of sake bottles or buds vases. -
Shape the planters:
Throw the remaining larger ball into a simple open bowl shape with vertical walls for the planter. For the small bowl (the bottom of the lidded jar), throw a shallow, wide cylinder with a straight gallery rim to accept a lid. -
Throw the lid:
Using a tiny scrap of clay, throw a small, low dome. Add a distinctive ring-shaped knob on top. Ensure the diameter matches the gallery of your small lidded jar base. I usually measure with calipers while the clay is wet to be safe.
Sticky Lids?
If you fire the lid on the pot, use alumina hydrate mixed with wax on the contact points. This powder prevents the glaze or bare clay from fusing together.
Step 3: Trimming and Refining
-
Leather hard drying:
Allow all pieces to dry to a leather-hard state. They need to be firm enough to handle without warping but soft enough to carve. -
Trim the feet:
Place each piece back on the wheel inverted. Trim the bottoms to create neat foot rings. This lifts the form visually and gives the pieces a professional finish. -
Smooth the surfaces:
Use a damp sponge to smooth out any throwing lines if you prefer a cleaner look, or leave slight ridges for texture. Pay special attention to the rims, rounding them off perfectly.
Pro Tip
To get perfectly matching rim colors, wipe back the white glaze from the rim with a damp sponge before painting on your oxide. This keeps the color rich and muddy.
Step 4: Decorating and Glazing
-
Bisque fire:
Load your bone-dry pieces into the kiln and bisque fire them according to your clay body’s specifications (usually Cone 06 or 04). -
Apply wax resist:
Wax the bottoms of all pieces and the gallery rim of the lidded jar to prevent the lid from sticking during the glaze firing. -
Dip in base glaze:
Dip each piece into a creamy, matte white glaze. Shake off excess gently to ensure an even coat. The speckles in the clay should eventually show through this layer. -
Accent the rims:
Once the base glaze is dry to the touch, use a small brush to apply a band of iron oxide wash or rust-colored underglaze to the very rim of every vessel and the ring handle of the lid. This creates that toasted contrast. -
Glaze fire:
Fire the pieces to maturity (likely Cone 5 or 6 for stoneware). Ensure the lid is fired separately or on a stilt if you are worried about the fit, though firing it in place (with wax interlock) helps maintain the shape.
Now you have a cohesive family of ceramics ready to bring a touch of handmade warmth to any shelf