Brown is my favorite “quiet hero” color in jewelry—especially when it’s brown clay beads with that soft, matte finish. Here are my go-to brown clay bead bracelet ideas that range from classic neutral strands to a few studio-style twists that still feel totally wearable.
Classic Matte Brown Heishi Strand

Embrace simplicity with this minimalist bracelet featuring rich, cocoa-brown beads with a lovely organic matte finish. This Heishi-style strand captures a natural aesthetic that pairs beautifully with casual wear or stacks effortlessly with other jewelry.
Step-by-Step Tutorial
Materials
- Dark brown wood or polymer clay rondelle beads (approx. 6-8mm)
- Strong elastic cord (0.7mm or 0.8mm clear)
- Jewelry glue or clear nail polish
- Scissors or jewelry snips
- Bead stopper or simple binder clip
- Tape measure
- Small dab of masking tape (optional)
Step 1: Preparation
-
Measure your wrist:
Wrap a flexible tape measure around your wrist to find the circumference. Add about 0.5 inches to this measurement to ensure a comfortable fit that isn’t too tight. -
Prepare the cord:
Cut a length of elastic cord about 10-12 inches long. Having this extra length makes the final knotting process much easier than working with short ends. -
Pre-stretch the elastic:
Hold the cord firmly at both ends and give it a few gentle tugs. This pre-stretching step helps prevent the bracelet from loosening up after the first few wears. -
Secure one end:
Attach a bead stopper or a binder clip to one end of the cord. Alternatively, you can use a small piece of masking tape folded over the end to stop beads from sliding off.
Knot Strength
Don’t trim the ends immediately after gluing. Let the glue cure fully for 24 hours to ensure the elastic doesn’t snap back or unravel.
Step 2: Stringing the Beads
-
Inspect your beads:
Look through your brown beads and discard any that are chipped or misshapen to ensure a uniform look for your classic strand. -
Begin stringing:
Ideally, start sliding the beads onto the cord one by one. I like to check the fit periodically by wrapping the partially strung cord around my wrist to gauge the size. -
Check for consistency:
As you string, ensure the flat sides of the rondelle beads are nesting together snugly. This créeates that satisfying, continuous column effect. -
Double-check length:
Once you think you have enough beads, hold the two ends of the elastic together to form a circle. There should be no gaps between beads, and it should slide comfortably over your hand.
Step 3: Finishing the Bracelet
-
Remove the stopper:
Carefully remove the bead stopper or tape while gripping the end of the cord tightly so no beads escape. -
Tie the first knot:
Bring the two ends together and tie a simple overhand knot. Pull it tight gently to bring the beads together without bunching them up. -
Tie a surgeon’s knot:
For the second knot, loop the cord end through the loop twice instead of once before pulling tight. This extra pass creates friction that holds the elastic securely. -
Secure with glue:
Apply a tiny drop of jewelry glue or clear nail polish directly onto the knot. This prevents it from slipping over time. -
Hide the knot:
While the glue is still tacky but not wet, gently pull the cord so the knot slides inside the hole of the nearest bead. This hides the mechanics for a seamless finish. -
Trim the excess:
Once dry, use your scissors to trim the excess cord ends close to the bead hole. Be careful not to nick the main knot.
Texture Twist
Intersperse a few brass or copper spacer beads every five brown beads to add a warm, metallic highlight to the earthy matte tones.
Enjoy wearing your new handcrafted accessory brings a touch of nature to your daily style


Cocoa-To-Tan Ombre Fade
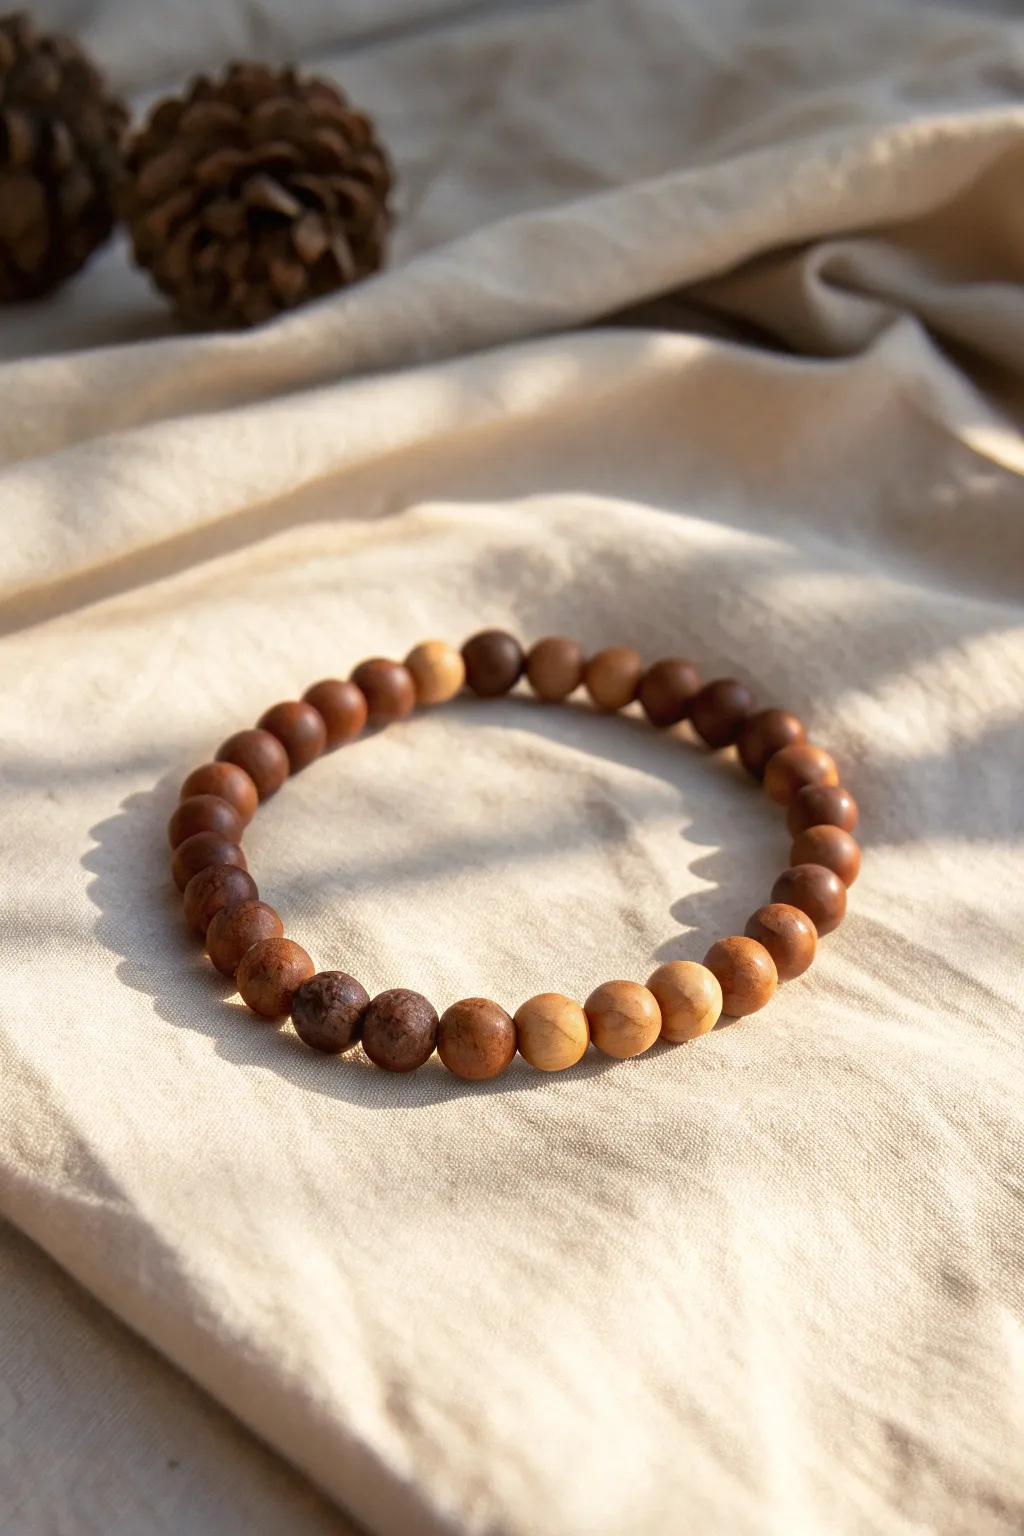
Embrace the warmth of nature with this subtle gradient bracelet that shifts gently from deep cocoa browns to light, sandy tans. Using simple polymer clay blends, you’ll create a sophisticated accessory that mimics the organic look of polished wood.
How-To Guide
Materials
- Polymer clay in dark brown (Burnt Umber)
- Polymer clay in beige or tan (Ecru)
- Polymer clay in white (for lightening)
- Bead roller or acrylic sheet
- Toothpick or bead recking pins
- Elastic cord (0.8mm or 1mm)
- Super glue or jewelry cement
- Parchment paper-lined baking sheet
- Oven (for baking clay)
- Sandpaper (optional, fine grit)
Step 1: Mixing the Clay Gradients
-
Prepare Base Colors:
Condition your dark brown and tan clay separately by kneading them in your hands until they are soft and pliable. -
Create the Darkest Shade:
Set aside a lump of pure dark brown clay; this will form your darkest ‘cocoa’ beads. -
Create the Lightest Shade:
Set aside a lump of pure tan clay; this will be for the lightest ‘sand’ beads at the opposite end of the gradient. -
Mix the Mid-Tones:
To create the transition shades, mix specific ratios of brown and tan. For a dark-medium shade, mix 3 parts brown with 1 part tan. -
Blend the Middle Tone:
Mix equal parts (1:1) of brown and tan clay to create a perfect middle bead color. -
Mix the Light-Medium Tone:
Finally, mix 1 part brown with 3 parts tan to bridge the gap to your lightest color.
Step 2: Forming the Beads
-
Portion the Clay:
Pinch off small, equal-sized pieces from each of your five color blends. Aim for pieces that are roughly the size of a pea. -
Roll Spheres:
Roll each piece between your palms to form smooth, round spheres. I like to check them against each other occasionally to ensure uniform sizing. -
Pierce the Holes:
Gently twist a toothpick or piercing pin through the center of each bead. Rotate the bead as you push to avoid squishing the spherical shape. -
Add Texture (Optional):
For that organic, wood-like look seen in the photo, gently roll the pierced beads ever so slightly on a piece of sandpaper or concrete before baking. -
Bake:
Arrange your beads on a parchment-lined baking sheet and bake according to your clay manufacturer’s instructions (usually 275°F/135°C for 15-30 minutes). -
Cool Down:
Let the beads cool completely before handling them; they harden fully as they cool.
Seamless Finish
Make the hole of one specific bead slightly larger than the rest. This allows you to hide the final bulky knot completely inside it for a professional look.
Step 3: Assembly
-
Layout the Design:
Lay your beads out on a bead board or towel. Arrange them in a gradient from darkest to lightest and back to darkest to visualize the ombre flow. -
Measure the Cord:
Cut a piece of elastic cord about 10 inches long to give yourself plenty of room for tying knots. -
Pre-stretch the Cord:
Give the elastic cord a few firm tugs to pre-stretch it; this prevents the bracelet from loosening up later. -
String the Beads:
Thread the beads onto the cord following your laid-out pattern, being careful to maintain the color transition. -
Check fit:
Wrap the strand around your wrist to check the size, adding or removing specific transition connector beads if needed. -
Tie the Knot:
Tie a surgeon’s knot (right over left, left over right, loop through twice) and pull it tight. -
Secure and Trim:
Add a tiny dot of super glue to the knot, let it dry for a minute, then tuck the knot inside one of the bead holes before trimming the excess cord.
Sticky Texturing?
If your clay gets too soft and fingerprints are showing, pop the raw beads in the fridge for 10 minutes before doing the final piercing and texturing steps.
Wear your new ombre bracelet stacked with others or solo for a refined, earthy statement piece


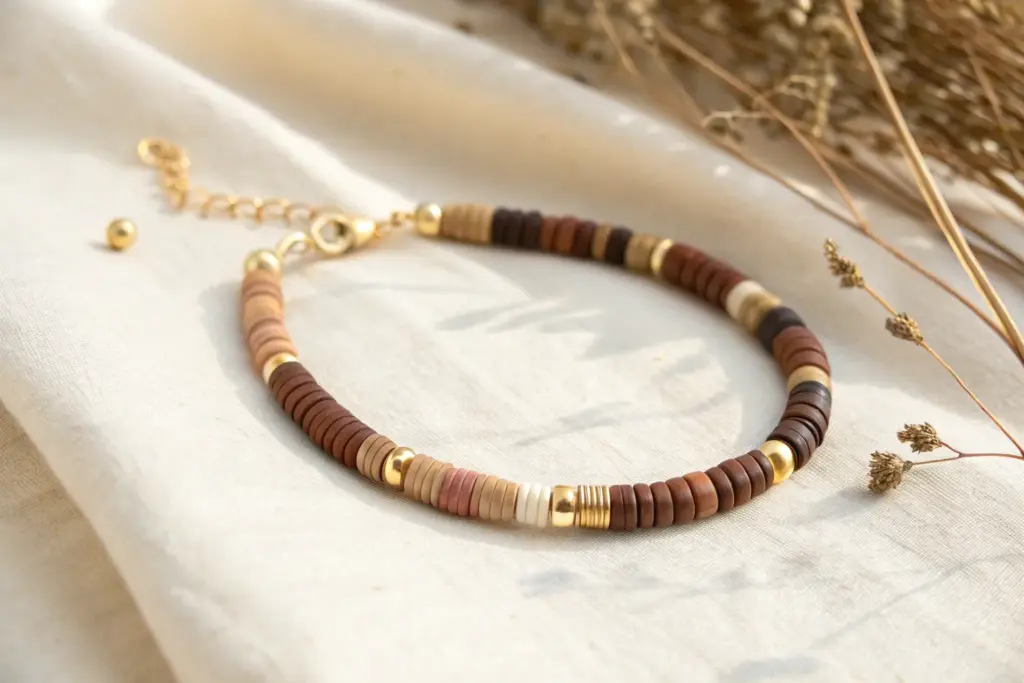
Brown Heishi With Gold Spacer Pops
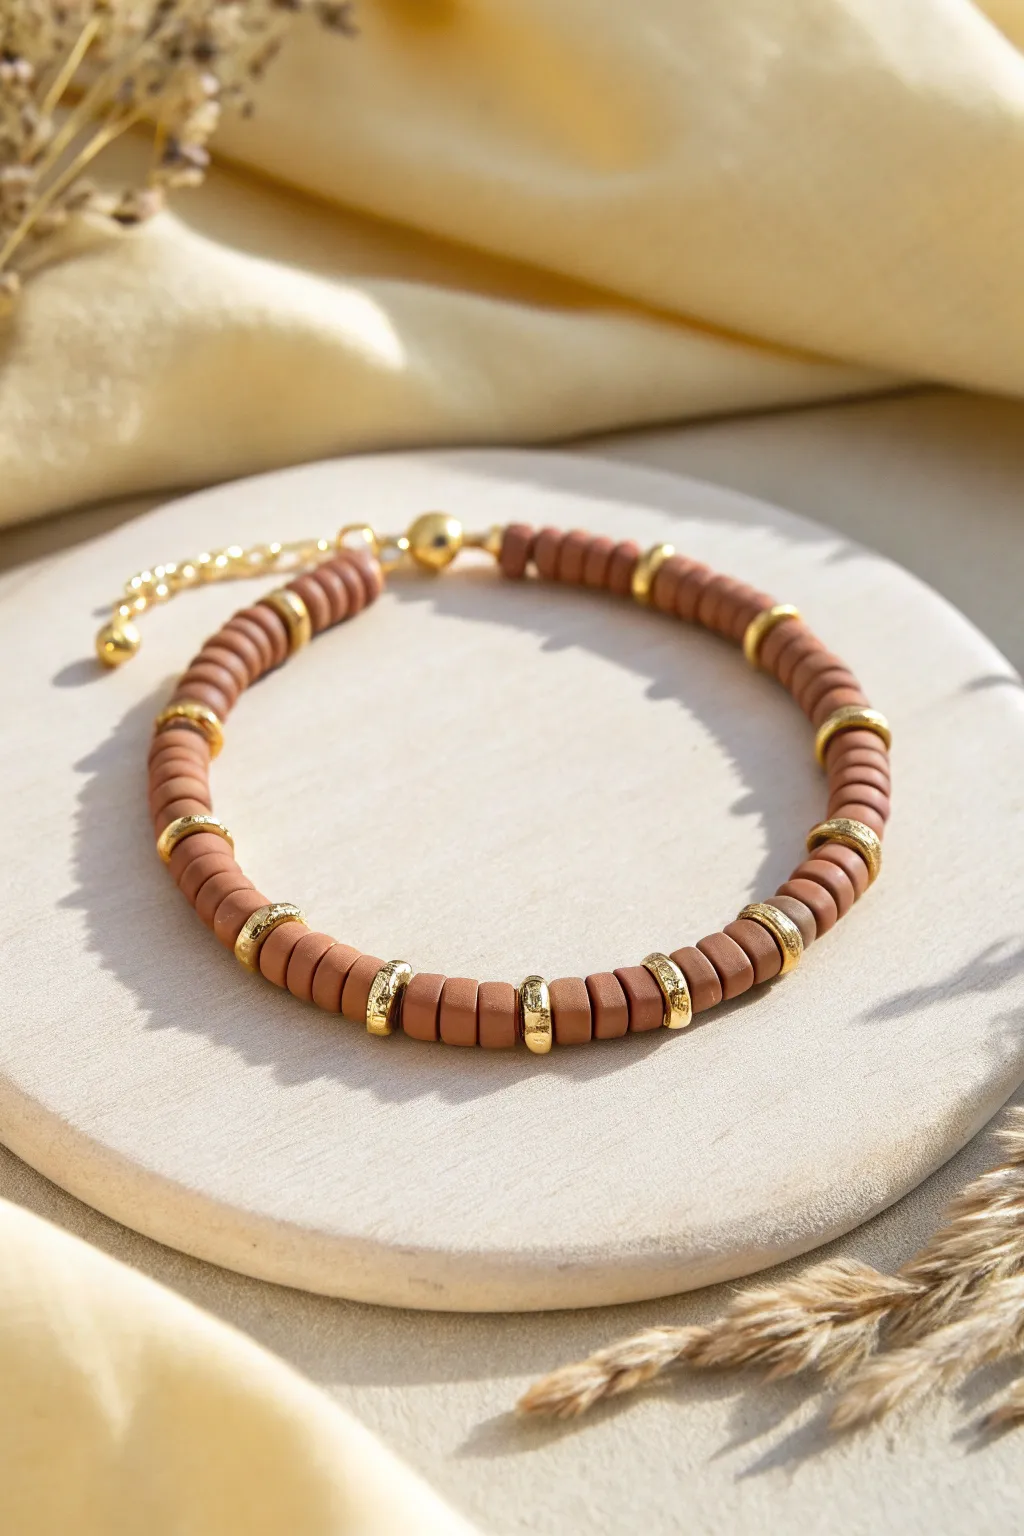
Embrace warm, natural tones with this sophisticated bracelet that pairs matte brown heishi beads with shimmering gold accents. The textured spacers add just the right amount of rhythm and shine, making this piece perfect for stacking or wearing as a standalone statement.
Step-by-Step Tutorial
Materials
- Brown polymer clay heishi disc beads (approx. 6mm)
- Textured gold spacer beads (disc or rondelle shape, approx. 5-6mm)
- Smooth gold melon bead or crimp cover (optional for finish)
- Gold lobster clasp
- Gold extension chain with drop charm
- Beading wire (gold or clear, flexible)
- 2 Gold crimp beads
- 2 Gold wire guards (optional but recommended for longevity)
- Crimping tool (or flat nose pliers)
- Wire cutters
- Bead design board or masking tape
Step 1: Setting up the Pattern
-
Measure and Cut:
Cut a piece of beading wire about 10-12 inches long. It’s always better to have extra length to work with comfortably rather than struggling with short ends later. -
Secure the End:
Place a piece of masking tape on one end of the wire or attach a ‘bead stopper’ spring. This simple step prevents your beads from sliding off while you design your pattern. -
Establish the Rhythm:
Examine the reference image closely. The pattern isn’t just random; it relies on small groups of clay beads separated by gold. Plan for sections of roughly 5-6 brown heishi beads. -
Select Your Gold Accents:
Sort through your gold spacers. The bracelet uses spacers that are roughly the same diameter as the clay beads but have a textured or ‘stardust’ finish for visual interest.
Textured Shine
Look specifically for ‘brushed’ or ‘stardust’ finish gold beads. Their rougher surface catches light better than smooth beads and hides fingerprints.
Step 2: Stringing the Beads
-
Start with Clay:
Begin stringing by threading on your first group of brown clay heishi beads. I usually start with a group of five to create a solid foundation near the clasp. -
Add the First Spacer:
Slide on one gold spacer bead. Ensure it sits flush against the flat clay beads; if there’s a gap, check for any imperfections on the clay bead edges. -
Build the Repetition:
Continue the pattern: 5-6 brown beads, followed by 1 gold spacer. Repeat this sequence. -
Check the Fit:
Periodically wrap the strung wire around your wrist. The goal is to cover enough length to go around your wrist minus about an inch for the clasp hardware. -
Adjust the Pattern:
If you reach the end and your pattern is cut short, add or subtract one clay bead from each section to extend or shorten the overall length while keeping it symmetrical. -
Final Bead Section:
Finish the stringing with a matching group of brown clay beads to mirror the starting end.
Uneven Clay Beads?
Vinyl heishi beads often vary in thickness. Before stringing, stack them on a needle to visually check that your ‘groups of 5’ are actually the same height.
Step 3: Attaching the Hardware
-
Prepare the Crimp:
Remove the tape/stopper. Slide a crimp bead onto the wire end, followed by a wire guard (horseshoe shape). -
Loop the Clasp:
Thread the wire through the wire guard and hook the lobster clasp onto the guard. If not using a guard, loop the wire directly through the clasp ring and back through the crimp bead. -
Secure the First End:
Pull the wire snug so the loop is small but the clasp moves freely. Use your crimping tool to flatten or fold the crimp bead securely. Trim the excess tail wire close to the crimp. -
Prepare the Second End:
Move to the other end of the bracelet. Slide on a crimp bead and a wire guard. -
Attach the Extender:
Thread the wire through the guard and hook on the jump ring of your extension chain. Pass the wire back down through the crimp bead and into the first few clay beads. -
Tighten Tension:
Pull the wire to remove slack, but test the bracelet’s flexibility. It should form a circle easily without being stiff or showing bare wire gaps. -
Final Crimp:
Crimp the bead firmly to lock everything in place. -
Clean Finish:
Trim the remaining wire tail flush against the bead. If you have crimp covers (gold beads shaped like a ‘C’), wrap them over your flattened crimps for a polished professional look.
Your wrist now features a warm, earthy accessory that looks effortlessly high-end


Neutral Color-Block In Brown, Cream, and Black
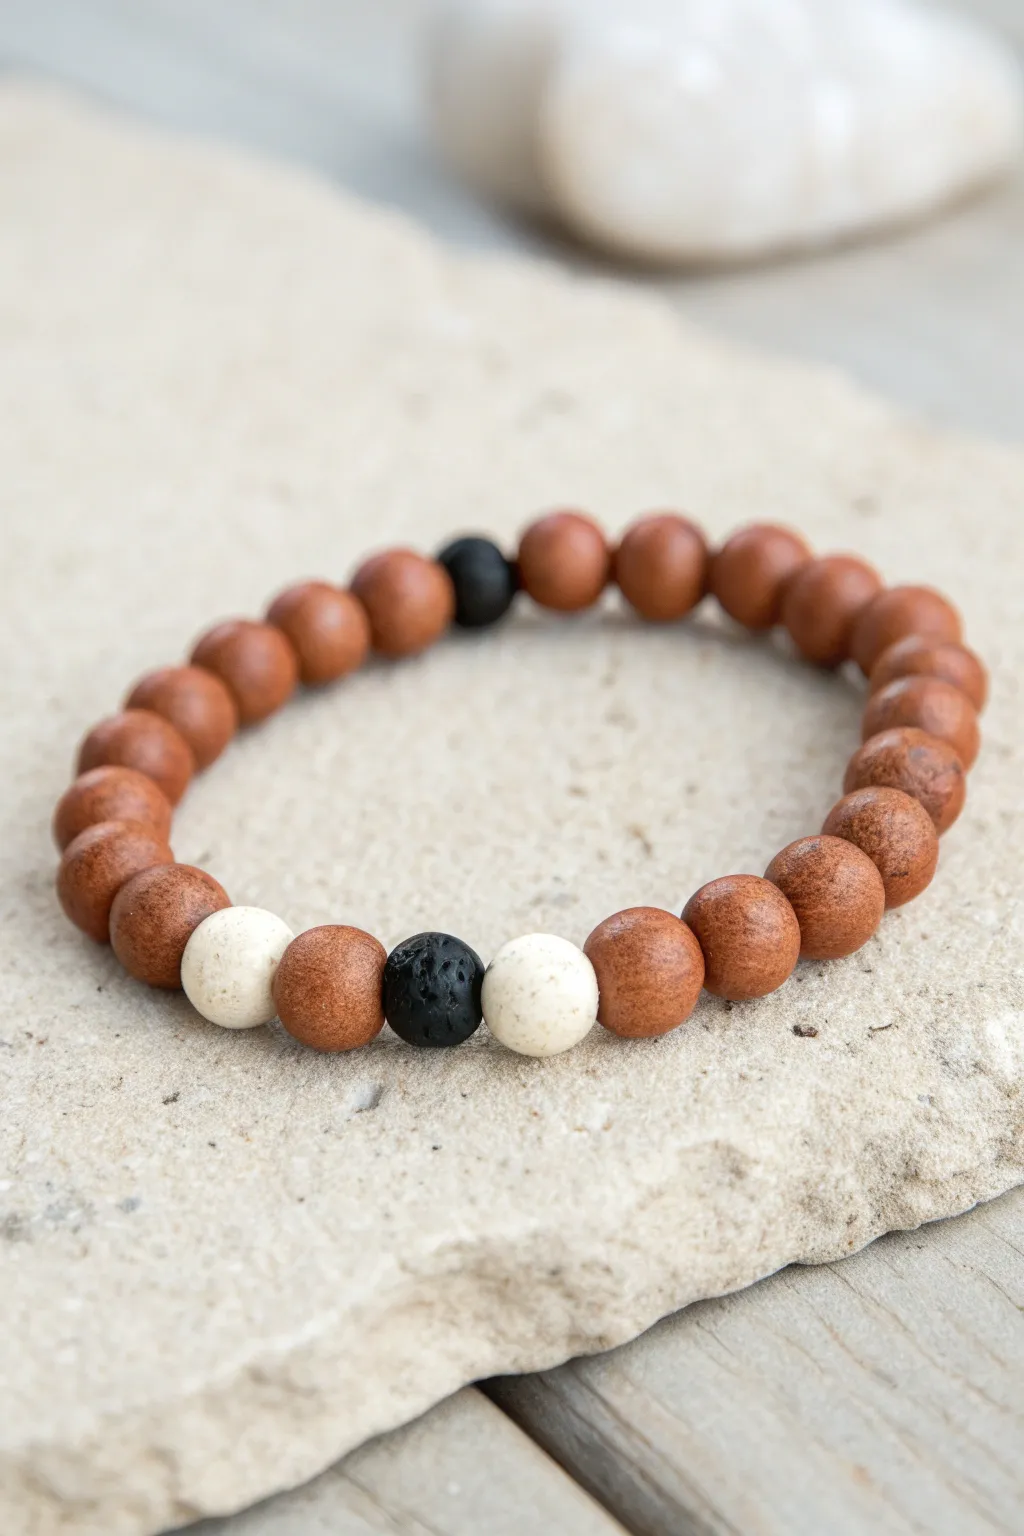
This project combines the warmth of terracotta-colored clay with striking accents of cream and black lava stone for a grounded, natural look. The simple color-blocking pattern creates a versatile accessory that feels both rustic and modern.
Step-by-Step
Materials
- Approximately 20-22 round terracotta/brown clay beads (8mm or 10mm)
- 2 round cream/white speckled clay beads (same size as main beads)
- 2 round black lava stone beads (same size as main beads)
- Elastic jewelry cord (0.8mm or 1mm thickness)
- Super glue or jewelry cement
- Scissors
- Bead stopper or painter’s tape
- Ruler or measuring tape
Step 1: Preparation and Design
-
Measure the wrist:
Begin by measuring your wrist with a flexible measuring tape to determine the comfortable length for your bracelet. -
Calculate bead count:
Lay out your beads along the ruler to match your wrist measurement, adding about half an inch for a comfortable fit. -
Layout the focal point:
Center your design by placing one black lava bead in the middle of your workspace. -
Add flanking beads:
Place one brown clay bead on immediate left and one on the immediate right of the central black bead. -
Position the cream accents:
Next to those brown beads, place one cream bead on each side to create the high-contrast focal section. -
Complete the pattern:
Continue filling out the rest of the strand with the remaining brown clay beads until you reach your desired length. -
Place the hidden knot bead:
Locate the second black lava bead and place it at the very end of your layout; this will sit opposite the front focal section and can hide your knot later.
Knot Slipping Out?
If the knot won’t stay inside the bead hole, widen the hole slightly using a bead reamer tool, or simply use a bead with a larger bore specifically for the knots.
Step 2: Stringing the Bracelet
-
Prepare the cord:
Cut a piece of elastic cord about 10-12 inches long to give yourself plenty of room to tie knots comfortably. -
Secure the end:
Attach a bead stopper or a piece of tape to one end of the cord so beads don’t slide off while you work. -
Pre-stretch the elastic:
I always give the elastic a few gentle tugs before stringing; this helps prevent the bracelet from stretching out permanently after the first wear. -
Thread the beads:
Thread your beads onto the cord, following the pattern you laid out carefully. -
Check the fit:
Once all beads are strung, wrap the strand around your wrist to verify the size is correct before tying anything off.
Aromatic Addition
Don’t seal the lava beads! Their porous surface is perfect for holding a drop of essential oil, turning your jewelry into a personal diffuser.
Step 3: Finishing Touches
-
Tie the first knot:
Remove the bead stopper and bring the two ends of the cord together, tying a simple overhand knot. -
Secure with a surgeon’s knot:
Follow up with a surgeon’s knot—this is like a standard square knot, but you loop the cord through twice before pulling tight for extra security. -
Apply adhesive:
Place a tiny drop of super glue or jewelry cement directly onto the knot. -
Hide the knot:
While the glue is still tacky, gently slide the knot inside the hole of the black lava bead at the back of the design. -
Trim excess cord:
Once the glue has fully dried (check manufacturer instructions for time), use sharp scissors to trim the excess cord as close to the bead as possible without cutting the knot.
Wear your new bracelet alone or stacked with others for a textured, earthy statement piece

The Complete Guide to Pottery Troubleshooting
Uncover the most common ceramic mistakes—from cracking clay to failed glazes—and learn how to fix them fast.
Espresso Brown and Olive Green Stack
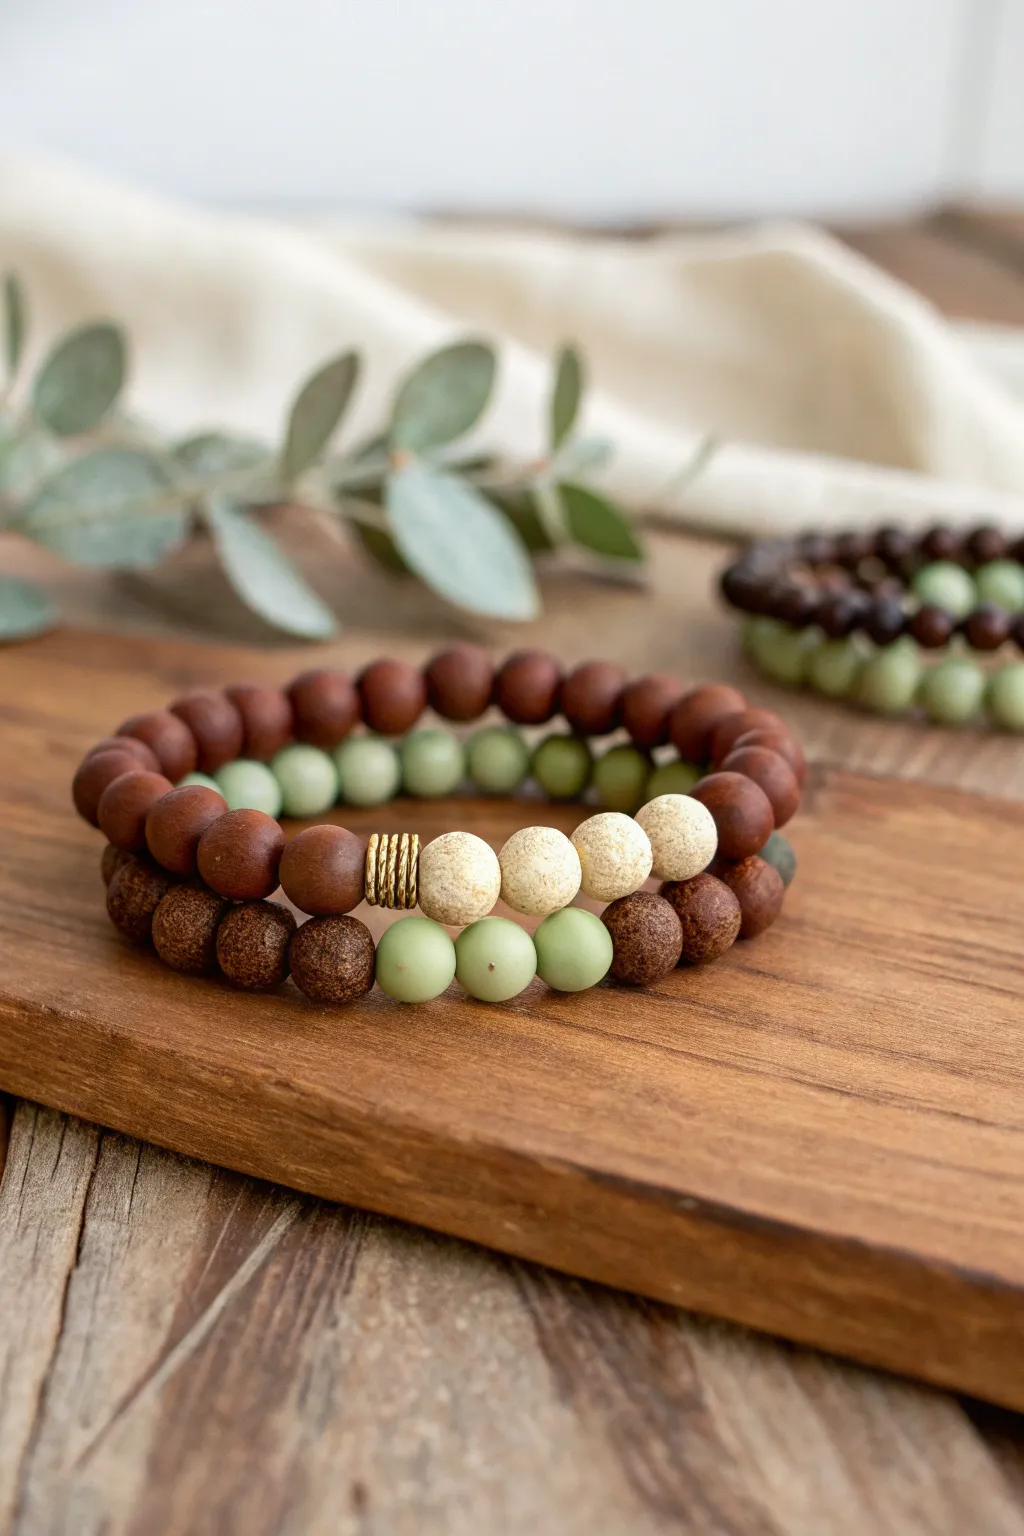
Embrace the soothing tones of nature with this dual-bracelet stack design, pairing rich espresso-stained wood with soft olive hues. The combination of smooth and textured beads, accented by raw cream lava stones and brass, creates a sophisticated yet grounded accessory perfect for everyday wear.
Detailed Instructions
Materials
- Dark reddish-brown round wood beads (approx. 8mm-10mm)
- Matte olive green round beads (matte stone or wood, approx. 8mm-10mm)
- Cream or off-white porous lava stone beads (approx. 10mm)
- Textured dark brown lava or sponge coral beads (approx. 8mm-10mm)
- Gold-tone or brass heishi spacer beads (flat disc shape)
- Strong stretch cord (0.7mm or 0.8mm clear elastic)
- Super glue or jewelry adhesive
- Scissors or bead nippers
- Bead stopper or simple binder clip
- Beading tray or soft mat
Step 1: Planning and Preparation
-
Measure your wrist:
Before cutting any cord, wrap a measuring tape around your wrist to find your size. Add about 0.5 to 1 inch to this measurement depending on how loose you like your fit. -
Prepare the elastic:
Cut two pieces of stretch cord, each about 10-12 inches long. This extra length is essential for tying secure knots later without struggling. -
Pre-stretch the cord:
Hold a segment of the cord firmly between your hands and give it several gentle tugs. This pre-stretching prevents the bracelets from sagging or loosening after you’ve worn them a few times. -
Secure the ends:
Attach a bead stopper or a binder clip to one end of each cord piece so your beads don’t slide right off while you work.
Knot Slipping?
If your surgeon’s knot feels slippery, try adding a dab of clear nail polish if you don’t have jewelry glue. It seals the fibers and holds the elastic tight.
Step 2: Creating the Solid Espresso Bracelet
-
Select your beads:
For the top bracelet, grab your smooth, dark reddish-brown wooden beads. You’ll need enough to cover the full length of your wrist measurement. -
Start stringing:
Begin threading the dark brown wood beads onto the first cord. Keep the tension consistent but not too tight. -
Check the fit:
Once you have strung enough beads to circle your wrist, wrap it around your arm to check the fit. Add or remove a bead until it sits comfortably. -
Knot the first bracelet:
Tie the ends together using a surgeon’s knot—cross right over left, then wrap the end through the loop twice instead of once before pulling tight. Repeat this knotting process for security. -
Secure and trim:
Place a tiny drop of super glue or jewelry adhesive on the knot. Let it dry completely before trimming the excess cord close to the knot. Hide the knot inside a bead hole if possible.
Step 3: Designing the Mixed Texture Bracelet
-
Lay out the pattern:
For the second bracelet, layout your design on a bead board. The focal point is a central section: stack about 4-5 brass heishi spacers, followed by 3-4 cream lava beads. -
Plan the sides:
On either side of the central cream/brass section, plan to alternate between your smooth olive green beads and the textured dark brown beads. I like to group them slightly asymmetrical or blocks of color for visual interest. -
Start with the focal point:
Thread the stack of 4-5 brass heishi spacers onto your second cord first, followed directly by the 3-4 cream lava beads. -
Add side beads:
Continue stringing the pattern you laid out. For instance, you might place a smooth olive bead, then a textured brown bead, repeating until you reach the desired length. -
Verify sizing:
Wrap this second strand around your wrist alongside the first finished bracelet. Adjust the number of olive/brown beads to ensure both bracelets share the same circumference. -
Tie the second knot:
Perform the same surgeon’s knot technique as before. Pull the elastic firmly to ensure there are no gaps between beads, but be careful not to snap it. -
Glue and finish:
Apply a final dab of glue to the knot, let it dry, and trim the excess tails. Gently pull a neighboring bead over the knot to conceal it. -
Stack them up:
Place both bracelets on your wrist, adjusting the focal point of the mixed bracelet so the cream and brass section sits prominently on top.
Scent Infusion
The porous cream lava beads are perfect diffusers. Add a drop of essential oil like cedarwood or sandalwood to them for a lasting, earthy fragrance.
Enjoy the tactile beauty of your new nature-inspired bracelet stack
Minimal Name Bracelet in Earthy Neutrals
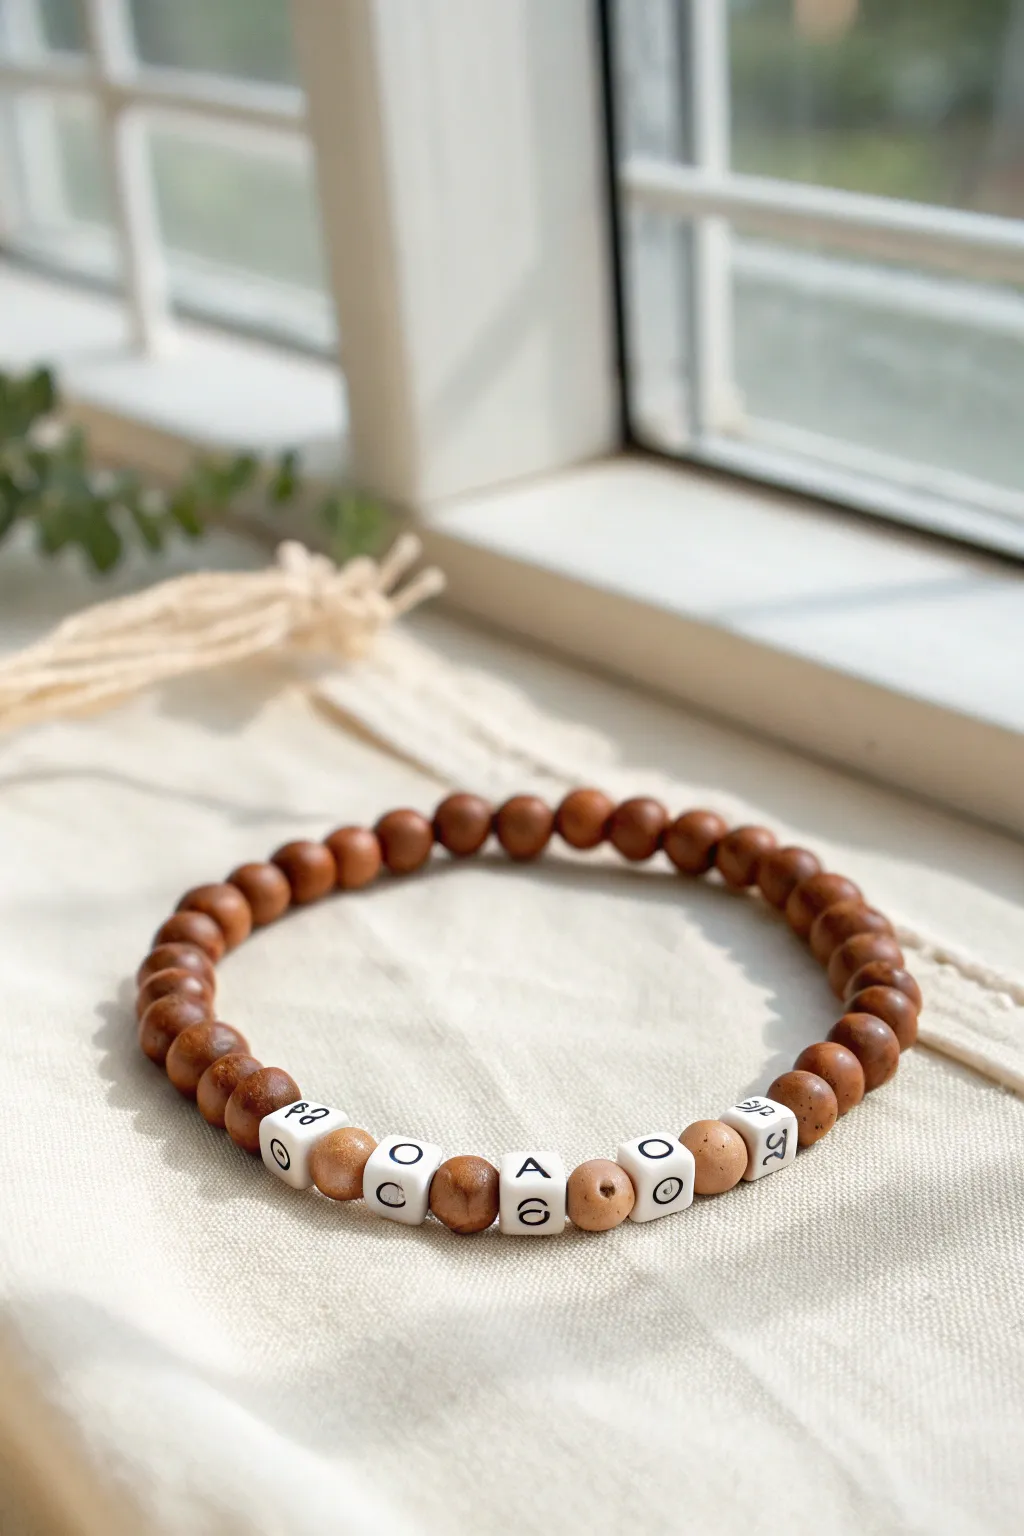
Embrace the warmth of natural tones with this minimalist beaded name bracelet. Combining rich, earthy brown beads with stark white letter cubes creates a balanced, organic accessory perfect for everyday wear.
Step-by-Step Guide
Materials
- 8mm brown wood or matte clay beads (approx. 30)
- 6mm white rectangular letter beads (black lettering)
- 0.8mm clear elastic stretch cord
- Jewelry glue or clear nail polish
- Scissors
- Bead stopper or masking tape
- Optional: Bead board
Step 1: Preparation
-
Measure your wrist:
Wrap a piece of string around your wrist to find your comfortable size, then add about half an inch for a comfortable fit that isn’t too tight. -
Cut the elastic:
Cut a length of elastic cord about 10-12 inches long. Having extra length makes tying the knot at the end much easier than struggling with short ends. -
Pre-stretch the cord:
Gently pull on the elastic cord several times. This pre-stretching step helps prevent the bracelet from sagging or loosening up immediately after you wear it. -
Secure the end:
Place a bead stopper or a piece of masking tape on one end of your cord to prevent your beads from sliding off while you work.
Knot Slipping?
If your elastic knot feels insecure, try a drop of GS Hypo Cement. It has a precision tip perfect for getting right inside the knot without gluing the beads together.
Step 2: Designing the Pattern
-
Select your letters:
Pick out the letter beads for your chosen word or name. The example shows a four-letter pattern interspersed with clay beads, but you can customize this freely. -
Plan the layout:
Lay out your beads on a bead board or towel. Place the letter beads in the center and arrange the brown clay beads equally on both sides to ensure the word stays centered. -
Check the spacing:
Notice how the example places a single brown spacer bead between each letter block. Decide if you want this spaced-out look or if you prefer the letters flush against each other.
Step 3: Stringing the Beads
-
Start with the main color:
Begin threading the brown clay beads onto the elastic. I usually start with about half of the total brown beads required for the bracelet. -
Add the focal section:
Thread your first letter bead, followed by a brown spacer bead. Continue this alternating pattern until your full word or name is strung on the cord. -
Verify orientation:
Double-check that all your letter beads are facing the correct direction and aren’t upside down before proceeding. -
Finish the strand:
String the remaining half of the brown clay beads onto the other side of the letter section. -
Test the size:
Carefully wrap the unfinished strand around your wrist to check the fit. Add or remove brown beads from the ends as needed to get the perfect size.
Level Up: Texture Mix
Swap the plain brown spacer beads between the letters for small gold or brass discs. This adds a subtle metallic flash that elevates the rustic look.
Step 4: Finishing Touches
-
Prepare to tie:
Remove the bead stopper or tape carefully, holding both ends of the elastic firmly. -
Tie the first knot:
Make a simple overhand knot, pulling the elastic tight to bring the beads together without leaving gaps. -
Secure with a surgeon’s knot:
Follow up with a surgeon’s knot: cross the threads, loop one end through twice instead of once, and pull tight. This creates a much stronger hold than a standard knot. -
Add adhesive:
Apply a tiny dab of jewelry glue or clear nail polish directly onto the knot. Allow it to dry completely before touching it to ensure it doesn’t become brittle. -
Hide the knot:
Once the glue is dry, trim the excess elastic ends close to the knot. Gently tug the strand to slide the knot inside the hole of the nearest brown bead to hide it.
Slip on your new custom bracelet and enjoy the grounded, natural vibe it brings to your outfit


What Really Happens Inside the Kiln
Learn how time and temperature work together inside the kiln to transform clay into durable ceramic.
Morse Code Message in Two Brown Tones
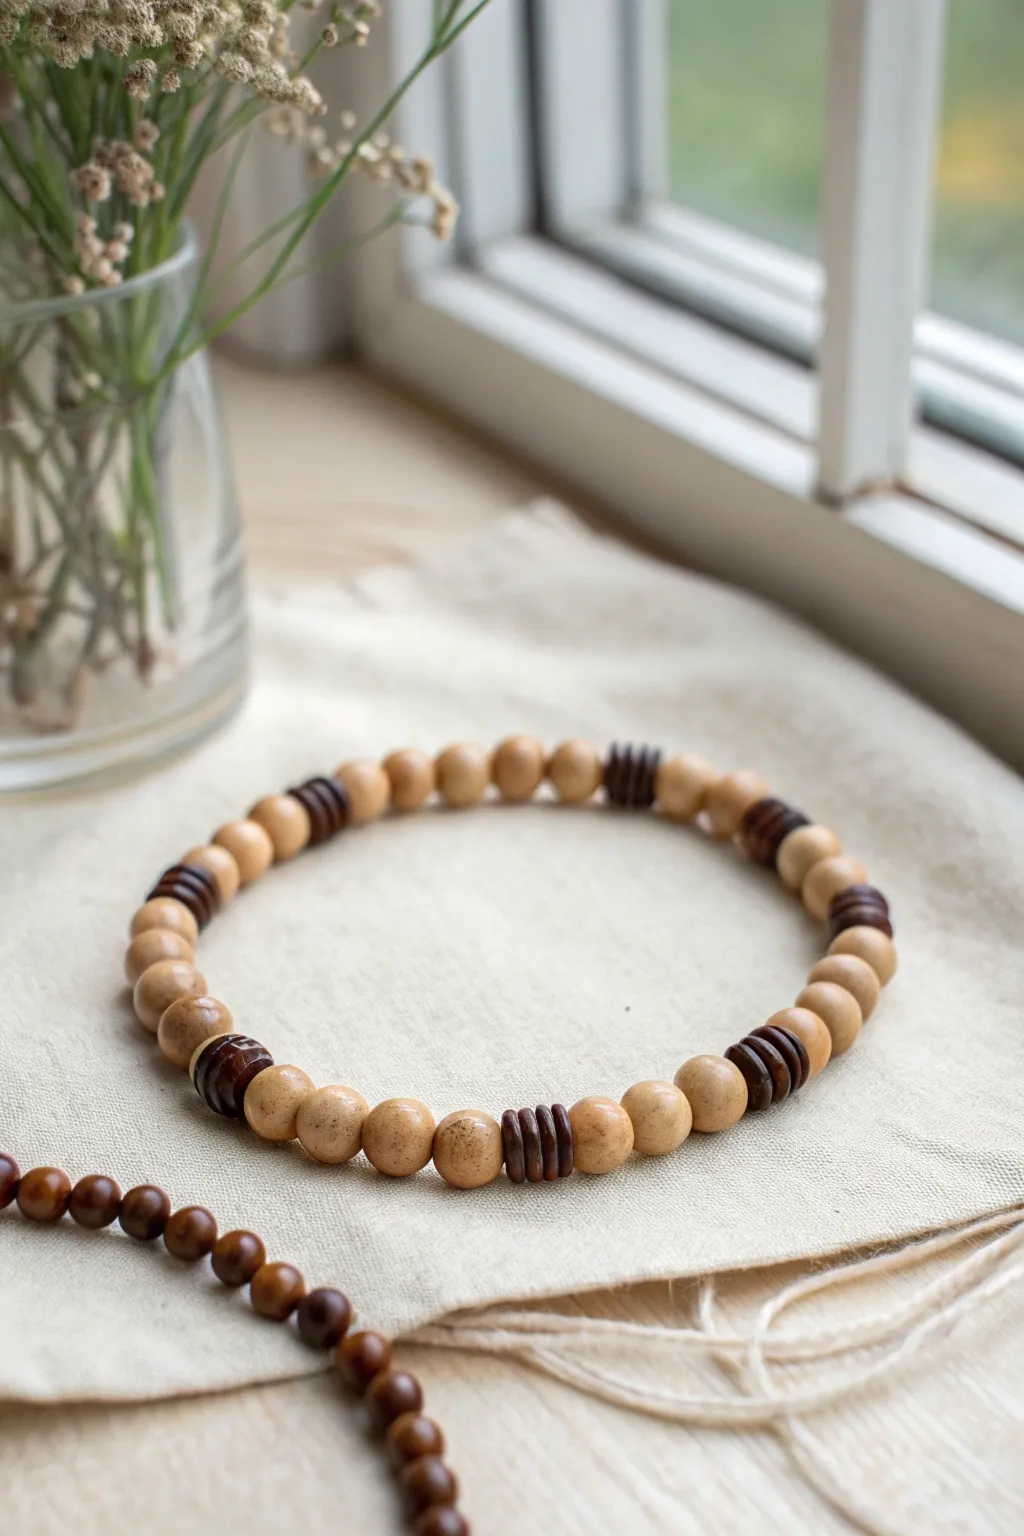
Create a meaningful accessory with this understated design that uses contrasting bead shapes and shades to hide a secret message. By alternating round tan clay beads with stacks of dark brown disc spacers, you can spell out a name or phrase in Morse code for a personalized touch.
Step-by-Step
Materials
- Light tan round polymer clay beads (approx. 8-10mm)
- Dark brown flat disc spacer beads (coconut shell or dark wood)
- Strong elastic cord (0.8mm or 1mm thickness)
- Jewelry adhesive or super glue
- Scissors
- Beading needle (optional but helpful)
- Tape or bead stopper
- Ruler or measuring tape
Step 1: Preparation & Planning
-
Map your message:
Before threading a single bead, decide on your secret word or phrase. Write it out on paper and translate it into Morse code using a reference chart. Decide which bead represents a ‘dot’ (likely a single dark disc) and which represents a ‘dash’ (a stack of three dark discs). -
Calculate spacing:
Determine how many light tan ‘feature’ beads will go between your code sequences. In the reference image, groups of three to four round tan beads are used as spacers to separate the letters or simply to balance the design. -
Measure the cord:
Cut a piece of elastic cord about 10-12 inches long. This generous length gives you plenty of room to tie knots later without struggling with short ends. -
Secure the end:
Place a piece of tape over one end of the cord or attach a bead stopper. I find this essential to prevent beads from sliding off the other side while I’m focused on the pattern.
Step 2: Stringing the Beads
-
Start the sequence:
Begin threading your pattern. Start with a neutral section of the round tan beads—threading about three or four is a good starting point to hide the knot later. -
Add first code element:
Thread your first Morse code element. If your first letter starts with a dot, slide on one dark flat disc bead. If it’s a dash, slide on a stack of three dark discs together. -
Separate the code:
After your dark code element, add a single round tan bead if you are still within the same letter. If you have finished a full letter, use a larger group of 3-4 tan beads to create a visual pause. -
Continue the pattern:
Keep stringing your beads, alternating between the dark ‘code’ sections and the light tan ‘space’ sections. Check your paper guide frequently to ensure accuracy. -
Check the length:
Wrap the unfinished strand around your wrist to check the fit. It should sit comfortably without digging in. Add extra tan filler beads at the end if you need more length to complete the circle.
Knot Security
If the bead hole is too small to hide the knot perfectly, simply ensure the knot is very tight and dab clear nail polish on it instead of bulky glue.
Step 3: Finishing the Bracelet
-
Pre-stretch the cord:
Hold both ends of the elastic and give the bracelet a gentle tug. This pre-stretching helps prevent the bracelet from loosening up permanently after the first few times you wear it. -
Tie the first knot:
Remove the tape or stopper. Bring the two ends together and tie a simple overhand knot to bring the beads into a circle, pulling it tight enough that there are no gaps between beads. -
Secure with a surgeon’s knot:
Tie a second knot, but this time loop the cord through twice before pulling tight (this is a surgeon’s knot). This adds extra security against slipping. -
Apply adhesive:
Dab a tiny drop of jewelry glue directly onto the knot. Be careful not to get glue on the visible parts of the beads. -
Hide the knot:
While the glue is still slightly tacky but not wet, pull the knot inside the hole of the nearest round tan bead. This hides the mechanics and gives a seamless finish. -
Trim the ends:
Once dry, use sharp scissors to trim the excess elastic cord as close to the bead hole as possible without nicking the knot itself.
Texture Twist
Swap the smooth round clay beads for faceted wooden ones or lava stones. This adds a tactile element and allows the bracelet to double as an oil diffuser.
Now you have a stylish, personalized accessory that holds a hidden meaning only you know about
Chunky Organic Brown Pebble Beads
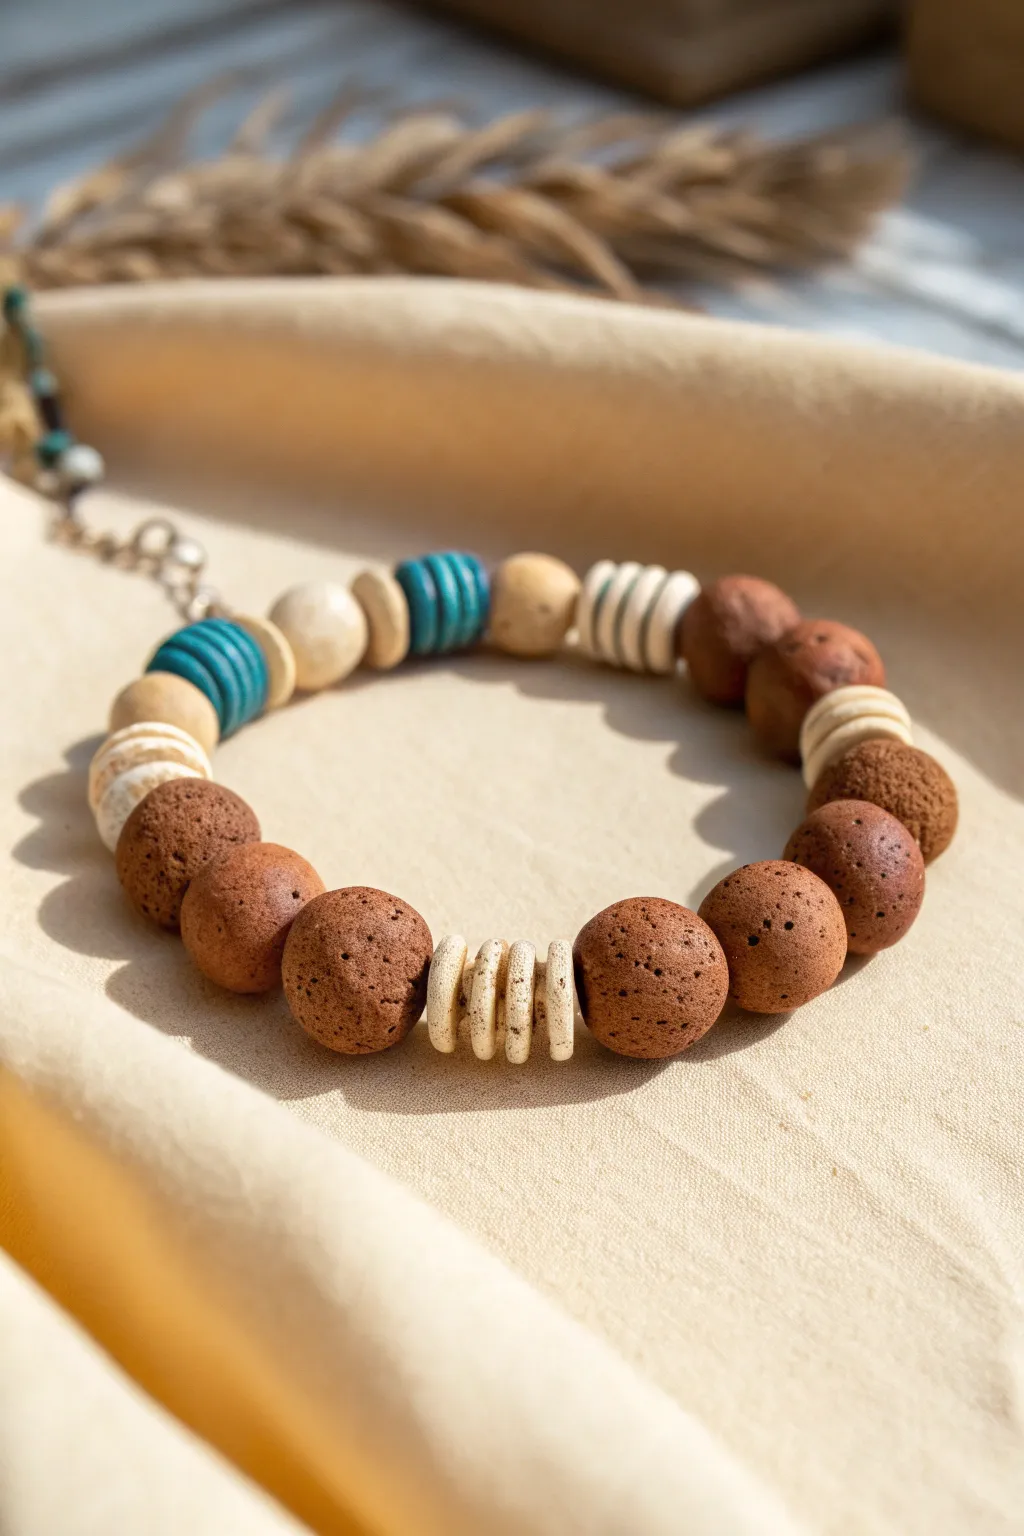
Embrace organic textures with this stunning chunky bracelet that combines porous brown clay spheres with pops of teal and cream spacers. The mix of raw, matte finishes creates a grounded, natural look perfect for adding a bohemian touch to any outfit.
Step-by-Step Guide
Materials
- Large round brown textured clay or lava stone beads (approx. 10-12mm)
- Medium round teal/turquoise wooden beads with grooved texture
- Off-white or cream heishi/disc spacer beads (bone, ceramic, or coconut shell)
- Cream round wooden beads (approx. 8-10mm)
- Strong elastic beading cord (0.8mm or 1mm transparent)
- Jewelry adhesive or clear nail polish
- Scissors
- Optional: decorative chain extender and crimp beads if using non-elastic wire
- Bead design board or soft cloth
Step 1: Planning and Preparation
-
Lay out your design:
Before stringing, arrange your beads on a bead board or a soft towel. This bracelet features a distinct asymmetrical pattern, so laying it out first is crucial to getting the balance right. -
Establish the focal section:
Identify your main focal run: a series of five to seven large brown textured beads. These act as the ‘front’ of the bracelet and carry the most visual weight. -
Create the spacer transitions:
Between the central brown beads, plan to intersperse small groupings of the cream disc spacers. In the image, there’s a specific stack of four cream discs sitting right in the middle of the brown clay run. -
Plan the back section:
For the rest of the loop, alternate between single cream wooden beads, the teal grooved beads, and stacks of the flat disc spacers to create visual rhythm.
Sticky Situation
If the knot won’t hide inside a bead, don’t force it. Instead, position the knot next to a bead with a larger hole (like the wooden ones) before gluing.
Step 2: Stringing the Beads
-
Cut the cord:
Cut a piece of elastic cord about 10-12 inches long. This generous length gives you plenty of room to tie knots without struggling. -
Pre-stretch the elastic:
Give your elastic cord a few firm tugs. This pre-stretching step prevents the bracelet from sagging or loosening up shortly after you first wear it. -
String the focal beads:
Start by threading on the large brown beads. Insert the stack of four cream disc spacers between the middle two brown beads for that signature detail shown in the photo. -
Add side transitions:
On either side of your main brown section, adding a single cream disc or a small wooden bead softens the transition into the colorful back section. -
String the teal accents:
Thread on the teal beads. Notice how they are often bookended by cream discs or wooden rounds to make the blue color pop against the neutrals. -
Complete the loop:
Continue following your laid-out pattern until the strand reaches your desired wrist size (standard is usually around 7 inches). -
Check the fit:
Wrap the unfinished strand around your wrist to check the size. It should sit comfortably without pinching skin or sliding off too easily.
Essential Oil Hack
Use unfinished lava stone or clay beads for the brown sections. Add a drop of essential oil to them, and your bracelet becomes a wearable diffuser.
Step 3: Finishing Touches
-
Prepare the knot:
Bring the two ends of the elastic together, ensuring there is no slack between the beads but also not too much tension that the bracelet bunches up. -
Tie the surgeon’s knot:
Cross the ends, loop one under, and pull tight. Then, cross them again, loop under twice this time, and pull firmly. This double-loop creates a secure surgeon’s knot. -
Secure with glue:
Apply a tiny dot of jewelry adhesive or clear nail polish directly onto the knot. I find a toothpick helps apply the glue precisely without getting it on the beads. -
Hide the knot:
While the glue is still tacky but set, gently pull the elastic so the knot slides inside the hole of one of the larger beads adjacent to it. -
Trim the ends:
Once the glue is fully dry (wait at least 15 minutes), use sharp scissors to trim the excess cord ends as close to the bead as possible. -
Optional charm addition:
If you wish to replicate the dangle seen in the background, attach a small jump ring and a bit of chain with a tiny teal bead to the loop before tying your knot.
Now you have a beautifully textured accessory that brings a bit of nature to your everyday style

TRACK YOUR CERAMIC JOURNEY
Capture glaze tests, firing details, and creative progress—all in one simple printable. Make your projects easier to repeat and improve.
Textured Ribbed Brown Disc Beads
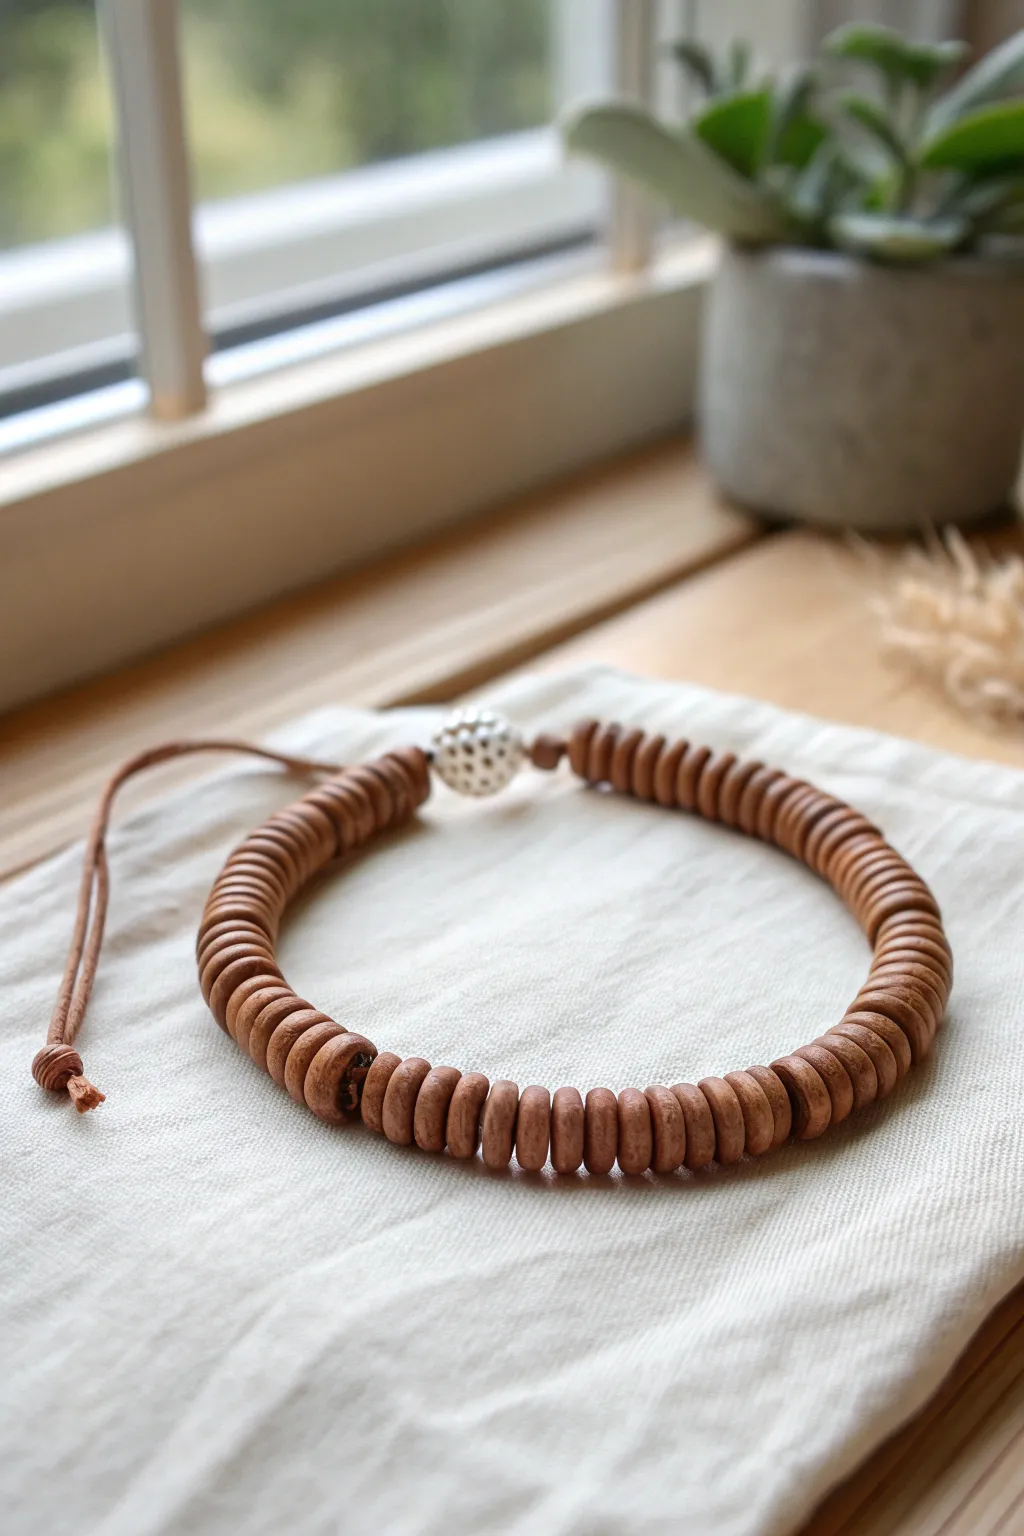
Embrace organic textures with this understated bracelet featuring ribbed brown clay disc beads and a unique speckled focal point. The leather cord construction adds a rustic finish, making this piece perfect for stacking or wearing as a subtle statement.
How-To Guide
Materials
- Polymer clay (terracotta or reddish-brown)
- White polymer clay
- Black acrylic paint (for speckles)
- Round leather cord (1.5mm or 2mm)
- Toothpick or needle tool
- Clay roller or pasta machine
- Small round clay cutter (approx. 10mm)
- Gloss glaze (optional for the white bead)
- Super glue
- Sandpaper (fine grit)
Step 1: Crafting the Ribbed Beads
-
Condition the clay:
Start by warming the terracotta polymer clay in your hands until it is soft and pliable. -
Roll a log:
Roll the clay into a long snake or log shape. Try to keep the thickness consistent, about the diameter of a pencil. -
Cut equal sections:
Using a blade, slice the log into many small, equal discs. Aim for about 3-4mm thickness per disc, as you’ll need around 40-50 beads depending on your wrist size. -
Shape the discs:
Gently roll each slice between your fingers to round off the sharp edges, creating a softer, wheel-like shape rather than a sharp cylinder. -
Add texture:
This is the crucial step for the ‘ribbed’ look. Use the side of a needle tool or toothpick to press vertical indentations all around the outer edge of each bead. -
Create the hole:
Pierce the center of each bead with your toothpick. Wiggle it slightly to ensure the hole is large enough for your leather cord to pass through later. -
Bake the brown beads:
Arrange the beads on a baking sheet or tile. Bake according to your clay package instructions (usually 275°F/135°C for 15-30 minutes) and let them cool completely.
Step 2: Creating the Focal Bead
-
Form the focal bead:
Roll a ball of white polymer clay. This should be slightly larger than your brown beads, perhaps 12-14mm in diameter. -
Add the speckled effect:
You can either mix cracked black pepper into the clay before rolling or use a stiff toothbrush to flick tiny specks of black acrylic paint onto the raw bead. -
Refine the surface:
If you painted, let it dry briefly. Then, pierce a hole through the center, matching the size of the holes in your brown beads. -
Bake the focal bead:
Bake the white bead separately or with the brown ones if the timing matches. Once cool, I sometimes like to add a coat of gloss glaze to this bead only for contrast.
Uneven Textures?
If your ribbed lines look too messy, try lightly rolling the bead on your work surface after texturing to soften the indentations without erasing them completely.
Step 3: Assembly
-
Prepare the cord:
Cut a length of leather cord about 12 inches long. This gives you plenty of room to work with the knots. -
Knot the end:
Tie a sturdy overhand knot at one end of the cord, leaving a small tail. Trim the tail if it’s too long, leaving a rustic frayed end. -
String the beads:
Begin threading your cooled brown ribbed beads onto the leather cord. -
Check the fit:
Periodically wrap the strand around your wrist. Stop adding brown beads when you are about 1/2 inch shy of your desired length. -
Add the focal bead:
Slide the white speckled focal bead onto the cord last. It serves as both a decorative element and a stopper for the loop closure. -
Create the closure loop:
Tie a loop knot immediately after the white bead. Ensure the loop is just large enough to fit snugly over the starting knot you made in the first step. -
Secure the knots:
Dab a tiny drop of super glue on both the starting knot and the finishing knot to ensure they don’t slip over time. -
Final trim:
Trim any excess leather cord from the loop end, leaving a short tail to match the aesthetic of the starting end.
Use Real Wood
For an even more organic feel, swap the brown clay for unfinished wooden spacer beads and use a wood burning tool to scorch vertical lines into the sides.
Now you have a beautifully textured accessory that brings a touch of nature to your everyday style
Speckled Terracotta Stoneware Look
This rustic piece combines the warmth of terracotta with the sparkle of faux goldstone, creating a beautiful contrast between earthy textures and subtle shimmer. The combination of rich reddish-brown hues and creamy white accents mimics high-end stoneware pottery in wearable form.
Step-by-Step Guide
Materials
- Polymer clay (translucent, terracotta/red-brown, and white)
- Fine copper glitter or metallic mica powder
- Coarse black pepper or crushed dried herbs (for speckling)
- Stretch magic cord (0.7mm or 0.8mm)
- Bead piercing pin or toothpick
- Cornstarch (to prevent sticking)
- Wet/dry sandpaper (400-800 grit)
- Gloss glaze or polyurethane varnish (optional)
- Oven for baking
- Jewelry glue
Step 1: Creating the Faux Goldstone Clay
-
Mix the base color:
Start by conditioning your translucent clay until it is soft and pliable. Mix in a very small amount of terracotta or reddish-brown clay—you want the clay to remain mostly see-through, just tinted with that warm earthy tone. -
Add the shimmer:
Flatten the conditioned clay and sprinkle a generous amount of fine copper glitter or metallic copper mica powder into the center. Fold the clay over and knead thoroughly until the sparkles are evenly distributed throughout the batch. -
Check the opacity:
The key to the depth of real goldstone is transparency. Hold a thin sheet of your mix up to the light; if it’s too opaque, add more translucent clay. If it lacks sparkle, add a pinch more glitter.
Sticky Situation?
If clay gets too soft or sticks to your hands while rolling, pop it in the fridge for 10 minutes. A light dusting of cornstarch on your palms also helps keep round beads perfectly spherical without stickiness.
Step 2: Forming the Speckled White Accent Beads
-
Prepare the white clay:
Condition a small block of white polymer clay until soft. To achieve that organic, stoneware pottery look, I like to mix in a tiny bit of beige or translucent clay to cut the stark whiteness. -
Add organic speckles:
Sprinkle coarse black pepper or finely crushed dried herbs onto the white clay. Knead the clay to distribute these particles, creating natural-looking ‘imperfections’ typical of ceramic glazes. -
Roll the accent beads:
Pinch off three small pieces of the speckled mixture. Roll them between your palms to create perfect spheres, roughly 8-10mm in diameter.
Step 3: Shaping and Baking
-
Roll the main beads:
Take your red-brown shimmer mixture and roll out approximately 20-24 spheres (depending on wrist size). Aim to make these slightly larger than your white accent beads to give the bracelet visual weight. -
Pierce the holes:
Using a bead pin or a toothpick, carefully pierce a hole through the center of each bead. Rotate the pin as you push through to avoid squashing the sphere shape. Wiggle slightly to ensure the hole is wide enough for your cord. -
Smooth fingerprints:
Lightly dust your fingertips with cornstarch and gently buff over any fingerprints on the raw beads. -
Bake the beads:
Arrange your beads on a baking sheet or skewered on a bead rack. Bake according to your polymer clay manufacturer’s instructions (usually 275°F/130°C for 15-30 minutes per 1/4 inch thickness). -
Cool and finish:
Let the beads cool completely. If you want a glossy, polished stone look for the brown beads, apply a coat of gloss glaze now. Leave the white beads matte for a textural contrast.
Textural Twist
Before baking, gently roll the still-soft brown beads over a piece of sandpaper or a textured sponge. This creates a pitted, stone-like surface that looks even more realistic once glazed.
Step 4: Assembly
-
Arrange the pattern:
Lay out your beads on a bead board or cloth. Following the image, place two white speckled beads together, flanked by one brown bead, then the third white bead, creating a focal section. -
String the beads:
Cut a 10-inch length of stretch cord. Pre-stretch it by pulling firmly a few times to prevent sagging later. Thread your beads onto the cord in your desired pattern. -
Check fit:
Wrap the strand around your wrist to check the size. Add or remove brown beads from the back section as needed for a comfortable fit. -
Tie the knot:
Tie a surgeon’s knot (right over left twice, then left over right). Pull the knot tight, secure it with a tiny dot of jewelry glue, and let it dry before trimming the excess cord.
Enjoy the gentle clink of your new stoneware-inspired beads on your wrist
Marbled Mocha Swirl Bead Mix
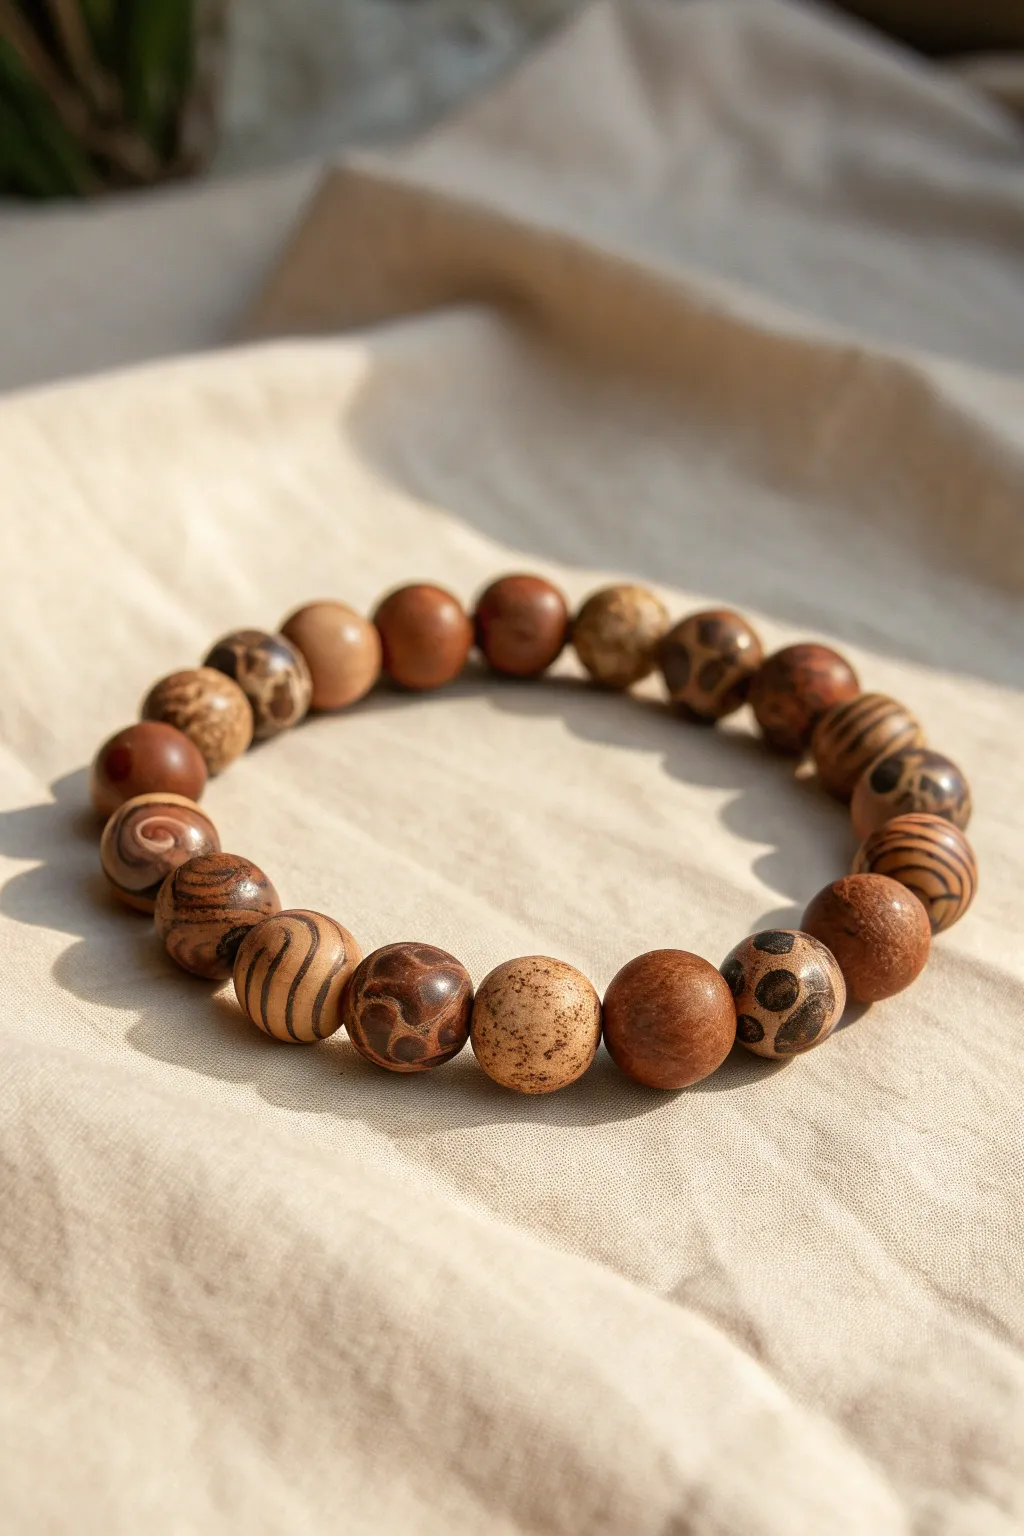
Bring the warmth of a coffee shop to your wrist with this earthy, textured bracelet featuring handmade polymer clay beads. By mixing various shades of brown and employing simple surface techniques, you create a harmonious blend of marbled, speckled, and patterned designs.
Detailed Instructions
Materials
- Polymer clay in varying shades: dark chocolate, terra cotta, tan, and beige
- Liquid polymer clay (translucent)
- Acrylic paint (dark brown/black) for antiquing
- Stretch cord (0.8mm or 1mm)
- Bead roller or acrylic block
- Toothpick or bead reamer
- Needle tool
- Small paintbrush
- Sandpaper (fine grit)
- Oven for baking clay
- Gloss or matte varnish (optional)
Step 1: Clay Preparation & Mixing
-
Condition the clay:
Begin by kneading each block of clay separately until it is soft and pliable. This warmth makes the marbling process much smoother later on. -
Create a marbled log:
Take a portion of dark chocolate clay and a portion of beige clay. Twist them together into a candy-cane shape, fold, and twist again. Stop before the colors fully blend to keep distinct striations, then roll this into a smooth log. -
Create a speckled mix:
For the cappuccino-style speckled beads, chop a tiny bit of dry, dark clay into dust-like crumbs. Mix these crumbs into a ball of tan clay to create a natural, gritty texture effect. -
Prepare solid colors:
Roll out pure balls of the terra cotta and medium brown clay. These solid ‘palate cleansers’ will help balance the busy patterns in the final design.
Step 2: Forming & Patterning the Beads
-
Size the portions:
Cut your various clay logs (marbled, speckled, and solid) into equal-sized segments. I find using a small circle cutter on a flattened sheet helps keep volume consistent, but you can also eyeball it. -
Roll into spheres:
Roll each segment between your palms to create a smooth, round bead. Aim for a size of about 10mm to 12mm wide. -
Create striped beads:
For the zebra-striped beads, take a solid tan ball. Roll very thin threads of dark brown clay and press them onto the surface. Gently roll the bead between your palms again to embed the stripes flat. -
Create leopard spots:
Make tiny C-shapes or irregular circles with dark brown clay and press them onto a lighter beige bead. You can add a tiny dot of a third color inside the C-shape for depth, then roll smooth. -
Add swirl details:
For swirled beads, use a needle tool to gently drag the surface clay around in a spiral motion before the final smoothing roll. This distorts the marbling into deliberate whirlpool shapes. -
Pierce the beads:
Gently insert a toothpick or bead reamer through the center of each bead to create the stringing hole. Rotate the tool as you push to avoid squashing the sphere.
Fixing Distortion
If your beads flatten while piercing holes, pop them in the fridge for 10 minutes before piercing. The firmer clay resists squishing.
Step 3: Baking & Finishing
-
Bake the beads:
Arrange your beads on a baking sheet or tile. Bake according to your polymer clay package instructions (usually around 275°F/135°C for 15-30 minutes). Let them cool completely. -
Sand for finish:
Once cool, use fine-grit sandpaper under running water to smooth out any fingerprints or rough edges near the holes. -
Apply an antique wash:
Dilute a small drop of dark brown acrylic paint with water. Brush it over the textured or patterned beads and quickly wipe it off with a paper towel. The paint will stay in the crevices, highlighting the depth. -
Seal the surface:
If you prefer a polished look like the inspiration image, brush a light coat of matte or satin varnish over the beads and let them dry.
Variant Styles
Mix in real wooden beads or lava stone beads alongside your clay creations to add authentic texture and aromatherapy capabilities.
Step 4: Assembly
-
Arrange the layout:
Lay your finished beads out in a circle. Experiment with the pattern—try alternating the busy marbled beads with the simpler solid or speckled ones to create a visual rhythm. -
String the beads:
Cut a piece of stretch cord about 10 inches long. Pre-stretch it by pulling firmly on the ends. Thread your beads onto the cord in your chosen order. -
Tie the knot:
Tie a surgeon’s knot (right over left twice, then left over right). Pull the knot tight and secure it with a tiny dab of super glue or jewelry cement. -
Hide the knot:
Trim the excess cord and gently tuck the knot inside the hole of the nearest bead.
Enjoy the organic, handcrafted feel of your new mocha-inspired accessory
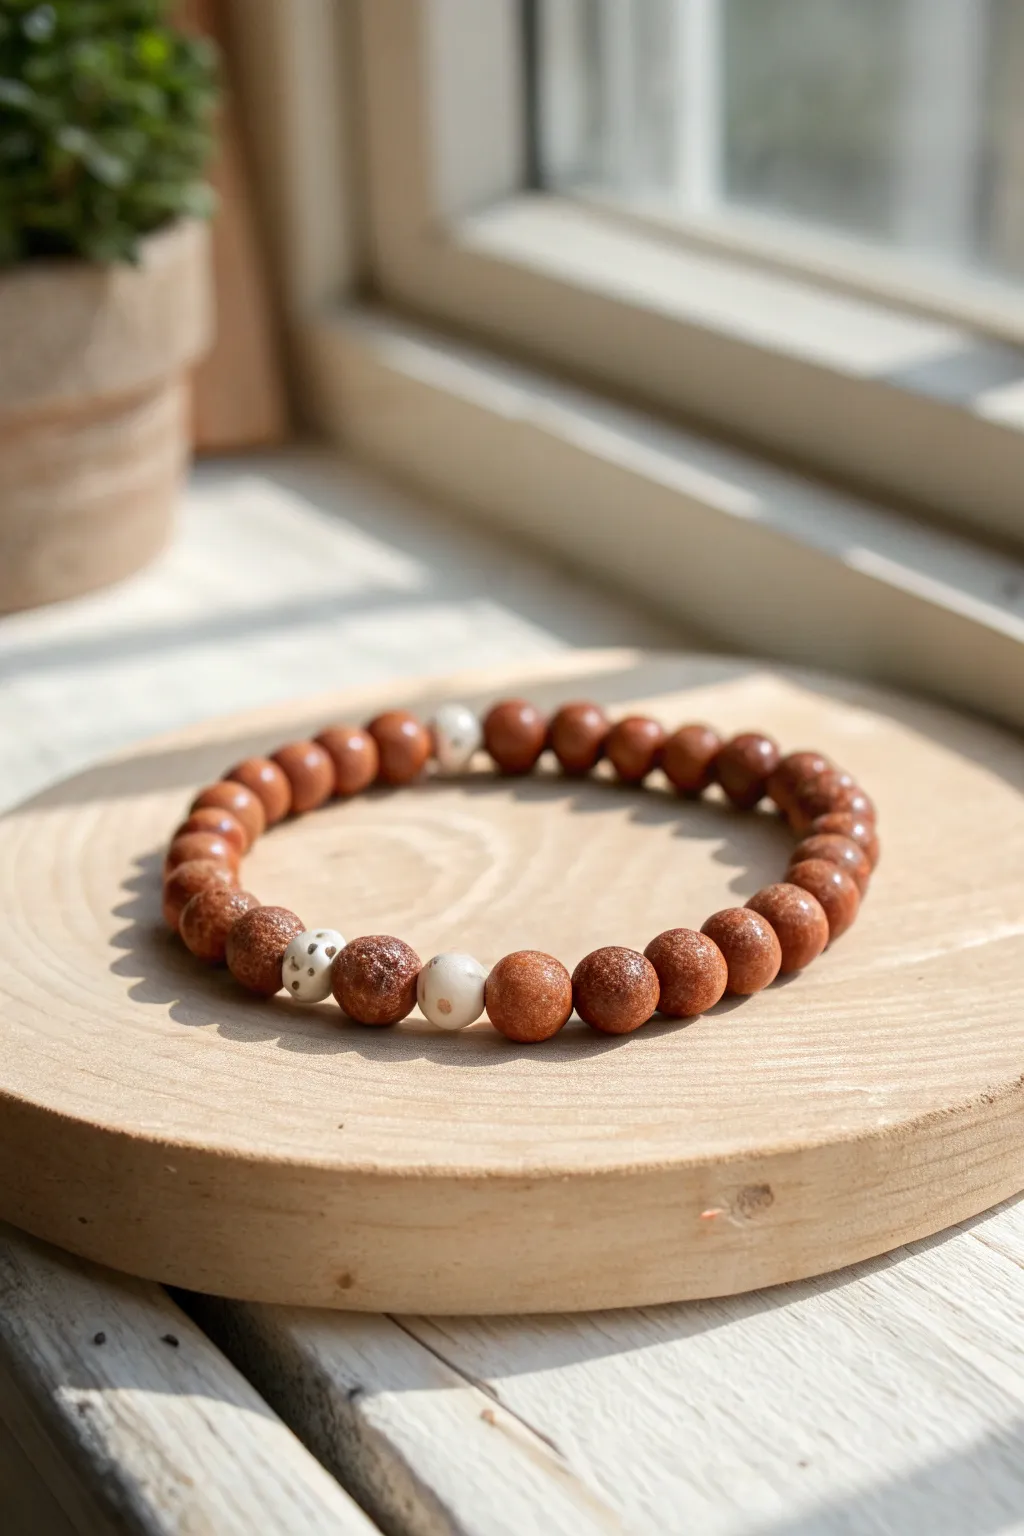
Coffee Bean Accent Beads in Brown
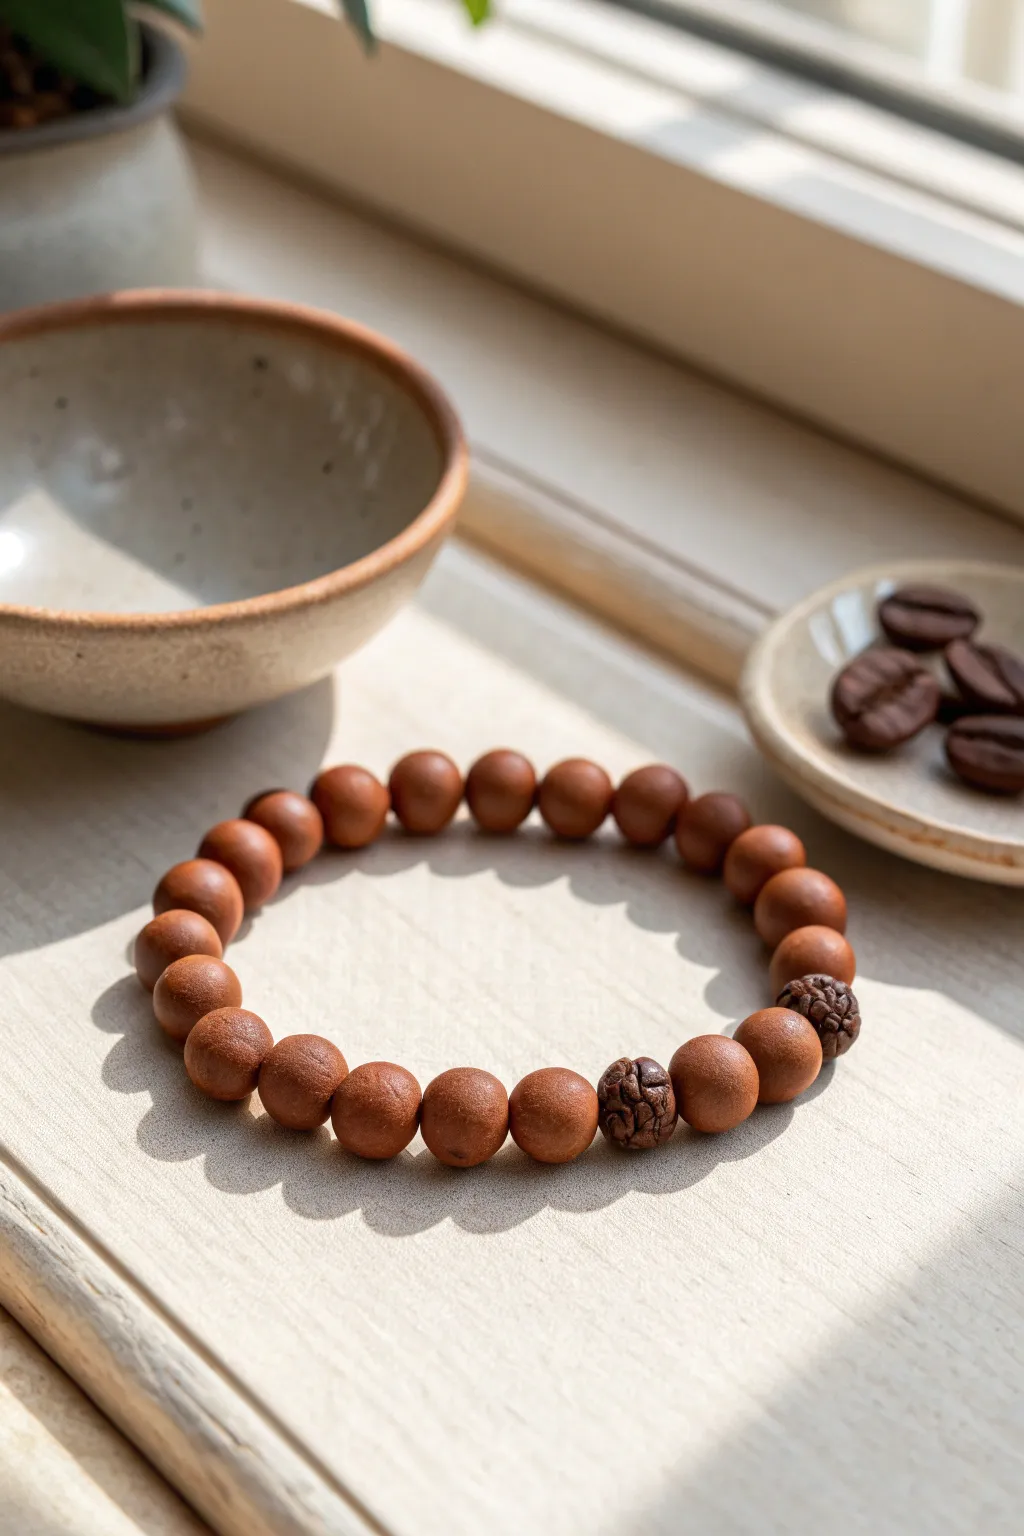
This earthy bracelet combines smooth, terracotta-colored clay beads with textured accent beads that resemble roasted coffee beans. The warm brown tones and simple design make it a versatile accessory that brings a touch of natural elegance to any outfit.
How-To Guide
Materials
- Polymer clay (terracotta or reddish-brown color)
- Polymer clay (dark espresso brown color)
- Elastic beading cord (0.8mm or 1mm thickness)
- Beading needle (optional but helpful)
- Scissors
- Super glue or jewelry adhesive
- Toothpick or bead reamer
- Sculpting tool or needle tool (for texturing)
- Oven for baking clay
- Baking sheet with parchment paper
- Ruler
Step 1: Creating the Terracotta Beads
-
Condition the clay:
Begin by taking your terracotta-colored polymer clay and kneading it thoroughly in your hands until it becomes soft and pliable. -
Portion the clay:
Roll the conditioned clay into a long, even log or snake, approximately 1/2 inch in diameter. -
Cut equal segments:
Using a blade or knife, cut the log into equal segments. For the bracelet shown, you will need about 20-22 segments to fit an average wrist. -
Roll spheres:
Take each segment and roll it between your palms to create a perfect sphere. Aim for a diameter of about 8-10mm for each bead. -
Pierce the holes:
Gently hold a clay sphere and use a toothpick or bead reamer to pierce a hole through the center. Rotate the bead as you push the tool through to keep the shape round. -
Smooth the openings:
Inspect the entry and exit points of the hole. Smooth down any rough edges with your finger to ensure the bead sits flush against its neighbors.
Sticky Situation?
If your bead holes close up during baking, don’t panic. Use a small hand drill or a bead reamer to carefully open them back up once the clay is fully cooled and hardened.
Step 2: Crafting the Coffee Bean Accents
-
Prepare dark clay:
Condition a small amount of the dark espresso brown polymer clay until soft. -
Form the base shape:
Create two small spheres, slightly larger than your terracotta beads, creating a subtle focal point for the bracelet. -
Apply texture:
Using a needle tool or a small sculpting tool, gently carve random, craggy lines into the surface. The goal is to mimic the wrinkled texture of a dried coffee cherry or a carved wooden nut. -
Create the center crevice:
Press a deeper indentation down one side to invoke the classic coffee bean shape, though keeping it abstract works well for this rustic style. -
Pierce holes:
carefully pierce a hole through the center of these textured beads, ensuring the hole runs perpendicular to the main textural lines if desired.
Scented Secret
Mix a tiny amount of ground coffee or cinnamon into the polymer clay before baking. It adds authentic specks of texture and a very faint, pleasant aroma to your jewelry.
Step 3: Baking and Assembly
-
Bake the beads:
Arrange all your beads on a parchment-lined baking sheet. Bake according to your clay manufacturer’s instructions (usually around 275°F or 130°C for 15-30 minutes). -
Cool down:
Once baked, turn off the oven and let the beads cool completely before handling them to prevent cracking. -
Measure the cord:
Cut a piece of elastic cord about 10-12 inches long. This extra length makes tying the final knot much easier. -
Pre-stretch the elastic:
Give the elastic cord a few firm tugs. I find this pre-stretching step crucial to prevent the bracelet from sagging later on. -
String the beads:
Thread your beads onto the cord. A common pattern is to string about 10 terracotta beads, then one coffee accent bead, followed by another 10 terracotta beads, and finally the second accent bead. -
Check the fit:
Wrap the strung beads around your wrist to check the size. Add or remove terracotta beads as needed for a comfortable fit. -
Tie the knot:
Tie a surgeon’s knot (a square knot with an extra loop through) to secure the bracelet. Pull the elastic tight so the knot is firm. -
Secure and finish:
Apply a tiny drop of super glue or jewelry adhesive to the knot. Let it dry, then trim the excess cord close to the knot. Ideally, hide the knot inside one of the larger accent beads.
Enjoy wearing your handcrafted piece that perfectly captures the warmth of a morning coffee.
Tortoiseshell-Inspired Brown Pattern Beads
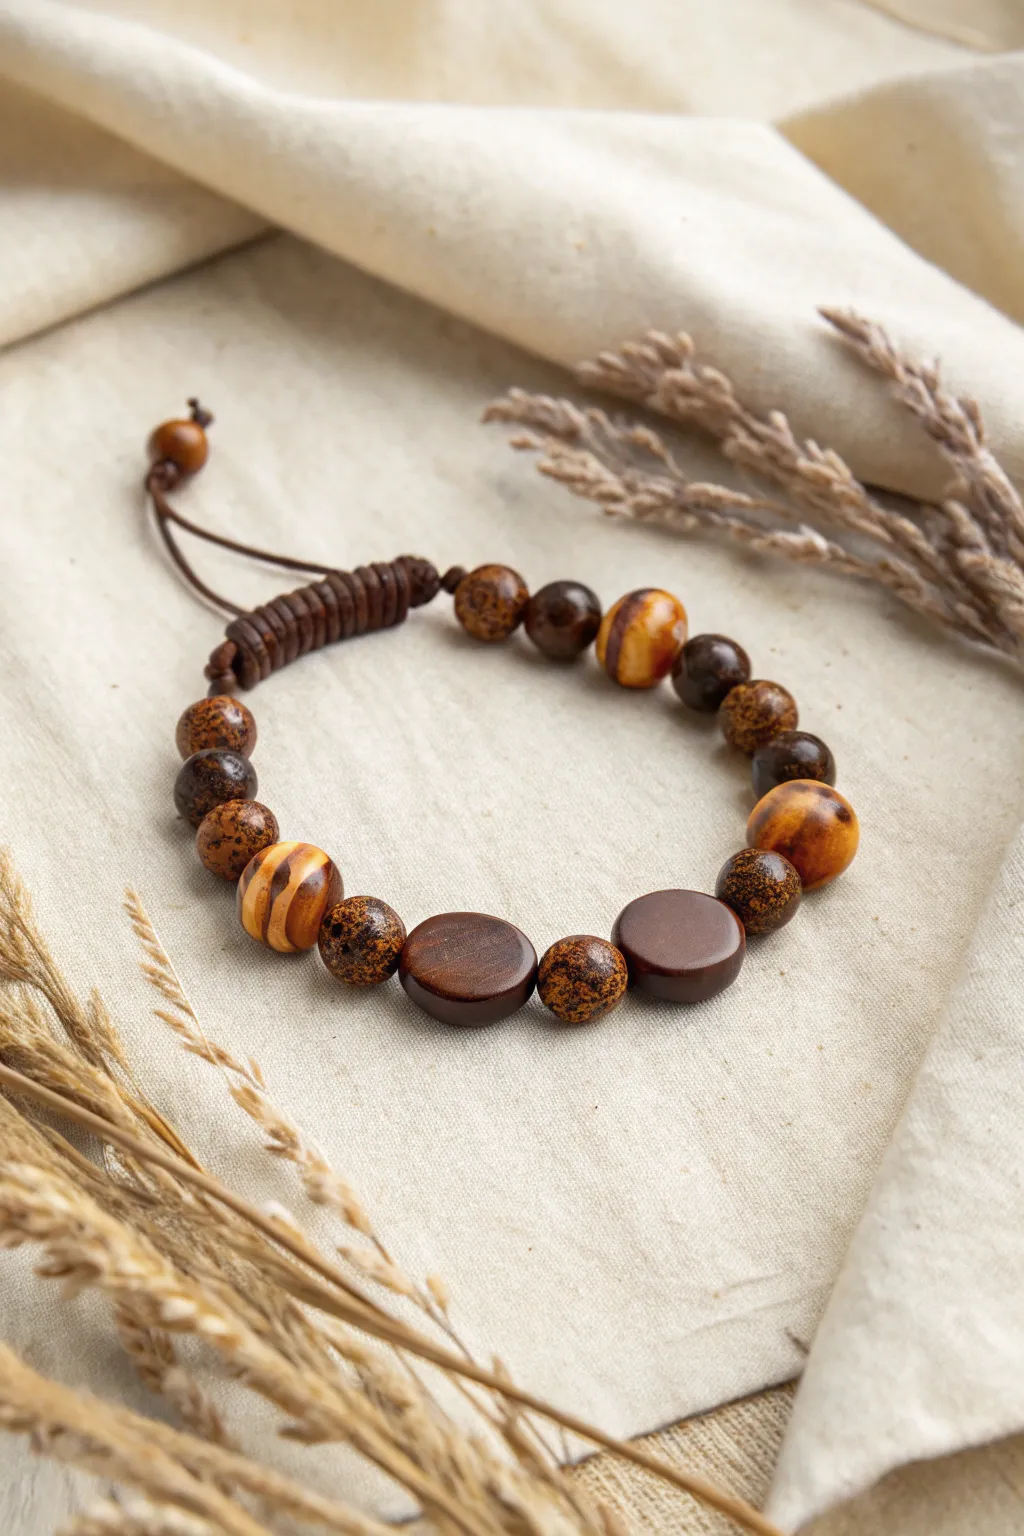
This rustic bracelet combines smooth, dark cylindrical beads with patterned clay rounds that mimic the warmth and depth of tortoiseshell. The adjustable leather cord closure makes it a comfortable, unisex accessory that is perfect for everyday wear.
Step-by-Step Guide
Materials
- Polymer clay (translucent, dark brown, burnt orange/amber)
- Dark brown wooden or clay tube beads (flat disc shape)
- Dark brown wooden spacer beads (small rounds)
- Dark brown leather or waxed cotton cord (1mm – 1.5mm)
- Bead reamer or toothpick
- Sharp clay blade
- Pasta machine or acrylic roller
- Oven for baking
- Gloss varnish (optional)
Step 1: Creating the Tortoiseshell Pattern
-
Prepare the colored clays:
Condition your translucent, dark brown, and amber clays separately until they are soft and pliable. I find that warming the clay in my hands for a few minutes makes this much easier. -
Chop the clay:
Using your sharp blade, chop the dark brown and amber clays into very small, irregular fragments. Keep the translucent clay separate for a moment. -
Mix the fragments:
Gently mix the chopped colored bits into a block of translucent clay. Do not overmix; you want distinct chunks of color suspended in the clear base to create the mottled tortoiseshell effect. -
Form the log:
Roll your mixed clay into a snake or log shape, about 1/2 inch in diameter. Twist the log gently to swirl the colors together slightly without blending them into a muddy brown. -
Shape separate beads:
Cut the log into equal segments based on how many patterned beads you need (the image features about 8-10 of these patterned rounds). Roll each segment into a smooth ball. -
Pierce the beads:
Carefully poke a hole through the center of each bead using a toothpick or bead pin. Rotate the tool as you push through to avoid distorting the round shape.
Step 2: Sourcing or Creating Solid Beads
-
Prepare solid rounds:
If you aren’t using pre-made wooden spacers, roll small spheres of solid dark brown clay. These should be slightly smaller than your patterned beads. -
Create disc beads:
To mimic the flat, dark beads in the center, roll a thick sheet of dark brown clay and cut out circles using a small round cutter, or flatten a ball of clay gently between two acrylic blocks. -
Bake the beads:
Arrange all your clay beads on a baking sheet or tile. Bake according to the manufacturer’s instructions for your specific brand of clay (usually around 275°F/135°C for 15-30 minutes). -
Finish the surface:
Once cool, you can sand the beads lightly if needed. For that true tortoiseshell gleam on the patterned beads, apply a coat of gloss varnish.
Tortoiseshell Hack
Add a tiny pinch of black alcohol ink or gold leaf flakes into your translucent clay mix before rolling. It adds depth and a realistic, organic shimmer to the pattern.
Step 3: Assembly and Knotting
-
Measure the cord:
Cut a length of leather cord about 12-14 inches long. Fold it in half to find the center, but you will be stringing on a single strand, not a loop. -
Plan the layout:
Lay out your beads on a bead board or towel. The design shown alternates patterned rounds, dark solids, and features two flat disc beads flanking a central patterned bead. -
String the beads:
Thread your beads onto the cord in your desired order. Ensure the hole size is large enough for your chosen leather cord; use a bead reamer to widen them if the fit is too tight. -
Secure the ends:
Once all beads are centered, tie a simple overhand knot on both ends of the beaded section to keep them in place. -
Create the sliding closure:
Overlap the two tail ends of the cord. Cut a separate piece of cord (about 5 inches) and use it to tie a series of square macramé knots (a ‘cobra stitch’) over the overlapped tails. -
Trim and finish:
Trim the excess cord from your sliding knot and add a tiny dot of glue to secure it. Tie small knots at the very ends of the pull cords to prevent them from slipping through the closure.
Level Up: Texture
Before baking the solid dark brown spacers, roll them over a piece of coarse sandpaper or a texture sponge. This creates a stone-like surface that contrasts beautifully with the glossy patterned beads.
Now you have a stunning, organic-looking bracelet that captures the timeless elegance of nature.
Matte Brown With Metallic Clay Bead Highlights
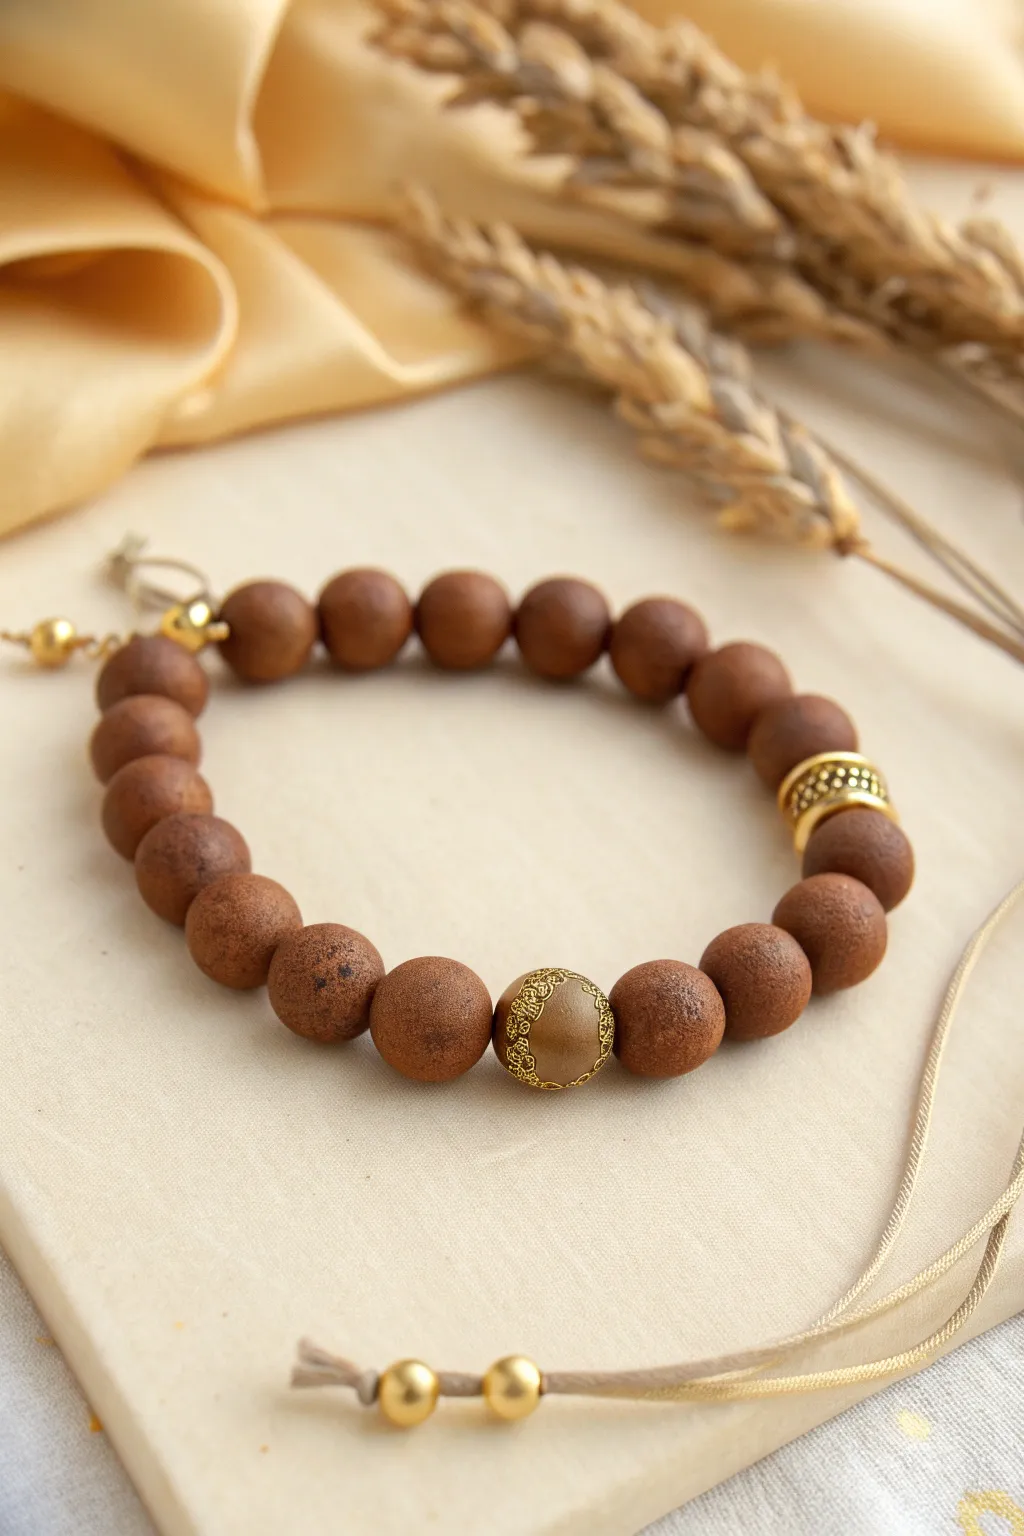
This sophisticated bracelet combines the raw, natural texture of matte brown clay with the luxurious shine of gold filigree accents. It’s a perfect project for mastering sliding knot closures while creating a piece that feels both organic and high-end.
Step-by-Step Tutorial
Materials
- Polymer clay in a rich, chocolate brown shade
- Polymer clay in antique gold or metallic gold
- Gold filigree bead caps or stamps (for texture)
- Thick styling needle or bead reamer
- Sandpaper (grit 400 and 600)
- Beige or tan nylon cord (0.8mm or 1mm thickness)
- Gold spacer beads with pattern detail
- Small gold crimp beads or decorative end beads
- Oven for baking clay
- Clear matte varnish (optional)
- Cutting blade
- Ruler
Step 1: Creating the Clay Beads
-
Conditioning the Brown Clay:
Begin by thoroughly kneading your chocolate brown polymer clay until it is soft and pliable. This prevents cracking later. Roll it into a long, even log roughly the thickness of your finger. -
Measuring and Cutting:
Use your ruler and blade to cut the log into equal segments. You will need about 18-20 segments for the main beads, depending on your wrist size. -
Rolling Spheres:
Roll each brown segment between your palms to create perfectly round spheres. Aim for a diameter of about 10mm. -
Adding Texture:
To achieve that matte, stone-like look seen in the photo, gently roll the uncured beads over a piece of sandpaper or dab them lightly with a coarse sponge. This removes the plastic shine. -
Creating the Focal Bead:
Take a piece of gold polymer clay and roll a slightly larger sphere (about 12mm). Alternatively, you can use brown clay as a base and cover it with gold mica powder. -
Detailing the Focal Bead:
Press a filigree stamp or use curved bead caps to imprint a delicate pattern onto the sides of your gold bead. Ensure the pattern is deep enough to show but doesn’t distort the bead’s shape.
Uniform Bead Sizing
Use a small circular cookie cutter to punch out clay portions from a flat sheet. This ensures every bead starts with the exact same volume of clay.
Step 2: Baking and Finishing
-
Piercing the Beads:
Using your styling needle, carefully pierce a hole through the center of every bead. Twist the needle as you push to keep the hole clean. -
Baking:
Arrange your beads on a baking sheet lined with cardstock or parchment paper. Bake according to the manufacturer’s instructions on your clay package (usually around 275°F/135°C for 15-30 minutes). -
Cooling and Refining:
Let the beads cool completely. If there are any fingerprints or sharp edges around the holes, lightly sand them with fine-grit sandpaper. -
Optional Matte Finish:
For extra durability without adding shine, you can brush a very thin layer of matte varnish over the brown beads. Leave the gold bead unvarnished to maintain its metallic sheen.
Step 3: Assembly and Stringing
-
Cutting the Cord:
Cut a length of nylon cord approximately 24 inches long. This generous length makes tying the knots much easier. -
Stringing the Pattern:
Begin stringing your beads. Thread about 9 brown beads, then add a decorative gold spacer bead (the cylindrical one with the grid pattern). Add 3 more brown beads. -
Placing the Focal Bead:
Thread your textured gold focal bead next, followed by the remaining brown beads to mirror the other side. -
Checking the Size:
Wrap the strand around your wrist to check the fit. Add or remove brown beads at the ends if necessary.
Hole Distortion
If piercing the beads squishes them into ovals, let the clay rest for 15 minutes after rolling, or refrigerate the spheres briefly before piercing.
Step 4: The Sliding Knot Closure
-
Forming the Circle:
Bring the two ends of the cord together so they overlap parallel to each other. You may want to tape the main bracelet down to a surface to keep it steady. -
Creating the Square Knot:
Cut a separate 10-inch piece of cord. Tie this new piece around the two parallel bracelet cords using a series of square knots (macramé technique). Make about 4-5 knots for a secure slider. -
Sealing the Slider:
Trim the excess tails of the knotting cord (not the bracelet cord!) and carefully melt the tips with a lighter or use a dab of glue to secure the knot. -
Adjustable Ends:
Pull the bracelet cords to your desired maximum opening width. Tie a simple overhand knot at the very end of each cord tail. -
Final Decorative Touch:
Before tightening the end knots, slip a small gold crimp bead onto the tail for a polished finish, as seen in the image.
Enjoy the organic, handcrafted feel of your new jewelry piece as it complements your daily wardrobe
Layered Two-Strand Brown Clay Bead Bracelet

This rustic yet elegant bracelet combines deep espresso-toned clay heishi beads with warm tan accents and flashes of gold. The dual-strand design creates an instantly layered look that feels organic and handcrafted, perfect for capturing that earthy aesthetic.
Step-by-Step Guide
Materials
- Dark brown/espresso clay heishi beads (approx. 4-6mm)
- Light tan/beige clay heishi beads (approx. 4-6mm)
- Gold cylindrical spacer beads (around 4mm)
- Gold tone crimp cord ends (sized to fit your stringing material)
- Gold lobster clasp
- Gold extender chain
- Gold jump rings (4-6mm)
- Beading wire or strong nylon cord (brown or clear)
- Jewelry adhesive (e.g., E6000)
- Flat nose pliers
- Wire cutters
Step 1: Preparation
-
Measure and Cut:
Begin by determining your desired bracelet length. Measure your wrist and add about an inch for comfort. Cut two equal lengths of beading wire, ensuring you leave at least 2-3 extra inches on each piece for attaching the hardware later. -
Anchor the First Ends:
Take one end of both wire strands. If your crimp cord ends are large enough, you can feed both wires into a single cap. Apply a tiny dot of jewelry adhesive inside the gold crimp cord end. -
Secure the Crimp:
Insert the wire ends securely into the glue-filled cap. Using your flat nose pliers, gently but firmly squeeze the center of the cord end to flatten it against the wires, locking them in place. Allow this to set for a few minutes so the wires don’t slip while you bead.
Loose Beads?
If the wire slips out of the crimp end, try folding the very tip of the wire over with pliers before inserting it into the cap. This creates a thicker ‘hook’ for the metal to grab.
Step 2: Creating the Strands
-
Bead the Solid Strand:
Select one wire to be your ‘solid’ strand. Isolate your dark brown clay heishi beads. Thread them continuously onto this wire until you are about half an inch from your finish length. -
Start the Accent Strand:
On the second wire, begin threading the dark brown beads just like the first strand. You want to cover roughly two-thirds of the bracelet’s length with just the dark color. -
Introduce the Pattern:
Pause threading dark beads once you reach the side section where the accent will go. Pick up three gold spacer beads and slide them on. -
Add Texture:
Following the gold spacers, thread on about 5-7 light tan clay beads. This creates a soft contrast against the dark brown. -
Finish the Accent Pattern:
cap off the tan section with three more gold spacer beads to frame the lighter color perfectly. -
Complete the Second Strand:
Finish stringing the second wire with the dark brown beads until it matches the exact beaded length of your first solid strand.
Mixed Metals
For a cooler, modern look, swap the gold spacers and hardware for sterling silver or gunmetal components. It dramatically changes the vibe while keeping the earth tones.
Step 3: Assembly and Finishing
-
Align the Ends:
Hold the open ends of both strands together. Ensure there are no large gaps between beads, but don’t pull them so tight that the bracelet becomes stiff; it needs to drape. -
Prep the Final Crimp:
Apply a small drop of adhesive into the second gold crimp cord end. -
Seal the Bracelet:
Insert both wire ends into the crimp cap. Squeeze the cap flat with your pliers, ensuring a tight hold on both strands. Trim any excess wire sticking out. -
Attach Jump Rings:
Using your pliers, gently twist open two gold jump rings. Loop one through the small loop on one of your crimp ends. -
Add Clasp:
Slide the lobster clasp onto this open jump ring before twisting it closed securely. -
Attach Extender:
On the other end of the bracelet, attach the second jump ring to the crimp end loop. Slide the gold extender chain onto this ring and close it up. -
Final Polish:
Wipe down any metal parts with a soft cloth to remove fingerprints and check that your crimps are secure by giving a gentle tug.
You now have a beautifully textured double-strand bracelet that looks effortlessly stylish stacked or worn solo
Hand-Stamped Initial Focal in Brown Clay

Achieve a warm, rustic aesthetic with this hand-stamped clay bracelet that mimics the look of rich, dark wood grain. This project combines simple bead rolling techniques with personalized stamping to create a customized accessory perfect for daily wear or thoughtful gifting.
Detailed Instructions
Materials
- Dark brown polymer clay (or mix brown with a touch of black)
- Small circle cutter (approx. 1/2 inch)
- Small alphabet letter stamp set
- Thick needle tool or toothpick
- Elastic stretch cord (0.7mm or 0.8mm)
- Bead rack or baking sheet lined with parchment paper
- Gloss or matte glaze (optional)
- Super glue or jewelry cement
Step 1: Crafting the Clay Beads
-
Condition the Clay:
Begin by warming the dark brown polymer clay in your hands, kneading it until it is soft and piable. -
Portion the Clay:
Roll the clay into a long, even snake about 1/2 inch in diameter. Use a blade to slice the snake into equal-sized segments to ensure your beads are uniform. -
Roll the Beads:
Take each segment and roll it between your palms using a gentle circular motion until you form a perfectly smooth sphere. -
Pierce the Holes:
Hold a bead gently between your thumb and forefinger. Use your needle tool or toothpick to pierce a hole straight through the center. -
Refine the Hole:
I find it helpful to twist the needle as it exits the other side to keep the opening clean and round. -
Create Spacer Beads:
Take a small amount of clay and create 3–4 flattened disc shapes or rings to act as spacers near the focal pendant.
Step 2: Making the Stamped Initial Pendant
-
Roll a Slab:
Flatten a piece of your conditioned clay to a thickness of about 4mm using an acrylic roller. -
Cut the Pendant Shape:
Use your small circle cutter to punch out a clean disc. Smooth the edges with your finger to remove any sharp ridges. -
Stamp the Initial:
Select your desired letter stamp. Press it firmly into the center of the clay disc, rocking it ever so slightly to ensure a deep, clear impression. -
Create the Hanging Hole:
Pierce a hole through the top edge of the disc, running parallel to the flat face, so it can string smoothly onto the cord.
Natural Wood Texture
Before baking, lightly roll a textured sponge or sandpaper over the clay beads. This creates micropores that mimic real timber.
Step 3: Baking and Assembly
-
Bake the Components:
Arrange your beads and pendant on a baking sheet. Follow the temperature instructions specifically for your brand of clay, usually baking for around 15–20 minutes. -
Cool Down:
Let the beads cool completely before handling them to ensure they harden properly. -
Optional Glazing:
If you want a polished wood look, dry brush a tiny amount of glaze over the beads, or leave them matte for a raw, natural texture. -
String the Bracelet:
Cut a length of elastic cord about 10 inches long. Begin threading your round beads onto the cord. -
Add the Focal Point:
Once about half the beads are on, thread on your disc spacers, then the stamped pendant, followed by the remaining spacers. -
Finish Stringing:
Continue adding round beads until the bracelet reaches your desired length. -
Tie the Knot:
Pre-stretch the elastic slightly, then tie a secure surgeon’s knot (right over left, left over right). -
Secure and Trim:
Add a tiny drop of super glue to the knot for security. Once dry, trim the excess cord and tuck the knot inside a neighboring bead.
Highlight the Letter
After baking, rub dark brown or black acrylic paint into the stamped letter groove, then wipe the surface clean to make the initial pop.
Wear your personalized bracelet stack with pride or gift it to friends for a matching set