When I’m craving a quick, feel-good craft session, I always reach for polymer clay and make something tiny, bright, and ridiculously cute. These easy kawaii ideas are all about simple shapes you can finish fast—then turn into charms, gifts, or little desk buddies.
Kawaii Strawberry Charms
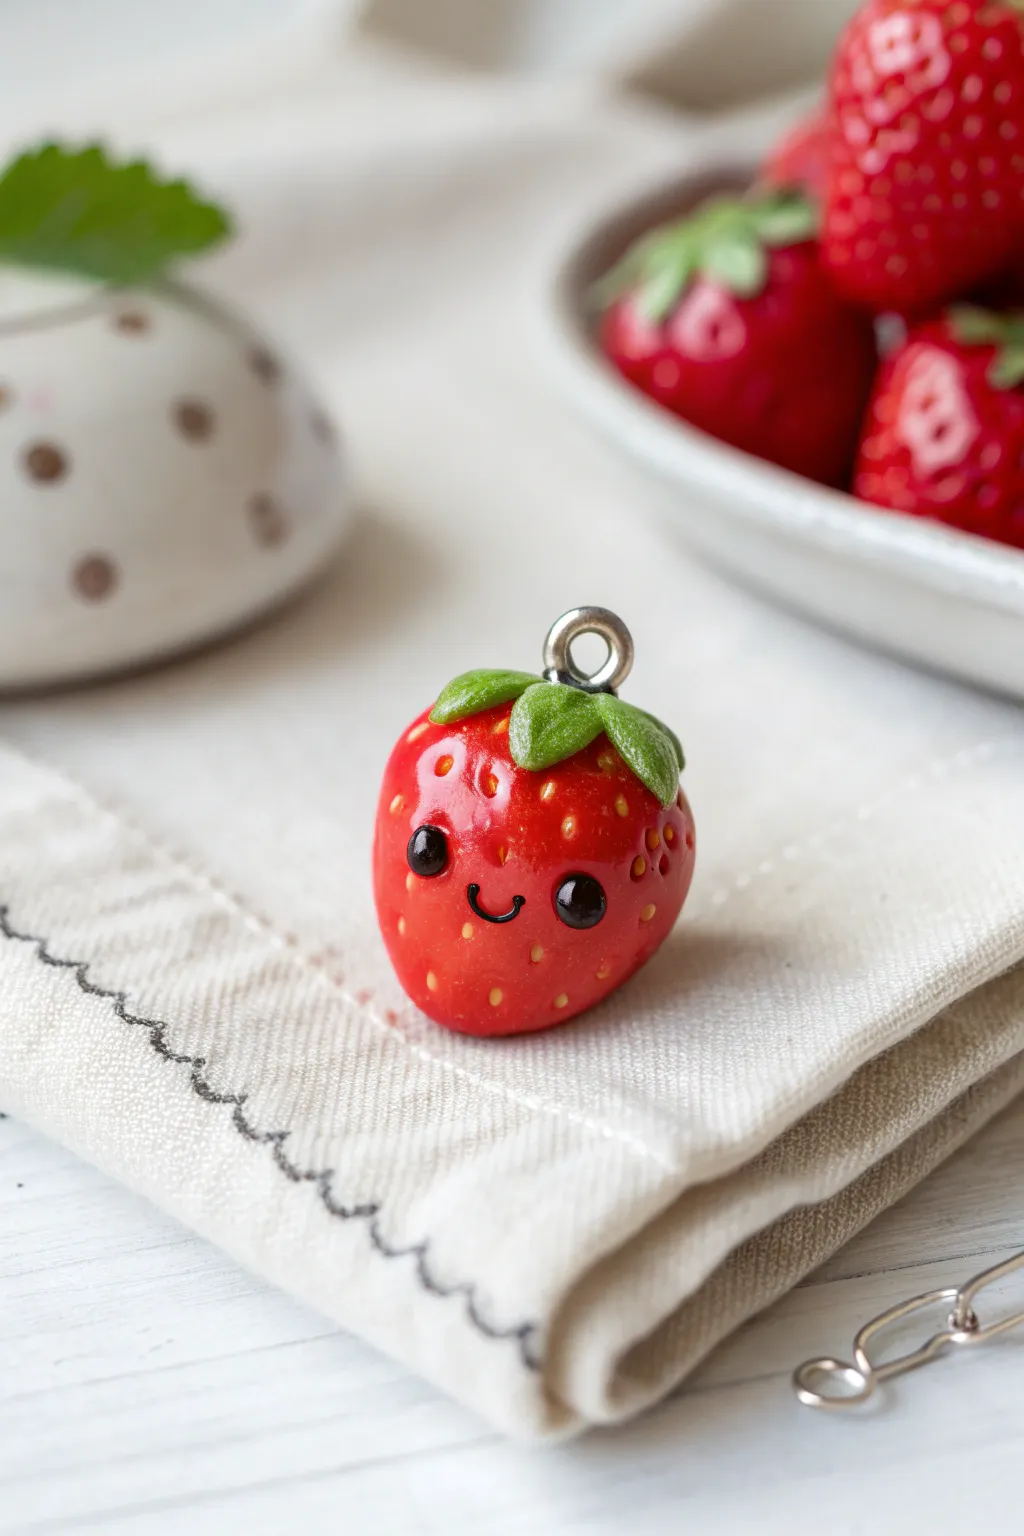
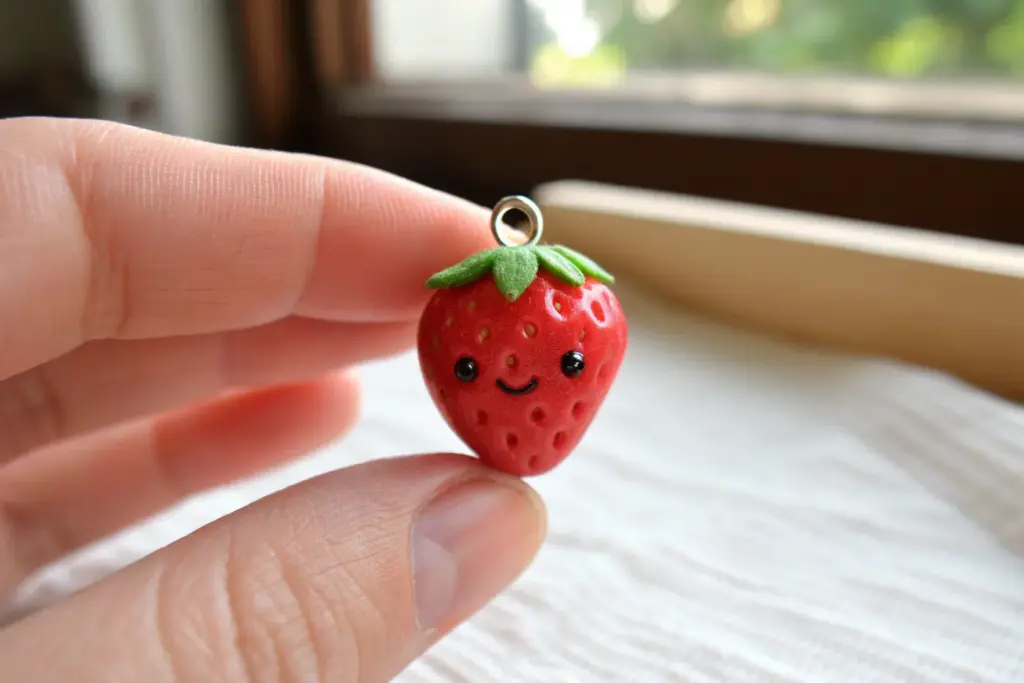
Capture the sweetness of summer with this adorable, glossy strawberry charm made from polymer clay. Its tiny, cheerful face and realistic touches make it a perfect addition to a bracelet or necklace.
How-To Guide
Materials
- Red polymer clay (e.g., Fimo or Sculpey)
- Green polymer clay
- Black polymer clay
- Translucent liquid clay or bake and bond (optional)
- Needle tool or toothpick
- Ball stylus tool
- Eye pin or screw eye
- High-gloss glaze or UV resin
- Yellow acrylic paint
- Fine detail paintbrush
- Oven
Step 1: Sculpting the Base
-
Condition the clay:
Start by kneading a small amount of red polymer clay until it is soft and pliable. This conditioning step is crucial to prevent cracks later on. -
Form the strawberry shape:
Roll the red clay into a smooth ball about the size of a large marble. Gently pinch and roll one end between your fingers to taper it into a rounded cone or teardrop shape, flattening the top slightly. -
Texture the seeds:
Using a needle tool or the tip of a toothpick, gently press small indentations all over the surface of the strawberry. Be careful not to press too deep; you just want to create the texture for the seeds. -
Create the eye sockets:
Decide where the face will go—usually slightly lower than the middle looks cutest. Use a ball stylus to press two distinct, round hollows for the eyes.
Fingerprint Fix
If you see fingerprints on your raw clay, lightly brush the surface with a little baby oil or cornstarch before baking to smooth them out completely.
Step 2: Adding Details
-
Insert the eyes:
Roll two extremely tiny balls of black clay. Carefully place them into the eye sockets you created and gently press them flat so they are flush with the surface. -
Make the smile:
Roll an incredibly thin snake of black clay. Cut a tiny u-shaped segment and press it onto the face between the eyes to create a smile. Alternatively, you can paint this on after baking if the clay is too fiddly. -
Create the leafy cap:
Flatten a small amount of green clay. Using a craft knife or a small star cutter, cut out a five-pointed star shape or several small teardrops. -
Texture the leaves:
Use your needle tool to press a central vein line down the middle of each green leaf segment for added realism. -
Attach the leaves:
Place the green cap onto the flat top of the strawberry. Gently curv the tips of the leaves down over the red shoulders of the fruit. A dab of liquid clay here helps it stick permanently. -
Add the hardware:
Insert a metal eye pin or screw eye into the center of the green leafy top. I find twisting it slightly as you push down helps it grip the raw clay better.
Step 3: Finishing Touches
-
Bake the charm:
Place your strawberry on a baking sheet or ceramic tile. Bake according to the manufacturer’s instructions for your specific brand of clay (usually around 230°F – 275°F for 15-30 minutes). -
Cool down:
Allow the charm to cool completely before handling. Polymer clay is slightly soft when hot and hardens as it cools. -
Paint the seeds:
Dip a very fine brush into yellow acrylic paint. Carefully dab a tiny dot of yellow into each of the seed indentations you made earlier. Wipe away excess surface paint with a damp paper towel if needed. -
Seal and shine:
Once the paint is dry, coat the entire charm with a layer of high-gloss glaze or UV resin. This gives it that juicy, fruit-like finish and protects the paint. -
Cure the glaze:
Let the glaze air dry or cure the UV resin under a UV lamp until hard and non-tacky.
Make it Sparkle
Mix a tiny pinch of fine holographic glitter into your gloss glaze before applying it. It gives the strawberry a magical, sugar-coated appearance.
Now your sweet little berry is ready to be worn and admired


Smiling Citrus Slice Earrings
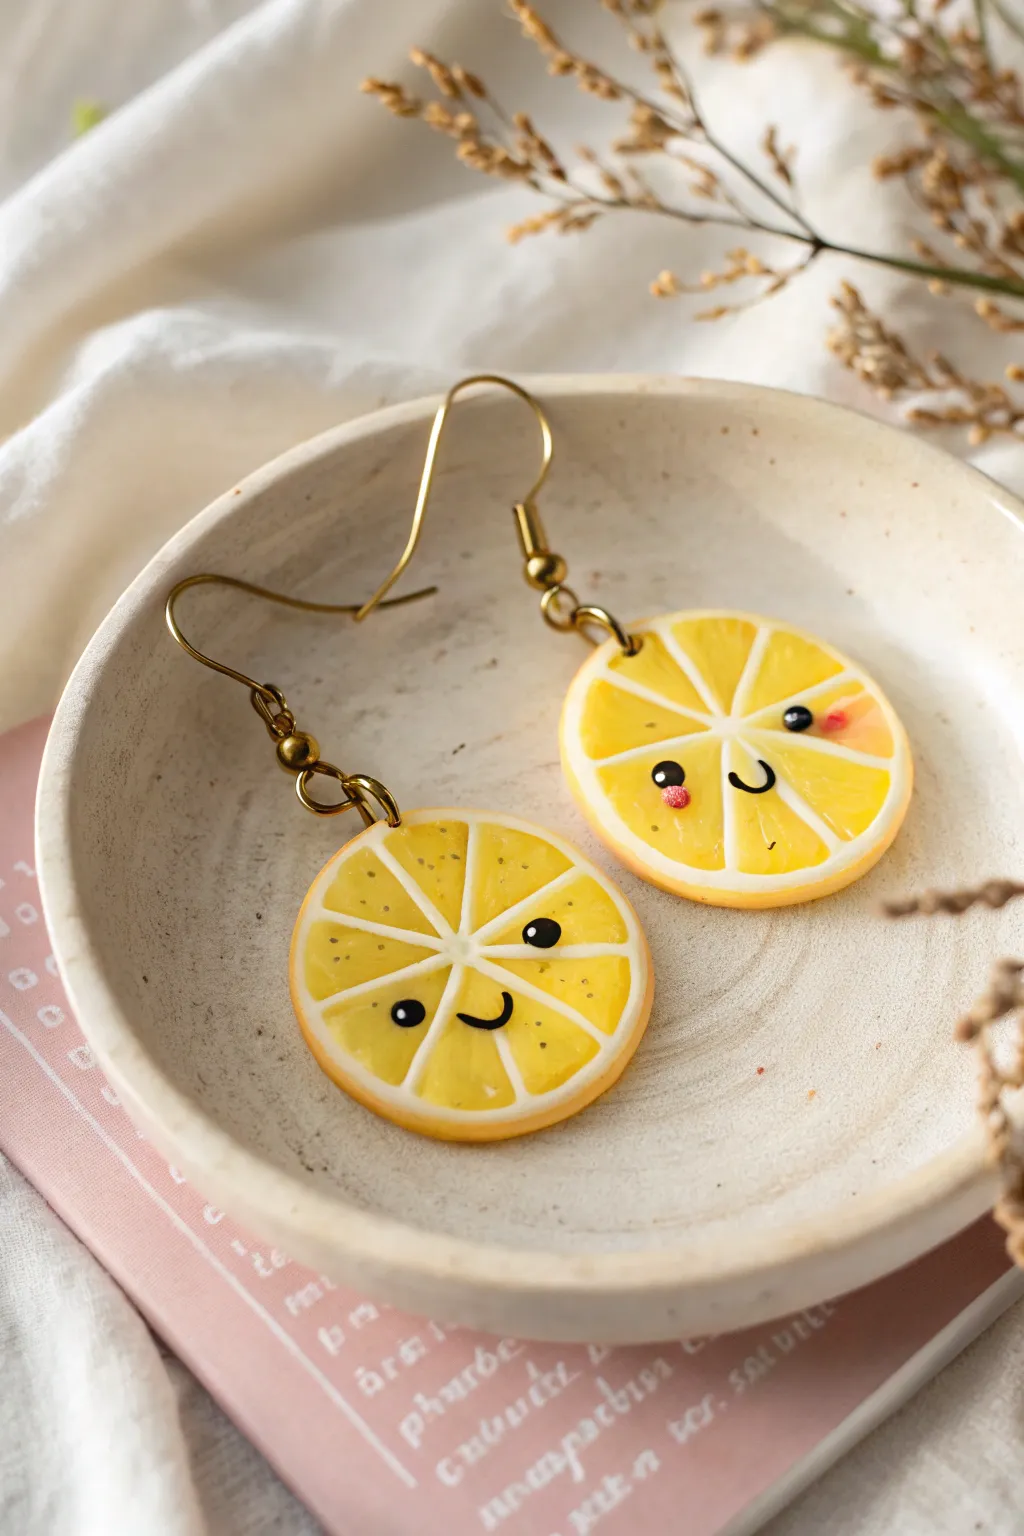
Add a squeeze of happiness to your jewelry collection with these adorable lemon slice earrings made from polymer clay. Their cheerful expressions and translucent citrus details make them a delightful summer accessory that looks good enough to eat.
Detailed Instructions
Materials
- Translucent yellow polymer clay
- Opaque white polymer clay
- Opaque yellow polymer clay (for the rind)
- Black acrylic paint or black polymer clay (for eyes/mouth)
- Pink chalk pastel or blush
- High-gloss glaze or UV resin
- Clay roller or pasta machine
- Small circle cutter (approx. 1 inch)
- Precision craft knife / scalpel
- Needle tool
- Jump rings (gold or brass tone)
- Earring hooks (fishhook style)
- Small pliers
- Hand drill or pin vibe (if baking before making holes)
Step 1: Creating the Citrus Cane
-
Prepare the pulp:
Condition a block of translucent yellow polymer clay until it’s soft and pliable. Roll it into a thick log, about 1 inch in diameter. -
Wrap in pith:
Roll out a thin sheet of opaque white clay. Wrap this white sheet around the yellow log, trimming the excess so the seams meet cleanly without overlapping. Smooth the seam with your finger. -
Reduce the cane:
Gently squeeze and roll the log to elongate it, reducing its diameter. Keep rolling until the log is quite thin, roughly the thickness of a pencil. -
Cut the segments:
Using your sharpest blade to avoid squishing the clay, cut the long log into 8 equal lengths. These will become the individual juice sacs of your lemon. -
Form the wedge shape:
Pinch one side of each small log to create a teardrop or triangular cross-section. These are your citrus wedges. -
Assemble the center:
Roll a very thin snake of white clay to act as the center core. Arrange your 8 triangular wedges around this central core, pointing the gathered ‘sharp’ ends inward. -
Add the separating membranes:
If there are gaps between your yellow wedges, place thin strips of white clay between them to create the structural membranes of the fruit.
Juicy Translucency
For realistic ‘juice’, mix a tiny speck of orange into your translucent yellow clay. Quench the baked pieces in ice water immediately after baking to maximize transparency.
Step 2: Forming and Slicing
-
Wrap the outer rind:
Roll out a sheet of opaque yellow clay (slightly thicker than the white pith). Wrap this around your assembled bundle of wedges to create the lemon skin. -
Final reduction:
Gently compress and roll the entire large cane to bond the layers. Aim for a final diameter of about 1 inch for earring size. -
Chill the cane:
Place your cane in the refrigerator for about 20 minutes. Firm clay slices much cleaner than warm clay, preventing the design from smearing. -
Slice the lemons:
Use a tissue blade to cut two even slices from the cane, each about 3-4mm thick. Lay them flat on your work surface. -
Add texture:
Take a needle tool and gently prick the translucent yellow sections to mimic the texture of juice sacs. Don’t go all the way through; just disturb the surface.
Glitter Zest
Mix extremely fine translucent or iridescent glitter into the yellow ‘pulp’ clay before making your cane. It mimics the sparkle of wet citrus in the sunlight.
Step 3: Evaluating the Face
-
Sculpt the face:
Roll tiny specks of black clay into balls for eyes and thin threads for mouths. Press them gently onto the slices. Alternatively, you can paint these on after baking for more precision. -
Add blush:
Scrape a little bit of pink chalk pastel into dust. Use a small brush or q-tip to dab rosy cheeks onto the clay before baking. -
Insert hardware holes:
Use a needle tool to pierce a hole near the top edge of the rind for the jump ring. Make sure the hole is large enough for your hardware. -
Bake the pieces:
Bake strictly according to your clay manufacturer’s instructions, usually around 275°F (130°C) for 15-30 minutes depending on thickness.
Step 4: Finishing Touches
-
Glaze for shine:
Once cooled, coat the front of the slices with UV resin or a gloss glaze. This makes the translucent clay look juicy and protects the face. -
Attach findings:
Use pliers to open a jump ring, thread it through the hole in the lemon slice, and attach the earring hook. Close the ring securely.
Enjoy wearing your vibrant, zestful creations that are sure to brighten up any outfit


Tiny Donut Keychain Charms

This adorable little donut charm brings a touch of sweetness to your keys or bag with its gentle pink frosting and kawaii face. The soft, rounded edges and tiny sprinkle details make it an irresistible beginner project that looks professionally made.
Step-by-Step
Materials
- Polymer clay (beige/tan for dough, soft pink for icing, white, dark pink, black)
- Small eye pin or screw eye
- Keychain hardware (jump rings, chain, split ring)
- Dotting tool or ball stylus
- Mustard or yellow ochre soft pastel (shaved into powder)
- Soft paintbrush
- Liquid polymer clay (optional, for securing sprinkles)
- Gloss glaze or UV resin (optional)
- Needle tool or toothpick
- Circle cutter (small, approx 1 inch)
- Smaller circle cutter or straw (for the donut hole)
Step 1: Shaping the Dough
-
Mix the dough color:
Start by conditioning your beige or tan clay until it is soft and pliable. If it’s too pale, mix in a tiny pinhead amount of orange or yellow to get a baked-good warmth. -
Form the base:
Roll the clay into a smooth ball about 1 inch in diameter, then gently flatten it into a thick disc. Don’t go too thin; you want a chubby, plush look for the donut. -
Round the edges:
Use your fingers to smooth and round off the edges of the disc so it looks like a puffed pastry rather than a sharp cylinder. -
Create the hole:
Press a small circle cutter, a straw, or the back of a paintbrush handle through the center to create the donut hole. Smooth the inner edges so they curve inward naturally. -
Add texture and baking effect:
Using a soft brush, pick up some shaved mustard or ochre pastel powder. Dust it lightly around the edges and bottom of the donut to simulate a golden-baked crust.
Clean Clay Tip
Keep baby wipes or hand sanitizer nearby. Clean your hands thoroughly before handling the light pink or white clay to prevent lint or dark smudges.
Step 2: Frosting & Details
-
Prepare the icing:
Condition a piece of soft pink clay. Flatten it out securely, or run it through a pasta machine on a relatively thin setting. It needs to look like a draped glaze. -
Cut the icing shape:
Use a cutter slightly larger than your donut to cut a circle of pink clay. Then, gently use your fingers or a wave cutter to make the edges uneven and wavy. -
Apply the icing:
Place the wavy pink clay on top of your donut base. Gently press down the edges so they look like they are melting slightly over the sides. -
Open the center:
poke through the pink clay where the donut hole is. Use a dotting tool to push the pink clay down into the hole, blending it smoothly against the dough color. -
Make the sprinkles:
Roll out very thin snakes of white and dark pink clay. I find it easiest to let these sit for a minute to firm up, then chop them into tiny bits with a blade. -
Apply the sprinkles:
Gently press the chopped bits onto the pink icing in a random scattering pattern. You can use a tiny dab of liquid clay if they aren’t sticking well.
Step 3: The Kawaii Face
-
Position the eyes:
Roll two tiny balls of black clay. Press them onto the lower half of the donut face, spacing them wide enough apart to leave room for the mouth. -
Add the smile:
Roll an extremely thin thread of black clay. Cut a tiny segment and curve it into a ‘U’ shape. Place it centered between the eyes using a needle tool. -
Secure the hardware:
Insert your screw eye pin into the top of the donut. If you want extra security, dip the tip in liquid clay or super glue gel before inserting. -
Optional button charm:
To match the photo, create a tiny flat pink disc, poke four holes in it to resemble a button, and insert a small jump ring before baking.
Sprinkles Keep Falling?
If sprinkles won’t stick, apply a whisper-thin layer of liquid polymer clay or Fimo Gel over the frosting area before placing them down.
Step 4: Finishing Up
-
Bake carefully:
Bake according to your clay manufacturer’s instructions (usually 275°F/130°C for 15-30 minutes). Use an oven thermometer to ensure you don’t burn the light pink frosting. -
Cool and glaze:
Once fully cooled, you can add a coat of matte or satin varnish to protect the face details, or leave it natural for a soft matte look. -
Assemble keychain:
Using pliers, attach your keychain ring and chain to the eye screw. Attach the small button charm on a separate link for extra cuteness.
Now you have a sweet little companion to brighten up your daily travels


Cute Avocado Besties
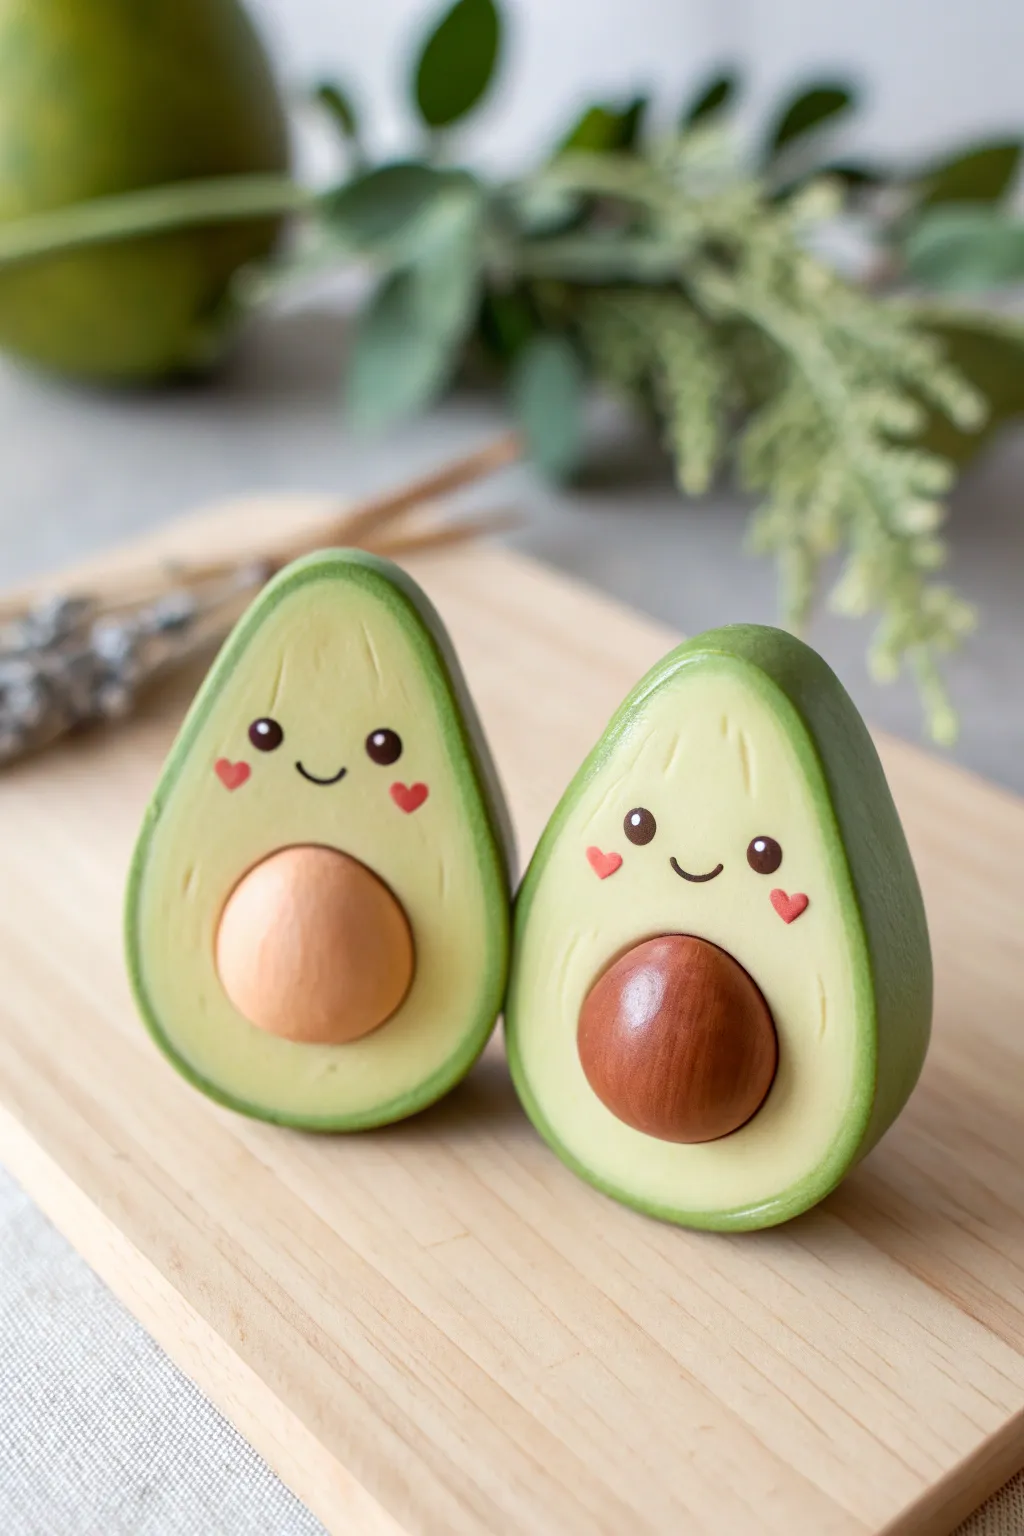
These adorable avocado halves are the perfect best friend charm set, complete with sweet little faces and heart-shaped cheeks. Their smooth, matte finish and soft pastel colors make them irresistibly squeezable even though they’re made of clay.
Step-by-Step Guide
Materials
- Polymer clay (Avocado Green, Pale Yellow, Dark Brown, Light Tan)
- Blade or X-Acto knife
- Small ball stylus or dotting tool
- Rolling pin or acrylic roller
- Soft pastel chalks (pink, red)
- Small detail paintbrush
- Acrylic paint (Black, White, Pink)
- Gloss glaze (optional for just the pit or eyes)
- Oven for baking
Step 1: Shaping the Avocado Body
-
Mix the perfect green:
Start by conditioning your avocado green polymer clay until it is soft and pliable. If the green is too dark straight from the packet, mix in a little white or yellow to brighten it up. -
Review the shape:
Roll the green clay into a smooth ball, then gently taper one end to create a pear shape. Flatten it slightly so it mimics an avocado half, ensuring the back is flat so it can sit on a surface. -
Create the inner flesh:
Take your pale yellow clay (mix with a tiny bit of green for realism) and roll it into a slightly smaller teardrop shape. Flatten this piece significantly. -
Layer the clay:
Place the pale yellow ‘flesh’ onto the green body. Gently press from the center outwards, smoothing the edges so the two colors bond seamlessly without trapping air bubbles. -
Make space for the pit:
Using your thumb or a large ball tool, create a deep, circular indentation in the lower, wider part of the avocado. This is where the seed will sit later. -
Texture the flesh:
Using a needle tool or a stiff brush, you can add very faint, radiating lines coming from the pit area for added texture, though leaving it smooth is also perfectly cute.
Clean Clay Tip
Before working with the pale yellow clay, wipe your hands and tools with a baby wipe. Dark fuzz or lint shows up instantly on light clay and is hard to remove later.
Step 2: Forming the Pits
-
Prepare the seed colors:
For the ‘besties’ affect, use two different shades for the pits. Condition a dark brown clay for one and a light tan or beige clay for the other. -
Roll the spheres:
Roll two smooth, perfectly round balls that are just slightly larger than the indentation you made earlier. -
Insert the pits:
Press one ball firmly into each avocado half. They should bulge out significantly, looking nice and round.
Step 3: Adding the Kawaii Faces
-
Position the eyes:
Use a small dotting tool to mark where the eyes will go on the upper, yellow part of the avocado. Keep them wide set for extra cuteness. -
Paint the eyes:
Using a very fine brush or a needle tool dipped in black acrylic paint, create two small black circles for eyes. I prefer to do this before baking for better bonding, but you can also do it after. -
Draw the smile:
Paint a tiny, shallow ‘U’ shape between the eyes for a smile. Keep the line thin and delicate. -
Add blush details:
Instead of round cheeks, paint tiny heart shapes using pink or red paint just under the eyes. This heart detail is key to recreating the look in the photo. -
Highlight the eyes:
Add a microscopic dot of white paint to the upper corner of each black eye pupil to bring the character to life. -
Add forehead details:
Using a needle tool, gently etch or paint very faint, short vertical lines at the very top of the yellow section to suggest avocado fibers.
Fixing Fingerprints
If you notice fingerprints on the smooth skin before baking, brush the raw clay lightly with a little rubbing alcohol or baby oil to melt them away.
Step 4: Finishing Touches
-
Bake carefully:
Place your avocados on a tile or baking sheet. Bake according to your clay manufacturer’s instructions, usually around 275°F (135°C) for 15-30 minutes. -
Cool down:
Let the pieces cool completely inside the oven with the door slightly ajar to prevent cracking from thermal shock. -
Seal properly:
For a matte look like the photo, leave the bodies unglazed. However, you might want to add a touch of gloss glaze just to the brown pits to make them look shiny and fresh.
Now you have a sweet pair of veggie friends to display on your desk or turn into matching keychains

The Complete Guide to Pottery Troubleshooting
Uncover the most common ceramic mistakes—from cracking clay to failed glazes—and learn how to fix them fast.
Chubby Cat Charms
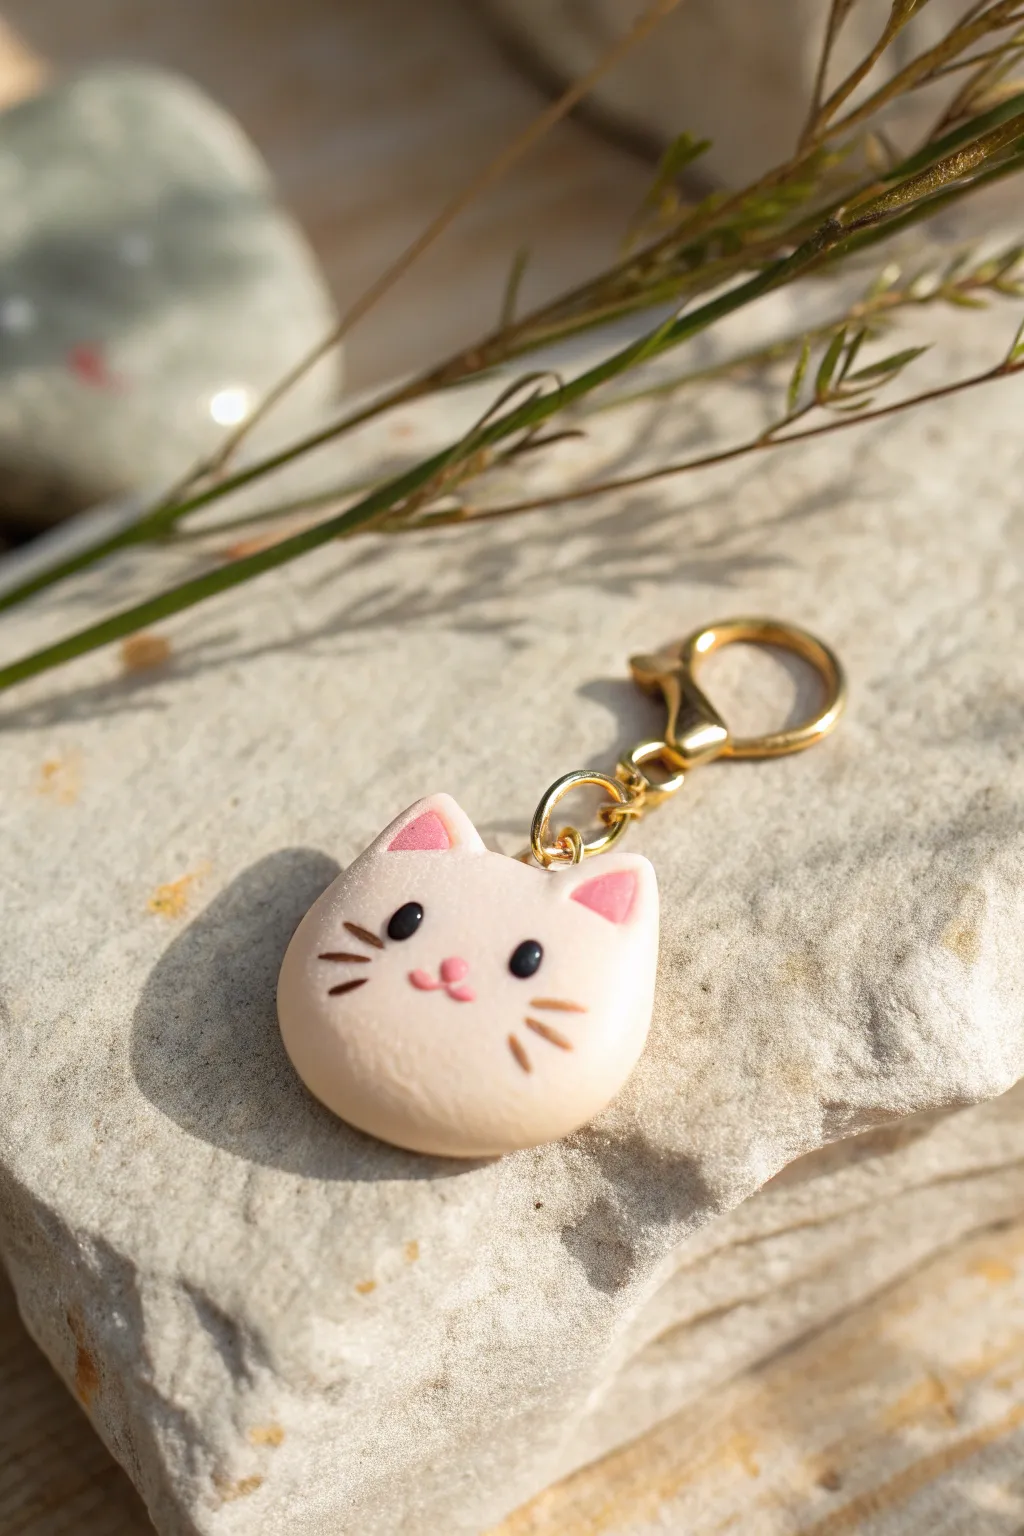
These delightfully chubby cat charms are perfect for beginners, featuring a simple, smooth shape and adorable hand-painted details. The soft cream color paired with gold hardware creates a sweet, boutique-style accessory for your keys or bag.
Step-by-Step
Materials
- Polymer clay (light cream or beige)
- Polymer clay (soft pink)
- Black acrylic paint
- Brown acrylic paint
- Pink acrylic paint
- Fine detail paintbrush (size 00 or 000)
- Dotting tool or ball stylus
- X-acto knife or clay blade
- Eye pin (gold tone)
- Jump rings (gold tone)
- Lobster clasp keychain (gold tone)
- Oven for baking
- Gloss glaze or UV resin (optional)
Step 1: Sculpting the Base
-
Condition the clay:
Start by taking a chunk of your light cream polymer clay and kneading it in your hands until it becomes soft, pliable, and warm. -
Form the head shape:
Roll the conditioned clay into a smooth ball about the size of a large grape, ensuring there are no cracks or seams visible. -
Flatten slightly:
Gently press the ball down onto your work surface with your palm to flatten it into a thick disc, keeping the edges soft and rounded like a marshmallow. -
Shape the ears:
Pinch the top two corners of the disc gently to pull out triangular shapes for the ears. Use your fingers to smooth the transition where the ears meet the head so it looks like one cohesive piece. -
Create the inner ear:
Take two tiny balls of soft pink clay, flatten them into small triangles, and press them gently onto the front of the sculpted ears.
Step 2: Hardware and Baking
-
Insert the eye pin:
Trim a gold eye pin so the stem is about half an inch long. Push it vertically into the center top of the cat’s head, between the ears. -
Secure the pin:
If I want extra security, I like to add a tiny dab of liquid clay or bake-and-bond to the pin before inserting it. -
Smooth imperfections:
Do a final check for fingerprints. If you see any, lightly brush them away with a drop of baby oil on your finger or a soft brush. -
Bake:
Place your charm on a baking sheet lined with parchment paper. Bake according to your clay package instructions (usually 275°F/135°C for about 15-20 minutes). -
Cool down:
Let the charm cool completely before painting. The clay hardens fully as it returns to room temperature.
Paint Pro-Tip
If your hand is shaky when painting whiskers, practice drawing lines on a scrap piece of baked clay or paper first to get the paint consistency right.
Step 3: Painting and Assembly
-
Paint the eyes:
Using a dotting tool dipped in black acrylic paint, place two oval-shaped dots for the eyes. Ideally, space them wide apart for maximum cuteness. -
Add the nose:
With a very fine brush and pink paint, draw a tiny rounded triangle or oval right between the eyes for the nose. -
Draw the mouth:
Using the same pink paint, carefully paint two small curves coming down from the nose to form a ‘w’ shape mouth. -
Detail the whiskers:
Switch to brown paint and your finest brush. Draw three short, floating lines on each cheek. Keep your hand steady and use very light pressure for thin lines. -
Seal (optional):
Once the paint is fully dry, you can coat the face with a thin layer of matte or gloss varnish to protect the paint from scratching. -
Attach hardware:
Open a gold jump ring using two pairs of pliers (twist side-to-side, don’t pull apart). Loop it through the eye pin on the cat’s head. -
Finish assembly:
Before closing the jump ring, slide on your gold lobster clasp. Twist the jump ring closed securely.
Calico Remix
Make a calico version by adding small, flattened patches of orange and black clay onto the cream base before rolling it smooth, then sculpt as usual.
Now you have an adorable companion to keep your keys company
Pocket-Size Octopus Figurines
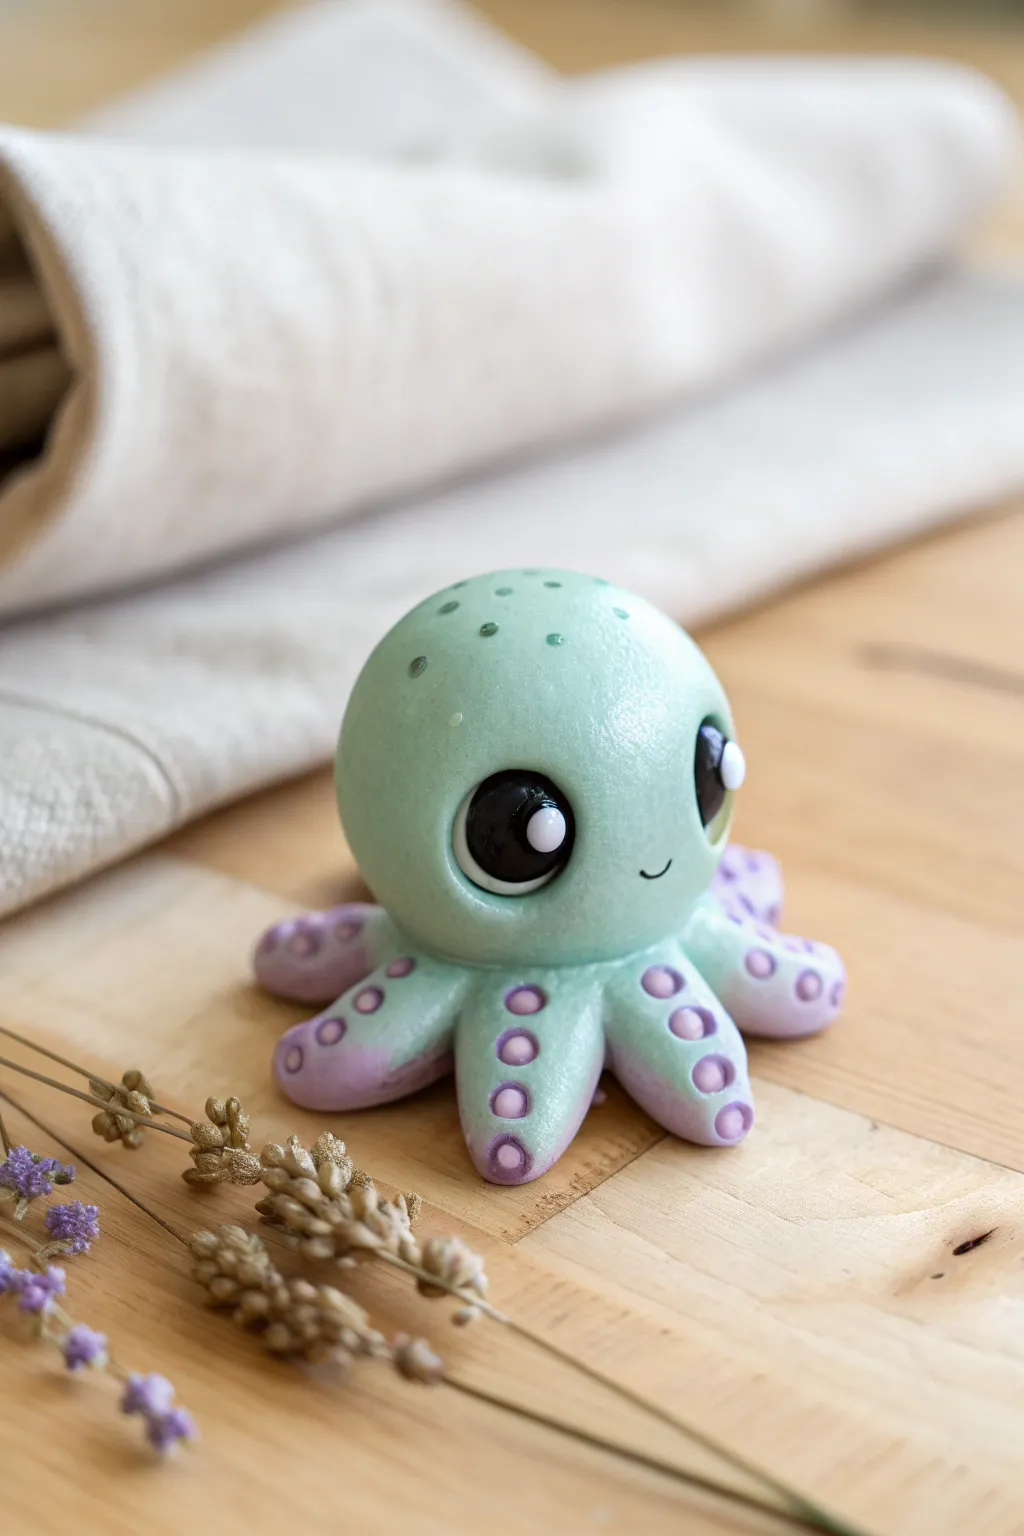
This adorable mint-green and lilac octopus fits right in your palm and is simpler to make than it looks. With its glossy finish and oversized eyes, it’s the perfect desk companion or handmade gift.
Step-by-Step Guide
Materials
- Polymer clay (Mint Green)
- Polymer clay (Lilac/Lavender)
- Polymer clay (Black and White)
- Gloss glaze or UV resin
- Dotting tools (various sizes)
- Needle tool or toothpick
- Blade or craft knife
- Ceramic tile or baking surface
- Oven (for curing)
Step 1: Shaping the Head
-
Prepare the main color:
Start by conditioning a chunk of mint green polymer clay. Roll it in your palms until it is warm, soft, and completely free of cracks. -
Form the sphere:
Roll the green clay into a smooth ball about the size of a golf ball (or smaller depending on your preference). This will be the main head. -
Flatten the base:
Gently press the ball onto your work surface to create a flat bottom while keeping the top nice and round.
Dust Magnets?
Polymer clay loves dust. Keep rubbing alcohol and cotton swabs nearby to wipe away lint before baking, or use baby wipes to clean your hands between colors.
Step 2: Creating Tentacles
-
Mix the tentacle color:
Take your lilac clay and condition it. Roll it into eight small, equal-sized balls, each about the size of a pea. -
Shape the logs:
Roll each lilac ball into a short, tapered log or teardrop shape. These will form the core of the tentacles. -
Add the green overlay:
Roll out a thin sheet of mint green clay. Cut eight small pieces that will cover the top half of each lilac tentacle, leaving the purple visible underneath. -
Attach tentacles to head:
Press the eight tentacles evenly around the base of the head. Smooth the green overlay clay upward into the head so there are no visible seams. -
Curl the tips:
Gently curl the tips of the tentacles upward for a playful look.
Super Glossy Eyes
For extra-shiny eyes that look alive, add a drop of UV resin specifically to the black eye area after baking and cure it with a UV lamp for a glass-like finish.
Step 3: Adding Details
-
Create egg sockets:
Use a large ball tool or the rounded end of a paintbrush to press deep, large indentations where the eyes will go. -
Sculpt the eyes:
Roll two balls of black clay and press them firmly into the sockets. Flatten two tiny discs of white clay and place them on the black eyes for highlights. -
Add suction cups:
Roll tiny balls of the lilac clay. Press two onto the top of each tentacle using a small dotting tool to create the suction cup indents. -
Texture the head:
Using a needle tool, gently poke small indents on top of the head for texture, or add tiny flat dots of green clay. -
Carve the smile:
Use a curved tool or the edge of a small straw to impress a tiny, happy mouth between the eyes.
Step 4: Finishing
-
Bake:
Bake the figurine according to the specific temperature and time instructions on your brand of polymer clay packaging. -
Cool down:
Let the octopus cool completely inside the oven if possible to prevent thermal shock cracks. -
Glaze:
Apply a coat of gloss glaze or UV resin over the entire piece (except the bottom) to give it that wet, shiny look shown in the photo.
Once the glaze is dry, your glossy aquatic friend is ready for display


What Really Happens Inside the Kiln
Learn how time and temperature work together inside the kiln to transform clay into durable ceramic.
Sleepy Whale Charms
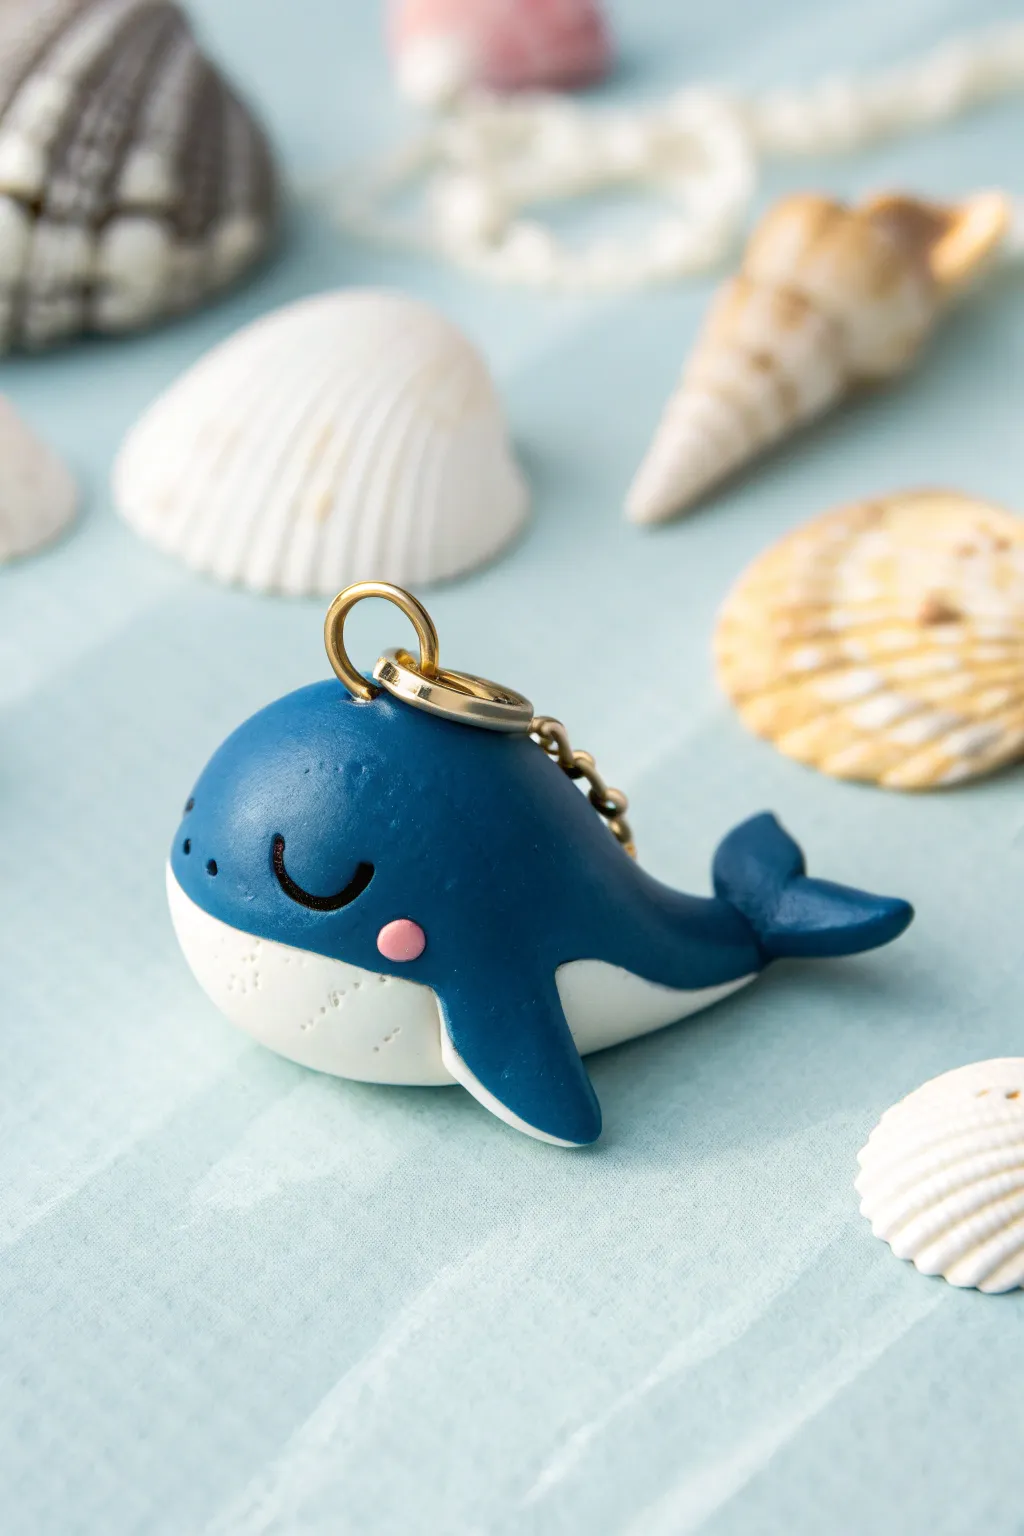
This adorable sleepy whale charm captures the serene feeling of the deep blue sea in miniature form. With its smooth curves, peaceful expression, and durable finish, it makes for a perfect keychain or a thoughtful handmade gift.
How-To Guide
Materials
- Navy blue polymer clay
- White or cream polymer clay
- Pink polymer clay (tiny amount)
- Black acrylic paint or polymer clay (for eyes)
- Clay sculpting tools (dotting tool, needle tool)
- Small rolling pin
- Blade or craft knife
- Gold screw eye pin
- Gold jump ring and keychain attachment
- Gloss glaze or UV resin (optional)
- Oven and baking tray
Step 1: Shaping the Base
-
Condition the clay:
Start by warming up your navy blue clay between your hands until it is soft and pliable. This prevents cracks later on. -
Form the body:
Roll a medium-sized ball of blue clay, then gently taper one end to create a teardrop shape. This tapered end will become the tail. -
Flatten the bottom:
Lightly press the main body onto your work surface to create a flat bottom, while keeping the top rounded and domed. -
Create the belly:
Condition a piece of white clay and roll it into a thin sheet. Use a round cutter or your blade to cut a clean oval shape. -
Attach the belly:
Gently press the white oval onto the bottom of the blue body. Smooth the edges where the two colors meet with your finger or a silicone tool so they bond seamlessly.
Smooth Operator
Before baking, lightly brush the clay with a little baby oil or cornstarch to smooth out any fingerprints for a professional finish.
Step 2: Sculpting the Fins
-
Make the fluke:
Take a small piece of blue clay and shape it into a wide triangle. Use a needle tool to create a notch in the middle of the wide end, forming the tail flukes. -
Attach the tail:
Press the tail flukes onto the tapered end of the body. You can use a blending tool to smooth the seam so it looks like one continuous piece. -
Shape the side fins:
Roll two small, equal-sized balls of blue clay. Flatten them slightly into teardrop or leaf shapes. -
Position the fins:
Attach one fin to each side of the whale’s body, angling them slightly backwards. Use your tool to blend the top edge of the fin into the body. -
Add the hardware:
Insert the gold screw eye pin into the top center of the whale’s back. Twist it gently to ensure it grips the clay well.
Splash of Sparkle
Mix a tiny amount of glitter into the blue clay before sculpting to give your whale a shimmering, magical ocean effect.
Step 3: Adding the Face
-
Mark the eyes:
Using a needle tool or a very fine paintbrush dipped in black paint, carefully mark two small curves for the sleeping eyelids. I find it helpful to practice the curve on paper first. -
Make the cheeks:
Roll two tiny, microscopic balls of pink clay. Flatten them gently onto the whale’s face, just below and outside the eyes. -
Create freckles (optional):
Using a needle tool, you can add tiny texture dots on the white belly area near the face for a little extra character. -
Add side details:
Use a needle tool or small dotting tool to add three tiny indentations on the side near the eye for extra texture.
Step 4: Finishing Up
-
Bake the charm:
Place your whale on a baking tray lined with parchment paper. Bake according to your clay manufacturer’s specific instructions (usually around 275°F or 130°C for 15-30 minutes depending on thickness). -
Cool down:
Allow the charm to cool completely inside the oven or on the counter before handling it. The clay is fragile while hot. -
Paint the eyes (method B):
If you didn’t sculpt the eyes with black clay, use a fine detail brush and black acrylic paint to paint the sleepy curves now. -
Apply glaze:
For a shiny, wet look, brush a coat of gloss glaze or apply UV resin over the blue parts of the whale. -
Assemble the keychain:
Once everything is dry and set, use pliers to open your jump ring, loop it through the eye pin, and attach your keychain hardware.
Now you have a tranquil little companion ready to swim alongside your keys or decorate your bag
Round Chick Charms
These delightfully round chick charms capture the essence of spring with their vibrant yellow hue and sweet, rosy cheeks. The smooth, glossy finish makes them perfect for a cheerful necklace or a cute keychain addition.
Step-by-Step Guide
Materials
- Polymer clay (yellow, orange, pink, black)
- Eye pin or screw eye hook
- Jump ring
- Glossy polymer clay glaze or UV resin
- Small paintbrush (for glaze)
- Clay sculpting tools (needle tool or toothpick)
- Baking surface (ceramic tile or parchment paper)
- Oven (for baking)
- Wet wipes (for cleaning hands)
Step 1: Shaping the Base
-
Condition the clay:
Start by kneading a chunk of yellow polymer clay until it is soft and pliable. Warm clay prevents cracks during shaping. -
Form a ball:
Roll the conditioned yellow clay into a smooth, even ball. It should be roughly the size of a large gum ball, but you can adjust the size to your preference. -
Flatten slightly:
Gently press the ball down against your work surface to create a thick disc shape. You want it to resemble a macaroon—a flattened circle with rounded edges, not a pancake. -
Smooth the surface:
Inspect the clay for any fingerprints or lint. Lightly rub your finger over any imperfections to smooth them out completely before adding details.
Clean Hands, clean clay
Yellow clay picks up dust easily. Keep a wet wipe nearby to clean your hands before handling the yellow clay, especially after touching the black clay.
Step 2: Adding Facial Features
-
Form the eyes:
Take a tiny amount of black clay and roll two very small, identical spheres. These should be quite small to keep the ‘kawaii’ look. -
Place the eyes:
Position the black spheres on the upper half of the yellow disc, spacing them slightly apart. Press them gently so they adhere but remain slightly raised. -
Create the beak:
Roll a small bit of orange clay into a tiny ball, then pinch one side to form a teardrop or cone shape. -
Attach the beak:
Place the orange cone between and slightly below the eyes, with the pointy end facing downward. Press it gently to secure it. -
Prepare the cheeks:
Condition a small amount of pink clay. Roll two tiny balls, slightly larger than the eyes but smaller than the beak. -
Apply the blush:
Place the pink balls on either side of the face, just below the eye level. Flatten them gently onto the yellow surface so they look like soft, flush cheeks.
Textured feathers
Before baking, use a needle tool to scratch tiny ‘v’ shapes or lines into yellow clay for a fluffy feather texture instead of the smooth look.
Step 3: Finishing Touches
-
Insert hardware:
Take your eye pin or screw eye hook. Insert it carefully into the top center of the chick, ensuring it goes in straight and doesn’t distort the round shape. -
Secure the pin:
If I find the clay is too soft, I sometimes wiggle the pin slightly to help the clay grip the metal threads or loop base. -
Final smooth:
Do one last check for fingerprints. If you see any, lightly brush them away with a tiny bit of baby oil or a soft brush. -
Bake the charm:
Place the chick on your baking tile or parchment paper. Bake according to your clay manufacturer’s instructions (usually 275°F/135°C for 15-30 minutes depending on thickness). -
Cool down:
Let the charm cool completely inside the oven or on a cooling rack. Do not handle it while hot, as the clay is still fragile. -
Glaze application:
Once cool, apply a thin coat of glossy glaze or UV resin over the entire piece (avoiding the metal loop). This gives it that specific shiny, finished look shown in the photo. -
Add jump ring:
After the glaze is fully dry or cured, use pliers to open a jump ring, loop it through the eye pin, and close it securely.
Now you have an adorable, glossy little friend ready to brighten up your keychain or jewelry collection

TRACK YOUR CERAMIC JOURNEY
Capture glaze tests, firing details, and creative progress—all in one simple printable. Make your projects easier to repeat and improve.
Star And Moon Face Charms
Bring a touch of the night sky to your jewelry collection with these adorable sleepy star and moon charms. Made from soft pastel polymer clay, they feature sweet, painted expressions and delicate details that make them perfect for keychains or stitch markers.
How-To Guide
Materials
- Polymer clay (pale pink, pastel yellow, bright pink)
- Black acrylic paint or fine tip marker
- Rolling pin or pasta machine
- Star cookie cutter (small)
- Circle cookie cutter (medium)
- Needle tool or toothpick
- Small dotting tool
- Fine detail paintbrush
- Gold jump rings and lobster clasp
- Jewelry pliers
- Glaze (optional)
Step 1: Shaping the Star
-
Condition the yellow clay:
Begin by kneading your pastel yellow polymer clay until it is soft and pliable. This warmth helps prevent cracks later on. -
Roll the slab:
Roll the clay out to a medium thickness, roughly 4-5mm. You want it thick enough to be sturdy but not chunky. -
Cut the star shape:
Use your small star-shaped cookie cutter to punch out a clean shape. If the edges are jagged, smooth them gently with a fingertip. -
Add texture (optional):
For a subtle, cookie-like texture as seen in the photo, you can gently tap the surface with a clean toothbrush or a piece of texturing sponge. -
Create the hole:
Use a needle tool or toothpick to poke a hole through the top point of the star. Wiggle it slightly to ensure it’s large enough for your jump ring.
Sticky Situation?
If clay sticks to your cutter, dip the cutter in cornstarch before pressing it into the slab. This acts as a release agent and dusts off easily after baking.
Step 2: Forming the Moon
-
Condition the pink clay:
Repeat the conditioning process with your pale pink clay until smooth. -
Cut the crescent shape:
Roll out a slab of pink clay. Use your medium circle cutter to cut a round shape. Then, overlap the cutter slightly offset onto that circle and cut again to create a crescent moon shape. -
Soften the tips:
Use your finger to gently round off the sharp points of the crescent moon so they aren’t too fragile. -
Create the hole:
Just like with the star, carefully pierce a hole near the top curve of the moon for the hardware.
Step 3: Adding Details & Baking
-
Attach rosy cheeks:
Take a tiny amount of bright pink clay and roll two microscopic balls for each charm. Press them gently onto the face area to flatten them into cute cheeks. -
Add tiny stars to the moon:
Roll extremely tiny bits of yellow clay. Using the tip of a needle tool, press them onto the moon’s surface and shape them into mini stars. I find using a magnifying glass helps with these tiny details. -
Bake the charms:
Place your pieces on a baking tile or parchment paper. Bake according to your specific clay brand’s instructions (usually around 275°F/135°C for 15-30 minutes). -
Cool down completely:
Let the pieces cool fully before handling so they harden properly.
Make It Sparkle
Mix a pinch of iridescent glitter into your translucent liquid clay and brush it over the finished star for a magical, shimmering galaxy effect.
Step 4: Finishing Touches
-
Paint the faces:
Using a very fine detail brush and black acrylic paint, carefully draw the closed eyelids with eyelashes and a small ‘u’ shape for the smile. Alternatively, a fine-tip permanent marker works great for beginners. -
Seal the charms:
Once the paint is dry, apply a thin coat of polymer clay glaze or matte varnish to protect the surface and the painted details. -
Attach hardware:
Open a gold jump ring using your pliers by twisting the ends sideways. Loop it through the hole in the charm. -
Add the clasp:
Before closing the jump ring, slide on your lobster clasp. Twist the ring closed securely.
Once assembled, these charming celestial friends are ready to brighten up your daily accessories
Turtle Trinket Box With Shell Lid
Create a charming hideaway for your tiny treasures with this adorable turtle-themed box. The clever design features a rounded shell lid that reveals a friendly, smiling turtle friend nestled inside when opened.
How-To Guide
Materials
- Polymer clay (Sage Green, White, Terracotta/Coral, Black, Pink)
- Round clay cutters (circle set)
- Acrylic roller or pasta machine
- Selecting tools (needle tool, dotting tool)
- Small bowl or half-sphere mold (metal or glass) for forming the lid
- Liquid polymer clay or Bake & Bond
- Blade or X-Acto knife
- Sandpaper (fine grit)
- Oven thermometer and baking tray
Step 1: Forming the Base Box
-
Roll the base slab:
Begin by conditioning your sage green clay until it is pliable. Roll it out into a smooth, even sheet about 1/4 inch thick. Use a medium-sized circle cutter to punch out the base of your box. -
Create the walls:
Roll a long strip of sage green clay of the same thickness. Measure the circumference of your circle base and trim the strip to match this length exactly. -
Assemble the cylinder:
Wrap the strip around the edge of the circle base. Gently blend the seams together on both the inside and outside using a modeling tool or your finger to ensure a seamless connection. -
Add decorative lines:
Using a needle tool, lightly score vertical lines around the exterior of the box at equal intervals. Add small circle details on these lines using a tiny cutter or straw to mimic the geometric pattern shown in the photo. -
Pre-bake the base:
To keep the shape sturdy while you work on the inside, bake this bottom portion for 15 minutes at the temperature recommended on your clay package.
Lid Fitting Trouble?
If the lid is too loose after baking, add a thin inner ring of fresh clay to the inside rim of the lid, check the fit, and re-bake briefly.
Step 2: Sculpting the Turtle
-
Shape the body:
Form a rounded mound of sage green clay that fits comfortably inside your baked box base. Texturize the back slightly with curved lines to suggest a soft under-shell. -
Create the head:
Roll a smooth sphere of sage green clay for the head. Attach this firmly to the front of the body mound using a dab of liquid clay to ensure a strong bond. -
Add facial features:
For the eyes, press two tiny balls of black clay flat onto the face. Add a tiny white glint to each eye for liveliness. Use a dotting tool to add rosy pink cheeks. -
Detail the smile:
Roll an extremely thin snake of black clay and curve it into a gentle smile, pressing it onto the face between the cheeks. -
Secure inside box:
Apply liquid polymer clay to the bottom of the turtle sculpt and press it securely into the center of your pre-baked box base.
Step 3: Creating the Shell Lid
-
Prepare the mold:
Find a heat-safe metal or glass bowl that is slightly wider than your box base. Lightly dust the outside with cornstarch to prevent sticking. -
Form the dome:
Roll a sheet of white clay and drape it over your convex mold, trimming the edges so you have a clean half-sphere shape. -
Apply the pattern:
Roll a thin sheet of terracotta or coral clay. Cut elongated teardrop or petal shapes. Gently press these onto the white dome in a radial pattern, radiating from the center to the rim. -
Texture the shell:
I like to gently roll over the applied pattern with an acrylic roller to flatten the seams, creating a smooth, inlaid effect called ‘cane’ style patterning. -
Refine the rim:
Create a rim for the lid by adding a strip that matches the pattern—alternating white and coral stripes—around the bottom edge of the dome. -
Check the fit:
Before baking, carefully lift the dome (if firm enough) and check that it sits nicely over your base box. If the clay is too soft, bake it on the mold first. -
Final Bake:
Bake the entire project—the lid (on its mold) and the base with the turtle inside—for the full duration recommended by the manufacturer, usually 30-45 minutes. -
Finishing touches:
Once cool, lightly sand any rough edges on the rim of the lid or box with fine-grit sandpaper for a professional finish.
Pro Tip: Texture
Use a piece of roughly textured sandpaper or a toothbrush on the unbaked ‘coral’ parts of the shell to give it a natural, matte stone finish.
Place this delightful little turtle on your desk to guard your paperclips or rings with a smile
Mini Bento Snack Characters
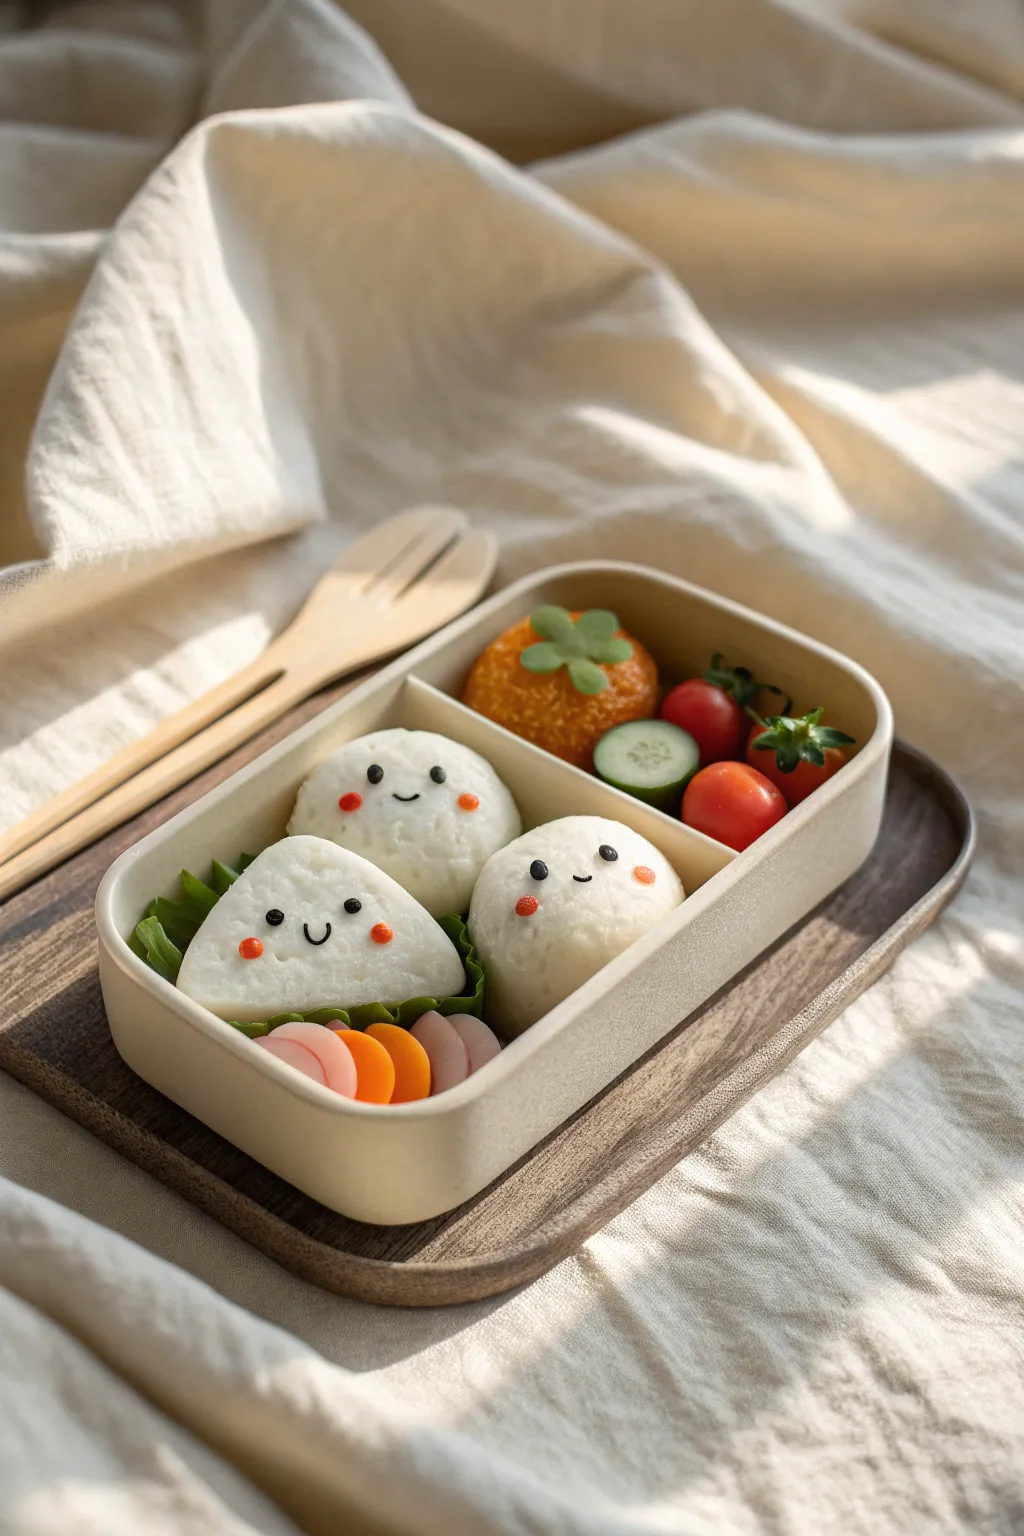
Create an impossibly cute miniature lunch that never spoils with this adorable polymer clay bento set. You’ll sculpt tiny smiling rice balls and fresh-looking veggies to arrange in a realistic bento container.
Step-by-Step Guide
Materials
- Polymer clay (white, translucent, orange, green, red, yellow, tan, black)
- Liquid polymer clay (translucent)
- Rectangular bento box mold or small ceramic dish
- Chalk pastels (orange, brown, red)
- Needle tool and ball stylus
- Old toothbrush or stiff bristled brush
- Gloss glaze or UV resin
- Craft knife or tissue blade
- Rolling pin
Step 1: Sculpting the Rice Characters
-
Mix the Rice Clay:
Start by mixing a large amount of white clay with a tiny pinch of translucent clay. This gives the ‘rice’ a slightly waxy, realistic cooked finish rather than being stark, opaque white. -
Shape the Bodies:
Roll three balls of your white mixture. Gently shape two into round dumplings and one into a soft triangle shape (onigiri). Keep them plump and smooth. -
Texture the Rice:
Gently tap the surface of all three shapes with an old toothbrush. You want to create a subtle, grainy texture without ruining the overall shape. -
Add Cheeks:
Roll extremely tiny balls of orange or pink clay. Flatten them onto the faces of your characters to create blushing cheeks, pressing them in gently so they bond. -
Create Expressions:
Roll thin snakes of black clay for mouths and tiny balls for eyes. Use a needle tool to place them. I find using a tiny dot of liquid clay helps secure these microscopic pieces.
Step 2: Creating the Side Dishes
-
Make the Croquette:
Mix tan clay with a little yellow and form a flattened round bun shape. Texture it heavily with a toothbrush or crumpled foil to simulate a fried breadcrumb surface. -
Shade the Croquette:
Use a soft brush to dust orange and brown chalk pastel over the textured croquette to give it a golden-brown, fried appearance. -
Form the Tomatoes:
Roll small balls of red clay. Poke a small hole in the top and insert a tiny green star shape for the stem. Add a tiny green snake coming out of the center for realism. -
Slice the Cucumber:
Make a ‘cane’ by wrapping a snake of translucent green clay in a thin sheet of dark green clay. Slice thin rounds from this log to create cucumber slices. -
Make the Ham/Carrots:
Mix pink and orange clays with a bit of translucent. Roll them into thin sheets and use a small circle cutter to make rounds. Cut these rounds in half to make semi-circles.
Sticky Situation?
If your black clay smears onto the white rice while making faces, use a cotton swab dipped in rubbing alcohol to gently wipe the white clay clean.
Step 3: Assembly and Finishing
-
Prepare the Lettuce:
Roll green clay very thin. Tear the edges irregularly and ruffle them with a ball tool. Place these ruffles into the bottom of your bento container as a bed. -
Arrangement Strategy:
Begin placing your items. Put the two round rice characters in the back, and the triangle one in the front left. Tuck the ham/carrot slices tightly next to the front rice ball. -
Fill the Gaps:
Place the croquette in the separate compartment or back corner. Fill empty spaces with the tomatoes and cucumber slices to make the box look bountiful. -
Bake the Project:
Bake the entire bento box according to your clay package instructions (usually 275°F/130°C for 15-30 minutes). Let it cool completely. -
Glaze certain items:
Apply gloss glaze only to the tomatoes and the cucumber skins to make them look fresh and wet. Leave the rice and breaded items matte.
Miniature Master
Add tiny sesame seeds to the rice balls by rolling microscopic teardrops of black or tan clay and pressing them onto the foreheads of your characters.
Enjoy displaying your kawai miniature meal on a shelf or turning it into a unique magnet
Tiny Mushroom Buddies
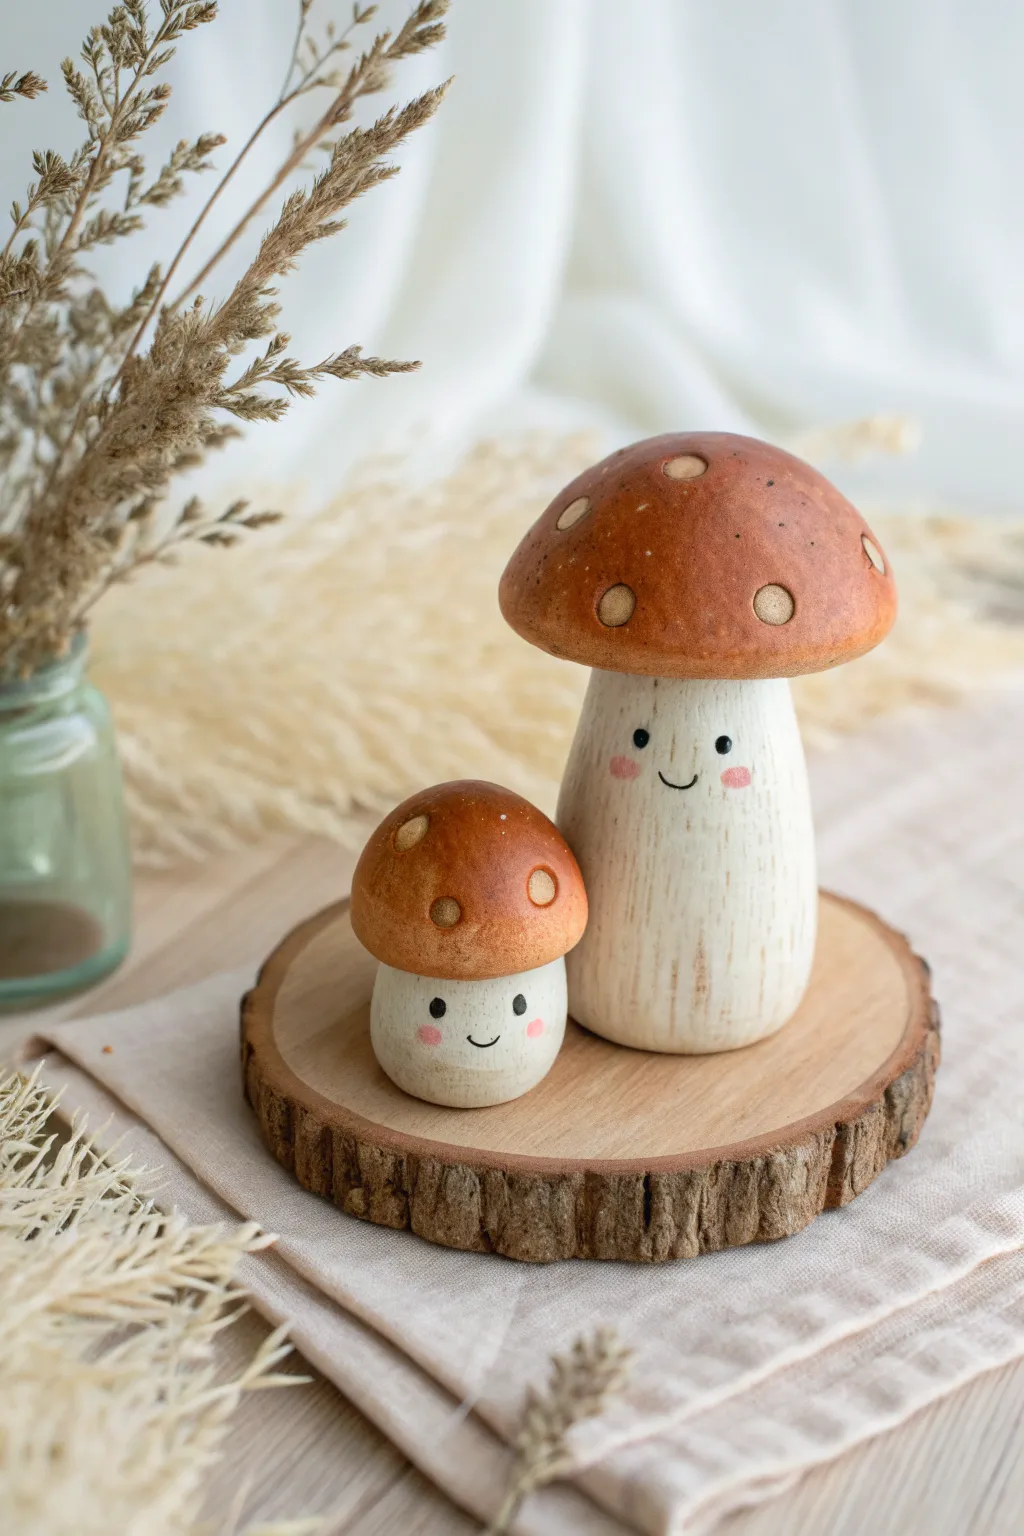
Create a pair of adorable smiling mushrooms that boast a natural, rustic charm perfect for whimsical decor. By mimicking the texture of unfinished wood using polymer clay, these buddies achieve a cozy, handcrafted aesthetic without any carving tools.
Step-by-Step
Materials
- White or beige polymer clay (wood tone base)
- Brown polymer clay (for caps)
- Raw sienna or ochre pastel chalks
- Acrylic paints: Black, Pink, White, Burnt Umber
- Fine detail paintbrush
- Toothbrush or coarse sponge
- Sculpting tools (needle tool, dotting tool)
- Liquid polymer clay (optional)
- Matte varnish
Step 1: Shaping the Stams
-
Condition the Clay:
Begin by conditioning your white or beige clay until it is soft and pliable. You want a color that resembles distinctive light wood, so feel free to mix in a tiny pinch of brown if your white is too stark. -
Form the Base Shape:
Roll two cylinders of clay—one larger for the parent mushroom and a smaller, stubbier one for the little buddy. Gently taper them so they are slightly wider at the bottom for stability. -
Texturize the ‘Wood’:
This is the secret to the look: take a toothbrush or a coarse texturing sponge and firmly press it vertically up and down the stems. This creates delicate striations that mimic wood grain. -
Add Grain Details:
I like to enhance the grain by taking a needle tool and lightly scratching longer, deeper vertical lines randomly around the stalk to simulate natural wood cracks and fibers. -
Highlighting:
Brush a small amount of raw sienna or light brown pastel chalk powder into the textured grooves you just made. This will make the grain pop once baked.
Grain Master Tip
For ultra-realism, mix translucent clay into your base color. The slight transparency mimics the depth of real wood fibers better than solid opaque colors.
Step 2: Creating the Caps
-
Mold the Caps:
Roll two balls of brown clay. Flatten the bottom of each and round out the top to create a classic mushroom dome shape. Make sure the large cap overhangs the large stem significantly. -
Weather the Texture:
Lightly texture the surface of the caps with your toothbrush or crumpled aluminum foil. You don’t want them perfectly smooth; a little unevenness adds to the organic feel. -
Create the Spots:
Instead of adding clay on top, use a dotting tool or the back of a paintbrush to press circular indentations into the clay caps. These are recessed spots, like carved wood divots. -
Color Variation:
Dust the top center of the caps with a slightly lighter or darker brown pastel chalk to give them a sun-baked, realistic gradient. -
Face Indentations:
Before assembling, press two tiny divots into the stems where the eyes will go. This helps map out the face and ensures the paint sits well later. -
Assembly:
Place the caps onto the stems. If the clay isn’t sticky enough, use a drop of liquid polymer clay or ‘bake and bond’ to secure the connection. Press down firmly but gently to avoid squishing the stem texture.
Display Idea
Make a whole forest family! Create varying sizes and glue them permanently onto a real wood slice or a mossy stone for a complete woodland scene.
Step 3: Finishing Touches
-
Baking:
Bake the mushrooms according to your clay package instructions. Usually, this is around 275°F (130°C) for 15–30 minutes depending on thickness. Let them cool completely. -
Painting the Eyes:
Using a fine detail brush and black acrylic paint, fill in the eye divots you made earlier with small, solid black circles. -
Adding the Sparkle:
Once the black is dry, add a tiny white dot to the upper corner of each eye. This ‘catchlight’ brings the character to life. -
Blush and Snoot:
Dilute a bit of pink paint with water (or use a dry brush technique) to dab soft, rosy cheeks under the eyes. Paint a tiny, tough-shaped smile between the eyes with thinned black paint or a fine liner pen. -
Defining the Cap Spots:
Paint the inside of the recessed circles on the cap with a lighter beige or tan acrylic paint to make them stand out against the darker brown cap. -
Sealing:
Apply a coat of matte varnish to the entire piece. Avoid glossy finishes, as the matte look preserves the illusion of natural dry wood.
Enjoy your charming little forest friends sitting on your shelf or desk