When I’m craving a quick creative win, I reach for polymer clay because it’s perfect for cute little projects that actually get used. Here are my favorite polymer clay art ideas—heavy on kawaii vibes, simple shapes, and that satisfying “I made this!” feeling.
Easy Polymer Clay Earrings in Bold Shapes
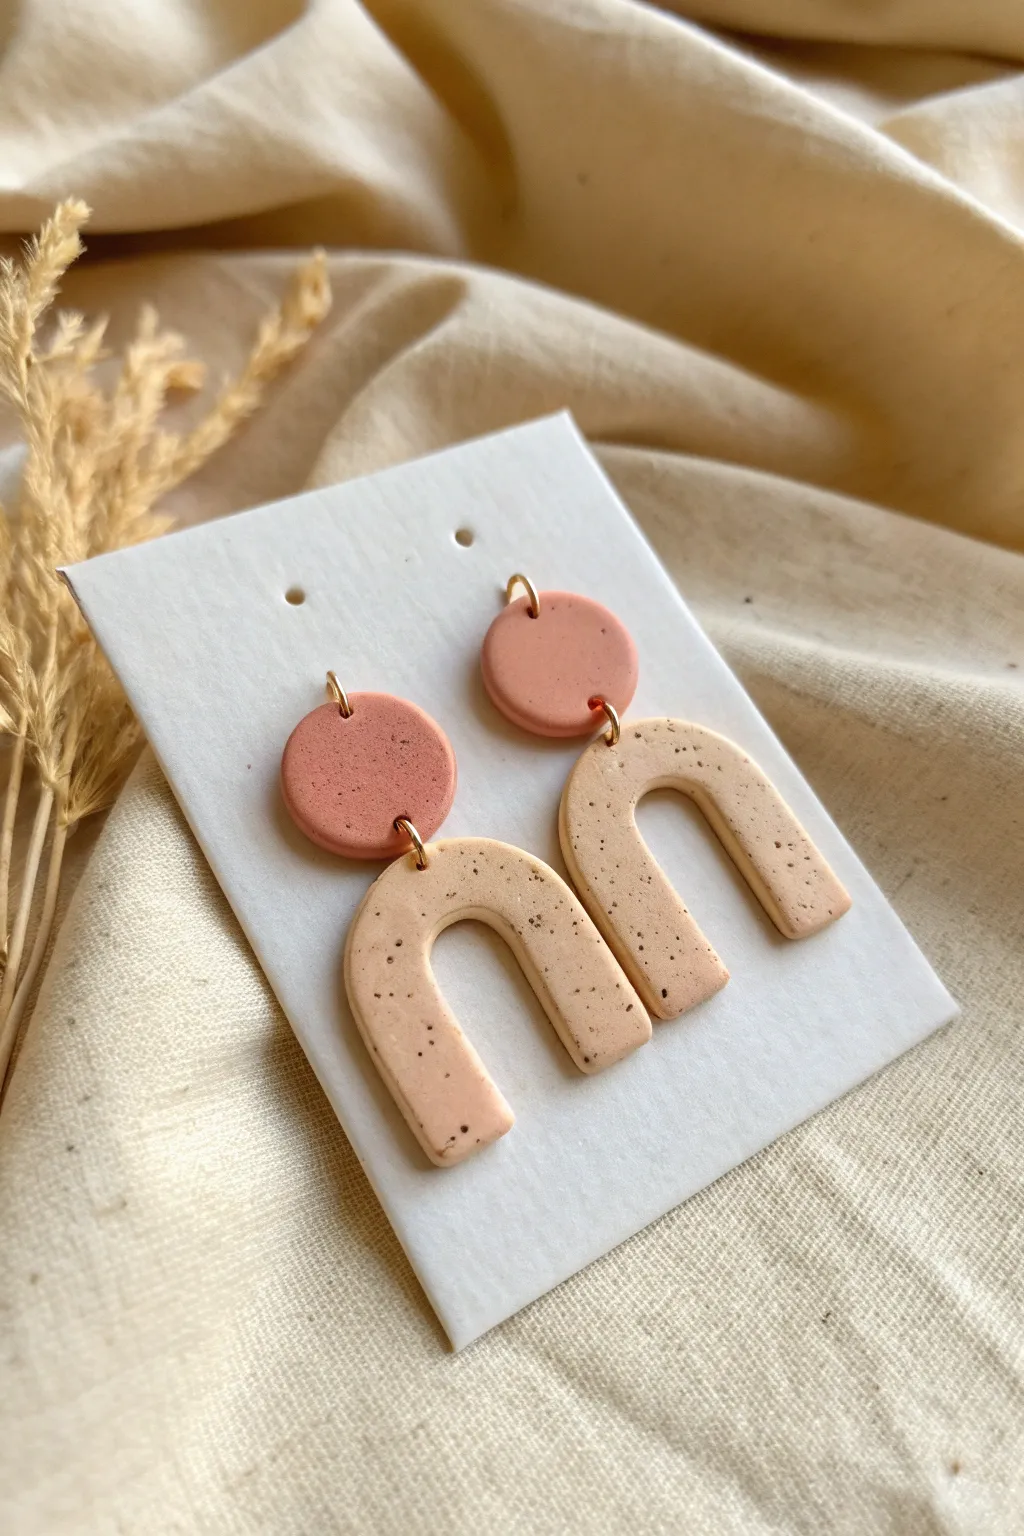
These trendy, minimalist earrings combine soft earth tones with a playful speckled texture for a modern boho look. The simple geometric shapes make this an ideal beginner project that looks professionally handmade.
Step-by-Step Tutorial
Materials
- Polymer clay in muted pink (terracotta)
- Polymer clay in beige or cream
- Ground black pepper or dried coffee grounds (for speckles)
- Acrylic rolling pin
- Small circle cutter (approx. 1 cm)
- U-shape or arch cutter
- Jump rings (gold finish)
- Earring hooks or studs
- Needle tool or toothpick
- Parchment paper
- Jewelry pliers
- Baking sheet
- Oven
Step 1: Preparing the Clay
-
Condition the clay:
Start by kneading the beige clay in your hands until it becomes soft and pliable. This warmth helps prevent cracking later on. -
Add texture:
To achieve that organic speckled look seen in the bottom arch, sprinkle a small pinch of ground black pepper or dried coffee grounds onto your beige clay. -
Mix the inclusions:
Fold the clay over the pepper and knead it thoroughly until the speckles are evenly distributed throughout the batch. -
Condition the pink clay:
Repeat the conditioning process with your terracotta pink clay. You can leave this solid or add speckles as well, though the example keeps the top circle relatively solid for contrast. -
Roll it out:
Using your acrylic rolling pin, roll both colors of clay out on a piece of parchment paper. Aim for a thickness of about 3mm—thick enough to be sturdy but light enough to wear comfortably.
Step 2: Cutting and Selling
-
Cut the arches:
Press your U-shaped cutter firmly into the speckled beige clay. Wiggle it slightly to ensure a clean cut, then lift. Repeat to make two matching arches. -
Cut the circles:
Use your small circle cutter on the pink clay to create two identical tops. These will sit close to the ear lobe. -
Smooth the edges:
Gently run your finger along the cut edges of all four pieces to soften any sharp ridges or loose bits of clay left by the cutters. -
Create connection holes:
Using a needle tool, carefully poke a hole at the top center of each U-shape and at the bottom center of each pink circle. I personally like to wiggle the needle slightly to ensure the hole is large enough for the jump ring. -
Add top holes:
Pierce a second hole at the very top of the pink circles. This is where your earring hook or stud connector will eventually go.
Smooth Operator
Before baking, dip your fingertip in cornstarch or baby oil and gently rub the surface of the clay. This removes fingerprints and dust for a flawless finish.
Step 3: Baking and Assembly
-
Bake the pieces:
Arrange your clay shapes on a parchment-lined baking sheet. Bake according to your brand’s specific package instructions (usually around 275°F/135°C for 15-30 minutes). -
Cool down:
Let the pieces cool completely on the baking sheet before handling them. Polymer clay is slightly soft when hot and hardens as it cools. -
Open the jump rings:
Using two pairs of jewelry pliers, twist a gold jump ring open. Always twist connection rings sideways (like opening a door) rather than pulling them apart, to maintain their circle shape. -
Connect the shapes:
Thread the open jump ring through the top of the beige arch and the bottom of the pink circle, then twist it closed securely. -
Attach the hardware:
Add a second jump ring or hook to the top hole of the pink circle to complete the earring assembly.
Level Up: Resin Shine
After baking, apply a thin layer of UV resin to the pieces and cure under a UV lamp. This adds a glossy, glass-like finish that makes the colors pop.
Now you have a stylish pair of custom earrings ready to wear or gift.


Kawaii Food Charms With Tiny Faces
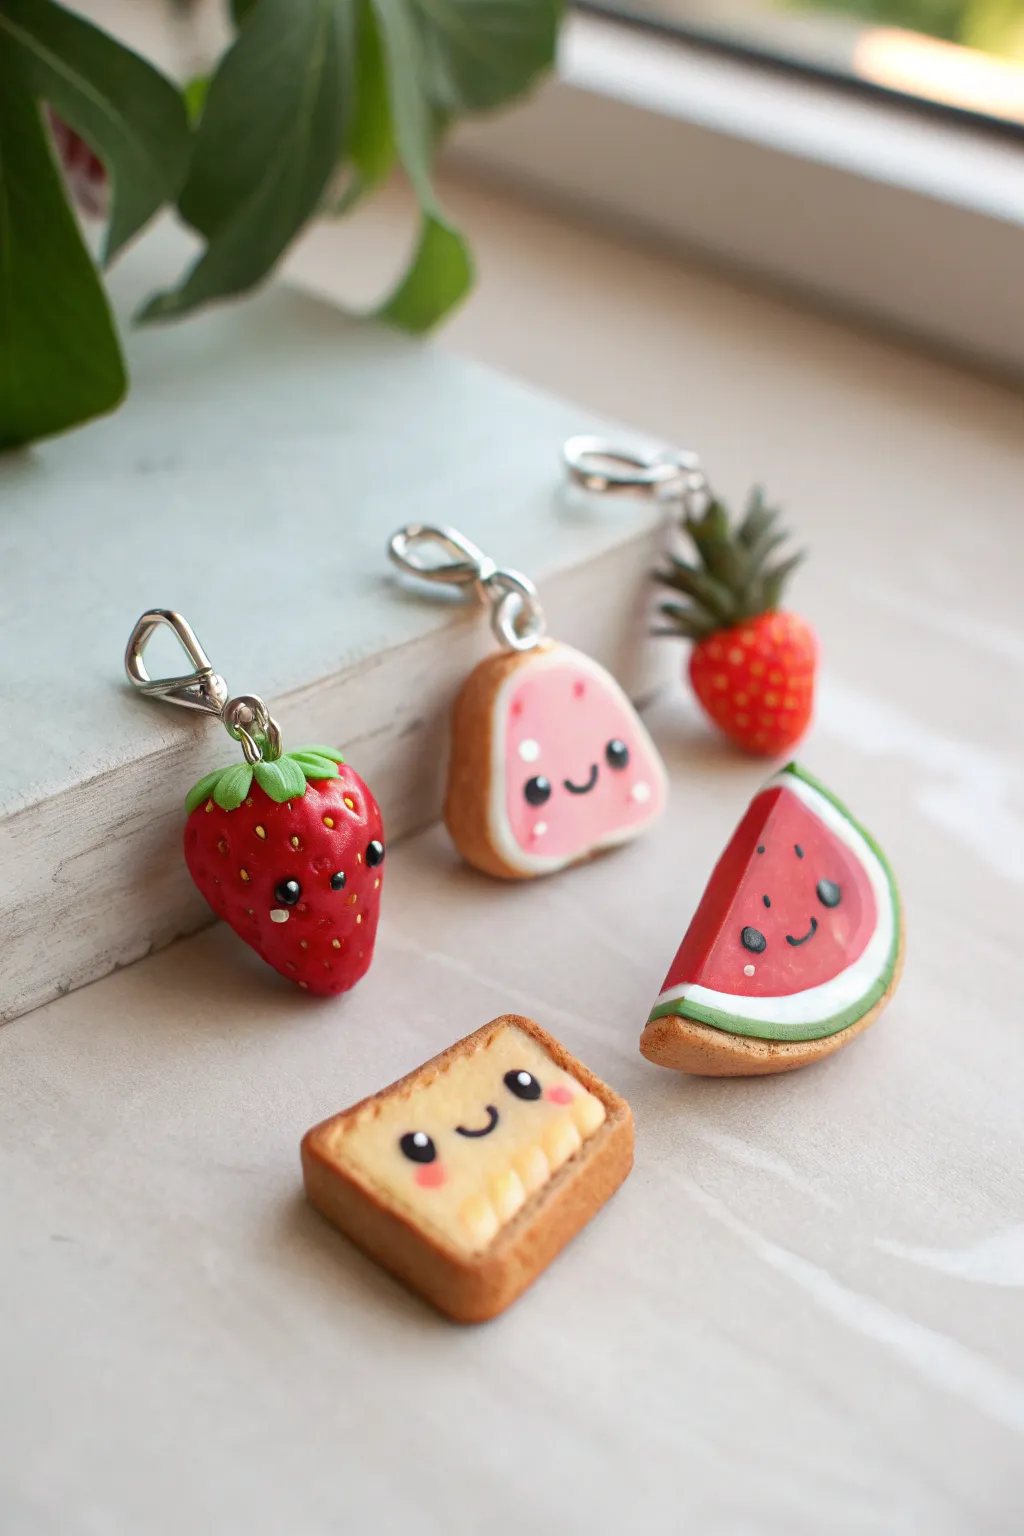
Transform simple balls of clay into adorable, smiling food friends with this delightful polymer clay project. These tiny charms feature sweet, glossy faces and textured details that make them perfect for keychains, jewelry, or just brightening up your desk.
How-To Guide
Materials
- Polymer clay (Red, Green, White, Beige, Pink, Yellow, Black)
- Eye pin findings or small screw eyes
- Liquid polymer clay (Translucent)
- Gloss glaze or UV resin
- Ball stylus tools (various sizes)
- Needle tool or toothpick
- Soft pastel chalks (pink for cheeks, golden brown for toast)
- Soft brush
- Blade or craft knife
- Oven for baking
Step 1: The Sweet Strawberry
-
Shape the Base:
Begin by conditioning a small amount of red clay and rolling it into a smooth ball. Gently taper one end to create a strawberry shape, slightly flattening the top. -
Add Texture:
Use a needle tool to gently poke small indentations all over the surface for seeds, leaving a smooth space in the center for the face. -
Leafy Greens:
Flatten a tiny bit of green clay and cut out a small star or flower shape. Press this onto the top of the strawberry. Use a tool to texture the leaves to look realistic. -
Hardware:
Insert an eye pin into the center of the green leaves before baking to ensure it bonds securely.
Step 2: The Happy Toast
-
Create the Bread:
Mix beige clay to a light bread color. Shape it into a small square with rounded corners. I like to gently indent the top edge to give it that classic loaf shape. -
Toasting the Edges:
Use a soft brush and golden-brown pastel chalk shavings to dust the edges of the bread, giving it a realistic baked appearance. -
Butter or Cheese Topping:
Mix liquid polymer clay with a tiny bit of yellow clay or pastel chalk. Carefully drip this onto the center of the toast to look like melted butter or a slice of cheese.
Pin Keep Popping Out?
If your eye pin slides out after baking, pull it out completely, add a drop of super glue to the metal shaft, and slide it back into the existing hole.
Step 3: Ham and Watermelon Pals
-
Watermelon Slice:
Make a thick triangle of red clay. Wrap the bottom curved edge in a thin strip of white clay, followed by a strip of green clay for the rind. -
Ham or Meat Slice:
Shape a piece of beige clay into a rounded shape with a flat bottom. Create a pink center piece that mimics the shape but is slightly smaller, and press it into the beige ‘crust’. -
Adding Details:
Add white clay dots to the pink meat slice for marbling. For the watermelon, press tiny black seeds into the red clay.
Clean Clay Tip
Keep baby wipes nearby to clean your hands between colors. Red and black clay stain darker colors easily, so always handle your lightest colors (like white or beige) first.
Step 4: Bringing Them to Life
-
Pre-Bake Faces:
Roll incredibly tiny balls of black clay for eyes and press them onto the faces. Roll a distinctively thin snake of black clay for the mouths. -
Baking:
Bake all your pieces according to your specific brand of clay’s package directions (usually 275°F/130°C for 15-30 minutes). -
Cooling:
Allow the pieces to cool completely before handling them further so the clay hardens properly. -
Highlighting Eyes:
Use a toothpick dipped in white acrylic paint to add tiny reflection dots to the black eyes. This is crucial for that ‘kawaii’ look. -
Rosy Cheeks:
Dust pink pastel chalk onto the cheek areas with a small brush, or paint tiny pink ovals. -
Sealing:
Coat the charms with a gloss glaze or UV resin to protect the surface and give them a professional, shiny finish.
Now you have a collection of tiny, smiling friends ready to turn into accessories or gifts


Mini Animal Face Magnets as a Set
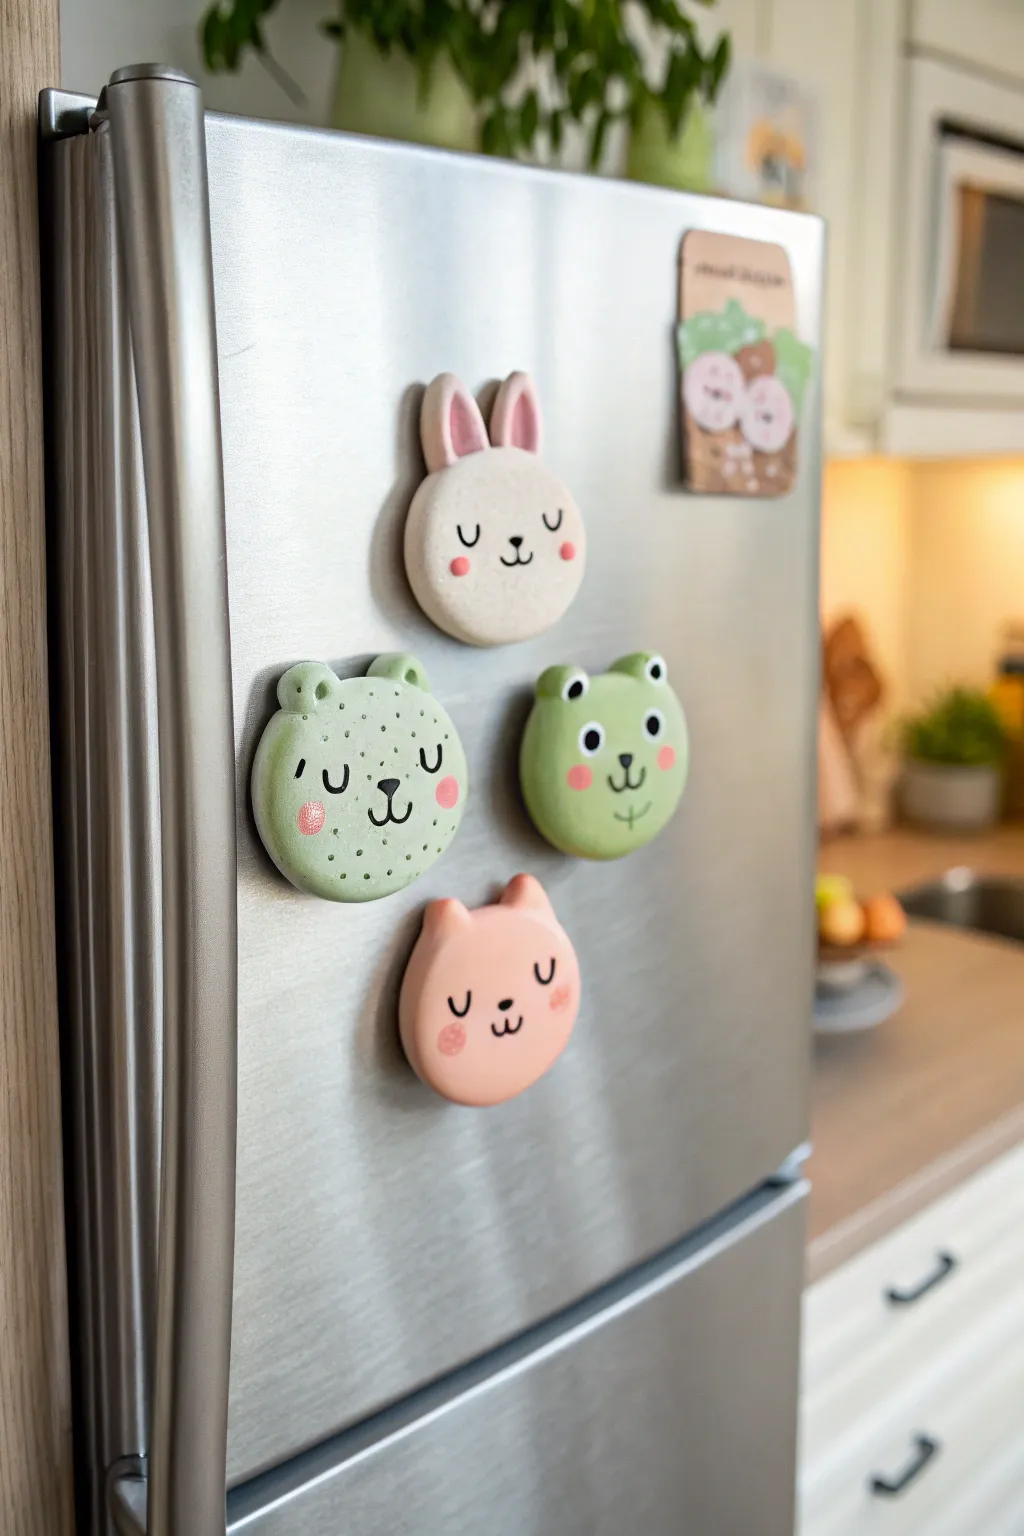
Brighten up your fridge with this charming set of pastel animal magnets, featuring a sleepy bunny, a cheerful frog, a speckled bear, and a contented cat. These smooth, rounded discs are simple to sculpt but packed with personality thanks to their sweet painted expressions.
Detailed Instructions
Materials
- Polymer clay (white, mint green, pale pink, lime green)
- Round cookie cutter (approx. 2 inches)
- Acrylic rolling pin
- Small ball tool or dotting tool
- Needle tool or toothpick
- Black acrylic paint or fine-tip black permanent marker
- Pink acrylic paint (for cheeks)
- Small round magnets (strong neodymium recommended)
- Super glue or E6000
- Matte or satin glaze (optional)
- Parchment paper or baking tile
- Sandpaper (fine grit)
Step 1: Basic Shape Formation
-
Condition the clay:
Start by thoroughly kneading your polymer clay colors until they are soft and pliable. You will need white for the bunny, mint green for the bear, lime green for the frog, and pale pink for the cat. -
Roll out the slab:
Using an acrylic rolling pin, roll each color of clay into a thick slab, approximately 1/4 inch thick. You want them substantial enough to hold the magnet firmly. -
Cut the bases:
Use your round cookie cutter to punch out four identical circles. Smooth the cut edges gently with your finger to remove any sharp ridges or loose bits of clay.
Step 2: Adding Animal Features
-
Sculpt the bunny ears:
For the white bunny, shape two small, elongated teardrops and flatten them slightly. Press a smaller pink teardrop inside each for the inner ear. Attach these to the top edge of the white circle, blending the seam on the back. -
Create the bear ears:
For the mint green bear, roll two small balls of mint clay. Flatten them slightly and press them onto the top left and right of the circle. Use a needle tool to make a tiny indentation in the center of each ear. -
Form the frog eyes:
The lime green frog has prominent eyes. Roll two medium-sized balls of lime clay and attach them firmly to the top edge of the head so they pop up above the circle’s rim. -
Shape the cat ears:
For the pink cat, create two small triangles. Pinch the tips gently to sharpen them and attach them to the top of the pink circle, smoothing the clay downwards to secure the bond. -
Apply texture (Bear only):
Use a needle tool or toothpick to gently poke shallow dots all over the surface of the mint green bear’s face to create a speckled fur texture.
Clean Clay Tip
Keep baby wipes nearby! When switching between colored clays and white clay, wipe your hands and tools thoroughly to avoid transferring lint or dye onto the pristine white bunny face.
Step 3: Baking and Assembly
-
Bake the pieces:
Place all four faces on a parchment-lined baking sheet or ceramic tile. Bake according to your clay manufacturer’s instructions (usually 275°F for 15-30 minutes). Let them cool completely before handling. -
Sand the edges:
Once cool, check the edges. If there are any fingerprints or rough spots, lightly sand them with fine-grit sandpaper for a professional finish. -
Attach the magnets:
Turn the faces over. Apply a drop of strong super glue or E6000 to the center of each back and press a magnet firmly into place. Let the glue cure fully.
Make it a Gift Set
Make matching packaging! Cut a strip of cardstock and attach the magnets to it using magnetic tape or washers, creating a boutique-style display perfect for gifting.
Step 4: Painting Faces
-
Plan the expressions:
Before painting, visualize the faces. The bunny, bear, and cat have sleepy ‘U’ shaped eyes, while the frog has wide, open eyes. -
Paint the eyes:
Using a very fine brush and black acrylic paint (or a paint pen provided the clay is clean), draw two small ‘U’ shapes for the sleepy animals. For the frog, paint large white circles on the eye bumps, let dry, and add black dots for pupils. -
Add noses and mouths:
Paint a tiny ‘Y’ shape or a small triangle nose with a vertical line for the mouths. Keep the lines thin and delicate. The frog gets a wider simple smile with a vertical line through it. -
Blush the cheeks:
I find the best way to do cheeks is dipping a ball tool or the handle end of a paintbrush into pink paint and stamping a perfect dot on each side of the face. -
Seal the work:
To protect the paint from scratching off on the fridge, apply a thin coat of matte or satin glaze over the painted areas once they are completely dry.
Now these adorable friends are ready to hold up your grocery lists and favorite photos with style


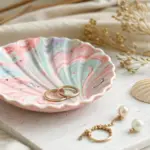
Marbled Polymer Clay Ring Dish
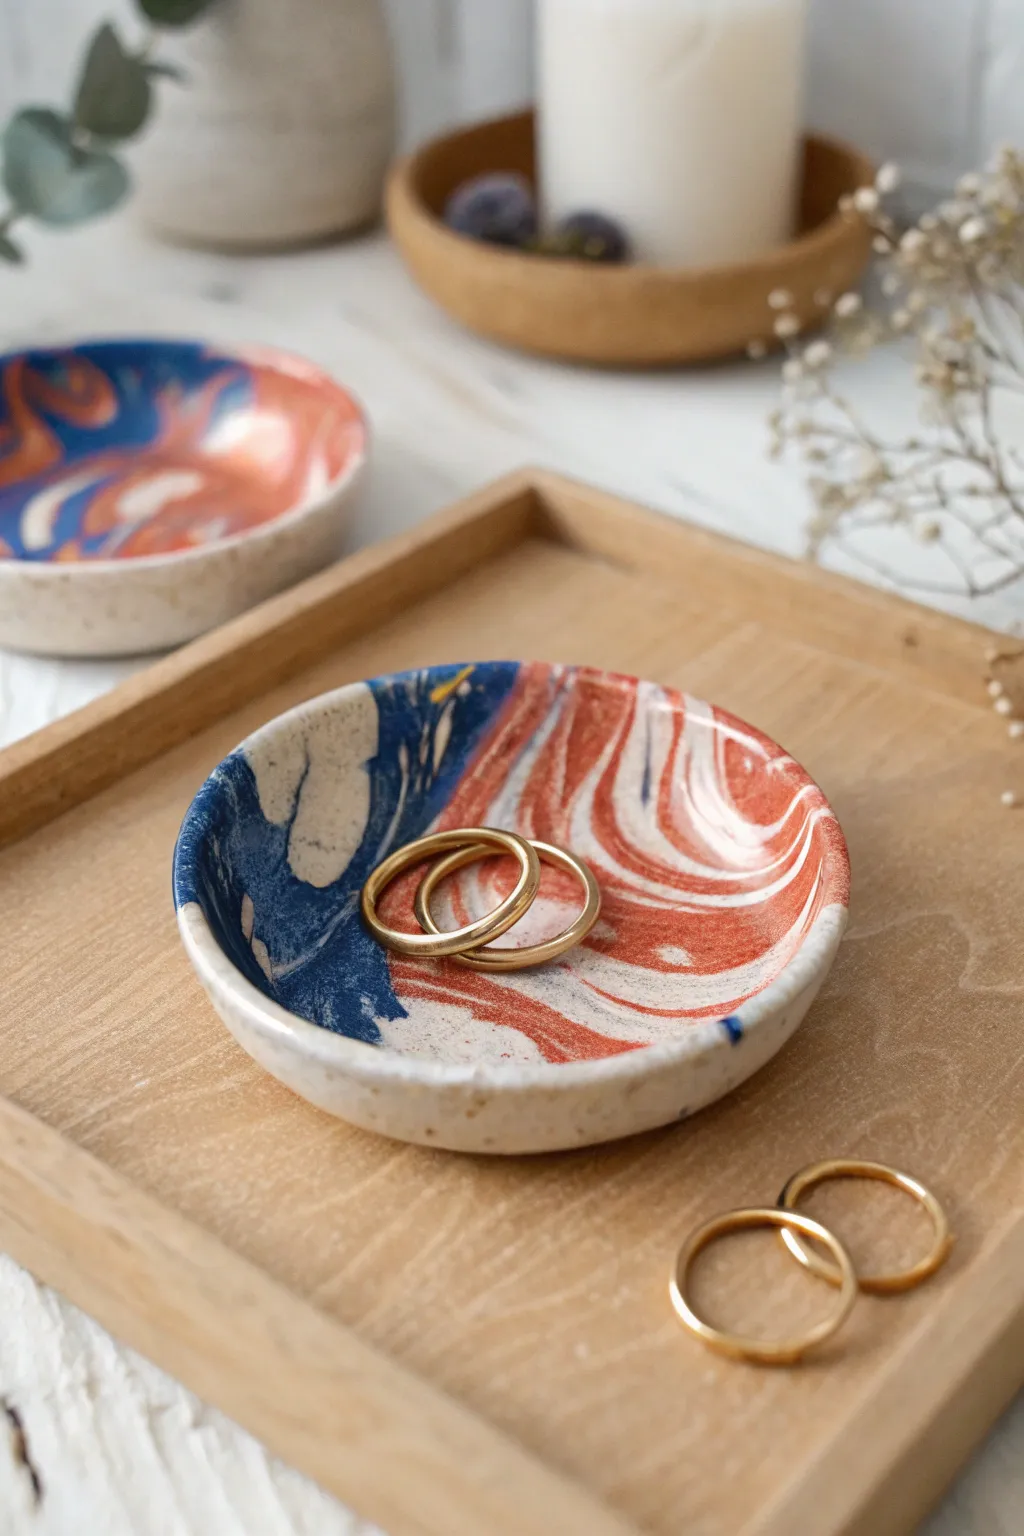
These elegant ring dishes feature a striking tri-color marble effect that looks sophisticated but is surprisingly simple to achieve. With swirls of navy, terracotta, and speckled cream, this project creates a functional piece of art perfect for keeping your favorite jewelry safe.
Step-by-Step Tutorial
Materials
- Polymer clay (navy blue, terracotta orange, white, and translucent)
- Black pepper or dried vanilla bean specks (for the ceramic look)
- Acrylic rolling pin
- Circle cookie cutter (approx. 4 inches)
- Oven-safe bowl or ramekin (for forming the shape)
- Fine-grit sandpaper (400 to 1000 grit)
- Glossy polymer clay glaze or varnish
- Soft paintbrush
- Ceramic tile or glass work surface
Step 1: Preparing the Clay
-
Create the faux-ceramic base:
Start by conditioning a large block of white clay until it is soft and pliable. -
Add texture:
Mix in a small amount of translucent clay to give the white depth, then sprinkle in cracked black pepper or vanilla bean specks. Knead thoroughly until the specks are evenly distributed, mimicking stoneware pottery. -
Condition the colors:
Condition your navy blue and terracotta orange clays separately. Roll each color, including your speckled white mix, into distinct ‘snakes’ or ropes about 5 inches long.
Muddy Colors?
If your colors are blending into brown or gray, stop rolling sooner. The key to distinct marbling is fewer folds—stop as soon as you see streaks.
Step 2: Creating the Marble Effect
-
Twist the ropes:
Gather your clay snakes together. Twist them around each other into one large, spiraled thick rope to begin blending the colors. -
Fold and roll:
Fold the twisted rope in half, then roll it out again into a snake. Repeat this twist-fold-roll process 3-4 times. Be careful not to over-mix, or the colors will turn muddy instead of defined. -
Form a ball:
Once you see nice striations, squash the clay into a ball. Make sure the most interesting swirls are visible on the surface. -
Roll out the slab:
Place the ball on your work surface and use the acrylic rolling pin to flatten it into a slab about 1/4 inch thick. This thickness ensures the final dish is sturdy. -
Check the pattern:
I usually inspect both sides of the slab at this point to see which side has the more pleasing marble pattern.
Gold Rim Upgrade
For an extra touch of luxury, paint the very top edge of the rim with metallic gold liquid leaf paint after baking and sanding.
Step 3: Shaping and Baking
-
Cut the circle:
Place your chosen side facing up. Use the 4-inch circle cutter to punch out a clean, perfect round disc from the marbled slab. -
Smooth the edges:
Gently run your finger around the cut edge of the circle to soften any sharp corners left by the cutter. -
Form the curve:
Carefully lift the clay circle and drape it inside your oven-safe bowl. Gently press the center down so the clay conforms to the bowl’s curve, creating the dish shape. -
Bake:
Place the bowl with the clay inside into a preheated oven. Bake according to your specific clay brand’s package instructions (usually 275°F for 15-30 minutes). -
Cool down:
Once baked, remove from the oven and let the clay cool completely inside the bowl before attempting to pop it out. This prevents warping.
Step 4: Finishing
-
Sand the rim:
Using fine-grit sandpaper, gently sand the rim of the dish under running water to ensure it is perfectly smooth and professional-looking. -
Clean surface:
Wipe the dish dry with a lint-free cloth to remove any sanding dust or residue. -
Glaze the rim:
Dip a soft brush into the glossy varnish and apply it carefully to the rim. Some crafters enjoy painting just the edge with gold liquid leaf here, but a clear gloss keeps it modern. -
Seal the interior:
Apply a thin, even coat of glaze to the inside of the dish to protect the surface and make the marble colors pop. Allow to dry fully according to the varnish instructions.
Now you have a chic, custom catch-all dish ready to display your treasures on a vanity or bedside table

What Really Happens Inside the Kiln
Learn how time and temperature work together inside the kiln to transform clay into durable ceramic.
Terrazzo-Style Polymer Clay Coasters
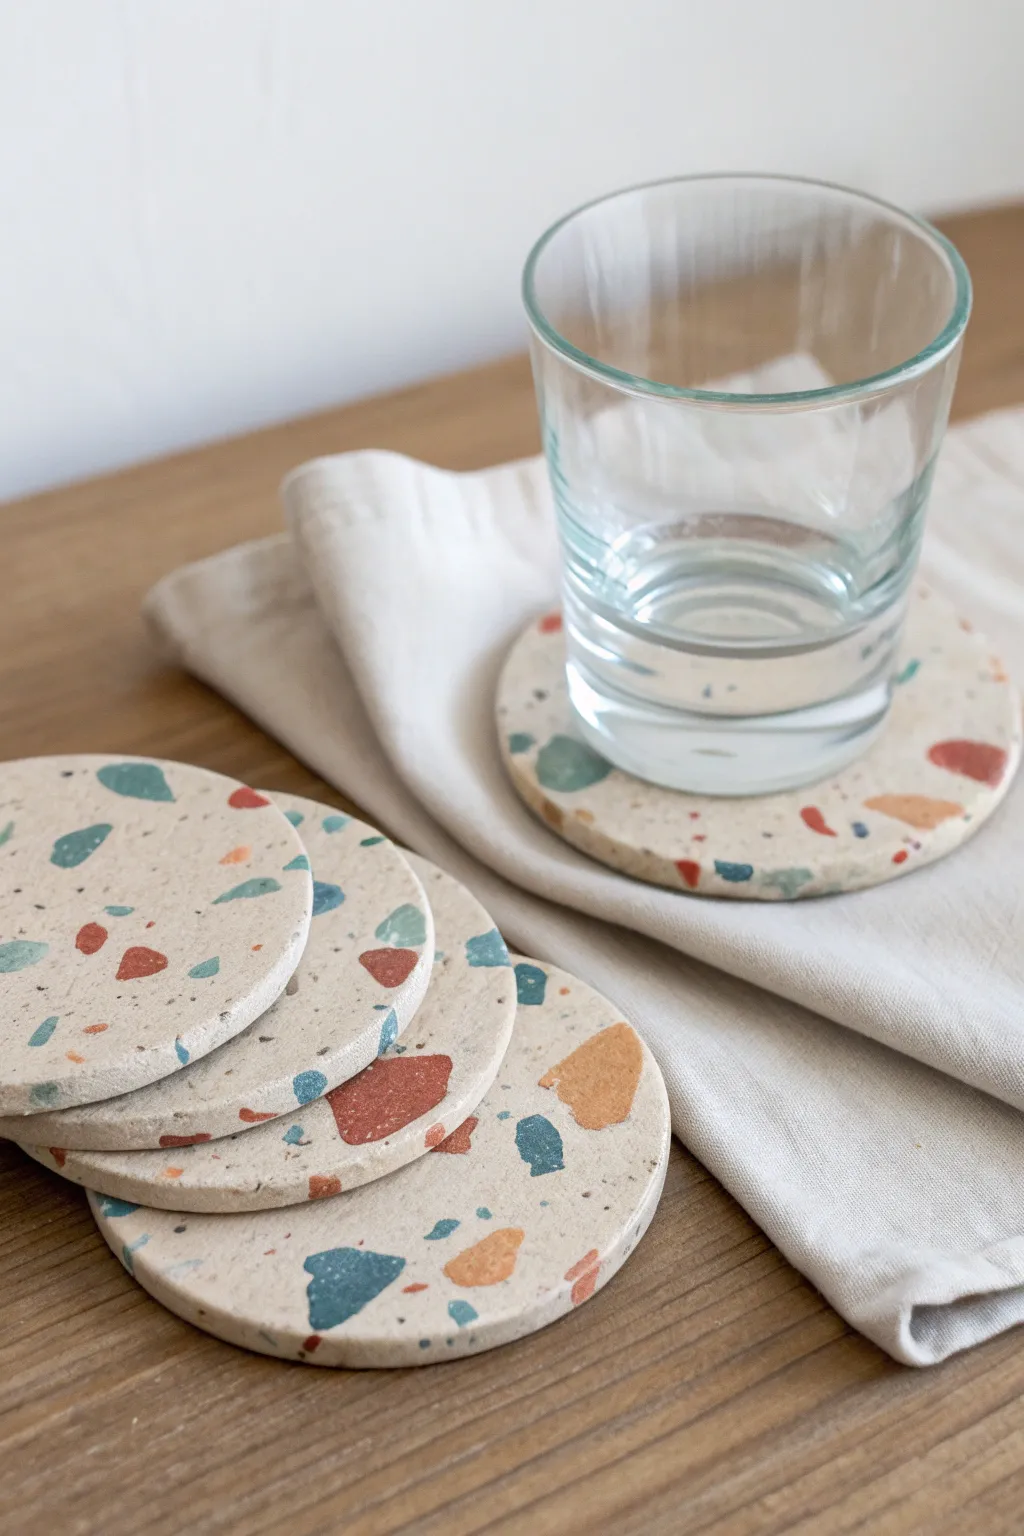
Embrace the trendy, speckled beauty of terrazzo with these elegant handcrafted coasters. Featuring a neutral sand-colored base dotted with chips of rust, teal, and slate blue, they bring a modern artistic touch to any coffee table.
Step-by-Step Guide
Materials
- Polymer clay (Sand/Beige, Terracotta, Teal, Navy/Dark Blue, Light Grey)
- Acrylic rolling pin or pasta machine
- Round cookie cutter (approx. 9-10 cm diameter)
- Sharp craft knife or tissue blade
- Parchment paper or baking mat
- Rolling guides or popsicle sticks (optional for even thickness)
- Fine-grit sandpaper (400, 600, and 1000 grit)
- Gloss or matte varnish (optional)
Step 1: Preparing the Chips
-
Condition the colors:
Begin by thoroughly conditioning your colored clays—terracotta, teal, navy, and light grey—until they are soft and pliable. -
Flatten the clay:
Roll each color out into a very thin sheet. You want these to be significantly thinner than your final coaster. -
Create the fragments:
Tear or cut these thin sheets into random, jagged little pieces. Vary the sizes from tiny specks to larger shards for an authentic stone look. -
Refrigerate (optional):
If your climate is warm, you can pop these little chips in the fridge for 10 minutes to firm them up so they don’t smear during the next steps.
Step 2: Forming the Base
-
Condition the base clay:
Take a large block of sand or beige polymer clay. Condition it well until it is smooth and warm. -
Roll the slab:
Roll the beige clay into a thick slab, roughly 4-5mm thick. I prefer using rolling guides here to ensure the thickness is perfectly uniform across the whole sheet.
Clean Chip Tip
To keep your colors distinct and prevent smearing, wipe your roller with a baby wipe between rolling passes, especially if working with dark blues or reds.
Step 3: Creating the Terrazzo Pattern
-
Distribute the chips:
Sprinkle your prepared colored chips onto the beige slab. Be generous but leave enough negative space to let the base color shine through. -
Press gently:
Lightly press the chips down with your fingers just so they stick to the surface of the base clay. -
Roll to embed:
Place a piece of parchment paper over the slab to prevent sticking, then use your acrylic roller to roll over the chips. Apply firm pressure to press them evenly into the base clay surface. -
Smooth the surface:
Continue rolling in different directions until the surface is completely flat and the chips are flush with the beige clay.
Make it Matte
Skip the varnish for a raw stone feel. Instead, apply a tiny amount of Renaissance Wax and buff well. It protects against moisture while keeping the finish matte.
Step 4: Cutting and Baking
-
Cut the shapes:
Press your round cookie cutter firmly into the clay slab to cut out your coasters. Wiggle it slightly before lifting specific cutters to get clean edges. -
Soften edges:
Use your fingertip to gently run along the cut edge of each circle to smooth out any sharpness leftover from the cutter. -
Bake:
Place the rounds on a baking sheet lined with parchment paper. Bake according to your brand of clay’s instructions—usually around 275°F (130°C) for 30–45 minutes. -
Cool down:
Allow the coasters to cool completely on a flat surface. Do not attempt to sand them while they are still warm.
Step 5: Finishing Touches
-
Wet sanding:
Dip your 400-grit sandpaper in water and sand the surface of the coaster in circular motions. This reveals the chips more clearly and removes fingerprints. -
Refine the finish:
Move gradually to the 600 and then 1000 grit sandpaper, keeping the surface wet throughout the process. -
Buffing:
Rub the dry coasters briskly with a soft denim or cotton cloth to bring out a natural satin sheen. -
Seal (Optional):
If you want extra protection against drink spills, apply a thin layer of polyurethane varnish or resin to seal the surface.
Stack your finished coasters on your table and enjoy the customized pop of color they add to your decor
Tiny Mushroom Polymer Clay Figures
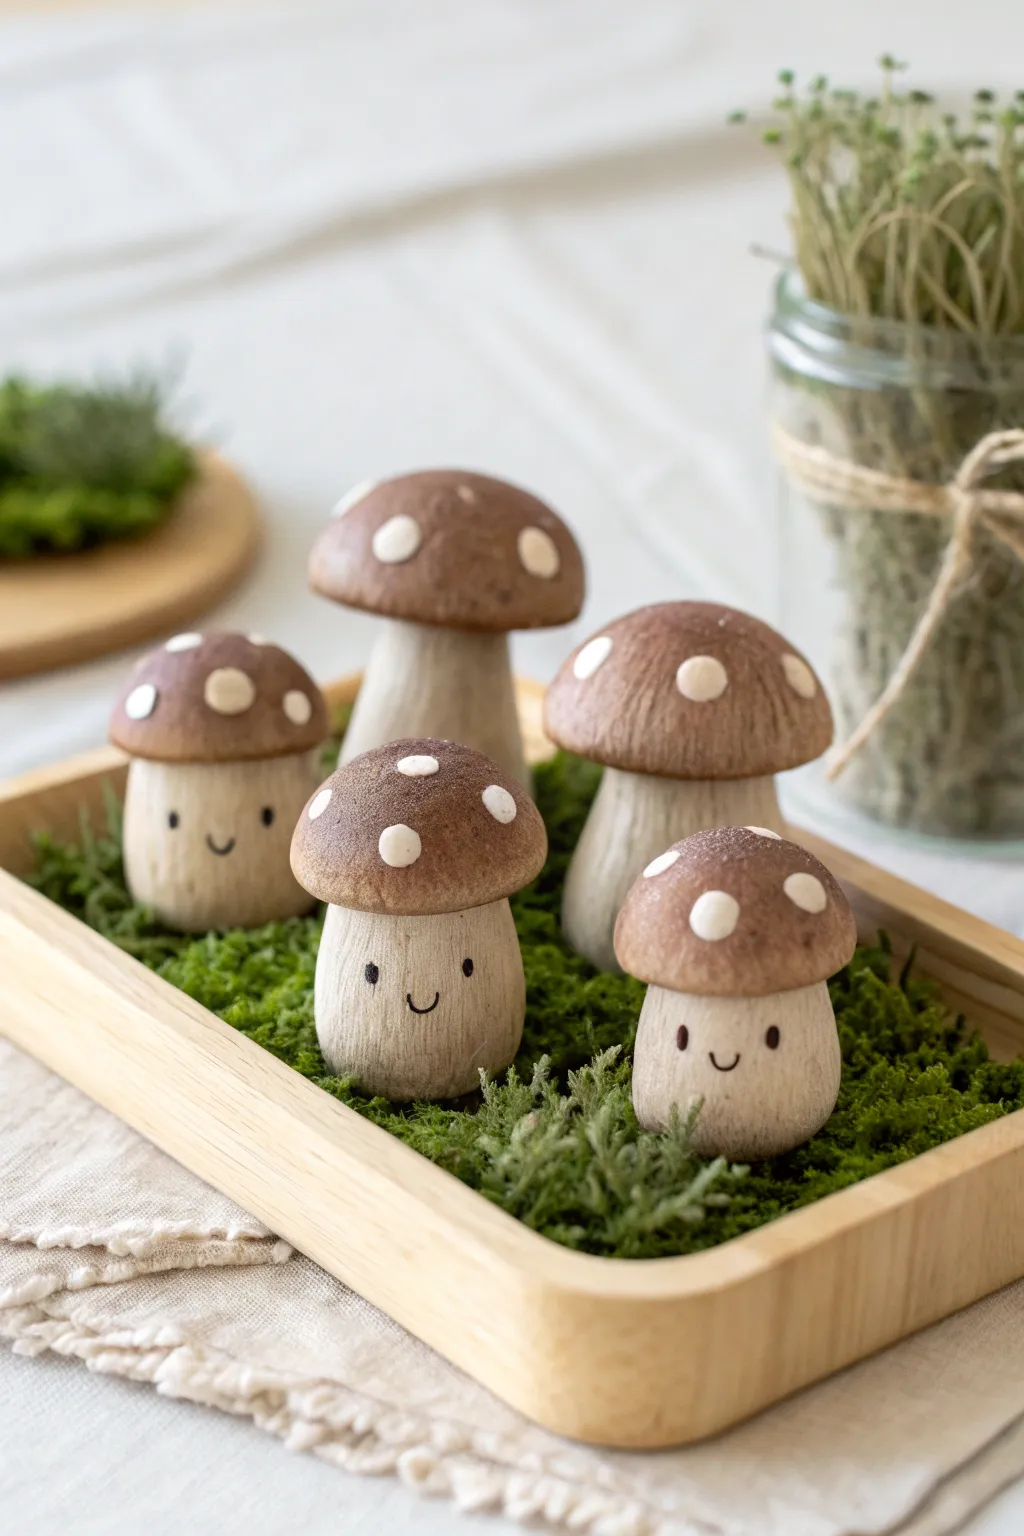
Create a charming little family of smiling bolete mushrooms that brings a touch of forest magic to your desk or shelf. These polymer clay figures feature textured stems, earthy brown caps with classic white spots, and simplistic painted faces that exude happiness.
Step-by-Step
Materials
- Ecru or beige polymer clay (for stems)
- Chocolate brown polymer clay (for caps)
- White polymer clay (for spots)
- Black acrylic paint
- Fine-tipped paintbrush or dotting tool
- Texture tool (stiff bristle brush, sandpaper, or toothbrush)
- Liquid polymer clay (optional, for adhesion)
- Matte varnish
- Wooden tray and preserved moss (for display)
Step 1: Shaping the Stems
-
Portion the clay:
Start by conditioning your beige or ecru polymer clay until it is soft and pliable. Divide the clay into five unequal portions to create variety in your mushroom sizes, making some plump and others a bit taller. -
Form the base cylinder:
Roll each portion into a ball, then gently roll it back and forth on your work surface to create a thick cylinder. You want the base to be slightly wider than the top to give the mushroom stability and a chubby look. -
Round the ends:
Tap the bottom of each cylinder on the table to flatten it so it stands upright. Gently round the top edge with your finger, creating a smooth dome where the cap will eventually sit. -
Add texture:
To mimic the organic look seen in the photo, gently roll the sides of the stems over a piece of sandpaper or tap them all over with a stiff toothbrush. This takes away the fake smoothness of the clay.
Natural Texture
Before baking, lightly brush the clay with cornstarch. This prevents fingerprints and gives the clay a velvety, matte texture that looks very organic.
Step 2: Creating the Caps
-
Prep the brown clay:
Condition the chocolate brown clay. Divide it into five portions corresponding to your stem sizes—larger stems need larger caps. -
Dome the caps:
Roll each brown portion into a smooth ball. Press it gently against your palm or work surface to flatten the bottom while keeping the top rounded, forming a classic mushroom cap shape. -
Refine the shape:
Smooth out any fingerprints. Gently curve the edges downward slightly so the cap will cup the top of the stem rather than just sitting flatly on top. -
Texture the caps:
Just like the stems, give the brown caps a very light texture using a sponge or a gentle tap with a toothbrush. This matte, organic finish looks much better than shiny, smooth clay.
Forest Relics
Glue real acorn caps onto smaller clay stems instead of making clay caps. The mix of natural materials and polymer clay creates a lovely mixed-media look.
Step 3: Assembly and Decoration
-
Attach cap to stem:
If you have liquid polymer clay, add a tiny drop to the top of a stem. Press a brown cap firmly onto the stem. I prefer to give it a little twist back and forth to ensure a tight seal between the two pieces. -
Create the spots:
Roll out very tiny balls of white polymer clay. These should be extremely small and varied in size. -
Apply the spots:
Press the tiny white balls onto the brown caps. Flatten them completely with your fingertip so they look like flush spots rather than raised bumps. Add 3-5 spots per mushroom. -
Pre-bake check:
Ensure all your mushrooms are standing straight and the caps are secure. If any are top-heavy, gently press the base wider against the table. -
Bake carefully:
Bake the figures according to your clay package instructions (usually 275°F/130°C for 15-30 minutes). Let them cool completely before handling.
Step 4: Bringing them to Life
-
Paint the eyes:
Using a very fine dotting tool or a toothpick dipped in black acrylic paint, place two small dots widely spaced on the upper half of the stem for the eyes. -
Paint the smile:
With an ultra-fine detail brush, paint a tiny, simple ‘U’ shape between the eyes for the mouth. Keep the lines thin for a gentle expression. -
Seal the work:
Once the paint is totally dry, apply a coat of matte varnish over the entire mushroom. This protects the paint and unifies the texture. -
Final display:
Arrange your finished mushroom family in a shallow wooden tray or saucer filled with preserved moss to recreate the forest floor scene.
See how a little bit of moss and some simple clay shapes can transform a corner of your home into a tiny woodland story


The Complete Guide to Pottery Troubleshooting
Uncover the most common ceramic mistakes—from cracking clay to failed glazes—and learn how to fix them fast.
Polymer Clay Hair Clips With Playful Patterns
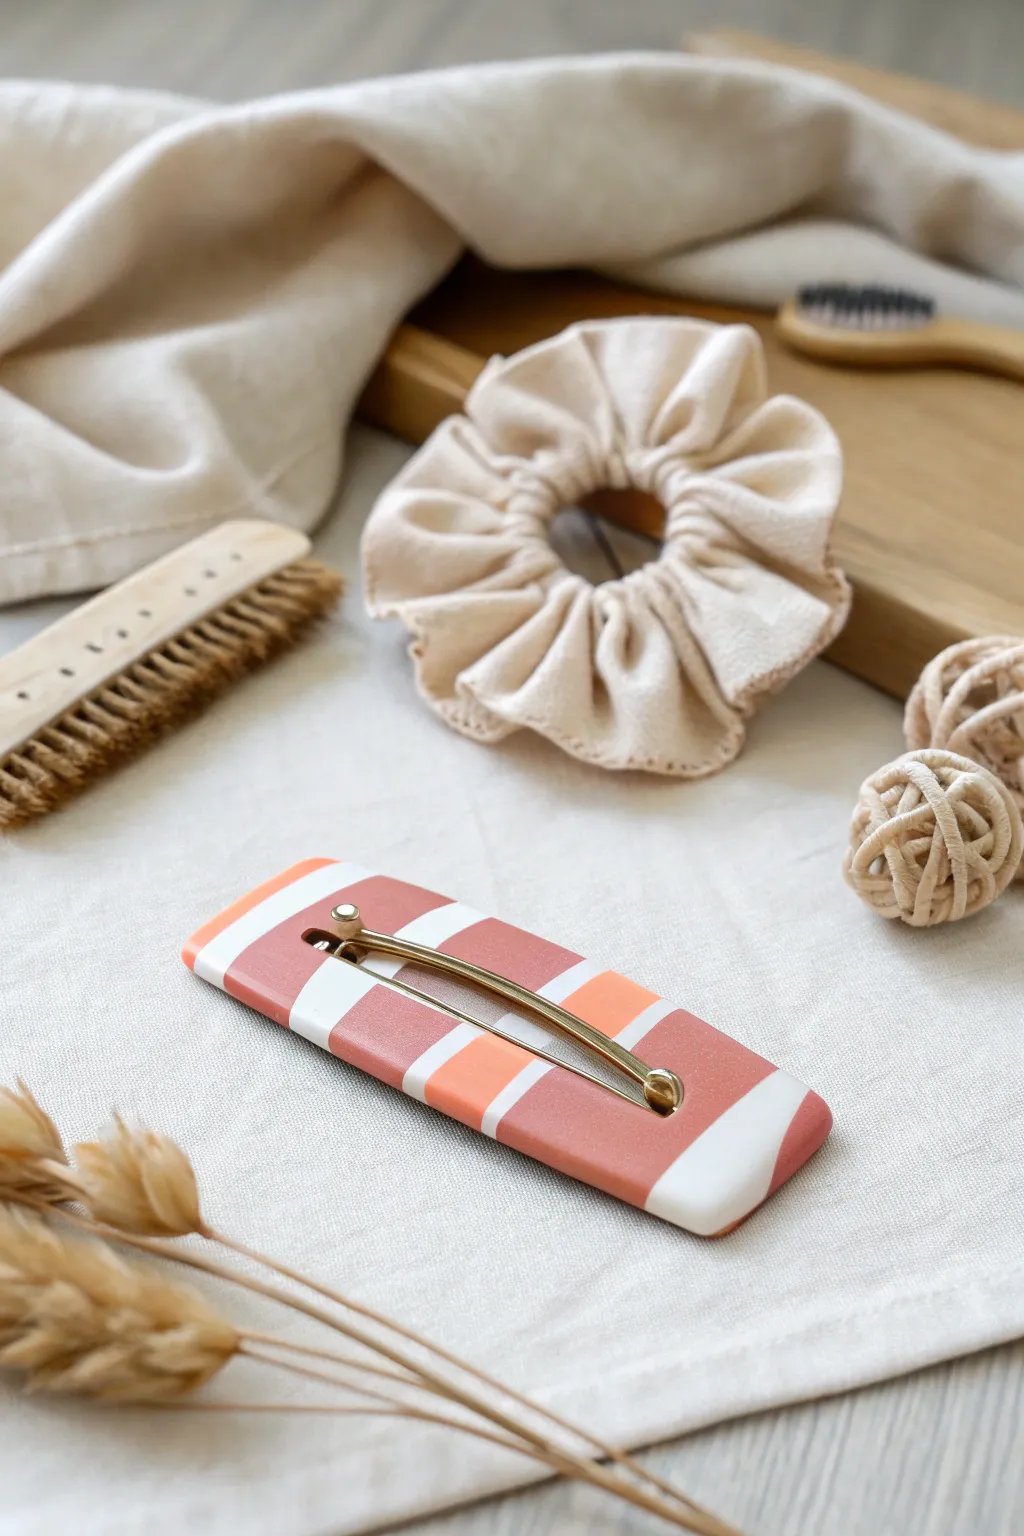
Bring a touch of modern art to your hairstyle with this chic polymer clay barrette. Featuring a warm, earthy color palette of terracotta, muted peach, and crisp white in a bold striped design, this accessory is the perfect sleek finish for any outfit.
How-To Guide
Materials
- Polymer clay in three colors: Terracotta/Rust, Light Peach/Salmon, and White
- Metal rectangular alligator clip or French barrette blank (approx 3 inches)
- Liquid polymer clay or bake-and-bond
- Tissue blade or sharp clay knife
- Acrylic rolling pin or pasta machine
- Clay glue (like E6000 or superglue)
- Fine grit sandpaper (optional for finishing)
- Oven for baking
Step 1: Preparing the Clay Slab
-
Condition the clay:
Begin by conditioning all three colors of your polymer clay until they are soft and pliable. This ensures they will bond together smoothly without cracking. -
Roll out sheets:
Roll each color into a sheet of the same thickness. I usually use a medium setting on my pasta machine (around setting 3 or 4) so the stripes are substantial but not chunky. -
Cut strips:
Using your tissue blade, cut straight strips from each colored sheet. Vary the widths—make some wide and some very narrow—to create visual interest in your final pattern. -
Assemble the stripes:
Lay the strips side-by-side on a flat work surface. Press the edges gently together as you go to ensure there are no gaps between the colors. Experiment with the order until you find a sequence that flows well.
Step 2: Creating and Shaping the base
-
Consolidate the slab:
Once your stripes are arranged, place a piece of parchment paper over the striped sheet. Gently use your acrylic roller to flatten the seams and bond the strips into a single cohesive slab. -
Roll for uniformity:
You want the final slab to be relatively thin but sturdy. Continue rolling until the surface is completely smooth and the thickness is even throughout. -
Prepare the backing layer:
Roll out a separate sheet of scrap clay or one of your solid colors to use as a base layer. This adds strength to the barrette. -
Stack the layers:
Place your striped slab on top of the base layer. Roll gently one last time to fuse them, ensuring no air bubbles are trapped between the layers. -
Cut the rectangle:
Use your rectangular clay cutter or a template and your blade to cut out the final barrette shape. Measure against your metal clip blank to ensure the clay is slightly larger than the metal mechanism. -
Smooth the edges:
Gently run your finger along the cut edges to soften them and remove any sharp corners or drag marks from the blade.
Seamless Stripes
To prevent colors from smearing into each other while rolling, roll ‘with’ the stripes (parallel), not across them. This keeps lines crisp.
Step 3: Baking and Assembly
-
Initial bake:
Place your clay rectangle on a baking sheet lined with parchment paper. Bake according to your brand’s specific instructions (usually 275°F / 130°C for 15-30 minutes). -
Cool down:
Allow the clay to cool completely before handling. It will be slightly flexible when warm but hardens as it cools. -
Sand for perfection:
If you have any uneven edges or fingerprints, I like to lightly sand the edges now with fine-grit sandpaper for a professional, matte finish. -
Prepare the clip:
Rough up the top surface of your metal clip slightly with sandpaper to help the glue adhere better. -
Attach the clip:
Apply a strong adhesive like E6000 or superglue to the metal clip. Center it on the back of your baked clay piece. -
Secure the bond:
For extra durability, you can apply a small strip of clay over the metal bar (if the clip style allows) and use liquid clay to bond it, then re-bake. Otherwise, simply clamp the glued pieces together and let the glue cure fully for 24 hours.
Textured Twist
Before baking, press a coarse fabric or sandpaper onto the clay surface to deter fingerprints and add a subtle, organic texture.
Now you have a stylish, handcrafted accessory ready to wear or gift to a friend
Clay-Covered Pens With Cute Critter Huggers
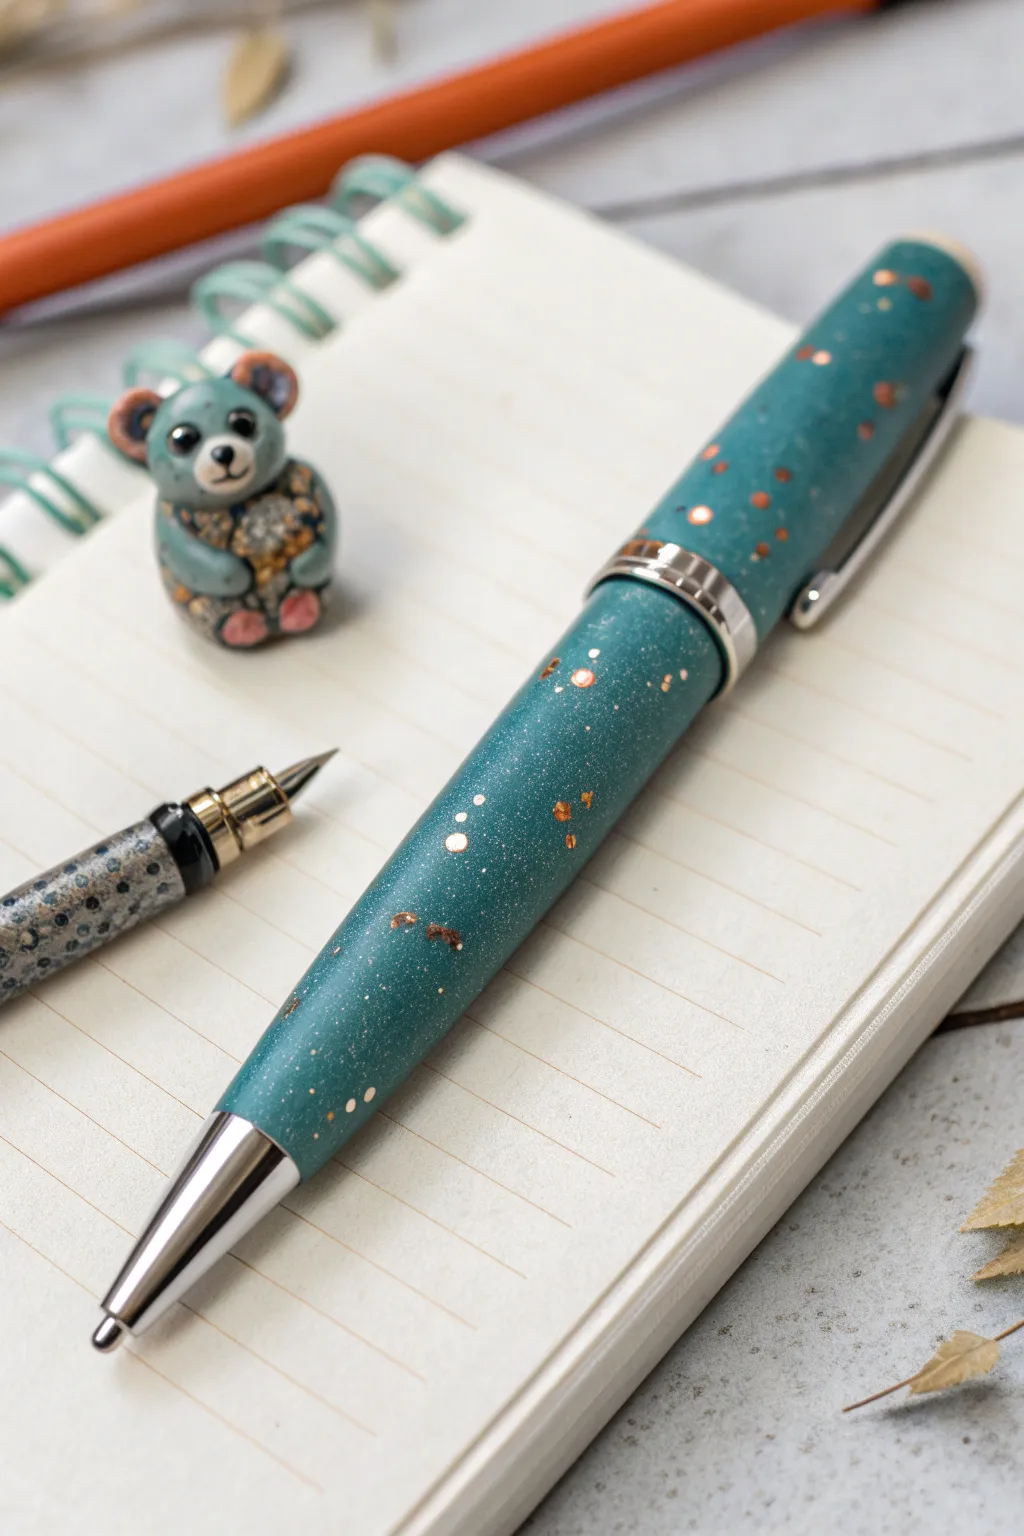
Transform a standard ballpoint pen into a bespoke writing instrument featuring a mesmerizing teal finish speckled with gold leaf. This project includes a matching miniature bear figurine that acts as a charming desk companion or pen rest.
Step-by-Step
Materials
- Retractable ballpoint pen (metal body preferred)
- Small fountain pen nib section (for the separate figurine prop)
- Teal polymer clay
- Gold leaf flakes or foil
- Translucent liquid polymer clay
- Glossy polymer clay glaze or UV resin
- Clay roller or pasta machine
- Craft knife or scalpel
- Sandpaper (various grits from 400 to 1200)
- Buffing wheel or soft denim cloth
- Needle tool or dotting tool
- Black acrylic paint (for the bear’s eyes/nose)
Step 1: Preparing the Clay Body
-
Condition the clay:
Begin by thoroughly conditioning your teal polymer clay until it is soft and pliable. Warm clay is essential for a smooth, crack-free covering on the pen barrel. -
Incorporate gold leaf:
Flatten the conditioned clay into a thin sheet. Gently press pieces of gold leaf flakes onto the surface. Don’t worry about being neat; random placement creates a more natural, stone-like effect. -
Create the speckle effect:
Fold the clay over the gold leaf and run it through your pasta machine or roll it out again. Repeat this folding and rolling process several times. This distributes the gold into tiny, shimmering flecks throughout the teal matrix rather than leaving large chunks. -
Sheet creation:
Roll your final speckled clay mixture into a uniform sheet, approximately 2mm thick. Ensure it is wide enough to wrap completely around your pen barrel.
Air Bubble Blues?
If you see bubbles after baking, gently poke them with a needle, add a drop of liquid clay, and re-bake for 5-10 mins. Sand smooth afterward to hide the repair.
Step 2: Wrapping the Pen
-
Pen disassembly:
Disassemble your pen, removing the ink cartridge and any clips. You only want the metal tubes (barrel and cap) that will be covered. -
Apply wrapping adhesive:
Brush a very thin layer of translucent liquid polymer clay (like Bake & Bond) onto the metal barrel. This acts as a glue to keep the raw clay adhered during baking. -
Wrap the barrel:
Place the pen barrel onto the edge of your clay sheet and roll it forward, wrapping the clay around the metal. Slice the excess clay away cleanly with a craft knife where the edges meet. -
Seamless join:
Gently massage the seam with your finger or a clay tool until it disappears. Roll the pen on your work surface to ensure the clay is smooth and even all the way around. -
Trim edges:
Slice off any excess clay at the top and bottom of the barrel. It helps to angle your blade slightly inward to leave space for the hardware to screw back on later. -
Repeat for cap:
Repeat the wrapping, smoothing, and trimming process for the pen cap if your model has one.
Shiny Top Coat
For a glass-like finish instead of a matte look, coat the baked pen in UV resin and cure under a UV lamp for 2 minutes. It makes the gold shine intensely.
Step 3: Creating the Bear Buddy
-
Form the body:
Using the leftover speckled teal clay, roll a small ball (about the size of a marble) for the bear’s body and a slightly smaller sphere for the head. Press them gently together. -
Add limbs:
Roll four tiny teardrop shapes for the arms and legs. Attach them to the body, pressing the clay firmly to bond. -
Sculpt the face:
Use a small dotting tool to indent sockets for the eyes. Add a tiny muzzle patch using a lighter colored clay if desired, or simply shape the nose area directly. -
Ear details:
Create two small flattened discs for ears. I like to use a contrasting color, like a soft pink, for the inner ear and the paw pads to add personality. -
Texture the outfit:
If you want the patterned look shown in the image, roll a very thin strip of differently colored clay (perhaps with glitter) and wrap it around the bear’s torso to mimic a little shirt or dress.
Step 4: Finishing Touches
-
Bake everything:
Arrange the pen parts (standing up on a rack is best) and the little bear on a baking tile. Bake according to your brand of clay’s instructions, typically around 275°F (130°C) for 30 minutes. -
Sanding:
Once cool, wet-sand the pen barrel and cap. Start with 400 grit to remove fingerprints and progress to 1200 grit for a silky smooth finish. -
Buffing:
Vigorously rub the sanded pieces with a piece of denim or use a buffing wheel on a rotary tool. This brings out the depth of the gold flakes without making it look artificially glassy. -
Painting details:
Use a fine-point brush or toothpick to paint the bear’s eyes and nose with black acrylic paint. Let it dry completely. -
Assembly:
Reassemble your pen mechanics. If you made the bear as a pen rest, check that a pen sits comfortably against it; if it’s just a figurine, simply admire your cute new desk friend.
Enjoy writing your next journal entry with this sophisticated, handcrafted pen and its adorable guardian.

TRACK YOUR CERAMIC JOURNEY
Capture glaze tests, firing details, and creative progress—all in one simple printable. Make your projects easier to repeat and improve.
Polymer Clay Phone Grip Topper
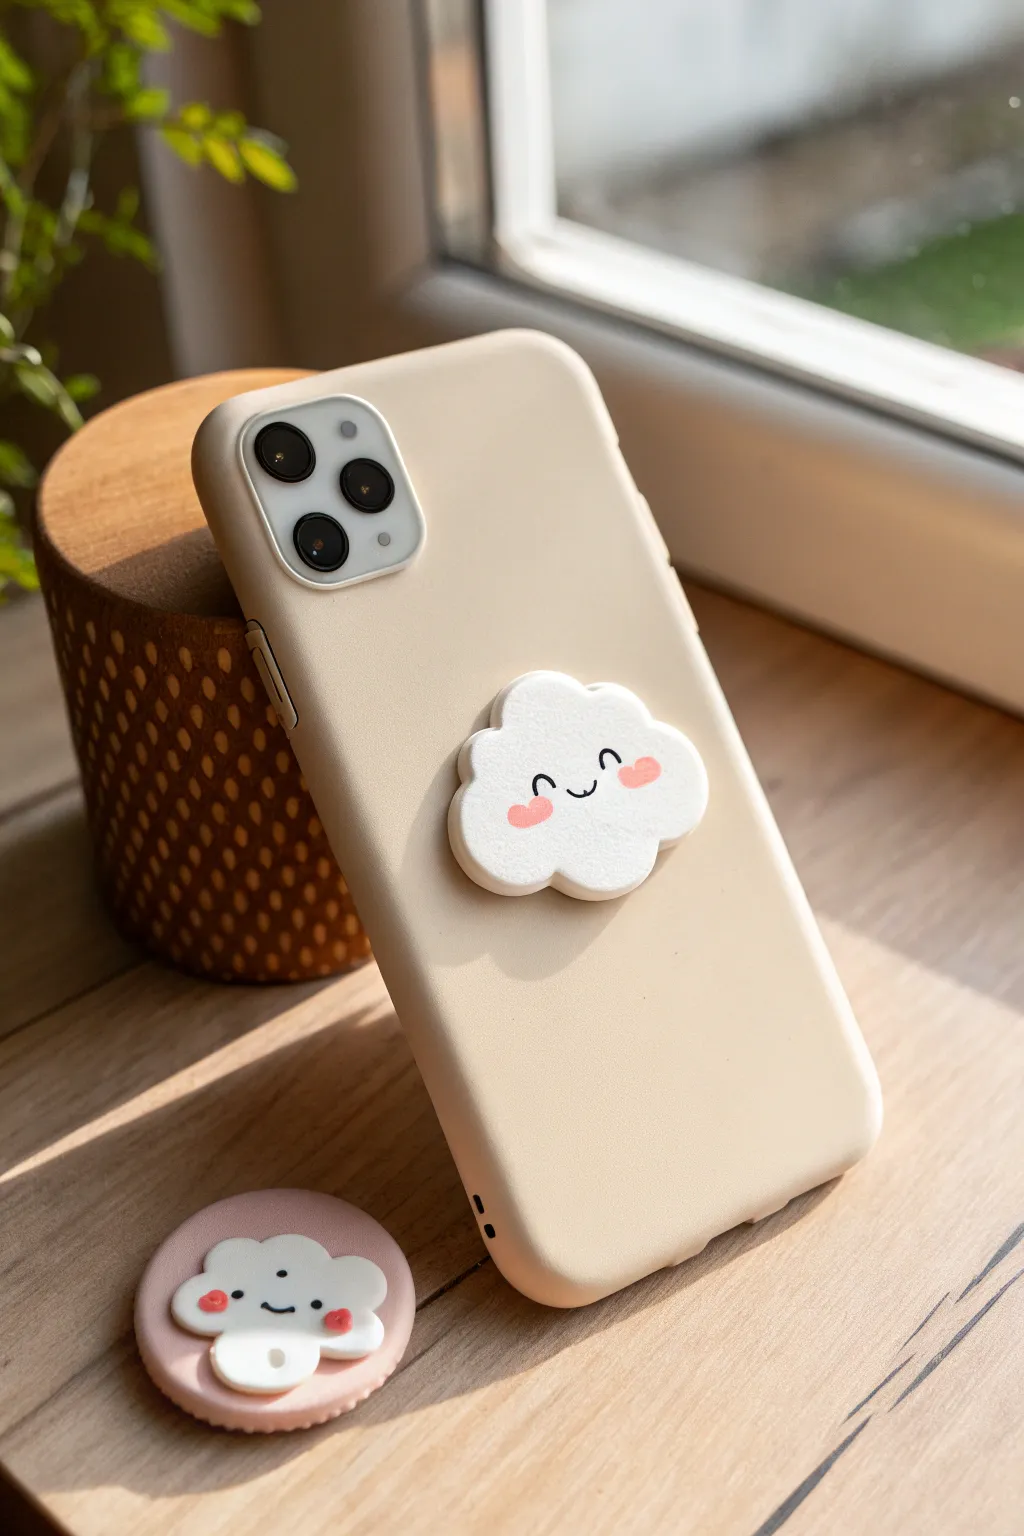
Add a touch of whimsy to your tech with this adorable cloud-shaped phone grip topper. This simple polymer clay project features a sweet, smiling face with rosy cheeks that brings a bit of sunshine to your daily scrolling.
Step-by-Step Tutorial
Materials
- White polymer clay
- Pink polymer clay (soft pastel shade)
- Black acrylic paint or fine-tip black permanent marker
- Pop-socket base or blank phone grip
- Strong craft adhesive (E6000 or similar)
- Clay roller or pasta machine
- Cloud-shaped clay cutter (small) or X-acto knife
- Small dotting tool or toothpick
- Fine detail paintbrush (if using paint)
- Baking sheet and parchment paper
- Wet wipes
- Matte polyurethane varnish (optional)
Step 1: Shaping the Cloud Base
-
Condition the white clay:
Start by taking a chunk of white polymer clay and kneading it in your hands until it becomes soft and pliable. This conditioning step is crucial to prevent cracks during baking. -
Roll out the slab:
Using a clay roller or acrylic rolling pin, flatten the conditioned white clay into a consistent slab. Aim for a thickness of about 4mm to 5mm so the grip feels sturdy but not too heavy. -
Cut the cloud shape:
If you have a small cloud cutter, press it firmly into the slab. If you’re working freehand, sketch a cloud shape lightly onto the clay with a needle tool first, then carefully cut it out using an X-acto knife. Smooth the edges with your finger to remove any sharp cut marks. -
Refine the edges:
Gently tap the edges of the cloud inward to round them off slightly. We want the cloud to look puffy and soft, not like a sharp geometric cutout.
Dirty Clay Disaster?
White clay picks up everything. If you see dust specks after baking, lightly sand the surface with high-grit sandpaper or use 100% acetone on a Q-tip to wipe away the impurities.
Step 2: Adding the Cute Features
-
Create the cheeks:
Take a very small amount of pink clay and roll it into a tiny ball. Divide this ball into two equal halves to ensure symmetry. -
Flatten the cheeks:
Gently press the two pink balls onto the white cloud surface where you want the cheeks to sit, slightly below the horizontal center line. Flatten them until they are flush with the surface but still have a little dimension. -
Clean up:
Before baking, use a baby wipe or a cotton swab dipped in rubbing alcohol to gently wipe the white areas of the clay. This removes any dust, fingerprints, or pink smudges that might have transferred.
Pro Tip: Eye Placement
Draw the face on paper first to test expressions. Placing the eyes wider apart creates a ‘kawaii’ look, while putting them closer together looks more traditional.
Step 3: Baking and Assembly
-
Bake the piece:
Place your cloud on a parchment-lined baking sheet. Bake according to your polymer clay manufacturer’s instructions—usually around 275°F (130°C) for 15-20 minutes for this thickness. -
Cool down completely:
Let the clay cool completely on the baking sheet. It will be slightly soft while hot and hardens as it returns to room temperature. -
Paint the face:
Once cool, use a fine-tip paintbrush with black acrylic paint or a minimal permanent marker to draw the face. Create two small ‘U’ shapes for the smiling eyes and a small curved line relative to the cheeks for the mouth. I find resting my pinky on the table helps steady my hand for these fine lines. -
Seal the surface (optional):
To protect the paint from rubbing off with daily use, apply a thin layer of matte varnish over the entire surface. Let it dry completely. -
Prepare the grip base:
Take your blank phone grip base and ensure the plastic surface is clean and dry. Sometimes scuffing the surface lightly with sandpaper helps the glue adhere better. -
Apply adhesive:
Squeeze a generous dot of strong adhesive, like E6000, onto the center of the phone grip base. Do not use hot glue, as it tends to pop off plastic surfaces easily. -
Attach the cloud:
Press the baked clay cloud firmly onto the adhesive. Center it carefully. -
Final cure:
Allow the glue to cure undisturbed for at least 24 hours before sticking it to your phone case. This patience ensures your cute cloud won’t pop off when you pull your phone out of your pocket.
Enjoy your new custom accessory that makes every text message just a little bit happier
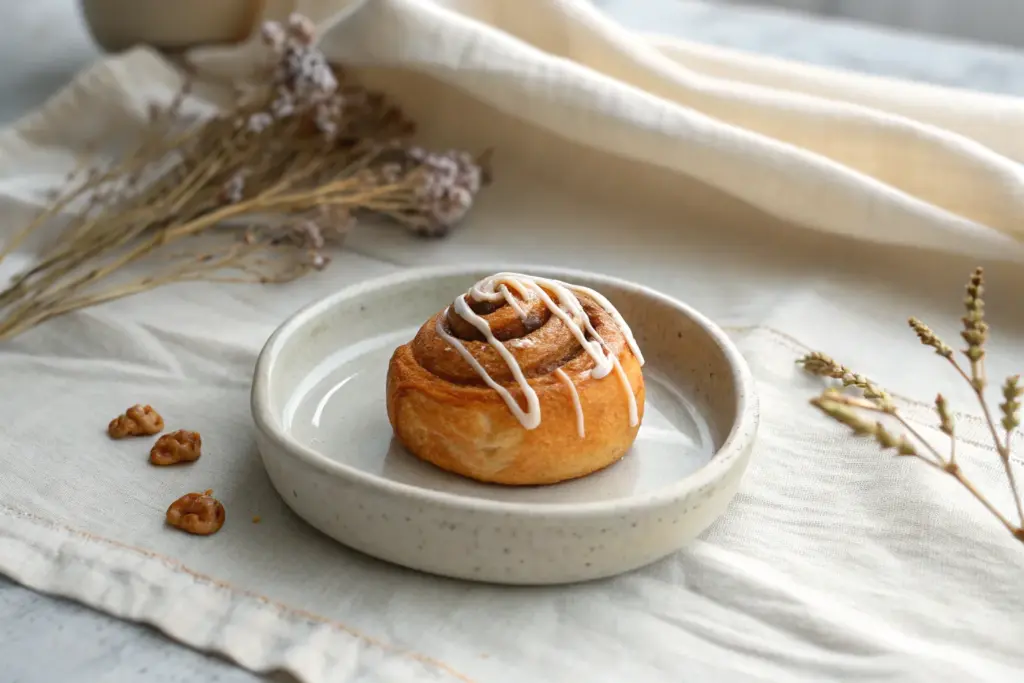
Sweet Donut and Candy Bag Tags
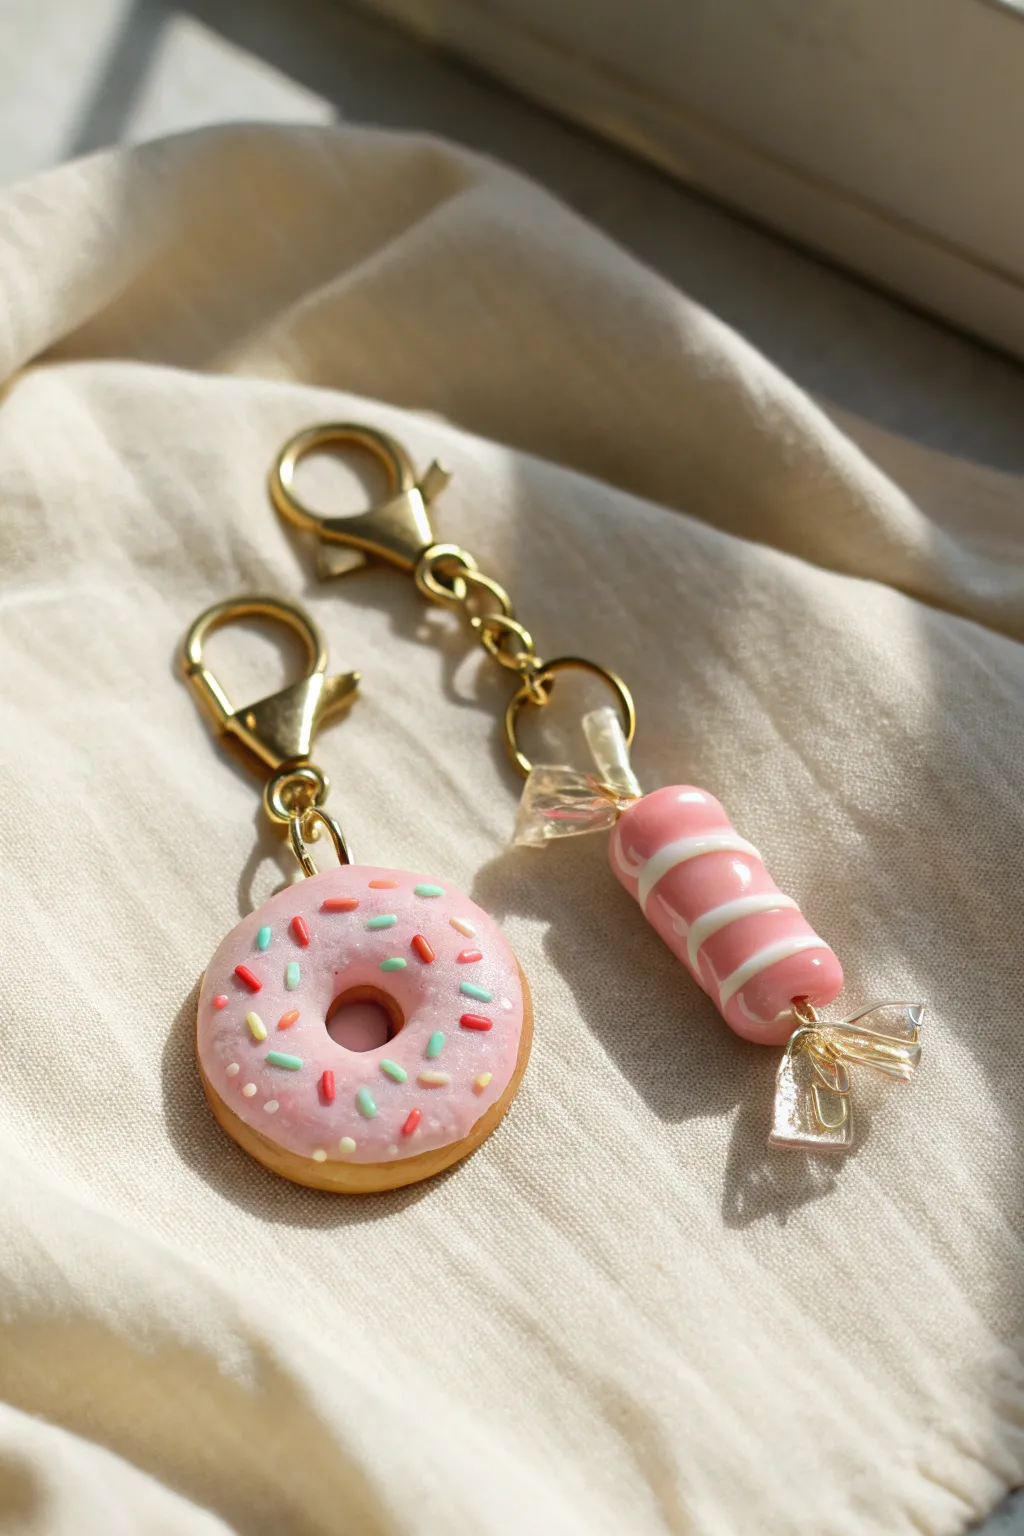
These delightful bag tags feature a realistic miniature donut and a striped hard candy, perfect for adding a touch of sweetness to your keys or zipper pulls. Using polymer clay and some clever finishing techniques, you’ll create durable accessories with a glossy, candy-shop shine.
Detailed Instructions
Materials
- Polymer clay (chunky tan/beige, solid pink, white)
- Liquid polymer clay (translucent) or UV resin
- Soft artist pastels (brown, orange/yellow ochre)
- Eye pins (gold)
- Lobster clasp keychains with jump rings (gold)
- Gloss glaze or polyurethane varnish
- Sculpting tools (needle tool, dotting tool)
- Small soft brush
- Oven for baking
- Wire cutters and round nose pliers
- Clear cellophane or iridescent film (optional, for candy ends)
Step 1: Sculpting the Donut
-
Form the base:
Start by conditioning the tan or beige clay until it is soft and pliable. Roll a small amount into a smooth ball, then flatten it slightly into a thick disc shape. -
Create the hole:
Use the back of a paintbrush or a specialized dotting tool to press a hole through the center of the disc. Gently widen the hole by rotating the tool, smoothing the edges to create that classic donut shape. -
add texture:
To make the dough look baked, lightly texture the surface with a toothbrush or a ball of crinkled aluminum foil. Focus on the sides where the ‘fry line’ would naturally be lighter. -
Shade the dough:
Scrape some brown and orange chalk pastel into a fine powder. Using a soft, dry brush, dust the edges and top of the donut to give it a golden-brown, baked appearance. -
Frost it:
Roll out a thin sheet of pink clay. Cut a wavy circle shape slightly smaller than your donut. Lay this over the top, gently pressing the edges down so it looks like dripping icing. -
Poke the center:
Re-pierce the hole through the pink icing layer so it matches the dough beneath, smoothing the pink clay down into the center hole. -
Sprinkle time:
Roll tiny, thin snakes of various clay colors (mint, yellow, red). Cut them into minuscule segments and gently press them onto the pink frosting. You can lightly tap them down with a flat tool to ensure they adhere.
Use Liquid Clay
Mix pink clay with liquid translucent clay to create a ‘syrup’ icing. Drizzle it on for a more realistic, self-leveling frosting.
Step 2: Crafting the Candy
-
Shape the body:
Condition a piece of pink clay and roll it into a short, thick cylinder for the main candy body. -
Add stripes:
Roll very thin snakes of white clay. Wrap them spirally around the pink cylinder. Gently roll the entire cylinder on your work surface to embed the white stripes flush with the pink clay. -
Creating the wrappers:
For the twisted wrapper ends, you have two options. You can sculpt triangular ends from translucent polymer clay and ruffle them with a needle tool, or bake the main body first and glue on plastic film later perfectly. -
Attach wrapper ends (Clay Method):
If using clay, attach small cones of translucent clay to each end of the cylinder. Use a needle tool to press deep indentations, simulating the crinkled texture of twisted cellophane. -
Insert hardware:
Before baking, carefully trim an eye pin to size and insert it into the top of the donut and one end of the candy piece. Ensure the loop sits flush against the clay.
Scented Charms
Before baking, mix a tiny drop of vanilla or strawberry fragrance oil into the clay to make your charms smell as sweet as they look.
Step 3: Baking and Assembly
-
Bake:
Bake your pieces according to the specific temperature and time instructions on your brand of polymer clay packaging. Let them cool completely before handling. -
Glaze:
Apply a coat of gloss glaze or UV resin to the icing of the donut and the entire body of the candy. This step is crucial for that wet, sugary look seen in the photo. -
Plastic Wrapper Variation:
If you didn’t sculpt clay ends, cut small rectangles of clear iridescent film. Pinch and glue them to the ends of the baked candy using strong adhesive or UV resin for a realistic plastic crinkle. -
Secure the pin:
If the eye pin feels loose after baking, pull it out, add a dab of super glue (cyanoacrylate), and reinsert it immediately. -
Attach keychain:
Using pliers, open the jump ring on your gold lobster clasp. Loop it through the eye pin on your charm and close the ring securely. I prefer using two pairs of pliers to twist the ring shut without distorting its round shape.
Clip these onto your favorite bag and enjoy your calorie-free treats
Mini Polymer Clay Succulent Pots
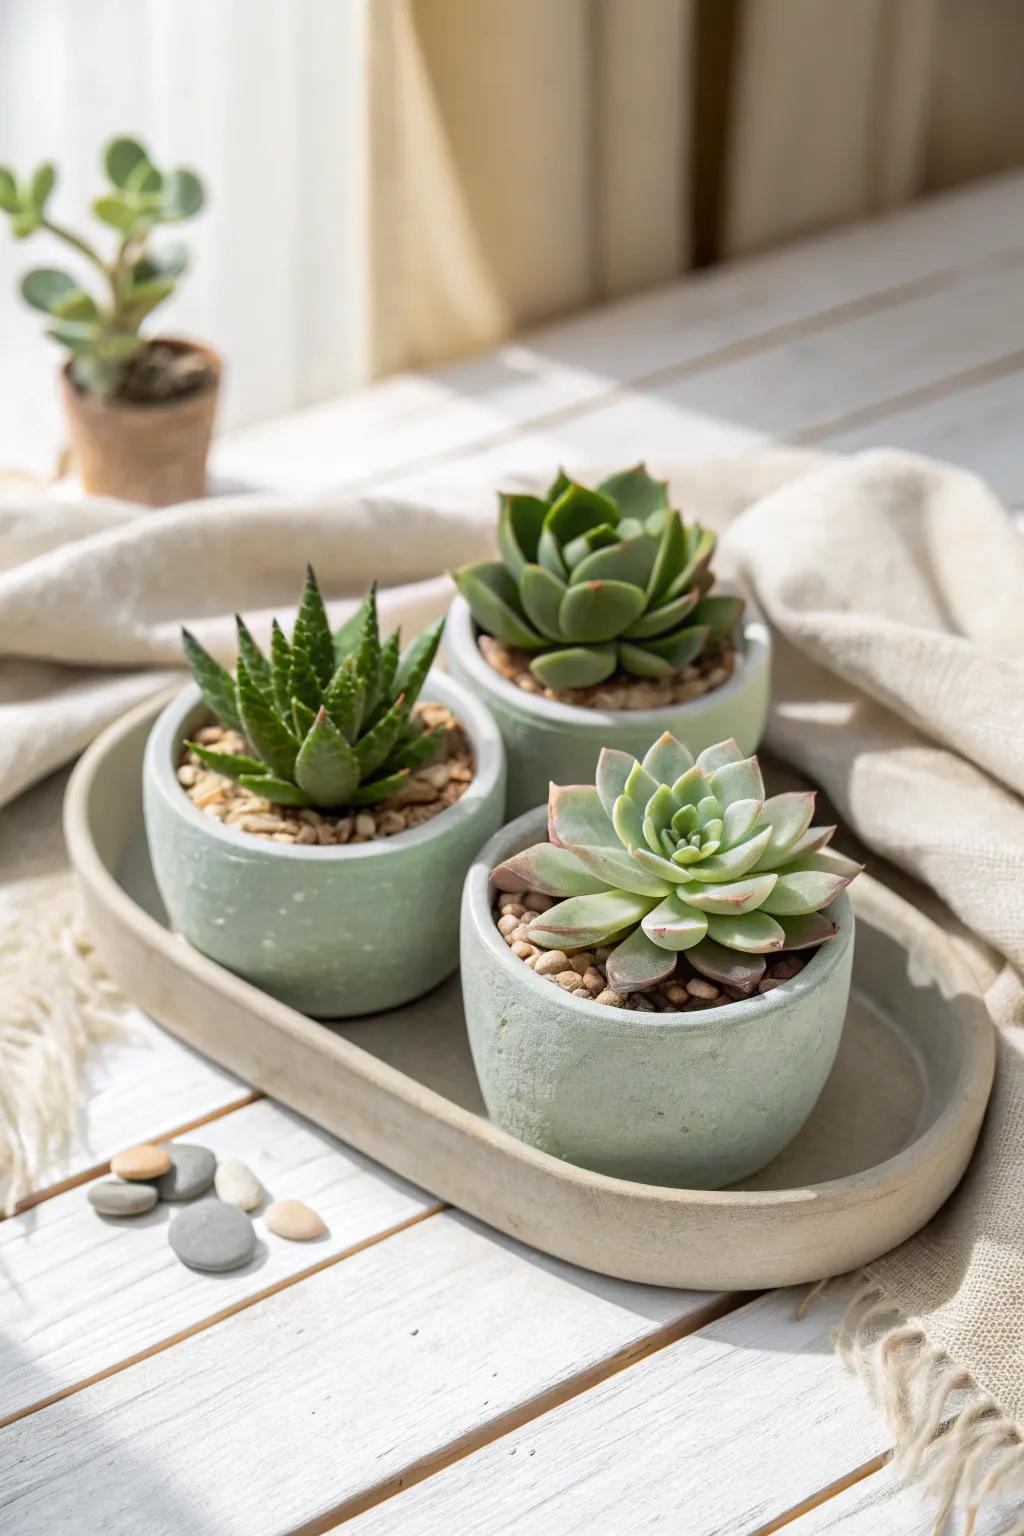
Bring a touch of serene greenery to your space with these incredibly realistic faux-stone planters and matching tray. Using polymer clay and a clever texturing technique, you’ll create a chic, minimalist set perfect for showcasing your favorite mini succulents.
Step-by-Step Tutorial
Materials
- White polymer clay (approx. 4 blocks, 2oz each)
- Sage green and grey polymer clay (for marbling)
- Small round cookie cutter or jar lid (approx. 2.5 inches)
- Smooth glass rolling pin or pasta machine
- Coarse sandpaper or an old toothbrush (for texturing)
- Cornstarch or baby powder (release agent)
- Three small oven-safe ramekins or glass jars (to use as forms)
- Craft knife
- Liquid polymer clay (optional)
- Water-based matte varnish
Step 1: Preparing the Stone Clay
-
Mix the base color:
Start by conditioning your white polymer clay until it’s soft and pliable. To achieve that subtle, misty green hue seen in the photo, mix in a very small amount of sage green and a tiny pinch of grey. You want a pale, muted pastel, not a vibrant color. -
Add faux-stone flecks:
For a realistic stony appearance, chop up tiny, grain-sized bits of grey and translucent clay. Fold these into your conditioned sage-white mixture, but don’t blend them fully; you want distinct speckles to remain visible. -
Roll out the slab:
Roll your clay out into a long, even sheet about 1/4 inch thick. I find a pasta machine on a medium setting ensures consistency, but a rolling pin works perfectly if you use depth guides. -
Texture the surface:
Before cutting, press coarse sandpaper or the bristles of an old toothbrush firmly into the clay sheet. Rotate the texture tool to create a random, organic pitted surface that mimics concrete or limestone.
Sticky Situation?
Can’t get the clay off the glass form? Pop the cooled piece in the freezer for 10 minutes. The clay will contract slightly, usually causing it to pop right off the jar.
Step 2: Forming the Pots
-
Cut the bases:
Using your round cutter or a jar lid, punch out three circles from your textured slab. These will serve as the bottoms of your three pots. -
Cut the walls:
Measure the circumference of your oven-safe forms (ramekins works best). Cut three long rectangular strips of clay that are slightly longer than that circumference and about 2 inches tall. -
Prepare the forms:
Lightly dust your glass jars or ramekins with cornstarch. This crucial step prevents the clay from sticking permanently to the glass during the baking process. -
Wrap the forms:
Wrap a clay strip around each dusted form. Where the ends meet, slice through both layers diagonally with your craft knife to create a seamless bevel joint. -
Blend the seams:
Gently smooth the vertical seam with a sculpting tool or your finger, re-texturing that area with your toothbrush so the join disappears completely. -
Attach the bottom:
Place the wrapped form onto one of the circular bases. Use a blending tool to smear the clay from the wall down onto the base, sealing the pot from the outside. Ensure a watertight seal if you plan to use real plants.
Step 3: Crafting the Oval Tray
-
Form the tray base:
Take the remaining clay scraps and re-roll them into a larger, oval shape roughly 8-10 inches long. You can sketch the oval on paper first to use as a template. -
Create the rim:
Roll a long snake of clay and flatten it slightly into a strip. Attach this strip around the edge of your oval base to create a low, raised rim, blending the seams on the inside and outside for a unified look. -
Final texturing:
Go over the entire tray with your texturing tool, ensuring it matches the pots perfectly. Pay special attention to the rim, giving it a soft, rounded edge rather than a sharp one.
Level Up: Aged Patina
Dilute brown acrylic paint with water and wash it over the baked pots. Wipe it off immediately with a paper towel; dark paint stays in the texture pits for an aged look.
Step 4: Baking and Finishing
-
Bake the pieces:
Place your pots (still on their forms) and the tray onto a ceramic tile or baking sheet. Bake according to your clay package instructions—usually around 275°F (130°C) for 30-45 minutes. -
Cool and remove forms:
Let the pieces cool completely inside the oven. Once cool, carefully twist the glass forms to pop them out. The cornstarch should make this release easy. -
Sand the edges:
Use fine-grit sandpaper to smooth only the top rims of the pots and tray if they feel sharp. Leaving the sides rough maintains that nice concrete aesthetic. -
Seal the work:
Brush a very thin layer of water-based matte varnish over the pieces to protect them from dirt and moisture without adding unwanted shine. -
Plant and display:
Fill your new pots with small pebbles and soil, then nestle in your succulents. Arrange the trio on the oval tray for a complete, modern display.
Now you have a stylish, handmade home for your little green friends using simple clay techniques
Geometric Polymer Clay Incense Holder
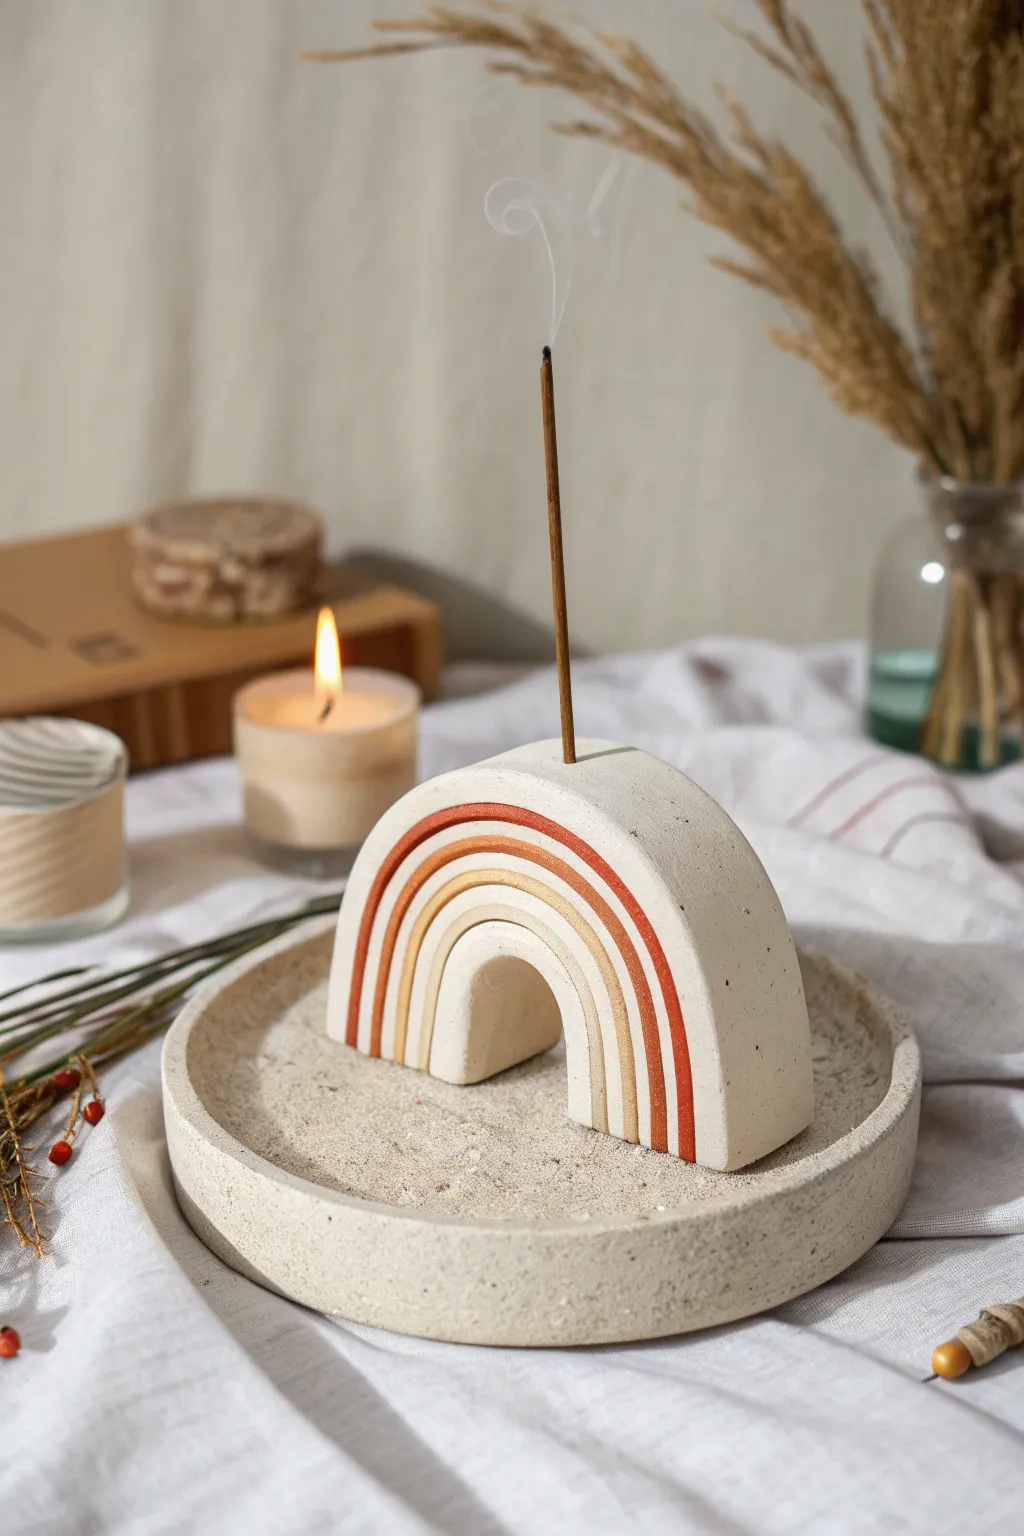
Bring a sense of calm to your space with this minimalist incense holder that mimics the texture of natural stone. The warm, earthy stripes of the arch and the matching sand tray create a stunning, functional piece of decor that looks far more expensive than the materials required to make it.
Step-by-Step
Materials
- White or granite-effect polymer clay (approx. 3-4 blocks)
- Black pepper or black embossing powder (if using plain white clay)
- Circle cutter (approx. 5-6 inches diameter)
- Sharp crafting blade
- Acrylic rolling pin
- Sandpaper (medium and fine grit)
- Acrylic paints (Rust, Terracotta, Mustard Yellow)
- Fine detail paintbrush
- Incense stick (for sizing the hole)
- Decorative sand
Step 1: Prepping the Faux Stone Clay
-
Mix the clay:
If you aren’t using pre-mixed granite clay, start by conditioning white polymer clay until it is soft and pliable. Flatten it out and sprinkle a generous amount of ground black pepper or black embossing powder over the surface. -
incorporate the speckles:
Fold the clay over and knead it thoroughly to distribute the black specks. Repeat this folding and rolling process until you have a uniform stone-like texture throughout the block.
Clean Lines Pro Tip
Rather than trying to paint perfectly inside the grooves, apply a wash of diluted paint and wipe the high points of the clay with a damp cloth immediately. The color will stay trapped in the recessed lines.
Step 2: Forming the Rainbow Arch
-
Roll the slab:
Roll out a thick slab of your stone-effect clay, aiming for a depth of at least 1 inch (2.5 cm). This thickness is crucial for the arch to stand stably on its own. -
Cut the arch shape:
Use a large circle cutter or a bowl to cut a semi-circle shape. Then, use a smaller circle cutter to remove the inner semi-circle, creating a thick rainbow tunnel shape. -
Smooth the edges:
With your fingers and a little water or clay softener, gently smooth all the sharp edges of your arch to give it a weathered, organic look. -
Create the grooves:
Using a carving tool or the blunt back of your knife, carefully press three distinct arched lines into the front face of the rainbow. These grooves will hold the paint later, so make them deep enough to be distinct but shallow enough to look elegant. -
Add the incense hole:
Take an actual incense stick and press it vertically into the very top center of the arch. Wiggle it slightly to ensure the hole is just loose enough for the stick to slide in easily after baking.
Level Up: Texture
Mix actual dried, used coffee grounds into your clay instead of pepper. This adds a richer, browner speckle and a coarser texture that looks even more like convincing sandstone.
Step 3: Creating the Sand Tray
-
Roll the base:
Roll out a second slab of clay, thinner this time—about 1/4 inch thick. Cut a large circle, roughly 6 inches in diameter, to serve as the tray base. -
Form the rim:
Roll a long snake of clay and flatten it into a strip about 1/2 inch tall. Wrap this strip around the circumference of your base circle. -
Blend the seams:
On the inside of the tray, use a modeling tool to blend the rim clay downward into the base clay so they fuse completely. I like to smooth the outside seam with my finger for a flawless finish. -
Texture the surface:
Before baking, lightly tap the surface of both the arch and the tray with a toothbrush or stiff bristles to enhance the stone texture and remove any fingerprints.
Step 4: Baking and Finishing
-
Bake the pieces:
Place the arch standing up and the tray flat on a ceramic tile or baking sheet. Bake according to your clay package instructions (usually 275°F/135°C for 30 minutes per 1/4 inch of thickness). -
Cool and sand:
Allow the pieces to cool completely in the oven to prevent cracking. Once cool, wet-sand any rough spots under running water using fine-grit sandpaper. -
Paint the arches:
Using a fine detail brush, carefully paint inside the grooves you created earlier. Use a rust color for the top groove, terracotta for the middle, and a muted mustard yellow for the inner arch. -
Clean up:
If any paint spills onto the ‘stone’ surface, immediately wipe it away with a damp paper towel or scrape it gently once dry to keep the lines crisp. -
Assembly:
Fill the tray with decorative sand. Place the rainbow arch in the center of the sand, nestling it down slightly so it sits securely.
Light your favorite scent and watch the smoke drift through your beautiful handmade sculpture
Moon Phase Polymer Clay Garland
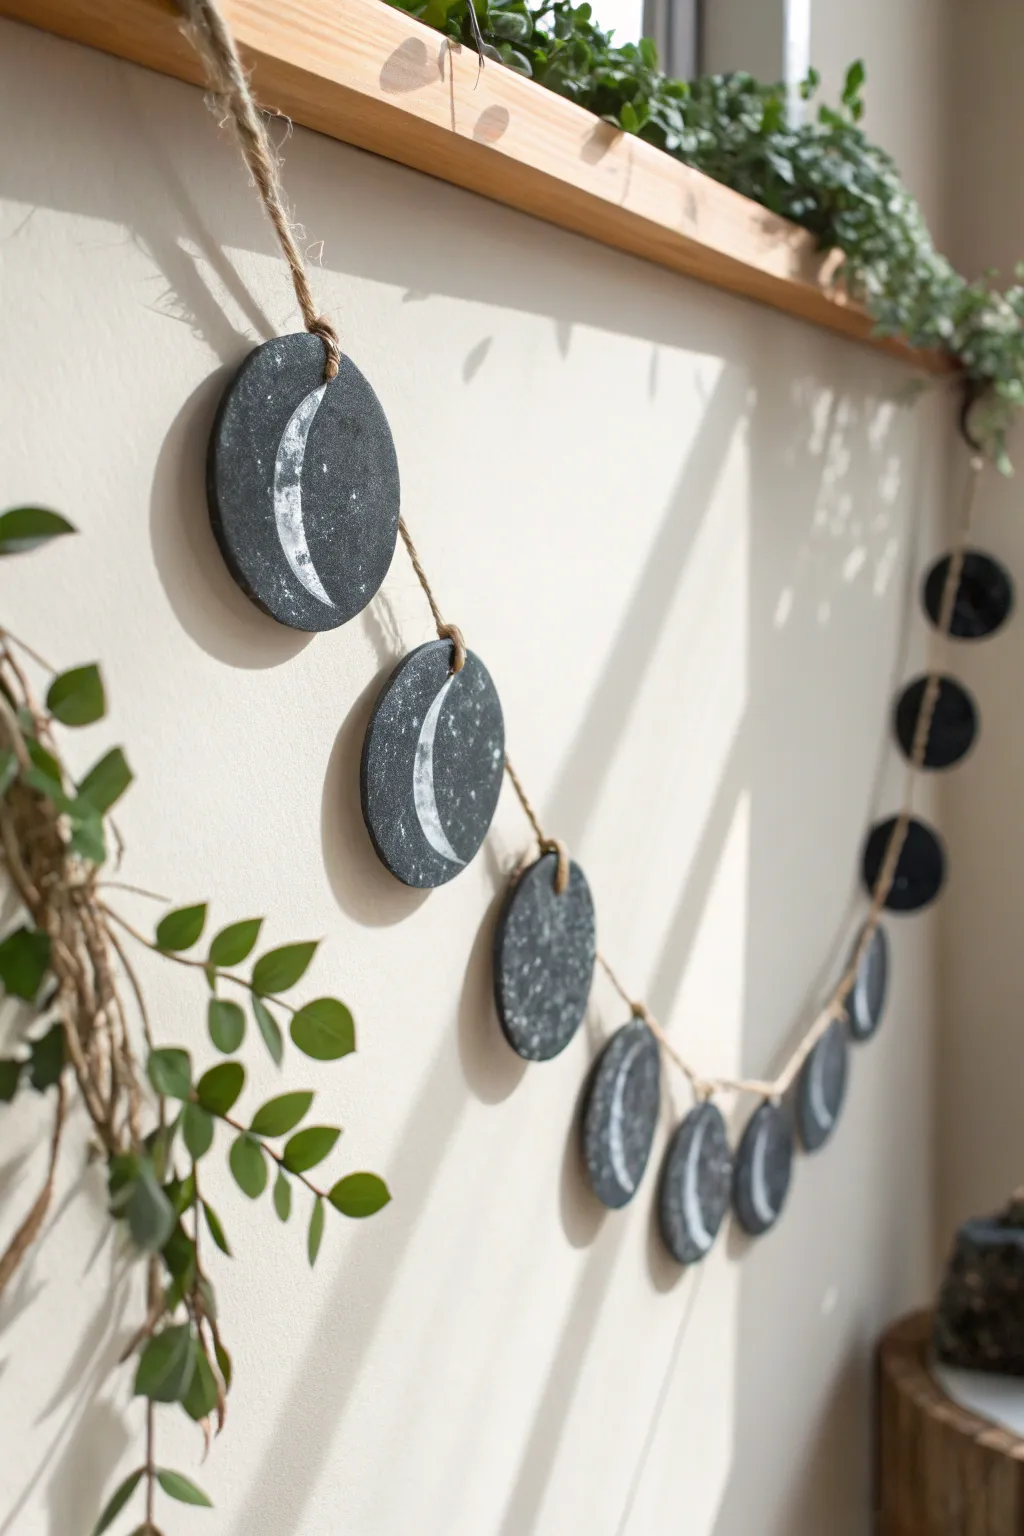
Bring the mystic beauty of the night sky indoors with this surprisingly simple polymer clay garland. With a faux-stone finish and delicate hand-painted moon phases, it adds a serene, earthy touch to any wall.
Step-by-Step Guide
Materials
- Black polymer clay (approx. 4-6 oz)
- White acrylic paint
- Stiff bristle brush (e.g., old toothbrush)
- Fine detail paintbrush
- Round cookie cutter (approx. 2-3 inches diameter)
- Rolling pin or pasta machine
- Parchment paper
- Jute twine or hemp cord
- Straw or small circular cutter (for holes)
- Sandpaper (fine grit)
- Matte spray varnish (optional)
Step 1: Shaping the Moons
-
Condition the Clay:
Begin by kneading your black polymer clay until it is soft and malleable. If it feels too stiff, the warmth of your hands will eventually loosen it up. -
Roll the Base:
Roll the clay out onto a piece of parchment paper to an even thickness of about 1/4 inch. I find that using spacers or a pasta machine ensures every moon is perfectly uniform. -
Cut the Circles:
Use your round cookie cutter to punch out at least 7 to 9 circles, depending on how long you want your cycle to be. -
Texture the Surface:
To achieve that stony, concrete look seen in the photo, gently tap the surface of each clay circle with a stiff bristle brush or a crumpled ball of aluminum foil. Don’t press too hard; you just want surface imperfections. -
Create Hanging Holes:
Use a straw or a small circular cutter to punch a hole near the top edge of each disc. Ensure the hole is large enough for your twine to pass through later. -
Bake:
Place the parchment paper with the clay shapes onto a baking sheet. Bake according to your specific clay package’s instructions—usually around 275°F (135°C) for 15-30 minutes. -
Cool and Sand:
Let the discs cool completely. Once cool, lightly sand the edges to remove any sharp burrs or fingerprints, giving them a smooth, professional stone finish.
Granite Texture Hack
Mix a pinch of white or translucent clay into your black clay but don’t blend completely. This marbling creates natural stone veins before you even paint.
Step 2: Painting the Phases
-
Create the Spatter Effect:
Dip a stiff brush or old toothbrush into white acrylic paint. Run your thumb across the bristles to flick tiny specks of ‘stars’ onto the black discs. Let this layer dry completely. -
Outline the Moons:
Arrange your discs in order: typically waxing crescent, first quarter, waxing gibbous, full moon, waning gibbous, third quarter, waning crescent. Using the fine detail brush, lightly outline the corresponding moon shape on each disc. -
Fill in the White:
Fill in the outlined moon shapes with white paint. For a more textured, cratered look, dab the paint on rather than stroking it smoothly. -
Layering:
You may need a second coat of white to get a bright, opaque finish against the dark background. Allow full drying time between coats. -
Seal (Optional):
If you want extra protection, give the discs a light coat of matte spray varnish. This locks in the paint without making the ‘stone’ looking too shiny.
Step 3: Assembly
-
Prepare the Twine:
Cut a length of jute twine or hemp cord, measuring where you want to hang it and adding an extra foot of length for knots and draping loops. -
Knot the Center:
Find the center of your twine. Thread the ‘Full Moon’ disc onto it and tie a simple overhand knot right at the top of the hole to secure it in place. -
Add Remaining Phases:
Working outward from the center, thread the remaining discs. Space them evenly—about 2 to 3 inches apart works well—tying a knot at each position so the discs don’t slide around. -
Create End Loops:
Tie a small loop at each end of the twine for easy hanging on hooks or nails.
Paint Won’t Stick?
If acrylic paint beads up on the baked clay, wipe the surface with a cotton ball dipped in rubbing alcohol or acetone to remove oils before painting.
Hang your lunar cycle above a bed or workspace to enjoy a little piece of the cosmos every day
Wood-Texture Polymer Clay Name Plaques
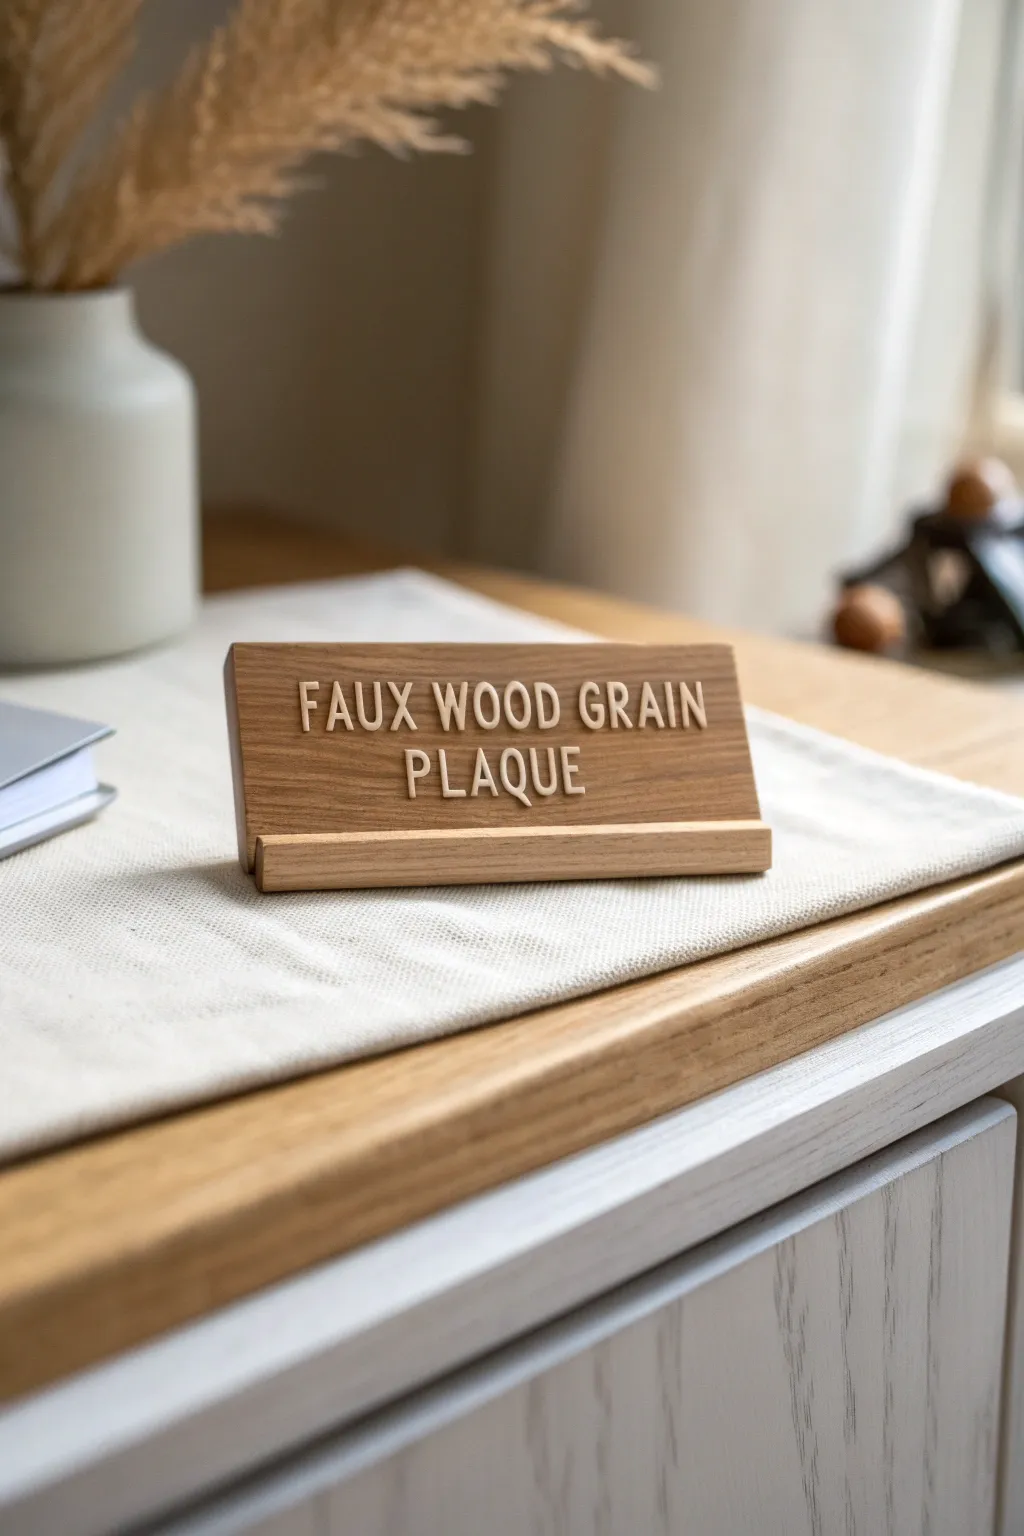
Learn to transform simple polymer clay into a stunningly realistic wooden desk sign with raised lettering. This project uses clever texturing techniques to mimic the warmth and grain of real timber without needing a saw or sandpaper.
Step-by-Step Tutorial
Materials
- Polymer clay (beige or light tan)
- Polymer clay (white or cream for letters)
- Acrylic paints (brown, ochre, darker brown)
- Clay roller or pasta machine
- Credit card or rigid plastic blade
- Wire texture brush or stiff toothbrush
- Needle tool
- Clay cutters (small alphabet set)
- Liquid polymer clay (optional)
- Paintbrush (flat)
- Paper towels or baby wipes
- Ruler
- Exacto knife or craft blade
- Oven for baking
Step 1: Creating the Lumber Base
-
Prepare the base color:
Start by conditioning your beige or tan polymer clay until it is soft and pliable. Roll it out into a thick, even sheet, approximately 1/4 inch thick. This thickness gives the plaque a substantial, wood-block feel. -
Cut the main shape:
Using a ruler and your rigid blade, cut a clean rectangle for the main signboard. A standard desk size is about 4 inches by 2 inches, but feel free to adjust to your needs. -
Form the stand piece:
Cut a long, narrow strip from the same rolled sheet, slightly longer than your main rectangle and about 1/2 inch wide. This will become the front ledge of the base. -
Assemble the structure:
To create the L-shaped stand, press the narrow strip against the bottom front edge of the main rectangle. Alternatively, create a separate triangular wedge to support the back so the plaque leans slightly.
Uneven Texture?
If your wood grain looks too uniform, try dragging a crumpled ball of aluminum foil across the surface. Rolling the tool at different angles creates random, organic patterns.
Step 2: Simulating Wood Grain
-
Initial scratching:
Take your wire texture brush or a stiff toothbrush and drag it horizontally across the clay surface. Apply varying pressure to create deep and shallow grooves, mimicking natural wood fibers. -
Adding knots and imperfections:
Use a needle tool to draw occasional swirly knots or deeper cracks. Real wood isn’t perfect, so these organic details help sell the illusion. -
Smoothing the harsh edges:
Lightly run your finger over the textured surface to knock down any sharp shards of clay that lifted up. You want the texture to look worn, not fuzzy. -
Pre-baking (optional):
If you are worried about squishing the texture while adding letters, you can bake this base piece for 15 minutes at the temperature recommended on your clay package. Let it cool completely.
Level Up: Metal Accents
Add tiny clay balls to the corners of the plaque and paint them metallic silver or gold after baking to mimic industrial bolts or rivets holding the wood together.
Step 3: Adding the Typography
-
Prepare the lettering clay:
Roll out a thin sheet of the lighter cream or white clay. It should be thinner than the base, roughly 1/8 inch. -
Cut out your message:
Using small alphabet cutters, carefully punch out the letters for your chosen phrase. If the clay sticks to the cutter, dip the cutter in cornstarch first. -
Position the text:
Arrange the letters on the textured base without pressing them down yet ensuring your spacing is centered and even. -
Secure the letters:
Once happy with the placement, gently press the letters onto the base. If you pre-baked the base, apply a tiny drop of liquid polymer clay to the back of each letter to act as glue. -
Final Bake:
Bake the entire assembled piece according to the manufacturer’s instructions (usually 275°F/135°C for 30 minutes per 1/4 inch of thickness). Let it cool completely before painting.
Step 4: The Antique Finish
-
Apply the wash:
Mix a small amount of dark brown acrylic paint with water to create a thin wash. Brush this generously over the entire faux wood base, ensuring it gets into all the texture grooves. -
Wipe back:
Immediately use a paper towel or baby wipe to gently wipe away the paint from the raised surfaces. The dark paint will stay in the cracks, revealing the grain pattern. -
Highlighting:
I like to dry-brush a tiny bit of ochre paint over the high points of the ‘wood’ to give it a sun-bleached look. -
Clean up the letters:
If any brown wash got onto the light letters, carefully clean them with a damp cotton swab or paint them over with a fresh coat of acrylic paint.
Place your finished plaque on your desk and enjoy the warm, rustic charm of your custom creation
Stamped Polymer Clay Plant Markers
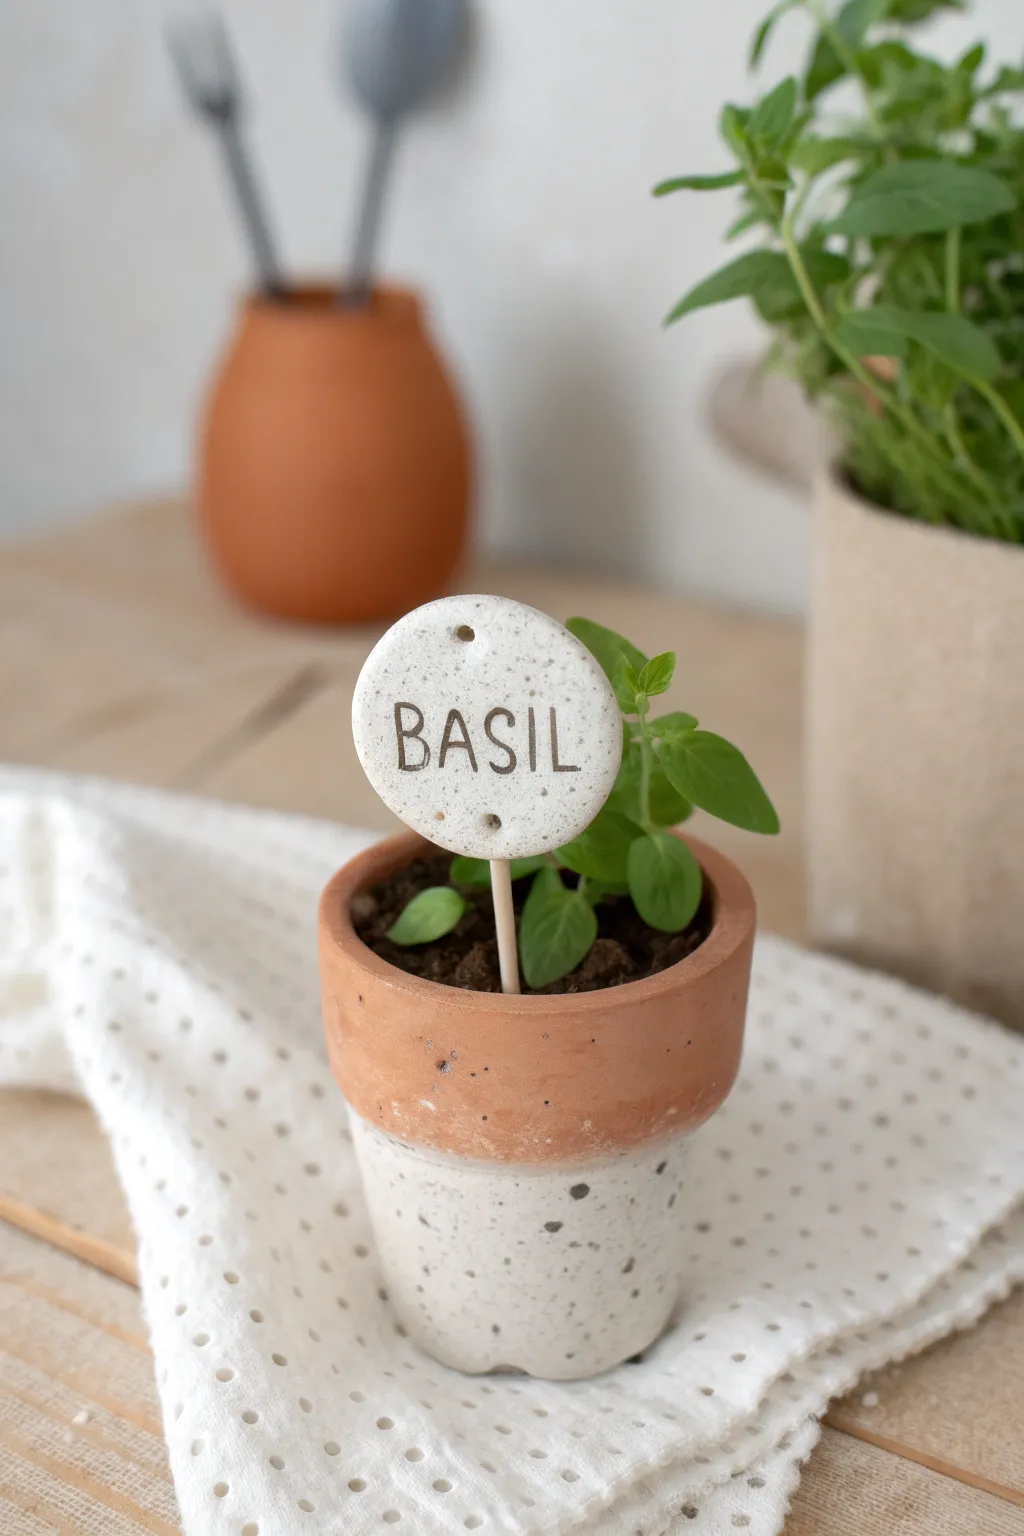
Bring a rustic, organized charm to your herb garden with these speckled polymer clay plant markers. This project uses a beautiful granite-effect clay to create durable, water-resistant labels that look like real stone.
Detailed Instructions
Materials
- White or translucent polymer clay
- Black pepper or black embossing powder (for speckles)
- Granite-effect polymer clay (alternative)
- Small alphabet stamps
- Rolling pin or acrylic roller
- 2-inch round circle cutter
- Bamboo skewers or wooden dowels
- Toothpick or needle tool
- Baking sheet
- Parchment paper
- Dark acrylic paint (black or dark brown)
- Paper towel or wet wipe
- Oven
Step 1: Preparing the Clay Base
-
Condition the clay:
Start by warming up your white polymer clay in your hands. Knead it thoroughly until it is soft, pliable, and free of any cracks. -
Create the speckled effect:
If you aren’t using pre-mixed granite clay, flatten your white clay and sprinkle a generous pinch of ground black pepper or black embossing powder over it. Fold the clay over and knead repeatedly to distribute the speckles evenly throughout the block. -
Roll it out:
Place the conditioned clay on a clean, flat work surface. Use your acrylic roller to flatten the clay into an even sheet, aiming for approximately 1/4 inch thickness. You want it sturdy enough to hold its shape. -
Cut the shape:
Press your round circle cutter firmly into the clay sheet to create a perfect disc. Lift the cutter and peel away the excess clay, smoothing any rough edges on the circle with your fingertip.
Fixing Wonky Letters
If you stamp a letter crooked or too lightly, simply roll the clay back into a ball and re-roll the sheet. Clay is infinitely forgiving until it’s baked, so take your time to get it right.
Step 2: Stamping and Shaping
-
Plan your spacing:
Before stamping, gently hover your alphabet stamps over the clay disc to center the word ‘BASIL’. This helps ensure you won’t run out of room on either side. -
Stamp the text:
Press each letter stamp firmly into the center of the clay disc. Apply even pressure to create a deep, clear impression, but be careful not to push all the way through the clay. -
Create mounting holes:
Using a toothpick or a small needle tool, poke two small holes in the clay disc—one centered near the very top edge and another directly opposite near the bottom edge. These can be decorative or used for wiring later. -
Insert the stake channel:
Carefully insert the dull end of a bamboo skewer into the bottom edge of the clay circle, pushing it up through the center about half an inch deep to create a channel for the stick. I find gently twisting the skewer helps it glide in without distorting the circle. -
Remove and refine:
Gently remove the skewer for baking. Check the shape of your circle again; if the stamping or poking warped it, gently pat it back into a perfect round shape.
Step 3: Baking and Finishing
-
Bake the marker:
Place your clay disc on a parchment-lined baking sheet. Bake according to the manufacturer’s instructions for your specific brand of clay (typically around 275°F for 15-30 minutes per 1/4 inch thickness). -
Cool down:
Once bakes, let the clay cool completely on the baking sheet. It will harden fully as it cools down to room temperature. -
Highlight the text:
Squeeze a small amount of dark acrylic paint onto the stamped area. Use a brush to work the paint into the recessed letters. -
Wipe away excess:
Immediately wipe the surface with a damp paper towel or wet wipe. This removes the surface paint while leaving the dark pigment trapped inside the stamped letters for high contrast. -
Final assembly:
Apply a drop of super glue or strong craft adhesive to the end of your bamboo skewer and re-insert it into the hole you created earlier. Let the glue set completely before placing it in the soil.
Add Weather Proofing
For outdoor use, coat the finished marker with a layer of matte UV-resistant varnish. This protects the acrylic paint from rain and prevents the white clay from yellowing in the sun.
Your herbs will look beautifully curated with these custom markers guiding the way
Whimsical Polymer Clay Mini Diorama Scene
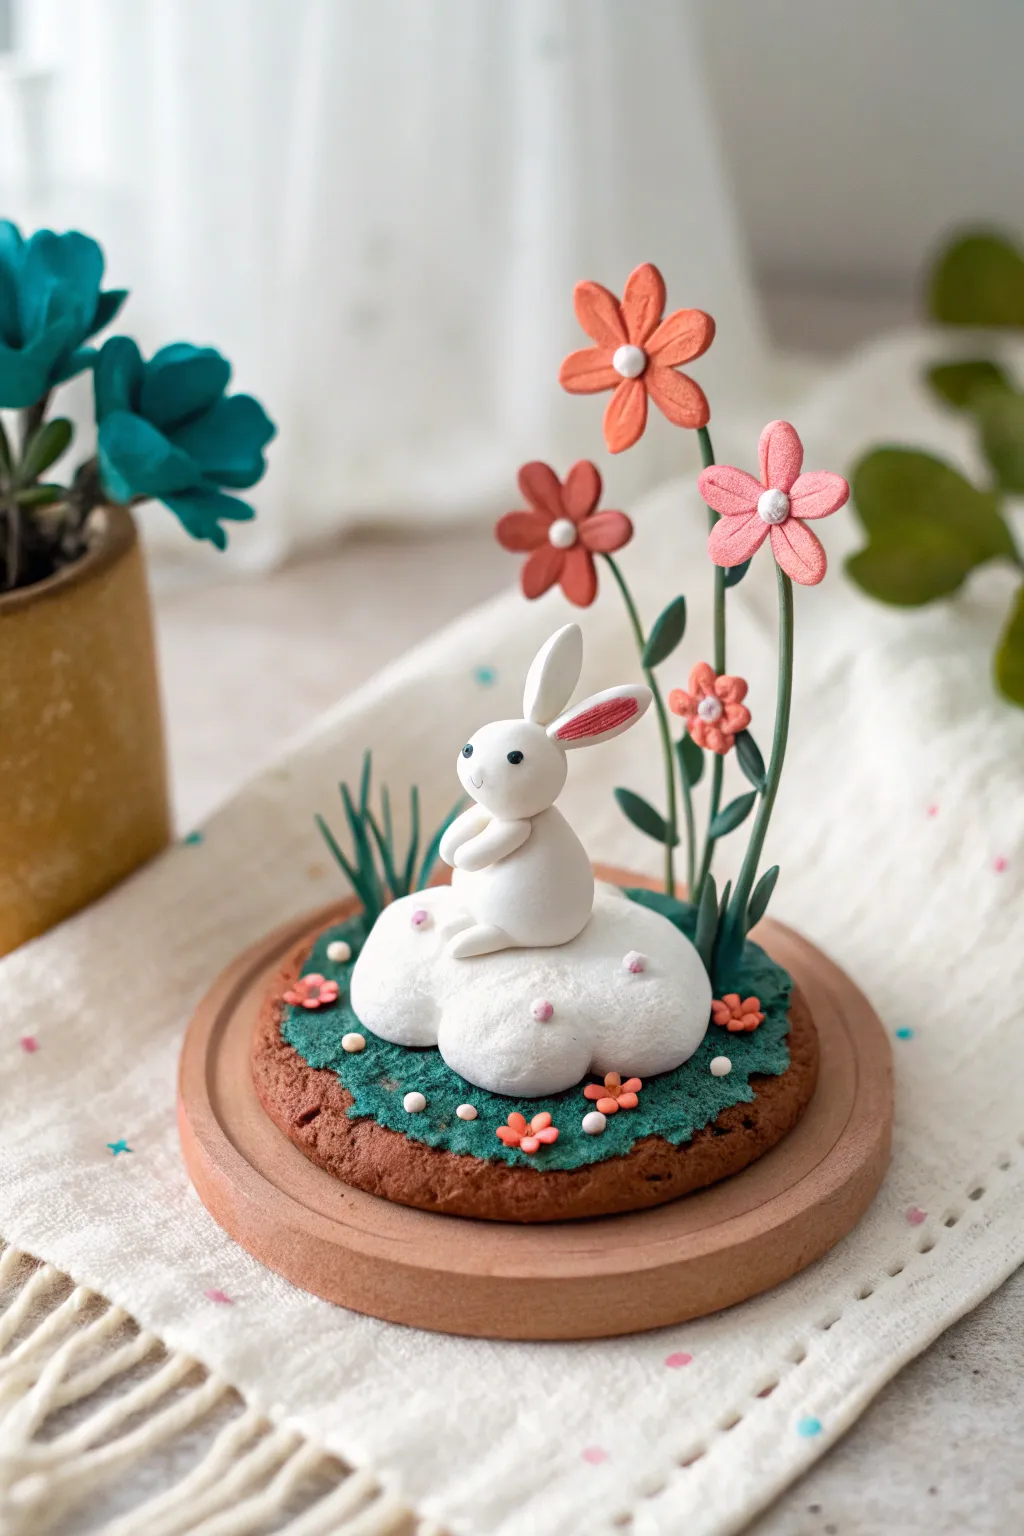
Capture a moment of pure whimsy with this enchanting polymer clay scene, featuring an adorable bunny perched atop a fluffy cloud base. With its vibrant stylized flowers and textured grassy details, this miniature diorama is a perfect beginner-friendly project that looks impressively intricate.
How-To Guide
Materials
- Polymer clay (white, terracotta/brown, green, orange, pink)
- Round wooden coaster or base (approx. 3-4 inches)
- Floral wire or thin armature wire
- Liquid polymer clay (Translucent or Bake & Bond)
- Clay tools (needle tool, ball stylus, silicone shaper)
- Texturing tool (toothbrush or stiff bristle brush)
- Wire cutters
- Soft pastels (pink for blushing)
- Oven and baking sheet
Step 1: Creating the Base
-
Form the earth foundation:
Condition a large ball of terracotta or brown clay. Flatten it into a thick disc that fits comfortably within the center of your wooden coaster or forms a standalone base about 3 inches wide. -
Texture the soil:
Using a stiff toothbrush or a dedicated texturing tool, firmly tap the entire surface of the brown disc to create a rough, cookie-like earthen texture. This adds realism and visual interest. -
Apply the grassy layer:
Roll out a thin, uneven sheet of green clay. Tear edges to make it look organic rather than cut, and press this onto the top of your brown base, leaving a rim of brown visible. -
Texturizing the grass:
Use your needle tool or toothbrush again to stipple the green clay, blending it slightly into the brown beneath for a mossy, grassy effect.
Step 2: Sculpting the Cloud & Bunny
-
Shape the cloud mound:
Take a significant amount of white clay and form 3-4 distinct balls of varying sizes. Press them together into a single, lumpy mound that resembles a fluffy cloud. -
Soften the cloud:
Place the cloud structure onto the center of your grassy base. Use a large ball tool or your finger to smooth the seams between the clay balls just slightly, keeping the bubbly definition. -
Sculpt the bunny body:
Roll a smooth, pear-shaped piece of white clay for the body. Place it firmly on top of the cloud mound. -
Add the head:
Roll a slightly smaller sphere for the head. Attach it to the top of the body, tilting it slightly to one side for a cute, inquisitive expression. -
Form the limbs:
Create two small elongated teardrops for the arms and press them against the chest. Add two larger ovals for the feet sticking out from under the body. -
Creating the ears:
Shape two long teardrops of white clay. Flatten them gently and press a smaller sliver of pink clay into the center of each for the inner ear detail. -
Attach the ears:
Attach the ears to the top of the head. I like to bend one ear slightly to give the bunny more character. -
Face details:
Use a needle tool or small black clay beads for the eyes. Scrape a tiny bit of pink pastel dust and apply it to the cheeks with a soft brush for a delicate blush.
Clean Slate Trick
Keep wet wipes or baby oil handy when switching to white clay. Even tiny specks of color or dust will show up clearly on the bunny’s bright white fur.
Step 3: Adding Flora
-
Prepare the stems:
Cut three pieces of floral wire to varying heights (2 to 4 inches). Coat them thinly with green clay, rolling them between your fingers to smooth. -
Plant the stems:
Insert the wire stems into the base behind the bunny. If the clay is soft, they should stick easily; otherwise, use a dab of liquid clay for security. -
Create flower petals:
For the flowers, make five small teardrops of orange or pink clay. Flatten them and arrange them in a circle to form a flower head. -
Assemble the blooms:
Place a small white ball in the center of the petals. Press this flower head onto the top of a wire stem. Repeat for the other stems with different colors. -
Add leaves:
Shape tiny green teardrops and attach them along the stems and at the base of the wires to simulate foliage growing up towards the light. -
Scattered details:
Roll tiny balls of leftover pink and orange clay. Scatter these ‘wildflowers’ on the green grass and the cloud base for a magical touch. -
Final baking:
Bake the entire piece according to your clay manufacturer’s instructions (usually 275°F/135°C for 15-30 minutes). Let it cool completely before handling.
Glow Up
Mix a tiny amount of translucent clay into the white for the cloud. After baking, it will have a soft, ethereal quality that catches the light beautifully.
Once cooled, display your little bunny scene on a shelf or desk to bring a smile to your face every day
Charm-Hanging Polymer Clay Tree Sculpture
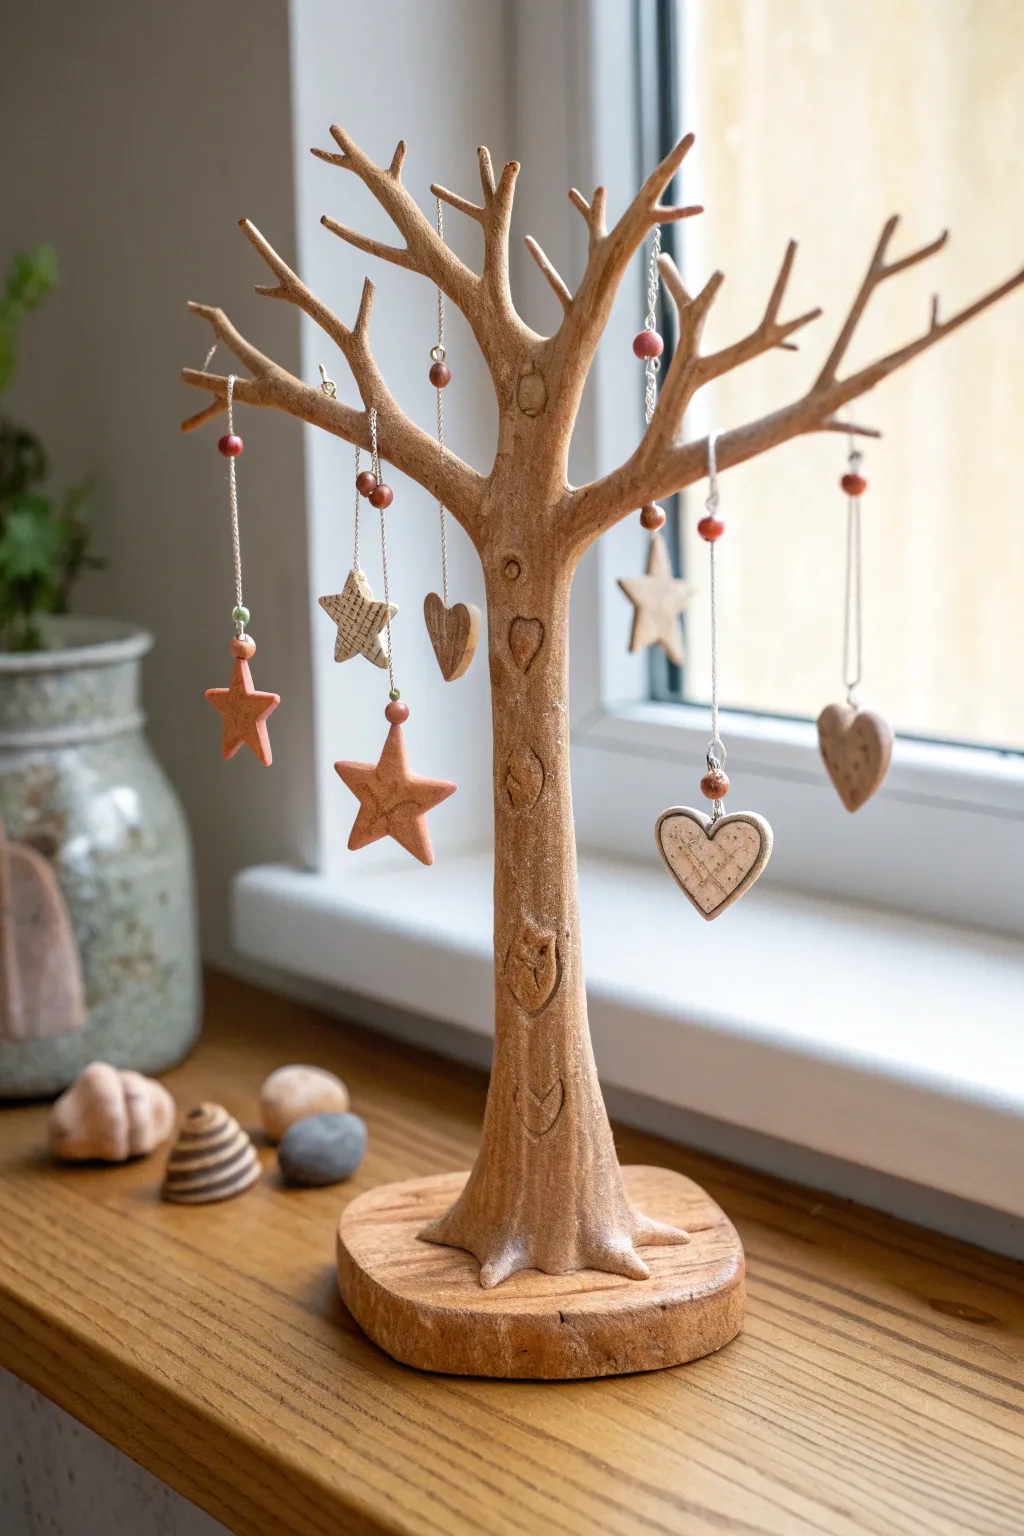
Bring the outdoors in with this enchanting stylized tree sculpture, perfect for displaying your favorite polymer clay charms or earrings. The natural wood-like texture and warm earth tones create a cozy, whimsical centerpiece for any windowsill.
Step-by-Step
Materials
- Polymer clay (beige, tan, brown, and terracotta colors)
- Strong wire armature (14-16 gauge for trunk, 18-20 gauge for branches)
- Aluminum foil
- Wire cutters and pliers
- Sculpting tools (needle tool, ball stylus, rubber shaper)
- Texture tools (coarse sandpaper, toothbrush, or dedicated bark texture mat)
- Thin hemp cord or silver chain
- Small eye pins and jump rings
- Acrylic paint (burnt umber) for antiquing
- Gloss or matte varnish (optional)
Step 1: Building the Core Structure
-
Twisting the Armature:
Cut several lengths of heavier wire for the trunk and roots. Twist them together at the bottom to form a flared base, leaving the tops loose to become the lower branches. -
Adding Branch Extensions:
Attach thinner gauge wire to the trunk bundle to create the upper, delicate branches. Fan them out in a natural, organic ‘Y’ shape pattern, ensuring they are evenly distributed. -
Bulking with Foil:
Wrap the wire trunk tightly with aluminum foil to build volume without using too much clay. Compress the foil firmly so it doesn’t shift later. -
Creating the Base:
Form a sturdy, oval-shaped slab of beige or light wood-colored clay about 1/2 inch thick for the base. Texture the edges slightly to look like rough-hewn wood.
Droopy Branches?
Charms slipping off? Use pliers to make tiny loops or kinks at the very tips of the wire branches before covering with clay. This creates a stopper so strings stay put.
Step 2: Sculpting the Tree
-
Applying the Trunk Clay:
Condition your tan or light brown clay. Roll it into sheets and wrap the foil trunk, smoothing the seams together with your fingers or a rubber shaper. -
Covering the Branches:
Roll thin snakes of clay. Slide them onto the wire branches like sleeves or wrap them spirally, smoothing the clay down onto the wire. Taper the ends to a gentle point. -
Root Connection:
Blend the bottom of the trunk clay down onto the slab base. Pull small sections of clay outward to simulate root flares anchoring the tree into the ‘ground’. -
Texturing the Bark:
Use a needle tool to drag vertical lines up the trunk and branches. I also like to press a coarse toothbrush or sandpaper against the clay to mimic the micro-texture of real bark. -
Adding Knots and Features:
Roll tiny balls of clay, flatten them onto the trunk, and press a spiral or heart shape into them to look like whimsical knots or carvings. -
First Bake:
Bake the tree structure according to your clay package instructions. Use a few crumpled foil supports under the branches to keep them from drooping while hot.
Step 3: Creating the Charms
-
Cutting Shapes:
Roll out terracotta, beige, and tan clay. Use small star and heart cutters to create your hanging ornaments. -
Texturing Charms:
While the clay is soft, press a texture sheet, lace, or cross-hatch pattern onto the surface of the stars and hearts for rustic detail. -
Inserting Hardware:
Insert a small eye pin into the top of each charm before baking. Ensure the loop is facing the correct direction to hang flat. -
Second Bake:
Bake your assortment of charms on a tile or baking sheet.
Level Up: Seasonal Swap
Make sets of seasonal charms—leaves for autumn, snowflakes for winter, flowers for spring. The hook system lets you change the tree’s theme all year round.
Step 4: Assembly and Finish
-
Antiquing Wash:
Once cool, water down some burnt umber acrylic paint. Brush it over the entire tree and the textured charms, getting into all the crevices. -
Wiping Back:
Immediately wipe the wet paint off the raised surfaces with a damp paper towel or baby wipe. The dark paint will remain in the textures, enhancing the bark and ‘carved’ details. -
Attaching Cords:
Cut varying lengths of thin hemp cord or silver chain. Tie or loop them onto the branches securely. -
Hanging the Charms:
Attach the baked charms to the ends of the cords using jump rings. Add small beads above the charms for an extra pop of color if desired.
Now you have a stunning, functional sculpture that displays your artistry with natural elegance
Knit-Texture Polymer Clay Animal Minis
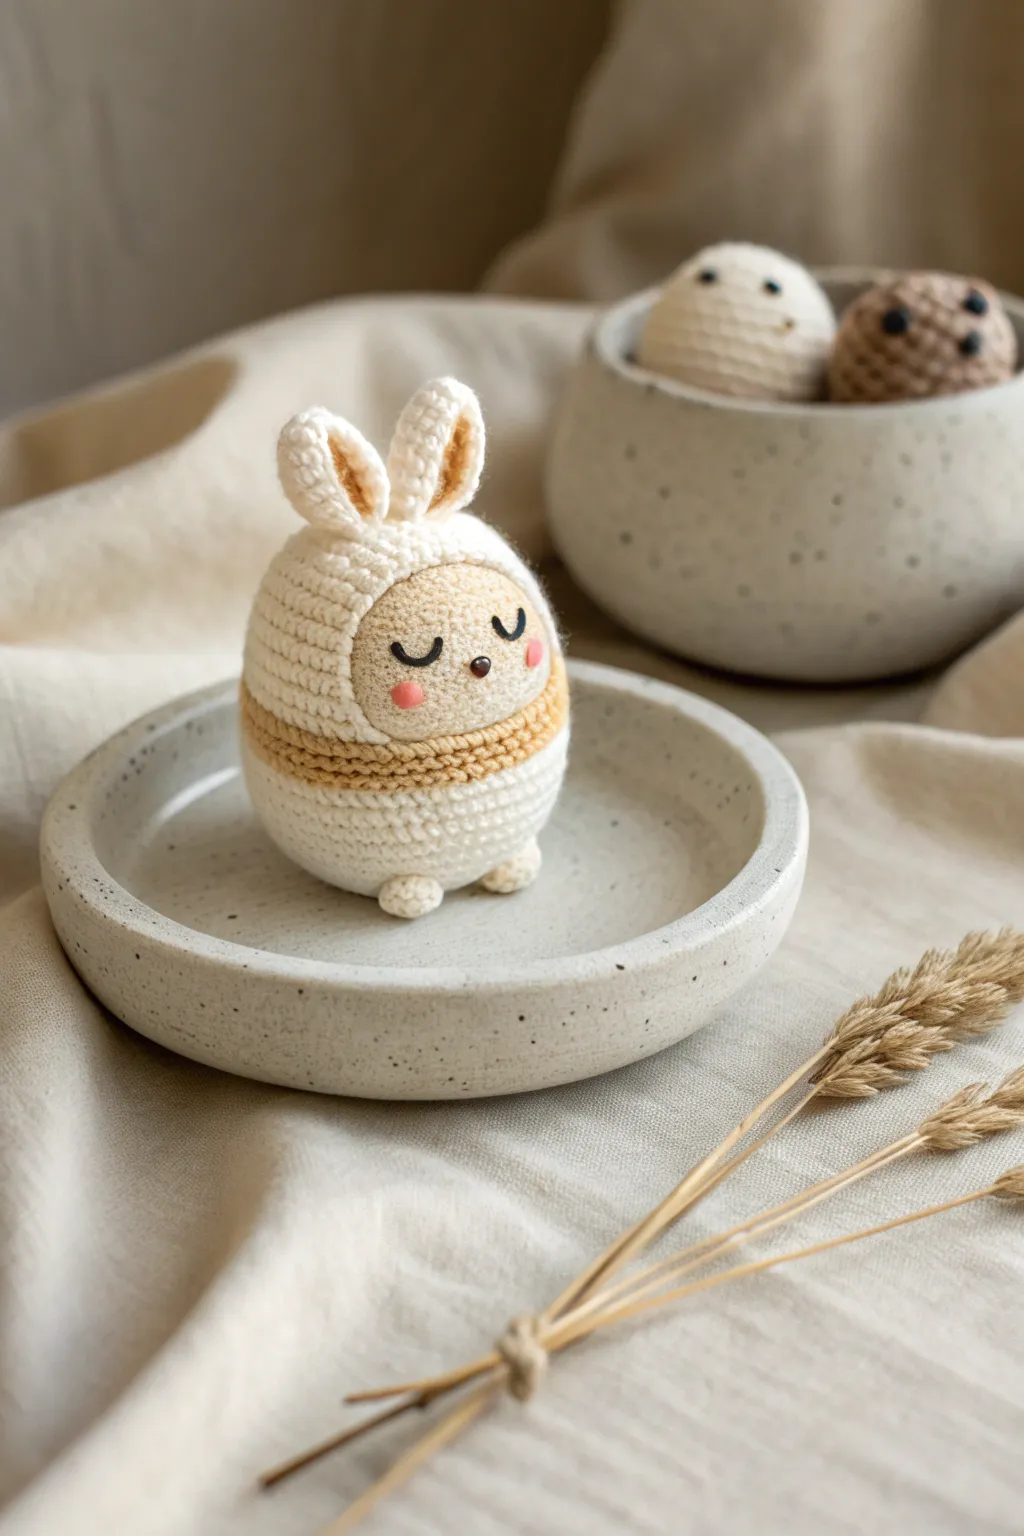
Blend the cozy charm of amigurumi with the durability of clay in this adorable egg-shaped bunny project. By using a clever needle tool technique, you can mimic the intricate loops of crochet stitches without tying a single knot.
Detailed Instructions
Materials
- Polymer clay (white, beige/tan, pale orange, black)
- Aluminum foil
- Pointed needle tool or toothpick
- Texture sponge or toothbrush
- Small ball stylus tool
- Craft knife or scalpel
- Wet wipes or rubbing alcohol (for smoothing)
- Baking sheet and oven
Step 1: Core Structure and Base
-
Prepare the foil core:
Crumple a piece of aluminum foil into a compact egg shape, roughly 1.5 inches tall. This saves clay and keeps the figurine lightweight. -
Base layer:
Condition your white clay and roll it into a sheet about 3mm thick. Wrap this fully around the foil core, smoothing the seams until you have a seamless white egg. -
Add the face area:
Flatten a small ball of beige/tan clay into an oval. Press this firmly onto the front center of the egg for the face, blending the edges slightly so it sits flush.
Step 2: Creating the Knit Texture
-
Texture the face:
Before adding the hood, gently tap the beige face area with a texture sponge or toothbrush. This gives it a soft, fuzzy yarn appearance. -
Forming the hood coils:
Roll very thin, long snakes of white clay. These will become your ‘yarn’ strands. You’ll need quite a few of these. -
Apply the first rows:
Twist two thin white snakes together loosely to mimic a yarn twist. Wrap this twisted strand around the bottom of the egg. Repeat this stacking process upwards. -
Create the color band:
Midway up the body, switch to a beige clay snake twisted with a white one (or just pure beige) to create the striped texture seen in the reference. Apply two rows of this accent color. -
Face opening texture:
Around the beige face oval, carefully lay a single twisted white snake to frame the hood. Use your needle tool to make tiny diagonal impressions on this border, mimicking the ribbed edge of a knit hat. -
Stitching details:
For the main body, use your needle tool to poke repeating ‘V’ shapes or small diagonal dashes across the white clay surface. This transforms the smooth clay into something that looks like individual crochet stitches.
Smudged Texture?
If your ‘knit’ details get flattened while holding the egg to work on the face, place the clay on a small square of parchment paper so you can rotate it without touching the sides directly.
Step 3: Ears and Features
-
Shape the ears:
Create two small teardrop shapes from white clay. Flatten the centers slightly with a ball tool. -
Add inner ear detail:
Fill the flattened centers with a tiny tear of beige clay. Texture this inner part with your sponge. -
Attach the ears:
Place the ears on top of the head. Blend the bottom seams into the body clay, then use your needle tool to continue the faux-knit texture over the join so it looks seamless. -
Tiny feet:
Roll two minuscule balls of white clay. Press them onto the bottom front so the egg stands securely. Texture them with poking dots to look like little yarn pom-poms. -
Sweet face details:
Roll two tiny black snakes for eyes and curve them into a ‘U’ shape for a sleeping expression. Place them gently on the face. -
Finishing touches:
Add a microscopic brown or black dot for the nose between the eyes. Finally, apply two small, flattened circles of pale orange clay for the rosy cheeks. -
Bake:
Bake according to your clay manufacturer’s instructions, usually at 275°F (135°C) for 15-30 minutes depending on thickness. Let it cool completely before handling.
Powder Softness
After baking, lightly brush the ‘yarn’ areas with matte cornstarch or translucent powder. This creates a velvety, non-shiny finish that makes the faux fiber illusion even more convincing.
Display your charming little knit-imposter in a small bowl or on a desk for a cozy touch
Cone-Shaped Polymer Clay Wall Pocket Planter
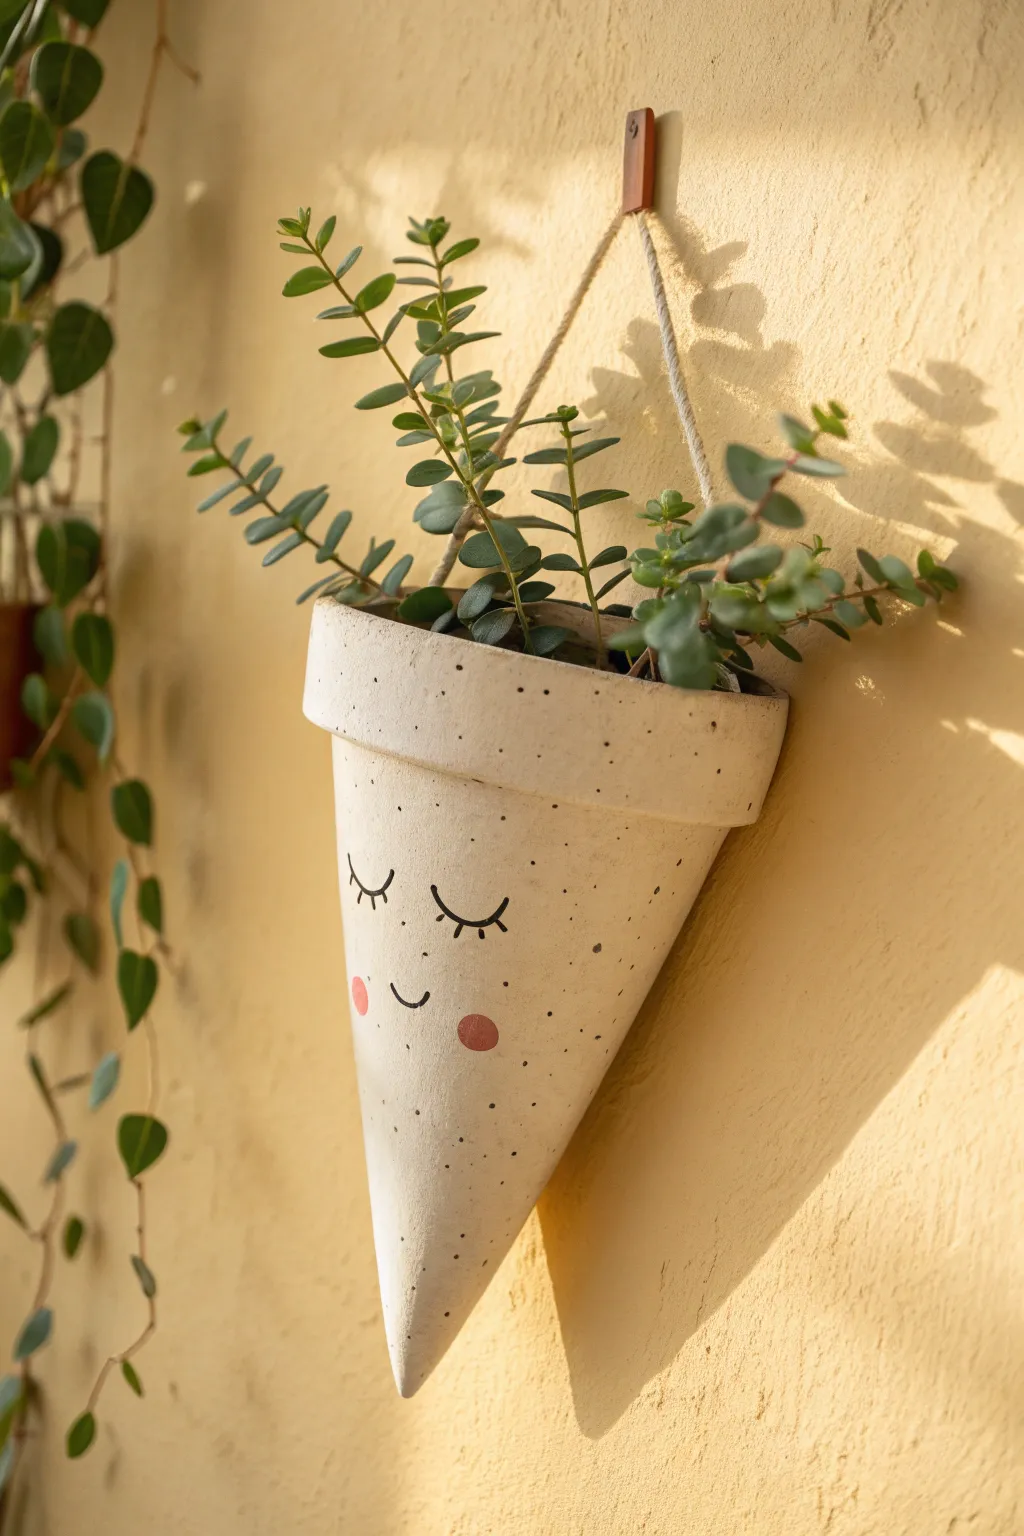
Brighten up any vertical space with this adorable cone-shaped wall pocket that looks just like speckled ceramic. Featuring a sweet, sleeping face and a faux-stone finish, this polymer clay project is perfect for holding air plants or lightweight dried florals.
Step-by-Step
Materials
- White or beige polymer clay (approx. 4-6 oz)
- Black pepper or dried coffee grounds (for speckles)
- Rolling pin or pasta machine
- Cone-shaped form (card thick stock paper or aluminum foil)
- Parchment paper
- Cutting blade or craft knife
- Liquid polymer clay (optional but helpful)
- Black acrylic paint
- Pink or coral acrylic paint
- Fine detail paintbrush
- Dotting tool or round sponge brush
- Twine or jute cord
- Oven
Step 1: Preparing the Clay Base
-
Condition and Speckle:
Start by conditioning your white or beige polymer clay until it is soft and pliable. To achieve that organic, stoneware look, knead in a pinch of coarse black pepper or dried coffee grounds until they are evenly distributed. -
Roll It Out:
Roll the clay into a flat, even sheet, approximately 1/4 inch thick. A pasta machine works wonders for consistency, but a rolling pin does the job nicely too. -
Create the Template:
Make a cone template using stiff cardstock paper. Roll the paper into a cone shape of your desired size, tape it securely, and trim the top opening so it is flat and level. -
Wrap the Form:
Cover your paper cone template with a layer of parchment paper to prevent sticking. Then, gently drape your clay sheet over the cone, wrapping it around until the edges meet.
Slumping Planter?
If the clay cone starts sagging while shaping, place the paper form into the freezer for 10 minutes before draping the clay. The cold form will firm up the clay quickly.
Step 2: Sculpting the Form
-
Seaming the Cone:
Where the clay edges meet, use your cutting blade to slice through both overlapping layers at once. Remove the excess scraps and press the raw edges together. -
Smooth the Joint:
Gently rub the seam with your finger or a smoothing tool until it disappears completely. The goal is a seamless, continuous cone surface. -
Trim the Top:
Using your blade, trim the excess clay at the wide opening of the cone to create a straight, level rim. -
Add the Rim Band:
Roll out a separate long, narrow strip of speckled clay, about 3/4 inch wide. Wrap this around the top edge of the cone to create the thicker, cuff-like rim seen in the photo. -
Blend the Rim:
Press the band securely against the cone body. I like to use a little liquid polymer clay here to ensure a permanent bond, blending the bottom edge of the band slightly into the cone for stability. -
Make Hanging Holes:
Pierce two holes on opposite sides of the rim band using a straw or a knitting needle. Make sure they are large enough for your twine to pass through after baking.
Step 3: Baking and Decorating
-
First Bake:
Propping the cone upright in a crumpled foil nest, bake the clay according to the manufacturer’s instructions. Let it cool completely before removing the inner paper form. -
Painting the Face:
Load a fine detail brush with black acrylic paint. Carefully paint two curved lines for the closed eyes, adding three small lashes to the outer corner of each. -
Adding the Smile:
Paint a small, simple ‘U’ shape centered below the eyes to create the smiling mouth. -
Rosy Cheeks:
Dip a round sponge pouncer or your pinky finger into the pink acrylic paint. Dab off the excess, then stamp two soft circles securely onto the clay for the blushing cheeks. -
Add More Speckles:
If your clay isn’t speckled enough, you can flick a toothbrush loaded with watered-down black paint over the surface for extra texture. -
Seal (Optional):
For durability, apply a matte varnish over the painted areas or the entire planter to protect the design from moisture. -
Final Assembly:
Cut a length of jute twine. Thread one end through each hole from the outside in, and tie sturdy double knots on the inside of the cone to secure the hanger.
Textured Finish
Before baking, gently pat the entire clay surface with a stiff-bristled toothbrush or sandpaper. This removes fingerprints and mimics the grainy texture of real pottery.
Fill your new charming friend with lush greenery and hang it where it can make you smile every day
Cute-Face Polymer Clay Tabletop Game Pieces
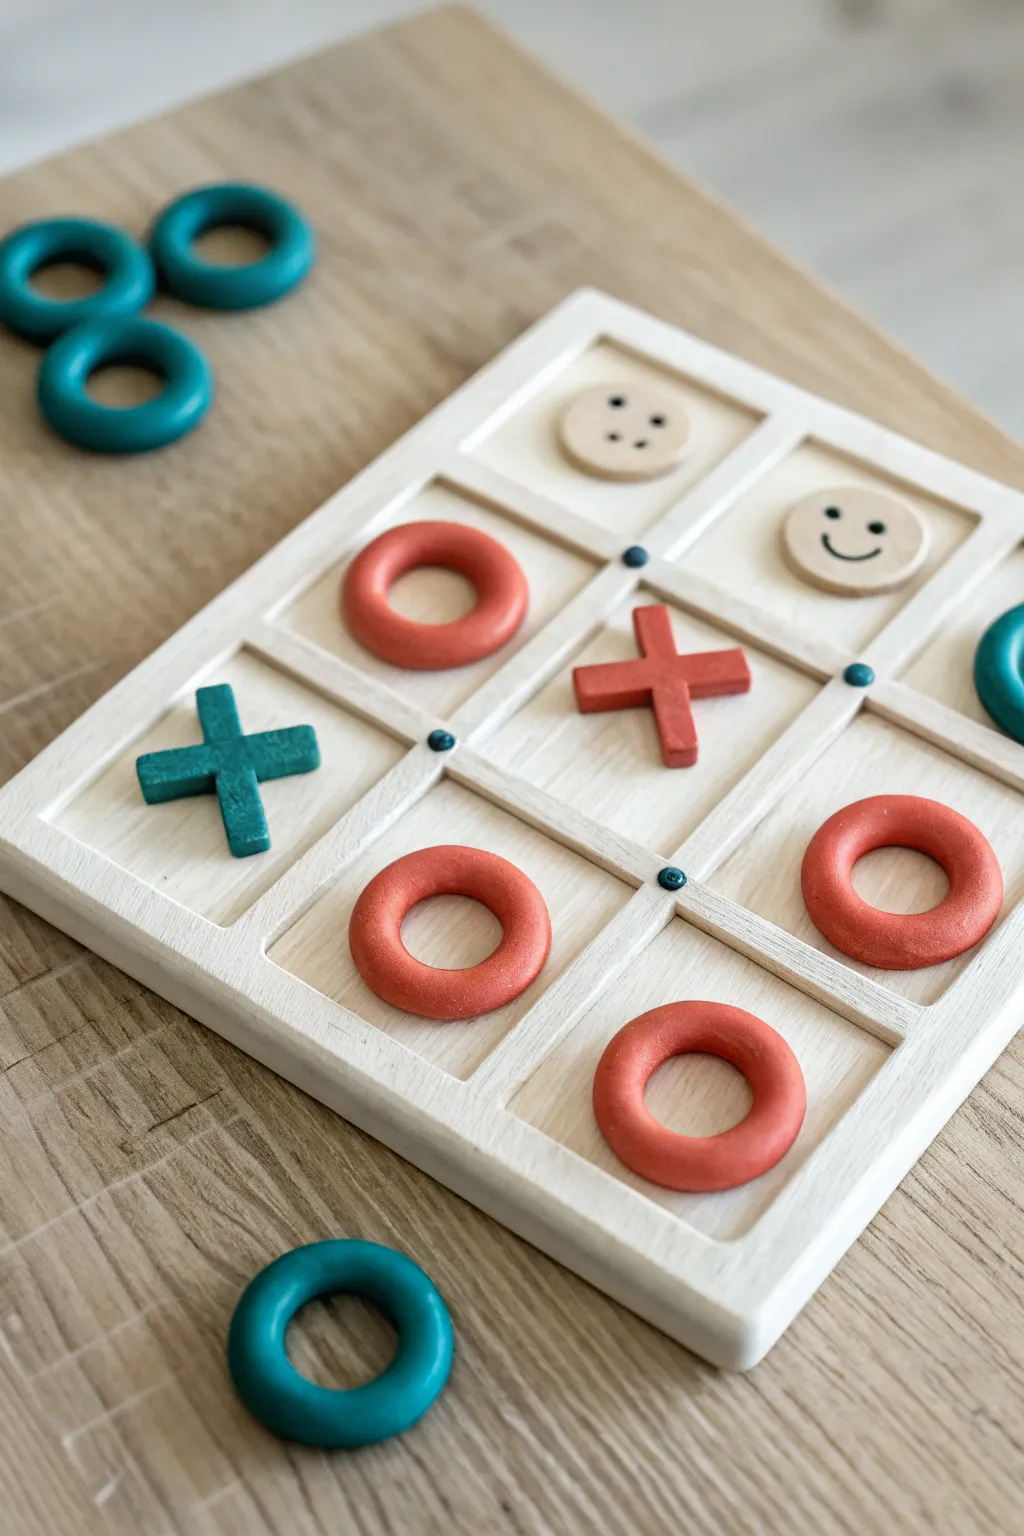
Bring classic fun to your coffee table with this charming handmade Tic-Tac-Toe set featuring smooth polymer clay game pieces. The mix of coral pink circles, teal crosses, and adorable smiley faces creates a modern, playful aesthetic perfect for family game night.
How-To Guide
Materials
- Polymer clay (coral/terracotta, teal/turquoise, beige/cream)
- Square wooden plaque or tray (approx. 6×6 inches)
- Square dowels (balsa or basswood)
- Wood glue
- Sandpaper (fine grit)
- Acrylic paint (white or cream for the board)
- Paintbrushes
- Circle cutters (various sizes)
- Craft knife or clay blade
- Black acrylic paint or fine-tip marker
- Dotting tool or toothpick
- Clay roller or pasta machine
- Oven for baking clay
Step 1: Preparing the Game Board
-
Measure and Cut:
Begin with your square wooden base. Measure the length and width to determine the size for your grid. Cut four strips of square dowel to create the grid lines—two running vertically and two horizontally—to form nine equal squares for play. -
Sand and Smooth:
Lightly sand the wooden base and your dowel strips to remove any rough edges or splinters. Wipe away the dust with a slightly damp cloth. -
Assemble the Frame:
Also cut four additional strips to frame the outer edge of the square base if your plaque doesn’t already have raised edges. Glue the outer frame pieces first, clamping them if necessary until dry. -
Create the Grid:
Glue the inner dowel strips into the cross-hatch pattern inside the frame. Ensure the spaces are even so your game pieces will fit comfortably. Allow the wood glue to cure completely. -
Paint the Base:
Apply a coat of whitewash or cream acrylic paint to the entire wooden structure. You want a sheer, rustic look where the wood grain subtly peeks through, rather than a heavy, opaque plastic finish. -
Add Decorative Dots:
Once the base paint feels dry to the touch, use a small dotting tool or the end of a paintbrush handle dipped in teal paint to add a tiny dot at each intersection where the grid lines cross.
Step 2: Sculpting the Game Pieces
-
Condition the Clay:
Start by kneading your coral and teal polymer clays separately until they are soft and pliable. This prevents cracking later. -
Form the ‘O’ Pieces:
Roll the coral clay into a thick, even snake. Cut it into equal lengths and join the ends of each segment to form a ring. Smooth the seam with your finger so it becomes invisible. -
Refine the Rings:
Alternatively, roll a sheet of coral clay to about 1/4 inch thickness and use two circle cutters (one strictly larger than the other) to punch out perfect donut shapes. Round off the sharp cut edges with your fingertips. -
Create the ‘X’ Pieces:
Switch to the teal clay for the crosses. Roll a thick snake or slab similar to the coral clay. Cut two short rectangular strips for each ‘X’ piece. -
Join the Crosses:
Lay one teal strip over the other to form a cross. Gently press the center intersection to bond them without smashing the shape. I find flipping the piece over and pressing from the back helps secure the bond. -
Make the Smiley Faces:
Roll your beige or cream clay into a smooth sheet. Use a medium circle cutter to punch out discs that fit comfortably within your board’s grid squares. -
Add Details:
Before baking, gently press facial features using dotting tools for eyes and a curved tool for the smile, or wait to paint them on after baking. For the version shown, paint simple black eyes and smiles post-bake for a crisp look. -
Bake:
Arrange all your clay pieces on a parchment-lined baking sheet or ceramic tile. Bake according to the specific temperature and time instructions on your package of polymer clay. -
Paint Features:
Once the smiley discs have cooled completely, use a fine detail brush and black acrylic paint to carefully draw the eyes and mouth if you didn’t impress them earlier.
Sticky Situation?
If your clay sticks to the cutters or work surface, dust the clay lightly with cornstarch or use a piece of plastic wrap between the clay and the cutter for a clean release.
Level Up Your Game
Instead of Xs and Os, create themed shapes like stars and moons, or flowers and leaves, to customize the set for holidays or special gifts.
Place your finished pieces on the board and you are ready for a stylish round of strategy