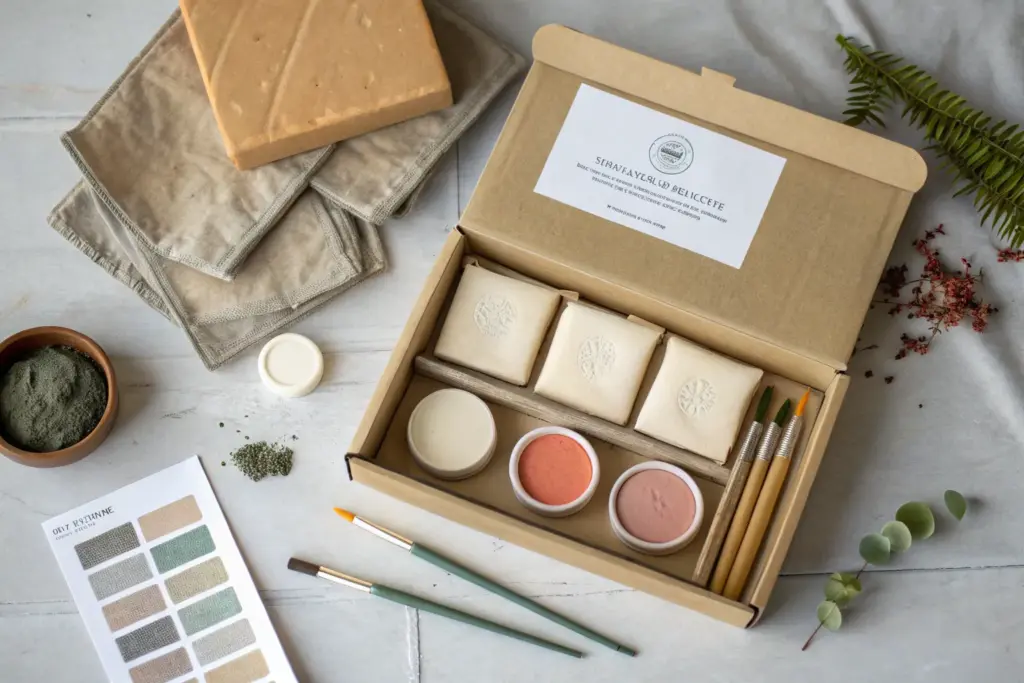
When I want a cozy, creative date night at home, I reach for air dry clay because it’s all the fun of pottery with no kiln and way less pressure. Here are my favorite at home pottery date night ideas that keep your hands busy and your conversation easy.
Set Up a Cozy Two-Person Clay Table
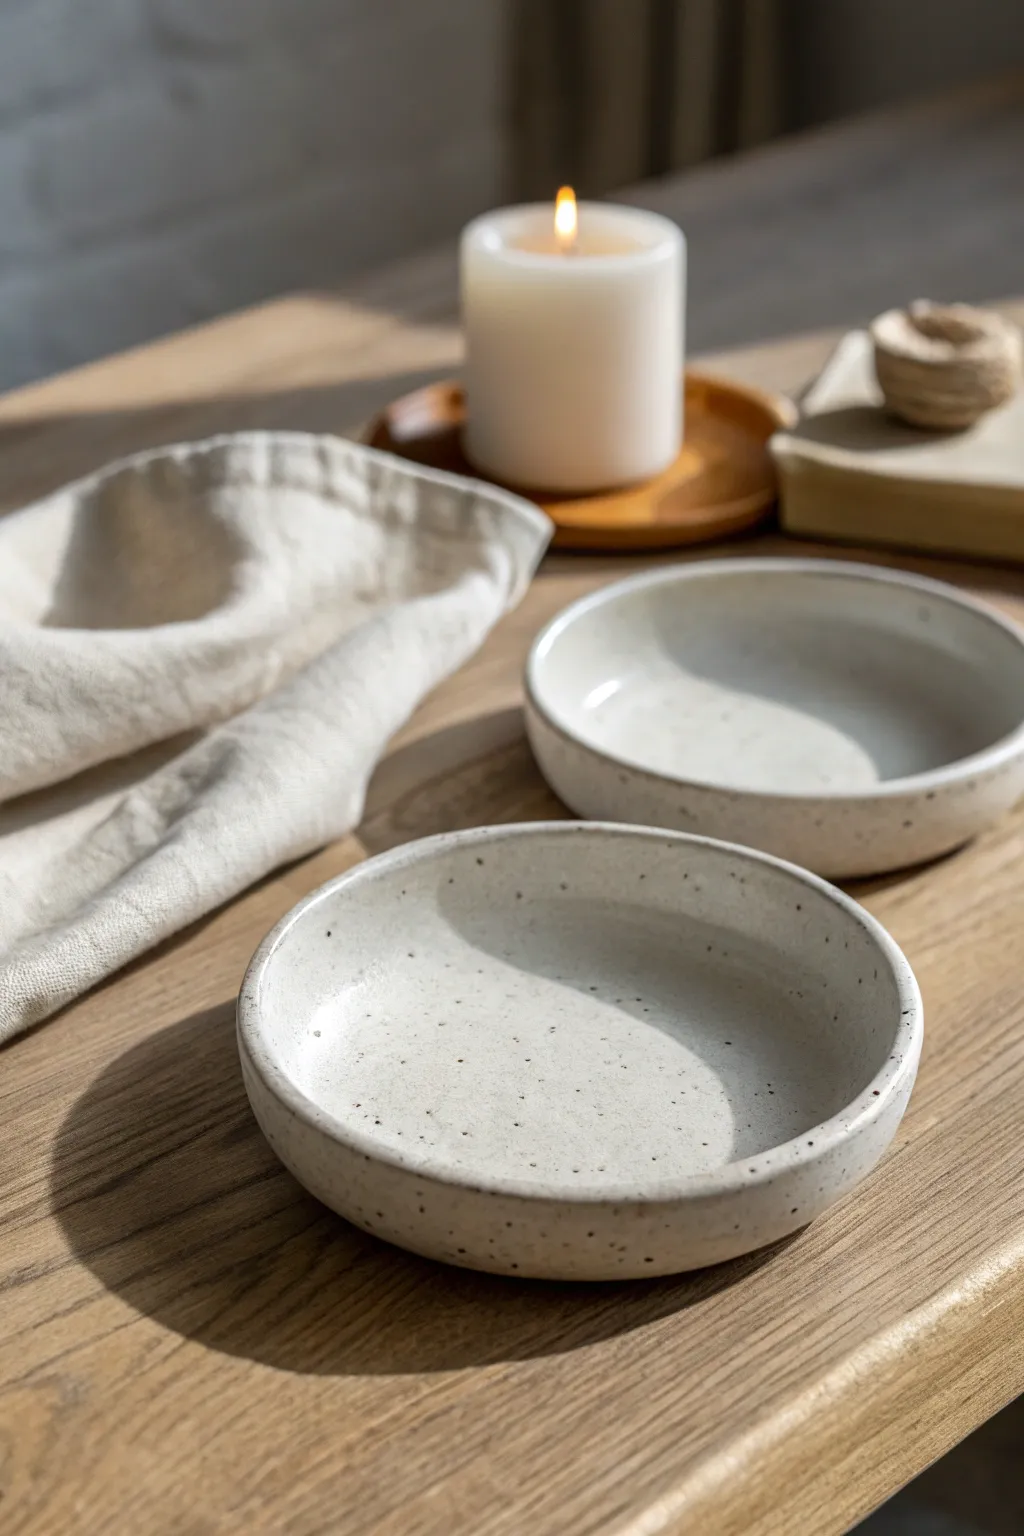
These simple, elegant dishes bring a touch of warm minimalism to your table with their low profile and subtle speckled finish. Their wide, open shape makes them perfect catch-alls for jewelry or keys, or purely decorative pieces to admire.
Step-by-Step
Materials
- White air dry clay (approx. 1 lb per bowl)
- Rolling pin
- Canvas mat or parchment paper
- Round template (paper plate or bowl approx. 6-7 inches)
- Needle tool or fettling knife
- Sponge
- Bowl of water
- Fine sandpaper (220 grit)
- White acrylic paint (matte finish)
- Black acrylic paint
- Old toothbrush
- Gloss or satin varnish/sealant for clay
Step 1: Shaping the Clay
-
Prepare your clay:
Start by taking a generous handful of white air dry clay. Knead it in your hands for a minute to warm it up and ensure there are no air bubbles trapped inside. -
Roll the slab:
Place the clay on your canvas mat or parchment paper. Use the rolling pin to roll it out into an even slab, aiming for a consistent thickness of about 1/4 inch. Rotate the clay frequently to keep a circular shape. -
Cut the circle:
Place your round template gently on top of the rolled slab. Using your needle tool or knife, careful trace around the edge to cut out a perfect circle, then discard the excess clay. -
Smooth the edges:
Dip your finger in a little water and run it along the cut edge of the clay circle to round it off. This prevents sharp or jagged edges later on. -
Lift the walls:
Gently cup the clay circle in your hands. Using your thumbs, slowly press the very edge of the circle upward to create a small vertical rim, about 3/4 of an inch high. Work your way around the circle multiple times to raise it gradually. -
Refine the shape:
Place the bowl back on the table. Use a damp sponge to smooth the transition from the flat base to the raised wall, ensuring a soft inside curve rather than a sharp angle. -
Level the rim:
Look at the bowl from the side to check if the rim height is even. Gently tap the rim with a flat wooden tool or your fingers to level out any high spots. -
Dry partially:
Let the bowl sit for about 24 hours until it is leather hard. If you notice any warping, you can place a small weighted bag of sand or rice in the center to keep the bottom flat.
Cracked Rim?
If small cracks appear on the rim while drying, make a paste of clay and water (slip) and fill the crack. Smooth it over with a sponge and let it dry again.
Step 2: Finishing and Decoration
-
Sand for smoothness:
Once the bowl is completely bone dry (usually 48-72 hours), use fine grit sandpaper to gently sand the entire surface. Pay special attention to the rim to create that clean, modern look. -
Wipe clean:
Use a barely damp sponge or a tack cloth to remove all the sanding dust from the surface. The clay needs to be dust-free for the paint to adhere properly. -
Apply base coat:
Paint the entire bowl with a matte white acrylic paint. You may need two thin coats to get full opacity, letting the first coat dry completely before adding the second. -
Prepare the speckle:
Put a pea-sized amount of black paint on a palette and water it down significantly until it is very runny, almost ink-like. -
Test the spatter:
Dip an old toothbrush into the watery black paint. Use your thumb to flick the bristles over a piece of scrap paper first to control the size of the droplets. -
Speckle the bowl:
Hold the toothbrush about 6-8 inches above your bowl. Gently flick the bristles to send a fine mist of black speckles onto the white surface. I like to do this sparingly at first; you can always add more. -
Seal the piece:
Allow the paint to dry fully. Finally, apply a coat of gloss or satin varnish to seal the clay and give it a finished ceramic look. This protects the finish but remember, air dry clay is not food safe.
Level Up: Texture
Before drying, press a piece of rough linen fabric into the wet clay slab and remove it. This leaves a subtle woven texture that looks beautiful under the white paint.
Now you have a chic, modern set of decorative bowls ready to style your coffee table


Matchy Pinch Pot Snack Bowls
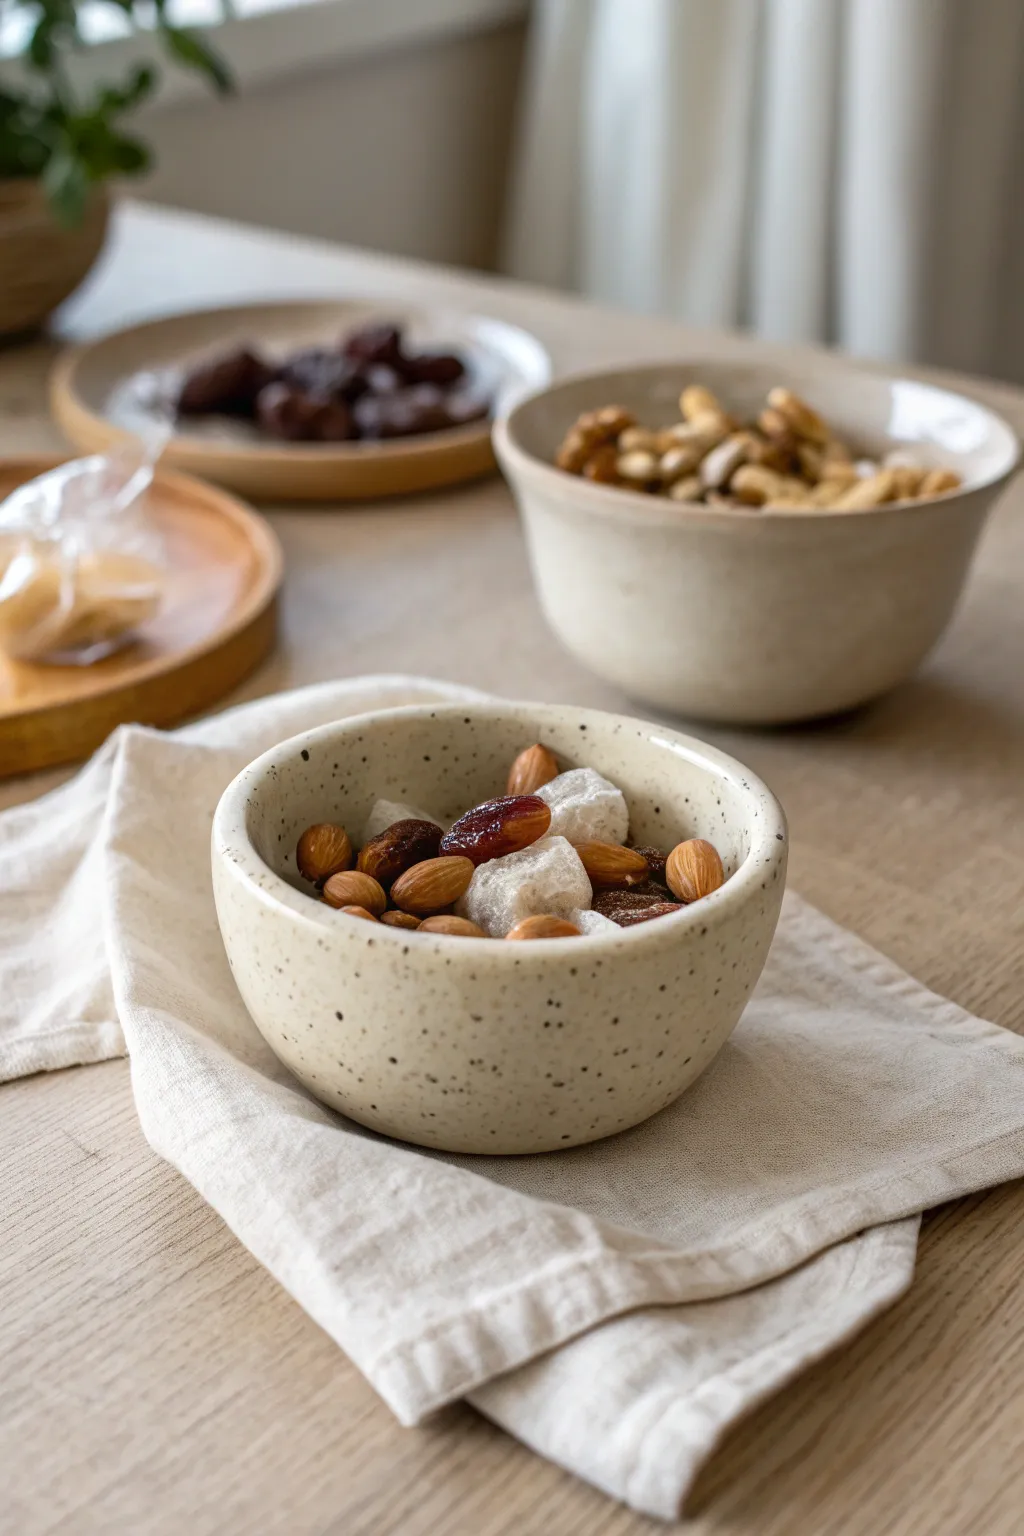
These charming, rustic bowls rely on the timeless pinch pot technique to create organic, imperfect shapes perfect for snacking. The finish features a creamy, speckled glaze effect that mimics high-fire stoneware without needing a kiln.
Step-by-Step
Materials
- White air-dry clay (approx. 1 lb)
- Small bowl of water
- Sponge
- Sandpaper (fine grit)
- Acrylic paint (Cream or Off-White)
- Acrylic paint (Black or Dark Brown)
- Stiff bristle brush or old toothbrush
- Glossy varnish or sealant (food-safe if strictly for dry snacks, otherwise standard acrylic varnish)
Step 1: Shaping the Clay
-
Prepare the clay:
Start with a ball of air-dry clay roughly the size of a tennis ball. Knead it briefly in your hands to warm it up and ensure there are no air bubbles. -
Open the form:
Hold the clay ball in your non-dominant hand. Press your thumb directly into the center, stopping about a half-inch from the bottom. This base thickness is crucial for stability. -
Pinch the walls:
Using your thumb on the inside and fingers on the outside, gently pinch and rotate the clay. Work your way from the bottom upward in a spiral motion. -
Even it out:
Continue pinching until the walls are an even thickness, roughly 1/4 inch thick. Don’t worry about perfect symmetry; the organic look is part of the charm. -
Refine the rim:
If the rim is cracking, dip your finger in a little water and smooth it over. Gently tap the rim against a flat surface if you want a flatter top edge, or leave it rounded. -
Smooth the surface:
Dip your sponge in water and wring it out almost completely. Wipe the interior and exterior to remove fingerprints and smooth out deep ridges. -
Create a foot:
Gently tap the bottom of the bowl on your table to flatten it slightly so it sits stable without wobbling. -
Let it dry:
Set the bowl aside to dry completely. This usually takes 24-48 hours. I find flipping the bowl upside down halfway through helps the bottom dry evenly.
Pro Tip: Crack Control
Start with slightly moist hands to prevent minimal surface cracking. If a deep crack appears while pinching, score it, add a tiny bit of slip (watery clay), and smooth it over immediately.
Step 2: Finishing and Decorating
-
Sand the imperfections:
Once fully dry, use fine-grit sandpaper to buff away any sharp edges or rough patches on the rim and exterior. Wipe away dust with a slightly damp cloth. -
Apply the base coat:
Paint the entire bowl, inside and out, with your cream or off-white acrylic paint. You may need two coats to get solid, opaque coverage. -
Prepare the speckle:
Water down a small amount of black or dark brown acrylic paint on a palette. It should be the consistency of ink or thin cream. -
Create the splatter:
Dip a stiff brush or toothbrush into the thinned paint. Hold it near the bowl and run your thumb across the bristles to flick tiny droplets onto the surface. -
Check density:
Rotate the bowl as you splatter to ensure even coverage. Go lightly at first—you can always add more speckles, but you can’t take them away. -
Seal the piece:
After the paint is bone dry, apply a coat of glossy varnish. This gives it that ceramic-glaze look and protects the paint from chipping. -
Add a second coat:
For a truly glassy finish, apply a second coat of varnish once the first is dry to the touch.
Level Up: Color Contrast
Paint the the bottom third of the exterior a solid terracotta or dark grey, leaving the speckled cream on top, to create a modern dipped-glaze aesthetic.
Fill your new bowls with your favorite nuts or candies and enjoy a cozy movie night


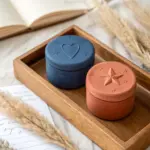
His-and-Hers Trinket Dishes With Initials
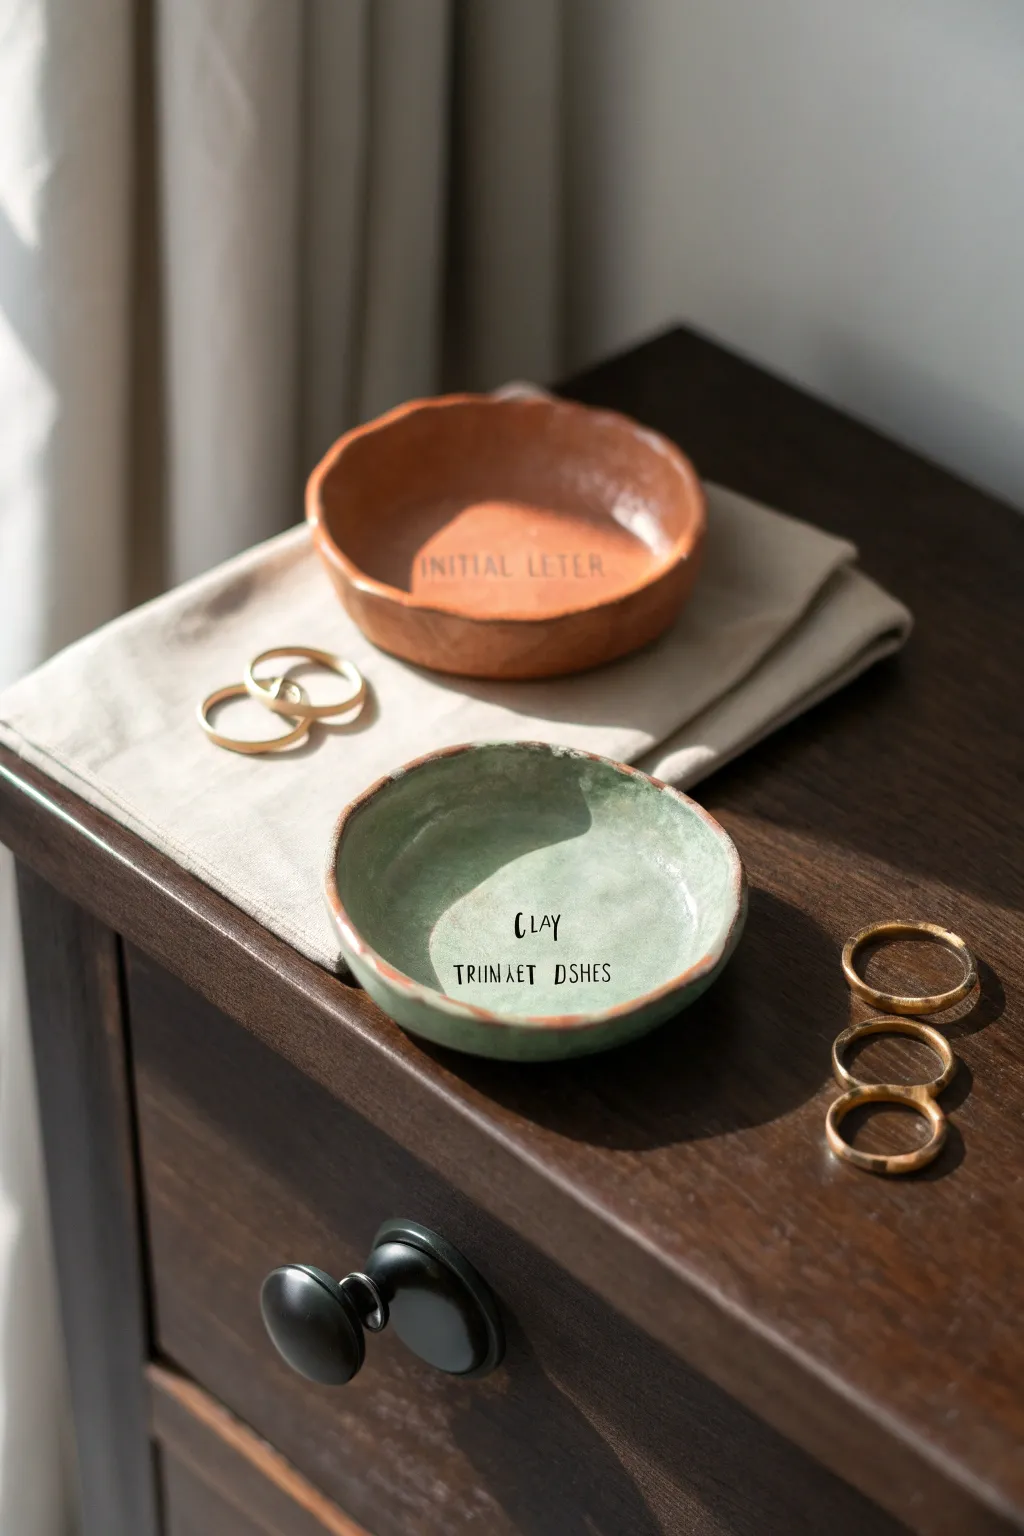
Create a personalized touch for your bedside table with these charming, rustic trinket dishes. Featuring a terracotta warmth and a soothing sage green glaze effect, they perfect for holding rings or small keepsakes.
Step-by-Step Guide
Materials
- Air-dry clay (terracotta color)
- Air-dry clay (white, optional if painting instead)
- Rolling pin
- Small bowl or round cookie cutter (approx. 4-5 inches)
- Small alphabet rubber stamps
- Sponge or small bowl of water
- Acrylic paints (sage green, creamy white)
- Paintbrushes (flat shader and fine detail)
- Matte varnish or sealant
- Fine-grit sandpaper (220 grit)
- Two small bowls (for shaping)
Step 1: Shaping the Clay
-
Preparation:
Begin by kneading a ball of terracotta-colored air-dry clay until it is pliable and smooth. If the clay feels dry, dip your fingers in a tiny bit of water to work into the material. -
Rolling out:
Roll the clay flat on a clean, non-stick surface or canvas mat to a thickness of about 1/4 inch. Try to keep the thickness consistent to ensure even drying later. -
Cutting the circle:
Place your round cookie cutter or an upside-down bowl onto the clay and cut out two perfect circles. Remove the excess clay and set it aside for future projects. -
Forming the rim:
Gently pinch the edges of the circle upwards to create a raised wall. I like to use my thumb on the inside and forefinger on the outside to create that slightly organic, hand-modeled look. -
Smoothing the edges:
Dip your finger in water and run it along the rim to smooth out any cracks or sharp edges. The rim should be slightly uneven and rustic, but not jagged. -
Creating the curved base:
To give the dish a gentle curve, place your clay circle inside a slightly larger bowl to dry. This acts as a mold to keep the rounded shape while it sets.
Cracked Clay Fix
If small cracks appear while drying, mix a tiny bit of fresh clay with water to make a paste (slip). Fill the cracks, smooth it out, and let dry again.
Step 2: Stamping and Drying
-
Positioning the text:
While the clay is still soft inside the mold, decide where you want your text. For the orange dish, center the text; for the green one, stack the words. -
Stamping:
Gently press your alphabet stamps into the center of the dish. Don’t press too hard—you just want a clear impression, not to punch through the clay. -
Drying time:
Let the dishes air dry completely. This usually takes 24-48 hours depending on humidity. Rotate them occasionally to let air reach the bottom center. -
Sanding:
Once bone dry, take your fine-grit sandpaper and lightly sand the rim and any rough spots on the surface to ensure a professional finish.
Step 3: Painting and Finishing
-
Painting the sage dish:
For the green dish, mix sage green acrylic paint with a drop of water for a wash effect. Paint the inside, but leave the very top edge of the rim unpainted to reveal the terracotta color underneath. -
Coloring the orange dish:
The terracotta dish can be left raw if you used colored clay. If you used white clay, paint the entire dish in a burnt orange or terracotta acyclic shade. -
Highlighting the text:
Use a very fine detail brush and black or dark grey paint to carefully fill in the stamped letters so the message stands out clearly. -
Sealing the work:
Apply two thin coats of matte varnish to both dishes. This protects the clay from moisture and gives the surface a finished, durable quality.
Inking the Letters
For crisp text without painting, lightly tap your rubber stamps onto a black ink pad before pressing them into the wet clay.
Place these lovely custom dishes on your nightstand to keep your treasures safe and organized


Mini Bud Vases for One Perfect Stem
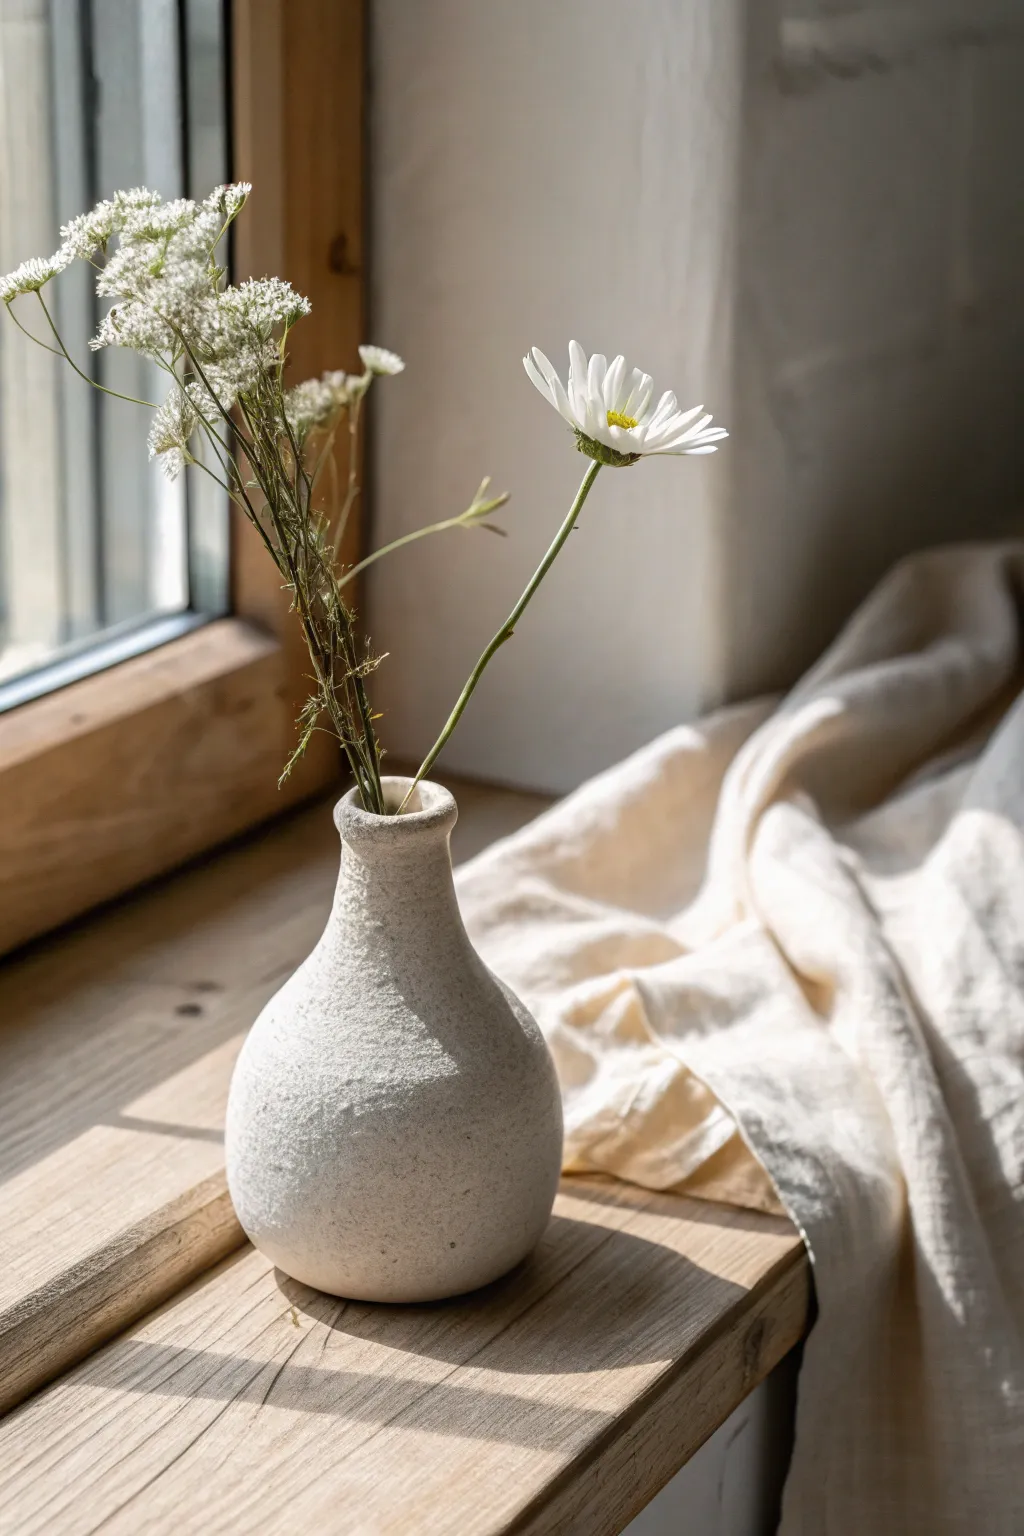
Embrace the beauty of imperfection with this lovely, textured bud vase that mimics the look of raw stone. Its heavy bottom and delicate neck are specifically designed to hold just a few stems, making it perfect for foraging wildflowers while out on a stroll.
Step-by-Step
Materials
- White or grey air-dry clay
- Rolling pin
- Small cup of water
- Sponge
- Waiters corkscrew or a small knitting needle
- Coarse sandpaper
- White acrylic paint
- Baking soda
- Matte spray varnish
Step 1: Shaping the Base
-
Prepare the clay:
Start by cutting a chunk of clay about the size of a tennis ball. Knead it in your hands for a minute to warm it up and remove any trapped air bubbles. -
Form a sphere:
Roll the clay between your palms or on a table until you have a smooth, solid ball. This will be the main body of your vase. -
Create the opening:
Using your thumb, press gently into the center of the ball, but don’t go all the way through to the bottom. I like to stop about half an inch from the base to ensure it stays weighted and stable. -
Pinch the walls:
Slowly pinch the clay around the thumb hole, rotating the ball as you go. You want to create a hollow cavity while keeping the bottom thick.
Step 2: Building the Neck
-
Narrow the top:
Instead of opening the hole wider like a bowl, gently squeeze the upper rim inward. This is called ‘collaring’ and helps form the transition from the belly to the neck. -
Roll a coil:
Take a separate small piece of clay and roll it into a thick worm or coil. This should be roughly the same circumference as the opening you just collared. -
Score and slip:
Use a tool to scratch little hash marks on both the top rim of your base and the bottom of your coil. Dab a little water (slip) on the scratches to act as glue. -
Attach the neck:
Place the coil on top of the base opening. Smooth the clay downward on the outside and upward on the inside to merge the two pieces seamlessly. -
Refine the shape:
Wet your fingers slightly and smooth out the transition area. Gently pull the neck upward to elongate it, flaring the lip out just a tiny bit at the very top for a classic vase silhouette.
Stone Effect Secret
Mix different sizes of sand or grain into your baking soda paint. The variation in particle size makes the faux-stone finish look incredibly realistic.
Step 3: Texture and Finishing
-
Add surface texture:
While the clay is still damp, take a rough sponge or even a crumpled ball of aluminum foil and tap it all over the surface. This creates that organic, stone-like pitting seen in the photo. -
Dry completely:
Set the vase in a safe spot away from direct sunlight. Let it dry for at least 24-48 hours. It will turn a lighter color when fully dry. -
Mix the faux-stone paint:
In a small dish, mix white acrylic paint with a teaspoon of baking soda. The baking soda adds grit and creates a fluffy, stucco-like texture. -
Apply the finish:
Dab the baking soda paint onto the vase using a sponge rather than brushing it on. Sponging builds up the texture further. -
Seal the work:
Since air-dry clay isn’t waterproof, finish with a coat of matte decorative varnish. Only use dried flowers or a hidden glass tube insert if you want fresh stems.
Make it Waterproof
Can’t use a glass insert? Coat the INSIDE with resin or a specialized waterproofing varnish like ‘Dishwasher Safe Mod Podge’ to hold real water safely.
Now find a sunny windowsill to display your new handcrafted piece.

The Complete Guide to Pottery Troubleshooting
Uncover the most common ceramic mistakes—from cracking clay to failed glazes—and learn how to fix them fast.
Stamped Texture Coasters as a Set
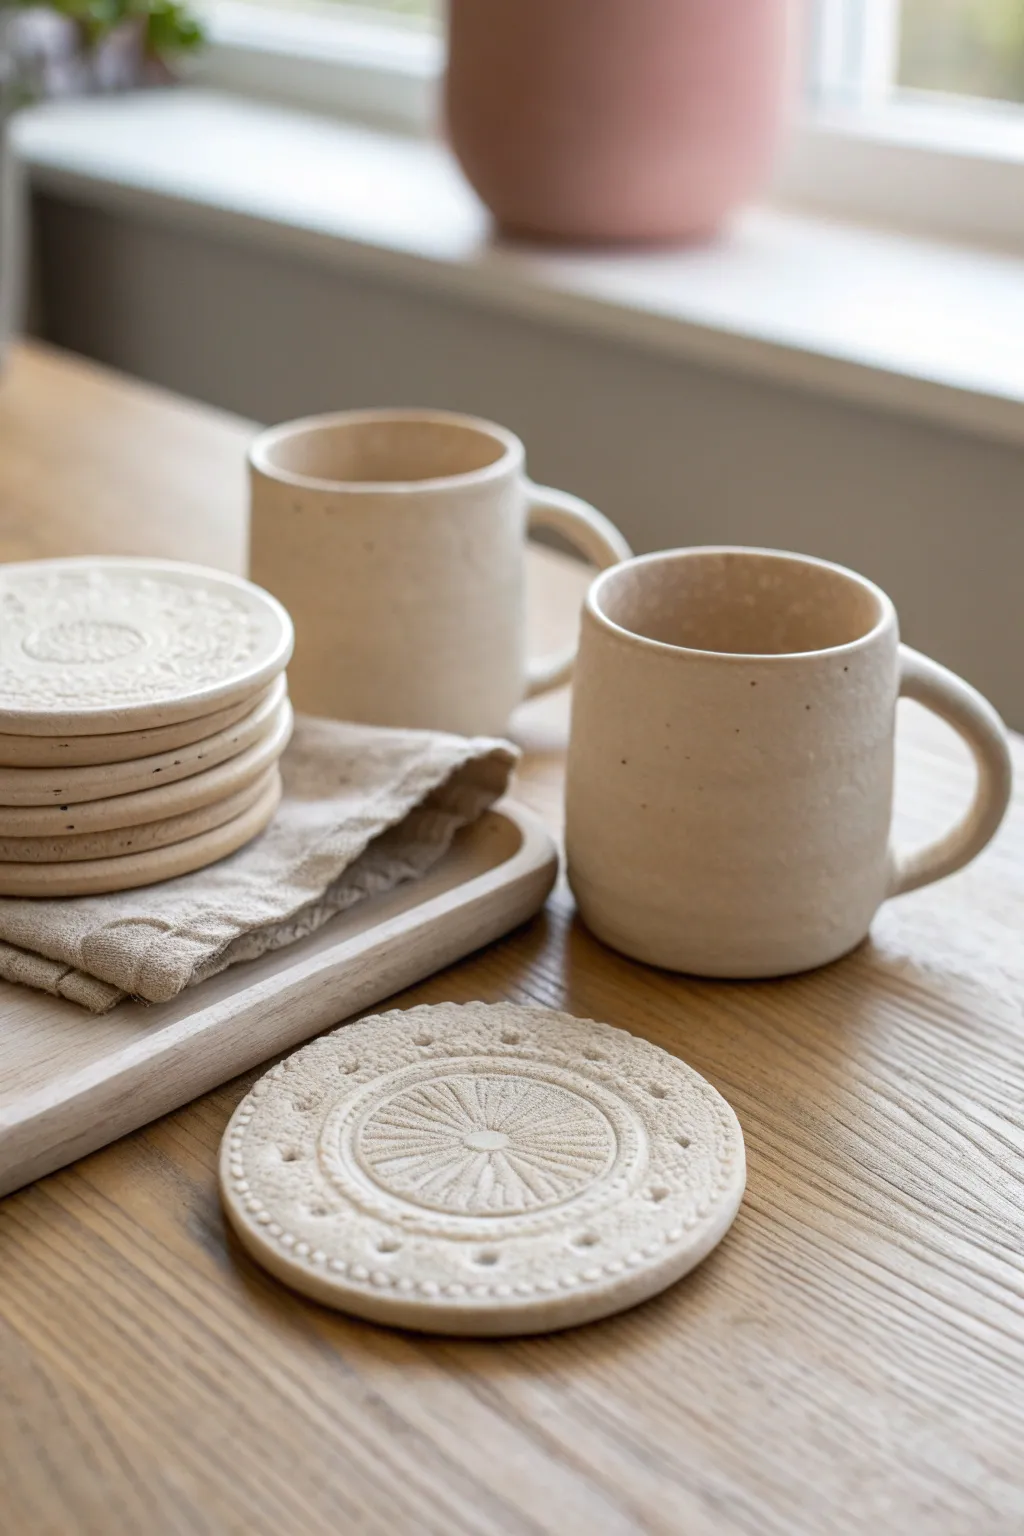
These simple yet stunning coasters feature a delicate, radially symmetrical pattern that looks professional but is incredibly easy to achieve. The natural, raw stoneware look pairs perfectly with the intricate relief texture, making them a beautiful addition to any coffee table.
How-To Guide
Materials
- White or sandstone air-dry clay
- Rolling pin
- Two wooden guide sticks (approx. 5mm thick)
- Circular cookie cutter (approx. 4 inches diameter)
- Large rubber stamp with mandala or radial pattern
- Sponge
- Cup of water
- Fine-grit sandpaper
- Matte acrylic sealant or varnish
- Canvas mat or parchment paper
Step 1: Prepping the Clay
-
Slice and warm:
Cut a generous slice of clay from your block using a wire tool or knife. Knead it in your hands for a minute or two to warm it up and make it pliable, which helps prevent cracking later. -
Set up guides:
Place your canvas mat or parchment paper on a flat work surface. Lay your two wooden guide sticks parallel to each other, slightly wider than the width of your clay ball. -
Roll the slab:
Place the clay ball between the guides. Using the rolling pin, roll the clay out until the pin rests on the guide sticks. This ensures your entire slab is a perfectly even 5mm thickness. -
Smooth the surface:
Dip your sponge lightly in water and wring it out almost completely. Gently wipe it over the clay slab to remove any canvas texture or rolling pin marks, creating a pristine canvas for your stamping.
Step 2: Creating the Design
-
Position the stamp:
Take your large mandala or radial pattern rubber stamp. I like to hover it over the clay first to visualize exactly where I want the center to be. -
Press firmly:
Press the stamp down into the clay with firm, even pressure. Do not rock the stamp, as this can smudge the design; just press straight down. -
Lift carefully:
Peel the stamp away from the clay slowly. If it sticks, gently nudge the edge of the clay down while lifting the stamp. -
Cut the shape:
Center your circular cookie cutter over the stamped impression. Press down firmly to cut the coaster shape, ensuring the design is perfectly centered within the circle. -
Remove excess:
Peel away the excess clay from around the circle first, then carefully lift the coaster if needed. It’s often safer to leave it on the mat if possible to avoid warping the circle. -
Repeat the process:
Gather your clay scraps, re-knead them, and repeat the rolling and stamping process until you have a set of 4-6 coasters.
Clean Release Tip
If your stamp sticks to the clay, lightly dust the surface of the clay with cornstarch before stamping. The powder brushes right off after drying.
Step 3: Refining and Finishing
-
Smooth edges:
Dip your finger in a tiny bit of water and run it gently around the cut rim of each coaster. This softens the sharp cut angle into a nice, rounded edge. -
Initial dry:
Let the coasters dry on a flat board for about 24 hours. Placing a light book on top (with parchment in between) can help keep them perfectly flat as moisture leaves the clay. -
Flip and finish drying:
After the first day, flip the coasters over to let the undersides dry completely. Allow another 24-48 hours until the clay feels room temperature to the touch, not cool. -
Sand for perfection:
Once bone dry, take fine-grit sandpaper and very gently go over the rims again to remove any tiny burrs or sharp spots. Be careful not to sand off your stamped texture. -
Dust off:
Use a soft, dry brush or a vacuum to remove all clay dust from the deep crevices of the stamped pattern. -
Apply sealant:
Apply a thin coat of matte acrylic varnish or sealant. This protects the clay from moisture, which is crucial for coasters. I usually do two thin coats rather than one thick one. -
Final cure:
Let the varnish cure according to the bottle’s instructions before using the coasters for your next coffee break.
Warped Edges?
If coasters curl upward while drying, dampen the underside slightly and place them under a heavy stack of books for a day to flatten them back out.
Enjoy your beautifully textured coaster set, perfect for holding your morning coffee or gifting to a friend
Simple Tea Light Holders for Instant Ambience
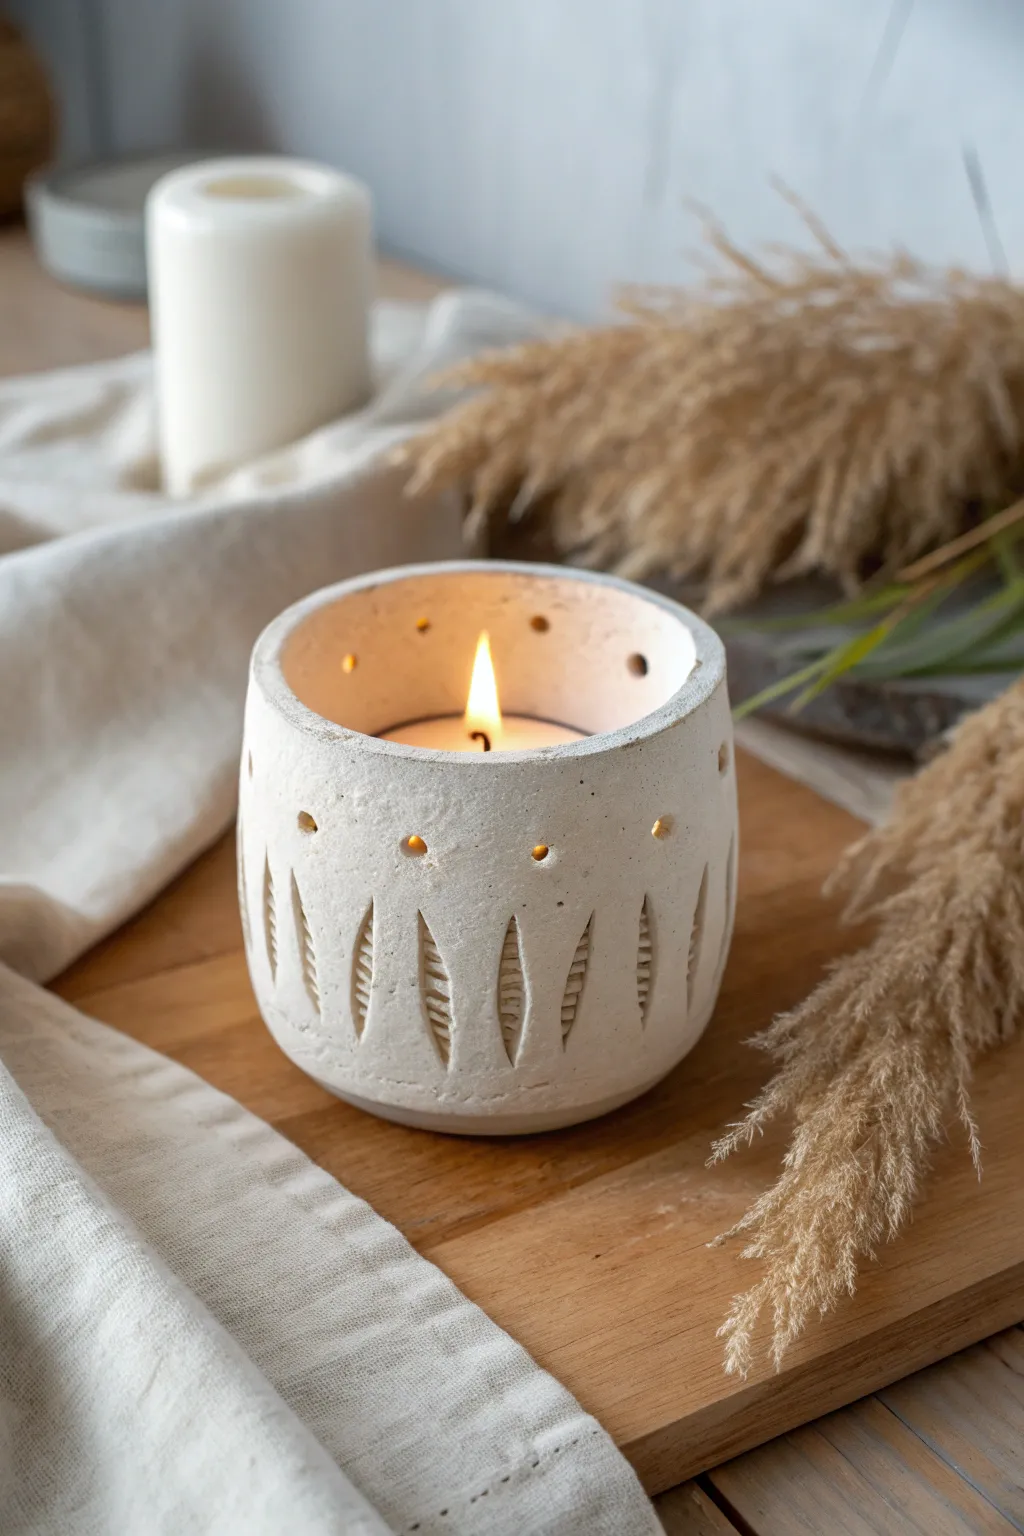
Create a cozy glow with this rustic air-dry clay tealight holder featuring delicate cutouts and natural textures. Its white, carved finish mimics high-end stoneware, making it the perfect centerpiece for a romantic evening at home.
Step-by-Step Tutorial
Materials
- White air-dry clay (approx. 500g)
- Rolling pin
- Circle cutter or bowl (approx. 4-5 inches diameter)
- Small cup or jar (to use as a mold)
- Needle tool or toothpick
- Small straw (for circular holes)
- Carving tool or small knife
- Small sponge and water
- Fine-grit sandpaper
Step 1: Preparation and Forming
-
Prepare your clay:
Begin by kneading your air-dry clay to warm it up and remove any air bubbles. Aim for a smooth, pliable consistency. -
Roll out the slab:
Roll the clay out into a flat slab. You want it to be about 1/4 inch thick—thick enough to be sturdy, but thin enough to let light shine through. -
Cut the base:
Use a circle cutter or place a bowl upside down on the clay to cut out a perfect circle for your base. Set this aside. -
Measure the wall:
Measure the circumference of your base circle. Roll out a long rectangular strip of clay that matches this length plus a tiny bit of overlap, keeping the height around 3-4 inches. -
Create the cylinder:
Wrap the rectangular strip around your small jar or cup mold. The mold helps keep the shape perfectly round while you work on the seam. -
Score and slip:
Where the ends of the rectangle meet, score the edges (scratch them up with your needle tool) and add a dab of water. Press them firmly together to seal. -
Attach the base:
Score the bottom edge of your cylinder and the outer edge of your base circle. Press the cylinder onto the base. -
Smooth the seams:
Use your finger or a modelling tool to blend the clay across the seams on both the inside and outside until they are invisible.
Step 2: Texturing and Carving
-
Initial smoothing:
Before carving, use a slightly damp sponge to wipe down the entire piece, refining the rim and ensuring the surface is ready for detail work. -
Add circular vents:
Using a small straw or a specialized hole punch tool, punch a row of small circles near the top rim. I like to space these evenly to create a crown of light. -
Add middle accents:
Punch a second row of circular holes slightly lower down, positioning them in between the top holes for a staggered look. -
Outline the leaf shapes:
Use a needle tool to lightly sketch vertical leaf or feather shapes around the bottom half of the holder. Space them evenly around the circumference. -
Carve the relief:
Use a carving loop tool to gently scoop out the clay inside your leaf outlines. You aren’t cutting all the way through; just creating a deep depression. -
Detail the texture:
inside the carved leaf depressions, use your needle tool to scratch horizontal lines. This creates the ribbed texture seen in the reference image. -
Let it firm up:
Allow the clay to dry until it is leather-hard. This makes it easier to clean up without warping the shape. -
Refine the edges:
Go back over your cutouts and carvings with a damp brush or finger to smooth any sharp crumbs of clay.
Crack Control
If you see tiny hairline cracks appearing as it dries, mix a tiny bit of wet clay into a paste (slip) and fill the cracks immediately, then smooth over.
Step 3: Finishing Touches
-
Dry completely:
Let the piece dry for 24-48 hours. Keep it away from direct heat sources to prevent cracking. -
Sand for smoothness:
Once fully bone dry, gently sand the rim and any rough patches on the exterior with fine-grit sandpaper for a professional finish. -
Optional sealing:
If you want a matte look like the photo, leave it natural or apply a matte varnish. Never use real candles with unsealed clay; use battery tealights for safety.
Level Up
After carving the leaf depressions, rub a tiny bit of diluted brown paint into the grooves and wipe the surface to make the texture pop.
Place an LED tealight inside and watch the shadows dance on your walls for a calm, romantic vibe


What Really Happens Inside the Kiln
Learn how time and temperature work together inside the kiln to transform clay into durable ceramic.
Photo Card Holders for Your Favorite Memory

Transform simple air dry clay into a stunning faux-concrete arch that doubles as a minimalist photo display. This chunky, architectural piece features a deep textural blue finish that looks heavy and industrial but is surprisingly easy to sculpt at home.
How-To Guide
Materials
- Air dry clay (white or grey)
- Acrylic paint (Denim blue, black, and white)
- Rolling pin
- Sharp crafting knife or clay blade
- Sandpaper (medium and fine grit)
- Sea sponge or rough kitchen sponge
- Small paintbrush
- Ruler
- Gloss or matte varnish (optional)
Step 1: Sculpting the Arch
-
Prepare the Clay:
Cut off a substantial block of clay, enough to form a thick log about the size of a soda can. Knead it in your hands to warm it up and remove any internal air bubbles. -
Roll the Slab:
Using your rolling pin, roll the clay out into a thick, long rectangular slab. Aim for a thickness of about 1 to 1.5 inches to ensure the finished piece can stand stably. -
Cut the Strip:
Use a ruler and your clay blade to cut a clean, straight strip from the slab. The width of this strip will determine the depth of your arch—about 1.5 to 2 inches is ideal for stability. -
Form the Curve:
Gently pick up the strip and bend it into a U-shape or rainbow arch. Place it upright on your work surface to check the curve. -
Level the Base:
Press the two ends of the arch firmly onto the table to flatten them. If they aren’t level, use your knife to trim the bottoms so the arch stands perfectly straight without wobbling. -
Refine the Shape:
Smooth out any fingerprints or major cracks with a little water on your finger. Run a damp sponge along the edges to soften them slightly, mirroring the rounded look of cast concrete. -
Dry Completely:
Let the arch dry for 24-48 hours. Turn it over gently halfway through the drying process to ensure the bottom surfaces dry evenly.
Faux-Concrete Hack
Mix baking soda into your blue acrylic paint before applying. The gritty texture dries hard and looks incredibly realistic, just like stone or cement.
Step 2: Texture and Paint
-
Sand the Imperfections:
Once bone dry, use medium-grit sandpaper to smooth out large bumps, but don’t aim for perfection. Concrete has natural irregularities. -
Mix the Base Color:
Mix denim blue acrylic paint with a tiny drop of black to deepen the tone. You want a rich, muted blue rather than a bright primary color. -
Apply Base Coat:
Paint the entire arch with this mixture. Don’t worry if the coverage isn’t perfectly opaque yet; the texture comes next. -
Create the Spattering 1:
To mimic the pitted look of concrete, mix a slightly lighter shade of blue (add a touch of white to your base mix). Load a coarse sponge with this paint and dab off he excess on a paper towel. -
Applied Texture:
Gently stipple the sponge over the arch. This adds visual depth and that characteristic porous look. -
Create the Spattering 2:
The secret to the stone effect is speckling. Dilute a tiny bit of black paint with water. Load an old toothbrush or stiff brush, and flick the bristles with your thumb to spray tiny dark specks over the blue surface. -
Add Light Specs:
Repeat the flicking process, this time using watered-down white paint. These white specks simulate the aggregate found in real concrete. -
Seal (Optional):
If you want a polished look like the inspiration image, apply a coat of gloss varnish. For a rawer feel, use a matte sealer. -
Display:
Once fully dry, simply lean your favorite thick cardstock photo against the front of the arch.
Add a Groove
Before the clay dries, use a fettling knife to cut a shallow groove across the top center of the arch. This lets you slot a photo directly into the top.
Place your new sculptural arch on a floating shelf or entryway table to highlight your favorite memories with modern flair
Footed Mini Planters for Desk Plants
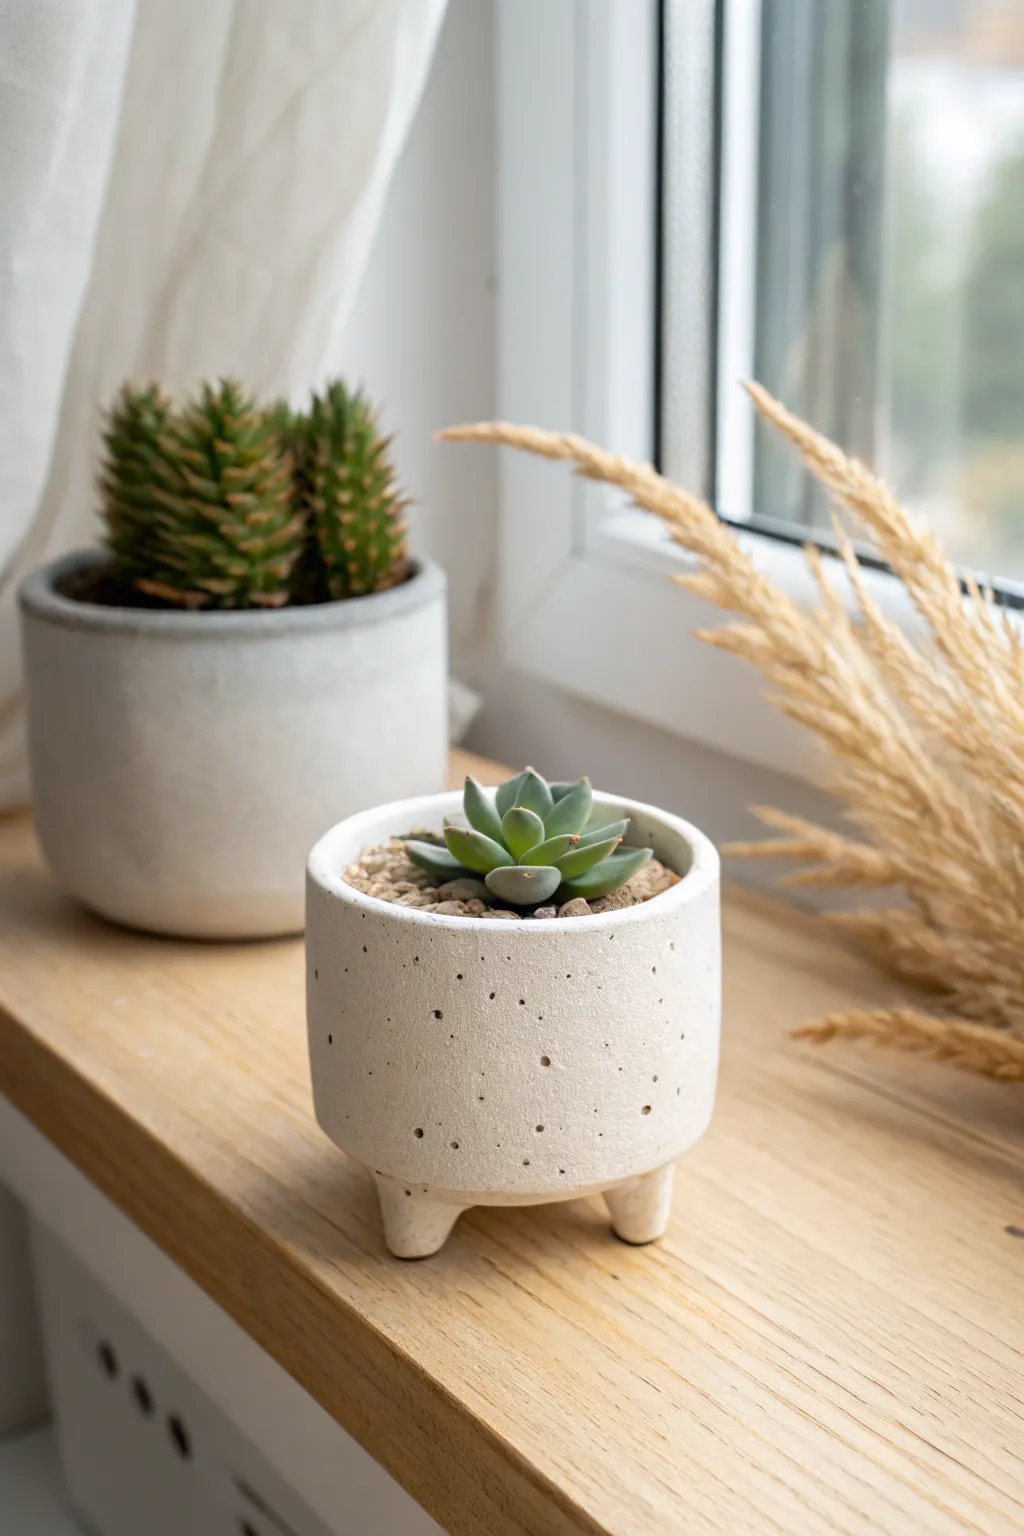
This charming little planter brings a modern, minimalist aesthetic to any desk or windowsill with its clean cylinder shape and distinctive tripod feet. The faux-stone speckled finish adds a high-end ceramic look without needing a kiln, making it a perfect beginner sculpture project.
Step-by-Step Guide
Materials
- White air-dry clay (approx. 500g)
- Rolling pin
- Circle cutter or template (approx. 3-4 inches)
- Craft knife
- Small cup or jar (to use as a mold)
- Slip (clay mixed with water)
- Sandpaper (medium and fine grit)
- Acrylic paint (creamy white and dark brown/black)
- Old toothbrush
- Matte sealant or varnish
Step 1: Forming the Cylinder Body
-
Prepare the clay:
Begin by kneading your air-dry clay to warm it up and remove any trapped air bubbles, ensuring a smooth, pliable working surface. -
Roll out the base:
Roll a portion of clay to an even thickness of about 1/4 inch. Use your circle cutter or cut around a template to create a perfect disc for the base. -
Cut the wall slab:
Roll out a long, rectangular strip of clay with the same 1/4 inch thickness. Calculate the length by wrapping a piece of string around your base disc to find the circumference, then add a tiny bit for overlapping. -
Assemble the cylinder:
Score (scratch) the outer edge of the base disc and the bottom edge of your rectangular strip. Apply a little slip to these rough areas. -
Join the seams:
Wrap the strip around the base, pressing firmly where the scored edges meet. Join the vertical seam where the wall ends meet by smoothing the clay together with your finger or a modeling tool. -
Smooth the interior:
Reach inside the pot—or use a tool if it’s too small—to smooth out the bottom seam so the connection is invisible and watertight-tight for the clay’s integrity. -
Refine the shape:
Place your small cup or jar inside the clay cylinder gently to help maintain a perfect circle shape while you work on the outside.
Step 2: Adding the Feet
-
Shape the feet:
Roll three small balls of clay, identical in size. Gently tap them on your work surface to create a slight cone shape with a flat top. -
Positioning:
Flip your main cylinder upside down. Mark three equidistant points on the base where you want the feet to sit, ensuring they are slightly inset from the edge. -
Score and slip:
Thoroughly score both the bottom of the pot at your marks and the flat tops of your clay feet. Add a generous dab of slip to each. -
Attach and blend:
Press the feet firmly onto the base. Use a small modeling tool or your finger to smooth the clay from the foot onto the pot body, eliminating any visible seams. -
Level check:
Flip the pot right-side up and gently press it down onto the table to ensure all three feet sit flat and the rim is level.
Smoother Seams
bDip your finger in a tiny bit of water (or vinegar!) while smoothing the clay joints. It helps dissolve the surface slightly, making seams vanish like magic.
Step 3: Finishing and Texturing
-
Drying phase:
Allow the pot to dry completely for 24-48 hours. I find that turning it upside down halfway through helps the bottom dry evenly. -
Sand for smoothness:
Once bone dry, use medium-grit sandpaper to remove any bumps or fingerprints, paying special attention to the rim. Finish with fine grit for a silky touch. -
Base coat:
Paint the entire pot, inside and out, with a creamy white acrylic paint. You may need two coats for opaque coverage. -
Create the speckles:
Dilute a small amount of dark brown or black paint with water. Dip an old toothbrush into this mixture. -
Splatter technique:
Hold the toothbrush near the pot and run your thumb across the bristles to flick tiny specks of paint onto the surface. Rotate the pot to cover all sides. -
Seal:
Apply a coat of matte sealant or varnish to protect the paint and clay from moisture.
Drainage Hack
Air-dry clay hates wet soil. Use a plastic nursery pot inside your clay creation, so you can remove the plant for watering and keep your art dry.
Now you have a stylish, custom-made home for your favorite little succulent or cactus

TRACK YOUR CERAMIC JOURNEY
Capture glaze tests, firing details, and creative progress—all in one simple printable. Make your projects easier to repeat and improve.
Couples Wall Medallions With Pressed Patterns
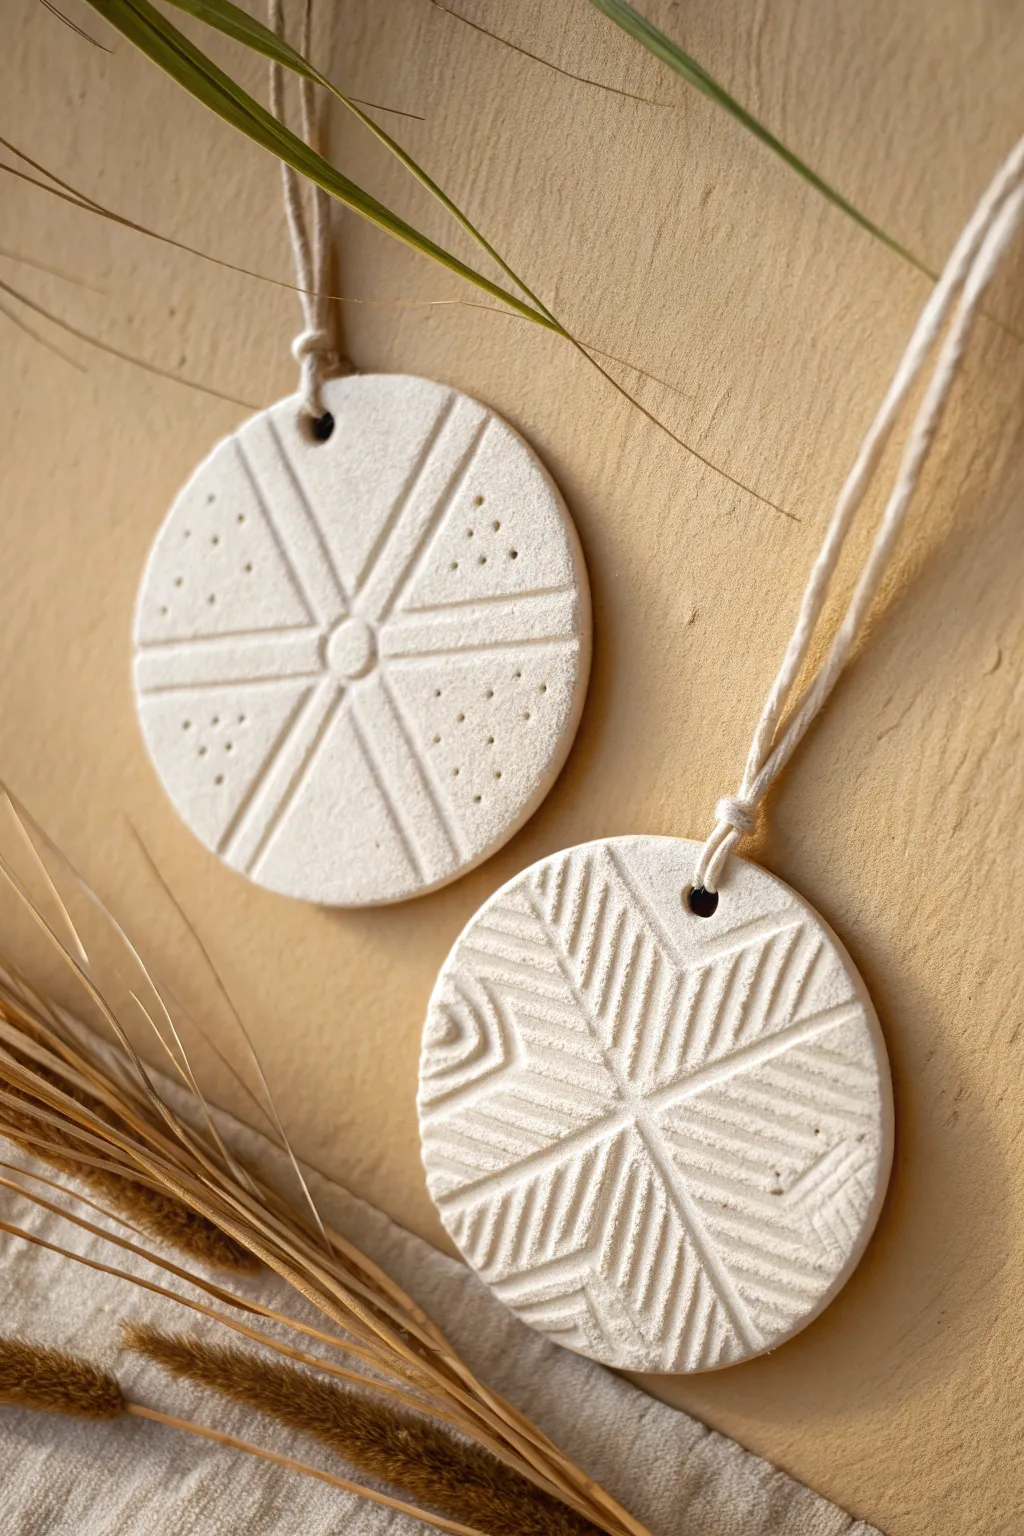
Create sophisticated texture with these stunning geometric wall hangings that look like high-end boutique finds. Using simple air dry clay, you’ll learn to impress crisp lines and patterns to craft a cohesive set of two distinct yet complementary designs.
Detailed Instructions
Materials
- White smooth air dry clay
- Rolling pin
- Two wood slats or guide sticks (approx. 1/4 inch thick) for even rolling
- Round cookie cutter (approx. 3-4 inch diameter) or a bowl to trace
- X-acto knife or clay needle tool
- Small straw or pen cap (for making the hanging hole)
- Ruler or straight edge
- Wooden skewer or toothpick
- Small circular object (like a marker cap) for center impressions
- Sandpaper (fine grit)
- Natural twine, cotton cord like macramé string, or leather cord for hanging
- Small cup of water
Step 1: Preparation & Shaping
-
Prepare your workspace:
Lay down a canvas mat, parchment paper, or a smooth wooden board to prevent sticking. Place your two guide sticks on either side of your work area. -
Roll out the clay:
Take a generous handful of air dry clay and knead it briefly to warm it up. Place it between your guide sticks and roll it out with the rolling pin until it is perfectly flat and even. -
Cut the circles:
Using your large round cookie cutter or by tracing a bowl with a needle tool, cut out two perfect circles. Carefully pull away the excess clay. -
Smooth the edges:
Dip your finger in a tiny bit of water and run it gently around the circumference of each circle to smooth out any rough cut marks. This little step saves sanding time later. -
Create the hanging holes:
Use a straw to punch a clean hole near the top edge of each circle. Make sure it’s at least a quarter-inch from the edge so the clay doesn’t crack there when hung.
Clean Lines Secret
To keep clay from sticking to your ruler or texture tools, dust the tools lightly with cornstarch before pressing them into the surface.
Step 2: Design 1: The Ray Pattern (Left)
-
Stamp the center:
Take the small circular object (like the back of a marker) and press it gently into the exact center of the first medallion to create a small ring. -
Mark the primary axes:
Using a ruler and a dull knife or clay tool, lightly press a horizontal line and a vertical line through the center circle, extending to the edges. Don’t cut through; just indent. -
Add diagonal rays:
Add two diagonal lines crossing through the center, effectively dividing the circle into eight equal ‘slice’ sections. -
Reinforce the lines:
Use the edge of your ruler or a flat modeling tool to press these lines deeper, giving them a distinct, architectural groove. I find pressing straight down gives a cleaner line than dragging the tool. -
Add texture dots:
Select every other triangular section (four sections total). Using a blunt toothpick or skewer, poke a pattern of small dots into the clay, keeping them somewhat random but evenly spaced within the section.
Step 3: Design 2: The Chevron Pattern (Right)
-
Create quadrants:
On the second medallion, lightly impress a vertical and horizontal line to distinct quadrants. -
Start the chevron texture:
Working in the top-left quadrant, use a clay tool or dull knife to press diagonal lines running parallel to each other. Keep the spacing tight and consistent. -
Mirror the lines:
Move to the adjacent quadrant (top-right). Press diagonal lines that mirror the first set, creating a V-shape or arrow pointing upwards where the quadrants meet. -
Complete the bottom half:
Repeat this process on the bottom two quadrants. Ensure the lines in the bottom-left mirror the top-left, and bottom-right mirror top-right, creating a cohesive X-pattern in the negative space or a diamond effect. -
Refine the edges:
Go over the primary vertical and horizontal dividing lines again to make sure they stand out clearly against the texture.
Add Subtle Color
Before sealing, wash a diluted mix of terracotta acrylic paint and water over the impressed lines, then wipe the surface clean to highlight the grooves.
Step 4: Finishing Touches
-
Let them dry:
Leave the medallions flat on a wire rack or parchment paper. Rotate them gently every few hours to ensure even drying and prevent curling. Let them cure for 24–48 hours. -
Sand for perfection:
Once bone dry, take fine-grit sandpaper and lightly buff the edges and surface to remove any burrs or sharp points. -
Attach the cord:
Cut a length of natural twine or macramé cord. Fold it in half, push the loop through the hole from front to back, and pull the ends through the loop to create a lark’s head knot.
Hang these beauties together at slightly staggered heights to admire your handiwork.
Cute Face Magnets You Make for Each Other
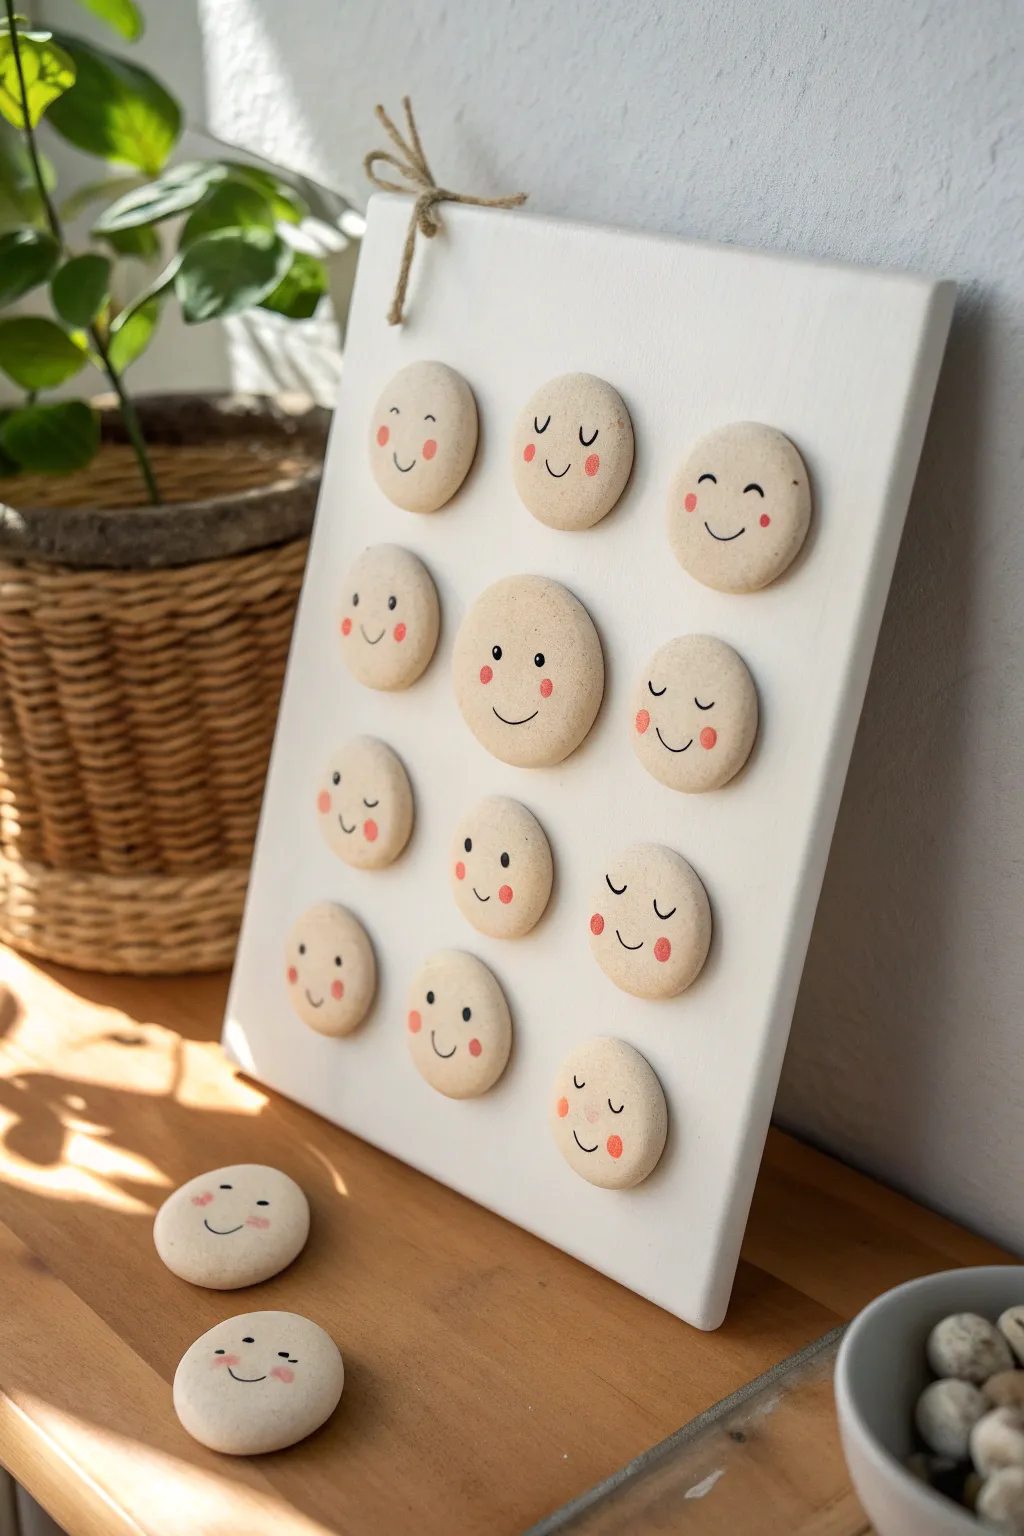
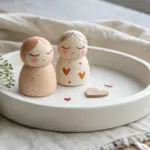
These charming minimalist magnets add a touch of personality to your fridge or message board with their soft, stone-like finish and sweet expressions. The project combines simple shaping techniques with delicate facial detailing for a modern, whimsical look.
Step-by-Step
Materials
- Air dry clay (white or stone/beige color)
- Circular cookie cutter (approx. 1.5 – 2 inches)
- Acrylic rolling pin
- Sandpaper (fine grit)
- Small round magnets
- Strong craft glue (E6000 or similar)
- Acrylic paint (black and soft pink/coral)
- Fine detail paintbrush (size 0 or 00)
- Dotting tool or toothpick
- Matte varnish or sealant
- Canvas board or wooden plaque (optional for display)
Step 1: Shaping the Clay Bases
-
Prepare your clay:
Take a generous handful of air dry clay and knead it in your hands until it becomes soft, pliable, and free of cracks. -
Roll out the slab:
Place the clay on a smooth surface or canvas mat. Use your acrylic rolling pin to roll it out to an even thickness of about 1/4 inch to ensure durability. -
Cut the circles:
Using your circular cookie cutter, press firmly into the clay to cut out your shapes. You’ll need about 12-15 circles for a full set. -
Smooth the edges:
Dip your finger in a little water and gently run it around the cut edges of each circle to soften any sharp ridges left by the cutter. -
Optional texture:
If you want that slightly organic, stone-like feel seen in the example, gently tap the surface with a crumpled piece of foil or a slightly coarse sponge before drying. -
Dry completely:
Lay the clay circles on a flat surface to dry. I find flipping them over halfway through the drying process helps prevent curling. Let them cure for 24-48 hours.
Uneven Drying?
If your clay circles warp while drying, place a heavy book on top of them (with parchment paper in between) once they are semi-dry to flatten them back out.
Step 2: Painting and Assembly
-
Sand for perfection:
Once fully dry, lightly sand the edges and surface with fine-grit sandpaper to remove any remaining imperfections or burrs. -
Base tone check:
If you used white clay but want the beige stone look shown, mix a wash of very diluted beige or warm grey acrylic paint and apply a thin layer over the front, wiping off excess for a stained effect. -
Practice your expressions:
Sketch out a few face ideas on scratch paper first. Try happy eyes, winking faces, and sleepy lashes to get a variety of moods. -
Paint the eyes and mouth:
Dip your fine detail brush into black acrylic paint. With a steady hand, paint delicate curves for the smiles and simple dots or arcs for the eyes. -
Add the cheeks:
Mix a soft coral or pink shade. Using a dotting tool or the back of your paintbrush handle, stamp two small circles on either side of the smile for the rosy cheeks. -
Seal the artwork:
Allow the paint to dry completely, then apply a coat of matte varnish. This protects the clay from moisture and gives it a professional finish. -
Attach the magnets:
Flip the faces over. Apply a dab of strong craft glue to the back of a magnet and press it firmly into the center of the clay disc. -
Let the glue cure:
Leave the magnets undisturbed for several hours (check your glue instructions) until fully set. -
Prepare the display board (Optional):
If creating the display shown, take a small white canvas or painted wooden board. Drill a small hole at the top center for twine. -
Finish the display:
Clean the board surface and arrange your magnets. The sleek white background makes the beige faces pop beautifully.
Make it Interactive
Paint blank faces and keep loose magnetic eyes and mouths so you can swap expressions daily based on your mood.
Now your adorable collection of faces is ready to brighten up your refrigerator or create a sweet magnetic art display
Ring Cone and Jewelry Dish Duo
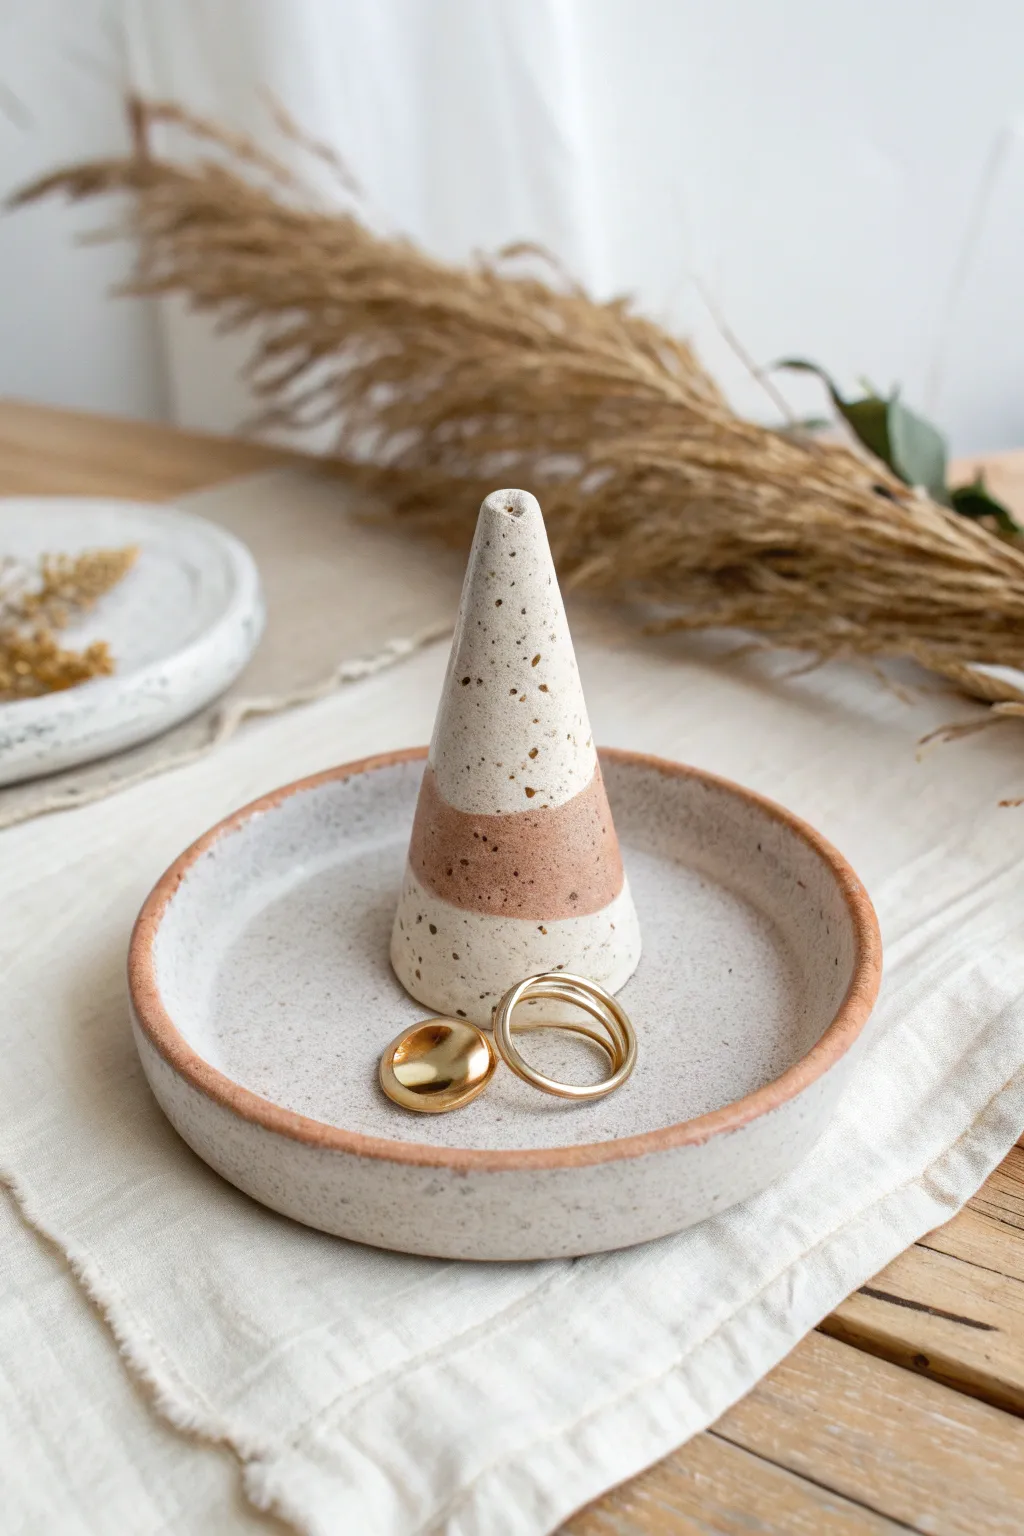
This charming, minimalist jewelry holder combines a shallow trinket dish with a central ring cone for stylish organization. With its faux-stone speckled finish and warm terracotta accent stripe, it adds an earthy, artisanal touch to any vanity.
How-To Guide
Materials
- White air-dry clay (approx. 1/2 lb)
- Dried coffee grounds or coarse black pepper (for speckling)
- Terra cotta-colored acrylic paint
- Gloss varnish or sealant (Mod Podge or clay glaze)
- Rolling pin
- Circular cookie cutter or small bowl (approx. 4-inch diameter)
- Knife or clay cutting tool
- Small cup of water
- Sponge or fine sandpaper
- Paintbrush
- Masking tape
Step 1: Preparing the Speckled Clay
-
Mix in the Texture:
Begin by taking a ball of white air-dry clay. To achieve that beautiful stone-like speckled effect, sprinkle a teaspoon of dried coffee grounds or coarse black pepper onto the clay. -
Knead Thoroughly:
Fold and knead the clay repeatedly until the specks are evenly distributed throughout the entire ball. If the clay feels too dry during this process, dampen your hands slightly with water.
Step 2: Forming the Dish Base
-
Roll the Slab:
Roll out about two-thirds of your clay on a flat surface to an even thickness of approximately 1/4 inch. Turning the clay over occasionally helps prevent it from sticking to your work surface. -
Cut the Circle:
Use a circular cookie cutter or trace around a small bowl with a knife to cut out a perfect circle. This will serve as the base of your dish. -
Create the Rim Coil:
Take a separate small chunk of clay and roll it into a long, thin snake (coil), roughly the thickness of a pencil and long enough to circle your base. -
Score and Slip:
Use your knife to make small scratch marks (scoring) around the top edge of your base circle and on one side of your coil. Dab a little water (slip) on the scratched areas to act as glue. -
Attach the Rim:
Place the coil on top of the rim of the base circle. Gently press it down to bond the two pieces together. -
Blend the Seams:
Using your thumb or a modeling tool, drag the clay from the inside of the coil down onto the base to create a seamless transition. Repeat on the outside to ensure the wall is sturdy. -
Smooth the Edges:
Dip your finger in a little water and run it along the rim and the interior to smooth out any rough textures or fingerprints. Aim for a clean, vertical edge.
Cracking Up?
If you see small cracks appearing as the clay dries, dip your finger in water and smooth a tiny bit of fresh wet clay into the fissure to patch it immediately.
Step 3: Creating the Cone
-
Shape the Cone:
Take the remaining clay and roll it into a smooth ball, then gently roll one side against the table with more pressure to form a tapered cone shape. It should be roughly 2 to 3 inches tall. -
Refine the Form:
Tap the bottom of the cone on the table to flatten the base so it stands straight. Check that the top is rounded but narrow enough to hold rings comfortably. -
Optional: Score the Center:
If you want the cone permanently attached, score the center of the dish and the bottom of the cone, add water, and press firmly. I actually prefer leaving them separate for easier painting, then gluing later.
Design Upgrade
Try marbling two different colors of clay together before rolling the slab, or stamp initials into the bottom of the dish for a personalized gift.
Step 4: Finishing Touches
-
Let it Dry:
Allow both pieces to dry completely for 24-48 hours. They should turn white and feel hard to the touch. -
Sand for Smoothness:
Once fully dry, use fine-grit sandpaper to gently buff away any sharp edges or uneven spots on the rim and the cone. -
Tape the Stripe:
To create the geometric stripe on the cone, apply two rings of masking tape around the cone, leaving a gap of exposed clay in the middle where the stripe will go. -
Paint the Accents:
Paint the exposed clay stripe on the cone with terra cotta acrylic paint. You can also paint the very top rim of the dish with the same color to tie the set together. -
Peel and Seal:
Carefully peel off the tape while the paint is still slightly tacky for a crisp line. Once the paint is dry, coat the entire project with a gloss varnish to seal the clay and bring out the speckles.
Place your favorite rings on the cone and enjoy the satisfaction of displaying your jewelry on a piece you crafted yourself
Salt Pinch Bowls and Tiny Spoons
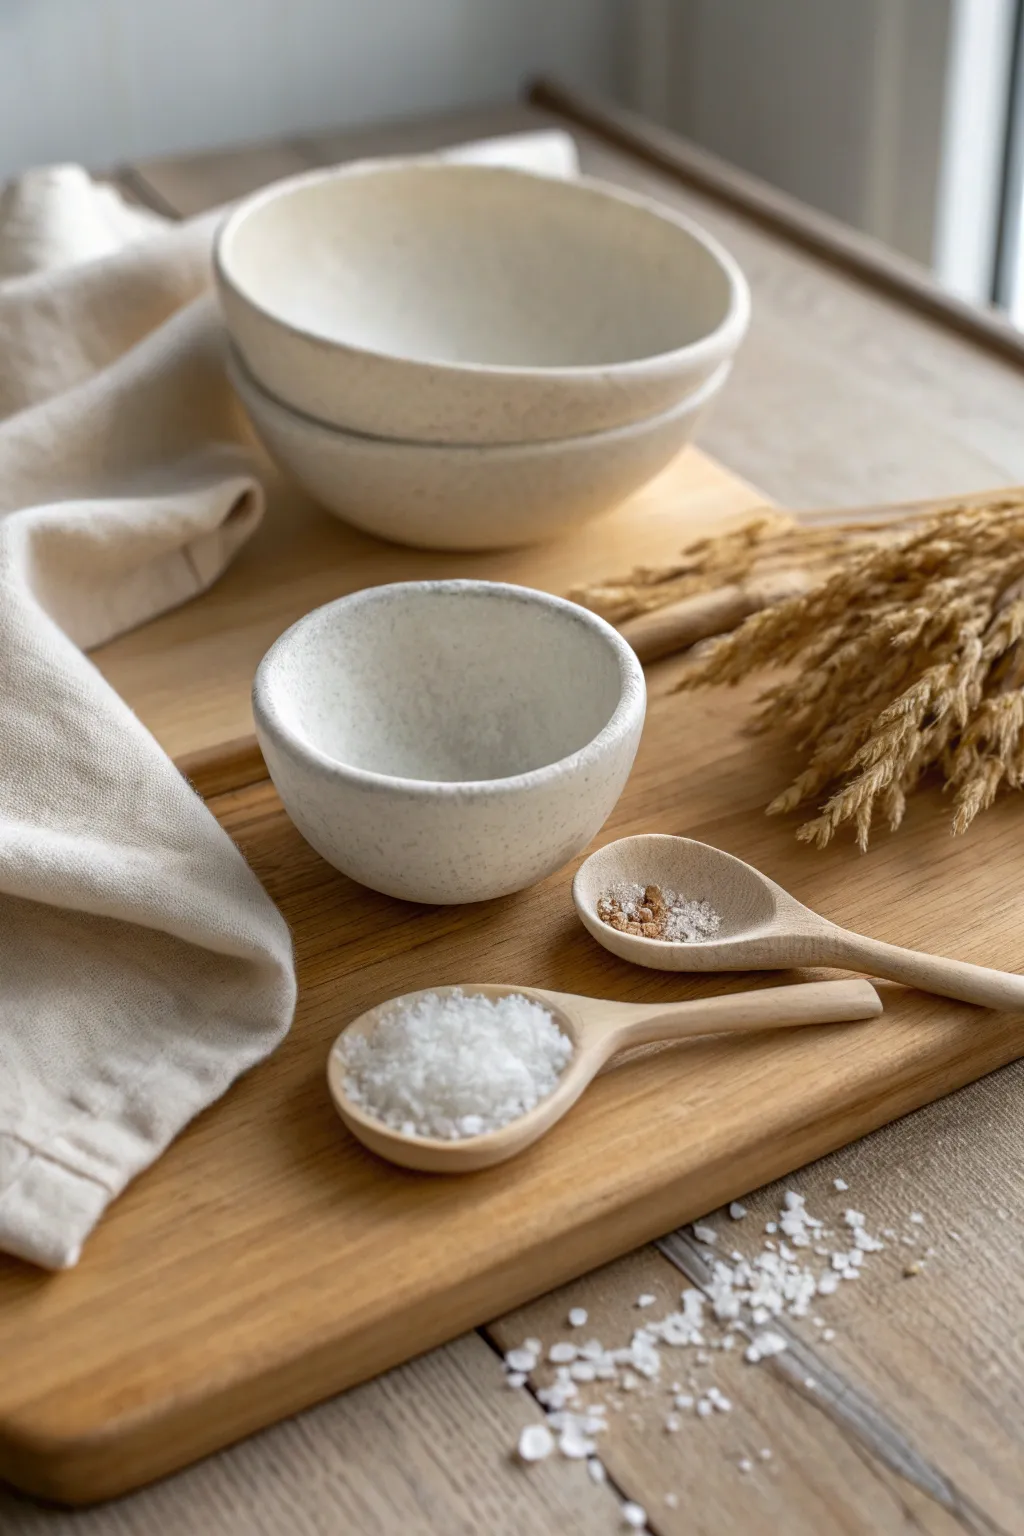
Embrace the textured, organic beauty of raw ceramic with this simple air dry clay set featuring nesting bowls, a dedicated pinch pot, and delicate serving spoons. The speckled, matte finish mimics high-end stoneware without the need for a kiln, making it perfect for a cozy creative evening.
Step-by-Step Tutorial
Materials
- White or stone-colored air dry clay
- Rolling pin
- Small bowl (for a mold)
- Plastic wrap
- Sponge
- Bowl of water
- Sandpaper (fine grit)
- Modeling tools (or kitchen knife/spoon)
- Matte acrylic varnish or clay sealant
- Brown/tan acrylic paint (for speckling)
- Old toothbrush
Step 1: Shaping the Bowls
-
Prepare the Clay:
Start by kneading a fist-sized ball of air dry clay to warm it up and remove air bubbles. This ensures the clay is pliable and less prone to cracking later. -
Roll the Slab:
Roll the clay out on a flat surface until it is about 1/4 inch thick. Aim for an even thickness throughout. -
Cut the Circle:
Place a cereal bowl or a circle template onto the clay slab and cut around it using a sharp tool to get a perfect disc shape. -
Prep the Mold:
Take a bowl from your kitchen that has the shape you want to replicate. Verify it is clean, then drape a piece of plastic wrap over the bottom (inverted) side to prevent sticking. -
Form Over Mold:
Gently drape your clay circle over the plastic-covered bowl bottom. Smooth the clay down the sides with your hands, pressing gently to form the curve. -
Refine the Rim:
While the clay is on the mold, use a damp sponge to smooth out the rim. The edges in the photo are rounded and organic, not sharp, so soften any hard angles now. -
Create the Pinch Pot:
For the smaller salt cellar, roll a ball of clay roughly the size of a lime. Stick your thumb into the center and pinch around the walls while rotating to open up the shape. -
Smooth Towards the Top:
As you pinch, gently push the clay upward to create slightly taller walls. Keep the rim thick and rounded to match the larger bowls.
Cracks Appearing?
If small cracks appear while drying, mix a tiny bit of clay with water to make a paste (slip). Fill the cracks, smooth over, and let dry again.
Step 2: Sculpting the Spoons
-
Roll a Coil:
Roll a small snake of clay for the spoon handle. Taper it slightly so it is wider at the holding end and narrower near the scoop. -
Form the Scoop:
Create a small ball of clay and press your thumb into it to make a shallow dish shape. This will be the spoon’s head. -
Join the Pieces:
Score the connection points (scratch cross-hatch marks) on both the handle and the scoop. Apply a tiny bit of water and press them firmly together. -
Blend the Seam:
Use your thumb or a modeling tool to smear the clay across the join until the seam disappears completely. I find getting this seamless is crucial for strength. -
Curve the Handle:
Give the handle a very slight curve or organic wave so it doesn’t look too rigid. Let everything dry for 24-48 hours until completely hard and white.
Texture Play
Before drying, gently press a piece of coarse linen fabric into the slightly damp clay surface to give it an authentic, woven imprint texture.
Step 3: Finishing Touches
-
Sand Smooth:
Once dry, gently sand the surfaces with fine-grit sandpaper. Focus on the rims and the spoon handles to ensure they feel good in the hand. -
Create Speckle Paint:
Mix a tiny amount of brown or tan acrylic paint with water until it is very runny. -
Apply Speckles:
Dip an old toothbrush into the watery paint. flick the bristles with your thumb to spray fine speckles over the white bowls and spoons for that stone-like effect. -
Seal:
Apply a coat of matte varnish to protect the surface. Note that standard air dry clay isn’t food safe for wet foods, so reserve these for dry items like salt or pepper.
Enjoy styling your new minimalist set on a wooden board for a kitchen counter upgrade
Incense Holder or Aroma Stone Pair
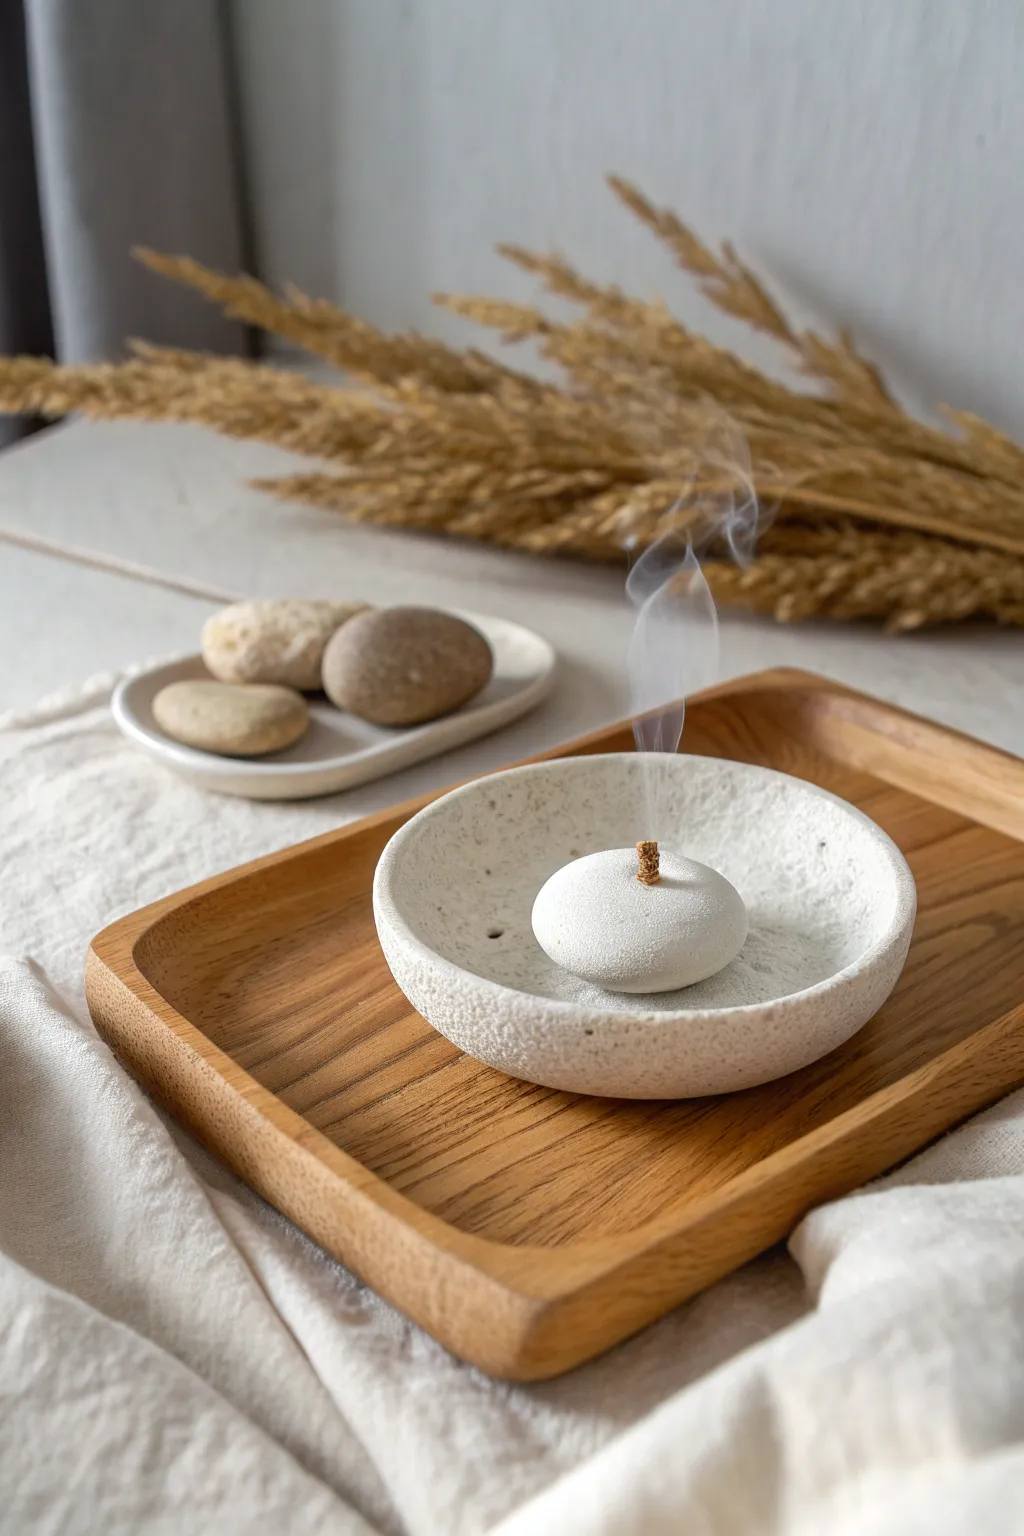
Create a serene sanctuary in your home with this two-piece incense holder set that mimics the organic texture of natural limestone. The simple rounded bowl catches ash effortlessly while the central pebble anchors your incense stick, making it both a functional safety piece and a beautiful sculptural object.
Step-by-Step Guide
Materials
- White air-dry clay (stone effect or speckled variant preferred)
- Fine sand or dried coffee grounds (for texturing if using plain clay)
- Rolling pin
- Small bowl or existing pottery bowl (to use as a mold)
- Sponge
- Water
- Wooden skewer or incense stick (for hole making)
- Fine-grit sandpaper (220-400 grit)
- Clear matte varnish or sealant
Step 1: Preparing the Textured Clay
-
Conditioning the clay:
Start by taking a grapefruit-sized ball of white air-dry clay. Knead it in your hands to warm it up and make it pliable. -
Creating the stone texture:
If your clay is plain white, this is the moment to add character. I like to knead in a small teaspoon of fine sand or even dried coffee grounds to achieve that speckled, natural stone look seen in the photo. Keep kneading until the texture is evenly distributed. -
Splitting the portions:
Divide your clay into two unequal parts. You’ll need a larger portion (about 3/4) for the main bowl and a smaller portion (about 1/4) for the central incense pebble.
Stone-Cold Pro Tip
Mix black pepper into the clay for a finer, more subtle speckle than sand. It mimics granite beautifully and won’t affect the clay’s structure.
Step 2: Forming the Catch Bowl
-
Rolling the slab:
Take the larger ball of clay and roll it out on a flat surface to an even thickness of about 1/4 inch (0.6 cm). A consistent thickness ensures even drying. -
Shaping the bowl:
Gently lift your clay slab and drape it inside your mold bowl. Press it softly against the curves to take the shape, but don’t press so hard that you thin the clay out. You want a shallow, open curve. -
Refining the rim:
Trim any excess clay from the rim using a knife or clay tool. Use a slightly damp sponge to smooth the cut edge, rounding it off so it looks organic rather than sharp. -
Texturing the surface:
Take a stiff brush or a crumpled ball of aluminum foil and gently tap it against the inside and outside surfaces of the bowl. This enhances the stone-like texture. -
Initial drying:
Let the bowl sit in the mold for about 3-4 hours until it’s leather hard—firm enough to hold its shape but not fully dry.
Step 3: Creating the Pebble Holder
-
Rolling the pebble:
Take your smaller portion of clay and roll it into a smooth ball in your palms. -
Flattening the form:
Place the ball on your work surface and gently press down with your palm to flatten it into a thick disc shape, resembling a river stone. It should be substantial enough to stand stable. -
Smoothing the edges:
Dip your finger in water and run it around the circumference of the pebble to remove any cracks or imperfections. The goal is a seamless, soft form. -
Creating the incense hole:
Take an actual incense stick or a skewer of the same diameter. Press it into the center of the pebble, going about halfway through. Wiggle it ever so slightly to ensure the hole is large enough for the stick to slide in easily after the clay shrinks during drying. -
Matching the texture:
Just like the bowl, use your foil or stiff brush to lightly texture the surface of the pebble so it matches the main dish perfectly.
Level Up: Aromatherapy
Add a few drops of essential oil directly into the raw clay while kneading. As the holder warms up from the incense, it will release a faint, custom scent.
Step 4: Finishing Touches
-
Full drying:
Allow both pieces to air dry completely for 24-48 hours. Keep them away from direct sunlight to prevent cracking. -
Sanding:
Once bone dry, take your fine-grit sandpaper and lightly sand any rough spots on the rim or base. Don’t over-sand the textured areas, or you’ll lose that stone effect. -
Sealing:
Apply a coat of clear matte varnish to protect the clay from ash stains. The matte finish is crucial to maintaining the natural stone appearance.
Place your smooth pebble inside the textured bowl and enjoy a moment of peace with your new creation
Make a “First Date Map” Trinket Dish
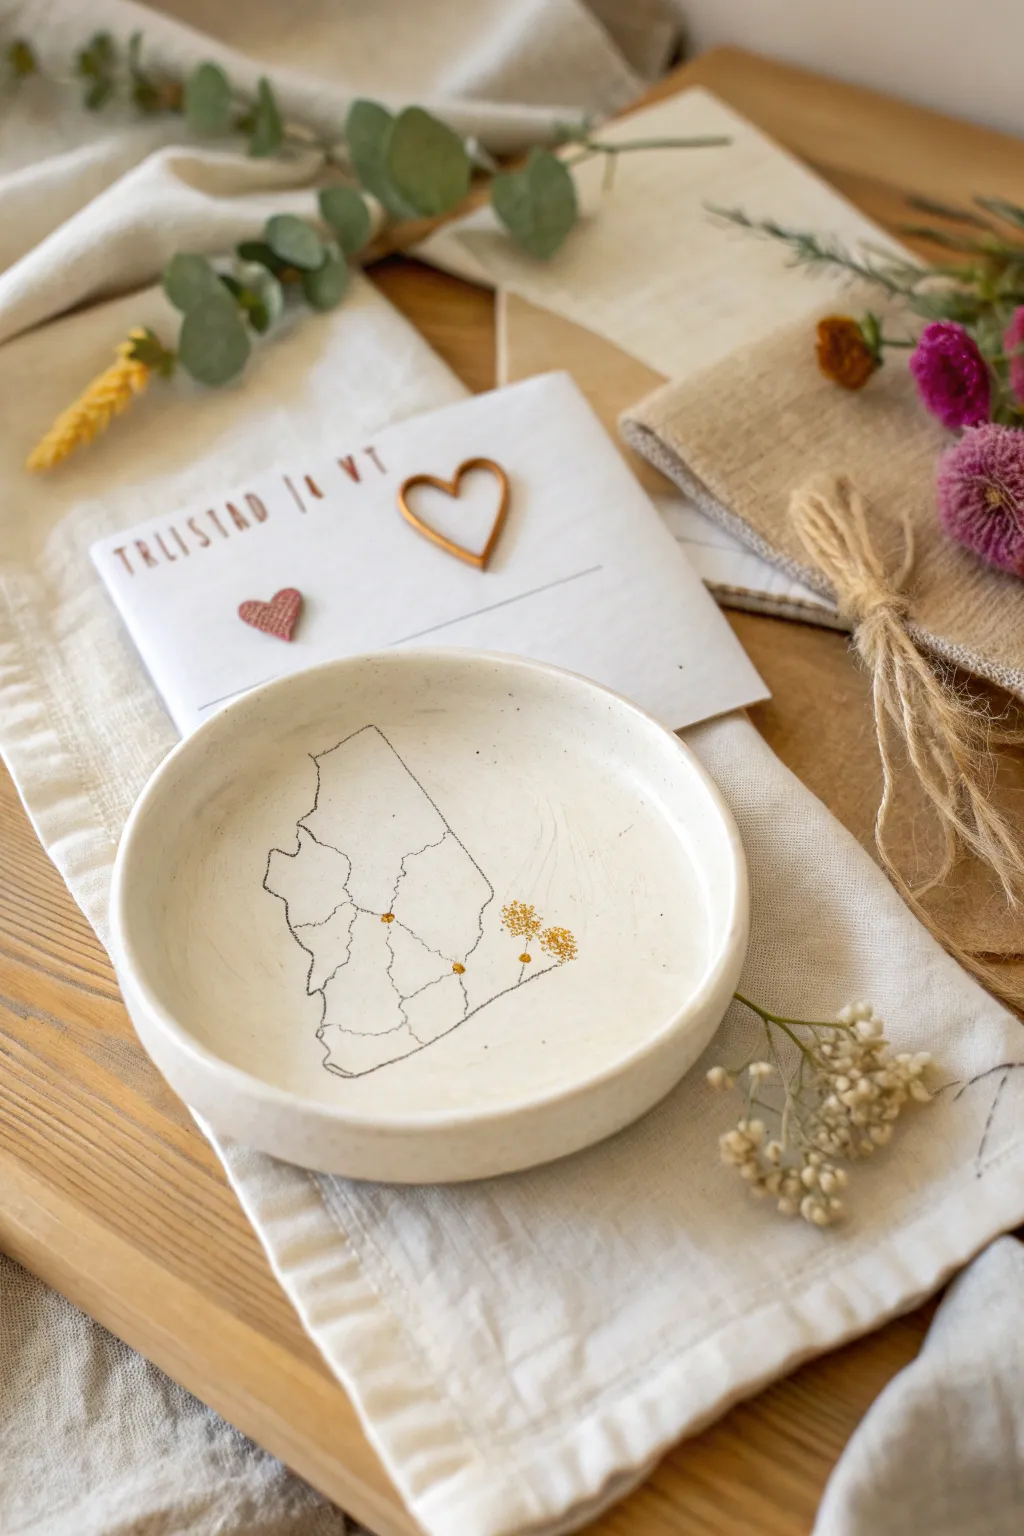
Capture the memory of where your story began with this charming, minimalist trinket dish. Featuring a delicate hand-drawn map and subtle gold accents on creamy air-dry clay, it’s a sentimental keepsake that’s surprisingly simple to create.
How-To Guide
Materials
- White or cream air-dry clay
- Rolling pin
- Small bowl (approx. 4-5 inches) for use as a mold
- Craft knife or clay needle tool
- Sponge and water
- Fine grit sandpaper (220 grit or higher)
- Fine-point black ink pen (archival/waterproof) or fine paintbrush
- Gold metallic paint or gold leaf pen
- Small printed map cutout (optional)
- Matte or satin sealant/varnish
Step 1: Shaping the Dish
-
Condition the clay:
Begin by taking a handful of air-dry clay and kneading it in your hands until it becomes soft, pliable, and free of cracks. -
Roll the slab:
Place the clay on a smooth surface or canvas mat. Use a rolling pin to flatten it into an even slab, aiming for a thickness of about 1/4 inch. -
Cut the circle:
Place your bowl upside down on the clay to use as a template. Trace around the rim with a craft knife or needle tool to cut out a perfect circle. -
Smooth the edges:
Dip your finger or a small sponge into a little water and gently run it along the cut edge of the clay circle to smooth out any roughness or sharp corners. -
Form the shape:
Gently lift your clay circle and press it into the *inside* of your bowl mold. Press lightly from the center outward to ensure it takes the curve of the bowl without trapping air bubbles. -
Refine the rim:
Once nestling inside the mold, give the rim one final smoothing pass with a damp sponge to ensure a professional, rounded lip. -
Let it dry:
Allow the clay to dry inside the mold for at least 24 hours. Once it feels firm and chalky to the touch, pop it out and let the bottom dry for another few hours on a wire rack.
Step 2: Decorating the Map
-
Sand the surface:
When completely bone dry, use fine-grit sandpaper to gently buff the surface of the dish, removing any fingerprints or uneven texture. -
Dust it off:
Wipe away all clay dust with a slightly damp cloth or a dry soft brush so your ink will adhere properly. -
Trace the map outline:
If you aren’t confident freehanding, cut out a small paper map of your chosen state or region. Lay it in the curve of the bowl and lightly trace the outline with a pencil. -
Ink the borders:
Using a fine-point archival ink pen, carefully go over your pencil lines. To loosen up the look, I like to use a slightly broken, sketchy line rather than a solid heavy one. -
Add internal details:
Draw faint internal borders if your map includes counties or regions, keeping the lines thinner than the main outline. -
Mark special spots:
Identify the specific location of your first date or special memory. Use the gold paint or a gold leaf pen to create small dots at these coordinate points. -
Paint decorative accents:
Add a tiny, stylized floral cluster near your gold markers using the gold paint. Simple dots grouped together mimic baby’s breath or wildflowers effectively. -
Seal the piece:
Once the ink and paint are fully dry, apply a thin coat of matte or satin varnish to the entire dish to protect the clay from moisture and stains.
Transfer Trick
Can’t draw freehand? Print your map, rub the back with soft pencil graphite, place it on the clay, and trace firmly to transfer the lines.
Make it a Set
Create a second matching dish featuring a map of where you got engaged or married for a meaningful bedside coaster set.
Now you have a timeless, personalized piece that quietly celebrates your unique journey together
Swap Halfway and Finish Each Other’s Piece
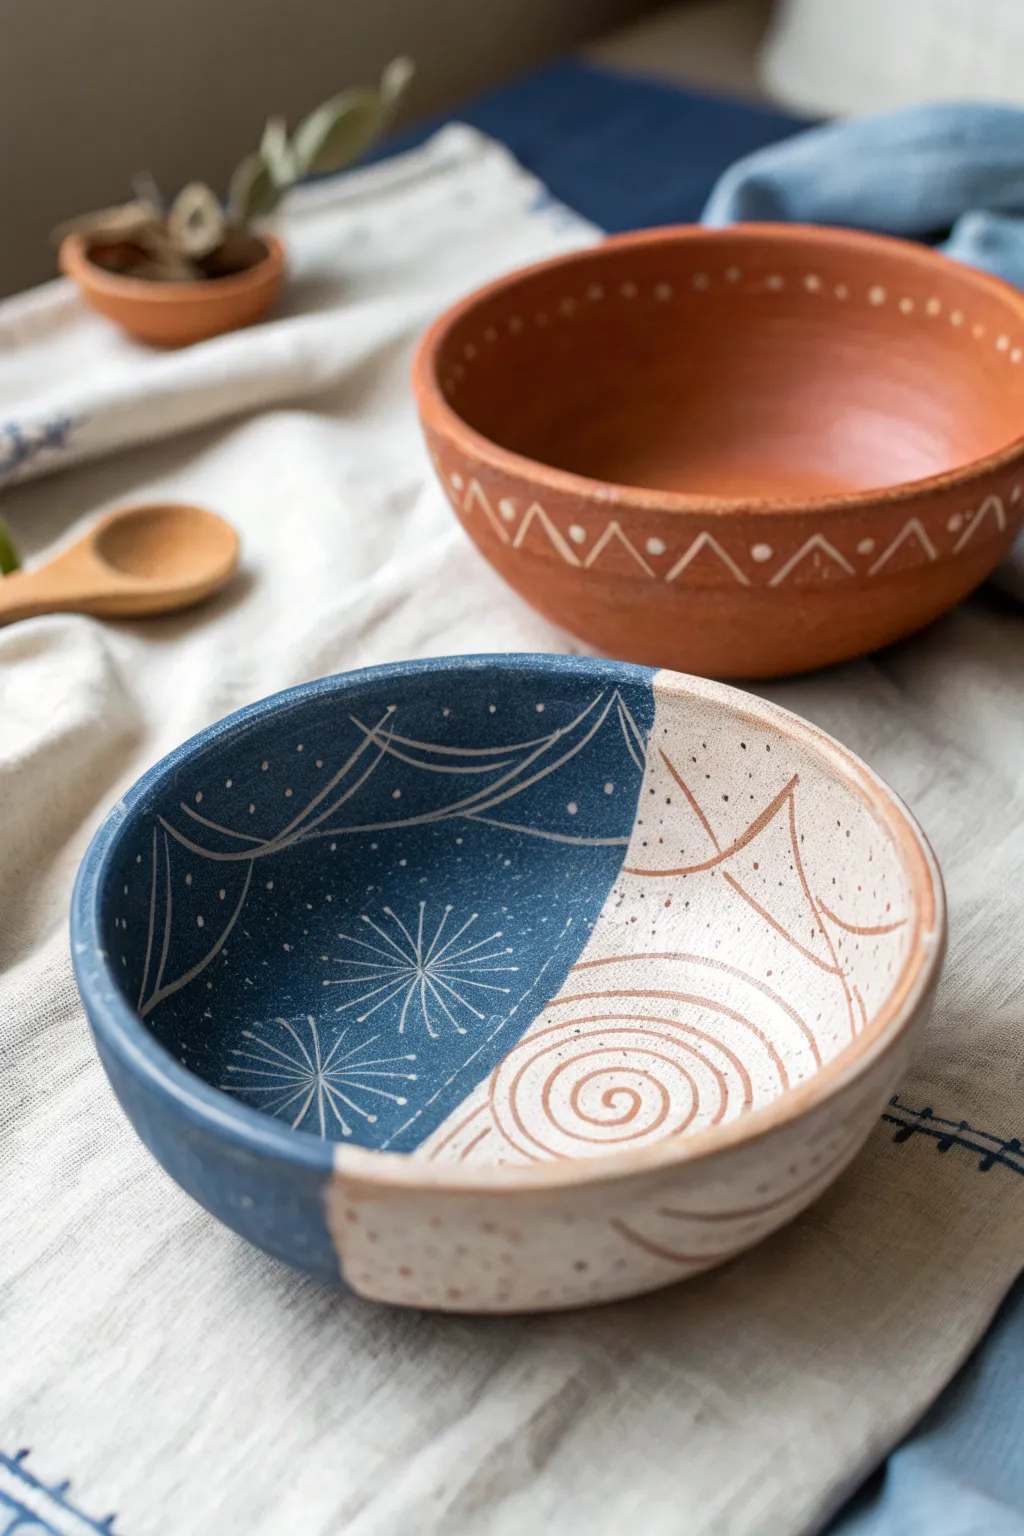
This striking bowl combines two distinct artistic styles into one cohesive piece, featuring deep celestial blue on one side and earthy terracotta detailing on the other. The magic happens by dividing the bowl down the middle, allowing you and your partner to experiment with both carving and line painting techniques.
Step-by-Step Tutorial
Materials
- Air-dry clay (white or cream)
- Small bowl for molding (optional)
- Rolling pin
- Sponge and water
- Deep indigo acrylic paint (matte)
- Terracotta or rust-colored acrylic paint
- Fine-point paintbrush (size 0 or 1)
- Carving tool or needle tool
- Masking tape or painter’s tape
- Clear sealant (matte finish)
Step 1: Shaping the Foundation
-
Roll and shape:
Begin with a ball of air-dry clay roughly the size of a grapefruit. Roll it out into a smooth slab about 1/4 inch thick. Alternatively, for a more organic look, use the pinch pot method to shape the bowl by hand from a single ball. -
Form the curve:
If rolling a slab, gently drape the clay over an upside-down kitchen bowl to create a uniform curve. Press lightly to mold it, then trim any excess from the rim with a knife. -
Smooth the surface:
Dip a sponge in a tiny amount of water and wipe down the interior and exterior. This removes fingerprints and creates a clean canvas for your detailed work later. -
Initial dry:
Let the clay dry until it is leather-hard—firm to the touch but still cool and slightly damp. This consistency is crucial for clean carving.
Paint Peeling?
If the blue paint peels while carving, the layer is likely too thick or ‘rubbery.’ Try gently sanding the paint surface before carving for cleaner lines.
Step 2: The Big Divide
-
Mark the center:
Visualize a line splitting the bowl directly in half. You can lightly score this line with a tool or apply a piece of masking tape down the center of the interior to mask off the ‘light’ side. -
Paint the night side:
On one half of the interior, apply the deep indigo paint. Cover the clay fully and evenly up to your center line (or over the tape edge). Extend the paint over the rim and slightly down the outside if desired. -
Let the base layer set:
Allow the blue paint to dry completely. If the layer looks streaky, add a second coat for that rich, matte opacity. Remove the tape carefully once the paint is tacky but not fully hardened.
Metallic Accent
Trace the dividing line between the two halves with gold leaf or metallic gold paint to turn the separation into a luxurious feature.
Step 3: Carving & Painting Designs
-
Clean the divider:
If any blue paint seeped under the tape, carefully scrape it away with your knife to maintain a crisp line between the two halves. -
Carve the blue side:
Using a sharp needle tool or sgraffito tool, scratch designs through the dried blue paint to reveal the white clay underneath. I suggest delicate starburst patterns and sweeping curved lines to mimic constellations. -
Add texture marks:
Intersperse the starbursts on the blue side with tiny carved dots to create texture and depth, resembling distant stars. -
Paint the earth side:
On the unpainted cream half, switch to your fine brush and terracotta paint. Paint a large spiral at the bottom of the bowl. -
Geometric webbing:
From the spiral, extend terracotta lines upward toward the rim. Add triangles and curved ‘web’ lines that mirror the movement of the white lines on the blue side. -
Speckle detail:
Using the very tip of your brush, add tiny terracotta dots around the geometric lines to balance the texture with the carved dots on the opposing side.
Step 4: Finishing Touches
-
Rim check:
Examine the rim of the bowl. Ensure the transition between the blue painted section and the plain clay section is neat. -
Full cure:
Allow the entire bowl to air dry for 24-48 hours until the clay turns bone white and feels room temperature. -
Seal and protect:
Finish with a coat of clear matte sealant to protect the paint and carving. This also deepens the contrast between the indigo and white clay.
Place your finished bowl on a coffee table or shelf to show off its artistic duality
Blind Sculpt Mini Portrait Charms
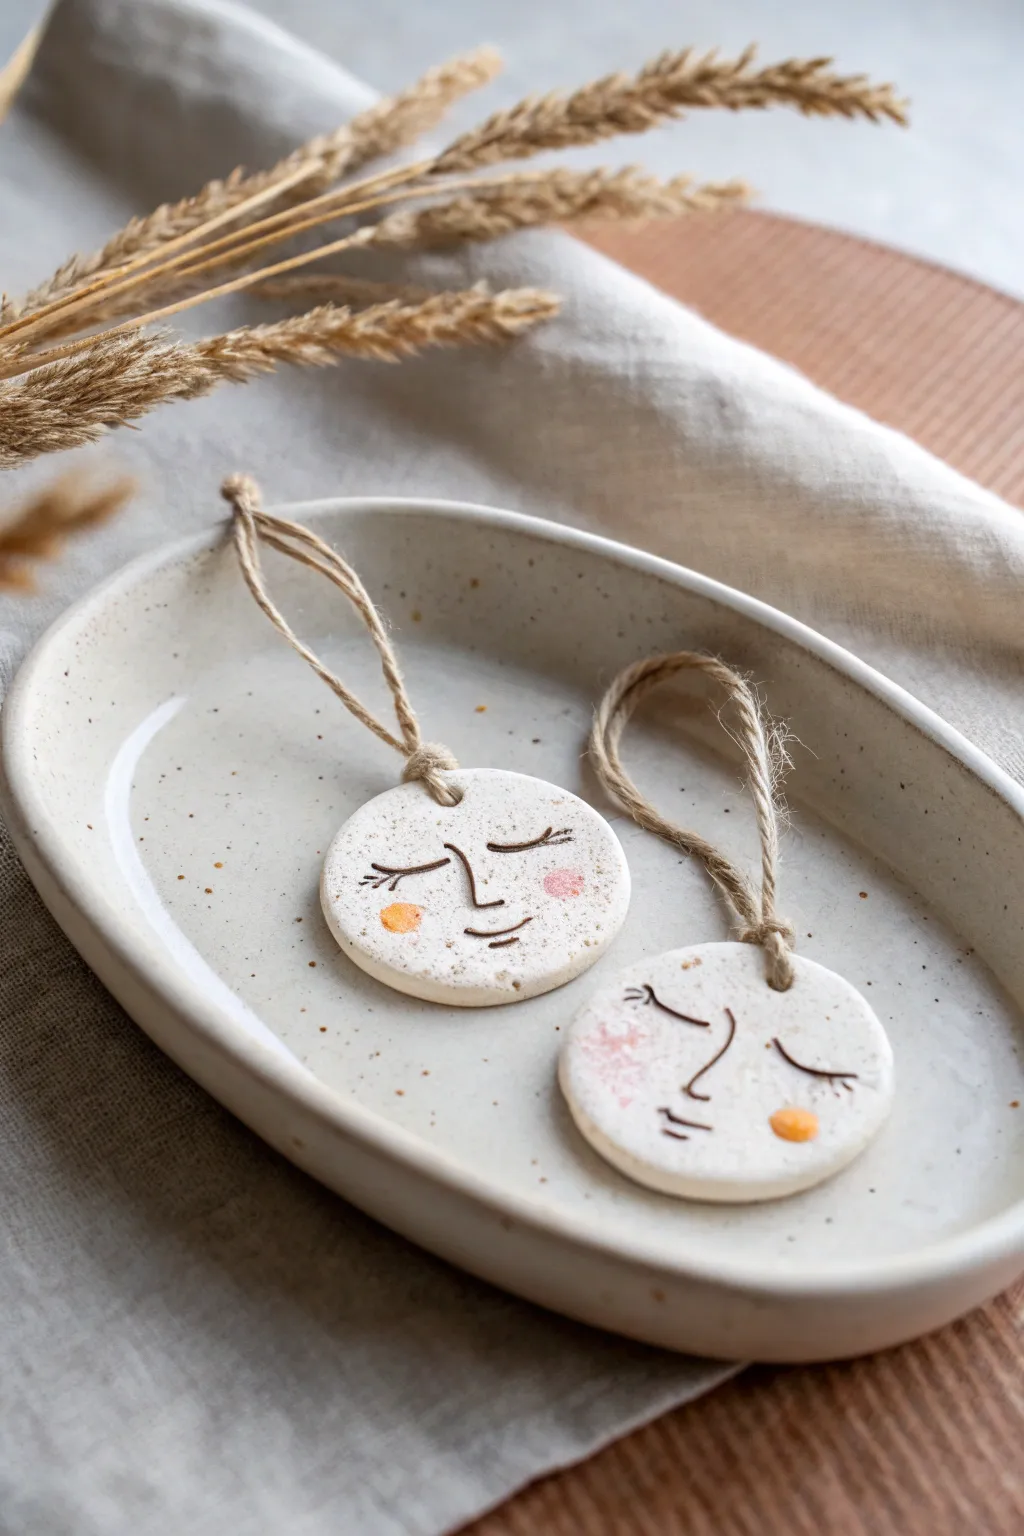
These sweetly serene clay charms feature minimalist line art portraits with soft blushing cheeks, perfect for a calming crafting session. They make lovely personalized gift tags or simple wall hangings to bring a touch of whimsy to your space.
Step-by-Step
Materials
- White air-dry clay (smooth texture)
- Rolling pin
- Circle cookie cutter (approx. 2-3 inches)
- Small straw or bamboo skewer
- Fine grit sandpaper (220 or higher)
- Fine tip black permanent marker or acrylic paint pen
- Pink and orange watercolor or diluted acrylic paint
- Small round paintbrush
- Jute twine or hemp cord
- Clear matte sealant spray (optional)
- Sponge and water bowl
Step 1: Shaping the Base
-
Prepare the Clay:
Begin by pinching off a golf-ball-sized portion of air-dry clay. Knead it in your hands for a minute until it is warm, soft, and pliable, which helps prevent cracks later. -
Roll it Out:
Place the clay on a clean, flat work surface or canvas cloth. Use your rolling pin to flatten the clay to an even thickness of about 1/4 inch. -
Cut the Circles:
Press your circle cookie cutter firmly into the clay to create clean, round shapes. If you don’t have a cutter, trace the rim of a glass with a needle tool. -
Smooth the Edges:
Dip your finger in a tiny bit of water and gently run it around the cut edge of the circle to soften any sharpness or ragged bits left by the cutter. -
Create the Hanger Hole:
At the top of each circle, use a straw or a skewer to punch a clear hole. Make sure it’s not too close to the edge, or the clay might break when hanging. -
Drying Time:
Place your clay discs on a wire rack or parchment paper to dry. This typically takes 24-48 hours depending on humidity. Flip them over halfway through so they dry evenly.
Step 2: Decorating the Face
-
Sand for Perfection:
Once bone dry, take your fine-grit sandpaper and very gently buff the surface and edges. You want a super smooth canvas for your drawing. -
Dust Clean:
Wipe the discs with a dry cloth or soft brush to remove all fine clay dust. Drawing on a dusty surface will clog your marker tip. -
Draft the Features:
lightly sketch the sleepy face design with a pencil first. Draw two closed, curved eyes with long lashes, a small ‘L’ shape for the nose, and a tiny curved mouth. -
Ink the Lines:
Trace over your pencil lines with a fine-tip black permanent marker or paint pen. Keep your hand steady and use swift, confident strokes. -
Add a Speckled Effect:
For that organic, ceramic look, create tiny faux speckles. Flick a toothbrush with diluted brown paint over the piece, or manually dot a few tiny spots with your marker. -
Mix the Blush:
Dilute a tiny drop of pink or orange paint with water until it acts like watercolor. I find this transparency looks much softer on the white clay. -
Apply Rosy Cheeks:
Dab a small circle of pink on one cheek and an orange circle on the other, or mix and match. The color should be subtle and translucent. -
Seal (Optional):
If you want these to last longer, spray them with a light coat of matte clear sealant. This protects the marker from smudging and the clay from moisture. -
String it Up:
Cut a length of jute twine, fold it in half, and thread the loop through the hole. Pull the tails through the loop to create a lark’s head knot, or simply tie it off at the top.
Preventing Curling
If your clay circles start curling up at the edges while drying, gently weigh them down with a heavy book placed over a sheet of parchment paper once they are leather-hard.
Make it Scented
Turn these into passive diffusers by putting a drop of essential oil on the textured back of the unsealed clay. The porous material holds scent beautifully.
Hang your charming new artwork near a window or gift it to a friend to brighten their day
Build a Tiny “Our Living Room” Clay Scene
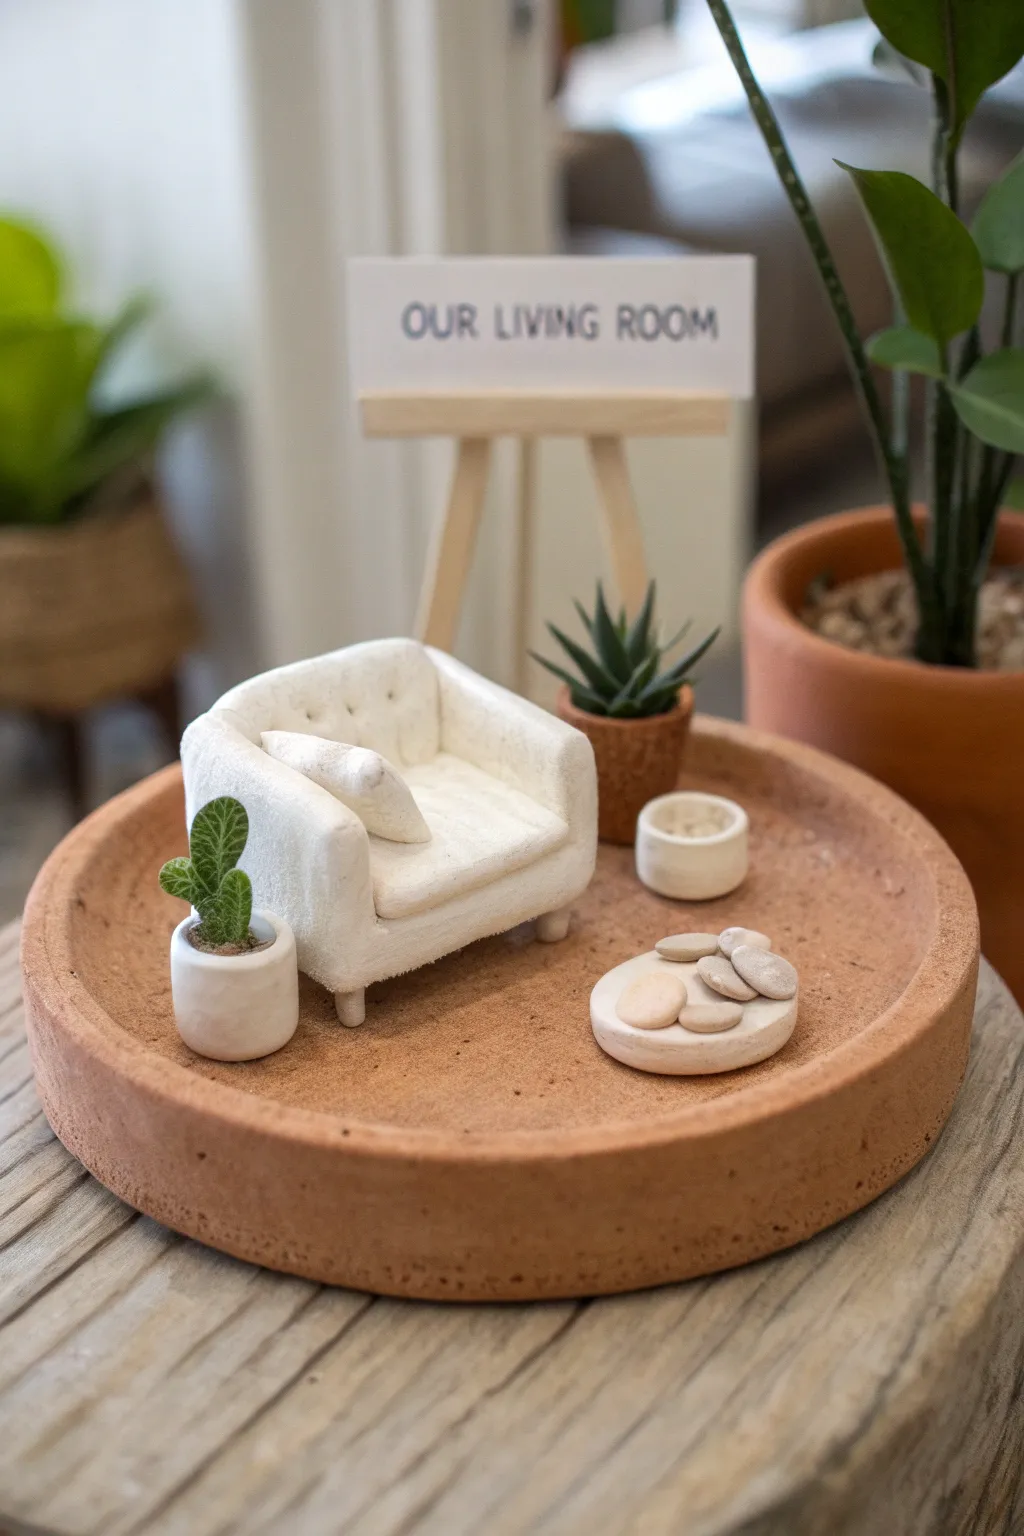
Immortalize your cozy living space in miniature form with this adorable clay project. You’ll build a tiny, detailed armchair, potted plants, and decor arranged inside a terracotta saucer for a sweet display piece.
Detailed Instructions
Materials
- Air dry clay (white)
- Small terracotta saucer (approx. 6-8 inches)
- Clay sculpting tools (needle tool, smoother)
- Small rolling pin
- Water in a small cup
- Tiny pebbles or gravel
- Miniature wooden easel
- Cardstock and black pen
- Acrylic paint (greens, browns)
- Fine grit sandpaper
- Clear matte sealant (optional)
Step 1: Sculpting the Furniture
-
Shape the armchair base:
Start with a block of clay about 2 inches wide. Roughly shape it into a cube for the seat of the chair, smoothing the edges with a wet finger. -
Add the backrest and arms:
Roll out a thick slab of clay and cut a long rectangular strip. Wrap this around the back and sides of your base cube to form the backrest and arms, blending the seams where the clay joins the base so it looks like one solid piece. -
Create the tufted detail:
Using a needle tool or a dull pencil point, poke a pattern of small indentations into the inside backrest to mimic button tufting. -
Make the seat cushion:
Roll a smaller, thinner square of clay that fits exactly onto the seat area. Place it on the chair and gently round the edges to look soft and plush. -
Add a throw pillow:
Form a tiny rounded triangle or square of clay and press it onto the corner of the seat for a cozy throw pillow. -
Attach the legs:
Roll four tiny balls of clay. Flip the chair over gently and attach one to each corner, flattening the bottoms so the chair stands level. -
Form the coffee table:
Shape a flat, round disk of clay about 1.5 inches wide. Smooth the edges and set it aside to dry flat. You can add tiny legs if you wish, or keep it low.
Step 2: Crafting the Accessories
-
Make the planters:
Roll two small balls of clay. Press your thumb or a tool into the center to create a pot shape. Make one cylinder-shaped and one slightly tapered like a traditional terra cotta pot. -
Sculpt the plants:
For the succulent, pinch tiny teardrop shapes and arrange them in a rosette. For the cactus, shape an oval and flatten it slightly, adding a smaller oval on top. Attach these inside your planters. -
Create the small bowl:
Make a very small pinch pot, keeping the walls thick and uniform. This can act as a decorative bowl or catch-all. -
Dry all components:
Let all your clay pieces dry completely for 24-48 hours. I like to flip the thicker pieces, like the chair, halfway through to ensure the bottom dries evenly.
Cracking Clay?
Cracks often happen if clay dries too fast. Repair them by mixing a tiny bit of clay with water to make a paste (slip) and filling the gap, then smoothing.
Step 3: Assembly and Finishing
-
Sand imperfections:
Once bone dry, use fine-grit sandpaper to gently smooth out any fingerprints or rough ridges on the furniture and pots. -
Paint the plants:
Paint the cactus and succulent leaves with various shades of green. You can paint the tapered pot a terra cotta color, or leave it white for a modern look. -
Decorate the table:
Glue a few tiny real pebbles onto the clay coffee table for a natural, spa-like texture. -
Prepare the base:
Clean your large terracotta saucer. This will serve as the ‘room’ floor. -
Arrange the scene:
Place your chair, table, and plants into the saucer. Play with the arrangement until it feels balanced. -
Make the sign:
Cut a small rectangle of cardstock. Write ‘OUR LIVING ROOM’ (or your names) in neat capital letters. adhere it the wooden easel and place it behind the furniture.
Texturizing Tip
Before the clay dries, gently press a piece of actual fabric against the armchair surface to give it a realistic ‘upholstery’ texture.
Place this miniature scene on a shelf as a charming reminder of your creative date night
Do a Faux “Kintsugi” Repair for a Wow Finish
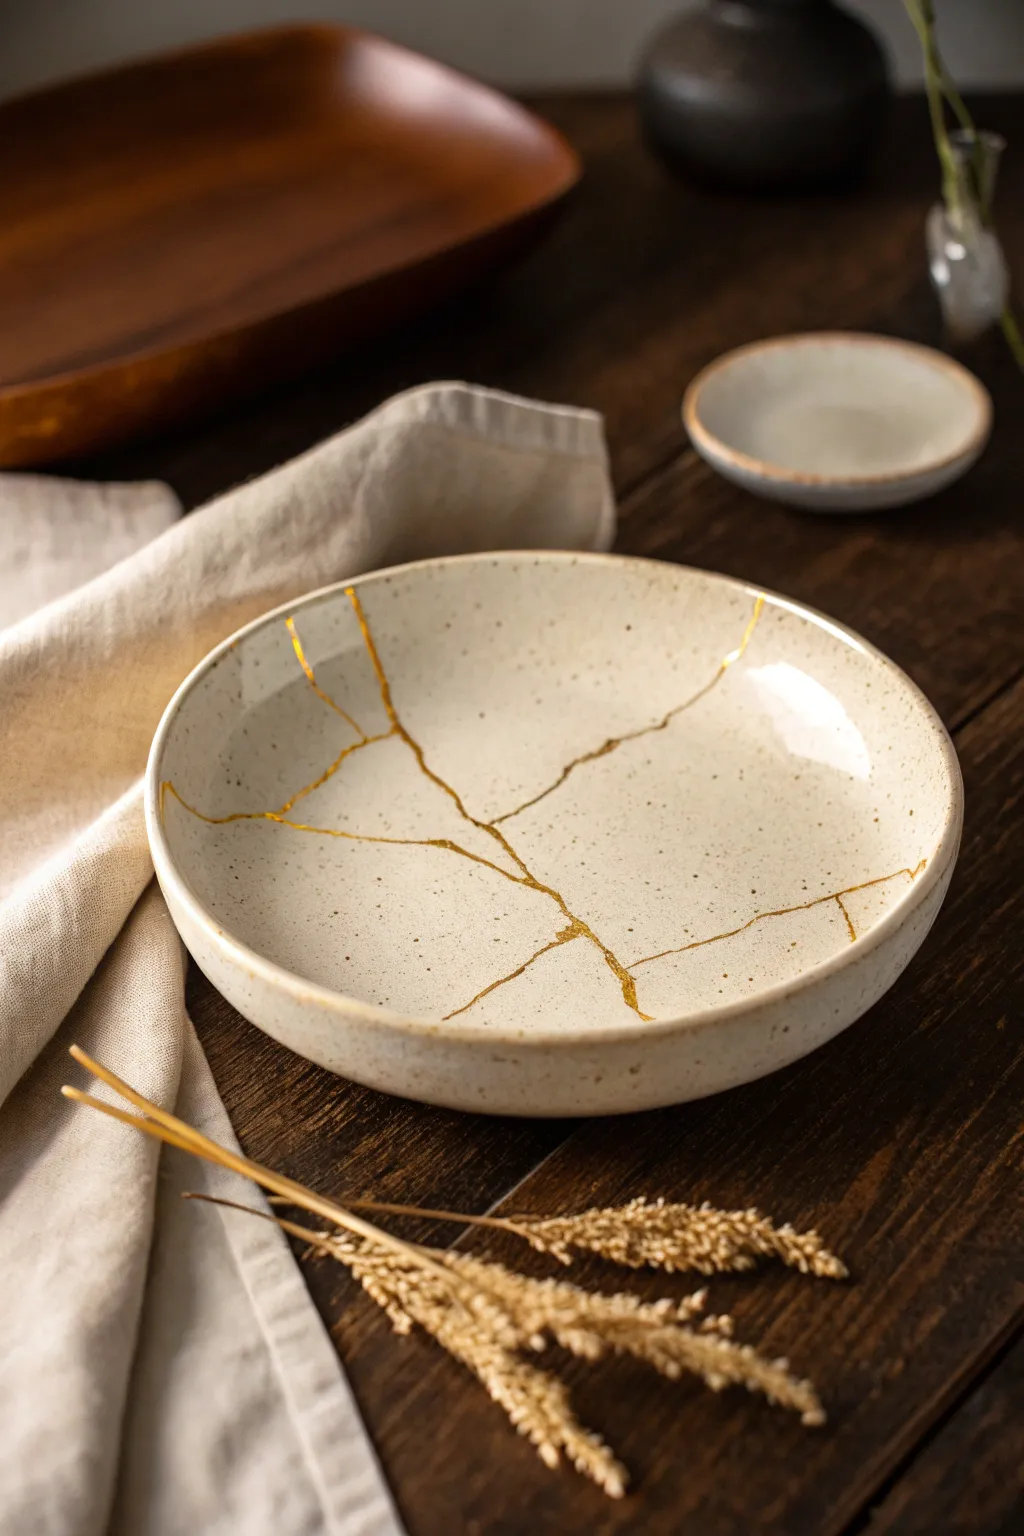
Embrace the beauty of imperfection with this stunning faux Kintsugi project, which creates the illusion of a broken bowl mended with veins of gold. Using accessible air dry clay and gold leaf paint, you’ll craft a modern heirloom that celebrates resilience and artistic flair.
Step-by-Step Tutorial
Materials
- White air dry clay (approx. 1-2 lbs)
- Rolling pin
- Shallow bowl to use as a slump mold
- Plastic wrap or cling film
- Potter’s sponge
- Potter’s needle tool or craft knife
- Sandpaper (medium and fine grit)
- Liquid gold leaf or gold enamel paint
- Fine detail paintbrush
- Clear acrylic sealant (matte or satin finish)
- Old toothbrush (optional for speckling)
- Brown acrylic paint (watered down for speckling)
Step 1: Shaping the Base Vessel
-
Prepare your clay:
Begin by working a substantial amount of white air dry clay in your hands to warm it up. Knead it gently on a clean surface to remove any large air bubbles, ensuring the texture is smooth and pliable. -
Roll out a slab:
Using a rolling pin, flatten the clay into a slab about 1/4 inch thick. Try to keep the thickness consistent across the entire piece for even drying. Lift and rotate the clay occasionally so it doesn’t stick to your work surface. -
Prepare the mold:
Take a standard kitchen bowl that has a shape you admire. Cover the inside or outside (depending on your preference) with plastic wrap to prevent the clay from sticking. This will act as your ‘slump’ or ‘hump’ mold. -
Form the bowl:
Drape your clay slab over or inside the mold. Gently press the clay to conform to the bowl’s shape, using your damp sponge to smooth out any fingerprints or wrinkles. Trim the excess clay from the rim using a needle tool for a clean edge. -
Add faux speckles:
For that authentic stoneware look seen in the photo, dip an old toothbrush into watered-down brown acrylic paint. Run your thumb over the bristles to flick tiny specks onto the wet clay surface. -
Initial drying:
Allow the clay to dry in the mold for about 24 hours until it is ‘leather hard’—firm but still slightly cool to the touch. Carefully remove it from the mold and let it dry completely, ideally for another 24-48 hours.
Clean Lines
For sharper gold veins, you can lightly sand the surface again after painting the gold. This removes overflow from the high points, leaving gold only in the deep etched cracks.
Step 2: Creating the ‘Breaks’
-
Prepare the surface:
Once bone dry, sand the entire bowl with medium grit paper to refine the shape, paying special attention to the rim. -
Refine the finish:
Follow up with fine grit sandpaper for a silky smooth finish. Wipe away all dust with a slightly damp cloth or sponge. -
Simulate the cracks:
Instead of actually breaking your fragile clay piece (which can result in unusable shards), we will etch deep channels. Use your needle tool or a carving tool to scratch deep, jagged lines across the surface. -
Deepen the channels:
Go over your etched lines several times to make them distinct and slightly wide. I prefer to carve slightly deeper than I think necessary so the gold has a nice ‘well’ to sit in. -
Create branching paths:
Extend your lines from one side of the rim to the other, adding smaller branching fractures to mimic the random nature of cracked ceramic.
Make it Real
Feeling brave? Actually snap your dried clay bowl into 3-4 large pieces, then glue them back together with strong epoxy mixed with gold mica powder for true Kintsugi style.
Step 3: The Golden Mending
-
Seal the piece:
Before painting, apply a thin coat of clear acrylic sealant to the entire bowl. This prevents the porous clay from absorbing too much of the gold paint and keeps your lines crisp. -
Apply the gold:
Dip a fine detail brush into liquid gold leaf or high-quality gold enamel. Carefully paint inside the carved channels you created. -
Allow overflow:
Don’t worry if the gold paint spills slightly over the edges of the carved lines—this actually adds to the realistic look of the lacquer used in traditional Kintsugi. -
Paint the rim connection:
Ensure the gold line wraps over the rim of the bowl and continues just a bit onto the underside, creating the illusion that the crack goes all the way through the material. -
Final drying time:
Let the gold paint cure completely according to the manufacturer’s instructions. Liquid gold leaf can remain tacky for a while, so patience is key here. -
Protective finish:
Finish with a final coat of clear sealant over the entire piece to protect your work and give it a finished sheen. Note that air dry clay is not food safe, so use this bowl for jewelry or decorative display.
Place your finished bowl on a side table to catch keys or trinkets and enjoy the elegant story of repair it tells