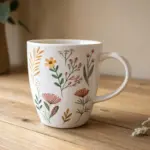
When you’re painting pottery for laughs, the best designs are the ones that land instantly from across the room. I love turning ordinary mugs, plates, and bowls into conversation pieces with puns, visual jokes, and a little bit of cheeky charm.
Punny Quote Mug With a Simple Doodle
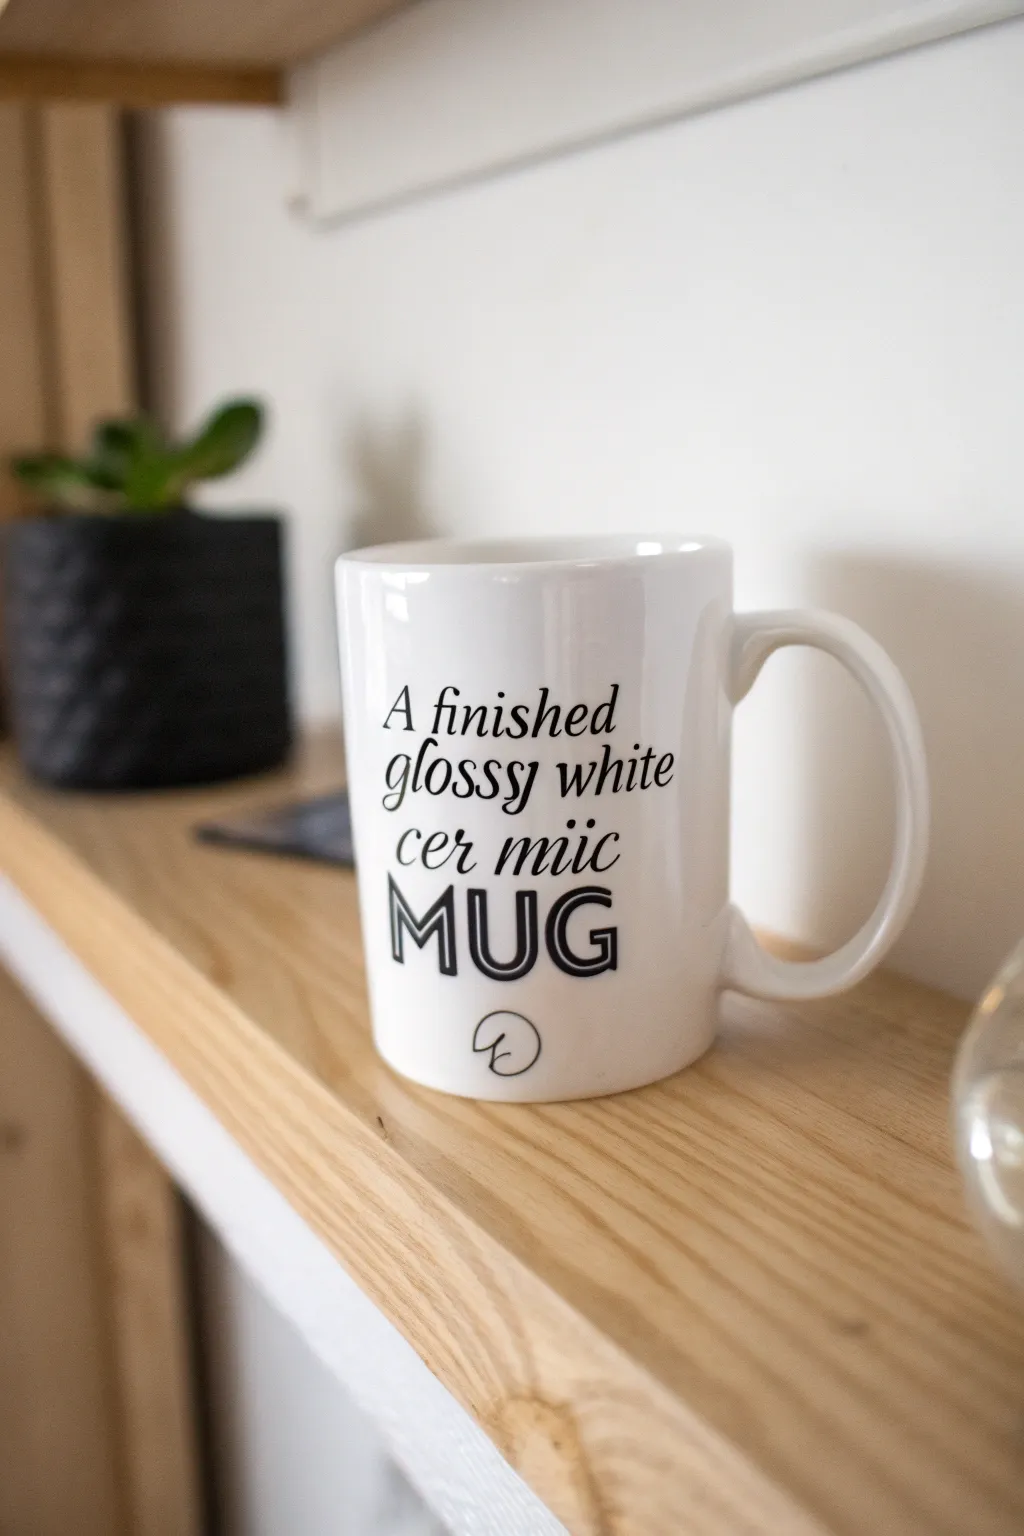
Embrace the meta-humor with this cleverly simple design that states exactly what it is. This project uses crisp lettering and a touch of intentional imperfection to turn a plain white mug into a witty conversation piece.
How-To Guide
Materials
- Bisque ceramic mug (standard 11oz size)
- Black underglaze (or ceramic paint)
- Small round brush (size 0 or 1)
- Fine liner brush (size 00 or 000)
- Pencil (for sketching)
- Damp sponge
- Clear dipping glaze
- Kiln access
Step 1: Planning and Sketching
-
Clean the bisque:
Start by wiping down your bisque mug with a damp sponge. This removes any dust or oils from handling that might repel the glaze later. -
Map out the text area:
Visualise where the text will sit. You want it centered on the side of the mug, opposite the handle if you want it visible while drinking. -
Draft the first lines:
Using a pencil, lightly sketch the first three lines: ‘A finished’, ‘glossy white’, and ‘cer miic’. Use a casual serif font style that mimics typewriter text but with a handwritten feel. -
Sketch the emphasis word:
Below the smaller text, sketch the word ‘MUG’ much larger. Draw these letters as block outlines rather than solid strokes. -
Add the doodle:
At the very bottom, center a small, loose circular doodle that looks like a simplified knot or a signature flourish. -
Review spacing:
Step back and look at your pencil marks. Don’t worry about the graphite; it will burn off in the kiln, so feel free to erase and correct spacing now.
Step 2: Painting the Lettering
-
Prepare the black underglaze:
Place a small amount of black underglaze on your palette. I usually add a tiny drop of water to improve the flow for fine lettering. -
Outline the top text:
Load your fine liner brush. Carefully trace over your pencil lines for the top three rows of text. -
Thicken the strokes:
Go back over the downstrokes of the letters in ‘finished’, ‘glossy’, and ‘white’ to give them a slight calligraphy effect, varying the line weight. -
Paint the intentional typo:
For the line ‘cer miic’, keep the lettering slightly looser. Ensure the ‘miic’ spelling is clear—it adds to the quirky charm. -
Outline the big MUG:
Switch to your small round brush if needed for better control, or stick with the liner. Paint the outline of the block letters M-U-G. -
Create the shadow effect:
To make ‘MUG’ pop, thicken the lines on the right side of each letter slightly, giving a subtle drop-shadow impression. -
Paint the bottom doodle:
Quickly stroke the small circular doodle at the bottom. A quick, confident motion makes this look more natural than tracing slowly.
Brush Control Tip
Rest your pinky finger on the mug surface while painting to stabilize your hand. This acts as an anchor for shaky intricate lettering.
Step 3: Finishing Touches
-
Dry completely:
Let the black underglaze dry until it is chalky and cool to the touch. This prevents smearing during the glazing process. -
Clean up stray marks:
If you made any mistakes with the paint, scratch them off gently with a wooden skewer or a stiff brush dampened with water. -
First dip:
Dip the entire mug into a clear glossy glaze. Ensure you submerge it fully and pull it out in one smooth motion to avoid drip marks. -
Check the foot:
Wipe the bottom foot of the mug with a sponge to ensure no glaze is left there, or it will stick to the kiln shelf. -
Fire the piece:
Place the mug in the kiln and fire according to the glaze and clay specifications (usually Cone 06 or Cone 6 depending on your materials).
Paint rubbing off?
Underglaze creates dust if you touch it too much after drying. Handle the mug by the handle or rim only until it’s glazed.
Once fired, sit back and enjoy a hot drink in a mug that literally speaks for itself


Dad-Joke Plate With a Mushroom Pun
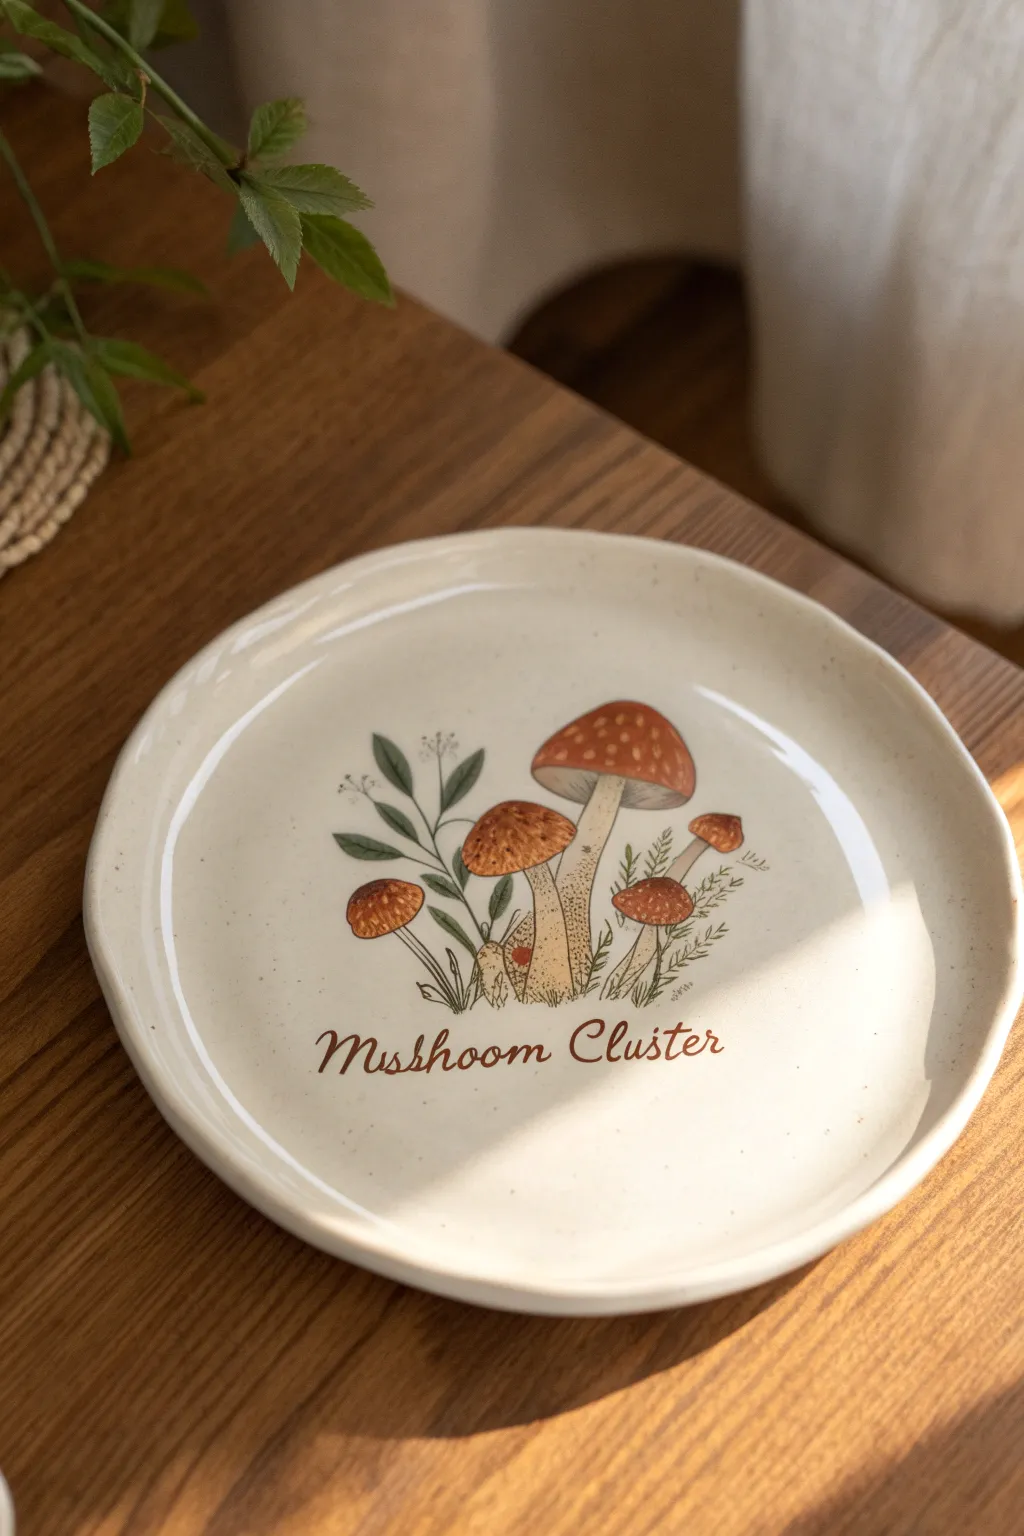
This charming ceramic plate features a delightful botanical-style illustration of amber and rust-colored mushrooms surrounded by delicate foliage. The warm, earthy tones and vintage lettering make it a cozy addition to any table setting, perfect for serving up a side of dad jokes along with dinner.
Step-by-Step
Materials
- Bisque ceramic plate (dinner or salad size)
- Underglaze paints (Cream/Off-white, Rust Orange, Amber/Tan, Deep Green, Dark Brown)
- Pencil for sketching
- Fine liner brush (size 0 or 00)
- Small round brush (size 2 or 4)
- Fan brush or wide soft brush for base coat
- Clear dipping glaze
- Palette or tile for mixing
- Water cup and sponge
Step 1: Base Preparation
-
Wipe the bisque:
Start by wiping your ceramic plate with a slightly damp sponge to remove any kiln dust. This ensures the glaze adheres perfectly to the surface. -
Apply the background color:
Using a fan brush or a wide soft brush, apply three even coats of a Cream or warm Off-white underglaze to the entire top surface of the plate. Let each coat dry until it’s chalky to the touch before adding the next. -
Sketch the design:
Once the background is fully dry, lightly sketch your design with a pencil. Draw a central taller mushroom, flanked by two medium ones and a couple of smaller buttons. Add simple line stems for the surrounding leaves. Don’t worry about erasing; the graphite will burn off in the kiln.
Step 2: Painting the Mushrooms
-
Base coat the caps:
Mix a warm Rust Orange color. Using your small round brush, fill in the cap of the largest mushroom. For the smaller mushrooms, use an Amber or Tan shade to create subtle variety. -
Paint the stems:
There is a lot of negative space here. Use a very pale wash of tan or cream (slightly darker than your background) to gently fill in the mushroom stems. Keep this layer translucent. -
Add cap details:
Once the orange caps are dry, mix a lighter version of your orange or use plain cream. Dot small, irregular spots onto the large mushroom cap using the tip of your round brush to create that classic amanita look. -
Texture the smaller caps:
For the amber-colored mushrooms, use a slightly darker brown on your fine liner brush to add tiny hatching lines or stippling on the caps to suggest texture. -
Outline the stems:
Switch to your fine liner brush and Dark Brown underglaze. Very delicately outline the stems. Add vertical, shaky lines up the length of the stems to mimic fibrous mushroom textures. -
Add the gills:
Underneath the large mushroom cap, paint very fine, radiating lines from the stem to the edge of the cap using a diluted brown to represent the gills.
Oops! Smudged Line?
Don’t panic! Wait for the smudge to dry completely, then gently scratch the excess paint off with a wooden toothpick or a clean, stiff brush.
Step 3: Foliage and Lettering
-
Paint the leaves:
Using Deep Green and your round brush, paint simple, almond-shaped leaves on the stems you sketched earlier on the left side. Aim for a flat, graphical style rather than hyper-realism. -
Add delicate sprigs:
On the right side, use your liner brush to create feathery, fern-like plants. Use swift, short strokes branching off a central stem. -
Connect the greenery:
Use the liner brush to draw thin stems connecting your leaves to the base of the mushroom cluster, grounding the composition. -
Draft the text guide:
Lightly mark a curved line beneath the illustration with your pencil to serve as a baseline for your text. -
Letter the text:
Using the Dark Brown underglaze and your steadiest hand with the liner brush, write ‘Mushroom Cluster’ in a cursive, script font. I find it helps to exhale slowly while pulling the long strokes of the letters. -
Thicken the downstrokes:
Go back over your lettering and slightly thicken the downward strokes of the letters to create a faux-calligraphy effect. -
Final speckled effect:
Dilute a small amount of dark brown paint with water on your brush. Hold it over the plate and tap the handle against another brush to splatter tiny speckles over the design for a vintage, earthy finish. -
Glaze and fire:
Allow the plate to dry completely for 24 hours. Dip the entire piece in clear glaze and fire it according to the clay and glaze manufacturer’s instructions.
Level Up: Retro Vibe
Instead of pure white, mix a tiny drop of yellow into your clear glaze bucket for an ‘antique’ finish that makes the plate look like a thrift store find.
Now you have a whimsical piece of dishware ready to start conversations at your next meal


Sassy Bowl With a “Harder to Clean” Message
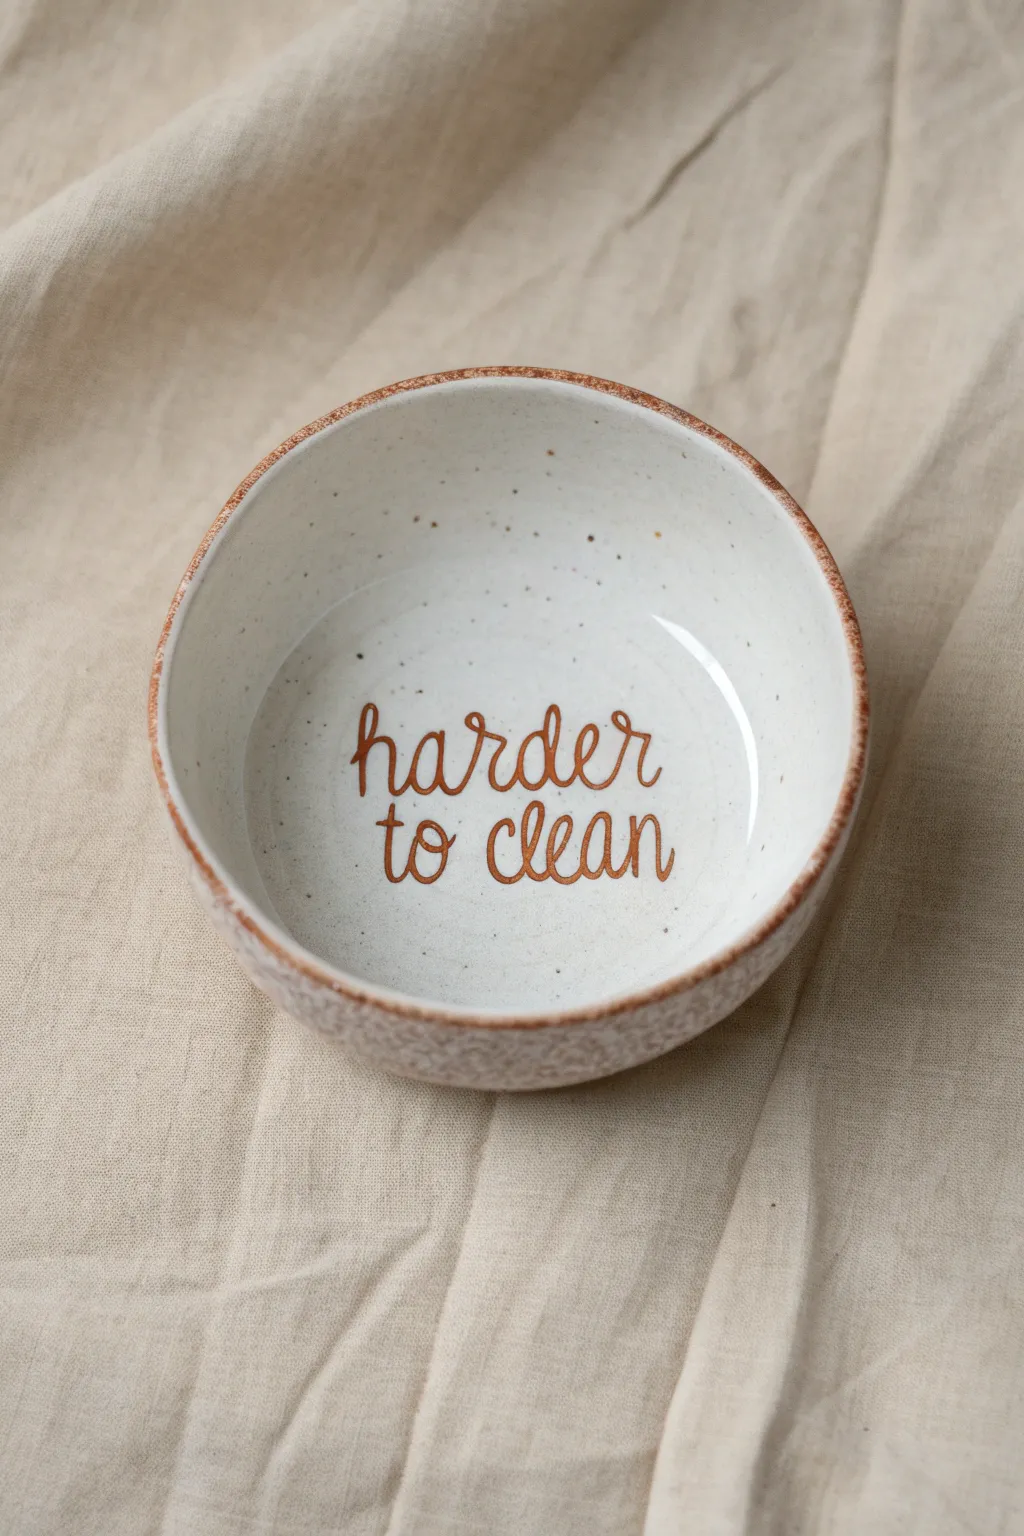
Embrace the irony of handcrafted pottery with this cheeky bowl design that explicitly acknowledges the rough, speckled texture at the bottom. The finish features a creamy white speckled glaze paired with rustic brown lettering and a perfectly imperfect rim, creating a piece that is as stylish as it is honest.
Detailed Instructions
Materials
- Small bisqueware bowl (smooth surface)
- Cream or off-white underglaze (speckled variety)
- Dark brown underglaze (rust or chestnut shade)
- Fine liner brush (size 0 or 00)
- Medium soft fan brush
- Small round sponge
- Light pencil (HB or lighter)
- Clear dipping glaze (transparent)
- Pottery wheel or banding wheel (optional)
Step 1: Base Coat and Speckling
-
Clean the bisque:
Start by wiping your bisqueware bowl with a slightly damp sponge to remove any kiln dust or oils from your hands, ensuring the glaze adheres properly. -
Apply the base color:
Using your medium soft fan brush, apply three even coats of the cream speckled underglaze to the entire interior and exterior of the bowl. -
Allow extensive drying:
Wait until the surface loses its sheen and is dry to the touch between each coat. Since we are writing text on top, the final coat needs to be completely bone dry before proceeding. -
Enhance the speckle (optional):
If your cream underglaze doesn’t have enough built-in speckles, load a stiff toothbrush with watered-down brown underglaze and flick fine mist over the bowl’s interior. I find this adds that trendy stoneware look if your base glaze is too plain.
Smudged Words?
If you mess up a letter, let it dry completely, then gently scratch the mistake off with a toothpick or needle tool. Repaint the base cream color over the spot before trying again.
Step 2: Lettering and Rim
-
Planning the layout:
Lightly sketch the words ‘harder’ and ‘to clean’ in the center of the bowl using a light pencil. -
Structuring the text:
Stack the words so ‘harder’ sits on the top line and ‘to clean’ rests centered beneath it to balance the composition. -
Lettering technique:
Load your fine liner brush with the dark brown underglaze. You want the consistency to be like melted ice cream—fluid enough to flow off the brush, but thick enough to be opaque. -
Paint the first word:
Carefully trace over your pencil lines for ‘harder’ using a casual, loopy script font. Keep the pressure light on the upstrokes and heavier on the downstrokes. -
Paint the second line:
Repeat the process for ‘to clean,’ ensuring the lettering size matches the first line. -
Thicken the downstrokes:
Go back over the downstrokes of your letters with a second pass to add weight and definition, giving it a faux-calligraphy look. -
Clean up edges:
If you have any jagged edges, use a clean, slightly damp angled brush to gently nudge the paint back into line. -
Rim preparation:
Pour a small amount of the dark brown underglaze onto your palette and dip your small round sponge into it. -
Create the rustic rim:
Dab the sponge gently along the very edge of the bowl’s rim. Don’t try to make looking perfect; an uneven, organic line enhances the handmade aesthetic. -
Refining the rim:
Allow the sponge to drag slightly down the exterior wall in a few random spots to mimic the look of exposed clay.
Use a Writer Bottle
Struggling with brush control? Fill a slip trailer or precision writer bottle with your dark brown underglaze. It works like a pen and makes consistent lettering much easier.
Step 3: Finishing
-
Burn off the pencil:
Don’t worry about erasing your sketch marks; the graphite will burn away completely in the kiln. -
Clear glaze application:
Once all underglaze is fully dry, dip the entire bowl into a clear transparent glaze to seal the design and make it food safe. -
Fire the piece:
Fire the bowl according to the specific temperature guidelines of your clay and glaze, usually Cone 5 or 6 for this type of finish.
Enjoy your new bowl that gets a laugh every time you reach the bottom of your cereal


Googly-Eyed Mug Face That Stares Back
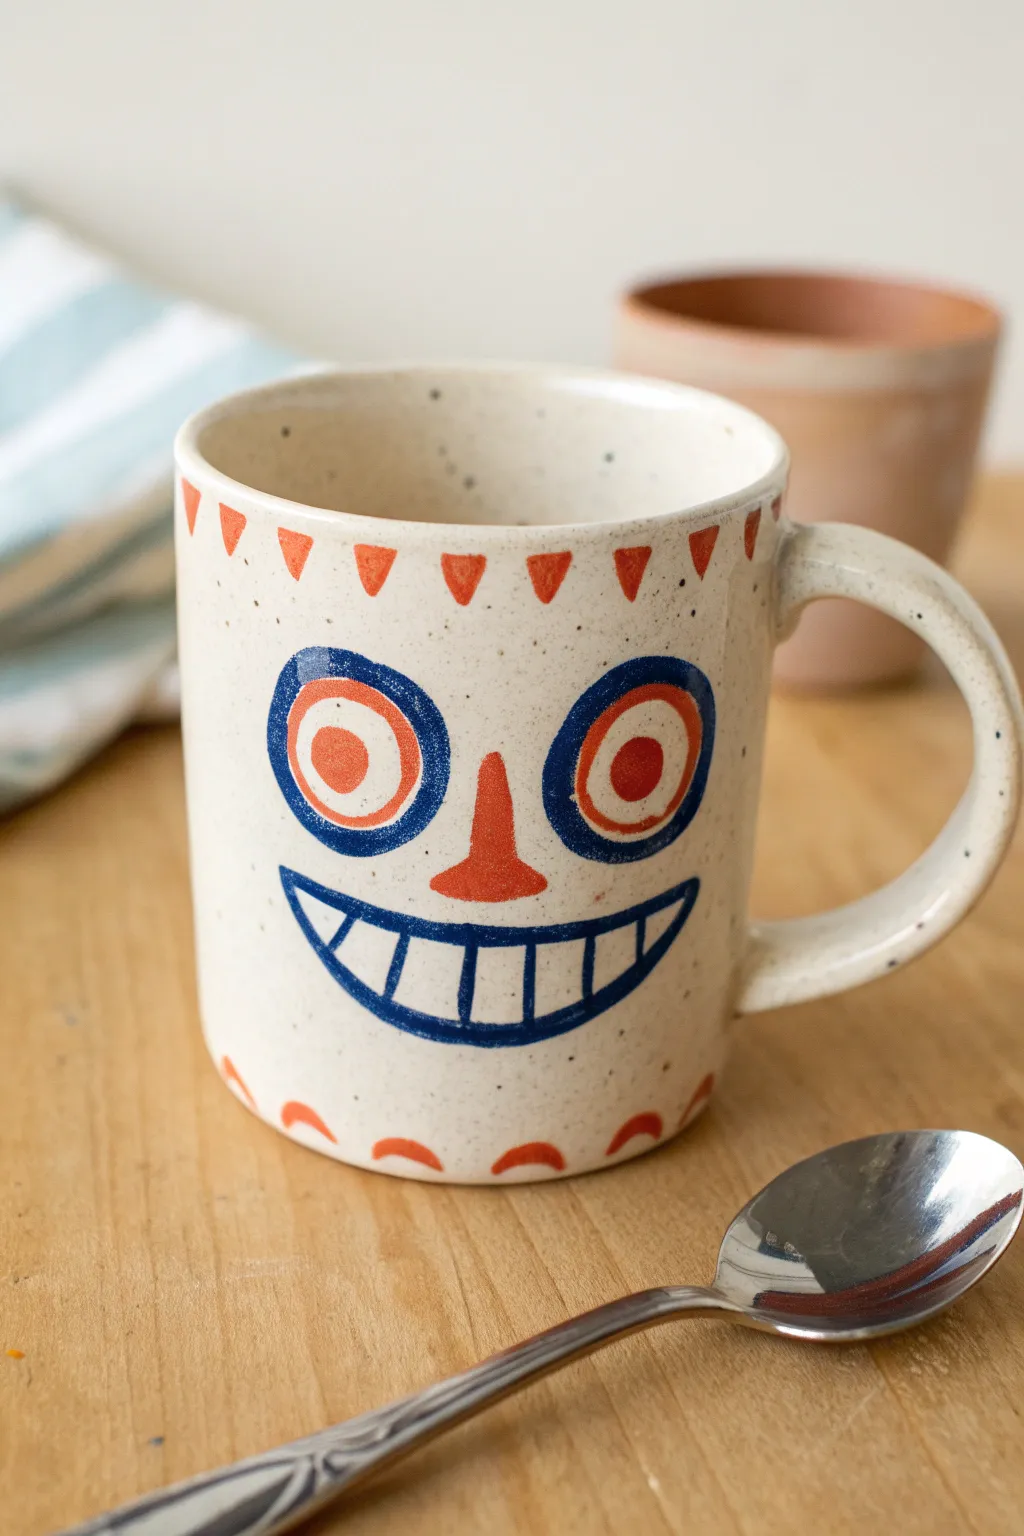
Brighten up your morning coffee routine with a mug that is just as thrilled to see you as you are to tackle the day. This charmingly goofy design uses simple shapes and bold primary colors to create a folk-art inspired face that bursts with personality.
Step-by-Step Tutorial
Materials
- Bisque-fired ceramic mug (preferably white clay body)
- Small round paintbrush (size 2 or 3)
- Fine liner or detail brush (size 0 or 00)
- Underglaze in Cobalt Blue
- Underglaze in Pumpkin or Terracotta Orange
- Speckled transparent glaze (or clear glaze if using speckled clay)
- Pencil for sketching
- Clean water for rinsing brushes
- Sponge
Step 1: Preparation & Sketching
-
Clean the bisque:
Before you start, wipe your bisque mug down with a damp sponge. This removes any ceramic dust that might prevent the glaze from adhering properly. -
Map out the face:
Using a regular pencil, lightly sketch the main features onto the center of the mug. Don’t worry about mistakes; the graphite will burn off in the kiln. -
Position the eyes:
Draw two large circles side-by-side for the outer eyes. Inside each, draw a smaller circle for the whites, and a dot in the very center for the pupil. -
Draft the grin:
Below the eyes, sketch a wide, curved ‘U’ shape for the mouth. Add a horizontal line across the top to close the shape, and draw vertical lines inside to create the teeth. -
Add borders:
Lightly mark spaces for the triangular border around the rim and the scalloped semicircles near the base.
Steady Hands Pro Tip
If you’re shaky on the lines, try using a slip trailer or a needle-tip applicator bottle for the blue outlines instead of a brush. It gives a consistent line width.
Step 2: Painting the Features
-
Outline the eyes:
Load your round brush with Cobalt Blue underglaze. Carefully paint the thick outer ring of the eyes. I find resting my pinky finger on the mug surface helps stabilize my hand for curves like this. -
Paint the pupils:
Using the same blue, paint the small central dots in the eyes. Keep them relatively centered to maintain that intense staring look. -
Fill the irises:
Switch to your orange underglaze. Fill in the ring between the blue pupil and the blue outer circle. Apply 2-3 coats here to ensure the orange is opaque and vibrant. -
Create the nose:
Paint a simple orange triangle between the eyes for the nose. Extend a thin line upwards from the top of the triangle to bridge the gap between the eyes. -
Outline the smile:
Switch back to blue. Using your detail brush, carefully outline the entire mouth shape and draw the horizontal line across the top. -
Define the teeth:
With the detail brush and blue underglaze, paint the vertical lines inside the mouth to separate the teeth. Keep the lines somewhat thick for a bold, illustrative look.
Step 3: Decorative Details & Glazing
-
Paint the rim border:
Using the orange underglaze and the tip of your round brush, paint small inverted triangles all around the top rim. Space them evenly, pointing downward. -
Add the base border:
Paint small orange semicircles or mounds along the very bottom edge of the mug. This grounds the design and frames the face perfectly. -
Check for coverage:
Look over your design. If the orange looks streaky, add one final thin coat. The blue is usually darker and needs fewer layers. -
Let it dry:
Allow the underglaze to dry completely. It should look chalky and matte to the touch before you proceed. -
Apply the clear glaze:
Dip or brush on your transparent glaze. If you want the speckled look shown in the photo but have smooth clay, use a ‘speckled’ clear glaze formula. Otherwise, a standard clear glaze works if your clay body already has specks. -
Final wipe:
Wipe the very bottom foot of the mug with a wet sponge to ensure no glaze touches the kiln shelf. -
Fire it:
Fire the mug in the kiln according to the temperature requirements of your chosen clay and glaze (usually Cone 5 or 6 for stoneware).
Level Up: interior Surprise
Paint a tiny version of the same face, or just a pair of staring eyes, on the inside bottom of the mug. It offers a funny reward for finishing a drink.
Once fired, you will have a delightfully quirky companion for your daily tea or coffee break

The Complete Guide to Pottery Troubleshooting
Uncover the most common ceramic mistakes—from cracking clay to failed glazes—and learn how to fix them fast.
“Oops” Plate With a Fake Bite Mark
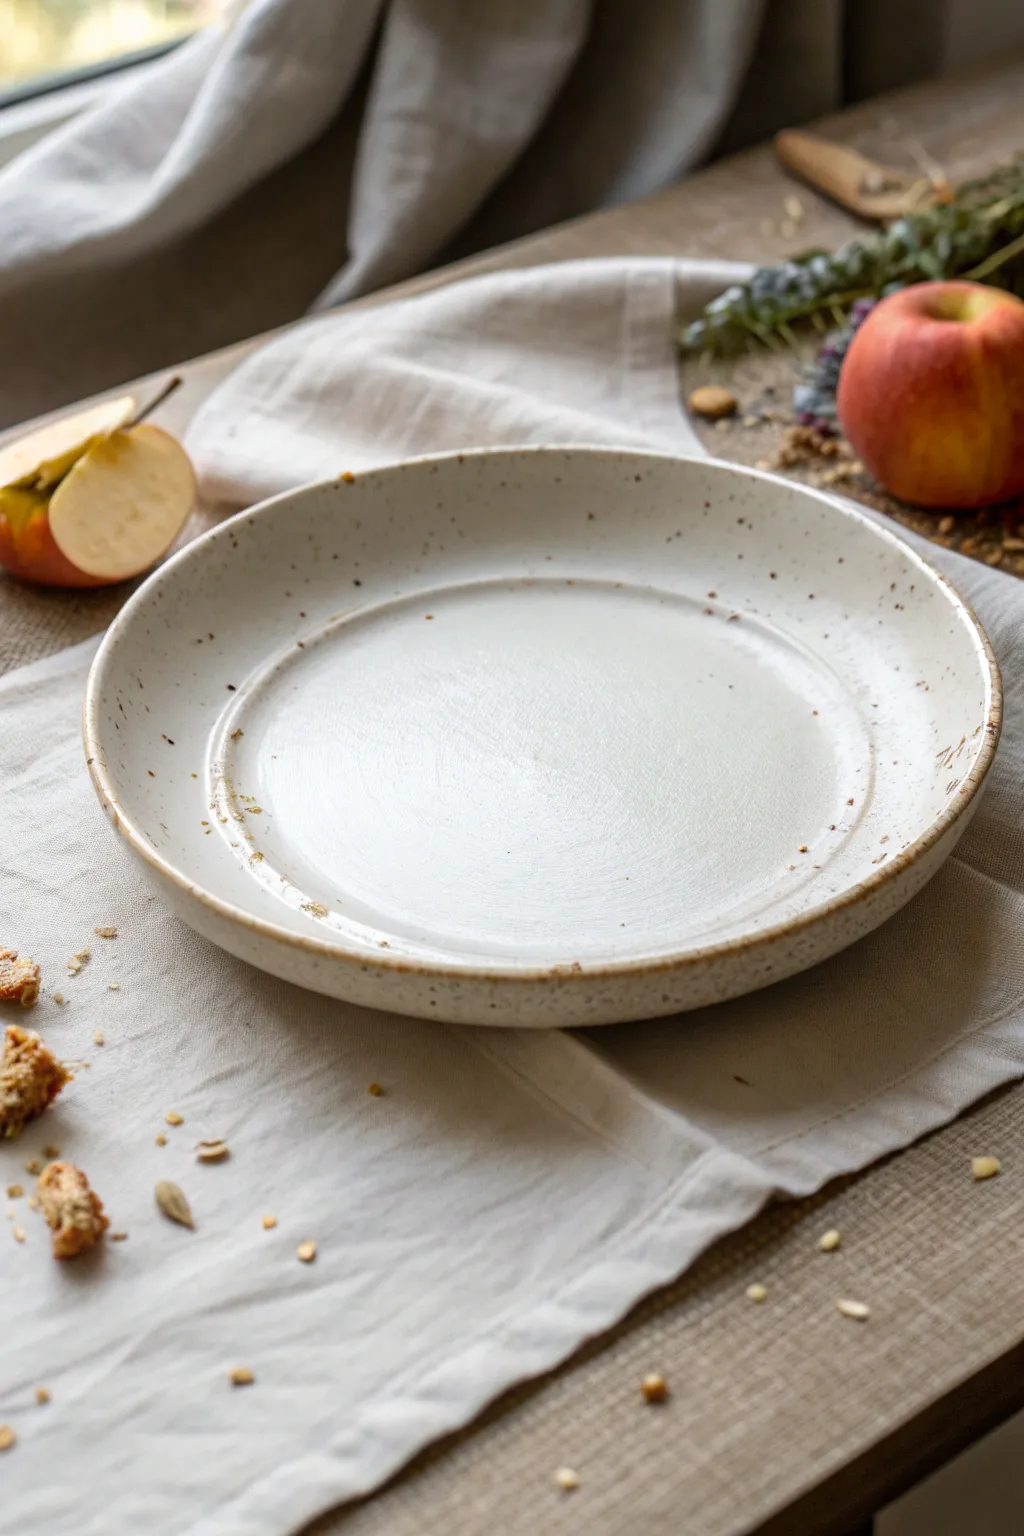
Embrace the charm of wabi-sabi with this speckled stoneware-style plate featuring subtle, earthy textures. While the title suggests a “fake bite mark,” this foundation tutorial teaches you how to create the realistic, speckled pottery base that makes any added gag element look authentic.
How-To Guide
Materials
- Bisque ceramic plate (dinner or salad size)
- Cream or off-white glaze (opaque)
- Brown iron oxide wash or thinned brown underglaze
- Stiff bristle toothbrush
- Fan brush or large soft glaze brush
- Sponge
- Water container
- Rubber ribs or sculpting tools (optional for texture)
Step 1: Base Application
-
Clean the bisque:
Start by wiping down your bisque plate with a damp sponge. This removes any dust that might prevent the glaze from adhering properly. -
Mix your base color:
Stir your cream or off-white glaze thoroughly. You want a consistent texture with no lumps. -
First coat application:
Using a fan brush, apply a smooth, even coat of the cream glaze to the entire top surface of the plate. -
Directional brushing:
Brush in long, sweeping strokes across the plate. Don’t worry about perfect smoothness yet; subtle brush marks add to the hand-thrown look. -
Dry and repeat:
Let the first coat dry until it loses its sheen. Apply a second coat, brushing in the opposite direction (perpendicular) to the first layer to ensure full coverage. -
Apply a third coat:
For a solid, opaque finish, I usually add a third coat. This ensures the stoneware color looks rich and deep after firing. -
Rim detailing:
Carefully wipe the very edge of the rim with a damp sponge if you want to expose a bit of the raw clay body, or paint a thin line of tan glaze along the edge for a defined border.
Blob Control
Did a large drop of brown speckle ruin the look? Let it dry instantly with a hair dryer, then gently scratch it off with an X-Acto knife or needle tool before firing.
Step 2: Creating the Speckle Effect
-
Prepare the speckle mix:
Dilute a small specific amount of brown iron oxide wash or dark brown underglaze with a little water. You want a consistency similar to skim milk. -
Load the toothbrush:
Dip just the tips of a stiff toothbrush into the brown mixture. Tap off any excess liquid on a paper towel to avoid large blobs. -
Test spray:
Hold the toothbrush over a scrap piece of paper first. Run your thumb across the bristles to flick the paint forward, testing the spray pattern. -
Flick the color:
Hold the brush about 6-8 inches above the plate. Gently flick the bristles to send a fine mist of brown speckles across the surface. -
Vary density:
Concentrate slightly more speckles near the rim and the transition curve of the plate, leaving the center a bit more sparse for a natural look. -
Check for blobs:
If a large droplet falls, don’t wipe it! Daub it gently with a dry sponge corner to lift it, or embrace it as a natural pottery mark.
Step 3: Finishing Touches & Firing
-
Add ‘imperfections’:
To enhance the rustic feel, you can dip a small brush in a slightly darker tan glaze and tap it randomly along the rim to create faux chips or uneven glazing. -
Simulate a bite (Optional):
If following the prompt’s theme, this is where you would paint a crisp, semi-circular biting shape in black or dark grey on the rim to look like a missing chunk. -
Clear glaze application:
Since your base glaze is likely glossy, you might not need a clear coat. However, if using underglazes for the base, apply two coats of clear food-safe glaze over the entire piece now. -
Clean the foot:
Flip the plate over and meticulously sponge off any glaze from the bottom foot ring. This prevents the plate from fusing to the kiln shelf. -
Final drying:
Allow the plate to dry completely for at least 24 hours to ensure all moisture has evaporated from the bisque. -
Fire the piece:
Fire the plate according to your clay and glaze specifications (typically Cone 5 or 6 for stoneware) to achieve that durable, stone-like finish.
Matte Finish Magic
For an ultra-realistic stoneware look, use a matte clear glaze instead of a glossy one. It reduces shine and makes the faux texture feel more like raw clay.
Once out of the kiln, fill your new rustic plate with treats to complete the scene
Mug With a Hidden Bottom Surprise Line
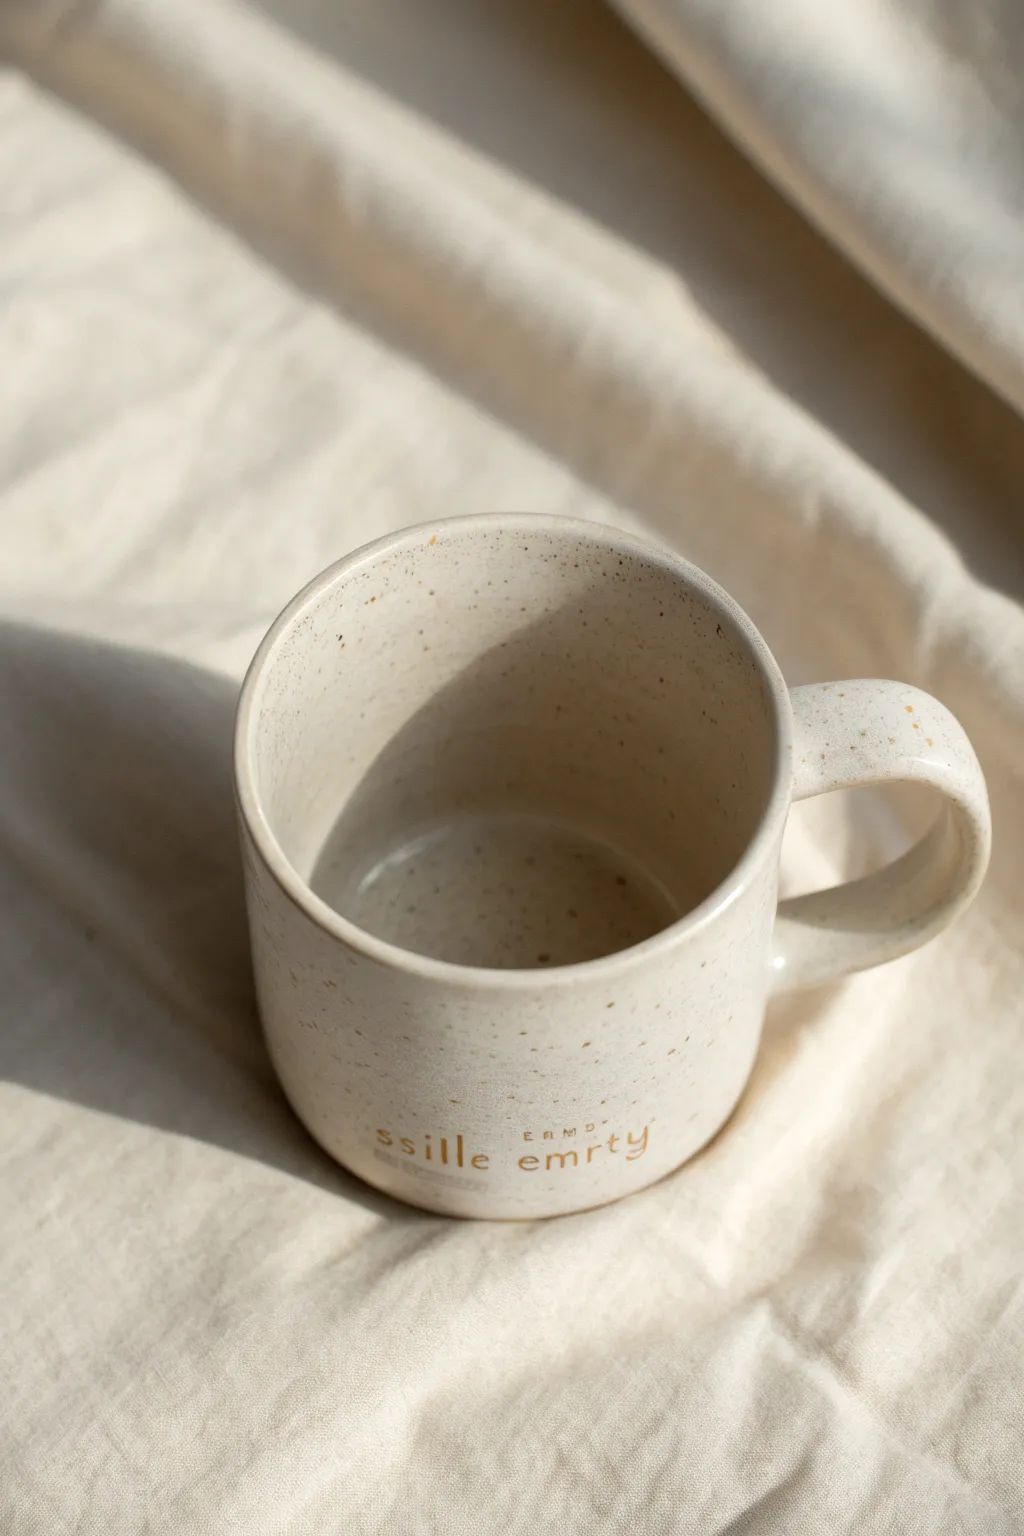
This minimalist project embraces the natural beauty of ceramic clay while adding a quirky, barely-there message near the base. It features a lovely speckled finish that mimics stoneware and a stamped text effect that feels modern and understated.
Step-by-Step
Materials
- Bisque-fired ceramic mug (smooth surface)
- Speckled buff underglaze or ‘speckle coat’ glaze
- Glossy clear dipping glaze (transparent)
- Small rubber alphabet stamps
- Underglaze pencil or dark brown underglaze
- Small fine-detail brush
- Damp sponge
- Fan brush (for application)
- Clean water
Step 1: Preparation and Base Coat
-
Clean surface:
Begin by wiping down your bisque mug with a damp sponge. This removes any dust or oils from your hands that might resist the glaze. -
Choose your speckled base:
Select a speckled buff underglaze or a special effect glaze that has suspended particles. If you want the raw clay look shown in the photo, you might choose a very pale cream or oatmeal color. -
Apply the first coat:
Loading up a fan brush, apply a smooth, even layer of your base color to the entire exterior and interior of the mug. -
Let it dry:
Allow this first layer to dry until it is chalky to the touch and no longer cool. -
Second coat:
Apply a second coat of the base color to ensure full opacity, especially if you are covering white bisque. I like to brush in a cross-hatch direction to minimize streaks. -
Wait for full set:
Let the mug dry completely before attempting to add any text, or you risk smudging the base layer.
Smudged Letters?
If a stamp leaves a blurry mark, let it dry instantly. Gently scrape the error off with a sharp tool or X-Acto knife, patch the base color, and try again.
Step 2: Adding the Text Detail
-
Plan placement:
Locate the spot near the very bottom edge of the mug where the text will sit. Visualize the spacing for ‘smile empty’ so it sits centered. -
Prepare the stamps:
Get your small rubber alphabet stamps ready. If you don’t have stamps, you can hand-letter, but stamps provide that authentic uneven look. -
Load the color:
Lightly brush a dark brown or oxide-colored underglaze onto the face of the letters. Don’t overload them, or the text will blob. -
Stamp the first word:
Gently press the word ‘smile’ onto the dry base glaze. Rock the stamp slightly to ensure the clay picks up the pigment. -
Check spacing:
Leave a significant gap, then prepare to stamp the second line or word slightly offset if desired. -
Stamp the second word:
Press ’empty’ (or your chosen phrase) next to the first word. In the photo, the text is intentionally imperfect and slightly faint. -
Touch up:
If any letters didn’t transfer fully, use a very fine detail brush with a tiny amount of underglaze to connect the lines.
Simulate Speckles
No speckled clay? Use an old toothbrush dipped in brown underglaze. Run your thumb over bristles to flick tiny splatters onto the mug before clear glazing.
Step 3: The Hidden Surprise & Glazing
-
Paint the bottom interior:
Since this is a ‘Hidden Bottom Surprise,’ use your detail brush to paint a small hidden message or symbol (like a smiley face) on the very bottom inside of the mug. -
Ensure dryness:
Let all your stamped and painted additions dry completely. They should not smear when lightly touched. -
Prepare clear glaze:
Stir your transparent clear dipping glaze thoroughly to ensure it is smooth and mixed. -
Dip the mug:
Using dipping tongs, submerge the entire mug into the clear glaze for a count of three, then lift it out in a smooth motion to avoid drips. -
Clean the foot:
Once the glaze is dry on the surface, sponge off the very bottom foot ring of the mug so it doesn’t fuse to the kiln shelf. -
Fire:
Fire the mug in the kiln according to the clay and glaze manufacturer’s specifications (usually Cone 5 or 6 for stoneware).
Once fired, you will have a beautiful, modern mug that reveals its wit slowly as you sip your coffee


What Really Happens Inside the Kiln
Learn how time and temperature work together inside the kiln to transform clay into durable ceramic.
“Definitely Sugar” Label on the Wrong Jar
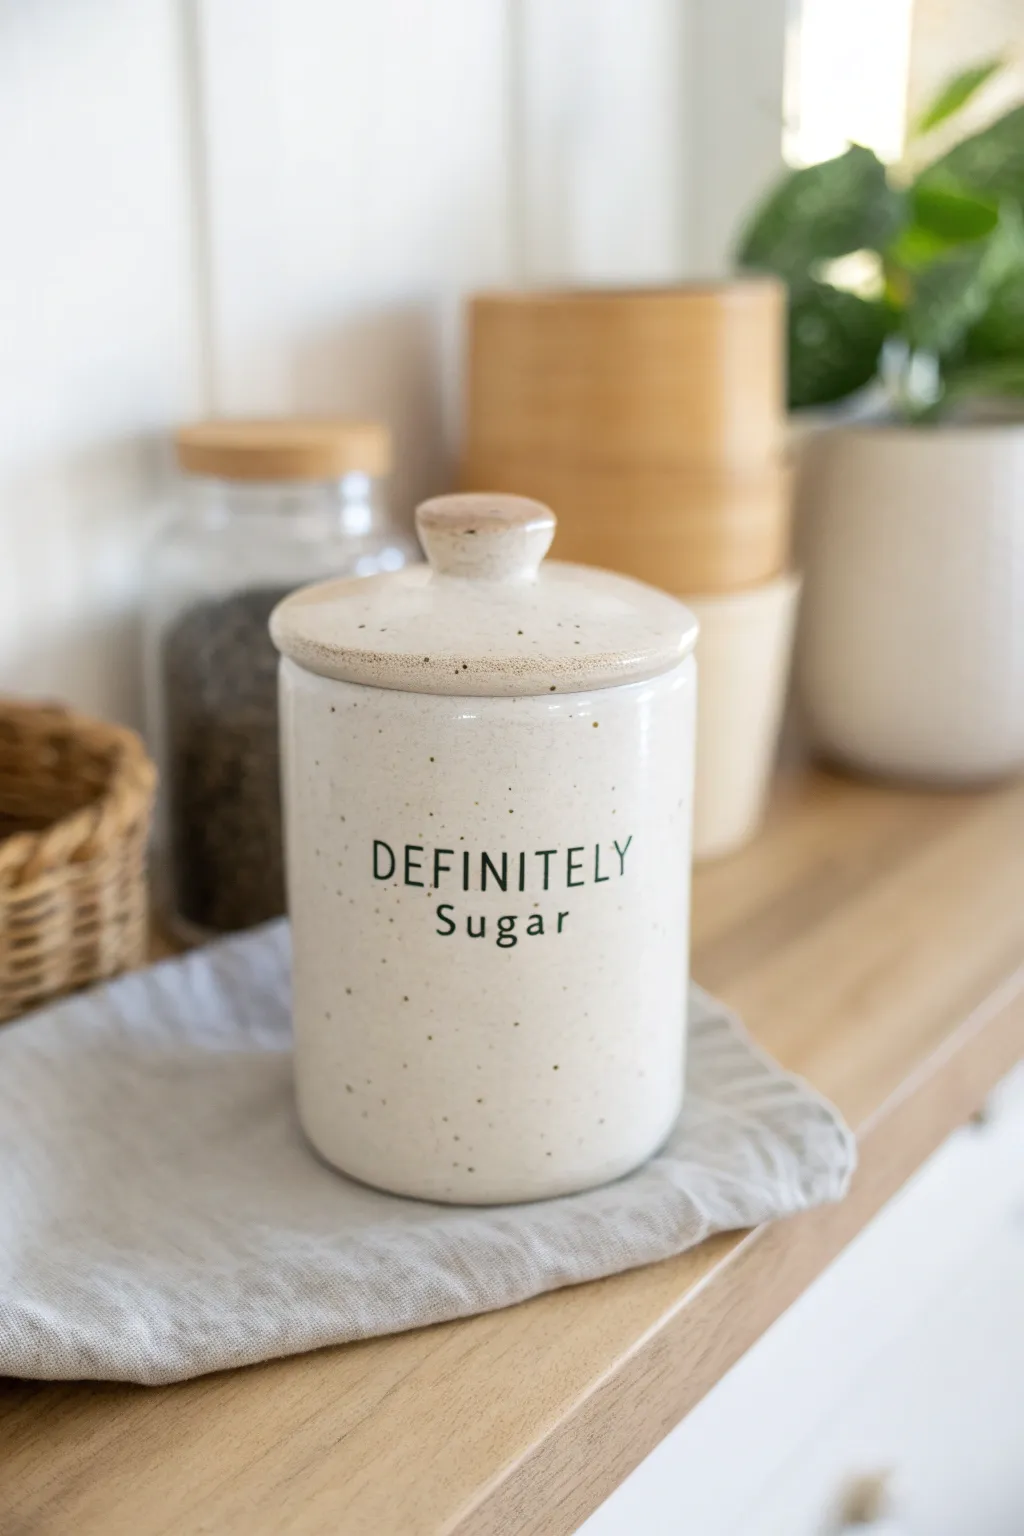
Add a touch of humor to your kitchen storage with this deceptively simple ceramic painting project. The charm lies in the speckled, rustic finish and the tongue-in-cheek label that makes everyone wonder what’s actually inside.
How-To Guide
Materials
- Bisque-fired ceramic canister with lid
- Speckled cream or oatmeal stoneware glaze (e.g., Mayco Speckled Vanilla or similar)
- Dark forest green underglaze
- Clear dipping glaze (if your cream glaze isn’t self-sealing)
- Wide soft fan brush
- Fine liner brush (size 0 or 00)
- Pencil
- Sponge
- Small bowl of water
- Measuring tape (optional)
Step 1: Base Coat Application
-
Prep the bisque:
Begin by wiping down your bisque canister and lid with a slightly damp sponge. This removes any kiln dust and ensures your glaze adheres smoothly without rolling. -
Mix the base glaze:
Shake your speckled cream glaze jar vigorously. The speckles often settle at the bottom, and you need them evenly distributed for that authentic rustic look. -
Apply first layer:
Using the wide fan brush, apply a smooth, even coat of the speckled cream glaze to the entire exterior of the jar. -
Lid coverage:
Don’t forget the lid! Coat the top and sides of the lid, ensuring you get into the crevices around the knob. -
Second coat:
Allow the first coat to dry until it’s chalky and cool to the touch. Apply a second coat, brushing in a different direction (cross-hatching) to minimize brush strokes. -
Review finish:
Check the manufacturer’s instructions for your specific glaze. Some require three coats for opacity; if so, apply a third layer now and let it dry completely.
Steadier Hands
Rest your pinky finger on the jar’s surface while painting letters. This acts as an anchor point, giving you much more control for fine lines than hovering your hand.
Step 2: Lettering Design
-
Mark the center:
Lightly sketch a vertical centerline on the front of the jar with a pencil to help align your text. -
Sketch alignment lines:
Draw two horizontal guidelines. The top line should be slightly curved upward to give the word ‘DEFINITELY’ a gentle arch. The bottom line should be straight for ‘Sugar’. -
Pencil in the text:
Using a pencil, lightly write ‘DEFINITELY’ in all caps on the arched line. The beauty of underglaze is that pencil marks burn off in the kiln, so don’t worry about being messy. -
Adjust lettering:
I find it helpful to start with the middle letter (‘I’ in DEFINITELY) on the centerline and work outward to keep it symmetrical. -
Add the second word:
Sketch ‘Sugar’ in a classic serif font below, keeping the letters upright and centered.
Step 3: Detailed Painting & Firing
-
Load the liner brush:
Dip your fine liner brush into the dark green underglaze. You want the consistency to be like thin cream—add a tiny drop of water if it’s too thick to flow smoothly. -
Paint vertical strokes:
Start by painting only the vertical lines of each letter. This helps establish the spacing before you commit to the curves and crossbars. -
Complete the letters:
Go back and fill in the horizontal lines and curves. Press slightly harder on the downstrokes to give the font a serif style weight. -
Second pass for opacity:
Once the green is dry, retrace the letters carefully. A single coat of dark green can sometimes look streaky after firing, so a second thin pass ensures a crisp, solid color. -
Clean up:
If you made any mistakes, use a stiff brush dampened with water to gently ‘erase’ the green paint by scrubbing it off the base glaze, then touch up the cream base if needed. -
Clear glaze (if needed):
If your speckled base glaze is a matte underglaze rather than a gloss glaze, you will need to dip the entire piece in clear glaze now. If it’s a self-sealing stoneware glaze, skip this step. -
Clean the foot:
Use a sponge to wipe any glaze off the very bottom (foot ring) of the jar so it doesn’t fuse to the kiln shelf. -
The final fire:
Fire the piece according to expectations for your clay and glaze, typically Cone 5 or 6 for stoneware to get those lovely speckles to pop.
Salty Sibling
Create a matching jar that says ‘PROBABLY Salt’ or use a different font color like navy blue for a mismatched but cohesive kitchen set.
Once cooled from the kiln, fill your jar with sugar (or something else entirely) and enjoy the confusion on your guests’ faces
Pun-Heavy Plant Pot for Your Drama Queen Plant
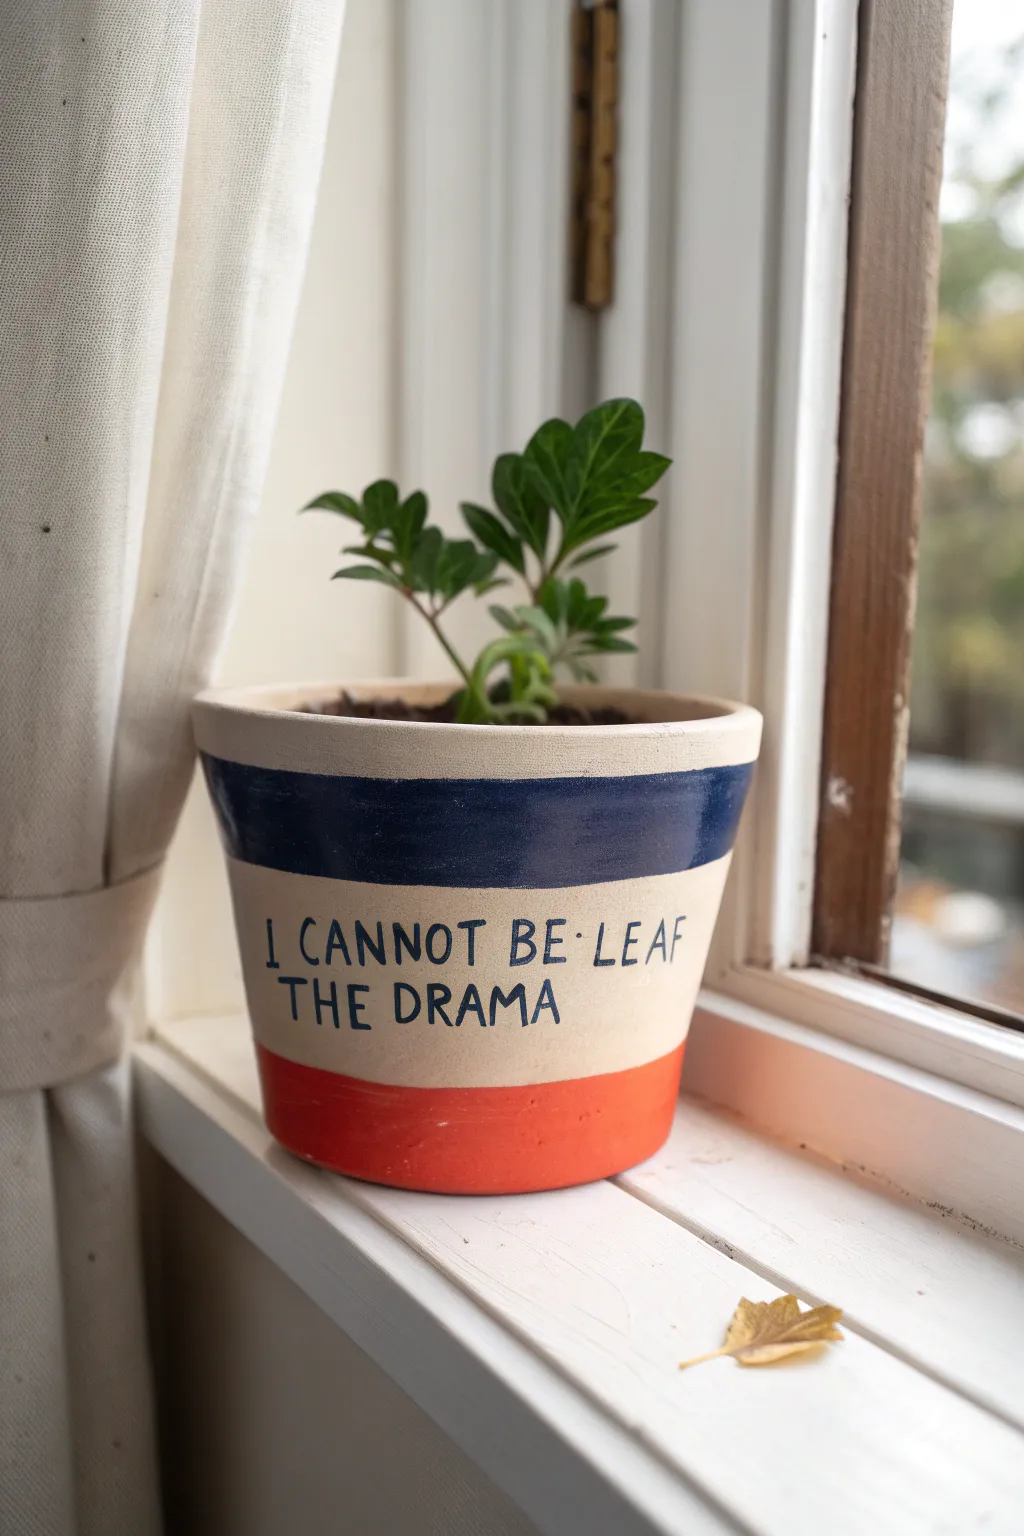
Embrace the theatrical side of gardening with this pun-tastic terracotta pot design. Featuring bold bands of navy and coral, this project uses clever wordplay and classic colors to frame your most dramatic houseplants perfectly.
Detailed Instructions
Materials
- Standard terracotta pot (cleaned and dried)
- Acrylic craft paints: Navy Blue, Bright Coral/Orange, Cream/Off-White
- Wide flat paintbrush (1 inch)
- Medium flat paintbrush
- Small round detail brush (size 0 or 1)
- Masking tape or painter’s tape
- Pencil
- Water cup and paper towels
- Spray sealant (matte or glossy)
Step 1: Base Prep
-
Clean surface:
Ensure your terracotta pot is completely free of dust and dirt. Wipe it down with a damp cloth and let it dry fully so the paint adheres properly. -
Prime the middle:
Using your medium flat brush, paint the entire middle section of the pot with the Cream/Off-White paint. This creates a neutral background for your text. -
Second coat:
Let the first cream layer dry for about 15-20 minutes. Apply a second coat to ensure solid coverage so no terracotta orange shows through the center band.
Clean Lines Secret
Before painting your blue or orange color, paint a thin layer of the CREAM base color over the tape edge first. This seals the tape, meaning any bleed is invisible.
Step 2: Blocking the Color
-
Tape the top line:
Once the cream base is 100% dry, apply a strip of masking tape horizontally around the pot, creating a straight line where you want the bottom of the blue band to be. -
Tape the bottom line:
Apply a second strip of tape around the lower section to mark the top edge of the coral band. -
Seal the edges:
Run your fingernail firmly along the edges of the tape to prevent paint from bleeding underneath. -
Paint the top band:
Load your wide flat brush with Navy Blue paint. Paint the top rim and the area down to your top tape line. -
Paint the interior rim:
Don’t forget to paint just inside the top rim of the pot (about an inch down) for a polished look when filled with soil. -
Paint the bottom band:
Using the Bright Coral/Orange paint, fill in the bottom section of the pot below the lower tape line. -
Remove tape:
Carefully peel off the tape while the paint is still slightly tacky to achieve crisp, clean lines.
Level Up: Glossy Finish
Use a high-gloss Mod Podge or varnish only on the colored stripes while leaving the text area matte. This creates a wonderful texture contrast.
Step 3: Lettering
-
Pencil planning:
With the color bands dry, lightly sketch your text ‘I CANNOT BE LEAF THE DRAMA’ in the cream center section using a pencil. Center the two lines of text by eye. -
Load detail brush:
Thin your Navy Blue paint with a tiny drop of water to help it flow more smoothly for lettering. Dip your small round detail brush. -
Paint vertical strokes:
Start by painting the down-strokes of the letters first. Keep your hand steady and use the tip of the brush. -
Add serifs:
Go back and add the small horizontal lines (serifs) to the tops and bottoms of the letters. This gives the font that specific slightly irregular, hand-drawn character seen in the photo. -
Thicken lines:
Retrace any letters that look too thin. The charm of this design is that the letters are a bit shaky and organic, so don’t worry about perfection. -
Erase markings:
Once the lettering is completely dry (give it at least an hour), gently erase any visible pencil marks.
Step 4: Finishing Touches
-
Touch-ups:
Inspect the edges where the colors meet. If there was any bleed, use a small brush with the cream paint to tidy up the lines. -
Seal the pot:
Take the pot to a ventilated area and apply a clear spray sealant. This protects the acrylic from moisture when you water your plant.
Now you have a cheeky home for your most dramatic plant that is sure to get a smile from guests

TRACK YOUR CERAMIC JOURNEY
Capture glaze tests, firing details, and creative progress—all in one simple printable. Make your projects easier to repeat and improve.
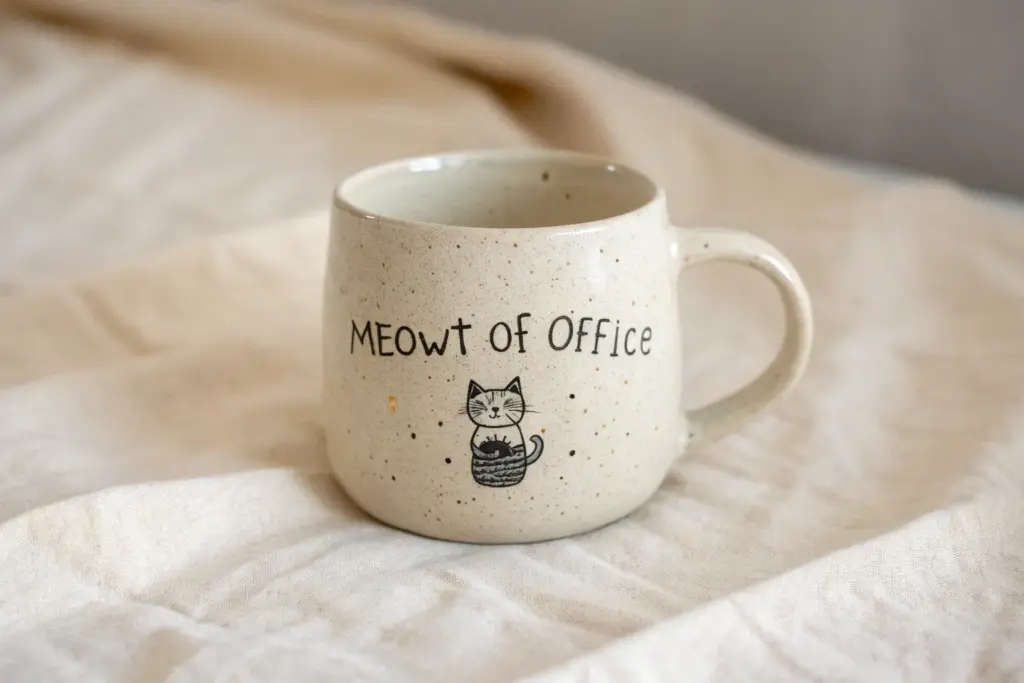
Grumpy Pet Portrait With a Petty Caption
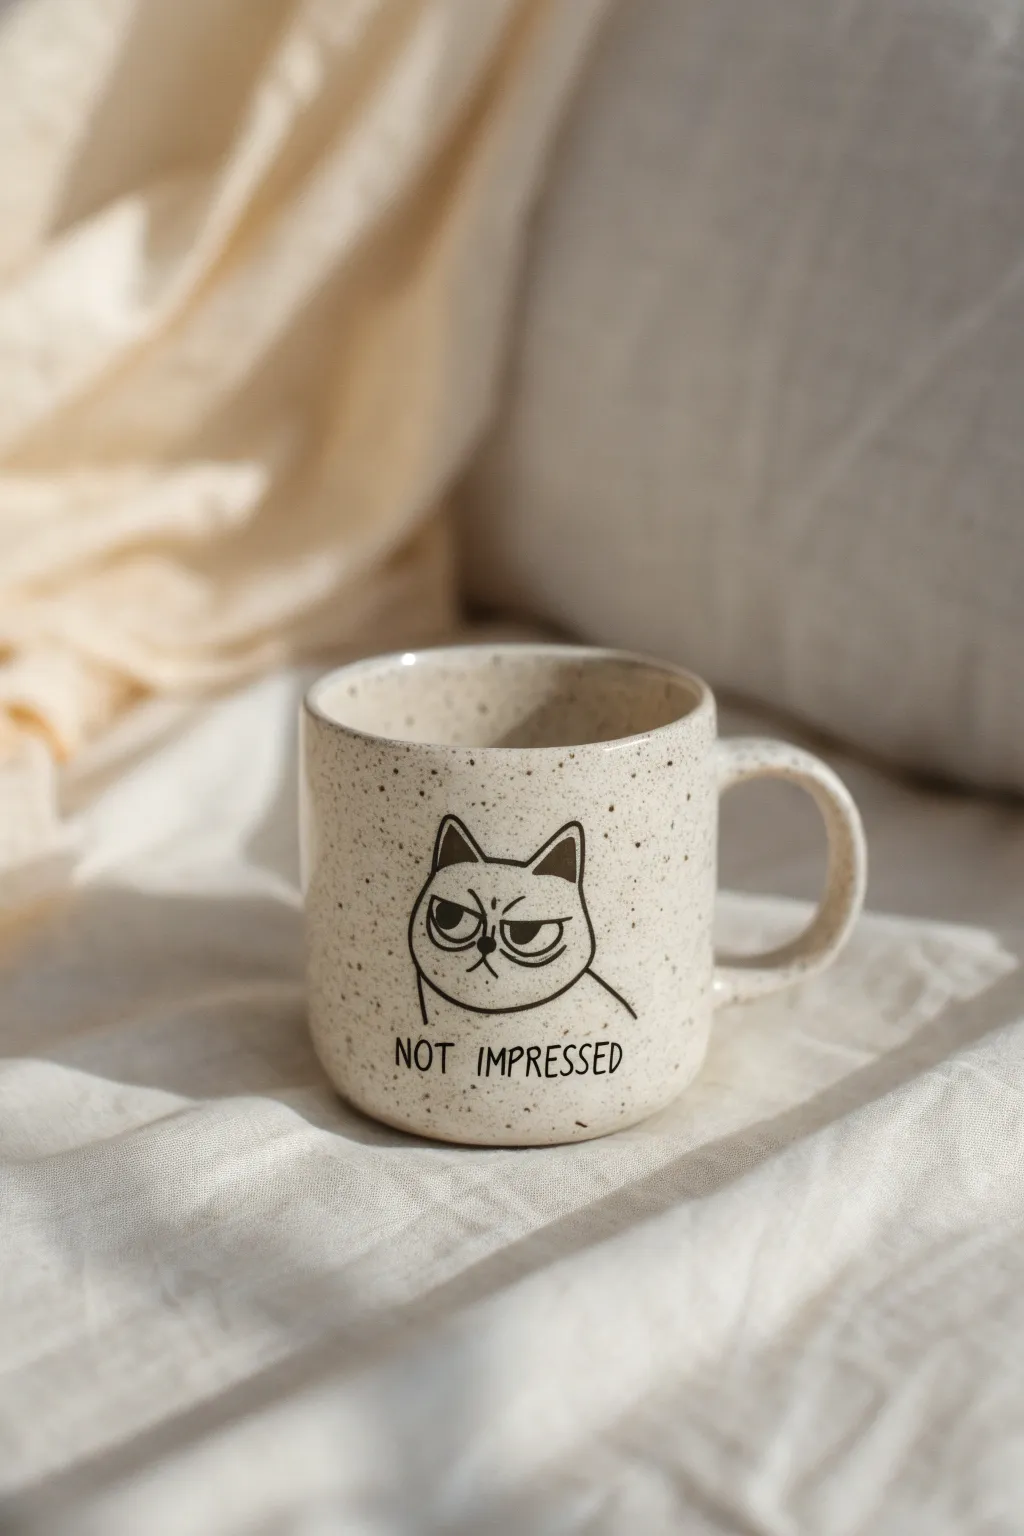
Channel your feline’s most judgmental stare with this delightfully unassuming mug. Featuring a speckled oatmeal finish and a minimalist line drawing, this project proves that sometimes a simple grumpy face says it all.
Step-by-Step Guide
Materials
- Bisque ceramic mug (standard shape)
- Speckled oatmeal or cream pottery glaze (food safe)
- Black underglaze
- Fine liner brush (size 0 or 00)
- Pencil (graphite transfers easily in kiln)
- Fan brush or wide glazing brush
- Sponge
- Clear dipping glaze (if using underglaze on bare bisque)
Step 1: Preparation and Base Coat
-
Clean the bisque:
Start by wiping down your bisque mug with a slightly damp sponge. This removes any dust from the shelf that could prevent the glaze from adhering properly. -
Apply the speckled base:
Using a fan brush, apply your first coat of the speckled oatmeal glaze. If you want the speckles to be prominent, ensure you mix the jar thoroughly before dipping your brush, as the heavy particles sink to the bottom. -
Dry and repeat:
Let the first coat dry until it’s chalky and cool to the touch. Apply a second evenly distributed coat. For a solid, opaque cream finish like the photo, I usually recommend a third coat, but check your specific glaze bottle instructions. -
Smooth the surface:
Once the final coat is dry, gently rub out any obvious brush strokes or drips with your finger to ensure a smooth canvas for your drawing.
Text wobbling?
If painting letters is tricky, write the text with a specialized underglaze pencil or a needle-tip applicator bottle for better control.
Step 2: Outlining the Attitude
-
Sketch the placement:
With a standard pencil, lightly sketch the cat’s position in the center of the mug. Don’t worry about mistakes; the graphite will burn off completely in the kiln. -
Draw the ears:
Start the actual design by drawing two triangular ears. Make the left ear slightly more horizontal and flattened to suggest irritation. -
Shape the head:
Connect the ears with a curved line for the top of the head. Draw a wide, slightly flattened U-shape for the chin and cheeks, keeping the face round and squashy. -
Add the eyes:
Draw two half-circles for eyelids. Beneath them, add the pupils as small dots looking upward or straight ahead. The flat eyelids are crucial for that ‘unbothered’ look. -
Insert the nose and mouth:
Place a tiny triangle nose between the eyes. Draw a small, inverted ‘V’ or frown line extending directly from the nose to serve as the mouth. -
Detail the shoulders:
Add two simple curved lines extending downward from the jawline to suggest the cat’s shoulders.
Glaze Consistency
If your black lines look transparent or grey after firing, apply a second pass of black underglaze over the design to ensure a deep, solid black color.
Step 3: Inking and Lettering
-
Load the liner brush:
Dip your fine liner brush into the black underglaze. Thin it with a tiny drop of water if it feels too thick to pull a smooth line. -
Trace the design:
Carefully go over your pencil lines with the black underglaze. Keep your hand steady and apply even pressure for a consistent line width. -
Fill the ears:
Use the black underglaze to fill in the inner triangles of the ears, creating depth and contrast against the cream background. -
Thicken the eyes:
Go back over the upper eyelids to thicken the line slightly, emphasizing the heavy-lidded expression. -
Draft the text:
Beneath the portrait, lightly pencil in the words ‘NOT IMPRESSED’. Using all caps keeps the style consistent and legible. -
Paint the text:
Trace the letters with your finest brush. Take your time here; crisp lettering makes the mug look professionally made. -
Final drying:
Allow the black detail work to dry completely before handling the mug to move it to the kiln shelf. -
Firing:
Fire the mug according to the clay and glaze specifications (usually Cone 06 or Cone 6 depending on your materials) to reveal the glossy, speckled finish.
Enjoy sipping your coffee while your mug silently judges everyone around you
Food With Attitude: A Talking Snack Design
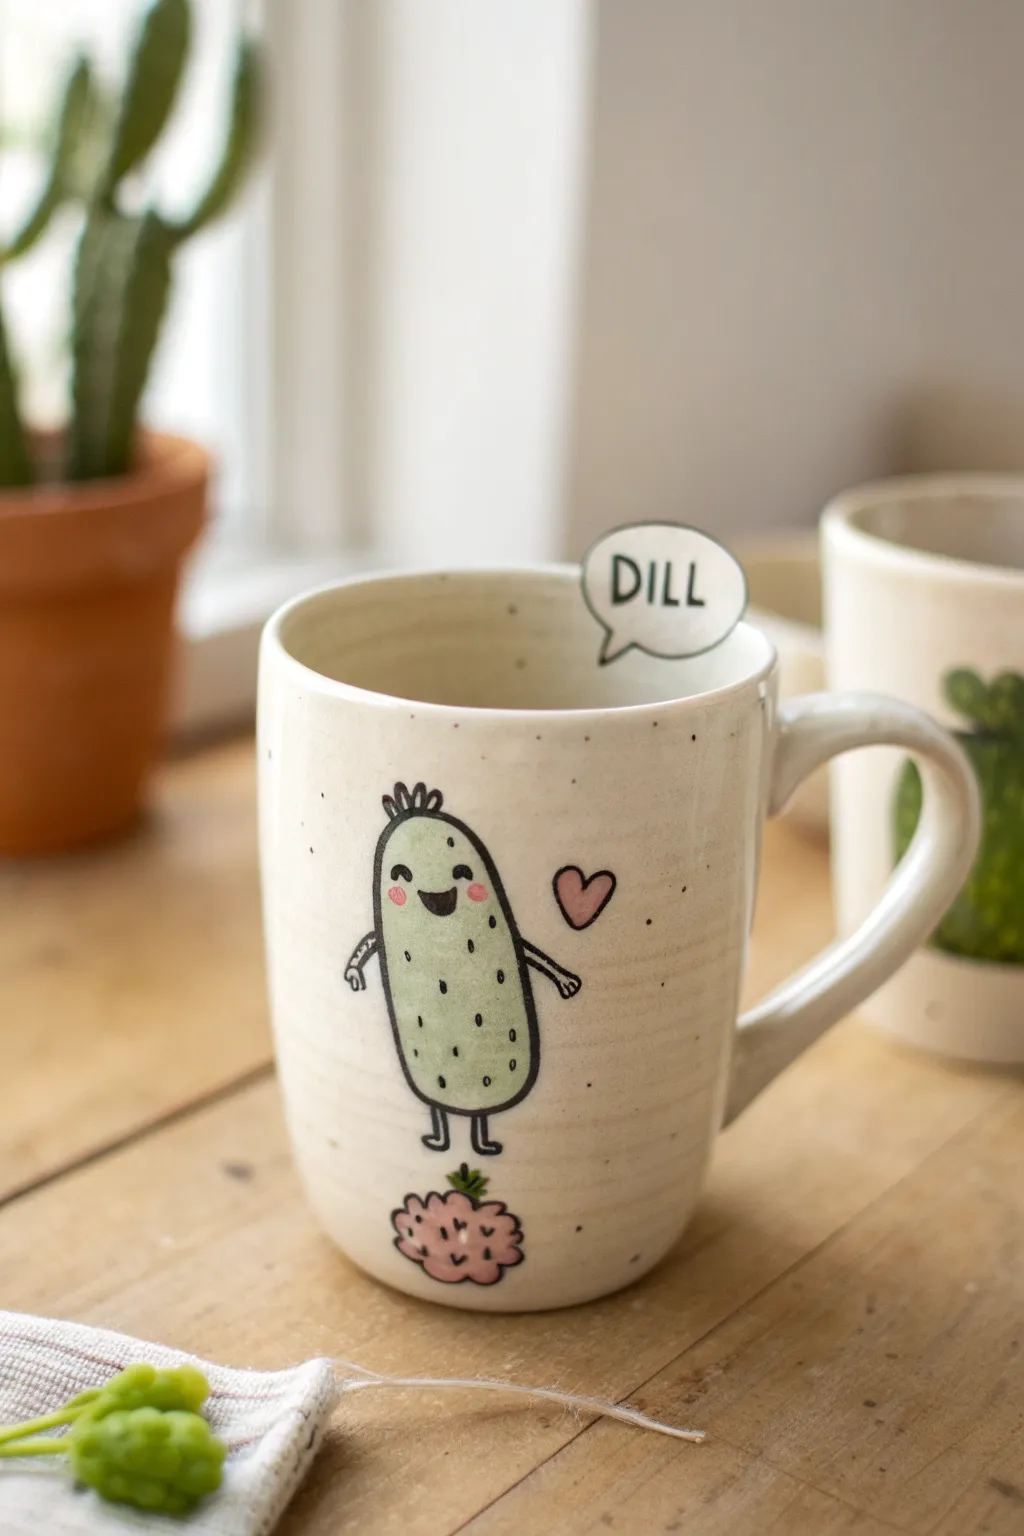
Add a dose of salty humor to your morning routine with this adorable talking pickle mug. This design features a whimsical pickle character standing triumphantly over a pink flower, complete with a quirky speech bubble on the inner rim.
Step-by-Step
Materials
- Bisque fired ceramic mug (smooth surface ideal)
- Underglazes: Light Olive Green, Dark Green, Blush Pink, Black
- Pencil (No. 2 or lighter)
- Detail brush (size 0 or 00)
- Small round brush (size 2 or 4)
- Clear dipping glaze
- Damp sponge
- Optional: Black underglaze decal sheet (for lettering)
Step 1: Preparation & Sketching
-
Clean surface:
Wipe down your bisque mug with a damp sponge. This removes any dust that might prevent the glaze from adhering properly. -
Plan the placement:
Visualize the center of the mug face. You want the pickle to be the main event, floating slightly above the bottom edge. -
Lightly sketch:
Using a pencil, draw a tall, rounded oblong shape for the pickle’s body. Don’t worry about perfection; pencil lines burn off in the kiln. I find a slightly wiggly line adds character. -
Add limbs and features:
Sketch two thin arms reaching out and two simple legs at the bottom. Mark the placement for the eyes and a wide, open smile. -
Draw the flower base:
Directly under the pickle’s feet, sketch a fluffy cloud-like shape for the pink flower or berry he’s standing on. -
Outline the speech bubble:
Move to the upper rim. Draw a speech bubble shape that actually goes *over* the rim, so part of it rests on the inside of the mug.
Step 2: Blocking in Color
-
Paint the body:
Using the light olive green and a small round brush, fill in the pickle shape. Apply 2-3 coats for solid opacity, letting each coat dry until matte before adding the next. -
Color the cheeks:
Dip a detail brush or a Q-tip into blush pink. Dab two small circles onto the pickle’s cheeks while the green is dry. -
Fill the flower:
Use the same blush pink to fill in the flower shape at the bottom. Again, aim for 3 coats for a nice, solid pastel look. -
Add the heart:
To the right of the pickle, paint a small, floating heart using the blush pink underglaze. -
Whiten the bubble:
If your mug clay isn’t naturally white, paint the speech bubble area with white underglaze to make the text pop later.
Smudged Lines?
If you smudge a black line, let it dry completely. Then, gently scratch the mistake off with a wooden toothpick or a stiff clean brush before reapplying.
Step 3: Fine Details & Linework
-
Mix lining color:
Prepare your black underglaze. If it’s too thick, thin it slightly with water until it has an ink-like consistency for smooth lining. -
Outline the body:
With your finest detail brush (size 0), carefully outline the green pickle. Use shaky, deliberate strokes to give it that hand-drawn, illustrative feel. -
Draw the face:
Paint two small black arches for closed, happy eyes and a curved line for the mouth. Fill in the mouth shape if you want a wide smile. -
Add texture:
Dot small vertical dashes or dots all over the green body to simulate pickle bumps. Add a little tuft of hair or a stem on top. -
Outline the extras:
Outline the pink flower, the floating heart, and the speech bubble. Don’t forget the little leaf detail on the flower. -
Letter the bubble:
Carefully paint the word ‘DILL’ inside the speech bubble. Steady your hand by resting your pinky on the mug surface.
Add a Surprise
Paint a tiny pickle slice or seeds at the bottom *inside* the mug so the drinker reveals it as they finish their coffee or tea.
Step 4: Finishing
-
Check for mistakes:
Use a clean, damp stiff brush or a specialized cleanup tool to gently scratch off any stray paint specks. -
Glaze and fire:
Once fully dry, dip the entire mug into a clear glaze. Fire according to your studio’s instructions (usually Cone 06 for bisque painting).
Enjoy your new mug that proves pottery can be a pretty big dill
Trompe-l’Œil Popcorn Bowl That Lies to Everyone
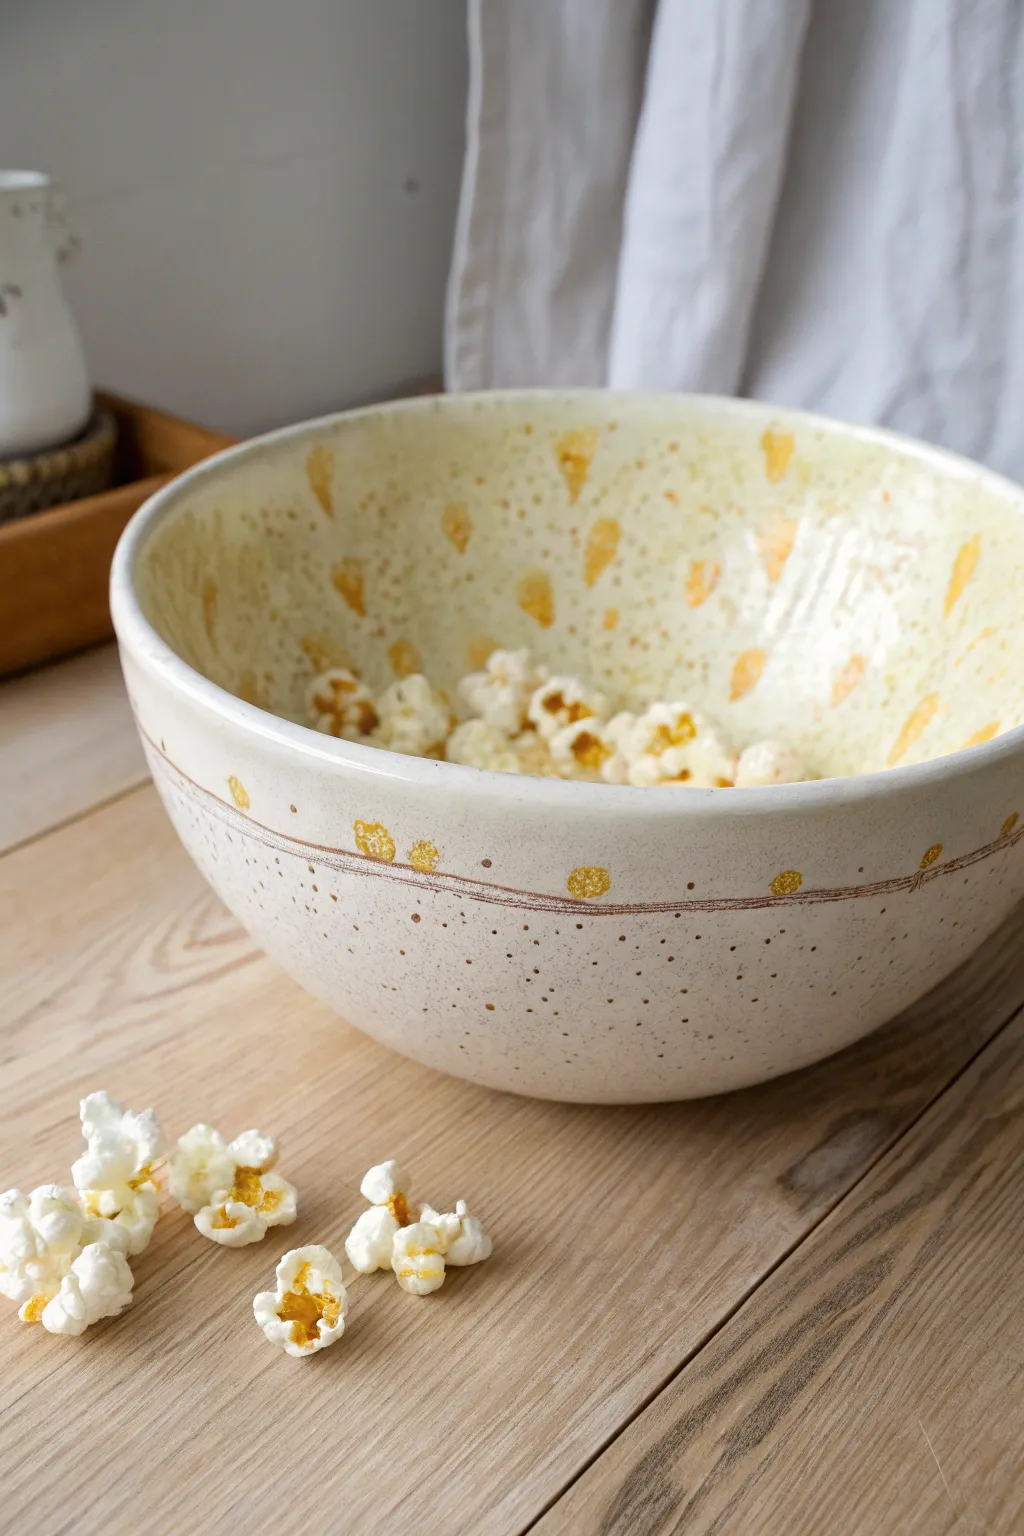
Prank your snack guests with this delightful optical illusion bowl that looks partially filled even when it’s empty. By painting realistic popcorn kernels on the interior walls, you’ll create a fun trompe-l’œil effect that perfectly matches your movie night treats.
Step-by-Step Tutorial
Materials
- Bisque-fired ceramic bowl (medium to large size)
- Underglazes: Creamy White, Butter Yellow, Golden Orange, Chocolate Brown
- Clear transparent glaze
- Fan brush (for base coats)
- Small round brush (size 2 or 4)
- Detail liner brush
- Natural sea sponge (optional)
- Palette or tile for mixing
- Water cup and sponge
Step 1: Base Preparation
-
Clean the bisque:
Start by wiping down your bisque bowl with a slightly damp sponge to remove any kiln dust or oils from your hands, ensuring the glaze adheres properly. -
Apply the interior base:
Using a fan brush, apply 2-3 coats of a creamy white underglaze to the entire inside of the bowl. Allow each coat to dry until it’s chalky to the touch before adding the next. -
Coat the exterior:
Continuing with the creamy white underglaze, apply the same 2-3 coats to the exterior of the bowl so the background color is uniform inside and out. -
Speckle effect (Optional):
If your clay body isn’t naturally speckled, you can flick a toothbrush loaded with watered-down brown underglaze lightly over the interior and exterior to mimic the natural stoneware look shown in the photo.
Step 2: Painting the Popcorn Illusion
-
Map out the kernels:
Vizualize where your popcorn pieces will ‘stick’ to the bowl. You want a random scattering, mostly concentrated on the upper half of the inner walls. -
Paint kernel silhouettes:
Using your small round brush and the Creamy White (or a slightly lighter white if available), paint cloud-like, fluffy popcorn shapes over your dried base coat. I find that making them slightly irregular adds to the realism. -
Add the butter flavor:
Take your Butter Yellow underglaze and dab it onto the erratic curves of your white popcorn shapes. Don’t cover the whole shape; just highlight the ‘puffed’ areas. -
Deepen the details:
Switch to Golden Orange underglaze. Add tiny, sharp accents within the yellow areas to represent the crunchy hull parts of the popcorn and the deepest crevices where the ‘butter’ settles. -
Scattered crumbs:
Use the tip of your brush or a small sponge to dab tiny yellow and orange specks randomly between the larger kernel shapes, simulating the delicious salt and crumbs that coat a well-used popcorn bowl.
Natural Texture
Use a torn piece of natural sea sponge instead of a brush to apply the yellow ‘butter’ patches. It creates an organic, uneven texture that looks much more like real food.
Step 3: Exterior Details & Finishing
-
Draw the rim line:
On the outside of the bowl, about two inches up from the bottom, use a detail liner brush and watered-down Chocolate Brown underglaze to paint a thin, slightly wavy horizontal line encircling the bowl. -
Add decorative dots:
Dip a round brush handle or a small brush into your Golden Orange or Butter Yellow. Press dots along the brown line you just painted, spacing them irregularly for a rustic feel. -
Speckle the bottom:
Add a few more scatterings of tiny brown or orange dots on the exterior below the line to tie the outside design to the messy, buttery interior. -
Clear glaze application:
Once all underglaze details are bone dry, apply a coat of clear transparent glaze over the entire piece. Ensure the coating is even to prevent cloudiness. -
Final fire:
Refire the piece in the kiln according to the clear glaze manufacturer’s instructions (usually cone 06 or cone 5/6 depending on your clay).
Smudged Details?
If your orange details are bleeding into the yellow, the underglaze is likely too wet. Let the yellow layer dry completely for 10-15 minutes before adding the darker hull accents.
Fill your new bowl with real popcorn and watch guests double-take as they reach the bottom
Fake Coffee Spill That Looks Like a Disaster
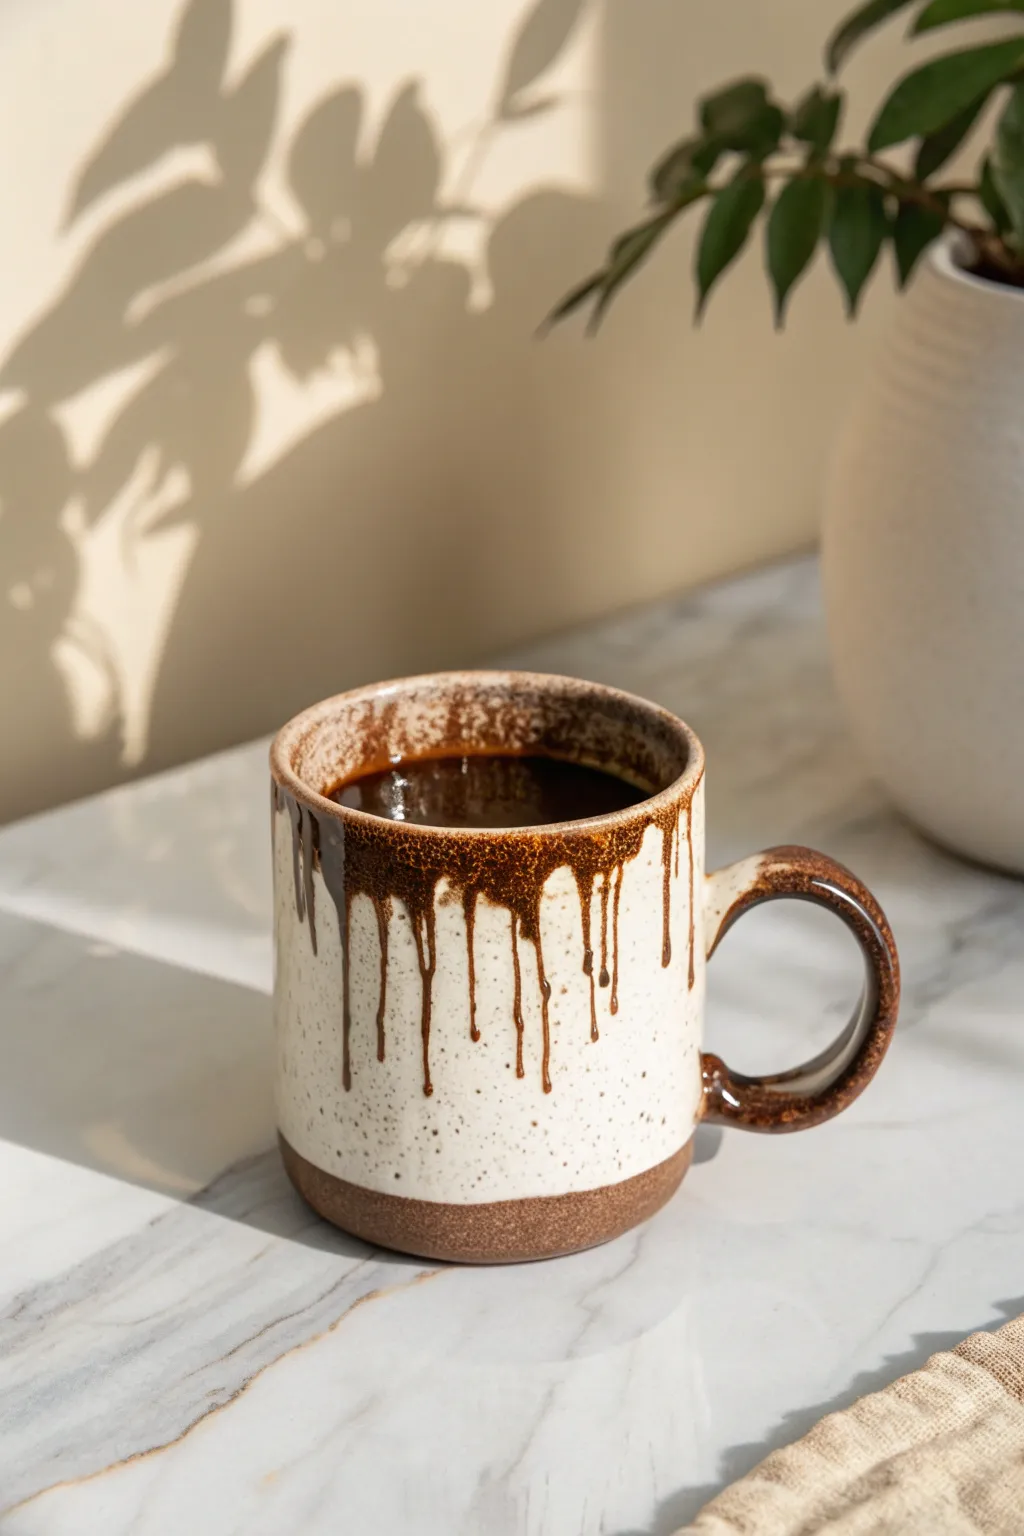
Prank your guests or just enjoy the perpetual suspense of a spill that never happens with this clever drip-glaze mug. Using a thick, dark glaze application, you’ll freeze that heart-stopping moment of coffee overflowing the rim forever.
Step-by-Step Guide
Materials
- Bisque-fired ceramic mug (straight-sided preferred)
- Cream or speckled white underglaze/glaze (base)
- Dark coffee-brown gloss glaze
- Soft fan brush
- Small round detail brush
- Sponge
- Water cup
- Wax resist (optional but recommended)
Step 1: Base Preparation
-
Wipe it down:
Start by using a slightly damp sponge to wipe down your bisque mug, removing any dust or debris that could interfere with glaze adhesion. -
Create the raw bottom:
For that earthy, modern look seen in the photo, leave the bottom half-inch of the mug unglazed. You can either apply wax resist to this band or simply paint carefully above an imaginary line. -
Apply the base coat:
Load your fan brush with the cream or speckled white glaze. Apply the first coat horizontally around the body of the mug, stopping cleanly at your bottom line. -
Layer up opacity:
Once the first coat is dry to the touch, apply a second and third coat of the white base glaze. Alternate the direction of your brush strokes (horizontal then vertical) to ensure smooth, opaque coverage without streaks. -
Speckle effect (optional):
If your white glaze doesn’t have speckles built-in, you can create them now. Dip a stiff toothbrush in a tiny amount of diluted brown or black underglaze and flick the bristles to spray fine dots over the white surface. Let this dry completely.
Drip too runny?
Glaze moves in the kiln! Don’t paint your drips all the way to the bottom. Stop them at least an inch above the base, or gravity will cause them to run onto the shelf during firing.
Step 2: The Spill Effect
-
Rim foundation:
Now for the coffee! Take your dark brown gloss glaze and paint a solid, generous band around the very top rim of the mug, about half an inch wide. Make sure you also coat the inside lip for realism. -
Plan your drips:
Look at the mug and decide where your ‘major’ spills will be. The reference photo shows varied lengths—some drips travel halfway down, while others are just small bumps on the rim. -
Load the drip brush:
Switch to your small round detail brush. Load it heavily with the dark brown glaze—you want a bead of glaze on the tip, not just a wet brush. -
Start the flow:
Place your loaded brush at the bottom edge of the brown rim band. Press gently and drag downward to create a trail. For the end of the drip, deposit a thicker glob of glaze by holding the brush in place for a second before lifting off. -
Vary the lengths:
Continue around the mug, creating drips of different lengths. I generally try to avoid a uniform picket-fence look by grouping two long drips together, followed by a few short nubs. -
Enhance the thickness:
To make the spill look viscous like real coffee, go back over your drip lines with a second coat of brown glaze. Add extra glaze specifically to the rounded bottom of each drip to create a raised, tactile droplet effect. -
Handle spills:
Don’t forget the handle! Paint the top curve of the handle dark brown and add a small drip or two running down the side where the coffee might have sloshed over your hand.
Level Up: Latte Art
For the ultimate realism, paint the inside bottom of the mug with a splash of brown, so it looks like dregs of coffee are left even when empty.
Step 3: Finishing and Firing
-
Clean the distinct line:
Check the bottom edge where your white glaze meets the unpainted clay. If any stray marks crossed the line, use a damp sponge or a clean brush to tidy up that edge for a crisp finish. -
Inspect the foot:
Flip the mug over and ensure absolutely no glaze is on the very bottom foot ring. Any glaze here will fuse your mug to the kiln shelf, ruining both. -
Dry thoroughly:
Let the piece dry completely. The thick ‘drip’ areas will take longer to dry than the rest of the mug, so give it extra time. -
Clear glaze (if needed):
If you used underglazes rather than gloss glazes, apply a clear dipping glaze over the entire interior and exterior (except the unglazed foot). If you used gloss glazes, skip this step. -
Fire it:
Load into the kiln and fire according to your clay and glaze specifications (likely Cone 06 or Cone 6). The heat will fuse the drips, making them permanent and shiny.
Once fired, you’ll have a permanently messy mug that is sure to start conversations at your next coffee break
Tiny Comic Strip Wrapped Around a Mug
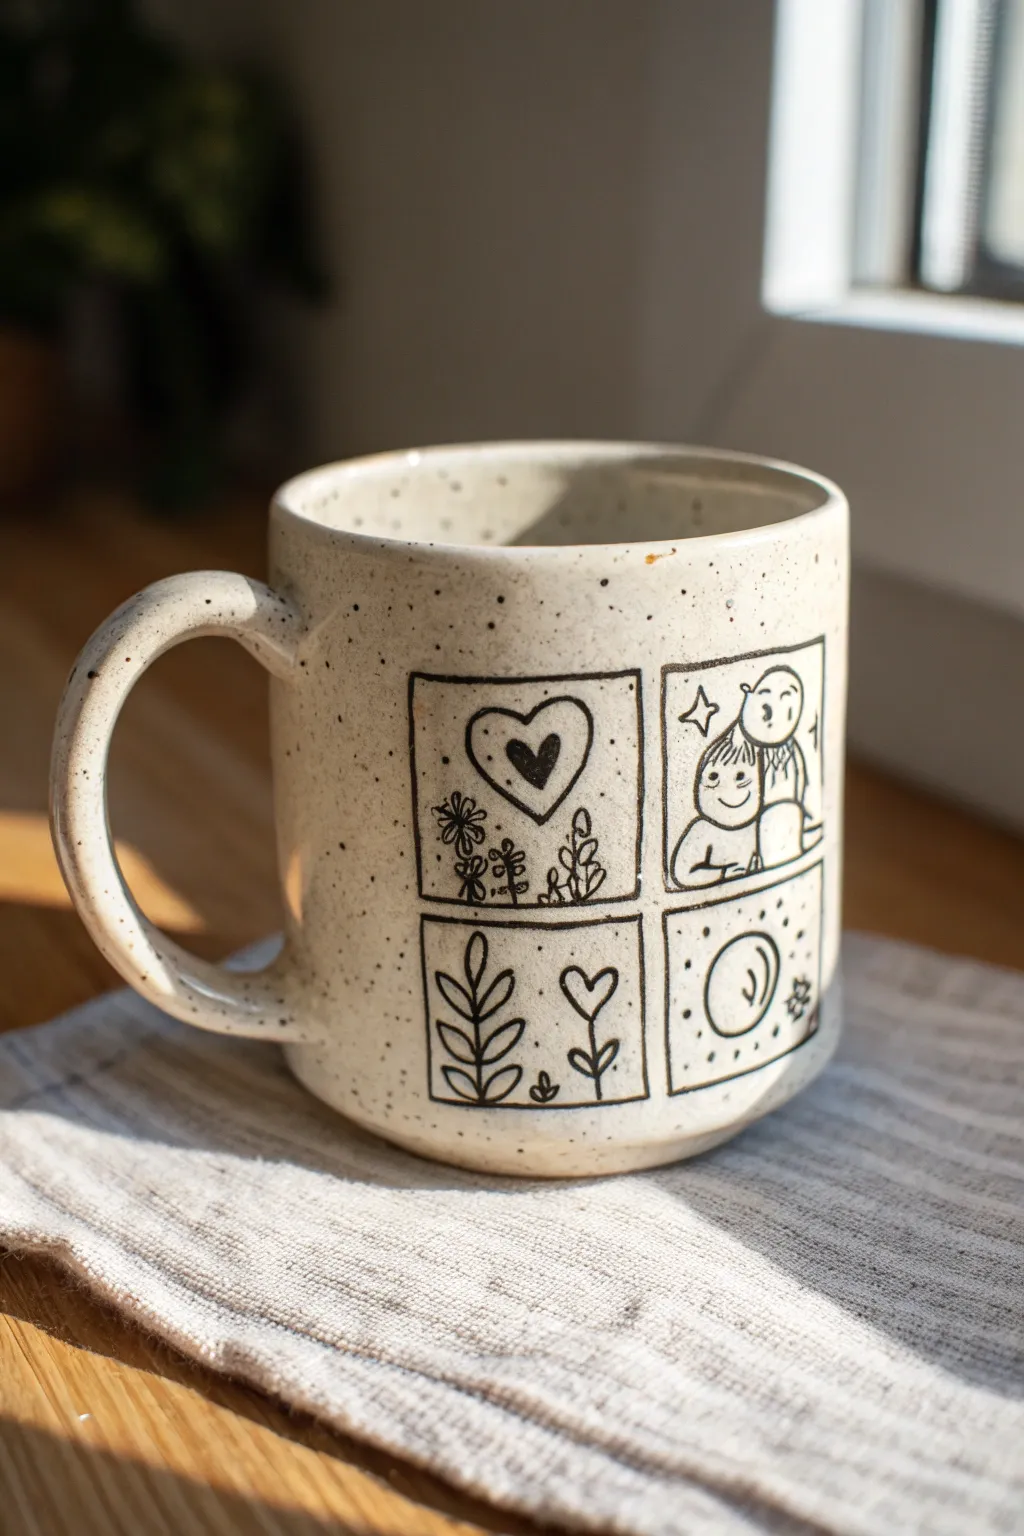
Capture sweet, simple moments with this comic-strip style design featuring four distinct panels of hand-drawn illustrations. The black slip trailing creates a satisfyingly tactile, raised line that contrasts beautifully against the creamy, speckled clay body.
How-To Guide
Materials
- Bisque-fired ceramic mug (preferably speckled clay body)
- Black underglaze transfer or fine-tip underglaze applicator bottle
- Underglaze pencil (optional, for sketching)
- Clear matte or glossy dipping glaze
- Damp sponge
- Clean intricate brush (size 0 or 00)
- Plain paper and pencil for drafting
Step 1: Drafting the Comic Strip
-
Measure the canvas:
Before touching the mug, measure the height and circumference of the flat area on the side of your bisque mug to determine how large your grid should be. -
Sketch on paper:
Draw a 2×2 grid on a piece of scrap paper based on your measurements. This will be your blueprint. -
Plan the scenes:
Sketch your four scenes: a large heart with flowers, two smiling figures under a star, a sprouting plant, and a moon circle. Keep the lines simple and bold, as detail is harder to achieve with glaze. -
Transfer the grid:
Using a light touch with a regular pencil or specialty underglaze pencil, lightly draw the outer square boundary and the internal cross lines directly onto the bisque mug.
Clogged Tip?
If your applicator bottle keeps clogging, use a sewing needle or thin wire to clear the tip. Don’t squeeze harder or it might explode over your art.
Step 2: Applying the Design
-
Prepare the applicator:
Fill a fine-tip bulb applicator or needle-tip bottle with black underglaze. Ensure distinct flow consistency—it should act like heavy cream, not water. -
Test the flow:
Squeeze a small amount of underglaze onto a paper towel or test tile to ensure no air bubbles sputter out and ruin your line. -
Outline the boxes:
Carefully trace the main grid lines first. Use a steady, even pressure to keep the line thickness consistent. I find resting my pinky on the mug helps stabilize my hand. -
Draw the heart panel:
In the top-left box, draw a central heart with a smaller solid heart inside. Add simple flower stems with circular petals to the left and leafy sprigs to the right. -
Create the characters:
In the top-right box, draw two simple, rounded figures. Focus on the smiling faces and oval heads, adding a small four-point star in the background. -
Detail the garden scene:
Move to the bottom-left square. Draw a central stem with paired leaves climbing up, and add a smaller heart-flower hybrid next to it. -
Finish with the moon:
In the final bottom-right box, draw a circle with a crescent shape inside to imply a moon, surrounding it with tiny dots and a small star.
Step 3: Refining and Glazing
-
Let it dry completely:
Allow the black underglaze to dry until it is chalky and matte. This prevents smudging during cleanup. -
Clean up mistakes:
If any lines are too thick or shaky, use a clean, slightly damp paintbrush or a needle tool to gently scrape away or tidy the edges of the black lines. -
Sponge the rim:
Wipe down the rim and the handle area with a damp sponge to remove any unintentional smudges or dust from the sketching process. -
Dipping glaze:
Using dipping tongs, submerge the entire mug into a clear glaze bucket (transparent or semi-transparent works best to see the speckles). -
Shake off excess:
Hold the mug upside down for a few seconds and give it a gentle shake to remove excess glaze drips. -
Wipe the foot:
Thoroughly clean the bottom foot ring of the mug with a sponge so it doesn’t stick to the kiln shelf. -
Final fire:
Fire the mug in the kiln according to the clay and glaze specifications (usually Cone 5 or 6 for stoneware).
Make it Personal
Swap the generic characters for stick-figure versions of your own family or pets, and change the moon to a sun for a ‘morning mug’ vibe.
Enjoy sipping your morning coffee while admiring your hand-drawn comic strip
Plate That Roasts Your Cooking Skills
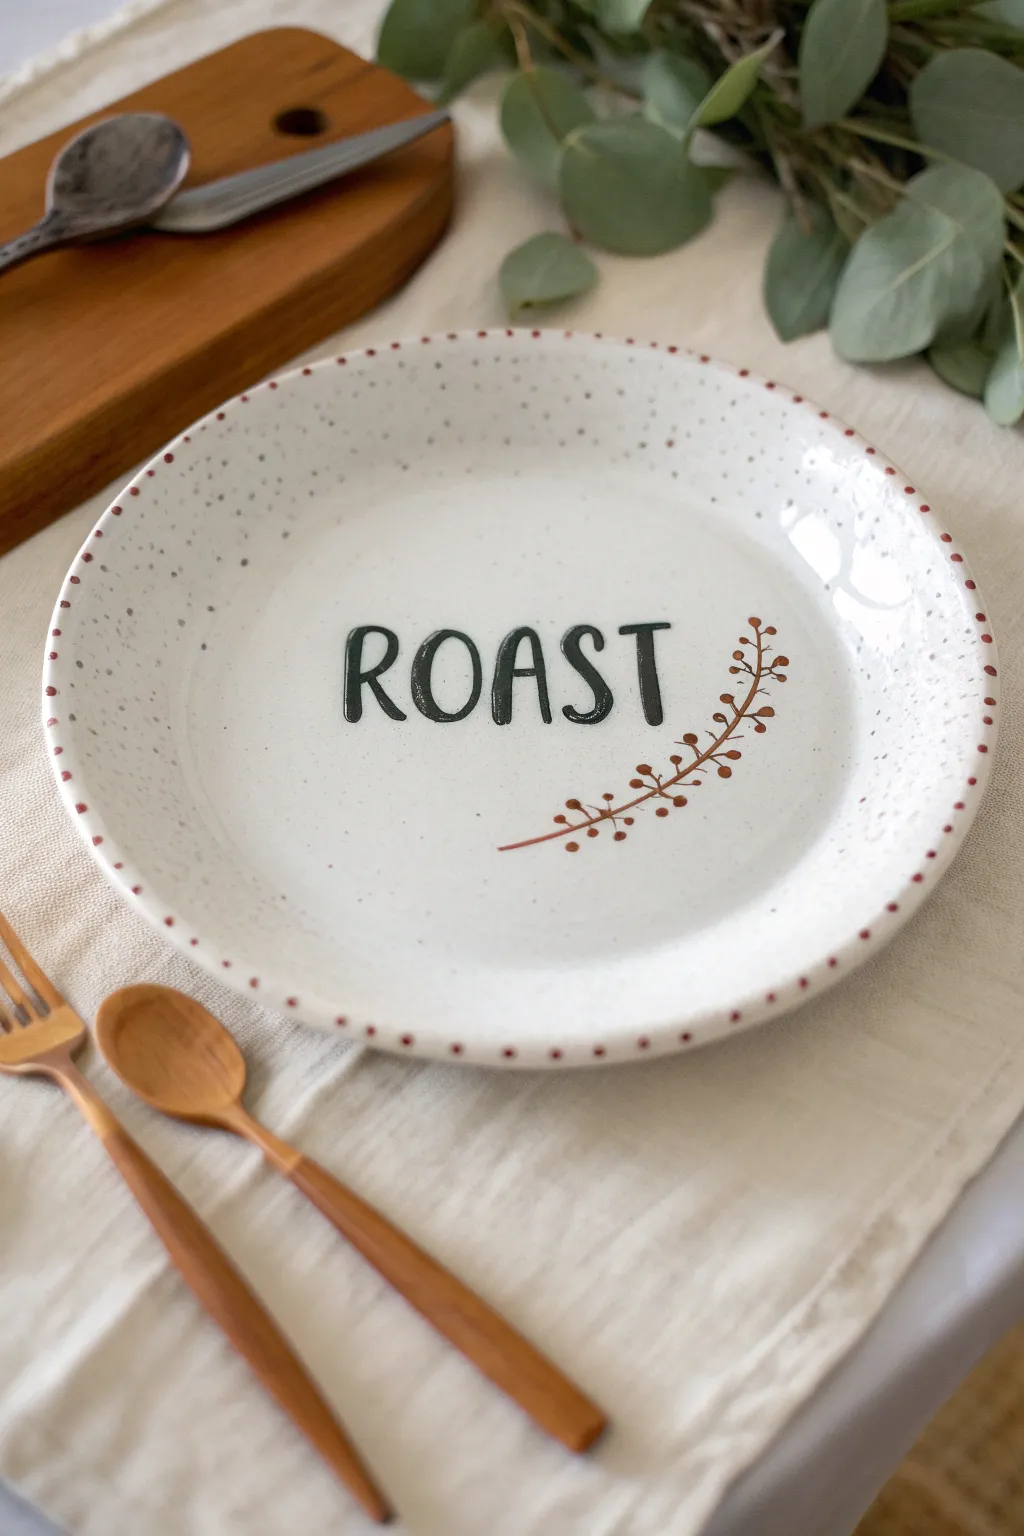
Embrace a bit of kitchen humor with this minimalist design that gets straight to the point. Featuring a creamy speckled base and playful typography, this project combines rustic charm with a cheeky nod to whatever happens to be on the menu.
Step-by-Step
Materials
- Bisque fired ceramic plate or shallow bowl
- Speckled cream or white underglaze (e.g., ‘Speckled Toad’ or similar)
- Black underglaze (for lettering)
- Rust or terracotta brown underglaze (for the branch)
- Small round detail brush (size 1 or 2)
- Sponge
- Water bowl and pencil
- Clear dipping glaze
Step 1: Base Preparation
-
Clean the bisque:
Start by wiping down your bisque plate with a damp sponge. This removes any kiln dust or oils from your hands that might prevent the glaze from adhering properly. -
Apply the base coat:
Stir your speckled cream underglaze thoroughly to ensure the little speckles are evenly distributed. Apply 3 generous coats to the entire top surface of the plate using a soft fan brush. -
Let it dry:
Allow each coat to dry until it loses its sheen before applying the next one. This prevents you from accidentally pulling up the previous layer of paint.
Step 2: Lettering
-
Sketch the word:
Once the base is dry to the touch, lightly sketch the word ‘ROAST’ in the center of the plate using a standard pencil. Don’t worry about marks; the graphite will burn off in the kiln. -
Refine the font:
Aim for a tall, narrow, hand-lettered style. The letters should be slightly uneven to maintain that organic, handmade feel. -
Paint the outline:
Dip your fine detail brush into black underglaze. Carefully trace the outline of your pencil letters. Keep your hand steady and your paint consistency creamy, like melted ice cream. -
Fill in the letters:
Gently fill in the body of the letters with the black underglaze. You might need a second coat here to ensure the black is solid and opaque.
Lettering Pro-Tip
Turn the plate upside down when painting tricky curves of letters like ‘S’ or ‘R’. Pulling the brush toward you is often easier than pushing it away.
Step 3: Botanical Details
-
Draw the stem:
Using your rust or terracotta underglaze, paint a thin, curved line starting from below the ‘T’ and arching up towards the right rim. -
Add stem offshoots:
Paint tiny, short lines branching off the main stem. Keep them irregular—nature isn’t perfectly symmetrical. -
Paint the berries:
At the end of each small branch, dab a small dot of the rust color to create little berries or buds. Vary the pressure to make some dots slightly larger than others.
Level Up: Texture
After the main ‘ROAST’ text dries, use a pin tool to gently scratch thin white lines inside vertical strokes of the letters for a vintage, weathered look.
Step 4: Rim Decoration
-
Plan the spacing:
Visualize a simple dotted pattern around the rim. You don’t need to measure; eyeball the spacing to keep it casual. -
Dot the rim:
Using the handle end of a paintbrush dipped in rust underglaze, dot the very edge of the plate rim. Re-dip frequently to keep the dots relatively uniform in size. -
Check for consistency:
Work your way around the entire circumference. If a dot looks too light, just dab it again while the paint is wet.
Step 5: Final Steps
-
Clean up splatters:
Check the white space for any accidental smudges or stray specks of black or rust. Scratch them off gently with a toothpick or clean with a damp brush. -
Final drying:
Let the entire piece dry completely for at least 24 hours to ensure all moisture has evaporated. -
Glaze and fire:
Dip the plate in a clear transparent glaze and fire it according to your clay body’s instructions (usually cone 06 or cone 6).
Now you have a charming piece of serveware ready to debut at your next Sunday dinner
“Close Enough” Measurement Marks on a Mixing Bowl
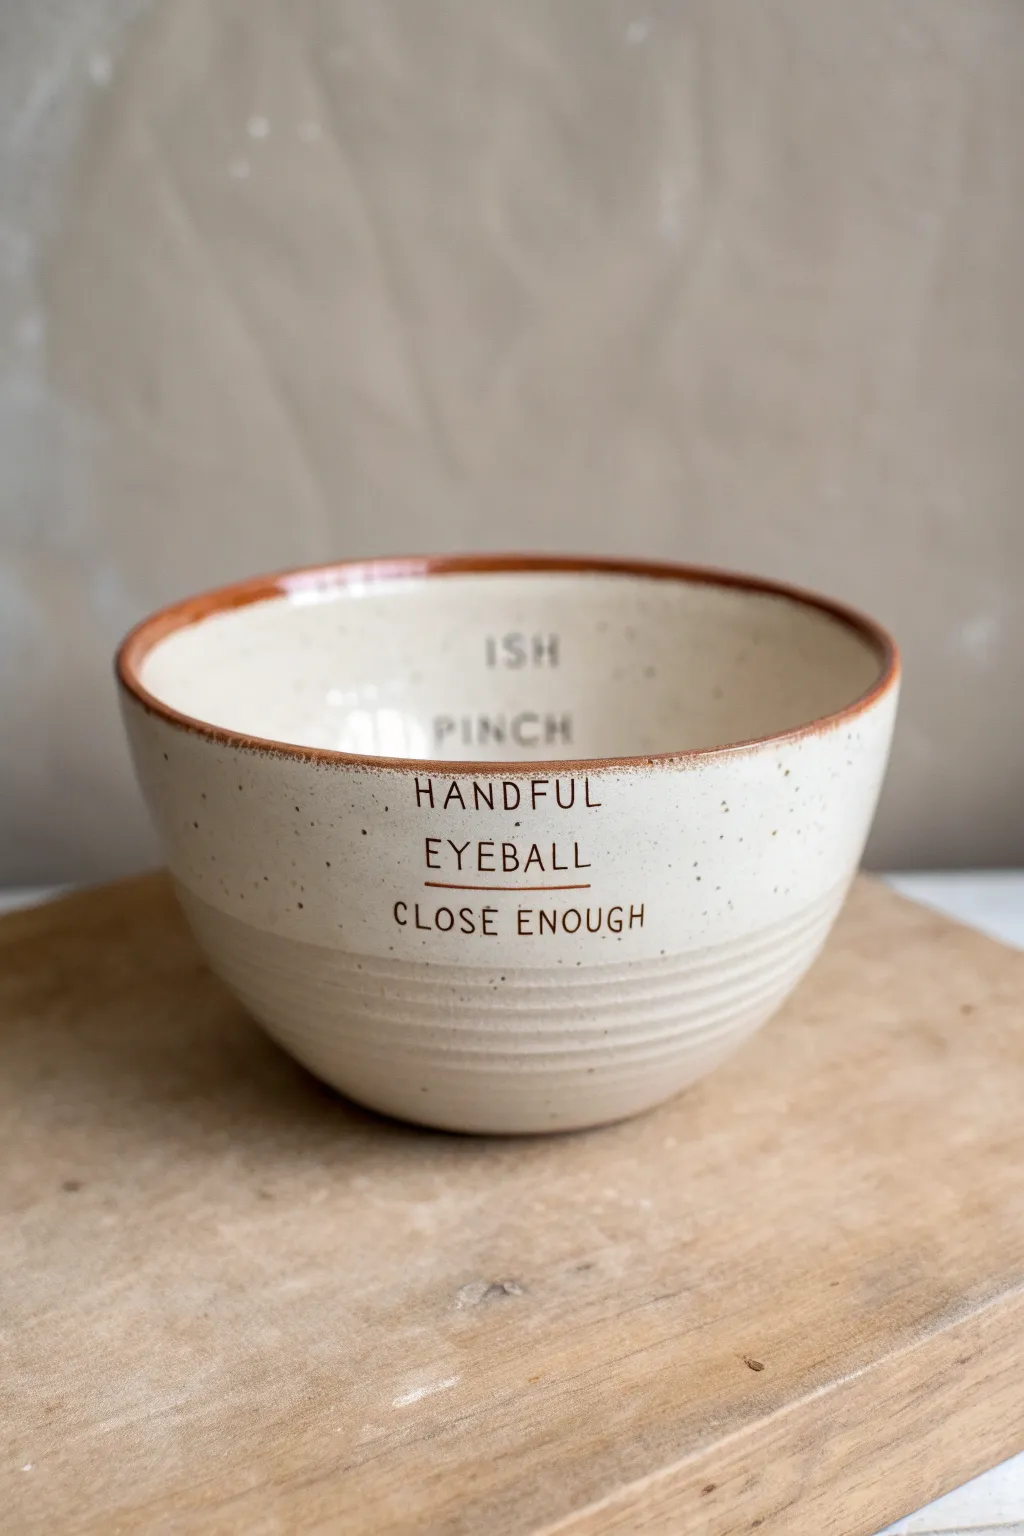
This witty project transforms a standard ceramic bowl into a baker’s best friend—or perhaps their honest accomplice. With its charmingly imprecise measurements stamped or hand-lettered onto a speckled cream glaze, this bowl celebrates the intuitive art of cooking over exact science.
Step-by-Step Tutorial
Materials
- Bisque-fired ceramic bowl (medium to large size)
- Cream or off-white speckled ceramic glaze (underglaze or dipping glaze)
- Chocolate brown or rust-colored underglaze
- Clear dipping glaze (if using underglazes)
- Small letter stamps (rubber or foam)
- Thin liner brush (size 0 or 1)
- Fan brush or wide soft mop brush
- Sponge
- Lazy Susan or pottery banding wheel
- Pencil
Step 1: Preparation and Base Glaze
-
Clean the bisque:
Start by wiping down your bisque-fired bowl with a damp sponge. This removes any dust or oils from handling that might resist the glaze. -
Apply the base color:
Using a fan brush, apply three even coats of your cream speckled glaze to the entire bowl. Allow each coat to dry until it loses its sheen before applying the next. -
Check for coverage:
Ensure the glaze is opaque and even. If you notice any thin spots, dab a little extra glaze there and smooth it out. -
Dry completely:
Let the base glaze dry completely. It should be chalky and dry to the touch before you attempt any lettering.
Smudged Stamp?
Don’t wipe wet underglaze immediately! Let the mistake dry completely, then gently scratch it off with a needle tool before repatching the base color.
Step 2: Adding the ‘Measurements’
-
Plan your spacing:
Place the bowl on a banding wheel. Lightly mark where your text lines will go using a pencil. Don’t worry, the graphite will burn off in the kiln. -
Stamp preparation:
Pour a small amount of the chocolate brown underglaze onto a palette or tile. Lightly press your letter stamps into the underglaze, ensuring even coverage without globs. -
Stamp the interior:
Starting near the top rim on the inside, carefully stamp the word ‘ISH’. Below that, stamp ‘PINCH’. Steadiness is key here. -
Stamp the exterior:
Now move to the outside. Align your first word, ‘HANDFUL’, just below the rim area. Leave a vertical gap and stamp ‘EYEBALL’ below it. -
Add the final line:
For the last tier, stamp ‘CLOSE ENOUGH’ near the bottom third of the bowl. Check that your vertical alignment looks pleasingly centered. -
Draw the rim:
Dip your liner brush into the brown underglaze. Hold the brush steady against the rim while slowly spinning the banding wheel to create a smooth, continuous brown line along the top edge. -
Add the divider lines:
Using the same steady hand and spinning technique, paint thin horizontal lines under ‘HANDFUL’ and ‘EYEBALL’. These mimic traditional measuring cup markers.
Step 3: Finishing Touches
-
Creating texture:
The bottom half of the bowl in the image has subtle ridges. If your bisque didn’t have this texture, you can simulate it by painting faint, parallel rings with a diluted version of your cream glaze on the lower half. -
Clean up smudges:
If any stamping went awry, use a clean, slightly damp brush or a scratch tool to gently scrape away the mistake. Then, patch the area with a dab of base glaze. -
Clear glaze application:
If you used underglaze for the text on top of a base glaze, you generally don’t need a clear coat unless your base is matte. However, if you painted on raw bisque, dip the entire bowl into a clear dipping glaze now. -
Check the foot:
Wipe the bottom foot ring of the bowl completely clean with a sponge. Any glaze left here will fuse the bowl to the kiln shelf. -
Final Fire:
Load the bowl into the kiln and fire it to the temperature recommended by your glaze manufacturer (usually Cone 5 or 6 for stoneware).
Speckle Upgrade
If your base glaze isn’t speckled, flick a toothbrush loaded with brown iron oxide or underglaze over the damp pot for that vintage flecked look.
Once fired, you will have a delightful kitchen accessory that reminds everyone that cooking is as much about feeling as it is about formulas
Museum Label Design for a “Precious” Snack Plate
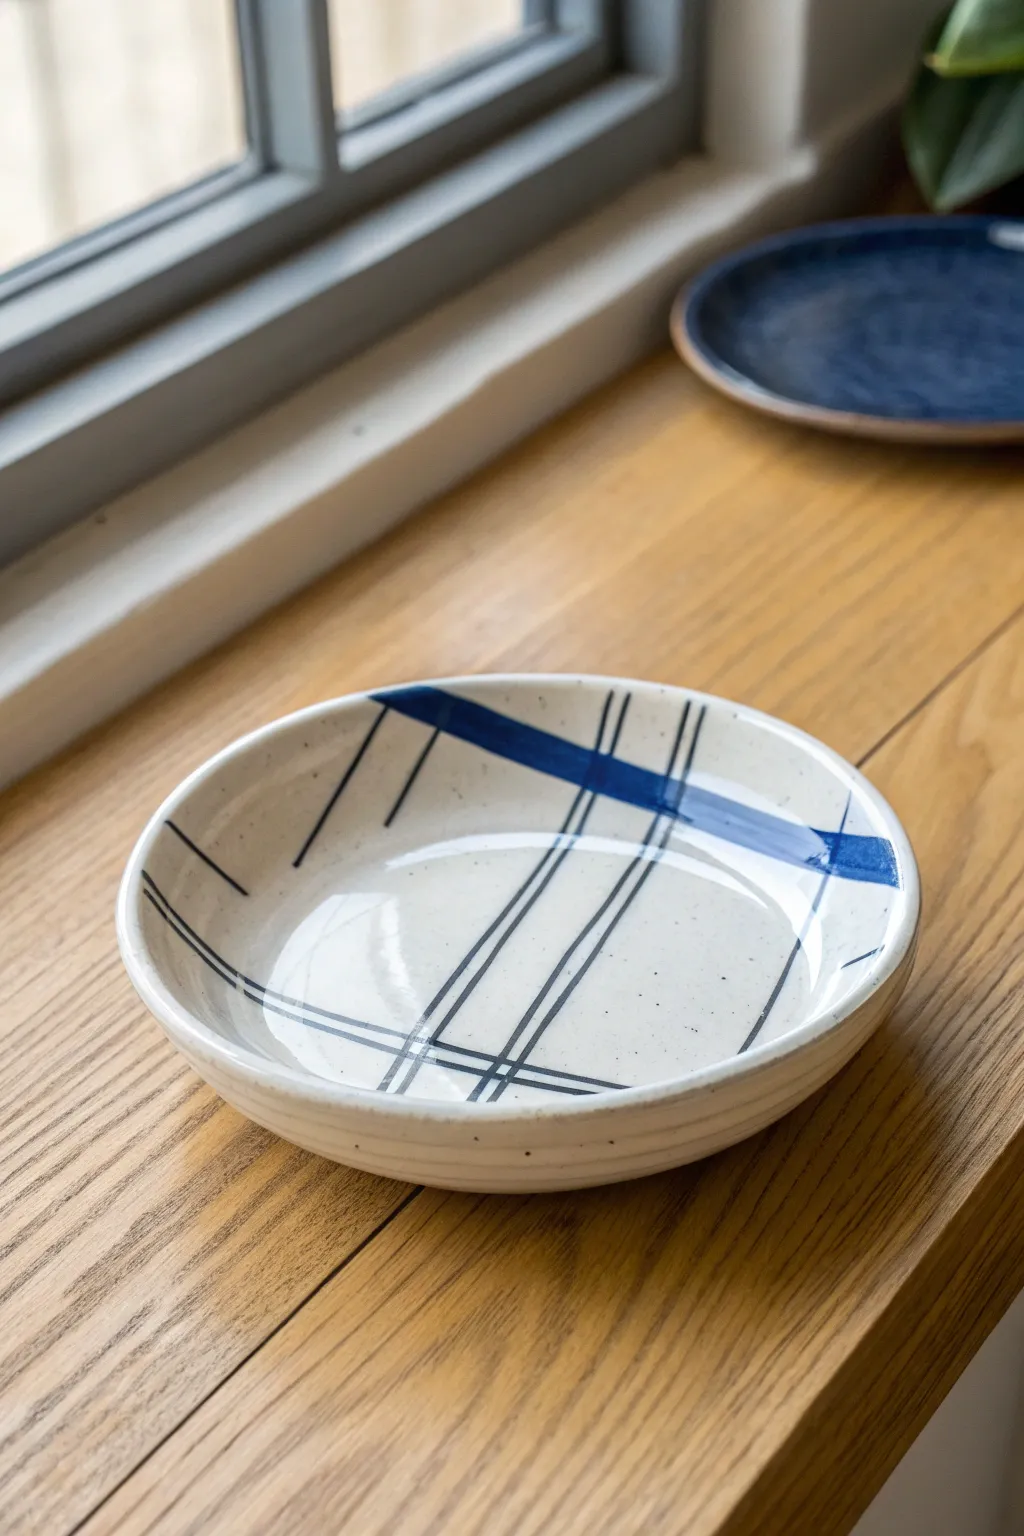
Transform a simple bisque plate into a piece of modern art with this deceptively simple linear design. Using bold cobalt stripes and delicate grid lines against a speckled background, you’ll create a sophisticated vessel perfect for display or daily snacking.
How-To Guide
Materials
- Bisque ceramic shallow bowl or plate (stoneware style preferred)
- Speckled white or cream underglaze (or clear glaze with speckles)
- Cobalt blue underglaze
- Black underglaze (or very dark blue)
- Wide flat brush (1 inch)
- Fine liner brush (size 0 or 00)
- Clean water for rinsing
- Sponge
- Clear dipping glaze (if not using gloss glazes)
Step 1: Preparation and Base Coat
-
Clean the bisque:
Begin by wiping down your bisque plate with a damp sponge. This is crucial as it removes any ceramic dust that could prevent the glaze from adhering properly to the surface. -
Mix your base glaze:
Stir your speckled white or cream underglaze thoroughly. To get that authentic stoneware look, ensure the speckles are well-distributed throughout the liquid before you start painting. -
Apply the first base coat:
Using a wide soft brush, apply a smooth, even layer of the speckled background color to the entire interior of the plate. Use long, sweeping strokes to minimize texture. -
Let it dry:
Wait until the first coat loses its sheen and is dry to the touch. This usually takes about 10–15 minutes depending on the humidity in your workspace. -
Apply subsequent layers:
Apply two more coats of the base color, allowing drying time between each. Three coats generally provide that solid, opaque coverage seen in the photo. -
Glaze the exterior:
Don’t forget the outside! Turn the plate over carefully and apply the same three coats to the exterior walls, stopping just before the foot ring if you need to leave the bottom bare for the kiln.
Use a Banker’s Trick
To get straighter lines, rest your painting hand’s pinky finger on the dry center of the plate while holding the brush. This anchors your hand and reduces shakiness.
Step 2: Designing the Grid
-
Plan the bold stripe:
Visualize where your thick blue stripe will go. In the reference image, it cuts across the upper third of the plate at a slight angle, not perfectly centered. -
Paint the cobalt band:
Load a medium flat brush with cobalt blue underglaze. With a confident hand, paint a single thick stripe across the plate. Don’t worry if the edges aren’t razor-sharp; a little organic waviness adds to the handmade charm. -
Reinforce the blue:
If your cobalt looks translucent, let it dry briefly and add a second layer right on top to ensure a deep, rich blue color after firing. -
Prepare the liner brush:
Switch to your fine liner brush and black underglaze. Thin the black paint slightly with a drop of water if it feels too thick; you want ink-like consistency for smooth lines. -
Draw the main vertical lines:
Paint two parallel lines that run perpendicular to your blue stripe. These should cross through the blue band and extend toward the bottom rim. -
Add intersecting lines:
Create the grid effect by painting two or three lines that run parallel to the blue stripe but are much thinner. Let these lines intersect the vertical ones you just painted. -
Include distinct fragments:
To mimic the fragmented look, add a few short, floating lines near the rim that don’t quite connect to the main grid. This negative space keeps the design feeling open and modern. -
Clean up interior edges:
If any lines went too far or smudged, you can gently scrape the excess dried underglaze away with a crafting knife or a stiff, damp brush for a cleaner look.
Step 3: Finishing and Firing
-
Dry completely:
Allow the entire piece to dry for at least an hour. The underglaze should be bone dry before you move to the final glazing step. -
Apply clear glaze:
If you used underglazes, the piece now needs a clear glossy coat. Dip the plate into a clear glaze bucket, or brush on two coats of brush-on clear glaze. -
Wipe the foot:
Use a wet sponge to meticulously wipe any glaze off the bottom foot ring of the plate. Any glaze left here will fuse the plate to the kiln shelf during firing. -
Final inspection:
Check for any pinholes or thick drips in the clear glaze and smooth them out with your finger. -
Fire the piece:
Fire the plate in a kiln according to your clay and glaze specifications (typically Cone 5 or 6 for stoneware durability).
Line too wobbly?
Don’t panic! Wait for the wobbly line to dry completely, then gently scratch away the mistake with a wooden toothpick. You can then repaint that section cleanly.
Once fired, you’ll have a striking piece of functional art ready for your favorite small bites
Misleading “Fancy” Pattern That Turns Into a Silly Reveal
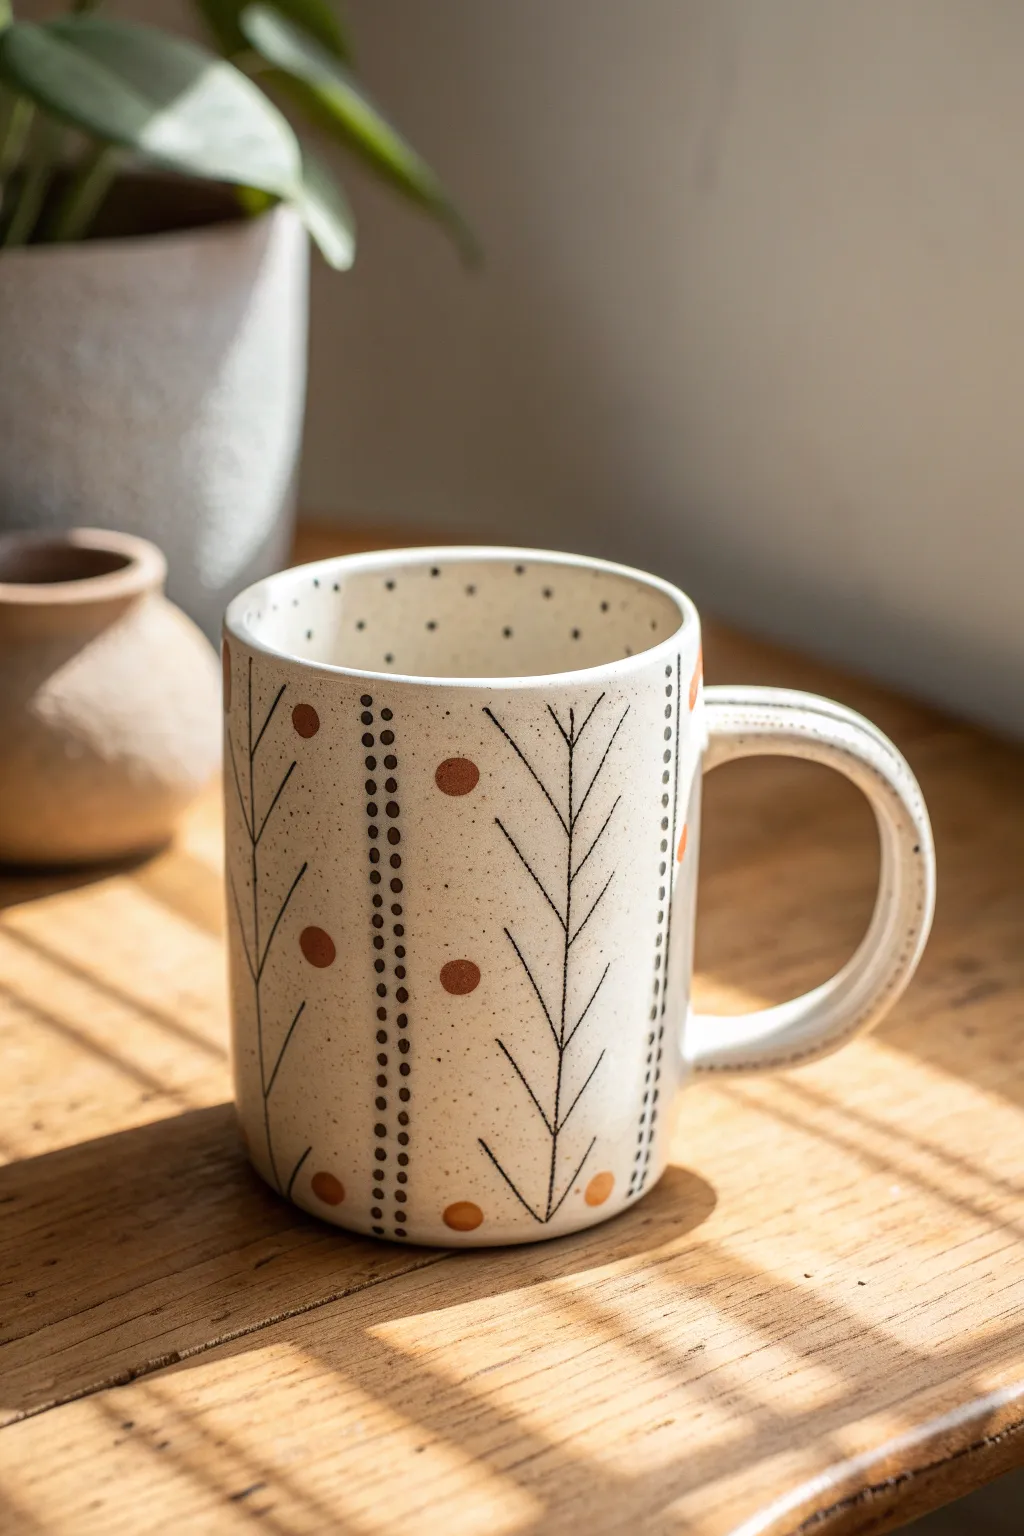
Create a deceptively elegant piece of pottery that looks like high-end decor but relies on simple, repetitive strokes. This speckled cream mug features vertical geometric branches and dotted lines, perfect for hiding a silly message on the bottom or inside rim for an unsuspecting coffee drinker.
Detailed Instructions
Materials
- Bisque ceramic mug (straight-sided cylinder shape preferred)
- Cream or off-white underglaze (speckled variety)
- Black underglaze fine-tip applicator bottle (or liner brush)
- Terracotta or warm brown underglaze
- Medium flat brush
- Small round brush or dotting tool
- Clear dipping glaze
- Pencil for sketching
- Sponge and water bowl
Step 1: Base Preparation
-
Clean the bisque:
Wipe down your entire bisque mug with a damp sponge to remove any kiln dust or oils from your hands, ensuring a clean surface for the glaze to adhere to. -
Apply base color:
Using a medium flat brush, apply three even coats of the speckled cream underglaze to the entire exterior and interior of the mug. -
Dry between coats:
Allow each coat to dry until it’s chalky to the touch before applying the next layer. Alternatively, use a fan brush to achieve a smooth, streak-free finish. -
Optional speckling:
If your cream glaze doesn’t have built-in speckles, you can flick a toothbrush loaded with watered-down brown glaze over the surface to create that organic, earthy texture.
Applicator Tip Trick
Squeeze a tiny bit of underglaze onto a paper towel first to simulate flow. This prevents a big blob from exploding onto your first branch line.
Step 2: Geometric Branch Design
-
Sketch guidelines:
Lightly sketch vertical lines with a pencil to mark where your branch patterns will go. Space them out evenly around the mug, leaving room for the dotted columns in between. -
Draft the stems:
Using the black underglaze applicator bottle or a very fine liner brush, draw the long, thin vertical lines for the main stems of your branches. -
Add upward branches:
Draw angled lines extending upward and outward from the main stem to create a ‘V’ shape branching pattern. -
Create downward branches:
In the lower section of the stem, draw the angled lines pointing downward. This mix of directions gives the pattern a rhythmic, folk-art feel. -
Check consistency:
Keep your hand steady but don’t worry about perfection; slight wobbles add to the handmade charm. I suggest resting your pinky on the mug for stability.
Smudged A Line?
Don’t panic! Once the mistake is dry, you can gently scratch the black underglaze off the cream base using a wooden skewer or needle tool.
Step 3: Dot Work & Accents
-
Paint vertical dot rows:
Between each branch column, paint two parallel vertical lines using tiny black dots. A fine-tip applicator makes this much easier than a brush. -
Spacing the dots:
Keep the dots close together to form a solid visual line structure, mirroring the verticality of the stems. -
Add terracotta accents:
Dip a small round brush or the back of a paintbrush into the terracotta underglaze. -
Place the large dots:
Stamp large, round dots randomly near the branch structures. Focus on placing them in the negative spaces rather than directly on the lines. -
Rim detailing:
Add a few tiny black dots along the very top rim of the mug for a finished look. -
Inner rim surprise:
Paint a row of tiny dots just inside the rim, or if you are following the ‘silly reveal’ theme, paint a small funny face or word at the bottom of the inside.
Step 4: Finishing Up
-
Final drying:
Let all your detailed work dry completely. The thick dots of terracotta might take a little longer than the rest. -
Clear glaze application:
Once fully dry, dip the entire mug into a clear dipping glaze using glazing tongs. -
Clean the foot:
Wipe the bottom foot of the mug clean with a wet sponge to prevent it from sticking to the kiln shelf. -
Fire the piece:
Have the mug fired in a kiln according to the clay and glaze specifications (usually cone 06 or cone 6).
Now you have a stunning, seemingly sophisticated mug that secretly holds your silly sense of humor