If you love that cozy wizard-school vibe, clay is such a fun way to turn it into little keepsakes you can actually use. Here are my go-to wizard-inspired clay ideas—mostly cute, palm-sized projects that feel magical without being complicated.
Chibi Boy Wizard Charm
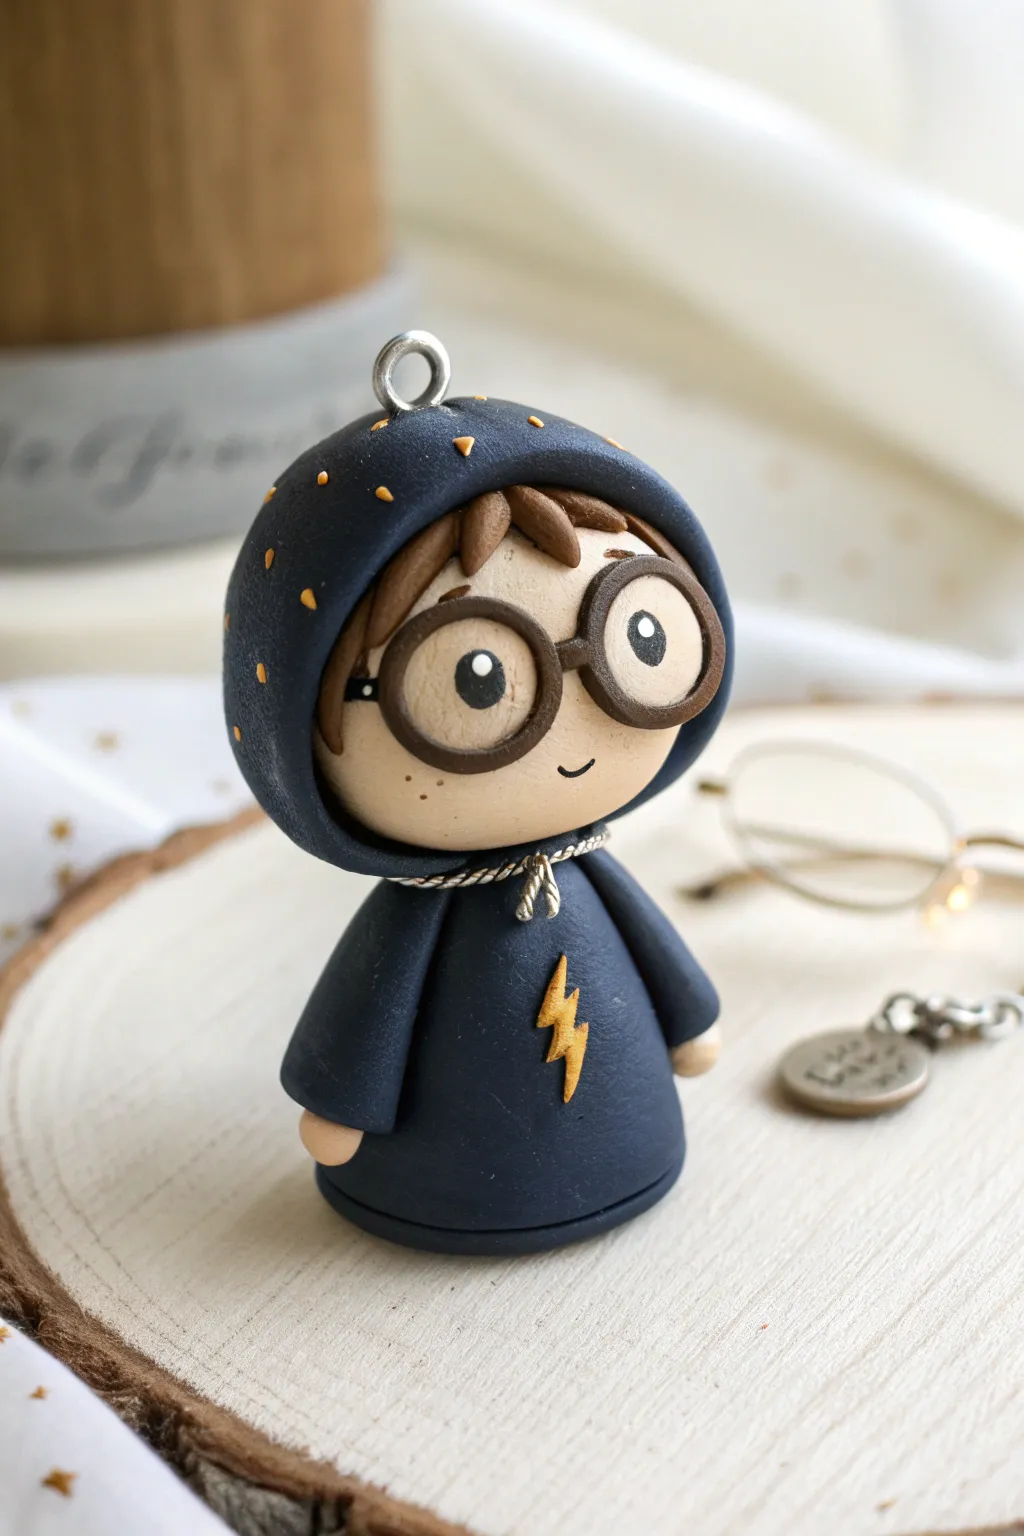
Capture the magic of the boy wizard with this adorable chibi polymer clay charm. Featuring oversized round glasses, a celestial hood, and that iconic lightning bolt, this figurine makes a perfect pendant or keychain for any fan.
Detailed Instructions
Materials
- Polymer clay (midnight blue, beige/skin tone, brown, metallic silver, yellow)
- Eye pin or screw eye hook
- Ball stylus tool
- Needle tool or toothpick
- Clay knife or blade
- Black acrylic paint
- White acrylic paint
- Fine detail brush or dotting tool
- Liquid clay (TLS) or strong glue
- Gloss varnish (optional)
Step 1: Sculpting the Head and Face
-
Form the base:
Start by conditioning a ball of beige clay until it’s smooth and pliable. Roll it into a flattened sphere shape to create the chibi-style head, roughly 2-3 cm in diameter. -
Shape the eyes:
Using a ball stylus, gently press two indentations where you want the eyes to sit. This helps the glasses sit naturally later. -
Add hair base:
Flatten a small disc of brown clay and press it onto the top back of the head. It doesn’t need to be perfect, as the hood will cover most of it, but it provides a clean backing. -
Create the bangs:
Roll small teardrop shapes of brown clay. Arrange 3-4 of these across the forehead to create messy bangs, pressing them gently to adhere to the beige clay. -
Making the glasses:
Roll a very thin snake of dark brown clay. Create two equal circles for the frames and a tiny bridge piece to connect them. Carefully place these over the eye indentations. -
Adding the eyes:
Roll two small circles of black clay (or paint them later) and place them inside the frames. Add a tiny dot of white paint for a highlight to bring him to life.
Hood Cracking?
If the clay tears while draping the hood, roll the sheet slightly thicker. Warm the clay in your hands longer to ensure maximum flexibility before shaping.
Step 2: Creating the Robe and Hood
-
Form the body:
Condition a piece of midnight blue clay into a cone shape with a rounded top. The bottom should be flat so the figure can stand on its own. -
Attach the head:
Insert a short piece of wire or a toothpick into the top of the body cone, leaving half exposed. Push the head onto this support to secure it. -
Sculpt the hood:
Roll a large flat sheet of midnight blue clay. Cut a wide semi-circle and drape it over the head, pinching gently at the back to close the seam. Smooth the edges around the face, ensuring the bangs peek through. -
Texture the hood:
Using a needle tool, you can create tiny triangular indentations scattered across the hood to mimic stars. I like to fill these later with yellow paint for a glowing effect. -
Add the arms:
Roll two small sausages of blue clay for sleeves. Attach them to the sides of the body. Add tiny balls of beige clay at the ends for hands. -
Create the rope tie:
Twist two very thin threads of silver or grey clay together to make a rope texture. Wrap this around the neck where the hood meets the robe and add a tiny knot detail at the front. -
The lightning bolt:
Carefully cut a tiny lightning bolt shape from yellow clay. Press this onto the front chest of the robe. Alternatively, you can paint this on after baking. -
Insert the hardware:
If you plan to hang this as a charm, screw an eye pin securely into the top center of the hood before baking.
Step 3: Finishing Touches
-
Bake the charm:
Bake the piece according to your clay manufacturer’s instructions (usually around 275°F/130°C for 15-30 minutes). Let it cool completely inside the oven to prevent cracking. -
Paint details:
Once cool, use a fine brush to fill the hood indentations with yellow or gold paint if you made them. Add a tiny black smile line with a fine marker or paint. -
Add freckles:
Dilute a tiny drop of brown paint with water. Dip a toothbrush or stiff brush in it and flick it gently with your thumb to speckle faint freckles across the cheeks. -
Seal:
Coat the eyewear and the lightning bolt with a gloss varnish to make them shine, leaving the robe matte for fabric contrast.
Make it Glow
Use glow-in-the-dark clay for the lightning bolt and hood stars. When the lights go out, your little wizard will reveal his magic!
Attach a keychain ring or string it on a necklace to keep a little bit of wizardry with you everywhere you go


Chibi Brainy Best Friend Charm
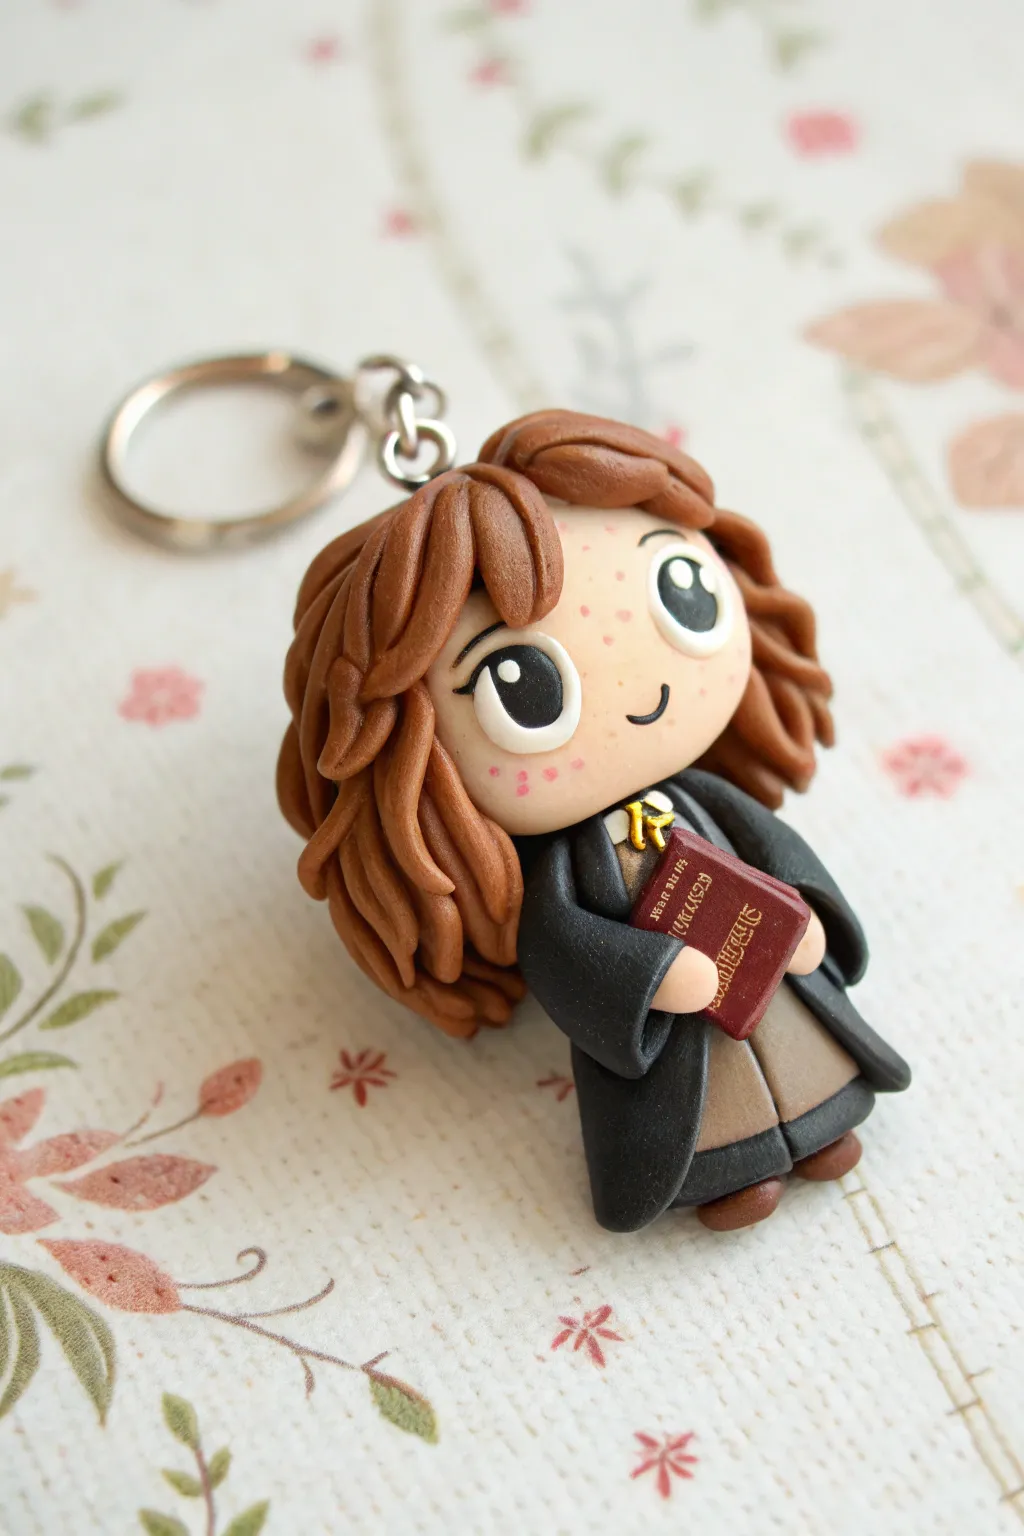
Capture the cleverest witch of her age in miniature form with this adorable polymer clay charm. Featuring her signature bushy hair and a tiny spellbook, this chibi character makes a perfect keychain companion or gift for a fellow fan.
Step-by-Step Guide
Materials
- Polymer clay (flesh tone, brown, black, grey, dark red/maroon, gold/yellow, white)
- Clay tools (dotting tools, needle tool, blade)
- Eyepin or screw eye
- Keychain ring and jump ring
- Gloss glaze (optional)
- Soft pastel chalks (pink/blush) and a small brush
- Acrylic paint (gold) and fine detail brush
- Oven for baking
Step 1: Sculpting the Head and Face
-
Form the Base:
Start by rolling a ball of flesh-tone clay about the size of a large marble. Gently press it slightly flat to create a wide, chibi-style face shape. -
Add the Eyes:
Using a large ball tool, press two deep indentations into the face for eye sockets. Roll two small balls of white clay, place them in the sockets, and flatten them. Repeat with slightly smaller black circles for the iris, placing them towards the upper left to give her a looking-up expression. -
Create the Sparkle:
Add tiny white dots of clay to the upper corners of the black pupils for that signature anime-style shine. Add very thin strings of black clay above the eyes for eyelashes and curved eyebrows. -
Blush and Freckles:
Before baking, use a soft brush to dust pink pastel chalk onto her cheeks. Add tiny freckles using brown acrylic paint or tiny specks of brown clay pressed flat. -
Add the Smile:
Use a needle tool or small blade to impress a gentle, curved smile into the clay.
Hair Volume Trick
Don’t press the hair strands flat against the head. Leave them slightly raised and layered loosely over each other. The air gaps create realistic, ‘bushy’ volume without using too much heavy clay.
Step 2: Creating the Body and Robes
-
Torso Core:
Form a small cone of grey clay for the skirt area and attach it to a small block of white clay for the shirt. -
The Robe:
Roll out a thin sheet of black clay. Cut a rectangle and wrap it around the back and sides of the torso, leaving the front open. Smooth the seams at the back. -
Gryffindor Details:
Place a tiny triangle of grey clay for the sweater vest near the neck. Add a minuscule strip of maroon clay for the tie, and use a needle tool to add gold paint or tiny yellow clay strips for the stripes. -
Sleeves and Hands:
Roll two small cones of black clay for sleeves. Attach them to the shoulders. Roll two tiny balls of flesh-tone clay for hands and attach them inside the sleeve cuffs. -
Shoes:
Add two small brown ovals to the bottom of the grey skirt for her shoes.
Step 3: Hair and Accessories
-
Attach Head to Body:
Insert a short piece of wire or a toothpick into the neck area to act as an armature, then press the head firmly onto the body. -
Hair Base:
Roll out a thin sheet of brown clay and cover the back of the head so the skin tone doesn’t show through the hair strands. -
Creating the Curls:
This part takes patience. Roll many thin snakes of brown clay. Twist them slightly or curl the ends to mimic bushy, wavy hair. Begin attaching them at the bottom back of the head and layer upwards toward the crown. -
Framing the Face:
Add shorter, sweeping strands around the face for bangs. Ensure the hair has plenty of volume—it’s her trademark look. -
The Spellbook:
Shape a small rectangle of maroon clay. Use a blade to make lines on the side for pages (you can use white clay for the pages if you prefer). Place it in her arms. -
Book Details:
Add tiny gold paint details to the book cover to simulate a title or magical symbols.
Smudge Patrol
White and flesh-tone clays pick up dust easily. Keep a pack of baby wipes or rubbing alcohol nearby to clean your hands and tools before touching the lighter clay colors to avoid dirty smudges.
Step 4: Assembly and Baking
-
Secure the Hardware:
Insert an eyepin into the top of the head. I recommend adding a drop of liquid clay or bake-and-bond to the shaft of the pin to ensure it stays put after baking. -
Bake:
Bake the charm according to your clay manufacturer’s instructions (usually 275°F/130°C for 15-30 minutes). Let it cool completely inside the oven to prevent cracking. -
Finishing Touches:
Once cool, glaze the eyes with a gloss varnish to make them shine. Attach your jump ring and keychain functionality.
Now you have a brilliantly smart companion to guard your keys on all your magical adventures


Chibi Red-Haired Bestie Charm
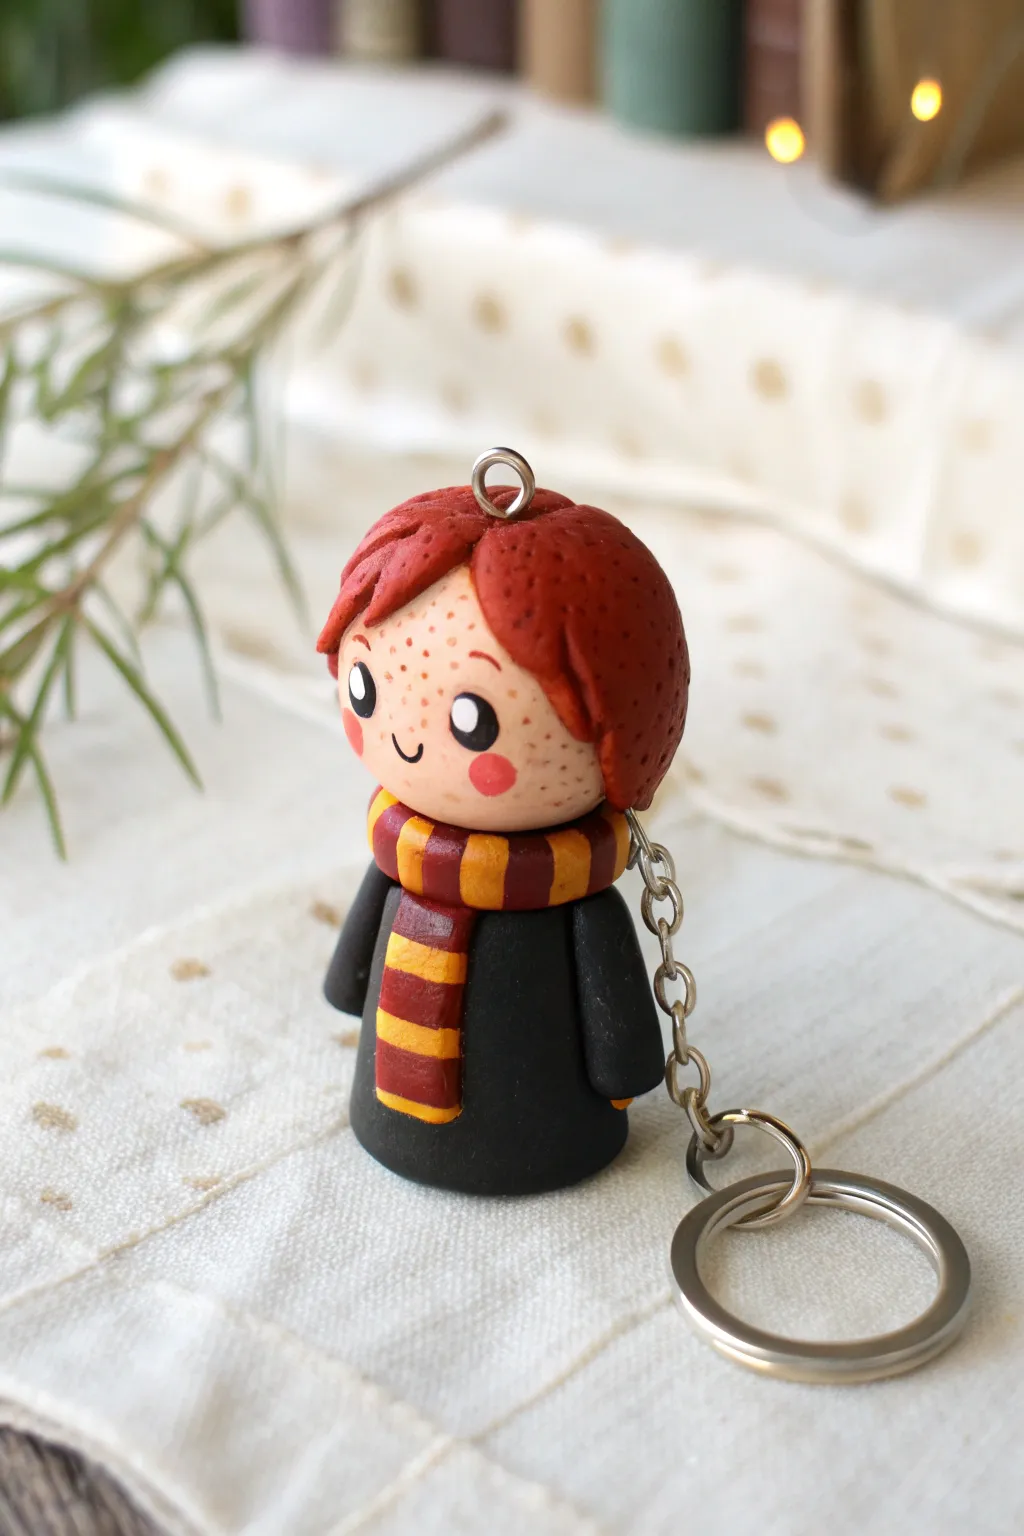
Capture the loyalty and charm of the wizarding world’s favorite sidekick with this adorable chibi clay figure. This project features distinctive red hair, a cozy striped scarf, and plenty of freckles, all compacted into a cute, rounded style perfect for keychains.
Detailed Instructions
Materials
- Polymer clay: Flesh tone, terracotta red, black, mustard yellow, dark maroon
- Headpin or eye pin
- Clay sculpting tools (needle tool, dotting tool)
- Acrylic paint: Black, white, pink, reddish-brown
- Fine detail paintbrush or toothpick
- Gloss glaze or polyurethane varnish
- Keychain hardware and jump rings
- Craft knife
- Oven for baking
Step 1: Sculpting the Base Form
-
Form the head:
Start by conditioning a ball of flesh-toned polymer clay about the size of a large marble. Roll it between your palms until it is perfectly smooth and round, ensuring there are no cracks or fingerprints visible. -
Create the body shape:
Take black clay and roll it into a slightly larger ball, then shape it into a squat cone or cylinder with a flat bottom so the figure can stand. Gently press the top flat where the head will attach. -
Connect head and body:
Insert a small piece of wire or a toothpick into the top of the body to act as a supportive armature. Press the flesh-toned head firmly onto the body, smoothing the seam slightly if needed, though the scarf will cover most of the neck area. -
Add the arms:
Roll two small sausages of black clay for the arms. Flatten one end slightly and attach them to the sides of the body, angling them downwards. Ensure they blend seamlessly into the shoulders.
Clean Clay Only
Red and black clay can stain lighter colors easily. Wash hands thoroughly or use baby wipes before handling the flesh-toned clay to keep the face smudge-free.
Step 2: Adding the Hair and Details
-
Prepare the hair cap:
Flatten a disk of terracotta red clay and drape it over the top and back of the head. Smooth it down to create a base layer for the hair. -
Add hair strands:
Create small, flattened teardrop shapes of red clay for the bangs. Layer them across the forehead, sweeping slightly to the side to create that distinctively messy look. -
Texture the hair:
Using a needle tool or a dull knife, gently impress lines into the hair clay to mimic strands. Add slight indentations all over the hair surface to give it a rougher, textured appearance rather than perfectly smooth helmet hair. -
Insert the hardware:
Carefully push an eye pin into the center top of the head. I like to twist the pin as I insert it to help the metal grip the raw clay better. -
Construct the scarf:
Roll a long, thin snake of maroon clay. Flatten it gently. -
Stripe the scarf:
Roll extremely thin snakes of mustard yellow clay. Lay these across the maroon strip at regular intervals and gently roll over them with an acrylic roller or pen casing to embed the yellow into the maroon.
Step 3: Assembly and Finishing
-
Wrap the scarf:
Cut a section of your striped clay strip. Wrap it around the neck area, overlapping the ends at the front. One end should drape down the front of the black robe. -
Secure the scarf ends:
Add a second, shorter piece of the striped clay hanging vertically from strictly under the wrap to create the illusion of a tied scarf. Trim the bottom edge cleanly. -
Bake the figure:
Place your figure on a ceramic tile or baking sheet. Bake according to your polymer clay manufacturer’s instructions, usually at 275°F (130°C) for about 15-20 minutes depending on thickness. -
Cool down:
Allow the piece to cool completely before handling. It will be fragile while warm. -
Paint the face:
Using a fine dotting tool or toothpick, dip into black acrylic paint to create two simple, round eyes. Add a tiny smile with a very thin brush or fine-tip marker. -
Add the freckles:
Take reddish-brown paint slightly watered down. Spatter or carefully dot many tiny freckles across the cheeks and nose area. This is the defining feature, so don’t be shy with them. -
Rosy cheeks and highlights:
Dab two soft pink circles for cheeks using a slightly larger dotting tool. Add tiny white reflections to the black eyes to bring the character to life. -
Seal and assemble:
Once the paint is fully dry, coat the figure—especially the painted face—with a matte or satin varnish. Attach your keychain ring to the eye pin using jump rings.
Make It a Set
Create a trio of best friends by making two more figures: one with messy black hair and glasses, and another with bushy brown hair and a book.
Now your loyal little companion is ready to guard your keys on all your magical adventures


Mini White Owl Companion
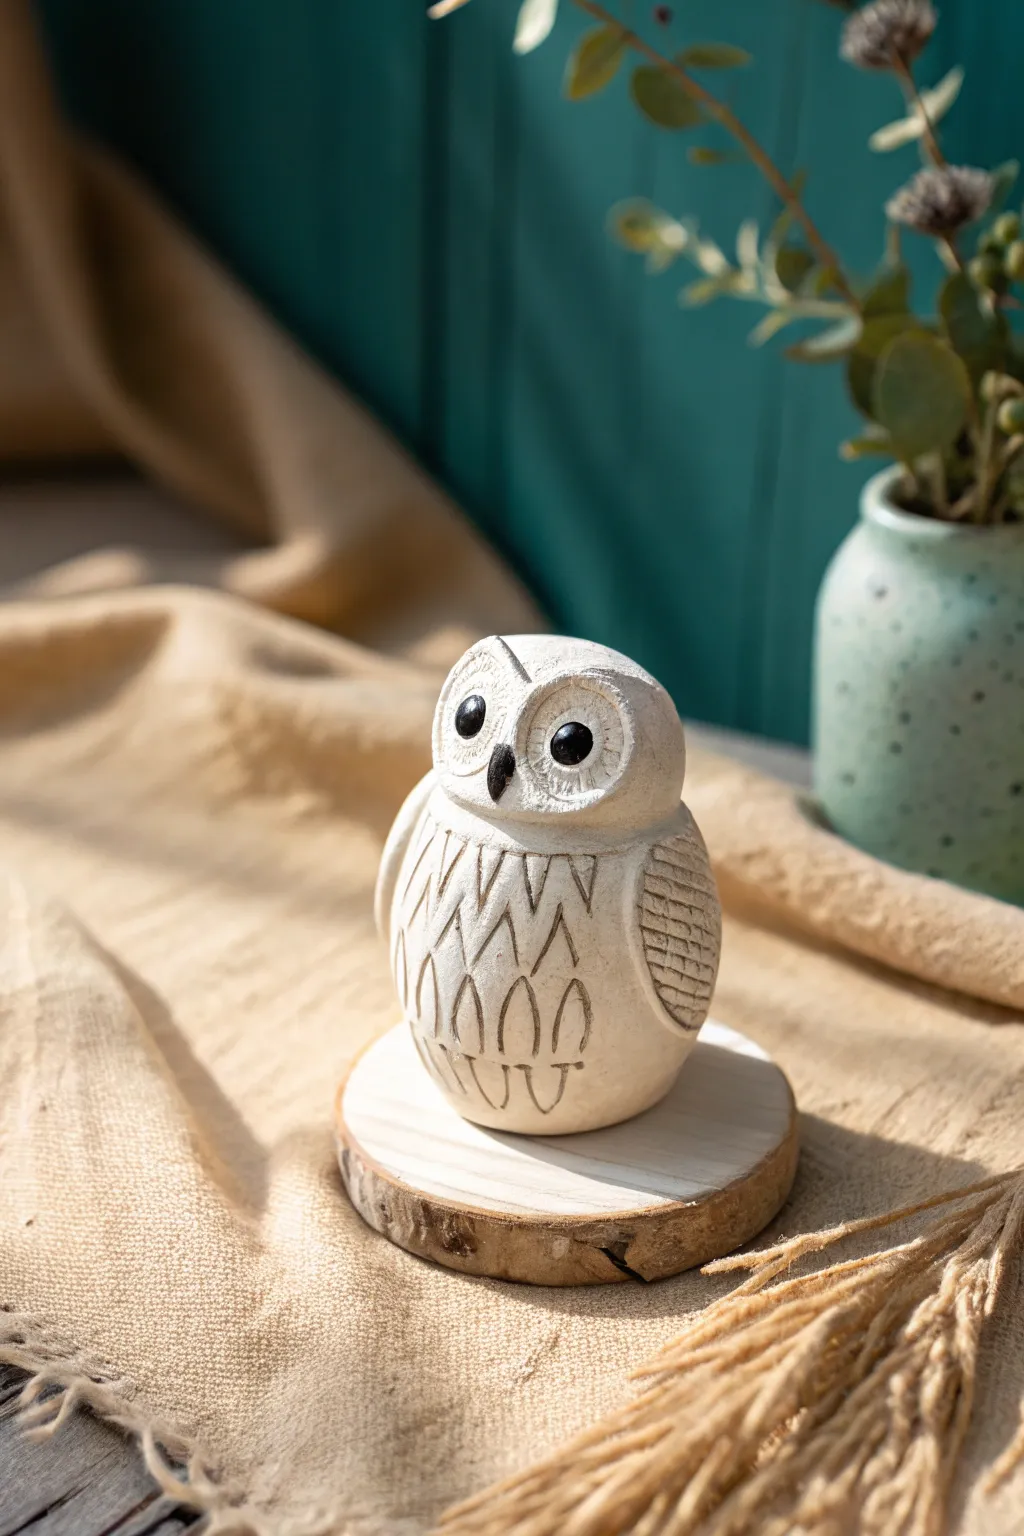
Every wizard needs a loyal messenger, and this miniature clay owl captures that snowy charm perfectly. With carved feather details and a rustic, stone-like finish, this little figurine makes an ideal desk mate or bookshelf guardian.
Step-by-Step Tutorial
Materials
- White polymer clay (or air-dry clay)
- Black acrylic paint
- Brown acrylic paint (for antiquing)
- Sculpting tool set (needle tool, small ball tool)
- Small rolling pin
- Aluminum foil (for the core)
- Fine-grit sandpaper
- Clear matte varnish
- Small wooden slice coaster
- Superglue or heavy-duty craft glue
- Detail paintbrush
- Paper towel or soft cloth
Step 1: Shaping the Core Body
-
Establish the armature:
Begin by crumpling a small piece of aluminum foil into a tight egg shape. This saves clay and keeps the figurine lightweight while providing a solid core. -
Wrap the core:
Condition your white clay until it is soft and pliable. Flatten a sheet about 1/4 inch thick and wrap it completely around your foil egg, smoothing the seams until invisible. -
Define the head:
Gently gently press a slight indentation about one-third of the way down from the top to distinguish the head from the body. The transition should be subtle, not a skinny neck. -
Form the wings:
Roll two smaller flattened teardrop shapes of clay. Press these onto the sides of the body, starting at the ‘shoulder’ area and curving down towards the back. -
Refine the silhouette:
Smooth the edges of the wings into the body so they look attached but slightly raised. Flatten the bottom of the owl firmly against your work surface so it stands upright securely.
Clean Carving Lines
If your carving tool drags the clay and creates crumbs, dip the tip of your needle tool in a little bit of baby oil (for polymer) or water (for air-dry) before scratching the details.
Step 2: Carving the Details
-
Create the eye sockets:
Using a larger ball tool or the rounded end of a paintbrush, press two distinct, circular indentations into the face area to act as the eye disks. -
Add the beak:
Roll a tiny, tiny cone of clay. Attach it right between the eye sockets, pointing downward. Blend the top edge slightly into the forehead. -
Sculpt the eyes:
Roll two small balls of white clay and place them into the indentations you made earlier. Press them flat gently; they should look like large, alert eyes. -
Carve the chest feathers:
Using a needle tool or a V-gouge, care rows of upside-down ‘V’ shapes or ‘U’ shapes down the owl’s chest. I like to make the top rows smaller and the bottom rows slightly larger. -
Detail the wings:
On the wing pads, use your tool to draw a grid-like pattern or horizontal lines to simulate flight feathers tucked against the body. -
Texture the face:
Use a needle tool to scratch very fine, short lines radiating outward from the eyes to give the face a fluffy, feathery texture. -
Add the brow:
Carve a gentle arch over the eyes to give the owl a wise, slightly defined brow ridge. -
Bake or dry:
If using polymer clay, bake according to the package instructions (usually 275°F for 15-30 minutes). If using air-dry clay, let it sit for 24-48 hours until fully hard.
Step 3: Painting and Assembly
-
Paint the features:
Using your smallest brush, paint the round clay eyes solid jet black. Carefully paint the beak black or a dark charcoal grey. -
Highlight the eyes:
Once the black paint is dry, add a tiny white dot to the upper corner of each eye to create a lively reflection. -
Apply an antique wash:
Mix a small amount of brown paint with water to create a thin wash. Brush this over the carved feather details on the chest and wings. -
Wipe back:
Immediately use a damp paper towel to wipe away the excess brown paint. The dark color will stay in the carved grooves, making the texture pop. -
Mount the owl:
Apply a dab of superglue to the bottom of your finished owl and center it on the small wooden slice coaster. Hold it in place for 30 seconds. -
Seal the piece:
finish by brushing a coat of matte varnish over the clay parts to protect the paint and give it a finished, ceramic look.
Hogwarts Delivery
Before gluing the owl down, sculpt a tiny envelope from white clay and seal it with a dot of red clay. Glue this under the owl’s wing or at its feet as if it just arrived with post.
Your loyal snowy owl is now ready to oversee your wizarding studies from its perch

The Complete Guide to Pottery Troubleshooting
Uncover the most common ceramic mistakes—from cracking clay to failed glazes—and learn how to fix them fast.
Cute House-Elf Buddy Figurine
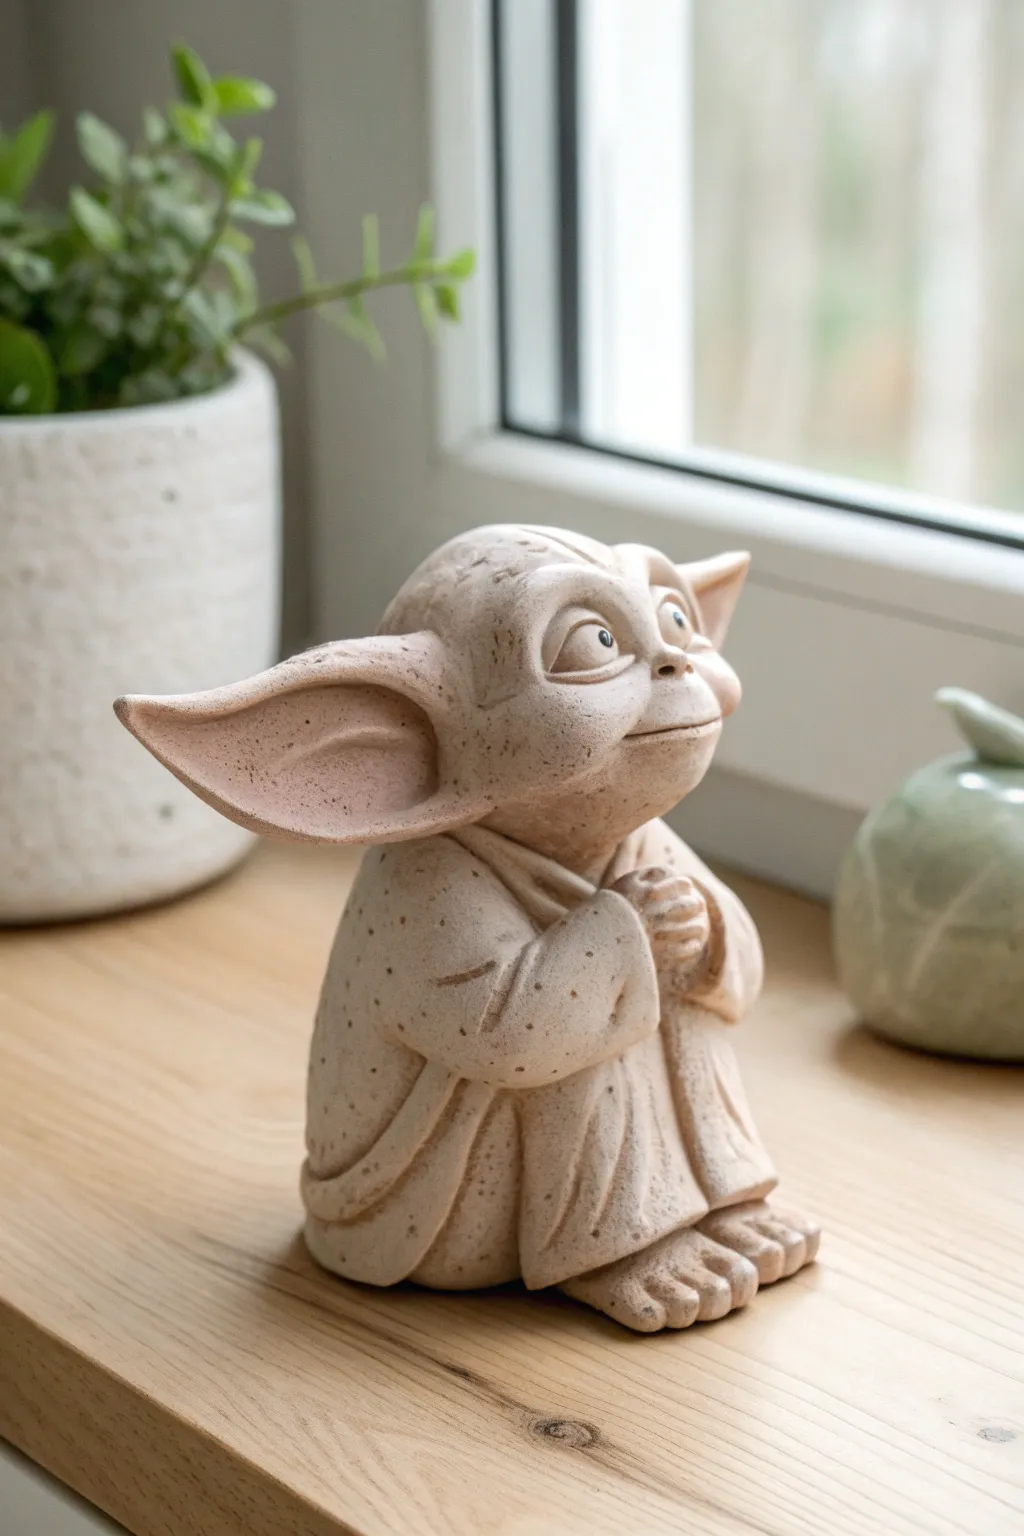
Bring a touch of magic to your windowsill with this contemplative little house-elf figurine, sculpted from speckled beige clay. With oversized ears, large soulful eyes, and a textured robe, this peaceful guardian adds warmth and charm to any shelf.
Step-by-Step Guide
Materials
- Beige polymer clay with granite/speckled effect
- Aluminum foil (for armature)
- Sculpting tools (needle tool, ball stylus, silicone shapers)
- Black acrylic paint
- White acrylic paint
- Fine detail paintbrush
- Matte varnish
- Translucent liquid clay (optional)
- Mod Podge or gloss glaze (for the eyes)
Step 1: Forming the Base Structure
-
Create the foil core:
Begin by crumpling aluminum foil into a pear shape for the body and a slightly flattened sphere for the head. This saves clay and keeps the figurine lightweight. -
Cover the core:
Roll out a sheet of your speckled beige clay to about 1/4 inch thickness. Wrap the foil shapes completely, smoothing the seams so no foil is visible. -
Join head and body:
Press the head onto the top of the pear-shaped body. Insert a small piece of wire or a toothpick between them for extra stability, blending the clay at the neck seam until smooth.
Drooping ears?
If the large ears sag before baking, prop them up with little wedges of cardboard or crumpled foil. Remove these props only after the clay has fully cooled post-bake.
Step 2: Sculpting the Robe
-
Drape the robe:
Roll a new sheet of clay and drape it over the body section to form the robe. It should look loose and flowing, not tight. -
Carve fold lines:
Use a silicone shaper or modeling tool to press deep vertical grooves into the robe, mimicking heavy fabric folds gathering at the bottom. -
Define the collar:
Add a small strip of clay around the neck area, texturing it slightly to look like a folded collar resting on the elf’s shoulders. -
Add the sleeves:
Attach two cone-shaped tubes of clay on either side of the upper body for sleeves. These should end right where the hands will meet in the center.
Make it ancient
Before baking, gently dab the entire surface with a stiff toothbrush or crumpled foil ball. This creates a pitted, stone-like texture for an ‘ancient statue’ vibe.
Step 3: Crafting the Features
-
Shape the hands:
Form two small balls of clay into hands with three fingers each. Position them clasping together near the chest, tucked slightly into the sleeves. -
Add large ears:
Shape two large, teardrop-shaped pieces of clay. Flatten them and pinch the base before attaching them to the sides of the head. I like to angle them slightly upward for an alert expression. -
Detail the ears:
Use a large ball tool to gently indent the inner ear, creating a deep, smooth cavity while leaving a thick outer rim. -
Sculpt the face structure:
Add a small lump of clay for the nose and brow ridge. Smooth it onto the face, creating a prominent brow line and a small, button-like nose. -
Carve the mouth:
Use a needle tool or knife to cut a wide, gentle smile. Add tiny creases at the corners of the mouth to enhance the joyful expression. -
Create eye sockets:
Press two indentations under the brow ridge where the eyes will go. Insert two small balls of plain beige clay into these sockets for the eyeballs. -
Add the feet:
Shape two flat, wide feet with three or four distinct toes each. Attach them peeking out from under the robe at the very bottom.
Step 4: Finishing Touches
-
Baking:
Bake the figurine according to your specific clay package instructions. Usually, this is around 275°F (130°C) for 15-30 minutes per 1/4 inch of thickness. -
Painting the eyes:
Once cool, paint the eyeballs black. Add a tiny white reflection dot in the upper corner of each eye to bring the character to life. -
Adding texture:
Though the clay is speckled, you can dry-brush a tiny amount of darker beige paint into the robe crevices to deepen the shadows. -
Glazing:
Apply a coat of gloss glaze solely to the eyes to make them look wet and shiny. Leave the rest of the figure matte to mimic stone or rough skin.
Place your finished house-elf on a bookshelf or near a plant to serve as a wise and quiet companion.
Textured Mini Wand Zipper Pull
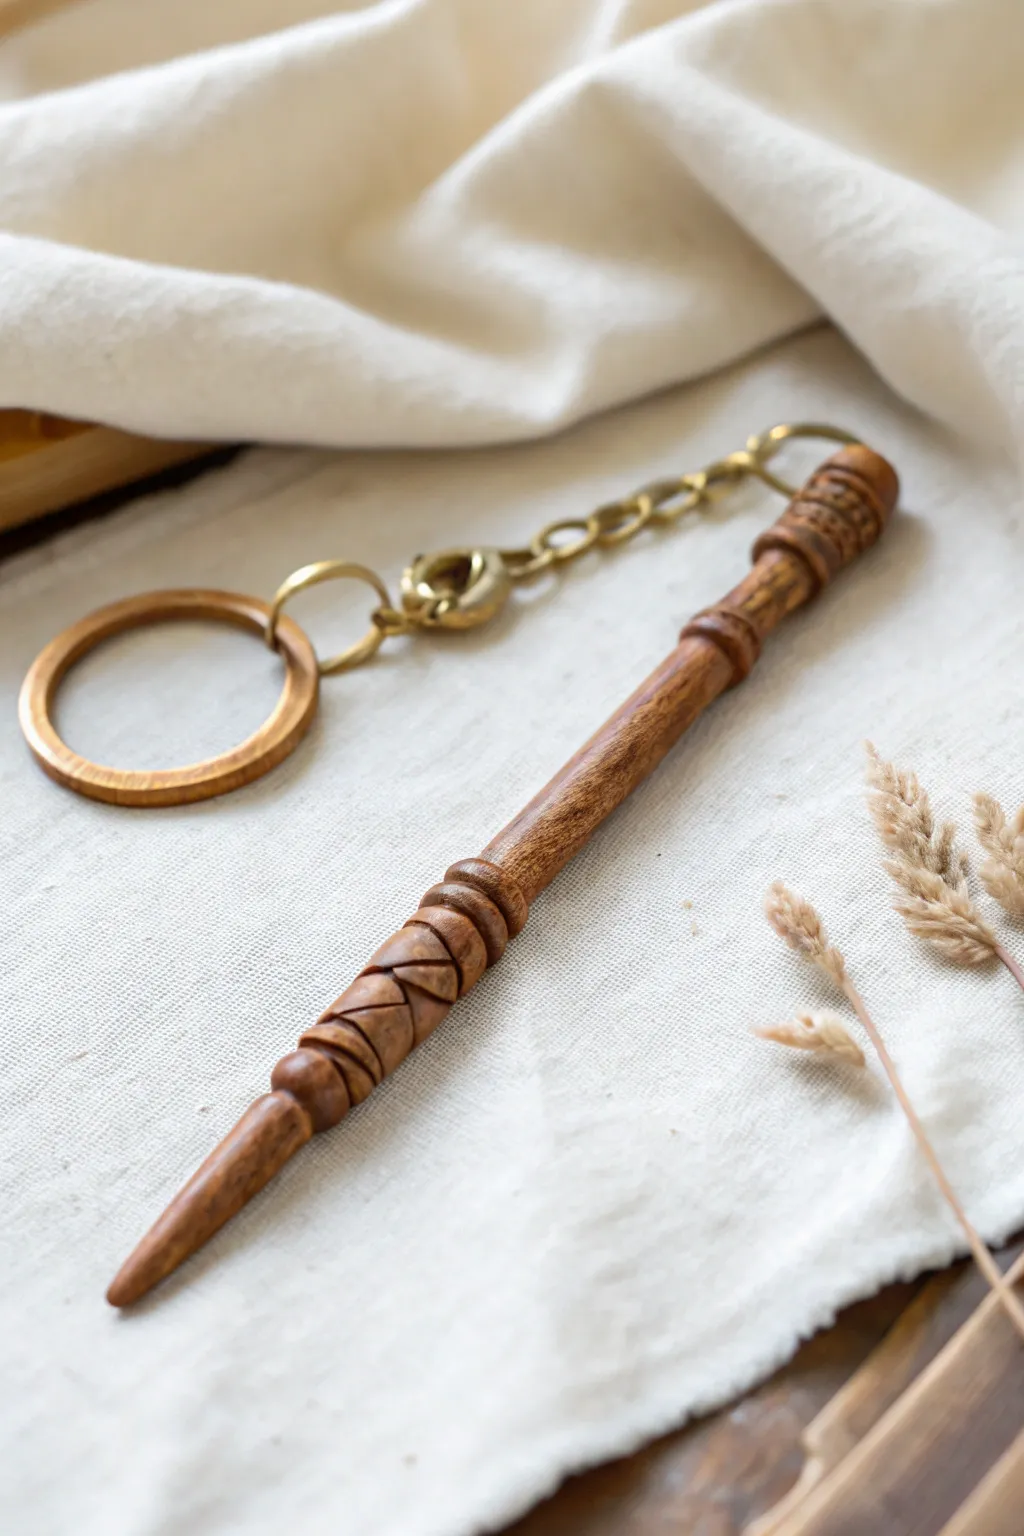
Transform polymer clay into a stunning miniature wooden wand that looks surprisingly realistic attached to your keys or zipper. This project uses clever texturing and staining techniques to mimic the grain and warmth of aged timber without needing a lathe.
Step-by-Step Tutorial
Materials
- Polymer clay (light tan or beige)
- Acrylic paints (dark brown, burnt umber, raw sienna)
- Gloss or satin polyurethane varnish
- Keyring hardware (split ring, chain, small eye screw)
- Sculpting tools (needle tool, small ball stylus)
- X-acto knife or craft blade
- Paintbrushes (fine detail and soft wash)
- Wet wipe or paper towel
- Needle-nose pliers
- Sandpaper (fine grit)
Step 1: Sculpting the Wand Form
-
Condition the base:
Start by conditioning a small amount of light tan polymer clay until it is soft and pliable. You want a color that represents raw, unfinished pine or oak. -
Roll the main shaft:
Roll the clay into a smooth snake, tapering it so one end is thicker (the handle) and one end comes to a rounded point (the tip). The total length should be about 3 to 4 inches. -
Define the handle:
About one-third of the way down from the thick end, gently roll your finger or a tool to create a slight indentation, separating the handle section from the shaft. -
Insert hardware:
Carefully screw the small metal eye screw into the very center of the thick flat end of the handle. Remove it for now; this pre-threads the hole so you can bake it without the metal, or bake with it if your hardware is oven-safe. -
Carve the spiral grip:
Using your craft knife, carve shallow, diagonal spiral channels into the handle section. Cut deeply enough to create a distinct groove but not so deep you weaken the clay. -
Add circular details:
Roll thin snakes of clay and wrap them around the wand to create raised rings. Place one at the base of the handle and two near the transition to the shaft. Blend the seams smoothly. -
Refine the shape:
Smooth out any fingerprints with a light touch or a drop of baby oil. Ensure the taper is straight and the rings are even.
Fixing Wobbly Lines
If your carved spirals look uneven, don’t restart. Gently rub the clay with a finger to soften the sharp edges. It makes the ‘carving’ look worn and old rather than messy.
Step 2: Texturing and Baking
-
Mock wood grain:
use a needle tool to scratch very fine, vertical lines along the length of the shaft. These shouldn’t be deep cuts, just surface scratches to simulate wood grain. -
Detail the grip:
Inside the spiral grooves of the handle, add a few extra texture marks or tiny dots with a needle tool to make it look carved and rustic. -
Bake the clay:
Place your wand on a tile or baking sheet. I like to support the tip with a bit of polyester batting so it stays straight. Bake according to your clay package instructions. -
Cool and sand:
Once fully cooled, lightly sand any rough burrs or sharp edges with fine-grit sandpaper.
Step 3: The Faux Wood Finish
-
Base wash:
Mix raw sienna paint with a little water. Paint the entire wand and let it dry completely to establish a warm undertone. -
Apply the dark stain:
Mix dark brown or burnt umber paint. Brush a generous coat over the entire wand, ensuring the paint gets into all the carved spirals and grain lines. -
The wipe-back technique:
Immediately wipe the wet paint off the surface using a damp paper towel or wet wipe. The dark paint will stay trapped in the crevices and texture, revealing the lighter clay on the raised areas. -
Deepen the handle:
If the handle looks too light, apply a second thin wash of brown to just that area to give it a ‘well-handled’ look. -
Seal the piece:
Once the paint is bone dry, coat the wand with a satin or gloss varnish. This protects the paint and gives it that polished wood sheen. -
Attach hardware:
Secure the eye screw back into the top hole with a dab of superglue. Use pliers to attach the chain and split ring to the eye screw.
Pro Tip: Realistic sheen
Buff the baked, unpainted clay with denim before painting. Then, use layers of transluscent liquid clay mixed with brown paint for a depth that looks like varnished wood.
Now you have a charming piece of wizardry to carry with you on every muggle adventure


What Really Happens Inside the Kiln
Learn how time and temperature work together inside the kiln to transform clay into durable ceramic.
Winged Golden Ball Pendant
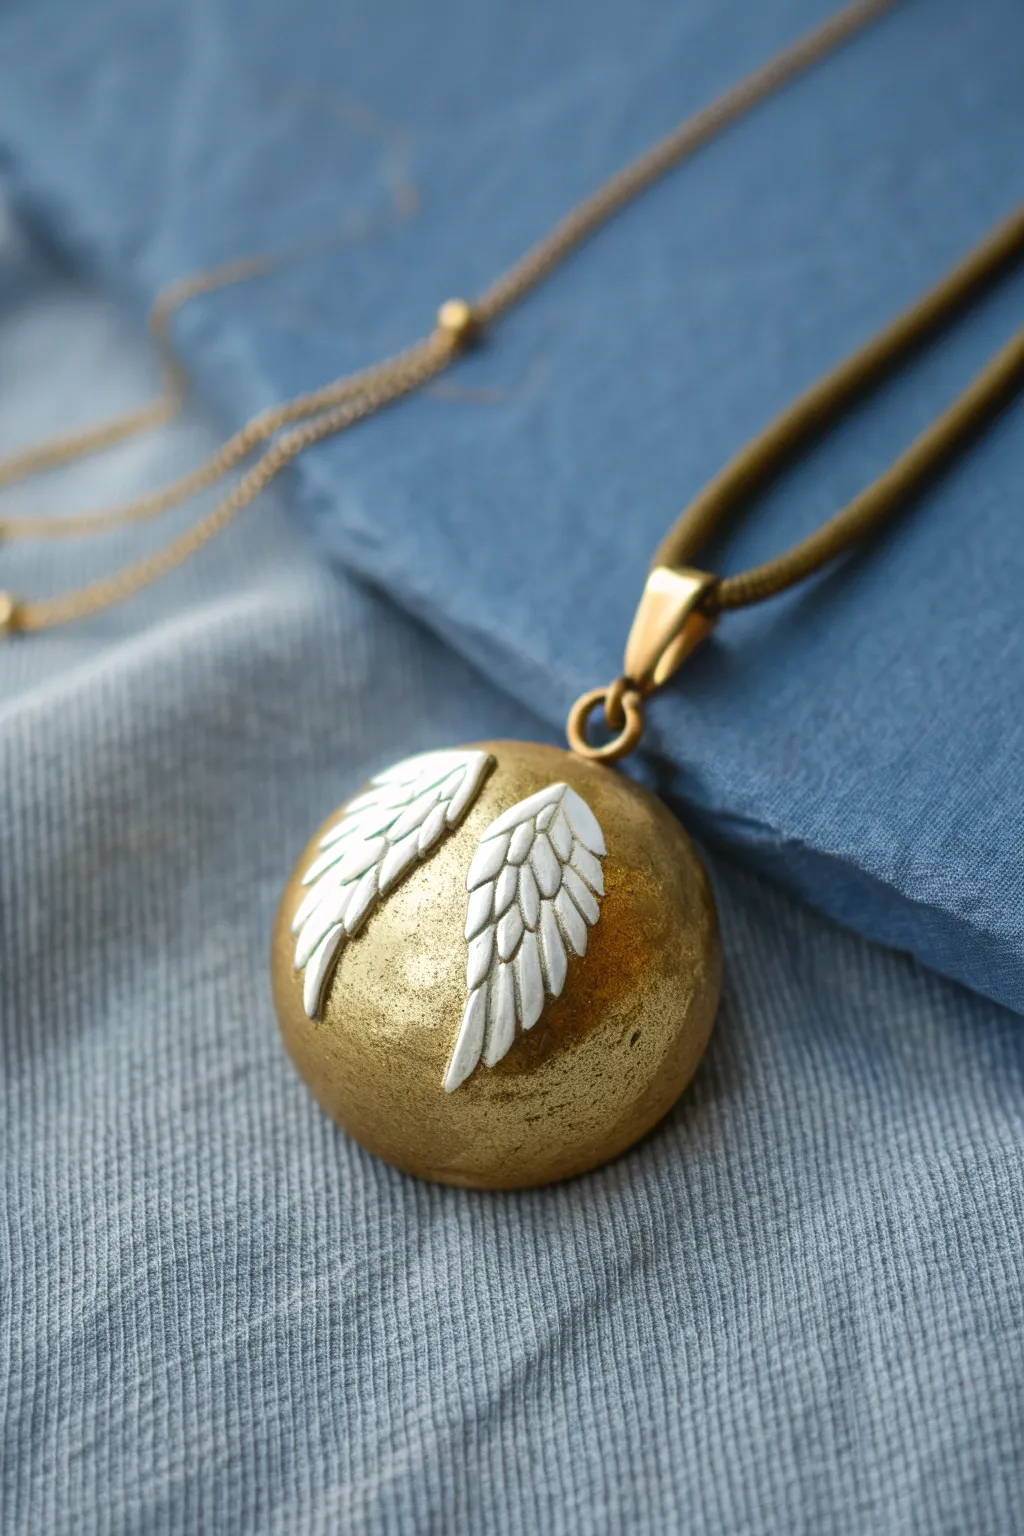
Capture the magic of the Quidditch itch with this stunning Golden Snitch pendant. Featuring a textured metallic gold finish and delicate white clay wings, this necklace makes for an enchanting accessory or a whimsical gift for any wizarding fan.
Step-by-Step Guide
Materials
- Gold polymer clay (or scrap clay for the core)
- White or translucent white polymer clay
- Gold mica powder (metallic)
- Small metal eye pin
- Texture tools (sandpaper, toothbrush, or crumpled foil)
- Needle tool or X-Acto knife
- Liquid polymer clay (Bake and Bond)
- Glossy varnish (optional)
- Jewelry pliers
- Cord or chain for hanging
Step 1: Forming the Golden Sphere
-
Condition the base clay:
Start by thoroughly conditioning your polymer clay until it is soft and pliable. If you plan to cover it in mica powder later, you can save your good gold clay by using scrap clay for the inner core. -
Shape the ball:
Roll a piece of clay into a smooth sphere, roughly 1 to 1.5 inches in diameter. Roll it gently between your palms to remove any seams or cracks. -
Create surface texture:
To mimic the antique look in the photo, gently press a piece of coarse sandpaper, an old toothbrush, or a crumpled ball of aluminum foil all over the surface of the sphere to create a pitted, metallic texture. -
Apply the gold finish:
Dip your finger or a soft brush into gold mica powder. Rub it generously over the entire textured sphere. The powder will catch in the texture you created, really enhancing that metallic shine. -
Insert the hanging mechanism:
Take your metal eye pin and trim it if it’s too long. Dip the end into a tiny dot of liquid polymer clay for extra grip, then push it straight down into the top of the sphere until only the loop is visible.
Stay Shiny Pro-Tip
Mix a tiny amount of gold glitter into the mica powder application. It catches the light differently than the flat metallic powder, adding magical depth.
Step 2: Sculpting the Wings
-
Prepare white clay:
Clean your hands thoroughly to avoid transferring gold dust. Condition a small amount of white polymer clay until smooth. -
Shape the wing teardrops:
Divide the white clay into two equal, pea-sized balls. Roll each ball into a teardrop shape that is slightly flattened. -
Outline the feather shape:
Using your needle tool or a dull knife, gently press indentation lines horizontally across the teardrop to define the primary ‘feathers’. -
Add feather details:
For added realism, make smaller, diagonal marks within each feather segment to simulate the barbs of a real feather. I sometimes use the very tip of a hobby knife for these ultra-fine lines. -
Curve the wings:
Gently bend the wings slightly to give them a natural curve that will contour against the round shape of the ball.
Step 3: Assembly and Finishing
-
Attach the wings:
Apply a small dab of liquid polymer clay to the back of each wing. Press them firmly but carefully onto the upper front section of the gold sphere, positioning them symmetrically. -
Secure edges:
Use a rounded tool or your finger to gently smooth the very inner edge of the wing onto the ball so there are no large gaps. -
Bake the piece:
Place the pendant on a tile or baking sheet. To prevent a flat spot on the bottom, you can rest the sphere inside a small bed of cornstarch or on a curved piece of foil. Bake according to your clay manufacturer’s instructions (usually 275°F/135°C for 15-30 minutes). -
Cool and inspect:
Let the pendant cool completely in the oven before removing it. Once cool, check that the wings and eye pin are secure. -
Add a bail (optional):
If your necklace cord is thick, attach a jump ring or a jewelry bail to the eye pin loop to allow for better movement. -
String the pendant:
I prefer using a simple brown leather cord or gold chain to complete the look. Thread your chosen material through the loop.
Loose Eye Pin?
If the pin wiggles after baking, pull it out, add a drop of superglue (cyanoacrylate) to the hole, and reinsert. It will bond instantly.
Now you have a magical golden accessory ready to help you win your next match
School House Color Scarf Charm
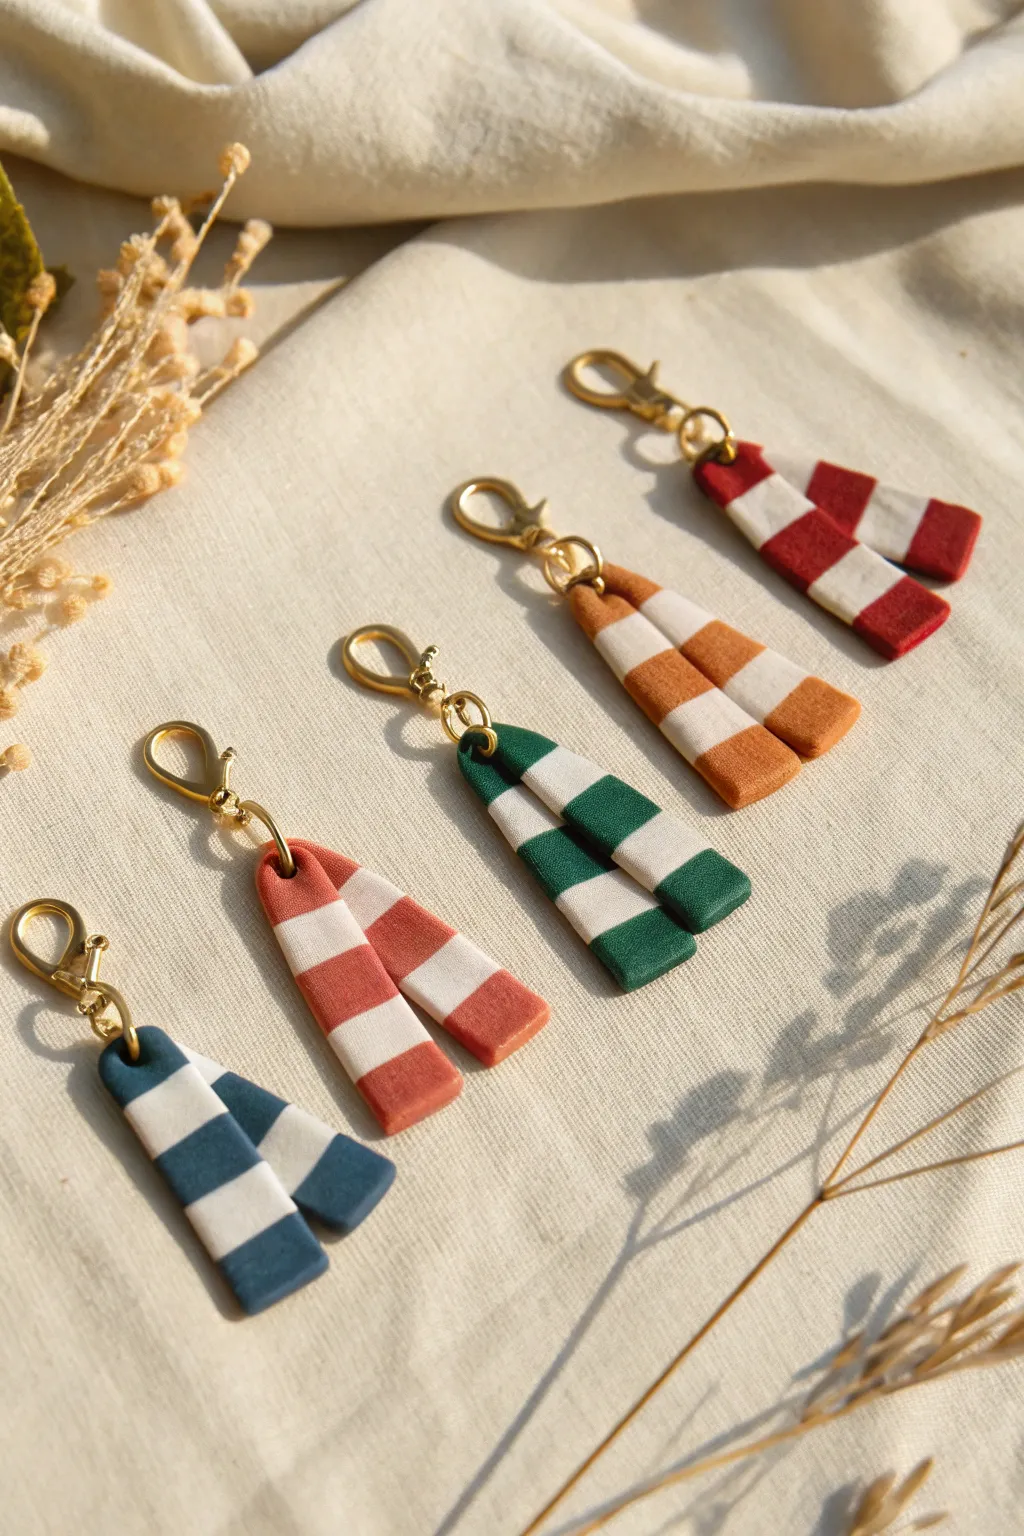
Show off your house pride with these adorable polymer clay bag charms that look just like cozy, folded winter scarves. The muted, earthy tones give them a sophisticated, magical touch perfect for attaching to zippers or keychains.
How-To Guide
Materials
- Polymer clay in house colors (e.g., deep red, emerald green, navy blue, yellow/gold, black/grey)
- White or cream polymer clay
- Tissue blade or X-Acto knife
- Acrylic rolling pin or pasta machine
- Strip of paper or cardstock (for measuring)
- Gold lobster clasp keychains with jump rings
- Needle tool or toothpick
- Smooth work surface (ceramic tile or glass)
- Oven for baking
Step 1: Prepping the Stripes
-
Condition the clay:
Start by thoroughly conditioning your chosen house color and your cream clay until they are soft and pliable. This prevents cracking later. -
Roll out sheets:
Roll both colors into sheets of equal thickness, aiming for about 2-3mm thick. If you have a pasta machine, use a medium setting. -
Cut linear strips:
Use your tissue blade to cut long, straight strips from both color sheets. I like to make these about 1cm wide, but you can adjust the width depending on how chunky you want your stripes. -
Form the striped slab:
Lay the strips side-by-side on your work surface, alternating colors (Color A, Cream, Color A, Cream). Gently press them together along the seams to attach them. -
Smooth the seams:
Gently roll over the assembled stripes with your acrylic roller to flatten the seams and create one cohesive sheet of striped clay.
Step 2: Shaping the Scarf
-
Cut the main rectangle:
From your striped sheet, cut a long, rectangular strip that is roughly 1.5cm wide and 8-10cm long. -
Prepare the fold:
Take the long strip and gently fold it in half, creating a loop at the top. Don’t crease it sharply; you want a soft, rounded bend where the hardware will go. -
Position the tails:
Arrange the two dangling ends (the tails of the scarf) so they overlap slightly. One tail should hang naturally a little lower than the other to mimic a real tied scarf. -
Define the knot area:
Cut a small, separate rectangle of clay from your leftover striped sheet (or a solid color if you prefer). This should be wide enough to wrap around the top of the folded scarf tails. -
Attach the knot:
Wrap this small rectangle horizontally around the gathered part of the scarf, just below the top loop. This mimics the ‘knot’ of the scarf and holds the shape together. -
Secure the back:
Smooth the seam of the ‘knot’ piece on the back side of the charm so it looks seamless from the front.
Clean Cuts Only
Chill your clay sheet in the fridge for 10 minutes before slicing your strips. Cold clay drags less against the blade, giving you perfectly crisp, straight lines for your stripes.
Step 3: Adding Hardware & Baking
-
Pierce the hole:
Using a needle tool, carefully pierce a hole through the top loop of the scarf. Make sure the hole is large enough for your jump ring to pass through comfortably. -
Texture the ends (optional):
If you want extra detail, use your needle tool to make tiny vertical indentations at the very bottom of the scarf tails to look like fringe. -
Final smooth:
Check for any fingerprints. You can dip your finger in a tiny bit of rubbing alcohol or cornstarch and rub lightly to remove them. -
Bake:
Place the charms on a tile or parchment-lined baking sheet. Bake according to your polymer clay package instructions (usually 275°F/135°C for 15-30 minutes depending on thickness). -
Cool down:
Let the clay cool completely in the oven or on the counter before handling to ensure maximum strength. -
Attach the clasp:
Open a jump ring using two pairs of pliers. Thread it through the hole you made in the clay loop and attach the lobster clasp. -
Close the ring:
Securely close the jump ring, ensuring there is no gap for the charm to slip out of.
House Crest Detail
Before baking, press a tiny shaped glitter piece or metal nail art charm (like a snake or lion) into the ‘knot’ area of the scarf for a subtle, high-end house crest emblem.
Now you have a subtle and stylish way to represent your magical house wherever you go

TRACK YOUR CERAMIC JOURNEY
Capture glaze tests, firing details, and creative progress—all in one simple printable. Make your projects easier to repeat and improve.
Tiny Spellbook Necklace Locket

This enchanting necklace charm captures the magic of an ancient tome in miniature form, featuring a realistic leather texture and a celestial star emblem. Perfect for carrying your own tiny spells or secrets close to your heart, this polymer clay project results in a stunning, wearable accessory.
Step-by-Step Tutorial
Materials
- Polymer clay (leather brown/terracotta)
- Polymer clay (white or cream)
- Acrylic paint (dark brown/burnt umber)
- Rolling pin or pasta machine
- Clay blade or craft knife
- Needle tool or toothpick
- Small square cutter (optional)
- Texturing tool (sandpaper or stiff toothbrush)
- Gold jump ring (medium size)
- Gold necklace chain
- Eye pin or screw eye
- Sculpting tools with a small ball end
Step 1: Forming the Book Base
-
Condition the white clay:
Start by kneading a small amount of white or cream clay until it is soft and pliable. Roll it into a thick sheet, approximately 3-4mm thick, which will serve as the block of pages. -
Cut the page block:
Cut a rectangle from the white clay sheet. The size depends on how big you want your charm, but 2cm by 2.5cm is a good standard size for a necklace. -
Texture the page edges:
Using a needle tool or a very fine blade, gently score lines along three of the edges (top, bottom, and right side) to simulate the look of individual stacked paper pages. -
Prepare the cover clay:
Condition the brown clay and roll it out into a thinner sheet, about 1-2mm thick. This needs to be long enough to wrap around the white block with a little overhang. -
Texturizing the leather:
Before cutting, press a piece of sandpaper or a stiff toothbrush gently onto the brown clay sheet. This creates a realistic, pebbled leather grain effect.
Step 2: Assembling and Detailing
-
Cut the cover to size:
Place your white page block onto the textured brown clay to measure. Cut a rectangle that covers the front, spine, and back, leaving a tiny 1mm overhang on the edges. -
Wrap the book:
Carefully wrap the brown clay cover around the white block. Gently press the spine area to ensure it adheres to the back edge of the white clay without squashing your page textures. -
Create the border:
Using a blunt tool or the back of a knife, gently press a rectangular border line about 2mm inside the edge of the front cover. Add four small dots at the corners of this border using a needle tool. -
Emboss the star:
In the center of the front cover, use a needle tool to lightly sketch an eight-pointed star. Deepen the lines by pressing the side of the needle into the clay to create beveled indentations. -
Add spine straps:
Roll two very thin snakes of the brown clay. Flatten them slightly and wrap them horizontally across the spine of the book to mimic leather binding ribs. -
Insert the eye pin:
Trim a metal eye pin to about 1cm long. Insert it carefully into the top center of the book’s spine. You may want to add a tiny dab of liquid clay or bake-and-bond glue to the shaft for security.
Uneven Texture?
If your sandpaper texture fades while you are handling the clay, re-apply it gently right before baking. Press lightly so you don’t distort the rectangular shape of the book.
Step 3: Finishing Touches
-
Refine the shape:
Give the entire piece a once-over. Smooth out any fingerprints (unless they add to the leather look) and ensure the corners are neat. -
Bake:
Bake the charm according to your specific polymer clay’s package instructions. I usually tent a piece of foil over the top to prevent the white pages from scorching or the brown color from darkening too much. -
Antique the cover:
Once cooled, dilute a small amount of dark brown acrylic paint with water. Brush it over the brown cover, particularly into the star grooves and border lines. -
Wipe away excess:
Quickly wipe the surface with a damp paper towel or cloth. The dark paint will remain in the recesses, highlighting the embossed star and the leather texture while leaving the high points lighter. -
Attach the hardware:
Open a gold jump ring using two pairs of pliers. Thread it through the eye pin loop on your book, then attach it to your necklace chain before closing the ring securely.
Level Up: Gold Leaf
After baking, try carefully painting inside the embossed star with metallic gold paint or applying tiny flakes of gold leaf to make the magical symbol truly shine against the leather.
Now you have a tiny piece of wizarding world charm ready to wear on your next adventure
Little Cauldron Ring Dish
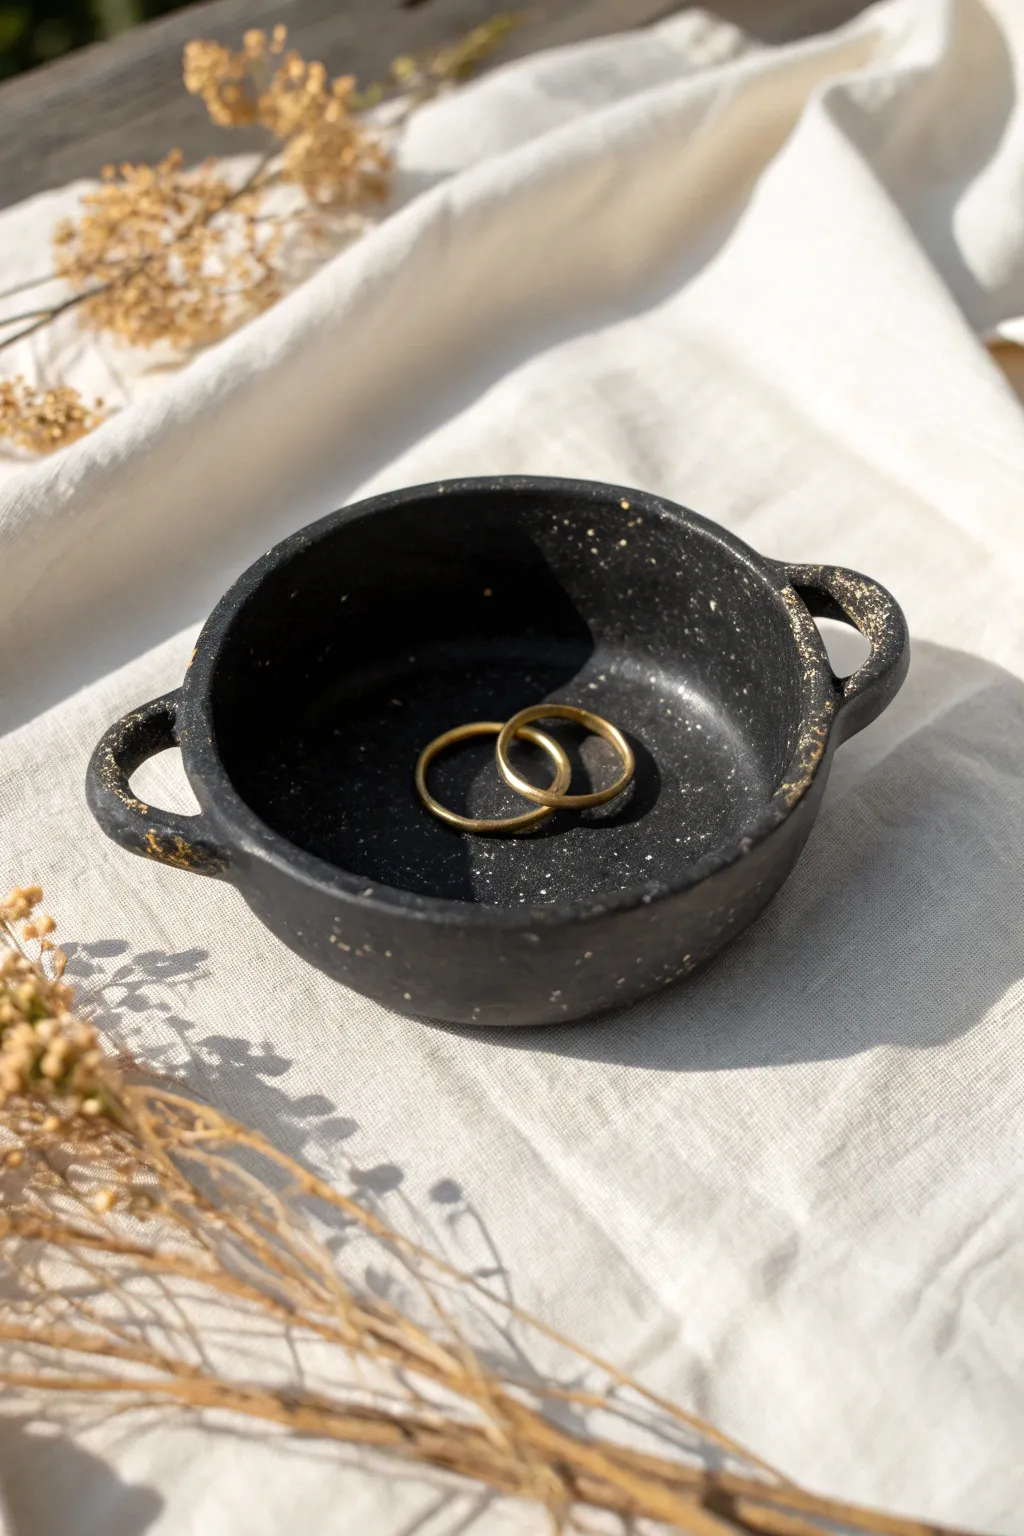
Summon a touch of magic to your vanity with this charming miniature cauldron ring dish. Crafted from black polymer clay and dusted with subtle gold speckles, it’s the perfect resting place for your most precious magical artifacts.
Detailed Instructions
Materials
- Black polymer clay (e.g., Fimo or Sculpey)
- Acrylic rolling pin
- Circle cutter or a small round glass
- Small ball tool or rounded end of a paintbrush
- Needle tool or toothpick
- Gold acrylic paint
- Stiff bristle toothbrush or fan brush
- Gloss or matte glaze (optional)
- Parchment paper
Step 1: Forming the Base
-
Condition the Clay:
Begin by taking a chunk of black polymer clay and kneading it in your hands until it becomes soft, pliable, and warm. -
Roll a Sphere:
Roll the conditioned clay into a smooth ball, roughly the size of a golf ball or slightly larger depending on how big you want your final dish. -
Create the Pinch Pot:
Push your thumb gently into the center of the sphere, stopping before you break through the bottom. -
Shape the Walls:
Using your thumb and forefinger, pinch the clay walls while rotating the ball, working your way upward to create an even bowl shape. -
Flatten the Bottom:
Gently tap the bottom of your bowl on your work surface to create a flat base so the cauldron sits steadily without wobbling. -
Smooth the Rim:
Use your fingers to round off the top rim of the bowl, ensuring there are no sharp edges or cracks. A tiny bit of water or clay softener can help smooth stubborn fingerprints.
Step 2: Adding Magical Details
-
Roll Handle Coils:
Take a small amount of leftover black clay and roll a thin, even snake or coil. -
Cut to Size:
Cut two small sections of the coil, each about an inch long, to serve as the cauldron handles. -
Arch the Handles:
Bend each small coil piece into a ‘U’ shape. -
Attach Handles:
Press the ends of the ‘U’ shapes onto opposite sides of the cauldron rim. I find that scoring the attachment points slightly with a needle tool helps them stick better. -
Blend the Seams:
Use a small ball tool or your finger to smooth the clay where the handle meets the bowl, blending the seams until they are invisible. -
Refine the Shape:
Give the cauldron a final check for symmetry and smooth out any accidental dents made while attaching the handles.
Potion Master Protocol
Work on a piece of white parchment paper or a ceramic tile. Black clay loves to pick up dust, and a clean white surface helps you spot lint before it gets stuck.
Step 3: Firing and Finishing
-
Bake the Cauldron:
Place your creation on parchment paper and bake according to your clay manufacturer’s instructions (usually 275°F/135°C for 15-30 minutes). -
Cool Completely:
Allow the cauldron to cool down fully before moving to the painting stage to ensure the clay is hardened. -
Prepare the Speckle:
Squeeze a tiny dot of gold acrylic paint onto a palette. You want the paint to be slightly dry, not watery. -
Apply the Splatter:
Dip the tips of a stiff toothbrush or fan brush into the gold paint. Run your thumb across the bristles to flick tiny speckles over the black surface. -
Highlight the Rim/Handles:
Use your finger to lightly dab a very faint amount of gold paint onto the top rim and the tops of the handles for an aged, metallic look. -
Seal (Optional):
If you want extra protection, apply a thin coat of matte or satin varnish once the paint is fully dry.
Bubbling Brew Upgrade
Fill the bottom of the cauldron with UV resin dyed green or purple. Cure it with a UV light to create the permanent illusion of a bubbling potion inside.
Now your tiny cauldron is ready to hold your rings or earrings safely on your nightstand
Potion Bottle Earrings Set
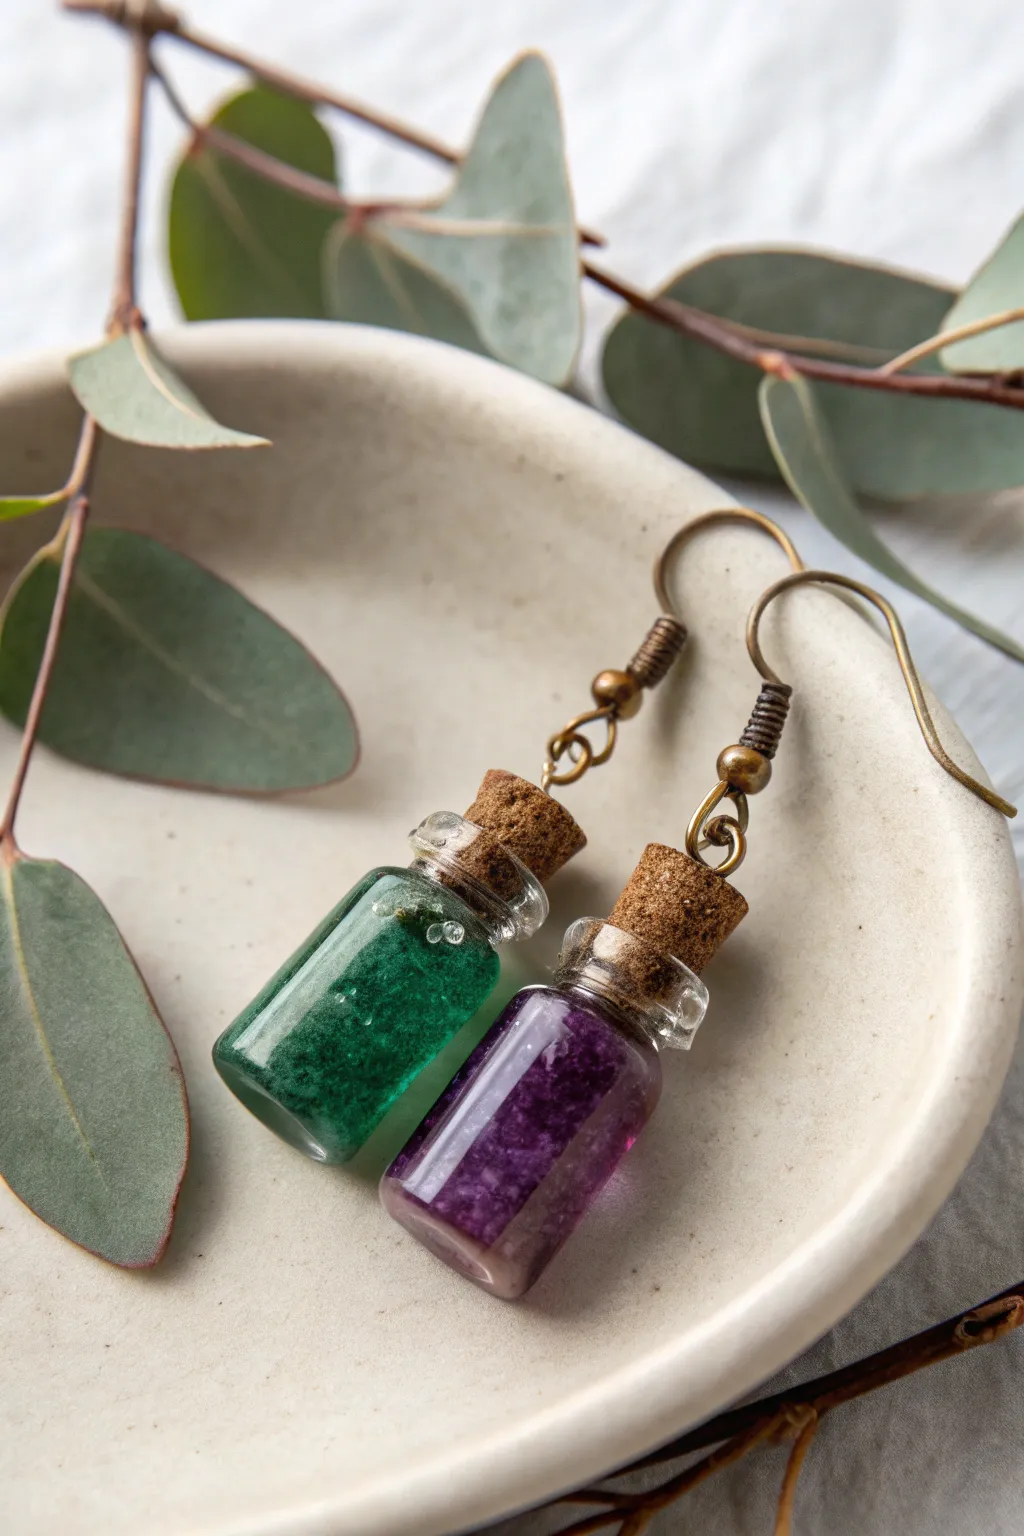
These enchanting earrings capture the essence of a wizard’s apothecary in wearable form, featuring tiny glass vials filled with shimmering green and purple concoctions. Perfect for any aspiring potioneer, these charming accessories combine the rustic look of cork and bronze with the mysterious allure of magical elixirs.
Step-by-Step
Materials
- Miniature glass bottles with cork stoppers (approx. 2cm tall)
- UV resin or 2-part epoxy resin
- Mica powder or alcohol ink (emerald green and deep purple)
- Bronze-finish earring hooks (French hook style)
- Bronze-finish eye screws (sized for the corks)
- Bronze-finish jump rings (4mm or 5mm)
- Toothpicks or a fine needle tool
- Jewelry pliers (round nose and chain nose)
- UV lamp (if using UV resin)
- Super glue or E6000 adhesive
Step 1: Preparing the Potions
-
Mix the green potion:
In a small disposable cup or on a silicone mat, mix a small amount of resin with a pinch of emerald green mica powder. Stir thoroughly with a toothpick until the shimmer is evenly distributed. -
Fill the first vial:
Carefully pour or drip the green resin mixture into one of the miniature glass bottles. Fill it almost to the neck, but leave just enough space so the cork won’t touch the liquid. -
Remove bubbles:
Check for trapped air bubbles in the resin. I like to use a lighter quickly passed over the surface or a needle tool to pop stubborn ones for a clearer potion look. -
Cure the green potion:
If using UV resin, place the bottle under a UV lamp for 2-3 minutes until completely solid. If using epoxy, set it aside in a dust-free area to cure according to the package instructions (usually 24 hours). -
Mix the purple potion:
Repeat the mixing process for the second earring, this time combining clear resin with a deep purple mica powder or purple alcohol ink. -
Fill and cure:
Fill the second glass vial with your purple mixture, remove bubbles, and cure it completely just like the first one.
Step 2: Hardware Assembly
-
Prepare the corks:
Take the cork stoppers that fit your bottles. Locate the center of the top surface on each cork. -
Insert eye screws:
Gently twist a bronze eye screw into the center of each cork. If the cork feels dense, you might need to make a tiny pilot hole with a needle first to prevent crumbling. -
Secure the hardware:
Unscrew the eye pin halfway, add a tiny drop of super glue or E6000 to the threads, and screw it back in tight. This ensures the earring won’t pull apart while you’re wearing it. -
Seal the bottles:
Apply a thin rim of adhesive around the bottom half of the cork stopper. Press the cork firmly into the neck of the glass bottle. Wipe away any excess glue immediately.
Sticky Corks?
If your cork crumbles when inserting the screw, the cork is too dry. Soak the corks in warm water for 5 minutes to make them pliable, insert the screw, let dry, then glue.
Step 3: Final Touches
-
Open jump rings:
Using two pairs of pliers, twist your jump rings open. Remember to twist the ends away from each other (front to back) rather than pulling them apart side-to-side. -
Connect the hooks:
Slide the open jump ring through the eye screw on the cork, and then add the loop of the bronze earring hook. -
Close the rings:
Use your pliers to twist the jump ring closed again, ensuring the ends meet perfectly flush so the hook doesn’t slip out. -
Add detail:
For an aged effect, you can lightly brush the edges of the cork with brown acrylic paint or ink, though the natural cork usually looks great on its own. -
Final Polish:
Wipe the glass bottles with a microfiber cloth to remove any fingerprints or smudges from the assembly process.
Bubbling Effect
Want fizzy potions? Stir the resin vigorously to intentionally introduce tiny bubbles before pouring, or add tiny glass micro-beads into the mix for a permanent bubbling look.
Now you have a charming set of magical accessories ready to wear around Hogw… I mean, anywhere you like
Brick Wall Portal Magnet
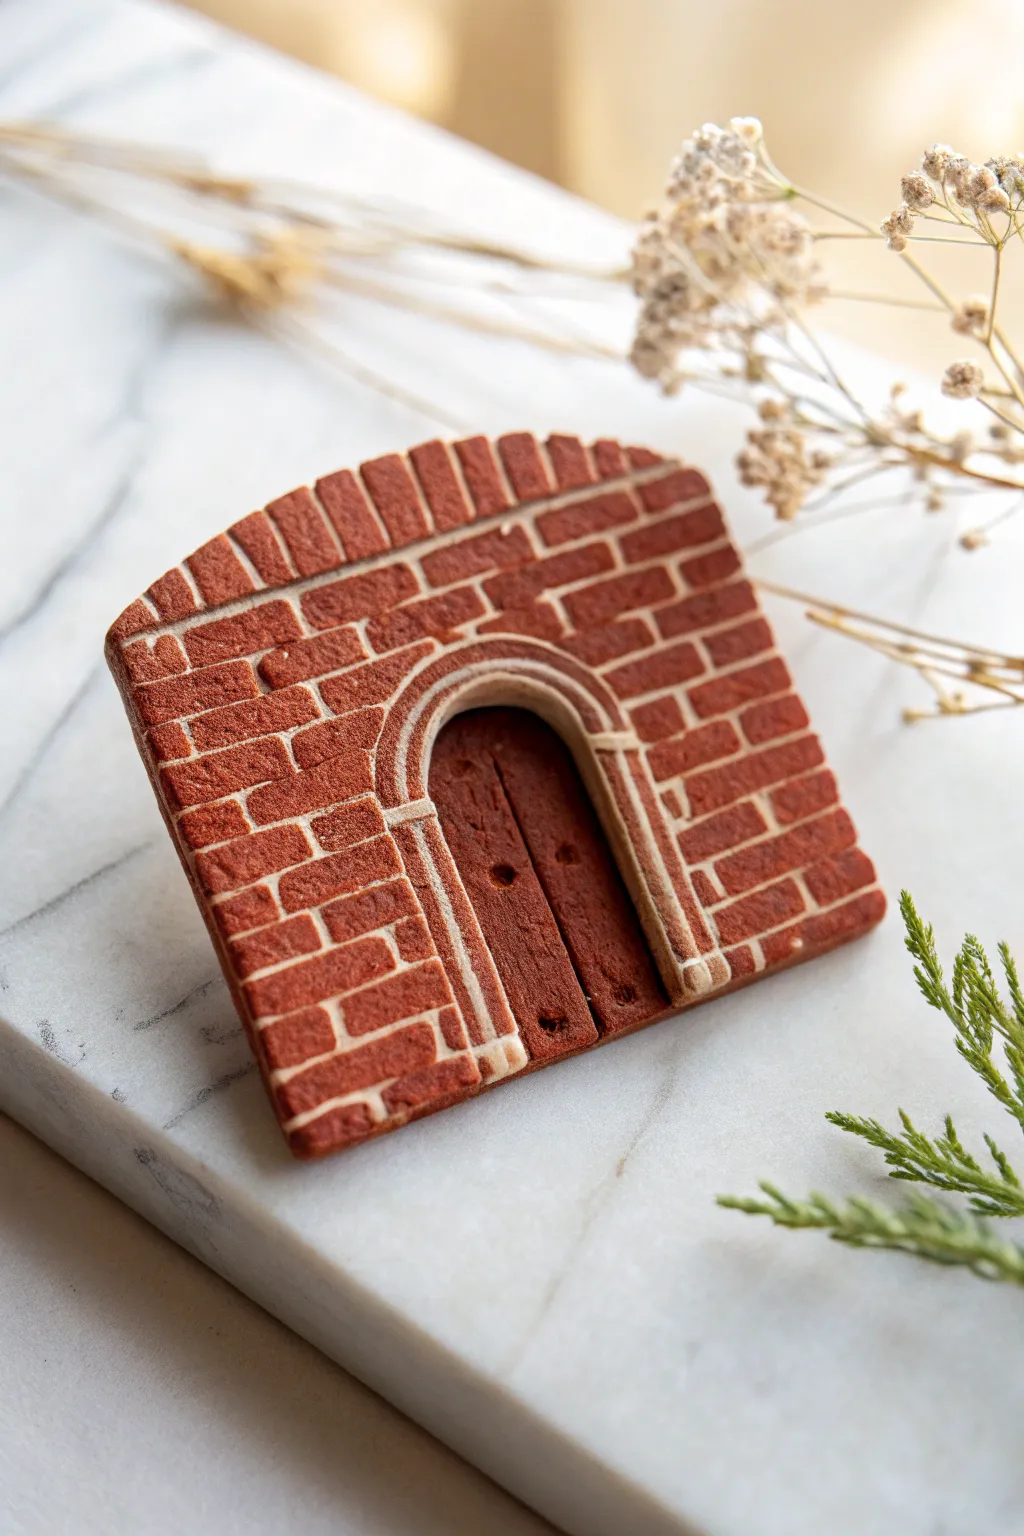
Create a little piece of wizarding world magic with this textured polymer clay magnet featuring a rustic brick wall and a mysterious wooden door. This enchanting project relies on simple carving techniques to create a realistic architectural miniature perfect for your fridge or locker.
Step-by-Step Guide
Materials
- Terracotta or brick-red polymer clay
- Dark brown polymer clay
- White liquid polymer clay (or white acrylic paint)
- Small rolling pin
- Clay blade or craft knife
- Needle tool or toothpick
- Small round cutter (approx. 1.5 – 2 inches)
- Texture tool (stiff brush or sandpaper)
- Strong round magnet
- Super glue
- Gloss varnish (optional)
Step 1: Forming the Base
-
Prepare the Red Clay:
Begin by conditioning your terracotta or brick-red polymer clay until it is soft and pliable. Roll it out into a flat sheet approximately 1/4 inch thick to ensure it’s sturdy enough for a magnet. -
Cut the Shape:
Use your clay blade to cut a rectangle roughly 2.5 inches wide by 3 inches tall. Use the round cutter to trim just the very top edge into a gentle curve, creating an arched silhouette for the wall piece. -
Texture the Surfce:
Before carving any bricks, gently tap the entire surface with a stiff toothbrush, a ball of aluminum foil, or coarse sandpaper. This gives the ‘stone’ a realistic, weathered finish rather than looking like smooth plastic.
Uneven Grout Lines?
If acrylic paint stains the ‘brick’ face too much, lightly sand the surface with fine-grit sandpaper after the paint dries to reveal the clean clay color underneath.
Step 2: Creating the Doorway
-
Mark the Arch:
Use your needle tool to lightly sketch an arch shape in the lower center of the rectangle. This will be the outline for your wooden door. -
Cut Out the Door Space:
Carefully cut out the clay inside your sketched arch and remove it. You want an open hole here so we can insert a different color clay for the wood later. -
Add the Door Jamb:
Take a tiny snake of the red clay, flatten it slightly, and run it around the interior edge of your arch cut-out to create a defined door jamb. -
Insert the Dark Clay:
Roll out your dark brown clay to the same thickness as the wall. Cut a piece that fits snugly inside the arched hole you created and press it gently into place, smoothing the back seam with your finger. -
Texture the Wood:
Use the needle tool to draw vertical lines on the brown clay to simulate wooden planks. Add tiny dots for nail heads near the top and bottom of each ‘plank’ for added detail.
Magical Glow
Mix a tiny amount of glow-in-the-dark powder into your white liquid clay or paint for the grout. When the lights go out, the portal cracks will glow!
Step 3: Carving the Bricks
-
Outline the Arch Trim:
Using the needle tool, carve two concentric arch lines around the door frame to represent the stone trim. Keep these lines fairly deep. -
Carve Horizontal Lines:
Carve horizontal lines across the entire red surface, spacing them about 1/4 inch apart. I find it helpful to gently gently curve the lines near the top to follow the silhouette of the piece. -
Create Vertical Joints:
Carve short vertical lines between the horizontal rows to create the individual bricks. Ensure you stagger them—alternating the position on each row—so it looks like a structurally sound brick pattern. -
Deepen the Grooves:
Go back over your carved lines with the needle tool or a slightly thicker carving tool. You need the grooves to be deep enough to hold the grout later. -
Distress the Edges:
Use your tool to nick the corners of a few random bricks. Real walls aren’t perfect, and these imperfections add character.
Step 4: Finishing Touches
-
Bake the Piece:
Bake the clay according to the manufacturer’s instructions for the specific brand you are using. Let it cool completely before moving to the next step. -
Apply the Grout:
If using liquid clay, squeeze a thin line into all the carved grooves and bake again briefly to set. Alternatively, paint thinned white acrylic paint over the bricks, let it sit for a moment, and then wipe the surface with a damp paper towel or baby wipe so the paint stays only in the cracks. -
Clean Up:
If any white hazing remains on the brick faces, use a slightly damp cotton swab to clean them off individually, making the red color pop again. -
Add the Magnet:
Flip the finished piece over. Apply a drop of super glue to the center of the back and press your strong round magnet firmly into place. Let it dry completely.
Place your finished portal on the fridge and wait for it to transport you to your next magical adventure
Grumpy Root Baby Plant Pot
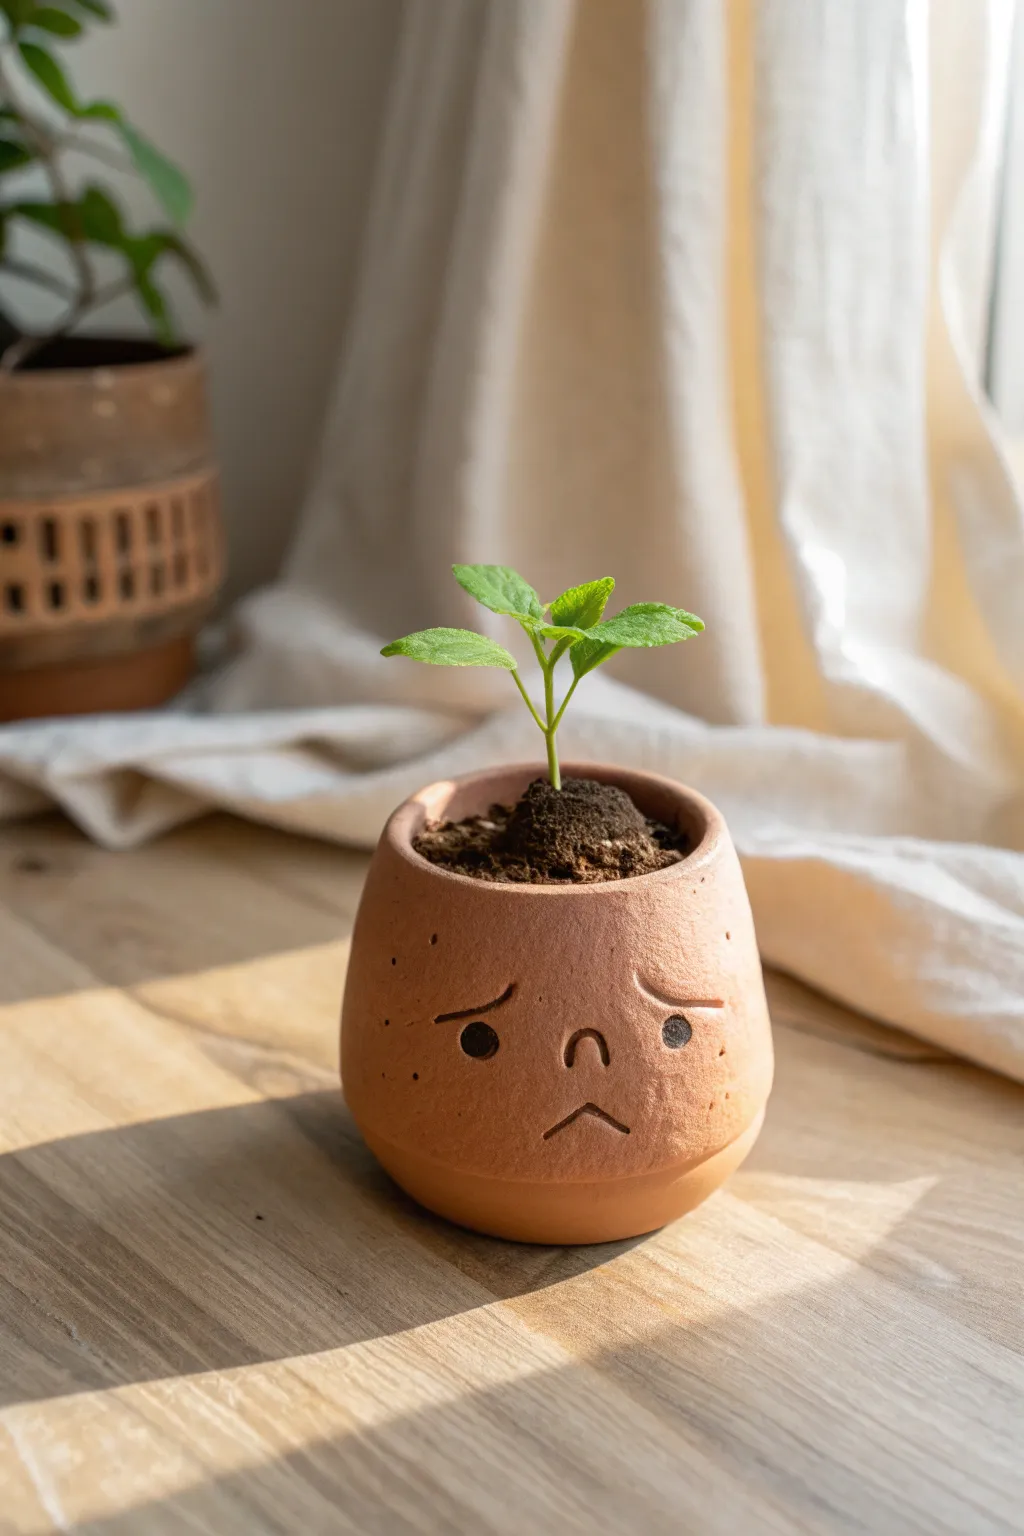
Bring a touch of Herbology class to your windowsill with this adorable, grumpy-faced planter inspired by a young Mandrake root. Its textured, earthy surface and expressive frown make it the perfect home for a small seedling or succulent.
Step-by-Step
Materials
- Terracotta-colored air-dry clay (or polymer clay)
- Small round cutter or sculpting tool for eyes
- Pointed sculpting tool or toothpick
- Fine-grit sandpaper
- Water for smoothing
- Matte sealant or varnish
- Small seedling pot (to line the inside, optional)
- Rolling pin
Step 1: Sculpting the Base Form
-
Prepare the clay:
Begin by conditioning a large ball of terracotta-colored clay until it is soft and pliable. Roll it between your palms to remove any major cracks. -
Form the basic shape:
Shape the ball into a tall, rounded mound. It should be slightly wider at the bottom, tapering gently towards the top rim, mimicking the bulbous shape of a root vegetable. -
Create the opening:
Press your thumb into the center of the mound to start the opening. Carefully pinch and pull the walls upwards and outwards, maintaining a thickness of about a quarter-inch. -
Refine the rim:
Smooth the top edge of the pot. It doesn’t need to be perfectly level; a slightly organic, uneven rim adds to the natural root aesthetic.
Pot Within a Pot
To maintain the longevity of air-dry clay, don’t plant directly inside. sculpt the clay around a small plastic nursery pot so you can remove the plant for watering.
Step 2: Adding the Grumpy Features
-
Mark eye placement:
About halfway down the pot, use a tool to lightly mark where the eyes will go. They should be set relatively wide apart to enhance the grumpy expression. -
Indenting the eyes:
Using a small round sculpting tool or the end of a paintbrush, press firmly into the clay to create two deep circular indentations for the eyes. -
Sculpting the nose:
Between and slightly below the eyes, use a small U-shaped tool or a steady hand with a needle tool to carve a small, inverted ‘U’ shape for the nose. -
Carving the frown:
This is the most crucial step for personality. Carve a distinct downward-curving line below the nose. I like to make the corners drag down significantly to really sell that miserable Mandrake look. -
Adding eyebrows:
Above the eyes, carve two slanted lines dipping inward. These ‘angry eyebrows’ work together with the frown to complete the expression.
Step 3: Texturing and Finishing
-
Adding skin texture:
Take a stiff bristles brush or a crumpled ball of aluminum foil and gently press it against the surface randomly. This gives the clay a porous, root-like skin texture. -
Creating freckles:
Use a needle tool to poke tiny, shallow holes sporadically around the face, concentrating slightly on the cheeks for a freckled appearance. -
Smooth imperfections:
Dip your finger in a little water and gently run it over any sharp burrs created by the carving, softening the edges without losing the detail. -
Drying:
Allow the pot to dry completely according to your clay package instructions. This usually takes 24-48 hours for air-dry clay. -
Sanding:
Once fully dry, use fine-grit sandpaper to lightly smooth the bottom so the pot sits flat, and touch up the rim if it feels too sharp. -
Sealing:
Apply a coat of matte sealant or varnish to protect the clay from moisture, especially on the inside if you plan to put soil directly in it. -
Planting:
Fill with a bit of soil and add a small, leafy seedling. The plant acts as the Mandrake’s ‘hair’ sprouting from the top.
Level Up: Root Details
Add tiny worms of clay to the bottom sides of the pot before drying to look like little root tendrils or ‘arms’ folded across the Mandrake’s body.
Now you have your very own magical seedling to tend, just remember to wear earmuffs if you ever need to repot it
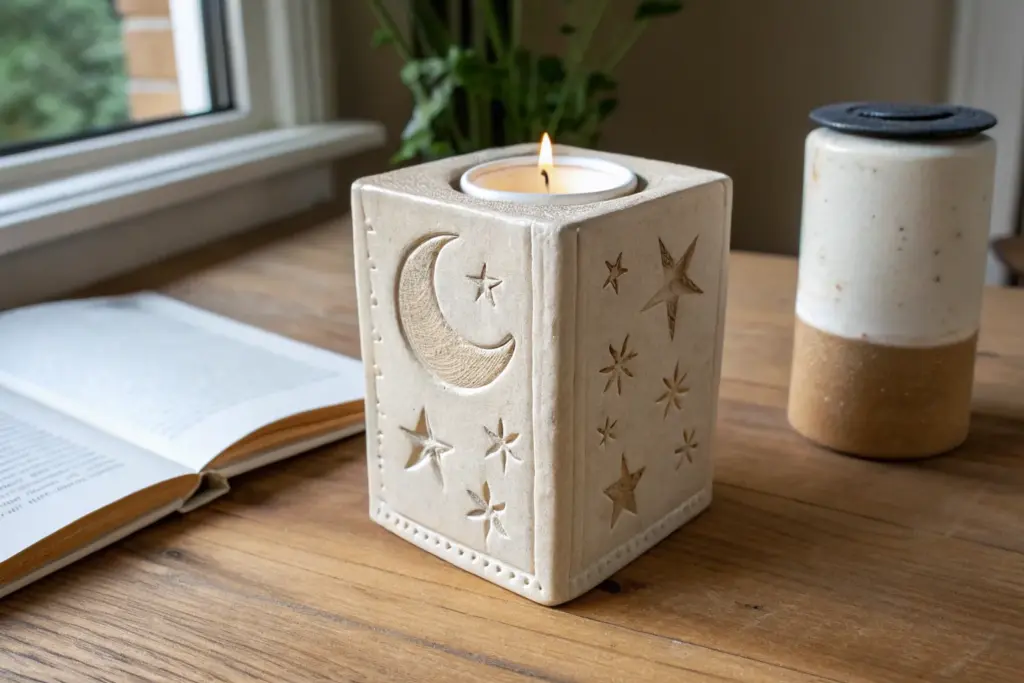
Star Map Trinket Tray
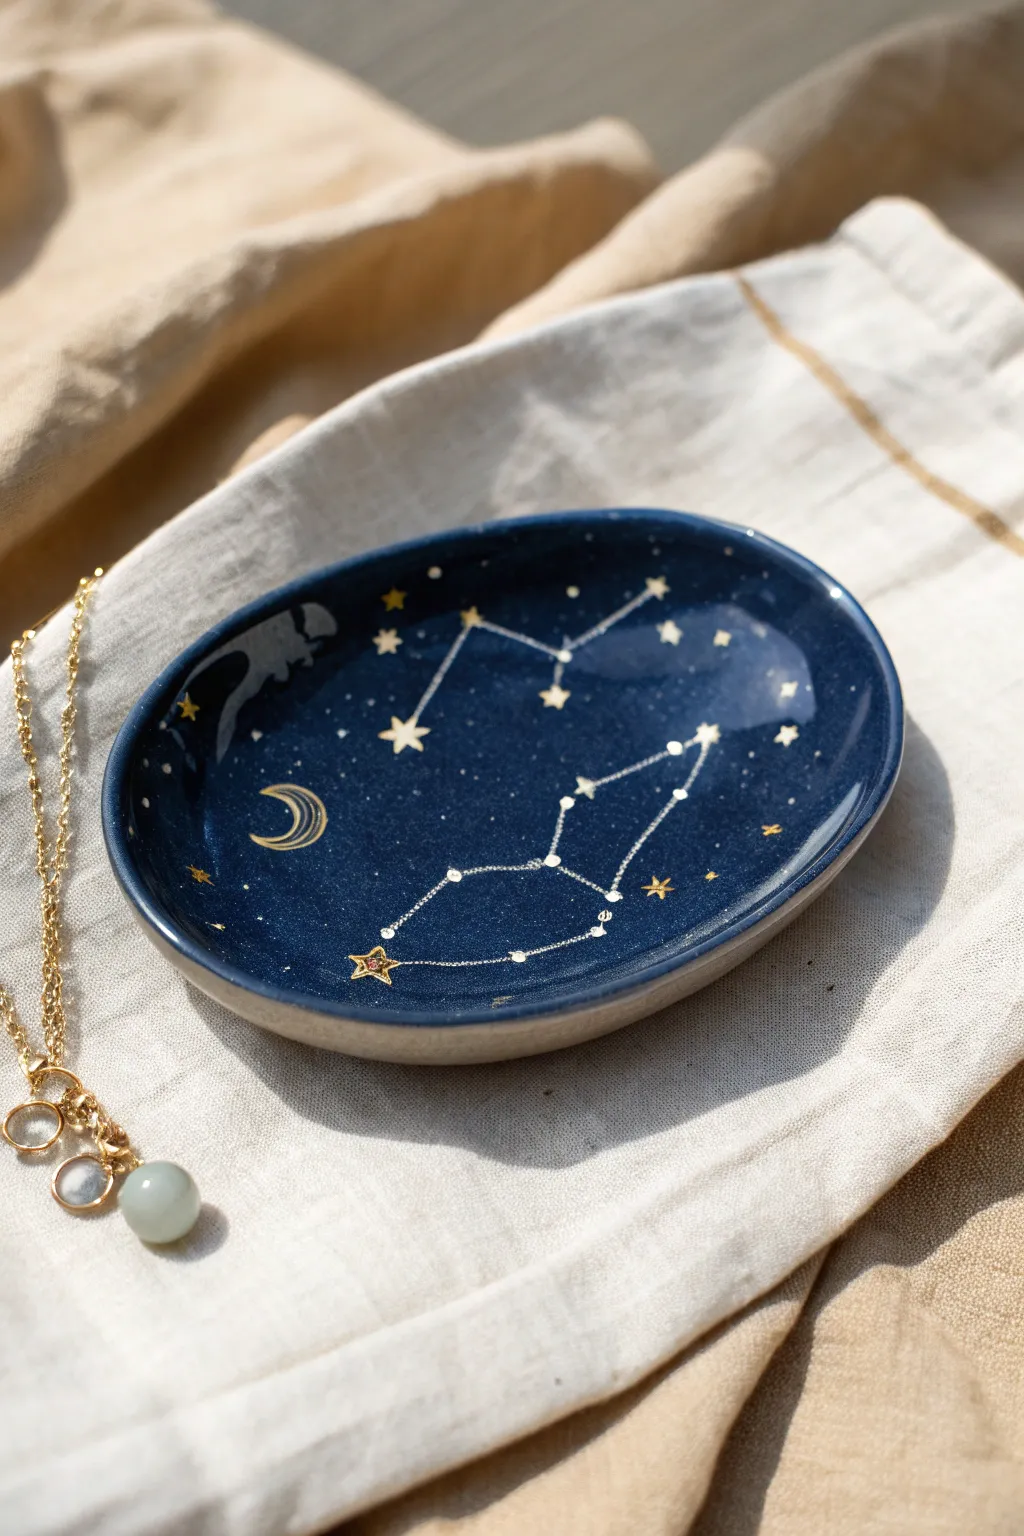
Capture the magic of the Astronomy Tower with this stunning oval trinket dish. Featuring a deep midnight blue base adorned with delicate gold constellations and a crescent moon, it’s the perfect resting place for your most magical jewelry.
Step-by-Step Guide
Materials
- Air-dry clay (white) or polymer clay
- Rolling pin
- Oval cutter or tracing template
- Craft knife
- Bowl of water and smooth sponge
- Fine-grit sandpaper
- Dark navy blue acrylic paint
- Gold leaf pen or fine-point metallic gold marker
- White gel pen or fine detail brush with white acrylic
- Glossy varnish or sealant
- Paintbrushes (flat shader and fine liner)
Step 1: Shaping the Clay
-
Condition the clay:
Start by kneading a handful of clay until it’s soft, pliable, and free of any air bubbles. If using polymer clay, warm it in your hands first. -
Roll it out:
Roll the clay onto a smooth surface to an even thickness of about 1/4 inch. I find using guides or slats on either side helps keep the thickness consistent. -
Cut the oval shape:
Place your oval template or cutter onto the clay and cut cleanly around it. If cutting freehand, lightly sketch the oval with a needle tool first. -
Form the rim:
Gently lift the edges of the oval with your fingertips, curving them upward to create a shallow bowl shape. Smooth the transition so there are no sharp creases. -
Smooth the surface:
Dip your finger or a small sponge in a little water and gently run it over the clay to remove fingerprints and smooth out the rim. -
Dry the piece:
Let the tray dry completely according to package instructions. For air-dry clay, flip it occasionally to ensure even drying on both sides. -
Sand for perfection:
Once fully cured, use fine-grit sandpaper to buff away any rough edges on the rim or surface bumps, wiping away the dust with a damp cloth afterward.
Galaxy Splatter
For a deeper galaxy effect, flick a toothbrush with watered-down white paint over the dry navy base before drawing your main gold stars.
Step 2: Painting the Night Sky
-
Base coat application:
Apply a coat of dark navy blue acrylic paint to the entire interior of the tray. Use smooth, long strokes to minimize texture. -
Deepen the color:
Let the first layer dry, then add a second or third coat until the blue is rich, opaque, and resembles a midnight sky. Leave the outer rim natural or paint it a contrasting neutral tone if desired. -
Plan the constellation:
Lightly mark the dots of your chosen constellation (like Leo or Orion) using a pencil. Keep the marks very faint so they don’t show through later. -
Draw the connection lines:
With a fine-point white gel pen or a liner brush with thinned white paint, carefully draw the thin lines connecting your star points. -
Add the stars:
Use a gold leaf pen or metallic marker to draw small stars or solid dots over your pencil marks. Vary the sizes for a more realistic galaxy effect. -
Detail the moon:
Paint a crescent moon shape near the edge using the gold marker. You can add thin internal lines to the crescent for a stylized, magical look. -
Create background atmosphere:
add tiny specks of white and gold throughout the empty space to represent distant stars. A toothpick dipped in paint works perfectly for these micro-dots.
Step 3: Finishing Touches
-
Seal the magic:
Once all paint is completely dry, apply a coat of glossy varnish. This protects the paint and gives the ‘night sky’ a beautiful, vitreous shine. -
Final cure:
Allow the varnish to cure fully in a dust-free area for at least 24 hours before placing any jewelry on the surface.
Warping Edges?
If the edges curl while air-dry clay is drying, weigh the center down with a small bag of rice or sand to keep the bottom flat.
Now your celestial tray is ready to hold your time-turners and treasures
Mini Broom and Magic Ball Desk Set
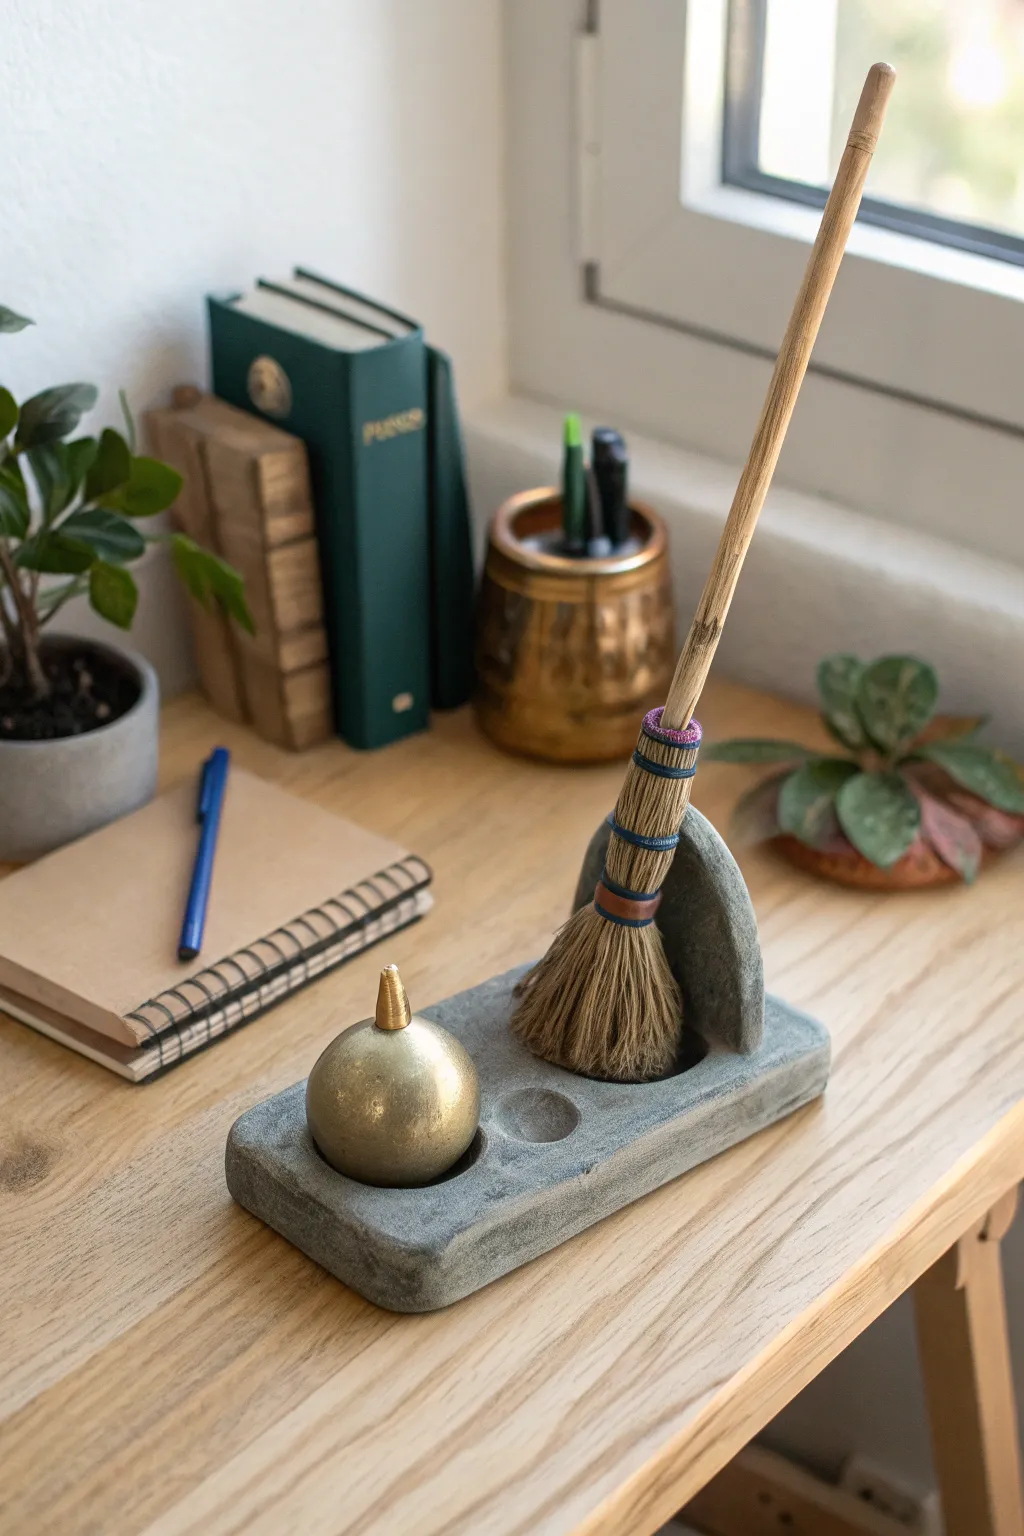
Bring a touch of magic to your study space with this clever desk accessory that combines Quidditch charm with practical organization. This faux-stone stand elegantly displays a miniature broomstick while cradling a golden snitch-inspired storage bauble.
Step-by-Step Tutorial
Materials
- Air-dry stone clay or polymer clay (gray)
- Small wooden dowel or chopstick (approx. 8 inches)
- Natural broom straw or dried grass
- Thin copper wire or embroidery floss (blue and brown)
- Round wooden bead or small plastic ornament (approx. 2 inches)
- Small brass finial or cone-shaped bead
- Gold metallic spray paint or acrylic paint
- Strong craft glue (E6000 or similar)
- Sculpting tools
- Fine-grit sandpaper
- Matte sealant spray
Step 1: Sculpting the Stone Base
-
Form the foundation:
Begin with a large block of gray clay. Roll it into a thick, rectangular slab about 6 inches long and 3 inches wide. Aim for rounded, soft corners rather than sharp edges to mimic worn stone. -
Create the broom rest:
Shape a vertical, tombstone-like arch out of additional clay. Attach this securely to one end of your rectangular base, blending the seams with a little water or clay softener until invisible. -
Add impressions:
Press the rounded bottom of your large wooden bead (the future Snitch) into the flat end of the base to create a perfectly sized divot. Create a smaller shallow indentation next to it for paperclips or small items. -
Refine the texture:
Use a crumpled ball of aluminum foil to gently tap over the entire surface of the clay. This creates a realistic, pitted stone texture. Let the clay dry completely according to package instructions, which may take 24-48 hours.
Step 2: Crafting the Golden Snitch
-
Prepare the sphere:
Take your wooden bead or round ornament. If it has a hole, position it facing upwards. If it’s solid, drill a very small hole at the top. -
Apply the gold finish:
Spray paint or hand-paint the sphere with a rich metallic gold. Apply 2-3 thin coats for the best luster, allowing drying time between layers. Do the same for your small brass finial. -
Assemble the handle:
Once dry, glue the small brass finial into the top hole of the sphere. This acts as a handle to lift the ‘Snitch’ out of its recessed holder.
Uneven Drying?
If your clay base starts curling up at the edges while drying, gently weigh down the corners with books (use wax paper in between!) or flip it over halfway through the drying process.
Step 3: Assembling the Broomstick
-
Prepare the shaft:
Cut your wooden dowel to size, slightly tapering one end if desired. Sand it lightly to remove any shine and stain it with a light oak wood stain or diluted brown paint. -
Gather the bristles:
Cut a bundle of natural broom straw or dried grass to about 3 inches long. Arrange them evenly around the bottom inch of the wooden shaft. -
Secure the bind:
Wrap thin wire or brown thread tightly around the top of the bristles to secure them to the stick. I find a dab of glue under the binding helps prevent slipping. -
Add decorative bands:
Using embroidery floss or colored wire, create two distinct bands further down the bristles to mimic the Nimbus 2000 look. Use blue and bronze (or copper) colors for accuracy. -
Trim the sweep:
Use sharp scissors to trim the bottom of the bristles into a uniform, rounded curve.
Level Up: Hidden Magic
Make the golden sphere hollow! Use a two-part plastic ornament painted gold inside and out. It can become a secret hiding spot for small treasures or specific desk accessories like pins.
Step 4: Final Touches
-
Sand the stone:
Once the clay base is fully cured, lightly sand any rough edges that look too sharp. You want it to look weathered, not manufactured. -
Seal the project:
Apply a matte sealant spray to the stone base to protect it from stains and dust. Place the golden ball in its divot and lean the broom against the upright rest.
Now you have a charming piece of the wizarding world keeping your muggle workspace tidy