If you’re just getting started with lightweight air-dry modeling clay, the easiest wins come from simple shapes—balls, coils, and little pancakes pressed flat. Here are my go-to beginner clay ideas that look adorable fast, even if you’re still figuring out how sticky clay likes to behave.
Mini Penguin From Two Ovals
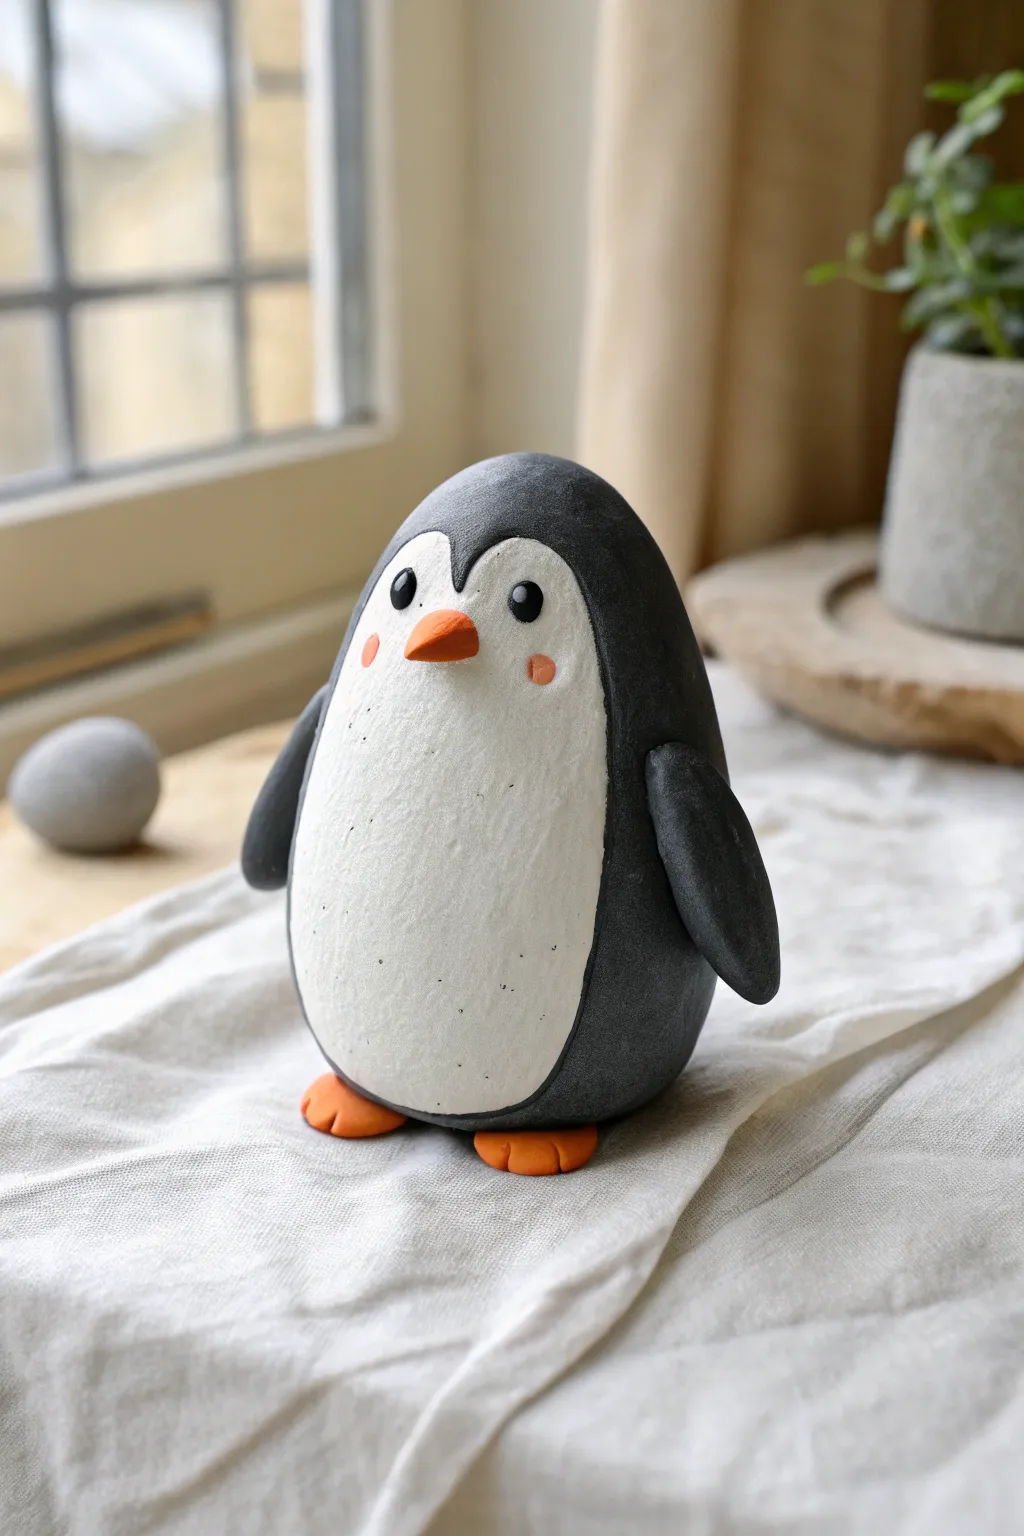
This adorable little penguin captures the Antarctic spirit with its simple, smooth shapes and charming rosy cheeks. Crafted from basic clay ovals, the finished piece has a lovely matte texture that looks great on any shelf.
Step-by-Step Guide
Materials
- Black Model Magic clay (or air-dry clay)
- White Model Magic clay
- Orange Model Magic clay
- Small amount of pink clay (or pink acrylic paint)
- Clay sculpting tool or toothpick
- Clean work surface (parchment paper works well)
Step 1: Forming the Body
-
Create the main oval:
Start with a generous handful of black clay. Roll it into a smooth ball first to remove cracks, then gently elongate it into a tall, standing egg shape. This will be the penguin’s main body. -
Flatten the base:
Tap the wider bottom end of your black oval against your work surface. You want the penguin to stand upright securely without wobbling. -
Prepare the tummy:
Take a smaller amount of white clay, roughly half the size of the black piece. Roll this into a ball and then press it flat into an oval shape. -
Attach the white patch:
Press the white oval onto the front of the black body. Use your thumb to smooth the edges incredibly gently so the white clay seems to merge seamlessly into the black, covering the belly and chest area. -
Shape the face curve:
At the top of the white patch, use your finger to gently push the white clay downward in the center to create a subtle heart-shaped dip. This forms the penguin’s forehead hairline.
Uneven Seams?
If the white belly clay isn’t sticking or looks lumpy against the black, dampen your finger slightly with water and smooth the seam where the colors meet.
Step 2: Adding the Flippers and Feet
-
Make flipper ovals:
Roll two equal-sized small balls of black clay. Flatten them into long, teardrop shapes to serve as the wings. -
Attach wings:
Press the rounded top of each wing against the sides of the body, just below the ‘neck’ area. Leave the bottom tips slightly flared out for a dynamic look. -
Create feet bases:
Roll two small balls of orange clay. Flatten them slightly into thick discs. -
Detail the toes:
Using a clay tool or the side of a toothpick, press two indentations into the front edge of each orange disc to create a three-toed webbed look. -
Connect the feet:
Place the feet under the front edge of the body. Press the black body down firmly onto them so they stick well and peek out from under the tummy.
Step 3: Bringing the Face to Life
-
Form the beak:
Take a very small piece of orange clay and roll it into a cone. Flatten the underside slightly so it isn’t perfectly round. -
Position the beak:
Press the beak into the center of the white face area, just below the forehead dip. It should point slightly downward. -
Make the eyes:
Roll two tiny specks of black clay into balls. I find it helpful to place them on the face first to check symmetry before pressing them down firmly on either side of the beak. -
Add eye highlights:
Roll two microscopic dots of white clay. Carefully place these on the upper right corner of each black eye to give it a spark of life. -
Apply rosy cheeks:
Take two tiny dots of pink clay and flatten them onto the cheeks, right below the eyes. If you don’t have pink clay, you can dab on a bit of pink paint after the clay dries. -
Add texture (optional):
For a rustic look, you can gently tap the white belly area with a toothbrush or stiff brush to create tiny divots, making it look more like feathers.
Smooth Operator
Before attaching any pieces, roll your clay balls until they are perfectly smooth. Cracks in the initial ball will turn into large fissures when the clay dries.
Let your little arctic friend dry completely for 24 hours before moving him to his new home


Simple Owl With Dot Eyes
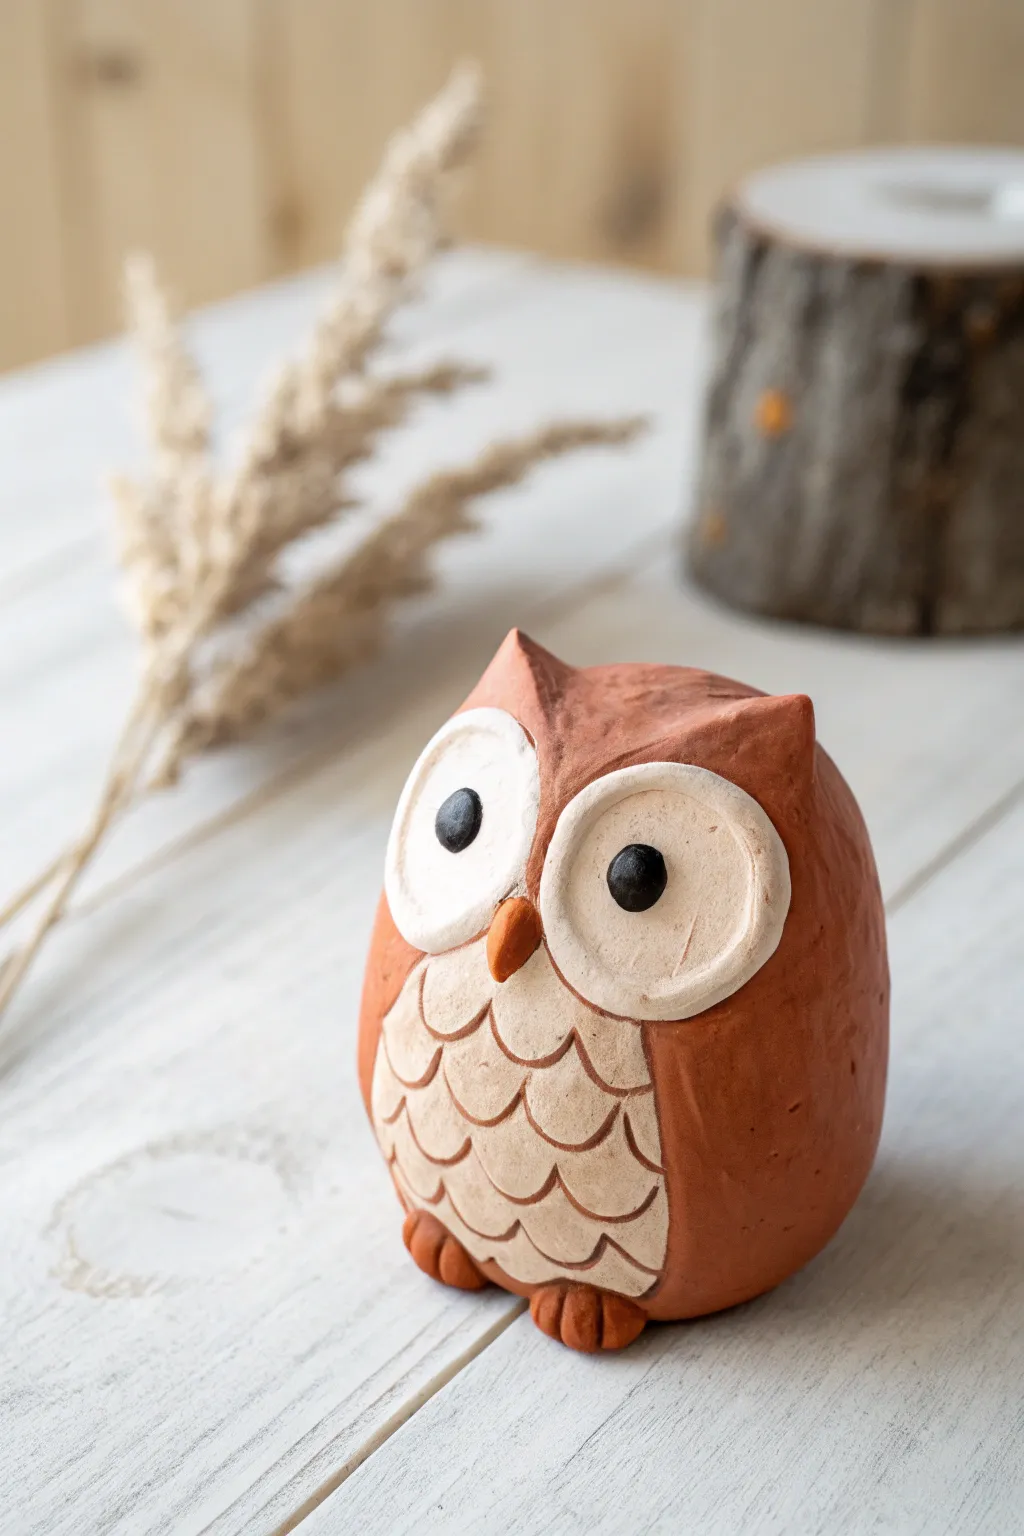
This charming little owl is crafted from terracotta and white air-dry clay, giving it a rustic, natural pottery look without the need for a kiln. With its oversized eyes and textured chest feathers, it makes for an adorable desk companion or a sweet handmade gift.
Detailed Instructions
Materials
- Terracotta-colored air-dry clay (or Model Magic mixed with brown/orange)
- White Model Magic or air-dry clay
- Black acrylic paint or a black clay ball
- Small pointed sculpting tool or toothpick
- Rolling pin
- Small round cutter (or a bottle cap)
- Water (for smoothing and attaching)
- Clear matte varnish (optional)
Step 1: Shaping the Base
-
Form the Body:
Start by taking a large handful of terra-cotta colored clay. Roll it into a smooth ball between your palms to remove any cracks. -
Create the Oval Shape:
Gently gently press and roll the ball on your work surface to elongate it slightly into a sturdy egg or oval shape. This will be the owl’s main body. -
Flatten the Bottom:
Tap the bottom of your oval firmly against the table so the owl stands up straight on its own without wobbling. -
Pinch the Ears:
At the top of the head, use your thumb and forefinger to pinch up two small points on the left and right sides to create the tufted ears. Smooth the area between them so it dips slightly.
Step 2: Adding Features
-
Prepare the Belly:
Roll out a piece of white clay until it is about 1/8 inch thick. Cut or shape it into an oval that fits the lower front of your owl’s body. -
Attach the Belly:
Press the white oval onto the front of the body. If the clay is a bit dry, use a tiny drop of water on your finger to help it stick securely. -
Texture the Feathers:
Using a small sculpting tool or a toothpick, scratch creating ‘U’ shaped scallops across the white belly patch to mimic layers of feathers. I find starting from the bottom and working up creates the most realistic overlap effect. -
Make the Eye Discs:
Roll two equal-sized balls of white clay and flatten them into thick discs. These should be quite large relative to the body to give it that cute, wide-eyed look. -
Position the Eyes:
Press the two white discs onto the face area, right above the belly patch. They should touch each other slightly in the center. -
Add Depth:
Use your thumb or a rounded tool to gently press an indentation into the center of each white eye disc, creating a rim around the edge. -
Create the Beak:
Roll a tiny piece of terracotta clay into a small cone or teardrop shape. Place this pointed-side-down right where the two eye discs meet at the bottom. -
The Pupils:
Roll two very small balls of black clay (or paint them later). Press them into the center of the white eye indentations. Placing them slightly cross-eyed or off-center can add a lot of personality.
Cracking Clay?
If your clay starts cracking while shaping, wet your fingers with water and smooth over the cracks immediately. Keep unused clay covered in plastic wrap while you work.
Step 3: Wings and Final Touches
-
Shape the Wings:
Take two pieces of terracotta clay and flatten them into teardrop shapes. These should be long enough to cover the sides of the owl. -
Attach Wings:
Press the wings onto the sides of the body, wrapping them slightly towards the front so they frame the white belly. -
Wing Texture:
Use your sculpting tool to scratch a few vertical lines or feather marks into the wings for added detail. -
Add the Feet:
Roll two small balls of terracotta clay and flatten them slightly. Use a knife tool to mark two indentations in each to create toes. -
Attach Feet:
Tuck these feet just under the front bottom edge of the owl so they poke out slightly. -
Smoothing:
Do a final check around the sculpture. If you see any rough fingerprints, dip your finger in a little water and gently buff them away before setting the owl aside to dry.
Make it a set
Make a whole family by varying the sizes of the base ovals. You can create a tiny owlet by using just a thumb-sized amount of clay and skipping the wing details.
Once fully dry, you will have a sturdy little woodland friend ready to watch over your bookshelf


Baby Chick With Flat Wings
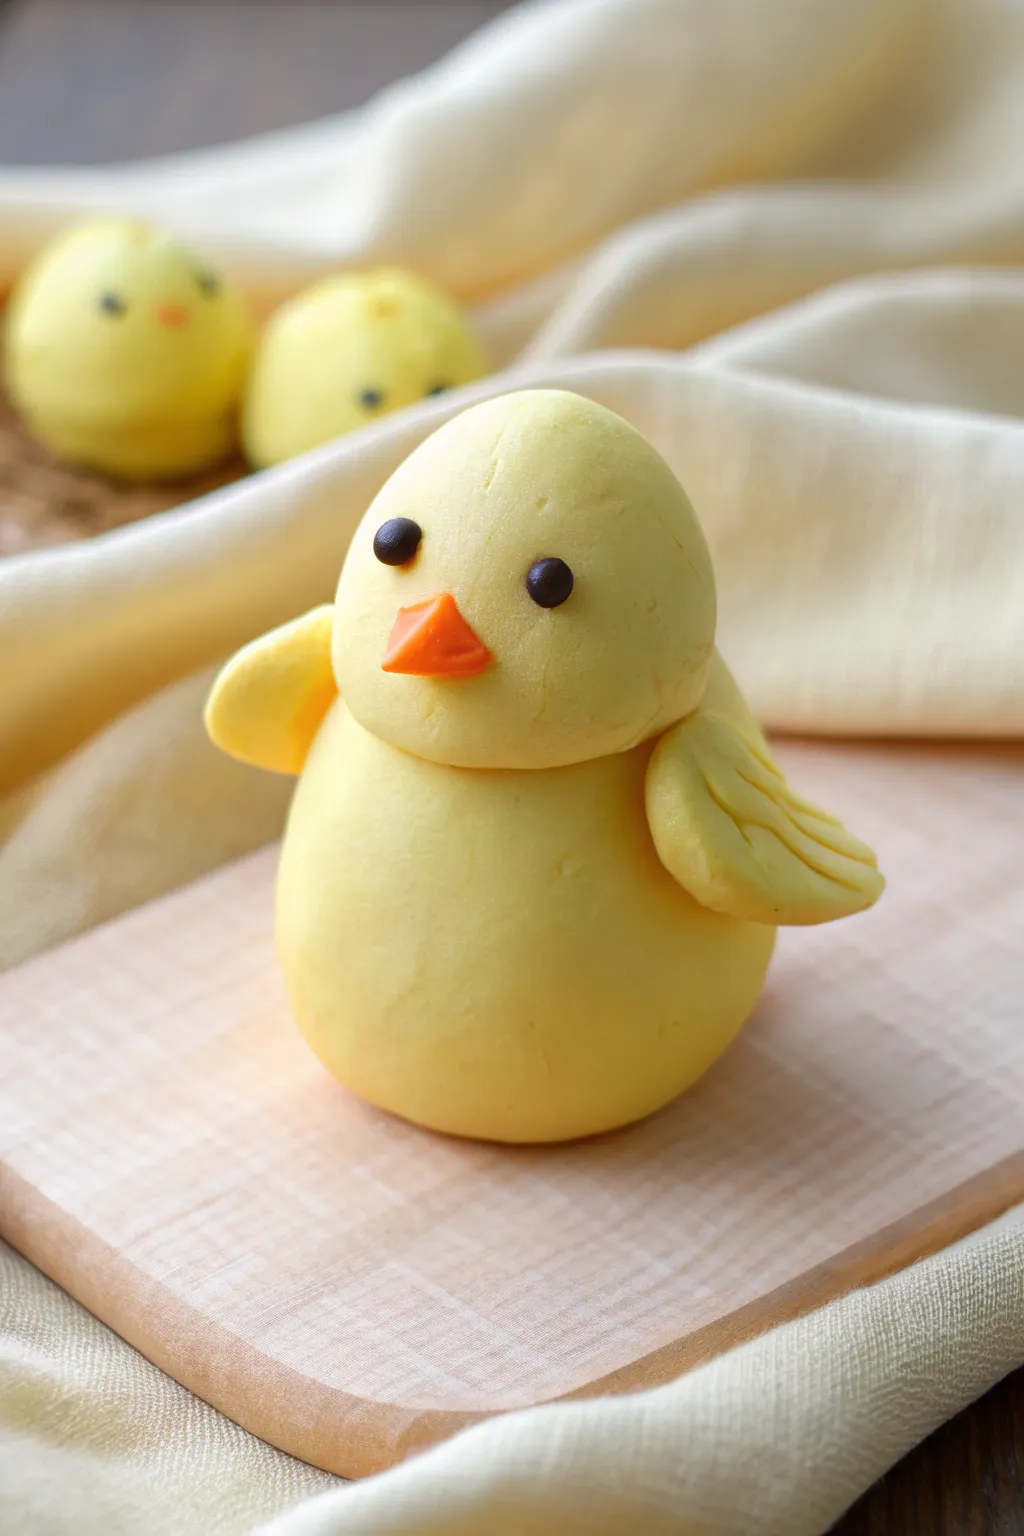
This adorable baby chick features a sunshine yellow body and charmingly flat, detailed wings that are perfect for beginners to practice shaping. The soft, matte finish of the clay gives it a marshmallow-like appearance that looks sweet enough to eat, though it’s strictly for decoration.
How-To Guide
Materials
- Model Magic clay (Yellow)
- Model Magic clay (Orange)
- Model Magic clay (Black)
- Plastic clay sculpting tool (knife or flat edge)
- Smooth work surface (or parchment paper)
- Small wooden board (optional, for display)
Step 1: Forming the Body
-
Prepare the yellow clay:
Start by taking a medium-sized chunk of yellow Model Magic clay. Knead it in your hands for about 30 seconds to warm it up and make it pliable, removing any potential cracks. -
Roll the main body:
Separate a portion of the yellow clay, about the size of a golf ball or large walnut. Roll this between your palms until you have a perfectly smooth ball. -
Shape the base:
Gently tap the bottom of the ball against your work surface. You want to create a slightly flattened bottom so the chick stands upright without rolling away, forming a slightly squat teardrop shape. -
Create the head:
Take a second piece of yellow clay, slightly smaller than the body piece. Roll this until it is completely round and smooth. -
Attach head to body:
Place the head sphere directly on top of the body piece. Press down gently but firmly to adhere the pieces without squashing the shapes too much; Model Magic sticks to itself well.
Cracks Appearing?
If you see small cracks while rolling, add a tiny drop of water to your fingers and keep kneading. Model Magic needs to be warmed up well to stay smooth.
Step 2: Sculpting the Wings
-
Portion the wings:
Pinch off two equal-sized small beans of yellow clay. I like to roll them side-by-side first to ensure they are the exact same volume before shaping. -
Flatten the teardrops:
Roll each small piece into a teardrop shape, then press them flat against your table. They should be roughly uniform in thickness, resembling flat paddle shapes. -
Add wing details:
Use your plastic sculpting tool or a dull knife edge to press three lines into the wider end of the wing. These indentations mimic flight feathers. -
Attach the right wing:
Press one wing onto the right side of the chick’s body, positioning it where the head meets the torso. Angle the tips slightly upward for a cheerful look. -
Attach the left wing:
Repeat the process on the left side, mirroring the angle of the first wing so the chick looks symmetrical.
Step 3: Facial Features
-
Make the eyes:
Pinch off two tiny specs of black clay. Roll them into minuscule balls between your thumb and index finger. -
Place the eyes:
Press the black dots onto the upper half of the head face, spacing them somewhat wide apart to create a cute, innocent expression. -
Form the beak:
Take a very small amount of orange clay. Roll it into a tiny ball, then shape it into a small cone or pyramid. -
Attach the beak:
Place the orange cone directly between and slightly below the eyes. Press it on gently so it sticks out. -
Refine the surface:
Check the clay for any fingerprints. If you see any, lightly rub the surface with your finger to smooth them out before the clay begins to dry. -
Let it dry:
Place your finished chick on a clean, safe surface to air dry. It will take roughly 24-72 hours to fully harden depending on the humidity.
Pro Tip: Seamless Join
When attaching the head, you can insert a small piece of toothpick or dry spaghetti between the head and body for invisible structural support.
Now you have a cheerful little springtime friend to brighten up your desk or shelf


Spiral-Shell Snail
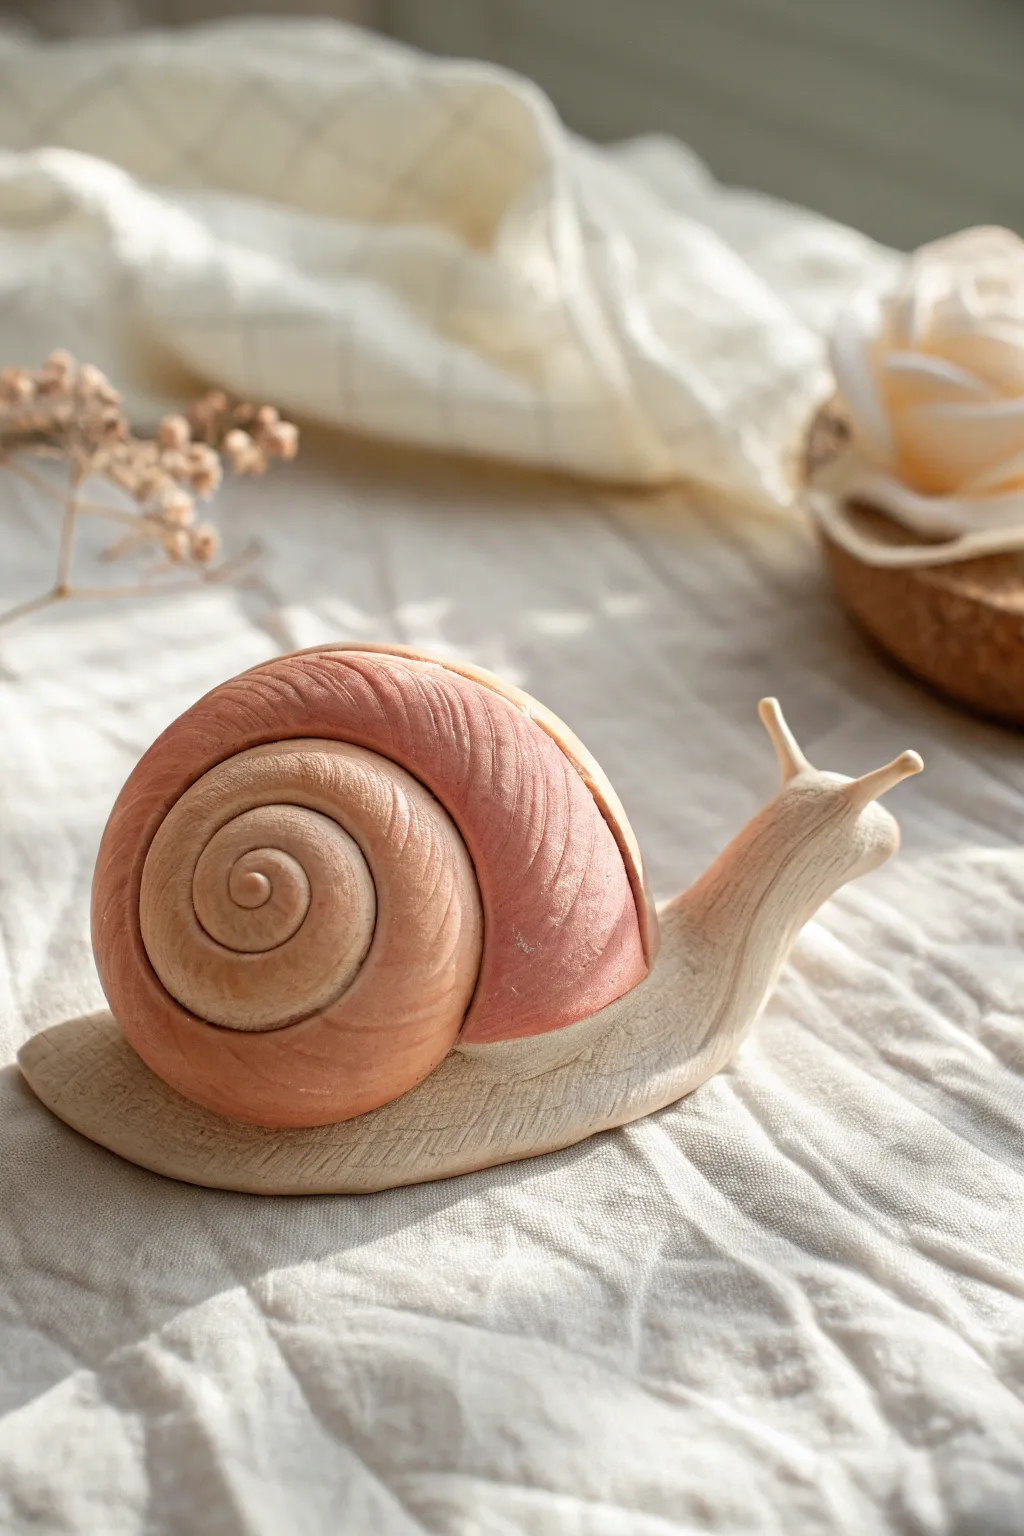
Create a charming, rustic snail that captures the warmth of carved wood using simple Model Magic clay. This project focuses on texture and subtle coloring to transform soft foam clay into a convincing faux-wooden keepsake.
Step-by-Step Tutorial
Materials
- White Model Magic clay
- Acrylic paints (Cream, Burnt Sienna, Light Pink, Raw Umber)
- Small flat paintbrush
- Fine-grit sandpaper or a stiff toothbrush
- Needle tool or toothpick
- Matte varnish or sealant
Step 1: Sculpting the Body
-
Base Color Mixing:
Start by taking a medium-sized ball of white Model Magic. Knead in a tiny drop of Cream and a speck of Raw Umber acrylic paint to tint the clay a very pale, natural wood color. Keep the color uniform. -
Forming the Slime:
Divide your clay. Take the smaller portion (about 1/3) and roll it into a thick log that tapers gently at one end for the tail and curves up at the other for the neck. This forms the snail’s foot and head. -
Flattening the Foot:
Gently press the ‘foot’ section against your work surface so it has a flat bottom. Use your thumb to smooth the edges, giving it a soft, rounded perimeter similar to a sanded wooden base. -
Shaping the Head:
Pinch the raised end upwards to create the neck and head. It doesn’t need detailed facial features, just a smooth, rounded nub. -
Adding Tentacles:
Roll two very tiny, thin snakes of clay. Attach them to the top of the head for the eye stalks (tentacles). Blend the seams where they join the head so they look like they were carved from the same block. -
Texturing the Body:
Before the clay dries, use a stiff toothbrush or fine sandpaper to gently scratch horizontal lines along the side of the body. This mimics the grain of wood.
Step 2: Crafting the Spiral Shell
-
Rolling the Coil:
Take the remaining larger portion of clay. Roll it into a long, tapered snake. One end should be quite thick, gradually becoming thinner toward the other end. -
Winding the Shell:
Starting from the thinnest end, begin rolling the coil tightly into a spiral. Keep the spiral vertical (like a cinnamon roll standing on its side) rather than flat like a lollipop. -
Securing the Shape:
As you wind the thicker part of the coil, gently press the layers together so they bond without squishing the round profile of the coil. The outer layer should act as a hood over the inner spiral. -
Shell Texture:
Using a needle tool or toothpick, score diagonal lines across the curves of the shell segments. Vary the pressure to create grooves that look like carved growth rings. -
Assembly:
Place the finished shell onto the back of the body piece. Press down firmly to adhere. If the clay is too dry, use a tiny dab of water or white glue to help it stick.
Wood Grain Magic
Drag a fork gently partially through the wet clay body before hardening. When painted later, these deeper grooves will catch the dark wash perfectly.
Step 3: Painting the Faux Wood Finish
-
Drying Time:
Allow the snail to dry completely for at least 24 hours. Model Magic needs to be firm before painting. -
Base Wash:
Mix a very watery wash of Cream paint. Brush this over the entire snail to prime the surface and unify the color. -
Painting the Shell Pink:
Mix Light Pink with a tiny touch of Burnt Sienna to create a dusty rose color. Paint the outer large curve of the shell, avoiding the center spiral for now. -
Detailing the Spiral:
For the inner spiral, use a watered-down Burnt Sienna wash. Let it settle into the deep crevices between the coils to create depth. -
Highlighting the Wood Grain:
This is my favorite step: take a nearly dry brush with a tiny bit of Cream paint (dry brushing) and lightly whisk it over the textured lines on the body and shell. This catches the raised areas and makes the texture pop. -
Final Wash:
To age the ‘wood,’ apply a very transparent wash of Raw Umber over the entire piece, then immediately wipe most of it off with a paper towel. This leaves dark color only in the deepest grooves. -
Sealing:
Once the paint is fully dry, apply a matte varnish. A glossy finish would look like plastic, but matte preserves the soft wooden aesthetic.
Forest Friends
Create a whole woodland scene! Sculpt tiny mushrooms or a flat leaf base for your snail to sit on, painting them with the same rustic wash technique.
Now you have a timeless little snail that looks beautifully hand-carved.

The Complete Guide to Pottery Troubleshooting
Uncover the most common ceramic mistakes—from cracking clay to failed glazes—and learn how to fix them fast.
Coil Caterpillar Critter
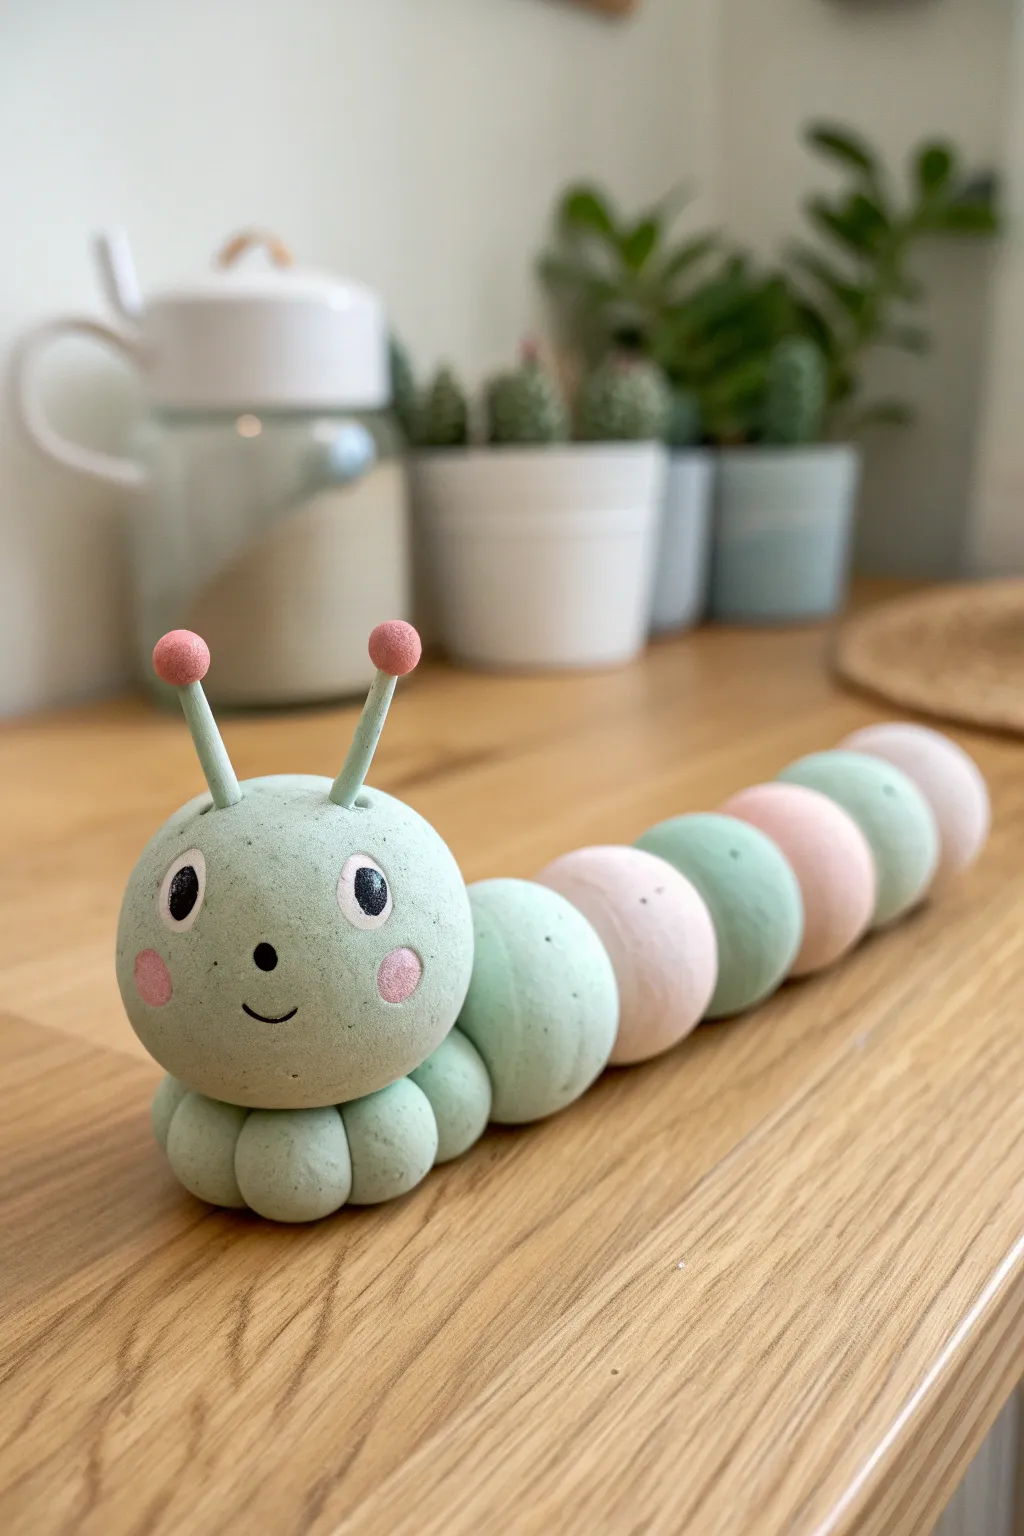
This adorable critter is made of soft, pastel-colored spheres that create a delightful segmented body. With its sweet expression and bouncy antennae, this lightweight clay project is perfect for adding a touch of whimsy to any shelf.
Step-by-Step Guide
Materials
- Model Magic or lightweight air-dry clay (white)
- Acrylic paint or markers (pastel green, pastel pink, black, white)
- Toothpicks or crafting wire (for internal support)
- Small ball tool or rounded stick
- Fine-point black marker or detail paintbrush
- Glossy varnish (optional, for the eyes)
Step 1: Mixing and Prepping
-
Tint your clay:
Start by dividing your white clay into two unequal portions. Knead a very small amount of green paint into the larger portion and a tiny drop of pink into the smaller portion to create soft pastel shades. Keep kneading until the color is completely uniform without streaks. -
Create the head base:
Take a generous amount of green clay and roll it into a smooth, perfect sphere about the size of a golf ball. This will be the main head piece. -
Form the body segments:
Roll five or six slightly smaller spheres. Alternate between your green and pink clay. I like to make them gradually decrease in size towards the tail for a natural tapered look. -
Shape the feet:
Create six tiny green balls for the feet. These should be quite small compared to the body segments.
Smooth Operator
To get rid of fingerprints, lightly dip your finger in water and gently rub the surface of the clay before it begins to dry.
Step 2: Assembly
-
Flatten the feet:
Gently press the six tiny green balls together in a circle or flower shape to create a stable base for the head. -
Attach the head:
Press your large head sphere firmly onto the circle of feet. The clay should stick on its own if fresh, but a dab of water helps act as glue. -
Connect the body:
Line up your body segments behind the head. Press them gently into each other to fuse the clay. If you want the caterpillar to curve slightly, arrange them in a gentle ‘S’ shape. -
Reinforce the connections:
If the segments feel loose, you can insert small pieces of toothpick between the balls to act as an internal skeleton.
Sagging Segments?
If the body won’t stay round while drying, rest the caterpillar in a bed of cornstarch or flour to support its shape without creating flat spots.
Step 3: Adding Details
-
Make the antennae stalks:
Roll two thin, small cylinders of green clay for the antennae stalks. They should be about an inch long. -
Add antennae tips:
Roll two tiny pink balls and press them onto the ends of your green stalks. -
Mount the antennae:
Press the finished antennae onto the top of the head. You might need to use a tool to blend the base of the stalks into the head for a seamless connection. -
Detail the eyes:
Using a small ball tool or your finger, make slight indentations where the eyes will go. Paint white circles inside these spots. -
Add pupils:
Once the white paint is dry, use a fine black marker or paint to add large black pupils. Leave a tiny white dot in each for a sparkle. -
Create the blushing cheeks:
Paint small pink circles directly below the eyes to give your caterpillar a rosy, cheerful look. -
Draw the smile:
Use a fine-point black marker to draw a small, simple ‘U’ shape for the mouth alongside a tiny dot for the nose.
Now you have a charming little desk buddy to keep you company while you work
Pancake Frog With Big Eyes
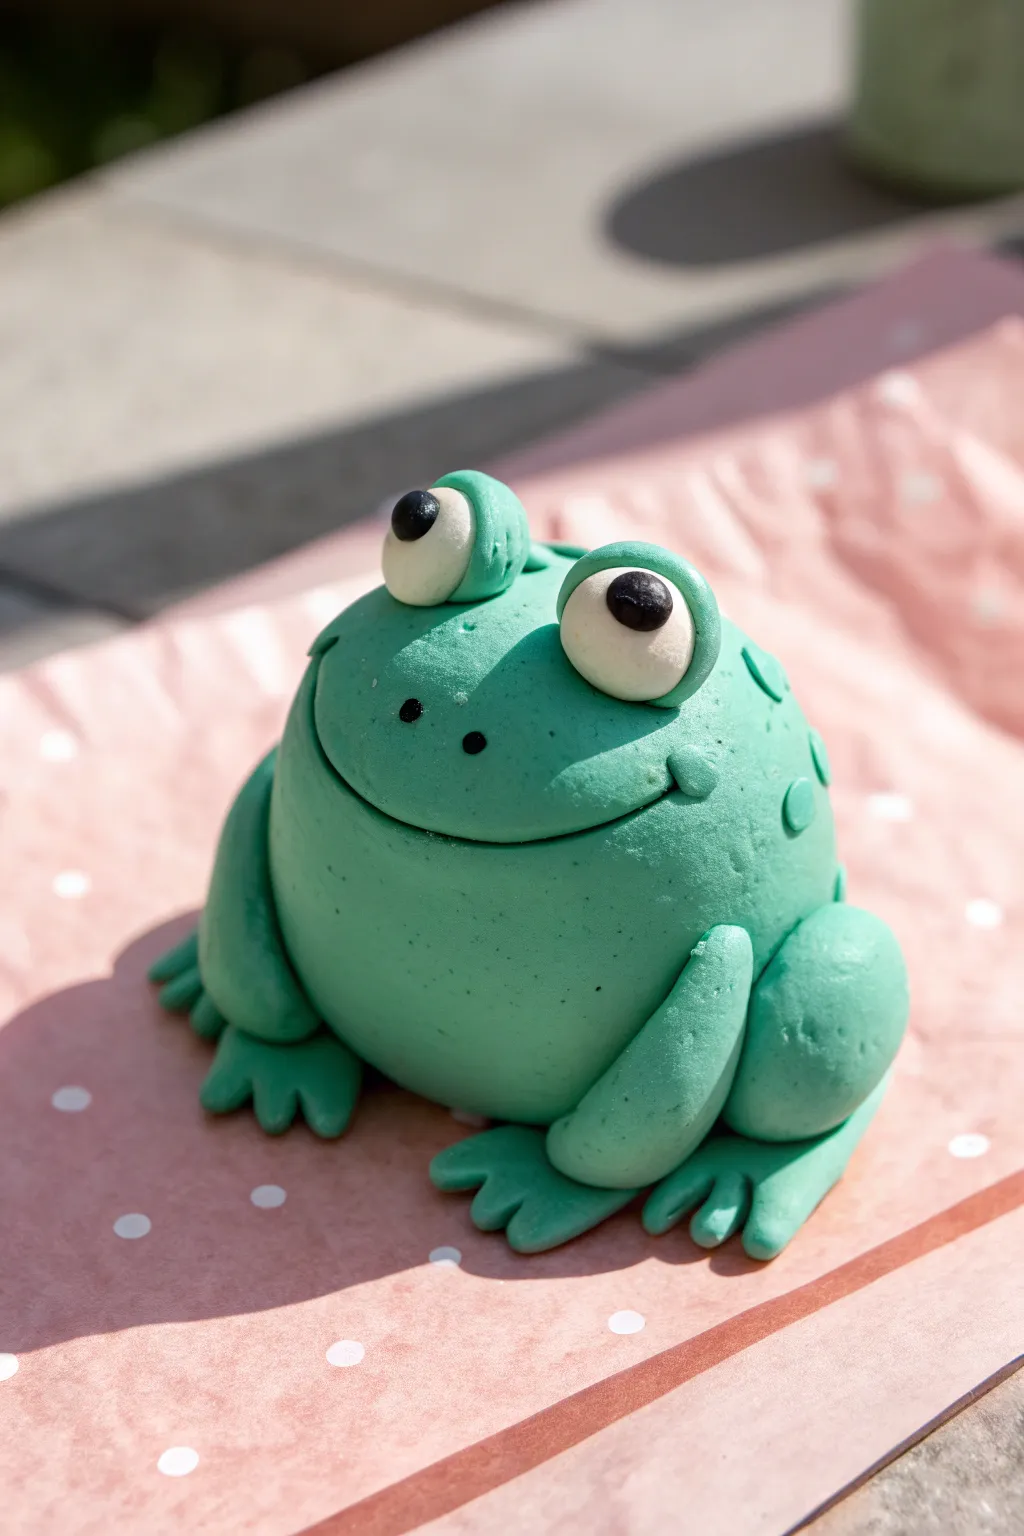
This adorable frog statue brings a quirky charm to any desk or shelf with its round, pancake-like body and expressive oversized eyes. The smooth, matte texture of Model Magic makes this project incredibly satisfying to sculpt and surprisingly lightweight.
Step-by-Step Tutorial
Materials
- Model Magic clay (green)
- Model Magic clay (white)
- Model Magic clay (black)
- Modeling tool (curved or spoon-shaped)
- Toothpick or pin tool
- Clean work surface (parchment paper works well)
Step 1: Shaping the Base
-
Create the main body:
Start with a large ball of green clay. Roll it firmly between your palms until it’s seamless, then gently press it down onto your work surface to flatten the bottom slightly while keeping a nice dome shape. -
Form the legs:
Roll two medium-sized balls of green clay for the hind legs. Flatten them into thick discs and attach one to each side of the body, towards the back. -
Add the front arms:
Roll two slightly smaller cylinders for the front arms. Attach these vertically to the front of the body, blending the top seam gently so they look integrated but distinct.
Cracks appeared?
Model Magic can crack if handled too much once it starts drying. If you see cracks forming, add a tiny drop of water to your finger and rub the fissure in a circular motion to seal it.
Step 2: Sculpting the Feet
-
Shape the back feet:
Take two small balls of green clay and flatten them into teardrop shapes. Use your modeling tool to impress two deep notches into the wide end of each teardrop, creating three toes. -
Attach the back feet:
Press these toes firmly under the large hind leg discs you created earlier, angling them slightly outward. -
Make the front paws:
Repeat the process for the front feet: flatten two small balls, cut notches for toes, and press these directly under the front arm cylinders.
Step 3: The Face & Eyes
-
Carve the mouth:
Using a curved modeling tool or the edge of a spoon, press a wide, confident smile into the front of the main body dome. I like to curve the ends upward significantly to give it a cheerful expression. -
Form the eye sockets:
Roll two small balls of green clay and press them onto the top of the head, spaced slightly apart. -
Indent the sockets:
Press your thumb or a rounded tool into the center of these green balls to create cup-like shapes that will hold the eyeballs. -
Create the eyeballs:
Roll two balls of white clay that fit snugly inside your green sockets. Press them in so they bulge out prominently. -
Add pupils:
Take tiny pinched pieces of black clay, roll them into spheres, and press them onto the center of the white eyeballs. Flatten them slightly as you attach them. -
Make the nostrils:
Use a toothpick or pin tool to poke two small holes right in the center of the face, above the smile line.
Pro Tip: Custom Colors
Don’t settle for the stock green! Knead a tiny amount of yellow or white into your green Model Magic before starting to create a lighter, lime-green shade like the one in the photo.
Step 4: Final Details
-
Add spots:
Roll very tiny balls of green clay—maybe slightly lighter or darker if you have it, or just create relief texture—and flatten them onto the back and sides of the frog for warty texture. -
Refine the seams:
Look over your frog and smooth out any rough connections with a fingertip. If the clay is drying, a tiny drop of water can help smooth it. -
Let it dry:
Place your frog on parchment paper and let it air dry completely. Model Magic takes about 24-72 hours to fully cure depending on thickness.
Enjoy your charming new spotted friend and find the perfect sunny spot for him to sit


What Really Happens Inside the Kiln
Learn how time and temperature work together inside the kiln to transform clay into durable ceramic.
Silly Finger Puppet Faces
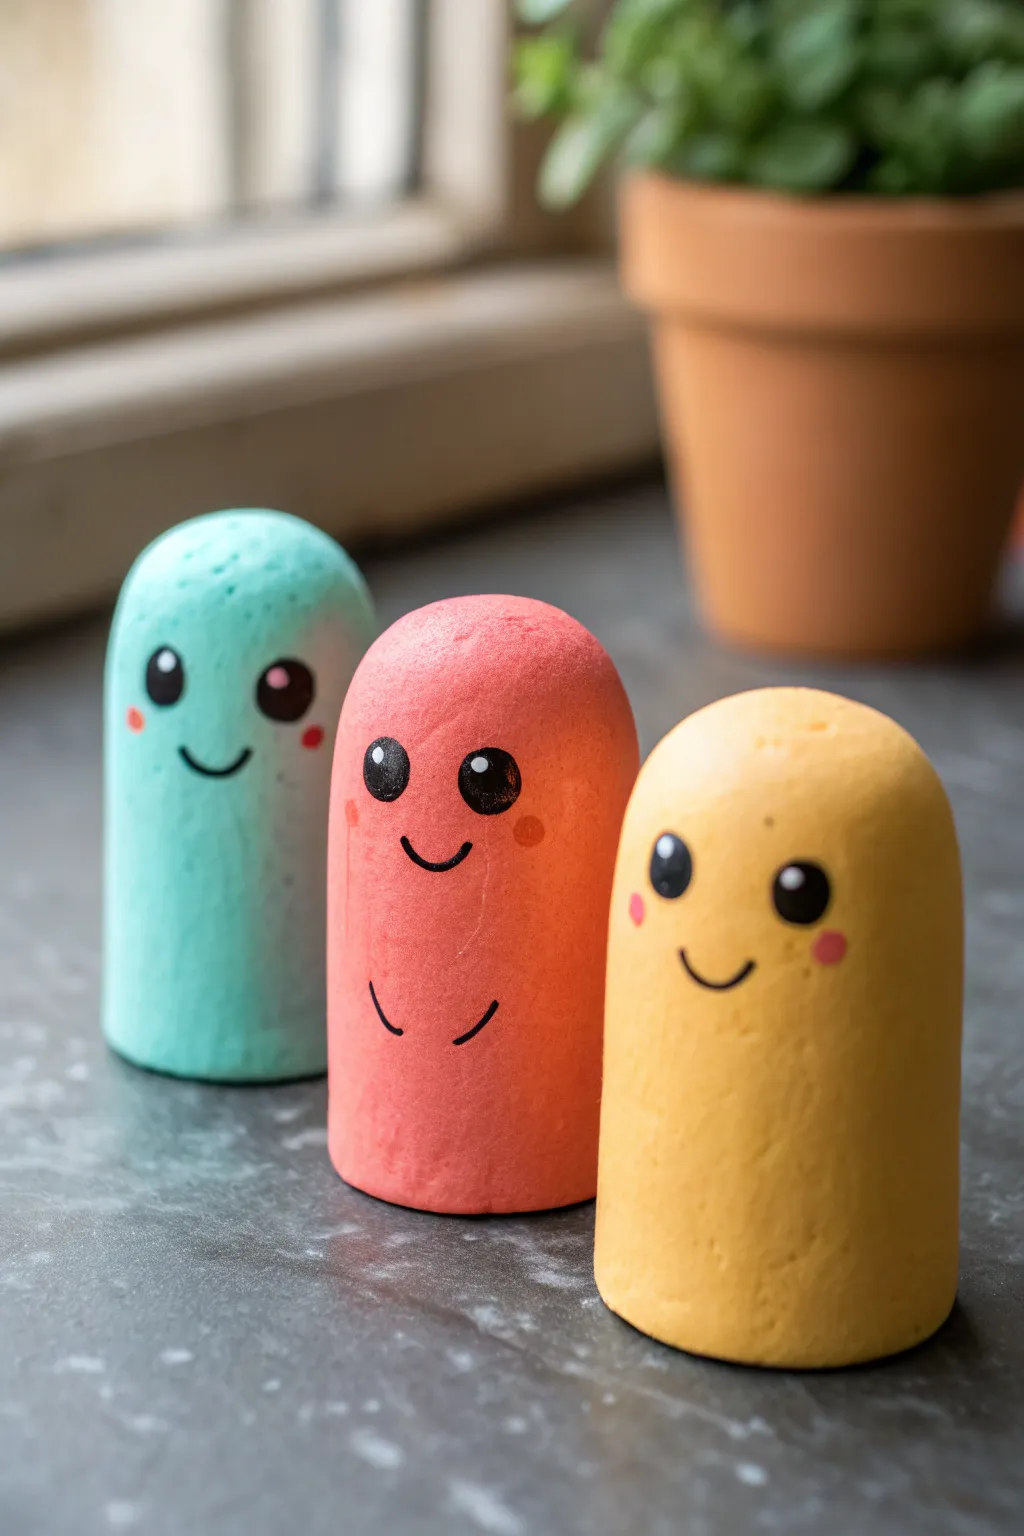
These adorable, candy-colored characters are a perfect beginner project to get comfortable with air-dry clay. With their smooth, rounded shapes and expressive painted faces, they make delightful finger puppets or cheerful desk companions.
Step-by-Step Tutorial
Materials
- Crayola Model Magic (Turquoise, Pink/Salmon, Yellow)
- Black acrylic paint or black Posca marker
- White acrylic paint or white Posca marker
- Small detail paintbrush
- Dotting tool or toothpick
- Pink colored pencil or pastel chalk (optional for cheeks)
- Smooth work surface (placemat or parchment paper)
Step 1: Shaping the Base Bodies
-
Prepare the workspace:
Before starting, ensure your hands and work surface are clean to keep the bright clay colors pure. -
Portion the clay:
Take a ping-pong ball sized amount of turquoise Model Magic. Repeat this for the pink and yellow clay as well. -
Create a smooth ball:
Roll the turquoise clay between your palms firmly to create a sphere. The goal here is to eliminate any major cracks or seams. -
Elongate the shape:
Place the ball on your surface and gently roll it back and forth to create a thick cylinder or sausage shape. -
Round the top:
Stand the cylinder upright. Gently pat and smooth the top with your fingertip to create a nice, domed head shape rather than a flat top. -
Flatten the base:
Press the bottom of the cylinder firmly against the table so it stands up straight and stable. -
Create the finger hole (Optional):
If you want these to be functional finger puppets, carefully push your pinky finger into the bottom center of the cylinder while supporting the sides so the shape doesn’t distort. -
Repeat for all colors:
Follow the same shaping process for the pink and yellow characters. Try to keep them roughly the same height and width for a cohesive set. -
Partial drying time:
Let the figures sit for about 30 to 60 minutes. Model Magic doesn’t need to be rock hard to paint, but a slightly drier surface prevents the marker ink from bleeding.
Smooth Operator
To get that super smooth finish without fingerprints, gently rub the surface of the shaped clay with a tiny drop of water on your finger before letting it dry.
Step 2: Painting the Faces
-
Outline the eyes:
Using a black paint marker or a very fine brush, draw two ovals for eyes about one-third of the way down the face. -
Fill in the eyes:
Carefully color in the ovals with solid black. Ensure the paint is opaque. -
Add the smile:
Draw a small, U-shaped mouth centered between and slightly below the eyes. -
Add arm details:
For the pink character, I like to draw two tiny curved lines near the bottom of the body to suggest little arms resting against its side. -
Add color to checks:
You can paint small pink dots for cheeks, or for a softer look, gently rub a pink colored pencil or some pastel chalk dust onto the clay right under the eyes. -
Create eye highlights:
Dip a dotting tool or the tip of a toothpick into white acrylic paint. -
Apply the sparkle:
Place a small white dot in the upper corner of each black eye. This ‘catchlight’ brings the character to life instantly. -
Final drying:
Allow the paint to dry completely untouched for at least 15 minutes.
Marker Bleeding?
If your paint marker bleeds into the clay, the clay is too fresh. Wait another hour for the surface to form a ‘skin’, or switch to acrylic paint which sits on top better.
Enjoy displaying your colorful trio of clay friends on your desk or windowsill