Whenever I need a creative reset, I reach for clay—because you can go from a plain lump to something genuinely cool in one session. Here are my favorite cool clay art ideas that mix cute style with functional little wins you’ll actually want to keep on your desk or shelf.
Cute Pinch-Pot Animal Minis

This adorable miniature bear starts as a simple ball of clay and transforms into a cheerful desk companion with just a few pinches and some paint. Its matte white finish and scattered pink polka dots give it a modern, whimsical look perfect for gifts or decor.
Step-by-Step Guide
Materials
- Air-dry clay (white) or polymer clay
- Acrylic paints (matte white, baby pink, black)
- Fine-grit sandpaper
- Detail paintbrushes (fine tip)
- Dotting tool or toothpick
- Small bowl relative to bear size (for water)
- Modeling tool or dull knife
Step 1: Shaping the Base
-
Form the body:
Start with a lime-sized ball of clay. Roll it between your palms until it is completely smooth and free of cracks, then gently gently manipulate it into a tall, rounded cone shape with a flat bottom so it can stand on its own. -
Pinch the ears:
At the top of the rounded cone, use your thumb and forefinger to gently pinch up two small mounds for ears. Keep them rounded but distinct from the main head shape. -
Pull the muzzle:
Slightly below the eyes’ anticipated position, pinch a small amount of clay forward to create a subtle, protruding snout. Smooth the connection points so the face looks seamless. -
Create the feet:
At the base of the bear, use a modeling tool to press two small indentations at the front bottom edge to suggest little feet, rather than adding separate pieces of clay. This keeps the shape stable. -
Refine the surface:
Dip your finger in a tiny bit of water and rub the entire surface of the bear to smooth out any fingerprints or uneven textures. The smoother the clay now, the better the paint will look later. -
Let it dry to leather hard:
Allow the clay to dry until it is firm but not fully cured (leather hard). This usually takes a few hours for air-dry clay. -
Carve details:
Using a dull knife or modeling tool, gently carve three vertical lines onto each foot indentation to represent toes.
Cracks Appearing?
If you see hairline cracks while drying, make a ‘slip’ paste of water and clay dust. Fill the crack, smooth it over, and let it dry again.
Step 2: Painting and Finishing
-
Full dry and sand:
Let the bear dry completely (24-48 hours for air-dry clay). Once fully dry, lightly sand any rough spots or bumps with fine-grit sandpaper for a professional finish. -
Base coat:
Paint the entire bear with matte white acrylic paint. You may need two coats to ensure the natural clay color is completely covered and the finish is opaque. -
Paint the ears:
Mix a soft baby pink color. Using a fine brush, paint the inner semi-circle of the ears, leaving a white rim around the edges. -
Add rosy cheeks:
Using the same pink shade but perhaps slightly watered down for a softer look, paint two circular blush spots on either side of the muzzle. -
Dot the body:
Dip a dotting tool or the back end of a paintbrush into the pink paint. Apply random polka dots all over the bear’s body, keeping the spacing somewhat irregular for a playful feel. -
Paint fine facial features:
Switch to black paint and your finest brush. Paint a small oval for the nose right on the tip of the muzzle, and add a thin anchor shape below it for the mouth. -
Add the eyes:
Using the black paint, add two small dots for eyes just above the muzzle area. Keep them wide-set for maximum cuteness. -
Define the toes:
Take a very small amount of black paint (or a fine-tip marker) and carefully trace the carved lines on the feet to make the toes pop. -
Final seal:
Once all paint is totally dry, apply a matte varnish to protect your work without making it shiny, preserving that soft, ceramic look.
Perfect Polka Dots
For uniform dots, use a Q-tip with the cotton pulled off or the head of a pin. Always test your dot size on a scrap paper first.
Place your finished bear on a shelf near a window to brighten up your workspace


Wavy Painted Trinket Bowls
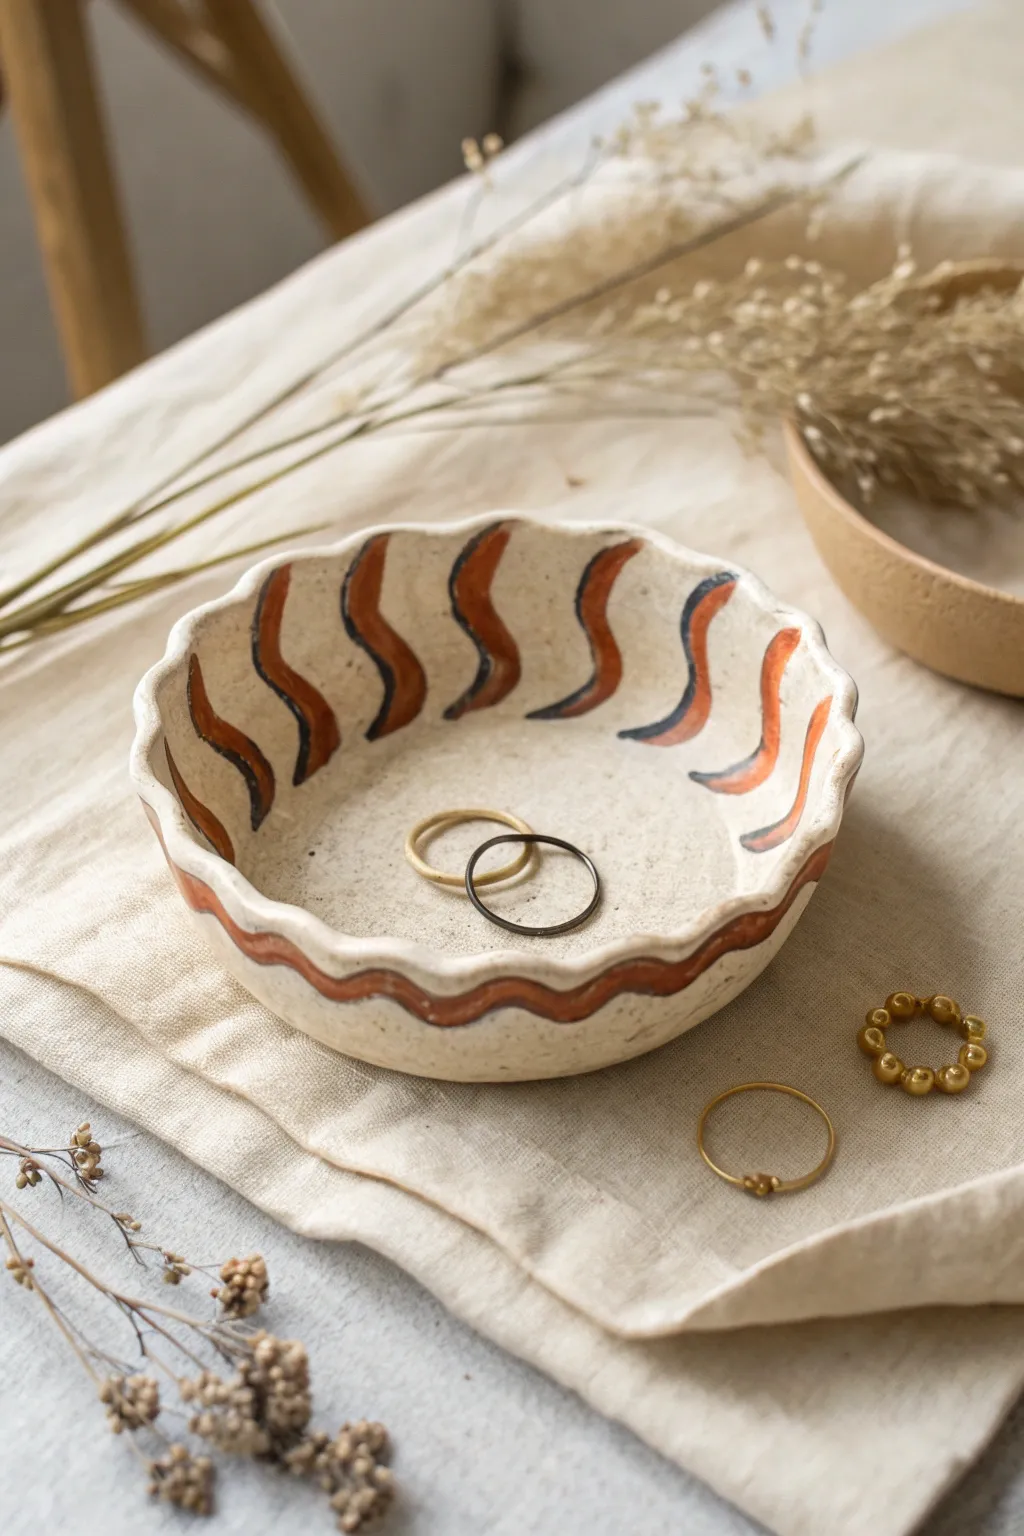
Capture the warmth of desert sands with this charming trinket dish, featuring a scalloped rim and rustic wavy patterns. The speckled clay texture and burnt orange accents give it a lovely organic feel, perfect for holding your favorite rings.
Step-by-Step
Materials
- Speckled air-dry clay or polymer clay (cream/beige)
- Acrylic paints (burnt sienna, black)
- Small round bowl (for mold)
- Plastic wrap
- Rolling pin
- Fine grit sandpaper
- Fine liner paintbrush
- Gloss varnish or sealant
- Craft knife
- Sponge
Step 1: Shaping the Clay Foundation
-
Condition and Roll:
Start by taking a handful of your speckled clay and kneading it until it’s pliable and warm. Roll it out on a smooth surface until you have an even slab about 1/4 inch thick; keeping it slightly thicker adds to that rustic pottery look. -
Cut the Circle:
Place a bowl or circular template (about 5-6 inches in diameter) gently onto the clay slab. Use your craft knife to trace around it, cutting out a clean circle. -
Prepare Your Mold:
Grab the small bowl you’re using as a mold. Tightly cover the outside bottom of the bowl with plastic wrap to prevent sticking, ensuring there are no large wrinkles. -
Form the Bowl Shape:
Carefully lift your clay circle and drape it over the cling-film-covered bowl. Gently press the clay down around the sides so it takes the curved shape, but don’t smooth it perfectly flat yet.
Smooth Operator
dip your finger in water (or baby oil for polymer clay) and run it along the rim before drying. This eliminates cracking and saves sanding time later.
Step 2: Sculpting the Wavy Rim
-
Mark Intervalls:
To get evenly spaced waves, lightly mark 8 to 10 points around the rim of your clay circle with a dull tool or your fingernail. -
Pinch the Scallops:
At each mark, use your thumb and forefinger to gently pinch the rim inward. Simultaneously, use a finger from your other hand to push the clay outward between the pinches, creating a gentle undulating wave pattern. -
Refine the Edge:
Go around the rim once more, smoothing any sharp edges with a slightly damp finger. The goal is a soft, rounded lip rather than a sharp cut. -
First Drying Phase:
Let the clay sit on the mold for about 2–4 hours until it holds its shape firmly but isn’t bone dry. I like to carefully remove it from the mold at this stage so the inside can dry evenly. -
Full Cure:
Allow the bowl to dry completely (24–48 hours for air-dry clay, or bake according to package instructions if using polymer).
Step 3: Painting the Design
-
Smooth the Surface:
Once fully dry, run a piece of fine-grit sandpaper gently over any rough spots on the rim or interior to ensure a professional finish. -
Mix Your Colors:
Squeeze out some burnt sienna paint. If it’s too bright, mix in a tiny drop of brown or black to achieve that earthy terracotta tone seen in the image. -
Paint the Exterior Wave:
Using a fine liner brush, paint a continuous wavy line horizontally across the exterior side of the bowl. Follow the physical rise and fall of the scalloped rim as you go. -
Start the Interior Pattern:
Inside the bowl, paint vertical wavy lines that mimic the shape of flames or seaweed. Start from the upper rim and pull the brush stroke down toward the center bottom. -
Add Shadow Detail:
For the two-tone effect, wait for the orange paint to dry completely. Then, using a very thin brush and watery black paint, add a thin shadow line along just one side of each orange wave. -
Seal the piece:
Finish by applying a coat of gloss or satin varnish to the entire bowl. This protects the paint and deepens the speckled clay color.
Make it Functional
Before the clay dries, press real dried flowers or textured lace into the bottom center of the bowl for a beautiful hidden embossed detail.
Place your favorite jewelry inside and enjoy the handmade warmth on your dresser


Kawaii Food Charms and Key Tags
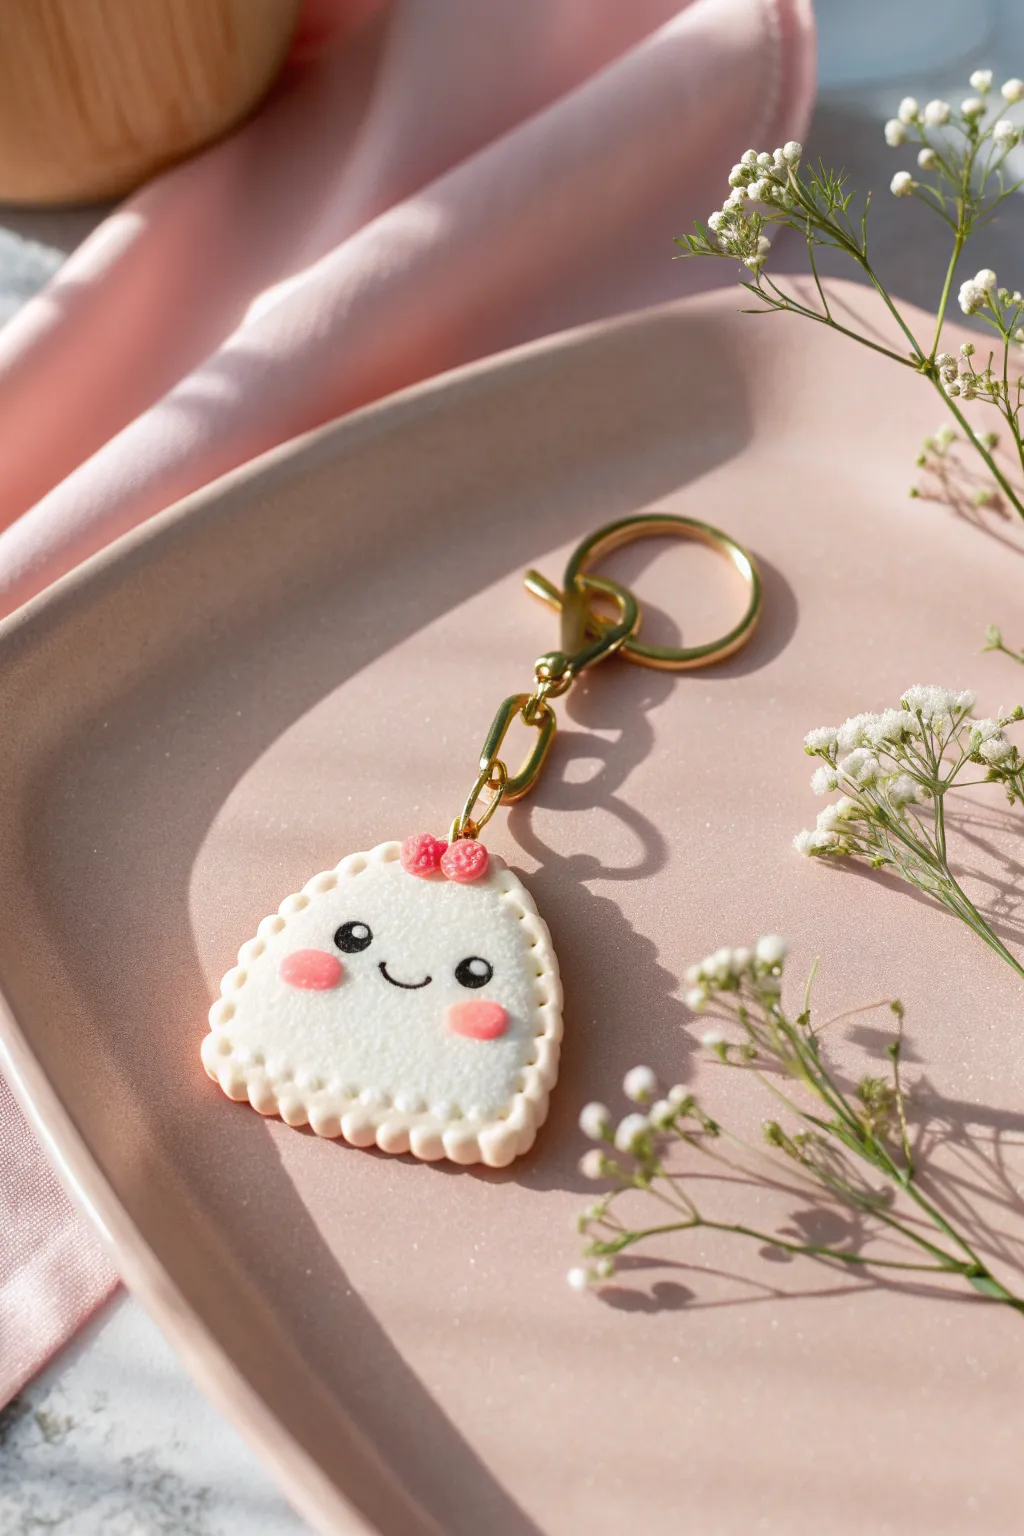
Learn to sculpt this adorable, biscuit-shaped ghost charm that looks almost good enough to eat. With its scalloped edges, sweet blushing face, and tiny pink bow, this kawaii accessory is perfect for adding a touch of sweetness to your keyring or bag.
Step-by-Step Guide
Materials
- White polymer clay
- Pink polymer clay
- Black polymer clay
- Translucent liquid clay (TLS)
- Short, rippled cookie cutter (teardrop or triangle shape) or a scalloped blade
- Dotting tools (various sizes)
- Needle tool
- Soft pastel chalks (pink/blush)
- Small paintbrush
- Eye pin
- Gold keychain hardware and jump rings
- Needle nose pliers
- Gloss glaze or UV resin (optional)
- Oven for baking
Step 1: Shaping the Base
-
Condition the clay:
Start by thoroughly conditioning your white polymer clay until it is soft and pliable. This prevents cracks during baking. -
Roll out the slab:
Roll the white clay out into a thick slab, approximately 1/4 inch (6mm) thick. You want it substantial enough to hold the eye pin securely. -
Cut the shape:
If you have a scalloped teardrop or rounded triangle cutter, press it firmly into the clay. If not, cut a basic rounded triangle shape first. -
Create the scalloped edge (manual method):
If you didn’t use a specialized cutter, take a small round tool or the back of a thin paintbrush and gently press indentations all along the outer edge to create that ‘bitten biscuit’ or scalloped look. -
Soften the edges:
Gently tap the edges with your finger to round them off slightly so the clay doesn’t look sharp or raw. -
Texturing the surface:
Using an old toothbrush or a stiff brush, tap the entire surface of the white clay lightly to give it a realistic, baked cookie texture.
Step 2: Adding the Details
-
Apply the blush:
Shave a tiny bit of pink soft pastel onto a piece of paper. Use a soft, dry brush to pick up the powder and gently dust two rosy circles where the cheeks will be. -
Sculpt the cheeks:
Take two tiny balls of pink clay, flatten them into ovals, and press them firmly onto the dusted cheek areas for a 3D effect. -
Create the eyes:
Roll two very small balls of black clay. Press them onto the face, spacing them evenly between the cheeks. -
Add eye sparkle:
Here I prefer to use a needle tip or the smallest dotting tool to add a microscopic spec of white clay (or white paint after baking) to the corner of each black eye. -
Make the smile:
Roll an incredibly thin snake of black clay. Cut a tiny U-shape and gently press it into the clay between the eyes using a needle tool. -
Form the bow:
Make two tiny teardrops of pink clay and join the points in the center. Add a minuscule ball in the middle to complete the bow. -
Detail the bow:
Use a needle tool to poke small texture holes or dots into the pink bow to give it a fabric or candy texture, then press it onto the top center of the head.
Sticky Situation?
If your clay gets too soft and fingerprints are showing, pop the piece in the fridge for 10 minutes to firm it up before smoothing it out with baby oil.
Step 3: Assembly and Baking
-
Insert the hardware:
Trim an eye pin to the correct length (about 1cm). Dip the end into liquid clay for extra grip and insert it centered into the top of the charm. -
Bake carefully:
Place your charm on a ceramic tile or baking sheet. Bake according to your brand of clay’s instructions (usually 275°F/135°C for 30 minutes). -
Cool down:
Allow the piece to cool completely in the oven or on a wire rack before handling, as warm clay is fragile. -
Seal (Optional):
For extra durability, coat the front with a thin layer of UV resin or polyurethane gloss varnish. -
Attach the keychain:
Use pliers to open a jump ring, thread it through the eye pin and the gold keychain clasp, and close strictly.
Make It Sparkle
Mix fine iridescent glitter into the white clay before rolling it out to give your little ghost a magical, shimmering ectoplasm effect.
Clip this delightful little character onto your keys and enjoy the smiles it brings


Textured Coasters With Pressed Botanicals
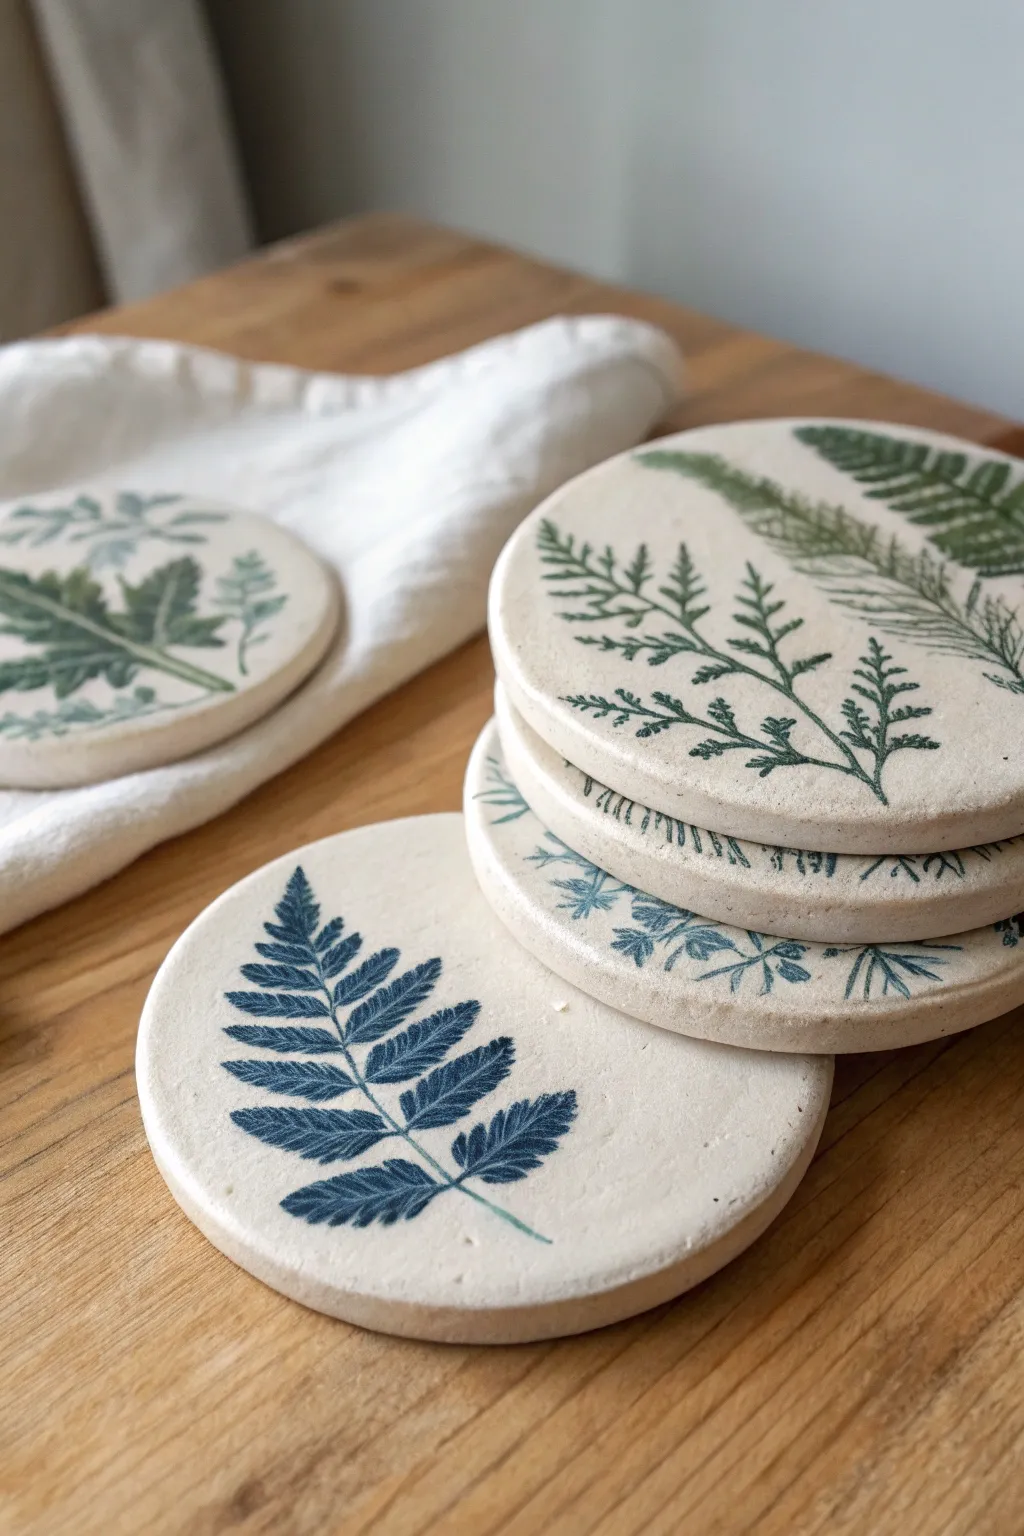
These elegant, nature-inspired coasters capture the delicate veins of ferns and leaves in durable white clay. The result is a set of functional art pieces with a modern-rustic charm, perfect for protecting your furniture in style.
Step-by-Step Tutorial
Materials
- White classic air-dry clay (or polymer clay)
- Fresh or dried botanical sprigs (ferns work best)
- Rolling pin
- Circle cookie cutter (approx. 4 inches) or a bowl/jar rim
- Sandpaper (fine grit)
- Acrylic paints (dark green, sage, teal, navy)
- Small flat brush
- Paper towels or sponge
- Clear waterproof sealant (matte or satin varnish)
- Small bowl of water
- Felt backing (optional)
Step 1: Preparation and Rolling
-
Prepare your workspace:
Lay down a clean, smooth mat or piece of parchment paper to work on. This prevents the clay from sticking to your table and picking up unwanted texture. -
Knead the clay:
Take a generous handful of white air-dry clay. Knead it firmly in your hands to warm it up and remove any air bubbles, ensuring the texture is uniform and pliable. -
Roll the slab:
Roll out the clay to a uniform thickness, aiming for about 1/4 inch. I like to use wooden dowels on either side of the rolling pin as guides to ensure the thickness is perfectly even. -
Inspect the surface:
Check the clay surface for any small cracks or lint. Smooth them away gently with a damp finger before proceeding to the imprinting phase.
Vein Definition
Choose leaves with thick, woody stems or pronounced veins on the underside. Flip leaves over so the ‘back’ presses into the clay for a deeper, clearer print.
Step 2: Imprinting and Cutting
-
Arrange the botanicals:
Select your fern or leaf sprig. Place it carefully onto the rolled clay slab. Think about composition—sometimes having the leaf go off the edge looks more artistic than centering it perfectly. -
Press the design:
Using your rolling pin, roll gently but firmly over the leaf once. Don’t roll back and forth, as this can create a ‘ghost’ image. You want to press the veins deep enough to catch paint later. -
Remove the vegetation:
Carefully lift the stem with tweezers or your fingernail and peel the leaf away from the clay to reveal the intricate impression left behind. -
Cut the shape:
Position your circular cutter over the imprinted design. Press straight down firmly to cut the coaster shape, then lift away the excess clay from the outside.
Step 3: Finishing and Coloring
-
Smooth the edges:
Dip your finger in a little bit of water and run it around the cut edge of the circle to smooth out any roughness or sharp corners created by the cutter. -
Let it dry:
Place the coasters on a wire rack or a piece of cardboard to dry. Air-dry clay takes about 24-48 hours. Turn them over halfway through the drying process to prevent curling. -
Sand for perfection:
Once fully dry and hard, use fine-grit sandpaper to buff the edges and surface lightly, removing any slight imperfections or fingerprints. -
Apply the wash:
Dilute your acrylic paint (greens or blues) with a small amount of water. Brush this wash liberally over the imprinted area, ensuring the paint gets into the deep crevices of the leaf impression. -
Wipe back:
Immediately use a slightly damp sponge or paper towel to wipe the surface of the clay. The paint will stay trapped in the sunken texture of the leaf while wiping clean from the raised surface, creating a high-contrast print. -
Seal the coaster:
Allow the paint to dry completely. Apply 2-3 coats of a waterproof varnish or sealant. This step is crucial for coasters, as condensation from cold drinks will ruin unsealed clay. -
Add backing (optional):
If desired, glue a circle of felt or cork to the bottom of the coaster to give it a finished look and protect your table surfaces.
Gilded Edges
For a luxe touch, paint the rim of the coaster with liquid gold leaf or metallic gold paint after the sealing step is complete.
Now you have a stunning set of botanical coasters ready to gift or keep for your coffee table

The Complete Guide to Pottery Troubleshooting
Uncover the most common ceramic mistakes—from cracking clay to failed glazes—and learn how to fix them fast.
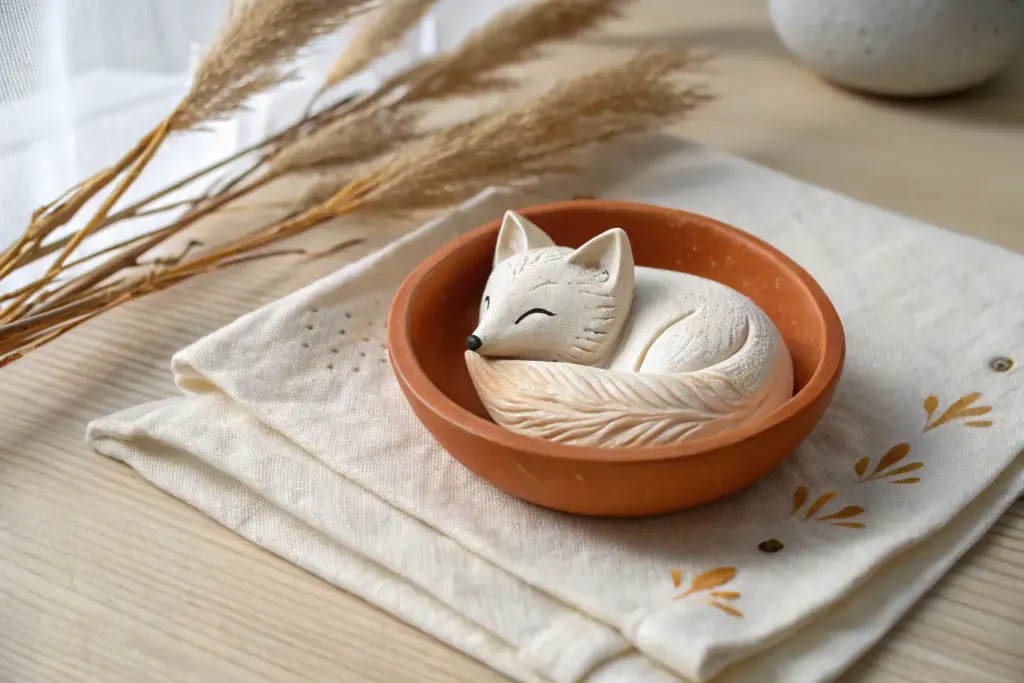
Face Planters With Silly Expressions
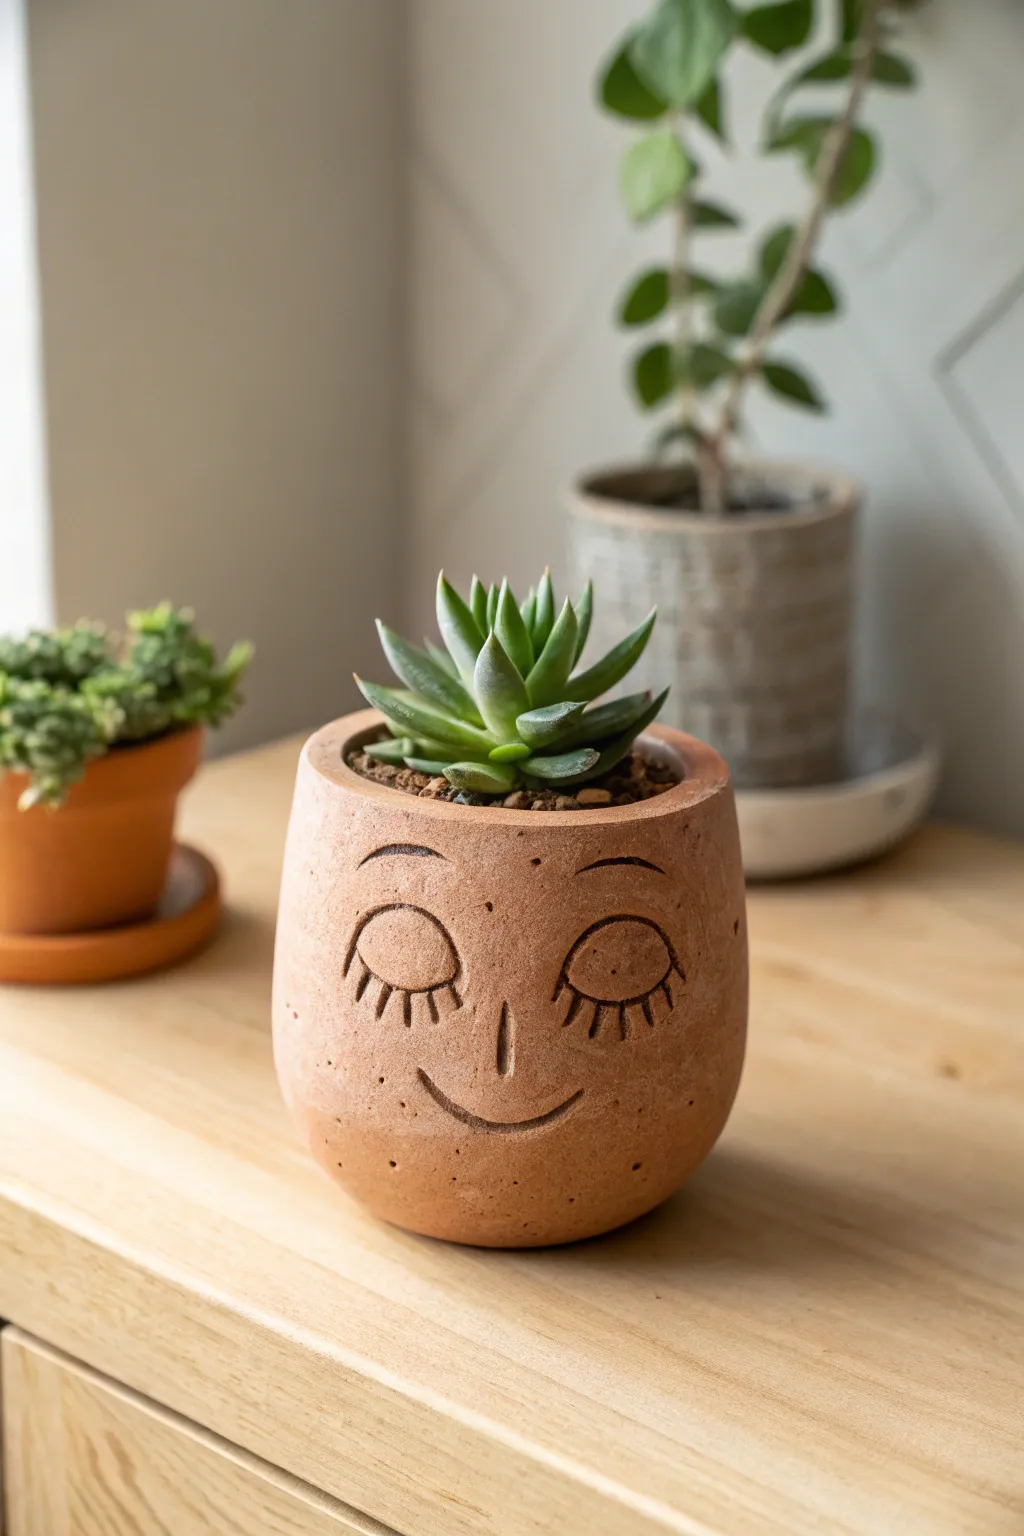
Bring a sense of calm to your indoor garden with this charming face planter featuring a peaceful, sleeping expression. The warm terracotta tone and simple carved details give it a modern yet handmade feel perfect for showcasing small succulents.
Detailed Instructions
Materials
- Terracotta-colored polymer clay or air-dry clay (approx. 1 lb)
- Rolling pin
- Cylindrical container or jar (for use as a mold/armature)
- Needle tool or toothpick
- Loop tool or small carving gouge
- Smoothing sponge
- Small bowl of water
- Flexible clay rib
- Sandpaper (fine grit)
- Matte clear sealant spray
Step 1: Forming the Base
-
Prepare the Clay:
Begin by conditioning your clay thoroughly until it is soft and pliable. If you’re using air-dry clay, ensure it’s moist enough to work without cracking but stiff enough to hold its shape. -
Roll out a Slab:
Use your rolling pin to flatten the clay into a long, even rectangular slab about 1/4 inch thick. Aim for a consistent thickness to ensure even drying. -
Cut to Size:
Measure the height and circumference of your cylindrical mold. Cut the clay slab into a rectangle that matches these dimensions, adding a slight overlap for the seam. -
Wrap the Cylinder:
Carefully lift the clay slab and wrap it around your cylindrical mold. I like to dust the mold with a little cornstarch first to prevent sticking. -
Join the Seam:
Press the overlapping edges together firmly. Use a modeling tool or your fingers to smear the clay across the seam line, blending it until the join is invisible. -
Create the Bottom:
Roll out a smaller piece of clay and cut a circle slightly larger than the base of your cylinder. Place the wrapped cylinder on top of this circle. -
Blend the Base:
Use a flexible rib or your thumb to pull the clay from the base circle up onto the walls of the pot. Smooth the connection thoroughly so it becomes one solid piece. -
Shape the Curve:
To achieve the rounded bottom shown in the photo, gently cup the bottom edge of the pot with your palms while rotating it, softening the sharp angle into a gentle curve.
Uneven Carving Lines?
If your carved lines look ragged or messy, wait until the clay is ‘leather hard’ (stiff but cool/damp) before carving. The tool will cut cleaner lines without dragging the clay.
Step 2: Sculpting the Face
-
Smooth the Surface:
Use a damp sponge to smooth out any fingerprints or tool marks on the exterior. The goal is a clean, slightly textured matte finish. -
Mark the Features:
Lightly trace the facial features with a needle tool before committing to deep cuts. Center the nose about halfway down the pot, with the eyes spaced evenly on either side. -
Carve the Closed Eyes:
Using a loop tool or needle tool, carve two downward-curving semicircles for the eyelids. Make the lines deep enough to hold a shadow. -
Add Eyelashes:
Carve short, vertical lines descending from the eyelid curves to create the sleeping eyelashes. Keep them fairly uniform in length. -
Indicate Eyebrows:
Just above the eyes, carve subtle, shorter curved lines to suggest relaxed eyebrows. These should be thinner than the main eye lines. -
Sculpt the Nose:
Instead of additive sculpting, create the nose with a simple vertical line indentation in the center. Press slightly deeper at the bottom of the line. -
Carve the Smile:
etching a wide, gentle U-shape below the nose. Ensure the curve is symmetrical to convey a peaceful expression. -
Add Texture (Optional):
To mimic the stone-like look in the photo, gently tap the surface with a stiff toothbrush or crumpled foil to add tiny pores and imperfections.
Step 3: Finishing Touches
-
Remove the Mold:
once the clay has stiffened slightly (leather hard), carefully slide the inner cylinder out. If it sticks, gently twist it loose. -
Refine the Rim:
Smooth the top rim of the pot with a damp sponge or your finger to ensure it’s rounded and comfortable to the touch. -
Dry or Bake:
Follow manufacturer instructions for your specific clay. If baking, ensure the oven is fully preheated. If air drying, let it sit in a draft-free spot for 24-48 hours. -
Sanding:
Once fully cured and dry, lightly sand any rough spots, especially around the rim, with fine-grit sandpaper. -
Seal:
Finish with a matte clear sealant spray to protect the clay from moisture, especially if you plan to put a real plant inside.
Add Freckles
For extra character, dip a toothbrush in diluted brown acrylic paint and flick the bristles to spatter tiny ‘freckles’ across the cheeks and nose before sealing.
Pop in your favorite succulent and enjoy the serene vibe this little planter adds to your space
Animal Pencil or Toothbrush Holders
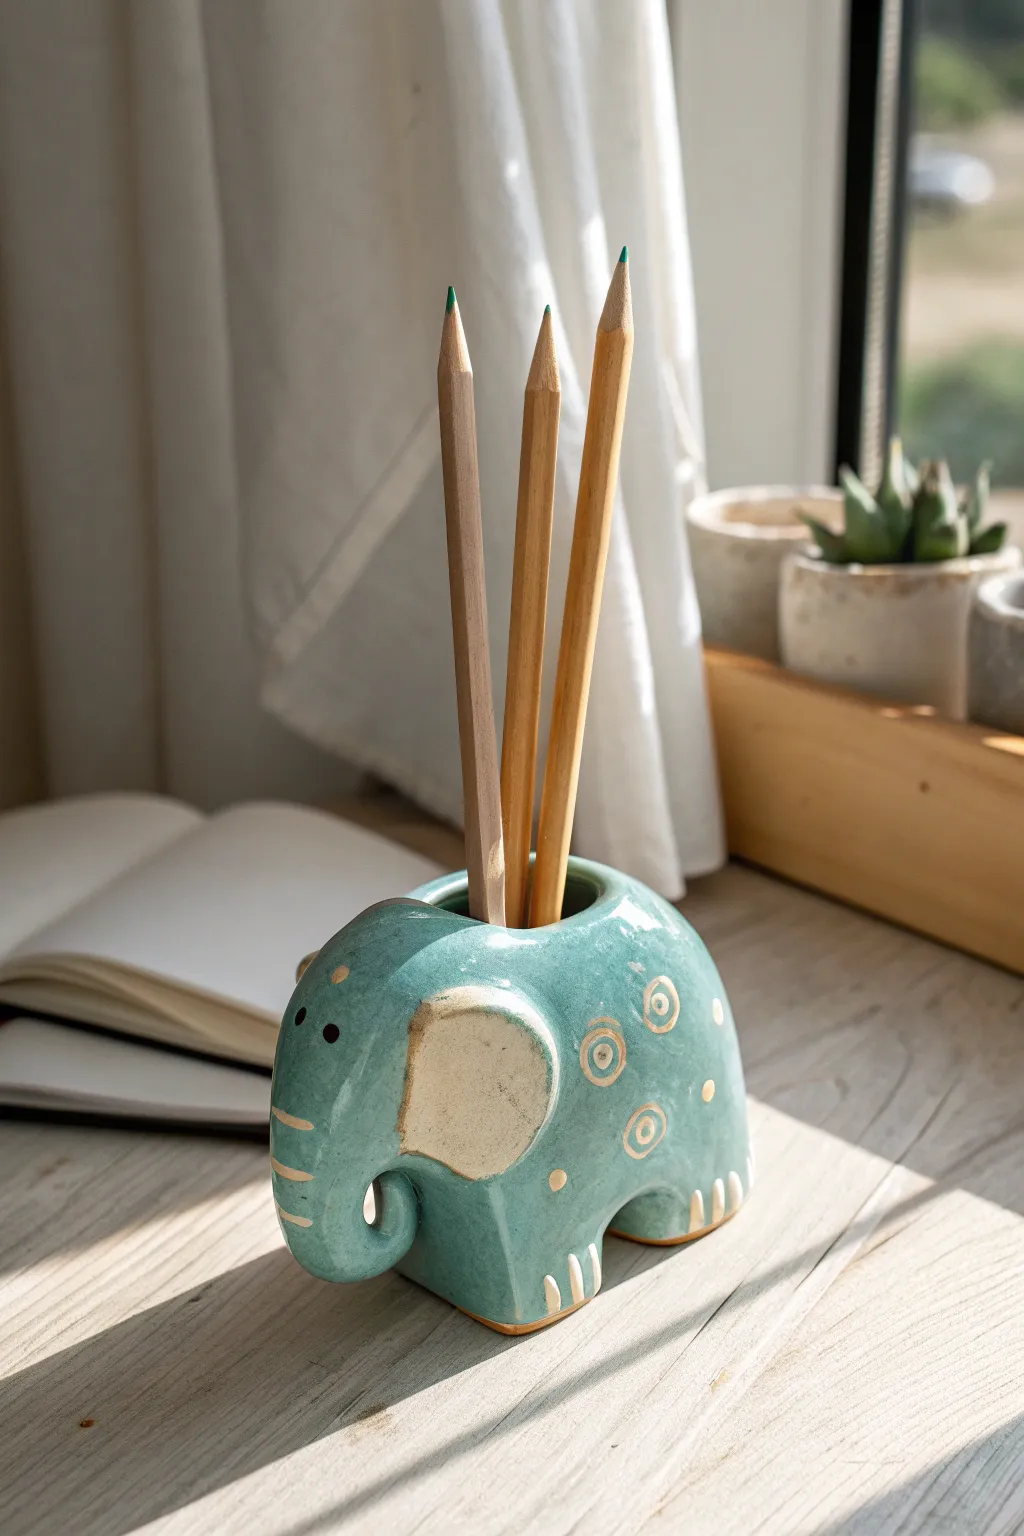
Brighten up your desk or bathroom counter with this charming teal elephant that happily carries your pencils or toothbrushes. With its sturdy four-legged stance, curling trunk, and playful spiral decorations, this project combines functional storage with a friendly face.
Step-by-Step Guide
Materials
- Air-dry clay or polymer clay (white or light base)
- Small rolling pin
- Modeling tools (or a butter knife and toothpick)
- Slip (clay and water mixture for joining)
- Sponge and water
- Teal acrylic paint or glaze
- Cream or off-white acrylic paint
- Gold or bronze metallic paint (for details)
- Black acrylic paint (for eyes)
- Clear varnish or sealant (waterproof if using for toothbrushes)
- Paintbrushes (medium flat and fine liner)
Step 1: Shaping the Body
-
Prepare the base:
Start by conditioning a large ball of clay until it is smooth and pliable. Roll it into a thick, elongated oval shape, slightly flatter on the bottom so it sits stably. -
Form the legs:
Instead of attaching separate legs, gently pull and pinch the clay downwards from the four corners of your oval. I like to tap the feet on the table to flatten them, creating a solid, blocky stance. -
Define the belly:
Use your thumb to push up gently underneath the belly area between the legs to create an arch, giving the elephant definition and separating the front legs from the back. -
Create the storage hole:
Use a large marker cap, a thick dowel, or a clay hole cutter to hollow out a deep vertical cylinder in the center of the elephant’s back. Twist gently while pushing down to avoid distorting the body shape. -
Refine the opening:
Smooth the inner rim of the hole with a wet finger or a damp sponge so there are no sharp edges.
Step 2: Adding Character Details
-
Make the trunk:
Roll a coil of clay that tapers at one end. Attach the thicker end to the front of the face using the score-and-slip method. -
Curl the trunk:
Gently curl the tapered end of the trunk upwards and inwards so it creates a spiral near the elephant’s chin. -
Attach the ears:
Flatten two small balls of clay into semi-circles created to look like large flaps. Attach these to the sides of the head using slip, smoothing the seams well so they look integrated. -
Add texture to the trunk:
Use a toothpick or clay knife to press small horizontal lines along the front of the trunk for realistic wrinkles. -
Create the tail:
Roll a very small, thin snake of clay and attach it to the rear. Press it flat against the body so it doesn’t break off easily. -
Dry the sculpture:
Allow your piece to dry completely according to package instructions. For air-dry clay, this usually takes 24-48 hours. If baking polymer clay, follow the temperature guide.
Smooth Surface Secret
Before drying, wipe the entire clay surface with a damp fine-grit sponge. This removes fingerprints and creates a professional finish.
Step 3: Painting and Finishing
-
Apply base color:
Paint the entire elephant with a glossy teal acrylic paint. You may need two coats for full opacity. -
Paint the ears:
Once dry, paint the flat surface of the ears with a cream or off-white color, leaving a teal border around the edges. -
Add the toes:
Using the same cream color, paint three small vertical stripes on the bottom of each foot to represent toenails. -
Decorate the body:
Dip a fine liner brush into gold or bronze metallic paint. Paint small spiral circles and dots randomly across the elephant’s flanks and back for a decorative touch. -
Highlight the trunk:
Carefully paint thin cream or gold lines into the indented wrinkles you carved on the trunk earlier. -
Paint the eyes:
Use the handle end of a paintbrush dipped in black paint to dot two small eyes on either side of the trunk. -
Seal the piece:
Finish with a high-gloss waterproof varnish to give it that ceramic look and protect it from moisture.
Double Duty Design
Make the center hole larger or oval-shaped during the sculpting phase to hold a small succulent pot instead of pencils.
Place your new elephant friend on your desk and fill it with your favorite stationery


What Really Happens Inside the Kiln
Learn how time and temperature work together inside the kiln to transform clay into durable ceramic.
Stackable Trinket Boxes With Hidden Surprises
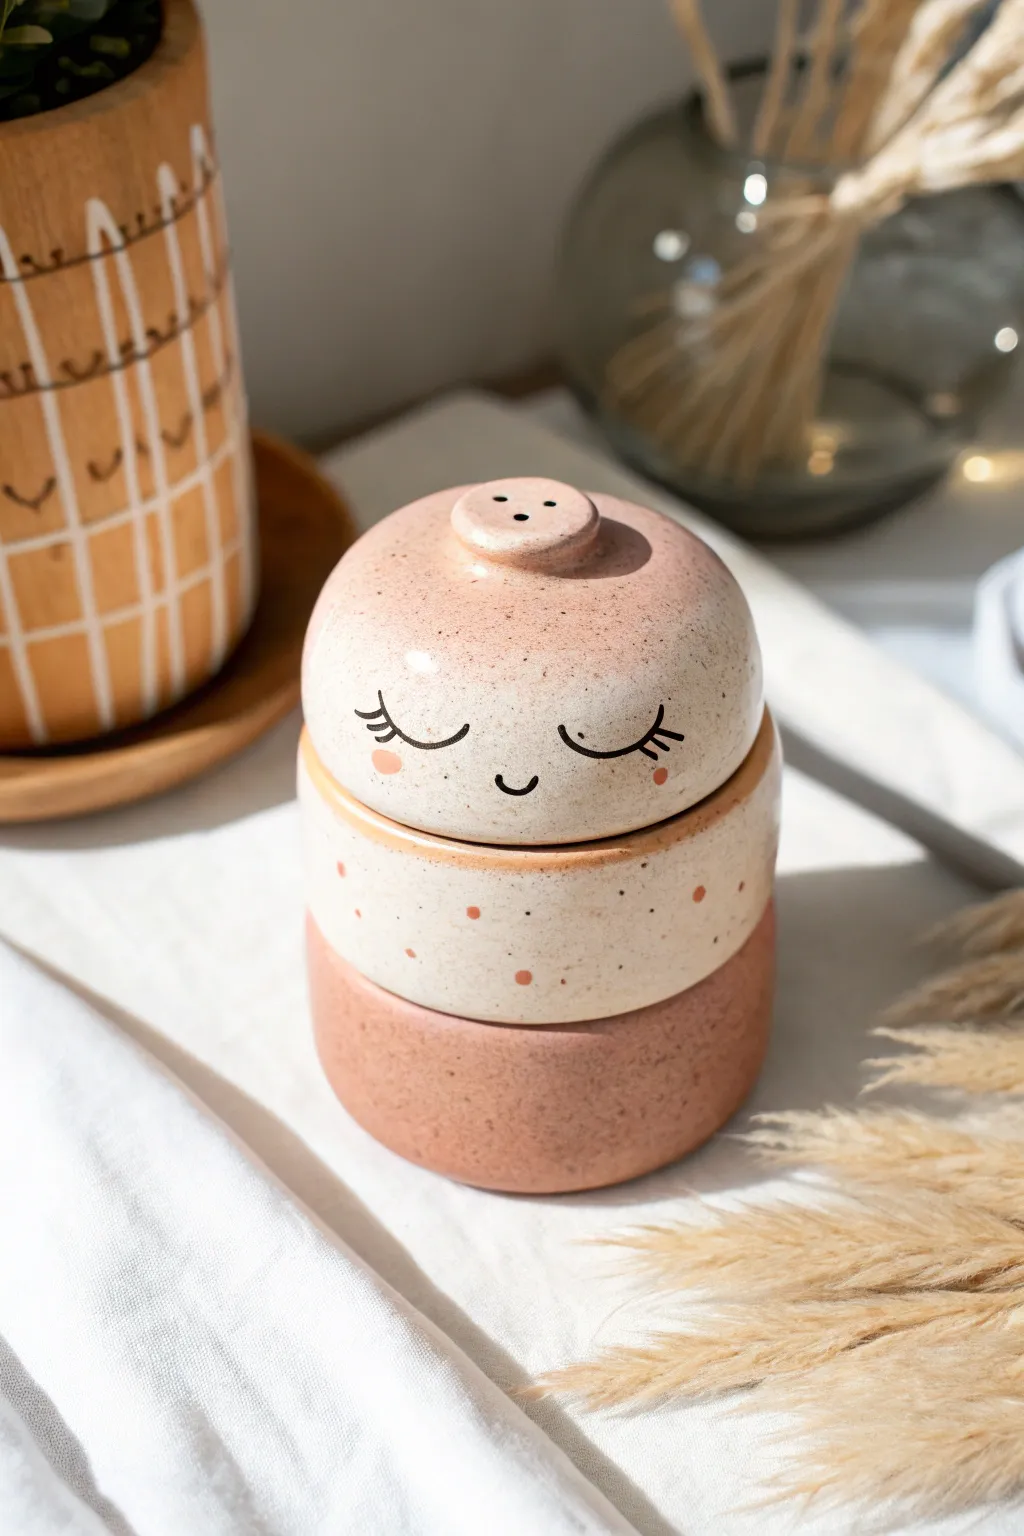
Create a charming three-tier storage tower that doubles as adorable decor with this sleeping face design. This project combines simple wheel-throwing or hand-building techniques with delicate glazing to achieve a soft, speckled finish perfect for holding jewelry or small treasures.
How-To Guide
Materials
- Speckled stoneware clay (white or buff)
- Pottery wheel or rolling pin and circle cutters
- Loop tools for trimming
- Ribs (metal and wooden)
- Needle tool
- Sponge
- Scoring tool
- Slip
- Underglaze pencil or fine liner brush (black)
- Underglaze (pale pink/blush)
- Clear or transparent matte glaze
- Kiln
Step 1: Forming the Tiered Bowls
-
Prepare your clay:
Wedge your speckled stoneware clay thoroughly to remove air bubbles. You will need three roughly equal balls of clay. -
Throw the base bowl:
Center the first ball on the wheel and open it up. Pull the walls straight up to create a simple cylinder with a flat bottom, roughly 3 inches wide and 1.5 inches tall. I like to keep the rim slightly thick and flat to support the weight of the layers above. -
Create the middle section:
Repeat the throwing process for the second bowl. Crucially, measure the rim of your first bowl with calipers. Ensure the bottom of this second bowl matches that measurement perfectly so they stack securely. -
Form the top lid section:
Throw a third bowl of similar width but shape it into a dome or rounded curve rather than a straight cylinder. This will be the face. -
Add a knob:
While the top dome is still on the wheel (or by hand-building later), pinch and shape a small, flat button knob at the very center. Use a needle tool to poke two small holes in the knob for a decorative button look.
Wobbly Stack?
If the dried bowls don’t sit flat, wet sand the rims and bottoms in a figure-8 motion on a flat surface before the final glaze firing to level them out.
Step 2: Refining and Fitting
-
Dry to leather hard:
Allow all three pieces to dry until they are leather hard. They should be firm enough to handle without deforming but still cold to the touch. -
Trim the foot rings:
Place the bottom and middle bowls upside down on the wheel. Trim a recessed foot ring on the bottom of each. This ‘gallery’ indentation is vital; it prevents the bowls from sliding off one another when stacked. -
Test the fit:
Stack the pieces while they are still workable. If the middle bowl wobbles on the bottom one, refine the foot ring or the rim below it until they sit flush and stable. -
Smooth surfaces:
Use a damp sponge or a soft rib to smooth out any throwing lines on the exterior walls, creating a clean canvas for the face details. -
Bisque fire:
Once bone dry, load the pieces into the kiln and bisque fire them according to your clay body’s specifications (usually Cone 04).
Step 3: Decoration and Glazing
-
Draw the face:
On the top dome piece, lightly sketch the sleeping lashes, smile, and cheeks with a regular pencil first (the graphite will burn off). -
Apply the features:
Using a fine liner brush and black underglaze, carefully paint over your pencil lines for the eyes and mouth. Alternatively, an underglaze pencil works well for a more crayon-like texture. -
Add blush and dots:
Dip a small round brush into pale pink underglaze. Dab rosy cheeks onto the face piece and add random polka dots to the middle bowl section. -
Glaze the interior:
Pour clear or white liner glaze into the inside of each bowl, swirl to coat, and pour out the excess. Wipe any drips off the rims immediately. -
Glaze the exterior:
Dip the exterior of all three pieces into a transparent matte glaze. I find matte works best here to let the natural speckles of the clay shine through without excessive shine distortion. -
Wipe the contact points:
Carefully wipe the glaze off the rims and foot rings where the pieces touch each other. If glaze remains here, the stack will fuse together permanently in the kiln. -
Final firing:
Load into the kiln, ensuring the pieces are not touching during the glaze firing (fire them side-by-side, not stacked). Fire to maturity, usually Cone 5 or 6.
Make it a family
Make varied sizes to create a family of stackable characters. Swap the polka dots for stripes or hearts on the middle tier for different personalities.
Assemble your tiers once cool and enjoy your friendly new storage companion
Ring Cones and Mini Jewelry Trays
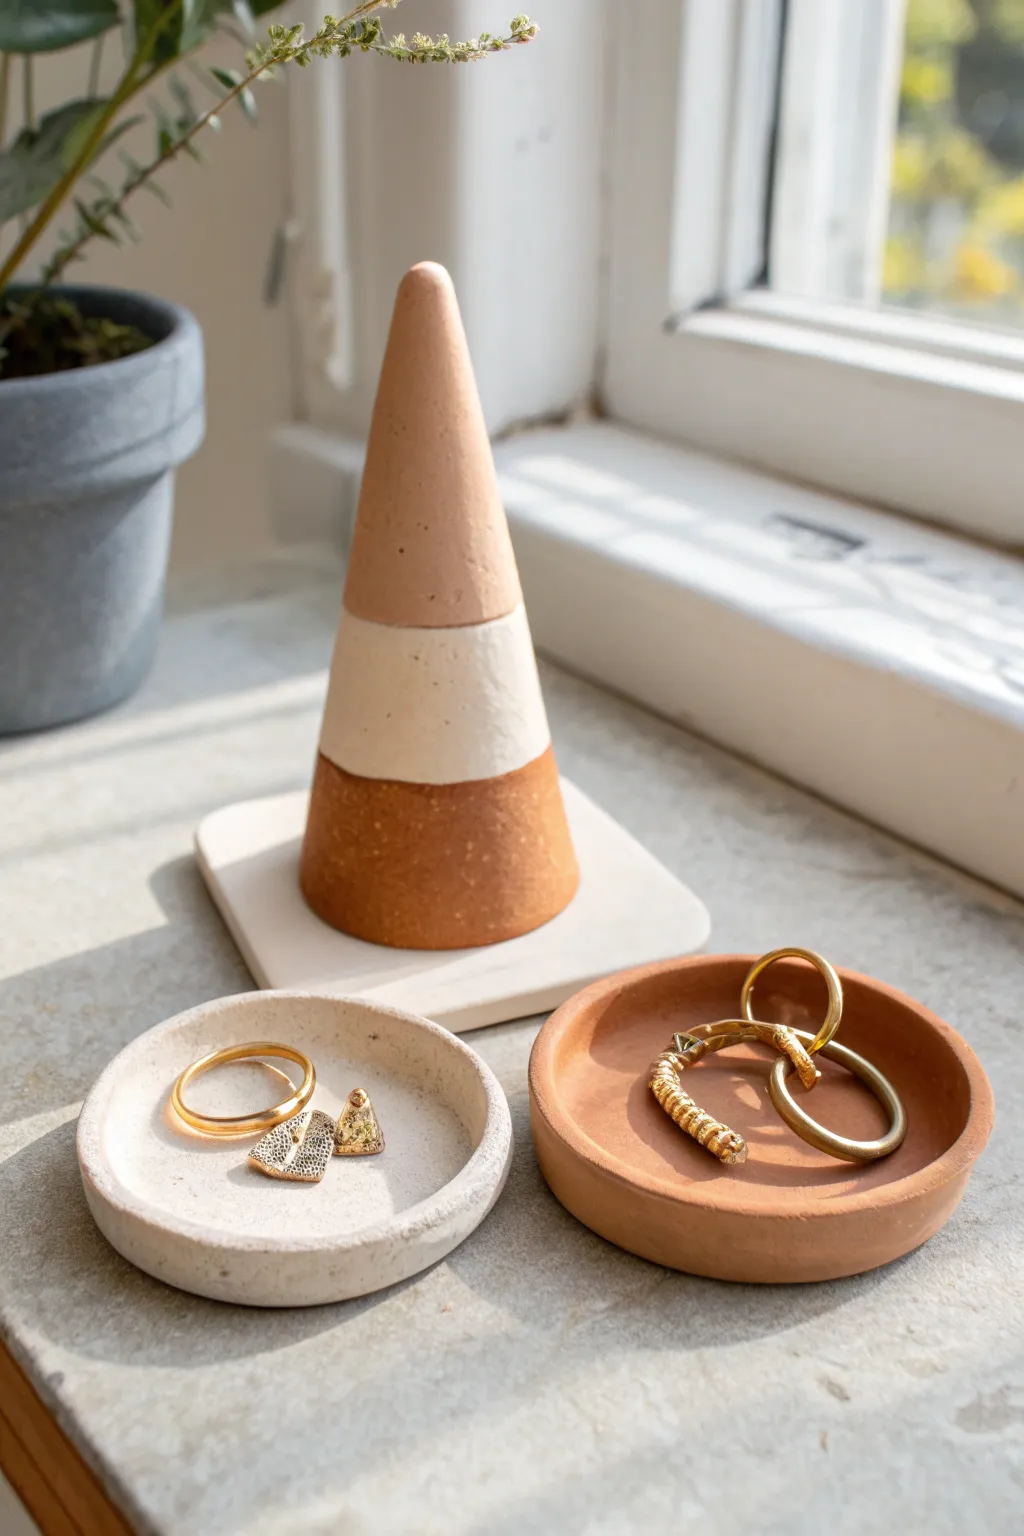
Create a sleek and functional jewelry organization set featuring a geometric ring cone and two coordinating mini dishes. This project combines warm terracotta tones with cool neutrals for a minimalist look that beautifully showcases your favorite rings and accessories.
Step-by-Step Guide
Materials
- Air-dry clay or polymer clay (White)
- Air-dry clay or polymer clay (Terracotta/Red-Brown)
- Air-dry clay or polymer clay (Beige/Sand)
- Acrylic rolling pin
- Clay knife or craft blade
- Small bowl or round cookie cutter (approx. 3-inch diameter)
- Square cookie cutter (approx. 3.5-inch)
- Cardstock or heavy paper
- Tape
- Fine-grit sandpaper (220-400 grit)
- Matte sealant or varnish
- Small sponge brush
- Water (for smoothing)
Step 1: Shaping the Tri-Tone Cone
-
Prepare the Colors:
Condition your white, beige, and terracotta clay separately until soft and pliable. If you don’t have pre-colored clay, mix white clay with small amounts of acrylic paint to achieve the beige and terracotta shades. -
Form the Base Section:
Take a walnut-sized ball of the terracotta clay and roll it into a thick, tapered cylinder. Flatten the bottom against your work surface so it stands upright. -
Add the Middle Layer:
Roll a slightly smaller ball of the white clay. Flatten it into a thick disc, then gently press it onto the top of your terracotta base. Smooth the seam downwards with your thumb to join them securely. -
Create the Peak:
Shape a piece of the beige clay into a small cone tip. Attached this to the top of the white section, blending the edges downward just enough to seal the connection without losing the distinct color block lines. -
Refine the Shape:
Gently roll the entire stacked form on your work surface to create a smooth, unified cone shape. Use your fingers to keep the lines relatively straight. -
Final Surface Smoothing:
Dip your finger in a little water and buff out any fingerprints or tiny cracks. The cone should be smooth but retain a tactile, handmade matte texture.
Cracks Appearing?
If small cracks appear while drying, mix a tiny bit of fresh clay with water to make a paste (slip) and fill the crack. Smooth it over and let dry again.
Step 2: Creating the Base and Dishes
-
Roll the Square Base:
Roll out white clay to about 1/4 inch thick. Use a square cookie cutter or knife to cut a square base for your cone. Smooth the edges with a wet finger. -
Form the Dish Bases:
Roll out the remaining beige (speckled) and terracotta clay to a similar 1/4 inch thickness. Use a round cutter or trace a small bowl to cut two circles. -
Build the Rims:
Roll thin snakes (coils) of clay matching each dish base color. Place the coil around the edge of the corresponding circle base. -
Blend the Rims:
Use a modeling tool or your finger to blend the inside seam of the coil down into the base, creating a seamless transition. Leave the outside slightly distinct or smooth it completely for a modern look. -
Add Texture (Optional):
For the speckled beige dish, I like to mix in a tiny pinch of dried tea leaves or sand before rolling to mimic the stone look in the photo.
Pro Tip: Clean Lines
For sharper color transitions on the cone, slice the contact surfaces flat with a blade before stacking them, rather than just pressing rounded balls together.
Step 3: Finishing Touches
-
Dry Completely:
Allow all pieces to dry for 24-48 hours. Turn them over halfway through the drying process to ensure the bottoms dry evenly and don’t warp. -
Sand for Smoothness:
Once fully dry, lightly sand any rough edges or uneven rims with fine-grit sandpaper. Focus on the tip of the cone and the lips of the trays. -
Attach Cone to Base:
Apply a strong craft glue or scrolling of fresh wet clay slip to the bottom of the cone and center it on the white square tile. -
Seal:
Apply a thin coat of matte varnish to protect the clay from oils and moisture. Let it cure completely before placing jewelry on the set.
Now you have a stylish display worthy of your favorite accessories

TRACK YOUR CERAMIC JOURNEY
Capture glaze tests, firing details, and creative progress—all in one simple printable. Make your projects easier to repeat and improve.
Minimal Photo and Card Holders
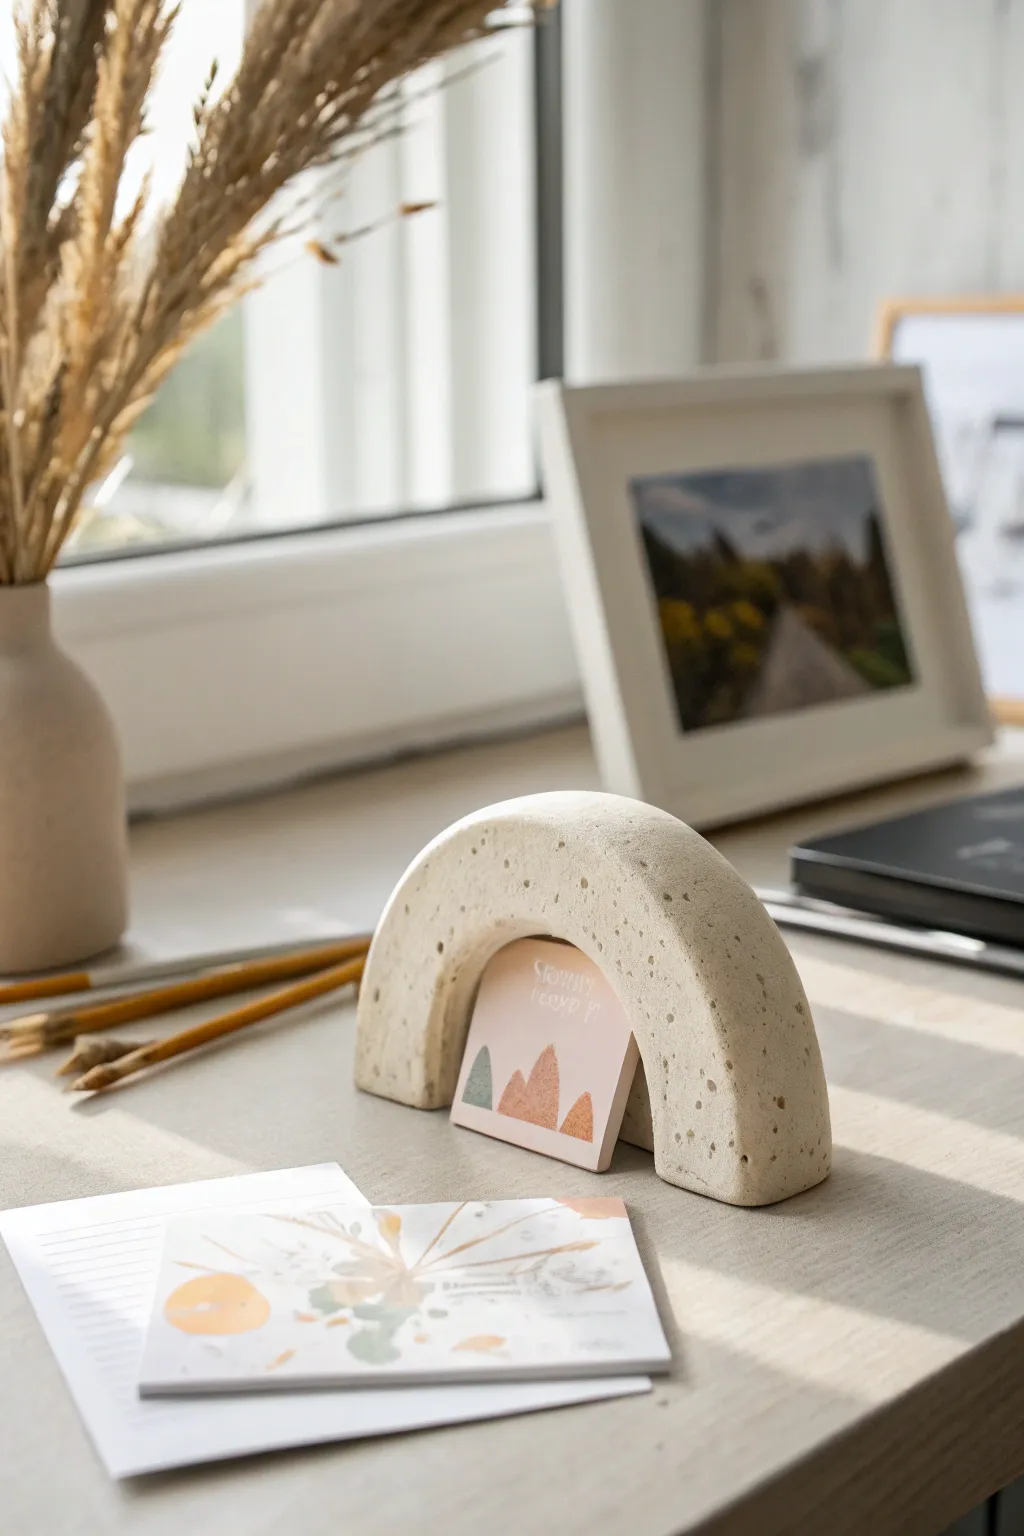
Bring a touch of modern minimalism to your workspace with this sturdy arch-shaped card holder. Its textured, speckled finish mimics the look of raw stone or concrete while keeping your favorite photos or notes displayed upright.
Detailed Instructions
Materials
- Air-dry clay (white or light grey)
- Used coffee grounds or coarse black pepper (for speckling)
- Rolling pin
- Sharp craft knife or clay blade
- Sandpaper (medium and fine grit)
- Small bowl of water
- Cardboard or cardstock template (arch shape)
- Ruler
- Acrylic sealer (matte finish)
Step 1: Preparation and Mixing
-
Create the texture mix:
Begin by taking a substantial chunk of white air-dry clay. To achieve that beautiful stone-like speckled effect, sprinkle a pinch of dried used coffee grounds or coarse black pepper onto the clay. -
Knead thoroughly:
Knead the clay repeatedly to distribute the organic material evenly throughout the block. You want the speckles to be visible but not clumping together. -
Roll out the slab:
Using a rolling pin, flatten your clay into a thick slab. Aim for a thickness of about 1 to 1.5 inches to ensure the holder is heavy enough to stand stably. -
Smooth the surface:
Dip your finger in a little water and gently run it over the surface of the slab to remove any rolling pin marks or large cracks.
Step 2: Shaping the Arch
-
Using a template:
Draw an arch shape on a piece of cardboard and cut it out. This ensures your final piece is symmetrical. Place this template gently onto your clay slab. -
Cut the outer shape:
With a sharp craft knife held perpendicular to the table, trace around the outer edge of your template to cut the basic arch form. Remove the excess clay. -
Cut the inner arch:
Using the same steady motion, cut out the inner semi-circle of the arch. This creates the negative space that defines the shape. -
Refine the edges:
Use a damp sponge or your wet fingertip to smooth down the sharp cut edges. Rounding them slightly gives the piece a more finished, pottery-like appearance.
Natural Texture
Don’t over-sand the piece. Leaving a few small natural divots or fingerprints actually enhances the ‘raw stone’ aesthetic of this minimalist style.
Step 3: Creating the Slot
-
Measure the center:
Place the arch upright on its feet. Use a ruler to find the direct center line along the top ridge of the arch. -
Cut the holding slot:
Carefully slice a straight line down into the top center of the arch. Gently wiggle the knife side-to-side to widen the gap just enough to fit a thick piece of cardstock. -
Alternative slot method:
If you prefer the card to sit underneath (as shown in the inspo image), you can skip the top slot and simply ensure the inner arch is wide enough to lean a small card against a back support, or create a small groove at the base of the feet. -
Stability check:
Stand the arch up on a flat surface. If it wobbles, gently press it down to flatten the bottom of the feet, or trim slightly with your knife.
Cracking Issues?
If hairline cracks appear while drying, mix a tiny bit of fresh clay with water to make a ‘slip’ paste and fill the cracks, then sand smooth once dry.
Step 4: Finishing Touches
-
Initial drying phase:
Let the piece dry slowly away from direct sunlight and heat sources to prevent cracking. I usually rotate the piece every few hours during the first day so all sides get air exposure. -
Full cure:
Allow the clay to dry completely for 24-48 hours. The clay will turn a chalky white and feel lighter when fully cured. -
Sanding for texture:
Once bone dry, take your sandpaper and gently buff the surface. This will reveal more of the coffee or pepper speckles and create that faux-stone finish. -
Clean up:
Wipe away any clay dust with a dry cloth or soft brush. -
Sealing:
Apply a thin coat of matte acrylic sealer. This protects the clay from moisture and stains without making it look glossy or plastic.
Now you have a chic, sculptural element to display your favorite memories on your desk
Color-Blocked Candle Holders
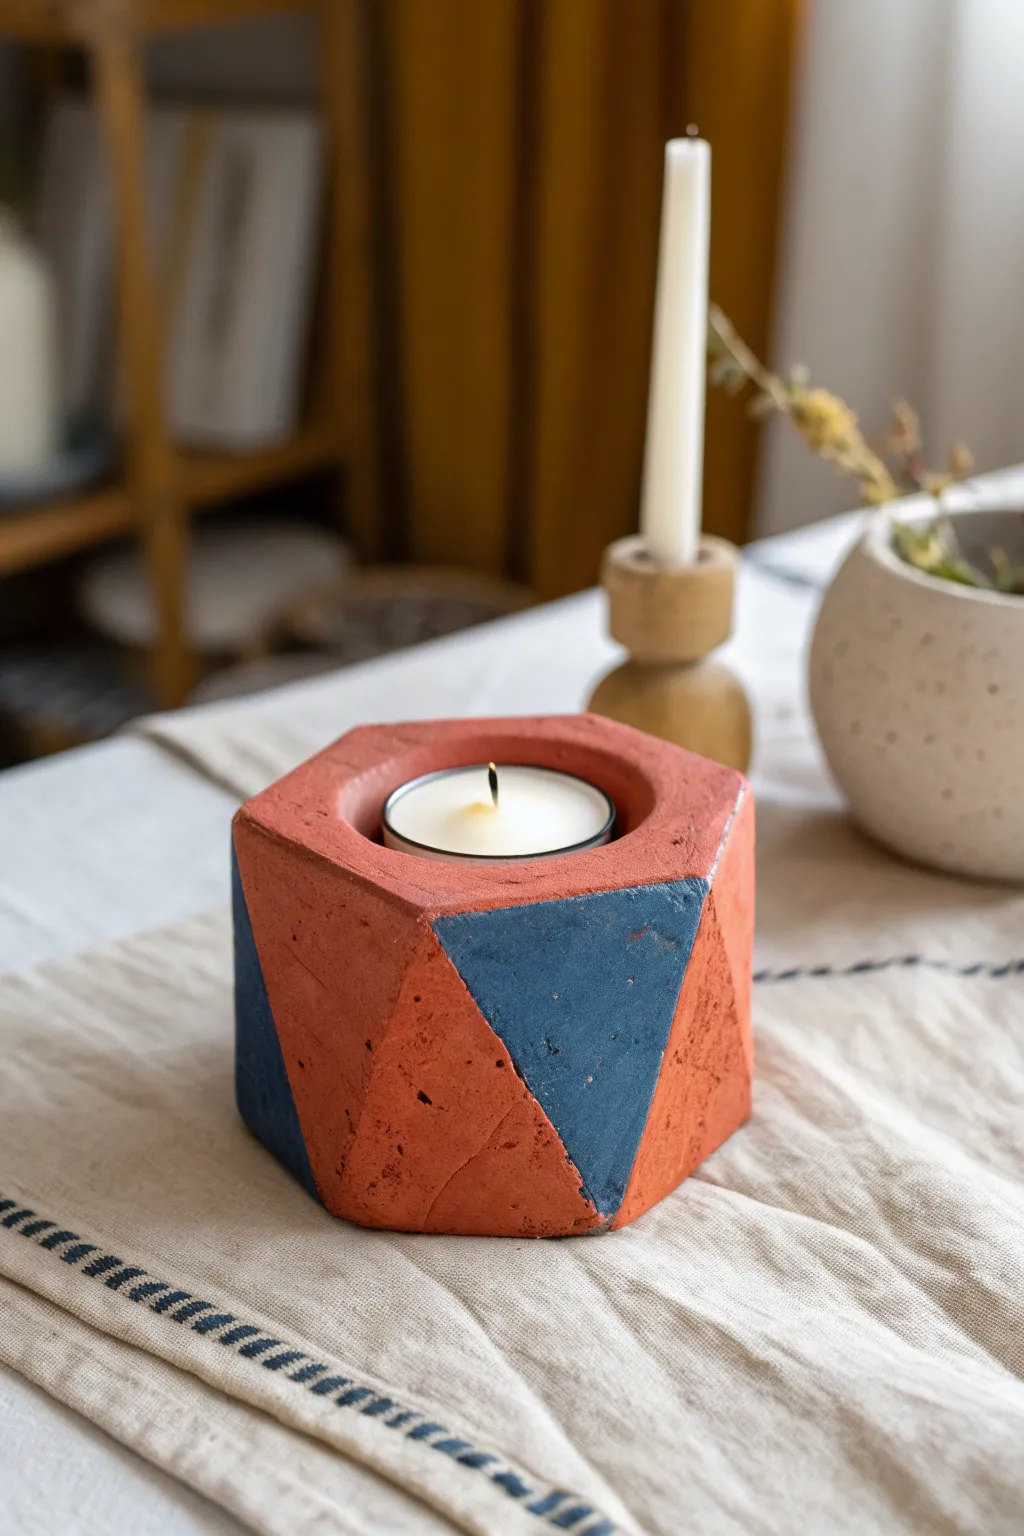
Bring a touch of modern design to your table with this chunky, geometric tea light holder. Featuring a faceted hexagonal shape and bold Terracotta and Navy color blocking, this clay project mimics the weight and texture of cast concrete.
How-To Guide
Materials
- Air-dry clay (white or terracotta)
- Small rolling pin
- Ruler
- Craft knife or clay cutter
- Cardboard or sturdy paper (for templates)
- Tea light candle (for sizing)
- Acrylic paints (Terracotta Orange, Deep Navy Blue)
- Small flat paintbrush
- Fine-grit sandpaper
- Masking tape or painter’s tape
- Small bowl of water
- Mod Podge or clear matte sealant
Step 1: Shaping the Hexagon
-
Prepare your clay:
Start with a large ball of air-dry clay, kneading it in your hands until it becomes soft and pliable. You want a smooth consistency without cracks. -
Create the base block:
Press the ball onto your work surface and flatten the top and bottom to create a thick, puck-like cylinder. Aim for a height of about 2 inches. -
Shape the hexagon:
Using a flat tool or just your hands and a ruler, gently tap and press the sides of your cylinder to form six flat faces. It helps to work on opposite sides simultaneously to keep it symmetrical. -
Refine the edges:
Use your ruler or craft knife to slice off thin layers from the sides if your hand-shaping isn’t sharp enough. You want crisp, defined corners for that faceted look. -
Create the candle well:
Take your actual tea light candle and press it firmly into the center of the hexagon’s top face. Push it down until the metal cup is flush with the clay surface. -
Wiggle for clearance:
Gently wiggle the candle in a circular motion to widen the hole slightly. Clay shrinks as it dries, so making the opening a tiny bit larger ensures the candle fits later. -
Remove the candle:
Carefully pull the tea light out. Smooth the inner rim of the hole with a wet finger to fix any jagged edges caused by the removal.
Crisp Lines Secret
Burnish your painter’s tape down firmly with a fingernail or credit card edge before painting. This simple step is key to getting those razor-sharp geometric lines.
Step 2: Refining and Drying
-
Smoothing the surface:
Dip your finger in a little water and run it over the flat exterior sides. This removes fingerprints and creates a smoother canvas for the paint later. -
Let it dry completely:
Set the holder in a cool, dry place. Depending on the thickness of your clay brand, this could take 24 to 48 hours. Rotate it occasionally so the bottom dries too. -
Sand for perfection:
Once fully dry and hard, use fine-grit sandpaper to lightly sand the flat faces. Focus on sharpening the corners where the hexagon sides meet. -
Dust off:
Wipe the entire piece down with a slightly damp cloth or dry brush to remove all the sanding dust.
Step 3: Painting the Design
-
Apply the base coat:
Paint the entire candle holder with your Terracotta Orange paint. You might need two coats for full opacity. Let this dry completely before moving on. -
Tape the geometric pattern:
Use masking tape to create the triangular color-blocked sections. To match the image, tape a diagonal line across one or two side faces, creating a triangle shape. -
Seal the tape edge:
I like to brush a tiny bit of the base orange paint over the tape edge first. This seals the tape and prevents the blue paint from bleeding underneath. -
Paint the accents:
Fill in the taped-off triangle sections with your Deep Navy Blue paint. Apply in thin layers to avoid ridges. -
Reveal the design:
Wait until the paint is tacky but not fully dry, then carefully peel off the masking tape at a 45-degree angle to reveal crisp lines. -
Final touches:
If any paint bled, use a tiny brush and the original orange paint to tidy up the straight lines. -
Seal the piece:
Apply a coat of matte sealant over the entire holder to protect the paint and give it a finished, professional look.
Cracked Clay?
If small cracks appear during drying, make a paste of clay and water (slip) to fill them. Smooth it over the crack, let dry, and sand it flush before painting.
Place a tea light inside and enjoy the warm glow against your modern, handmade decor
Happy Face Magnet Sets
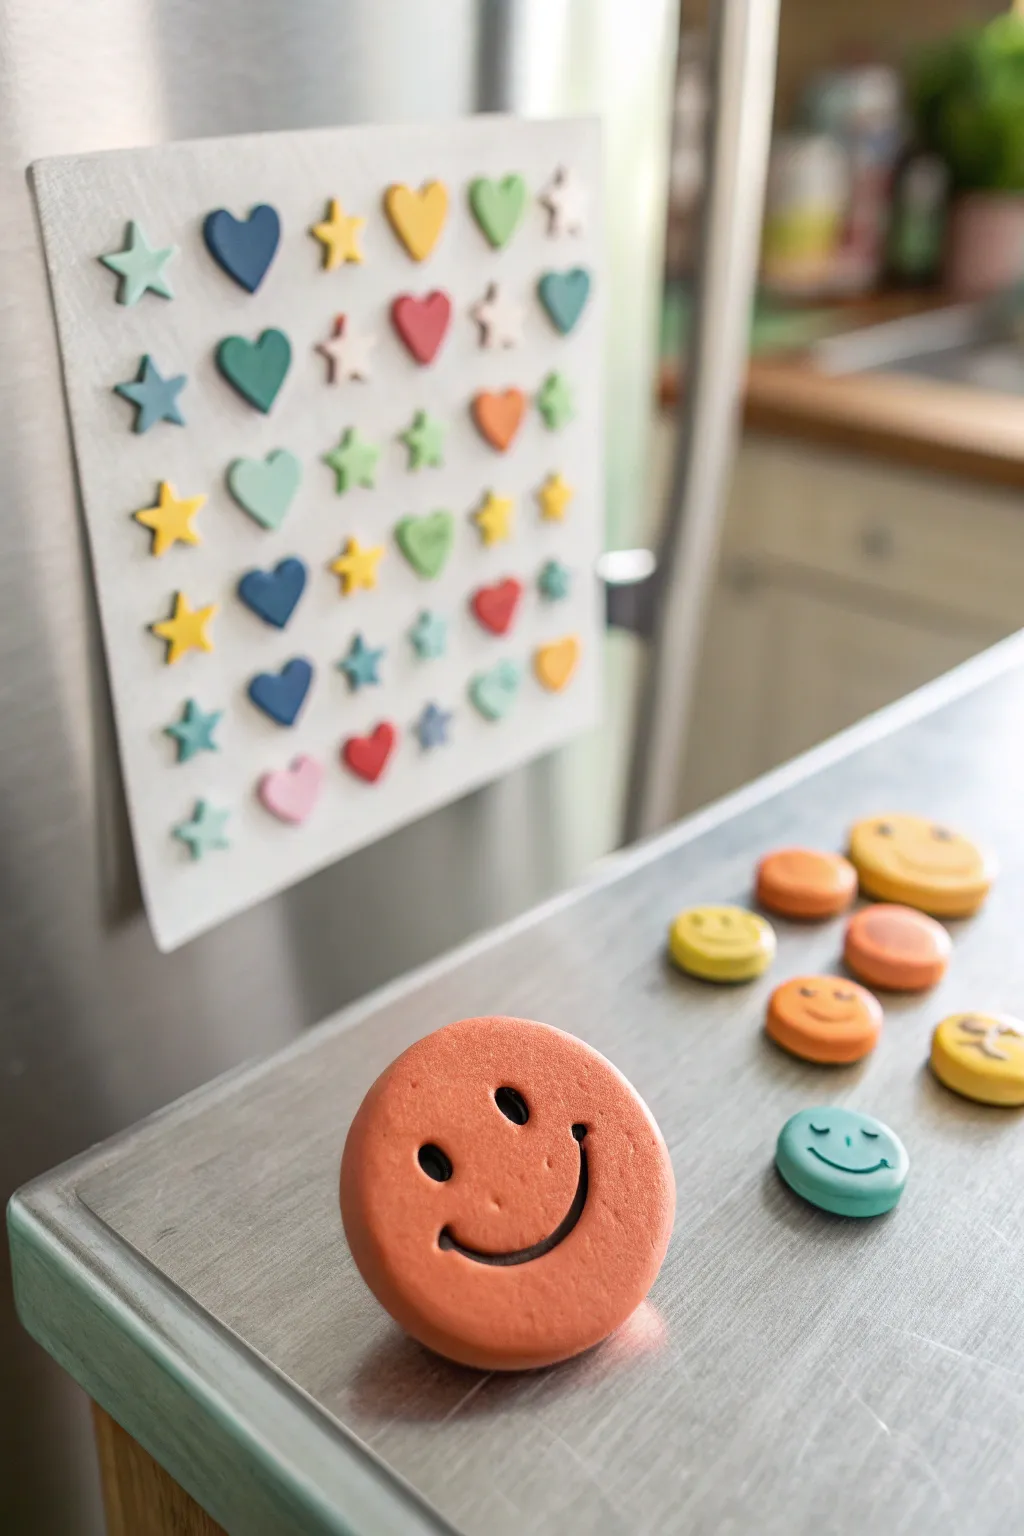
Brighten up your kitchen with these impossibly cheerful, chunky clay magnets. Featuring a smooth matte finish and simple geometric shapes, this project combines retro vibes with functional organization for a display that truly smiles back.
How-To Guide
Materials
- Polymer clay (orange, yellow, teal, blue, white, pink)
- Small round cookie cutter (approx. 1-1.5 inches)
- Small heart and star mini cutters (optional, for the board)
- Acrylic rolling pin or clay machine
- Sculpting tools (needle tool and ball stylus)
- ParCHMENT paper or baking tile
- Strong craft magnets (round ceramic or neodymium)
- Super glue or E6000
- Fine-grit sandpaper (400-600 grit)
- Small black acrylic paint or black clay for eyes
- Matte spray varnish (optional)
Step 1: Preparing the Happy Faces
-
Condition the Clay:
Begin by warming up your orange, yellow, and teal polymer clay in your hands until it is soft and malleable. This prevents cracking later on. -
Roll Even Slabs:
Roll out the clay to a substantial thickness, aiming for about 1/4 inch (6mm). Using depth guides can help keep the thickness uniform so they look like chunky cookies. -
Cut the Circles:
Press your round cutter firmly into the clay slab to create clean discs. Gently push them out of the cutter, being careful not to warp the circle shape. -
Smooth the Edges:
Use your fingertip, dipped slightly in water or cornstarch, to gently round off the sharp top edge of the cut circle for a soft, pillowy look. -
Impress the Eyes:
Take a ball stylus or the end of a paintbrush handle and press two indentations into the upper half of the circle to create the eye sockets. Vary the angle slightly for ‘winking’ expressions. -
Carve the Smile:
Use a needle tool or a small curved carving tool to press a deep, wide smile into the clay. Rock the tool gently side-to-side to widen the line so it remains visible after baking.
Step 2: Creating the Magnet Board Shapes
-
Roll Scraps for Shapes:
Use your clay scraps or fresh colors (blue, pink, green) to roll out a slightly thinner slab, around 1/8 inch thick. -
Cut Hearts and Stars:
Use mini shaped cutters to punch out dozens of small stars and hearts. These will become the smaller magnets seen on the background board. -
Baking:
Arrange all your pieces on parchment paper or a ceramic tile. Bake according to your specific brand’s instructions (usually 275°F/135°C for 15-30 minutes). -
Cooling Down:
Allow the clay pieces to cool completely in the oven with the door slightly ajar. Sudden temperature changes can sometimes cause brittle cracks.
Sticky Situation?
If your clay sticks to the table or cutter, dust your work surface lightly with cornstarch before rolling. It acts like flour for dough.
Step 3: Finishing Touches
-
Sanding for Smoothness:
Once cool, lightly sand the surface of the smiley faces with fine-grit sandpaper to remove any fingerprints or dust specs. -
Filling the Features:
If you want high-contrast features like the photo, dilute a small amount of black acrylic paint and wash it into the eye and mouth grooves. -
Wiping the Excess:
Immediately wipe the surface with a damp paper towel or baby wipe, leaving the black paint only deep inside the carved recessed lines. -
Attaching Magnets:
Apply a drop of strong adhesive to the back of each clay piece and press a magnet firmly into place. I prefer to let these cure overnight for maximum hold. -
Sealing (Optional):
For a durable finish that resists shine, mist the faces with a matte spray varnish. Let dry completely before placing them on your fridge.
Make It 3D
Instead of carving eyes, bake tiny balls of black clay into the sockets before baking for cute, protruding bead eyes.
Now you have a collection of cheerful magnets to hold up your grocery lists and photos
Moon Phase and Rainbow Wall Hangings
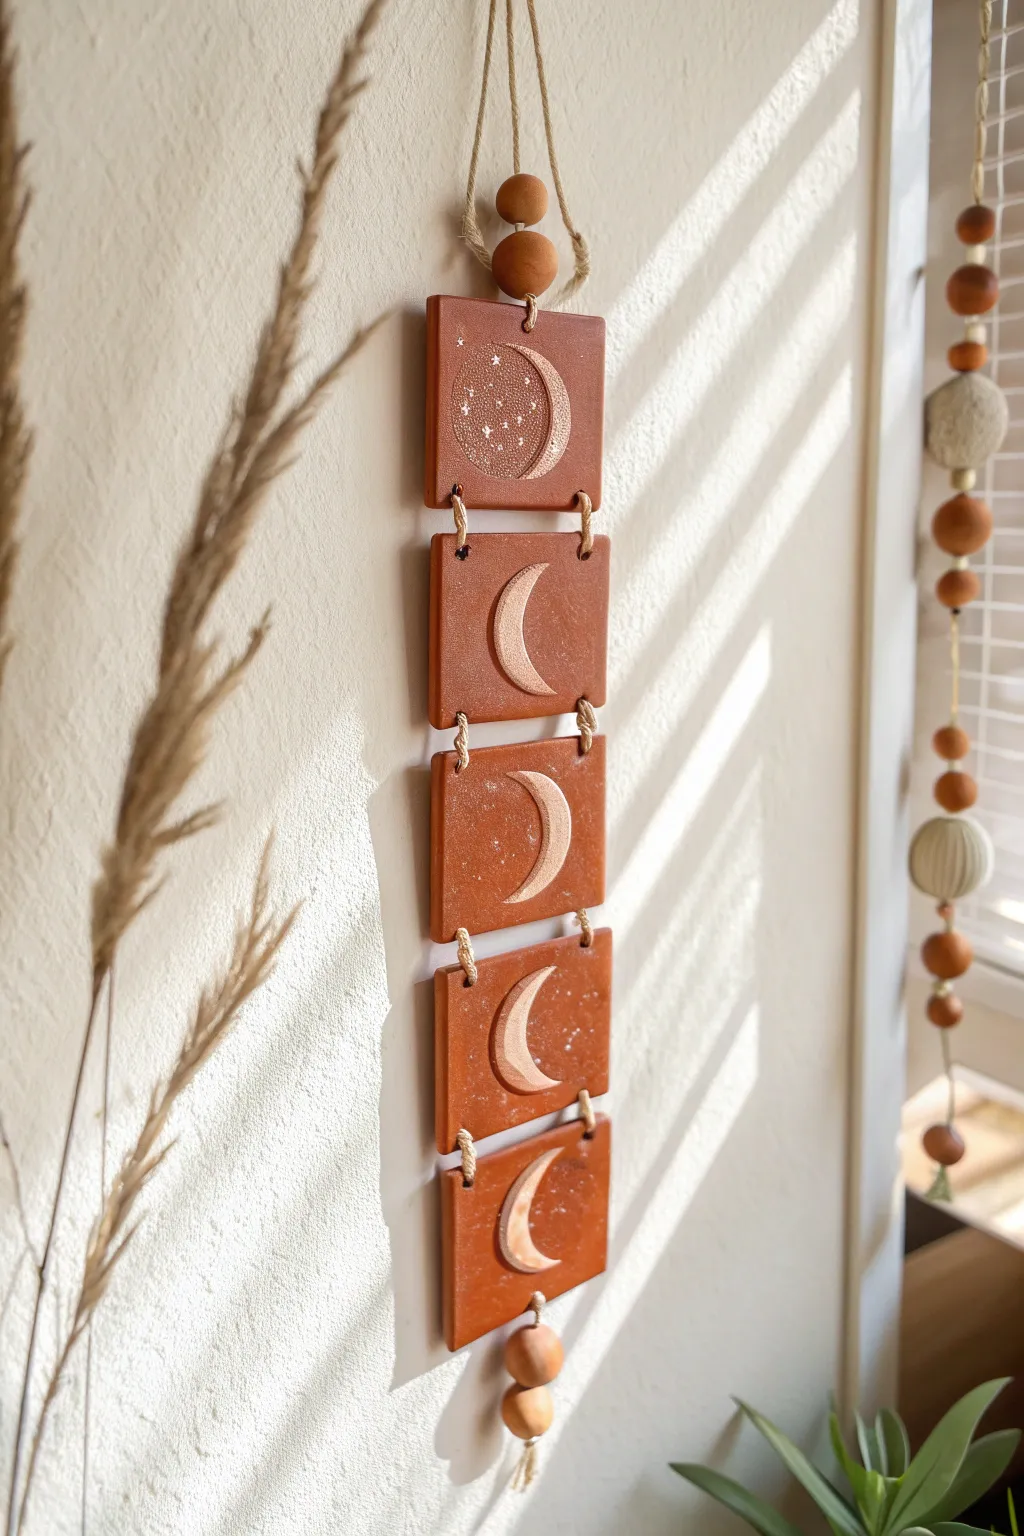
Bring celestial charm to your space with this warm, boho-inspired wall hanging featuring the phases of the moon. Crafted from terracotta-colored polymer clay and accented with shimmering metallic gold, this vertical garland adds a perfect earthy touch to any room.
Step-by-Step Guide
Materials
- Terracotta colored polymer clay (approx. 4-6 oz)
- Square clay cutter (approx. 2-3 inches) or a ruler and craft knife
- Round cookie cutter (slightly smaller than square width)
- Acrylic rolling pin and depth guides (1/4 inch)
- Jute twine or hemp cord
- Wooden beads (varying sizes, dark wood tone)
- Gold or copper metallic acrylic paint
- Fine detail paintbrush
- White acrylic paint (for speckling)
- Toothbrush (for speckling)
- Toothpick or straw (for piercing holes)
- Sandpaper (fine grit)
- Varnish or sealant (optional)
Step 1: Shaping the Base
-
Condition the Clay:
Begin by thoroughly conditioning your terracotta polymer clay until it is soft and pliable. Warm hands make this easier, preventing cracks later on. -
Roll Out the Slab:
Roll the clay out onto a clean work surface or silicone mat. Use depth guides or stack playing cards to ensure an even thickness of about 1/4 inch across the entire slab. -
Cut the Squares:
Using your square cutter or a ruler and craft knife, cut out five identical square tiles. Smooth the edges of each square with your finger to remove any sharp cutting lines.
Clean Cuts Pro Tip
Place a sheet of plastic wrap over the clay before using your cutters. This creates a beautifully rounded, ‘domed’ edge on the cut clay, reducing the need for sanding later.
Step 2: Creating the Moons
-
Stamp the Crescents:
Take your round circle cutter. Position it over the first square to create a crescent shape on the right side. Press down gently but firmly to impress the shape without cutting all the way through the clay. -
Vary the Phases:
Repeat this for the other four tiles, but vary the width and tilt of the crescent slightly to mimic the waxing and waning phases, or keep them uniform as shown in the inspiration photo. -
Texture the Moons:
Inside the impressed crescent shape, use a toothbrush or a ball of crinkled foil to gently tap texture into the clay. This rough surface will grab the metallic paint beautifully later. -
Create Connection Holes:
Using a straw or a tool intended for piercing, create two holes at the top and two holes at the bottom of each tile. Ensure they are aligned vertically so the garland hangs straight. The top and bottom tiles only need holes on one connection side, plus one central hole for the decorative beads.
Level Up: Gemstones
Embed small, oven-safe crystals or glass rhinestones into the ‘starry’ sections of the clay before baking to add real sparkle that catches the sunlight.
Step 3: Baking and Decorating
-
Bake the Pieces:
Transfer your clay tiles to a parchment-lined baking sheet. Bake according to the manufacturer’s instructions on your clay package (usually at 275°F/135°C for 15-30 minutes per 1/4 inch thickness). -
Cool and Sand:
Let the tiles cool completely. If there are any rough edges on the sides, gently sand them down with fine-grit sandpaper for a professional finish. -
Paint the Gold:
Dip a fine detail brush into your metallic gold or copper paint. carefully fill in the textured crescent moon depressions. You may need two coats for full opacity. -
Add Celestial Speckles:
For the top tile (or all of them, if you prefer), create a starry effect. Dip an old toothbrush in watered-down white paint and flick the bristles with your thumb to mist tiny specks over the moon area. -
Seal the Work:
Once the paint is fully dry, apply a thin coat of matte varnish to seal the clay and protect the paint, though this step is optional if you prefer the raw clay look.
Step 4: Assembly
-
Prepare the Cord:
Cut four shorter lengths of jute twine for the connections between tiles, and two longer pieces for the top hanger and bottom tassel. -
Detail the Top:
Thread a long piece of twine through the top hole of your first tile. Add two large wooden beads to the cord, then tie a loop at the very top for hanging. -
Connect the Phases:
To join the tiles, thread a short piece of twine through the bottom left hole of the first tile and the top left hole of the second tile. Tie knots on the front face of the tiles to secure them. Repeat for the right side. -
Continue Linking:
Continue this process until all five tiles are linked together in a vertical chain, keeping the spacing between them consistent. -
Add certain Bottom Weight:
Thread the final piece of twine through the bottom center hole of the last tile. Add two more wooden beads and tie a knot underneath to hold them in place. -
Fray the Ends:
Trim any excess twine from your knots. I like to unravel the very ends of the twine slightly to create mini tassels for a softer, textured look.
Hang your new moon phase art near a window to catch the light on those golden crescents
Cutout Suncatchers With Bold Shapes
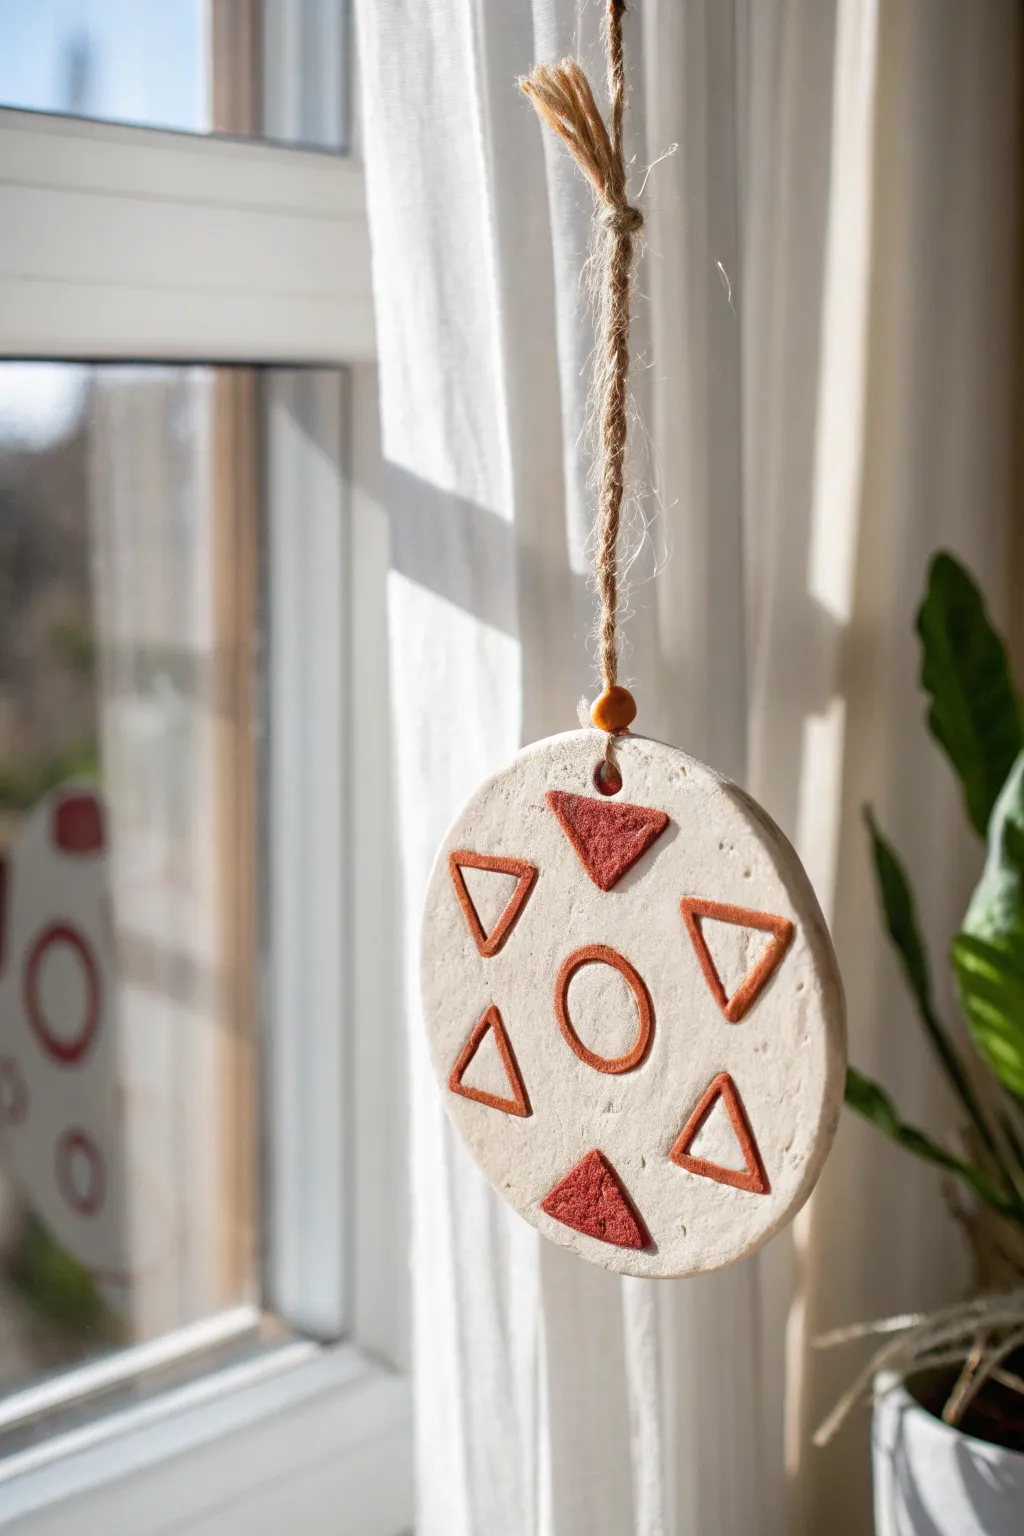
Brighten up your window with this rustic yet modern clay suncatcher featuring bold geometric shapes. The contrast between the natural white clay and the warm terracotta accents creates a striking visual that plays beautifully with sunlight.
How-To Guide
Materials
- Air-dry clay (white)
- Rolling pin
- Circle cookie cutter (approx. 3-4 inches)
- Small triangle cutter or craft knife
- Small circle cutter or bottle cap
- Terracotta or rust-colored acrylic paint
- Small flat paintbrush
- Jute twine
- Wooden bead
- Skewer or straw (for hole punching)
- Sandpaper (fine grit)
- Clear matte varnish (optional)
Step 1: Shaping the Base
-
Prepare your clay:
Take a handful of white air-dry clay and knead it briefly until it is soft and pliable. If it feels too dry, wet your fingers slightly. -
Roll it out:
Roll the clay onto a smooth surface to an even thickness of about 1/4 inch. I like to continuously rotate the clay while rolling to ensure it doesn’t stick to the table. -
Cut the main circle:
Use your large circle cookie cutter to punch out the main disk shape. Create a clean edge by twisting the cutter slightly before lifting it. -
Smooth the edges:
Dip your finger in a little water and run it around the circumference of the circle to smooth down any rough clay burrs left by the cutter.
Clean Lines Trick
If you struggle to paint inside the thin indented lines, try using a paint marker or an ultra-fine tipped brush. Wipe away mistakes immediately with a damp Q-tip.
Step 2: Adding the Design
-
Create the center impression:
Press a small circle cutter or a bottle cap gently into the center of the disk. Don’t cut all the way through; just create a deep impression. -
Mark the triangle points:
Visualize a clock face. You will be placing triangles at the 12, 2, 4, 6, 8, and 10 o’clock positions surrounding the center circle. -
Impress the outlines:
For the side triangles (left and right pairs), gently press a small triangle cutter into the clay to create an outline, again without cutting all the way through. -
Create recessed shapes:
For the top and bottom triangles, press the form deeper into the clay, then use a small tool or your finger to scoop out or flatten the interior of the triangle so the whole shape is recessed, not just the outline. -
Punch the hanging hole:
Use a skewer or a drinking straw to poke a hole near the top edge of the circle. Make sure it’s large enough for your twine to pass through later. -
Let it dry:
Place the clay piece on a wire rack or parchment paper. Let it air dry completely for 24 to 48 hours, flipping it halfway through to prevent curling.
Step 3: Decorating and Finishing
-
Sand for smoothness:
Once fully dry and hard, lightly sand the edges and surface with fine-grit sandpaper to remove any fingerprints or imperfections. -
Paint the accents:
Dip a small flat brush into terracotta or rust-colored acrylic paint. Carefully paint inside the recessed center circle ring and the triangle outlines. -
Fill the solid shapes:
Paint the entire recessed area of the top and bottom triangles to create a bold, solid block of color that contrasts with the outlined shapes. -
Seal the piece:
If you plan to hang this in a sunny window, apply a coat of clear matte varnish to protect the paint from fading and seal the clay. -
Prepare the hanger:
Cut a length of jute twine, fold it in half, and thread the loop end through the hole from the front to the back. -
Secure the twine:
Pull the loose ends through the loop to create a lark’s head knot, tightening it gently against the top of the clay disk. -
Add the bead:
Thread a wooden bead onto both strands of the twine and slide it down until it sits just above the clay. -
Tie it off:
Tie a knot at the top of the twine strands to create a loop for hanging.
Mix Up The hanging
Instead of a single disk, create three smaller versions and hang them vertically in a chain using jump rings or knotted twine for a mobile effect.
Hang your new geometric art piece in a sunlit spot and enjoy the simple, earthy charm it brings to your room
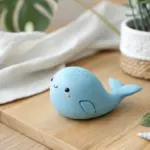
Pinch-Pot Whistles and Tiny Bells
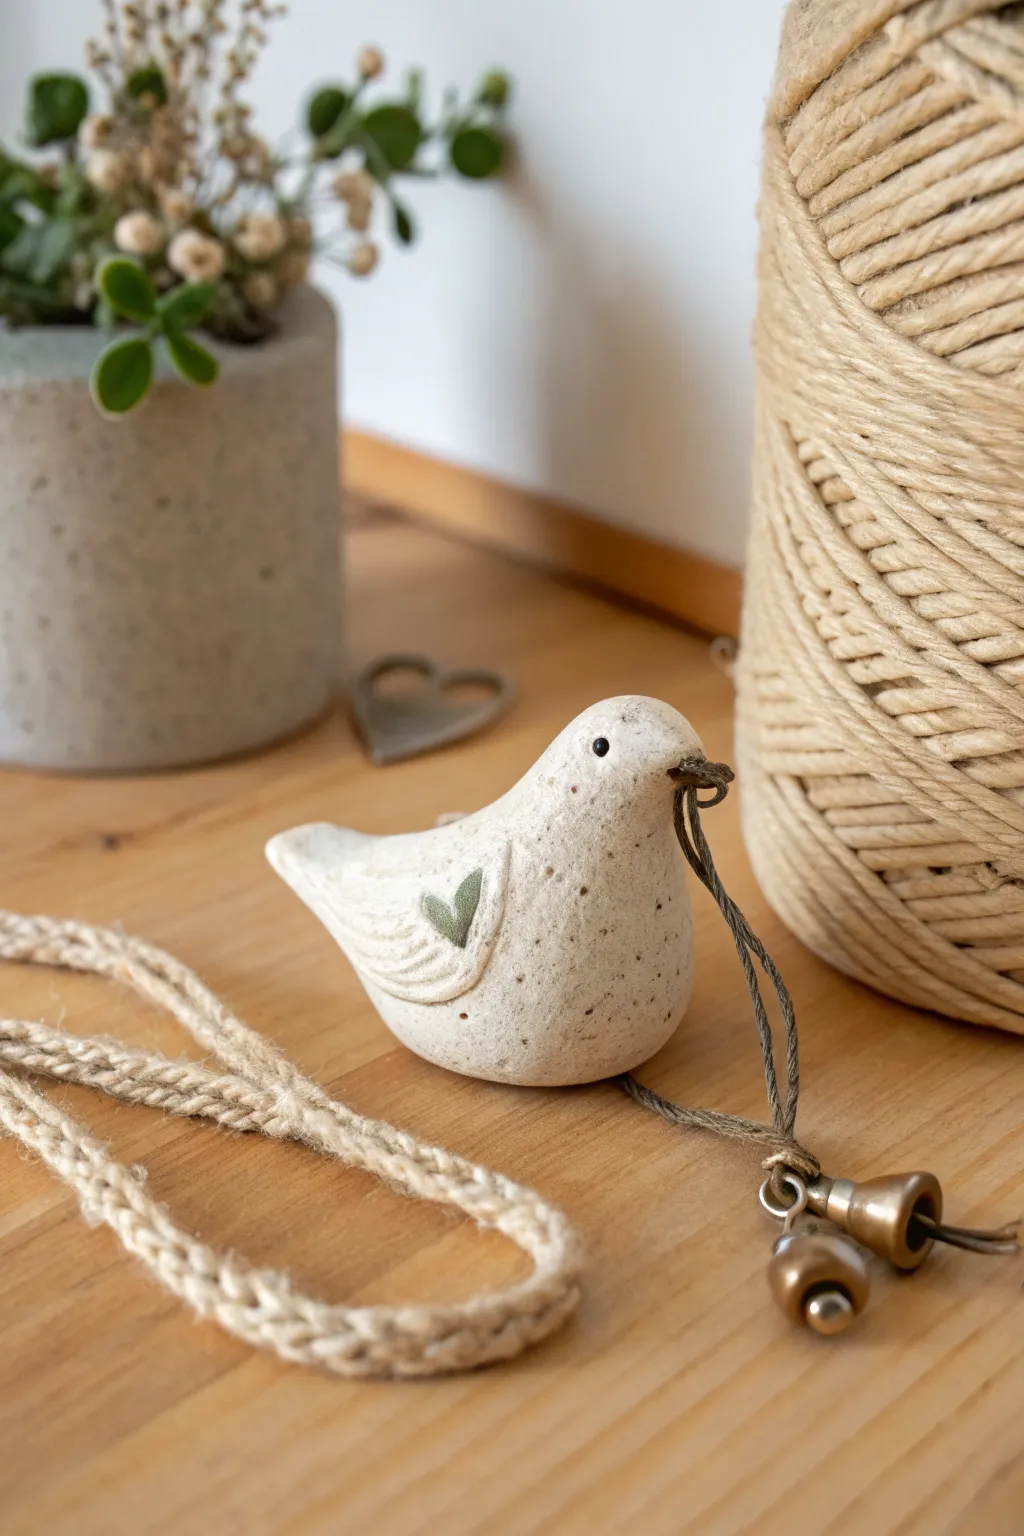
Create a charming ceramic bird companion that brings a gentle jingle to your space. This simple yet elegant project features a smooth, speckled clay body, a sweet heart accent, and rustic metal bells for a touch of whimsy.
Step-by-Step Tutorial
Materials
- White stoneware or polymer clay (speckled variety preferred)
- Green underglaze or acrylic paint
- Clear glaze (if using ceramic clay)
- Needle tool or toothpick
- Small paintbrush
- Jute twine or hemp cord
- Small brass bells (2)
- Sponge
- Water
- Kiln (if using stoneware) or oven (if polymer)
Step 1: Shaping the Bird
-
Prepare the clay:
Start with a ball of clay roughly the size of a golf ball or slightly larger. Knead it well to remove air bubbles if you are using ceramic clay, or condition it until pliable if using polymer. -
Create the basic form:
Gently roll the clay into an egg shape. This will form the main body of your bird. -
Pinch the tail:
On the wider end of the egg, gently pinch and pull the clay upwards and outwards to form an upturned tail. Smooth the transition so it flows naturally from the body. -
Form the head:
On the narrower end, gently pull and shape the clay to create a rounded head. Pinch slightly at the very front to create a small, pointed beak. -
Flatten the base:
Tap the bottom of the bird firmly against your work surface. This creates a flat area so your bird will sit stable and upright without wobbling. -
Smooth the surface:
Use a damp sponge (for ceramic) or your finger (for polymer) to smooth out any fingerprints or bumps. The goal is a sleek, matte finish.
Keep it Clean
When smoothing clay, use a tiny bit of baby oil on your finger (for polymer) or a damp chamois strip (for pottery) to erase fingerprints without ruining the shape.
Step 2: Adding Details & Hardware
-
Sculpt the wings:
Roll two small, teardrop-shaped pieces of clay for the wings. Flatten them slightly and press one onto each side of the bird’s body. -
Define the feathers:
Using your needle tool, scratch delicate, curved lines into the wing pieces to simulate flight feathers. -
Add the heart:
Use the needle tool or a tiny stamp to impress a small heart shape right in the center or top corner of the wing. -
Create the eye:
Make a small indentation for the eye using the dull end of a paintbrush or a specialized dotting tool. Position it high on the head for a cute expression. -
Pierce the beak:
Carefully poke a hole horizontally through the beak using your needle tool. Ensure the hole is wide enough to accommodate your twine later. -
Fire or bake:
If using ceramic clay, let it dry completely before bisque firing. If using polymer, bake according to the manufacturer’s temperature instructions.
Step 3: Finishing Touches
-
Painting the details:
Carefully paint the impressed heart with moss green unedrglaze or acrylic paint. Paint the eye black for contrast. -
Applying the glaze:
If working with ceramics, apply a clear matte or satin glaze over the entire piece to seal it while keeping the natural clay texture visible. Fire the piece again. For polymer, a matte varnish is optional. -
Prepare the chime:
Cut a 6-inch length of hemp cord or jute twine. Thread one end through the loop of your first brass bell. -
Add the second bell:
Thread the second bell onto the cord. I like to tie a knot above each bell to stagger them slightly so they jingle against each other. -
Attach to the bird:
Fold the cord in half (with bells at the bottom) and thread the looped end through the hole in the bird’s beak. -
Secure the cord:
Pass the bells through the loop you just pulled through the beak (a lark’s head knot) or simply tie a secure knot at the beak to hold the chime in place.
Make it a Whistle
Before sealing the form, you can hollow out the body to create a pinch pot and shape the tail into a mouthpiece to turn this decorative figurine into a working ocarina or whistle.
Now your sweet speckled bird is ready to sit on a shelf and chirp softly whenever moved