Some days you just want fun easy clay ideas that don’t require fancy tools or a huge time commitment. These projects are my go-to picks when I want quick wins, cute results, and that satisfying “I made this!” feeling.
Cute Face Magnets
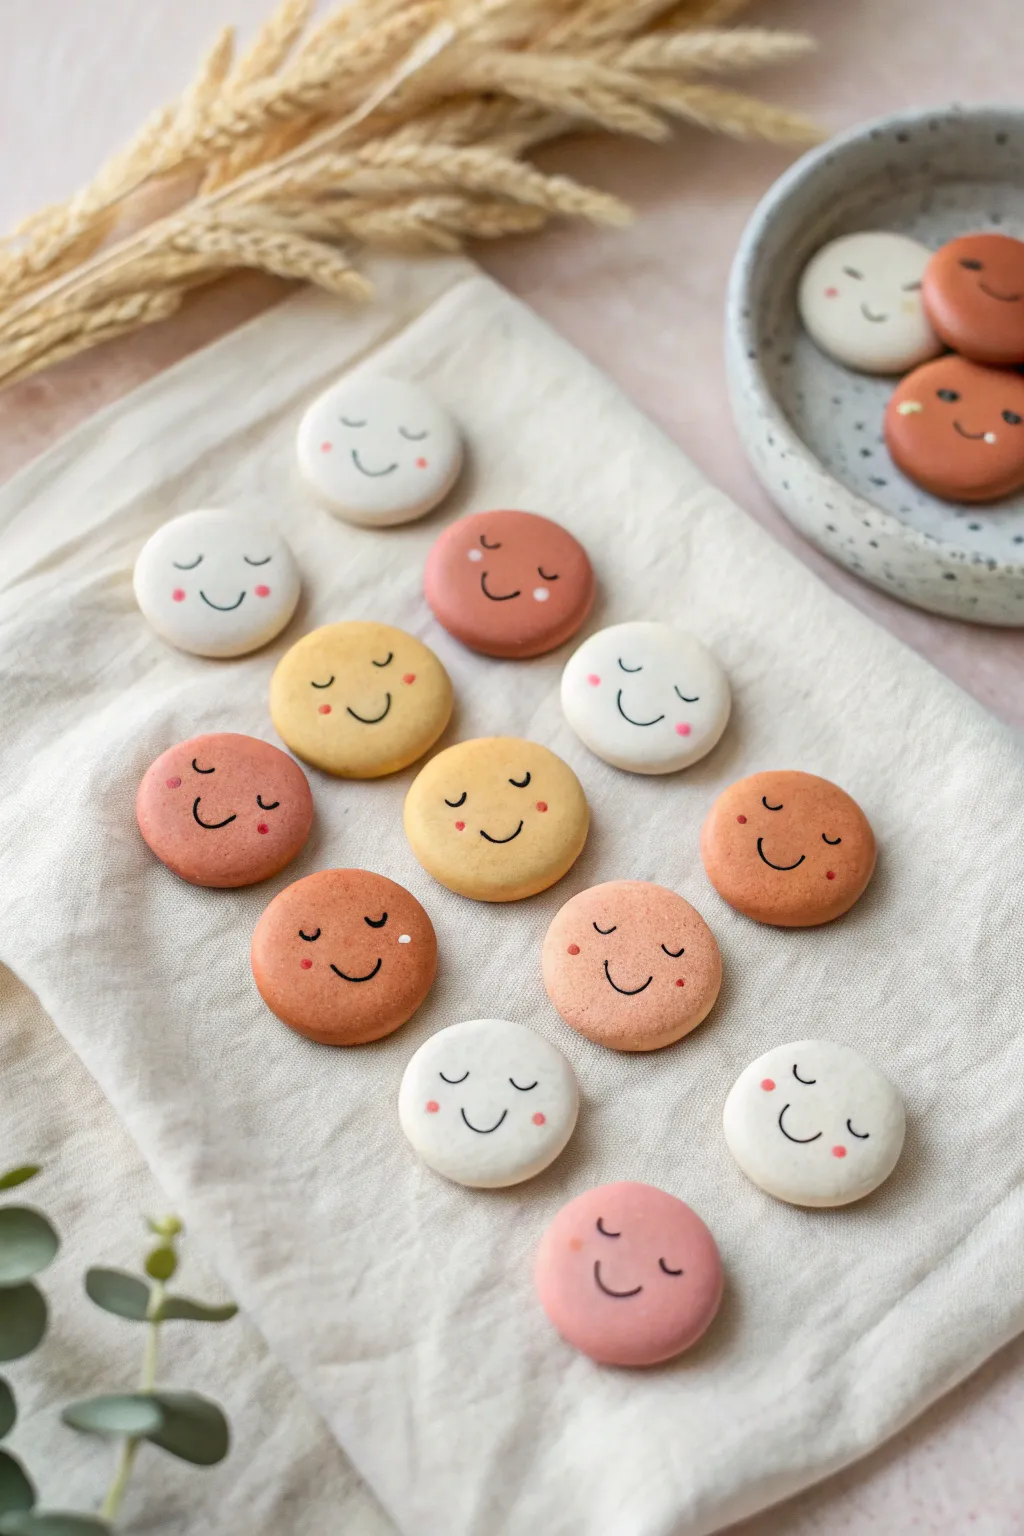
These adorable little clay tokens bring a sense of calm and happiness to any magnetic surface with their muted earthy tones and simple expressions. They look almost like sweet macarons or soft cookies, but they’re actually sturdy magnets perfect for holding up your favorite photos.
Step-by-Step Guide
Materials
- Polymer clay (white, beige, terracotta, ochre, soft pink)
- Small circle cutter (approx. 1.5 inch)
- Acrylograph pens or fine tip markers (black and pink)
- Rolling pin or pasta machine
- Parchment paper
- Baking sheet
- Sandpaper (fine grit, optional)
- Strong craft glue (E6000 or similar)
- Small round magnets
- Matte varathane or clay sealer (optional)
Step 1: Prepping and Shaping the Clay
-
Condition the clay:
Start by warming up your polymer clay in your hands. Knead each color separately until it is soft and pliable to prevent cracking later. -
Mix custom shades:
To achieve that muted, boho palette, try mixing a tiny bit of brown or translucent clay into your bright colors. This tones them down for a sophisticated matte look. -
Roll it out:
Roll your conditioned clay onto a smooth surface to a thickness of about 1/4 inch. You want them thick enough to feel substantial, like a little biscuit. -
Cut the circles:
Using your small circle cutter, press firmly into the clay to cut out your shapes. If the clay sticks, you can dip the cutter in a little cornstarch first. -
Soften the edges:
Gently tap the edges of each circle with your finger to round them off. You want to remove the sharp cut line so it looks smooth and organic.
Clean Cuts
Place a piece of plastic wrap over the clay before cutting with your circle cutter. This creates a beautifully domed, pillow-like edge without needing to smooth it by hand.
Step 2: Baking and Refining
-
Arrange for baking:
Place your clay circles on a parchment-lined baking sheet, spacing them out so they don’t touch. -
Bake the clay:
Bake according to your specific polymer clay package instructions (usually around 275°F/135°C for 15-30 minutes). Be careful not to overcook the lighter colors. -
Cool down completely:
Remove the tray from the oven and let the pieces cool completely before handling. The clay hardens as it cools. -
Sand for smoothness:
If you notice any fingerprints or uneven texture, lightly buff the surface with fine-grit sandpaper for a flawless matte finish. -
Wipe clean:
Use a slightly damp cloth or baby wipe to remove any sanding dust before you start decorating.
Step 3: Adding Personality
-
Draw the eyes:
Using a fine-tip black paint pen or marker, draw two small arched curves for closed, sleepy eyes. Keep them spaced widely for a cute look. -
Add the smile:
Draw a small, simple ‘u’ shape between the eyes, placed slightly lower down on the face. -
Add rosy cheeks:
With a pink paint pen or a dab of pink paint, add tiny dots or small ovals just under the outer corners of the eyes. -
Add highlights:
If you’re feeling fancy, add a tiny white dot to the cheek color for a little extra dimension. -
Seal the design:
I prefer to brush on a very thin layer of matte varnish to protect the paint, though this is optional if you used permanent markers. -
Attach the magnet:
Flip the face over and apply a dot of strong craft glue to the center of the back. -
Final assembly:
Press a magnet into the glue and let it sit undisturbed for the full cure time listed on your glue bottle.
Make Them 3D
Before baking, create tiny balls of clay for the cheeks and press them onto the face instead of painting them later. It adds adorable texture and depth.
Once the glue is fully set, your charming little faces are ready to brighten up your fridge or magnetic board


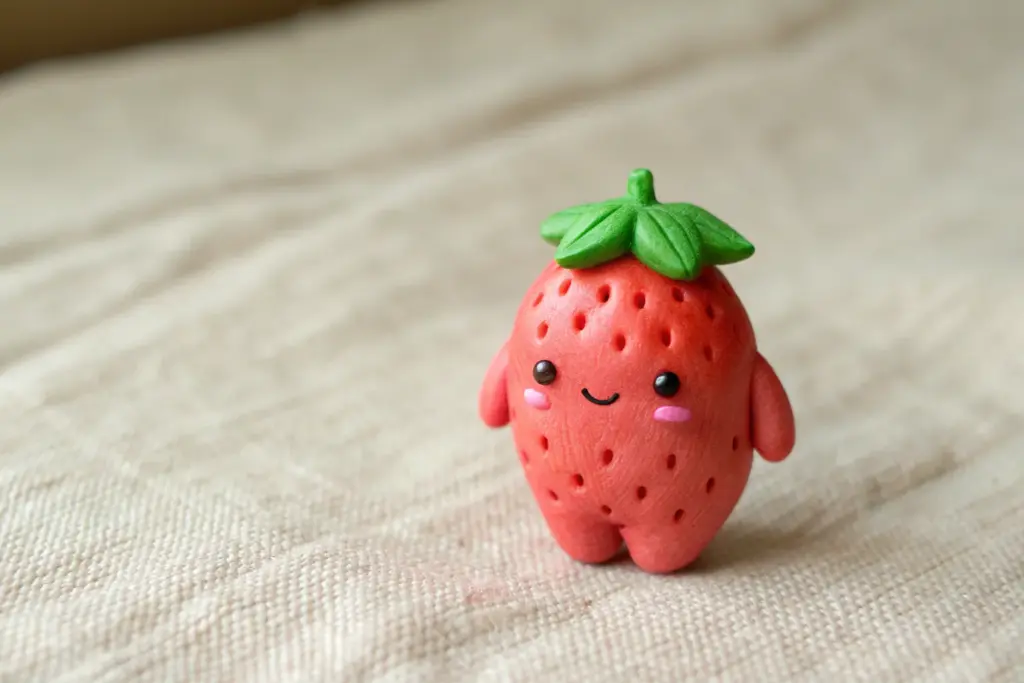
Tiny Fruit Charms
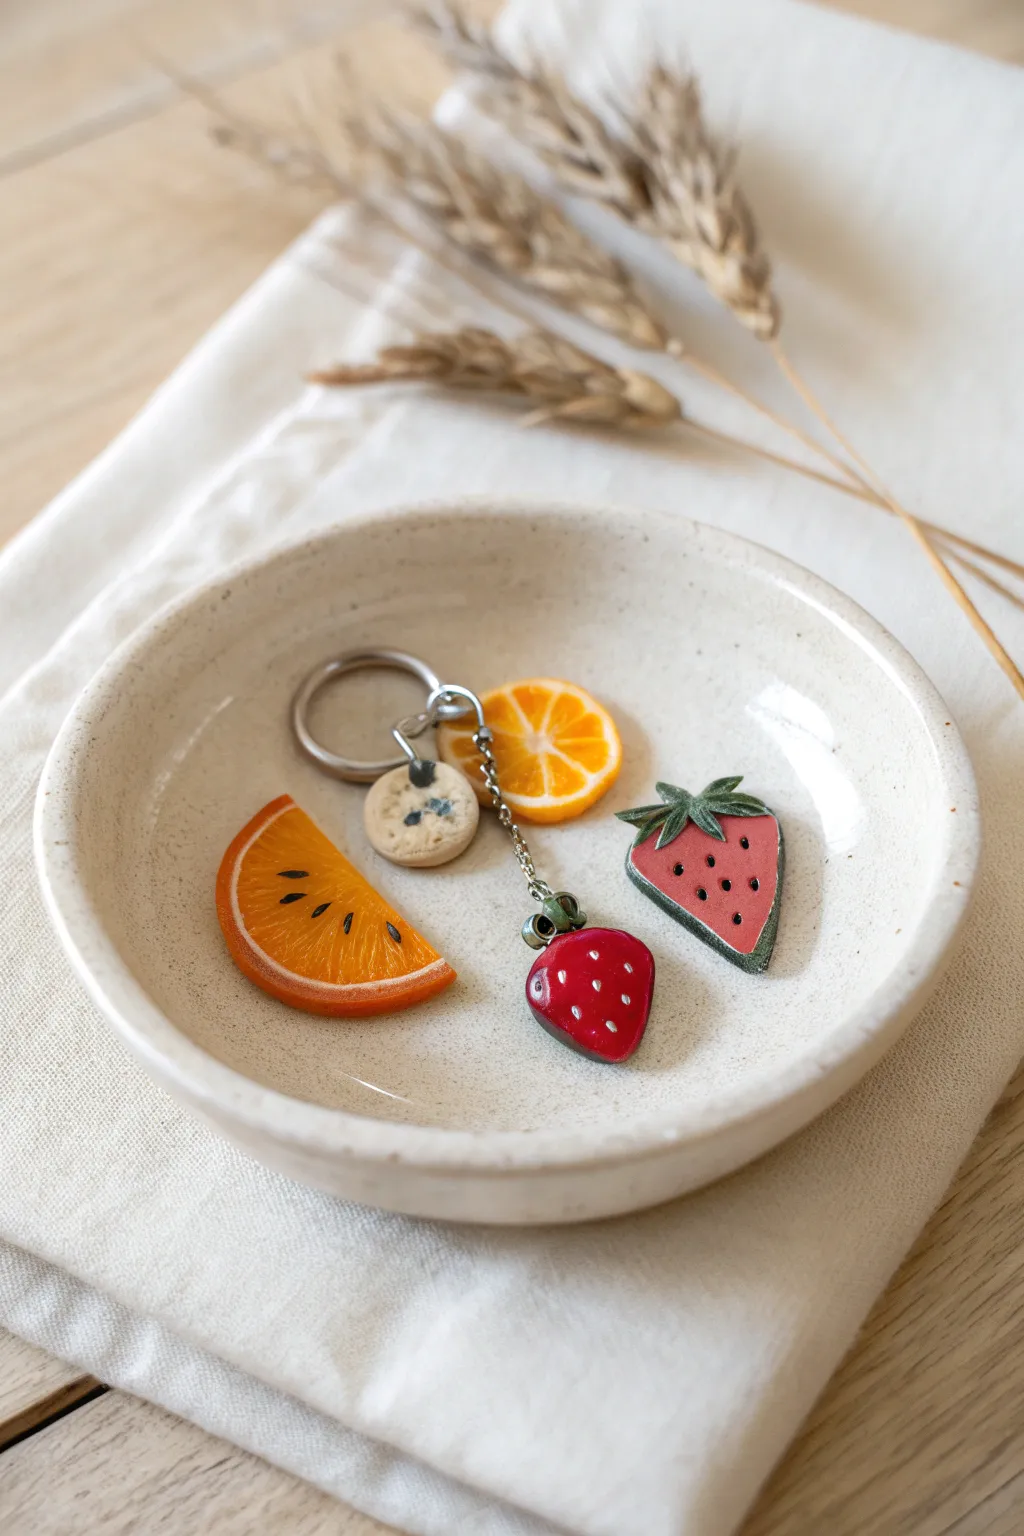
These delightful polymer clay charms capture the juicy textures of summer fruits in miniature form. From translucent citrus segments to seeded strawberries, this tutorial guides you through creating a medley of accessories perfect for keychains or jewelry.
Detailed Instructions
Materials
- Polymer clay (orange, translucent white, red, green, beige/cookie color)
- Black acrylic paint
- Silver eye pins
- Silver keychain hardware and jump rings
- Gloss glaze or UV resin
- Needle tool or toothpick
- Small dotting tool
- Fine detail paintbrush
- X-Acto knife or clay blade
- Small rolling pin
Step 1: Citrus Slices & Wedges
-
Mix the citrus cane:
Start by mixing translucent clay with a small amount of orange clay to create a ‘pulp’ color. Rolled this into a log about 1/2 inch thick. -
Create the segments:
Roll a very thin sheet of white clay. Wrap the orange log in this white sheet, then reduce the cane by rolling and pulling until it’s about 1/4 inch thick. Cut this long cane into 8 equal lengths. -
Assemble the orange:
Stack the 8 wedges into a circle to form the orange center. Wrap the entire bundle in another thin sheet of white clay (the pith), followed by a slightly thicker sheet of solid orange clay (the rind). -
Reduce and slice:
Gently squeeze and roll the cane to reduce it to your desired diameter. Slice thin rounds for the keychain charms. For the larger wedge, slice a thick round and cut it in half. -
Add texture:
For the loose wedge, use a needle tool to gently scratch radial lines into the translucent orange pulp. This mimics the fibrous texture of real fruit. -
Seed details:
Once baked and cooled (baking instructions come later), you’ll paint tiny teardrop seeds with black acrylic on the wedge surface.
Keep it Clean
White clay picks up dust instantly. Clean your hands and work surface with a baby wipe before handling the white or translucent clay parts.
Step 2: Strawberries Two Ways
-
Form the 3D strawberry base:
Roll a small ball of red clay and gently taper one end to create a rounded cone shape. -
Add seeds:
Using a needle tool, poke shallow indentations all over the strawberry surface. These will be filled with paint later. -
Create the leafy cap:
Flatten a tiny ball of green clay. Cut small triangles out of the edge to create a star shape, then press this onto the top of your strawberry. Use a needle tool to drag the green clay down slightly for texture. -
Make the flat strawberry slice:
Roll a slab of red clay about 4mm thick. Use a blade to cut a triangle shape with rounded corners. Create a ‘crust’ by wrapping the edges in a thin strip of green clay for the rind. -
Texture the slice:
Add a small leafy top similar to the 3D berry. Use a dotting tool to press indentations into the red center for the seeds.
Make it Sparkle
Mix a tiny pinch of fine iridescent glitter into your translucent orange clay pulp mixture for a glistening, sugary fruit effect.
Step 3: The Tiny Cookie
-
Shape the dough:
Take a tiny amount of beige clay and flatten it into a rough circle. It doesn’t need to be perfect; a little irregularity looks baked. -
Add texture:
Gently tap the surface with an old toothbrush or a ball of aluminum foil to give it a crumbly cookie texture. -
Chocolate chips:
Roll incredibly tiny specks of black or dark brown clay and press them randomly into the cookie surface.
Step 4: Finishing Up
-
Insert hardware:
Before baking, carefully trim your eye pins to size. Push an eye pin into the top of the 3D strawberry, the cookie, and through the top edge of the orange slice. -
Bake:
Bake all pieces according to your clay package instructions (typically 275°F/135°C for 15-30 minutes). Let them cool completely. -
Paint details:
I prefer to use a fine brush to dab white acrylic paint into the seed holes of the 3D strawberry. For the flat strawberry and orange wedge, paint small black seeds. -
Glaze:
Apply a coat of gloss glaze or UV resin to the fruit parts to make them look juicy. Leave the cookie matte for realism. -
Assemble:
Use jump rings to attach your finished charms to the keychain hardware.
Now your refreshing fruit accessories are ready to sweeten up any bag or jacket.


Cloud and Star Keychains
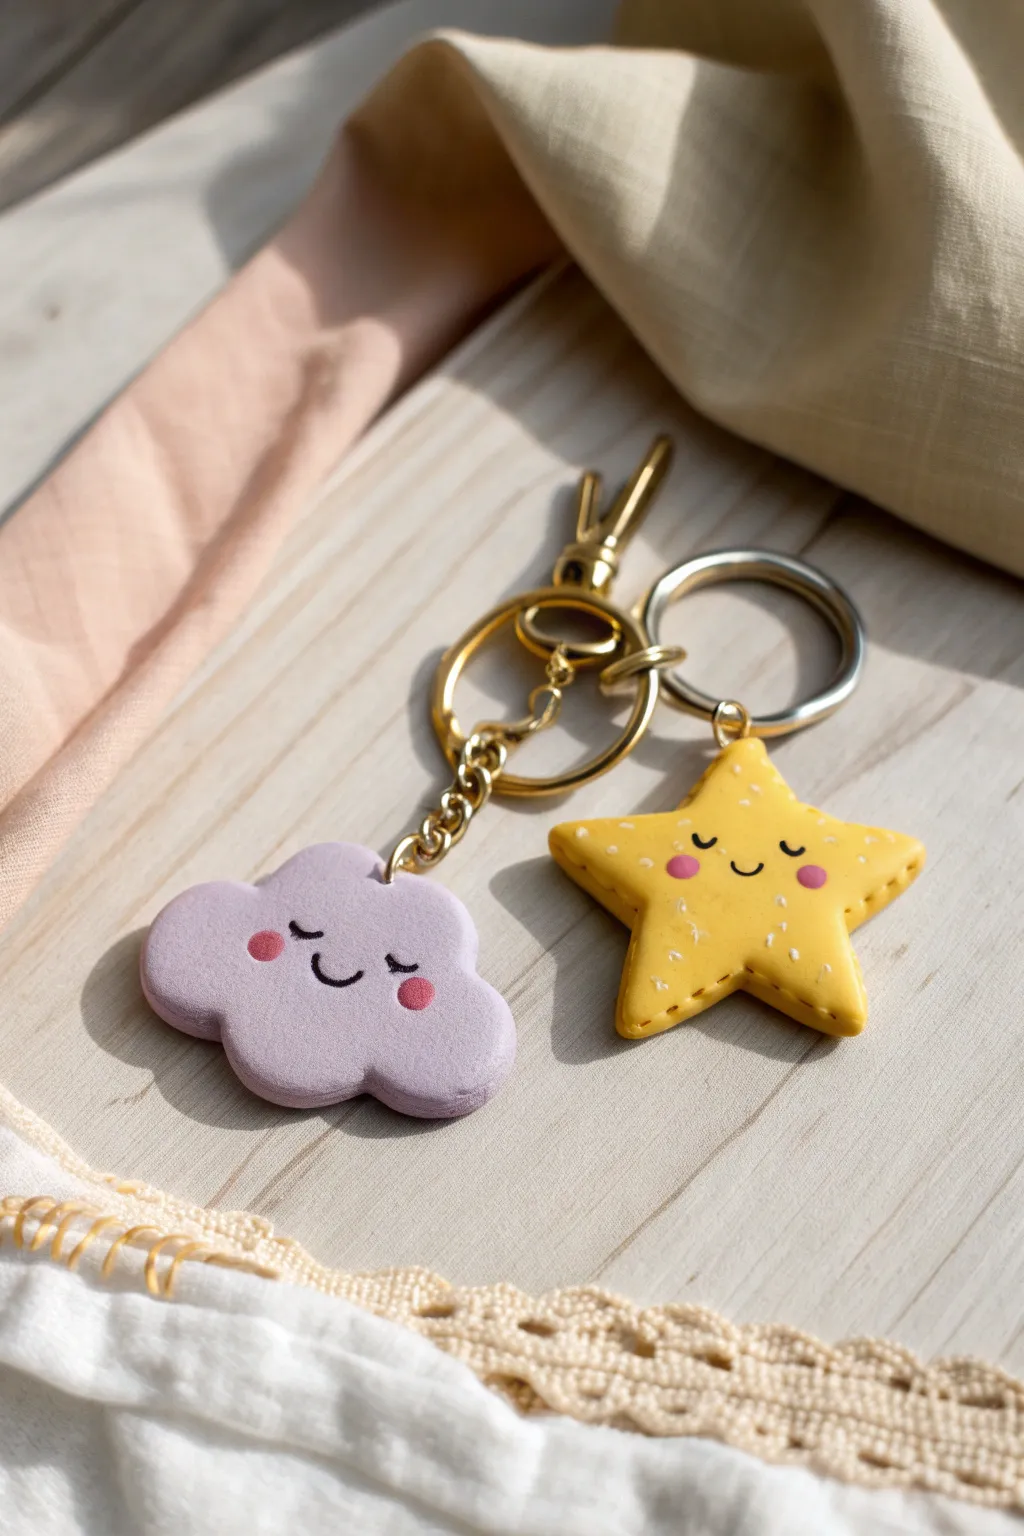
Bring a little sunshine and softness to your keyring with this adorable duo featuring a sleepy purple cloud and a cheerful yellow star. These chunky, tactile charms are perfect for beginners and make a sweet handmade gift for a best friend.
Step-by-Step Guide
Materials
- Polymer clay (Lavender/Light Purple and Sunny Yellow)
- Black acrylic paint or fine-tip permanent marker
- Pink acrylic paint or Posca pen
- White acrylic paint (for star details)
- Clay roller or rolling pin
- Cloud and star cookie cutters (approx. 1.5 – 2 inches)
- Small eye pins (gold tone)
- Jump rings and keychain hardware (gold tone)
- Gloss glaze or UV resin (optional)
- Pliers (round nose and flat nose)
- Dotting tool or toothpick
- Needle tool
Step 1: Shaping the Sky Duo
-
Condition the clay:
Begin by warming up your lavender polymer clay in your hands. Knead it thoroughly until it’s soft, pliable, and free of any air bubbles or cracks. Repeat this process separately with the yellow clay. -
Roll it out:
Roll the lavender clay into a smooth slab. You want these keychains to be sturdy, so aim for a thickness of about 1/4 inch (6mm). Do the same for the yellow clay. -
Cut the shapes:
Use your cloud cutter on the purple slab and the star cutter on the yellow slab. If the edges stick or look rough, gently smooth them with your finger or a little cornstarch. -
Soften the edges:
For that soft, puffed look seen in the photo, gently pat down the sharp edges of your cut-outs with your fingertip. You want them to look like soft pillows rather than sharp cookie-cutter shapes. -
Insert eye pins:
Take a small gold eye pin. If the stem is too long, trim it so it doesn’t poke through the other side. Carefully insert it into the center top of the cloud. Repeat for one of the star’s points. -
Detail the star:
Using a needle tool or a toothpick, press tiny indentations all around the edge of the star to mimic a stitching effect. This adds a lovely texture.
Dirty Clay Blues?
Yellow and white clay attract dust like magnets. Clean your hands and work surface with a baby wipe or rubbing alcohol right before handling light colors.
Step 2: Baking and Painting
-
Bake carefully:
Place your clay pieces on a parchment-lined baking sheet. Bake according to your brand’s specific instructions (usually around 275°F/135°C for 15-30 minutes). I recommend tenting them with foil to prevent the yellow from darkening. -
Cool down:
Allow the pieces to cool completely before touching them; polymer clay is slightly brittle when warm but hardens as it cools. -
Paint the faces:
Using a fine brush with black acrylic paint or a permanent marker, draw two small ‘U’ shapes for closed, sleeping eyes on both charms. Add a tiny smile in the center. -
Add rosy cheeks:
Dip a dotting tool or the subtle end of a paintbrush handle into pink paint. Gently stamp rosy cheeks just below the eyes on both the cloud and the star. -
Add star speckles:
For the star specifically, take a very fine brush with white paint and create tiny speckles or dashes across the surface to give it a magical, sparkling texture. -
Seal the deal:
Once the paint is fully dry, apply a thin coat of glaze or UV resin. This protects the painted faces from scratching off in your pocket and gives them a nice sheen.
Make It Sparkle
Mix a pinch of iridescent glitter into the yellow clay before rolling it out to make your star shimmer even without the white paint speckles.
Step 3: Final Assembly
-
Secure the pin:
Check the eye pins. If they feel loose after baking, pull them out gently, add a dab of super glue to the stem, and slide them back in. -
Attach jump rings:
Using two pairs of pliers, twist open a jump ring (don’t pull it apart). Hook it through the eye pin loop on your charm. -
Add a chain:
Before closing the jump ring, attach a small length of gold chain for extra dangle. -
Connect the hardware:
Use a second jump ring to connect the top of your chain to the main keychain ring or lobster clasp. -
Final check:
Give everything a gentle tug to ensure all jump rings are closed tightly and aligned perfectly.
Enjoy carrying these little pockets of happiness around with you wherever the road takes you


Mini Animal Buddies From Shapes
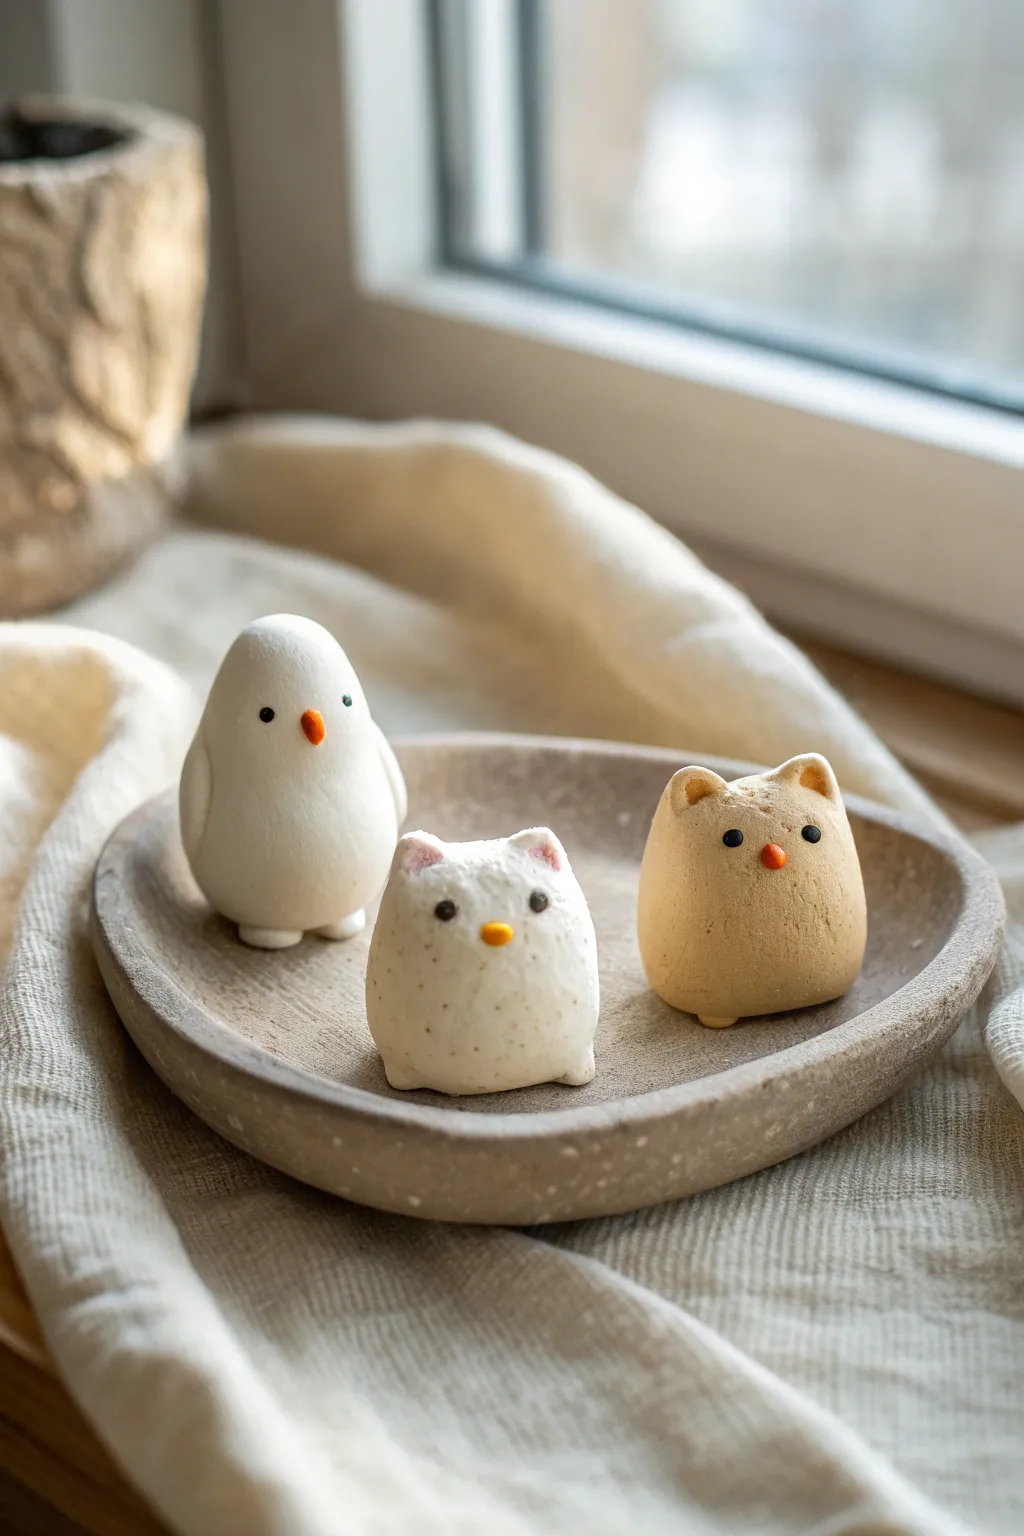
These adorable, puffy figurines look just like sweet meringue cookies, but they’re charming little clay pets you can keep forever. With their soft matte finish and simple, rounded bodies, they are the perfect beginner project for mastering basic sculpting shapes.
Detailed Instructions
Materials
- Air-dry clay or polymer clay (white and light beige/tan)
- Acrylic paints (black, orange, pink)
- Fine-point paintbrush or dotting tool
- Ball stylus tool
- Toothpick
- Parchment paper (surface protection)
- Gloss varnish (optional, for eyes)
Step 1: Shaping the Bird
-
Base shape:
Start with a walnut-sized ball of white clay. Roll it until it is perfectly smooth, removing any cracks. -
Form the body:
Gently shape the ball into a tall, rounded cone or teardrop shape. The bottom should be wide and flat, tapering slightly toward a rounded head, giving it a penguin-like silhouette. -
Add wings:
Using a modeling tool or your finger, gently flatten the sides of the body just slightly to suggest wings that are tucked in close. -
Create feet:
Roll two tiny spheres of white clay, flatten them slightly, and press them underneath the front edge of the body so just the tips peek out.
Step 2: Sculpting the Round Buddies
-
Base shapes:
For the other two figures, roll two balls of clay—one white and one light beige—to roughly the same size as the bird’s base. -
Create the squat shape:
Instead of a tall cone, gently press these balls down onto your work surface to create a squat, marshmallow-like dome shape. They should feel heavy and settled. -
Pinch the ears:
For the beige figure, pinch the top corners of the head to create two triangular ears. Smooth the clay around them so they look integrated, not attached. -
Shape the white ears:
Repeat the pinching process for the white figure, but make these ears slightly smaller and more rounded, like a bear or a cat. -
Add tiny feet:
Just like the bird, roll tiny balls of matching clay (beige for beige, white for white) and press them under the front bottom edge to stabilize the figures. -
Adding texture:
If you want a speckled look like the white bear in the photo, you can mix a tiny pinch of black pepper or dried vanilla bean into the clay before shaping, or gently stipple the surface with a stiff brush.
Keep it Clean
White clay picks up dust instantly. Keep wet wipes nearby and clean your hands thoroughly before switching between colors or handling the white clay.
Step 3: Bringing Them to Life
-
Dry the clay:
Allow your clay figures to dry completely according to the package instructions. Air dry clay usually takes 24-48 hours. -
Paint the eyes:
Dip a dotting tool or the handle end of a paintbrush into black acrylic paint. Carefully dot two wider-set eyes onto the beige and white round figures. -
Bird eyes:
For the tall bird, place the black eye dots slightly higher and closer to the sides of the head. -
Nose details:
Using a fine paintbrush and orange paint, add a small inverted triangle for the nose on the round figures. -
Bird beak:
Paint a slightly longer, oval-shaped orange beak on the tall white bird, positioned vertically between the eyes. -
Ear details:
Mix a tiny amount of pink paint and gently dab the inside of the white figure’s ears for a soft, blushed look.
Texture Play
Before the clay dries, gently press a clean piece of canvas or linen fabric against the surface to give your animals a cozy, woven texture effect.
Arranging your new tiny friends together on a shelf or small dish creates an instant heartwarming display

The Complete Guide to Pottery Troubleshooting
Uncover the most common ceramic mistakes—from cracking clay to failed glazes—and learn how to fix them fast.
Octopus Made From a Ball and Coils
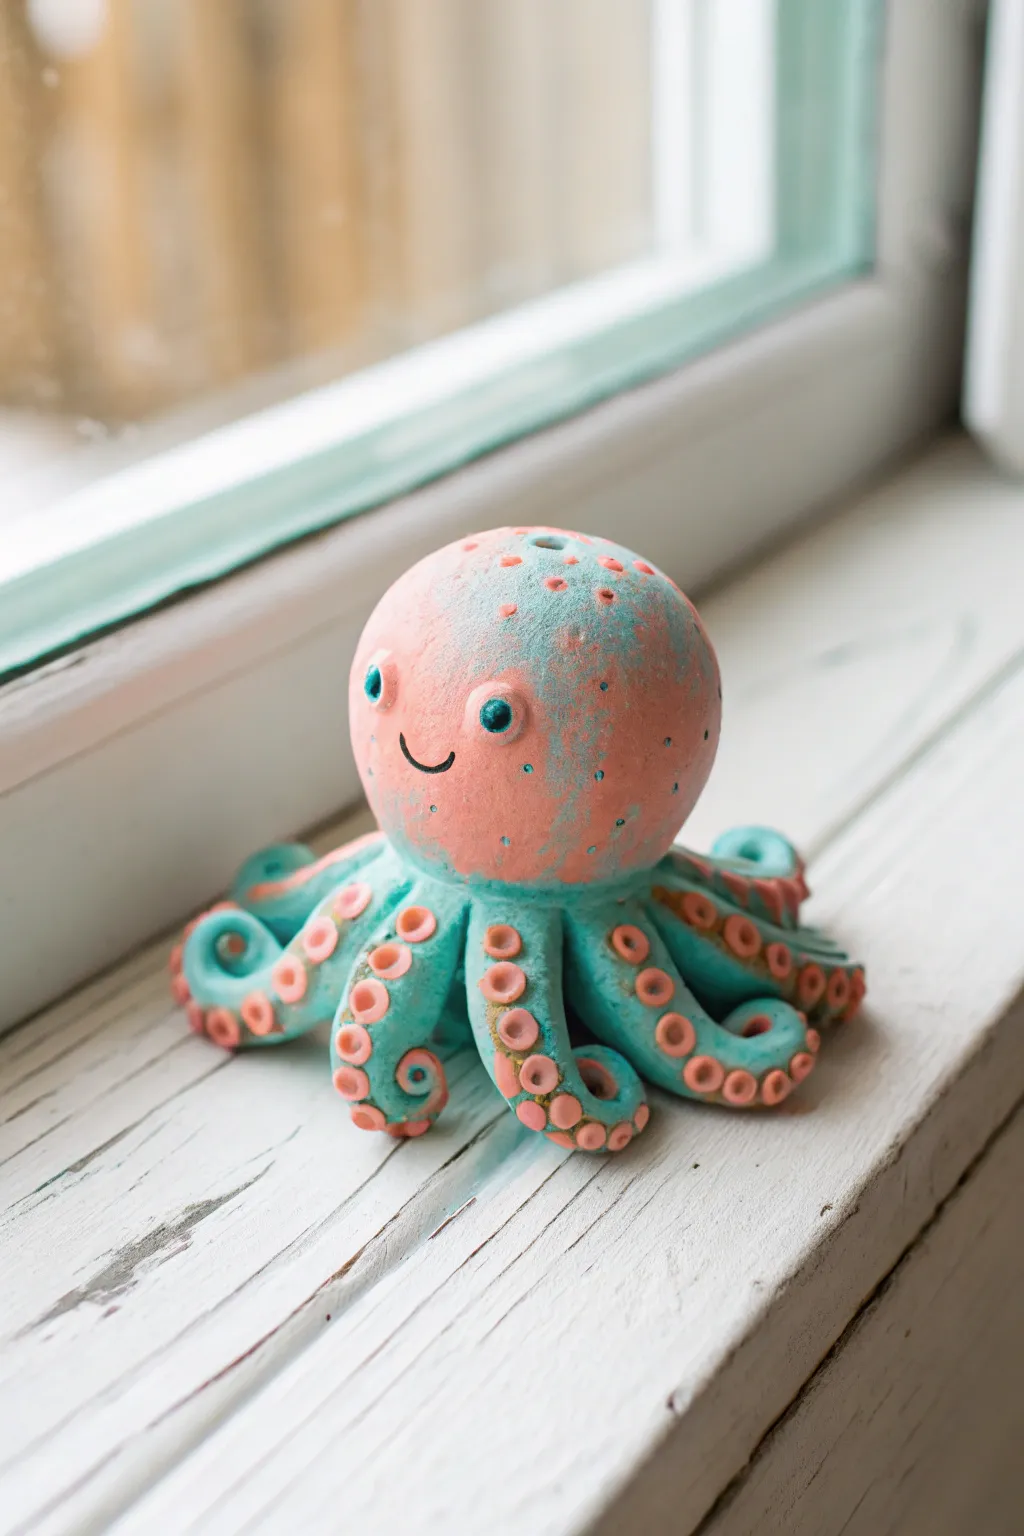
Transform simple shapes into an adorable sea creature with this beginner-friendly clay project. This charming octopus features a soft pink head, teal tentacles, and carefully added sucker details for a textured finish.
Step-by-Step
Materials
- Polymer clay (Pink, Teal, Black, White)
- Clay sculpting tools (needle tool, ball stylus)
- Aluminum foil (optional for core)
- Rolling pin or pasta machine
- Baking sheet
- Parchment paper
- Oven (for baking polymer clay)
Step 1: Creating the Base
-
Prepare the head:
Start by conditioning a large portion of pink clay until it is soft and pliable. Roll it into a smooth, seamless sphere about the size of a golf ball or slightly larger. -
Lighten the weight (optional):
If you want to save clay, you can crumple a tight ball of aluminum foil first and cover it with a layer of pink clay, smoothing it out so no foil shows. -
Shape the tentacles:
Take your teal clay and roll out eight individual log shapes. These should be thicker at one end and taper gently to a curled point at the other. -
Curl the ends:
Gently curl the tapered end of each teal log into a spiral shape, varying the tightness of the curls to give the octopus a natural, organic look. -
Attach tentacles to head:
Arrange the eight tentacles in a circle on your work surface, wider ends touching in the center. Press the pink sphere firmly onto the center of the joined tentacles. Use a blending tool to smooth the clay where the teal meets the underside of the pink head for a secure bond.
Step 2: Adding Details
-
Mix lighter pink:
Mix a small amount of pink clay with a tiny bit of white to create a slightly lighter shade for the suckers. -
Create sucker discs:
Roll tiny balls of this lighter pink clay. You will need about 5-6 for each tentacle. Flatten them slightly into small discs. -
Attach suckers:
Press the small pink discs onto the teal tentacles. I like to arrange them in a line following the curve of the tentacle, graduating from larger discs near the body to tiny ones near the tip. -
Indent the suckers:
Takes a small ball stylus tool and press it into the center of each pink disc. This creates the cup-like appearance of real octopus suckers. -
Add texture to the head:
Using a needle tool or a stiff toothbrush, gently stipple the surface of the pink head. Add a few very tiny balls of teal clay onto the head and flatten them into the texture for spots.
Head sliding off?
If the heavy head won’t stay on the tentacles, insert a short piece of toothpick or wire vertically through the tentacles and into the head acts as an internal spine.
Step 3: Face & Finishing
-
Make the eyes:
Press two shallow indentations into the face area with a large ball tool. Roll two small balls of white clay and press them into the sockets. -
Add pupils:
Add tiny flattened discs of teal or black clay onto the white eyes for pupils. -
Create the smile:
Roll an incredibly thin snake of black clay. Cut a small curved section and gently press it onto the face to form a simple, happy smile. -
Final check:
Look over your creation and smooth out any accidental fingerprints. Ensure the head is sitting securely centered on the tentacles. -
Bake:
Place your octopus on a baking sheet lined with parchment paper. Bake according to your specific clay brand’s instructions (usually 275°F/135°C for 15-30 minutes). -
Cool:
Allow the piece to cool completely in the oven with the door cracked open to prevent cracking.
Make it a planter
Before baking, press a large hole into the top of the head deep enough to hold a tiny air plant. Bake as usual, and you have a mini octopus planter.
Enjoy displaying your colorful new ocean friend on a sunny windowsill
Vegetables With Little Faces
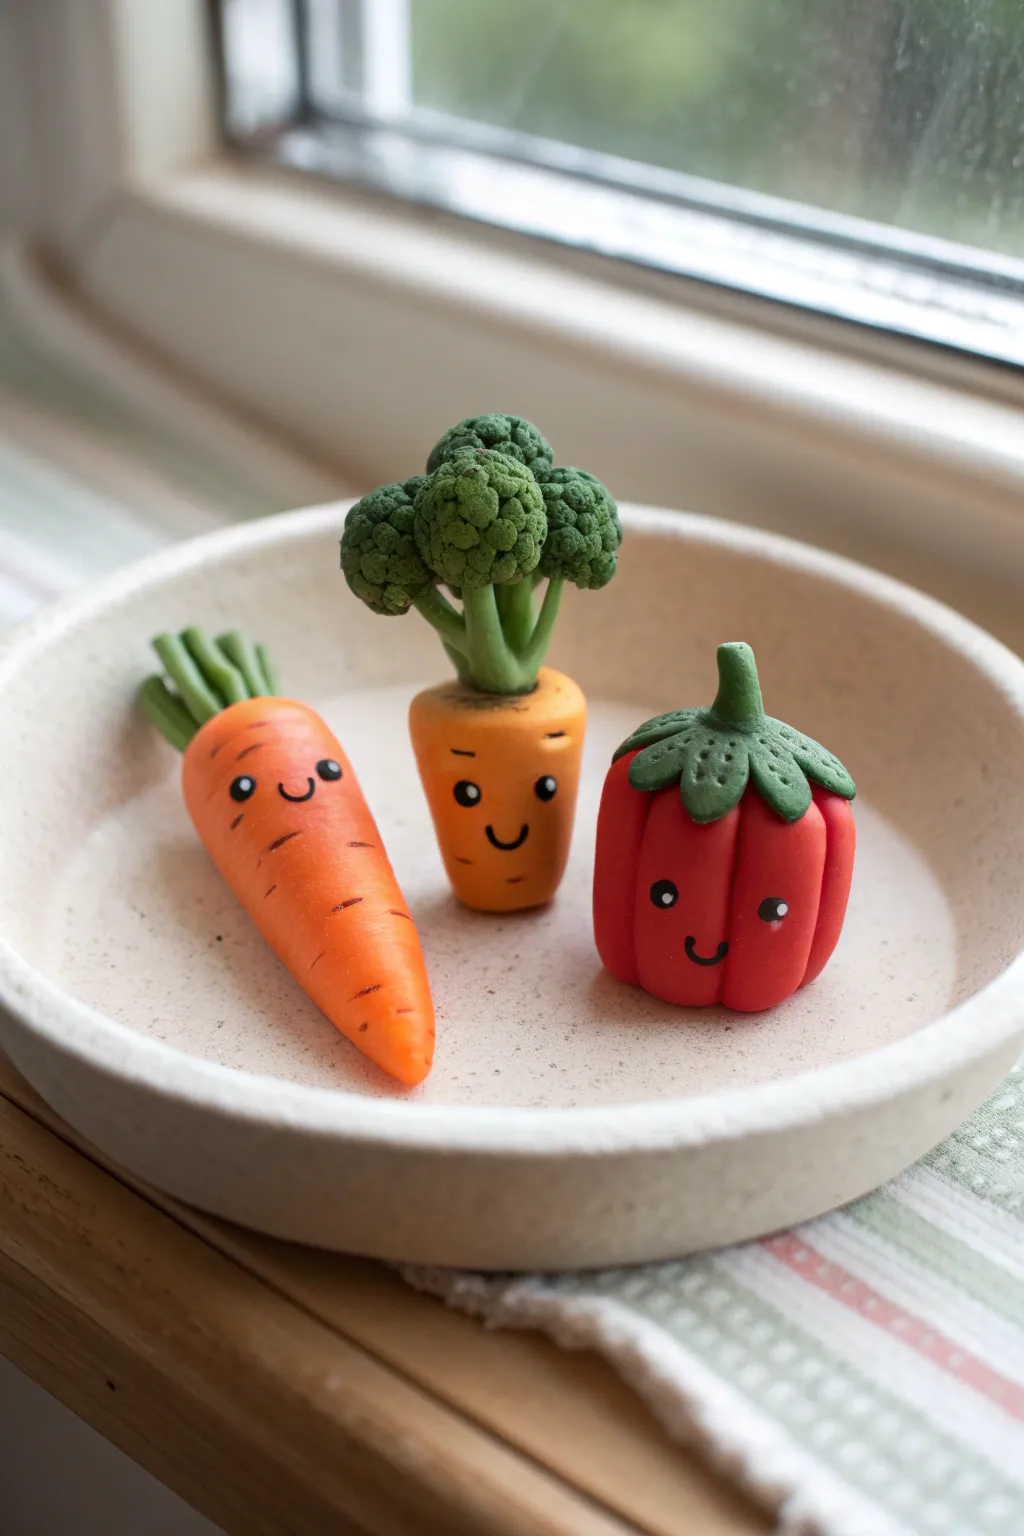
Bring your kitchen to life with these three adorable miniature vegetable friends. Featuring a classic carrot, a cheerful broccoli stem, and a plump red pepper, these easy-to-make clay figures add a touch of whimsy to any windowsill or planter.
Step-by-Step Guide
Materials
- Polymer clay (Orange, Green, Dark Green, Red)
- Black acrylic paint or fine tip marker
- Sculpting tools (needle tool, ball stylus)
- Toothbrush or crumpled foil (for texturing)
- Baking sheet and parchment paper
- Oven (if using polymer clay)
Step 1: Sculpting the Classic Carrot
-
Shape the Base:
Start with a medium ball of orange clay. Roll it into a tapered cone shape, keeping the top end slightly rounded and the bottom end pointy. -
Add Texture:
Using a needle tool or a crafting knife, gently press horizontal lines across the orange body. These don’t need to be perfect; irregular spacing makes it look more organic. -
Create the Stems:
Take three or four small pieces of green clay and roll them into short logs. Flatten the ends slightly. -
Attach the Greens:
Press the green stems onto the top center of your carrot. I like to pinch them together slightly at the base so they look like they’re sprouting from one spot.
Stay Clean
Polymer clay picks up dust easily. Keep baby wipes or rubbing alcohol nearby to clean your hands, especially when switching from darker greens to the bright orange clay.
Step 2: Crafting the Broccoli Stock
-
Form the Stalk:
Roll a cylinder of orange clay for the base, slightly tapering it at the bottom so it can stand on its own but resembles a thick carrot or stalk. -
Prepare the Florets:
Roll several small balls of dark green clay. You’ll need about 5-7 balls of varying sizes. -
Texture the Broccoli:
This is the fun part—take a clean toothbrush or a ball of crumpled foil and press it firmly into each green ball to create a bumpy, realistic broccoli texture. -
Assemble the Head:
Add small lighter green stems to your orange base, then press the textured dark green florets onto these stems, clustering them tightly to form a crown.
Garden Party
Make a whole salad! Try creating a purple eggplant, a round white onion, or a bumpy cucumber using similar techniques to expand your collection.
Step 3: Making the Red Pepper
-
Shape the Body:
Roll a ball of red clay into a squat, rounded shape. It should look a bit like a small pumpkin. -
Define the Lobes:
Use the side of your needle tool to press vertical indentations around the red ball. This creates the puffy sections of the pepper. -
Create the Cap:
Flatten a small piece of dark green clay into a star shape. Smooth the edges so they aren’t too sharp. -
Attach Cap and Stem:
Place the green star on top of your red pepper, pressing the points down over the lobes. Add a small bent log of green clay to the center for the stem.
Step 4: Bringing Them to Life
-
Bake the Figures:
Place all three veggies on a parchment-lined baking sheet. Follow the temperature and time instructions on your specific package of clay. -
Cool Completely:
Let the figures cool down fully before touching them again, as the clay hardens as it cools. -
Paint the Faces:
Using black acrylic paint and a very fine brush (or a permanent marker), draw wide-set eyes and a tiny ‘U’ smile on each vegetable. Place the faces low on the bodies for maximum cuteness. -
Add Highlights:
Dip a toothpick in white paint and add a tiny dot to the upper corner of each black eye to give them a sparkle.
Enjoy displaying your tiny, smiling garden on a desk or shelf to brighten your day


What Really Happens Inside the Kiln
Learn how time and temperature work together inside the kiln to transform clay into durable ceramic.
Frog Toothbrush Holder
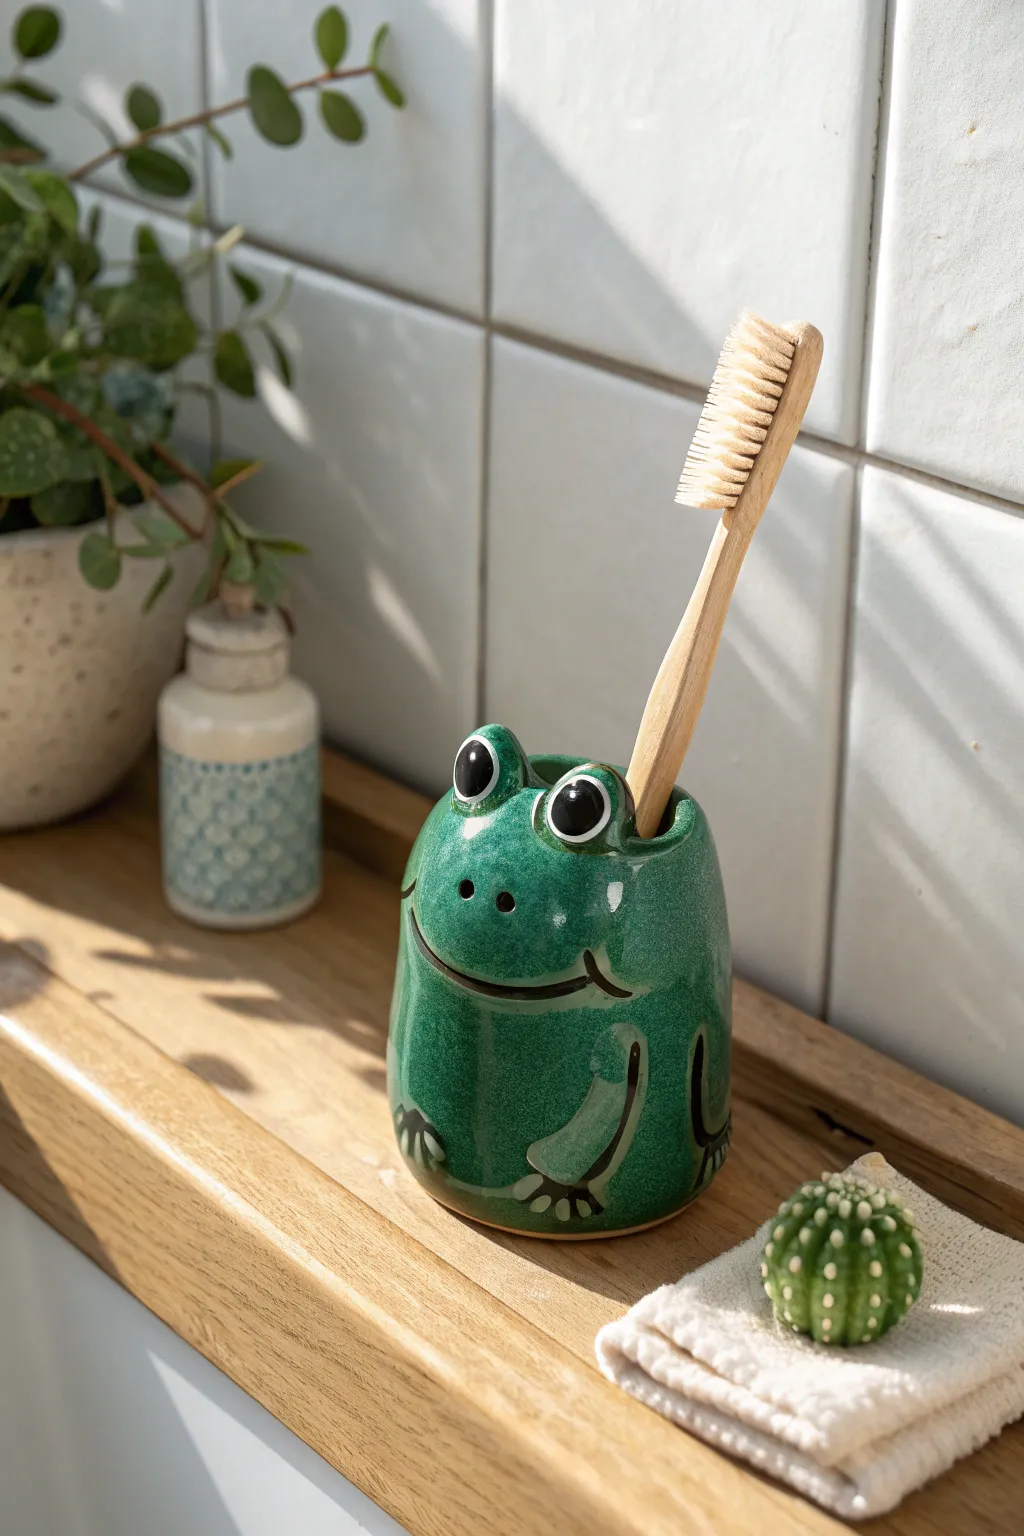
Bring a splash of pondside charm to your bathroom sink with this adorable ceramic frog toothbrush holder. With its wide, friendly smile and vibrant green glaze, this functional sculpture is as delightful to make as it is to use.
How-To Guide
Materials
- Earthenware clay (white or light-bodied)
- Small rolling pin
- Fettling knife or clay needle tool
- Scoring tool (or serrated rib)
- Slip (clay mixed with water)
- Medium round brush
- Detail liner brush
- Sponge
- Deep green underglaze
- Black underglaze
- White underglaze
- Clear gloss glaze
- Kiln access (or suitable oven for polymer clay adaptations)
Step 1: Forming the Body
-
Preparation:
Begin by wedging a ball of clay roughly the size of a large orange to remove air bubbles and ensure the consistency is even. -
Create the base cylinder:
Roll the clay into a thick cylinder shape. Using your thumb, press down into the center to open up the form, pinching and pulling the walls up to create a hollow vessel about 4 inches tall. -
Refining the shape:
Gently shape the cylinder so it is slightly wider at the bottom and tapers just a bit towards the top, giving the frog a sturdy, seated posture. -
Smoothing walls:
Use a damp sponge or your fingers to smooth the exterior and interior walls, ensuring they are an even thickness—about 1/4 inch is ideal.
Clean Lines Tip
If your black outlines look shaky, let the green base coat dry completely first. This prevents colors from muddying if you need to wipe a mistake.
Step 2: Sculpting Features
-
Modeling the eyes:
Roll two small balls of clay, roughly the size of cherries. Attach these to the very top rim of the cylinder using the score and slip method. -
Integrating the eyes:
Smooth the clay from the bottom of the eye balls down into the body so they look seamless and structural, rather than just stuck on. -
Adding nostrils:
Just below the eyes, use the rounded end of a paintbrush handle or a small modeling tool to press two small indentations for the nostrils. -
Carving the smile:
With a needle tool or small loop tool, carve a long, wide smile across the front of the face. Curve the ends upward slightly for a happy expression. -
Creating the ridge:
To make the smile pop, I sometimes roll a tiny, thin coil of clay and blend it just beneath the carved line to create a protruding lip. -
Making the legs:
Roll two thin coils of clay for the legs. Shape them into a bent ‘L’ shape to mimic frog legs sitting at the side. -
Attaching legs:
Score and slip the sides of the body and attach the leg coils. Blend the edges into the body so they look low-relief, leaving only the outline raised. -
Sculpting feet:
At the bottom of each leg coil, flatten a small pad of clay and use a knife to cut small toes. Attach these at the base of the frog.
Polka Dot Pond Friend
Give your frog some personality by adding lighter green or yellow spots on its back before the clear glaze, creating a fun textured toad look.
Step 3: Bisque & Glazing
-
Drying:
Allow the piece to dry slowly under plastic for a day, then uncover until it is bone dry. This prevents cracking. -
Bisque firing:
Fire the piece in a kiln to cone 04 (or according to your specific clay’s instructions) to harden it for glazing. -
Base color application:
Apply three even coats of deep green underglaze to the entire exterior and interior of the frog, letting each coat dry before applying the next. -
Eye details:
Dip a brush in white underglaze and paint the large circles of the eyes. Let dry, then add large black pupils in the center using a detail brush. -
Defining features:
Use a liner brush with black underglaze to carefully outline the smile, fill in the nostrils, and outline the legs and toes to make them stand out. -
Highlighting:
Add a tiny dot of white to each black pupil. This ‘catchlight’ brings life to the character instantly. -
Clear glaze:
Once the underglaze is completely dry, carefully brush on or dip the piece in a clear gloss glaze. This will seal the clay and make it waterproof. -
Final wipe:
Wipe the very bottom (the foot ring) of the holder with a damp sponge to remove any glaze so it doesn’t stick to the kiln shelf. -
Glaze firing:
Fire the piece a second time to the temperature required by your clear glaze (typically cone 05 or 06) to achieve that shiny, glassy finish.
Place your finished frog on the countertop and enjoy a cheerful start to your brushing routine
Monster Desk Buddy Pencil Holder
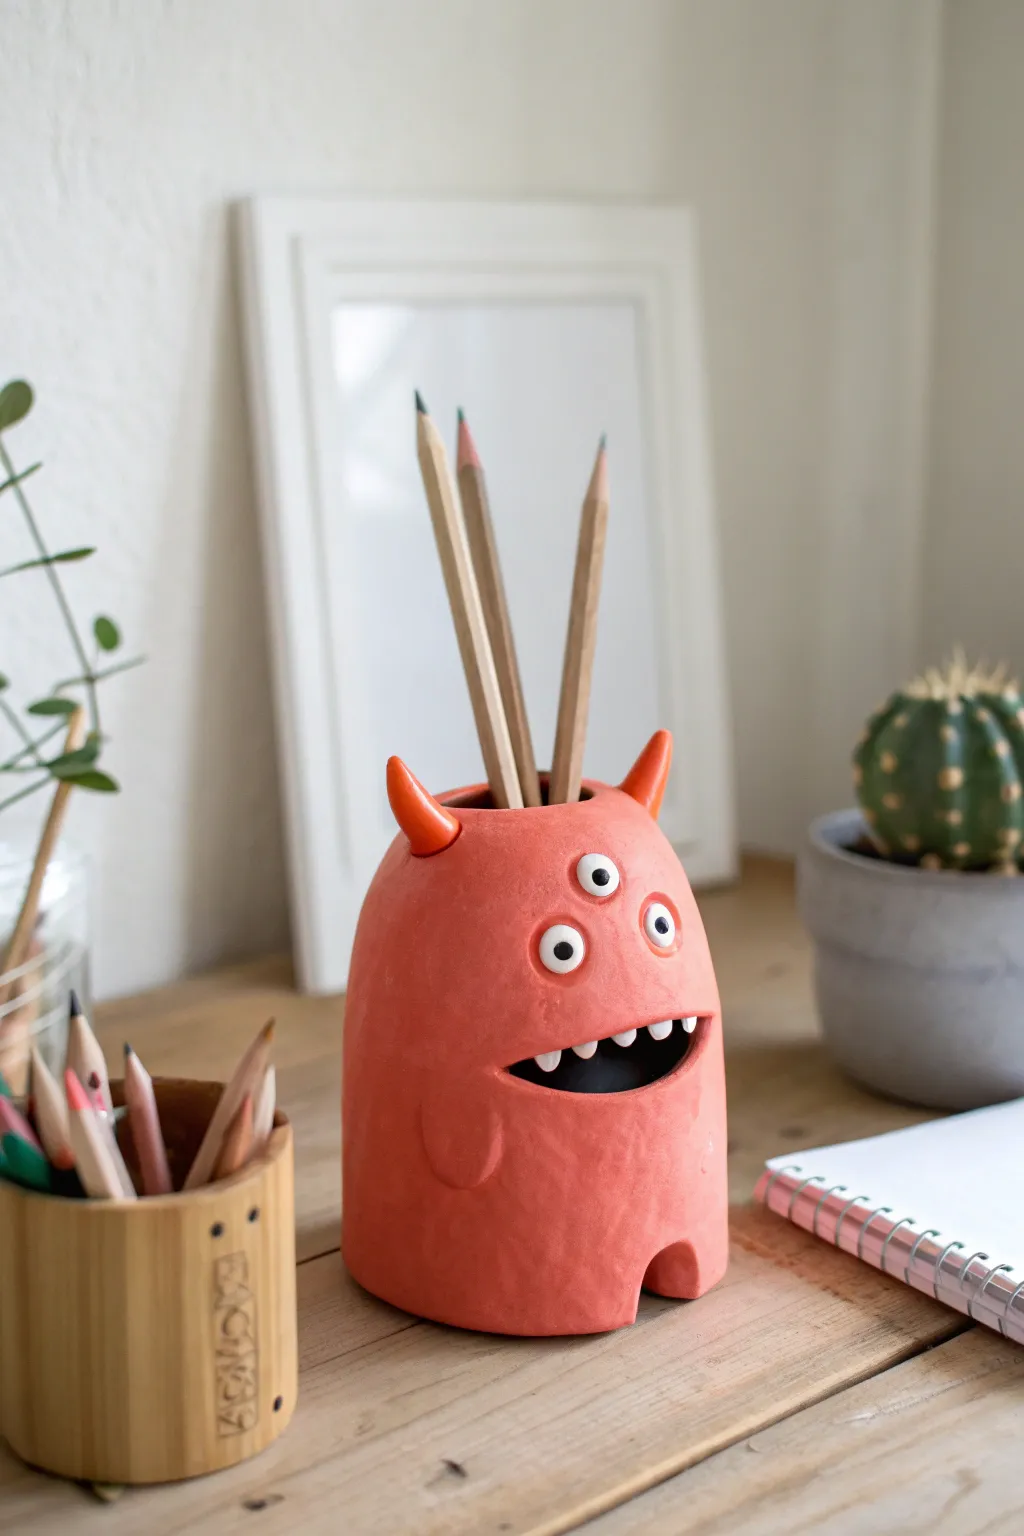
Add some playful personality to your workspace with this quirky three-eyed desk buddy. Sculpted from simple air-dry clay and painted in a vibrant coral-orange, this hollow figurine keeps your favorite pencils ready for action.
Step-by-Step
Materials
- Air-dry clay (white or terracotta)
- Rolling pin
- Aluminum foil (for armature)
- Clay sculpting tools (knife, needle tool)
- Water and small sponge
- Coral/orange acrylic paint
- White acrylic paint
- Black acrylic paint
- Paintbrushes (medium flat and fine liner)
- Sandpaper (fine grit)
- Varnish or sealant (matte or satin)
- Pencil or dowel (for sizing holes)
Step 1: Sculpting the Base Shape
-
Create the core:
Crumple a ball of aluminum foil into a pill-shaped oval to serve as the core armature. This saves clay and keeps the figure lightweight. Ensure the top is slightly flatter than the bottom. -
Prepare the clay:
Condition your clay by kneading it until it’s soft and pliable. Use a rolling pin to flatten a large portion into a sheet about 1/4 inch thick. -
Cover the armature:
Wrap the clay sheet around your foil core, trimming away excess. Smooth the seams together with your fingers and a little water until you have a seamless, rounded cylinder shape. -
Create the base:
Gently tap the bottom of the cylinder on your work surface to flatten it so the monster stands stably on its own.
Smooth Seams Like a Pro
If you struggle blending clay seams, use a “cross-hatching” technique. Score both sides, add water, press together, and smooth. It creates a much stronger bond.
Step 2: Adding Features
-
Cut the mouth:
Use a clay knife to cut a horizontal slit for the mouth about halfway down the body. Gently push the clay inward to open the mouth into a wide grin, smoothing the edges with a wet finger. -
Make the teeth:
Roll tiny balls of clay and shape them into small triangles or flat squares. Score the upper lip area lightly with a needle tool, add a dab of water, and press the teeth into place. -
Add arm details:
Roll a small coil of clay and attach it to the side of the body in a “U” shape to resemble an arm resting against the side. Blend the edges seamlessly into the body using a modeling tool. -
Form the horns:
Roll two small cones of clay. Score the top of the head where you want them to sit, apply a bit of slip (water and clay mix), and press the horns firmly onto the head. -
Sculpt the eyes:
Roll three small balls of clay—one slightly larger than the others. Attach them in a triangular formation on the forehead area. Use a rounded tool to press a gentle indentation into the center of each eye for the pupil. -
Create pencil holes:
Use the back of a pencil or a thick dowel to press holes into the top of the head behind the horns. I like to twist the dowel gently as I push down to ensure the walls of the hole are smooth and deep enough to hold a pencil securely.
Cracks While Drying?
Keep your drying clay covered loosely with a plastic bag for the first 12 hours. This slows evaporation and helps prevent those frustrating surface cracks.
Step 3: Finishing Touches
-
Smooth the texture:
Take a slightly damp sponge and wipe down the entire surface of the monster. This removes fingerprints and gives the clay a cohesive, organic texture. -
Cut the leg notch:
At the very bottom front, cut a small inverted ‘U’ shape to suggest two separation legs, rather than just a flat base. -
Dry completely:
Allow the sculpture to dry for 24-48 hours. Keep it away from direct heat to prevent cracking. -
Sand imperfections:
Once fully dry, use fine-grit sandpaper to smooth out any rough patches or sharp edges, especially around the mouth and pencil holes.
Step 4: Painting
-
Base coat:
Paint the entire body with the coral-orange acrylic paint. You may need two coats for full opacity, letting the first coat dry before applying the second. -
Detail the eyes and teeth:
Switch to a smaller brush and paint the eyeballs and teeth bright white. Be careful to stay within the sculpted lines. -
Add pupils:
Using your finest liner brush or a dotting tool, paint small back dots in the center of the white eyes. -
Darken the mouth:
Paint the inside of the mouth black to create depth. If you want the horns to stand out, you can paint them a slightly glossier orange or a different shade. -
Seal the work:
Apply a coat of matte or satin varnish to protect the paint and give your monster a finished, durable look.
Now you have a charming little monster ready to organize your desk supplies

TRACK YOUR CERAMIC JOURNEY
Capture glaze tests, firing details, and creative progress—all in one simple printable. Make your projects easier to repeat and improve.
Shell Creature Mashups
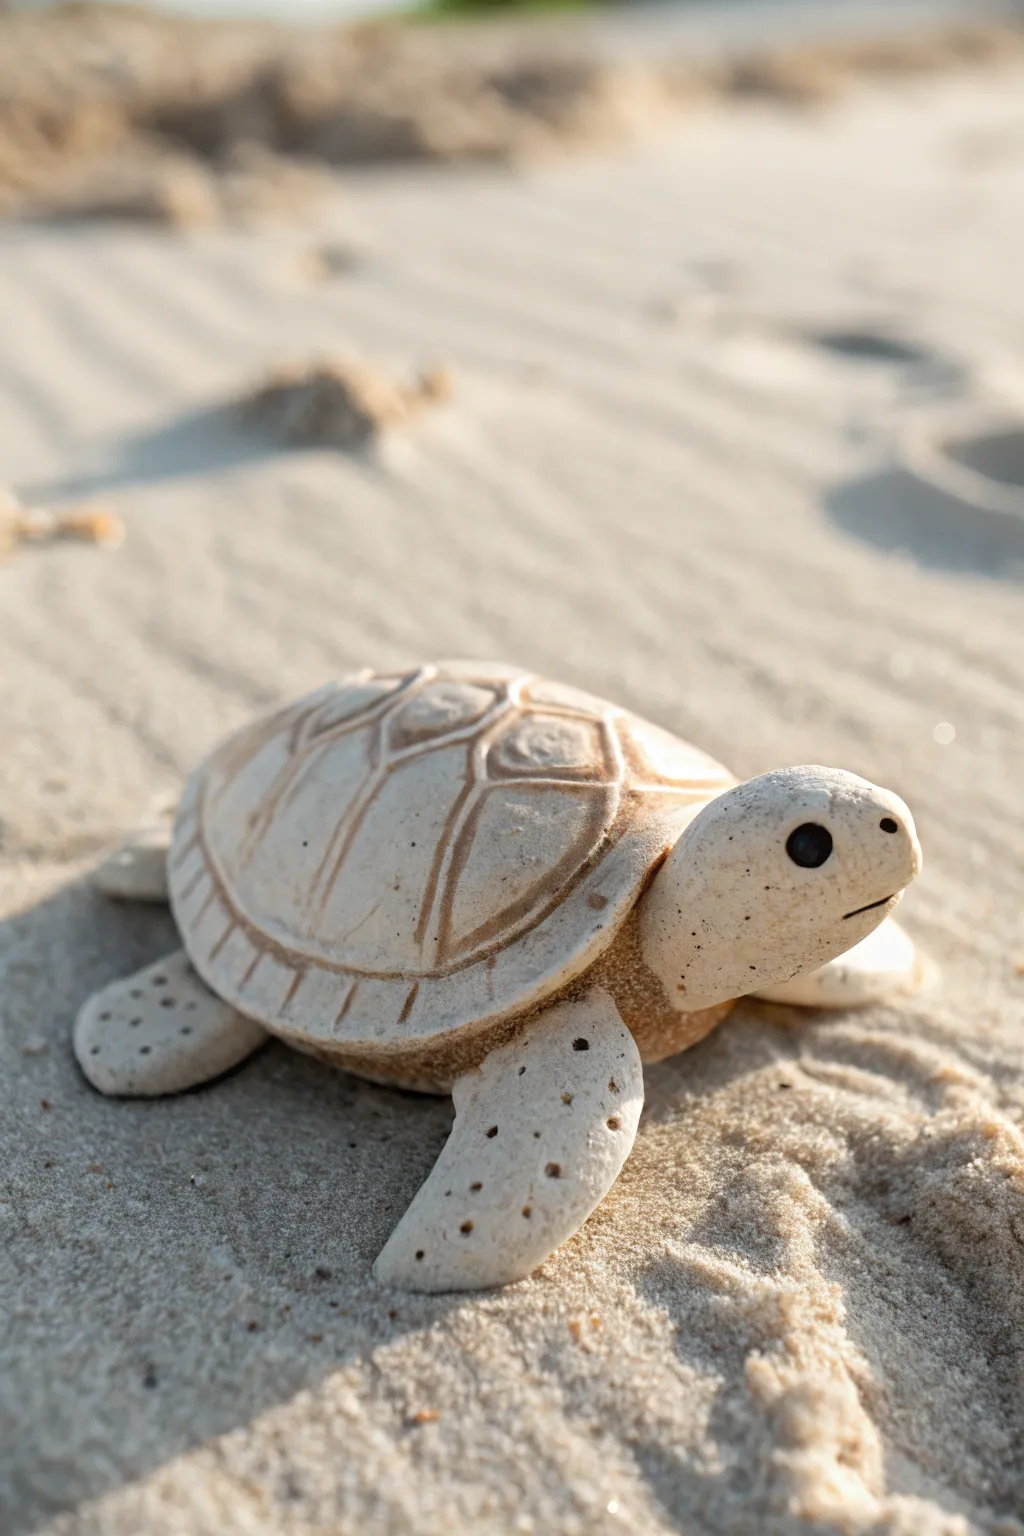
Sculpt a charming, minimalist sea turtle that looks as though it was carved straight from beach stone. This project focuses on simple shapes and subtle carving techniques to create a natural, eroded texture perfect for a coastal vibe.
Step-by-Step Guide
Materials
- Light beige or stone-effect polymer clay (or air-dry clay)
- Brown acrylic paint (burnt umber or raw sienna)
- Black acrylic paint
- Sculpting tools (needle tool, small ball stylus)
- Paper towel or sponge
- Sandpaper (fine grit)
- Old toothbrush (optional for texture)
Step 1: Forming the Body
-
Prepare the base:
Start by conditioning your clay until it is soft and malleable. Roll a medium-sized ball for the main body/shell, slightly flattening it into a dome shape. -
Shape the head:
Roll a smaller ball for the head. Gently pinch the front to form a blunt snout, ensuring it isn’t too pointed, as we want a rounded, friendly appearance. -
Attach the head:
Press the head firmly onto the front underside of the shell dome. Blend the clay at the connection point underneath so it is secure. -
Create flippers:
Form four smaller, flattened teardrop shapes for the flippers. The front two should be slightly larger and longer than the back two. -
Position the limbs:
Attach the front flippers angled slightly backward and the rear flippers tucking out from the back of the shell. Blend the seams underneath carefully. -
Add a tail:
Roll a very tiny cone of clay and attach it centered between the rear flippers for a little tail.
Dull Details?
If your carving lines are vanishing during smoothing, pop the clay in the fridge for 10 minutes to firm it up before re-carving.
Step 2: Detailing and Texturing
-
Shell pattern outline:
Using a needle tool, lightly sketch the shell pattern. Draw a central row of hexagonal shapes down the spine of the shell. -
Connected scutes:
Connect the corners of your central hexagons to the outer rim of the shell to create the surrounding scutes. -
Deepen the lines:
Once you are happy with the spacing, go back over your lines with the needle tool, pressing deeper to create distinct grooves. -
Shell rim detail:
Use the needle tool or a small knife to create vertical tick marks all around the bottom edge of the shell for a rim border effect. -
Flipper texture:
Using a small ball stylus or the point of a toothpick, press random, shallow holes into the flippers to mimic porous stone or skin texture. -
Facial features:
Use a larger ball tool to press indentations for the eyes. Use a knife tool to slice a simple, horizontal line for the mouth. -
Stone texture:
Lightly tap the entire surface of the turtle (avoiding the deep grooves) with an old toothbrush or a ball of tin foil to remove fingerprints and add a gritty texture.
Make it a Keepsake
Carve a date or initials into the flat underside of the turtle belly before baking to turn this easy sculpt into a personalized memento.
Step 3: Finishing Touches
-
Baking or drying:
If using polymer clay, bake according to package instructions. If using air-dry clay, allow it to dry completely for typically 24-48 hours. -
Applying the wash:
Mix a small amount of brown acrylic paint with plenty of water to create a thin wash. Brush this over the entire shell, ensuring it gets into the carved grooves. -
Wiping back:
Before the paint dries, use a paper towel or damp sponge to wipe away the surface paint. The brown will remain in the cracks, highlighting the shell pattern. -
Painting eyes:
Dip the end of a paintbrush or toothpick into black acrylic paint and carefully fill the eye indentations. -
Final sanding:
I find that lightly sanding the high points of the shell after the paint is dry enhances the weathered, beach-stone look.
Place your finished turtle on a shelf or in a potted plant for a relaxed decorative accent
Calendar Cubes Desk Pal
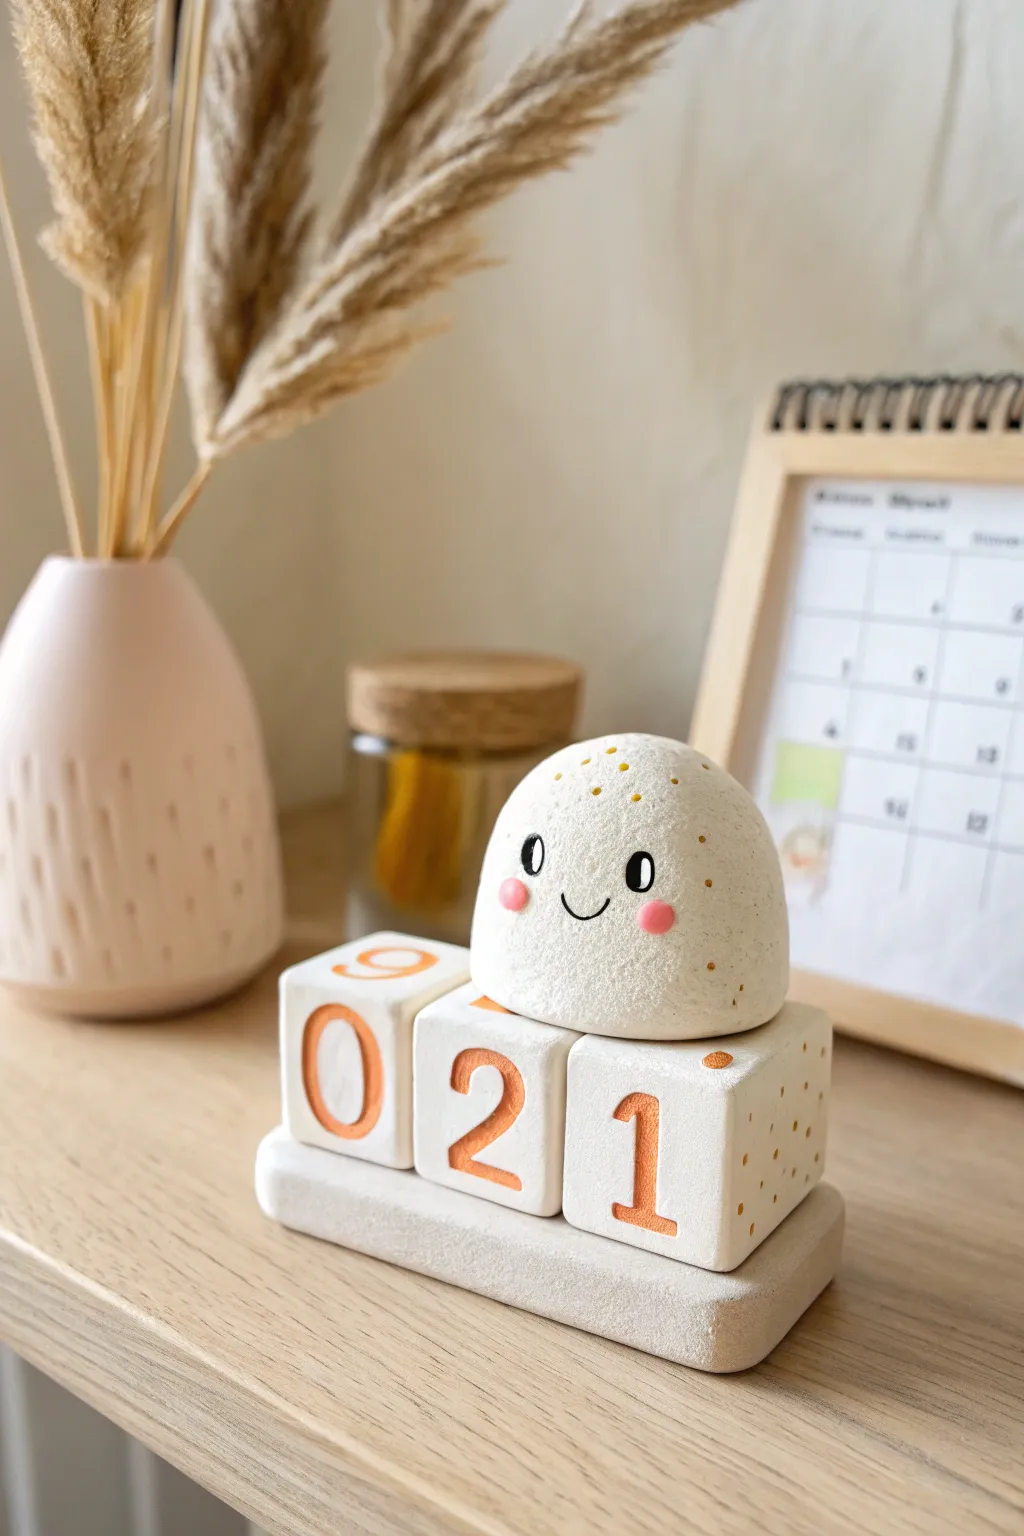
This adorable desk accessory combines functionality with cuteness, featuring a perpetual block calendar topped with a happy little dumpling friend. Crafted from polymer or air-dry clay, the textured cubes and minimalistic character create a charming, clean aesthetic perfect for brightening up any workspace.
Step-by-Step
Materials
- White air-dry clay or polymer clay
- Rolling pin
- Craft knife or clay blade
- Square cookie cutter (approx. 1 inch/2.5cm) – optional but helpful
- Fine-grit sandpaper
- Acrylic paints (terracotta/orange, black, pink)
- Small fine-point paintbrush
- Dotting tool or toothpick
- Old toothbrush or stiff bristle brush
- Clear matte varnish
Step 1: Creating the Base Components
-
Shape the base tray:
Start by rolling out a thick slab of white clay, roughly 1/4 inch thick. Cut out a long rectangle that is wide enough to fit three cubes side-by-side with a little wiggle room. Smooth the edges with a bit of water on your finger to round them off gently. -
Add texture:
Before the base dries, gently tap the surface with an old toothbrush or a crumpled ball of aluminum foil. This gives it that subtle, stone-like texture seen in the photo. -
Form the cubes:
You will need three cubes for the calendar numbers. Roll a block of clay and cut three identical squares. Refine them into perfect cubes by tapping each side against your work surface. They should be sized to sit comfortably on your rectangular base. -
Impress or carve numbers:
If you have number stamps, you can impress the digits 0, 1, and 2 into the front faces now. If not, wait until they are dry to paint them on. For the full calendar functionality, you’ll need two cubes with 0-1-2-3-4-5 and 0-1-2-6-7-8 (where 6 doubles as 9) plus a third block for months or decoration, but for this specific look, just focus on the visible 0, 2, and 1. -
Simple texture details:
On the side of the ‘1’ cube (the rightmost block), use a needle tool to poke small, random shallow holes to mimic a porous stone texture.
Sharp Edges Pro Tip
For crispest cube edges, don’t mold by hand. Cut a long square ‘snake’ of clay and slice segments with a very sharp blade, then barely touch them while drying.
Step 2: Sculpting the Character
-
Roll the main body:
Take a ball of white clay, slightly larger than one of your cubes. Roll it into a smooth sphere, then gently flatten the bottom so it sits stable. -
Shape the dome:
Mold the sphere into a soft dome shape, like a little dumpling or a ghostly mound. Keep the surface rounded and friendly. -
Apply texture:
Just like the base, texture the entire surface of your character by dabbing it with the stiff bristles of a brush. I find this helps hide any fingerprints while adding a nice organic feel. -
Dry everything:
Allow all your clay pieces—the tray, the three cubes, and the character—to dry completely according to your clay’s package instructions. This usually takes 24-48 hours for air-dry clay.
Uneven Painting?
If your painted numbers look shaky, use a fine-tip acrylic paint marker instead of a brush. It gives you much more control for lettering on textured surfaces.
Step 3: Painting and Assembly
-
Refining the surface:
Once fully dry, lightly sand any sharp edges or uneven spots on your cubes and base with fine-grit sandpaper to ensure a professional finish. -
Adding the numbers:
Using the terracotta or orange acrylic paint and a fine brush, carefully paint the numbers ‘0’, ‘2’, and ‘1’ onto the front faces of the cubes. If you impressed them earlier, fill the indentations; if not, paint them freehand with a steady hand. -
Painting the top number:
Don’t forget the top face of the middle cube! Paint a large ‘9’ (or the next number in your sequence) in the same orange tone. -
Decorating the side:
On the side of the rightmost cube, use a toothpick dipped in the orange paint to fill in those tiny porous holes you made, or simply dot them on if the surface is flat. -
Character face details:
For the character, use black paint to draw two tall, oval eyes and a simple ‘u’ shape for a smile. The eyes should be spaced apart to look innocent and sweet. -
Rosy cheeks:
Mix a tiny bit of pink paint or use a soft pink pastel. Apply small circular blush marks right under the eyes. This brings the character to life. -
Top speckles:
Using the very tip of your brush or a toothpick, add tiny orange/gold speckles to the top of the character’s head, resembling freckles or seasoning. -
Sealing the project:
Protect your hard work with a coat of clear matte varnish. This will keep the paint from chipping and seal the clay. -
Assembly:
Stack the cubes on the base tray in the order 0-2-1. Place the character proudly on top of the middle cube to complete the scene.
Now you have a charming little calendar guardian to keep you company while you work