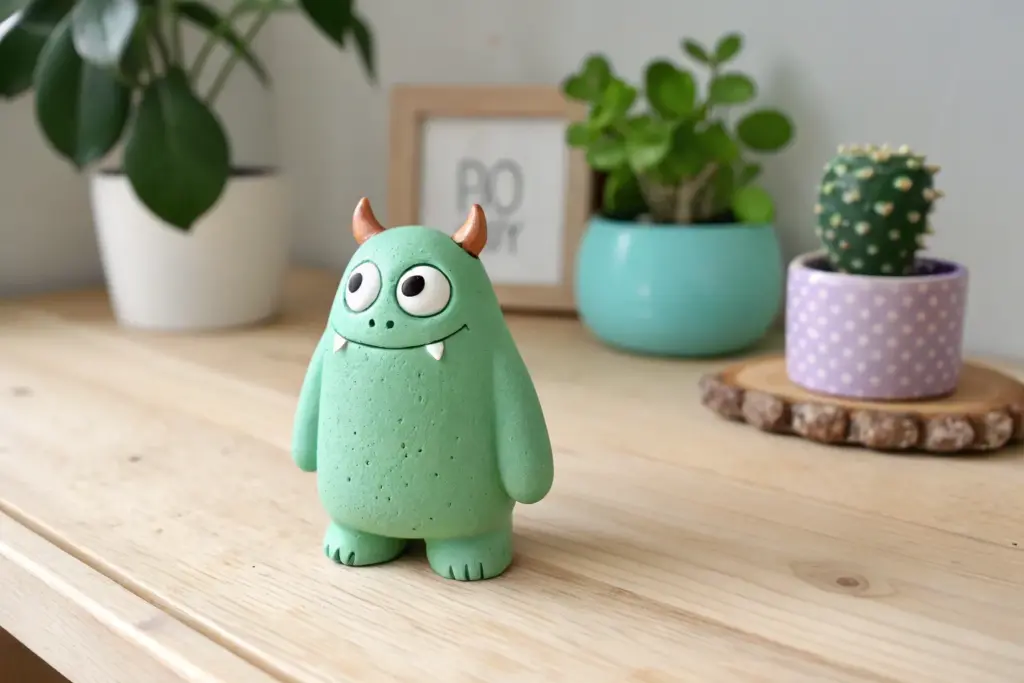
Whenever I need a quick joy-spark in the studio, I make cute clay monsters—they’re basically little blobs of personality with goofy faces and zero pressure to be “perfect.” Here are my favorite ideas you can pull off with air-dry clay or polymer clay, focusing on charm, big expressions, and simple shapes.
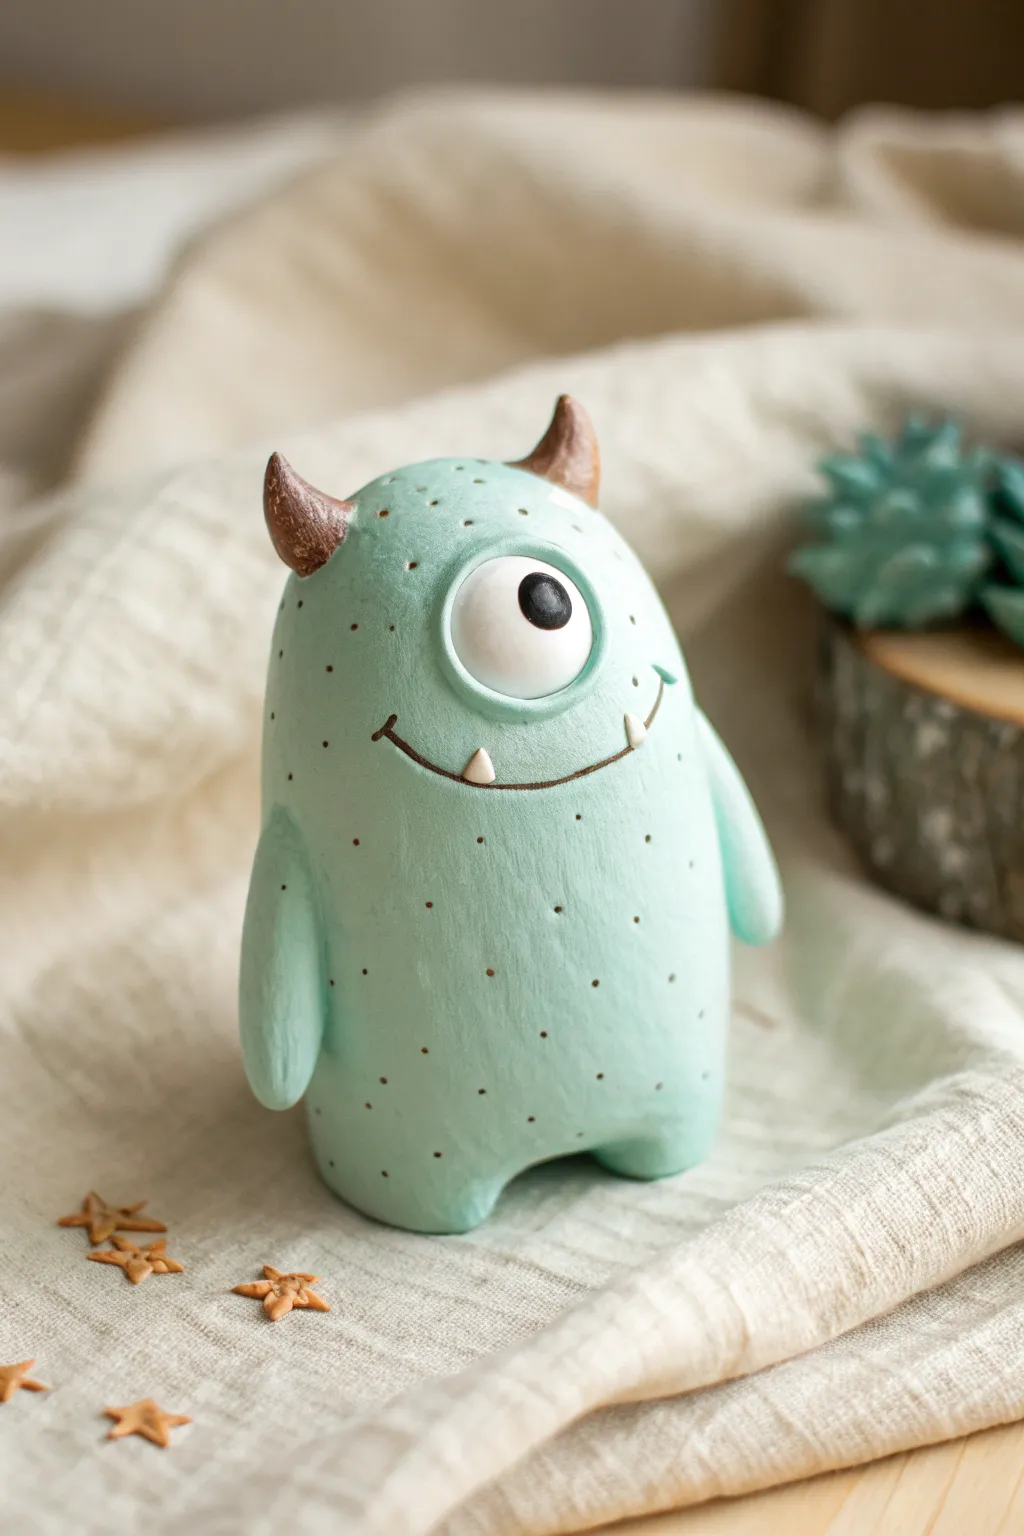
Classic One-Eyed Blob Buddy
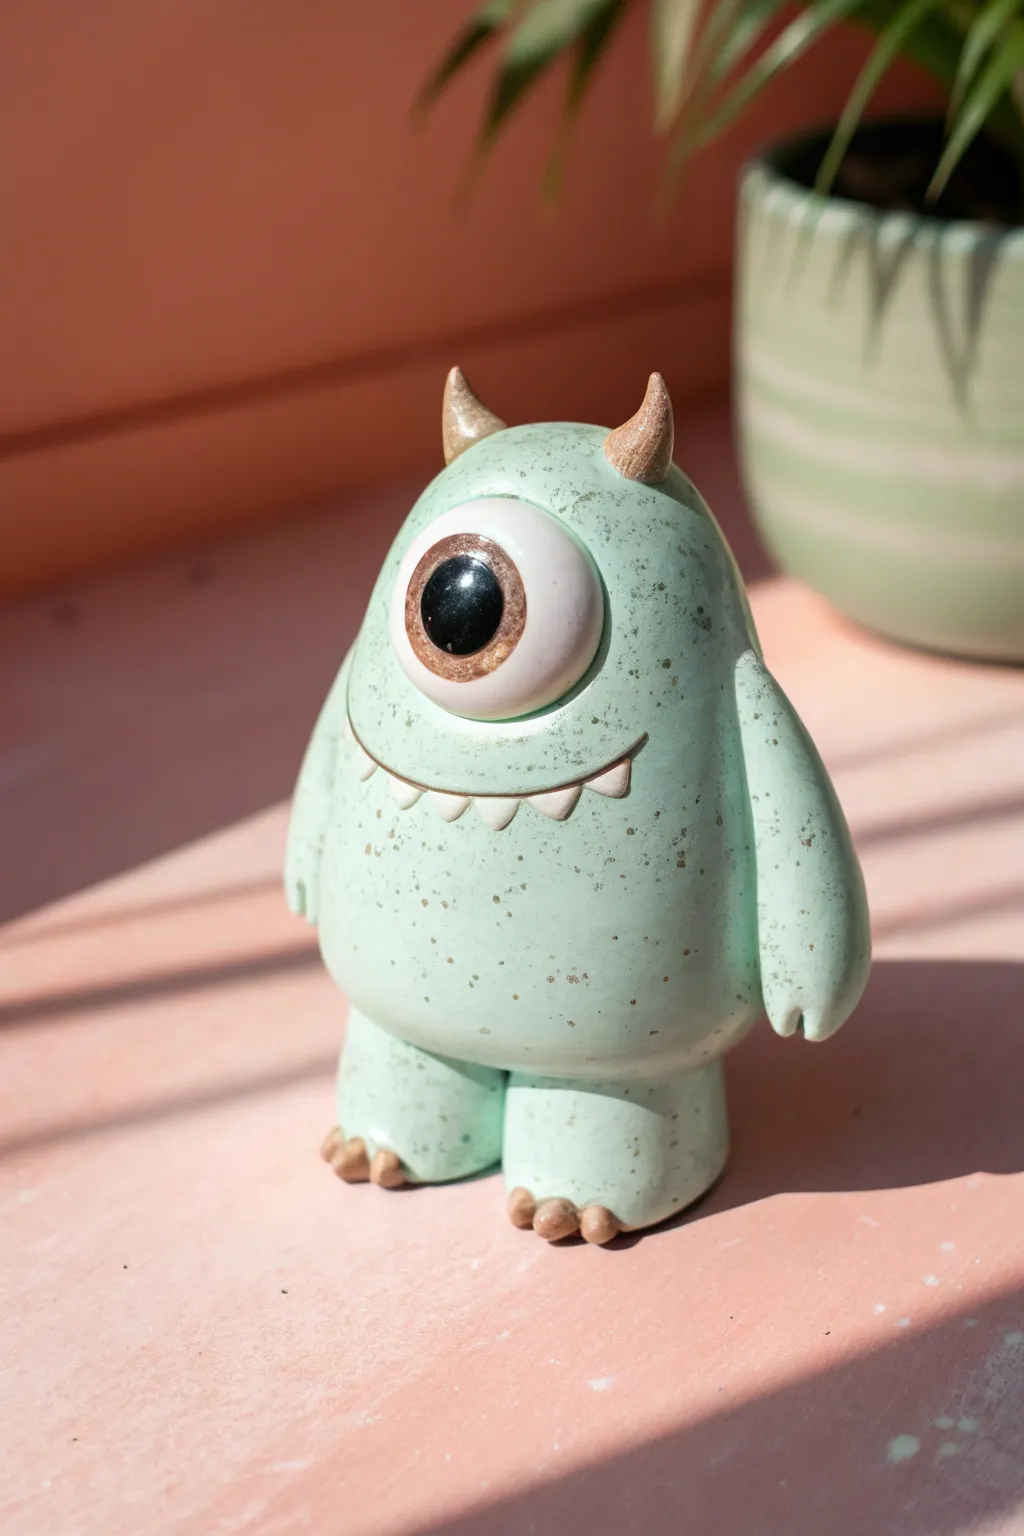
Meet the friendliest one-eyed blob you’ll ever sculpt, featuring a charming mint-green body peppered with earthy speckles. This delightful figurine stands on stubby feet with tiny claws and sports a glossy finish that makes his eye pop.
Detailed Instructions
Materials
- Polymer clay (Mint Green or Speckled Green)
- Polymer clay (White, Black, Bronze/Brown)
- Aluminum foil
- Pointed sculpting tool (for details)
- Needle tool
- Acrylic roller
- Gloss glaze or resin
- Soft brush for glazing
- Oven (for baking polymer clay)
Step 1: Sculpting the Body Base
-
Prepare the core:
Ball up a piece of aluminum foil into a large egg shape about the size of a lemon. This reduces clay usage and keeps the sculpture lightweight while baking. -
Condition the main clay:
Take your speckled mint green clay and knead it until it’s soft and pliable. If you don’t have pre-speckled clay, mix tiny flakes of dried brown clay or black pepper into solid mint clay for a faux-stone look. -
Cover the armature:
Flatten the conditioned clay into a large sheet and wrap it completely around your foil egg. Smooth all the seams so you have a seamless, elongated gumdrop shape. -
Shape the torso:
Gently press the bottom of the shape against your work surface to flatten it so it stands upright. Refine the top to be slightly narrower than the bottom.
Clean Seams
Use a tiny amount of baby oil or clay softener on your finger to smooth out fingerprints and blending lines before baking for a professional finish.
Step 2: Adding the Cyclops Eye
-
Form the eyeball canvas:
Roll a medium-sized ball of white clay and flatten it into a thick disc. Press this firmly onto the upper front center of the body. -
Create the iris:
Mix bronze and brown clay to get a metallic earthy tone. Roll a smaller ball, flatten it, and place it in the center of the white disc. -
Add the pupil:
Place a smaller black clay circle in the very center of the iris. -
Outline the eye:
Roll a very thin snake of the mint green clay. Wrap this around the outer edge of the white eyeball to create an eyelid rim, blending the outer edge into the main body.
Custom Colors
Swap the mint green base for a galaxy purple or burnt orange clay, and use gold mica powder on the horns for a magical variant.
Step 3: Face & Limbs
-
Carve the smile:
Use a needle tool or a curved blade to press a wide, U-shaped smile just below the eye. Don’t cut too deep; just mark the placement. -
Insert the teeth:
Make very tiny triangles of white clay. Carefully press these downward onto the lower lip of the smile line you just created. -
Attach the arms:
Roll two thick, short logs of mint clay. Taper one end of each log and blend that end onto the sides of the body. Make a small slit at the loose end to suggest a thumb or mitten-hand. -
Build the legs:
Form two short, chunky cylinders for legs. Attach them to the bottom of the body, ensuring the monster still balances comfortably. -
Add toes:
Roll tiny distinct balls of brownish-bronze clay—three for each foot. Press them onto the front of the legs to create little claws.
Step 4: Horns & Finishing Touches
-
Sculpt the horns:
Create two small cones using the bronze clay. I like to give them a very slight curve for character. -
Mount the horns:
Place the horns on top of the head, spacing them out slightly. Blend the base of the horns into the head using a silicone tool for a strong bond. -
Texture check:
Look over the whole figure. If you lost any speckles or want more texture, gently press coarse sand or spices into the surface now. -
Bake carefully:
Bake the figure according to your clay package instructions (usually 275°F/135°C for 15-30 minutes per 1/4 inch thickness). Let it cool completely. -
Apply gloss:
Once cool, brush a coat of high-gloss glaze or UV resin over the entire eye and the body to give it that wet, ceramic look. Leave the horns and claws matte for contrast if you prefer.
Place your little horned buddy on a shelf near a potted plant for perfect company


Three-Eyed Goofy Grin Monster

This friendly little beast features a delightful yellow jumper and a wide, charming smile that’s hard to resist. With its soft pink skin and oversized teal eyes, this clay monster makes for a whimsical desk companion or shelf sitter.
How-To Guide
Materials
- Polymer clay (Pink, Light Yellow, Teal, White, Black)
- Clay sculpting tools (needle tool, ball stylus)
- Acrylic paint (light yellow, white, mint green) – optional but recommended for crisp patterns
- Small detail paintbrush
- Rolling pin (acrylic or glass)
- Aluminum foil (for the core)
- Craft knife or scalpel
- Smoothing oil or baby oil (optional)
- Oven for baking
Step 1: Sculpting the Body Base
-
Form the core:
Crumple a piece of aluminum foil into a tight, slightly pear-shaped ball. This saves clay and keeps the figure lightweight. It should be wider at the bottom. -
Wrap the core:
Condition your pink polymer clay until soft. Roll it into a thick sheet and wrap it completely around your foil core, smoothing out all seams until you have a seamless, gumdrop-shaped mound. -
Shape the feet:
Roll two small balls of pink clay for the feet. Flatten them slightly and attach them to the bottom front of the body. Blend the seams upward so they look connected. -
Add stubby arms:
Create two sausage shapes from pink clay. Attach them to the sides of the body, letting them hang down naturally. Smooth the shoulder connection point into the main body. -
Create paw details:
Using a needle tool or a knife, gently press three vertical lines into the bottom of each foot and the tip of each hand to create little toes and fingers.
Step 2: Creating the Outfit
-
Make the shirt layer:
Roll out a thin sheet of light yellow clay. Cut a wide strip long enough to wrap around the monster’s midsection. -
Dress the monster:
Wrap the yellow strip around the body, positioning the top edge just under where the mouth will go. Smooth the clay down over the belly and back, trimming away excess near the legs. -
Refine the shirt fit:
Since the arms are already attached, you’ll need to carefully cut openings or mold the yellow clay around the shoulders so the pink arms peek out like sleeves. -
Smooth the transition:
Use a modeling tool to blend the bottom edge of the shirt slightly if you want it snug, or leave a tiny ridge to look like fabric thickness.
Clean Clay Tip
Yellow clay gets dirty easily! Wipe your hands and work surface with a baby wipe before handling the yellow shirt pieces to keep the color bright.
Step 3: Face and Features
-
Sculpt the eye sockets:
Press two shallow indentations into the upper pink area where you want the eyes to sit. -
Add the eyes:
Flatten two balls of teal clay into ovals and press them into the sockets. Add smaller white balls on top, followed by tiny black pupils. -
Form the grin base:
Roll a thin snake of black clay. Press it onto the face in a wide U-shape to define the smile line. -
Add teeth:
I find it easiest to roll a very thin strip of white clay, cut tiny triangles, and press them pointing downward (top row) and upward (bottom row) against the black line. -
Outline the mouth:
To make the smile pop, run a very thin snake of black clay along the top and bottom edge of the teeth, framing the grin. -
Add horns and hat:
Make two small yellow cones for horns and attach them to the head. Add a small yellow disc on top of the head with a tiny ball in the center for a little hat or bun. -
Nostrils and texture:
Use a small ball stylus to poke two nostril holes between the eyes and mouth. Use a needle pointing straight down to scratch short texture lines on the top of the head.
Glaze It Up
After the paint dries, brush a coat of matte varnish over the body and a gloss glaze over the eyes and teeth to make them look wet and shiny.
Step 4: Finishing Touches
-
Bake the figure:
Place your monster on a baking sheet and bake according to your clay package instructions (usually 275°F/135°C for 15-30 minutes). -
Cool down:
Let the figure cool completely before painting. The clay needs to be fully hardened. -
Paint the pattern:
Using a fine detail brush and white acrylic paint (or a contrasting light clay color), paint small polka dots all over the yellow shirt area. -
Add floral details:
Intersperse the polka dots with occasional asterisk shapes in mint green or white to look like simple embroidered flowers.
Place your new goofy friend on a windowsill where the light can catch that winning smile


Tiny Horned Pocket Monster
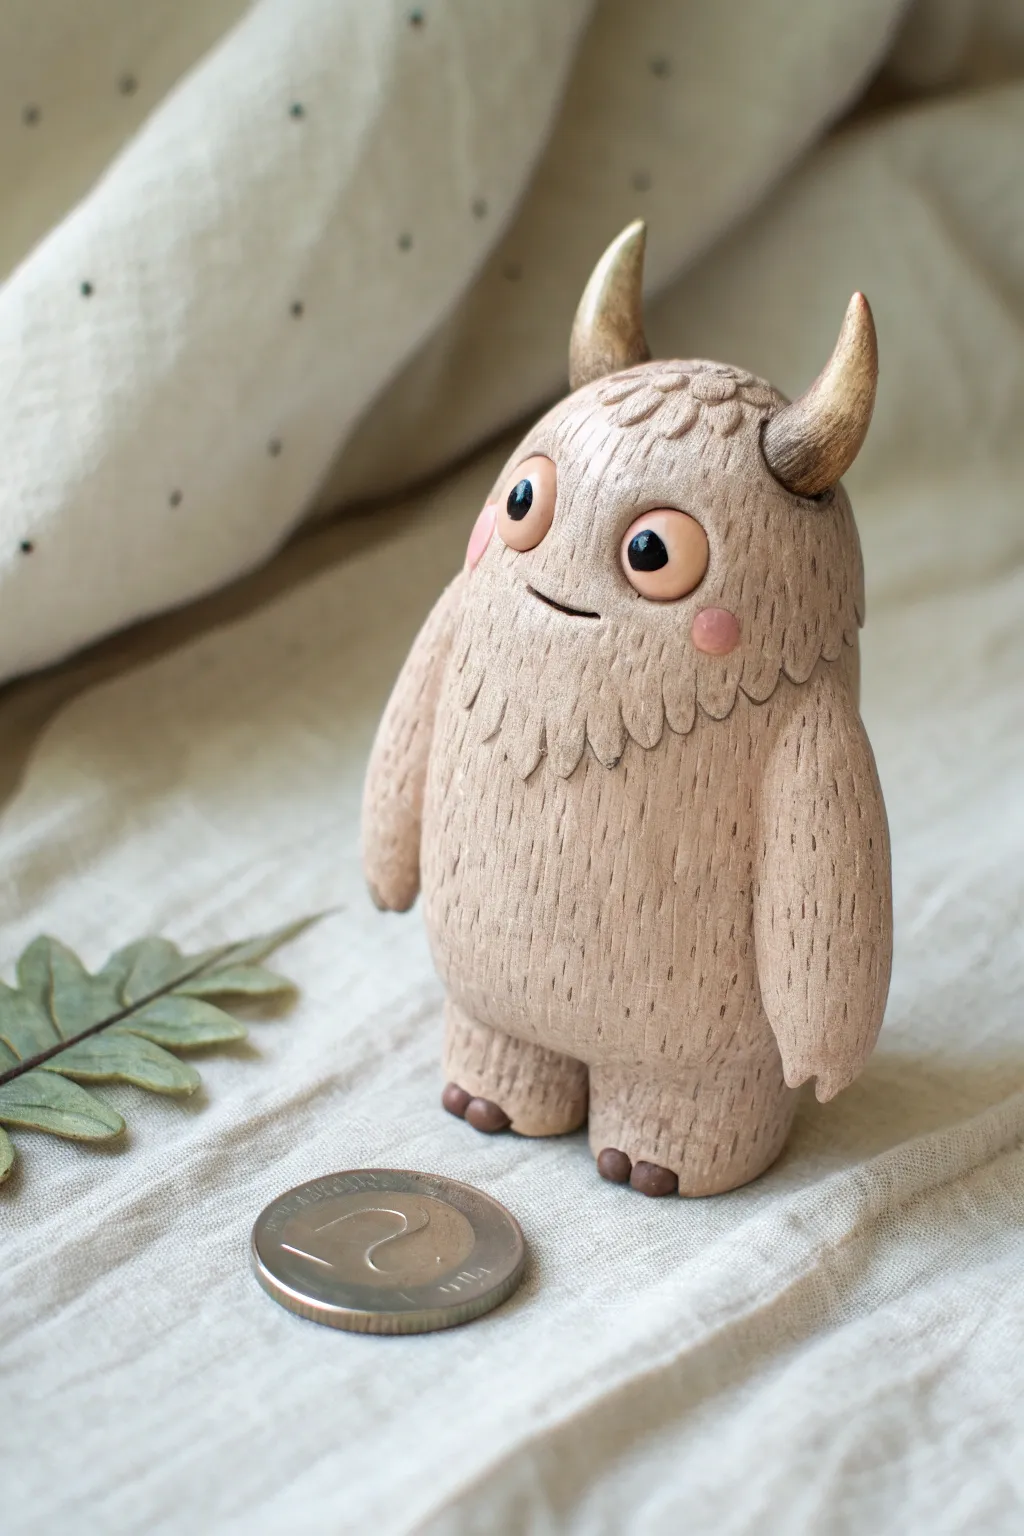
Create this adorable, pocket-sized companion that looks like it stepped right out of a fairytale forest. With its convincing faux-wood texture, petite golden horns, and expressive eyes, this little clay creature brings a touch of organic magic to any shelf.
Detailed Instructions
Materials
- Polymer clay (beige or light wood tone)
- Polymer clay (white and black for eyes, pink for cheeks)
- Acrylic paints (dark brown, gold)
- Needle tool or sharp toothpick
- Ball stylus tool
- Small paintbrush
- Soft pastel chalk (pink or peach)
- Matte varnish
- Sculpting wire or foil (for armature core, optional)
Step 1: Shaping the Base Body
-
Form the Core:
Start with a ball of beige polymer clay roughly the size of a walnut. Roll it between your palms until it’s smooth and warm, then gently elongate it into a rounded egg shape. -
Flatten the Base:
Tap the wider bottom end of your egg shape against your work surface. You want a flat bottom so the monster stands securely on its own. -
Create the Legs:
Roll two small marble-sized balls of the same beige clay. Flatten them slightly into stout cylinders and press them onto the bottom of the body, blending the seams upward so they look integrated. -
Add Tiny Toes:
For the feet detail, roll six tiny specks of dark brown clay into ovals. Press three onto the front of each foot to look like little claws or toes. -
Attach the Arms:
Roll two sausage shapes for the arms, tapering one end slightly. Press the shoulder end onto the sides of the body, blending the clay smooth. Let the arms hang naturally at the sides, curved slightly inward.
Step 2: Adding Textures and Features
-
Define the Chest Fluff:
Using a needle tool, lightly sketch a semi-circle shape on the upper chest to mark where the chest fur begins. -
Sculpting the Chest Fur:
Take small, flattened teardrop shapes of clay and layer them over your sketched line, pointing downward. Blend the top edges into the neck area but leave the bottom tips slightly lifted for dimension. -
Creating the Wood Texture:
This is the most critical step. Take your needle tool and drag it vertically down the entire body (except the face area). Make many distinct, slightly wavy lines to mimic rough tree bark or coarse fur. -
Refining the Face:
Keep a smooth, oval patch free of texture in the center of the face. Use your ball stylus to create two shallow indents where the eyes will go. -
Inserting the Eyes:
Roll two white balls of clay and press them into the sockets. I prefer to bake these briefly first so they don’t squish, but you can add them raw. Add tiny black pupils to the center. -
Adding the Horns:
Shape two tapered cones from beige clay. Mount them on top of the head, curving them slightly upward. Texture the horns with horizontal rings using your needle tool. -
Painting the Horns:
Before baking, brush a light coat of gold mica powder or metallic acrylic paint onto the horns to give them that subtle shimmer. -
Adding Cheeks and Smile:
Shave a little pink pastel chalk into dust. Apply it softly to the cheeks with a dry brush for a gentle blush. Finally, use your needle tool to press a tiny, curved smile into the face.
Muddy Texture?
If your acrylic wash is staining the whole piece too dark, your clay might be too porous. Try sealing the clay with a thin layer of matte varnish *before* applying the dark wash.
Step 3: Finishing Touches
-
Baking:
Bake your figurine according to the clay package instructions. Usually, this is around 275°F (130°C) for 15-30 minutes depending on thickness. -
Applying the Wash:
Once cool, water down some dark brown acrylic paint heavily. Brush it over the textured body, letting it sink into the grooves. -
Wiping Back:
Quickly wipe the surface with a damp paper towel or cloth. This leaves the dark paint in the deep ‘bark’ lines while revealing the lighter clay color on the raised areas. -
Sealing:
Finish by applying a matte varnish to the body to protect the paint, and a dot of glossy glaze to the eyes to make them look wet and alive.
Level Up: Forest Base
Make a small display base using a slice of real wood branch. Glue dried moss and tiny pebbles around the monster’s feet to complete the woodland creature aesthetic!
Now you have a charming little forest guardian ready to keep you company on your desk.


Spiky-Back Dino Monster

This cheerful little dinosaur combines a soft coral-pink body with contrasting teal triangular spikes for a pop of color. With its smooth finish and friendly upright posture, it makes for an adorable desk companion or windowsill guardian.
Step-by-Step Tutorial
Materials
- Polymer clay (Coral Pink)
- Polymer clay (Teal)
- Polymer clay (Black and White for the eye)
- Needle sculpting tool or toothpick
- Ball stylus tool
- Clay roller or pasta machine
- Baking sheet and parchment paper
- Oven (for curing)
- Optional: Smoothing oil or baby oil
Step 1: Shaping the Body
-
Create the base:
Start by conditioning a large ball of coral pink clay until it is soft and pliable. Roll it into a smooth, pear-shaped oblong, ensuring the bottom is wider than the top to form the belly. -
Form the head:
Gently pinch and pull the narrower top part of your pear shape to define a distinct head area. Smooth the neck transition so it looks natural but keeps the head slightly rounded and protruding forward. -
Sculpt the snout:
Press lightly on the front of the face to flatten the snout area slightly. Use your finger to round off the edges so the dinosaur has a soft, chubby profile. -
Add the smile:
Using a needle tool or a clay sculpting knife, carefully carve a curved line into the side of the snout for the mouth. Curve the end upward to give it a happy expression. -
Define the nostrils:
Take a small ball tool and press two shallow detents near the front of the snout to create nostrils.
Keeping Light Colors Clean
Light pink clay picks up dust easily. Keep a pack of wet wipes or baby wipes nearby to clean your hands and tools often, especially before switching back to pink after using dark or teal clay.
Step 2: Limbs and Details
-
Make the legs:
Roll two thick logs of pink clay for the legs. Attach them to the bottom of the body, blending the seams upwards into the torso so the dinosaur stands sturdily on its own. -
Add the toes:
Use a knife tool or toothpick to press small indentations into the front of the feet to suggest toes. -
Attach the arms:
Create two smaller, teardrop-shaped logs for the arms. Press them onto the sides of the belly. I like to position them slightly forward as if the dino is reaching out for a hug. -
Add claws:
Roll very tiny balls of teal clay—three for each hand. Gently press these onto the tips of the pink arms to act as small claws. -
Create the eye socket:
Use a large ball tool to press a deep, round socket into the side of the head where the eye will go. -
Assemble the eye:
Place a flattened circle of teal clay into the socket first. Top that with a slightly smaller black circle, and finish with a tiny white speck for a highlight. -
Texture the skin:
Take a sponge or a piece of texturing foam and very lightly dab it over the pink surfaces. This removes fingerprints and gives the skin a realistic, matte texture.
Step 3: Spikes and Finishing Touches
-
Form the spike base:
Roll out a sheet of teal clay to about 1/4 inch thickness. Use a blade to cut out a series of triangles, graduating from small to large and back to small again. -
Attach the spikes:
Starting at the top of the head, press the triangles onto the center of the back in a row. Continue down the spine all the way to the tip of the tail. Gently blend the base of each triangle into the pink body. -
Add the tail:
If you haven’t already extended the body enough, attach a cone of pink clay to the rear bottom to form a thick tail that helps balance the figure. -
Apply decorative dots:
Roll extremely tiny balls of teal clay. Press these randomly onto the neck and upper back of the dinosaur, flattening them flush with the skin for a spotted pattern. -
Final smooth check:
Look over your creation one last time. If you see any rough seams where the spikes attach, smooth them carefully with a rubber-tipped tool. -
Bake:
Place your dinosaur on a parchment-lined baking sheet. Bake according to your clay manufacturer’s instructions (usually around 275°F or 135°C for 15-30 minutes per 1/4 inch thickness).
Glaze it Up
After baking and cooling, apply a coat of satin or gloss water-based varnish to the teal spikes and the eye only. This contrast in sheen makes the features pop against the matte body.
Once cooled, your spiky friend is ready to brighten up any shelf with its permanent smile

The Complete Guide to Pottery Troubleshooting
Uncover the most common ceramic mistakes—from cracking clay to failed glazes—and learn how to fix them fast.
Snail-Shell Monster With Antennae
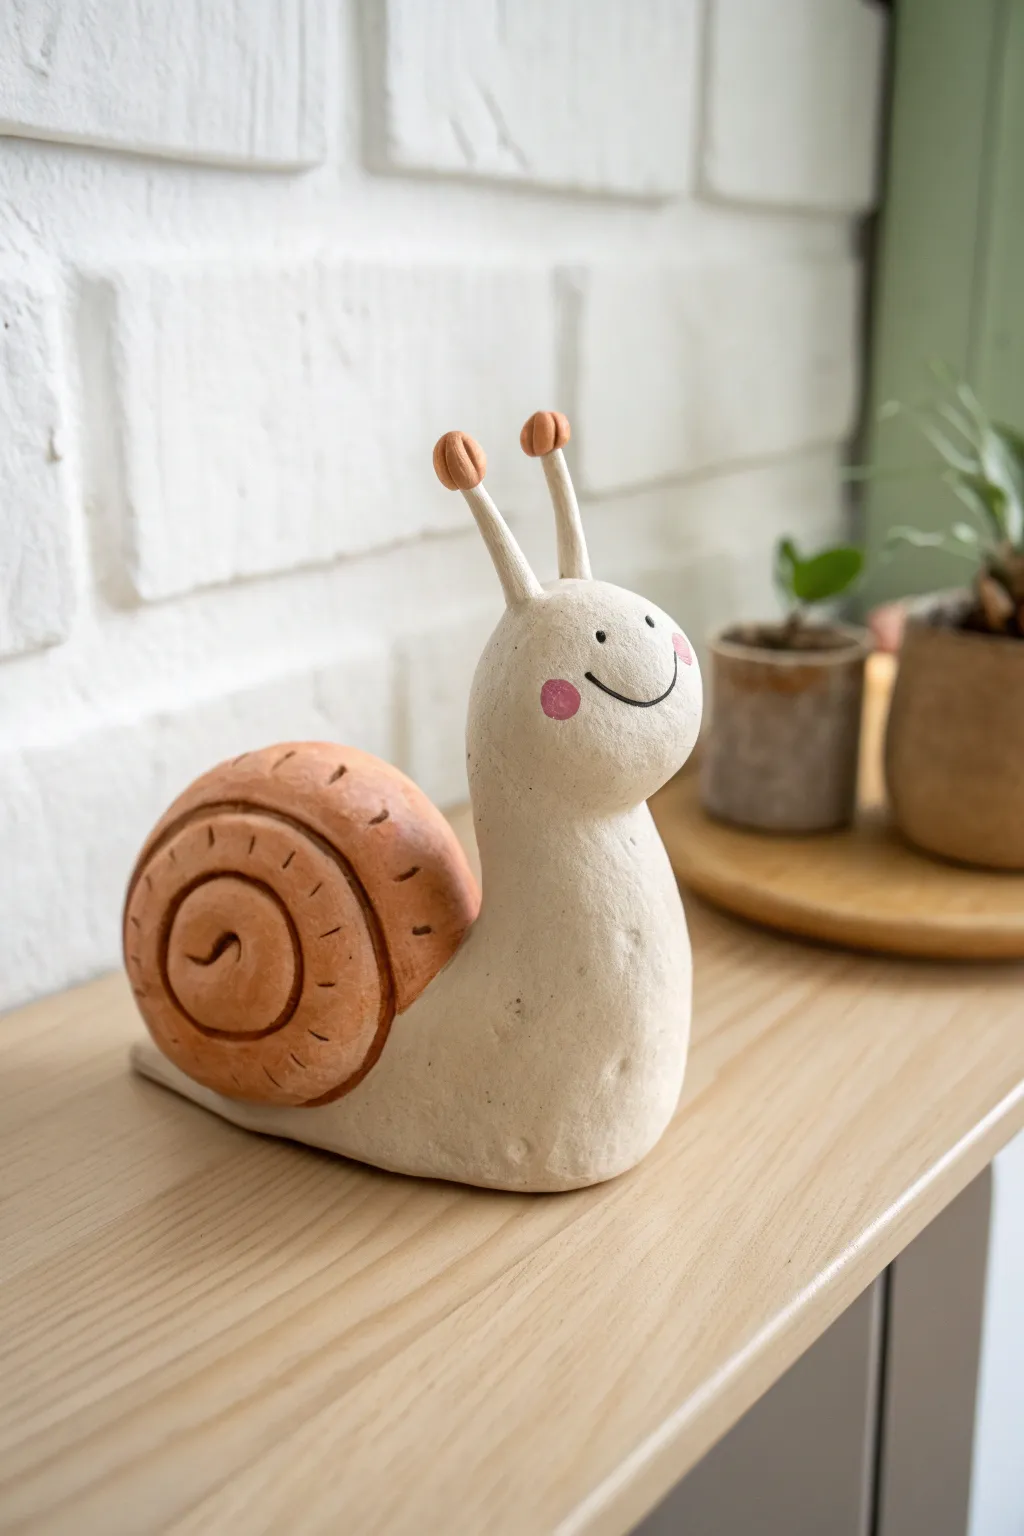
This charming clay snail brings a touch of slow-living magic to any shelf with its warm terracotta-toned shell and friendly expression. The smooth, speckled off-white body contrasts beautifully with the textured spiral shell, creating a delightful woodland character perfect for beginners.
Step-by-Step
Materials
- Air-dry clay or polymer clay (white/cream and terracotta)
- Acrylic paints (black, pink)
- Sculpting tools (needle tool, smooth modeling tool)
- Small paintbrush
- Water (for smoothing)
- Clear matte varnish (optional)
- Cardboard or foil for armature (optional)
Step 1: Shaping the Snail Body
-
Form the base log:
Start by taking a generous amount of the cream-colored clay and rolling it into a thick, smooth log. One end should be tapered for the tail, while the other end should remain bulbous for the head. -
Curve the body:
Gently bend the log into an ‘L’ shape. Apply pressure to flatten the bottom surface so the snail sits stably on your work surface without tipping over. -
Sculpt the head:
Refine the upright portion into a rounded head shape. Smooth any fingerprints with a bit of water or baby oil, merging the neck seamlessly into the horizontal body. -
Create the eye sockets:
Using a small ball tool or the rounded end of a paintbrush, make two very shallow indentations where the eyes will eventually be painted.
Smooth Operator
Before drying or baking, wipe your sculpture with a brush dipped in baby oil (for polymer) or water (for air-dry) to erase all fingerprints.
Step 2: Creating the Shell
-
Roll the shell coil:
Switch to your terracotta-colored clay. Roll a long, even snake that tapers slightly toward one end. This will become the spiral of the shell. -
Coil the spiral:
Starting from the tapered end, roll the clay snake into a tight spiral. Keep the coil flat like a cinnamon roll rather than building it upwards into a cone. -
Smooth the seams:
Once coiled, use a modeling tool to gently blend only the back seams of the spiral together for structural integrity, leaving the front spiral distinct and visible. -
Add texture:
Take a needle tool or a dull knife edge and press small, decorative hash marks along the outer ridges of the spiral to mimic shell growth lines. -
Attach the shell:
Score the side of the snail’s body and the back of the shell. Apply a little water or slip (liquid clay), then firmly press the shell onto the side of the body. I like to blend a tiny bit of clay from underneath the shell onto the body to lock it in place.
Texture Twist
Mix sanitized sand or dried coffee grounds into your cream clay before sculpting to create a speckled, stone-like texture naturally.
Step 3: Detailing & Finishing
-
Make the antennae stalks:
Roll two small, thin rods of cream clay for the eye stalks. Attach these to the top of the head, blending the clay downward so they stand tall and sturdy. -
Add the antennae tips:
Roll two tiny balls of terracotta clay. Gently press one onto the tip of each stalk, flattening them slightly like little mushrooms. -
Dry or bake:
If using air-dry clay, let the figure dry for 24-48 hours. If using polymer clay, bake according to the manufacturer’s instructions. -
Paint the face:
Using a fine detail brush and black acrylic paint, add two small dots for eyes and a long, sweeping ‘U’ shape for the smile. Keep the lines thin and delicate. -
Add rosy cheeks:
Dip a rounded tool or the back of a brush into pink paint. Dot cheeks onto the face on either side of the smile. You can soften the edges by dabbing with your finger before it dries. -
Seal the work:
Once the paint is fully dry, apply a thin coat of clear matte varnish to protect your snail and give it a finished, professional look.
Place your happy little snail near a potted plant to keep your greenery company
Big Mouth Chiclet-Tooth Monster
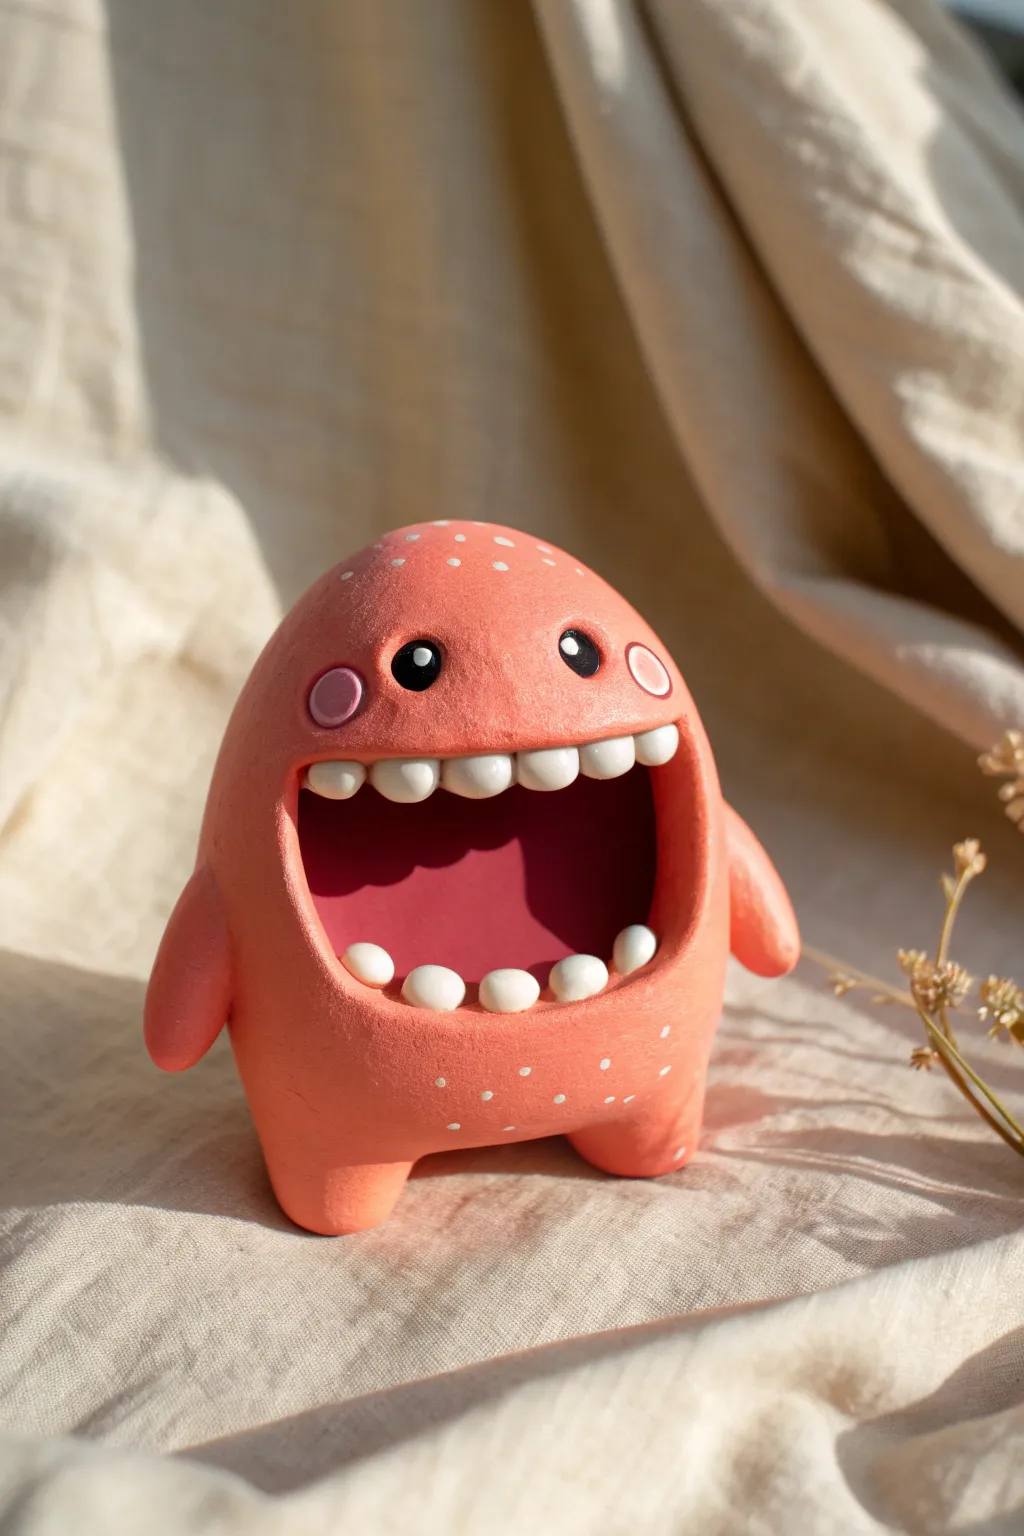
This friendly little creature features a delightful salmon-pink hue and an exaggerated, joyful expression dominated by its wide, toothy grin. With chubby little limbs and a speckled texture, this project is perfect for beginners looking to practice basic sculpting and expressive character design.
How-To Guide
Materials
- Polymer clay (Salmon pink, Black, White, Soft Pink)
- Foil or scrap clay (for armature)
- Clay sculpting tools (ball tool, needle tool)
- Acrylic paint (optional highlights)
- Glaze/Varnish (matte finish)
- Baking sheet and oven
Step 1: Forming the Body
-
Create the core:
Start by balling up a piece of aluminum foil into a vague egg shape, roughly 2-3 inches tall. This saves clay and keeps the monster lightweight. -
Cover the core:
Roll out a sheet of your salmon pink clay to about 1/4 inch thickness. Wrap this smoothly around your foil core, blending the seams until you have a smooth, solid egg shape. -
Sculpt the mouth cavity:
Using your thumbs, press deeply into the lower front of the egg shape to create a large, cavernous indentation. It should take up almost half the height of the body. -
Refine the mouth walls:
Smooth the inside of this indentation. The background of the mouth should be flat and deeply recessed to allow room for the teeth later. -
Add the mouth interior:
Blend a tiny bit of darker pink or red clay into the back wall of the mouth for depth, or simply smooth the salmon clay perfectly if you plan to paint the interior shadow later.
Fixing Falling Teeth
If the teeth won’t stick to the gums, dab a tiny amount of liquid translucent polymer clay (often called liquid Sculpey) on the back of each tooth before pressing it into place.
Step 2: Adding Features
-
Form the legs:
Roll two small, stubby cylinders of salmon clay. Attach these to the bottom of the body, blending the clay upwards so there are no visible seams. -
Add the arms:
Create two teardrop shapes for the arms. Attach them low on the sides of the body, letting them hang down casually. Blend the shoulder connection smoothly. -
Create the eyes:
Roll two small balls of black clay. Press them flat onto the face above the mouth, spacing them fairly wide apart. -
Add eye highlights:
Place a tiny dot of white clay in the upper corner of each black eye to give it life and spark. -
Make the cheeks:
Roll two small circles of soft pink clay. Press these onto the cheeks, just below and slightly outside the eyes.
Make it Functional
Before baking, make the mouth cavity extra deep and wide. After baking, this playful monster can double as a cute air plant holder or a spot to stash varied trinkets.
Step 3: The Chiclet Teeth
-
Prepare the teeth:
Roll a small snake of white clay and cut it into uniformed ‘chiclet’ square segments. I prefer to slightly round the corners of each square so they look friendly, not sharp. -
Place the upper row:
Press a row of about 6-7 teeth into the upper lip of the mouth cavity. They should hang down slightly from the upper ridge. -
Place the lower row:
Arrange about 5 teeth along the bottom lip ridge, spacing them slightly differently than the top row for a whimsical look. -
Texture the body:
Using a very small dotting tool or a toothpick, add tiny white dots of clay or paint randomly over the forehead and chin area for texture.
Step 4: Finishing Touches
-
Smooth the surface:
Do a final check for fingerprints. Brush a little baby oil or cornstarch over the clay (avoiding the eyes) to lightly smooth out any imperfections. -
Bake the monster:
Bake according to your polymer clay package instructions—usually around 275°F (135°C) for 15-30 minutes depending on thickness. -
Cool down:
Let the piece cool completely in the oven before handling to prevent cracking. -
Varnish:
Apply a coat of matte varnish to the body to protect the clay, and a gloss varnish to the eyes and teeth to make them look wet and shiny.
Once the varnish is dry, display your cheerful monster on a shelf to bring a smile to anyone who sees it


What Really Happens Inside the Kiln
Learn how time and temperature work together inside the kiln to transform clay into durable ceramic.
Tongue-Out Tease Monster
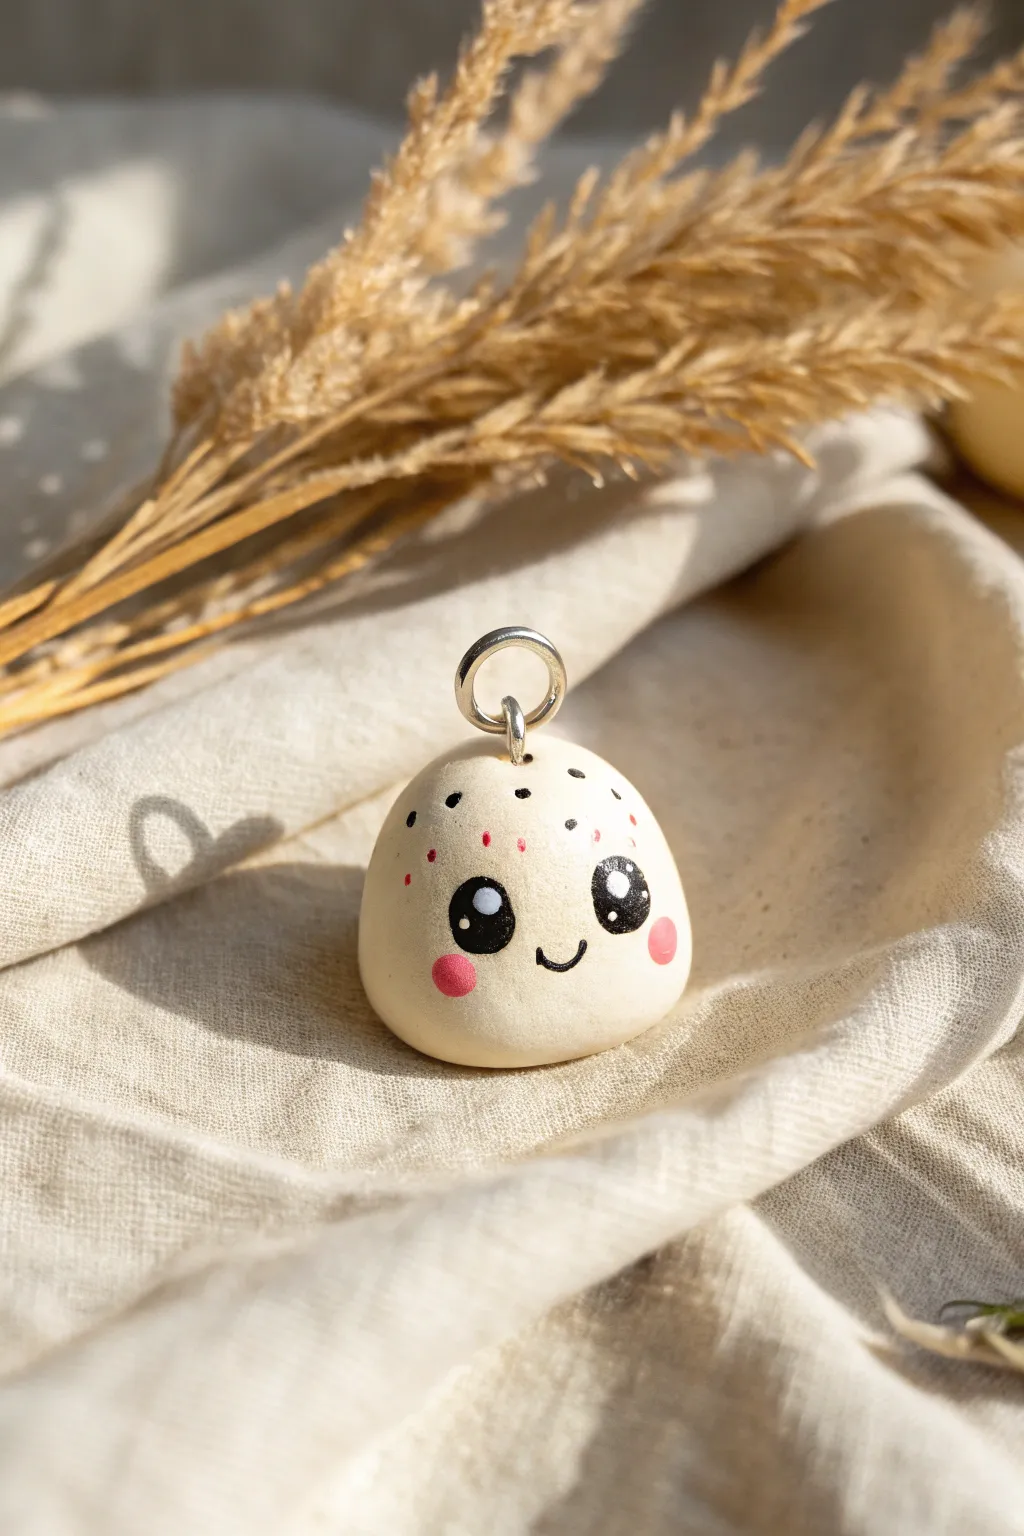
This charming little character is as simple as it is sweet, featuring a smooth, rounded shape and an adorably wide-eyed expression. With delicate speckling and bright pink cheeks, this clay pendant makes for a lovable accessory or keychain buddy.
Step-by-Step
Materials
- White polymer clay (approx. 1 oz)
- Black acrylic paint
- Pink acrylic paint
- Red acrylic paint (optional, for warmer speckles)
- Small detail paintbrush (size 00 or 000)
- Dotting tool or toothpick
- Metal jump ring (approx. 8-10mm)
- Eye pin (silver tone)
- Gloss glaze or polyurethane varnish
- Oven for baking clay
Step 1: Sculpting the Base
-
Condition the clay:
Start by taking a chunk of white polymer clay about the size of a walnut. Knead it thoroughly in your hands until it becomes warm, soft, and pliable to prevent cracking later. -
Form a ball:
Roll the clay between your palms to create a smooth, seamless ball. Check for any lint or dust and gently pick it off. -
Shape the droplet:
Gently press the ball down onto your work surface to create a flat bottom so it sits upright. Then, use your fingers to taper the top slightly, creating a soft, rounded droplet or gumdrop shape. -
Smooth the surface:
Dip your finger in a tiny bit of water (or baby oil) and lightly run it over the clay to smooth out any fingerprints. The surface should be matte and even. -
Insert the hardware:
Take your metal eye pin and carefully push it straight down into the center of the top of the shape. If the pin is too long, trim it first with wire cutters. -
Secure the pin:
Only leave the loop exposed. Gently nudge the clay back around the wire entry point so the pin is held firmly in place during baking. -
Bake the piece:
Place your sculpture on a baking sheet or tile. Bake according to your clay manufacturer’s instructions—usually around 275°F (130°C) for 15-20 minutes.
Uneven Eyes?
If you mess up an eye shape, don’t panic. While the paint is wet, quickly wipe it away with a damp Q-tip or wet wipe and try again once the surface is dry.
Step 2: Painting the Face
-
Cool down:
Let the piece cool completely before you start painting. Attempting to paint on warm clay can make acrylics dry too strictly or peel. -
Outline the eyes:
Using your smallest detail brush and black paint, carefully draw two large, oval shapes for the eyes. Place them relatively low on the face for that classic ‘cute’ proportion. -
Fill the eyes:
Fill in the ovals with solid black paint. I find it helpful to rotate the charm as I paint to keep the edges smooth. -
Add the smile:
Paint a tiny, curved ‘u’ shape directly between the eyes for a happy little smile. Keep the line thin and delicate. -
Paint the cheeks:
Dip a rounded tool (like the back of a paintbrush handle) into pink paint. Stamp two round circles just below and to the outside of the eyes for rosy cheeks. -
Add eye highlights:
Once the black paint is dry, use a toothpick dipped in white paint to add a large dot in the upper corner of each eye, followed by a tinier dot below it for sparkle. -
Create the speckles:
Mix a tiny amount of black paint with water to thin it. Dip an old toothbrush or stiff brush in it and flick it excessively lightly from a distance to create tiny speckles, or dot them on manually with a needle tool for precision. -
Add colored dots:
Using the very tip of your detail brush, add a few tiny red or pink micro-dots on the
Step 3: Finishing Touches
-
Allow to dry:
Let all the paint dry fully for at least 30 minutes to ensure you don’t smudge your hard work. -
Glaze the piece:
Apply a coat of gloss glaze or varnish over the entire charm to seal the paint and give it a porcelain-like shine. -
Attach the ring:
Open your large jump ring with pliers, loop it through the eye pin at the top of the charm, and close it securely.
Galaxy Variant
Swap the white clay for black or dark blue, and use white/silver paint for the speckles to turn this little monster into a cosmic space blob.
Now you have a durable, delightful little friend ready to hang on your bag or necklace
Sleepy Monster With Closed Eyes
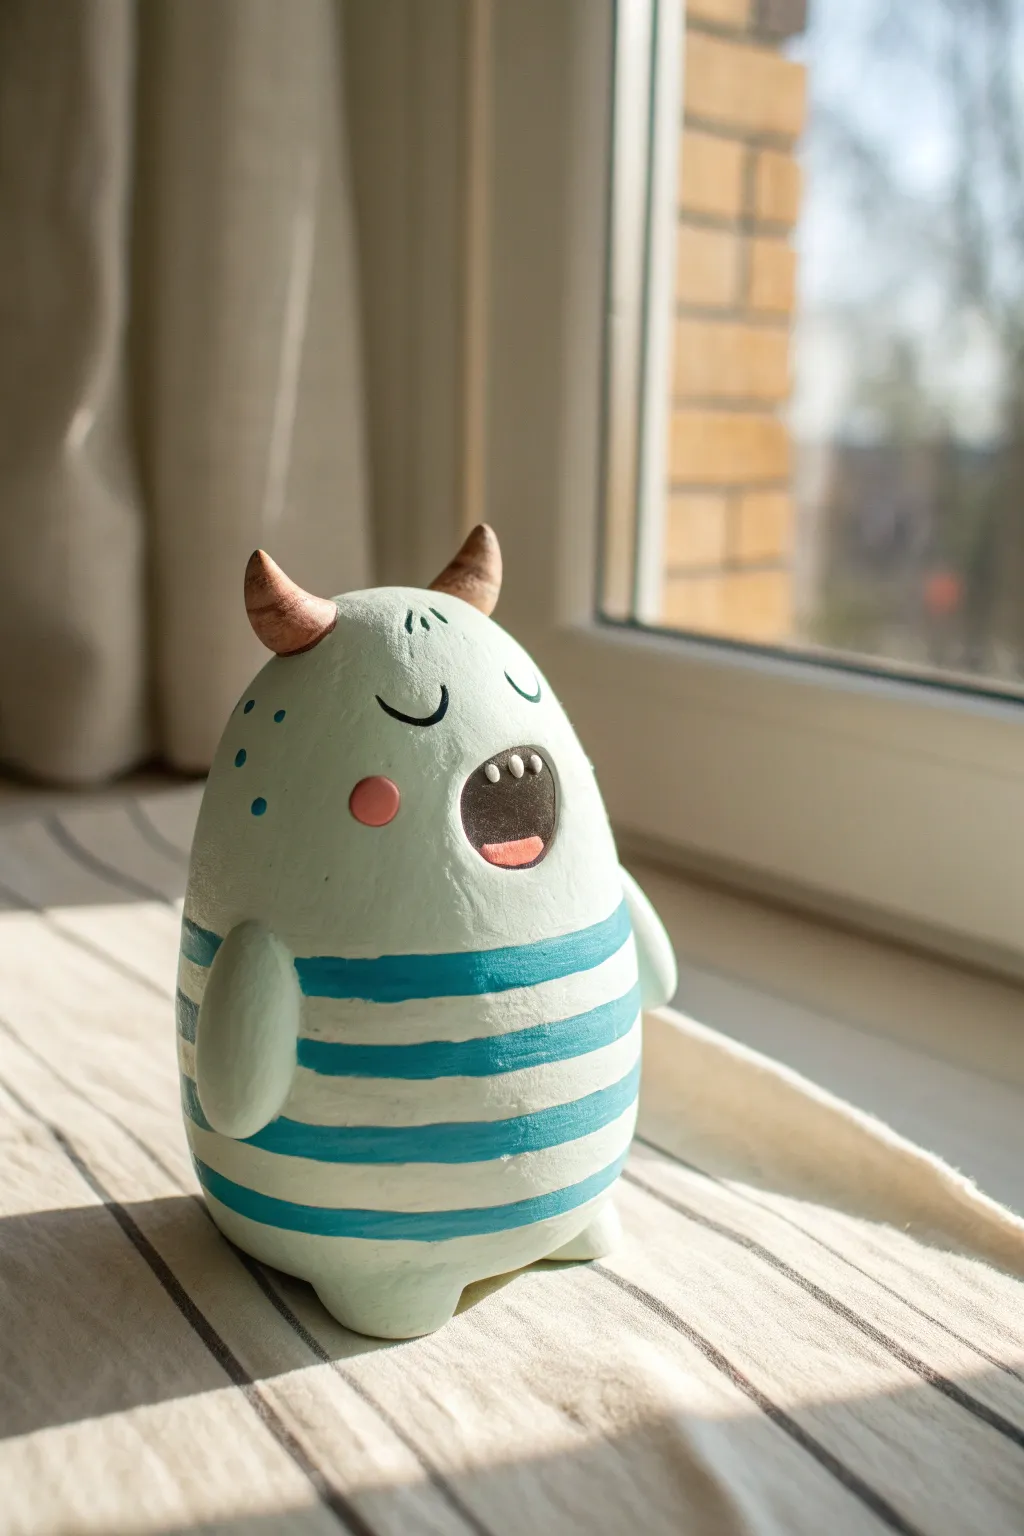
This charming, egg-shaped monster is caught mid-note in a sleepy lullaby, featuring a soft mint-green body wrapped in nautical blue stripes. With its tiny brown horns and expressive singing mouth, this project combines simple pinch-pot techniques with precise painting for a delightful desk companion.
Step-by-Step Tutorial
Materials
- Air-dry clay or polymer clay (white)
- Acrylic paints (mint green, teal blue, brown, black, pink, coral)
- Fine grit sandpaper
- Small bowl of water
- Sculpting tools (needle tool, smoothing tool)
- Paintbrushes (medium flat, fine detail)
- Matte varnish or sealant
Step 1: Sculpting the Body
-
Form the Base Shape:
Start with a large ball of clay about the size of a tennis ball. Roll it smooth between your palms, then gently elongate the top half to create a rounded egg shape that is slightly wider at the bottom for stability. -
Create the Feet:
Pinch two small sections at the very bottom front of your egg shape to pull out stubby little feet. Flatten the bottoms by tapping the whole figure gently against your table surface so it stands upright on its own. -
Add the Arms:
Roll two small, flattened sausage shapes for the arms. Score and slip the clay (scratch the surface and add water) on the sides of the body, then attach the arms facing downward, blending the seams smoothly into the torso so they look like one continuous piece. -
Sculpt the Horns:
Use a needle tool to gently scratch horizontal texture lines around each horn, mimicking the look of rugged bone or wood.
Step 2: Adding Facial Features
-
Form the Mouth Cavity:
Press your thumb or a rounded sculpting tool firmly into the upper center of the face to create a deep, oval indentation. This will be the open singing mouth. -
Add Teeth and Tongue:
Roll tiny tic-tac-sized pellets of clay for teeth and press them along the top inner ridge of the mouth. Add a small flat pad of clay at the bottom of the mouth cavity for the tongue. -
Refine and Dry:
Check the overall surface for fingerprints. Smooth them away with a slightly damp finger or sponge. Let the sculpture dry completely according to your clay’s instructions (usually 24-48 hours for air-dry clay).
Clean Stripe Hack
Struggling with straight lines? Wrap thin washi tape or masking tape around the dried body to mask off the stripe areas before painting the teal blue.
Step 3: Sanding and Priming
-
Sand the Surface:
Once fully cured, use fine-grit sandpaper to buff out any remaining bumps or roughness. Pay special attention to the seams around the arms and feet. -
Apply Base Color:
Paint the entire body (except the horns) with a pale mint green. You may need two to three thin coats to get an opaque, even finish. Let each coat dry fully before adding the next.
Turn It Functional
Before drying, cut a coin slot in the back and a hole in the bottom with a stopper to turn this sculpture into a functional piggy bank.
Step 4: Painting the Details
-
Paint the Stripes:
Using a flat brush and teal blue paint, carefully hand-paint horizontal stripes around the lower half of the body. I find it helps to rotate the monster on a lazy susan or piece of paper while holding the brush steady. -
Detail the Face:
Use your finest detail brush and black paint to draw two curved, U-shaped lines for the closed, sleeping eyes. Add tiny vertical ticks for eyelashes. -
Color the Cheeks and Horns:
Dab a perfect circle of coral or soft pink paint onto the cheeks. Paint the horns a solid medium brown. -
Fill the Mouth:
Paint the inside depth of the mouth dark brown or black. Carefully paint the tongue pink and leave the teeth white (or touch them up with white paint if they got messy). -
Add Finishing Touches:
Add three small teal dots near the left shoulder/cheek area for extra texture. Finally, coat the entire piece with a matte varnish to protect the paint and give it a finished, professional look.
Place your little singing monster on a windowsill where the light can catch his cheerful stripes

TRACK YOUR CERAMIC JOURNEY
Capture glaze tests, firing details, and creative progress—all in one simple printable. Make your projects easier to repeat and improve.
Monster Face Fridge Magnets Set
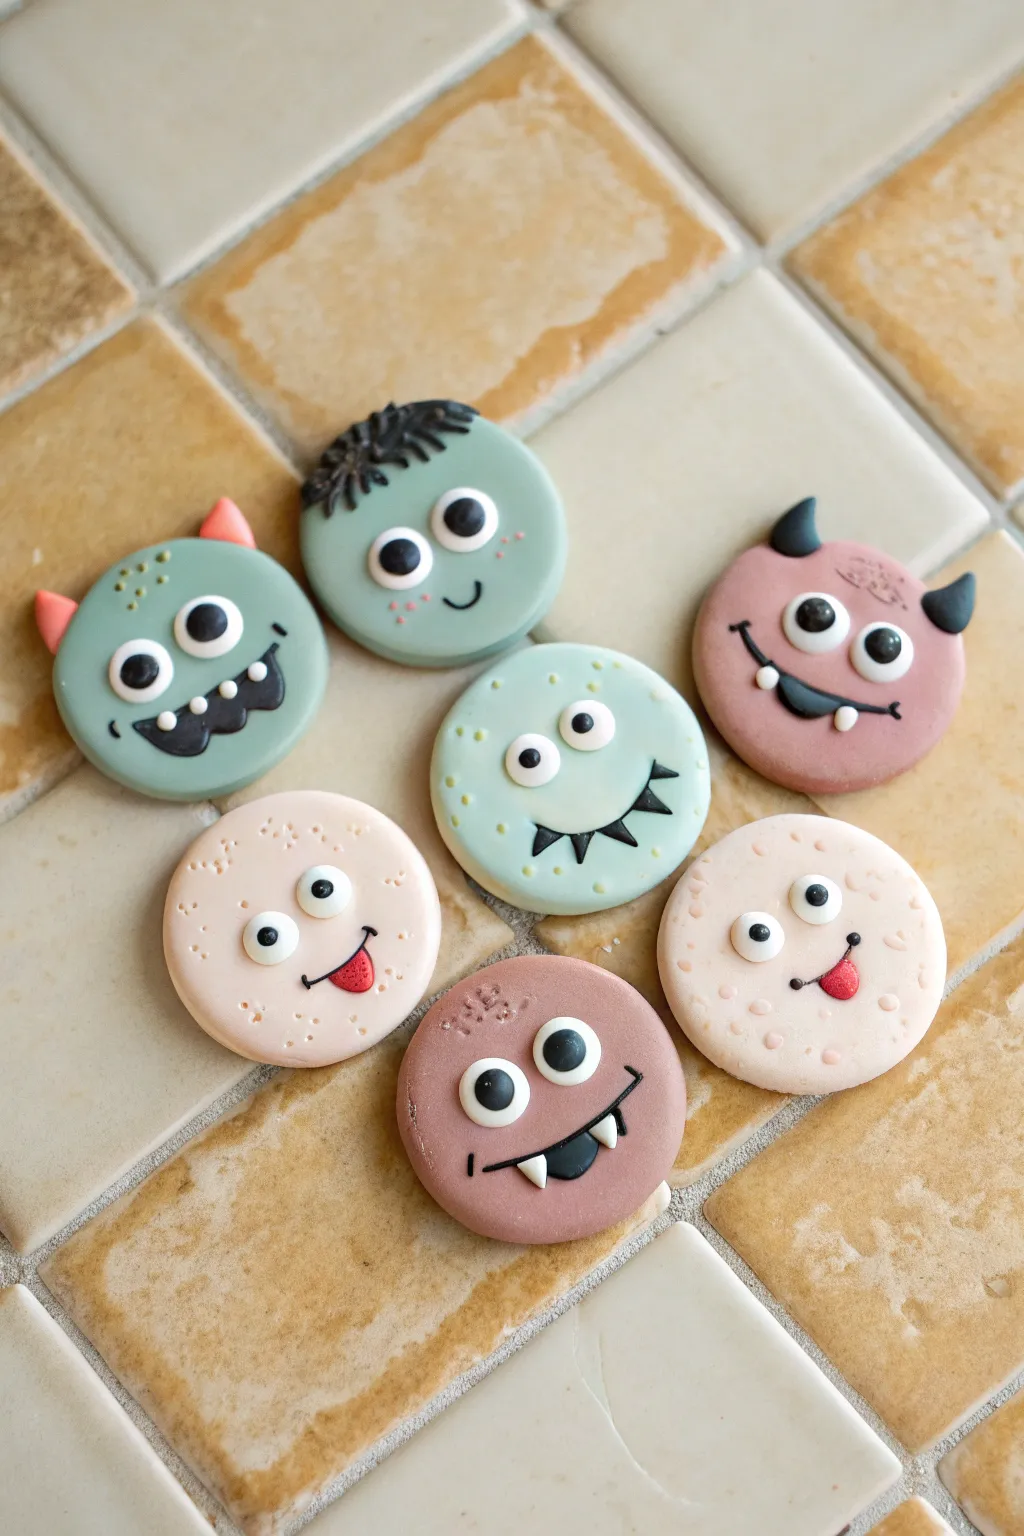
These adorable circular magnets feature muted pastel monster faces with a variety of silly expressions. By mixing simple shapes and minimal detailing, you can create a cohesive set of friendly creatures perfect for brightening up any fridge door.
Step-by-Step
Materials
- Polymer clay in pastel shades (sage green, light blue, dusty pink, pale peach, maroon)
- Polymer clay in black and white
- Circle cookie cutter (approx. 2 inches)
- Acrylic rolling pin
- Small ball stylus tool
- Needle tool or toothpick
- Strong round magnets
- Super glue or E6000
- Oven and baking sheet
- Parchment paper
Step 1: Base Preparation
-
Condition the Clay:
Start by warming up your pastel clay colors—sage green, light blue, dusty pink, maroon, and pale peach—by kneading them in your hands until they are soft and pliable. -
Roll the Slabs:
Roll out each color into a smooth slab about 1/4 inch thick. Aim for a consistent thickness across all colors so your finished magnet set looks uniform. -
Cut the Circles:
Using your circle cookie cutter, punch out seven rounds. You can mix and match the colors as shown: two sage, one light blue, one maroon, one pink, and two peach. -
Smooth the Edges:
Gently run your finger around the circumference of each circle to soften the sharp cut edge created by the cutter, giving the monsters a friendlier, rounded look.
Clean Clay Pro-Tip
Keep baby wipes nearby to clean your hands between colors. Dark colors like black or red can easily stain lighter pastel clays if you aren’t careful.
Step 2: Adding Expressions
-
Make the Eyes:
Roll small balls of white clay and flatten them gently onto the faces. Position them differently for personality—some centered, some wide apart. Add tiny black clay flattened balls for pupils. -
Create Simple Smiles:
For the peach and maroon monsters, roll extremely thin snakes of black clay. Curve them into smiles and gently press them onto the faces below the eyes. -
Sculpt Toothy Grins:
For the sage green monster, cut a small crescent shape from black clay. Press it onto the face, then add two tiny white triangles for fangs along the bottom edge. -
Add Tongues:
Give the peach monsters a playful look by adding a tiny teardrop shape of red or dark pink clay just sticking out of their black line mouths. -
Detail the Hair:
For the Frankie-style monster, flatten a small piece of black clay on top of the head area. Use your needle tool to score vertical lines, creating a messy hair texture. -
Attach Horns:
Shape tiny cones from contrasting colors (like pink on green, or black on pink). Press these gently onto the top edge of the designated monster circles to create little horns.
Step 3: Texturing and Finishing
-
Add Skin Texture:
Using a small ball stylus or a toothpick, gently stipple small dots or dimples onto the cheeks or foreheads of the monsters. This adds a nice tactile dimension to the flat surface. -
Create Freckles:
For the light blue monster, prick tiny groupings of holes with a needle tool to mimic freckles or monster spots. -
Bake the Clay:
Arrange the faces on a parchment-lined baking sheet. Bake according to your polymer clay package instructions (usually around 275°F or 135°C for 15-30 minutes). -
Cool Down:
Allow the clay pieces to cool completely on the baking sheet. Moving them while hot can cause them to warp or crack. -
Attach Magnets:
Flip the cooled monsters over. Apply a generous dab of strong adhesive like E6000 to the back of a round magnet and press it firmly into the center of the clay disc. -
Final Cure:
I usually let the glued magnets sit undisturbed overnight to ensure the bond is completely secure before sticking them to the fridge.
Troubleshooting: Fingerprints
If you see fingerprints on your smooth clay circles, lightly brush them with a little cornstarch or baby oil before baking to smooth them out.
Once the glue is dry, your quirky monster squad is ready to hold up your grocery lists and photos with style
Tiny Monster Planter Pal
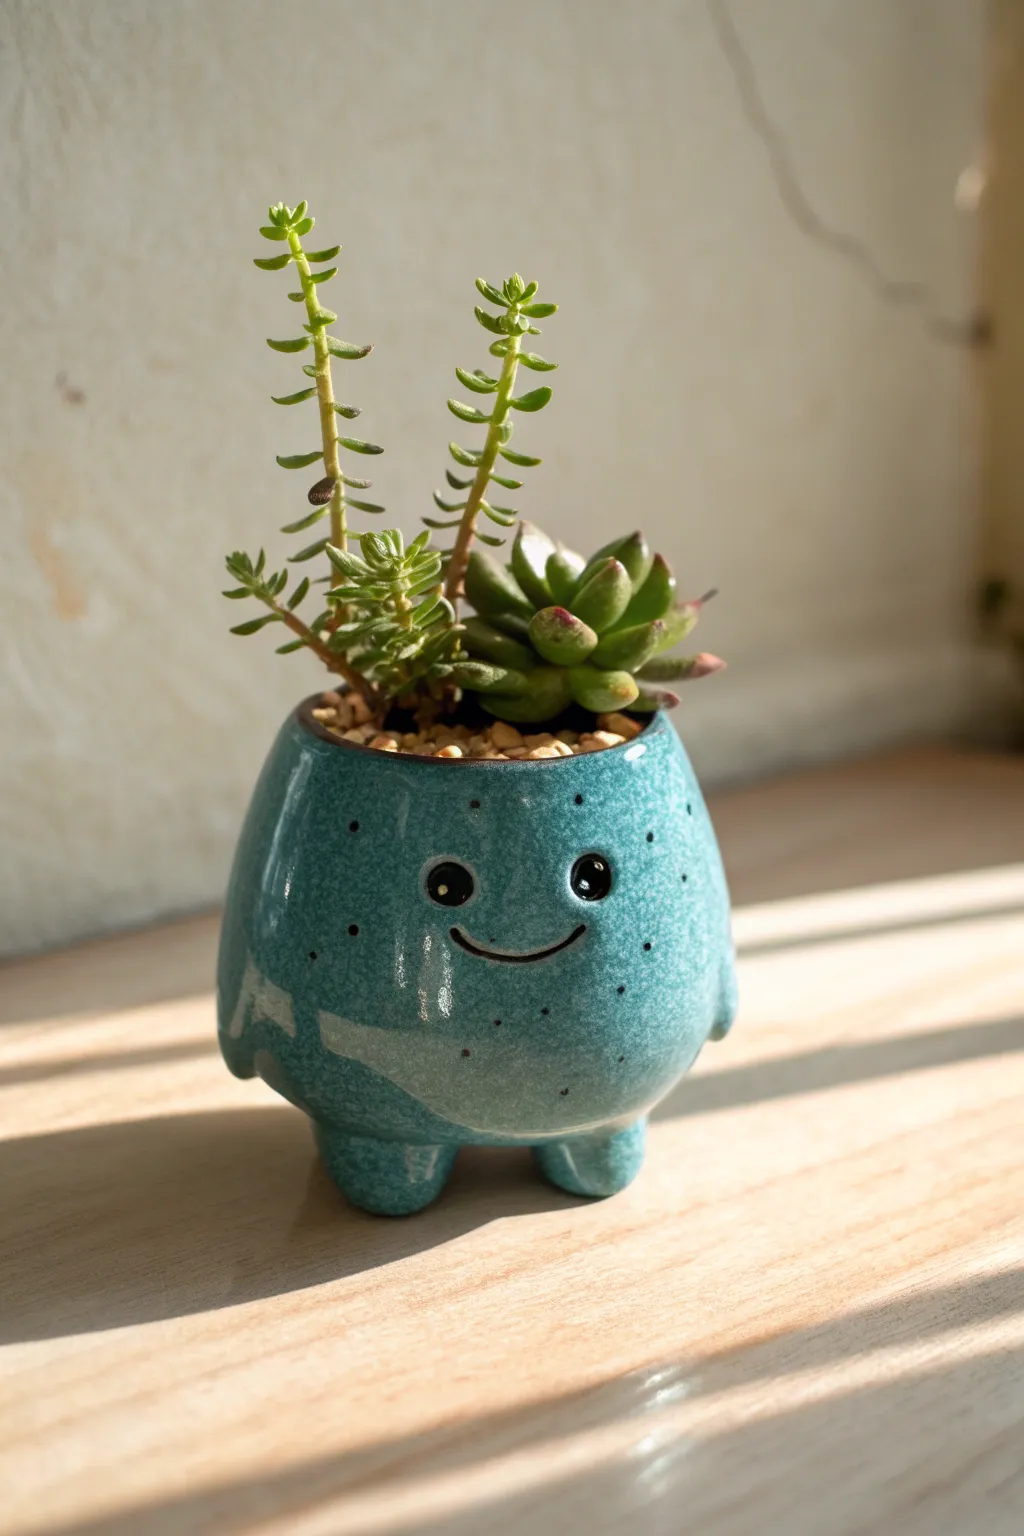
Transform a lump of clay into this adorable, speckled turquoise friend ready to hold your tiniest succulents. This little monster features stubby legs, a friendly smile, and a glossy glazed finish that makes the colors pop.
Step-by-Step Guide
Materials
- White or light-colored stoneware clay
- Pottery wheel (optional, creates the base shape easier) or rolling pin
- Modeling tools (wooden knife, needle tool)
- Small sponge
- Turquoise ceramic glaze (glossy)
- Black underglaze or glaze pen
- Clear glaze (if using underglaze)
- Kiln
- Succulent potting mix and small pebbles
Step 1: Shaping the Monster Body
-
Create the base form:
Start by throwing a small, rounded pot on the wheel with a slightly narrowed opening. If hand-building, create a pinch pot and smooth the outside until it is roughly egg-shaped with a flat top rim. -
Refine the curve:
Gently push the walls outward from the inside to create a chubby belly shape near the bottom. The form should taper slightly as it goes up. -
Add the legs:
Roll two small, equal-sized balls of clay for the feet. Flatten the tops slightly and score the clay where they will attach to the bottom of the pot. -
Attach and smooth:
Use slip to attach the legs to the base. Blend the clay seams thoroughly with a modeling tool or your finger so the legs look like they grow naturally from the body. -
Create little arms:
Roll two very tiny snakes of clay and attach them flush against the sides of the pot to resemble small arms resting at the monster’s side. Blend the edges until they are subtle bumps. -
Punch drainage holes:
Don’t forget to poke a hole in the bottom of the pot between the legs for drainage, especially for succulents. -
Dry partially:
Let the piece dry to a leather-hard state where it is firm but still carveable.
Smooth Seams Tip
When attaching the stubby legs, use a barely damp paintbrush to smooth the connection point perfectly. This prevents cracking during drying.
Step 2: Giving It Face and Color
-
Carve the expression:
Using a needle tool, lightly sketch the placement of the eyes and mouth. The mouth should be a simple upward curve. -
Deepen features:
Press a small round tool into the clay to create slight indentations for the eyes, giving them depth before firing. -
Bisque fire:
Once bone dry, fire the piece in the kiln to bisque temperature. -
Apply the base glaze:
Dip the entire pot into a turquoise speckled glaze. Shake off excess drops gently. Ensure the coat is even but not so thick that it obscures the tiny arm details. -
Clean the feet:
Wipe the very bottom of the feet with a damp sponge to remove glaze so it doesn’t stick to the kiln shelf. -
Paint the face details:
Using a fine brush and black underglaze (or a specialized glaze pen), carefully fill in the eye indentations and trace the smile line over the dry turquoise glaze. -
Add eye highlights:
Dip the very tip of a needle tool into white glaze and place a tiny dot in each black eye pupil for that spark of life. -
Final smooth:
I like to gently rub any rough glaze spots with my finger to ensure a perfect finish before the final firing. -
Glaze fire:
Fire the piece again to the temperature required by your specific glaze instructions.
Make It a Family
Create a whole set in different sizes and glaze colors. Try a purple one with three eyes or a green one with a toothy grin to build a monster squad.
Step 3: Planting Your Pal
-
Prepare for planting:
Once cool, fill the bottom third of the pot with small pebbles for extra drainage. -
Add the greenery:
Fill with succulent soil and gently plant a tall succulent (like a jelly bean sedum) in the back and a rosette type in the front for a balanced look. -
Top dressing:
Sprinkle decorative golden gravel over the soil surface to finish the look.
Now you have a charming little ceramic companion to brighten up your windowsill
Pinch-Pot Mouth Desk Holder Monster
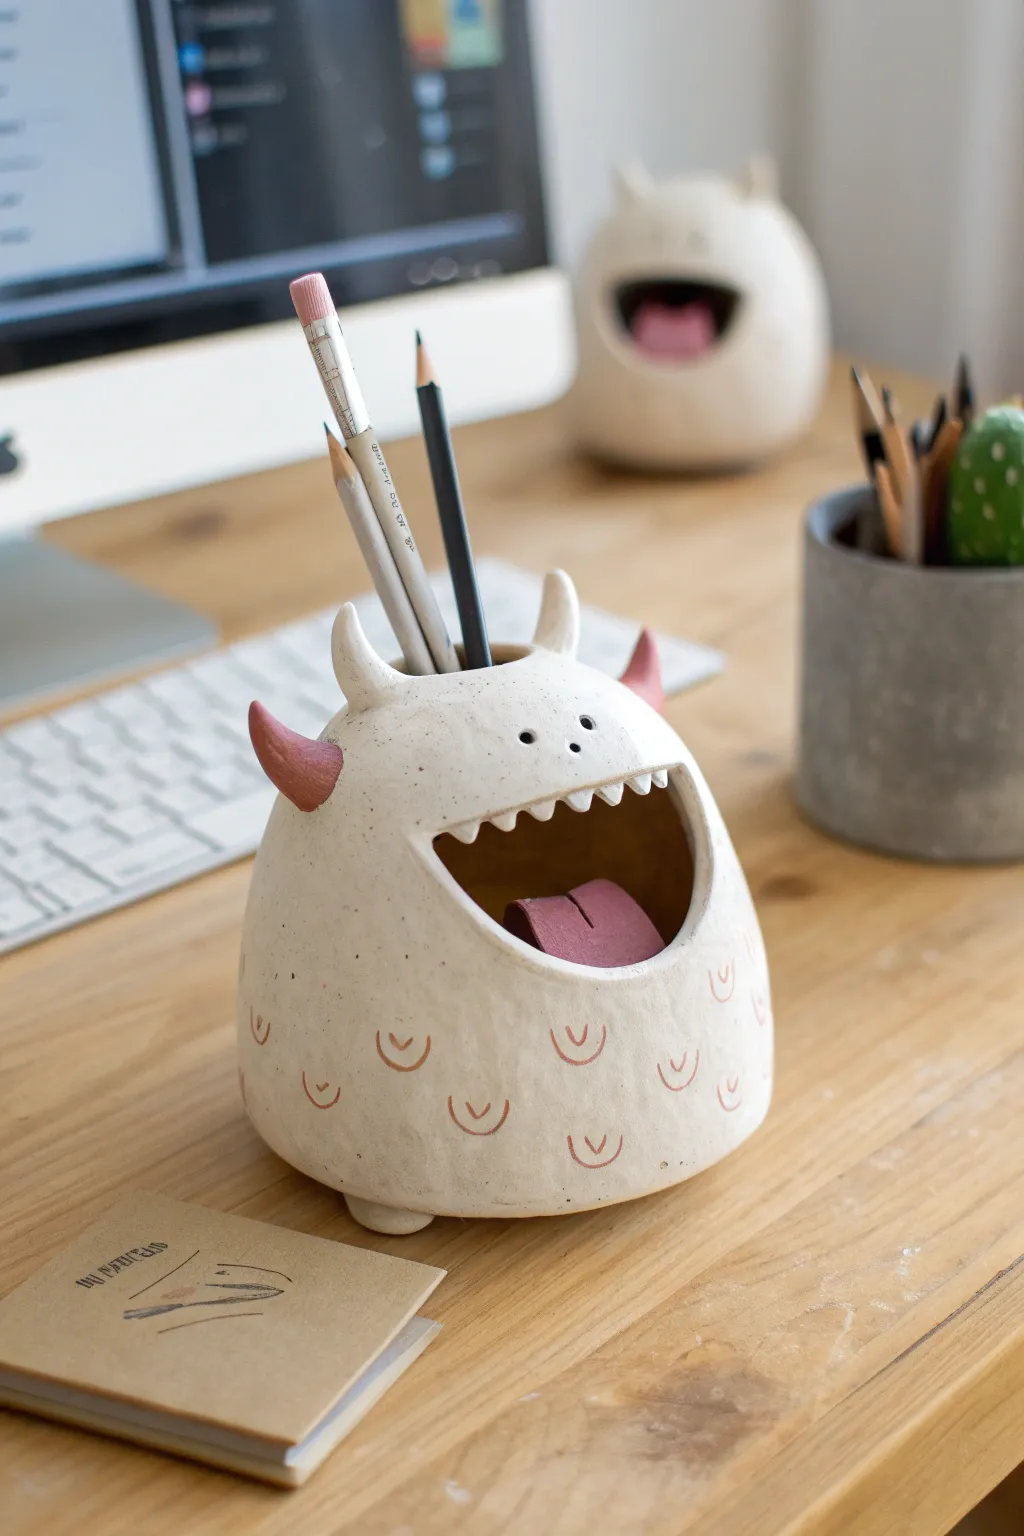
This whimsical desk companion doubles as a pencil holder and a catch-all for small items. With its charmingly irregular teeth, playful tongue, and polka-dot texture, this white clay monster adds personality to any workspace while keeping your stationery tidy.
Step-by-Step Tutorial
Materials
- White earthenware or stoneware clay
- Pottery tools (needle tool, sponge, modeling tool)
- Slip (clay mixed with water)
- Pink underglaze or acrylic paint (if not firing)
- Clear glaze (if firing)
- Rolling pin
- Paintbrush
Step 1: Forming the Body
-
Create the base pinch pots:
Start with two balls of white clay, roughly the size of large oranges. Stick your thumb into the center of each and pinch the walls evenly while rotating to create two bowl shapes. -
Join the pots:
Score the rims of both pinch pots by scratching cross-hatch marks with a needle tool. Apply slip to the scored areas. -
Seal the join:
Press the rims together firmly to form a hollow sphere. Smear the clay across the seam with your thumb or a modeling tool until the line disappears completely. -
Shape the monster body:
Gently paddle or roll the sphere on your work surface to flatten the bottom slightly so it stands stable. Squeeze the top gently to elongate the shape into a rounded, egg-like form.
Step 2: Sculpting the Features
-
Cut the mouth:
Using a needle tool, cut a wide, curved ‘U’ shape into the front of the body. Remove this slice of clay to create the gaping mouth opening. -
Refine the lips:
Smooth the cut edges of the mouth with a damp sponge so they are rounded and neat, not sharp. -
Create the pencil holder hole:
Cut a circular hole in the very top of the head, large enough to fit several pencils or pens. Smooth these edges as well. -
Add the teeth:
Roll tiny cones of clay for the upper teeth. Score and slip the upper inside lip of the mouth, then attach the teeth pointing downward. -
Form the tongue:
Flatten a small piece of clay into a tongue shape. Score and slip it onto the bottom floor of the mouth interior, curling the tip upward slightly for a dynamic look. -
Attach the horns:
Roll two medium-sized cones for horns. Attach them to the sides of the head using the score-and-slip method, blending the clay at the base for a seamless transition. -
Add feet:
Form extremely small balls of clay and flatten them slightly. Attach three or four to the base to give the monster little feet. -
Make the eyes:
Use a small hole-punch tool or a straw to press two small indents for eyes above the mouth. Poke two tiny nostrils between the eyes for extra character.
Smoother Surfaces
Before cutting the mouth, let the hollow sphere sit for an hour to become leather-hard. This prevents the shape from collapsing while you carve.
Step 3: Decoration and Finish
-
Texture the skin:
Using a small U-shaped carving tool or the end of a bobby pin, gently stamp or carve small semi-circles all over the body to create a scaly texture. -
Bisque fire:
Allow the piece to dry completely (bone dry) before firing it in a kiln to bisque temperature. -
Apply color:
Paint the horns, the tongue, and the stamped semi-circle scales with a soft pink underglaze. I find a fine-tip brush works best for getting inside the stamped lines. -
Clear glaze:
Dip or brush a clear glaze over the entire piece (avoiding the bottom of the feet) to seal the clay and make the pink accents pop. -
Final firing:
Fire the piece a second time to the temperature required by your specific glaze and clay body.
Make it Glow
For a spooky twist, skip the pencil hole and place a battery-operated tea light inside the mouth to turn your monster into a cute nightlight.
Once fired and cooled, your friendly monster is ready to gobble up your pencils and guard your desk.
Stackable Monster Totem Trio
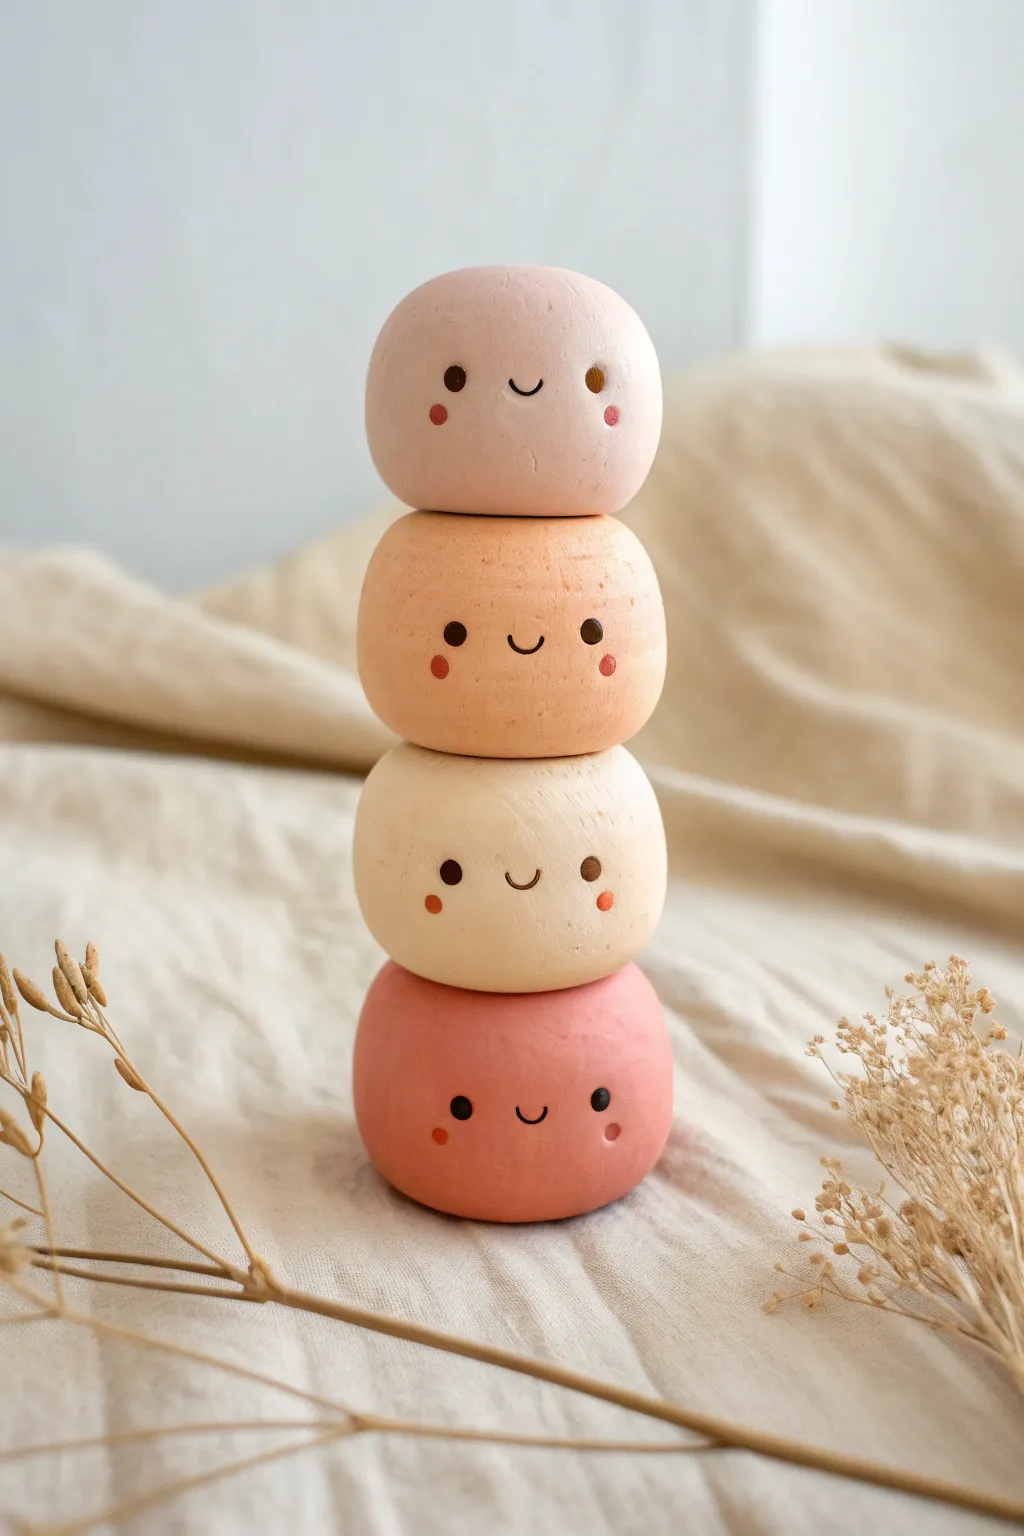
Create a charming desk companion with this stack of four smooth, rounded clay friends in a gradient of soft, earthy pastels. Their simple, joyous faces and satisfyingly imperfect organic shapes make them a delightful beginner sculpting project.
Step-by-Step Guide
Materials
- Polymer clay (air-dry clay works too)
- Acrylic paints: white, terracotta, peach, blush pink, brown, black
- Matte varnish or sealant
- Fine grit sandpaper
- Dotting tool or small ball stylus
- Fine detail paintbrush (size 00 or 000)
- Foil or scrap clay for armatures (optional)
- Toothpick or wire for structural support
Step 1: Shaping the Base Forms
-
Portioning the Clay:
Begin by dividing your clay into four roughly equal portions. You want enough clay to form balls about 1.5 to 2 inches in diameter. -
Conditioning:
Knead each portion of clay thoroughly in your hands until it warms up and becomes pliable. This prevents cracks later on. -
Rolling the Spheres:
Roll each portion between your palms to create a smooth sphere. Don’t worry about perfect geometric precision; a hand-rolled look adds character. -
Creating the Flattened Look:
Gently press each sphere down onto your work surface to flatten the bottom. Then, press lightly on the top to create a slightly squashed, marshmallow-like shape. -
Test Stacking:
Before baking or drying, stack the four pieces to ensure they balance well. Gently press them together to create slight indentations where they meet, which helps stability later. -
Adding Structural Support:
For extra security, you can push a toothpick or a piece of wire vertically through the center of all four pieces while they are stacked. Separate them carefully afterwards for baking.
Wobbly Towers?
If your stack keeps tipping over, the bottoms aren’t flat enough. Use coarse sandpaper to grind the bottom of each hardened piece until perfectly level before gluing.
Step 2: Smoothing and Prepping
-
Refining the Surface:
Rub a tiny bit of water (for air-dry clay) or baby oil (for polymer) over the surface to smooth out fingerprints. -
Curing or Drying:
Bake your polymer clay according to the package instructions, or let air-dry clay sit for 24-48 hours until fully hardened. -
Sanding:
Once hardened, use fine-grit sandpaper to buff away any remaining lint, bumps, or uneven spots. Wipe away the dust with a damp cloth.
Step 3: Painting and Detailing
-
Mixing Custom Colors:
Mix your acrylics to create a soft, warm palette. Aim for a gradient: a pale blush pink for the top, a warm peach for the second, a creamy off-white for the third, and a deeper terracotta rose for the base. -
Base Coats:
Paint each clay ‘bun’ entirely in its designated color. I find that two thin coats provide a much smoother finish than one thick gloop. Let dry completely. -
Painting the Eyes:
Using a dark brown or black paint and a dotting tool, place two small eyes wide apart on the ‘face’ area of each piece. Keep the spacing consistent for a uniform look. -
Adding the Smile:
With your finest brush and the same dark paint, draw a tiny, shallow ‘U’ shape exactly centered between the eyes. Keep the line thin for delicacy. -
Rosy Cheeks:
Mix a slightly darker or redder version of each body color. Use a dotting tool to add tiny blush marks just outside and below the eyes.
Perfect Blush
For softer, more natural cheeks, use a dry brush technique or real powdered blush makeup instead of paint to dust on the rosy spots.
Step 4: Assembly and Finish
-
Final Assembly:
Once the paint is bone dry, stack your pieces back in order. Use a strong craft glue or epoxy between the layers to permanently fix them into a totem. -
Sealing:
Apply a coat of matte varnish over the entire sculpture. This protects the paint and gives that soft, ceramic-like finish seen in the photo.
Place your adorable totem on a shelf where its cheerful smiles can greet you every day
Pastel Sprinkle Party Monster
This adorable speckled friend brings a playful charm with its soft aqua hue and single, curious eye. Standing on sturdy little legs with tiny brown horns, it’s a delightful desktop companion that perfectly balances spooky and sweet.
Detailed Instructions
Materials
- Polymer clay (light aqua/mint green, white, black, brown)
- Clay sculpting tools (dotting tool, needle tool)
- Acrylic roller or pasta machine
- Liquid polymer clay (optional, for adhesion)
- Hobby knife
- Smooth work surface (ceramic tile or glass mat)
- Oven for baking
Step 1: Shaping the Monster’s Body
-
Create the base form:
Start with a generous ball of light aqua or mint green polymer clay. Roll it in your palms until smooth and free of cracks, then gently shape it into an elongated egg or potato shape. -
Form the legs:
Stand your egg shape upright. Using your thumb or a rounded modeling tool, gently push up into the bottom center of the clay to create an arch, dividing the base into two stubby legs. -
Refine the stance:
Press the feet gently against your work surface so the monster stands flat and stable. Smooth out the area between the legs to keep it rounded and soft-looking. -
Taper the head:
Gently gently squeeze the top portion of the body so it is slightly narrower than the base, giving it a cute, pear-like silhouette.
Step 2: Adding Arms and Features
-
Sculpt the arms:
Roll two smaller logs of aqua clay for the arms. Flatten one end of each log to blend it onto the body, keeping the other end rounded like a mitten without a thumb. -
Attach the arms:
Press the arms onto the sides of the body, positioned slightly lower than the halfway point. Blend the seams at the shoulders using a silicone tool or your finger so they look seamless. -
The single eye socket:
Decide where the face will be. Use a large ball tool or the pad of your thumb to press a shallow indentation into the upper front of the face where the eye will sit. -
Create the eyeball:
Roll a neat ball of white clay that fits snugly into your indentation. I usually flatten the back slightly before pressing it in so it doesn’t bulge out too far. -
Add the pupil:
Take a tiny pinch of black clay, roll it into a ball, flatten it into a disc, and place it in the center of the white eye. Add a minuscule dot of white clay on the pupil for a ‘sparkle’ highlight.
Clean Clay Pro-Tip
Use baby wipes or hand sanitizer to clean your hands thoroughly before switching from the dark brown clay back to the light aqua or white to avoid smudges.
Step 3: Adding Details and Texture
-
The mouth line:
Roll a very thin ‘snake’ of brown clay. Carefully lay it in a wide U-shape curve below the eye to form a smile. Press it gently to adhere. -
Add tiny teeth:
Shape two incredibly small cones of white clay. Place them on the brown mouth line, pointing upward like little fangs, spacing them apart for a goofy look. -
Create the horns:
Form two small cones from brown clay. Curve the tips slightly inward or backward to give them character. -
Attach the horns:
Place the horns on top of the head. You can blend the base of the horns onto the head slightly or leave a distinct seam depending on your preference. -
Apply the eyelid:
Roll a thin snake of aqua clay and flatten it. Place it over the top edge of the white eyeball to create an eyelid, blending the top edge into the forehead so it looks natural. -
Create the speckles:
Take a needle tool or a sharp toothpick. Gently poke shallow, tiny holes all over the monster’s green skin—on the body, arms, and head—to simulate the speckled texture seen in the photo. -
Fill the speckles:
This is the trickiest part: take extremely tiny bits of brown clay and press them into the holes you just made. Alternatively, you can bake the piece first and paint these brown dots later with a fine brush.
Fixing Falling Horns
If the horns keep sliding off while you work, insert a small piece of wire or a toothpick snipped in half into the head to act as an internal armature.
Step 4: Baking and Finishing
-
Final smooth check:
Look over your monster for any fingerprints. Buff them out gently with a drop of baby oil on your finger if needed. -
Bake carefully:
Bake the monster according to your polymer clay package instructions (usually around 275°F or 130°C for 15-30 minutes). Let it cool completely in the oven to prevent cracking.
Once cooled, your cute monster is officially ready to guard your desk with its gentle smile
Glow-in-the-Dark Night Buddy Monster
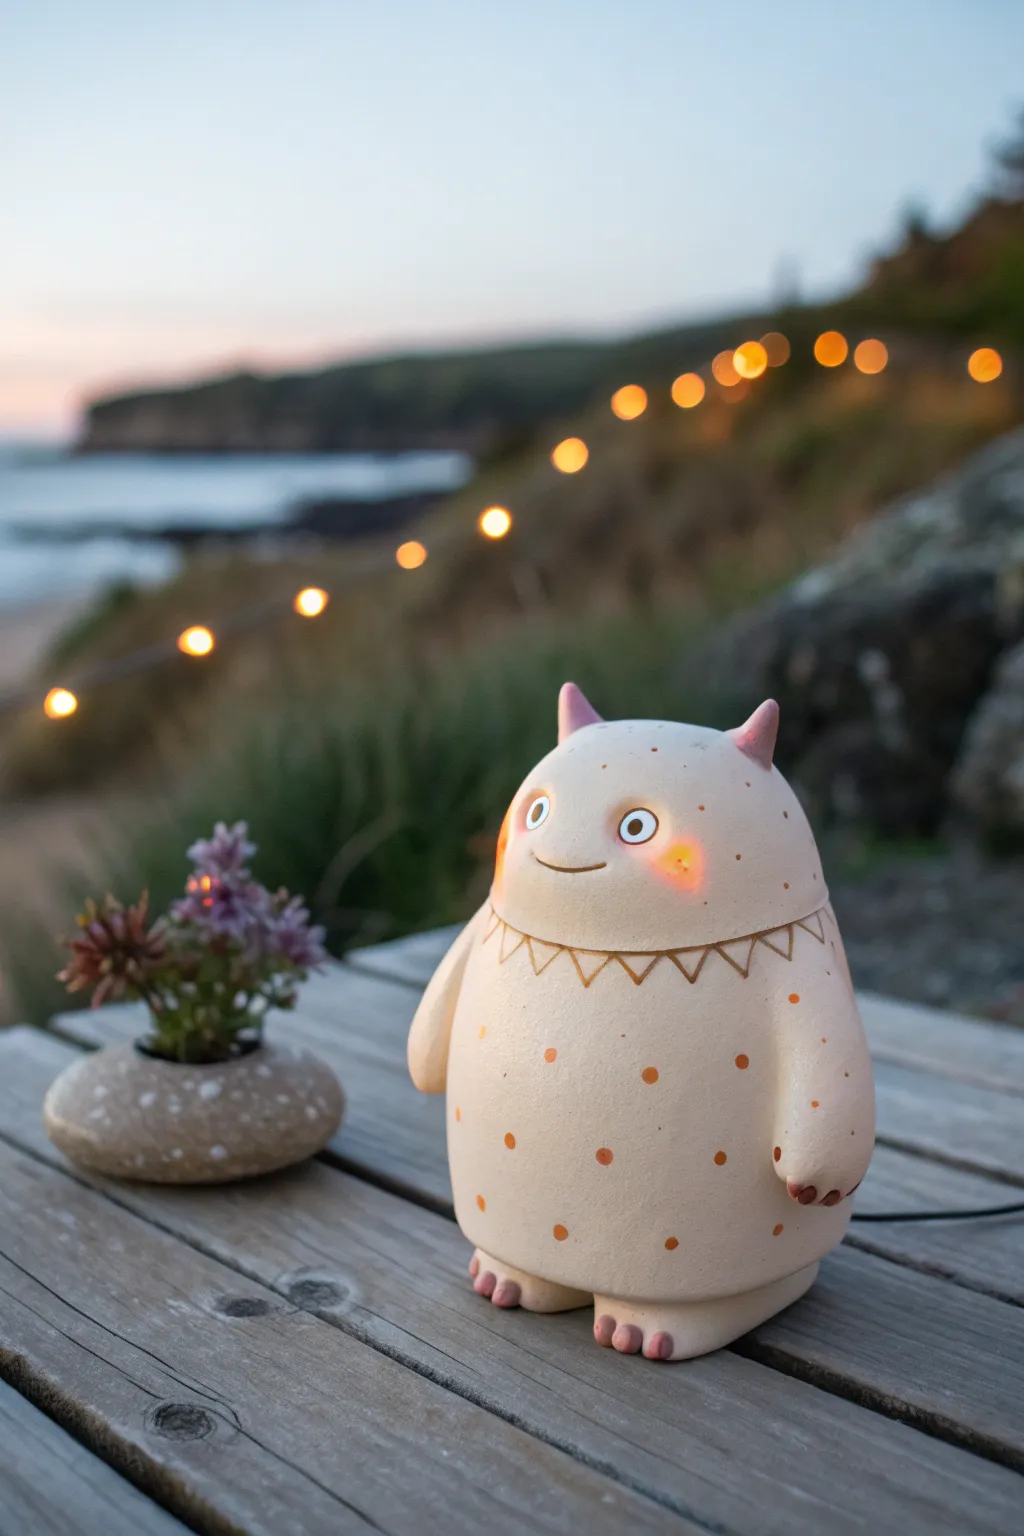
Create a charming, rotund companion to light up your evenings with this clay luminary project. This gently glowing monster features a smooth cream body, playful orange speckles, and tiny illuminated cheeks that add warmth to any bedside table.
Step-by-Step Tutorial
Materials
- Light-colored polymer clay or air-dry clay (approx. 500g)
- Acrylic paints (Cream/Beige, Soft Orange, Pink)
- Gloss varnish or sealant
- LED tea light or small fairy light strand
- Basic sculpting tools (needle tool, ball tool)
- Small round piping tip or straw (optional for dots)
- Fine-grit sandpaper
- Paintbrushes (detail and broad)
Step 1: Forming the Base Body
-
Core Structure:
Begin by conditioning your clay until it is soft and pliable. Roll a large ball of clay, roughly the size of a grapefruit, to serve as the main body. -
Shaping the Torso:
Gently taper the top of the ball slightly to create an egg-like shape, but keep the bottom wide and flat so the monster sits sturdily. -
Hollowing Out:
If you plan to put a light inside, now is the time to hollow it out. Carefully pinchpot the bottom upwards, thinning the walls to about 1/4 inch thickness so light can eventually filter through or fit underneath. -
Smoothing the Canvas:
Use a little water (for air-dry clay) or baby oil (for polymer) to smooth out any fingerprints. The surface should be as seamless as possible before adding details. -
Creating the Lid Seam:
About one-third of the way down from the top, use a needle tool to lightly score a horizontal line around the circumference. This visual line suggests a ‘lid’ or separation, though we aren’t actually cutting it open yet.
Step 2: Adding Character Details
-
Tiny Ears and Horns:
Roll two small cones of clay and attach them to the very top of the head for horns. Blend the seams downward so they look like they grow naturally from the skull. -
Arms and Hands:
Fashion two sausage shapes for arms. Attach them low on the sides of the body. Use a small knife tool to gently press indentations for fingers or claws at the ends. -
Sturdy Feet:
Create two flat, oval pads for feet. Press them underneath the front of the body so they poke out slightly. Use a tool to define three or four little toes on each foot. -
Facial Features:
For the eyes, press two small indentations into the face area. Roll tiny balls of white clay and press them in, adding minute black pupils. Create a wide, gentle smile by pressing a curved line with a tool. -
Geometric Neck Pattern:
Using a fine-point tool, carve a zigzag pattern just below the ‘lid’ line you scored earlier. This creates a triangular collar effect distinct from the rest of the body. -
Cheek Glow Holes:
To let the light shine through the cheeks specifically, carefully poke a few tiny holes or thin the clay significantly in the cheek area where the blush will go.
Cracks while drying?
If you see hairline cracks in air-dry clay, mix a small amount of fresh clay with water to make a paste (slip) and fill the cracks. Smooth over and let dry again.
Step 3: Finishing and Painting
-
Baking or Drying:
Follow manufacturer instructions to bake your polymer clay or let your air-dry clay cure completely (this may take 24-48 hours depending on thickness). -
Sanding:
Once hardened, use fine-grit sandpaper to buff away any rough spots, especially around the base and horns. -
Base Coat:
Paint the entire figure in a soft cream or beige tone. I find applying two thin coats gives a smoother finish than one thick one. -
Detailing the Zigzags:
Use a fine brush to paint the zigzag line in a contrasting brownish-gold tone to define the neck area. -
Apply the Polka Dots:
Dip the handle end of a paintbrush into soft orange paint and dot it randomly over the lower body to create the spotted texture. -
Blushing Cheeks:
Dry brush a little pink or coral paint onto the cheeks, right over the thinned areas or holes, to enhance the glow effect when lit. -
Sealing:
Finish with a coat of semigloss varnish to protect the paint and give the monster a ceramic-like sheen.
Make it Shine
Mix glow-in-the-dark powder into your orange paint for the polka dots. When the lights go out, the spots will glow independently from the internal LED light.
Now you have a softly glowing friend ready to keep the shadows at bay