I love how a pinch pot rattle turns the simplest handbuilding move into something you can actually hear. Here are my go-to pinch pot rattle ideas, starting with classic critters and ending with a few playful twists I can’t resist trying in the studio.
Classic Round Frog Rattle
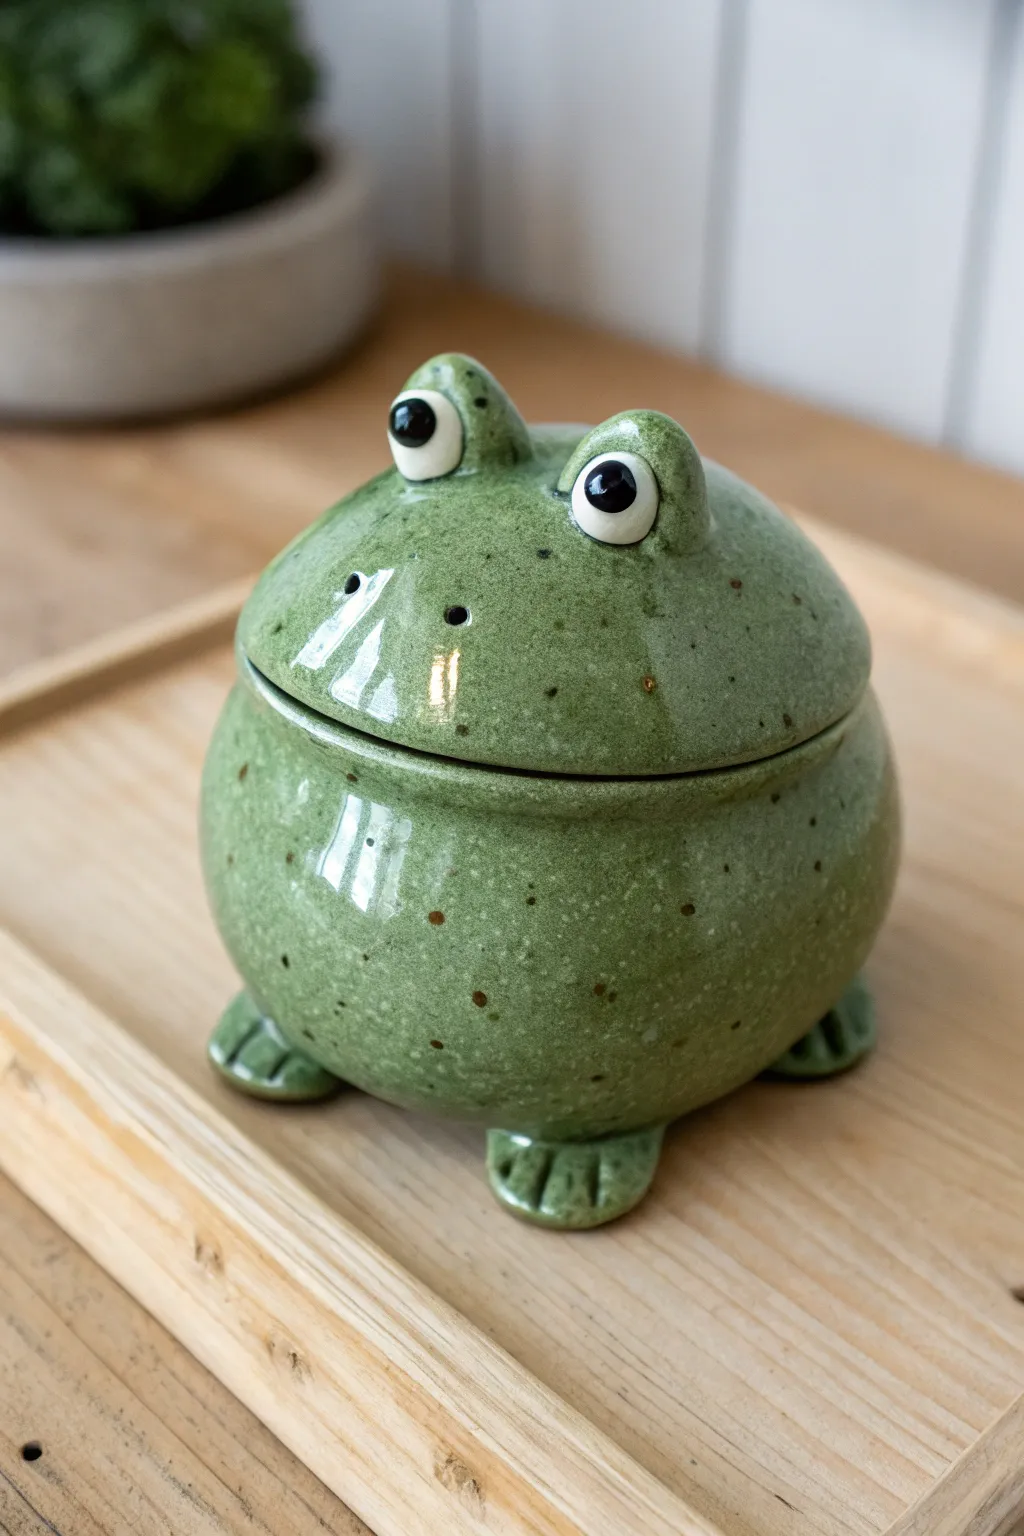
This charming ceramic rattle takes the form of a roly-poly frog with a gentle speckled green glaze and prominent, curious eyes. Its hollow, round body fits perfectly in the hand, making a pleasant sound when shaken.
How-To Guide
Materials
- Earthenware clay (white or light buff)
- Clay rattle beads (small dried clay balls)
- Newspaper or paper towel
- Scoring tool or needle tool
- Slip (liquid clay)
- Wooden paddle or spoon
- Sponge
- Underglaze (black and white)
- Speckled green transparent glaze
- Clear glaze (optional over eyes)
- Kiln
Step 1: Forming the Body
-
Create two pinch pots:
Start with two balls of clay roughly the size of tennis balls. Push your thumb into the center of each and gently pinch the walls while rotating to create two varying hemispheres. -
Prepare the rattle interior:
Before joining, place 5-7 small dried clay beads inside one of the pinch pots. Wrap them loosely in a small piece of newspaper to prevent them from sticking to the walls during construction (the paper will burn away later). -
Score and slip:
Rough up the rims of both pinch pots using your scoring tool and apply a generous amount of slip to the textured areas. -
Join the halves:
Press the two halves together firmly. Use your thumb to smooth clay across the seam, dragging clay from one side to the other until the join is completely invisible and the form is sealed. -
Shape the sphere:
With the air and beads trapped inside, gently paddle the exterior with a wooden spoon to shape it into a perfect, slightly squat round body. This compression also strengthens the wall structure.
Stuck beads?
If the rattle doesn’t sound after firing, the beads may be stuck to the side. Tap the frog firmly against a cushioned surface to dislodge them.
Step 2: Adding Frog Features
-
Define the mouth:
Find the center of your sphere. Using a needle tool, draw a deep line horizontally across the upper third to represent the mouth. Don’t cut all the way through; imply a wide, friendly grin. -
Sculpt the legs:
Roll four small coils of clay. Attach two to the bottom front and two to the bottom back for feet. Flatten the ends slightly and use a tool to press in toe indentations. -
Attach the feet:
Score and slip the feet securely to the base of the body. Press the body down gently onto a table so the frog sits flat and stable. -
Form the eyes:
Roll two small balls of clay for the eye sockets. Attach them to the top of the head, spacing them apart slightly. Use your thumb to create a concave depression in the front of each mound. -
Insert eyeballs:
Roll significantly smaller balls of white clay (or regular clay to be painted later) and slip them into the depressions you just made, so they bulge out slightly. -
Add nostrils:
Pierce two small holes below the eyes for nostrils. This is crucial—these holes allow the trapped air to escape during firing so your frog doesn’t explode.
Step 3: Glazing and Finishing
-
Bisque fire:
Allow the frog to dry slowly and completely before firing it in the kiln to a bisque temperature suitable for your clay body. -
Paint the eyes:
Apply white underglaze to the eyeballs. Once dry, add a large black pupil in the center. I like to add a tiny white dot on the black pupil as a ‘catchlight’ to bring the character to life. -
Apply wax resist:
Paint liquid wax resist carefully over the white and black eye areas. This prevents the green glaze from adhering to the eyeballs. -
Glaze the body:
Dip the frog into a speckled green transparent glaze, or brush on three even coats. The speckles in the glaze will give the frog a natural, spotted texture. -
Final wipe:
Use a damp sponge to wipe any glaze off the very bottom of the feet so it doesn’t stick to the kiln shelf. -
Glaze fire:
Fire the piece a second time to the recommended temperature for your glaze. Once cool, shake it to hear the rattle.
Air Escape Vent
Never forget the air hole! If you don’t want visible nostrils, hide a small vent hole discreetly underneath the frog between the back legs.
Enjoy the rhythmic sound of your finished ceramic friend


Turtle Shell Pinch Pot Rattle
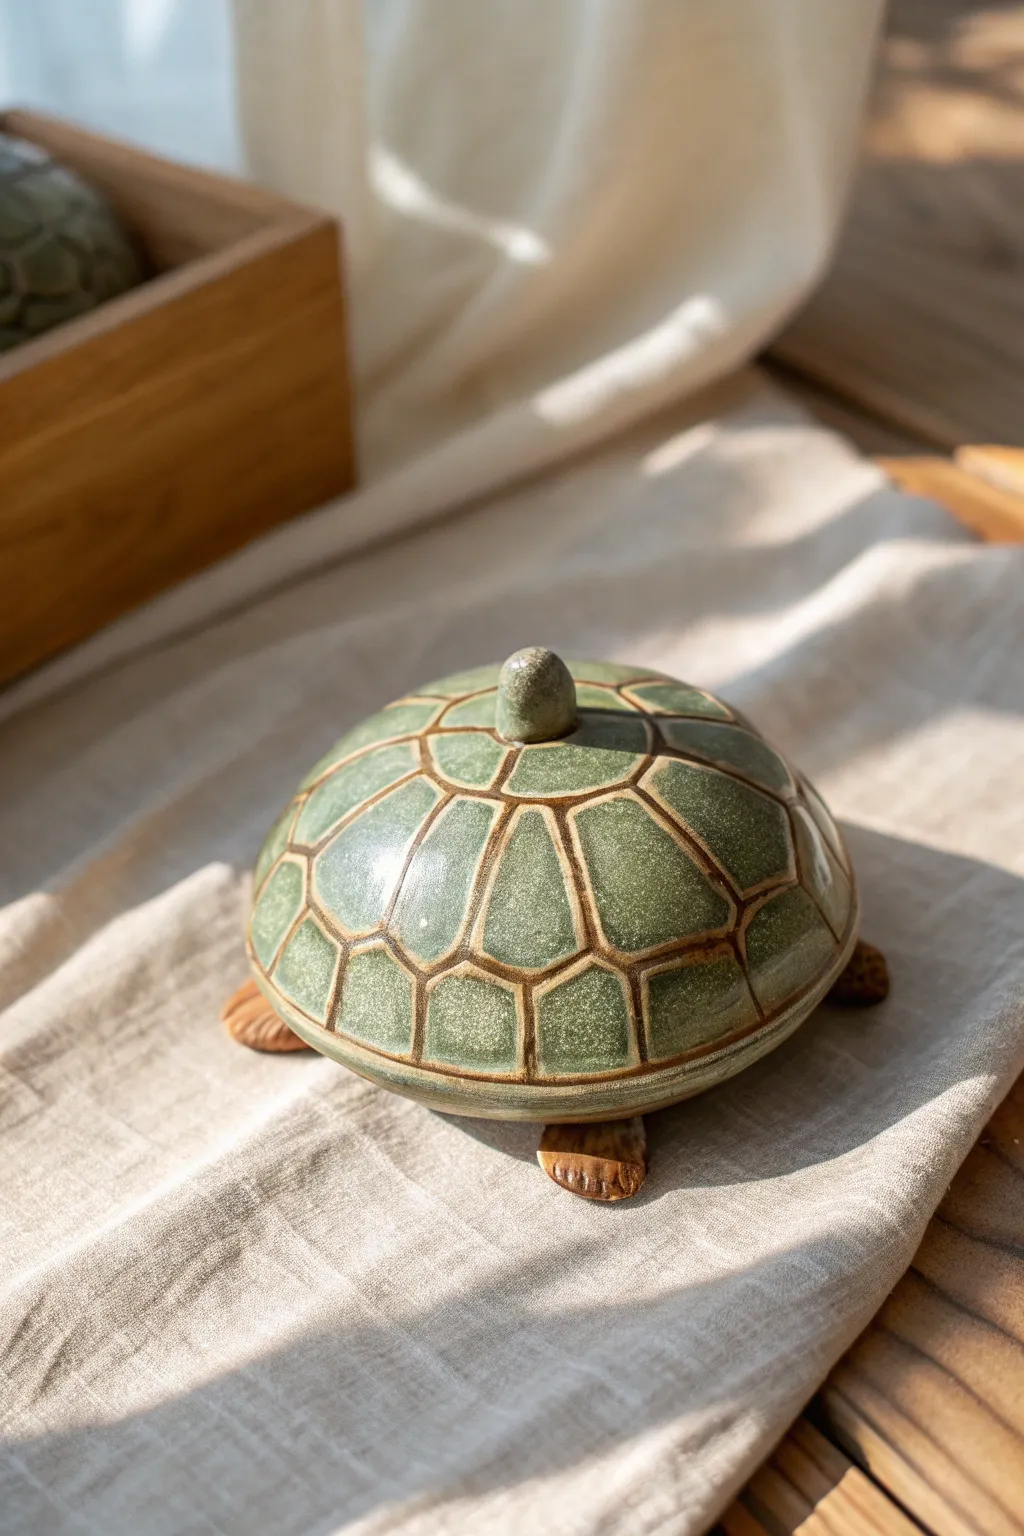
This charming ceramic rattle combines the ancient technique of pinch pots with a delightful turtle motif, featuring a rich green glaze and distinct shell segmentation. It’s not just a beautiful shelf piece; when shaken, the hidden clay beads inside create a gentle, satisfying sound.
Step-by-Step
Materials
- Stoneware clay (smooth body recommended)
- Clay slip (or vinegar)
- Newspaper or paper towel
- Wooden modeling tool or needle tool
- Small kidney rib (metal or rubber)
- Sponge
- Celadon or Oribe green glaze (cone 5/6 or suitable for your clay)
- Iron oxide wash or brown underglaze
- Small clay beads (pre-made and dried)
- Soft paintbrush
- Scoring tool (serrated rib)
Step 1: Forming the Rattle Body
-
Prepare the sphere:
Begin by wedging a ball of clay roughly the size of a tennis ball. Divide this ball into two equal halves to ensure your pinch pots will match in size. -
Create pinch pots:
Take one half-ball and press your thumb into the center. Gently pinch and rotate the clay between your thumb and fingers to thin the walls, creating a deep bowl shape. Repeat with the second half. -
Add the noise makers:
Before joining, place 8-10 small, bone-dry clay pellets or balls inside one of the pots. You can wrap them loosely in a small piece of newspaper to prevent them from sticking to the walls while you work; the paper will burn away in the kiln. -
Join the halves:
Score the rims of both pinch pots thoroughly with a serrated tool. Apply slip or vinegar to the scored areas. Press the two halves together firmly to create a sealed hollow sphere. -
Shape the shell:
Gently paddle the sphere on your work surface to flatten the bottom slightly—this will be the rattle’s belly. Retain the high dome shape on top for the shell. -
Smooth the seam:
Using a wooden tool or your thumb, drag clay across the seam to knit the halves together. Follow up with a kidney rib to smooth the entire surface until the join is invisible.
Step 2: Sculpting Details
-
Add the feet:
Fashion four small, flattened ovals of clay. Score and slip the underside of the ‘belly’ and attach these feet so they just barely peek out from under the shell. -
Texture the feet:
Use a needle tool or small knife to press vertical lines into the exposed parts of the feet, simulating toes. -
Attach the knob:
Roll a small nub of clay into a rounded cone shape. Score and slip the very center of the shell’s dome and attach this knob firmly. -
Design the shell pattern:
Using a needle tool, lightly sketch the turtle shell pattern. Start with a circle around the center knob, then draw radiating lines down to the rim, connecting them with horizontal lines to form the scutes (plates). -
Deepen the grooves:
Once satisfied with the sketch, go over the lines with a carving tool or a modeling tool to create deep, V-shaped channels. This channel depth is crucial for the glaze effect later. -
Refine the surface:
Use a damp sponge to smooth away any burrs or sharp crumbs of clay created by the carving process.
Air Escape Pro-Tip
Since this is a sealed hollow form, use a needle tool to poke a tiny, inconspicuous hole (perhaps near a foot) to let expanding air escape during firing.
Step 3: Glazing and Finishing
-
Bisque fire:
Allow the piece to dry slowly and completely. Bisque fire it to the appropriate temperature for your specific clay body (usually Cone 04). -
Apply oxide wash:
Paint a dark iron oxide wash or brown underglaze into all the carved grooves. Use a wet sponge to wipe the oxide off the raised surfaces, leaving the dark color only in the recesses. -
Apply the green glaze:
Dip or brush a translucent green glaze (like a Celadon) over the entire shell. The glaze should be thin enough to let the oxide lines show through but thick enough to pool slightly at the edges. -
Glaze the details:
I prefer to leave the feet unglazed for a nice textural contrast, or you can use a matte brown oxide wash on them. Ensure the bottom is wiped clean of glaze. -
Final firing:
Fire the piece to the glaze’s recommended temperature (e.g., Cone 5/6). The heat will fuse the shell, and the internal manufacturing paper will burn away, releasing the rattle beads.
Muffled Rattle Fix
If your rattle doesn’t make noise after firing, the beads may be stuck. Gently tap the piece against a wooden surface to dislodge the internal beads.
Place your finished turtle in a sunny spot where the light can catch the beautiful glassy depth of the shell.


Plump Pig Pinch Pot Rattle
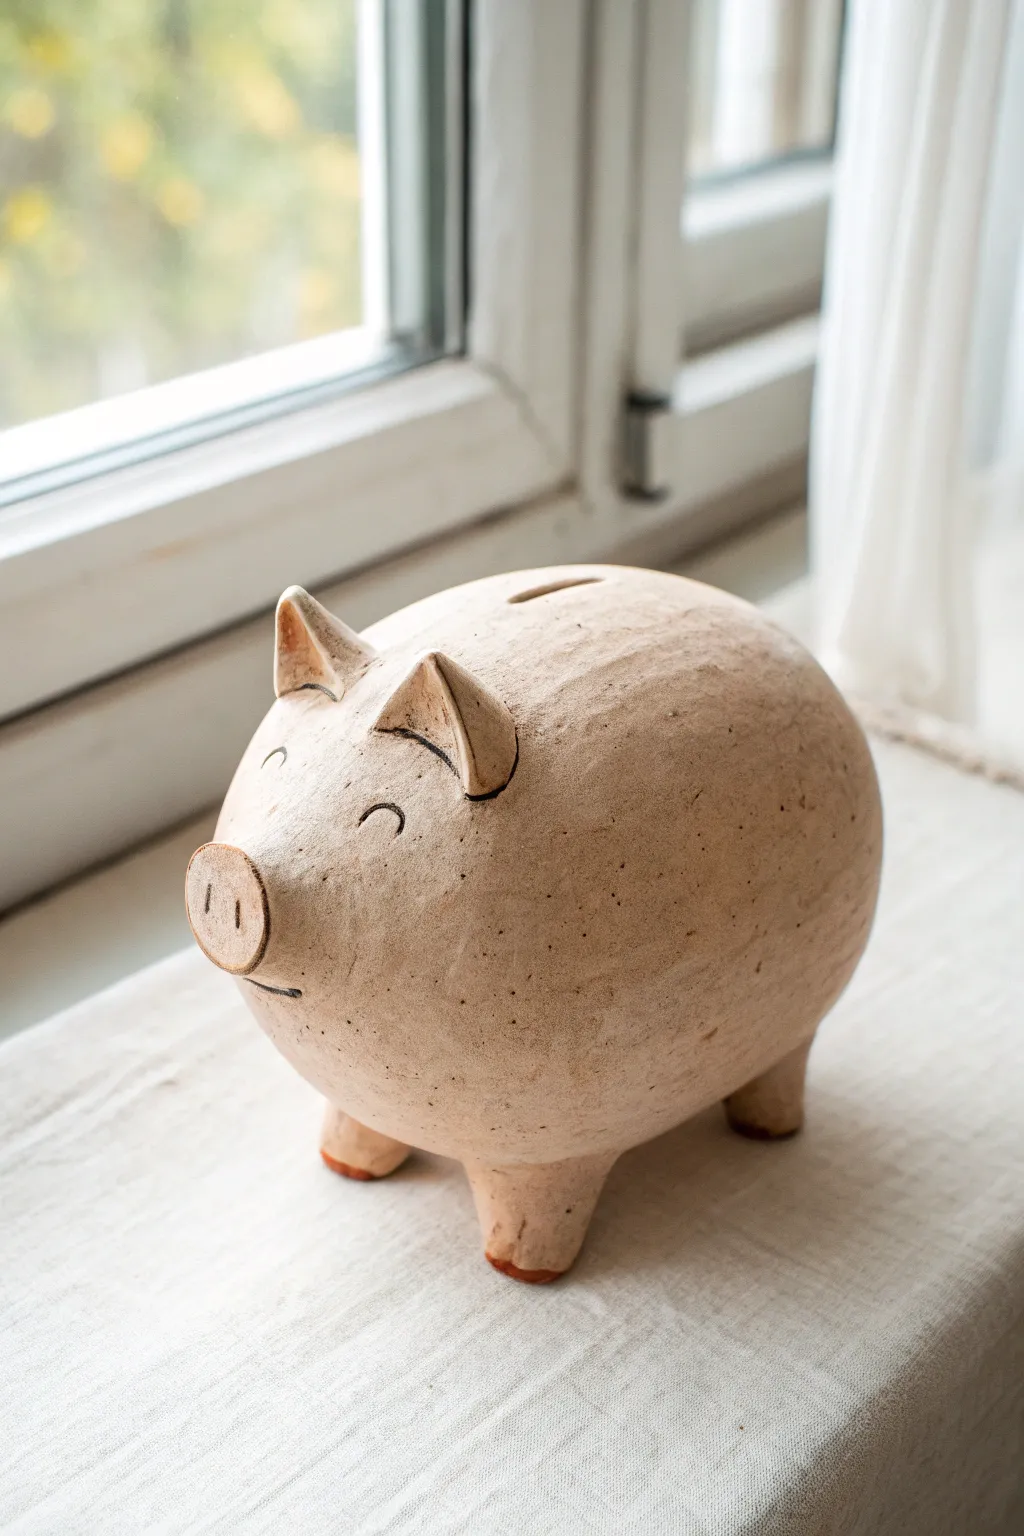
This charming, rotund pig is crafted using the classic double pinch pot method, resulting in a delightfully chubby silhouette. Its natural, unglazed finish highlights the earthy speckled clay and simple carved details for a rustic, handmade feel.
Detailed Instructions
Materials
- Speckled stoneware clay (or air-dry clay)
- Small clay beads or dried beans (for rattle)
- Scoring tool or fork
- Slip (clay and water mixture)
- Wooden modeling tool
- Needle tool
- Sponge
- Small paintbrush
- Black underglaze or acrylic paint
Step 1: Forming the Body
-
Create two pinch pots:
Start by rolling two equal balls of clay, roughly the size of oranges. Insert your thumb into the center of each and gently pinch the walls while rotating to create two bowl shapes. -
Thin and stick:
Note the thickness of your walls; aim for an even 1/4 inch thickness throughout. Tap the rims gently on a table to flatten them slightly, which makes joining easier. -
Insert the rattle element:
Before closing the form, wrap a few small clay balls (or dried beans if not firing in a kiln) in a small piece of newspaper or paper towel and place them inside one of the pots. -
Join the halves:
Score the rims of both pots vigorously with your scoring tool, apply a generous amount of slip, and press the two halves firmly together to create a closed sphere. -
Seal the seam:
Using a wooden tool or your thumb, drag clay across the seam to knit the two halves together. Smooth the area with a damp sponge until the join line completely disappears and the body is round.
Step 2: Adding Features
-
Shape the nose:
Roll a small ball of clay and flatten it into a thick disc. Score and slip the back of the disc and attach it to the front of the body, pressing firmly to secure it. -
Detail the snout:
Use a needle tool or the end of a paintbrush to press two vertical oval indentations into the disc to create nostrils. -
Create the ears:
Form two small triangles of clay. Gently curve them forward to give them a perky, alert appearance. -
Attach the ears:
Score and slip the base of each ear and attach them near the top of the head, blending the clay at the back of the ear downward into the body for a strong bond. -
Make the legs:
Roll four short, stout cylinders of clay. Tap them on the table to flatten the bottoms so the pig will stand stably. -
Stand him up:
Attach the legs to the bottom of the body using the score and slip method. I find it helpful to gently tap the whole pig on the table once the legs are on to level it out.
Rattle Sound Tip
Wrap your rattle beads in paper before sealing inside. The paper burns away in the kiln (or degrades), leaving loose beads that rattle cleanly.
Step 3: Finishing Touches
-
Cut the slot:
If you want this to double as a bank, carefully cut a thin rectangular slot into the top center of the pig’s back using a fettling knife. -
Refine the surface:
Wipe the entire pig down with a slightly damp sponge to remove any fingerprints or rough crumbs of clay. -
Carve the eyes:
Using a sharp needle tool, carve two small semi-circles for the closed, happy eyes. Add small markings inside the ears for depth. -
Dry properly:
Allow the piece to dry slowly under plastic for at least a day to prevent cracking, then uncover to bone dry. -
Highlight details:
Once dry (or bisque fired if using kiln clay), use a thin brush to paint black underglaze or paint into the eye curves, mouth line, and ear details. -
Wipe back:
Use a damp sponge to wipe away excess black paint from the surface, leaving the color only deep within the carved lines.
Curly Tail Upgrade
Roll a thin ‘snake’ of clay and coil it into a corkscrew shape. Attach it to the rear for a classic piggy tail that adds 3D character.
Give your pig a gentle shake to hear that satisfying rattle sound


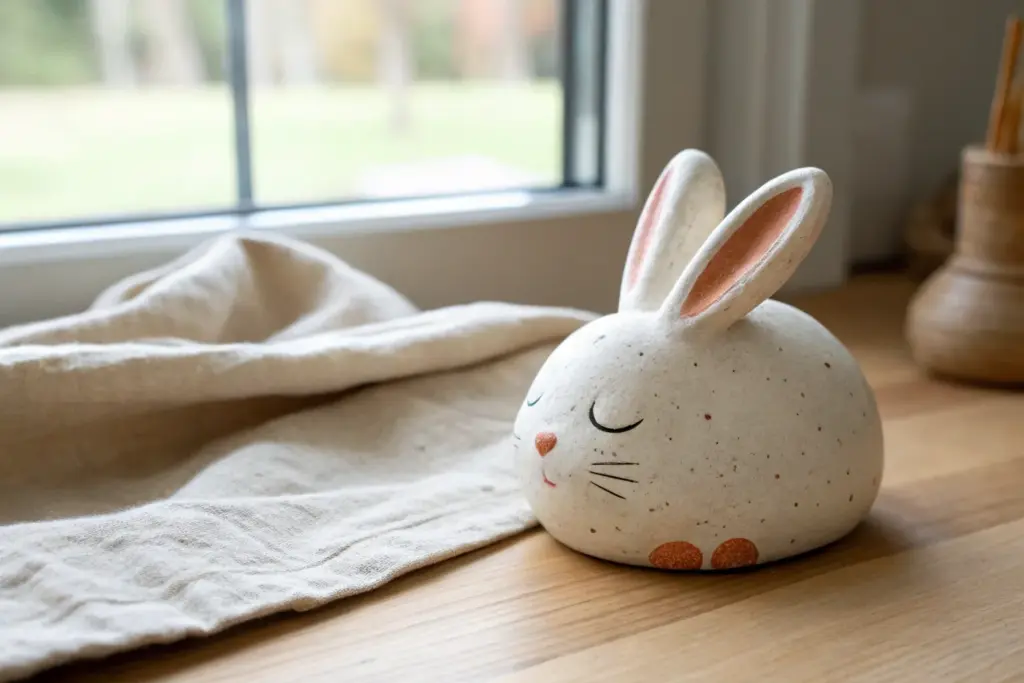
Sleepy Owl Belly Rattle
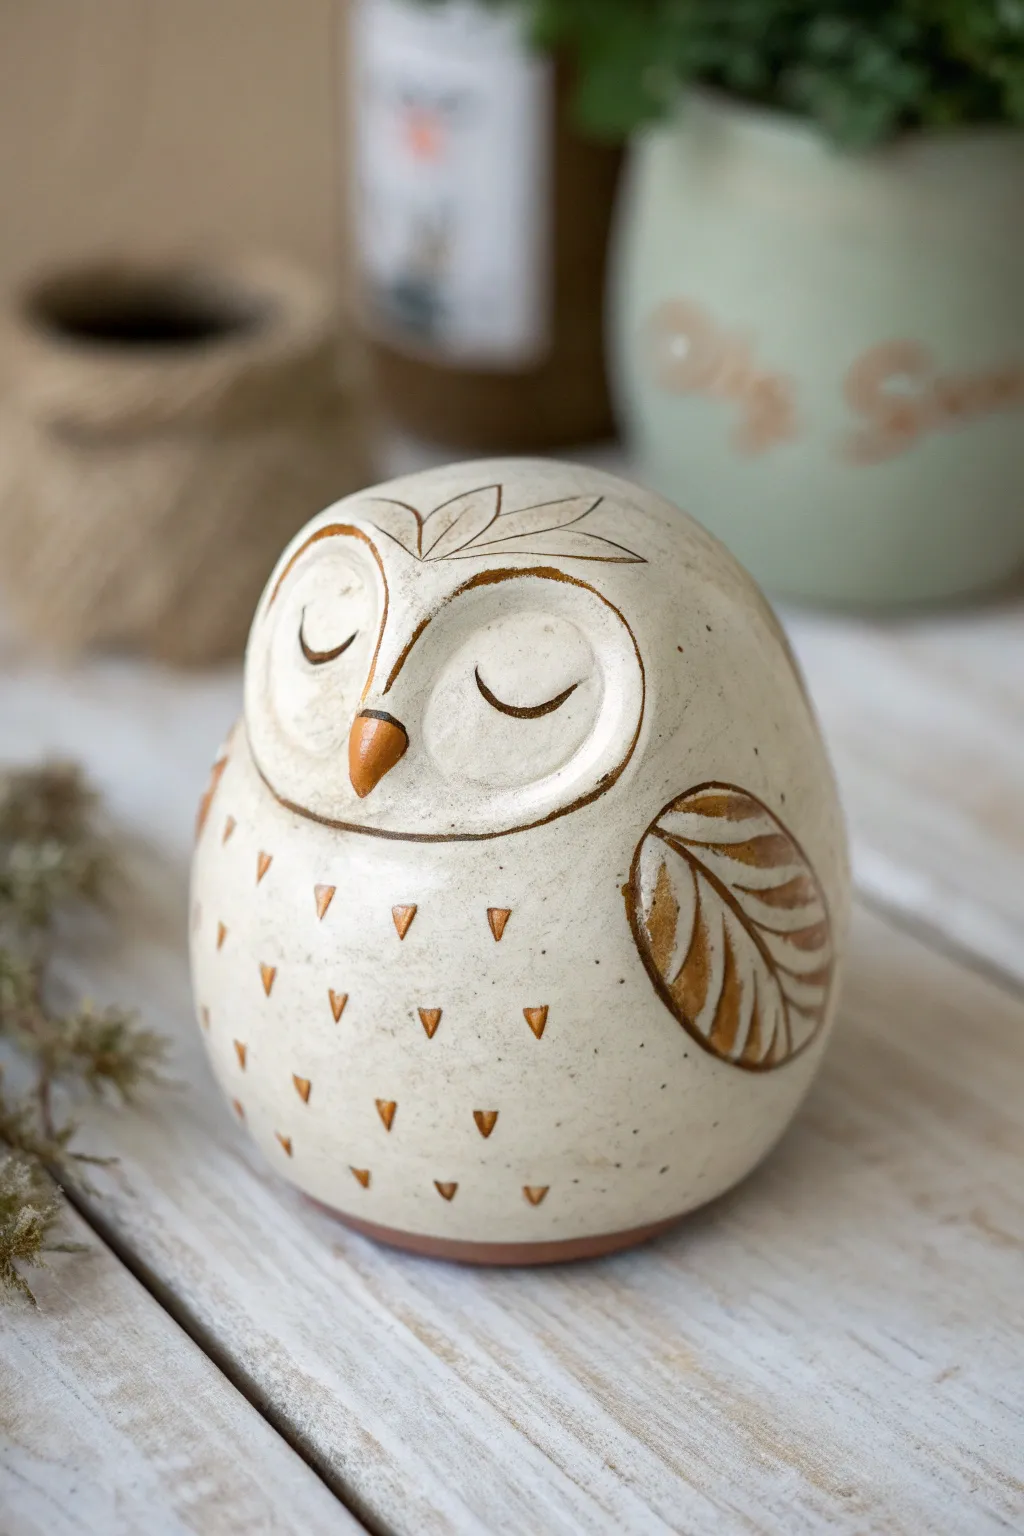
This charming ceramic rattle begins as a simple sphere but transforms into a delightful, sleepy owl with just a few clever alterations. The creamy glaze and rust-colored geometric accents give it a warm, folk-art feel perfect for a nursery shelf or a tactile toy.
How-To Guide
Materials
- White stoneware or earthenware clay
- Newspaper or paper towel (for the rattle insert)
- Small dried clay beads or ceramic rattle balls
- Wooden modeling tool or popsicle stick
- Needle tool
- Scoring tool (or fork)
- Slip (clay mixed with water)
- Small loop tool
- Creamy matte white glaze
- Iron oxide wash or rust-colored underglaze
- Small round paintbrush
- Sponge
Step 1: Forming the Rattle Base
-
Shape the pinch pots:
Start by creating two equal-sized balls of clay, roughly the size of tangerines. Press your thumb into the center of each and pinch the walls evenly while rotating to create two hemispherical bowls. -
Prepare the rattle mechanism:
Take a small scrap of newspaper or paper towel and wrap up 5-7 small dried clay balls or ceramic beads into a tight little package. This prevents the beads from sticking to the walls while the clay is wet. -
Join the halves:
Score the rims of both pinch pots thoroughly and apply a generous amount of slip. Place the paper packet inside one half, then press the two rims together firmly to seal the sphere. -
Refine the sphere:
Gently paddle the joined seam with a wooden spoon or smooth it with your thumb to create a seamless, round egg-shape. Trap the air inside to help it hold its form while you work.
Muffled Rattle?
If the rattle doesn’t sound after firing, the beads likely stuck to the walls. Next time, wrap them in more paper, or ensure the clay balls are bone-dry before sealing them inside.
Step 2: Sculpting the Owl Features
-
Define the face:
Using a needle tool, lightly sketch a heart-shaped facial disk on the upper front of the sphere. This will guide where you crave the eyes. -
Carve the eye sockets:
Use a small loop tool to gently carve away a shallow layer of clay within that heart shape, leaving a raised ridge around the edge to define the face. -
Add the beak:
Roll a tiny cone of clay for the beak. Score and slip the area between the eyes, then attach the beak, blending the edges smoothly into the face for a secure bond. -
Sculpt the wings:
Sketch large teardrop shapes on the sides of the body for wings. Use your loop tool again to carve out the negative space around the wing shape so it appears slightly raised from the body. -
Engrave the details:
With a sharp needle tool or a dull pencil, press distinct lines into the wings to mimic feathers. Draw three small leaf-shapes on the forehead for tufts, and press two curved slits for the sleepy eyes. -
Create belly texture:
I like to use the triangular tip of a modeling tool to stamp repeating upside-down triangles across the belly area, creating a patterned feather effect. -
Vent hole:
Don’t forget to poke a very small, inconspicuous hole in the bottom of the owl to allow expanding air to escape during firing, preventing explosions.
Level Up: Sgraffito Style
Instead of carving, paint the leather-hard owl with black underglaze and scratch the feather details through it to reveal the white clay underneath before clear glazing.
Step 3: Glazing and Finishing
-
Bisque fire:
Allow the owl to dry completely—this may take up to a week depending on humidity. Fire the piece to bisque temperature (usually Cone 04) in a kiln. -
Apply the oxide wash:
Paint an iron oxide wash or rust-colored underglaze into all the carved lines: the eyes, wing feathers, forehead tufts, and belly triangles. -
Wipe back:
Use a clean, damp sponge to wipe away the excess oxide from the surface, leaving color trapped only in the recessed lines and textures. -
Highlight the beak:
Paint the beak carefully with a solid coat of the rust underglaze to make it stand out against the pale face. -
Apply the main glaze:
Dip or brush a creamy, matte white glaze over the entire piece (avoiding the bottom where it sits on the shelf). The glaze should be translucent enough to let the oxide lines show through but opaque enough to look white. -
Final fire:
Fire the owl again to the maturity temperature of your clay and glaze (often Cone 5 or 6). Once cool, give it a shake to hear the paper burn away and the beads rattle.
Give your little owl a gentle shake to hear the soothing sound of your craftsmanship

The Complete Guide to Pottery Troubleshooting
Uncover the most common ceramic mistakes—from cracking clay to failed glazes—and learn how to fix them fast.
Simple Fish Pinch Pot Rattle
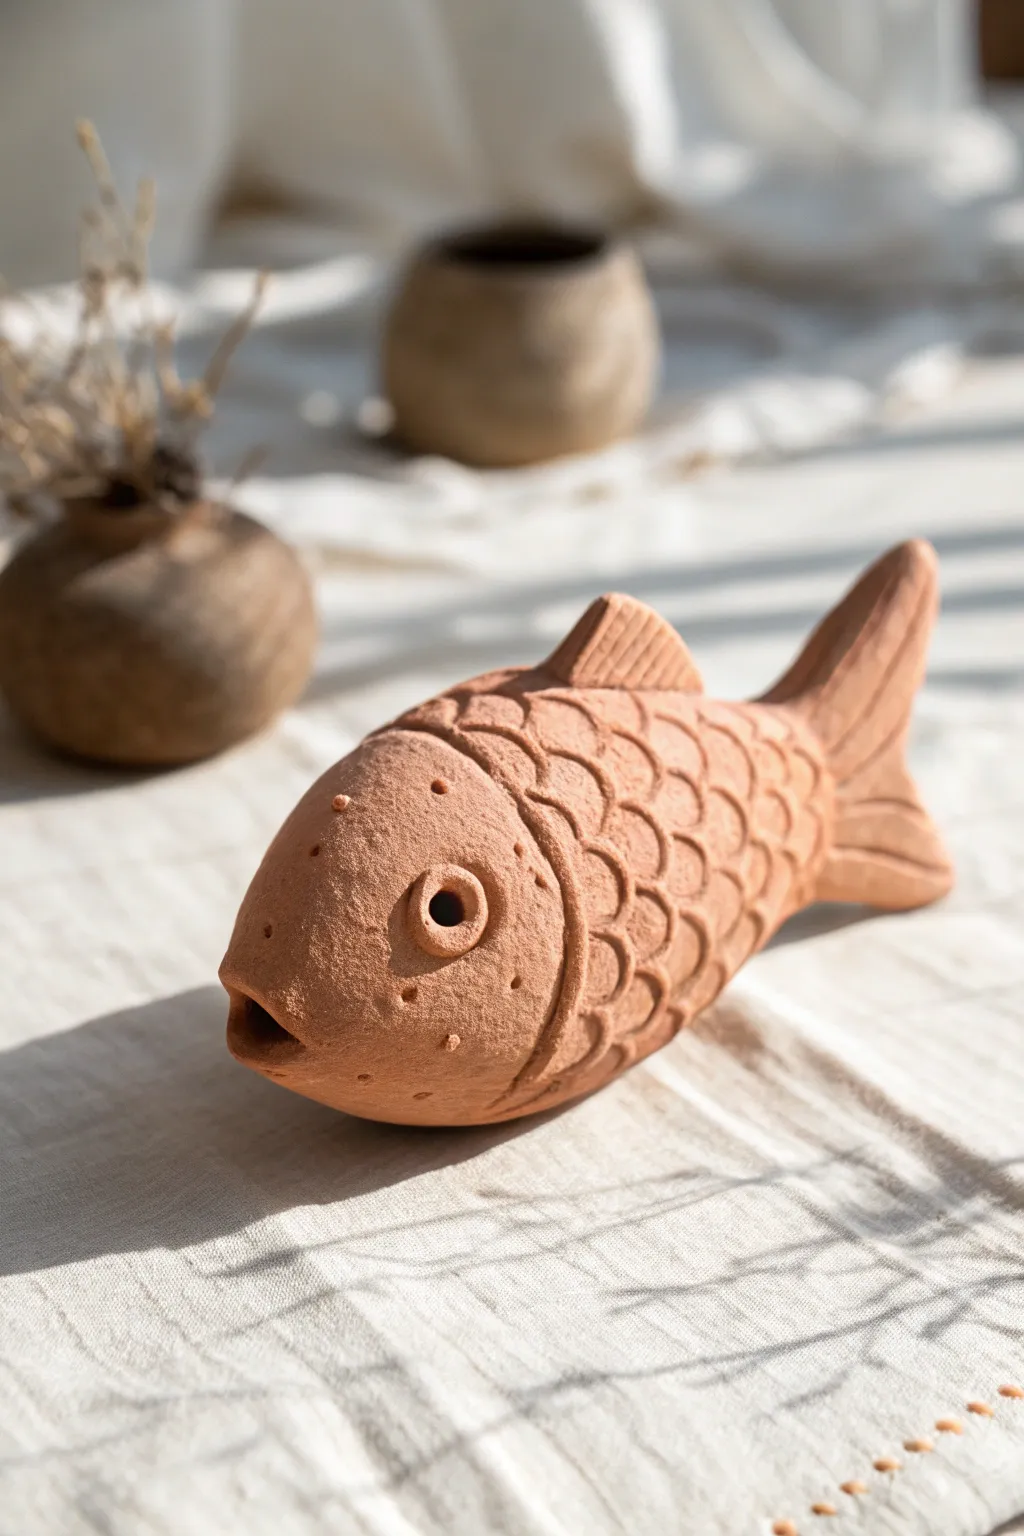
This charming, earthy fish combines the hollow construction of a pinch pot with the playful function of a rattle. Its textured scales and unglazed terracotta finish give it a warm, timeless look that feels wonderful to hold in your hand.
Step-by-Step
Materials
- Terracotta clay or air-dry clay (terracotta color)
- Small dried clay beads or dried beans (for the rattle sound)
- Wooden modeling tool or butter knife
- Loop tool (optional for carving)
- Small sponge and water cup
- Slip (clay mixed with water to a creamy consistency)
- Needle tool or toothpick
Step 1: Forming the Body
-
Prepare the Clay Balls:
Start by taking two equal-sized lumps of terracotta clay. Roll them between your palms until you have two smooth spheres, roughly the size of tennis balls. -
Create Pinch Pots:
Press your thumb into the center of one sphere. Rotate the clay while gently pinching between your thumb and fingers to open it up into a bowl shape. Repeat this with the second ball to make a matching pair. -
Add the Rattle Contents:
Before joining them, drop five or six small dried clay beads into one of the pinch pots. You can wrap them in a small piece of paper towel to prevent them from getting stuck in the wet clay walls; the paper will burn away or disintegrate later. -
Score and Slip:
Rough up the rims of both pinch pots using a needle tool or an old fork (scoring). Apply a generous amount of slip to these rough areas to act as glue. -
Join the Halves:
Press the two rims firmly together to seal the hollow form. Smooth the seam with your thumb, dragging clay across the line until the join completely disappears and you have a sealed oval shape. -
Shape the Fish:
Gently gently squeeze one end of the oval to taper it slightly—this will become the tail area. Round out the other end to define the fish’s head.
Clean Sounds
Make sure your clay beads are bone dry before putting them inside. If they are wet, they will stick to the inside walls and your rattle will be silent.
Step 2: Adding Fins and Details
-
Form the Tail Fin:
Flatten a separate small piece of clay into a triangular fan shape. Score and slip the tapered end of the body and attach this fin securely. -
Blend the Tail:
Use a wooden tool to blend the clay from the tail fin onto the body so it looks like one continuous piece, not just stuck on. Add striations with a knife to mimic fin rays. -
Attach the Dorsal Fin:
Make a smaller, flatter triangle for the top fin. Score the top ridge of the fish’s back and attach the fin, smoothing the base into the body. -
Define the Mouth:
At the front of the rounded head, press a small, round indentation to form an open mouth. I like to smooth the edges of this opening with a slightly damp finger to keep it soft. -
Add the Eyes:
Roll two tiny balls of clay for eyes. Score the desired spot on the head, attach the balls, and then press a deep hole into the center of each to create a pupil.
Step 3: Texturing
-
Mark the Gill Line:
Using a needle tool or knife, draw a deep curved line separating the head from the body. This defines where the scales will begin. -
Apply Scales:
Use a U-shaped loop tool or the rounded end of a modeling tool to imprint scale patterns. Press into the clay in overlapping rows, starting near the gill line and working your way back toward the tail. -
Detail the Face:
Add small stippled dots around the face and cheeks using a needle tool for extra texture and personality. -
Dry and Finish:
Allow the fish to dry slowly under loose plastic if using kiln clay, or fully air dry according to package instructions. Ensure the air escape hole (the mouth) stays clear so it doesn’t crack during firing.
Change the Texture
Instead of carving scales, try pressing a piece of lace or burlap into the wet clay body for an instant, intricate texture before adding the fins.
Listen to the gentle sound of your creation once it is completely dry or fired
Baby Whale Bubble Rattle
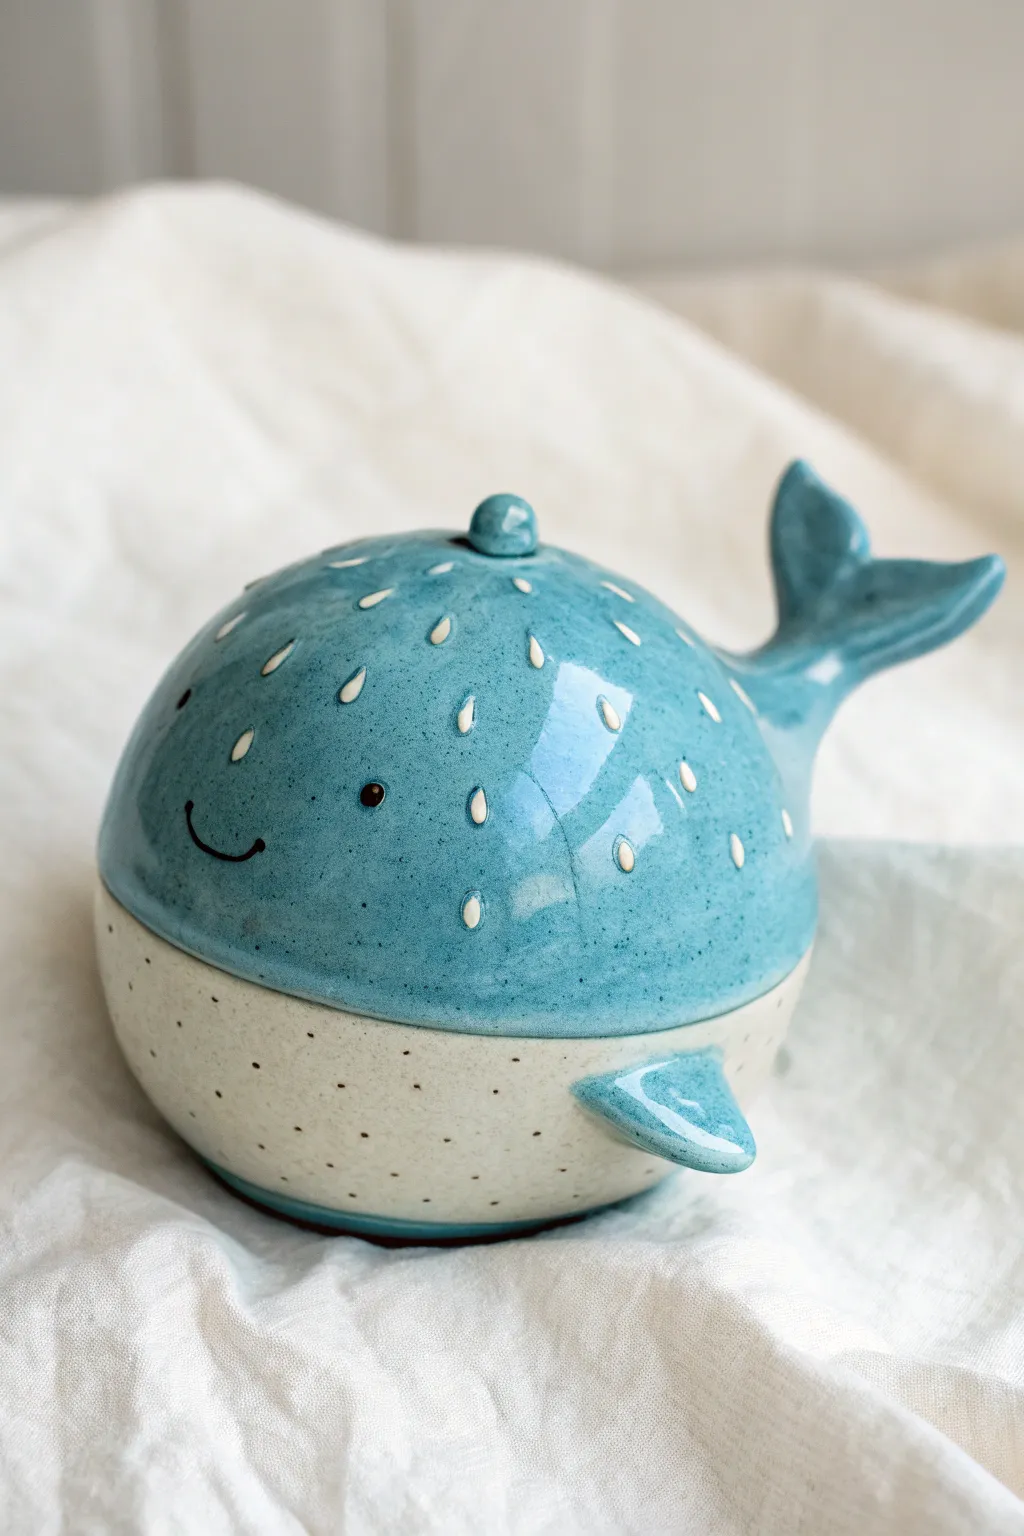
This adorable baby whale combines the timeless charm of hand-built pottery with the gentle sound of a hidden rattle. Its glossy blue glaze, speckled belly, and upturned tail make it a playful keepsake perfect for a nursery shelf.
Detailed Instructions
Materials
- Low-fire white earthenware clay
- Ceramic rattle beads (or small clay balls wrapped in newspaper)
- Scoring tool or needle tool
- Slip (clay mixed with water)
- Sponge
- Underglaze (Light Blue, Black, White)
- Clear transparent glaze
- Small paintbrush
- Loop tool (optional for refining)
- Kiln access
Step 1: Forming the Body
-
Create two pinch pots:
Start by rolling two equal-sized balls of white clay, roughly the size of a tangerine. Make a pinch pot from each ball by pressing your thumb into the center and pinching the walls to an even thickness. -
Insert the rattle sound:
Place your rattle beads or dry clay balls wrapped in a small piece of newspaper inside one of the pinch pots. The paper prevents the balls from sticking to the walls while wet and will burn away in the kiln. -
Join the halves:
Score the rims of both pinch pots thoroughly with your needle tool and apply a generous amount of slip. Press the two halves together firmly to create a sealed sphere, trapping the rattle inside. -
Smooth the seam:
Using your thumb or a wooden rib, smudge the clay across the seam line until it disappears completely. You want a seamless, smooth round ball. -
Shape the whale:
Gently tap the ball on your work surface to create a slightly flattened bottom for stability. Then, smooth the entire surface with a damp sponge to remove fingerprints.
Step 2: Adding Fins and Details
-
Sculpt the tail:
Roll a thick coil of clay and flatten one end into a fan shape. Pinch the middle to create the fluke definition. I like to curve one side up slightly to give the tail a sense of movement. -
Attach the tail:
Score and slip the back of your whale body and the base of the tail. Press them together firmly and blend the clay with a modeling tool so the tail transitions smoothly out of the body. -
Add side fins:
Shape two small triangles of clay for the pectoral fins. Score and slip them onto the lower sides of the whale, angling them slightly backward. -
Create the blowhole:
Roll a very tiny ball of clay and attach it to the very top center of the head. Use the handle of a paintbrush to press a small indentation into the center of this knob. -
Refine the surface:
Give the entire piece a final smoothing with a slightly damp sponge or chamois cloth. Ensure all attachments are secure and there are no sharp edges.
Rattle Rescue
If your rattle doesn’t make noise after the bisque fire, the beads may be stuck to the wall. Try gently tapping the piece on a table or using a needle tool through a pinhole to dislodge them.
Step 3: Glazing and Finishing
-
Bisque fire:
Allow the whale to dry slowly and completely before firing it in the kiln to a bisque temperature (usually cone 04). Shake it gently after firing to ensure the rattle sound works. -
Paint the top coat:
Apply three coats of light blue underglaze to the top two-thirds of the whale, covering the tail and the top of the fins. Leave the belly area unpainted to show the natural clay color. -
Add the face:
Using a fine detail brush and black underglaze, paint a simple U-shaped smile and a small round eye on each side. Keep the expression simple and sweet. -
Detail the belly:
Dip a stiff-bristled brush or toothbrush into watered-down black underglaze and flick it gently to create tiny speckles on the unpainted white belly area. -
Add water droplets:
With white underglaze (or a white glaze that sits on top), paint small teardrop shapes scattered across the blue back of the whale. Add small dots to the side fins for texture. -
Clear glaze and final fire:
Once the decoration is dry, dip the entire whale into a clear transparent glaze. Wipe the bottom clean with a sponge so it doesn’t stick to the kiln shelf, and fire again to the glaze temperature.
Make it a Set
Create a whole pod by making different sizes! Try varying the tail positions—one diving down, one splashing up—to create a dynamic nursery shelf display.
Now you have a charming ceramic friend ready to bring a splash of joy to any room


What Really Happens Inside the Kiln
Learn how time and temperature work together inside the kiln to transform clay into durable ceramic.
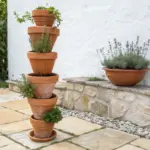
Snail Shell Rattle With Coil Body
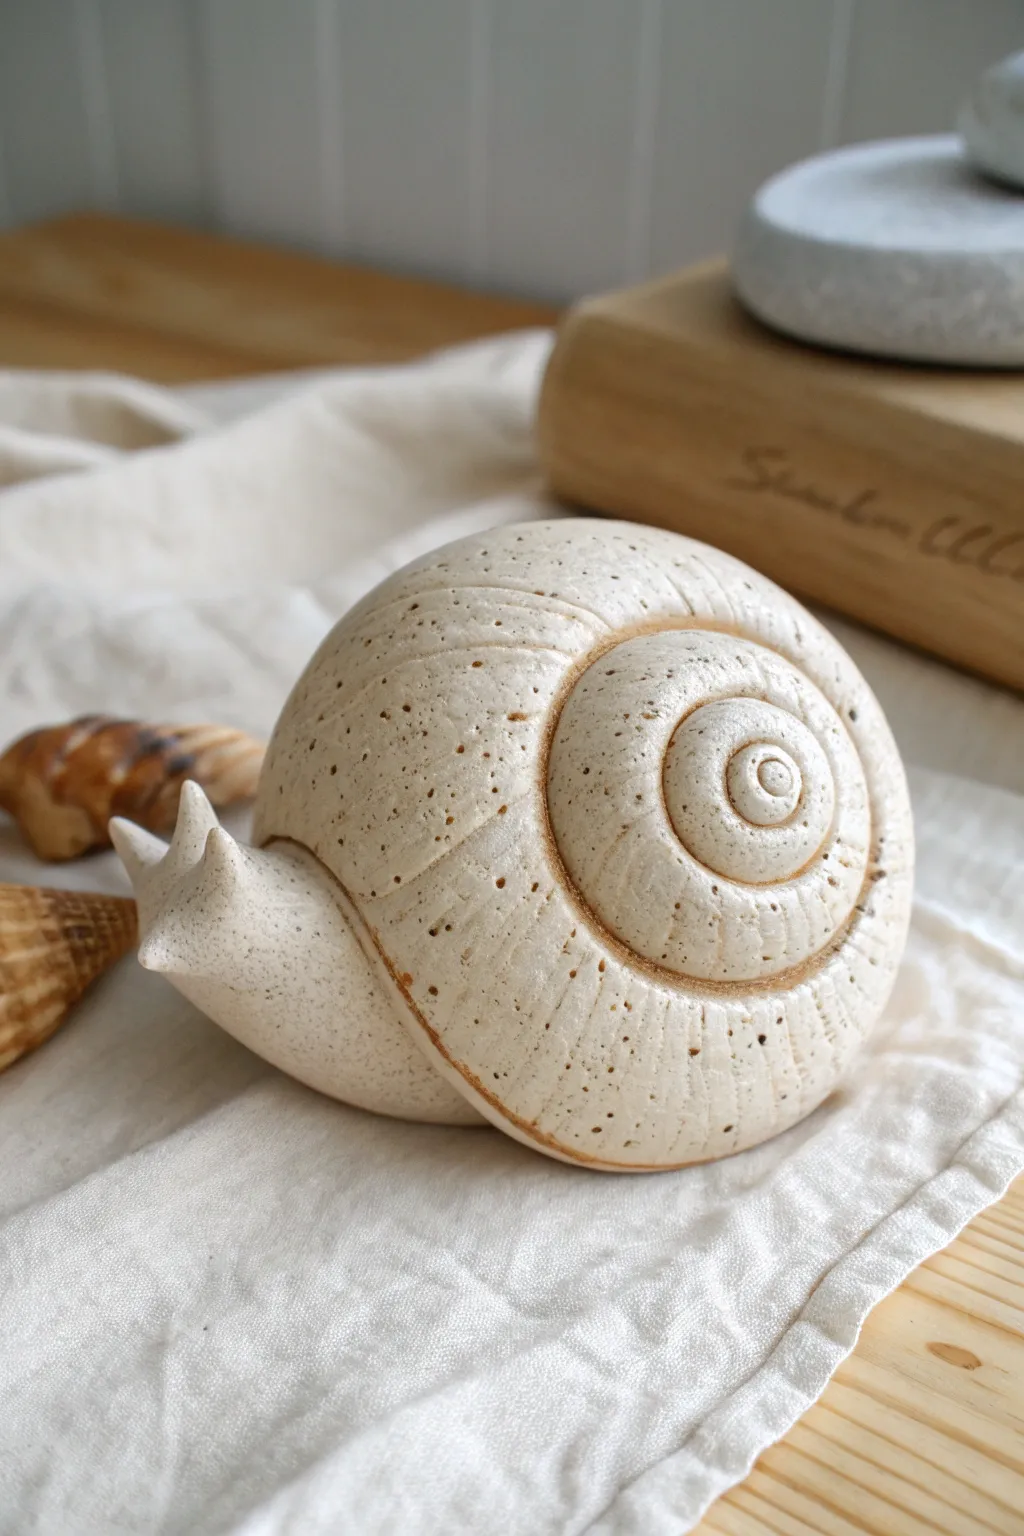
This charming ceramic snail features a spiraling pinch pot shell that doubles as a gentle rattle, paired with a simple hand-sculpted body. The natural speckled finish gives it an organic, beach-combed look perfect for a shelf or nursery.
Step-by-Step
Materials
- Speckled stoneware clay (or white clay with speckles added)
- Small dried clay beads or ceramic rattle pellets
- Newsprint or paper towel
- Scoring tool or needle tool
- Slip (clay mixed with water)
- Wooden modeling tool
- Sponge
- Loop tool (optional for carving)
- Clear matte or satin glaze
Step 1: Forming the Shell Rattle
-
Prepare pinch pots:
Start by rolling two equal balls of speckled clay, roughly the size of a tangerine. Press your thumb into the center of each ball and gently pinch the walls while rotating to create two hemispherical pinch pots. -
Insert the rattle elements:
Before joining them, wrap your small clay beads or pellets loosely in a small piece of newsprint or paper towel. Place this bundle inside one of the pinch pots; the paper prevents the beads from sticking to the walls during construction and will burn away in the kiln. -
Join the pots:
Score the rim of both pinch pots thoroughly with your needle tool and apply a generous amount of slip. Press the two halves together firmly to create a sealed sphere, trapping the rattle bundle inside. -
Smooth the seam:
Using a wooden tool or your thumb, drag clay across the seam to knit the two halves together. Smooth the entire surface with a damp sponge until the join is completely invisible and the sphere is round.
Natural Texture Hack
To get realistic aging on the shell, lightly dab the raw clay with a real seashell or coral piece. This imitates the pitted texture found in nature better than tools can.
Step 2: Sculpting the Spiral
-
Draft the spiral line:
With a needle tool, lightly sketch a continuous spiral starting from one side of the sphere (the center of the shell) and wrapping around to the other side. This guide helps ensure your proportions look like a natural gastropod. -
Define the ridges:
Use a modeling tool to deepen the spiral line. I like to press in slightly on one side of the line to create a stepped or layered effect, making it look like the shell segments are overlapping. -
Refine the shape:
Gently gently flatten the sides of the sphere slightly so it isn’t perfectly round, mimicking the slightly compressed shape of a real snail shell.
Rattle Doesn’t Rattle?
If your rattle is silent after firing, the beads may have fused to the wall. Ensure you use paper to separate them, or try using pre-bisqued clay pellets next time.
Step 3: Creating the Snail Body
-
Roll a coil:
Roll a thick coil of clay for the snail’s foot and head. It should be slightly tapered at one end (the tail) and thicker and uplifted at the other (the head). -
Drill the eye stalks:
At the thicker head end, gently pinch out two small protrusions for the eye stalks. Use your fingers to smooth them so they look organic rather than sharp. -
Flatten the base:
Tap the bottom of the coil on your work surface to create a flat base. This ensures the finished piece will sit stably without rolling over. -
Shape the neck:
Curve the head section upwards gently, creating a smooth transition from the ground to where the shell will rest.
Step 4: Assembly and Finishing
-
Attach the shell:
Position the rattle shell onto the back of the coil body. Mark the contact area, then score and slip both surfaces thoroughly. Press them together firmly. -
Blend the connection:
Use a small coil of clay to reinforce the seam where the shell meets the body. Smooth this coil down so it looks like the body is naturally carrying the shell. -
Add texture:
Using a stiff bristled brush or a needle tool, add subtle vertical striations along the shell, following the curve of the spiral to simulate growth lines. -
Final smoothing:
Wipe the entire piece down with a slightly damp sponge to remove any sharp burrs or clay crumbs. -
Vent the rattle:
Use a needle tool to poke a hidden hole (perhaps underneath the body or in a deep crevice of the shell spiral) to allow air to escape during firing, preventing explosions. -
Dry and Bisque:
Let the snail dry slowly under plastic to prevent cracking at the seams. Once bone dry, bisque fire the piece. -
Glaze:
Apply a thin coat of clear matte or satin glaze to highlight the natural speckles of the clay body. If you used white clay, you might choose an iron-speckled glaze instead. -
Final Fire:
Fire to the maturity temperature of your clay and glaze. Once cool, handle gently to hear the soft rattle sound.
Enjoy the gentle sound and organic beauty of your new ceramic pet
Kawaii-Style Kitty Face Rattle
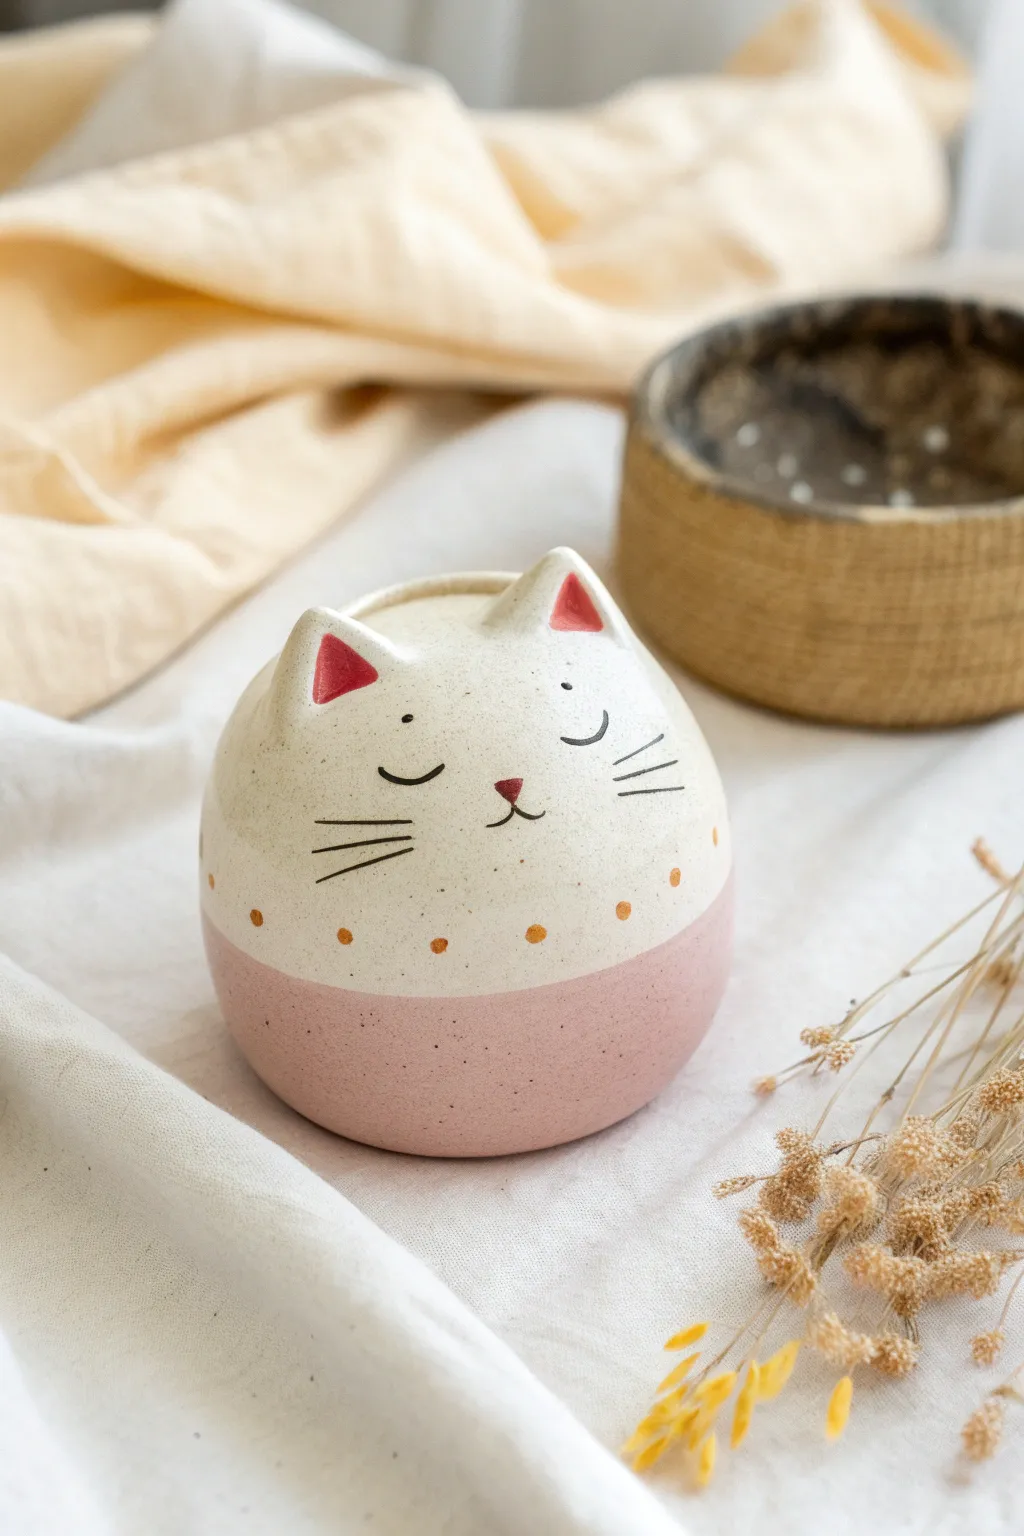
This adorable pinch pot rattle adds a touch of serene charm with its rounded form and sweet, sleepy expression. The finished piece features a lovely two-tone glaze effect in creamy white and dusty rose pink, making it a perfect keepsake or delightful nursery decor.
Detailed Instructions
Materials
- Stoneware or earthenware clay body
- Underglaze in pink, black, and rust/golden-brown
- Ceramic beads or dried clay balls (for the rattle sound)
- Clear dipping glaze or brush-on clear glaze
- Pottery sponge
- Needle tool
- Fine-point paintbrush
- Rib tool
- Scoring tool or old toothbrush
- Slip (clay mixed with water)
Step 1: Forming the Body
-
Create two pinch pots:
Start by taking two balls of clay roughly the size of a tangerine. Push your thumb into the distinct center of each and pinch the walls evenly against your palm to create two symmetrical bowl shapes. -
Insert the rattle sound:
Before joining, place 3-5 small ceramic beads or dried bits of clay inside one of the pots. You can wrap them loosely in a small piece of paper towel or newspaper to prevent them from sticking to the walls while the clay is wet; the paper will burn away in the kiln. -
Join the halves:
Score the rims of both pinch pots thoroughly using your scoring tool or a serrated kidney. Apply a generous amount of slip to the roughed-up edges. -
Seal the seam:
Press the two pots together firmly to create a hollow sphere. Using your thumb or a wooden rib tool, drag clay across the seam to knit the two halves together, smoothing the surface until the join line disappears completely. -
Shape the egg form:
Gently roll and paddle the sphere on your work surface or between your hands to create a slightly tapered, egg-like shape. The bottom should be slightly flatter so it stands stable. -
Smooth the surface:
Wipe the entire form with a slightly damp sponge to remove any fingerprints or texture marks. The goal is a super smooth, rounded canvas for the face.
Rattle Integrity
Make the walls slightly thicker than a normal bowl (about 1/4 inch). Thin walls amplify sound better, but too thin risks cracking when you join the halves.
Step 2: Adding the Ears
-
Form the ears:
Roll two small, marble-sized balls of clay. Flatten them slightly and pinch them into triangular points to form the cat’s ears. -
Positioning:
Place the ears on the upper curved section of the body, spacing them somewhat wide apart to achieve that cute, chubby kawaii look. -
Attach the ears:
Score the bottom of the ears and the attachment points on the head. Apply slip, press them down firmly, and blend the clay at the base of the ears seamlessly into the head using a small modeling tool. -
Detail the inner ear:
Use the rounded end of a tool or your pinky finger to gently press a small indentation into the front of each ear to give them depth. -
Create the air vent:
Flip the cat over. Using your needle tool, pierce a small, discreet hole in the base. This is crucial so the trapped air can escape during firing, preventing your piece from exploding.
Make it a Set
Create a whole family of woodland creatures using the same base shape—try round ears for a bear or long, floppy ears for a bunny.
Step 3: Decoration & Glazing
-
Bisque fire:
Let the piece dry slowly and thoroughly before your first firing (bisque fire) to cone 04 (or your clay’s specification). -
Apply the blush tone:
Dip the bottom third of the bisque-fired rattle into a dusty rose or light pink underglaze or glaze. I prefer to hold it at a slight angle to give it a dipped, organic feel. -
Paint the dots:
Using a rust or golden-brown underglaze and a small brush, dab a horizontal line of small dots right above the pink dipped line, creating a decorative collar. -
Paint the face details:
With a fine liner brush and black underglaze, paint two downward-curving crescents for sleepy eyes. Add three thin whiskers on each cheek and a small mouth. -
Add nose and ear accents:
Use a darker pink or reddish underglaze to paint a small triangular nose and fill in the indentations of the ears. -
Apply clear glaze:
Once the underglaze details are fully dry, dip the entire piece in a clear transparent glaze. This will brighten the clay body to a creamy white and seal the decoration. -
Final Fire:
Fire the piece for the second time (glaze firing) to the temperature required by your clay and glaze combination.
Now you have a charming, handmade rattle ready regarding its gentle sound and sweet expression

TRACK YOUR CERAMIC JOURNEY
Capture glaze tests, firing details, and creative progress—all in one simple printable. Make your projects easier to repeat and improve.
Puppy Nose and Paws Rattle
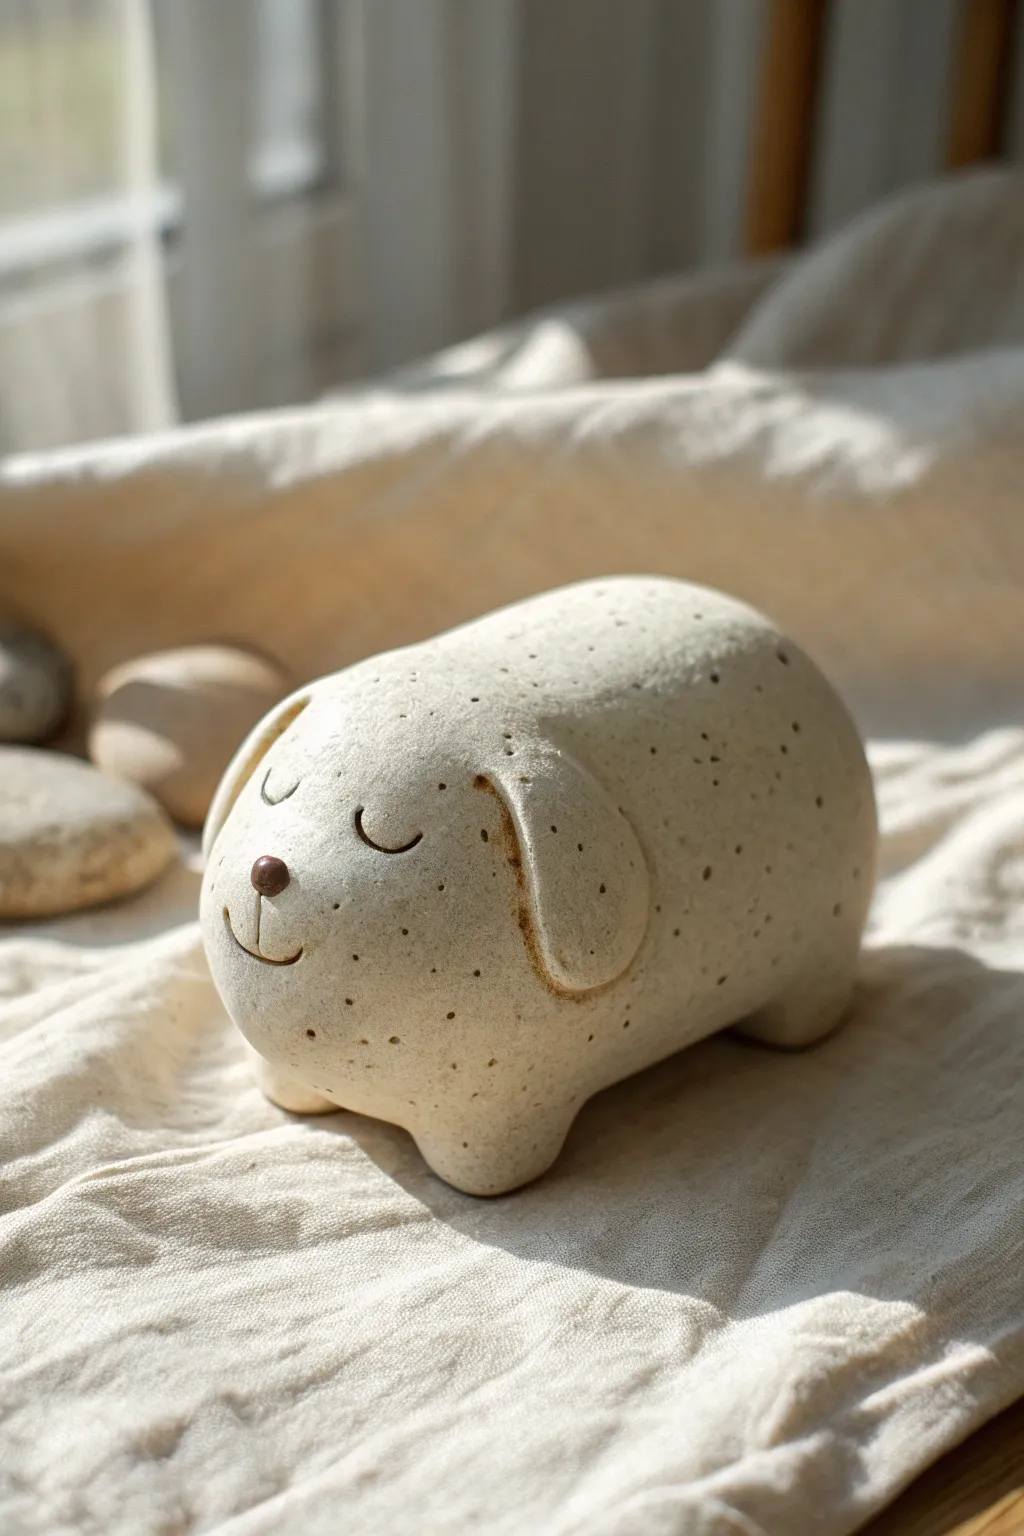
This adorable, sleepy puppy rattle combines the classic pinch pot technique with charming details to create a palm-sized friend. With its soft, speckled finish and calming expression, it makes for a delightful sensory object or a sweet decorative piece for a nursery shelf.
Step-by-Step
Materials
- Speckled cream stoneware clay (e.g., cone 5-6)
- Small piece of scrap clay (for rattle beads)
- Newspaper or tissue paper
- Brown underglaze or slip
- Needle tool
- Scoring tool or old toothbrush
- Small paintbrush
- Sponge
- Slip (clay glue)
- Modeling tool with a small scoop or curved edge
Step 1: Forming the Body
-
Prepare the rattle beads:
Before starting the main body, roll 5-6 small, pea-sized balls of clay. Wrap them loosely in a small scrap of newspaper or tissue paper. This prevents them from sticking to the joyful walls of the rattle while you work. -
Create two pinch pots:
Divide a fist-sized ball of speckled clay into two equal halves. Using your thumb, press into the center of the first half and gently pinch the walls while rotating the clay to create a smooth, even bowl shape. Repeat with the second half. -
Join the pinch pots:
Place your wrapped clay beads into one of the pinch pots. Score the rims of both pots thoroughly using your scoring tool or a serrated kidney. Apply a generous amount of slip to the scored areas. -
Seal the form:
Press the two pots together firmly, ensuring no air is trapped in the seam itself. Use your thumb or a modeling tool to smudge the clay across the seam line, blending the two halves until the join is completely invisible and the shape is a smooth, closed oval. -
Shape the puppy:
Gently paddle the clay oval against your work surface to flatten the bottom slightly so it won’t roll away. Use your hands to refine the potato-like shape, making one end slightly broader for the head area.
Step 2: Adding Features and Legs
-
Make the legs:
Roll four small, equal-sized balls of clay. These don’t need to be long; short, stubby nubs work best for this style. Score and slip the bottom of the body where the legs will go. -
Attach the feet:
Press the balls onto the scored spots. Instead of just sticking them on, use a modeling tool to drag clay from the leg up onto the body to create a strong bond, then smooth out your marks. Tap the figure gently on the table to ensure it sits flat. -
Form the ears:
Roll two tear-drop shapes of clay and flatten them into pancakes. These should be thick enough to be sturdy but thin enough to look like floppy ears. Score the side of the head and the top of the ear pieces. -
Attach the ears:
Secure the ears to the side of the head, blending the top edge smoothly into the skull so it looks like one continuous piece using your thumb or a wooden tool. Let the bottom of the ears hang loose slightly for a natural look. -
Refine the surface:
Take a slightly damp sponge and wipe down the entire piece. This removes fingerprints, smoothes out any rough tool marks, and helps expose the natural speckles in the clay body.
Rattle Silence?
If the rattle doesn’t sound after bisque firing, the beads probably fused to the wall. Ensure beads are wrapped in paper and not touching the wet clay directly during construction.
Step 3: Detailing and Finishing
-
Sketch the face:
Using a needle tool, very lightly sketch where you want the eyes and mouth to be. I find it helpful to keep the features low on the face to enhance the cute factor. -
Carve the expression:
Once happy with the placement, press your needle tool a bit deeper to create the curved lines for the sleeping eyes and the small smile. Wipe away any little clay burrs with a soft brush. -
Add the nose:
Roll a tiny, lentil-sized ball of clay. Score a small spot above the mouth and attach the nose firmly. -
Apply color:
Using a fine detail brush, paint the tiny nose with dark brown underglaze. You can also carefully run a very small amount of underglaze into the carved lines of the eyes, ears, and mouth to accentuate them. -
Vent hole:
This is crucial: flip the puppy over and use your needle tool to poke a hidden hole in the belly (between the legs). This allows hot air to escape during firing so your rattle doesn’t explode. -
Drying:
Let the piece dry slowly under loose plastic for a day or two before uncovering it completely. Shake it gently once bone dry; if you hear a rattle, the paper has burned away or shrunk enough (though usually firmly stuck until firing), and your beads are loose. -
Firing:
Bisque fire the piece, then glaze with a clear matte or satin glaze to protect the surface while keeping that natural stone look. Fire again to the temperature appropriate for your clay body.
Ear Placement Pro-Tip
Attach ears slightly lower than you think they should go. High ears look like a bear; lower, floppier ears instantly read as a puppy dog.
Once fired, you’ll have a charming handmade keepsake that makes a gentle, earthy sound when shaken
One-Eyed Monster Pinch Pot Rattle
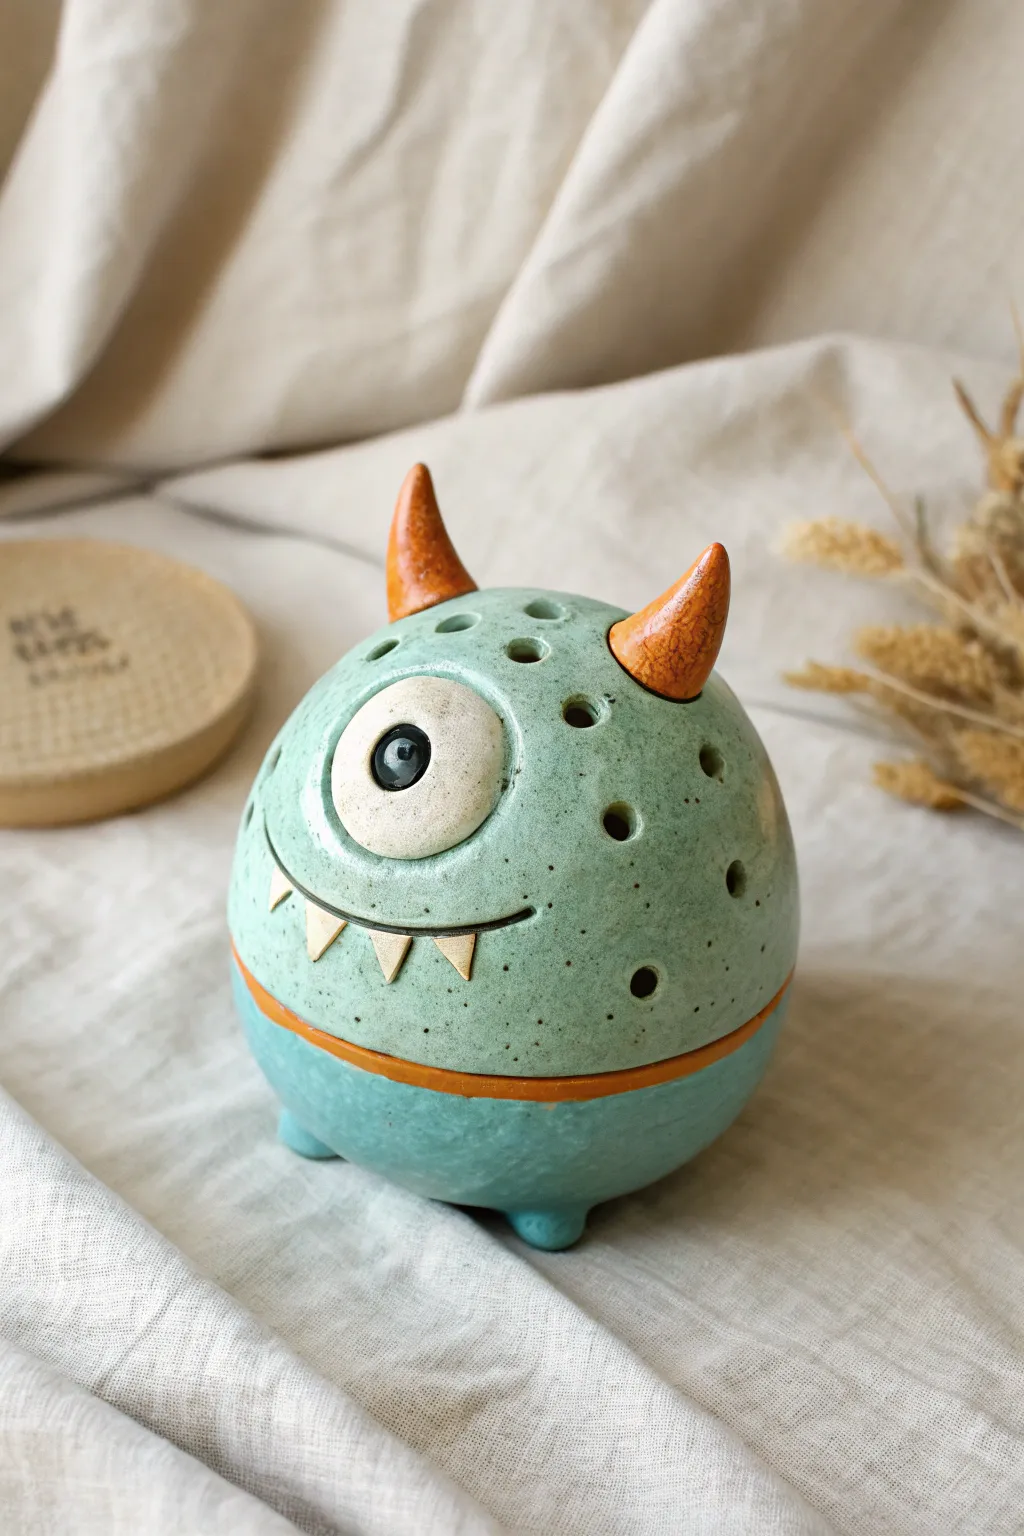
Bring a charming little monster to life with this ceramic pinch pot rattle tutorial. Featuring a speckled teal glaze, whimsical orange horns, and a single inquisitive eye, this project is as fun to make as it is to shake.
Step-by-Step Guide
Materials
- Stoneware clay (speckled or buff)
- Clay rattle beads (small clay balls, bisque fired or dried hard)
- Pottery tools (needle tool, scoring tool, rib)
- Slip (clay mixed with water)
- Underglaze (black)
- Glaze (speckled teal/mint for body, orange for horns, white for eye)
- Clear glaze (optional over underglaze)
- Small hole punch or straw
- Kiln for firing
Step 1: Forming the Body
-
Shape two pinch pots:
Start with two equal balls of clay, roughly the size of a clementine. Press your thumb into the center of each and pinch the walls evenly as you rotate the clay, aiming for a thickness of about 1/4 inch. -
Insert the rattle beads:
Place 5-7 small, dry clay beads or bisque-fired balls into one of the pinch pot halves. Wrap them in a small piece of paper towel first if you want to prevent them from sticking to the wet walls during construction. -
Score and slip:
Use a scoring tool or fork to scratch up the rims of both pinch pots. Apply a generous amount of slip to the scored areas to act as glue. -
Join the halves:
Press the two halves together firmly to create a closed sphere. Use your thumb or a wooden tool to smudge the clay across the seam, completely blending the two pots into one solid unit. -
Shape and smooth:
Gently paddle the sphere on your work surface to create a flat bottom for stability. Use a rib tool to smooth out the entire surface, erasing the seam line and refining the round shape.
Step 2: Adding Features
-
Create the horns:
Roll two small cones of clay for the horns. Score and slip the bottom of the cones and attach them symmetrically to the top of the monster’s head, smoothing the seams downward. -
Form the eye:
Roll a flat disc of clay for the eyeball base. Create a smaller ball for the pupil and attach it to the center. Score the back of the disc and attach this large eye assembly to the front of the body. -
Carve the mouth:
Use a needle tool or a small carving loop to incise a curved line for the mouth below the eye. -
Add teeth:
Cut tiny triangles from a thin slab of clay. Slip and score theme onto the lower lip of the incised mouth line, pointing upward. -
Add feet:
Roll four tiny balls of clay for the feet. Attach them to the bottom so the monster stands slightly elevated, blending the clay well so they don’t pop off. -
Create ventilation holes:
Using a small hole punch tool or a straw, punch several holes around the upper back and sides of the head. These are crucial for letting air escape so the rattle sounds clear and the pot doesn’t explode in the kiln.
Muffled Rattle?
If your rattle doesn’t make noise after firing, the beads likely fused to the wall. Wrap beads in paper towel before sealing; the paper burns away, leaving space.
Step 3: Glazing & Firing
-
Bisque fire:
Allow the piece to dry slowly and completely. Bisque fire it to cone 04 (or your clay’s specific temperature). -
Wax resist:
Apply wax resist to the bottom of the feet and the very tips of the teeth if you want them to remain unglazed raw clay. -
Glaze the body:
Apply your speckled teal or mint green glaze to the entire body, carefully working around the eye and horns. I find a soft fan brush works best for getting an even coat here. -
Detail glaze:
Paint the horns with a rusty orange glaze. Use a bright white glaze for the eyeball and a dot of black underglaze for the pupil. -
Define the mouth:
You can leave the incised mouth line raw, or carefully inlay a dark wash into the line to make the smile pop. -
Glaze fire:
Fire the piece again to the maturation temperature of your glaze (typically cone 5 or 6 for stoneware).
Air Escape
Don’t forget the holes! A sealed air pocket will explode in the kiln. The holes also let the sound escape, making the rattle louder and clearer.
Once cooled, give your little cyclops a shake to hear its cheerful sound
Mushroom-Capped Toad Rattle
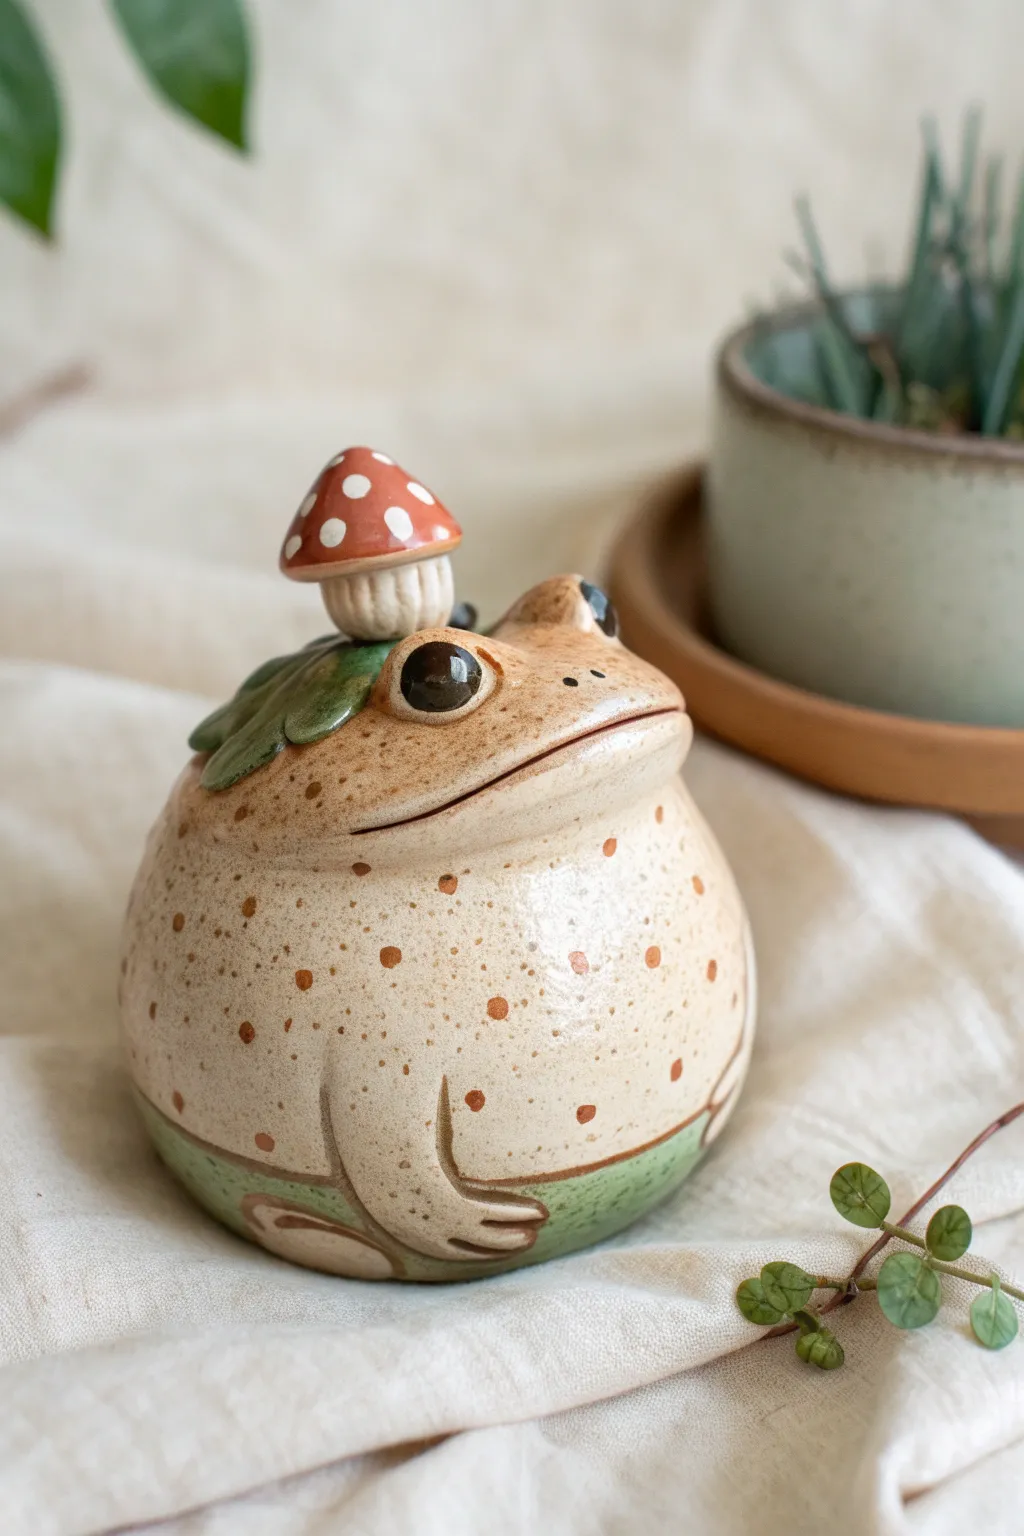
This charming ceramic rattle combines a round, speckled toad base with a delightful mushroom topper, creating a woodland-inspired noisemaker. The distinctive glossy eyes and earthy speckles give it a professional finish while retaining a handmade feel.
Step-by-Step Tutorial
Materials
- Stoneware clay (buff or speckled)
- Clay rattle beads (small, pre-fired clay balls)
- Scoring tool and slip
- Underglazes: Leaf green, Cream/Beige, Red, White, Black
- Clear transparent glaze
- Modeling tools
- Sponge
- Paintbrushes
- Kiln
Step 1: Forming the Body
-
Create two pinch pots:
Start by rolling two equal balls of stoneware clay. Insert your thumb and pinch the walls evenly to create two matching bowl shapes. -
Insert rattle beads:
Place 5-7 pre-fired clay beads inside one of the hollow pinch pots. Ensure they are dry so they don’t stick to the interior walls later. -
Join the halves:
Score the rims of both pinch pots and apply slip. Press them firmly together to create a sealed hollow sphere. -
Smooth the seam:
Use a rib tool or your thumb to blend the seam where the two pots meet until it is completely invisible. Gently paddle the shape if needed to make it slightly squat and toad-like. -
Add texture:
Take a moment to sponge the surface smooth, removing any fingerprints. -
Form the mouth:
Using a needle tool or knife, slice a horizontal line across the upper third of the sphere for the mouth. Gently press the clay below the cut inward slightly to create a slight pout and separation.
Rattle Sound Check
If the rattle doesn’t make noise after firing, the beads may be fused. Shake it vigorously immediately after the glaze firing while it’s still cooling to detach them.
Step 2: Sculpting Features
-
Add the eye sockets:
Roll two small balls of clay for the eyes. Score and slip them onto the top of the head, then press your thumb into the center of each to create the socket/eyelid ridge. -
Insert the eyes:
Roll smaller, very smooth balls for the eyeballs and press them gently into the sockets you just created. -
Sculpt the legs:
Roll coils for the arms and legs. Attach the arms curving around the belly and flatten the ends to suggest webbed fingers. I like to use a modeling tool to define the toes clearly. -
Attach leg slabs:
For the back legs, add folded slabs of clay low on the body to represent the folded haunches typical of a sitting toad. -
Create the leafy cap:
Flatten small pieces of clay into leaf shapes. Score and slip them onto the top of the toad’s head, just behind the eyes. -
Build the mushroom:
Form a stem and a classic mushroom cap shape separately. Attach the stem to the center of the leaves, then attach the cap to the stem. Add tiny coils under the cap for gills if you want extra detail.
Step 3: Glazing and Finishing
-
The first firing:
Allow the piece to dry slowly to the bone-dry stage. Bisque fire the toad in the kiln according to your clay body’s specifications. -
Base colors:
Apply a cream or light beige underglaze to the entire body, avoiding the bottom green section if you want that raw clay look or painting it specific green. Paint the mushroom cap red and the stem cream. -
Speckling technique:
Using a stiff brush, flick brown underglaze onto the body to create the random spotted pattern. Use a fine brush to add larger, deliberate brown spots. -
Detailing the face:
Carefully paint the eyeballs black, leaving a tiny white dot for a highlight. Paint the leaves green and add white polka dots to the red mushroom cap. -
Final glaze application:
Dip or brush the entire piece in a clear transparent glaze to seal it and give it that wet, amphibian shine. -
Final firing:
Glaze fire the piece to the appropriate cone temperature (often Cone 5 or 6 for stoneware) to finish the rattle.
Go Botanical
Instead of a generic mushroom, try sculpting specific fungi varieties like chanterelles or morels, or swap the mushroom entirely for a blooming lotus flower.
Now you have a charming woodland creature that makes a delightful sound when shaken
Heart-Shaped Pinch Pot Rattle
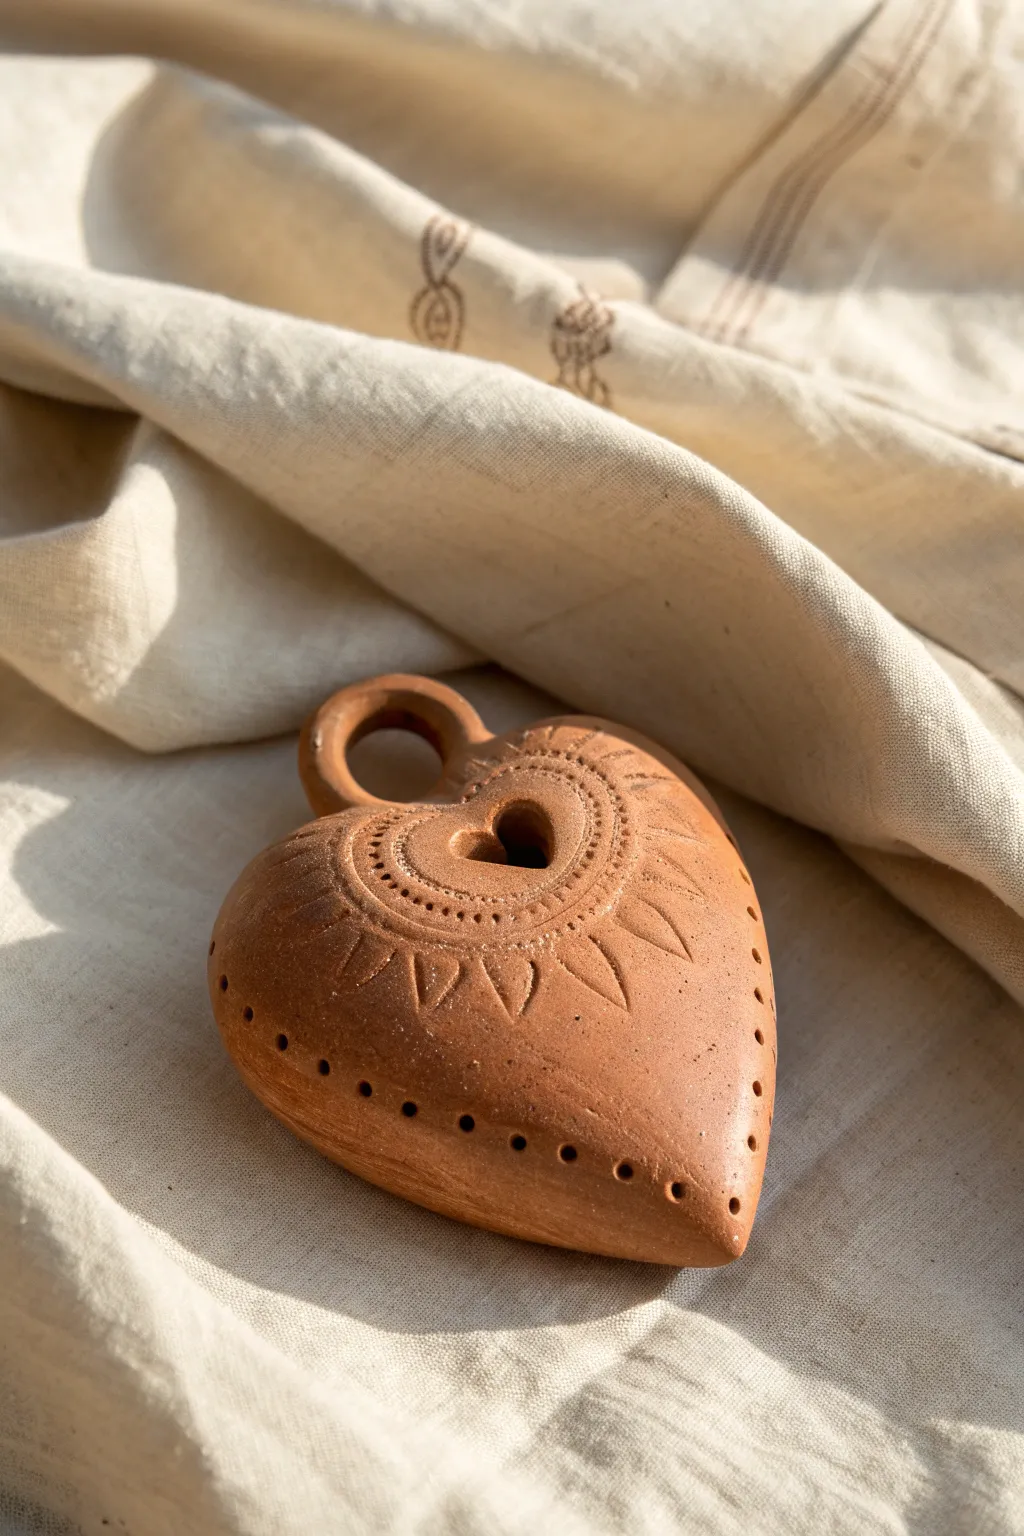
This charming, warm terracotta heart isn’t just a visual delight; filled with clay beads, it doubles as a gentle rattle. The design features a sunburst of carved petals surrounding a central heart motif, all pierced with delicate detailing for a folk-art aesthetic.
Step-by-Step
Materials
- Terracotta-colored polymer clay or air-dry clay
- Small dried beans, rice, or fired clay beads (for rattle sound)
- Small rolling pin
- Heart-shaped cookie cutter (medium size)
- Small heart cutter (optional, or use a knife)
- Loop tool or needle tool
- Small drinking straw or hole punch tool
- Slip and scoring tool (if using air-dry clay)
- Sponge and water (for smoothing)
- Carving tool or V-gouge
Step 1: Forming the Rattle Body
-
Prepare the Clay:
Start by conditioning your terracotta clay until it’s smooth and pliable. You’ll need two equal-sized balls, roughly the size of a golf ball or slightly larger, depending on how big you want your final heart to be. -
Create Pinch Pots:
Using your thumb, press into the center of the first ball and gently pinch the walls while rotating the clay. Aim for an even thickness of about 1/4 inch. Repeat this with the second ball to create two matching bowl shapes. -
Shape into Hearts:
Before joining them, gently squeeze the top curve of each bowl to form the lobes of a heart, and taper the bottom into a point. It’s easier to get the general heart shape now rather than forcing it after joining. -
Add the Sound:
Place your rattle filling—dried beans or small clay beads work best for this size—into one of the pinch pot halves. Don’t overfill it; the beads need room to move around to make a sound. -
Score and Slip:
If using air-dry stoneware, rough up the edges of both pots with a scoring tool and apply a little water or slip. If you’re using polymer clay, you can simply rough the edges slightly to help them bond. -
Join the Halves:
Press the two halves together firmly, matching up the heart contours. Use your thumb to smudge the clay across the seam, completely sealing the two pots into one hollow, enclosed heart form. -
Smooth the Form:
Refine the shape. Use a damp sponge (for air-dry) or your fingers to smooth out the seam until it is invisible. The heart should look puffy and continuous, like a pillow.
Clean Cuts
When carving the radiating petals, wait until the clay is ‘leather hard’ (stiff but cool) for cleaner lines. Soft clay tends to drag and clump up.
Step 2: Adding the Handle and Details
-
Create the Hanger:
Roll a small coil of clay. Create a loop and attach it securely to the top center of the heart, between the two lobes. Blend the clay at the base of the loop downward so it integrates seamlessly with the body. -
Central Indentation:
In the center of the heart, gently press a smaller heart shape. You can use a small cutter for this, pressing lightly just to make an impression, or sketch it lightly with a needle tool. -
Open the Center:
Using a small sculpting tool, carefully carve out a deep recess or actual hole in the middle of that central heart. This adds dimension and mimics the look of the reference piece. -
Add the Rays:
Using a V-gouge or a sharp needle tool, carve triangular ‘rays’ or petals radiating outward from the central heart. I find it helpful to mark the four compass points first to keep the spacing even. -
Detail the Center:
Use a needle tool to poke a series of tiny, consistent dots outlining the inner heart shape, creating a border pattern between the center hole and the carved rays. -
Perimeter Piercing:
For the final touch, take a small hole punch or a blunt needle tool and create a line of holes following the very outer edge of the heart rattle. Space them about a quarter-inch apart. -
Final Smooth:
Check for any rough burrs of clay from your carving. Gently brush them away with a soft brush or smooth them with a finger. Let the piece dry completely or bake according to your clay’s specific instructions.
Rustic Wash
After firing or drying, apply a dark acrylic wash and wipe it back. The paint will stay in the carved holes and lines, making the pattern pop.
Once fired or dried, give your rattle a shake to hear the satisfying sound of your craftsmanship
Seam-Hiding Stamped Pattern Rattle
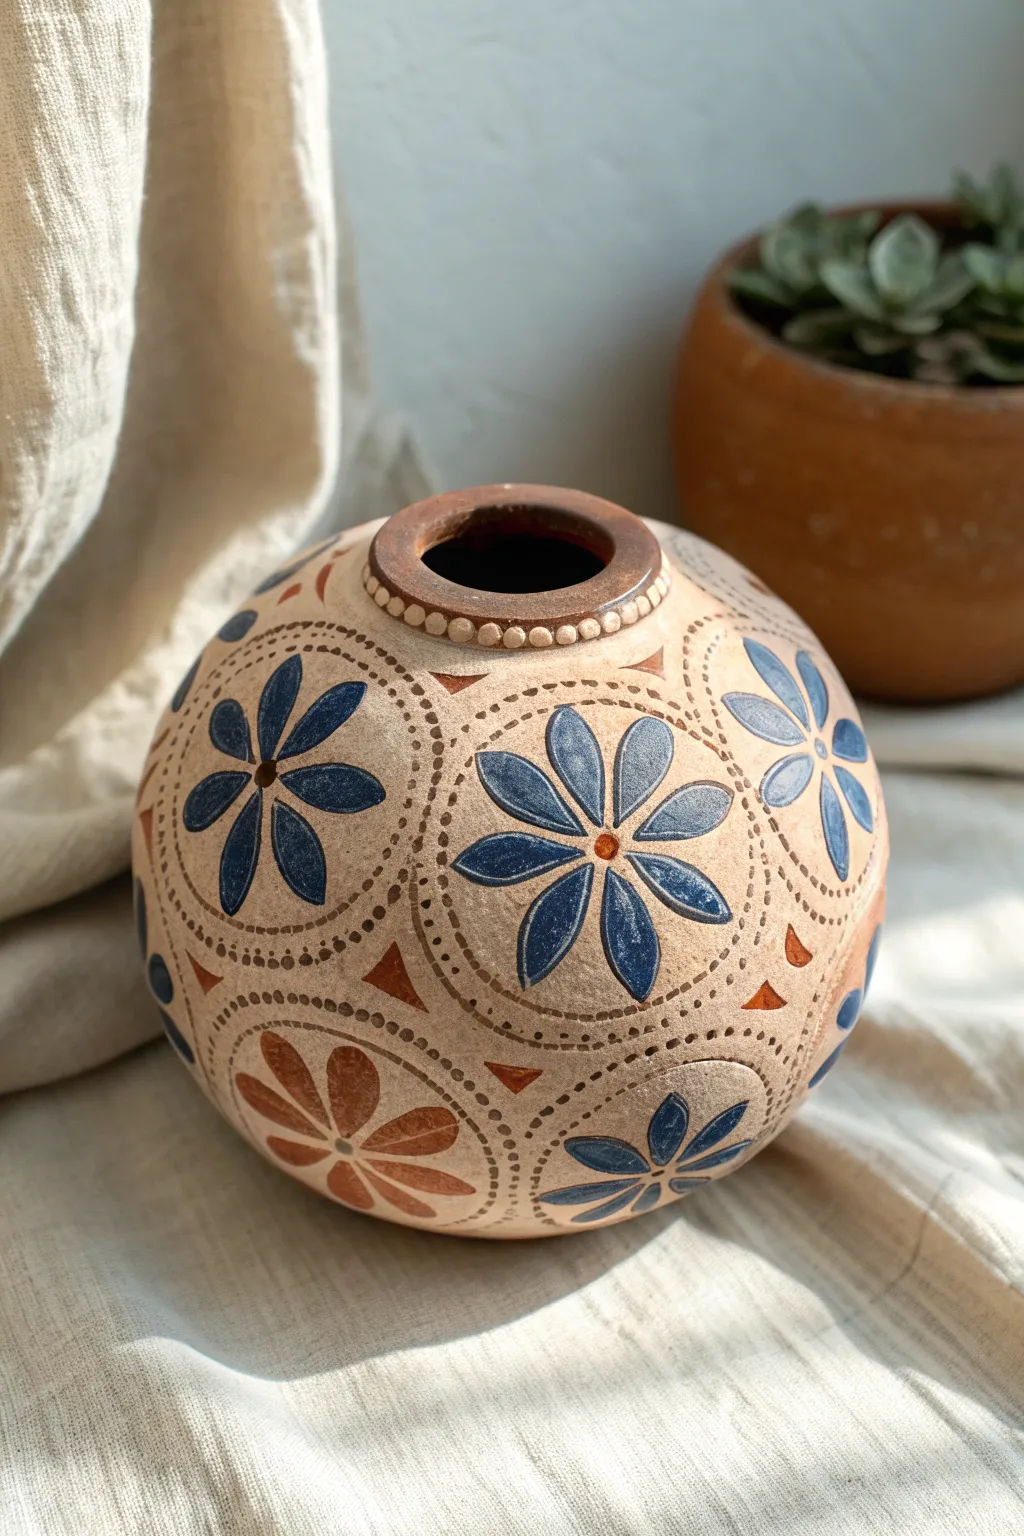
This charming spherical rattle uses a simple pinch pot construction method that is cleverly disguised by an all-over floral pattern. The finished piece features lovely raised bead details and rustic blue and rust-colored petals that give it a timeless, folk-art aesthetic.
Step-by-Step Tutorial
Materials
- Stoneware or earthenware clay (buff or speckled)
- Small clay beads or dried beans (for the rattle sound)
- Serrated kidney rib
- Rubber rib tool
- Wooden paddle
- Circular cookie cutter or jar lid (approx. 2-3 inches)
- Leaf or petal shaped stamps (or carving tools)
- Small round piping tip or hole punch (for texture)
- Underglazes (Cobalt blue and reddish-brown)
- Clear matte glaze
- Sponge
Step 1: Forming the Sphere
-
Pinch two bowls:
Start with two equal balls of clay, roughly the size of tennis balls. Open each one up using your thumb to create two matching pinch pot bowls. Keep the walls even, about 1/4 inch thick. -
Refine the rims:
Tap the rims of both bowls gently on your work surface to flatten them slightly. Scrape the rims with a serrated kidney rib to create a rough texture, then apply a generous amount of slip. -
Insert the rattle sound:
Place 5-7 small rolled clay balls (dried to leather hard) or dried beans into one of the bowls. Wrap each rattle piece in a tiny bit of paper towel prevents them from sticking to the wet clay; the paper will burn away in the kiln. -
Join the halves:
Press the two bowls together rim-to-rim securely. Use your thumb to smooth the clay across the seam on the outside, dragging clay from one side to the other until the join line disappears. -
Paddle into shape:
Gently trap air inside the hollow form. Use a wooden paddle to gently tap the exterior while rotating the ball. This compresses the clay, strengthens the join, and perfects the round spherical shape. -
Create the opening:
Choose the top of your rattle and cut a neat, circular hole. Smooth the rim of this opening with a damp sponge or piece of chamois leather.
Clean Lines Pro-Tip
When stamping the clay, dust your tools lightly with cornstarch. This prevents sticky clay from clinging to the stamp and ensures your flower impressions stay crisp and clean.
Step 2: Adding Texture & Pattern
-
Map the circles:
Wait until the clay is leather hard. Using a circular cutter or lid, gently press guide circles into the surface. Leave a tiny gap between the circles for the dotted border. These circles will effectively hide any remaining unevenness from your original seam. -
Stamp the petals:
Inside each large circle, press a petal-shaped stamp five or six times to form a central flower. If you don’t have a stamp, you can carve these shapes using a small loop tool. -
Add triangular details:
in the negative spaces between the large circles, press a small triangular stamp or carve small wedge shapes to fill the gaps and balance the composition. -
Create the dotted borders:
Use a small, round tool—like the end of a paintbrush handle or a piping tip—to press a chain of dots outlining every large circle. This ‘beaded’ texture adds crucial definition. -
Add the rim detail:
Roll a very thin coil of clay and attach it around the neck of the top opening. Use your round tool to press indentations all around this coil, mimicking the dotted borders on the body.
Step 3: Glazing & Finishing
-
Bisque fire:
Once the piece is bone dry, fire it to cone 04 (or your clay’s bisque temperature). -
Wax resist (optional):
If you want the base clay color to remain raw between shapes, you can carefully apply wax resist to the negative spaces. -
Paint the petals:
Using a fine brush, fill in the stamped petal shapes with cobalt blue underglaze. I find that two coats usually provides the perfect depth without hiding the texture. -
Accent colors:
Fill the triangular filler shapes and select flower centers with a warm, rust-colored or reddish-brown underglaze. -
Darken the rim:
Apply a dark brown or black underglaze to the interior of the neck and the very top lip for contrast. -
Wipe back:
Use a slightly damp sponge to wipe the surface gently. This cleans up any messy edges and helps the underglaze settle into the recessed stamped textures while highlighting the raised dots. -
Final glaze and fire:
Dip or brush a clear matte glaze over the entire exterior to seal the rattle. Fire to the final maturity temperature of your clay body (likely cone 5 or 6).
Uneven Drying?
If your sphere cracks at the seam while drying, you likely trapped air that expanded. Poke a tiny, invisible pinhole near the base to let expanding air escape during the drying phase.
Give your rattle a gentle shake to hear that satisfying sound once it comes out of the kiln cool and finished.
Two-Tone Glaze Character Rattle
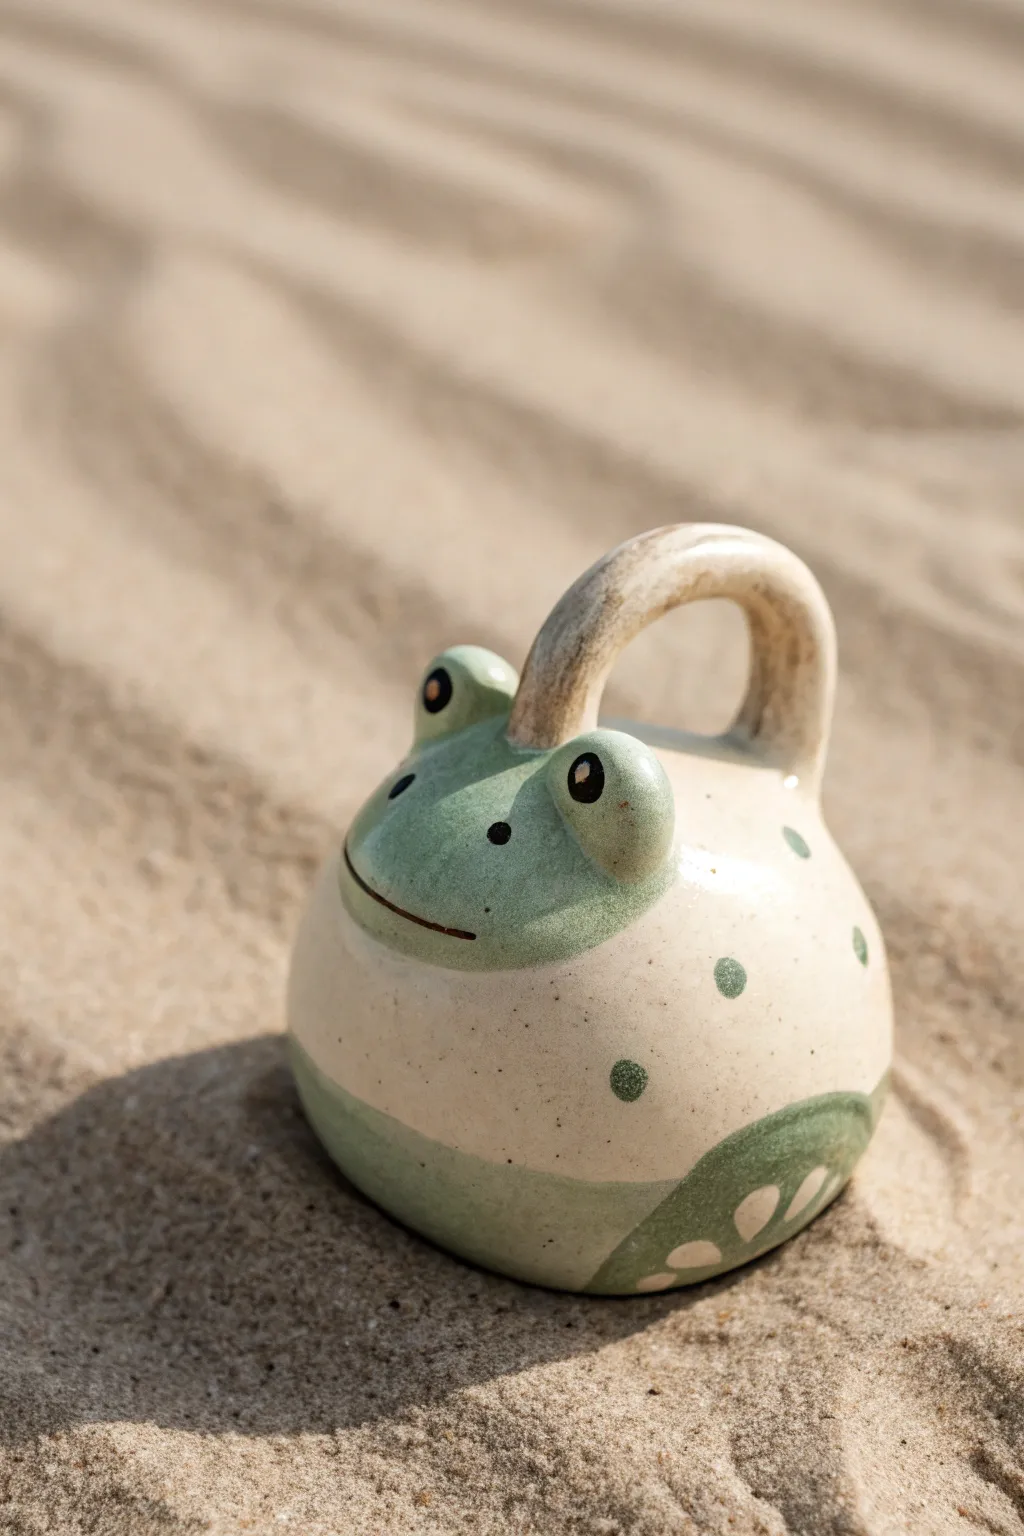
Capture the charm of a pond-side friend with this delightful ceramic frog rattle. Using simple pinch pot techniques and a lovely two-tone glazing method, you’ll create a musical sculpture that feels great in the hand and looks even better on the shelf.
Detailed Instructions
Materials
- Stoneware clay (smooth is best)
- Small clay beads or dried beans (for rattle sound)
- Newspaper or tissue paper
- Loop tool & needle tool
- Serrated kidney or scoring tool
- Slip (clay and water slurry)
- Underglaze (Light Celadon Green, Cream/Beige, Dark Green)
- Black underglaze (for details)
- Clear transparent glaze
- Small sponge
- Detail brushes
Step 1: Forming the Body
-
Pinch perfect:
Start with two balls of clay roughly the size of a tangerine. Insert your thumb into one and gently pinch while rotating to create a uniform bowl shape. Repeat with the second ball to make a matching pair. -
Create the sound:
Before joining, place 5-7 small clay beads inside one of the bowls. Wrap them loosely in a small piece of newspaper or tissue; this prevents them from sticking to the interior wads during construction and burns away in the kiln. -
Score and slip:
Rough up the rim of both pinch pots using your serrated tool or a fork. Apply a generous amount of slip to the scored areas. -
Join the halves:
Press the two rims together firmly to trap the rattle beads inside. Gently twist slightly to lock the clay particles together. -
Smooth the seal:
Using a wooden modeling tool or your thumb, drag clay across the seam to merge the two bowls. Smooth out the entire sphere with a rubber rib until the join line disappears completely. -
Shape the base:
Gently tap the bottom of the sphere on your work surface to create a flat, stable base so your frog sits without rolling.
Air Escape Route
A crucial safety tip: Always prick a tiny, hidden pinhole (try the bottom) into the hollow body. This allows expanding air to escape in the kiln so your frog doesn’t explode.
Step 2: Adding Features
-
Form the eyes:
Roll two small balls of clay for the eyes. Score and slip the top of the head where you want them to sit, then press them on firmly. Use a small tool to blend the bottom edge of the eyes into the head for a seamless look. -
Sculpt the handle:
Roll a coil of clay about the thickness of your pinky finger. Arch it into a ‘U’ shape to create the handle. -
Attach the handle:
Score and slip the attachment points just behind the eyes. Press the handle ends onto the body. I find it helpful to use a tiny coil around the base of the handle to strengthen the connection before smoothing it down. -
Refine the surface:
Once the clay is leather hard, use a damp sponge to wipe away any fingerprints or rough textures. This is crucial for a smooth finish under the glaze. -
Carve the mouth:
Using a needle tool, incite a wide, gentle curve for the mouth just below the eyes. Make the line deep enough to catch the black stain later.
Step 3: Painting & Glazing
-
Bisque fire:
Allow your frog to dry completely before its first firing in the kiln to bisque temperature (usually Cone 04). -
Base coat:
Apply 2-3 coats of a creamy beige underglaze to the entire mid-section of the frog. Leave the bottom and top exposed for the green tone. -
Apply the green:
Paint a soft celadon or sage green underglaze on the very bottom third and the top head area (including the eyes). Feather the edges where it meets the beige for a softer transition. -
Handle detail:
Paint the handle with a watered-down wash of brown or beige to give it a slightly organic, woody look. -
Dotting the body:
Dip the end of a paintbrush handle or a dedicated dotting tool into dark green underglaze. Stamp polka dots randomly around the beige section of the body. -
Leg illusion:
Paint a semi-circle shape on the side bottom in dark green to suggest a folded leg. Add three beige dots inside this green patch for contrast. -
Face details:
Using a fine liner brush and black underglaze, paint the pupils on the eyes. Carefully trace the incised mouth line with black to make the smile pop. -
Dip and fire:
Once the underglaze is dry, dip the entire piece in a clear transparent glaze. Fire again to glaze temperature (Cone 5 or 6 depending on your clay body).
Texture Play
Instead of painting the leg details, try carving the leg shape slightly into the clay at the leather-hard stage (sgraffito) for a tactile, 3D effect before glazing.
Give your finished rattle a gentle shake and enjoy the soothing sound of your handcrafted amphibian