When you’re making clay pieces as an adult, it’s extra satisfying when they look polished and actually earn a spot in your home. Here are my favorite clay project ideas for adults—a mix of home decor, functional accessories, and wearable art that feel modern and totally doable.
Marbled Ring Dish
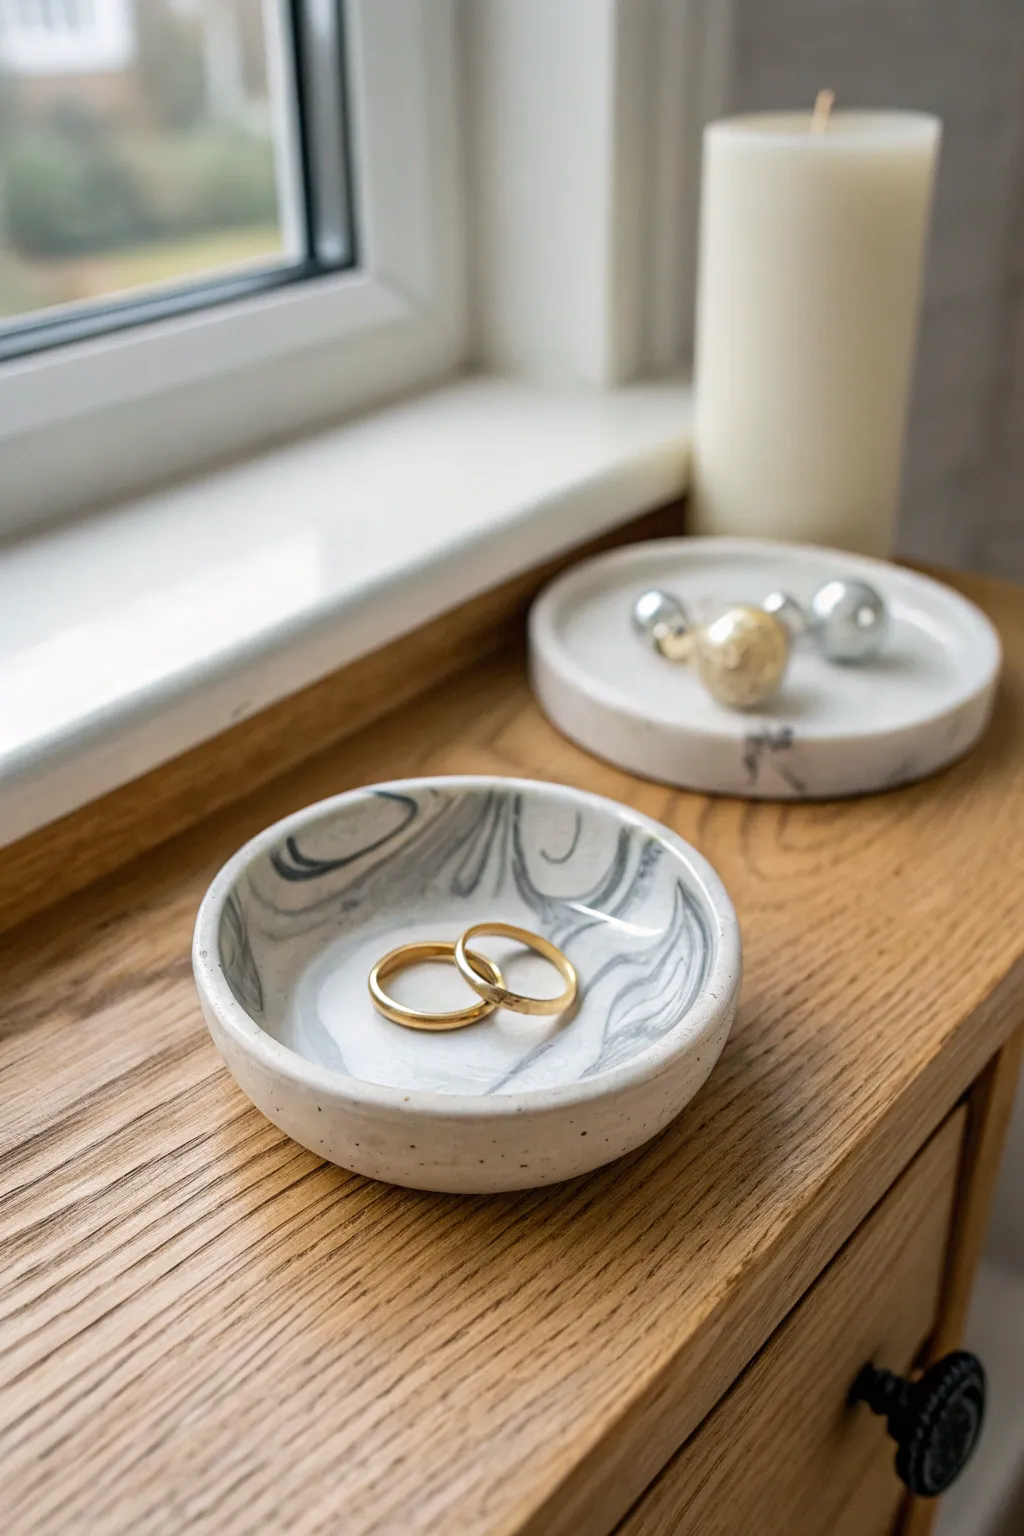
Achieve the sophisticated look of real stone without the hefty price tag using this simple marbling technique. These delicate dishes feature swirls of charcoal grey against a creamy white base, creating a stunning, modern organizer for your favorite jewelry pieces.
Detailed Instructions
Materials
- White polymer clay (approx. 2 oz)
- Black or dark grey polymer clay (small amount)
- Rolling pin or acrylic roller
- Circle cookie cutter or small bowl (3-4 inches diameter)
- Small oven-safe bowl (to use as a mold)
- Craft knife or clay blade
- Sandpaper (fine grit, 400-600)
- Gloss or matte varnish (optional)
- Soft paintbrush
Step 1: Preparing the Clay
-
Condition the white clay:
Start by taking a generous amount of white polymer clay. Knead it thoroughly in your hands until it becomes warm, soft, and pliable. This conditioning step is crucial to prevent cracks later on. -
Prepare the contrasting color:
Take a very small piece of black or dark grey clay—you need much less than you think, roughly the size of a pea for a muted marble look. Condition this piece as well until soft. -
Create distinct ropes:
Roll the white clay into a thick log, about 4 inches long. Then, roll your black clay into a very thin, long snake, roughly the same length as the white log.
Pro Tip: Gold Rim
For an extra touch of luxury that matches gold jewelry, paint the very top rim of the dish with liquid gold leaf or metallic acrylic paint after baking.
Step 2: Creating the Marble Effect
-
Combine the colors:
Lay the thin black snake along the length of the white log. Twist the two together like a candy cane. This is the beginning of your marbling pattern. -
Fold and roll:
Take your twisted log and fold it in half. Roll it out into a log again. Repeat this twist-fold-roll process about 3 or 4 times. Be careful not to over-mix, or the distinct lines will turn into a solid grey slush. -
Form a ball:
Once you see nice streaks running through the clay, roll the entire mixture into a smooth ball. You should see interesting lines wrapping around the surface. -
Flatten the clay:
Place the ball on a smooth work surface. Using your roller, flatten the ball into a sheet approximately 1/4 inch thick. I like to rotate the clay periodically to keep the circle relatively even. -
Check the pattern:
Look at your rolled sheet. If you aren’t happy with the marbling on one side, flip it over—the other side often has a completely different and unique pattern.
Troubleshooting: Air Bubbles
If you see air bubbles while rolling out the clay, gently pierce them with a needle tool or pin, then smooth the air out with your finger before baking.
Step 3: Shaping and Baking
-
Cut the circle:
Use your circle cutter or place a small bowl upside down on the clay as a template. Press down firmly or trace around it with your craft knife to cut out a perfect circle. -
Smooth the edges:
Gently run your finger along the cut edge of the clay circle to smooth out any sharpness or knife marks. This creates a more professional, finished look. -
Form the dish shape:
Place your clay circle inside your small oven-safe bowl. Gently press it into the bottom so it takes on the curved shape of the bowl. Ensure it sits evenly and isn’t tilted. -
Bake the project:
Place the bowl with the clay inside into a preheated oven. Bake according to the specific temperature and time instructions on your package of polymer clay (usually around 275°F for 15-30 minutes). -
Cool down:
Remove the bowl from the oven and let it cool completely before attempting to remove the clay dish. The clay hardens fully as it cools.
Step 4: Finishing Touches
-
Remove from mold:
Once cool, pop the clay dish out of the bowl. It should release easily. If there are any rough spots on the rim, gently sand them with fine-grit sandpaper. -
Add speckles (optional):
To mimic the stone look in the reference photo, you can flick a tiny bit of diluted black or brown paint onto the surface using a stiff brush, though the marbling alone is beautiful. -
Seal the piece:
For a glossy, ceramic-like finish visible in the photo, apply a thin coat of gloss varnish. If you prefer a raw stone texture, you can leave it unsealed or use a matte varnish. -
Final cure:
Let the varnish dry completely according to the bottle instructions before placing any jewelry inside.
Place your new dish on a bedside table to keep your rings safe and stylishly displayed


Stamped Coaster Set
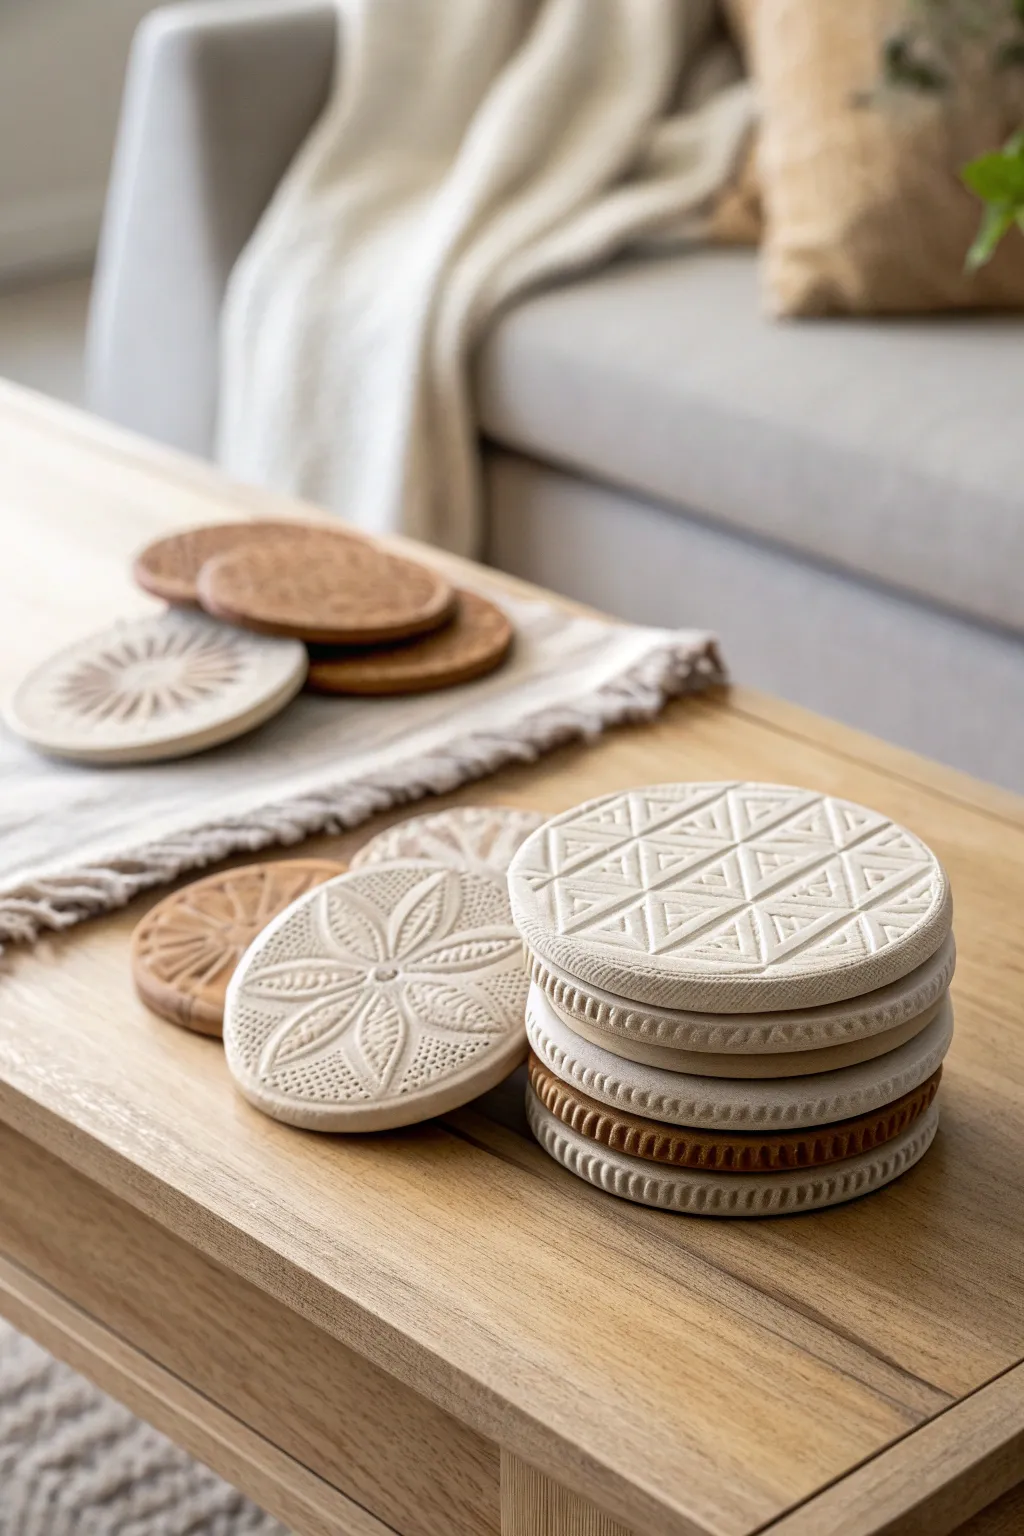
Elevate your home decor with these beautifully textured clay coasters that blend rustic charm with modern geometric precision. By using simple clay stamping techniques, you’ll create a durable and stylish set perfect for your coffee table or as a thoughtful handmade gift.
Step-by-Step Tutorial
Materials
- Air-dry clay (white and terracotta/brown colors)
- Rolling pin
- Circle cookie cutter (approx. 3.5 – 4 inches diameter)
- Texture stamps (geometric patterns, mandala designs, or rubber stamps)
- Canvas mat or parchment paper
- Fine-grit sandpaper (220 grit)
- Clear acrylic sealant (matte or satin finish)
- Felt pads (optional for backing)
- Bowl of water
- Sponge
Step 1: Preparing the Clay Base
-
Condition the clay:
Begin by taking a handful of air-dry clay. Knead it in your hands for a few minutes until it becomes warm, soft, and pliable. This prevents cracks later on. -
Roll it out:
Place your clay on a canvas mat or parchment paper to prevent sticking. Use your rolling pin to flatten the clay into an even slab, aiming for a consistent thickness of about 1/4 inch. -
Cut the shapes:
Press your large circle cookie cutter firmly into the clay slab to cut out your coaster bases. Gently lift away the excess clay around the circles. -
Smooth the edges:
Dip your finger slightly in water and run it specifically along the cut edge of each circle to smooth out any roughness or loose bits of clay led behind by the cutter.
Step 2: Adding Designs and Texture
-
Select your pattern:
Decide on your design approach. The image shows a mix of all-over geometric triangle patterns and centered floral mandala motifs. -
Stamp geometric patterns:
For the geometric coasters, take a square or rectangular stamp with a triangle motif. Press it firmly into the clay, repeating the impression in rows to cover the entire surface. -
Create floral centers:
For the floral designs, position a large mandala-style stamp directly in the center of the circle. Press down evenly to ensure the deep details transfer clearly. -
Detail the edges:
To recreate the ridged edge seen on the stacked coasters, use a small texture tool or the side of a comb. Gently press vertical lines into the side edge of the coaster while carefully rotating it. -
Check impression depth:
Inspect your work. If an impression looks too shallow, carefully line the stamp back up and re-press. The clay should deform slightly but not become too thin. -
Flatten warping:
Stamping can sometimes distort the perfect circle shape. Give the coaster a final gentle inspection and nudge it back into a round shape if needed.
Sticky Stamp Troubles?
If your stamp keeps pulling up chunks of clay, lightly dust the surface of the clay with cornstarch or dip your stamp in a little bit of water before pressing it down.
Step 3: Finishing Touches
-
Initial drying:
Transfer the coasters carefully to a flat drying rack or a clean sheet of parchment paper. Store them in a cool, dry place away from direct sunlight. -
Flip occasionally:
I like to flip the coasters over every 12 hours during the drying process. This encourages even airflow and prevents the edges from curling upward as moisture evaporates. -
Let fully cure:
Allow the clay to dry completely for 24 to 48 hours, depending on the humidity and brand of clay used. They should feel light and hard to the touch. -
Sand imperfections:
Once fully dry, take your fine-grit sandpaper and lightly buff the edges and surface to remove any sharp burrs or fingerprints. -
Dust off residue:
Wipe each coaster down with a slightly damp sponge or cloth to remove the fine clay dust generated by sanding. -
Apply sealant:
Using a soft brush, apply a thin coat of clear acrylic sealant (matte or satin) to the top and sides. This protects the clay from moisture, which is crucial for a coaster. -
Finish the bottom:
After the top sealant dries, flip the coasters and seal the bottom. You can attach small felt pads or a circle of felt to the base to protect your furniture.
Two-Tone Effect
For a marbled look shown in the darker coasters, twist ropes of white and terracotta clay together before rolling out your slab to create beautiful natural swirls.
Now you have a stunning set of custom coasters ready to protect your surfaces with style


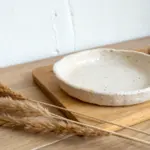
Scalloped Trinket Bowl
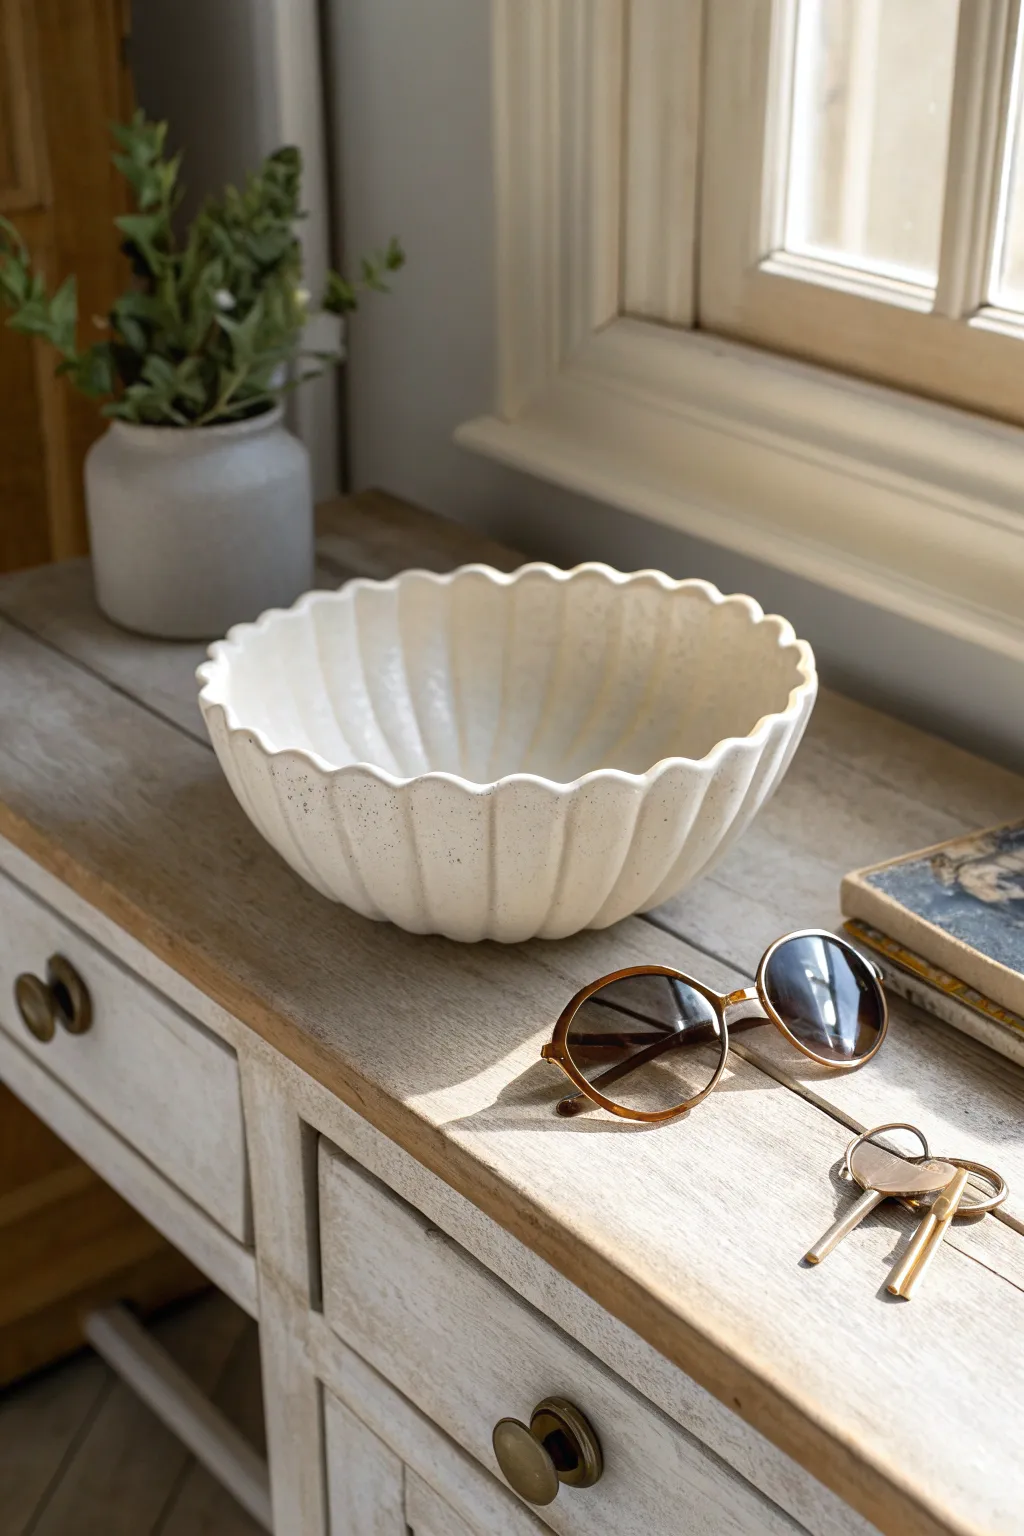
Capture the charm of vintage serveware with this elegant, hand-built clay bowl. Featuring a distinct fluted design and a soft, matte speckled finish, it makes a perfect catch-all for sunglasses and keys or a standout centerpiece on its own.
Detailed Instructions
Materials
- White stoneware clay (preferably with fine grog)
- Rolling pin
- Canvas mat or slab roller
- Large plaster or bisque hump mold (bowl shape)
- Rib tool (flexible rubber)
- Needle tool or fettling knife
- Modeling tool (rounded wooden end)
- Sponge
- Matte white glaze (speckled or add speckles)
- Sureform tool (optional)
- Paintbrush for glazing
Step 1: Creating the Slab Base
-
Wedging and prepping:
Begin by thoroughly wedging your white stoneware clay to remove air bubbles. This step is crucial for preventing cracks during firing. Roll a ball of clay roughly the size of a grapefruit. -
Rolling the slab:
Place the clay on your canvas mat to prevent sticking. Use the rolling pin to flatten the ball into a consistent slab about 1/4 inch thick. For even thickness, you can place wooden slats of that height on either side of the clay as guides for your rolling pin. -
Compressing the surface:
Take your flexible rubber rib tool and gently drag it across the surface of the slab in multiple directions. This aligns the clay particles and strengthens the slab, minimizing warping later. -
Cutting the circle:
Place your bowl mold upside down on the slab to gauge the size, ensuring you have enough excess clay to drape over the sides. Use a needle tool to cut a large circle that extends about 2-3 inches beyond your intended bowl rim.
Uneven Scallops?
If your rim looks messy, use a paper template. Cut a scalloped edge on specific cardstock and trace it onto the slab before draping.
Step 2: Forming and Shaping
-
Draping the mold:
Carefully lift your clay circle and drape it over your hump mold. Gently press the clay down against the mold, starting from the center and working outward to avoid trapping air pockets. -
Establishing the depth:
Use the edge of your hand to define where the base meets the walls. I usually take a moment here to ensure the slab is centered on the mold before proceeding. -
Creating the flutes:
This is the signature step. Using your fingers or a rounded wooden modeling tool, gently press vertical indentations into the clay wall at regular intervals. Support the clay from underneath with your other hand if possible, or press firmly against the rigid mold. -
Defining the scallops:
As you create the vertical flutes, the rim will naturally start to wave. Accentuate this by pressing down into the ‘valley’ of the flute at the rim and gently pulling up the ‘peak’ between flutes to create a sharp, scalloped edge. -
Trimming the excess:
Once the shape is established, use a needle tool or fettling knife to trim the bottom edge of the rim so it is even all the way around, maintaining the wavy pattern. -
Refining the rim:
Smooth the cut edge with a damp sponge or your fingertip. You want a soft, rounded lip rather than a sharp, cut edge.
Pro Tip: Texture
For a truly natural look, don’t smooth the flutes perfectly. Leaving slight finger marks adds to the organic, handmade aesthetic.
Step 3: Drying and Finishing
-
Leather hard stage:
Let the bowl dry on the mold until it is leather hard. This means it’s firm enough to hold its shape but still workable. Carefully lift the bowl off the mold. -
Cleaning up:
Inspect the interior of the bowl. Smooth out any marks left by the mold using a rib or a slightly damp sponge. If the rim needs more definition, you can refine the scallops now. -
Bisque firing:
Allow the piece to dry completely until it is bone dry. This usually takes several days. Fire the piece in a kiln to cone 04 (or your clay body’s specific bisque temperature). -
Glazing preparation:
Once out of the kiln, wipe the bisque ware with a damp sponge to remove dust. Apply a wax resist to the very bottom foot of the bowl to prevent it from sticking to the kiln shelf. -
Applying the glaze:
Dip the bowl into a matte white glaze. If your glaze doesn’t have speckles pre-mixed, you can achieve the look by lightly flicking a toothbrush dipped in iron oxide wash over the wet glaze. -
Glaze firing:
Fire the bowl again to the maturity temperature of your clay and glaze (typically cone 5 or 6 for stoneware).
Place your finished bowl on an entryway table or dresser to beautifully hold your daily essentials


Abstract Face Planter
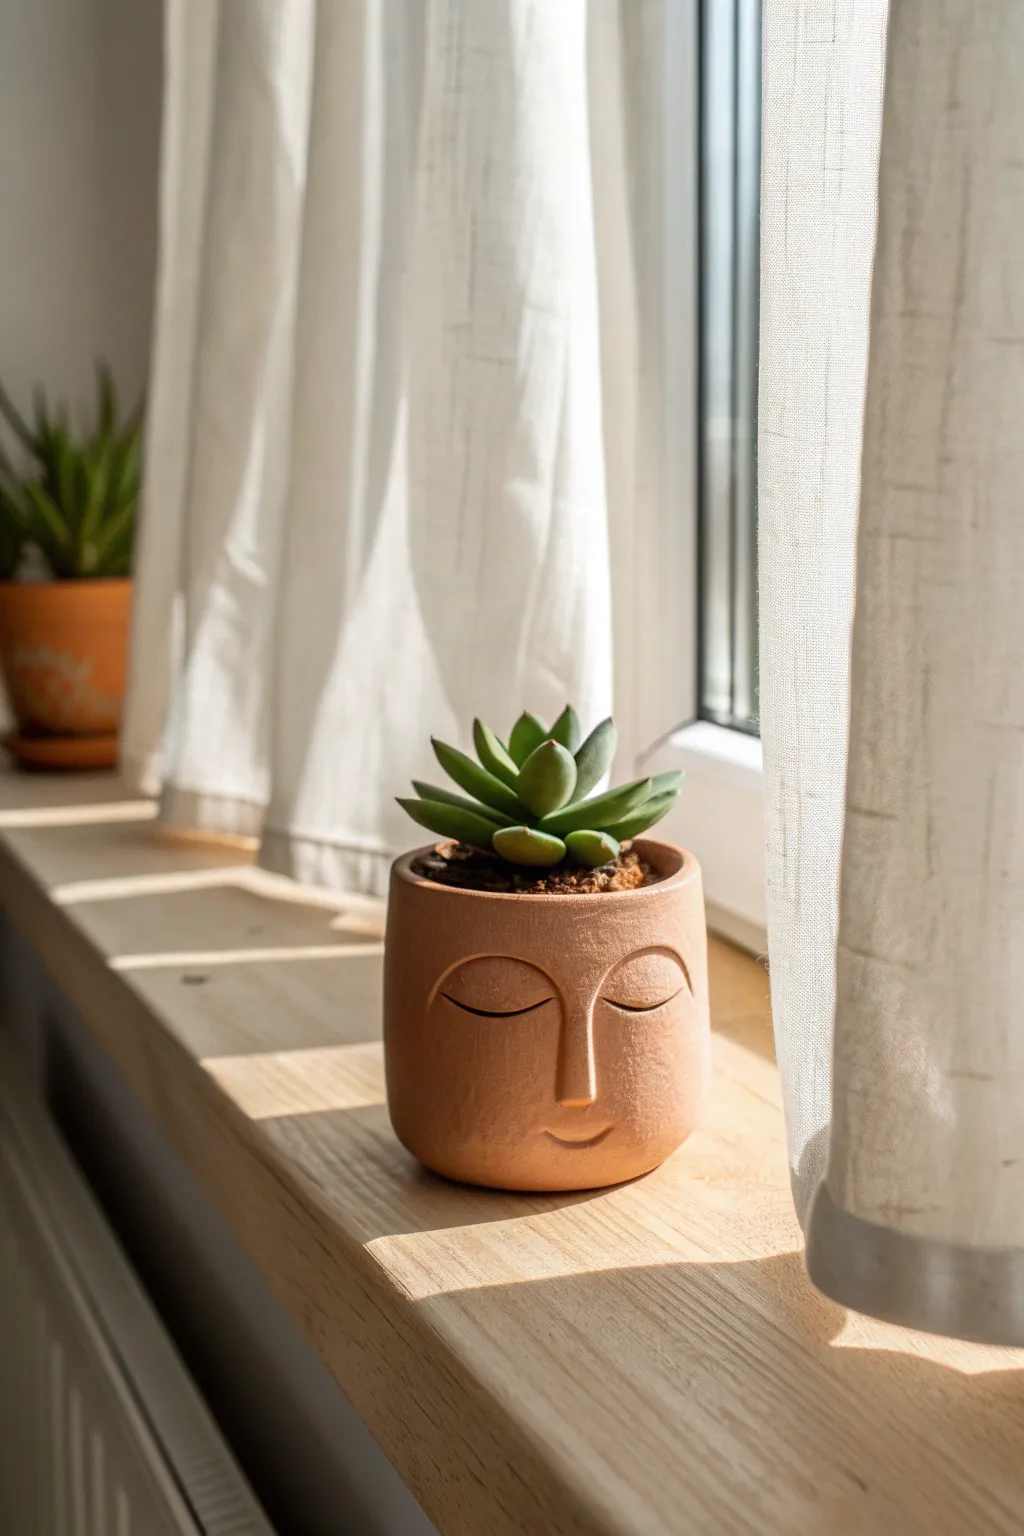
Bring a sense of calm to your windowsill with this terracotta planter featuring a peaceful, sleeping face. This minimalist design relies on simple relief techniques to create a modern, sculptural home for your favorite succulent.
Step-by-Step Tutorial
Materials
- Terracotta-colored air-dry clay or polymer clay
- Cylindrical container (like an empty clean tin can or glass jar) to use as a mold
- Rolling pin
- Clay knife or fettling knife
- Needle tool
- Small bowl of water (for slip)
- Smoothing sponge
- Fine-grit sandpaper
- Matte spray sealant (optional)
- Succulent of choice
Step 1: Forming the Base
-
Prepare your clay:
Start by warming up a large chunk of terracotta clay in your hands until it is pliable and free of cracks. -
Roll out the slab:
Using your rolling pin, flatten the clay into a long rectangular slab, roughly 1/4 inch thick. Aim for an even thickness throughout to ensure sturdy walls. -
Cut to size:
Wrap the slab around your chosen cylindrical mold (tin can or jar) to measure the length needed. Cut the slab to the correct height and circumference, leaving just a slight overlap for the seam. -
Create the cylinder:
Wrap the clay sheet around the mold. Score the edges where they overlap with your needle tool (make little hash marks) and dab on some water. Press the edges firmly together to seal. -
Blend the seam:
With your thumb or a modeling tool, smooth out the vertical seam until it disappears completely. The surface should look continuous. -
Add the base:
Roll out a separate circular piece for the bottom. Place your cylinder on top of it, trace the circle, and cut it out. Score and slip the bottom edge of the cylinder and the new base piece, then press them together firmly. -
Refine the shape:
Gently remove the internal mold if possible, or leave it in for stability if using a loose tin. Smooth the top rim with a damp sponge so it’s rounded and soft, not sharp.
Smooth Operator
Keep a small piece of cling film handy. When smoothing features like the nose, place the film over the clay and rub with your thumb. It creates a polished surface with no fingerprints.
Step 2: Sculpting the Face
-
Mark the center:
Identify the ‘front’ of your pot (opposite the seam). Use a needle tool to very faintly mark where the nose and eyes will sit to ensure symmetry. -
Form the nose:
Roll a small snake of clay about an inch long. Flatten one end slightly to blend into the forehead area, keeping the other end raised for the tip of the nose. -
Attach the nose:
Score the center of the face and the back of your nose piece. Attach it using a little water, blending the clay onto the pot at the sides and top so it looks like it emerges naturally from the surface. -
Create the eyelids:
Roll two small, thin semicircles or flattened oval shapes. These shouldn’t be too thick; they act as the closed eyelids. -
Position the eyes:
Attach the eyelids on either side of the nose bridge. They should curve downward in a ‘U’ shape to mimic sleeping eyes. Blend the top edge of the eyelids into the pot surface, leaving the bottom edge distinctive for depth. -
Add the lash line:
I find that using a needle tool to gently underscore the bottom curve of the eyelid adds a nice shadow that defines the eye clearly. -
Sculpt the mouth:
Roll a tiny, very thin snake of clay. Curve it slightly upwards into a gentle smile. Attach it below the nose, blending the ends into the ‘cheeks’ of the pot. -
Final smoothing:
Dip your finger or a small sponge in water and run it over the facial features to remove any fingerprints or tool marks. The features should look soft and organic, not sharp.
Step 3: Finishing Touches
-
Drying:
Allow the pot to dry slowly away from direct sunlight. If you used air-dry clay, this might take 24-48 hours. If using polymer, bake according to package instructions. -
Sanding:
Once fully dry or cured, use fine-grit sandpaper to gently buff away any remaining rough spots, paying attention to the rim and the seam. -
Sealing:
If you plan to put a real plant directly inside, coat the interior with multiple layers of a waterproof sealant. For the exterior, a single coat of matte sealant protects the finish without making it shiny.
Cracks Appearing?
If you see tiny hairline cracks as the clay dries, mix a small amount of clay with water to make a paste (slip) and fill the cracks immediately, then smooth over.
Place your favorite succulent inside and enjoy the peaceful vibe this little character adds to your space

The Complete Guide to Pottery Troubleshooting
Uncover the most common ceramic mistakes—from cracking clay to failed glazes—and learn how to fix them fast.
Leaf-Imprint Catchall Dish
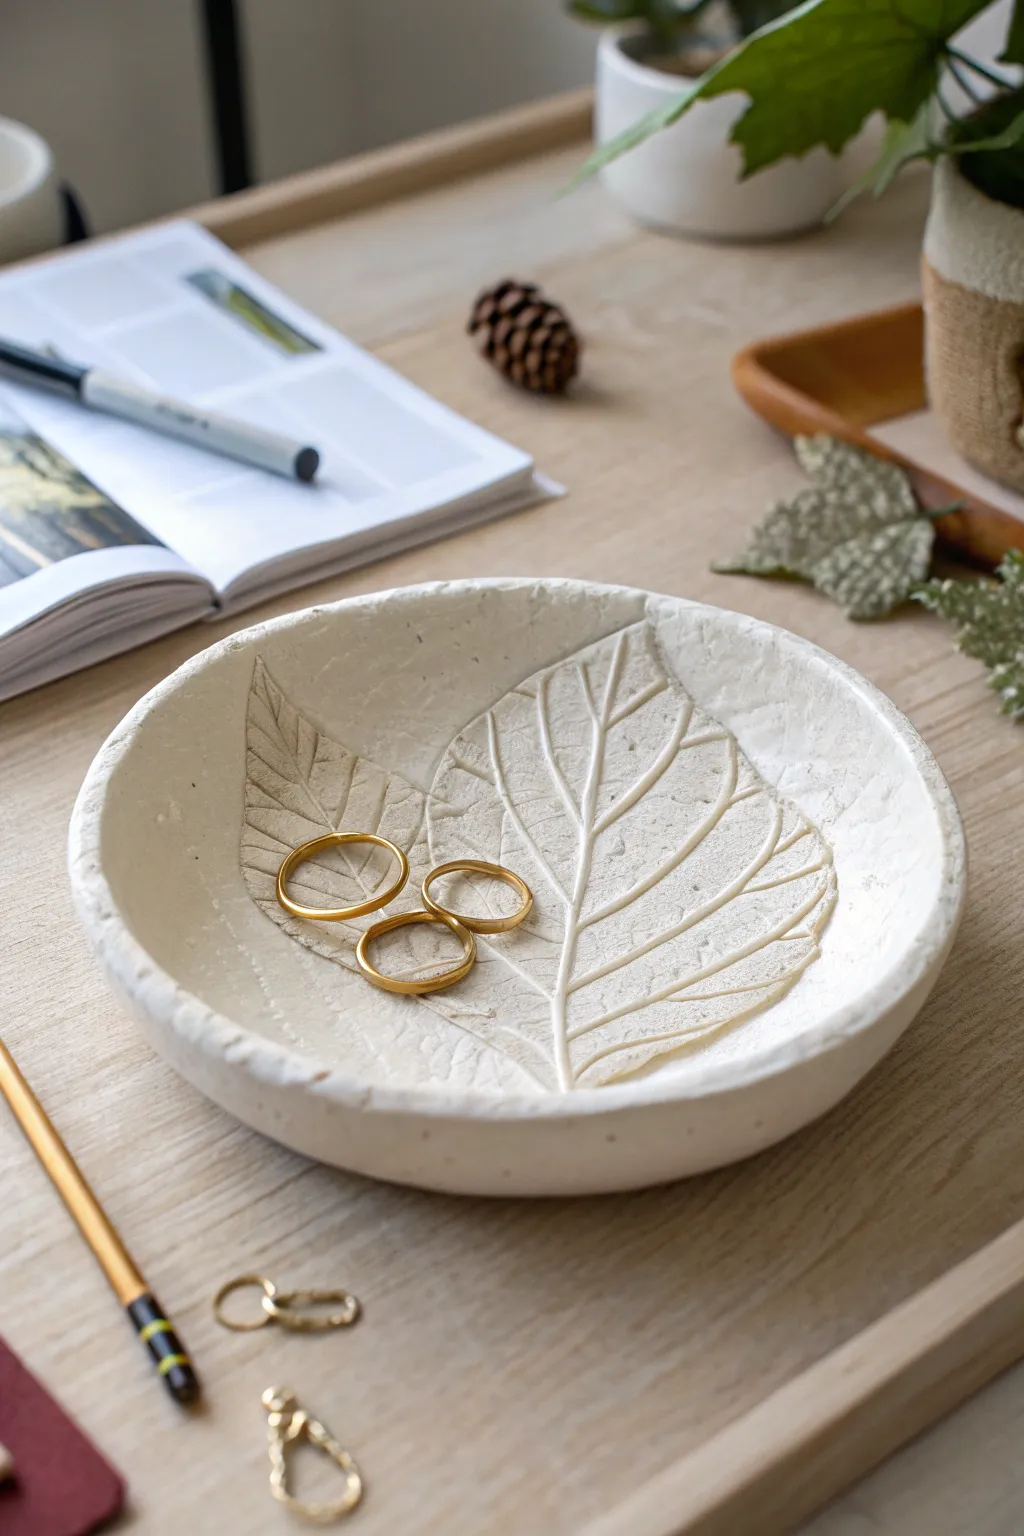
Capture the delicate veins of nature with this elegant clay catchall, perfect for holding your everyday jewelry. The subtle leaf impression creates a sophisticated, organic texture that looks beautifully modern in a matte white finish.
Step-by-Step Guide
Materials
- White polymer clay or air-dry clay (approx. 4-6oz)
- Small rolling pin or acrylic roller
- Fresh leaves with prominent veins (like hydrangea or hosta)
- Small bowl (approx. 5-6 inches diameter) for molding
- Craft knife or needle tool
- Fine-grit sandpaper (220-400 grit)
- Matte white acrylic paint (optional if using white clay)
- Matte sealant or varnish
- Parchment paper
- Sponge or soft brush
Step 1: Preparing the Slab
-
Condition the Clay:
Begin by kneading your clay until it is warm, pliable, and free of cracks. If you are using air-dry clay, ensure your hands are slightly damp to keep it workable. -
Roll it Out:
Place the ball of clay onto a sheet of parchment paper. Use your rolling pin to flatten it into an even circle, aiming for a thickness of about 1/4 inch. Avoid going too thin, as the leaf impression will compress it further. -
Smooth the Surface:
Before imprinting, run a slightly damp finger or a very smooth sponge over the surface to remove any initial fingerprints or imperfections.
Vein Definition
Choose fresher, thicker leaves rather than dried ones. Fresh leaves are flexible and won’t crumble into the clay, and their veins are usually turgid and distinct.
Step 2: Creating the Impression
-
Position the Leaf:
Select your leaf and place it vein-side down onto the center of the clay slab. The vein side is usually the back of the leaf and provides the crispest detail. -
Roll the Impression:
Gently roll over the leaf with your rolling pin. Apply firm, even pressure to push the veins deep into the clay, but be careful not to distort the overall shape of your circle too much. -
Remove the Leaf:
Find the stem or a sturdy edge of the leaf. Carefully peel it back to reveal the imprint. If any small bits of leaf remain stuck, gently lift them out with a needle tool. -
Trim the Edges:
Place a circular template (like a bowl rim or lid) over the clay, centering the leaf design. Use your craft knife to cut around the template for a perfect circle, or freehand a slightly wavy edge for a more rustic look.
Step 3: Shaping and Drying
-
Create the Curve:
Lift the parchment paper with the clay slab on it. Gently place the clay circle inside your molding bowl. Press it down lightly so it takes the concave shape of the bowl. -
Refine the Rim:
While it’s in the mold, smooth the cut edge of the rim with a damp finger. I like to tap the edge gently to round it off so it isn’t sharp after drying. -
Initial Drying:
Let the clay dry inside the bowl for 12-24 hours. This ensures it holds the curved shape while it hardens. -
Remove and Flip:
Once the clay is visibly lighter and firm enough to hold its shape, carefully remove it from the bowl. Flip it over onto a drying rack to allow air to circulate underneath. -
Full Cure:
Allow the piece to dry completely for another 24-48 hours. If using polymer clay, bake according to the package instructions at this stage instead of air-drying.
Gilded Edge
After the sealant is dry, run a gold leaf pen along the very top rim of the bowl. This adds a hint of luxury that complements gold rings perfectly.
Step 4: Finishing Touches
-
Sand for Smoothness:
Once fully dry (or baked and cooled), use fine-grit sandpaper to gently smooth the rim and the underside of the dish. Avoid sanding the interior texture to preserve the leaf details. -
Paint (Optional):
If you want a brighter white or a stone effect like the image, dilute a little matte white acrylic paint with water and apply a wash over the entire dish. -
Apply Sealant:
Protect your dish by applying a thin coat of matte varnish or sealant. This makes the dish durable and easier to dust later on. -
Final Cure:
Let the sealant dry completely according to the manufacturer’s timeframe before placing any jewelry inside.
Now you have a serene, nature-inspired spot to keep your favorite rings safe
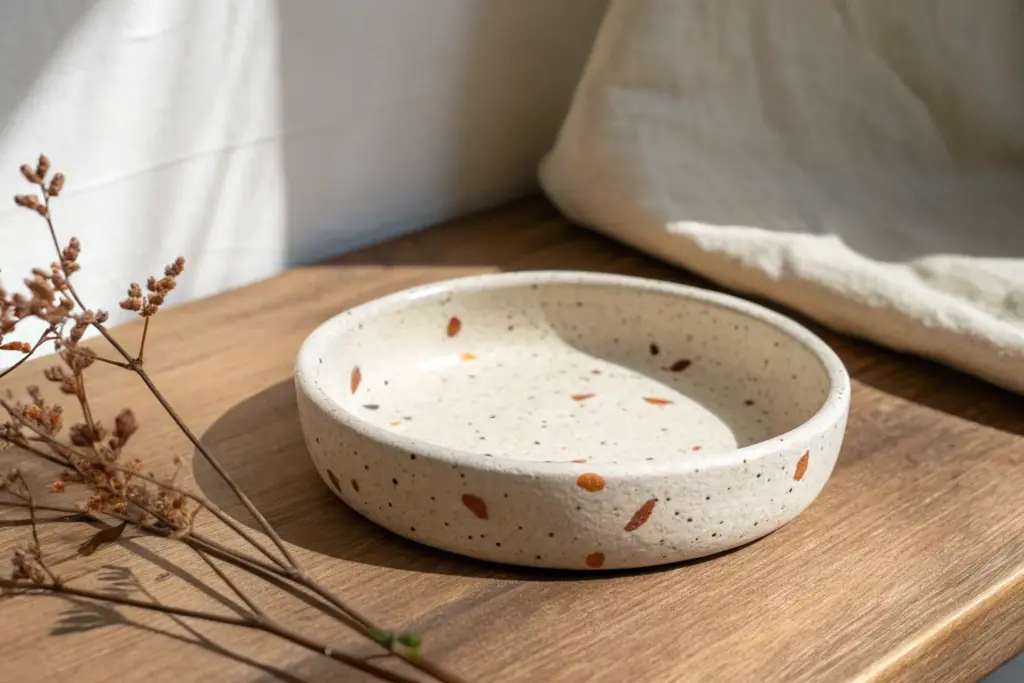
Polymer Clay Statement Earrings

These lightweight statement earrings feature a chic terrazzo effect, combining a creamy white base with pops of autumn-inspired speckles. The modern arch shape paired with sleek gold findings makes them a versatile accessory for any outfit.
Step-by-Step
Materials
- Polymer clay (white or cream for base)
- Polymer clay (scraps in burnt orange, mustard yellow, dark grey/black, and rust red)
- Acrylic roller or pasta machine
- U-shaped or arch clay cutter (approx. 1.5 inches)
- Small circular clay cutter (to match stud tops, approx. 10mm)
- Needle tool or toothpick
- Smooth work surface (ceramic tile or glass mat)
- Blade or tissue slicer
- Parchment paper
- Gold-tone earring posts (flat circle pad)
- Gold jump rings (6mm or 7mm)
- Jewelry pliers (flat nose and round nose)
- Super glue or jewelry resin
- Fine grit sandpaper (400-1000 grit) or a buffing tool
- Hand drill or pin vise
- Small oven for baking
Step 1: Prepping the Terrazzo
-
Condition the base:
Begin by conditioning your white or cream polymer clay until it is soft and pliable, then roll it into a thick sheet, about 3mm to 4mm thick. This will be the canvas for your design. -
Create the chips:
Take your colored clay scraps—orange, mustard, grey, and red—and roll them into very thin, paper-like sheets. -
Chop the colors:
Using your blade, chop these thin colored sheets into tiny, irregular confetti pieces. I find that varying the sizes slightly creates a more natural stone look. -
Apply the pattern:
Sprinkle the colored clay chips randomly over your white base sheet. Don’t overthink placement; organic distribution looks best. -
Embed the chips:
Place a piece of parchment paper over the clay to prevent sticking, then gently roll over the slab with your acrylic roller to press the colorful chips flat into the white base. -
Final smooth:
Roll in different directions until the surface is completely level and smooth, ensuring the chips aren’t raised above the base clay.
Step 2: Cutting and Baking
-
Cut the arches:
Press your U-shaped cutter firmly into the terrazzo slab to cut out two identical arch shapes. -
Refine the edges:
Gently smooth the cut edges with your fingertip to remove any stray bits of clay or sharp corners before baking. -
Make the toppers:
For the gold stud backers shown, you don’t actually need clay tops, but if you want clay studs, cut two small circles from plain gold or mustard clay now. -
Pierce the holes:
Using a needle tool, poke a hole at the very top center of each arch. Ensure the hole is large enough for your jump rings to move freely. -
Bake:
Transfer the pieces to a baking sheet lined with paper or a ceramic tile. Bake according to your brand of clay’s instructions (usually 275°F/135°C for 30 minutes). -
Cool and sand:
Let the pieces cool completely. If there are fingerprints or rough spots, wet sand them gently with fine-grit sandpaper for a professional finish.
Sticky Situation?
If your clay sticks to the table or cutter, pop the rolled slab in the fridge for 10 minutes before cutting. Alternatively, dip your cutters in cornstarch.
Step 3: Assembly
-
Prepare the studs:
Take your gold disc earring posts. These are the metal circles that sit on the earlobe. -
Attached the jump rings:
Use two pairs of pliers to twist open a gold jump ring. We twist the ends away from each other (front to back) rather than pulling them apart to preserve the circle shape. -
Link the pieces:
Loop the open jump ring through the hole in your clay arch and through the loop on the bottom of the gold stud post. -
Secure the ring:
Twist the jump ring closed again with your pliers until the ends meet perfectly flush. -
Final clean:
Wipe the finished earrings with a soft cloth to remove any sanding dust or oils, and they are ready to wear.
Make it Shine
coat the baked clay arches with a thin layer of UV resin or polyurethane gloss varnish. This makes the terrazzo colors pop and adds a high-end ceramic look.
Now you have a stunning pair of custom earrings that look like tiny pieces of modern art


What Really Happens Inside the Kiln
Learn how time and temperature work together inside the kiln to transform clay into durable ceramic.
Neutral Clay Bead Necklace
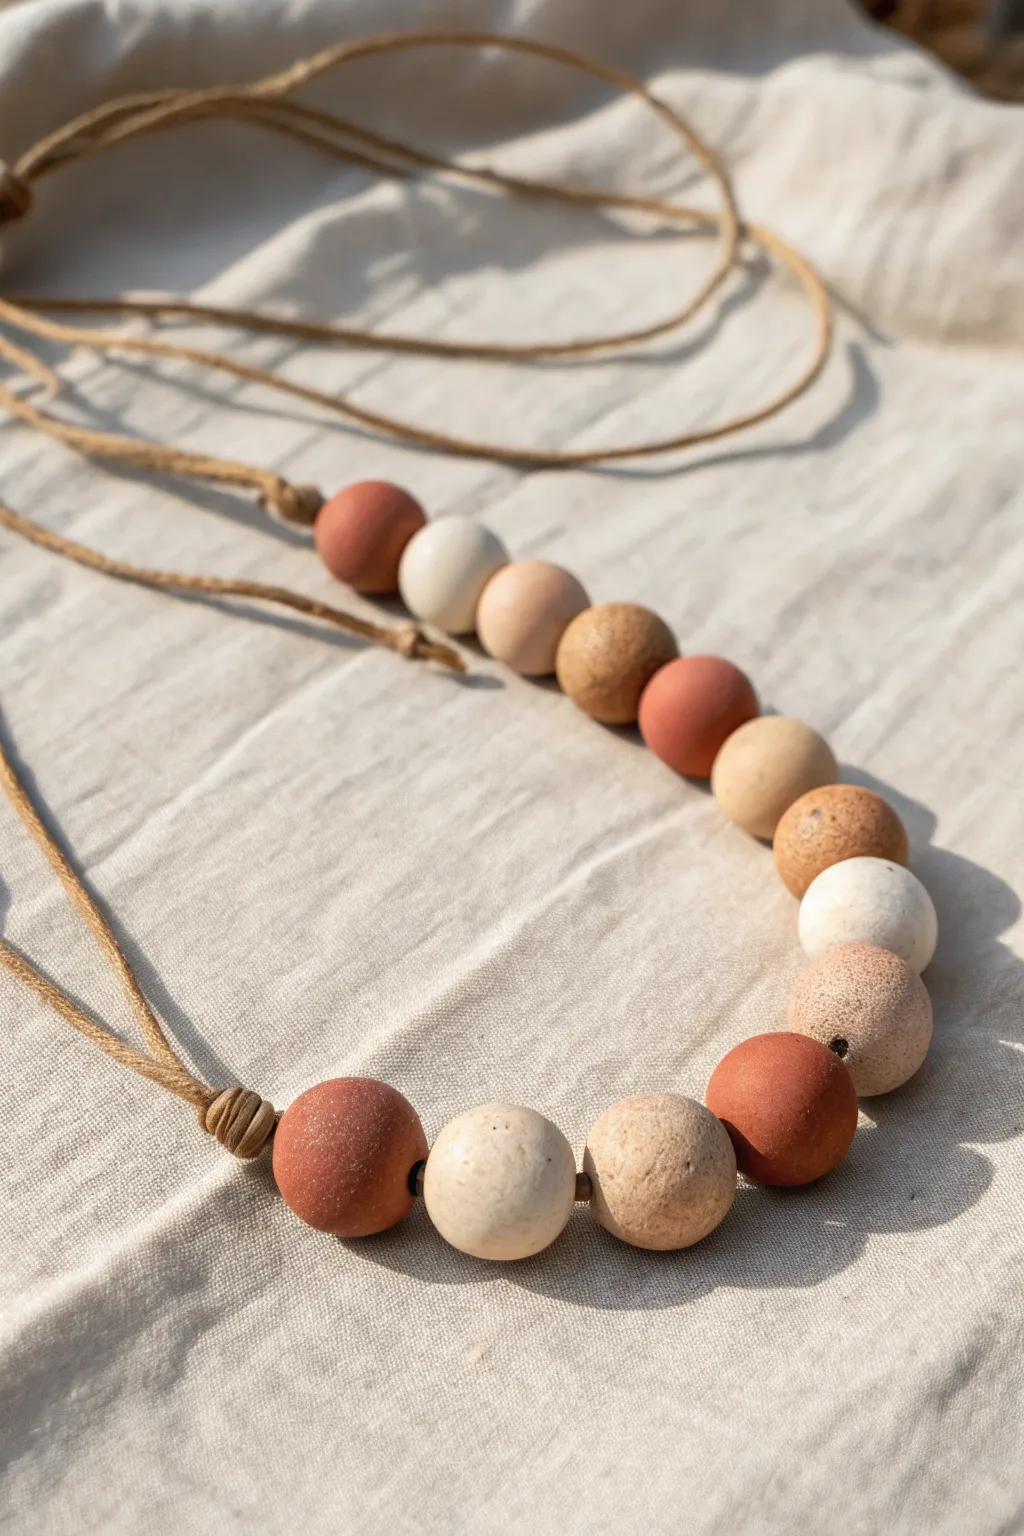
Embrace the beauty of neutrals with this sophisticated yet simple beaded necklace, featuring a harmonious gradient of terracotta, cream, and sand tones. The matte finish and organic variation in the beads give this piece a modern, high-end artisanal quality that complements almost any outfit.
Step-by-Step Tutorial
Materials
- Polymer clay (terracotta/rust color)
- Polymer clay (white or cream)
- Polymer clay (beige or sand)
- Ground black pepper or dried coffee grounds (for speckling)
- Small wooden skewer or toothpick
- Baking sheet with parchment paper
- Oven
- Faux suede cord or waxed cotton cord (tan or brown)
- Scissors
- Fine grit sandpaper (optional)
Step 1: Mixing & Shaping
-
Condition the Clay:
Begin by warming up your clay blocks in your hands. Knead the terracotta, white, and beige clays separately until they are soft and pliable, which prevents cracking later. -
Create Custom Hues:
To achieve the subtle gradient seen in the photo, you’ll want to mix custom shades. Experiment by blending a small amount of terracotta into the white to create a soft peach, or mixing beige and white for an off-white bone color. -
Add Texture:
For the speckled ‘stone’ look on the beige beads, flatten a piece of beige clay and sprinkle a pinch of ground black pepper or coffee grounds onto it. Fold the clay over and knead until the specks are evenly distributed. -
Section the Clay:
Roll your various colors into thick logs of equal diameter. Slice off equal-sized segments to ensure your beads will be roughly the same size, aiming for about 1 inch in diameter. -
Form the Spheres:
Take each segment and roll it briskly between your palms. Use a light, circular motion to create a smooth, perfect sphere. I find looking away while rolling helps me feel for imperfections better than looking at it. -
Create the Bead Holes:
Hold a bead gently in one hand without squishing it. Using a twisting motion, slowly push a skewer through the center. Once it pokes through the other side, twist it back out and re-insert from the opposite side to ensure a clean exit hole.
Smooth Surface Secret
Before baking, lightly brush your unbaked clay beads with a tiny bit of cornstarch or baby powder. This helps smooth out fingerprints and contributes to that velvety matte finish.
Step 2: Baking & Finishing
-
Prepare for Baking:
Arrangement is key here. Place your beads on a parchment-lined baking sheet. To prevent flat spots from forming where they touch the paper, you can gently thread them onto a skewer and prop the skewer ends on crumpled foil. -
Bake the Beads:
Bake according to the manufacturer’s instructions for your specific brand of polymer clay. This is usually around 275°F (135°C) for 15-30 minutes depending on bead thickness. -
Cool Down:
Allow the beads to cool completely on the baking sheet. They harden as they cool, so don’t be alarmed if they feel slightly soft right out of the oven. -
Sand for Texture:
Once cool, inspect your beads. To achieve the ultra-matte, stone-like finish shown in the project, lightly buff the surface with fine-grit sandpaper to remove any fingerprints or shiny spots. -
Clean the Beads:
Wipe the beads down with a damp cloth or a baby wipe to remove any sanding dust.
Level Up: Essential Oil Diffuser
Leave one or two beads unsealed and unpolished. Terracotta polymer clay, or specifically using air-dry clay for a few beads, makes them porous enough to act as essential oil diffusers.
Step 3: Assembly
-
Cut the Cord:
Cut a length of suede or waxed cotton cord. A length of about 30-36 inches allows for adjustable tying, but you can hold it up to your neck to find your preferred drop length. -
Plan the Pattern:
Lay your beads out on a table to finalize the order. The example uses a pleasing ‘messy’ symmetry: terracotta, cream, peach, tan, rust, tan, speckled, cream, speckled, peach, cream, terracotta. -
String the Beads:
Thread the cord through your arranged beads. If the cord end is fraying, wrap a tiny piece of tape around the tip to make it act like a needle. -
Secure the Ends:
Once all beads are strung, verify they sit nicely in the center. At the very ends of the cord, tie a simple overhand knot to prevent fraying. -
Create a Sliding Knot (Optional):
To make the necklace adjustable like the one shown, cross the two ends of the cord. Tie a knot with the right cord around the left cord, then a knot with the left cord around the right cord. This allows the knots to slide toward and away from each other. -
Final Adjustments:
Pull the cord to test the strength of your knots and ensure the beads hang centrally. Your necklace is now ready to wear.
Now you have a stunning, minimalistic statement piece that brings an earthy warmth to your wardrobe
Monogram Trinket Tray
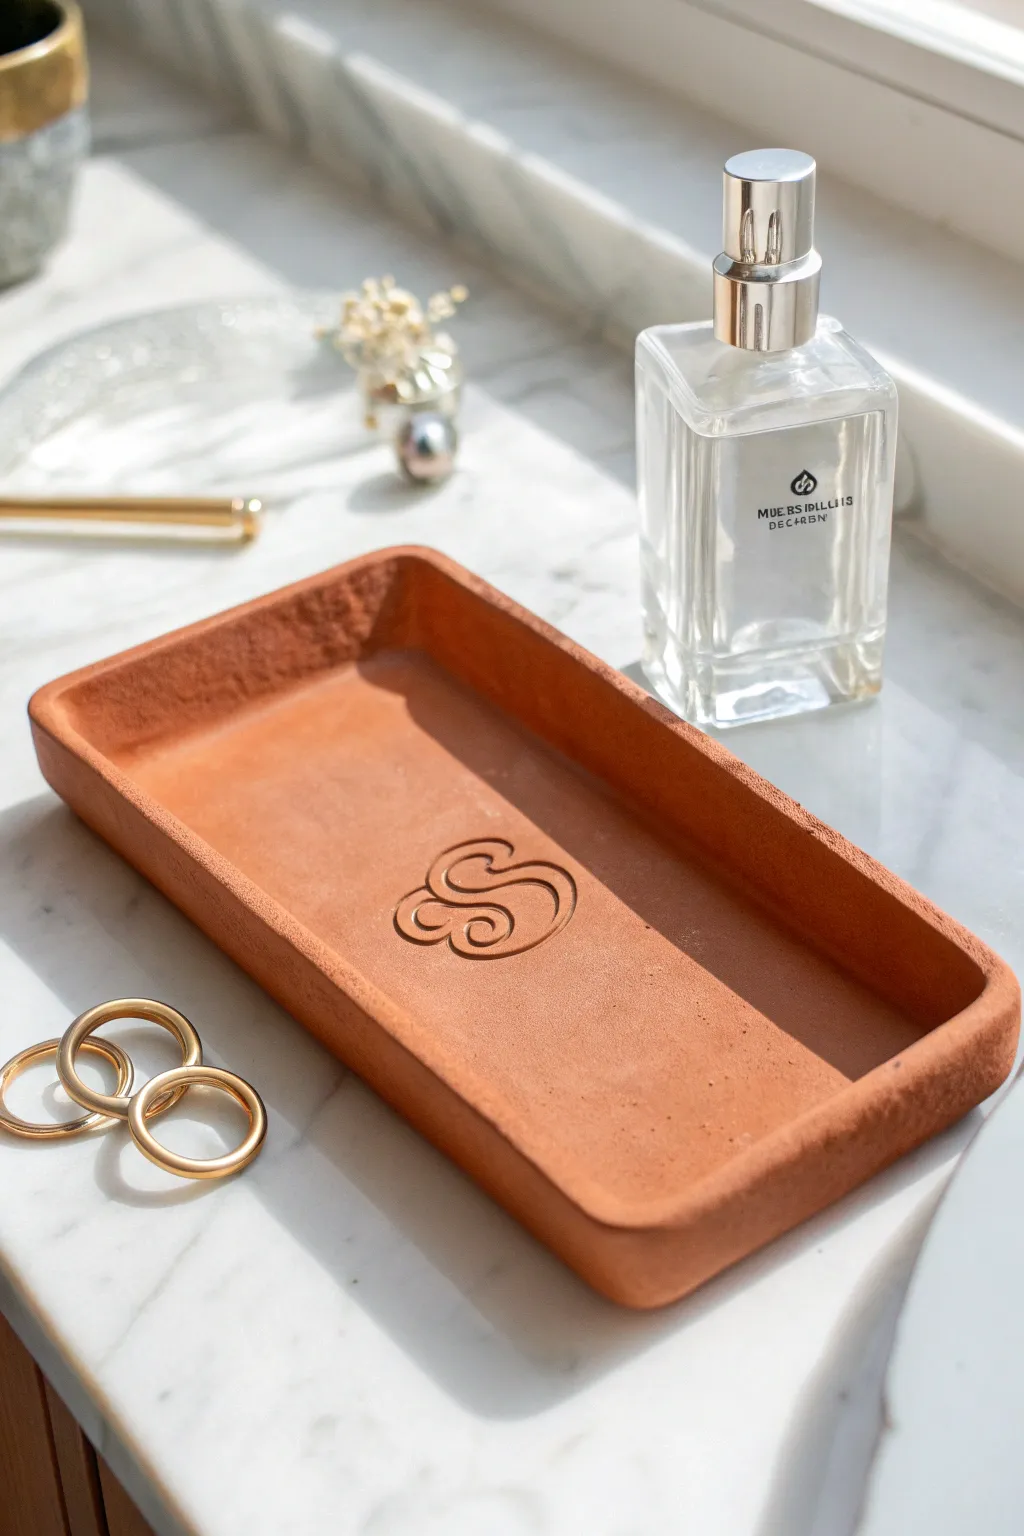
This rustic, rectangular trinket tray offers a warm, earthy spot to catch your daily jewelry or keys. Made from air-dry clay with a rich terracotta hue, it features a stamped monogram detail that adds a personalized, sophisticated touch.
How-To Guide
Materials
- Terracotta-colored air-dry clay
- Rolling pin
- Rectangular template (cardboard or sturdy paper)
- Clay knife or craft knife
- Small bowl of water
- Fine-grit sandpaper (optional)
- Letter stamp or embossing tool
- Ruler
- Rolling guides or wooden slats (approx. 1/4 inch thick)
- Canvas mat or parchment paper
Step 1: Preparation and Shaping
-
Prepare your workspace:
Lay down your canvas mat or parchment paper to prevent sticking. If you’re using a table, tape the paper down so it doesn’t slide while you roll. -
Condition the clay:
Take a generous handful of terracotta air-dry clay. Knead it in your hands for a few minutes until it feels warm, pliable, and free of cracks. -
Roll the slab:
Place the clay between your two rolling guides (wooden slats). Use the rolling pin to flatten the clay into an even slab, ensuring the pin rides on the guides for consistent thickness. -
Cut the base shape:
Place your rectangular template onto the clay slab. Using your clay knife, carefully trace around the template to cut out the base shape. -
Smooth the edges:
Dip your finger lightly in water and run it along the cut edges of the rectangle to remove any sharpness or burrs left by the knife.
Step 2: Creating the Rim
-
Prepare coils:
Roll out long, even snakes of clay slightly thicker than your base slab. These will form the walls of your tray. -
Score and slip:
Use your knife to scratch cross-hatch marks (scoring) along the perimeter of your base rectangle. Apply a small amount of water (slip) to the scratched area. -
Attach the coils:
Lay the clay coils on top of the scored perimeter. Press them down firmly but gently to ensure they adhere well to the base. -
Blend the seams:
Using your thumb or a modeling tool, drag the clay from the coil down onto the base on the inside, and from the base up onto the coil on the outside. This merges the pieces into one solid unit. -
Define the corners:
Gently pinch and smooth the corners. For the look in the photo, keep them slightly rounded rather than sharp 90-degree angles. -
Refine the walls:
Use your fingers to pinch the walls to an even height all around. I find it helpful to wet my fingertips slightly to smooth out fingerprints as I go.
Cracks Appearing?
If small fissures appear while drying, mix a tiny bit of fresh clay with water to make a paste (slip) and fill them in immediately.
Step 3: Detailing and Drying
-
Smooth the surface:
Run a slightly damp sponge or finger over the entire piece to create a consistent, matte texture similar to the example. -
Position the monogram:
Find the exact center of the tray using a ruler. Make a tiny, faint mark as a guide for your stamp. -
Stamp the design:
Press your letter stamp or custom embossing tool firmly into the center. Ensure you apply even pressure so the entire design indents clearly. -
Initial drying phase:
Let the tray sit for about an hour. Check for any small cracks that might appear and smooth them over with a drop of water. -
Full cure:
Allow the tray to dry completely for 24-48 hours. Turn it over halfway through the process to let the bottom dry evenly. -
Optional sanding:
If there are any rough spots once fully dry, lightly sand them with fine-grit sandpaper for a professional finish.
Gilded Touch
Once fully dry, use a small detail brush to paint liquid gold leaf inside the pressed monogram letters for a luxurious highlight.
Place this on your vanity or bedside table for an instantly organized and personalized space

TRACK YOUR CERAMIC JOURNEY
Capture glaze tests, firing details, and creative progress—all in one simple printable. Make your projects easier to repeat and improve.
Desk Organizer Cup Set
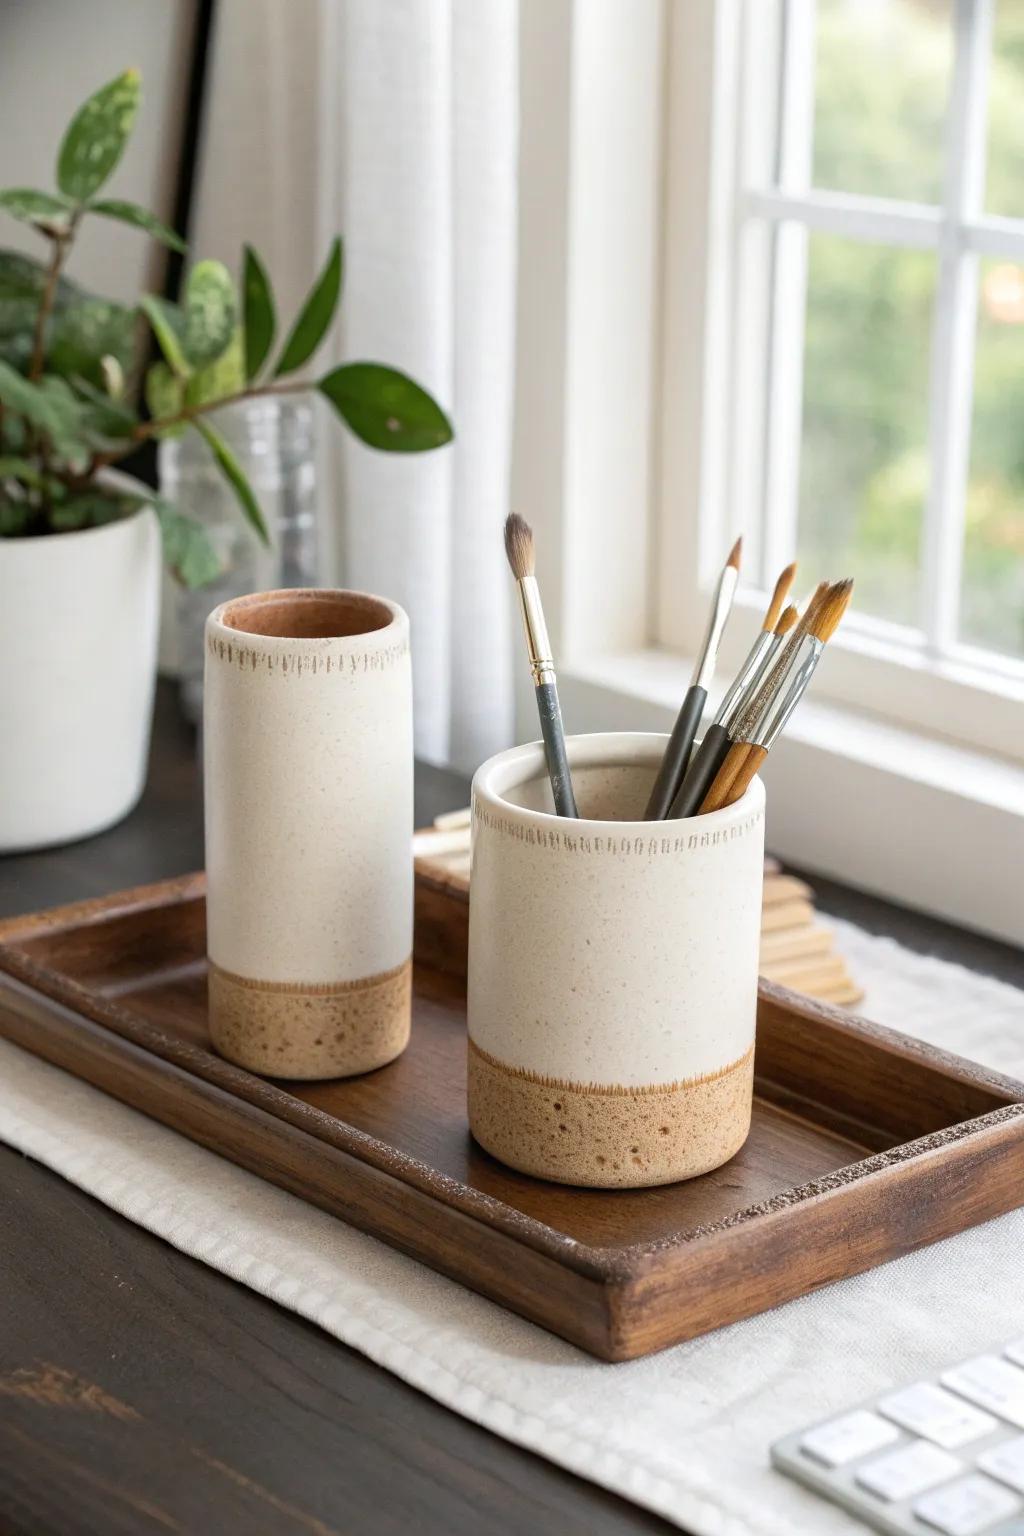
Elevate your workspace with these sleek, speckled clay organizers featuring a raw textured base and a smooth, creamy glaze. Creating a matching set of varying heights adds visual interest and functionality to your desk while keeping your essential tools within reach.
Step-by-Step Guide
Materials
- Speckled stoneware clay (buff or white)
- Rolling pin with guide strips (approx. 1/4 inch)
- Circular clay cutters or templates (3-inch diameter)
- Rectangular templates (for cylinder walls)
- Scoring tool or needle tool
- Slip (clay mixed with water)
- Wooden modeling tool or rib
- Small textured stamp or tool (for rim detail)
- Sponge
- White or cream dipping glaze (gloss or satin)
- Wax resist
- Kiln access
Step 1: Preparing the Slabs
-
Roll out the clay:
Begin by wedging your speckled stoneware clay to remove air bubbles. Roll it out into an even slab about 1/4 inch thick. Using guide strips is crucial here to ensure the walls of your cups are uniform. -
Cut the bases:
Use a 3-inch circular cutter to punch out two circles from the slab. These will serve as the heavy, stable bases for your organizers. -
Measure and cut walls:
Determine the height you want for each cup. In the example, one is taller (approx. 5-6 inches) and one is shorter (approx. 3-4 inches). Calculate the circumference needed (Diameter x Pi) and cut two rectangular strips to match your bases. -
Add texture to the bottom:
Before assembling, take a stiff bristle brush or a needle tool and gently stipple the bottom inch of each rectangular strip. This creates the raw, sandy texture seen on the unglazed portion of the finished piece.
Step 2: Assembling the Cylinders
-
Score and slip edges:
Score the short ends of your rectangular strips and the outer edges of your circular bases. Apply a generous amount of slip to these roughed-up areas. -
Form the tube:
Carefully curve the rectangular clay slab until the scored ends meet. Press them together firmly to create a cylinder. Use a wooden tool to blend the seam on both the inside and outside so it becomes invisible. -
Attach to the base:
Place the cylinder onto the scored circular base. Use your thumb or a modeling tool to drag clay from the wall down onto the base to seal the connection. Smooth this join with a damp sponge. -
Refine the shape:
Once assembled, check that your cylinders are perfectly round. If they look a bit oval, gently reshape them with your hands or place a rigid tube inside briefly to true up the walls.
Cracked Seams?
If the vertical seam splits during drying, your clay was likely too dry when joining. Score deeper next time and use more vinegar-based slip.
Step 3: Detailing and Drying
-
Refine the rim:
Smooth the top rim with a chamois or a wet sponge to ensure it is comfortable to the touch. It should be slightly rounded, not sharp. -
Add the rim texture:
Using a small, straight-edged tool or a custom stamp, press small vertical lines around the exterior circumference, just about a half-inch below the rim. I find that spacing them slightly irregularly adds to the handmade charm. -
Slow drying:
Cover the cups loosely with plastic to let them dry slowly. Rapid drying can cause the seam to crack or the base to warp. Once they are bone dry, bisque fire them according to your clay’s specifications.
Pro Tip: Beveled Cuts
Cut the short ends of your wall slabs at a 45-degree angle. This overlapping joint is much stronger and easier to hide than a blunt butt-joint.
Step 4: Glazing and Finishing
-
Apply wax resist:
Paint a line of wax resist around the bottom third of the bisque-fired cup, covering the textured area you created earlier. This ensures the glaze won’t stick to the raw clay base. -
Clean the surface:
Wipe the bisque ware with a damp sponge to remove any kiln dust, which can cause pinholes in the glaze. -
Dip the cups:
Holding the cup by the base (where the wax is), dip the item into a creamy white or oatmeal glaze. Submerge it until the glaze meets the wax line, then lift it out immediately. -
Clean the foot:
Even with wax resist, little droplets of glaze can stick. Use a damp sponge to wipe the bottom of the base and the sidewall completely clean up to your intended line. -
Glaze fire:
Place the pieces in the kiln for the final glaze firing. Ensure they don’t touch any other pots, as the glaze will become molten glass.
Once cooled, fill your new handmade organizers with your favorite brushes and pens to enjoy a tidy, stylish desk.