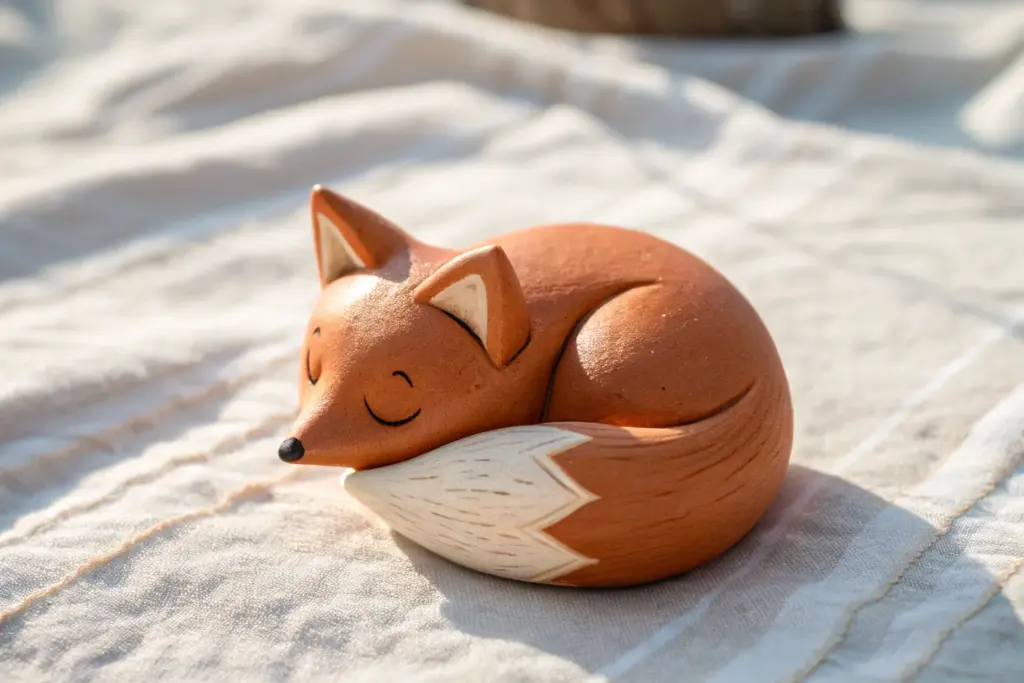
Tiny air dry clay projects are my favorite kind of studio play—quick, cute, and totally doable with just your fingers and a little patience. If you’re craving small wins (and tiny masterpieces), these mini ideas will keep your hands busy in the best way.
Tiny Heart Charms
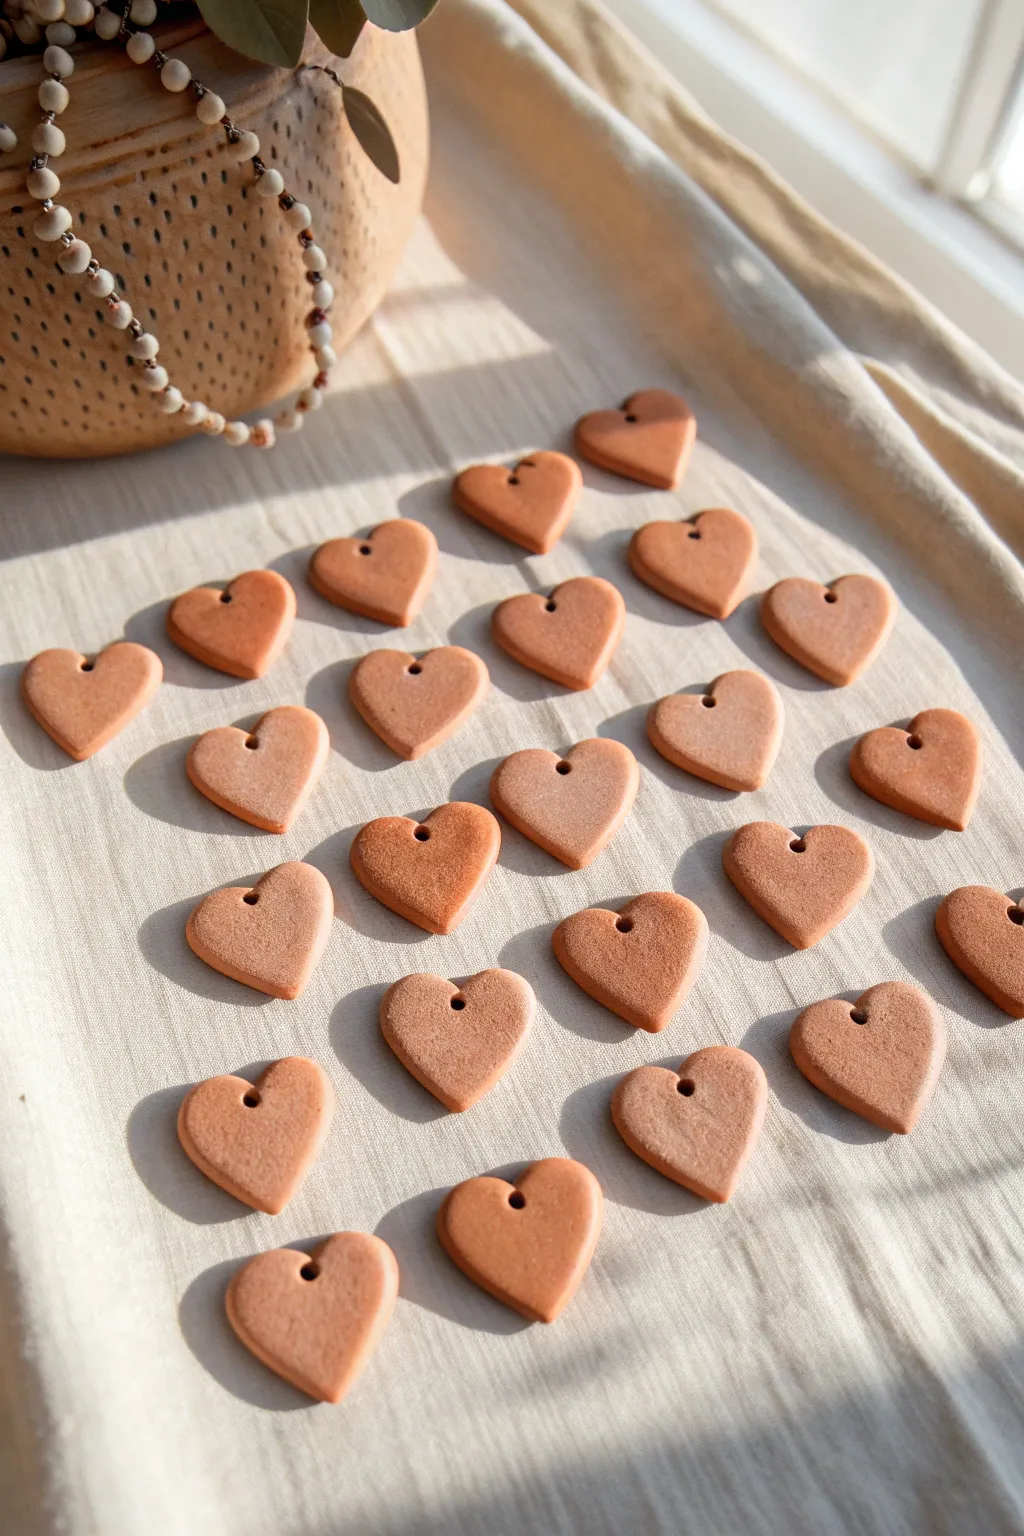
These simple, uniform heart charms have a lovely earthy aesthetic that mimics the look of real fired terracotta. Perfect for jewelry making or gift tags, their warm reddish-brown hue and smooth matte finish make them a versatile addition to your crafting repertoire.
Step-by-Step Guide
Materials
- Air dry clay (terracotta color)
- Small heart-shaped cookie cutter (approx. 1 inch)
- Rolling pin
- Parchment paper or non-stick mat
- Two craft sticks or guides (approx. 3-4mm thickness)
- Straw, toothpick, or small circular poking tool
- Fine grit sandpaper (400-600 grit)
- Small bowl of water
- Soft sponge
Step 1: Preparation and Cutting
-
Prepare your workspace:
Lay down your parchment paper or non-stick mat on a flat surface. Secure it with tape if it tends to curl up, as a stable base is crucial for even rolling. -
Condition the clay:
Take a handful of terracotta-colored air dry clay and knead it well in your hands. You want it to be pliable, warm, and free of any air bubbles before you start rolling. -
Set up thickness guides:
Place your two craft sticks or thickness guides on either side of your clay ball on the mat. This ensures every single heart will have the exact same thickness, giving your final set a professional, uniform look. -
Roll the slab:
Using the rolling pin, roll the clay out until the pin rests flat on your height guides. Go slowly to avoid creating ripples in the surface. -
Cut the shapes:
Press your small heart-shaped cutter firmly into the clay. Try to position your cuts close together to maximize the use of your clay slab. -
Release the suction:
Give the cutter a tiny wiggle before lifting it up to help release the shape cleanly. If the clay sticks inside, gently push it out from the top without denting the surface. -
Remove excess clay:
Carefully peel away the excess ‘scrap’ clay from around your heart shapes, leaving the hearts sitting on the mat. You can ball up these scraps to re-roll later.
Cracked Edges?
If jagged edges appear while cutting, your clay might be too dry. Spritz a little water into your clay ball and knead it thoroughly before rolling out again.
Step 2: Refining and Drying
-
Smooth the edges:
Dip your finger slightly in water and very gently run it around the cut edges of each heart. This softens the sharp cut lines and creates that pillowy, finished look seen in the photo. -
Create the hole:
Using a straw or a small circular tool, punch a hole near the top center (the ‘V’) of the heart. Ensure the hole is low enough not to break the edge, but high enough to hang straight. -
Clean the hole:
Check the back of the heart where the tool exited; often a small burr of clay remains. Gently tap it flat or smooth it away with a damp fingertip. -
Initial drying phase:
Let the hearts sit undisturbed on the parchment paper for about 24 hours. Placing them in a draft-free area helps them dry evenly without warping. -
Flip for even drying:
After the first day, carefully flip each heart over. This exposes the bottom side to air, ensuring the core dries completely and preventing curling. -
Check for dryness:
Allow them to dry for another 24-48 hours. The clay will lighten slightly in color and feel hard and room temperature (not cold) when fully dry. -
Sand for perfection:
Once fully cured, take your fine-grit sandpaper and very lightly buff the edges and flat surfaces. This step is key to achieving that velvety, stone-like texture. -
Dust off and finish:
Wipe each charm with a barely damp sponge or cloth to remove the sanding dust. Your charms are now ready to be strung.
Scented Charms
Add a few drops of essential oil into the clay while kneading. The porous texture will hold the scent, turning these into cute aromatherapy diffusers.
Now you have a charming collection of hearts ready to be turned into a garland or jewelry


Mini Mushroom Figurines
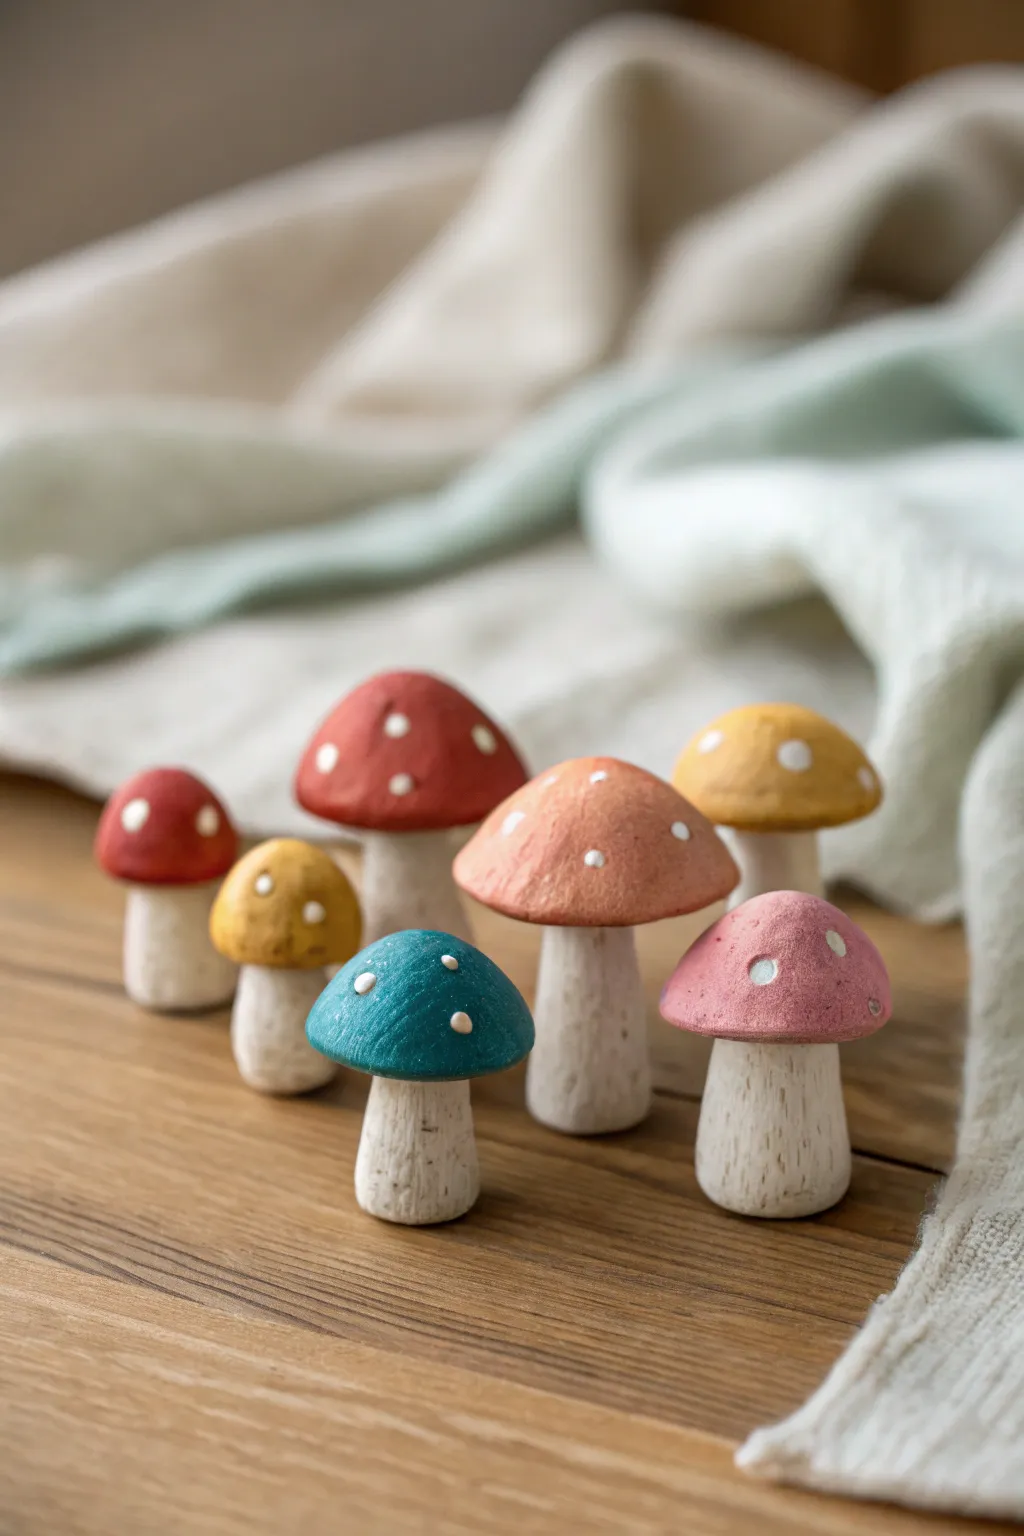
Create your own enchanted forest floor with these adorable, textured mushroom figurines. These miniature sculptures feature tactile, wood-like stems and vibrantly colored caps dotted with charming white speckles.
Step-by-Step Tutorial
Materials
- Air dry clay (white or natural color)
- Acrylic paints (Teal, Dusty Pink, Mustard Yellow, Terracotta, Burnt Orange, Red, White)
- Sculpting tools (needle tool or toothpick, ball tool)
- Small paintbrushes (flat shader and fine liner)
- Water cup
- Aluminum foil (optional for bigger caps)
- Matte varnish or sealant
Step 1: Sculpting the Stems
-
Portion the clay:
Pinch off small pieces of air dry clay, roughly the size of a marble or slightly larger, depending on how tall you want each mushroom. -
Roll cylinders:
Roll each piece into a thick cylinder shape. Tap the bottom gently on your work surface to create a flat base so the mushroom stands independently. -
Taper the neck:
Gently pinch and roll the top third of the cylinder to narrow it slightly, creating a ‘neck’ where the cap will eventually sit. -
Add texture:
Using a needle tool or the sharp end of a toothpick, scratch vertical lines up and down the length of the stem. Vary the depth and length of your scratches to mimic the look of natural bark or fibrous mushroom stalks. -
Refine the base:
If the texture distorted the shape, gently roll the stem between your fingers again to round it out, preserving the vertical lines.
Loose heads?
If a cap falls off after drying, don’t worry. A dab of superglue or strong white craft glue will reattach it permanently to the stem.
Step 2: Forming the Caps
-
Shape balls:
Roll fresh pieces of clay into smooth balls. These should be slightly wider than your stems. -
Create the dome:
Flatten the bottom of the ball against your palm and gently press the top to form a smooth dome shape. I like to curve the edges downward slightly for a classic toadstool look. -
Indent the underside:
Use a ball tool or the handle of a paintbrush to create a small indentation in the center of the flat underside of the cap. This will act as a socket for the stem. -
Attach the pieces:
Dip your finger in a tiny bit of water (or slip) and wet the indentation. Press the stem firmly into the cap. Use a sculpting tool to smooth the clay where they join underneath if desired, or leave it as a distinct separation. -
Final shaping:
Adjust the angle of the cap—tilting some slightly gives them a quirky personality. Let the mushrooms dry completely for 24-48 hours until hard and white.
Pro Tip: Hidden Texture
Before attaching the stem, scratch fine radiating lines on the underside of the cap to mimic mushroom gills. It’s a tiny detail that adds huge realism.
Step 3: Painting and Details
-
Base coat the stems:
Mix a very watery wash of light brown or beige acrylic paint. Brush this over the textured stems so the paint settles into the grooves, highlighting the bark texture. Wipe away excess from the surface with a paper towel. -
Dry brush the stems:
Once the wash is dry, take a dry brush with a tiny amount of off-white paint and lightly whisk it over the raised parts of the stem texture to add dimension. -
Paint the caps:
Select your matte acrylic colors—teal, yellow, pink, and reds. Paint the top of each cap carefully. You may need two thin coats for opaque coverage. -
Add the dots:
Dip the very tip of a fine paintbrush or a toothpick into white acrylic paint. Gently dot the tops of the caps. In the reference image, the dots are fairly large and somewhat irregular, not perfect circles. -
Protect your work:
Finish with a coat of matte varnish to seal the paint and clay without adding an unnatural shine.
Arrange your colorful grove on a shelf or planter for a touch of handmade magic


Tiny Cloud Face Tokens
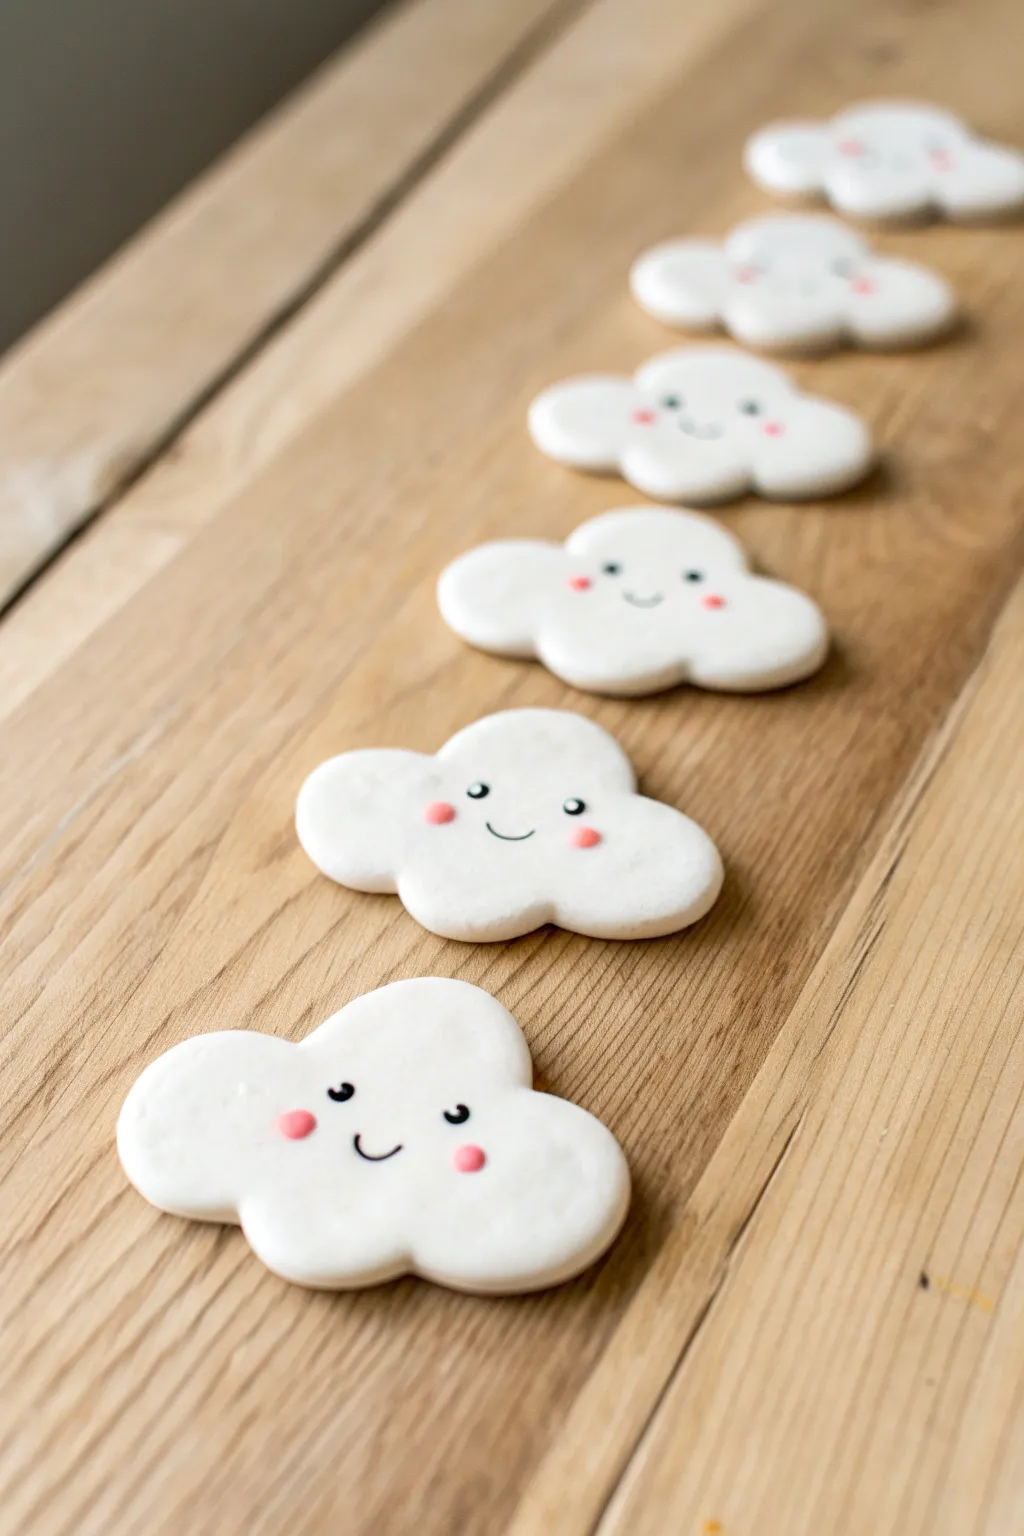
Create a charming lineup of weather-themed tokens perfect for pocket charms or desk decorations. These pristine white clouds feature simple, kawaii faces with rosy cheeks that instantly bring a smile to anyone who sees them.
Step-by-Step Guide
Materials
- White air dry clay
- Rolling pin
- Cloud-shaped cookie cutter (approx. 2 inches wide)
- Parchment paper or non-stick mat
- Fine-grit sandpaper
- Black fine-tip acrylic paint marker or permanent marker
- Pink acrylic paint
- Small dotting tool or toothpick
- Matte finish sealant spray or varnish
Step 1: Shaping the Clouds
-
Condition the Clay:
Begin by taking a handful of white air dry clay and kneading it thoroughly in your hands until it feels warm, pliable, and smooth. -
Roll it Out:
Place the clay on a sheet of parchment paper. Use your rolling pin to flatten the clay into an even slab, aiming for a thickness of about 1/4 inch (6mm) to ensure the tokens are sturdy. -
Cut the Shapes:
Press your cloud-shaped cookie cutter firmly into the rolled clay. Wiggle it slightly to ensure a clean cut, then lift the cutter. Repeat this to create as many tokens as you desire. -
Smooth the Edges:
Dip your finger in a tiny bit of water and gently run it along the cut edges of each cloud to smooth down any roughness or sharp ridges left by the cutter. -
Initial Drying:
Leave the cloud shapes on a flat surface lined with fresh parchment paper. Let them air dry in a cool, dry place for at least 24 to 48 hours, flipping them over halfway through so both sides dry evenly.
Cracking Up?
If small cracks appear as the clay dries, make a ‘slip’ by mixing a tiny bit of clay with water into a paste. Fill the cracks, smooth it over, and let dry again.
Step 2: Refining and Decorating
-
Sand for Perfection:
Once the clouds are completely bone dry, take a piece of fine-grit sandpaper and very gently buff the surface and edges. This creates a porcelain-like finish that is perfect for painting. -
Wipe Clean:
Use a dry, soft cloth or a clean paintbrush to dust off any powder residue left from sanding. The surface must be totally clean before adding the faces. -
Plan the Faces:
Before marking the actual clay, you might want to sketch a few face designs on paper to decide on the spacing of the eyes and mouth. -
Draw the Eyes:
Using a black fine-tip acrylic paint marker, draw two small, solid black circles for eyes near the center of the cloud. Keep them spaced slightly apart for a cute look. -
Add the Smile:
Directly between and slightly below the eyes, draw a small, simple ‘U’ shape for the mouth. A tiny, subtle curve works best for a sweet expression. -
Prepare the Cheeks:
Squeeze a tiny drop of pink acrylic paint onto a palette or scrap of paper. I find that a soft, pastel pink works better than a hot pink for these gentle faces. -
Apply Rosy Cheeks:
Dip a dotting tool (or the blunt end of a toothpick) into the pink paint. Carefully dab a single dot on the outside of each eye, slightly lower than the eye level. -
Let the Paint Set:
Allow the painted features to dry completely, which should only take about 15 to 20 minutes. -
Seal the Project:
To protect your work from moisture and handling, apply a thin coat of matte varnish or spray sealant over the entire front surface of the cloud. -
Final Cure:
Let the sealant cure fully according to the manufacturer’s instructions before using or gifting your little cloud tokens.
Water Trick
Keep a small bowl of water nearby while shaping. If the clay starts to dry out or crack at the edges while you work, a damp finger can smooth it instantly.
Arrange your little fleet of happy clouds on your desk or glue magnets to the back for a cheerful fridge display


Mini Animal Blob Buddies
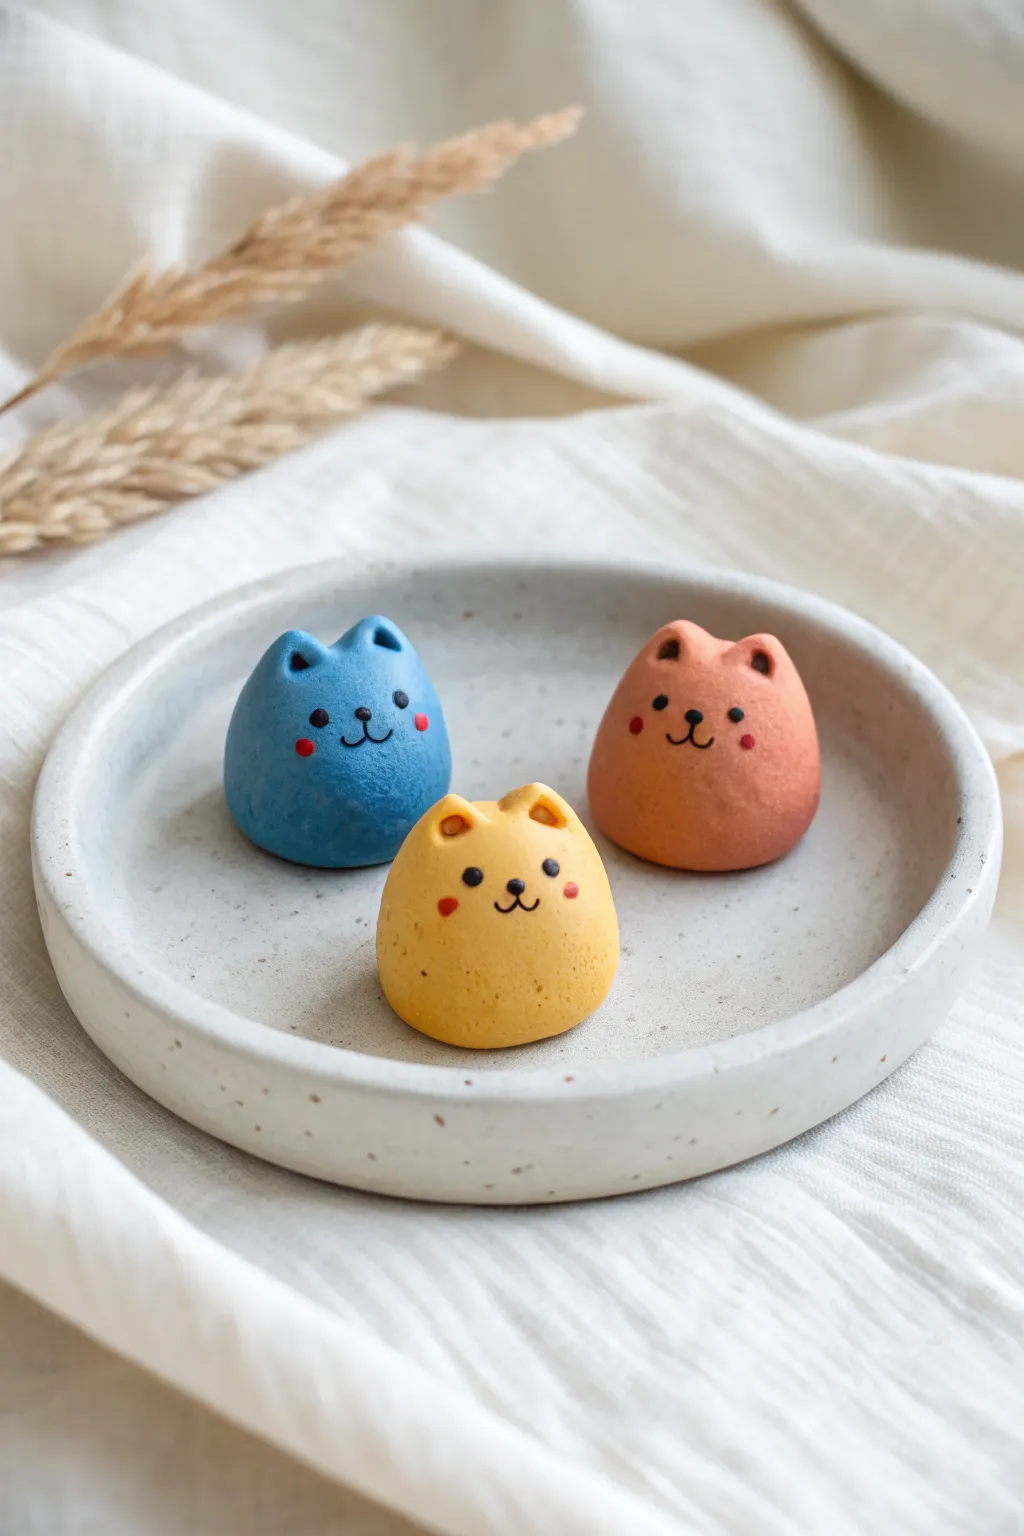
These delightfully chubby cat figures are the perfect beginner project to brighten up your desk or shelf. With their smooth, rounded forms and simple painted expressions, they capture a minimalist kawaii aesthetic that is both charming and achievable.
Step-by-Step Guide
Materials
- High-quality white air dry clay (or polymer clay)
- Acrylic paints (pastel blue, warm yellow, terracotta/salmon)
- Fine detail paintbrushes (size 0 and 00)
- Black acrylic paint or fine tip black marker
- Red acrylic paint for cheeks
- Small bowl of water
- Smoothing tool or spoon
- Palette or mixing tray
- Matte varnish (optional)
Step 1: Shaping the Base
-
Portion the clay:
Start by taking three equal pieces of white air dry clay, roughly the size of a large walnut or a golf ball. -
Condition the clay:
Knead each piece thoroughly in your hands to warm it up and remove any air bubbles, ensuring the texture is smooth and pliable. -
Form the blob:
Roll the first piece into a tight, seamless ball between your palms. -
Create the base shape:
Gently tap the bottom of the ball against your work surface to flatten it slightly so it sits stable without rolling. -
Taper the top:
Use your fingers to gently narrow the upper half of the ball, creating a slight dome or gumdrop shape rather than a perfect sphere.
Smooth Operator Tip
If you struggle with fingerprints, lightly brush the raw clay with a soft, damp paintbrush before drying. It acts like a mini-mop to erase texture.
Step 2: Sculpting Ears & Details
-
Pinch the ears:
At the top of the dome, use your thumb and forefinger to pinch two small triangles upward to form the cat ears. -
Refine ear shape:
Smooth the transition between the head and the ears so they look integrated, not stuck on. I find using a little water on my finger helps blend any tiny cracks here. -
Indenting the ears:
Take the rounded end of a paintbrush or a small modeling tool and gently press into the front of each ear to create a shallow hollow. -
Smooth the surface:
Dip your finger in a tiny bit of water and run it over the entire surface of the cat to ensure it is perfectly smooth and free of fingerprints. -
Repeat for all figures:
Repeat the shaping process for the other two clay balls, keeping them relatively uniform in size. -
Dry completely:
Set the figures aside to dry. Depending on humidity and clay brand, this usually takes 24 to 48 hours for solid pieces of this thickness.
Cracking Up?
If small cracks appear while drying, mix a tiny bit of fresh clay with water to make a paste (slip) and fill the cracks, then sand smooth once dry.
Step 3: Painting & Finishing
-
Base coat application:
Once fully dry, paint each cat a different solid color. Use the pastel blue, warm yellow, and terracotta paints. You may need two thin coats for full opacity. -
Paint the inner ears:
Mix a slightly darker shade of your base color (or use a contrasting tone) and carefully paint the inside hollows of the ears. -
Draw the face features:
Using your smallest brush (size 00) and black paint, create two small dots for eyes. Place them fairly wide apart for a cute look. -
Add the nose and mouth:
Paint a tiny triangular nose between the eyes, and draw a small ‘w’ shape directly beneath it to form the mouth. -
Add rosy cheeks:
Dip the end of a paintbrush handle or a toothpick into red paint and dot it gently onto the cheeks, just outside the mouth lines. -
Seal the work:
allow the paint to dry completely, then apply a layer of matte varnish to protect your tiny friends from dust and moisture.
Arrange your colorful trio on a small dish or scattered among your plants for a pop of handmade joy

What Really Happens Inside the Kiln
Learn how time and temperature work together inside the kiln to transform clay into durable ceramic.
Tiny Ghost Shelf Sitters
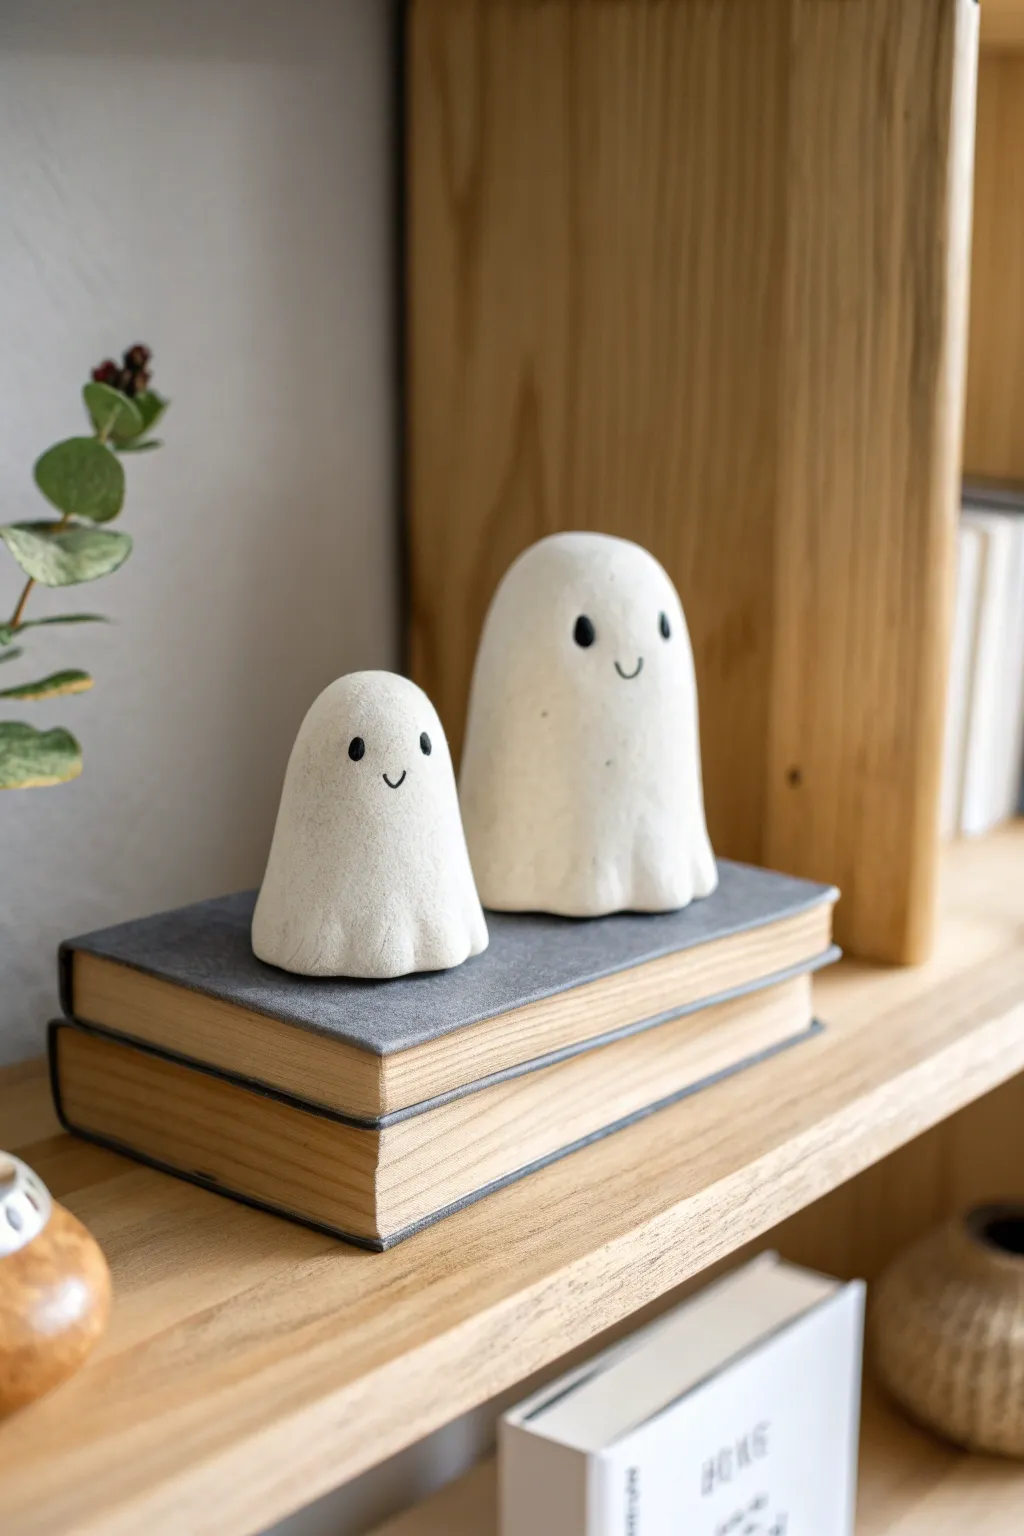
Add a touch of whimsical charm to your bookshelf with these adorable minimalist ghost figures. Their smooth, matte finish and subtle ruffled bases give them a classic handmade feel that is perfect for subtle Halloween decor or year-round cuteness.
Detailed Instructions
Materials
- White smooth air-dry clay (like DAS or Crayola)
- Small cup of water
- Rolling pin or smooth round jar
- Sculpting tools (or a toothpick and butter knife)
- Fine-grit sandpaper (400 or 600 grit)
- Black acrylic paint
- Fine detail paintbrush (size 0 or 00)
- Matte sealant spray (optional)
- Non-stick work surface (parchment paper or silicone mat)
Step 1: Sculpting the Base Forms
-
Prep your clay:
Start by taking two portions of air-dry clay. Make one portion slightly larger than the other to create the size difference seen in the photo. Knead the clay in your hands until it is warm, soft, and pliable. -
Roll into balls:
Roll each portion into a smooth ball between your palms. Inspect them for any major cracks; smooth these out with a tiny drop of water on your finger if you find any. -
Form the ghost shape:
Place the larger ball on your work surface. Gently roll it into a thick cylinder, then taper the top to create a rounded cone shape. The top should be a smooth dome, not a sharp point. -
Refine the silhouette:
Repeat the shaping process for the smaller ghost. Stand them side-by-side to ensure you like the height difference. The taller one should look like a protective older sibling. -
Hollow the base:
Pick up a ghost and gently press your thumb into the bottom center deeply to start hollowing it out. Rotate the piece while pinching the walls slightly thinner, aiming for a consistent thickness of about 1/4 inch at the base.
Step 2: Adding Details & Drying
-
Create the ruffled hem:
Place the ghost back on the table. Using your thumb and forefinger, gently pinch and pull the bottom edge of the clay outward periodically to create soft, wavy folds. -
Emphasize the folds:
Use a smooth sculpting tool handle or the back of a paintbrush to gently press vertical indentations just above the bottom waves. This enhances the look of hanging fabric. -
Smooth the surface:
Dip your finger in a little water and run it over the entire surface of the ghost to remove fingerprints and bumps. I find that spending extra time here saves a lot of sanding later. -
Check stability:
Press the ghost gently onto the flat surface one last time to ensure it sits level and won’t wobble on your shelf. -
Let them dry:
Set your ghosts aside in a safe, dry place away from direct sunlight. Allow them to dry completely for 24-48 hours. Turn them over occasionally so the inside dries too.
Cracks Appearing?
If small cracks appear while drying, mix a tiny bit of fresh clay with water to make a paste (slip). Fill the cracks, smooth over, and let dry again.
Step 3: Finishing Touches
-
Sand for perfection:
Once fully dry and hard, use fine-grit sandpaper to buff away any remaining uneven spots or roughness. Wipe away the dust with a slightly damp cloth or dry brush. -
Plan the face:
Lightly mark the position of the eyes and mouth with a pencil. Place the eyes wide apart and somewhat high on the ‘head’ area for that cute, innocent look. -
Paint the eyes:
Dip your fine detail brush into black acrylic paint. Carefully paint two small, vertical oval shapes for the eyes. Start small; you can always make them bigger. -
Paint the smile:
Using just the very tip of your brush, paint a tiny, thin ‘U’ shape between the eyes for the smile. A steady hand is key here—resting your pinky on the table helps stabilize your stroke. -
Touch-ups:
If you make a mistake with the paint, let it dry, carefully scrape it off or sand it lightly, and try again. The rustic look is forgiving. -
Seal the work:
To protect your ghosts from dust and moisture, take them to a well-ventilated area and apply a light coat of matte sealant spray. Let this dry completely before handling.
Glow Up
Mix glow-in-the-dark powder into your white clay before sculpting, or use glow-in-the-dark acrylic paint for a spooky night-time surprise.
Now you have a charming ghostly pair ready to haunt your shelves in the sweetest way possible
Mini Star Garland Pieces
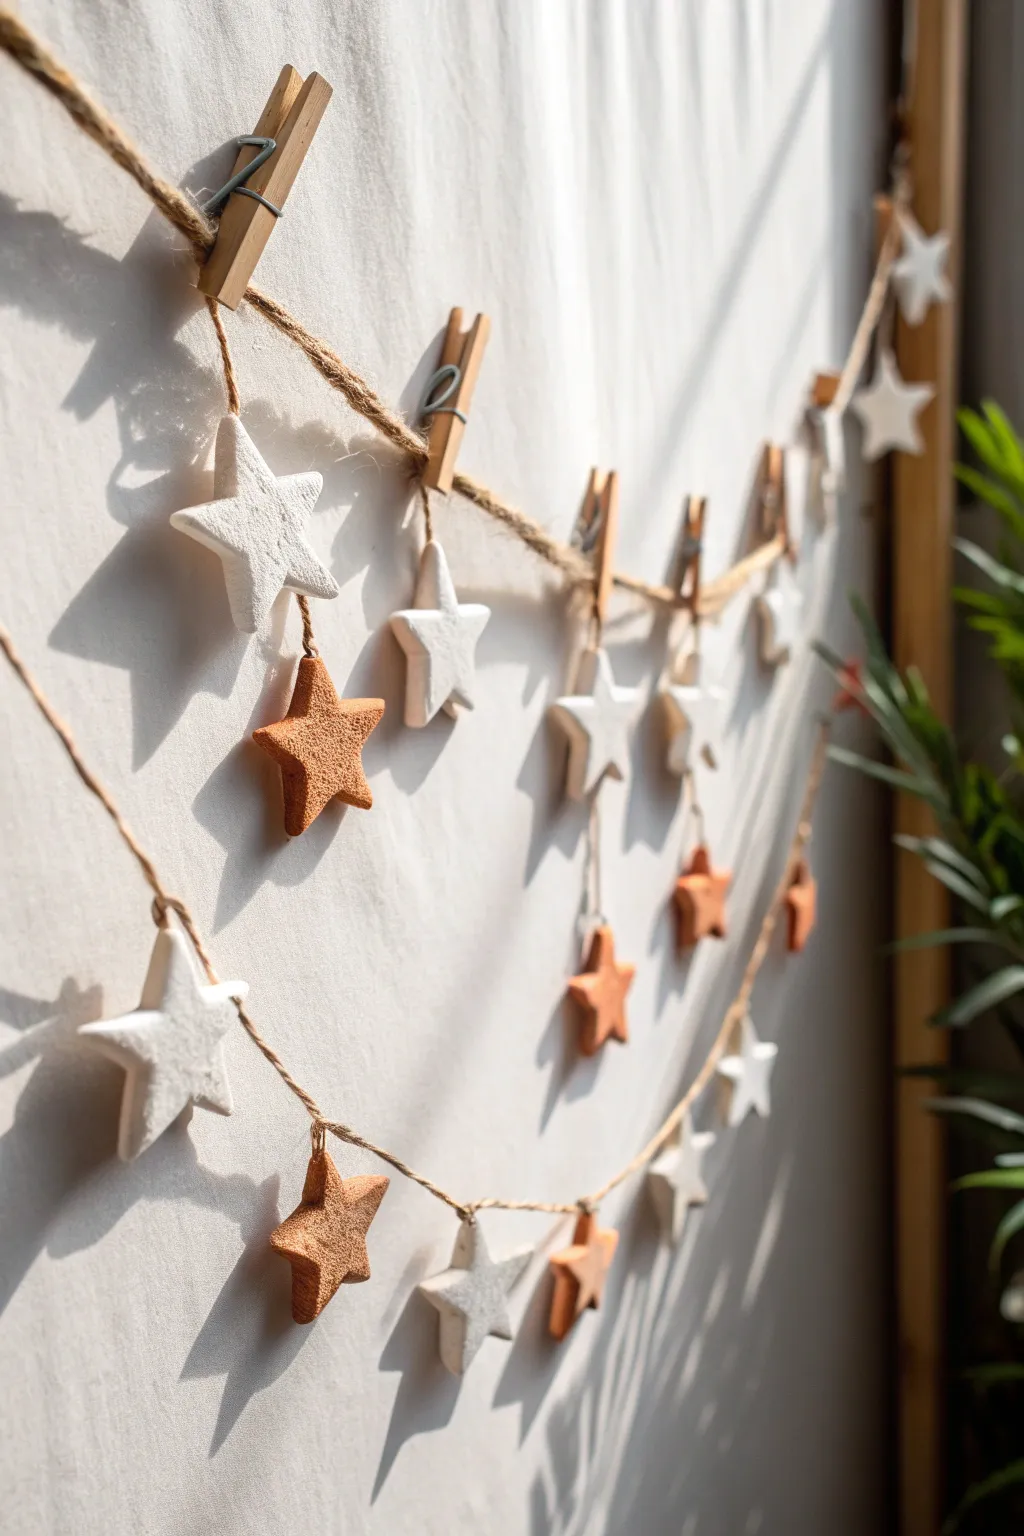
Add a touch of warmth and texture to your walls with this simple yet charming star garland. Featuring a mix of crisp white and earthy terracotta stars suspended on natural jute twine, this project brings a cozy, handcrafted feel to any space.
Step-by-Step Guide
Materials
- White polymer or air-dry clay
- Terracotta-colored air-dry clay
- Small star-shaped cookie cutter (approx. 1.5 – 2 inches)
- Rolling pin
- Parchment paper or silicone mat
- Toothpick or skewer
- Fine-grit sandpaper
- Natural jute twine
- Mini wooden clothespins
- Scissors
- Clear matte varnish (optional)
Step 1: Shaping the Stars
-
Prepare your workspace:
Lay down a sheet of parchment paper or a silicone mat on a flat surface to prevent the clay from sticking while you work. -
Roll out the white clay:
Take a portion of the white clay and knead it briefly until pliable. Roll it out to an even thickness of about 1/4 inch; you want them sturdy but not too heavy. -
Cut the white stars:
Press your star-shaped cookie cutter firmly into the clay. Gently wiggle it slightly to ensure a clean cut, then lift the cutter. Repeat until you have your desired number of white stars. -
Create terracotta stars:
Repeat the rolling and cutting process with the terracotta-colored clay. I usually aim for a mix of about two-thirds white stars and one-third terracotta to balance the colors. -
Smooth the edges:
Dip your finger in a little water and gently run it along the cut edges of each star to smooth out any roughness or stray clay bits. -
Poke hanging holes:
Using a toothpick or skewer, carefully pierce a hole through the top point of *each* star. Make sure the hole is large enough for your twine to thread through later, wiggling the toothpick slightly to widen it. -
Dry the stars:
Lay all the stars flat on your parchment paper in a safe place. Let them air dry completely according to the package instructions, usually 24-48 hours. Flipping them halfway through helps them dry evenly.
Step 2: Finishing and Assembly
-
Sand imperfections:
Once fully dry, inspect your stars. If there are any sharp edges or rough spots, gently buff them away with fine-grit sandpaper until smooth. -
Cut the main string:
Measure the space where you want to hang the garland and cut a length of jute twine to size, adding about 12 inches extra for hanging loops on the ends. -
Prepare vertical hangers:
Cut several shorter pieces of jute twine, varying in length from 4 to 8 inches. These will create the dangling effect for the lower tier of stars. -
Attach lower stars:
Thread a short piece of twine through the hole of a star. Tie a simple knot at the top of the hole to secure the star, then tie the other end of the twine to the main horizontal garland string. -
Spacing the danglers:
Continue tying these dangling stars along the main string, spacing them out roughly 4-6 inches apart. -
Clip the upper stars:
For the stars that sit directly on the line, simply use a mini wooden clothespin to clip a star onto the main twine in the spaces between your dangling stars. -
Clip excess twine:
Trim any long tails from your knots on the dangling stars to keep look clean and tidy. -
Final arrangement:
Adjust the spacing of your clipped and tied stars by sliding them gently along the twine until the garland looks balanced.
Twine Tip
Add a tiny dab of clear glue to the knot on the dangling stars. This prevents the jute knot from slipping undone over time.
Preventing Curling
If your stars curl up while drying, place a light book over them (with parchment paper in between) once they are semi-dry to flatten them.
Hang your new garland near a window or over a bed frame to enjoy the interplay of light and shadow on the clay textures


The Complete Guide to Pottery Troubleshooting
Uncover the most common ceramic mistakes—from cracking clay to failed glazes—and learn how to fix them fast.
Mini Bow Knot Charms
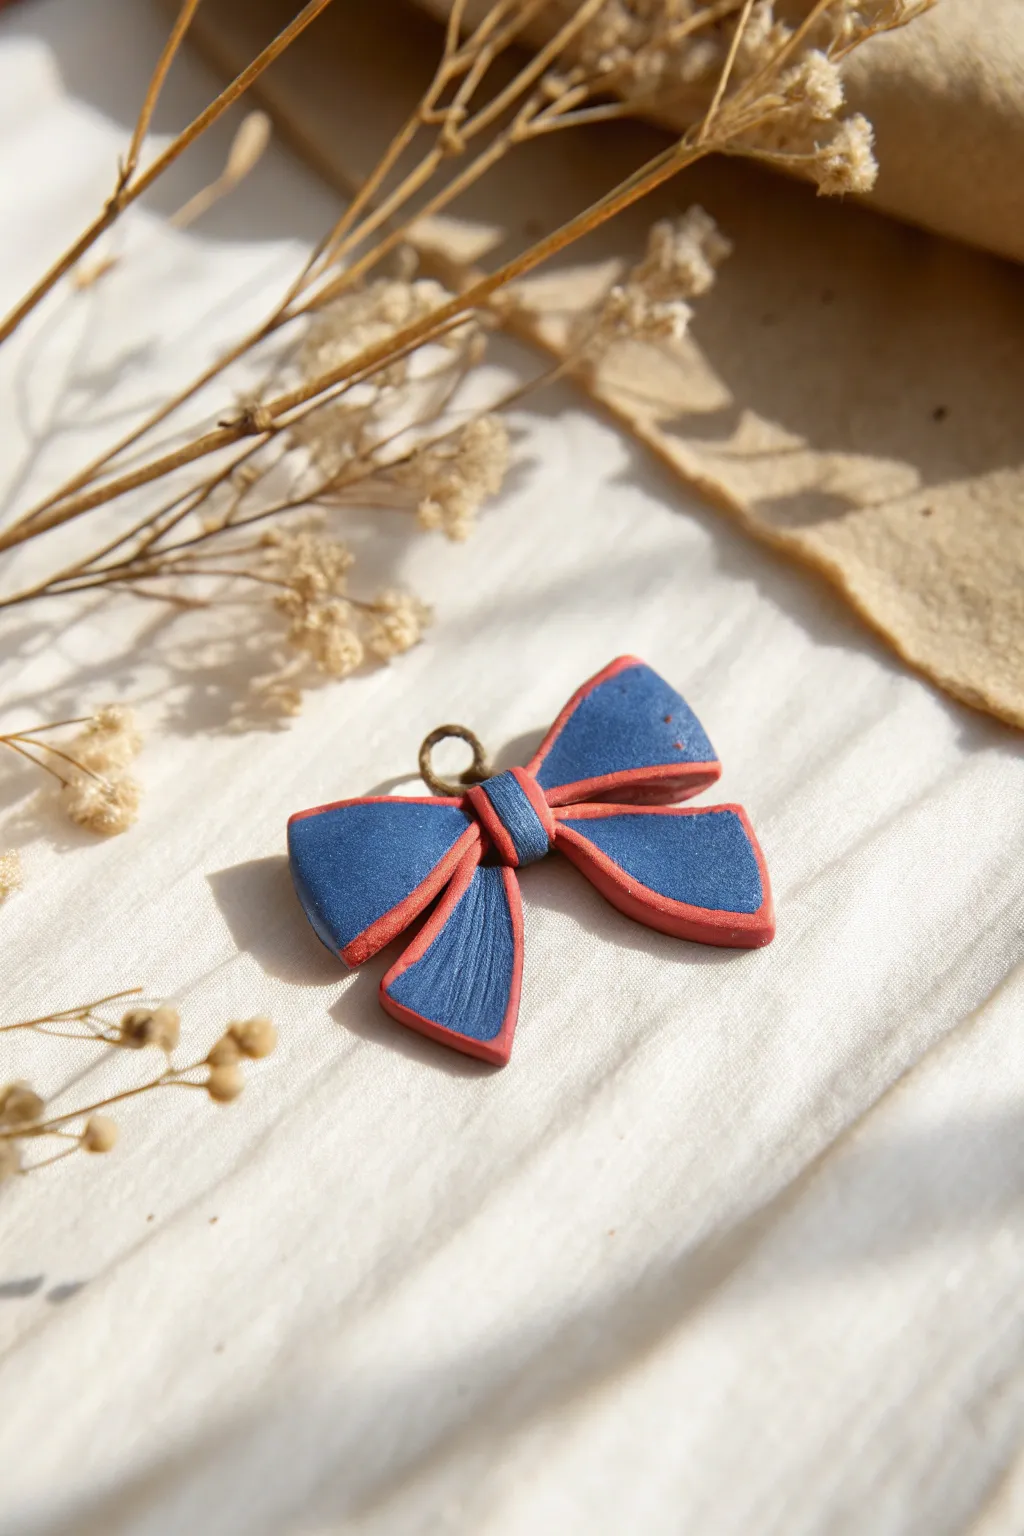
This nautical-inspired charm captures the soft, fluid look of fabric ribbons using simple air-dry clay techniques. With its deep denim blue body and striking coral-red piping, it makes for an adorable pendant or keychain addition.
Detailed Instructions
Materials
- Air-dry clay (white or pre-colored)
- Acrylic paints (navy blue, coral/red)
- Small rolling pin or smooth marker
- Clay knife or X-Acto blade
- Needle tool or toothpick
- Small metal screw eye pin
- Super glue (liquid or gel)
- Fine-grit sandpaper (optional)
- Matte varnish or sealant
Step 1: Prepping and Rolling
-
Prepare your clay base:
Start with a small ball of conditioning air-dry clay. If you are using white clay, you can either knead blue paint directly into it now for a solid color base or plan to paint it later. I prefer to knead the color in for a deeper, more uniform tone. -
Create the main sheet:
Roll out your blue clay on a non-stick surface until it is about 3-4mm thick. You want it substantial enough to hold its shape but thin enough to look delicate. -
Create the piping sheet:
Taking a smaller amount of clay (colored red/coral), roll it out very thinly, about 1-2mm. This will be used for the decorative borders.
Cracking Clay?
If you see tiny cracks forming as the clay dries, mix a tiny bit of fresh clay with water to make a paste (slip) and smooth it into the cracks with a brush.
Step 2: Shaping the Bow
-
Cut the bow loops:
From your blue sheet, cut two equal elongated teardrop shapes or rounded triangles. These will form the top loops of the bow. -
Cut the ribbon tails:
Cut two slightly longer, curved trapezoids for the tails. Angle the bottom edges to mimic the classic ribbon cut. -
Add the piping border:
Cut very thin strips from your red clay sheet. Carefully wrap these strips around the edges of your blue bow pieces. Gently press them together so they fuse without squashing the shape. -
Refine the border connection:
Use a smoothing tool or just your finger with a tiny drop of water to blend the seam where the red piping meets the blue body on the back side, ensuring a strong bond.
Texture Trick
Make the fabric lines realistic by dragging your needle tool lightly from the center knot outwards, letting the pressure fade as you reach the edges.
Step 3: Assembly and Detailing
-
Arrange the base:
Lay the two tail pieces down first, angled slightly outward. Place the two loop pieces on top of the tails, having them meet in the center. -
Create the center knot:
Roll a small rectangular strip of blue clay and edge it with red clay strips just like you did for the loops. -
Wrap the center:
Place this strip vertically over the intersection of all your pieces. Fold the ends of the strip behind the bow to lock everything together. -
Add fabric texture:
Using a needle tool, gently etch subtle lines into the blue parts of the tails and loops. Follow the curve of the clay to mimic the natural grain and pull of fabric. -
Insert hardware:
Dip the thread of your metal screw eye pin into a dab of super glue. Carefully screw it into the top center of the bow knot.
Step 4: Finishing Touches
-
Let it dry:
Allow the piece to dry completely for at least 24 hours. Flip it over halfway through the drying process to ensure the back dries evenly. -
Smooth imperfections:
Once fully hard, inspect the edges. If there are any sharp or rough burrs, gently buff them away with fine-grit sandpaper. -
Seal the charm:
Apply a coat of matte varnish to protect the paint and clay. A matte finish looks more like fabric than a glossy one, keeping the realistic aesthetic.
String this charming little bow onto a necklace or keychain to carry a bit of handmade sweetness with you