There’s something so satisfying about turning simple terracotta into a charming little clay pot lighthouse that looks right at home in your yard or on a porch. Here are my favorite ideas to help you nail the classic lighthouse shape first, then play with color, details, and fun add-ons once you’re feeling confident.
Classic Stacked Terracotta Lighthouse
This elegant garden feature transforms ordinary terracotta pots into a striking nautical beacon with clean lines and classic colors. By stacking graduated pot sizes, you achieve a tapered lighthouse shape that looks beautiful nestled among flowers or standing guard on a patio step.
Detailed Instructions
Materials
- 4 terracotta pots in graduated sizes (e.g., 60cm, 50cm, 40cm, 30cm)
- 4 terracotta saucers (sized slightly larger than the base of the pot that will sit in them)
- Small terracotta saucer (for the roof)
- Small terracotta drainage saucer (for the very top cap)
- White outdoor acrylic paint or spray paint
- Terracotta or rust-red outdoor acrylic paint
- Grey outdoor acrylic paint
- Dark brown or black outdoor acrylic paint
- Strong outdoor construction adhesive (e.g., E6000 or Liquid Nails)
- Heavy-duty round concrete paver (for the base)
- Paintbrushes (flat brush, detail brush)
- Painter’s tape
- Pencil
- Glossy black marble or large bead (for the lantern room window)
- Small wood pieces or clay (to form the door handles)
Step 1: Preparing the Base Layers
-
Clean and Dry:
Begin by thoroughly cleaning all your pots and saucers to remove any garden center dust or oil. Let them dry completely, as trapped moisture can cause paint to peel later. -
Prime the Surface:
Apply a base coat of primer or white paint to the exterior of all four pots. I find spray paint works fastest here for an even finish, but brushing works fine too. -
White Base Coats:
Once the primer is dry, apply 2-3 coats of white outdoor acrylic paint to the pots. Allow full drying time between coats to ensure a solid, opaque finish that hides the clay color. -
Rim Painting:
Take your four graduated saucers. Paint the exterior rim and the bottom of each saucer with the terracotta/rust-red paint. These will act as the decorative bands between levels.
Sticky Situation
Apply adhesive only to unpainted surfaces if possible. Scuff painted contact points with sandpaper before gluing for a much stronger bond.
Step 2: Assembly and Structure
-
Prepare the Foundation:
Place your round concrete paver on a flat work surface. This adds essential weight to keep the lighthouse stable in wind. -
Attach the Base:
Apply a generous ring of construction adhesive to the bottom rim of your largest pot. Center it upside down on the concrete paver and press firmly. -
First Tier:
Glue the largest painted saucer upside down onto the flat bottom of the first pot. This creates the first ‘shelf’ or walkway. -
Stacking Up:
Apply adhesive to the rim of the second-largest pot and center it upside down on the first saucer. Repeat this stack—saucer, then pot—until all four pots are stacked. -
The Lantern Room:
For the top ‘lantern room’ section (the smallest pot), glue the small saucer upside down on top of it to form the base of the roof.
Solar Upgrade
Instead of the very top saucer cap, glue on a solar path light. The top fits perfectly into the pot hole, creating a real working beacon at night.
Step 3: Creating the Roof
-
Roof Texture:
You can tackle the roof detail in two ways. For the shingled look shown, paint the small saucer grey first. Then, paint over-lapping semi-circles in a slightly darker grey to mimic slate tiles. -
Roof Cap:
Glue the tiny drainage saucer (painted rust-red to match the rims) to the very top center of the roof. -
Attach the Roof:
Glue the finished roof assembly securely onto the top of your stack.
Step 4: Detailing and Windows
-
Drafting Windows:
Using a pencil, lightly sketch arched windows on the front of the lighthouse. Place one window centered on each of the top three tiers. -
Detailing Arches:
Outline your pencil marks with the rust-red paint to create the window frames. Keep your hand steady or use a very fine brush for the curves. -
Filling the Panes:
Fill the inside of the arches with dark brown or black paint to create depth. Once dry, paint a thin cross in the center to suggest windowpanes. -
The Main Door:
On the bottom-most pot (the base), paint a larger arched double door using a wood-tone brown color. -
Door Hardware:
Add small white dots for doorknobs on the painted door. For a 3D effect like the photo, you can glue on small beads or bits of clay. -
Adding the Lower Windows:
Paint two smaller arched windows on either side of the main door on the bottom tier to balance the visual weight. -
The Beacon Light:
Glue a flat-backed glossy black marble or a large black button onto the center of the top-most tier to represent the hole where the light shines through. -
Final Seal:
Once all paint and glue is fully cured (give it 24 hours), spray the entire structure with a clear UV-resistant outdoor sealer to protect your handiwork from the elements.
Now you have a charming nautical centerpiece ready to guide visitors through your garden path.


Bold Red and White Stripes
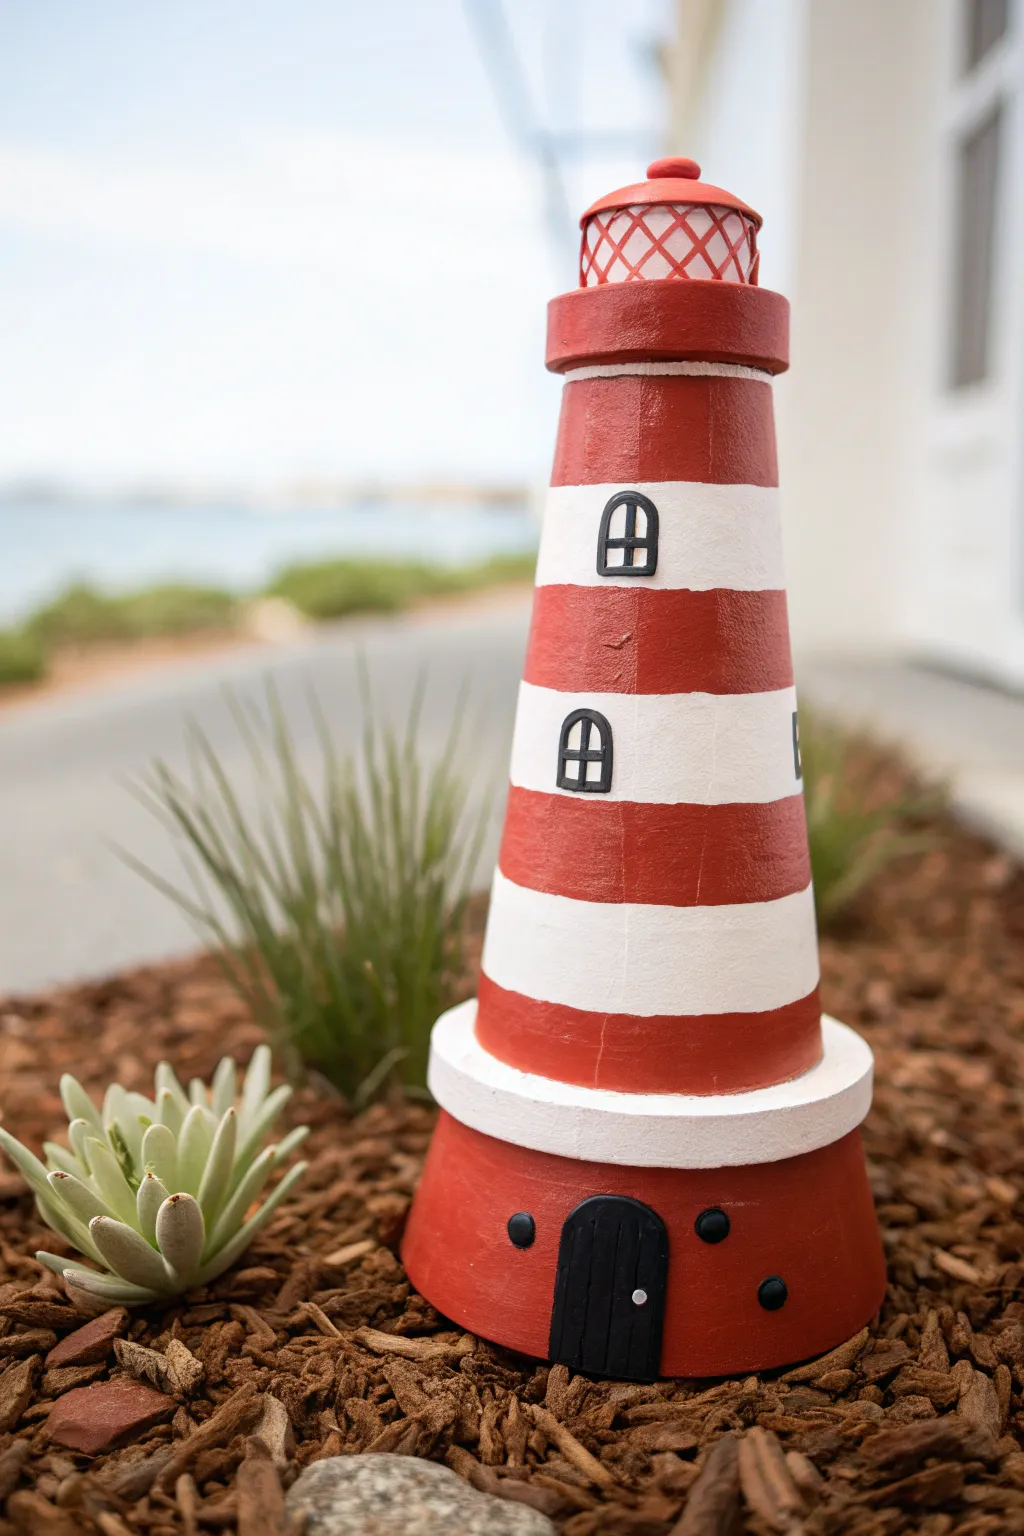
Bring a touch of nautical charm to your garden with this bold and bright project. By stacking simple terracotta pots and adding crisp painted details, you can transform everyday garden supplies into a delightful seaside sentry.
How-To Guide
Materials
- 1 large terracotta pot (base)
- 3-4 graduated terracotta pots (for the tower)
- 1 small terracotta saucer (top platform)
- 1 tiny terracotta pot (lantern room)
- Outdoor acrylic craft paint (Cardinal Red, White, Black, Grey)
- Strong outdoor adhesive (e.g., PL500 or E6000)
- Painter’s tape (various widths)
- Foam brushes and fine detail brushes
- Small solar light (optional, to replace the top saucer)
Step 1: Preparing the Base Structure
-
Clean and test fit:
Before painting, wipe down your terracotta pots with a damp cloth to remove any dust or pottery residue. Stack them upside down from largest to smallest to ensure you like the proportions. -
Paint the base coats:
Separate the pots. Paint the rim of the largest pot white and the body red. For the middle pots, I usually paint them entirely white first, as red covers white easier than vice versa if you change your mind on stripe placement. -
Let it dry:
Allow the base coats to dry completely for at least an hour. Terracotta is porous, so a second coat is almost always necessary for a solid, opaque look.
Step 2: Creating the Stripes
-
Stack and visualize:
Temporarily restack your dry pots. Decide where your red stripes will go so they flow continuously up the tower. -
Apply painter’s tape:
Use painter’s tape to mask off the areas that should remain white. Press the tape edges down firmly with your fingernail to prevent paint bleed. -
Paint the red stripes:
Apply your red outdoor acrylic paint to the unmasked sections. Use a foam brush for a smooth finish without brushstrokes. -
Remove tape carefully:
Peel off the tape while the paint is still slightly tacky—this helps keep the lines crisp and prevents the dried paint from cracking.
Clean Lines Trick
Paint a thin layer of the *base* color over your tape edge first. This seals the tape, meaning any bleed is invisible, leaving your stripe color perfectly crisp.
Step 3: Assembling the Tower
-
Glue the base:
Apply a ring of strong outdoor adhesive to the bottom (now top) of the largest base pot. -
Stack the first section:
Center the next largest pot upside down onto the adhesive. Press firm and ensure it is centered from all angles. -
Continue stacking:
Repeat the gluing process for each subsequent pot until your tower is built. Let the adhesive cure according to the package instructions before handling excessively.
Wobbly Stack?
If your pots don’t sit flush against each other, the adhesive won’t bond well. Use a coarse sandpaper to level out the bottom ridges of the pots before gluing.
Step 4: Adding Details
-
Paint the lantern room:
Take the smallest saucer and the tiny pot. Paint the saucer rim red and the very top tiny pot red. Paint the sides of the tiny pot white to represent the glass. -
Draw the grid:
Using a very fine detail brush or a paint pen, draw a diamond cross-hatch pattern on the white section of the top pot in red to mimic the lantern panes. -
Attach the top:
Glue the painted saucer upside down on the top of your tower stack, then glue the tiny lantern pot on top of that saucer. -
Paint the door:
On the bottom rim of the base pot, sketch a small arched door. Paint it black with a fine brush. -
Add windows:
Paint small arched windows on the white stripes going up the tower. Outline them in black and add a cross in the middle for the window pane detail. -
Final hardware details:
Add a tiny dot of white or silver on the black door to serve as a doorknob, and paint two small black circles on either side of the door for extra detail. -
Seal the project:
Once all paint is fully dry, spray the entire lighthouse with a clear outdoor weatherproof sealer to protect it from the elements
Place your new nautical creation near a walkway or garden bed to guide visitors safely to your door


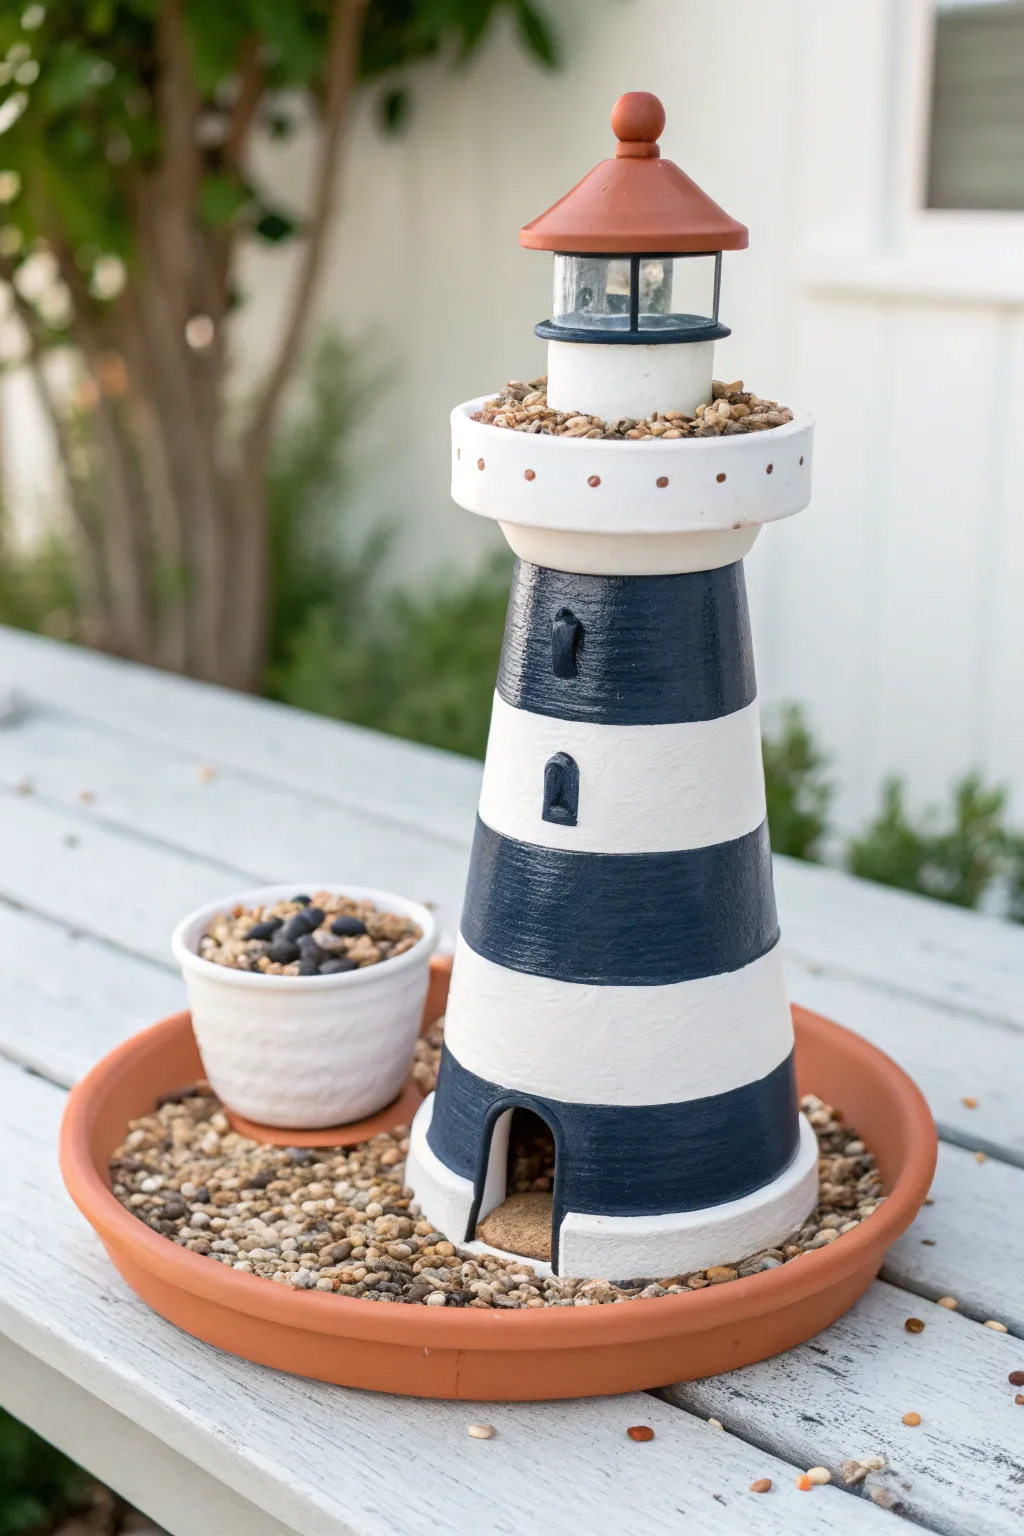
Navy and White Coastal Stripes
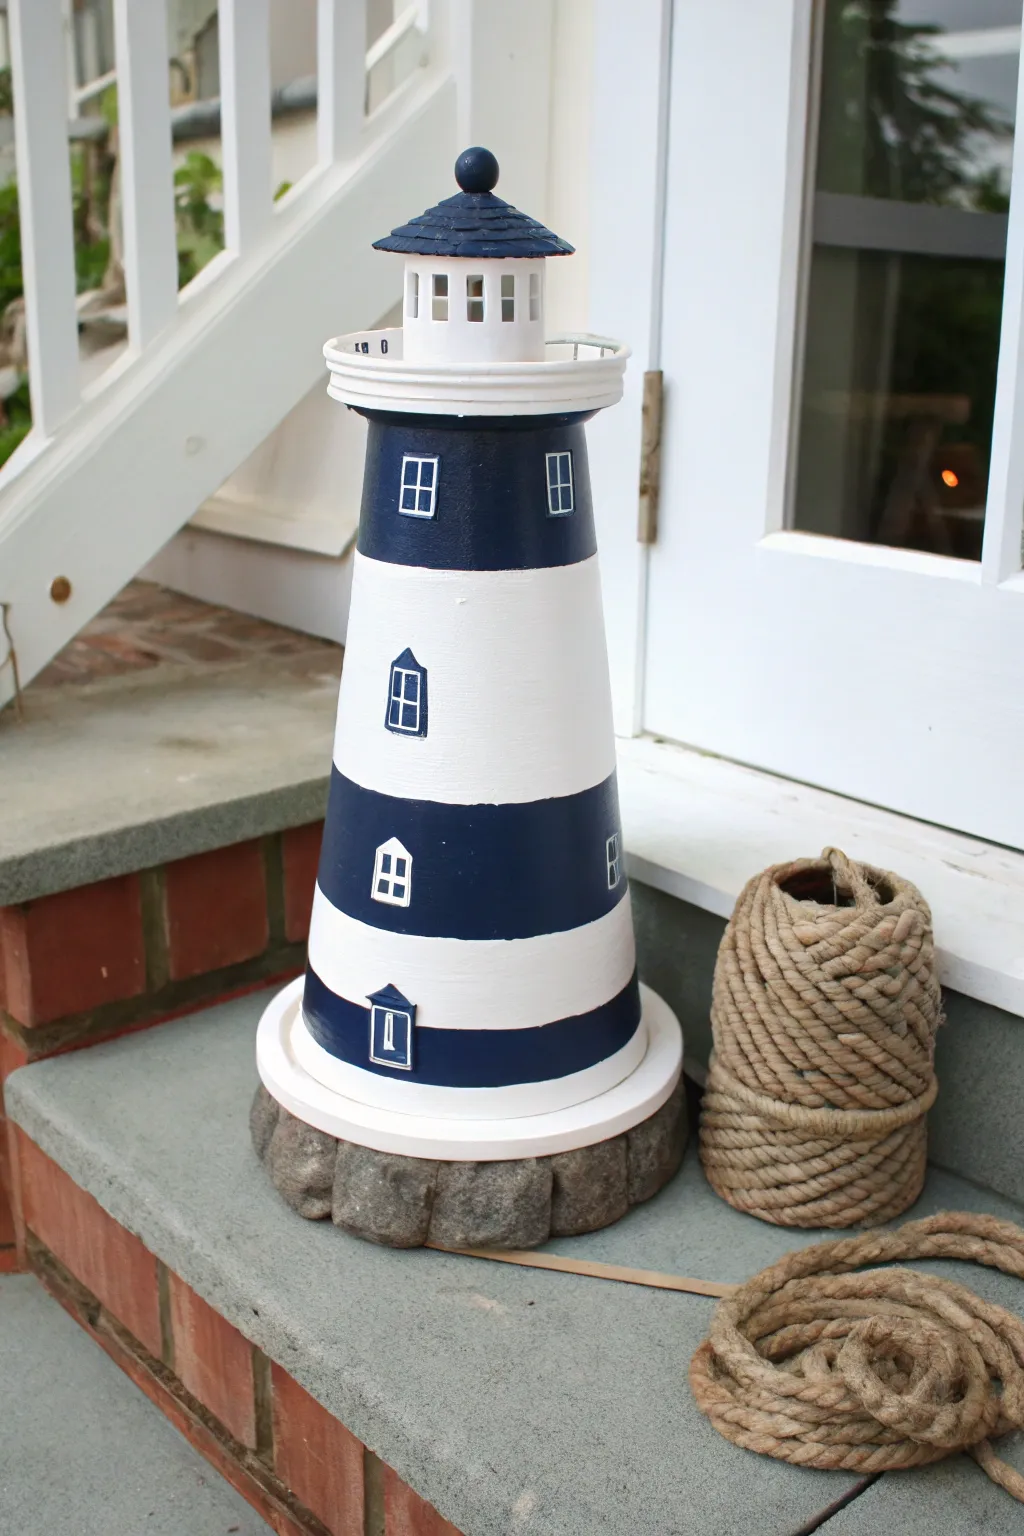
Transform standard terra cotta pots into a striking coastal accent with bold navy and white stripes. This majestic lighthouse stands tall on a faux stone base, guiding charm right to your front porch or garden path.
Step-by-Step
Materials
- Three terra cotta pots (graduated sizes, e.g., 8-inch, 6-inch, 4-inch)
- Two terra cotta saucers (one large for the base, one small for the top)
- Outdoor craft paint (Navy Blue, White)
- Grey and textured stone spray paint (optional, for base)
- Small wooden craft shapes (rectangles/squares for windows)
- Strong adhesive (E6000 or construction adhesive)
- Clear matte or satin sealant spray
- Small glass candle holder or solar path light (for the lantern)
- Painter’s tape
- Foam brushes and fine detail brushes
- Blue wooden bead or knob (for top finial)
- Small wooden ring or coaster (to mount the lantern)
Step 1: Preparing the Base and Body
-
Clean and prime:
Begin by wiping down all terra cotta pots and saucers with a damp cloth to remove unwanted dust. Allow them to dry completely before applying a coat of white primer or a base coat of white acrylic paint to seal the porous clay. -
Create the stone foundation:
Take the largest saucer, which will serve as your base, and turn it upside down. Spray or paint this saucer with grey textured stone paint to mimic a rocky foundation. I find that applying two light coats gives a more realistic rock texture than one heavy coat. -
Stack and glue:
Once the pots are dry, stack them upside down from largest to smallest to test the fit. Apply a ring of adhesive around the bottom rim (now top) of the largest pot and center the medium pot on top of it. Repeat with the smallest pot on top of the medium one. -
Secure the structure:
Let the adhesive cure fully according to the package instructions—usually overnight is best to ensure stability before painting.
Uneven Lines?
If paint bleeds under the tape, wait for it to dry fully. Then, use a small flat brush and the base color to carefully touch up the edge.
Step 2: Painting the Design
-
Paint the base white:
Paint the entire stacked tower with two to three coats of white outdoor acrylic paint. Ensure you get solid coverage where the pots meet to make it look like a single structure. -
Mark the stripes:
Using painter’s tape, mask off horizontal sections to create your stripes. For this look, you want the rim of the top pot and the rim of the bottom pot to remain white, while the main bodies of the pots get painted navy. -
Apply navy sections:
Paint the exposed clay sections with deep navy blue paint. Use a sponge brush to dab paint near the tape edges initially to prevent seepage, then fill in the rest. -
Remove tape:
Carefully peel away the painter’s tape while the navy paint is still slightly tacky to achieve crisp, clean lines.
Solar Power
Use a solar path light for the top instead of a candle holder. Pop the stake off and glue the light housing directly to the top saucer for an automatic evening glow.
Step 3: Adding Details and Assembly
-
Prepare the windows:
Paint your small wooden craft shapes navy blue to match the stripes. Once dry, use a fine liner brush and white paint to add window pane details: a simple cross for squares or an arch detail for rounded pieces. -
Attach windows:
Glue the painted windows onto the lighthouse body. Place them vertically aligned, typically one on the center of each navy stripe. -
Create the lantern room:
Paint the smaller saucer white. If using a solar light, remove the stake and adhere the light element to the saucer. Alternatively, glue a small glass votive holder to the saucer. -
Top it off:
Paint a small wooden ring or coaster and a wooden bead/knob in navy blue. Glue the bead to the top of your lantern or light fixture to act as a finial. -
Assemble the top:
Glue the completed lantern assembly (saucer plus light) onto the very top of the smallest pot. -
Mount to base:
Finally, glue the entire painted tower onto your faux-stone base saucer. -
Seal only if necessary:
Spray the entire project with a clear outdoor sealant to protect the paint from sun and rain damage.
Place your new beacon near a walkway or entry for a charming nautical welcome


Black and White Minimal Lighthouse
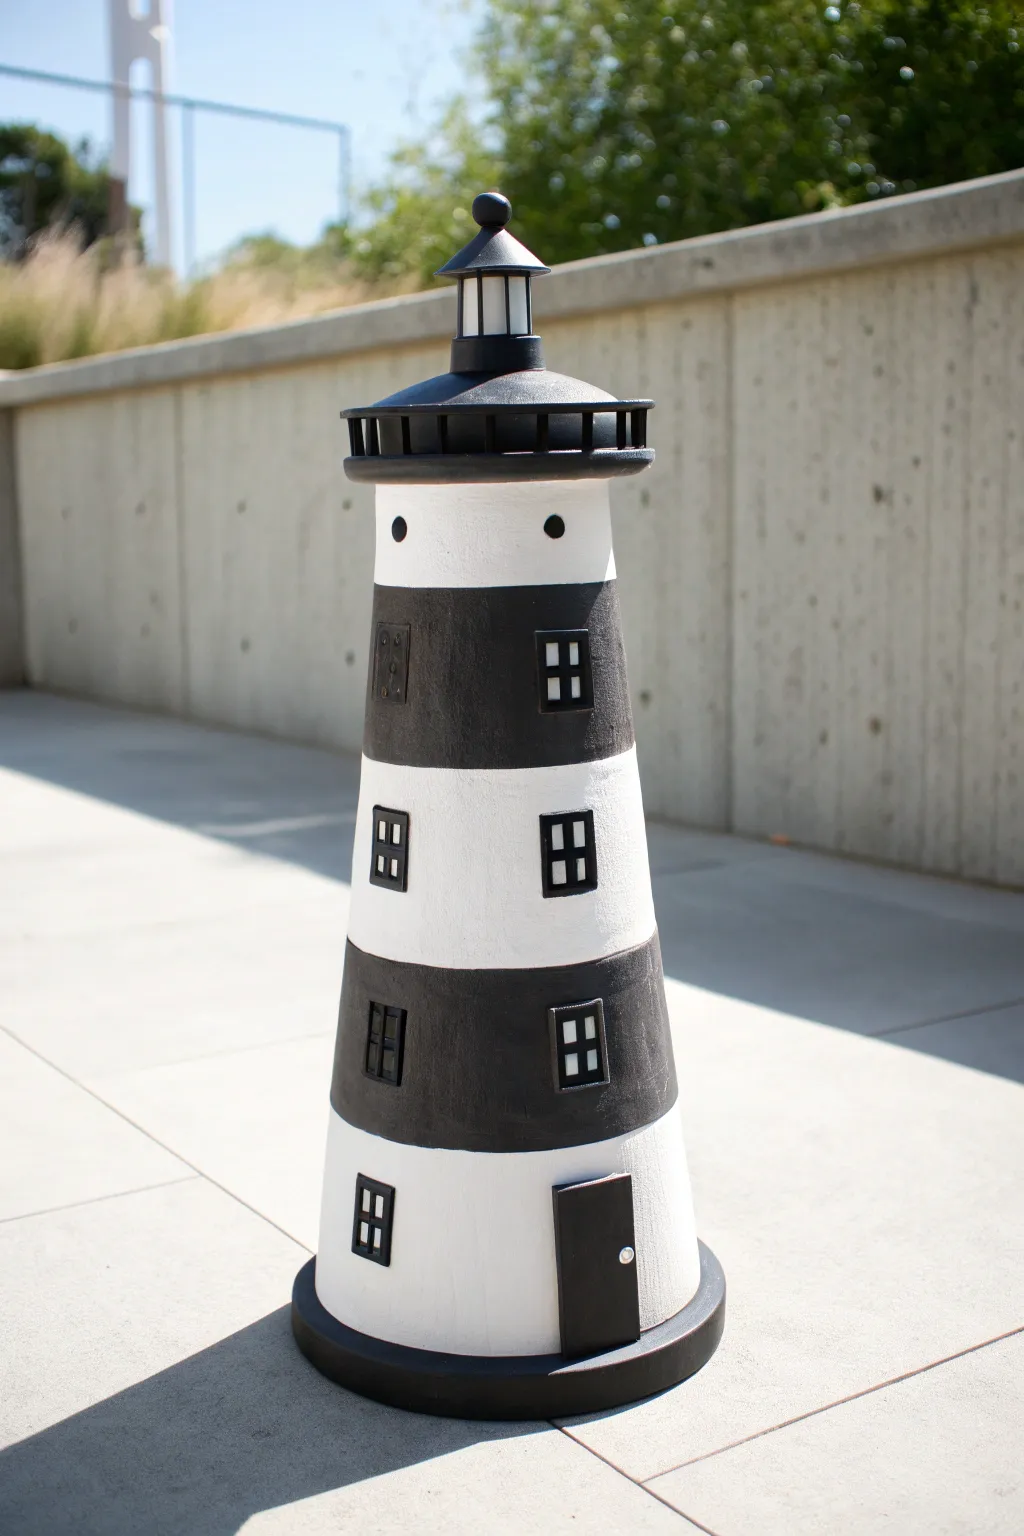
Embrace a sleek, modern aesthetic with this striking black and white lighthouse tower. Using terracotta pots as your base, you’ll create a bold architectural statement piece perfect for a contemporary garden or porch display.
Step-by-Step Guide
Materials
- 3 Terra cotta pots (graduated sizes, e.g., 8-inch, 6-inch, 4-inch)
- 2 Terra cotta saucers (one fitting the largest pot, one fitting the smallest)
- Small solar pathway light (black)
- Outdoor acrylic craft paint (White)
- Outdoor acrylic craft paint (Black)
- Strong craft adhesive (e.g., E6000) or construction adhesive
- Wide flat paintbrush
- Medium flat paintbrush
- Small detail brush
- Painter’s tape or masking tape
- Pencil
- Ruler or measuring tape
- Black adhesive felt, foam sheets, or wood pieces (for windows/door)
- Small gems or beads (white/silver)
- Clear outdoor sealant spray (matte)
Step 1: Base Preparation & Stacking
-
Clean surface:
Begin by thoroughly cleaning all your terracotta pots and saucers with a damp cloth to remove any dust or nursery residue. Let them dry completely, as moisture will prevent the paint from adhering properly. -
Prime the pots:
Apply a base coat of white outdoor acrylic paint to the exterior of all three pots. Terracotta is porous, so this first layer might look streaky; don’t worry, it’s just the foundation. -
Apply second coat:
Once the primer layer is dry to the touch, apply a second, thicker coat of white paint for a solid, opaque finish. Repeat this process for the larger saucer, which will serve as the base. -
Paint the top saucer:
Take the smaller saucer (the one that fits the top pot) and paint it completely black. This will become the gallery deck of your lighthouse. -
Initial assembly:
Invert the largest pot onto the large white saucer. Apply a ring of strong adhesive around the drain hole of the large pot, then center the medium pot upside down on top of it. Repeat with the smallest pot on top of the medium one. Let the adhesive cure according to package instructions.
Uneven Stripes?
If your tape lines bleed on the curved surface, use a flat-edged craft stick or credit card to burnish the tape edge down firmly before painting to ensure a perfect seal.
Step 2: Building the Stripes
-
Mark the lines:
Using a ruler and a pencil, lightly mark horizontal lines around the circumference of your stacked tower to define the stripes. You want alternating bands of equal width. -
Tape the boundaries:
Firmly press painter’s tape along your pencil lines. Ensure the edges are sealed tightly to prevent paint bleed. Tape off the areas that will remain white. -
Paint black bands:
Using your medium flat brush, paint the exposed clay sections with black outdoor acrylic paint. Use long, horizontal strokes for a smooth finish. -
Dry and peel:
Allow the black paint to dry until tacky but not fully hardened, then carefully peel away the tape at a 45-degree angle to reveal crisp lines. Touch up any bleed-through with a small brush and white paint.
Step 3: Architectural Details
-
Create door and windows:
Cut small rectangles from black craft foam, felt, or thin balsa wood. You will need one larger rectangle for the door and several smaller squares for the windows. -
Detail the glazing:
Using a very fine detail brush and white paint, carefully paint a four-pane grid onto each small black window square. Paint a tiny white dot or glue a small silver bead onto the door piece to simulate a doorknob. -
Attach the features:
Plan the placement of your windows. I like to stagger them slightly as they go up the tower. Glue the door at the base of the bottom white stripe and affix the windows to the black and white bands using strong adhesive. -
Add circular accents:
Paint two small black circles near the very top of the white section on the smallest pot, just below the rim, to create decorative porthole accents.
Steady As She Goes
For perfectly straight paint lines on round pots, place the pot on a lazy susan. Hold your brush steady in one spot and slowly rotate the turntable.
Step 4: The Lantern Room
-
Disassemble the solar light:
Remove the stake from your solar pathway light. You only need the top lantern portion. -
Mount the gallery:
Glue the small black saucer (rim facing up) onto the flat bottom of the topmost inverted pot. This creates the walkway platform. -
Install the light:
Apply adhesive to the base of the solar light lantern and center it firmly inside the black saucer. Make sure the solar panel at the top is unobstructed. -
Adding railing details:
For the railing look seen in the inspiration image, cut small vertical strips of black wood or stiff foam and glue them around the rim of the black saucer, spaced evenly. -
Final seal:
Once all glue is cured and paint is dry, spray the entire tower (masking off the solar panel and clear light parts) with a clear matte outdoor sealant to protect it from the elements.
Place your new nautical beacon in a sunny spot to charge during the day and watch it guide the way at night

The Complete Guide to Pottery Troubleshooting
Uncover the most common ceramic mistakes—from cracking clay to failed glazes—and learn how to fix them fast.
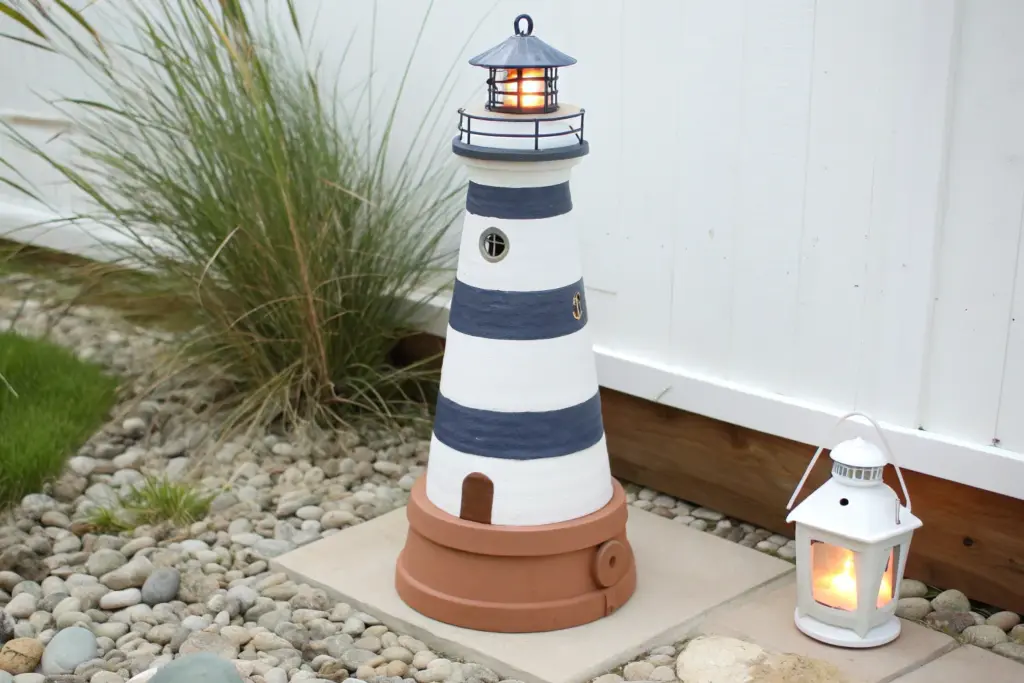
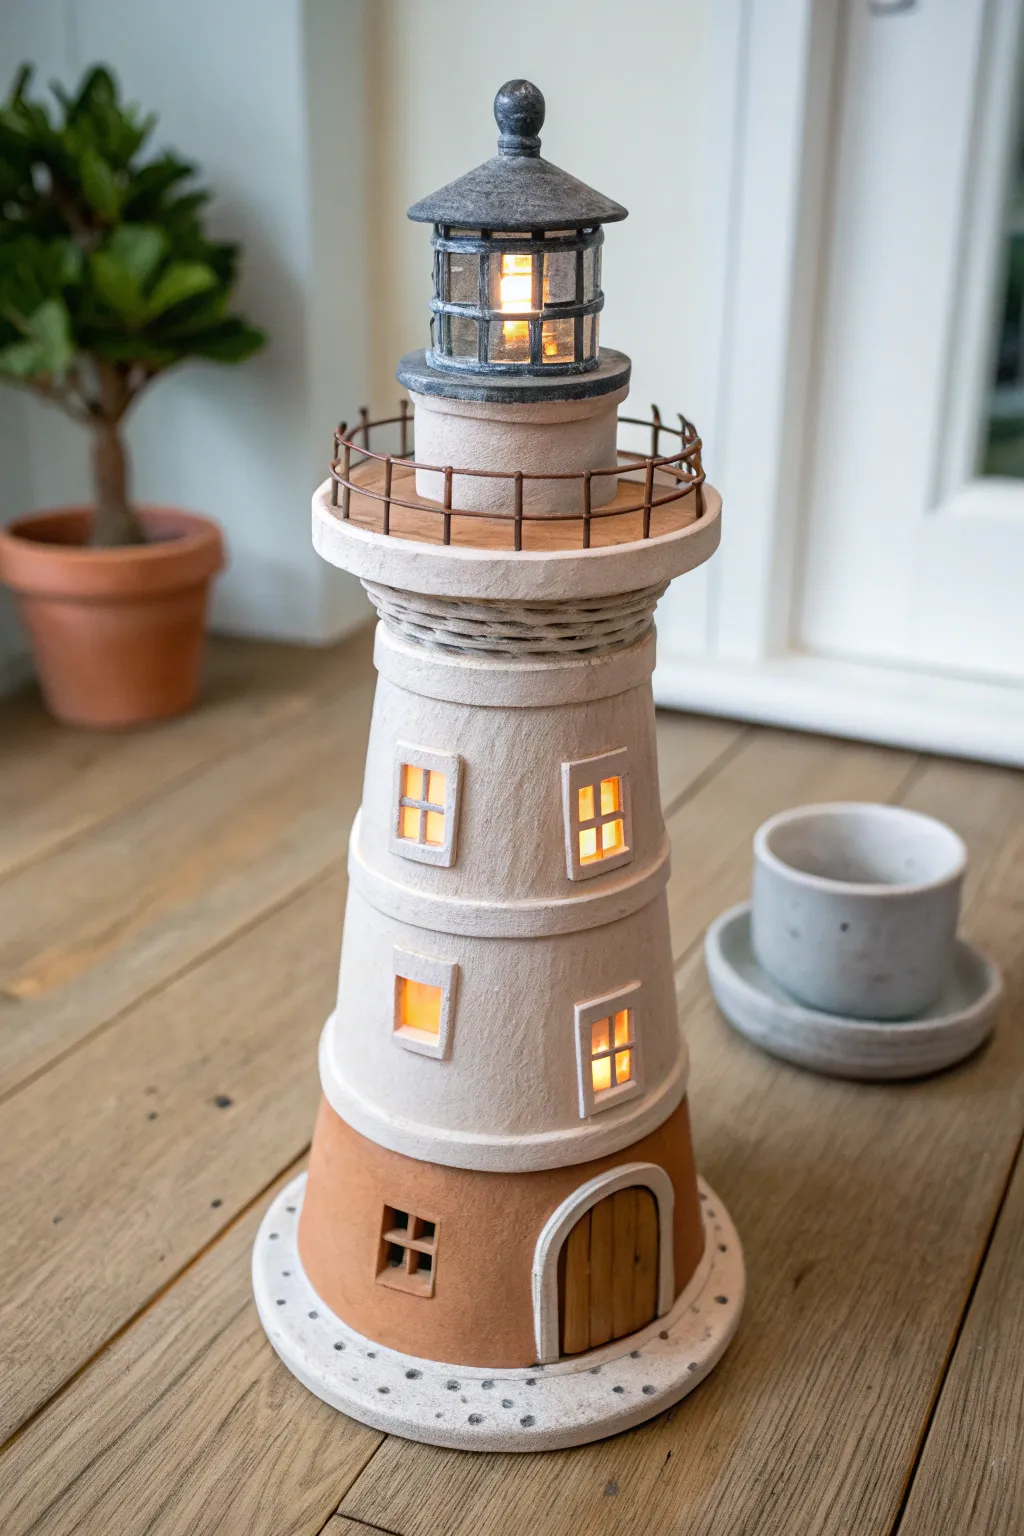
Solar Beacon Lighthouse Topper
Transform ordinary terracotta pots into a charming nautical beacon complete with a glowing lantern room. This project achieves a weathered, architectural look using simple stacking techniques and textured paint effects to mimic aged stone.
Detailed Instructions
Materials
- 4 terracotta pots (graduated sizes: base, bottom, middle, top)
- 2 terracotta saucers (one slightly larger for the base, one smaller for the railing)
- Strong craft adhesive (E6000 or similar)
- White acrylic paint (matte or chalk finish)
- Tan or beige acrylic paint
- Puffy paint or texture paste
- Solar path light (to fit the top pot)
- Small square dowels or popsicle sticks (for lantern grid)
- Wire mesh or plastic mesh (optional, for safety railing)
- Cardboard or craft foam (for door frame)
- Sponge brush and fine detail brush
- Sandpaper
Step 1: Structural Assembly
-
Prepare the drainage holes:
Before stacking, check that the solar light fits into the drainage hole of your smallest (top) pot. If the standard hole is too small, use a tile file or rotary tool to gently widen it until the solar stake fits snugly. -
Form the main tower:
Stack the three main pots upside down (bottoms up). Apply a ring of strong adhesive to the bottom rim of the largest pot and attach the middle pot. Repeat this to attach the smallest pot on top. Let this structure cure fully according to adhesive instructions. -
Create the lantern room foundation:
Take the saucer intended for the lantern deck. Invert it (bottom up) and glue it securely to the flat top of your stacked tower. This creates the balcony platform.
Weathering Wax
After painting, rub a tiny amount of dark antique wax or diluted brown paint into the crevices of the stone base and banding to create instant depth and age.
Step 2: Architectural Details
-
Add banding texture:
The lighthouse has distinct bands where the pots meet. Enhance these seams by applying a thick line of puffy paint or texture paste around the joints to smooth the transition and create a unified ‘molding’ look. -
Construct the lantern cage:
While the glue dries, create the grid for the lantern. Measure the circumference of your solar light housing. Cut vertical supports from small dowels or stiff cardboard and glue them around the light housing to mimic window panes. -
Install the safety railing:
Cut a strip of plastic mesh or bend a piece of wire to form a small fence. Glue this around the rim of the top saucer to create the lighthouse balcony railing. -
Door and window frames:
Cut small arched shapes from craft foam or cardboard for the windows and the main door. Glue these onto the pots: a large door at the base and smaller windows spiraling up the tower.
Step 3: Base Construction
-
Prepare the foundation:
Take the largest saucer (the base). Invert it so the flat side is up. This will serve as the rocky foundation for the lighthouse. -
Create stone texture:
Cut small rectangular pieces of thick cardboard or foam to resemble heavy paving stones. Glue these along the vertical rim of the base saucer, spacing them out slightly to look like masonry blocks. -
Mount the tower:
Center your main tower structure onto this prepared base saucer and glue it down firmly.
Night-time Glow
Replace inner ‘window’ areas of the lantern room with vellum paper before inserting the light. This diffuses the LED glow for a softer, more realistic beacon effect.
Step 4: Painting and Finishing
-
Base coat application:
Paint the entire structure—including the base, tower, and lantern area—with a solid coat of white chalk paint. You may need two coats to fully cover the terracotta orange. -
Distressing the white:
Once the white is dry, lightly sand areas on the tower walls to reveal just a hint of the clay texture beneath, giving it that wind-worn coastal look. -
Painting the accents:
Use the tan or beige paint for the horizontal bands between pots, the door/window frames, and the stone blocks on the base. Apply this color gently, perhaps blotting with a sponge for an uneven, natural stone finish. -
Detailing the door:
Paint the inside of the door arch a dark brown or bronze to simulate wood. I like to add a tiny dot of metallic paint for a doorknob. -
Final assembly:
Insert your prepared solar light into the top hole. Secure the lantern cap (the solar light’s original top or a small painted funnels/finial) on top.
Place your finished beacon in a sunny spot in the garden or by a window to charge up for the evening glow
Lantern-Style Light Room Look
This charming lighthouse project combines the rustic texture of terra cotta with the cozy glow of a lantern, creating a beacon of warmth for your decor. By stacking pots and adding a specialized lantern top, you achieve a sophisticated, architectural look that feels both nautical and handmade.
Step-by-Step
Materials
- Three terra cotta pots of graduating sizes (small, medium, large)
- One terra cotta saucer (large enough for the base)
- One terra cotta saucer (small, to separate the top section)
- Small solar lantern replacement top or battery-operated LED puck light with cage
- Strong craft adhesive (E6000 or construction adhesive)
- White acrylic paint (matte or textured)
- Terra cotta colored acrylic paint (if pots are not naturally uniform)
- Dark grey/slate acrylic paint
- Yellow vellum or translucent plastic sheeting
- Wooden craft sticks or balsa wood strips
- Miniature wire railing (or thin jewelry wire)
- Small pebbles or faux stone texture paste
- Utility knife or rotary tool
- Paintbrushes (flat and fine detail)
- Sandpaper
Step 1: Preparing the Structure
-
Clean and test stack:
Begin by wiping down all terra cotta pots to remove dust or oils. Stack them upside down—largest on bottom, medium in middle, smallest on top—to ensure they fit snugly and create a pleasing tapered shape. -
Cut window openings:
Mark rectangular window locations on the middle and top pots using a pencil. Carefully cut these out using a rotary tool with a cutting wheel; wear essential eye protection during this step. -
Create the door arch:
On the bottom-most pot (the largest one), trace an arched doorway. Use your rotary tool to cut this shape out, sanding the edges smooth afterwards to remove sharp burrs.
Rotary Tool Safety
Cutting terra cotta creates significant dust. Always wear a mask and safety goggles, and keep the clay wet with a spray bottle to reduce dust clouds.
Step 2: Painting and Texturing
-
Paint the base coat:
Leave the bottom third of the largest pot unpainted to expose the natural terra cotta warmth. Paint the rest of that pot, and the entire surface of the other two pots, with a matte white acrylic paint. -
Add stone texture:
To mimic the weathered look in the photo, dab the wet white paint with a crumpled paper towel or sponge. For extra grit, mix a pinch of sand or baking soda into your white paint before applying the second coat. -
Define the tiers:
Paint the rims of the pots a slightly darker shade of white or light grey to emphasize the tiered construction. This separation mimics the concrete rings often seen on real lighthouses. -
Create the base platform:
Flip the large saucer upside down to serve as the foundation. Paint it white with grey speckles to look like a concrete or stone pad.
Coastal Embellishment
Glue tiny pieces of sea glass or crushed shells around the very bottom base for an authentic shoreline appearance.
Step 3: Assembly and illumination
-
Install window panes:
Cut small squares of yellow vellum slightly larger than your window holes. Glue these to the *inside* of the pots covering the holes to diffuse the light and create a warm glow. -
Stack and glue:
Apply a strong adhesive to the bottom rim of the largest pot and center it on the saucer base. Glue the medium pot upside down onto the large one, and the small pot onto the medium one. -
Add the gallery deck:
Take the small terra cotta saucer and glue it right-side up onto the very top of the stack. This creates the ‘gallery’ walkway area. -
Fabricate the lantern room:
Paint your solar light replacement or LED housing a dark slate grey. Glue this assembly into the center of the top saucer.
Step 4: Detailed Finishings
-
Install the railing:
Ideally, use pre-made miniature dollhouse railing. If making your own, bend thin wire into a circle and solder or glue vertical posts. Adhere this railing around the rim of the top saucer. -
Frame the windows:
Cut thin strips of balsa wood or craft sticks. Paint them white and glue them around the window openings to create frames and muntins (the crossbars). -
Build the door:
Cut a piece of wood or gathered bark to fit inside the door arch. Glue it in place slightly recessed. Paint a small white arch around it to finish the entrance. -
Final weathering:
Using a very dry brush with a tiny amount of grey paint, lightly dust the edges of the white sections to simulated wind-worn aging.
Place a flickering LED tealight under the hollow stack to bring your seaside beacon to life in the evening


What Really Happens Inside the Kiln
Learn how time and temperature work together inside the kiln to transform clay into durable ceramic.
Saucer Gallery Deck at the Top
This charming nautical decoration brings a coastal touch to your porch or garden using simple terracotta pots stacked to form a classic lighthouse shape. The standout feature is the unique gallery deck created with inverted saucers and a distinctive railing, all topped with a functional lantern light.
How-To Guide
Materials
- 1 large terracotta saucer (12-14 inch base)
- 3 terracotta pots of graduating sizes (large, medium, small)
- 2 terracotta saucers (one slightly larger than the small pot’s rim, one small one for the very top)
- Outdoor acrylic craft paint (Sage Green, White, Terracotta/Brown, Black)
- Strong adhesive (E6000 or construction adhesive)
- Plastic fencing edging or dollhouse railing
- Solar path light (removed from stake)
- Medium and fine paintbrushes
- Painter’s tape
- Hot glue gun (for temporary hold)
- Clear outdoor sealant spray (matte finish)
Step 1: Painting the Base Elements
-
Prepare the pots:
Begin by cleaning all your terracotta pots and saucers thoroughly to remove any dust or sticker residue. Let them dry completely, then apply a base coat of white primer or paint to the exterior of the three main pots to ensure your colors pop later. -
Paint the lighthouse body:
Take the medium and small pots. Use painter’s tape to mark off horizontal rings. Paint alternating stripes of Sage Green and White. I find that peeling the tape while the paint is still slightly tacky gives the crispest lines. -
Create the brick base:
For the largest bottom pot, paint the rim Sage Green to match the gallery above. Paint the body of this pot a dark brown or reddish terracotta color to simulate a foundation. -
Detail the bricks:
Once the brown base is dry, use a fine liner brush and black paint to draw a brick pattern. Draw horizontal lines first, then stagger short vertical lines between them. Add a small green door shape at the bottom rim to ground the structure.
Step 2: Constructing the Gallery Deck
-
Prepare the saucer deck:
Take the saucer that is slightly larger than your top pot’s rim. Flip it upside down so the bottom faces up. Paint the rim and top surface Sage Green. -
Add deck details:
Using the back of a paintbrush or a dotting tool, dab small dots of dark green or black paint evenly around the flat rim of this inverted saucer to simulate rivets or drainage holes. -
Construct the railing:
Measure the circumference of your smallest terracotta pot (the one that will sit on top of this deck). Cut a strip of plastic garden edging or miniature fencing to this length. -
Paint the railing:
Paint your fencing strip Sage Green to match the other green elements. Simply lay it flat on newspaper to spray or brush painting it before attaching. -
Attach the railing:
Glue the fencing in a circle to the top of the inverted green saucer. It should sit just inside the rim, creating a little enclosed balcony.
Wobbly Structure?
If the pots sit unevenly due to rim imperfections, run a bead of silicone caulk along the rim before pressing them together to fill gaps and level it.
Step 3: Assembly and Finishing Touches
-
Stack the main tower:
Place the large brick-painted pot upside down on the largest base saucer. Apply strong adhesive to the rim of the medium pot and glue it upside down on top of the large pot. -
Add the gallery layer:
Glue the inverted gallery saucer (the one with the railing) onto the bottom of the medium pot. Ensure it is centered perfectly. -
Secure the top section:
Glue the smallest striped pot upside down onto the center of the gallery saucer, inside the railing you created. -
Paint the windows:
Using black paint, add small arched window silhouettes on the white stripes of the tower and a small door on the green stripe near the gallery deck. -
Prepare the light housing:
Take the smallest saucer and paint it a natural terracotta color. This will act as the cap for your light. -
Assemble the light:
Glue the solar light (glass or plastic portion) onto the rim of the top small pot. Then, glue the small terracotta saucer on top of the solar light as a roof. -
Seal the project:
Once all paint and glue is fully cured (usually 24 hours), spray the entire structure with a clear matte outdoor sealant to protect it from the elements.
Illumination Tip
Use a solar path light that has a removable stake. Ensure the top solar panel isn’t covered by paint so it can recharge during the day.
Place your new lighthouse in a sunny spot and watch it guide the way when evening falls
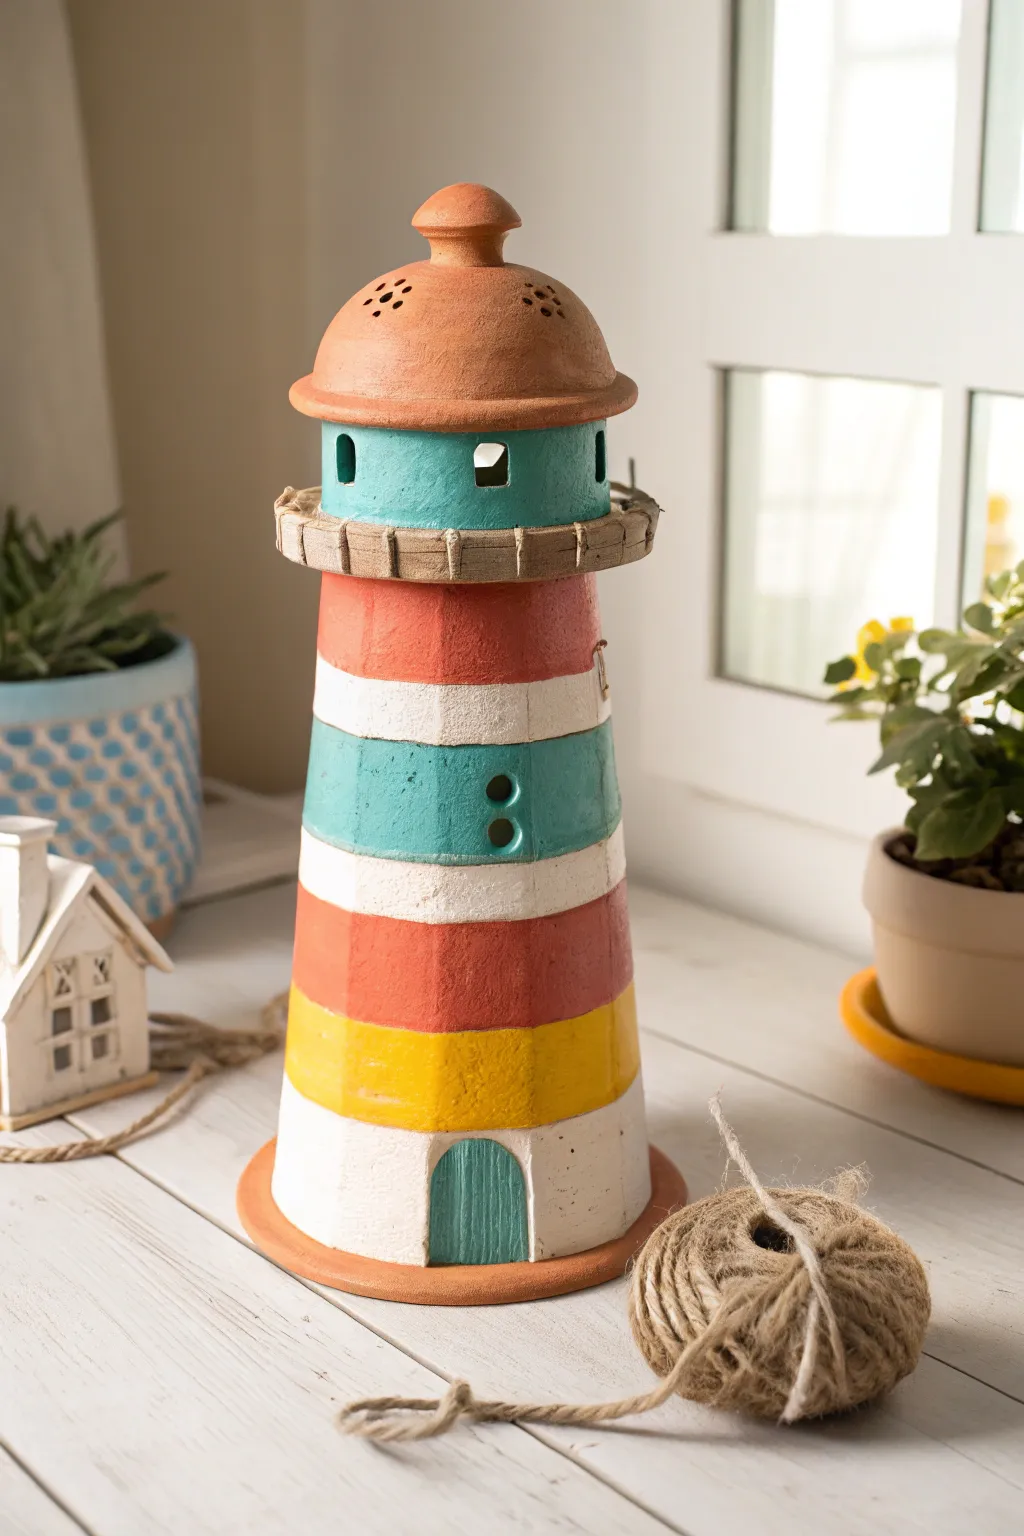
Painted Windows and Front Door Details
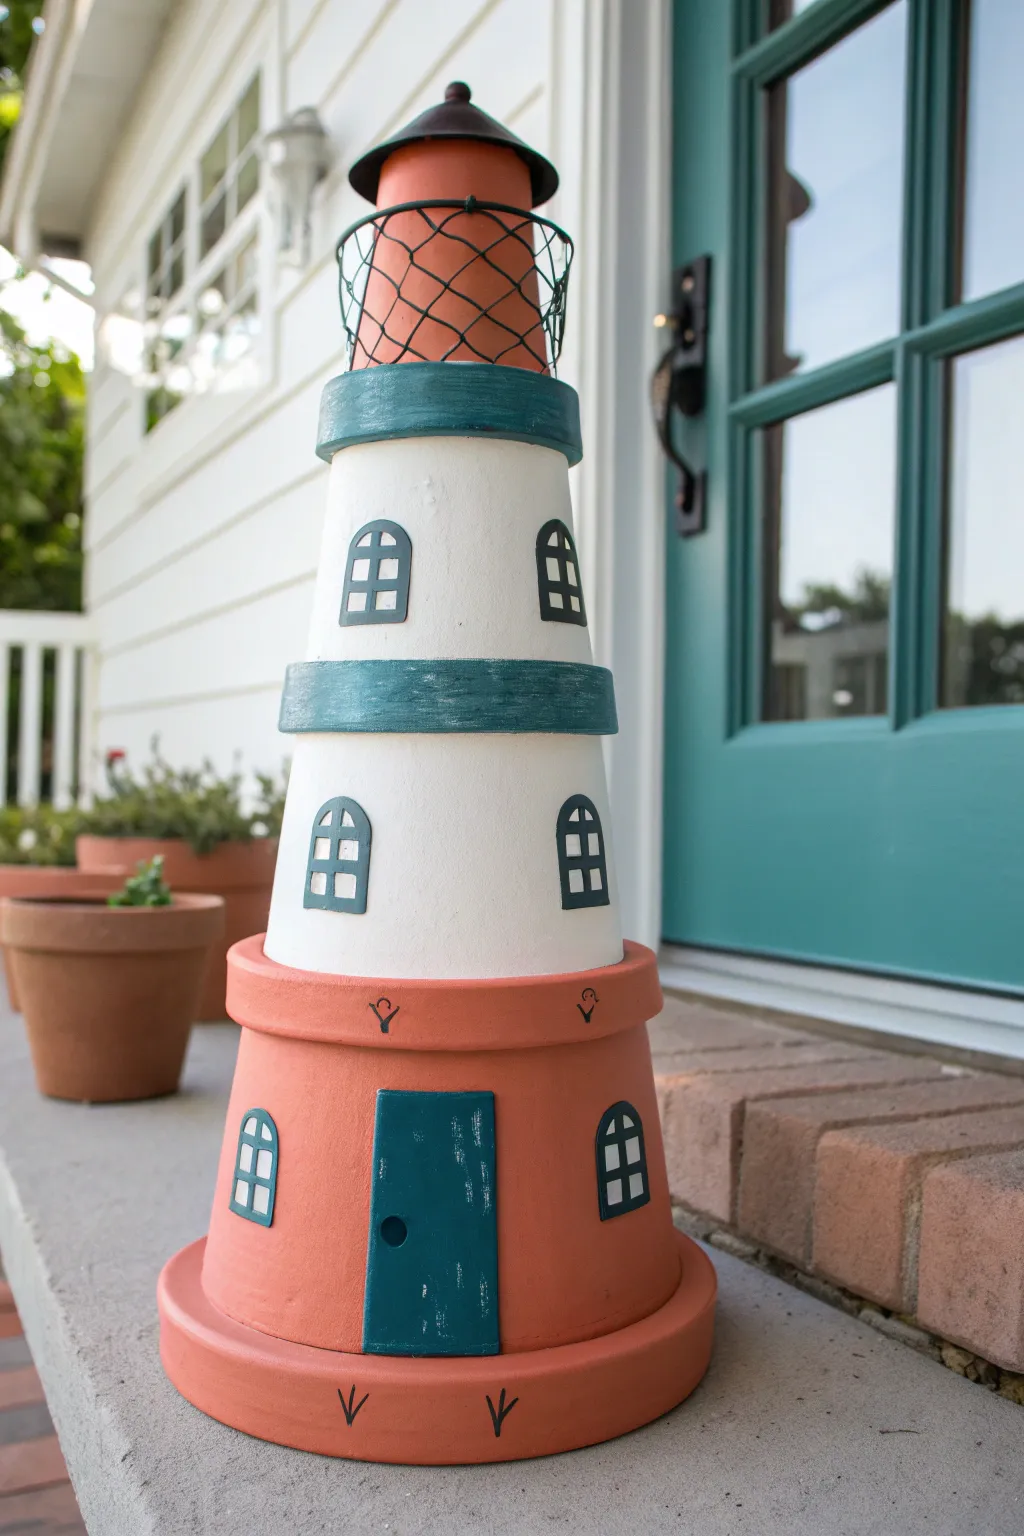
Transform ordinary terracotta pots into a charming seaside beacon with this stacked lighthouse project. Featuring classic tiers painted in crisp white, terracotta, and teal, this garden accent is topped with a solar light for a welcoming evening glow.
Detailed Instructions
Materials
- 3 Terracotta pots of graduating sizes (large, medium, small)
- 2 Terracotta saucers (one slightly larger than the large pot base, one sized to the medium pot base)
- Small solar pathway light (disassembled)
- Acrylic craft paint: White, Teal/Dark Turquoise, Black, Terracotta (optional for touch-ups)
- Strong craft adhesive (like E6000) or outdoor construction adhesive
- Paintbrushes: 1-inch flat brush, fine detail brush
- Pencil
- Black wire or chicken wire mesh
- Wire cutters
- Hot glue gun and glue sticks
- Clear outdoor sealer spray (matte or satin)
- Small wooden craft piece (rectangle for door – optional, can be painted on)
Step 1: Base Preparation and Painting
-
Clean the pots:
Begin by thoroughly wiping down all terracotta pots and saucers with a damp cloth to remove any dust or nursery residue. Let them dry completely, as moisture will prevent the paint from adhering properly. -
Paint the base pot:
Take the largest pot and flip it upside down. Although the rim is already terracotta, I like to give the main body of this bottom pot a fresh coat of terracotta-colored paint if the original finish is uneven; otherwise, you can leave it natural. -
Paint the middle and top sections:
Paint the body of the medium and small pots with white acrylic paint. You will likely need 2-3 coats to get a solid, opaque white coverage over the dark clay. Allow each coat to dry for about 20 minutes. -
Detail the rims:
Using your 1-inch flat brush, paint the thick rims of the medium and small pots with a deep teal or dark turquoise color. Do the same for the small saucer that will sit between the top tiers.
Step 2: Assembly and Structure
-
Prepare the foundation:
Place your largest saucer right-side up on your work surface. Apply a ring of strong craft adhesive to the bottom rim of the large (upside down) pot and press it firmly into the center of the saucer. -
Stack the second tier:
Apply adhesive to the top (actually the bottom/flat part) of the large base pot. Center the largest saucer upside down on it to create a platform. Wait, looking closely at the image, the large pot acts as the base directly. Let’s adjust: Place the large pot upside down on the large saucer. That’s the base. -
Stack the middle tier:
Apply a generous amount of adhesive to the flat bottom of the large, upside-down pot. Center the medium white pot (also upside down) directly on top of it. Check from all angles to ensure it’s straight. -
Stack the top tier:
Glue the medium saucer (upside down) onto the flat bottom of the medium pot. This creates the ‘walkway’ ledge. Then, glue the small white pot (upside down) on top of that saucer.
Uneven Stacking?
If the pots wobble when stacked, the clay bottoms may not be perfectly flat. Use a thick bead of E6000 glue to fill gaps, or add small felt pads as shims before gluing.
Step 3: Detailing the Light and Cage
-
Create the lantern room:
Paint the smallest saucer entirely teal to match the rims. Once dry, glue it upside down onto the very top of the stack. -
Prepare the solar light:
Take your solar light apart, keeping just the top light/panel section and the clear lens if possible. Paint any plastic housing terracotta or teal to match your scheme. This creates the ‘lamp’ at the top. -
Make the wire cage:
Cut a strip of black wire mesh or chicken wire that is tall enough to cover your solar light housing. Bend it into a cylinder shape that fits inside the rim of the top saucer. -
Attach the light assembly:
Glue the solar light component to the top of the smallest pot. carefully place your wire cylinder over it, securing it with dabs of hot glue or strong adhesive along the bottom edge.
Level Up: Real Light
Swap the painted lantern room for a real geometric glass candle holder glued to the top. Place a battery-operated LED candle inside for a flickering, realistic beacon effect.
Step 4: Adding Character
-
Sketch the windows:
Using a pencil, lightly draw arched window outlines on the white sections. Aim for two windows on the middle tier and two on the top tier, spacing them evenly. -
Paint the windows:
Fill in the window shapes with black acrylic paint. Use your fine detail brush to carefully paint the grid lines (muntins) over the black in teal or grey, or simply outline the black shape with a teal border as shown in the photo. -
Create the door:
For the door on the bottom terracotta section, you can paint a rectangle in teal directly onto the pot. For a 3D effect, paint a small rectangular piece of wood teal and glue it on. Add a tiny black dot for the doorknob. -
Add decorative markings:
Using a thin brush and black paint, add small ‘V’ shapes or little crow’s feet markings around the rims of the saucers for extra nautical detailing. -
Distress the paint (optional):
If you want a weathered look, lightly sand the teal rims and the door with fine-grit sandpaper to reveal a bit of the clay underneath. -
Seal the project:
Once all paint is fully cured (at least 24 hours), spray the entire lighthouse with two coats of clear outdoor sealer. This protects the paint from sun fading and rain.
Place your new lighthouse in a garden bed or on a porch step to guide visitors to your door.

TRACK YOUR CERAMIC JOURNEY
Capture glaze tests, firing details, and creative progress—all in one simple printable. Make your projects easier to repeat and improve.
Weathered Driftwood Finish Lighthouse
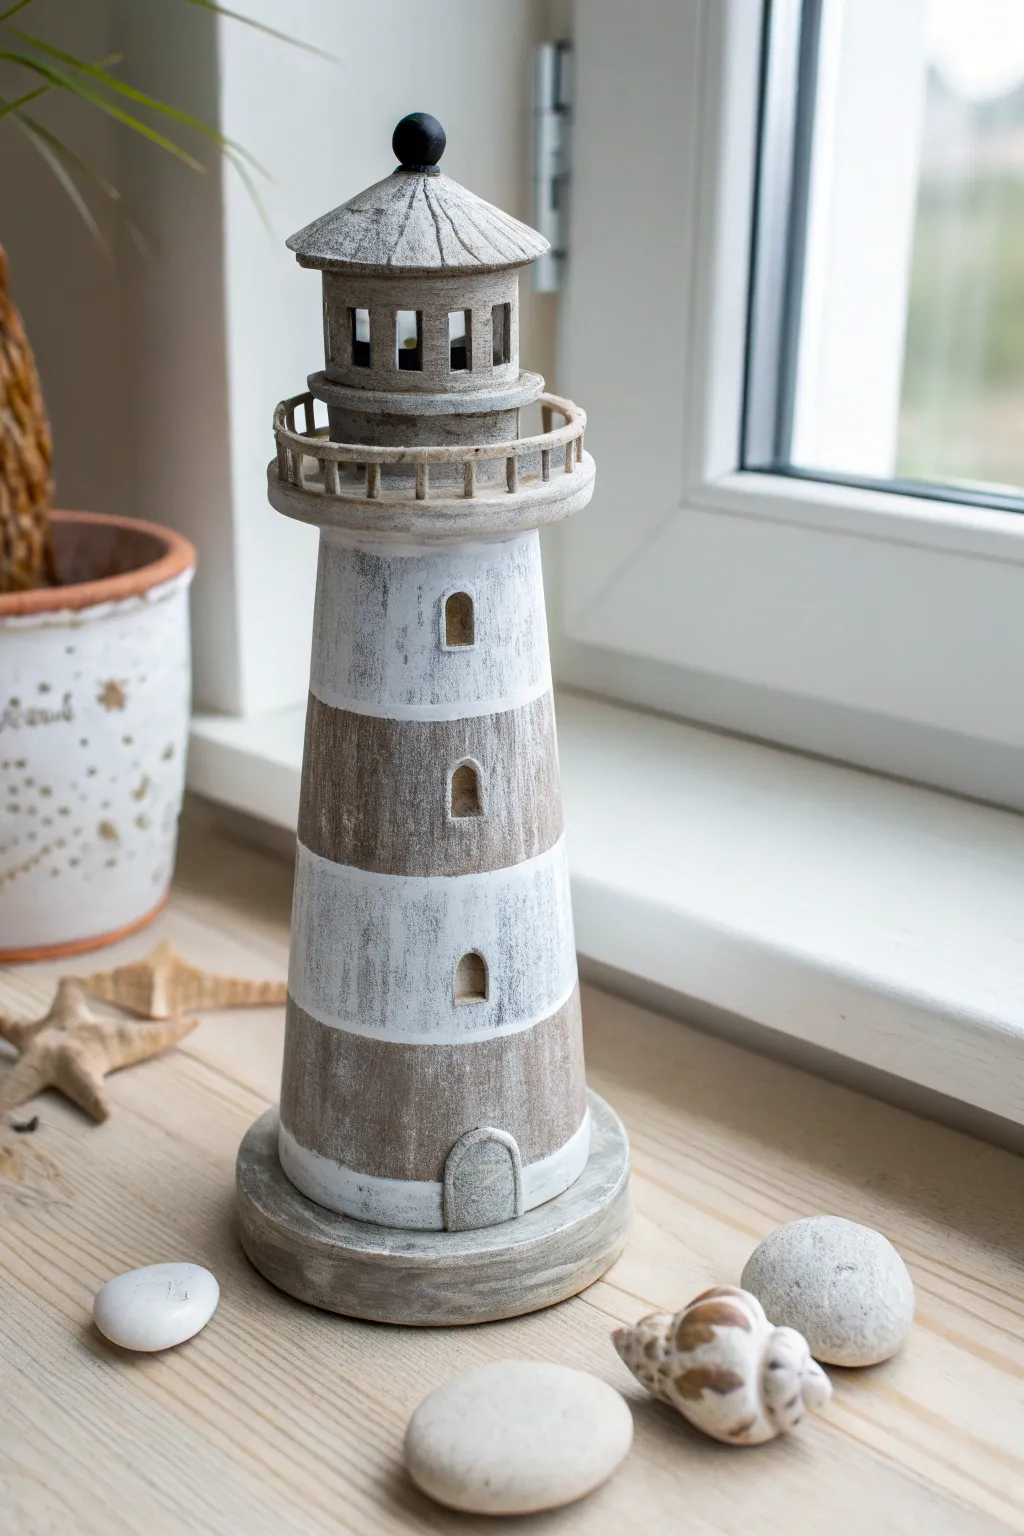
Capture the essence of the seaside with this charming lighthouse project that mimics the look of sun-bleached, weathered driftwood. Using simple clay pots and a clever painting technique, you can create a rustic coastal decoration perfect for a windowsill or mantel display.
Step-by-Step
Materials
- 3 Terracotta pots (graduated sizes: small, medium, large)
- 1 Terracotta saucer (to fit the smallest pot)
- Small wooden ball or finial (for the top)
- Strong craft adhesive or construction glue (e.g., E6000)
- White acrylic paint
- Brown/taupe acrylic paint (driftwood shade)
- Grey acrylic paint
- Paintbrushes (medium flat brush, small detail brush)
- Dry brush or coarse bristle brush
- Sandpaper (medium grit)
- Small balsa wood sheet or thick cardstock (for railing)
- Craft knife
Step 1: Assembling the Structure
-
Prepare the Pots:
Clean all three terracotta pots thoroughly to remove any dust or grease. Ensure they are completely dry before you begin assembly. -
Stack the Pots:
Apply a generous ring of strong adhesive to the bottom rim of the largest pot. Turn the medium pot upside down and press it firmly onto the inverted large pot. Repeat this process with the smallest pot on top. -
Create the Lamp Room:
Glue the small terracotta saucer right-side up onto the base of the smallest (top) pot. This creates the platform for the lighthouse’s lamp room. -
Add the Roof:
If you have a very small miniature pot, glue it upside down onto the saucer. Top this assembly with the wooden ball or finial to create the classic lantern shape. -
Let it Cure:
Allow the glue to cure fully according to the manufacturer’s instructions. This usually takes overnight, ensuring your structure is solid before painting.
Step 2: Creating the Driftwood Effect
-
Base Coat:
Paint the entire structure with a mix of brown and grey acrylic paint. Aim for a muddy, taupe color that resembles old, wet wood. Let this base coat dry completely. -
Apply White Weathering:
Load a coarse brush with white paint and wipe most of it off on a paper towel. Dry brush this over the entire lighthouse using vertical strokes. The goal is to catch the texture, leaving the darker base visible in crevices. -
Add Stripes:
Mark out horizontal bands for your stripes lightly with a pencil. Paint alternating bands with a slightly heavier coat of white paint, but keep the edges rough and uneven for that aged look. -
Refine the Wood Look:
Mix a small amount of dark grey paint with water to create a thin wash. Lightly brush this over the white areas, especially near the bottom and joints, to simulate years of exposure to salt air. -
Sand for Texture:
Once dry, gently sand areas of the paint with medium grit sandpaper. Focus on the raised edges and rims to reveal hints of the darker base coat or even the terracotta underneath, enhancing the distressed driftwood vibe.
Dry Brushing Tip
Always test your dry brush on a scrap piece of paper first. If the paint goes on solid, you have too much on the brush. It should look scratchy and faint.
Step 3: Adding Details
-
Paint the Windows:
Using a small detail brush and black or dark brown paint, carefully paint small arched windows on the main body of the lighthouse. Keeping them simple and silhouette-like works best. -
Simple Doorway:
Paint a small, arched door at the very bottom base. I often add a tiny outline in a lighter grey to give the door frame a bit of dimension. -
Construct the Railing:
Cut a thin strip of balsa wood or thick cardstock to circle the saucer (the lamp room platform). Cut tiny vertical pieces for posts. Glue these around the saucer rim to create a gallery railing. -
Weather the Railing:
Paint the railing with your brown/grey mix, then dry brush with white to match the rest of the lighthouse. This step integrates the delicate addition with the sturdy pot structure. -
Final Coat (Optional):
If you plan to keep this decoration outside, apply a clear matte sealer spray to protect your paint job from the elements without adding unwanted shine.
Light Up the Night
Before gluing the very top roof piece (the mini pot), install a small battery-operated tea light underneath it to give the lantern room a real glow at night.
Now you have a beautifully weathered lighthouse that brings a touch of coastal calm to any room in your home
Coastal Rope Trim Around the Seams
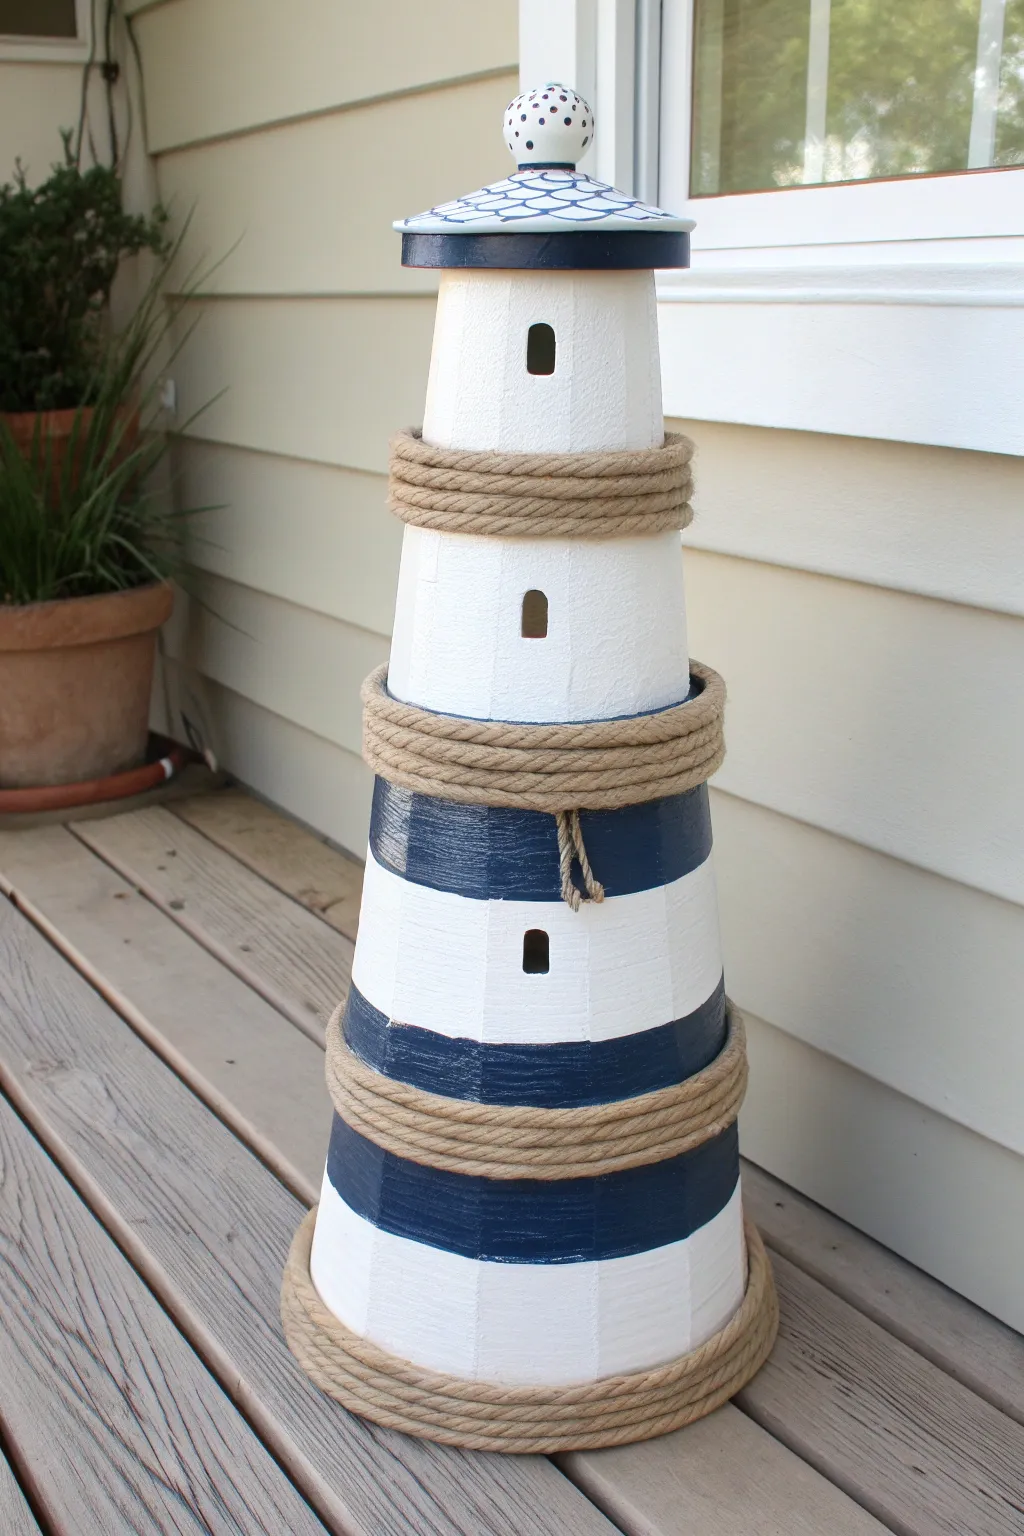
Transform ordinary terracotta pots into a charming nautical beacon for your porch or garden. This project combines crisp paint lines with rustic rope accents to create a timeless coastal decoration that looks professionally made.
Step-by-Step Tutorial
Materials
- 3 Terra cotta pots (graduated sizes, e.g., 8-inch, 6-inch, 4-inch)
- 2 Terra cotta saucers (one matching the smallest pot, one slightly smaller)
- Small wooden finial or round knob
- Outdoor acrylic craft paint (white, navy blue)
- Thick jute rope (approx. 1/2 inch to 3/4 inch thick)
- Heavy-duty construction adhesive or E6000 glue
- Painter’s tape
- Foam brushes and detail brushes
- Hot glue gun and heavy-duty glue sticks
- Clear outdoor sealant spray (matte or satin)
- Scissors
Step 1: Preparation & Base Coating
-
Clean the pots:
Before starting, ensure all your terra cotta pots and saucers are completely clean and dry. Wipe away any loose dust or sticker residue that might interfere with paint adhesion. -
Stack and test:
Experiment with your stacking order to ensure the sizes look proportional. The standard arrangement is largest pot on bottom, medium in middle, and smallest on top, all inverted upside down. -
Prime the surface:
Apply a base coat of white outdoor acrylic paint to all outer surfaces of the pots and the bottoms of the saucers. You don’t need to paint the insides, but be sure to cover the rims. -
Apply coverage coats:
Let the first coat dry completely, then apply 2-3 additional coats of white paint until you have a solid, opaque finish. Terracotta is porous and tends to soak up the first few layers.
Step 2: Painting the Design
-
Tape the stripes:
Select the largest pot (the base) for the striped design. Use painter’s tape to mark off two thick horizontal bands where you want the navy blue stripes to go. -
Paint the navy stripes:
Fill in the taped areas with navy blue outdoor paint. Use a foam brush for a smooth application, and peel the tape off while the paint is still slightly wet to get the crispest lines. -
Paint the top section:
Take the smallest pot (the top section) and paint the rim navy blue as well, creating a visual connection to the base. -
Detail the ‘windows’:
Using a small detail brush, paint small black or dark grey arched rectangles on the middle and top pots to mimic lighthouse windows. Center them vertically on the pot faces. -
Create the lantern room:
Paint the larger of the two saucers navy blue. For the smaller saucer (the roof), paint a scalloped or scale pattern in navy blue over the white base to resemble roof shingles.
Sticky Situation?
If the rope keeps popping off the curved surface, use small dabs of hot glue every inch instead of a long strip. Hold the rope in place for 10 seconds until the glue cools solid.
Step 3: Assembly
-
Glue the tower:
Once all paint is cured, apply a strong construction adhesive or E6000 to the bottom rim of the middle pot and center it on top of the large base pot. -
Add the top tier:
Repeat the gluing process with the smallest pot, adhering it securely to the top of the middle pot. Ensure your ‘windows’ are aligned vertically before the glue sets. -
Assemble the light housing:
Glue the navy blue saucer upside down onto the top pot. Then, glue the patterned ‘roof’ saucer right-side up on top of that. -
Attach the finial:
Paint your wooden finial or knob white with blue polka dots. Once dry, glue it securely to the very center of the top saucer.
Light Up the Night
Instead of gluing the top saucer down permanently, leave it loose. Place a battery-operated outdoor LED tea light underneath it to make the lantern room actually glow at night.
Step 4: Rope Accents & Finishing
-
Wrap the seams:
To hide the joints where the pots meet, apply a thick bead of hot glue around the seam. Press the heavy jute rope into the glue, wrapping it around the lighthouse 2-3 times depending on the rope thickness. -
Secure the rope ends:
Cut the rope at an angle so the ends lay flat against each other. I find adding a dab of hot glue directly to the cut end prevents fraying and keeps the spiral tight. -
Trim the base:
Add a final wrap of rope around the very bottom rim of the large pot to ground the structure and give it a finished, weighty appearance. -
Seal the project:
Take the finished lighthouse to a well-ventilated area and spray the entire piece with two thin coats of clear outdoor sealer to protect the paint against sun and moisture.
Place your new lighthouse in a garden bed or by the front door to welcome guests with seaside charm
Nautical Icon Add-Ons for Extra Charm
Transform ordinary terracotta pots into a charming seaside beacon with this stacked lighthouse project. Featuring crisp white paint, nautical blue stripes, and adorable starfish accents, it adds a touch of coastal whimsy to any porch or garden.
How-To Guide
Materials
- 3 Terracotta pots (graduated sizes: small, medium, large)
- 2 Terracotta saucers (sized to fit inverted pots as rims)
- 1 Small terracotta saucer (for the base)
- 1 Small glass jar or votive holder (for the light room)
- 1 Small saucer (for the roof)
- 1 Wooden bead or finial
- Outdoor acrylic craft paint (white, navy blue, silver)
- Strong craft adhesive (E6000 or construction adhesive)
- Hot glue gun and glue sticks
- Wooden star shapes and wooden anchor shape
- Flat paintbrushes (various sizes)
- Small round detail brush
- Sealer or outdoor varnish (spray or brush-on)
Step 1: Preparation and Base Coating
-
Clean the pots:
Before starting, wipe down all your terracotta pots and saucers with a damp cloth to remove any dust or manufacturing residue. Let them dry completely. -
Paint the pots white:
Turn the three pots upside down. Apple a coat of white outdoor acrylic paint to the exterior of each pot. You will likely need 2-3 coats to get solid, opaque coverage over the red clay. -
Paint the jar:
While the pots dry, paint your small glass jar or votive holder white to match the body of the lighthouse. If the surface is slick, a primer spray might help the paint stick better. -
Paint the saucers:
Select the saucers that will act as the rims between the lighthouse levels. Paint the outer edges of these—as well as the large base saucer—a custom ‘weathered wood’ color. I achieve this by mixing a little silver into brown paint, or simply using a metallic taupe. -
Paint the roof:
Take the smallest saucer meant for the very top. Paint this navy blue. Once dry, lightly dab a dry brush with white or silver paint to create a speckled, weathered texture on top.
Weathering Hack
To get that salt-blasted look on the roof, dip an old toothbrush in white paint and flick the bristles with your thumb to mist tiny speckles.
Step 2: Painting the Details
-
Add navy stripes:
Paint a thick navy blue band around the bottom rim of each inverted white pot. Use painter’s tape if you want extremely crisp lines, though a steady hand works well for a rustic look. -
Prepare the icons:
Paint your wooden wooden stars silver. Paint the wooden anchor navy blue to match the stripes. -
Paint the finial:
Coat the wooden bead or knob in silver paint. This will sit on top of the blue roof saucer. -
Seal the pieces:
Once all paint is thoroughly dry, coat every individual piece with an outdoor clear sealer. This is crucial if your lighthouse will live outside.
Make It Grow
Instead of gluing the final assembly shut, leave the pots unglued from the saucers so you can lift them off and hide spare keys or small items inside.
Step 3: Assembly and Decoration
-
Attach the base:
Place the largest saucer face up. Apply strong adhesive (like E6000) to the rim of the largest inverted pot and press it firmly into the center of the saucer. -
Add the first rim:
Gluing the pieces securely is key. Glue the medium-sized saucer (rim side down) onto the flat bottom of the large inverted pot. -
Stack the middle pot:
Glue the medium inverted pot onto that saucer. Repeat this process with the next saucer and the smallest pot until your tower is built. -
Attach the light room:
Glue the painted white jar onto the flat top of the smallest, highest pot. -
Finish the roof:
Glue the silver bead to the center of the blue roof saucer, then glue the entire roof assembly onto the top of the white jar. -
Apply the icons:
Using hot glue for an instant hold, attach the silver stars randomly around the tier levels. Place the navy anchor prominently on the bottom tier.
Place your new nautical creation near an entryway to welcome guests with seaside style
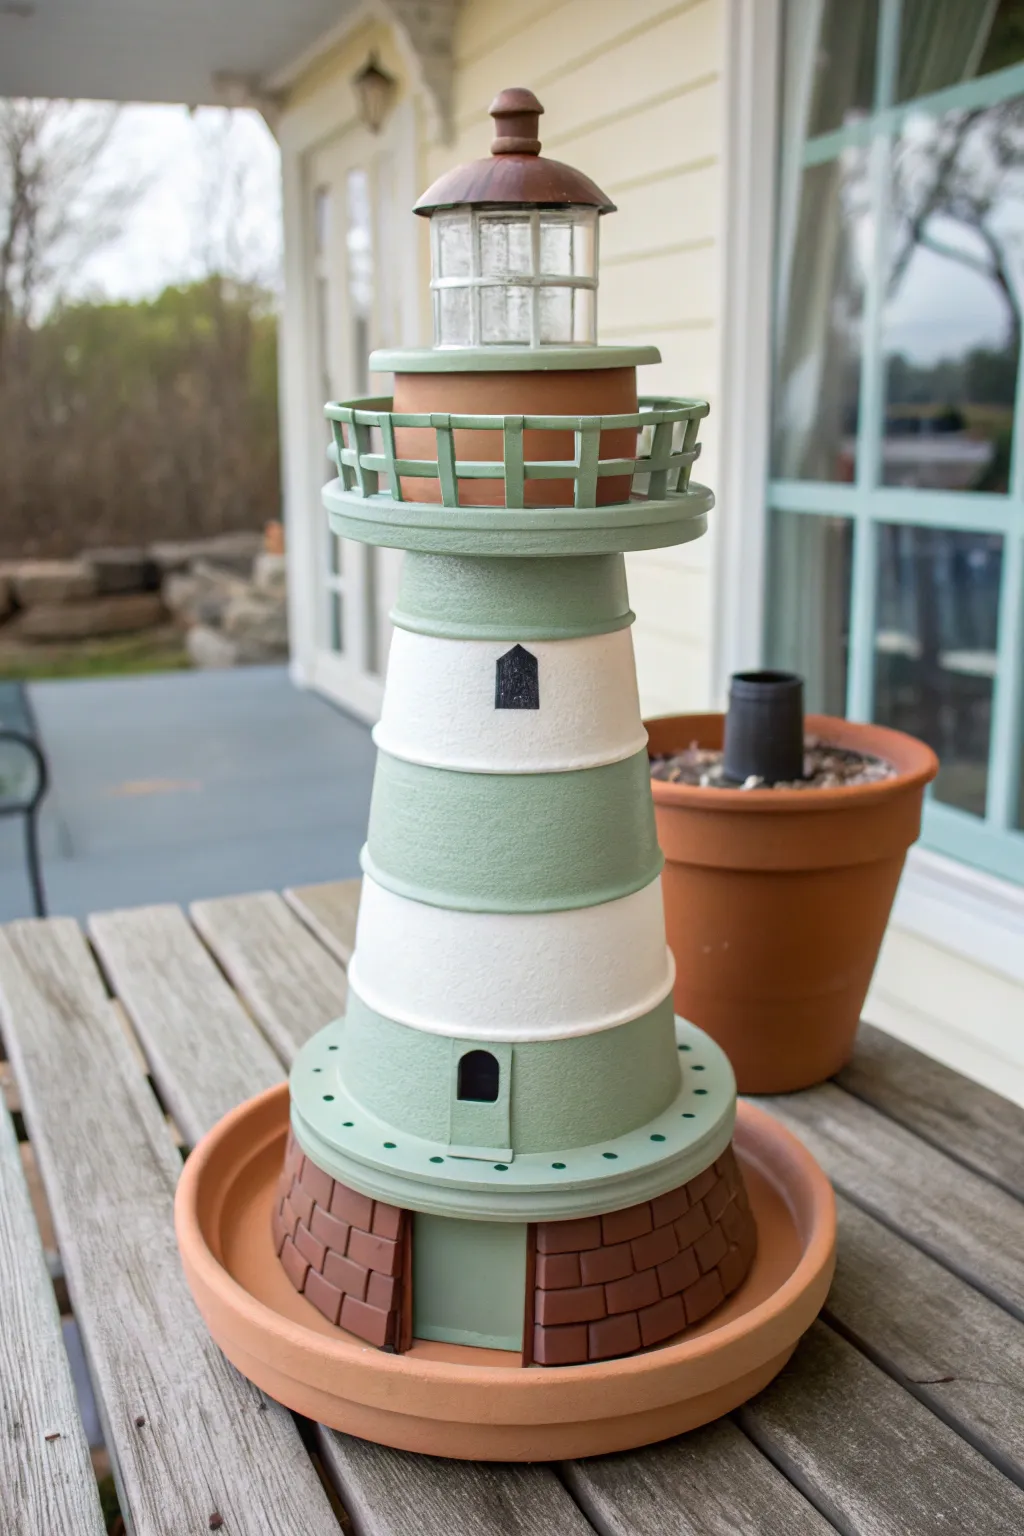
Seaside Color Palette Lighthouse
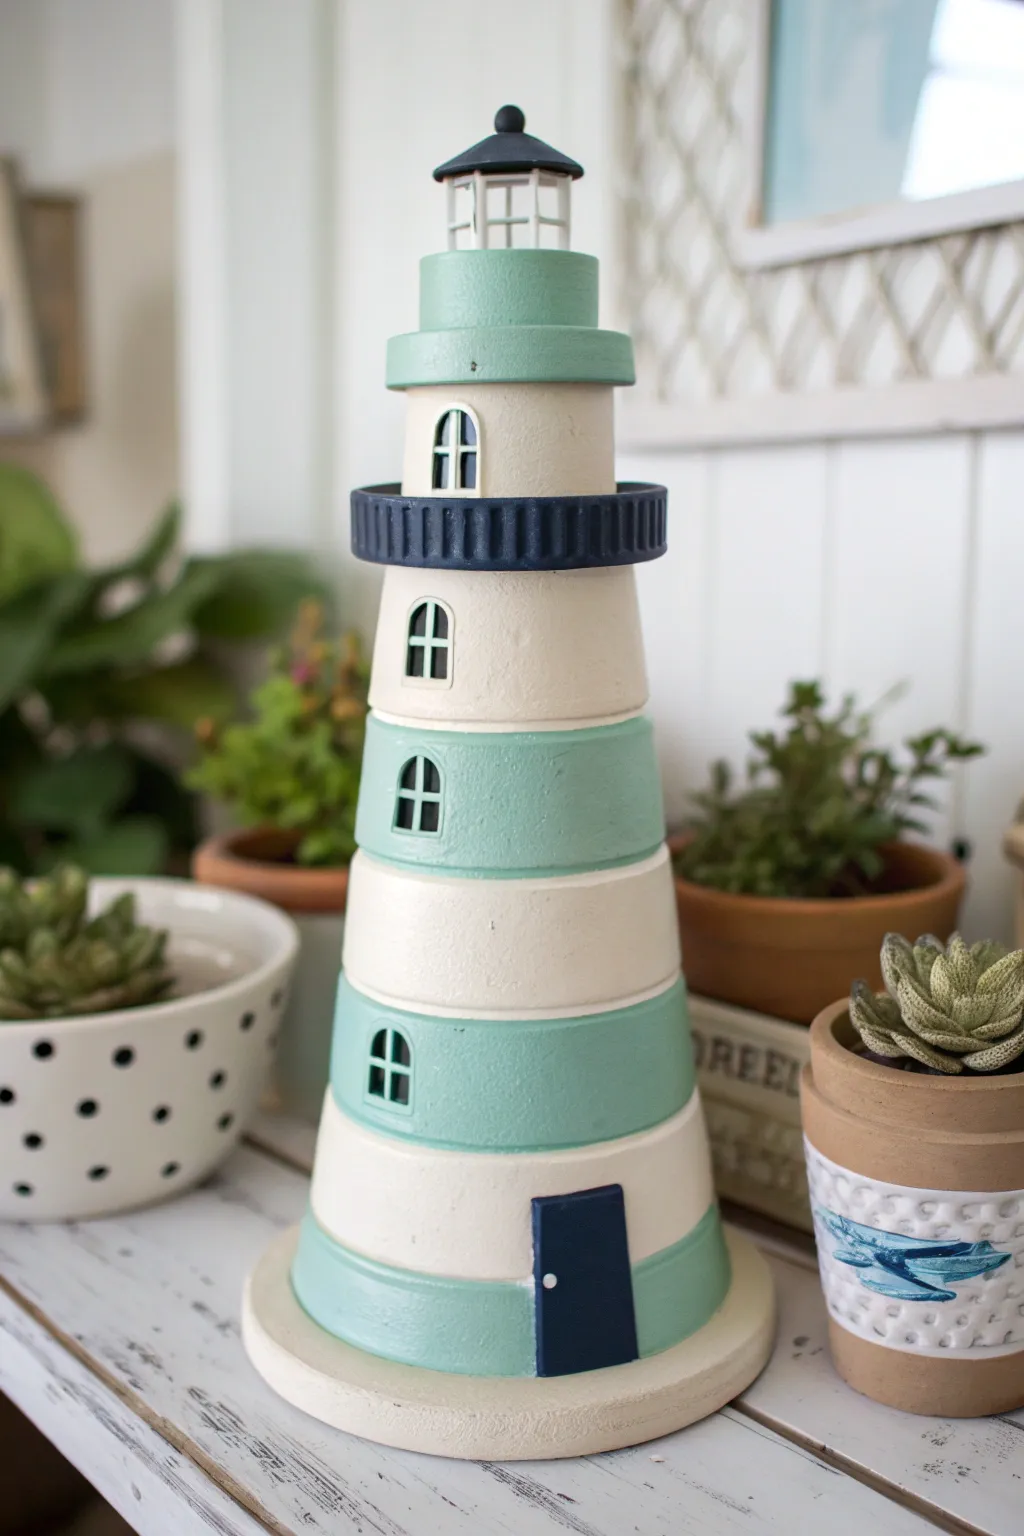
Bring the calming vibes of the coast into your home with this charming stacked pot lighthouse featuring a soft, beachy color palette. The combination of minty seafoam green, creamy white, and navy blue creates a sophisticated nautical look that feels fresh rather than kitschy.
Step-by-Step
Materials
- 3 terra cotta pots (graduated sizes to stack, e.g., 6″, 5″, 4″)
- 2 small terra cotta saucers (one slightly larger for the balcony, one smaller for the top)
- 1 large terra cotta saucer (for the base)
- Small glass votive holder or baby food jar (for the light room)
- Wooden knob or finial
- Outdoor acrylic paints: Seafoam Green, Cream/Off-White, Navy Blue, Black
- Strong adhesive (E6000 or construction adhesive)
- Painter’s tape
- Flat paint brushes (medium and fine tip)
- Small piece of foam or wood (for the door)
- Small white bead (for the doorknob)
Step 1: Base Coat & Prep
-
Clean the pots:
Before starting, wipe down all your terra cotta pots and saucers with a damp cloth to remove any dust or debris. Let them dry completely. -
Prime the surface:
Apply a base coat of white primer or your cream acrylic paint to all the pots and saucers. This seals the clay and ensures your final colors pop, especially the light seafoam green.
Step 2: Painting the Tower
-
Paint the rims:
On all three main pots, paint the thick rim (the lip) with your Seafoam Green paint. This creates the distinctive striped look when they are stacked. -
Paint the bodies:
Paint the body of the largest (bottom) and smallest (top) pots in Cream/Off-White. -
Create the middle stripe:
For the middle-sized pot, reverse the pattern: paint the body Seafoam Green and the rim Cream/Off-White. This alternating pattern adds visual interest. -
Paint the base:
Take the largest saucer (the base) and paint the bottom rim Seafoam Green. Paint the flat top surface Cream/Off-White. -
Detail the balcony:
Take the larger of the two small saucers (which will be the balcony). Paint the entire saucer Navy Blue. I like to use a second coat here to get a really deep, rich color. -
Create the lantern top:
Paint the smallest saucer Seafoam Green. Paint the wooden knob or finial Navy Blue to match the balcony. -
Dry time:
Allow all painted pieces to dry fully, ideally overnight, before assembly.
Crisp Stripes Tip
For perfectly straight lines between the rims and bodies, use painter’s tape or a large rubber band as a guide while painting.
Step 3: Adding Details
-
Paint the windows:
Using a fine-tip brush and black paint, add arched windows to each pot level. Paint a simple arch shape first. -
Window frames:
Once the black paint is dry, use a very fine brush or a white paint pen to draw the window panes—a simple cross shape works perfectly for this scale. -
Balcony railing:
The image shows a textured railing. You can simulate this by painting small vertical ticks or lines in a lighter blue or grey along the Navy Blue saucer rim, or by gluing on small craft sticks if you want 3D texture. -
Make the door:
Paint your small foam or wood rectangle Navy Blue. Once dry, glue the small white bead on as a doorknob.
Wobbly Tower?
If pots don’t sit flat, check for clay bumps. Sand rim edges lightly with coarse sandpaper before gluing for a flush fit.
Step 4: Assembly
-
Stack the tower:
Apply adhesive to the bottom rim of the largest pot and press it onto the center of the large base saucer. -
Secure the levels:
Apply adhesive to the top (now flat bottom) of the large pot. Place the middle pot on top. Repeat for the smallest pot. -
Attach the balcony:
Invert the painted Navy Blue saucer and glue it centered on top of the smallest pot. -
Add the lantern room:
Glue your small glass votive holder or jar onto the Navy Blue saucer. You can paint grid lines on the glass first for a realistic window effect. -
Top it off:
Glue the smallest Seafoam Green saucer (inverted) on top of the glass jar, then glue the Navy Blue finial on the very top. -
Install the door:
Finally, glue your prepared door to the bottom rim of the lowest pot.
Place your lighthouse in a sunny spot or garden nook to enjoy its coastal charm all year round
Bright Retro Color Pop Lighthouse
Bring a splash of vintage seaside charm to your windowsill with this terra cotta lighthouse. Featuring bold bands of teal, coral, and yellow, this project transforms ordinary garden pots into a whimsical nautical beacon perfect for holding a tea light.
Step-by-Step Tutorial
Materials
- 3 terra cotta pots (graduated sizes, e.g., 4″, 3″, 2″)
- 1 terra cotta saucer (slightly larger than base pot)
- 1 small terra cotta saucer (for the top dome base)
- 1 small terra cotta bowl or rounded saucer (for the dome)
- Small wooden knob or finial
- Acrylic craft paints: teal/aquamarine, coral red, sunshine yellow, bright white
- Strong craft adhesive (E6000 or similar)
- Textured paste or thick primer (optional for stone effect)
- Flat paintbrushes (medium and small)
- Detail brush
- Rough twine or small rope
- Cardboard or thin wood strip (for the railing)
- Drill with masonry bit (optional for windows)
- Sandpaper
Step 1: Preparation and Stacking
-
Prepare the surface:
Begin by wiping down all your terra cotta pieces with a damp cloth to remove any pottery dust. If there are rough edges or price stickers, sand them down gently. -
Test the stack:
Invert your three pots and stack them from largest (bottom) to smallest (top) to check the fit. If they wobble, you might need to sand the rims slightly flat. -
Secure the base:
Glue the largest pot upside down onto the center of the large base saucer using strong adhesive. Let this set for a few minutes to establish a solid foundation. -
Build the tower:
Apply glue to the rim of the upside-down base pot and place the medium pot upside down on top of it. Repeat with the smallest pot on top to form the lighthouse profile.
Textured Finish Tip
To get that matte, chalky finish seen in the photo, mix a tablespoon of calcium carbonate powder or unsanded grout into your acrylic paints before applying.
Step 2: Painting the Bands
-
Base coat:
For that slightly textured, weathered look, I like to mix a tiny bit of baking soda into white acrylic paint. Coat the entire tower structure in white and let it dry completely. -
Map the stripes:
Lightly mark horizontal rings around the tower using a pencil. You want distinct sections: a base band, a yellow band, a red band, a white band, a teal band, and another white/red section near the top. -
Paint the yellow band:
Paint the second section from the bottom in a bright sunshine yellow. You may need two coats for vibrancy. -
Add the coral red:
Apply the coral red paint to the large middle section just above the yellow, and the lower section of the top pot. Keep your edges relatively clean, but a little hand-painted wobble adds charm. -
Apply the teal:
Paint the upper section of the middle pot and the very top rim section in the teal/aquamarine shade. -
Create the door:
At the very bottom of the white base section, paint a small arch shape using the teal paint to represent the entrance door. Use a detail brush to add vertical lines for wood planks. -
Add windows:
Using black or dark grey paint and a fine brush, paint small rectangular or circular windows on the colored bands. The example shows two small vertical circles on the teal band.
Level Up: Solar Power
Before gluing the dome on, place a small solar landscaping light insert inside the top pot. The light will shine through the painted windows at night.
Step 3: Creating the Lantern Room
-
Assemble the top:
Glue the small terra cotta bowl upside down onto the small saucer. Glue the wooden knob to the very top center of the bowl. -
Paint the dome:
Paint this entire dome assembly in a natural terra cotta color, or use a mix of orange and brown to mimic unglazed clay if yours is already glazed. -
Drill vent holes (optional):
If you have the tools and skill, carefully drill small holes in the dome for light to escape. Otherwise, paint small black dots to simulate vents. -
Paint the lantern glass:
Paint the vertical rim of the saucer (or the top pot rim) in teal. Add black squares to represent the glass panes of the lantern room.
Step 4: Final Details
-
Construct the railing:
Cut a strip of cardboard or thin balsa wood that wraps around the top of the tower stack. Glue small vertical snippets of twine or wood to it to create a ‘fence’ look. -
Attach the railing:
Glue this railing assembly around the top rim of the highest pot, just below where the dome will sit. Paint it a weathered beige or grey to look like driftwood. -
Attach the dome:
Glue the painted dome assembly securely onto the top of the tower. -
Weathering:
Using a very dry brush with a tiny amount of grey paint, lightly whisk over the colorful bands to give the lighthouse a sun-bleached, vintage texture.
Place your colorful creation near a sunny window or on a porch step to guide weary travelers home.
Mini Lighthouse Set for Planters

Transform stacking terracotta pots into a charming nautical scene perfect for succulent planters. These miniature lighthouses use simple painted stripes and clever wire details to bring a breezy coastal vibe to your indoor garden.
Detailed Instructions
Materials
- Miniature terracotta pots (various sizes for stacking)
- Small terracotta saucers (to fit inverted on top pots)
- Strong craft glue or construction adhesive (E6000 recommended)
- Acrylic paint: White and a color matching the terracotta (reddish-brown)
- Small flat paintbrush
- Fine liner paintbrush
- Thin crafting wire (silver or white)
- Jute twine
- Small wooden craft sticks or balsa wood scraps
- Sandpaper (fine grit)
- Scissors and wire cutters
Step 1: Planning and Assembly
-
Select your stacks:
Begin by arranging your mini pots into stacks of two or three to create the tapered lighthouse shape. Ensure the bottom of the smallest pot sits flush against the bottom of the pot beneath it when inverted. -
Clean surface:
Wipe down all pots with a damp cloth to remove any clay dust or residue, ensuring a clean surface for the glue and paint to adhere to. -
Glue the tower:
Apply a ring of strong adhesive to the bottom rim of the base pot and stack the next size up (inverted) on top of it. Repeat until your tower is built. Let this cure completely. -
Add the lantern room:
Glue a small inverted terra cotta saucer to the very top of the stack to act as the roof of the lantern room. You can also glue a tiny wooden bead or clay ball to the center of the saucer for a finial.
Step 2: Painting the Details
-
Mark the stripes:
Using a pencil, lightly sketch horizontal rings around the tower to mark where your white stripes will go. Following the natural ridges of the pots makes this much easier. -
Paint the white bands:
Use a flat brush to paint the designated stripes white. You may need two coats to get solid coverage over the dark clay. Keep the edges relatively neat, but a distressed look adds charm. -
Touch up the red:
If you want a cleaner look, use terracotta-colored paint to tidy up the unpainted sections, or simply leave the natural clay exposed for a rustic texture. -
Create the windows:
With a fine liner brush and white paint, draw small arched window shapes on the terracotta-colored sections. Add internal grid lines once the white outline is dry. -
Paint the lantern glass:
On the very top section under the saucer roof, paint vertical white lines to simulate the glass panes of the light room.
Uneven Stripes?
If painting freehand is difficult, place rubber bands around the pots to act as flexible painter’s tape guides for perfectly straight horizontal lines.
Step 3: Adding Dimension
-
Fashion the doors:
Cut small arched shapes from craft sticks or balsa wood to serve as doors. I like to draw vertical wood grain lines on them with a pencil or beige paint for realism. -
Attach the doors:
Glue the wooden doors to the base of each lighthouse. For extra detail, outline the door arch with white paint to mimic a door frame. -
Create the railing:
Cut a length of thin crafting wire. Wrap it around the ‘neck’ of the lighthouse (just below the top roof section) to measure the circumference. -
Form the railing supports:
Cut tiny vertical pieces of wire (about 1/4 inch) and glue them upright around the top platform ledge. -
Attach the top rail:
Glue your circular wire loop on top of the vertical supports to complete the safety railing look. This requires patience and a steady hand. -
Add decorative twine:
For a nautical touch, wrap jute twine loosely around the upper section of the largest lighthouse and tie a simple bow. -
Final weathering:
Optionally, lightly sand the white painted areas to scuff them up, making the lighthouses look weather-beaten and authentic.
Level Up: Night Light
Before gluing, place a small battery-operated LED tea light inside the top pot. Leave the roof unglued so you can access the switch for a real glowing beacon.
Nestle your finished towers into a bowl of sand and succulents to complete your tiny coastal landscape
Extra-Tall Lighthouse Using More Pots
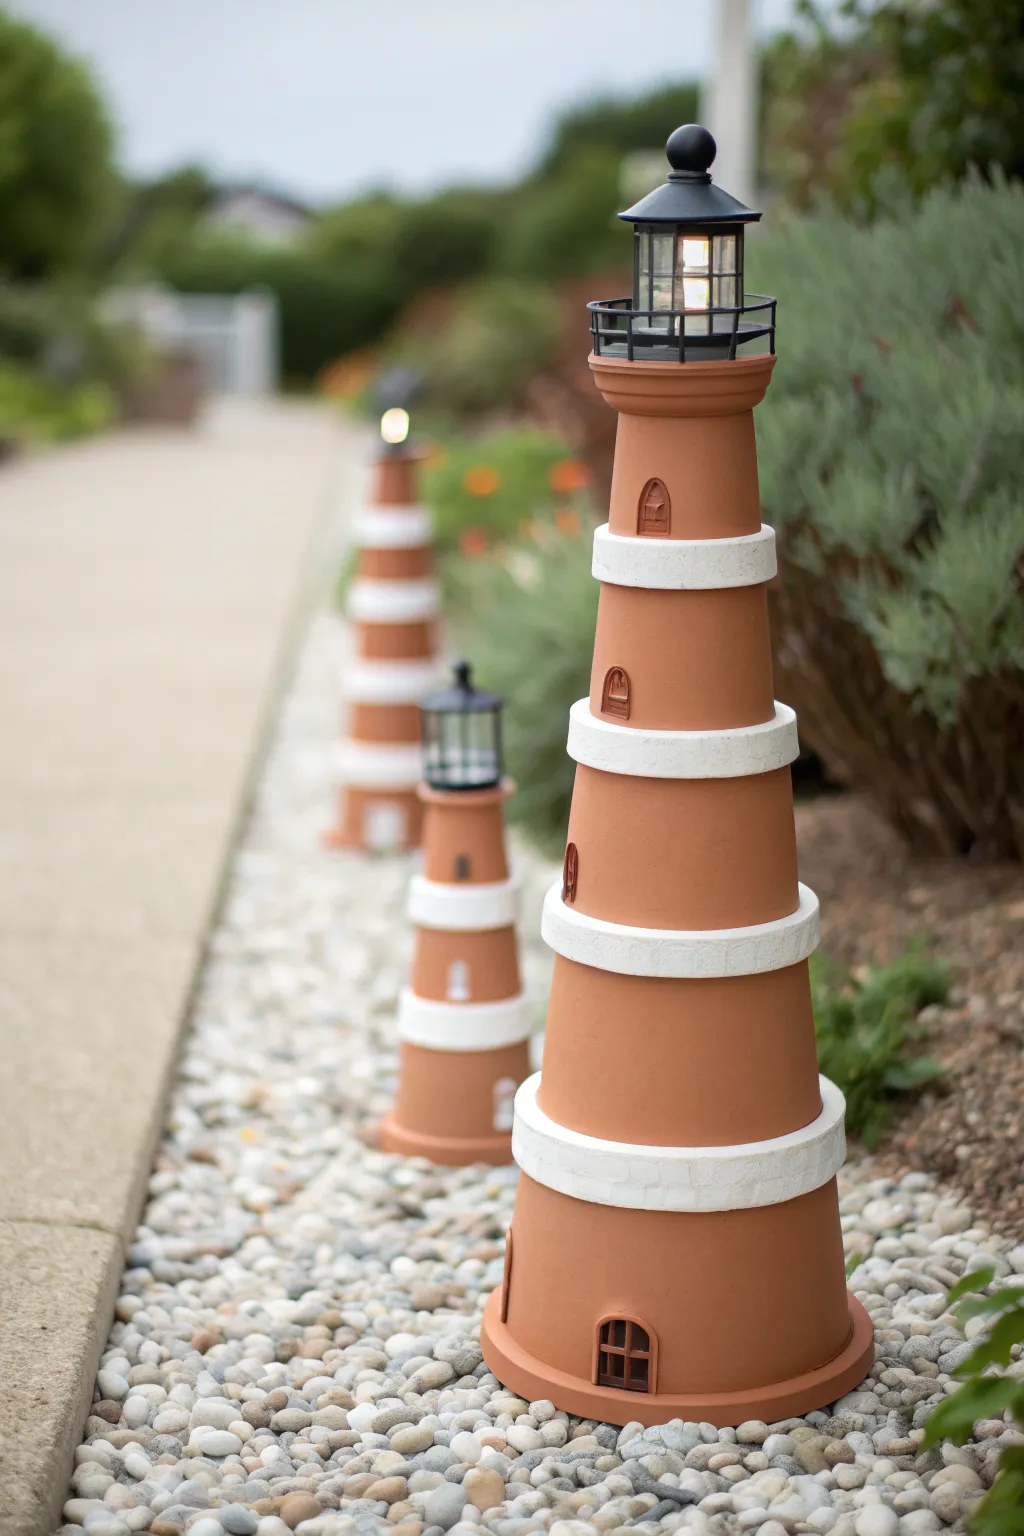
Elevate your garden decor quite literally with this impressive extra-tall lighthouse design completely made from standard terracotta pots. By stacking five graduated pots instead of the usual three or four, you create a striking focal point that stands tall among flower beds or along a pebble pathway.
Step-by-Step Tutorial
Materials
- 5 terracotta pots in graduated sizes (e.g., 14″, 12″, 10″, 8″, 6″)
- 4 terracotta saucers (sized to fit between the pots)
- Strong construction adhesive (e.g., E6000 or Liquid Nails)
- Outdoor craft paint (Terra Cotta/Burnt Orange)
- Outdoor craft paint (White/Cream)
- Textured stone spray paint (optional, for rims)
- Painter’s tape
- Solar pathway light (stake removed)
- Small decorative windows (plastic dollhouse pieces or clay)
- Clear outdoor sealant spray
- Sandpaper
Step 1: Preparing the Base Structure
-
Clean and test stack:
Begin by thoroughly scrubbing all your pots and saucers to remove any dust or sticker residue. Let them dry completely. I like to do a distinct ‘dry run’ stack first just to ensure the proportions look right and the saucers sit flush between the tiered pots before any glue touches the clay. -
Glue the base tiers:
Turn your largest pot upside down. Apply a generous ring of construction adhesive around the bottom (now the top) rim. Place the largest saucer upside down onto this rim, pressing firmly to bond. -
Build the tower:
Repeat this process, moving upward. Apply glue to the bottom of the second-largest pot and adhere it to the saucer you just placed. Continue stacking upside-down pots and upside-down saucers in alternating fashion until you reach the fourth tier. -
Add the crown:
For the fifth and final pot at the very top, you may not need a saucer underneath depending on fit, but ensure it is glued securely to the pot below. This topmost pot will hold your light fixture. -
Allow to cure:
This tower is heavy and needs structural integrity. Let the adhesive cure for at least 24 hours in a dry, calm spot where it won’t be bumped.
Stability Pro-Tip
For windy areas, run a piece of threaded rod through the drainage holes of all pots, securing bottom & top with washers and nuts.
Step 2: Painting and Detailing
-
Establish the main color:
Even though the pots are already terracotta, painting them with a fresh coat of burnt orange or terracotta outdoor paint gives the piece a uniform, clean look that hides glue seams. Paint the main body of all five pots, avoiding the saucer rims. -
Texture the rims:
To mimic the textured white bands seen in the photo, you have two options. You can paint the saucer rims with a textured stone spray paint in cream, or dab thick white acrylic paint on with a sponge to create a stucco effect. Apply two coats for opacity. -
Install the lantern:
Take your solar pathway light and remove the ground stake. If the top hole of your smallest pot is too large, use a large washer or a small glued saucer to create a platform. Glue the lantern housing to the very top of the lighthouse. -
Add the railing:
For the black railing detail around the light, you can repurpose a small wire plant stand, stripped wire, or a plastic jar lid painted black with the center cut out. Adhere this around the base of the lantern. -
Attach windows:
Plan the placement of your windows. They should spiral up the tower or alternate sides. Glue small dollhouse windows or sculpted clay rectangles painted black onto the pots. -
Seal the project:
Once all paint and glue is dry, spray the entire structure with a clear, UV-resistant outdoor sealer. This protects your color from fading and helps the clay resist water damage. -
Final placement:
Move the lighthouse to its final spot in your garden. Because it is tall and top-heavy, consider burying the bottom inch of the base in gravel or soil to add stability against the wind.
Level Up: Coastal Charm
Wrap thin jute rope around where the pots meet the saucers before painting the rims for an added nautical texture.
Watch your garden transform as this towering beacon begins to glow automatically when the sun goes down
Bird Feeder Lighthouse Base Tray
Transform ordinary terracotta pots into a charming seaside beacon that doubles as a functional bird feeder. This project stacks pots into a classic lighthouse shape complete with a lantern top and a convenient seed tray base.
Step-by-Step
Materials
- 3 Terracotta pots of graduating sizes (small, medium, large)
- 2 small terracotta saucers (one fitting the smallest pot, one larger for the top rim)
- 1 large terracotta saucer (for the base)
- Small glass votive holder or jar (for the lantern)
- Strong outdoor adhesive (e.g., E6000 or construction adhesive)
- White outdoor acrylic paint
- Navy blue outdoor acrylic paint
- Terracotta or rust-colored paint (optional for roof)
- Small wooden finial or knob
- Painter’s tape
- Paintbrushes (flat wide brush and small detail brush)
- Black permanent marker or paint pen
- Birdseed
- Small bowl or ramekin (optional seed dish)
- Pea gravel or small stones
Step 1: Preparation and Base Coat
-
Clean the pots:
Begin by thoroughly wiping down all terracotta pots and saucers with a damp cloth to remove any dust or sticker residue. Let them dry completely, as moisture will prevent the paint from adhering properly. -
Stack for visualization:
Before gluing, stack your three pots upside down from largest to smallest to ensure they fit together nicely. Place the largest saucer under the bottom pot to check the spacing for the bird feeder tray. -
Paint the base white:
Apply a coat of white outdoor acrylic paint to the exterior of all three pots and the rim of the large base saucer. You will likely need 2-3 coats for solid coverage, allowing about 20 minutes of drying time between layers. -
Paint the lantern roof:
Take the smallest saucer that will serve as the lighthouse roof and the wooden finial. Paint these in a contrasting terracotta or copper color to mimic a metal roof.
Step 2: Creating the Nautical Stripes
-
Tape the top section:
Once the white paint is fully cured, use painter’s tape to mark off the area for the navy blue rim on the top pot. Press the edges of the tape down firmly to prevent bleed-through. -
Mark the body stripes:
On the main body (the stacked pots), decide where you want your navy stripes. I find using a pencil to lightly mark the lines helps keep things straight before applying the tape. -
Apply tape for stripes:
Wrap painter’s tape around the pots to mask off the white areas. Typically, the rims of the pots make natural dividing lines for your stripes. -
Paint the navy layers:
Using a flat brush, apply the navy blue paint to the exposed areas. Use smooth, horizontal strokes. Apply a second coat if the color looks streaky. -
Remove tape carefully:
While the blue paint is still slightly tacky (not completely dry, but not wet), carefully peel off the painter’s tape at a 45-degree angle to reveal crisp lines.
Sticky Situation?
If your pots slide around while the glue sets, use masking tape to hold the stacked sections in place temporarily until the adhesive fully cures.
Step 3: Assembly and Detailing
-
Detail the door and windows:
Using a small detail brush and navy paint, create a small arch shape at the bottom of the largest pot to simulate a door. Paint small arched windows on the middle and upper sections. -
Add window panes:
Once the blue window shapes are dry, you can use a fine white paint pen or a very small brush to add a cross-hatch pattern for window panes. -
Decorate the railing:
On the saucer that sits beneath the glass lantern, add small dots of brown or copper paint around the white rim to simulate rivets or railing details. -
Glue the main tower:
Apply a strong outdoor adhesive to the bottom rim of the smallest pot and press it onto the bottom of the middle pot. Repeat to attach the middle pot to the largest pot. Let this cure according to glue instructions. -
Attach the tower to the tray:
Center the assembled tower onto the large base saucer. Apply a generous amount of adhesive to the bottom rim of the tower and press it firmly into the center of the saucer. -
Construct the lantern room:
Glue the small glass votive holder to the top of the tower. Then, glue the painted small saucer (roof) onto the glass. Finally, attach the wooden finial to the very top. -
Add the lantern grid:
To mimic the metal cage of a lighthouse light, cut thin strips of black electrical tape or use a black paint pen to draw vertical lines on the glass votive holder.
Solar Flare Up
Swap the glass votive holder for a small, inexpensive solar path light. Remove the stake and glue the light on top for a real working beacon at night.
Step 4: Final Touches
-
Fill the tray:
Pour small pea gravel or decorative stones into the large saucer around the base of the lighthouse. This adds stability and creates a finished look. -
Add a seed bowl:
Place a small white ceramic bowl or ramekin filled with seeds onto the gravel, or scatter seeds directly onto the stones if you prefer. -
Seal the project:
To protect your hard work from the elements, spray the entire painted surface with a clear UV-resistant outdoor sealer.
Place your new lighthouse in a sunny spot in the garden and watch for the first feathery visitors to arrive
Hanging Lighthouse Feeder Version
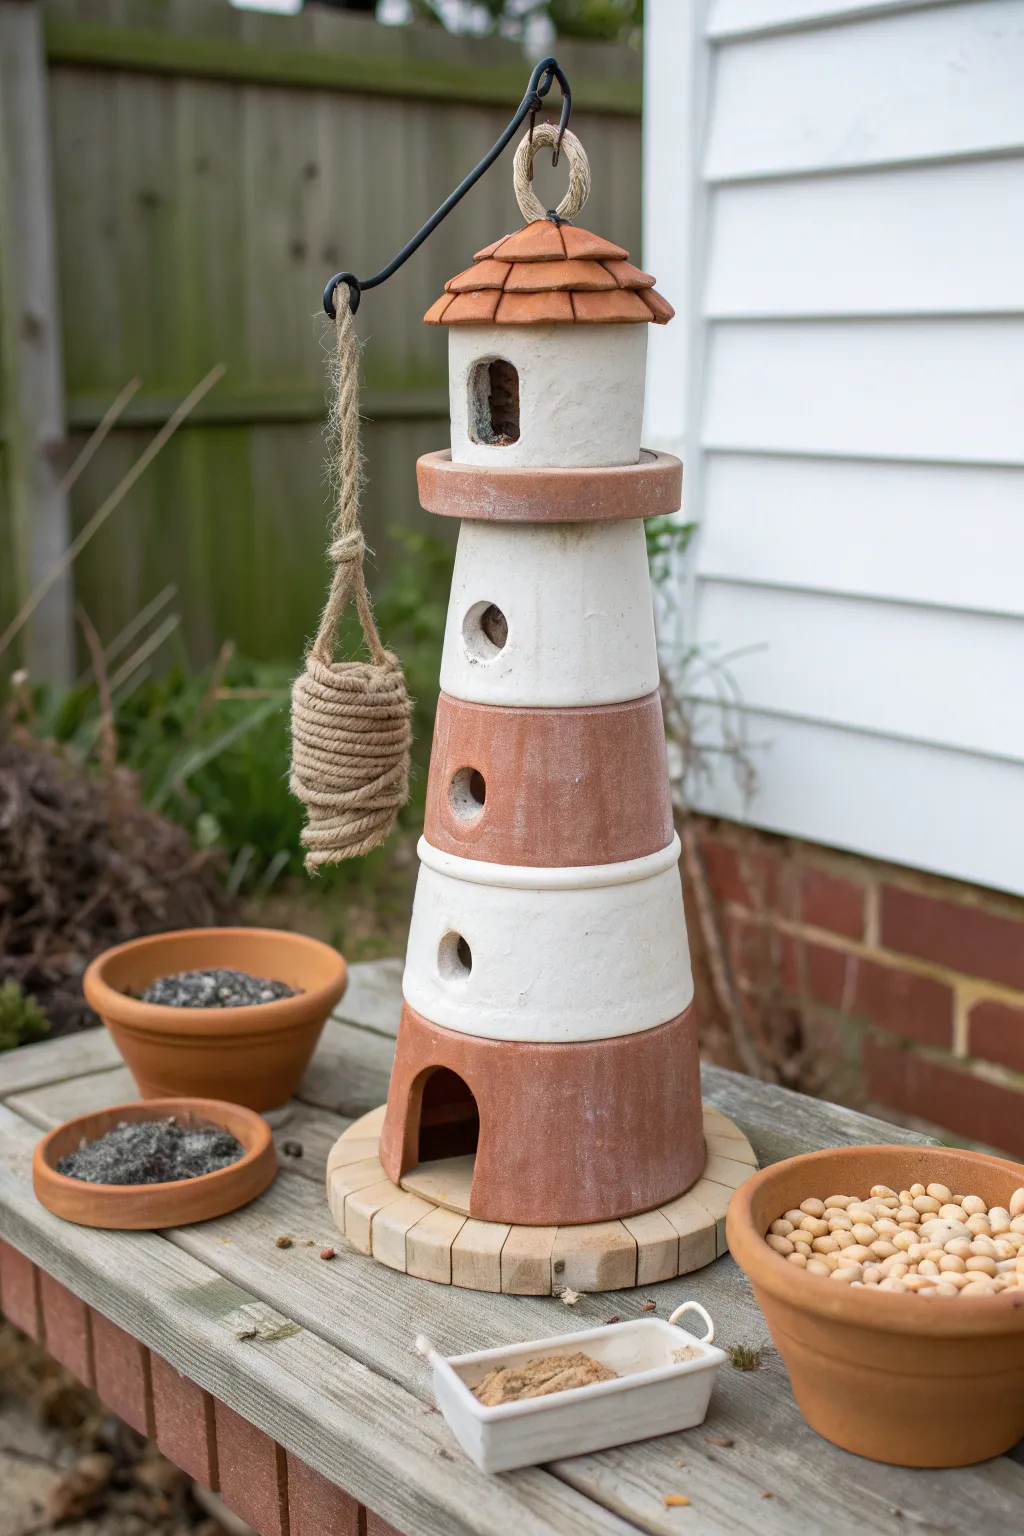
This charming nautical project combines the classic stacked pot lighthouse aesthetic with a functional bird feeder twist. By incorporating a hanging rope knot and multiple feeding ports, you create a delightful garden sculpture that local birds will love to visit.
Step-by-Step Tutorial
Materials
- 4 terracotta pots (graduated sizes: large base, medium, small, extra small)
- 2 terracotta saucers (one for the base platform, one for the roof brim)
- 1 very small terracotta pot (for the lantern)
- Small terracotta tiles or shingles
- White exterior acrylic paint
- Strong outdoor adhesive (E6000 or construction adhesive)
- Thick jute rope or manila rope
- Black metal wire or a pre-made hanging rod hook
- Drill with masonry bits (various sizes)
- Round file or sandpaper
- Small wooden rectangular tray (optional, for feeder base)
- Bird seed
Step 1: Preparing the Base Structure
-
Select your stack:
Begin by dry-stacking your four main pots upside down to ensure the proportions look right. You want a smooth, tapered lighthouse shape where each pot rests securely on the base of the one below it. -
Mark the doorways:
Using a pencil, mark where you intend to cut the holes. On the bottom-most pot (the largest one), draw an arch for the main door. On the upper pots, mark circular holes for the bird feeding ports. -
Drill the entrance arch:
Carefully drill a series of small holes along your arched line on the bottom pot. Use a larger masonry bit to gently tap out the center piece, or use a rotary tool with a cutting disc to slice along the line. -
Create the windows:
For the circular windows on the middle and upper pots, use a large diamond-coated hole saw bit. Go very slowly and keep the clay wet to prevent cracking. -
Smooth the edges:
Once your holes are cut, the edges will be sharp. Use a round file or coarse sandpaper to smooth out the door arch and the circular windows so birds can land safely without snagging their feathers.
Drilling Safety
Terracotta breaks easily. Apply masking tape over the area you plan to drill to prevent the bit from slipping, and don’t apply heavy pressure.
Step 2: Painting and Assembly
-
Paint the white sections:
Paint the second and fourth pots (counting from the bottom up) with white exterior paint. I prefer to leave the alternating pots and the rims in their natural terracotta color for that classic striped look. -
Distress the paint (optional):
If you want the weathered look shown in the photo, wipe away some of the wet paint with a rag or lightly sand it after drying to let hints of the clay show through. -
Construct the main tower:
Apply a generous bead of outdoor adhesive to the bottom rim of the second pot and press it onto the base of the largest pot. Repeat this stacking process for all four main body pots. -
Add the walkway:
Take a terracotta saucer that is slightly larger than the top of your tower stack. Glue it upside down onto the top of the highest pot to create the lighthouse walkway. -
Create the lantern room:
Glue your smallest pot (painted white) onto the center of the saucer walkway. Ensure you have cut a small window into this pot beforehand if you want it to match the rest of the tower. -
Build the roof:
For the roof, use a small saucer inverted over the lantern room pot. To create the tiled effect, glue small semicircular terracotta chips or miniature shingles in overlapping rows starting from the bottom edge. -
Attach the base platform:
Glue the entire lighthouse structure onto a large, sturdy wooden round or a large inverted saucer to give it stability and a place for seed to catch.
Step 3: Rigging the Hanging Rope
-
Install the hanger arm:
Drill a very small hole into the side of the lantern room (the top white pot) or wedge a black wire hook into the top drainage hole before sealing the roof. Secure it with epoxy so it acts as a crane arm. -
Tie the bell knot:
Take a length of thick jute rope and tie a ‘monkey’s fist’ knot or a simple heavy coil at one end to create the hanging weight. -
Attach the rope:
Loop the other end of the rope onto your metal hook arm. The rope should hang down alongside the tower, adding a nautical touch and giving smaller birds another place to perch. -
Add the top loop:
Thread a smaller loop of rope through the very top of the roof structure if you wish to hang the entire lighthouse, or simply use the top loop as a decorative finial. -
Final cure:
Allow all glues and paints to cure for at least 24 hours in a dry place before moving the lighthouse outdoors. -
Fill with seed:
Pour birdseed into the saucer base and place small bowls of feed nearby. You can also sprinkle seed inside the window holes if the internal structure allows.
Pro Tip: Weatherproofing
Spray the finished piece with a clear matte UV-resistant sealer. This protects the paint from fading and prevents the clay from absorbing moisture.
Set up your nautical creation near a window and enjoy watching your feathered friends navigate the lighthouse!
Poolside Nautical Lighthouse Decor
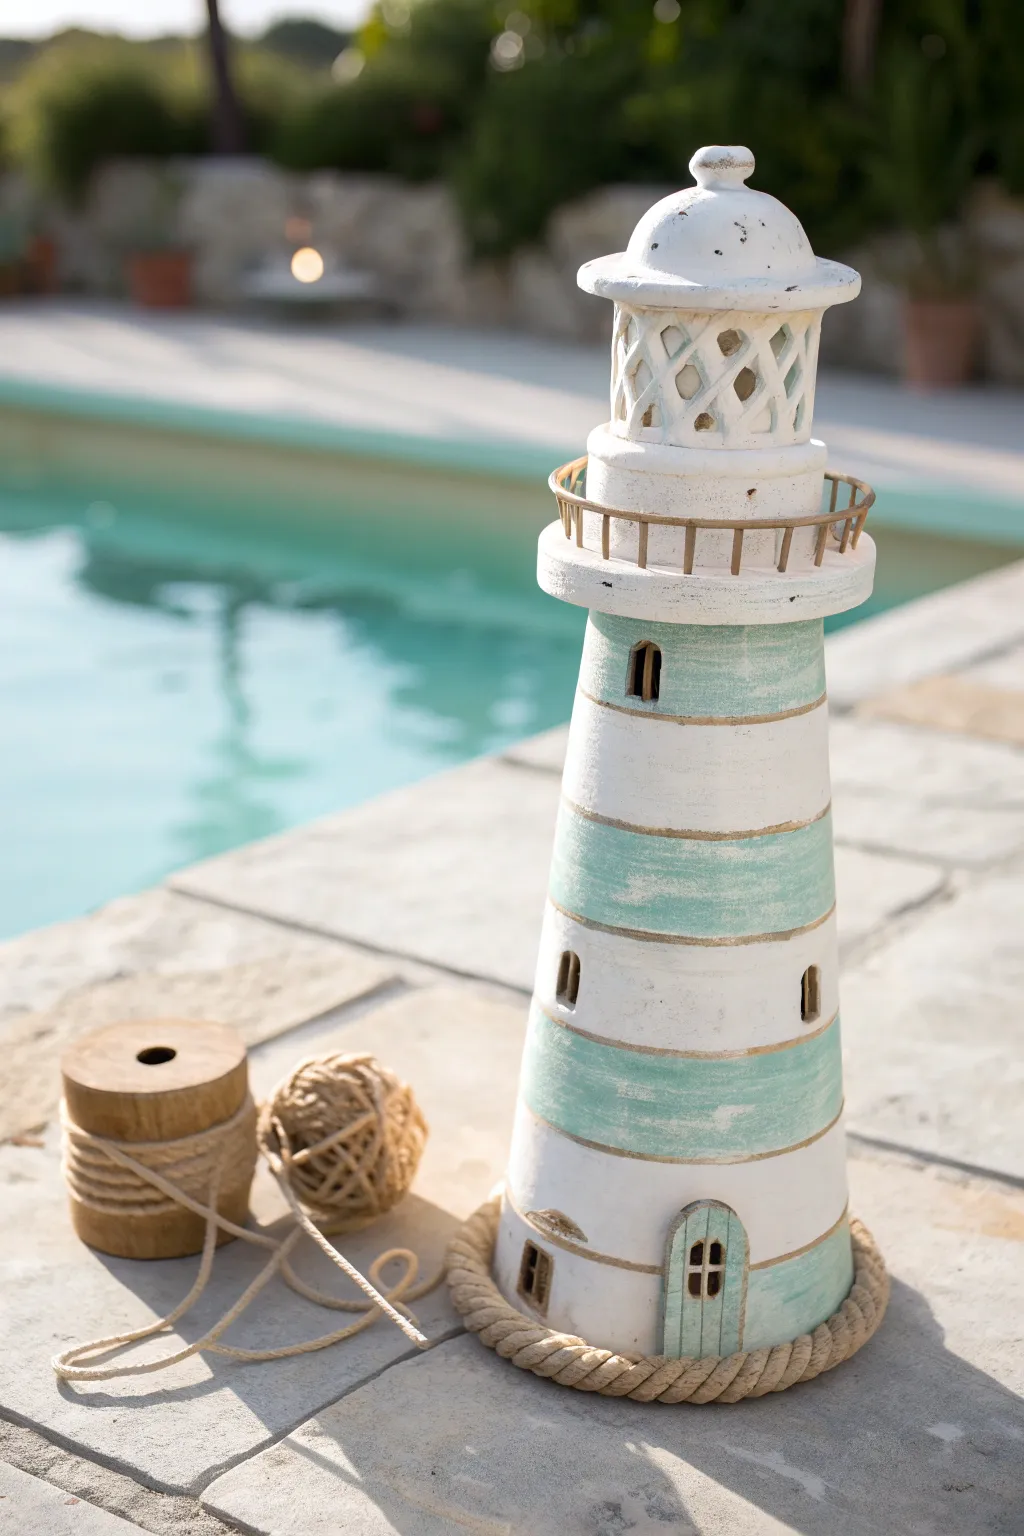
Bring the calming vibes of the coast to your backyard with this elegant stacked clay pot lighthouse. Featuring a soft teal and white palette with rustic gold accents, this piece creates a charming poolside focal point.
How-To Guide
Materials
- 3 Terra cotta pots (graduated sizes: large, medium, small)
- 2 Terra cotta saucers (one slightly larger than the medium pot rim, one small for the top)
- Small glass jar or votive holder (for the light room)
- White acrylic craft paint
- Teal or aqua acrylic craft paint (chalk finish works well)
- Gold metallic paint
- Construction adhesive (e.g., E6000 or Liquid Nails)
- Thick jute rope (approx. 1 inch diameter)
- Thin floral wire or gold craft wire
- Small wooden craft knob or round bead
- Sandpaper (medium grit)
- Paintbrushes (various sizes)
- Low-temp hot glue gun and glue sticks
Step 1: Preparing the Base Structure
-
Clean and stack:
Begin by wiping down all terra cotta pots and saucers to remove any dust or oils, ensuring the paint adheres properly later. -
Initial assembly:
Flip the largest pot upside down to serve as the base. Apply a strong construction adhesive to the bottom rim (now facing up) and center the medium pot upside down on top of it. -
Building the tower:
Repeat the process by gluing the smallest pot upside down onto the medium pot. This creates your tapered lighthouse tower shape. -
Adding the walkway:
Glue the larger terra cotta saucer (right side up) onto the top of the smallest pot. This will act as the balcony or walkway area. -
Creating the lantern room:
Center your small glass jar or votive holder on the saucer and secure it with adhesive. Top it off with the smallest saucer turned upside down to form the roof. -
Finishing the cap:
Glue a small wooden knob or round bead to the very top center of the roof saucer for a decorative finial touch.
Rustic Texture Trick
Mix a teaspoon of baking soda into your white paint before applying. This creates a gritty, stone-like texture that looks authentic and aged.
Step 2: Painting and Distressing
-
Base coat application:
Paint the entire structure with two coats of white acrylic paint. Let the first coat dry completely before applying the second to ensure solid coverage. -
Marking the stripes:
Once the white base is dry, use painter’s tape or faint pencil lines to mark off horizontal bands around the tower where you want your teal stripes to be. -
Adding color:
Fill in the marked sections with your teal or aqua paint. I find a flat brush works best here to get clean edges without needing tape. -
Distressing the finish:
After the paint is fully dry, take medium-grit sandpaper and gently scuff the raised edges, rims, and random spots on the body to reveal hints of the terra cotta underneath for a weathered look. -
Painting the details:
Use a small detail brush to paint faux windows and a door at the base. You can paint these dark grey or black to simulate depth. -
Gilded accents:
Dip a small brush into gold metallic paint and carefully outline the rims of the pots where they connect. This adds a subtle shimmer between the painted sections.
Step 3: Final Nautical Details
-
Crafting the railing:
Cut small lengths of gold wire or thin dowels to serve as railing posts. Glue them vertically around the rim of the ‘walkway’ saucer. -
Connecting the rails:
Run a continuous piece of wire horizontally across the tops of your posts, securing it with dab of super glue or hot glue to complete the safety rail look. -
Simulating the lantern grid:
If your glass jar is plain, paint a diamond lattice pattern on it using white paint to mimic the window panes seen in the inspiration image. -
Rope base installation:
Apply a generous bead of hot glue around the very bottom edge of the large base pot. Press the thick jute rope firmly into the glue. -
Securing the rope:
Wrap the rope around a second time if you want a chunkier look, or simply trim the end at the back and glue it down securely so it doesn’t fray. -
Weatherproofing:
If this lighthouse will live outdoors by the pool, finish the entire project with two coats of clear, outdoor-rated spray sealer to protect your paint job from sun and splash.
Solar Power Upgrade
Instead of a glass jar, use a disassembled solar path light for the top section. It will automatically glow at night without needing batteries.
Set your new creation by the water and enjoy the coastal charm it brings to your outdoor oasis
Fairy Garden Lighthouse With Tiny Path
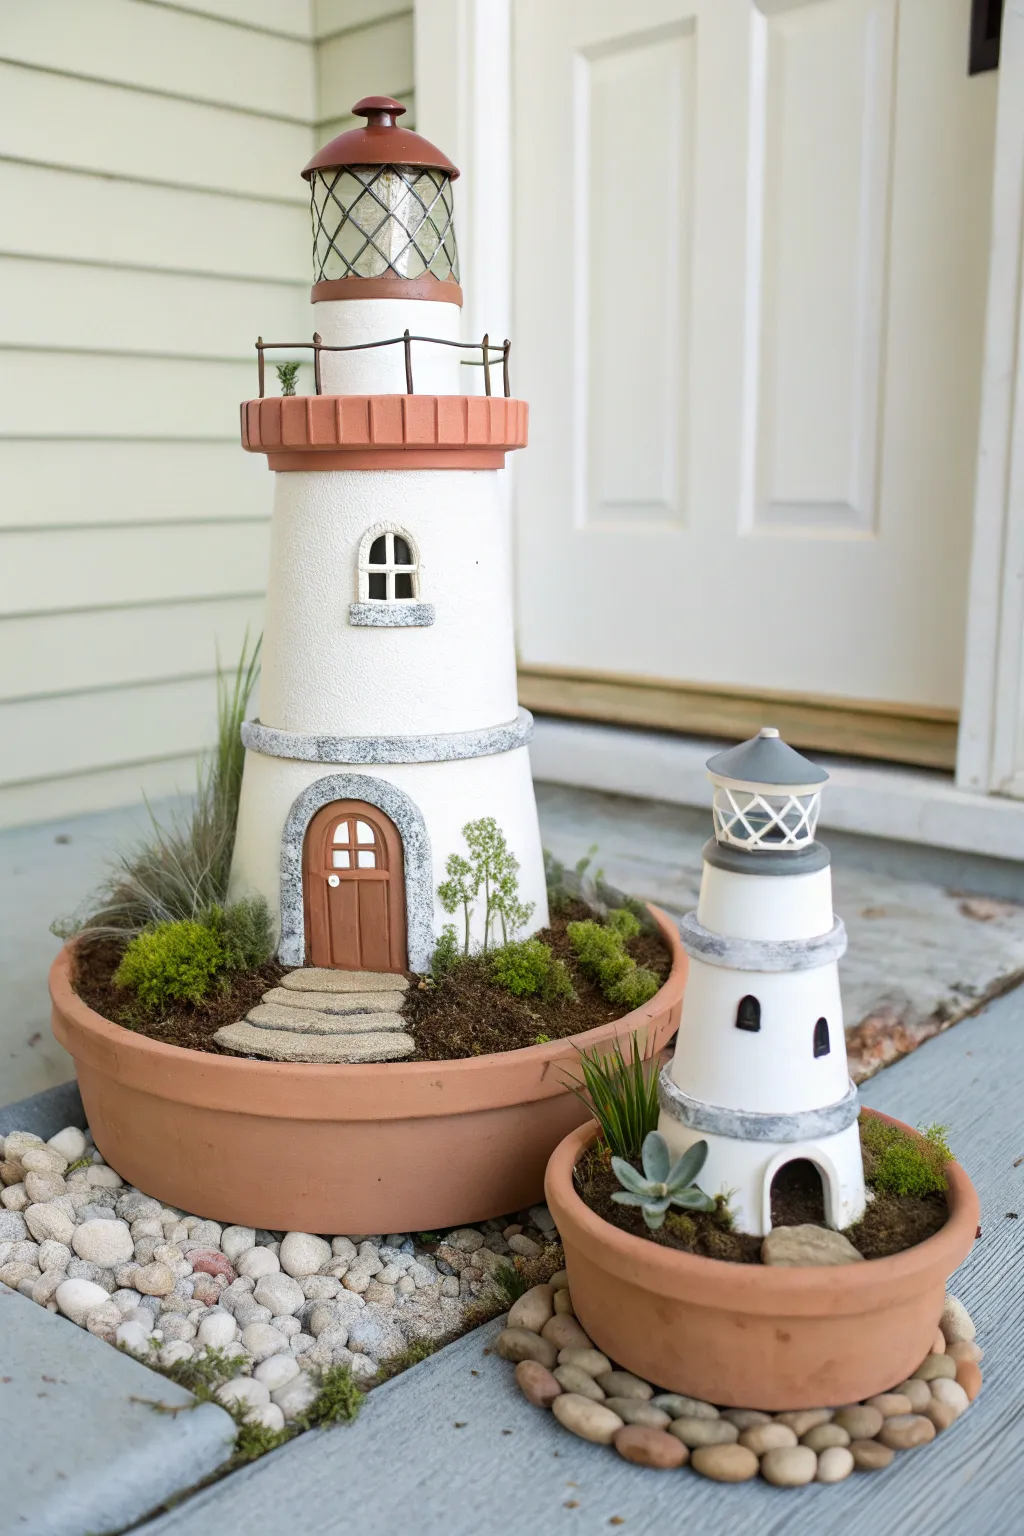
Transform ordinary terra cotta pots into a charming coastal scene perfect for your porch or garden. This detailed project creates a whimsical lighthouse fairy garden, complete with a tiny stone path and lush mossy landscaping.
Step-by-Step Guide
Materials
- 3 Terra cotta pots (graduated sizes for the tower base)
- 1 Terra cotta saucer (large enough to hold the base)
- 1 Small glass jar or solar light top (for the lantern room)
- White spray paint (textured or stone-finish preferred)
- Acrylic craft paints (brown, grey, black, terracotta)
- Strong construction adhesive (like E6000)
- Polymer clay or air-dry clay (for door and window frames)
- Small flat stones or pebbles
- Potting soil
- Live moss, small succulents, and miniature plants
- Faux greenery or dried floral bits
- Wire (for railings)
- Small saucer for the lantern base
Step 1: Constructing the Tower Structure
-
Prepare the pots:
Begin by cleaning your three graduated terra cotta pots thoroughly to remove any dust or oils. Flip them upside down and trial-stack them to ensure they sit flush against each other. -
Adhere the stack:
Apply a strong construction adhesive like E6000 to the bottom rim of the largest pot (which is now the top). Press the middle-sized pot onto it, centering it carefully. Repeat with the smallest pot on top. Let this cure for at least 24 hours. -
Prime and textural coat:
Once the adhesive is solid, spray the entire tower stack with a white primer. For that realistic stucco look seen in the photo, I recommend using a stone-texture spray paint in a light cream or white shade over the primer. -
Create the lantern deck:
Paint a small terra cotta saucer in a terracotta red or brown color. Glue this saucer right-side up to the very top of your white tower to act as the walkway deck for the light.
Fixing Wobbly Stacks
If the pots don’t sit flush due to rim imperfections, run a bead of silicone caulk between the layers. It fills gaps and acts as a strong, waterproof adhesive once dry.
Step 2: Adding Architectural Details
-
Sculpt the door and windows:
While the paint sets, use polymer clay or air-dry clay to fashion a small arched door and a separate arched window frame. Add texture to the door to mimic wood planks. Bake or dry according to the clay package instructions. -
Paint the embellishments:
Paint your clay door a warm wood brown and the window frames white or grey. Use black paint to fill in the window panes so they look like glass. Paint a small stone archway border around the door using grey paint with speckles of black and white. -
Attach the features:
Glue the door securely to the bottom tier of your lighthouse. Glue the window to the middle tier. Adding a tiny white bead works perfectly as a doorknob. -
Install the lantern room:
Clean your small glass jar or solar light top. Glue it into the center of the top saucer. If using a jar, you can paint a grid pattern on the glass with metallic paint to mimic lantern panes. -
Top it off:
Find a small rounded object—like a drawer knob, a tiny bowl, or a specialized finial—paint it a deep red-brown, and glue it to the top of your glass jar as the roof cap. -
Add railings:
Bend thin crafting wire into a circular shape slightly smaller than the top saucer’s rim. Cut small vertical posts from the wire and glue them around the rim, then attach your circular rail to these posts.
Pro Tip: Weatherproofing
Before adding soil, spray the entire painted lighthouse with a clear outdoor matte sealer. This prevents the paint from peeling when exposed to moisture from the plants.
Step 3: Landscaping the Scene
-
Prepare the base:
Take your extra-large terra cotta saucer (the base for the whole scene). Fill it nearly to the brim with potting soil, packing it down firmly. -
Position the lighthouse:
Nestle your finished lighthouse tower into the soil, placing it slightly off-center to leave room for the garden. -
Lay the path:
Select flat, smooth stones to create a walkway leading from the edge of the saucer to the lighthouse door. Press them firmly into the soil so they sit flat. -
Plant the greenery:
Tuck small clumps of moss around the base of the lighthouse and between the path stones. Add a miniature succulent or some tufts of ornamental grass on the sides to frame the tower. -
Final touches:
Sprinkle fine sand or tiny pebbles in any gaps to complete the ground cover, and place a tiny faux tree on the right side of the door for scale.
Place your finished lighthouse garden in a sunny spot and enjoy the seaside charm it brings to your home